

Yamaha YOB-431, YOB-241 Owner’s Manual
ホルン
取扱説明書
Horn
Owner’s Manual
WALDHORN
Bedienungsanleitung
COR
Mode d’emploi
TROMPA
Manual de instrucciones
圆号
使用手册
日本語
ENGLISHDEUTSCHFRANÇAISESPAÑOL
中文
Валторна
Руководство пользователя
호른
사용설명서
Русский
한국어

ごあいさつ
A
このたびは、ヤマハ管楽器をお買い上げいただき、まことにありがとうございます。
楽器を正しく組み立て性能をフルに発揮させるため、また永く良い状態で楽器を
お使いいただくために、この取扱説明書をよくお読みください。
Congratulations!
You are now the owner of a high quality musical instrument. Thank you for choosing
Yamaha. For instructions on the proper assembly of the instrument, and how to keep the
instrument in optimum condition for as long as possible, we urge you to read this Owner’s
Manual thoroughly.
Wir beglückwünschen Sie!
Sie sind nun der stolze Besitzer eines hochwertigen Musikinstruments. Vielen Dank, dass Sie sich für
ein Instrument der Marke Yamaha entschiedenen haben. Um mit den Handgriffen zum Zusammen
setzen und Zerlegen des Instruments vertraut zu werden und dieses über Jahre hinweg in optimalem
Zustand halten zu können, raten wir Ihnen, diese Anleitung aufmerksam durchzulesen.
-
Félicitations!
Vous êtes dès à présent le propriétaire d’un instrument de musique de haute qualité. Nous vous
remercions d’avoir choisi Yamaha. En ce qui concerne les instructions relatives à un assemblage adé
quat de l’instrument et sur la façon de garder l’instrument dans des conditions optimales aussi long
temps que possible, nous vous conseillons vivement de lire entièrement le présent Mode d’emploi.
¡Enhorabuena!
Usted es ahora propietario de un instrumento musical de alta calidad. Le agradecemos su elección
de un instrumento Yamaha. Le aconsejamos que lea todo este manual de instrucciones para ver las
instrucciones para el montaje correcto del instrumento y para aprender a conservar el instrumento
en óptimas condiciones durante tanto tiempo como sea posible.
-
-
祝贺您 !
您已经拥有了一款高品质的乐器。感谢您选择雅马哈品牌的乐器。为正确组装乐器且尽量长时间
地保持其最佳状态 , 我们强烈建议您通读此使用手册。
P.3
P.19
P.33
P.47
P.61
P.75
Поздравляем!
Вы стали обладателем высококачественного музыкального инструмента. Благодарим Вас
за выбор продукции Yamaha. Для получения инструкций по правильной сборке данного
инструмента и его длительном хранении в оптимальных условиях мы нас тоятельно
рекомендуем Вам внимательно прочитать настоящее руководство.
인사말
야마하 악기를 구입해 주셔서 감사합니다 . 악기의 알맞은 조립 방법 및 보관을 위해 본 사용설명서를
반드시 읽어주시기 바랍니다 .
P.89
P.103
Horn
Owner’s Manual
Precautions Please read before using
The precautions given below concern the proper and safe use of the instrument, and are to
protect you and others from any damage or injuries. Please follow and obey these precautions.
If children are using the instrument, a guardian should clearly explain these precautions to the child and make
sure they are fully understood and obeyed. After reading this manual, please keep it in a safe place for future
reference.
■ About the Icons
: This icon indicates points which should be paid attention to. : This icon indicates actions that are prohibited.
Caution
Do not throw or swing the instrument.
The mouthpiece or other parts may fall off hitting other people.
Always treat the instrument gently.
Keep the oil, polish, etc., out of children’s mouths.
Keep the oil, polish, etc., out of children’s reach and do maintenance when children are not present.
Be aware of climatic conditions such as temperature, humidity, etc.
Keep the instrument away from heat sources such as heaters,
etc. Also, do not use or store the instrument in any extreme
conditions of temperature or humidity. Doing so may result
in damage to key balance, linkage, or pads, resulting in problems during performance.
Disobeying the points indicated with this mark may
lead to damage or injury.
Never use benzene or thinner for maintenance on
instruments with a lacquer finish.
Doing so may result in damage to the finish’s top coat.
Take care not to disfigure the instrument.
Placing the instrument where it is unstable may cause the
instrument to fall or drop resulting in disfigurement. Take care
as to where and how you place the instrument.
Do not modify the instrument.
Besides voiding the warranty, modification of the instrument
may make repairs impossible.
In regards to brass instruments with a plate finish, the color of the finish may change over time however, it should
be of no concern in regards to the instrument’s performance. Discoloration in its early stage can easily be removed
with maintenance. (As discoloration progresses, it may be difficult to remove.)
* Please use the accessories that are specified for use with the particular type of finish found on the instrument. Also, metal polishes remove
a thin layer of the finish’s top coat which will make the finish thinner. Please be aware of this before using polish.
19
Nomenclature
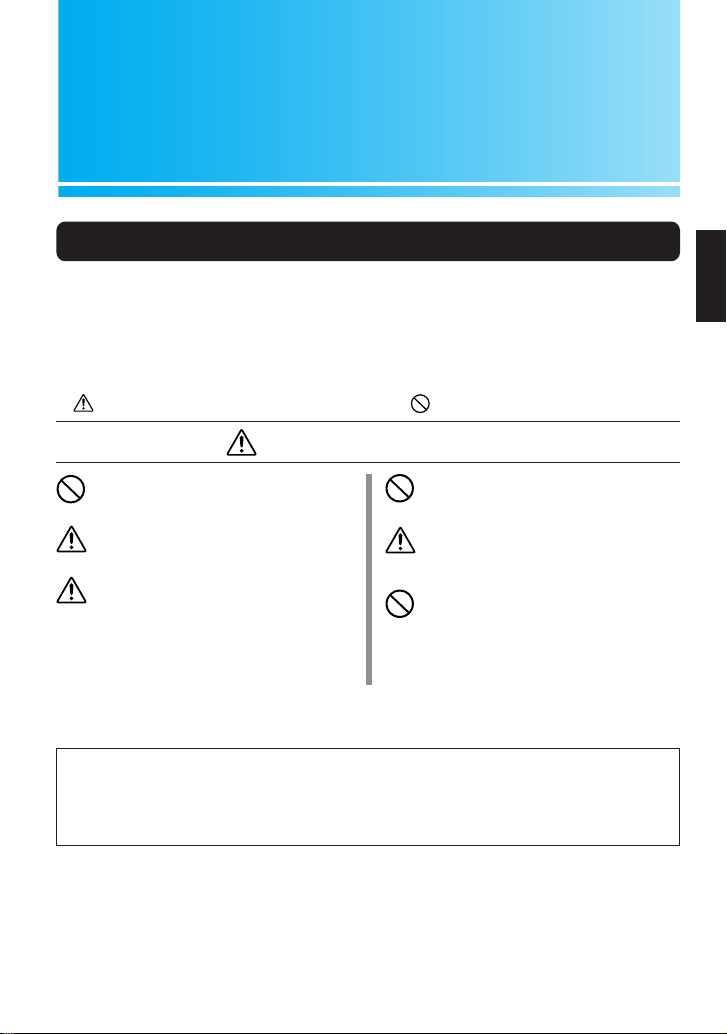
■ F Single
Mouthpipe
Mouthpiece
Main Tuning Slide
■ Bb Single
3rd Lever
2nd Lever
1st Lever
Mouthpipe
1st Valve Slide
3rd Lever
2nd Lever
1st Lever
4th Lever
Finger Hook
Finger Hook
3rd Valve
2nd Valve
1st Valve
3rd Valve Slide
Bell
2nd Valve
Slide
4th Valve
3rd Valve
2nd Valve
1st Valve
3rd Valve Slide
Mouthpiece
Main Tuning Slide(Back side)
20
Bell
4th Valve Slide
1st Valve Slide
2nd Valve Slide
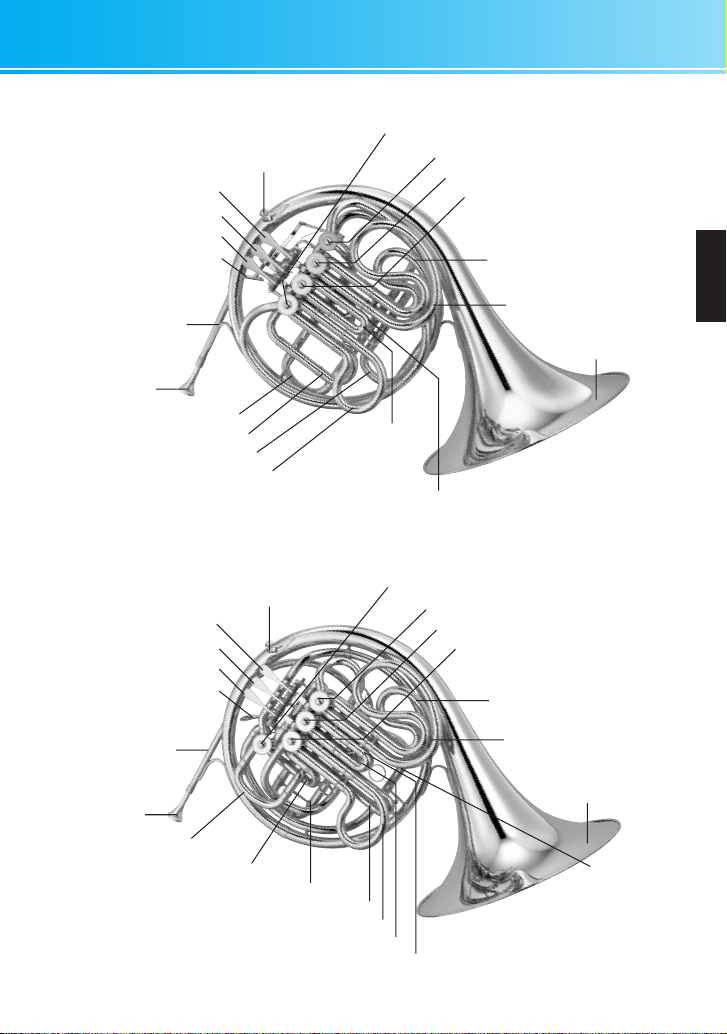
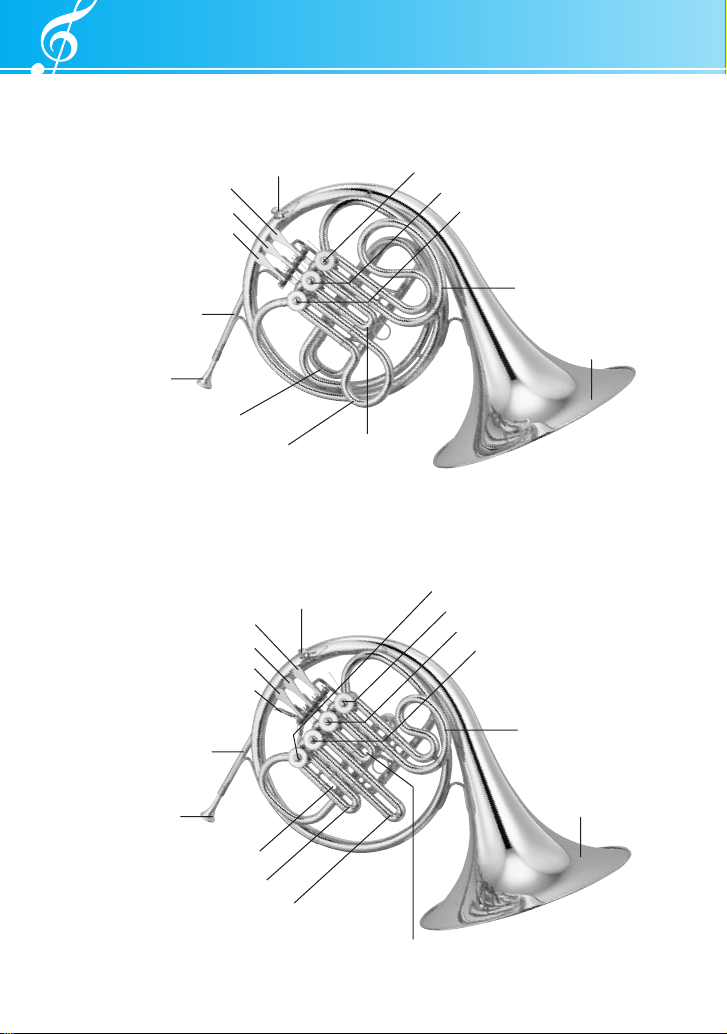
Nomenclature
■ F/Bb Full Double
3rd Lever
2nd Lever
1st Lever
4th Lever
Mouthpipe
Mouthpiece
Main Tuning Slide
Bb 1st Valve Slide
F Tuning Slide
F 1st Valve Slide
3rd Lever
2nd Lever
1st Lever
4th Lever
Finger Hook
Finger Hook
1st Valve
4th Valve
3rd Valve
2nd Valve
Bb 3rd Valve Slide
F 3rd Valve Slide
Bell
F 2nd Valve
Slide
Bb 2nd Valve Slide
4th Valve
3rd Valve
2nd Valve
1st Valve
Bb 3rd Valve Slide
Mouthpipe
Mouthpiece
F Tuning Slide(2)
F 3rd Valve Slide
Bb Tuning Slide
Main Tuning Slide
Bb 1st Valve Slide
F 1st Valve Slide
F 2nd Valve Slide
Bb 2nd Valve Slide
* Specifications and/or design may change without notice for reasons of improvement.
Bell
F Tuning Slide(1)
21
Before You Play
Handling the Instrument
The instrument is made of a thin metal so please handle it with care. Do not apply any
excessive force to the instrument, or bump it in a manner that will dent or damage it.
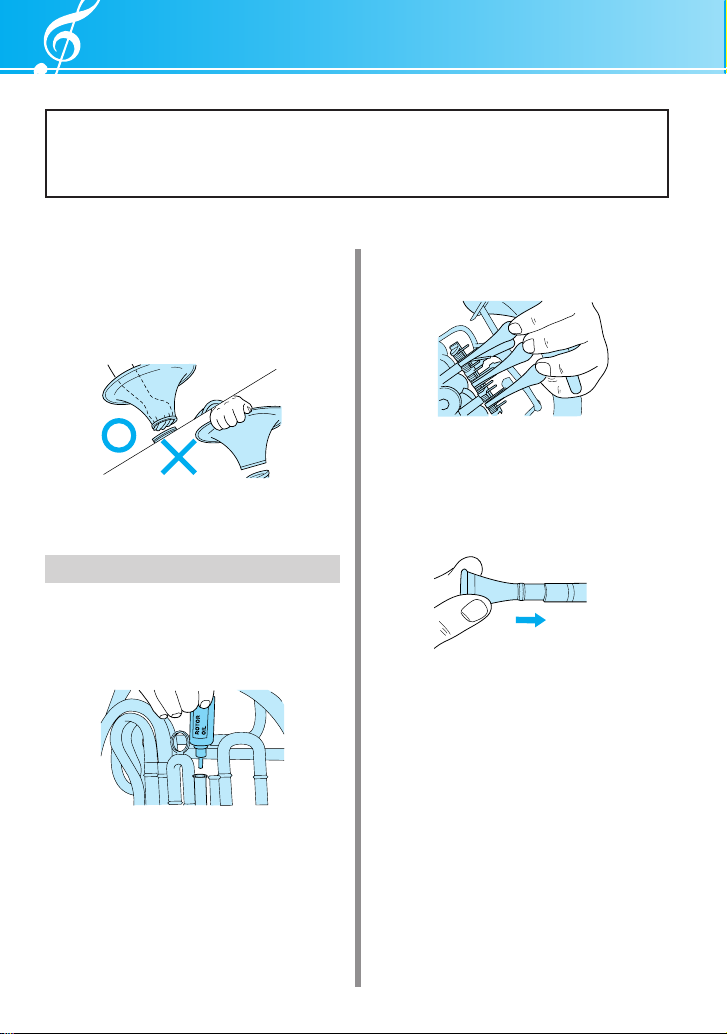
■ Attaching the Screw-On Bell
When attaching the screw-on bell, always hold
the bell by its mid section and assemble. Do
not over-tighten.
■ Lubrication
Oiling the Rotors
1. While holding the levers down, remove the
valve slides then apply rotor oil to the rotors as shown in the illustration below (a
few drops per rotor).
* Apply oil if the lever does not work
smoothly.
* When applying oil, do not let the oil mix
with the slide grease adhering to the valve
slide’s interior.
2. Move the levers so that the oil is spread
evenly.
■ Attaching the Mouthpiece
Gently insert the mouthpiece into the
mouthpipe.
* Never force the mouthpiece into the
mouthpipe. The mouthpiece may become
stuck in the mouthpipe.
22
Tuning
Use the main tuning slide to make sure that the instrument is in tune before playing.
Since temperature has an effect on the instrument’s pitch, blow some warm air through
it to warm it up before tuning. The amount of tuning slide adjustment needed to get the
horn in tune will vary between individuals so there is no standard rule to follow
(however, at 68°F pulling the main tuning slide out about 0.6” should more or less tune
the instrument to A=442Hz).
Take notice that when temperatures are warmer, the main tuning slide should be pulled
out a little more, while cooler temperatures will require that you push the slide in. Also,
the position and angle of your right hand in the bell will have an influence on pitch as
well.
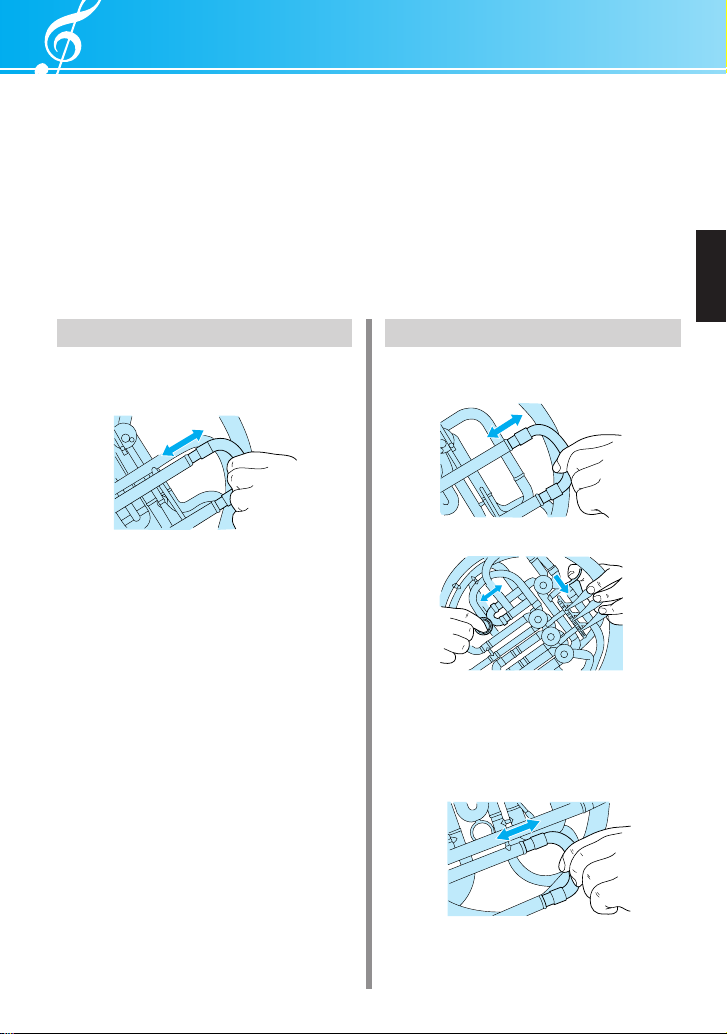
Single Horns
Slide the main tuning slide in or out to tune the
instrument.
Double Horns
1. Use the main tuning slide to tune the Bb side.
* Instruments with a Bb tuning slide should
tune with the main tuning slide as well.
2. Use the F tuning slide to tune the F side of
the instrument.
23
 Loading...