

Page 1

G
Front Surround System
Système Surround Frontal
Owner’s Manual
Mode d’emploi
Bedienungsanleitung
Bruksanvisning
Manuale di istruzioni
Manual de Instrucciones
Gebruiksaanwijzing
Инструкция по эксплуатации
Page 2

CAUTION: READ THIS BEFORE OPERATING YOUR UNIT.
• To assure the finest performance, please read this
manual carefully. Keep it in a safe place for future
reference.
• Install this unit in a well ventilated, cool, dry, clean
place - away from direct sunlight, heat sources,
vibration, dust, moisture, and/or cold. For proper
ventilation, allow the following minimum
clearances.
Top: 10 cm ( 4 in), Rear: 10 cm (4 in), Sides: 10 cm
(4 in)
• Locate this unit away from other electrical
appliances, motors, or transformers to avoid
humming sounds.
• Do not expose this unit to sudden temperature
changes from cold to hot, and do not locate this
unit in an environment with high humidity (i.e. a
room with a humidifier) to prevent condensation
inside this unit, which may cause an electrical
shock, fire, damage to this unit, and/or personal
injury.
• Avoid installing this unit where foreign objects
may fall onto this unit and/or this unit may be
exposed to liquid dripping or splashing. On the top
of this unit, do not place:
− Other components, as they may cause damage
and/or discoloration on the surface of this unit.
− Burning objects (i.e. candles), as they may cause
fire, damage to this unit, and/or personal injury.
− Containers with liquid in them, as they may fall
and liquid may cause electrical shock to the user
and/or damage to this unit.
• Do not cover this unit with a newspaper,
tablecloth, curtain, etc., in order not to obstruct
heat radiation. If the temperature inside this unit
rises, it may cause fire, damage to this unit, and/or
personal injury.
• Do not plug in this unit to a wall outlet until all
connections are complete.
• Do not operate this unit upside-down. It may
overheat, possibly causing damage.
• Do not use force on switches, knobs and/or cords.
• When disconnecting the power cable from the wall
outlet, grasp the plug; do not pull the cable.
• Do not clean this unit with chemical solvents; this
might damage the finish. Use a clean, dry cloth.
• Only voltage specified on this unit must be used.
Using this unit with a higher voltage than specified
is dangerous and may cause fire, damage to this
unit, and/or personal injury. Yamaha will not be
held responsible for any damage resulting from use
of this unit with a voltage other than specified.
• To prevent damage by lightning, keep the power
cable and outdoor antennas disconnected from a
wall outlet or the unit during a lightning storm.
• Do not attempt to modify or fix this unit. Contact
qualified Yamaha service personnel when any
service is needed. The cabinet should never be
opened for any reasons.
• When not planning to use this unit for long periods
of time (i.e. vacation), disconnect the AC power
plug from the wall outlet.
• Be sure to read the “Troubleshooting” section on
common operating errors before concluding that
this unit is faulty.
• Before moving this unit, press to set this unit in
standby mode, and disconnect the power supply
cable from the wall outlet.
• Condensation will form when the surrounding
temperature changes suddenly. Disconnect the
power supply cable from the outlet, then leave the
unit alone.
• Install this unit near the wall outlet and where the
AC power plug can be reached easily.
• Secure placement or installation is the owner’s
responsibility. Yamaha shall not be liable for any
accident caused by improper placement or
installation of speakers.
• Keep the product out of reach of children to avoid
them swallowing small parts.
Notes on remote controls and batteries
• Do not spill water or other liquids on the remote
control.
• Do not drop the remote control.
• Do not leave or store the remote control in the
following places:
− places of high humidity, such as near a bath
− places of high temperatures, such as near a
heater or a stove
− places of extremely low temperatures
− dusty places
• Do not expose the remote control sensor of this
unit to direct sunlight or lighting such as inverted
fluorescent lamps.
• If the batteries grow old, the effective operation
range of the remote control decreases
considerably. If this happens, replace the batteries
with two new ones as soon as possible.
• Do not use old batteries together with new ones.
• Do not use different types of batteries (such as
alkaline and manganese batteries) together. Read
the packaging carefully as these different types of
batteries may have the same shape and color.
• Exhausted batteries may leak. If the batteries have
leaked, dispose of them immediately. Avoid
touching the leaked material or letting it come into
contact with clothing, etc. Clean the battery
compartment thoroughly before installing new
batteries.
• Do not carry batteries in a pocket or purse with
metal objects like coins, etc.
• Do not throw away batteries with general house
waste. Dispose of them correctly in accordance
with your local regulations.
• Keep batteries away from children. If a battery is
accidentally swallowed, contact your doctor
immediately.
• When not planning to use the remote control for
long periods of time, remove the batteries from the
remote control.
• Do not charge or disassemble the supplied
batteries.
• The batteries shall not be exposed to excessive
heat such as sunshine, fire or like.
WARNING
TO REDUCE THE RISK OF FIRE OR
ELECTRIC SHOCK, DO NOT EXPOSE THIS
UNIT TO RAIN OR MOISTURE.
As long as this unit is connected to the AC wall
outlet, it is not disconnected from the AC power
source even if you turn off this unit by . In this
state, this unit is designed to consume a very
small quantity of power.
(Power key)
Turns on the power of this unit or sets it to the
standby mode.
Do not use this unit within 22 cm (9 inches) of
persons with a heart pacemaker implant or
defibrillator implant.
Radio waves may affect electro-medical devices.
Do not use this unit near medical devices or
inside medical facilities.
The name plate is located on the bottom of the
unit.
FOR U.K. CUSTOMERS
If the socket outlets in the home are not suitable for
the plug supplied with this appliance, it should be cut
off and an appropriate 3 pin plug fitted. For details,
refer to the instructions described below.
NOTE
The plug severed from the mains lead must be
destroyed, as a plug with bared flexible cord is
hazardous if engaged in a live socket outlet.
SPECIAL INSTRUCTIONS FOR U.K.
MODEL
IMPORTANT
THE WIRES IN THE MAINS LEAD ARE
COLOURED IN ACCORDANCE WITH THE
FOLLOWING CODE:
Blue: NEUTRAL
Brown: LIVE
As the colours of the wires in the mains lead of this
apparatus may not correspond with the coloured
markings identifying the terminals in your plug,
proceed as follows:
The wire which is coloured BLUE must be connected
to the terminal which is marked with the letter N or
coloured BLACK. The wire which is coloured
BROWN must be connected to the terminal which is
marked with the letter L or coloured RED.
Making sure that neither core is connected to the
earth terminal of the three pin plug.
En
i
Page 3
Contents
Supplied items ..................................................................... 2
Features ................................................................................ 3
Frequently asked questions ................................................ 3
Part names and functions .................................................... 4
Installation ............................................................................ 5
Connections .......................................................................... 6
Operations ............................................................................ 8
Listening to the sound from a Bluetooth device .............. 10
Settings................................................................................ 12
Programming the sound bar with the TV’s remote control
(TV’s remote control learning function).................................................... 12
Using an external subwoofer............................................................................ 14
Setting the auto power standby function ............................................... 15
Initializing the sound bar ............................................................................... 15
Troubleshooting ................................................................. 16
Specifications...................................................................... 19
About this manual
NOTE
This indicates precautions for use of the product and its feature limitations.
HINT
This indicates supplementary explanations for better use.
En
1
Page 4
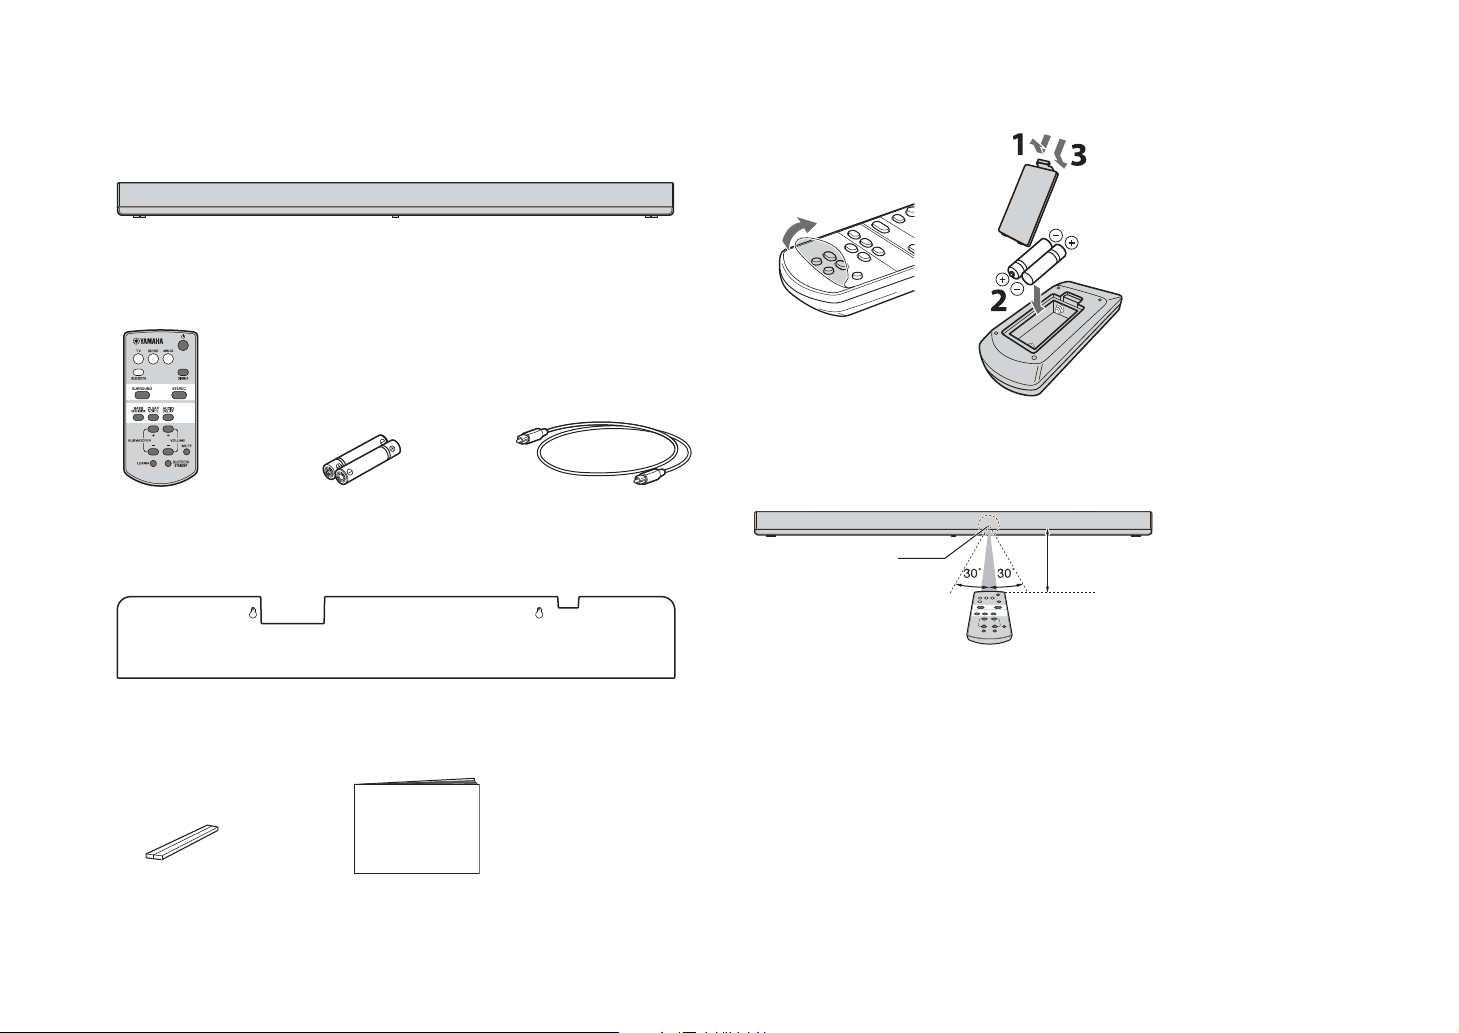
Supplied items
Sound bar
Remote control Battery x 2
(AAA, R03, UM4)
Optical cable (1.5 m [4.9 ft])
Mounting template
* Use when attaching the sound bar to a wall
Spacer × 2
* Use when attaching the sound
bar to a wall
Owner’s Manual
(This manual)
Remote control sensor
Within 6 m
(20 ft)
Make sure you have received all of the following items.
Preparing the remote control
Peel off the protection sheet before use.
Operating range of the remote control
Remain within the operating range shown below. When attaching the sound bar to a
wall, operate with the remote control sensor on the top panel (p.5).
En
2
Page 5
Features
Frequently asked questions
Enjoy powerful and realistic sound from the sound bar with built-in
subwoofer, and easy installation and connection to a TV and other
devices.
•AIR SURROUND XTREME
Enjoy 7.1 channel surround sound, which creates a wide and deep soundstage, as
if speakers are set, not only on the front, but also on the left and right, and behind
the listener (p.9).
• Bass extension
Enjoy a powerful bass sound with the Yamaha original bass boost technology
“Advanced Bass Extension Processing” (p.9).
• Bluetooth® connection
Content on a Bluetooth compatible smartphone, tablet, or computer can be played
back easily (p.10).
You can enjoy realistic and impressive sound as close to the original by the
Compressed Music Enhancer.
• HOME THEATER CONTROLLER
You can operate the sound bar easily by installing the dedicated controlling
application “HOME THEATER CONTROLLER.”
• TV’s remote control learning function
Operate the sound bar with the TV’s remote control (p.12).
The following section covers popular functions and frequently asked questions about the
sound bar.
Q1
Can I operate the sound bar using the remote control of the TV?
Switching between the remote controls of the TV and sound bar is
inconvenient.
A1
Yes. You can control the sound bar using your TV’s remote control by the
“TV’s remote control learning” function (p.12).
This function is available only for the IR (infrared) remote control. Check your
TV’s remote control type.
Q2
Can I improve the clarity of dialogue?
A2
Yes. Dialogue in movies, TV news, sports programs, etc., can be made
clearer using the “clear voice” function (p.9).
Q3
Can I operate the sound bar using a smartphone? And, can I turn on/off
the sound bar with a smartphone?
A3
Yes. You can operate the sound bar with your smartphone by using the
dedicated control application “HOME THEATER CONTROLLER” (p.11).
When using this function, it is necessary to connect your smartphone to the
sound bar through Bluetooth connection.
Also, if you use the Bluetooth standby mode function, the sound bar will turn
on when a Bluetooth connection is made between your smartphone and the
sound bar, and turns off when disconnected (p.11).
•Clear voice
Makes voice sound (such as dialogues and narrations) clear (p.9).
En
3
Page 6
Part names and functions
* Keys are located in the rear
part of the sound bar.
** *
*
ANALOG
SUBWOOFEROUT
* Bottom panel
*
Sound bar (front panel/top panel)
A Indicators
Indicate the status of the sound bar. Refer to “Operations” (p.8 to 9) for the main
functions of the indicators.
B (input) key
Selects an input source to be played back (p.8).
C (mute) key
Mutes the audio output. Press the key again to unmute (p.9).
D / (volume +/-) keys
Adjust the volume (p.8).
E (power) key
Turns on or off (standby) the sound bar (p.9).
HINT
• The sound bar may automatically turn off when the auto power standby function is enabled (p.15).
F Remote control sensors
Receive infrared signals from the remote control of the sound bar (p.2).
The remote control sensors are located on the front panel and on the top panel of the
sound bar (p.5).
Sound bar (rear panel/bottom panel)
G Dual built-in subwoofers
The built-in subwoofers are located in the top part of the sound bar.
H Speakers
I TV input jack
For connecting to a TV with an optical cable (p.6).
J BD/DVD input jack
For connecting to a playback device, such as a Blu-ray Disc (BD) player, with a
coaxial digital cable (p.7).
K ANALOG input jack
For connecting an external device with a 3.5 mm stereo mini plug cable (p.7).
L SUBWOOFER OUT jack
For connecting an external subwoofer with a monaural pin cable (p.14).
M Installation position selector switch
Sets the sound quality appropriate to the installation position of the sound bar (p.5).
En
4
Page 7
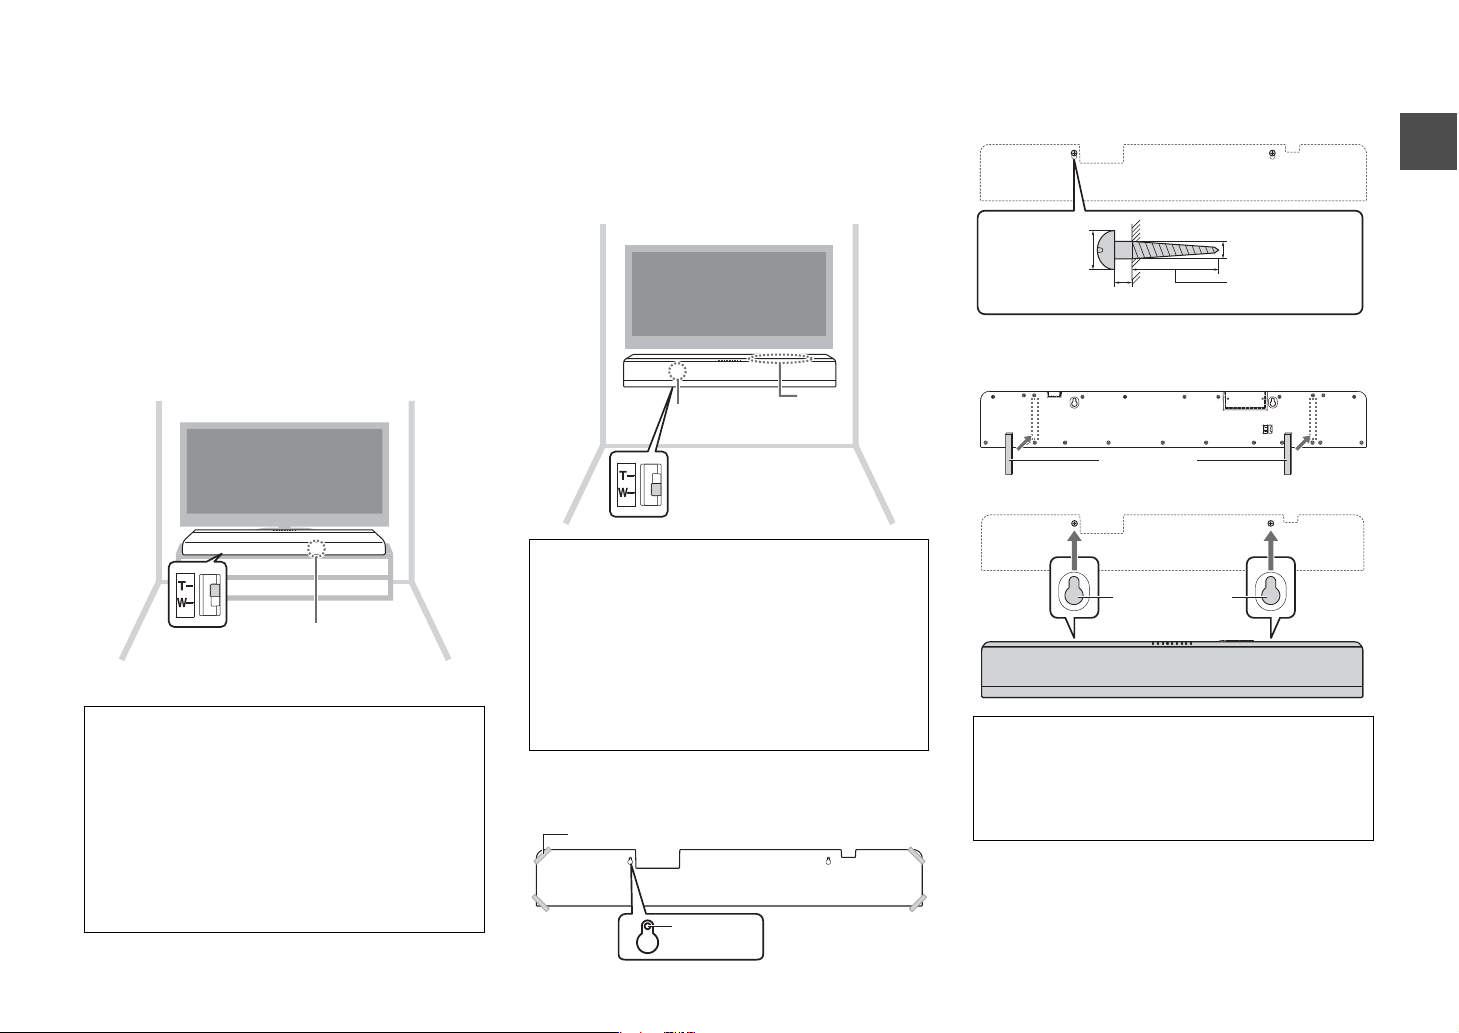
Installation
Installation position
selector switch
(bottom panel)
Remote control sensor
(front panel)
Remote control
sensor (top panel)
Keys
Installation position selector
switch (bottom panel)
Tapes or thumbtacks
Mounting template (supplied)
Screw
holes
7 to 9 mm
(1/4" to 3/8")
10 to 12 mm (3/8" to 1/2")
4 mm (#8)
20 mm (3/4")
or more
Spacer
Mounting holes
on bottom of
sound bar
The orientation of the sound bar and the appropriate
remote control sensor depend on the installation
location.
Installing the sound bar on a TV cabinet,
etc.
1 Slide the installation position selector switch on
the bottom panel of the sound bar to the T (for
Tabletop) side (T, by default).
The sound quality appropriate to the installation will
be set.
2 Place the sound bar on a TV cabinet, etc., so that
the keys are facing the wall.
Cautions
• Do not stack the sound bar and a BD player or other device
directly on each other. Doing so may cause a malfunction due to
vibrations.
• Do not hold the speaker portion (fabric parts) on the front and the
top of the sound bar.
• The sound bar contains non-magnetic shielding speakers. Do not
place magnetically sensitive items (hard disk drive, etc.) near the
sound bar.
• Depending on your installation environment, it may be better to
connect the sound bar and external devices (such as a TV)
before installing the sound bar.
• Do not place the sound bar within 50 mm (2") of the TV.
Attaching the sound bar to a wall
1 Slide the installation position selector switch on
the bottom panel of the sound bar to the W (for
Wall mount) side.
The sound quality appropriate to the installation will
be set.
2 Following “How to install on the wall” below, install
the sound bar so that the keys face upwards.
Cautions
• When installing the sound bar on a wall, all installation work must
be performed by a qualified contractor or dealer. The customer
must never attempt to perform this installation work. Improper or
inadequate installation could cause the sound bar to fall,
resulting in personal injury.
• Do not attach the sound bar to a wall that is made of weak
materials such as plaster or veneered woods. Doing so may
cause the sound bar to fall.
• Make sure you use commercially available screws that can
support the weight of the installation (specified in Step 2 on the
right). Using clamps other than specified screws, such as short
screws, nails, and two-sided tape, may cause the sound bar to
fall.
How to install on the wall
1 Attach the mounting template on a wall and mark
for the screw holes.
2 Remove the mounting template from the wall,
then install commercially available screws (as
illustrated below) at the points marked on the
wall.
3 Peel off the backing paper from the spacers and
attach the adhesive face to the sound bar as
illustrated below.
4 Hang the sound bar on the screws.
Cautions
• Fix the cables in place where they will not become loose. If your
foot or hand accidentally gets caught on a loose cable, the sound
bar may fall.
• Check that the sound bar is fixed securely after the installation.
Yamaha will bear no responsibility for any accidents caused by
improper installations.
En
5
Page 8
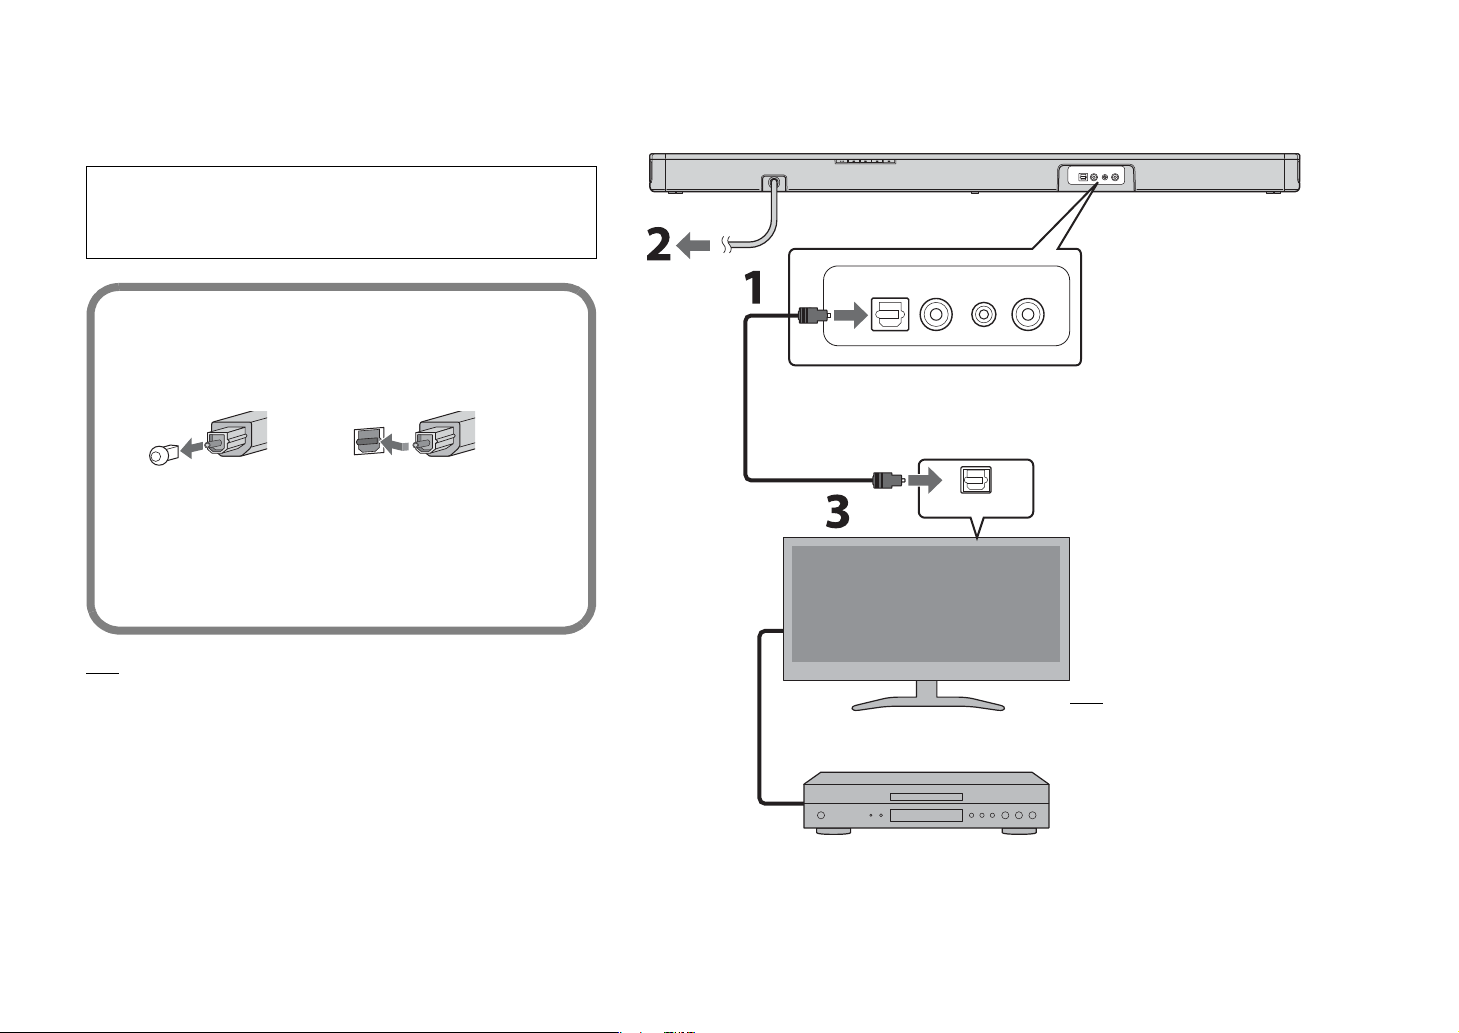
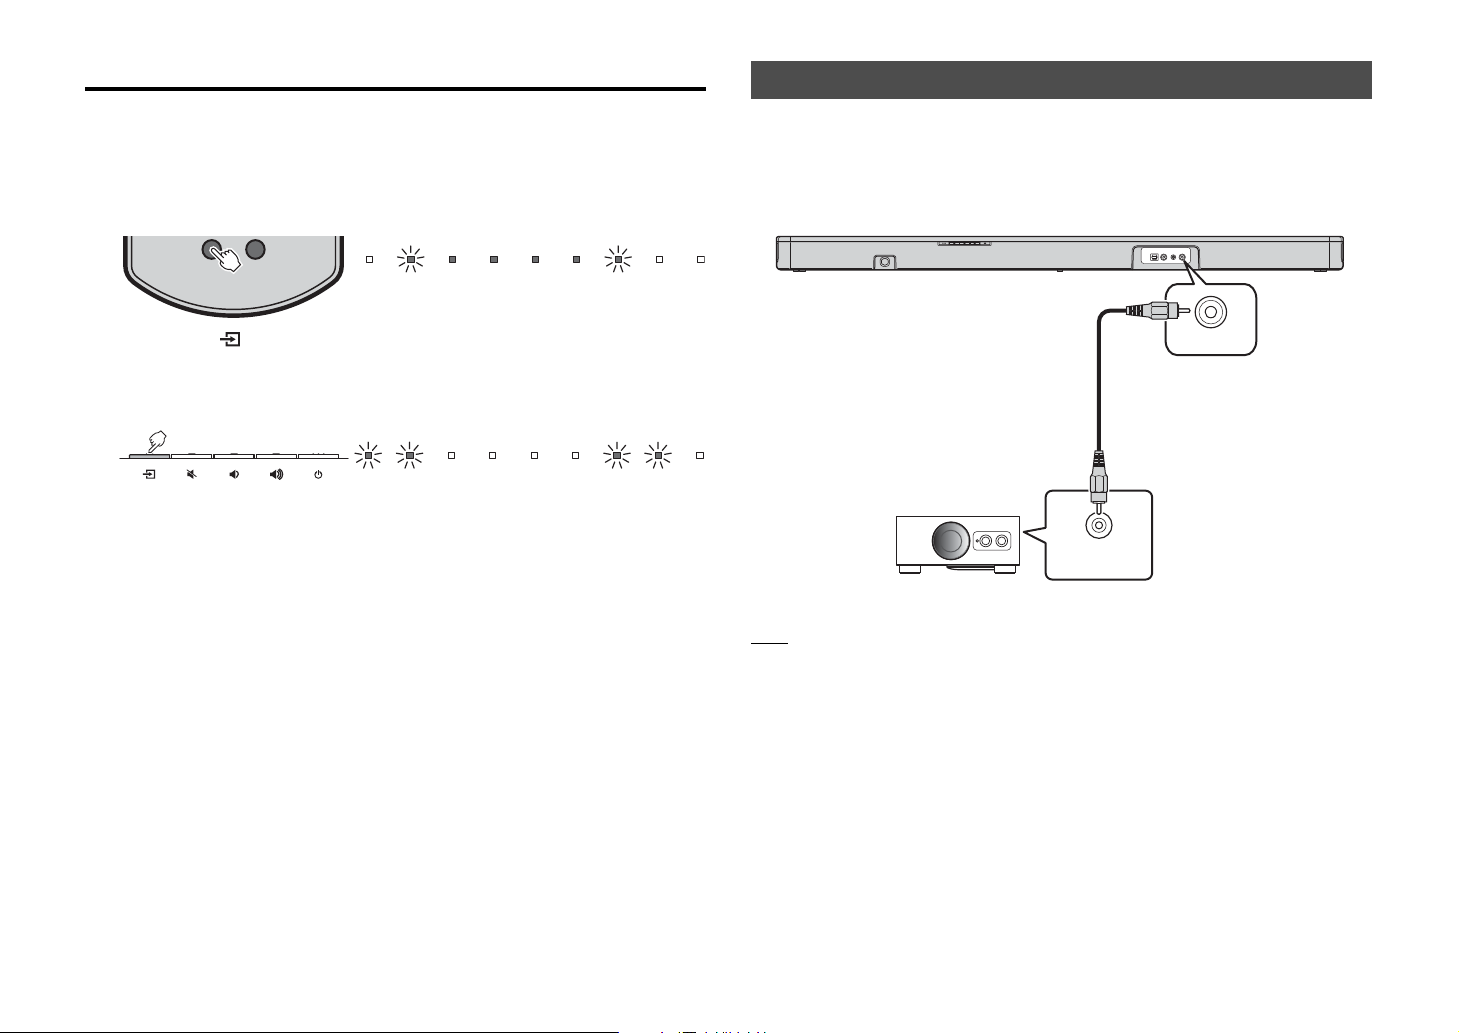
Connections
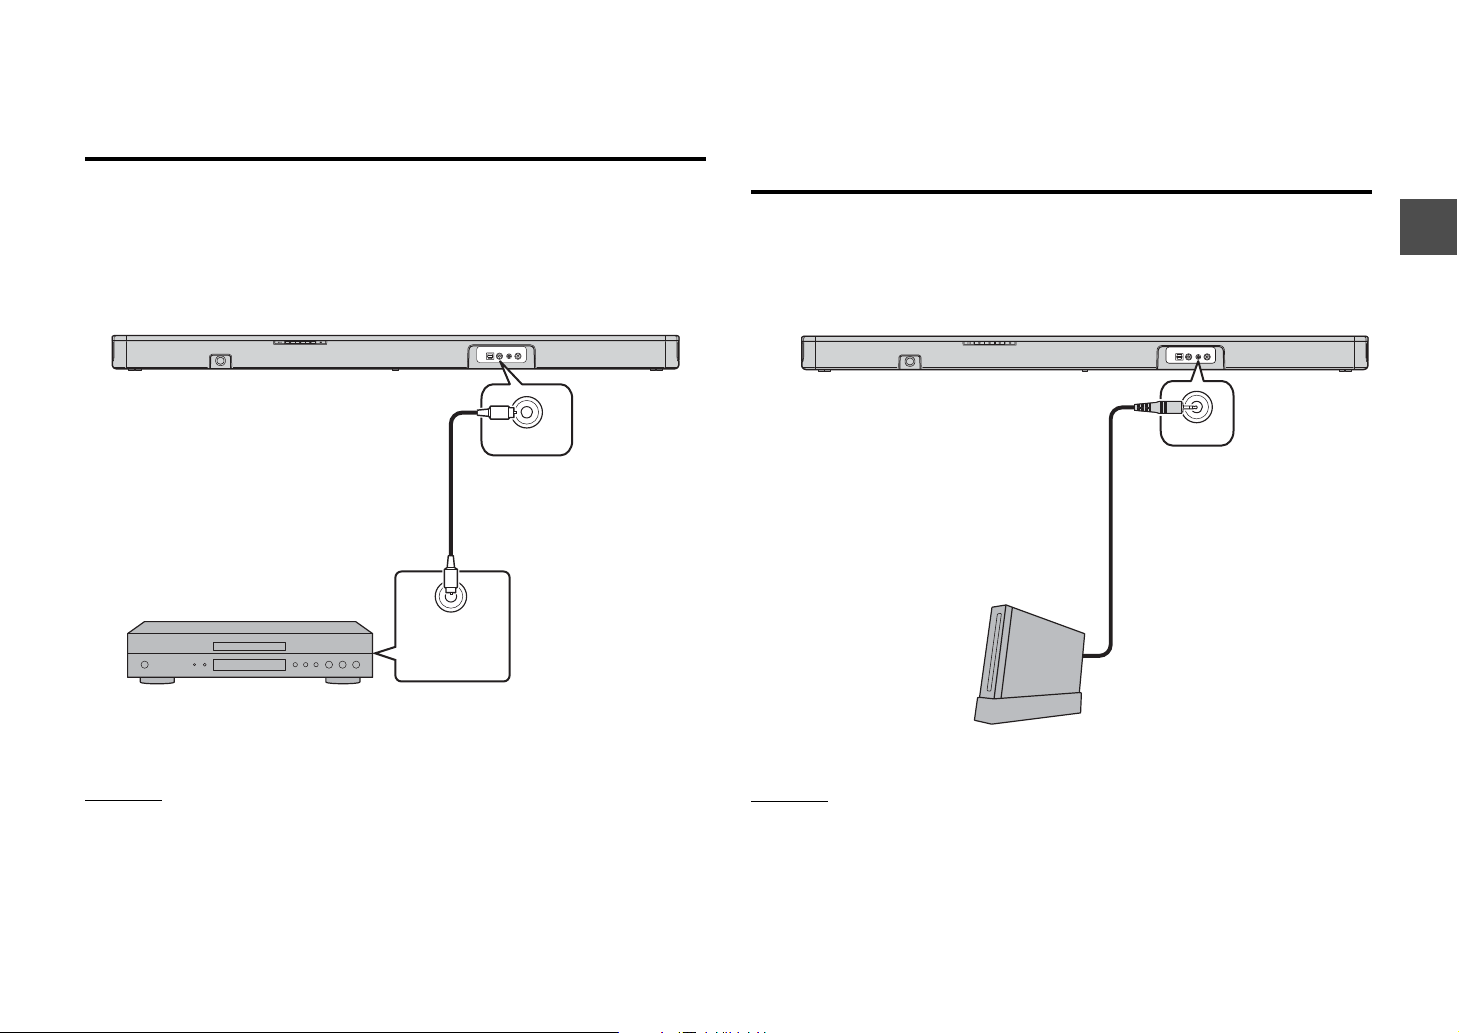
BD/DVD ANALOG
SUBWOOFEROUT
TV
Power cable
To AC wall outlet
Sound bar (rear)
Optical cable
Playback device
(such as a BD player)
Set top box
OPTICAL OUTPUT
TV
HINT
In the following cases, connect the coaxial digital
audio output of the playback device to the BD/DVD
input of the sound bar with a coaxial digital cable
(commercially available), then select the BD/DVD
key on the remote control for the input source.
− The TV does not have an optical output.
− The TV does not output audio (or outputs low
volume audio) from the connected playback
device.
− The audio from the playback device connected to
the TV cannot be heard as surround sound.
Connect to a TV (or other peripheral device).
HINT
• If a setting to disable the speaker output is not available on your TV, you may disable it
by connecting headphones to the headphone jack on the TV. For details, refer to the
manuals of the TV.
• The TV and BD/DVD input jacks support the following audio signals.
− PCM (2 channel)
− Dolby Digital (up to 5.1 channel)
CAUTIONS
• Do not connect the power cable of the sound bar to the AC wall outlet before making
connections.
• Do not use excessive force when inserting the cable plug. Doing so may damage the
cable plug or terminal.
1 Connect the TV and sound bar with the optical
cable (supplied).
Remove the cap of the optical cable and check the
direction of the plug.
2 Connect the power cable of the sound bar to an
AC wall outlet.
3 Set the TV as follows.
• Set the TV volume to minimum.
• Disable the TV built-in speaker output (if available).
HDMI cable (etc.)
En
6
Page 9
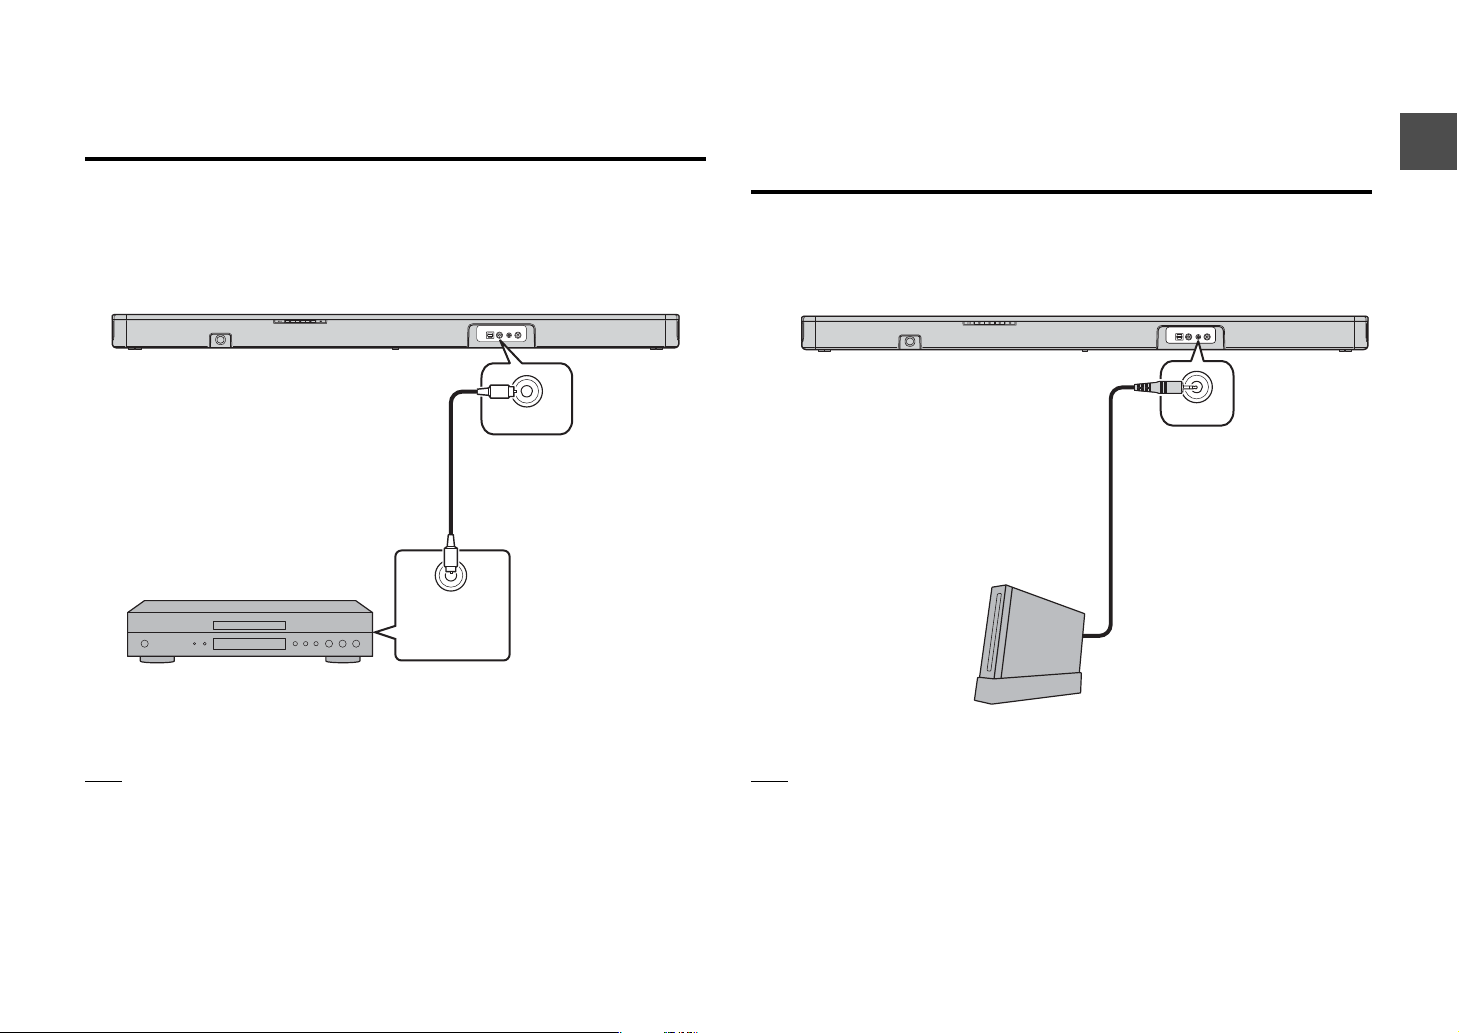
Digital connection of an external device
BD/DVD
Coaxial digital cable
(commercially available)
Coaxial digital
audio output
(orange)
Playback device
ANALOG
3.5 mm stereo mini plug cable
(commercially available)
Game console (etc.)
You can connect an external device that has a coaxial digital audio output, such as a
DVD player, to the BD/DVD input jack of the sound bar.
NOTE
• Select the BD/DVD key on the remote control for the input source.
Analog connection of an external device (game
console)
You can connect an external device, such as a game console or TV that does not have
a digital audio output, to the ANALOG input jack of the sound bar.
NOTE
• Select the ANALOG key on the remote control for the input source.
• If you can adjust the volume on an external device connected to the ANALOG input jack of the sound bar,
adjust it to the same volume as the external device connected to the TV or BD/DVD input jack.
En
7
Page 10
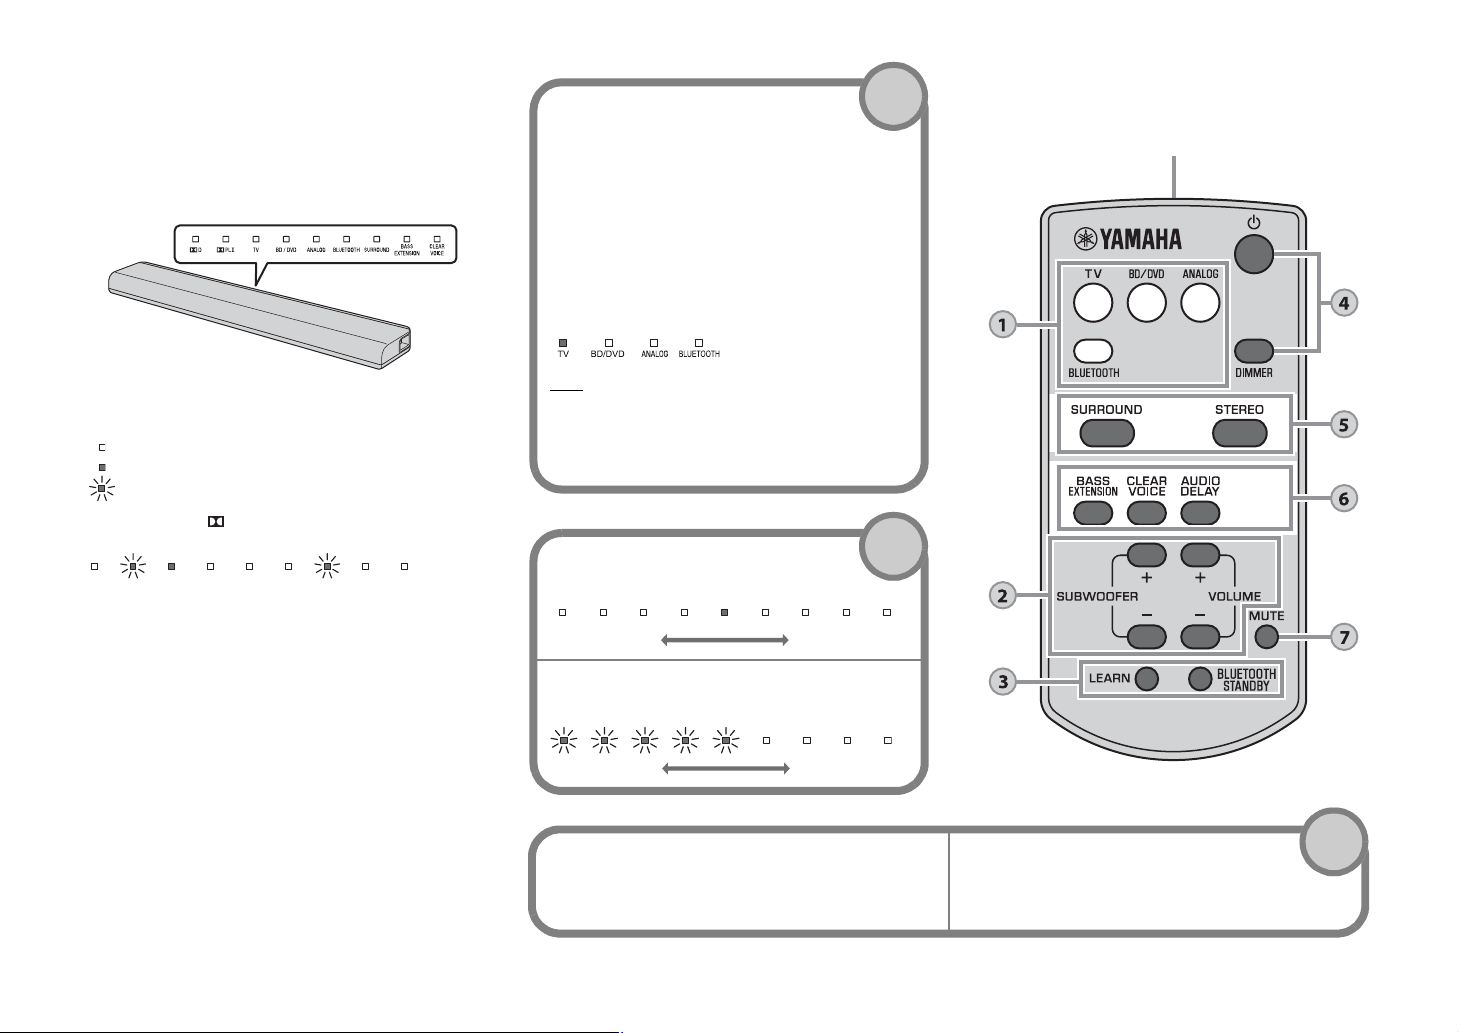
Operations
Input keys
Select an input source to be played back.
TV ....................TV audio
BD/DVD...........Audio from a device connected to
the BD/DVD input jack
ANALOG .........Audio from a device connected to
the ANALOG input jack
BLUETOOTH
.........................Audio from a Bluetooth connected
device
The indicator for the selected input source lights up.
(Example: when TV is selected)
HINT
• To play audio of the playback device connected to the TV or
to watch videos of the playback device, set the TV’s input
source to the playback device.
• For details on Bluetooth connection, refer to “Listening to the
sound from a Bluetooth device” (p.10).
SUBWOOFER keys (+/-)
Adjust the volume of the subwoofer.
VOLUME keys (+/-)
Adjust the volume of the sound bar.
Volume down (–) Volume up (+)
Volume down (–) Volume up (+)
1
2
LEARN key
★
Sets the sound bar to the TV’s remote control
learning mode (p.12).
BLUETOOTH STANDBY key
★
Enables/disables the Bluetooth standby mode
(p.11).
3
Remote control signal transmitter
Transmits infrared signals.
★
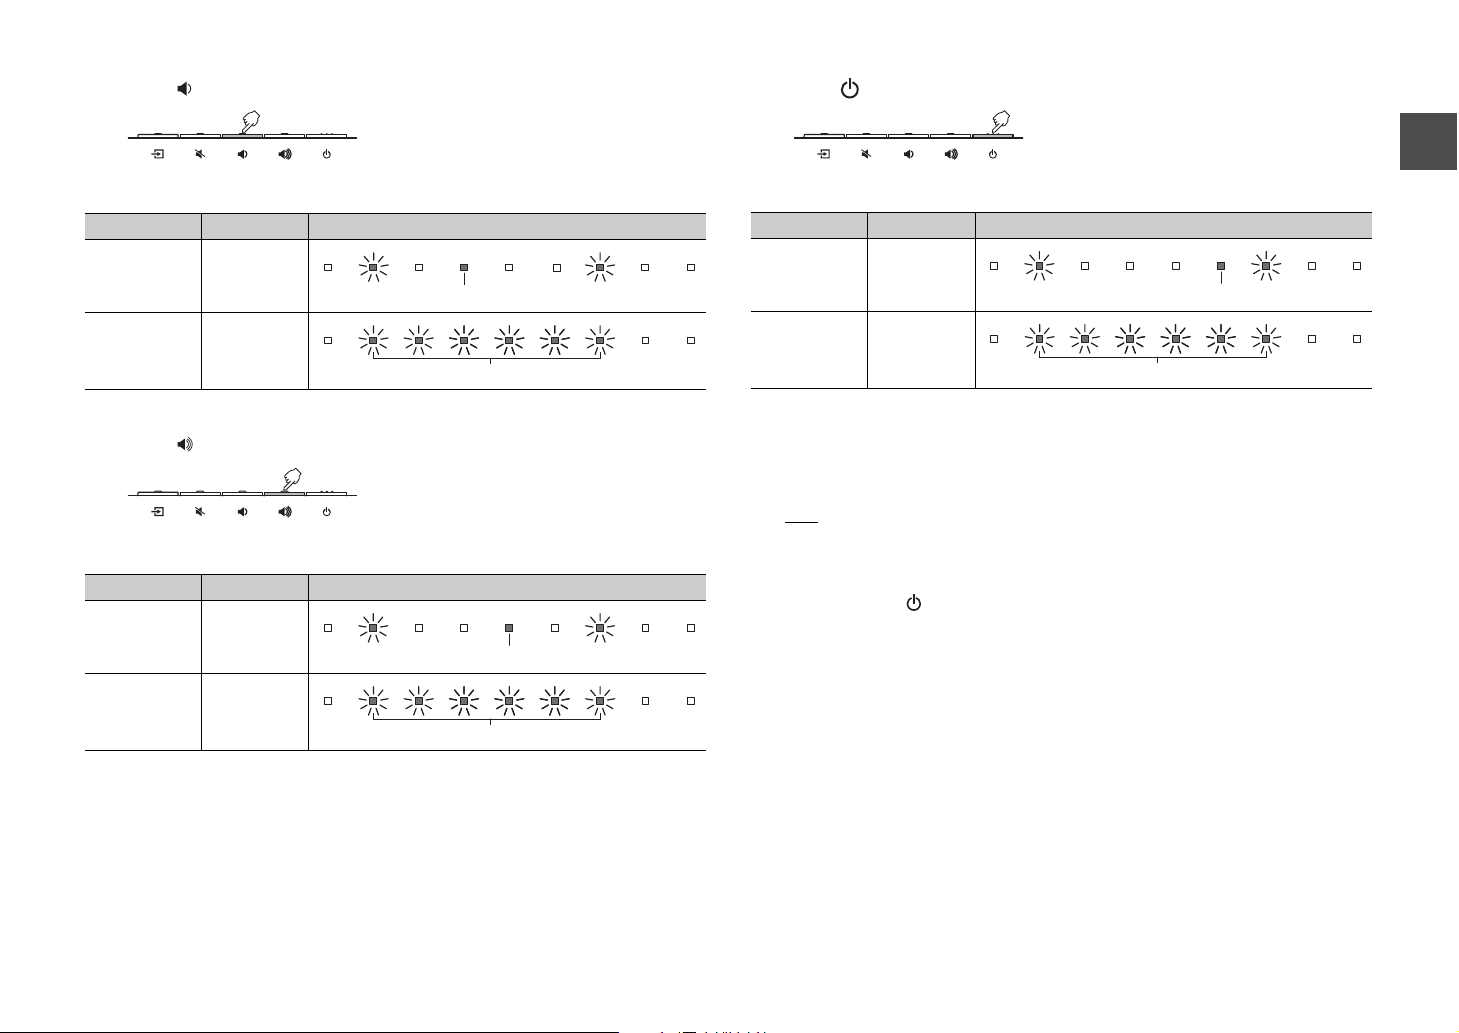
★
Indicators
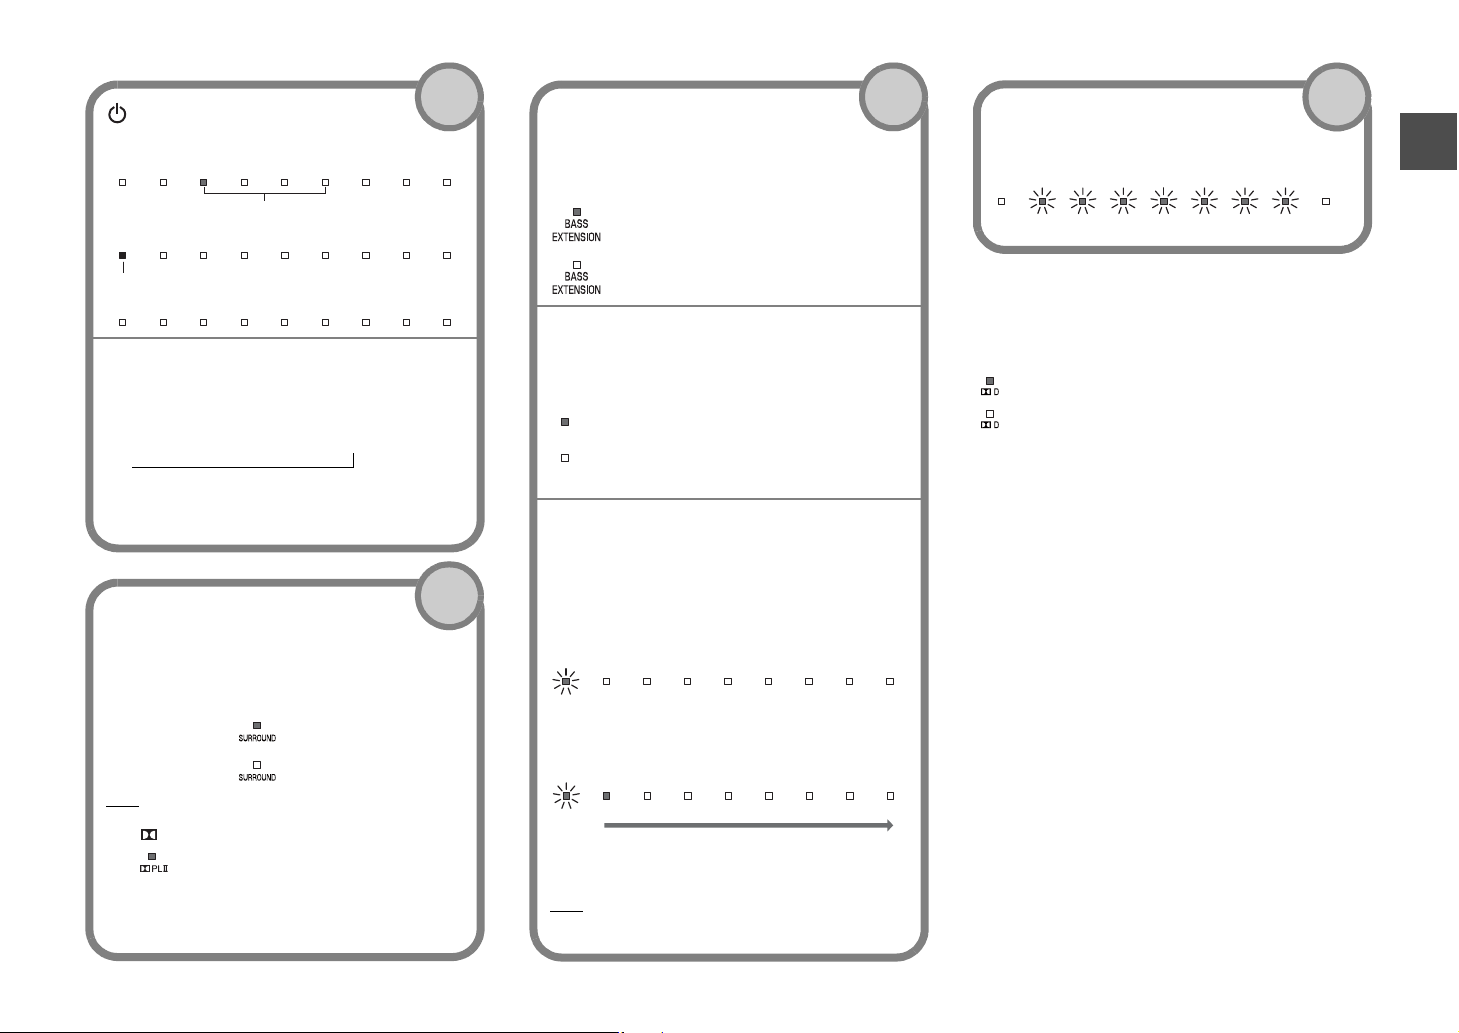
The indicators on the top panel flash or light up, to
indicate the operation and setting status.
★: Keys that require pressing for more than 3 seconds
LEARN, BLUETOOTH STANDBY, AUDIO DELAY
In this manual, illustrations of the nine in-line indicators
are used for explanation.
: Off
: Lights up
: Flashes
(Example: When the PLII indicator and SURROUND indicator
flash, and the TV indicator lights up)
En
8
Page 11
(power) key
Turns on or off (standby) the sound bar.
Turned on
Bluetooth standby (p.11)
Turned off
DIMMER key
Switches the brightness of the indicators. Pressing
the key each time switches the status of the
indicators as follows.
Dim (default setting) → Off → Bright
↑
Indicators illuminate bright just after the operation
and become the set brightness after a few
seconds.
Indicator of the selected input source lights up (green)
Lights up (red)
SURROUND and STEREO keys
Switch between surround and stereo
(2 channel) playback. When surround playback is
selected, you can enjoy a realistic sound effect using
Yamaha’s exclusive AIR SURROUND XTREME.
HINT
• When 2 channel stereo signals are played in surround,
the PLII indicator lights up.
• By installing the dedicated free application “HOME
THEATER CONTROLLER” to a Bluetooth device, such as a
smartphone, you can choose the following surround modes:
TV PROGRAM, MOVIE, MUSIC, SPORTS, and GAME.
Lights up (surround playback)
Off (stereo playback)
SURROUND
STEREO
Lights up (Dolby Pro Logic II)
4
5
BASS EXTENSION key
Enables/disables the bass extension function.
When this function is enabled, you can enjoy a powerful
bass sound with the Yamaha original bass boost
technology “Advanced Bass Extension Processing.”
CLEAR VOICE key
Enables/disables the clear voice function.
When this function is enabled, you can enjoy clear
voice sounds while watching movies, TV dramas,
news programs or sports programs.
AUDIO DELAY key
★
Adjusts the audio delay to synchronize the sound
with the video when the video image on the TV
may seem delayed with respect to the sound.
Follow the procedure below to adjust the audio delay.
1 Hold down the AUDIO DELAY key for more
than 3 seconds.
The left most indicator flashes.
2 Press the SUBWOOFER (+/-) key to adjust the
audio delay.
Pressing the SUBWOOFER (+) key delays the
audio output timing.
3 To finish the adjustment, press the AUDIO
DELAY key.
HINT
• The adjustment will be finished automatically if no
operations are performed for 20 seconds.
Lights up (enabled)
Off (disabled)
CLEAR
VOICE
CLEAR
VOICE
Lights up (enabled)
Off (disabled)
(–) (+)
6
MUTE key
Mutes the audio output. Press the key again
to unmute.
Flash (on mute)
7
Green (Dolby Digital)
Off (PCM)
Decoder indication
The sound bar supports the following audio signals. You
can check the type of the input audio signal by the color
of the indicator.
En
9
Page 12
Listening to the sound from a
Bluetooth devices
Playing back audio from a Bluetooth device
on the sound bar
For the first Bluetooth
connection
Pairing a Bluetooth device
with the sound bar
For subsequent
Bluetooth connection
Flashes
YAS-105 Yamaha
PIN 0 0 0 0
123
456
789
0
Bluetooth device
You can play back wirelessly from Bluetooth devices, such as a smartphone or digital
music player.
See also the operating manual of the Bluetooth device for more details.
Perform the following steps to use a Bluetooth device with the sound bar.
Pairing a Bluetooth device with the sound bar
When connecting to a Bluetooth device for the first time, “pairing” between the device
and sound bar is required. “Pairing” is necessary for each Bluetooth device you use.
Once “pairing” with a device is completed, subsequent connection with that device will
not require “pairing.”
1 Press the BLUETOOTH key on the sound bar’s remote control to
select Bluetooth as the input source.
The BLUETOOTH indicator on the top panel flashes.
2 Turn on the Bluetooth function of the device to be paired, and
perform pairing.
The operation varies depending on the device. Refer to the operation manual of the
device.
3 Select “YAS-105 Yamaha” in the Bluetooth device list on the device.
If a passkey (PIN) is required, enter the number “0000.”
10
En
When pairing is completed, or a completion message appears on the device.
NOTE
• Perform pairing with the Bluetooth device and sound bar within 10 meters (33 ft) of each other.
• Up to eight Bluetooth devices can be paired with the sound bar. If a ninth device is paired, pairing data for
the device with the oldest connection date will be deleted.
• If pairing information for a device is deleted, to use that device again, pairing of the device is required
again.
• If a Bluetooth device is already connected to the sound bar, terminate that Bluetooth connection (p.11),
then perform pairing with the new device.
• Refer to “Bluetooth” (p.18) in “Troubleshooting” if pairing cannot be achieved.
Page 13
Playing back audio from a Bluetooth device on the
Flashes
Lights up
BLUETOOTH
STANDBY
Flash 3 times (enabled), flash once (disabled)
Lights up (red)
sound bar
1 With the sound bar turned on, press the BLUETOOTH key on the
sound bar’s remote control to select Bluetooth as the input source.
The BLUETOOTH indicator on the top panel flashes.
2 Turn on the Bluetooth function of the device and then connect.
When Bluetooth connection is made correctly, the BLUETOOTH indicator of the
sound bar lights up.
Using the Bluetooth standby mode
The Bluetooth standby mode allows you to turn on (or off) the sound bar automatically,
linked with the operation of the Bluetooth device.
1 With the sound bar turned on, hold down the BLUETOOTH STANDBY
key on the sound bar’s remote control for more than 3 seconds.
Holding down the BLUETOOTH STANDBY key for 3 seconds each time toggles the
mode between enabled and disabled.
When the Bluetooth standby mode is enabled and the sound bar is turned off, the
D indicator lights up in red (Bluetooth standby).
3 Play back a song on the device.
NOTE
• Perform Bluetooth connection with the device and sound bar within 10 meters (33 ft) of each other.
• It may be necessary to select “YAS-105 Yamaha” in the Bluetooth device list again, in the event that a
connection problem occurs. You may have to change the output setting to output audio to the sound bar,
depending on the Bluetooth device you are using.
• Adjust the volume level of the Bluetooth device as required.
• If a Bluetooth device is already connected to the sound bar, terminate that Bluetooth connection, then
connect with the new device.
Terminating Bluetooth connection
Bluetooth connection is terminated in the following cases. When the Bluetooth connection
is terminated with the sound bar turned on, the BLUETOOTH indicator changes from the lit
status to the flashing status and the sound bar enters the connection wait status.
• The Bluetooth function is turned off on the compatible device.
• The BLUETOOTH key on the sound bar’s remote control is pressed for more
than 3 seconds.
• The sound bar is turned off.
Functions available on Bluetooth devices with Bluetooth standby mode enabled
Power on interlock function (when the sound bar is turned off)
When Bluetooth connection is made on the device, the sound bar will turn on and will be ready to play
back sound from the device.
Power off interlock function (when the sound bar is turned on)
The sound bar will be turned off when Bluetooth connection is terminated on a Bluetooth device. (Only
when BLUETOOTH is selected as the input source.)
Using the HOME THEATER CONTROLLER application
By installing the dedicated free application “HOME THEATER CONTROLLER” to a
Bluetooth device, such as a smartphone, you can perform various operations easily and
conveniently with the Bluetooth device. (Setting items: basic operation, surround mode,
sound adjustments)
NOTE
• To use the application, connect the sound bar and a Bluetooth device via Bluetooth connection.
• If you enable the Bluetooth standby mode of the sound bar, you can turn on the power of the sound bar
with the Bluetooth device.
For details on “HOME THEATER CONTROLLER”, see the product information on our
website.
En
11
Page 14
Settings
CLEAR
VOICE
CLEAR
VOICE
Approx. 30 cm (1 ft)
TV’s remote control
Hold down
(more than 1 second)
Release
(more than 1 second)
Hold down
(more than 1 second)
Release
(...)
Lights up
Flash
Programming the sound bar with the TV’s remote control (TV’s remote control learning function)
NOTE
• Steps 5 to 8 require only the TV’s remote control and the keys on the rear panel of the sound bar.
The remote control of the sound bar is not necessary.
• If the sound bar has already learned functions, the following indicators light up.
Mute: TV
Volume (-): BD/DVD
Volume (+): ANALOG
Power: BLUETOOTH
Once you program the sound bar, you can control it with your TV’s remote control for
functions such as turning on/off the TV and sound bar simultaneously, or volume up/
down and muting/unmuting of the sound bar.
• This function is available only when your TV’s remote control uses IR (infrared) signal.
• A radio wave remote control will not work.
• If you want to use a cable or satellite set top box’s remote control to operate the sound bar, use your
original TV’s IR (infrared) remote control to program the sound bar, then use the set top box’s remote
control to operate.
• If by changing the volume of the sound bar the TV’s volume also changes, set the TV’s volume to
minimum, or disable speaker output.
1 Turn off the TV.
2 Turn off the sound bar.
3 Hold down the LEARN key on the sound bar’s remote control for
more than 3 seconds while pointing at the appropriate remote
control sensor (p.5).
The sound bar enters the learning mode, and the indicators on the top panel flash
as shown below.
LEARN BLUETOOTH
STANDBY
4 Check if the appropriate remote control sensor has been activated.
You can check which remote control sensor has been activated with the CLEAR
VOICE indicator.
CLEAR VOICE
indicator
Off On the front panel
Lights up On the top panel
If the appropriate remote control sensor has not been activated, press the LEARN
key to exit from the learning mode, and repeat from Step 3.
Activated remote control
sensor
Activated remote control
sensor is appropriate when…
Installing the sound bar on a TV
cabinet, etc.
Attaching the sound bar to a
wall
5 Teach the sound bar the “Mute” code of the TV’s remote control.
5-1 Press (mute) on the rear panel of the sound bar.
5-2 While pointing your TV’s remote control at the remote control sensor, hold
down the mute key for more than 1 second twice or three times.
The appropriate remote control sensor depends on the installation position (p.5).
Result Bleep/buzzer Indicators
Successfully
learned
Failed to learn
* Repeat from
Step 5-1.
Once
Twice
En
12
Page 15
6
Lights up
Flash
Lights up
Flash
Lights up
Flash
Teach the sound bar the “Volume (–)” code of the TV’s remote control.
6-1 Press (volume -) on the rear panel of the sound bar.
8 Teach the sound bar the “Power” code of the TV’s remote control.
8-1 Press (power) on the rear panel of the sound bar.
6-2 While pointing your TV’s remote control at the remote control sensor, hold
down the volume (–) key for more than 1 second twice or three times.
Result Bleep/buzzer Indicators
Successfully
learned
Failed to learn
* Repeat from
Step 6-1.
Once
Twice
7 Teach the sound bar the “Volume (+)” code of the TV’s remote control.
7-1 Press (volume +) on the rear panel of the sound bar.
7-2 While pointing your TV’s remote control at the remote control sensor, hold
down the volume (+) key for more than 1 second twice or three times.
Result Bleep/buzzer Indicators
Successfully
learned
Failed to learn
* Repeat from
Step 7-1.
Once
Twice
8-2 While pointing your TV’s remote control at the remote control sensor, hold
down the power key for more than 1 second twice or three times.
Result Bleep/buzzer Indicators
Successfully
learned
Failed to learn
* Repeat from
Step 8-1.
Once
Twice
9 To finish the learning mode, press the LEARN key on the sound bar’s
remote control.
This completes the necessary settings. Now you can operate the sound bar with
the TV’s remote control’s mute key, volume keys, or power key.
HINT
• The learning mode will be finished automatically if no operations are performed for 5 minutes.
• Set the TV volume to minimum. When you turn up the volume of the sound bar with the TV’s remote
control, the volume of the TV may be turned up at the same time. In this case, follow Step 3 in
“Connections” (p.6) to change the TV setting.
• You can press the (power) key on the sound bar’s remote control to finish learning mode.
En
13
Page 16
Clearing all programmed functions
SUBWOOFEROUT
Pin cable for subwoofer
(commercially available)
Mono input
Using an external subwoofer
1 With the sound bar turned off, hold down the LEARN key on the
sound bar’s remote control for more than 3 seconds (for entering the
learning mode).
When the sound bar is in the learning mode, the indicators on the top panel flash as
shown below.
LEARN BLUETOOTH
STANDBY
2 Hold down (input) on the rear panel of the sound bar for more
than 3 seconds.
The corresponding indicator of the learned function turns off and the indicators on
the top panel flash as shown below.
If the clearing is completed, you will hear the bleep sound three times.
3 Press the LEARN key on the sound bar’s remote control.
The sound bar has dual built-in subwoofers; however you can connect an external
subwoofer when you want to enhance low frequency sound. Connect a subwoofer to the
SUBWOOFER OUT jack of the sound bar. Sound is output from both the built-in
subwoofers and external subwoofer.
NOTE
• Use an external subwoofer with built-in amplifier.
14
En
Page 17

Setting the auto power standby function
Off (enabled), lights up (disabled)
Flash (initialized)
Initializing the sound bar
By enabling the auto power standby function, you can avoid forgetting to turn off the
sound bar after use, or if you fall asleep while watching TV.
NOTE
• When the auto power standby function is enabled and one of the following conditions is met, the sound bar
will automatically turn off.
− No operations for 8 hours
− No audio input and no operations for 20 minutes when BLUETOOTH is selected as the input source.
1 With the sound bar turned off, hold down the MUTE key on the sound
bar’s remote control for more than 3 seconds to enable/disable the
auto power standby function.
You can check the status of the auto power standby function with the indicators on
the top panel for several seconds right after the sound bar is turned on.
HINT
• Initial setting varies depending on the country or region.
− U.K. and Europe models: enabled
− Other models: disabled
Follow the procedure below to initialize the sound bar.
1 Turn off the sound bar.
2 Hold down (power) on the rear panel of the sound bar for more
than 3 seconds.
En
15
Page 18
Troubleshooting
Refer to the table below when the sound bar does not function properly. If the problem
you are experiencing is not listed below or if the instructions below do not help, turn off
the sound bar, disconnect the power cable, and contact the nearest authorized Yamaha
dealer or service center.
First, check the following:
A The power cables of the sound bar, TV and playback devices (such as BD
players) are connected to AC wall outlets securely.
B The sound bar, TV and playback devices (such as BD players) are turned on.
C The connectors of each cable are securely inserted into jacks on each device.
Power and system
Problem Cause Remedy
The power turns
off suddenly.
The power
cannot be turned
on.
The auto power standby function
worked.
When the auto power standby
function is enabled and one of the
following conditions is met, the
sound bar will automatically turn
off.
- No operations for 8 hours
- No audio input and no
operations for 20 minutes when
BLUETOOTH is selected as the
input source.
The protection circuitry has been
activated. (The D indicator on
the top panel of the sound bar
flashes.)
Bluetooth connection is
terminated on a Bluetooth device
when the Bluetooth standby mode
is enabled.
The protection circuitry has been
activated three times
consecutively. (If you try to turn on
the power in this condition, the
D indicator on the top panel of the
sound bar flashes.)
Turn on the sound bar again. To stop
the sound bar from turning off
automatically, disable the auto power
standby function (p.15).
After confirming that all connections
are made properly, turn on the sound
bar again. If the power still turns off
suddenly or cannot be turned on,
unplug the power cable from the AC
wall outlet and contact the nearest
authorized Yamaha dealer or service
center.
Disable the Bluetooth standby mode
(p.11).
To protect the product, the power
cannot be turned on. Unplug the
power cable from the AC wall outlet
and contact the nearest authorized
Yamaha dealer or service center.
All indicators go
out although the
sound bar is
turned on (it may
seem that the
sound bar is
turned off).
The sound bar is
not responding
correctly.
The sound bar
operates by
itself.
TV’s 3D glasses
do not work.
The sound bar
cannot be
operated using
the dedicated
application
“HOME
THEATER
CONTROLLER.”
(The screen of
the application
does not shift
from the demo
mode.)
The brightness of indicators is set
to off on the DIMMER key setting.
The internal microcomputer is
frozen, due to an external electric
shock (such as lightning or
excessive static electricity) or to a
drop in the power supply voltage.
Another Bluetooth device is being
operated nearby.
The sound bar is blocking the 3D
glasses transmitter of your TV.
The Bluetooth device on which
the application has been installed
is not connected to the sound bar.
Operate the DIMMER key to select the
desired brightness (p.9).
Hold down (power) on the rear
panel of the sound bar for more than
10 seconds to reboot it. (If the problem
persists, unplug the power cable from
the AC wall outlet and plug it again.)
Terminate Bluetoot h connection of the
sound bar (p.11).
Check the position of the 3D glasses
transmitter of your TV and adjust the
position of the sound bar.
Connect the Bluetooth device and the
sound bar via Bluetooth and use the
application.
16
En
Page 19

Audio Remote control
Problem Cause Remedy
No sound.
No sound is
coming from the
subwoofer.
The volume
decreases when
the sound bar is
turned on.
No surround
effect.
Noise is heard.
Another input source is selected. Select an appropriate input source (p.8).
The mute function is activated. Cancel the mute function (p.9).
The volume is too low. Turn up the volume (p.8).
The power cable of the sound bar
is not connected properly.
Input jacks on both devices are
connected.
Signals that the sound bar cannot
play back are being input.
The volume of the subwoofer is
too low.
The playback source does not
contain low-frequency signals.
The automatic volume adjustment
function worked. To prevent
excessive loudness, the sound
bar automatically controls its
volume within a certain level when
the sound bar is turned on.
Stereo playback is selected. Select surround playback (p.9).
The volume is too low. Turn up the volume (p.8).
The TV or playback device is set
to output 2 channel audio (such
as PCM) only.
The audio is output from the TV
built-in speakers.
The listening position is too close
to the sound bar.
The installation position selector
switch is not set appropriately.
The sound bar is too close to
another digital or high-frequency
device.
Make sure that the power cable of the
sound bar is connected to an AC wall
outlet securely (p.6).
Connect the input jack on the sound
bar and the output jack on the external
playback device.
Change the digital audio output setting
on the playback device to PCM or
Dolby Digital.
Turn up the volume of the subwoofer
(p.8).
Play back a sound source containing
low-frequency signals, and confirm
that the sound is output from the
subwoofer.
If necessary, turn up the volume (p.8).
Change the digital audio output setting
on the TV or playback device to Dolby
Digital or BitStream.
Set the TV volume to minimum (p.6).
Listen from a position at some
distance from the sound bar.
When placing the sound bar in front of
a TV, set the installation position
selector switch to “T.”
When attaching the sound bar to a
wall, set the installation position
selector switch to “W.”
Move those devices away from the
sound bar.
Problem Cause Remedy
The sound bar
cannot be
controlled using
the remote
control.
The TV cannot
be controlled
using the TV’s
remote control.
The sound bar
does not learn
TV’s remote
control
operations.
Sound is coming
from the TV
when the sound
bar volume is
turned up with
the TV’s remote
control.
(when TV’s
The sound bar is out of the
operating range.
The batteries are weak. Replace with new batteries (p.2).
The remote control sensor of the
sound bar is exposed to direct
sunlight or strong lighting.
The remote control sensor of the
TV is hidden by the sound bar.
The TV’s remote control key was
not held down long enough.
The TV’s remote control does not
use infrared signals. (Some
remote controls may not work
even if it uses infrared signals.)
The position where you operated
the TV’s remote control is not
appropriate.
The batteries of the TV’s remote
control are weak.
The remote control sensor of the
sound bar is exposed to direct
sunlight or strong lighting.
The transmission of the remote
control signal was disturbed by
the TV screen light.
Audio output is enabled on the
TV.
Use the remote control within the
operating range (p.2).
Adjust the lighting angle, or reposition
the sound bar.
Adjust the installation position of the
sound bar so that the remote control
sensor of the TV is not hidden by the
sound bar when operating the TV from
the ordinary operation position.
Hold down the key for more than 1
second twice or three times (p.12).
The TV’s remote control learning
function cannot be used in this case.
Use the sound bar’s remote control to
operate the sound bar.
Operate the TV’s remote control at the
appropriate position (p.12).
Replace with new batteries.
Adjust the lighting angle, or reposition
the sound bar.
Turn off the TV and perform the
learning operation again (p.12).
Change the TV setting to disable the
TV speaker output. If a setting to
disable the speaker output is not
available on your TV, try the following
methods.
- Connect headphones to the
headphone jack on the TV.
- Set the TV volume to minimum.
remote control
learning function
is used)
En
17
Page 20
The power of the
sound bar and of
the TV switch in
the opposite
direction. (For
The power of the TV was on when
you performed the learning
operation.
Press the power key on the TV and
(power) on the rear panel of the sound
bar to turn them on and then press the
power key on the TV’s remote control
to turn them off.
example, the TV
is turned off if
the sound bar is
turned on.)
(when TV’s
remote control
learning function
is used)
Bluetooth
Problem Cause Remedy
Cannot make the
sound bar pair
with the
Bluetooth
device.
Bluetooth is not selected as the
input source.
The device does not support
A2DP.
A Bluetooth adaptor, etc., that you
want to pair with the sound bar
has a password other than
“0000.”
The sound bar and device are too
far apart.
There is a device (microwave
oven, wireless LAN, etc.) that
outputs signals in the 2.4 GHz
frequency band nearby.
Another Bluetooth device is
connected.
Select Bluetooth as the input source.
Perform pairing operations with a
device which supports A2DP.
Use a Bluetooth adaptor, etc., whose
password is “0000.”
Move the device closer to the sound
bar.
Move the sound bar away from the
device that is emitting radio frequency
signals.
If the Bluetooth device is equipped
with the wireless LAN function, turn off
the wireless LAN function, and turn on
the Bluetooth function only.
Terminate current Bluetooth
connection, and perform pairing with
the new device.
Cannot make a
Bluetooth
connection.
Cannot make a
Bluetooth
connection (the
BLUETOOTH
indicator
continues to
flash rapidly).
No sound is
produced or the
sound is
interrupted
during playback.
Another Bluetooth device is
connected.
More than nine devices are paired
and the oldest pairing information
is deleted.
There is a problem within the
sound bar.
The Bluetooth connection of the
sound bar with the device is
disconnected.
Bluetooth is not selected as the
input source.
The sound bar and device are too
far apart.
There is a device (microwave
oven, wireless LAN, etc.) that
outputs signals in the 2.4 GHz
frequency band nearby.
The device is not set to send
Bluetooth audio signals to the
sound bar.
Playback on the device has not
been performed.
The device’s volume is set to
minimum.
The sound bar cannot make multiple
Bluetooth connections. Terminate
current Bluetooth connection, and
make connection for the desired
device.
Perform pairing again. The sound bar
can retain pairing information for up to
eight devices. When pairing a ninth
device, pairing data for the device with
the oldest connection date will be
deleted.
Unplug the power cable from the AC
wall outlet and contact the nearest
authorized Yamaha dealer or service
center.
Perform Bluetooth connection
operations again (p.10).
Select Bluetooth as the input source.
Move the device closer to the sound
bar.
Move the sound bar away from the
device that is emitting radio frequency
signals.
If the Bluetooth device is equipped
with the wireless LAN function, turn off
the wireless LAN function, and turn on
the Bluetooth function only.
Change the audio output setting and
connection setting on the device.
Perform playback on the device.
Turn up the device’s volume level.
18
En
Page 21
Specifications
Item specifications
Amplifier
Section
Front L/R
Section
Tweeter
Section
Subwoofer
Section
Decoder
Input Jacks
Output Jack
Maximum Rated
Output Power
Type Acoustic suspension type
Driver
Frequency
Response
Impedance 6Ω
Type —
Driver
Frequency
Response
Impedance 4Ω
Type Bass reflex type
Driver 7.5 cm (3") cone non-magnetic shielding type x 2
Frequency
Response
Impedance 3Ω
Supported audio
signal (TV, BD/DVD)
Digital (Optical) 1 (TV)
Digital (Coaxial) 1 (BD/DVD)
Analog
(3.5 mm stereo mini)
Analog
(RCA/monaural)
Front L/R 30 W x 2 ch
Subwoofer 60 W
5.5 cm (2-1/8") cone non-magnetic shielding type
x 2
160Hz to 22kHz
19 mm (3/4") balanced dome magnetic shielding
type x 2
4kHz to 23kHz
55Hz to 160Hz
PCM (2ch)
Dolby Digital (up to 5.1ch)
1 (ANALOG)
1 (SUBWOOFER OUT)
Bluetooth version Ver. 2.1 +EDR
Supported protocols A2DP, SPP
Supported codecs SBC, MPEG4 AAC
Bluetooth
General
* Specifications are subject to change without notice.
Wireless output Bluetooth Class 2
Maximum
communication
distance
Supported content
protection method
Power Supply
Power Consumption 22 W
Standby Power
Consumption
Bluetooth standby
power consumption
Dimensions
(W x H x D)
Weight 4.0 kg (8.8 lbs)
10 m ([33 ft] without obstructions)
SCMS-T
U.S.A. and Canada models: AC 120 V, 60Hz
Taiwan model: AC 110 - 120 V, 50/60Hz
China model: AC 220V, 50Hz
Other models: AC 220 - 240 V, 50/60Hz
0.4 W
0.5 W (Taiwan, U.S.A., and Canada models)
0.6 W (China, and other models)
890 x 53 x 131 mm (installing the sound bar in
front of a TV, etc.)
(35" x 2-1/8" x 5-1/8")
890 x 131 x 59 mm (attaching the sound bar to a
wall, with spacer)
(35" x 5-1/8" x 2-3/8")
En
19
Page 22
ATTENTION : LISEZ CE QUI SUIT AVANT D’UTILISER VOTRE APPAREIL.
• Pour utiliser l’appareil au mieux de ses
possibilités, lisez attentivement ce mode d’emploi.
Conservez-le soigneusement pour référence.
• Installez cet appareil audio dans un endroit bien
aéré, frais, sec et propre - à l’abri de la lumière
directe du soleil, des sources de chaleur ou de
vibration, des poussières, de l’humidité et du froid.
Pour une ventilation correcte, respectez les espaces
libres conseillés lors de l’installation.
Au-dessus : 10 cm, À l’arrière : 10 cm,
Sur les côtés : 10 cm
• Placez l’appareil loin des équipements, moteurs et
transformateurs électriques, pour éviter les
ronflements parasites.
• N’exposez pas l’appareil à des variations brutales
de température, ne le placez pas dans un
environnement très humide (par exemple dans une
pièce contenant un humidificateur) car cela peut
entraîner la condensation d’humidité à l’intérieur
de l’appareil qui elle-même peut être responsable
de décharge électrique, d’incendie, de dommage à
l’appareil ou de blessure corporelle.
• Evitez d’installer l’appareil dans un endroit où des
objets peuvent tomber, ainsi que là où l’appareil
pourrait être exposé à des éclaboussures ou des
gouttes d’eau. Sur le dessus de l’appareil, ne
placez pas:
− d’autres appareils qui peuvent endommager la
surface de l’appareil ou provoquer sa
décoloration.
− des objets se consumant (par exemple, une
bougie) qui peuvent être responsables
d’incendie, de dommage à l’appareil ou de
blessure corporelle.
− des récipients contenant des liquides qui peuvent
être à l’origine de décharge électrique ou de
dommage à l’appareil.
• Ne couvrez pas l’appareil d’un journal, d’une
nappe, d’un rideau, etc. car cela empêcherait
l’évacuation de la chaleur. Toute augmentation de
la température intérieure de l’appareil peut être
responsable d’incendie, de dommage à l’appareil
et/ou de blessure corporelle.
• Ne branchez pas la fi che du câble d’alimentation
de l’appareil sur une prise secteur aussi longtemps
que tous les raccordements n’ont pas été effectués.
• Ne pas faire fonctionner l’appareil à l’envers. Il
risquerait de chauffer et d’être endommagé.
• N’exercez aucune force excessive sur les
commutateurs, les boutons et les cordons.
• Pour débrancher la fiche du câble d’alimentation
au niveau de la prise secteur, saisissez la fiche et
ne tirez pas sur le câble.
• Ne nettoyez pas l’appareil au moyen d’un solvant
chimique, ce qui pourrait endommager la finition.
Utilisez un chiffon sec et propre.
• N’alimentez l’appareil qu’à partir de la tension
prescrite. Alimenter l’appareil sous une tension
plus élevée est dangereux et peut être responsable
d’incendie, de dommage à l’appareil ou de
blessure corporelle. Yamaha ne saurait être tenue
responsable des dommages résultant de
l’alimentation de l’appareil sous une tension autre
que celle prescrite.
• Pour empêcher tout dommage causé par les éclairs,
déconnectez la câble d’alimentation et toute
antenne extérieure de la prise murale pendant un
orage.
• Ne tentez pas de modifier ni de réparer l’appareil.
Consultez le service Yamaha compétent pour toute
réparation qui serait requise. Le coffret de
l’appareil ne doit jamais être ouvert, quelle que soit
la raison.
• Si vous envisagez de ne pas vous servir de
l’appareil pendant une longue période (par
exemple, pendant les vacances), débranchez la
fiche du câble d’alimentation au niveau de la prise
secteur.
• Lisez la section intitulée « Guide de dépannage »
où figurent une liste d’erreurs de manipulation
communes avant de conclure que l’appareil
présente une anomalie de fonctionnement.
• Avant de déplacer l’appareil, appuyez sur pour
placer l’appareil en veille puis débranchez la fiche
du câble d’alimentation au niveau de la prise
secteur.
• La condensation se forme lorsque la température
ambiante change brusquement. En ce cas,
débranchez la fiche du câble d’alimentation et
laissez l’appareil reposer.
• Installez cet appareil à proximité de la prise secteur
et à un emplacement où la fiche du câble
d’alimentation est facilement accessible.
• Le propriétaire est responsable d’installer
correctement les composants. Yamaha ne peut être
tenue responsable de toute installation incorrecte
des enceintes.
• Tenez ce produit hors de la portée des enfants afin
d’éviter qu’ils n’avalent les petites pièces.
Remarques à propos des télécommandes
et piles
• Ne renversez aucun liquide sur la télécommande.
• Ne laissez pas tomber la télécommande.
• Ne laissez pas et ne rangez pas la télécommande
dans les endroits suivants :
− endroits très humides, par exemple près d’une
baignoire
− endroits très chauds, par exemple près d’un
poêle ou d’un appareil de chauffage
− endroits très froids
− endroits poussiéreux
• N’exposez pas le capteur de télécommande de ce
système à la lumière directe du soleil ou à une
lampe fluorescente à onduleur.
• Si les piles sont vieilles, la portée de la
télécommande risque de diminuer
considérablement. Le cas échéant, remplacez les
piles le plus rapidement possible par deux piles
neuves.
• N’utilisez pas à la fois des piles neuves et des piles
usagées.
• N’utilisez pas non plus des piles de deux types
différents (par exemple, des piles alcalines et des
piles au manganèse). Lisez les instructions de
l’emballage, car ces types de piles peuvent être de
forme et de couleur différentes.
• Des piles épuisées risquent de fuir. En cas de fuite,
jetez les piles immédiatement. Évitez de toucher le
liquide qui a fui et veillez à ce qu’il n’entre pas en
contact avec vos vêtements, etc. Nettoyez
soigneusement le logement d’insertion des piles
avant d’insérer de nouvelles piles.
• Ne transportez pas les piles dans une poche ou un
sac avec des objets métalliques comme des pièces
de monnaie, etc.
• Ne jetez pas les piles avec les ordures ménagères.
Mettez-les au rebut conformément aux
réglementations locales en vigueur.
• Tenez les piles à l’écart des enfants. En cas
d’ingestion accidentelle, contactez immédiatement
un médecin.
• Si vous pensez ne pas utiliser la télécommande
pendant une période prolongée, retirez les piles.
• Ne chargez pas et ne démontez pas les piles
fournies.
• Les piles ne doivent pas être exposées à une
chaleur extrême, par exemple au soleil, à une
flamme, etc.
AVERTISSEMENT
POUR RÉ DUIRE LES RISQUES D’INCENDIE
OU DE SECOUSSE ÉLECTRIQUE,
N’EXPOSEZ PAS CET APPAREIL À LA
PLUIE OU À L’HUMIDITÉ.
Aussi longtemps qu’il est branché sur la prise de
courant, cet appareil n’est pas déconnecté du
secteur, même si vous le mettez hors tension à
l’aide de la touche . Dans cet état, l’appareil
consomme une très faible quantité de courant.
Touche (alimentation)
Cette touche permet de mettre l’appareil sous
tension ou en mode veille.
N’utilisez pas cet appareil à moins de 22 cm des
personnes disposant d’un stimulateur cardiaque
ou d’un défibrillateur.
Les ondes radio peuvent avoir une incidence sur
les équipements électroniques médicaux.
N’utilisez pas cet appareil à proximité
d’équipements médicaux ou à l’intérieur
d’institutions médicales.
La plaque signalétique est située sous l’appareil.
Fr
i
Page 23
Table des matières
Éléments livrés...................................................................... 2
Fonctions............................................................................... 3
Questions fréquemment posées ......................................... 3
Noms et fonctions des pièces............................................... 4
Installation ............................................................................ 5
Raccordements ..................................................................... 6
Fonctionnement ................................................................... 8
Écoute du son à partir d’un appareil Bluetooth................ 10
Réglages .............................................................................. 12
Programmation de la barre de son avec la télécommande du
téléviseur (fonction d’apprentissage de la télécommande du
téléviseur) ............................................................................................................ 12
Utilisation d’un caisson de graves externe .............................................. 14
Réglage de la fonction de mise en veille automatique....................... 15
Initialisation de la barre de son .................................................................... 15
Guide de dépannage .......................................................... 16
Caractéristiques techniques .............................................. 19
Quelques mots sur ce mode d’emploi
REMARQUE
Ce symbole signale les précautions à prendre concernant l’utilisation du produit et les limites de ses
fonctions.
ASTUCE
Ce symbole signale des explications supplémentaires permettant une meilleure utilisation.
Fr
1
Page 24
Éléments livrés
Barre de son
Télécommande Pile x 2
(AAA, R03, UM4)
Câble optique (1,5 m)
Gabarit pour le montage
* À utiliser en cas de fixation de la barre de son au mur
Entretoise x 2
* À utiliser en cas de fixation de
la barre de son au mur
Mode d’emploi
(le présent manuel)
Capteur de la
télécommande
6 m maximum
Assurez-vous d’avoir reçu l’ensemble des éléments suivants :
Préparation de la télécommande
Retirez la feuille de protection avant d’utiliser la télécommande.
Rayon d’action de la télécommande
Respectez le rayon d’action indiqué ci-dessous. Lorsque vous fixez la barre de son au
mur, commandez-la au moyen du capteur de la télécommande du panneau supérieur
(p.5).
Fr
2
Page 25
Fonctions
Questions fréquemment
Profitez d’un son réaliste et puissant grâce à cette barre de son avec
caisson de graves intégré, facile à installer et à raccorder à un téléviseur
et à d’autres appareils.
•AIR SURROUND XTREME
Profitez d’un son surround 7.1 canaux, qui donne de l’ampleur et de la profondeur
à l’espace sonore, comme si les enceintes étaient non seulement disposées à
l’avant, mais aussi sur la gauche, sur la droite et derrière l’auditeur (p.9).
• Extension des graves
Profitez de graves puissants avec le « Traitement avancé d’extension des
graves », la technologie d’accentuation des graves originale de Yamaha (p.9).
• Connexion Bluetooth®
Les contenus provenant d’un smartphone, d’une tablette ou d’un ordinateur
compatible Bluetooth peuvent être lus en toute simplicité (p.10).
Vous pouvez bénéficier d’un son réaliste et impressionnant aussi proche que
possible de l’original grâce au système d’amélioration de la musique compressée.
• HOME THEATER CONTROLLER
Vous pouvez contrôler facilement la barre de son en installant l’application de
contrôle dédiée « HOME THEATER CONTROLLER ».
• Fonction d’apprentissage de la télécommande du
téléviseur
Contrôle de la barre de son à l’aide de la télécommande du téléviseur (p.12).
posées
La section suivante aborde les fonctions les plus utilisées et les questions fréquemment
posées relatives à la barre de son.
Q1
Puis-je contrôler la barre de son à l’aide de la télécommande du
téléviseur ? Il n’est pas pratique de devoir passer de la télécommande
du téléviseur à celle de la barre de son.
R1
Oui. Vous pouvez contrôler la barre de son à l’aide de la télécommande du
téléviseur en utilisant la fonction « d’apprentissage de la télécommande du
téléviseur » (p.12).
Cette fonction n’est disponible que pour la télécommande IR (infrarouge).
Vérifiez le type de télécommande dont vous disposez pour votre téléviseur.
Q2
Est-il possible de rendre les dialogues plus distincts ?
R2
Oui. La fonction « Clear voice » permet de rendre les dialogues des films, des
informations à la télévision, des programmes sportifs, etc. plus distincts (p.9).
Q3
Puis-je contrôler la barre de son à l’aide d’un smartphone ? Et puis-je
mettre la barre de son sous/hors tension à l’aide d’un smartphone ?
R3
Oui. Vous pouvez contrôler la barre de son avec votre smartphone en
installant l’application de contrôle dédiée « HOME THEATER
CONTROLLER » (p.11).
Quand vous utilisez cette fonction, vous devez connecter votre smartphone à
la barre de son via le Bluetooth.
En outre, si vous utilisez le mode de veille Bluetooth, la barre de son se met
sous tension quand une connexion Bluetooth est établie entre elle et le
smartphone et elle se met hors tension lorsqu’ils sont déconnectés (p.11).
•Clear Voice
Cette fonction permet d’obtenir des voix (dialogues et narrations, par exemple)
distinctes (p.9).
Fr
3
Page 26
Noms et fonctions des pièces
* Les touches sont situées à
l’arrière de la barre de son.
** *
*
ANALOG
SUBWOOFEROUT
* Panneau inférieur
*
Barre de son (panneau avant/panneau supérieur)
A Témoins
Indiquent l’état de la barre de son. Reportez-vous à la section « Fonctionnement »
(p.8 à 9) pour obtenir des explications sur les fonctions principales des témoins.
B Touche (entrée)
Sélectionne une source d’entrée à lire (p.8).
C Touche (silencieux)
Met la sortie audio en silencieux. Appuyez à nouveau sur la touche pour désactiver
le silencieux (p.9).
D Touches / (volume +/–)
Règlent le volume (p.8).
E Touche (alimentation)
Met la barre de son sous ou hors tension (en veille) (p.9).
ASTUCE
• La barre de son peut être mise hors tension automatiquement lorsque la fonction de mise en veille
automatique est activée (p.15).
F Capteurs de la télécommande
Reçoivent les signaux émis par la télécommande de la barre de son (p.2).
Les capteurs de la télécommande sont situés sur le panneau avant et sur le panneau
supérieur de la barre de son (p.5).
Barre de son (panneau arrière/panneau inférieur)
G Deux caissons de graves intégrés
Les caissons de graves intégrés sont situés sur la partie supérieure de la barre de
son.
H Enceintes
I Prise d’entrée TV
Pour le raccordement à un téléviseur à l’aide d’un câble optique (p.6).
J Prise d’entrée BD/DVD
Pour le raccordement à un appareil de lecture, tel qu’un lecteur de disques Blu-ray
(BD), à l’aide d’un câble numérique coaxial (p.7).
K Prise d’entrée ANALOG
Pour le raccordement d’un appareil externe à l’aide d’un câble avec mini-fiche stéréo
de 3,5 mm (p.7).
L Prise SUBWOOFER OUT
Pour le raccordement d’un caisson de graves externe à l’aide d’un câble à broche
mono (p.14).
M Sélecteur de position d’installation
Détermine la qualité sonore adaptée à la position d’installation de la barre de son
(p.5).
Fr
4
Page 27
Installation
Sélecteur de position
d’installation
(panneau inférieur)
Capteur de la
télécommande
(panneau avant)
Capteur de la télécommande
(panneau supérieur)
Touches
Sélecteur de position
d’installation (panneau
inférieur)
Rubans ou punaises
Gabarit de montage (fourni)
Trous de vis
7 à 9 mm
10 à 12 mm
4 mm (#8)
20 mm ou plus
Entretoise
Orifices de montage
sur le dessous de la
barre de son
L’orientation de la barre de son et du capteur de
télécommande approprié dépendent de l’emplacement
d’installation.
Installation de la barre de son sur un
meuble TV, etc.
1
Faites glisser le sélecteur de position d’installation
du panneau inférieur de la barre de son vers le
côté T (pour Tabletop : Table) (T, par défaut)
Cela détermine la qualité sonore adaptée à l’installation.
2 Placez la barre de son sur un meuble TV, par
exemple, en dirigeant les touches vers le mur.
Précautions
• N’empilez pas la barre de son et un lecteur de disques Blu-ray
(BD) ou un autre appareil directement les uns sur les autres. Un
mauvais fonctionnement pourrait être provoqué par les
vibrations.
• Ne tenez pas la partie enceinte (pièces de tissu) à l’avant et au
dessus de la barre de son.
• La barre de son dispose d’enceintes à blindage non magnétique.
Veillez à ne placer aucun objet sensible aux champs
magnétiques (disques durs, par exemple) à proximité de la barre
de son.
• Selon l’environnement, il peut être préférable de raccorder la
barre de son et les appareils externes (tels qu’un téléviseur)
avant d’installer la barre de son.
• Ne placez pas la barre de son à moins de 50 mm du téléviseur.
Fixation de la barre de son au mur
1
Faites glisser le sélecteur de position d’installation
du panneau inférieur de la barre de son vers le
côté W (pour Wall mount : Fixation murale)
.
2 Retirez le gabarit de montage du mur, puis fixez
des vis disponibles dans le commerce (comme
illustré ci-dessous) aux endroits indiqués sur le
mur.
Cela détermine la qualité sonore adaptée à l’installation.
2 En suivant « Procédure d’installation sur un mur »
ci-dessous, installez la barre de son en veillant à ce
que les touches soient dirigées vers le haut.
.
3 Détachez le support en papier des entretoises et
fixez la face adhésive à la barre de son, de la
manière illustrée ci-dessous.
4 Accrochez la barre de son sur les vis.
Précautions
Si la barre de son doit être fixée à un mur, veillez à confier ce
•
travail à une personne qualifiée ou à votre revendeur. Le client ne
doit jamais essayer d’effectuer ce travail lui-même. Si l’installation
n’est pas correcte ou si elle n’est pas adaptée, la barre de son
risque en effet de tomber et des personnes peuvent être blessées
• Ne tentez pas d’installer la barre de son sur un mur peu solide,
notamment en plâtre ou en bois plaqué. La barre de son pourrait
tomber.
• Assurez-vous d’utiliser des vis pouvant supporter le poids de
l’installation (spécifié à l’étape 2 ci-contre). La barre de son
risque de tomber si vous utilisez des éléments de fixation autres
que les vis spécifiées, notamment des vis plus courtes, des clous
ou du ruban double face.
Procédure d’installation sur un mur
1 Fixez le gabarit pour montage sur le mur et
marquez l’emplacement des trous de vis.
.
Précautions
• Fixez les câbles de telle sorte qu’ils soient tendus. Un câble
lâche peut être accidentellement accroché d’une main ou d’un
pied, ce qui peut provoquer la chute de la barre de son.
• Vérifiez que la barre de son est correctement fixée une fois
l’installation terminée. Yamaha décline toute responsabilité en
cas d’accidents provoqués par des installations incorrectes.
Fr
5
Page 28
Raccordements
BD/DVD ANALOG
SUBWOOFEROUT
TV
Câble d’alimentation
Branchement sur
une prise secteur
Barre de son (arrière)
Câble optique
Appareil de lecture (ex. : lecteur
de disques Blu-ray (BD))
Décodeur
OPTICAL OUTPUT
Téléviseur
ASTUCE
Dans les cas suivants, raccordez la sortie audio
numérique coaxiale de l’appareil de lecture à
l’entrée BD/DVD de la barre de son à l’aide d’un
câble numérique coaxial (disponible dans le
commerce), puis appuyez sur la touche BD/DVD de
la télécommande pour sélectionner la source
d’entrée.
− Le téléviseur ne possède pas de sortie optique.
− Le téléviseur ne reproduit pas le son (ou reproduit
un niveau de son faible) de l’appareil de lecture
raccordé.
− Le son de l’appareil de lecture raccordé au
téléviseur ne peut pas être perçu en tant que son
surround.
Raccordement à un téléviseur (ou à un autre appareil).
ASTUCE
• Si aucun réglage ne permet de désactiver la sortie des enceintes sur votre téléviseur,
vous pouvez connecter des écouteurs à la prise pour écouteurs de votre téléviseur.
Consultez la documentation du téléviseur.
• Les prises d’entrée TV et BD/DVD prennent en charge les signaux audio suivants.
− PCM (2 canaux)
− Dolby Digital (jusqu’à 5.1 canaux)
PRÉCAUTIONS
• Ne branchez pas le cordon d’alimentation de la barre de son à la prise secteur avant
d’avoir terminé les raccordements.
• N’exercez aucune force excessive pour introduire la fiche. Vous risqueriez
d’endommager la fiche du câble ou la borne.
1 Raccordez le téléviseur à la barre de son à l’aide
du câble optique (fourni).
Retirez le capuchon du câble optique et vérifiez le sens de
la fiche.
2 Branchez le câble d’alimentation de la barre de
son à une prise secteur.
3 Réglez le téléviseur comme suit :
• Réglez le son du téléviseur au minimum.
• Désactivez la sortie des enceintes intégrées du
téléviseur (le cas échéant).
Câble HDMI (etc.)
Fr
6
Page 29
Raccordement numérique d’un appareil externe
BD/DVD
Câble numérique coaxial
(disponible dans le
commerce)
Sortie audio
numérique coaxiale
(orange)
Appareil de lecture
ANALOG
Câble avec mini-fiche stéréo 3,5 mm
(disponible dans le commerce)
Console de jeux
(etc.)
Vous pouvez raccorder un appareil externe qui possède une sortie audio numérique
coaxiale, notamment un lecteur DVD, à la prise d’entrée BD/DVD de la barre de son.
REMARQUE
• Appuyez sur la touche BD/DVD de la télécommande pour sélectionner la source d’entrée.
Connexion analogique d’un appareil externe (console
de jeux)
Vous pouvez raccorder un appareil externe, comme une console de jeu vidéo ou un
téléviseur qui ne dispose pas de sortie audio numérique, à la prise d’entrée ANALOG de
la barre de son.
REMARQUE
• Appuyez sur la touche ANALOG de la télécommande pour sélectionner la source d’entrée.
• Si vous pouvez régler le volume de l’appareil externe raccordé à la prise d’entrée ANALOG de la barre de
son, ajustez-le au même volume que l’appareil externe raccordé à la prise d’entrée TV ou BD/DVD.
Fr
7
Page 30
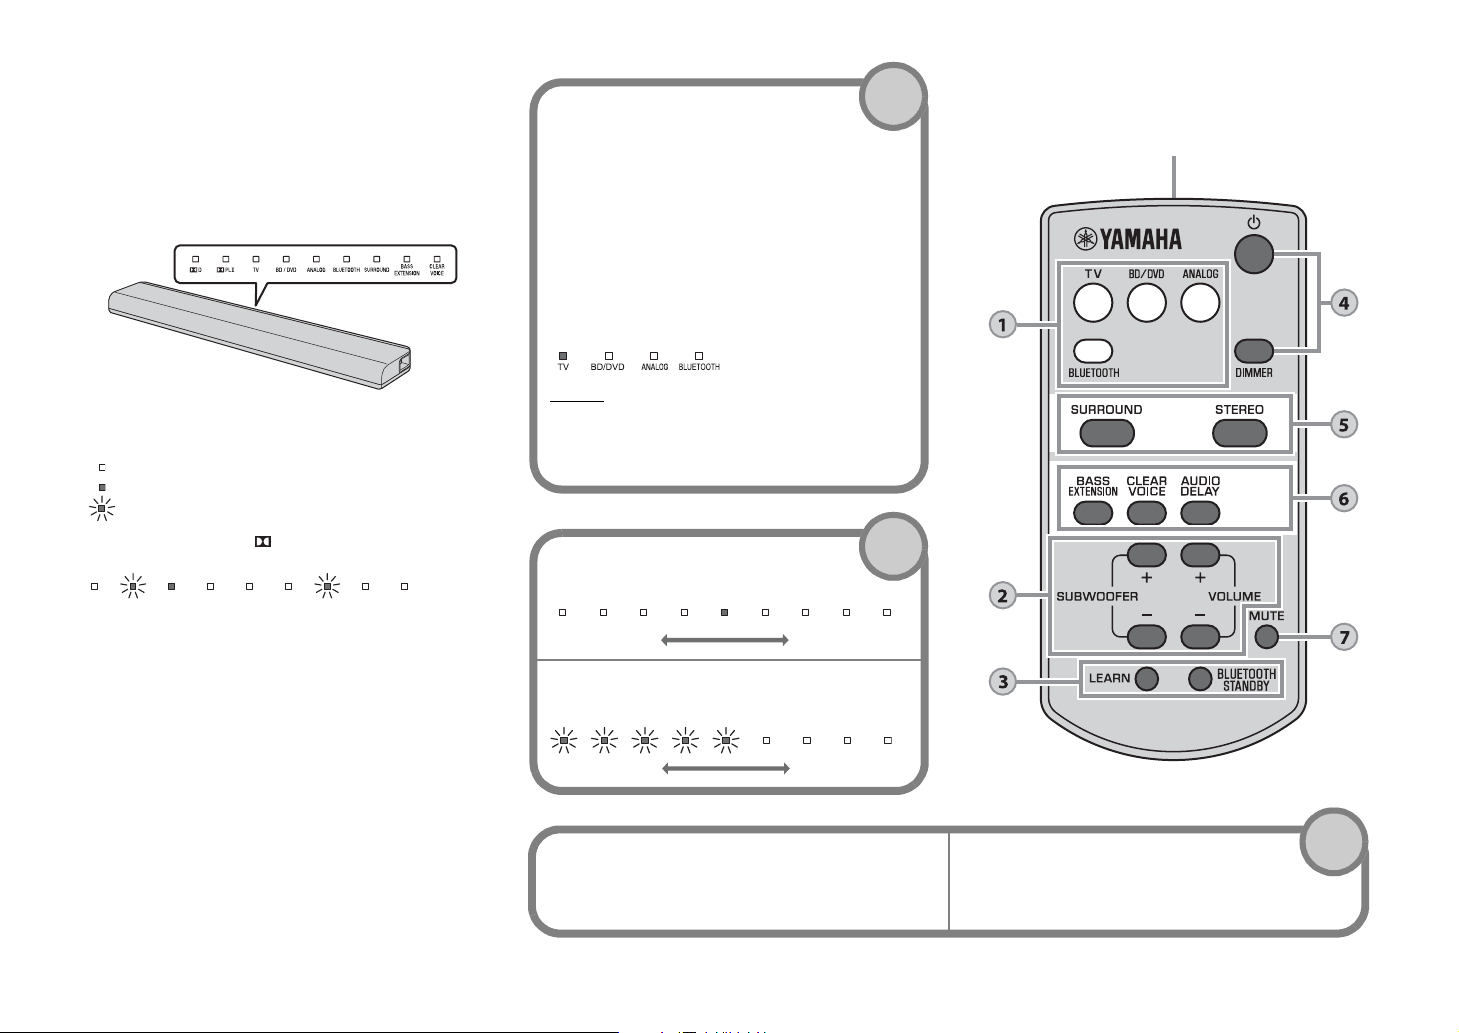
Fonctionnement
Touches d’entrée
Sélectionnez une source d’entrée à lire.
TV ....................Son du téléviseur
BD/DVD...........Son d’un appareil raccordé à la
prise d’entrée BD/DVD
ANALOG .........Son d’un appareil raccordé à la
prise d’entrée ANALOG
BLUETOOTH
.........................Son d’un appareil connecté via
Bluetooth
Le témoin correspondant à la source d’entrée
sélectionnée s’allume.
(Exemple : lorsque l’entrée TV est sélectionnée)
ASTUCE
•
Pour lire de l’audio de l’appareil de lecture raccordé au
téléviseur ou pour regarder des vidéos de l’appareil, définissez
la source d’entrée du téléviseur sur l’appareil de lecture
.
• Pour plus d’informations sur la connexion
Bluetooth
, consultez
« Écoute du son à partir d’un appareil
Bluetooth
» (p.10).
Touches SUBWOOFER (+/–)
Règlent le volume du caisson de graves.
Touches VOLUME (+/–)
Règlent le volume de la barre de son.
Diminuer le volume (–)
Augmenter le volume (+)
Diminuer le volume (–)
Augmenter le volume (+)
1
2
Touche LEARN
★
Définit la barre de son en mode apprentissage de la
télécommande du téléviseur (p.12).
Touche BLUETOOTH STANDBY
★
Activer/désactive le mode de veille Bluetooth
(p.11).
3
Émetteur de signal de commande
Émet des signaux infrarouges.
★
★
Témoins
Les témoins du panneau supérieur clignotent ou
s’allument pour indiquer l’état de fonctionnement ou de
réglage.
★ : Touches à enfoncer pendant plus de 3 secondes
LEARN, BLUETOOTH STANDBY, AUDIO DELAY
Dans ce manuel, les illustrations des neuf témoins
alignés sont utilisées à des fins explicatives.
: éteint
: allumé
: clignote
(Exemple : lorsque le témoin PLII et le témoin SURROUND
clignotent et que le témoin TV s’allume)
Fr
8
Page 31

Touche (alimentation)
Met la barre de son sous ou hors tension (en veille).
Sous tension
Veille Bluetooth (p.11)
Hors tension
Touche DIMMER
Règle la luminosité des témoins. Chaque fois que
vous appuyez sur la touche, l’état des témoins
change comme suit.
Estompé (réglage par défaut) → Éteint → Brillant
↑
Les témoins brillent immédiatement après
l’opération et adoptent quelques secondes plus
tard la luminosité choisie.
Le témoin correspondant à la source d’entrée sélectionnée s’allume (vert)
Allumé (rouge)
Touches SURROUND et STEREO
Permutent la lecture surround et stéréo
(2 canaux). Lorsque la lecture surround est
sélectionnée, vous pouvez profiter d’effets sonores
réalistes grâce à la technologie exclusive AIR
SURROUND XTREME de Yamaha.
ASTUCE
• Lors de la lecture de signaux stéréo à 2 canaux en mode
surround, le témoin PLII s’allume.
•
Installez l’application gratuite « HOME THEATER
CONTROLLER » sur un appareil
Bluetooth
, notamment sur un
smartphone, pour choisir parmi les modes surround suivants :
TV PROGRAM, MOVIE, MUSIC, SPORTS et GAME
.
Allumé (lecture surround)
Éteint (lecture stéréo)
SURROUND
STEREO
Allumé (Dolby Pro Logic II)
4
5
Touche BASS EXTENSION
Active/désactive la fonction d’extension des
graves. Quand cette fonction est activée, vous pouvez
bénéficier de graves puissants grâce au « Traitement
avancé d’extension des graves », la technologie
originale d’accentuation des graves de Yamaha.
Touche CLEAR VOICE
Active/désactive la fonction Clear Voice.
Lorsque cette fonction est activée, vous pouvez
profiter de dialogues distincts lorsque vous
regardez des films, des séries TV, les actualités
ou des programmes sportifs.
Touche AUDIO DELAY
★
Ajuste le retard audio pour synchroniser le son et
l’image lorsque l’image du téléviseur semble en
décalage par rapport au son.
Procédez comme suit pour ajuster le retard audio.
1 Maintenez la touche AUDIO DELAY
enfoncée pendant plus de 3 secondes.
L’indicateur situé le plus à gauche clignote.
2 Appuyez sur la touche SUBWOOFER (+/–)
pour ajuster le retard audio.
Une pression sur la touche SUBWOOFER (+)
retarde la synchronisation de sortie audio.
3
Pour terminer le réglage, appuyez sur la touche AUDIO DELAY
.
ASTUCE
•
Le réglage prend automatiquement fin après 20 secondes d’inactivité
.
Allumé (activé)
Éteint (désactivé)
CLEAR
VOICE
CLEAR
VOICE
Allumé (activé)
Éteint (désactivé)
(–) (+)
6
Touche MUTE
Met la sortie audio en silencieux. Appuyez à
nouveau sur la touche pour désactiver le silencieux.
Clignotent (en mode silencieux)
7
Vert (Dolby Digital)
Éteint (PCM)
Indication du décodeur
La barre de son prend en charge les signaux audio qui
suivent. Vous pouvez vérifier le type de signal audio
d’entrée grâce à la couleur du témoin.
Fr
9
Page 32

Écoute du son à partir d’un
Appareils Bluetooth
Lecture du son d’un appareil Bluetooth
sur la barre de son
Connexion Bluetooth
initiale
Jumelage d’un appareil
Bluetooth avec la barre de
son
Connexion Bluetooth
suivante
Clignote
YAS-105 Yamaha
PIN 0 0 0 0
123
456
789
0
appareil Bluetooth
Vous pouvez reproduire sans fil le son des appareils Bluetooth, notamment un
smartphone ou un lecteur audio numérique.
Consultez également le mode d’emploi de l’appareil Bluetooth pour plus d’informations.
Suivez les étapes ci-dessous pour utiliser un appareil Bluetooth avec la barre de son.
Jumelage d’un appareil Bluetooth avec la barre de son
Lorsque vous connectez pour la première fois un appareil Bluetooth, vous devez
« jumeler » l’appareil et la barre de son. Il est nécessaire de « jumeler » tous les
appareils Bluetooth que vous utilisez.
Une fois le « jumelage » avec un appareil terminé, la connexion ultérieure avec cet
appareil ne nécessite plus de « jumelage ».
1 Appuyez sur la touche BLUETOOTH de la télécommande de la barre
de son fournie pour sélectionner la source d’entrée Bluetooth.
Le témoin BLUETOOTH du panneau supérieur clignote.
2 Activez la fonction Bluetooth sur l’appareil à jumeler, puis procédez
au jumelage.
Cette opération varie selon l’appareil. Consultez le mode d’emploi de l’appareil.
3 Sur le système, sélectionnez « YAS-105 Yamaha » dans la liste des
appareils Bluetooth.
Si l’on vous invite à saisir un code d’accès (code PIN), saisissez le code « 0000 ».
10
Fr
Une fois le jumelage terminé, le symbole ou un message de fin s’affiche sur l’appareil.
REMARQUE
• Le jumelage de l’appareil Bluetooth et de la barre de son doit s’effectuer dans un rayon de 10 mètres.
• Vous pouvez jumeler jusqu’à huit appareils Bluetooth avec la barre de son. Si un neuvième appareil est
jumelé, les données de jumelage du plus ancien appareil connecté sont effacées.
• Si les informations de jumelage d’un appareil sont supprimées, vous devez jumeler à nouveau l’appareil
pour l’utiliser.
• Si un appareil Bluetooth est déjà connecté à la barre de son, désactivez cette connexion Bluetooth (p.11),
puis procédez au jumelage du nouvel appareil.
• En cas de jumelage impossible, reportez-vous à la section « Bluetooth » (p.18) sous « Guide de
dépannage ».
Page 33

Lecture du son d’un appareil Bluetooth sur la barre de
Clignote
Allumé
Clignote 3 fois (fonction activée), clignote une fois (fonction désactivée)
Allumé (rouge)
son
1 Lorsque la barre de son est sous tension, appuyez sur la touche
BLUETOOTH de la télécommande de la barre de son pour
sélectionner la source d’entrée Bluetooth.
Le témoin BLUETOOTH du panneau supérieur clignote.
2
Activez la fonction
Lorsque la connexion Bluetooth est établie, le témoin BLUETOOTH de la barre de
son s’allume.
Bluetooth
sur l’appareil, puis établissez la connexion
Utilisation du mode veille Bluetooth
Le mode de veille Bluetooth vous permet d’activer (désactiver) automatiquement la
barre de son, selon l’utilisation du périphérique Bluetooth.
1 Lorsque la barre de son est sous tension, maintenez enfoncée la
touche BLUETOOTH STANDBY de la télécommande de la barre de
son pendant plus de 3 secondes.
Maintenez enfoncée la touche BLUETOOTH STANDBY pendant 3 secondes
successivement pour activer et désactiver ce mode.
BLUETOOTH
STANDBY
.
Lorsque le mode veille Bluetooth est activé et que la barre de son est hors tension,
le témoin
D s’allume en rouge (veille Bluetooth).
3 Lancez la lecture sur l’appareil.
REMARQUE
• Connectez l’appareil et la barre de son via Bluetooth dans un rayon de 10 mètres.
• Il est possible que vous deviez à nouveau sélectionner « YAS-105 Yamaha » dans la liste des appareils
Bluetooth en cas de problème de connexion. Il est possible que vous deviez modifier le réglage de sortie
de façon à reproduire le son sur la barre de son selon l’appareil Bluetooth que vous utilisez.
• Réglez le niveau de volume de l’appareil Bluetooth au besoin.
• Si un appareil Bluetooth est déjà connecté à la barre de son, désactivez cette connexion Bluetooth, puis
procédez au jumelage du nouvel appareil.
Désactivation de la connexion Bluetooth
La connexion Bluetooth est désactivée dans les cas suivants. Lorsqu’il est mis fin à la
connexion Bluetooth alors que la barre de son est sous tension, le témoin BLUETOOTH
cesse de briller et clignote tandis que la barre de son passe à l’état d’attente de connexion.
• La fonction Bluetooth est désactivée sur l’appareil compatible.
• Vous appuyez sur la touche BLUETOOTH de la télécommande de la barre de son
pendant plus de 3 secondes.
• Vous mettez hors tension la barre de son.
Fonctions disponibles sur les appareils Bluetooth dont le mode veille Bluetooth est activé
Fonction d’activation de mise sous tension (lorsque la barre de son est hors tension)
Lorsque la connexion Bluetooth est établie sur l’appareil, la barre de son se met sous tension et est prête
à reproduire le son de l’appareil.
Fonction d’activation de la mise hors tension (lorsque la barre de son est sous tension)
La barre de son se met hors tension lorsque la connexion Bluetooth est désactivée sur un appareil
Bluetooth (uniquement lorsque vous sélectionnez la source d’entrée BLUETOOTH).
Utilisation de l’application HOME THEATER CONTROLLER
Installez l’application gratuite « HOME THEATER CONTROLLER » sur un appareil
Bluetooth, notamment sur un smartphone, pour effectuer facilement et efficacement
certaines opérations avec l’appareil Bluetooth. (Réglages : fonctionnement de base,
mode surround, réglages sonores)
REMARQUE
• Pour utiliser l’application, raccordez la barre de son et un appareil Bluetooth via la connexion Bluetooth.
• Si vous activez le mode de veille Bluetooth de la barre de son, vous pouvez la mettre sous tension à l’aide
de l’appareil Bluetooth.
Pour plus de détails sur l’application « HOME THEATER CONTROLLER », reportezvous aux informations concernant le produit sur notre site Web.
Fr
11
Page 34

Réglages
CLEAR
VOICE
CLEAR
VOICE
Env. 30 cm
Télécommande du téléviseur
Maintenez la touche
enfoncée
(pendant plus
d’1 seconde)
Relâchez la touche
(pendant plus
d’1 seconde)
Maintenez la touche
enfoncée
(pendant plus
d’1 seconde)
Relâchez la
touche
(...)
Allumé
Clignotent
Programmation de la barre de son avec la télécommande du téléviseur (fonction d’apprentissage de la télécommande du téléviseur)
Après avoir programmé la barre de son, vous pouvez la contrôler avec la télécommande
du téléviseur pour utiliser des fonctions telles que la mise sous tension/hors tension
simultanée du téléviseur et de la barre de son ou l’augmentation/la diminution du
volume et l’activation/la désactivation du son de la barre de son.
•
Cette fonction est disponible uniquement si la télécommande de votre téléviseur utilise des signaux IR (infrarouges)
• Une télécommande à ondes radio ne fonctionnera pas.
Si vous souhaitez utiliser la télécommande d’un boîtier de décodeur de type câble ou satellite pour
•
contrôler la barre de son, utilisez la télécommande IR (infrarouge) d’origine du téléviseur pour programmer
la barre de son, puis utilisez la télécommande du boîtier du décodeur pour contrôler la barre de son
• Si le volume du téléviseur change également lorsque vous modifiez le volume de la barre de son,
réduisez le volume du téléviseur au minimum ou désactivez la sortie des enceintes du téléviseur.
1 Mettez le téléviseur hors tension.
2 Mettez la barre de son hors tension.
3 Maintenez enfoncée la touche LEARN de la télécommande de la
barre de son pendant plus de 3 secondes tout en dirigeant la
télécommande vers le capteur de la télécommande approprié (p.5).
La barre de son passe en mode d’apprentissage et les témoins situés sur le
panneau supérieur clignotent comme illustré ci-dessous.
LEARN BLUETOOTH
STANDBY
.
REMARQUE
• Les étapes 5 à 8 nécessitent uniquement l’utilisation de la télécommande du téléviseur et des
touches du panneau arrière de la barre de son. La télécommande de la barre de son n’est pas
nécessaire.
• Si la barre de son a déjà appris des fonctions, les témoins suivants s’allument.
Silencieux : TV
Volume (–) : BD/DVD
Volume (+) : ANALOG
Alimentation : BLUETOOTH
5 Apprenez à la barre de son le code « Silencieux » de la
télécommande du téléviseur.
5-1
Appuyez sur la touche (silencieux) située sur le panneau arrière de la barre de son
.
5-2 Tout en pointant la télécommande du téléviseur vers le capteur, maintenez
deux ou trois fois la touche silencieux enfoncée pendant plus de 1 seconde.
Le capteur de la télécommande approprié dépend de la position d’installation (p.5).
.
4 Vérifiez si le capteur de la télécommande appropriée a été activé.
Fr
12
Au moyen du témoin CLEAR VOICE, vous pouvez vérifier le capteur de la
télécommande qui a été activé.
Témoin
CLEAR VOICE
Éteint Sur le panneau avant
Allumé Sur le panneau supérieur
Capteur de la
télécommande activé
Le capteur de la télécommande
activé est approprié quand…
Installation de la barre de son
sur un meuble TV, etc.
Fixation de la barre de son au
mur
Si le capteur de télécommande approprié n’a pas été activé, appuyez sur la touche
LEARN pour quitter le mode d’apprentissage et recommencez à partir de l’étape 3.
Résultat
Apprentissage
réussi
Échec de
l’apprentissage
*
Recommencez
la procédure à
partir de
l’étape 5-1
.
Signal sonore
Un son
Deux sons
Témoins
Page 35

6
Allumé
Clignotent
Allumé
Clignotent
Allumé
Clignotent
Apprenez à la barre de son le code « Volume (–) » de la télécommande
du téléviseur.
6-1 Appuyez sur la touche (volume –) située sur le panneau arrière de la
barre de son.
8 Apprenez à la barre de son le code « Alimentation » de la
télécommande du téléviseur.
8-1 Appuyez sur la touche (alimentation) située sur le panneau arrière de la
barre de son.
6-2 Tout en pointant la télécommande du téléviseur vers le capteur, maintenez
deux ou trois fois la touche de volume (–) enfoncée pendant plus de
1 seconde.
Résultat
Apprentissage
réussi
Échec de
l’apprentissage
*
Recommencez
la procédure à
partir de
l’étape 6-1
.
Signal sonore
Un son
Deux sons
Témoins
7 Apprenez à la barre de son le code « Volume (+) » de la télécommande
du téléviseur.
7-1 Appuyez sur la touche (volume +) située sur le panneau arrière de la
barre de son.
7-2 Tout en pointant la télécommande du téléviseur vers le capteur, maintenez
deux ou trois fois la touche de volume (+) enfoncée pendant plus de
1 seconde.
Résultat
Apprentissage
réussi
Signal sonore
Un son
Témoins
8-2 Tout en pointant la télécommande du téléviseur vers le capteur, maintenez
deux ou trois fois la touche d’alimentation enfoncée pendant plus de
1 seconde.
Résultat
Apprentissage
réussi
Échec de
l’apprentissage
*
Recommencez
la procédure à
partir de
l’étape 8-1
.
Signal sonore
Un son
Deux sons
Témoins
9 Pour quitter le mode d’apprentissage, appuyez sur la touche LEARN
de la télécommande de la barre de son.
Tous les réglages nécessaires sont maintenant terminés. Vous pouvez désormais
contrôler la barre de son à l’aide des touches « silencieux », de volume ou de mise
sous/hors tension de la télécommande du téléviseur.
ASTUCE
• Le mode apprentissage prend automatiquement fin après 5 minutes d’inactivité.
• Réglez le son du téléviseur au minimum. Lorsque vous augmentez le volume de la barre de son à
l’aide de la télécommande du téléviseur, le volume de celui-ci peut augmenter en même temps.
Dans ce cas, procédez à l’étape 3 de la section « Raccordements » (p.6) pour modifier les réglages
du téléviseur.
• Vous pouvez appuyer sur la touche (alimentation) de la télécommande de la barre de son pour
mettre fin au mode d’apprentissage.
Échec de
l’apprentissage
*
Recommencez
la procédure à
partir de
l’étape 7-1
.
Deux sons
Fr
13
Page 36

Effacement de l’ensemble des fonctions
LEARN BLUETOOTH
STANDBY
SUBWOOFEROUT
Câble à broche pour caisson de
graves
(disponible dans le commerce)
Entrée mono
programmées
1 Lorsque la barre de son est hors tension, maintenez enfoncée la
touche LEARN de la télécommande de la barre de son pendant plus
de 3 secondes (pour activer le mode d’apprentissage).
Une fois la barre de son en mode d’apprentissage, les témoins situés sur le
panneau supérieur clignotent comme illustré ci-dessous.
2 Maintenez enfoncée la touche (entrée) du panneau arrière de la
barre de son pendant plus de 3 secondes.
Le témoin correspondant de la fonction apprise s’éteint et les témoins du panneau
supérieur clignotent comme illustré ci-dessous.
Vous entendrez le signal sonore retentir 3 fois si l’effacement a réussi.
3 Appuyez sur la touche LEARN de la télécommande de la barre de
son.
Utilisation d’un caisson de graves externe
La barre de son intègre deux caissons de graves. Toutefois, vous pouvez raccorder un
caisson de graves externe lorsque vous souhaitez accentuer les fréquences graves.
Raccordez un caisson de graves à la prise SUBWOOFER OUT de la barre de son. Le
son est reproduit par les caissons de graves intégrés ainsi que par le caisson de graves
externe.
Fr
14
REMARQUE
• Utilisez un caisson de graves externe avec amplificateur intégré.
Page 37

Réglage de la fonction de mise en veille
Éteints (fonction activée), allumés (fonction désactivée)
Clignote (initialisation)
automatique
En activant la fonction de mise en veille automatique, vous pouvez éviter d’oublier de
désactiver la barre de son après utilisation ou si vous vous endormez devant la
télévision.
REMARQUE
• Lorsque la fonction de mise en veille automatique est activée et que l’une des conditions suivantes est
remplie, la barre de son se met automatiquement hors tension :
− Aucune opération pendant 8 heures
− Aucun son en entrée et absence d’utilisation pendant 20 minutes lorsque la source d’entrée
BLUETOOTH est sélectionnée.
1 Lorsque la barre de son est hors tension, maintenez enfoncée la
touche MUTE de la télécommande de la barre de son pendant plus
de 3 secondes pour activer/désactiver la fonction de mise en veille
automatique.
Vous pouvez vérifier l’état de la fonction de mise en veille automatique à l’aide des
témoins du panneau supérieur pendant les quelques secondes qui suivent la mise
sous tension de la barre de son.
ASTUCE
• Le réglage initial varie selon le pays ou la région.
− Modèles destinés au Royaume-Uni et à l’Europe : activé
− Autres modèles : désactivé
Initialisation de la barre de son
Procédez comme suit pour initialiser la barre de son.
1 Mettez la barre de son hors tension.
2 Maintenez enfoncée la touche (alimentation) située sur le
panneau arrière de la barre de son pendant plus de 3 secondes.
Fr
15
Page 38

Guide de dépannage
Reportez-vous au tableau suivant si la barre de son ne fonctionne pas convenablement. Si
l’anomalie constatée n’est pas mentionnée, ou encore si les actions correctives suggérées
sont sans effet, mettez la barre de son hors tension, débranchez la fiche du câble
d’alimentation et prenez contact avec le revendeur ou le centre d’entretien Yamaha agréé.
Vérifiez tout d’abord les points suivants :
A Les câbles d’alimentation de la barre de son, du téléviseur et des appareils de
lecture (ex. : lecteurs de disques Blu-ray (BD)) sont correctement raccordés
aux prises secteur.
B La barre de son, le téléviseur et les appareils de lecture (ex. : lecteurs de
disques Blu-ray (BD)) sont sous tension.
C Les connecteurs de chaque câble sont correctement insérés dans les prises
de chaque appareil.
Alimentation et système
Anomalies Causes possibles Actions correctives
Le système se
met
brusquement
hors tension.
Il est impossible
de mettre la
barre de son
sous tension.
La fonction de mise en veille
automatique a fonctionné.
Lorsque la fonction de mise en
veille automatique est activée et
que l’une des conditions suivantes
est remplie, la barre de son se met
automatiquement hors tension :
- Aucune opération pendant
8heures
- Aucun son en entrée et absence
d’utilisation pendant 20 minutes
lorsque la source d’entrée
BLUETOOTH est sélectionnée.
Le circuit de protection a été
activé. (Le témoin D situé sur
le panneau supérieur de la barre
de son clignote.)
La connexion Bluetooth est
interrompue sur un appareil
Bluetooth lorsque le mode de
veille Bluetooth est activé.
Le circuit de protection a été activé
trois fois consécutives. (Si vous
tentez de mettre la barre de son sous
tension dans cette condition, le
témoin D situé sur le panneau
supérieur de la barre de son clignote.)
Remettez la barre de son sous
tension. Pour empêcher la barre de
son de se mettre automatiquement
hors tension, désactivez la fonction de
mise en veille automatique (p.15).
Après avoir vérifié que tous les
raccordements ont été faits
correctement, remettez la barre de son
sous tension. Si la barre de son se met
brusquement hors tension ou ne peut
pas être mise sous tension,
débranchez le câble d’alimentation de
la prise secteur et contactez votre
revendeur Yamaha le plus proche ou
un centre de réparation agréé.
Désactivez le mode de veille Bluetooth
(p.11).
Pour protéger le produit, il est
impossible de le mettre sous tension.
Débranchez le câble d’alimentation de
la prise secteur et contactez votre
revendeur Yamaha le plus proche ou
un centre de réparation agréé.
Tous les témoins
s’éteignent alors
que la barre de
son est sous
tension (cela peut
donner
l’impression que
la barre de son
est hors tension).
La barre de son
ne réagit pas
correctement.
La barre de son
fonctionne toute
seule.
Les lunettes 3D
du téléviseur ne
fonctionnent pas.
L’application
dédiée « HOME
THEATER
CONTROLLER »
ne permet pas de
commander la
barre de son.
(L’écran de
l’application ne
quitte pas le mode
de démonstration.)
La luminosité des témoins est
coupée dans le réglage de la
touche DIMMER.
Le microprocesseur interne s’est
figé en raison d’une décharge
électrique externe (provoquée par
un orage ou une décharge
d’électricité statique), ou d’une
baisse importante de la tension.
Un autre appareil Bluetooth est
en cours de fonctionnement à
proximité de la barre de son.
La barre de son obstrue l’accès à
l’émetteur des lunettes 3D de
votre téléviseur.
L’appareil Blueto oth sur lequel
l’application a été installée n’est
pas raccordé à la barre de son.
À l’aide de la touche DIMMER,
sélectionnez la luminosité souhaitée
(p.9).
Maintenez la touche (alimentation)
située sur le panneau arrière de la
barre de son enfoncée pendant plus
de 10 secondes pour la redémarrer.
(Si l’anomalie persiste, débranchez la
fiche du câble d’alimentation de la
prise secteur et rebranchez-la.)
Désactivez la connexion Bluetooth de
la barre de son (p.11).
Vérifiez la position de l’émetteur des
lunettes 3D sur votre téléviseur et
ajustez la position de la barre de son.
Raccordez l’appareil Bluetooth et la
barre de son via Bl uetooth et utilisez
l’application.
16
Fr
Page 39

Audio Télécommande
Anomalies Causes possibles Actions correctives
Absence de son.
Le caisson de
graves n’émet
aucun son.
Le volume
diminue lors de
la mise sous
tension de la
barre de son.
Aucun effet de
surround.
Présence de
bruit.
Une autre source d’entrée est
sélectionnée.
Le silencieux est activé. Désactivez le silencieux (p.9).
Le volume est trop bas. Augmentez le volume (p.8).
Le câble d’alimentation de la
barre de son n’est pas branché
correctement.
Les prises d’entrée des deux
appareils sont raccordées.
Présence de signaux d’entrée que
la barre de son est incapable de
lire.
Le volume du caisson de graves
est insuffisant.
La source de lecture ne fournit
aucun signal de fréquence grave.
La fonction de réglage automatique
du volume a fonctionné. La barre de
son contrôle automatiquement son
volume à un certain niveau lors de sa
mise sous tension afin d’éviter que le
son ne soit trop assourdissant.
La lecture stéréo est
sélectionnée.
Le volume est trop bas. Augmentez le volume (p.8).
Le téléviseur ou l’appareil de
lecture est réglé pour restituer
uniquement un son à 2 canaux
(PCM par exemple).
Le son est émis par les enceintes
intégrées du téléviseur.
La position d’écoute est trop
proche de la barre de son.
Le sélecteur de position
d’installation n’est pas
correctement réglé.
La barre de son est trop proche
d’un autre appareil numérique ou
à haute fréquence.
Sélectionnez la source d’entrée
appropriée (p.8).
Assurez-vous que le câble
d’alimentation de la barre de son est
fermement branché sur une prise
secteur (p.6).
Raccordez la prise d’entrée de la barre
de son et la prise de sortie de
l’appareil de lecture externe.
Modifiez le réglage de la sortie audio
numérique du périphérique de lecture
et réglez-la sur PCM ou Dolby Digital.
Augmentez le volume du caisson de
graves (p.8).
Lisez une source sonore contenant des
signaux à basse fréquence, puis vérifiez
que le caisson de graves émet des sons.
Si nécessaire, augmentez le volume
(p.8).
Sélectionnez la lecture surround (p.9).
Modifiez le réglage de la sortie audio
numérique du téléviseur ou de
l’appareil de lecture en mode Dolby
Digital ou BitStream.
Réglez le son du téléviseur au
minimum (p.6).
Éloignez-vous de la barre de son.
Lorsque vous placez la barre de son
devant un téléviseur, réglez le sélecteur
de position d’installation sur « T ».
Lorsque vous fixez la barre de son au
mur, réglez le sélecteur de position
d’installation sur « W ».
Éloignez ces appareils de la barre de
son.
Anomalies Causes possibles Actions correctives
La
télécommande
ne fonctionne
pas sur la barre
de son.
La
télécommande
du téléviseur ne
fonctionne pas
sur le téléviseur.
La barre de son
ne parvient pas à
apprendre les
opérations de la
télécommande
du téléviseur.
Le téléviseur émet
des sons lors de
l’augmentation du
volume de la barre
de son à l’aide de
la télécommande
du téléviseur.
(lors de l’utilisation
de la fonction
d’apprentissage de
la télécommande
du téléviseur)
La barre de son se trouve hors du
rayon d’action.
Les piles sont usagées. Remplacez les piles (p.2).
Le capteur de la télécommande
de la barre de son est exposé à la
lumière directe du soleil ou d’un
éclairage puissant.
Le capteur de la télécommande
du téléviseur est masqué par la
barre de son.
Vous n’avez pas maintenu la
touche de la télécommande du
téléviseur assez longtemps.
La télécommande du téléviseur
n’utilise pas de signaux
infrarouges. (Certaines
télécommandes peuvent ne pas
fonctionner, même si elles
utilisent des signaux infrarouges.)
Vous n’utilisez pas la
télécommande du téléviseur à
partir d’un endroit approprié.
Les piles de la télécommande du
téléviseur sont faibles.
Le capteur de la télécommande
de la barre de son est exposé à la
lumière directe du soleil ou d’un
éclairage puissant.
La transmission du signal de la
télécommande a été perturbée par la
luminosité de l’écran du téléviseur.
La sortie audio est activée sur le
téléviseur.
Utilisez la télécommande dans le
rayon d’action (p.2).
Réglez l’angle d’éclairage ou
repositionnez la barre de son.
Ajustez la position d’installation de la
barre de son de sorte que le capteur de
la télécommande sur le téléviseur ne soit
pas masqué par la barre de son quand
vous commandez le téléviseur à partir
de la position d’utilisation habituelle.
Maintenez la touche enfoncée
pendant plus d’1 seconde, deux ou
trois fois (p.12).
La fonction d’apprentissage de la
télécommande du téléviseur ne peut
pas être utilisée dans ce cas. Utilisez
la télécommande fournie pour
contrôler la barre de son.
Utilisez la télécommande du téléviseur
à partir d’un endroit approprié (p.12).
Remplacez les piles.
Réglez l’angle d’éclairage ou
repositionnez la barre de son.
Mettez le téléviseur hors tension et
exécutez à nouveau la procédure
d’apprentissage (p.12).
Modifiez les réglages du téléviseur
pour désactiver la sortie des enceintes
du téléviseur. Si les paramètres de
votre téléviseur ne permettent pas de
désactiver la sortie des enceintes,
essayez d’appliquer l’une des
méthodes suivantes :
- Connectez des écouteurs à la prise
écouteurs de votre téléviseur.
- Réglez le son du téléviseur au
minimum.
Fr
17
Page 40

La mise sous/hors
tension de la barre
de son et du
téléviseur est
inversée. (Le
téléviseur est par
exemple mis hors
tension et la barre
Le téléviseur était sous tension
lorsque vous avez procédé à
l’apprentissage.
Appuyez sur la touche d’alimentation
du téléviseur et sur la touche
(alimentation) située sur le
panneau arrière de la barre de son afin
de les mettre sous tension, puis
appuyez sur la touche d’alimentation
de la télécommande du téléviseur pour
les mettre hors tension.
de son sous
tension.)
(lors de l’utilisation
de la fonction
d’apprentissage de
la télécommande
du téléviseur)
Bluetooth
Anomalies Causes possibles Actions correctives
Impossible de
jumeler la barre
de son avec le
périphérique
Bluetooth.
Vous n’avez pas sélectionné la
source d’entrée Bluetooth.
L’appareil ne prend par en charge
le protocole A2DP.
Le mot de passe de l’appareil
Bluetooth que vous souhaitez
jumeler avec la barre de son
(notamment un adaptateur) est
différent de « 0000 ».
La barre de son et l’appareil sont
trop éloignés.
Un appareil à proximité (four à
micro-ondes, réseau local sans fil,
etc.) émet des signaux de sortie
dans la bande de fréquences
2,4 GHz.
Un autre appareil Bluetooth est
connecté.
Sélectionnez la source d’entrée
Bluetooth.
Effectuez le jumelage avec un appareil
prenant en charge le protocole A2DP.
Utilisez un adaptateur Bluetooth, etc.
dont le mot de passe est « 0000 ».
Rapprochez l’appareil de la barre de
son.
Éloignez la barre de son de l’appareil
qui émet des signaux de
radiofréquence.
Si l’appareil Bluetooth est équipé de la
fonction réseau local sans fil,
désactivez cette dernière et activez
uniquement la fonction Bluetooth.
Désactivez la connexion Bluetooth en
cours, puis procédez au jumelage du
nouvel appareil.
Connexion
Bluetooth
impossible.
Impossible
d’établir une
connexion
Bluetooth (le
témoin
BLUETOOTH
continue à
clignoter
rapidement).
Absence de son
ou interruption
du son pendant
la lecture.
Un autre appareil Bluetooth est
connecté.
Plus de neuf périphériques sont
jumelés et les informations de
jumelage les plus anciennes sont
supprimées.
La barre de son présente un
problème.
La connexion Bluetooth de la
barre de son avec l’appareil est
désactivée.
Vous n’avez pas sélectionné la
source d’entrée Bluetooth.
La barre de son et l’appareil sont
trop éloignés.
Un appareil à proximité (four à
micro-ondes, réseau local sans fil,
etc.) émet des signaux de sortie
dans la bande de fréquences
2,4 GHz.
L’appareil n’est pas configuré
pour envoyer des signaux audio
Bluetooth à la barre de son.
La lecture n’a pas démarré sur
l’appareil.
Le volume de l’appareil est réglé
sur le niveau minimum.
La barre de son n’autorise pas
plusieurs connexions Bluetooth.
Désactivez la connexion Bluetooth en
cours et établissez la connexion avec
l’appareil de votre choix.
Renouvelez le jumelage. La barre de
son conserve les informations de
jumelage de huit appareils maximum.
Si un neuvième appareil est jumelé,
les données de jumelage du plus
ancien appareil connecté sont
effacées.
Débranchez le câble d’alimentation de
la prise secteur et contactez votre
revendeur Yamaha le plus proche ou
un centre de réparation agréé.
Renouvelez la connexion Bluet ooth
(p.10).
Sélectionnez la source d’entrée
Bluetooth.
Rapprochez l’appareil de la barre de
son.
Éloignez la barre de son de l’appareil
qui émet des signaux de
radiofréquence.
Si l’appareil Bluetooth est équipé de la
fonction réseau local sans fil,
désactivez cette dernière et activez
uniquement la fonction Bluetooth.
Modifiez le réglage de la sortie audio
et le réglage de la connexion sur
l’appareil.
Démarrez la lecture sur l’appareil.
Augmentez le volume de l’appareil.
18
Fr
Page 41

Caractéristiques techniques
Élément Caractéristiques techniques
Amplificateur
G/D avant
Tweeter
Caisson de
graves
Décodeur
Prises
d’entrée
Prise de
sortie
Puissance de sortie
nominale maximale
Type Type acoustique à suspension
Excitateur
Réponse en
fréquence
Impédance 6 Ω
Type —
Excitateur
Réponse en
fréquence
Impédance 4Ω
Type Type Bass reflex
Excitateur
Réponse en
fréquence
Impédance 3Ω
Signaux audio pris
en charge (TV, BD/
DVD)
Numérique (optique) 1 (TV)
Numérique
(coaxiale)
Analogique
(mini-prise stéréo
3,5 mm)
Analogique
(RCA/mono)
Avant G/D 30 W x 2 canaux
Caisson de graves 60 W
Type à blindage non magnétique à cône de
5,5 cm x 2
160 Hz à 22 kHz
Type à blindage magnétique à dôme équilibré de
19 mm x 2
4 kHz à 23 kHz
Type à blindage non magnétique à cône de
7,5 cm x 2
55 Hz à 160 Hz
PCM (2 canaux)
Dolby Digital (jusqu’à 5.1 canaux)
1 (BD/DVD)
1 (ANALOG)
1 (SUBWOOFER OUT)
Version Bluetooth Ver. 2.1 +EDR
Protocoles pris en
charge
Codecs pris en
charge
Bluetooth
Généralités
* Les spécifications peuvent être modifiées sans avis préalable.
Sortie sans fil Bluetooth classe 2
Distance de
communication
maximale
Méthode de
protection de
contenu prise en
charge
Alimentation
Consommation 22 W
Consommation en
veille
Consommation en
veille Bluetooth
Dimensions
(L x H x P)
Poids 4,0 kg
A2DP, SPP
SBC, MPEG4 AAC
10 m (sans obstructions)
SCMS-T
Modèles pour les États-Unis et le Canada :
120 V CA, 60 Hz
Modèle pour Taïwan : 110 - 120 V CA, 50/60 Hz
Modèle pour la Chine : 220 V CA, 50 Hz
Autres modèles : 220 - 240 V CA, 50/60 Hz
0,4 W
0,5 W (Modèles pour Taïwan, États-Unis et le
Canada)
0,6 W (Modèles pour la Chine et autres pays)
890 x 53 x 131 mm (installation de la barre de son
devant un téléviseur, etc.)
890 x 131 x 59 mm (fixation de la barre de son à
un mur avec entretoise)
Fr
19
Page 42

VORSICHT: LESEN SIE DIES, BEVOR SIE IHR GERÄT BEDIENEN.
• Um optimales Leistungsvermögen sicherzustellen,
lesen Sie bitte die Anleitung aufmerksam durch.
Bewahren Sie die Anleitung danach für spätere
Nachschlagzwecke sorgfältig auf.
• Stellen Sie dieses Klangsystem an einem gut belüfteten,
kühlen, trockenen und sauberen Ort auf - schützen Sie
es vor direktem Sonnenlicht, Wärmequellen,
Vibrationen, Staub, Feuchtigkeit und/oder Kälte.
Lassen Sie für die Belüftung um das Gerät mindestens
so viel Platz frei, wie im Folgenden angegeben.
Oben: 10 cm, Hinten: 10 cm, Seiten: 10 cm
• Stellen Sie dieses Gerät entfernt von anderen
elektrischen Haushaltgeräten, Motoren oder
Transformatoren auf, um Brummgeräusche zu
vermeiden.
• Setzen Sie dieses Gerät keinen plötzlichen
Temperaturänderungen von kalt auf warm aus, und
stellen Sie dieses Gerät nicht an Orten mit hoher
Luftfeuchtigkeit auf (z.B. in Räumen mit
Luftbefeuchtern), um Kondensation im Inneren
des Gerätes zu vermeiden, da es anderenfalls zu
elektrischen Schlägen, Feuer, Beschädigung dieses
Gerätes und/oder zu persönlichen Verletzungen
kommen kann.
• Vermeiden Sie die Aufstellung dieses Gerätes an
Orten, an welchen Fremdkörper in das Gerät fallen
können bzw. an welchen Flüssigkeiten auf das
Gerät verschüttet werden können. Stellen Sie auf
der Oberseite des Gerätes niemals Folgendes auf:
− Andere Komponenten, da diese Beschädigung
und/oder Verfärbung der Oberfläche dieses
Gerätes verursachen können.
− Brennende Objekte (z.B. Kerzen), da diese
Feuer, Beschädigung des Gerätes und/oder
persönliche Verletzungen verursachen können.
− Mit Flüssigkeiten gefüllte Behälter, da diese
umfallen und die Flüssigkeit auf das Gerät
verschütten können, wodurch es zu elektrischen
Schlägen für den Anwender und/oder zu
Beschädigung des Gerätes kommen kann.
• Decken Sie dieses Gerät niemals mit Zeitungen,
Tischdecken, Vorhängen usw. ab, damit die
Wärmeabfuhr nicht behindert wird. Falls die
Temperatur im Inneren des Gerätes ansteigt, kann
es zu Feuer, Beschädigung des Gerätes und/oder
zu Personenschäden kommen.
• Schließen Sie dieses Gerät erst an eine
Wandsteckdose an, nachdem alle anderen
Anschlüsse ausgeführt wurden.
• Stellen Sie dieses Gerät niemals mit der Unte rseite nach
oben auf, da es sonst beim Betrieb zu Überhitzung mit
möglichen Beschädigungen kommen kann.
• Wenden Sie niemals Gewalt bei der Bedienung der
Schalter, Knöpfe und/oder Kabel an.
• Wenn Sie das Netzkabel von der Wandsteckdose
abtrennen, fassen Sie immer den Netzstecker an;
ziehen Sie niemals an dem Kabel.
• Reinigen Sie dieses Gerät niemals mit chemisch
behandelten Tüchern; anderenfalls kann das Finish
beschädigt werden. Verwenden Sie ein reines,
trockenes Tuch.
• Verwenden Sie nur die für dieses Gerät
vorgeschriebene Netzspannung. Falls Sie eine
höhere als die vorgeschriebene Netzspannung
verwenden, kann es zu Feuer, Beschädigung dieses
Gerätes und/oder zu persönlichen Verletzungen
kommen. Yamaha kann nicht verantwortlich
gemacht werden für Schäden, die auf die
Verwendung dieses Gerätes mit einer anderen als der
vorgeschriebenen Spannung zurückzuführen sind.
• Um Beschädigungen durch Blitzschlag zu
vermeiden, ziehen Sie den Netzstecker von der
Netzdose ab, wenn es ein Gewitter gibt.
• Versuchen Sie niemals ein Modifizieren oder
Ändern dieses Gerätes. Falls eine Wartung
erforderlich ist, wenden Sie sich bitte an einen
Yamaha-Kundendienst. Das Gehäuse sollte
niemals selbst geöffnet werden.
• Falls Sie das Gerät für längere Zeit nicht
verwenden (z.B. während der Ferien), ziehen Sie
den Netzstecker von der Netzdose ab.
• Lesen Sie unbedingt den Abschnitt
„Problembehebung“ durch, um übliche
Bedienungsfehler zu berichtigen, bevor Sie auf
eine Störung des Gerätes schließen.
• Bevor Sie dieses Gerät an einen anderen Ort
transportieren, drücken Sie die Taste , um das
Gerät in den Bereitschaftsmodus zu schalten, und
ziehen Sie danach den Netzstecker von der
Netzsteckdose ab.
• Es kommt zu Kondensatbildung, wenn die
Umgebungstemperatur plötzlich ändert. Ziehen Sie
den Netzstecker von der Netzdose ab, und lassen
Sie das Gerät ruhen.
• Stellen Sie dieses Gerät in die Nähe der Steckdose
und so auf, dass der Netzstecker gut zugänglich ist.
• Eine sichere Aufstellung oder Installation liegt in
der Verantwortung des Besitzers. Yamaha
übernimmt keinerlei Haftung für Unfälle, die auf
unsachgemäße Aufstellung oder falschen
Anschluss von Lautsprechern zurückzuführen sind.
• Halten Sie das Produkt von Kindern fern, damit
diese keine Kleinteile verschlucken.
Hinweise zu Fernbedienungen und Batterien
• Achten Sie darauf, dass kein Wasser oder andere
Flüssigkeiten auf die Fernbedienung geschüttet
werden.
• Lassen Sie die Fernbedienung nicht fallen.
• Belassen oder lagern Sie die Fernbedienung
niemals an den folgenden Orten:
− Orte mit hoher Luftfeuchtigkeit (z. B. in der
Nähe eines Bads)
− Orte mit hohen Temperaturen (z. B. in der Nähe
eines Ofens oder Heizgeräts)
− Orte mit extrem niedrigen Temperaturen
− staubige Orte
• Setzen Sie den Fernbedienungssensor dieses
Geräts nicht direkter Sonneneinstrahlung oder
Beleuchtungskörpern, wie beispielsweise InverterLeuchtstofflampen, aus.
• Wenn sich die Batterien dem Ende ihrer
Lebensdauer annähern, verringert sich die
effektive Reichweite der Fernbedienung erheblich.
Ersetzen Sie die Batterien so bald wie möglich
gegen zwei neue, sollte dieser Fall eintreten.
• Verwenden Sie niemals alte Batterien gemeinsam
mit neuen Batterien.
• Verwenden Sie niemals gleichzeitig Batterien
unterschiedlichen Typs (wie z. B. Alkali- und
Manganbatterien). Lesen Sie die Anweisungen auf
der Verpackung sorgfältig durch, da
unterschiedliche Batterietypen die gleiche Form
und Farbe haben können.
• Verbrauchte Batterien können auslaufen.
Entsorgen Sie Batterien, die auslaufen, umgehend.
Vermeiden Sie einen Kontakt zwischen der
auslaufenden Flüssigkeit und Ihrer Haut oder
Kleidung, usw. Reinigen Sie das Batteriefach
sorgfältig, bevor Sie neue Batterien einsetzen.
• Tragen Sie Batterien nicht in der Hosentasche oder
einer Handtasche zusammen mit metallischen
Gegenständen, wie Münzen usw.
• Batterien dürfen nicht mit dem Hausmüll entsorgt
werden. Entsorgen Sie Batterien sachgemäß unter
Einhaltung der lokalen Vorschriften.
• Halten Sie Batterien von Kindern fern. Wenden
Sie sich sofort an einen Arzt, wenn jemand
versehentlich eine Batterie verschluckt hat.
• Wenn Sie die Fernbedienung längere Zeit nicht
verwenden werden, entnehmen Sie die Batterien
aus der Fernbedienung.
• Laden Sie die mitgelieferten Batterien nicht auf
und nehmen Sie sie nicht auseinander.
• Die Batterien dürfen nicht starker Hitze wie direktem
Sonnenschein, Feuer o.ä. ausgesetzt werden.
WARNUNG
UM DIE GEFAHR EINES FEUERS ODER
EINES ELEKTROSCHOCKS ZU
VERMEIDEN, DARF DAS GERÄT WEDER
REGEN NOCH FEUCHTIGKEIT
AUSGESETZT WERDEN.
Dieses Gerät ist nicht vom Netz abgetrennt,
solange der Netzstecker eingesteckt ist, auch
wenn Sie das Gerät selber mit dem Schalter
ausschalten. In diesem Zustand nimmt das Gerät
ständig eine geringe Menge Strom auf.
(Netzschalter)-Taste
Schaltet die Stromversorgung des Geräts ein oder
versetzt es in den Bereitschaftsmodus.
Verwenden Sie dieses Gerät nicht in einer
Entfernung von weniger als 22 cm zu Personen mit
implantiertem Herzschrittmacher oder Defibrillator.
Funkwellen können elektronische medizinische
Geräte stören.
Benutzen Sie dieses Gerät nicht in der Nähe von
medizinischen Geräten oder Einrichtungen.
Das Typenschild befindet sich an der Unterseite
des Geräts.
De
i
Page 43

Inhalt
Lieferumfang......................................................................... 2
Funktionen............................................................................ 3
Häufig gestellte Fragen........................................................ 3
Teilebezeichnungen und Funktionen................................. 4
Installation ............................................................................ 5
Anschlüsse............................................................................. 6
Bedienung ............................................................................. 8
Wiedergabe des Tons von einem Bluetooth-Gerät .......... 10
Einstellungen ...................................................................... 12
Programmieren der Soundbar mit der Fernbedienung des
Fernsehers (Funktion zum Erlernen der Fernbedienungssignale des
Fernsehers).......................................................................................................... 12
Verwenden eines externen Subwoofers .................................................. 14
Einstellen der Funktion Automatische Bereitschaft............................. 15
Initialisieren der Soundbar ............................................................................ 15
Problembehebung.............................................................. 16
Technische Daten................................................................ 19
Über dieses Handbuch
HINWEIS
Dies zeigt Vorsichtsmaßnahmen und Funktionsbeschränkungen für das Produkt an.
TIPP
Dies zeigt zusätzliche Erklärungen zur besseren Bedienung an.
De
1
Page 44

Lieferumfang
Soundbar
Fernbedienung Batterie x 2
(AAA, R03, UM4)
Optisches Kabel (1,5 m)
Montageschablone
* Zur Befestigung der Soundbar an einer Wand
Abstandshalter x 2
* Zur Befestigung der Soundbar
an einer Wand
Bedienungsanleitung
(diese Anleitung)
Fernbedienungssensor
Maximal 6 m
Vergewissern Sie sich, dass Sie sämtliche folgenden Teile erhalten haben.
Vorbereiten der Fernbedienung
Ziehen Sie vor der Verwendung die Schutzfolie ab.
Reichweite der Fernbedienung
Bleiben Sie innerhalb des unten aufgeführten Betriebsbereichs. Wenn Sie die Soundbar
an einer Wand befestigen, bedienen Sie sie über den Fernbedienungssensor an der
Oberseite (S.5).
De
2
Page 45

Funktionen
Häufig gestellte Fragen
Genießen Sie leistungsstarken und realistischen Klang über die
Soundbar und den integrierten Subwoofer und erfreuen Sie sich an der
einfachen Installation und dem einfachen Anschluss an ein Fernseher
und andere Geräte.
•AIR SURROUND XTREME
Genießen Sie 7.1-Kanal-Surroundsound, der eine breite und tiefe
Klangwiedergabe bietet, als ob sich die Lautsprecher nicht nur vorne, sondern
auch links und rechts sowie hinter der Hörposition befinden (S.9).
• Basserweiterung
Genießen Sie leistungsstarken Basston mit der original YamahaBassverstärkungstechnologie „Advanced Bass Extension Processing“ (S.9).
• Bluetooth®-Verbindung
Inhalte auf einem Bluetooth-kompatiblen Smartphone, Tablet oder Computer
können problemlos wiedergegeben werden (S.10).
Durch den Verstärker für komprimierte Musik können Sie realistischen und
beeindruckenden Klang ganz nah am Original genießen.
• HOME THEATER CONTROLLER
Sie können die Soundbar ganz einfach durch Installation der speziellen
Steuerungsanwendung „HOME THEATER CONTROLLER“ bedienen.
• Funktion zum Erlernen der Fernbedienungssignale des
Fernsehers
Bedienen Sie die Soundbar mit der Fernbedienung des Fernsehers (S.12).
Der folgende Abschnitt deckt beliebte Funktionen und häufig gestellte Fragen zur
Soundbar ab.
F1
Kann ich die Soundbar über die Fernbedienung des Fernsehgeräts
bedienen? Das Wechseln zwischen der Fernsehgerät- und SoundbarFernbedienung ist unpraktisch.
A1
Ja. Sie können die Soundbar über die Fernbedienung des Fernsehers
steuern, indem Sie die Funktion zum „Erlernen der Fernbedienungssignale
des Fernsehers“ verwenden (S.12).
Diese Funktion ist nur für IR-Fernbedienungen (Infrarot) verfügbar.
Überprüfen Sie den Fernbedienungstyp Ihres Fernsehgeräts.
F2
Kann ich die Deutlichkeit von Dialogen verbessern?
A2
Ja. Die Dialoge in Filmen, Fernsehnachrichten, Sportsendungen usw. sind
mit der Funktion „Clear Voice“ klarer zu hören (S.9).
F3
Kann ich die Soundbar über ein Smartphone bedienen? Und kann ich
die Soundbar mit einem Smartphone ein-/ausschalten?
A3
Ja. Sie können die Soundbar mit dem Smartphone bedienen, indem Sie die
spezielle Steuerungsanwendung „HOME THEATER CONTROLLER“
verwenden (S.11).
Wenn Sie diese Funktion verwenden, müssen Sie das Smartphone über eine
Bluetooth-Verbindung mit der Soundbar verbinden.
Wenn Sie die Bluetooth-Bereitschaftsmodus-Funktion verwenden, schaltet
sich die Soundbar ein, wenn eine Bluetooth-Verbindung zwischen dem
Smartphone und der Soundbar hergestellt wird, und schaltet sich aus, wenn
diese getrennt wird (S.11).
•Klare Dialoge
Lassen Sie Sprachsignale (wie Dialoge und Erzählungen) klar verständlich klingen
(S.9).
De
3
Page 46

Teilebezeichnungen und Funktionen
* Die Tasten befinden sich
im hinteren Bereich der
Soundbar.
** *
*
ANALOG
SUBWOOFEROUT
* Unterseite
*
Soundbar (Vorderseite/Oberseite)
A Anzeigen
Zeigen den Status der Soundbar an. Informationen zu den Hauptfunktionen der
Anzeigen finden Sie unter „Bedienung“ (S.8 bis 9).
B (Eingang)-Taste
Wählt eine Eingangsquelle für die Wiedergabe aus (S.8).
C (Stummschalten)-Taste
Schaltet die Audioausgabe stumm. Drücken Sie die Taste nochmals, um die
Stummschaltung aufzuheben (S.9).
D / (Lautstärke +/–)-Tasten
Stellen Sie die Lautstärke ein (S.8).
E (Netzschalter)-Taste
Schaltet die Soundbar ein oder aus (Bereitschaftsmodus) (S.9).
TIPP
• Die Soundbar schaltet sich möglicherweise automatisch aus, wenn die Funktion Automatische
Bereitschaft aktiviert ist (S.15).
F Fernbedienungssensoren
Empfangen Infrarotsignale von der Fernbedienung der Soundbar (S.2).
Die Fernbedienungssensoren befinden sich an der Vorderseite und der Oberseite
der Soundbar (S.5).
Soundbar (Rückseite/Unterseite)
G Integrierte Dual-Subwoofer
Die integrierten Subwoofer befinden sich im oberen Bereich der Soundbar.
H Lautsprecher
I Eingangsbuchse TV
Zum Anschließen eines Fernsehers über ein optisches Kabel (S.6).
J Eingangsbuchse BD/DVD
Zum Anschließen eines Abspielgeräts, wie eines Blu-ray Disc-Players (BD), über ein
digitales Koaxialkabel (S.7).
K Eingangsbuchse ANALOG
Zum Anschluss eines externen Geräts über ein 3,5-mm-Stereo-Ministeckerkabel
(S.7).
L SUBWOOFER OUT-Buchse
Zum Anschluss eines externen Subwoofers mit einem monauralen Cinchkabel
(S.14).
M Auswahlschalter für die Aufstellungsposition
Legt die Klangqualität entsprechend der Aufstellungsposition der Soundbar fest
(S.5).
De
4
Page 47

Installation
Auswahlsc halter für die
Aufstellungsposition
(Unterseite)
Fernbedienungssensor
(Vorderseite)
Fernbedienungssensor
(Oberseite)
Tasten
Auswahlschalter für die
Aufstellungsposition
(Unterseite)
Klebebänder oder Reißnägel
Montageschablone (mitgeliefert)
Schrauben
-bohrungen
7 bis 9 mm
10 bis 12 mm
4 mm (Nr. 8)
mindestens 20 mm
Abstandshalter
Befestigungsbohrung
en auf der Unterseite
der Soundbar
Die Ausrichtung der Soundbar und der entsprechende
Fernbedienungssensor hängen von der
Aufstellungsposition ab.
Aufstellen der Soundbar auf einem
Fernsehrack usw.
1 Schieben Sie den Auswahlschalter für die
Aufstellungsposition an der Unterseite der
Soundbar in die Position T (für Tabletop:
Tischständer) (T ist die Standardeinstellung).
Die für die Aufstellung geeignete Klangqualität wird
eingestellt.
2 Stellen Sie die Soundbar auf ein Fernsehrack usw.,
sodass die Tasten zur Wand zeigen.
Vorsicht
• Stellen Sie die Soundbar und einen BD-Player oder ein anderes
Gerät nicht unmittelbar übereinander auf. Dies kann zu
Fehlfunktionen aufgrund von Vibrationen führen.
• Halten Sie die Soundbar nicht am Lautsprecherteil (stoffbespannter
Bereich) an der Vorder- und Oberseite fest.
• Die Soundbar enthält Lautsprecher ohne magnetische
Abschirmung. Legen Sie keine Gegenstände in die Nähe der
Soundbar, die empfindlich auf Magnetfelder reagieren (Festplatten
usw.).
• Je nach Ihrer Aufstel lumgebung kann es besser sein, die Soundbar
und externe Geräte (wie einen Fernseher) miteinander zu
verbinden, bevor Sie die Soundbar installieren.
• Stellen Sie die Soundbar nicht innerhalb von 50 mm des
Fernsehgeräts auf.
Befestigen der Soundbar an einer Wand
1
Schieben Sie den Auswahlschalter für die
Aufstellungsposition an der Unterseite der Soundbar
in die Position W (für Wall mount: Wandbefestigung).
Die für die Aufstellung geeignete Klangqualität wird eingestellt.
2 Befolgen Sie die Schritte unter „So montieren Sie
das Gerät an der Wand“ unten und montieren Sie die
Soundbar so, dass die Tasten nach oben weisen.
Vorsicht
• Bei der Montage der Soundbar an einer Wand müssen alle Installationsarbeiten
von einem qualifizierten Fachmann oder Händler durchgeführt werden. Auf
keinen Fall darf der Kunde versuchen, diese Installationsarbeiten selbst
durchzuführen. Durch eine falsche oder ungeeignete Installation kann die
Soundbar herunterfallen und Verletzungen verursachen.
• Befestigen Sie die Soundbar auf keinen Fall an einer Wand aus
schwachem Material, wie beispielsweise Gipskarton oder furnierten
Brettern. Andernfalls könnte die Soundbar herunterfallen.
• Achten Sie darauf, im Handel erhältliche Schrauben zu verwenden, die
das Gewicht des Geräts tragen können (in Schritt 2 rechts angegeben).
Wenn Sie nicht die angegebenen Schrauben, sondern andere
Befestigungsteile wie Kurzschrauben, Nägel und doppelseitiges
Klebeband verwenden, kann die Soundbar herunterfallen.
So montieren Sie das Gerät an der Wand
1 Befestigen Sie die Montageschablone an der
Wand und markieren Sie die Stellen für die
Schraubenbohrungen.
2 Nehmen Sie die Montageschablone von der Wand
ab und installieren Sie dann im Handel erhältliche
Schrauben (wie unten dargestellt) an den an der
Wand markierten Stellen.
3 Ziehen Sie die Schutzfolie von den
Abstandshaltern ab und bringen Sie die
Klebeseite an der Soundbar an, wie unten
dargestellt.
4 Hängen Sie die Soundbar an die Schrauben.
Vorsicht
• Befestigen Sie die Kabel, sodass sie sich nicht lösen können. Falls
Sie versehentlich mit dem Fuß oder der Hand in einem losen Kabel
hängen bleiben, kann die Soundbar herunterfallen.
• Vergewissern Sie sich nach der Montage der Soundbar, dass diese
sicher befestigt ist. Yamaha übernimmt keine Haftung für Unfälle,
die auf eine unsachgemäße Installation zurückzuführen sind.
De
5
Page 48

Anschlüsse
BD/DVD ANALOG
SUBWOOFEROUT
TV
Netzkabel
An eine Wand-/
Netzsteckdose
Soundbar (Rückseite)
Optisches Kabel
Abspielgerät (wie BD-Player)
Set-Top-Box
OPTICAL OUTPUT
Fernseher
TIPP
Verbinden Sie in den folgenden Fällen den digitalen
Koaxialaudioausgang des Abspielgeräts über ein
digitales Koaxialkabel (im Handel erhältlich) mit
dem BD/DVD-Eingang der Soundbar und wählen
Sie dann über die BD/DVD-Taste auf der
Fernbedienung die Eingangsquelle.
− Der Fernseher hat keinen optischen Ausgang.
− Der Fernseher gibt keinen Ton vom
angeschlossenen Abspielgerät aus (oder gibt den
Ton nur sehr leise aus).
− Der Ton des Abspielgeräts, das an das
Fernsehgerät angeschlossen ist, ist nicht als
Surroundsound zu hören.
Schließen Sie das Gerät an ein Fernsehgerät (oder andere
Peripheriegeräte) an.
TIPP
• Wenn Ihr Fernseher keine Einstellung zur Deaktivierung der Lautsprecherausgabe
besitzt, können Sie sie deaktivieren, indem Sie an der Kopfhörerbuchse des
Fernsehers einen Kopfhörer anschließen. Näheres hierzu finden Sie in den
Handbüchern des Fernsehers.
• Die Eingangsbuchsen TV und BD/DVD unterstützen die folgenden Audiosignale.
− PCM (2-Kanal)
− Dolby Digital (bis zu 5.1 Kanäle)
VORSICHT
• Schließen Sie das Netzkabel der Soundbar nicht an die Netzsteckdose an, bevor Sie
die Anschlüsse hergestellt haben.
• Gehen Sie beim Einstecken des Kabelsteckers keinesfalls gewaltsam vor.
Andernfalls können der Kabelstecker oder der Anschluss beschädigt werden.
1 Verbinden Sie Fernseher und Soundbar mit dem
optischen Kabel (mitgeliefert).
Entfernen Sie die Kappe des optischen Kabels und prüfen
Sie die Richtung des Steckers.
2 Schließen Sie das Netzkabel der Soundbar an
eine Netzsteckdose an.
3 Stellen Sie den Fernseher wie folgt ein.
• Stellen Sie den Fernseher auf minimale Lautstärke ein.
• Deaktivieren Sie die Ausgabe über den eingebauten
Fernsehlautsprecher (falls verfügbar).
HDMI-Kabel (usw.)
De
6
Page 49

Digitalverbindung eines externen Geräts
BD/DVD
Digitales Koaxialkabel
(im Handel erhältlich)
Digitaler
Koaxialaudioausgang
(orange)
Abspielgerät
ANALOG
3,5-mm-Stereo-Ministeckerkabel
(im Handel erhältlich)
Spielkonsole (usw.)
Sie können ein externes Gerät, das über einen digitalen Koaxialaudioausgang verfügt,
wie ein DVD-Player, an den BD/DVD-Eingang der Soundbar anschließen.
Analoge Verbindung eines externen Geräts
(Spielekonsole)
Sie können ein externes Gerät, wie eine Spielekonsole oder ein Fernsehgerät, das
keinen digitalen Audioausgang hat, an den ANALOG-Eingang der Soundbar
anschließen.
HINWEIS
• Wählen Sie über die Taste BD/DVD der Fernbedienung die Eingangsquelle.
HINWEIS
• Wählen Sie über die Taste ANALOG der Fernbedienung die Eingangsquelle.
• Wenn Sie die Lautstärke an einem externen Gerät anpassen können, das an den ANALOG-Eingang der
Soundbar angeschlossen ist, stellen Sie sie auf die gleiche Lautstärke wie das externe Gerät ein, das an
den Eingang TV oder BD/DVD angeschlossen ist.
De
7
Page 50

Bedienung
Eingangswahltasten
Wählen Sie eine wiederzugebende Eingangsquelle aus.
TV ....................Audio vom Fernseher
BD/DVD
............. Audio vom an der BD/DVD-
Eingangsbuchse angeschlossenen Gerät
ANALOG
........... Audio von einem an die ANALOG-
Eingangsbuchse angeschlossenen Gerät
BLUETOOTH
.........................Audio von einem über Bluetooth
verbundenen Gerät
Die Anzeige für die ausgewählte Eingangsquelle leuchtet.
(Beispiel: wenn TV gewählt ist)
TIPP
• Um Audio des an den Fernseher angeschlossenen Abspielgeräts
wiederzugeben oder Videos des Abspielgeräts zu betrachten,
stellen Sie als Eingangsquelle des Fernsehers das Abspielgerät ein.
• Ausführliche Informationen zur
Bluetooth
-Verbindung finden Sie
unter „Wiedergabe des Tons von einem
Bluetooth
-Gerät“ (S.10).
SUBWOOFER-Tasten (+/–)
Stellen die Lautstärke des Subwoofers ein.
VOLUME-Tasten (+/–)
Stellen die Lautstärke der Soundbar ein.
Lautstärke verringern (–)
Lautstärke erhöhen (+)
Lautstärke verringern (–)
Lautstärke erhöhen (+)
1
2
Taste LEARN
★
Schaltet die Soundbar in den Lernmodus für die
Fernbedienung des Fernsehers (S.12).
Taste BLUETOOTH STANDBY
★
Aktiviert/deaktiviert den Bluetooth-
Bereitschaftsmodus (S.11).
3
Fernbedienungssignal-Sender
Sendet Infrarotsignale.
★
★
Anzeigen
Die Anzeigen an der Oberseite blinken oder leuchten
und zeigen so den Betriebs- und Einstellungsstatus.
★: Tasten, die länger als 3 Sekunden gedrückt werden
müssen: LEARN, BLUETOOTH STANDBY, AUDIO
DELAY
In dieser Anleitung werden zur Erläuterung Abbildungen
der neun integrierten Anzeigen verwendet.
: Aus
: Leuchtet auf
: Blinkt
(Beispiel: Wenn die PLII-Anzeige und die SURROUND-Anzeige
blinken und die TV-Anzeige leuchtet)
De
8
Page 51

(Netzschalter)-Taste
Schaltet die Soundbar ein oder aus
(Bereitschaftsmodus).
Eingeschaltet
Bluetooth-Bereitschaft (S.11)
Ausgeschaltet
DIMMER-Taste
Schaltet die Helligkeit der Anzeigen um. Beim Betätigen der
Taste wird der Status der Anzeigen wie folgt umgeschaltet.
Gedimmt (Standardeinstellung) → Aus → Hell
↑
Die Anzeigen leuchten unmittelbar nach der
Bedienung auf und stellen sich nach einigen
Sekunden auf die eingestellte Helligkeit ein.
Anzeige der ausgewählten Eingangsquelle leuchtet (grün)
Leuchtet (rot)
Tasten SURROUND und STEREO
Schalten Sie zwischen Surround- und Stereo (2 Kanal)Wiedergabe um. Wenn Surround-Wiedergabe gewählt ist,
können Sie einen realistischen Klangeffekt unter Verwendung
von Yamahas exklusivem AIR SURROUND XTREME genießen.
TIPP
• Wenn 2-kanalige Stereo-Signale im Surround-Sound
wiedergegeben werden, leuchtet die Anzeige PLII.
•
Indem Sie die kostenlose spezielle Anwendung „HOME THEATER
CONTROLLER“ auf einem
Bluetooth
-Gerät installieren, wie zum Beispiel auf
einem Smartphone, können Sie ganz einfach die folgenden Surroundmodi
auswählen: TV PROGRAM, MOVIE, MUSIC, SPORTS und GAME
.
Leuchtet (Surround-Wiedergabe)
Aus (Stereo-Wiedergabe)
SURROUND
STEREO
Leuchtet (Dolby Pro Logic II)
4
5
Taste BASS EXTENSION
Aktiviert/deaktiviert die Basserweiterungsfunktion. Wenn
diese Funktion aktiviert ist, können Sie leistungsstarken
Bassklang durch Yamahas original Bassverstärkungstechnologie
„Fortschrittliche Basserweiterungsverarbeitung“ genießen.
Taste CLEAR VOICE
Aktiviert/deaktiviert die Clear-Voice-Funktion.
Wenn diese Funktion aktiviert ist, können Sie beim
Betrachten von Filmen, Fernsehdramen, Nachrichten- oder
Sportprogrammen klar verständlichen Sprachton genießen.
Taste AUDIO DELAY
★
Reguliert die Audioverzögerung, um den Ton mit dem
Bild zu synchronisieren, wenn das Bild am Fernseher
gemessen am Ton verzögert zu sein scheint.
Folgen Sie der nachstehenden Vorgehensweise,
um die Audioverzögerung einzustellen.
1 Halten Sie die Taste AUDIO DELAY länger
als 3 Sekunden gedrückt.
Die Anzeige ganz links blinkt.
2 Drücken Sie die Taste SUBWOOFER (+/–), um
die Audioverzögerung einzustellen.
Durch Drücken der Taste SUBWOOFER (+)
wird das Timing der Audioausgabe verzögert.
3 Um die Einstellung zu beenden, drücken Sie
die Taste AUDIO DELAY.
TIPP
• Die Einstellung wird automatisch beendet, wenn 20 Sekunden
lang keine Bedienvorgänge durchgeführt werden.
Leuchtet (aktiviert)
Aus (deaktiviert)
CLEAR
VOICE
CLEAR
VOICE
Leuchtet (aktiviert)
Aus (deaktiviert)
(–) (+)
6
Taste MUTE
Schaltet die Audioausgabe stumm. Drücken
Sie die Taste nochmals, um die Stummschaltung
aufzuheben.
Blinkt (bei Stummschaltung)
7
Grün (Dolby Digital)
Aus (PCM)
Decoder-Anzeige
Die Soundbar unterstützt die folgenden Audiosignale.
Die Art des zugeführten Audiosignals können Sie an der
Farbe der Anzeige ablesen.
De
9
Page 52

Wiedergabe des Tons von
Bluetooth-Geräte
Wiedergabe des Tons von einem Bluetooth-Gerät
über die Soundbar
Bei der ersten
Bluetooth-Verbindung
Koppeln eines Bluetooth-
Geräts mit der Soundbar
Bei nachfolgenden
Bluetooth-Verbindungen
Blinkt
YAS-105 Yamaha
PIN 0 0 0 0
123
456
789
0
einem Bluetooth-Gerät
Sie können drahtlos Ton von Bluetooth-Geräten wiedergeben, wie zum Beispiel von
Smartphones oder digitalen Musik-Playern.
Ausführliche Informationen finden Sie auch in der Bedienungsanleitung des Bluetooth-
Geräts.
Führen Sie die folgenden Schritte durch, um ein Bluetooth-Gerät mit der Soundbar zu
verwenden.
Koppeln eines Bluetooth-Geräts mit der Soundbar
Wenn Sie ein Bluetooth-Gerät zum ersten Mal anschließen, müssen Sie eine Kopplung
zwischen dem Gerät und der Soundbar durchführen. Die Kopplung ist für jedes
verwendete Bluetooth-Gerät erforderlich.
Wenn die Kopplung mit einem Gerät abgeschlossen wurde, ist bei nachfolgenden
Verbindungen mit dem Gerät keine Kopplung erforderlich.
1 Drücken Sie die BLUETOOTH-Taste auf der Fernbedienung der
Soundbar, um Bluetooth als Eingangsquelle auszuwählen.
Die BLUETOOTH-Anzeige an der Oberseite blinkt.
2 Schalten Sie die Bluetooth-Funktion bei dem zu koppelnden Gerät
ein und führen Sie die Kopplung durch.
Die Schritte variieren abhängig vom Gerät. Lesen Sie im Handbuch des Geräts nach.
3 Wählen Sie in der Bluetooth-Geräteliste des Geräts die Option „YAS-
105 Yamaha“ aus.
Wenn ein Passcode (PIN) erforderlich ist, geben Sie die Nummer „0000“ ein.
De
10
Wenn die Kopplung abgeschlossen ist, wird beim Gerät oder eine Meldung zum
Abschluss angezeigt.
HINWEIS
• Führen Sie die Kopplung durch, während sich das Bluetooth-Gerät und die Soundbar maximal 10 Meter
voneinander entfernt befinden.
• Es können bis zu acht Bluetooth-Geräte mit der Soundbar gekoppelt werden. Wenn ein neuntes Gerät
gekoppelt wird, werden die Kopplungsdaten für das Gerät mit dem ältesten Verbindungsdatum gelöscht.
• Wenn die Kopplungsinformationen für ein Gerät gelöscht werden, ist eine erneute Kopplung mit dem Gerät
erforderlich, damit es wieder verwendet werden kann.
• Wenn bereits ein Bluetooth-Gerät mit der Soundbar verbunden ist, beenden Sie diese BluetoothVerbindung (S.11) und führen Sie dann die Kopplung mit dem neuen Gerät durch.
• Schlagen Sie unter „Bluetooth“ (S.18) unter „Problembehebung“ nach, wenn die Kopplung nicht
durchgeführt werden kann.
Page 53

Wiedergabe des Tons von einem Bluetooth-Gerät über
Blinkt
Leuchtet auf
Blinkt dreimal (aktiviert), blinkt einmal (deaktiviert)
Leuchtet (rot)
die Soundbar
1 Drücken Sie bei eingeschalteter Soundbar die BLUETOOTH-Taste
auf der Fernbedienung der Soundbar, um Bluetooth als
Eingangsquelle auszuwählen.
Die BLUETOOTH-Anzeige an der Oberseite blinkt.
2 Schalten Sie die Bluetooth-Funktion bei dem Gerät ein und stellen
Sie die Verbindung her.
Wenn die Bluetooth-Verbindung korrekt hergestellt wurde, leuchtet die
BLUETOOTH-Anzeige der Soundbar.
Verwenden des Bluetooth-Bereitschaftsmodus
Mit dem Bluetooth-Bereitschaftsmodus können Sie die Soundbar automatisch ein- (oder
aus-) schalten, verbunden mit der Bedienung des Bluetooth-Geräts.
1 Halten Sie bei eingeschalteter Soundbar die Taste BLUETOOTH
STANDBY der Soundbar-Fernbedienung länger als 3 Sekunden
gedrückt.
Wenn die Taste BLUETOOTH STANDBY jeweils 3 Sekunden lang gedrückt wird,
wird der Modus zwischen Aktiviert und Deaktiviert umgeschaltet.
BLUETOOTH
STANDBY
Wenn der Bluetooth-Bereitschaftsmodus aktiviert ist und die Soundbar
ausgeschaltet wird, leuchtet die Anzeige D rot (Bluetooth-Bereitschaft).
3 Geben Sie einen Titel auf dem Gerät wieder.
HINWEIS
• Führen Sie die Verbindung durch, während sich das Bluetooth-Gerät und die Soundbar maximal 10 Meter
voneinander entfernt befinden.
• Wenn es zu Verbindungsproblemen kommt, müssen Sie möglicherweise „YAS-105 Yamaha“ erneut in der
Bluetooth-Geräteliste auswählen. Abhängig vom verwendeten Bluetooth-Gerät müssen Sie
möglicherweise die Ausgabeeinstellung so ändern, dass der Ton an die Soundbar ausgegeben wird.
• Passen Sie den Lautstärkepegel des Bluetooth-Geräts nach Bedarf an.
• Wenn bereits ein Bluetooth-Gerät mit der Soundbar verbunden ist, beenden Sie diese BluetoothVerbindung und stellen Sie dann die Verbindung mit dem neuen Gerät her.
Beenden der Bluetooth-Verbindung
Die Bluetooth-Verbindung wird in den folgenden Fällen beendet. Wenn die BluetoothVerbindung beendet wird, während die Soundbar eingeschaltet ist, wechselt die
BLUETOOTH-Anzeige von leuchtend zu blinkend und die Soundbar wartet auf eine
Verbindung.
•Die Bluetooth-Funktion wird bei dem kompatiblen Gerät deaktiviert.
• Die BLUETOOTH-Taste auf der Fernbedienung der Soundbar wird länger als
3 Sekunden lang gedrückt.
• Die Soundbar wird ausgeschaltet.
Bei Bluetooth-Geräten mit aktiviertem Bluetooth-Bereitschaftsmodus verfügbare Funktionen
Einschalt-Verbindungsfunktion (wenn die Soundbar ausgeschaltet ist)
Wenn die Bluetooth-Verbindung beim Gerät hergestellt wird, schaltet sich die Soundbar ein und ist bereit
für die Wiedergabe des Tons des Geräts.
Ausschalt-Verbindungsfunktion (wenn die Soundbar eingeschaltet ist)
Die Soundbar wird ausgeschaltet, wenn die Bluetooth-Verbindung bei einem Bluetooth-Gerät beendet
wird. (Nur wenn BLUETOOTH als Eingangsquelle ausgewählt ist.)
Verwenden der Anwendung HOME THEATER
CONTROLLER
Indem Sie die kostenlose spezielle Anwendung „HOME THEATER CONTROLLER“ auf
einem Bluetooth-Gerät installieren, wie zum Beispiel auf einem Smartphone, können
Sie ganz einfach und praktisch verschiedene Bedienschritte über das Bluetooth-Gerät
ausführen. (Einstelloptionen: grundlegende Bedienung, Surround-Modus,
Klanganpassungen)
HINWEIS
• Zur Verwendung der Anwendung verbinden Sie die Soundbar und ein Bluetooth-Gerät über eine
Bluetooth-Verbindung.
• Wenn Sie den Bluetooth-Bereitschaftsmodus der Soundbar aktivieren, können Sie die Soundbar mit dem
Bluetooth-Gerät einschalten.
Ausführliche Informationen zu „HOME THEATER CONTROLLER“ finden Sie in den
Produktinformationen auf unserer Website.
De
11
Page 54

Einstellungen
CLEAR
VOICE
CLEAR
VOICE
Circa 30 cm
Fernbedienung des Fernsehers
Gedrückt halten
(mehr als eine Sekunde)
Loslassen
(mehr als eine Sekunde)
Gedrückt halten
(mehr als eine Sekunde)
Loslassen
(...)
Leuchtet auf
Blinkt
Programmieren der Soundbar mit der Fernbedienung des Fernsehers (Funktion zum Erlernen der Fernbedienungssignale des Fernsehers)
Wenn Sie die Soundbar programmiert haben, können Sie mit der Fernbedienung des
Fernsehgeräts Funktionen wie das gleichzeitige Ein-/Ausschalten des Fernsehgeräts
und der Soundbar oder das Erhöhen/Verringern der Lautstärke sowie das
Stummschalten/Aufheben der Stummschaltung der Soundbar steuern.
• Diese Funktion ist nur verfügbar, wenn die Fernbedienung Ihres Fernsehers IR-Signale (Infrarot) verwendet.
• Eine Funkwellen-Fernbedienung funktioniert nicht.
• Wenn Sie die Fernbedienung einer Kabel- oder Satelliten-Set-Top-Box verwenden möchten, um die
Soundbar zu bedienen, verwenden Sie die Original-IR-Fernbedienung (Infrarot) des Fernsehgeräts, um die
Soundbar zu programmieren, und verwenden Sie dann zur Bedienung die Fernbedienung der Set-Top-Box.
• Wenn sich bei der Änderung der Lautstärke der Soundbar auch die Lautstärke des Fernsehgeräts ändert, stellen
Sie die Lautstärke des Fernsehgeräts auf das Minimum ein oder deaktivieren Sie die Lautsprecherausgabe.
1 Schalten Sie das Fernsehgerät aus.
2 Schalten Sie die Soundbar aus.
3 Halten Sie die Taste LEARN auf der Soundbar-Fernbedienung länger
als drei Sekunden gedrückt, während Sie damit auf den
entsprechenden Fernbedienungssensor zeigen (S.5).
Die Soundbar wechselt zum Lernmodus und die Anzeigen an der Oberseite
blinken, wie nachstehend gezeigt.
LEARN BLUETOOTH
STANDBY
HINWEIS
• Für die Schritte 5 bis 8 sind nur die Fernbedienung des Fernsehgeräts und die Tasten an der
Rückseite der Soundbar erforderlich. Die Fernbedienung der Soundbar ist nicht erforderlich.
• Wenn die Soundbar bereits Funktionen gelernt hat, leuchten die folgenden Anzeigen.
Stummschalten: TV
Lautstärke (–): BD/DVD
Lautstärke (+): ANALOG
Netzschalter: BLUETOOTH
5 Bringen Sie der Soundbar den Code für „Stummschalten“ der
Fernbedienung des Fernsehgeräts bei.
5-1 Drücken Sie (Stummschalten) auf der Rückseite der Soundbar.
5-2 Richten Sie die Fernbedienung Ihres Fernsehers auf den
Fernbedienungssensor und halten Sie gleichzeitig zwei- oder dreimal die
Stummschalten-Taste länger als eine Sekunde gedrückt.
Der geeignete Fernbedienungssensor hängt von der Aufstellungsposition ab (S.5).
4 Überprüfen Sie, ob der entsprechende Fernbedienungssensor
De
12
aktiviert wurde.
Sie können über die Anzeige CLEAR VOICE prüfen, welcher
Fernbedienungssensor aktiviert wurde.
Anzeige CLEAR
VOICE
Wenn der entsprechende Fernbedienungssensor nicht aktiviert wurde, drücken Sie die Taste
LEARN, um den Lernmodus zu beenden, und wiederholen Sie die Schritte ab Schritt 3.
Aus An der Vorderseite
Leuchtet auf An der Oberseite
Aktivierter
Fernbedienungssensor
Geeigneter aktivierter
Fernbedienungssensor, beim …
Aufstellen der Soundbar auf
einem Fernsehrack usw.
Befestigen der Soundbar an
einer Wand
Ergebnis
Erfolgreich
gelernt
Lernvorgang
fehlgeschlagen
* Wiederholen
Sie ab Schritt
5-1.
Piep-/
Summton
Einmal
Zweimal
Anzeigen
Page 55

6 Bringen Sie der Soundbar den Code für „Lautstärke (–)“ der
Leuchtet auf
Blinkt
Leuchtet auf
Blinkt
Leuchtet auf
Blinkt
Fernbedienung des Fernsehgeräts bei.
6-1 Drücken Sie (Lautstärke –) auf der Rückseite der Soundbar.
8 Bringen Sie der Soundbar den Code für „Ein-/Ausschalten“ der
Fernbedienung des Fernsehgeräts bei.
8-1 Drücken Sie (Netzschalter) auf der Rückseite der Soundbar.
6-2 Richten Sie die Fernbedienung Ihres Fernsehers auf den
Fernbedienungssensor und halten Sie gleichzeitig zwei- oder dreimal die
Taste Lautstärke (–) länger als eine Sekunde gedrückt.
Ergebnis
Erfolgreich
gelernt
Lernvorgang
fehlgeschlagen
* Wiederholen
Sie ab Schritt
6-1.
Piep-/
Summton
Einmal
Zweimal
Anzeigen
7 Bringen Sie der Soundbar den Code für „Lautstärke (+)“ der
Fernbedienung des Fernsehgeräts bei.
7-1 Drücken Sie (Lautstärke +) auf der Rückseite der Soundbar.
7-2 Richten Sie die Fernbedienung Ihres Fernsehers auf den
Fernbedienungssensor und halten Sie gleichzeitig zwei- oder dreimal die
Taste Lautstärke (+) länger als eine Sekunde gedrückt.
Ergebnis
Erfolgreich
gelernt
Piep-/
Summton
Einmal
Anzeigen
8-2 Richten Sie die Fernbedienung Ihres Fernsehers auf den
Fernbedienungssensor und halten Sie gleichzeitig zwei- oder dreimal die
Netztaste länger als eine Sekunde gedrückt.
Ergebnis
Erfolgreich
gelernt
Lernvorgang
fehlgeschlagen
* Wiederholen
Sie ab Schritt
8-1.
Piep-/
Summton
Einmal
Zweimal
Anzeigen
9 Um den Lernmodus zu verlassen, drücken Sie die Taste LEARN auf
der Soundbar-Fernbedienung.
Nun wurden alle erforderlichen Einstellungen vorgenommen. Jetzt können Sie die
Soundbar mit der Stummschalttaste, den Lautstärketasten oder der Netztaste der
Fernbedienung des Fernsehers bedienen.
TIPP
• Der Lernmodus wird automatisch beendet, wenn fünf Minuten lang keine Bedienvorgänge
durchgeführt werden.
• Stellen Sie den Fernseher auf minimale Lautstärke ein. Wenn Sie die Lautstärke der Soundbar mit
der Fernbedienung des Fernsehers erhöhen, kann sich gleichzeitig auch die Lautstärke des
Fernsehers erhöhen. Folgen Sie in diesem Fall Schritt 3 im Kapitel „Anschlüsse“ (S.6), um die
Einstellung des Fernsehers zu ändern.
• Sie können die (Netzschalter)-Taste auf der Fernbedienung der Soundbar drücken, um den
Lernmodus zu beenden.
Lernvorgang
fehlgeschlagen
* Wiederholen
Sie ab Schritt
7-1.
Zweimal
De
13
Page 56

Löschen aller programmierten Funktionen
SUBWOOFEROUT
Cinchkabel für Subwoofer
(im Handel erhältlich)
Monoeingang
Verwenden eines externen Subwoofers
1 Halten Sie bei ausgeschalteter Soundbar die Taste LEARN der
Soundbar-Fernbedienung länger als 3 Sekunden gedrückt (um in
den Lernmodus zu wechseln).
Wenn sich die Soundbar im Lernmodus befindet, blinken die Anzeigen auf der
Oberseite wie nachstehend gezeigt.
LEARN BLUETOOTH
STANDBY
2 Halten Sie (Eingang) auf der Rückseite der Soundbar länger als
drei Sekunden gedrückt.
Die entsprechende Anzeige der gelernten Funktion schaltet sich aus und die
Anzeigen auf der Oberseite blinken, wie nachstehend gezeigt.
Wenn der Löschvorgang abgeschlossen ist, hören Sie den Piepton dreimal.
3 Drücken Sie die Taste LEARN auf der Soundbar-Fernbedienung.
Die Soundbar verfügt über integrierte Dual-Subwoofer. Sie können aber einen externen
Subwoofer anschließen, wenn Sie den Klang für niedrige Frequenzen verstärken
möchten. Schließen Sie einen Subwoofer an die Buchse SUBWOOFER OUT der
Soundbar an. Der Ton wird über die integrierten Subwoofer und den externen
Subwoofer ausgegeben.
HINWEIS
• Verwenden Sie einen externen Subwoofer mit einem integrierten Verstärker.
14
De
Page 57

Einstellen der Funktion Automatische Bereitschaft
Aus (aktiviert), leuchtet auf (deaktiviert)
Blinkt (initialisiert)
Initialisieren der Soundbar
Indem Sie die Funktion Automatische Bereitschaft aktivieren, müssen Sie nicht mehr
daran denken, die Soundbar nach der Verwendung oder wenn Sie beim Fernsehen
einschlafen auszuschalten.
HINWEIS
• Wenn die Funktion Automatische Bereitschaft aktiviert ist und eine der folgenden Bedingungen erfüllt ist,
schaltet sich die Soundbar automatisch aus.
− Keine Bedienung innerhalb von 8 Stunden
− Keine Audioeinspeisung und keine Bedienung innerhalb von 20 Minuten, wenn BLUETOOTH als
Eingangsquelle ausgewählt ist.
1 Halten Sie bei ausgeschalteter Soundbar die Taste MUTE der
Soundbar-Fernbedienung länger als 3 Sekunden gedrückt, um die
Funktion Automatische Bereitschaft zu aktivieren/deaktivieren.
Sie können den Status der Funktion Automatische Bereitschaft über die Anzeigen
an der Oberseite innerhalb der ersten Sekunden unmittelbar nach dem Einschalten
der Soundbar prüfen.
TIPP
• Die anfängliche Einstellung variiert abhängig vom Land oder der Region.
− Modelle für Großbritannien und Europa: aktiviert
− Andere Modelle: deaktiviert
Folgen Sie der nachstehenden Vorgehensweise, um die Soundbar zu initialisieren.
1 Schalten Sie die Soundbar aus.
2 Halten Sie (Netzschalter) auf der Rückseite der Soundbar länger
als drei Sekunden gedrückt.
De
15
Page 58

Problembehebung
Schlagen Sie in der nachfolgenden Tabelle nach, wenn die Soundbar nicht richtig
funktionieren sollte. Falls das aufgetretene Problem in der nachfolgenden Tabelle nicht
aufgeführt ist oder wenn die nachstehenden Anweisungen nicht helfen, schalten Sie die
Soundbar aus, ziehen Sie den Netzstecker, und wenden Sie sich an den nächsten
autorisierten Fachhändler oder Kundendienst von Yamaha.
Prüfen Sie zunächst folgende Punkte:
A Die Netzkabel von Soundbar, Fernseher und Abspielgeräten (wie BD-Player)
sind sicher an einer Netzsteckdose angeschlossen.
B Soundbar, Fernseher und Abspielgeräte (wie BD-Player) sind eingeschaltet.
C Die Stecker aller Kabel sind sicher und fest an den Buchsen der Geräte
angeschlossen.
Netzstrom und System
Problem Ursache Abhilfe
Das Gerät
schaltet sich
plötzlich aus.
Das Gerät lässt
sich nicht
einschalten.
Die Funktion Automatische
Bereitschaft ist aktiviert.
Wenn die Funktion Automatische
Bereitschaft aktiviert ist und eine
der folgenden Bedingungen erfüllt
ist, schaltet sich die Soundbar
automatisch aus.
- Keine Bedienung innerhalb von
8 Stunden
- Keine Audioeinspeisung und
keine Bedienung innerhalb von
20 Minuten, wenn BLUETOOTH
als Eingangsquelle ausgewählt
ist.
Die Schutzschaltung wurde
ausgelöst. (Die Anzeige D an
der Oberseite der Soundbar
blinkt.)
Die Bluetooth-Verbindung wurde
bei einem Bluetooth-Gerät
beendet, während der Bluetooth-
Bereitschaftsmodus aktiviert ist.
Die Schutzschaltung wurde
dreimal in Folge ausgelöst. (Wenn
Sie in diesem Fall versuchen, das
Gerät einzuschalten, blinkt die
Anzeige D an der Oberseite
der Soundbar.)
Schalten Sie die Soundbar wieder ein.
Um zu verhindern, dass sich die
Soundbar automatisch ausschaltet,
deaktivieren Sie die Funktion
Automatische Bereitschaft (S.15).
Schalten Sie nach der Überprüfung,
dass alle Verbindungen
ordnungsgemäß hergestellt wurden,
die Soundbar wieder ein. Wenn sich
das Gerät dennoch plötzlich
ausschaltet oder nicht eingeschaltet
werden kann, trennen Sie das
Netzkabel von der Netzsteckdose und
wenden Sie sich an den nächsten
autorisierten Yamaha-Händler oder an
den Kundendienst.
Deaktivieren Sie den Bluetooth-
Bereitschaftsmodus (S.11).
Um das Produkt zu schützen, lässt es
sich nicht einschalten. Trennen Sie
das Netzkabel von der Netzsteckdose
und wenden Sie sich an den nächsten
Yamaha-Händler oder an den
Kundendienst.
Alle Anzeigen
erlöschen,
obwohl die
Soundbar
eingeschaltet ist
(die Soundbar
scheint
ausgeschaltet zu
sein).
Die Soundbar
reagiert nicht
richtig.
Die Soundbar
arbeitet
selbsttätig.
Die 3D-Brille des
Fernsehers
funktioniert nicht.
Die Soundbar
kann nicht über
die spezielle
Anwendung
„HOME
THEATER
CONTROLLER“
bedient werden.
(Der Bildschirm
der Anwendung
bleibt im DemoModus.)
Die Helligkeit der Anzeigen wurde
über die Einstellung der DIMMERTaste ausgeschaltet.
Der interne Mikrocomputer ist
aufgrund eines externen
Stromschlags (z.B. durch
Blitzschlag oder übermäßige
statische Elektrizität) oder
aufgrund eines
Versorgungsspannungseinbruchs
hängen geblieben.
In der Nähe wird ein anderes
Bluetooth-Gerät betrieben.
Die Soundbar blockiert den Sender
Ihres Fernsehers für die 3D-Brille.
Das Bluetooth-Gerät, auf dem die
Anwendung installiert wurde, ist
nicht mit der Soundbar
verbunden.
Bedienen Sie die DIMMER-Taste, um
die gewünschte Helligkeit
auszuwählen (S.9).
Halten Sie (Netzschalter) an der
Rückseite der Soundbar länger als
zehn Sekunden gedrückt, um sie neu
zu starten. (Falls das Problem
fortbesteht, ziehen Sie das Netzkabel
aus der Netzsteckdose und stecken
Sie es erneut ein.)
Beenden Sie die Bluetooth-
Verbindung der Soundbar (S.11).
Prüfen Sie die Position des Senders Ihres
Fernsehers für die 3D-Brille, und
korrigieren Sie die Position der Soundbar.
Verbinden Sie das Blue tooth-Gerät
und die Soundbar über Bluetooth und
verwenden Sie die Anwendung.
16
De
Page 59

Audio Fernbedienung
Problem Ursache Abhilfe
Kein Ton.
Es ist kein Ton
vom Subwoofer
zu hören.
Beim
Einschalten der
Soundbar
verringert sich
die Lautstärke.
Kein SurroundEffekt.
Es sind
Störgeräusche
zu hören.
Eine andere Eingangsquelle ist
ausgewählt.
Die Stummschaltungsfunktion ist
aktiviert.
Die Lautstärke ist zu niedrig. Erhöhen Sie die Lautstärke (S.8).
Das Netzkabel der Soundbar ist
nicht ordnungsgemäß
angeschlossen.
An beiden Geräten wurden die
Eingänge für die Verbindung
verwendet.
Es werden Signale eingespeist,
die die Soundbar nicht
wiedergeben kann.
Die Lautstärke des Subwoofers ist
zu niedrig eingestellt.
Die Eingangsquelle enthält keine
tieffrequenten Signale.
Die automatische Lautstärkeanpassung
wurde aktiviert. Um übermäßige
Lautstärken zu vermeiden, reguliert die
Soundbar, wenn sie eingeschaltet wird,
automatisch ihre Lautstärke innerhalb
eines bestimmten Pegelbereichs.
Die Stereo-Wiedergabe ist
ausgewählt.
Die Lautstärke ist zu niedrig. Erhöhen Sie die Lautstärke (S.8).
Der Fernseher oder das Abspielgerät
ist ausschließlich auf die 2-KanalAusgabe eingestellt (wie PCM).
Der Ton wird über die integrierten
Lautsprecher des Fernsehgeräts
ausgegeben.
Die Hörposition befindet sich zu
nah an der Soundbar.
Der Auswahlschalter für die
Aufstellungsposition ist nicht
ordnungsgemäß eingestellt.
Die Soundbar steht zu dicht an
einem anderen Digital- oder
Hochfrequenzgerät.
Wählen Sie eine geeignete
Eingangsquelle aus (S.8).
Beenden Sie die
Stummschaltungsfunktion (S.9).
Stellen Sie sicher, dass das Netzkabel
der Soundbar sicher an eine
Netzsteckdose angeschlossen ist (S.6).
Verbinden Sie den Eingang der
Soundbar mit dem Ausgang des
externen Abspielgeräts.
Schalten Sie die digitale
Audioausgabeeinstellung am Abspielgerät
auf PCM oder Dolby Digital um.
Erhöhen Sie die Lautstärke des
Subwoofers (S.8).
Geben Sie eine Tonquelle mit
niederfrequenten Signalen wieder und
überprüfen Sie, ob der Ton über den
Subwoofer ausgegeben wird.
Verringern Sie, wenn nötig, die
Lautstärke (S.8).
Wählen Sie die Surround-Wiedergabe
aus (S.9).
Ändern Sie die Einstellung des digitalen
Audioausgangs am Fernseher oder
Abspielgerät auf Dolby Digital oder BitStream.
Stellen Sie den Fernseher auf
minimale Lautstärke ein (S.6).
Wählen Sie eine Hörposition in
einigem Abstand zur Soundbar.
Wenn Sie die Soundbar vor dem Fernsehgerät
platzieren, stellen Sie den Auswahlschalter für
die Aufstellungsposition auf „T“.
Wenn Sie die Soundbar an einer Wand
montieren, stellen Sie d en Auswahlschalter
für die Aufstellungsposition auf „W“.
Bringen Sie diese Geräte in einen
größeren Abstand zur Soundbar.
Problem Ursache Abhilfe
Die Bedienung
der Soundbar per
Fernbedienung
ist nicht möglich.
Die Bedienung
des Fernsehers
über dessen
Fernbedienung
ist nicht möglich.
Die Soundbar
lernt keine
Fernbedienungsvorgänge
des Fernsehers.
Wenn die
Lautstärke der
Soundbar mit der
Fernbedienung des
Fernsehers erhöht
wird, ist Ton vom
Fernseher zu hören.
(wenn die Funktion
zum Erlernen der
Fernbedienungssignale des
Fernsehers
verwendet wird)
Die Soundbar befindet sich außerhalb
der Reichweite der Fernbedienung.
Die Batterien sind schwach.
Der Fernbedienungssensor der
Soundbar ist direktem Sonnenlicht
oder starkem Kunstlicht ausgesetzt.
Der Fernbedienungssensor des
Fernsehers ist durch die
Soundbar verdeckt.
Die Fernbedienungstaste des
Fernsehers wurde nicht lange
genug gedrückt gehalten.
Die Fernbedienung des
Fernsehers verwendet keine
Infrarotsignale. (Bei einigen
Fernbedienungen kann es sein,
dass sie nicht funktionieren, auch
wenn sie Infrarotsignale
verwenden.)
Sie haben die Fernbedienung des
Fernsehers von einer
ungeeigneten Position aus bedient.
Die Batterien der Fernbedienung
des Fernsehers sind schwach.
Der Fernbedienungssensor der
Soundbar ist direktem
Sonnenlicht oder starkem
Kunstlicht ausgesetzt.
Die Übertragung des
Fernbedienungssignals wurde
durch das Licht des
Fernsehbildschirms gestört.
Am Fernseher ist die
Audioausgabe aktiviert.
Betätigen Sie die Fernbedienung
innerhalb des Betriebsbereichs (S.2).
Ersetzen Sie die Batterien durch neue (S.2).
Ändern Sie den Lichteinfallwinkel, oder
positionieren Sie die Soundbar neu.
Korrigieren Sie die Aufstellposition der
Soundbar, sodass der
Fernbedienungssensor des
Fernsehers nicht von der Soundbar
verdeckt wird, wenn der Fernseher
von der normalen Bedienposition aus
bedient wird.
Halten Sie die Taste zwei- oder
dreimal mehr als eine Sekunde lang
gedrückt (S.12).
In diesem Fall kann die Funktion zum
Erlernen der Fernbedienungssignale
des Fernsehers nicht verwendet
werden. Bedienen Sie die Soundbar
mit der Soundbar-Fernbedienung.
Bedienen Sie die Fernbedienung des
Fernsehers an einer geeigneten
Position (S.12).
Ersetzen Sie die Batterien durch neue.
Ändern Sie den Lichteinfallwinkel,
oder positionieren Sie die Soundbar
neu.
Schalten Sie den Fernseher aus, und
führen Sie den Lernvorgang erneut
durch (S.12).
Ändern Sie die Einstellung des
Fernsehers, sodass die Ausgabe über
den Fernsehlautsprecher deaktiviert
ist. Wenn Ihr Fernseher keine
Einstellung zur Deaktivierung der
Lautsprecherausgabe hat, versuchen
Sie es mit den folgenden Methoden.
- Schließen Sie an der Kopfhörerbuchse
des Fernsehers einen Kopfhörer an.
- Stellen Sie den Fernseher auf
minimale Lautstärke ein.
De
17
Page 60

Das Ein- und
Ausschalten von
Soundbar und
Fernseher erfolgt
in die gegenteilige
Richtung. (Zum
Beispiel wird der
Fernseher
ausgeschaltet,
wenn die Soundbar
eingeschaltet wird.)
(wenn die Funktion
zum Erlernen der
Fernbedienungssignale des
Fernsehers
verwendet wird)
Der Fernseher war eingeschaltet,
als Sie den Lernvorgang
durchführten.
Drücken Sie den Netzschalter des
Fernsehers und (Netzschalter) an
der Rückseite der Soundbar, um beide
Geräte einzuschalten, und drücken
Sie dann die Netztaste auf der
Fernbedienung des Fernsehers, um
die Geräte auszuschalten.
Bluetooth
Problem Ursache Abhilfe
Die Soundbar
lässt sich nicht
mit dem
Bluetooth-Gerät
koppeln.
Bluetooth ist nicht als
Eingangsquelle ausgewählt.
Das Gerät unterstützt kein A2DP. Führen Sie den Kopplungsvorgang mit
Ein Bluetooth-Adapter usw., den
Sie mit der Soundbar koppeln
möchten, hat ein anderes
Passwort als „0000“.
Die Soundbar und das Gerät
stehen zu weit voneinander
entfernt.
In der Nähe befindet sich ein
Gerät (Mikrowellenofen, WLAN
usw.), das Signale im 2,4-GHzFrequenzbereich ausgibt.
Es ist ein weiteres Bluetooth-
Gerät angeschlossen.
Wählen Sie Bluetooth als
Eingangsquelle.
einem Gerät durch, das A2DP
unterstützt.
Verwenden Sie einen Bluetooth-
Adapter usw., dessen Passwort „0000“
ist.
Bringen Sie das Gerät näher zur
Soundbar.
Stellen Sie die Soundbar weiter
entfernt von dem Gerät auf, das
Radiofrequenzsignale abgibt.
Wenn das Bluetooth-Gerät mit der
WLAN-Funktion ausgestattet ist,
deaktivieren Sie die WLAN-Funktion
und aktivieren Sie nur die Bluetooth-
Funktion.
Beenden Sie die aktuelle Bluetooth-
Verbindung und führen Sie die
Kopplung mit dem neuen Gerät durch.
Es kann keine
BluetoothVerbindung
hergestellt
werden.
Es kann keine
BluetoothVerbindung
hergestellt
werden (die
BLUETOOTHAnzeige blinkt
weiterhin
schnell).
Es wird kein Ton
ausgegeben
oder der Ton
wird während
der Wiedergabe
unterbrochen.
Es ist ein weiteres Bluetooth-
Gerät angeschlossen.
Es sind mehr als neun Geräte
gekoppelt und die ältesten
Kopplungsinformationen wurden
gelöscht.
Es liegt ein Problem innerhalb der
Soundbar vor.
Die Bluetooth-Verbindung
zwischen der Soundbar und dem
Gerät wurde getrennt.
Bluetooth ist nicht als
Eingangsquelle ausgewählt.
Die Soundbar und das Gerät
stehen zu weit voneinander
entfernt.
In der Nähe befindet sich ein
Gerät (Mikrowellenofen, WLAN
usw.), das Signale im 2,4-GHzFrequenzbereich ausgibt.
Das Gerät ist nicht auf die
Übertragung von Bluetooth-
Audiosignalen an die Soundbar
eingestellt.
Die Wiedergabe am Gerät wurde
nicht gestartet.
Die Lautstärke des Geräts ist zu
niedrig eingestellt.
Die Soundbar kann nicht mehrere
Bluetooth-Verbindungen herstellen.
Beenden Sie die aktuelle Bluetooth-
Verbindung und stellen Sie die
Verbindung mit dem gewünschten
Gerät her.
Führen Sie die Kopplung erneut durch.
Die Soundbar kann die
Kopplungsinformationen für bis zu
acht Geräte speichern. Wenn ein
neuntes Gerät gekoppelt wird, werden
die Kopplungsdaten für das Gerät mit
dem ältesten Verbindungsdatum
gelöscht.
Trennen Sie das Netzkabel von der
Netzsteckdose und wenden Sie sich
an den nächsten Yamaha-Händler
oder an den Kundendienst.
Führen Sie den Bluetooth-
Verbindungsvorgang erneut durch
(S.10).
Wählen Sie Bluetooth als
Eingangsquelle.
Bringen Sie das Gerät näher zur
Soundbar.
Stellen Sie die Soundbar weiter
entfernt von dem Gerät auf, das
Radiofrequenzsignale abgibt.
Wenn das Bluetooth-Gerät mit der
WLAN-Funktion ausgestattet ist,
deaktivieren Sie die WLAN-Funktion
und aktivieren Sie nur die Bluetooth-
Funktion.
Ändern Sie die
Audioausgangseinstellung und die
Verbindungseinstellung des Geräts.
Starten Sie die Wiedergabe am Gerät.
Erhöhen Sie die Lautstärke des
Geräts.
18
De
Page 61

Technische Daten
Element Technische Daten
Verstärkerbereich
Bereich
Vorne L/R
Hochtöner
Subwoofer
Decoder
Eingangsbuchsen
Ausgang
Maximale
Ausgangsnennleistung
Typ Akustische Aufhängung
Lautsprechersystem 5,5-cm-Konus x 2, nicht magnetisch abgeschirmt
Frequenzgang 160 Hz bis 22 kHz
Impedanz 6Ω
Typ —
Lautsprechersystem 19-mm-Kalotte x 2, magnetisch abgeschirmt
Frequenzgang 4 kHz bis 23 kHz
Impedanz 4Ω
Typ Bassreflex
Lautsprechersystem 7,5-cm-Konus x 2, nicht magnetisch abgeschirmt
Frequenzgang 55 Hz bis 160 Hz
Impedanz 3Ω
Unterstütztes
Audiosignal
(TV, BD/DVD)
Digital (Optisch) 1 (TV)
Digital (Koaxial) 1 (BD/DVD)
Analog
(3,5-mmStereoministecker)
Analog
(RCA/monaural)
Vorne L/R 30 W x 2 Kanäle
Subwoofer 60 W
PCM (2-Kanal)
Dolby Digital (bis zu 5.1-Kanal)
1 (ANALOG)
1 (SUBWOOFER OUT)
Bluetooth-Version Version 2.1+EDR
Unterstützte
Protokolle
Unterstützte Codecs SBC, MPEG4 AAC
Bluetooth
Allgemeines
* Änderungen der technischen Daten jederzeit ohne Vorankündigung vorbehalten.
Drahtlosausgang Bluetooth Klasse 2
Maximale
Kommunikationsentfernung
Unterstütztes
Inhaltsschutzverfahren
Netzspannung/
-frequenz
Leistungsaufnahme 22 W
Leistungsaufnahme
im
Bereitschaftsmodus
Leistungsaufnahme
im BluetoothBereitschaftsmodus
Abmessungen
(B x H x T)
Gewicht 4,0 kg
A2DP, SPP
10 m (ohne Hindernisse)
SCMS-T
Modelle für die USA und Kanada: 120 V
Wechselstrom, 60 Hz
Modell für Taiwan: 110-120 V Wechselstrom,
50/60 Hz
Modell für China: 220 V Wechselstrom, 50 Hz
Sonstige Modelle: 220-240 V Wechselstrom,
50/60 Hz
0,4 W
0,5 W (Modelle für Taiwan, USA und Kanada)
0,6 W (Modelle für China und sonstige Modelle)
890 x 53 x 131 mm (bei Aufstellung der Soundbar
vor einem Fernseher usw.)
890 x 131 x 59 mm (beim Anbringen der
Soundbar an einer Wand, mit Abstandshaltern)
De
19
Page 62

FÖRSIKTIGT: LÄS DETTA INNAN DU ANVÄNDER LJUDSYSTEMET.
• Läs noga denna bruksanvisning för att kunna ha
största möjliga nöje av enheten. Förvara
bruksanvisningen nära till hands för framtida
referens.
• Installera detta ljudsystem på en väl ventilerad,
sval, torr och ren plats, skyddad mot direkt
solljus, värmekällor, vibration, damm, fukt och/
eller kyla. För korrekt ventilation, underskrid
inte följande minimiavstand.
Ovansida: 10 cm, Baksida: 10 cm, Sidor: 10 cm
• Placera enheten på behörigt avstånd från andra
elapparater, motorer, transformatorer och annat
som kan orsaka störningar.
• Utsätt inte enheten för hastiga
temperaturväxlingar och placera den inte på ett
ställe där luftfuktigheten är hög (t.ex. nära en
luftfuktare) då fuktbildning i enheten skapar risk
för brand, elstötar, skador på enheten eller
personskador.
• Placera inte enheten på ett ställe där främmande
föremål kan tränga in i den eller där den kan
utsättas för droppar eller vattenstänk. Placera
aldrig det följande ovanpå enheten:
− Övriga apparater då sådana kan orsaka skador
och/eller missfärgning av enhetens hölje.
− Brännbara föremål (t.ex. stearinljus) då sådana
skapar risk för brand, skador på enheten och/
eller personskador.
− Vätskebehållare som kan falla och spilla
vätska över enheten, vilket skapar risk för
elstötar och/eller skador på enheten.
• Täck aldrig över enheten med en tidning, duk,
gardin el.dyl. då detta skapar risk för
överhettning. En alltför hög temperatur inuti
enheten kan leda till brand, skador på enheten
och/eller personskador.
• Anslut inte enheten till ett vägguttag förrän
samtliga övriga anslutningar slutförts.
• Använd aldrig enheten vänd upp och ned. Detta
kan leda till överhettning som orsakar skador.
• Hantera inte tangenter, reglage och kablar
onödigt hårdhänt.
• Fatta tag i själva kontakten när nätkabeln
kopplas bort från vägguttaget; dra aldrig i
kabeln.
• Använd aldrig några kemiska lösningar för
rengöring då dessa kan skada ytbehandlingen.
Använd en ren, torr trasa.
• Använd endast den spänning som står angiven
på enheten. Anslutning till en strömkälla med
högre spänning än den angivna kan orsaka
brand, skador på enheten och/eller personskador.
Yamaha åtar sig inget ansvar för skador
beroende på att enheten används med en
spänning utöver den angivna.
• Koppla bort nätkabeln från vägguttaget för att
undvika skador p.g.a. blixtnedslag om ett
åskväder uppstår.
• Försöka aldrig att utföra egna reparationer.
Kontakta en kvalificerad tekniker från Yamaha
om servicebehov föreligger. Du får inte under
några omständigheter ta av höljet.
• Koppla bort nätkabeln från vägguttaget om
enheten inte ska användas under en längre tid
(t.ex. under semestern).
• Läs avsnittet ”Felsökning” om vanligt
förekommande driftsproblem innan du
förutsätter att enheten är söndrig.
• Innan ljudsystemet flyttas ska du trycka på
för att ställa den i standby och sedan koppla bort
nätkabeln från vägguttaget.
• Kondensation (imma) uppstår, om den
omgivande temperaturen plötsligt ändras.
Koppla i så fall loss nätkabeln från nätuttaget
och låt apparaten vila.
• Installera receivern nära ett nätuttag och där
stickkontakten lätt kan kommas åt.
• En säker placering eller installation är ägarens
ansvar. Yamaha ska inte hållas ansvarigt för
eventuella olyckor som orsakas av felaktig
placering eller installation av högtalare.
• Håll produkten utom räckhåll för barn så att de
inte sväljer smådelar av misstag.
Anmärkning angående fjärrkontroller
och batterier
• Spill inte vatten eller andra vätskor på
fjärrkontrollen.
• Tappa inte fjärrkontrollen.
• Fjärrkontrollen ska inte läggas eller förvaras på
följande platser:
− hög luftfuktighet, som t.ex. nära ett bad
− höga temperaturer, t.ex. nära ett värmeelement
eller en kamin
− extremt låg temperatur
− mycket dammigt
• Utsätt inte enhetens fjärrkontrollsensor för direkt
solljus eller belysning från t.ex. lysrör av
invertertyp.
• Om batterierna blir gamla minskar
fjärrkontrollens räckvidd betydligt. Om detta
inträffar byter du till två nya batterier så snart
som möjligt.
• Använd inte gamla batterier tillsammans med
nya.
• Använd inte olika typer av batterier (t.ex.
alkaliska batterier och manganbatterier)
tillsammans. Läs förpackningen noggrant
eftersom dessa typer av olika batterier kan ha
samma form och färg.
• Förbrukade batterier kan läcka. Om batterierna
har läckt, måste du kasta bort dem omedelbart.
Undvik att komma i kontakt med det läckta
materialet eller låta det komma i kontakt med
kläder och liknande. Rengör batteriutrymmet
noga innan du sätter i nya batterier.
• Ha inte batterier i en ficka eller väska
tillsammans med metallföremål som mynt eller
liknande.
• Kasta inte bort batterier med det vanliga
hushållsavfallet. Kasta bort dem enligt gällande
lokala förordningar.
• Håll batterier borta från barn. Om någon sväljer
ett batteri av misstag måste läkare kontaktas
omgående.
• Om du inte tänker använda fjärrkontrollen under
en längre period bör du ta ut batterierna ur den.
• De medföljande batterierna får inte laddas eller
öppnas.
• Utsätt inte batterierna för kraftig värme från
exempelvis solljus, eld eller liknande.
VARNING
UTSÄTT INTE ENHETEN FÖR REGN
ELLER FUKT DÅ DETTA SKAPAR RISK
FÖR BRAND ELLER ELSTÖTAR.
Så länge den här enheten är ansluten till
vägguttaget, är den inte bortkopplad från
nätströmmen, även om enheten stängs av med
. Enheten är konstruerad för att förbruka en
mycket liten mängd ström i detta tillstånd.
OBSERVERA
Apparaten kopplas inte bort från
växelströmskällan (nätet) så länge som den är
ansluten till vägguttaget, även om själva
apparaten har stängts av.
ADVARSEL
Netspæendingen til dette apparat er IKKE
afbrudt, sålæenge netledningen siddr i en
stikkontakt, som er t endt – også selvom der or
slukket på apparatets afbryder.
VAROITUS
Laitteen toisiopiiriin kytketty käyttökytkin ei
irroita koko laitetta verkosta.
-knapp (ström)
Slår på strömmen till enheten eller ställer den i
viloläge.
Ha minst 22 cm mellan ljudsystemet och
personer som har pacemaker eller
defibrillatorimplantat inopererade.
Radiovågor kan påverka elektromedicinsk
utrustning.
Använd inte denna enhet nära medicinsk
utrustning eller innanför
sjukvårdsanläggningar.
Namnskylten sitter på enhetens undersida.
Sv
i
Page 63

Innehåll
Medföljande komponenter.................................................. 2
Funktioner............................................................................. 3
Vanliga frågor ....................................................................... 3
Delarnas namn och funktioner............................................ 4
Installation ............................................................................ 5
Anslutningar ......................................................................... 6
Styrning ................................................................................. 8
Lyssna på ljudet från en Bluetooth-enhet......................... 10
Inställningar........................................................................ 12
Programmera ljudplankan med TV:ns fjärrkontroll
(TV-fjärrkontrollens inlärningsfunktion)................................................... 12
Använda en extern subwoofer..................................................................... 14
Ställa in den automatiska standbyfunktionen ....................................... 15
Initiera ljudplankan .......................................................................................... 15
Felsökning........................................................................... 16
Tekniska data...................................................................... 19
Om den här bruksanvisningen
OBS!
Anger försiktighetsåtgärder som bör iakttas vid användning av produkten samt begränsningar i dess
funktioner.
TIPS
Anger extra förklaringar som hjälper dig att använda produkten bättre.
Sv
1
Page 64

Medföljande komponenter
Ljudplanka
Fjärrkontroll Batteri x 2
(AAA, R03, UM4)
Optisk kabel (1,5 m)
Monteringsmall
* Används vid montering av ljudplankan på en vägg
Distans x 2
* Används vid montering av
ljudplankan på en vägg
Bruksanvisning
(Denna handbok)
Fjärrkontrollssensor
Inom 6 m
Innan du ansluter enheten måste du kontrollera att du har följande delar.
Förbereda fjärrkontrollen
Dra bort skyddsarket innan användning.
Fjärrkontrollens räckvidd
Håll dig inom räckvidden (se nedan). När ljudplankan monteras på en vägg styrs den via
fjärrkontrollsensorn på den övre panelen (s.5).
Sv
2
Page 65

Funktioner
Vanliga frågor
Njut av kraftfullt och realistiskt ljud från ljudplankan med inbyggd
subwoofer, och enkel installation och anslutning till TV-apparater och
andra enheter.
•AIR SURROUND XTREME
Njut av 7.1-kanals surroundljud som skapar ett brett och djupt ljudfält, precis som
om högtalarna inte bara står framför utan även till vänster och höger, och bakom
lyssnaren (s.9).
•Basförstärkning
Njut av ett kraftfullt basljud med Yamahas egna basförstärkningsteknik ”Advanced
Bass Extension Processing” (s.9).
• Bluetooth®-anslutning
Innehåll på en Bluetooth-kompatibel smartphone, surfplatta eller dator kan enkelt
spelas upp (s.10).
Du kan njuta av realistiskt och imponerande ljud så nära originalet som möjligt med
hjälp av Compressed Music Enhancer.
• HOME THEATER CONTROLLER
Du kan styra ljudplankan enkelt genom att installera den dedikerade
fjärrkontrollappen ”HOME THEATER CONTROLLER”.
• Inlärningsfunktion (TV-fjärrkontroll)
Använd fjärrkontrollen till TV:n för att styra ljudplankan (s.12).
Följande avsnitt täcker populära funktioner och vanliga frågor om ljudplankan.
F1
Kan jag styra ljudplanen med hjälp av TV:ns fjärrkontroll? Det är
opraktiskt att växla mellan TV:ns och ljudplankans fjärrkontroller.
S1
Ja. Du kan styra ljudplankan med TV:ns fjärrkontroll genom funktionen
”inlärning av TV:ns fjärrkontroll” (s.12).
Den här funktionen är bara tillgänglig för IR-fjärrkontrollen (infraröd).
Kontrollera vad din TV har för typ av fjärrkontroll.
F2
Kan jag göra dialogen tydligare?
S2
Ja. Dialogen i filmer, TV-nyheter, sportprogram etc., kan göras tydligare med
hjälp av ”clear voice”-funktionen (s.9).
F3
Kan jag styra ljudplankan med smartphone? Och kan jag slå på/stänga
av ljudplankan med en smartphone?
S3
Ja. Du kan styra ljudplankan med din smartphone genom att installera den
dedikerade fjärrkontrollappen ”HOME THEATER CONTROLLER” (s.11).
När du använder den här funktionen måste du ansluta din smartphone till
ljudplankan med Bluetooth.
Om du använder Bluetooth-vilolägesfunktionen, kommer ljudplankan att slås
på när en Bluetooth-anslutning upprättas mellan din smartphone och
ljudplankan och stängas av när den kopplas ned (s.11).
•Tydliga röster
Ger klara röster (t.ex. dialog och berättelser) (s.9).
Sv
3
Page 66

Delarnas namn och funktioner
* Knapparna sitter på den
bakre delen av ljudplankan.
** *
*
ANALOG
SUBWOOFEROUT
* Undre panel
*
Ljudplanka (frontpanel/övre panel)
A Indikatorer
Visar status för ljudplankan. Se ”Styrning” (s.8 till 9) för indikatorernas
huvudfunktioner.
B -knapp (ingång)
Väljer en ingångskälla för uppspelning (s.8).
C -knapp (ljudavstängning)
Stänger av ljudutmatningen. Tryck på knappen igen för att sätta på ljudet (s.9).
D / -knappar (volym +/–)
Justera volymen (s.8).
E -knapp (ström)
Slår på eller stänger av (standby) ljudplankan (s.9).
TIPS
• Ljudplankan kan stängas av automatiskt när den automatiska standbyfunktionen är aktiverad (s.15).
F Sensorer för fjärrkontroll
Tar emot infraröda signaler från ljudplankans fjärrkontroll (s.2).
Fjärrkontrollsensorerna sitter på ljudplankans frontpanel och övre panel (s.5).
Ljudplanka (bakpanel/undre panel)
G Dubbla inbyggda subwooferhögtalare
De inbyggda subwooferhögtalarna sitter på den övre delen av ljudplankan.
H Högtalare
I TV-ingång
För anslutning med en optisk digitalkabel till TV:n (s.6).
J BD/DVD-ingång
För anslutning till en uppspelningsenhet, t.ex. en Blu-ray-spelare (BD) med en
koaxial digital kabel (s.7).
K ANALOG-ingångar
För anslutning av en extern enhet med en 3,5 mm-ministereokabel (s.7).
L SUBWOOFER OUT-utgång
För anslutning av en extern subwoofer med en RCA-monokabel (s.14).
M Omkopplare för installationsläge
Ställer in ljudkvaliteten utifrån ljudplankans installationsläge (s.5).
Sv
4
Page 67

Installation
Omkopplare för
installationsläge
(under panel)
Fjärrkontrollsensor
(frontpanel)
Fjärrkontrollsensor
(övre panel)
Knappar
Omkopplare för
installationsläge (under panel)
Tejp eller häftstift
Monteringsmall (medföljer)
Skruvhål
7 till 9 mm
10 till 12 mm
4 mm (#8)
20 mm eller mer
Mellanlägg
Monteringshål på
ljudplankans
undersida
Ljudplankans riktning och lämplig fjärrkontrollsensor
beror på installationsplatsen.
Installera ljudplankan på ett TV-skåp
eller liknande.
1 Skjut omkopplaren för installationsläge på den
undre panelen av ljudplankan mot T (för Tabletop
(bord)) (T, som standard).
Ljudkvaliteten anpassas nu till installationsläget.
2 Placera ljudplankan på ett TV-skåp eller liknande,
så att knapparna är riktade mot väggen.
Försiktighetsåtgärder
• Placera inte ljudplankan och en BD-spelare eller en annan enhet
direkt ovanpå varandra. Om du gör det kan den sluta fungera på
grund av vibrationerna.
• Håll inte i högtalardelen (tygdelen) på ljudplankans framsida och
ovansidan när du flyttar den.
• Ljudplankan innehåller högtalare som inte är magnetiskt
avskärmade. Placera inte magnetiskt känsliga föremål
(hårddiskar etc.) nära ljudplankan.
• Beroende på din installationsmiljö kan det vara bättre att koppla
ihop ljudplankan och externa apparater (t.ex. TV:n) innan du
ansluter ljudplankan.
• Placera inte ljudplankan inom 50 mm från TV:n.
Montering av ljudplankan på en vägg
1 Skjut omkopplaren för installationsläge på den
undre panelen av ljudplankan mot W (för Wall
mount (vägg)).
Ljudkvaliteten anpassas nu till installationsläget.
2 Följ ”Installera på väggen” nedan och installera
ljudplankan så att knapparna är riktade uppåt.
Försiktighetsåtgärder
• När du monterar ljudplankan på en vägg ska allt
monteringsarbete utföras av en kvalificerad konsult eller
återförsäljare. Kunden ska aldrig försöka utföra sådant
installationsarbete på egen hand. Felaktig eller undermålig
montering kan göra att ljudplankan lossnar och faller ned vilket
kan leda till personskador.
• Montera inte ljudplankan på en vägg som består av svaga
material som gips eller faner. Det kan leda till att den ramlar ned.
• Säkerställ att du använder kommersiellt tillgängliga skruvar som
klarar installationens vikt (anges i steg 2 till höger). Om du
använder andra fästdon än de skruvar som specificeras, t.ex.
kortare skruvar, spik eller dubbelhäftande tejp, kan ljudplankan
ramla ned.
Installera på väggen
1 Fäst den medföljande monteringsmallen på
väggen och märk ut var skruvarna ska sitta.
2 Ta bort monteringsmallen från väggen och
installera sedan vanliga skruvar (se bilden nedan)
vid punkterna markerade på väggen.
3 Dra bort skyddfilmen från mellanläggen och
montera den vidhäftande ytan på ljudplankan
enligt bilden.
4 Häng upp ljudplankan på skruvarna.
Försiktighetsåtgärder
• Fäst kablarna så att de inte lossnar. Om du av misstag fastnar i
en lös kabel med foten eller handen kan ljudplankan ramla ned.
• Kontrollera att ljudplankan sitter ordentligt när du är klar. Yamaha
ansvarar inte för olyckor orsakade av felaktiga installationer.
Sv
5
Page 68

Anslutningar
BD/DVD ANALOG
SUBWOOFEROUT
TV
Nätkabel
Till ett vägguttag
Ljudplanka (baksida)
Optisk kabel
Uppspelningsenhet
(t.ex. en BD-spelare)
Digital-TV-mottagare
OPTICAL OUTPUT
TV
TIPS
I följande fall, anslut den koaxiala digitala
ljudutgången på uppspelningsenheten till BD/DVDingången på ljudplankan med en koaxial
digitalkabel (kommersiellt tillgänglig), välj sedan BD/
DVD-knappen på fjärrkontrollen för ingångskälla.
− TV:s saknar optisk utgång.
− TV skickar inte ut ljud (eller ljudnivån är låg) från
den anslutna uppspelningsenheten.
− Ljudet från uppspelningsenhe ten ansluten till TV:n
hörs inte som surroundljud.
Anslut till en TV (eller annan extern enhet).
TIPS
• Om det inte finns någon inställning för att stänga av ljudet via högtalaren på din TV kan
du prova att stänga av det genom att koppla in hörlurar till hörlursuttaget på TV:n. Se
bruksanvisningarna till TV:n för mer detaljerad information.
• TV- och BD/DVD-ingångarna stöder följande ljudsignaler.
− PCM (2-kanals)
− Dolby Digital (upp till 5.1-kanals)
FÖRSIKTIGHETSÅTGÄRDER
• Anslut inte strömkabeln från ljudplankan till vägguttaget innan du gjort övriga
anslutningar.
• Tvinga inte i kontakten. Det kan skada kontakten eller uttaget.
1 Anslut TV:n och ljudplankan med den optiska
kabeln (medföljer).
Avlägsna den optiska kabelns kåpa och kontrollera
riktningen på kontakten.
2 Anslut strömkabeln för ljudplankan till ett
vägguttag.
3 Ställ in TV:n enligt följande.
• Ställ in TV:ns volym på lägsta nivån.
• Avaktivera TV:ns inbyggda högtalarljud (om det finns).
HDMI-kabel (etc.)
Sv
6
Page 69

Digital anslutning av en extern enhet
BD/DVD
Koaxial digitalkabel
(kommersiellt tillgänglig)
Koaxial
digitalljudutgång
(orange)
Uppspelningsenhet
ANALOG
3,5-mm stereominikabel
(kommersiellt tillgänglig)
Spelkonsol (etc.)
Analog anslutning av en extern enhet (spelkonsol)
Du kan ansluta en extern enhet som har en koaxial digital ljudutgång, t.ex. en DVDspelare till BD/DVD-ingången på ljudplankan.
OBS!
• Välj BD/DVD-knappen på fjärrkontrollen för ingångskällan.
Du kan ansluta en extern enhet, t.ex. en spelkonsol eller en TV som inte har en digital
ljudutgång till ANALOG-ingången på ljudplankan.
OBS!
• Välj ANALOG-knappen på fjärrkontrollen för ingångskällan.
• Om du kan justera volymen på en extern enhet ansluten till ANALOG-ingången på ljudplankan, justerar du
den till samma volym som den externa enhet ansluten till TV-eller BD/DVD-ingången.
Sv
7
Page 70

Styrning
Ingångsknappar
Välj en ingångskälla för uppspelning.
TV ....................TV-ljud
BD/DVD...........Ljud från en enhet ansluten till BD/
DVD-ingången
ANALOG .........Ljud från en enhet ansluten till
ANALOG-ingången
BLUETOOTH
.........................Ljud från en Bluetooth-ansluten
enhet
Indikatorn för den valda ingångskällan tänds.
(Exempel: när TV har valts)
TIPS
• För att spela upp ljud från uppspelningsenheten som är
ansluten till TV:n eller titta på video på uppspelningsenheten
ställer du in TV:ns ingångskälla på uppspelningsenheten.
• Mer information om Bluetooth-anslutning finns i ”Lyssna på
ljudet från en Bluetooth-enhet” (s.10).
SUBWOOFER-knappar (+/–)
Justera volymen på subwooferhögtalaren.
VOLUME-knappar (+/–)
Justera volymen på ljudplankan.
Volym ned (–) Volym upp (+)
Volym ned (–) Volym upp (+)
1
2
LEARN-knapp
★
Ställer in ljudplankan på TV-fjärrkontrollens
inlärningsläge (s.12).
BLUETOOTH STANDBY-knapp
★
Aktiverar/avaktiverar Bluetooth-viloläget (s.11).
3
Fjärrkontrollsignalsändare
Överför infraröda signaler.
★
★
Indikatorer
Indikatorerna på den övre panelen blinkar eller lyser för
att ange funktions- och inställningsstatus.
★: Knappar som behöver hållas ned i mer än 3 sekunder
LEARN, BLUETOOTH STANDBY, AUDIO DELAY
I denna bruksanvisning används illustrationer av de nio
indikatorsegmenten som förklaring.
: Släckt
: Tänds
: Blinkar
(Exempel: När PLII-indikatorn och SURROUND-indikatorn blinkar
och TV-indikatorn tänds)
Sv
8
Page 71

-knapp (ström)
Slår på eller stänger av (standby) ljudplankan.
Påslagen
Bluetooth-viloläge (s.11)
Avstängd
DIMMER-knapp
Justerar indikatorernas ljusstyrka. Varje gång du
trycker på knappen växlar indikatorernas status
enligt följande.
Lyser svagt (standardinställning)
→
Släckt
→
Lyser starkt
↑
Indikatorer lyser stark just när de tryckts ned och
återgår sedan till den inställda ljusstyrkan efter
några sekunder.
Indikatorn för den valda ingångskällan tänds (grön)
Tänds (röd)
SURROUND- och STEREO-knappar
Växla mellan uppspelning med surround- och
stereoljud (2 kanaler). När uppspelning med surroundljud
har valts kan du njuta av verklighetstrogna ljudeffekter
med Yamahas exklusiva AIR SURROUND XTREME.
TIPS
• När stereoljud med 2 kanaler spelas i surround tänds
PLII-indikatorn.
• Genom att installera den kostnadsfria appen ”HOME
THEATER CONTROLLER” på en Bluetooth-enhet, t.ex. en
smartphone, kan du välja mellan följande surroundläge: TV
PROGRAM, MOVIE, MUSIC, SPORTS och GAME.
Tänds (uppspelning med surroundljud)
Släckt (uppspelning med stereoljud)
SURROUND
STEREO
Tänds (Dolby Pro Logic II)
4
5
BASS EXTENSION-knapp
Aktiverar/avaktiverar basförstärknings-funktionen.
När den här funktionen är aktiverad kan du få ett kraftfullt
basljud med Yamahas egna basförstärkningsteknik
”Advanced Bass Extension Processing”.
CLEAR VOICE-knapp
Aktiverar/avaktiverar clear voice-funktionen.
När den här funktionen har aktiverats kan du njuta
av klart ljud när du tittar på film, TV-dramer,
nyhetsprogram eller sport.
AUDIO DELAY-knapp
★
Justerar ljudfördröjningen så att ljud och bild
synkroniseras när videobilder på TV:n verkar
fördröjda i förhållande till ljudet.
Följ instruktionerna nedan för att justera ljudfördröjningen.
1 Håll ned AUDIO DELAY-knappen i mer än
3 sekunder.
Lampan längst till vänster blinkar.
2 Tryck på SUBWOOFER (+/–)-knappen för att
justera ljudfördröjningen.
Att trycka på SUBWOOFER (+)-knappen
fördröjer timingen för ljudutmatningen.
3 Avsluta justeringen genom att trycka på
AUDIO DELAY-knappen.
TIPS
• Justeringen avslutas automatiskt om inga funktioner
används på 20 sekunder.
Tänds (aktiverad)
Släckt (avaktiverad)
CLEAR
VOICE
CLEAR
VOICE
Tänds (aktiverad)
Släckt (avaktiverad)
(–) (+)
6
MUTE-knapp
Stänger av ljudutmatningen. Tryck på
knappen igen för att sätta på ljudet.
Blinkar (på mute)
7
Grön (Dolby Digital)
Släckt (PCM)
Avkodarlampor
Ljudplankan har stöd för följande ljudsignaler. Du
kontrollerar typen av insignal med hjälp av färgen på
lampan.
Sv
9
Page 72

Lyssna på ljudet från en
Bluetooth-enheter
Spela upp ljud från en Bluetooth-enhet
på ljudplankan
För den första
Bluetooth-anslutningen
Para ihop en Bluetooth-
enhet med ljudplankan
För efterföljande
Bluetooth-anslutning
Blinkar
YAS-105 Yamaha
PIN 0 0 0 0
123
456
789
0
Bluetooth-enhet
Du kan spela upp trådlöst från B luetooth-enheter, t.ex. smartphones eller digitala
musikspelare.
Se även användarhandboken för Bluetooth-enheten för mer information.
Utför följande steg för att använda en Bluetooth-enhet med ljudplankan.
Para ihop en Bluetooth-enhet med ljudplankan
När du ansluter till en Bluetooth-enheten för första gången måste enheten och
ljudplankan ”paras ihop”. ”Ihopparning” är nödvändigt för varje Bluetooth-enhet du
använder.
När ”ihopparning” med en enhet är klar kommer efterföljande anslutning till enheten inte
att kräva ”ihopparning”.
1 Tryck på BLUETOOTH-knappen på ljudplankans fjärrkontroll för att
välja Bluetooth som ingångskälla.
BLUETOOTH-indikatorn på den övre panelen blinkar.
2 Slå på Bluetooth-funktionen på den enhet som ska paras ihop och
utför sedan ihopparningen.
Åtgärden varierar beroende på enhet. Se bruksanvisningen för enheten.
3 Välj ”YAS-105 Yamaha” i listan med Bluetooth-enheter på enheten.
Om ett lösenord (PIN-kod) krävs, anger du ”0000”.
Sv
10
När ihopparningen är klar visas eller ett meddelande om slutförande.
OBS!
• Utför ihopparningen med Bluetooth-enheten och ljudplankan inom 10 meters avstånd.
• Upp till åtta Bluetooth-enheter kan paras ihop med ljudplankan. Om en nionde enhet paras ihop kommer
ihopparningsinformationen för den enhet som har det äldsta anslutningsdatumet att tas bort.
• Om ihopparningsinformationen för en enhet tas bort, måste du para ihop den enheten igen om den ska
användas.
•Om en Bluetooth-enhet redan är ansluten till ljudplankan avslutar du den Bluetooth-anslutningen (s.11)
och utför sedan ihopparning med den nya enheten.
•Se ”Bluetooth” (s.18) i ”Felsökning” om enheterna inte kan paras ihop.
Page 73

Spela upp ljud från en Bluetooth-enhet på
Blinkar
Tänds
BLUETOOTH
STANDBY
Blinkar tre gånger (aktiverad), blinkar en gång (avaktiverad)
Tänds (röd)
ljudplankan
1 Slå på ljudplankan och tryck på BLUETOOTH-knappen på
ljudplankans fjärrkontroll för att välja Bluetooth som ingångskälla.
BLUETOOTH-indikatorn på den övre panelen blinkar.
2 Slå på enhetens Bluetooth-funktion och anslut sedan.
När Bluetooth-anslutningen görs på rätt sätt tänds BLUETOOTH-indikatorn på
ljudplankan.
Använda Bluetooth-viloläget
Med Bluetooth-standbyläget kan du slå på (eller stänga av) ljudplankan automatiskt,
kopplat till funktionen för Bluetooth-enheten.
1 Slå på ljudplankan och håll ned BLUETOOTH STANDBY-knappen på
den medföljande fjärrkontrollen i minst 3 sekunder.
När du håller ned BLUETOOTH STANDBY-knappen i 3 sekunder växlar läget
mellan aktiverat och avaktiverat.
När Bluetooth-viloläget är aktiverat och ljudplankan stängs av, tänds
indikatorn med rött sken (Bluetooth-viloläge).
D-
3 Spela upp en låt på enheten.
OBS!
• Utför Bluetooth-anslutningen med enheten och ljudplankan inom 10 meters avstånd.
• Det kan bli nödvändigt att välja ”YAS-105 Yamaha” i Bluetooth-enhetslistan igen om ett
anslutningsproblem uppstår. Du kan behöva ändra utgångsinställningen till att mata ut ljud till ljudplankan,
beroende på vilken Bluetooth-enhet du använder.
• Justera volymnivån för Bluetooth-enheten om det behövs.
•Om en Bluetooth-enhet redan är ansluten till ljudplankan avbryter du den Bluetooth-anslutningen och
ansluter sedan till den nya enheten.
Avbryta Bluetooth-anslutning
Bluetooth-anslutningen avbryts i följande fall. När Bluetooth-anslutningen avbryts med
ljudplankan påslagen, går BLUETOOTH-indikatorn över från att lysa till att blinka och
ljudplankan placeras i väntan på anslutning.
• Bluetooth-funktionen stängs av på den kompatibla enheten.
• BLUETOOTH-knappen på ljudplankans fjärrkontroll hålls nedtryckt i mer än
3 sekunder.
• Ljudplankan stängs av.
Funktioner tillgängliga på Bluetooth-enheter med Bluetooth-viloläget aktiverat
Samtidigt påslag (när ljudplankan är avstängd)
När Bluetooth-anslutningen görs på enheten slås ljudplankan på och blir redo för uppspelning av ljud från
enheten.
Samtidig avstängning (när ljudplankan är påslagen)
Ljudplankan stängs av när Bluetooth-anslutningen avbryts på en Bluetooth-enhet. (Endast när
BLUETOOTH väljs som ingångskälla.)
Använda HOME THEATER CONTROLLER-appen
Genom att installera den kostnadsfria appen ”HOME THEATER CONTROLLER” på en
Bluetooth-enhet, t.ex. en smartphone, kan du enkelt och praktiskt utföra olika funktioner
med Bluetooth-enheten. (Inställningsalternativ: grundläggande användning,
surroundläge, ljudjusteringar)
OBS!
• Om du vill använda appen ansluter du ljudplankan och en Bluetooth-enhet via Bluetooth.
• Om du aktiverar Bluetooth-viloläget på ljudplankan kan du slå på strömmen till ljudplankan med Bluetooth-
enheten.
Mer information om ”HOME THEATER CONTROLLER” finns i produktinformationen på
vår webbplats.
Sv
11
Page 74

Inställningar
CLEAR
VOICE
CLEAR
VOICE
Ca. 30 cm
TV:ns fjärrkontroll
Tryck ned
(mer än 1 sekund)
Släpp
(mer än 1 sekund)
Tryck ned
(mer än 1 sekund)
Släpp
(...)
Tänds
Blinkar
Programmera ljudplankan med TV:ns fjärrkontroll (TV-fjärrkontrollens inlärningsfunktion)
OBS!
• Steg 5 till 8 kräver bara TV-fjärrkontrollen och knapparna på ljudplankans bakre panel. Ljudplankans
fjärrkontroll behövs inte.
• Om ljudplankan redan innehåller inlärda funktioner tänds följande indikatorer.
Stäng av ljudet: TV
Volym (-): BD/DVD
Volym (+): ANALOG
Ström: BLUETOOTH
När du har programmerat ljudplankan kan du styra den med TV:ns fjärrkontroll för
funktioner som att slå på/stänga av TV:n och ljudplankan samtidigt eller höja/sänka
volymen och stänga av/slå på ljudplankans ljud.
• Funktionen är endast tillgänglig när TV:ns fjärrkontroll använder sig av infraröda signaler.
• En RF-fjärrkontroll (radiofrekvens) fungerar inte.
• Om du vill använda en kabel-TV- eller satellitmottagares fjärrkontroll för att styra ljudplankan använder
du TV:ns originalfjärrkontroll (IR) till att programmera ljudplankan och styr den sedan med TVmottagarens fjärrkontroll.
• Om TV:ns volym ändras när du ändrar ljudplankans volym ställer du in TV:ns volym på det lägsta värdet
eller stänger av dess högtalare.
1 Stäng av TV:n.
2 Stäng av ljudplankan.
3 Håll ned LEARN-knappen på ljudplankans fjärrkontroll i minst
3 sekunder medan du riktar den mot önskad fjärrkontrollsensor (s.5).
Ljudplankan placeras i inlärningsläge och indikatorerna på den övre panelen blinkar
enligt nedan.
LEARN BLUETOOTH
STANDBY
4 Kontrollera om rätt fjärrkontrollsensor har aktiverats.
Du kan kontrollera vilken fjärrkontrollsensor som har aktiverats via CLEAR VOICEindikatorn.
CLEAR VOICEindikator
Om lämplig fjärrkontrollsensor inte har aktiverats, tryck på LEARN-knappen för att
lämna inlärningsläget och upprepa från steg 3.
Släckt På frontpanelen
Tänds På övre panelen
Aktiverad
fjärrkontrollsensor
Aktiverad fjärrkontrollsensor
är lämplig när ...
Ljudplankan installeras på en
TV-bänk eller liknande
Ljudplankan monteras på en
vägg
5 Lär ljudplankan ”Stäng av ljud”-koden från TV:ns fjärrkontroll.
5-1 Tryck på (stäng av ljud) på ljudplankans bakre panel.
5-2 Håll ljudavstängningsknappen nedtryckt i mer än 1 sekund två eller tre
gånger, samtidigt som du riktar TV:ns fjärrkontroll mot
fjärrkontrollssensorn.
Den lämpliga fjärrkontrollsensorn beror på installationsläget (s.5).
Resultat Pip/ljud Lampor
Inlärt En gång
Det gick inte
att lära
* Börja om från
steg 5-1.
Två gånger
Sv
12
Page 75

6
Tänds
Blinkar
Tänds
Blinkar
Tänds
Blinkar
Lär ljudplankan ”Volym (–)”-koden från TV:ns fjärrkontroll.
6-1 Tryck på (volym –) på ljudplankans bakre panel.
8 Lär ljudplankan ”Ström”-koden från TV:ns fjärrkontroll.
8-1 Tryck på (ström) på ljudplankans bakre panel.
6-2 Håll volymknappen (–) nedtryckt i mer än 1 sekund två eller tre gånger,
samtidigt som du riktar TV:ns fjärrkontroll mot fjärrkontrollssensorn.
Resultat Pip/ljud Lampor
Inlärt En gång
Det gick inte
att lära
* Börja om från
steg 6-1.
Två gånger
7 Lär ljudplankan ”Volym (+)”-koden från TV:ns fjärrkontroll.
7-1 Tryck på (volym +) på ljudplankans bakre panel.
7-2 Håll volym (+)-knappen nedtryckt i mer än 1 sekund två eller tre gånger,
samtidigt som du riktar TV:ns fjärrkontroll mot fjärrkontrollssensorn.
Resultat Pip/ljud Lampor
Inlärt En gång
Det gick inte
att lära
* Börja om från
steg 7-1.
Två gånger
8-2 Håll strömknappen nedtryckt i mer än 1 sekund två eller tre gånger,
samtidigt som du riktar TV:ns fjärrkontroll mot fjärrkontrollssensorn.
Resultat Pip/ljud Lampor
Inlärt En gång
Det gick inte
att lära
* Börja om från
steg 8-1.
Två gånger
9 Avsluta inlärningsläget genom att trycka på LEARN-knappen på
ljudplankans fjärrkontroll.
Nu är de nödvändiga inställningarna klara. Nu kan du styra ljudplankan med TV:ns
fjärrkontroll.
TIPS
• Inlärningsläget avslutas automatiskt om inga funktioner används på 5 minuter.
• Ställ in TV:ns volym på lägsta nivån. När du skruvar upp volymen på ljudplankan med TV:ns
fjärrkontroll kan volymen på TV:n skruvas upp samtidigt. Följ då steg 3 i ”Anslutningar” (s.6) för att
ändra TV-inställningen.
• Du kan trycka på -knappen (ström) på ljudplankans fjärrkontroll för att slutföra inlärningsläget.
Sv
13
Page 76

Rensa alla programmerade funktioner
SUBWOOFEROUT
Anslutningskabel för subwoofer
(kommersiellt tillgänglig)
Monoingång
Använda en extern subwoofer
1 Stäng av ljudplankan och håll ned LEARN-knappen på den
medföljande fjärrkontrollen i minst 3 sekunder (för att aktivera
inlärningsläget).
När ljudplankan är i inlärningsläge blinkar lamporna på den bakre panelen enligt
nedan.
LEARN BLUETOOTH
STANDBY
2 Håll ned (ingång) på ljudplankans bakre panel i minst
3 sekunder.
Den motsvarande indikatorn för den inlärda funktionen slocknar och indikatorerna
på den övre panelen blinkar enligt nedan.
När raderingen är klar hörs 3 korta pip.
3 Tryck på LEARN-knappen på ljudplankans fjärrkontroll.
Ljudplankan har två inbyggda subwooferhögtalare, men du kan även ansluta en extern
subwoofer när du vill förbättra lågbasljudet. Anslut en subwoofer till SUBWOOFER
OUT-utgången på ljudplankan. Ljudet hörs både i de inbyggda subwooferhögtalarna och
den externa subwoofern.
OBS!
• Använd en extern subwoofer med inbyggd förstärkare.
14
Sv
Page 77

Ställa in den automatiska standbyfunktionen
Släckt (aktiverad), tänds (avaktiverad)
Blinkar (återställd)
Initiera ljudplankan
Genom att aktivera den här funktionen kan du undvika att glömma stänga av
ljudplankan efter användning, t.ex. om du somnar medan du tittar på TV.
OBS!
• När den här funktionen är aktiverad och något av följande villkor uppfylls stängs ljudplankan automatiskt
av.
− Inga funktioner används på 8 timmar
− Ingen ljudsignal tas emot och inga åtgärder utförs på 20 minuter när BLUETOOTH är valt som
ingångskälla.
1 Stäng av ljudplankan och håll ned MUTE-knappen på den
medföljande fjärrkontrollen i minst 3 sekunder för att aktivera/
avaktivera den automatiska standbyfunktionen.
Du kan kontrollera statusen för den automatiska strömvilolägesfunktionen med
indikatorerna på den övre panelen i flera sekunder när ljudplankan precis slagits
på.
TIPS
• Den ursprungliga inställningen varierar beroende på land eller region.
− Modeller för Storbritannien och Europa: aktiverad
− Övriga modeller: avaktiverad
Följ instruktionerna nedan för att återställa ljudplankan.
1 Stäng av ljudplankan.
2 Håll -knappen (ström) på ljudplankans bakre panel nedtryckt i
minst 3 sekunder.
Sv
15
Page 78

Felsökning
Gå igenom tabellen nedan om ljudplankan inte fungerar korrekt. Om det aktuella
problemet inte finns upptaget i tabellen nedan, eller om det inte kan lösas med hjälp av
anvisningarna i felsökningstabellen, stäng av ljudplankan, koppla loss nätkabeln och
kontakta närmaste auktoriserade Yamaha-handlare eller servicecenter.
Kontrollera först följande:
A Att nätkablarna till ljudplankan, TV:n och alla uppspelningsenheter (t.ex. BD-
spelare m.m.) är ordentligt anslutna till vägguttag.
B Att ljudplankan, TV:n och alla uppspelningsenheter (t.ex. BD-spelare m.m.) är
påslagna.
C Alla kablar sitter ordentligt i uttagen på varje enhet.
Strömförsörjning och system
Problem Orsak Åtgärd
Strömmen
stängs plötsligt
av.
Strömmen kan
inte slås på.
Den automatiska
standbyfunktionen fungerade.
När den här funktionen är
aktiverad och något av följande
villkor uppfylls stängs ljudplankan
automatiskt av.
- Inga funktioner används på
8timmar
- Ingen ljudsignal tas emot och
inga åtgärder utförs på
20 minuter när BLUETOOTH är
valt som ingångskälla.
Skyddskretsen har aktiverats. (
D-indikatorn på ljudplankans övre
panel blinkar.)
Bluetooth-anslutningen avslutas
på en Bluetooth-enhet när
Bluetooth-viloläget är aktiverat.
Skyddskretsen har aktiverats tre
gånger i följd. (Om du försöker slå
på strömmen i detta tillstånd
blinkar D-indikatorn på
ljudplankans övre panel.)
Slå på ljudplankan igen. För att
förhindra att ljudplankan stängs av
automatiskt ska du avaktivera den
automatiska ljudavstängningsfunktionen (s.15).
Starta ljudplankan igen när du har
kontrollerat att alla anslutningar sitter
ordentligt. Om strömmen fortfarande
stängs av plötsligt eller inte kan slås
på, ska du koppla bort strömkabeln
från vägguttaget och kontakta
närmaste auktoriserade Yamahaåterförsäljare eller servicecenter.
Avaktivera Bluetooth -viloläget (s.11).
I syfte att skydda produkten går det
inte att slå på strömmen. Koppla bort
strömkabeln från vägguttaget och
kontakta närmaste auktoriserade
Yamaha-återförsäljare eller
servicecenter.
Alla indikatorer
slocknar trots att
ljudplankan är
påslagen (det ser
ut som om
ljudplankan är
avstängd).
Ljudplankan
reagerar inte
korrekt.
Ljudplankan
styrs av sig själv.
TV:ns 3Dglasögon
fungerar inte.
Ljudplankan kan
inte styras med
appen ”HOME
THEATER
CONTROLLER”.
(Appens skärm
växlar inte från
demoläget.)
Indikatorernas ljusstyrka är
avstängd i DIMMERknappinställningen.
Den interna mikrodatorn har
hängt sig på grund av en yttre
elektrisk stöt (som ett blixtnedslag
eller kraftig statisk elektricitet)
eller på grund av ett
spänningsfall.
En annan Bluetooth-enhet
används i närheten.
Ljudplankan blockerar sändaren
för 3D-glasögon på TV:n.
Bluetooth-enheten som appen
har installerats på är inte ansluten
till ljudplankan.
Tryck på DIMMER-knappen för att
välja önskad ljusstyrka (s.9).
Håll -knappen (ström) på
ljudplankans bakre panel nedtryckt i
minst 10 sekunder för att starta om
den. (Om problemet kvarstår, dra ut
nätkabeln ur vägguttaget och sätt i den
igen.)
Avbryt Bluetooth-anslutningen för
ljudplankan (s.11).
Kontrollera placeringen av sändaren
för 3D-glasögon på TV:n och justera
ljudplankans placering.
Anslut Bluetooth-enheten och
ljudplankan via Bluetooth och använd
appen.
16
Sv
Page 79

Ljud Fjärrkontroll
Problem Orsak Åtgärd
Inget ljud.
Inget ljud hörs från
subwooferhögtalaren.
Volymen sänks
när ljudplankan
sätts på.
Ingen
surroundeffekt.
Brus hörs.
En annan ingångskälla har valts. Välj en lämplig ingångskälla (s.8).
Mute-funktionen har aktiverats. Avaktivera mute-funktionen (s.9).
Volymen är för låg. Höj volymen (s.8).
Strömkabeln till ljudplankan är
inte ordentligt ansluten.
Ingångsuttagen på båda
enheterna är anslutna till
varandra.
Signaler som ljudplankan inte kan
spelas upp matas in.
Subwooferns volym är för låg. Höj volymen på subwooferhögtalaren
Uppspelningskällan innehåller
inga lågfrekventa signaler.
Den automatiska
volymjusteringen fungerade. För
att undvika allt för hög volym
ställer ljudplankan ner volymen till
en viss nivå när ljudplankan slås
på.
Stereouppspelning har valts. Välj uppspelning med surroundljud
Volymen är för låg. Höj volymen (s.8).
TV:n eller uppspelningsenheten
är inställd på att endast mata ut
tvåkanalsljud (som PCM).
Ljudet spelas upp från TV:ns
inbyggda högtalare.
Lyssningspositionen är för nära
ljudplankan.
Omkopplaren för installationsläge
är inte inställd på rätt sätt.
Ljudplankan står för nära annan
digital utrustning eller
högfrekvensenhet.
Kontrollera att strömkabeln för
ljudplankan är ordentligt ansluten till
vägguttaget (s.6).
Anslut ingången på ljudplankan till
utgången på den externa
uppspelningsenheten.
Ändra inställningen för digital
ljudutgång på uppspelningsenheten till
PCM eller Dolby Digital.
(s.8).
Spela upp en ljudkälla som innehåller
lågfrekvenssignaler och bekräfta att
ljudet avges från subwoofern.
Höj volymen om det behövs (s.8).
(s.9).
Ändra inställningen för utmatning av
digitalt ljud på TV:n eller
uppspelningsenheten till Dolby Digital
eller BitStream.
Ställ in TV:ns volym på lägsta nivån
(s.6).
Lyssna från en position lite längre bort
från ljudplankan.
När du placerar ljudplankan framför en
TV, ställ in omkopplaren i läge ”T”.
När du placerar ljudplankan på en
vägg, ställ in omkopplaren i läge ”W”.
Flytta de enheterna längre bort från
ljudplankan.
Problem Orsak Åtgärd
Ljudplankan kan
inte styras med
fjärrkontrollen.
Det går inte att
styra TV:n med
fjärrkontrollen till
TV:n.
Ljudplankan lär sig
inte TV:ns
fjärrkontrollfunktioner.
Ljudet kommer
från TV:n när
ljudplankans
volym har
skruvats upp
med TV:ns
fjärrkontroll.
(när TV-
Ljudplankan har inte tillräcklig
räckvidd.
Batterierna är svaga. Byt ut batterierna (s.2).
Fjärrkontrollssensorn på
ljudplankan utsätts för direkt
solljus eller stark belysning.
Styrning av TV:n via ljudplankan
(när TV:ns fjärrkontrollssensor har
blockerats).
TV:ns fjärrkontrollknapp hölls inte
nedtryckt tillräckligt länge.
TV:ns fjärrkontroll använder inte
infraröda signaler. (Vissa
fjärrkontroller kanske inte
fungerar även om de använder
infraröda signaler.)
Den placering från vilken du
använder TV:ns fjärrkontroll är
inte lämplig.
Batterierna till TV:ns fjärrkontroll
är svaga.
Fjärrkontrollssensorn på
ljudplankan utsätts för direkt
solljus eller stark belysning.
Sändaren för fjärrkontrollens
signal stördes av TV-skärmens
ljus.
Ljudutgången har aktiverats på
TV:n.
Använd fjärrkontrollen inom
kontrollens räckvidd (s.2).
Justera ljusets vinkel eller placera
ljudplankan på en annan plats.
Ändra installationsläget för ljudplankan
så att TV:ns fjärrkontrollssensor inte
blockeras av ljudplankan och använd
TV:ns fjärrkontroll för att styra TV:n.
Håll knappen nedtryckt i minst
1 sekund två eller tre gånger (s.12).
TV-fjärrkontrollens inlärningsfunktion
kan inte användas i det här fallet.
Använd ljudplankans fjärrkontroll för
att styra ljudplankan.
Använd TV:ns fjärrkontroll från en
lämplig plats (s.12).
Byt ut batterierna.
Justera ljusets vinkel eller placera
ljudplankan på en annan plats.
Stäng av TV:n och utför
inlärningsfunktionen igen (s.12).
Ändra TV:ns inställning för att
avaktivera ljud via TV:ns högtalare.
Om det inte finns någon inställning för
att avaktivera ljud via högtalaren på
din TV, prova följande.
- Anslut hörlurar till hörlursuttaget på
TV:n.
- Ställ in TV:ns volym på lägsta nivån.
fjärrkontrollens
inlärningsfunktion
används)
Sv
17
Page 80

Strömknappen
på ljudplankan
och TV-knappen
står i motsatt
riktning. (Till
Strömmen till TV:n var på när du
utförde inlärningsfunktionen.
Tryck på strömknappen på TV:n och
panel för att sätta på dem och tryck
sedan på strömknappen på TV:ns
fjärrkontroll för att stänga av dem.
exempel, TV:n
stängs av om
ljudplankan sätts
på.)
(när TVfjärrkontrollens
inlärningsfunktion
används)
Bluetooth
Problem Orsak Åtgärd
Det går inte att få
ljudplankan att
para ihop sig
med Bluetoothenheten.
Bluetooth har inte valts som
ingångskälla.
Enheten stöder inte A2DP. Utför ihopparningsåtgärderna med en
En Bluetooth-adapter etc. som du
vill para ihop med ljudplankan har
ett annat lösenord än ”0000”.
Ljudplankan och enheten är för
långt ifrån varandra.
Det finns en enhet
(mikrovågsugn, trådlöst LAN etc.)
som sänder ut signaler i 2,4 GHzfrekvensbandet i närheten.
En annan Bluetooth-enhet är
ansluten.
Välj Bluetooth som ingångskälla.
enhet som stöder A2DP.
Använd en Bluetoot h-adapter etc. med
lösenordet ”0000”.
Flytta enheten närmare ljudplankan.
Flytta ljudplankan bort från den enhet
som avger radiofrekvenssignaler.
Om Bluetooth-enheten är utrustad
med trådlöst nätverk, stänger du av
den trådlösa nätverksfunktionen och
slår på enbart Bluetooth-funktionen.
Avbryt den aktuella Bluetooth-
anslutningen och utför ihopparningen
med den nya enheten.
(ström) på ljudplankans bakre
Det går inte att
upprätta en
Bluetoothanslutning.
Det går inte att
skapa en
Bluetoothanslutning
(BLUETOOTHindikatorn
fortsätter att
blinka snabbt).
Inget ljud hörs
eller så avbryts
ljudet under
uppspelningen.
En annan Bluetooth-enhet är
ansluten.
Mer än nio enheter är ihopparade
och den äldsta
ihopparningsinformationen tas
bort.
Det är ett problem i ljudplankan. Koppla bort strömkabeln från
Bluetooth-anslutningen för
ljudplankan med enheten kopplas
från.
Bluetooth har inte valts som
ingångskälla.
Ljudplankan och enheten är för
långt ifrån varandra.
Det finns en enhet
(mikrovågsugn, trådlöst LAN etc.)
som sänder ut signaler i 2,4 GHzfrekvensbandet i närheten.
Enheten är inte inställd på att
skicka Bluetooth-ljudsignaler till
ljudplankan.
Uppspelning på enheten har inte
utförts.
Enhetens volym är inställd på
minimivärdet.
Ljudplankan kan inte upprätta flera
Bluetooth-anslutningar. Avbryt den
aktuella Bluetoot h-anslutningen och
utför anslutningen för den önskade
enheten.
Utför ihopparningen igen. Ljudplankan
kan behålla ihopparningsinformation
för upp till åtta enheter. Efter
ihopparning med den nionde enheten
kommer ihopparningsi nformationen för
den enhet som har det äldsta
anslutningsdatumet att tas bort.
vägguttaget och kontakta närmaste
auktoriserade Yamaha-återförsäljare
eller servicecenter.
Utför Bluetooth-anslutningen igen
(s.10).
Välj Bluetooth som ingångskälla.
Flytta enheten närmare ljudplankan.
Flytta ljudplankan bort från den enhet
som avger radiofrekvenssignaler.
Om Bluetooth-enheten är utrustad
med trådlöst nätverk, stänger du av
den trådlösa nätverksfunktionen och
slår på enbart Bluetooth-funktionen.
Ändra inställningen för ljudutmatning
och anslutningsinställningen på
enheten.
Utför uppspelning på enheten.
Höj enhetens volymnivå.
18
Sv
Page 81

Tekniska data
Detalj Specifikationer
Förstärkare Maximal uteffekt
Typ Akustiskt upphängd typ
Fram V/H
Diskant
Subwoofer
Dekoder
Ingångar
Utgångar
Element 5,5 cm kon icke-magnetiskt skärmat x 2
Frekvensåtergivning 160 Hz till 22 kHz
Impedans 6 Ω
Typ —
Element 19 mm balanserad dome magnetiskt skärmat x 2
Frekvensåtergivning 4 kHz till 23 kHz
Impedans 4 Ω
Typ Bastyp
Element 7,5 cm kon icke-magnetiskt skärmat x 2
Frekvensåtergivning 55 Hz till 160 Hz
Impedans 3 Ω
Kompatibla
ljudsignaler
(TV, BD/DVD)
Digital (optisk) 1 (TV)
Digital (koaxial) 1 (BD/DVD)
Analog
(3,5-mm stereomini)
Analog
(RCA/mono)
Fram V/H 30 W x 2 kanaler
Subwoofer 60 W
PCM (2-kanals)
Dolby Digital (upp till 5.1-kanals)
1 (ANALOG)
1 (SUBWOOFER OUT)
Bluetooth-version Ver. 2.1 +EDR
Kompatibla
protokoll
Kompatibla kodekar SBC, MPEG4 AAC
Bluetooth
Allmänt
* Tekniska data kan ändras utan föregående avisering.
Trådlös utgång Bluetooth klass 2
Max.
kommunikationsavstånd
Kompatibel metod
för skydd av innehåll
Strömförsörjning
Effektförbrukning 22 W
Effektförbrukning i
standby-läge
Effektförbrukning i
Bluetoothstandbyläge
Mått
(B x H x D)
Vikt 4,0 kg
A2DP, SPP
10 m (utan hinder)
SCMS-T
Modeller för USA och Kanada: AC 120 V, 60 Hz
Modell för Taiwan: AC 110 - 120 V, 50/60 Hz
Modell för Kina: AC 220 V, 50 Hz
Övriga modeller: AC 220 - 240 V, 50/60 Hz
0,4 W
0,5 W (modeller för Taiwan, USA och Kanada)
0,6 W (modeller för Kina och andra länder)
890 x 53 x 131 mm (installera ljudplankan framför
en TV eller liknande)
890 x 131 x 59 mm (montera ljudplankan på en
vägg, med distans)
Sv
19
Page 82

ATTENZIONE: LEGGERE PRIMA DI AZIONARE L’UNITÀ.
• Per assicurarsi le migliori prestazioni dell’unità,
leggere questo manuale per intero. Conservarlo
poi in un luogo sicuro per poterlo riutilizzare al
momento del bisogno.
• Installare questo sistema audio in un luogo ben
ventilato, fresco, asciutto e pulito, lontano dalla
luce diretta del sole, da fonti di calore,
vibrazioni, polveri, umidità e/o freddo. Per una
ventilazione appropriata, lasciare i seguenti
spazi minimi.
Sopra: 10 cm, Retro: 10 cm, Ai lati: 10 cm
• Installare quest’unità lontano da
elettrodomestici, motori o trasformatori, perché
possono causare ronzi.
• Non esporre quest’unità a variazioni repentine
della temperatura ambiente e non installarle in
stanze molto umide (ad esempio dove è in uso un
umidifi catore) per evitare che in essa si formi
condensa, che a sua volta può causare
folgorazioni, incendi, guasti e/o ferite.
• Evitare di installare l’unità in una posizione dove
possano su di essa cadere oggetti o liquidi.
Inoltre, non posare su di essa:
− Altri componenti, dato che possono causare
danni e/o lo scolorimento della superfi cie
dell’apparecchio.
− Candele o altri oggetti che bruciano, dato che
possono causare incendi, danni all’unità e/o
ferite a persone.
− Contenitori di liquidi, dato che possono cadere
e causare folgorazioni all’utente e guasti a
quest’unità.
• Non coprire quest’unità con giornali, tovaglie,
tende o altro per non impedirne la dispersione
del calore. Se la temperatura al suo interno
dovesse salire, può causare incendi, guasti e/o
ferite.
• Non collegare quest’unità ad una presa di
corrente sino a che tutti i suoi collegamenti sono
completi.
• Non usare l’unità capovolta. Potrebbe
surriscaldarsi e guastarsi.
• Non agire con forza eccessiva su interruttori,
manopole e/o cavi.
• Per scollegare un cavo, tirare la spina e mai il
cavo stesso.
• Non pulire mai quest’unità con solventi ed altre
sostanze chimiche. Essi possono danneggiarne le
finiture. Usare semplicemente un panno soffice e
pulito.
• Usare solo corrente elettrica del voltaggio
indicato. L’uso di voltaggi superiori è pericoloso
e può causare incendi, guasti e/o ferite. Yamaha
non può venire considerata responsabile di danni
risultanti dall’uso di quest’unità con un
voltaggio superiore a quello prescritto.
• Per evitare danni dovuti a fulmini, scollegare il
cavo di alimentazione dalla presa durante
temporali.
• Non tentare di modificare o riparare quest’unità.
Affidare qualsiasi riparazione a personale
qualificato Yamaha. In particolare, non aprirla
mai per alcun motivo.
• Se si prevede di non dover fare uso di
quest’unità per qualche tempo, ad esempio per
andare in vacanza, scollegarne la spina di
alimentazione dalla presa di corrente.
• Prima di concludere che l’unità è guasta, non
mancate di leggere la sezione di questo manuale
dedicata alla “Risoluzione dei problemi”.
• Prima di spostare quest’unità, premere il
pulsante portandolo nella modalità di attesa,
quindi, scollegare la spina di alimentazione dalla
presa di corrente.
• Quando la temperatura ambiente cambia
improvvisamente, si forma condensa. Scollegare
il cavo di alimentazione dalla presa di corrente e
lasciare riposare l’apparecchio.
• Installare quest’unità vicino ad una presa di
corrente alternata dove la spina del cavo di
alimentazione possa venire facilmente raggiunta.
• Il posizionamento o l’installazione in sicurezza è
una responsabilità del proprietario. Yamaha non
sarà ritenuta responsabile per eventuali incidenti
causati da posizionamento o installazione non
corretti degli altoparlanti.
• Tenere il prodotto fuori dalla portata dei
bambini, per evitare che possano ingerire
qualche piccolo componente.
Note su telecomando e batterie
• Non versare acqua o altri liquidi sul
telecomando.
• Non far cadere il telecomando.
• Non lasciare o non riporre il telecomando in
ambienti quali:
− luoghi umidi, ad esempio un bagno
− luoghi ad alta temperatura, ad esempio un
calorifero o una stufa
− luoghi a temperatura molto bassa
− luoghi polverosi
• Non esporre il sensore del telecomando di questa
unità alla luce diretta del sole o all’illuminazione
di lampade quali le lampade a fluorescenza.
• Man mano che le batterie invecchiano, la portata
operativa del telecomando si riduce in modo
considerevole. Se si verifica tale condizione,
sostituire appena possibile le batterie con due
batterie nuove.
• Non mescolare batterie vecchie e nuove.
• Non usare insieme batterie di tipo differente (ad
esempio alcaline e al manganese). Leggere
attentamente la confezione, dato che questi tipi
di batterie, benché differenti, possono avere la
stessa forma e lo stesso colore.
• Le batterie scariche possono perdere. Se le
batterie perdono, devono essere smaltite
immediatamente. Non toccare il materiale
fuoriuscito ed evitare che venga a contatto con
gli indumenti, ecc. Pulire accuratamente il vano
batterie prima di installare delle batterie nuove.
• Non trasportare le batterie in una tasca o un
borsellino insieme a oggetti metallici quali
monete e simili.
• Non gettare le batterie insieme ai normali rifiuti
domestici. Smaltirle in modo corretto, secondo
le normative locali.
• Tenere le batterie fuori dalla portata dei bambini.
Qualora una batteria dovesse essere ingerita
accidentalmente, contattare immediatamente un
medico.
• Se si prevede di non utilizzare il telecomando
per lunghi periodi di tempo, rimuovere le
batterie dal telecomando.
• Non ricaricare o smontare le batterie in
dotazione.
• Le batterie vanno protette da calore eccessivo,
ad esempio luce solare diretta, fiamme, e così
via.
AVVERTENZA
PER RIDURRE IL RISCHIO DI INCENDI E
FOLGORAZIONI, NON ESPORRE
QUEST’UNITÀ A PIOGGIA O UMIDITÀ.
Fintanto che quest’unità è collegata ad una
presa di corrente alternata, non è del tutto
spenta anche se la si spegne con il comando .
In questa condizione, quest’unità consuma una
quantità molto piccola di energia.
Tasto (power)
Accende l’unità o la imposta in modalità di
attesa.
Non usare questa unità a meno di 22 cm da
persone dotate di pacemaker cardiaco o
defibrillatore.
Le onde radio potrebbero interferire con gli
apparecchi elettromedicali.
Non utilizzare l’unità vicino ad apparecchi
medici o all’interno di strutture mediche.
La piastrina del nome è posizionata nella parte
inferiore dell’unità.
It
i
Page 83

Indice
Componenti in dotazione .................................................... 2
Funzioni................................................................................. 3
Domande frequenti .............................................................. 3
Nomi e funzioni delle parti................................................... 4
Installazione.......................................................................... 5
Collegamenti......................................................................... 6
Operazioni............................................................................. 8
Ascolto dell’audio da un dispositivo Bluetooth................ 10
Impostazioni ....................................................................... 12
Programmazione della barra audio con il telecomando della TV
(funzione di apprendimento con telecomando della TV).................. 12
Utilizzo di un subwoofer esterno ................................................................ 14
Impostazione della funzione di standby automatico .......................... 15
Inizializzazione della barra audio ................................................................ 15
Risoluzione dei problemi ................................................... 16
Dati tecnici........................................................................... 19
Informazioni su questo manuale
NOTA
Indica le precauzioni per l’uso del prodotto e le limitazioni delle relative funzioni.
SUGGERIMENTO
Indica spiegazioni aggiuntive per un migliore uso del prodotto.
It
1
Page 84

Componenti in dotazione
Barra audio
Telecomando Batteria x 2
(AAA, R03, UM4)
Cavo ottico (1,5 m)
Modello per il montaggio
* Da usare quando si fissa la barra audio alla parete
Distanziatore x 2
* Da usare quando si fissa la
barra audio alla parete
Manuale di istruzioni
(questo manuale)
Sensore del
telecomando
Entro 6 m
Assicurarsi di aver ricevuto tutti i componenti indicati di seguito.
Preparazione del telecomando
Rimuovere la pellicola protettiva prima dell’uso.
Distanza operativa del telecomando
Rimanere all’interno della distanza operativa indicata sotto. Quando si fissa la barra
audio a una parete, utilizzare il sensore del telecomando sul pannello superiore (pag.5).
It
2
Page 85

Funzioni
Domande frequenti
La barra audio con il subwoofer integrato assicura un audio potente e
realistico e la massima semplicità di installazione e collegamento alla TV
e ad altri dispositivi.
•AIR SURROUND XTREME
Riproduzione di un audio surround a 7.1 canali in grado di creare un sound stage
ampio e profondo, come se i diffusori non si trovassero solo davanti, ma anche a
destra, a sinistra e dietro l’ascoltatore (pag.9).
• Potenziamento dei bassi
Riproduzione di bassi potenti grazie alla tecnologia originale Yamaha per il
potenziamento dei bassi “Advanced Bass Extension Processing” (pag.9).
•Connessione Bluetooth®
È possibile riprodurre facilmente i contenuti memorizzati su un computer, un tablet
o uno smartphone compatibile con Bluetooth (pag.10).
Compressed Music Enhancer consente di riprodurre un audio profondo e limpido,
estremamente simile alla qualità dell’originale.
• HOME THEATER CONTROLLER
È possibile far funzionare facilmente la barra audio installando l’applicazione di
controllo dedicata “HOME THEATER CONTROLLER”.
• Funzione di apprendimento con telecomando della TV
Aziona la barra audio col telecomando della TV (pag.12).
La sezione seguente spiega le funzioni più utilizzate e risponde alle domande più
frequenti relative alla barra audio.
D1
Posso far funzionare la barra audio usando il telecomando della TV? È
scomodo cambiare telecomando per passare dal controllo della TV a
quello della barra audio.
R1
Sì. È possibile controllare la barra audio usando il telecomando della TV
grazie alla funzione di “Apprendimento con telecomando della TV” (pag.12).
Questa funzione è disponibile solo per i telecomandi a infrarossi (IR).
Verificare se il proprio telecomando è di questo tipo.
D2
Posso rendere i dialoghi più chiari?
R2
Sì. È possibile rendere più chiari i suoni delle voci in film, notiziari, programmi
sportivi ecc. utilizzando la funzione “clear voice” (pag.9).
D3
Posso far funzionare la barra audio usando uno smartphone? E posso
accendere/spegnere la barra audio tramite uno smartphone?
R3
Sì. È possibile far funzionare la barra audio mediante uno smartphone
installando l’applicazione di controllo dedicata “HOME THEATER
CONTROLLER” (pag.11).
Quando si utilizza questa funzione, è necessario collegare lo smartphone alla
barra audio tramite la connessione Bluetooth.
Inoltre, se si utilizza la modalità Bluetooth in standby, la barra audio si
accende quando viene effettuata una connessione Bluetooth tra lo
smartphone e la barra audio e si spegne quando tale connessione viene
annullata (pag.11).
•Clear voice
Rende chiari suoni di voci (come dialoghi e narrazioni) (pag.9).
It
3
Page 86

Nomi e funzioni delle parti
* I tasti si trovano nella parte
posteriore della barra
audio.
** *
*
ANALOG
SUBWOOFEROUT
* Pannello inferiore
*
Barra audio (pannello anteriore/pannello superiore)
A Indicatori
Indicano lo stato della barra audio. Consultare “Operazioni” (pag.8 a 9) per
informazioni sulle funzioni principali degli indicatori.
B Tasto (input)
Seleziona una sorgente di ingresso da riprodurre (pag.8).
C Tasto (mute)
Disattiva l’uscita audio. Premere di nuovo il tasto per riattivarla (pag.9).
D / Tasti (volume +/–)
Regolano il volume (pag.8).
E Tasto (power)
Accende o spegne (mette in standby) la barra audio (pag.9).
SUGGERIMENTO
• È possibile spegnere automaticamente la barra audio selezionando la funzione di standby automatico
(pag.15).
F Sensori del telecomando
Ricevono segnali a infrarossi dal telecomando della barra audio (pag.2).
I sensori del telecomando si trovano sul pannello anteriore e superiore della barra
audio (pag.5).
Barra audio (pannello posteriore/pannello inferiore)
G Due subwoofer integrati
I subwoofer integrati si trovano nella parte superiore della barra audio.
H Diffusori
I Presa d’ingresso TV
Per il collegamento alla TV tramite un cavo ottico (pag.6).
J Presa d’ingresso BD/DVD
Per il collegamento a un dispositivo di riproduzione, come un lettore Blu-ray (BD),
tramite un cavo digitale coassiale (pag.7).
K Presa d’ingresso ANALOG
Per il collegamento a un dispositivo esterno con un cavo mini presa stereo da
3,5 mm (pag.7).
L Presa SUBWOOFER OUT
Per il collegamento a un subwoofer esterno con un cavo monofonico a spinotti
(pag.14).
M Selettore posizione di installazione
Consente di impostare la qualità dell’audio appropriata alla posizione di installazione
della barra audio (pag.5).
It
4
Page 87

Installazione
Selettore posizione di
installazione
(pannello inferiore)
Sensore del
telecomando
(pannello anteriore)
Sensore del telecomando
(pannello superiore)
Tasti
Selettore posizione di
installazione (pannello
inferiore)
Nastro o puntine
Modello per il montaggio (in dotazione)
Fori da vite
Da 7 a 9 mm
Da 10 a 12 mm
4 mm (n. 8)
20 mm o superiore
Distanziatore
Fori per i l montaggio
nella parte inferiore
della barra audio
L’orientamento della barra audio e il sensore del telecomando
appropriato dipendono dalla posizione di installazione.
Installazione della barra audio su un
mobile porta TV ecc.
1 Spostare il selettore posizione di installazione sul
pannello inferiore della barra audio in posizione T
(Tabletop: ripiano) (T, impostazione predefinita).
Sarà impostata la qualità audio appropriata per
questo tipo di installazione.
2 Posizionare la barra audio sul mobile porta TV
ecc. assicurandosi che i tasti siano rivolti verso la
parete.
Attenzione
• Non collocare la barra audio e un lettore BD o un altro dispositivo
direttamente uno sopra l’altro. La cosa può provocare un
malfunzionamento dovuto alle vibrazioni.
• Non afferrare la porzione diffusore (parti in tessuto) sulla parte
anteriore e superiore della barra audio.
• La barra audio contiene diffusori con protezione non magnetica.
Non posizionare oggetti sensibili ai campi magnetici (dischi fissi
ecc.) in prossimità della barra audio.
• A seconda dell’ambiente di installazione, può essere preferibile
collegare la barra audio e i dispositivi esterni (come la TV) prima
di installare la barra audio.
• Posizionare la barra audio a una distanza maggiore di 50 mm
dalla TV.
Fissaggio della barra audio alla parete
1 Spostare il selettore posizione di installazione sul
pannello inferiore della barra audio in posizione
W (Wall mount: parete).
Sarà impostata la qualità audio appropriata per
questo tipo di installazione.
2 Attenersi alla sezione “Come eseguire
l’installazione a parete” riportata di seguito per
installare la barra audio; accertarsi che i tasti siano
rivolti verso l’alto.
Attenzione
• Quando si fissa la barra audio alla parete, tutto il lavoro di
installazione deve essere eseguito da un installatore qualificato o da
un rivenditore. Il cliente non deve tentare di effettuare questo lavoro
di installazione. Un’installazione scorretta o inadeguata potrebbe
causare la caduta della barra audio, provocando lesioni personali.
• Non tentare mai l’installazione della barra audio se le pareti sono
realizzate in materiali cedevoli come gesso o compensato. In tal
caso, la barra audio potrebbe cadere.
• Assicurarsi di utilizzare viti disponibili in commercio che possano
sopportare il peso dell’installazione (specificato al punto 2 a destra). Se
si utilizzano morsetti diversi dalle viti specificate, come ad esempio viti
troppo corte, chiodi e nastro bi-adesivo, la barra audio potrebbe cadere.
Come eseguire l’installazione a parete
1 Applicare il modello per il montaggio alla parete e
contrassegnare i fori da vite.
2 Rimuovere il modello per il montaggio dalla
parete, quindi fissare delle viti disponibili in
commercio (attenendosi all’illustrazione
sottostante) nei punti contrassegnati sulla parete.
3 Staccare il foglio di protezione dai distanziatori e
fissare il lato adesivo alla barra audio attenendosi
all’illustrazione sottostante.
4 Appendere la barra audio sulle viti.
Attenzione
• Fissare i cavi in modo che non si allentino. Se un piede o una
mano si dovesse impigliare accidentalmente in un cavo della
barra audio allentato, questa potrebbe cadere.
• Dopo aver installato la barra audio, verificare che sia ben fissata.
Yamaha non si assume alcuna responsabilità per incidenti
causati da un’installazione scorretta.
It
5
Page 88

Collegamenti
BD/DVD ANALOG
SUBWOOFEROUT
TV
Cavo di alimentazione
A una presa di
corrente CA
Barra audio (retro)
Cavo ottico
Dispositivo di riproduzione
(ad esempio un lettore BD)
Set top box
OPTICAL OUTPUT
TV
SUGGERIMENTO
Nei casi seguenti, collegare l’uscita dell’audio
digitale coassiale del dispositivo di riproduzione
all’ingresso BD/DVD della barra audio con un cavo
digitale coassiale (disponibile in commercio), quindi
selezionare il tasto BD/DVD sul telecomando per la
sorgente di ingresso.
− La TV non dispone di un’uscita ottica.
− La TV non emette audio (oppure emette audio a
basso volume) dal dispositivo di riproduzione
collegato.
− L’audio emesso dal dispositivo di riproduzione
collegato alla TV non è un audio surround.
Effettuare il collegamento a una TV (oppure a un’altra periferica).
SUGGERIMENTO
• Se nelle impostazioni della TV non ci fosse la possibilità di disattivare l’uscita dei
diffusori, è possibile disattivarli collegando una cuffia alla corrispondente presa sulla
TV. Consultare i manuali della TV per i particolari.
• Le prese d’ingresso TV e BD/DVD supportano i segnali audio seguenti.
− PCM (2 canali)
− Dolby Digital (fino a 5.1 canali)
ATTENZIONE
• Non collegare il cavo di alimentazione della barra audio alla presa di corrente CA
prima di aver effettuato i collegamenti.
• Non usare eccessiva forza nell’inserire la spina del cavo. In caso contrario, si
potrebbe danneggiare la spina o il terminale.
1 Collegare la TV e la barra audio col cavo ottico
(in dotazione).
Rimuovere il cappuccio del cavo ottico e controllare la
direzione della spina.
2 Collegare il cavo di alimentazione della barra
audio alla presa di corrente CA.
3 Impostare la TV come segue.
• Impostare il volume della TV al minimo.
• Disattivare l’uscita dei diffusori TV integrati (se presenti).
Cavo HDMI (ecc.)
It
6
Page 89

Collegamento digitale di un dispositivo esterno
BD/DVD
Cavo digitale coassiale
(disponibile in commercio)
Uscita audio
digitale coassiale
(arancione)
Dispositivo di riproduzione
ANALOG
Cavo mini presa stereo da 3,5 mm
(disponibile in commercio)
Console per giochi
(ecc.)
È possibile collegare un dispositivo esterno con un’uscita dell’audio digitale coassiale,
per esempio un lettore DVD, alla presa d’ingresso BD/DVD della barra audio.
Collegamento analogico a un dispositivo esterno
(console per giochi)
È possibile collegare un dispositivo esterno, per esempio una console per giochi o una
TV che non dispone di un’uscita audio digitale, alla presa d’ingresso ANALOG della
barra audio.
NOTA
• Come sorgente d’ingresso, selezionare il tasto BD/DVD sul telecomando.
NOTA
• Come sorgente d’ingresso, selezionare il tasto ANALOG sul telecomando.
• Se è possibile regolare il volume su un dispositivo esterno collegato alla presa d’ingresso ANALOG della
barra audio, regolarlo impostandolo sullo stesso volume del dispositivo esterno collegato alla TV o alla
presa d’ingresso BD/DVD.
It
7
Page 90

Operazioni
Tasti input
Selezionano una sorgente di ingresso da riprodurre.
TV ....................Audio della TV
BD/DVD...........Audio da un dispositivo collegato
alla presa d’ingresso BD/DVD
ANALOG .........Audio da un dispositivo collegato
alla presa d’ingresso ANALOG
BLUETOOTH
............................... Audio da un dispositivo
Bluetooth
collegato
L’indicatore corrispondente alla sorgente di
ingresso selezionata si accende.
(Esempio: quando si seleziona TV)
SUGGERIMENTO
• Per riprodurre l’audio o guardare un video dal dispositivo di
riproduzione collegato alla TV, impostare la sorgente di
ingresso TV sul dispositivo di riproduzione.
• Per informazioni sulla connessione Bluetooth, fare
riferimento a “Ascolto dell’audio da un dispositivo Bluetooth”
(pag.10).
Tasti SUBWOOFER (+/–)
Regolare il volume del subwoofer.
Tasti VOLUME (+/–)
Regolare il volume della barra audio.
Volume giù (–) Volume su (+)
Volume giù (–) Volume su (+)
1
2
Tasto LEARN
★
Imposta la barra audio nella modalità di
apprendimento con telecomando della TV (pag.12).
Tasto BLUETOOTH STANDBY
★
Attiva/disattiva la modalità Bluetooth in standby
(pag.11).
3
Trasmettitore di segnali del telecomando
Trasmette i segnali infrarossi.
★
★
Indicatori
Gli indicatori sul pannello superiore lampeggiano o si
accendono per indicare l’operazione e lo stato
dell’impostazione.
★: Tasti che richiedono una pressione superiore a
3 secondi
LEARN, BLUETOOTH STANDBY, AUDIO DELAY
In questo manuale sono utilizzate le illustrazioni dei
nove indicatori in linea a titolo di esempio.
: Spento
: Si accende
: Lampeggiante
(Esempio: Quando gli indicatori PLII e SURROUND lampeggiano
e l’indicatore TV si accende)
It
8
Page 91

Tasto (power)
Accende o spegne (mette in standby) la barra audio.
Acceso
Bluetooth in standby (pag.11)
Spento
Tasto DIMMER
Modifica la luminosità degli indicatori. Ogni volta
che viene premuto il tasto lo stato degli indicatori
cambia nel modo seguente.
Attenuato (impostazione predefinita)
→
Spento
→
Luminoso
↑
Gli indicatori diventano luminosi solo subito dopo
l’esecuzione dell’operazione e tornano alla
luminosità impostata dopo alcuni secondi.
L’indicatore corrispondente alla sorgente di ingresso selezionata si accende (in verde)
Si accende (in rosso)
Tasti SURROUND e STEREO
Passano da riproduzione surround a stereo
(2 canali) e viceversa. Selezionando la riproduzione
surround, è possibile riprodurre un effetto audio realistico
usando l’esclusivo AIR SURROUND XTREME Yamaha.
SUGGERIMENTO
• Riproducendo segnali stereo a due canali in surround,
l’indicatore PLII si accende.
• Installando l’applicazione gratuita dedicata “HOME
THEATER CONTROLLER” su un dispositivo Bluetooth, per
esempio su uno smartphone, è possibile scegliere le
seguenti modalità surround: TV PROGRAM, MOVIE,
MUSIC, SPORTS e GAME.
Si accende (riproduzione surround)
Spento (riproduzione stereo)
SURROUND
STEREO
Si accende (Dolby Pro Logic II)
4
5
Tasto BASS EXTENSION
Attiva/disattiva la funzione di potenziamento
dei bassi. Quando questa funzione è attivata, è
possibile riprodurre bassi potenti grazie alla
tecnologia originale Yamaha per il potenziamento
dei bassi “Advanced Bass Extension Processing”.
Tasto CLEAR VOICE
Attiva/disattiva la funzione “clear voice”.
Quando questa funzione è attivata, è possibile
riprodurre voci chiare mentre si guardano dei film,
telefilm, telegiornali o programmi sportivi.
Tasto AUDIO DELAY
★
Regola il ritardo audio per sincronizzare il suono
col video quando un’immagine sulla TV può
sembrare ritardata rispetto al suono.
Seguire la seguente procedura per regolare il ritardo audio.
1 Tenere premuto il tasto AUDIO DELAY per
più di 3 secondi.
L’indicatore posto più in alto a sinistra lampeggia.
2 Premere SUBWOOFER (+/–) per regolare il
ritardo audio.
Premendo il tasto SUBWOOFER (+) viene
ritardata l’emissione dell’audio.
3 Per terminare la regolazione, premere il
tasto AUDIO DELAY.
SUGGERIMENTO
• La regolazione terminerà automaticamente se non vengono
eseguite operazioni per 20 secondi.
Acceso (abilitato)
Spento (disabilitato)
CLEAR
VOICE
CLEAR
VOICE
Acceso (abilitato)
Spento (disabilitato)
(–) (+)
6
Tasto MUTE
Disattiva l’uscita audio. Premere di nuovo il
tasto per riattivarla.
Lampeggia (su mute)
7
Verde (Dolby Digital)
Spento (PCM)
Indicazione del decoder
La barra audio supporta i seguenti segnali audio. È
possibile controllare il tipo di segnale audio in ingresso
tramite il colore dell’indicatore.
It
9
Page 92

Ascolto dell’audio da un
Dispositivi Bluetooth
Riproduzione audio da un dispositivo Bluetooth
sulla barra audio
Per la prima
connessione Bluetooth
Associazione di un
dispositivo Bluetooth con
la barra audio
Per la connessione
Bluetooth successiva
Lampeggia
YAS-105 Yamaha
PIN 0 0 0 0
123
456
789
0
dispositivo Bluetooth
È possibile eseguire riproduzioni in modalità wireless da dispositivi Bluetooth, per
esempio uno smartphone o un lettore musicale digitale.
Per ulteriori informazioni, consultare anche il manuale d’uso del dispositivo Bluetooth.
Attenersi alla procedura seguente per utilizzare un dispositivo Bluetooth con la barra
audio.
Associazione di un dispositivo
Quando un dispositivo Bluetooth viene collegato per la prima volta, è necessario
eseguire l’“associazione” tra il dispositivo e la barra audio. È necessario eseguire
l’“associazione” per ogni dispositivo Bluetooth che si desidera utilizzare.
Una volta completata l’“associazione”, la connessione successiva con il dispositivo non
richiederà di eseguire nuovamente l’“associazione”.
Bluetooth
con la barra audio
1 Premere il tasto BLUETOOTH sul telecomando della barra audio per
selezionare Bluetooth come sorgente di ingresso.
L’indicatore BLUETOOTH sul pannello superiore lampeggia.
2 Attivare la funzione Bluetooth del dispositivo da associare, quindi
eseguire l’associazione.
L’operazione varia a seconda del dispositivo. Consultare il manuale d’uso del dispositivo.
3 Selezionare “YAS-105 Yamaha” nell’elenco dei dispositivi Bluetooth
sul dispositivo.
Se è richiesto un codice di protezione (PIN), immettere il numero “0000”.
10
It
Una volta completata l’associazione, viene visualizzato o un messaggio di
avvenuto completamento sul dispositivo.
NOTA
• Eseguire l’associazione tra il dispositivo Bluetooth e la barra audio tenendoli a una distanza massima di
10 metri l’uno dall’altra.
• È possibile associare alla barra audio fino a otto dispositivi Bluetooth. Se viene associato un nono
dispositivo, vengono eliminati i dati di associazione del dispositivo con la data di connessione più vecchia.
• Se vengono cancellate le informazioni sull’associazione di un dispositivo, per utilizzare ancora il dispositivo
occorre eseguire nuovamente l’associazione.
• Se un dispositivo Bluetooth è già collegato alla barra audio, terminare quella connessione Bluetooth
(pag.11) prima di eseguire l’associazione con il nuovo dispositivo.
• Consultare “Bluetooth” (pag.18) in “Risoluzione dei problemi” qualora l’associazione risultasse impossibile.
Page 93

Riproduzione audio da un dispositivo Bluetooth sulla
Lampeggia
Si accende
BLUETOOTH
STANDBY
Lampeggia 3 volte (attivato), lampeggia una volta (disattivato)
Si accende (in rosso)
barra audio
1
Mentre la barra audio è accesa, premere il tasto BLUETOOTH sul telecomando
della barra audio per selezionare
L’indicatore BLUETOOTH sul pannello superiore lampeggia.
Bluetooth
come sorgente di ingresso.
2 Attivare la funzione Bluetooth del dispositivo, quindi eseguire la
connessione.
Se la connessione Bluetooth è stata eseguita correttamente, l’indicatore
BLUETOOTH sulla barra audio si accende.
Utilizzo della modalità Bluetooth in standby
La modalità Bluetooth in standby consente di accendere (o spegnere) la barra audio
automaticamente, collegandola al funzionamento del dispositivo Bluetooth.
1 Con la barra audio accesa, tenere premuto il tasto BLUETOOTH
STANDBY sul telecomando della barra audio per più di 3 secondi.
Ogni volta che si tiene premuto il tasto BLUETOOTH STANDBY per 3 secondi la
modalità passa da attivata a disattivata.
Quando la modalità Bluetooth in standby è attivata e la barra audio è spenta,
l’indicatore
D si accende in rosso (Bluetooth in standby).
3 Avviare la riproduzione di un brano sul dispositivo.
NOTA
• Eseguire la connessione Bluetooth tra il dispositivo e la barra audio tenendoli a una distanza massima di
10 metri l’uno dall’altra.
• Potrebbe essere necessario selezionare nuovamente “YAS-105 Yamaha” nell’elenco dei dispositivi
Bluetooth, in caso si verificassero problemi di connessione. Potrebbe essere necessario modificare
l’impostazione di uscita dell’audio emesso verso la barra audio, a seconda del dispositivo Bluetooth in uso.
• Regolare il livello del volume del dispositivo Bluetooth secondo necessità.
• Se un dispositivo Bluetooth è già collegato alla barra audio, terminare quella connessione Bluetooth prima
di collegare il nuovo dispositivo.
Termine della connessione Bluetooth
La connessione Bluetooth viene terminata nei casi seguenti. Quando la connessione
Bluetooth viene terminata con la barra audio accesa, l’indicatore BLUETOOTH passa
dallo stato acceso allo stato lampeggiante e la barra audio entra nello stato in attesa di
connessione.
• La funzione Bluetooth viene spenta sul dispositivo compatibile.
• Il tasto BLUETOOTH sul telecomando della barra audio viene premuto per più di
3 secondi.
• La barra audio viene spenta.
Funzioni disponibili sui dispositivi Bluetooth con la modalità Bluetooth in standby attivata
Attivazione della funzione di sincronizzazione (quando la barra audio è spenta)
Quando viene eseguita la connessione Bluetooth sul dispositivo, la barra audio si accende ed è pronta a
riprodurre l’audio dal dispositivo.
Disattivazione della funzione di sincronizzazione (quando la barra audio è accesa)
La barra audio si spegne quando la connessione Bluetooth viene terminata sul dispositivo Bluetooth.
(Solo quando è selezionato BLUETOOTH come sorgente di ingresso.)
Utilizzo dell’applicazione HOME THEATER
CONTROLLER
Installando l’applicazione gratuita dedicata “HOME THEATER CONTROLLER” su un
dispositivo Bluetooth, per esempio su uno smartphone, è possibile eseguire diverse
operazioni in modo semplice e comodo con il dispositivo Bluetooth. (Voci di
impostazione: funzioni di base, modalità surround, regolazioni dell’audio)
NOTA
• Per utilizzare questa applicazione, collegare la barra audio a un dispositivo Bluetooth tramite una
connessione Bluetooth.
• Se si abilita la modalità Bluetooth in standby della barra audio, è possibile accendere la barra audio tramite
il dispositivo Bluetooth.
Per ulteriori informazioni sull’applicazione “HOME THEATER CONTROLLER”, leggere
le informazioni sul prodotto disponibili sul nostro sito web.
It
11
Page 94

Impostazioni
CLEAR
VOICE
CLEAR
VOICE
Circa 30 cm
Telecomando della TV
Tenere premuto
(più di 1 secondo)
Rilasciare
(più di 1 secondo)
Tenere premuto
(più di 1 secondo)
Rilasciare
(...)
Si accende
Lampeggia
Programmazione della barra audio con il telecomando della TV (funzione di apprendimento con telecomando della TV)
Una volta programmata la barra audio, è possibile controllarla con il telecomando della
TV per funzioni quali accendere/spegnere la TV e la barra audio contemporaneamente
o alzare/abbassare il volume e disattivare/riattivare l’audio della barra audio.
• Questa funzione è disponibile solo se il telecomando della TV usa segnali a infrarossi (IR).
• Un telecomando a onde radio non funzionerebbe.
• Se si utilizza il telecomando di un set top box satellitare o via cavo per far funzionare la barra audio,
utilizzare il telecomando IR (a infrarossi) della TV originale per programmare la barra audio, quindi
utilizzare il telecomando del set top box per controllare la barra audio.
• Se cambiando il volume della barra audio cambia anche il volume della TV, impostare il volume della TV
sul livello minimo oppure disattivare l’uscita dei diffusori.
1 Spegnere la TV.
2 Spegnere la barra audio.
3 Tenere premuto il tasto LEARN per più di 3 secondi sul telecomando
della barra audio puntando verso il sensore del telecomando
appropriato (pag.5).
La barra audio entra in modalità di apprendimento e gli indicatori sul pannello
superiore lampeggiano come mostrato qui di seguito.
LEARN BLUETOOTH
STANDBY
NOTA
• I punti da 5 a 8 richiedono soltanto il telecomando della TV e i tasti sul pannello posteriore della barra
audio. Non è necessario il telecomando della barra audio.
• Se la barra audio ha già appreso le funzioni, si accendono gli indicatori seguenti.
Funzione mute: TV
Volume (–): BD/DVD
Volume (+): ANALOG
Power: BLUETOOTH
5 Fare in modo che la barra audio apprenda il codice “Mute” del
telecomando della TV.
5-1 Premere (mute) sul pannello posteriore della barra audio.
5-2 Puntando il telecomando della TV verso il sensore dello stesso, tenere premuto
il tasto mute per più di 1 secondo, ripetendo l’operazione per due o tre volte.
Il sensore del telecomando appropriato dipende dalla posizione di installazione (pag.5).
It
12
4
Verificare che il sensore del telecomando appropriato sia stato attivato.
È possibile controllare quale sensore del telecomando è stato attivato tramite
l’indicatore CLEAR VOICE.
Indicatore CLEAR
VOICE
Se non è stato attivato il sensore del telecomando appropriato, premere il tasto LEARN
per uscire dalla modalità di apprendimento e ripetere la procedura a partire dal punto 3.
Spento Sul pannello anteriore
Si accende Sul pannello superiore
Sensore del telecomando
attivato
Il sensore del telecomando
attivato è appropriato con…
Installazione della barra audio
su un mobile porta TV ecc.
Fissaggio della barra audio alla
parete
Risultato
Apprendimento
avvenuto
Apprendimento
non riuscito
* Ripetere la
procedura a
partire dal
punto 5-1.
Bip/segnalazione
acustica
Una volta
Due volte
Indicatori
Page 95

6
Si accende
Lampeggia
Si accende
Lampeggia
Si accende
Lampeggia
Fare in modo che la barra audio apprenda il codice “Volume (–)” del
telecomando della TV.
6-1 Premere (volume –) sul pannello posteriore della barra audio.
8 Fare in modo che la barra audio apprenda il codice “Power” del
telecomando della TV.
8-1 Premere (power) sul pannello posteriore della barra audio.
6-2 Puntando il telecomando della TV verso il sensore dello stesso, tenere
premuto il tasto del volume (–) per più di 1 secondo, ripetendo l’operazione
per due o tre volte.
Risultato
Apprendimento
avvenuto
Apprendimento
non riuscito
* Ripetere la
procedura a
partire dal
punto 6-1.
Bip/segnalazione
acustica
Una volta
Due volte
Indicatori
7 Fare in modo che la barra audio apprenda il codice “Volume (+)” del
telecomando della TV.
7-1 Premere (volume +) sul pannello posteriore della barra audio.
7-2 Puntando il telecomando della TV verso il sensore dello stesso, tenere
premuto il tasto del volume (+) per più di 1 secondo, ripetendo l’operazione
per due o tre volte.
Risultato
Apprendimento
avvenuto
Bip/segnalazione
acustica
Una volta
Indicatori
8-2 Puntando il telecomando della TV verso il sensore dello stesso, tenere
premuto il tasto di accensione per più di 1 secondo, ripetendo l’operazione
per due o tre volte.
Risultato
Apprendimento
avvenuto
Apprendimento
non riuscito
* Ripetere la
procedura a
partire dal
punto 8-1.
Bip/segnalazione
acustica
Una volta
Due volte
Indicatori
9 Per terminare la modalità di apprendimento, premere il tasto LEARN
sul telecomando della barra audio.
Questa operazione completa le impostazioni necessarie. Ora è possibile far
funzionare la barra audio con i tasti mute, volume e power del telecomando della
TV.
SUGGERIMENTO
• La modalità di apprendimento terminerà automaticamente se non vengono eseguite operazioni per
5 minuti.
• Impostare il volume della TV al minimo. Quando si aumenta il volume della barra audio con il
telecomando della TV, anche il volume della TV può aumentare allo stesso tempo. In tal caso
seguire il punto 3 in “Collegamenti” (pag.6) per modificare le impostazioni TV.
• È possibile premere il tasto (power) sul telecomando della barra audio per terminare la modalità
di apprendimento.
Apprendimento
non riuscito
* Ripetere la
procedura a
partire dal
punto 7-1.
Due volte
It
13
Page 96

Cancellazione di tutte le funzioni programmate
SUBWOOFEROUT
Cavo a spinotti per subwoofer
(disponibile in commercio)
Ingresso mono
Utilizzo di un subwoofer esterno
1 Con la barra audio spenta, tenere premuto il tasto LEARN sul
telecomando della barra audio per più di 3 secondi (per entrare in
modalità di apprendimento).
Quando la barra audio è in modalità di apprendimento, gli indicatori sul pannello
superiore lampeggiano come mostrato qui di seguito.
LEARN BLUETOOTH
STANDBY
2 Tenere premuto (input) sul pannello posteriore della barra audio
per più di 3 secondi.
L’indicatore corrispondente alla funzione appresa si spegne e gli indicatori sul
pannello superiore lampeggiano come mostrato qui di seguito.
Se la cancellazione è completata, si udirà un bip per tre volte.
3 Premere il tasto LEARN sul telecomando della barra audio.
La barra audio è dotata di due subwoofer integrati; tuttavia, è possibile collegare un
subwoofer esterno se si desidera potenziare i suoni a bassa frequenza. Collegare un
subwoofer alla presa SUBWOOFER OUT della barra audio. L’audio viene emesso da
entrambi i subwoofer integrati e dal subwoofer esterno.
NOTA
• Utilizzare un subwoofer esterno con amplificatore integrato.
14
It
Page 97

Impostazione della funzione di standby automatico
Spento (attivato), si accende (disattivato)
Lampeggia (inizializzato)
Inizializzazione della barra audio
Attivando la funzione di standby automatico, si evita il pericolo di dimenticarsi di
spegnere la barra audio dopo aver finito di usarla o in caso ci si addormenti guardando
la TV.
NOTA
• Quando la funzione di standby automatico è attivata e si verifica una delle condizioni seguenti, la barra
audio si spegne automaticamente.
− Nessuna operazione eseguita per 8 ore
− Nessuna immissione audio e nessuna operazione eseguita per 20 minuti quando come sorgente di
ingresso è selezionato BLUETOOTH.
1 Con la barra audio spenta, tenere premuto il tasto MUTE sul
telecomando della barra audio per più di 3 secondi per attivare/
disattivare la funzione di standby automatico.
È possibile controllare lo stato della funzione di standby automatico con gli
indicatori sul pannello superiore per diversi secondi subito dopo l’accensione della
barra audio.
SUGGERIMENTO
• L’impostazione iniziale varia a seconda del paese o della regione.
− Modelli per il Regno Unito e l’Europa: attivata
− Altri modelli: disattivata
Seguire la seguente procedura per inizializzare la barra audio.
1 Spegnere la barra audio.
2 Tenere premuto per più di 3 secondi il tasto (power) sul pannello
posteriore della barra audio.
It
15
Page 98

Risoluzione dei problemi
Se la barra audio non funzionasse a dovere, consultare la tabella seguente. Se il
problema riscontrato non fosse presente nell’elenco o se i rimedi proposti non fossero di
aiuto, spegnere la barra audio, scollegare il cavo di alimentazione e mettersi in contatto
col rivenditore autorizzato o centro assistenza Yamaha più vicino.
Controllare in primo luogo quanto segue:
I cavi di alimentazione della barra audio, della TV e dei dispositivi di riproduzione
A
(ad esempio i lettori BD) sono collegati saldamente a prese di corrente CA.
B La barra audio, la TV e i dispositivi di riproduzione (ad esempio i lettori BD)
sono accesi.
I connettori di ogni cavo sono inseriti saldamente nelle prese di ogni dispositivo.
C
Alimentazione e sistema
Problema Causa Rimedio
La barra audio si
spegne
improvvisamente.
Impossibile
accendere
l’unità.
La funzione di standby automatico
è attivata.
Quando la funzione di standby
automatico è attivata e si verifica
una delle condizioni seguenti, la
barra audio si spegne
automaticamente.
- Nessuna operazione eseguita
per 8 ore
- Nessuna immissione audio e
nessuna operazione eseguita
per 20 minuti quando come
sorgente di ingresso è
selezionato BLUETOOTH.
Il circuito di protezione è stato
attivato. (L’indicatore D sul
pannello superiore della barra
audio lampeggia.)
La connessione Bluetooth viene
terminata sul dispositivo
Bluetooth quando la modalità
Bluetooth in standby è attivata.
Il circuito di protezione è stato
attivato per tre volte consecutive.
(Se si cerca di accendere la barra
audio in questa situazione,
l’indicatore D sul pannello
superiore della barra audio
lampeggia.)
Riaccendere la barra audio. Per
evitare che la barra audio si spenga
automaticamente, disattivare la
funzione di standby automatico
(pag.15).
Dopo aver verificato che tutti i
collegamenti sono stati effettuati
correttamente, riaccendere la barra
audio. Se la barra audio continua a
spegnersi improvvisamente oppure
non può essere riaccesa, scollegare il
cavo di alimentazione dalla presa di
corrente CA e contattare il rivenditore
o il centro di assistenza autorizzato
Yamaha più vicino.
Disattivare la modalità Bluetooth in
standby (pag.11).
Per evitare di danneggiare il prodotto,
non è possibile accendere la barra
audio. Scollegare il cavo di
alimentazione dalla presa di corrente
CA e contattare il rivenditore o il centro
di assistenza autorizzato Yamaha più
vicino.
Tutti gli
indicatori si
spengono anche
se la barra audio
è accesa (la
barra audio
potrebbe
sembrare
spenta).
La barra audio
non reagisce
correttamente.
La barra audio
funziona da sola.
Gli occhiali 3D
per la TV non
funzionano.
Non è possibile
far funzionare la
barra audio
utilizzando
l’applicazione
dedicata “HOME
THEATER
CONTROLLER”.
(La schermata
dell’applicazione
non esce dalla
modalità demo.)
La luminosità degli indicatori è
stata impostata su spento con il
tasto DIMMER.
Il microprocessore interno si è
bloccato a causa di una scarica
elettrica (ad esempio un fulmine o
elettricità statica eccessiva)
oppure a causa di una caduta di
tensione.
Un altro dispositivo Bluetooth è in
funzione nelle vicinanze.
La barra audio sta bloccando il
trasmettitore degli occhiali 3D
della propria TV.
Il dispositivo Bluetooth su cui è
stata installata l’applicazione non
è collegato alla barra audio.
Utilizzare il tasto DIMMER per
selezionare la luminosità desiderata
(pag.9).
Tenere premuto per più di 10 secondi
il tasto (power) sul pannello
posteriore della barra audio per
riavviarla. (Se il problema persiste,
scollegare il cavo di alimentazione
dalla presa di corrente e collegarlo
nuovamente).
Terminare la connessione Bluetooth
della barra audio (pag.11).
Controllare la posizione del
trasmettitore degli occhiali 3D della
propria TV e regolare la posizione
della barra audio.
Collegare il dispositivo Bluetooth e la
barra audio tramite connessione
Bluetooth e utilizzare l’applicazione.
16
It
Page 99

Audio Telecomando
Problema Causa Rimedio
Non viene
emesso alcun
suono.
Il subwoofer non
produce alcun
suono.
Il volume
diminuisce
quando la barra
audio viene
accesa.
Manca l’effetto
surround.
Presenza di
rumori.
È selezionata un’altra sorgente di
ingresso.
La funzione mute è attivata. Disattivare la funzione mute (pag.9).
Il volume è troppo basso. Aumentare il volume (pag.8).
Il cavo di alimentazione della
barra audio non è collegato
correttamente.
Le prese d’ingresso su entrambi i
dispositivi sono collegate.
Vengono emessi segnali che la
barra audio non è in grado di
riprodurre.
Il volume del subwoofer è troppo
basso.
La sorgente di riproduzione non
contiene segnali a bassa
frequenza.
La funzione di regolazione
automatica del volume funziona.
Per evitare un volume troppo alto,
la barra audio controlla
automaticamente che il suo
volume rientri in un certo livello
quando viene accesa.
È stata selezionata la
riproduzione stereo.
Il volume è troppo basso. Aumentare il volume (pag.8).
La TV o il dispositivo di
riproduzione è impostato in modo
da emettere solo un audio a 2
canali (ad esempio PCM).
L’audio viene emesso dai diffusori
integrati della TV.
La posizione di ascolto è troppo
vicina alla barra audio.
Il selettore posizione di
installazione non è impostato
correttamente.
La barra audio è troppo vicina a un altro
dispositivo digitale o ad alta frequenza.
Selezionare una sorgente di ingresso
appropriata (pag.8).
Accertarsi che il cavo di alimentazione
della barra audio sia collegato
saldamente a una presa di corrente
CA (pag.6).
Collegare la presa d’ingresso sulla
barra audio e la presa di uscita del
dispositivo di riproduzione esterno.
Modificare l’impostazione dell’uscita audio
digitale sul dispositivo di riproduzione
selezionando PCM o Dolby Digital.
Aumentare il volume del subwoofer
(pag.8).
Riprodurre una sorgente audio che contiene
segnali a bassa frequenza e verificare che
l’audio sia emesso dal subwoofer.
Eventualmente aumentare il volume
(pag.8).
Selezionare la riproduzione surround
(pag.9).
Modificare l’impostazione di uscita
dell’audio digitale della TV o del
dispositivo di riproduzione
selezionando Dolby Digital o BitStream.
Impostare il volume della TV al minimo
(pag.6).
Ascoltare da una posizione
sufficientemente lontana dalla barra audio.
Se si installa la barra audio davanti
alla TV, impostare il selettore
posizione di installazione su “T”.
Se si installa la barra audio a parete,
impostare il selettore posizione di
installazione su “W”.
Allontanare questi dispositivi dalla
barra audio.
Problema Causa Rimedio
Non è possibile
controllare la
barra audio con
il telecomando.
Non è possibile
controllare la TV
con il suo
telecomando.
La barra audio
non apprende le
operazioni del
telecomando
della TV.
Quando si
aumenta il
volume della
barra audio
tramite il
telecomando
della TV, il suono
proviene dalla
TV.
(quando si usa la
funzione di
apprendimento
con telecomando
della TV)
La barra audio è al di fuori della
distanza operativa.
Le batterie si stanno esaurendo. Sostituire le batterie con altre nuove
Il sensore del telecomando della
barra audio è esposto alla luce
solare diretta o a un’illuminazione
intensa.
Il sensore del telecomando della
TV è nascosto dalla barra audio.
Il tasto del telecomando della TV
non è stato premuto abbastanza a
lungo.
Il telecomando della TV non usa
segnali a infrarossi. (Alcuni
telecomandi possono non
funzionare anche se usano
segnali a infrarossi.)
La posizione da cui si aziona il
telecomando della TV non è
appropriata.
Le batterie del telecomando della
TV sono scariche.
Il sensore del telecomando della
barra audio è esposto alla luce
solare diretta o a un’illuminazione
intensa.
La trasmissione del segnale del
telecomando è stata disturbata
dalla luce dello schermo TV.
L’uscita audio della TV è attivata. Cambiare le impostazioni della TV per
Utilizzare il telecomando entro la
distanza operativa (pag.2).
(pag.2).
Regolare l’angolo di illuminazione o
spostare la barra audio.
Regolare la posizione di installazione
della barra audio in modo che il
sensore del telecomando della TV non
sia nascosto dalla barra audio quando
si controlla la TV da una posizione
normale.
Premere il tasto due o tre volte per più
di un secondo (pag.12).
In tal caso non è possibile usare la
funzione di apprendimento del
telecomando della TV. Usare il
telecomando della barra audio per
azionare la barra audio.
Azionare il telecomando della TV dalla
posizione appropriata (pag.12).
Sostituire le batterie con altre nuove.
Regolare l’angolo di illuminazione o
spostare la barra audio.
Spegnere la TV e ripetere l’operazione
di apprendimento (pag.12).
disattivare l’uscita dei diffusori della
televisione. Se le impostazioni della
TV non permettessero di disattivare
l’uscita dei diffusori, provare i seguenti
metodi.
- Collegare le cuffie alla
corrispondente presa sulla TV.
- Impostare il volume della TV al
minimo.
It
17
Page 100

L’accensione
(power) della
barra audio e
dell’interruttore
TV sono in
posizioni
opposte (per
esempio, la TV è
spenta se la
barra audio è
accesa).
(quando si usa la
funzione di
apprendimento
con telecomando
della TV)
La TV era accesa quando è stata
eseguita l’operazione di
apprendimento.
Premere il tasto di accensione della
TV e (power) sul pannello
posteriore della barra audio per
accenderli e poi premere il tasto di
accensione del telecomando della TV
per spegnerli.
Bluetooth
Problema Causa Rimedio
Impossibile
associare la
barra audio al
dispositivo
Bluetooth.
Come sorgente di ingresso non è
stato selezionato Bluetooth.
Il dispositivo non supporta A2DP. Eseguire l’associazione con un
Un adattatore Bluetooth o simile
che si desidera associare con la
barra audio ha una password
diversa da “0000”.
La barra audio e il dispositivo
sono troppo lontani.
Un dispositivo nelle vicinanze
(forno a microonde, LAN wireless
ecc.) emette segnali con
frequenza 2,4 GHz.
Un altro dispositivo Bluetooth è
collegato.
Selezionare Bluetooth come sorgente
di ingresso.
dispositivo che supporta A2DP.
Utilizzare un adattatore Bluetooth o
simile la cui password sia “0000”.
Avvicinare il dispositivo alla barra
audio.
Allontanare la barra audio dal
dispositivo che emette segnali in radio
frequenza.
Se il dispositivo Bluetooth è dotato di
funzione LAN wireless, spegnere la
funzione LAN wireless e accendere
solo la funzione Bluetooth.
Terminare la connessione Bluetooth
corrente ed eseguire l’associazione
con il nuovo dispositivo.
Impossibile
effettuare la
connessione
Bluetooth.
Impossibile
effettuare una
connessione
Bluetooth
(l’indicatore
BLUETOOTH
continua a
lampeggiare
rapidamente).
Non viene
emesso alcun
suono oppure
l’audio è
interrotto
durante la
riproduzione.
Un altro dispositivo Bluetooth è
collegato.
Sono stati associati più di nove
dispositivi e le informazioni
sull’associazione più vecchie
sono state cancellate.
Si è verificato un problema nella
barra audio.
La connessione Bluetooth della
barra audio con il dispositivo è
interrotta.
Come sorgente di ingresso non è
stato selezionato Bluetooth .
La barra audio e il dispositivo
sono troppo lontani.
Un dispositivo nelle vicinanze
(forno a microonde, LAN wireless
ecc.) emette segnali con
frequenza 2,4 GHz.
Il dispositivo non è impostato per
inviare segnali audio Bluetooth
alla barra audio.
La riproduzione sul dispositivo
non è stata avviata.
Il volume del dispositivo è
impostato sul minimo.
La barra audio non può effettuare più
connessioni Bluetooth. Terminare la
connessione Bluetooth corrente ed
eseguire la connessione con il
dispositivo desiderato.
Eseguire nuovamente l’associazione.
La barra audio può conservare
informazioni sull’associazione per un
massimo di otto dispositivi. Quando
viene associato un nono dispositivo,
vengono eliminati i dati di
associazione del dispositivo con la
data di connessione più vecchia.
Scollegare il cavo di alimentazione
dalla presa di corrente CA e contattare
il rivenditore o il centro di assistenza
autorizzato Yamaha più vicino.
Eseguire nuovamente la connessione
Bluetooth (pag.10).
Selezionare Bluetooth come sorgente
di ingresso.
Avvicinare il dispositivo alla barra
audio.
Allontanare la barra audio dal
dispositivo che emette segnali in radio
frequenza.
Se il dispositivo Bluetooth è dotato di
funzione LAN wireless, spegnere la
funzione LAN wireless e accendere
solo la funzione Bluetooth.
Modificare l’impostazione di uscita
dell’audio e le impostazioni di
connessione sul dispositivo.
Avviare la riproduzione sul dispositivo.
Aumentare il livello del volume del
dispositivo.
18
It
 Loading...