

Page 1
PCI SOUND CARD
Y amaha W AVEFORCE WF192XG Installation Wizard License Agreement
Yamaha Corporation (Yamaha) permits you use the Yamaha WAVEFORCE WF192XG Installation Wizard
(Software) conditioned on your acceptance of this agreement.
Use of this Software will be taken to mean acceptance of this agreement, so please read the following terms
carefully before you use the Software.
1 Copyright and permission for use
Yamaha grants you as an individual the right to use the Software on only one computer at any single time. The
ownership of the disk on which the Software is recorded belongs to you, but the ownership and copyright of the Program
itself belongs to Yamaha.
2 Prohibitions and restrictions
You may not reverse-compile, disassemble, reverse-engineer, or use any other method to convert the Software into a
human-readable form, nor may you allow another person to do so. The Software may not be duplicated, corrected,
modified, lent, leased, sold, distributed, licensed or disposed of in any other way in part or in whole. The creation of
derivative works based on the content of the Software is also prohibited. The Software may not be transmitted over a
network to another computer without written authorization from Yamaha. Your rights regarding the Software may be
transferred to a third party only if this is done for non-commercial purposes and if the Software and all associated
documentation including this agreement are included, and if the third party accepts this agreement.
3 Limitations of Liability
The Software was developed at, and is copyrighted by, Yamaha. The Software is offered “AS IS” and Yamaha makes
no warranty as to its use or performance.
YAMAHAAND ITS SUPPLIERS DO NOT AND CANNOT WARRANT THE PERFORMANCE OR RESULTS YOU MAY
OBTAIN BY USING THE SOFTWARE OR DOCUMENTATION.YAMAHA AND ITS SUPPLIERS MAKE NO
WARRANTIES, EXPRESS OR IMPLIED, AS TO NONINFRINGEMENT OF THIRD PARTY RIGHTS,
MERCHANTABILITY, OR FITNESS FOR ANY PARTICULAR PURPOSE.IN NO EVENT WILL YAMAHA OR ITS
SUPPLIERS BE LIABLE TO YOU FOR ANY CONSEQUENTIAL, INCIDENTALOR SPECIAL DAMAGES, INCLUDING
ANY LOST PROFITS OR LOST SAVINGS, EVEN IF AN YAMAHA REPRESENTATIVE HAS BEEN ADVISED OF THE
POSSIBILITY OF SUCH DAMAGES, OR FOR ANY CLAIM BY ANY THIRD PARTY.
Copyright © 1998 YAMAHACORPORATION
All Rights Reserved
The screen displays as illustrated in this manual are for instructional purposes, and may appear somewhat different from the
screens which appear on your computer.
1
Page 2
Preface
Thank you for buying Yamaha WAVEFORCE (WF192XG) package. This product is designed to enhance
and integrate your DOS/Windows computer’s sound and music capabilities in combination of the high-quality
sound hardware and a wide variety of application software. The WAVEFORCE soundcard can provide audio
signal mixing feature plus its onboard XG wavetable synthesizer (with S-VAphysical modeling voices),
maintaining downward compatibility to Yamaha OPL3 FM audio, SoundBlaster Pro 16-bit audio, MPU401
UARTMIDI interface mode and joystick or game pad connecting features. You can soon and fully enjoy the
features of this soundcard with several kinds of applications included in the package. Before using your new
soundcard and bundled software, please read this manual thoroughly. Also, keep this manual in a safe
location for future reference.
nYamaha OPL3 FM audio is not available under Windows 95. It is available only in MS-DOS real mode, DOS box (Windows DOS
emulation) and Windows NT.
User Registration
User registration is important to prove that you are a legal user of the product and have a right to receive a
technical support and other useful information from Yamaha. This registration should be done online via
Internet at Yamaha’s WAVEFORCE web site (http://www.waveforce.com) using a serial number labeled on
the soundcard so that you should write down the number before installation of the card.
These two lines are both necessary for user
registration. Write them down BEFORE installing
the soundcard.
A serial number
on the sticker
nIf the user registration card is contained in your WAVEFORCE package, the registration can be done by filling in the card and
posting it.
2
Page 3
TAD
CDAUDIO (CD In)
VIDEO
CDAUDIO
AUX
PCPCI
TAD (Telephone Answering Device (TAD) In/Out)
VIDEO (Video In)
AUX (AUX In)
Game Port & MIDI
Line In
Mono Microphone In
Line Out
Speaker Out
PCPCI (PC/PCI)
External connectors Internal connectors
User Support Service
User support service is available if your user registration is completed.
Registered users can receive the following services:
• Driver software update
• Useful information
• Technical support
For details on the technical support service, see Yamaha’s WAVEFORCE web site
(http://www.waveforce.com).
Installation of the SoundCard
Installation of the card must be done in the following procedure:
n Notice that installation of the card requires an empty PCI card slot in your computer. If you use a PCI slot that has been occupied
with another card, first remove the driver software for that card, turn off the computer to remove the card, and then reboot the
computer to forcibly recognize that the old card is not there. After completion of this process, turn off the computer and start the
following installation process for the new card.
1 Referring to the manual that came with your computer, as explained in “Consulting on Documentation” of
the paper document (Getting Started) in the package, prepare for installation of the card inside your
computer.
2 Open the antistatic bag and take out the card while holding it by its edge to avoid touching metal PCI
connectors and electronic components on the card.
3 Locate a sticker put on the card that is printed with a card’s serial number. Make a note of the number
for online registration, as explained in “User Registration” above.
4 Make sure the location of internal connectors on the card that attach with appropriate connectors from the
internal devices of the computer (audio lines from CD-ROM drive, Modem card, video card). Each
location of the card’s connector is as follows:
3
Page 4
Tip
Line In (Stereo mini-jack)
Left channel
Ring Right channel
Sleeve Ground
Tip
Mono Microphone In (Stereo mini-jack)
Mic In
Ring Power supply
Sleeve Ground
Tip
Line Out (Stereo mini-jack)
Left channel
Ring Right channel
Sleeve Ground
Tip
Speaker Out (Stereo mini-jack)
Left channel
Ring Right channel
Sleeve Ground
1
CDAUDIO
CD Ground
2 Left channel
3 CD Ground
4 Right channel
1
TAD
Phone In
2 Ground
3 Ground
4 Mono Out
1
VIDEO
Left channel
2 Ground
3 Ground
4 Right channel
1
AUX
Left channel
2 Ground
3 Ground
4 Right channel
1
PCPCI
PC/PCI Grant #
2 Ground
3
4 PC/PCI Request #
5 Ground
6 Serialized IRQ #
1
Game Port & MIDI
+5V
2 Joystick A Button 1
Joystick A X-coordinate
GND
GND
Joystick A Y-coordinate
Joystick A Button 2
+5V
+5V
Joystick B Button 1
Joystick B X-coordinate
MIDI Out
Joystick B Y-coordinate
Joystick B Button 2
MIDI In
3
4
5
6
7
8
9
10
11
12
13
14
15
Connect this socket to your mother
board if you wish to reproduce the
sound from a DOS game in MS-DOS
real mode.
5 Making necessary internal connections between the card and devices, attach the card to the PCI card slot
in the computer. Make sure that the card is firmly seated in the appropriate direction. Do not force on the
card if you feel it does not fit to the slot. Reconfirm first that you are attempting with a correct slot referring
to the manual that came with your computer, and then retry.
6 After internal connections, make external connections with your peripheral devices (speakers,
microphone, MIDI keyboard, etc.).
4
Page 5

Installation of the Driver Software
The soundcard will not work until you install appropriate driver software (Yamaha DS-XG driver) and reboot
the computer. Follow the instructions below to install the appropriate DS-XG driver.
n Different driver software should be installed to a different version of Windows 95. Say, Windows 95 OEM System Release 2 (aka.,
OSR2) requires driver software other than for pre-OSR2 version of Windows 95.
Installing the DS-XG Driver Software for Windows 95 (4.00.950 or 4.00.950a)
The WAVEFORCE soundcard is a Windows 95 Plug-and-Play device. Once the soundcard is installed and
your computer is rebooted, Windows 95 will automatically detect the device and start the Install Wizard.
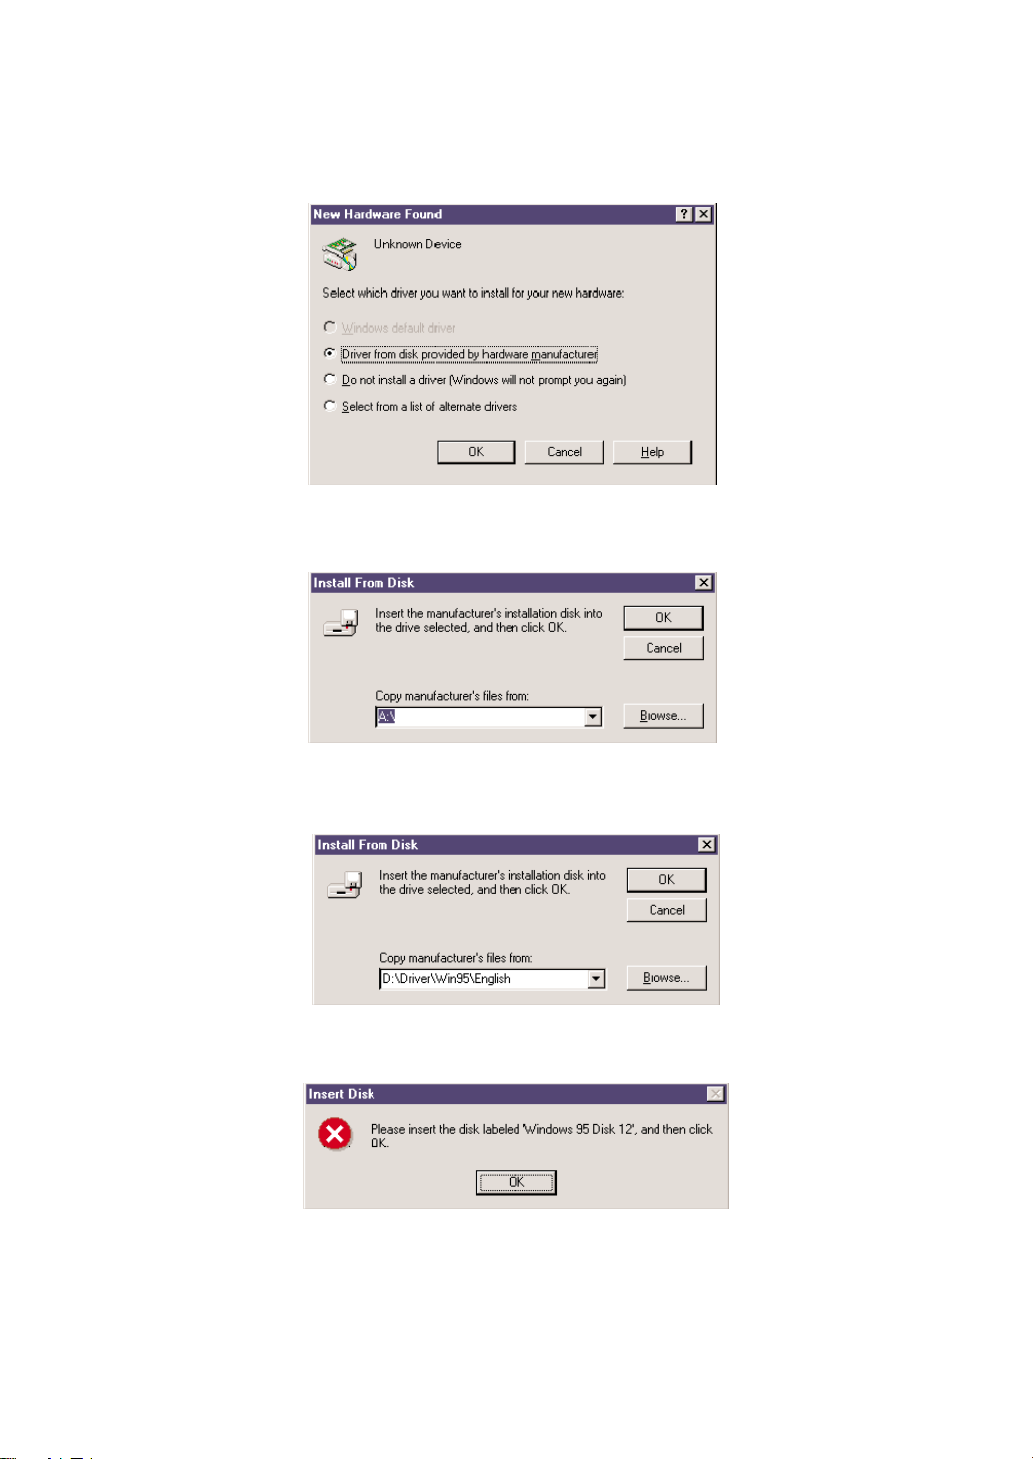
The New Hardware Found window will appear as shown below.
1 Insert the WF192XG Installation Wizard CD-ROM in your CD drive, select “Driver from disk provided by
hardware manufacture” and click the [OK] button to continue.
2 Windows95 asks you to insert a floppy disk. But the drivers are supplied by CD-ROM, click the [Browse]
button.
3 Select CD-ROM drive and the folder “drivers\win95\English”. Then click the [OK] button.
n The folder “drivers\win95\Italian” and “drivers\win95\Spanish” are also available instead of “\English”.
This completes the installation process of the DS-XG Device Manager. Consecutively, install the device
drivers for PCI Audio Codec, Legacy Sound System and Legacy Game Port.
5
Page 6
Installing the Device Drivers for PCI Audio Codec, Legacy Sound System and Legacy Game Port
1 Once the DS-XG Device Manager installation is complete, the New Hardware Found window will appear
as shown below. Insert the WF192XG Installation Wizard CD-ROM in your CD drive now. Select “Driver
from disk provided by hardware manufacturer” and click the [OK] button to continue.
2 Windows95 asks you to insert a floppy disk. But the drivers are supplied by CD-ROM, click the [Browse]
button.
3 Select CD-ROM drive and the folder “drivers\win95\English”. Then click the [OK] button.
n The folder “drivers\win95\Italian” and “drivers\win95\Spanish” are also available instead of “\English”.
4 If you have never installed the joystick driver, a message below appears. Insert Windows95 CD-ROM or
disk, click the [OK] button and install the joystick driver.
This completes all the installation procedures.
6
Page 7
Verifying the DS-XG Driver Installation
To see if the DS-XG device driver has been installed successfully, complete the following steps:
1 Click the [Start] button on the Windows taskbar.
2 Highlight [Settings] and click [Control Panel].
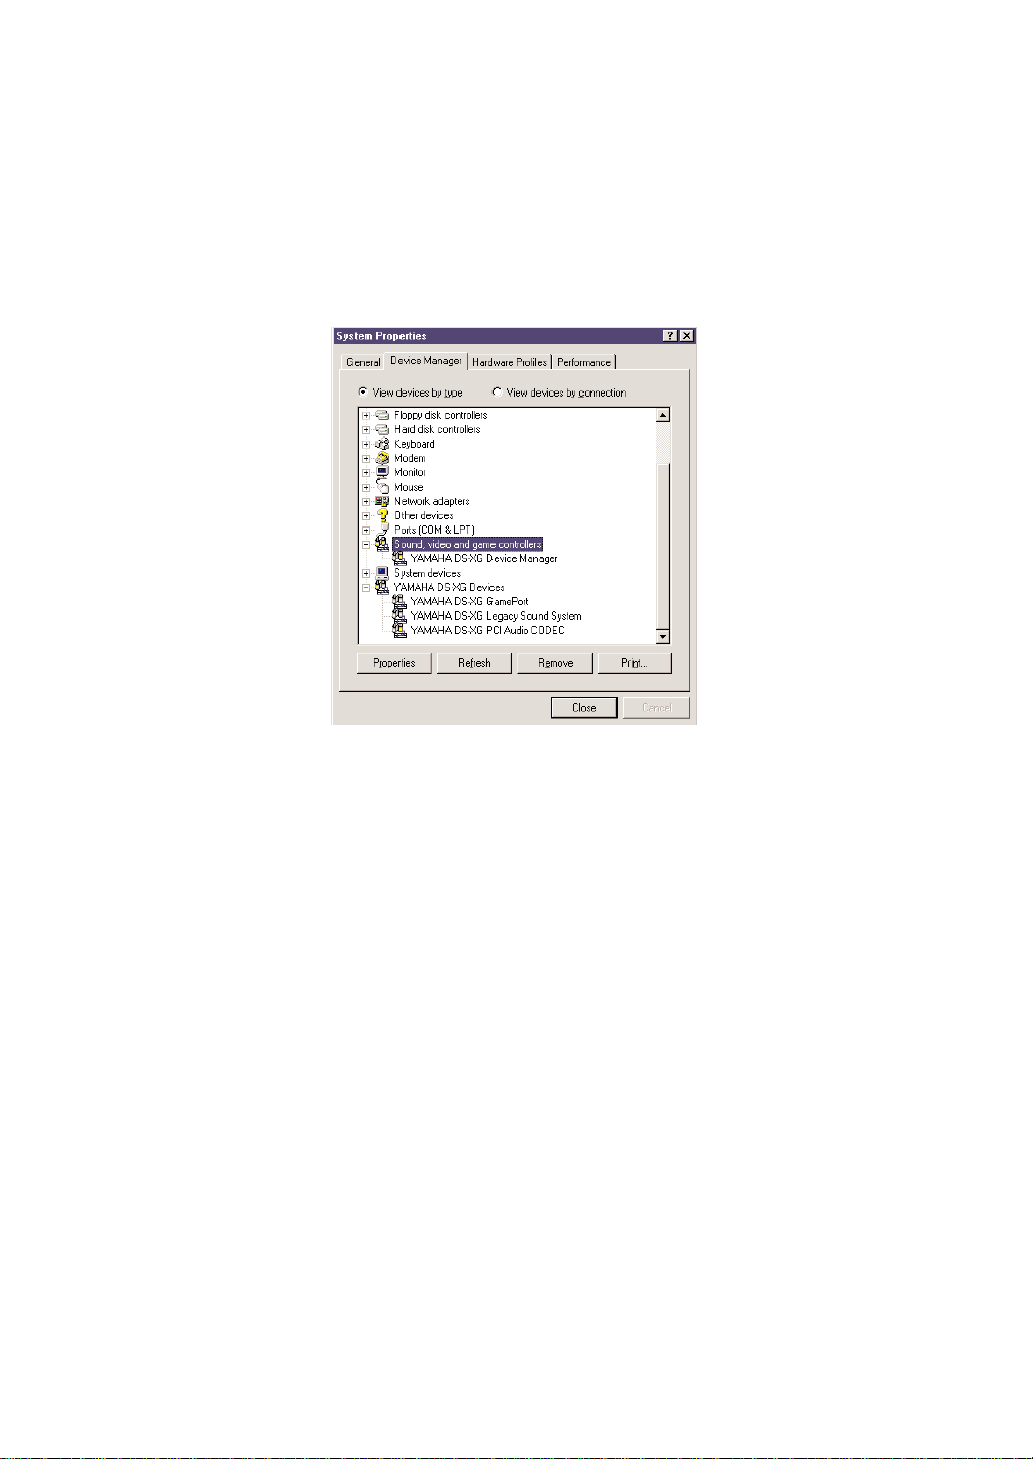
3 The Control Panel now appears. Double-click the “System” icon.
4 The System Properties window now appears. Click on the “Device Manager” tab as shown below. The
Device Manager page now appears as shown.
5 In the hierarchical directory structure illustrated above, double-click on “Sound, video and game
controllers” and verify that “YAMAHADS-XG Device Manager” is listed as shown.
6 Double-click on “YAMAHA DS-XG Devices” and verify that the following devices are listed as illustrated
above.
• YAMAHA DS-XG GamePort
• YAMAHA DS-XG Legacy Sound System
• YAMAHA DS-XG PCI Audio CODEC
n There may be an exclamation mark (!) shown next to one of above device names when you have another sound device installed,
in addition to the WAVEFORCE card. The exclamation mark shows that the WAVEFORCE card conflicts the existing sound
device. To solve this problem, you should take either of the following:
• Remove the driver software of the conflicting device.
• Manually adjust the resource configuration (IRQ or so on) of the conflicting device.
n If the DS-XG device driver has not been installed successfully, uninstall it (→P.28) and retry the installation.
7
Page 8
Installing the DS-XG Driver Software for Windows 95 OSR2 (4.00.950b)
The WAVEFORCE soundcard is a Windows 95 Plug-and-Play device. Once the soundcard is installed and
your computer is rebooted, Windows 95 will automatically detect the device and start the Install Wizard.
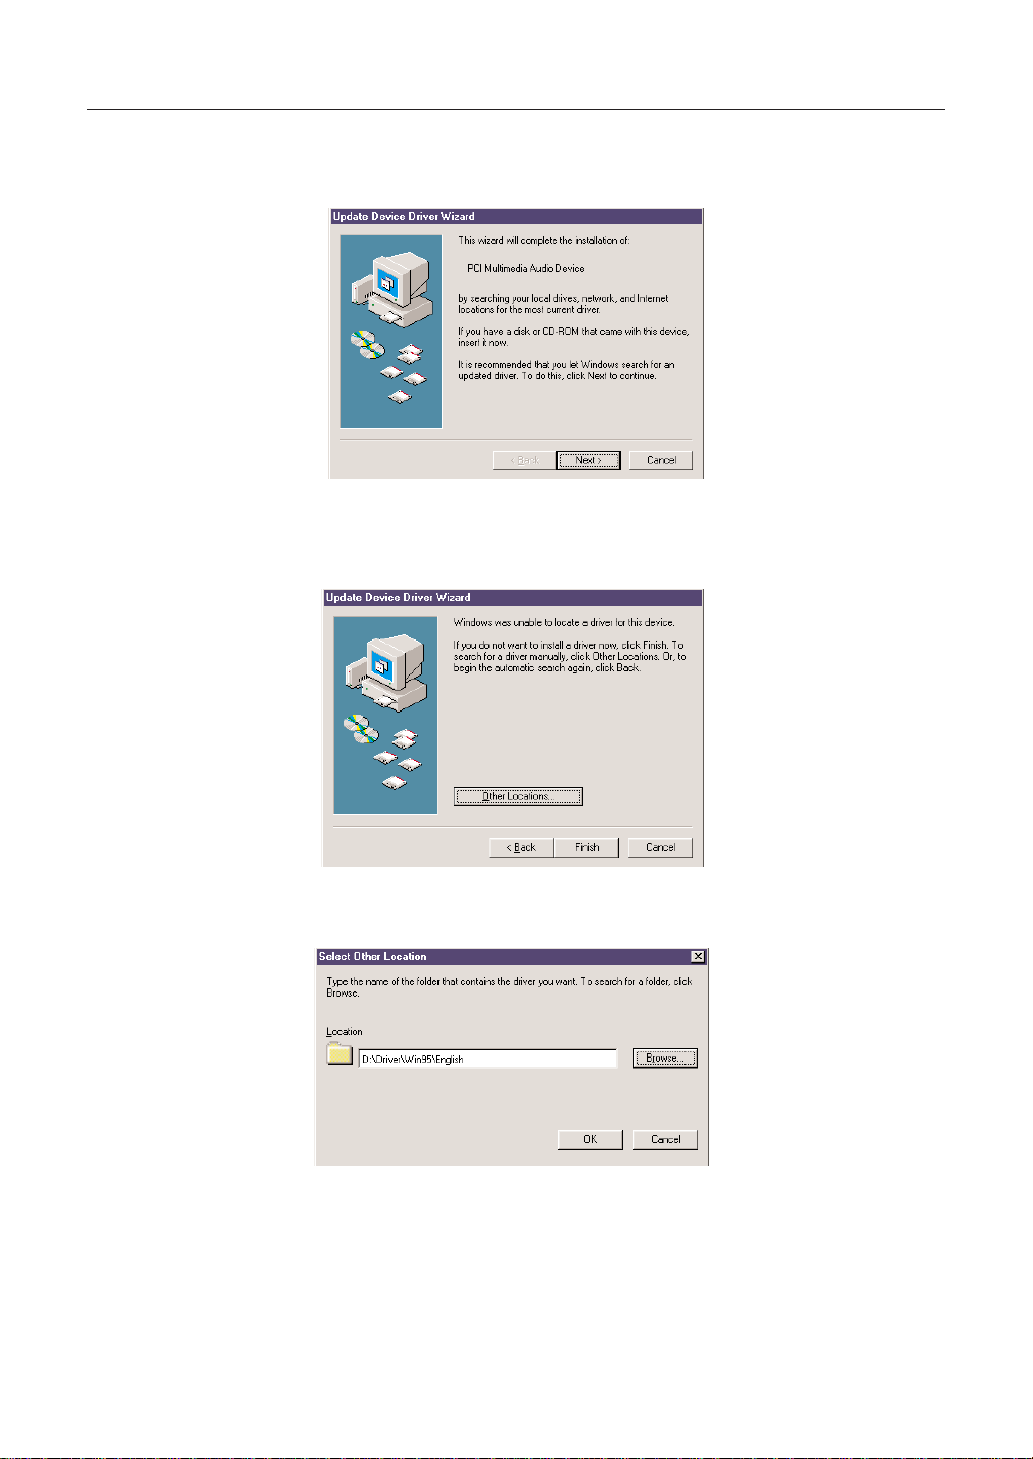
The Updated Device Driver Wizard window will appear as shown below.
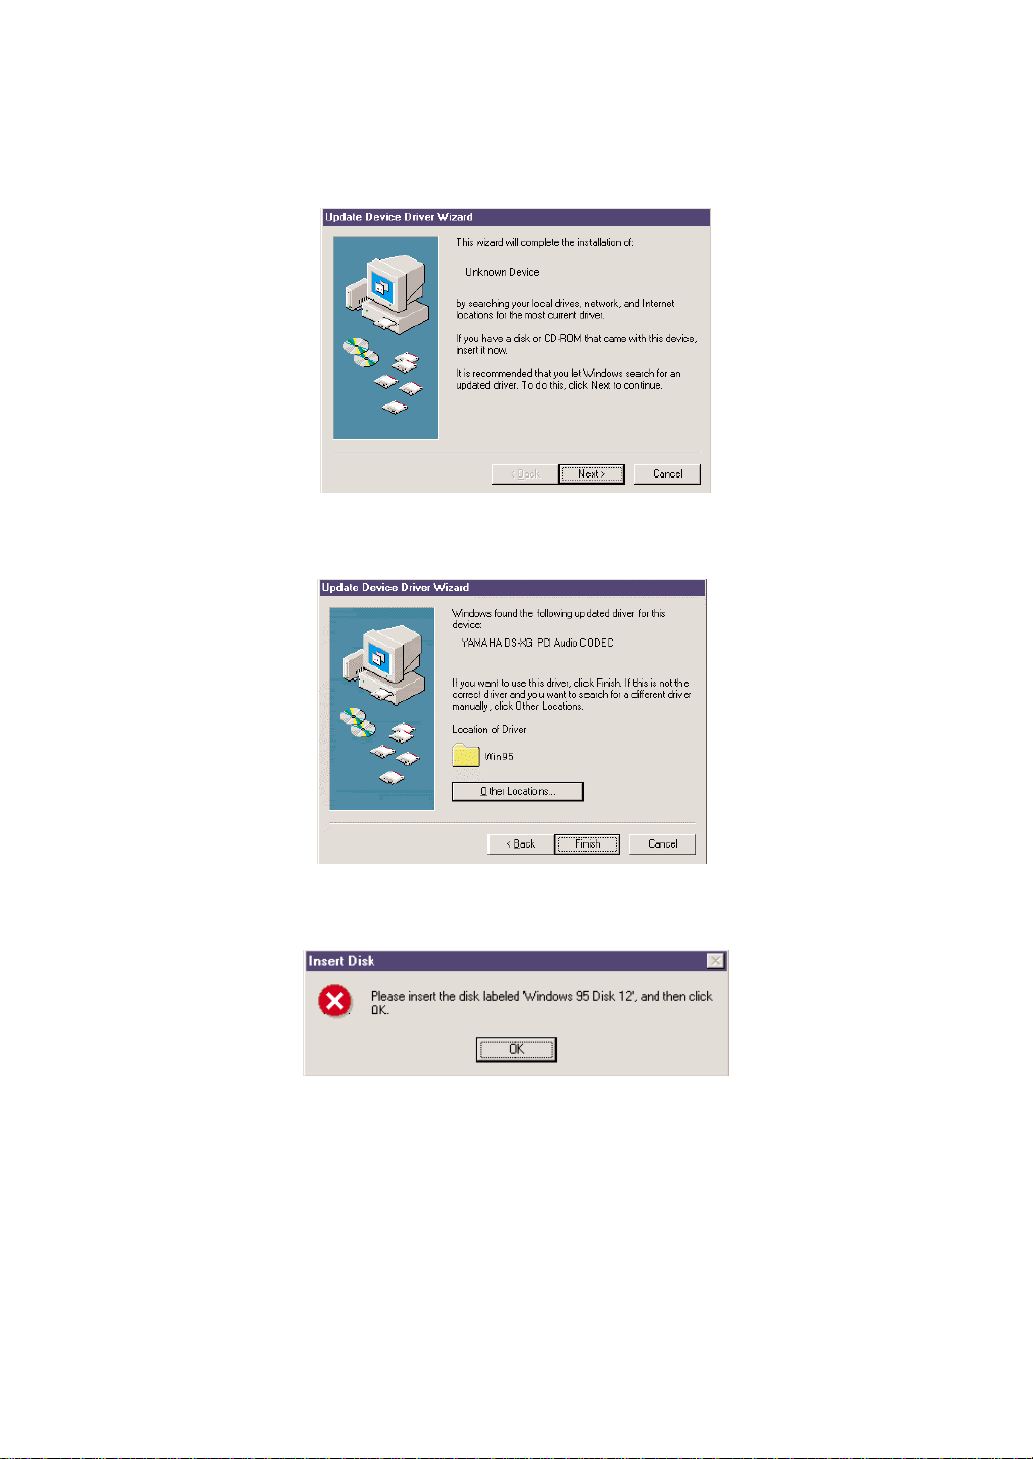
1 Insert the WF192XG Installation Wizard CD-ROM in your CD drive and click the [Next] button to continue.
2 The information displayed in Update Device Driver Wizard window will now change as shown below. Click
the [Other Locations] button to continue.
3 Click the [Browse] button, select CD-ROM drive and the folder “Drivers\Win95\English”. Then click the
[OK] button.
8
Page 9
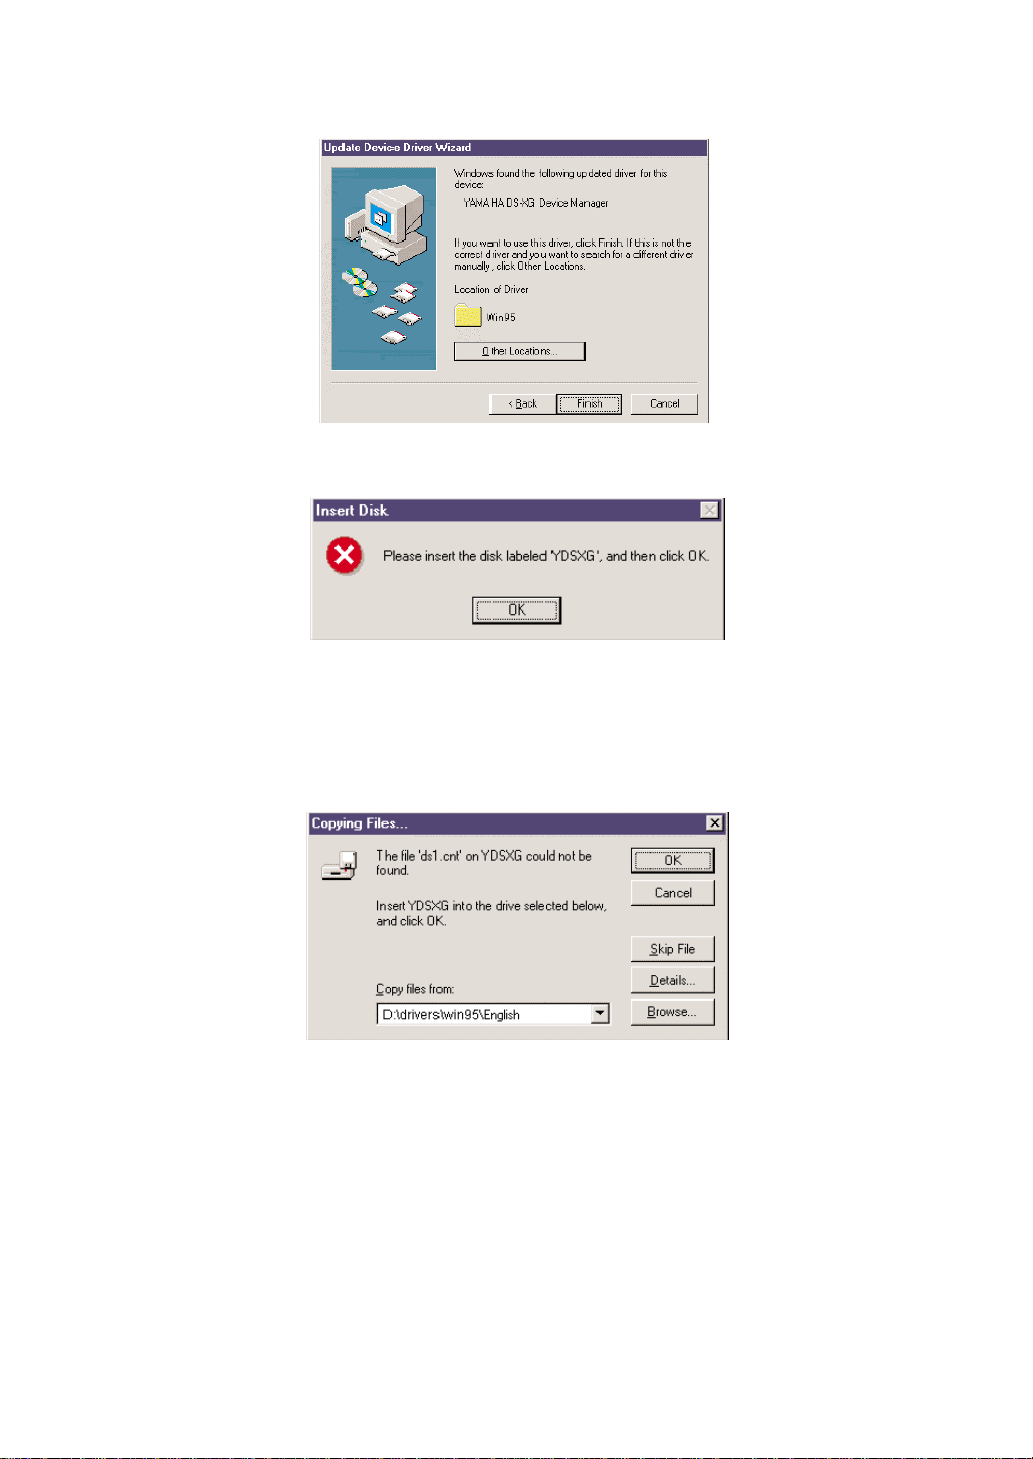
4 The information displayed in the Updated Device Driver Wizard window will now change as shown below.
Verify that “YAMAHA DS-XG Device Manager” is displayed as shown and click the [Finish] button.
5 The Insert Disk window will now appear as shown below and you will be prompted to insert a disk. Simply
click the [OK] button to continue.
6 Windows 95 will now copy the necessary files to your computer. If the Copying Files window appears as
shown below, then edit the path box with the following values:
D:\drivers\win95\English
n If your CD drive is other than “D”, input the actual drive in the path box. (e.g. “E:\drivers\win95\English” “F:\drivers\win95\English”)
n The folder “drivers\win95\Italian” and “drivers\win95\Spanish” are also available instead of “\English”.
Click the [OK] button to continue with the installation.
This completes the installation process of the DS-XG Device Manager.
Consecutively, install the device drivers for PCI Audio Codec, Legacy Sound System and Legacy Game Port.
9
Page 10
Installing the Device Drivers for PCI Audio Codec, Legacy Sound System and Legacy Game Port
1 Once the DS-XG Device Manager installation is complete, the Update Device Driver Wizard window will
appear as shown below. Insert the WF192XG Installation Wizard CD-ROM in your CD drive and click the
[Next] button to continue.
2 The information displayed in the Updated Device Driver Wizard window will now change as shown below.
Verify that “YAMAHA DS-XG PCI Audio CODEC” is displayed as shown and click the [Finish] button.
3 If you have never installed the joystick driver, a message below appears. Insert Windows95 CD-ROM or
disk, click the [OK] button and install the joystick driver.
This completes all the installation procedures.
10
Page 11

Verifying the DS-XG Driver Installation
To see if the DS-XG device driver has been installed successfully, complete the following steps:
1 Click the [Start] button on the Windows taskbar.
2 Highlight [Settings] and click [Control Panel].
3 The Control Panel now appears. Double-click the “System” icon.
4 The System Properties window now appears. Click on the “Device Manager” tab as shown below. The
Device Manager page now appears as shown.
5 In the hierarchical directory structure illustrated above, double-click on “Sound, video and game
controllers” and verify that “YAMAHADS-XG Device Manager” is listed as shown.
6 Double-click on “YAMAHA DS-XG Devices” and verify that the following devices are listed as illustrated
above.
• YAMAHA DS-XG GamePort
• YAMAHA DS-XG Legacy Sound System
• YAMAHA DS-XG PCI Audio CODEC
n There may be an exclamation mark (!) shown next to one of above device names when you have another sound device installed,
in addition to the WAVEFORCE card. The exclamation mark shows that the WAVEFORCE card conflicts the existing sound
device. To solve this problem, you should take either of the following:
• Remove the driver software of the conflicting device.
• Manually adjust the resource configuration (IRQ or so on) of the conflicting device.
n If the DS-XG device driver has not been installed successfully, uninstall it (→P.28) and retry the installation.
11
Page 12

Installing the DS-XG Driver Software for Windows 98 ver.1.0
The WAVEFORCE soundcard is a Windows 98 Plug-and-Play device. Once the soundcard is installed and
your computer is rebooted, Windows 98 will automatically detect the device and start the Install Wizard.
The Add New Hardware Wizard window will appear as shown below.
1 Insert the WF192XG Installation Wizard CD-ROM in your CD drive and click the [Next] button to continue.
2 The information displayed in Add New Hardware Wizard window will now change as shown below. Select
“Search for the best driver for your device. (Recommended).” and click the [Next] button.
3 Select “CD-ROM drive” and click the [Next] button.
12
Page 13

4 Windows 98 will now search for the DS-XG Device Manager by scanning the CD-ROM automatically.
Verify that “YAMAHA DS-XG Device Manager” is displayed in the Add New Hardware Wizard window as
shown below and click the [Next] button.
5 The Add New Hardware Wizard window will tell you that “Windows has finished installing the software” as
shown below. Click the [Finish] button.
This completes the installation process of the DS-XG Device Manager.
Consecutively, install the device drivers for PCI Audio Codec, Legacy Sound System and Legacy Game Port.
13
Page 14

Installing the Device Drivers for PCI Audio Codec, Legacy Sound System and Legacy Game Port
1 Once the DS-XG Device Manager installation is complete, the Add New Hardware Wizard window will
appear as shown below. Insert the WF192XG Installation Wizard CD-ROM in your CD drive and click the
[Next] button to continue.
2 The information displayed in Add New Hardware Wizard window will now change as shown below. Select
“Search for the best driver for your device. (Recommended).” and click the [Next] button.
3 Select “CD-ROM drive” and click the [Next] button.
14
Page 15

4 Windows 98 will now search for the DS-XG PCI Audio Codec by scanning the CD-ROM automatically.
Verify that “YAMAHA DS-XG PCI Audio Codec” is displayed in the Add New Hardware Wizard window as
shown below and click the [Next] button.
5 If you have never installed the joystick driver, the Insert Disk window appears. Insert Windows 98 CD-
ROM, click the [OK] button and install the joystick driver.
This completes all the installation procedures.
15
Page 16

Verifying the DS-XG Driver Installation
To see if the DS-XG device driver has been installed successfully, complete the following steps:
1 Click the [Start] button on the Windows taskbar.
2 Highlight [Settings] and click [Control Panel].
3 The Control Panel now appears. Double-click the “System” icon.
4 The System Properties window now appears. Click on the “Device Manager” tab as shown below. The
Device Manager page now appears as shown.
5 In the hierarchical directory structure illustrated above, double-click on “Sound, video and game
controllers” and verify that “YAMAHADS-XG Device Manager” is listed as shown.
6 Double-click on “YAMAHA DS-XG Devices” and verify that the following devices are listed as illustrated
above.
• YAMAHADS-XG GamePort
• YAMAHA DS-XG Legacy Sound System
• YAMAHA DS-XG PCI Audio CODEC
n There may be an exclamation mark (!) shown next to one of above device names when you have another sound device installed,
in addition to the WAVEFORCE card. The exclamation mark shows that the WAVEFORCE card conflicts the existing sound
device. To solve this problem, you should take either of the following:
• Remove the driver software of the conflicting device.
• Manually adjust the resource configuration (IRQ or so on) of the conflicting device.
n If the DS-XG device driver has not been installed successfully, uninstall it (→P.28) and retry the installation.
16
Page 17

Installing the DS-XG Driver Software for Windows NT 4.0
This section explains the procedures for installing the DS-XG device driver software on your computer.
1 Log on to Windows NT 4.0.
2 Click the [Start] button on the Windows taskbar.
3 Highlight [Settings] and click [Control Panel].
4 The Control Panel now appears. Double-click the “Multimedia” icon.
5 The Multimedia Properties window now appears as shown below. Click on the “Devices” tab.
6 The Devices page is now displayed as shown below. Verify that your computer does not contain any
existing DS-XG audio devices and then click the [Add] button.
n Verify if DS-XG audio devices exist by double-clicking the “Audio Devices” icon. If any drivers are listed, you will need to uninstall
the device by selecting it and then clicking the [Remove] button. Click the [Yes] button to confirm and then the [Restart Now] button
to restart your computer. Once you log on to Windows NT4.0 again, open the “Devices” page and continue with the next step.
17
Page 18

7 The “Add” window now appears. Highlight “Unlisted or Updated Driver” by clicking on it as shown below.
Click the [OK] button.
8 The “Install Driver” window now appears as shown below. Insert the WF192XG Installation Wizard CD-
ROM in your CD drive. In the path box, type:
D:\drivers\winnt
n If your CD drive is other than “D”, input the actual drive in the path box. (e.g. “E:\drivers\winnt” “F:\drivers\winnt”)
Click the [OK] button to continue.
9 The “Add Unlisted or Updated Driver” window now appears prompting you to select a language. Click on
the desired language in the list and click the [OK] button as shown below.
18
Page 19

) If the “Driver Exists” window appears as shown below, click the [New] button to overwrite the existing
driver.
! Windows NT will now copy the necessary files to your computer. When the “YAMAHA DS-XG Audio
Driver” window appears, verify that the MPU401 I/O address, IRQ, FM I/O address and Joystick I/O
address settings are correct as shown below. Click the [OK] button to continue.
n In case any of the above settings (for the MPU401 I/O address, FM I/O address and Joystick I/O address) conflict with address
settings of other devices, change the values for above settings to avoid any conflict.
n You don’t need to change the default IRQ setting (INTA#) for MPU401. However, when attaching the WF192XG soundcard to
the motherboard using the PC/PCI cable provided, to play a DOS game in DOS real mode, you should change the above IRQ
setting to match the one that DOS game requires.
@ The “System Setting Change” window will now appear as shown below and you will be prompted to restart
your computer. Click the [Restart Now] button.
Your computer will now restart. This completes the installation of the DS-XG device drivers.
Select “MIDI for YAMAHA DS-XG Synthesizer” for MIDI output device in the Control Panel’s Multimedia
Properties.
19
Page 20

Adjusting the DS-XG Mixer Control Settings
Once all DS-XG device drivers are installed, you can use the Windows standard volume control to adjust the
volume level of selected audio devices by following the procedures in this section.
1 Click on the Speaker icon located in the bottom rightmost corner of the Windows taskbar.
2 The DS-XG mixer control starts and the Volume Control window is displayed as shown below.
3 Adjust the volume as desired for each audio device by dragging the slide-bars vertically. You may also
click on [Options] in the menu bar and then click on [Properties].
4 To access the advanced controls for the Microphone device, first click on the “Mute” box and then click
the [Advanced] button as below.
20
Page 21

5 The “Advanced Control for Microphone” window will now appear as shown below. If you wish to enable
the Mic20dB setting for your microphone, then click on “Mic20dB Enable” box.
Adjusting the Volume of Recording Devices
This section explains how to use the Windows standard volume control to adjust the volume of recording
devices in your computer.
n The procedures in this section assume that the DS-XG Mixer is already started and the Volume Control window is already displayed.
If this is not the case, refer to the steps illustrated above for the necessary steps to reach this stage.
1 To access the volume control for recording device, click on [Options] in the menu bar and then click on
[Properties].
2 Click on “Recording”. The Recording Control window will now appear as shown below.
3 Adjust the volume as desired for each recording device by dragging the slide-bars vertically.
21
Page 22

DS-XG Driver Configuration
After the DS-XG Driver is installed, the “YAMAHADS-XG Audio Config.” icon will be located in the Windows’
Control Panel. You can open the configuration dialog box by double-clicking the icon.
n On Windows NT4.0, only “About” and “Synthesizer” pages are available.
1. About
This field shows the driver’s version information and its copyright notice.
If you click [Help], the help for the DS-XG driver configuration will be displayed.
2. Synthesizer
n On Windows NT4.0, “SONDIUS-XG” check box is not available.
22
Page 23

This field has a mechanism to provide MIDI synthesizer with a variety of magnificent effects such as
reverberation, chorus and variation effects in order to enhance acoustic sound variations richly. You can
select any desired effects among options by clicking the corresponding check boxes respectively. The MIDI
synthesizer is based on the AWM2(Advanced Wave Memory 2) wavetable sound generation method, and
fully supports the XG specification proposed by YAMAHA. Addition of the optional SONDIUS-XG makes it
possible to use virtual acoustic sources (S-VAvoices).
* SONDIUS-XG(http://www .sondius-xg.com) is a registered trademark that Stanford University in the United
States and YAMAHA Corporation hold jointly.
* GM is a registered trademark of Association of Musical Electronics Industry(AMEI).
* XG is a registered trademark of Yamaha Corporation.
Reverb
This adds a striking reverberation (resounding) effect to the acoustic sound just as if it could give you echoback sound with concert-hall ambience.
n This effect is only available for MIDI sounds, not for other audio sounds.
Chorus
This adds a chorus-swelling and spreading effect to the musical sound.
n This effect is only available for MIDI sounds, not for other audio sounds.
Variation
This is one of the effects available in compliance with the YAMAHA XG standard specification, and achieves
some certain sound effects with capabilities such as distortion, overdrive, etc. including Reverberation and
Chorus features.
n This effect is only available for MIDI sounds, not for other audio sounds.
SONDIUS-XG
The SONDIUS-XG produces acoustic sound outputs by running a virtual simulation of the actual acoustic
instrument operation. Therefore, it provides much more real-world acoustic sound outputs fundamentally
different from the AWM2 wavetable sound generator that simply processes the recorded acoustic sound
sources only. The DS-XG supports a single virtual acoustic sound source like this, and deals with the virtual
acoustic sound signals called “S-VAvoices” with MIDI data.
The SONDIUS-XG runs on PC with Pentium II/233MHz or higher.
23
Page 24

3. MIC Echo
This field provides a mechanism for applying a Mic echo sound effect to the microphone input. In addition, it
enables any changes of Mic echo setting status.
Enable
You can check this box when it is desirable to apply a Mic echo sound effect to the microphone input. Use
of Mic echo is disabled during the period of recording. Recording is disabled while Mic echo is being used.
Mic echo sound effect will always become invalid after Windows is started up. Volume control should be
performed via microphone input with Windows’ standard volume control capability.
Delay Time
This sets up a Mic echo repetitive cycle period. Moving a slide bar toward the right direction lengthens a cycle
period.
Feedback
This sets up a Mic echo duration period of time. Moving a slide bar toward the right direction lengthens a
duration time.
24
Page 25

4. DOS-BOX
This provides a mechanism to fully support the DOS applications for the Windows DOS-BOX.
MPU401 Out
This field has a mechanism to transfer MIDI data, which is delivered to the MPU401 as output from the DOS
applications, to either MIDI port interface or internal XG synthesizer.
n You should adjust the IRQ or DMAconfiguration of a DOS game to match the configuration in this field.
Serial
Checking this box outputs MIDI data externally through the MPU401 compatible MIDI port.
XG
Checking this box transfers MIDI data to internal XG synthesizer for producing the acoustic sound outputs.
Volume control is performed via MIDI with Windows’ standard volume control capability.
25
Page 26

5. DirectSound
This field provides a mechanism to select the hardware accelerator or software for handling the DirectSound
application.
The hardware accelerator makes a lower CPU utilization. However, if the application does not work properly
with the hardware accelerator, please click the “Disable All” checkbox and the software will take care of this
trouble.
n Please DO NOT click the checkbox while application is being used.
Enable
Checking this box follows to use the hardware accelerator for handling the DirectSound application.
Disable All
Checking this box follows to use the software for handling the DirectSound application.
Disable 3D
Checking this box follows to disable 3D acceleration.
26
Page 27

6. DirectSound3D
This field provides a mechanism to fully support the 3D positional stereo audio mode on the basis of the
Sensaura technology developed by CRL Corp. in England. Selecting this feature makes it possible to enjoy
invariable and unchangeable sound feelings in all-positional area covering as wide as 360 degrees with
stereo speakers and a headphone. Generally such a 3D acoustic sound output can be routed to stereo
speakers or a headphone under the DirectSound 3D settings. However, forced 3D sound output routing
changeover option is available for applications where such an output routing changeover is partly unable.
n Sensaura is a registered trademark of CRL Corp. in England.
Headphone
Checking this box forces the 3D sound mode to change over to optimal one for the headphone. Output
routing changeover for the 3D sound mode under the DirectSound settings is completely neglected.
Speakers
Checking this box forces the 3D sound mode to change over to optimal one for the stereo speakers. Output
routing changeover for the 3D sound mode under the DirectSound settings is completely neglected.
Application Settings
Checking this box follows the output routing changeover under the DirectSound settings.
Audio Testing Program
You can confirm the soundcard properly sounding by using Audio Testing Program. To start this program,
double-click startup.exe icon located in the root directory of the WF192XG Installation Wizard CD-ROM and
follow the Installation Wizard’s instruction.
27
Page 28

Uninstalling the Driver Software
Y ou can uninstall the DS-XG driver by using the Installation Wizard. Double-click the startup.exe icon located
in the root directory of the CD-ROM to start the Installation Wizard, and follow the instruction in the display.
Installation of the Bundled Applications
Application software that came with the card can also be installed using the Installation Wizard in the
supplied CD-ROM (To start the Installation Wizard, double-click startup.exe icon located in the root directory
of the CD-ROM). On installation, follow the message shown in the display. Note that some software is only
usable with Windows 95. Following is a brief description for each application:
n Please refer to the “readme” file, help file or online manual attachached to each application to see its system requirements, how to
use it, and so on.
✱YSTATION 32 (for Windows 95/NT)
Similar to the multimedia applications that comes with Windows 95/NT, this provides an integrated
operability like a sophisticated audio system. Thus, not only you can play an audio CD or MIDI file or WAV
sound files, but also mix different kinds of audio sources to play together. You can even record such a mix
into a WAV file.
• Directory: App\Yst\Setup.exe
✱ Classic 100 (for Windows 95)
With this software, you can play famous classical compositions using an XG sound module on the
soundcard. Since this software gives a description of the composition during playing, you can gain some
knowledge about the music.
• Directory: App\Cla\Classic100-E\Setup.exe
✱ XGworks lite (for Windows 95)
Use this MIDI sequence software to make your own music using an XG sound module on the soundcard
or external sound module.
• Directory: App\Xgwrksl\XGworks lite International\Setup.exe
✱ S-YXG50 (for Windows 95/NT)
Besides 64 polyphonic sounds from the XG sound module on the soundcard, this XG Soft Synthesizer
offers 128 additional polyphonic sounds, with a total of 192 polyphony—origination of the name, Wave
Force 192XG. The Soft Synthesizer offers 676 timbres plus 21 different drum kits along with 3 kinds of
effects, reverb, chorus and variation.
• Directory: App\Syxg50\Win95\sxg50us_\disk1\Setup.exe
App\Syxg50\Winnt\2_00-1\Syxg50e_\disk1\Setup.exe
✱Y amaha W ave Editor TWE (for Windows 95/NT)
Unlike its original name, TWE (Tiny Wave Editor) is a powerful audio wave form editor. It can edit various
formats of AIFF or WA V files for pre- and post-editing audio. As it can record an external audio into a WAV
file, you can fully capture the high-quality sounds from the WAVEFORCE soundcard.
• Directory: App\Twe\Twe-e\Setup.exe
28
Page 29

✱ MIDPLUG (for Windows 95)
This Netscape plug-in software adds MIDI playback functionality to the browser. If you like to visit a MIDIoriented Internet site, it will be quite useful.
• Directory: App\Midplg\Mp95Ev3\Setup.exe
✱ SoundVQ (for Windows 95/NT)
Based on “TwinVQ” audio compression technology developed by Nippon Telegram and Telephone
Corporation (http://www.ntt.co.jp/), this audio codec (encoder/decoder) applications are developed to
transfer high-quality audio via Internet in a possibly less traffic. SoundVQ consists of its encoding
software, SoundVQ Encoder, and decoding software, SoundVQ Player. If you are interested in delivery of
hi-quality audio at your site, these applications may be useful and convenient.
• Directory: App\Svq\Eng\vqe250b1e.exe(vqp250b1e.exe)
✱ DemonStar (for Windows 95)
Experience a great 3D shooting game from Mountain King Studios, with sound enhancement by an XG
sound module on the soundcard! Realistic sound effects plus hi-quality back ground music is always
necessary for serious gamers!
• Directory: App\Dstar\Demods.exe
About “Setupds”
If you install YSTATION 32, an application called “Setupds.exe” is
also installed.
1. What is Setupds
Setupds.exe is an application which makes settings so that the
WF192XG can be used in a Real DOS mode. If you install
YSTATION 32, the Setupds.exe will be copied into C:\Program
Files\YAMAHA\DS-XG.
This application operates on Real DOS mode.
The setting data will be saved in DS.INI
2. Start-up
Click [Shut Down] on the Windows’ [Start] menu and select
“Restart the computer in MS-DOS mode?”. Move the directory
as follows in the Command Prompt:
C:>CD \PROGRA~1\YAMAHA\DS-XG
Start the application.
At the command line, input the following.
Setupds [/s] (/s is optional)
Setupds [/d] (/d is optional)
Setupds [/?] (/? is optional)
If Setupds is started up without an option, a setting dialog box
will appear in the screen.
/s option:
Setupds will make the settings for soundcard I/O port, IRQ,
DMA, and volume settings that were written into the DS.INI file,
will display these settings on the screen, and will exit. (In this
case it will not be possible to change the settings.)
/d option:
Setupds will display the Legacy and Extended Legacy Audio
Control Volume.
/? option:
Setupds will display the options.
3. Operation
When Setupds is started up without an option, a setting dialog
box will appear on the screen. This will display the following.
<When using a keyboard>
[ ↑ ],[ ↓ ] keys Select the item.
[←],[→] keys Select the setting.
[Enter] key Enter to the Sub-menu in Main-menu window.
Decide the setting in Select-menu window.
[ESC] key Return to upper menu in Sub-menu window.
Enter to Exit-menu in Main-menu window.
4. About the default settings
The factory default settings are as follows.
Legacy Audio: Enable
Sound Blaster: I/O=220, IRQ=5, DMA=1
FM: I/O=388
MPU: I/O=330, IRQ=5
Joystick: I/O=201
IRQ Mode: IRQ[5,7,9,10,11]
DMA Mode: PC/PCI
SB Volume: Master= (Lch=0dB, Rch=0dB)
Voice = (Lch=0dB, Rch=0dB)
FM = (Lch=0dB, Rch=0dB)
AC97 Volume: Master= (Lch=0dB, Rch=0dB)
PCM = (Lch=0dB, Rch=0dB)
The others are muted.
At the IRQ and DMAMode, if Setupds judges that the default can
not be used, the other mode is selected or the function is not
used.
5. Testing sound
By using SOUND TEST menu, the following sound’s playback
can be tested.
16 bit sound
8 bit sound(SOUND BLASTER)
FM
29
Page 30

WF192XG PCI SoundCard
External connectors
◆ Mic input (for condenser microphone of approx. 2.5 Volt biased voltage)
◆ Line input Input impedance: 20 Kohms (approx.)
◆ Line output Maximum output: 0.9 Vrms (10 Kohms)
◆ Speaker output Maximum output: 3 Watts (4 ohms)
Internal connectors
◆ CD input Input impedance: 20 Kohms (approx.)
◆ VIDEO input Input impedance: 40 Kohms (approx.)
◆ AUX input Input impedance: 40 Kohms (approx.)
◆ PHONE input Input impedance: 25 Kohms (approx.)
Tone generation
◆ AWM2 (Advanced Wave Memory 2) tone generator
Sound module mode compatibility
◆ S-VA physical modeling tone generator
Specifications
Input impedance: 8 Kohms (approx.)
Maximum input: 1 Vrms/100mVrms
Maximum input: 2 Vrms
Maximum input: 1 Vrms
Maximum input: 1 Vrms
Maximum input: 1 Vrms
Maximum input: 1 Vrms
Number of voices: 676 normal voices, 21 drum voices
Maximum polyphony: 64
Multi-timbral capability: 32 parts
XG/GM mode . . . .
TG300B mode . . . The mode with voice arrangement adopted in the tone generators of
Number of voices: 256
Maximum polyphony: 1
Usual mode for the WAVEFORCE soundcard based on Yamaha’s XG
format, which expands GM (General MIDI) specifications. S-VA
physical modeling voices of the WAVEFORCE soundcard can be
played together in this mode.
the other manufacturer. Depending on the data format of the MIDI
files played, the sound module mode of the WAVEFORCE soundcard
may change to this mode automatically.
Effects
◆ Reverb: 8 types
◆ Chorus: 8 types
◆ Variation effects: 36 types
System requirements
◆ OS Windows95 / WindowsNT 4.0 or later
◆ CPU Pentium / 120 MHz or greater (Pentium II / 233 MHz or greater needed
◆ Memory 32 MB or more
◆ Hardware PCI bus slot, CD-ROM drive for software installation
◆ Software Direct X5 or later
for sounding S-VAvoices.)
Specifications and descriptions in this manual are for information purposes
only.Yamaha Corp. reserves the right to change or modify products or specifications at
any time without prior notice. Since specifications, equipment or options may not be the
same in every locale, please check with your Yamaha dealer.
30
Page 31

FAQ
1: INSTALLATION
Q
What if the WF192XG is not making any sound?
A
Make sure that:
1) You have properly installed the WAVEFORCE soundcard into your PC.
2) The soundcard’s audio output is plugged into an amplifier or pair of powered speakers.
3) Cables are correctly plugged in.
4) You are running Windows95 or Windows NT4.0.
5) You have correctly followed the instructions for installing the soundcard driver (Yamaha DS-XG
driver).
6) The soundcard is recognized by your windows device manager.
7) The device manager is not reporting any conflicts with any other devices. (For more information, see
the resources tab of the device’s properties.)
8) The default device for both audio playback and MIDI output in your multimedia properties box is set
to YAMAHADS-XG.
9) You are playing either a wave audio or standard MIDI file type 0 or type1 through the soundcard.
(Use Media Player to test that the soundcard is working.)
10) If all else fails, remove the soundcard and place it in another available PCI slot, then try again. If
this also fails, take the card to an authorized service center and have them test it. If they find the
card to be working properly, then the problem lies within your system.
Q
How do I install the soundcard in my machine?
A
Installation of any new device into a PC is easy if you apply three simple rules, as follows:
1) Before attempting to install the card, turn off the power of your PC and ground yourself by touching
the outside of the computer case.
2) Do not force the soundcard into a slot, and make sure that the slot you are trying to fit the card into
is the correct type of slot for the card.
3) Make sure the card is secure and screwed in tightly, so that it cannot come loose. This also helps
reduce the amount of background noise due to improper earthing.
Q
What version of Direct X should be installed?
A
For most applications and particularly for games, it is recommended that you run DirectX5.0 or higher.
Q
How do I instruct my PC not to use the S-VA voices?
A
Go to your control panel for the WF192XG (YAMAHADS-XG Audio Config), and deselect SONDIUSXG as the default device in the synthesizer section.
Q
What if I need the latest version of the driver for my WF192XG?
A
Go to the drivers download page on the WAVEFORCE web site, at www.waveforce.com.
31
Page 32

Q
Will the WF192XG work on all motherboards?
A
The WF192XG will work with all motherboards with at least 1 available PCI bus, although some people
have experienced difficulties with the TX & high speed bus range of boards due to voltage level
incompatibilities and the bus speed itself. Contact your board supplier to check.
Q
How do I find out what the latest version of the driver is for the WF192XG and compare this to
my own version?
A
Go to your device manager, select ‘Sound Video and Game controllers’, and the YAMAHA DS-XG
Device Manager will appear. To see which version you are using, double-click on the YAMAHA DS-XG
Device Manager icon and select ‘Driver’.
Q
Does the WF192XG work as an ISA soundcard?
A
In the Windows DOS Box, the WF192XG runs as an ISAsoundcard. However, since many new games
support Direct X technology in Windows95, this should not be a problem. Note that the PCI nature of
the WF192XG means that it will not run in true DOS.
Q
What if the memory map location for the WF192XG is already in use by another card, such as
a legacy device like the Adaptec 1542CF SCSI card?
A
Go to your system properties and click on resources (Control Panel/System/Device
Manager/Properties/Resource Tab), select Manual configuration, and change the setting until you see
‘No conflict’.
2: PLAYING GAMES
Q
Can I install the WF192XG with an ISA soundcard, since I would like to keep running DOS
games as well as Win95 games with XG?
A
Yes, so long as these is no IRQ conflict you can still run your old ISA bus SoundBlaster card at the
same time.
Q
Can WF192XG be used with DOS game?
A
The WF192XG is compatible with an ISA soundcard via the following methods.
PC/PCI
When your motherboard has a PC/PCI connector, connect the cable between the WF192XG and the
motherboard to run DOS game in DOS real-mode.
Note that some games don’t work properly with the above methods, when beyond the limit of software
emulation in DOS programming. Check the DOS game compatibility list on the WAVEFORCE web site.
32
Page 33

Q
What if I am experiencing problems with the audio playback in some of my games?
A
First check for information on the game developer’s web site to see if there are any known problems
within the game. Next, post a message in the relevant newsgroups to see if anyone else has
encountered this problem with any other soundcard. Then, post a message to the Yamaha forum to
see if anyone else has had this problem. If none of this helps, then E-mail us.
Q
Which games have Yamaha tested with the WF192XG?
A
Check the WAVEFORCE web site for information.
Q
What speakers are recommended for use with the WF192XG?
A
Any good hi-fi speakers will be OK. However, we recommend that you use one of our YSTMultimedia
Speakers. Also, try the Yamaha YST sub woofers (available from most Yamaha sales outlets
worldwide.)
Q
What games currently support XG?
A
Basically any game that supports GM will perform without a problem, and will even sound much better
by XG. Some games (such as Final Fantasy VII from SquareSoft, for example) specifically support the
XG system extension. After you hear some of the demo MIDI files that are available for XG and realize
what a massive difference it can make, you may wish to request that your games company seriously
consider supporting XG!
Q
What is DirectSound3D?
A
Microsoft’s 3D-positional audio API, first introduced with DirectX5.0, makes it possible to position and
move audio events (e.g., gunshots, door slams, engine noises, etc.) in a three-dimensional space.
Basically, it depends on the game. The WAVEFORCE web site can inform you of the latest news.
Q
What is DLS?
A
DLS is an acronym which stands for downloadable sounds. A soundcard that supports DLS has a
functionally infinite library of waveforms at its disposal because new sounds can be loaded into
memory, i.e., either system memory or local memory on the card itself. WF192XG has DLS function
included.The DLS driver will be available from the WAVEFORCE web site.
33
 Loading...