

Page 1
PCI SOUND CARD
Y amaha W AVEFORCE WF192XG Installation Wizard License Agreement
Yamaha Corporation (Yamaha) permits you use the Yamaha WAVEFORCE WF192XG Installation Wizard
(Software) conditioned on your acceptance of this agreement.
Use of this Software will be taken to mean acceptance of this agreement, so please read the following terms
carefully before you use the Software.
1 Copyright and permission for use
Yamaha grants you as an individual the right to use the Software on only one computer at any single time. The
ownership of the disk on which the Software is recorded belongs to you, but the ownership and copyright of the Program
itself belongs to Yamaha.
2 Prohibitions and restrictions
You may not reverse-compile, disassemble, reverse-engineer, or use any other method to convert the Software into a
human-readable form, nor may you allow another person to do so. The Software may not be duplicated, corrected,
modified, lent, leased, sold, distributed, licensed or disposed of in any other way in part or in whole. The creation of
derivative works based on the content of the Software is also prohibited. The Software may not be transmitted over a
network to another computer without written authorization from Yamaha. Your rights regarding the Software may be
transferred to a third party only if this is done for non-commercial purposes and if the Software and all associated
documentation including this agreement are included, and if the third party accepts this agreement.
3 Limitations of Liability
The Software was developed at, and is copyrighted by, Yamaha. The Software is offered “AS IS” and Yamaha makes
no warranty as to its use or performance.
YAMAHAAND ITS SUPPLIERS DO NOT AND CANNOT WARRANT THE PERFORMANCE OR RESULTS YOU MAY
OBTAIN BY USING THE SOFTWARE OR DOCUMENTATION.YAMAHA AND ITS SUPPLIERS MAKE NO
WARRANTIES, EXPRESS OR IMPLIED, AS TO NONINFRINGEMENT OF THIRD PARTY RIGHTS,
MERCHANTABILITY, OR FITNESS FOR ANY PARTICULAR PURPOSE.IN NO EVENT WILL YAMAHA OR ITS
SUPPLIERS BE LIABLE TO YOU FOR ANY CONSEQUENTIAL, INCIDENTALOR SPECIAL DAMAGES, INCLUDING
ANY LOST PROFITS OR LOST SAVINGS, EVEN IF AN YAMAHA REPRESENTATIVE HAS BEEN ADVISED OF THE
POSSIBILITY OF SUCH DAMAGES, OR FOR ANY CLAIM BY ANY THIRD PARTY.
Copyright © 1998 YAMAHACORPORATION
All Rights Reserved
The screen displays as illustrated in this manual are for instructional purposes, and may appear somewhat different from the
screens which appear on your computer.
1
Page 2
Preface
Thank you for buying Yamaha WAVEFORCE (WF192XG) package. This product is designed to enhance
and integrate your DOS/Windows computer’s sound and music capabilities in combination of the high-quality
sound hardware and a wide variety of application software. The WAVEFORCE soundcard can provide audio
signal mixing feature plus its onboard XG wavetable synthesizer (with S-VAphysical modeling voices),
maintaining downward compatibility to Yamaha OPL3 FM audio, SoundBlaster Pro 16-bit audio, MPU401
UARTMIDI interface mode and joystick or game pad connecting features. You can soon and fully enjoy the
features of this soundcard with several kinds of applications included in the package. Before using your new
soundcard and bundled software, please read this manual thoroughly. Also, keep this manual in a safe
location for future reference.
nYamaha OPL3 FM audio is not available under Windows 95. It is available only in MS-DOS real mode, DOS box (Windows DOS
emulation) and Windows NT.
User Registration
User registration is important to prove that you are a legal user of the product and have a right to receive a
technical support and other useful information from Yamaha. This registration should be done online via
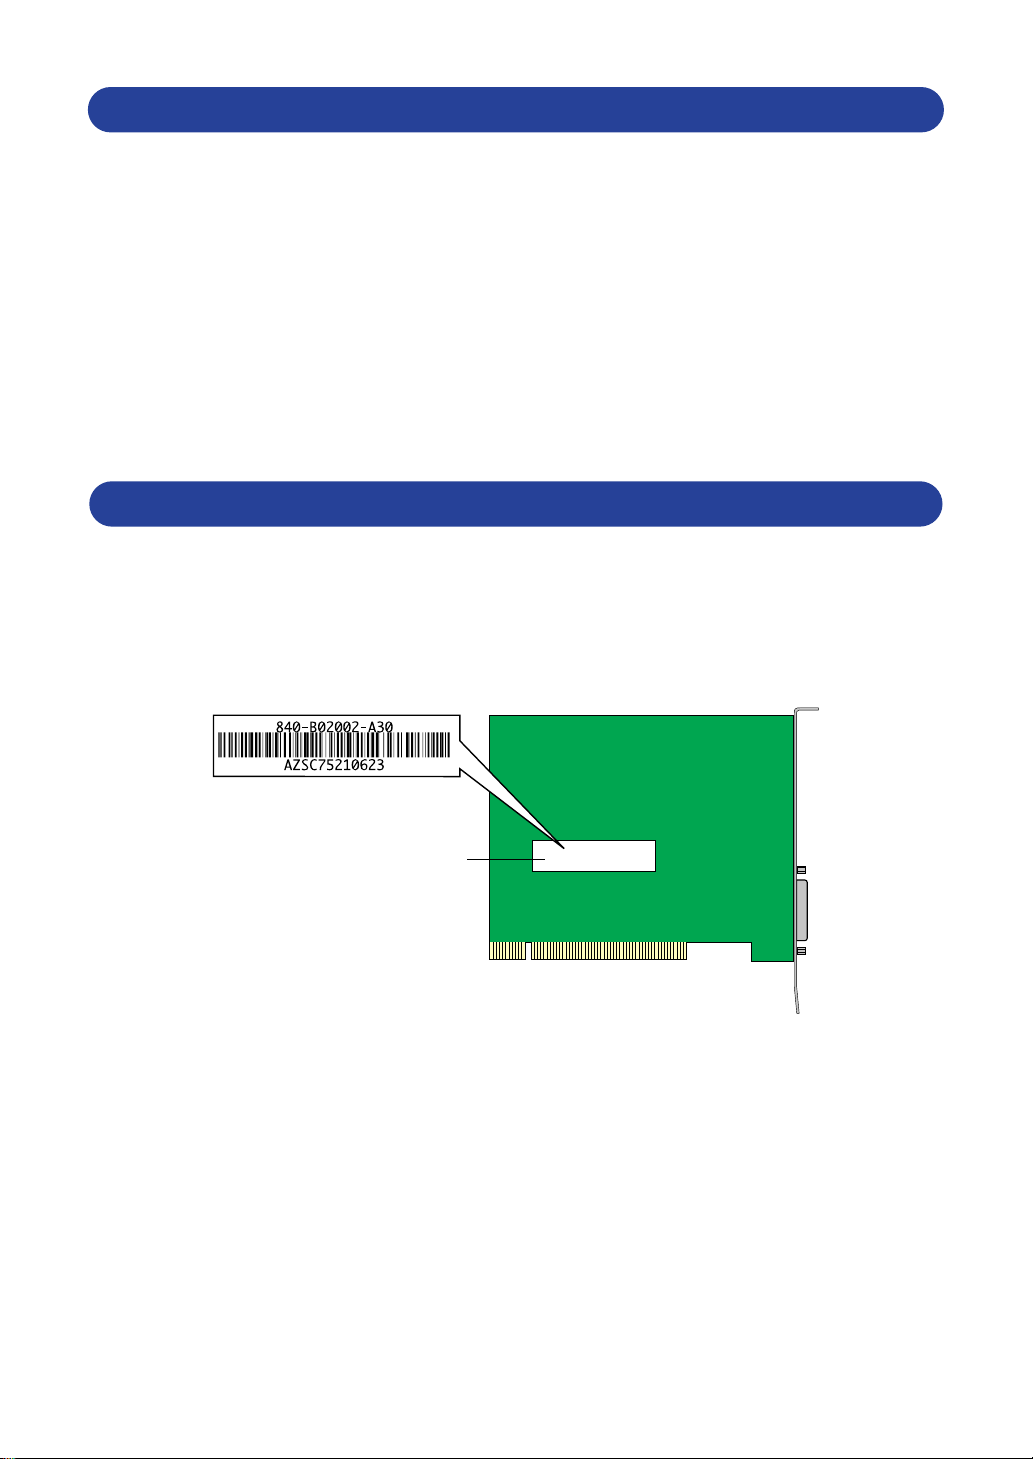
Internet at Yamaha’s WAVEFORCE web site (http://www.waveforce.com) using a serial number labeled on
the soundcard so that you should write down the number before installation of the card.
These two lines are both necessary for user
registration. Write them down BEFORE installing
the soundcard.
A serial number
on the sticker
nIf the user registration card is contained in your WAVEFORCE package, the registration can be done by filling in the card and
posting it.
2
Page 3
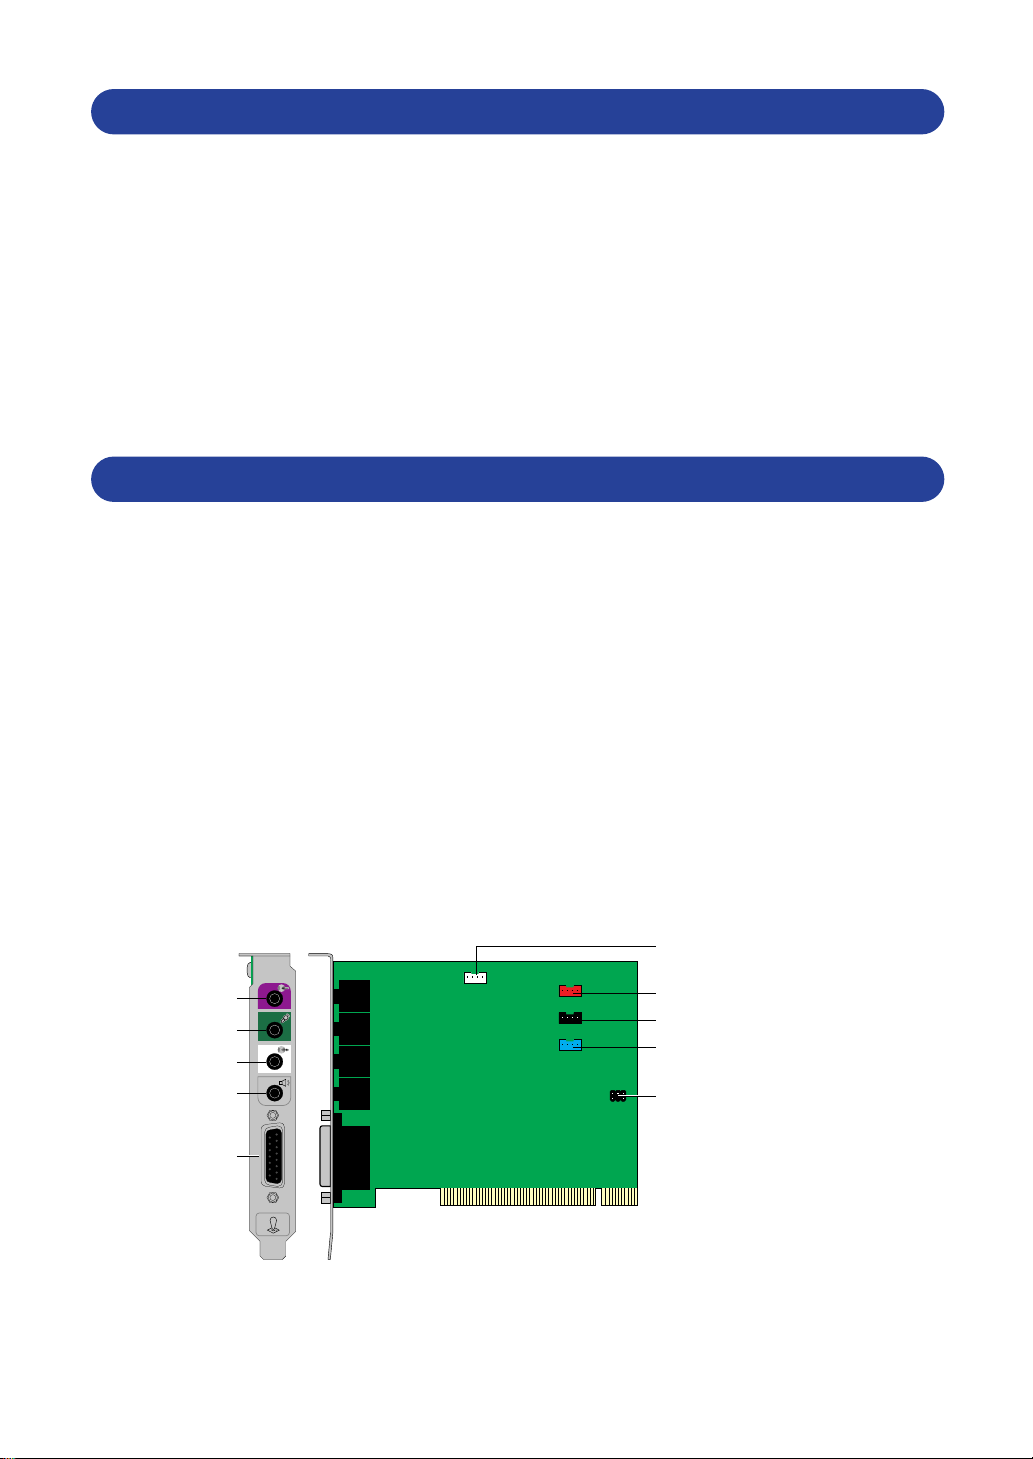
TAD
CDAUDIO (CD In)
VIDEO
CDAUDIO
AUX
PCPCI
TAD (Telephone Answering Device (TAD) In/Out)
VIDEO (Video In)
AUX (AUX In)
Game Port & MIDI
Line In
Mono Microphone In
Line Out
Speaker Out
PCPCI (PC/PCI)
External connectors Internal connectors
User Support Service
User support service is available if your user registration is completed.
Registered users can receive the following services:
• Driver software update
• Useful information
• Technical support
For details on the technical support service, see Yamaha’s WAVEFORCE web site
(http://www.waveforce.com).
Installation of the SoundCard
Installation of the card must be done in the following procedure:
n Notice that installation of the card requires an empty PCI card slot in your computer. If you use a PCI slot that has been occupied
with another card, first remove the driver software for that card, turn off the computer to remove the card, and then reboot the
computer to forcibly recognize that the old card is not there. After completion of this process, turn off the computer and start the
following installation process for the new card.
1 Referring to the manual that came with your computer, as explained in “Consulting on Documentation” of
the paper document (Getting Started) in the package, prepare for installation of the card inside your
computer.
2 Open the antistatic bag and take out the card while holding it by its edge to avoid touching metal PCI
connectors and electronic components on the card.
3 Locate a sticker put on the card that is printed with a card’s serial number. Make a note of the number
for online registration, as explained in “User Registration” above.
4 Make sure the location of internal connectors on the card that attach with appropriate connectors from the
internal devices of the computer (audio lines from CD-ROM drive, Modem card, video card). Each
location of the card’s connector is as follows:
3
Page 4
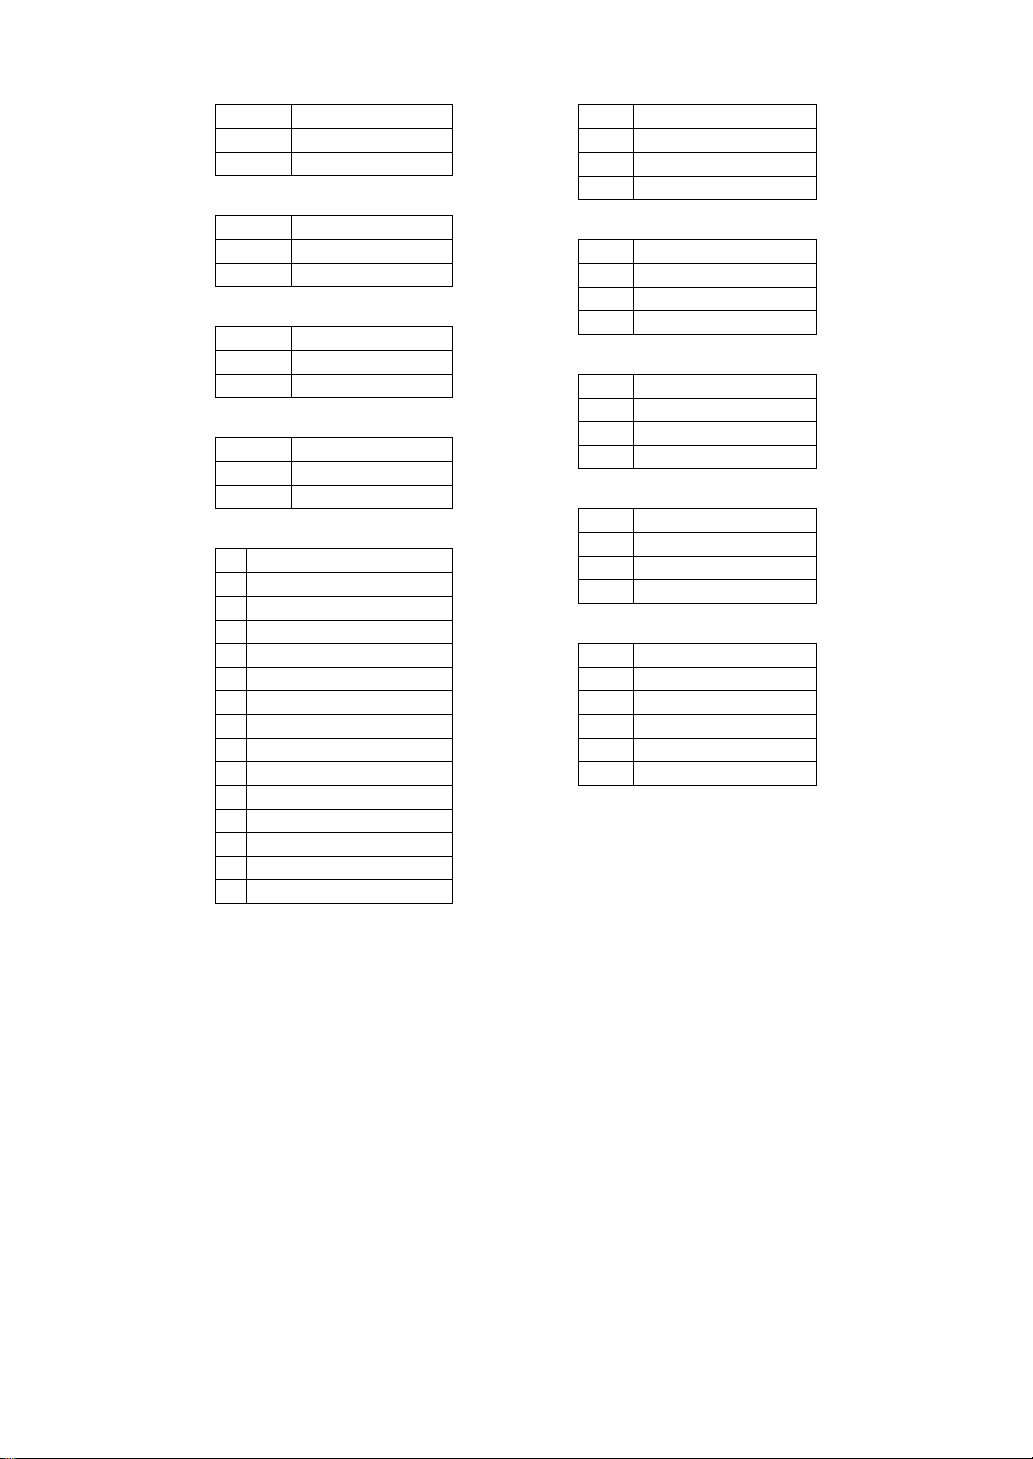
Tip
Line In (Stereo mini-jack)
Left channel
Ring Right channel
Sleeve Ground
Tip
Mono Microphone In (Stereo mini-jack)
Mic In
Ring Power supply
Sleeve Ground
Tip
Line Out (Stereo mini-jack)
Left channel
Ring Right channel
Sleeve Ground
Tip
Speaker Out (Stereo mini-jack)
Left channel
Ring Right channel
Sleeve Ground
1
CDAUDIO
CD Ground
2 Left channel
3 CD Ground
4 Right channel
1
TAD
Phone In
2 Ground
3 Ground
4 Mono Out
1
VIDEO
Left channel
2 Ground
3 Ground
4 Right channel
1
AUX
Left channel
2 Ground
3 Ground
4 Right channel
1
PCPCI
PC/PCI Grant #
2 Ground
3
4 PC/PCI Request #
5 Ground
6 Serialized IRQ #
1
Game Port & MIDI
+5V
2 Joystick A Button 1
Joystick A X-coordinate
GND
GND
Joystick A Y-coordinate
Joystick A Button 2
+5V
+5V
Joystick B Button 1
Joystick B X-coordinate
MIDI Out
Joystick B Y-coordinate
Joystick B Button 2
MIDI In
3
4
5
6
7
8
9
10
11
12
13
14
15
Connect this socket to your mother
board if you wish to reproduce the
sound from a DOS game in MS-DOS
real mode.
5 Making necessary internal connections between the card and devices, attach the card to the PCI card slot
in the computer. Make sure that the card is firmly seated in the appropriate direction. Do not force on the
card if you feel it does not fit to the slot. Reconfirm first that you are attempting with a correct slot referring
to the manual that came with your computer, and then retry.
6 After internal connections, make external connections with your peripheral devices (speakers,
microphone, MIDI keyboard, etc.).
4
Page 5
Installation of the Driver Software
The soundcard will not work until you install appropriate driver software (Yamaha DS-XG driver) and reboot
the computer. Follow the instructions below to install the appropriate DS-XG driver.
n Different driver software should be installed to a different version of Windows 95. Say, Windows 95 OEM System Release 2 (aka.,
OSR2) requires driver software other than for pre-OSR2 version of Windows 95.
Installing the DS-XG Driver Software for Windows 95 (4.00.950 or 4.00.950a)
The WAVEFORCE soundcard is a Windows 95 Plug-and-Play device. Once the soundcard is installed and
your computer is rebooted, Windows 95 will automatically detect the device and start the Install Wizard.
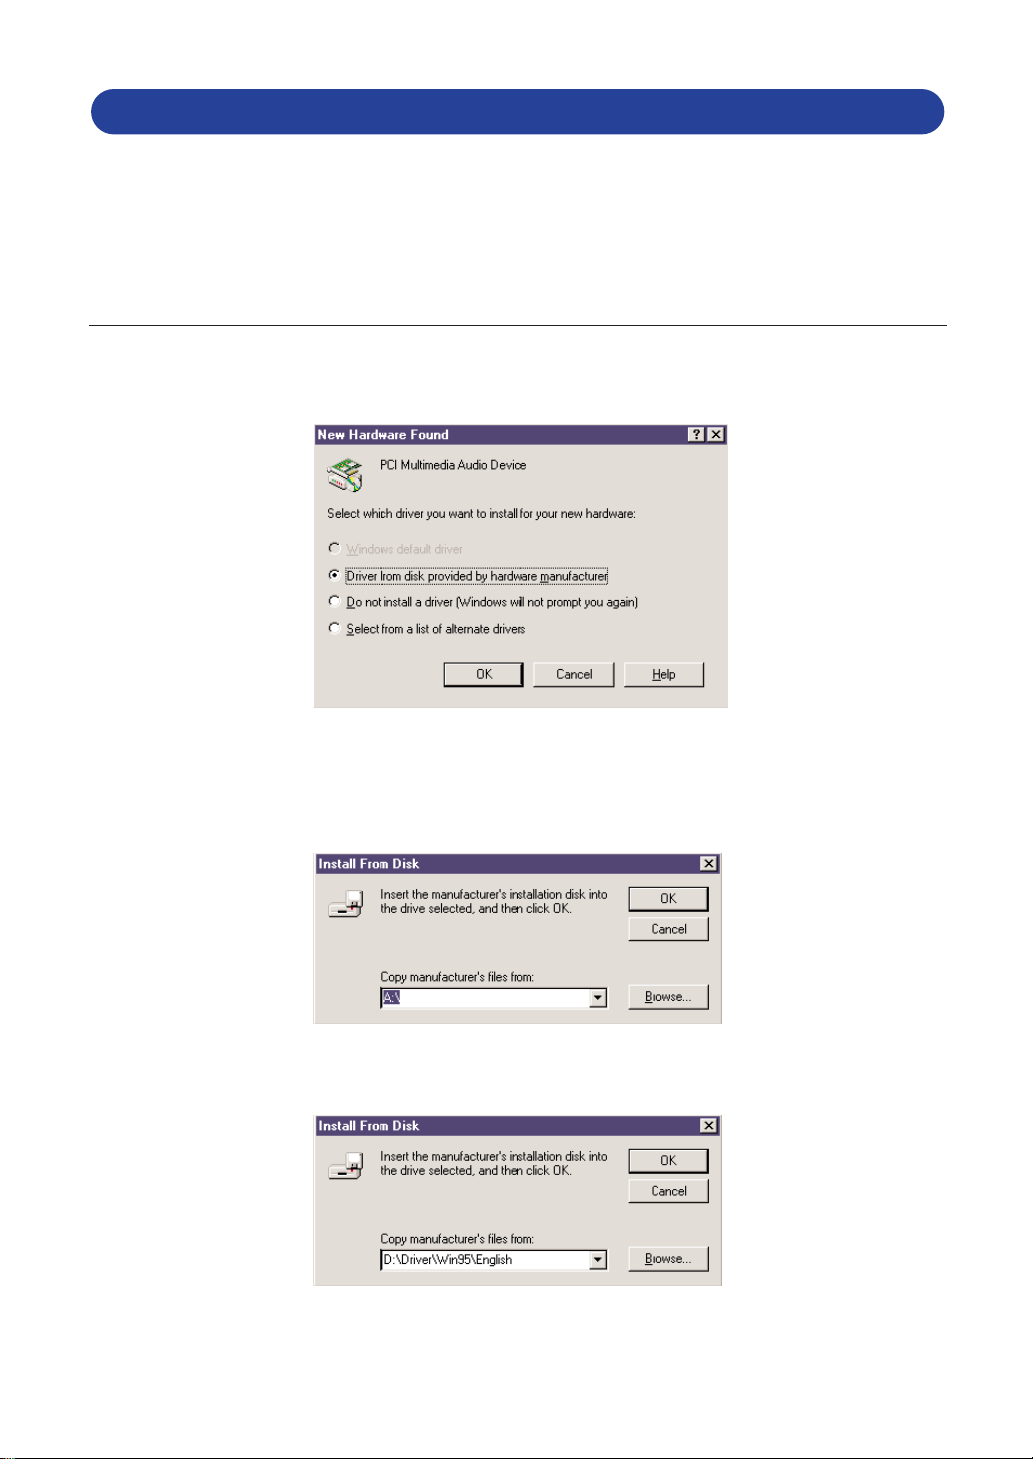
The New Hardware Found window will appear as shown below.
1 Insert the WF192XG Installation Wizard CD-ROM in your CD drive, select “Driver from disk provided by
hardware manufacture” and click the [OK] button to continue.
2 Windows95 asks you to insert a floppy disk. But the drivers are supplied by CD-ROM, click the [Browse]
button.
3 Select CD-ROM drive and the folder “drivers\win95\English”. Then click the [OK] button.
n The folder “drivers\win95\Italian” and “drivers\win95\Spanish” are also available instead of “\English”.
This completes the installation process of the DS-XG Device Manager. Consecutively, install the device
drivers for PCI Audio Codec, Legacy Sound System and Legacy Game Port.
5
Page 6
Installing the Device Drivers for PCI Audio Codec, Legacy Sound System and Legacy Game Port
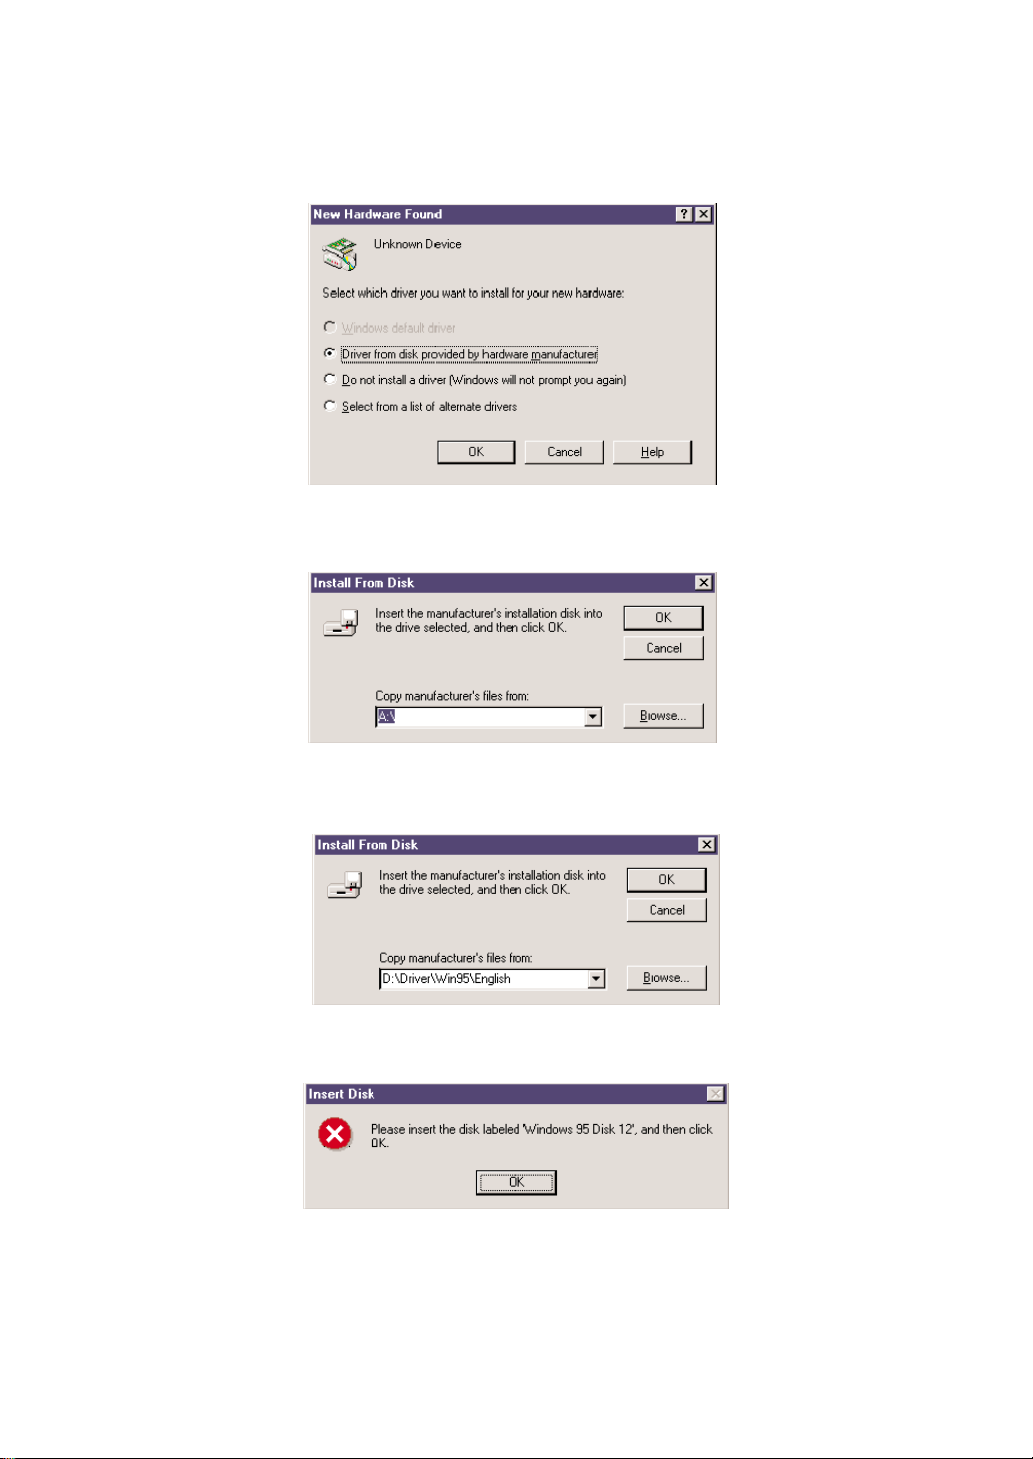
1 Once the DS-XG Device Manager installation is complete, the New Hardware Found window will appear
as shown below. Insert the WF192XG Installation Wizard CD-ROM in your CD drive now. Select “Driver
from disk provided by hardware manufacturer” and click the [OK] button to continue.
2 Windows95 asks you to insert a floppy disk. But the drivers are supplied by CD-ROM, click the [Browse]
button.
3 Select CD-ROM drive and the folder “drivers\win95\English”. Then click the [OK] button.
n The folder “drivers\win95\Italian” and “drivers\win95\Spanish” are also available instead of “\English”.
4 If you have never installed the joystick driver, a message below appears. Insert Windows95 CD-ROM or
disk, click the [OK] button and install the joystick driver.
This completes all the installation procedures.
6
Page 7
Verifying the DS-XG Driver Installation
To see if the DS-XG device driver has been installed successfully, complete the following steps:
1 Click the [Start] button on the Windows taskbar.
2 Highlight [Settings] and click [Control Panel].
3 The Control Panel now appears. Double-click the “System” icon.
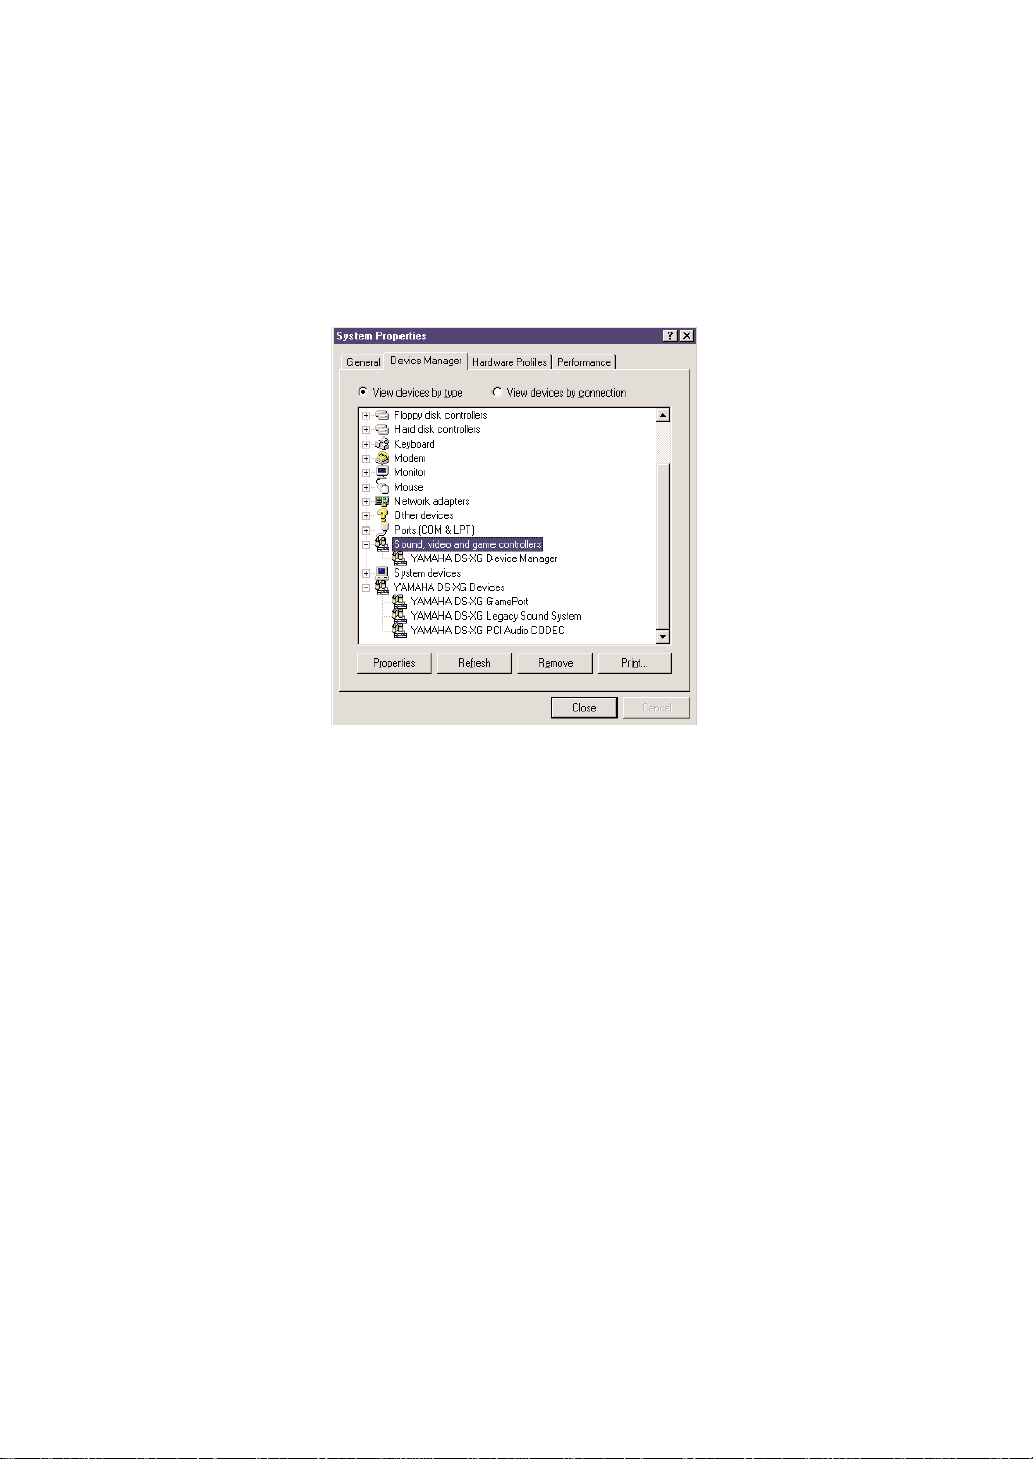
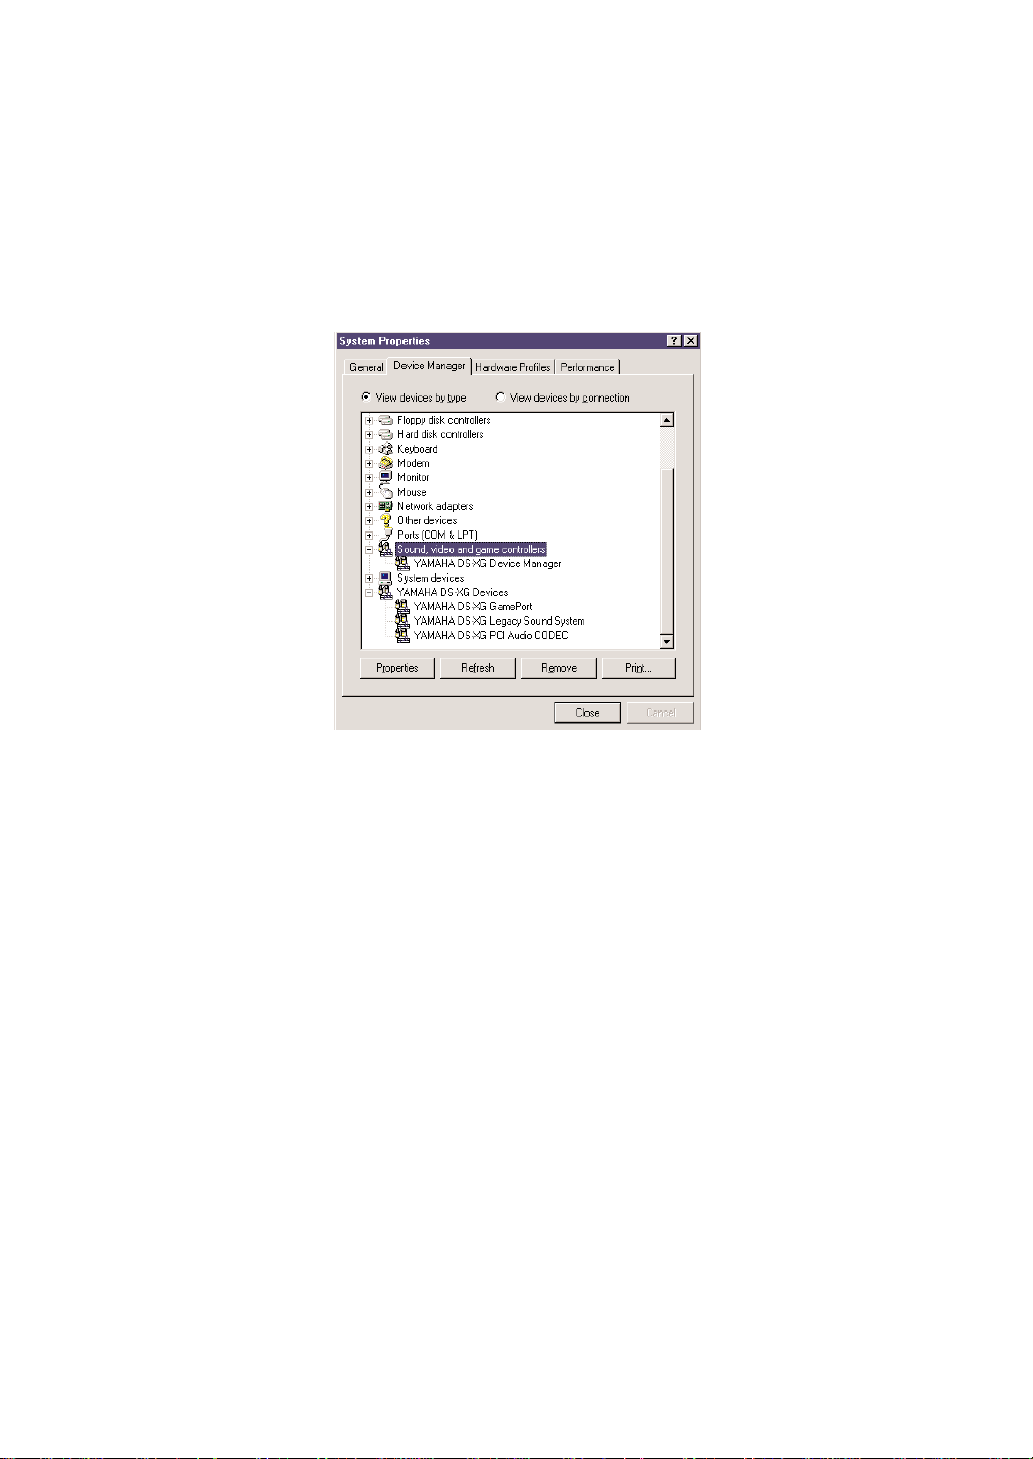
4 The System Properties window now appears. Click on the “Device Manager” tab as shown below. The
Device Manager page now appears as shown.
5 In the hierarchical directory structure illustrated above, double-click on “Sound, video and game
controllers” and verify that “YAMAHADS-XG Device Manager” is listed as shown.
6 Double-click on “YAMAHA DS-XG Devices” and verify that the following devices are listed as illustrated
above.
• YAMAHA DS-XG GamePort
• YAMAHA DS-XG Legacy Sound System
• YAMAHA DS-XG PCI Audio CODEC
n There may be an exclamation mark (!) shown next to one of above device names when you have another sound device installed,
in addition to the WAVEFORCE card. The exclamation mark shows that the WAVEFORCE card conflicts the existing sound
device. To solve this problem, you should take either of the following:
• Remove the driver software of the conflicting device.
• Manually adjust the resource configuration (IRQ or so on) of the conflicting device.
n If the DS-XG device driver has not been installed successfully, uninstall it (→P.28) and retry the installation.
7
Page 8
Installing the DS-XG Driver Software for Windows 95 OSR2 (4.00.950b)
The WAVEFORCE soundcard is a Windows 95 Plug-and-Play device. Once the soundcard is installed and
your computer is rebooted, Windows 95 will automatically detect the device and start the Install Wizard.
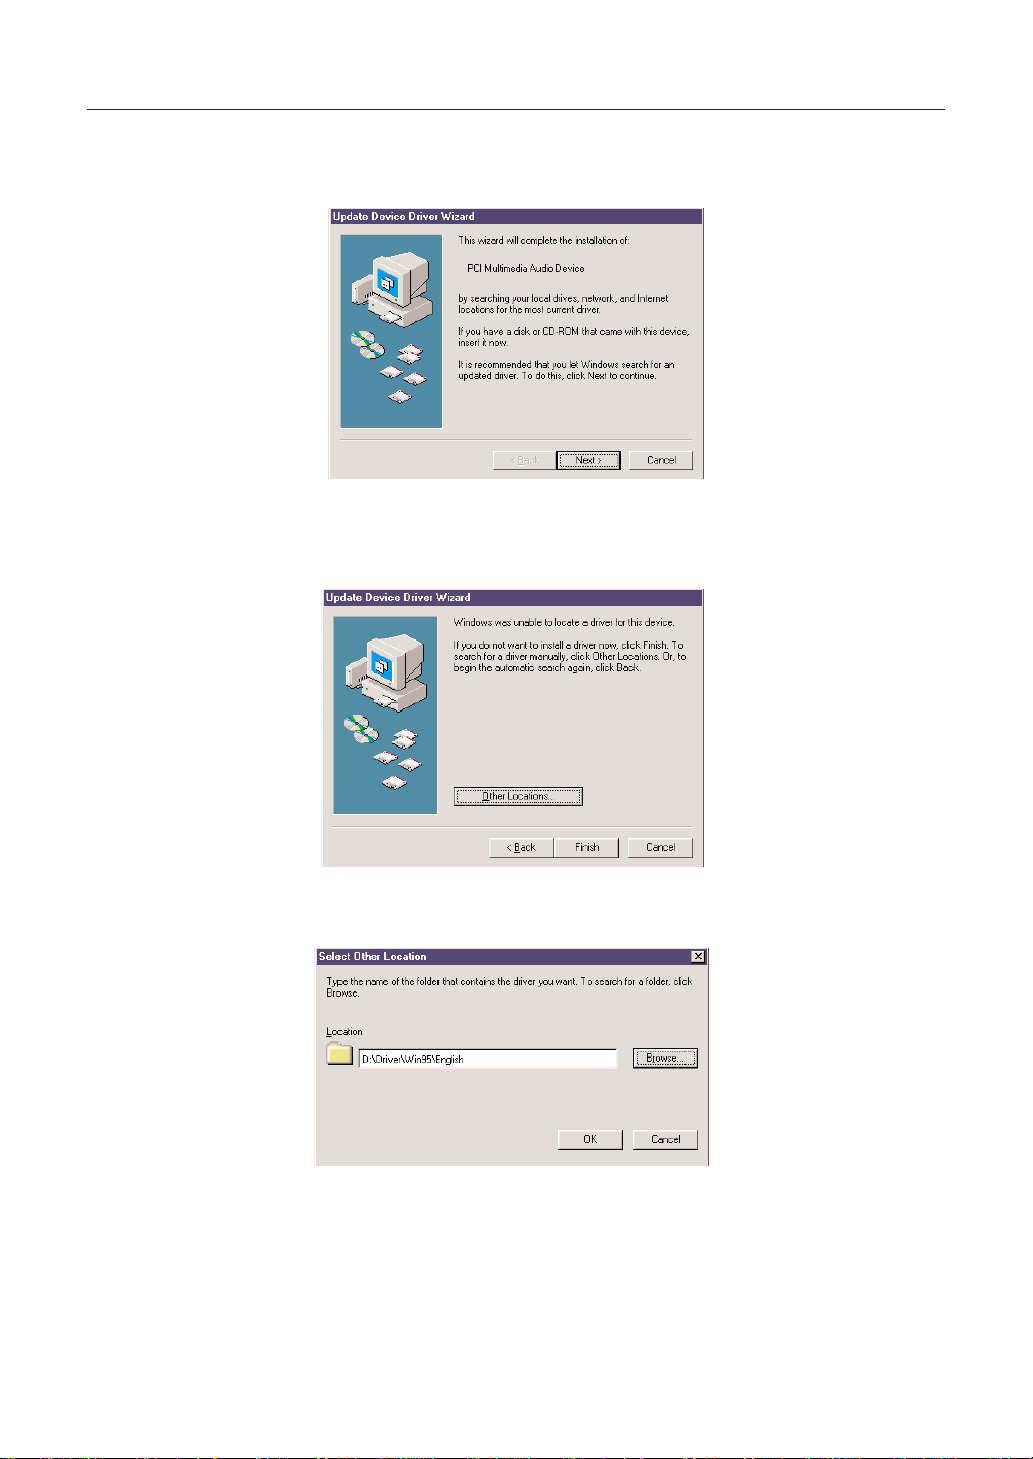
The Updated Device Driver Wizard window will appear as shown below.
1 Insert the WF192XG Installation Wizard CD-ROM in your CD drive and click the [Next] button to continue.
2 The information displayed in Update Device Driver Wizard window will now change as shown below. Click
the [Other Locations] button to continue.
3 Click the [Browse] button, select CD-ROM drive and the folder “Drivers\Win95\English”. Then click the
[OK] button.
8
Page 9
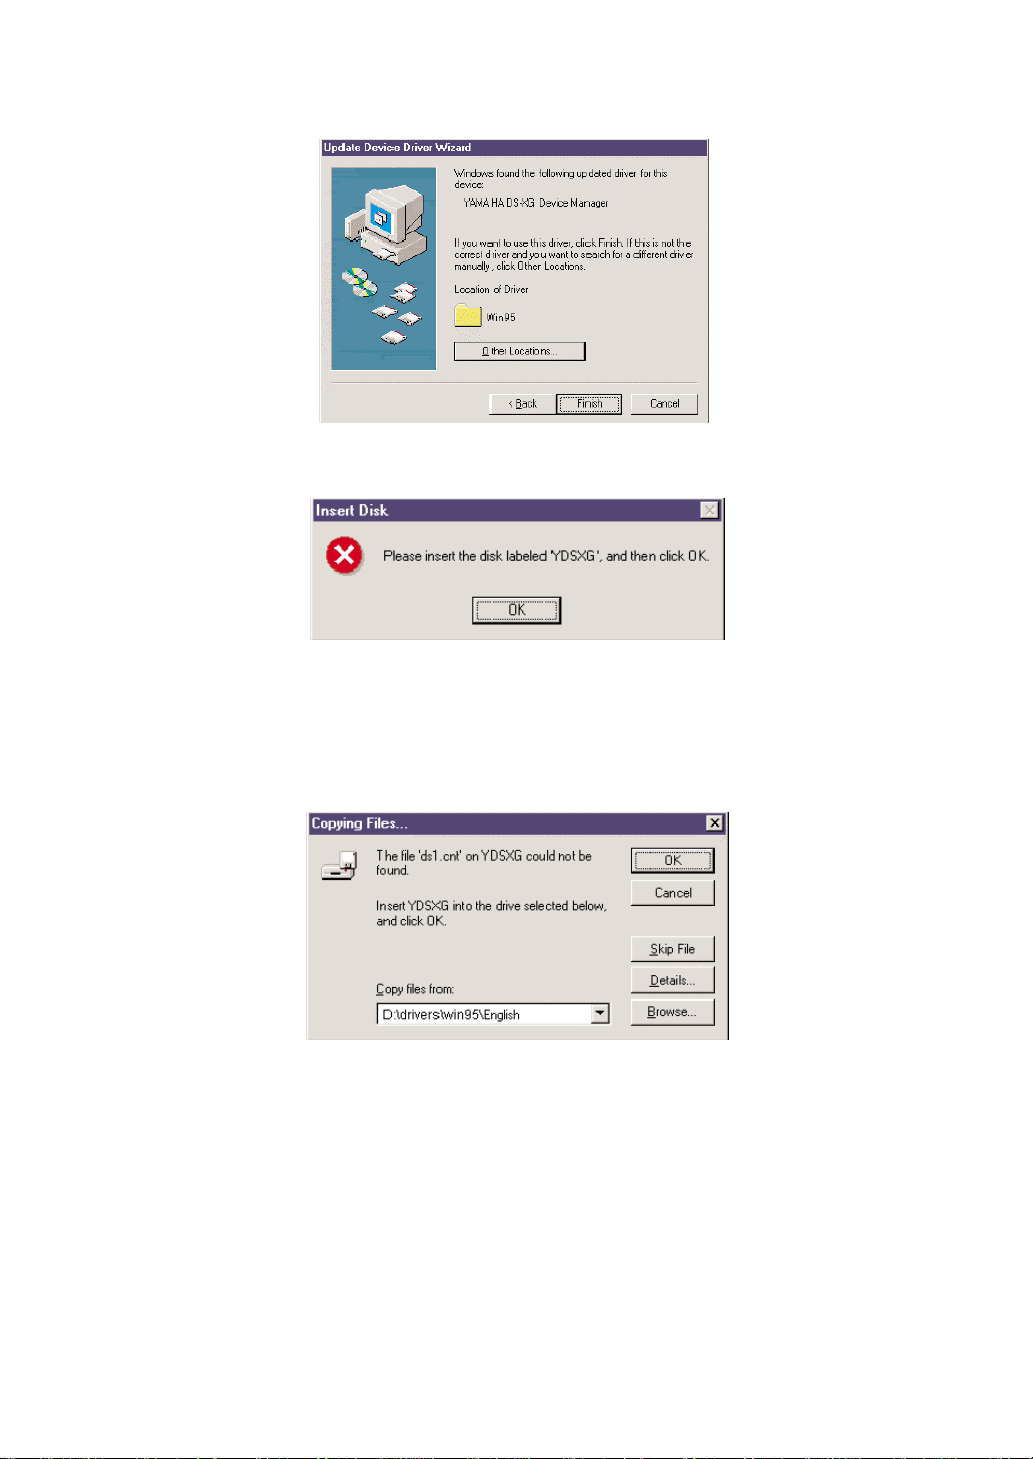
4 The information displayed in the Updated Device Driver Wizard window will now change as shown below.
Verify that “YAMAHA DS-XG Device Manager” is displayed as shown and click the [Finish] button.
5 The Insert Disk window will now appear as shown below and you will be prompted to insert a disk. Simply
click the [OK] button to continue.
6 Windows 95 will now copy the necessary files to your computer. If the Copying Files window appears as
shown below, then edit the path box with the following values:
D:\drivers\win95\English
n If your CD drive is other than “D”, input the actual drive in the path box. (e.g. “E:\drivers\win95\English” “F:\drivers\win95\English”)
n The folder “drivers\win95\Italian” and “drivers\win95\Spanish” are also available instead of “\English”.
Click the [OK] button to continue with the installation.
This completes the installation process of the DS-XG Device Manager.
Consecutively, install the device drivers for PCI Audio Codec, Legacy Sound System and Legacy Game Port.
9
Page 10
Installing the Device Drivers for PCI Audio Codec, Legacy Sound System and Legacy Game Port
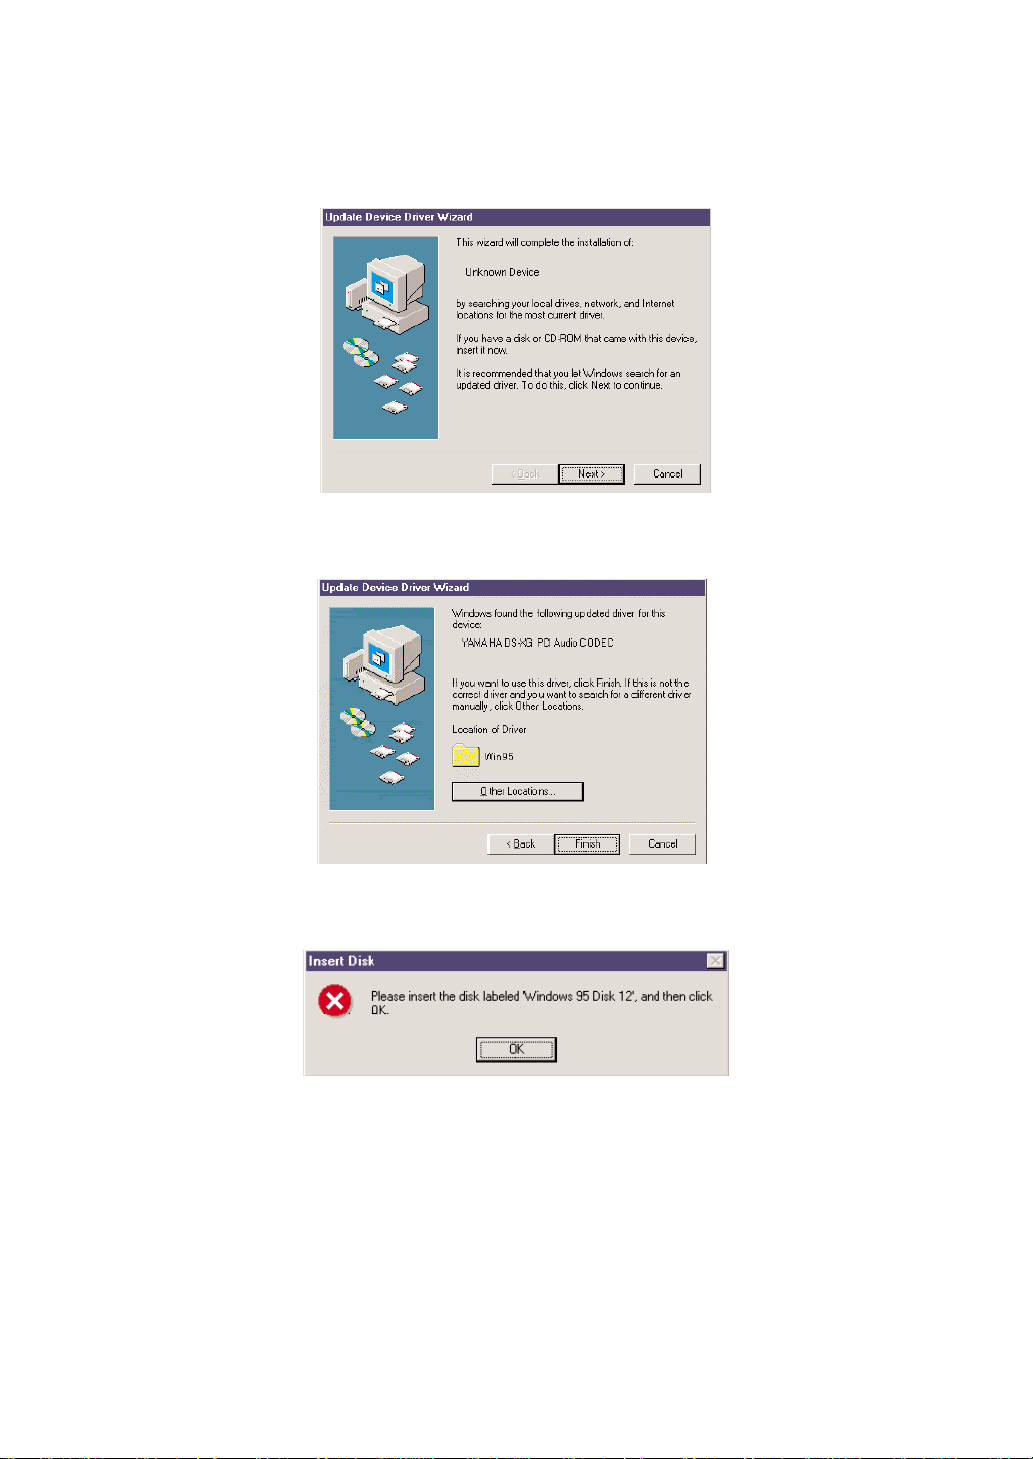
1 Once the DS-XG Device Manager installation is complete, the Update Device Driver Wizard window will
appear as shown below. Insert the WF192XG Installation Wizard CD-ROM in your CD drive and click the
[Next] button to continue.
2 The information displayed in the Updated Device Driver Wizard window will now change as shown below.
Verify that “YAMAHA DS-XG PCI Audio CODEC” is displayed as shown and click the [Finish] button.
3 If you have never installed the joystick driver, a message below appears. Insert Windows95 CD-ROM or
disk, click the [OK] button and install the joystick driver.
This completes all the installation procedures.
10
Page 11
Verifying the DS-XG Driver Installation
To see if the DS-XG device driver has been installed successfully, complete the following steps:
1 Click the [Start] button on the Windows taskbar.
2 Highlight [Settings] and click [Control Panel].
3 The Control Panel now appears. Double-click the “System” icon.
4 The System Properties window now appears. Click on the “Device Manager” tab as shown below. The
Device Manager page now appears as shown.
5 In the hierarchical directory structure illustrated above, double-click on “Sound, video and game
controllers” and verify that “YAMAHADS-XG Device Manager” is listed as shown.
6 Double-click on “YAMAHA DS-XG Devices” and verify that the following devices are listed as illustrated
above.
• YAMAHA DS-XG GamePort
• YAMAHA DS-XG Legacy Sound System
• YAMAHA DS-XG PCI Audio CODEC
n There may be an exclamation mark (!) shown next to one of above device names when you have another sound device installed,
in addition to the WAVEFORCE card. The exclamation mark shows that the WAVEFORCE card conflicts the existing sound
device. To solve this problem, you should take either of the following:
• Remove the driver software of the conflicting device.
• Manually adjust the resource configuration (IRQ or so on) of the conflicting device.
n If the DS-XG device driver has not been installed successfully, uninstall it (→P.28) and retry the installation.
11
Page 12
Installing the DS-XG Driver Software for Windows 98 ver.1.0
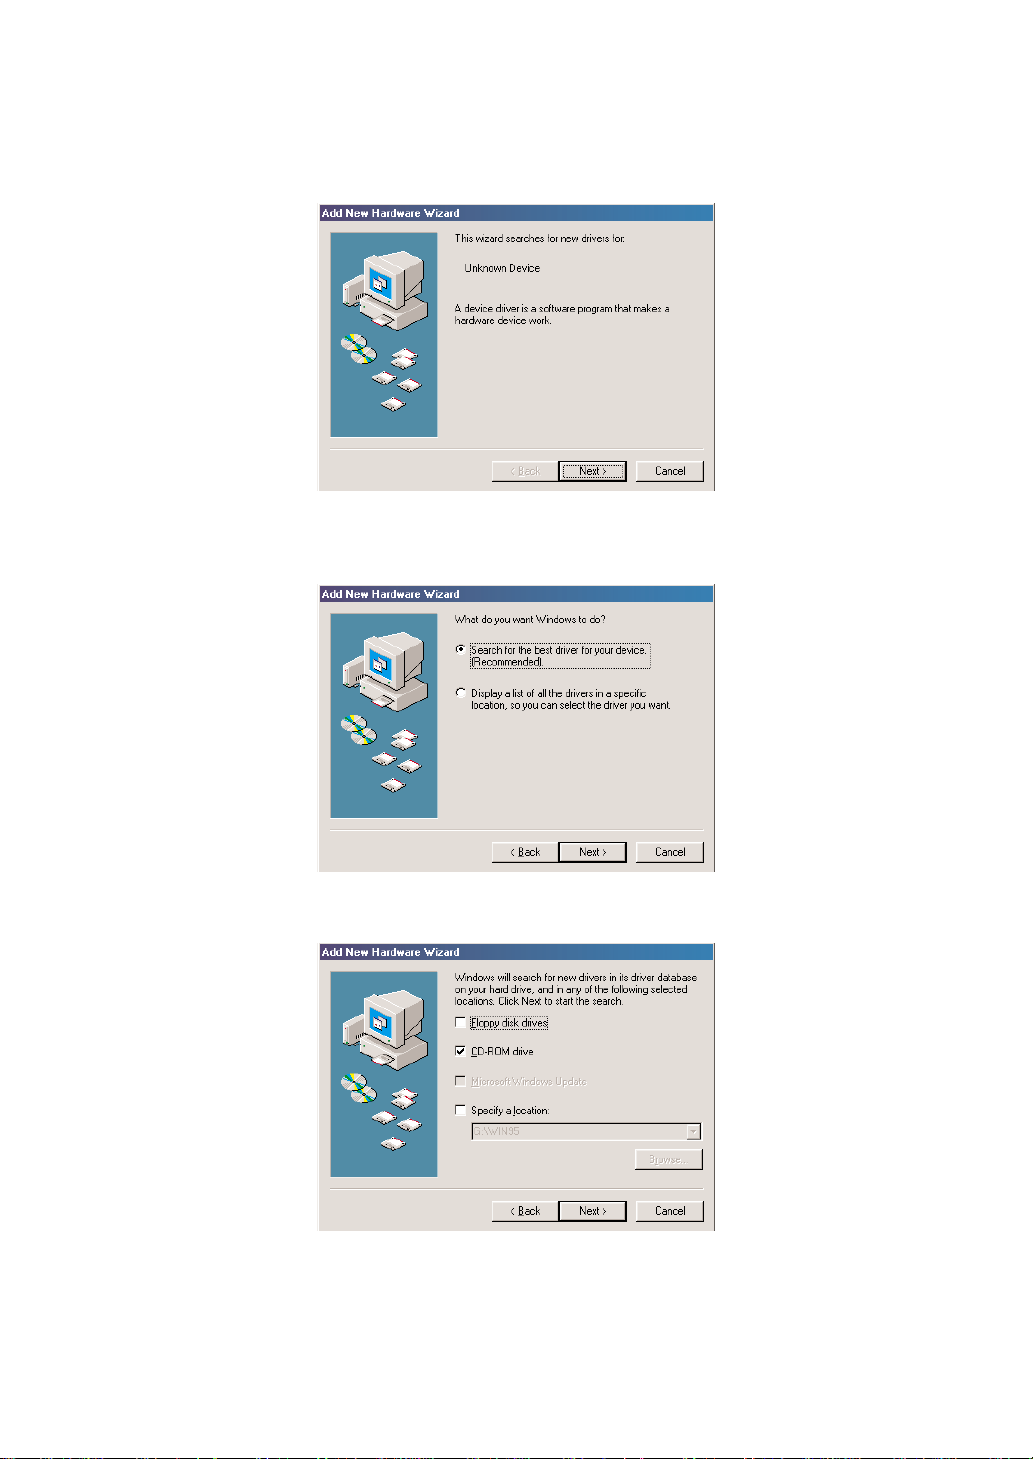
The WAVEFORCE soundcard is a Windows 98 Plug-and-Play device. Once the soundcard is installed and
your computer is rebooted, Windows 98 will automatically detect the device and start the Install Wizard.
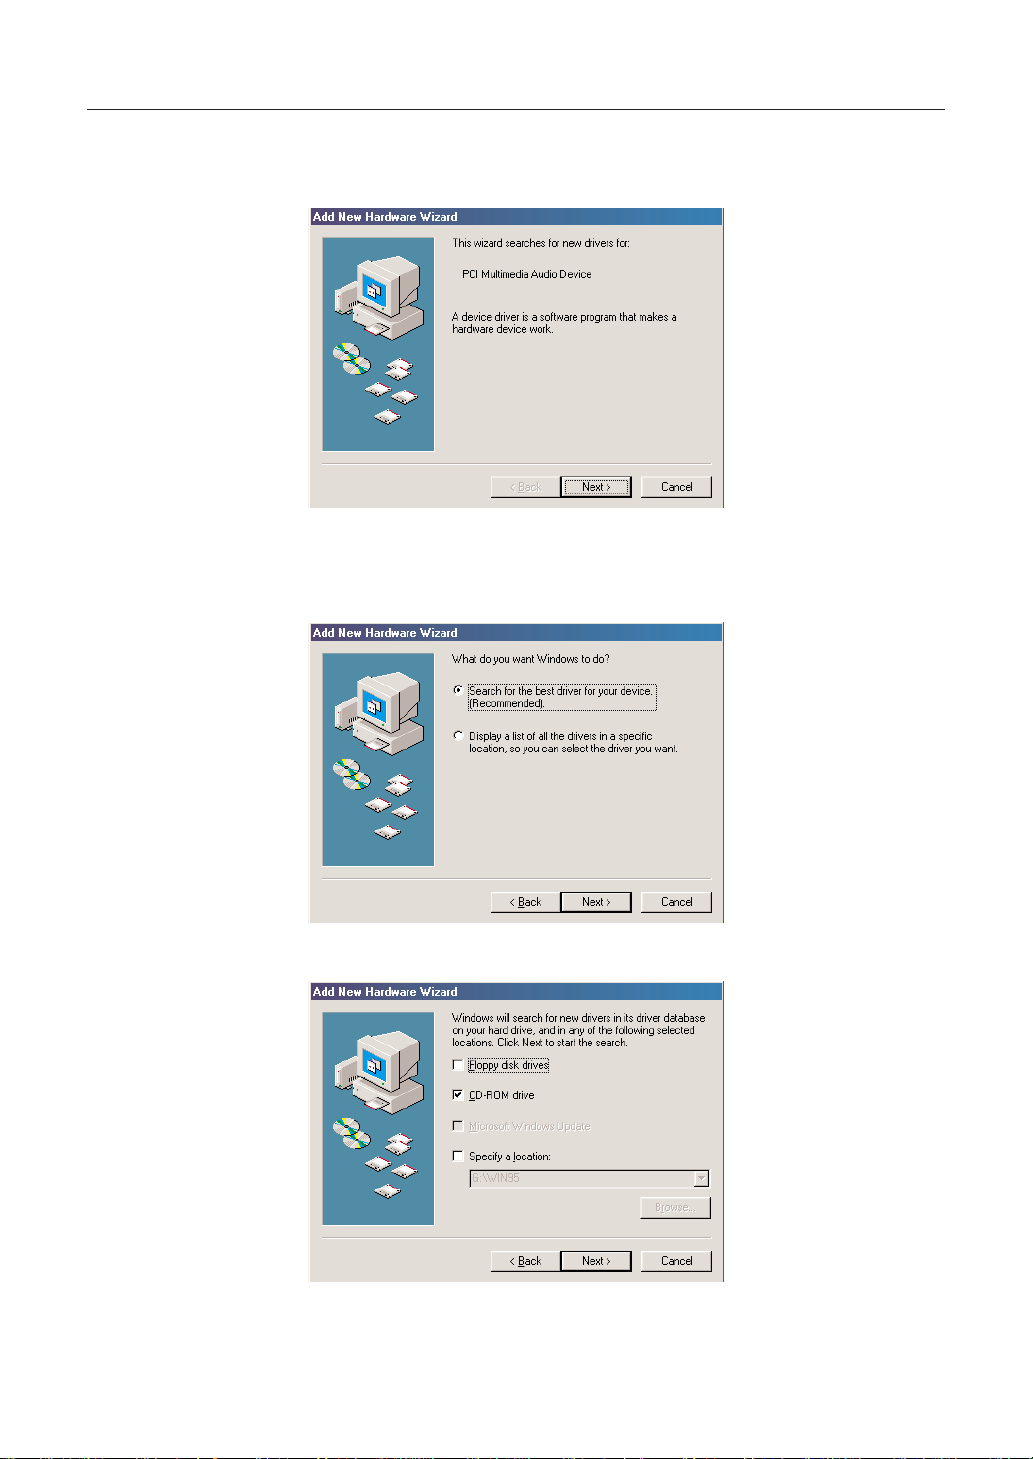
The Add New Hardware Wizard window will appear as shown below.
1 Insert the WF192XG Installation Wizard CD-ROM in your CD drive and click the [Next] button to continue.
2 The information displayed in Add New Hardware Wizard window will now change as shown below. Select
“Search for the best driver for your device. (Recommended).” and click the [Next] button.
3 Select “CD-ROM drive” and click the [Next] button.
12
Page 13
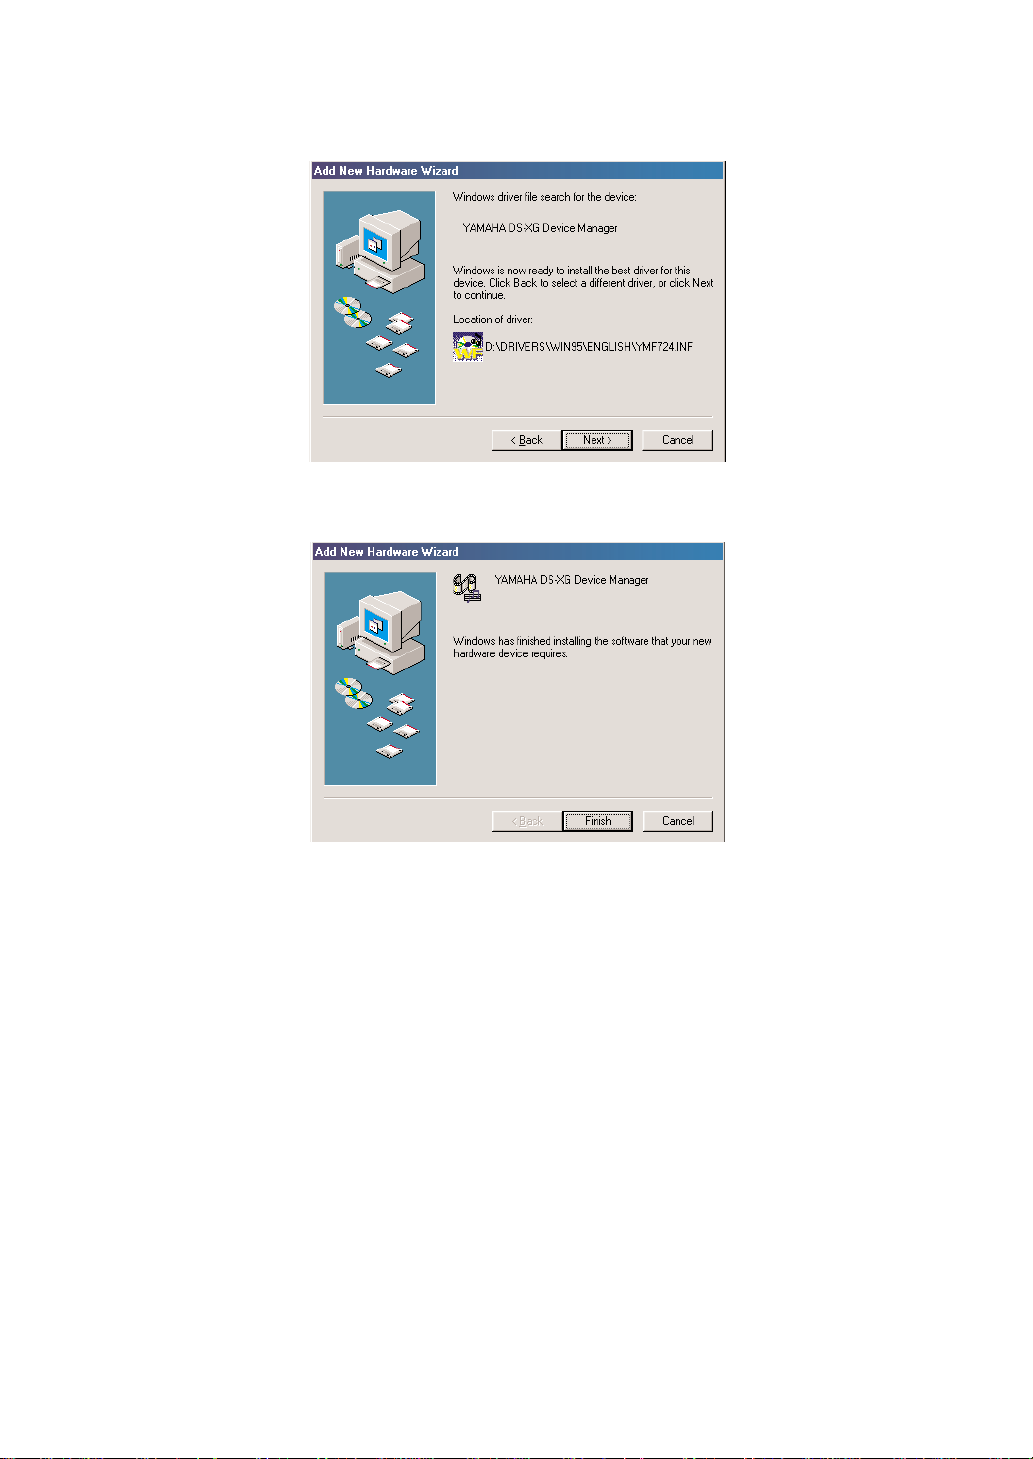
4 Windows 98 will now search for the DS-XG Device Manager by scanning the CD-ROM automatically.
Verify that “YAMAHA DS-XG Device Manager” is displayed in the Add New Hardware Wizard window as
shown below and click the [Next] button.
5 The Add New Hardware Wizard window will tell you that “Windows has finished installing the software” as
shown below. Click the [Finish] button.
This completes the installation process of the DS-XG Device Manager.
Consecutively, install the device drivers for PCI Audio Codec, Legacy Sound System and Legacy Game Port.
13
Page 14
Installing the Device Drivers for PCI Audio Codec, Legacy Sound System and Legacy Game Port
1 Once the DS-XG Device Manager installation is complete, the Add New Hardware Wizard window will
appear as shown below. Insert the WF192XG Installation Wizard CD-ROM in your CD drive and click the
[Next] button to continue.
2 The information displayed in Add New Hardware Wizard window will now change as shown below. Select
“Search for the best driver for your device. (Recommended).” and click the [Next] button.
3 Select “CD-ROM drive” and click the [Next] button.
14
Page 15
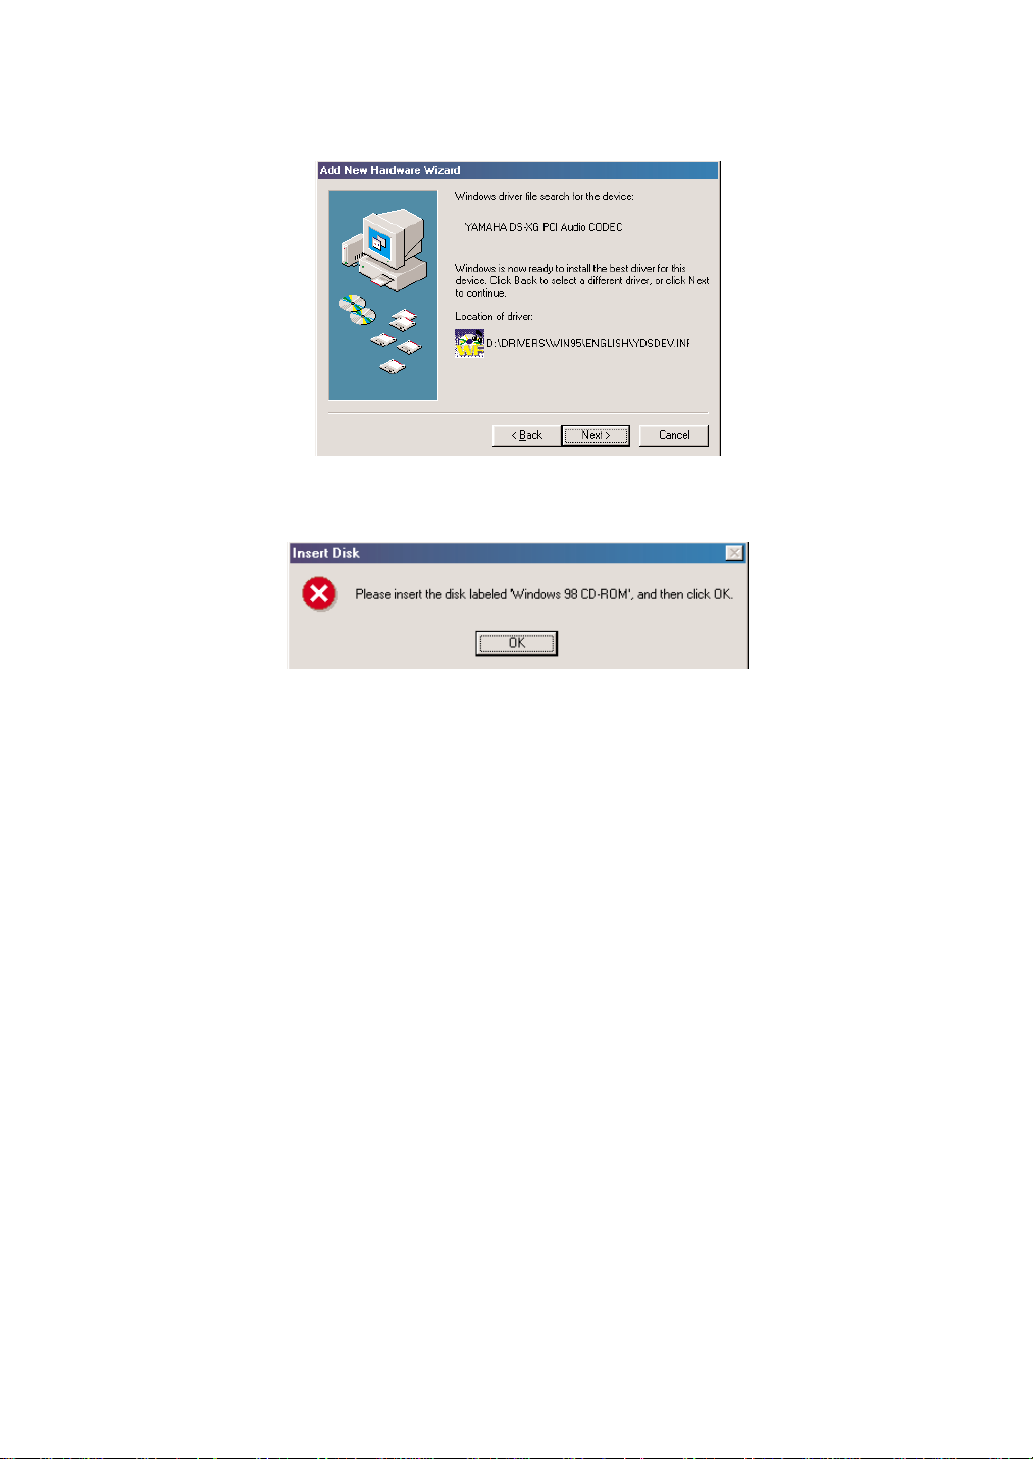
4 Windows 98 will now search for the DS-XG PCI Audio Codec by scanning the CD-ROM automatically.
Verify that “YAMAHA DS-XG PCI Audio Codec” is displayed in the Add New Hardware Wizard window as
shown below and click the [Next] button.
5 If you have never installed the joystick driver, the Insert Disk window appears. Insert Windows 98 CD-
ROM, click the [OK] button and install the joystick driver.
This completes all the installation procedures.
15
Page 16
Verifying the DS-XG Driver Installation
To see if the DS-XG device driver has been installed successfully, complete the following steps:
1 Click the [Start] button on the Windows taskbar.
2 Highlight [Settings] and click [Control Panel].
3 The Control Panel now appears. Double-click the “System” icon.
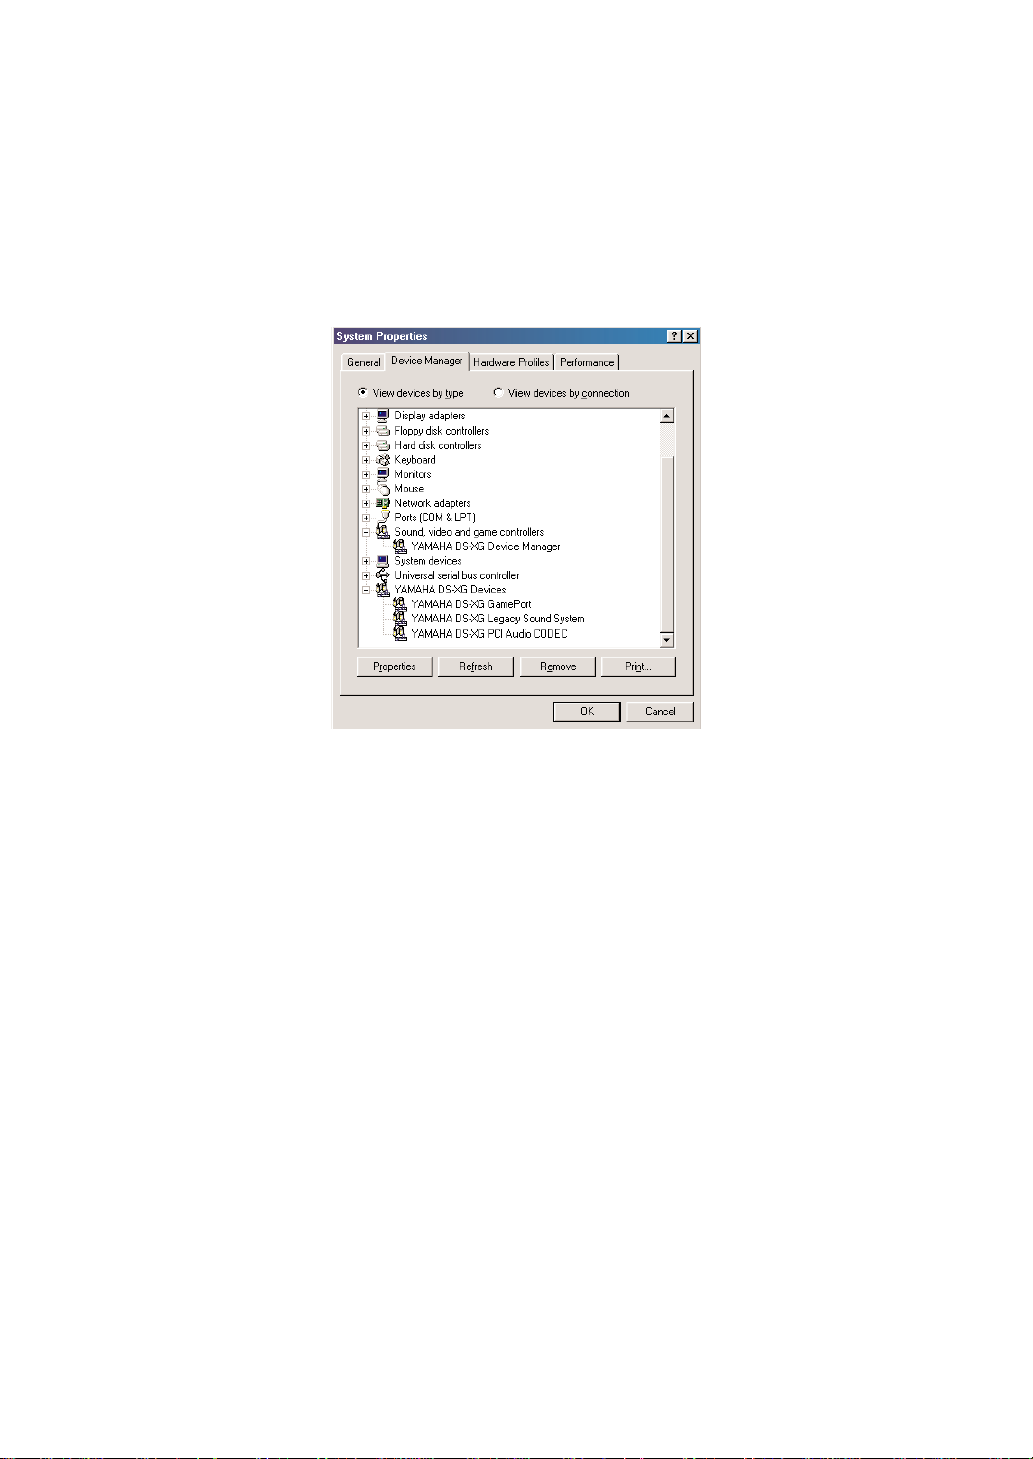
4 The System Properties window now appears. Click on the “Device Manager” tab as shown below. The
Device Manager page now appears as shown.
5 In the hierarchical directory structure illustrated above, double-click on “Sound, video and game
controllers” and verify that “YAMAHADS-XG Device Manager” is listed as shown.
6 Double-click on “YAMAHA DS-XG Devices” and verify that the following devices are listed as illustrated
above.
• YAMAHADS-XG GamePort
• YAMAHA DS-XG Legacy Sound System
• YAMAHA DS-XG PCI Audio CODEC
n There may be an exclamation mark (!) shown next to one of above device names when you have another sound device installed,
in addition to the WAVEFORCE card. The exclamation mark shows that the WAVEFORCE card conflicts the existing sound
device. To solve this problem, you should take either of the following:
• Remove the driver software of the conflicting device.
• Manually adjust the resource configuration (IRQ or so on) of the conflicting device.
n If the DS-XG device driver has not been installed successfully, uninstall it (→P.28) and retry the installation.
16
Page 17
Installing the DS-XG Driver Software for Windows NT 4.0
This section explains the procedures for installing the DS-XG device driver software on your computer.
1 Log on to Windows NT 4.0.
2 Click the [Start] button on the Windows taskbar.
3 Highlight [Settings] and click [Control Panel].
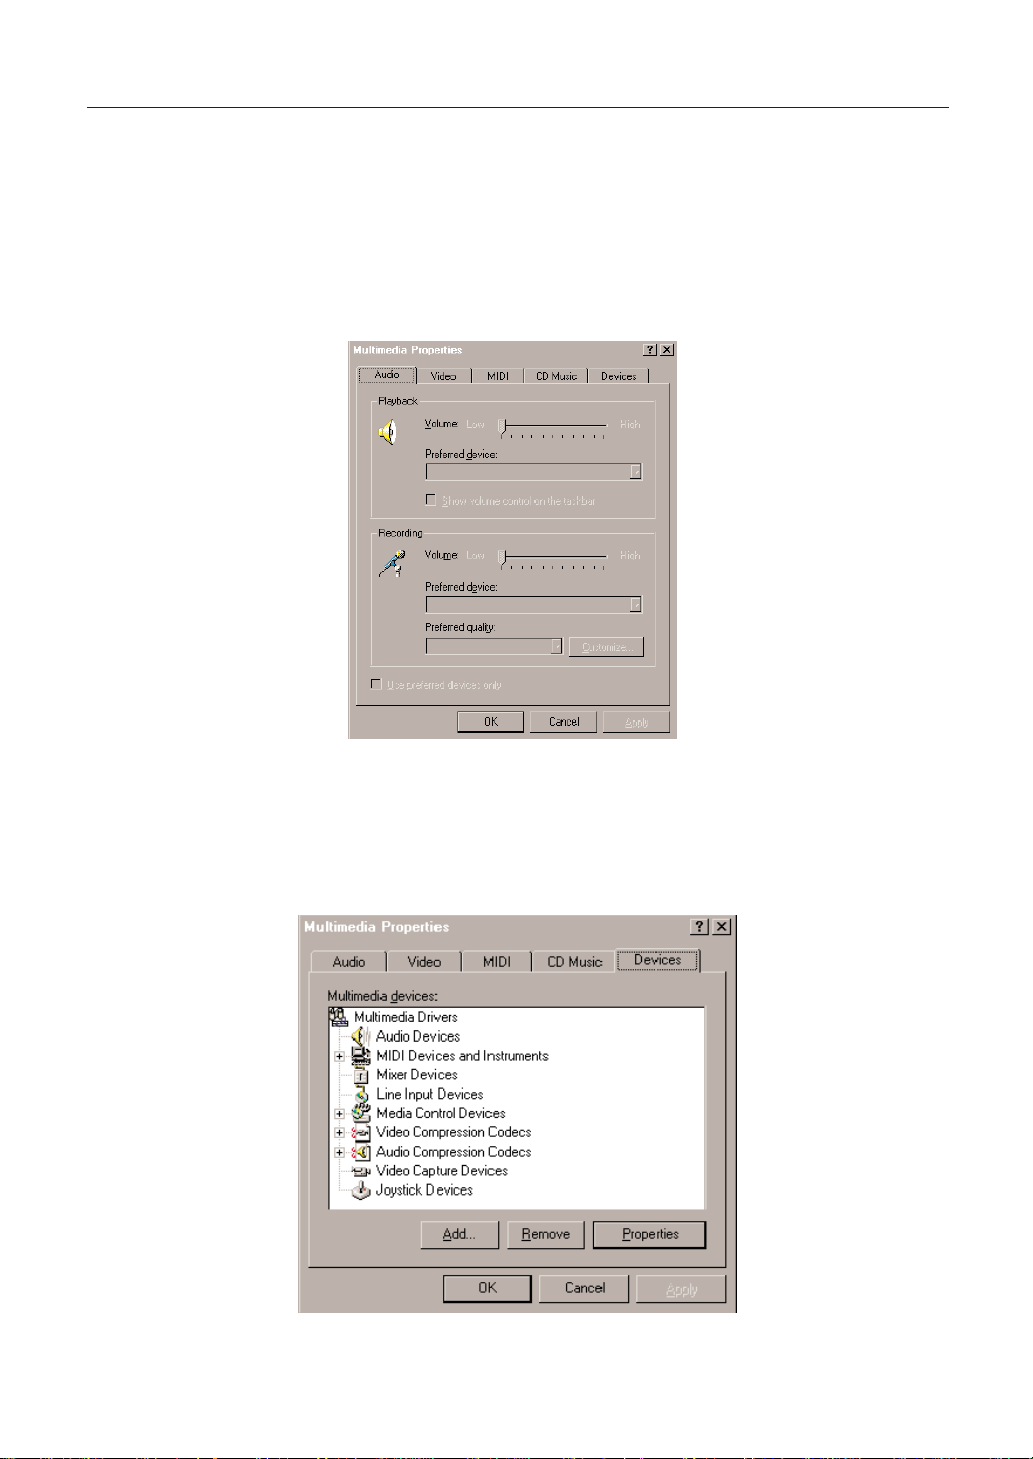
4 The Control Panel now appears. Double-click the “Multimedia” icon.
5 The Multimedia Properties window now appears as shown below. Click on the “Devices” tab.
6 The Devices page is now displayed as shown below. Verify that your computer does not contain any
existing DS-XG audio devices and then click the [Add] button.
n Verify if DS-XG audio devices exist by double-clicking the “Audio Devices” icon. If any drivers are listed, you will need to uninstall
the device by selecting it and then clicking the [Remove] button. Click the [Yes] button to confirm and then the [Restart Now] button
to restart your computer. Once you log on to Windows NT4.0 again, open the “Devices” page and continue with the next step.
17
Page 18
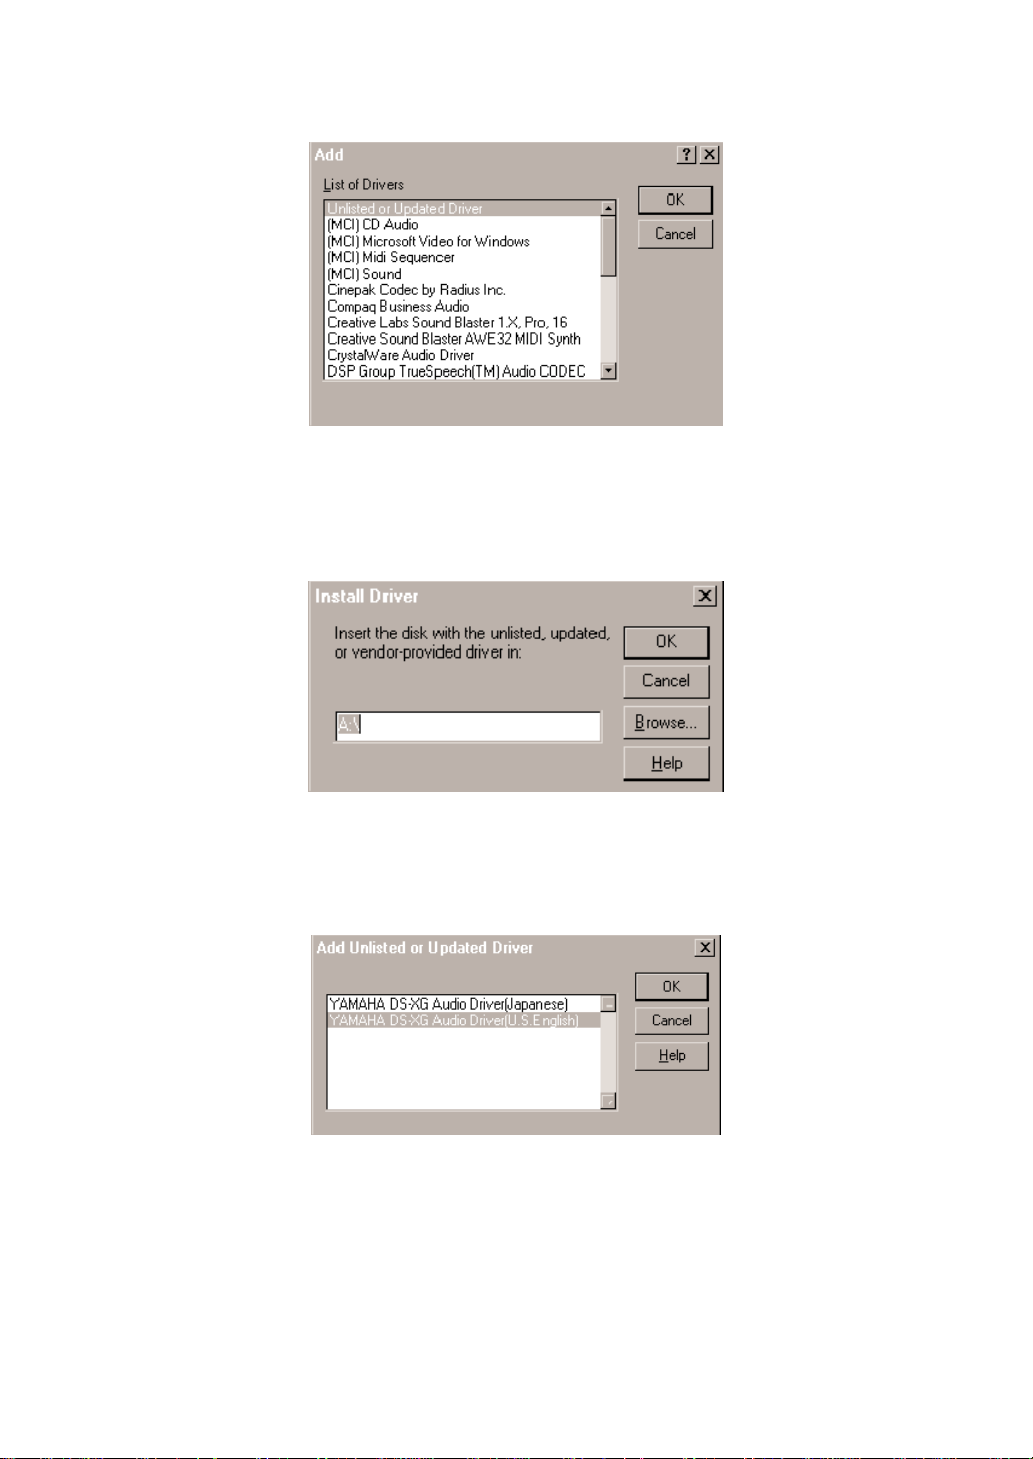
7 The “Add” window now appears. Highlight “Unlisted or Updated Driver” by clicking on it as shown below.
Click the [OK] button.
8 The “Install Driver” window now appears as shown below. Insert the WF192XG Installation Wizard CD-
ROM in your CD drive. In the path box, type:
D:\drivers\winnt
n If your CD drive is other than “D”, input the actual drive in the path box. (e.g. “E:\drivers\winnt” “F:\drivers\winnt”)
Click the [OK] button to continue.
9 The “Add Unlisted or Updated Driver” window now appears prompting you to select a language. Click on
the desired language in the list and click the [OK] button as shown below.
18
Page 19
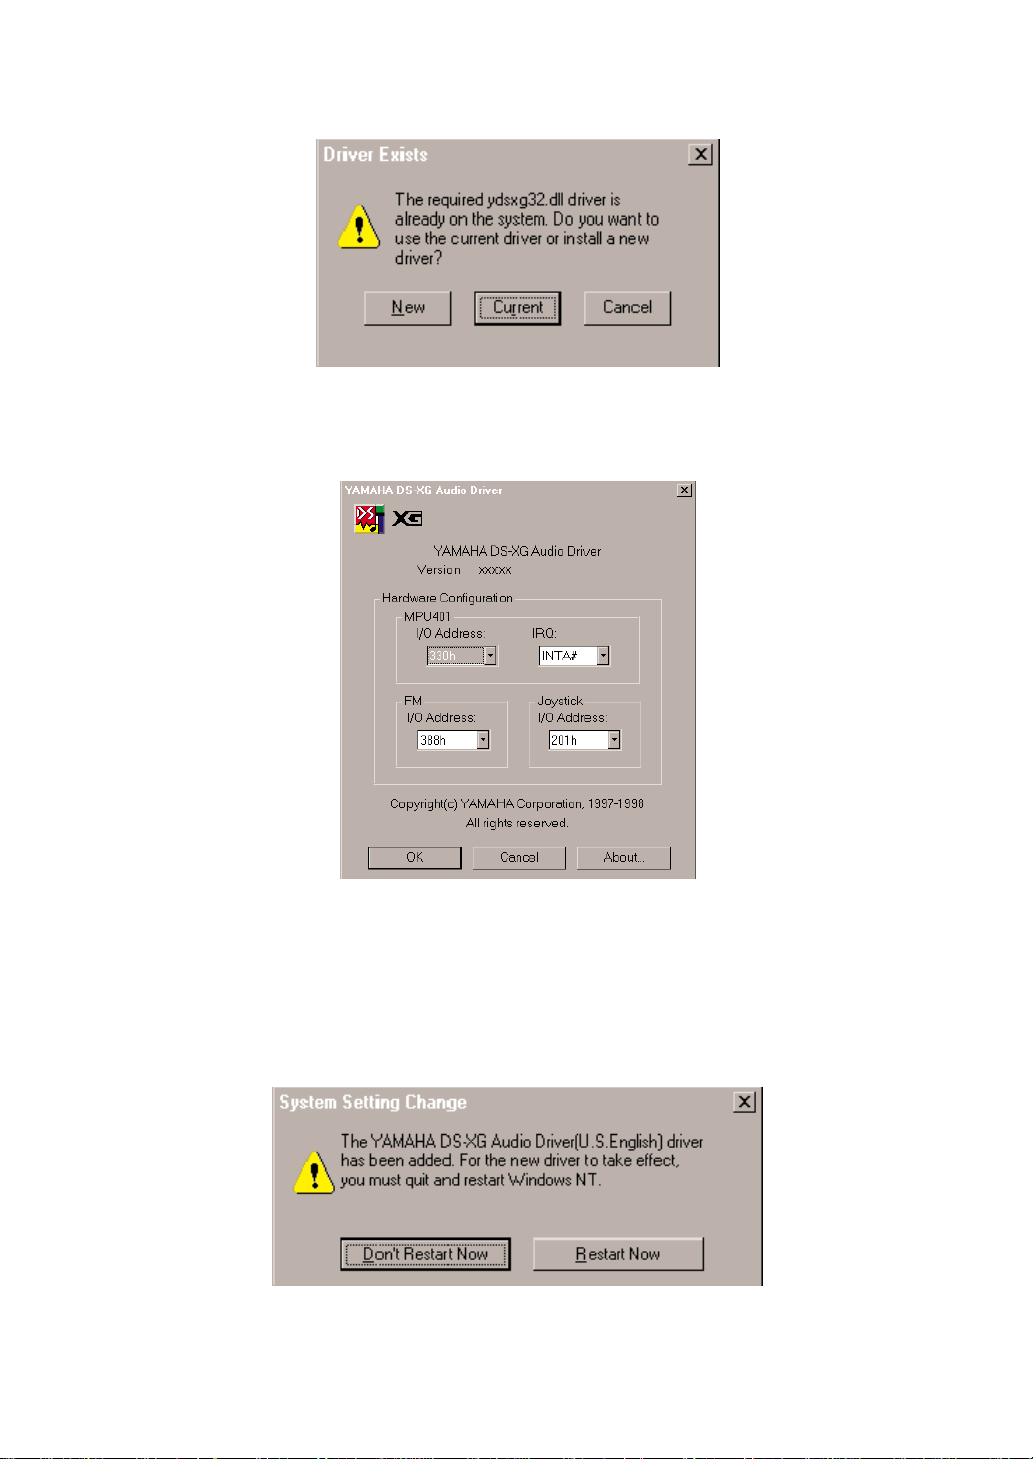
) If the “Driver Exists” window appears as shown below, click the [New] button to overwrite the existing
driver.
! Windows NT will now copy the necessary files to your computer. When the “YAMAHA DS-XG Audio
Driver” window appears, verify that the MPU401 I/O address, IRQ, FM I/O address and Joystick I/O
address settings are correct as shown below. Click the [OK] button to continue.
n In case any of the above settings (for the MPU401 I/O address, FM I/O address and Joystick I/O address) conflict with address
settings of other devices, change the values for above settings to avoid any conflict.
n You don’t need to change the default IRQ setting (INTA#) for MPU401. However, when attaching the WF192XG soundcard to
the motherboard using the PC/PCI cable provided, to play a DOS game in DOS real mode, you should change the above IRQ
setting to match the one that DOS game requires.
@ The “System Setting Change” window will now appear as shown below and you will be prompted to restart
your computer. Click the [Restart Now] button.
Your computer will now restart. This completes the installation of the DS-XG device drivers.
Select “MIDI for YAMAHA DS-XG Synthesizer” for MIDI output device in the Control Panel’s Multimedia
Properties.
19
Page 20
Adjusting the DS-XG Mixer Control Settings
Once all DS-XG device drivers are installed, you can use the Windows standard volume control to adjust the
volume level of selected audio devices by following the procedures in this section.
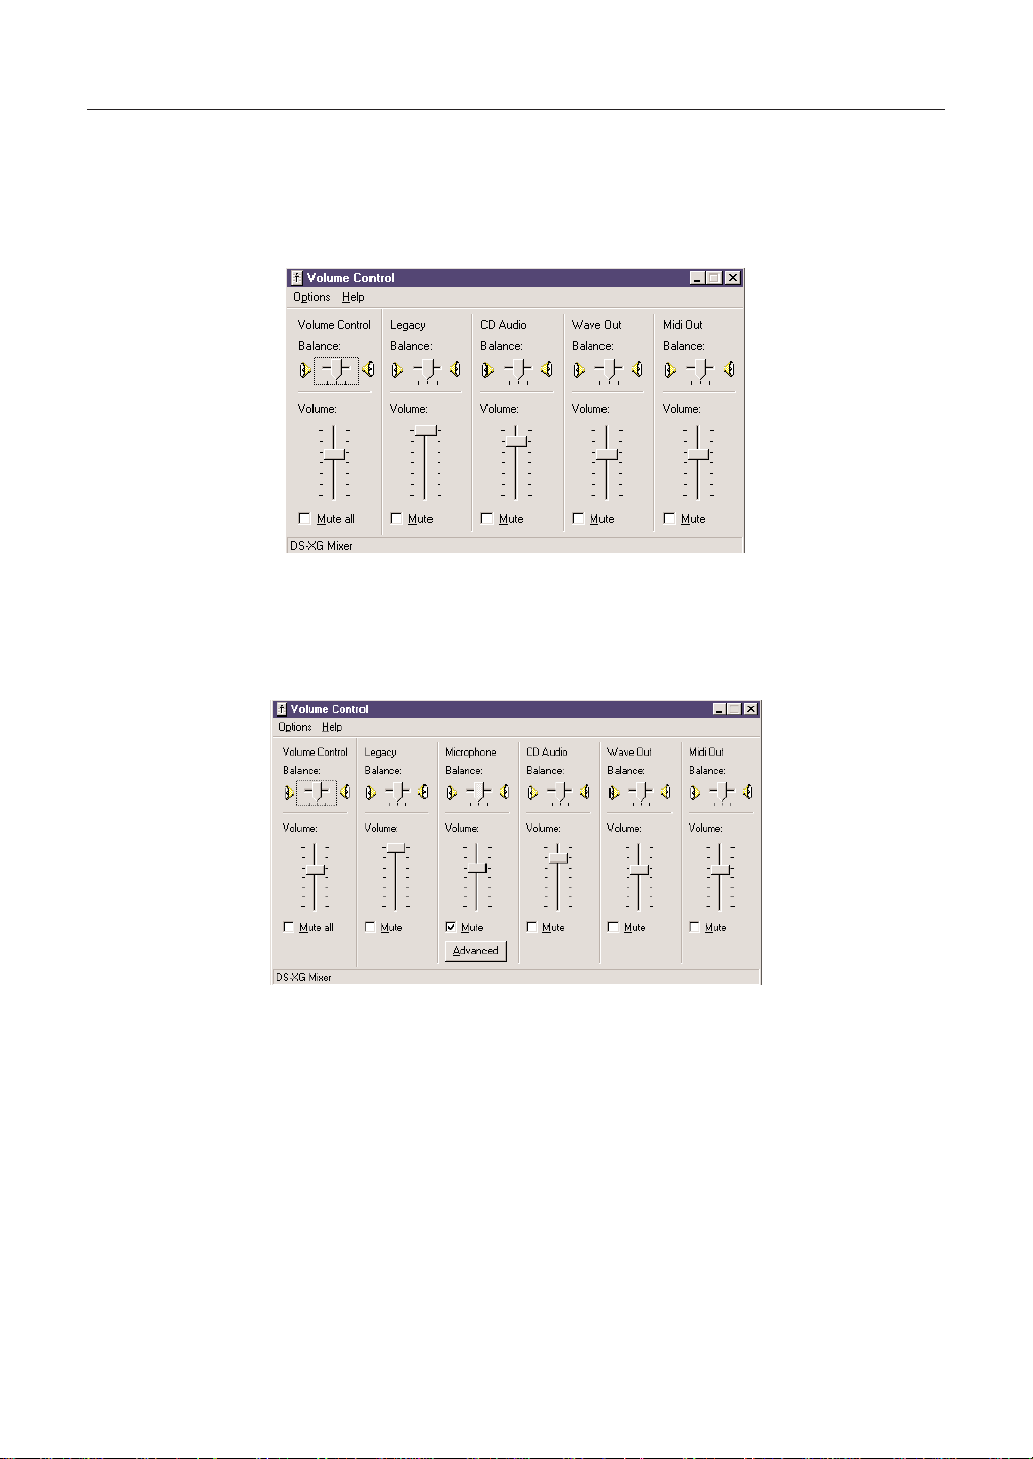
1 Click on the Speaker icon located in the bottom rightmost corner of the Windows taskbar.
2 The DS-XG mixer control starts and the Volume Control window is displayed as shown below.
3 Adjust the volume as desired for each audio device by dragging the slide-bars vertically. You may also
click on [Options] in the menu bar and then click on [Properties].
4 To access the advanced controls for the Microphone device, first click on the “Mute” box and then click
the [Advanced] button as below.
20
Page 21

5 The “Advanced Control for Microphone” window will now appear as shown below. If you wish to enable
the Mic20dB setting for your microphone, then click on “Mic20dB Enable” box.
Adjusting the Volume of Recording Devices
This section explains how to use the Windows standard volume control to adjust the volume of recording
devices in your computer.
n The procedures in this section assume that the DS-XG Mixer is already started and the Volume Control window is already displayed.
If this is not the case, refer to the steps illustrated above for the necessary steps to reach this stage.
1 To access the volume control for recording device, click on [Options] in the menu bar and then click on
[Properties].
2 Click on “Recording”. The Recording Control window will now appear as shown below.
3 Adjust the volume as desired for each recording device by dragging the slide-bars vertically.
21
Page 22

DS-XG Driver Configuration
After the DS-XG Driver is installed, the “YAMAHADS-XG Audio Config.” icon will be located in the Windows’
Control Panel. You can open the configuration dialog box by double-clicking the icon.
n On Windows NT4.0, only “About” and “Synthesizer” pages are available.
1. About
This field shows the driver’s version information and its copyright notice.
If you click [Help], the help for the DS-XG driver configuration will be displayed.
2. Synthesizer
n On Windows NT4.0, “SONDIUS-XG” check box is not available.
22
Page 23

This field has a mechanism to provide MIDI synthesizer with a variety of magnificent effects such as
reverberation, chorus and variation effects in order to enhance acoustic sound variations richly. You can
select any desired effects among options by clicking the corresponding check boxes respectively. The MIDI
synthesizer is based on the AWM2(Advanced Wave Memory 2) wavetable sound generation method, and
fully supports the XG specification proposed by YAMAHA. Addition of the optional SONDIUS-XG makes it
possible to use virtual acoustic sources (S-VAvoices).
* SONDIUS-XG(http://www .sondius-xg.com) is a registered trademark that Stanford University in the United
States and YAMAHA Corporation hold jointly.
* GM is a registered trademark of Association of Musical Electronics Industry(AMEI).
* XG is a registered trademark of Yamaha Corporation.
Reverb
This adds a striking reverberation (resounding) effect to the acoustic sound just as if it could give you echoback sound with concert-hall ambience.
n This effect is only available for MIDI sounds, not for other audio sounds.
Chorus
This adds a chorus-swelling and spreading effect to the musical sound.
n This effect is only available for MIDI sounds, not for other audio sounds.
Variation
This is one of the effects available in compliance with the YAMAHA XG standard specification, and achieves
some certain sound effects with capabilities such as distortion, overdrive, etc. including Reverberation and
Chorus features.
n This effect is only available for MIDI sounds, not for other audio sounds.
SONDIUS-XG
The SONDIUS-XG produces acoustic sound outputs by running a virtual simulation of the actual acoustic
instrument operation. Therefore, it provides much more real-world acoustic sound outputs fundamentally
different from the AWM2 wavetable sound generator that simply processes the recorded acoustic sound
sources only. The DS-XG supports a single virtual acoustic sound source like this, and deals with the virtual
acoustic sound signals called “S-VAvoices” with MIDI data.
The SONDIUS-XG runs on PC with Pentium II/233MHz or higher.
23
Page 24

3. MIC Echo
This field provides a mechanism for applying a Mic echo sound effect to the microphone input. In addition, it
enables any changes of Mic echo setting status.
Enable
You can check this box when it is desirable to apply a Mic echo sound effect to the microphone input. Use
of Mic echo is disabled during the period of recording. Recording is disabled while Mic echo is being used.
Mic echo sound effect will always become invalid after Windows is started up. Volume control should be
performed via microphone input with Windows’ standard volume control capability.
Delay Time
This sets up a Mic echo repetitive cycle period. Moving a slide bar toward the right direction lengthens a cycle
period.
Feedback
This sets up a Mic echo duration period of time. Moving a slide bar toward the right direction lengthens a
duration time.
24
Page 25

4. DOS-BOX
This provides a mechanism to fully support the DOS applications for the Windows DOS-BOX.
MPU401 Out
This field has a mechanism to transfer MIDI data, which is delivered to the MPU401 as output from the DOS
applications, to either MIDI port interface or internal XG synthesizer.
n You should adjust the IRQ or DMAconfiguration of a DOS game to match the configuration in this field.
Serial
Checking this box outputs MIDI data externally through the MPU401 compatible MIDI port.
XG
Checking this box transfers MIDI data to internal XG synthesizer for producing the acoustic sound outputs.
Volume control is performed via MIDI with Windows’ standard volume control capability.
25
Page 26

5. DirectSound
This field provides a mechanism to select the hardware accelerator or software for handling the DirectSound
application.
The hardware accelerator makes a lower CPU utilization. However, if the application does not work properly
with the hardware accelerator, please click the “Disable All” checkbox and the software will take care of this
trouble.
n Please DO NOT click the checkbox while application is being used.
Enable
Checking this box follows to use the hardware accelerator for handling the DirectSound application.
Disable All
Checking this box follows to use the software for handling the DirectSound application.
Disable 3D
Checking this box follows to disable 3D acceleration.
26
Page 27

6. DirectSound3D
This field provides a mechanism to fully support the 3D positional stereo audio mode on the basis of the
Sensaura technology developed by CRL Corp. in England. Selecting this feature makes it possible to enjoy
invariable and unchangeable sound feelings in all-positional area covering as wide as 360 degrees with
stereo speakers and a headphone. Generally such a 3D acoustic sound output can be routed to stereo
speakers or a headphone under the DirectSound 3D settings. However, forced 3D sound output routing
changeover option is available for applications where such an output routing changeover is partly unable.
n Sensaura is a registered trademark of CRL Corp. in England.
Headphone
Checking this box forces the 3D sound mode to change over to optimal one for the headphone. Output
routing changeover for the 3D sound mode under the DirectSound settings is completely neglected.
Speakers
Checking this box forces the 3D sound mode to change over to optimal one for the stereo speakers. Output
routing changeover for the 3D sound mode under the DirectSound settings is completely neglected.
Application Settings
Checking this box follows the output routing changeover under the DirectSound settings.
Audio Testing Program
You can confirm the soundcard properly sounding by using Audio Testing Program. To start this program,
double-click startup.exe icon located in the root directory of the WF192XG Installation Wizard CD-ROM and
follow the Installation Wizard’s instruction.
27
Page 28

Uninstalling the Driver Software
Y ou can uninstall the DS-XG driver by using the Installation Wizard. Double-click the startup.exe icon located
in the root directory of the CD-ROM to start the Installation Wizard, and follow the instruction in the display.
Installation of the Bundled Applications
Application software that came with the card can also be installed using the Installation Wizard in the
supplied CD-ROM (To start the Installation Wizard, double-click startup.exe icon located in the root directory
of the CD-ROM). On installation, follow the message shown in the display. Note that some software is only
usable with Windows 95. Following is a brief description for each application:
n Please refer to the “readme” file, help file or online manual attachached to each application to see its system requirements, how to
use it, and so on.
✱YSTATION 32 (for Windows 95/NT)
Similar to the multimedia applications that comes with Windows 95/NT, this provides an integrated
operability like a sophisticated audio system. Thus, not only you can play an audio CD or MIDI file or WAV
sound files, but also mix different kinds of audio sources to play together. You can even record such a mix
into a WAV file.
• Directory: App\Yst\Setup.exe
✱ Classic 100 (for Windows 95)
With this software, you can play famous classical compositions using an XG sound module on the
soundcard. Since this software gives a description of the composition during playing, you can gain some
knowledge about the music.
• Directory: App\Cla\Classic100-E\Setup.exe
✱ XGworks lite (for Windows 95)
Use this MIDI sequence software to make your own music using an XG sound module on the soundcard
or external sound module.
• Directory: App\Xgwrksl\XGworks lite International\Setup.exe
✱ S-YXG50 (for Windows 95/NT)
Besides 64 polyphonic sounds from the XG sound module on the soundcard, this XG Soft Synthesizer
offers 128 additional polyphonic sounds, with a total of 192 polyphony—origination of the name, Wave
Force 192XG. The Soft Synthesizer offers 676 timbres plus 21 different drum kits along with 3 kinds of
effects, reverb, chorus and variation.
• Directory: App\Syxg50\Win95\sxg50us_\disk1\Setup.exe
App\Syxg50\Winnt\2_00-1\Syxg50e_\disk1\Setup.exe
✱Y amaha W ave Editor TWE (for Windows 95/NT)
Unlike its original name, TWE (Tiny Wave Editor) is a powerful audio wave form editor. It can edit various
formats of AIFF or WA V files for pre- and post-editing audio. As it can record an external audio into a WAV
file, you can fully capture the high-quality sounds from the WAVEFORCE soundcard.
• Directory: App\Twe\Twe-e\Setup.exe
28
Page 29

✱ MIDPLUG (for Windows 95)
This Netscape plug-in software adds MIDI playback functionality to the browser. If you like to visit a MIDIoriented Internet site, it will be quite useful.
• Directory: App\Midplg\Mp95Ev3\Setup.exe
✱ SoundVQ (for Windows 95/NT)
Based on “TwinVQ” audio compression technology developed by Nippon Telegram and Telephone
Corporation (http://www.ntt.co.jp/), this audio codec (encoder/decoder) applications are developed to
transfer high-quality audio via Internet in a possibly less traffic. SoundVQ consists of its encoding
software, SoundVQ Encoder, and decoding software, SoundVQ Player. If you are interested in delivery of
hi-quality audio at your site, these applications may be useful and convenient.
• Directory: App\Svq\Eng\vqe250b1e.exe(vqp250b1e.exe)
✱ DemonStar (for Windows 95)
Experience a great 3D shooting game from Mountain King Studios, with sound enhancement by an XG
sound module on the soundcard! Realistic sound effects plus hi-quality back ground music is always
necessary for serious gamers!
• Directory: App\Dstar\Demods.exe
About “Setupds”
If you install YSTATION 32, an application called “Setupds.exe” is
also installed.
1. What is Setupds
Setupds.exe is an application which makes settings so that the
WF192XG can be used in a Real DOS mode. If you install
YSTATION 32, the Setupds.exe will be copied into C:\Program
Files\YAMAHA\DS-XG.
This application operates on Real DOS mode.
The setting data will be saved in DS.INI
2. Start-up
Click [Shut Down] on the Windows’ [Start] menu and select
“Restart the computer in MS-DOS mode?”. Move the directory
as follows in the Command Prompt:
C:>CD \PROGRA~1\YAMAHA\DS-XG
Start the application.
At the command line, input the following.
Setupds [/s] (/s is optional)
Setupds [/d] (/d is optional)
Setupds [/?] (/? is optional)
If Setupds is started up without an option, a setting dialog box
will appear in the screen.
/s option:
Setupds will make the settings for soundcard I/O port, IRQ,
DMA, and volume settings that were written into the DS.INI file,
will display these settings on the screen, and will exit. (In this
case it will not be possible to change the settings.)
/d option:
Setupds will display the Legacy and Extended Legacy Audio
Control Volume.
/? option:
Setupds will display the options.
3. Operation
When Setupds is started up without an option, a setting dialog
box will appear on the screen. This will display the following.
<When using a keyboard>
[ ↑ ],[ ↓ ] keys Select the item.
[←],[→] keys Select the setting.
[Enter] key Enter to the Sub-menu in Main-menu window.
Decide the setting in Select-menu window.
[ESC] key Return to upper menu in Sub-menu window.
Enter to Exit-menu in Main-menu window.
4. About the default settings
The factory default settings are as follows.
Legacy Audio: Enable
Sound Blaster: I/O=220, IRQ=5, DMA=1
FM: I/O=388
MPU: I/O=330, IRQ=5
Joystick: I/O=201
IRQ Mode: IRQ[5,7,9,10,11]
DMA Mode: PC/PCI
SB Volume: Master= (Lch=0dB, Rch=0dB)
Voice = (Lch=0dB, Rch=0dB)
FM = (Lch=0dB, Rch=0dB)
AC97 Volume: Master= (Lch=0dB, Rch=0dB)
PCM = (Lch=0dB, Rch=0dB)
The others are muted.
At the IRQ and DMAMode, if Setupds judges that the default can
not be used, the other mode is selected or the function is not
used.
5. Testing sound
By using SOUND TEST menu, the following sound’s playback
can be tested.
16 bit sound
8 bit sound(SOUND BLASTER)
FM
29
Page 30

WF192XG PCI SoundCard
External connectors
◆ Mic input (for condenser microphone of approx. 2.5 Volt biased voltage)
◆ Line input Input impedance: 20 Kohms (approx.)
◆ Line output Maximum output: 0.9 Vrms (10 Kohms)
◆ Speaker output Maximum output: 3 Watts (4 ohms)
Internal connectors
◆ CD input Input impedance: 20 Kohms (approx.)
◆ VIDEO input Input impedance: 40 Kohms (approx.)
◆ AUX input Input impedance: 40 Kohms (approx.)
◆ PHONE input Input impedance: 25 Kohms (approx.)
Tone generation
◆ AWM2 (Advanced Wave Memory 2) tone generator
Sound module mode compatibility
◆ S-VA physical modeling tone generator
Specifications
Input impedance: 8 Kohms (approx.)
Maximum input: 1 Vrms/100mVrms
Maximum input: 2 Vrms
Maximum input: 1 Vrms
Maximum input: 1 Vrms
Maximum input: 1 Vrms
Maximum input: 1 Vrms
Number of voices: 676 normal voices, 21 drum voices
Maximum polyphony: 64
Multi-timbral capability: 32 parts
XG/GM mode . . . .
TG300B mode . . . The mode with voice arrangement adopted in the tone generators of
Number of voices: 256
Maximum polyphony: 1
Usual mode for the WAVEFORCE soundcard based on Yamaha’s XG
format, which expands GM (General MIDI) specifications. S-VA
physical modeling voices of the WAVEFORCE soundcard can be
played together in this mode.
the other manufacturer. Depending on the data format of the MIDI
files played, the sound module mode of the WAVEFORCE soundcard
may change to this mode automatically.
Effects
◆ Reverb: 8 types
◆ Chorus: 8 types
◆ Variation effects: 36 types
System requirements
◆ OS Windows95 / WindowsNT 4.0 or later
◆ CPU Pentium / 120 MHz or greater (Pentium II / 233 MHz or greater needed
◆ Memory 32 MB or more
◆ Hardware PCI bus slot, CD-ROM drive for software installation
◆ Software Direct X5 or later
for sounding S-VAvoices.)
Specifications and descriptions in this manual are for information purposes
only.Yamaha Corp. reserves the right to change or modify products or specifications at
any time without prior notice. Since specifications, equipment or options may not be the
same in every locale, please check with your Yamaha dealer.
30
Page 31

FAQ
1: INSTALLATION
Q
What if the WF192XG is not making any sound?
A
Make sure that:
1) You have properly installed the WAVEFORCE soundcard into your PC.
2) The soundcard’s audio output is plugged into an amplifier or pair of powered speakers.
3) Cables are correctly plugged in.
4) You are running Windows95 or Windows NT4.0.
5) You have correctly followed the instructions for installing the soundcard driver (Yamaha DS-XG
driver).
6) The soundcard is recognized by your windows device manager.
7) The device manager is not reporting any conflicts with any other devices. (For more information, see
the resources tab of the device’s properties.)
8) The default device for both audio playback and MIDI output in your multimedia properties box is set
to YAMAHADS-XG.
9) You are playing either a wave audio or standard MIDI file type 0 or type1 through the soundcard.
(Use Media Player to test that the soundcard is working.)
10) If all else fails, remove the soundcard and place it in another available PCI slot, then try again. If
this also fails, take the card to an authorized service center and have them test it. If they find the
card to be working properly, then the problem lies within your system.
Q
How do I install the soundcard in my machine?
A
Installation of any new device into a PC is easy if you apply three simple rules, as follows:
1) Before attempting to install the card, turn off the power of your PC and ground yourself by touching
the outside of the computer case.
2) Do not force the soundcard into a slot, and make sure that the slot you are trying to fit the card into
is the correct type of slot for the card.
3) Make sure the card is secure and screwed in tightly, so that it cannot come loose. This also helps
reduce the amount of background noise due to improper earthing.
Q
What version of Direct X should be installed?
A
For most applications and particularly for games, it is recommended that you run DirectX5.0 or higher.
Q
How do I instruct my PC not to use the S-VA voices?
A
Go to your control panel for the WF192XG (YAMAHADS-XG Audio Config), and deselect SONDIUSXG as the default device in the synthesizer section.
Q
What if I need the latest version of the driver for my WF192XG?
A
Go to the drivers download page on the WAVEFORCE web site, at www.waveforce.com.
31
Page 32

Q
Will the WF192XG work on all motherboards?
A
The WF192XG will work with all motherboards with at least 1 available PCI bus, although some people
have experienced difficulties with the TX & high speed bus range of boards due to voltage level
incompatibilities and the bus speed itself. Contact your board supplier to check.
Q
How do I find out what the latest version of the driver is for the WF192XG and compare this to
my own version?
A
Go to your device manager, select ‘Sound Video and Game controllers’, and the YAMAHA DS-XG
Device Manager will appear. To see which version you are using, double-click on the YAMAHA DS-XG
Device Manager icon and select ‘Driver’.
Q
Does the WF192XG work as an ISA soundcard?
A
In the Windows DOS Box, the WF192XG runs as an ISAsoundcard. However, since many new games
support Direct X technology in Windows95, this should not be a problem. Note that the PCI nature of
the WF192XG means that it will not run in true DOS.
Q
What if the memory map location for the WF192XG is already in use by another card, such as
a legacy device like the Adaptec 1542CF SCSI card?
A
Go to your system properties and click on resources (Control Panel/System/Device
Manager/Properties/Resource Tab), select Manual configuration, and change the setting until you see
‘No conflict’.
2: PLAYING GAMES
Q
Can I install the WF192XG with an ISA soundcard, since I would like to keep running DOS
games as well as Win95 games with XG?
A
Yes, so long as these is no IRQ conflict you can still run your old ISA bus SoundBlaster card at the
same time.
Q
Can WF192XG be used with DOS game?
A
The WF192XG is compatible with an ISA soundcard via the following methods.
PC/PCI
When your motherboard has a PC/PCI connector, connect the cable between the WF192XG and the
motherboard to run DOS game in DOS real-mode.
Note that some games don’t work properly with the above methods, when beyond the limit of software
emulation in DOS programming. Check the DOS game compatibility list on the WAVEFORCE web site.
32
Page 33

Q
What if I am experiencing problems with the audio playback in some of my games?
A
First check for information on the game developer’s web site to see if there are any known problems
within the game. Next, post a message in the relevant newsgroups to see if anyone else has
encountered this problem with any other soundcard. Then, post a message to the Yamaha forum to
see if anyone else has had this problem. If none of this helps, then E-mail us.
Q
Which games have Yamaha tested with the WF192XG?
A
Check the WAVEFORCE web site for information.
Q
What speakers are recommended for use with the WF192XG?
A
Any good hi-fi speakers will be OK. However, we recommend that you use one of our YSTMultimedia
Speakers. Also, try the Yamaha YST sub woofers (available from most Yamaha sales outlets
worldwide.)
Q
What games currently support XG?
A
Basically any game that supports GM will perform without a problem, and will even sound much better
by XG. Some games (such as Final Fantasy VII from SquareSoft, for example) specifically support the
XG system extension. After you hear some of the demo MIDI files that are available for XG and realize
what a massive difference it can make, you may wish to request that your games company seriously
consider supporting XG!
Q
What is DirectSound3D?
A
Microsoft’s 3D-positional audio API, first introduced with DirectX5.0, makes it possible to position and
move audio events (e.g., gunshots, door slams, engine noises, etc.) in a three-dimensional space.
Basically, it depends on the game. The WAVEFORCE web site can inform you of the latest news.
Q
What is DLS?
A
DLS is an acronym which stands for downloadable sounds. A soundcard that supports DLS has a
functionally infinite library of waveforms at its disposal because new sounds can be loaded into
memory, i.e., either system memory or local memory on the card itself. WF192XG has DLS function
included.The DLS driver will be available from the WAVEFORCE web site.
33
Page 34

3: SPECIFICATIONS
Q
What is full duplex, and is the WF192XG full duplex capable?
A
Full duplex is the ability for a soundcard to record and playback audio at the same time. The WF192XG
is able to do this while maintaining full 16-bit 44.1kHz quality.
Q
What wave file types is the WF192XG compatible with (i.e ., what types can it play back)?
A
Pretty much anything. Most of the supported sample rates of audio applications such as Soundforge
or Wavelab are supported, although one or two of the more non-standard ones may not work.
Q
Is the WF192XG a 32-bit device?
A
Yes, the PCI architecture is 32-bit, but as with almost every soundcard in the world, playback of 32-bit
audio files is not possible. The card has 16-bit audio inputs and outputs.
Q
What is the difference between normal XG and SONDIUS-XG
A
SONDIUS-XG is a joint license with Stanford University. The SONDIUS-XG system uses Yamaha’s SVA physical modeling synthesis system (S-VA voices) alongside the wavetable (AWM2) XG engine,
whereas standard XG just uses the wavetable (AWM2) XG aspect. At present SONDIUS-XG is very
CPU intensive.
Q
How do I test for full duplex in Windows 95?
A
Using Sound Recorder, open up a file at 44.1k/16-bit. Whilst playing this file, open up another sound
recorder and record another at the same freq. and bit rate. This should work fine, as all Yamaha DSXG based systems such as the WF192XG are full duplex compatible.
Q
How can I check the Audio wave playback function in Windows?
A
Start the media player and select ‘Sound’ from the Device menu. Then load up any good 16-bit stereo
sound (44.1kHz). Make sure the audio out is connected to your speakers or amplifier, and press play.
Check the cables to your amplifier, and check in the device manager that Windows is not reporting any
conflicts with your soundcard.
34
Page 35

4: GENERAL PC TOPICS
Q
What are samples, waveforms, and wavetables?
A
Simply put, a sample is basically a digital representation of an analog sound, whether it be a piano, an
animal sound, or the sound of breaking glass. Analog sound waves must be converted into binary form
(ones and zeros) before they can be stored and processed by a computer. This conversion is
accomplished by taking pictures (samples) of an analogue waveform (picture of a sound wave) at
regular intervals thousands of times each second. The end of the sample is then linked to the
beginning, forming a continuous loop. A wavetable is a collection, i.e., a library, if you will, of these
waveform samples.
Q
What does the term ‘sampling rate’mean?
A
The sampling rate indicates the speed, measured in thousands of cycles per second, at which analog
audio is converted to digital, or digital audio is converted back to analog. The measurement is
expressed in kilohertz (kHz), so a sampling rate of 44.1kHz would equal 44,100 samples per second.
High sampling rates obviously deliver more accurate representations than low sampling rates because
they capture more information about the sound.
Q
What are DACs and ADCs?
A
A DAC is a digital-to-analog converter. An ADC is an analog-to-digital converter. A DAC is used to play
back digital audio and an ADC is used to digitally record analog audio. Most soundcards have DACs
that play back audio with 16-bit.
Q
What other Yamaha web sites provide information?
A
Try the following:
www.yamaha.co.jp/english/xg
www.yamaha-xg.com
Q
What is Acrobat Reader?
A
Acrobat Reader is a utility that gives users on both Macintosh & PC platforms the ability to read
documents stored in the PDF (Portable Document) Format.
35
Page 36

5: MUSIC AND OTHER APPLICATIONS
Q
What is MIDI?
A
MIDI is an acronym which stands for Musical Instrument Digital Interface. A 5-pin socket running at
31.25kBaud allows communication between compatible devices which adhere to the original MIDI
specification.
Q
Where can I get XG MIDI files from?
A
The Yamaha online shop at www.yamaha.co.uk/shop is a good place to start, but any reputable XG file
outlet can supply good quality MIDI files.
Q
How do I connect to external MIDI equipment?
A
There are two ways:
1) Use the joystick terminal with the optional MDC-01 cable.
2) Use the serial port with a serial cable & serial driver.
Q
What is the AWM2 that is used by the XG aspect of the WF192XG?
A
AWM, or Advanced Wave Memory, is Yamaha’s original system for effectively using sampled
waveforms in synthesizers and tone generators. Although the basis for all AWM voices is a sampled
waveform, e.g., a sample of a real existing instrument, a classic synthesizer sound, or other
electronically created sounds, the AWM system provides an extensive range of envelope generator,
filter, modulation, and other parameters which can be applied to the basic waveform. Furthermore, up
to four ‘elements’, each with its own wave and a complete set of editable parameters, can be assigned
to each voice. The strength of AWM synthesis lies not only in its outstanding sound quality (it uses 16bit, 44.1kHz samples), but also in its extraordinary ability to shape and control the sound of the
samples. AWM synthesis also allows the creation of drum voices in which different drum and
percussion instruments with individual volume, pitch, and timbre parameters can be assigned to
individual notes of a keyboard (from C-2 to G8). The WF192XG feature a built-in sampling system
(utilizing DLS technology) which is capable of sampling sounds from external sources (via line or
microphone). Waveforms sampled using this feature can be used in AWM voices, so your capacity to
create totally new AWM voices is truly unlimited.
DLS driver will be available from the WAVEFORCE web site.
Q
Why don’t the effects work when I play an XG file?
A
Check that the XG file is properly programmed. All files supplied by Yamaha are properly programmed.
Second, check that the Reverb, Chorus and Variation effects are enabled in the Control Panel’s DSXG configuration.
Q
Where can I get an information pack on how to make my own XG files?
A
The XG-compatible MIDI data production document is available online at www.yamaha.co.uk/xg. This
is an Adobe Acrobat Document, which covers everything you need to know about how XG works in full.
Also available are several issue of the acclaimed XGXTRA magazine, again as PDF files. These give
a more informal insight into XG.
36
Page 37

Q
If I make a file on the WF192XG will it playback on my friend’s GM synth or soundcard?
A
Yes, but it won’t sound as good as if you have used XG properly. The fact is that XG has many more
effects and controllable parameters than any other GM synths on the market.
Q
How do I edit and save an XG voice?
A
There are two easy ways. One is to buy a full copy of Xgedit or XGworks from the Y amaha online shop.
The other is to learn as much as possible about sysex using some of our guidebooks which you can
download from the software pages. Simply save the edited voice in the event list of your sequencer
application.
Q
How can I test my XG files in Windows ?
A
Media Payer is one solution although its MIDI playback spec is not exactly the best. Yamaha
recommends an application such as XGworks demo or Xgedit demo which both handle XG very well
and should give an indication of how a correct XG file should sound. Remember that well programmed
XG files will adhere fully to the specifications set down by Yamaha, and that Yamaha cannot
recommend files not supplied directly by this site or by an authorized Y amaha outlet, although there are
many good third party programmers on the net.
Q
Is there an overview of XG?
A
There are several. You may wish to download the XG Specs from our XG home page, or try the online
tutorial quiz , also in the XG home page.
37
Page 38

XG Normal Voice List
Organ 17 0 DrawOrgn 1
32 DetDrwOr 2
33 60sDrOr1 2
34 60sDrOr2 2
35 70sDrOr1 2
36 DrawOrg2 2
37 60sDrOr3 2
38 EvenBar 2
40 16+2"2/3 2
64 Organ Ba 1
65 70sDrOr2 2
66 CheezOrg 2
67 DrawOrg3 2
18 0 PercOrgn 1
24 70sPcOr1 2
32 DetPrcOr 2
33 LiteOrg 2
37 PercOrg2 2
19 0 RockOrgn 2
64 RotaryOr 2
65 SloRotar 2
66 FstRotar 2
20 0 ChrchOrg 2
32 ChurOrg3 2
35 ChurOrg2 2
40 NotreDam 2
64 OrgFlute 2
65 TrmOrgFl 2
21 0 ReedOrgn 1
40 Puff Org 2
22 0 Acordion 2
32 AccordIt 2
23 0 Harmnica 1
32 Harmo 2 2
24 0 TangoAcd 2
64 TngoAcd2 2
Guitar 25 0 NylonGtr 1
16 NylonGt2 1
25 NylonGt3 2
43 VelGtHrm 2
96 Ukulele 1
26 0 SteelGtr 1
16 SteelGt2 1
35 12StrGtr 2
40 Nyln&Stl 2
41 Stl&Body 2
96 Mandolin 2
27 0 Jazz Gtr 1
18 MelloGtr 1
32 JazzAmp 2
28 0 CleanGtr 1
32 ChorusGt 2
29 0 Mute.Gtr 1
40 FunkGtr1 2
41 MuteStlG 2
43 FunkGtr2 2
45 Jazz Man 1
30 0 Ovrdrive 1
43 Gt.Pinch 2
31 0 Dist.Gtr 1
40 FeedbkGt 2
41 FeedbGt2 2
32 0 GtrHarmo 1
65 GtFeedbk 1
66 GtrHrmo2 1
Instrument
Group
Program
#
Bank
#
Voice Name
Ele-
ment
Program
#
Voice Name
Ele-
ment
Program
#
Ele-
ment
Bass 33 0 Aco.Bass 1
40 JazzRthm 2
45 VXUprght 2
34 0 FngrBass 1
18 FingrDrk 2
27 FlangeBa 2
40 Ba&DstEG 2
43 FngrSlap 2
45 FngBass2 2
65 ModAlem 2
35 0 PickBass 1
28 MutePkBa 1
36 0 Fretless 1
32 Fretles2 2
33 Fretles3 2
34 Fretles4 2
96 SynFretl 2
97 Smooth 2
37 0 SlapBas1 1
27 ResoSlap 1
32 PunchThm 2
38 0 SlapBas2 1
43 VeloSlap 2
39 0 SynBass1 1
18 SynBa1Dk 1
20 FastResB 1
24 AcidBass 1
35 Clv Bass 2
40 TeknoBa 2
64 Oscar 2
65 SqrBass 1
66 RubberBa 2
96 Hammer 2
40 0 SynBass2 2
6 MelloSB1 1
12 Seq Bass 2
18 ClkSynBa 2
19 SynBa2Dk 1
32 SmthBa 2 2
40 ModulrBa 2
41 DX Bass 2
64 X WireBa 2
Strings 41 0 Violin 1
8 SlowVln 1
42 0 Viola 1
43 0 Cello 1
44 0 Contrabs 1
45 0 Trem.Str 1
8 SlowTrStr 1
40 Susp Str 2
46 0 Pizz.Str 1
47 0 Harp 1
40 YangChin 2
48 0 Timpani 1
Instrument
Group
Bank
#
Ensemble 49 0 Strings1 1
3 S.Strngs 2
8 SlowStr 1
24 ArcoStr 2
35 60sStrng 2
40 Orchestr 2
41 Orchstr2 2
42 TremOrch 2
45 VeloStr 2
50 0 Strings2 1
3 S.SlwStr 2
8 LegatoSt 2
40 Warm Str 2
41 Kingdom 2
64 70s Str 1
65 Str Ens3 1
51 0 Syn.Str1 2
27 ResoStr 2
64 Syn Str4 2
65 SS Str 2
52 0 Syn.Str2 2
53 0 ChoirAah 1
3 S.Choir 2
16 Ch.Aahs2 2
32 MelChoir 2
40 ChoirStr 2
54 0 VoiceOoh 1
55 0 SynVoice 1
40 SynVox2 2
41 Choral 2
64 AnaVoice 1
56 0 Orch.Hit 2
35 OrchHit2 2
64 Impact 2
Brass 57 0 Trumpet 1
16 Trumpet2 1
17 BriteTrp 2
32 WarmTrp 2
58 0 Trombone 1
18 Trmbone2 2
59 0 Tuba 1
16 Tuba 2 1
60 0 Mute.Trp 1
61 0 Fr.Horn 2
6 FrHrSolo 1
32 FrHorn2 1
37 HornOrch 2
62 0 BrasSect 1
35 Tp&TbSec 2
40 BrssSec2 2
41 HiBrass 2
42 MelloBrs 2
63 0 SynBras1 2
12 QuackBr 2
20 RezSynBr 2
24 PolyBrss 2
27 SynBras3 2
32 JumpBrss 2
45 AnaVelBr 2
64 AnaBrss1 2
64 0 SynBras2 1
18 Soft Brs 2
40 SynBras4 2
41 ChorBrss 2
45 VelBras2 2
64 AnaBras2 2
Instrument
Group
Bank
#
Voice Name
Piano 1 0 GrandPno 1
1 GrndPnoK 1
18 MelloGrP 1
40 PianoStr 2
41 Dream 2
2 0 BritePno 1
1 BritPnoK 1
3 0 E.Grand 2
1 ElGrPnoK 2
32 Det.CP80 2
40 ElGrPno1 2
41 ElGrPno2 2
4 0 HnkyTonk 2
1 HnkyTnkK 2
5 0 E.Piano1 2
1 El.Pno1K 1
18 MelloEP1 2
32 Chor.EP1 2
40 HardEl.P 2
45 VX El.P1 2
64 60sEl.P 1
6 0 E.Piano2 2
1 El.Pno2K 1
32 Chor.EP2 2
33 DX Hard 2
34 DXLegend 2
40 DX Phase 2
41 DX+Analg 2
42 DXKotoEP 2
45 VX El.P2 2
7 0 Harpsi. 1
1 Harpsi.K 1
25 Harpsi.2 2
35 Harpsi.3 2
8 0 Clavi. 2
1 Clavi. K 1
27 ClaviWah 2
64 PulseClv 1
65 PierceCl 2
Chromatic 9 0 Celesta 1
Percussion 10 0 Glocken 1
11 0 MusicBox 2
64 Orgel 2
12 0 Vibes 1
1 VibesK 1
45 HardVibe 2
13 0 Marimba 1
1 MarimbaK 1
64 SineMrmb 2
97 Balafon2 2
98 Log Drum 2
14 0 Xylophon 1
15 0 TubulBel 1
96 ChrchBel 2
97 Carillon 2
16 0 Dulcimer 1
35 Dulcimr2 2
96 Cimbalom 2
97 Santur 2
Instrument
Group
Program#Bank
#
Voice Name
Ele-
ment
Bank 0:(GM)
Bank 1:Key Scale Panning
Bank 3:Stereo
Bank 6:Single
Bank 8:Slow
Bank 12:Fast Decay
Bank 14:Double Attack
Bank 16:Bright
Bank 17:Bright
Bank 18:Dark
Bank 19:Dark
Bank 20:Resonant
Bank 24:Attack
Bank 25:Release
Bank 27:Reso Sweep
Bank 28:Muted
Bank 32:Detune 1
Bank 33:Detune 2
Bank 34:Detune 3
Bank 35:Octave 1
Bank 36:Octave 2
Bank 37:5th 1
Bank 38:5th 2
Bank 39:Bend
Bank 40:Tutti
Bank 41:Tutti
Bank 42:Tutti
Bank 43:Velo-Switch
Bank 45:Velo-Xfade
Bank 64:Other wave
Bank 65:Other wave
Bank 66:Other wave
Bank 67:Other wave
Bank 68:Other wave
Bank 69:Other wave
Bank 70:Other wave
Bank 71:Other wave
Bank 72:Other wave
Bank 96:Other wave
Bank 97:Other wave
Bank 98:Other wave
Bank 99:Other wave
Bank 100:Other wave
Bank 101:Other wave
Bank Select MSB=000, LSB=Bank#
Appendix
38
Page 39

Instrument
Group
Reed 65 0 SprnoSax 1
Pipe 73 0 Piccolo 1
Synth Lead 81 0 SquareLd 2
Synth Pad 89 0 NewAgePd 2
Bank
Program
Voice Name
#
#
66 0 Alto Sax 1
40 Sax Sect 2
43 HyprAlto 2
67 0 TenorSax 1
40 BrthTnSx 2
41 SoftTenr 2
64 TnrSax 2 1
68 0 Bari.Sax 1
69 0 Oboe 2
70 0 Eng.Horn 1
71 0 Bassoon 1
72 0 Clarinet 1
74 0 Flute 1
75 0 Recorder 1
76 0 PanFlute 1
77 0 Bottle 2
78 0 Shakhchi 2
79 0 Whistle 1
80 0 Ocarina 1
6 Square 2 1
8 LMSquare 2
18 Hollow 1
19 Shmoog 2
64 Mellow 2
65 SoloSine 2
66 SineLead 1
82 0 Saw.Lead 2
6 Saw 2 1
8 ThickSaw 2
18 DynaSaw 1
19 DigiSaw 2
20 Big Lead 2
24 HeavySyn 2
25 WaspySyn 2
40 PulseSaw 2
41 Dr. Lead 2
45 VeloLead 2
96 Seq Ana 2
83 0 CaliopLd 2
65 Pure Pad 2
84 0 Chiff Ld 2
64 Rubby 2
85 0 CharanLd 2
64 DistLead 2
65 WireLead 2
86 0 Voice Ld 2
24 SynthAah 2
64 VoxLead 2
87 0 Fifth Ld 2
35 Big Five 2
88 0 Bass &Ld 2
16 Big&Low 2
64 Fat&Prky 2
65 SoftWurl 2
64 Fantasy2 2
90 0 Warm Pad 2
16 ThickPad 2
17 Soft Pad 2
18 SinePad 2
64 Horn Pad 2
65 RotarStr 2
91 0 PolySyPd 2
64 PolyPd80 2
65 ClickPad 2
66 Ana Pad 2
67 SquarPad 2
Instrument
Ele-
Group
ment
Synth Pad 92 0 ChoirPad 2
Synth 97 0 Rain 2
Effects 45 ClaviPad 2
Bank
Program
#
#
64 Heaven2 2
66 Itopia 2
67 CC Pad 2
93 0 BowedPad 2
64 Glacier 2
65 GlassPad 2
94 0 MetalPad 2
64 Tine Pad 2
65 Pan Pad 2
95 0 Halo Pad 2
96 0 SweepPad 2
20 Shwimmer 2
27 Converge 2
64 PolarPad 2
66 Celstial 2
64 HrmoRain 2
65 AfrcnWnd 2
66 Caribean 2
98 0 SoundTrk 2
27 Prologue 2
64 Ancestrl 2
99 0 Crystal 2
12 SynDrCmp 2
14 Popcorn 2
18 TinyBell 2
35 RndGlock 2
40 GlockChi 2
41 ClearBel 2
42 ChorBell 2
64 SynMalet 1
65 SftCryst 2
66 LoudGlok 2
67 XmasBell 2
68 VibeBell 2
69 DigiBell 2
70 AirBells 2
71 BellHarp 2
72 Gamelmba 2
100 0 Atmosphr 2
18 WarmAtms 2
19 HollwRls 2
40 NylonEP 2
64 NylnHarp 2
65 Harp Vox 2
66 AtmosPad 2
67 Planet 2
101 0 Bright 2
64 FantaBel 2
96 Smokey 2
102 0 Goblins 2
64 GobSyn 2
65 50sSciFi 2
66 Ring Pad 2
67 Ritual 2
68 ToHeaven 2
70 Night 2
71 Glisten 2
96 BelChoir 2
103 0 Echoes 2
8 EchoPad2 2
14 Echo Pan 2
64 EchoBell 2
65 Big Pan 2
66 SynPiano 2
67 Creation 2
68 Stardust 2
69 Reso Pan 2
104 0 Sci-Fi 2
64 Starz 2
Voice Name
Instrument
Ele-
Group
ment
Ethnic 105 0 Sitar 1
Percussive 113 0 TnklBell 2
Sound 121 0 FretNoiz 2
Effects 122 0 BrthNoiz 2
Bank
Program
#
#
32 DetSitar 2
35 Sitar 2 2
96 Tambra 2
97 Tamboura 2
106 0 Banjo 1
28 MuteBnjo 1
96 Rabab 2
97 Gopichnt 2
98 Oud 2
107 0 Shamisen 1
108 0 Koto 1
96 T. Koto 2
97 Kanoon 2
109 0 Kalimba 1
110 0 Bagpipe 2
111 0 Fiddle 1
112 0 Shanai 1
64 Shanai2 1
96 Pungi 1
97 Hichriki 2
96 Bonang 2
97 Gender 2
98 Gamelan 2
99 S.Gamlan 2
100 Rama Cym 2
101 AsianBel 2
114 0 Agogo 2
115 0 SteelDrm 2
97 GlasPerc 2
98 ThaiBell 2
116 0 WoodBlok 1
96 Castanet 1
117 0 TaikoDrm 1
96 Gr.Cassa 1
118 0 MelodTom 2
64 Mel Tom2 1
65 Real Tom 2
66 Rock Tom 2
119 0 Syn.Drum 1
64 Ana Tom 1
65 ElecPerc 2
120 0 RevCymbl 1
123 0 Seashore 2
124 0 Tweet 2
125 0 Telphone 1
126 0 Helicptr 1
127 0 Applause 1
128 0 Gunshot 1
Voice Name
Ele-
SFX Voice List
ment
MSB=064, LSB=000
Program
#
1 CuttngNz 1
2 CttngNz2 2
3
4 Str Slap 1
5
6
7
8
9
10
11
12
13
14
15
16
17 Fl.KClik 1
18
19
20
21
22
23
24
25
26
27
28
29
30
31
32
33 Rain 1
34 Thunder 1
35 Wind 1
36 Stream 2
37 Bubble 2
38 Feed 2
39
40
41
42
43
44
45
46
47
48
49 Dog 1
50 Horse 1
51 Bird 2 1
52
53
54
55 Ghost 2
56 Maou 2
57
58
59
60
61
62
63
64
MSB=064
LSB=000
Program
Ele-
#
ment
65 Tel.Dial 1
66 DoorSqek 1
67 Door Slam 1
68 Scratch 1
69 Scratch 2 2
70 WindChm 1
71 Telphon2 1
72
73
74
75
76
77
78
79
80
81 CarEngin 1
82 Car Stop 1
83 Car Pass 1
84 CarCrash 1
85 Siren 2
86 Train 1
87 Jetplane 2
88 Starship 2
89 Burst 2
90 Coaster 2
91 SbMarine 2
92
93
94
95
96
97 Laughing 1
98 Scream 1
99 Punch 1
100 Heart 1
101 FootStep 1
102
103
104
105
106
107
108
109
110
111
112
113 MchinGun 1
114 LaserGun 2
115 Xplosion 2
116 FireWork 2
117
118
119
120
121
122
123
124
125
126
127
128
: No Sound
MSB=064
LSB=000
Ele-
ment
39
Page 40

S-V A Voice List
Bank Select MSB=33, LSB=0 Bank Select MSB=33, LSB=1
Program # Program #Voice Name Range Voice Name Range Program # Voice Name Range Program # Voice Name Range
1 Mad Tube C1 ~ B4 C0 ~ C6
2 VintgLd B-1 ~ C6 C0 ~ C6
3 SpaceZoo *** F0 ~ G5
4 GuitHero G0 ~ C5 E0 ~ C6
5 StoneHng F0 ~ G6 C0 ~ C6
6 Whizzer G#0 ~ F#5 C0 ~ C6
7 SimpleBa C0 ~ C6 E0 ~ C6
8 ClavBass C0 ~ E3 C0 ~ C6
9 SuperBas C0 ~ F#3 C0 ~ C6
10 New Slap C0 ~ D5 G0 ~ C6
11 RockPigs C0 ~ E4 C0 ~ C6
12 Igneous C0 ~ C5 C1 ~ C6
13 50 / 50 C0 ~ F5 A-1 ~ C6
14 Cybastrg C-1 ~ C6 C0 ~ C6
15 Wynth A-1 ~ G5 G0 ~ C6
16 BuzzSaw E-1 ~ C6 B-1 ~ C6
17 ZubZub B-1 ~ C6 C0 ~ C6
18 Blue G0 ~ D3 C0 ~ C6
19 OsciLead C0 ~ G5 C0 ~ C6
20 SqrLead D#0 ~ C6 F#2 ~ C6
21 Bigger C-1 ~ C6 G#1 ~ C6
22 AnaSquid G-1 ~ C6 D0 ~ C6
23 SharpSyn G0 ~ C6 C0 ~ C6
24 AnaWave C0 ~ E4 E0 ~ C6
25 AnaWurl C0 ~ C6 C0 ~ C6
26 Babalog C0 ~ C6 C0 ~ C6
27 FngerBass B-1 ~ C4 E0 ~ C6
28 Upright B-1 ~ C4 B-1 ~ C6
29 Fnground A-1 ~ C4 C0 ~ C6
30 Birdland A-1 ~ C4 B-1 ~ C6
31 FlageoBs G0 ~ C4 B-1 ~ C6
32 DampBass G-1 ~ C3 C0 ~ C6
33 Fretles! E-1 ~ C4 C0 ~ C6
34 Frtles!2 B-1 ~ C#4 C0 ~ C6
35 ThumBass C0 ~ C3 C0 ~ C6
36 RockBass G-1 ~ C4 C0 ~ C6
37 SmooBass B-1 ~ A#3 C0 ~ C6
38 WarmBass B-1 ~ C4 C0 ~ C6
39 YamaBass A-1 ~ C4 C0 ~ C5
40 Box Bass C0 ~ C4 C0 ~ C5
41 BassCab B-1 ~ G#4 B-1 ~ C6
42 FruitBas C0 ~ C4 A-1 ~ C5
43 AcidBas! B-1 ~ C5 A-1 ~ C5
44 SqrBass! B-1 ~ G4 C0 ~ C7
45 PulsClav A-1 ~ G5 C0 ~ C7
46 MogueBas B-1 ~ C#7 C0 ~ G6
47 BoppaBas B-1 ~ C4 C0 ~ C6
48 BuzzrBas D0 ~ E4 C0 ~ C6
49 MuteHrBs C0 ~ C5 B-1 ~ C6
50 TekBass B-1~ C4 E0 ~ C6
51 TranzBas C0 ~ F#4 C0 ~ C6
52 Chamlion C0 ~ B4 E0 ~ C6
53 ParaSyn A-1 ~ C4 G1 ~ C6
54 SteamBas C0 ~ C#7 C0 ~ C6
55 BooBass B-1 ~ C5 C1 ~ C6
56 WhelkBas E-1 ~ C#5 E0 ~ G5
57 AtackSyn G0 ~ B4 C0 ~ G6
58 Q.Klav A-1 ~ C#4 C0 ~ C6
59 Sitar! G0 ~ E4 C0 ~ C6
60 India F#0 ~ C6 F0 ~ C6
61 YamSteel A2 ~ C6 C0 ~ C6
62 StungSt F#0 ~ B5 F0 ~ B5
63 Mu *** G0 ~ C5
64 Waterphn ***
1 Vento
2 Floboe
3 Sintax
4 Eastern
5 Trumpet!
6 SoprSax!
7 LiteAlto
8 Trmbone!
9 BtlFlute
10 Air Sax
11 TenrSax!
12 Coca
13 JetLpBow
14 Viol Inn
15 MuteCone
16 BrethBow
17 Trumpt!2
18 FluglHr!
19 Cornet
20 JzTrump
21 JzTrump2
22 Flumpet
23 WXTrumpt
24 MuteTp!
25 MuteTp!2
26 Melwbone
27 NerzoBr
28 Horn!
29 Horn!2
30 NuHorne
31 WX Horn
32 Tuba!
33 NuViolin
34 C Violin
35 BrtVioln
36 MuteViol
37 BrtViola
38 ViolOutt
39 Cello!
40 Eleanor
41 Nu Cello
42 Contrair
43 DoublBow
44 Piccolo!
45 Piccol!2
46 BowPicol
47 C Flute
48 C Flute2
49 JazFlute
50 OakFlute
51 BtlFlut2
52 RzdeFlt
53 Flutuen
54 Nz Flute
55 WX Shaku
56 Pan Pipe
57 PanPicol
58 Bamboo
59 Andean
60 Flurinet
61 SoftReed
62 Flurmod
63 Jhopali
64 Baroquen C0 ~ C6
65 DinoPerc ***
66 Formula ***
67 Jurassic ***
68 Devil ***
69 SpcHorse ***
70 Jason ***
71 Suedhead F-1 ~ C6
72 Spanish F-1 ~ E4
73 JazzGtr! B-1 ~ A4
74 JazzyGtr A-1 ~ C6
75 L7 Pluck B-1 ~ E4
76 WetPluck B-1 ~ E4
77 Comp Gtr B-1 ~ A4
78 FunkyGtr B-1 ~ D5
79 Thin Gtr B-1 ~ G5
80 Carlos B-1 ~ G4
81 Destiny C0 ~ C5
82 Gonzo B-1 ~ G5
83 Grunge C0 ~ B6
84 Ossyncro B-1 ~ G5
85 Talk Box F#0 ~ E7
86 SyncLed B-1 ~ E6
87 Old Mini A-1 ~ A5
88 Fat Mini G-1 ~ A5
89 Parlopho B-1 ~ C5
90 SimpleSy B-1 ~ E5
91 Choronic C0 ~ G5
92 SlitMinu F0 ~ C6
93 SynHarmo B-1 ~ G6
94 Flaggoot C0 ~ D4
95 SynSkex C0 ~ A#5
96 ResoSqr A-1 ~ D5
97 WurliLd B-1 ~ C6
98 FlatLead G#1 ~ G5
99 PhilTur B-1 ~ C6
100 ChalPuls B-1 ~ C6
101 Pluck Ld B-1 ~ C6
102 Brassyn B-1 ~ C6
103 AcoSynLd A-1 ~ C6
104 Moby G-1 ~ F5
105 Digitrn C0 ~ C6
106 LyricOff B-1 ~ C6
107 Rezzawi B-1 ~ G5
108 Macro B-1 ~ C6
109 Claribo G#-1 ~ G5
110 Binaphon C0 ~ C6
111 MokoPipe C0 ~ C6
112 AliBaba B-1 ~ C6
113 Persinet B-1 ~ G5
114 PicoPipe Ab0 ~ C6
115 Gertrude C0 ~ C6
116 Xynth G-1 ~ C6
117 Duality G-1 ~ C6
118 AltKwek G#1 ~ C7
119 Softblow C0 ~ C6
120 AlbaPipe C0 ~ C6
121 Electrum C0 ~ C6
122 Edgeopho B-1 ~ F5
123 BassCla! C0 ~ C6
124 WX Clari C1 ~ C6
125 WX Oboe C0 ~ B5
126 WX J Gtr C0 ~ A4
127 Shakuha! C1 ~ C6
128 LipClari F-1 ~ C6
65 SquealAT C0 ~ C6
66 NuSopSax C0 ~ G5
67 CvSopSax A-1 ~ C6
68 SoprPipe F0 ~ C6
69 LiteSopr E0 ~ C6
70 AnaSoprn F0 ~ C6
71 NuAltSax C0 ~ C5
72 SweetAlt F#0 ~ E5
73 AltoSax! E0 ~ C6
74 HarpAlto G0 ~ C6
75 HarpAlt2 G0 ~ C6
76 GlassAlt C0 ~ C6
77 AcidSax C0 ~ C6
78 WackSax G#0 ~ E5
79 NuTenrSx D0 ~ E5
80 MildTenr C0 ~ C6
81 Jazz Sax A#0 ~ E5
82 TenorSub A#0 ~ A5
83 BellMike C0 ~ C5
84 GlasTenr G0 ~ E5
85 FnkyTenr C0 ~ G5
86 OldTenor C0 ~ A5
87 BrtTenor C0 ~ C6
88 BariSax! C0 ~ C5
89 VoxoSaxo C0 ~ C5
90 Oboe! F0 ~ C6
91 Oboe!2 C0 ~ C6
92 Noboe C0 ~ G5
93 OboeWhi G1 ~ G6
94 DblReedy C0 ~ A5
95 TripleRd C0 ~ C6
96 EngHorn! C0 ~ C6
97 Loboe C0 ~ C6
98 Bassoon! C0 ~ C5
99 Clarint! A0 ~ C6
100 LitePipe C0 ~ C6
101 HyperCla C0 ~ C6
102 Clarint2 F0 ~ C6
103 IslePipe C1 ~ C5
104 Chanter D1 ~ C6
105 ThaiReed C0 ~ C5
106 Recordr! C0 ~ A5
107 Claricrd C0 ~ C5
108 SoftPipe G0 ~ C5
109 BowdSaw C0 ~ C5
110 Ocarina! F0 ~ C7
111 Lonely C#2 ~ E6
112 Ophelia C0 ~ C6
113 Maysbe? D#0 ~ A5
114 MizuHorn C0 ~ C6
115 PicoStrg G#0 ~ C5
116 Sylophon C0 ~ C5
117 BowLead C0 ~ C6
118 Squeeze C0 ~ C6
119 MouthKey C0 ~ C6
120 AmpdHarp C0 ~ C6
121 CromHarp A-1 ~ C6
122 WahUpHp B-1 ~ C6
123 YamaBotl A#-1 ~ C6
124 Blowsoo G-1 ~ C5
125 Brappo C0 ~ C5
126 Crumbon E0 ~ G5
127 Klarina E0 ~ B5
128 ReedWin E0 ~ C6
40
Page 41

S-V A Voice List (SOUNDIUS-XG Voice List)
Instrument
Group
Program
#
Bank 112 Bank 113 Bank 114 Bank 115 Bank 116 Bank 117 Bank 118 Bank 119
Organ 22 Squeeze
23 MouthKey AmpdHarp CromHarp
Guitar 25 Spanish
27 JazzGtr! Carlos Destiny
28 L7 Pluck WetPluck
Bass 33 Upright
34 Fnground Birdland
35 FlageoBs DampBass
36 Fretles! Frtles!2
37 New Slap ThumBass
39 AcidBas! SqrBass!
40 PulsClav MogueBas
Strings 41 NuViolin Viol Inn C Violin BrtVioln MuteViol
42 BrtViola ViolOutt
43 Cello! Eleanor Nu Cello
44 Contrair DoublBow
Brass 57 Trumpet! Trumpt!2 FluglHr! Cornet
58 Trmbone! Melwbone
59 Tuba!
60 MuteTp! MuteTp!2
61 Horn! Horn!2
Reed 65 SoprSax! CvopSax SoprPipe LiteSopr
66 AltoSax! SweetAlt LiteAlto HarpAlto HarpAlt2 GlassAlt
67 TenrSax! MildTenr Jazz Sax TenorSub BellMike GlasTenr FnkyTenr OldTenor
68 BariSax! VoxoSaxo
69 Oboe! Oboe!2 DblReedy TripleRd
70 EngHorn! Loboe
71 Bassoon! Flurinet
72 Clarint! LitePipe HyperCla BassCla!
Pipe 73 Piccolo! Piccol!2 BowPicol
74 C Flute C Flute2 JazFlute OakFlute
75 Recordr! Claricrd SoftPipe
76 Pan Pipe PanPicol
77 YamaBotl Bamboo Andean BtlFlute BtlFlut2
78 Shakuha!
79 BowedSaw
80 Ocarina!
Synth Lead 81 50 / 50 ChalPuls PluckLd
82 Brassyn AcoSynLd VintgLd
83 Maysbe? Air Sax Baroquen LipClari
84 Grunge Ossyncro Talk Box
85 MizuHorn Floboe
86 SoftReed BrethBow
88 Chamlion Old Mini
Ethnic 105 Sitar! India
110 Chanter ThaiReed
111 JetLpBow
Percussive 115 YamSteel
* When Bank Select MSB is 81, the blank boxes indicate the same voice as the ones for Bank 112.
* When Bank Select MSB is 97, the blank boxes indicate the same voice as the ones for XG Normal Voice Bank 1.
Bank Select MSB=81 LSB=Bank#
Instrument
Group
Program
#
Bank 112 Bank 113 Bank 114 Bank 115 Bank 116 Bank 117 Bank 118 Bank 119
Synth Effects 97 Mad Tube
98 StoneHng
99 Mu
100 Moby
101 Igneous
102 SquealAT
Sound Effects 121 Jurassic
122 Formula
123 Waterphn
124 Devil
125 SpcHorse
126 DinoPerc
127 SpaceZoo
128 Jason
* The blank boxes indicate the same voice as the ones for Bank 112.
* When Bank Select MSB is 97, the voices above are not included.
Bank Select MSB=81, 97 LSB=Bank#
41
Page 42

XG Drum Voice List
Bank 127 127 127 127 127 127 127 127 127 126 126
Program # 1 2 9 17 25 26 33 41 49 1 2
Note# Note Key Alternate Standard Kit Standard2 Kit Room Kit Rock Kit Electro Kit Analog Kit Jazz Kit Brush Kit Classic Kit SFX 1 SFX 2
off
assign
13 C# -1 3 Surdo Mute
14 D -1 3 Surdo Open
15 D# -1 Hi Q
16 E -1 Whip Slap
17 F -1 4 Scratch Push
18 F# -1 4 Scratch Pull
19 G -1 Finger Snap
20 G# -1 Click Noise
21 A -1 Metronome Click
22 A# -1 Metronome Bell
23 B -1 Seq Click L
24 C 0 Seq Click H
25 C# 0 Brush Tap
26 D 0 O Brush Swirl L
27 D# 0 Brush Slap
28 E 0 O Brush Swirl H Reverse Cymbal Reverse Cymbal
29 F 0 O Snare Roll Snare Roll 2
30 F# 0 Castanet Hi Q Hi Q
31 G 0 Snare L Snare L 2 SD Rock M Snare M SD Rock H Brush Slap L
32 G# 0 Sticks
33 A 0 Bass Drum L Bass Drum M Bass Drum H 4 Bass Drum M Bass Drum L2
34 A# 0 Open Rim Shot Open Rim Shot 2
35 B 0 Bass Drum M Bass Drum M 2 Bass Drum H 3 BD Rock BD Analog L Gran Cassa
36 C 1 Bass Drum H Bass Drum H 2 BD Rock BD Gate BD Analog H BD Jazz BD Soft Gran Cassa Mute Guitar Cutting Noise Dial Tone
37 C# 1 Side Stick Analog Side Stick Guitar Cutting Noise 2 Door Creaking
38 D 1 Snare M Snare M 2 SD Room L SD Rock SD Rock L Analog Snare L Brush Slap M Marching Sn M Door Slam
39 D# 1 Hand Clap String Slap Scratch
40 E 1 Snare H Snare H 2 SD Room H SD Rock Rim SD Rock H Analog Snare H Brush Tap H Marching Sn H Scratch 2
41 F 1 Floor Tom L Room Tom 1 Rock Tom 1 E Tom 1 Analog Tom 1 Jazz Tom 1 Brush Tom 1 Jazz Tom 1 Windchime
42 F# 1 1 Hi-Hat Closed Analog HH Closed 1 Telephone Ring2
43 G 1 Floor Tom H Room Tom 2 Rock Tom 2 E Tom 2 Analog Tom 2 Jazz Tom 2 Brush Tom 2 Jazz Tom 2
44 G# 1 1 Hi-Hat Pedal Analog HH Closed 2
45 A 1 Low Tom Room Tom 3 Rock Tom 3 E Tom 3 Analog Tom 3 Jazz Tom 3 Brush Tom 3 Jazz Tom 3
46 A# 1 1 Hi-Hat Open Analog HH Open
47 B 1 Mid Tom L Room Tom 4 Rock Tom 4 E Tom 4 Analog Tom 4 Jazz Tom 4 Brush Tom 4 Jazz Tom 4
48 C 2 Mid Tom H Room Tom 5 Rock Tom 5 E Tom 5 Analog Tom 5 Jazz Tom 5 Brush Tom 5 Jazz Tom 5
49 C# 2 Crash Cymbal 1 Analog Cymbal Hand Cym.Open L
50 D 2 High Tom Room Tom 6 Rock Tom 6 E Tom 6 Analog Tom 6 Jazz Tom 6 Brush Tom 6 Jazz Tom 6
51 D# 2 Ride Cymbal 1 Hand Cym.Closed L
52 E 2 Chinese Cymbal FL.Key Click Engine Start
53 F 2 Ride Cymbal Cup Tire Screech
54 F# 2 Tambourine Car Passing
55 G 2 Splash Cymbal Crash
56 G# 2 Cowbell Analog Cowbell Siren
57 A 2 Crash Cymbal 2 Hand Cym.Open H Train
58 A# 2 Vibraslap Jetplane
59 B 2 Ride Cymbal 2 Hand Cym.Closed H Starship
60 C 3 Bongo H Burst Noise
61 C# 3 Bongo L Coaster
62 D 3 Conga H Mute Analog Conga H SbMarine
63 D# 3 Conga H Open Analog Conga M
64 E 3 Conga L Analog Conga L
65 F 3 Timbale H
66 F# 3 Timbale L
67 G 3 Agogo H
68 G# 3 Agogo L Rain Laughing
69 A 3 Cabasa Thunder Screaming
70 A# 3 Maracas Analog Maracas Wind Punch
71 B 3 O Samba Whistle H Stream Heartbeat
72 C 4 O Samba Whistle L Bubble Footsteps
73 C# 4 Guiro Short Feed
74 D 4 O Guiro Long
75 D# 4 Claves Analog Claves
76 E 4 Wood Block H
77 F 4 Wood Block L
78 F# 4 Cuica Mute Scratch Push Scratch Push
79 G 4 Cuica Open Scratch Pull Scratch Pull
80 G# 4 2 Triangle Mute
81 A 4 2 Triangle Open
82 A# 4 Shaker
83 B 4 Jingle Bell
84 C 5 Bell Tree Dog Machine Gun
85 C# 5 Horse Gallop Laser Gun
86 D 5 Bird 2 Explosion
87 D# 5 FireWork
88 E 5
89 F 5
90 F# 5 Ghost
91 G 5 Maou
: Same as Standard Kit
: No Sound
Drum and percussion sounds assigned to the same Alternate Assign numberd group cannot be sounded simultaneously.
For example, the Hi-Hat Closed sound (group 1) and the Hi-Hat Open sound (also group 1) cannot be sounded at the same time.
Bank Select MSB=Bank#, LSB=000
42
Page 43

TG300B Normal Voice List
Program
#
Voice Name
Ele-
ment
Program
#
Ele-
ment
Organ 17 0 DrawOrgn 1
1 70sDrOr1 2
8 DetDrwOr 2
9 70sDrOr2 2
16 60sDrOr1 2
17 60sDrOr2 2
18 60sDrOr3 2
24 CheezOrg 2
32 DrawOrg2 2
33 EvenBar 2
40 Organ Ba 1
126 Slap-2 2
127 harpsi1 1
18 0 PercOrgn 1
1 70sPcOr1 2
8 DetPrcOr 2
32 PercOrg2 2
126 Slap-3 2
127 harpsi2 2
19 0 RockOrgn 2
8 RotaryOr 2
16 SloRotar 2
24 FstRotar 2
126 Slap-4 2
127 harpsi3 1
20 0 ChrchOrg 2
8 ChurOrg2 2
16 ChurOrg3 2
24 OrgFlute 2
32 TrmOrgFl 2
126 Slap-5 2
127 clavi1 1
21 0 ReedOrgn 1
126 Slap-6 2
127 clavi2 1
22 0 Acordion 2
8 AccordIt 2
126 Slap-7 2
127 clavi3 1
23 0 Harmnica 1
1 Harmo 2 2
126 Slap-8 2
127 celesta1 1
24 0 TangoAcd 2
126 Finger-1 1
127 celesta2 1
Guitar 25 0 NylonGtr 1
8 Ukulele 1
16 NylonGt3 2
24 VelGtHrm 2
32 NylonGt2 1
40 LequintG 1
126 Finger-2 2
127 synbras1 2
26 0 SteelGtr 1
8 12StrGtr 2
9 Nyln&Stl 2
16 Mandolin 2
32 SteelGt2 1
126 Picked-1 1
127 synbras2 2
27 0 Jazz Gtr 1
1 MelloGtr 1
8 PdlSteel 1
126 Picked-2 2
127 synbras3 2
28 0 CleanGtr 1
8 ChorusGt 2
126 FretlsBs 1
127 synbras4 2
Instrument
Group
Bank
#
Guitar 29 0 Mute.Gtr 1
8 FunkGtr1 2
16 FunkGtr2 2
126 A-Bass 2
127 synbass1 1
30 0 Ovrdrive 1
126 Choir-1 1
127 synbass2 1
31 0 Dist.Gtr 1
8 FeedbkGt 2
9 FeedbGt2 2
126 Choir-2 1
127 synbass3 2
32 0 GtrHarmo 1
8 GtFeedbk 1
126 Choir-3 2
127 synbass4 1
Bass 33 0 Aco.Bass 1
126 Choir-4 2
127 newagepd 2
34 0 FngrBass 1
1 FngBass2 2
126 Strngs-1 2
127 synharmo 2
35 0 PickBass 1
8 MutePkBa 1
126 Strngs-2 2
127 choir pd 2
36 0 Fretless 1
1 Fretles2 2
2 Fretles3 2
3 Fretles4 2
4 SynFretl 2
5 Smooth 2
126 Strngs-3 2
127 bowed pd 2
37 0 SlapBas1 1
8 ResoSlap 1
126 Strngs-4 2
127 soundtrk 2
38 0 SlapBas2 1
126 E-Organ1 2
127 atmosphr 2
39 0 SynBass1 1
1 SynBa1Dk 1
8 AcidBass 1
9 FastResB 1
10 TeknoBa 2
16 ResoBass 1
126 E-Organ2 2
127 syn warm 2
40 0 SynBass2 2
1 ClkSynBa 2
2 ModulrBa 2
3 Seq Bass 2
8 DX Bass 2
9 X WireBa 2
16 RubberBa 2
17 SynBa2Dk 1
18 MelloSB1 1
19 SmthBa 2 2
126 E-Organ3 2
127 synfunny 1
Instrument
Group
Bank
#
Voice Name
Program
#
Ele-
ment
Strings 41 0 Violin 1
8 SlowVln 1
126 E-Organ4 2
127 synecho1 2
42 0 Viola 1
126 E-Organ5 2
127 rain 2
43 0 Cello 1
126 E-Organ6 2
127 synoboe 2
44 0 Contrabs 1
126 E-Organ7 2
127 synecho2 2
45 0 Trem.Str 1
8 SlowTrStr 1
9 Susp Str 2
126 E-Organ8 2
127 synsolo 2
46 0 Pizz.Str 1
126 E-Organ9 2
127 synrdorg 2
47 0 Harp 1
126 SoftTP-1 1
127 synbell 1
48 0 Timpani 1
126 SoftTP-2 1
127 squareld 2
Ensemble 49 0 Strings1 1
1 Slow Str 1
8 Orchestr 2
9 Orchstr2 2
10 TremOrch 2
11 ChoirStr 2
16 S.Strngs 2
24 VeloStr 2
126 TP/TRB-1 1
127 strsect1 2
50 0 Strings2 1
1 70s Str 1
8 LegatoSt 2
9 Warm Str 2
10 S.SlwStr 2
126 TP/TRB-2 1
127 strsect2 2
51 0 Syn.Str1 2
1 Syn Str4 2
126 TP/TRB-3 1
127 strsect3 2
52 0 Syn.Str2 2
126 TP/TRB-4 1
127 pizz.str 1
53 0 ChoirAah 1
8 S.Choir 2
9 MelChoir 2
32 Ch.Aahs2 2
126 TP/TRB-5 2
127 violin 1 2
54 0 VoiceOoh 1
126 TP/TRB-6 2
127 violin 2 1
55 0 SynVoice 1
8 SynVox2 2
126 Sax-1 1
127 cello 1 1
56 0 Orch.Hit 2
1 OrchHit2 2
8 Impact 2
16 LoFiRave 2
126 Sax-2 1
127 cello 2 1
Instrument
Group
Bank
#
Voice Name
Piano 1 0 GrandPno 1
8 GrndPnoK 1
16 MelloGrP 1
126 A-Piano1 2
127 a.piano1 1
2 0 BritePno 1
8 BritPnoK 1
126 A-Piano2 2
127 a.piano2 1
3 0 E.Grand 2
1 ElGrPno1 2
2 ElGrPno2 2
8 ElGrPnoK 2
126 A-Piano3 2
127 a.piano3 1
4 0 HnkyTonk 2
8 HnkyTnkK 2
126 A-Piano4 2
127 e.piano1 1
5 0 E.Piano1 2
8 Chor.EP1 2
16 VX El.P1 2
24 60sEl.P 1
25 HardEl.P 2
26 MelloEP1 2
32 El.Pno1K 1
126 A-Piano5 1
127 e.piano2 1
6 0 E.Piano2 2
8 Chor.EP2 2
16 VX El.P2 2
24 DX Hard 2
32 El.Pno2K 1
126 A-Piano6 1
127 e.piano3 1
7 0 Harpsi. 1
8 Harpsi.3 2
16 Harpsi.K 1
24 Harpsi.2 2
126 A-Piano7 1
127 e.piano4 1
8 0 Clavi. 2
8 Clavi. K 1
126 E-Piano1 2
127 hnkytnk 2
Chromatic 9 0 Celesta 1
Percussion 126 E-Piano2 2
127 e.organ1 2
10 0 Glocken 1
126 E-Piano3 2
127 e.organ2 2
11 0 MusicBox 2
126 A-Guitr1 1
127 e.organ3 1
12 0 Vibes 1
1 HardVibe 2
8 VibesK 1
126 A-Guitr2 2
127 e.organ4 1
13 0 Marimba 1
8 MarimbaK 1
17 Balafon2 2
24 Log Drum 2
126 A-Guitr3 2
127 pipeorg1 2
14 0 Xylophon 1
126 E-Guitr1 2
127 pipeorg2 2
15 0 TubulBel 1
8 ChrchBel 2
9 Carillon 2
126 E-Guitr2 1
127 pipeorg3 2
16 0 Dulcimer 1
1 Dulcimr2 2
8 Cimbalom 2
126 Slap-1 2
127 acordion 2
Instrument
Group
Program#Bank
#
Voice Name
Ele-
ment
Bank Select MSB=Bank#, LSB=000
43
Page 44

Instrument
Group
Brass 57 0 Trumpet 1
Reed 65 0 SprnoSax 1
Pipe 73 0 Piccolo 1
Bank
Program
Voice Name
#
#
1 Trumpet2 1
24 BriteTrp 2
25 WarmTrp 2
126 Sax-3 1
127 contrabs 1
58 0 Trombone 1
1 Trmbone2 2
126 Sax-4 2
127 harp 1 1
59 0 Tuba 1
1 Tuba 2 1
126 Brass-1 1
127 harp 2 1
60 0 Mute.Trp 1
126 Brass-2 1
127 guitar 1 1
61 0 Fr.Horn 2
1 FrHorn2 2
8 FrHrSolo 1
16 HornOrch 2
126 Brass-3 2
127 guitar 2 1
62 0 BrasSect 1
8 BrssSec2 2
126 Brass-4 2
127 elecgtr1 2
63 0 SynBras1 2
1 PolyBrss 2
8 SynBras3 2
9 QuackBr 2
16 AnaBrss1 2
126 Brass-5 2
127 elecgtr2 2
64 0 SynBras2 1
1 Soft Brs 2
8 SynBras4 2
16 AnaBrss2 2
17 VelBras2 2
126 Orch-Hit 1
127 sitar 1
127 a.bass 1 1
66 0 Alto Sax 1
8 HyprAlto 2
127 a.bass 2 1
67 0 TnrSax 2 1
8 BrthTnSx 2
127 e.bass 1 1
68 0 Bari.Sax 1
127 e.bass 2 1
69 0 Oboe 2
127 slapbas1 1
70 0 Eng.Horn 1
127 slapbas2 1
71 0 Bassoon 1
127 fretles1 1
72 0 Clarinet 1
127 fretles2 1
127 flute1 1
74 0 Flute 1
127 flute2 1
75 0 Recorder 1
127 piccolo1 1
76 0 PanFlute 1
127 piccolo2 2
77 0 Bottle 2
127 recorder 1
78 0 Shakhchi 2
127 panpipes 2
79 0 Whistle 1
127 sax1 2
80 0 Ocarina 1
127 sax2 1
Instrument
Ele-
Group
ment
Synth Lead 81 0 SquareLd 2
Synth Pad 89 0 NewAgePd 2
Bank
Program
#
#
1 Square 2 1
2 Hollow 1
3 Mellow 2
4 SoloSine 2
5 Shmoog 2
6 LMSquare 2
8 SineLead 1
127 sax3 1
82 0 Saw.Lead 2
1 Saw 2 1
2 PulseSaw 2
3 ThickSaw 2
4 Big Lead 2
5 VeloLead 2
6 HeavySyn 2
7 DynaSaw 1
8 Dr. Lead 2
16 WaspySyn 2
127 sax4 1
83 0 CaliopLd 2
2 Pure Pad 2
127 clarint1 1
84 0 Chiff Ld 2
127 clarint2 1
85 0 CharanLd 2
8 DistLead 2
127 oboe 1
86 0 Voice Ld 2
127 eng.horn 1
87 0 Fifth Ld 2
1 Big Five 2
127 bassoon 1
88 0 Bass &Ld 2
1 Big&Low 2
2 Fat&Prky 2
127 harmnica 1
1 Fantasy2 2
127 trumpet1 1
90 0 Warm Pad 2
1 ThickPad 2
2 Horn Pad 2
3 RotarStr 2
4 Soft Pad 2
127 trumpet2 1
91 0 PolySyPd 2
1 PolyPd80 2
127 trmbone1 2
92 0 ChoirPad 2
1 Heaven2 2
127 trmbone2 2
93 0 BowedPad 2
127 fr.horn1 1
94 0 MetalPad 2
1 Tine Pad 2
2 Pan Pad 2
127 fr.horn2 2
95 0 Halo Pad 2
127 tuba 2
96 0 SweepPad 2
1 PolarPad 2
8 Converge 2
9 Shwimmer 2
10 Celstial 2
127 brssect1 1
Voice Name
Instrument
Ele-
Group
ment
Synth 97 0 Rain 2
Effects 1 HrmoRain 2
Ethnic 105 0 Sitar 1
Bank
Program
#
2 AfrcnWnd 2
8 ClaviPad 2
127 brssect2 2
98 0 SoundTrk 2
1 Ancestrl 2
2 Prologue 2
127 vibe1 1
99 0 Crystal 2
1 SynMalet 1
2 SftCryst 2
3 RndGlock 2
4 LoudGlok 2
5 GlockChi 2
6 ClearBel 2
7 XmasBell 2
8 VibeBell 2
9 DigiBell 2
16 ChorBell 2
17 AirBells 2
18 BellHarp 2
19 Gamelmba 2
127 vibe2 1
100 0 Atmosphr 2
1 WarmAtms 2
2 NylnHarp 2
3 Harp Vox 2
4 HollwRls 2
5 NylonEP 2
6 AtmosPad 2
127 symallet 1
101 0 Bright 2
127 maletwin 2
102 0 Goblins 2
1 GobSyn 2
2 50sSciFi 2
127 glocken 2
103 0 Echoes 2
1 EchoBell 2
2 Echo Pan 2
3 EchoPad2 2
4 Big Pan 2
6 SynPiano 2
127 tubulbel 1
104 0 Sci-Fi 2
1 Starz 2
127 xylophen 1
1 Sitar 2 2
2 DetSitar 2
8 Tambra 2
16 Tamboura 2
127 marimba 2
106 0 Banjo 1
1 MuteBnjo 1
8 Rabab 2
16 Gopichnt 2
24 Oud 2
127 koto 1
107 0 Shamisen 1
127 sho 2
108 0 Koto 1
8 T. Koto 2
16 Kanoon 2
127 shakhchi 2
109 0 Kalimba 1
127 whistle1 2
110 0 Bagpipe 2
127 whistle2 1
111 0 Fiddle 1
127 bottle 2
112 0 Shanai 1
1 Shanai2 1
8 Pungi 1
16 Hichriki 2
127 breath 2
Voice Name
#
Instrument
Ele-
Group
ment
Percussive 113 0 TnklBell 2
Sound 121 0 FretNoiz 2
Effects 1 CuttngNz 1
Bank
Program
#
#
8 Bonang 2
9 Gender 2
10 Gamelan 2
11 S.Gamlan 2
16 Rama Cym 2
127 timpani 1
114 0 Agogo 2
127 melotom 1
115 0 SteelDrm 2
127 deepsnar 1
116 0 WoodBlok 1
8 Castanet 1
127 e.perc1 1
117 0 TaikoDrm 1
8 Gr.Cassa 1
127 e.perc2 1
118 0 MelodTom 2
1 Real Tom 2
8 Mel Tom2 1
9 Rock Tom 2
127 taiko 1
119 0 Syn.Drum 1
8 Ana Tom 1
9 ElecPerc 2
127 taikorim 1
120 0 RevCymbl 1
127 cymbal 2
2 Str Slap 1
3 CttngNz2 2
127 castanet 1
122 0 BrthNoiz 2
1 Fl.KClik 1
127 triangle 1
123 0 Seashore 2
1 Rain 1
2 Thunder 1
3 Wind 1
4 Stream 2
5 Bubble 2
127 orchehit 1
124 0 Tweet 2
1 Dog 1
2 Horse 1
3 Bird 2 1
127 telphone 1
125 0 Telphone 1
1 Tel.Dial 1
2 DoorSqek 1
3 DoorSlam 1
4 Scratch 1
5 WindChm 1
6 Scratch2 2
127 bird 1
126 0 Helicptr 1
1 CarEngin 1
2 Car Stop 1
3 Car Pass 1
4 CarCrash 1
5 Siren 2
6 Train 1
7 Jetplane 2
8 Starship 2
9 Burst 2
16 Coaster 2
127 jam 1
127 0 Applause 1
1 Laughing 1
2 Scream 1
3 Punch 1
4 Heart 1
5 FootStep 1
127 efctwatr 2
128 0 Gunshot 1
1 MchinGun 1
2 LaserGun 2
3 Xplosion 2
127 efctjngl 2
Voice Name
Ele-
ment
44
Page 45

TG300B Drum Voice List
Program # 1 9 17 25 26 33 41 49 57 128
Note# Note Alternate Standard Kit Room Kit Power Kit Electro Kit Analog Kit Jazz Kit Brush Kit Orchestra Kit SFX Set C/M Kit
assign
25 C# 0 Snare Roll
26 D 0 Finger Snap
27 D# 0 Hi Q Hi-Hat Closed
28 E 0 Whip Slap Hi-Hat Pedal
29 F 0 7 Scratch Push Hi-Hat Open
30 F# 0 7 Scratch Pull Ride Cymbal 1
31 G 0 Sticks
32 G# 0 Click Noise
33 A 0 Metronome Click
34 A# 0 Metronome Bell
35 B 0 Bass Drum M BD Jazz
36 C 1 Bass Drum H BD Power BD Electronic BD Analog H BD Jazz BD Soft Gran Cassa
37 C# 1 Side Stick Analog Side Stick
38 D 1 Snare M SD Power SD Electronic Analog Snare L Brush Tap Concert SD
39 D# 1 Hand Clap Brush Slap Castanet High-Q
40 E 1 Snare H SD Power Brush Swirl Concert SD Slap SD Electro
41 F 1 Floor Tom L Room Tom 1 Room Tom 1 E Tom 1 Analog Tom 1 Jazz Tom 1 Jazz Tom 1 Timpani F Scratch Push
42 F# 1 1 Hi-Hat Closed Analog HH Closed 1 Timpani F# Scratch Pull
43 G 1 Floor Tom H Room Tom 2 Room Tom 2 E Tom 2 Analog Tom 2 Jazz Tom 2 Jazz Tom 2 Timpani G Sticks
44 G# 1 1 Hi-Hat Pedal Analog HH Closed 2 Timpani G# Square Click Hi-Hat Open 1
45 A 1 Low Tom Room Tom 3 Room Tom 3 E Tom 3 Analog Tom 3 Jazz Tom 3 Jazz Tom 3 Timpani A Metronome Click
46 A# 1 1 Hi-Hat Open Analog HH Open Timpani A# Metronome Bell Hi-Hat Open 2
47 B 1 Mid Tom L Room Tom 4 Room Tom 4 E Tom 4 Analog Tom 4 Jazz Tom 4 Jazz Tom 4 Timpani B Guitar Fret Noise
48 C 2 Mid Tom H Room Tom 5 Room Tom 5 E Tom 5 Analog Tom 5 Jazz Tom 5 Jazz Tom 5 Timpani C Guitar Cutting Down
49 C# 2 Crash Cymbal 1 Analog Cymbal Timpani C# Guitar Cutting Up
50 D 2 High Tom Room Tom 6 Room Tom 6 E Tom 6 Analog Tom 6 Jazz Tom 6 Jazz Tom 6 Timpani D Ac Bass Slap
51 D# 2 Ride Cymbal 1 Timpani D# FL.Key Click
52 E 2 Chinese Cymbal Reverse Cymbal Timpani E Laughing
53 F 2 Ride Cymbal Cup Timpani F Screaming
54 F# 2 Tambourine Punch
55 G 2 Splash Cymbal Heartbeat
56 G# 2 Cowbell Analog Cowbell Footsteps 1
57 A 2 Crash Cymbal 2 Hand Cym.1 Footsteps 2
58 A# 2 Vibraslap Applause
59 B 2 Ride Cymbal 2 Hand Cym.2 Door Creaking
60 C 3 Bongo H Door Slam
61 C# 3 Bongo L Scratch
62 D 3 Conga H Mute Analog Conga H Windchime
63 D# 3 Conga H Open Analog Conga M Engine Start
64 E 3 Conga L Analog Conga L Tire Screech
65 F 3 Timbale H Car Passing
66 F# 3 Timbale L Crash
67 G 3 Agogo H Siren
68 G# 3 Agogo L Train
69 A 3 Cabasa Jetplane
70 A# 3 Maracas Analog Maracas Helicopter
71 B 3 2 Samba Whistle H Starship
72 C 4 2 Samba Whistle L Gunshot
73 C# 4 3 Guiro Short Machine Gun Vibraslap
74 D 4 3 Guiro Long Laser Gun
75 D# 4 Claves Analog Claves Explosion
76 E 4 Wood Block H Dog Laughing
77 F 4 Wood Block L Horse Gallop Screaming
78 F# 4 4 Cuica Mute Bird Tweet Punch
79 G 4 4 Cuica Open Rain Heartbeat
80 G# 4 5 Triangle Mute Thunder Footsteps 1
81 A 4 5 Triangle Open Wind Footsteps 2
82 A# 4 Shaker Seashore Applause
83 B 4 Jingle Bell Stream Door Creaking
84 C 5 Bell Tree Bubble Door Slam
85 C# 5 Castanet Scratch
86 D 5 6 Surdo Mute Windchime
87 D# 5 6 Surdo Open Engine Start
88 E 5 Applause Tire Screech
89 F 5 Car Passing
90 F# 5 Crash
91 G 5 Siren
92 G# 5 Train
93 A 5 Jetplain
94 A# 5 Helicopter
95 B 5 Starship
96 C 6 Gunshot
97 C# 6 Machine Gun
98 D 6 Laser Gun
99 D# 6 Explosion
100 E 6 Dog
101 F 6 Horse Gallop
102 F# 6 Bird Tweet
103 G 6 Rain
104 G# 6 Thunder
105 A 6 Wind
106 A# 6 Seashore
107 B 6 Stream
108 C 7 Bubble
: No Sound
: Same as Standard Kit
Drum and percussion sounds assigned to the same Alternate Assign numbered group cannot be sounded simultaneously. For example, the
Hi-Hat Closed sound (group 1) and the Hi-Hat Open sound (also group 1) cannot be sounded at the same time.
Some of the C/M Kit instruments in common with the Standard Kit differ from those of the Standard Kit in effect send level or pan settings
etc., even though the instrument itself is the same.
45
Page 46

Effect T ype List
REVERB
Exclusive
MSB LSB
Effect Type Remarks
0 0 NO EFFECT Turn off the effect.
1 0 HALL1 Reverb simulating the acoustics of a hall.
1 1 HALL2
2 0 ROOM1 Reverb simulating the acoustics of a room.
2 1 ROOM2
2 2 ROOM3
3 0 STAGE1 Reverb appropriate for a solo instrument.
3 1 STAGE2
4 0 PLATE Reverb simulating a metal plate reverb device.
CHORUS
Exclusive
MSB LSB
Effect Type Remarks
0 0 NO EFFECT Turn off the effect.
41 0 CHORUS1 A standard chorus effect, adding natural spaciousness to the sound.
41 1 CHORUS2
41 2 CHORUS3
42 0 CELESTE1 An effect which uses a 3-phase LFO to add modulation and spaciousness to the sound.
42 1 CELESTE2
42 2 CELESTE3
43 0 FLANGER1 An effect reminiscent of a jet airplane taking off and landing.
43 1 FLANGER2
VARIATION
Exclusive
MSB LSB
Effect Type Remarks
0 0 NO EFFECT Turn off the effect.
1 0 HALL1 Reverb simulating the acoustics of a hall.
1 1 HALL2
2 0 ROOM1 Reverb simulating the acoustics of a room.
2 1 ROOM2
2 2 ROOM3
3 0 STAGE1 Reverb appropriate for a solo instrument.
3 1 STAGE2
4 0 PLATE Reverb simulating a metal plate reverb device.
5 0 DELAY L,C,R Three delay sounds L, R and C (center).
6 0 DELAY L,R Two delay sounds L and R, with two feedback delays.
7 0 ECHO Two delays L and R, with independent feedback delay for L and R.
8 0 CROSS DELAY This effect crosses the feedback of two delays.
9 0 EARLY REF1 This effect isolates only the early reflection components of the reverb.
9 1 EARLY REF2
0A 0 GATE REVERB Simulation of gated reverb.
0B 0 REVERSE GATE Simulation of gated reverb played back in reverse.
41 0 CHORUS1 A standard chorus effect, adding natural spaciousness to the sound.
41 1 CHORUS2
41 2 CHORUS3
42 0 CELESTE1 An effect which uses a 3-phase LFO to add modulation and spaciousness to the sound.
42 1 CELESTE2
42 2 CELESTE3
43 0 FLANGER1
An effect reminiscent of a jet airplane taking off and landing.
43 1 FLANGER2
44 0 SYMPHONIC
A multi-stage version of CELESTE modulation.
45 0 ROTARY SPEAKER
Simulation of a rotary speaker. AC1 (assignable controller 1) etc. can be used to control the ro
tation speed.
46 0 TREMOLO
An effect which cyclically modulates the volume.
47 0 AUTO PAN
An effect which cyclically moves the sound between left/right and front/back.
48 0 PHASER1
Cyclically changes the phase to modulate the sound.
48 8 PHASER2
49 0 DISTORTION
Adds a hard-edged distortion to the sound.
4A 0 OVER DRIVE
Adds mild distortion to the sound.
4B 0 AMP SIMULATOR
Simulation of a guitar amp.
4C 0 3BAND EQ(MONO)
Mono EQ with equalization of LOW, MID and HIGH.
4D 0 2BAND EQ(STEREO)
Stereo EQ with equalization of LOW and HIGH. Ideal for Drum Parts.
4E 0
AUTO WAH(LFO)
Cyclically changes the center frequency of a wah filter. Can also be used with AC1 etc. as a pedal
wah.
40 0 THRU
Bypass without applying an effect.
MSB, LSB is represented in hexadecimal.
LSB = 0 is the basic effect type.
46
Page 47

Effect Parameter List
■HALL1,2, ROOM1,2,3, STAGE1,2, PLATE ■CROSS DELAY
No.* Parameter Range Value →table** Control No.* Parameter Range Value →table** Control
1 Reverb Time 0.3 - 30.0s 0 - 69 table#4 1 L->R Delay 0.1 - 355.0ms 1 - 3550
2 Diffusion 0 - 10 0 - 10 2 R->L Delay 0.1 - 355.0ms 1 - 3550
3 Initial Delay 0 - 63 0 - 63 table#5 3 Feedback Level -63 - +63 1 - 127
4 HPF Cutoff Thru - 8.0kHz 0 - 52 table#3 4 Input Select L, R, L&R 0 - 2
5 LPF Cutoff 1.0k - Thru 34 - 60 table#3 5 High Damp 0.1 - 1.0 1 - 10
6 6
7 7
8 8
9 9
10 Dry/Wet D63>W - D=W - D<W63 1 - 127
● 10 Dry/Wet D63>W - D=W - D<W63 1 - 127 ●
11 Rev Delay 0 - 63 0 - 63 table#5 11
12 Density 0 - 3 0 - 3 12
13 Er/ Rev Balance E63>R - E=R - E<R63 1 - 127 13 EQ Low Frequency 50Hz - 2.0kHz 8 - 40 table#3
14 14 EQ Low Gain -12 - +12dB 52 - 76
15 Feedback Level -63 - +63 1 - 127 15 EQ High Frequency500Hz - 16.0kHz 28 - 58 table#3
16 16 EQ High Gain -12 - +12dB 52 - 76
■DELAY L,C,R ■EARLY REF1,2
No.* Parameter Range Value →table** Control No.* Parameter Range Value →table** Control
1 Lch Delay 0.1 - 715.0ms 1 - 7150 1 Type
S-H, L-H, Rdm, Rvs, Plt, Spr
0 - 5
2 Rch Delay 0.1 - 715.0ms 1 - 7150 2 Room Size 0.1 - 7.0 0 - 44 table#6
3 Cch Delay 0.1 - 715.0ms 1 - 7150 3 Diffusion 0 - 10 0 - 10
4 Feedback Delay 0.1 - 715.0ms 1 - 7150 4 Initial Delay 0 - 63 0 - 63 table#5
5 Feedback Level -63 - +63 1 - 127 5 Feedback Level -63 - +63 1 - 127
6 Cch Level 0 - 127 0 - 127 6 HPF Cutoff Thru - 8.0kHz 0 - 52
7 High Damp 0.1 - 1.0 1 - 10 7 LPF Cutoff 1.0k - Thru 34 - 60
8 8
9 9
10 Dry/Wet D63>W - D=W - D<W63 1 - 127
● 10 Dry/Wet D63>W - D=W - D<W63 1 - 127 ●
11 11 Liveness 0 - 10 0 - 10
12 12 Density 0 - 3 0 - 3
13 EQ Low Frequency 50Hz - 2.0kHz 8 - 40 table#3 13 High Damp 0.1 - 1.0 1 - 10
14 EQ Low Gain -12 - +12dB 52 - 76 14
15 EQ High Frequency 500Hz - 16.0kHz 28 - 58 table#3 15
16 EQ High Gain -12 - +12dB 52 - 76 16
■DELAY L,R ■GATE REVERB, REVERSE GATE
No.* Parameter Range Value →table** Control No.* Parameter Range Value →table** Control
1 Lch Delay 0.1 - 715.0ms 1 - 7150 1 Type TypeA, TypeB 0 - 1
2 Rch Delay 0.1 - 715.0ms 1 - 7150 2 Room Size 0.1 - 7.0 0 - 44 table#6
3 Feedback Delay 1 0.1 - 715.0ms 1 - 7150 3 Diffusion 0 - 10 0 - 10
4 Feedback Delay 2 0.1 - 715.0ms 1 - 7150 4 Initial Delay 0 - 63 0 - 63 table#5
5 Feedback Level -63 - +63 1 - 127 5 Feedback Level -63 - +63 1 - 127
6 High Damp 0.1 - 1.0 1 - 10 6 HPF Cutoff Thru - 8.0kHz 0 - 52
7 7 LPF Cutoff 1.0k - Thru 34 - 60
8 8
9 9
10 Dry/Wet D63>W - D=W - D<W63 1 - 127
● 10 Dry/Wet D63>W - D=W - D<W63 1 - 127 ●
11 11 Liveness 0 - 10 0 - 10
12 12 Density 0 - 3 0 - 3
13 EQ Low Frequency 50Hz - 2.0kHz 8 - 40 table#3 13 High Damp 0.1 - 1.0 1 - 10
14 EQ Low Gain -12 - +12dB 52 - 76 14
15 EQ High Frequency 500Hz - 16.0kHz 28 - 58 table#3 15
16 EQ High Gain -12 - +12dB 52 - 76 16
■ECHO ■CHORUS1,2,3, CELESTE1,2,3
No.* Parameter Range Value →table** Control No.* Parameter Range Value →table** Control
1 Lch Delay1 0.1 - 355.0ms 1 - 3550 1 LFO Frequency 0.00 - 39.7Hz 0 - 127 table#1
2 Lch Feedback Level -63 - +63 1 - 127 2 LFO PM Depth 0 - 127 0 - 127
3 Rch Delay1 0.1 - 355.0ms 1 - 3550 3 Feedback Level -63 - +63 1 - 127
4 Rch Feedback Level -63 - +63 1 - 127 4 Delay Offset 0 - 127 0 - 127 table#2
5 High Damp 0.1 - 1.0 1 - 10 5
6 Lch Delay2 0.1 - 355.0ms 1 - 3550 6 EQ Low Frequency 50Hz - 2.0kHz 8 - 40 table#3
7 Rch Delay2 0.1 - 355.0ms 1 - 3550 7 EQ Low Gain -12 - +12dB 52 - 76
8 Delay2 Level 0 - 127 0 - 127 8 EQ High Frequency 500Hz - 16.0kHz 28 - 58 table#3
9 9 EQ High Gain -12 - +12dB 52 - 76
10 Dry/Wet D63>W - D=W - D<W63 1 - 127
● 10 Dry/Wet D63>W - D=W - D<W63 1 - 127 ●
11 11
12 12
13 EQ Low Frequency 50Hz - 2.0kHz 8 - 40 table#3 13
14 EQ Low Gain -12 - +12dB 52 - 76 14
15 EQ High Frequency 500Hz - 16.0kHz 28 - 58 table#3 15 Input Mode mono/stereo 0 - 1
16 EQ High Gain -12 - +12dB 52 - 76 16
● : Can be controlled by AC1 (Assignable Controller 1)
No.* : These numbers correspond to the Parameter Suffix numbers in <Table 1-3> of the MIDI Data Format.
→table ** : Refer to “Effect Data Assign Table”.
47
Page 48

■FLANGER1,2 ■AUTO PAN
No.* Parameter Range Value →table** Control No.* Parameter Range Value →table** Control
1 LFO Frequency 0.00 - 39.7Hz 0 - 127 table#1 1 LFO Frequency 0.00 - 39.7Hz 0 - 127 table#1 ●
2 LFO Depth 0 - 127 0 - 127 2 L/R Depth 0 - 127 0 - 127
3 Feedback Level -63 - +63 1 - 127 3 F/R Depth 0 - 127 0 - 127
4 Delay Offset 0 - 63 0 - 63 table#2 4 PAN Direction L<->R, L->R, L<-R, Lturn, Rturn, L/R
5 5 0-5
6 EQ Low Frequency 50Hz - 2.0kHz 8 -40 table#3 6 EQ Low Frequency 50Hz - 2.0kHz 8 - 40 table#3
7 EQ Low Gain -12 - +12dB 52 - 76 7 EQ Low Gain -12 - +12dB 52 - 76
8 EQ High Frequency 500Hz - 16.0kHz 28 - 58 table#3 8 EQ High Frequency 500Hz - 16.0kHz 28 - 58 table#3
9 EQ High Gain -12 - +12dB 52 - 76 9 EQ High Gain -12 - +12dB 52 - 76
10 Dry/Wet D63>W - D=W - D<W63 1 - 127 ● 10
11 11
12 12
13 13
14 LFO Phase Difference -180 - +180deg 4 - 124 resolution=3deg. 14
15 15
16 16
■SYMPHONIC ■PHASER1,2
No.* Parameter Range Value →table** Control No.* Parameter Range Value →table** Control
1 LFO Frequency 0.00 - 39.7Hz 0 - 127 table#1 1 LFO Frequency 0.00 - 39.7Hz 0 - 127 table#1
2 LFO Depth 0 - 127 0 - 127 2 LFO Depth 0 - 127 0 - 127
3 Delay Offset 0 - 127 0 - 127 table#2 3 Phase Shift Offset 0 - 127 0 - 127
4 4 Feedback Level -63 - +63 1 - 127
5 5
6 EQ Low Frequency 50Hz - 2.0kHz 8 - 40 table#3 6 EQ Low Frequency 50Hz - 2.0kHz 8 - 40 table#3
7 EQ Low Gain -12 - +12dB 52 - 76 7 EQ Low Gain -12 - +12dB 52 - 76
8 EQ High Frequency 500Hz - 16.0kHz 28 - 58 table#3 8 EQ High Frequency 500Hz - 16.0kHz 28 - 58 table#3
9 EQ High Gain -12 - +12dB 52 - 76 9 EQ High Gain -12 - +12dB 52 - 76
10 Dry/Wet D63>W - D=W - D<W63 1 - 127 ● 10 Dry/Wet D63>W - D=W - D<W63 1 - 127 ●
11 11 Stage 6 - 10(phaser1)/3 - 5(phaser2) 3 - 10
12 12 Diffusion Mono/Stereo 0 - 1
13 13
14 14
15 15
16 16
■ROTARY SPEAKER ■DISTORTION, OVERDRIVE
No.* Parameter Range Value →table** Control No.* Parameter Range Value →table** Control
1 LFO Frequency 0.00 - 39.7Hz 0 - 127 table#1 ● 1 Drive 0 - 127 0 - 127 ●
2 LFO Depth 0 - 127 0 - 127 2 EQ Low Frequency 50Hz - 2.0kHz 8 - 40 table#3
3 3 EQ Low Gain -12 - +12dB 52 - 76
4 4 LPF Cutoff 1.0k - Thru 34 - 60 table#3
5 5 Output Level 0 - 127 0 - 127
6 EQ Low Frequency 50Hz - 2.0kHz 8 - 40 table#3 6
7 EQ Low Gain -12 - +12dB 52 - 76 7 EQ Mid Frequency 500Hz - 10.0kHz 28 - 54 table#3
8 EQ High Frequency 500Hz - 16.0kHz 28 - 58 table#3 8 EQ Mid Gain -12 - +12dB 52 - 76
9 EQ High Gain -12 - +12dB 52 - 76 9 EQ Mid Width 1.0 - 12.0 10 - 120
10 Dry/Wet D63>W - D=W - D<W63 1 - 127 10 Dry/Wet D63>W - D=W - D<W63 1 - 127
11 11 Edge(Clip Curve) 0 - 127 0 - 127 mild - sharp
12 12
13 13
14 14
15 15
16 16
■TREMOLO ■GUITAR AMP SIMULATOR
No.* Parameter Range Value →table** Control No.* Parameter Range Value →table** Control
1 LFO Frequency 0.00 - 39.7Hz 0 - 127 table#1 ● 1 Drive 0 - 127 0 - 127 ●
2 AM Depth 0 - 127 0 - 127 2 AMP Type Off, Stack, Combo, Tube 0 - 3
3 PM Depth 0 - 127 0 - 127 3 LPF Cutoff 1.0k - Thru 34 - 60 table#3
4 4 Output Level 0 - 127 0 - 127
5 5
6 EQ Low Frequency 50Hz - 2.0kHz 8 - 40 table#3 6
7 EQ Low Gain -12 - +12dB 52 - 76 7
8 EQ High Frequency 500Hz - 16.0kHz 28 - 58 table#3 8
9 EQ High Gain -12 - +12dB 52 - 76 9
10 10 Dry/Wet D63>W - D=W - D<W63 1 - 127
11 11 Edge(Clip Curve) 0 - 127 0 - 127 mild - sharp
12 12
13 13
14 LFO Phase Difference -180 - +180deg 4 - 124 resolution=3deg. 14
15 Input Mode mono/stereo 0 - 1 15
16 16
LFO Phase Difference
-180 - +180deg. 4 - 124 Phaser2 only
● : Can be controlled by AC1 (Assignable Controller 1)
No.* : These numbers correspond to the Parameter Suffix numbers in <Table 1-3> of the MIDI Data Format.
→table ** : Refer to “Effect Data Assign Table”.
48
Page 49

■ 3-BAND EQ
No.* Parameter Range Value →table** Control
1 EQ Low Gain -12 - +12dB 52 - 76
2 EQ Mid Frequency 500Hz - 10.0kHz 28 - 54 table#3
3 EQ Mid Gain -12 - +12dB 52 - 76
4 EQ Mid Width 1.0 - 12.0 10 - 120
5 EQ High Gain -12 - +12dB 52 - 76
6 EQ Low Frequency 50Hz - 2.0kHz 8 - 40 table#3
7 EQ High Frequency 500Hz - 16.0kHz 28 - 58 table#3
8
9
10
11
12
13
14
15
16
■ 2-BAND EQ
No.* Parameter Range Value →table** Control
1 EQ Low Frequency 50Hz - 2.0kHz 8 - 40 table#3
2 EQ Low Gain -12 - +12dB 52 - 76
3 EQ High Frequency 500Hz - 16.0kHz 28 - 58 table#3
4 EQ High Gain -12 - +12dB 52 - 76
5
6
7
8
9
10
11
12
13
14
15
16
■ AUTO WAH
No.* Parameter Range Value →table** Control
1 LFO Frequency 0.00 - 39.7Hz 0 - 127 table#1
2 LFO Depth 0 - 127 0 - 127
3 Cutoff Frequency Offset 0 - 127 0 - 127 Åú
4 Resonance 1.0 - 12.0 10 - 120
5
6 EQ Low Frequency 50Hz - 2.0kHz 8 - 40 table#3
7 EQ Low Gain -12 - +12dB 52 - 76
8 EQ High Frequency 500Hz - 16.0kHz 28 - 58 table#3
9 EQ High Gain -12 - +12dB 52 - 76
10 Dry/Wet D63>W - D=W - D<W63 1 - 127
11
12
13
14
15
16
● : Can be controlled by AC1 (Assignable Controller 1)
No.* : These numbers correspond to the Parameter Suffix numbers in <Table 1-3> of the MIDI Data Format.
→table ** : Refer to “Effect Data Assign Table”.
49
Page 50

Effect Data Assign Table
Data Value
LFO Frequency (Hz)
Table#1
Data Value Data Value
0 0.00
1 0.04
2 0.08
3 0.13
4 0.17
5 0.21
6 0.25
7 0.29
8 0.34
9 0.38
10 0.42
11 0.46
12 0.51
13 0.55
14 0.59
15 0.63
16 0.67
17 0.72
18 0.76
19 0.80
20 0.84
21 0.88
22 0.93
23 0.97
24 1.01
25 1.05
26 1.09
27 1.14
28 1.18
29 1.22
30 1.26
31 1.30
32 1.35
33 1.39
34 1.43
35 1.47
36 1.51
37 1.56
38 1.60
39 1.64
40 1.68
41 1.72
42 1.77
43 1.81
44 1.85
45 1.89
46 1.94
47 1.98
48 2.02
49 2.06
50 2.10
51 2.15
52 2.19
53 2.23
54 2.27
55 2.31
56 2.36
57 2.40
58 2.44
59 2.48
60 2.52
61 2.57
62 2.61
63 2.65
64 2.69
65 2.78
66 2.86
67 2.94
68 3.03
69 3.11
70 3.20
71 3.28
72 3.37
73 3.45
74 3.53
75 3.62
76 3.70
77 3.87
78 4.04
79 4.21
80 4.37
81 4.54
82 4.71
83 4.88
84 5.05
85 5.22
86 5.38
87 5.55
88 5.72
89 6.06
90 6.39
91 6.73
92 7.07
93 7.40
94 7.74
95 8.08
96 8.41
97 8.75
98 9.08
99 9.42
100 9.76
101 10.10
102 10.80
103 11.40
104 12.10
105 12.80
106 13.50
107 14.10
108 14.80
109 15.50
110 16.20
111 16.80
112 17.50
113 18.20
114 19.50
115 20.90
116 22.20
117 23.60
118 24.90
119 26.20
120 27.60
121 28.90
122 30.30
123 31.60
124 33.00
125 34.30
126 37.00
127 39.70
Table#2
Data Value
Modulation Delay Offset (ms)
Data Value Data Value
00.0
10.1
20.2
30.3
40.4
50.5
60.6
70.7
80.8
90.9
10 1.0
11 1.1
12 1.2
13 1.3
14 1.4
15 1.5
16 1.6
17 1.7
18 1.8
19 1.9
20 2.0
21 2.1
22 2.2
23 2.3
24 2.4
25 2.5
26 2.6
27 2.7
28 2.8
29 2.9
30 3.0
31 3.1
32 3.2
33 3.3
34 3.4
35 3.5
36 3.6
37 3.7
38 3.8
39 3.9
40 4.0
41 4.1
42 4.2
43 4.3
44 4.4
45 4.5
46 4.6
47 4.7
48 4.8
49 4.9
50 5.0
51 5.1
52 5.2
53 5.3
54 5.4
55 5.5
56 5.6
57 5.7
58 5.8
59 5.9
60 6.0
61 6.1
62 6.2
63 6.3
64 6.4
65 6.5
66 6.6
67 6.7
68 6.8
69 6.9
70 7.0
71 7.1
72 7.2
73 7.3
74 7.4
75 7.5
76 7.6
77 7.7
78 7.8
79 7.9
80 8.0
81 8.1
82 8.2
83 8.3
84 8.4
85 8.5
86 8.6
87 8.7
88 8.8
89 8.9
90 9.0
91 9.1
92 9.2
93 9.3
94 9.4
95 9.5
96 9.6
97 9.7
98 9.8
99 9.9
100 10.0
101 11.1
102 12.2
103 13.3
104 14.4
105 15.5
106 17.1
107 18.6
108 20.2
109 21.8
110 23.3
111 24.9
112 26.5
113 28.0
114 29.6
115 31.2
116 32.8
117 34.3
118 35.9
119 37.5
120 39.0
121 40.6
122 42.2
123 43.7
124 45.3
125 46.9
126 48.4
127 50.0
Table#3
Data Value
EQ Frequency (Hz)
Data Value
0 THRU(20)
122
225
328
432
536
640
745
850
956
10 63
11 70
12 80
13 90
14 100
15 110
16 125
17 140
18 160
19 180
20 200
21 225
22 250
23 280
24 315
25 355
26 400
27 450
28 500
29 560
30 630
31 700
32 800
33 900
34 1.0k
35 1.1k
36 1.2k
37 1.4k
38 1.6k
39 1.8k
40 2.0k
41 2.2k
42 2.5k
43 2.8k
44 3.2k
45 3.6k
46 4.0k
47 4.5k
48 5.0k
49 5.6k
50 6.3k
51 7.0k
52 8.0k
53 9.0k
54 10.0k
55 11.0k
56 12.0k
57 14.0k
58 16.0k
59 18.0k
60
THRU(20.0k)
50
Page 51

Table#4
Reverb Time (s)
Data Value
0 0.3
1 0.4
2 0.5
3 0.6
4 0.7
5 0.8
6 0.9
7 1.0
8 1.1
9 1.2
10 1.3
11 1.4
12 1.5
13 1.6
14 1.7
15 1.8
16 1.9
17 2.0
18 2.1
19 2.2
20 2.3
21 2.4
22 2.5
23 2.6
24 2.7
25 2.8
26 2.9
27 3.0
28 3.1
29 3.2
30 3.3
31 3.4
32 3.5
33 3.6
34 3.7
35 3.8
36 3.9
37 4.0
38 4.1
39 4.2
40 4.3
41 4.4
42 4.5
Data Value
43 4.6
44 4.7
45 4.8
46 4.9
47 5.0
48 5.5
49 6.0
50 6.5
51 7.0
52 7.5
53 8.0
54 8.5
55 9.0
56 9.5
57 10.0
58 11.0
59 12.0
60 13.0
61 14.0
62 15.0
63 16.0
64 17.0
65 18.0
66 19.0
67 20.0
68 25.0
69 30.0
Table#5
Delay Time (ms)
Data Value
0 0.1
1 1.7
2 3.2
3 4.8
4 6.4
5 8.0
6 9.5
7 11.1
8 12.7
9 14.3
10 15.8
11 17.4
12 19.0
13 20.6
14 22.1
15 23.7
16 25.3
17 26.9
18 28.4
19 30.0
20 31.6
21 33.2
22 34.7
23 36.3
24 37.9
25 39.5
26 41.0
27 42.6
28 44.2
29 45.7
30 47.3
31 48.9
32 50.5
33 52.0
34 53.6
35 55.2
36 56.8
37 58.3
38 59.9
39 61.5
40 63.1
41 64.6
42 66.2
Data Value Data Value
43 67.8
44 69.4
45 70.9
46 72.5
47 74.1
48 75.7
49 77.2
50 78.8
51 80.4
52 81.9
53 83.5
54 85.1
55 86.7
56 88.2
57 89.8
58 91.4
59 93.0
60 94.5
61 96.1
62 97.7
63 99.3
64 100.8
65 102.4
66 104.0
67 105.6
68 107.1
69 108.7
70 110.3
71 111.9
72 113.4
73 115.0
74 116.6
75 118.2
76 119.7
77 121.3
78 122.9
79 124.4
80 126.0
81 127.6
82 129.2
83 130.7
84 132.3
85 133.9
86 135.5
87 137.0
88 138.6
89 140.2
90 141.8
91 143.3
92 144.9
93 146.5
94 148.1
95 149.6
96 151.2
97 152.8
98 154.4
99 155.9
100 157.5
101 159.1
102 160.6
103 162.2
104 163.8
105 165.4
106 166.9
107 168.5
108 170.1
109 171.7
110 173.2
111 174.8
112 176.4
113 178.0
114 179.5
115 181.1
116 182.7
117 184.3
118 185.8
119 187.4
120 189.0
121 190.6
122 192.1
123 193.7
124 195.3
125 196.9
126 198.4
127 200.0
Table#6
Room Size (meter)
Data Value
0 0.1
1 0.3
2 0.4
3 0.6
4 0.7
5 0.9
6 1.0
7 1.2
8 1.4
9 1.5
10 1.7
11 1.8
12 2.0
13 2.1
14 2.3
15 2.5
16 2.6
17 2.8
18 2.9
19 3.1
20 3.2
21 3.4
22 3.5
23 3.7
24 3.9
25 4.0
26 4.2
27 4.3
28 4.5
29 4.6
30 4.8
31 5.0
32 5.1
33 5.3
34 5.4
35 5.6
36 5.7
37 5.9
38 6.1
39 6.2
40 6.4
41 6.5
42 6.7
Data Value
43 6.8
44 7.0
51
Page 52

MIDI Data Format
By sending various types of MIDI messages you can directly
control and change the settings on the WF192XG soundcard.
Please refer to the owner’s manual of your software for
information about how to transmit MIDI messages to the
WF192XG soundcard.
1. CHANNEL MESSAGES
1.1 Key On / Key Off
Messages which are generated when the keyboard is played.
Reception note range = C-2 (0)-G8 (127), C3 = 60
Velocity range = 1-127 (Only the Key On velocity is received)
Key On: Generated when a key is pressed.
Key Off: Generated when a key is released.
Each message includes a specific note number which
corresponds to the key which is pressed, plus a velocity
value based on how hard the key is struck.
If the Multi Part parameter Rcv NOTE MESSAGE (Table 1-4)
= OFF for a specific Part, that Part will ignore Key On and
Key Off messages.
If the Drum Setup parameter Rcv NOTE OFF (Table 1-5) =
OFF, the Drum Part will ignore Key Off messages.
If the Drum Setup parameter Rcv NOTE ON = OFF (Table 1-
5), the Drum Part will ignore Key On messages.
1.2 Control Change
Messages which control volume, panning, and other
controller parameters.
Each type of Control Change message is assigned to a
specific control number.
If the Multi Part parameter for each Control Change Receive
(Table 1-4, nn30-nn40) = OFF, that Part will ignore the
specific Control Change message.
1.2.1 Bank Select
Messages which select variation Voice bank
numbers.
CNTRL# PARAMETER DATA RANGE
0 Bank Select MSB 0...127
32 Bank Select LSB 0...127
1.2.2 Modulation
Messages which control vibrato depth.
CNTRL# PARAMETER DATA RANGE
1 Modulation 0...127
A setting of 0 = vibrato off, and a setting of 127 =
maximum vibrato.
1.2.3 Breath Controller
CNTRL# PARAMETER DATA RANGE
2 Breath Controller 0...127
Effective only for S-VA voices.
1.2.4 Foot Controller
CNTRL# PARAMETER DATA RANGE
4 Foot Controller 0...127
Effective only for S-VA voices.
1.2.5 Portamento Time
Messages which control the duration of portamento, or a
continuous pitch glide between successively played
notes.
CNTRL# PARAMETER DATA RANGE
5 Portamento Time 0...127
When the parameter 1.2.12 Portamento = ON, this
adjusts the speed of pitch change.
A setting of 0 = minimum portamento time, and 127 =
maximum portamento time.
1.2.6 Data Entry
Messages which set the value for the parameter
specified by RPN/NRPN.
CNTRL# PARAMETER DATA RANGE
6 Data Entry MSB 0...127
38 Data Entry LSB 0...127
Parameter value is determined by combining MSB and
LSB.
You can select the Voice banks with MSB and LSB
numbers. MSB and LSB functions differently depending
on the sound module mode.
In XG mode, MSB numbers select Voice type (Normal
Voice or Drum Voice), and LSB numbers select Voice
banks. In TG300B mode, LSB is fixed, and MSB numbers
select Voice banks.(See XG/TG300B normal voice list,
XG/TG300B drum voice list, S-VAvoice list.)
A new bank selection will not become effective until the
next Program Change message is received.
1.2.7 Main Volume
Messages which control the volume of each Part.
CNTRL# PARAMETER DATA RANGE
7 Main Volume 0...127
A setting of 0 = minimum volume, and 127 = maximum
volume.
52
Page 53

1.2.8 Pan
Messages which control the stereo panning position of
each Part.
CNTRL# PARAMETER DATA RANGE
10 Pan 0...127
A setting of 0 = extreme left position, and 127 = extreme
right position.
1.2.9 Expression
Messages which control intonation expression of each
Part.
CNTRL# PARAMETER DATA RANGE
11 Expression 0...127
A setting of 0 = minimum expression volume, and 127 =
maximum expression volume.
1.2.10 Control Change 13
CNTRL# PARAMETER DATA RANGE
13 Control Change 13 0...127
Effective only for S-VA voices.
1.2.11 Hold1
Messages which control sustain on/off.
CNTRL# PARAMETER DATA RANGE
64 Hold1 0...127
Settings between 0-63 = sustain off, and settings
between 64-127 = sustain on.
CNTRL# PARAMETER DATA RANGE
71 Harmonic Content 0...127 (0 : -64, 64 : +0, 127 : +63)
The value set here is an offset value which will be added
to or subtracted from the Voice data.
Higher values will result in a more resonant sound.
Depending on the Voice, the effective range may be
narrower than the range available for adjustment.
1.2.16 Release Time
Messages which adjust the envelope release time set for
each Voice.
CNTRL# PARAMETER DATA RANGE
72 Release Time 0...127 (0 : -64, 64 : +0, 127 : +63)
The value set here is an offset value which will be added
to or subtracted from the Voice data.
1.2.17 Attack Time
Messages which adjust the envelope attack time set for
each Voice.
CNTRL# PARAMETER DATA RANGE
73 Attack Time 0...127 (0 : -64, 64 : +0, 127 : +63)
The value set here is an offset value which will be added
to or subtracted from the Voice data.
1.2.18 Brightness
Messages which adjust the filter cutoff frequency set for
each Voice.
1.2.12 Portamento
Messages which control portamento on/off.
CNTRL# PARAMETER DATA RANGE
65 Portamento 0...127
Settings between 0-63 = portamento off, and settings
between 64-127 = portamento on.
The parameter 1.2.5 Portamento Time controls the
portamento speed.
1.2.13 Sostenuto
Messages which control sostenuto on/off.
CNTRL# PARAMETER DATA RANGE
66 Sostenuto 0...127
Holding specific notes and then pressing and holding the
sostenuto pedal will sustain those notes as you play
subsequent notes, until the pedal is released.
Settings between 0-63 = sostenuto off, and settings
between 64-127 = sostenuto on.
Ineffective for S-VA voices.
1.2.14 Soft Pedal
Messages which control soft pedal on/off.
CNTRL# PARAMETER DATA RANGE
67 Soft Pedal 0...127
Notes played while holding the soft pedal will be
dampened. Settings between 0-63 = soft pedal off, and
settings between 64-127 = soft pedal on.
1.2.15 Harmonic Content
Messages which adjust the resonance set for each
Voice.
CNTRL# PARAMETER DATA RANGE
74 Brightness 0...127 (0 : -64, 64 : +0, 127 : +63)
The value set here is an offset value which will be added
to or subtracted from the Voice data.
Lower values will result in a softer sound.
Depending on the Voice, the effective range may be
narrower than the range available for adjustment.
1.2.19 Portamento Control
Messages which apply a portamento between the
currently sounding note and the subsequent note.
CNTRL# PARAMETER DATA RANGE
84 Portamento Control 0...127
Portamento Control is transmitted specifying the Note On
Key of the currently-sounding note.
Specify a Portamento Source Key number between 0-
127.
When a Portamento Control message is received, the
currently sounding pitch will change with a Portamento
Time of 0 to the next Key On key on the same channel.
For example, the following settings would apply a
portamento from note C3 to C4.
90 3C 7F C3 = Key On
B0 54 3C Source Key number set to C3
90 48 7F C4 = Key On (When C4 = on, C3 is
Even if the Multi Part parameter Rcv PORTAMENTO
(Table 1-4) = OFF, the Portamento Control message will
be received.
Ineffective for S-VA voices.
raised by a portamento to C4.)
53
Page 54

1.2.20 Effect1 Depth (Reverb Send Level)
Messages which adjust the send level for the Reverb
effect.
CNTRL# PARAMETER DATA RANGE
91 Effect1 Depth 0...127
1.2.21 Effect3 Depth (Chorus Send Level)
Messages which adjust the send level for the Chorus
effect.
CNTRL# PARAMETER DATA RANGE
93 Effect3 Depth 0...127
1.2.22 Effect4 Depth
(Variation Effect Send Level)
Messages which adjust the send level for the Variation
effect.
CNTRL# PARAMETER DATA RANGE
94 Effect4 Depth 0...127
If Variation Connection (Table 1-3) = 1 (System), this
message sets the send level for the Variation effect.
If Variation Connection = 0 (Insertion), this has no effect.
1.2.23 Data Increment / Decrement (for RPN)
Messages which increase or decrease the MSB value of
Pitch Bend Sensitivity, Fine Tune, or Coarse Tune in
steps of 1.
CNTRL# PARAMETER DATA RANGE
96 RPN Increment 0...127
97 RPN Decrement 0...127
The data byte is ignored.
When the maximum value or minimum value is reached,
the value will not be incremented or decremented further.
(Incrementing the Fine Tune will not cause the Coarse
Tune to be incremented.)
1.2.24 NRPN
(Non-Registered Parameter Number)
Messages which adjust a Voice’s vibrato, filter, EG, drum
setup or other parameter settings.
CNTRL# PARAMETER DATA RANGE
98 NRPN LSB 0...127
99 NRPN MSB 0...127
First send the NRPN MSB and NRPN LSB to specify the
parameter which is to be controlled. Then use Data Entry
to set the value of the specified parameter.
* Note that once the NRPN has been set for a channel,
subsequent data entry will be recognized as the same
NRPN’s value change. Therefore, after you use the
NRPN, you should set a Null (7FH, 7FH) value to avoid
an unexpected result.
The following NRPN numbers can be received.
NRPN DATA ENTRY
MSB LSB MSB PARAMETER NAME and VALUE RANGE
01H 08H mmH Vibrato Rate
01H 09H mmH Vibrato Depth
01H 0AH mmH Vibrato Delay
01H 20H mmH Filter Cutoff Frequency
01H 21H mmH Filter Resonance
01H 22H mmH Filter EG Depth
01H 30H mmH Bass
01H 31H mmH Treble
01H 63H mmH EG Attack Time
01H 64H mmH EG Decay Time
01H 66H mmH EG Release Time
14H rrH mmH Drum Filter Cutoff Frequency
15H rrH mmH Drum Filter Resonance
16H rrH mmH Drum EG Attack Rate
17H rrH mmH Drum EG Decay Rate
18H rrH mmH Drum Instrument Pitch Coarse
19H rrH mmH Drum Instrument Pitch Fine
1AH rrH mmH Drum Instrument Level
1CH rrH mmH Drum Instrument Pan
1DH rrH mmH Drum Instrument Reverb Send Level
1EH rrH mmH Drum Instrument Chorus Send Level
1FH rrH mmH Drum Instrument Variation
mm : 00H-40H-7FH (-64 - 0 - +63)
mm : 00H-40H-7FH (-64 - 0 - +63)
mm : 00H-40H-7FH (-64 - 0 - +63)
mm : 00H-40H-7FH (-64 - 0 - +63)
mm : 00H-40H-7FH (-64 - 0 - +63)
mm : 00H-40H-7FH (-64 - 0 - +63)
*Effective only for S-VA voices.
mm : 00H-40H-7FH (-64 - 0 - +63)
*Effective only for S-VA voices.
mm : 00H-40H-7FH (-64 - 0 - +63)
*Effective only for S-VA voices.
mm : 00H-40H-7FH (-64 - 0 - +63)
mm : 00H-40H-7FH (-64 - 0 - +63)
mm : 00H-40H-7FH (-64 - 0 - +63)
mm : 00H-40H-7FH (-64 - 0 - +63)
rr : drum instrument note number
mm : 00H-40H-7FH (-64 - 0 - +63)
rr : drum instrument note number
mm : 00H-40H-7FH (-64 - 0 - +63)
rr : drum instrument note number
mm : 00H-40H-7FH (-64 - 0 - +63)
rr : drum instrument note number
Applies to both Decay1 and 2.
mm : 00H-40H-7FH (-64 - 0 - +63)
rr : drum instrument note number
mm : 00H-40H-7FH (-64 - 0 - +63)
rr : drum instrument note number
mm : 00-7F (0-max)
rr : drum instrument note number
mm : 00H, 01H-40H-7FH(random,
left-center-right)
rr : drum instrument note number
mm : 00H-7FH (0-max)
rr : drum instrument note number
mm : 00H-7FH (0-max)
rr : drum instrument note
number
Send Level
mm : 00H-7FH (0-max)
rr : drum instrument note number
54
MSB 14H-1FH (for Drum) is valid only if the Multi Part
parameter (Table 1-4) PART MODE = DRUMS1 or
DRUMS2 for that channel. (If PART MODE = DRUM, no
values will be changed.)
Page 55

1.2.25 RPN (Registered Parameter Number)
Messages which offset, or add or subtract values from a
Part’s pitch bend sensitivity, tuning, or other parameter
settings.
CNTRL# PARAMETER DATA RANGE
100 RPN LSB 0...127 (Default:7FH)
101 RPN MSB 0...127 (Default:7FH)
* Note that once the RPN has been set for a channel,
subsequent data entry will be recognized as the same
RPN’s value change. Therefore after you use the RPN,
you should set a Null (7FH, 7FH) value to avoid an
unexpected result.
The following RPN numbers can be received.
RPN DATA ENTRY
MSB LSB MSB LSB PARAMETER NAME and VALUE RANGE
00H 00H mmH — Pitch Bend Sensitivity
00H 01H mmH 11H Fine Tuning
00H 02H mmH — Coarse Tuning
7FH 7FH — — RPN null
mm : 00-18H (0-24 chromatic
steps) Assignable in chromatic
steps up to 2 octaves
Default : 02H
LSB value is ignored.
mm : 00H-40H-7FH (-64 - 0 - +63)
mm : 28H-40H-58H (-24 - +24
chromatic steps)
LSB value is ignored.
Cancels RPN and NRPN numbers.
1.2.26 Channel Mode Messages
The following Channel Mode Messages can be received.
2nd BYTE 3rd BYTE MESSAGE
120 0 All Sounds Off
121 0 Reset All Controllers
123 0 All Notes Off
124 0 Omni Off
125 0 Omni On
126 0 - 16 Mono
127 0 Poly
1.2.26.1 All Sounds Off
Terminates all sounds currently sounding on the
specified channel. However, the status of channel
messages such as Note On and Hold On is maintained.
1.2.26.2 Reset All Controllers
The values of the following controllers will be reset to the
defaults.
CONTROLLER VALUE
Pitch Bend Change +/-0 (center)
Channel Aftertouch 0 (off)
Polyphonic Aftertouch 0 (off)
Modulation 0 (off)
Breath Control 127 (max)
Foot Control 127 (max)
Expression 127 (max)
Control Change13 +/-0 (center)
Hold1 0 (off)
Portamento 0 (off)
Sostenuto 0 (off)
Soft Pedal 0 (off)
Portamento Control cancels the Portamento
RPN number not specified;
NRPN number not specified;
Source Key Number that
was received.
internal data will not
change.
internal data will not
change.
1.2.26.3 All Notes Off
Terminates all notes currently on for the specified
channel. However, if Hold1 or Sostenuto is on, notes will
continue sounding until these are turned off.
1.2.26.4 Omni Off
Performs the same function as when an All Notes Off
message is received.
1.2.26.5 Omni On
Performs the same function as when an All Notes Off
message is received.
1.2.26.6 Mono
Performs the same function as when an All Sounds Off
message is received, and if the 3rd byte (mono number)
is in the range of 0-16, sets the corresponding channel to
Mono Mode (Mode 4 : m = 1).
1.2.26.7 Poly
Performs the same function as when an All Sounds Off
message is received, and sets the corresponding
channel to Poly Mode (Mode 3).
1.3 Program Change
Messages for Voice selection.
With a combination of Bank Select, you can select not
only basic Voice numbers, but also variation Voice bank
numbers.
If the Multi Part parameter Rcv PROGRAM CHANGE
(Table 1-4) = OFF, that Part will not receive Program
Change messages.
1.4 Pitch Bend
Messages for pitch bend wheel values.
If the Multi Part parameter Rcv PITCH BEND CHANGE
(Table 1-4) = OFF, that Part will not receive Pitch Bend
messages.
55
Page 56

1.5 Channel Aftertouch
Messages which let you control various functions by the
pressure you apply to the keys after the initial striking of
the keys, over the entire channel.
If the Multi Part parameter Rcv CHANNEL AFTER
TOUCH (Table 1-4) = OFF, that Part will not receive
Channel Aftertouch.
1.6 Polyphonic Aftertouch
Messages which let you control various functions by the
pressure you apply to the keys after the initial striking of
the keys, for each individual key.
If the Multi Part parameter Rcv POLYPHONIC AFTER
TOUCH (Table 1-4) = OFF, that Part will not receive
Polyphonic Aftertouch. Effective range is between note
numbers 36-97.
2. SYSTEM EXCLUSIVE MESSAGES
System Exclusive messages control various functions of the
WF192XG soundcard, including master volume and master
tuning, play mode, effect type and various other parameters.
* The device number of the WF192XG soundcard is fixed to
“All”.
2.1 Parameter Change
The WF192XG soundcard receives the following
parameter change messages.
[UNIVERSAL REALTIME MESSAGE]
1) Master Volume
[UNIVERSAL NON REALTIME MESSAGE]
1) General MIDI Mode On
[XG NATIVE PARAMETER CHANGE]
1) XG System on
2) XG System Data parameter change
3) Multi Effect1 Data parameter change
4) Multi Part Data parameter change
5) Drums Setup Data parameter change
[VL70-m NATIVE PARAMETER CHANGE]
1) S-VA System parameter change
2) S-VA Current Voice/Common Misc parameter change
3) S-VA Part parameter change
4) S-VA Current Voice/Element parameter change
[OTHER]
1) Master tuning
2) TG300 System Data parameter change
3) TG300 Multi Effect Data parameter change
4) TG300 Multi Part Data parameter change
2.1.1 Universal Realtime Messages
2.1.1.1 Master Volume
11110000 F0 Exclusive status
01111111 7F Universal Real Time
01111111 7F ID of target device
00000100 04 Sub-ID #1=Device Control Message
00000001 01 Sub-ID #2=Master Volume
0sssssss ss* Volume LSB
0ttttttt tt Volume MSB
11110111 F7 End of Exclusive
or,
11110000 F0 Exclusive status
01111111 7F Universal Real Time
0xxxnnnn xn Device Number, xxx=irrelevant
00000100 04 Sub-ID #1=Device Control Message
00000001 01 Sub-ID #2=Master Volume
0sssssss ss Volume LSB
0ttttttt tt Volume MSB
11110111 F7 End of Exclusive
When received, the Volume MSB will be effective for the
System Parameter MASTER VOLUME (Table 1-2).
* “ss” is the hexadecimal expression of 0sssssss; same as
for “tt”, “aa”, etc.
2.1.2 Universal Non-Realtime Messages
2.1.2.1 General MIDI Mode On
11110000 F0 Exclusive status
01111110 7E Universal Non-Real Time
01111111 7F ID of target device
00001001 09 Sub-ID #1=General MIDI Message
00000001 01 Sub-ID #2=General MIDI On
11110111 F7 End of Exclusive
or,
11110000 F0 Exclusive status
01111110 7E Universal Non-Real Time
0xxxnnnn xn Device Number, xxx = irrelevant
00001001 09 Sub-ID #1=General MIDI Message
00000001 01 Sub-ID #2=General MIDI On
11110111 F7 End of Exclusive
When General MIDI Mode On is received, the sound
module mode will be changed to XG mode.
When this happens, the WF192XG soundcard will
receive the MIDI messages which compatible with GM
System Level 1, and consequently will not receive NRPN
and Bank Select messages.
Since approximately 50ms is required to execute this
message, be sure to leave an appropriate interval before
the subsequent message.
56
Page 57

2.1.3 XG Native Parameter Change
With the Parameter Change messages as listed below,
you can change the basic character or sound of a Voice,
such as by effect type or effect parameter, transpose,
tuning, and others.
11110000 F0 Exclusive status
01000011 43 YAMAHA ID
0001nnnn 1n* Device Number
01001100 4C XG Model ID
0aaaaaaa aa Address High
0aaaaaaa aa Address Mid
0aaaaaaa aa Address Low
0ddddddd dd Data
||
11110111 F7 End of Exclusive
* Any number is OK since the device number for the
WF192XG soundcard is fixed to “All”.
For parameters with data size of 2 or 4, transmit the
appropriate number of data bytes.
When sending the parameter change messages
consecutively, be sure to leave an appropriate interval
(if the time base is 480, ca 5 clocks) between the
messages.
EXAMPLE OF PARAMETER CHANGE
1. To change reverb effect type to Stage 1, first check the
Effect Type List to identify the MSB and LSB numbers; for
Stage 1 Reverb effect type numbers are MSB = 03, LSB =
00.
Next, check the Address in Table 1-3 for the REVERB
TYPE parameter; in this case the address is High, Mid,
Low = 02, 01, 00, respectively.
Apply these to the 2.1.3 XG Native Parameter Change list
as follows:
11110000 F0 Exclusive status
01000011 43 YAMAHA ID
0001nnnn 1n* Device Number
01001100 4C XG Model ID
00000010 02 Address High
00000001 01 Address Mid
00000000 00 Address Low
00000011 03 Data (REVERB TYPE MSB)
00000000 00 Data (REVERB TYPE LSB)
11110111 F7 End of Exclusive
When this data is received, the WF192XG soundcard will
change the effect type to Stage 1 Reverb.
* Any number is OK since the device number for the
WF192XG soundcard is fixed to “All”.
2. To change the effect Dry/Wet balance of Stage 1 to 50%
each, first check the Effect Parameter List, parameter
number 10, to identify the Dry (50%)/Wet (50%); in this
case the Dry=Wet value is 64 (hexadecimal 40).
Next, check the Address in Table 1-3 for the REVERB
PARAMETER 10; in this case the address is High, Mid,
Low = 02, 01, 0B, respectively.
Apply these to the 2.1.3 XG Native Parameter Change list
as follows:
11110000 F0 Exclusive status
01000011 43 YAMAHA ID
0001nnnn 1n Device Number
01001100 4C XG Model ID
00000010 02 Address High
00000001 01 Address Mid
00001011 0B Address Low
01000000 40 Data (MSB)
00000000 00 Data (LSB) *fixed at 00.
11110111 F7 End of Exclusive
When this data is received, the WF192XG soundcard will
change the effect Dry/Wet balance of Stage 1 to 50%
each.
Be sure to allow enough time for the procedure to take
place by inserting an empty measure at the top of the
song for every channel.
2.1.3.1 XG System On
11110000 F0 Exclusive status
01000011 43 YAMAHA ID
0001nnnn 1n Device Number
01001100 4C XG Model ID
00000000 00 Address High
00000000 00 Address Mid
01111110 7E Address Low
00000000 00 Data
11110111 F7 End of Exclusive
When this data is received, the WF192XG soundcard will
switch to XG mode and all the parameters will be
initialized accordingly, and XG-compatible messages
such as NRPN and Bank Select messages can be
received.
Since approximately 50ms is required to execute this
message, be sure to leave an appropriate interval before
the subsequent message.
SOUND MODULE MODE CHANGE
(XG mode / TG300B mode)
XG System On = F0 43 1n 4c 00 00 7E 00 F7
TG300B Reset = F0 41 1n 42 12 40 00 7F 00 41 F7
n = device number
2.1.3.2 XG System Data parameter change
See Tables 1-1 and 1-2.
2.1.3.3 Multi Effect1 Data parameter change
See Tables 1-1 and 1-3.
2.1.3.4 Multi Part Data parameter change
See Tables 1-1 and 1-4.
57
Page 58

2.1.3.5 Drums Setup Data parameter change
See Tables 1-1 and 1-5.
If a Drum Setup Reset parameter change message (T able 1-
2) is received, the Drum Setup parameter values will be
initialized. Selecting a Drum Set will cause the Drum Setup
parameter values to be initialized.
2.1.4 VL70-m Native Parameter Change
11110000 F0 Exclusive status
01000011 43 YAMAHA ID
0001nnnn 1n Device Number
01010111 57 Model ID
0aaaaaaa aa Address High
0aaaaaaa aa Address Mid
0aaaaaaa aa Address Low
0ddddddd dd Data
||
11110111 F7 End of Exclusive
2.1.4.1 S-VA System parameter change
See Table 2-1.
2.1.4.2 S-VA Current Voice/Common Misc
parameter change
See Table 2-2.
2.1.4.3 S-VA Part parameter change
See Table 2-3.
2.1.4.4 S-VA Current Voice/Element parameter
change
See Table 2-4.
2.1.5 Other parameter changes
2.1.5.1 Master Tuning
11110000 F0 Exclusive status
01000011 43 YAMAHA ID
0001nnnn 1n Device Number
00100111 27 Model ID
00110000 30 Sub ID2
00000000 00
00000000 00
0mmmmmmm mm Master Tune MSB
01111111 11 Master Tune LSB
Occccccc cc irrelevant
11110111 F7 End of Exclusive
This message simultaneously changes the pitch of all
channels.
3. REALTIME MESSAGES
3.1 Active Sensing
Once FE has been received, if no MIDI data is
subsequently received for longer than an interval of
approximately 300msec, the WF192XG soundcard will
perform the same function as when ALLSOUNDS OFF,
ALL NOTES OFF, and RESET ALL CONTROLLERS
messages are received, and will then return to a status
in which FE is not monitored.
58
Page 59

<Table 1-1>
Addres Parameter
3n 0D 00 note number 13
3n 0E 00 note number 14
::
3n 5B 00 note number 91
Parameter Base Address
Model ID = 4C [XG]
57 [S-VA]
Parameter Change
Address
XG SYSTEM 00 00 00 System
EFFECT 1 02 01 00 Effect1(Reverb,Chorus,Variation)
MULTI PART 08 00 00 Multi Part 1
DRUM 30 0D 00 Drum Setup 1
High Mid Low Description
00 00 7D Drum setup Reset
00 00 7E XG System On
00 00 7F All Parameter Reset
::
08 0F 00 Multi Part 16
31 0D 00 Drum Setup 2
n : Drum Setup number (0, 1)
<Table 1-2>
MIDI Parameter Change table (SYSTEM) [XG]
Address Size Data Parameter Description Default
(H) (H) (H) value(H)
00 00 00 4 0000 - 07FF MASTER TUNE -102.4 - +102.3[cent] 00 04 00 00
04 1 00 - 7F MASTER VOLUME 0 - 127 7F
05 1 00 - 7F NOT USED
06 1 28 - 58 TRANSPOSE -24 - +24[semitones] 40
7D n DRUM SETUP RESET n=Drum Setup number (0, 1)
7E 00 XG SYSTEM ON 00=XG System ON (receive only)
7F 00 ALL PARAMETER RESET 00=ON (receive only)
TOTAL SIZE 07
1st bit3 - 0→bit15 - 12
2nd bit3 - 0→bit11 - 8
3rd bit3 - 0→bit7 - 4
4th bit3 - 0→bit3 - 0
<Table 1-3>
MIDI Parameter Change table (EFFECT 1) [XG]
Address Size Data Parameter Description Default
(H) (H) (H) value(H)
02 01 00 2 00 - 7F REVERB TYPE MSB Refer to the Effect Type List 01(=HALL1)
02 1 00 - 7F REVERB PARAMETER 1 Refer to the Effect Parameter List depends on
03 1 00 - 7F REVERB PARAMETER 2 ” ”
04 1 00 - 7F REVERB PARAMETER 3 ” ”
05 1 00 - 7F REVERB PARAMETER 4 ” ”
06 1 00 - 7F REVERB PARAMETER 5 ” ”
07 1 00 - 7F REVERB PARAMETER 6 ” ”
08 1 00 - 7F REVERB PARAMETER 7 ” ”
09 1 00 - 7F REVERB PARAMETER 8 ” ”
0A 1 00 - 7F REVERB PARAMETER 9 ” ”
0B 1 00 - 7F REVERB PARAMETER 10 ” ”
0C 1 00 - 7F REVERB RETURN -∞dB...0dB...+6dB
0D 1 01 - 7F REVERB PAN L63...C...R63
TOTAL SIZE 0E
00 - 7F REVERB TYPE LSB 00 : basic type 00
reverb type
(0...64...127) 40
(1...64...127) 40
59
Page 60

Address Size Data Parameter Description Default
(H) (H) (H) value(H)
02 01 10 1 00 - 7F REVERB PARAMETER 11 Refer to the Effect Parameter List depends on
11 1 00 - 7F REVERB PARAMETER 12 ” ”
12 1 00 - 7F REVERB PARAMETER 13 ” ”
13 1 00 - 7F REVERB PARAMETER 14 ” ”
14 1 00 - 7F REVERB PARAMETER 15 ” ”
15 1 00 - 7F REVERB PARAMETER 16 ” ”
TOTAL SIZE 6
Address Size Data Parameter Description Default
(H) (H) (H) value(H)
02 01 20 2 00 - 7F CHORUS TYPE MSB Refer to the Effect Type List 41
22 1 00 - 7F CHORUS PARAMETER 1 Refer to the Effect Parameter List depends on
23 1 00 - 7F CHORUS PARAMETER 2 ” ”
24 1 00 - 7F CHORUS PARAMETER 3 ” ”
25 1 00 - 7F CHORUS PARAMETER 4 ” ”
26 1 00 - 7F CHORUS PARAMETER 5 ” ”
27 1 00 - 7F CHORUS PARAMETER 6 ” ”
28 1 00 - 7F CHORUS PARAMETER 7 ” ”
29 1 00 - 7F CHORUS PARAMETER 8 ” ”
2A 1 00 - 7F CHORUS PARAMETER 9 ” ”
2B 1 00 - 7F CHORUS PARAMETER 10 ” ”
2C 1 00 - 7F CHORUS RETURN -∞dB...0dB...+6dB
2D 1 01 - 7F CHORUS PAN L63...C...R63
2E 1 00 - 7F SEND CHORUS TO REVERB -∞dB...0dB...+6dB
TOTAL SIZE 0F
Address Size Data Parameter Description Default
(H) (H) (H) value(H)
02 01 30 1 00 - 7F CHORUS PARAMETER 11 Refer to the Effect Parameter List depends on
31 1 00 - 7F CHORUS PARAMETER 12 ” ”
32 1 00 - 7F CHORUS PARAMETER 13 ” ”
33 1 00 - 7F CHORUS PARAMETER 14 ” ”
34 1 00 - 7F CHORUS PARAMETER 15 ” ”
35 1 00 - 7F CHORUS PARAMETER 16 ” ”
TOTAL SIZE 6
00 - 7F CHORUS TYPE LSB 00 : basic type 00
(0...64...127) 40
(1...64...127) 40
(0...64...127) 00
reverb type
(=CHORUS1)
chorus type
chorus type
Address Size Data Parameter Description Default
(H) (H) (H) value(H)
02 01 40 2 00 - 7F VARIATION TYPE MSB Refer to the Effect Type List 05
42 2 00 - 7F VARIATION PARAMETER 1 MSB Refer to the Effect Parameter List depends on
44 2 00 - 7F VARIATION PARAMETER 2 MSB ” ”
46 2 00 - 7F VARIATION PARAMETER 3 MSB ” ”
48 2 00 - 7F VARIATION PARAMETER 4 MSB ” ”
4A 2 00 - 7F VARIATION PARAMETER 5 MSB ” ”
4C 2 00 - 7F VARIATION PARAMETER 6 MSB ” ”
4E 2 00 - 7F VARIATION PARAMETER 7 MSB ” ”
50 2 00 - 7F VARIATION PARAMETER 8 MSB ” ”
52 2 00 - 7F VARIATION PARAMETER 9 MSB ” ”
54 2 00 - 7F VARIATION PARAMETER 10 MSB ” ”
56 1 00 - 7F VARIATION RETURN -∞dB...0dB...+6dB
57 1 01 - 7F VARIATION PAN L63...C...R63
58 1 00 - 7F SEND VARIATION TO REVERB -∞dB...0dB...+6dB
59 1 00 - 7F SEND VARIATION TO CHORUS -∞dB...0dB...+6dB
5A 1 00 - 01 VARIATION CONNECTION 0:INSERTION,1:SYSTEM 00
00 - 7F VARIATION TYPE LSB 00 : basic type 00
00 - 7F VARIATION PARAMETER 1 LSB ” ”
00 - 7F VARIATION PARAMETER 2 LSB ” ”
00 - 7F VARIATION PARAMETER 3 LSB ” ”
00 - 7F VARIATION PARAMETER 4 LSB ” ”
00 - 7F VARIATION PARAMETER 5 LSB ” ”
00 - 7F VARIATION PARAMETER 6 LSB ” ”
00 - 7F VARIATION PARAMETER 7 LSB ” ”
00 - 7F VARIATION PARAMETER 8 LSB ” ”
00 - 7F VARIATION PARAMETER 9 LSB ” ”
00 - 7F VARIATION PARAMETER 10 LSB ” ”
(0...64...127) 40
(1...64...127) 40
(0...64...127) 00
(0...64...127) 00
(=DELAY L,C,R)
variation type
60
Page 61

5B 1 00 - 0F, VARIATION PART Part 1...16 = 0...15, 7F
5C 1 00 - 7F MW VARIATION CONTROL DEPTH -64 - +63 40
5D 1 00 - 7F BEND VARIATION CONTROL DEPTH -64 - +63 40
5E 1 00 - 7F CAT VARIATION CONTROL DEPTH -64 - +63 40
5F 1 00 - 7F AC1 VARIATION CONTROL DEPTH -64 - +63 40
60 1 00 - 7F AC2 VARIATION CONTROL DEPTH -64 - +63 40
TOTAL SIZE 21
Address Size Data Parameter Description Default
(H) (H) (H) value(H)
02 01 70 1 00 - 7F VARIATION PARAMETER 11 Refer to the Effect Parameter List depends on
71 1 00 - 7F VARIATION PARAMETER 12 ” ”
72 1 00 - 7F VARIATION PARAMETER 13 ” ”
73 1 00 - 7F VARIATION PARAMETER 14 ” ”
74 1 00 - 7F VARIATION PARAMETER 15 ” ”
75 1 00 - 7F VARIATION PARAMETER 16 ” ”
TOTAL SIZE 6
7F OFF = 127
variation type
<Table 1-4>
MIDI Parameter Change table (MULTI PART) [XG]
Address Size Data Parameter Description Default
(H) (H) (H) value(H)
08 nn 00 1 00 - 20 ELEMENT RESERVE 0 - 32 part10 = 00,
nn 01 1 00 - 7F BANK SELECT MSB 0 - 127 part10 = 7F,
nn 02 1 00 - 7F BANK SELECT LSB 0 - 127 00
nn 03 1 00 - 7F PROGRAM NUMBER 1 - 128 00
nn 04 1 00 - 0F,7F Rcv CHANNEL 1 - 16,OFF part no.
nn 05 1 00 - 01 MONO/POLY MODE 0:MONO, 1:POLY 01
nn 06 1 00 - 02 SAME NOTE NUMBER 0:SINGLE 01
nn 07 1 00 - 03 PART MODE 0:NORMAL 00(Other Than Part10)
nn 08 1 28 - 58 NOTE SHIFT -24 - +24 [semitones] 40
nn 09 2 00 - FF DETUNE -12.8 - +12.7 [Hz] 08 00
nn 0A 1st bit3-0→bit7-4 (80)
nn 0B 1 00 - 7F VOLUME 0 - 127 64
nn 0C 1 00 - 7F VELOCITY SENSE DEPTH 0 - 127 40
nn 0D 1 00 - 7F VELOCITY SENSE OFFSET 0 - 127 40
nn 0E 1 00 - 7F PAN 0:random,L63...C...R63
nn 0F 1 00 - 7F NOTE LIMIT LOW C-2 - G8 00
nn 10 1 00 - 7F NOTE LIMIT HIGH C-2 - G8 7F
nn 11 1 00 - 7F DRY LEVEL 0 - 127 7F
nn 12 1 00 - 7F CHORUS SEND 0 - 127 00
nn 13 1 00 - 7F REVERB SEND 0 - 127 28
nn 14 1 00 - 7F VARIATION SEND 0 - 127 00
nn 15 1 00 - 7F VIBRATO RATE -64 - +63 40
nn 16 1 00 - 7F VIBRATO DEPTH -64 - +63 40(drum part ignores)
nn 17 1 00 - 7F VIBRATO DELAY -64 - +63 40(drum part ignores)
nn 18 1 00 - 7F FILTER CUTOFF FREQUENCY -64 - +63 40
nn 19 1 00 - 7F FILTER RESONANCE -64 - +63 40
nn 1A 1 00 - 7F EG ATTACK TIME -64 - +63 40
nn 1B 1 00 - 7F EG DECAY TIME -64 - +63 40
nn 1C 1 00 - 7F EG RELEASE TIME -64 - +63 40
nn 1D 1 28 - 58 MW PITCH CONTROL -24 - +24 [semitones] 40
nn 1E 1 00 - 7F MW FILTER CONTROL -9600 - +9450 [cent] 40
nn 1F 1 00 - 7F MW AMPLITUDE CONTROL -64 - +63 40
nn 20 1 00 - 7F MW LFO PMOD DEPTH 0 - 127 0A
nn 21 1 00 - 7F MW LFO FMOD DEPTH 0 - 127 00
nn 22 1 00 - 7F MW LFO AMOD DEPTH 0 - 127 00
nn 23 1 28 - 58 BEND PITCH CONTROL -24 - +24 [semitones] 42
nn 24 1 00 - 7F BEND FILTER CONTROL -9600 - +9450 [cent] 40
nn 25 1 00 - 7F BEND AMPLITUDE CONTROL -64 - +63 40
nn 26 1 00 - 7F BEND LFO PMOD DEPTH +100 - +100 [%] 40
nn 27 1 00 - 7F BEND LFO FMOD DEPTH +100 - +100 [%] 40
nn 28 1 00 - 7F BEND LFO AMOD DEPTH +100 - +100 [%] 40
TOTAL SIZE 29
KEY ON ASSIGN 1:MULTI
2:INST (for DRUM)
1:DRUM 02(Part10)
2 - 3:DRUMS1 - 2
2nd bit3-0→bit3-0
(1...64...127) 40
other = 02
other = 00
61
Page 62

Address Size Data Parameter Description Default
(H) (H (H) value(H)
nn 30 1 00 - 01 Rcv PITCH BEND 0:OFF, 1:ON 01
nn 31 1 00 - 01 Rcv CH AFTER TOUCH (CAT) 0:OFF, 1:ON 01
nn 32 1 00 - 01 Rcv PROGRAM CHANGE 0:OFF, 1:ON 01
nn 33 1 00 - 01 Rcv CONTROL CHANGE 0:OFF, 1:ON 01
nn 34 1 00 - 01 Rcv POLY AFTER TOUCH (PAT) 0:OFF, 1:ON 01
nn 35 1 00 - 01 Rcv NOTE MESSAGE 0:OFF, 1:ON 01
nn 36 1 00 - 01 Rcv RPN 0:OFF, 1:ON 01
nn 37 1 00 - 01 Rcv NRPN 0:OFF, 1:ON XG=01, GM=00
nn 38 1 00 - 01 Rcv MODULATION 0:OFF, 1:ON 01
nn 39 1 00 - 01 Rcv VOLUME 0:OFF, 1:ON 01
nn 3A 1 00 - 01 Rcv PAN 0:OFF, 1:ON 01
nn 3B 1 00 - 01 Rcv EXPRESSION 0:OFF, 1:ON 01
nn 3C 1 00 - 01 Rcv HOLD1 0:OFF, 1:ON 01
nn 3D 1 00 - 01 Rcv PORTAMENTO 0:OFF, 1:ON 01
nn 3E 1 00 - 01 Rcv SOSTENUTO 0:OFF, 1:ON 01
nn 3F 1 00 - 01 Rcv SOFT PEDAL 0:OFF, 1:ON 01
nn 40 1 00 - 01 Rcv BANK SELECT 0:OFF, 1:ON XG=01, GM=00
nn 41 1 00 - 7F SCALE TUNING C -64 - +63 [cent] 40
nn 42 1 00 - 7F SCALE TUNING C# -64 - +63 [cent] 40
nn 43 1 00 - 7F SCALE TUNING D -64 - +63 [cent] 40
nn 44 1 00 - 7F SCALE TUNING D# -64 - +63 [cent] 40
nn 45 1 00 - 7F SCALE TUNING E -64 - +63 [cent] 40
nn 46 1 00 - 7F SCALE TUNING F -64 - +63 [cent] 40
nn 47 1 00 - 7F SCALE TUNING F# -64 - +63 [cent] 40
nn 48 1 00 - 7F SCALE TUNING G -64 - +63 [cent] 40
nn 49 1 00 - 7F SCALE TUNING G# -64 - +63 [cent] 40
nn 4A 1 00 - 7F SCALE TUNING A -64 - +63 [cent] 40
nn 4B 1 00 - 7F SCALE TUNING A# -64 - +63 [cent] 40
nn 4C 1 00 - 7F SCALE TUNING B -64 - +63 [cent] 40
nn 4D 1 28 - 58 CAT PITCH CONTROL -24 - +24 [semitones] 40
nn 4E 1 00 - 7F CAT FILTER CONTROL -9600 - +9450 [cent] 40
nn 4F 1 00 - 7F CAT AMPLITUDE CONTROL -64 - +63 40
nn 50 1 00 - 7F CAT LFO PMOD DEPTH 0 - 127 00
nn 51 1 00 - 7F CAT LFO FMOD EPTH 0 - 127 00
nn 52 1 00 - 7F CAT LFO AMOD DEPTH 0 - 127 00
nn 53 1 28 - 58 PAT PITCH CONTROL -24 - +24 [semitones] 40
nn 54 1 00 - 7F PAT FILTER CONTROL -9600 - +9450 [cent] 40
nn 55 1 00 - 7F PAT AMPLITUDE CONTROL -64 - +63 40
nn 56 1 00 - 7F PAT LFO PMOD DEPTH 0 - 127 00
nn 57 1 00 - 7F PAT LFO FMOD DEPTH 0 - 127 00
nn 58 1 00 - 7F PAT LFO AMOD DEPTH 0 - 127 00
nn 59 1 00 - 5F AC1 CONTROLLER NUMBER 0 - 95 10
nn 5A 1 28 - 58 AC1 PITCH CONTROL -24 - +24 [semitones] 40
nn 5B 1 00 - 7F AC1 FILTER CONTROL -9600 - +9450 [cent] 40
nn 5C 1 00 - 7F AC1 AMPLITUDE CONTROL -64 - +63 40
nn 5D 1 00 - 7F AC1 LFO PMOD DEPTH 0 - 127 00
nn 5E 1 00 - 7F AC1 LFO FMOD DEPTH 0 - 127 00
nn 5F 1 00 - 7F AC1 LFO AMOD DEPTH 0 - 127 00
nn 60 1 00 - 5F AC2 CONTROLLER NUMBER 0 - 95 11
nn 61 1 28 - 58 AC2 PITCH CONTROL -24 - +24 [semitones] 40
nn 62 1 00 - 7F AC2 FILTER CONTROL -9600 - +9450 [cent] 40
nn 63 1 00 - 7F AC2 AMPLITUDE CONTROL -64 - +63 40
nn 64 1 00 - 7F AC2 LFO PMOD DEPTH 0 - 127 00
nn 65 1 00 - 7F AC2 LFO FMOD DEPTH 0 - 127 00
nn 66 1 00 - 7F AC2 LFO AMOD DEPTH 0 - 127 00
nn 67 1 00 - 01 PORTAMENTO SWITCH 0:OFF, 1:ON 00
nn 68 1 00 - 7F PORTAMENTO TIME 0 - 127 00
nn 69 1 00 - 7F PITCH EG INITIAL LEVEL-64 - +63 40
nn 6A 1 00 - 7F PITCH EG ATTACK TIME -64 - +63 40
nn 6B 1 00 - 7F PITCH EG RELEASE LEVEL -64 - +63 40
nn 6C 1 00 - 7F PITCH EG RELEASE TIME -64 - +63 40
nn 6D 1 01 - 7F VELOCITY LIMIT LOW 1 - 127 01
nn 6E 1 01 - 7F VELOCITY LIMIT HIGH 1 - 127 7F
TOTAL SIZE 3F
nn = PART NUMBER (0 : Part 1, 1 : Part 2, 2 : Part 3, ... , 15 : Part 16)
In the case of the DRUM PART, there will be no effect for the following parameters.
• SOFT PEDAL • BANK SELECT LSB • MONO/POLY • SCALE TUNING • PORTAMENTO
• POLY AFTER TOUCH • PITCH EG INITIAL LEVEL • PITCH EG ATTACK TIME
• PITCH EG RELEASE LEVEL • PITCH EG RELEASE TIME
62
Page 63

<Table 1-5>
MIDI Parameter Change table (DRUM SETUP) [XG]
Address Size Data Parameter Description Default
(H) (H) (H) value(H)
3n rr 00 1 00 - 7F PITCH COARSE -64 - +63 40
3n rr 01 1 00 - 7F PITCH FINE -64 - +63[cent] 40
3n rr 02 1 00 - 7F LEVEL 0 - 127 depend on
3n rr 03 1 00 - 7F ALTERNATE GROUP 0:OFF, 1 - 127 ”
3n rr 04 1 00 - 7F PAN 0:random,
3n rr 05 1 00 - 7F REVERB SEND 0 - 127 ”
3n rr 06 1 00 - 7F CHORUS SEND 0 - 127 ”
3n rr 07 1 00 - 7F VARIATION SEND 0 - 127 7F
3n rr 08 1 00 - 01 KEY ASSIGN 0:SINGLE, 1:MULTI 00
3n rr 09 1 00 - 01 Rcv NOTE OFF 0:OFF, 1:ON depend on
3n rr 0A 1 00 - 01 Rcv NOTE ON 0:OFF, 1:ON 01
3n rr 0B 1 00 - 7F FILTER CUTOFF FREQUENCY -64 - +63 40
3n rr 0C 1 00 - 7F FILTER RESONANCE -64 - +63 40
3n rr 0D 1 00 - 7F EG ATTACK RATE -64 - +63 40
3n rr 0E 1 00 - 7F EG DECAY1 RATE -64 - +63 40
3n rr 0F 1 00 - 7F EG DECAY2 RATE -64 - +63 40
TOTAL SIZE 10
[Note] n : Drum Setup number (0, 1)
rr : note number (0D - 5B)
When XG system on or GM mode on messages are received, all Drum Setup parameters are initialized.
The Drum Setup Reset message can be used to initialize each Drum Setup parameter.
Selecting a Drum Set will cause the Drum Setup parameter values to be initialized.
L63...C...R63 (1...64...127) ”
the note
the note
<Table 2-1>
S-VA System Parameter
Address Size Data Parameter Description Default
(H) (H) (H) value(H)
00 00 00 4 0000 - 07FF MASTER TUNE -102.4 - +102.3[cent] 00 04 00 00
04 1 00 - 7F MASTER VOLUME 0 - 127 7F
05 1 00 - 7F MASTER ATTENEUTOR 0 - 127 00
06 1 28 - 58 TRANSPOSE -24 - +24[semitones] 40
07 1 NOT USED
08 1 ”
09 1 ”
0A 1 ”
0B 1 00 - 01 BREATH CONTROL NUMBER BC, EXPRESSION 00
0C 1 30 - 50 BREATH CONTROL CURVE -16 - +16 40
0D 1 00 - 01 WX LIP LOCK OFF/ON 00
0E 1 00 - 01 BREATH SET LOCK OFF/ON 00
OF 1 00 - 01 WX LIP NORMAL, EXPAND 00
10 1 00 - 02 BREATH MODE BC/WX, VELOCITY, TOUCH EG 00
11 1 00 - 7F VELOCITY DEPTH 0 - 127 30
12 1 00 - 7F VELOCITY OFFSET 0 - 127 50
13 1 00 - 7F TOUCH EG TIME 0 - 127 2A
14 1 00 - 7F AT LOW DEPTH 0 - 127 1B
15 1 00 - 7F AT LOW OFFSET 0 - 127 50
16 1 00 - 7F AT HIGH DEPTH 0 - 127 25
17 1 00 - 7F AT HIGH OFFSET 0 - 127 65
TOTAL SIZE 18
1st bit3 - 0→bit15 - 12
2nd bit3 - 0→bit11 - 8
3rd bit3 - 0→bit7 - 4
4th bit3 - 0→bit3 - 0
63
Page 64

<Table 2-2>
S-VA Current Voice/Common Misc Parameter
Address Size Data Parameter Description Default
(H) (H) (H) value(H)
10 00 00 1 20 - 7F VOICE NAME#1 32 - 127(ASCII)
01 1 20 - 7F VOICE NAME#2 32 - 127(ASCII)
02 1 20 - 7F VOICE NAME#3 32 - 127(ASCII)
03 1 20 - 7F VOICE NAME#4 32 - 127(ASCII)
04 1 20 - 7F VOICE NAME#5 32 - 127(ASCII)
05 1 20 - 7F VOICE NAME#6 32 - 127(ASCII)
06 1 20 - 7F VOICE NAME#7 32 - 127(ASCII)
07 1 20 - 7F VOICE NAME#8 32 - 127(ASCII)
08 1 NOT USED
09 1 00 - 7F VOICE LEVEL 0 - 127
0A 1 00 - 02 ASSIGN MODE BOTTOM, TOP, LAST
0B 1 00 00 - 1F 1F POLY EXPAND off...32>32
0D 1 00 -01 PORTAMENTO MODE FULL TIME, FINGERED
0E 1 NOT USED
TOTAL SIZE 0F
<Table 2-3>
S-VA Part Parameter
Address Size Data Parameter Description Default
(H) (H) (H) value(H)
09 00 17 1 00 - 7F AMP LEVEL SCALE BREAK POINT C-2 - G8 3C
18 1 00 - 7F DEPTH -64 - +63 40
19 1 00 - 7F FILTER CUTOFF SCALE BREAK POINT C-2 - G8 3C
1A 1 00 - 7F DEPTH -64 - +63 40
1B 1 NOT USED
1C 1 NOT USED
TOTAL SIZE 06
<Table 2-4>
S-VA Current Voice/Element Parameter
Address Size Data Parameter Description Default
(H) (H) (H) value(H)
20 00 00 1 20 - 7F ELEMENT NAME #1 32-127(ASCII)
00 01 1 20 - 7F ELEMENT NAME #2 32-127(ASCII)
00 02 1 20 - 7F ELEMENT NAME #3 32-127(ASCII)
00 03 1 20 - 7F ELEMENT NAME #4 32-127(ASCII)
00 04 1 20 - 7F ELEMENT NAME #5 32-127(ASCII)
00 05 1 20 - 7F ELEMENT NAME #6 32-127(ASCII)
00 06 1 20 - 7F ELEMENT NAME #7 32-127(ASCII)
00 07 1 20 - 7F ELEMENT NAME #8 32-127(ASCII)
00 08 1 20 - 7F ELEMENT NAME #9 32-127(ASCII)
00 09 1 20 - 7F ELEMENT NAME #10 32-127(ASCII)
00 0A 1 00 - 01 EXPRESSION MODE BC,VOLUME
00 0B 1 00 - 62 PRESSURE CONTROL NO. off - 95, AT, VELOCITY, PB
00 0C 2 01 01 - 00 7F DEPTH -127 - +127
00 0E 1 70 - 10 CURVE -16 - +16
00 0F 1 00 - 62 FILTER CONTROL NO. off - 95, AT, VELOCITY, PB
00 10 2 01 01 - 00 7F DEPTH -127 - +127
00 12 1 70 - 10 CURVE -16 - +16
00 13 1 00 - 62 AMPLITUDE CONTROL NO. off - 95, AT, VELOCITY, PB
00 14 2 01 01 - 00 7F DEPTH -127 - +127
00 16 1 70 - 10 CURVE -16 - +16
00 17 1 00 - 62 EMBOUCHURE CONTROL NO. off - 95, AT, VELOCITY, PB
00 18 2 01 01 - 00 7F UPPER DEPTH -127 - +127
00 1A 2 01 01 - 00 7F LOWER DEPTH -127 - +127
00 1C 1 00 - 01 MODE CENTER BASE, MINIMUM BASE
00 1D 1 00 - 62 TONGUING CONTROL NO. off - 95, AT, VELOCITY, PB
00 1E 2 01 01 - 00 7F DEPTH -127 - +127
00 20 1 70 - 10 CURVE -16 - +16
00 21 1 00 - 62 SCREAM CONTROL NO. off - 95, AT, VELOCITY, PB
00 22 2 01 01 - 00 7F DEPTH -127 - +127
00 24 1 70 - 10 CURVE -16 - +16
00 25 1 00 - 62 BREATH NOISE CONTROL NO. off - 95, AT, VELOCITY, PB
00 26 2 01 01 - 00 7F DEPTH -127 - +127
00 28 1 70 - 10 CURVE -16 - +16
00 29 1 00 - 62 GROWL CONTROL NO. off - 95, AT, VELOCITY, PB
00 2A 2 01 01 - 00 7F DEPTH -127 - +127
00 2C 1 70 - 10 CURVE -16 - +16
00 2D 1 00 - 62 THROAT FORMANT CONTROL NO. off - 95, AT, VELOCITY, PB
00 2E 2 01 01 - 00 7F DEPTH -127 - +127
00 30 1 70 - 10 CURVE -16 - +16
00 31 1 00 - 62 HARMONIC ENHANCER CONTROL NO. off - 95, AT, VELOCITY, PB
64
Page 65

00 32 2 01 01 - 00 7F DEPTH -127 - +127
00 34 1 70 - 10 CURVE -16 - +16
00 35 1 00 - 62 DAMPING CONTROL NO. off - 95, AT, VELOCITY, PB
00 36 2 01 01 - 00 7F DEPTH -127 - +127
00 38 1 70 - 10 CURVE -16 - +16
00 39 1 00 - 62 ABSORPTION CONTROL NO. off - 95, AT, VELOCITY, PB
00 3A 2 01 01 - 00 7F DEPTH -127 - +127
00 3C 1 70 - 10 CURVE -16 - +16
00 3D reserve
: : reserve
0A 6A reserve
TOTAL SIZE 56B
65
Page 66

❋❋❋❋❋❋❋❋
0-127
*3
(123-127)
: True #
: Song Pos.
: Song Sel.
: Tune
: Clock
: Commands
: Local On/Off
: All Notes Off
: Active Sense
: Reset
Prog
Change
System Exclusive
System
Common
System
Real Time
Aux
Messages
Mode 2: OMNI ON, MONO
Mode 4: OMNI OFF, MONO
Mode 1: OMNI ON, POLY
Mode 3: OMNI OFF, POLY
: Yes
: No
Notes : *1 ; receive if switch is on.
*2 ; m is always treated as "1" regardless of its value.
*3 ; transmit/receive if exclusive switch is on.
*4 ; not receice in case of VL Voice
*5 ; not receice in case of XG(AWM2) Voice
0, 32
1,5,7,10,11
2,4,13
6,38
64-67
71-74
84
91,93,94
96-97
98-99
100-101
120
121
Control Change
*1
*1
*1 *5
*1
*4
*1
*1
*1
Bank select
Data Entry
Sound Controller
Portamento Cntrl
Effect Depth
RPN Inc, Dec
NRPN LSB, MSB
RPN LSB, MSB
All Sound Off
Reset All Cntrls
Default
Changed
Default
Messages
Altered
: True voice
Note on
Note off
Key's
Ch's
Basic
Channel
Mode
Note
Number
Velocity
After
Touch
Pitch Bender
Function... Transmitted Recognized Remarks
1 - 16
1 - 16
3
3,4 (m = 1) *2
0 - 127
0 - 127
9nH, v=1-127
*1 *4
*1
0-24 semi *1
❋❋❋❋❋❋❋❋
YAMAHA [PCI Sound Card]]
MODEL WF-192XG MIDI Implementation Chart
Date:10-Apr-1998
Version : 1.00
66
 Loading...