

Page 1
Reference Manual
Guitar Amplifier
Contents
Introduction ...........................................................................2
Main Features ............................................................................. 2
Accessories ................................................................................ 2
Names and Functions ..........................................................3
Control Panel .............................................................................. 3
Rear Panel .................................................................................. 6
Connection ............................................................................7
Connection Example (on THR30II Wireless) .............................. 7
Power ......................................................................................... 8
Connecting to guitar by wireless (THR-II Wireless only) ............ 9
Connecting to a smart device ................................................... 10
Connecting to a computer ........................................................ 12
Troubleshooting .................................................................14
Specifications .....................................................................16
Technical Specifications ........................................................... 16
THR30II Wireless, THR10II Wireless*
Power Button LED status list ............................................ 17
Signal Flow Diagrams ............................................................... 18
Amp Modeling List .................................................................... 19
EN
THR30II Wireless THR10II Wireless THR10II Reference Manual 1
Page 2

Thank you for purchasing this Yamaha product.
Introduction
This product is an exceptionally versatile and compact guitar amplifier designed for use in your home, rehearsal
spaces, and other places—virtually anywhere you want it!
We recommend that you read this manual carefully so that you can fully take advantage of the advanced and
convenient functions of the product. We also recommend that you keep this manual in a safe and handy place
for future reference
Main Features
• Sophisticated guitar amplifier utilizing advanced amp modeling, made possible with Yamaha’s original VCM technology
• Advanced wireless guitar transmitter Relay G10T (made by LINE6) for wireless use (THR30II Wireless
and THR10II Wireless only)
• Bluetooth® capability enables playing music and editing sound settings from a smart device and a
computer.
• Built‐in rechargeable battery enables use without power adaptor.
• Yamaha’s original Extended Stereo technology enables an exceptionally wide stereo image, much
wider than the unit’s compact size.
• The audio interface capability enables recording your guitar to computer via USB.
• Incorporates a chromatic auto tuner.
* What is VCM Technology?
An original physical modeling technology developed by Yamaha, VCM Technology reproduces the characteristics of analog
circuitry at a micro level to accurately reproduce the sound of the modeled equipment.
Accessories
•Power Adaptor
•Quick Guide
• Safety Instructions Sheet
• Service Offices list
• Cubase AI Download Information
In this document, the THR30II Wireless, THR10II Wireless and THR10II are collectively
called THR-II. The THR30II Wireless and THR10II Wireless are called THR-II Wireless.
THR30II Wireless THR10II Wireless THR10II Reference Manual 2
Page 3
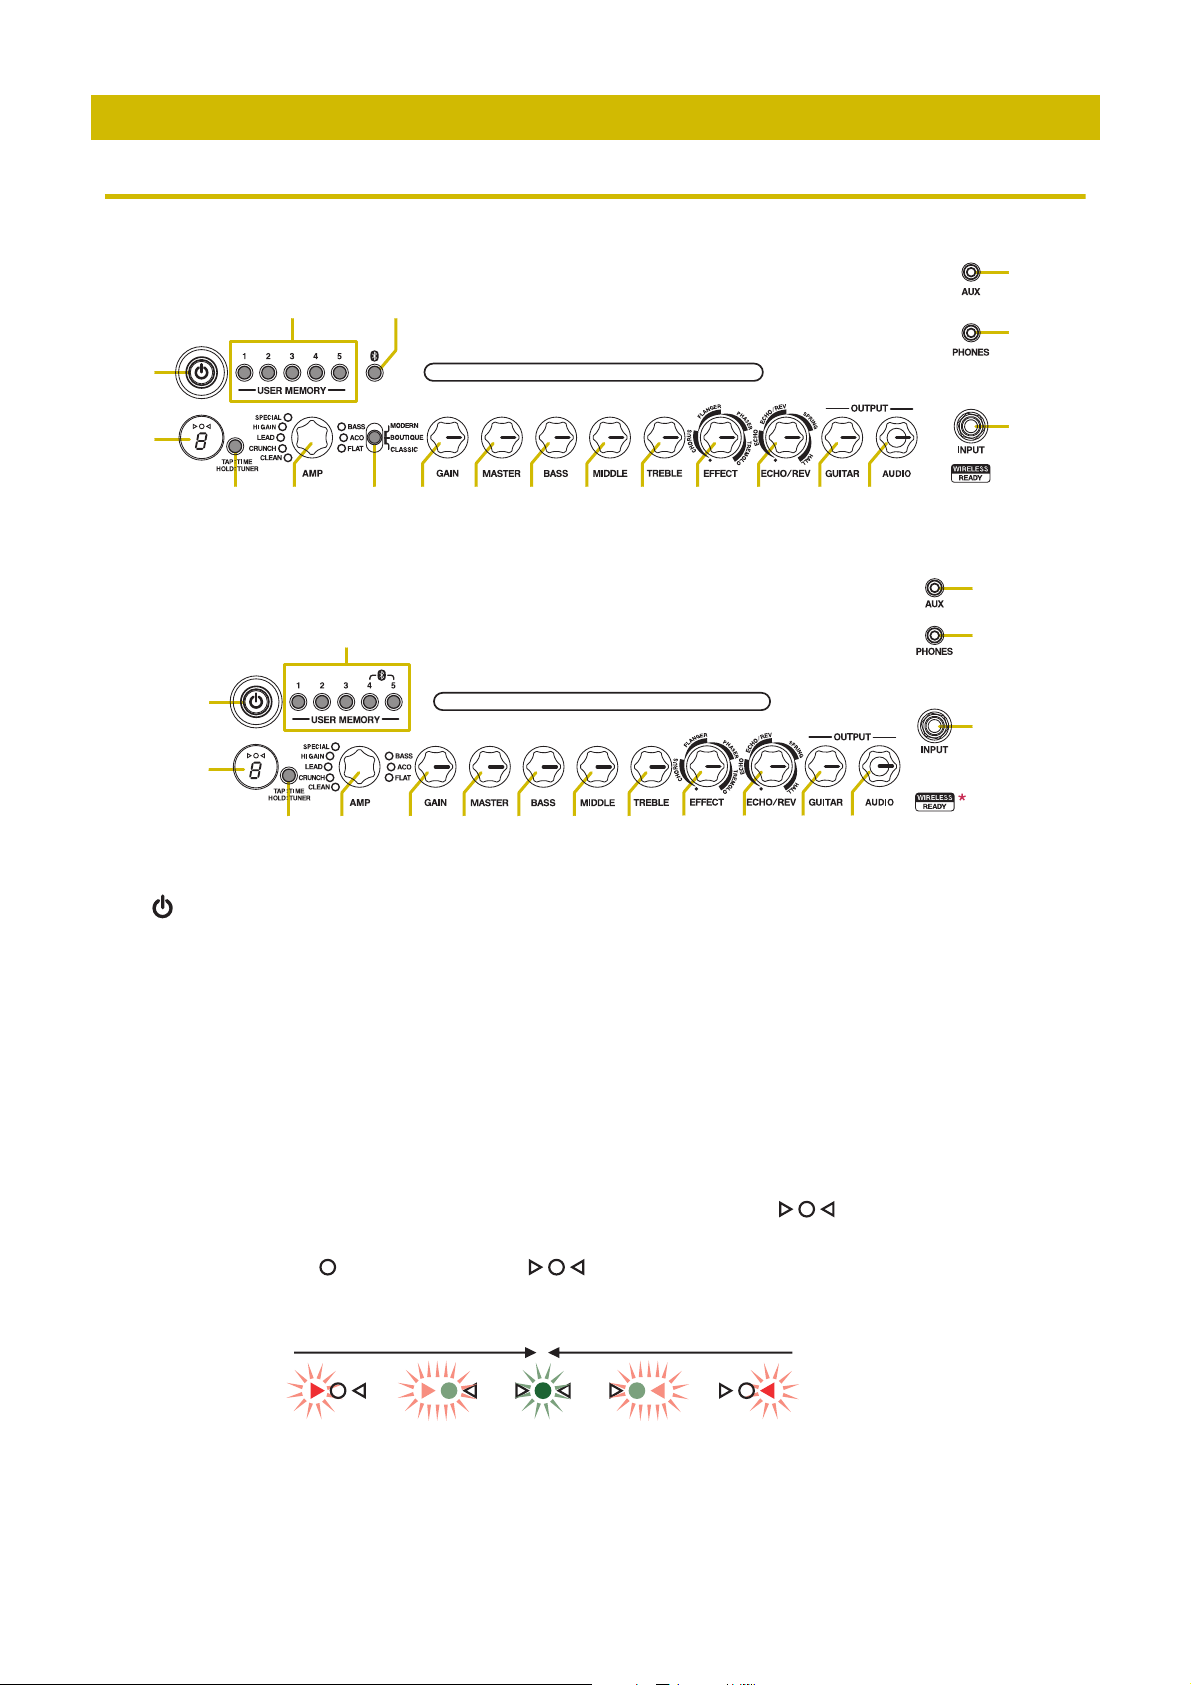
Control Panel
Names and Functions
q
w
!5
!6
!7
e y u i o !0
!1 !2 !3 !4
r
!8
q
w
!5
!6
!7
e t y u i o !0 !1 !2 !3 !4r
!8 !9
THR30II Wireless
THR10II Wireless
THR10II
*
THR10II Wireless only
Pitch is low Pitch is highIn tune
q [ ] (Power Button) / Power Button LED
This is the unit’s power button.
When the power is ON, the Power Button LED, the lamp corresponding to the selected amp type and the
Power Lamp in the speaker cabinet light.
w LED Display
Indicates each of the THR-II’s settings and conditions.
e [TAP/TUNER] button
Tuner Function
Holding the switch for 1 second engages the tuner function and lights the indicators.
The tuner is calibrated to A4=440Hz. Tune the guitar until the desired pitch appears in the LED display.
When only the circle ( ) in the center of the display is visible, tuning is accurate.
Press the [TAP/TUNER] button (less than one second) to turn OFF the tuner function.
* When the tuner function is set to ON, the guitar sound to the main speaker, [PHONES] jack, and [USB] jack is muted. The
sounds from the [AUX] jack, [USB] jack and Bluetooth are output to the main speaker and [PHONES] jack.
THR30II Wireless THR10II Wireless THR10II Reference Manual 3
Page 4

Names and Functions
Tap Tempo Function
When an ECHO or ECHO/REV effect is selected with the [ECHO/REV] knob !2 control, the tempo of the
delay can be set by tapping (more than twice) on the switch.
Extended Stereo Setting
Hold the switch for more than three seconds to switch the Extended Stereo* function ON/OFF.
ON: “#” on LED Display w is off (default setting).
OFF: “#” on LED Display w is lit.
* Extended Stereo: The Extended Stereo function produces a much wider stereo field. Extended Stereo affects the sounds
from the [AUX] jack, [USB] jack and Bluetooth as well as the guitar sounds with reverb effects applied.
* The Extended Stereo setting (ON/OFF) is saved when the power is turned OFF.
r [AMP] knob
Selects the amp type. The lamp for the corresponding amp type lights.
* When the power is turned ON, the most recent amp type is selected.
Tips on Creating Sound
Using the [GAIN] knob y and [MASTER] knob u in combination gives you broad control over the sound for
each amp type, except ACO and FLAT. Setting the [GAIN] knob and [MASTER] knob properly provides the
desired amount of distortion on the power amp. Once you have the desired sound, use the [GUITAR] knob !3
to set the overall volume of the guitar sound.
t [AMP] switch (THR30II Wireless only)
Selects the amp mode. Selects the amp modeling by combination of amp mode and amp type. The [AMP]
knob r lamp lights for the corresponding amp mode color.
For further details of amp modeling settings that can be selected by combining the amp mode and amp type,
refer to the Amp Modeling List (page 19)
y [GAIN] knob
Adjusts the amount of guitar distortion. Turn the knob to the right to increase the amount of distortion.
* When ACO is selected with the [AMP] knob r, the modeled sound is a mixture of the front-mic’d sound and pickup sound
of an acoustic electric guitar. (Minimum setting produces the direct pickup sound only. Maximum setting produces the mic
sound only.)
u [MASTER] knob
Adjusts the volume for the guitar sound. Turn the knob to the right to increase the volume and create power
amp distortion and change in the low-range frequency.
* When BASS, ACO or FLAT is selected with the [AMP] knob r, this only adjusts the volume.
i [BASS] knob
Tone adjustment for the guitar’s sound. Turn the knob to the right to enhance the low-range frequencies.
o [MIDDLE] knob
Tone adjustment for the guitar’s sound. Turn the knob to the right to enhance the mid-range frequencies.
!0 [TREBLE] knob
Tone adjustment for the guitar’s sound. Turn the knob to the right to enhance the high-range frequencies.
!1 [EFFECT] knob
Selects one of four different effects: CHORUS, FLANGER, PHASER, or TREMOLO. Turn the knob to the right
to increase the amount of each effect.
* Turn the knob fully to the left to set the effect OFF.
THR30II Wireless THR10II Wireless THR10II Reference Manual 4
Page 5

Names and Functions
!2 [ECHO /REV] knob
Selects one of four different effects: ECHO (tape echo), ECHO/REV (tape echo/reverb), SPRING (spring
reverb), and HALL (hall reverb).
Turn the knob to the right to increase the amount of each effect.
* Turn the knob fully to the left to set the effect OFF.
* When ECHO or ECHO/REV is selected, the [TAP/TUNER] button
e can be used to set the delay time.
!3 [GUITAR] knob
Adjusts the overall volume of the guitar sound.
* This knob’s setting has no effect on the signal sent to the [USB] jack @0.
* The volume output to the [LINE OUT] [L] [R] jack (THR30II Wireless only) is constant regardless of the setting of the [GUI-
TAR] knob.
!4 [AUDIO] knob
Adjusts the audio playback volume for audio from the computer connected to the [USB] jack @0, an audio
device connected to the [AUX] jack !7, or a smart device connected by Bluetooth (page 10).
!5 [INPUT] jack
This is a standard phone jack used to connect a guitar to the THR-II.
* Connecting the Relay G10T to the [INPUT] jack starts charging that device automatically. (THR-II Wireless only)
* The optimal channel is set automatically by connecting the Relay G10T to the [INPUT] jack for at least 10 seconds. (THR-II
Wireless only)
!6 [PHONES] jack
This is a stereo mini phone jack used to connect stereo headphones to the THR-II.
* Speaker sound is muted when a plug is inserted into the [PHONES] jack.
!7 [AUX] jack
This is a stereo mini phone jack used to connect an external audio device to the THR-II.
* The signal received at the [AUX] jack is not sent to the [USB] jack @0.
!8 [USER MEMORY] [1] [2] [3] [4] [5] button
Saves up to five sets of amp section controller settings (GAIN, MASTER, BASS, MIDDLE, TREBLE, EFFECT,
ECHO/REV).
Press and hold the number of the desired [USER MEMORY] button for saving your settings to (about 2 seconds).
The save operation is complete when the memory number for the button being pushed appears in the
w
. Press one of the numbered buttons (less than 2 seconds) to recall the saved settings.
* On the THR10II Wireless and THR10II, enable Bluetooth by pressing the [USER MEMORY] button [4] and [5] simultane-
ously.(Same as [Bluetooth] button
!9)
LED Display
!9 [Bluetooth]button (THR30II Wireless only)
Set the Bluetooth. Hold the Bluetooth button (for more than three seconds) to switch the pairing mode (the
LED Display w flashes in green).
For further details of Bluetooth connecting, refer to the Connecting to a smart device. (page 10)
THR30II Wireless THR10II Wireless THR10II Reference Manual 5
Page 6
Names and Functions
@0
@1
@2
LR
Hold down switches [1], [3], and [5].
Switch on the power.
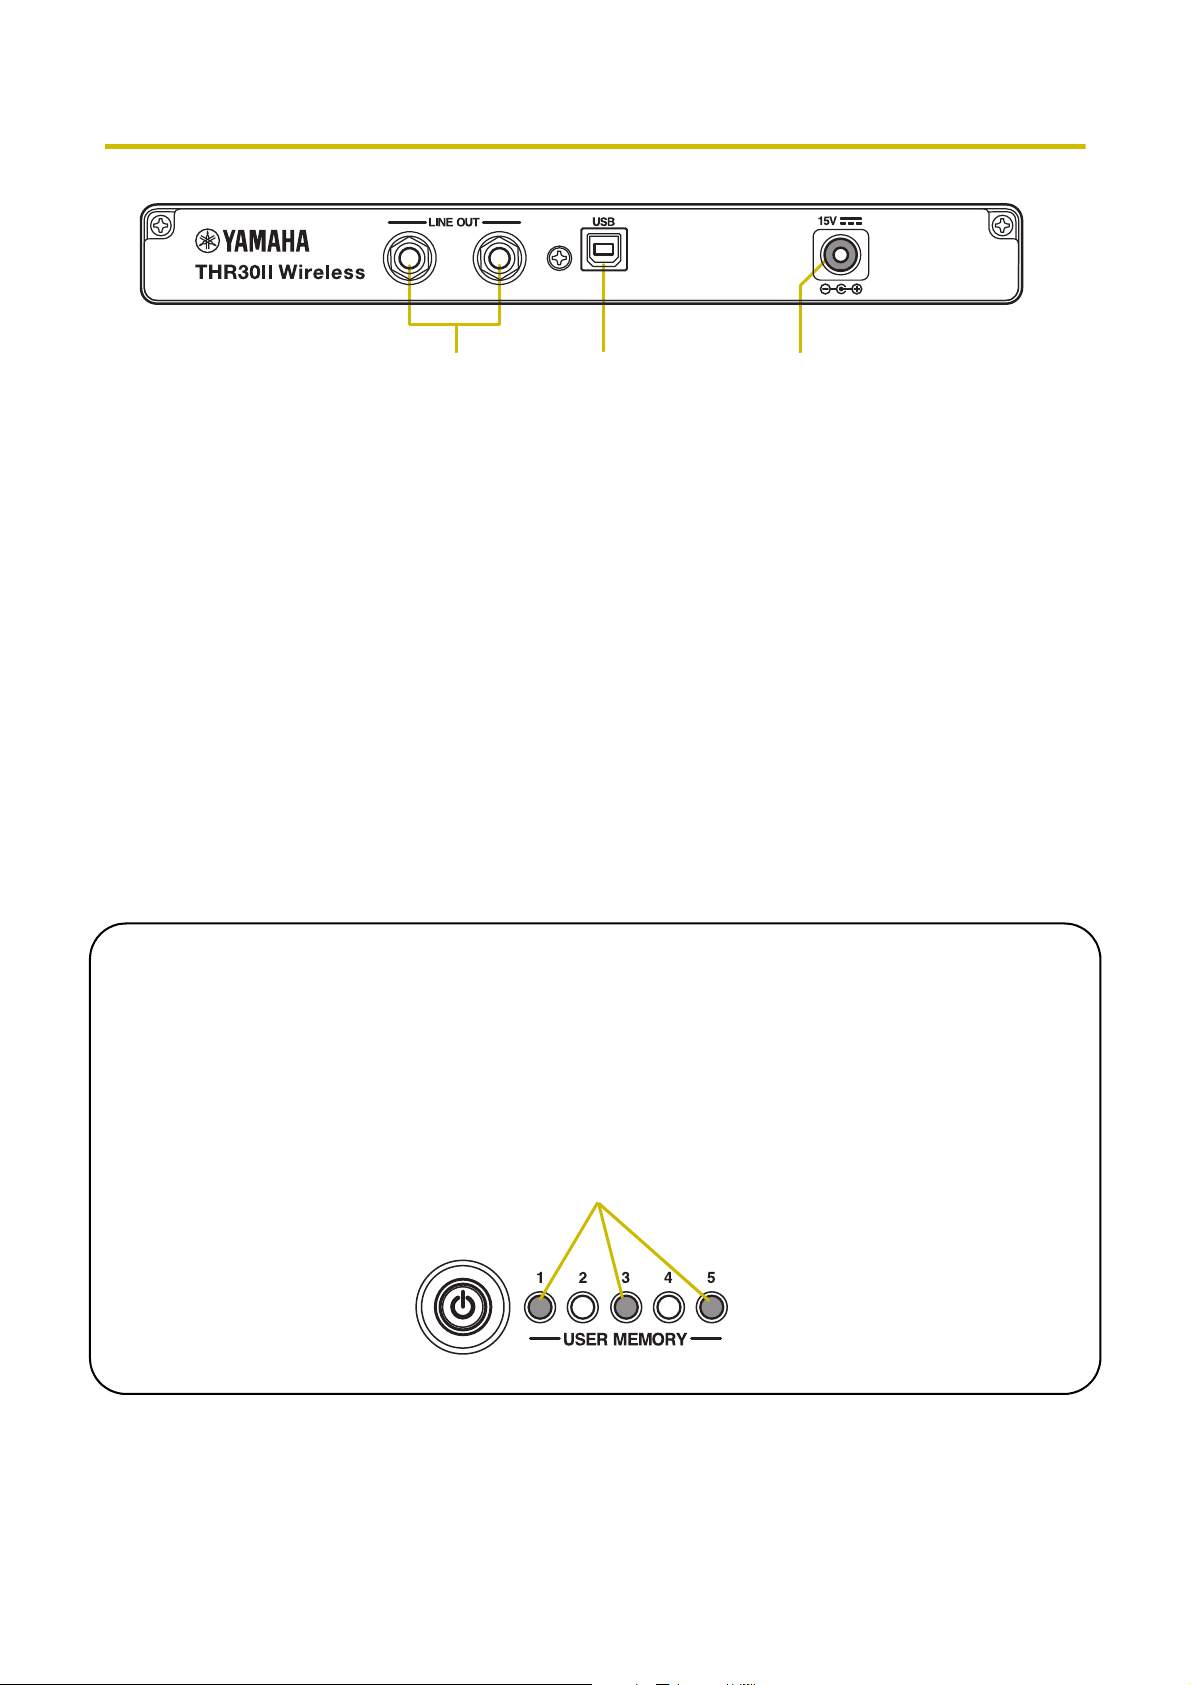
Rear Panel
@0 [LINE OUT] [L] [R] jack (THR30II Wireless only)
These are standard phone jacks used to output line level audio signals.
For connection to external devices with line level signals.These jacks can be connected to phone-type (balanced/unbalanced) plugs.
@1 [USB] jack
This jack is used to connect THR-II to a computer via a USB cable.
@2 [15V] DC IN connector
Connects the supplied power adaptor.
About the Default Settings
To reset all contents stored in the user memory, switch on the power while holding down [USER MEMORY] buttons [1], [3], and [5].
NOTICE
All contents stored in the user memory will return to factory defaults when the unit is initialized.
THR30II Wireless THR10II Wireless THR10II Reference Manual 6
Page 7

The THR-II can be used either with a conventional wired connection with an appropriate cable, or with a wireless
Connection
LR
* The illustrations and LCD screens as shown in this manual are for instructional purposes only,
and may appear somewhat different from those on your instrument.
NOTE
When using both cable and wireless
connection simultaneously, the cable
connection outputs sounds.
• Playing music/audio
NOTE
Make sure to adjust the device’s level
appropriately to avoid distortion.
• Wireless tone editing with the iOS/
Android app (THR Remote).
• Wireless control with a third-party
Bluetooth footswitch (via THR
Remote).
Wireless
Connection
Audio output from
an audio player or
computer
Computer, Tablets and Smartphones
USB Cable
Power Adaptor
LED display
When connecting Bluetooth, check LED lighting in this area.
• Order for turning the power on
THR30II Wireless → Mixer → Amp (or powered speaker)
• Order for turning the power off
Amp (or powered speaker) → Mixer → THR30II Wireless
External Audio Devices
Power
Outlet
Bluetooth
connection.
Connection Example (on THR30II Wireless)
• Make sure that all devices to be connected to the unit by cable are turned off.
• When connecting the unit to an external device, check the shape of the jack and use an appropriate
cable that matches with the jack’s specifications and connect it securely.
Precautions for using the USB jack
Make sure to follow the points at next page when connecting a computer to the THR-II USB jack, to avoid loss
of data by the computer and prevent the THR-II from freezing or shutting down.
THR30II Wireless THR10II Wireless THR10II Reference Manual 7
Page 8

Connection
Power Adaptor
(supplied)
Power Ou tlet
DC IN Jack
DC plug
the supplied power cord
Battery full No battery remaining
NOTICE
• Use an AB type USB cable of less than 3 meters. USB 3.0 cables cannot be used.
• Be sure to wake the computer from suspended/sleep/standby mode before connecting a computer
to the USB jack.
• Always quit all applications that are running on the computer before connecting or disconnecting
the USB cable and set the volume output on the computer to its minimum level.
• When connecting or disconnecting the USB cable, be sure to set the OUTPUT controls ([GUITAR]
knob and [AUDIO] knob) on the THR-II to their minimum levels.
• Wait at least 6 seconds between connecting or disconnecting the USB cable.
Power
The THR-II Wireless can operate on either DC power (via the power adaptor) or with the built‐in rechargeable
battery. The THR10II can operate on DC power (via the power adaptor).
* When you use THR-II Wireless with the built-in rechargeable battery, the output sound may become small. (page 16)
When using the power adaptor
Connect the supplied power cord to the power adapter. Connect the supplied power adaptor to the [15V] DC IN
jack located on the rear panel of the THR-II. Connect the AC plug to a power outlet.
* Follow the bundled Safety Instruction Sheet before making connections.
Turning the power on and off
Press the [ ] power button on the top of THR-II for one second to turn the power on. The LED of the power
button lights when turning the power button on. The LED of the THR-II Wireless lights in green while charging.
Otherwise, it lights in red.
* Follow the bundled Safety Instruction Sheet before making connections.
Checking the battery level
Press the [ ] power button on the top of the THR-II for less than one second to check the battery level. The
remaining battery capacity is displayed in four levels of 3, 2, 1 and L (Low).
THR30II Wireless THR10II Wireless THR10II Reference Manual 8
Page 9

Connection
Charging to the built‐in rechargeable battery (THR-II Wireless only)
Connect the supplied power adaptor to the DC IN jack located on the rear side of the THR-II Wireless. The LED
of the power button lights in green while charging.
* For further details of the Power Button LED state, refer to the THR30II Wireless, THR10II Wireless* Power Button LED status
list (page 17).
NOTE
• When you use the THR-II Wireless in an environment of extreme temperatures, charging may not be
possible.
Charging the Relay G10T (THR-II Wireless only)
Connect the Relay G10T to the [INPUT] jack located on the top of the THR-II Wireless. The built‐in rechargeable
battery starts charging automatically.
* When you resume charging after pulling out the Relay G10T from the INPUT jack of the THR-II Wireless, connect the Relay
G10T to the INPUT jack after more than 2 seconds.
* If the supplied power adapter is not connected to the THR-II Wireless, charging of the Relay G10T will not start.
* Refer to the manual of Relay G10T for the meaning of LED display indications on the Relay G10T.
NOTE
• After charging, unplug the Relay G10T from the THR-II Wireless.
• When the THR-II Wireless is turned off and the power adapter is connected, the Relay G10T is
charged by simply connecting. However, the THR-II Wireless is initially set to turn off the power
when the Relay G10T charging is finished. In this state, leaving the Relay G10T connected to the
THR-II Wireless may result in discharge of the Relay G10T's battery.
• You can release the setting that turn off the power of the THR-II Wireless automatically, after the
Relay G10T is charged, with the THR Remote.
Connecting to guitar by wireless (THR-II Wireless only)
The THR-II Wireless can connect with the Relay G10T wireless guitar transmitter (made by LINE6) by wireless.
Moreover, the optimal channel is set automatically by connecting the Relay G10T to the [INPUT] jack located on
the top of the THR-II Wireless for at least 10 seconds. For details on wireless connection, refer to the Relay
G10T’s manual.
THR30II Wireless THR10II Wireless THR10II Reference Manual 9
Page 10

Connection
Playing an audio on
the smart device.
5. Check that the LED
is lit in green
(connected).
4. Complete the Blu-
etooth configuration within 3
minutes.
3. Check that the LED flashes in
green (pairing mode).
1.Unlit
(disconnected)
2. Press and hold the
Bluetooth button* for
three seconds (pairing).
*
On the THR10II Wireless and THR10II,
enable Bluetooth by pressing the [USER
MEMORY] button [4] and [5] simultane-
ously.
Press the Bluetooth
button* once
then disconnected.
(reconnect)
Press the Bluetooth
button*.
(disconnect)
Connecting to a smart device
By connecting a smart device to the THR-II, you can:
• Play audio files on a smart device via Bluetooth.
• Edit effects and tone controls on a smart device.
Playing audio files on a smart device via Bluetooth
To play audio from a smart device via Bluetooth, configure Bluetooth on the smart device while in the pairing
mode.
Setting the THR-II to pairing mode
1. Check that the at the top of the LED DISPLAY is unlit (disconnected).
2. Press and hold the [Bluetooth] button* located on the top of the THR-II for three seconds.
3. Check that the LED DISPLAY flashes in green (pairing mode).
Configuring Bluetooth on the smart device
4. Complete the Bluetooth configuration of the smart device within 3 minutes after entering pairing mode.
* For details on Bluetooth configuration, refer to the manual of your smart device.
5. Check that the LED DISPLAY is lightning in green (connected).
Confirm sound output from the THR-II by playing music on the smart device.
NOTE
• After turn off the THR-II, and when turn on the power and the Bluetooth connection record remains
on both the THR-II and the smart device, reconnect the Bluetooth automatically.
THR30II Wireless THR10II Wireless THR10II Reference Manual 10
Page 11

Connection
Editing effects and tone controls on a smart device
Install the THR Remote app to the smart device to allow editing of effects and tone controls on that device.
Installing THR Remote (Android, iOS)
1. Access the app distribution service on the smart device.
Android devices: Google Play*
iOS devices: App Store
2. Search for the THR Remote app.
3. Download and install the THR Remote app following the onscreen instructions.
Configuring Bluetooth MIDI
1. Start the THR Remote.
2. Touch the Bluetooth icon on the display.
3. Connect to LE_THRII following the onscreen instructions.
Starting the THR Remote app
Start the THR Remote app on the smart device.
Press the desired [USER MEMORY] button for 2 seconds to save the settings made with THR Remote to the
THR-II’s built-in user memory (page 5).
• For connecting general android devices, refer to the Smart Device Connection Manual for Android.
For connecting general iOS devices, refer to the iPhone/iPad Connection Manual.
Yamaha Downloads. https://download.yamaha.com/
* Google Play and the Google Play logo are trademarks of Google LLC.
THR30II Wireless THR10II Wireless THR10II Reference Manual 11
Page 12

Connection
USB Connection diagram
[AUDIO] knob
Playback an
audio file on the
computer.
Guitar sound
+
audio playback
[USB] jack
Connecting to a computer
Connecting a computer to the THR-II makes the following possible:
• Outputting audio files played on the computer with the THR-II.
• Record with Cubase AI.
• Edit effects and tone controls on the computer.
Outputting audio files played on the computer with the THR-II
Configuring and Operating
Select the model name (THR30II WIRELESS, THR10II WIRELESS, THR10II) of the connected THR-II as the
computer’s audio output setting.
Windows
Control Panel → Sound → “Sound” tab
Macintosh
System Preferences → Sound → “Output” tab
Connect the computer’s USB connector to the USB connector on the THR-II as shown in the diagram below.
You can play a guitar along to the audio played on the computer.
Use the [AUDIO] knob to adjust volume of the audio played on acomputer.
THR30II Wireless THR10II Wireless THR10II Reference Manual 12
Page 13

Connection
to the [USB] jack
on THR-II
Help
Recording with Cubase AI
Installing Cubase AI
A download access code for Cubase AI music production software is included in the THR-II. Using Cubase AI
enables you to record a guitar connected to the THR-II and edit songs.
Cubase AI System Requirements
For the latest information, refer to the Steinberg website below.
https://www.steinberg.net/
Installing Cubase AI
To install Cubase AI, an active Internet connection is required. Follow the instructions provided in the “Cubase
AI Download Information” sheet to download, install and activate the software.
Connecting to the THR-II
Connect the computer’s USB connector to the USB connector on the THR-II as shown in the diagram below.
(See the USB Connection diagram on page 12.)
* For more information on operating, refer to the Cubase AI’s Help Menu (see the illustration below).
Editing effects and tone controls on a computer
Installing the THR Remote app (Windows, Mac)
1. Access the following website and extract the THR Remote file after downloading.
https://download.yamaha.com/
* Check the above website for information on system requirements.
* The THR Remote may be updated without notice. Check the above website for the latest details and updates.
2. Install the THR Remote app to your computer.
Configuring and Operating after Installing
Connect the computer’s USB connector to the [USB] connector on the THR-II as shown in the diagram below.
(See the USB Connection diagram on page 12.)
Press the desired [USER MEMORY] button for 2 seconds to save the settings made with THR Remote to the
THR-II’s built-in user memory (page 5).
THR30II Wireless THR10II Wireless THR10II Reference Manual 13
Page 14

No power
Troubleshooting
• Connect the power adaptor properly (see page 8).
• Make sure that the THR-II Wireless been properly charged, when the power adapter is disconnected (see page 8).
No audio sound is output by Bluetooth
• Confirm the status of LED display. When the
LED is unlit or flashing in green, the devices are
not connected via Bluetooth (see page 17).
• When the Bluetooth configuration on the smart
device is ON, turn it OFF once and configure
"Playing audio files on a smart device via Bluetooth" (see page 10).
No sound
No guitar sound is output (wired connection)
• Connect the guitar to [INPUT] jack properly (see
page 7).
• Make sure that the volume control on the guitar
is turned up properly.
• Make sure that the [GAIN] knob, [MASTER]
knob and [GUITAR] knob are not set to minimum (see pages 4, 5).
• When the [AMP] knob is set to CLEAN, make
sure that all of the [BASS] knob, [MIDDLE] knob
and [TREBLE] knobs are not set to minimum
(see page 4).
• Don’t connect the headphones to [PHONES]
jack to outputs from the speaker on THR-II (see
page 5).
• Make sure that the COMPRESSOR Level is not
set to 0 on the THR Remote app (see pages 11,
13).
• Set the Tuner function OFF (see page 3).
• Make sure that the cable connecting the guitar
is not damaged.
• Delete the Bluetooth registration once on the
Bluetooth configuration screen on the smart
device and configure "Playing audio files on a
smart device via Bluetooth" (see page 10).
• Move the smart device and the THR-II closer
together.
• Turn off the power of the THR-II. (see page 8)
• Restart the smart device.
* For details on Bluetooth configuration, refer to the
manual of the smart device.
• Disconnect any other Wi-Fi and Bluetooth
devices. The connection may be broken due to
the influence of other nearby Wi-Fi or Bluetooth
devices.
No audio sound is output from a computer
by USB connection
• Connect the USB cable properly (see page 12).
• Confirm the configuration of the audio output
port on the computer (see page 12).
• Confirm the configuration of the computer on
the computer or that audio is not muted on the
application.
No guitar sound is output (wireless connection)
• Use the Relay G10T. THR-II Wireless cannot
connect to any guitar wireless transmitter other
than the Relay G10T.
• Connect the Relay G10T to the INPUT jack
located on the top of the THR-II Wireless for at
least 10 seconds. The appropriate channel is
set automatically.
• Make sure that the volume control on the guitar
is turned up.
• Set the Tuner function OFF (see page 3).
• Make sure the [AUDIO] knob is turned up (see
page 5).
• Make sure the USB cable connecting the
devices is not damaged.
No audio sound is output from an external
device by AUX connection
• Connect the cable to the external device properly (see page 7).
• Make sure that the volume control on the external device is turned up.
• Make sure the [AUDIO] knob is turned up (see
page 5).
• Make sure the cable connecting the devices is
not damaged.
THR30II Wireless THR10II Wireless THR10II Reference Manual 14
Page 15

Others
Tap Tempo cannot be set
• Select ECHO or ECHO/REV. The tap tempo cannot be set with SPRING or HALL (see page 4).
A “#” appears in the LED display
• When Extended Stereo is set to OFF, a “#”
appears in the LED display (see page 4).
THR-II Wireless cannot be charged
• Keep the THR-II Wireless at room temperature
and don’t use it until the built-in rechargeable
battery reaches a suitable temperature. If charging cannot be performed after a sufficient time,
there may be a problem with the built-in
rechargeable battery. If the problem persists,
consult your Yamaha dealer (see page 17).
Relay G10T cannot be charged
• When Relay G10T is disconnected from the
[INPUT] jack, connect to the [INPUT] jack on
THR-II Wireless again after 2 seconds.
Volume is low
• Keep the THR-II Wireless at room temperature
and don’t use it until the built-in rechargeable
battery reaches a suitable temperature.
For safety reasons, the built-in rechargeable
battery is designed to limit the volume when the
built-in rechargeable battery's temperature rises.
The built-in rechargeable battery charge
does not last
• THR-II Wireless's built-in rechargeable battery
may have reached the end of its life. If the problem persists, consult your Yamaha dealer.
• Charge the battery every six months to maintain
the battery power function.
• The built-in rechargeable battery has a limited lifetime. The capacity decreases gradually with the
number of times of use and the passage of time.
• The lifetime of the built-in rechargeable battery
depends on the storage method, usage and environment.
THR30II Wireless THR10II Wireless THR10II Reference Manual 15
Page 16

Technical Specifications
Specifications
Digital Section
Built-in Amp Simulations
CLEAN, CRUNCH, LEAD, HI GAIN, SPECIAL, BASS,
*, FLAT
ACO
There is an amp mode MODERN, BOUTIQUE, and
CLASSIC for each amp type (THR10II Wireless and
THR10II can switch the amp mode by THR Remote)
* Mic simulation
Built-in Effects
• CHORUS, FLANGER, PHASER, TREMOLO
• ECHO, ECHO/REVERB, SPRING REVERB, HALL
REVERB
In addition to the above, THR Remote can choose
two types of reverve Room and Plate.
• COMPRESSOR
• NOISE GATE*
*
Can be choose by THR Remote.
Built-in Chromatic Auto Tuner
Knob/Switch
AMP, GAIN, MASTER, BASS, MIDDLE, TREBLE,
EFFECT, ECHO/REV, GUITAR, AUDIO, USER MEMORY button x 5, TAP/TUNER button, Amp switch*,
Bluetooth button*
* Only THR30II Wireless
Display
LED × 1
Connections
INPUT (Standard Monaural Phone Jack, Unbalanced),
LINE OUT (Standard Jack, Balanced/Unbalanced),
PHONES (Stereo Mini Jack),
AUX (Stereo Mini Jack),
USB TYPE B,
DC IN (15V)
A/D Converter
24-bit + 3 Bit Floating
D/A Converter
24-bit
Sampling Frequency
48 kHz
*
Rated Output
THR30II Wireless: 30 W (15 W + 15 W)
THR10II Wireless, THR10II: 20 W (10 W + 10 W)
Maximum output during built-in rechargeable battery operation
THR30II Wireless, THR10II Wireless:
15 W (7.5W + 7.5W)
Power Source
Power Adaptor or built-in rechargeable battery
Power Adaptor (YNT345-1530)
Built-in rechargeable battery
Continuous driving time*: About 5 hours
* Depends on usage situation
Power Consumption
THR30II Wireless, THR10II Wireless: 22 W
THR10II: 11 W
Dimensions (W x H x D)
THR30II Wireless:
420 x 195 x 155 mm (16.5” × 7.7” × 6.1”)
THR10II Wireless, THR10II:
368 x 183 x 140 mm (14.5” × 7.2” × 5.5”)
Weight
THR30II Wireless: 4.3 kg (9 lbs. 8 oz.)
THR10II Wireless: 3.2 kg (7 lbs)
THR10II: 3.0 kg (6 lbs. 1 oz.)
Accessories
• Power Adaptor (YNT345-1530)
• Quick Guide
• Safety Instructions Sheet
• Service offices list
• Cubase AI Download Information
Bluetooth
Bluetooth Version: Bluetooth Ver. 4.2
Supported Profile: A2DP
Compatible Codec: SBC
RF Outout Power: Bluetooth class 2
Maximum Communication Range: 10m (33ft) (without
obstacles)
Memory Allocations
User Memory: 5
Input Level
GUITAR IN : -10 dBu
AUX IN : -10 dBu
PHONES Output Level
10 mW
* The contents of this manual apply to the latest
specifications as of the publishing date. To
obtain the latest manual, access the Yamaha
website then download the manual file. Since
specifications, equipment or separately sold
accessories may not be the same in every locale,
please check with your Yamaha dealer.
THR30II Wireless THR10II Wireless THR10II Reference Manual 16
Page 17

THR30II Wireless, THR10II Wireless* Power Button LED status list
Red
Unlit
Green
Red
Unlit
Charging error indication
When the power is on Indicates charging error
When the power is off Indicates charging error
If the built-in rechargeable battery has a charging error, immediately turn off the THR-II Wireless power,
unplug the power adapter, and consult your Yamaha dealer.
Flashes
(green red)
Flashes
(green unlit)
* Since the THR-10II does not have a built-in rechargeable battery, the power button LED status is
only red (ON) and off (OFF).
When not using the power adaptor
The power is ON
The power is OFF
When using the power adaptor
Specifications
Under charging
The battery is full and the power is ON
The battery is full and the power is OFF
THR30II Wireless THR10II Wireless THR10II Reference Manual 17
Page 18

Signal Flow Diagrams
+
Guitar In
Extended Stereo
Bluetooth In
USB In
Speakers &
Headphones Out
USB Out
Line Out
Wet
GUITAR
Knob
Sync
Compressor
(FX1)
Speaker
Simulator
Simulator
(FX2)
Delay
(FX3)
AUX In
Reverb
(FX4)
AUDIO
Knob
USB
Dry
Output gain
App. control
Noise
Gate
Mix gain
App. control
Sync
Direct
Switch
THR30II Only
Variable gain
Specifications
THR30II Wireless THR10II Wireless THR10II Reference Manual 18
Page 19

Amp Modeling List
Mode Amp Type Description
A low-gain preamp for sparkling American-style cleans, with 6L6 tubes in the output stage
for brightness and a strong midrange.
EL84 power tubes in a true Class-A configuration with a highly responsive EQ for rich,
complex harmonic tones and warm overdrive. Inspired by British chime.
A low-gain preamp with an EL34-based power section that breaks into classic British overdrive as the master volume is pushed.
Powerful modern distortion that fills out as the high-gain preamp is pushed. Tread carefully
after 12 o'clock.
12AX7 and 6L6 tubes in pursuit of the "Brown" sound. Set the gain around 11 o'clock for
classic rock crunch, or crank it for saturated rhythm tones.
Designed for acoustic-electric guitar, modeling the response of a boutique condenser
microphone.
A neutral tone with no amp or speaker modeling. Great for connecting other instruments to
your THR.
A low-watt EL34 design. Turning up the preamp gain will thicken up the cleans, then push
into bluesy overdrive.
A deceptively simple amp circuit with just a single 12AX7 and EL84. A full, no-frills tone
that is highly responsive to picking dynamics.
A version of the Classic/Lead circuit, modified for extra gain with a darker tone and
scooped mids.
ECC83s into 6L6s for high gain with a highly responsive EQ, inspired by German engineering.
Four 12AX7 preamp tubes into 6L6 output tubes. Tight, fast tracking for crushing highgain.
Designed for acoustic-electric guitar, modeling the response of a boutique tube microphone.
A neutral tone with no amp or speaker modeling, and a slight bass boost. Great for connecting other instruments to your THR.
A boutique, low-watt EL84 design that adds fullness and sustain as the master volume is
turned up. A great match for neck pickups.
A mid-volume boutique design with 6550 power tubes. Listen for tight bass response and a
singing sustain.
A high-gain design with 12AX7s into EL34s, for the tone that defined 1980s hard rock and
heavy metal.
A boosted version of the Classic/Special amp, with even more gain for aggressive rhythms
or searing leads.
A classic overdrive circuit before the preamp tightens low-frequency response and provides
even more gain. Ideal for extended-range guitars.
Designed for acoustic-electric guitar, modeling the response of a boutique dynamic microphone.
A neutral tone with no amp or speaker modeling, and a slight mid scoop. Great for connecting other instruments to your THR.
Classic
Boutique
Modern
Clean
Crunch
Lead
Hi Gain
Special
Bass Woody, vintage tone with late breakup.
Acoustic
Flat
Clean
Crunch
Lead
Hi Gain
Special
Bass Full, modern tone that breaks into a fuzz-like overdrive when pushed hard.
Acoustic
Flat
Clean
Crunch
Lead
Hi Gain
Special
Bass Vintage voicing with early breakup for overdrive that works well with bass or guitar.
Acoustic
Flat
Specifications
THR30II Wireless THR10II Wireless THR10II Reference Manual 19
Page 20

Manual Development Department
© 2019 Yamaha Corporation
Published 09/2019 PO-A0
THR30II Wireless THR10II Wireless THR10II Reference Manual 20
 Loading...