

Page 1
Upgrading Your STAGEA to the Latest
Version via the Internet
*SmartMedia, USB flash memory and an Internet
Direct Connection environment, or a Windows or
Macintosh computer with internet connection are
required.
* The version update using USB flash memory is not
applicable to a STAGEA with a version earlier than
1.60. Confirm that your STAGEA is updated to
version 1.60 (see “Checking the Current Version”
below).
■ Operation
1. Check the current version of your STAGEA.
2. Prepare to download the version update
data.
3. Download the version update data.
4. Install the version update data.
Checking the current version
1. Turn on the STAGEA.
2. Check the current version of the STAGEA.
2-1 Press the [UTILITY] button on the panel.
2-2 Press the [Version] button in the display.
If the current version is prior to the latest version,
you’ll need to install the version update. Go on to the
instructions in the section “Preparing to download
the version update data” below.
2-3 Press [OK] to close the message.
5. Confirm the version of your STAGEA.
1
Page 2
Preparing to download the
Downloading the version update
version update data
Make sure that you have an appropriate SmartMedia
card or USB flash memory device, formatted for use
on the STAGEA, and having enough free space for the
version update data.
*If a previous version update data has already been
loaded to SmartMedia or USB flash memory, the
version update data on the media/device will be
deleted and replaced with the new data.
■ For those using USB flash memory
for updating
If the current version of your STAGEA is earlier than
1.60, installing the version update data is not possible
by using USB flash memory. Start the operation by
first checking the version of your STAGEA and
making sure that the version is 1.60 or later.
Check that the USB memory device (other USB flash
memory or USB-FDD, etc.) is not connected and
that a SmartMedia card is not inserted to/in the
STAGEA.
• No USB memory device is connected and no
SmartMedia card is inserted.
There is no problem. Go on to the download
operation.
• SmartMedia card is inserted.
Please pull out the SmartMedia card until the
installation is completed.
• USB memory device is connected.
Please disconnect it until the installation is
completed. As for a USB-FDD (floppy disk drive),
as long as a floppy disk is not inserted, there is no
problem.
*We recommend that you connect USB flash
memory directly to the STAGEA, and not via a
USB hub.
■ If there is not enough empty capacity
in SmartMedia or USB flash memory
data
■ Method A
Using Internet Direct Connection
(INTERNET)
Please access the Internet from the STAGEA and start
the operation from the top page.
Insert the SmartMedia or USB flash memory in the
STAGEA and press “STAGEA’s version upgrade”,
then the download button on the display.
A “downloading…” message appears when the
download starts, and a “Download completed”
message is shown when the download has been
properly completed.
The time necessary for downloading differs depending
on your Internet connection and provider. In some
cases, this may take more than ten minutes.
For more information on using Internet Direct
Connection, refer to the STAGEA Owner’s Manual.
Please go on to the next step when the download is
completed.
■ Method B
Using computer with Internet connection
(INTERNET)
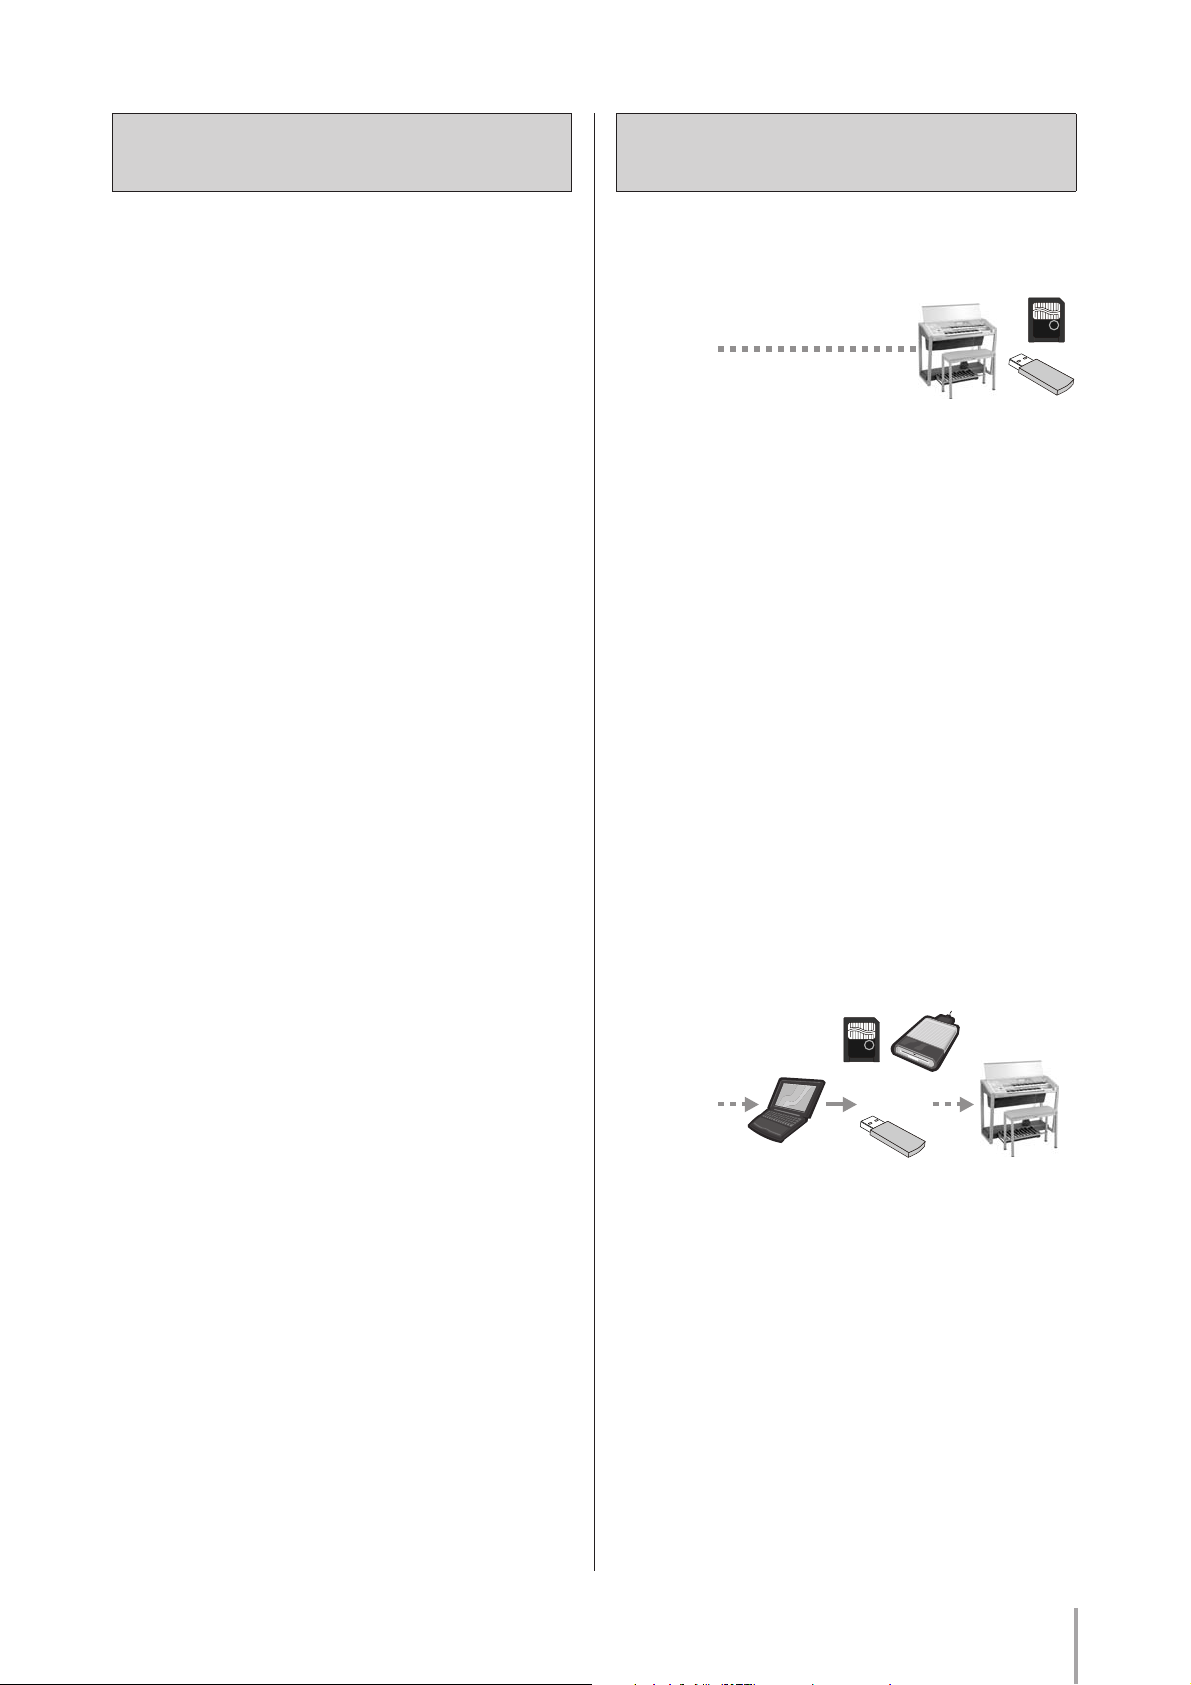
*Only USB flash memory is applicable on the ELS-
01/01C typeU.
Cable / Wireless connection
SmartMedia card
or
PC STAGEA
USB flash memory
or
•You can delete unnecessary data (registration data,
etc.) with the STAGEA.
•If you don’t have the appropriate SmartMedia card
or USB flash memory, you’ll have to purchase it.
Please use the SmartMedia card or USB flash
memory which has been formatted on the
STAGEA.
•Download the update data to your computer
Windows:
Access
http://asia.yamaha.com/en/products/musicalinstruments/keyboards/electone/, select your model
(If you are using the ELS-01C or -01C typeU, select
“ELS-01C typeU.” If you are using the ELS-01 or -01
typeU, select “ELS-01 typeU.”), click 'Support' tab,
then download the version update data, and finally
save the file “els-01_01c_01x_v***.exe” (“v***”
2
Page 3
indicates the latest version number) to the desired
folder on your computer.
The time necessary for downloading differs depending
on your internet connections and provider.
When the download is completed, double-click on
the “els-01_01c_01x_v***.exe” file. Click [Unzip] to
extract the installation files to the folder.
Macintosh:
Access
http://asia.yamaha.com/en/products/musicalinstruments/keyboards/electone/, select your model
(If you are using the ELS-01C or -01C typeU, select
“ELS-01C typeU.” If you are using the ELS-01 or -01
typeU, select “ELS-01 typeU.”), click 'Support' tab,
then download the version update data. The folder
“els-01_01c_01x_v***.zip” (“v***” indicates the latest
version number) is created after being extracted
automatically to the desktop. (In the case of Mac OS
9, please unzip with ZipIt or StuffIt Expander (version
6.5 or later)).
The time necessary for downloading differs depending
on your internet connections and provider.
• Copy the update data to SmartMedia card or
USB flash memory
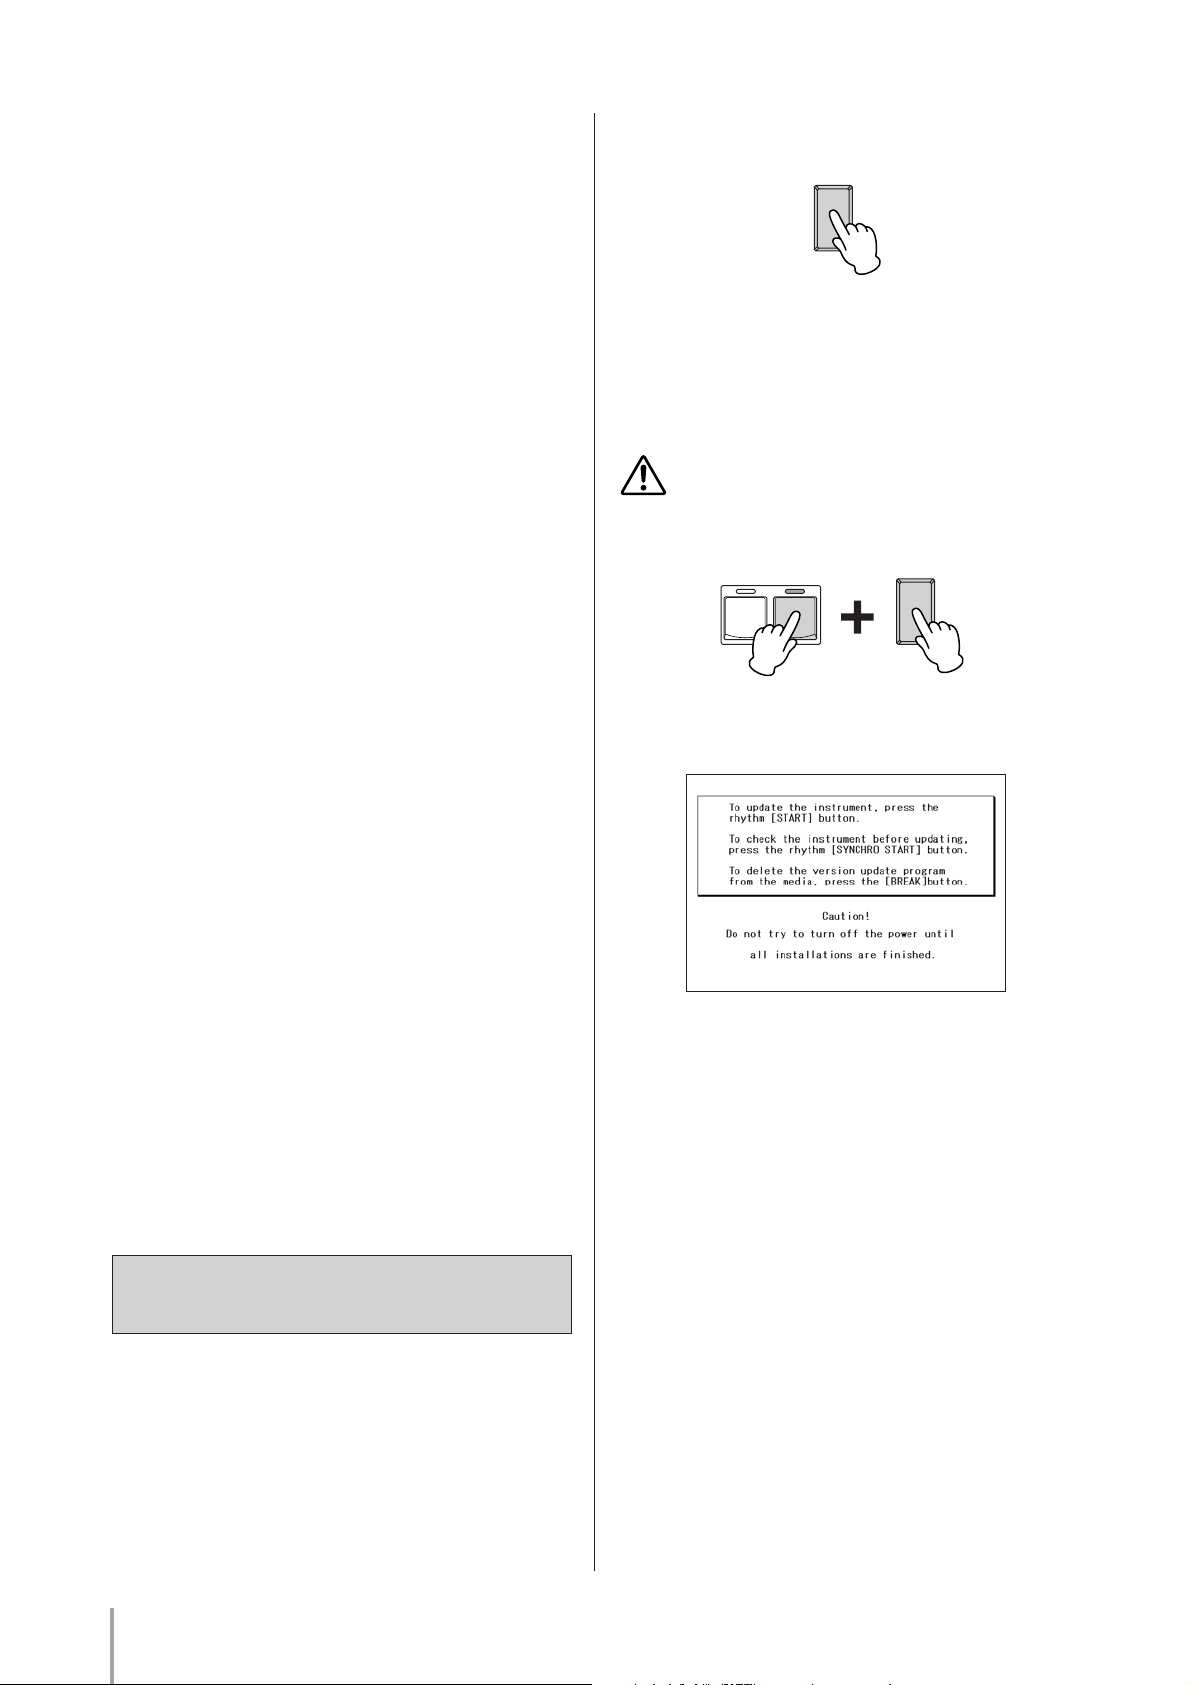
1. Turn off the power of the STAGEA once.
POWER
2. With the SmartMedia card or USB flash
memory device containing the version
update inserted/connected, simultaneously
hold down the [START] button in the
Rhythm section on the panel and turn on
the power switch.
Make sure that you do not disconnect the
SmartMedia card or USB flash memory, or turn off
the power during the operation. Doing so may result
in damage to the STAGEA.
POWER
START
SYNCHRO
START
Keep pressing down the [START] button until the
following message appears in the display.
The folder contains:
• ELS-01XINST.PRG
• ELS-01XMAINBOOT.PRG
• ELS-01Xmainprg1.prg
• ELS-01Xmainprg2.prg
• ELS-01Xmainprg3.prg
• ELS-01Xmainprg4.prg
• ELS-01Xmainprg5.prg
• ELS-01Xmainprg6.prg
• ELS-01Xmainprg7.prg
• ELS-01Xmainprg8.prg
Copy these files to the root folders (shown directly
underneath the drive name) of the SmartMedia card
or USB flash memory.
Remove the SmartMedia card or USB flash memory.
Installing the version update data
Be sure to carefully follow all the installation
instructions below.
3. Install the version update data.
●When executing the operation check
program and installing the version
update data
Please go to Step 4, “Execute the program check and
install the version update.”
• Checking the program and installation takes a
maximum of sixty minutes.
• The version update starts automatically after
the check is completed.
●When installing the version update
data only (without program check)
Go on to Step 5, “Installing the version update data.”
•Installation takes about ten minutes to
complete.
•Only installation of the version update is
performed.
3
Page 4
4. Execute the program check and install the
version update.
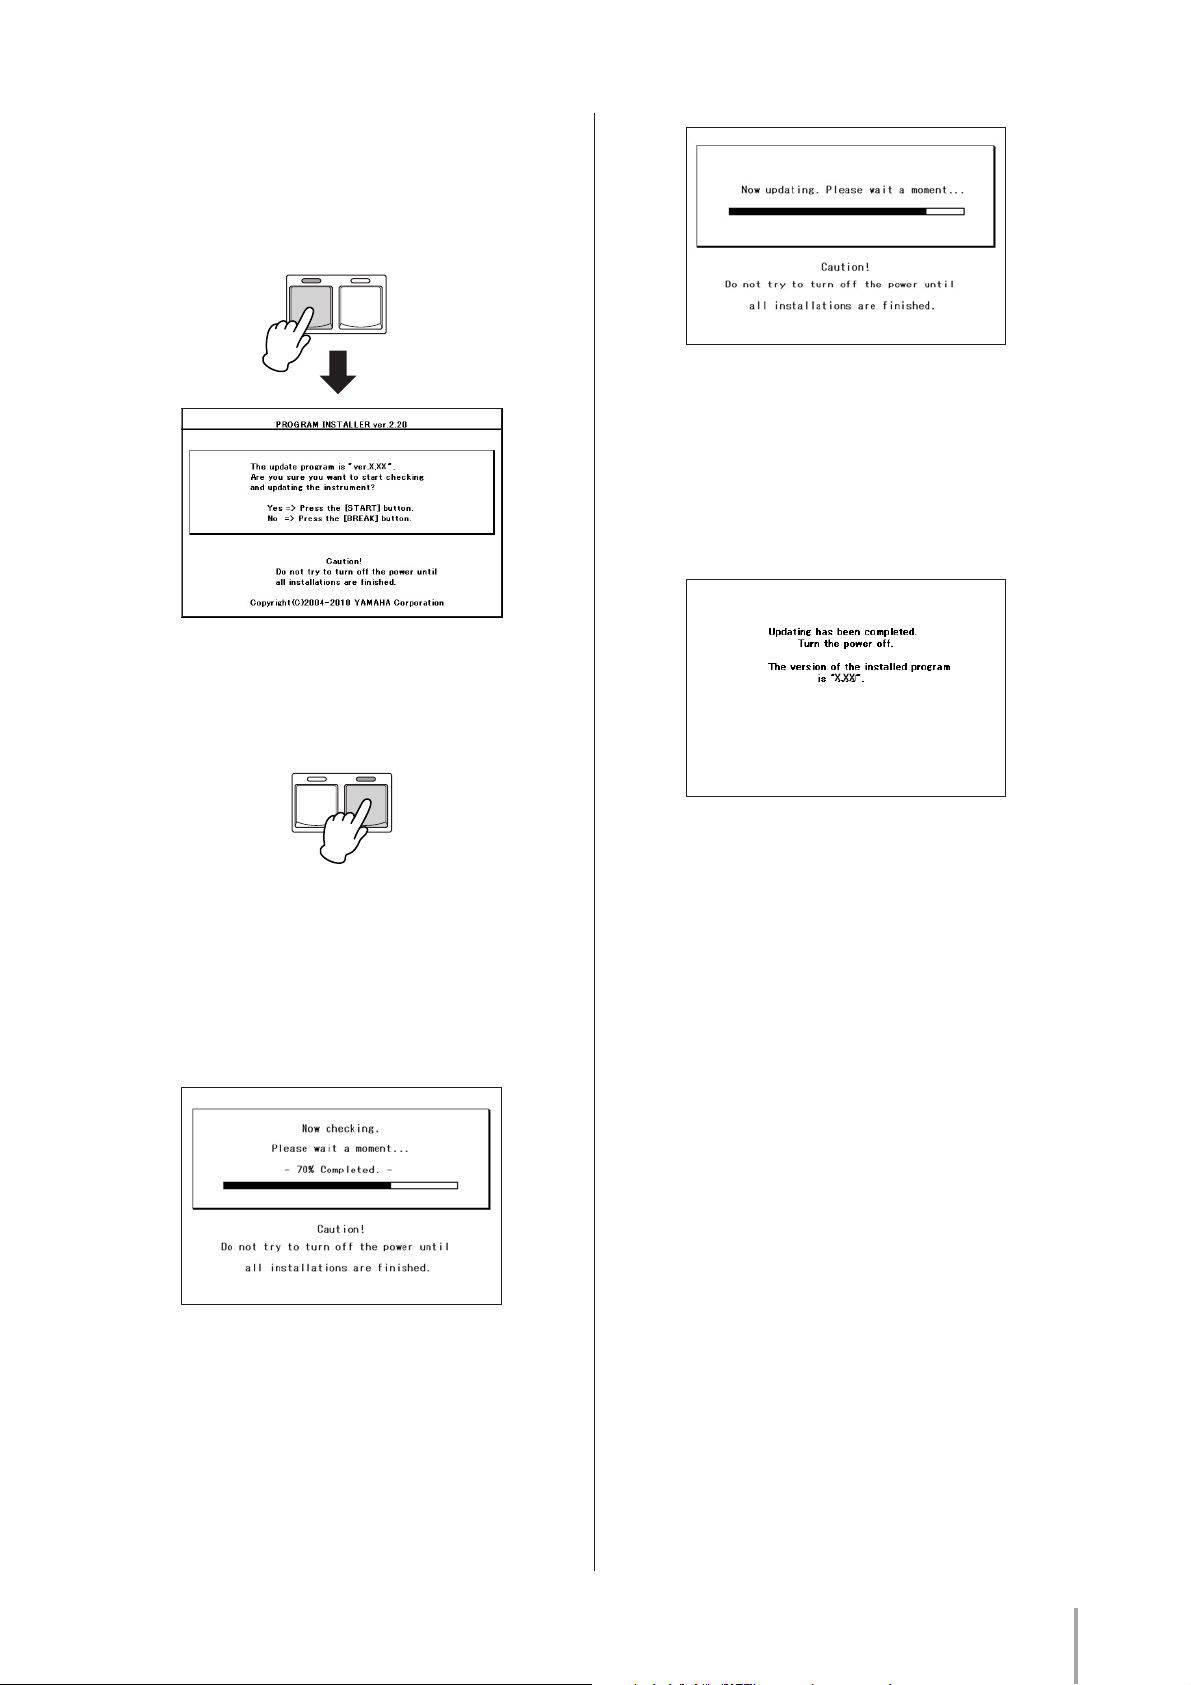
Press the [SYNCHRO START] button in the
Rhythm section on the panel. The following display
appears.
START
SYNCHRO
START
Confirm the version number to be installed, then
press the [START] button to start the program check
and install the version update.
Program check and version update are completed
when the message of the check result and the
completion of the installation of the version update
data is shown in the display.
Turn off the STAGEA and disconnect the
SmartMedia card or USB flash memory.
START
SYNCHRO
START
While the program check is in progress, the display
below is shown.
If your particular STAGEA is not included in the
supported instruments (according to its serial
number) for the program check, the check is skipped
automatically and the version update is installed.
* “X.XX” indiates the version number installed.
* “X.XX” indiates the version number installed.
*If the check results in an error, follow the
message shown in the display.
Installation of the version update will be
automatically be executed regardless of the check
results when the check is finished.
4
Page 5

5. Installing the version update data.
Supplemental instructions
Press the [START] button in the Rhythm section on
the panel. The following display appears.
START
SYNCHRO
START
Confirm the version number to be installed, then
press the [START] button to start installing the
version update.
START
SYNCHRO
START
If you are using a STAGEA with a version of 1.50 or
later, it is possible to delete the version update data in
the SmartMedia card or USB flash memory with the
STAGEA.
Deleting the version update data
1. Insert the SmartMedia or USB flash
memory with the version update data.
*With the terminal (gold-plated) part of the
SmartMedia card face down, insert it in the
card slot until a click sound is heard.
*Make sure to insert the SmartMedia card in
the correct position (up/down and front/
back).
The version update is complete when the completion
message below appears. Turn off the STAGEA and
disconnect the SmartMedia card or USB flash
memory.
* Check the connector of the USB flash memory
device and insert it firmly into the USB TO
DEVICE terminal located under the keys.
USB
OPTICAL
TO DEVICE TO HOST
OUT
USB flash memory
USB flash memory
2. Simultaneously hold down the [START]
button in the Rhythm section on the panel
and turn on the power switch.
POWER
START
SYNCHRO
START
Keep holding down the [START] button until the
display below (or a similar one) appears.
IN
5
Page 6

3. Press the [BREAK] button in the Rhythm
section on the panel.
START
SYNCHRO
START
BREAK
4. The Delete operation starts when you press
the [START] button in the Rhythm section.
START
SYNCHRO
START
Make sure that you do not disconnect the
SmartMedia card or USB flash memory, or turn off
the power during the Delete operation. Doing so may
result in damage to the SmartMedia card or USB flash
memory.
5. The Delete operation is complete when the
message below appears in the display.
Turn off the STAGEA and disconnect the
SmartMedia card or USB flash memory
device.
POWER
6
 Loading...