

Page 1
YAMAHA
poRTHTone
Owner’s Guide
Bedienungsanleitung
Manuel dlnstructlons
Manual del Propietario
®YAMAHA
Page 2

Thank you for purchasing a Yamaha
PortaTone PC-1000. It’s a revolutionary
product that lets you enjoy playing
and learning keyboard music in a variety
of ways. You can quickly learn melodies
and chords with the Playcard system.
And with the Auto Bass Chord system
you can start playing professional-like
accompaniments — using just one
finger — today! You can also use your
PC-1000 as a 49-note portable keyboard
— a keyboard that gives you multiple
choices of instrument voices and rhythm
accompaniments, too. The PortaTone
PC-1000, with its broad range of great
features, introduces you to a new world
of musical fun and pleasure. To be sure
you get maximum satisfaction, we
suggest you follow the steps in this
manual carefully while actually playing
the instrument.
Wir bedanken uns für den Kauf der
einmanualigen Yamaha PortaTone PC-1000.
Es handelt sich hier um ein vollkommen
neues Produkt, das mit einer Vielfalt von
interessanten Spielmöglichkeiten ausgestattet
ist und mit dem Sie mühelos lernen, auf
einer Tastatur zu spielen. Zum schnellen
Erlernen von Melodien ist ein ,,Playcard“-
System vorgesehen, und dank der BaßAkkord-Automatik können Sie gleich vom
ersten Tag an mit einem einzigen Finger
professionell klingende Musik spielen—
sogar mit Begleitung! Weiterhin können
Sie das PC-1000 auch als portable 49-TöneTastatur verwenden—mit verschiedenen
Instrumentalstimmen und mit Rhythmus-
Begleitung. Sie werden sicher bald an den
vielen Sonderfunktionen Freude finden.
Um alle gebotenen Spielmöglichkeiten aus
schöpfen zu können, gehen Sie zunächst
die Anleitung sorgfältig durch. Probieren
Sie dabei gleich alle Punkte direkt aus, um
sich mit dem Instrument vertraut zu machen,
Tout d’abord merci pour la confiance
que vous témoignez à Yamaha pour son
PortaTone PC-1000. Il s’agit d’un modèle
révolutionnaire qui vous permet d’ap
précier la musique et d’en jouer, au
clavier, de bien des manières.
Vous pouvez — dès aujourd’hui —
apprendre rapidement des mélodies
grâce au Système “Playcard”. Quant au
Système Basses/Accords Automatiques,
il vous permet — sur la pression d’un
seul doigt — d’exécuter des accom
pagnements professionnels. Enfin, vous
pouvez utiliser toutes les ressources de
votre PC-1000 comme clavier portatif à
49 notes offrant un choix étendu de
sonorités d’instruments et d’accom
pagnements rythmés. Le PortaTone
PC-1000 — grâce à sa riche gamme de
possibilités — vous ouvre un champ
étendu de divertissements musicaux, en
fait un nouveau monde fertile en sensa
tions musicales. Afin d’utiliser pleine
ment les ressources de votre PC-1000,
nous vous conseillons vivement de
suivre scrupuleusement les instructions
du Manuel, au cours de l’utilisation de
votre instrument.
Gracias por haber adquirido un PortaTone
PC-1000 Yamaha. Es un producto revolu
cionario que le permite disfrutar tocando y
aprendiendo música de teelado en una
diversidad de maneras. Puede aprender
melodías rápidamente con el sistema Playcard
(tarjetas musicales), y con el sistema de
Acorde y Bajo Automático puede empezar a
tocar con acompañamiento profesionalizado
—utilizando un solo dedo—¡Hoy mismo!
También puede utilizar su PC-KXX) como
teclado portátil de 49 notas—un teclado que le
ofrece múltiples selecciones de voces instru
mentales y acompañamientos de ritmo
también.
El PortaTone PC-1000, con su amplia gama
de posibilidades, le introduce a un nuevo
mundo de placer y diversión musical. Para
sacar el máximo provecho, le sugerimos siga
las indicaciones del Manual del Propietario
cuando toque el instrumento.
Before Playing
The 3-way power system
PortaTone operates on internal batteries
or, with optional power adaptors, on
household current or a car battery.
Inserting batteries
Remove the battery compartment cover
on the bottom of the instrument and
insert six 1.5V SUM-1, “D” size, R-20, or
equivalent alkaline batteries (sold sepa
rately), making sure that the polarities
are correct as indicated inside the com
partment. Replace the cover, ensuring
that it locks securely in place. When the
internal batteries are weak and need
replacing, the Power-on light flashes on
and off; when this occurs, it is recom
mended that all the batteries be re
placed at the same time since this is
more economical in the long term.
Vor dem Spielen
3-Weg-Stromversorgung
Portatone kann entweder über die einge
setzten Batterien, über Netzstrom oder über
die Autobatterie betrieben werden.
Einsetzen der Batterien
Nehmen Sie den Batteriefachdeckel am
Boden des Instrumentes ab, und legen Sie
sechs l,5V-Monozellen (nicht mitgeliefert,
möglichst Alkali-Batterie) unter Beachtung
der im Inneren angegebenen Polarität ein.
Bringen Sie den Deckel wieder an, und
achten Sie darauf, daß er einrastet. Sind die
Batterien erschöpft und müssen ersetzt
werden, so blinkt die Einschaltanzeige. Es
empfiehlt sich, alle Batterien gleichzeitig
zu ersetzen, da dies langfristig gesehen
wirtschaftlicher ist.
Avant de jouer
Le triple système d’alimentation
Le PortaTone fonctionne soit sur piles
internes, soit — à l’aide d’adaptateurs
en option — sur le courant secteur ou
sur une batterie automobile.
Insertion des piies
Retirer le couvercle du compartier des
piles se trouvant sous l’appareil et .
Insérer 6 piles 1,5V, SUM-1, format “D”,
R-20, ou des piles alcalines équivalentes
(vendues séparément), en s’assurant que
les polarités sont bien correctes et
conformes aux indications figurant à
l’intérieur du compartier. Remettre le
couvercle en place, en s’assurant de son
parfait verrouillage. Lorsque les piles
internes sont défaillantes ou que leur
remplacement s’avère nécessaire, le
clignotant d’alimentation s’allume et
s’éteint alternativement; dans ce cas, il
est recommandé de changer toutes les
piles en même temps, cette solution
s’avérant plus économique à long terme.
Antes de tocar
El sistema de potencia de 3 vías
El PortaTone funciona con baterías internas
o, utilizando los adaptadores de potencia
opcionales, con corriente doméstica o con la
batería del automóvil.
Inserción de las baterias
Extraer la cubierta del compartimiento de
baterías de la parte inferior del instrumento
e insertar seis baterías alcalinas de 1,5V
SUM-1, de tamaño “D”, R-20 o equivalentes
(vendidas por separado), asegurándose de
que las polaridades sean correctas, como se
indica dentro del compartimiento. Volver
a colocar la cubierta, asegurándose de que
se fije firmemente en su posición. Cuando
las baterías internas estén desgastadas y sea
necesario cambiarlas, la luz de conexión
de potencia parpadeará; cuando ocurra
esto, se recomienda cambiar todas las baterías
al mismo tiempo ya que esto resulta
más económico a largo plazo.
Page 3
Optional power adaptors
Household current: Power Adaptor PA-4.
When you purchase a power adaptor
please ensure that it is model PA-4.
Car battery: Car Battery Adaptor CA-1.
Als Sonderzubehör erhältliche Adapter
Für Netzstrom: Verwenden Sie für Netzbe
trieb ausschließlich den Netzadapter PA-4.
Für Betrieb über die Autobatterie: Auto
batterieadapter CA-1.
Adaptateurs en option
Courant secteur: L’adaptateur PA-4 est
disponible pour le courant secteur.
Aucun autre adaptateur ne convient.
Lors de l’acquisition de l’adaptateur,
s’assurer qu’il s’agit bien du modèle
PA-4.
Batterie automobile: L’adaptateur CA-1,
prévu pour batterie automobile, se
branche sur l’allume-cigare du tableau
de bord.
Adaptadores de potencia opcionales
Corriente doméstica: Adaptador de Potencia
PA-4.
Cuando adquiera un adaptador de potencia,
asegúrese de que sea el modelo PA-4.
Batería de automóvil: Adaptador para
Batería de Automóvil CA-1.
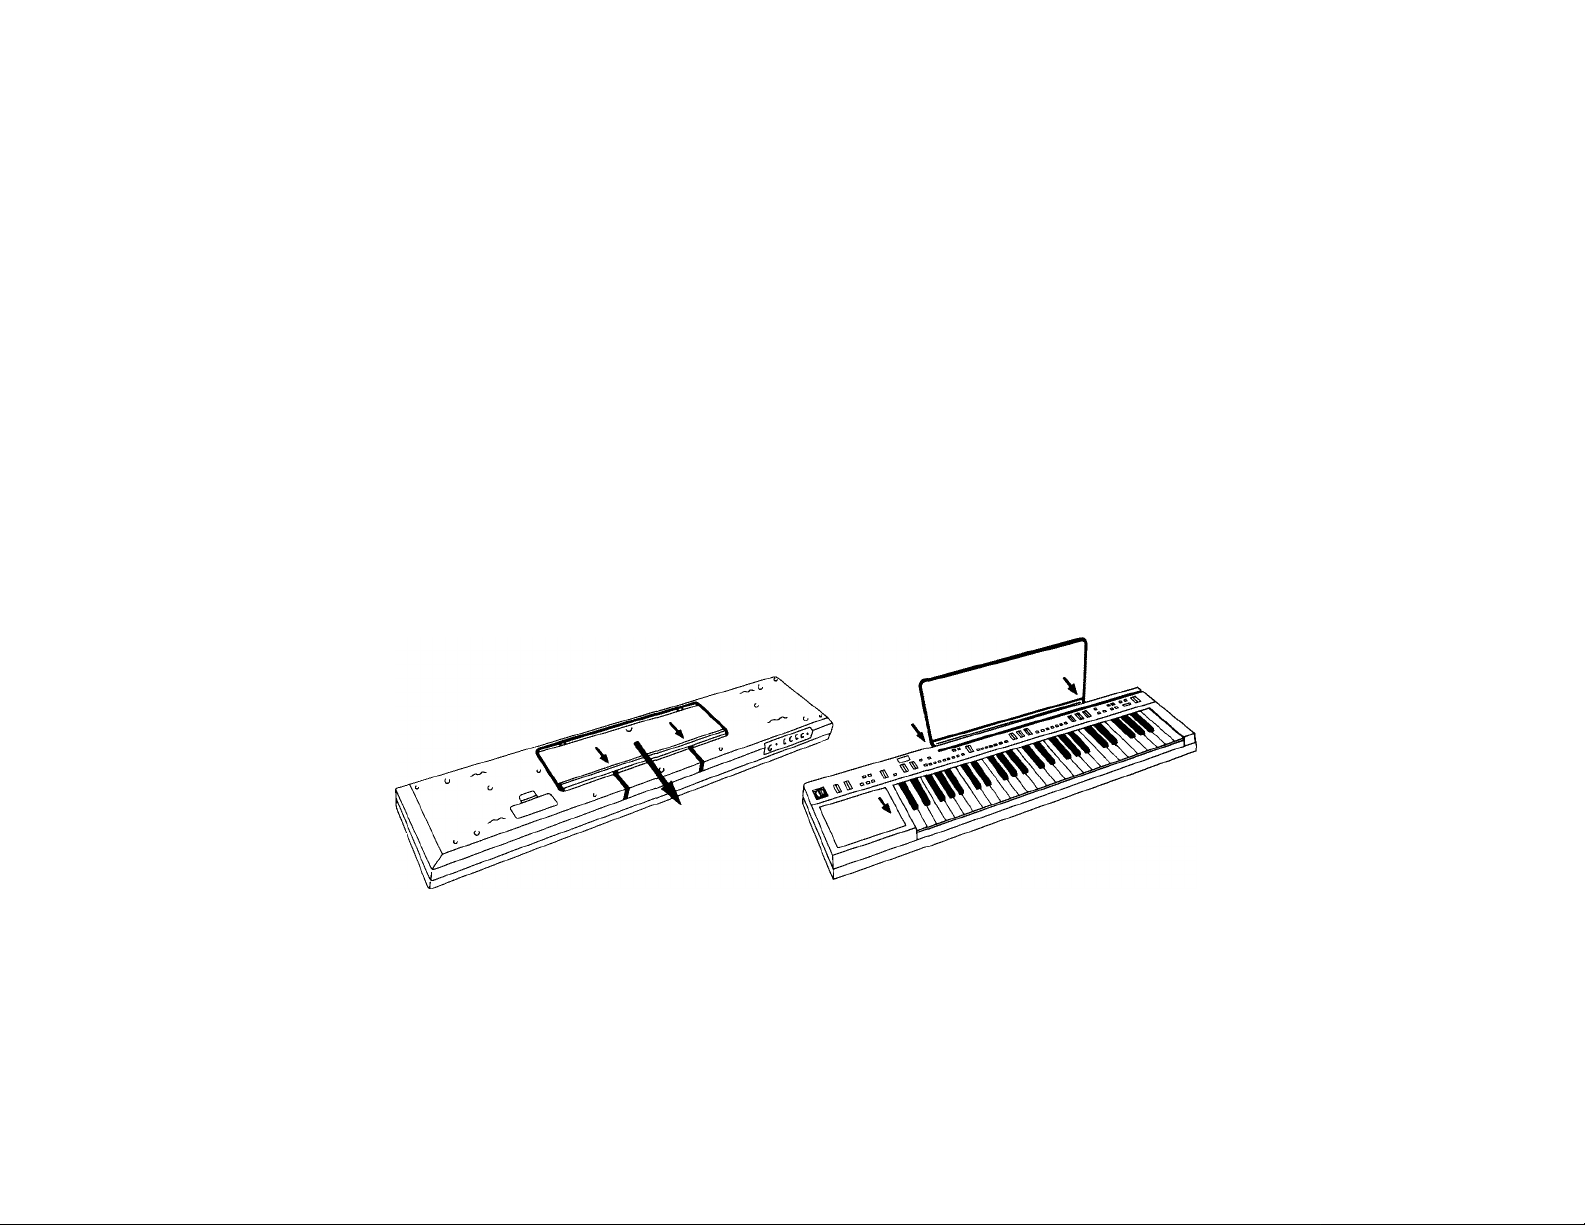
Attaching the music rest
The music rest is stored on the under
side of the keyboard.
• To remove the music rest, turn the
keyboard over then slide the plastic
plate towards you (see figure).
Do not try to remove the music rest
by lifting up the metal frame.
• Put the keyboard the right way up,
and insert the ends of the music rest
firmly into the two holes at the back
of the instrument.
• Finally, lower the plastic plate so that
it rests on the keyboard.
Anbringen des Notenständers
Der Notenständer befindet sich auf der
Unterseite des Instruments.
• Um den Notenständer herausnehmen zu
können, drehen Sie das Instrument um
und ziehen Sie die Plastikplatte nach
vorne (siehe Abb.). Heben Sie zum
Herausnehmen des Notenständers den
Metallrahmen nicht hoch.
• Heben Sie das Instrument hoch, und
stecken Sie die Enden des Notenständers
in die zwei Löcher auf der Hinterseite des
Instrumentes.
• Klappen Sie die Plastikplatte nach unten,
so daß sie auf dem Instrument aufliegt.
Fixation du pupitre
Le pupitre se trouve sur la face opposée
du clavier.
• Pour retirer le pupitre, retournez le
clavier et faites glisser vers vous
l’élément en plastique (voir schéma).
S’abstenir — pour cette opération —
de soulever le châssis métallique.
• Replacez le clavier en position
normale et insérez fermement les
deux extrémités du pupitre dans les
deux trous ménagés au dos de
l’instrument.
• Enfin, abaissez l’élément en plastique,
de manière à ce qu’il repose sur le
clavier.
Fijación dei soporte musical
El soporte msical se encuentra debajo del
teclado.
• Para extraer el soporte musical, dar la
vuelta al teclado y deslizar la placa de
plástico hacia Ud. (ver figura).
No debe intentarse extraer el soporte
musical levantando el bastidor metálico.
• Poner el teclado en su posición normal
e insertar los extremos del soporte
musical firmemente en los dos orificios
de la parte trasera del instrumento.
• Finalmente, bajar la placa de plástico de
manera que repose sobre el teclado.
Contents
1. Nomenclature.......................................3
2. Starting to play
3. Playcard system...................................5
4. How to use all the other
features
5. External jacks.....................................25
6. Optional accessories..........................27
7. Taking care of the PC-1CKX) and
Playcards
8. Specifications
9. Playcard Library
.....................................
..............................................
...........................................
.....................................
................................
13
28
30
31
Inhalt
1. Bezeichnung der Bedienungs
4
elemente .................................................3
2. Spielbeginn
3. ,, Playcard “-System
............................................
..............................
4. Verwendung der anderen
Funktionen
5. Anschlußmöglichkeiten
6. Sonderzubehör
...........................................
.......................
.....................................
7. Nützliche Hinweise...............................28
8. Technische Daten..................................30
9. ,,Playcard“-Bibliothek
..........................
13
25
27
31
Table des matières
1. Nomenclature
2. Début de l’exécution
4
3. Système “Playcard”..............................5
5
4. Mode d’utilisation des autres
fonctions.............................................13
5. Prises extérieures
6. Accessoires en option
7. Entretien de votre PortaTone
8. Spécifications
9. Fichier de “Playcards”
...
..................................
............................
..............................
........................
.....................................
.......................
..............
25
27
30
31
Indice
1. Nomenclatura..........................................3
3
2. Comenzando a tocar................................4
4
3 . Sistema Playcard (tarjetas
musicales)
...............................................
4. Cómo utilizar las demás
características........................................13
5 . Contactos externos
6. Accesorios opcionales...........................27
28
.............................
7. Cuidados para su PortaTone
8. Especificaciones
..................................
9. Biblioteca de tarjetas Playcard
.................
.............
5
25
28
1 30
31
Page 4

Nomenclature
Auto Bass Chord Section
Bafi-Akkord-Automatik-Teil
Section Basses/Accords Automatiques
Sección de Accorde y Bajo Automático
Arpeggio Section
Arpeggio-Teil
Section Arpège
Sección de Arpegio
. ri.
®® ® ®@® ®
Bezeichnung der
Bedienungselemente
Rhythm Section
Rhythmus-Tei!
Section Rhythmique
Sección de Ritmo
@ @
Nomenclature
Orchestra Section
Orchester-Teil
Section Orchestrale
Sección de Orquesta
“Ì
T
@ @ @ (§) (g (23) (3)
Soio Section
Solo-Teil
Section Solo
Sección de Solo
Nomenclatura
YAMjAHA p)(g®(Q|®(5)
Í> TRANSPOSER
8
WASTER VOLUME
^ ¡3 Q-
Q Q EJ- -Ö
1
T'ï“'" .
■(29)
SI il
liil
!5!Sl
Page 5

1 Transposer
0) Transponierungsregler
Q) Hauptlautstärkeregler
'3 Chord Name Display
4 Auto Bass Chord Volume
5 Auto Bass Chord Selectors
i' Auto Bass Chord Key Section
7 Arpeggio Volume
,8 Arpeggio Variation (¿) Arpeggio-Variationsschalter
@ Anzeige der Akkordbezeichnung
0 Baß-Akkord-Automatik-Lautstärkeregler
© Baß-Akkord-Automatik-Teil
© Baß-Akkord-Automatik-Tastenbereich
© Arpeggio-Lautstärkeregler
9 Rhythm Volume '© Rhythmus-Lautstärkeregler
fo Rhythm Tempo
11 Rhythm Start & Synchro Start
Rhythm Selectors © Rhythmus-Wahlschalter
13 Handclap Selectors
© Rhythmus-Temporegler
® Rhythmus-Start-u. Synchro-Start-Schalter
© Händeklatsch-Wahlschalter
14 Fill-In Variation Selector '© Schlagzeugsolo-Variationsschalter
15 Fill-In Bar
I'e Orchestra Voice Selectors
17 Orchestra On/Off
'© Schlagzeugsolo-Taste (auch für Akkord
abschaltung u. Speicher/WiedergabeStart)
18 Orchestra Sustain I© Orchesterstimmen-Register
19 Orchestra Volume
20 Solo Volume
21 Solo On/Off
22 Solo Voice Selectors
», Solo Sustain
j4 Solo Vibrato Depth
2} Solo Celeste
26 playcard System Selectors
,27 Power Switch
Pitch Control © Schalter für das „Playcard“-System
Playcard Groove
Playcard
© Orchester-Ein/Aus-Schalter
© Orchester-Sustain-Regler
@ OrchesterLautstärkeregler
© Solo-Lautstärkeregler
&' Solo-Ein/Aus-Schalter
© Solostimmen-Register
(© Solo-Sustain-Regler
'© Solo-Vibratointensitäts-Regler
® Solo-Celeste-Regler
© Ein/Aus-Schalter
© Tonhöhenregler
©i „Playcard“-Schlitz
© „Playcard“ (Spielkarte)
© Transpositeur © Transposicionador
@ Volume Principal
© Volumen Principal1 Master Volume
© Affichage du Nom de l’Accord © Indicación de Nombre del Acorde
© Volume Basses/Accords Auto
matiques
© Volumen de Acorde y Bajo Automático
©1 Selectores de Acorde y Bajo Automático
© Sélecteurs Basses/Accords Auto ® Sección de Teclas de Acorde y Bajo
matiques
® Section Touches de Basses/Accords @ Volumen de Arpegio
Automatiques
@ Volume Arpège
® Variation Arpège
© Volume Rythme
(fo: Tempo Rythme
® Départ Rythme et Départ Synchro
® Sélecteurs de Rythme
® Sélecteurs Battements de Mains
Automático
© Variación de Arpegio
© Volumen del Ritmo
© Tempo del Ritmo
© Arranque del Ritmo y Arranque
Sincronizado
@ Selectores de Ritmo
(© Selectores de Palmadas
(í?i Selector de Variación de Relleno
© Sélecteur Variation Fill In © Barra de Relleno (también para
® Touche Fill In (aussi pour “Sans
Accords” et Début Enregistrement/
Reproduction)
Arranque de Grabación/Reproducción y
Sin Acorde)
16 Selectores de Voces de Orquesta
® Sélecteurs Voix Orchestrales r Conector On/Off de Orquesta
© Orchestre Marche/Arrêt
isi Sostenido de Orquesta
© Sustain Orchestre 161 Volumen de Orquesta
® Volume Orchestre
(20) Volume Solo
á 1 Volumen de Solo
; Conector On/Off de Solo
@ Solo Marche/Arrêt » Selectores de Voces de Solo
® Sélecteurs Voix Solo
(23) Sustain Solo
(24 Profondeur Vibrato Solo
® Solo Céleste
Il Touches du Système “Playcard”
® Interrupteur d’Alimentation
Il Contrôle Hauteur Tonale
Rainure “Playcard”
(39) “Playcard”
T' Sostenido de Solo
24 Profundidad de Vibrato de Solo
Celeste de Solo
Botones del Sistema Playcard
2. Interruptor de Potencia
2f Control de Tono
2f' Hendidura para Playcard
Tarjetas Playcard
Page 6
starting to play
Spielbeginn
Début de l’exécution
Comenzando a tocar
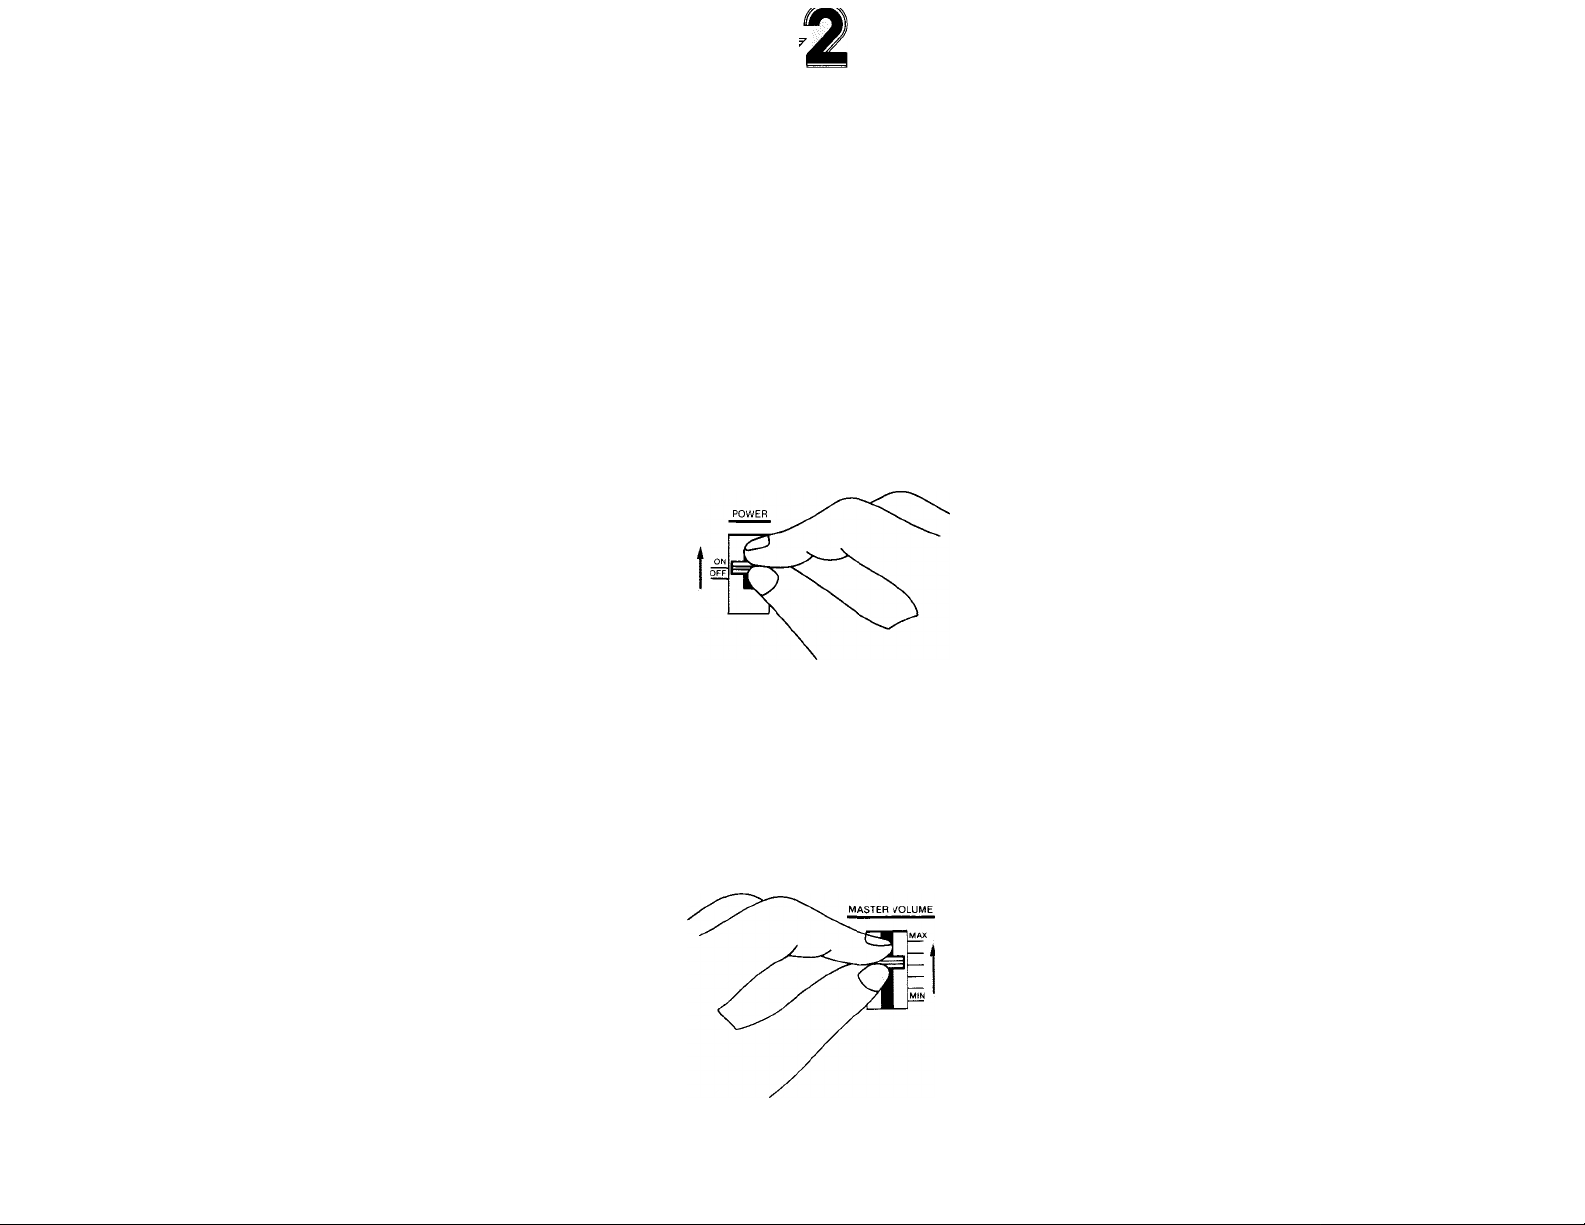
1. If you are going to use battery power,
first insert the batteries in the com
partment as described eariier. Before
using with household current or a
car battery, ensure that the optional
adaptor is safeiy connected.
Siide the POWER switch @ to the
“ON” position. The Power-on light
will then illuminate. If the light flickers
when you’re using batteries, this
indicates that the batteries need
replacing.
3. Adjust the overall volume using the
MASTER VOLUME control @.
SoU das Instrument mit Batterien betrieben
werden, setzen Sie diese wie zuvor
beschrieben ein. Bei Betrieb mit Netzstrom
oder an einer Autobatterie überprüfen
Sie, daß der Adapter (Sonderzubehör)
richtig angeschlossen ist.
Schieben Sie den Ein/Aus-Schalter
(POWER) ® auf ON. Der Schalter
leuchtet dann. Blinkt er bei Batteriebe
trieb, so müssen die Batterien ersetzt
werden.
3. Regeln Sie die Gesamtlautstärke mit dem
Hauptlautstärkeregler (MASTER
VOLUME) @ ein.
1. Si vous décidez d’utiliser des piles,
insérez tout d’abord les piles dans le
compartier selon la description
antérieure. Avant toute utilisation sur
le courant secteur ou sur une batterie
automobile, assurez-vous que l’adap
tateur en option a été dûment
branché.
2. Déplacer l’Interrupteur d’Alimentation
(POWER) @ sur la position de marche
(ON). Le clignotant d’alimentation
s’allume alors. Si ce voyant lumineux
s’allume et s’éteint alternativement,
en cas de fonctionnement sur piles,
ce signal indique qu’il convient de
remplacer les piles.
3. Réglez le volume global en utilisant
le contrôle de Volume Principal
(MASTER VOLUME)®.
1. Si va a utilizar las baterías como fuente de
potencia, inserte antes las baterías en el
compartimiento como se ha descrito antes.
Antes de utilizar el instrumento con co
rriente doméstica o con la batería del auto
móvil, asegúrese de que el adaptador
opcional esté bien conectado.
2. Deslice el Interruptor de Potencia
(POWER)® a la posición “ON”.
Entonces se iluminará la luz de conexión
de potencia. Si la luz parpadea cuando esté
utilizando baterías, esto indicará que las
baterías necesitan ser cambiadas.
3. Ajuste el volumen general utilizando el
control de Volumen Principal (MASTER
VOLUME)®.
Page 7

Piaycard system
, ,Playcard“-System
Système “Piaycard”
Sistema de tarjetas
In addition to its full range of voices,
rhythms and other functions, the PC-1000
has the Piaycard system, which enables
you to listen to or sing along with a piece
of music, or to practice playing the
melody and chord accompaniment.
Playcards
Each Piaycard (§) has a music score
together with a magnetic strip on one
side, and instructions for use on the
other. The magnetic strip has musical
data recorded on it. This data comprises
a melody, obbligato, chords, rhythm
accompaniment, drum fill-ins, bass line,
instrument voices, program instructions,
and, when appropriate, arpeggios. The
PC-1000 memorizes all this information
when you slide the Piaycard across the
Instrument’s reading head.
Zusätzlich zu ihrer reichhaltigen Ausdrucksmöglichkeit besitzt die PC-1000 ein
„Playcard“-System (Notenkarten). Damit
sind Sie in der Lage, zu wählen, ob Sie der
Musik nur zuhören, die Gesangsbegleitung
machen oder Melodie bzw. die Begleitak
korde ganz selbst spielen wollen.
^^aycarcf Syste^*^
m
Q
PRESET
BALANCE
CANCEL
r=l r=1
INSTR. PHRASE
SEQUEN- REPEAT
CER
MELODY SING
CANCEL ALONG
CHORD CHORD
CANCEL LESSON
,,Playcards“ (Notenkarten)
Auf der einen Seite dieser ,,Playcards“ @
befinden sich die Partitur und ein Magnet
streifen, auf der anderen die Anleitung. Auf
dem Magnetstreifen sind die Musik-Daten
abgespeichert. Diese Daten enthalten die
Melodie, die obligaten Stimmen, die
Akkorde, die Rhythmus-Begleitung, den
Schlagzeug-Einsatz, die Baßlinie, die Instru
mentalstimmen, Programmanweisungen und
gegebenenfalls auch die Arpeggien. Alle
diese Information werden im PC-1000 abge
speichert, wenn eine ,,Piaycard“ über den
Lesekopf des Instruments gleitet.
Outre ses fonctions d’expression, le
PC-1000 offre un système “Playcard”
qui permet d’écouter et d’accompagner
en chantant un morceau de musique,
de s’exercer à jouer une mélodie ou
d’accompagner les accords soi-même.
И
AUTO
PLAY
1 -1
STOP
■ i
Q
FREE
TEMPO
■ ■ ■
Q 13
Q Q
“Playcards”
Chaque “Playcard” comporte, d’un côté,
une partition musicale associée à une
piste magnétique; de l’autre, les instruc
tions relatives à son utilisation. La piste
musicale contient des données musica
les dûment enregistrées. Ces données
comportent une mélodie, une partie
obligée, des accords, un accompagne
ment rythmé, des passages de batterie,
une suite de basses, des voix instrumen
tales, et des instructions programmées.
Le PC-1000 met en mémoire l’ensemble
de ces données, lors de l’Insertion de
la “Playcard” dans la tête de lecture
de l’Instrument.
Además de sus completísimas funciones de
expresión, el PC-1000 ofrece un sistema de
tarjetas musicales que le permitirán escuchar
y acompañar con su voz las melodías, o bien
practicar tocando la melodía y los acordes
de acompañamiento.
Tarjetas Playcard
Cada tarjeta tiene un patrón musical junto
con una franja magnética en un lado, y las
instrucciones para su uso en el otro. La franja
magnética lleva grabada información
musical. Esta información comprende una
melodía, obligado, acordes, acompaña
miento de ritmo, batería, Unea de bajo,
voces instrumentales e instrucciones de
programa. El PC-1000 memoriza toda esta
información cuando Ud. desliza la tarjeta
Playcard por la cabeza lectora del instru
mento.
Greensleeves
4 ' • .í
ir tf ir !• N >r
1
j í I * I■' rriJ L I Г
Ili if; li IJ -¿¡J i
-Melody
-Obbligalo (decorative solo
passages)
-Chords
-Rhythm accompaniment
with drum fill-ins
- Bass line
-Instrument voices
-Program instructions
Melodie
Obligate Stimmen
Akkorde
Rhythmus-Begleitung mit
Schlagzeug-Einsätzen
BaJiiinie
Instrumentalstimmen
Programmanweisungen
Mélodie
Partie obligée (fioritures
exécutées en solo)
Accords
Accompagnement rythmé à
la batterie
Basses
Voix instrumentales
Instructions programmées
Melodía
Obligado (partes con solos
decorativos)
Acordes
Acompañamiento de ritmo
con inclusión de batería
Linea de bajo
Voces instrumentales
Instrucciones de programa
Page 8

г
Insert a Playcard
Select a Playcard, remove it from the
protective envelope, and place it in the
groove so that its ieading edge is
ievei with the arrow designating the
insertion position (see figure). Then slide
the Playcard firmly along the groove in
one action from right to left until it
reaches the end of the groove. If the
PC-IOOO’s head, which is iocated in the
groove, has read the magnetic strip cor
rectly, the last Melody Lamp on the right
of the keyboard will light up for a few
seconds. Repeat the procedure if the
Melody Lamp does not illuminate. If you
slide the Playcard too slowly, the head
will not read the data; the sliding action
should take from one to two seconds.
Try several times to familiarize yourself
with the correct speed.
Reading of the Playcard is completed,
and your PC-1000 immediately starts to
play the Playcard music automatically.
At the same time the Melody Lamps
light up to show you the progression
of the melody notes. If you want to
stop the music at any time, press the
STOP button.
„Playcard“ einschicbcn
Wählen Sie eine ,, Play card“ aus, nehmen
Sie sie aus ihrer Schutzhülle, und stecken
Sie sie so in den ,j:PIaycard“-Schlitz @,
daß ihr vorderer Rand an dem die Aus
gangsposition markierenden Pfeil liegt
(siehe Abb.). Schieben Sie dann die ,,Play
card“ gleichmäßig ohne Unterbrechung von
rechts nach links bis zum Ende des Schlitzes.
Hat der im Schlitz befindliche Lesekopf alle
päten des Magnetstreifens richtig gelesen,
leuchtet die letzte, ganz rechts auf der
Tastatur befindliche Melodie-Lampe ein bis
zwei Sekunden lang auf. Leuchtet diese
Lampe nicht, so muß der Vorgang wieder
holt werden. Wenn die ,,Playcard“ zu
langsam durch den Schlitz geschoben wird,
kann der Lesekopf die Daten nicht lesen.
Der Schiebevorgang sollte ein bis zwei
Sekunden dauern. Üben Sie einige Male,
um ein Gefühl für die richtige Geschwin
digkeit zu bekommen. Das Einlesen der
Playcard ist damit beendet, und das
PC-1000 beginnt sofort mit der Wiedergabe
der ,,Playcard“ Musik. Gleichzeitig wird
die Melodie an den Melodie-Lampen
aiigc/cigt. Durch Drücken des Stop-Schal-
lors (S TOP) kiinnen Sie die Musik an einer
beliebigen Stelle abbrechen.
Insérer une “Playcard”
Retirer la “Playcard” choisie de l’enve
loppe protectrice et la placer dans la
rainure en veillant à ce que le bord
principal soit au niveau de la flèche
désignant la position d’insertion (se
référer ou schéma). Déplacer ensuite
la “Playcard” fermement le long de la
rainure d’un seul mouvement de droite
à gauche jusqu’à ce qu’elle parvienne
au bout de la rainure.
Si la tête du PC-1000 — située dans
la rainure — a procédé correctement à
la lecture de la piste magnétique, la
dernière Lampe de Mélodie à droite du
clavier s’allumera pendant quelques
secondes. Il conviendra de répéter l’opéra
tion si la Lampe de Mélodie ne s’allume
pas. Si le déplacement de la “Playcard”
s’effectue trop lentement, la lecture
des données informatiques ne se fera
pas; il conviendra donc de procéder au
déplacement de la “Playcard” en une
ou 2 secondes maximum. Effectuez
l’opération piusieurs fois, de manière
à vous familiariser avec la vitesse qui
convient.
Insertar una tarjeta Playcard
Seleccionar рва tarjeta, sacarla de su sobre
protector y colocarla en la hendidura ü?) de
manera que su borde principal esté nivelado
con la flecha que señala la posición de inser
ción (ver figura). Luego, deslizar firme
mente la tarjeta por la hendidura con ««
solo movimiento hasta que alcance el final
de la hendidura, de derecha a izquierda. Si
la cabeza del PC-1000, localizada en la
hendidura, ha leído correctamente la franja
magnética, la última Luz de Melodía de la
derecha deí teclado se iluminará por unos
segundos. Repetir el procedimiento si la Luz
de Melodía no se enciende. SI desliza la
tarjeta Playcard demasiado despacio, la
cabeza no leerá la información; la acción de
deslizar debe llevar de uno a dos segundos.
Inténtelo varias veces para familiarizarse
con la velocidad correcta.
Se ha completado la lectura de la tarjeta y su
PC-1000 comienza a tocar inmediatamente
la música Playcard de forma automática, y
al mismo tiemp las Luces de Melodía se
iluminarán para mostrarle la progresión de
las notas de melodía. Si desea parar la
música en cualquier momento, pulse el
botón STOP.
Playcard System Functions
Note
Once the PC-1000 has memorized the Play
card data, you can remove the Playcard if
you wish; for safety’s sake, return it to its
protective envelope.
Hold Р1ауеф01п bôth hand t v
Die ,,Plaÿcard‘tiait feeidfflVH
Tenez la; ‘“Pjàydàrd’’ avec lès depx;raaln^
Sujete la tarjeta icönämbäs manQS^^^^
Arrow
Pfeil
Flèche
Flecha
^4
---------
Groove
Schlitz
Rainure
Hendidura
Funktionen des ,,Playcard“-Systems
Hinweis
Sind die „Playcard“-Daten erst einmal im PC-1000
abgespeichert, so kann die „Playcard" heraus
genommen werden. Stecken Sie die „Playcard"
dann wieder in ihre Schutzhülle zurück, um sie vor
Beschädigungen zu bewahren.
Fonctions du Système “Playcard”
Remarque
Une fois que le PC-1000 a mis en mémoire
les données de la “Playcard", cette dernière
peut être retirée à volonté. Dans ce cas,
par mesure de précaution, Il conviendra de
la replacer dans son enveloppe protectrice.
Slide în òhe actiôn
Ohne Üwerbrechung eittschièben
Dépláoez látérálerheni en un
- j seul möuvenrtent
f DesMeela con un solo
moviiniento
Funciones del Sistema Playcard
Nota
Una vez que el PC-1000 ha memorizado la infor
mación de la tarjeta Playcard, puede quitar la
tarjeta si lo desea; para mayor seguridad vuelva
a introducirla en su sobre protector.
Page 9

1. For Automatic Playing
1. Automatisches Spielen
1. Lecture Automatique des “Playcards”
1. Ejecución Automática
AUTO PLAY
When the Playcard music has finished,
or if you have halted it by pressing the
STOP selector, and you wish it to be
played again, press the AUTO PLAY
selector. The music will be played from
the beginning. To stop the music at any
time, press the STOP selector.
Note
The suggested instrument voice and rhythm
have been preset on the Piaycard’s magnetic
strip, if you wish, you can change the meiody
voice and rhythm during a performance.
However, waitz music shouid not be switched
to a 4/4 beat.
SING ALONG
After inserting a Playcard, press the
SING ALONG selector. The Playcard
music will be reproduced with the vol
ume of the melody suppressed. This
feature is convenient when you wish to
sing the song with the Playcard music
in the background or to play the melody
with another instrument. To stop the
music at any time, press the STOP
selector.
2. To play the melody by yourself
FREE TEMPO
The FREE TEMPO function helps you
learn melodies at your own playing
speed — there’s no need to search hur
riedly for the correct keys to keep up
with the accompaniment because the
accompaniment always waits for you
to lead it.
After inserting a Playcard, press the
FREE TEMPO selector. You’ll hear the
introductory music phrase (the small
notes at the beginning of the Playcard
music score), then the Melody Lamp
corresponding to the first note of the
melody (large notes on the music score)
will light up. The PC-1000 will wait until
you start playing the melody. As you
speed up or slow down your melody
playing, the accompaniment will stay
right with you. Because the PC-1000
waits for you when you can’t find the
AUTO PLAY (Automatisches Spielen)
Wenn die Musik von der ,,Playcard“
beendet ist, oder Sie sie mit Hilfe des
Stop-Schalters (STOP) unterbrochen haben,
können Sie sie erneut spielen, wenn Sie
den AUTO PLAY-Schalter drücken. Die
Musik wird von Anfang an gespielt. Wenn
Sie den Stop-Schalters (STOP) drücken,
können sie den Spielvorgang zu jeder
beliebigen Zeit abbrechen.
Hinweis
Die vorgesehene Instrumentalstimme und der
Rhythmus ist durch Einlesen der „Piaycard“Daten bereits automatisch eingestellt. Wenn
gewünscht, kann aber die Melodie-Stimme und
der Rhythmus noch während des Spielvorgangs
geändert werden. Jedoch sollte bei Walzer kein
4/4-Takt verwendet werden.
SING ALONG (Mitsingen)
Nach dem Einlesen einer ,, Play card“
drücken Sie den Mitsingschalter (SING
ALONG). Die Wiedergabe der ,,Playcard“Musik erfolgt nun mit gedämpfter Lautstärke.
Diese Einrichtung ist sehr nützlich, wenn
Sie die ,,Playcard“-Musik als Hintergrund
für Gesangsdarbietung verwenden wollen
oder die Melodie mit einem anderen Instru
ment spielen wollen. Wenn Sie den StopSchalters (STOP) drücken, können Sie den
Spiel Vorgang zu jeder beliebigen Zeit
abbrechen.
2. Eigenes Spielen der Melodie
FREE TEMPO (Tempoautomatik-Schalter)
Mit dieser Tempoautomatik (FREE TEMPO)
können Sie Melodien mit Ihrer eigenen
Spielgeschwindigkeit erlernen. Sie brauchen
sich beim Drücken der richtigen Taste nicht
zu beeilen, da die Begleitung sich auto
matisch nach Ihrem Spieltempo richtet.
Drücken Sie nach dem Einschieben der
,,Playcard“ den Tempoautomatik-Schalter
(FREE TEMPO). Sie hören dann das
Einführungs-Musikstück (kleine Noten am
Anfang der ,,Playcard“-Partitur), und
anschließend leuchtet die Melodie-Lampe
des ersten Tons der zu spielenden Melodie
(auf der ,,Playcard“ groß gedruckte Note)
auf. Das PC-1000 wartet nun darauf,
daß Sie die erste Note spielen. Wird das
Spieltempo erhöht oder verringert so ändert
sich auch automatisch das Tempo der
Begleitung. Da das PC-1000 auch wartet,
bis Sie die als nächstes zu spielende Taste
AUTO PLAY (Exécution Automatique)
Quand la carte musicale est achevée ou
si sa lecture a été interrompue par pous
sée sur la touche d’Arrêt (STOP) et que
l’on désire la jouer de nouveau, appuyer
sur la touche d’exécution Automatique
(AUTO PLAY). La lecture de la carte se
déclenchera à son début. Pour inter
rompre la musique à n’importe quel
moment, appuyer sur la touche d’Arrêt
(STOP).
Remarque
Les voix instrumentales et rythmes sug
gérés ont été pré-réglés sur la piste mag
nétique de la “Playcard". Vous pouvez, si
vous le désirez, modifier la ligne mélodi
que et le rythme au cours de l’exécution
du morceau. Une musique de valse ne
saurait, toutefois, être associée à un rythme
4/4.
SING ALONG
(Chant d’accompagnement)
Insérer une carte musicale et appuyer
sur la touche SING ALONG. Le contenu
de la carte musicale sera reproduit
sans la mélodie. Cette caractéristique
est particulièrement précieuse lorsque
l’on souhaite chanter un air avec le
contenu de la carte musicale comme
musique de fond ou si l’on veut jouer
la mélodie sur un autre instrument.
Pour interrompre la musique à n’importe
quel moment, appuyer sur la touche
d’Arrêt (STOP).
2. Exécution de la mélodie par le
musicien
FREE TEMPO (Tempo Libre)
Grâce à la fonction Tempo Libre (FREE
TEMPO) vous pouvez apprendre l’exécu
tion d’une mélodie
vôtre. Vous n’aurez pas à chercher à la
hâte les notes correspondant à l’accom
pagnement: celui-ci, en effet, vous suit
docilement.
Après avoir inséré une “Playcard”,
appuyez sur la touche Tempo Libre (FREE
TEMPO). Vous entendrez alors la phrase
musicale d’introduction (les notes du
début de la partition musicale sur carte);
puis la Lampe de Mélodie correspon
dant à la première note de la mélodie
(grande note sur la partition musicale)
s’allumera. Le PC-1000 attendra le début
de votre exécution de la mélodie. Que
vous accélériez ou que vous ralentissiez
à l’allure qui est la
AUTO PLAY (Toque Automático)
Al concluir la música de la tarjeta, o al ser
interrumpida presionando el botón STOP
durante su ejecución, y si deseara que tocara
otra vez, presione de nuevo el botón STOP;
se tocará la música desde el principio.
Presione el botón STOP cuando desee inter
rumpir la música.
Nota
El ritmo y la voz instrumental sugeridos han sido
preseleccionados en ¡a franja magnética de la
melodía. Si lo desea, puede cambiar la voz de
melodía y el ritmo durante la interpretación.
De todas maneras, la música de vals no deberá
disponerse a un compás 4 por 4.
SING ALONG (Para cantar con la melodía)
Presione el botón SING ALONG después de
insertar una tarjeta musical. La música de
esta será ejecutada suprimiendo el volumen
de la melodía. Es una función muy inte
resante para cuando desee cantar el tema
teniendo como fondo la música de la tarjeta,
o con otro instrumento. Presione el botón
STOP cuando desee interrumpir la música.
2. Ejecución personal de la melodía
FREE TEMPO (Tempo Libre)
Esta función de Tempo Libre (FREE
TEMPO), le ayuda a aprender melodías a su
propia velocidad de toque—no hay necesi
dad de buscar apresuradamente las teclas
correctas para seguir el acompañamiento
porque el acompañamiento siempre espera
a que Ud. lo dirija. Después de insertar una
tarjeta Playcard, oprima el botón de Tempo
Libre (FREE TEMPO). Escuchará la frase
musical de introducción (las notas cortas al
principio del patrón de música de Playcard),
y entonces, la Luz de Melodía correspon
diente a la primera nota de la melodía (notas
largas del patrón musical) se iluminará. El
PC-1000 esperará hasta que Ud. empiece a
tocar la melodía. A medida que acelera o
retrasa su toque de melodía, el acompaña
miento le seguirá. Como el PC-1000 le
espera cuando Ud. no puede encontrar la
siguiente nota a tocar, o cuando se equivoca,
Page 10

next note to play, or when you make
a mistake, you can learn the correct
melody at your own pace. If you want to
stop the music at any time, press the
STOP selector.
MELODY CANCEL
Press the MELODY CANCEL selector,
and you will hear the accompaniment
only. You can then play the melody,
following the Melody Lamps. If the
tempo is too fast, use the TEMPO control
® to slow it down so you can practice
comfortably. As with automatic playing,
you can select the instrument and rhythm
of your choice. If you want to stop the
music at any time, press the STOP
selector.
• When the FREE TEMPO or MELODY
CANCEL selector is pressed, the
melody will be played using both
Solo and Orchestra voices.
gefunden haben oder einen Fehler korrigiert
haben, sind Sie beim Erlernen der Melodie
stets Ihr eigener Schrittmacher. Durch
Drücken des Stop-Schalters (STOP) kann
der Spiel Vorgang zu jeder beliebigen Zeit
abgebrochen werden.
MELODY CANCEL
(Melodie-Lösch-Schalter)
Drücken Sie den Melodie-Lösch-Schalter
(MELODY CANCEL). Sie hören dann
nur noch die Begleitung und können
versuchen, die Melodie durch Drücken der
Taste, deren Melodie-Lampe gerade
leuchtet, zu spielen. Ist das Tempo zu hoch,
so schieben Sie den Temporegler (TEMPO)
@ nach links, um ein Ihren Fähigkeiten
angepaßtes Tempo einzustellen. Genau wie
beim automatischen Spielen können Sie die
Instrumentalstimmen und den Rhythmus
frei wählen. Durch Drücken des StopSchalters (STOP) kann der Spielvorgang
zu jeder beliebigen Zeit abgebrochen werden.
• Wenn die Tempoautomatik (FREE
TEMPO) oder der Melodie-Löschschalter
(MELODY CANCEL) gedrückt werden,
wird die Melodie sowohl mit der Soloals auch der Orchesterstimme erzeugt.
votre jeu, l’accompagnement vous suivra
fidèlement. Etant donné que le PC-1000
“vous attend” pendant que vous cher
chez la note suivante à jouer ou à l’oc
casion d’une erreur, vous avez toute
latitude pour apprendre la mélodie à
votre gré et selon votre humeur. Si vous
désirez arrêter la musique à un moment
donné, appuyez sur la touche d’Arrêt
(STOP).
MELODY CANCEL (Annulation de la
Mélodie)
Sur la pression de la touche Annulation
de la Mélodie (MELODY CANCEL), seul
l’accompagnement sera exécuté. Vous
pouvez alors jouer la mélodie, en suivant
les Lampes de Mélodie. Si le tempo est
trop rapide, utilisez le contrôle Tempo
(TEMPO) (io) pour le ralentir et vous
permettre ainsi de jouer plus aisément.
Pour ce qui est de l’exécution automati
que, vous pouvez choisir, à votre gré,
l’instrument et le rythme. Si vous désirez
suspendre, à un moment donné, l’exécu
tion du morceau, il vous suffit d’appuyer
sur la touche d’Arrêt (STOP).
• La poussée de la touche de Tempo
Libre (FREE TEMPO) ou d’Annulation
de la Mélodie (MELODY CANCEL)
commande l’exécution de la mélodie
à la fois en Solo et en Orchestre.
Ud. puede aprender la melodía correcta a su
propio ritmo de marcha. Si desea parar la
música en cualquier momento, oprima el
botón de Parada (STOP).
MELODY CANCEL
(Anulación de Melodía)
Oprima el botón de Anulación de Melodía
(MELODY CANCEL) y sólo escuchará el
acompañamiento. Entonces Ud. puede tocar
la melodía, siguiendo las Luces de Melodía.
Si el tempo es demasiado rápido, utilice el
control de Tempo (TEMPO) (¡o) para bajar
la velocidad y poder tocar más a gusto. En
cuanto al toque automático, Ud. puede selec
cionar el instrumento y el ritmo que guste.
Si desea parar la música en cualquier
momento, oprima el botón de Parada
(STOP).
Al presionar el botón Anulación de la
Melodía (MELODY CANCEL) o el
Tempo Libre (FREE TEMPO), la
melodía será ejecutada con ambas voces
de Solo y Orquesta.
3. To play the chords by yourself CHORD LESSON
By using the CHORD LESSON function,
you can practice playing chords. The
PC-1000 will always stop playing the
music and wait until you press the cor
rect chord keys. So you can take your
time looking for the correct keys.
After inserting a Playcard, press the
CHORD LESSON button. The Chord
Lamps will light up to indicate the posi
tions of the notes which make up the
first chord. When the correct keys for the
chord are pressed, the music will con
tinue until a chord change is necessary.
When this occurs, the music again
stops and waits for you to press the
correct keys as indicated by the Chord
Lamps. As the PC-1000 stops playing
when you cannot find a chord or you
3. Eigenes Spielen der Akkorde
CHORD LESSON (Akkordübung)
Mit Hilfe der Akkordübungsfunktion
(CHORD LESSON) können Sie Akkorde
üben. Das PC-1000 unterbricht die Wieder
gabe der Musik und wartet, bis Sie die
richtigen Akkordtasten gedrückt haben.
Sie haben daher genug Zeit, den richtigen
Akkord zu suchen. Nach dem Abspeichern
einer ,,Playcard“ drücken Sie den Akkord
übungsschalter (CHORD LESSON). Die
Akkordlampen leuchten nun auf und zeigen
Ihnen die Lage der Töne, aus denen der
Akkord besteht. Wenn Sie die richtigen
Tasten für den Akkord gedrückt haben,
spielt das Instrument weiter, bis ein anderer
Akkord für die Musik erforderlich ist.
Das PC-1000 unterbricht das Spiel wieder,
wenn es auf einen neuen Akkor stößt
und wartet, bis Sie die richtigen Tasten
3. Exécution d’un accord par le musicien
CHORD LESSON (Apprentissage
d’Accord)
L’exploitation de la fonction CHORD
LESSON permet de s’exercer à exécuter
des accords. Le PC-1000 arrêtera de
jouer et attendra le musicien jusqu’à ce
qu’il ait actionné les touches d’accord
qu’il convient. On aura donc tout son
temps pour rechercher l’accord appro
prié. Insérer une carte musicale et
appuyer sur la touche d’Apprenstissage
d’Accord (CHORD LESSON). Les voyants
d’Accord s’allumeront pour indiquer les
positions des notes qui composent
l’accord. Quand les touches appropriées
sont actionnées, la lecture reprendra
jusqu’à ce qu’un autre accord soit
sollicité dans la musique. A l’apparition
d’un nouvel accord, le PC-1000 s’arrête
3. Ejecución personal de los acordes
CHORD LESSON (Lección de Acorde)
Utilizando esta función puede practicar
tocando con los acordes. El PC-1000 dejará
de tocar la música para esperar a que Vd.
toque las teclas correctas del acorde. Así le
permite tiempo suficiente para encontrar el
acorde correcto.
Presione el botón CHORD LESSON después
de insertar la tarjeta; se iluminarán las
Lámparas de Acorde para indicarle las posi
ciones de las notas que forman el acorde.
Al presionar las teclas del acorde correcto,
la música continuará hasta que sea necesario
un cambio de acorde. Cuando ocurre esto, se
detiene de nuevo para esperarle a que
presione las teclas correspondientes al nuevo
acorde, indicadas por las lámparas.
Dado que el PC-1000 deja de tocar siempre
que no encuentre el siguiente acorde, o se
Page 11

make a mistake, you can learn correct
chord constructions at your own pace.
To stop the music at any time, press
the STOP selector.
für diesen Akkord, die mit den Akkord-
Lampen angezeigt werden, gedrückt haben.
Da das PC-1000 wartet, bis Sie den als
nächstes zu spielenden Akkord gefunden
oder einen Fehler korrigiert haben, sind
Sie beim Erlernen der Akkordfolge stets
Ihr eigener Schrittmacher. Durch Drücken
des Stop-Schalters (STOP) kann der Spiel
vorgang zu jeder Zeit abgebrochen werden,
werden.
de jouer jusqu’à ce que le musicien
appuie sur les touches appropriées qui
composent l’accord et qui sont indi
quées par les voyants d’Accord. Comme
le PC-KXXD s’arrêtera chaque fois qu’on
ne pourra pas trouver l’accord suivant
ou qu’on commettra une erreur, on aura
tout le loisir d’apprendre l’accord
convenable à son propre rythme. Pour
interrompre la musique à n’importe quel
moment, appuyer sur la touche d’Arrêt
(STOP).
equivoque, puede aprender los acordes
correctos a su propio paso. Presione el
botón STOP cuando desee interrumpir la
0CHORD NAME DISPLAY
The CHORD NAME DISPLAY indicates
the name of the chord you play to help
you learn the chord names.
• The name of a chord whose root is
one of the black keys of the key
board is displayed by D^, E'’, F*, A^
and B'’ (in other words, C‘, D", G‘,
and A* are not used).
• Even if one or more keys besides the
correct keys indicated by the Chord
Lamps are pressed, the music will
continue as long as the correct keys
are among those pressed.
• In some cases the chords indicated
on the Playcard’s music score may
not be the same as those indicated
by the Chord Lamps and CHORD
NAME DISPLAY since the chord pro
gression may have been simplified
in order to make the score easy to
read. Please follow the Chord Lamps
when you use the CHORD LESSON
mode.
O CHORD NAME DISPLAY (Anzeige der
Akkordbezeichnung)
Die Anzeige für die Akkordbezeichnung
(CHORD NAME DISPLAY) zeigt Ihnen
beim Spielen die Bezeichnung des betref
fenden Akkordes an und Sie können
sie leichter lernen.
• Die Bezeichnung eines Akkordes, deren
Grundton auf einer der schwarzen
Tasten der Tastatur liegt, werden als
D\ E^ F*, A^ und B^ angezeigt (mit
anderen Worten die Bezeichnungen C*,
D", G\ G', und A*, werden nicht
verwendet).
• Wenn Sie neben den richtigen, durch die
Akkord-Lampen bezeichneten Tasten
auch andere Tasten drücken, setzt die
Orgel das Spiel fort, wenn Sie nur
einmal die richtigen Tasten gedrückt
haben.
• In einigen Fällen stimmen die Akkord
bezeichnungen der Playcard-Partitur
nicht mit den von den Akkordlampen
und der Anzeige für Akkordbezeich
nungen (CHORD NAME DISPLAY)
angezeigten Akkorden überein, da die
Akkordfolge möglicherweise vereinfacht
wurde, um die Partitur leichter lesen zu
können. Folgen Sie bei der Verwendung
der Akkordlernfunktion den leuchtenden
Akkordlampen.
OCHORD NAME DISPLAY (Affichage du Nom de l’Accord)
La fonction CHORD NAME DISPLAY
indique le nom de l’accord que l’on joue
pour aider le musicien à apprendre
les noms des accords.
• Le nom d’un accord dont la racine
correspond à l’une des touches
noires du clavier est affiché par D\
E^, F", A^ et (C*, D", G^ G», et A*
ne sont donc pas utilisées).
• Même si une ou plusieurs touches
sont enfoncées en plus des touches
appropriées indiquées par les voyants
d’Accord, la lecture se déclenchera
tant que les touches appropriées
seront enfoncées.
• Dans certains cas, les accords indi
qués sur la partition musicale de la
“Playcard” peuvent différer de ceux
indiqués par les Lampes d’Accord
et l’AFFICHAGE DU NOM DE L’AC
CORD (“CHORD NAME DISPLAY”),
étant donné que la progression des
accords a été simplifiée afin de
rendre la lecture de la partition plus
aisée. Il convient donc de suivre les
Lampes d’Accord lors de l’utilisation
du mode APPRENTISSAGE D’AC
CORD (“CHORD LESSON”).
OCHORD ÑAME DISPLAY
(Indicación del Nombre dei Acorde)
La indicación CHORD ÑAME le muestra la
denominación del acorde que Ud. está
tocando para que aprenda sus nombres.
• La denominación de un acorde cuya raíz
es una de las teclas negras, queda
mostrado por D^ (re‘), E ^ (mi^), F" (fa‘),
A*^ (la'') y B'' (si^) (es decir, no se utilizan
do*, re", soL, sol', y la').
• Incluso aunque se toquen una o más
teclas además de las correctas indicadas
por las lámparas, la música continuará
siempre que se toquen las teclas correctas.
• En algunos casos puede que los acordes
indicados en las partituras de las Playcíu'd no sean los mismos que los indica
dos por las Luces de Acordes y la
INDICACION DEL NOMBRE DEL
ACORELE, ya que la progresión de
acordes puede naberse simplificado
para facilitar la lectura de la partitura.
Cuando utilice la modalidad de LEC
CION DE ACORDES siga las Luces de
Acordes.
CHORD CANCEL
After inserting a Playcard, press the
CHORD CANCEL selector. The chord
accompaniment will be excluded from
the Playcard music performance, and
only the melody, obbligato, rhythm and
bass will be reproduced. You can then
play the chords, following the Chord
Lamps. When the correct keys are
pressed, the CHORD NAME DISPLAY
vyill indicate the name of the chord
played. Unlike with the CHORD LESSON
mode, the music will continue to be
CHORD CANCEL (Akkord-Löschung)
Drücken Sie nach dem Einlesen einer
,,Playcard“ den Akkord-Lösch-Schalter
(CHORD CANCEL). Die Akkord
begleitung wird dann aus der Wiedergabe
der ,, Play card “-Musik ausgeblendet. Nur
die Melodie, die obligaten Stimmen,
Rhythmus- und Baßbegleitung werden
wiedergegeben. Sie können nun die Akkord
begleitung selber spielen, indem Sie der
Abfolge der Akkord-Lampen folgen.
Wenn Sie die richtigen Tasten gedrückt
haben, erscheint die Bezeichnung für den
CHORD CANCEL (Annulation de l’Accord)
Insérer une “Playcard” et appuyer sur
la touche CHORD CANCEL L’accord
d’accompagnement sera exclu de la
performance musicale de la carte et
seuls la mélodie, la partie obligée,
l’accord rythmique et la basse seront
reproduits. Il sera possible alors de
jouer les accords en suivant les indica
tions de l’ordre de séquence des voyants
d’Accord. Si les touches appropriées
sont actionnées, l’affichage CHORD
CHORD CANCEL (Anulación del Acorde)
Presione el botón CHORD CANCEL tras
insertar una tarjeta. Se excluirá el acompaña
miento de acordes de la música Playcard,
tocándose solamente la melodía, obligado,
ritmo y bajo. Puede tocar los acordes
siguiendo después la secuencia indicada por
las lámparas correspondientes. Al presionar
las teclas correctas, el indicador CHORD
NAME mostrará la denominación del
acorde tocado. A diferencia de la modalidad
CHORD LESSON, la música continúa
siendo tocada. Por lo tanto, regule el tempo
Page 12

played. Therefore, adjust the TEMPO
control so that you can practice
comfortably.
Akkord auf der Anzeige (CHORD NAME
DISPLAY).
Anders als bei der Betriebsart für Akkord
übung (CHORD LESSON) wird die Musik
hier nicht unterbrochen. Stellen Sie daher
den Tempo-Regler (TEMPO) so ein, daß
Sie dem Ablauf bequem folgen können.
NAME DISPLAY indiquera le nom de
l’accord joué.
Contrairement au mode d’ApprentIssage
d’Accord (CHORD LESSON) la musique
continuera lorsque l’instrument est
réglé sur ce mode. Cependant, il con
viendra d’ajuster le réglage de Tempo
(TEMPO) de manière à faciliter la pratique.
(TEMPO) para practicar a su gusto.
4. Learning through repetition PHRASE REPEAT
The best way to learn how to play Is to
practice repeatediy, and the PC-1000 has
a very convenient feature for this purpose.
During the Piaycard performance, a
phrase, or an entire music selection can
be repeatedly produced using the
PHRASE REPEAT function.
1. On the score printed on each Play-
card, every phrase is indicated by
a number. Choose the phrase or
phrases you wish to repeat.
2. Starting from the left of the keyboard,
the white keys are numbered 1 to 20.
After inserting a Piaycard, press the
keys whose numbers correspond to
the first and last phrase numbers of
the passage you wish to have repeat
ed, while depressing the PHRASE
REPEAT button. For example, if you
wish to repeat phrase 3 through
phrase 5, press keys 3 and 5 while
depressing the PHRASE REPEAT
button. When you wish to have the
entire piece of music repeated, press
the rightmost white key, which is
indicated by an asterisk (*), while
depressing the PHRASE REPEAT
button (when this key is pressed,
the introduction of the music will not
be repeated).
3. Press either the FREE TEMPO,
AUTO PLAY, SING ALONG, MELODY
CANCEL, CHORD LESSON, or
CHORD CANCEL selector. The
music will start.
To cancel PHRASE REPEAT, first press
the STOP selector, then press the
PHRASE REPEAT selector once again.
The PHRASE REPEAT lamp will go out
and PHRASE REPEAT will be cancelled.
4. Lernen durch Wiederholen
PHRASE REPEAT (Phrasenwiederholung)
Der beste Weg, um spielen zu lernen, ist
ständige Wiederholung. Das РС-КХЮ hat
zu diesem Zweck eine sehr nützliche
Einrichtung. Während der „Piaycard“Wiedergabe können Sie mit Hilfe der
Phrase-Wiederholungsfunktion (PHRASE
REPEAT) eine Phrase oder den gesamten
Musikabschnitt mehrfach wiedergeben.
1. Auf der Partitur, die sich auf jeder
,,Piaycard“ befindet, ist jede Phrase
mit einer Zahl gekennzeichnet. Wählen
Sie bitte die Phrase oder Phrasen zur
Wiederholung aus.
2. Direk unter den Tasten des РС-КХЮ
sind Tasten mit den Zahlen 1-20 ange
ordnet. Nach dem Einlesen einer ,,Piay
card“ drücken Sie die erste und die letzte
Zahl des Teils, den Sie wiederholen möch
ten, und drücken Sie dabei die Phrasen-
Wiederholungschalter (PHRASE RE
PEAT). Wenn Sie z.B. den Teil zwischen
Phrase 3 bis Phrase 5 wiederholen möch
ten, drücken Sie zunächst den Phrasen-
Wiederholungsschalter (PHRASE RE
PEAT) und dann die Tasten 3 und 5. Zur
Wiederholung des gesamten Stücks
drücken Sie zunächst den PhrasenWiederholungsschalter (PHRASE
REPEAT) und dann die Taste mit dem
(*) Zeichen ganz rechts. (Wenn Sie die
(*) Taste drücken, wird die Einleitung
für die Musik nicht wiederholt).
3. Drücken Sie einen der Spiel-Schalter
(FREE TEMPO, AUTO PLAY, SING
ALONG, MELODY CANCEL, CHORD
LESSON und CHORD CANCEL) den
Sie gewält haben. Die Orgel beginnt
dann zu spielen.
Um die Phrase-Wiederholungsfunktion
(PHRASE REPEAT) aufzuheben, drücken
Sie zunächst den Stop-Schalters (STOP), um
den Spielablauf zu unterbrechen und dann
den Phrasen-Wiederholungsschalter
(PHRASE REPEAT) noch einmal. Die
Lampe für diese Funktion erlischt, und
die Phrasen-Wiederholungsfunktion
(PHRASE REPEAT) wird aufgehoben.
4. Initiation musicale par la répétition PHRASE REPEAT (Répétition de Phrase)
La meilleure façon d’apprendre à jouer,
c’est de répéter. Et le PC-1000 est équipé
d’une fonction idéale pour ce type
d’apprentissage.
Au cours d’une performance sur “Piay
card”, Il est possible de répéter à
plusieurs reprises une phrase, un groupe
de phrases ou encore une partition
musicale complète au moyen de la
fonction PHRASE REPEAT.
1. Sur le chiffrage de chaque carte
musicale, chaque phrase est indiquée
par un nombre. Il sera donc facile
de choisir la ou les phrases dont on
souhaite la répétition.
2. Les touches de 1 à 20 sont situées
juste au-dessous du clavier du
PC-1000.
Insérer la carte musicale de son
choix et appuyer sur le premier et
le dernier chiffre de la sélection
que l’on désire répéter tout en enfon
çant la touche PHRASE REPEAT. Si
l’on souhaite, par exemple, répéter
de la phrase 3 à la phrase 5, appuyer
sur la touche 3 et sur la touche 5
tout en enfonçant la touche REPEAT.
Si l’on veut répéter la partition com
plète, appuyer sur la touche la plus
à droite Identifiable par sa petite
étoile (*) tout en enfonçant la touche
PHRASE REPEAT. (Quand la touche
(*) est enfoncée, l’introduction de la
musique ne sera pas répétée.)
3. Appuyer sur celle des touches de
lecture FREE TEMPO, AUTO PLAY,
SING ALONG, MELODY CANCEL,
CHORD LESSON et CHORD CANCEL
qui a été sélectionnée.
4. Aprendiendo por repetición
PHRASE REPEAT (Repetición de Frases)
La mejor manera de aprender a tocar es la
práctica repetida, y para ello, el PC-IOOO
posee una función muy conveniente.
Durante la ejecución de una tarjeta musical,
pueden repetirse una o varias frases, o todo
un tema musical, utilizando la función
PHRASE REPEAT (repetición de frases
musicales).
1. Cada frase queda indicada por un
número en la partitura de las tarjetas
musicales. Elija la frase o frases que
desee repetir.
2. Comenzando por la izquierda del teclado,
las teclas blancas están numeradas del 1
al 20.
Presione el primero y el último número
de la parte que desea repetir, después de
insertar la tarjeta, presionando el botón
PHRASE REPEAT. Por ejemplo, si
desea repetir de la frase 3 la 5, presione
las teclas 3 y 5 mientras presiona el botón
PHRASE repeat. Cuando desee
repetir todo el tema, presione la tecla del
extremo derecho (marcada’^) mientras
presiona el botón PHRASE REPEAT
(con la tecla (*) presionada no se repite la
introducción).
3. Presione cualquiera de los botones FREE
TEMPO, AUTO PLAY, SING ALONG,
MELODY CANCEL, CHORD LESSON,
y CHORD CANCEL; se iniciará
la reproducción.
Para cancelar la repetición de frases, pre
sione primero el botón STOP para inter
rumpir la ejecución, y después otra vez el
PHRASE REPEAT. Se apagará la lámpara
PHRASE REPEAT, cancelándose dicha
función.
Pour annuler la fonction de Répétition
de Phrase (PHRASE REPEAT), appuyer
d’abord sur la touche d’Arrêt (STOP)
pour interrompre la lecture, puis à
nouveau sur la touche PHRASE REPEAT.
Le voyant PHRASE REPEAT s’éteindra
et la fonction PHRASE REPEAT sera
annulée.
10
Page 13

5. INSTRUMENTAL SEQUENCER
The melody and obbligato voices are
preset on the Piaycard. However, you
can change them, phrase by phrase,
into the voices of your choice by using
the INSTRUMENTAL SEQUENCER.
1. After inserting a Piaycard, hoid the
iNSTRUMENTAL SEQUENCER seiec-
tor down while pressing the SOLO
voice seiector (for meiody) and
ORCHESTRA voice selector (for
obbligato).
2. While depressing the INSTRUMENTAL
SEQUENCER selector, press the key
whose number corresponds with the
number of the phrase where you
wish to change the tone. The tone of
the subsequent phrase will be altered.
5. INSTRUMENTAL SEQUENCER
(Instrumentenabfolge-Schalter)
Mit Hilfe des Instrumentenabfolge-Schalters
(INSTRUMENTAL SEQUENCER) können
Sie die Klangfarbe von Melodie oder
obligaten Stimmen, die auf der ,,Piaycard”
voreingestellt wurden, Phrase für Phrase in
die Klangfarbe Ihrer Wahl ändern.
1. Nach dem Abspeichern einer ,,Piaycard“
drücken Sie den InstrumentenabfolgeSchalter (INSTRUMENTAL SEQUEN
CER) und dann nach Belieben die
Wahlschalter für Orchesterstimme
(ORCHESTRA) zur Einstellung der
Klangfarbe für die obligaten Stimmen
und für die Solostimme (SOLO)- zur Ein
stellung der Klangfarbe für die Melodie.
2. Halten Sie den InstrumentenabfolgeSchalter (INSTRUMENTAL SEQUEN
CER) gedrückt, und drücken Sie die
Taste mit der Nummer für die Phrase, in
der Sie die Klangfarbe ändern möchten.
Auch die Klangfarbe der nachfolgenden
Phrasen wird damit verändert.
5. INSTRUMENTAL SEQUENCER (Séquenceur Instrumental)
Les tonalités de la mélodie ou de la
partie obligée qui ont été préréglées sur
une “Piaycard” pourront être modi
fiées phrase par phrase selon ses préfé
rences au moyen de la fonction INSTRU
MENTAL SEQUENCER.
1. Insérer une carte musicale, appuyer
sur une touche de sélection ou sur
les touches de son choix pour faire
appel aux voix d’orchestre (ORCHES
TRA) (contrôlant la tonalité en vue
de la partie obligée) ainsi qu’à la voix
Solo (SOLO) (contrôlant la tonalité
en vue de la mélodie) tout en appu
yant sur la touche INSTRUMENTAL
SEQUENCER.
2. Appuyer sur la touche correspondant
au numéro de la phrase à partir de
laquelle on souhaite changer la
tonalité, et ce, tout en enfonçant la
touche INSTRUMENTAL SEQUENCER.
La tonalité de phrase suivante sera
altérée.
5. INSTRUMENTAL SEQUENCER
(Secuencíador Instrumental)
Las voces de melodía y obligado están pre
seleccionadas en la tarjeta, y utilizando esta
función, puede cambiarlas frase por frase,
a las de su elección.
1. Tras insertar una tarjeta, y mientras
presiona el botón INSTRUMENTAL
SEQUENCER, presione un selector
o selectores a su elección para el sonido
de orquesta (ORCHESTRA) (regulando
el tono del obligado), y para el sonido de
SOLO (regulando el tono de la melodía).
2. Mientras presiona el botón del secuenciador, presione la tecla con el número
de frase en que desee cambiar el tono.
Se cambiará el tono de frase siguiente.
I°1 r=l
I°1 [°1
3. To change voices in several phrases,
repeat steps 1 and 2.
Be sure not to release the INSTRU
MENTAL SEQUENCER selector,
othen/vise all the voices which have
been set will be cancelled.
4. After you have finished your selection,
press either the AUTO PLAY or SING
ALONG selector.
When you wish to return to the voices
which were originally preset on the Piay-
3. Wenn Sie die Klangfarbe in verschiedenen
Phrasen ändern wollen, wiederholen Sie
die Schritte 1) und 2). Hier bei müssen Sie
unbedingt Ihren Finger auf dem Instru
mentenabfolge-Schalter (INSTRU
MENTAL SEQUENCER) lassen. Wenn
Sie den Schalter loslassen und ihn dann
noch einmal drücken, werden alle
vorherigen Klangfarbeneinstellungen
gelöscht.
4. Wenn Sie diese Einstellung beendet
haben, drücken Sie eine der gewünschten
Schalter AUTO PLAY oder SING
ALONG. Die Orgel beginnt dann zu
spielen.
Wenn Sie zur ursprünglichen, d.h. in der
Karte abgespeicherten Klangfarbe zurück-
3. Pour modifier les tonalités de diffé
rentes phrases, renouveler les étapes
1) et 2). A ce moment, attention à
ne pas quitter son doigt de la touche
INSTRUMENTAL SEQUENCER! Si le
doigt quitte la touche et l’enfonce
à nouveau, toutes les tonalités qui
ont été réglées jusqu’à présent
seront effacées.
4. A l’achèvement du réglage, appuyer
sur l’une des touches, AUTO PLAY ou
SING ALONG qui a été sélectionnée.
La lecture commencera.
Si l’on souhaite rétablir les tonalités
préréglées à l’origine sur la carte.
11
3. Repita los pasos 1 y 2 anteriores para
cambiar los tonos en varias frases.
Asegúrese entonces de no liberar el botón
del secuenciador instrumental (INSTRU
MENTAL SEQUENCER), de lo
contrario, y si vuelve a presionarlo, se
cancelarían todos los tonos establecidos.
4. Una vez concluido el ajuste, presione
uno de los botones AUTO PLAY o SING
ALONG.
Cuando desee volver a los tonos originales
establecidos en la tarjeta, vuelva a presionar
Page 14

card press the INSTRUMENTAL SE
QUENCER selector again. The INSTRU
MENTAL SEQUENCER lamp will go out
and the original voices will be restored.
6. PRESET BALANCE CANCEL
The rhythm tempo and the volume
balance between the melody, obbligato
and accompaniment for the Playcard
performance have been preset on the
Playcard; the positions of the VOLUME
and TEMPO controls have no influence
on the performance. By using the PRESET
BALANCE CANCEL selector, however,
you can change the volume balance and
tempo to the actual positions of the
controls, or return to the original preset
setting.
1. After inserting a Playcard, press the
PRESET BALANCE CANCEL selector.
The PRESET BALANCE CANCEL
lamp will light up, and the volume
balance and tempo can be adjusted
with the controls on the PC-1 OCX).
Adjust the ORCHESTRA VOLUME
control (for obbligato), SOLO VOLUME
control (for melody) and RHYTHM
TEMPO control as you wish.
2. Press one of the “playback” selectors.
The Playcard music will be produced
with the volume balance and rhythm
tempo in accordance with the posi
tions of the PC-1(X)0’s controls.
3. When the PRESET BALANCE CAN
CEL selector is pressed again, the
PRESET BALANCE CANCEL lamp
will go off, and the music will be
played with originally preset volume
balance and tempo.
• If a VOLUME control or the TEMPO
control is moved during the Playcard
performance, the PRESET BALANCE
CANCEL lamp will light up and the
balance will be shifted from the
preset setting to the setting on the
keyboard only for the control that is
moved.
kehren wollen, drücken Sie den Instrumen
tenabfolge-Schalter (INSTRUMENTAL
SEQUENCER) erneut. Die Instrumptenabfolge-Lampe erlischt dann, und die
ursprüngliche Klangfarbe wird wieder
gespeichert.
6. PRESET BALANCE CANCEL
(Aufheben der Balancevoreinstellung)
Die Balance von Lautstärke der Melodie,
obligaten Stimmen, sowie Rhythmus und
Tempo der Musik sind in der Karte für
,.Playcard‘ ‘-Darbietungen vorprogram
miert. Dabei ist es egal, auf welche Positionen
Sie die Lautstärkeregler (VOLUME) oder den
Temporegler (TEMPO) des PC-ICKX) setzen.
Mit Hilfe des Schalters für die Aufhebung
der Balancevoreinstellung (PRESET
BALANCE CANCEL) ist es jedoch
möglich, Lautstärkebalance- und TempoEinstellung auf die tatsächlichen Positionen
der Regler umzuschalten oder wieder zur
Voreinstellung zurückzukehren.
1. Nach dem Einschieben einer ,,Playcard“
drücken Sie den Schalter für Aufheben
der Balancevoreinstellung (PRESET
BALANCE CANCEL).
Die entstprechende Lampe leuchtet auf,
und Lautstärkebalance und Tempo
können mit den Reglern auf der PC-1000Orgel geregelt werden. Stellen Sie die
Regler für Lautstärke (VOLUME) und
Tempo (TEMPO) für Orchester
(ORCHESTRA), die die obligaten
Stimmen steuern, Solo (SOLO) für die
Klangfarbe der Melodie und Rhythmus
(RHYTHM) nach Ihrem Geschmack ein.
2. Drücken Sie einen der von Ihnen
gewählten Spielschalter und die Musik
auf der ,,Playcard“ wird mit der
Balanceeinstellung wiedergegeben, die auf
den Reglern der Orgel eingestellt ist.
3. Wenn der Schalter für das Aufheben der
Balancevoreinstellung (PRESET
BALANCE CANCEL) erneut gedrückt
wird, erlischt die entsprechende Lampe
und die Musik wird wieder mit der
ursprünglichen Balance gespielt, wie
sie von den Daten auf der Karte
vorgegeben war.
• Wenn Lautstärke-(VOLUME) oder
Temporegler (TEMPO) während einer
Darbietung mit ,,Playcard“ verstellt
wird, leuchtet die Lampe für das
Aufheben der Balancevoreinstellung
(PRESET BALANCE CANCEL) auf und
die Balance wird von der Voreinstellung
auf die Einstellung der Orgel umgeschaltet.
Dies gilt jedoch nur für den Teil, der von
dem betreffenden Regler gesteuert wird.
appuyer à nouveau sur la touche
INSTRUMENTAL SEQUENCER.
Le voyant INSTRUMENTAL SEQUENCER
s’éteindra et les tonalités d’origine
seront rétablies.
6. PRESET BALANCE CANCEL
(Annulation de la Balance Préréglée)
La balance du volume de la mélodie,
celle de la partie obligée, du rythme et
du tempo destinés à la carte musicale
ont fait l’objet d’un préréglage qui sera
respecté indépendamment des positions
sur lesquelles seront ajustés les réglages
de volume (VOLUME) ou le réglage de
Tempo (TEMPO) du PC-10CX). Au moyen
de la touche PRESET BALANCE
CANCEL, il sera cependant possible de
modifier la balance de volume et le
réglage de tempo sur les positions des
réglages et de revenir par la suite sur
les préréglages d’origine.
1. Insérer une carte musicale et appuyer
sur la touche PRESET BALANCE
CANCEL.
Le voyant PRESET BALANCE
CANCEL s’allumera et la balance du
volume aussi bien que le tempo pour
ront être commandés au moyen des
réglages du PC-1(X)0. Ajuster les
réglages VOLUME et TEMPO pour
les tonalités d’Orchestre (ORCHES
TRA) (contrôlant les tonalités de partie
obligée), les tonalités Solo (SOLO)
(contrôlant les tonalités de la mélodie)
et le Rythme (RHYTHM) pour accorder
la balance selon ses préférences.
2. Appuyer parmi les touches de lecture
que l’on a sélectionnées. La musique
en provenance de la carte musicale
sera reproduite avec la balance
ajustée au moyen des réglages de
l’orgue.
3. Quand on appuie à nouveau sur la
touche PRESET BALANCE CANCEL,
le voyant PRESET BALANCE CANCEL
s’éteint et la musique sera exécutée
au niveau de balance préréglé à
l’origine sur la carte.
• Si le réglage VOLUME ou TEMPO
est déplacé au cours d’une perform
ance sur carte musicale, le voyant
PRESET BALANCE CANCEL s’al
lumera et la balance préréglée sera
remplacée par la balance ajustée
sur l’orgue au moyen du réglage.
el botón INSTRUMENTAL SEQUENCER.
Se apagará la lámpara de dicho botón y se
restaurarán los tonos originales.
6. PRESET BALANCE CANCEL
(Anulación del Balance Preseleccíonado)
El equilibrio del volumen de melodía,
obligado y el acompañamiento para la
ejecución de tarjetas ha sido determinado
previamente en la tarjeta, las posiciones de
los controles de Volumen y Tempo no
influyen en la ejecución. Utilizando el botón
PRESET BALANCE CANCEL puede, sin
embargo, cambiar el equilibrio del volumen
y el tempo con los controles, o volver al
ajuste original.
1. Una vez insertada la tarjeta, presione
el botón PRESET BALANCE CANCEL
(cancelación del balance preseleccionado).
Se iluminará la lámpara correspondiente
y se podrá regular el balance del volumen
y el tempo con los controles del PC-1000.
Ajuste los controles de volumen
(VOLUME) y tempo (TEMPO) para los
tonos de orquesta (para obligado), de
solo (para melodía), y del ritmo para
adaptarlos al equilibrio preferido.
2. Presione uno de los botones seleccionados
por Vd. Se tocará la música de la tarjeta
con el balance determinado por las
posiciones de las palancas del PC-1000.
3. Al presionar de nuevo el botón PRESET
BALANCE CANCEL se apaga la lámpara,
tocándose la música con el balance
original determinado en la tarjeta.
• En caso de mover el control de volumen
o del tempo durante la ejecución de la
tarjeta, se encenderá la lámpara PRESET
BALANCE CANCEL, cambiándose
el balance determinado entonces al
ajuste del teclado, solo con el control
que se mueve.
12
Page 15

7. Erasing the PC-1000’s Playcard
memory
The memory will be erased whenever you
switch off the PC-1000. Also, if you
change from one Playcard to another
the PC-1000 automatically wipes the
memory clean and records the fresh
data.
7. Löschen des „Playcard“-Speichers des
PC-1000
Der Speicher wird beim Ausschalten des
PC-1000 gelöscht. Auch beim Einlesen
neuer ,,Playcard“-Daten wird der Speicher
vorher gelöscht.
7. Effacement des données stockées
sur la “Playcard” du PC-1000
Les données sont effacées chaque fois
que vous mettez le PC-1000 en position
d’arrêt. Par ailleurs, lors de chaque
changement de “Playcard”, le PC-1000
procède automatiquement à l’efface
ment des données portées sur la “Play
card” précédente et stocke les nouvel
les données.
7. Borrado de la memoria de la tarjeta
Playcard del PC-1000
La memoria se borrará siempre que des
conecte el PC-1000. Además, si cambia de
una tarjeta Playcard a otra, el PC-1000
borra automáticamente la memoria y graba
la nueva información.
How to use all the
other features
Various voices and rhythms can be freely
selected by simply pressing selectors.
With the AUTO BASS CHORD function,
musical accompaniment can be per
formed with just a single finger. Now,
play the PC-1000 by yourself without
using a Playcard.
First, switch on by moving the POWER
switch ■ . Then slide the MASTER
VOLUME ■' to the desired position.
Orchestra Section
Verwendung der
anderen Funktionen
Mit einem einfachen Schalterdruck können
Sie verschiedene Klangfarben und Rhythmen
frei wählen. Mit Hilfe der Baß-AkkordAutomatik (AUTO BASS CHORD) können
Sie mit einem Finger die Begleitung Ihrer
Musik spielen. Spielen Sie nun das PC-1000
vollständig selbst, ohne ,,Playcard“ zu
verwenden.
Schalten Sie zunächst ein, indem Sie den
l-.in-Aus-Schalter (I’OWrk) ' schieben,
und stellen Sie dann dett Hauptlautstär
keregler (MAS lER VOLL ME) . in die
gewünschte Position.
Orchester-Teil
Exploitation
des autres
fonctions
Divers tonalités et rythmes peuvent être
librement sollicités par simple poussée
des touches correspondantes.
Au moyen de la fonction AUTO BASS
CHORD, des airs d’accompagnement
pourront être exécutés avec un seul
doigt. Il convient dès à présent que le
musicien joue lui-même sur le PC-1000
sans l’aide d’une “Playcard”.
Tout d'abord, mettez l'instrument en
marche en déplaçant l'Interrupteur d'ali
mentation (POWER) ■ ■■. Déplacez ensuite
le contrôle Volume Principal (MASTER
VOLUME) <■ sur la position désirée.
Section orchestraie
ORCHESTRA
-------
Utilización de las
demás funciones
Simplemente presionando botones pueden
elegirse a voluntad, varias voces y ritmos.
Con la función AUTO BASS CHORD
(Acorde y Bajo Automático), puede ejecutar
los acompañamientos con un solo dedo.
Toque el PC-1000 Ud. solo, sin utilizar
tarjetas musicales.
Primero, conecte deslizando cl Interruptor
de Potencia (POWER) ' .1 negó deslice el
\'olumen Principal (.M,\STE.R VOI UML)
' a la posieióit deseada.
Sección de orquesta
1. Choose the voice you want
Select the desired voice by pressing one
of the ORCHESTRA voice selectors®.
Only one selector may be used at a time
1. Gewünschte Instrumentalstimme wählen
Drücken Sie zur Wahl der Instrumental
stimme das gewünschte OrchesterstimmenRegister (ORCHESTRA) ®. Es kann
1. Sélection de la voix souhaitée
Choisissez la voix désirée en appuyant
sur l’un des sélecteurs de voix
d’Orchestre (ORCHESTRA)®. Il n’est
13
1. Escoja la voz que desee
Seleccione la voz deseada presionando uno
de los selectores de voces de Orquesta
(ORCHESTRA) @. Sólo puede utilizarse
Page 16

and the other selectors will release
automatically as each new selection is
made. When the red selector is locked
down, the voices printed closest to the
keys can be selected. When this is
released, or in the “up” position, the
remaining voices can be selected.
immer nur ein Register zur gleichen Zeit
gedrückt werden; beim Drücken eines neuen
Registers rasten die vorhergehenden Register
automatisch aus. Ist der rot markierte Schalter
gedrückt, so können die vorderen Instru
mentalstimmen gewählt werden. Ist er
ausgerastet, so können die hinteren Stimmen
gewählt werden.
possible d’utiliser qu’un seul sélecteur
à la fois; à noter qu’à chaque nouveau
choix, les autres sélecteurs reviendront
à leur position initiale. Lorsque le
sélecteur rouge est verrouillé vers
le bas, les voix imprimées le plus près
des touches peuvent être choisies.
Quand il se trouve relâché, ou sur la
position supérieure, les voix restantes
peuvent être choisies.
un selector al mismo tiempo y los demás
selectores se soltarán automáticamente
cuando se haga una nueva selección.
Cuando el selector rojo esté bajado, las voces
impresas más cercanas a las teclas pueden
seleccionarse. Cuando está suelto, o en la
posición “superior”, pueden seleccionarse
las demás voces.
2. Adjust the volume
Adjust the level by sliding the ORCHES
TRA VOLUME control i® towards MAX.
• When two or more voice selectors
are pressed simultaneously, the righthand selector always has priority.
• If no selector is depressed, the JAZZ
ORGAN voice will be automatically
selected.
Notes
1. Be sure to press the NORMAL selector
in the AUTO BASS CHORD section.
When the SINGLE FINGER CHORD or
FINGERED CHORD selector is depressed,
the keys in the Auto Bass Chord key
section ® cannot be used for playing
melodies.
2. No ORCHESTRA voice can be heard if
the ORCHESTRA ON/OFF selector @ is
in the “up" position and the SOLO ON/
OFF selector @ is depressed.
2. Lautstärke einstellen
Beim PC-1000 ist zur Einstellung der
Lautstärke der Orchester-Lautstärkeregler
(ORCHESTRA VOLUME) @ in Richtung
MAX zu schieben.
• Werden zwei oder mehr Register gedrückt,
so besitzt das weiter rechts liegende
Register Vorrang.
• Wird kein Register gedrückt, so schaltet
das Instrument automatisch auf Jazz-
Orgel.
Hinweise
1. Achten Sie darauf, den Normal-Schalter
(NORMAL) der Baß-Akkord-Automatik
immer zu drücken. Ist der EinfingerakkordSchalter (SINGLE FINGER CHORD) oder
der Fingerakkord-Schaiter (FINGERED
CHORD) gedrückt, so können die Tasten im
Baß-Akkord-Automatik-Bereich @ nicht zum
Spielen einer Melodie verwendet werden.
2. Beim PC-IOOO kann keine Orchesterstimme
gehört werden, wenn der Orchester-Ein/
Aus-Schalter (ORCHESTRA ON/OFF) ®
ausgerastet und der Solo-Ein/Aus-Schalter
(SOLO ON/OFF) @ eingeschaltet ist.
2. Réglage du volume
Réglez aussi le niveau en déplaçant le
contrôle Volume d’Orchestre (ORCHES
TRA VOLUME) ® vers la position MAX.
• Si l’on appuie simultanément sur 2
ou plusieurs sélecteurs de voix, le
sélecteur de droite a toujours la
priorité.
• Si l’on n’appuie sur aucun sélecteur,
c’est la voix Orgue de Jazz (JAZZ
ORGAN) qui est automatiquement
choisie.
Remarques
1. Veiller à appuyer sur le sélecteur
NORMAL de la Section Basses/Accords
Automatiques (AUTO BASS CHORD).
Lorsque le sélecteur Accord à Un Seul
Doigt (SINGLE FINGER CHORD) ou
Accord à Plusieurs Doigts (FINGERED
CHORD) est en position abaissée, les
touches de la section touches Basses/
Accords Automatiques (AUTO BASS
CHORD) ® ne peuvent pas être utilisées
pour l’exécution de mélodies.
2. Aucune voix d’Orchestre ne peut être
entendue si le sélecteur Orchestre
Marche/Arrêt (ORCHESTRA ON/OFF) ®
se trouve en position supérieure et le
sélecteur Solo Marche/Arrêt (SOLO ON/
OFF) @ en position appuyée.
2. Ajuste el volumen
Ajuste el nivel deslizando el control de
Volumen de Orquesta (ORCHESTRA
VOLUME) ® hacia MAX.
• Cuando se pulsen simultáneamente dos o
más selectores de voces, el selector de
la derecha siempre tendrá prioridad.
• Si no se pulsa ningún selector, se selec
cionará automáticamente la voz de
Organo de Jazz (JAZZ ORGAN).
Notas
1. Asegúrese de pulsar el selector NORMAL de
la sección de Acorde y Bajo Automático
(A UTO BASS CHORD). Cuando se pulse el
selector de Acorde de Un Solo Dedo (SINGLE
FINGER CHORD) o ei de Acorde Digitado
(FINGERED CHORD) no se podrán utilizar
las teclas de la sección de teclas de Acorde y
Bajo Automático ® para tocar melodías.
2. No podrá escucharse ninguna voz de Orquesta
(ORCHESTRA) si el selector de Orquesta
(ORCHESTRA ON/OFF) ® está en la posi
ción “superior” y ei selector de Solo (SOLO
ON/OFF) ® está pulsado.
14
Page 17

Sustain
A sustain effect for the Orchestra voices
can be obtained by using the sliding
SUSTAIN control The sustained
sound gradually fades after a note is
played.
Sustain-Effekt
Mit dem Orchester-Sustain-Regler
(SUSTAIN) @ kann den Orchesterstimmen
ein Sustain-Effekt hinzugefügt werden. Der
Sustain-Effekt klingt nach Anschlägen einer
Taste langsam aus.
Sustain
Le déplacement du contrôle SUSTAIN (g)
permet d’obtenir un effet soutenu pour
les voix d’Orchestre (ORCHESTRA). Le
son soutenu s’estompe graduellement
lorsqu’une note est jouée.
Sostenido
Puede obtenerse un efecto de sostenido para
las voces de Orquesta utilizando el control
deslizante de Sostenido (SUSTAIN) @. El
sonido sostenido desaparece gradualmente
después de tocar una nota.
Soio Section
In addition to and independent of the
Orchestra voices described so far, there
are 12 Solo voices.
1. The ORCHESTRA ON/OFF ® and
SOLO ON/OFF @ selectors enable
you to play an Orchestra voice either
on its own or together with a Solo
voice, or a Solo voice on its own.
To play only a Solo voice, first depress
the SOLO ON/OFF selector @ (the
ORCHESTRA ON/OFF selector ®
should be in the “up” position). If
both these selectors are off, an
Orchestra voice is produced.
Solo-Teil
. a )
TRUM- CLARI-
PICCOLO PET NET SYNTH6 PIANO GUITAR
lililí
ORGAN OBOE VIOLIN BANJO HARPSI- VIBES
Zusätzlich zu den bisher beschriebenen
Orchesterstimmen gibt es noch 12 unab
hängig arbeitende Solo-Stimmen.
1. Mit dem Orchester-Ein/Aus-Schalter
(ORCHESTRA ON/OFF) @ und dem
Solo-Ein/Aus-Schalter (SOLO ON/OFF)
@ können die Orchester- und Solo
stimmen entweder alleine oder zusammen
verwendet werden. Wollen Sie nur eine
Solostimme spielen, so drücken Sie den
Solo-Ein/Aus-Schalter (SOLO ON/OFF)
® und rasten Sie den Orchester-Ein/
Aus-Schalter (ORCHESTRA ON/OFF)
® aus. Sind beide Schalter ausgerastet,
so sind nur die Orchesterstimmen zu
hören.
Section Soio Sección de Solo
LONG> ■ tMAXí ■[■■IMAXI Mj '
SHORT
I
---
_NOR- ■
J MAL MIN MIN
CHORD
En plus des voix d’Orchestre déjà
décrites—et indépendamment d’elles
—l’instrument comporte 12 voix Solo.
1. Les sélecteurs Orchestre Marche/
Arrêt (ORCHESTRA ON/OFF) ® et
Solo Marche/Arrêt (SOLO ON/OFF)@
vous permettent d’obtenir la voix
d’Orchestre—soit seule, soit associée
à la voix Solo—ou la voix Solo,
seulement.
Pour obtenir une voix Solo seulement,
appuyez tout d’abord sur le sélecteur
Solo Marche/Arrêt (SOLO ON/OFF) @
(le sélecteur Orchestre Marche/Arrêt
(ORCHESTRA ON/OFF) ® devant se
trouver en position élevée). Si ces
deux sélecteurs se trouvent sur la
position Arrêt (OFF), c’est une voix
d’Orchestre qui se fera entendre.
I I
--------
■ ■
Además e independientemente de las voces
de Orquesta descritas hasta ahora, hay otras
12 voces de Solo.
1. Los selectores de Orquesta ON/OFF
(ORCHESTRA ON/OFF) @ y Solo
ON/OFF (SOLO ON/OFF) @ le permi
ten tocar una voz de Orquesta bien sola
o con una voz de Solo, o una voz de Solo
únicamente.
Para tocar únicamente una voz de Solo,
pulsar ajites el selector de Solo ON/OFF
(SOLO ON/OFF) @ (el selector de
Orquesta ON/OFF (ORCHESTRA ON/
OFF) @ deberá estar en la posición
“superior”). Si ambos selectores están en
off, se produce una voz de Orquesta.
2. Select the desired voice by pressing
one of the SOLO voice selectors
Press the red button on the righthand side to select a voice in the
bottom row.
2. Wählen Sie die gewünschte Instrumental
stimme durch Drücken eines Solostimmen-Registers (SOLO) Wird der auf
der rechten Seite befindliche rote Schalter
gedrückt, so können die Instrumental
stimmen der unteren Reihe gewählt
werden.
__________________________________
2. Appuyez sur l’un des sélecteurs de
voix Solo®, pour obtenir la voix de
votre choix. Appuyez sur la touche
rouge située sur la droite, pour
choisir une voix dans la rangée
inférieure.
2. Seleccione la voz deseada pulsando uno
de los selectores de voz de SOLO @.
Pulse el botón rojo del lado derecho para
seleccionar una voz de la fila de abajo.
Page 18

3. Adjust the volume level using the
sliding SOLO VOLUME control
• When two or more voice selectors
are pressed simultaneously, the righthand selector always has priority.
• If no selector is depressed, the
PICCOLO voice will be automatically
selected.
3. Regeln Sie die Laustärke mit dem SoloLautstärkeregler (SOLO VOLUME) @.
• Werden zwei oder mehr Register gleich
zeitig gedrückt, so hat das weiter rechts
liegende Vorrang.
• Wird kein Register gedrückt, so schaltet
das Instrument automatisch auf
PICCOLO.
3. Réglez le niveau du volume, en
déplaçant le contrôle Volume Solo
(SOLO VOLUME) (§).
• Lorsque deux ou plusieurs sélecteurs
de voix sont pressés simultanément,
le sélecteur de droite a toujours la
priorité.
• Si l‘on n’appuie sur aucun sélecteur,
la voix PICCOLO sera automatique
ment déclenchée.
3. Ajustar el nivel del volumen utilizando
el control deslizante de Volumen de Solo
(SOLO VOLUME) @.
• Cuando se pulsen simultáneamente dos o
más selectores de voces, el selector de la
derecha siempre tendrá prioridad.
• Si no se pulsa ningún selector, se selec
cionará automáticamente la voz de Pícolo
(PICCOLO).
Sustain
The sliding SUSTAIN control @ allows
you to adjust the degree of sustain.
Vibrato depth
The Piccolo, Trumpet, Oboe, and Violin
voices have a certain amount of delayed
vibrato built into them. The VIBRATO
DEPTH control @) is for modifying the
built-in vibrato or for adding vibrato to
the other Solo voices.
Celeste
The CELESTE control (§) enhances Solo
voices by thickening them.
Note
Because the Solo voices are mcnophonic,
If two or more keys are pressed only the
highest one will produce a scund.
Sustain
Mit dem Sustain-Regler (SUSTAIN) @ kann
ein Sustain-Effekt hinzugefügt werden.
Vibratointensität
Für folgende Stimmen ist bereits ein Vibrato
fest voreingestellt: Piceolo (PICCOLO),
Trompete (TRUMPET), Oboe (OBOE) und
Violine (VIOLIN). Mit dem Vibrato-Inten-
sitäts-Regler (VIBRATO DEPTH) @
können Sie die voreingestellte Intensität
ändern oder den anderen Solostimmen einen
Vibrato-Effekt hinzufügen.
Celeste
Mit dem Celeste-Regler (CELESTE) @
können die Solostimmen mehr zur Geltung
gebracht werden.
Hinweis
Die Solostimmen sind nur monophon spielbar.
Werden zwei oder mehr Tasten angeschlagen,
so ertönt lediglich die höchste Note.
Sustain
Le déplacement du contrôle SUSTAIN (§)
vous assure un réglage fin de cette
fonction.
Profondeur de Vibrato
Les voix Piccolo, Trompette (TRUM
PET), Hautbois (OBOE) et Violon
(VIOLIN) sont dotées d’un certain
effet de vibrato retardé incorporé.
Le contrôle Profondeur de Vibrato
(VIBRATO DEPTH) (g) permet de modifier
le vibrato incorporé ou d’ajouter un effet
de vibrato aux autres voix Solo.
OéiGSto
Le contrôle CELESTE (g étoffe et
enrichit les voix Solo.
Remarque
Les voix Solo étant monophoniques, si deux
ou plusieurs touches sont pressées, seule la
plus haute produira un son.
Sostenido
El control deslizante de Sostenido
(SUSTAIN) @ le permite ajustar el grado
de sostenido.
Profundidad del Vibrato
Las voces de Pícolo, Trompeta, Oboe y
Violín tienen una cierta cantidad de
vibrato retardado incorporado en ellas. El
control de Profundidad del Vibrato
(VIBRATO DEPTH) @ es para modificar
el vibrato incorporado o para añadir vibrato
a las otras voces de Solo.
Celeste
El control de Celeste (CELESTE) ®
refuerza las voces de Solo haciéndolas más
gruesas.
Nota
Como las voces de Solo son monofónicas, si se
pulsan dos 0 más teclas, sólo la más alta
producirá sonido.
16
Page 19

Advanced class: time for a more
accomplished performance.
Here’s how to enjoy an ensemble per
formance featuring a combination of
Solo and Orchestra voices:
1. Depress the ORCHESTRA ON/OFF
® and SOLO ON/OFF @ selectors.
2. Set the ORCHESTRA VOLUME
control ® at Max and the SOLO
VOLUME Control @ at about the
three-quarters position.
3. Decide on your combination of
Orchestra and Solo voices. Some
examples are shown below.
BRASS-f TRUMPET
STRING-I-VIOLIN
HARPSICHORD -I- TRUMPET
JAZZ ORGAN-I-GUITAR
4. Now, if a chord is played, a Solo
voice is added to the highest note of
the chord, resulting in a beautiful
ensemble effect. Try playing a chord!
Anspruchsvolle Funktionen für fort
geschrittene Spieler
Hier einige Beispiele für Ensembles aus
Solo- und Orchesterstimmen:
1. Drücken Sie den Orchester-Ein/AusSchalter (ORCHESTRA ON/OFF) ®
und den Solo-Ein/Aus-Schalter (SOLO
ON/OFF) ®.
2. Schieben Sie den Orchester-Laustär
keregler (ORCHESTRA VOLUME) ®
auf MAX und den Solo-Lautstärkeregler
(SOLO VOLUME) ® 3/4 hoch.
3. Wählen Sie die Orchester- und Solo
stimmen. Hier einige Beispiele:
BLECHBLÄSER + TROMPETE
STREICHER + VIOLINE
CEMBALO + TROMPETE
JAZZ-ORGEL -t GITARRE
4. Wenn Sie einen Akkord spielen, wird zu
der höchsten Note des Akkordes eine
Solostimme hinzugefügt. Dadurch erhält
man einen wunderschönen EnsembleEffekt. Versuchen Sie es einmal!
Classe de niveau avancé: une
exécution plus accomplie s’impose
Voici maintenant les modalités d’une
exécution d’ensemble associant voix
Solo et voix d’Orchestre:
1. Appuyez sur les sélecteurs Orchestre
Marche/Arrêt (ORCHESTRA ON/OFF)
® et Solo Marche/Arrêt (SOLO
ON/OFF)
2. Réglez le contrôle Volume Orchestre
(ORCHESTRA VOLUME) ® sur la
position MAX et le contrôle Volume
Solo (SOLO VOLUME) # sur la
position trois-quarts.
3. Choisissez la combinaison désirée
voix Orchestre et Solo. Voici, par
exemple, quelques possibilités:
CUIVRES-b TROMPETTE
CORDES H-VIOLON
CLAVECIN + TROMPETTE
ORGUE JAZZ-b GUITARE
4. Maintenant, si un accord est joué,
une voix Solo s’ajoute à la note la
plus haute de l’accord, produisant
un effet d’ensemble particulièrement
agréable. Essayez donc un accord!
Clase avanzada: el momento para una
interpretación más difícil.
He aquí cómo disfrutar de una interpretación
de conjunto caracterizada por una combi
nación de voces de Solo y Orquesta:
1. Pulse los selectores de Orquesta
(ORCHESTRA ON/OFF) @ y Solo
(SOLO ON/OFF)
2. Coloque el control de Volumen de
Orquesta (ORCHESTRA VOLUME) ®
en MAX y el control de Volumen de Solo
(SOLO VOLUME) @ en la posición
de tres cuartos.
3. Decida su combinación de voces de
Orquesta y Solo. Debajo se muestran
algunos ejemplos.
METALES -b TROMPETA
CUERDAS-b VIOLIN
CLAVICORDIO -b TROMPETA
ORGANO DE JAZZ-b GUITARRA
4. Ahora, si se toca un acorde, se añade una
voz de Solo a la nota más alta del acorde,
resultando en un precioso efecto de
conjunto. ¡Pruebe a tocar un acorde!
Example
(ORCHESTRA) STRING-b (SOLO) VIOLIN
Beispiel Exemple
(ORCHESTER) STREICHER-b (SOLO)
VIOLINE
(ORCHESTRE) CORDES-b(SOLO) VIOLON
17
Ejemplo
(ORQUESTA) CUERDAS-b (SOLO)
VIOLIN ,
Page 20

Note
When STRING and VIOLIN or TRUMPET are
used In combination, a "beat” or pulsing
sound can be heard when long single notes
are played. This Is caused by the slight
difference in the periods of the built-in String
vibrato and the Violin vibrato; the sound
may be heard as a beautiful sound if a
chord is played.
Hinweis
Wenn Sie einzelne langangehaltene Noten spielen
und Streicher (STRING), Violine (VIOLIN) oder
Trompete (TRUMPET) kombinieren, so ist ein
pulsierender Ton zu hören. Dies kommt durch
eine geringe Phasenverschiebung zwischen
Streicher- und Violinen-Vibrato. Der Effekt ist
sehr schön, wenn Sie einen Akkord spielen.
Remarque
Lorsque Cordes (STRING) et Violon (VIOLIN)
ou Trompette (TRUMPET) sont utilisés
ensemble, une “cadence" ou mouvement
rythmé se fait entendre lorsque des notes
isolées et longues sont jouées. Cet effet a
pour cause la légère différence dans les
périodes du vibrato Corde incorporé et du
vibrato Violon; le son est particulièrement
riche si un accord est joué.
Nota
Cuando se utiliza la combinación Cuerdas y
Violin o Trompeta, podrá escucharse un sonido
pulsante cuando se toquen notas sueltas largas.
Esto se origina por la ligera diferencia en los
periodos del vibrato de Cuerda incorporado y el
vibrato de Violín; el sonido sonará con gran
belleza si se toca un acorde.
Rhythm Section
Now let’s add a dynamic rhythm accom
paniment to your melody.
1. Choose a rhythm
Pick the rhythm that best suits the
music you’re going to play and press
the selector. If the selector with the red
tab is up, you can select rhythms in the
top row; if it is down, you can select
rhythms in the bottom row.
• If two or more selectors are pressed
the one on the right has priority.
• If no selector is depressed, SWING
is automatically selected.
Rhythmus-Teil
Ergänzen Sie nun noch eine dynamische
Rhythmusbegleitung zu Ihrer Melodie.
MAX ■ FAST|I f| [I—H
-SYNCHRO
START
— —^[^1 r^l f°] [O] p=T|
1. Wahl des Rhythmus
Wählen Sie den Rhythmus, der am besten
zu Ihrer Musik paßt, durch Drücken des
betreffenden Registers. Ist der rot markierte
Schalter ausgerastet, so können die Rhythmen
der oberen Reihe gewählt werden; ist er einge
rastet, so können die Rhythmen der unteren
Reihe gewählt werden.
• Werden zwei oder mehr Schalter gedrückt,
so hat der weiter rechts liegende Schalter
Vorrang.
• Wird kein Schalter gedrückt, so schaltet
das Instrument automatisch auf
„SWING“.
DISCO ROCK 16 BOSSA- MARCH/
SWING 1 1 BEAT NOVA RHUMBA POLKA WALTZ
I I I I I I I I
SLOW DISCO ROCK ROCK'N' TANGO SAMBA MARCH JAZZ
ROCK 2 2 ROLL 6/8 WALTZ
Section rythmique
Ajoutons maintenant un accompagne
ment rythmique dynamique à la mélodie.
1. Choix d’un rythme
Choisissez le r^hme convenant le
mieux à la musique que vous allez jouer
et appuyez sur le sélecteur. Si le sélec
teur marqué de rouge est en position
élevée, vous pouvez choisir les rythmes
de la rangée du haut; s’il est en position
abaissée, vous pouvez choisir les
rythmes de la rangée du bas.
• Si vous appuyez sur deux sélecteurs
(ou plus), celui de droite a la priorité.
• Si vous n’appuyez sur aucun sélec
teur, SWING est automatiquement
déclenché.
Sección de ritmo
Añadamos un acompañamiento de ritmo
dinámico a su melodía.
1. Escoja un ritmo
Escoja el ritmo más apropiado para la música
que vaya a tocar y pulse el selector. Si el
selector con la marca roja está arriba. Ud.
puede seleccionar ritmos de la fila de arriba;
si está abajo, puede seleccionar ritmos de la
fila de abajo.
• Si se pulsan dos o más selectores, tendrá
prioridad el de la derecha.
• Si no se pulsa ningún selector, se selec
ciona automáticamente SWING.
2. Start the rhythm
After selecting a rhythm, press the
START selector®.
2. Start des Rhythmus
Drücken Sie nach der Wahl des Rhythmus
den Rhythmus-Start-Schalter (START)®.
F=1 EJ
SYNCHRO
START
2. Déclenchement du rythme
Une fois le rythme choisi, appuyez sur le
sélecteur Départ (START)®.
START
18
2. Arranque el ritmo
Despúes de seleccionar un ritmo, pulse el
selector de Arranque (START) ® .
Page 21

3. Adjustments
3. Einstellungen
• Volume • Lautstärke
The RHYTHM VOLUME control @
lets you adjust the rhythm volume
In relation to the melody volume.
To stop the rhythm, press the START
Mit dem Rhythmus-Lautstärkeregler
(VOLUME) ® kann das Lautstärke
verhältnis zwischen Rhythmus und
Melodie eingestellt werden.
selector t) again. Zum Ausschalten des Rhythmus drücken
Sie den Rhythmus-Start-Schalter
(START) ® erneut.
3. Réglages
• Volume
Le contrôle Volume du Rythme
(VOLUME) ® vous permet de régler le
volume du rythme sur le volume de
3. Ajustes
• Volumen
El control de Volumen del Ritmo
(VOLUME) ® le permite ajustar el
volumen del ritmo en relación con el
la mélodie. volumen de la melodía.
Pour arrêter le rythme appuyer à Para detener el ritmo, pulse el selector
nouveau sur le sélecteur Départ®.
FAST
SLOW
de Arranque (START) ® una vez más.
• Tempo
Use the TEMPO control ® to adjust
the speed of the rhythm.
• Synchro Start
The SYNCHRO START selector ®
Is used when It Is desired to have
the rhythm begin the moment a key
is pressed. The 19 keys beginning
at the left of the keyboard will
activate the rhythm sounds. These
keys are identified by the words
AUTO BASS CHORD printed above
the keys. When a key has been
depressed in this section, the rhythm
will continue until shut off, which
is achieved by pressing the SYN
CHRO START selector ® again.
4. Making use of the Tempo Light
The Tempo Light functions as a visual
metronome, making it simple for you to
confirm the rhythm tempo when playing
the melody. When the rhythm Is play
ing, the light flashes at the first beat of
every bar^When the SYNCHRO START
selector ® is engaged but you have not
yet started the rhythm by pressing a
key, the Tempo Light flashes at every
quarter note.
VOLUME
• Tempo
Stellen Sie die Rhythmusgeschwindigkeit
am Temporegler (TEMPO) @ ein.
• Synchro-Start
Soil die Rhythmusbegleitung beim An
schlägen der ersten Taste einsetzen, so
drücken Sie den Synehro-Start-Schalter
(SYNCHRO START) ®. Mit den 19 links
auf der Tastatur befindlichen Tasten (mit
AUTO BASS CHORD markiert) kann
dann die Rhythmusbegleitung eingeschal
tet werden. Die Rhythmusbegleitung wird
solange fortgesetzt, bis sie durch Drücken
des Sync®o-Start-Schalters (SYNCHRO
START) ® wieder ausgeschaltet wird.
4. Verwendung der Tempoanzeige
Die Tempoanzeige dient als optisches Metro
nom zur einfachen Kontrolle des Rhythmus
tempos beim Spielen einer Melodie. Bei
eingeschaltetem Rhythmus blinkt die Anzeige
beim ersten Schlag jedes Taktes. Ist der
Synchro-Start-Schalter (SYNCHRO
START) ® gedrückt, der Rhythmus durch
Anschlägen einer Taste aber noch nicht ein
geschaltet, so blinkt die Tempoanzeige bei
jeder Viertelnote.
TEMPO
• Tempo
Utilisez le contrôle TEMPO ® pour
régler la vitesse du rythme.
• Départ Synchro
Le séiecteur Départ Synchro (SYN
CHRO START) ® est utilisé lorsqu’on
désire déclencher le rythme dès
qu’une touche est pressée. Les 19
touches commençant à la gauche du
clavier activeront les sons rythmi
ques. Ces touches sont signalées
par les mots AUTO BASS CHORD
figurant au-dessus des touches.
Lorsqu’une touche a été pressée
dans cette section, le rythme conti
nuera jusqu’à l’arrêt obtenu sur une
nouvelle pression du sélecteur Départ
Synchro (SYNCHRO START) ® .
4. Utilisation de la Lampe de Tempo
La Lampe de Tempo tient lieu de
métronome, ponctuant ainsi le tempo du
rythme durant l’exécution de la mélodie.
Quand le rythme est joué, la lampe
s’allume au premier temps de chaque
mesure. Lorsque le sélecteur Départ
Synchro (SYNCHRO START) ® a été
engagé mais que le rythme n’a pas été
encore déclenché sur la pression d’une
touche, la Lampe de Tempo s’allume à
chaque noire.
• Tempo
Utilice el control de Tempo (TEMPO) ®
para ajustar la velocidad del ritmo.
• Arranque Sincronizado
El selector de Arranque Sincronizado
(SYNCHRO START) ® se utiliza
cuando se desea que el ritmo comience
en el momento en que se pulsa una tecla.
Las 19 teclas que comienzan a la izquierda
del teclado, activarán los sonidos del
ritmo. Estas teclas están identificadas por
las palabras AUTO BASS CHORD
(Acorde y Bajo Automático) impresas
encima de las teclas. Cuando se pulsa una
tecla de esta sección, el ritmo continuará
hasta que se desactive, lo que se consigue
pulsando de nuevo el selector de Arranque
Sincronizado (SYNCHRO START)®.
4. Utilizando la Luz de Tempo
La Luz de Tempo actúa como un metró
nomo visual, simplificando la confirmación
del tempo del ritmo al tocar la melodía.
Cuando el ritmo está tocando, la luz se
ilumina al primer tiempo de cada compás.
Cuando el selector de Arranque Sincroni
zado (SYNCHRO START) @ está conec
tado pero todavía Ud. no ha comenzado el
ritmo pulsando una tecla, la Luz de Tempo
se ilumina eada cuarto de nota.
19
Page 22

5. Adding a handclap to the rhythm
A handclap effect that keeps perfect
tune with the beat can be added to any
of the rhythms; it Is particularly effective
with the Disco rhythm. There are two
HANDCLAP selectors®, and if they
are depressed simultaneously a third
handclap effect can be enjoyed.
5. Rhythmus mit zusätzlichem Hände
klatschen
Jedem Rhythmus kann ein im Tempo dazu
passendes Händeklatschen hinzugefügt
werden. Dies ist besonders bei Disco-Musik
sehr wirkungsvoll. Zwei HändeklatschWahjschalter (HANDCLAP) ® sind vor
handen; bei gleichzeitigem Drücken beider
Schalter erhält man noch einen dritten
Händeklatsch-Effekt.
5. Addition de battements de mains au
rythme
Un effet de battements de mains conve
nant parfaitement à la mesure peut être
ajouté à n’importe quel rythme, au
rythme Disco en particulier. Deux sélec
teurs Battements de Mains (HANDCLAP)
@ ont été prévus à cet effet. Si l’on
appuie sur les deux simultanément, un
troisième effet de battements de mains
est déclenché.
HAND CLAP
5. Añadiendo palmadas al ritmo
Puede añadirse un efecto de palmadas,
perfectamente sincronizado con el ritmo,
a cualquiera de los ritmos; resulta especial
mente efectivo con el ritmo Disco. Hay dos
selectores de Palmadas (HANDCLAP) @,
y si se pulsan simultáneamente puede obte
nerse un tercer efecto de palmadas.
6. Getting more realism with drum fill-ins
If you tap the FILL IN bar®, the
rhythm being played will be interrupted
by a short drum solo. Hold the FILL IN
bar down, and the drum solo continues.
Whenever the fill-in function is used,
the accompaniment voices are cut off
to enhance the overall effect. The FILL
IN VARIATION selector® gives a
choice of five fill-ins.
Auto Bass Chord Section
The AUTO BASS CHORD section is an
automatic accompaniment feature.
6. Realistischere Rhythmusbegleitung durch
Schlagzeug-Soli
Durch Drücken der Schlagzeug-Solo-Taste
(FILL IN) ® kann der Rhythmus unter
brochen und ein Schlagzeugsolo ausgelöst
werden. Wird die Taste länger gedrückt
gehalten, so ertönt das Schlagzeug-Solo
mehrmals hintereinander. Beim Auslösen
dieser Schlagzeug-Soli werden die begleiten
den Stimmen abgeschaltet, um eine noch
eindrucksvollere Wirkung zu erzielen.
Am Schlagzeugsolo-Variationsschalter
(FILL IN VARIATION)® kann zwischen
5 verschiedenen Soli gewählt werden.
Baß-Akkord-Automatik-Teil
Am Baß-Akkord-Automatik-Teil können Sie
verschiedene automatische Begleitungsfunk-
AUTO BASS CHORD
6. Encore du “réalisme” avec les solos
de batterie
Si vous frappez légèrement sur FILL IN
®, le rythme joué sera interrompu par ou
bref solo de batterie. Si vous maintenez
la touche en position appuyée, le solo
de batterie continuera.
A noter que chaque fois que cette fonc
tion est utilisée, les voix d’accompagne
ment sont coupées, de manière à rehaus
ser l’effet global. Le sélecteur FILL IN
VARIATION @ offre un choix de
cinq effets.
U 1 i.
Section Basses/Accords
Automatiques
La section Basses/Accords Automa
tiques (AUTO BASS CHORD) assure
r=l Q
MEMORY VARIATION
6. Obteniendo más realismo con rellenos
de batería
Si golpea ligeramente la barra de Relleno
(FILL IN) ®, el ritmo que está tocando se
verá interrumpido por un solo de batería
corto. Mantenga pulsada la barra de Relleno
(FILL IN) y el solo de batería continuará.
Cada vez que se utilice la función de relleno,
las voces de acompañamiento se desconectan
para reforzar el efecto general. El selector
de Variación de Relleno (FILL IN
VARIATION) @ ofrece una selección de
cinco rellenos.
Sección de Acorde y Bajo Automático
La sección de Acorde y Bajo Automático es
una función de acompañamiento automático.
' Q Q Q
VOLUME NORMAL SINGLE FINGERED
FINGER CHORD
CHORD
20
Page 23

If the NORMAL selector is depressed,
the Auto Bass Chord system does not
function. In this case, the entire key
board can be used to play the Orchestra
and/or Solo voice you have selected. For
instance, if you have seiected PiANO,
the keyboard becomes a 49-note piano.
With the SINGLE FINGER CHORD
selector depressed, you can play threenote chords using a singie finger if you
press any of the 19 keys in the Auto
Bass Chord key section ®. Press the
START or SYNCHRO START selector ®
and the chord will play in time with the
rhythm you selected. You will actually
hear three things:
1. A three-note chord (same as holding
down three keys).
2. A drummer playing a rhythm.
3. A bass player playing accompani
ment.
The FINGERED CHORD selector allows
more experienced players to play their
own chords and continue getting the
bass and rhythm backup.
tionen wählen.
Durch Drücken des Normal-Schalters
(NORMAL) wird die Baß-Akkord-Automatik ausgeschaltet und die gewählten
Orchester- und/oder Solo-Stimmen können
dann mit allen Tasten der Tastatur gespielt
werden. Wenn Sie z.B. eine Piano-Stimme
gewählt haben, so wird das instrument zu
einem 49-tastigen Piano.
Wird der Einfinger-Akkord-Schalter
(SINGLE FINGER CHORD) gedrückt, so
brauchen Sie lediglich eine Taste im Bal3Akkord-Automatik-Bereich @ anzuschlagen,
und schon ertönt ein Akkord aus drei Noten.
Wenn Sie nun noch den Rhythmus-Start
oder Synchro-Start-Schalter (START oder
SYNCHRO START) (n) drücken, ertönt ein
Akkord in dem vom gewählten Rhythmus
vorgegebenen Tempo. Es ist dann folgendes
zu hören:
1. Ein Akkord aus drei Noten (genau wie
beim Anschlägen von drei Tasten)
2. Ein Schlagzeuger, der die Rhythmusbe
gleitung spielt.
3. Baßbegleitung
Durch Drücken des Fingerakkord-Schalters
(FINGERED CHORD) können, erfahrene
Spieler eigene Akkorde mit Baß- und
Rhythmusbegleitung spielen.
l’accompagnement automatique.
Si le sélecteur NORMAL est en posi
tion engagée, le système Basses/
Accords Automatiques ne fonctionne
pas. Dans ce cas, l’ensemble du clavier
peut être utilisé pour jouer la voix
d’Orchestre et/ou la voix Solo que vous
avez choisie. Ainsi, par exemple, si vous
avez opté pour Piano, le clavier devient
un piano à 49 notes.
Avec le sélecteur Accord à Un Seul
Doigt (SINGLE FINGER CHORD) en
position engagée, des accords à trois
notes peuvent être obtenus sur la pres
sion d’un seul doigt. Si vous appuyez
sur l’une des 19 touches de la section
Touches Basses/Accords Automatiques
(AUTO BASS CHORD) ®. Appuyez sur le
sélecteur Départ (START) ou Départ
Synchro (SYNCHRO START)® et
l’accord sera joué conformément au
rythme choisi. Vous entendrez, en fait,
trois sons:
1. Un accord à trois notes (le même que
celui obtenu sur la pression de trois
touches).
2. Une batterie jouant un rythme.
3. Une basse assurant l’accompagne
ment.
Le sélecteur Accord à Plusieurs
Doigts (FINGERED CHORD) permet aux
exécutants plus avancés de jouer leurs
propres accords tout en restant assurés
du soutien de la basse et du rythme.
Si se pulsa el selector NORMAL, no funcio
nará el sistema de Acorde y Bajo Automático.
En este caso, puede utilizarse todo el teclado
para tocar la voz de Orquesta y/o la voz
de Solo que Ud. haya seleccionado. Por
ejemplo, si ha seleccionado PIANO, el
teclado se convierte en un piano de 49 notas.
Con el selector de Acorde de Un Solo Dedo
(SINGLE FINGER CHORD) pulsado, Ud.
puede toctn acordes de tres notas utilizando
un solo dedo, si pulsa cualquiera de las 19
teclas de la sección de teclas de Acorde
y Bajo Automático ®. Pulse el selector
de Arranque o Arranque Sincronizado
(START o SYNCHRO START)®
y el acorde tocará junto con el ritmo que
haya seleccionado. En realidad, se escucharán
tres cosas:
1. Un acorde de tres notas (igual que al
pulsar tres teclas).
2. Un batería tocando un ritmo.
3. Un bajista tocando el acompañamiento.
El selector de Acorde Digitado (FINGERED
CHORD) permite a los más avanzados tocar
sus propios acordes y continuar obteniendo
el respaldo del bajo y del ritmo.
ill
: D E F G A E
C.L
i F,«
Auto Bass Chord Key Section
Baß-Akkord-Automatik Tastatur-Teil
Section de touches de basses/accords automatiques
Section de teclas de Acorde y Bajo Automático
21
Page 24

For one-finger accompaniment
Einfinger-Begleitung
Accompagnement à un seul doigt
Para acompañamiento con un dedo
1. Seiect a rhythm
Choose the rhythm you want then press
the SYNCHRO START or START selector
®. (Don’t forget to do this whenever you
use the Auto Bass Chord feature.)
2. Press the SiNGLE FÌNGER CHORD selector
3. Press a key
Press one of the 19 keys in the Auto
Bass Chord key section ® on the left
side of the keyboard. You will hear the
corresponding chord with bass and
rhythm accompaniment. For instance,
when you press “C” (“Do”), you’ll obtain
a C major chord that strums along with
the bass and rhythm.
Obtaining minor, seventh and minor
seventh chords
You can play a total of 48 chords
(4 types X12) in Single Finger Chord
mode.
• To get a C major chord, push C key.
The bass accompaniment will always
conform to the strumming chord.
• To get a C minor chord depress the
C key together with the next black
key to the left.
• To get a C seventh chord depress
the C key together with the next
white key to the left.
• To get a C minor seventh chord,
simply press the C key together with
the next black key and white key to
the left.
• If the Auto Bass Chord feature is
used without SYNCHRO START or
START @ you will get a continuous
chord with bass.
1. Rhythmus wählen
Wählen Sie den gewünschten Rhythmus,
und drücken Sie dann den RhythmusStart- oder Synchro-Start-Schalter (START
oder SYNCHRO START)®. Vergessen
Sie nie, einen dieser Schalter zu drücken,
wenn die Baßakkord-Automatik verwendet
wird.
2. Einfingerakkord-Schalter (SINGLE
FINGER CHORD) drücken
3. Eine Taste anschlagen
Schlagen Sie eine der 19 im Baß-AkkordAutomatik-Bereich ® auf der linken
Seite der Tastatur befindlichen Tasten an.
Der entsprechende Akkord ertönt dann
mit Baß- und Rhythmusbegleitung. Wird
z.B. die C-Taste (,,do“) gedrückt, so
ertönt ein C-Dur-Akkord mit Baß- und
Rhythmusbegleitung.
Moll-, Septimen- und Moll-SeptimenAkkorde
Mit der Einfingerakkord-Funktion können
insgesamt 48 Akkorde (4 Arten x 12) gespielt
werden.
• Drücken Sie die C-Taste für einen C-Dur-
Akkord. Die Baßbegleitung ist immer
dem Akkord angepaßt.
• Drücken Sie die C-Taste zusammen mit
der links daneben liegenden schwarzen
Taste für einen C-Moll-Akkord.
• Drücken Sie die C-Taste zusammen mit
der links daneben liegenden weißen Taste
für einen Septimenakkord auf C.
• Drücken Sie die C-Taste zusammen mit
den links daneben liegenden schwarzen
und weißen Tasten für einen MollSeptimenakkord auf C.
• Wird die Baß-Akkord-Automatik verwen
det und sind Rhythmus-Start- sowie
Synchro-Start-Schalter (START oder
SYNCHRO START) ® nicht gedrückt,
so erhält man einen kontinuierlichen
Akkord mit Baßbegleitung.
1. Choisissez un rythme
Choisissez le rythme désiré, puis
appuyez sur le sélecteur Départ Synchro
(SYNCHRO START) ou Départ (START)
®. (N’oubliez pas ce détail chaque fois
que vous utilisez la fonction Basses/
Accords Automatiques.)
2. Appuyez sur le sélecteur Accord à Un Seul Doigt (SINGLE FINGER CHORD)
3. Appuyez sur une touche
Appuyez sur l’une des 19 touches de la
section Touches Basses/Accords Auto
matiques ® de la partie gauche du
clavier. Vous entendrez l’accord corres
pondant avec basses et accompagne
ment rythmé. Ainsi, par exemple, si vous
appuyez sur “Do”, vous obtiendrez un
accord en Do majeur agrémenté de la
basse et du rythme.
Accords mineurs, de septième et de
septième mineure
Vous pouvez, au total, jouer 48 accords
(4 types X12) sur le mode Accord à un
Seul Doigt.
• Pour obtenir un accord en Do (C)
majeur, appuyez sur la touche Do (C).
La basse d’accompagnement sera
toujours fidèle à l’accord.
• Pour obtenir un accord en Do (C)
mineur, appuyez simultanément sur la
touche Do (C) et sur la touche noire
voisine de gauche.
• Pour obtenir un accord de Do (C)
septième, appuyez simultanément sur
la touche Do (C) et sur la touche
blanche voisine de gauche.
• Pour obtenir un accord de Do (C)
septième mineure, appuyez simul
tanément sur la touche Do (C) et sur
les touches noire et blanche voisines
de gauche.
• SI le dispositif Basses/Accords
Automatiques est utilisé sans Départ
Synchro (SYNCHRO START) ou
Départ (START) ®, vous obtiendrez
un accord continu avec basse.
1. Seleccione un ritmo
Escoja el ritmo que desee y luego pulse el
selector de Arranque Sincronizado o
Arranque (SYNCHRO START o START)
®. (No se olvide de hacer esto cada vez que
utilice la función de Acorde y Bajo
Automático.)
2. Pulse el selector de Acorde de Un Solo
Dedo (SINGLE FINGER CHORD)
3. Pulse una tecla
Pulse una de las 19 teclas de la sección de
teclas de Acorde y Bajo Automático @ del
lado izquierdo del teclado. Escuchará el acor
de correspondiente con acompañamiento de
bajo y ritmo. Por ejemplo, cuando pulse
“C” (“Do”), obtendrá un acorde de C
mayor que sonará junto con el bajo y el ritmo.
Obtención de acorde de menor, séptima y
séptima menor
Ud. püede tocar un total de 48 acordes (4
tipos X 12) en la modalidad de Acorde de Un
Solo Dedo.
• Para obtener un acorde de C mayor,
pulse la teela C. El acompañamiento de
bajo siempre se acoplará al acorde.
• Para obtener un acorde de C menor,
pulse la teela C junto eon la siguiente tecla
negra a su izquierda.
• Para obtener un acorde de C séptima,
pulse la tecla C junto con la siguiente
tecla blanca a su izquierda.
• Para obtener un acorde de C séptima
menor, simplemente pulse la tecla C junto
con la siguiente tecla negra y tecla blanca
a su izquierda.
• Si la función de Acorde y Bajo Auto-
mátieo se utiliza sin el Arranque
Sincronizado o Arranque (SYNCHRO
START o START) ®, se obtendrá un
acorde continuo con bajo.
22
Page 25

Cm
4. Set the volume
Adjust the volume to suit the overall
level using the Auto Bass Chord’s inde
pendent VOLUME control
5. Set the tempo
Select the tempo you want using the
rhythm section’s TEMPO control (g).
For automatic accompaniment
based on three-note or four-note
chords
1. Press the FiNGERED CHORD
selector
2. When a combination of keys located
in the Auto Bass Chord key section
® are pressed, the resulting chord
will be played together with the auto
matic accompaniment consisting of
the bass line and the selected
rhythm.
In Fingered Chord mode, the following
chords can be played: major, minor,
seventh, minor seventh, diminished,
augmented, major seventh, and minor
seventh flatted fifth.
4. Lautstärke einstellen
Am Baßakkord-Automatik-Lautstärkeregler (VOLUME) @ kann die Lautstärke
der Gesamtlautstärke angepaßt werden.
5. Tempo einstellen
Am Rhythmus-Temporegler (TEMPO) ®
können Sie das Tempo wunschgemäß
einstellen.
Automatische Begleitung mit
Akkorden aus drei oder vier Tönen
1. Drücken Sie den EinfingerakkordSchalter (FINGERED CHORD)
2. Werden mehrere Tasten im Baß-AkkordAutomatik-Bereich ® angeschlagen, so
ertönt der entsprechende Akkord zusam
men mit einer automatischen Begleitung
aus Baßlinie und gewähltem Rhythmus.
Im Fingerakkord-Betrieb können folgende
Akkorde gespielt werden: Durakkorde,
Mollakkorde, Septimenakkorde, MollSeptimenakkorde, verminderte Akkorde,
übermäßige Akkorde, Dur-Septimen
akkorde und Moll-Septimenakkorde mit
erniedrigter Quinte.
4. Réglage du volume
Régler le volume de manière adéquate
en utilisant le contrôle de VOLUME ®
indépendant du dispositif Basses/
Accords Automatiques.
5. Réglage du tempo
Pour obtenir le tempo désiré, utilisez le
contrôle de TEMPO (g) de la section
rythmique.
Accompagnement automatique fondé
sur accords à trois ou quatre notes
1. Appuyez sur le sélecteur Accord à
Plusieurs Doigts (FINGERED
CHORD)
2. Lorsqu’on appuie sur plusieurs
touches de la section Touches
Basses/Accords Automatiques®,
l’accord qui en résulte sera joué avec
l’accompagnement automatique com
prenant basse et rythme choisi.
Dans le mode Accord à Plusieurs
Doigts, les accords suivants peuvent
être joués: majeur, mineur, septième,
septième mineure, accord diminué,
accord augmenté, septième majeure et
quinte bémolisée de septième mineure.
4. Fije el volumen
Ajuste el volumen para acoplarse al nivel
general utilizando el control independiente
de Volumen ^OLUME) @ del Acorde y
Bajo Automático.
5. Fije el tempo
Seleccione el tempo que desee utilizando el
control de Tempo (TEMPO) ® de la sección
de ritmo.
Para obtener acompañamiento
automático basado en acordes de
tres notas o cuatro notas
1. Pulse el selector de Acorde Digitado
(FINGERED CHORD)
2. Cuando se pulsa una combinación de
teclas localizadas en la sección de teclas
de Acorde y Bajo Automático ®, el
acorde resultante será tocado junto con el
acompañamiento automático consistente
en la h'nea de bajo y el ritmo seleccionado.
En la modalidad de Acorde Digitado, pueden
tocarse los siguientes acordes: mayor, menor,
séptima, séptima menor, disminuido,
aumentado, séptima mayor y quinta en
bemol de séptima menor.
Example Beispiel Exemple
I
---------
AUTO BASS CHORD
-----------------
1 |
---------
AUTO BASS CHORD
------------------
1 i
mi
C chord
G chord
23
---------
Ejemplo
AUTO BASS CHORD-
E
F chord
Page 26

Memory
This function is convenient for when you
change chords. If this selector is pressed
when the Single Finger Chord or Fingered
Chord mode is used, the bass pattern
and the strumming chords will continue
to play after you lift your finger(s) from
the keys. Therefore, you only have to
press the keys when you change chords.
If you prefer to hold down chords, you
must completely lift your finger(s) from
the keys when you change from one
chord to another, otherwise the chord
will not change correctly.
Memory-Funktion'
Diese Funktion ist beim Spielen von
Akkorden sehr vorteilhaft. Ist der MemorySchalter (MEMORY) gedrückt und befindet
sich das Instrument in der Einfingerakkord
oder Fingerakkord-Funktion, so ertönt die
Baß- und Akkordbegleitung noch weiter,
wenn Sie Ihren Finger von der Taste nehmen.
Somit braucht also nur beim Übergang zu
einem anderen Akkord eine Taste ange
schlagen zu werden. Beachten Sie, daß Sie
Ihre Finger erst ganz von den Tasten weg
nehmen müssen, bevor Sie einen neuen
Akkord anschlagen, da sonst kein richtiger
Akkordwechsel durchgeführt wird.
Mémoire
Cette fonction a son utilité lors du chan
gement d’accords. Si le sélecteur est
engagé lorsque le mode Accord à Un
Seul Doigt ou le mode Accords à
Plusieurs Doigts est utilisé, la basse et
les accords se prolongeront après que
vos doigts auront quitté les touches. En
conséquence, vous n’avez qu’à appuyer
sur les touches lors du changement
d’accords. Si vous préférez maintenir les
accords, vos doigts devront quitter les
touches quand vous passez d’un accord
à un autre, faute de quoi i’accord ne
changera pas correctement.
Memoria
Esa función es conveniente para cuando Ud.
cambie acordes. Si se pulsa este selector
cuando se utiliza la modalidad de Acorde de
Un Solo Dedo o Acorde Digitado, el patrón
de bajo y los acordes rasgueados continuarán
tocando después de separar el dedo(s) de las
teclas. Por lo tanto, sólo tiene que pulsar las
teclas cuando cambie acordes. Si prefiere
mantener los acordes, tiene que separar su
dedo(s) completamente de las teclas cuando
cambie de un acorde a otro, ya que si no, el
acorde no cambiará correctamente.
Variation
Press the VARIATION selector if you
want a different bass line and rhythm
accompaniment. Different patterns are
provided for each of the rh^hm patterns.
Arpeggio section
A special section called ARPEGGIO can
be seen to the right of the Auto Bass
Chord selectors^. This section pro
vides an effect similar to an experienced
keyboard player playing runs or progres
sions of notes up and down the key
board in a rippling effect.
This effect can be activated when the
Rhythm section and either the Single
Finger Chord or Fingered Chord mode
are being used. To use the Arpeggio
effect, first play a note or a chord in the
Auto Bass Chord key section ®. You
will hear the Arpeggio by sliding the
ARPEGGIO VOLUME control @ towards
MAX. Adjust the sound level to your per
sonal preference. To stop the Arpeggio
effect, slide the lever to MIN.
Variation
Durch Drücken des Variations-Schalters
(VARIATION) erhalten Sie unterschiedliche
Baßlinie und Rhythmusbegleitung. Alle vor
handenen Rhythmusfiguren können
geändert werden.
Arpeggio-Teil
Der Arpeggio-Teil befindet sich rechts neben
dem Baß-Akkord-Automatik-Teil ®.
Ähnlich wie ein erfahrener Spieler Läufe und
Sequenzen fließend aufwärts und abwärts
spielt, können Sie mit dieser Funktion
Akkorde in gebrochener Folge erklingen
lassen.
Das Arpeggio kann hinzugefügt werden,
wenn der Riiythmus-Teil entweder zusammen
mit der Einfingerakkord-oder FingerakkordFunktion verwendet wird. Spielen Sie
zunächst einen Ton oder einen Akkord aus
dem Baß-Akkord-Automatik-Bereich ®.
Schieben Sie dann den Arpeggio-Lautstärke-
regler (ARPEGGIO VOLUME) ® in
Richtung MAX, um die Lautstärke des
Arpeggios wunschgemäß einzustellen. Zum
Abschalten des Arpeggios schieben Sie den
Regler auf MIN.
Variation
Appuyez sur ie séiecteur VARIATiON si
vous désirez une basse et un accompag
nement rythmé différents. Diverses
structures peuvent être obtenues pour
chacune des structures rythmiques.
Section Arpège
La section spéciale Arpège (ARPEGGIO)
se trouve à droite des sélecteurs
Basses/Accords Automatiques®. Cette
section assure un effet comparable à
celui obtenu par un joueur expérimenté
qui agrémente son jeu d’une série
d’arpèges sur le clavier.
Cet effet peut être obtenu lorsque la
section Rythme et soit le mode Accord
à Un Seul Doigt soit le mode Accord à
Plusieurs Doigts sont utilisés. Pour
utiliser l’effet d’Arpège (ARPEGGIO),
jouez d’abord une note ou un accord de
la section Touches Basses/Accords
Automatiques®. L’effet d’Arpège est
obtenu par le déplacement du contrôle
Volume Arpège (ARPEGGIO VOLUME)
@ vers MAX. Régler le niveau sonore
selon votre préférence. Pour arrêter
l’effet d’Arpège, déplacez le contrôle
vers MIN.
Variación
Pulse el selector de Variación (VARIATION)
si desea una línea e bajo y un acompaña
miento diferentes. Existen patrones diferentes
para cada uno de los patrones de ritmo.
Sección de Arpegio
Puede verse una sección especial llamada
Arpegio (ARPEGGIO) a la derecha de los
selectores de Acorde y Bajo Automático ®.
Esta secéión proporciona un efecto
similar al de un experto intérprete de teclado
tocando corridos o progresiones de notas
arriba y abajo del teclado con un efecto
ondulante.
Este efecto puede activarse cuando la sección
de Ritmo y la modalidad de Acorde de Un
Solo Dedo o la de Acorde Digitado se estén
utilizando. Para usar el efecto de Arpegio,
toque primero una nota o un acorde en la
sección de teclas de Acorde y Bajo Auto
mático ®. Escuchará el arpegio deslizando
el control de Volumen de Arpegio
(ARPEGGIO VOLUME) @ hacia MAX.
Ajuste el nivel de sonido de acuerdo con sus
preferencias. Para detener el efecto de
Arpegio, deslice el control a MIN.
24
Page 27

Transposer
Transponierungsregler
Transpositeur
Transposicíonador
The TRANSPOSER (D lets you adjust
the PortaTone’s pitch to suit either a
singing voice — so anyone can sing
along as you play — or an instrument
such as a B*’ trumpet, clarinet or
saxophone. The right half of the dial is
for increasing the pitch up to half an
octave, and the left half for decreasing
up to half an octave.
External jacks
Several jacks are provided at the back
of the keyboard for connecting a variety
of optional accessories. There is also a
headphone jack at the front.
Mit dem Transponierungsregler
(TRANSPOSER) (O kann die Tonlage des
PortaTone entweder an eine Gesangsstimme
—so daß eine beliebige Person bei Ihrem
Spiel mitsingen kann—oder an ein Instrument
wie z.B. eine B-Trompete, eine Klarinette
oder ein Es-Saxophon angepaßt werden.
In der rechten Skalenhälfte erhält man
einen bis zu einer halben Oktave höheren
Ton und in der linken Hälfte einen bis zu
einer halben Oktave niedrigeren Ton.
Decrease pitch
Erniedrigen
Abaisse la hauteur du son
Disminuye el lono
Ansdilußmöglichkeiten
An der Rückseite des Instrumentes können
verschiedene Zubehörteile angeschlossen
werden. Außerdem ist an der Vorderseite
eine Kopfhörerbuchse vorhanden.
Le Transpositeur (TRANSPOSER) (D
permet de régler la hauteur tonale du
PortaTone et de l’ajuster soit à une voix
—un air peut être ainsi chanté pendant
l’exécution de la mélodie—soit à un
instrument tel qu’une trompette en si
bémol, une clarinette ou un saxophone
en mi bémol. La moitié droite du contrôle
permet d’augmenter la hauteur tonale
jusqu’à une demi-octave; la moitié
gauche, de la diminuer jusqu’à une
demi-octave.
Increase pitch
Erhóhen
Elève la hauteur du son
Aumenta el tono
Prises extérieures
Plusieurs prises sont fournies au dos du
clavier, destinées au branchement de
divers accessoires. Sur la partie
antérieure, se trouve aussi une prise
pour casque d’écoute.
El Transposicíonador (TRANSPOSER)®
le permite ajustar el tono del PortaTone para
acoplarse bien a una voz cantante—de manera
que cualquiera puede cantar mientras Ud. toca
—o a un instrumento, tal como una trompeta
afinada en B'’ clarinete, o Saxofón afinado
en E^ La mitad derecha del disco es para
aumentar el tono hasta media octava, y la
mitad izquierda es para disminuirlo hasta
media octava.
Contactos externos
Existen varios contactos en la parte posterior
del teclado para conectar una variedad de
accesorios opcionales. También hay un con
tacto para auriculares en la parte delantera.
A. External power source Jack (DC 9-12V
IN)
• AC power
Connect the optional AC power
Adaptor PA-4 to the DC 9-12V IN jack.
• Car battery
The Car Battery Adaptor CA-1 plugs
into the DC 9-12V IN jack and a
cigarette lighter socket.
B c D E
0 O
0 0
A. Fremdstrombuchse (DC- 9-12V IN)
• Netzstrom
Schließen Sie den als Sonderzubehör
erhältlichen Netzadapter PA-4 an die mit
DC 9-12V IN bezeichnete Buchse an.
• Autobatterie
Schließen Sie den als Sonderzubehör
erhältlichen Autobatterieadapter CA-1
an die mit DC 9-12V IN bezeichnete
Buchse und an die Zigarettenanzünder
buchse des Wagens an.
A. Prise pour source extérieure de
courant (CC 9—12V IN)
• Courant alternatif
Brancher l’adaptateur CA en option
PA-4 au jack CC 9—12V IN.
• Batterie automobile
L’adaptateur pour batterie automobile
CA-1 se branche sur la prise CC
9—12V IN et sur la prise d’allumecigare.
25
A.Contacto para fuente de potencia
externa (CC9-12V IN)
• Potencia CA
Conecte el adaptador de CA opcional
PA-4 al contacto de CC9-12V (DC
9-12V IN).
• Batería de automóvil
El adaptador para batería de automóvil
CA-1 se conecta al contacto de CC9-12V
(DC 9-12V IN) y al contacto del encende
dor de cigarrillos.
Page 28

B. Aux out jacks* (L&R)
You can channel sound through your
stereo system using these jacks. Also,
you can connect directly with a cassette
deck for recording. Use the optional
connecting cord PSC-3.
B. Ausgangsbuchsen* (AUX OUT L/R)
Mit diesen Buchsen ist auch eine Klang
wiedergabe über Ihre HIFIanlage möglich.
Außerdem können Sie diese Buchsen für
Aufnahmen direkt mit einem Cassettenrecorder verbinden. Verwenden Sie zum
Anschließen das als Sonderzubehör liefer
bare Anschlußkabel PSC-3.
B. Prises Aux Out* (L & R)
Ces prises permettent la reproduction
sonore par le biais de votre système
stéréo. Elles permettent, en outre, le
branchement sur un magnétophone, en
vue d’un enregistrement. Utilisez le
cordon de branchement en option PSC-3.
B. Contactos Aux Out* (I & D)
Ud. puede canalizar el sonido a través de
su equipo estereofónico utilizando estos
contactos. Además, puede conectarlo direc
tamente a una pletina de cassette para graba
ciones. Utilice el cable de ramificación
opcional PSC-3.
C. Aux in jack*
The AUX IN jack enables sound from a
record player or other audio component
to be channeled through PortaTone’s
speaker (the external sound source’s
volume cannot be controlled by the
MASTER VOLUME). Use this jack when
playing along with a record or other
music source.
* These jacks were designed to accommo
date the most commonly used impedances.
Significant deviation from these specifica
tions wiii result in inadequate drive, distor
tion, noise, and poor performance ir>
general. The use of AUX OUT and AUX IN
jacks at the same time causes howling or
other noise.
D. Expression pedai jack
The EXP. PEDAL jack is for connecting
the expression pedal (EP-1), which lets
you control the overall volume level
using your foot.
C. Eingangsbuchse* (AUX IN)
Unter Verwendung dieser Buchse kann ein
Plattenspieler oder eine andere HIFIKomponente über die Lautsprecher des
PortaTone wiedergegeben werden. Die
Lautstärke der externen Programmquelle
kann nicht am Hauptlautstärkeregler
(MASTER VOLUME) geregelt werden.
Diese Buchse ist nützlich, wenn Sie zur
Wiedergabe einer Schallplatte oder einer
anderen Programmquelle spielen möchten.
*Diese Buchsen sind für die üblichen Impe
danzen ausgelegt. Weichen die Impedanzen der
angeschlossenen Geräte stark vom normalen
Wert ab, so kann dies zu Verzerrungen,
Rauschen und schlechter Klangqualität führen.
Werden die Eingangs- und Ausgangsbuchsen
gleichzeitig verwendet, kann es zu Rick
kopplung kommen.
D. Fußschwellerbuchse (EXP. PEDAL)
Die mit EXP. PEDAL Gezeichnete Buchse
dient zum Anschließen des Fußschwellers
(EP-1), mit dem sich die Gesamtlautstärke
regeln läßt.
C. Prise Aux In*
La prise AUX IN permet la transmission
du son à partir d’un tournedisques ou
autre composant audio vers le haut-
parleur du PortaTone. (A noter que le
volume de la source sonore extérieure
ne peut pas être contrôlé par le Volume
Principal (MASTER VOLUME). Utilisez
cette prise lorsque vous jouez “en
tandem” avec un disque ou une autre
source musicale.
* Ces prises ont été conçues pour répondre
aux impédances les plus fréquemment
utilisées. Une disparité trop marquée par
rapport à ces spécifications se traduira par
un entraînement défectueux, des distor
sions, du bruit et une performance géné
ralement peu satisfaisante. L’utilisation
simultanée des prises AUX OUT et AUX IN
se traduit par divers bruits.
D. Prise de pédale d’expression
La prise de pédale d’expression sert au
branchement de la Pédale d’expression
(EP-1); grâce à celle-ci. Il vous est pos
sible de contrôler—au pied—le volume
global.
C. Contacto Aux In*
El contacto AUX IN permite que el sonido
de un giradiscos u otro audiocomponente
sea canalizado a través de la altavoz del
PortaTone (el volumen de la fuente de
sonido externa no puede ser controlado
por el Volumen Principal (MASTER
VOLUME). Utilice este contacto cuando
toque con un disco u otra fuente musical.
*Estos contactos han sido diseñados para
acomodarse a las impedancias más común
mente utilizadas. Las diferencias considerables
en las especificaciones resultarán en dirección
inadecuada, distorsión, ruido y bajo rendi
miento en general. El uso de los contactos
AUX OUT y AUX IN al mismo tiempo,
origina sonidos aullantes y otros ruidos.
D. Contacto de pedal de expresión
El contatcto de pedal de expresión (EXP.
PEDAL) es para conectar el Pedal de
Expresión (EP-1), que le permite contro
lar el nivel de volumen general, utilizando
su pie.
E. Sustain jack
This jack is for connecting the optional
sustain pedal (FC-5), and permits on/off
control of the Sustain effect on the
Orchestra and Solo voices by foot. The
length of sustain can be controlled by
the Orchestra and Solo Sustain controls.
E. Sustainbuchse
An dieser Buchse kann das als Sonderzu
behör lieferbare Sustain-Pedal (FC-5), mit
dem Sie den Sustain-Effekt für Orchesterund Solostimmen ein- und ausschalten
können, angeschlossen werden. Die SustainLänge kann am Orchester- und Solo-SustainRegler eingestellt werden.
E. Prise de “Sustain”
Cette prise sert au branchement de la
Pédale de “Sustain” en option (FC-5);
celle-ci permet de contrôler (marche/
arrêt)—au pied—l’effet “sustain” des
voix Solo et Orchestre. Quant à la durée
de l’effet “sustain”, elle peut être contrô
lée grâce au contrôle “Sustain” Orchestre
et Solo.
26
E. Contacto de sostenido
Este contacto es para conectar el pedal de
sostenido opcional (FC-5), y permite el
control on/off del efecto de sostenido de
las voces de Orquesta y Solo con el pie.
La duración del sostenido puede contro
larse con los controles de Sostenido de
Orquesta y Solo.
Page 29

F. Headphone jack
Connect a set of headphones to this
jack and you can practice without dis
turbing others.
F. Kopfhörerbuchse
Hier kann ein Kopfhörer angeschlossen
werden. Sie können dann üben, ohne
andere zu stören.
F. Prise de casque d’écoute
Permet ie branchement à un casque
d’écoute; celui-ci vous permet de
pratiquer vos exercices sans nuire à la
tranquillité de votre entourage.
F. Contacto de auriculares
Conecte un juego de auricularses a este
contacto y podrá practicar sin causar
molestias a nadie.
Optional accessories
•AC Power Adaptor (PA-4)
Transforms AC voltage to DC voltage.
•Car Battery Adaptor (CA-1)
Enables you to provide power to the
instrument from a car battery using the
cigarette lighter socket.
•Headphones (YH series)
Specially designed lightweight dynamic
headphones with extra-soft ear pads.
•Connecting Cord (PSC-3)
For connecting the keyboard to a stereo
hi-fi system or cassette tape deck.
•Expression Pedai (EP-1)
Lets you add more feeling to music by
enabling subtle control of the overall
volume level.
•Sustain Pedai (FC-5)
This pedal enables on/off control of the
sustain effect by foot. It is particularly
effective when the PIANO voice is used,
since it provides damper-like control.
•Keyboard Stand (L-2)
•Bench (BC-2)
•Soft Carrying Case (S-6)
Sonderzubehör
•Netzadapter (PA-4)
Dieser Adapter wandelt Netzspannung in
12V Gleichspannung um.
•Autobatterieadapter (CA-1)
Dieser Adapter kann an die Zigarettenan
zünderbuchse Ihres Wagens angeschlossen
werden, um das Instrument von der Auto
batterie zu versorgen.
•Kopfhörer (YH-Serie)
Speziell entwickelter, leichter, dynamischer
Kopfhörer mit besonders weichen
Ohrpolstern.
•Anschlußkabel (PSC-3)
Zum Anschluß des Instrumentes an eine
HIFIanlage oder ein Cassettendeck.
•Fußschweller (EP-1)
Mit diesem Pedal läßt sich die Gesamtlaut
stärke individuell regeln, um Musik aus
drucksvoller wiederzugeben.
•Sustain-Pedal (FC-5)
Mit diesem Pedal können Sie den SustainEffekt mit Ihrem Fuß ein- und ausschalten.
Da damit eine Art Dämpfung bewirkt wird,
kann dieses Pedal besonders bei einer
Piano-Stimme sehr wirkungsvoll eingesetzt
werden.
•Keyboard-Stand (L-2G)
•Bank (BC-2)
•Tragetasche (S-6G)
Accessoires en option
•Adaptateur courant alternatif (PA-4)
Transforme le voltage CA en voltage 00.
•Adaptateur batterie automobile
(CA-1)
Assure l’alimentation de l’instrument à
partir d’une batterie automobile, en
utilisant l’allume-cigare du tableau
de bord.
•Casque d’écoute (série YH)
Un casque “dynamique”: spécialement
conçu, léger et doté de coussinets extra
doux.
•Cordon de branchement (PSC-3)
Permet le branchement du clavier à un
système stéréo haute fidélité ou à un
magnétophone.
•Pedale d’expression (EP-1)
Grâce à un contrôle subtil du volume
global, elle permet de nuancer l’expres
sion musicale.
•Pédale “Sustain” (FC-5)
Elle permet le contrôle marche/arrêt—
au pied—de l’effet “sustain”. Cet effet
est à recommander, lorsque la voix
PIANO est en sen/ice; il s’apparente à
l’effet de sourdine.
•Support de clavier (L-2)
•Banquette (BC-2)
•Etui (S-6)
Accesorios opcionales
• Adaptador de potencia CA (PA-4)
Transforma el voltaje CA en voltaje CC.
• Adaptador para batería de automóvil
(CA-1)
Le permite proporcionar potencia al instru
mento desde la batería del automóvil
utilizando el contacto del encendedor de
cigarrillos.
• Auriculaite (serie YH)
Auriculares dinámicos ligeros, especialmente
diseñados, con almohadillas extra-suaves.
• Cable de conexión (PSC-3)
Para conectar el teclado a un sistema hi-fi
estéreo o a una pletina de cassette.
• Pedal de Expresión (EP-1)
Le permite añadir más sentimiento a la
música haciendo posible un control más sutil
del nivel de volumen general.
• Pedal de Sostenido (FC-S)
Este pedal permite el control on/off del
efecto de sostenido con el pie. Es particular
mente efectivo cuando se usa la voz de
PIANO, ya que ofrece un control similar al
apagador.
• Soporte del teclado (L-2)
• Asiento (BC-2)
• Estuche blando para transporte (S-6)
Some optional accessories may not be
available in every region.
Möglicherweise sind in einigen ländern nicht
alle Sonderzubehörteile erhältlich.
A noter que certains accessoires en
option peuvent ne pas être disponibles dans
chaque région.
27
Puede que algunos de los accesorios opcionales
no estén disponibles en todas las regiones.
Page 30

Taking care of the
PC-1000 and
Playcards
Nützliche Hinweise
Entretien du PC-1000
et des “Playcards”
Cuidados del PC-1000
у de las tarjetas
Playcard
Your PortaTone PC-1000 and Playcards
will remain in excellent condition if care
is taken concerning the following.
PC-1000
1. Occasionally clean the reading head
located in the groove by sliding the
head cleaning card (included) along
the Playcard groove several times.
2. Keep the Playcard groove free of dust
and other foreign matter, otherwise
damage to the head may occur.
3. When you use AC power, be sure to
use the optional PA-4 adaptor.
Before use, read the adaptor instruc
tions carefully. In particular, please
note that in some cases the PA-4 is
provided with a voltage selector, so
confirm that this selector is correctly
set.
4. The optional Car Battery Adaptor
CA-1 is only for use with a negative
ground 12V battery. Ensure that this
is the case before connecting the
adaptor.
5. Connections made between the
PortaTone PC-1000 and any other
device should be made with both
units turned off.
6. Do not set the MASTER VOLUME at
MAX when you connect the Porta
Tone PC-1000 to a stereo system.
Use the stereo system’s volume
control to adjust the sound level.
7. Avoid placing the instrument in exces
sively humid areas.
8. Do not subject the unit to physical
shock, and avoid placing anything
heavy on it.
9. The PortaTone PC-1000 should not
be placed in direct sunlight for a
long time.
10. Do not place the instrument near
any heating appliance, or leave it
inside a car in direct sunlight for
any length of time. Direct sunshine
can raise the interior temperature of
a car with closed doors and windows
to as high as 80°C (176°F). Tempera
tures in excess of 60°C (140°F) can
cause physical and/or electrical
damage not covered by warranty.
Damit Sie immer Freude an Ihrem Porta
Tone PC-1000 haben, beachten Sie bitte die
folgenden Punkte.
PC-1000
1.Reinigen Sie gelegentlich den im ,,Playcard“-Schlitz befindlichen Lesekopf,
indem Sie die Reinigungskarte (mitgelie
fert) mehrmals in den Schlitz schieben.
2.Schützen Sie den ,,Playcard“-Schlitz vor
Staub und fremden Gegenständen, da es
sonst zu einer Beschädigung des Kopfes
kommen kann.
3. Verwenden Sie für Netzbetrieb aus
schließlich den als Sonderzubehör liefer
baren Adapter PA-4, und lesen Sie vor
der Verwendung die Bedienungsan
leitung durch. In einigen Ländern ist
der PA-4 mit einem Spannungswähler
ausgestattet. Achten Sie dann besonders
darauf, daß dieser richtig eingestellt ist.
4. Der als Sonderzubehör erhältliche Auto
batterieadapter CA-1 ist nur für eine
negativ geerdete 12V-Batterie geeignet.
Vergewissern Sie sich vor dem An
schließen des Adapters, ob dies bei Ihrer
Wagenbatterie der Fall ist.
5. Beim Anschließen von PortaTone
PC-1000 an andere Geräte sollten alle
Geräte ausgeschaltet sein.
6. Stellen Sie den Hauptlautstärkeregler
(MASTER VOLUME) nicht auf MAX,
wenn das PortaTone PC-1000 an eine
HIFIanlage angeschlosssen ist. Verwenden
Sie zur Lautstärkeeinstellung den Laut
stärkeregler der HIFIanlage.
7. Halten Sie das Instrument von extrem
feuchten Plätzen fern.
8.Schützen Sie das Instrument vor
mechanischen Stößen, und stellen Sie
keine schweren Gegenständen darauf.
9. Setzen Sie das PortaTone PC-1000 nicht
längere Zeit direktem Sonnenlicht aus.
10. Halten Sie das PortaTone PC-1000 von
Heizungen fern, und lassen Sie es nicht
in einem Auto, das direkt in der Sonne
geparkt ist. Bei einem mit geschlossenen
Türen und Fenstern in der prallen
Sonne geparkten Wagen kann die
Innentemperatur bis auf 80°C ansteigen.
Bei extrem hohen Temperaturen (60 °C
oder höher) können die mechanischen
Votre PortaTone PC-1000 restera en
excellente condition, si les points suivants
sont observés.
PC-1000
1. Procédez de temps en temps au netto
yage de la tête de lecture située dans
la rainure, en déplaçant la carte de
nettoyage de tête (comprise) le long de
la rainure plusieurs fois.
2. Veillez à ce que la rainure ne contienne
ni poussière ni corps étranger, suscep
tible d’endommager la tête.
3. En cas d’utilisation du courant alter
natif, veillez à utiliser l’adaptateur PA-4
en option. Avant l’utilisation de ce
dernier, lire soigneusement les
instructions s’y rapportant. Il convient
de noter, en particulier, que, dans
certains cas, le PA-4 est fourni avec
un sélecteur de voltage; veillez, dans
cette hypothèse, à ce que le sélecteur
soit correctement réglé.
4. L’adaptateur batterie automobile CA-1
en option ne doit être utilisé qu’avec
une batterie négative de 12V. Assurez-
vous que cette condition est remplie
avant le branchement de l’adaptateur.
5. En cas de branchements entre le
PortaTone et tout autre appareil,
assurez-vous que les deux blocs sont
bien en position d’arrêt.
6. Lors du branchement du PortaTone
PC-1000 à un système stéréo, ne
réglez pas le Volume Principal
(MASTER VOLUME) sur la position
MAX. Utilisez le contrôle de volume
du système stéréo pour le réglage du
niveau sonore.
7. Evitez de piacer i’instrument dans des
lieux où l’humidité est excessive.
8. Ne pas soumettre l’instrument à
des chocs. Veillez aussi à ne pas
placer d’objet pesant sur l’instrument.
9. Evitez d’exposer directement au soleil
votre PortaTone PC-1000 pour une
longue durée.
10. Ne pas placer l’instrument à proximité
d’une source de chaleur quelconque.
Evitez aussi de le laisser dans une
voiture, exposé directement au soleil
pour une longue durée. Le rayonne-
Su PortaTone PC-1000 permanecerá en
excelente condición si se toman los cuidados
siguientes.
PC-1000
1. Limpiar de vez en cuando la cabeza
lectora localizada en la hendidura, desli
zando la tarjeta limpiadora de cabeza
(incluida) por la hendidura varias veces.
2. Mantener la hendidura de tarjetas Play
card limpia de polvo y materias extrañas,
ya que pueden ocasionar daños a la cabeza.
3. Cuando utilice potencia CA, asegúrese
de utilizar el adaptador opcional PA-4.
Antes de usarlo, lea detenidamente las ins
trucciones del adaptador. Sírvase notar
que en algunos casos el PA-4 está
provisto de un selector de voltaje, con
firmando que este selector esté dispuesto
correctamente.
4. El adaptador opcional para batería de
automóvil CA-1 es para utilizarse única
mente con batería de tierra negativa de
12V. Asegúrese de que éste sea el caso
antes de conectar el adaptador.
5. Las,conexiones entre el PortaTone
PC-'lOOO y cualquier otro dispositivo
deberán hacerse con ambas unidades
apagadas.
6. No ajuste el Volumen Principal
(MASTER VOLUME) a MAX cuando
conecte el PortaTone PC-1000 a un equipo
estereofónico. Utilice el control de
volumen del equipo estereofónico para
ajustar el nivel de sonido.
7. Evite dejar el instrumento en áreas
excesivamente húmedas.
8. Evite los impactos físicos a la unidad, y
no coloque nada pesado sobre ella.
9. El PortaTone PC-1000 no deberá dejarse
durante largo tiempo expuesto directa
mente a la luz del sol.
10. No coloque el instrumento cerca de fuentes
de calor, ni lo deje dentro del auto
móvil al sol. La luz solar directa puede
elevar la temperatura interior de un auto
móvil con las puertas y ventanas cerradas
hasta 80°C (176°F). A temperaturas
superiores a 60°C (140°F) se pueden
originar daños físicos y/o eléctricos, que
no cubrirá la garantía.
11. Utilice un paño seco o humedecido con
28
Page 31

11. Use a dry or damp cloth for cleaning.
12. Use the dust cover in order to
protect the keyboard from dust.
und/oder elektrischen Teile des Instru
mentes beschädigt werden. Derartige
Schäden werden nicht von der Garantie
gedeckt.
11. Verwenden Sie zur Reinigung ein
trockenes oder leicht angefeuchtetes Tuch.
12. Bewahren Sie das PortTone PC-IOOO
stets in seiner Tasche auf, um es vor Staub
zu schützen.
ment solaire direct peut, en effet,
élever la température à l’intérieur
d’une voiture fermée jusqu’à 80°C
(176° F). Soumis à des températures
de plus de 60°C (140°F), l’instrument
risque d’être endommagé et/ou de
présenter des défailiances éiectriques
non couvertes par la garantie.
11. Pour le nettoyage utilisez un morceau
d’étoffe sec ou humide.
12. Utilisez l’étui à poussière afin d’assurer
la protection du clavier.
agua para limpiarlo.
12.Utilice la cubierta contra el polvo para
proteger el teclado contra el polvo.
Playcards
1. Handle the Playcards carefully so
that the magnetic strips do not
become damaged in any way, and
ensure that you insert them in the
correct direction (see page 6).
2. Don’t place Playcards on the speaker
since the speaker’s magnet may
affect the recorded data. For the
same reason, do not put the Play
cards near a TV, amplifier or other
product having a magnetic field.
3. It is better not to touch the magnetic
strip with your fingers.
4. If water of alcohol is spilled on a Playcard, wipe it off immediately and allow
the Playcard to dry before using it.
5. Clean the Playcards with a soft cloth
when they become dirty.
6. Never put cleaning agents such as
thinner or benzine on the magnetic
strip.
7. Avoid placing the Playcards in exces
sively humid and high-temperature
areas.
8. Do not leave the Playcards in direct
sunlight.
9. When you aren’t using the Playcards,
keep them in their protective enve
lopes.
,,Playcards“ (Notenkarten)
1. Gehen Sie vorsichtig mit den ,, Play
cards“ um, damit der Magnetstreifen
nicht beschädigt wird. Stecken Sie die
Karten nicht seitenverkehrt ein (Seite 6).
2. Legen Sie die ,,Playcards“ nicht auf
einen Lautsprecher, da sonst die aufge
zeichneten Daten durch den Lautspre
chermagneten gelöscht werden können.
Aus dem gleichen Grund müssen die
,,Playcard“ auch von anderen Geräten
mit starken Magnetfeldern wie z.B.
Fernseher und Verstärker ferngehalten
werden.
3. Berühren Sie den Magnetstreifen
möglichst nicht mit den Fingern.
4. Sollten Wasser oder alkoholische
Getränke auf die ,,Playcard“ gelangen,
wischen Sie sie sofort ab, und lassen
Sie sie trocken, bevor Sie sie wieder
benutzen.
5. Verwenden Sie zur Reiningung einer
verschmutzten ,,Playcard“ ein trockenes
Tuch.
6. Verwenden Sie zur Säuberung des
Magnetstreifens niemals Reinigungs
flüssigkeiten wie Verdünner oder Benzin.
7. Halten Sie die ,,Playcards“ vor extrem
feuchten und heißen Plätzen fern.
8. Legen Sie die ,,Playcards“ nicht
längere Zeit die pralle Sonne.
9. Bewahren Sie die ,,Playcards“ stets in
ihren Schutzhüllen auf, wenn sie nicht
verwendet werden.
“Playcards”
1. II est recommandé de manier les
"Playcards” soigneusement, afin de
ne pas endommanger les pistes
magnétiques. Veillez, par ailleurs, à
les insérer dans la direction appro
priée (voir P.6).
2. Ne pas placer les “Playcards” sur le
haut-parleur: l’aimant du haut-parleur
pourrait, en effet, avoir une incidence
fâcheuse sur les données enregistrées.
Pour la même raison, ne pas placer
les “Playcards” à proximité d’un
téléviseur, d’un amplificateur ou quel
conque appareil possédant un champ
magnétique.
3. Il est recommandé de ne pas toucher
la piste magnétique avec les doigts.
4. Au cas où de l’eau ou de l’alcool
serait renversé (e) sur une “Playcard”,
essuyez immédiatement le liquide et
assurez-vous que la “Playcard” est
parfaitement sèche avant son utilisa
tion.
5. Nettoyez les “Playcards” — lorsque
cela s’avère nécessaire — avec une
étoffe douce.
6. Veillez à ne jamais mettre de produits
nettoyants — tels que dissolvant ou
benzine — sur la piste magnétique.
7. Evitez de placer les “Playcards” dans
des lieux excessivement humides ou
chauds.
8. Evitez d’exposer les “Playcards” au
rayonnement solaire direct.
9. Quand vous n’utilisez pas les “Play
cards”, il est recommandé de les
laisser dans leurs enveloppes
protectrices.
Tarjetas Playcard
1. Manejar las tarjetas Playcard cuidadosa
mente para que las franjas magnéticas no
resulten dañadas, y asegúrese de inser
tarlas en la dirección correcta (ver pág.6).
2. No coloque las tarjetas sobre el altavoz ya
que el imán de éste puede afectar a la
información grabada. Por la misma razón,
no coloque las tarjetas cerca de un
televisor, amplificador u otro producto
que tenga campo magnético.
3. Es mejor no tocar la franja magnética
con los dedos.
4. Si se deja caer alcohol o agua sobre la
tarjeta Playcard, limpiarla iimiediatamente y dejar que se seque antes de usarla.
5. Limpie las tarjetas Playcard con un paño
suave cuando se ensucien.
6. No poner nunca agentes limpiadores
como acetona o bencina sobre la franja
magnética.
7. Evite colocar las tarjetas en áreas excesi
vamente húmedas o calurosas.
8. No deje las tarjetas bajo la acción directa
de la luz solar.
9. Cuando no utilice las tarjetas, guárdelas
en sus sobres protectores.
29
Page 32

Specifications
Keyboard
49 keys (Cl—Cs)
Playcard System
Free Tempo, Auto Play, Singalong, Melody
Cancel, Chord Lesson, Chord Cancel, Stop,
Phrase Repeat, Instrumental Sequencer,
Preset Balance Cancel, Melody Lamps, Chord
Lamps
Solo (Melody)
Piccolo, Organ, Trumpet, Oboe, Clarinet,
Violin, Synthe, Banjo, Piano, Harpsichord,
Guitar, Vibes
Orchestra (Obbligato)
Jazz Organ, Pipe Organ, Brass, String, Jazz
Flute, Olarinet, Reed, Music Box, Piano,
Harpsichord, Jazz Guitar, Vibes
Effects
(Solo) Sustain, Vibrato Depth, Celeste
(Orchestra) Sustain
Rhythms
Swing, Slow Rook, Disco 1, Disco 2, Rock 1,
Rock 2, 16 Beat, Rook’n’Roll, Bossanova,
Tango, Rhumba, Samba, March/Polka, March
6/8, Waltz, Jazz Waltz, Handclap 1, 2, 3, Fill-in
Variation (1, 2, 3, 4, 5), Start, Synchro Start,
Tempo, Volume, Tempo Light
Auto Bass Chord
Normal, Single Finger Chord, Fingered Chord,
Memory, Variation, Volume, Chord Name
Display
Arpeggio
Volume, Variation
Transposer
1/2 octave high and low
Pitch Control
±50 cents
Other Controls
Power Switch, Power-On Light, Master Volume
Auxiliary Jacks
Headphones, DC 9-12V In, Aux Out (L&R),
Aux In, Expression Pedal, Sustain
Amplifiers
5W (4!))
Speaker
12om (4-3/4")
Rated Voltage
DC 9V (Six 1.5V SUM-1, “D” size, R-20 or
equivalent batteries, AC Power Adaptor, Car
Battery Adaptor)
Dimensions
863mm(W) x 259mm(D) x 85mm(H)
(34"x10-1/4"x3-3/8")
Weight
5.8kg (12.8 lbs.) without batteries
Technische Daten
Tastatur
49 Tasten (C—c'")
„PIaycard“-System
Tempoautomaiik-Schalter, Automatisches
Spielen, Mitsingen, Meiodie-Lösch-Schalter,
Akkordübung, Akkord-Löschung, Stop,
Phrasenwiederholung, InstrumentenabfolgeSchalter, Aufheben der Balancevoreinstellung,
Melodie-Lampen, Akkord-Lampen
Solo (Melodie)
Piccolo, Orgel, Trompete, Oboe, Klarinette,
Violine, Synthesizer, Banjo, Piano, Cembalo,
Gitarre, Vibraphon
Orchester (Obligato)
Jazz-Orgel, Orgel, Blechbläser, Streicher, JazzFlöte, Klarinette, Rohrblatt, Music Box, Piano,
Cembalo, Jazz-Gitarre, Vibraphon
Effekte
(Solo) Sustain, Vibratointensität, Celeste
(Orchester) Sustain
Rhythmen
Swing, Slow Rock, Disco 1, Disco 2, Rock 1,
Rock 2, 16 Beat, Rock’n’Roll, Bossanova, Tango,
Rumba, Samba, Marsch/Polka, 6/8 Marsch,
Walzer, Jazz-Walzer, Händeklatschen 1, 2, 3,
Schlagzeugsolo-Variation (1, 2, 3, 4, 5), Start,
Synchro-Start, Tempo, Lautstärke, Tempolampe
Baß-Akkord-Automatik
Normal, Einfingerakkord, Fingerakkord, Memory,
Variation, Lautstärke, Anzeige der Akkordbezeich
nung
Arpeggio
Lautstärke, Variation
Transponierungsregler
1/2 Oktave höher und niedriger
Tonhöhenregler
± 50 Cent
Weitere Bedienungselemente und Anzeigen
Ein/Aus-Schalter, Einschaltanzeige, Hauptlaut
stärkeregler
Anschlußbuchsen
Kopfhörer, Eingang für 9-12V Gleichspannung,
Tonausgang (L/R), Toneingang, Fußschweller,
Sustain
Verstärker
5W (4ß)
Lautsprecher
12cm
Nennspannung
9V Gleichspannung (sechs 1,5V Monozellen, R-20
oder entsprechende Batterien; Netzadapter; Auto
batterieadapter)
Abmessungen
863mm(B) X 259mm(T) x 85mm(H)
Gewicht
5,8kg ohne Batterien
Spécifications
Clavier
49 touches (Doi—Dos)
Système “Playcard”
Tempo Libre, Exécution Automatique, Chant
d’accompagnement. Annulation de la Mélodie,
Apprentissage d’Accord, Annulation de
l’Accord, Arrêt, Répétition de Phrase,
Séquenceur Instrumental, Annulation de la
Balance Préréglée, Lampes de Mélodie,
Lampes d'Accord
Solo (Mélodie)
Piccolo, Orgue, Trompette, Hautbois,
Clarinette, Violon, Synthe, Banjo, Piano,
Clavecin, Guitare, Vibraphone
Orchestre (Partie obliged)
Orgue jazz. Orgue, Ouivres, Cordes, Flûte jazz.
Clarinette, Chalumeau, Boîte à musique,
Piano, Clavecin, Guitare jazz. Vibraphone
Effets
(Solo) Sustain, Profondeur vibrato. Céleste
(Orchestre) Sustain
Rythmes
Swing, Slow Rock, Disco 1, Disco 2, Rock 1,
Rock 2, 16-Beat, Rock’n’Roll, Bossanova,
Tango, Rumba, Samba, Marche/Polka,
Marche 6/8, Valse, Valse jazz, Battements de
mains 1, 2, 3, Variation Fill In (1, 2, 3, 4, 5),
Départ, Départ Synchro, Tempo, Volume,
Lampe de tempo
Basses/Accords Automatiques
Normal Accord à un seul doigt. Accord à
plusieurs doigts. Mémoire, Variation
Arpège
Volume, Variation, Affichage du Nom de
l’Accord
Transpositeur
1/2 octave vers le haut et vers le bas
Contrôle hauteur tonale
±50 Cents
Autres contrôles
Interrupteur d’alimentation, Voyant lumineux
de marche, Volume principal
Jacks auxiliaires
Casque d’écoute, CC 9—12V In, Aux Out
(L&R), Aux In, Pédale d’expression, Sustain
Amplificateur
5W (40)
Haut-parleur
12cm (4-3/4")
Voltage nominal
CC 9V (six 1,5V SUM-1, format “D”, R-20
ou piles équivalentes. Adaptateur CA,
Adaptateur batterie automobile)
Dimensions
863mm(L) x 259mm(P) x 85mm(H)
(34" X10-1/4" X 3-3/8")
Poids
5,8kg (12,8 Ibs.) non compris les piles
Especificaciones
Teclado
49 teclas (Ci—Cs)
Sistema de tarjetas Playcard
Tempo Libre, Ejecución Automática, Para cantar
con la melodia, Anulación de Melodia, Lección de
Acorde, Anulación del Acorde, Parada, Repetición
de Frases, Secuenciador Instrumental, Anulación
del Balance Preseleccionado, Luces de Melodía,
Luces de Acorde
Solo (Melodía)
Pícolo, Organo, Trompeta, Oboe, Clarinete, Violín,
Sintetizador, Banjo, Piano, Clavicordio, Guitarra,
Vibràfono
Orquesta (Obligado)
Organo de Jazz, Organo de Tubos, Metales,
Cuerdas, Flauta de Jazz, Clarinete, Armonio,
Caja de Música, Piano, Clavicordio, Guitarra
de Jazz, Vibràfono
Efectos
(Solo) Sostenido, Profundidad de Vibrato, Celeste
(Orquesta) Sostenido
Ritmos
Swing, Rock Lento, Disco 1, Disco 2, Rock 1,
Rock 2, Ritmo 16, Rock’n’Roll, Bosanova, Tango,
Rumba, Samba, Marcha/Polka, Marcha 6/8, Vals,
Jazz Vals, Palmas 1, 2, 3, Variación de Relleno
(1, 2, 3, 4, 5), Arranque, Arranque Sincronizado,
Tempo, Volumen, Luz de Tempo
Acorde y Bajo Automático
Normal, Acorde de Un Solo Dedo, Acorde
Digitado, Memoria, Variación, Volumen, Indicación
de Nombre del Acorde
Arpegio ,
Volumen, Variación
Transposicionador
1/2 octava alta y baja
Control de Tono
± 50 cents
Otros Controles
Interruptor de Potencia, Luz de Conexión, Volumen
Principal
Contactos Auxiliares
Auriculares, CC 9-12V IN, Aux Out (I&D), Aux
In, Pedal de Expresión, Sostenido
Amplificador
5W (411)
Altavoz
12cm (4-3/4")
Voltaje Nominal
CC 9V (Seis baterías de 1,5V SUM-1, tamaño “D”,
R-20 0 equivalentes. Adaptador de Potencia CA,
Adaptador para batería de automóvil)
Dimensiones
863mm(An) X 259mm(Fondo) x 85mm(Al)
(34" X 10-1/4" X3-3/8")
Peso
5,8kg (12,8 Ibs.) excluyendo baterías
30
Page 33

Playcard Library
Playcard-Bibliothek
Fichier de
Biblioteca de tarjetas
There are numerous pieces of music in
the Playcard Library, so by the time you’ve
mastered them all you will have a very big
repertoire!
The selection is diverse. There are
popular hits, standards, screen music,
Latin numbers, classical music, Walt
Disney favorites, and the music of Paul
McCartney, Billy Joel, Barry Manllow, and
other popular artists. Each Playcard
Library package contains six Playcards.
POPULAR Arthur’s Theme
HITS 1 Antohio's Song
(17-547) Good-Bye Girl
Him
Upside Down
Can’t Smile Without You
POPULAR Bette Davis Eyes
HITS 2 Guilty
(17-552) I Write The Songs
POPULAR Don’t Cry Out Loud
HITS 3 Heartbreaker
(17-553) Woman In Love
You Needed Me
Breezin’
Feel Like Makin’ Love
Making Love
Modern Girl
Shadows In The Moonlight
Die Playcard-Bibliothek enthält eine Viel
zahl von Musikstücken, so daß Sie sich ein
großes eigenes Repertoir aneignen können.
Das Angebot ist vielfältig: aktuelle Schlager,
Evergreens, Filmmusik, lateinamerikanische
Musik, Klassik, Walt Disney Melodien, Stücke
von Paul McCartney, Billy Joel, Barry
Manilow und vieles mehr. Jeder PlaycardBibliothek-Satz enthält sechs Playcards.
GREAT In The Mood
STANDARDS 3 Charade
(17-555) By The Time 1 Get To Phoenix
GREAT Sunny
STANDARDS 4 Love is Blue
(17-562) Try To Remember
MIXED The Dock Of The Bay
POPS 1 Give Me The Night
(17-570) Windy
Fly Me To The Moon
This Guy’s In Love With You
Jambalaya
People
The Third Man Theme
Till
1 Am Woman
1 Go To Rio
An Old Fashioned Love Song
“Playcards”
Le Fichier de “Playcards” contient une
variété impressionnante de morceaux de
musique. Quand vous les connaîtrez tous,
vous aurez un répertoire enviable! Le
choix est varié: succès populaires,
chansons courantes, musique de films,
airs latins, classiques, airs de Walt Disney,
mélodies de Paul McCartney, Billy Joel,
Barry Manilow et autres artistes populaires.
Chaque Fichier “Playcard” contient six
“Playcards”.
FAVORITE Someday My Prince Will Come
DISNEY It’s A Small World
crtKinc Feed The Birds
oUNUo Chim Chim Cher-ee
(DISNEY’S Mickey Mouse March
COLLECTION) When You Wish Upon A Star
(17-550)
SCREEN star Trek
THEMES 1 Lovestory
(17-544) A Time For Us
Best of Dancing Queen
ABBA Songs
(17-542) Tiger
Moon River
Theme From Godfather
Ready To Take A Chance Again
® That’s Me
Summer Night City
The Winner Takes It All
Playcard
Hay numerosas piezas musicales en la Biblio
teca Playcard, de manera que cuando ya las
domine lodtis, Ud. tendrá un gran repertorio.
La seleeción es muy variada. Hay éxitos
populares, temas estándar, música de películas,
temas latinos, música clásica, canciones de
Walt Disney, y la música de Paul McCartney,
Billy Joel, Barry Manilow y otros conocidos
artistas. Cada paquete de la Biblioteca
Playcard contiene seis tarjetas.
Best of Don’t Ask Me Why
BILLY Honesty
I/-.CI It’s Still Rock And Roll To Me
, Piano Man
(17-569) She’s Always A Woman
Best of Copacabana
BARRY Fven Now
MANILOW 1 Made it Through The Rain
, Weekend In New England
(17-568) When 1 Wanted You
Best of Back Home Again
JOHN Follow Me
nPKn/ER Leaving On A Jet Plane
LTEirivcri Rocky Mountain High
(17-558) Take Me Home, Country Roads
My Life
Sunshine On My Shoulders
POPULAR Endless Love
HITS 4 For Your Eyes Only
(17-554) Private Eyes
GREAT Night And Day
STANDARDS 1 Gays Of Wine And Roses
(17-545) Theme From Summer Of’42
GREAT Ebbtide
STANDARDS 2 °j'®''JJi®,Flainbow
(17-546) It Was A Good Time
This Masquerade
Just The Way You Are
Physical
As Time Goes By
Softly As In A Morning Sunrise
’Round Midnight
The Shadow Of Your Smile
Singin’ In The Rain
Somewhere My Love
GOSPEL 1 Peace In The Valley
(17-572) Wh ither Thou Goest
SWING Honeysuckle Rose
TIME 1 I’hi Beginning To See The Light
(17-575) You Turned The Tables On Me
SING ALONG Brother John
FAVORITES il“'‘“'angSyne
(17-571) Come Home
He
Turn Your Radio On
Wings Of A Dove
How Great Thou Art
It’s Only A Paper Moon
All Of Me
Moonglow
Happy Birthday To You
You Are My Sunshine
Michael, Row The Boat Ashore
Bill Bailey, Won’t You Please
Best of Band On The Run
рди|_ Ebony And Ivory
^^^'CARTNEY Listen To What The Man Said
, , My Love
(17-559) Silly Love Songs
Best of 1 Won’t Last A Day Without You
T|-|E Only Yesterday
r'ADDCKiTEDC Rainy Days And Mondays
UMrircn 1 crte jop Of The ffvorid
(17-565) Yesterday Once More
Best of Cold, Cold Heart
HANK 1 Saw The Light
urn 1 lAMC I’m So Lonesome 1 Could Cry
WILLIAMS Hey, Good Lookin’
(17-574) Your Cheatin’Heart
We’ve Only Just Begun
You Win Again
31
Best of All Shook Up
ELVIS Can’t Help Falling In Love
pnpQi Ev Crying In The Chapel
rncoLCT 1 yyant You, 1 Need You, 1 Love
, Jailhouse Rock
(17-563) Love Me Tender
Best of California Girls
BEACH Fun, Fun, Fun
Rr^vc i Good Vibrations
RUTS 1 Help Me Rhonda
, 1 Get Around
(17-564) Wouldn’t It Be Nice
Best of Ballade Pour Adeline
RICHARD Lyphard Melodie
r-i AvnEDMAM Concerto Pour Une Jeune Fille
CLAYDERMAN Nommee “Je T’aime”
(17-543) Serenade De L’etoile
You
Souvenirs D’enfance
Voyage A Venise
Page 34

CHRISTMAS
SONGS 1
(17-557)
CHRISTMAS The Christmas Song
SONGS 2
(17-561) 0 Tannenbaum
EASY Chim Chim Cher-ee
PLAYCARD
(17-614) Londonderry Air
LATIN
FAVORITES 1
(17-548)
LATIN El Reloj
FAVORITES 2
(17-549)
EASY On The Beautiful Blue Danube
CLASSICS 1
(17-551)
EASY
CLASSICS 2
(17-556)
JAZZ
STANDARDS
(17-560)
BROADWAY
MUSICAL 1
(MY FAIR LADY)
(17-566)
BROADWAY Easy Street
MUSICAL 2
(ANNIE)
(17-567) Without A Smile
Silent Night
Jingle Bells
Rudolph, The Red-nosed
Reindeer
Santa Claus Is Cornin’ To Town
Joy To The World
0 Come, All Ye Faithful
Frosty The Snowman
Have Yourself A Merry Little
Christmas
Here Comes Santa Claus
Les Anges Dans Nos
Campagnes
Little Brown Jug
Moon River
When The Saints Go Marchin’ In
Dancing Queen
La Cucaracha
La Chapanecas
Marla Elena
Aquarela Do Brasil
Besame Mucho
La Paloma
Adoro
La Bamba
Quien Sera
La Cumparsita
El Chocio
Dance Of The Hours
Symphony No. 40, G min, K550
Swan Lake
Menuett
Cradle Song
Ode To Joy
The Wave Of The Danube
Nocturne
Air From Orchestral Suite No. 3
Plume In The Summer Wind
Slavonic March
Tenderly
Body And Soul
My Funny Valentine
1 Left My Heart In San Francisco
You’d Be So Nice To Come
Home To
Les Feuilles Mortes (Autumn
Leaves)
Get Me To The Church On Time
The Rain In Spain
I’ve Grown Accustomed To Her
Face
On The Street Where You Live
With A Little Bit Of Luck
Wouldn’t It Be Lovely
1 Think I’m Gonna Like It Here
It’s The Hard-Knock Life
Maybe
Tomorrow
You’re Never Fully Dressed
COUNTRY
&
WESTERN 1
(17-573)
COUNTRY
&
WESTERN 2
(17-577)
HAWAIIAN
FAVORITES 1
(17-576)
Best of
THE
BEATLES
(17-541)
Nobody Likes Sad Songs
Release Me
Ruby, Don’t Take Your Love To
Town
Little Green Apples
Crazy
Don’t It Make My Brown Eyes
Blue
Any Time
Bouquet Of Roses
Candy Kisses
Detour
I Really Don’t Want To Know
Green Green Grass Of Home
Now Is The Hour
The Hawaiian Wedding Song
Sleepy Lagoon
Pearly Shells
Tiny Bubbles
Quiet Village
Let It Be
Michelle
Here, There And Everywhere
Hey Jude
The Long And Winding Road
Lady Madonna
STEP-BY-STEP
Learning Playcard 1 (17-674)
STEP-BY-STEP
Learning Piaycard 2 (17-675)
STEP-BY-STEP
Learning Piaycard 3 (17-688)
Some Playearás may not be available in every region.
Piaycard Jacket designs and the contents of some Piaycard
packages may be changed without notice.
In einigen Gebieten sind möglicherweise nicht alle „Playearás”
lieferbar. Änderungen des Designs der „Playcard”-Hülle oder der
„Piaycard” selbst bleiben vorlxhalten.
Certaines "Piaycard” du fichier peuvent ne pas être disponibles
dans chaque région. La présentation des "Playeards” et le
contenu de certains fichiers "Playeards”peuvent faire l'objet de
modifications sans préavis.
Algunas tarjetas Playeará no se podrán adquirir en todas las regiones.
Los diseños de las tarjetas Playcard y el contenido de algunos
paquetes de tarjetas, podrán ser cambiados sin previo aviso.
Attention users in the U.S.A.
PortaTone PC-1000 prepared in accordance with
FCC ruies.
The PortaTone PC-1000 uses frequencies that appear in
the radio frequency range, and if installed in the immediate
proximity (within three meters) of some types of audio
or video devices interference may occur.
The PortaTone PC-10(X) has been type tested and found
to comply with the specifications set for a Class B comput
ing device in accordance with those specifications listed
in Subpart J of Part 15 of the FCC rules. These rules are
designed to provide a reasonable measure of protection
against such interference. However, this does not
guarantee that interference will not occur. If your Porta
Tone PC-10(X) should be suspected of causing interference
with other electronic devices, verification can be made
by turning your PortaTone PC-7000 off and on. If the
interference continues when your PortaTone PC-1000 is off,
PortaTone PC-7000 is not the source of the interference.
If your PortaTone PC-7000 does appear to be the source
of the interference, you should try to correct the situation
by using one or more of the following measures:
Relocate either the PortaTone PC-7000 or the elec
tronic device that is being affected by the interference.
Utilize power outlets for the PortaTone PC-7000
and the device being affected that are on different branch
(circuit breaker or fuse) circuits, or install A/C line filters.
In the case of radio-TV interference, relocate the
antenna or, if the antenna lead-in is a 300 ohm ribbon
lead, change the lead-in to a co-axial type cable.
If these corrective measures do not produce
satisfactory results, please contact your Authorized
Yamaha Specialty Products dealer for suggestions andfor
corrective measures. If you cannot locate an Authorized
Yamaha Specialty Products dealer in your general area,
contact the Specialty Products Service Center, Yamaha
International, 6600 Orangethorpe Ave., Buena Park, CA
90620.
If for any reason you should need additional informa
tion relating to radio or TV interference, you may find a
booklet prepared by the Federal Communications Com
mission helpful: "How to Identify and Resolve Radio-TV
Interference Problems”. This booklet is available from the
U.S. Government Printing Office, Washington D.C. 20402
— Stock #004-000-345-4.
32
Page 35

N« “ 0 YAMAHA
NIPPON GAKKI CO„ LTD. HAMAMATSU, JAPAN
The serial nurnber of this product may be found on
the bottom of the unit. You should note this serial
number in the space provided below and retain this
manual as a permanent record of your purchase to
aid identification in the event of theft.
Model No.
Serial No.
PC-1000
Concerning Warranty
This product was made for international distribution,
and since the warranty for this type of product varies
from marketing area to marketing area, please
contact the selling agency for information concern
ing the applicable warranty and/or service policies.
Die Seriennummer befindet sich an der Unterseite des
Instrumentes. Wir empfehlen, diese Nummer sicherheits
halber an der unten vorgesehenen Stelle einzutragen, um
sie auch im Falle eines Diebstahls jederzeit zur Hand zu
haben.
Modell-Nr. PC-1000
Le numéro de série de ce produit figure au bas du
bloc. Il conviendra de noter ce numéro de série dans
l’espace réservé au-dessous et de conserver ce
manuel: celui-ci constitue le document permanent de
votre achat et permet l’identification en cas de vol.
Modèle No. PC-1000
Serien-Nr. No. rie série:
Remarque relative à la garantie
Hinweis zur Garantie
Dieses Produkt wird international vertrieben, und
die Garantiebedingungen sind von Vertriebsland zu
Vertriebsland verschieden. Ihr Händler gibt Ihnen
gerne genauere Informationen zu den in Ihrem Land
gültigen Garantie- und/oder Servicebedingungen.
Ce modèle est destiné à être distribué à l’échelle
internationale. Etant donné que les conditions de
garantie pour ce type de produit varient en fonction
des zones de commercialisation, prière de prendre
contact avec l’agence chargée des ventes pour tous
renseignements relatifs aux conditions de garantie
et de service après-vente.
E1 número de serie de este producto se encuentra en la parte
inferior de la unidad. Sírvase anotar este número de serie en
el espacio proporcionado debajo y guarde este manual
como comprobante de compra para ayudar a la identifica
ción en caso de robo.
№ de modelo PC-IOOQ
№ de serie
______________________________________
_______________
Concerniente a la garantía
Este producto ha sido fabricado para ser distribuido inter
nacionalmente y, como la garantía para este tipo de
producto varía en relación a su área de comercialización,
sirvase consultar con el agente de ventas sobre la informa
ción en torno a la garantía aplicable y/o políticas de
servicio.
Ф @ Printed in Japan 11.84
 Loading...