

Page 1
YAMAHA.
Owners Cuide
Bedienungsanleitung
¡g
€
Manuel cfínsiructions
Manual del Propietario
PartdSouixd
® YAMAHA
Page 2
Thank you for purchasing a Yamaha
PortaSound PC-100. It’s a revolu
tionary product that iets you enjoy
playing and learning keyboard music
in a variety of ways. You can learn
melodies quickiy with the Playcard
System, and with the Auto Bass
Chord system you can start piaying
professionai-like accompaniment —
using just one finger — today! You
can also use your PC-100 as a 44note portable keyboard — a keyboard
that gives you multipie choices of
instrument voices and rhythm ac
companiments, too.
PortaSound PC-100, with its broad
range of great features, introduces
you to a new worid of musical fun
and pleasure. To be sure you get
maximum satisfaction, we suggest
you foliow the steps in the Owner’s
Guide carefully while actually play
ing the instrument.
Wir bedanken uns für den Kauf des
Yamaha PortaSound PC-100. Es han
delt sich hier um ein vollkommen neues
Produkt, das mit einer Vielfalt von
interessanten Spielmöglichkeiten ausge
stattet ist und mit dem Sie mühelos
lernen, ^uf einer Tastatur zu spielen.
Zum schnellen Erlernen von Melodien
ist ein „Playcard“-System vorgesehen,
und dank der Baßakkord-Automatik
können Sie gleich vom ersten Tag an mit
einem einzigen Finger professionell klin
gende Musik spielen—sogar mit Beglei
tung! Weiterhin können Sie das PC-100
auch als portable 44-Töne-Tastatur
verwenden—mit verschiedenen Instru
mentalstimmen und mit RhythmusBegleitung.
Sie werden sicher bald an den vielen
Sonderfunktionen Freude finden. Um
alle gebotenen Spielmöglichkeiten aus
schöpfen zu können, gehen Sie zunächst
die Anleitung sorgfältig durch. Probie
ren Sie dabei gleich alle Punkte direkt
am PortaSound aus, um sich mit ihm
vertraut zu machen.
Tout d’abord merci pour la confiance
que vous témoignez à Yamaha pour
son PortaSound PC-100. Le Porta
Sound PC-100 — un modèle révolu
tionnaire — vous permet d’apprécier
la musique et d’en jouer, au clavier,
de bien des manières.
Vous pouvez — dès aujourd’hui —
apprendre rapidement des mélodies
grâce au Système “Playcard”. Quant
au Système Basses/Accords Auto
matique, il vous permet — sur la
pression d’un seul doigt — d’exé
cuter des accompagnements profes
sionnels. Enfin, vous pouvez utiliser
toutes les ressources de votre PC100, clavier portatif à 44 notes offrant
un choix étendu de sonorités d’inst
ruments et d’accompagnements
rythmés.
Le PortaSound PC-100 — grâce à
sa riche gamme de possibilités —
vous ouvre un champ étendu de
divertissements musicaux, en fait un
nouveau monde fertile en sensations
musicales.
Afin d’utiliser pleinement les res
sources de votre PortaSound PC-100,
nous vous conseillons vivement de
suivre scrupuleusement les instruc
tions du Manuel, au cours de l’utilisa
tion de votre instrument.
Gracias рог haber adquirido un Porta
Sound PC-100 de Yamaha. Es un pro
ducto revolucionario que le permite dis
frutar tocando y aprendiendo música de
teclado en una diversidad de maneras.
Puede aprender melodias rápidamente
con el sistema Playcard (tarjetas
musicales), y con el sistema de Acorde y
Bajo Automático puede empezar a tocar
con acompañamiento profesionalizado
— utilizando un solo dedo — ¡Hoy
mismo! También puede utilizar su PC100 como teclado portátil de 44 notas
— un teclado que le ofrece múltiples
selecciones de voces instrumentales y
acompañamientos de ritmo también.
El PortaSound PC-100, con su
amplia gama de posibilidades, le intro
duce a un nuevo mundo de placer y
diversión musical. Para sacar el máximo
partido, le sugerimos que siga las indi
caciones del Manual del Propietario,
cuando toque el instrumento.
Contents
1. Before playing
2. Nomenclature ..................................
3. Playcard System ............................. ....4
4. How to use all the other
features
5. Making use of the jacks ... ...18
6. Optional accessories
7. Taking care of the PC-100
and Playcards ............................... ...20 7. Nützliche Hinweise .......................
8. Specifications
9. Playcard Library .............................
10. Troubleshooting
................................
.........................................
.....................
................................
............................
....1 1. Vor dem Spielen
....2 2. Bezeichnung der 2. Nomenclature
...12 4. Verwendung der anderen fonctions ...........................................
...19 5. Anschlußmöglichkeiten
...22 8. Technische Daten
...23 9. ,,Playcard“-Bibliothek
...24 10. Störungsüberprüfungen ....
Inhalt Table des matières
..........................
Bedienungselemente
3. ,,Playcard“-System ......................
Funktionen
6. Sonderzubehör
..................................
.............................
........................
.................
..............
..................
........
1 1. Avant de jouer
......
........
......
......
......
......
......
......
......
2
12
18
19
20
22
23
24
3. Système “Playcard”
4. Mode d’utilisation des autres musicales) ........................................ ....4
4
5. Mode d’utilisation des jacks ..
6. Accessoires en option
7. Entretien du PC-100 et des
“Playcards”
8. Spécifications
9. Fichier de “Playcards”
10. Détection d’une défaillance
éventuelle
....................................
.....................................
...........................
......................
..................... ...............
....................................
......................
..........................................
Indice
..1 1. Antes de tocar ..................................
..2 2. Nomenclatura
..4
.12
.18
.19
20
22
.23
25
3. Sistema Playcard (tarjetas
4. Cómo utilizar las demás
características
5. Utilización de los contactos .... ..18
6. Accesorios opcionales .....................
7. Cuidados del PC-100 y de las
tarjetas Playcard .............................
8. Especificaciones
9. Biblioteca de tarjetas
Playcard ........................................... ..23
10. Solución de problemas
...................................
................................
.............................
..................
....1
....2
..12
..19
..20
..22
..25
Page 3

'
4
«
Before Playing
The 3-way power system
PortaSound PC-100 operates on internal
batteries or, with optional power adaptors,
on household current or a car battery.
Inserting batteries
Remove the battery compartment cover
on the bottom of the instrument and
insert six 1.5V SUM-2, “C” size, R-14, or
equivalent batteries (sold separately),
making sure that the polarities are correct
as indicated on the base of the instru
ment. Replace the cover, ensuring that it
locks securely in place. When the internal
batteries are weak and need replacing,
the Power-on light flashes on and off.
Optional power adaptors
Household current: Power Adaptor PA-1 is
available for household current.
Car battery: Car Battery Adaptor CA-1
plugs into a car cigarette lighter socket.
Carrying case
The carrying case also serves as a music
rest when you use music sheets other
than Playcards. Two convenient pockets
in the case enable you to store Playcards,
but no more than 5 cards should be put in
each pocket otherwise the Playcards or
keyboard — or both — may be damaged.
Handiing the Playcards
Included with your PC-100 are 12 Play
cards and one head cleaning card. Follow
the instructions in Section 3 (page 4)
when you use the Playcards. Care should
be taken in handling the Playcards, as
described on page 21.
Vor dem Spielen
3-Weg-Stromversorgung
Das PortaSound PC-100 kann entweder
über die eingesetzten Batterien, über Netz
strom oder über eine Autobatterie betrieben
werden. In den beiden letzten Fällen sind als
Sonderzubehör erhältliche Adapter erfor
derlich.
Einsetzen der Batterien
Nehmen Sie den Batteriefachdeckel am
Boden des Instrumentes ab, und legen Sie
sechs l,5V-Babyzellen (nicht mitgeliefert)
unter Beachtung der auf der Unterseite an
gegebenen Polarität ein. Bringen Sie den
Deckel wieder an, und achten Sie darauf,
daß er einrastet. Sind die Batterien erschöpt
und müssen ersetzt werden, so blinkt die
Einschaltanzeige.
Als Sonderzubehör erhältliche Adapter
Für Netzstrom: Verwenden Sie zum An
schluß an eine Netzsteckdose den Netz
adapter PA-1.
Für Betrieb über Autobatterie: Verwenden
Sie zum Anschluß an die Zigaretten
anzünderbuchse Ihres Wagens den Auto
batterieadapter CA-1.
liragekoffer
Dieser Koffer dient auch als Notenständer,
wenn nicht die „Playcards” (Spielkarten),
sondern Notenblätter verwendet werden.
Zum bequemen Aufbewahren der ,,Play
cards“ sind im Koffer zwei Taschen vorgese
hen. Stecken Sie aber nicht mehr als 5 Karten
in eine Tasche, da sonst die Karten, das
Gerät oder beides beschädigt werden
könnten.
Behandeln der „Playcards“ (Spielkarten)
Bei der PC-100 werden 12 ,,Playcards“ und
eine Reinigungskarte mitgeliefert. Halten Sie
sich beim Verwenden der Karten an die
Erläuterungen von Kapitel 3 (Seite 4), und
beachten Sie auch die auf Seite 21 befind
lichen Hinweise zum Umgang mit den
,,Playcards“.
Avant de jouer
Le triple système d’alimentation
Le PortaSound PC-100 fonctionne soit
sur piles internes; soit sur le courant
secteur ou sur une batterie automobile,
des adaptateurs en option étant
nécessaires dans ces deux derniers cas.
Insertion des piles
Retirer le couvercle du compartiment des
piles situé sous l’appareil et insérer 6
piles SUM-2 de 1,5V, format “C”, R-14, ou
piles équivalentes (vendues séparément);
veiller à ce que les polarités soient con
formes à l’indication stipulée sur la base
de l’instrument. Remettre le couvercle en
place, en s’assurant de son parfait ver
rouillage. Quand les plies internes sont en
perte de puissance et que leur remplace
ment s’impose, le clignotant d’alimenta
tion s’allume et s’éteint.
Adaptateurs en option
Courant secteur: L’adaptateur PA-1 —
convenant au courant secteur — est
disponible.
Batterie automobile: L’adaptateur CA-1 —
prévu pour batterie automobile — se
branche sur l’allume-cigare du tableau
de bord.
Etui
En cas d’utilisation de partitions musi
cales — au lieu de “Playcards” — l’étui
peut être utilisé comme porte-partitions.
L’étui est doté de deux poches judicieuse
ment prévues pour le stockage des “Play
cards”. Veiller à ne pas y stocker plus de 5
cartes par poche, afin de ne pas causer
de dommage aux cartes ou ou clavier.
Maniement des “Piaycards”
Votre PC-100 est doté de 12 cartes et
d’une carte de nettoyage de tête. Se
conformer aux instructions stipulées à la
Section 3 (Page 4), lors de l’utilisation des
“Playcards”. Le maniement des “Play
cards” doit s’effectuer méticuleusement,
conformément aux instructions de la
Page 21.
Antes de tocar
El sistema de potencia de 3 vías
El PortaSound PC-100 funciona con
baterías internas o, utilizando adaptadores
de potencia opcionales, con corriente
doméstica o con batería del automóvil.
Inserción de las haterías
Extraer la cubierta del compartimiento de
baterías de la parte inferior del instrumento e
insertar seis baterías de 1,5V SUM-2, de
tamaño “C”, R-14 o equivalentes (vendidas
por separado), asegurándose de que las
polaridades sean correctas tal y como se
indica en la base del instrumento. Volver a
colocar la cubierta, asegurándola en su
posición. Cuando las baterías estén des
cargándose y necesiten cambiarse, la luz de
conexión se iluminará intermitentemente.
Adaptadores de potencia opcionales
Corriente doméstica: El adaptador de
potencia PA-1 está disponible para co
rriente doméstica.
Batería del automóvil: El adaptador de
batería del automóvil CA-1 se conecta al
contacto del encendedor de cigaríllos del
automóvil.
Caja de transporte
La caja de transporte sirve también como
soporte musical cuando utilice partitures de
música aparte de las tarjetas Playcard. Los
dos bolsillos de la caja resultan muy con
venientes ya que le permiten guardar las
tarjetas Playcard, pero no deben guardarse
más de cinco tarjetas en cada bolsillo ya que
las tarjetas o el teclado — o ambos —
pueden dañarse.
Manejo de las Playcards
Con su PC-100 se incluyen 12 Playcards y
una tarjeta limpiadora de cabeza. Siga las
instrucciones de la Sección 3 (pág. 4) cuando
utilice las tarjetas. Tomar las precauciones
convenientes al manejar las Playcards, como
se describe en la página 21.
Page 4
1
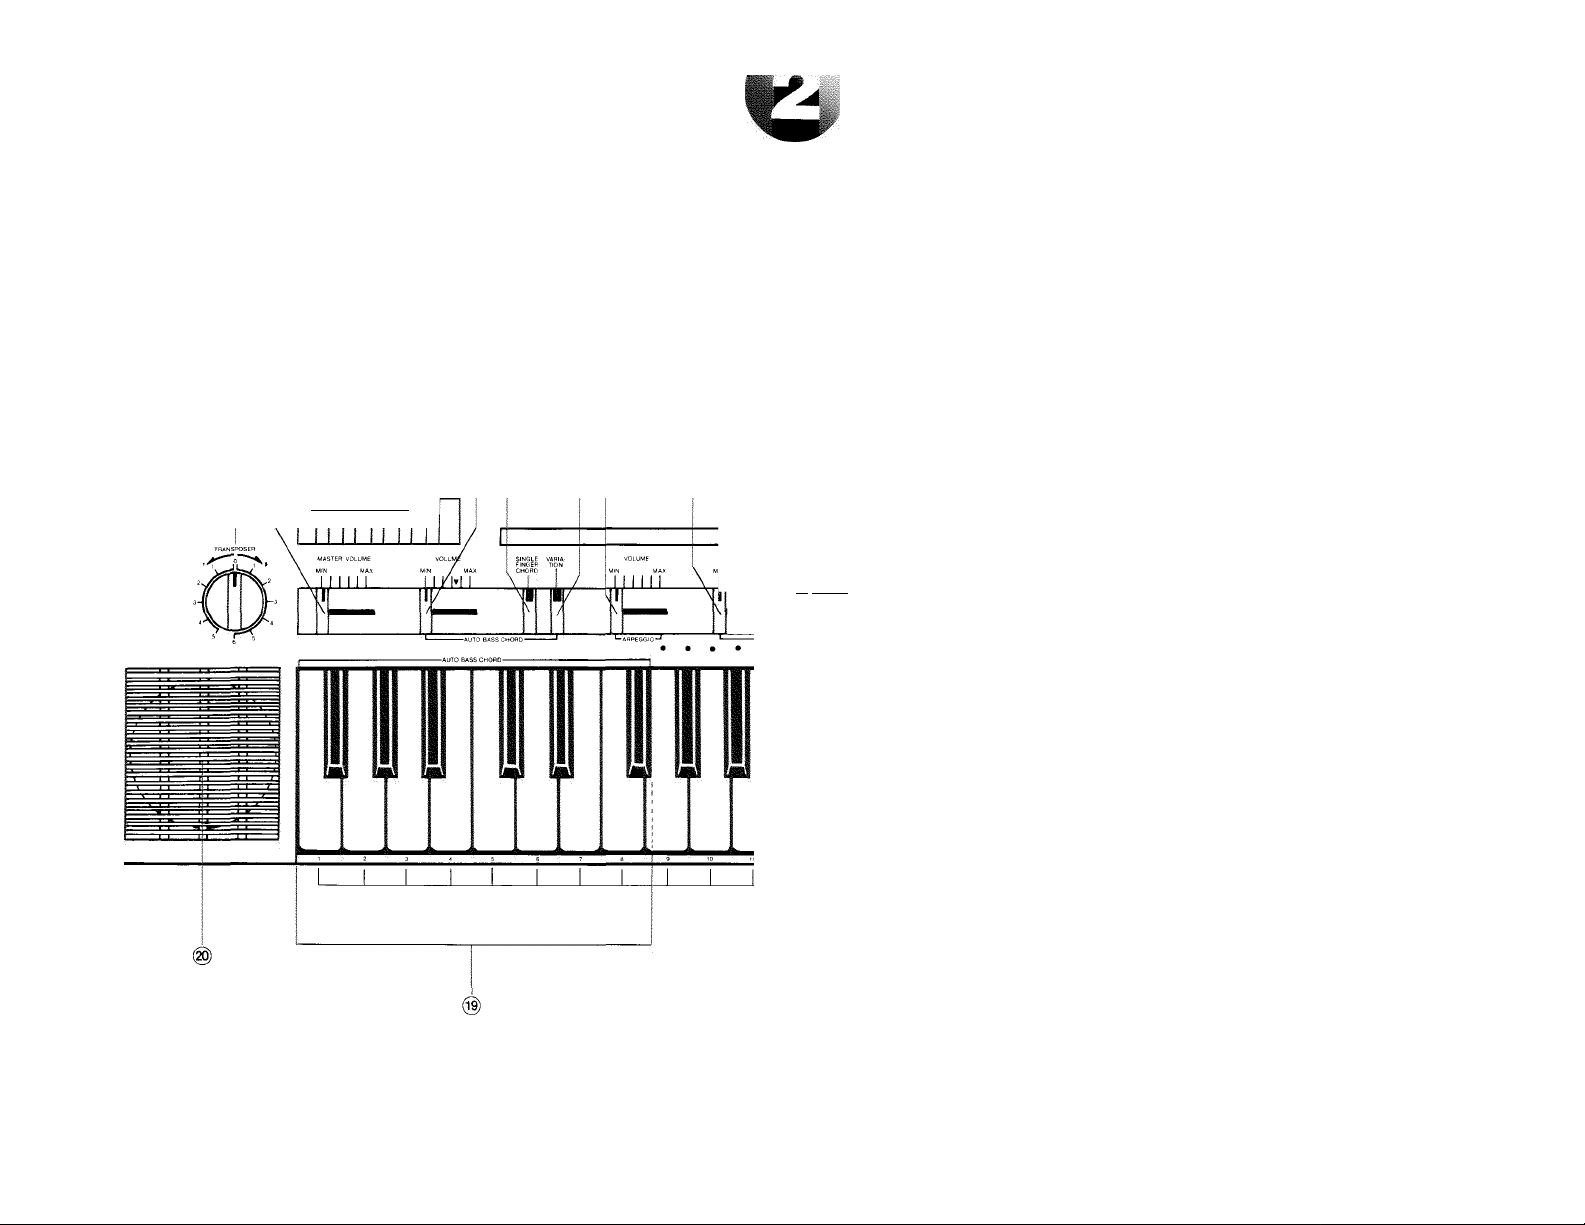
Nomenclature
YAMAHA
PartaSaurvd pcino
2 3
Bezeichnung der Bedìenungselemente
©
© @ © ® ©
ftaycarif
fBIE£ MELOtiT
REPEAT CANCLL TEMPO CANCi.l. I
TÉriÉ-ÉntnÉ
® ® ® @ ®
Nomenclature
IN MAX \ SLOW FAST
LLUU
___
V|J lili
SLOW i BOSSA-
Nomenclatura
13
ORGAN TRUM Cl_ARl PIANO GUITAR H
PICCOLO VIOLIN OBOE CHO^io F'MOTJE JL SUSTAIN
r
—ORCHESTRA —
Page 5

® Playcard System buttons
A) PLAY
B) MELODY CANCEL
C) FREE TEMPO
D) LAMP CANCEL
E) REPEAT
@ Transposer
@ Master Volume
® Auto Bass Chord Volume
® Single Finger Chord
® Auto Bass Chord Variation
® Arpeggio
® Rhythm Volume
@ Tempo Control
® Rhythm Selectors
® Synchro Start
® Tempo Light
@ Instrument Voice Selectors
(3) Sustain
® Playcard Groove
(16) Power Switch
@ Repeat Keys (with Phrase Numbers)
@ Melody Lamps
@ Auto Bass Chord Key Section
@ Speaker
@ Pitch Control (on bottom, under cap)
@ Jacks (on side)
® Schalter für das „Playcard“-System
A) Spielstart-Schalter (PLAY)
B) Melodie-Lösch-Schalter (NffiLCDY
CANCEL)
C) Tempoautomatik-Schalter
(FREE TEMPC)
D) Lampen-Lösch-Schalter
(LAMP CANCEL)
E) Wiederhol-Schalter (REPEAT)
@ Transponierungsregler
® Hauptlautstärkeregler
@ Baßakkord-Automatik-Lautstärkeregler
® Einfmgerakkord-Schalter
® Baßakkord- Automatik-Variations
schalter
@ Arpeggio-Lautstärkeregler
® Rhythmus-Lautstärkeregler
® Temporegler
® Rhythmus-Wahlschalter
® Synchron-Start-Schalter
@ Tempoanzeige
® Instrumentalstimmen-Register
@ Sustain-Schalter
® ,,Playcard“-Schlitz
@ Ein-Aus-Schalter
@ Wiederhol-Tasten (mit Phrasennummer)
@ Melodie-Lampen
® Tasten für den Baßakkord-Automatik-
Teil
(® Lautsprecher
@ Tonhöhenregler (am Boden unter einer
Kappe)
@ Anschlußbuchsen (an der Seite)
® Touches du Système “Playcard”
A) Exécution du Morceau (“PLAY”)
B) Annulation de la Mélodie
(“MELODY CANCEL”)
C) Tempo Libre (“FREE TEMPO”)
D) Annulation des Lampes (“LAMP
CANCEL”)
E) Répétition (“REPEAT”)
@ Transposeur
@ Volume Principal
@ Volume Basses/Accords Automati
ques
® Accord à Un Seul Doigt
® Variation Basses/Accords Automati
ques
@ Arpège
® Volume Rythme
® Contrôle Tempo
@ Sélecteurs de Rythme
@ Départ Synchro
@ Lampe Tempo
@ Sélecteurs Voix Instrumentales
@ Sustain
® Rainure “Playcard”
@ Interrupteur d’alimentation
® Touches Répétition (avec Numéros
des Phrases)
@ Lampes de Mélodie @ Luces de Melodia
® Section Touches Basses/Accords
Automatiques
Haut-parleur
(g) Contrôle Hauteur de Son (au bas,
sous élément protecteur) bajo la tapa)
(§) Jacks (sur le côté)
® Botones del sistema Playcard
A) Toque (PLAY)
B) Anulación de Melodía
(MELODY CANCEL)
C) Tiempo Libre (FREE TEMPO)
D) Anulación de Luz (LAMP
CANCEL)
E) Repetición (REPEAT)
@ Transposicionador
@ Volumen Principal
@ Volumen de Acorde y Bajo
Automático
® Acorde de Un Solo Dedo
® Variación de Acorde y Bajo
Automático
® Arpegio
® Volumen de Ritmo
@ Control de Tiempo
@ Selectores de Ritmo
® Arranque Sincronizado
@ Luz de Tiempo
@ Selectores de Voces Instrumentales
@ Sostenido
® Hendidura para Playcard
@ Interruptor de Potencia
@ Teclas de Repetición (con Números de
Frase)
@ Sección de Teclas de Acorde y Bajo
Automático
(® Altavoz
@ Control de Tono (en la parte inferior,
@ Contactos (en el lateral)
Page 6
Playcard System
,,Playcard“-System
Système “Playcard”
Sistema Playcard (taijetas musicales)
Why not start off playing music using the
PC-IOO’s biggest feature: the Playcard
System.
YAMAHA
PartaSouivd hiod
1 i
iri i k
Playeareis
Each Playcard has a music score together
with a magnetic strip on one side, and in
structions for use on the other. The
magnetic strip has musical data recorded
on it. This data comprises a melody, obbli
gato, chords, rhythm accompaniment,
drum fill-ins, bass line, instrument voices,
program instructions, and, when appro
priate, arpeggios. The PC-100 memorizes
all this information when you slide the
Playcard across the instrument’s reading
head.
Am besten beginnen Sie mit der außergewöhlichsten aller Spielmöglichkeiten: dem
Playeard-System.
1
........
..............
........................................................................................................................................................^^ ^ ............................................................................
„Playcards“ (Spielkarten)
Auf der einen Seite dieser ,,Playcards“ be
finden sich die Partitur und ein Magnet
streifen, auf der anderen die Anleitung. Auf
dem Magnetstreifen sind die Musik-Daten
abgespeichert. Diese Daten enthalten die
Melodie, die obligaten Stimmen, die
Akkorde, die Rhythmus-Begleitung, den
Schlagzeug-Einsatz, die Baßlinie, die Instru
mentalstimmen, Programmanweisungen und
gegebenenfalls auch die Arpeggien. Alle
diese Information werden im PC-IOO abge
speichert, weim eine ,,Playcard“ über den
Lesekopf des Instruments gleitet.
Une suggestion: commencez à jouer en
tirant parti des ressources offertes par le
système le plus accompli du PC-100: le
Système “Playcard”.
Mill
JÉLÉJÍlJ^
“Playeareis”
Chaque “Playcard” comporte, d’un côté,
une partition musicale associée à une
piste magnétique; de l’autre, les instruc
tions relatives à son utilisation. La piste
musicale contient des données musica
les dûment enregistrées. Ces données
comportent une mélodie, une partie
obligée, des accords, un accompagne
ment rythmé, des passages de batterie,
une suite de basses, des voix instrumen
tales, des instructions programmées et
— selon les cas — des arpèges. Le PC100 met en mémoire l’ensemble de ces
données, lors de l’insertion de la “Play
card” dans la tête de lecture de l’instru
ment.
Empecemos a tocar música utilizando la
característica principal del PC-100: El
sistema Playcard.
...........
. . -
Tarjetas Playcard
Cada tarjeta tiene un patrón musical junto
con una franja magnética en un lado, y las
instrucciones para su uso en el otro. La
franja magnética lleva grabada información
musical. Esta información comprende una
melodía, obligado, acordes, acompaña
miento de ritmo, batería, línea de bajo,
voces instrumentales, instrucciones de pro
grama, y cuando se hace necesario, arpegios.
El PC-100 memoriza toda esta información
cuando Ud. desliza la tarjeta Playcard por la
cabeza lectora del instrumento.
JUKIID
_
CieHo qntfo
ii
i-- 7 ^
-Melody
-Obbligato (decorative solo
passages)
-Chords
-Rhythm accompaniment
with drum fill-ins
-Bass line
-Instrument voices
-Program instructions
Melodie
Obligate Stimmen
Akkorde
Rhythmus-Begleitung mit
Schlagzeug-Einsätzen
Baßünie
Instrumenlaistimmen
Programmanweisungen
Mélodie
Partie obligée (fioritures
exécutées en solo)
Accords
Accompagnement rythmé à
la batterie
Basses
Voix Instrumentales
Instructions programmées
Melodía
Obligado (partes con solos
decorativos)
Acordes
Acompañamiento de ritmo
con inclusión de batería
Línea de bajo
Voces instrumentales
Instrucciones de programa
Page 7
How to use the Playcard System
Verwendung des ,,Playcard“-Systenis
Mode d’utilisation du Système
“Playcard”
Cómo utilizar el sistema Piaycard
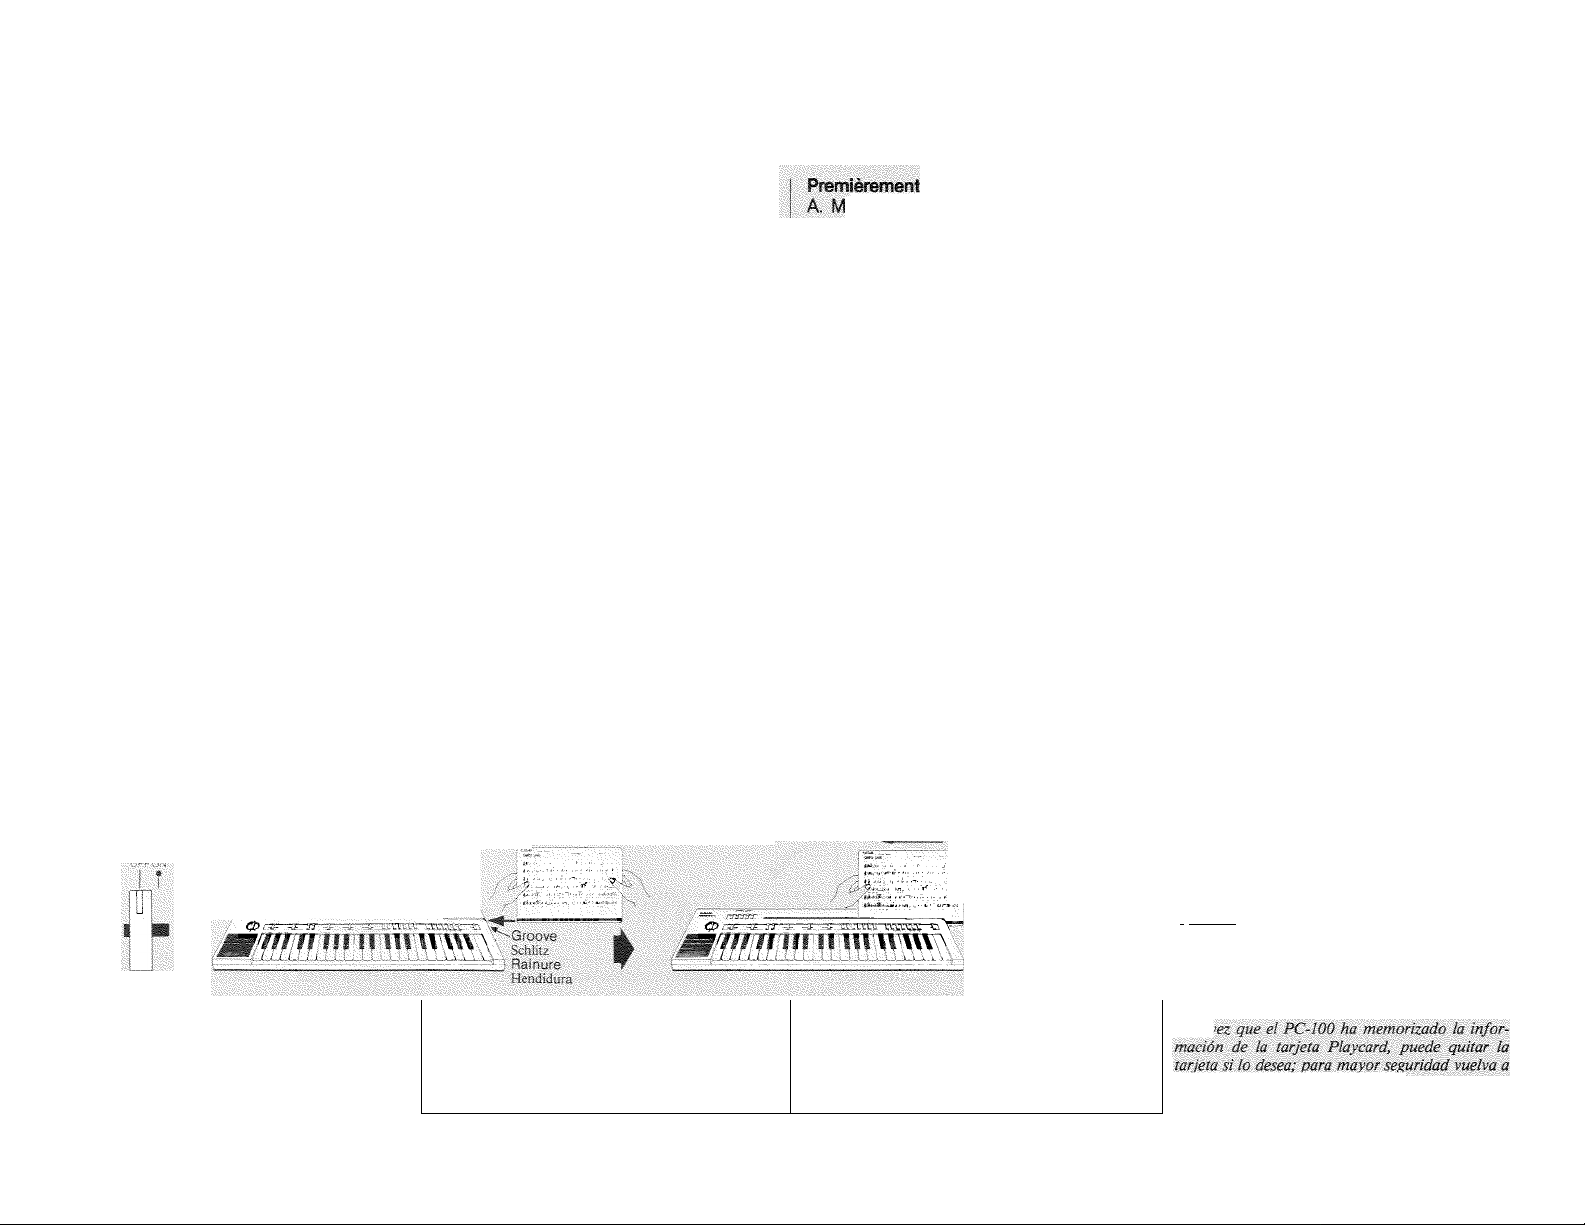
First
A, Switch on '
B. Insert a Playcard
Slide the POWER SWITCH '
Select a Playcard, remove It trom the
groove so that its leading ^ edge is
level'With the arrow designating the
insertion position (see ^ figure). ^ Then
slide the Playcard firmly', along the
groove in me action from right to 'left
the PC-100’s head, which' is located' in
the Melody Lamp does not illuminate.
head will not read the data; the sliding
action should take from one to rtwo
'seconds. Try ' several 'times to
familiarize yourself with the correct
' to'the
Zueret... :
A. Einscbalten ,
' Den Ein-Aus-Schalter '
B. „Playcard“ einschieben
Wählen Sie eine^„Playca'rd“ aus, nehmen
Sie sie aus ihrer Schut'zliülle, und stecken
Sie sie so in den „Playcard“-ScMitZ'@,
daß ihr vorderer Rand an dem die Aus'gangspositlon 'markierenden Pfeil liegt
{siehe Abb.). Schieben Sie dann die „Play
card“ gleichmäßig ohne Unterbrechung
von'rechts nach links bis zum Ende des
Schlitzes. Hat, der im Schlitz befindliche
Lesekopf alle Daten des Magnetstreifens
richtig gelesen, leuchtet zur Kontrolle die ,
letzte, ganz rechts auf der Tastatur befind- ^
liehe Melodie-Lampe' einige,' Sekunden '
lang auf.Xeuchtet diese Lam,pe nicht, so
muß der Vorgang wiederholt ,werden.
Wenn die „Playcard“ zu langsam durch'
den' Schlitz; geschoben wird, kann' der
Lesekopf die Daten ' nicht lesen. 'Der
Schiebevorgang sollte'eins bis zwei Se
kunden ,dauern. Oben Sie einige Male,
um ein Gefühl für ,die richtige Geschwin
digkeit zu bekommen.
Hold Playcard in both hands
Die „Playcard“ mit. beiden HSnden festhalien
Tenez la “Playcard” avec les deux mains
Arrow
Pfeii
Flèche
Flecha
-A
Sujete la tarjeta con ambas manos
ise en marche
' {POWER .SWITCH) vers'ta droite.,
B. Insérer .une “Playcard”.
Retirer la “Playcard” choisie de l’enve
loppe protectrice: et "la placer dans .la
' ' ramure ®., en veillant à'ceqcie'Ie bord
prlncipat'soiLau. niveau, de la .flèche
. désignant ' la' position.; d’insertion (se,
' : référer'Où' schéma).{Déplacer ensuite '
'.' la'“Playcard” fermement le long, de la;
rainure Wm seul mouvementée droite
au tjout'de la'rainure.
' Si la'tête du PC-100' — située dans
la rainure' — a procédé correctement à '
la' lecture de là. piste magnétique, la
clavier s’allumera pendant, quelques
secondes. Il convrendra de répéter
s’allume pas. '' , '
'convien,t.
Si le ' déplacernent de la “Playcard”
s’effectué trop lentement, la lecture
déplacement de la “Playcard'” en. une
ou 2 secondes 'maximum. Effectuez
l’opération plusieurs 'fois, de manière
Slide in one action .
Oline Unterbreehung'emscMeben '
., : Déplacez latéralement en on
seul mouvement
T'\f '\DesBcda con un solo,
movimiento ' ,j
Primero
А. Conectar el instrumento
Deslizar el Interruptor de Potencia
(POWER SWÍTCH) hacia la
derecha.
B; 'Insertar una tarjeta 'Playcard
Seleccionar иш'" tarjeta,: sacarla'de su
sobre: prO'tector y colocarla en. la hendi-
'. dura ®' .de manera que.su'borde piin'-
cipal esté'.uivebdo"con la fl'ecba que.
señala la,'posición 'de 'inserción (ver
figura).' Luego, 'deslizar' firmemente la
'' tarjeta, por ' la,' hendidura con ту solo
' movimiento basta, que alcance el final 'de.
cabeza'"del PC-100,.; localizada 'en 'la
hendidura, ha' leído correctamente la
franja ,'magnética, : la' última 'Luz de
Melodía' de. la derecha del teclado se
iluminará por'unos segundos.' Repetir el
procedimiento si la' Laz de.Melodía no se
enciende. Si desliza la' tarjeta P'Iaycard
demasiado despacio, lE'Cabeza no leerá la;
información; la acción de deslizar debe
' llevar'de uno .a dos segundos.. Inténtelo
vai'ias veces para familiarizarse, con la
velocidad'correcta. .
Lamp (llüminates briefly
Diese Lampe leuchtet kurz auf
Le'voyant lumineux s’allume
.. brièvement '
La, te. .se ilumina 'brevemente
-j-rj -d- -J-
Note
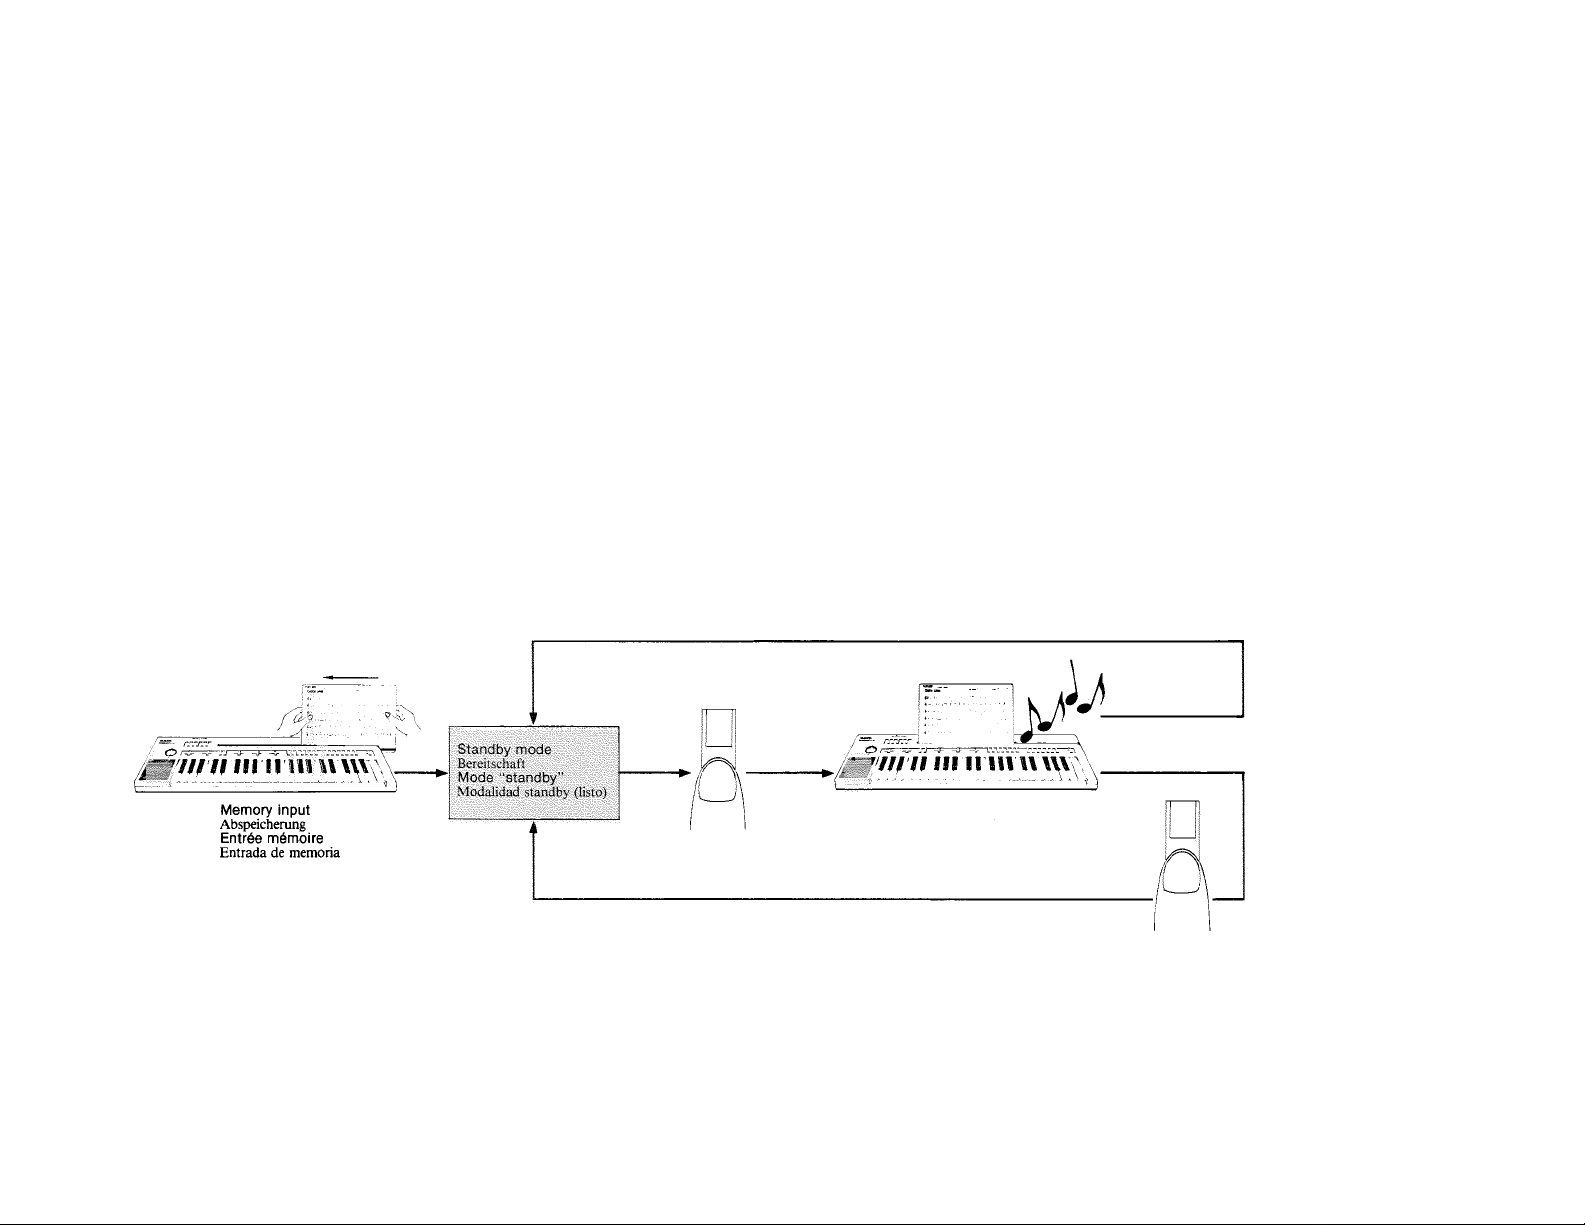
Once the PC-100 has memorized the Piaycard
data, you can remove the Playeará if you
wish: for safety’s sake, return it to its protec
tive envelope.
Hinweis ' . '
Sind die „Playcard“-Daten erst einmal im PC-100
abgespekhen, so kam die „Piaycard“ heraus
genommen werden. Stecken Sie die„,Piaycard"
rln'nn \ÁU£>A£ir' i-Tí ihf¿} ^r'huf'rhíiíío -am ci¿> \tr\f
uíinfi wiaaer tn tnre ocnuiznutie zurucK, um sie vor
Beschädigungen zu bewahren.
Remarque , ' „ ' . .
Une fois que le PC-100^ a mis en'mémoire les
être retirée a volonté. Dans ce cas, par mesure '.
Wû rtrÂnantinn il nnnMiO'nrira rièt îa rt^nlmr'etr
tic? fJltfL/atllUJUf fl LrUlIVItiÎIUi <3 üt? /w f C?jL/<oCxt?/
dans son enveloppe protectrice.
mm
Una »
introducirla m su sobre protector.
Page 8
For Playcards with magnetic strip
on isoth sides
Some Playcards that you purchase
separately may have a magnetic strip on
both sides. Follow the procedure de
scribed above to have the head read all
the data. When the data on one side has
been memorized, the extreme right-hand
Melody Lamp will flash on and off for a
few seconds. This indicates that you
should turn the card over and insert It
again so that the remainder of the data
can be read by the PC-100. The same
Melody Lamp will light up continuously
for a few seconds to indicate correct
insertion.
..1’la.U‘urds" mil auC hi-idi-n
Si-ilen
I Einige im Handel erhältliche ,,Playcard.s“
i haben auf beiden Seiten einen .Magneistrei; fen. Führen Sie den oben erläuterten Vorgang
I durch, um alle Daten einzuiesen. Sind alle
; Daten einer Seite eingele.sen, .so blinkt die
: ganz rechts befindliche .\1elodie-I..ampe einige
i Sekunden und zeigt damit an, daß die ,,Play; card“ umgedreht noch einmal einzuschieben
, ist, um auch die restlichen Daten noch in der
: PC-100 abzuspeichern. Sobald dies richtig
durchgeführt wurde, leuchtet zur Kontrolle
: die gleiche Melodie-Lampe konstant einige
■ Sekunden lang auf.
■‘Playcards" comportant une piste
magnétique sur chaque face
Certaines “Playcards” achetées séparé
ment comportent, parfois, une piste
magnétique sur chaque face. Procéder à
la manoeuvre indiquée plus haut pour que
la tête assure la iecture de l’ensemble des
données.
Quand les données d’une face ont été
dûment mises en mémoire, la Lampe de
Mélodie située à l’extrême droite
clignotera pendant quelques secondes.
Ce signai indique qu’il est temps de
retourner la “Playcard” et de l’insérer à
nouveau, de manière à ce que les don
nées informatiques portées sur l’autre
face puissent, à leur tour, être lues par le
PC-100. La même Lamipe de Mélodie
s’ailumera pendant quelques secondes,
signalant ainsi que l’insertion a été
effectuée correctement.
Para Tarjv!a.s f’lajcarsl t-ür; t'i'jnia
magiu-fka fii amh(>s iaíii;>
Algunas tarjetas Playcard que se adquieren
separadamente puede que tengan franja
magnética en ambos lados. Seguir el
procedimiento descrito ame.s para que la
cabeza lea toda la información. Cuando se
haya memorizado la información de un lado,
la Luz de Melodía de! extremo derecho se
iluminará intermitentemente durante unos
segu.ndos. Esto indica que deberá dar la
vuelta a la tarjeta e i.nsertarla de nuevo para
que el resto de la información pueda ser leída
por el PC-iOO. La misma Luz de Melodía se
iluminará continuamente durante ur¡os
segundos para indicar la correcta inserción.
Reading of the Playcard is completed,
and your PC-100 is in standby mode. Now
you’re ready to play music using the Playcard System.
Playcard System Functions
1. For automatic playing (Button @)
Press the PLAY button ®. The PC-100
will play the entire Playcard music for
you, and at the same time the Melody
Lamps will light up to show you the pro
gression of the melody notes. When the
music ends, the PC-100 automatically
returns to the standby mode. If you want
Das Einlesen der Spielkarten-Daten ist da
mit beendet, und das PC-100 befindet sich in
Spielbereitschaft. Sie können nun beginnen,
mit dem Spielkarten-System zu spielen.
Funktionen des „Playcard“-Systems
1. Automatisches Spielen (Schalter®)
Drücken Sie den Schalter (PLAY)®. Das
PC-100 spielt dann die gesamte auf der
„Playcard“ enthaltene Musik, wobei die
Melodie durch Aufleuchten der MelodieLampen angezeigt wird. Am Ende des Spiel
vorgangs kehrt das PC-100 automatisch in die
Spielbereitschaft zurück. Durch Drücken
L’opération de lecture de la “Playcard”
est terminée: votre PC-100 est maintenant
en mode “standby”. L’exécution du
morceau peut commencer.
Fonctions du Système “Playcard”
1. Exécution automatique (Touche ® ) Appuyez sur la touche Exécution du Morceau Ç‘PLAY”) ® . Le PC-100 jouera, dans son intégralité, la partition musicale désignée par la carte; en même temps, les Lampes de Mélodie s’allumeront pour vous indiquer la progression des notes mélodiques. A la fin du morceau, le
La lectura de la tarjeta Playcard se ha
completado, y su PC-100 està en la modali
dad de standby (listo). Ahora ya está prepa
rado para tocar música utilizando el sistema
Playcard.
Funciones del Sistema Playcard
1. Para toque automático (Botón ®)
Oprimir el botón de Toque (PLAY) @ . El
PC-100 tocará para Ud. toda la música de
Playcard, y al mismo tiempo las Luces de
Melodía se iluminarán para mostrarle la
progresión de notas de la melodía. Al termi
nar la música, el PC-100 vuelve automática
mente a la modalidad de standby (listo). Si
Page 9
to stop the music at any time, press either
button (A) , ® or ©.
der Schalter®,©oder©kann der Spielvor
gang zu jeder beliebigen Zeit abgebrochen
werden.
PC-100 revient automatiquement au mode
“standby”. Si vous désirez, à un moment
donné, suspendre l’exécution du
morceau, appuyez indifféremment sur ia
touche ®, ©ou ©.
desea parar la música en cualquier momento,
oprima cualquiera de los botones ®, © o
Note
1. Adjust the rhythm speed by moving the
TEMPO control @ to the position indi
cated on the Playcard.
2. For optimum balance, move the AUTO
BASS CHORD and RHYTHM VOLUME
controls, ®and®, to the positions indi
cated by the arrows. For overall volume
adjustment, use the MASTER VOLUME @
control.
3. The suggested instrument voice and
rhythm have been preset on the Playcard’s
magnetic strip. If you wish, you can
change the melody voice (see page 12) and
rhythm (see page 13) during a perform
ance. However, waltz music should not be
switched to a 4/4 beat.
Hinweise
1. Stellen Sie den Temporegler (TEMPO)® zur
Einstellung der Rhythmus-Geschwindigkeit
auf die auf der „Playcard“ angegebene
Position.
2. Stellen Sie den Baßakkord-A utomatik-(A UTO
BASS CHORD) ® und den RhythmusLautstärkeregler (RHYTHM VOLUME) ®
auf die Pfeilmarkierungen, um ein möglichst
ausgewogenes Lautstärkeverhältnis zu erhal
ten. Die Einstellung der Gesamtlautstärke
erfolgt dann am Hauptlautstärkeregler
(MASTER VOLUME) ®.
3. Die vorgesehene Instrumentalstimme und der
Rhythmus ist durch Einlesen der „Playcard”Daten bereits automatisch eingestellt. Wenn
gewünscht, kann aber die Melodie-Stimme
(siehe S.12) und der Rhythmus (siehe S.13)
noch während des Spielvorgangs geändert
werden. Jedoch sollte bei Walzer kein 4/4-Takt
verwendet werden.
Remarques
1. Réglez la vitesse du rythme en amenant le
contrôle Tempo (TEMPO) 9 sur la position
indiquée sur ia "Playcard".
2. Pour assurer un équilibre optimal, amenez
les contrôles Volume Basses/Accords
Automatiques (AUTO BASS CHORD
VOLUME), et Volume Rythme (RHYTHM
VOLUME) — ®et® — sur les positions
indiquées par les flèches. Pour le réglage
du volume global, utilisez le contrôle
Volume principal (MASTER VOLUME)®.
3. Les voix instrumentales et rythmes sug
gérés ont été pré-réglés sur la piste mag
nétique de la “Playcard". Vous pouvez, si
vous le désirez, modifier la ligne mélodi
que (voir P.12) et le rythme (voir P.13) au
cours de l'exécution du morceau. Une
musique de valse ne saurait, toutefois,
être associée à un rythme 4/4.
Notas
1. Ajustar la velocidad del ritmo moviendo el
control de Tiempo (TEMPO) ® a la posición
indicada en la tarjeta Playcard.
2. Para un balance óptimo, mover los controles
de Acorde y Bajo Automático (AUTO BASS
CHORD) y de Volumen de Ritmo (RHYTHM
VOLUME), ® y ®, a las posiciones
indicadas por las flechas. Para ajustar el
volumen general, utilizar el control de
Volumen Principal (MASTER VOLUME) ®.
3. El ritmo y la voz instrumental sugeridos han
sido preseleccionados en la franja magnética
de la tarjeta. Si lo desea, puede cambiar la voz
de la melodía (ver pág. 12) y el ritmo (ver pág.
13) durante ¡a ejecución. De todas maneras, la
música de vals no deberá disponerse a un
compás 4 por 4.
Returns to standby at
music end
RUckkehr in die
Bereitschaftsfunktion
am Ende des
Spielvorgangs
Revient au mode
“standby” à la fin du
morceau
Vuelve a standby (liste) al
final de la mùsica
Press button 0, ® or g
to stop music
Zum Abbrechen des
Spielvorgangs Taste ®,
® Oder V drücken
Appuyez sur la touche
0, B) ou g pour arrêter
la musique
Oprima el botón ® , ® o
r para parar la música
2. To play the melody by yourself
(Button©)
Press the MELODY CANCEL button ©,
and you will hear the accompaniment
only. You can then play the melody, follow
ing the Melody Lamps. If the tempo is too
fast, use the TEMPO control ® to slow it
down so you can practice comfortably. As
with automatic playing, you can select
2. Eigenes Spielen der Melodie
(Schalter ©)
Drücken Sie den Melodie-Lösch-Schalter
(MELODY CANCEL)® Sie hören dann nur
noch die Begleitung und können versuchen,
die Melodie durch Drücken der Taste, deren
Melodie-Lampe gerade leuchtet, zu spielen.
Ist das Tempo zu hoch, so schieben Sie den
Temporegler (TEMPO)® nach links, um ein
2. Exécution du morceau par vous-même
(Touche ®)
Sur la pression de la touche Annulation
de la Mélodie(MELODYCANCEL)©, seul
l’accompagnement sera exécuté. Vous
pouvez alors jouer la mélodie, en suivant
les Lampes de Mélodie. Si le tempo est
trop rapide, utilisez le contrôle Tempo
(TEMPO) @ pour le ralentir et vous
2. Para tocar Ud. mismo la melodía
(Botón ®)
Oprima el botón de Anulación de Melodia
(MELODY CANCEL) ® y sólo escuchará
el acompañamiento. Entonces Ud. puede
tocar la melodía, siguiendo las Luces de
Melodía. Si el tiempo es demasiado rápido,
utilice el control de Tiempo (TEMPO) @
para bajar la velocidad y poder tocar más a
Page 10

the instrument and rhythm of your choice.
If you want to stop the music at any time,
press either button @ or ©.
3. To make the accompaniment follow
you (Button ©)
This is the FREE TEMPO function, and
it’s one of the PC-100’s most exciting
features. It helps you learn melodies at
your own playing speed — there’s no
need to search hurriedly for the correct
keys to keep up with the accompaniment
because the accompaniment always
waits for you to lead it.
After setting the PC-100 in the standby
mode (refer to flow chart), press the FREE
TEMPO button ©. You’ll hear the intro
ductory music phrase (the small notes at
the beginning of the Playcard music
score), then the Melody Lamp corre
sponding to the first note of the melody
(large notes on the music score) will light
up. The PC-100 will wait until you start
playing the melody. As you speed up or
slow down your melody playing, the
accompaniment will stay right with you.
Because the PC-100 waits for you when
you can’t find the next note to play, or
when you make a mistake, you can learn
the correct melody at your own pace. If
you want to return the PC-100 to standby
mode at any time, press either button @,
® or ©.
4. Playing without the Melody Lamps
(Button ®)
When you have learned the melody, you
no longer need the Melody Lamps to
guide you. You can switch them off by
pressing the LAMP CANCEL button ®.
Ihren Fähigkeiten angepaßtes Tempo einzu
stellen. Genau wie beim automatischen Spie
len können Sie die Instrumentalstimmen und
den Rhythmus frei wählen. Durch Drücken
der Schalter®,©oder©kann der Spielvor
gang zu jeder beliebigen Zeit abgebrochen
werden.
3. Anpassung der Begleitung an Ihre
Spielgeschwindigkeit (Schalter ©)
Diese Tempoautomatik (FREE TEMPO)
stellt eine der interessantesten Funktionen
Ihres PC-KX) dar. Sie können damit Melodien
mit Ihrer eigenen Spielgeschwindigkeit erler
nen—Sie brauchen sich beim Drücken der
richtigen Taste nicht zu beeilen, da die Be
gleitung sich automatisch nach Ihrem Spiel
tempo richtet.
Schalten Sie das PC-KX) in Spielbereitschaft
(siehe Diagramm), und drücken Sie den
Tempoautomatik-Schalter (FREE TEMPO)
©. Sie hören dann das Einführungs-Musik
stück (kleine Noten am Anfang der „Play
card “-Partitur), und anschließend leuchtet
die Melodie-Lampe des ersten Tons der zu
spielenden Melodie (auf der „Playcard“ groß
gedruckte Note) auf. Das PC-100 wartet nun
darauf, daß Sie die erste Note spielen. Wird
d£is Spieltempo erhöht oder erniedrigt, so
ändert sich auch automatisch das Tempo der
Begleitung. Da das PC-100 auch wartet, bis
Sie die als nächstes zu spielende Taste ge
funden haben oder einen Fehler korrigiert
haben, sind Sie beim Erlernen der Melodie
stets Ihr eigener Schrittmacher. Durch
Drücken der Schalter®,® oder ©kann der
Spielvorgang zu jeder beliebigen Zeit abge
brochen werden.
4. Spielen ohne Melodie-Lampen
(Schalter ®)
Wenn Sie im Spielen der Melodie sicher ge
worden sind, brauchen Sie keine Hilfestellung
durch die Melodie-Lampen mehr. Schalten
Sie die Lampen dann durch Drücken des
Lampen-Lösch-Schalters (LAMP CANCEL)
® aus.
permettre ainsi de jouer plus aisément.
Pour ce qui est de l’exécution automati
que, vous pouvez choisir, à votre gré,
l’instrument et le rythme. Si vous désirez
suspendre, à un moment donné, l’exécu
tion du morceau, il vous suffit d’appuyer
indifféremment sur la touche @, ® ou
©■
3. L’accompagnement suit l’exécution
de la mélodie (Touche : )
Grâce à !a fonction Tempo Libre (FREE
TEMPO) —■ uns des fonctions les plus att
rayantes du PC-TOO — vous pouvez app
rendre l’exécution d’une mélodie à l’allure
qui est la vôtre. Vous n’aurez pas à cher
cher à la hâte ies notes correspondant à
l’accompagnement; celui-ci, en effet, vous
suit docilement.
Après avoir réglé le PC-100 sur le
mode “standby” (se référer au graphique),
appuyez sur ia touche Tempo Libre (FREE
TEMPO) n . Vous entendrez alors la
phrase musicale d’introduction (les notes
du début de la partition musicale sur
carte): puis la Lampe de Mélodie corres
pondant à la première note de la mélodie
(grande note sur la partition musicale)
s’allumera. Le PC-100 attendra le début
de votre exécution de la mélodie. Que
vous accélériez ou que vous ralentissiez
votre jeu, l’accompagnement vous suivra
fidèlement. Etant donné que le PC-100
“vous attend” pendant que vous cherchez
la note suivante à jouer ou à l’occasion
d’une erreur, vous avez toute latitude pour
apprendre la mélodie à votre gré et selon
votre humeur. Vous pouvez, n’importe
quand, revenir au mode “standby”, sur la
simple pression de la touche ®, ® ou
©.
4. Exécution du morceau sans les
Lampes de Mélodie (Touche ® )
Une fois que la mélodie est apprise, vous
n’avez plus besoin des Lampes de Mélo
die pour vous guider. Vous pouvez sus
pendre leur mise en senrice, sur simple
pression de la touche Annulation des
Lampes (LAMP CANCEL) ®.
gusto. En cuanto al toque automático, Ud.
puede seleccionar el instrumento y el ritmo
que guste. Si desea parar la música en cual
quier momento, oprima el botón ®, ® o
©•
3. Para hacer que el acompañamiento le siga
(Botón ©)
Esta es la función de Tiempo Libre (FREE
TEMPO), y es una de las características más
interesantes del PC-100. Le ayuda a
aprender melodías a su propia velocidad de
toque — no hay necesidad de buscar apresu
radamente las teclas correctas para seguir el
acompañamiento porque el acompaña
miento siempre espera a que Ud. lo dirija.
Después de colocar el PC-100 en la
modalidad standby (consultar la tabla),
oprima el botón de Tiempo Libre (FREE
TEMPO) ©. Escuchará la frase musical de
introducción (las notas cortas al principio del
patrón de música de Playcard), y entonces,
la Luz de Melodía correspondiente a la
primera nota de la melodía (nota larga del
patrón musical) se iluminará. El PC-100
esperará hasta que Ud. empiece a tocar la
melodía. A medida que acelera o retrasa su
toque de melodía, el acompañamiento le
seguirá. Como el PC-100 le espera cuando
Ud. no puede encontrar la siguiente nota a
tocar, o cuando se equivoca, Ud. puede
aprender la melodía correcta a su propio
ritmo de marcha. Si desea redisponer el PC-
100 a la modalidad de standby (listo) en
cualquier momento, oprima cualquiera de
los botones ®, ® o ©.
4. Tocando sin las Luces de Melodía
(Botón ®)
Cuando haya aprendido la melodía, ya no
necesitará las Luces de Melodía para guiarle.
Puede desconectarlas oprimiendo el botón
de Anulación de Luces (LAMP CANCEL)
Page 11

Phrase numbers beneath keys
Unter den Tasten befindliche Phrasen-Nummen
Numéros des phrases musicales sous les touches
Numeros de frase bajo las teclas
Left han(j
Linke Hand
Main gauche
Mano izquierda
«taycaiw
Right hand
Rechte Hand
Main (jroite
Mano derecha
5. Learning through repetition
(Button ©)
The best way to learn a melody is to
practice it repeatedly, and the PC-100 has
a very convenient feature for this purpose.
Each phrase on every Playcard music
score is numbered (the numbers appear
in circles), and the first 20 white keys on
the left of the keyboard are also
numbered (see figure). To repeat a
specific phrase over and over until you
want to stop it, set the PC-100 in standby
mode, hold the REPEAT button © down
using your ieft hand then, using your right
hand, press the white key that corre
sponds to the phrase number on the
score, e.g. if the phrase number is 4,
press the white key marked “4”. Release
the REPEAT button ©, then press either
the PLAY ®, MELODY CANCEL (b or
FREE TEMPO © button (see Nos. 1, 2
and 3 above for the functions of these
buttons). The selected phrase will be
played and repeated continuously until
you stop it by pressing either button ®,
© or ©.
5. Lernen durch Wiederholen (Schalter ©)
Am besten läßt sieh eine Melodie durch stets
wiederholtes Spielen erlernen. Hierzu besitzt
das PC-1(X) eine bequeme Wiederholfunk
tion. Alle Phrasen der „Playcard“-Partitur
sind mit einer Nummer versehen (mit Kreis
markiert), und auch die ersten 20 Tasten auf
der linken Seite der Tastatur sind numeriert
(siehe Abb.). Um eine bestimmte Phrase fort
laufend zu wiederholen, bringen Sie das
PC-100 auf Spielbereitschaft, halten Sie dann
den Wiederhol-Schalter (REPEAT) © mit
der linken Hand gedrückt, und drücken Sie
gleichzeitig mit der rechten Hand die weiße
Taste, die die Nummer der gewünschten
Phrase besitzt. (Soll z.B. die Phrase Nr. 4
wiederholt werden, so ist die mit „4“ mar
kierte weiße Taste zu drücken.) Nun können
Sie den Wiederhol-Schalter (REPEAT) ©
wieder loslassen und entweder den SpielstartSchalter (PLAY) ®, den Melodie-LöschSchalter (MELODY CANCEL)©oder den
Tempoautomatik-Schalter (FREE TEMPO)
©drücken (die Funktion dieser Schalter ist in
den obigen Abschnitten 1, 2 und 3 erläutert).
Die gewünschte Phrase wird nun wiederholt
gespielt, bis Sie den Spielvorgang durch
Drücken der Schalter ®, ® oder ©
abbrechen.
5. Initiation musicale par la répétition
(Touche ©)
La meilleure méthode pour apprendre une
mélodie est la pratique assidue, et le PC100 est spécialement adapté à cette
méthode. Chaque phrase de chaque parti
tion musicale sur “Playcard” est assortie
d’un nombre (les nombres sont entourés
d’un cercle), et les 20 premières touches
blanches sur la gauche du clavier sont,
elles aussi, assorties d’un nombre (voir
schéma). Pour répéter une phrase quel
conque à loisir, réglez le PC-100 sur le
mode “standby”, maintenez avec la main
gauche la touche Répétition (REPEAT) ©
en position appuyée, puis appuyez, avec
la main droite, sur la touche blanche cor
respondant au nombre désignant la
phrase sur la partition. Autrement dit, si la
phrase est assortie du nombre 4,
appuyez sur la touche blanche marquée
“4”. Ramenez à sa position initiale la
touche Répétition (REPEAT) ©, puis
appuyez indifféremment sur la touche
Exécution de Morceau (PLAY) ®, la
touche Annulation de la Mélodie
(MELODY CANCEL) © ou la touche
Tempo Libre (FREE TEMPO) © (voir Para
graphes 1,2 et 3 pour les fonctions de ces
touches). La phrase choisie sera jouée et
répétée systématiquement jusqu’à ce que
vous décidiez d’en suspendre l’exécution
en appuyant indifféremment sur la touche
@, ©ou ©.
5. Aprendiendo рог repetición (Botón ©)
La mejor manera de aprender una melodía
es practicándola repetidamente, y el PC-100
tiene una característica muy conveiüente
para este propósito. Cada frase en todos los
patrones de música de Playcard está nume
rada (los números aparecen en círculos), y
las primeras 20 teclas blancas de la parte
izquierda del teclado están numeradas
también (ver figura). Para repetir una frase
específica una y otra vez hasta que desee
pararla, disponer el РС-КЮ en la modalidad
de standby, mantener pulsado hacia abajo el
botón de Repetición (REPEAT) © utili
zando la mano izquierda, y con la mano
derecha, pulsar la tecla blanca correspon
diente al número de la frase en el patrón. Por
ejemplo, si el número de la frase es 4 ,
pulsar la tecla blanca marcada con el “4”.
Soltar el botón de Repetición (REPEAT) ©
y luego oprimir el botón de Toque (PLAY)
® , el de Anulación de Melodía (MELODY
CANCEL) ® o el de Tiempo Libre (FREE
TEMPO) © (Ver los números 1, 2 y 3
anteriores para las funciones de estos
botones). La frase seleccionada se tocará y
repetirá continuamente hasta que Ud. la
pare oprimiendo cualquiera de los botones
® , © o ©.
Page 12

Note
By pressing either button ®, @ or © to
return the PC-100 to the standby mode, you
also cancel the REPEAT programming.
You can even program the PC-100 to repeat
two or more successive phrases. For
example, if you want phrases 3,4,5 and 6
to be repeated, return to the standby mode,
then hold down the REPEAT button © while
pressing key no. "3" and no. "6” (only the first
and last keys need be pressed).
For automatic repetition of the entire
length of music, press the white key on the
extreme right (indicated by an asterisk*)
together with the REPEAT button ©.
Hinweis
Durch Drücken der Schalter ® , ® oder © kehrt
das PC-100 in die Spielbereitschaft zurück, wobei
die Wiederholfunktion gelöscht wird.
Es ist sogar möglich, zwei oder mehr aufein
anderfolgende Phrasen stetig zu wiederholen.
Sollen Z.B. die Phrasen 3, 4, 5 und 6 fortlaufend
wiederholt werden so schalten Sie zunächst auf
Spielbereitschaft, halten Sie dann den WiederholSchalter (REPEAT) © gedrückt, und drücken Sie
gleichzeitig noch die Tasten Nr. „3 " und„6" (nur
die jeweils erste und letzte Taste braucht gedrückt
zu werden.).
Zum automatischen Wiederholen des gesamten
Musikstückes ist die ganz rechts liegende weiße
Taste (mit markiert) zusammen mit dem
Wiederhol-Schalter (REPEAT) © zu drücken.
«taycwd Sy,,*««»
Remarque
Il conviertt de noter que la pression de la
touche (A), © ou © — déclenchant le retour
au mode "standby" — annule aussi la pro
grammation de répétition (REPEAT).
Vous pouvez même programmer le PC-100
en vue d’obtenir la répétition de plusieurs
phrases successives. Si, par exemple, vous
désirez la répétition des phrases 3, 4, 5 et
6, revenez au mode “standby”, maintenez
ensuite la touche Répétition (REPEAT) © en
position appuyée et appuyez sur les touches
“3" et "6" (il suffit d’appuyer sur la première et
la dernière touche de ta série).
Pour la répétition automatique du morceau
de musique intégral, appuyez sur la touche
blanche de l’extrême droite (marquée d’une
astérisque) ainsi que sur la touche Répétition
(REPEAT) ©.
Nota
Oprimiendo cualquiera de los botones ®, ® o
© para devolver el PC-100 a la modalidad de
standby, se anula también la programación de
Repetición (REPEAT).
Incluso puede programar que el PC-100 repita
dos o más frases sucesivamente. Por ejemplo, si
desea repetir las frases 3 , 4, 5 y 6, vuelva a la
modalidad de standby, mantenga oprimido el
botón de Repetición (REPEAT) © mientras
pulsa las teclas n° "3’’yn° “6” (sólo es necesario
pulsar las teclas primera y última).
Para la repetición automática de toda la
música, pulse la tecla blanca del extremo derecho
(indicadapor un asterisco*) junto con el botón de
Repetición (REPEAT) © .
6. Using the TRANSPOSER The TRANSPOSER @ lets you adjust the PC-100’s pitch to suit either a singing
voice — so anyone can sing along as you
play — or an instrument such as a
trumpet, clarinet or saxophone. The right
half of the dial is for increasing the pitch
up to half an octave, and the left half for
decreasing up to half an octave.
Left hand
Linke Hand
Main qauche
Mano izquierda
6. Verwendung des 'Transponierungsreglers
(TRANSPOSER) '
Mit dem Transponierungsregler (TRANS
POSER) © kann die Tonlage des PC-100
entweder an eine Gesangsstimme—so daß
eine beliebige Person bei Ihrem Spiele mit
singen kann—oder an ein Instrument wie z.B.
eine B-Trompete, eine Klarinette oder ein
Saxophon angepaßt werden. In der rechten
Skalenhälfte erhält man einen bis zu einer
halben Oktave höheren Ton und in der linken
Hälfte einen bis zu einer halben Oktave nie
drigeren Ton.
Decrease pitch
Erniedrigen
Abaisse la hauteur du son
Disminuye el tono
6. Mode d’utilisation du Transposeur
(TRANSPOSER)
Le Transposeur (TRANSPOSER) ©
permet le réglage de la hauteur du son du
PC-100 et de l’adapter ainsi soit à une
voix fredonnant la mélodie — la mélodie
peut donc être chantée pendant que vous
Jouez — soit à un instrument tel que trom
pette en si bémol, clarinette ou saxo
phone. La moitié droite du cadran permet
d’élever la hauteur de son d’une demioctave; la moitié gauche permet d’abalsser la hauteur de son d’une demi-octave.
TRANSPOSER
Increase pitch
Erhöhen
Eiève la hauteur du son
Aumenta el tono
Right hand
Rechte Hand
Main droite
Mano derecha
6. Utilización del Ilransposicionador
(TRANSPOSER)
El IVansposicionador (TRANSPOSER)
@ le permite ajustar el tono del PC-100
para acoplarlo a una voz cantante — para
que cualquiera pueda cantar mientras
Ud. toca — o a un instrumento tal como
una trompeta, clarinete o saxofón B^’. La
mitad derecha del disco es para aumentar
el tono hasta media octava, y la mitad
izquierda para disminuir hasta media
octava.
10
Page 13

7. Erasing the PC-100’s Playcard memory
The memory will be erased whenever you
switch off the PC-100. Also, If you change
from one Playcard to another the PC-100
automatically wipes the memory clean
and records the fresh data.
7. Löschen des „Playcard“-Speichers der
PC-100
Der Speicher wird beim Ausschalten des
PC-100 gelöscht. Auch beim Einlesen neuer
,,Playcard“-Daten wird der Speicher vorher
gelöscht.
7. Effacement des données stockées
sur la “Playcard” du PC-100
Les données sont effacées chaque fois
que vous mettez le PC-100 en position
d’arrêt. Par ailleurs, lors de chaque
changement de “Playcard”, le PC-100
procède automatiquement à l’effacement
des données portées sur la “Playcard”
précédente et stocke les nouvelles
données.
7. Borrado de la memoria de la tarjeta
Playcard del PC-100
La memoria se borrará siempre que des
conecte el PC-100. Además, si cambia de
una tarjeta Playcard a otra, el PC-100 borra
automáticamente la memoria y graba la
nueva información.
Using the Playcard and Auto Bass Chord
systems together
Single Finger Chord practice
This cpmblhétion: is Ideal for; practicing
' 'Single Finger Chords using:your1efthand'
(see page 15 for Auto Bass Chord descrip
tion), the Playcard music SGoresihave the 1
ehord names'(C, D, E,F,'G,A;:B):written on
Jhem.
; Jnsert aPlaycard,'and thé;FC-100 will
be Jn^ standby 'mode. Press the/SINGLE'
FINGER CHORD button W, then either
the^'PLAY A®, melody:CANCEL' or'
FREE 'TEMPO 'button" to Astart, the
music tsee Nos. 1,2 and 3 above for the
functions of these buttons). If you press
the PLAY button ®, you have to play the
chords only. With MELODY CANCEL b ,
you have to play both chords and melody.
FREE TEMPO ■(£) enables you to proceed
with the chords and melody at your own:
speed. '
Gleich/eitigc Verwendung des „Playcard-“
und des Baßakkord-.A.utomatik-Systems
Üben des Einfingerakkords
: Die® liombipätion eignet sich ideal Azuiii
Üben'ydn Einfingerakkorderi mit der linken
Hand/ Iprläuteruiig der a Baßakkord®utomatik aehe S. 15). Die Akkordbezeichriurigen:
(C, D, E, F, G, A, B*) sind der ,,Playcard”Partitür ZU; entnehmen, i'
Schieben Sie die „Playcmd“ ein. Das
PC-IOÖ befindt sieh nun in Spielbereifschaft.
Drücken Sie nun den EinfmgerakkordSchaker (SINGLE FINGER CHORD) >
und'' dann ' entweder ^ den, Spielstait-Schalter;
' (PLÄY) ® und den' Melödie-Lösch-Sehal- ^
ter , (MELODY;' CANCEL) i; ' oder'; den '
TeiBpoäutomatik-Schalter' (FREE ':TEMPO)^
© ,; um den';;Spjelvorgang:^',zu "Starten (die
Funktion dieser Schalter ist in "den' obigen
Abschnitten 1, 2 und 3 erläutert). Wenn Sie
de'nPpielstart-Scha!ter'(PLAY);® drücken,
brauchen Sie nur den Akkord W: spielen.:
Wenn Sie dagegen den Melodie-LÖsch-Schalter, FMELODY CANCEL) ''©/drücken,
müssen Sie sowohl die Akkorde als auch die
Melodie spielen. Durch Drücken des Tempo
automatik-Schalters (FREE TEMPO)/' ©'
können Sie die Akkorde und die Melodie mit
beliebigem Tempo spielen.
*B entspricht der deutschen Note H.
Mode d’utilisation des Systèmes à
“Piaycard” et Basses/Accords
Automatiques
Pratique d’Accords à Un Seui Doigt
Cette combinaison est idéale pour la
pratique d’Accords à Un Seul Doigt (main
gauche) (voir P.15 pour la description des
Basses/Accords Automatiques). Les par
titions musicales sur “Playcard” portent
les noms des accords — C, D, E, F, G, A,
B
(DO, RE, Ml, FA, SOL, LA, SI),
Procédez à l’insertion d’une “Play
card”, et le PC-100 se trouvera ainsi en
mode “standby”. Appuyez sur la touche
Accord à Un Seul Doigt (SINGLE FINGER
CHORD) Cl.j; appuyez ensuite sur ja
touche Exécution du Morceau (PLAY)
ou sur la touche Annulation de la Mélodie
(MELODY CANCEL) f ou sur la touche
TeropO" Libre '(FREE, TEMPO)'' ''pour
commencer l’exécution musicale (voir
Paragraphes 1, 2 et 3 pour les fonctions
de ces touches). Si vous appuyez sur la
touche Exécution de Morceau (PLAY)
: vous devez jouer les accords seulement.
; Avec la touche Annulation de la Mélodie
^ (MELODY CANCEL) §:, vous devez jouer
j les accords et la mélodie. La touche
I Tempo" Libre'(FR'EE TEMPO) © vous '
I permet de jouer accords et mélodie à
! votre propre vitesse.
Utilización conjunta de los sistemas Playcard
y de Acorde y Bajo Automático
Práctica con Acorde de Un Solo Dedo
Esta combinación es ideal para practicar
Acordes de Un Solo Dedo utilizando su
mano izquierda (ver pág. 15 para descripción
de Acorde y Bajo Automático). Los
patrones de inúsicá de Playcard tienen los
nombres de acorde (C, D, E, F, G, A, B)
:escritos encima."'
Inserte una tarjeta Playcard y el PC-100
se dispondrá en la modalidad de standby.
Oprima el botón de Acorde de un Solo Dedo
(SINGLE FINGER CHORD) ,? y luego
cualquiera de los botones de Toque (PLAY)
©, Anulación de Melodía (MELODY
CANCEL) ,H , o Tiempo Libre (FREE
TEMPO) c., para empezar la mùsica (ver
los n- 1, 2 y 3 anteriores para las funciones
de estos botones). Si oprime el botón de
Toque (PLAY) (J), sólo tiene que tocar los
acordes. Con el botón de Anulación de
.Melodía (MELODY CANCEL) , tiene
que tocar los acordes y la melodía. El botón
de Tiempo Libre (FREE TEMPO) ,c, le
permite tocar los acordes y la melodía a su
propia velocidad.
11
Page 14

How To Use All The
Verwendung der
Mode d’utilisation
Cómo utilizar las
Other Féatures
The PC-100 has many other great
features besides the Playcard System.
For example, you can employ the instru
ment’s Auto Bass Chord system to make
professional-like chords right away —
using only one finger. And you can
choose from among 10 different instru
ment voices and rhythms.
First, switch on by sliding the POWER
SWITCH @ to the right. Then slide the
MASTER VOLUME @ to the desired
position.
Orchestra Section
anderen Funktionen
Das PC-100 besitzt neben dem „Playcard“System noch eine Vielfalt anderer einzig
artiger Funktionen. So können Sie z.B. mit
dem Baßakkord-Automatik-System gleich
von Anfang—mit nur einem Finger—pro
fessionell klingende Musik spielen. Weiter
hin können Sie zwischen 10 verschiedenen
Instrumentalstimmen und Rhythmen wählen.
Schalten Sie zunächst ein, indem Sie den
Ein-Aus-Schalter (POWER SWITCH) ®
nach rechts schieben, und stellen Sie dann
den Hauptlautstärkeregler (MASTER
VOLUME) ® in die gewünschte Position.
Orchester-Teil
des autres dispositifs
Outre le Système “Playcard”, le PC-100
possède encore de nombreuses res
sources. Vous pouvez, par exemple,
utiliser le système Basses/Accords Auto
matiques pour obtenir des accords “pro
fessionnels”, sur la pression d’un seul
doigt. Votre choix est étendu: 10 possibili
tés d’instruments et de rythmes s’offrent
à vous.
Tout d’abord, mettez l’instrument en
marche en déplaçant l’Interrupteur d’ali
mentation (POWER SWITCH) i§) vers la
droite. ' Déplacez ensuite le contrôle
Volume Principal (MASTER VOLUME)
@ sur la position désirée.
Section orchestraie
demás características
El PC-100 tiene muchas otras características
interesantes aparte del sistema Playcard. Por
ejemplo, puede utilizar el sistema de Acorde
y Bajo Automático para conseguir
instantáneamente acordes “profesionales”
— utilizando un solo dedo. Y Ud. puede
escoger entre 10 diferentes voces instrumen
tales y ritmos.
Primero,' conecte deslizando el' Interruptor
de Potencia (POWER SWITCH) ® hacia
la derecha. Luego deslice , el Volumen
Principal (MASTER VOLUME) ® a la
posición deseada. ' '
Sección de orquesta
1. Instrument voice selectors The PC-100 lets you choose from 10 dif ferent instrument voices: ORGAN, PIC COLO, TRUMPET, VIOLIN, CLARINET, OBOE, PIANO, HARPSICHORD, GUITAR, and VIBRAPHONE.
• Press the selector corresponding to
the instrument voice you want to hear.
If the selector with the red tab is up,
you can select voices In the top row; if
it is down, you can select voices in
1. Instrumentalstimmen-Register
Am PC-100 sind 10 verschiedene Instrumen
talstimmen einstellbar: Orgel (ORGAN),
Piccolo (PICCOLO), Trompete (TRUM
PET), Violine (VIOLIN), lüarinette
(CLARINET), Oboe (OBOE), Piano
(PIANO), Cembalo (HARPSICHORD),
Gitarre (GUITAR) und Vibraphon
(VIBRAPHONE).
• Drücken Sie ein Register zur Wahl der
gewünschten Instrumentalstimme. Ist der
1. Sélecteurs d’instruments Le PC-100 voutr otrre 10 possibilités
instrumentales: Orgue rORGAN), Piccolo
(PICCOLO), Trorr oe^te (TPUMPÖ), Violon
(VIOUN), Clar nette (C_A ^NET), Hautbois
(OBOE), Piano M.ANO), Clavecin
(HARPSICHORD), Guitare (GUITAR), et
Vibraphone (VIBRAPHONS).
• Appuyez sur le sélecteur correspon
dant à l’Instrument désiré. Si le sélec
teur marqué en rouge est placé vers le
12
1. Selectores de voces instrumentales
El PC-100 le permite escoger entre 10
diferentes voces instrumentales: Organo
(ORGAN), Piccolo (PICCOLO), Trompeta
(TRUMPET), Violin (VIOLIN), Clarinete
(CLARINET), Oboe (OBOE), Piano
(PIANO), Clavicordio (HARPSICHORD),
Guitarra (GUITAR), y Vibràfono
(VIBRAPHONE).
• Pulse el selector correspondiente a la voz
instrumental deseada. Si el selector con la
Page 15

the bottom row. The volume can be
adjusted by means of the MASTER
VOLUME (3).
• When two or more voice selectors are
pressed simultaneously, the right hand
selector always has priority.
• If no selector is depressed, the
ORGAN voice will be automatically
selected.
• Delayed vibrato is built-in for the Pic
colo, Trumpet, Violin and Oboe voices.
rot markierte Schalter ausgerastet, so
können die Instrumentalstimmen der
oberen Reihe gewählt werden, ist er ein
gerastet, können die Instrumentalstim
men der unteren Reihe gewählt werden.
Die Lautstärke kann am Hauptlautstär
keregler (MASTER VOLUME)® einge
stellt werden.
• Werden zwei oder mehr Register gleich
zeitig gedrückt, so hat das jeweils rechts
liegende Register Vorrang.
• Wird kein Register gedrückt, so schaltet
das PC-100 automatisch auf Orgel
stimme.
• Für Piccolo-, Trompeten-, Violinen- und
Oboestimme ist ein verzögertes Vibrato
eingebaut.
haut, vous pouvez choisir les voix
instrumentales de la rangée du haut;
s’il est placé vers le bas, vous pouvez
choisir les voix instrumentales de la
rangée du bas. Le volume peut être
réglé grâce au contrôle du Volume
Principal (MASTER VOLUME) @.
• Si vous appuyez simultanément sur
plusieurs sélecteurs, le sélecteur de
droite a toujours la priorité.
• Si vous n’appuyez sur aucun sélecteur,
c’est l’orgue qui est automatiquement
choisi.
• Un vibrato retardé est incorporé pour le
Piccolo, la Trompette, le Violon et le
Hautbois.
marca roja está arriba, puede seleccionsir
las voces de la fila de arriba; si está abajo,
puede seleccionar las voces de la fila de
abajo. El volumen puede ajustarse por
medio del Volumen Principal (MASTER
VOLUME) @.
• Cuando se pulsen dos o más selectores de
voz simultáneamente, el selector de la
derecha siempre tendrá prioridad.
• Si no se pulsa algún selector, se selec
cionará automáticamente la voz de
Organo.
• El vibrato retardado está incorporado a
las voces de Piccolo, Tfompeta, Violin y
Oboe.
Z Sustain
This effect works with ali the instrument
voices except for Vibraphone, which has
sustain built In. Press the SUSTAIN selec
tor @, and notes will linger after you
take your fingers off the keys.
Rhythm Section
1, Choose a rhythm
Pick the rhythm that best suits the music
you’re going to play and press the button.
If the button with the red tab is up, you
can se;ec: rhythms in the top row; If It is
down, you can select rhythms in the
bottom row.
• If two or more buttons are pressed the
one on the right has priority.
• If no button is depressed, March is
automatically selected.
2. Sustain-Effekt
Wird der Sustain-Schalter (SUSTAIN) @
gedrückt, klingen die Töne nach, nachdem
Sie Ihre Finger von der Taste genommen
haben. Dieser Sustain-Effekt kann allen
Instrumentalstimmen außer der Vibraphon
stimme zugefügt werden.
Rhythmus-Teil
VOLUME TEMPO
MIN MAX SLOW FAST
J1
1. Wahl des Rhythmus
Drücken Sie den Schalter des Rhythmus der
am besten zu Ihrer Musik paßt. Ist der rot
markierte Schalter ausgerastet, können die
Rhythmen der oberen Reihe gewählt werden,
ist er eingerastet, können die Rhythmen der
unteren Reihe gewählt werden.
• Werden zwei oder mehr Schalter gedrükkt, so hat der weiter rechts liegende
Schalter Vorrang.
• Wird kein Schalter gedrückt, so schaltet
Z “Sustain”
Cet effet fonctionne avec toutes les voix
instrumentales, à l’exception du Vibra
phone qui est doté d’un effet de “sustain”
incorporé. Appuyez sur le sélecteur “Sus
tain” (SUSTAIN) @, et le son des notes
se prolongera après que vos doigts
auront quitté le clavier.
Section rythmique
MARCH WALTZ JAZZ SWING RHUMBA
I I ROCK
f SLOW I BOSSA-
DISCO ROCK 16 BEAT NOVA SAMBA
É É
1. Choisissez un rythme Choisissez le rythme cohvenant le mieux au type de musique que vous allez jouer et appuyez sur la touche. Si la touche marquée en rouge est vers le haut, vous pouvez choisir parmi les rythmes de la rangée du haut; si elle est placée vers le bas, vous pouvez choisir les rythmes de la rangée du bas.
• Si vous appuyez sur plusieurs touches,
la touche de droite a la priorité.
I i
ininir
T
SYNCHRO
START
2. Sostenido
Este efecto funciona con todas las voces
excepto con Vibràfono que tiene el sostenido
incorporado. Pulse el selector de Sostenido
(SUSTAIN) @, y las notas se prolongarán
después de haber separado los dedos de las
teclas.
Sección de ritmo
1. Elscoja un ritmo
Seleccione el ritmo más apropiado a la
música que vaya a tocar y oprima el botón.
Si el botón con la marca roja está arriba,
puede seleccionar ritmos de la fila superior;
si está abajo, puede seleccionar ritmos de la
fila inferior.
• Si se oprimen dos o más botones, tendrá
prioridad el de la derecha.
• Si no se oprime algún botón, se selecciona
Marcha automáticamente.
13
Page 16

das PC-100 automatisch auf „Marsch“.
• SI vous n’appuyez sur aucune touche,
c’est la Marche qui est automatique
ment choisie.
Z Press SYNCHRO START
After selecting a rhythm, press the
SYNCHRO START button
3. Press a key on the left part of
the keytx>ard
The rhythm will start the moment you play
a note in the Auto Bass Chord key sec
tion. To stop the rhythm, press the
SYNCHRO START button @ again.
4. Adjustments
• Tempo
Use the TEMPO controi ® to adjust
the speed of the rhythm.
• Volume
The RHYTHM VOLUME control ® lets
you adjust the rhythm volume in rela
tion to the melody volume.
5. Making use of the Tempo Light
The Tempo Light @ functions as a visual
metronome, making it simple for you to
confirm the rhythm tempo when playing
the melody. When the rhythm is playing,
the light flashes at the first beat of every
bar. When the SYNCHRO START button
@ is engaged but you have not yet
started the rhythm by pressing a key, the
Tempo Light ® flashes at every quarter
note.
2. Synchro-Start-Schalter drücken
Drücken Sie nach der Wahl des Rhythmus
den Synchro-Start-Schalter (SYNCHRO
START)®.
3. Eine Taste im linken Teil der Tastatur
drücken
Der Rhythmus beginnt, sobald eine Taste
im Baßakkord-Automatik-Teil gedrückt
wird. Um den Rhythmus wieder abzustellen,
drücken Sie den Synchro-Start-Schalter
(SYNCHRO START) ® erneut.
4. Einstellungen
• Tempo
Stellen Sie die Geschwindigkeit des
Rhythmus mit dem Temporegler
(TEMPO) ® ein.
• Lautstärke
Mit dem Rhythums-Lautstärkeregler
(RHYTHM VOLUME) ® kann das Ver
hältnis zwischen Rhythmus- und MelodieLautstärke eingestellt werden.
5. Verwendung der Tempoanzeige
Die Tempoanzeige ® dient als optisches
Metronom zur einfachen Überprüfung des
Rhythmustempos beim Spielen einer Melo
die. Bei eingeschaltetem Rhythmus blinkt
die Anzeige beim ersten Schlag jedes Taktes.
Ist der Synchro-Start-Schalter (SYNCHRO
START) @ gedrückt, der Rhythmus durch
Drücken einer Taste aber noch nicht einge
schaltet, blinkt die Tempoanzeige @ bei jeder
Viertelnote.
Z Appuyez sur la touche Départ Synchro
(SYNCHRO START)
Après avoir choisi un rythme, appuyez sur
la touche Départ Synchro (SYNCHRO
START) @.
3. Appuyez sur une touche de la partie
gauche du clavier
Le rythme est déclenché dès l’instant où
vous jouez une note de la section Basses/
Accords Automatiques. Pour suspendre
l’effet de rythme, appuyez à nouveau sur
la touche Départ Synchro (SYNCHRO
START) ®.
4. Réglages
• Tempo
Utilisez le contrôle Tempo (TEMPO) ®
pour régler la vitesse du rythme.
• Volume
Le contrôle Volume Rythme (RHYTHM
VOLUME) ® permet le réglage du
volume du rythme en relation avec le
volume de la mélodie.
5. Utilisation de la Lampe Tempo La Lampe Tempo ® fait office de métro
nome visuel, vous assurant, de manière
simple, la confirmation du tempo rythmi
que, lors de l’exécution de la mélodie.
Quand le rythme est joué, la lampe
s’allume au premier temps de chaque
mesure. Quand la touche Départ Synchro
(SYNCHRO START) ® est engagée mais
que vous n’avez pas encore déclenché le
rythme en appuyant sur la touche corres
pondante, la Lampe Tempo ® s’allume à
chaque noire.
2. Oprima Arranque Sincronizado
(SYNCHRO START)
Después de seleccionar un ritmo, oprima el
botón de Arranque Sincronizado (SYN
CHRO START) (n).
3. Pulse una tecla de la parte izquierda
del teclado.
El ritmo comenzará en el momento que
toque una nota de la sección de teclas de
Acorde y Bajo Automático. Para parar el
ritmo, oprima de nuevo el botón de
Arranque Sincronizado (SYNCHRO
START) ®.
4. Ajustes
• Tiempo
Utilice el control de Tiempo (TEMPO)
® para ajustar la velocidad del ritmo.
• Volumen
El control de Volumen de Ritmo
(RHYTHM VOLUME) ® le permite
ajustar el volumen del ritmo en relación al
volumen de la melodía.
5. Utilización de la Luz de Tiempo
La Luz de Tiempo ® funciona como un
metrónomo visual, facilitando la confirma
ción del tiempo del ritmo al tocar la melodía.
Cuando el ritmo está tocando, la luz se
ilumina al principio de cada compás.
Cuando el botón de Arranque Sincronizado
(SYNCHRO START) ® se encuentra
oprimido pero el ritmo no ha comenzado
todavía sin pulsar una tecla, la Luz de
Tiempo @ se ilumina a cada cuarto de
nota.
14
Page 17

Auto Bass Chord Section Baßakkord-Automatik-Teil Section Basses/Accords
Automatiques
Sección de Acorde y Bajo Automático
This feature lets you obtain a chord, bass
and rhythm accompaniment simply by
pressing a single key.
1. Select a rhythm
Choose the rhythm you want then press
the SYNCHRO START button (Don’t
forget to do this whenever you use the
Auto Bass Chord feature.)
2. Press the SINGLE FINGER CHORD
button ®.
3. Press a key Press one of the 14 keys on the left side of the keyboard. You will hear the corre sponding chord with bass and rhythm accompaniment. For instance, when you press “C” (“Do”), you’ll obtain a C major chord that strums along with the bass and rhythm.
4. Set the volume Adjust the volume to suit the overall level using the Auto Bass Chord’s independent VOLUME control @.
5. Set the tempo Select the tempo you want using the rhythm section’s TEMPO control ®.
6. Using VARIATION Press the VARIATION selector ® if you want a different bass line and rhythm accompaniment.
VOLUME
MIN MAX
I I Kl I
-AUTO BASS CHORD -
Diese Einrichtung ermöglicht eine Akkord-,
Baß- und Rhythmusbegleitung durch
Drücken einer einzigen Taste.
1. Rhythmus wählen
Wählen Sie den gewünschten Rhythmus, und
drücken Sie dann den Synchro-Start-Schalter
(SYNCHRO START) ®. (Dies ist immer
durchzuführen, wenn die BaßakkordAutomatik verwendet wird.)
2. Den Einfingerakkord-Schalter (SINGLE
nNGER CHORD) ® drücken.
3. Eine Taste drücken
Drücken Sie eine der 14 Tasten auf der linken
Seite der Tastatur. Der entsprechende Akkord
ist dann mit Baß- und Rhythmusbegleitung
zu hören. Wird zum Beispiel „C“ („do“)
gedrückt, erklingt ein C-Dur-Akkord samt
Baß und Rhythmus.
4. Lautstärke einstellen
Passen Sie mit dem unabhängigen Baßak
kord-Automatik-Lautstärkeregler (Y OLUME)®die Lautstärke dem Gesamtpegel an.
5. Tempo einstellen
Stellen Sie am Temporegler (TEMPO)® des
Rhythmus-Teils das gewünschte Tempo ein.
6. Verwendung einer Variation
Drücken Sie den Variationsschalter
(VARIATION)®zum Ändern der Baßlinie
und der Rhythmusbegleitung.
SiNGLE VARiAFINGER TION
CHORD r
im
Ce dispositif permet d’obtenir un accord,
basses et accompagnement rythmé, sur
la simple pression d’une seule touche.
1. Choisissez un rythme Choisissez un rythme donné et appuyez ensuite sur la touche Départ Synchro (SYNCHRO START) ®. (N’oubliez pas de procéder ainsi chaque fois que vous
utilisez le dispositif Basses/Accords
Automatiques.)
2. Appuyez sur la touche Accord à Un
Seul Doigt (SINGLE FINGER
CHORD) ®.
3. Appuyez sur une touche du clavier
Appuyez sur l’une des 14 touches de la
partie gauche du clavier. Vous entendrez
l’accord correspondant avec basses et
accompagnement rythmé. Ainsi, par
exemple, quand vous appuyez sur la
touche correspondant au “Do”, vous
obtenez un accord de do majeur assorti
des basses et du rythme.
4. Réglez le volume
Réglez le volume en fonction du niveau
d’ensemble, en utilisant le contrôle de
Volume Basses/Accords Automatiques
(VOLUME) ® indépendant.
5. Réglez le tempo Réglez le tempo désiré en utilisant le contrôle TEMPO ® de la section rythmique.
6. Utilisation de VARiATION Appuyez sur le sélecteur VARIATION ® si
vous désirez des basses et un accom
pagnement rythmé différents.
Esta característica le permite obtener un
acorde, y acompaflamiento de ritmo y bajo
simplemente pulsando una tecla.
1. Seleccione un ritmo
Escoja el ritmo que desee y oprima el botón
de Arranque Sincronizado (SYNCHRO
START) ®. (No se olvide de hacerlo
siempre que utilice la característica de
Acorde y Bajo Automático.)
2. Oprima el botón de Acorde de Un Solo
Dedo (SINGLE FINGER CHORD) ®.
3. Pulse una tecla
Pulse una de las 14 teclas de la parte
izquierda del teclado. Escuchará el acorde
correspondiente con acompañamiento de
ritmo y bajo. Por ejemplo, cuando pulse
“C” (“Do”), obtendrá un acorde C mayor
que sonará junto con bajo y ritmo.
4. Ajuste el volumen
Ajuste el volumen apropiado para el nivel
general utilizando el control de Volumen
(VOLUME) independiente @ de Acorde y
Bajo Automático.
5. Ajuste el tiempo
Seleccione el tiempo que desee utilizando el
control de Tiempo (TEMPO) ® de la
sección de ritmo.
6. Utilización de Variación (VARIATION)
Pulse el selector de Variación (VARIATION)
® si desea una línea de bajo y un acompaña
miento diferentes.
15
Page 18

Auto Bass Chord key section
Baßakkord-Automatik-Teil
Section touches de Basses/Accords Automatiques
Sección de teclas de Acorde y Bajo
Automático
Obtaining minor, seventh and minor seventh chords
To get a C major chord, push C key.
The bass accompaniment will always
conform to the strumming chord.
To get a C minor chord depress the C
key together with the next black key to
the left.
To get a C seventh chord depress the C
key together with the next white key to
the left.
To get a C minor seventh chord, simply
press the C key together with the next
black key and white key to the left.
Points to Note
You must completely lift your finger
from the key for the chord to change. If
you hold down the previous chord and
move to the next one, the PC-100 will
not change chords.
If the Auto Bass Chord feature is used
without SYNCHRO START you
will get a continuous chord with bass.
The chord will stop when you take your
finger from the key.
Moll-, Septimen- und Moll-Septimenakkord
Drücken Sie die C-Taste für einen C-DurAkkord. Die Baßbegleitung ist immer
dem gewählten Akkord angepaßt.
Drücken Sie die C-Taste zusammen mit
der links danebenliegenden schwarzen
Taste für einen C-Moll-Akkord.
Drücken Sie die C-Taste zusammen mit
der links danebeiüiegenden weißen Taste
für einen Septimenakkord auf C.
Drücken Sie die C-Taste zusammen mit
den links danebenliegenden schwarzen
und weißen Tasten für einen MollSeptimenakkord auf C.
Zu beachtende Punkte
Wird zum Akkord Wechsel eine neue Taste
gedrückt, so muß die alte vorher voll
kommen losgelassen werden, da das
PC-100 sonst keinen Akkordwechsel
durchführt.
Wird die Baßakkord-Automatik ohne
Drücken; des Synctiro-Stait-Schalters
(SYNCHRO START) verwendet, so
erhält man einen kontinuierlichen Akkord
mit Baßbegleitung. Der Akkord stoppt,
Obtention des accords: mineurs, de
septième et de septième mineure
Pour obtenir un accord de C (do)
majeur, appuyez sur la touche “C”
(“do”). L’accompagnement des basses
sera toujours conforme à l’accord.
Pour obtenir un accord de C (do)
mineur, appuyez en même temps sur la
touche “C” (“do”) et sur la touche noire
située immédiatement à gauche.
Pour obtenir un accord de septième en
C (do), appuyez en même temps sur la
touche “C” (“do”) et sur la touche
blanche située immédiatement à
gauche.
Pour obtenir un accord de septième
mineure en C (do), appuyez en même
temps sur la touche “C” (“do”) et sur
les 2 touches voisines — noire et blan
che — situées immédiatement à
gauche.
Remarques
• Votre doigt doit avoir quitté la touche
définitivement pour que l’accord
change. Si vous maintenez l’accord
précédent et passez au suivant, le PC100 ne procédera pas au changement
d’accord.
• Si le dispositif de Basses/Accords
Automatiques est utilisé sans le
Départ Synchro (SYNCHRO START)
ii' , vous obtiendrez un accord con-
Obtención de acordes de menor,
séptima y séptima menor
• Para obtener un acorde de C mayor,
pulse la tecla C. El acompañamiento de
bajo siempre se acoplará al acorde
tocado.
• Para obtener un acorde de C menor,
pulse la tecla C junto con la siguiente
tecla negra a su izquierda.
• Para obtener un acorde de C séptima,
pulse la tecla C junto con la siguiente
tecla blanca a su izquierda.
• Para obtener un acorde de C séptima
menor, pulse la tecla C junto con las
siguientes teclas blanca y negra a su
izquierda.
Puiitos a tener en euenla
• Pará'que'cambie^ el acordé debe'separar'
"completamente el dedo; de'¡aitecla.,Si"
mantiene, el acorde anterior'"y;pasa al
siguiente, el PC-100. no cambiará
acordes., "' ''''"'’I
• ;Si se utiliza la caracterí'Stjca de Acorde,y'
"Bajo" Automático sin. el Arranque''
' Sincronizado' (SYNCHRO' START)'',® ,'
, obtendrá un acorde continuo con bajo.
El acorde se detendrá cuando separe el
16
Page 19

• To cancel the Auto Bass Chord func' lion, press ' the SINGLE ^ BINGER
^sobald Sie Ihren Finger von'der Taste h
nehmen. ; '
dès q'ue votre doigt aura quitté ',la
' CHORD^ button ®-again. The rhythm:; '• Drücken Sie zum^ Ausschalten der Baß- touche.
' '' will also:stop, but wifi start again wberni:
r a aote Js pressed' in the' Auto-Bass., - :'Schalter'{SINGLE FINGER, CHORD)
\ Chord key section,: , ; ; c
' ^ afckord-Automafik'den'Einfingeraldcord-''
' ,Accords,'" Automatiques,, appuyez
' ^ 0 erneut. Der Rhythmus hört dann eben-.
' , falls,auf, beginnt'äber erneut, sobald,eine'
, ' , ,Taste'des Baßakkörd-Automatik-Teils ge- ','
'' drückt,wird.' , ; ''' "r ;
'' ' ,'0.','Le:fythme cesseraègalem,ent, :m;alS:, ' ", teclas,'dé:''Acorde y''Baj'oA'ot
reprendra'quand,unemote''est jouée,:,'
, d'an,s :':la ',''sectlQ'0 touches, de'^ 'Basses/I,',
', 1 Accords:,''AütOfB'aîlquésT , \ ',',-1" ''
S : tinu avec "basses. L’accord , cessera ' t
®"',Pour, annuler" : la,'lonction. 'Basses/
-t,nouveausur'ia 'touche Accord"'à\Un:, ,
' CiM.i c BiKiraeR AwoBrtt ^ ^
'dedo'de ladéela.'
'' '•' Рага' anularla ''función' de At;orde y Bajo,
^ 'Automático,, oprima' de: nue
vo^ el' botón ''
de Acorde de Un Solo Decí0 (SINGLE
FINGER CHORD) f . Eiri jno,'también,',, "
se parará, pero comenzarti" de:miévo,'.
omático,:'';'''
I
Single'^Etnger Chofd';practice^' Wnt,"v,
1^; canalise theAuto Bass Chord:Systero :
I
' In conjunetiGnlwtttì'the'Playeàrd .system^'.
',' Tips;zur Venfeniung,der „' :''''t
/ EIiifiBgerakfcord:-FB,Bk'ti«ii '; ''
Sie 'können ü das' „"BaBakfcö'rd-Aiitöraatik-' 'Vo'us':bo'uvez 'utiUserle^ système'''Basses/:',
'System' zusammen "'mit,'''dem ' „Playeard'“-, ^
'Seeipage' 1 tlfor^detalls; '
^ ,Sy.stem 'Verwenden,''^ lim'sich' mit deiii"Eiö-
: ,lBgerakko,rdwer'traut,z'tfm'ächep. ,Genaüeres ' ;
siehe S.:i'l, :, , ",'i:
Automatic Arpeggios Arpeggio-Automatik
The ARPEGGIO control @ adds a rippling
effect to the accompaniment. This feature
must be used in conjunction with the
Auto Bass Chord and Rhythm sections,
but since the Auto Bass Chord, Rhythm
and Arpeggio volumes are independently
controllable, you can finely balance all
three to suit the music.
Mit dem Arpe^io-Regler (ARPEGGIO) @
kann der Begleitung ein Welleneffekt hinzu
gefügt werden. Diese Funktion muß zusam
men mit dem Baßakkord-Automatik- und
Rythmus-Teil verwendet werden; da jedoch
für Baßakkord-Automatik, Rhythmus und
Arpeggio drei getrennte Regler vorhanden
sind, kann eine unabhängige Anpassung
aller drei Funktionen an die jeweilige Musik
vorgenommen werden.
"'''Suggestion "Portant, sar''la'pratiqué':, ::'
:',1’AcctordsSeuliOolft,
''^ ^Accords : Automatiq,ues: 'en:''',Gonl,on'etiqrî,:'''
'',dvec','''''le''','Système'''/‘PlayGard’’, '„pour'Vous'/''
''::,fa'G'il'itef:la pratiq'ue'des AGçords'''â':i|riiSéul: : :
: Dd'igt ',:Voi,r '':P,T1'': :'po'ur, ':'"de jp'ius ;,aiîî'Pi'es „' '
'détails."::,,'!:'", 'v:::':"::'',
Arpèges automatiques
VOLUME
MIN MAX
nil
Le contrôle Arpège (ARPEGGIO) @ ajoute
un effet d’arpège à l’accompagnement.
Cette fonction doit être utilisée en
conjonction avec les sections Basses/
Accords Automatiques et Rythme. Etant
donné que les volumes relatifs aux
Basses/Accords Automatiques, Rythme
et Arpège peuvent être indépendamment
contrôlés, vous pouvez procéder à un
réglage fin des trois pour trouver l’équi
libre le mieux adapté à la musique.
'€«ase|o':faral'ia'^pií<;tíc»:ée\AcorÍfe''ie,^
:SoIp'Peͩ h'V:CV;h >:) ''V'^ \
;Piiéd$l ptii?#;a:;asteina tìè\ ÀcòrSe ; y Sajo
-AutomáticoyeonjuntOTepte OQB::;eÍ;;slsteisa;:
, Piáfctód'paralayudarle la -praetícar; Acerdés; '
de Un Solo Dedo. Ver pág. 11 para má.s
detalles.
Arpegios Automáticos
F1 control de Arpegio (ARPEGGIO) @
añade un efecto ondulante al acompaña
miento. Esta característica debe utilizarse
conjuntamente con las secciones de Acorde y
Bajo Automático y de Ritmo, pero como los
volúmenes de Acorde y Bajo Automático,
Ritmo y Arpegio son controlables indepen
dientemente, puede equilibrar los tres exac
tamente para acoplarse a la música.
17
Page 20

Making Use Of The Jacks
You’ll find four jacks on the left side of the
instrument. These jacks are for connect
ing the optionai accessories and other
equipment.
Allschlußmöglichkeiten
An der rechten Seite des Instrumentes be
finden sich vier Buchsen, die zum Anschlie
ßen von Sonderzubehör und anderen Geräten
dienen.
O •:
DC 9-12VIN
+ -9 -
EXP. AUX HEAD
PEDAL OUT PHONES
Mode d’utilisation des jacks
Vous trouverez 4 jacks sur la partie
gauche de l’instrument. Ces jacks servent
au branchement des accessoires en
option et de matériei divers.
Utilizacíón de los contactos
EncontrEirá cuatro contactos en el lateral
izquierdo del instrumento. Estos contactos
son para conectar los accesorios opcionales y
otros equipos.
External power source jack
(DC 9-12V IN)
• AC power
Connect the optional AC Power Adaptor
PA-1 to the DC 9-12V IN jack.
• Car battery
The Car Battery Adaptor CA-1 plugs into
the DC 9-12V IN jack and a cigarette
lighter socket.
Expression pedal jack
• The EXP. PEDAL jack is for connecting
the Expression Pedai (EP-1), which iets
you control the overall volume level
using your foot.
Aux out jack
• The Speaker Cabinet (TO-100) is
connected to the PC-100 via the AUX
OUT jack.
• You can channel sound through your
stereo system’s speakers using this
jack. Also, you can connect directly
with a cassette deck for recording. In
either case, the connecting cord PC-2
or an ordinary extension cord is
required.
Headphone jack
• Connect a set of headphones to this
jack and you can practice in private or
play by yourself at night without dis
turbing a soul.
Fremdst rombuchse (DC 9-12V IN)
• Netzstrom
Schließen Sie den als Sonderzubehör erhält
lichen Netzadapter PA-1 an die mit DC
9V-12V IN bezeichnete Buchse an.
• Autobatterie
Schließen Sie den als Sonderzubehör erhält
lichen Autobatterieadapter CA-2, an die mit
DC 9-12V IN bezeichnete Buchse an.
Fußschwellerbuchse (EXP. PEDAL)
• Die mit EXP. PEDAL bezeichnete Buchse
dient zum Anschließen des Fußschwellers
(EP-1), mit dem sich die Gesamtlaut
stärke regeln läßt.
Ausgangsbuchse (AUX OUT)
• Das Tonkabinett (TO-100) kann an diese
Buchse angeschlossen werden.
• Bei Verwendung dieser Buchse ist auch
eine Klangwiedergabe über die Laut
sprecher Ihrer Stereo-Anlage möglich.
Außerdem können Sie diese Buchse für
Aufnahmen direkt mit einem Cassettenrecorder verbinden. In beiden Fällen ist
das Anschlußkabel PC-2 oder ein gewöhn
liches Verlängerungskabel erforderUch.
Kopfhörerbuchse (HEADPHONES)
• An diese Buchse kann ein Kopfhörer
angeschlossen werden, um ungestört üben
oder ohne die Nachbarn zu stören nachts
spielen zu können.
Jack d’alimentation extérieure (DC 9-12V IN)
• Courant alternatif
Branchez l’adaptateur courant alternatif
PA-1 en otion au jack courant continu
9-12V IN (DC 9-12V IN).
• Batterie automobile
L’adaptateur batterie automobiie CA-1 se
branche sur le jack courant continu 9-12V
IN et sur l’allume-cigare du tableau de
bord.
Jack de pédale d’expression
• Le jack de pédale d’expression sert au
branchement de la pédale d’expres
sion (EP-1), qui permet le contrôle —
au pied — du niveau de volume global.
Jack Aux Out
• L’enceinte haut-parleurs (TO-100) est
branchée au PC-100 par l’intermédiaire
du jack Aux Out.
• Ce jack permet la reproduction sonore
dans les haut-parleurs de votre
système stéréo. Le branchement direct
sur magnétophone à cassette — en
vue d’un enregistrement — est égale
ment possible. Dans les deux cas, le
cordon de branchement PC-2 (ou un
cordon ordinaire) est requis.
Jack casque d’écoute
• Branchez un casque d’écoute à ce jack
et vous pouvez pratiquer en privé, de
nuit par exemple, sans crainte de
déranger qui que ce soit.
Contacto de fuente de potencia externa
(DC 9-12V IN)
• Potencia CA
Conecte el adaptador de CA opcional PA-1
al contacto de CC 9-12V (DC 9-12V IN).
• Batería de automóvil
El adaptador para batería de automóvil
CA-1 se conecta al contacto de DC 9-12V IN
y al contacto del encendedor de cigarrillos.
Contacto de pedal de expresión
• El contacto de pedal de expresión es para
conectar el Pedal de Expresión (EP-1)
que le permite controlar el nivel de
volumen general, utilizando su pie.
Contacto Aux Out (salida de auxiliares)
• El Gabinete de Altavoz (TO-lOO) se
conecta al PC-100 por medio del contacto
Aux Out.
• Ud. puede canalizar el sonido a través de
los altavoces de su equipo estereofónico,
utilizando este contacto. Además, puede
conectarlo directamente a una pletina de
cassette para grabaciones. En cualquier
caso, son necesarios el adaptador de con
tacto y el cable de ramificación PC-2 o un
cable de extensión ordinario.
Contacto de auriculares
• Conecte un juego de auriculares a este
contacto y podrá practicar en privado o
tocar por la noche sin causar molestias a
nadie.
18
Page 21

Optional
Sonderzubehör
Accessoires en
Accesorios opcionales
Accessories
AC Power Adaptor (PA-1)
Transforms AC voltage to DC 12V.
Car Battery Adaptor (CA-1)
Enables you to provide power to the
instrument from a car battery using the
cigarette iighter socket. The adaptor con
tains a circuit for protecting the PortaSound PC-100 against high voitages.
Headphones (YH series)
Speciaily designed iightweight dynamic
headphones with extra-soft ear pads.
Expression Pedal (EP-1)
Lets you add more feeling to music by
enabiing subtle control of the overall
volume level.
Speaker Cabinet (TO-100)
An auxiliary speaker without an amplifier.
Provides fuller, more dynamic sound in
low note ranges.
Connecting Cord (PC-2)
For hooking the instrument up with a
stereo system so you can channel sound
through the stereo’s speakers or make a
direct recording.
Some optional accessories may not be avail
able in every region.
Netzadapter (PA-1)
Dieser Adapter wandelt Netzspannung in
12V Gleichspannung um.
Autobatterieadapter (CA-1)
Dieser Adapter kann an die Zigarettenan
zünderbuchse Ihres Wagens angeschlossen
werden, um das Instrument von der Auto
batterie zu versorgen. Der Adapter besitzt
eine Schaltung zum Schutz des PortaSound
PC-100 gegen zu hohe Spannung.
Kopfhörer (YH-Serie)
Speziell entwickelter, leichter, dynamischer
Kopfhörer mit besonders weichen Ohr
polstern.
Fußschweller (EP-1)
Mit diesem Pedal läßt sich die Gesamtlaut
stärke individuell regeln, um Musik aus
drucksvoller wiederzugeben.
Tonkabinett (TO-lOO)
Ein Zusatzlautsprecher ohne eingebauten
Verstärker. Liefert einen volleren, dyna
mischeren Klang.
Anschlußkabel (PC-2)
Dieses Kabel dient zum Anschließen des
Instrumentes an eine Stereo-Anlage, um den
Klang über die Lautsprecher der StereoAnlage wiederzugeben oder Direktauf
nahmen zu machen.
Möglicherweise sind in einigen Gebieten nicht alle
Sonderzubehör-Teile erhältlich.
option
Adaptateur courant alternatif (PA-1)
Transforme le voltage courant alternatif
en courant continu 12V.
Adaptateur Batterie automobile (CA-1)
Il vous permet d’assurer l’alimentation de
l’instrument à partir d’une batterie auto
mobile, en utilisant l’allume-cigare du
tableau de bord. L’adaptateur contient un
circuit assurant la protection du Porta
Sound PC-100 contre les hauts voltages.
Casque d’écoute (série YH)
Spécialement conçu, léger, ce casque
d’écoute est doté de coussinets extra
doux.
Pédale d’expression (EP-1)
Grâce à un contrôle subtil du niveau du
volume global, elle permet de nuancer
l’expression musicale.
Enceinte haut-parleur (TO-IOO)
Haut-parleur auxiliaire sans amplificateur.
Assure un son plus plein et plus dynami
que dans les notes basses.
Cordon de branchement (PC-2)
Permet le branchement à un système
stéréo. Vous pouvez, en conséquence,
obtenir le son dans les haut-parleurs
stéréo ou effectuer un enregistrement
direct.
Certains accessoires en option peuvent ne
pas être disponibles dans chaque région.
Adaptador de potencia CA (PA-1)
Ihansforma el voltaje CA en voltaje CC de
12V.
Adaptador para batería de automóvil (CA-1)
Le permite proporcionar potencia al instru
mento desde la batería del automóvil utili
zando el contacto del encendedor de cigarri
llos. El adaptador contiene un circuito para
proteger al PC-100 contra altos voltajes.
Auriculares (serie YH)
Auriculares dinámicos ligeros, especialmente
diseñados, con almohadillas extra-suaves.
Pedal de Expresión (EP-1)
Le permite añadir más sentimiento a la
música haciendo posible un control más sutil
del nivel de volumen general.
Gabinete de Altavoz (TO-lOO)
Un altavoz auxiliar sin amplificador.
Proporciona un mayor y más dinámico
sonido en la gama de notas bajas.
Cable ramificado de extensión (PC-2)
Para conectar el instrumento a un equipo
estereofónico, para poder canalizar el sonido
a través de los altavoces del equipo o para
hacer una grabación directa.
Puede que algunos de los accesorios opcionales no
estén disponibles en todas las áreas.
CM
YH-50
EP-1
TO-100
19
Page 22

Taking Care Of The
PC-100 And
Playcards
Nützliche Hinweise
Entretien du PC-100
et des “Playcards”
Cuidados del PC-100
y de las taijetas
Playcard
Your PortaSound PC-100 will remain in
excellent playing condition if care is
taken concerning the following.
PC-100
1. Occasionally clean the reading head
located in the groove by sliding the
head cleaning card (included) along
the Playcard groove several times.
2. Keep the Playcard groove free of dust
and other foreign matter, otherwise
damage to the head may occur.
3. When you use AC power or a car
battery, be sure to use the optional
PortaSound adaptors. Before use, read
the adaptor instructions carefully.
4. The optional car battery adaptor is
only for use with a negative ground
12V battery. Ensure that this is the
case before connecting the adaptor.
5. Do not set the MASTER VOLUME at
MAX when you connect the PC-100 to
a stereo system. Use the stereo
system’s volume control to adjust the
sound level.
6. Avoid placing the instrument in exces
sively humid areas.
7. Do not subject the unit to physical
shock, and avoid placing an^hing
heavy on it.
8. The PortaSound PC-100 should not be
placed In direct sunlight for a long
time.
9. Do not place the instrument near any
heating appliance, or leave it inside a
car in direct sunlight for any length of
time. Direct sunshine can raise the
interior temperature of a car with
closed doors and windows to as high
as 80°C (176°F). In extremely high
temperatures (60°C/140°F or higher)
the instrument may be damaged.
Damit Sie immer Freude an Ihrem Porta
Sound PC-100 haben, beachten Sie bitte die
folgenden Punkte.
PC-100
1. Reinigen Sie gelegentlich den im ,,Playcard“-Schlitz befindlichen Lesekopf,
indem Sie die Reinigungskarte (mitgelie
fert) mehrmals in den Schlitz schieben.
2. Schützen Sie den ,, Playcard “-Schlitz vor
Staub und fremden Gegenständen, da es
sonst zu einer Beschädigung des Kopfes
kommen kann.
3. Verwenden Sie für Netz- und Autobat
teriebetrieb ausschließlich für das Porta
Sound als Sonderzubehör lieferbare
Adapter. Lesen Sie vor der Inbetrieb
nahme die Anleitung des Adapters sorg
fältig durch.
4. Der als Sonderzubehör erhältliche Auto
batterieadapter ist nur für eine negativ
geerdete 12V-Batterie geeignet. Vergewis
sern Sie sich vor dem Anschließen des
Adapters, ob dies bei Ihrer Wagenbatterie
der Fall ist.
5. Stellen Sie den Hauptlautstärkeregler
(MASTER VOLUME) nicht auf MAX,
weim das PC-100 an eine' Stereo-Anlage
angeschlossen ist. Verwenden Sie zur
Lautstärkeneinstellung den Lautstärke
regler der Stereo-Anlage.
6. Halten Sie das Instrument von extrem
feuchten Plätzen fern.
7. Schützen Sie das Gerät vor mechanischen
Stößen, und stellen Sie keine schweren
Gegenstände darauf.
8. Setzen Sie das PortaSound nicht längere
Zeit direktem Sonnenlicht aus.
9. Halten Sie das PortaSound von Heizun
gen fern, und lassen Sie es nicht in einem
Auto, das direkt in der Sonne geparkt ist.
Bei einem mit geschlossenen Türen und
Votre PortaSound PC-100 restera en
excellente condition, si les points
suivants sont obsen/és:
PC-100
1. Procédez de temps en temps au netto
yage de la tête de lecture située dans
la rainure, en déplaçant la carte de
nettoyage de tête (comprise) le long de
la rainure plusieurs fois.
2. Veillez à ce que la rainure ne contienne
ni poussière ni corps étranger, suscep
tible d’endommager la tête.
3. En cas d’utilisation du courant alter
natif ou d’une batterie automobile,
n’oubliez pas d’utiliser les adaptateurs
PortaSound en option. Avant l’utilisa
tion de ces derniers, il est recom
mandé de lire les instructions s’y
rapportant avec la plus grande atten
tion.
4. L’adaptateur batterie automobile en
option doit être utilisé seulement avec
une batterie négative de 12V. Assurez-
vous que cette condition est remplie
avant de brancher l’adaptateur.
5. Ne pas régler le Volume Principal
(MASTER VOLUME) sur la position
MAX lors du branchement du PC-100 à
un système stéréo. Pour le réglage du
niveau sonore, utilisez le contrôle de
volume du système stéréo.
6. Evitez de placer l’instrument dans des
lieux où l’humidité est excessive.
7. Ne pas soumettre l’instrument à des
chocs. Veillez aussi à ne pas placer
d’objet pesant sur l’instrument.
8. Eviter d’exposer directement au soleil
votre PortaSound PC-100 pour une
longue durée.
9. Ne pas placer l’instrument à proximité
d’une source de chaleur. Evitez aussi
Su PortaSound PC-100 permanecerá en
excelente condición si se toman los cuidados
siguientes.
PC-100
1. Limpiar de vez en cuando la cabeza
lectora localizada en la hendidura, desli
zando la tarjeta limpiadora de cabeza
(incluida) por la hendidura varias veces.
2. Mantener la hendidura de tarjetas Play
card limpia de polvo y materias extrañas,
ya que pueden ocasionar daños a la
cabeza.
3. Cuando utilice potencia CA o batería de
automóvil, asegúrese de utilizar los adap
tadores opcionales PortaSound. Antes de
utilizarlos, lea detenidamente las instruc
ciones.
4. El adaptador opcional para batería de
automóvil es para utilizarse únicamente
con batería de tierra negativa de 12V.
Asegurarse de que este sea el caso antes
de conectar el adaptador.
5. No ajuste el Volumen Principal
(MASTER VOLUME) a MAX cuando
conecte el PC-100 a un equipo estereofónico. Utilice el control de volumen del
equipo estereofónico para ajustar el nivel
de sonido.
6. Evite dejar el instrumento en áreas excesi
vamente húmedas.
7. Evite los impactos físicos a la unidad, y
no coloque nada pesado sobre ella.
8. El PortaSound PC-100 no deberá dejarse
durante largo tiempo bajo la acción
directa de la luz solar.
9. No coloque el instrumento cerca de
fuentes de calor, ni lo deje dentro del
automóvil al sol. La luz solar puede
elevar la temperatura interior de un auto
móvil con las puertas y ventanas cerradas
hasta 80°C. A temperaturas extremada-
20
Page 23

possibly resulting in malfunction.
10. Use a dry or damp cloth for cleaning.
11. When you aren’t using the PortaSound
PC-100, keep it in the case to protect it.
Playcards
1. Handle the Playcards carefully so that
the magnetic strips do not become
damaged in any way, and ensure that
you insert them in the correct direction
(see page 5).
2. Don’t place Playcards on the speaker
since the speaker’s magnet may affect
the recorded data. For the same
reason, do not put the Playcards near
a TV, amplifier or other product having
a magnetic field.
3. It Is better not to touch the magnetic
strip with your fingers.
4. If water of alcohol Is spilled on a Playcard, wipe It off immediately and allow
the Playcard to dry before using it.
5. Clean the Playcards with a soft cloth
when they become dirty.
6. Never put cleaning agents such as
thinner or benzine on the magnetic
strip.
7. Avoid placing the Playcards in exces
sively humid and high-temperature
areas.
8. Do not leave the Playcards in direct
sunlight.
9. When you aren’t using the Playcards,
keep them in their protective enve
lopes.
Fenstern in der prallen Sonne geparkten
Wagen kann die Innentemperatur bis auf
80 °C ansteigen. Bei extrem hohen Tem
peraturen (60°C oder höher) karm das
Instrument beschädigt werden, und es
kommt zu Fehlfunktionen.
10. Verwenden Sie zur Reinigung ein trokkenes oder leicht angefeuchtetes T\ich.
11. Bewahren Sie das PortaSound stets in
seinem Koffer auf, wenn es nicht benutzt
wird.
„Playcards“ (Spielkarten)
1. Gehen Sie vorsichtig mit den ,,Play
cards“ um, damit der Magnetstreifen
nicht beschädigt wird. Stecken sie die
Karten nicht seitenverkehrt ein (Seite 5).
2. Legen Sie die ,,Playcards“ nicht auf
einen Lautsprecher, da sonst die aufge
zeichneten Daten durch den Lautspre
chermagneten gelöscht werden können.
Aus dem gleichen Grund müssen die
,,Playcards“ auch von anderen Geräten
mit starken Magnetfeldern wie z.B.
Fernseher und Verstärker ferngehalten
werden.
3. Berühren Sie den Magnetestreifen mög
lichst nicht mit den Fingern.
4. Sollten Wasser oder alkoholische Ge
tränke auf die ,,Playcard“ gelangen, wi
schen Sie sie sofort ab, und lassen Sie sie
trocknen, bevor Sie sie wieder benutzen.
5. Verwenden Sie zur Reinigung einer ver
schmutzten ,,Playcard“ ein trockenes
Tüch.
6. Verwenden Sie zur Säuberung des
Magnetstreifens niemals Reinigungs
flüssigkeiten wie Verdünner oder Benzin.
7. Halten Sie die ,,Playcards“ vor extrem
feuchten und heißen Plätzen fern.
8. Legen Sie die ,,Playcards“ nicht längere
Zeit in die pralle Sonne.
9. Bewahren Sie die ,,Playcards“ stets in
ihren Schutzhüllen auf, wenn sie ra'cht
verwendet werden.
de le laisser dans une voiture, exposé
directement au soleil. Le rayonnement
solaire direct peut, en effet, élever la
température à l’intérieur d’une voiture
fermée jusqu’à 80°C (176°F). Soumis
à des températures extrêmement
élevées (60°C/140°F ou plus), l’instru
ment risque d’être endommagé et de
présenter des défaillances de fonction
nement.
10. Pour le nettoyage utilisez un morceau
d’étoffe sec ou humide.
11. Quand vous n’utilisez pas le Porta
Sound PC-100, il est recommandé de
le laisser dans son étui protecteur.
“Playcards”
1. Il est recommandé de manier les
“Playcards” soigneusement, afin de
ne pas endommager les pistes magné
tiques. Veillez, par ailleurs, à les
insérer dans la direction appropriée
(voir P. 5).
2. Ne pas placer les “Playcards” sur le
haut-parleur: l’aimant du haut-parleur
pourrait, en effet, avoir une incidence
fâcheuse sur les données enregist
rées. Pour la même raison, ne pas
placer les “Playcards” à proximité d’un
téléviseur, d’un amplificateur ou d’un
quelconque appareil possédant un
champ magnétique.
3. Il est recommandé de ne pas toucher
la piste magnétique avec les doigts.
4. Au cas où de l’eau ou de l’alcool serait
renversé (e) sur une “Playcard”, essuyez
immédiatement le liquide et assurezvous que la “Playcard” est parfaite
ment sèche avant son utilisation.
5. Nettoyez les “Playcards” — lorsque
cela s’avère nécessaire — avec une
étoffe douce.
6. Veillez à ne jamais mettre de produits
nettoyants — tels que dissolvant ou
benzine — sur la piste magnétique.
7. Evitez de placer les “Playcards” dans
des lieux excessivement humides ou
chauds.
8. Exitez d’exposer les “Playcards” au
rayonnement solaire direct.
9. Quand vous n’utilisez pas les “Play
cards”, il est recommandé de les laisser
dans leurs enveloppes protectrices.
mente altas (60°C o más) puede dañarse
el instrumento, resultando en un funcio
namiento defectuoso.
10. Utilice un paño seco o humedecido con
agua, para limpiarlo.
11. Cuando no utilice el PortaSound PC-100,
guárdelo dentro de la caja para prote
gerlo.
Taijetas Playcard
1. Manejar las tarjetas Playcard cuidadosa
mente para que las franjas magnéticas no
resulten dañadas, y asegúrese de inser
tarlas en la dirección correcta (ver pág. 5).
2. No coloque las tarjetas sobre el altavoz ya
que el imán de éste puede afectar a la
información grabada. Por la misma
razón, no coloque las tarjetas cerca de un
televisor, amplificador u otro producto
que tenga campo magnético.
3. Es mejor no tocar la franja magnética
con los dedos.
4. Si se deja caer alcohol o agua sobre la
tarjeta Playcard, limpiarla inmediatamen
te y dejar que se seque antes de usarla.
5. Limpie las tarjetas Playcard con un paño
suave cuando se ensucien.
6. No poner nunca agentes limpiadores
como acetona o bencina sobre la franja
magnética.
7. Evite colocar las tarjetas en áreas excesi
vamente húmedas o calurosas.
8. No deje las tarjetas bajo la acción directa
de la luz solar.
9. Cuando no utilice las tarjetas, guárdelas
en sus sobres protectores.
21
Page 24

%
Specifications
Keytward
44 keys (F1-C5)
Playcard System
Repeat, Lamp Cancel, Free Tempo,
Melody Cancel, Play
30 Melody Lamps
Orchestra Section
Organ, Piccolo, Trumpet, Violin, Clarinet,
Oboe, Piano, Harpsichord, Guitar,
Vibraphone
Sustain
Rhythm Section
March, Disco, Waltz, Slow Rock, Jazz
Rock, 16 Beat, Swing, Bossanova,
Rhumba, Samba
Synchro Start, Tempo, Volume, Tempo
Light
Technische Daten
Tastatur
44 Tasten (Fi-Cs)
„Playcard“-System
Wiederholen, Löschen der Lampen, Exécution du Morceau, Répétition, Repetición, Anulación de Luz, Tiempo
Tempoautomatik, Löschen der Melodie,
Spielstart
30 Melodie-Lampen 30 Lampes de Mélodie Sección de orquesta
Orchester-Teil
Orgel, Piccolo, Trompete, Violine, Klarinette,
Oboe, Piano, Cembalo, Gitarre
Vibraphon, Sustain
Rhythmus-Teil Section Rythmique
Marsch, Disco, Walzer, Langsamer Rock, Marche, Disco, Valse, Slow Rock, Jazz
Jazz Rock, 16 Beat, Swing, Bossanova Rock, 16 Beat, Swing, Bossanova,
Rumba, Samba
Synchro-Start, Tempo, Lautstärke,
Tempoanzeige
Arpeggio Arpeggio
Volume
Auto Bass Chord Section
Single Finger Chord, Variation, Volume
Other Controls and Indicators
Power Switch, Power-On Light, Master
Volume, Transposer (1/2 octave high and
low). Pitch Control
Auxiliary Jacks
Headphones, Aux-out, Expression Pedal, Anschlußbuchsen
DC 9-12V Input
Amplifier
1.4W(RMS)
Lautstärke
Baßakkord-Automatik-Teil
Einfingerakkord, Variation, Lautstärke
Andere Bedienungselemente und Anzeigen Autres Contrôles et Indicateurs
Ein-Aus-Schalter, Einschaltanzeige, Haupt Interrupteur d’alimentation. Lampe
lautstärkeregler, Transponierungsregler
(1/2 Oktave höher oder niedriger). Transposeur (1/2 octave au-dessus et au-
Tonhöhenregler
Kopfhörer, Tonausgang, Fußschweller,
Eingang für 9-12V Gleichspannung
Verstäker Amplificateur
Speaker 1,4W (Sinus)
7.7cm (3")
Rated Voltage
DC 9V using six 1.5V SUM-2, “C” size. Nennspannung
R-14, or equivalent batteries, AC power
adaptor, or car battery adaptor
Lautsprecher Haut-parleur
7,7cm
9V Gleichspannung (sechs 1,5 V Babyzellen,
Netzadapter oder Autobatterieadapter) 1,5V, format “C”, R-14 ou piles équiva tamaño “C”, R-14 0 equivalentes, adaptador
Power Consumption Leistungsaufnahme
3.5W with AC adaptor, max. volume;
2.2W with batteries, max. volume
Body
ABS resin, acrylic lacquer finish
Dimensions
62.3(W)x 18.6(D) x4.3(H)cm 62,3cm breit x 18,6cm tief x 4,3cm hoch
(24-1/2" X 7-1/3" X1-7/8")
Weight
2.0kg (4.4 lbs.) (excluding batteries and
case)
(Specifications are subject to change without
notice.)
3,5W mit Netzadapter, max. Lautstärke adaptateur batterie automobile
2,2W mit Batterien, max, Lautstärke Consommation Electrique
Gehäusematerial
ABS-Kunstharz, Akryllack max. volume; 2,2W avec piles, max. volume
Abmessungen Corps
Gewicht
2,0kg (ohne Batterien und Tragekoffer)
(Änderungen, die dem technischen Fortschritt dienen,
bleiben Vorbehalten.)
Spécifications
Especificaciones
Clavier Teclado
44 touches (Fi-C5/Fai-D05)
44 teclas (Fj-C;)
Système “Playcard” Sistema de taijetas Playcard
Annulation des Lampes, Tempo Libre,
Annulation de la Mélodie
Section Orchestrale
Orgue, Piccolo, Trompette, Violon,
Clarinette, Hautbois, Piano, Clavecin,
Guitare, Vibraphone, “Sustain”
Libre, Anulación de Melodia, Toque
30 Luces de Melodia
Organo, Píccoio, Trompeta, Violin,
Clarinete, Oboe, Piano, Clavicordio,
Guitarra, Vibràfono
Sostenido
Sección de Ritmo
Marcha, Disco, Vals, Rock Lento, Jazz
Rock, Ritmo 16, Swing, Bossanova, Rumba,
Rumba, Samba
Départ Synchro, Tempo, Volume, Lampe
Tempo
Samba
Arranque Sincronizado, Tiempo, Voiumen,
Luz de Tiempo
Arpège Arpegio
Volume Volumen
Section Basses/Accords Automatiques Sección de Acorde y Bajo Automático
Accord à Un Seul Doigt, Variation, Volume
Acorde de Un Solo Dedo, Variación,
Volumen
Otros Controles e Indicadores
témoin/marche. Volume Principal,
Interruptor de Potencia, Luz de Conexión,
Volumen Principai, Transposicionador (1/2
dessous), Contrôle de la hauteur octava alta y baja). Control de Tono
Jacks Auxiliaires
Casque d’écoute, Aux-out, Pédale d’ex Auriculares, Aux-out, Pedal de Expresión,
pression, Entrée courant continu 9-12V
1,4W(RMS)
7,7cm (3") 7,7cm (3")
Contactos Auxiliares
Entrada de CC 9-12V
Amplificador
1,4W (RMS)
Altavoz
Voltage Nominal Voltaje Nominal
Courant continu 9V, utilisant six SUM-2 à CC 9V utilizando seis baterías SUM-2, de
lentes, adaptateur courant alternatif, ou de potencia CA 0 adaptador para batería de
automóvii
Consumo de energía
3,5W avec adaptateur courant alternatif.
3,5W con adaptador CA a voiumen máximo
2,2W con baterías a volumen máximo
Résine ABS, fini laque acrylique Resina ABS, acabado en iaca acrilica
Dimensions
62,3 (Largeur) X 18,6 (Profondeur) x 4,3
(Hauteur) cm (24-1/2"x 7-1/3"x 1-7/8")
Construcción del cuerpo
Dimensiones
62,3 (ancho) x 18,6 (fondo) x 4,3 (alto) cm.
(24-1/2 "X 7-1/3 "X1-7/8")
Poids Peso
2,0kgs (4,4 livres) (non compris les piles
et l’étui) (Las especificaciones están sujetas a cambio sin previo
(Il convient de noter que les spécifications peuvent
être modifiées sans préavis.)
2,0kg. (4,4 Ib) (excluyendo baterías y caja)
aviso.)
22
Page 25

Playcard Library
„Playcard“-
Fichier de
Biblioteca de taijetas
There are numerous pieces of music in
the Piaycard Library, so by the time you’ve
mastered them ali you wiii have a very big
repertoire!
The seiection is diverse. There are
popuiar hits, standards, screen music,
Latin numbers, ciassicai music. Wait
Disney favorites, and the music of ABBA,
Paul McCartney, John Denver and other
popular artists.
Attention users in the U.S.A.
PortaSound PC-100 prepared irt accordance with
FCC rules.
The PortaSound PC-100 uses frequencies that appear in the
radio frequency range, and if instaiied in the immediate
proximity (within three meters) of some types of audio or
video devices interference may occur.
The PortaSound PC-100 has been type tested and found
to comply with the specifications set for a Class B comput
ing device in accordance with those specifications listed in
Subpart J of Part 15 of the FCC rules. These rules are
designed to provide a reasonabie measure of protection
against such interference. However, this does not guarantee
that interference will not occur, if your PortaSound PC-100
should be suspected of causing interference with other
electronic devices, verification can be made by turning your
PortaSound PC-100 off andón. If the interference continues
when your PortaSound PC-100 is off, the PortaSound PC-
100 is not the source of the interference. If your PortaSound
PC-100 does appear to be the source of the interference, you
should try to correct the situation by using one or more of
the following measures:
Relocate either the PortaSound PC-100 or the electronic
device that is being affected by the interference.
Utilize power outlets for the PortaSound PC-100 and the
device being affected that are on different branch (circuit
breaker or fuse) circuits, or install AtC line filters.
In the case of radio-TV, interference, relocate the
antenna or, if the antenna lead-in is a 300 ohm ribbon lead,
change the lead-in to a co-axial type cable.
If these corrective measures do not produce satis
factory results, please contact your franchised Yamaha
Specialty Products dealer for suggestions and/or corrective
measures. If you cannot locate a franchised Yamaha
Specialty Products dealer in your general area, contact the
Specialty Products Service Center, Yamaha International,
6600 Orangethorpe Ave., Buena Park, CA 90620.
If for any reason you should need additional information
relating to radio or TV interference, you may find a booklet
prepared by the Federal Communications Commission
helpful: “How to Identify and Resolve Radio-TV Interference
Problems". This booklet is available from the U.S. Govern
ment Printing Office, Washington D.C. 20402 — Stock
n 004-000-345-4.
Bibliothek
Die ,,Playcard“-Bibliothek enthält eine
Vielzahl von Musikstücken, so daß Sie sich
ein großes eigenes Repertoir aneignen
können.
Das Angebot ist vielfältig: aktuelle
Schlager, Evergreens, Filmmusik, latein
amerikanische Musik, Klassik, Walt Disney
Melodien, Stücke von ABBA, Paul
McCartney, John Denver und vieles mehr.
“Piaycards”
Le Fichier de “Piaycards” contient une
variété impressionnante de morceaux de
musique. Quand vous les connaîtrez tous,
vous aurez un répertoire enviable! Le
choix est varié; succès populaires,
chansons courantes, musique de films,
airs latins, classiques, airs de Walt
Disney, mélodies d’ABBA, Pau! McCartney,
John Denver et autres artistes populaires.
Piaycard
Existen numerosas piezas musicales en la
Biblioteca de tarjetas Piaycard, de manera
que cuando ya las domine todas, Ud. tendrá
un gran repertorio.
La selección es muy diversa. Hay éxitos
populares, canciones comunes, música de
peUculas, temas latinos, clásicos, temas de
Walt Disney, y música de ABBA, Paul
McCartney, John Denver, y otros famosos
artistas.
23
Page 26

Troubleshooting
Störungsüberprüfungen
If your PC-100 is not functioning properiy,
check these points.
Problem
No music plays after
Playcard inserted.
No accompaniment when
Playcard System is used.
No rhythm when Playcard
System is used.
Instrument voice and rhythm
you select are not played
when Playcard System is
used.
Different instrument voice
to the one you select plays.
Rhythm does not play.
Different rhythm to one you
selected plays.
Cause
Data not read by head.
1. SINGLE FINGER
CHORD button is
depressed.
2. Auto Bass Chord
VOLUME control is at
MIN.
Rhythm VOLUME control
Is at MIN.
Voice and rhythm are
preset on Playcard’s
magnetic strip.
1. Upper/Lower voice
selector (red tab) is incor
rectly set.
2. You are playing keys in
Auto Bass Chord key
section with SINGLE
FINGER CHORD button
depressed.
1. SYNCHRO START button
not depressed.
2. Key not yet pressed
in Auto Bass Chord key
section.
3. Rhythm VOLUME control
is at MIN.
Upper/lower rhythm selector
is incorrectly set.
Solution
Insert Playcard again, and
make sure right-hand Melody
Lamp illuminates briefly.
See page 7/11 for explanation.
Select voice and rhythm after
you press PLAY.
See page 12 for explanation.
\Nhen SINGLE FINGER CHORD
button is pressed, only ORGAN
voice is played in Auto Bass
Chord key section.
See page 13 for explanation.
See page 13 for explanation.
überprüfen Sie bei Störungen des Instru
mentes die folgenden Punkte.
Störung
Nach dem Einschieben der
,.Playcard“ ist keine Musik zu
hören.
Keine Begleitung bei Verwen
dung des ,,Playcard“-Systems.
Ursache
Die Daten wurden vom
Lesekopf nicht gelesen.
1. Der EinfingerakkordSchalter ist gedrückt.
2. Der Baßakkord-AutomatikLautstärkeregler steht auf
MIN.
Kein Rhythmus bei Verwen
dung des ,,Playcard“-Systems.
Der Rhythmus-Lautstärkeregler
steht auf MIN.
Bei Verwendung des
,,Playcard“-Systems ist die
gewählte Instrumentalstimme
und der gewählte Rhythmus
nicht zu hören.
Wahl der Instrumentalstimme
und des Rhythmus erfolgt durch
die „Playcard“-Daten.
1. Der Oben/Unten-Schalter
(mit roter Markierung) steht
Bei Verwendung des
„Playcard“-Systems ist nicht die
gewählte, sondern eine andere
Instrumentalstimme zu hören.
Der Rhythmus ist nicht zu
hören.
falsch.
2. Bei gedrücktem Einfingerakkord-Schalter wurden Tasten
im Baßakkord-Automatik-Teil
gedrückt.
1. Der Synchro-StartSchalter ist nicht gedrückt.
2. Es wurde noch keine Taste
im Baßakkord-AutomatikTeil gedrückt.
3. Die Rhythmus-Lautstärke
steht auf MIN.
Es ist nicht der gewählte,
sondern ein anderer Rhythmus
zu hören.
Der Oben/Unten-Schalter
steht falsch.
Beseitigung
„Playcard“ erneut einschieben
und darauf achten, daß die
Melodie-Lampe ganz rechts kurz
aufleuchtet.
Erläuterungen dazu siehe S. 7/11.
Wählen Sie die Instrumental
stimme und den Rhythmus nach
Drücken des Spielstart-Schalters.
Erläuterungen dazu siehe S. 12.
Bei gedrücktem Einfingerakkord-Schalter ertönt beim
Drücken einer Taste im Baßak
kord-Automatik-Teil stets eine
Orgelstimme.
Erläuterungen dazu siehe S. 13.
Erläuterungen dazu siehe S. 13.
24
Page 27

Détection d’une défaillance éventuelle
Solución de problemas
Si votre PC-100 présente une défaillance
quelconque, vérifiez les points suivants;
Problème
La musique ne joue pas après
insertion de la “Playcard”.
Pas d’accompagnement
quand le système “Playcard”
est utilisé.
Pas de rythme quand le
système “Playcard” est
utilisé.
La voix instrumentale et le
rythme de votre choix ne
sont pas joués quand le
système “Playcard” est
utilisé.
Voix instrumentale différente
de celle choisie.
Le rythme n’est pas joué.
Rythme différent de celui
choisi.
Cause
Données non lues par la
tête.
1. La touche Accord à Un
Seul Doigt (SINGLE
FINGER CHORD) est
pressée.
2. Le contrôle Volume
Basses/Accords Auto
matiques (VOLUME) est
sur la position MIN.
Le contrôle Volume
Rythme (VOLUME) est sur
la position MIN.
Voix et rythme sont pré
réglés sur la piste
magnétique de la carte.
1. Sélecteur de voix haut/
bas (marqué en rouge)
est incorrectement
positionné.
2. Vous jouez sur les
touches de la section
touches de Basses/
Accords Automatiques,
avec la touche Accord à
Un Seul Doigt (SINGLE
FINGER CHORD) pressée.
1. Touche SYNCHRO
START non pressée.
2. Touche non encore
pressée dans la section
touches de Basses/
Accords Automatiques.
3. Le contrôle Volume
Rythme (VOLUME) est
sur la position MIN.
Sélecteur de rythme Haut/
bas est incorrectement
positionné.
Solution
Ré-insérer la “Playcard” et
s’assurer que la Lampe de
Mélodie de droite s’allume
brièvement.
Voir Page 7/11
pour explication.
Choisissez voix et rythme
après avoir appuyé sur
Exécution du Morceau (PLAY).
Voir Page 12
pour explication.
Quand la touche Accord à Un
Seul Doigt (SINGLE FINGER
CHORD) est pressée, seule
la voix instrumentale de
l’orgue (ORGAN) est jouée
dans la section touches de
Basses/Accords Automatiques
Voir Page 13
pour explication.
Voir Page 13
pour explication.
Si su PC-100 no funciona adecuadamente,
compruebe los siguientes puntos.
Problema
La música no suena después de
insertar la tarjeta Playcard.
No hay acompailamiento
cuando se utiliza el sistema
Playcard.
No hay ritmo cuando se utiliza
el sistema Playcard.
La voz instrumental y el ritmo
seleccionados no suenan
cuando se utiliza el sistema
Playcard.
Voz instrumental diferente a la
que se ha seleccionado.
El ritmo no suena
Ritmo diferente al que
se ha seleccionado.
Causa
La cabeza no lee la informa
ción.
1. Está oprimido el botón de
Acorde de un Solo Dedo
(SINGLE FINGER
CHORD).
2. El control de volumen
(VOLUME) de Acorde y
Bajo Automático está en
MIN.
El control de volumen
de ritmo (VOLUME) está en
MIN.
La voz y el ritmo están prese
leccionados en la franja
magnética de la tarjeta Play
card.
1. El selector de voz superior/
inferior (marca roja) está
colocado inadecuadamente.
2. Está tocando teclas de la
sección de teclas de Acorde
y Bajo Automático con el
botón de Acorde de Un Solo
Dedo (SINGLE FINGER
CHORD) oprimido.
1. El botón de Arranque
Sincronizado (SYNCHRO
START) no está oprimido.
2. Todavía no se ha pulsado la
tecla de la sección de teclas
de Acorde y Bajo Automá
tico.
3. El control de volumen
de ritmo (VOLUME) está
en MIN.
El selector de ritmo superior/
inferior se ha colocado inco
rrectamente.
Solución
Insertar de nuevo la tarjeta y
asegurarse de que la Luz de
Melodía de la derecha se
ilumine durante un momento.
Ver página 7/11 para
explicaciones.
Seleccionar voz y ritmo después
de oprimir Toque (PLAY).
Ver página 12 para explicaciones.
Cuando el botón de Acorde de Un
Solo Dedo (SINGLE FINGER
CHORD) está oprimido, sólo se
toca la voz de Organo en la sec
ción de teclas de Acorde y Bajo
Automático.
Ver página 13 para explicaciones.
Ver página 13 para explicaciones.
25
Page 28

” # YAMAHA
NIPPON GAKKI CO., LTD. HAMAMATSU. JAPAN
The serial number of this product may be found on
the bottom of the unit. You should note this serial
number In the space provided below and retain this
manual as a permanent record of your purchase to
aid Identification In the event of theft.
Model No. PC-100 Modell-Nr. PC-100 Modèle No. PC-100
Serial No. Nn rifi .«iérift'
Die Seriennummer befindet sich an der Unterseite des
Instrumentes. Wir empfehlen, diese Nummer sicherheit
shalber an der unten vorgesehenen Stelle einzutragen, um
sie auch im Falle eines Diebstahls jederzeit zur Hand zu
haben.
Le numéro de série de ce produit figure au bas du
bloc. Il conviendra de noter ce numéro de série dans
l’espace réservé au-dessous et de conserver ce
manuel: celul-cl constitue le document permanent de
votre achat et permet l’Identification en cas de vol.
Remarque relative à la garantie
Concerning Warranty
This product was made for International distribution,
and since the warranty for this type of product varies
from marketing area to marketing area, please
contact the selling agency for information concern
ing the applicable warranty and/or senrice policies.
Dieses Produkt wird international vertrieben, und
die Garantiebedingungen sing von Vertriebsland zu
Vertriebsland verschieden. Ihr Händler gibt Ihnen
gerne ganauere Informationen zu den in Ihrem Land
gültigen Garantie und/oder Servicebedingungen.
Hinweis zur Garantie
Ce modèle est destiné à être distribué à l’échelle
Internationale. Etant donné que les conditions de
garantie pour ce type de produit varient en fonction
des zones de commercialisation, prière de prendre
contact avec l’agence chargée des ventes pour tous
renseignements relatifs aux conditions de garantie
et de service après-vente.
E1 mimero de serie de este producto se encuentra en la parte
inferior de la unidad. Sírvase anotar este número de serie en
el espacio proporcionado debajo y guarde este manual
como comprobante de compra para ayudar a la identífíca>
ción en caso de robo.
N® de modelo ___________________________
N® de serie
________________________________________
Concerniente a la garantía
Este producto ha sido fabricado para ser distribuido inter
nacionalmente y, como la garantía para este tipo de
producto varía en relación a su área de comercialización,
sírvase consultar con el agente de ventas sobre la informa
ción en tomo a la garantía aplicable y/o políticas de
) @ Printed in Japan 12.83
 Loading...