

Yamaha NS-P350 Owner's Manual

Speaker Package
Package Enceintes
NS-P350
(NS-PC350 + NS-PB350)
G
English Français Deutsch Español Русский
Owner’s Manual
Mode d’emploi
Bedienungsanleitung
Manual De Instrucciones
Инструкция По Эксплуатации
Precautions
Contents
Features ..............................................................1
Package contents..............................................1
Installing the speakers .....................................1
Installing the center speaker........................................2
Wall-mounting the speakers........................................2
Connecting the speakers................................. 3
Connection diagram.......................................................3
Removing / Attaching the grille.....................5
Specifications..................................................... 5
Please read the following operating precautions before use. Yamaha will not be held responsible for any damage and/or
injury caused by not following the cautions below.
1. To assure the finest performance, please read this
manual carefully. Keep it in a safe place for future
reference.
2. Install the speakers in a cool, dry, clean place – away
from windows, sources of heat, sources of excessive
vibration, dust, moisture or cold. Avoid sources of
electrical humming (e.g., transformers and motors). To
prevent fire or electric shock, do not expose the
speakers to rain or water.
3. To prevent the enclosure from warping or discoloring,
do not expose the speakers to direct sunlight or
excessive humidity.
4. Avoid installing the speakers where foreign objects may
fall onto them and/or where they may be exposed to
liquid dripping or splashing.
5. Do not place the following objects on top of the
speakers:
– Other components, as they might damage or discolor
the surface of the speakers.
– Burning objects (e.g., candles), as they might cause
fire, damage to the speakers or personal injury.
– Containers of liquid, as they might spill and cause
electric shock to the user or damage to the speakers.
6. Do not place the speakers where they are liable to be
knocked over or struck by falling objects. Stable
placement will also ensure better sound performance.
7. Placing the speakers on the same shelf or rack as the
turntable can result in feedback.
8. Do not insert a hand or object into the port or pick up
the speaker by holding the port, as it may cause
personal injury or damage to the speaker.
9. Any time you note distortion, reduce the volume control
on your amplifier to lower setting. Never allow your
amplifier to be driven into “clipping”. Otherwise, the
speakers may be damaged.
10. When using an amplifier with a rated output power
higher than the nominal input power of the speakers,
care should be taken not to exceed the maximum input
of the speakers.
11. Do not attempt to clean the speakers with chemical
solvents as this might damage the finish. Use a clean,
dry cloth.
12. Do not attempt to modify or fix the speakers. Contact
qualified Yamaha service personnel when service is
needed. The cabinet should never be opened for any
reason.
13. Secure placement or installation is the owner’s
responsibility. Yamaha is not liable for accidents
caused by improper placement or installation of
speakers.
Information for Users on Collection and Disposal of
Old Equipment
This symbol on the products, packaging,
and/or accompanying documents means
that used electrical and electronic products
should not be mixed with general
household waste.
For proper treatment, recovery and
recycling of old products, please take them
to applicable collection points, in
accordance with your national legislation
and the Directives 2002/96/EC.
By disposing of these products correctly,
you will help to save valuable resources
and prevent any potential negative effects
on human health and the environment
which could otherwise arise from
inappropriate waste handling.
For more information about collection and
recycling of old products, please contact
your local municipality, your waste
disposal service or the point of sale where
you purchased the items.
[Information on Disposal in other
Countries outside the European Union]
This symbol is only valid in the European
Union. If you wish to discard these items,
please contact your local authorities or
dealer and ask for the correct method of
disposal.
Taking care of the speaker
When you wipe this unit, do not use chemical solvents
(e.g., alcohol or thinners, etc.): this might damage the
finish. Use a clean, dry cloth. For difficult soils,
dampen a soft cloth in water, wring it out, and then
wipe with the cloth.
i En
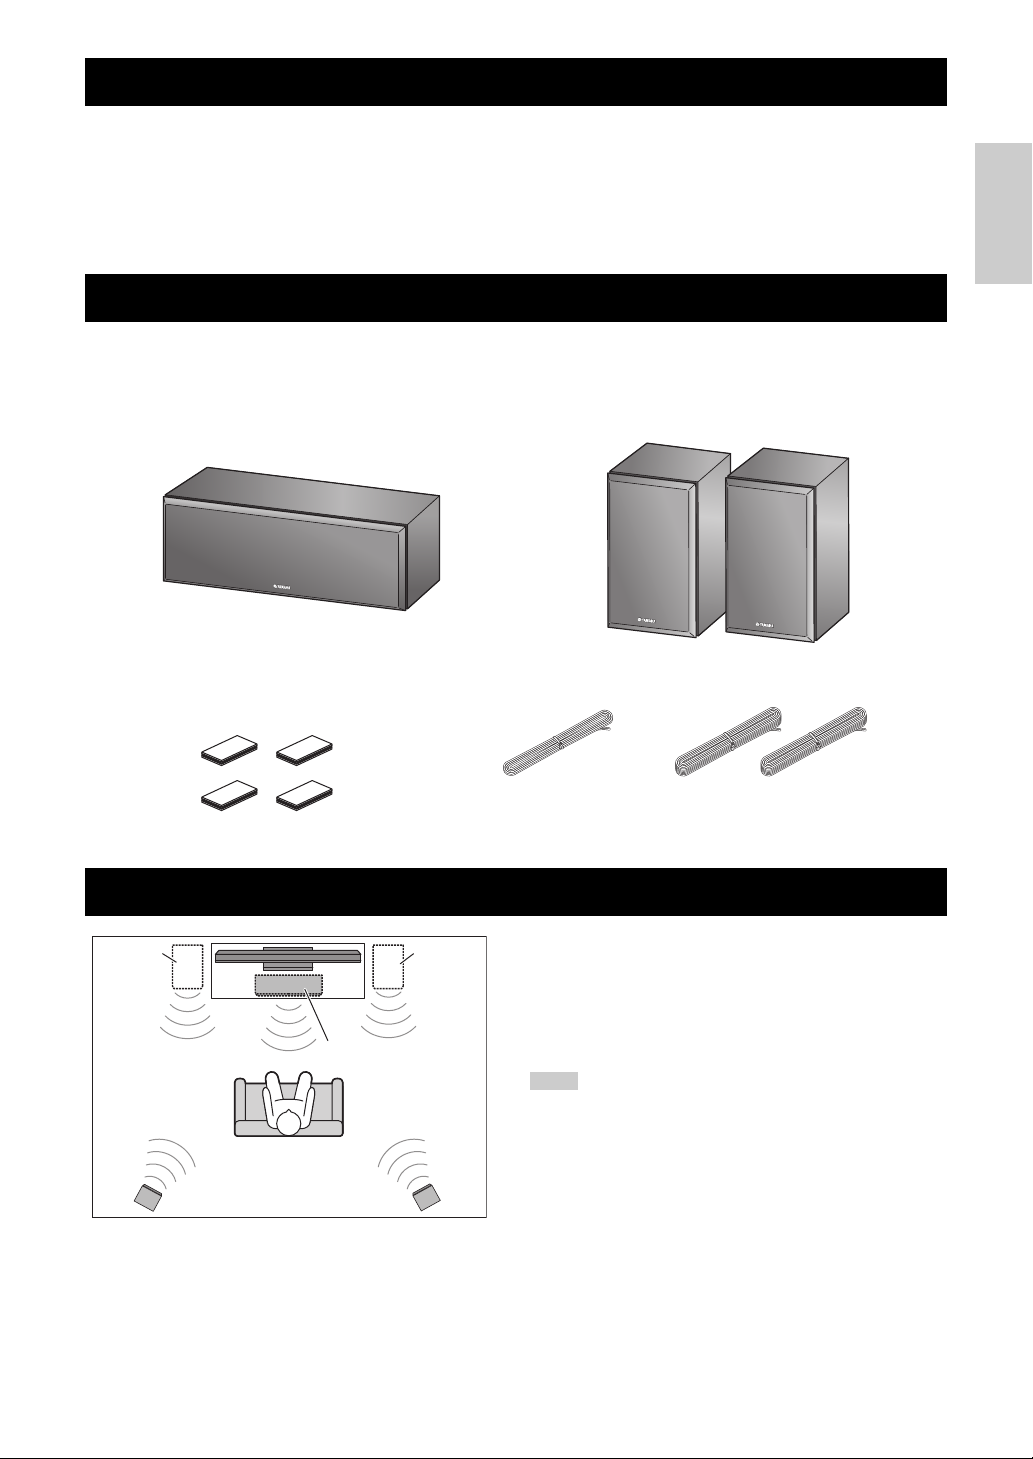
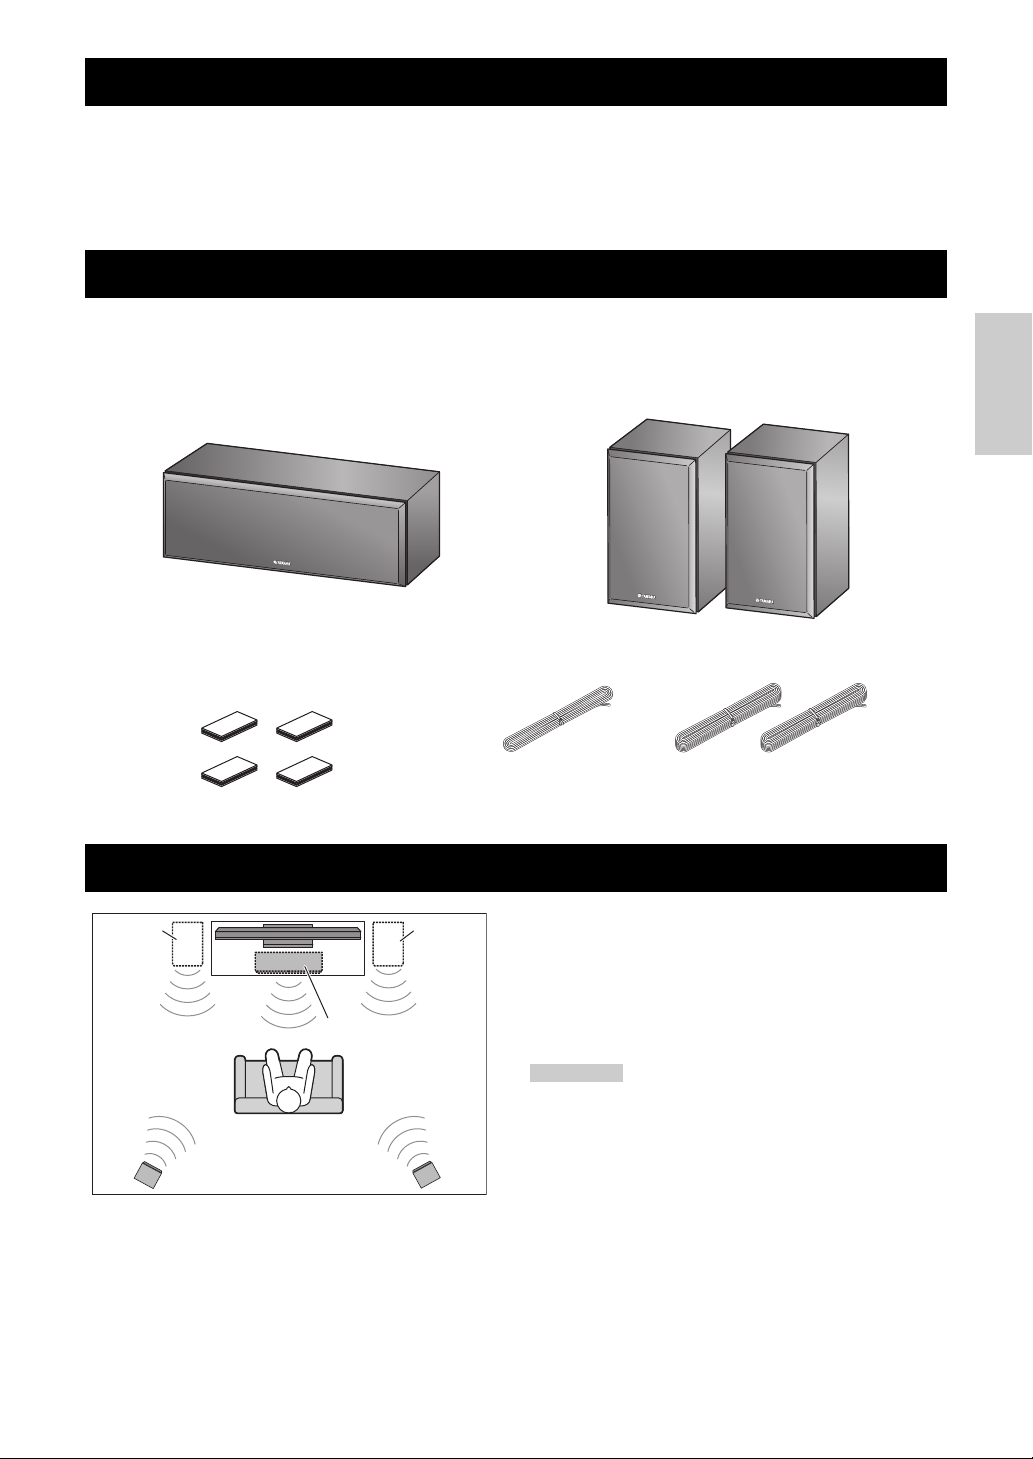
Features
Center speaker
(NS-PC350)
Surround speaker
(NS-PB350)
Fastener
(for center speaker)
Speaker cable
10 m
(32.8 ft.)
4 m
(13.1 ft.)
Center
NS-PC350
* Front
right
* Front
left
** Surround right
NS-PB350
** Surround left
NS-PB350
Note
[NS-PC350]
• Type: 2-way, 3-speaker acoustic suspension speaker for
center channels
• 2-way Acoustic Suspension
• Woofer: Dual 13 cm PMD cone
Tweeter: 3 cm Aluminum dome
Package contents
Make sure the package contains the following items.
[NS-PB350]
• Type: 2-way, 2-speaker bass-reflex speaker for main
channels
• Woofer: Dual 13 cm PMD cone
Tweeter: 3 cm Aluminum dome
English
Installing the speakers
Before you connect the speakers, place each speaker in its
respective location. Speaker positioning is very important
* Place the two front speakers (commercially available) on the left and right sides of the TV, facing directly forward.
** Place the left and right surround speakers behind your listening position, facing slightly inward.
as it affects the overall sound quality of the system. Place
the speakers in locations that will optimize the sound
quality at your listening position.
Refer to the illustration.
Placing the speakers too close to a CRT-type TV may
impair the picture color or cause a buzzing noise. In this
case, move the speakers at least 20 cm (8") away from the
TV. This is not an issue with LCD and plasma TVs.
1 En
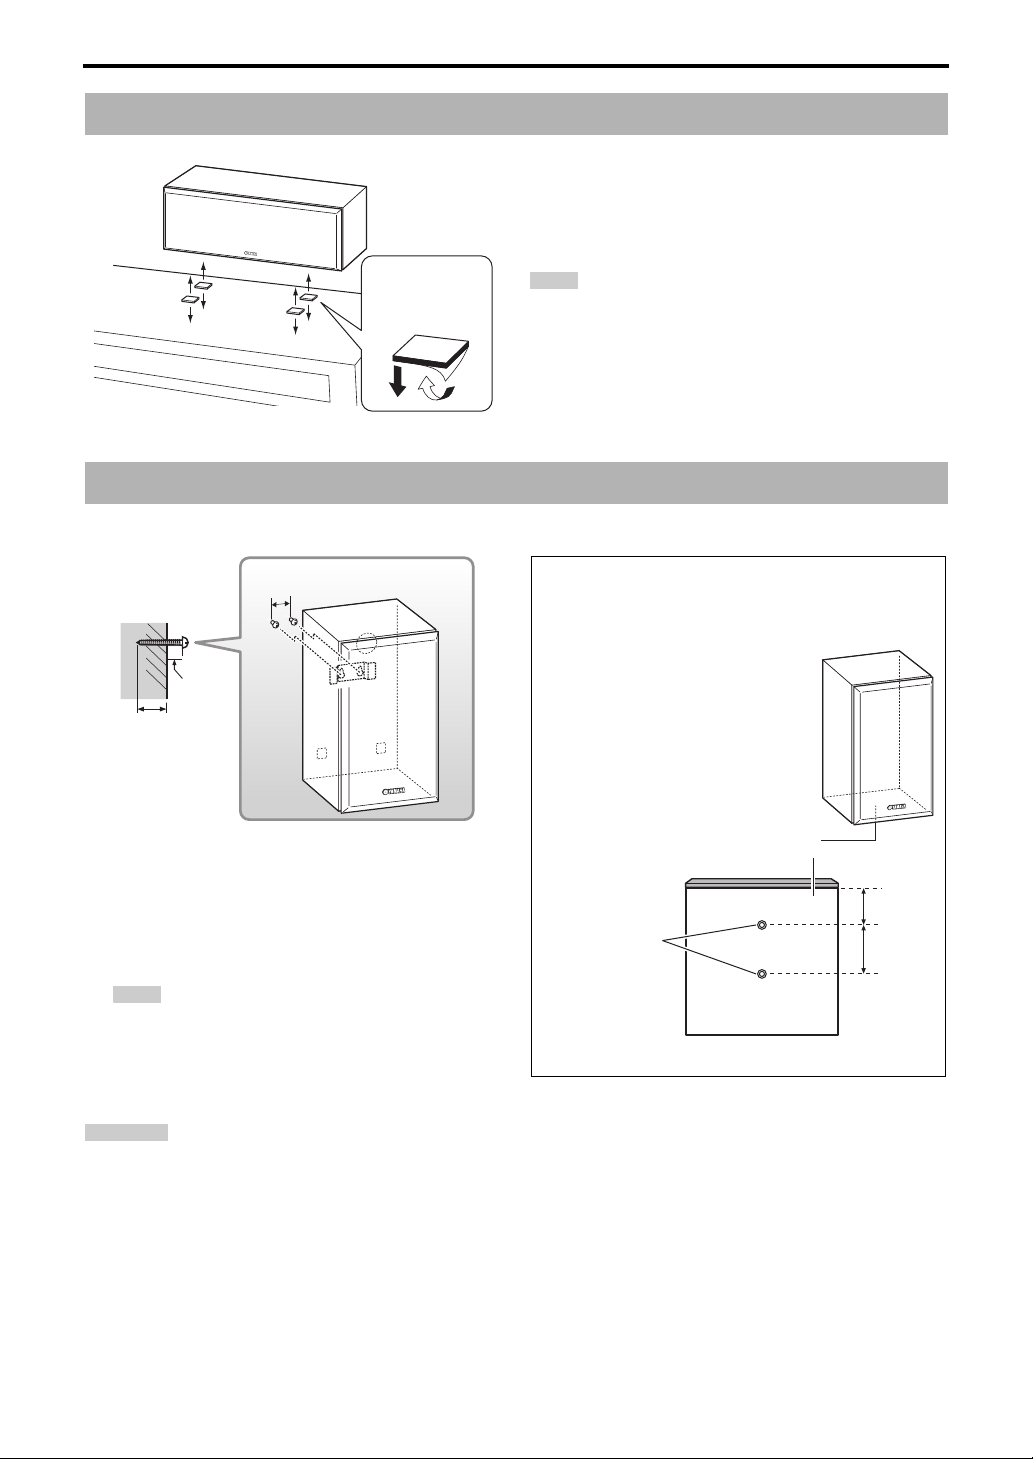
Installing the speakers
Peel off the seal.
TV rack, etc.
Fastener
Note
Wall/
wall support
3mm
(1/8")
Minimum
20 mm (3/4")
NS-PB350
4.8kg (10lbs. 9oz.)
40 mm
(1-5/8")
Note
60 mm
(2-3/8")
Bottom
(Front)
(Rear)
45 mm
(1-3/4")
If you mount the speaker on a
commercially-available speaker
stand, use the mounting screw
holes on the bottom of the speaker.
NS-PB350
Screw holes
Diameter:
4 mm (1/8")
Hole depth:
10 mm (3/8")
Warnin g
Installing the center speaker
Wall-mounting the speakers
You can mount the speakers on the wall as follows.
Place the center speaker centrally between the front
speakers, facing directly forward.
When placing it on a flat surface (TV rack, etc), affix the
supplied fasteners to bottom of the speaker.
Refer to the illustration.
Wipe the surface clean before affixing the fasteners. If the
surface is dirty, oily or wet, adhesive strength is weakened
and the speaker may fall.
Using a commercially-available speaker
stand
1 Install screws into a solid wall or wall support as
shown in the illustration. Use 3.5 to 4 mm (1/8")
diameter self-tapping screws.
2 Hang each speaker by its keyhole slots onto the
protruding screws.
Make sure the shaft of the screw is seated in the narrow
part of the keyhole slot. Otherwise, the speaker may
fall.
• Do not mount the speakers on thin plywood or on a wall with a soft surface material. Otherwise, the screws may pull
out of the surface and the speakers may fall, possibly damaging the speakers or causing personal injury.
• Do not install the speaker on a wall using nails, adhesives, or any other unstable hardware. Long term use and vibration
• Be careful not to pinch the speaker cables between the speaker and the speaker bracket or speaker stand.
• To avoid accidents resulting from tripping over loose speaker cable, affix them securely to the wall.
• When using speaker brackets (commercially available) to mount the speakers on the wall or ceiling, we strongly
• If you are not sure of a safe way to install these speakers, consult a professional installer or a building contractor.
2 En
may cause it to fall.
recommend using safety wire (may be supplied with the bracket) between the speaker and bracket to prevent the
speaker from falling.
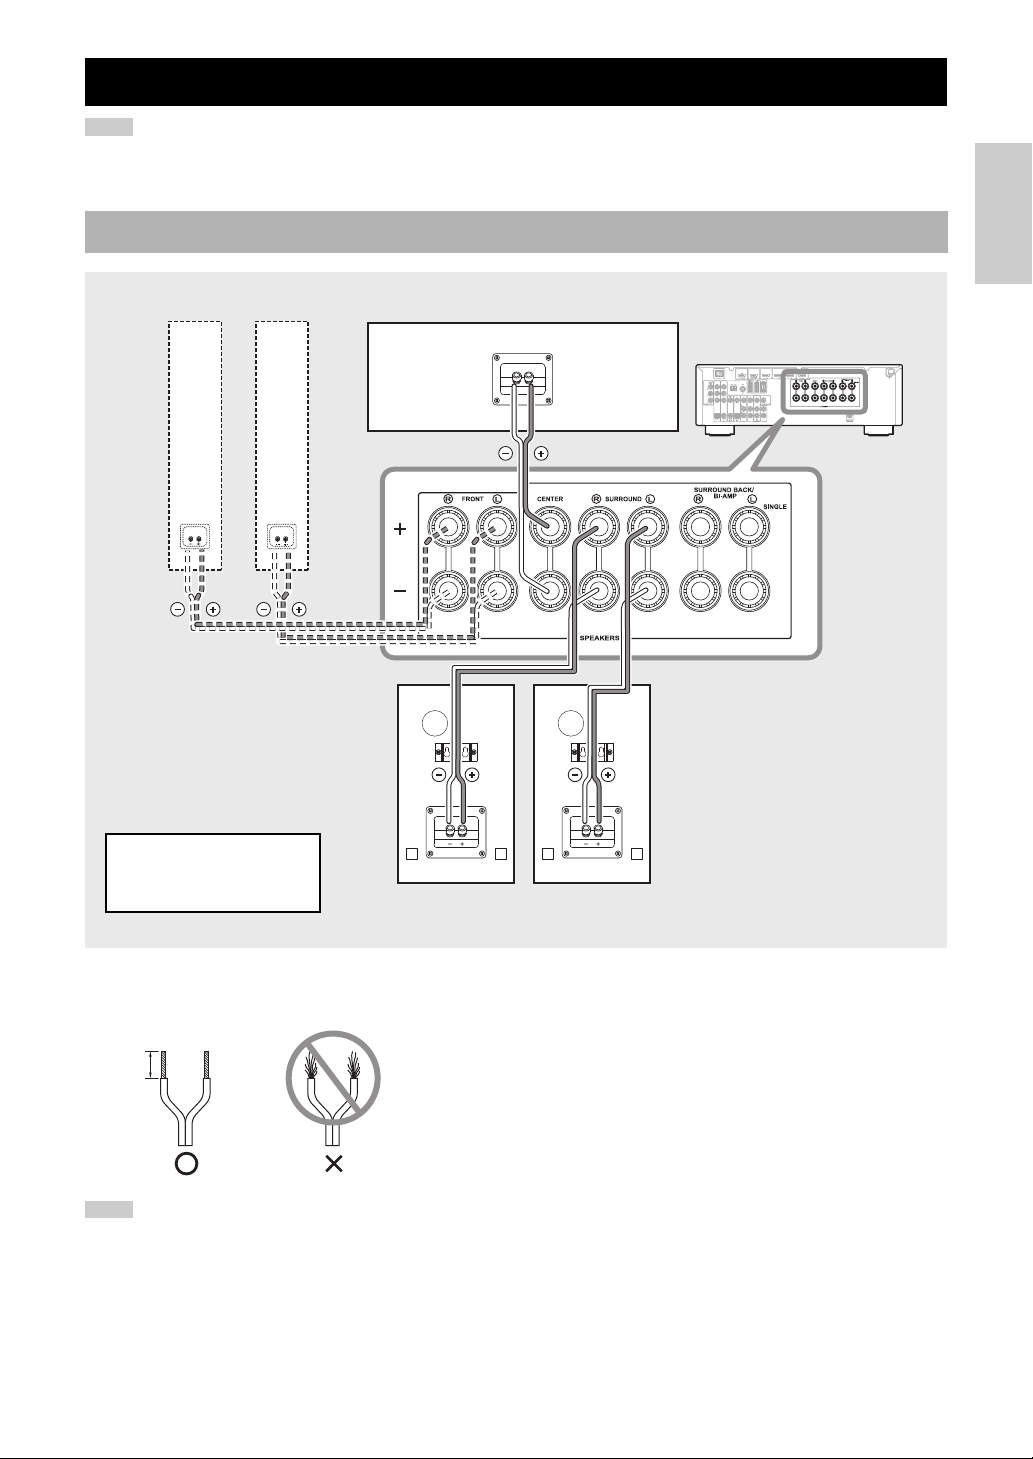
Connecting the speakers
Note
Center speaker
Amplifier/Receiver
Front speakers
Note:
The exact layout of the
speaker terminals depends
on your amplifier.
Surround speakers
Right Left
Right Left
15 mm
(5/8")
1 Remove about 15 mm (5/8") of insulation from the end of
each speaker cable.
2 Twist the bare wires tightly.
Note
Make sure the power cables for your other AV components are disconnected from the AC wall outlets before making any
connections.
Connection diagram
English
■ Preparing the speaker cables
Once you’ve positioned the speakers, you’ll need to prepare the speaker cables for connecting the speakers.
• Do not bundle or roll up excess cable.
• Twist the bare wires tightly so the individual strands are not splayed.
• Be careful not to injure yourself while preparing the speaker cables.
3 En
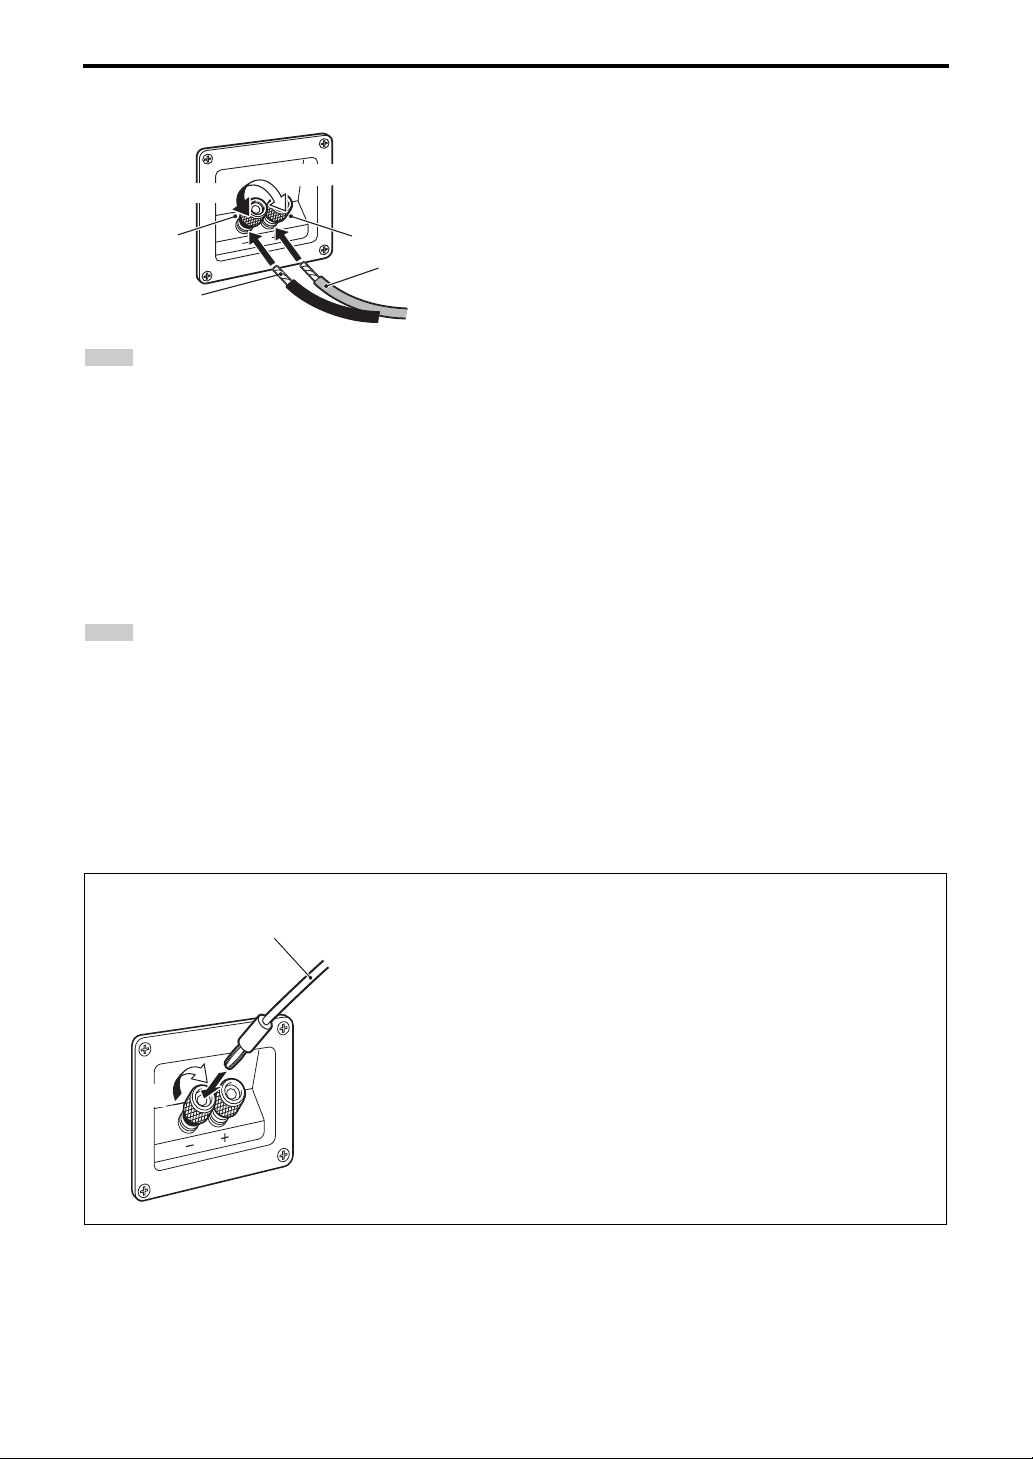
Connecting the speakers
Positive (+)
Negative (–)
Loosen
Tighten
Bare wire
1 Rotate the speaker terminal counterclockwise to
loosen it.
2
Insert the bare wire.
3
Rotate the speaker terminal clockwise to tighten it.
4
Test the security of the connection by pulling gently
on the cable.
Insulation
coating
Note
Note
1 Tighten the terminal knob.
2 Simply insert the banana plug into the terminal.
2
1
Banana plug
■ Operating the speaker terminals
• Make sure the terminal is gripping the bare wire, not the insulation.
• Make sure the bare wires do not touch each other, as this could damage the speaker or amplifier.
• If the connections are faulty, you will hear no sound from the speakers.
■ Connecting to an amplifier
Connect each speaker to the appropriate speaker terminals on your amplifier by using the cables you prepared earlier. For
details, see the “Connection diagram” (page3).
For the surround speakers only, connect one speaker to the left (marked L) terminals of your amplifier or receiver, and
another speaker to the right (marked R) terminals.
Please refer to the owner’s manual that came with your amplifier or receiver.
• Make sure you connect the speakers with the correct polarity—positive (+) terminals to positive (+) terminals, and
negative (–) terminals to negative (–) terminals. If you get them crossed over, the sound will be unnatural and lack bass.
• In your AV receiver’s speaker size settings, specify small (or “S”) for all of the speakers.
• The speaker may be damaged if certain sounds are continuously output at high volume level. For example, if sine waves
from a test disc, bass sounds from electronic instruments, etc., are continuously output, or when the stylus of a turntable
touches the surface of a disc, reduce the volume level to prevent the speaker from being damaged.
• Once you have connected all of the speakers, plug the amplifier and other AV components into suitable AC wall outlets.
• When using an amplifier with a rated output power higher than the nominal input power of the speaker, care should be
taken never to exceed the speaker’s maximum input.
■ When using a banana plug
4 En
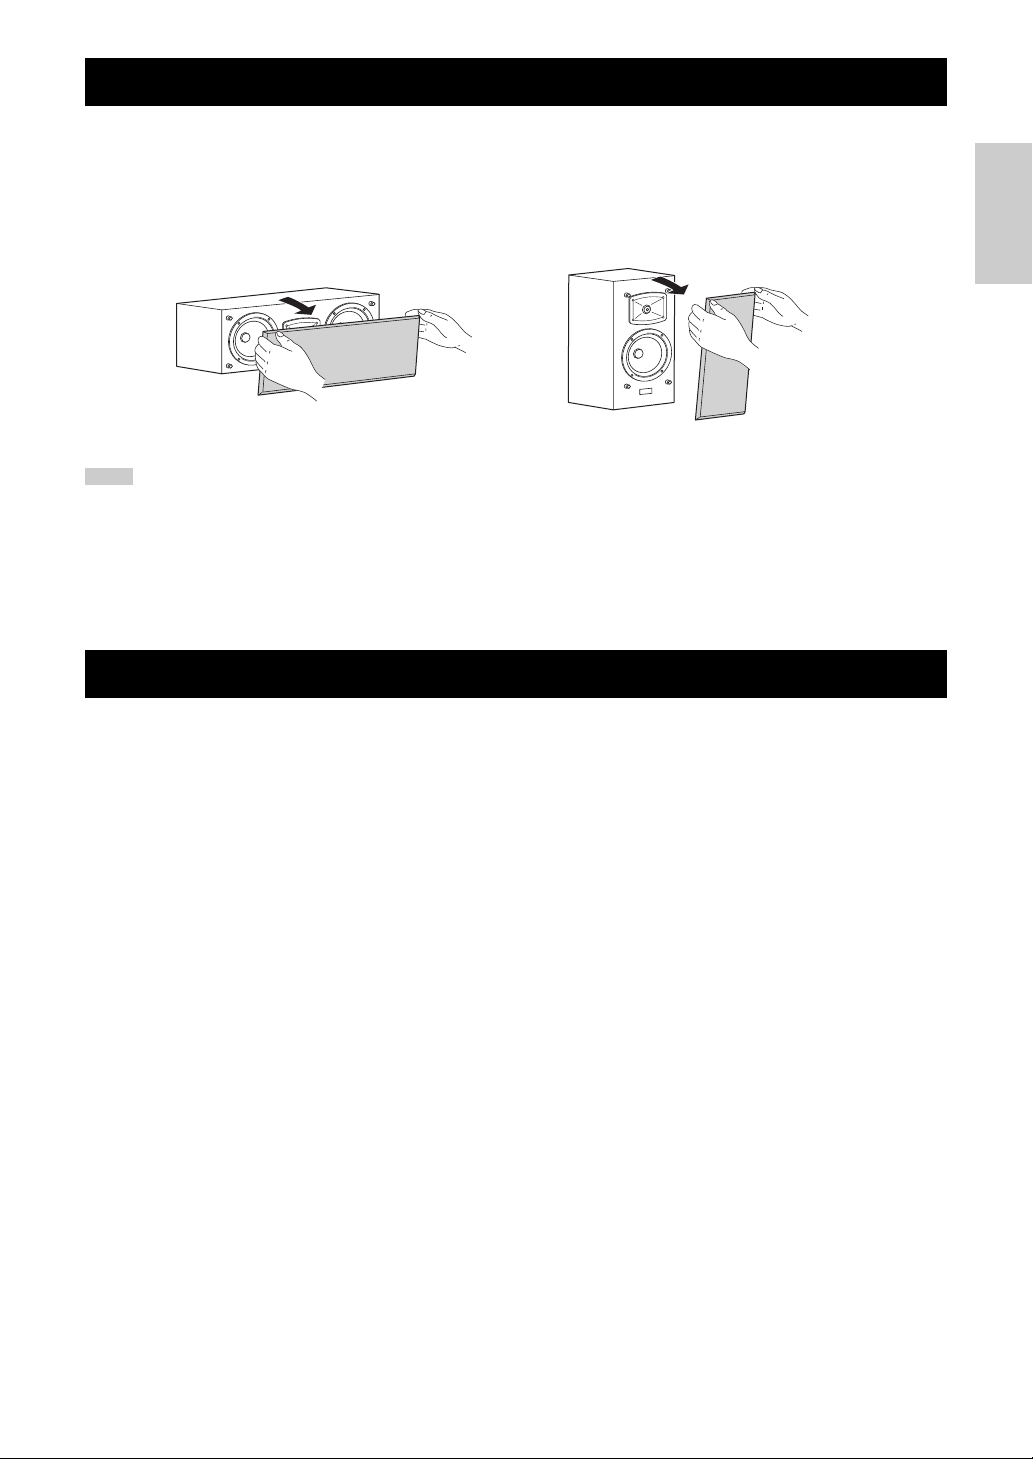
Removing / Attaching the grille
NS-PB350NS-PC350
Note
The grille is attached to protect the speaker unit, but you can remove it if necessary.
To remove the grille, hold on to both sides and slowly pull straight away from the speaker. To reattach, line up the four
holes on the inside surface of the grille with the four corresponding pegs on the speaker and push gently.
• When removing or attaching the grille, be careful not to touch the drive units, and not to exert excessive force with any
tools.
• Do not touch or apply impact to the speaker’s diaphragm. Otherwise, the speaker may malfunction.
• To avoid damaging the grille, never apply excessive force, and be sure to use its frame, never pull or push the surface, for
removing or attaching the grille.
English
Specifications
■ Center speaker (NS-PC350)
Typ e.................................................. 2-way Acoustic Suspension
Non-Magnetic shielding type
Driver
Woofer: ..............................................13 cm (5") cone type x 2
Tweeter: ................................. 3 cm (1") aluminum dome type
Impedance ............................................................... Nominal 6 Ω
Frequency response ........................... 58 Hz - 45 kHz (–10 dB)
- 100 kHz (–30 dB)
Nominal input power ....................................................... 100 W
Maximum input power .................................................... 200 W
Sensitivity ........................................................ 90 dB/2.83 V, 1 m
Crossover frequency....................................................... 2.8 kHz
Dimensions (W x H x D)
.................................500 x 174 x 202 mm (19-5/8" x 6-7/8" x 8")
We ig h t ......................................................... 6.3 kg (13 lbs. 14 oz)
* Specifications are subject to change without notice.
* Care should be taken not to exceed the input power values noted above.
■ Surround speakers (NS-PB350)
Typ e .................................................................... 2-way bass reflex
Driver
Woofer: .....................................................13 cm (5") cone type
Tweeter: .................................3 cm (1") aluminum dome type
Impedance ...............................................................Nominal 6 Ω
Frequency response ........................... 57 Hz - 45 kHz (–10 dB)
Nominal input power ......................................................... 50 W
Maximum input power .................................................... 150 W
Sensitivity.........................................................88 dB/2.83 V, 1 m
Crossover frequency.......................................................... 3 kHz
Dimensions (W x H x D)
......................... 186 x 320 x 208 mm (7-3/8" x 12-5/8" x 8-1/4")
We ig h t............................................................4.8 kg (10 lbs. 9 oz)
Non-Magnetic shielding type
- 100 kHz (–30 dB)
5 En

Lisez attentivement les précautions d’utilisation suivantes. Yamaha décline toute responsabilité en cas de dommages et/
Sommaire
Fonctionnalités.................................................. 1
Contenu de l’emballage................................... 1
Installation des enceintes................................ 1
Installation de l’enceinte centrale ...............................2
Monter les enceintes sur le mur...................................2
Connexion des enceintes ................................ 3
Diagramme de raccordement......................................3
Enlever / Mettre la grille .................................. 5
Caractéristiques techniques ........................... 5
ou de blessures découlant du non respect de ces consignes.
1. Pour profiter au mieux de votre acquisition, lisez
attentivement ce mode d’emploi. Conservez-le
soigneusement pour référence.
2. Installez les enceintes dans un endroit frais, sec, loin
des fenêtres et des sources de chaleur et de vibration,
des poussières, de l’humidité et du froid. Évitez les
sources de ronflements électriques (transformateurs et
moteurs, par exemple). Pour éviter les risques
d’incendie et de secousses électriques, n’exposez pas
les enceintes à la pluie ni à l’humidité.
3.
Pour éviter que la menuiserie des enceintes ne se
déforme ou ne se décolore, n’exposez pas les enceintes à
la lumière directe du soleil ni à une humidité excessive.
4. Évitez d’installer les enceintes dans un endroit exposé à
la chute d’objets ou encore à l’écoulement ou aux
éclaboussures de liquides.
5. Ne posez pas les objets suivants sur le dessus des
enceintes:
– D’autres appareils qui pourraient endommager ou
décolorer la menuiserie des enceintes;
– Des objets enflammés (par exemple, des bougies)
qui pourraient endommager les enceintes, provoquer
une blessure, voire un incendie;
– Des récipients contenant des liquides qui pourraient
se renverser, endommager les enceintes ou être à
l’origine d’une secousse électrique.
6. Ne placez pas les enceintes dans un endroit où elles
peuvent être heurtées, directement ou par la chute
d’objets. Un emplacement stable garantit l’obtention de
meilleures sonorités.
7. Placer les enceintes sur des étagères ou dans un meuble
qui contient également la platine de lecture, peut
entraîner un phénomène de bouclage.
8.
Ne pas insérer une main ou un objet dans le port ou porter
l’enceinte en tenant le port, vu que cela pourrait causer
des blessures corporelles ou endommager l’enceinte.
9. En cas de “saturation” , réduisez le niveau de sortie de
l’amplificateur. N’excitez pas l’amplificateur au point
qu’il écrête. Dans ce cas en effet, les enceintes
pourraient être endommagées.
10. Vous devez être très attentif, si l’amplificateur peut
délivrer une puissance supérieure à la puissance
maximale admissible par les enceintes, à ce que cela ne
se produise pas.
11. Ne nettoyez pas la menuiserie des enceintes avec un
produit chimique qui peut endommager leur finition.
Utilisez un chiffon sec et propre.
12. Ne tentez pas de modifier les enceintes ni de les réparer.
Consultez le service Yamaha compétent si une
réparation est nécessaire. Pour quelque raison que ce
soit, ne démontez pas la menuiserie des enceintes.
13. La détermination d’un endroit convenable est de
votre responsabilité. Yamaha ne saurait être
responsable des accidents provoqués par le choix
d’un emplacement qui ne conviendrait pas, ni par
l’installation incorrecte des enceintes.
i Fr
Précautions
Information concernant la Collecte et le Traitement
des déchets d’équipements électriques et
électroniques
Le symbole sur les produits, l’emballage et/
ou les documents joints signifie que les
produits électriques ou électroniques usagés
ne doivent pas être mélangés avec les
déchets domestiques habituels.
Pour un traitement, une récupération et un
recyclage appropriés des déchets d’équipements
électriques et électroniques, veuillez les déposer aux
points de collecte prévus à cet effet, conformément à la
réglementation nationale et aux Directives 2002/96/
EC.
En vous débarrassant correctement des déchets
d’équipements électriques et électroniques, vous
contribuerez à la sauvegarde de précieuses ressources
et à la prévention de potentiels effets négatifs sur la
santé humaine qui pourraient advenir lors d’un
traitement inapproprié des déchets.
Pour plus d’informations à propos de la collecte et du
recyclage des déchets d’équipements électriques et
électroniques, veuillez contacter votre municipalité,
votre service de traitement des déchets ou le point de
vente où vous avez acheté les produits.
[Information sur le traitement dans d’autres pays en
dehors de l’Union Européenne]
Ce symbole est seulement valables dans l’Union
Européenne. Si vous souhaitez vous débarrasser de
déchets d’équipements électriques et électroniques,
veuillez contacter les autorités locales ou votre
fournisseur et demander la méthode de traitement
appropriée.
Entretien de l’enceinte
Lorsque vous essuyez cet appareil, n’utilisez pas de
solvant chimique (l’alcool ou des diluants etc.) : cela
pourrait endommager la finition. Utilisez un chiffon
propre et sec. Pour les taches difficiles, humectez un
chiffon doux avec de l’eau, essorez et puis essuyez avec
le chiffon.
Fonctionnalités
Enceinte Centrale
(NS-PC350)
Enceinte Surround
(NS-PB350)
Patins antidérapants
(Pour enceinte centrale)
Câble d’enceinte
10 m4 m
Centre
NS-PC350
* Avant
droit
*Avant
gauche
** Surround droite
NS-PB350
** Surround gauche
NS-PB350
Remarque
[NS-PC350]
• Type : enceinte suspension acoustique 2 voies à 3 hautparleurs pour voies centrale
• Haut-parleur grave : double cône PMD de 13 cm
Haut-parleur aigu : dôme en aluminium de 3 cm
[NS-PB350]
• Type : enceinte Bass-Reflex 2 voies à 2 haut-parleurs
pour voies principales
• Haut-parleur grave : double cône PMD de 13 cm
Haut-parleur aigu : dôme en aluminium de 3 cm
Contenu de l’emballage
Veuillez-vous assurer que l’emballage contient les éléments suivants.
Français
*
Placez les deux enceintes avant (disponibles sur le marché) à la gauche et à la droite du téléviseur, orientez-les vers l’avant.
** Placez les enceintes surround droite et gauche derrière votre position d’écoute, orientées les légèrement vers l’intérieur.
Installation des enceintes
Avant de connecter les enceintes, placez chaque enceinte
dans sa position respective.
Le positionnement de l’enceinte est très important car il
affecte toute la qualité sonore du système. Placez les
enceintes dans des positions qui optimiseront la qualité
sonore dans votre position d’écoute. Référez-vous à
l’illustration.
Si des enceintes sont trop près d’un téléviseur à écran
cathodique, la couleur de l’image peut s’en ressentir et cela
peut générer un bourdonnement. Dans ce cas, éloignez les
enceintes d’au moins 20 cm du téléviseur.
Les téléviseurs à écran LCD ou plasma ne posent aucun
problème.
1 Fr

Installation des enceintes
Référez l’étiquette
de protection.
Un meuble de téléviseur, etc.
Patins
antiderapants
Remarque
Mur/
Support mural
3mm
Minimum
20 mm
NS-PB350
4,8 kg
40 mm
Remarque
60 mm
Vue de dessous
(Avant)
(Arrière)
45 mm
Si vous installez l’enceinte sur un
support d’enceinte, disponible dans
le commerce, utilisez les trous de
vis sous l’enceinte.
NS-PB350
Trous de vis
Diamètre: 4 mm
Profondeur du
trou: 10 mm
Avertissement
Installation de l’enceinte centrale
Monter les enceintes sur le mur
Vous pouvez monter les enceintes sur le mur comme suit.
Placez l’enceinte centrale exactement au milieu des
enceintes avant, orientée directement vers l’avant.
Quand vous les placez sur une surface plane (ou sur un
meuble de téléviseur, etc.), attachez les patins
antidérapants fournis sous l’enceinte. Référez-vous à
l’illustration.
Nettoyez la surface avant d’y attacher les fixations.
Veuillez noter que le pouvoir adhésif est considérablement
réduit si cette surface est sale, grasse ou humide, cela
pourrait entraîner la chute de l’enceinte.
Utilisation d’un support d’enceinte,
disponible dans le commerce
1 Vissez les vis dans un mur solide or un support
mural comme montré sur l’illustration. Utilisez
des vis auto taraudeuse de 3,5 à 4 mm de
diamètre.
2 Suspendez chaque enceinte en montant les
trous de support aux vis faisant protubérances.
Assurez-vous que les vis soient bien insérées dans les
parties étroites des trous. Sinon, l’enceinte pourrait tomber.
• Ne pas les monter sur du contre-plaqué fin ou sur un mur composé d’un matériau non résistant. Sinon, les vis
pourraient ressortir de la surface et les enceintes pourraient tomber. Ceci pourrait endommager les enceintes ou causer
des blessures corporelles.
• Ne pas monter les enceintes au mur à l’aide de clous, de ruban adhésif ou d’autres matériaux instables. Une utilisation
prolongée et les vibrations pourraient en causer la chute.
• Veillez à ne pas coincer les câbles d’enceinte entre l’enceinte et l’applique ou le support d’enceinte.
• Afin d’éviter des accidents causés par un trébuchage sur des câbles d’enceinte éparpillés, fixez-les au sol.
• Quand vous utilisez les supports de montage d’enceinte (disponible sur le marché) pour monter les enceintes sur le mur
ou le plafond, nous vous recommandons vivement d’utiliser des fils de sécurité (peuvent être fournis avec les supports
de montage) entre l’enceinte et le support de montage pour empêcher que l’enceinte ne tombe.
• Si vous avez des doutes sur la sûreté de votre méthode d’installation des enceintes, consultez un installateur
professionnel ou un entrepreneur en bâtiment.
2 Fr
 Loading...