

Page 1

CD/DAB RECEIVER
CRX-M170
B
OWNER'S MANUAL
1
Page 2
CAUTION: READ THIS BEFORE OPERATING YOUR UNIT.
1 To assure the finest performance, please read this manual
carefully. Keep it in a safe place for future reference.
2 Install this sound system in a well ventilated, cool, dry, clean
place with at least 10 cm on the top, 10 cm on the left and right,
and 10 cm at the back of this unit — away from direct sunlight,
heat sources, vibration, dust, moisture, and/or cold.
3 Locate this unit away from other electrical appliances, motors, or
transformers to avoid humming sounds.
4 Do not expose this unit to sudden temperature changes from cold
to hot, and do not locate this unit in an environment with high
humidity (i.e. a room with a humidifier) to prevent condensation
inside this unit, which may cause an electrical shock, fire,
damage to this unit, and/or personal injury.
5 Avoid installing this unit where foreign object may fall onto this
unit and/or this unit may be exposed to liquid dripping or
splashing. On the top of this unit, do not place:
– Other components, as they may cause damage and/or
discoloration on the surface of this unit.
– Burning objects (i.e. candles), as they may cause fire, damage
to this unit, and/or personal injury.
– Containers with liquid in them, as they may fall and liquid
may cause electrical shock to the user and/or damage to this
unit.
6 Do not cover this unit with a newspaper, tablecloth, curtain, etc.
in order not to obstruct heat radiation. If the temperature inside
this unit rises, it may cause fire, damage to this unit, and/or
personal injury.
7 Do not plug in this unit to a wall outlet until all connections are
complete.
8 Do not operate this unit upside-down. It may overheat, possibly
causing damage.
9 Do not use force on switches, knobs and/or cords.
10 When disconnecting the power cable from the wall outlet, grasp
the plug; do not pull the cable.
11 Do not clean this unit with chemical solvents; this might damage
the finish. Use a clean, dry cloth.
12 Only voltage specified on this unit must be used. Using this unit
with a higher voltage than specified is dangerous and may cause
fire, damage to this unit, and/or personal injury. YAMAHA will
not be held responsible for any damage resulting from use of this
unit with a voltage other than specified.
13 To prevent damage by lightning, keep the power cord and outdoor
antennas disconnected from a wall outlet or the unit during a
lightning storm.
14 Do not attempt to modify or fix this unit. Contact qualified
YAMAHA service personnel when any service is needed.
The cabinet should never be opened for any reasons.
15 When not planning to use this unit for long periods of time (i.e.
vacation), disconnect the AC power plug from the wall outlet.
16 Be sure to read the “TROUBLESHOOTING” section on
common operating errors before concluding that this unit is
faulty.
17 Before moving this unit, press STANDBY/ON to set this unit in
standby mode, and disconnect the AC power plug from the wall
outlet.
18 Condensation will form when the surrounding temperature
changes suddenly. Disconnect the power cable from the outlet,
then leave the unit alone.
19 When using the unit for a long time, the unit may become warm.
Turn the power off, then leave the unit alone for cooling.
20 Install this unit near the AC outlet and where the AC power plug
can be reached easily.
This unit is not disconnected from the AC power source as
long as it is connected to the wall outlet, even if this unit itself
is turned off. This state is called the standby mode. In this
state, this unit is designed to consume a very small quantity of
power.
CAUTION
The use of optical instruments with this product will increase eye
hazard.
The laser component in this product is capable of emitting
radiation exceeding the limit for Class 1.
WARNING
TO REDUCE THE RISK OF FIRE OR ELECTRIC SHOCK,
DO NOT EXPOSE THIS APPLIANCE TO RAIN OR
MOISTURE.
■ For U.K. customers
If the socket outlets in the home are not suitable for the plug
supplied with this appliance, it should be cut off and an
appropriate 3 pin plug fitted. For details, refer to the instructions
described below.
Note
The plug severed from the mains lead must be destroyed, as a
plug with bared flexible cord is hazardous if engaged in a live
socket outlet.
■ Special Instructions for U.K. Model
IMPORTANT
THE WIRES IN MAINS LEAD ARE COLOURED IN
ACCORDANCE WITH THE FOLLOWING CODE:
Blue: NEUTRAL
Brown: LIVE
As the colours of the wires in the mains lead of this apparatus may not correspond with the coloured markings
identifying the terminals in your plug, proceed as follows:
The wire which is coloured BLUE must be connected to
the terminal which is marked with the letter N or coloured
BLACK. The wire which is coloured BROWN must be
connected to the terminal which is marked with the letter L
or coloured RED.
Making sure that neither core is connected to the earth
terminal of the three pin plug.
Page 3

CONTENTS
INTRODUCTION
FEATURES ............................................................. 2
About this manual...................................................... 2
SUPPLIED ACCESSORIES ................................. 2
CONTROLS AND FUNCTIONS ......................... 3
Front panel ................................................................. 3
Remote control........................................................... 4
INSTALLING BATTERIES
IN THE REMOTE CONTROL ........................ 5
USING THE REMOTE CONTROL .................... 5
PREPARATION
CONNECTING SPEAKERS
AND SUBWOOFER .......................................... 6
Connecting speakers .................................................. 6
Connecting a subwoofer ............................................ 6
CONNECTING OTHER COMPONENTS ......... 7
CONNECTING ANTENNAS................................ 8
AM loop Antenna ...................................................... 8
Indoor FM Antenna ................................................... 8
Indoor DAB Antenna................................................. 9
CONNECTING THE POWER CABLE .............. 9
BASIC OPERATION
TURNING THE POWER TO ON/STANDBY .. 10
SELECTING AN INPUT SOURCE................... 10
ADJUSTING THE VOLUME LEVEL .............. 11
MUTING THE SOUND (MUTE) ....................... 11
LISTENING THROUGH THE HEADPHONES
ADJUSTING THE CLOCK ................................ 12
SETTING THE ON/STANDBY TIMER .......... 12
SETTING THE SLEEP TIMER ......................... 13
CHANGING THE BRIGHTNESS OF THE
DISPLAY........................................................... 13
RESTORING TO THE
FACTORY DEFAULTS .................................. 13
ADJUSTING SOUNDS ........................................ 14
.. 11
ENJOYING MUSIC DISCS
LISTENING TO A CD .........................................15
Playing a CD............................................................ 15
PROGRAMMING PLAYBACK .........................17
Customizing playback order (Program Play) .......... 17
Playing back randomly
(Random Play)..................................................... 18
REPEAT PLAYBACK .........................................19
TIME DISPLAY....................................................20
LISTENING TO
THE EXTERNAL SOURCES .........................20
ENJOYING RADIO
TUNING RADIO STATIONS .............................21
Tuning radio stations automatically (Auto tuning).. 21
Tuning radio stations manually (Manual tuning) .... 21
FM mode.................................................................. 22
Preset tuning 1 ......................................................... 22
Preset tuning 2 ......................................................... 23
RECEIVING RADIO DATA SYSTEM..............24
PTY search mode..................................................... 25
DAB TUNER .........................................................26
About DAB.............................................................. 26
Setting up your DAB tuner...................................... 26
Auto tuning .............................................................. 27
Using the channel list .............................................. 27
Function mode ......................................................... 28
Changing display setting ......................................... 31
APPENDIX
TROUBLESHOOTING .......................................32
General..................................................................... 32
Remote control ........................................................ 33
Disc playback .......................................................... 33
Radio reception........................................................ 34
ADDITIONAL INFORMATION ........................35
Disc Information...................................................... 35
Handling a disc ........................................................ 35
SPECIFICATIONS ...............................................36
PREPARATIONINTRODUCTION
OPERATION
BASIC
MUSIC DISCS
ENJOYING
ENJOYING
RADIO
APPENDIX
1
Page 4
FEATURES
FEATURES
• Minimum RMS output power per channel
25W + 25W (6 Ω, 1 kHz, 0.1% THD).
• Plays Audio CDs, CD-Rs and CD-RWs.
• Receives DAB station as well as FM or Radio
• Easy operation with the MULTI JOG.
• DIGITAL OUTPUT jack.
• 30-station FM/AM, 10-station DAB
preset tuning.
Data System.
About this manual
• This manual provides information relevant only to the YAMAHA “CRX-M170”. For information on speakers or other AV
components, refer to the manual for that product.
• In this manual, operations that can be performed using either the CD player and tuner or its remote control are explained using the
remote control.
• y indicates a tip for your operation.
• Notes contain important information about safety and operating instructions.
• This manual is printed prior to production. Design and specifications are subject to change in part as a result of improvements, etc. In
case of differences between the manual and the product, the product has priority.
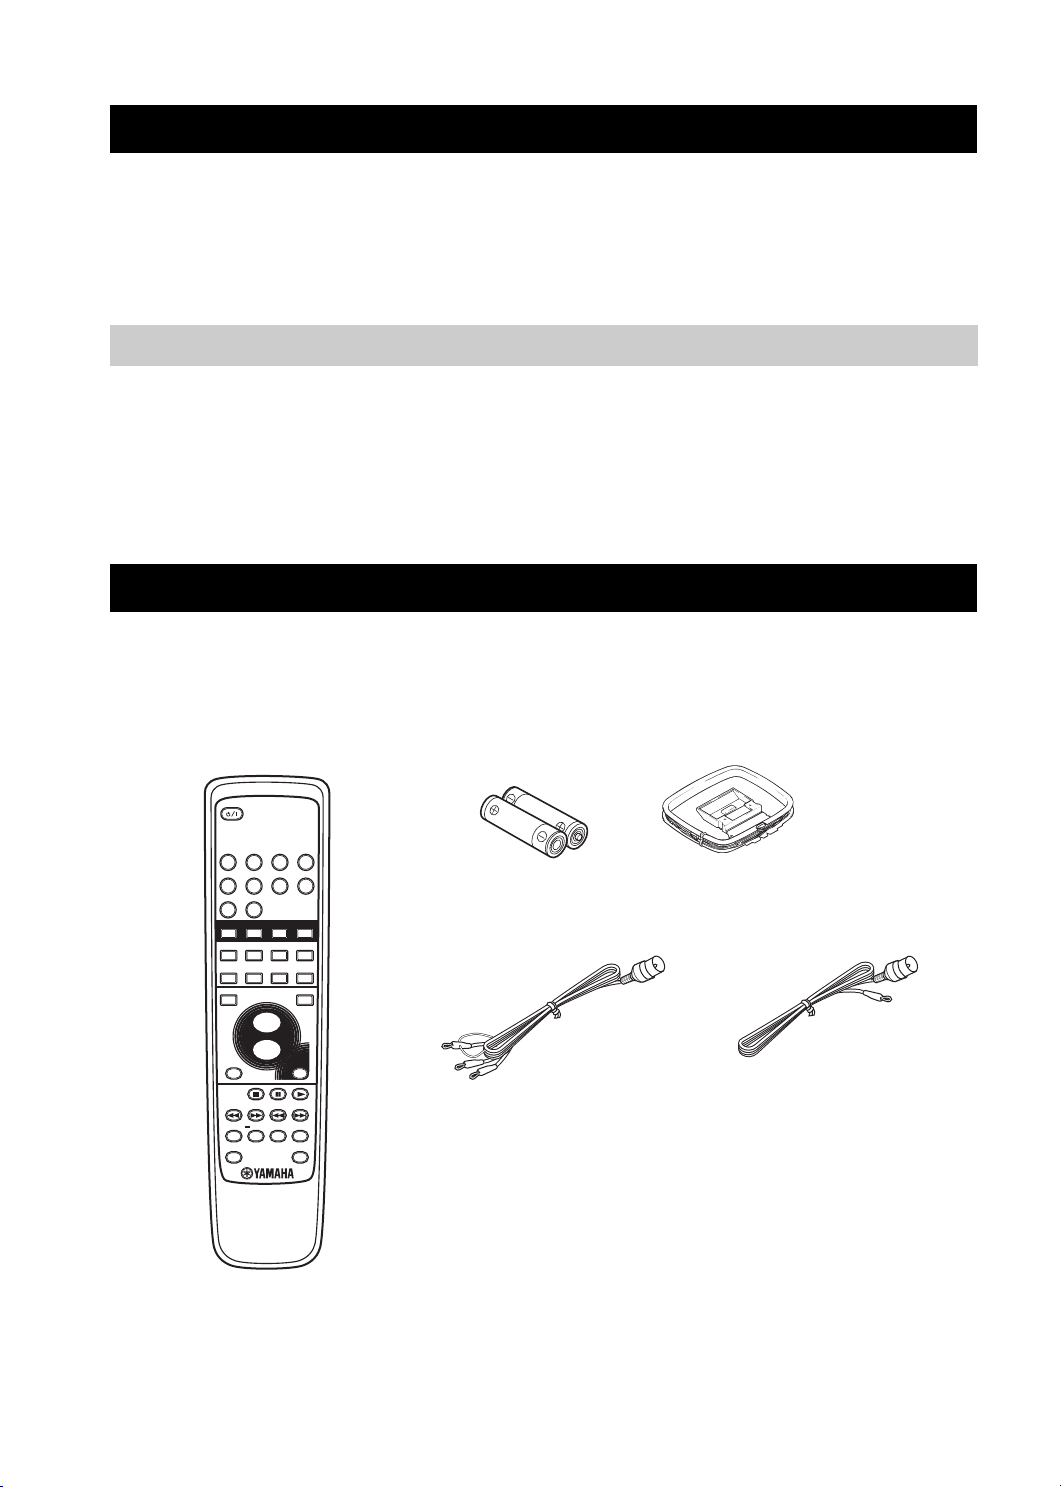
SUPPLIED ACCESSORIES
This product includes the following accessories. Before connecting speakers or other components to this product, make sure you
received all of the following parts.
Remote
control
(AAA, R03, UM-4)
AM loop antennaBatteries (x2)
STANDBY/ON
1 2 3 4
5 6 7 8
9 0
AUX 2AUX 1 TAPE CD
BAND PRESET TUNER
d
d
FUNCTION/
INFO/TEXT AUTO TUNE
FM MODE
TIMER DIMMER
VOLUME
+
–
SLEEP
REPEAT A-B PROG CLEAR
RANDOM TIME
MUTE
ENTER
Indoor DAB antenna
Indoor FM antenna
2
Page 5
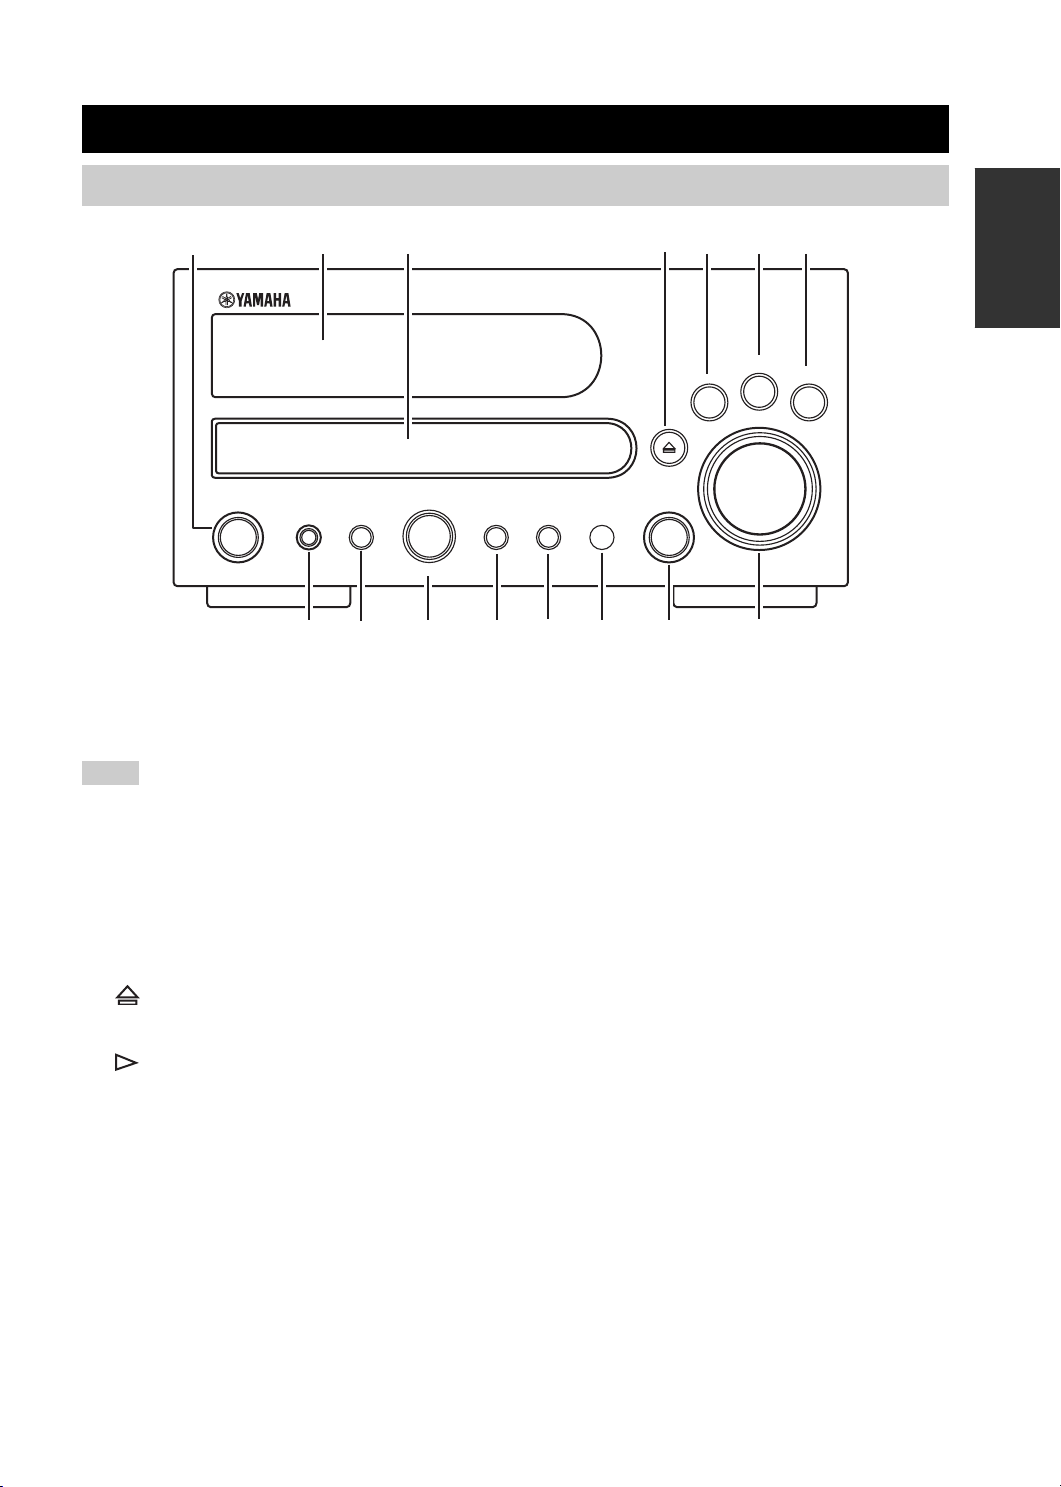
CONTROLS AND FUNCTIONS
Front panel
TUNING/PRESET/TIME
TIME
MODE
DE
3
b/w f/a
PUSH-ENTER
C
TONE/
BALANCE
1
POWER
STANDBY/ON
2
NATURAL SOUND CD RECEIVER CRX-M170
PHONES
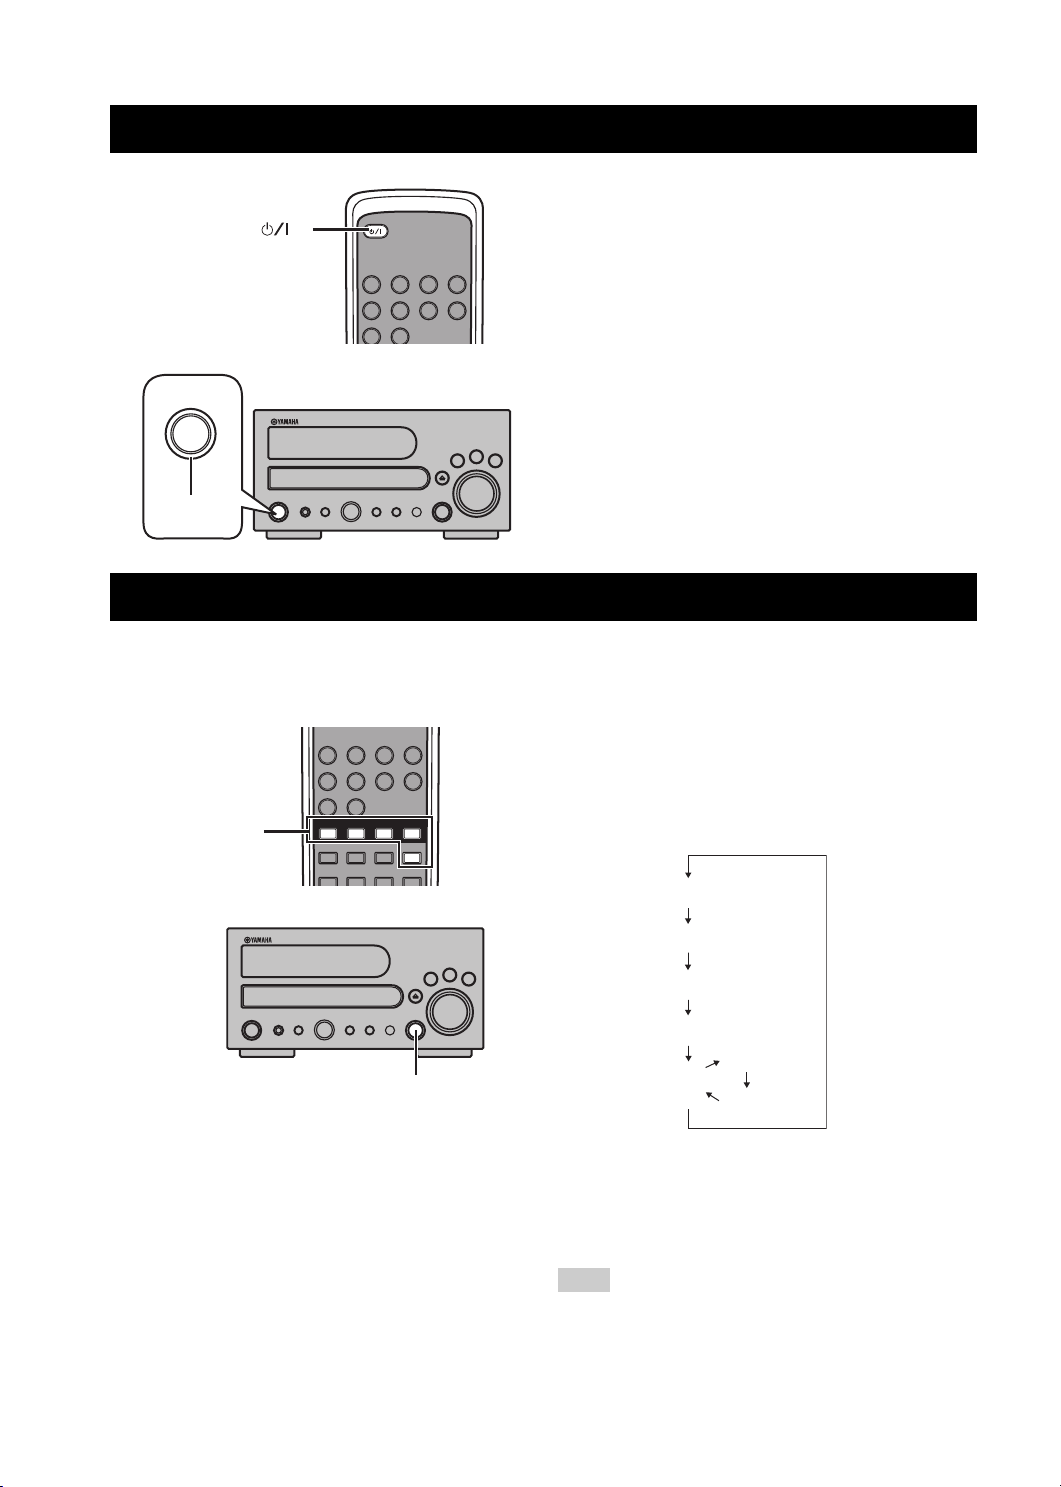
1 STANDBY/ON
Turns this unit on or sets it to the standby mode (page 10).
When this unit is in the standby mode, the Standby
indicator around STANDBY/ON button lights up orange.
Note
The Standby mode uses a little power to receive an infrared signal
from the remote control.
2 Display
Displays playback information or settings.
3 Disc tray
Holds a disc to be played.
4 (Open/Close)
In CD mode, use to open and close the disc tray.
5
(Play), BAND
In CD mode, use to start playback.
In TUNER mode, use to select FM, AM or DAB.
4
5
67
FUNCTION
PROGRAM
/MEMORY
AB
0
SOURCE
9
BAND
/FM MODE
h
e
VOLUME
8
INFO/
TEXT MODE
s
CLEAR
8 VOLUME
Turn this knob to adjust the volume.
9 SOURCE
Use to select a source.
0 Remote control sensor
Receives signals from the remote control.
A PROGRAM/MEMORY
In CD mode, use to enter the program mode.
In TUNER mode, use to memory the station manually.
B TONE/BALANCE
Use to adjust the tone and balance with the MULTI JOG.
C MULTI JOG
In CD mode, use to skip tracks etc.
In TUNER mode, adjusts various settings.
D TIME MODE
Use to adjust clock and to set timer.
INTRODUCTION
* (Pause), FUNCTION/FM MODE
6
In CD mode, use to pause playback.
In DAB mode, activates features such as preset tune, local
scan, full scan, manual tune etc.
In FM mode, use to select Stereo or Mono.
& (Stop), INFO/TEXT MODE, CLEAR
7
In CD mode, use to stop playback.
In DAB mode, use to change the text content (page 31).
In FM mode, use to select the mode. Also use to cancel the
entering or modes.
E PHONES jack
Connect headphones.
3
Page 6

CONTROLS AND FUNCTIONS
Remote control
1
2
3
4
5
6
7
8
9
0
A
B
C
STANDBY/ON
1 2 3 4
5 6 7 8
9 0
AUX 2AUX 1 TAPE CD
BAND PRESET TUNER
d
FUNCTION/
INFO/TEXT AUTO TUNE
FM MODE
TIMER DIMMER
VOLUME
+
–
SLEEP
REPEAT A-B PROG CLEAR
RANDOM TIME
7 INFO/TEXT
In FM or DAB mode, use to change the text content
(page 31).
8 SLEEP
Use to set the sleep timer.
9 STOP
In CD mode, use to stop disc playback.
0 1 / ¡ (Search)
During playback of CD, use to search the part you want to
d
ENTER
D
E
F
G
MUTE
H
I
J
K
L
M
N
listen to.
A REPEAT
Use to set the repeat play (one track or all tracks) (page 19).
B A-B
Use to set the A-B repeat (page 19).
C RANDOM
In CD mode, use to enter the random playback mode
(page 18).
D PRESET
In TUNER mode, use to select the preset stations.
E ENTER
In DAB mode, use to enter the selection.
F DIMMER
Use to dim the display.
1 STANDBY/ON
Turns this unit on, or sets it to the standby mode (page 10).
2 Number buttons (1 to 9, 0)
Use to select a track number or a preset channel after
selecting CD or TUNER.
3 Input selector
Use to select a source.
4 BAND
In TUNER mode, use to select FM, AM or DAB.
5 FUNCTION/FM MODE
In DAB mode, activates features such as preset tune, local
scan, full scan, manual tune, etc.
In FM mode, use to select Stereo or Mono.
6 TIMER
Use to set the on/standby timer function.
G AUTO TUNE
In DAB mode, use to activate Local scan or Full scan.
(page 27).
H MUTE
Use to mute the sound.
I
3 (Play)
In CD mode, use to start playback.
8 (Pause)
J
In CD mode, use to pause playback.
4 /¢ (Skip)
K
In CD mode, use to skip tracks.
L CLEAR
Use to delete a programmed track.
M PROGRAM
In CD mode, use to enter the program mode.
In program mode, use to enter the selection.
N TIME
In CD mode, use to change the time display.
4
Page 7
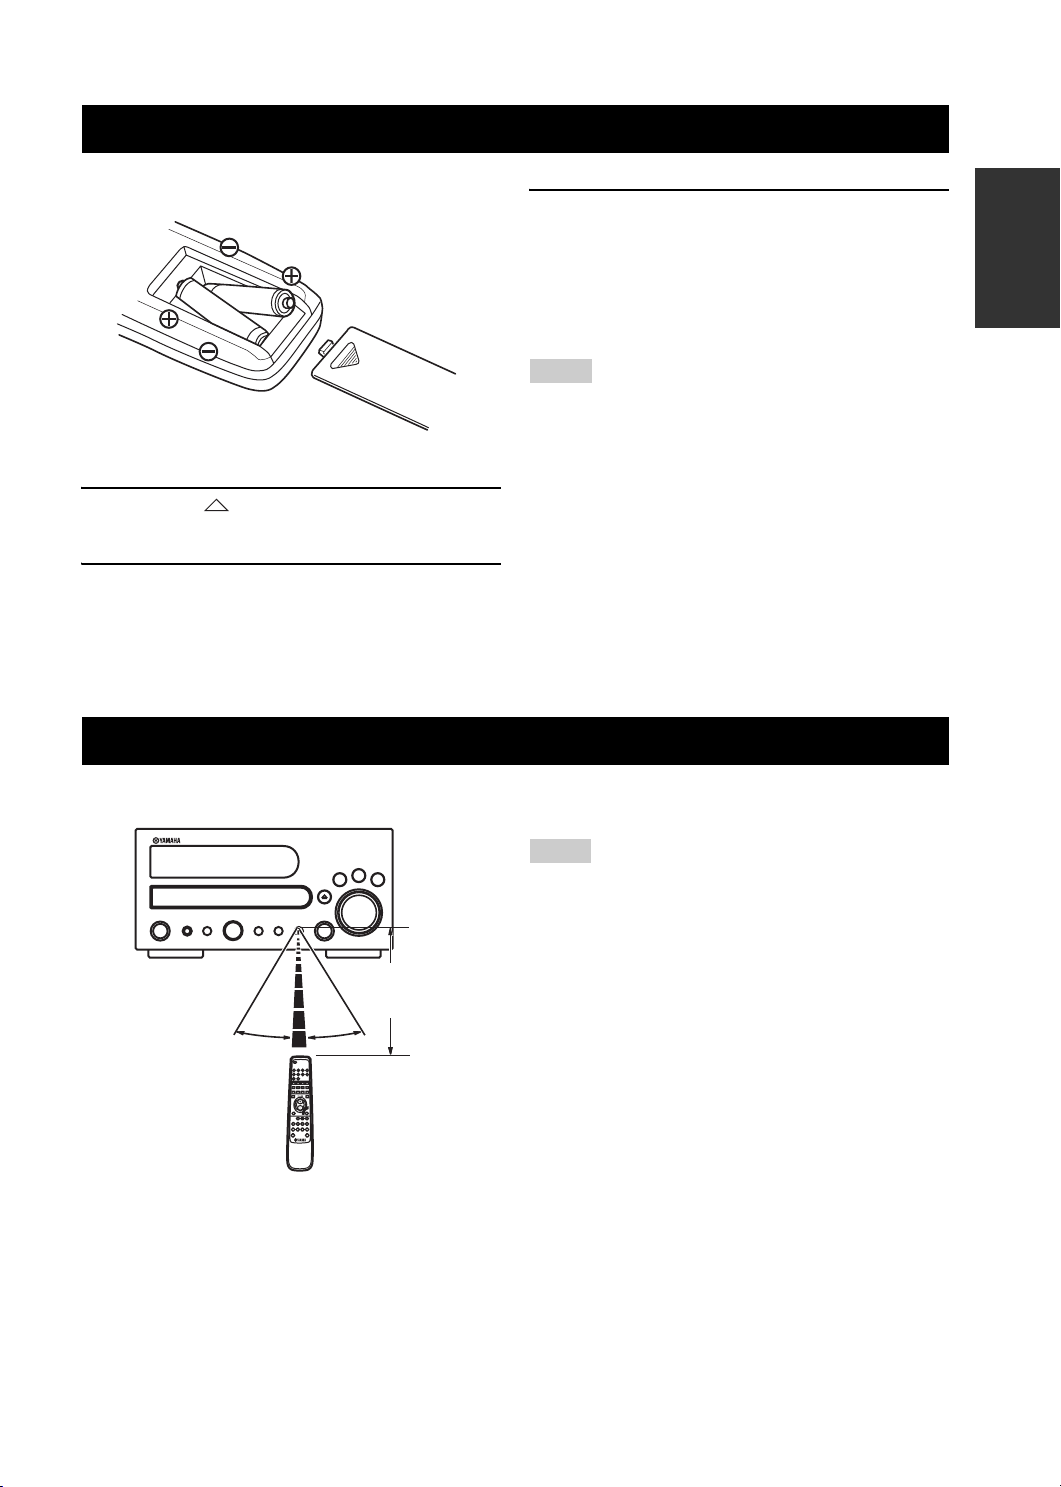
INSTALLING BATTERIES IN THE REMOTE CONTROL
1 Press the mark on the battery cover and
slide off the cover.
2 Insert the two supplied batteries (AAA, R03,
UM-4) into the battery compartment.
Make sure you insert the batteries according to the
polarity markings (+ and –).
INTRODUCTION
3 Close the battery cover.
■ To replace the batteries
If the batteries grow old, the effective operation distance of
the remote control decreases considerably. If this happens,
replace the batteries with two new ones as soon as possible.
Notes
• Do not use an old battery together with new one.
• Do not use different types of batteries (for example, alkaline
and manganese) together. Each type of battery has its own
characteristics even if they are similar in shape.
• If the batteries run out, immediately remove them from the
remote control to prevent an explosion or acid leak.
• Dispose of the batteries according to the regional regulations.
• If a battery starts leaking, dispose of it immediately. Be careful
not to let leaking battery acid come into contact with your skin
or clothing. Before inserting new batteries, wipe the
compartment clean.
STANDBY/ON
USING THE REMOTE CONTROL
Use the remote control within 6 m (20 feet) of this unit
and point it toward the remote control sensor.
e
s
h
POWER
Within 6 m
(20 feet)
30˚ 30˚
Notes
• Be careful not to spill liquid on the remote control.
• Be careful not to drop the remote control.
• Do not leave the remote control in the following places:
– hot or humid places, such as near a heater or in a bathroom
– extremely cold places
– dusty places
5
Page 8
RUNNING H/F 1
L
2
A
CONNECTING SPEAKERS AND SUBWOOFER
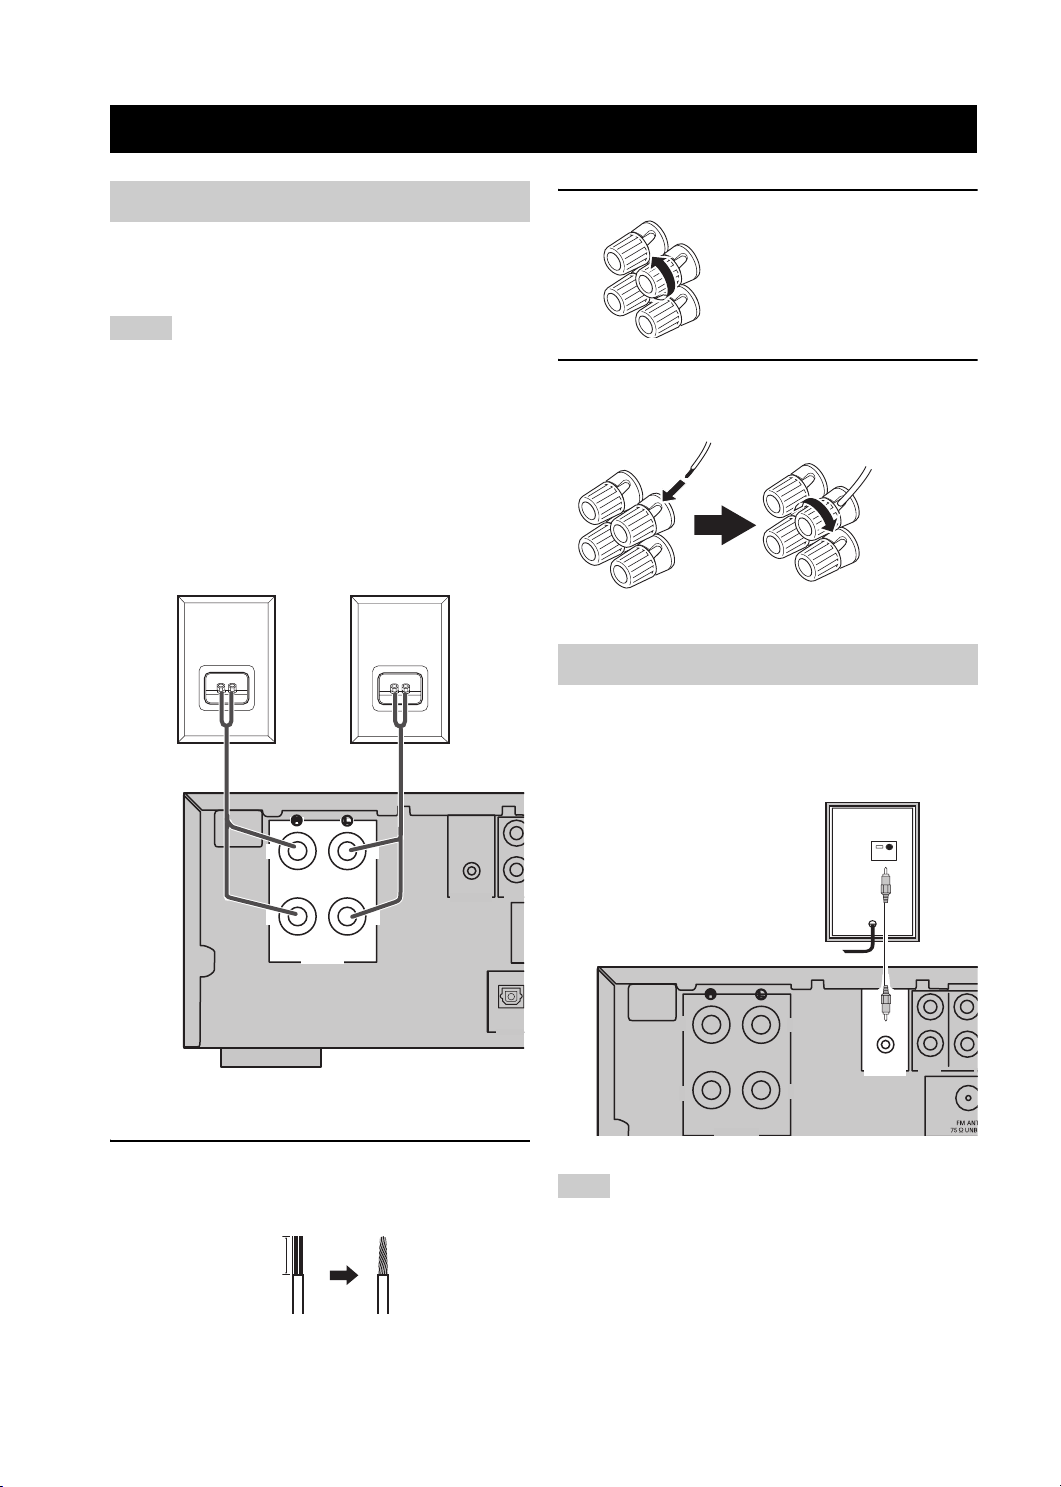
Connecting speakers
Follow the procedure below to connect speakers to this
unit. For information on your speakers, refer to the
owner’s manual for the speakers.
Notes
• Do not connect the power cable of this unit until all cable
connections are completed.
•
Be sure to connect the left channel (L), right channel (R), “+” (red)
and “
–
” (black) properly. If the connections are faulty, no sound
will be heard from the speakers, and if the polarity of the speaker
connections is incorrect, the sound will be unnatural and lack bass.
• Do not let the bare speaker wires touch each other or do not let
them touch any metal part of this unit. This could damage this
unit and/or the speakers.
• Use speakers with the specified impedance shown on the rear
panel of this unit.
R speaker
L speaker
2 Unscrew the knob.
Red: positive (+)
Black: negative (–)
3 Insert one bare wire into the hole in the side
of each terminal. And then tighten the knob
to secure the wire.
Red:
positive (+)
Black:
negative (–)
Connecting a subwoofer
Connect the SUBWOOFER OUT jack on this unit
to the INPUT jack on the subwoofer using a
subwoofer cable.
+ +
OUT
_
SPEAKERS
_
SUBWOOFER
OPTICA
DIGITAL
1 Remove approximately 10 mm of insulation
from the end of each speaker cable and twist
the exposed wires of the cable together to
prevent short circuits.
10 mm
Subwoofer
IN
AUX
OUT
+
_
+
_
Note
Do not connect the power cable of this unit or subwoofer until all
cable connections are completed.
INPUT
OUT
SUBWOOFER
AUX 2
IN
IN
6
Page 9
RUNNING H/F 1
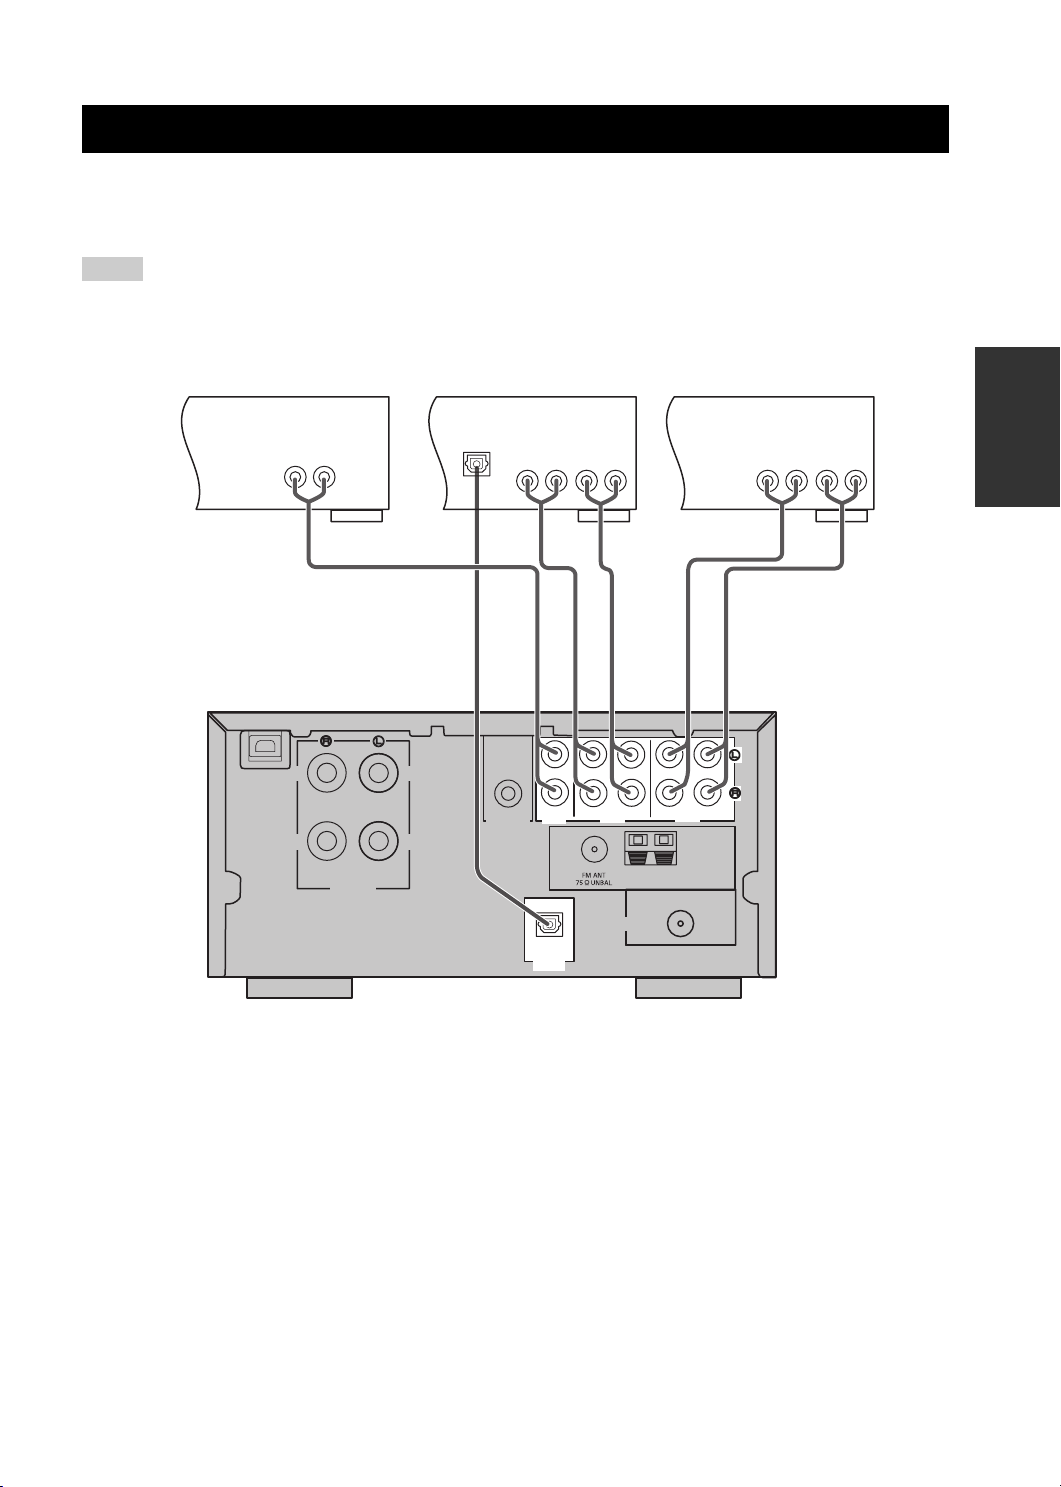
CONNECTING OTHER COMPONENTS
If you connect other components such as a VCR, DVD or MD to the following jacks on this unit, you can enjoy those
sources with this unit. This section provides some examples of other AV component connections. For information about
connecting to your AV components, refer to the owner’s manual for it.
Notes
• Do not connect the power cable of this unit until all cable connections are completed.
• Turn off the audio component before connecting it to this unit.
VCR, DVD, etc.
Cassette deck MD, CD-R, etc.
PREPARATION
OUT PUT
R
MAINS
+ +
_
L
SPEAKERS
OPTICAL IN
_
OUT
SUBWOOFER
OUT PUT
R
OPTICAL
AUX 2
DIGITAL
OUT
IN PUT
L
L
R
AUX 1
OUTIN
TUNER
IN
IN
AM ANTGND
DAB ANT
TAPE
OUT
OUT PUT
R
IN PUT
L
L
R
■ TAPE/AUX jacks
Connect the AUX IN jacks on this unit to the
output jacks of the each component. Then,
connect the AUX OUT jacks on this unit to the
each input jack of the component.
Be sure to insert each plug securely. To prevent humming and
noise, do not bundle the connection cords with the power cord or
speaker cord.
■ DIGITAL OUT terminal
Connect the DIGITAL OPTICAL OUT jack on this
unit to the digital input jack on the MD or CD-R
etc.
When inserting the optical cable plug, open the protective shutter
of the terminal and insert the cable plug until it makes a click
sound. Do not force the plug, because this could result in damage
to the protective shutter, the cable or the unit itself.
7
Page 10
RUNNING H/F 1
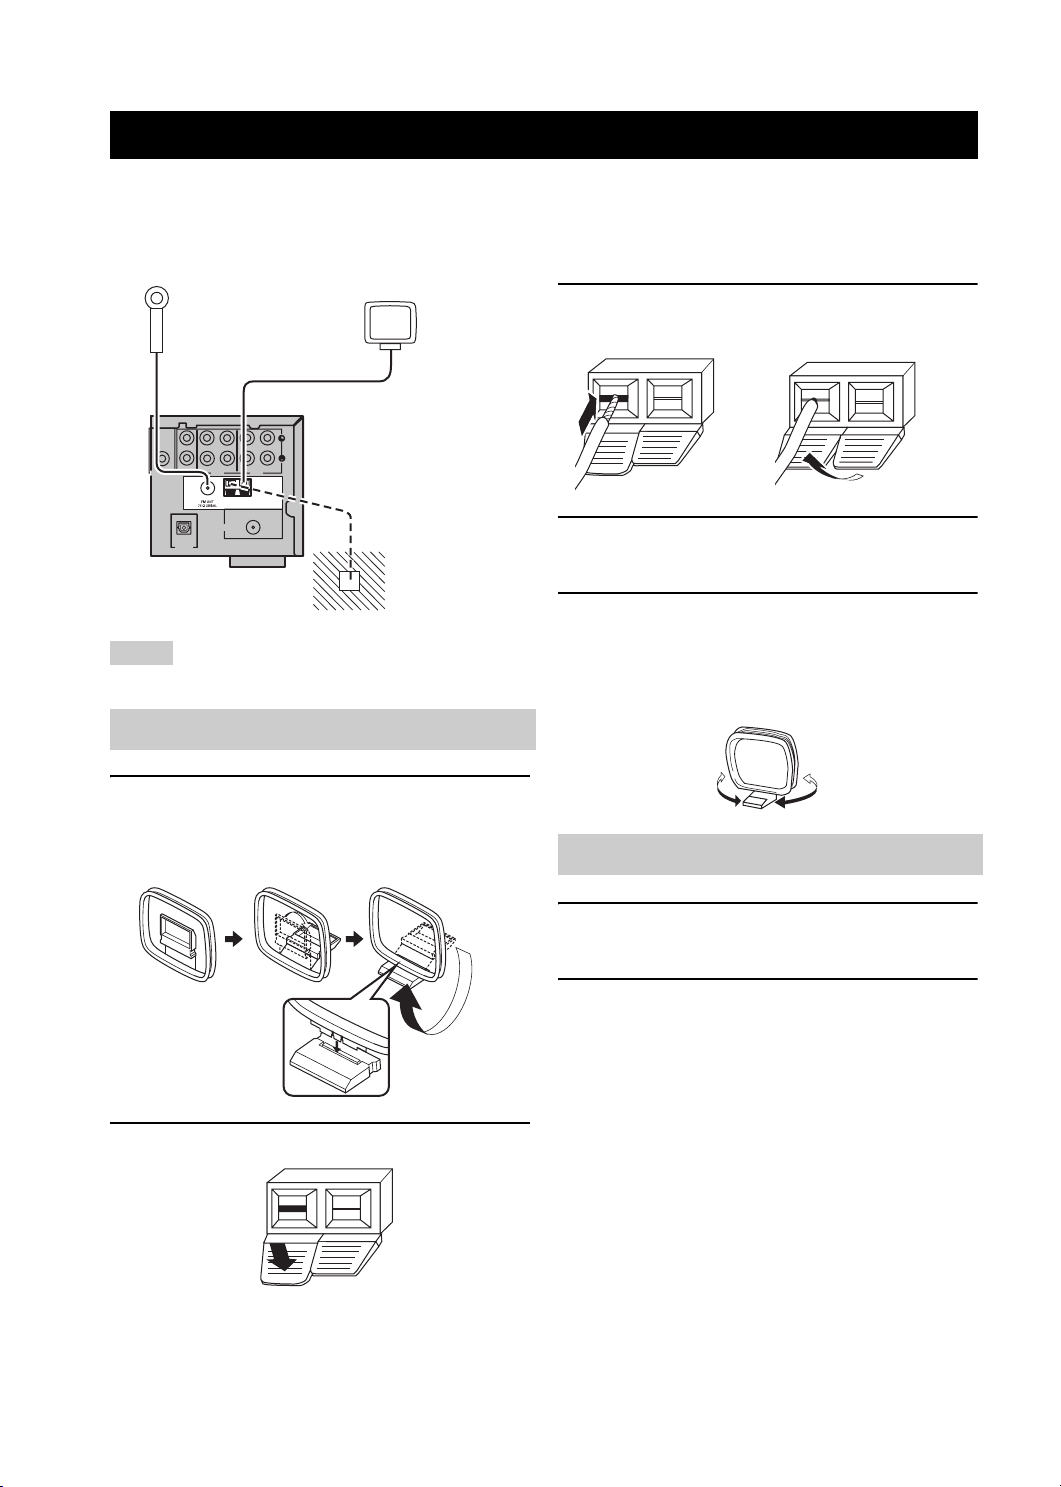
CONNECTING ANTENNAS
To enjoy the tuner on this unit, you need to connect AM, FM and DAB antennas to this unit. This product includes an
AM loop antenna, Indoor FM antenna and Indoor DAB antenna. If there is a problem of weak radio wave reception in
your area or you want to improve radio reception, we recommend that you use commercially available outdoor antennas.
For details, consult the nearest authorized YAMAHA dealer or service center.
Indoor FM
antenna
(supplied)
AM loop
antenna
(supplied)
OUT
OUT
SUBWOOFER
OUTIN
IN
AUX 2
OPTICAL
DIGITAL
OUT
IN
TAPE
AUX 1
AM ANTGND
DAB ANT
TUNER
Ground
(GND terminal)
Note
The AM loop Antenna should be placed away from this unit.
AM loop Antenna
1 Attach the antenna stand to the AM loop
antenna.
When attaching the antenna to the wall, you do not
need to use the antenna stand.
3 Insert the AM loop antenna lead wires into
the AM ANT terminal. Then release the tab.
4 Repeat steps 2 to 3 to insert the AM loop
antenna lead wires into the GND terminal.
5 Extend the cord and place the AM loop
antenna away from this unit and speaker
cables.
While listening to the radio, rotate the antenna head
to find the best angle for reception.
Indoor FM Antenna
2 Press and hold the tab.
8
1 Connect the supplied indoor FM antenna to
the FM ANT jack on this unit.
2 Place the antenna away from this unit and
speaker cables.
It is recommended to use an outdoor FM Antenna in weak
FM signal areas. In this case, d
antenna.
isconnect the indoor FM
Page 11
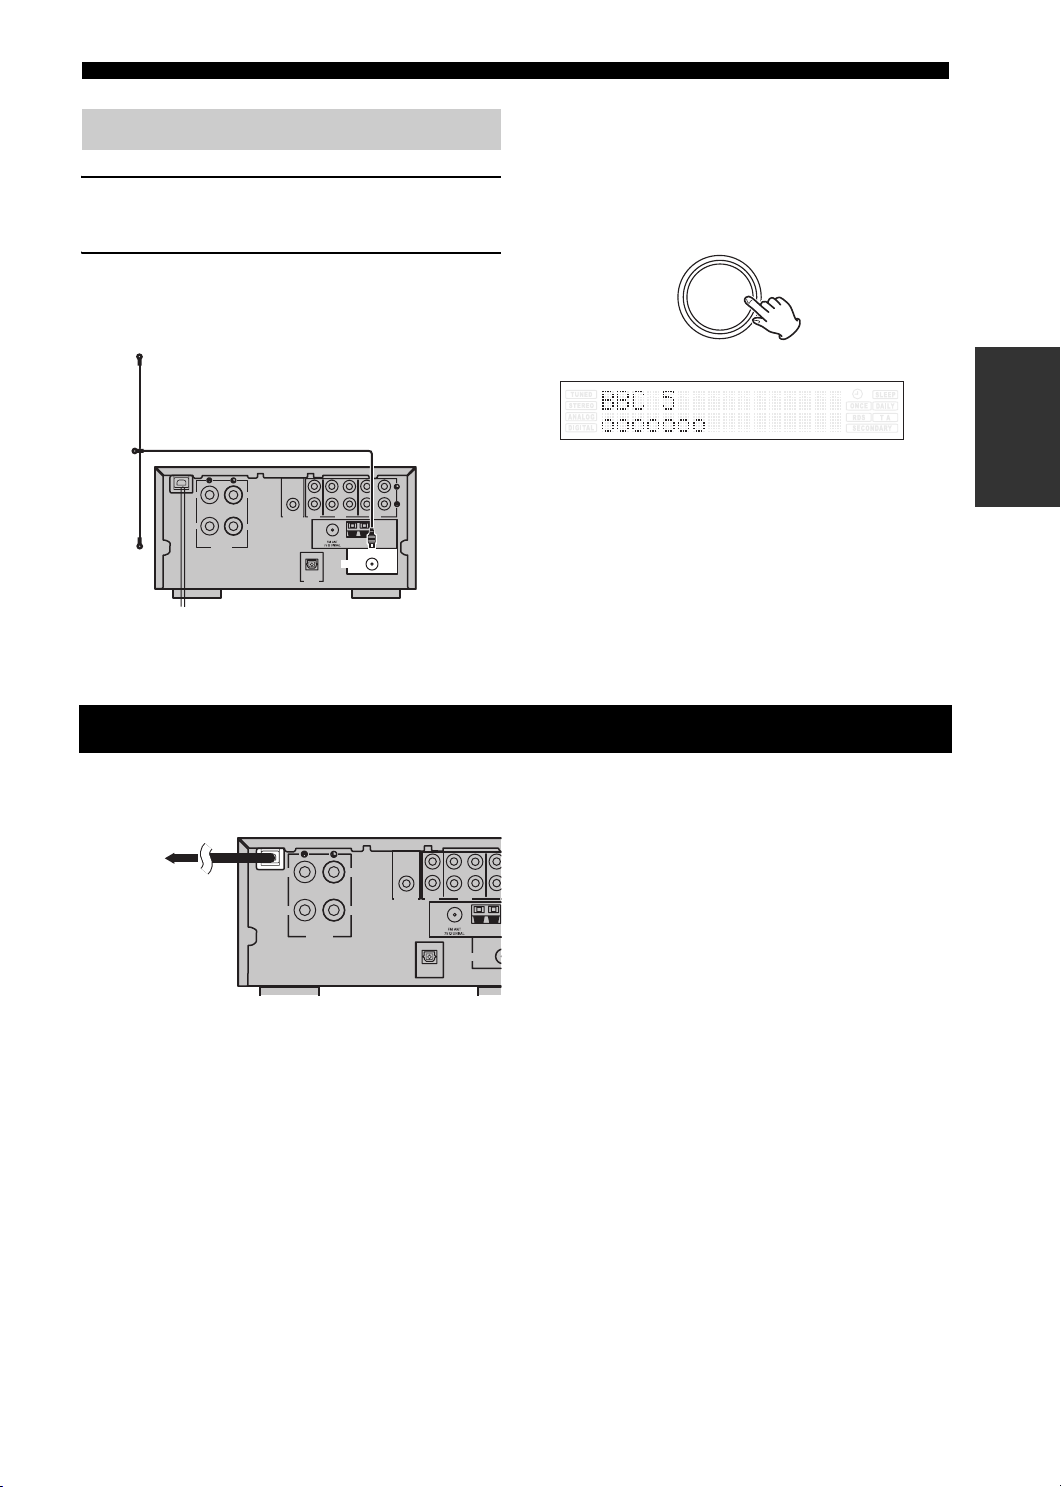
Indoor DAB Antenna
B
1 Connect the indoor DAB antenna to the DAB
terminal.
2 Extend the cord vertically and attach it to a
window frame or wall using drawing pin etc.,
where the signal reception is best .
MAINS
+ +
_
SPEAKERS
OUT
IN
AUX 2
SUBWOOFER
_
OPTICAL
DIGITAL
OUT
OUT
OUTIN
IN
TAPE
AUX 1
AM ANTGND
DAB ANT
TUNER
Connecting antennas
y
You can check the antenna adjustment or positioning for the best
reception by viewing the signal strength on the display.
The signal strength is displayed as a bar graph by pressing
MULTI JOG once.
TUNING/PRESET/TIME
b/w f/a
PUSH-ENTER
It is recommended to use outdoor DAB antenna in weak
DAB signal areas.
PREPARATION
CONNECTING THE POWER CABLE
After you made all connections, connect the power cables of this to an AC outlet.
MAINS
To an AC wall outlet
+ +
_
SPEAKERS
OUT
SUBWOOFER
_
OUTIN
IN
AUX 2
OPTICAL
DIGITAL
OUT
IN
AUX 1
AM ANGND
DA
TUNER
9
Page 12
TURNING THE POWER TO ON/STANDBY
TURNING THE POWER TO ON/STANDBY
STANDBY/ON ( )
POWER
STANDBY/ON
NATURAL SOUND CD RECEIVER CRX-M170
POWER
Standby
indicator
STANDBY/ON
TUNING/PRESET/TIME
b/w f/a
TIME
PHONES
MODE
PUSH-ENTER
SELECTING AN INPUT SOURCE
STANDBY/ON
1 2 3 4
5 6 7 8
9 0
TONE/
BALANCE
SOURCE
PROGRAM
/MEMORY
Press STANDBY/ON to turn on this unit or set it
to the standby mode.
• When the unit is turned on, the display lights up and the
standby indicator turns off.
• When the unit is in the standby mode, the display goes out
and the standby indicator turns on.
• If the timer is set while the unit is in the standby mode, the
standby indicator blinks slowly.
FUNCTION
/FM MODE
INFO/
BAND
TEXT MODE
e
s
h
VOLUME
CLEAR
You can enjoy various sources with this unit. After connecting speakers, antennas, or other equipments, follow the
procedure below to select an input source you want to play on this unit. For information on connection methods, refer to
pages 6 to 9.
Press source (or one of the input selector
Input selector
1 2 3 4
5 6 7 8
9 0
AUX 2AUX 1 TAPE CD
BAND PRESET TUNER
FUNCTION/
FM MODE
d
d
INFO/TEXT AUTO TUNE
ENTER
buttons on the remote control) to select the input
source you desire.
•Every time the SOURCE button is pressed, the mode
changes as follows:
CD
STANDBY/ON
POWER
NATURAL SOUND CD RECEIVER CRX-M170
TUNING/PRESET/TIME
b/w
TIME
PHONES
MODE
PUSH-ENTER
FUNCTION
/FM MODE
INFO/
BAND
TEXT MODE
e
s
h
VOLUME
CLEAR
a
f/
TONE/
BALANCE
SOURCE
PROGRAM
/MEMORY
SOURCE
* In the tuner mode, one for three you selected will be
displayed.
• Listening to CDs: see page 15.
• Listening to External source: see page 20.
• Listening to tuners: see page 21.
AUX 1
AUX 2
TAPE
∗
FM
AM
DAB
10
Note
This unit itself does not provide recording features. To make
recordings, you need to connect recording equipment to this unit.
Page 13

( )
ADJUSTING THE VOLUME LEVEL
Rotate VOLUME to the right (or press VOLUME +
on the remote control) to increase the volume
level and to the left (or press VOLUME – on the
remote control) to decrease it.
Note
To protect speakers from a sudden high-level signal,
(+)
TIMER DIMMER
VOLUME
+
–
SLEEP MUTE
+
–
gradually turn up the volume to the required level with
VOLUME.
MUTING THE SOUND (MUTE)
ADJUSTING THE VOLUME LEVEL
BAND PRESET TUNER
FUNCTION/
FM MODE
TIMER DIMMER
d
d
INFO/TEXT AUTO TUNE
VOLUME
ENTER
+
–
SLEEP
REPEAT A-B PROG CLEAR
RANDOM TIME
MUTE
+
–
MUTE
Press MUTE on the remote control to mute the
sound.
To restore audio output to the previous volume level, press
MUTE again or press VOLUME +/–.
LISTENING THROUGH THE HEADPHONES
Connect the headphone plug to the PHONES
jack, and adjust the volume.
The sound from speakers is cut off.
MODE
s
POWER
STANDBY/ON
NATURAL SOUND CD RECEIVER CRX-M170
TUNING/PRESET/TIME
b/w f/a
TIME
PHONES
MODE
PUSH-ENTER
FUNCTION
/FM MODE
INFO/
BAND
TEXT
e
h
VOLUME
CLEAR
PROGRAM
/MEMORY
SOURCE
TONE/
BALANCE
OPERATION
BASIC
11
Page 14

ADJUSTING THE CLOCK
S
ADJUSTING THE CLOCK
NATURAL SOUND CD RECEIVER CRX-M170
NATURAL SOUND CD RECEIVER CRX-M170
FUNCTION
FUNCTION
/FM MODE
/FM MODE
INFO/
INFO/
BAND
BAND
TEXT MODE
RDS MODE
e
e
s
s
h
h
VOLUME
VOLUME
POWER
POWER
STANDBY/ON
STANDBY/ON
PHONES
AUTO TUNING
TUNING/PRESET/TIME
TUNING/PRESET/TIME
b/w f/a
b/w f/a
TIME
TIME
PHONES
MODE
MODE
PUSH-ENTER
PUSH-ENTER
TONE/
PROGRAM
TONE/
PROGRAM
MULTI JOG
BALANCE
/MEMORY
BALANCE
/MEMORY
SOURCE
SOURCE
CLEAR
CLEAR
MULTI JOG
TIME MODE
1 Press TIME MODE.
The current time “hour” flashes on the display.
SETTING THE ON/STANDBY TIMER
This unit turns on and switches to the standby mode at the
specified time every day.
NATURAL SOUND CD RECEIVER CRX-M170
NATURAL SOUND CD RECEIVER CRX-M170
FUNCTION
FUNCTION
/FM MODE
/FM MODE
INFO/
INFO/
BAND
BAND
TEXT MODE
RDS MODE
e
e
s
s
h
h
VOLUME
VOLUME
POWER
POWER
STANDBY/ON
STANDBY/ON
TANDBY/ON
TIME MODE
PHONES
PHONES
TUNING/PRESET/TIME
TUNING/PRESET/TIME
b/w
b/w
TIME
TIME
MODE
MODE
PUSH-ENTER
PUSH-ENTER
MULTI JOG
AUTO TUNING
SOURCE
f/
a
f/
a
TONE/
PROGRAM
TONE/
PROGRAM
BALANCE
/MEMORY
BALANCE
/MEMORY
SOURCE
CLEAR
CLEAR
2 Rotate MULTI JOG to select the current hour,
then press MULTI JOG to set it.
The current time “minute” flashes on the display.
3 Rotate MULTI JOG to set the current minutes,
then press MULTI JOG to set it.
To quit the time mode, press TIME MODE again.
Notes
• You cannot set timer unless you adjust the clock.
• The clock is displayed in 24-hour format.
5 Rotate MULTI JOG to select the input source
to be played, then press MULTI JOG.
The timer setting is stored in memory, and the current
time “hour” flashes on the display.
6 Press Timer on the remote control.
The timer indicator “ ” appears on the display.
FUNCTION/
FM MODE
TIMER
TIMER DIMMER
INFO/TEXT AUTO TUNE
SLEEP
d
VOLUME
+
–
d
ENTER
MUTE
y
Adjust the clock before setting the timer.
7 Get ready for timer operation.
Adjust the volume, tune into a station, insert a CD,
etc.
1 Press TIME MODE once, then press MULTI
JOG repeatedly until “On time” is displayed.
The “hour” value flashes.
2 Rotate MULTI JOG to select the hour, then
press MULTI JOG to set it.
The “minute” value flashes.
3 Rotate MULTI JOG to select the minutes, then
To deactivate the timer, press TIMER again to turn it
off. (The timer indicator “ ” disappears from the
display.)
8 Press STANDBY/ON to switch the unit to the
standby mode.
The timer indicator “ ” disappears from the
display. Then
the standby indicator flashes slowly.
press MULTI JOG to set it.
4 Repeat steps 2 and 3 to set the “off time”.
“Source select” appears on the display.
12
Page 15

SETTING THE SLEEP TIMER
AUX 2AUX 1 TAP E CD
SETTING THE SLEEP TIMER
If you set the sleep timer, this unit automatically turns to
the standby mode after the specified time.
FUNCTION/
INFO/TEXT AUTO TUNE
FM MODE
TIMER DIMMER
ENTER
VOLUME
+
–
SLEEP
SLEEP
REPEAT A-B PROG CLEAR
RANDOM TIME
MUTE
CHANGING THE BRIGHTNESS OF THE DISPLAY
You can change the brightness of the display.
BAND PRESET TUNER
d
d
FUNCTION/
INFO/TEXT AUTO TUNE
VOLUME
+
–
ENTER
DIMMER
MUTE
FM MODE
TIMER DIMMER
SLEEP
Press SLEEP on the remote control repeatedly to
set the duration for the sleep timer (90 to 10
minutes).
You can set the duration in 10-minutes steps.
y
• When the sleep timer is activated, the brightness of the display
goes down.
• To check the remaining time, press SLEEP once. The remaining
time is displayed for three seconds, then the display returns to
the normal display.
Notes
• The sleep timer only works for this unit. It does not turn off
other equipment connected to this unit.
• The sleep timer is canceled if you turn this unit to the standby
mode.
OPERATION
BASIC
Press DIMMER on the remote control.
Each time you press DIMMER, the brightness of the
display switches between Dimmer on and Dimmer off.
RESTORING TO THE FACTORY DEFAULTS
Setting the DEFAULT function resets all options and your personal settings to the factory default.
FUNCTION/FM MODE
NATURAL SOUND CD RECEIVER CRX-M170
FUNCTION
/FM MODE
INFO/
BAND
TEXT MODE
e
s
h
VOLUME
CLEAR
POWER
STANDBY/ON
Press and hold down FUNCTION/FM MODE for
more than four seconds in standby mode to
manually initialize.
TUNING/PRESET/TIME
f/
b/w
a
TIME
PHONES
TONE/
MODE
BALANCE
PUSH-ENTER
SOURCE
PROGRAM
/MEMORY
13
Page 16

ADJUSTING SOUNDS
ADJUSTING SOUNDS
You can adjust following sound settings: BASS,TREBLE
and BALANCE.
NATURAL SOUND CD RECEIVER CRX-M170
FUNCTION
/FM MODE
INFO/
BAND
TEXT MODE
e
s
h
VOLUME
CLEAR
POWER
STANDBY/ON
TUNING/PRESET/TIME
b/w
a
f/
TIME
PHONES
TONE/
MODE
BALANCE
PUSH-ENTER
TONE/BALANCE
MULTI JOG
These settings have no effect on the recorded sound during
recording.
SOURCE
PROGRAM
/MEMORY
Note
Once a setting is displayed, you have three seconds to begin
adjusting it (or else it will return to the normal display).
BASS: Adjust the low frequency sound range.
(–10 to +10 dB)
TREBLE: Adjust the high frequency sound range.
(–10 to +10 dB)
1 Press TONE/BALANCE.
2 Press MULTI JOG repeatedly to select the
setting you want to adjust.
Each time you press MULTI JOG, the display
changes as follows:
BASS
TREBLE BALANCE
3 Rotate MULTI JOG to adjust the setting.
L/R BALANCE: Adjust the speaker balance.
(0 to 16 for either left or right speaker)
14
Page 17

LISTENING TO A CD
LISTENING TO A CD
You can enjoy music discs (CD, CD-R and CD-RW) with this unit. For information on supported disc standards and disc
usage notes, refer to “Disc Information” (page 35) and “Handling a disc” (page 35).
Playing a CD
* (Pause)
p (Play)
) (Open/Close)
NATURAL SOUND CD RECEIVER CRX-M170
FUNCTION
/FM MODE
BAND
h
TUNING/PRESET/TIME
b/w f/a
PHONES
TIME
MODE
PUSH-ENTER
TONE/
BALANCE
SLEEP
PROGRAM
/MEMORY
–
7 (Stop)
REPEAT A-B PROG CLEAR
RANDOM TIME
1 Press SOURCE to select “CD”.
If there is no disc has been inserted, “No Disc” is
displayed.
SOURCE
SOURCE
MUTE
3 (Play)
8 (Pause)
& (CLEAR)
INFO/
TEXT MODE
e
s
VOLUME
CLEAR
3 Place a CD on the disc tray with the printed
label facing up.
4 Press ) to close the tray.
The CD is read, and the total numbers of the tracks
and play time of the disc are displayed.
■ To start playback
Press p .
y
• Selecting the CD source starts playback automatically if a
disc is set on the disc tray.
• When you turn on the power, this unit automatically starts
playback if a CD has been inserted and the source is set to
“CD”.
• Whenever you change the source during playback, this
unit automatically memorizes the stopping position. So if
you return to CD source again, this unit resumes playback
from where it was stopped.
MUSIC DISCS
ENJOYING
2 Press ) .
The disc tray opens.
15
Page 18

LISTENING TO A CD
■ To stop playback
Press & .
■ To pause playback
Press * .
To return to normal playback, press
* again.
You can also return to playback by pressing p.
■ To skip to the next or previous track
NATURAL SOUND CD RECEIVER CRX-M170
FUNCTION
/FM MODE
INFO/
BAND
TEXT MODE
e
s
h
VOLUME
CLEAR
STANDBY/ON
POWER
TUNING/PRESET/TIME
b/w
f/
TIME
PHONES
MODE
PUSH-ENTER
MULTI JOG
SLEEP
a
TONE/
BALANCE
SOURCE
PROGRAM
/MEMORY
–
MUTE
■ To search for a section of a track
1 During playback, press MULTI JOG twice.
“Search mode” is displayed.
2 Rotate MULTI JOG to the right or left.
The display time of the track goes either forward or
backward, and the volume decreases automatically.
3 Press MULTI JOG when the section you want
to listen to is found (or press and hold 1 or
¡ on the remote control until the section
you want to listen to is found).
■ To specify a track for playback
While in the stop or playback mode, you can use the
number buttons on the remote control to select a track.
STANDBY/ON
2 3 4
Number
buttons
1
5 6 7 8
9 0
AUX 2AUX 1 TAPE CD
BAND PRESET TUNER
FUNCTION/
FM MODE
d
d
INFO/TEXT AUTO TUNE
ENTER
1 / 33
(Search)
REPEAT A-B PROG CLEAR
RANDOM TIME
4 / ¢
(Skip)
1 During playback, press MULTI JOG once.
“Skip mode” is displayed.
2 Rotate MULTI JOG until the desired track is
found (or press 4 or ¢ the remote
control).
y
• To play the current track from the beginning, press
MULTI JOG during playback and rotate MULTI JOG
once to the left (or press 4 on the remote control).
• To play the previous track, press MULTI JOG once and
rotate MULTI JOG twice to the left (or press 4 twice on
the remote control).
Press the number buttons to select a track.
Playback starts from the selected track.
y
• To enter a 2-digit number, press the number button for the
first digit, then the number button for the second digit. For
instance, to select track number 26, press ‘2’ and ‘6’.
• To select numbers less than 10, press ‘0’ and then the
number. For example, to select number 3, press ‘0’ and
‘3’. (A simpler option is to press just the number ‘3’ then
wait a few seconds.)
16
Page 19

PROGRAMMING PLAYBACK
PROGRAMMING PLAYBACK
Customizing playback order (Program Play)
You can customize the playback order for tracks stored in
the disc. Program play creates a custom play list of up to
32 tracks.
p (Play)
NATURAL SOUND CD RECEIVER CRX-M170
FUNCTION
/FM MODE
INFO/
BAND
TEXT MODE
e
s
h
VOLUME
CLEAR
POWER
STANDBY/ON
MULTI JOG
Number
buttons
7 (Stop)
TUNING/PRESET/TIME
f/
b/w
TIME
PHONES
MODE
PUSH-ENTER
1
5 6 7 8
9 0
BAND PRESET TUNER
FUNCTION/
FM MODE
TIMER DIMMER
SLEEP
REPEAT A-B PROG CLEAR
RANDOM TIME
a
TONE/
BALANCE
SOURCE
PROGRAM
/MEMORY
PROGRAM/MEMORY
STANDBY/ON
2 3 4
AUX 2AUX 1 TAPE CD
d
d
INFO/TEXT AUTO TUNE
ENTER
VOLUME
+
–
MUTE
3 (Play)
CLEAR
PROG
1 In the stop mode, press PROGRAM/MEMORY
(or PROG on remote control).
2
Select the desired track by rotating MULTI JOG,
and press MULTI JOG (or press the number
buttons on the remote control) to enter.
3 Repeat step 2 until you store all desired
tracks.
“FULL” appears on the display and no more can be
programmed, if you attempt to program more than 32
tracks.
4
Press
MULTI JOG
control)
again
(or
PROG
on the remote
to set the program.
The Program mode is finished.
To return to the normal display, press PROGRAM/
MEMORY (or 7 on the remote control) again.
■ To playback the program
1 Press PROGRAM/MEMORY (or PROG on
the remote control)
“Program mode” appears on the display.
.
2 Press p to start programmed playback.
• The programmed contents are not lost if the unit is
turned off, but they are lost when the disc tray is
opened.
• The unit will stop automatically when the playback
of all the programmed tracks is finished. The
programmed contents disappear from the display,
but it is not lost.
MUSIC DISCS
ENJOYING
y
You can play the programmed tracks repeatedly
(page 19).
17
Page 20

PROGRAMMING PLAYBACK
SLEEP
MUTE
SLEEP
MUTE
■ To check the programmed order
In the stop mode, press PROGRAM/MEMORY
once, then press MULTI JOG (or press PROG
on the remote control) repeatedly.
The track number and program number appear on the
display.
■ To delete a track from the program
& (CLEAR)
NATURAL SOUND CD RECEIVER CRX-M170
FUNCTION
/FM MODE
INFO/
BAND
TEXT MODE
e
s
h
VOLUME
CLEAR
PROG
STANDBY/ON
POWER
TUNING/PRESET/TIME
b/w
f/
TIME
PHONES
MODE
PUSH-ENTER
MULTI JOG
PROGRAM/MEMORY
REPEAT A-B PROG CLEAR
RANDOM TIME
a
TONE/
BALANCE
SOURCE
PROGRAM
/MEMORY
CLEAR
■ To add a track to the program
1 In the stop mode, press PROGRAM/MEMORY
once, then press MULTI JOG (or PROG on
the remote control) repeatedly until the
program number of the track you want to
insert appears on the display.
If you want to add a track to the end of the program,
press PROGRAM repeatedly until “P-END” briefly
appears on the display.
2 Rotate MULTI JOG (or press 4 or ¢ on
the remote control) to select a track number,
then press PROGRAM/MEMORY (or PRG on
the remote control).
The track is added to the program.
Playing back randomly (Random Play)
You can playback the tracks randomly.
In the stop or play mode, press RANDOM on the
remote control.
“RDM” appears on the display.
1 In the stop mode, press PROGRAM/MEMORY
once, then press MULTI JOG (or PROG on
the remote control) repeatedly until the
program number to be deleted appears on
the display.
2 Press & (or CLEAR on the remote control)
to delete the selected track.
■ To clear the program
1 In the stop mode, press PROGRAM/MEMORY
(or PROG on the remote control).
2
Press and hold & for more than two seconds.
y
If OPEN/CLOSE is pressed, the programmed
contents are also cleared.
4 / ¢
(Skip)
RANDOM
REPEAT A-B PROG CLEAR
RANDOM TIME
Notes
• If you press ¢ during random playback, the next track is
randomly selected and played. If you press
played track is played from the beginning. A track cannot be
replayed during random playback.
• To cancel random playback, press RANDOM or
4 ,the currently
& again.
18
Page 21

REPEAT PLAYBACK
S
U
REPEAT PLAYBACK
REPEAT
A-B
REPEAT A-B PROG CLEAR
RANDOM TIME
■ Repeat a currently selected track [R1] or
all tracks [Ra].
1 Play back the disc (track) you want to repeat.
For details, refer to “Playing a CD” (page 15).
2 Press REPEAT repeatedly.
Each time REPEAT is pressed, the mode is changed
as follows:
■ Repeat A-B [Rs]
This function repeats playback of any desired portion
of the disc.
1 Press A-B to select the start point of repeat
playback.
“Rs” blinks.
2 Press A-B to select the end point of repeat
playback.
“Rs” lights up. The selected portion is played back
repeatedly.
To cancel A-B repeat
Press A-B repeatedly until “Rs” disappears from the
display.
MUSIC DISCS
ENJOYING
Repeat one track
Repeat All tracks
Repeat off
19
Page 22

TIME DISPLAY
TIME DISPLAY
REPEAT A-B PROG CLEAR
RANDOM TIME
TIME
Elapsed time of the current track
Remaining time of the current track
Press TIME during playback.
Each time TIME is pressed, the display changes as
follows:
Remaining time of the disc
LISTENING TO THE EXTERNAL SOURCES
If you connect an other component such as VCR, TV or AUX to this unit, you can enjoy sources played back on that
component with this unit.
NATURAL SOUND CD RECEIVER CRX-M170
FUNCTION
/FM MODE
INFO/
BAND
TEXT MODE
e
s
h
VOLUME
CLEAR
STANDBY/ON
POWER
TUNING/PRESET/TIME
b/w
a
f/
TIME
PHONES
TONE/
MODE
BALANCE
PUSH-ENTER
SOURCE
PROGRAM
/MEMORY
SOURCE
1 2 3 4
5 6 7 8
9 0
AUX
AUX 2AUX 1 TAPE CD
BAND PRESET TUNER
FUNCTION/
FM MODE
TIMER DIMMER
d
d
INFO/TEXT AUTO TUNE
VOLUME
ENTER
+
–
SLEEP
MUTE
Press SOURCE (or AUX 1 or AUX 2 on the remote
control) to select ‘AUX 1’ or ‘AUX 2’.
20
Page 23

TUNING RADIO STATIONS
Tuning radio stations automatically (Auto tuning)
If the radio wave reception is strong in your area, Auto
Tuning is a quick and useful way to tune radio stations.
BAND
NATURAL SOUND CD RECEIVER CRX-M170
FUNCTION
/FM MODE
INFO/
BAND
TEXT MODE
e
s
h
VOLUME
CLEAR
POWER
STANDBY/ON
BAND
TUNING/PRESET/TIME
b/w f/a
TIME
PHONES
MODE
FUNCTION/
FM MODE
TONE/
PROGRAM
BALANCE
/MEMORY
PUSH-ENTER
SOURCEMULTI JOG
1 2 3 4
5 6 7 8
9 0
AUX 2AUX 1 TAPE CD
BAND PRESET TUNER
TIMER DIMMER
d
d
INFO/TEXT AUTO TUNE
VOLUME
ENTER
+
SOURCE
PRESET
TUNER
ENTER
Tuning radio stations manually (Manual tuning)
If the radio wave reception is weak in your area, tune radio
stations manually.
1
Follow steps 1 and 2 described in “Auto
Tuning”.
2 Press MULTI JOG (or ENTER on the remote
control) to select “Manual tune”.
3 Rotate MULTI JOG (or keep pressing
PRESET on the remote control) until the
station you want to listen to is found (FM: 50
kHz steps, AM: 9 kHz steps).
• “STEREO” appears on the display when a stereo
broadcast is tuned in.
• “TUNED” appears on the display when a broadcast
is correctly tuned in.
1
Press SOURCE (or TUNER on the remote
control) repeatedly to select TUNER.
2 Press BAND to select FM or AM.
3 Press MULTI JOG (or ENTER on the remote
control) to select the “Auto tune” mode.
Each time TUNING MODE is pressed, the mode is
changed as follows:
Manual tune
Auto tune
Preset tune
4 Select the station you want to listen to by
rotating MULTI JOG (or press PRESET on the
remote control).
• When a station is located and tuned in, the Auto
tuning process stops.
• To stop the tuning process, press MULTI JOG.
ENJOYING
RADIO
21
Page 24

TUNING RADIO STATIONS
E
5 6 7 8
FM mode
FUNCTION/FM MOD
NATURAL SOUND CD RECEIVER CRX-M170
FUNCTION
/FM MODE
INFO/
BAND
TEXT
MODE
e
s
h
VOLUME
CLEAR
POWER
STANDBY/ON
FUNCTION/
FM MODE
Press FUNCTION/FM MODE to switch between
the Stereo mode and Mono mode.
Stereo
• FM broadcasts of stereo signal are received in stereo.
The STEREO indicator lights up in the display.
Mono
• When the FM stereo signals are week, select this
mode to compensate for them. Reception will now
be monaural, increasing signal quality and
reducing unwanted noise.
TUNING/PRESET/TIME
b/w f/a
TIME
PHONES
MODE
TONE/
BALANCE
PUSH-ENTER
9 0
AUX 2AUX 1 TAPE CD
BAND PRESET TUNER
d
FUNCTION/
INFO/TEXT AUTO TUNE
FM MODE
TIMER DIMMER
VOLUME
PROGRAM
/MEMORY
SOURCE
d
ENTER
+
STANDBY/ON
2 3 4
Number
buttons
BAND
1
5 6 7 8
9 0
AUX 2AUX 1 TAPE CD
BAND PRESET TUNER
d
d
FUNCTION/
INFO/TEXT AUTO TUNE
FM MODE
TIMER DIMMER
ENTER
PRESET
ENTER
■ Preset stations manually (FM/AM/DAB)
1
Press BAND to select FM, AM or DAB reception
band.
2 Tune into the station you want to store.
3 Press PROGRAM/MEMORY.
FM or AM example
DAB example
“CH01” or “01” flashes on the display.
Preset tuning 1
The unit can preset station frequencies selected by
Automatic or Manual tuning. Up to 30 FM/AM stations
and 10 DAB stations can be stored. With this function, you
can select any desired station by pressing the
corresponding preset station number.
BAND
NATURAL SOUND CD RECEIVER CRX-M170
BAND
h
TUNING/PRESET/TIME
b/w
TIME
PHONES
MODE
MULTI JOG
f/
a
TONE/
PROGRAM
BALANCE
/MEMORY
PUSH-ENTER
PROGRAM/MEMORY
SOURCE
22
POWER
STANDBY/ON
FUNCTION
/FM MODE
VOLUME
4
Rotate MULTI JOG within four seconds after
flashing started to select a desired preset
number.
You can also use the number buttons on the remote
control.
y
• For example, to select the preset number 32, first press the
TUNER button, then press ‘3’ and ‘2’.
• To select numbers less than 10, press ‘0’ and then the
number. For example, to select number 6, press ‘0’ and
‘6’. (A simpler option is to press just the number ‘6’, then
wait a few seconds.)
INFO/
TEXT
MODE
e
s
CLEAR
5 Press PROGRAM/MEMORY within four
seconds.
If you do not press PROGRAM/MEMORY within
four seconds after selecting the channel, the selection
is canceled.
6 Repeat steps 1 to 5 until all desired stations
are preset.
Page 25

■ Preset Automatically (FM/AM only)
1 Press BAND to select AM or FM.
2 Press PROGRAM/MEMORY for more than
three seconds.
“Auto memory” flashes on the display.
Up to 30 of the best received stations in your area
are stored automatically.
Preset tuning 2
NATURAL SOUND CD RECEIVER CRX-M170
STANDBY/ON
Number
buttons
BAND
POWER
TUNING/PRESET/TIME
TIME
PHONES
MODE
MULTI JOG
1
5 6 7 8
9 0
BAND PRESET TUNER
FUNCTION/
FM MODE
TIMER DIMMER
f/
b/w
a
BALANCE
PUSH-ENTER
2 3 4
AUX 2AUX 1 TAPE CD
d
INFO/TEXT AUTO TUNE
VOLUME
TUNING RADIO STATIONS
BAND
FUNCTION
/FM MODE
BAND
e
h
VOLUME
PROGRAM
/MEMORY
ENTER
SOURCE
PRESET
ENTER
TONE/
d
INFO/
TEXT
MODE
s
CLEAR
■ To select FM/AM preset stations
1 Press BAND to select AM or FM.
2 Select “Preset tune” by pressing MULTI JOG
(or ENTER on the remote control).
3 Rotate MULTI JOG (or press the number
buttons or PRESET on the remote control)
until the desired preset station is found.
■ To select DAB preset stations
See “Preset tune” on page 28.
ENJOYING
RADIO
23
Page 26

Receiving RADIO DATA SYSTEM
5 6 7 8
RECEIVING RADIO DATA SYSTEM
The Radio Data System is a transmission system for FM
stations used mainly in the U.K. and Europe. The Radio
Data System transmissions include various types of
information such as PS (Program Service), PTY (Program
Type), RT (Radio Text), and CT (Clock Time). Follow the
procedure below to receive FM stations by the Radio Data
System transmissions on this unit.
NATURAL SOUND CD RECEIVER CRX-M170
TIME
PHONES
MODE
TUNING/PRESET/TIME
f/
b/w
a
TONE/
PROGRAM
BALANCE
/MEMORY
PUSH-ENTER
9 0
AUX 2AUX 1 TAPE CD
BAND PRESET TUNER
FUNCTION/
FM MODE
TIMER DIMMER
INFO/
d
TEXT
VOLUME
d
AUTO TUNE
SOURCE
ENTER
POWER
STANDBY/ON
INFO/TEXT
+
–
1 Turn into an FM station (page 21).
2 Press INFO/TEXT MODE.
Each time INFO/TEXT MODE (or INFO/TEXT on
the remote control) is pressed, the mode is changed as
follows:
(Normal display)
PROGRAM SERVICE
CLOCK TIME
PROGRAM TYPE
RADIO TEXT
TRAFFIC ANNOUNCE
y
When a mode is selected, the display screen blinks for three
seconds, then the information is displayed.
PROGRAM SERVICE
The name of the station being received is displayed.
The frequency will be displayed, if there is no
program service data.
INFO/TEXT
MODE
FUNCTION
/FM MODE
INFO/
BAND
TEXT MODE
e
s
h
VOLUME
CLEAR
TUNER
CLOCK TIME
The current time is displayed and updated every
minute.
“NO CT” is displayed if there is no time data.
PROGRAM TYPE
The program type is displayed (see page 25 for a list
of program types).
RADIO TEXT
Information about the program (such as the title of
the song or name of the singer) being received is
displayed using a maximum of 64 alphanumeric
characters.
The mode is automatically switched to PROGRAM
SERVICE mode, if there is no radio text data.
TRAFFIC ANNOUNCE
Traffic information is displayed. The TRAFFIC
ANNOUNCE MODE switches to PROGRAM
SERVICE mode, when a traffic program is found.
The mode switches to PROGRAM SERVICE mode
without searching for a traffic program, if the current
selected station is transmitting a traffic program
signal.
.
Notes
• The available Radio Data System information types vary
depending on the station.
• If the FM Radio Data System station’s signal transmission is
too weak, this unit may not be able to receive Radio Data
System information completely. In particular, RT (Radio Text)
information uses a lot of bandwidth, so it may not be available
even when other modes are selectable.
24
Page 27

Receiving RADIO DATA SYSTEM
PTY Search mode
You can tune into FM Radio Data System stations by
selecting a program type (genre). Once you select a
program type, this unit automatically searches for FM
Radio Data System stations currently broadcasting the
corresponding programs.
INFO/TEXT
MODE
NATURAL SOUND CD RECEIVER CRX-M170
FUNCTION
/FM MODE
INFO/
BAND
TEXTMODE
e
s
h
VOLUME
CLEAR
POWER
STANDBY/ON
INFO/TEXT
1 Turn into an FM station (page 21).
2 Press INFO/TEXT MODE (or INFO/TEXT on
the remote control) for more than three
seconds.
TUNING/PRESET/TIME
b/w
TIME
PHONES
MODE
PUSH-ENTER
MULTI JOG
5 6 7 8
9 0
BAND PRESET TUNER
FUNCTION/
FM MODE
TIMER DIMMER
f/
a
TONE/
PROGRAM
BALANCE
AUX 2AUX 1 TAPE CD
d
d
INFO/TEXT AUTO TUNE
VOLUME
+
–
/MEMORY
ENTER
SOURCE
PRESET
ENTER
3 Rotate MULTI JOG (or press PRESET on the
remote control) to select the desired PTY
program.
The available 31 program types are as follows:
Program Type (genre)
News News
Current Affairs Current Affairs
Information Information
Sport Sports
Education Education
Drama Drama
Cultures Cultures
Science Science
Varied Speech Varied Speech
Pop Music Pop Music
Rock Music Rock Music
Easy Listening Easy Listening
Light Classics Light Classics
Serious Classic Serious Classic
Other Music Other Music
Weather & Metr Weather & Meteorology
Finance Finance
Children s Prog
'
Social Affairs Social Affairs
Religion Religion
Phone In Phone In
Travel & Tourin Travel & Touring
Leisure & Hobby Leisure & Hobby
Jazz Music Jazz Music
Country Music Country Music
National Music National Music
Oldies Music Oldies Music
Folk Music Folk Music
Documentary Documentary
Alarm Test Alarm Test
Alarm-Alarm! Alarm-Alarm!
Children’s Program
ENJOYING
RADIO
4 Press MULTI JOG (or ENTER on the remote
control).
The program type stops flashing.
5 Rotate MULTI JOG (or press PRESET on the
remote control) to start seeking.
• The unit stops searching when it finds a station
broadcasting the selected type of program.
• PTY Search will stop at the beginning frequency if the
program type is not found.
• To cancel search, press INFO/TEXT MODE.
25
Page 28

Receiving RADIO DATA SYSTEM
DAB TUNER
About DAB
DAB (Digital Audio Broadcasting), also known as digital
radio, is a new way of radio broadcasting. DAB is
broadcast using digital signals instead of analog signals,
resulting in near CD-quality sound. Analog signals (i.e.
AM/FM) are susceptible to interference (i.e. distortion and
noise) caused by electrical equipment, weather conditions,
tall buildings, mountains, etc.; digital signals are not.
Thus, with DAB, there is virtually interference-free
reception and no hiss or crackle.
Another advantage of DAB is that a large amount of
information can be carried within the digital signal. DAB
is broadcast in blocks of data called ensembles (also
known as multiplexes). Several radio programs (called
primary services) can be broadcasted simultaneously in
each ensemble. This means that you can choose between
several radio programs within one frequency.
In addition to the audio signal, secondary services are also
broadcasted and displayed on this unit’s front panel
display. Part of the secondary services are text data
information called DLS (Dynamic Label Segment). For
more information, see page 31.
Setting up your DAB tuner
An initial scan for DAB services will need to be
performed before the unit can tune into DAB broadcasts.
A channel list is created during the initial scan.
BAND
NATURAL SOUND CD RECEIVER CRX-M170
FUNCTION
/FM MODE
INFO/
BAND
TEXTMODE
e
s
h
VOLUME
CLEAR
POWER
STANDBY/ON
BAND
Press BAND to select DAB.
The following screen appears for 2 seconds.
TUNING/PRESET/TIME
TIME
PHONES
MODE
b/w f/a
TONE/
PROGRAM
BALANCE
/MEMORY
PUSH-ENTER
5 6 7 8
9 0
AUX 2AUX 1 TAPE CD
BAND PRESET TUNER
d
d
FUNCTION/
INFO/TEXT AUTO TUNE
FM MODE
TIMER DIMMER
ENTER
VOLUME
+
SOURCE
Ensemble
(Multiplex)
Primary
services
Audio signal
and
Secondary
service
With DAB, there is no need to remember channel
frequencies, either. All broadcasts are selected by simply
selecting the service name.
Notes
• You can tune the range of channels are 10A to 12D in UK.
• The sound quality and PAD/SI information are controlled by the
DAB broadcaster, not this unit. Not all DAB broadcasters
transmit PAD/SI information.
• DAB signals are broadcast in Band-III (174 – 240 MHz).
26
The unit starts to scan for DAB services in the area and
add them to the channel list as they are found. The scan
takes about 10 seconds.
The number of channels found is displayed. The number is
updated when new channels are found.
Once the initial scan is complete and DAB channel list
created, the channels are listed in alphanumeric order.
• If no broadcast services are found, check that the
antenna is correctly connected to the unit.
Page 29

DAB tuner
Auto tuning
If the unit is moved to a new area or you want to check if
there are new DAB channels available in your area, you
can perform a scan.
There are two ways to scan certain ranges.
• Local scan: Use it to scan specified ranges in band III.
• Full scan: Use it to scan all ranges in band III.
FUNCTION/
FM MODE
NATURAL SOUND CD RECEIVER CRX-M170
FUNCTION
/FM MODE
INFO/
BAND
TEXT MODE
e
s
h
VOLUME
CLEAR
POWER
STANDBY/ON
1 Press FUNCTION/FM MODE while listening
to a DAB broadcast.
2 Rotate MULTI JOG, then press MULTI JOG to
select either “Full scan” or “Local scan”.
With the remote control,
Local scan: press AUTO TUNE briefly.
Full scan: press and hold
several seconds.
The unit starts to scan for new DAB channels. If new
DAB channels are found, they are added to the DAB
channel list.
TUNING/PRESET/TIME
b/w f/a
TIME
PHONES
MODE
PUSH-ENTER
MULTI JOG
9 0
AUX 2AUX 1 TAPE CD
BAND PRESET TUNER
d
FUNCTION/
INFO/TEXT AUTO TUNE
FM MODE
TIMER DIMMER
VOLUME
TONE/
BALANCE
SOURCE
PROGRAM
/MEMORY
d
ENTER
AUTO TUNE
+
AUTO TUN E
for
Using the channel list
BAND
NATURAL SOUND CD RECEIVER CRX-M170
FUNCTION
/FM MODE
INFO/
BAND
TEXT MODE
e
s
h
VOLUME
CLEAR
POWER
STANDBY/ON
BAND
Follow procedure below to tune into the channels found by
the unit.
1 Press BAND to select DAB.
2
Rotate MULTI JOG to the left or right (or press
PRESET on the remote control) to scroll
through the channels in the channel list.
The current channel being broadcasted is displayed
on the first line. A channel from the channel list is
displayed on the second line.
3 When you have found a channel that you
want to tune into, press MULTI JOG once (or
ENTER on the remote control).
The channel is broadcasted and channel information
is displayed.
TUNING/PRESET/TIME
b/w f/a
TIME
PHONES
MODE
PUSH-ENTER
MULTI JOG
TONE/
PROGRAM
BALANCE
/MEMORY
5 6 7 8
9 0
AUX 2AUX 1 TAPE CD
BAND PRESET TUNER
d
d
FUNCTION/
INFO/TEXT AUTO TUNE
FM MODE
TIMER DIMMER
ENTER
VOLUME
SOURCE
PRESET
ENTER
ENJOYING
RADIO
• Press ENTER to display the signal strength of a channel
being broadcasted. Press ENTER again to cancel the
signal strength display.
• In the channel list, channels are displayed in alphanumeric
order, with numbers coming first. Stations such as 6 Music
from the BBC will be listed early in the list; station each as
Virgin Radio will be listed later.
• If the unit is unable to tune into a DAB channel (e.g. the
channel is no longer broadcasting, the unit is moved out of
broadcasting range), then a question mark (?) is displayed in
front of the channel name. If you select a channel with a
question mark, “No stations Available” is displayed.
27
Page 30

DAB tuner
y
• When the primary services including secondary
services are broadcasting, the “SECONDARY” flashes
on the display.
• When the secondary services are broadcasted, the
“SECONDARY” is displayed.
Function mode
Follow the procedure below to preset radio stations
manually.
FUNCTION/
FM MODE
NATURAL SOUND CD RECEIVER CRX-M170
FUNCTION
/FM MODE
INFO/
BAND
TEXT MODE
e
s
h
VOLUME
CLEAR
STANDBY/ON
POWER
TUNING/PRESET/TIME
b/w f/a
TIME
PHONES
MODE
PUSH-ENTER
MULTI JOG
PROGRAM
/MEMORY
SOURCE
TONE/
BALANCE
■ Preset tune
Use this option to select the preset DAB stations.
To preset the DAB station, See “Preset stations
manually (FM/AM/DAB)” on page 22.
FUNCTION/
FM MODE
NATURAL SOUND CD RECEIVER CRX-M170
FUNCTION
/FM MODE
INFO/
BAND
TEXT MODE
e
s
h
VOLUME
CLEAR
POWER
STANDBY/ON
FUNCTION/
FM MODE
TUNING/PRESET/TIME
b/w f/a
TIME
PHONES
MODE
MULTI JOG
TONE/
PROGRAM
BALANCE
/MEMORY
PUSH-ENTER
5 6 7 8
9 0
AUX 2AUX 1 TAPE CD
BAND PRESET TUNER
FUNCTION/
FM MODE
TIMER DIMMER
d
d
INFO/TEXT AUTO TUNE
VOLUME
ENTER
SOURCE
PRESET
ENTER
+
1 Press FUNCTION/FM MODE while listening to
a DAB broadcast.
1 2 3 4
5 6 7 8
9 0
AUX 2AUX 1 TAPE CD
PRESET
ENTER
FUNCTION/
FM MODE
BAND PRESET TUNER
FUNCTION/
FM MODE
TIMER DIMMER
d
d
INFO/TEXT AUTO TUNE
VOLUME
ENTER
In DAB reception mode, use Function Control to set
system options. There are six options in the function
control.
Preset tune
DRC
Station order
Local scan
∗
Full scan
Manual scan
∗
* Local scan and Full scan:
See “Auto tuning” (page 27).
2 Rotate MULTI JOG (or press PRESET on the
remote control) until “Preset tune” is
displayed.
3 Press MULTI JOG (or ENTER on the remote
control).
The currently tuned station is displayed.
4 Rotate MULTI JOG (or press PRESET on the
remote control) until the station you want to
listen to is displayed.
5 Press MULTI JOG (or ENTER on the remote
control) to select the preset station.
28
Page 31

■ Manual tune
5 6 7 8
This option allows you to manually tune into a
channel and view a continuously updated display of
the signal strength. This is very useful when adjusting
or positioning an antenna for better reception.
FUNCTION/
FM MODE
NATURAL SOUND CD RECEIVER CRX-M170
FUNCTION
/FM MODE
INFO/
BAND
TEXT MODE
e
s
h
VOLUME
CLEAR
POWER
STANDBY/ON
FUNCTION/
FM MODE
TUNING/PRESET/TIME
b/w f/a
TIME
PHONES
MODE
MULTI JOG
TONE/
PROGRAM
BALANCE
/MEMORY
PUSH-ENTER
9 0
AUX 2AUX 1 TAPE CD
BAND PRESET TUNER
d
FUNCTION/
INFO/TEXT AUTO TUNE
FM MODE
TIMER DIMMER
VOLUME
SOURCE
d
ENTER
PRESET
ENTER
+
1 Press FUNCTION/FM MODE while listening to
a DAB broadcast.
1
2 Rotate MULTI JOG (or press PRESET on the
remote control) until “Manual tune” is
displayed, then press MULTI JOG (or ENTER
on the remote control).
3 Rotate MULTI JOG (or press PRESET on the
remote control) to scroll through the channel
list.
4 Press MULTI JOG (or Enter on the remote
control) when the channel you wish to tune
in is displayed.
The signal strength indicator is displayed.
DAB tuner
5 While viewing the indicator, adjust or
reposition the antenna until the best
reception is indicated.
6 Press MULTI JOG (or ENTER on the remote
control) to cancel Manual tune and resume
normal reception.
■ Station order
To set the order in which stations are listed, use
station order. There are three items:
• Fav Station (Favorite station)
This unit keeps track of the top 10 stations you listen
♥
to. Favorite stations have a “
station name and are listed at the top of the channel
list.
• Alphanumeric
This is the default order. Channels are listed in
alphanumeric order (0-9, A-Z) by the first letter of
the station name.
• Active station
This option will list active stations (stations that
can be received by the unit) at the top of the
channel list. Channels that are in the list but have
no service in your area are listed at the bottom of
the channel list.
” displayed after the
1 Press FUNCTION/FM MODE while listening to
a DAB broadcast.
2 Rotate MULTI JOG (or press PRESET on the
remote control) until “Station order” is
displayed.
ENJOYING
RADIO
3 Press MULTI JOG (or ENTER on the remote
control).
The current order option is displayed in the first line
of the display.
29
Page 32

DAB tuner
4 Rotate MULTI JOG (or press PRESET on the
remote control) to change between the
orders.
Each time MULTI JOG is rotated (or PRESET is
pressed), the mode changes as follows:
Fav station
Alphanumeric
Active station
5 Press MULTI JOG (or ENTER on the Remote
control).
■ DRC value
Dynamic range is the decibel (dB) range between the
highest and lowest sounds in a broadcast. Some DAB
broadcasters transmit a wide dynamic range (enabling high
quality sound), accompanied by Dynamic Range Control
(DRC) data. The DRC can be used to compress the dynamic
range of the broadcast, making softer sounds easier to hear.
This is especially useful when listening to a DAB service in
a noisy environment or at a low volume (such as at night).
There are three values of DRC you can apply.
0 : (None)
POWER
STANDBY/ON
1/2
NATURAL SOUND CD RECEIVER CRX-M170
TUNING/PRESET/TIME
b/w f/a
TIME
PHONES
MODE
PUSH-ENTER
MULTI JOG
: (Medium)
TONE/
PROGRAM
BALANCE
/MEMORY
1 : (Maximum)
FUNCTION/FM
MODE
FUNCTION
/FM MODE
INFO/
BAND
TEXT MODE
e
s
h
VOLUME
CLEAR
SOURCE
9 0
FUNCTION/
FM MODE
AUX 2AUX 1 TAPE CD
BAND PRESET TUNER
FUNCTION/
FM MODE
TIMER DIMMER
d
d
INFO/TEXT AUTO TUNE
VOLUME
ENTER
PRESET
ENTER
1 Press FUNCTION/FM MODE while listening to
a DAB broadcast.
2 Rotate MULTI JOG (or press PRESET on the
remote control) until “DRC value” is
displayed.
3 Press MULTI JOG (or ENTER on the remote
control).
4 Rotate MULTI JOG (or press PRESET on the
remote control) to select the desired DRC
level.
30
5 Press MULTI JOG (or ENTER on the
remote control).
Page 33

Changing display setting
You can choose the information type displayed in the
second line of the display while listening to a DAB
channel.
INFO/TEXT
MODE
NATURAL SOUND CD RECEIVER CRX-M170
FUNCTION
/FM MODE
INFO/
BAND
TEXT MODE
e
s
h
VOLUME
CLEAR
POWER
STANDBY/ON
Press INFO/TEXT MODE (or INFO/TEXT on the
remote control).
Each time INFO/TEXT MODE is pressed, the information
is displayed as follows:
TUNING/PRESET/TIME
f/
b/w
a
TIME
PUSH-ENTER
BALANCE
TONE/
PHONES
MODE
DLS
Program type
PROGRAM
/MEMORY
SOURCE
DAB tuner
■ Date and time
Displays the current date and time.
No matter which DAB mode is selected, the
unit receives clock time data from the DAB
station and adjusts the clock.
• The clock setting is automatically adjusted to the clock
time data being broadcast by the DAB station.
Note
Some functions (such as Sleep Timer) might be affected if
the clock is readjusted.
■ Bitrate mode
Displays the bitrate of the currently playing
broadcast.
Multiplex name
Date and time
Bitrate mode
Channel and frequency
Sig error rate
SW version
■ DLS
The Dynamic Label Segment (DLS) is the scrolling
text label supplied by the radio station. It may be
information about the song or program being
broadcasted.
■ Program type
Displays the type of broadcast supplied by the DAB
station, such as Pop, Rock or Classical music.
■ Channel and frequency
Displays the channel and frequency of the currently
playing broadcast.
■ Sig error rate (Signal error rate)
Displays the digital bit error rate (0-99) of the
currently playing broadcast. This is for information
only; no adjustment is available. The lower the figure,
the better the quality of the received broadcast.
■ Sw version (Software version)
Displays the version number of the installed software.
This is for information only; no adjustment is
available.
ENJOYING
RADIO
■ Multiplex name
Displays the name of the Multiplex that is
broadcasting the program.
31
Page 34

TROUBLESHOOTING
TROUBLESHOOTING
If there is any problem with this unit, check the following items. If you cannot solve your problem with the following
remedies or if your problem is not listed below, turn off and unplug the unit, then consult the nearest authorized
YAMAHA dealer or service center.
General
Problem Cause Solution
Power turns on but
immediately shuts off.
The speakers make no
sound.
Sound suddenly turns off. The Sleep Timer might be set. Turn on this unit and play the source
Sound is too low on one
side.
The volume does not
increase or sounds are
distorted.
This unit does not operate
properly.
A digital equipment or high
frequency equipment
produces noises.
The volume does not
increase or sounds are
distorted.
Sound played on this unit
cannot be recorded with an
external recorder.
The clock setting has been
cleared.
A digital equipment or high
frequency equipment
produces noises.
The power cable may be connected
improperly.
The speaker cable may be shorted. Make sure all speaker cables are
This unit may receive a strong
electrical shock such as from a
lightening bolt or excessive static
electricity.
The volume may be set to minimum
level.
The Mute function may be enabled. Cancel the Mute function.
The input source may be incorrect. Select the correct input source.
The cables may be connected
improperly.
The disc loaded into this unit may be
not compatible.
The cables may be connected
improperly.
The power of the equipment
connected to this unit’s output jack
may be turned off.
This unit may receive a strong
electrical shock, such as from a
lightening bolt or excessive static
electricity, or drop in power supply.
This unit may be placed close to the
digital equipment or high-frequency
equipment.
The power of the component
connected to a this unit’s output jack
may be turned off.
You may be trying to make a digital
recording with an analog source, or
analog recording with a digital source.
The recording equipment may be
connected to this unit with an analog
connection.
The power to this unit may be lost
more than a week.
This unit may be placed close to the
digital equipment or high-frequency
equipment.
Make sure the power cable is plugged
into the outlet firmly.
connected properly.
Set this unit to the Standby mode, then
disconnect the power cable. Wait for
about 30 seconds, then connect the
power cable and turn on this unit.
Adjust the volume level.
Make sure all cables are connected
properly. (page 8)
Make sure you use a disc supported by
this unit.
again.
Make sure all cables are connected
properly.
Turn on the power of the equipment
connected to this unit’s output jack.
Set this unit to the Standby mode, then
disconnect the power cable. Wait for
about 30 seconds, then connect the
power cable and turn on this unit.
Place this unit further away from such
equipment.
Turn on the power of the component
connected to a this unit’s output jack.
Use proper audio sources.
Connect them with a digital connection.
Make sure the power cable is plugged
into outlet firmly, then set the clock
again (page 12).
Place this unit further away from such
equipment.
32
Page 35

Remote control
Problem Cause Solution
The remote control does not
work for operating this unit.
Disc playback
Problem Cause Solution
Some button operations do
not work.
Playback does not start
immediately when pressing
h.
The message “No Disc”
appears in this unit display
even though a disc is
inserted.
TROUBLESHOOTING
The remote control may be operated
outside the remote control operation
range.
The remote control sensor on this
unit may be exposed to direct
sunlight or lighting (inverted
fluorescent lamps).
The remote control mode selection
may be improper.
The batteries may be worn out. Replace the batteries with new ones.
Some discs do not support certain
this unit functions.
The disc may not be set in the disc
tray properly.
The disc may be dirty. Wipe the disc clean.
The disc loaded into
not compatible.
When moved this unit from a cold
place to warm one, condensation may
be form on the disc reading lens.
The disc may not be set in the disc
tray.
this unit
may be
For information on the remote control
operation range, refer to “USING THE
REMOTE CONTROL” (page 5).
Change the lighting or this unit’s
orientation.
Select the mode that suits your purpose.
Set the disc in the disc tray properly.
Make sure you use a disc supported by
this unit.
Wait for one to two hours, then try
again.
Set the disc in the disc tray properly.
33
APPENDIX
Page 36

TROUBLESHOOTING
m
Radio reception
■ FM/AM
Problem Cause Solution
The Preset Tuning function
(page 22) does not work.
The preset station settings
have been cleared.
■ FM
Problem Cause Solution
Too much noise is
generated during stereo
broadcast.
Even with an outdoor
antenna, radio wave
reception is weak (audio is
distorted).
The Auto Tuning function
(page 27) does not work.
The preset (memory) may have been
erased.
The power to this unit may be lost
more than a week.
The FM antenna may be connected
improperly.
The radio station you selected may
be far away from your area or radio
wave reception is weak in your area.
Multipath reflection or other radio
interferences may occur.
The radio station you selected may
be far away from your area or radio
wave reception is weak in your area.
Preset radio stations again.
Make sure the power cable is plugged
into outlet firmly, then preset the
stations again.
Make sure the FM antenna is connected
properly.
Try Manual Tuning to increase the
signal quality or use a
multi-channel outdoor antenna.
Change the antenna’s height, direction,
or placement.
Try Manual Tuning to increase the
signal quality or use a multi-channel
outdoor antenna.
■ AM
Problem Cause Solution
Too much noise is
generated.
The Auto Tuning function
(page 27) does not work.
■ DAB
Problem Cause Solution
Cannot tune in to any DAB
stations.
The service reception is
weak.
The noises may be generated from
atmospheric electricity, lightening,
fluorescent lights, motors, or
thermostat electric devices.
If too much noise is generated
especially in the evening, this unit
may be placed close to a TV.
The AM loop antenna may be
connected improperly.
The radio station you selected may
be far away from your area or radio
wave reception is weak in your area.
There is no DAB coverage in your area
The positioning of the indoor DAB
antenna and/or the unit isn’t optimal for
DAB reception.
Connect an outdoor antenna and
establish better grounding to decrease
noises. However, it is difficult to
eliminate these types of noises.
Place this unit further away from a TV.
Make sure the AM loop antenna is
connected properly.
Try Manual Tuning to increase the
signal quality.
Use “Manual tune” (page 29) to locate the
best DAB antenna and unit positioning for
optimal DAB reception.
34
Page 37

ADDITIONAL INFORMATION
Disc Information
The following tables explain the disc types supported by this unit.
Music Discs
Type of Disc Disc Logo Mark
Music CD (Compact disc
digital audio)
y
Disc logo marks are printed on the disc and the disc jacket.
Notes
• Only use discs from a reputable manufacturer. Some discs
cannot be played back, depending on recording conditions and
disc characteristics.
• Do not use discs with non-standard shapes or sizes.
Music CDs made by copying onto a CD-R or CD-RW.
• This unit can play the disc types associated with the logos
shown above. (Do not attempt to load any other type of disc into
the unit, or the unit may be damaged.)
• Some discs cannot be played depending on the recording
conditions such as PC environment and application software.
Failure can also result from disc characteristics and condition,
like material quality, scratches or curvature.
APPENDIX
Handling a disc
• Do not touch the surface of the
disc. Hold a disc by its edge and
center hole.
• Do not leave a disc in the tray when
you are not playing it.
• Do not write on the disc with a pencil or other marker.
• Do not stick tape, seals or other attachments to a disc, and do
not bring into contact with glue.
• Do not use a protective cover to prevent scratches.
• Do not use a disc whose surface can be printed with a
commercially available label printer.
• Do not put a disc in a place with
direct sunlight, high
temperature, high humidity or a
lot of dust.
Caution
• If a disc becomes dirty, wipe it
with a clean, dry cloth from the
center out to the edge. Do not use
record cleaner or paint thinner.
• To avoid malfunction, do not use a
commercially available lens
cleaner.
35
Page 38

SPECIFICATIONS
SPECIFICATIONS
AUDIO SECTION
• Minimum RMS output power per channel
.......................................... 25 W + 25 W (6 Ω 1 kHz, 0.1% THD)
• Input sensitivity/ Impedance
Tape, AUX 1, AUX 2 ............................................ 300 mV/47 kΩ
• Frequency Response
CD etc. ................................................. 20 Hz to 20 kHz, ±0.5 dB
• Total Harmonic Distortion
CD etc. 1kHz........................................................................ 0.03%
• Signal to Noise Ratio (IHF-A Network)
CD etc. (300 mV Input shorted) ........................................... 98 dB
FM SECTION
• Tuning Range (50 kHz steps) ......................... 87.50 to 108.00 MHz
• Signal to Noise Ratio (Mono) ................................................. 65 dB
• Sensitivity (S/N 30 dB) ..................................................... 1.0 µV/m
AM SECTION
• Tuning Range (9 kHz steps)................................... 522 to 1629 kHz
• Signal to Noise Ratio .............................................................. 35 dB
• Sensitivity ........................................................................ 600 µV/m
DAB SECTION
• Tuning Range (BAND III) ............................. 174 MHz to 240MHz
• Input ........................................................................ 50 Ω, (nominal)
• Sensitivity ......................................................................... - 96 dBm
• Selectivity......................................................................... 35 dB typ.
• Audio out................................................................. Stereo, 2.0 Vp-p
• Digital out................................................. 24 bit / 48 kHz resolution
CD PLAYER SECTION
• Signal to Noise Ratio .............................................................. 90 dB
• Total Harmonic Distortion ................................................... 0.007%
• Separation ................................................................................ 90 dB
GENERAL
• Power Supply ......................................................... AC 230V, 50 Hz
• Power Consumption ................................................................. 75 W
• Standby Power Consumption ................................................. 0.9 W
• Laser pick up
Material........................................................................... GaAIAs
Wavelength .......................................................................789 nm
Laser output ............................................................ max 44.6 µW
• Dimensions (W x H x D) .................................. 215 x 110 x 359 mm
• Weight ..................................................................................... 4.4 kg
Specifications are subject to change without notice.
36
Page 39

CAUTION
Use of controls or adjustments or performance of procedures
other than those specified herein may result in hazardous
radiation exposure.
CAUTION - INVISIBLE LASER RADIATION WHEN OPEN AND
INTERLOCKS DEFEATED, AVOID EXPOSURE TO
BEAM.
VORSICHT! UNSICHTBARE LASERSTRAHLUNG TRITT AUS, WENN
DECKEL GEÖFFNET UND WENN SICHERHEITSVER RIEGELUNG ÜBERBRÜCKT IST. NICHT DEM STRAHL
AUSSETZEN!.
VARNING - OSYNLING LASERSTRÅLNING NÄR DENNA DEL ÄR
ÖPPNAD OCH SPÄRR ÄR URKOPPLAD. STRÅLEN ÄR
FARLIG.
ADVARSEL - USYNLIG LASERSTRÅLING VED ÅBNING, NÅR
SIKKERHEDSAFBRYDERE ER UDE AF FUNKTION.
UNDGÅ UDSÆTTELSE FOR STRÅKING.
VAROITUS! - SUOJAKOTEL OA EI SAA AVATA. LAITE SISÄLTÄÄ
LASERDIODIN, JOKA LÄHETTÄÄ (NÄKYMÄTÖNTÄ)
SILMILLE VAARALLISTA LASERSÄTEILYÄ.
ADVARSEL - USYNLING LASERBESTRÅLING NÅR DENNE DELEN ER
ÅPEN OG SIKKERHETSSPERREN ER UTKOBLET.
UNNGÅ UTSETTELSE FOR STRÅLING.
The name plate is located on the rear panel of the unit.
CLASS 1 LASER PRODUCT
LASER KLASSE 1 PRODUKT
LUOKAN 1 LASERLAITE
KLASS 1 LASER APPARAT
PRODUIT LASER DE CLASSE 1
MODEL NO. RDX-E700
MODEL NO. CRX-M170
230 VOLTS 75WATTS
50 Hz
Page 40

©
2005 All rights reserved.
YAMAHA ELECTRONICS CORPORATION, USA
YAMAHA CANADA MUSIC LTD.
YAMAHA ELECTRONIK EUROPA G.m.b.H.
YAMAHA ELECTRONIQUE FRANCE S.A.
YAMAHA ELECTRONICS (UK) LTD.
YAMAHA SCANDINAVIA A.B.
YAMAHA MUSIC AUSTRALIA PTY, LTD.
135 MILNER AVE., SCARBOROUGH, ONTARIO M1S 3R1, CANADA
J A WETTERGRENS GATA 1, BOX 30053, 400 43 VÄSTRA FRÖLUNDA, SWEDEN
6660 ORANGETHORPE AVE., BUENA PARK, CALIF. 90620, U.S.A.
SIEMENSSTR. 22-34, 25462 RELLINGEN BEI HAMBURG, GERMANY
RUE AMBROISE CROIZAT BP70 CROISSY-BEAUBOURG 77312 MARNE-LA-VALLEE CEDEX02, FRANCE
YAMAHA HOUSE, 200 RICKMANSWORTH ROAD WATFORD, HERTS WD18 7GQ, ENGLAND
17-33 MARKET ST., SOUTH MELBOURNE, 3205 VIC., AUSTRALIA
Printed in China
CQX1A1054Z
 Loading...