

Page 1

Installation Guide
Page 2

Yamaha LC3 Installation Guide
Contents Page
LC3 Installation
List of LC3 Controller Parts . . . . . . . . . . . . . . . . . 1
Step 1: Positioning of Instrument in Class . . . . . . 2
Step 2: Standard Installation of LC3 . . . . . . . . . . . 3
Split Mode . . . . . . . . . . . . . . . . . . . . . . . . . . . . . . 4
LC3 Settings . . . . . . . . . . . . . . . . . . . . . . . . . . . . . 4
Other Optional Items . . . . . . . . . . . . . . . . . . . . . . 5
Page 3
LC3 Installation
lch3 music lab hub
16 24
32 40 48
9 17
25 33 41
10 18
26 34 42
11 19
27 35 43
12 20
28 36 44
13 21
29 37 45
14 22
30 38 46
15 23
31 39 47
IBX3 INSTRUMENTBOX
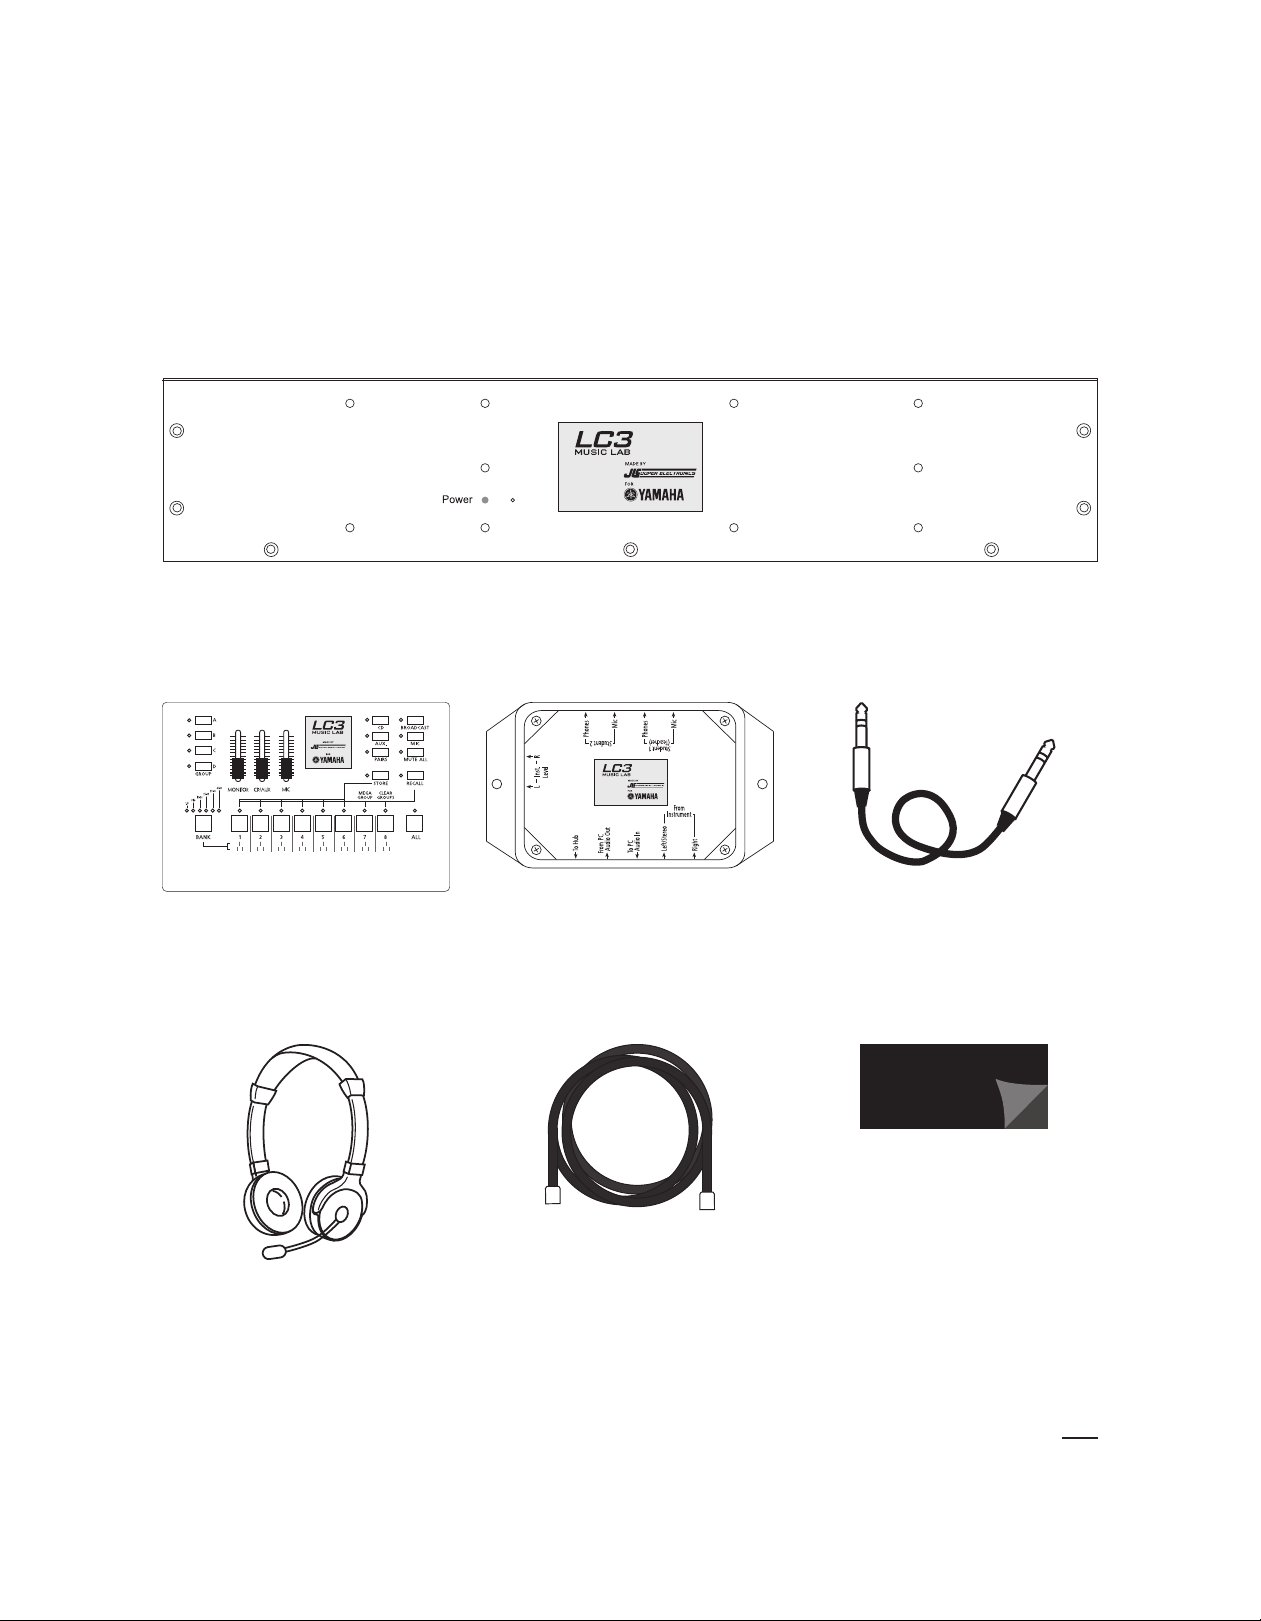
List of LC3 Controller System Parts
LC3 Class Hub with power adapter (Qty 1)
LC3 Controller Unit Instrument Box Stereo Instrument Cables
(Qty 1) (Qty 9) (Qty 9)
Stereo Headphones with RJ45 Lab Connector Cable Velcro strip pairs for
Microphones (Qty 9) 10 meters (Qty 10) Instrument Boxes (Qty 9)
Note: If installing more than the eight station base system, follow the steps outlined in the LC3 Expansion
Kit Installation Guide packaged with the expansion.
1
Page 4

Step 1: Positioning of Instruments in Classroom
1624
324048
917
253341
1018
263442
1119
273543
1220
283644
1321
293745
1422
303846
1523
313947
1. With input from the instructor, determine where instruments will be placed. Some teachers
want to see student hand positions in keyboard labs. Others want all students facing forward.
2. Determine the numbering system for instruments. The student buttons on the CONTROLLER
are labeled 1-8 left-to-right. It might be helpful to arrange students in that order from the
teacher’s perspective. (See illustration below)
3. Determine where cable and power cords are to be run. If possible, avoid places where students
would walk over cables. If cables will run across the floor, determine one spot where the cables
from each row of instruments will run. Obtain cord covers (from a hardware store) to cover the
cables so students don’t trip.
4. Place instruments in position.
Teacher
2
4
6
8
Pictured: one CP300 keyboard with LC3 controller, eight P155 digital pianos
1
3
5
7
2
Page 5

Step 2: Standard Installation LC3
1624
3240 48
917
2533 41
1018
2634 42
1119
2735 43
1220
2836 44
1321
2937 45
1422
3038 46
1523
3139 47
IBX3INSTRUMENTBOX IBX3INSTRUMENTBOX
IBX3INSTRUMENTBOX IBX3INSTRUMENTBOX IBX3INSTRUMENTBOX IBX3INSTRUMENTBOX IBX3INSTRUMENTBOX IBX3INSTRUMENTBOXIBX3INSTRUMENTBOX
Controller
1. Determine the position of the Hub in the room. Keep in mind that parts of the LC3 Lab must
be connected to the hub so several cables will run to it.
2. Connect the headphone out of all instruments to the FROM INSTRUMENT input on their
respective Instrument Boxes using the stereo instrument cables.
3. Plug a headset into the STUDENT 1 jacks on each Instrument Box. Plugs are marked with
headphone and mic icons. Make sure that the plastic plugs snap firmly and fully into the
Instrument Box.
4. Connect each student’s Instrument Box to their respective student number jack on the Hub using
RJ45 connector cables. If the cable is too long, the excess should be stored near the student station.
5. Connect the teacher’s Instrument Box to the TEACHER jack on the Hub using an RJ45 cable.
6. Connect the Controller to the CONTROLLER input on the Hub using an RJ45 cable.
7. Make sure the SPLIT switch on the Hub is set to OFF.
8. Plug in the power supply to the Hub.
9. Turn on the Hub.
1234 678
5 Teacher
3
Page 6

Split Mode
I
BX3INSTRUMENTBOX
If you would like to have two students at each instrument working independently of each other,
all that is required is setting your instrument properly and adding additional Yamaha CM500
headset microphones to your system. Each student instrument must have the following settings
made for SPLIT MODE to work properly:
1. Split Keyboard into two voices (sometimes called LEFT voice).
2. Octave shift both the RIGHT and LEFT voices. This allows each student to have their own
“Middle C” on their part of the keyboard.
3. Pan the RIGHT and LEFT voices to “hard right” and “hard left” respectively. This isolates each
student so they don’t hear each other (unless controlled by the teacher).
4. Switch any REVERB effect off. This ensures, for example, that Student 1 won’t hear an echo of
Student 2 in their headphones.
As you can see, there are many settings to perform on each student instrument each time they’re
powered up. The LC3 settings only need to be set once. If your instruments have a memory or
recall function (sometimes called Registrations), it’s a good idea to store these settings to get your
classes ready as quickly as possible.
Middle C Split Point Middle C
If your instruments (like the Yamaha PSR-E313 above) meet these requirements, then follow the
next three steps to start working in SPLIT MODE.
LC3 SETTINGS
1. Plug the first headset into the STUDENT 1 jacks on Instrument
Box. Plugs are marked with headphone and microphone icons.
2. Plug in optional second headsets to the STUDENT 2 jacks on
each Instrument Box.
3. Move the SPLIT switch on Hub to the ON position.
4
Page 7

Other Optional Items
Con
Con
IBX3INSTRUMENTBOX
1. CD or MP3 player. Use an external music player if you
would like students to play along with a recording.
2. External Powered Speakers. If it’s necessary that the lab be
heard in the room without headphones, external powered
speakers can be added.
3. Student Computers. If your lab involves computers for
recording audio from or playing audio to the students, use
1/8" stereo audio cables to get sound in and out of each
Instrument Box. If a student computer also uses 1/8"
connectors for audio, the required cable is available at
Radio Shack (part #42-2387).
Option 1: Music playback devices
Option 2: Monitor speakers
Option 3: Student computer
5
Page 8

©2009 Yamaha Corporation of America. All rights reserved.
www.yamaha.com/LC3
 Loading...