

Page 1

LLCC22
Music Lab
Operation Guide
Page 2

Yamaha LC2 Operation Guide
Contents Page
Controlling the Volume of the Teacher’s
Speaking Voice (Microphone). . . . . . . . . . . . . . . . . . . . . . . . . 1
Controlling the Teacher’s Instrument Volume Level. . . . . . . . . 1
Selecting Students. . . . . . . . . . . . . . . . . . . . . . . . . . . . . . . . . . . . . . . . . 2
Interacting With a Single Student. . . . . . . . . . . . . . . . . . . . . . . . . . 4
Listening to a Single Student . . . . . . . . . . . . . . . . . . . . . . . . . . . . . . 4
Playing a Single Student for the Entire Class. . . . . . . . . . . . . 5
Addressing All of the Students. . . . . . . . . . . . . . . . . . . . . . . . 6
Choosing to Allow the Entire Class to Interact. . . . . . . . . . . 7
Quickly Resetting All Buttons . . . . . . . . . . . . . . . . . . . . . . . . 8
Muting All Student Instruments. . . . . . . . . . . . . . . . . . . . . . . 8
Setting Students In PAIRS. . . . . . . . . . . . . . . . . . . . . . . . . . . 9
Interacting with a PAIR. . . . . . . . . . . . . . . . . . . . . . . . . . . . . 9
Grouping Students. . . . . . . . . . . . . . . . . . . . . . . . . . . . . . . . 10
Storing Custom Settings (RECALL MEMORY). . . . . . . . . 13
Recalling Settings. . . . . . . . . . . . . . . . . . . . . . . . . . . . . . . . . 14
Using a CD or MP3 Player . . . . . . . . . . . . . . . . . . . . . . . . . 15
Recording a Student’s Performance (Audio). . . . . . . . . . . . . 16
Using the AUX Input. . . . . . . . . . . . . . . . . . . . . . . . . . . . . . 17
Using External Powered Speakers. . . . . . . . . . . . . . . . . . . . . 18
Page 3
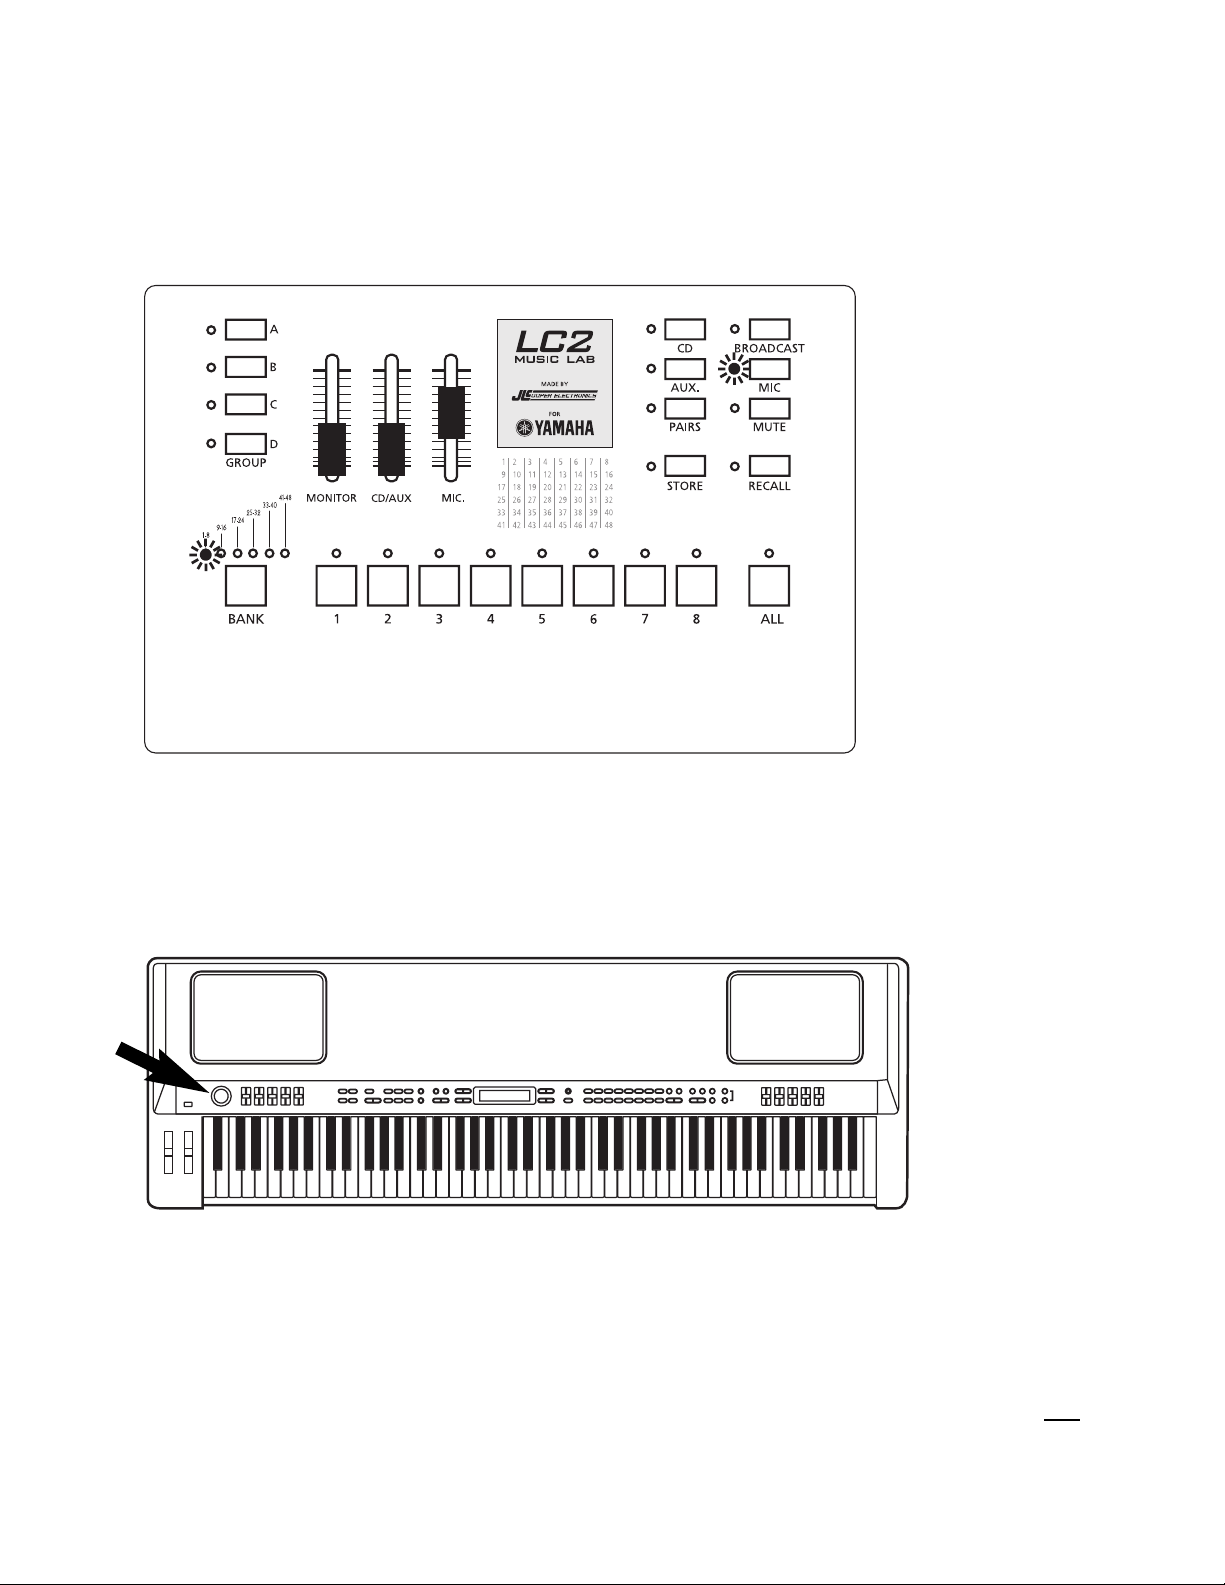
Controlling the Volume of the Teacher’s Speaking Voice (Microphone)
With the MIC button on, move the MIC slider up to the desired.
Controlling Teacher’s Instrument Volume Level
Use the built-in volume control on your instrument to raise or lower its volume in the
LC2 lab. It’s the only instrument volume control you need be concerned with.
1
Volume knob on Yamaha CP300
Page 4

Selecting Students
A BANK light will always be on no matter how many students are in the LC2 lab. The light will
show the bank of students buttons 1-8 at the bottom of the control unit. A fully expanded LC2
system will have a total of six banks (48 students). Each bank has eight students organized in the
following fashion:
BANK 1-8 BANK 9-16
BANK 17-24 BANK 25-32
BANK 33-40 BANK 41-48
Not all LC2s will have all banks available. It depends on the number of expansion cards installed
on the system. For LC2s with less than all expansion cards installed, the BANK select button will
only cycle through banks installed in the system. It then returns to the first bank and cycles
through again. Labs with no expansion cards will be locked on BANK 1-8.
Teachers of larger, expanded labs will find themselves jumping through banks quite frequently
since they can only view the status of eight students at a time. If this is seen as a limitation, we
recommend using the MUSIC LAB MANAGEMENT SOFTWARE (bundled with the LC2
CONTROLLER PLUS systems). Using a computer, the instructor can get a birds-eye-view of
the entire class and enable students quickly without scrolling through the different banks.
A handy table of numbers is printed on the control unit to help you quickly find the buttons of
students in the various BANKS. For example, button six enables students 6, 14, 22, 30, 38, and
46 depending on the currently selected BANK.
2
Page 5
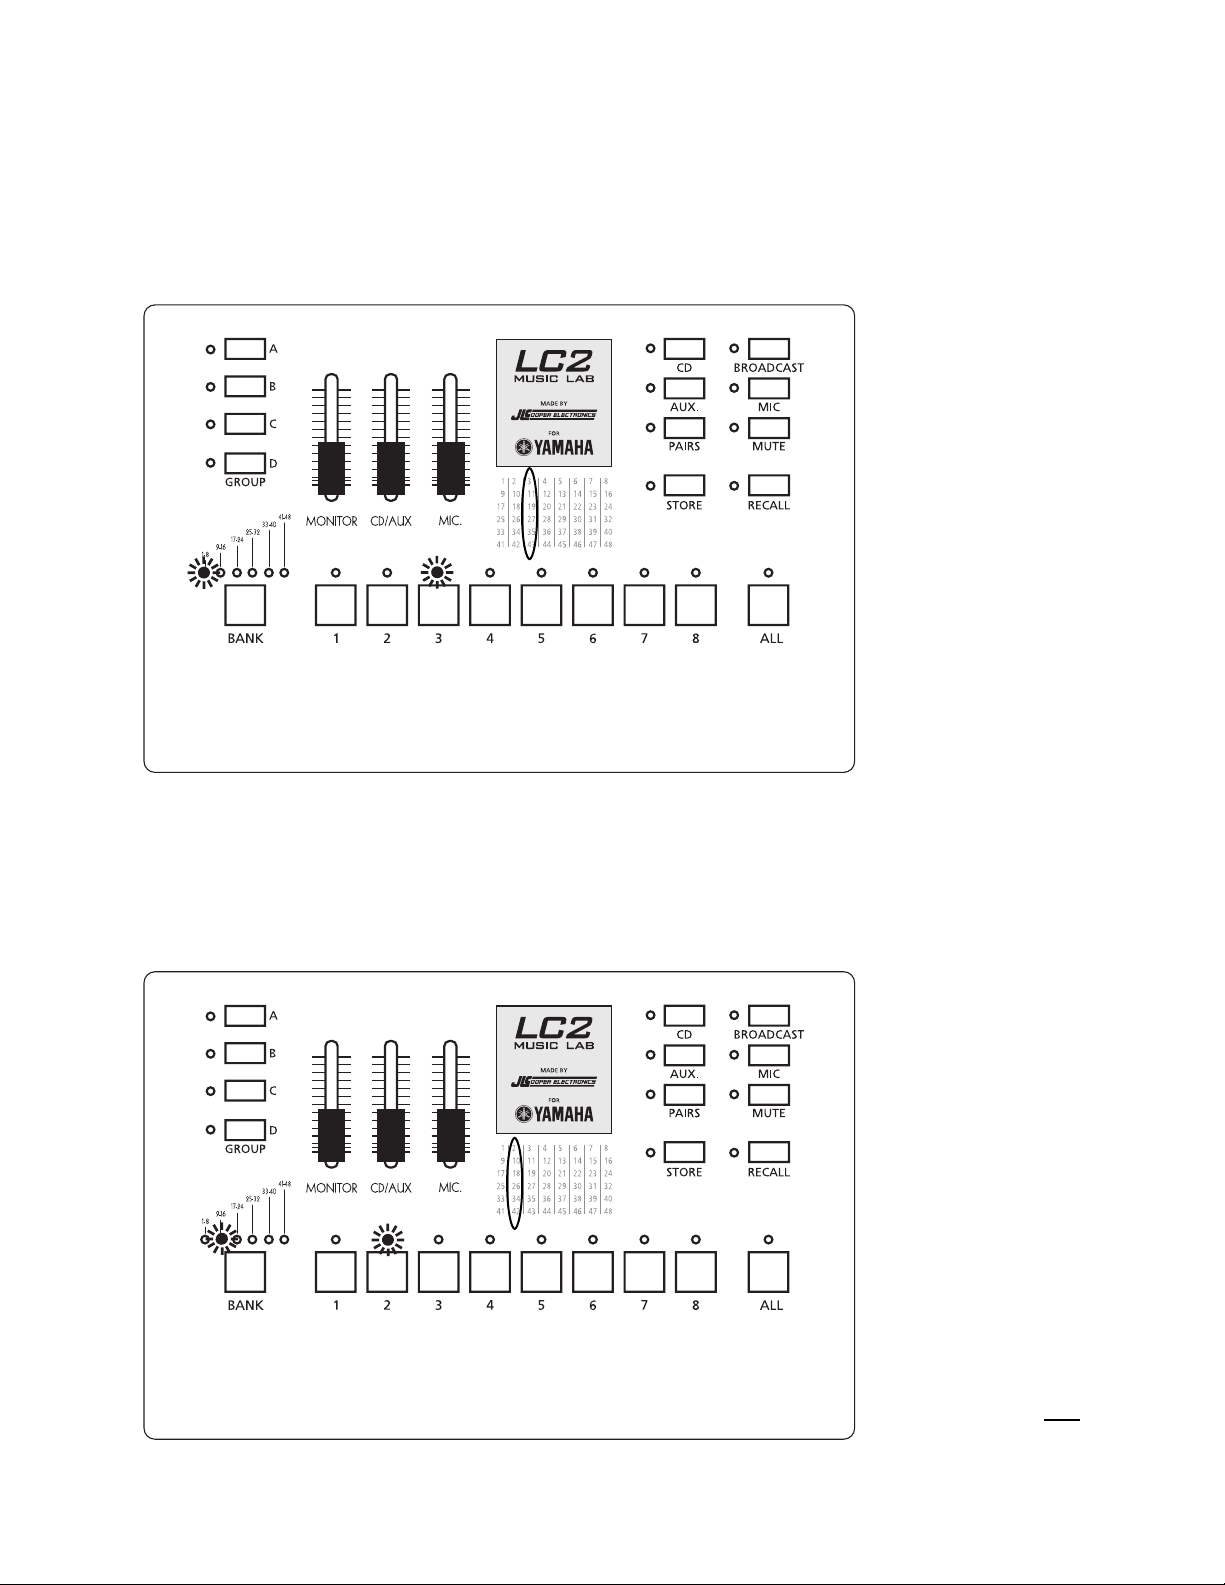
Example One
To listen to student 3, the BANK button would be set where the first light (1-8) is lit
and student button 3 would be on.
Example Two
To listen to student 10, press the BANK button until the second light is lit (signifying
BANK 9-16). Then, press button number two for student 10.
3
Page 6
Interacting With a Single Student
This is essentially paying a visit to a student’s virtual practice room. Once in the correct bank, select
the student button and then turn on the MIC button. Think of turning on the MIC button as
opening the practice room door. Make sure thte MIC volume is up by using the MIC slider.
When you’re ready to leave this student’s practice room, press the lit student button to turn it off.
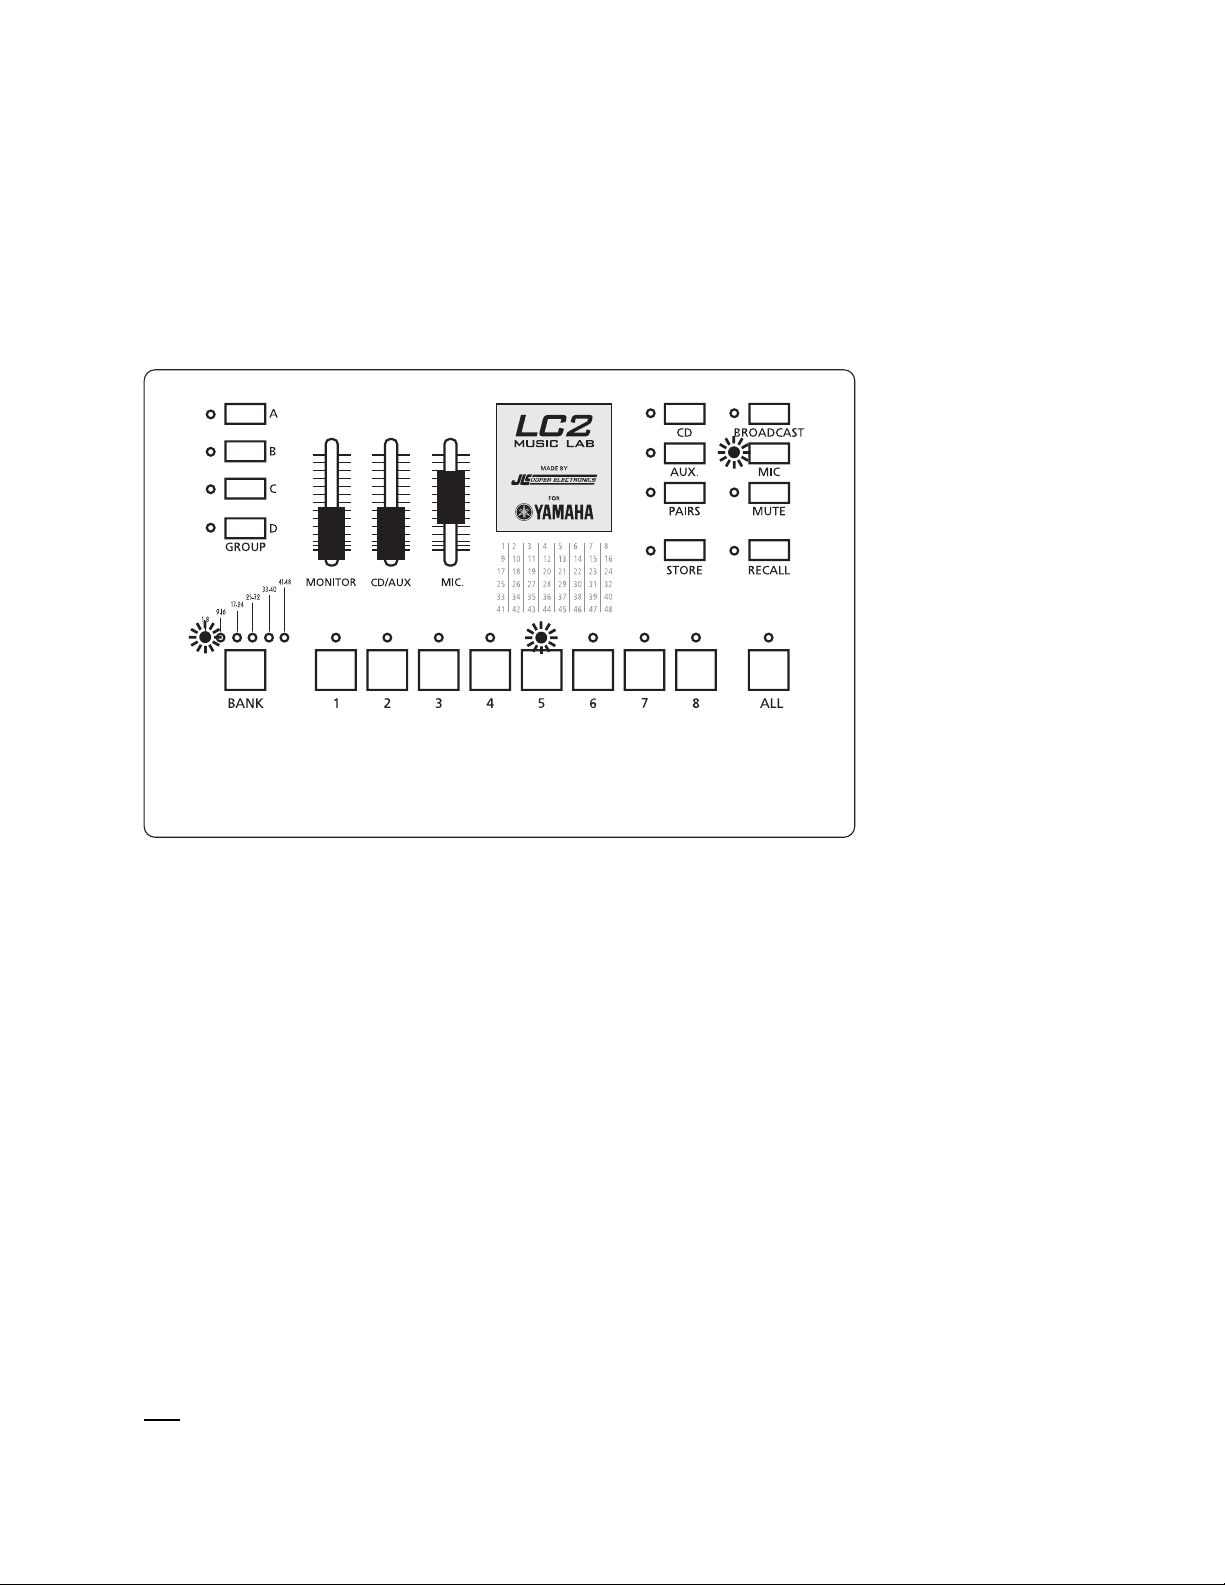
Listening to a Single Student
If you want to listen in on a student without talking to him, the equivalent of putting your ear to
the door, do not select the MIC button. You will know a student is selected when the light above
their number is on. When the MIC button light is not on, the student can not hear you speak.
4
In this example, you are interacting with student 5.
Page 7
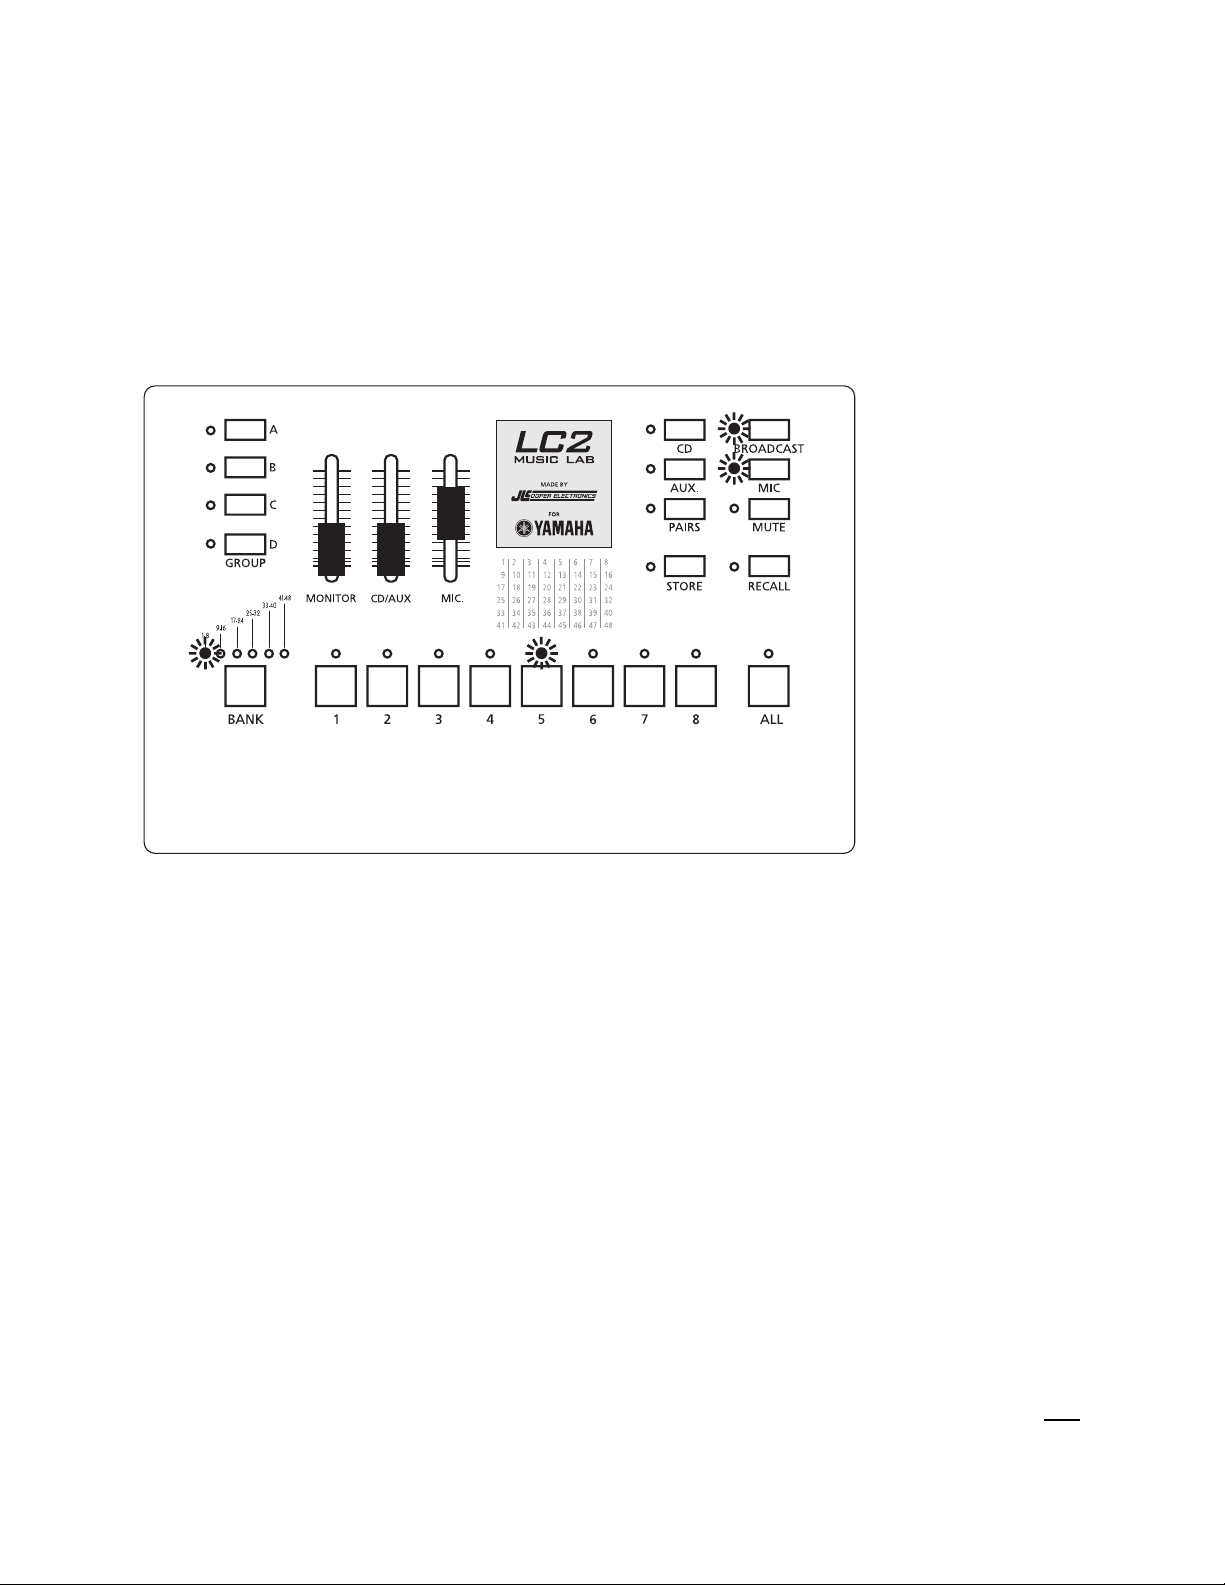
Playing a Single Student for the Entire Class
Select a student as if you were going to work with him, then turn on the BROADCAST
button. The selected student’s performance will be heard by entire class.
To exit this mode, effectively sending all students back to their virtual practice rooms,
turn BROADCAST off by touching the button again.
5
In this example, student 5 is playing for the class; you can make
comments with MIC on.
Page 8

Addressing All Students
To speak to and play for all students without hearing their instruments, and without them being
able to hear each other, press the ALL button (the MIC will come on automatically). The students
will not be able to hear each other speak or play but they will hear their own instruments. This is
the key difference of engaging the ALL button versus switching on every student button. The latter
would have the students interacting with each other. Engaging ALL is like visiting each and every
student in their virtual practice room at the same time... and the students never leave their rooms.
To cancel this mode, press the ALL button so its light turns off.
6
Page 9

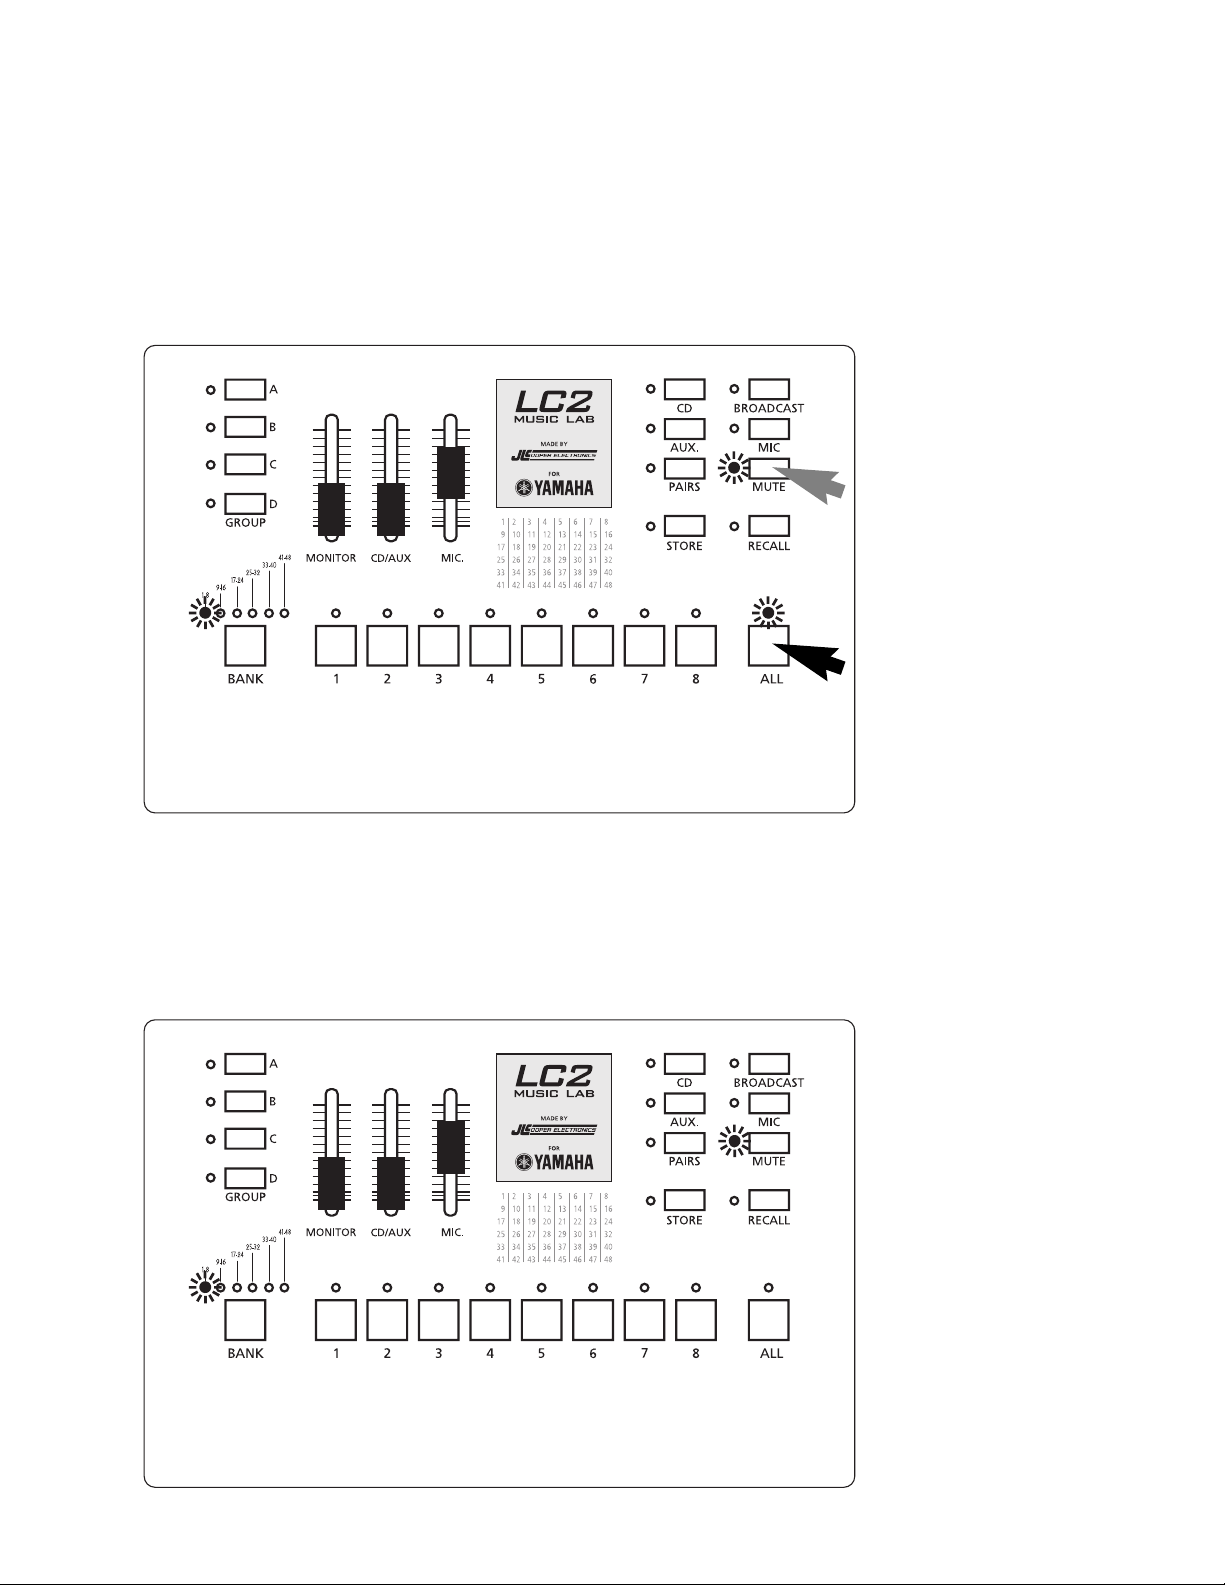
Choosing to Allow the Entire Class to Interact
This is essentially your “all together now” mode. You can hear students, students can hear you, and
students can hear each other speak and play. In a simple 8-student (non-expansion) lab, this can be
as simple as turning on student buttons 1, 2, 3, 4, 5, 6, 7 and 8. But in an expanded lab this would
have to be done for each bank. Yamaha has created a handy shortcut to get all student buttons on
or off quickly. RECALL MEMORY 8 and RECALL MEMORY 1 are reserved for these important
tasks.* Simply tap the RECALL button and then tap student button 8 to activate all student buttons.
This one action engages every student button across all banks. You will know your lab is in this
mode by seeing every student light on, the MIC light on, and the GROUP A button flashing. To
clear every student button, tap the RECALL button and then tap student button 1.
*Learn more about RECALL MEMORY on pages 13-14.
7
TAP
TAP
Page 10
Quickly Resetting All Buttons
If you’re unsure about which settings/buttons are on or off, press and hold the MUTE button and
then tap the ALL button. This resets all of the control unit buttons to off. This is the same as
turning the power off and then on again without making a trip to the power button on the hub.
Muting All Student Instruments
When it’s time for students to pay attention, temporarily disable their instruments by turning
the MUTE button on. Note: student MICs are active but reduced in volume.
TAP
HOLD
Page 11

Setting Students In PAIRS
To quickly get students working in simple pairs (two students per virtual practice room), press
the PAIR button. This will automatically place student 1 with 2, 3 with 4, 5 with 6, etc.
Interacting with a PAIR
With the PAIR button on, press the student selector button of either member of a pair and
turn on MIC. Notice that both lights turn on with a single button press. Work with pairs
exactly as you would with individual students.
In this example, students 7 and 8 make up a pair.
9
Page 12

Grouping Students
If simply pairing students isn’t flexible enough for your needs, the LC2 Lab allows you to create
easily recallable groups. Think of a group as a kind of virtual practice room in which multiple
students can meet at the same time. You can have as many as four groups (A/B/C/D) set up in the
control unit at any given time. To group a set of students, press and hold the GROUP button A,
B, C or D as desired, select the BANK for the student(s) desired, and turn on the appropriate
student buttons for that group. Students from different banks may be grouped together in any
combination within the four available groups.
A flashing light next to group button A, B, C or D indicates that you are currently working with
that group. A steady light next to button A, B, C and D indicates that the group is active and
working with each other but without you.
Keep in mind that RECALL MEMORY 8 and RECALL MEMORY 1 are factory group presets.
RECALL MEMORY 8 sets up GROUP A with all student buttons on… a kind of “super group”
(groups B/C/D are empty in this memory). RECALL MEMORY 1 has all four groups empty
of students. To create this clean slate as a starting point for building groups, simply tap the
RECALL button and then tap student button 1.
Example One
To set students 1, 3, 7 and 8 into a group, press and hold GROUP button A, select BANK 1, press
student 1 then 3 then 7 then 8. Release the GROUP button A and it will begin to flash, indicating
the group is active and you are with them. To speak with the group, turn on the MIC button.
10
TAP
HOLD
TAP
TAP
TAP
Page 13
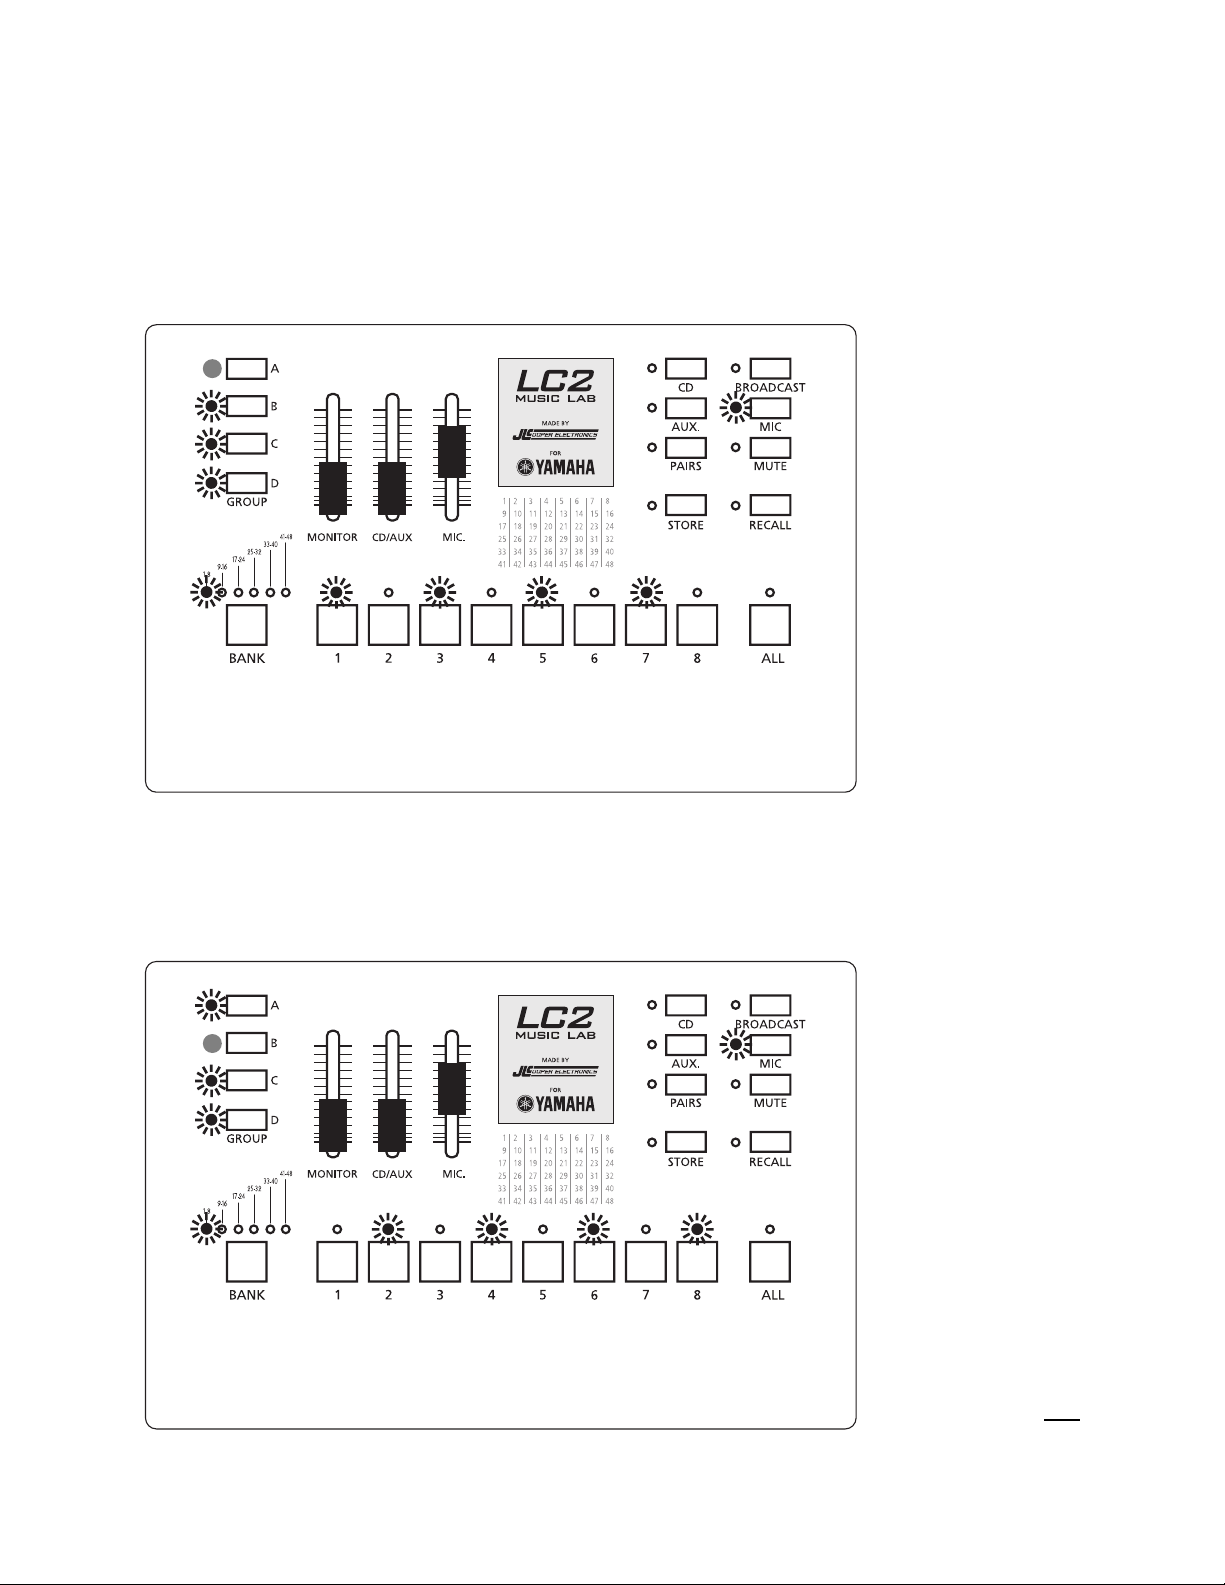
Example Two
Students 1, 3, 5 and 7 are group A, students 2, 4, 6 and 8 are group B, students 9, 10, 11 and 12
are group C, and students 13, 14, 15 and 16 are group D. In the illustration below, you are working
with GROUP A, which has a flashing light. Groups B, C and D are working by themselves.
Example Three
You are working with GROUP B, which has a flashing light. A, C and D are working by themselves.
11
Page 14

Example Four
You are working with GROUP C, which has a flashing light. A, B and D are working by themselves.
Example Five
You are working with GROUP D, which has a flashing light. A, B and C are working by themselves.
12
Page 15

It’s possible to group students from more than one bank—students 1 and 3 with student 10 and
11, for example. Simply press and hold the GROUP A button, select BANK 1, tap student 1 then
3, next select BANK 2 by pressing the BANK button and tap student number 10 (button 2) and
11 (button 3). Release the GROUP button A and it will begin to flash indicating the group is
active and you are working with them.
Storing Custom Settings (RECALL MEMORY)
It’s possible to save your GROUP A/B/C/D configurations as custom RECALL MEMORIES.
Your control unit actually has six buttons (2, 3, 4, 5, 6 and 7) each capable of holding a
GROUP A/B/C/D configuration. Remember that RECALL MEMORY 8 and RECALL
MEMORY 1 are pre-set to turn all student buttons on (into a kind of “super-group”) and all
student buttons off (students go back to the virtual practice rooms). RECALL MEMORIES 2-7
are yours to customize.
If you had six different classes, for example, you could have completely different GROUP A/B/C/D
configurations for each class at the touch of a button. If six different configurations isn’t enough, the
Music Lab Management (MLM) software bundled with the LC2 Plus can store a virtually infinite
number of group configurations, with each class having its own setup file. MLM files even let you
enter student names for each class!
To store your custom group settings in your control unit, first tap the STORE button, then tap the
desired student button number 2-7.
13
TAP
TAP
Tap one numbered button (2-7) to assign your RECALL MEMORY.
Page 16

Recalling Settings
To RECALL a memory, tap the RECALL button, then tap the button of the MEMORY desired.
14
Press one numbered button (2-7) to recall a preset you have stored.
TAP
TAP
Page 17

Using a CD or MP3 Player
For the entire class to hear audio from a playback device, simply connect the audio player to the
CD IN jack on the hub. Turn on the CD button from the control unit and move the CD/AUX
slider up to desired volume. When the CD input is used, all students will hear the playback regardless
of which student buttons are enabled. You can work with students or groups as described in the
previous sections while providing CD/AUX audio to every student.
15
Page 18

Recording a Student’s Performance (Audio)
Connect a tape or CD recorder to the REC OUT on the hub. Then, to record the student, select
the student, press RECORD on the recording device and tell the student to play. Anything you
hear gets sent to the audio recorder.
16
In this example, student 14 is being recorded.
Page 19

Using the AUX input
For the entire class to hear audio from additional devices like MIDI file players, metronomes or
computers, simply connect the device to the AUX IN jacks on the hub. Turn on the AUX button
on the control unit and then move the CD/AUX slider up to desired volume. When the AUX input
is used, all students will hear the device regardless of which student buttons are enabled. You can
work with students or groups as described in the previous sections while providing CD/AUX audio
to every student.
17
Page 20

Using External Powered Speakers
There might come a time when the audio in the LC2 lab needs to be heard by someone in the
room who is not wearing headphones. With powered speakers (like a stereo system) connected
to the MONITOR OUT of the hub, move the MONITOR slider up to volume desired.
18
Page 21

©2006 Yamaha Corporation of America. www.yamaha.com
 Loading...