

Page 1

INTEGRATED AUDIO SYSTEM
SYSTÈME AUDIO INTÉGRÉ
ISX-800
G
OWNER’S MANUAL
MODE D’EMPLOI
BEDIENUNGSANLEITUNG
BRUKSANVISNING
MANUALE DI ISTRUZIONI
MANUAL DE INSTRUCCIONES
GEBRUIKSAANWIJZING
ИНСТРУКЦИЯ ПО ЭКСПЛУАТАЦИИ
Page 2

CAUTION: READ THIS BEFORE OPERATING YOUR UNIT.
1 To assure the finest performance, please read this manual
carefully. Keep it in a safe place for future reference.
2 Install this unit in a well ventilated, cool, dry, clean place
– away from direct sunlight, heat sources, vibration, dust,
moisture and cold. For proper ventilation, allow the
following minimum clearances.
Top: 15 cm (6 in)
Rear: 2.5 cm (1 in)
Sides: 10 cm (4 in)
3 Locate this unit away from other electrical appliances,
motors, or transformers to avoid humming sounds.
4 Do not expose this unit to sudden temperature changes
from cold to hot (or vice versa), and do not locate this
unit in an environment with high humidity (i.e., a room
with a humidifier) to prevent condensation inside this
unit, which may cause an electrical shock, fire, damage to
this unit, and/or personal injury.
5 Avoid installing this unit where foreign object may fall
onto this unit and/or this unit may be exposed to liquid
dripping or splashing. On the top of this unit, do not
place:
– Other components, as they may cause damage and/or
discoloration on the surface of this unit.
– Burning objects (i.e., candles), as they may cause fire,
damage to this unit, and/or personal injury.
– Containers with liquid in them, as they may fall and
liquid may cause electrical shock to the user and/or
damage to this unit.
6 Do not cover this unit with a newspaper, tablecloth,
curtain, etc. in order not to obstruct heat radiation. If the
temperature inside this unit rises, it may cause fire,
damage to this unit, and/or personal injury.
7 Do not plug in this unit to a wall outlet until all
connections are complete.
8 Do not operate this unit upside-down. It may overheat,
possibly causing damage.
9 Do not use force on switches, knobs and/or cords.
10 When disconnecting the power cable from the wall outlet,
grasp the plug; do not pull the cable.
11 Do not clean this unit with chemical solvents; this might
damage the finish. Use a clean, dry cloth.
12 Only voltage specified on this unit must be used. Using
this unit with a higher voltage than specified is dangerous
and may cause fire, damage to this unit, and/or personal
injury. Yamaha will not be held responsible for any
damage resulting from use of this unit with a voltage
other than specified.
13 To prevent damage by lightning, keep the power cable
and outdoor antennas disconnected from a wall outlet or
this unit during a lightning storm.
14 Do not attempt to modify or fix this unit. Contact
qualified Yamaha service personnel when any service is
needed. The cabinet should never be opened for any
reasons.
15 When not planning to use this unit for long periods of
time (i.e., vacation), disconnect the AC power plug from
the wall outlet.
16 Be sure to read the “TROUBLESHOOTING” section on
common operating errors before concluding that this unit
is faulty.
17 Before moving this unit, press to set the system to off,
and disconnect the AC power plug from the wall outlet.
18 Condensation will form when the surrounding
temperature changes suddenly. Disconnect the power
cable from the outlet, then leave this unit alone.
19 When using this unit for a long time, this unit may
become warm. Turn the system off, then leave this unit
alone for cooling.
20 Install this unit near the wall outlet and where the AC
power plug can be reached easily.
21 The batteries shall not be exposed to excessive heat such
as sunshine, fire or the like.
– Keep the batteries in a location out of reach of
children. Batteries can be dangerous if a child were to
put in his or her mouth.
– If the batteries grow old, the effective operation range
of the remote control decreases considerably. If this
happens, replace the batteries with two new ones as
soon as possible.
– Do not use old batteries together with new ones.
Do not use different types of batteries (such as
–
alkaline and manganese batteries) together. Read the
packaging carefully as these different types of
batteries may have the same shape and color.
– Exhausted batteries may leak. If the batteries have
leaked, dispose of them immediately. Avoid touching
the leaked material or letting it come into contact with
clothing, etc. Clean the battery compartment
thoroughly before installing new batteries.
– If you plan not to use the unit for a long period of
time, remove the batteries from the unit. Otherwise,
the batteries will wear out, possibly resulting in a
leakage of battery liquid that may damage the unit.
– Do not throw away batteries with general house
waste. Dispose of them correctly in accordance with
your local regulations.
This unit is not disconnected from the AC power source as
long as it is connected to the wall outlet, even if this unit
itself is turned off by . In this state, this unit is designed
to consume a very small quantity of power.
WARNING
TO REDUCE THE RISK OF FIRE OR ELECTRIC SHOCK,
DO NOT EXPOSE THIS UNIT TO RAIN OR MOISTURE.
CAUTION
Danger of explosion if battery is incorrectly replaced.
Replace only with the same or equivalent type.
There is a chance that placing this unit too close to a CRTbased (Braun tube) TV set might impair picture color.
Should this happen, move this unit away from the TV set.
i En
Page 3
CONTENTS
ISX-800
Power cable Remote control
Dock cover
USB cap
FM antenna
Bracket
Pole
Base
Support
Cable clamp
Screw set
Note
Use these items to assemble the
stand. Read the separate
Assembly Guide for information
on how to assemble the stand.
Note
Keep the USB cap out of
reach of children so as to
ensure that it is not
mistakenly swallowed.
2 x Batteries
(AA, LR6, UM-3)
Owner’s Manual
(this manual)
Assembly Guide
6 m (20')
NAMES OF PARTS AND THEIR FUNCTIONS.........................2
ADJUSTING THE CLOCK.........................................................5
LISTENING TO iPod..................................................................6
LISTENING TO CD AND USB DEVICES..................................7
LISTENING TO FM STATIONS...............................................10
LISTENING TO EXTERNAL SOURCES .................................11
USING THE ALARM FUNCTION ............................................12
USING THE SLEEP TIMER.....................................................15
TONE CONTROL.....................................................................15
ADJUST BRIGHTNESS OF FRONT PANEL DISPLAY .........15
TROUBLESHOOTING.............................................................16
NOTES ON DISCS AND USB DEVICES.................................18
SPECIFICATIONS ...................................................................19
Features
• Playback music on external devices such as iPod/iPhone models, audio/data CDs and USB devices, and tune in to the FM.
• Use your favorite music or set of beeps as an alarm. The music you select is played at a volume of your own choice at the set alarm time,
giving you the best possible start to the day (IntelliAlarm function).
• Store/call up to five of your favorite FM stations easily.
• The 3-band equalizer (bass, middle, treble) can be set so that music sounds exactly how you want it.
• Two types of clocks (with hour hands) that match the design of the unit can be shown.
About this manual
• The phrase “iPod” used throughout this manual also includes the “iPhone”.
• If both the unit and remote control buttons can be used to operate a feature, the manual will describe steps using the buttons on the unit.
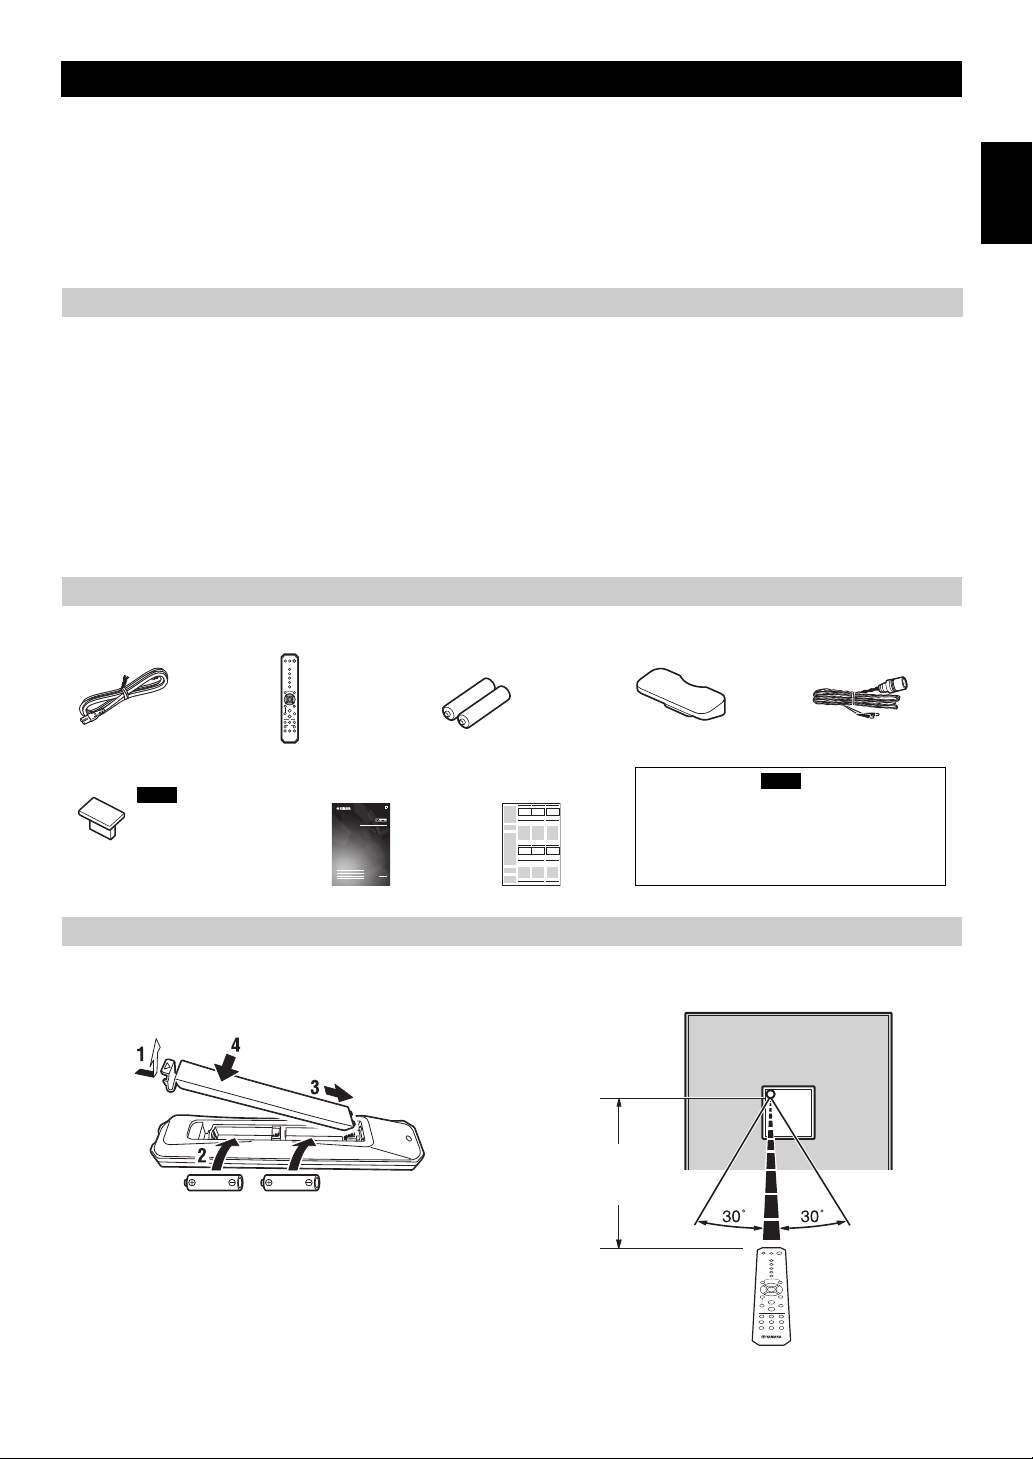
Supplied accessories
English Français Deutsch Svenska Italiano Español Nederlands Русский
How to use the remote control
Insert the batteries into the remote control in the correct direction
(+ and –).
Point the remote control at the remote control signal receiver (on
the front panel) and use within the range shown below.
1 En
Page 4
Top panel
AUTO SET BEEP
SOURCE + BEEP
SOURCE
DIMMER
CLOCK
ALARM TYPE
212
1
iPod
VOLUME
USB LABEL SIDE
SOURCE PRESETALARM SNOOZE
SLEEP
12345678 jlk9
y
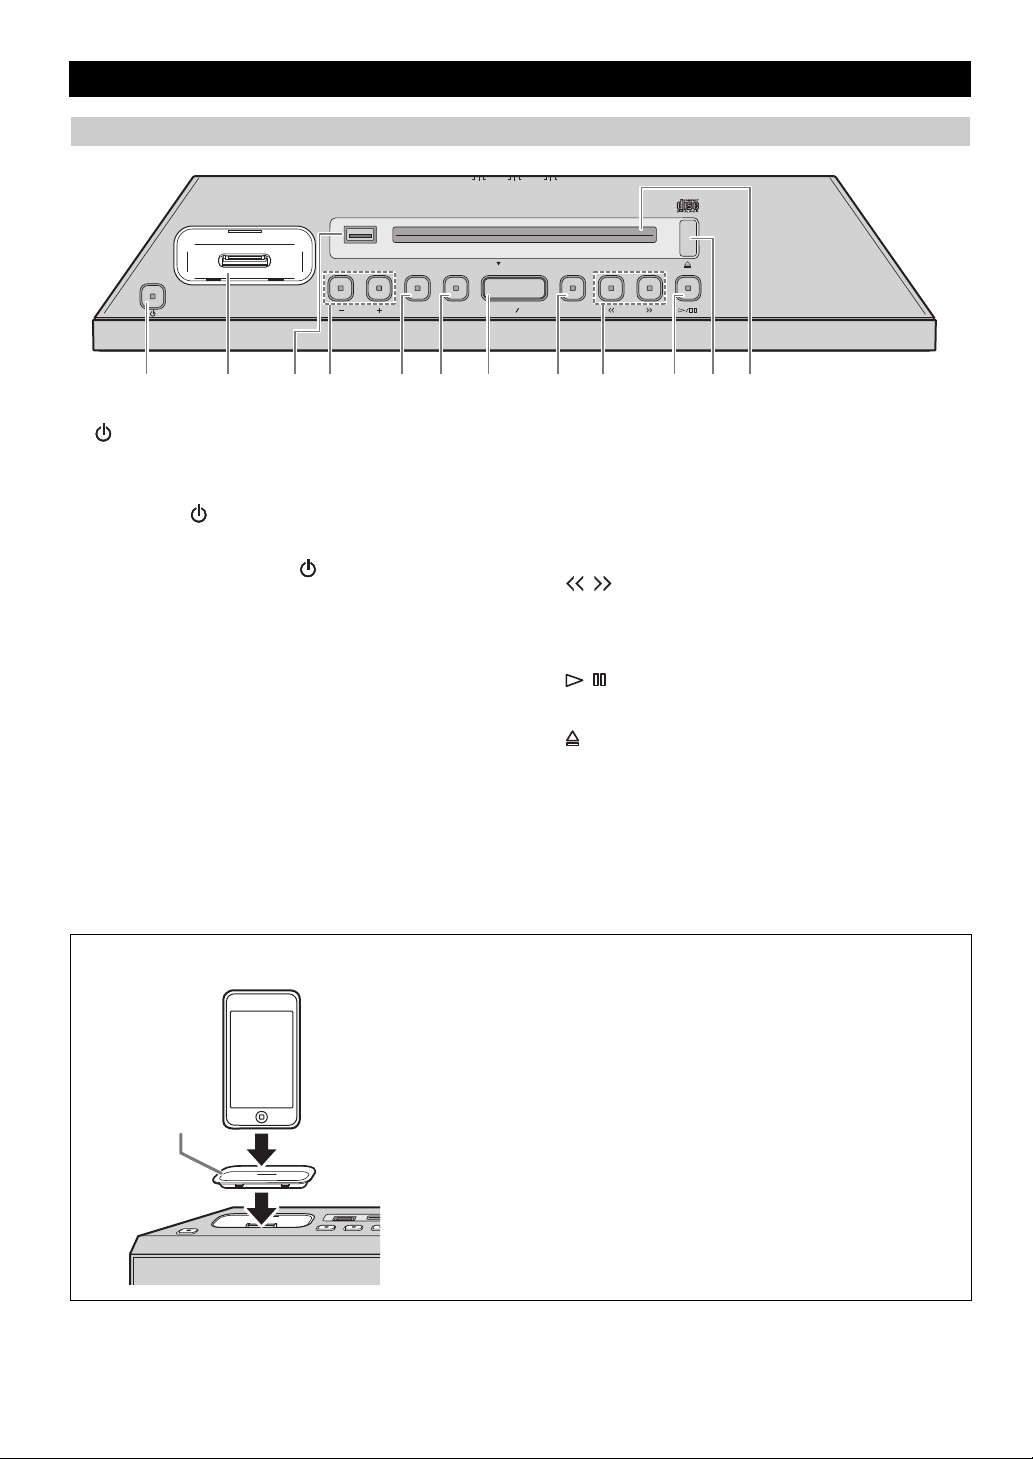
• An iPod will be recharged while it is connected to the dock. The iPod will not be recharged
when the unit is in power save mode.
• Be sure to use a dock adaptor that is compatible with your iPod. If you do not use the adaptor
or the adaptor is not compatible, the connection could be loose or poor, which could cause
damage to the connector. For details on dock adaptor information, please visit official Apple’s
website.
• If an iPod in protective case is connected by force, the connector may be damaged. Remove
the protective case before connection.
• When the iPod is not in use, set the iPod dock cover to protect the connector.
Dock adaptor
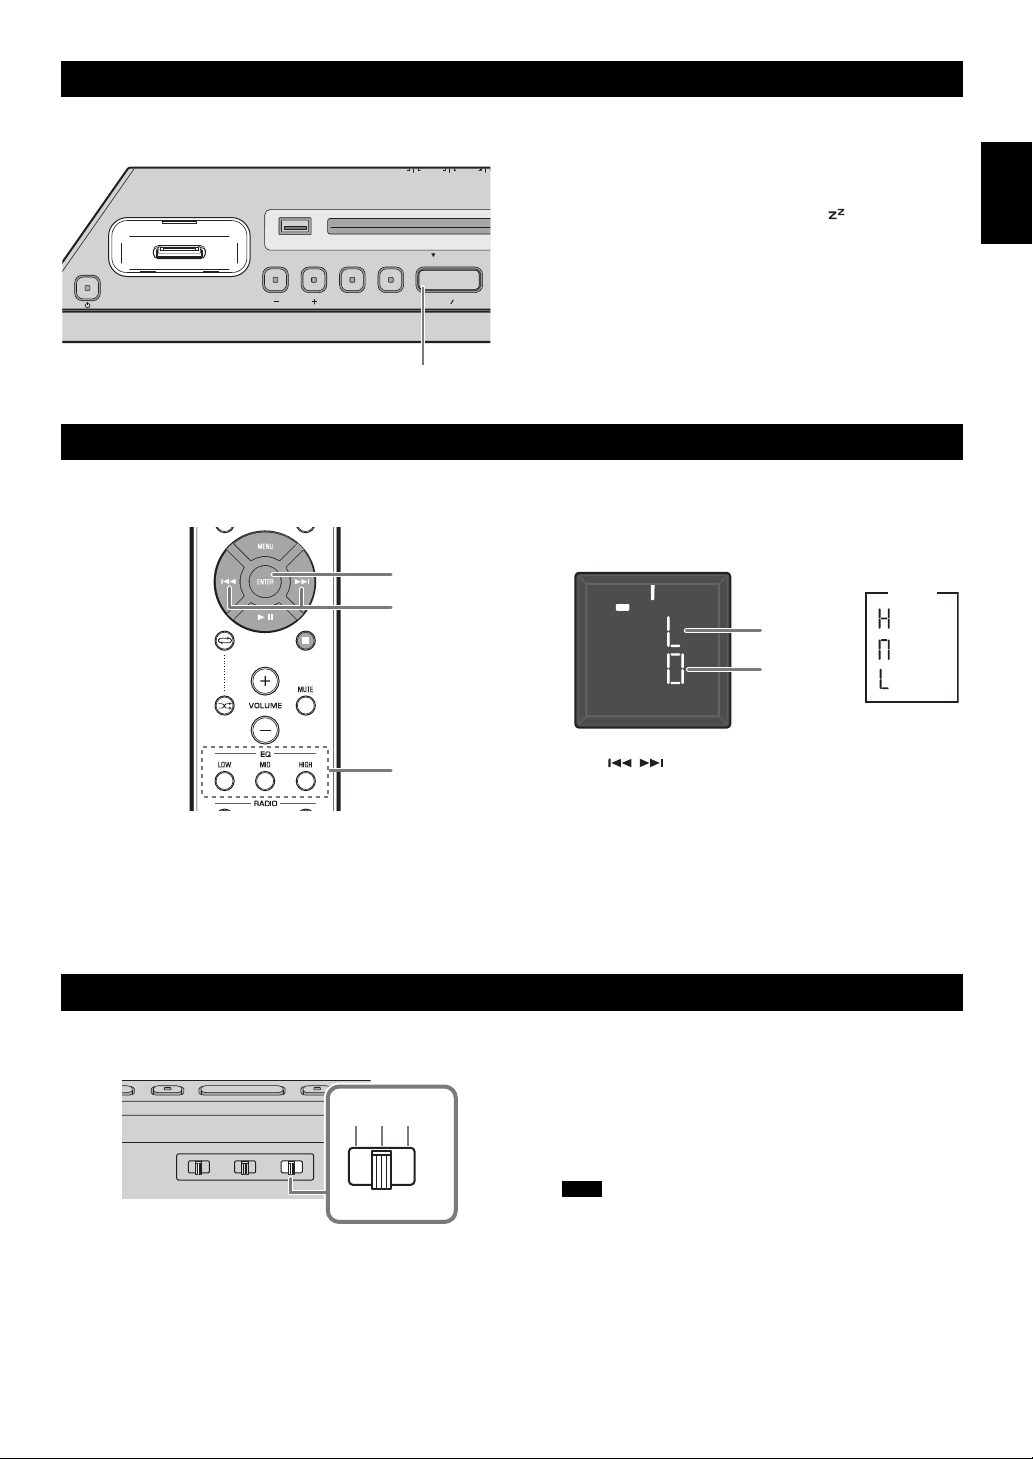
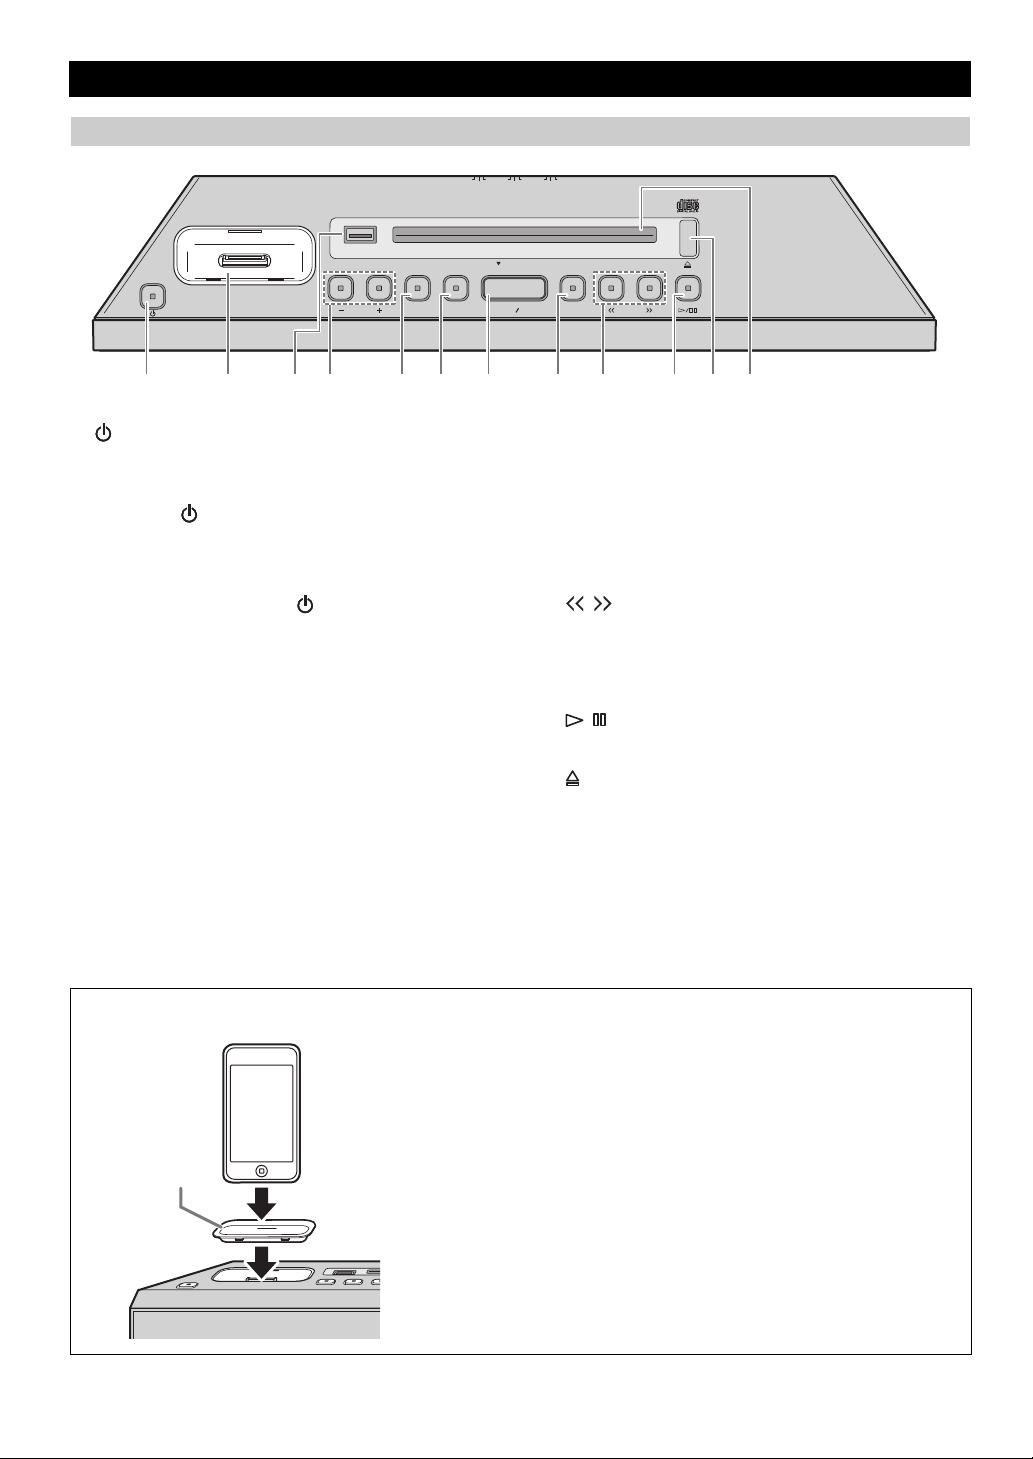
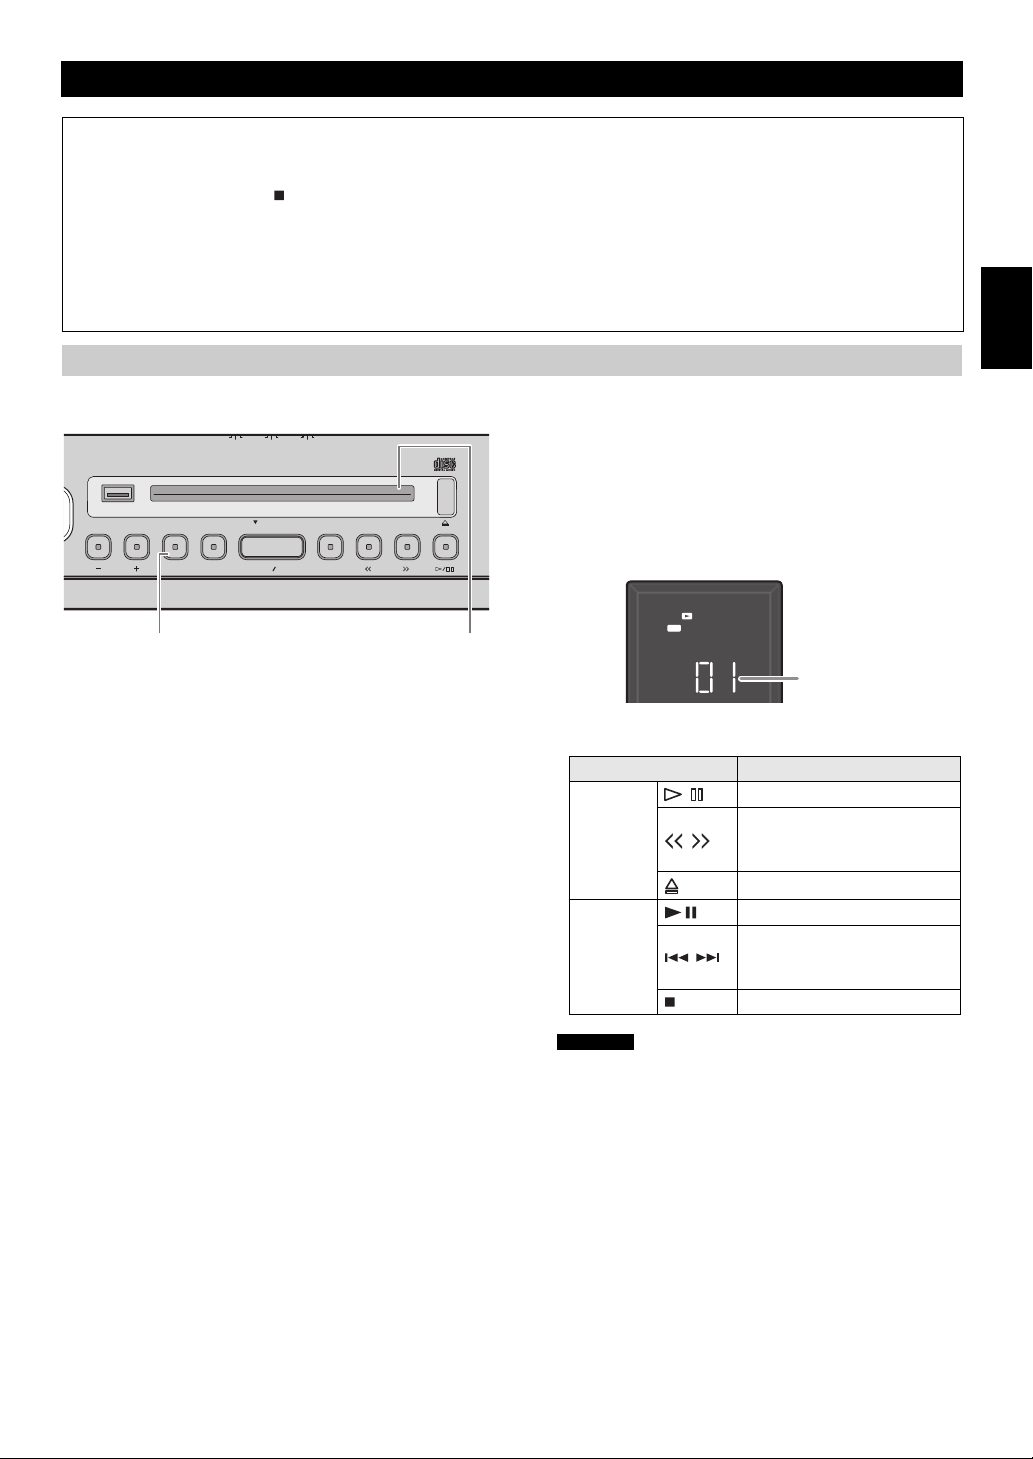
NAMES OF PARTS AND THEIR FUNCTIONS
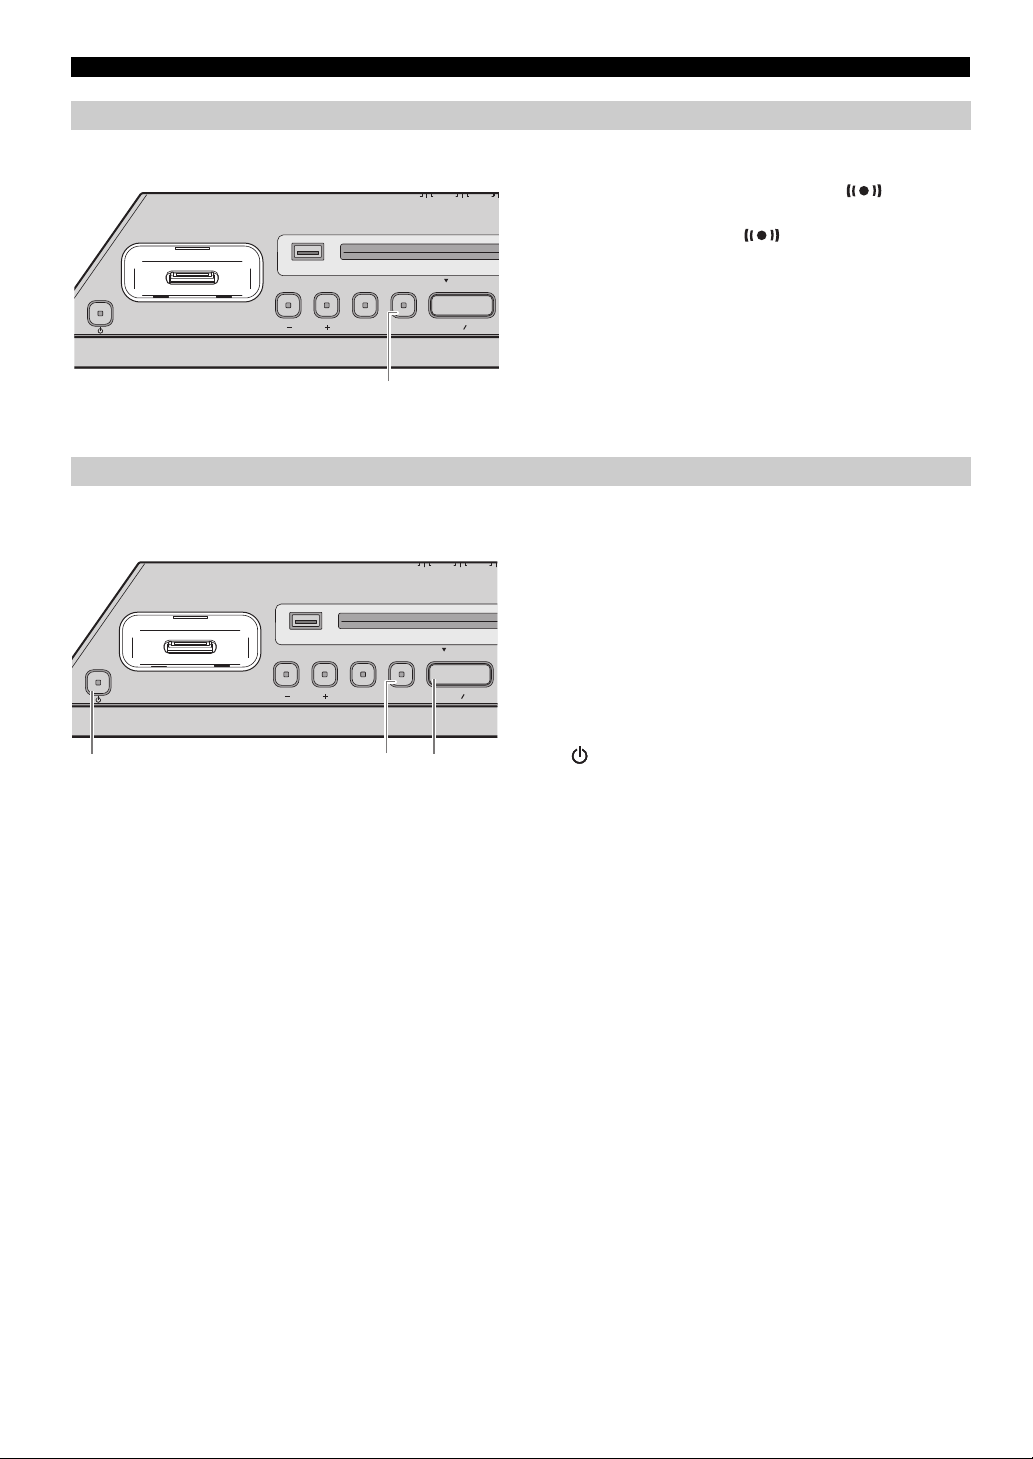
a (Power)
Press to turn the system on/off. Time is displayed on the front
panel even when the system is off.
y
• Press and hold on the top of the unit for more than 3 seconds to set
the system to power save mode. No information on the front panel is
displayed in power save mode. This can reduce power consumption.
To cancel power save mode, press again.
• Even in system off/power save mode, the alarm function is available.
b iPod dock
Connect an iPod.
c USB port
Connect a USB device (P. 9).
d VOLUME –/+
Adjust the volume.
e SOURCE
Switch the source to be played.
f ALARM
Turns the alarm on/off, and allows various alarm settings to be
adjusted (P. 13, 14).
Connecting an iPod to the iPod dock
g SNOOZE/SLEEP
Set the sleep timer or switch the alarm to snooze mode
(P. 14, 15).
h PRESET
Store/call up FM stations, or switch the playback folder (when
playing music on data CDs or USB devices).
i /
Skip the playback track/file, or tune the radio.
Holding the button down while playing a track/file will search
backward/forward the track/file.
j /
Play/pause the track being played.
k
Eject the CD.
l Disc slot
Insert a CD.
2 En
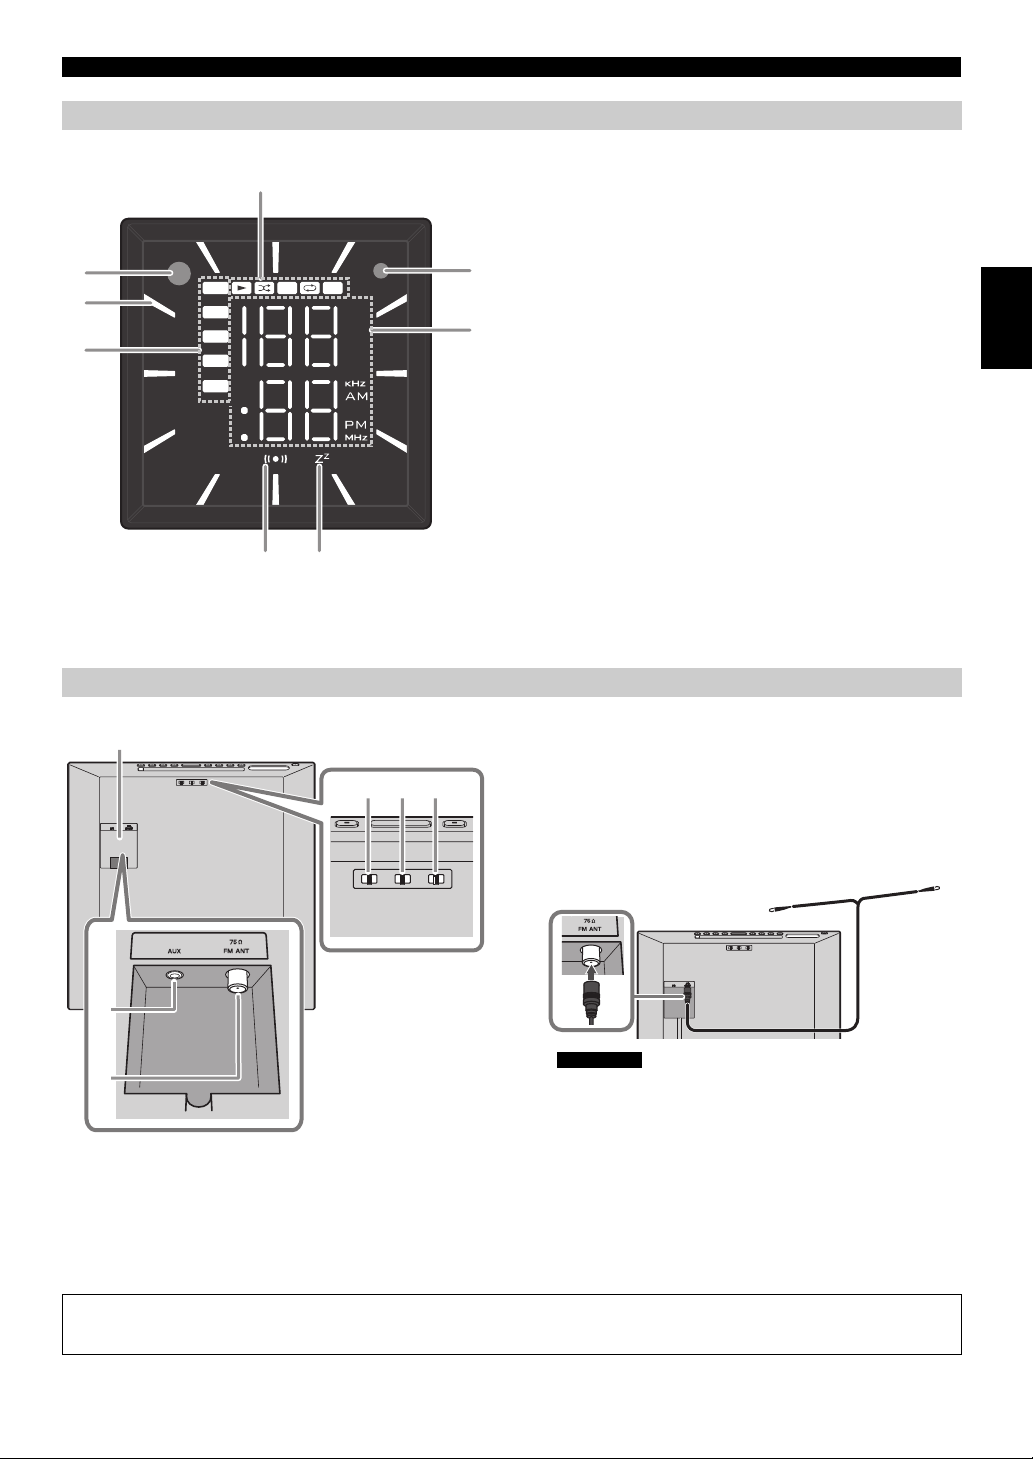
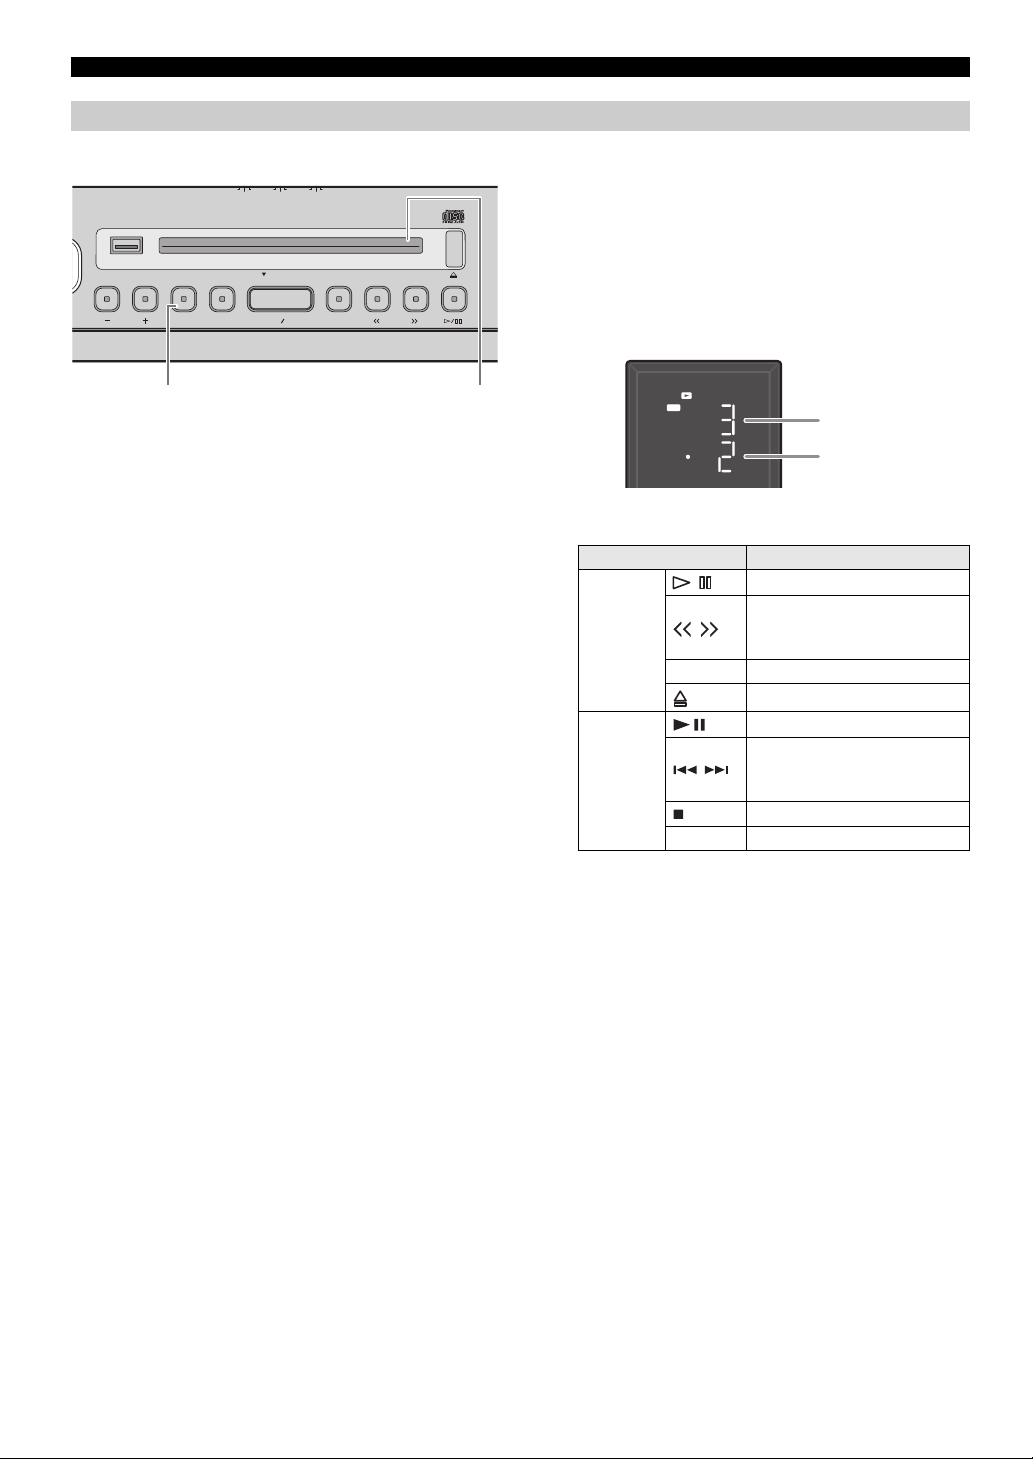
Page 5
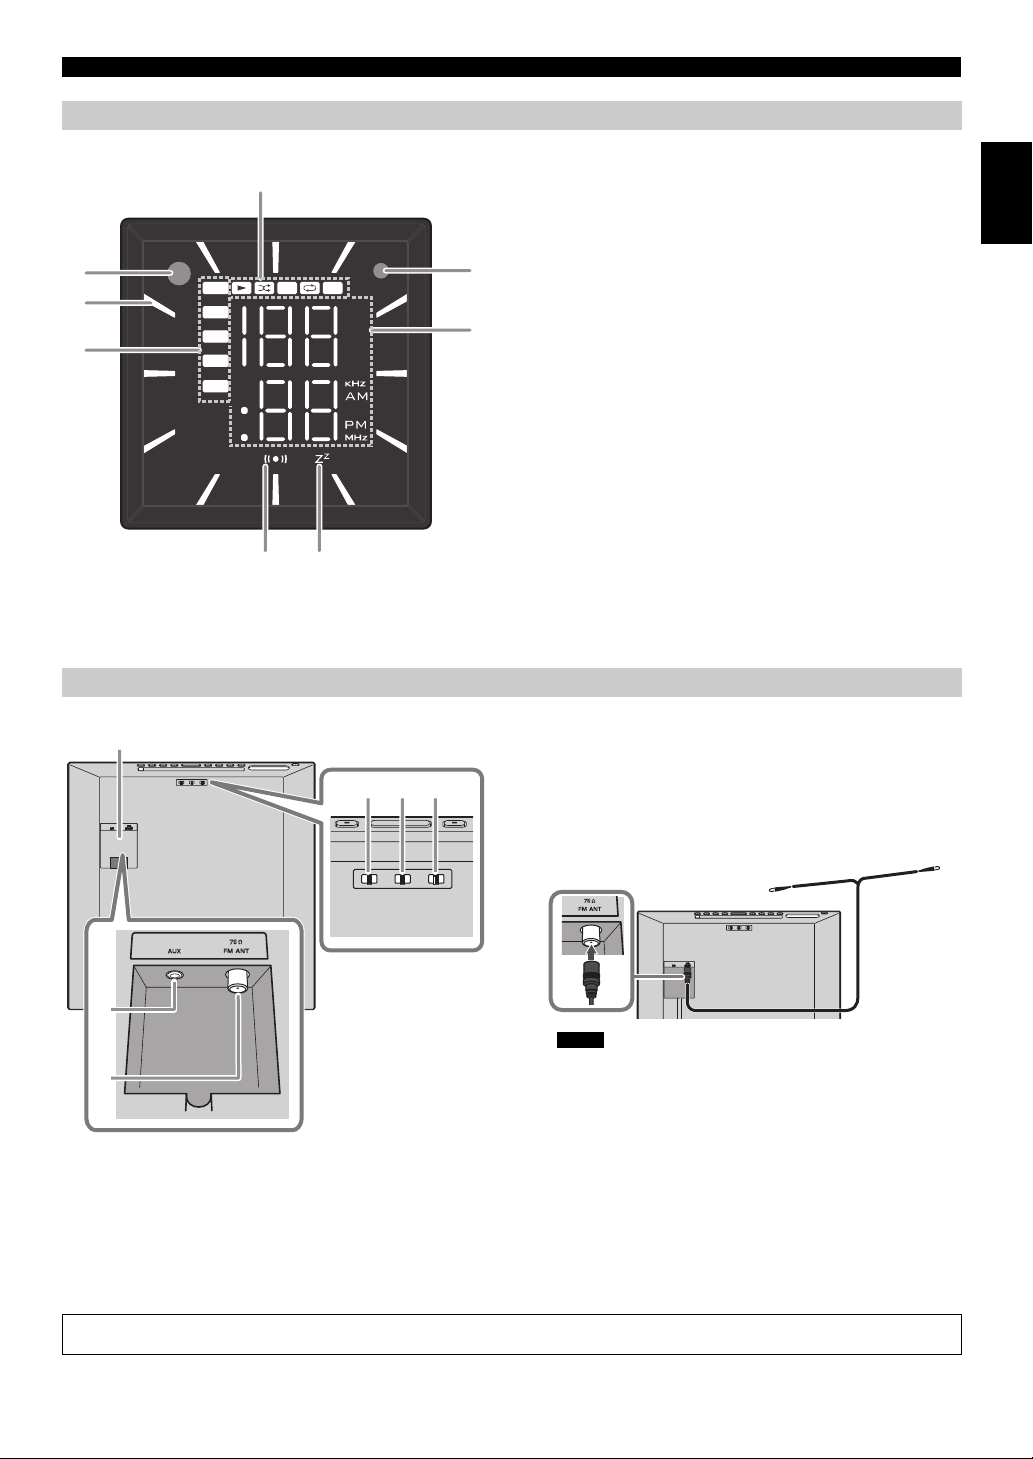
Notes
Front panel display
FM
CD
AUX
USB
iPod
ALL
1
2
1
8
56
7
3
4
162 3
4
5
Supplied
FM antenna
NAMES OF PARTS AND THEIR FUNCTIONS
Rear panel
1 Play/shuffle/repeat indicator
Displays the playback mode (P. 6, 9).
b Remote control signal receiver
c Clock indicator
Shows the clock hour hand (P. 5).
d Source indicator
Shows selected source.
e Alarm indicator
Turns on if the alarm has been set (P. 12).
f Sleep indicator
Turns on if the sleep timer has been set (P. 15).
g Multi-function indicator
Displays various information, including the clock time, track
number being played or FM station.
h Illumination sensor
Detects ambient lighting. Do not cover this sensor.
c DIMMER
Adjusts the brightness of the front panel display (P. 15).
English
d AUX
Connects an external device.
e FM antenna terminal
Connects the supplied FM antenna or outdoor antenna.
a ALARM TYPE
b CLOCK
If you pass the outdoor antenna cable and/or external device cable through the pole of the stand, read the separate Assembly Guide.
Switches the alarm type (P. 13).
Switches the type of clock display or allows the time to be set
(P. 5).
• The antenna should be stretched out. If radio reception is poor, change
the height, direction, or placement of the antenna.
• If you use an outdoor antenna instead of the supplied FM antenna,
reception will be better.
f Terminal cover
Remove the terminal cover before connecting external devices
to AUX, and/or connecting the FM antenna to antenna
terminal.
3 En
Page 6
NAMES OF PARTS AND THEIR FUNCTIONS
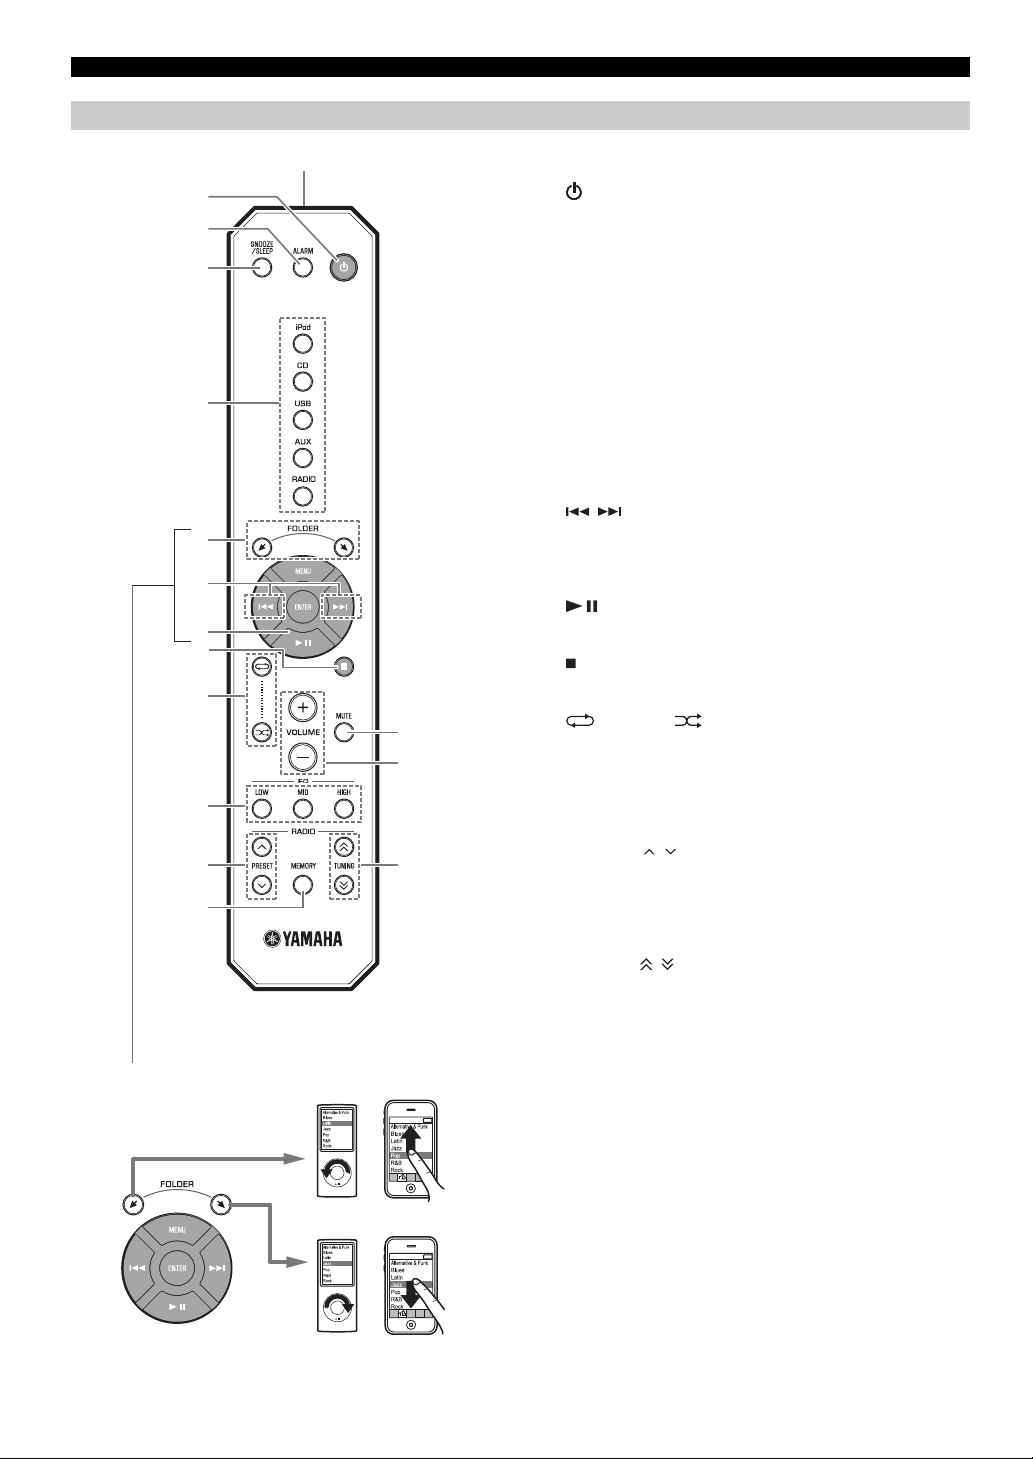
iPod control buttons
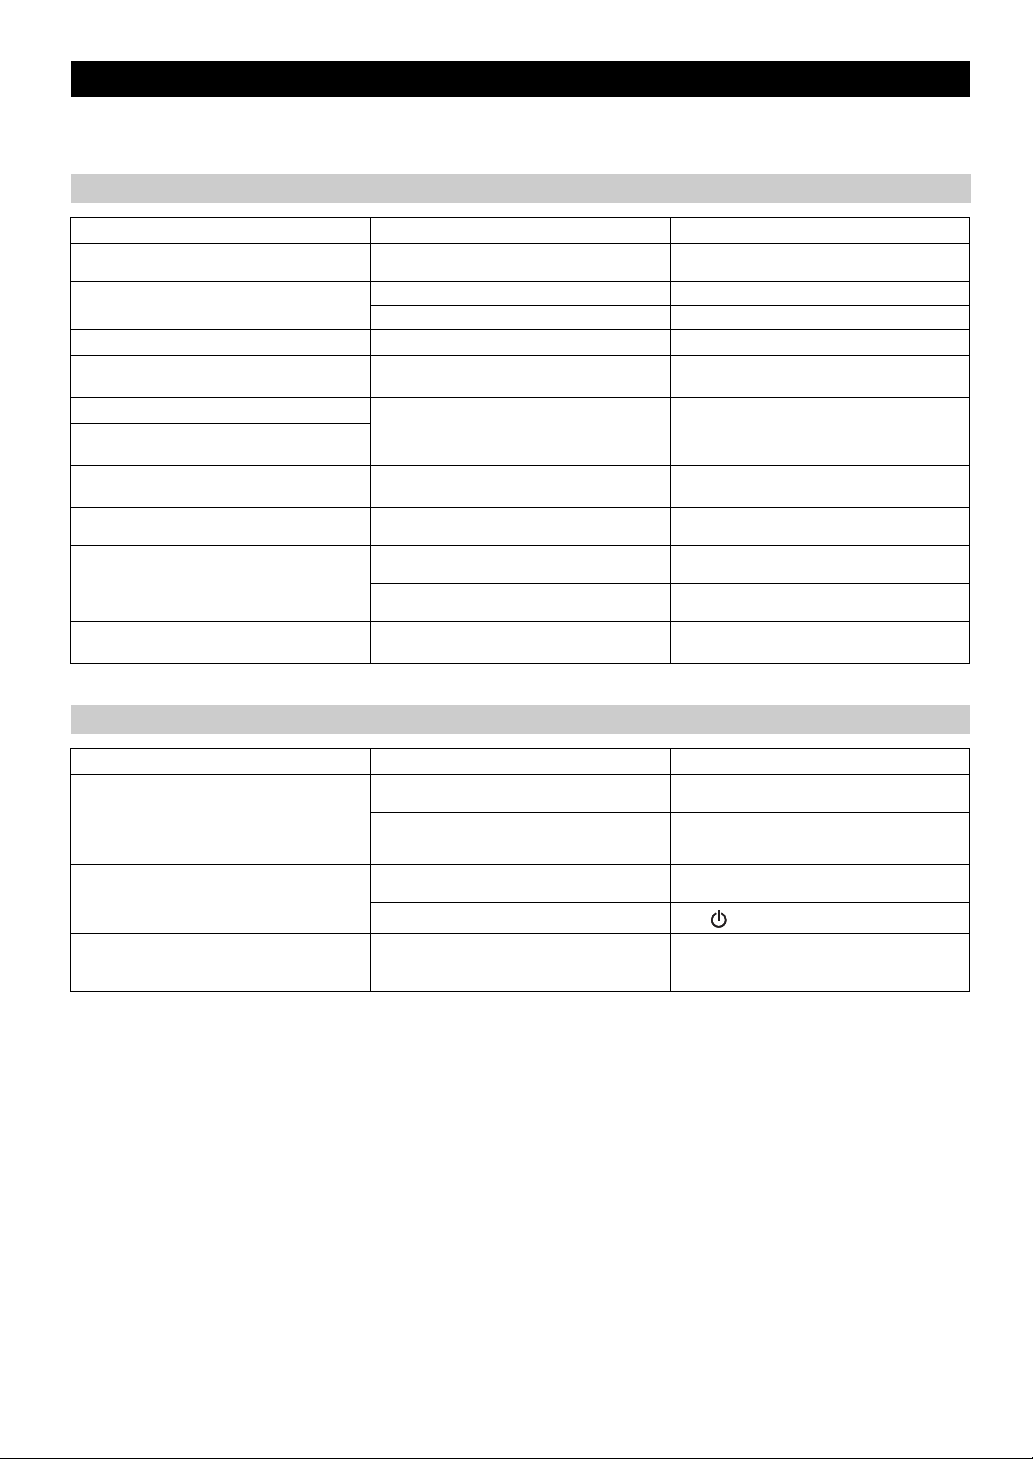
Remote control
1
2
3
4
5
6
7
8
9
j
k
p
o
a Remote control signal transmitter
b (Power)
Press to turn the system on/off.
c ALARM
Switches the alarm on/off.
d SNOOZE/SLEEP
Set the sleep timer or switch the alarm to snooze mode
(P. 14, 15).
e Source button
Switch the source to be played.
f FOLDER
Switch the playback folder when playing music on data CDs or
USB devices.
g /
Skip the playback track/file.
Holding the button down while playing a track/file will search
backward/forward the track/file.
h
Play/pause.
i
Stop playback.
j (Repeat)/ (Shuffle)
Play music on an iPod, audio/data CD or USB device in repeat/
shuffle (P. 6, 9).
k EQ LOW/MID/HIGH
Adjust the bass, middle or treble sound quality (P. 15).
l
m
4 En
n
l PRESET /
Select a preset FM station.
m MEMORY
Store the FM station (P. 10).
n TUNING /
Tune the radio.
o VOLUME +/–
Adjust the volume.
p MUTE
Mute/resume the sound.
Page 7
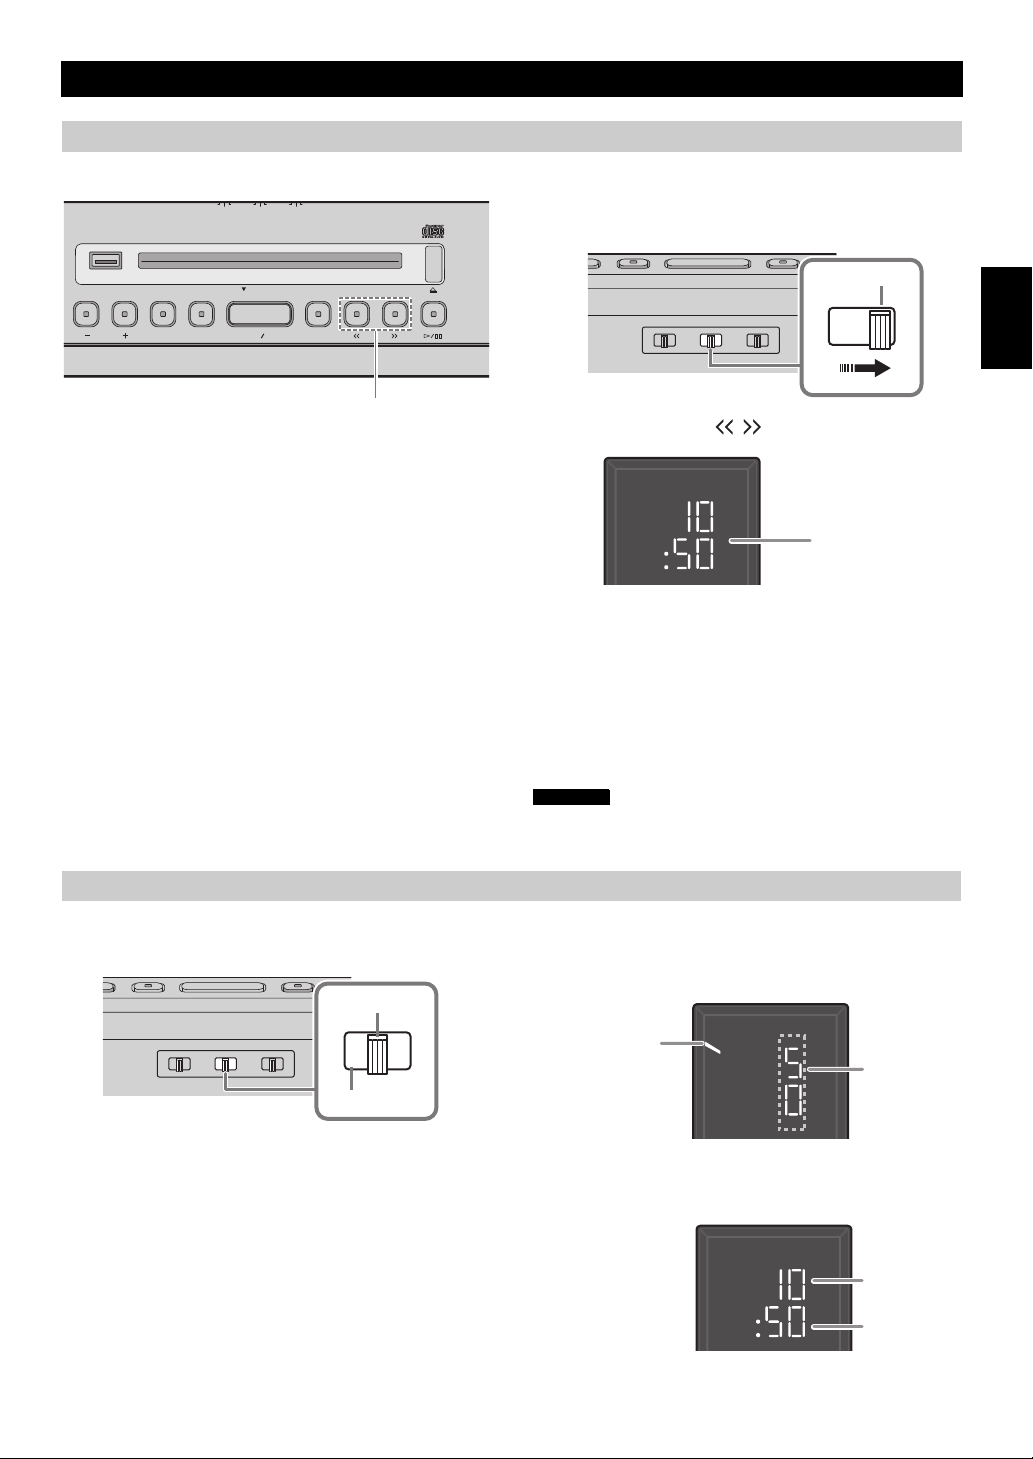
Note
Setting the time
AUTO SET BEEP
SOURCE + BEEP
SOURCE
DIMMER
CLOCK
ALARM TYPE
212
1
VOLUME
USB LABEL SIDE
SOURCE PRESETALARM SNOOZE
SLEEP
2
Top panel
SET
Rear panel
Set time (flashing)
CLOCK 2
CLOCK 1
Rear panel
Eg: 10:50 AM
Analog clock
hour hand
(hour)
Minute
Eg: 10:50 AM
Minute
Hour
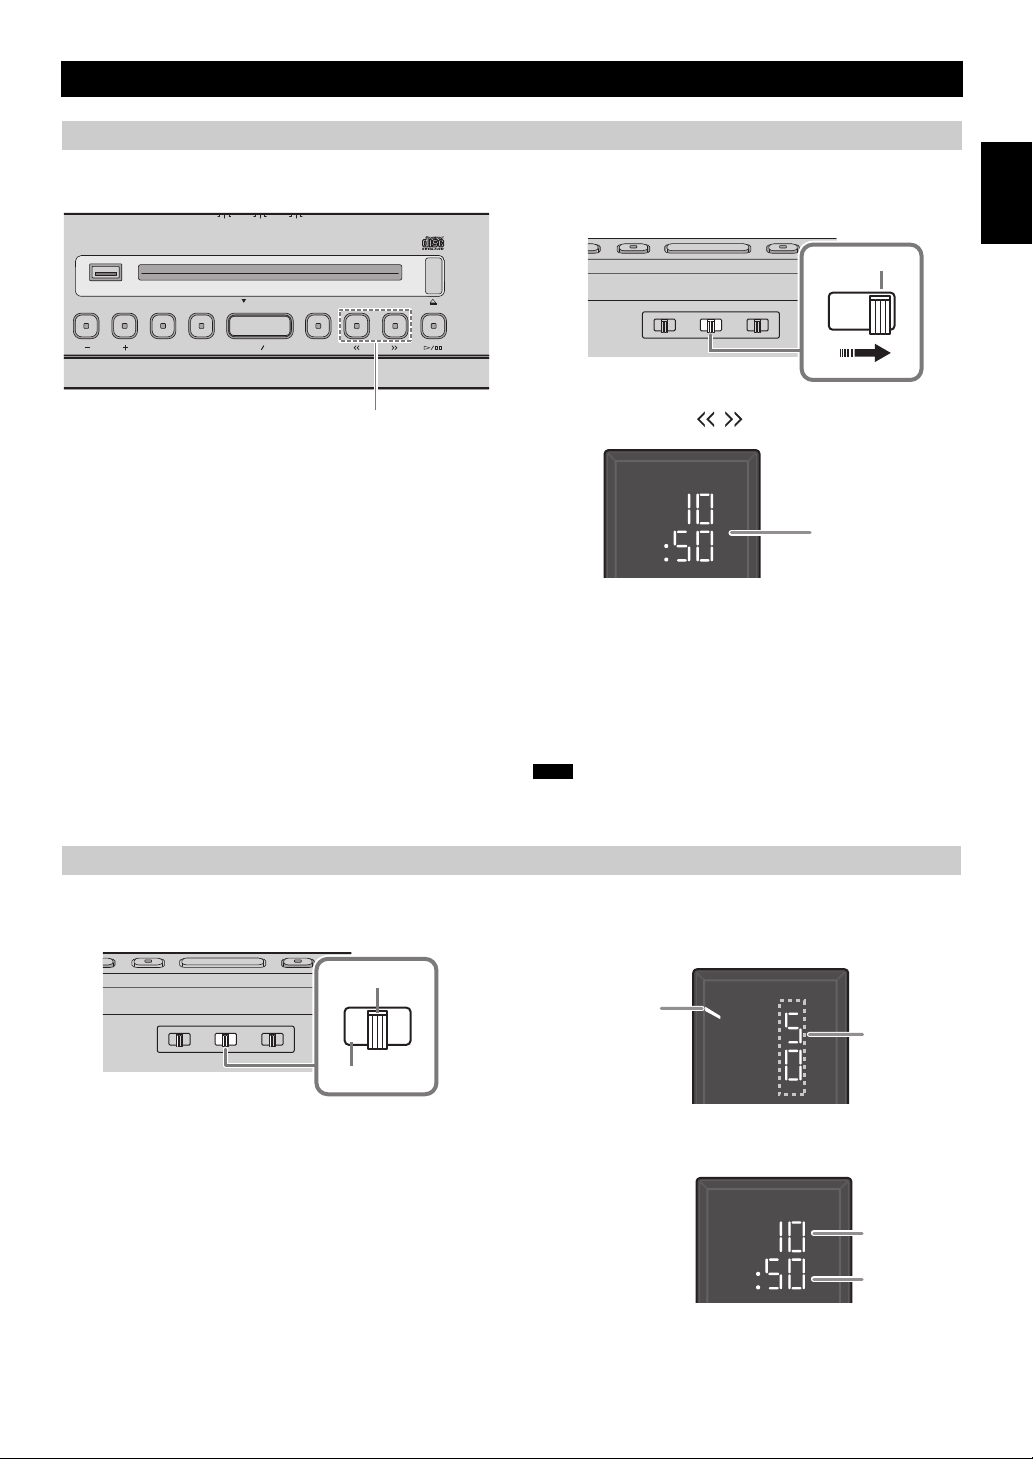
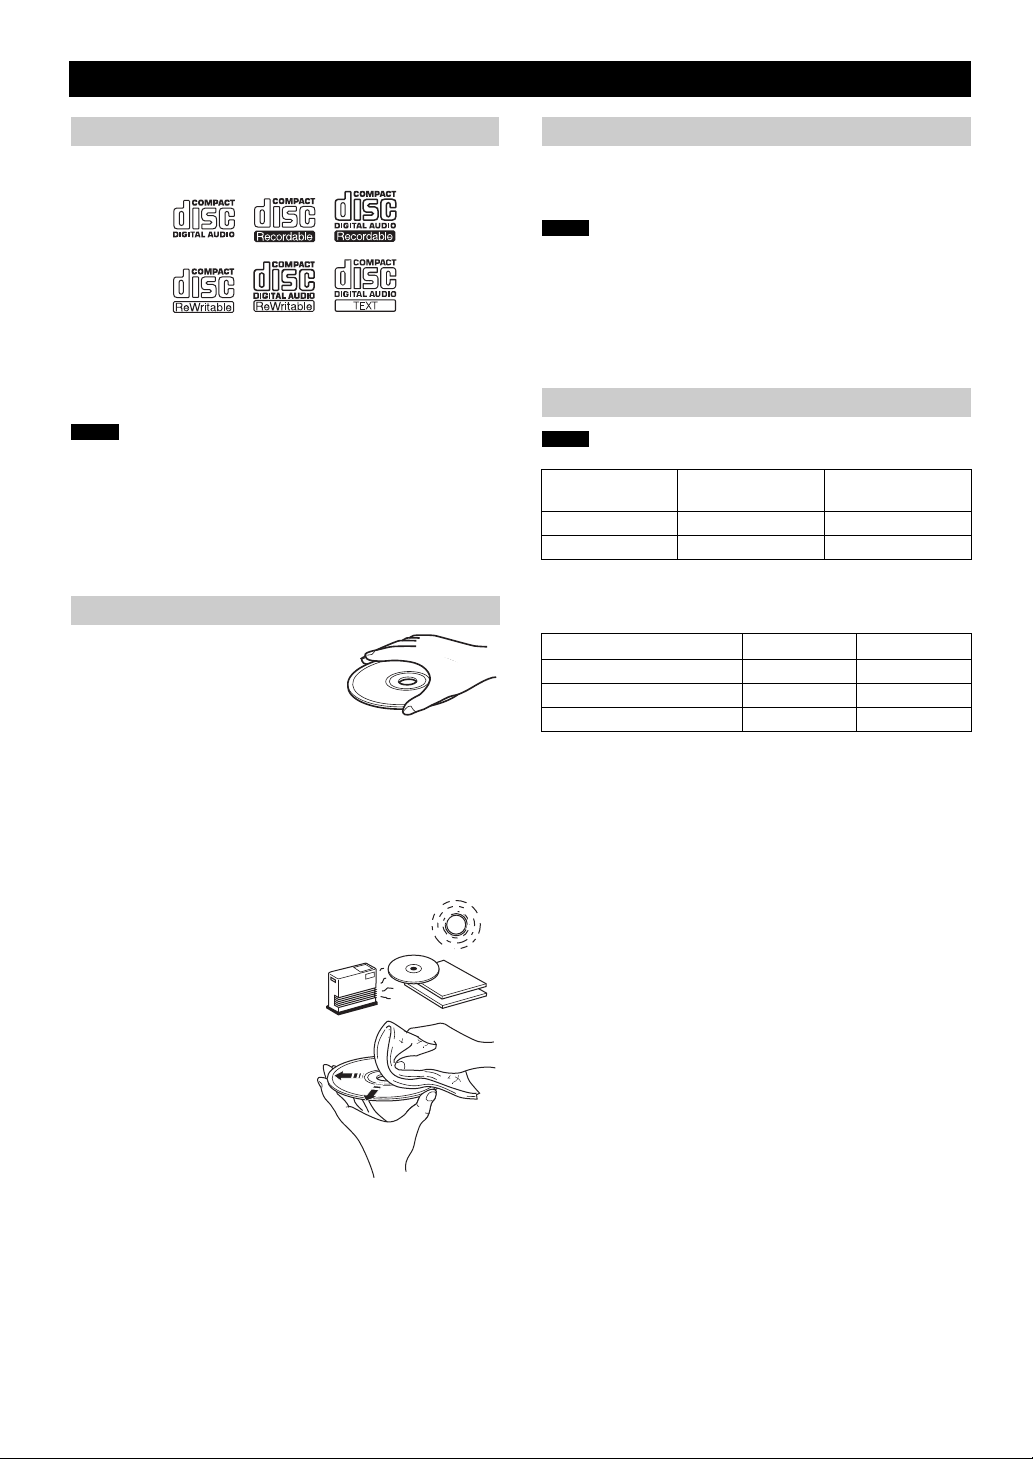
ADJUSTING THE CLOCK
1 Move the CLOCK switch on the rear panel to SET.
2 Set the time with / .
3 Move the CLOCK switch on the rear panel to
CLOCK1 or CLOCK2.
y
• Connecting an iPod to the iPod dock in step 2 will copy the time on the
iPod to the unit. If the iPod is already connected to the iPod dock when
CLOCK is set to SET, the time in the iPod will not be copied.
• Pressing SNOOZE/SLEEP in step
hour clock display.
English
2 will switch between the 12 and 24
Switching the clock type
Move the CLOCK switch on the rear panel to switch the clock type.
The time settings will be reset if the unit is not powered for more than one
week.
Clock display mode 1 (CLOCK 1)
Clock display mode 2 (CLOCK 2)
5 En
Page 8

Notes
LISTENING TO iPod
AUTO SET BEEP
SOURCE + BEEP
SOURCE
DIMMER
CLOCK
ALARM TYPE
212
1
VOLUME
USB LABEL SIDE
SOURCE PRESETALARM SNOOZE
SLEEP
23
Top panel
Remote control
REPEAT
SHUFFLE
Remote control
Playing the iPod
For details on compatible iPod models, refer to “SPECIFICATIONS” (P. 19).
1 Connect an iPod to the iPod dock.
2 Press SOURCE and set iPod as the playback
3 Play the iPod by pressing / .
y
• You can remove the iPod whenever you want.
• If the system is turned off, it will turn on automatically when music/video
source.
Playback can be controlled with either the remote control,
iPod or the top panel on this unit.
Button Function
Play/Pause
Skip
Search backward/forward
(press and hold down)
Play/Pause
Skip
Search backward/forward
(press and hold down)
iPod menu control
Top
Panel
Remote
control
on the iPod is played.
/
/
/
FOLDER/
MENU/
ENTER/
Repeat/shuffle playback
Playback
mode can be checked with the indicator on the front panel display.
• Repeat/shuffle may not operate correctly depending on the type of iPod
used.
• The repeat/shuffle playback order may differ depending on the type of
iPod used.
Repeat playback
Press REPEAT on the remote control to select a playback mode
from the following.
:One
:All
No display: Off
Shuffle playback
Press SHUFFLE on the remote control to select a playback mode
from the following.
: Songs
:Albums
No display: Off
6 En
Page 9
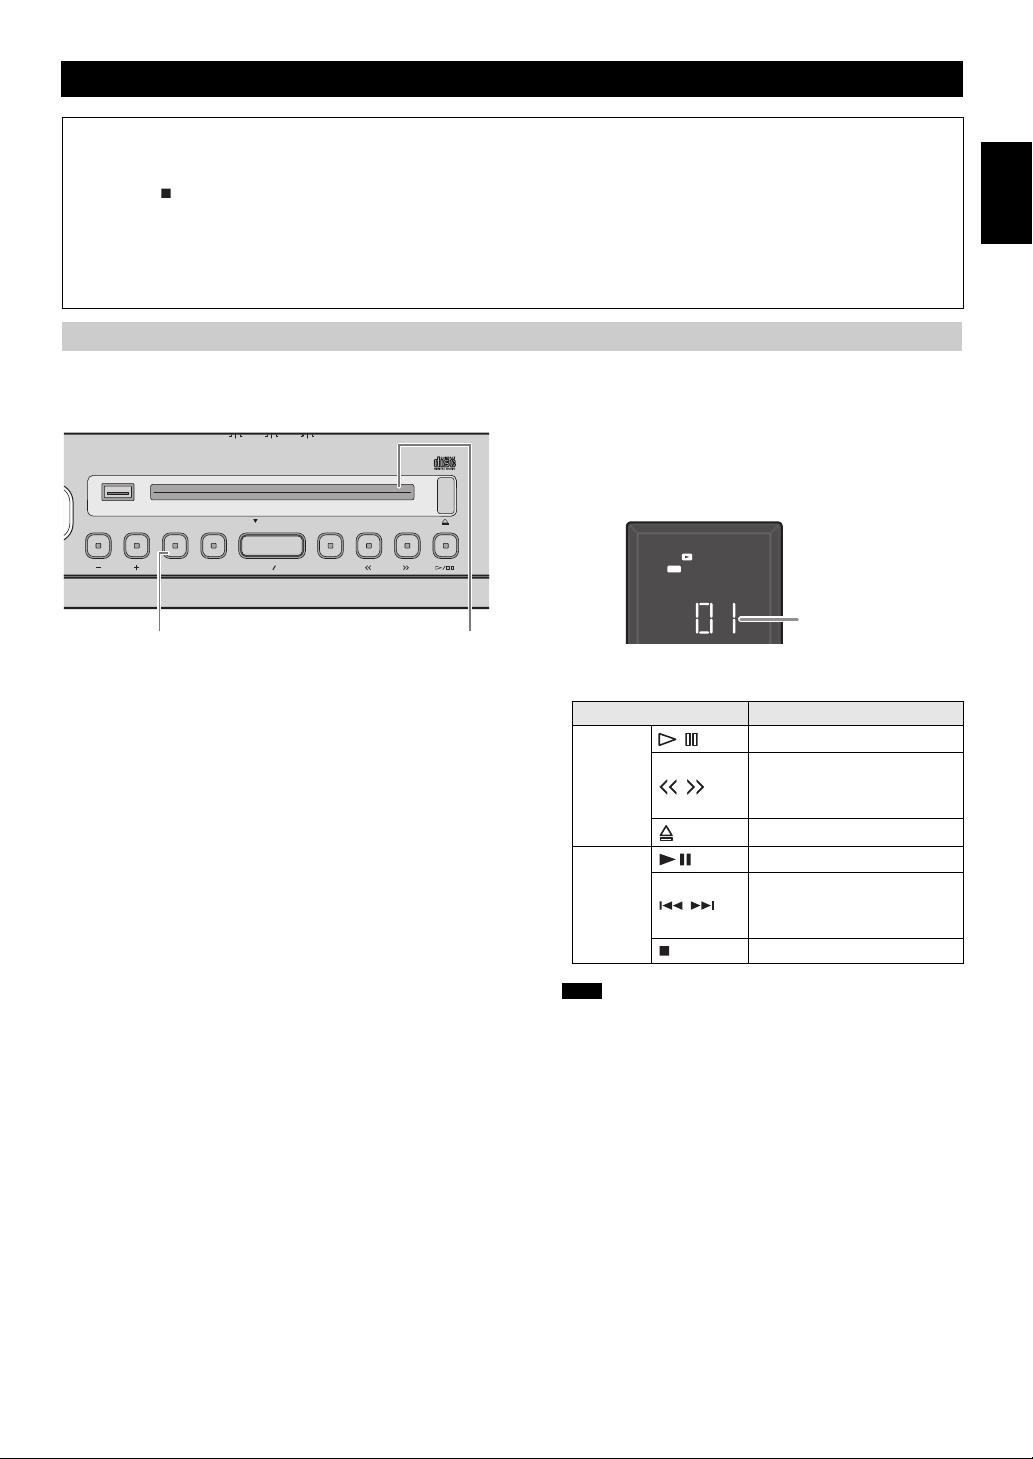
Note
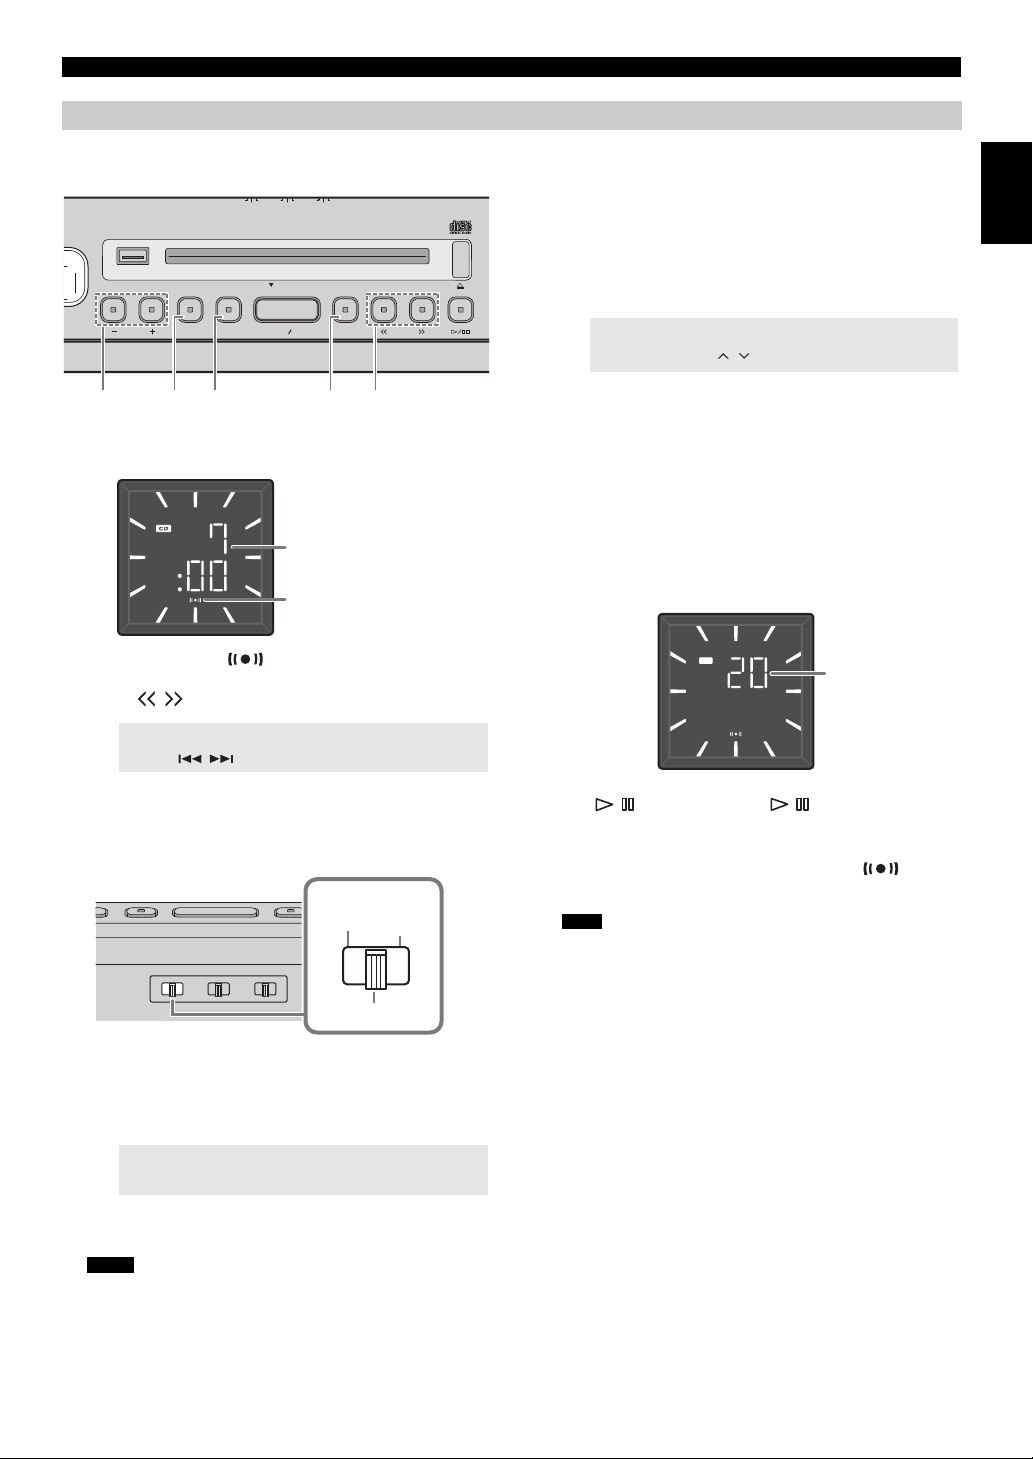
LISTENING TO CD AND USB DEVICES
Top panel
CD
Track number
The unit will operate as follows when playing back tracks/files on CD/USB devices.
• If the CD/USB device being played back is stopped, the track that was being played back will start playing from the beginning of the
track the next time playback begins.
• If you press on the remote control while playback is stopped, the next time playback begins, the unit will play tracks as follows:
– For audio CD : from the first track of the CD.
– For data CD/USB device: from the first track of the folder that contains the track that was played last.
• The system turns off automatically 60 minutes after CD/USB device playback is stopped.
y
For details on playable discs and files, refer to “NOTES ON DISCS AND USB DEVICES” (P. 18).
Listening to an audio CD
1 Press SOURCE to set CD as the playback source.
English
AUTO SET BEEP
212
1
CLOCK
DIMMER
ALARM TYPE
SOURCE + BEEP
SOURCE
2 Insert the audio CD into the Disc slot with the
label side facing toward the front of the unit.
Playback starts automatically. The track number is shown for a
while when starting playback or skipping tracks.
USB LABEL SIDE
VOLUME
SOURCE PRESETALARM SNOOZE
SLEEP
12
Use the following buttons to control the unit while playing
back tracks on audio CDs.
Button Function
Top
Panel
Remote
control
/
Play/Pause
Skip
/
Search backward/forward
(press and hold down)
Eject the CD
Play/Pause
Skip
/
Search backward/forward
(press and hold down)
Stop
CDs cannot be inserted or ejected when the system is in power save
mode (☞ P. 2 ).
7 En
Page 10
LISTENING TO CD AND USB DEVICES
AUTO SET BEEP
SOURCE + BEEP
SOURCE
DIMMER
CLOCK
ALARM TYPE
212
1
VOLUME
USB LABEL SIDE
SOURCE PRESETALARM SNOOZE
SLEEP
12
Top panel
CD
Folder number
File number
Listening to a data CD
1 Press SOURCE to set CD as the playback source.
2 Insert the data CD into the Disc slot with the
label side facing toward the front of the unit.
Playback starts automatically. The folder/file number is shown
for a while when starting playback or skipping tracks.
Use the following buttons to control the unit while playing
back tracks on data CDs.
Button Function
Play/Pause
Skip
Search backward/forward
(press and hold down)
Eject the CD
Play/Pause
Skip
Search backward/forward
(press and hold down)
Stop
Top
Panel
Remote
control
/
/
PRESET Change the playback folder
/
FOLDER Change the playback folder
8 En
Page 11
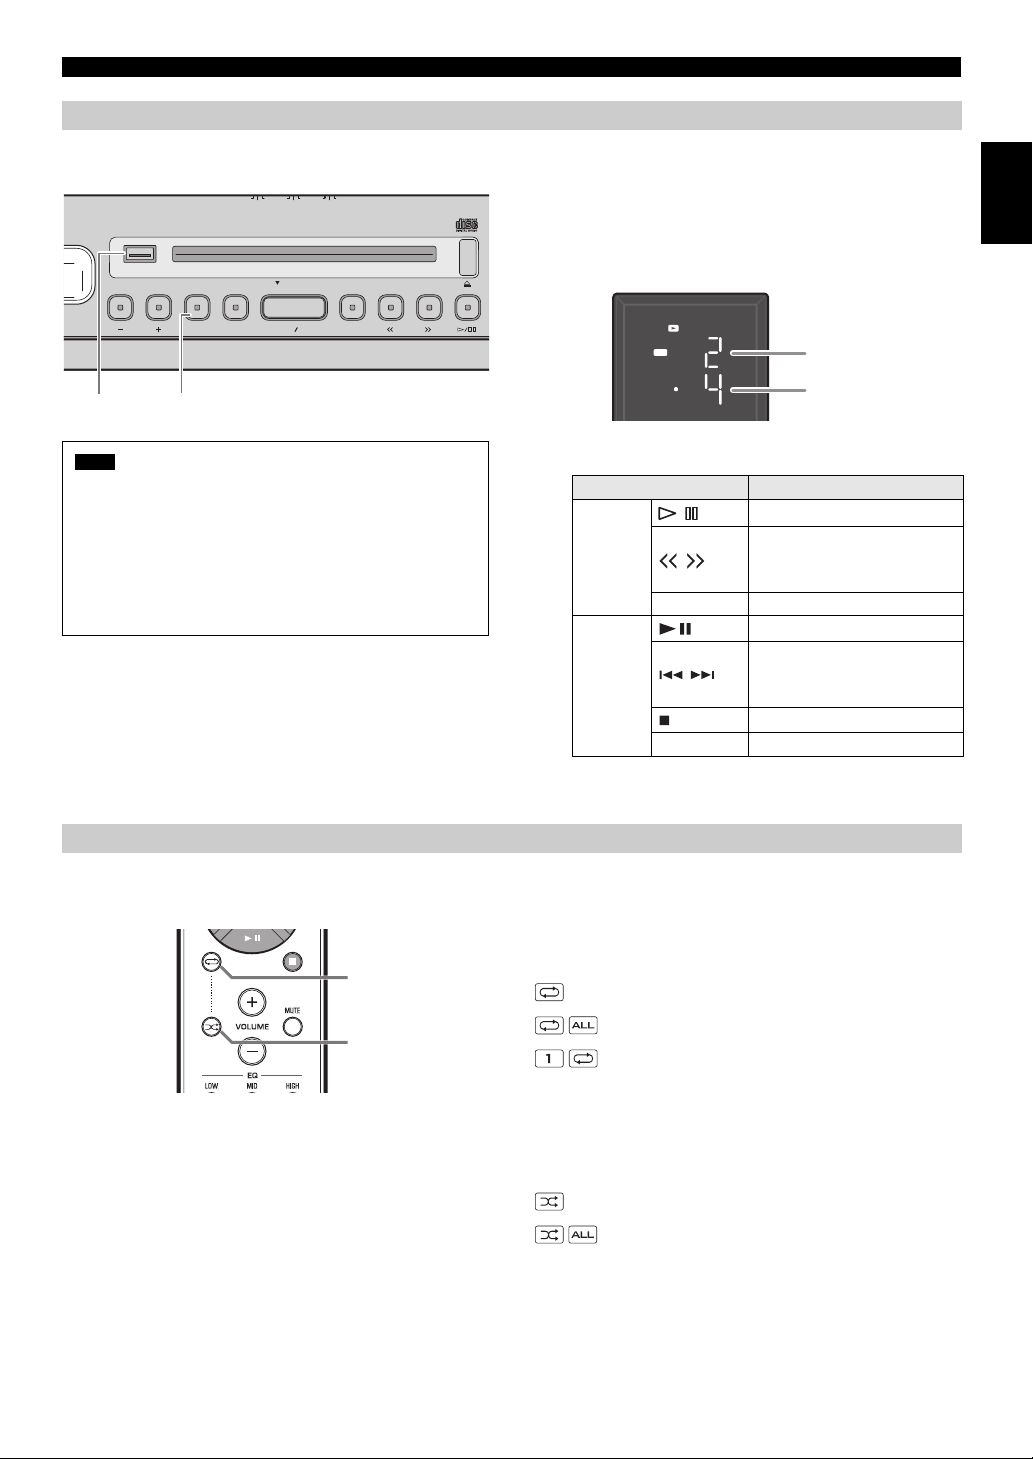
Listening to a USB device
Note
AUTO SET BEEP
SOURCE + BEEP
SOURCE
DIMMER
CLOCK
ALARM TYPE
212
1
VOLUME
USB LABEL SIDE
SOURCE PRESETALARM SNOOZE
SLEEP
21
Top panel
USB
Folder number
File number
REPEAT
SHUFFLE
Remote control
LISTENING TO CD AND USB DEVICES
When a USB device is connected, tracks are played back in the
following order:
– Folder playback order:
folders are played in alphabetical order of the first 3 characters
of the folder name. Folder containing characters other than the
alphabet are played after alphabet character folders.
– File playback order:
files will be played back in order from files with the oldest wrote
date.
1 Press SOURCE and set USB as the playback
source.
2 Connect a USB device to the USB port.
Playback starts automatically. The folder/file number is shown
for a while
Use the following buttons to control the unit while playing
back tracks on USB devices.
y
You can remove the USB device whenever you want.
when starting playback or skipping tracks.
Button Function
Play/Pause
Skip
Search backward/forward
(press and hold down)
Top
Panel
/
/
PRESET Change the playback folder
Play/Pause
Skip
Remote
control
/
Search backward/forward
(press and hold down)
Stop
FOLDER Change the playback folder
English
Repeat/shuffle playback
The playback mode can be checked with the play/shuffle/repeat indicator on the front panel display.
Repeat playback
Press REPEAT on the remote control to select a playback mode
from the following.
:
No display: Repeat mode off
y
If the selected source contains folders, each folder will be played in repeat/
shuffle mode.
Shuffle playback
Press SHUFFLE on the remote control to select a playback mode
from the following.
:
No display: Shuffle mode off
All tracks within the folder (data CD/USB device only)
: All tracks
: 1 track
All tracks within the folder (data CD/USB device only)
: All tracks
9 En
Page 12
Note
LISTENING TO FM STATIONS
AUTO SET BEEP
SOURCE + BEEP
SOURCE
DIMMER
CLOCK
ALARM TYPE
212
1
VOLUME
USB LABEL SIDE
SOURCE PRESETALARM SNOOZE
SLEEP
12
Top panel
Reception
frequency
AUTO SET BEEP
SOURCE + BEEP
SOURCE
DIMMER
CLOCK
ALARM TYPE
212
1
VOLUME
USB LABEL SIDE
SOURCE PRESETALARM SNOOZE
SLEEP
234 1
Top panel
Preset
number
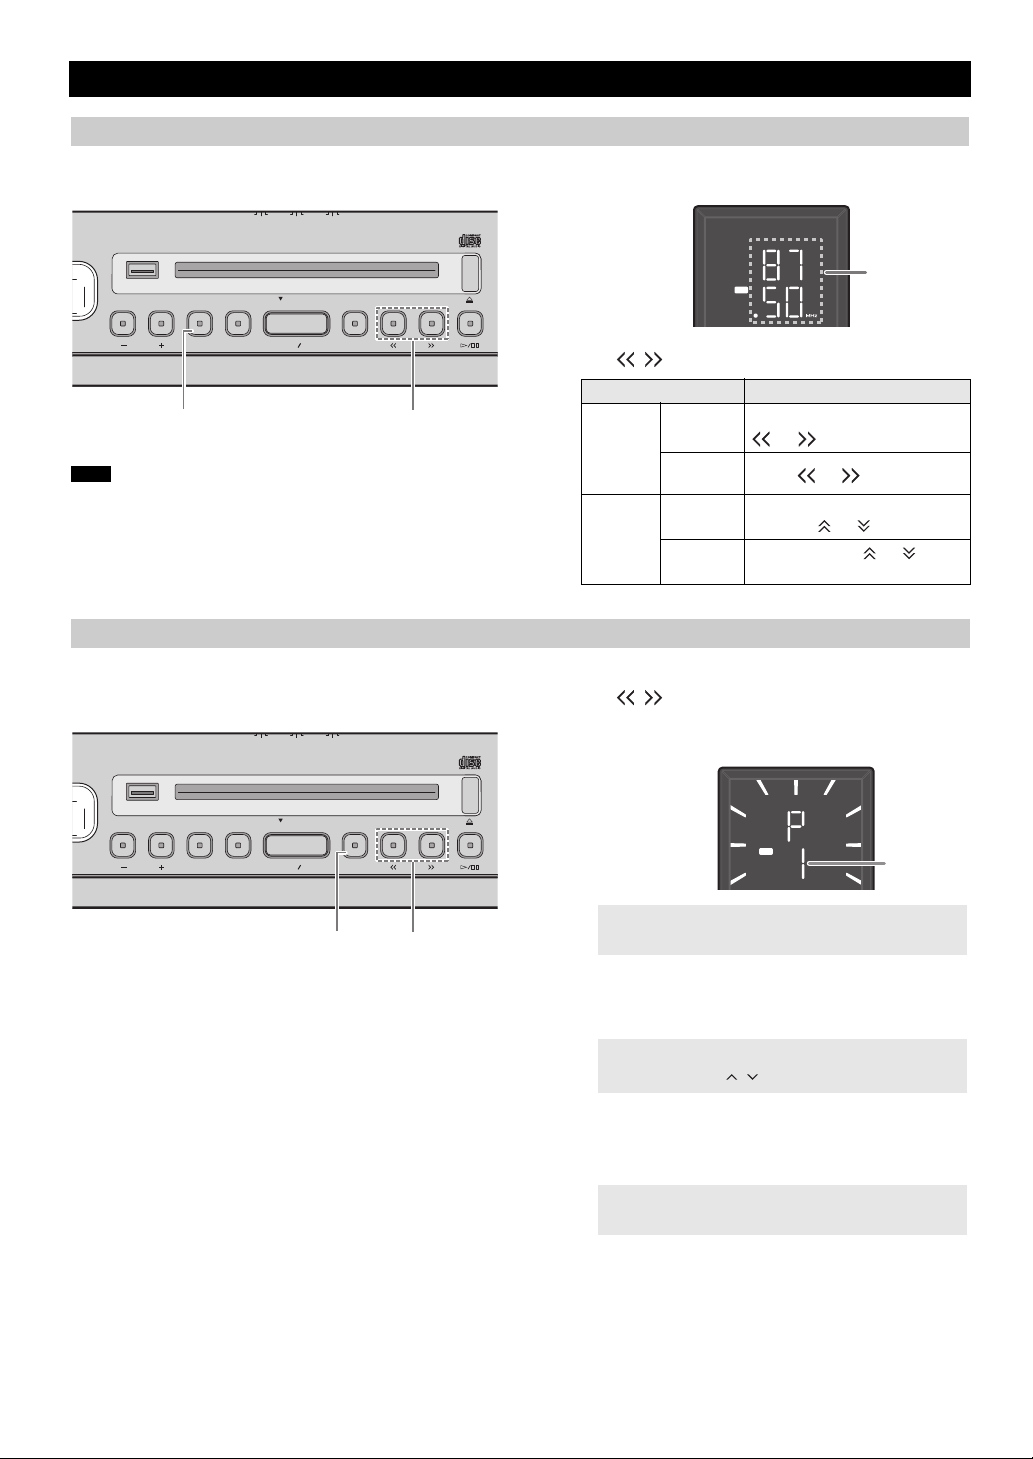
Selecting the FM station
If you tune to an FM station manually, the sound will be in monaural.
Storing FM stations (preset)
Use the preset function to store your favorite 5 stations.
1 Press SOURCE and set FM as the playback source.
FM
2 Press / to tune the FM station.
Tuning type Operation
Press and hold down
or .
Press or repeatedly.
Press and hold down
TUNING or .
Press TUNING or
repeatedly.
Top
panel
Remote
control
Automatic
tuning
Manual
tuning
Automatic
tuning
Manual
tuning
1 Press / to tune into your favorite FM station.
2 Press and hold down PRESET.
FM
Using the remote control
Press and hold down MEMORY.
3 Press PRESET and select the preset number to
store the FM station.
Using the remote control
Press PRESET /.
4 Press and hold down PRESET to store the preset
station.
This stores the FM station.
Using the remote control
Press MEMORY.
10 En
Page 13
Note
Selecting a preset FM station
Top panel
AUTO SET
DIMMER
CL
2
1
iPod
VOLUME
USB LAB
SOURCE ALARM SNOOZ
23
Top panel
AUX
75 Ω
FM ANT
AUX
LISTENING TO EXTERNAL SOURCES
AUTO SET BEEP
212
DIMMER
USB LABEL SIDE
VOLUME
SOURCE PRESETALARM SNOOZE
1 2
1 Press SOURCE and set FM as the playback source.
SOURCE + BEEP
1
SOURCE
CLOCK
ALARM TYPE
2 Press PRESET repeatedly to select the preset FM
station.
Using the remote control
Press PRESET /.
SLEEP
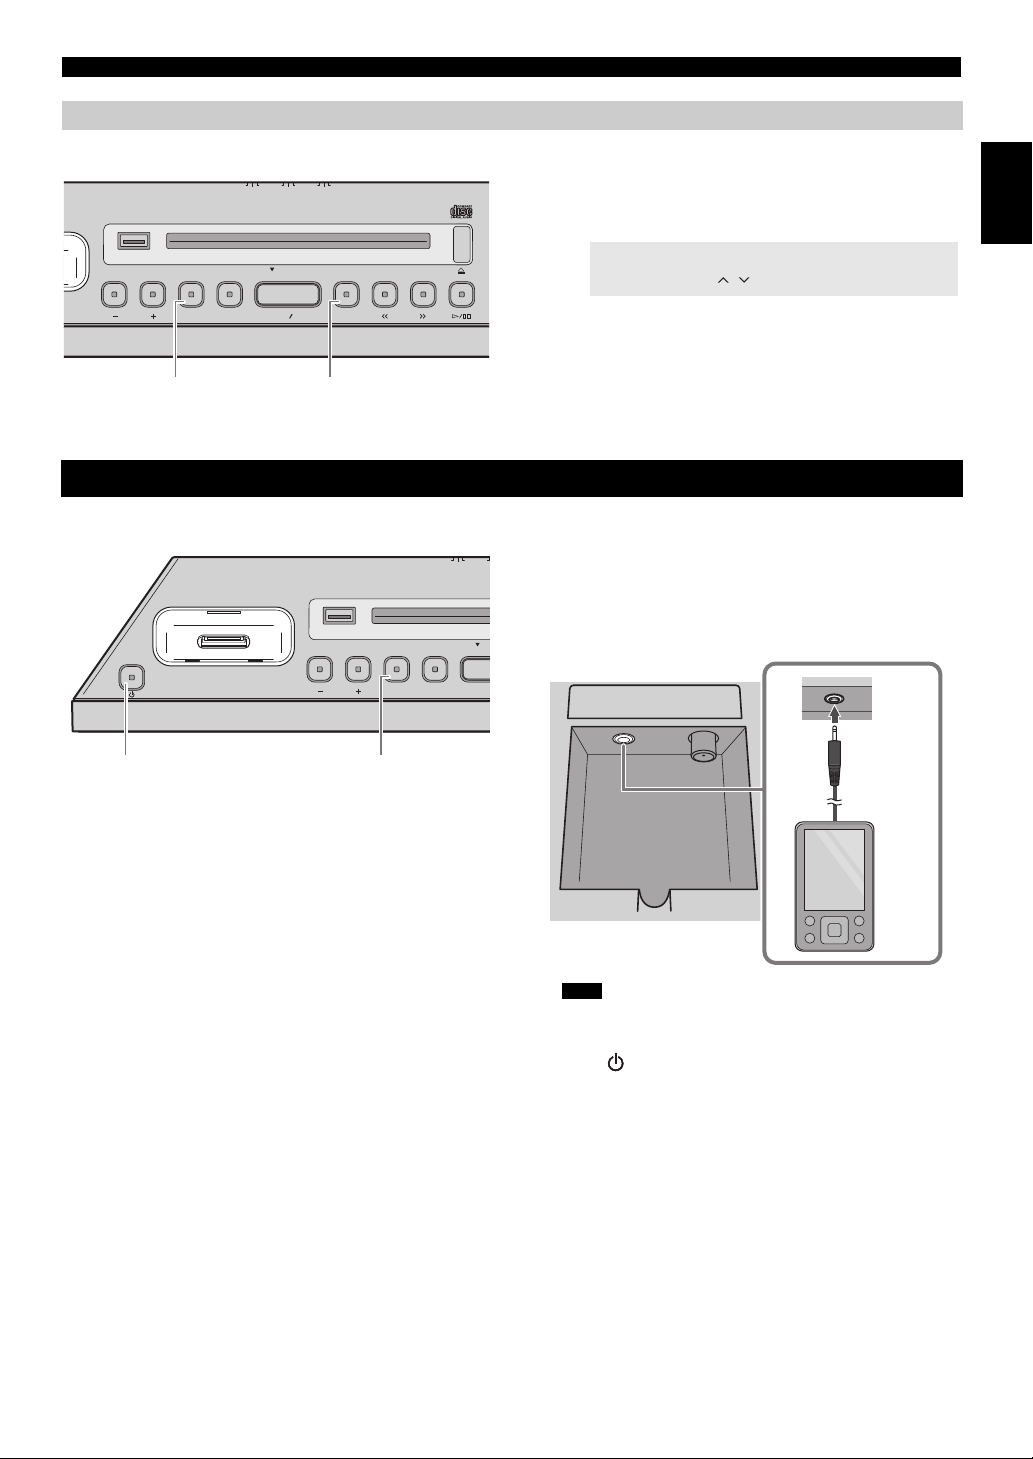
LISTENING TO EXTERNAL SOURCES
Turn the system off before connecting audio cables. Remove the
terminal cover before connecting external devices.
1 Connect external audio device to AUX on the rear
panel using a commercially available 3.5 mm (1/8 in)
stereo mini plug cable.
English
Turn down the volume of the unit and your external audio device before
connection.
2 Press to turn the system on.
3 Press SOURCE and set AUX as the playback
source.
4 Start playback on the connected external audio
device.
11 En
Page 14

USING THE ALARM FUNCTION
The unit includes an alarm function (IntelliAlarm) that plays back music sources or set of beeps at the set time in a variety of different
methods. The alarm function has following features.
3 types of alarms
Select from 3 alarm types, combining music and beep sounds.
The selected audio source and beep sound are played at the set time. This mode is recommended
for the best possible start to the day.
SOURCE + BEEP
3 minutes before the set time: the source music begins to fade in and the volume gradually increases
as the alarm time approaches.
Alarm time: a beeping sound also begins playing.
SOURCE
BEEP Only beep sound is played back at the set time.
The selected audio source is played at the set time. The volume fades in gradually and increases to
the set volume.
Various music sources
The iPod, audio CD, data CD, USB device and radio can be selected. The following can also be selected depending on the audio source:
Source Playback method Function
A specific playlist stored on the iPod can be played back repeatedly.
To play a playlist, create a playlist with the name “ALARM Yamaha
Playlist*
iPod
Resume
Selected track The selected track is played repeatedly.
Audio CD
Resume The track you listened to last time is played back.
Folder The selected folder is played repeatedly.
Data CD/USB
Resume The track you listened to last time is played back.
Preset station The selected preset FM station is played.
FM
Resume The FM station you listened to last time is played back.
DTA” in advance.
When creating the playlist name, make sure there are spaces
between words, and take note of upper/lower case letters.
If the “ALARM Yamaha DTA” playlist cannot be found within the iPod,
the unit resumes play from the last track you played.
* For information on creating a playlist, refer to the instructions for your iPod or iTunes.
Test alarm
You can test the sound of the alarm when setting the alarm function.
Snooze
The snooze function can be enabled to replay the alarm after 5 minutes.
12 En
Page 15
Notes
Note
Set the alarm time and alarm type
Top panel
Alarm indicator
Alarm time
BEEP
SOURCE+
BEEP
SOURCE
Rear panel
Alarm volume
USING THE ALARM FUNCTION
AUTO SET BEEP
212
DIMMER
USB LABEL SIDE
SOURCE PRESETALARM SNOOZE
VOLUME
17
SOURCE + BEEP
1
SOURCE
CLOCK
ALARM TYPE
SLEEP
2465
1 Press and hold ALARM.
The alarm indicator ( ) and set alarm time will flash.
2 Press / to set the alarm time.
Using the remote control
Press / .
3 Select the alarm type with the ALARM TYPE
switch on the rear panel.
For details on alarm types, refer to P. 12.
5 (when alarm types other than BEEP are selected)
Specify the track, folder or FM station to be played.
If iPod is set as the source:
No settings required.
If CD/USB/FM is selected as the source:
Press PRESET to select the track (audio CD), folder (data
CD/USB devise) or FM station to be played.
Using the remote control
Press PRESET /.
y
• When iPod is set as the source, the unit plays back the “ALARM
Yamaha DTA” playlist at the set alarm time. If this playlist cannot be
found within the iPod, the unit resumes play from the last track you
played (resume).
• When CD/USB is selected as the source and “0” is set as track/folder
number, the playback resumes from the track you listened to last time
(resume).
• When FM is selected as the source and preset number “0” is set, the
unit resumes broadcasting the last FM station you listened to
(resume).
6 Set the alarm volume by pressing VOLUME –/+
CD
y
Press / to test the alarm. Press / again to stop testing.
7 Press ALARM to complete setting the alarm.
The alarm will be set, and the alarm indicator ( ) will
light up.
English
.
4 (when alarm types other than BEEP are selected)
Press SOURCE to select music source.
Sources other than AUX can be selected.
Using the remote control
Press Source button to select music source.
If iPod/CD/USB has been selected, connect/insert the audio
source (iPod, audio/data CD, USB device) to the unit.
• If the selected source is not connected or inserted, the selected track/
folder cannot be played.
• If source cannot be played back at the time set for the alarm (eg. iPod
is not connected), the beep sound is played back.
The alarm setting will be erased if the system is turned off without
properly completing it.
13 En
Page 16
USING THE ALARM FUNCTION
AUTO SET BEEP
SOUR
DIMMER
CLOCK
ALARM
212
1
iPod
VOLUME
USB LABEL SIDE
SOURCE ALARM SNOOZE
SLEEP
1
Top panel
AUTO SET BEEP
SOUR
DIMMER
CLOCK
ALARM
212
1
iPod
VOLUME
USB LABEL SIDE
SOURCE ALARM SNOOZE
SLEEP
2
2
1
Top panel
Turning the alarm on/off
1 Press ALARM.
When the alarm is on, the alarm indicator ( ) is shown,
and the alarm time is shown for a while. If you press ALARM
again, the alarm indicator ( ) and the alarm will turn off.
y
The set alarm time will be saved even if the alarm is turned off. If the
alarm is turned on again by pressing ALARM, the alarm will sound
with the previously alarm settings.
Operations while playing back alarm sound
At the set time, the alarm sound is played back. During playback, the following operations are available.
1 (if you want to stop the alarm for a short time) Press
SNOOZE/SLEEP.
SNOOZE will stop the alarm and resume again in 5 minutes.
y
• When SOURCE + BEEP is set, press SNOOZE/SLEEP once to
stop the beep sound, and twice to stop the audio source. 5 minutes
after the audio source is stopped, it will start fading in again and the
beep sound will resume.
• The alarm indicator will flash when the snooze function is activated.
2 (if you want to turn the alarm off) Press ALARM or
.
y
The alarm stops automatically after 60 minutes unless you stop the
alarm.
14 En
Page 17
Note
USING THE SLEEP TIMER
AUTO SET BEEP
SOURC
DIMMER
CLOCK
ALARM T
212
1
iPod
VOLUME
USB LABEL SIDE
SOURCE ALARM SNOOZE
SLEEP
1
Top panel
1
2
3
Remote control
iPod
:HIGH
:MID
:LOW
Ton e
Setting
Tone
AUTO21
Rear panel
You can set the time to turn off the system automatically.
TONE CONTROL
1 Press SNOOZE/SLEEP a number of times to set
the time until the system turns off.
The sleep timer can be set to 30, 60, 90 and 120 minutes.
When the time is set, the sleep indicator ( ) is shown on the
front panel display.
y
If you press SNOOZE/SLEEP while the sleep timer is activated, the
sleep timer setting will be canceled.
1 Press one of the LOW/MID/HIGH EQ buttons on
the remote control while playing back.
Select the tone to be adjusted (LOW, MID, HIGH).
English
2 Press / to adjust the tone.
Each tone can be adjusted from –5 to +5.
3 Press ENTER to complete settings.
You can also press the EQ button that you pressed in Step 1
to complete the settings.
To change the tone of other audio frequencies, return to step
1 and press the EQ button to adjust the desired frequency.
ADJUST BRIGHTNESS OF FRONT PANEL DISPLAY
1 Adjust the brightness with the DIMMER switch on
the rear panel.
AUTO: adjusts the brightness automatically to match the
1: brighter.
2: darker.
When Auto is set, the brightness of the front panel display is adjusted
automatically with the brightness sensor (P. 3). Ensure that the sensor is
not covered.
surroundings.
15 En
Page 18
TROUBLESHOOTING
If there is a problem with the unit, check the following list first. If you cannot resolve the problem with the suggested solutions or if the
problem is not listed below, turn off and unplug the system, and consult the nearest authorized Yamaha dealer or service center.
General
Problem Cause Solution
Can’t turn on the unit.
The speakers make no sound.
Sound suddenly turns off.
Sound is cracked/distorted or there is
abnormal noise.
The unit does not operate properly.
The system turns on but immediately
shuts off.
A digital or high-frequency equipment
produces noises.
The clock setting has been cleared.
iPod does not play back at the alarm time
even if SOURCE is set to iPod.
Clock flashes and the unit cannot be
operated.
The power cable is not connect firmly. Reconnect the power cable into the wall outlet and
The volume may be set to the minimum level. Adjust the volume level.
The source may be incorrect. Select the correct source.
The sleep (☞ P. 15) may be set. Turn on the system and play the source again.
Input source volume is excessive, or volume of this
unit is excessive (especially Bass).
The unit may have received a strong electrical
shock such as lightning or excessive static
electricity, or power supply may have dropped.
The unit may be placed too close to the digital or
high-frequency equipment.
The unit is left more than one week after you
disconnect the power cable from the wall outlet.
The iPod is not connect in the iPod dock firmly. Remove an iPod from the unit, and then connect it
ALARM TYPE switch is set to BEEP. Set ALARM TYPE to SOURCE + BEEP or
CLOCK switch on the rear panel is set to SET, and
this unit is in clock setting mode.
the unit firmly.
Adjust volume with VOLUME, or adjust Bass with
EQ (☞ P. 1 5).
Turn the system off, and disconnect the power
cable. Wait about 30 seconds, reconnect the power
cable, and turn the system on.
Place the unit further away from the equipment.
Plug the power cable into the wall outlet firmly, and
set the clock again (☞ P. 5).
in the iPod dock again (☞ P. 2 ).
SOURCE (☞ P. 13).
Set CLOCK switch to CLOCK1 or CLOCK2
(☞ P. 5).
iPod
Problem Cause Solution
No sound.
The iPod does not charge up.
The iPod indicator flashes twice, and
repeated 3 times, after connecting the
iPod.
The iPod is not connect in the iPod dock firmly. Remove an iPod from the unit, and then connect it
The iPod software version has not been updated. Download the latest iTunes version from the Apple
The iPod is not connect in the iPod dock firmly. Remove an iPod from the unit, and then connect it
The system is set to power save mode (☞ P. 2).
The iPod being used is not supported by the unit. Use a supported iPod (☞ P. 19 ) .
in the iPod dock again (☞ P. 2 ).
website, and update the iPod software to the latest
version.
in the iPod dock again (☞ P. 2 ).
Press to cancel the power save mode.
16 En
Page 19

CD playback
TROUBLESHOOTING
Problem Cause Solution
Disc cannot be inserted.
Some button operations do not work.
Playback does not start immediately after
pressing / .
The CD indicator flashes twice, and
repeated 3 times, and the disc is ejected.
“Err” is displayed in the front panel
display after loading a disc.
USB device playback
Problem Cause Solution
MP3/WMA file on the USB device does
not play.
The USB indicator flashes twice, and
repeated 3 times, after connecting a USB
device.
“Err” is displayed in the front panel
display after connecting a USB device.
The system is set to power save mode.
The disc loaded into the unit may not be
compatible.
The disc may be dirty. Wipe the disc clean.
The disc loaded into the unit may not be
compatible.
If the unit was moved from a cold to warm place,
condensation may have formed on the disc reading
lens.
The disc loaded into the unit may not be
compatible.
The disc may be dirty. Wipe the disc clean.
The disc does not contain playable files. Use a disc contains playable files (☞ P. 18, 19).
The disc is loaded back to front. Insert a disc facing the label side to near side.
An error occurs in the unit.
The USB device is not recognized. Turn off the system and reconnect the USB device
An incompatible USB device is connected to the
unit.
The USB device does not contain playable files. Use a USB device contains playable files (☞ P. 18,
An incompatible USB device is connected to the
unit.
An overcurrent is detected.
Press to cancel the power save mode (☞ P. 2).
Use a disc supported by the unit (☞ P. 18).
Use a disc supported by the unit (☞ P. 18).
Wait for an hour or two until the unit adjusts to the
room temperature, and try again.
Use a disc supported by the unit (☞ P. 18).
Eject the disc with .
to the unit.
Connect an AC adapter if supplied with the device.
If the solutions above do not resolve the problem,
the USB device is not playable on the unit.
Turn off the system and reconnect the USB device
to the unit. If it does not resolve the problem, the
USB device is not playable on the unit.
19).
Turn off the system and reconnect the USB device
to the unit. If it does not resolve the problem, the
USB device is not playable on the unit.
English
FM radio reception
Problem Cause Solution
Too much noise during stereo broadcast.
Even with an outdoor antenna, radio wave
reception is weak. (Sound is distorted.)
Remote control
Problem Cause Solution
The remote control does not work
properly.
The antenna may be connected improperly. Make sure the antenna is connected properly
The radio station you selected may be far from your
area, or the radio wave reception is weak in your
area.
Multipath reflection or other radio interferences
may have occurred.
The remote control may be operated outside its
operation range.
The remote control signal receiver on the unit
(☞ P. 3) may be exposed to direct sunlight or
lighting (inverted fluorescent lamps).
The battery may be worn out. Replace the batteries with two new ones.
There are obstacles between the remote control
signal receiver on the unit and the remote control.
(☞ P. 3).
Try manual tuning to improve the signal quality
(☞ P. 10) or use a multi-channel outdoor antenna.
Change the height, direction, or placement of the
antenna.
For information on the remote control operation
range, refer to “How to use the remote control”
(P. 1).
Change the lighting or orientation of the unit.
Remove the obstacles.
17 En
Page 20
Notes
Notes
Notes
NOTES ON DISCS AND USB DEVICES
Caution
CD information
This unit is designed for use with audio CD, CD-R*, and CD-RW*
with the logos followings.
* ISO 9660 format CD-R/RW
y
This unit can play back discs bearing any of the logo marks above. A disc
logo mark is printed on the disc and the disc jacket.
• Do not load any other type of disc into this unit. Doing so may damage this
unit.
• CD-R/RW cannot be played back unless finalized.
• Some discs cannot be played back depending on the disc characteristics or
recording conditions.
• Do not use any non-standard shaped discs such as a heart-shaped disc.
• Do not use discs with many scratches on their surface.
Handling a disc
• Do not touch the surface of the disc.
Hold a disc by its edge (and the center
hole).
• Do not use a pencil or pointed marker
to write on the disc.
• Do not put a tape, seal, glue, etc., on a disc.
• Do not use a protective cover to prevent scratches.
• Do not load more than one disc into this unit at one time. This
can cause damage to both this unit and the discs.
• Do not insert any foreign objects into the disc slot.
• Do not load a cracked, warped, or glued disc.
• Do not expose a disc to direct
sunlight, high temperature, high
humidity, or a lot of dust.
USB device information
This unit supports USB mass storage class devices (e.g., flash
memories or portable audio players) using FAT16 or FAT32
format.
• Some devices may not work properly even if they meet the requirements.
• Do not connect devices other than USB mass storage class devices (such as
USB chargers or USB hubs), PCs, card readers, an external HDD, etc.
• Yamaha will not be held responsible for any damage to or data loss on the
USB device occurring while the device is connected to this unit.
• Playability of and power supply to all kind of USB devices are not
guaranteed.
About MP3 or WMA files
• The unit can play back:
File Bitrate (kbps)
MP3 8 - 320** 16 - 48
WMA 16 - 320** 22.05 - 48
** Both constant and variable bitrates are supported.
• The maximum numbers of files/folders that can be played on the unit are
as follows.
Data CD USB
Maximum total number of file 512 9999
Maximum folder number 255 128
Maximum file number per folder 511 255
• Copyright-protected files cannot be played back.
Sampling
frequency (kHz)
• If a disc becomes dirty, wipe it with
a clean, dry cloth from the center
out to the edge. Do not use record
cleaner or paint thinner.
• To avoid malfunction, do not use a
commercially available lens
cleaner.
• Insert only one CD into the system
at a time. Inserting two or more CDs may cause damage to both
the system and the CDs.
18 En
Page 21

SPECIFICATIONS
Φ 295 mm
(11-5/8 in)
997 mm
(39-1/4 in)
410 mm
(16-1/8 in)
410 mm
(16-1/8 in)
Weight: 12.0 kg
(26.5 lbs.)
587 mm
(23-1/8in)
PLAYER SECTION
iPod (Digital connection)
• Compatible iPod models
.............................................iPod touch (1st, 2nd, 3rd and 4th generations)
• Compatible iPhone models
........................................................................................................iPhone 4
iPod nano (2nd, 3rd, 4th, 5th and 6th generations)
CD
• Media .................................................................................. CD, CD-R/RW
• Audio format ......................................................... Audio CD, MP3, WMA
Laser
• Type .....................................................Semiconductor laser GaAs/GaAlAs
• Wave length ......................................................................................790 nm
• Output power ......................................................................................7 mW
USB
• Audio format ............................................................................MP3, WMA
AUX
• Input connector ...................................3.5 mm (1/8 in) STEREO mini jack
iPod classic
iPhone 3GS
iPhone 3G
iPhone
TUNER
• Tuning range
FM........................................................................... 87.50 to 108.00 MHz
GENERAL
• Power supply .....................................................AC 100 to 240 V, 50/60 Hz
• Power consumption ..............................................................................20 W
• System off consumption...................................................................... 1.5 W
• Power save consumption ......................................................... 0.5 W or less
• Dimensions
Specifications are subject to change without notice.
English
LASER SAFETY
This unit employs a laser. Due to possible eye injury, only a
qualified service person should remove the cover or attempt to
service this device.
DANGER
This unit emits visible laser radiation when open. Avoid direct eye
exposure to beam. When this unit is plugged into the wall outlet,
do not look inside the unit through the disc slot and other openings.
The laser component in this product is capable of emitting
radiation exceeding the limit for Class 1.
iPod, iPhone
“Made for iPod” and “Made for iPhone” mean that an electronic
accessory has been designed to connect specifically to iPod or
iPhone, respectively, and has been certified by the developer to
meet Apple performance standards.
Apple is not responsible for the operation of this device or its
compliance with safety and regulatory standards. Please note that
the use of this accessory with iPod or iPhone may affect wireless
performance.
iPhone, iPod, iPod classic, iPod nano, iPod touch and iTunes are
trademarks of Apple Inc., registered in the U.S. and other countries.
Information for Users on Collection and
Disposal of Old Equipment and Used Batteries
These symbols on the products, packaging, and/or
accompanying documents mean that used electrical and
electronic products and batteries should not be mixed
with general household waste.
For proper treatment, recovery and recycling of old
products and used batteries, please take them to
applicable collection points, in accordance with your
national legislation and the Directives 2002/96/EC and
2006/66/EC.
By disposing of these products and batteries correctly,
you will help to save valuable resources and prevent
any potential negative effects on human health and the
environment which could otherwise arise from
inappropriate waste handling.
For more information about collection and recycling of
old products and batteries, please contact your local
municipality, your waste disposal service or the point of
sale where you purchased the items.
[Information on Disposal in other Countries
outside the European Union]
These symbols are only valid in the European Union. If
you wish to discard these items, please contact your
local authorities or dealer and ask for the correct
method of disposal.
Note for the battery symbol (bottom two
symbol examples):
This symbol might be used in combination with a
chemical symbol. In this case it complies with the
requirement set by the Directive for the chemical
involved.
19 En
Page 22

ATTENTION : VEUILLEZ LIRE CE QUI SUIT AVANT D’UTILISER
L’APPAREIL.
1 Pour utiliser l’appareil au mieux de ses possibilités, lisez
attentivement ce mode d’emploi. Conservez-le
soigneusement pour référence.
2 Installez cet appareil dans un endroit frais, bien aéré, sec et
propre - à l’abri de la lumière du soleil, des sources de
chaleur, des vibrations, des poussières, de l’humidité et du
froid. Pour une aération correcte, tenez compte des distances
minimales suivantes.
Au-dessus : 15 cm
À l’arrière : 2,5 cm
Sur les côtés : 10 cm
3 Placez l’appareil loin des équipements, moteurs et
transformateurs électriques, pour éviter les ronflements
parasites.
4 N’exposez pas l’appareil à des variations brutales de
température, ne le placez pas dans un environnement très
humide (par exemple dans une pièce contenant un
humidificateur) car cela peut entraîner la condensation
d’humidité à l’intérieur de l’appareil qui elle-même peut être
responsable de décharge électrique, d’incendie, de dommage
à l’appareil ou de blessure corporelle.
5 Evitez d’installer l’appareil dans un endroit où des objets
peuvent tomber, ainsi que là où l’appareil pourrait être
exposé à des éclaboussures ou des gouttes d’eau. Sur le
dessus de l’appareil, ne placez pas :
– d’autres appareils qui peuvent endommager la surface de
l’appareil ou provoquer sa décoloration.
– des objets se consumant (par exemple, une bougie) qui
peuvent être responsables d’incendie, de dommage à
l’appareil ou de blessure corporelle.
– des récipients contenant des liquides qui peuvent être à
l’origine de décharge électrique ou de dommage à l’appareil.
6 Ne couvrez pas l’appareil d’un journal, d’une nappe, d’un
rideau, etc. car cela empêcherait l’évacuation de la chaleur.
Toute augmentation de la température intérieure de l’appareil
peut être responsable d’incendie, de dommage à l’appareil ou
de blessure corporelle.
7 Ne branchez pas la fiche du câble d’alimentation de
l’appareil sur une prise secteur aussi longtemps que tous les
raccordements n’ont pas été effectués.
8 Ne pas faire fonctionner l’appareil à l’envers. Il risquerait de
chauffer et d’être endommagé.
9 N’exercez aucune force excessive sur les commutateurs, les
boutons et les cordons.
10 Pour débrancher la fiche du câble d’alimentation au niveau
de la prise secteur, saisissez la fiche et ne tirez pas sur le
cordon.
11 Ne nettoyez pas l’appareil au moyen d’un solvant chimique,
ce qui pourrait endommager la finition. Utilisez un chiffon
sec et propre.
12 N’alimentez l’appareil qu’à partir de la tension prescrite.
Alimenter l’appareil sous une tension plus élevée est
dangereux et peut être responsable d’incendie, de dommage à
l’appareil ou de blessure corporelle. Yamaha ne saurait être
tenue responsable des dommages résultant de l’alimentation
de l’appareil sous une tension autre que celle prescrite.
13 Pour empêcher tout dommage causé par les éclairs,
déconnectez la câble d’alimentation et toute antenne
extérieure de la prise murale pendant un orage.
14 Ne tentez pas de modifier ni de réparer l’appareil. Consultez
le service Yamaha compétent pour toute réparation qui serait
requise. Le coffret de l’appareil ne doit jamais être ouvert,
quelle que soit la raison.
15 Si vous envisagez de ne pas vous servir de l’appareil pendant
une longue période (par exemple, pendant les vacances),
débranchez la fiche du câble d’alimentation au niveau de la
prise secteur.
16 Lisez la section intitulée “GUIDE DE DÉPANNAGE” où
figurent une liste d’erreurs de manipulation communes avant
de conclure que l’appareil présente une anomalie de
fonctionnement.
17 Avant de déplacer l’appareil, appuyez sur pour éteindre le
système puis débranchez la fiche du câble d’alimentation au
niveau de la prise secteur.
18 La condensation se forme lorsque la température ambiante
change brusquement. En ce cas, débranchez la fiche du câble
d’alimentation et laissez l’appareil reposer.
19 La température de l’appareil peut augmenter en raison d’une
utilisation prolongée. En ce cas, coupez l’alimentation de
l’appareil et laissez-le au repos pour qu’il refroidisse.
20 Installez cet appareil à proximité de la prise secteur et à un
emplacement où la fiche du câble d’alimentation est
facilement accessible.
21 Les piles ne doivent pas être exposées à une chaleur extrême,
par exemple au soleil, à une flamme, etc. Lors de la mise au
rebut des piles, suivez vos réglementations locales.
– Conservez les piles hors de portée des enfants. Les piles
constituent un danger potentiel si les enfants les mettent en
bouche.
– Si les piles sont vieilles, la portée de la télécommande risque
de diminuer considérablement. Le cas échéant, remplacez les
piles le plus rapidement possible par deux piles neuves.
– N’utilisez pas à la fois des piles neuves et des piles usagées.
– N’utilisez pas non plus des piles de deux types différents (par
exemple, des piles alcalines et des piles au manganèse). Lisez
les instructions de l’emballage, car ces types de piles peuvent
être de forme et de couleur différentes.
– Des piles épuisées risquent de fuir. En cas de fuite, jetez les
piles immédiatement. Évitez de toucher le liquide qui a fui et
veillez à ce qu’il n’entre pas en contact avec vos vêtements,
etc. Nettoyez soigneusement le logement d’insertion des piles
avant d’insérer de nouvelles piles.
– Retirez les piles de l’appareil si vous n’avez pas l’intention
d’utiliser ce dernier pendant une période prolongée. Sans
cela, les piles s’usent et risquent de fuir, ce qui pourrait
endommager l’appareil.
– Ne jetez pas les piles avec les ordures ménagères. Mettez-les
au rebut conformément aux réglementations locales en
vigueur.
Cet appareil n’est pas déconnecté du secteur tant qu’il reste
branché à la prise de courant, même si l’appareil en soi est
éteint par la touche . Dans cet état, l’appareil consomme une
très faible quantité de courant.
AVERTISSEMENT
POUR RÉDUIRE LES RISQUES D’INCENDIE OU DE
DÉCHARGE ÉLECTRIQUE, N’EXPOSEZ PAS CET
APPAREIL À LA PLUIE OU À L’HUMIDITÉ.
ATTENTION
Danger d’explosion si la pile n’est pas remplacée correctement.
La remplacer par une pile de type identique ou équivalent.
Il y a un risque possible de création d’interférences, visibles sur
les images en couleurs si cet appareil est placé à côté d’un
téléviseur à tube cathodique (tube de Braun). Dans ce cas,
éloigner l’unité du téléviseur.
i Fr
Page 23
TABLE DES MATIÈRES
Câble
d’alimentation
Télécommande Couvercle de la
station d’accueil
Capuchon USB
Antenne FM
Fixation
Perche
Socle
Support
Bride pour câble
Jeu de vis
Remarque
Utilisez ces éléments pour
monter le stand. Le montage
du stand est décrit dans le
guide d’installation
(Assembly Guide).
Remarque
Tenir le capuchon USB
hors de portée des enfants
afin d’éviter qu’il ne soit
malencontreusement avalé.
Piles x 2
(type AA, LR6, UM-3)
Mode d’emploi
(ce manuel)
Guide d’installation
(Assembly Guide)
6 m
NOM DES PARTIES ET LEURS FONCTIONS .........................2
RÉGLAGE DE L’HORLOGE .....................................................5
ÉCOUTE D’UN iPod..................................................................6
ÉCOUTE D’UN CD ET D’APPAREILS USB .............................7
ÉCOUTE DE STATIONS FM ...................................................10
ÉCOUTE DE SOURCES EXTERNES .....................................11
UTILISATION DE LA FONCTION D’ALARME .......................12
UTILISATION DE LA MINUTERIE ..........................................15
RÉGLAGE DE LA TONALITÉ .................................................15
RÉGLAGE DE LUMINOSITÉ DE L’AFFICHEUR....................15
GUIDE DE DÉPANNAGE ........................................................16
REMARQUES SUR LES DISQUES ET APPAREILS USB.....18
CARACTÉRISTIQUES TECHNIQUES....................................19
Caractéristiques
• Lecture de musique stockée sur dispositifs externes tels que iPod/iPhone, CD audio/de données et dispositifs USB, et réception de
programmes FM.
• Réveillez-vous avec votre musique préférée ou une sonnerie - ou les deux. La plage choisie est lue à l’heure et au volume prédéfinis, pour
le meilleur des réveils (fonction IntelliAlarm).
• Fonction de mémorisation/rappel pour un accès instantané à vos 5 stations FM préférées.
• Egaliseur 3 bandes (grave, médium, et aigu) permettant de faire sonner la musique exactement comme vous l’aimez.
• Horloge design à deux affichages (avec aiguille des heures).
Quelques mots sur ce mode d’emploi
• Le terme “iPod” utilisé dans ce mode d’emploi désigne aussi le “iPhone”.
• Si une fonction peut être pilotée via les boutons de l’appareil et les touches de sa télécommande, ce mode d’emploi décrit la procédure via
les boutons de l’appareil.
Accessoires fournis
English Français Deutsch Svenska Italiano Español Nederlands Русский
Utilisation de la télécommande
Logez les piles dans la télécommande en respectant les indications
de polarité (+ et –).
ISX-800
Dirigez la télécommande vers le capteur de télécommande (sur la
face avant) et respectez la portée indiquée ci-dessous.
1 Fr
Page 24
NOM DES PARTIES ET LEURS FONCTIONS
AUTO SET BEEP
SOURCE + BEEP
SOURCE
DIMMER
CLOCK
ALARM TYPE
212
1
iPod
VOLUME
USB LABEL SIDE
SOURCE PRESETALARM SNOOZE
SLEEP
12345678 jlk9
y
• L’iPod se recharge quand il est branché à son dock. L’iPod ne se recharge pas quand l’appareil
est en en mode d’économie d’énergie.
• Assurez-vous d’utiliser un adaptateur de station d’accueil compatible avec votre iPod. Si vous
n’utilisez pas l’adaptateur ou s’il n’est pas compatible, la connexion peut être en faux contact
ou faible, ce qui peut endommager le connecteur. Pour en savoir plus sur l’adaptateur de
station d’accueil, surfez sur le site web officiel de Apple.
• Si un iPod dans sa housse de protection est connecté de force, le connecteur risque d’être
endommagé. Retirez la housse de protection avant la connexion.
• Lorsque l’iPod n’est pas utilisé, mettez en place le couvercle de la station d’accueil iPod pour
protéger le connecteur.
Adaptateur de
station d’accueil
Panneau supérieur
a (Alimentation)
Appuyez pour allumer/éteindre le système. L’heure est affichée
sur le panneau avant même lorsque le système est éteint.
y
• Appuyez sur situé sur la partie supérieure de l’appareil et
maintenez-le enfoncé pendant plus de 3 secondes pour faire passer le
système en mode d’économie d’énergie. Le panneau avant n’affiche
pas d’information en mode d’économie d’énergie. Cela peut réduire la
consommation d’électricité. Pour annuler le mode d’économie
d’énergie, appuyez à nouveau sur .
• Même si le système est éteint/en mode d’économie d’énergie, la
fonction d’alarme est disponible.
b Dock pour iPod
Branchez-y un iPod.
c Port USB
Branchez un appareil USB (P. 9).
d VOLUME –/+
Réglez le volume.
e SOURCE
Changez de source de lecture.
f ALARM
Active/désactive l’alarme et permet de régler plusieurs
fonctions liées à l’alarme (P. 13, 14).
g SNOOZE/SLEEP
Règle la minuterie ou bascule l’alarme en mode snooze (P. 14,
15).
h PRESET
Mémorise/rappelle les stations FM, ou change de dossier de
lecture (lors de la lecture de plages sur CD de données ou
appareils USB).
i /
Saute la plage/le fichier en cours de lecture, ou recherche les
stations radio.
Maintenir le bouton enfoncé pendant la lecture d’un fichier
permet d’effectuer une recherche avant/arrière.
j /
Lance/interrompt momentanément la lecture.
k
Permet d’éjecter le CD.
l Fente pour disque
Insérez un CD.
Brancher un iPod au dock pour iPod
2 Fr
Page 25
Remarques
Afficheur
FM
CD
AUX
USB
iPod
ALL
1
2
1
8
56
7
3
4
162 3
4
5
Antenne FM
fournie
NOM DES PARTIES ET LEURS FONCTIONS
1 Indicateur de lecture/mode aléatoire/répétition
Affiche le mode de lecture (P. 6, 9).
b Capteur de télécommande
c Indicateur d’horloge
Affiche l’aiguille des heures de l’horloge (P. 5).
d Indicateur de source
Indique la source sélectionnée.
e Indicateur d’alarme
S’allume si l’alarme est activée (P. 12).
f Indicateur de minuterie
S’allume si la minuterie est activée (P. 15).
g Affichage multifonction
Affiche diverses informations telles que l’heure, le numéro de
la plage en cours de lecture ou la station FM.
h Détecteur de clarté
Détecte la lumière ambiante. Ne pas couvrir ce capteur.
Français
Panneau arrière
a ALARM TYPE
b CLOCK
Change le type d’alarme (P. 13).
Change le type d’horloge ou permet le réglage de l’heure (P. 5).
c DIMMER
Règle la luminosité de l’afficheur (P. 15).
d AUX
Permet de brancher un dispositif audio externe.
e Borne d’antenne FM
Permet de brancher l’antenne FM fournie ou une antenne
extérieure.
• L’antenne doit être déployée. Si la réception de la radio est mauvaise,
changez la hauteur, le sens ou la disposition de l’antenne.
• Si vous utilisez une antenne extérieure au lieu de l’antenne FM
fournie, la réception sera meilleure.
f Cache des bornes
Retirez le cache des bornes avant de brancher un dispositif
externe à la prise AUX et/ou avant de brancher l’antenne FM à
la borne d’antenne.
Si vous souhaitez passer le câble d’antenne extérieure et/ou le câble dispositif externe à travers le tube du pied, lisez le guide d’installation
(Assembly Guide) fourni.
3 Fr
Page 26

NOM DES PARTIES ET LEURS FONCTIONS
Touches de commande iPod
Télécommande
1
2
3
4
5
6
7
8
9
j
k
p
o
a Émetteur de télécommande
b (Alimentation)
Appuyez pour allumer/éteindre le système.
c ALARM
Active/désactive l’alarme.
d SNOOZE/SLEEP
Règle la minuterie ou bascule l’alarme en mode snooze
(P. 14, 15).
e Touche de sélection de source
Change de source de lecture.
f FOLDER
Change de dossier lors de la lecture de musique sur CD de
données ou dispositifs USB.
g /
Saute la plage/le fichier en cours de lecture.
Maintenir le bouton enfoncé pendant la lecture d’un fichier
permet d’effectuer une recherche avant/arrière.
h
Lance/interrompt momentanément la lecture.
i
Arrête la lecture.
j (répétition)/ (lecture aléatoire)
Lecture répétée/aléatoire de musique sur iPod, CD audio/de
données ou dispositif USB (P. 6, 9).
k EQ LOW/MID/HIGH
Règle le grave, le médium et l’aigu (P. 15).
l
m
4 Fr
n
l PRESET /
Permet de choisir une présélection FM.
m MEMORY
Mémorise la station FM (P. 10).
n TUNING /
Recherche les stations radio.
o VOLUME +/–
Règle le volume.
p MUTE
Coupe/rétablit le son.
Page 27
Remarque
Réglage de l’heure
Panneau supérieur
SET
Panneau arrière
Réglage de l’heure
(clignote)
CLOCK 2
CLOCK 1
Panneau arrière
Exemple : 10:50 du matin
Aiguille des
heures (horloge
analogique)
Minutes
Exemple : 10:50 du matin
Minutes
Heures
AUTO SET BEEP
212
DIMMER
RÉGLAGE DE L’HORLOGE
1 Placez le sélecteur CLOCK du panneau arrière sur
SOURCE + BEEP
1
SOURCE
CLOCK
ALARM TYPE
SET.
USB LABEL SIDE
VOLUME
SOURCE PRESETALARM SNOOZE
Français
SLEEP
2
2 Réglez l’heure avec / .
3 Placez le sélecteur CLOCK du panneau arrière sur
CLOCK1 ou CLOCK2.
y
• La connexion d’un iPod au dock pour iPod à l’étape 2 copie l’heure de
l’iPod vers le dock. Si l’iPod est déjà branché au dock pour iPod quand
vous réglez CLOCK sur SET, l’heure de l’iPod n’est pas copiée vers le
dock.
• Appuyez sur SNOOZE/SLEEP à l’étape
l’affichage de l’heure en 12 et 24 heures.
Les réglages de l’heure sont initialisés si l’appareil n’est pas alimenté
pendant plus d’une semaine.
2 pour basculer entre
Changement d’affichage de l’heure
Utilisez le sélecteur CLOCK du panneau arrière pour changer d’affichage de l’heure.
Mode 1 d’affichage de l’heure (CLOCK 1)
Mode 2 d’affichage de l’heure (CLOCK 2)
5 Fr
Page 28
Remarques
ÉCOUTE D’UN iPod
AUTO SET BEEP
SOURCE + BEEP
SOURCE
DIMMER
CLOCK
ALARM TYPE
212
1
VOLUME
USB LABEL SIDE
SOURCE PRESETALARM SNOOZE
SLEEP
23
Panneau supérieur
Télécommande
REPEAT
SHUFFLE
Télécommande
Lecture de l’iPod
Pour plus de détails à propos des modèles d’iPod compatibles, veuillez consulter “CARACTÉRISTIQUES TECHNIQUES” (P. 19).
1 Branchez un iPod au dock pour iPod.
2 Appuyez sur SOURCE et choisissez iPod comme
source de lecture.
3 Lancez la lecture sur l’iPod en appuyant sur / .
Vous pouvez piloter la lecture avec la télécommande, l’iPod ou
le panneau supérieur de l’appareil.
Touche Fonction
Lecture/pause
/
Panneau
supérieur
Télécom-
mande
FOLDER
MENU
ENTER
y
• Vous pouvez retirer l’iPod quand vous le souhaitez.
• Si le système est hors tension, il s’active automatiquement quand vous
lancez la lecture d’une plage/vidéo sur l’iPod.
Saut
/
Recherche arrière/avant
(maintenir enfoncé)
Lecture/pause
Saut
/
Recherche arrière/avant
(maintenir enfoncé)
/
/
Commande de menu iPod
Lecture répétée/aléatoire
Vous pouvez vérifier le mode de lecture avec l’indicateur de l’afficheur.
• Les modes de lecture répétée/aléatoire pourraient ne pas être disponibles
selon le modèle d’iPod utilisé.
• L’ordre des modes de lecture répétée/aléatoire pourrait différer selon le
modèle d’iPod utilisé.
Lecture répétée
Appuyez sur la touche REPEAT de la télécommande pour choisir
un des modes de lecture suivants.
:Un
: Tous
Aucun affichage: Désactivé
Lecture aléatoire
Appuyez sur la touche SHUFFLE de la télécommande pour
choisir un des modes de lecture suivants.
: Morceaux
:Albums
Aucun affichage: Désactivé
6 Fr
Page 29
Remarque
ÉCOUTE D’UN CD ET D’APPAREILS USB
Panneau supérieur
CD
Numéro de plage
Cette section décrit le fonctionnement de l’appareil pour la lecture de plages/fichiers sur CD/appareils USB.
• Quand vous arrêtez puis relancez la lecture du CD/de l’appareil USB, cet appareil reprend la lecture de la dernière plage lue depuis le
début.
• Si vous appuyez sur la touche de la télécommande quand la lecture est à l’arrêt, la prochaine fois que vous lancez la lecture, l’appareil
lit les plages comme suit:
– Pour un CD audio: à la première plage du CD.
– Pour un CD de données/appareil USB: à la première plage du dossier contenant la dernière plage lue.
• Le système s’éteint automatiquement 60 minutes après l’arrêt de la lecture sur le CD/l’appareil USB.
y
Pour plus de renseignements sur les disques et fichiers pouvant être lus, reportez-vous à “REMARQUES SUR LES DISQUES ET APPAREILS USB” (P. 18).
Écoute d’un CD audio
1 Appuyez sur SOURCE pour choisir le CD comme
AUTO SET BEEP
212
DIMMER
USB LABEL SIDE
VOLUME
SOURCE PRESETALARM SNOOZE
SOURCE + BEEP
1
SOURCE
CLOCK
ALARM TYPE
SLEEP
12
source de lecture.
2 Insérez le CD audio dans la fente pour disque
avec l’étiquette tournée vers l’avant de l’appareil.
La lecture commence automatiquement. Le numéro de plage
s’affiche un instant quand vous lancez la lecture ou sautez les
plages.
Français
Les touches suivantes pilotent la lecture de plages sur CD
audio.
Touche Fonction
Lecture/pause
/
Panneau
supérieur
Saut
/
Recherche arrière/avant
(maintenir enfoncé)
Permet d’éjecter le CD
Lecture/pause
Télécom-
mande
Saut
/
Recherche arrière/avant
(maintenir enfoncé)
Arrêt
Vous ne pouvez ni charger ni éjecter un CD quand le système est en
mode économie d’énergie (☞ P. 2).
7 Fr
Page 30
ÉCOUTE D’UN CD ET D’APPAREILS USB
AUTO SET BEEP
SOURCE + BEEP
SOURCE
DIMMER
CLOCK
ALARM TYPE
212
1
VOLUME
USB LABEL SIDE
SOURCE PRESETALARM SNOOZE
SLEEP
12
Panneau supérieur
CD
Numéro de dossier
Numéro de fichier
Écoute d’un CD de données
1 Appuyez sur SOURCE pour choisir le CD comme
source de lecture.
2 Insérez le CD de données dans la fente pour
disque avec l’étiquette tournée vers l’avant de
l’appareil.
La lecture commence automatiquement. Le numéro de
dossier/fichier s’affiche un instant quand vous lancez la lecture
ou sautez les plages.
Les touches suivantes pilotent la lecture de plages sur CD de
données.
Touche Fonction
Lecture/pause
/
Saut
/
Panneau
supérieur
Télécom-
mande
PRESET
FOLDER
Recherche arrière/avant
(maintenir enfoncé)
Change de dossier le lecture
Permet d’éjecter le CD
Lecture/pause
Saut
/
Recherche arrière/avant
(maintenir enfoncé)
Arrêt
Change le dossier de lecture
8 Fr
Page 31

Écoute d’un appareil USB
Remarque
AUTO SET BEEP
SOURCE + BEEP
SOURCE
DIMMER
CLOCK
ALARM TYPE
212
1
VOLUME
USB LABEL SIDE
SOURCE PRESETALARM SNOOZE
SLEEP
21
Panneau supérieur
USB
Numéro de dossier
Numéro de fichier
REPEAT
SHUFFLE
Télécommande
ÉCOUTE D’UN CD ET D’APPAREILS USB
1 Appuyez sur SOURCE et choisissez USB comme
source de lecture.
2 Branchez un appareil USB au port USB.
La lecture commence automatiquement.
fichier s’affiche un instant quand vous lancez la lecture ou
sautez les plages.
Le numéro de dossier/
Français
Quand un appareil USB est connecté, les plages sont lues dans l’ordre
suivant :
– Ordre de lecture des dossiers :
Les dossiers sont lus dans l’ordre alphabétique selon les 3
premiers caractères de leur nom. Les dossiers aux noms
comportant des caractères non alphabétiques sont lus après les
dossiers aux noms composés de caractères alphabétiques.
– Ordre de lecture des fichiers :
les fichiers sont lus selon leur date, en commençant par les
fichiers les plus anciens.
appareils USB.
Touche Fonction
Panneau
supérieur
Télécom-
mande
Les touches suivantes pilotent la lecture de plages sur
y
Vous pouvez retirer l’appareil USB quand vous le souhaitez.
Lecture répétée/aléatoire
Vous pouvez vérifier le mode de lecture avec l’indicateur de lecture/mode répétition/mode aléatoire de l’afficheur.
Lecture répétée
Appuyez sur la touche REPEAT de la télécommande pour choisir
un des modes de lecture suivants.
Toutes les plages du dossier (uniquement pour CD
de données/appareil USB)
: Répétition de toutes les plages
: Répétition d’une plage
Toutes les plages du dossier (uniquement pour CD
de données/appareil USB)
: Toutes les plages
y
Si la source choisie contient des dossiers, chaque dossier est lu en mode
répété/aléatoire.
:
Aucun affichage: Mode de répétition désactivé
Lecture aléatoire
Appuyez sur la touche SHUFFLE de la télécommande pour
choisir un des modes de lecture suivants.
:
Aucun affichage: Mode aléatoire désactivé
/
/
PRESET
/
FOLDER
Lecture/pause
Saut
Recherche arrière/avant
(maintenir enfoncé)
Change le dossier de lecture
Lecture/pause
Saut
Recherche arrière/avant
(maintenir enfoncé)
Arrêt
Change le dossier de lecture
9 Fr
Page 32

Remarque
ÉCOUTE DE STATIONS FM
AUTO SET BEEP
SOURCE + BEEP
SOURCE
DIMMER
CLOCK
ALARM TYPE
212
1
VOLUME
USB LABEL SIDE
SOURCE PRESETALARM SNOOZE
SLEEP
12
Panneau supérieur
Fréquence
de la station
AUTO SET BEEP
SOURCE + BEEP
SOURCE
DIMMER
CLOCK
ALARM TYPE
212
1
VOLUME
USB LABEL SIDE
SOURCE PRESETALARM SNOOZE
SLEEP
234 1
Panneau supérieur
FM
Numéro de
présélection
Sélection de la station FM
Si vous syntonisez manuellement une station FM, le son sera en mono.
Mémorisation de stations FM (présélections)
La fonction Preset vous permet de mémoriser vos 5 stations préférées.
1 Appuyez sur SOURCE et choisissez FM comme
source de lecture.
FM
2 Appuyez sur / pour syntoniser la station FM.
Type de syntonisation Touches utilisées
Appuyez et maintenez
ou enfoncé.
Appuyez plusieurs fois sur
ou .
Appuyez et maintenez
TUNING ou enfoncé.
Appuyez plusieurs fois sur
TUNING ou .
Panneau
supérieur
Télécom-
mande
Syntonisation
automatique
Syntonisation
manuelle
Syntonisation
automatique
Syntonisation
manuelle
1 Utilisez / pour choisir la fréquence de votre
station FM préférée.
2 Appuyez et maintenez PRESET enfoncé.
10 Fr
Utilisation de la télécommande
Appuyez et maintenez MEMORY enfoncé.
3
Appuyez sur
PRESET
et choisissez le numéro de
présélection où vous voulez mémoriser la station FM.
Utilisation de la télécommande
Appuyez sur PRESET /.
4 Appuyez et maintenez PRESET enfoncé pour
mémoriser la station choisie.
La station FM est mémorisée.
Utilisation de la télécommande
Appuyez sur MEMORY.
Page 33

Remarque
Rappel d’une présélection FM
Panneau supérieur
AUTO SET
DIMMER
CL
2
1
iPod
VOLUME
USB LAB
SOURCE ALARM SNOOZ
23
Panneau supérieur
AUX
75 Ω
FM ANT
AUX
ÉCOUTE DE SOURCES EXTERNES
AUTO SET BEEP
212
DIMMER
USB LABEL SIDE
VOLUME
SOURCE PRESETALARM SNOOZE
1 2
SOURCE + BEEP
1
SOURCE
CLOCK
ALARM TYPE
source de lecture.
2 Appuyez plusieurs fois sur PRESET pour choisir la
1 Appuyez sur SOURCE et choisissez FM comme
présélection voulue.
Utilisation de la télécommande
SLEEP
Appuyez sur PRESET /.
ÉCOUTE DE SOURCES EXTERNES
Mettez le système hors tension avant de brancher le câble audio.
Retirez le cache des bornes avant de brancher un dispositif externe.
1 Branchez l’appareil externe à la prise AUX du
panneau arrière avec un câble à fiches minijack
stéréo de 3,5mm disponible dans le commerce.
Français
Baissez le volume de cet appareil et de votre dispositif audio externe
avant le raccordement.
2 Appuyez sur pour mettre cet appareil en service.
3 Appuyez sur SOURCE et choisissez AUX comme
source de lecture.
4 Lancez la lecture sur le dispositif audio externe
raccordé.
11 Fr
Page 34

UTILISATION DE LA FONCTION D’ALARME
Cet appareil comporte une fonction d’alarme (IntelliAlarm) qui vous permet de lire la source voulue et/ou de déclencher une sonnerie à
l’heure prédéfinie. Voici les caractéristiques de la fonction d’alarme.
3 types d’alarmes
Les 3 types d’alarmes permettent de combiner de la musique avec la sonnerie.
La source audio sélectionnée et la sonnerie retentissent en même temps. Un mode recommandé pour
commencer la journée sur le bon pied.
SOURCE + BEEP
3 minutes avant l’heure prédéfinie: la lecture commence sur la source musicale choisie et le volume
augmente progressivement jusqu’à l’heure du réveil.
Heure du réveil: la sonnerie retentit en plus de la musique.
SOURCE
BEEP
La lecture de la source audio choisie démarre à l’heure prédéfinie. Le volume augmente progressivement
jusqu’au niveau prédéfini.
Seule la sonnerie retentit à l’heure réglée.
Variété des sources de musique
Vous pouvez choisir un iPod, un CD audio, un CD de données, un dispositif USB ou la radio. Selon l’appareil branché, vous pouvez aussi
choisir parmi les sources suivantes:
Source Méthode de lecture Fonction
Vous pouvez lire en boucle une liste de lecture mémorisée sur l’iPod.
Pour pouvoir lire une liste de lecture, créez au préalable une liste de
lecture, que vous nommerez “ALARM Yamaha DTA”.
Veillez quand vous définissez le nom de la liste à entrer les espaces
entre les mots et à respecter les majuscules/minuscules.
Si la liste de lecture “ALARM Yamaha DTA” est introuvable sur l’iPod,
l’appareil reprend la lecture de la dernière plage lue.
iPod
CD audio
CD de données/
USB
FM
Liste de lecture*
Reprise
Plage sélectionnée La plage sélectionnée est lue en boucle.
Reprise La dernière plage que vous avez écoutée est lue.
Dossier Le dossier sélectionné est lu en boucle.
Reprise La dernière plage que vous avez écoutée est lue.
Présélection La présélection FM choisie est activée.
Reprise La dernière station FM écoutée est activée.
* Pour en savoir plus sur la création d’une liste de lecture, voyez la documentation accompagnant votre iPod ou iTunes.
Test de l’alarme
Vous pouvez tester le son de l’alarme lorsque vous réglez cette fonction.
Snooze
Activer la fonction snooze permet de redéclencher l’alarme 5 minutes plus tard.
12 Fr
Page 35

Remarques
Remarque
Réglage de l’heure du réveil et du type d’alarme
AUTO SET BEEP
SOURCE + BEEP
SOURCE
DIMMER
CLOCK
ALARM TYPE
212
1
VOLUME
USB LABEL SIDE
SOURCE PRESETALARM SNOOZE
SLEEP
17
2465
Panneau supérieur
Indicateur d’alarme
Heure du réveil
BEEP
SOURCE+
BEEP
SOURCE
Panneau arrière
Volum e de
l’alarme
5 (si vous avez choisi un type d’alarme autre que
1 Appuyez et maintenez ALARM enfoncé.
UTILISATION DE LA FONCTION D’ALARME
BEEP) Sélectionnez la plage, le dossier ou la station
FM voulu pour le réveil.
Si vous avez choisi iPod comme source:
aucun réglage n’est nécessaire.
Si vous avez choisi CD/USB/FM comme source:
appuyez sur PRESET pour choisir la plage (CD audio), le
dossier (CD de données/appareil USB) ou la station FM voulu
pour le réveil.
Utilisation de la télécommande
Appuyez sur PRESET /.
y
• Si vous avez choisi iPod comme source, l’appareil lit la liste de
lecture “ALARM Yamaha DTA” à l’heure de réveil programmée. Si
cette liste de lecture est introuvable sur l’iPod, l’appareil reprend la
lecture de la dernière plage lue (reprise).
• Si vous avez choisi CD/USB comme source et que “0” est défini
comme numéro de plage/dossier, la lecture reprend à la dernière
plage lue (reprise).
• Si vous avez choisi FM comme source et que le numéro de
présélection “0” est choisi, l’appareil syntonise à nouveau la dernière
station FM écoutée (reprise).
Français
L’indicateur d’alarme ( ) et le réglage d’heure du réveil
clignotent.
2 Réglez l’heure du réveil avec / .
Utilisation de la télécommande
Appuyez sur
/.
3 Choisissez le type d’alarme avec le sélecteur
ALARM TYPE sur le panneau arrière.
Pour plus de détails sur les types d’alarmes, lisez P. 12.
4 (si vous avez choisi un type d’alarme autre que
BEEP) Appuyez sur SOURCE pour sélectionner la
source musicale.
Les sources autres que AUX peuvent être sélectionnées.
Utilisation de la télécommande
Appuyez sur Touche de sélection de source pour
sélectionner la source musicale.
Si vous avez choisi iPod/CD/USB, branchez/insérez la source
audio (iPod, CD audio/de données, dispositif USB) à/dans
l’appareil.
• Si la source choisie n’est pas branchée/insérée, vous ne pourrez pas
lire la plage/le dossier sélectionné.
• Si la source ne peut pas être lue à l’heure de réveil programmée (si
l’iPod n’est pas branché, par exemple), la sonnerie retentira.
6 Réglez le volume de l’alarme avec VOLUME –/+
CD
.
y
Appuyez sur / pour tester l’alarme. Appuyez à nouveau sur
/ pour arrêter la sonnerie de test.
7 Appuyez sur ALARM pour mémoriser les réglages
de l’alarme.
Les réglages de l’alarme sont mémorisés et l’indicateur
d’alarme ( ) s’allume.
Les réglages de l’alarme ne sont pas mémorisés si vous mettez le
système hors tension sans effectuer cette dernière étape.
13 Fr
Page 36

UTILISATION DE LA FONCTION D’ALARME
AUTO SET BEEP
SOUR
DIMMER
CLOCK
ALARM
212
1
iPod
VOLUME
USB LABEL SIDE
SOURCE ALARM SNOOZE
SLEEP
1
Panneau supérieur
AUTO SET BEEP
SOUR
DIMMER
CLOCK
ALARM
212
1
iPod
VOLUME
USB LABEL SIDE
SOURCE ALARM SNOOZE
SLEEP
2
2
1
Panneau supérieur
Activation/désactivation de l’alarme
1 Appuyez sur ALARM.
Quand l’alarme est activée, le témoin d’alarme ( )
s’allume et l’heure de l’alarme s’affiche quelques instants. Si
vous appuyez à nouveau sur ALARM, l’indicateur d’alarme
( ) s’éteint et l’alarme est coupée.
y
Le réglage d’heure du réveil est mémorisé même si vous désactivez
l’alarme. Si vous activez à nouveau l’alarme en appuyant sur ALARM,
la fonction d’alarme utilise les réglages précédents.
Opérations disponibles quand le son d’alarme retentit
À l’heure programmée, le son d’alarme retentit. Les opérations suivantes sont alors disponibles.
1 (pour interrompre momentanément l’alarme)
Appuyez sur SNOOZE/SLEEP.
La fonction SNOOZE arrête l’alarme et la redéclenche 5
minutes plus tard.
y
• Lorsque SOURCE + BEEP est choisi, appuyez une fois sur
SNOOZE/SLEEP pour arrêter la sonnerie, et appuyez deux fois sur
le même bouton pour arrêter la source audio. 5 minutes après l’arrêt
de la source audio, l’appareil reprend la lecture de cette source en
augmentant progressivement le volume et la sonnerie retentit de
nouveau.
• L’indicateur d’alarme clignote quand la fonction snooze est active.
2 (pour désactiver l’alarme) Appuyez sur ALARM ou
.
y
Si vous ne coupez pas l’alarme, elle s’arrête automatiquement après 60
minutes.
14 Fr
Page 37

Remarque
UTILISATION DE LA MINUTERIE
AUTO SET BEEP
SOURC
DIMMER
CLOCK
ALARM T
212
1
iPod
VOLUME
USB LABEL SIDE
SOURCE ALARM SNOOZE
SLEEP
1
Panneau supérieur
1
2
3
Télécommande
iPod
:HIGH
:MID
:LOW
Bande
Réglage
Bande
AUTO21
Panneau arrière
Vous pouvez régler l’heure à laquelle le système doit s’arrêter automatiquement.
1 Appuyez plusieurs fois sur SNOOZE/SLEEP pour
RÉGLAGE DE LA TONALITÉ
1 Appuyez sur un des boutons EQ LOW/MID/HIGH
choisir le délai avant la mise hors tension du
système.
Vous pouvez choisir un délai de 30, 60, 90 et 120 minutes.
Quand le réglage est effectué, le témoin de minuterie ( )
s’affiche sur la face avant.
y
Si vous appuyez sur SNOOZE/SLEEP quand la minuterie est active,
le réglage de minuterie est annulé.
de la télécommande pendant la lecture.
Choisissez la bande de fréquence à régler (LOW, MID,
HIGH).
Français
2 Appuyez sur / pour régler la bande choisie.
Chaque bande offre une plage de réglage de –5 à +5.
3 Appuyez sur ENTER pour mémoriser les réglages.
Vous pouvez aussi mémoriser les réglages en appuyant sur le
bouton EQ enfoncé à l’étape 1.
Pour changer l’égalisation d’une autre bande, retournez à
l’étape 1 et appuyez sur le bouton EQ de la bande à ajuster.
RÉGLAGE DE LUMINOSITÉ DE L’AFFICHEUR
1 Réglez la luminosité avec le sélecteur DIMMER sur
le panneau arrière.
AUTO: règle automatiquement la luminosité en fonction
de l’éclairage ambiant.
1: plus lumineux.
2: plus sombre.
Si vous choisissez la position AUTO, la luminosité de l’afficheur
s’ajuste automatiquement selon la clarté mesurée par le détecteur (P. 3).
Veillez à ce que le détecteur ne soit pas couvert.
15 Fr
Page 38

GUIDE DE DÉPANNAGE
Si cet appareil ne semble pas fonctionner normalement, vérifiez les points de la liste suivante. Si l’anomalie constatée n’est pas mentionnée,
ou bien si les mesures suggérées sont sans effet, mettez le système hors service, débranchez le cordon d’alimentation et adressez-vous au
revendeur ou service après-vente Yamaha le plus proche.
Généralités
Anomalies Causes possibles Solution
Impossible de mettre l’appareil sous
tension.
Les haut-parleurs n’émettent aucun son.
Le son est subitement coupé.
Le son grésille/comporte de la distortion
ou il y a un bruit anormal.
Cet appareil ne fonctionne pas
correctement.
Le système s’éteint immédiatement après
s’être allumé.
Un appareil numérique ou haute
fréquence produit des bruits.
Le réglage de l’horloge a été effacé.
L’iPod n’est pas lu à l’heure de l’alarme
même si SOURCE est réglé sur iPod.
L’horloge clignote et l’appareil ne peut
pas être manipulé.
Le cordon d’alimentation n’est pas correctement
branché.
Le volume est réglé au niveau minimum. Réglez le niveau du volume.
La source est peut-être incorrecte. Sélectionnez la source correcte.
La fonction minuterie (☞ P. 15) est peut être
réglée.
Le volume de la source d’entrée est excessif ou le
volume de l’appareil est excessif (en particulier les
graves).
Cet appareil a peut-être été soumis à un choc
électrique puissant, comme la foudre ou une forte
charge électrostatique, ou bien la tension
d’alimentation a chuté.
Cet appareil est trop près de l’appareil numérique
ou haute fréquence.
L’alimentation de cet appareil a été coupée pendant
plus d’une semaine.
L’iPod n’est pas correctement inséré dans sa station
d’accueil iPod.
Le sélecteur ALARM TYPE est placé sur BEEP. Réglez ALARM TYPE sur SOURCE + BEEP ou
Le sélecteur CLOCK sur le panneau arrière est
réglé sur SET et cet appareil est en mode de réglage
de l’horloge.
Branchez à nouveau fermement le cordon
d’alimentation à la prise de courant et à l’appareil.
Allumez l’appareil et lancez à nouveau la lecture.
Ajustez le volume à l’aide de VOLUME ou ajustez
les graves à l’aide de l’égaliseur (☞ P. 1 5) .
Mettez le système hors tension et débranchez le
cordon d’alimentation. Attendez environ 30
secondes, rebranchez le cordon d’alimentation et
remettez le système sous tension.
Éloignez les deux appareils l’un de l’autre.
Branchez à fond la prise du cordon d’alimentation
sur la prise murale et réglez de nouveau l’horloge
(☞ P. 5).
Retirez l’iPod de l’appareil puis insérez-le à
nouveau dans sa station d’accueil iPod (☞ P. 2 ).
SOURCE (☞ P. 13).
Réglez le sélecteur CLOCK sur CLOCK1 ou
CLOCK2 (☞ P. 5).
iPod
Anomalies Causes possibles Solution
Aucun son.
L’iPod ne se charge pas.
Après la connexion de l’iPod, l’indicateur
d’iPod clignote deux fois, et ce
clignotement se répète 3 fois.
Lecture de CD
Anomalies Causes possibles Solution
Le disque ne peut pas être inséré.
Certains boutons ne fonctionnent pas.
La lecture ne commence pas
immédiatement après avoir appuyé sur
/.
L’iPod n’est pas correctement inséré dans sa station
d’accueil iPod.
La version du logiciel de l’iPod n’a pas été mise à
jour.
L’iPod n’est pas correctement inséré dans sa station
d’accueil iPod.
Le système est réglé en mode d’économie
d’énergie (☞ P. 2).
L’iPod n’est pas pris en charge par cet appareil. Utilisez un iPod pris en charge (☞ P. 19).
Le système est réglé en mode d’économie
d’énergie.
Il se peut que le disque inséré dans l’appareil ne
soit pas compatible.
Il se peut que le disque soit sale. Essuyez le disque.
Il se peut que le disque inséré dans l’appareil ne
soit pas compatible.
Si l’appareil a été déplacé d’un endroit froid à un
endroit chaud, de la condensation a pu se former
sur la lentille de lecture de disque.
Retirez l’iPod de l’appareil puis insérez-le à
nouveau dans sa station d’accueil iPod (☞ P. 2 ).
Téléchargez la dernière version du logiciel iTunes
sur le site web de Apple, puis mettez à jour le
logiciel de l’iPod avec la dernière version
disponible.
Retirez l’iPod de l’appareil puis insérez-le à
nouveau dans sa station d’accueil iPod (☞ P. 2 ).
Appuyez sur pour annuler le mode d’économie
d’énergie.
Appuyez sur pour annuler le mode d’économie
d’énergie (☞ P. 2).
Utilisez un disque pris en charge par l’appareil
(☞ P. 18).
Utilisez un disque pris en charge par l’appareil
(☞ P. 18).
Attendez une heure ou deux que l’appareil
s’acclimate à la température de la pièce puis
réessayez.
16 Fr
Page 39

Anomalies Causes possibles Solution
L’indicateur de CD clignote deux fois, et
ce clignotement se répète 3 fois, après quoi
le disque est éjecté.
“Err” apparaît sur l’afficheur après
l’insertion d’un disque.
Lecture d’un appareil USB
Anomalies Causes possibles Solution
Un fichier MP3/WMA sur l’appareil USB
ne peut pas être lu.
L’indicateur USB clignote deux fois, et ce
clignotement se répète 3 fois après la
connexion de l’appareil USB.
“Err” apparaît sur l’afficheur après la
connexion d’un appareil USB.
GUIDE DE DÉPANNAGE
Il se peut que le disque inséré dans l’appareil ne
soit pas compatible.
Il se peut que le disque soit sale. Essuyez le disque.
Le disque ne contient aucun fichier lisible. Utilisez un disque contenant des fichiers lisibles
Le disque est inséré de l’arrière vers l’avant. Insérez un disque en dirigeant le côté avec
Une erreur est survenue dans l’appareil.
L’appareil USB n’est pas détecté. Arrêtez le système et rebranchez l’appareil USB à
Un appareil USB incompatible est connecté à
l’appareil.
L’appareil USB ne contient aucun fichier lisible. Utilisez un appareil USB contenant des fichiers
Un appareil USB incompatible est connecté à
l’appareil.
Une surtension est détectée.
Utilisez un disque pris en charge par l’appareil
(☞ P. 18).
(☞ P. 18, 19).
l’étiquette vers vous.
Éjectez le disque avec la touche .
l’appareil.
Connectez un adaptateur secteur, s’il est fourni
avec l’appareil.
Si les solutions ci-dessus ne permettent pas de
résoudre le problème, alors l’appareil USB n’est
pas compatible avec l’appareil.
Arrêtez le système et rebranchez l’appareil USB à
l’appareil. Si cela ne permet pas de résoudre le
problème, alors l’appareil USB n’est pas
compatible avec l’appareil.
lisibles (☞ P. 18, 19).
Arrêtez le système et rebranchez l’appareil USB à
l’appareil. Si cela ne permet pas de résoudre le
problème, alors l’appareil USB n’est pas
compatible avec l’appareil.
Français
Réception de stations FM
Anomalies Causes possibles Solution
Trop de parasites pendant l’écoute d’une
station stéréophonique.
Même avec une antenne extérieure, la
réception est médiocre. (Le son présente
de la distorsion.)
Télécommande
Anomalies Causes possibles Solution
La télécommande ne fonctionne pas
convenablement.
L’antenne n’est pas convenablement raccordée. Assurez-vous que l’antenne est convenablement
La station sélectionnée est trop éloignée, ou bien la
réception des ondes est médiocre dans la région où
vous habitez.
Distorsion due à la propagation par trajets multiples
ou aux interférences radio.
Vous utilisez la télécommande hors de sa portée de
fonctionnement.
Le capteur de télécommande de l’appareil (☞ P. 3)
peut être exposé à la lumière directe du soleil ou
d’un éclairage (lampe fluorescente à convertisseur).
La pile est épuisée. Remplacez les piles par deux neuves.
Présence d’obstacles entre le capteur de
télécommande de l’appareil et la télécommande.
raccordée. (☞ P. 3).
Essayez d’effectuer la syntonisation manuellement
pour obtenir un signal de meilleure qualité
(☞ P. 10) ou bien utilisez une antenne extérieure
multivoies.
Modifiez la hauteur, l’orientation ou la disposition
de l’antenne.
Pour de plus amples informations à ce sujet,
reportez-vous à “Utilisation de la télécommande”
(P. 1).
Changez d’éclairage ou réorientez l’appareil.
Retirez les obstacles.
17 Fr
Page 40

Remarques
Remarques
Remarques
REMARQUES SUR LES DISQUES ET APPAREILS USB
Attention
Informations sur les disques
Cet appareil est conçu pour lire des CD audio, CD-R*, et CD-RW*
comportant les logos suivants.
* CD-R/RW au format ISO 9660
y
De façon générale, cet appareil est capable de lire les disques portant les
logos ci-dessus. Les logos sont imprimés sur les disques et sur leur pochette.
• Ne mettez pas d’autres types de disques dans cet appareil. Vous risqueriez
sinon de l’endommager.
• Les CD-R/RW ne peuvent être lus que s’ils ont été clôturés.
• Certains disques ne peuvent pas être lus à cause de leurs caractéristiques
ou de leurs conditions d’enregistrement.
• Ne pas utiliser des disques qui ne sont pas ronds (en forme de cœur, etc.).
• Ne pas utiliser des disques dont la surface est rayée.
Manipulation des disques
• Ne touchez pas la surface des disques.
Tenez un disque par le bord (et le
centre).
• N’utilisez pas de stylo ni de marqueur
pointu pour écrire sur le disque.
• Ne collez pas de ruban, étiquette, adhésif ou autre sur vos
disques.
• Ne protégez pas le disque d’une enveloppe pour éviter les
rayures.
• N’insérez pas plus d’un disque dans le logement de disque.
L’appareil et les disques risqueraient d’être endommagés.
• N’insérez pas d’objets étrangers dans le logement de disque.
• Ne posez pas de disque fendu, voilé ou présentant des parties
collantes.
• N’exposez pas les disques à la
lumière directe du soleil, à une
température ou à une humidité
élevée, ou bien à la poussière.
Informations relatives aux appareils USB
Cet appareil prend en charge les dispositifs de stockage en masse
USB (ex. mémoires flash et lecteurs audio portables) conformes au
format FAT16 ou FAT32.
• Certains dispositifs peuvent ne pas fonctionner correctement avec cet
appareil même s’ils remplissent les exigences requises.
• Ne raccordez pas de dispositifs autres que des dispositifs de stockage en
masse USB (ex. chargeurs USB ou concentrateurs USB), ordinateurs,
lecteurs de cartes, disques durs externes, etc. à cet appareil.
• Yamaha décline toute responsabilité quant aux dommages ou pertes de
données enregistrées sur le dispositif USB pouvant se produire lorsqu’un
dispositif est relié à cet appareil.
• L’utilisation et l’alimentation de tous les types de dispositifs USB ne sont
pas garanties.
À propos des fichiers MP3 ou WMA
• L’appareil peut lire :
Fichier
MP3 8 - 320** 16 - 48
WMA 16 - 320** 22,05 - 48
** Les débits binaires constants et variables sont pris en charge.
• Voici les nombres maximaux de fichiers/dossiers pouvant être lus sur
l’appareil.
Débit binaire
(kbps)
CD de données USB
Nombre maximum de fichiers 512 9999
Nombre maximum de dossiers 255 128
Nombre maximum de fichiers par
dossier
• Les fichiers protégés par des droits d’auteur ne peuvent pas être lus.
511 255
Fréquence
d’échantillonnage
(kHz)
• Si le disque est sale, essuyez-le
avec un chiffon sec, du centre vers
la périphérie. N’utilisez pas
d’agent de nettoyage, ni de diluant.
• Pour éviter tout problème,
n’utilisez pas les nettoyeurs
d’optique, en vente dans le
commerce.
• Insérez un seul CD à la fois dans le logement de disque.
L’insertion de plusieurs CD risquerait d’endommager le système
et les CD.
18 Fr
Page 41

CARACTÉRISTIQUES TECHNIQUES
Φ 295 mm
997 mm
410 mm
410 mm
Poids: 12,0 kg
587 mm
SECTION LECTEUR
iPod (connexion numérique)
• iPod compatibles
.................................................... iPod touch (1re, 2e, 3e et 4e générations)
• iPhone compatibles
........................................................................................................iPhone 4
iPod nano (2e, 3e, 4e, 5e et 6e générations)
CD
• Supports ............................................................................... CD, CD-R/RW
• Format audio ........................................................... CD audio, MP3, WMA
Laser
• Type.................................................. Laser semi-conducteur GaAs/GaAlAs
• Longueur d’onde ..............................................................................790 nm
• Puissance de sortie .............................................................................. 7 mW
USB
• Format audio .............................................................................MP3, WMA
AUX
• Connecteur d’entrée ........................ prise STÉRÉO à mini fiche de 3,5 mm
iPod classic
iPhone 3GS
iPhone 3G
iPhone
RADIO
• Plage de syntonisation
FM.............................................................................87,50 à 108,00 MHz
GÉNÉRALITÉS
• Alimentation....................................................... CA 100 à 240 V, 50/60 Hz
• Consommation .....................................................................................20 W
• Consommation lorsque le système est désactivé.................................1,5 W
• Consommation en mode d’économie d’énergie.................. 0,5 W ou moins
• Dimensions
Les caractéristiques peuvent être modifiées sans préavis.
Français
SÉCURITÉ LASER
L’appareil utilise un laser. En raison des risques de blessure des
yeux, le retrait du couvercle ou les réparations de l’appareil
devront être confiés exclusivement à un technicien d’entretien
qualifié.
DANGER
Risque d’exposition au laser en cas d’ouverture. Eviter toute
exposition au faisceau. Quand cet appareil est branché à une prise
de courant, ne regardez jamais à l’intérieur de l’appareil à travers
la fente pour disque ou d’autres ouvertures.
Le laser de cet appareil peut émettre un rayonnement
dépassant les limites de la classe 1.
iPod, iPhone
“Made for iPod” et “Made for iPhone” signifient qu’un accessoire
électronique a été conçu pour être raccordé à un iPod ou à un
iPhone et qu’il est certifié par le développeur pour répondre aux
normes de performance Apple.
Apple n’est pas responsable du fonctionnement de cet appareil ni
de sa conformité aux normes de sécurité et aux normes
réglementaires. Notez que l’utilisation de cet accessoire avec un
appareil iPod ou iPhone peut avoir une incidence sur les
performances en mode sans fil.
iPhone, iPod, iPod classic, iPod nano, iPod touch et iTunes sont
des marques commerciales d’Apple Inc. déposées aux États-Unis
et dans d’autres pays.
Information concernant la collecte et le
traitement des piles usagées et des déchets
d’équipements électriques et électroniques
Les symboles sur les produits, l’emballage et/ou les
documents joints signifient que les produits électriques ou
électroniques usagés ainsi que les piles ne doivent pas être
mélangés avec les déchets domestiques habituels. Pour un
traitement, une récupération et un recyclage appropriés des
déchets d’équipements électriques et électroniques et des
piles usagées, veuillez les déposer aux points de collecte
prévus à cet effet, conformément à la réglementation
nationale et aux Directives 2002/96/EC et 2006/66/EC.
En vous débarrassant correctement des déchets
d’équipements électriques et électroniques et des piles
usagées, vous contribuerez à la sauvegarde de précieuses
ressources et à la prévention de potentiels effets négatifs
sur la santé humaine qui pourraient advenir lors d’un
traitement inapproprié des déchets.
Pour plus d’informations à propos de la collecte et du
recyclage des déchets d’équipements électriques et
électroniques et des piles usagées, veuillez contacter votre
municipalité, votre service de traitement des déchets ou le
point de vente où vous avez acheté les produits.
[Information sur le traitement dans d’autres
pays en dehors de l’Union Européenne]
Ces symboles sont seulement valables dans l’Union
Européenne. Si vous souhaitez vous débarrasser de déchets
d’équipements électriques et électroniques ou de piles
usagées, veuillez contacter les autorités locales ou votre
fournisseur et demander la méthode de traitement appropriée.
Note pour le symbole “pile” (les deux
symboles du bas) :
Ce symbole peut être utilisé en combinaison avec un symbole
chimique. Dans ce cas il respecte les exigences établies par la
Directive pour le produit chimique en question.
19 Fr
Page 42

VORSICHT: VOR DER BEDIENUNG DIESES GERÄTES DURCHLESEN.
1 Um optimales Leistungsvermögen sicherzustellen, lesen
Sie bitte die Anleitung aufmerksam durch. Bewahren Sie
die Anleitung danach für spätere Nachschlagzwecke
sorgfältig auf.
2 Installieren Sie dieses Gerät an einem gut belüfteten,
trockenen, sauberen Ort - entfernt von direktem
Sonnenlicht, Wärmequellen, Erschütterungen, Staub,
Feuchtigkeit und Kälte. Für eine sachgemäße Belüftung
sollten folgende Mindestabstände gewährleistet sein.
Oben: 15 cm
Hinten: 2,5 cm
Seiten: 10 cm
3 Stellen Sie dieses Gerät entfernt von anderen elektrischen
Haushaltgeräten, Motoren oder Transformatoren auf, um
Brummgeräusche zu vermeiden.
4 Setzen Sie dieses Gerät keinen plötzlichen
Temperaturänderungen von kalt auf warm aus, und stellen
Sie dieses Gerät nicht an Orten mit hoher Luftfeuchtigkeit
auf (z.B. in Räumen mit Luftbefeuchtern), um Kondensation
im Inneren des Gerätes zu vermeiden, da es anderenfalls zu
elektrischen Schlägen, Feuer, Beschädigung dieses Gerätes
und/oder zu persönlichen Verletzungen kommen kann.
5 Vermeiden Sie die Aufstellung dieses Gerätes an Orten,
an welchen Fremdkörper in das Gerät fallen können bzw.
an welchen Flüssigkeiten auf das Gerät verschüttet
werden können. Stellen Sie auf der Oberseite des Gerätes
niemals Folgendes auf:
– Andere Komponenten, da diese Beschädigung und/
oder Verfärbung der Oberfläche dieses Gerätes
verursachen können.
– Brennende Objekte (z.B. Kerzen), da diese Feuer,
Beschädigung des Gerätes und/oder persönliche
Verletzungen verursachen können.
– Mit Flüssigkeiten gefüllte Behälter, da diese umfallen
und die Flüssigkeit auf das Gerät verschütten können,
wodurch es zu elektrischen Schlägen für den Anwender
und/oder zu Beschädigung des Gerätes kommen kann.
6 Decken Sie dieses Gerät niemals mit Zeitungen,
Tischdecken, Vorhängen usw. ab, damit die
Wärmeabfuhr nicht behindert wird. Falls die Temperatur
im Inneren des Gerätes ansteigt, kann es zu Feuer,
Beschädigung des Gerätes und/oder zu persönlichen
Verletzungen kommen.
7 Schließen Sie dieses Gerät erst an eine Wandsteckdose
an, nachdem alle anderen Anschlüsse ausgeführt wurden.
8 Stellen Sie dieses Gerät niemals mit der Unterseite nach
oben auf, da es sonst beim Betrieb zu Überhitzung mit
möglichen Beschädigungen kommen kann.
9 Wenden Sie niemals Gewalt bei der Bedienung der
Schalter, Knöpfe und/oder Kabel an.
10 Wenn Sie das Netzkabel von der Wandsteckdose
abtrennen, fassen Sie immer den Netzstecker an; ziehen
Sie niemals an dem Kabel.
11 Reinigen Sie dieses Gerät niemals mit chemisch behandelten
Tüchern; anderenfalls kann das Finish beschädigt werden.
Verwenden Sie ein reines, trockenes Tuch.
12 Verwenden Sie nur die für dieses Gerät vorgeschriebene
Netzspannung. Falls Sie eine höhere als die
vorgeschriebene Netzspannung verwenden, kann es zu
Feuer, Beschädigung dieses Gerätes und/oder zu
persönlichen Verletzungen kommen. Yamaha kann nicht
verantwortlich gemacht werden für Schäden, die auf die
Verwendung dieses Gerätes mit einer anderen als der
vorgeschriebenen Spannung zurückzuführen sind.
13 Um Beschädigungen durch Blitzschlag zu vermeiden,
ziehen Sie den Netzstecker von der Netzdose ab, wenn es
ein Gewitter gibt.
14 Versuchen Sie niemals ein Modifizieren oder Ändern
dieses Gerätes. Falls eine Wartung erforderlich ist,
wenden Sie sich bitte an einen Yamaha-Kundendienst.
Das Gehäuse sollte niemals selbst geöffnet werden.
15 Falls Sie das Gerät für längere Zeit nicht verwenden (z.B.
während der Ferien), ziehen Sie den Netzstecker von der
Netzdose ab.
16 Lesen Sie unbedingt den Abschnitt „FEHLERBEHEBUNG“
durch, um übliche Bedienungsfehler zu berichtigen, bevor
Sie auf eine Störung des Gerätes schließen.
17 Bevor Sie dieses Gerät an einen anderen Ort transportieren,
drücken Sie , um das Gerät auszuschalten und ziehen Sie
danach den Netzstecker aus der Netzdose.
18 Es kommt zu Kondensatbildung, wenn die
Umgebungstemperatur plötzlich ändert. Ziehen Sie den
Netzstecker von der Netzdose ab, und lassen Sie das
Gerät ruhen.
19 Falls Sie das Gerät für längere Zeit in Betrieb halten,
kann sich das Gerät erwärmen. Schalten Sie das System
aus und lassen Sie das Gerät abkühlen.
20 Stellen Sie dieses Gerät in die Nähe der Steckdose und so
auf, dass der Netzstecker gut zugänglich ist.
21 Die Batterien dürfen nicht starker Hitze wie direktem
Sonnenschein, Feuer o.ä. ausgesetzt werden. Entsorgen
Sie Batterien gemäß den örtlichen Vorschriften.
– Bewahren Sie die Batterien außerhalb der Reichweite
von Kindern auf. Batterien können gefährlich sein,
wenn Kinder diese in den Mund nehmen.
– Wenn sich die Batterien dem Ende ihrer Lebensdauer
annähern, verringert sich die effektive Reichweite der
Fernbedienung erheblich. Ersetzen Sie die Batterien
so bald wie möglich gegen zwei neue, sollte dieser
Fall eintreten.
– Verwenden Sie niemals alte Batterien gemeinsam mit
neuenBatterien.
– Verwenden Sie niemals gleichzeitig Batterien
unterschiedlichen Typs (wie z. B. Alkali- und
Manganbatterien). Lesen Sie die Anweisungen auf der
Verpackung sorgfältig durch, da unterschiedliche
Batterietypen die gleiche Form und Farbe haben können.
– Verbrauchte Batterien können auslaufen. Entsorgen
Sie Batterien, die auslaufen, umgehend. Vermeiden
Sie einen Kontakt zwischen der auslaufenden
Flüssigkeit und Ihrer Haut oder Kleidung, usw.
Reinigen Sie das Batteriefach sorgfältig, bevor Sie
neue Batterien einsetzen.
– Falls Sie das Gerät über einen längeren Zeitraum nicht
nutzen, entfernen Sie die Batterien aus dem Gerät.
Andernfalls verschleißen die Batterien, was zum
Auslaufen der Batterieflüssigkeit und zur
Beschädigung des Geräts führen kann.
– Batterien dürfen nicht mit dem Hausmüll entsorgt
werden. Entsorgen Sie Batterien sachgemäß unter
Einhaltung der lokalen Vorschriften.
Dieses Gerät ist nicht vom Netz abgetrennt, so lange der
Netzstecker an eine Netzdose angeschlossen ist, auch wenn das
Gerät selbst ausgeschaltet wurde mit . Auch in diesem Status
weist das Gerät einen geringen Stromverbrauch auf.
WARNUNG
UM DIE GEFAHR EINES FEUERS ODER EINES
ELEKTROSCHOCKS ZU VERMEIDEN, DARF DAS GERÄT
WEDER REGEN NOCH FEUCHTIGKEIT AUSGESETZT WERDEN.
VORSICHT
Explosionsgefahr bei falschem Einlegen der Batterie. Nur mit
Batterien des gleichen oder eines gleichwertigen Typs ersetzen.
Es können Bildstörungen auftreten, wenn dieses Gerät zu nahe
an einem Fernseher mit Kathodenstrahlröhre (Braunsche Röhre)
aufgestellt wird. Sollte dies der Fall sein, entfernen Sie das
Gerät vom Fernseher.
i De
Page 43

INHALTSVERZEICHNIS
ISX-800
Netzkabel Fernbedienung Dock-Abdeckung
USB-Abdeckung
FM-Antenne
Halterung
Stab
Sockel
Auflage
Kabelklemme
Schraubensatz
Hinweis
Verwenden Sie diese Artikel
zum Montieren des
Ständers. Lesen Sie dazu die
separate Montageanleitung.
Hinweis
Halten Sie die USBAbdeckung von
Kindern fern, damit sie
nicht versehentlich
verschluckt wird.
2 x Batterien
(AA, LR6, UM-3)
Bedienungsanleitung
(diese Anleitung)
Montageanleitung
6 m
NAMEN UND FUNKTIONEN DER TEILE
EINSTELLEN DER UHR
WIEDERGABE EINES iPod
WIEDERGABE VON CDs ODER USB-GERÄTEN
WIEDERGABE VON FM-RADIOSENDERN
WIEDERGABE VON EXTERNEN QUELLEN
VERWENDEN DER WECKFUNKTION
................................................................5
...........................................................6
........................................2
...........................7
...................................10
.................................11
.........................................12
VERWENDUNG DES SLEEP-TIMERS
TONREGELUNG
EINSTELLEN DER HELLIGKEIT DES BEDIENFELDDISPLAYS
FEHLERBEHEBUNG
HINWEISE ZU DISCS UND USB-GERÄTEN
TECHNISCHE DATEN
........................................................................15
..................................................................16
.................................................................19
..........................................15
.................................18
....15
Eigenschaften
• Geben Sie Musik von externen Geräten wie z. B. iPod/iPhone-Modellen, Audio-/Daten-CDs und USB-Geräten wieder oder hören Sie FMRadio.
• Verwenden Sie Ihre Lieblingsmusik als Weckton, oder wählen Sie aus einer Reihe an Pieptönen. Die von Ihnen ausgewählte Musik wird in
einer von Ihnen festgelegten Lautstärke zur programmierten Weckzeit wiedergegeben, wodurch Sie bestmöglichst in den Tag starten
(IntelliAlarm-Funktion).
• Sie können bis zu fünf Ihrer bevorzugten FM-Radiosender ganz einfach speichern/abrufen.
• Stellen Sie den Klang mithilfe des 3-Band-Equilizers (Bass, mittlerer Frequenzbereich, Höhen) nach Ihren Wünschen ein.
• Zwei Uhrentypen (mit Stundenzeiger) im Gerätedesign können angezeigt werden.
Zu dieser Bedienungsanleitung
• Die Bezeichnung „iPod“ umfasst in der gesamten Bedienungsanleitung außerdem „iPhone“.
• Wenn für die Durchführung einer Operation sowohl die Tasten am Gerät als auch die auf der Fernbedienung verwendet werden können,
beschreibt die Bedienungsanleitung die Schritte mithilfe der Tasten am Gerät.
Mitgeliefertes Zubehör
English Français Deutsch Svenska Italiano Español Nederlands Русский
Verwendung der Fernbedienung
Setzen Sie die Batterien mit der korrekten Polarität (+ und –) in die
Fernbedienung ein.
Richten Sie die Fernbedienung auf den Empfänger des
Fernbedienungssignals (auf der Vorderseite) und verwenden Sie
die Fernbedienung innerhalb des unten angegebenen
Entfernungsbereichs.
1 De
Page 44

Oberseite
AUTO SET BEEP
SOURCE + BEEP
SOURCE
DIMMER
CLOCK
ALARM TYPE
212
1
iPod
VOLUME
USB LABEL SIDE
SOURCE PRESETALARM SNOOZE
SLEEP
12345678 jlk9
y
• Der iPod wird beim Anschließen an das Dock aufgeladen. Der iPod wird nicht aufgeladen,
wenn sich das Gerät im Energiesparmodus befindet.
• Achten Sie darauf, einen Dock-Adapter zu verwenden, der mit Ihrem iPod kompatibel ist.
Wenn Sie den Adapter nicht verwenden oder dieser nicht kompatibel ist, kann die Verbindung
nur locker oder schlecht zustande kommen, was Schäden am Anschluss verursachen kann.
Weitere Informationen zum Dock-Adapter erhalten Sie auf der offiziellen Apple-Webseite.
• Wenn ein iPod in einer Schutzhülle gewaltsam angeschlossen wird, kann der Anschluss
beschädigt werden. Entfernen Sie die Schutzhülle vor dem Einsetzen.
• Wenn der iPod nicht verwendet wird, setzen Sie die iPod-Dock-Abdeckung ein, um den
Anschluss zu schützen.
Dock-Adapter
NAMEN UND FUNKTIONEN DER TEILE
a (Netzschalter)
Schaltet das System ein/aus. Die Zeit wird auch bei
ausgeschaltetem System angezeigt.
y
• Halten Sie die Taste auf der Oberseite des Geräts länger als 3
Sekunden gedrückt, um den Energiesparmodus zu aktivieren. Im
Energiesparmodus werden auf dem Bedienfelddisplay keine
Informationen angezeigt. Dadurch wird der Stromverbrauch gesenkt.
Drücken Sie erneut, um den Energiesparmodus abzubrechen.
• Die Weckfunktion ist auch bei ausgeschaltetem System/System im
Energiesparmodus verfügbar.
b iPod-Dock
Anschluss für einen iPod.
c USB-Anschluss
Anschluss für ein USB-Gerät (S. 9).
d VOLUME –/+
Stellt die Lautstärke ein.
e SOURCE
Wählt die Wiedergabequelle.
f ALARM
Aktiviert/deaktiviert den Wecker und passt die verschiedenen
Weckeinstellungen an (S. 13, 14).
Anschluss eines iPod an den iPod-Dock
g SNOOZE/SLEEP
Stellt den Sleep-Timer ein oder aktiviert den SchlummerModus des Weckers (S. 14,15).
h PRESET
Speichert/ruft FM-Radiosender ab oder ändert den
Wiedergabeordner (bei Musikwiedergabe von Daten-CD oder
USB-Gerät).
i /
Überspringt Titel/Dateien oder sucht einen Radiosender.
Spult bei gedrückter Taste während der Titel-/Dateiwiedergabe
im Titel/in der Datei vor/zurück.
j /
Wiedergabe/Pause des wiedergegebenen Titels.
k
Wirft CD aus.
l Disc-Schacht
Legen Sie hier eine CD ein.
2 De
Page 45

Hinweise
Bedienfelddisplay
FM
CD
AUX
USB
iPod
ALL
1
2
1
8
56
7
3
4
162 3
4
5
Mitgelieferte
FM-Antenne
NAMEN UND FUNKTIONEN DER TEILE
1 Anzeige Wiedergabe/Zufallswiedergabe/
Wiederholungswiedergabe
Zeigt den Wiedergabemodus an (S. 6, 9).
b Empfänger Fernbedienungssignal
c Uhranzeige
Zeigt den Stundenzeiger der Uhr an (S. 5).
d Wiedergabequellenanzeige
Zeigt die gewählte Wiedergabequelle an.
Rückseite
e Weckanzeige
Leuchtet bei aktiviertem Wecker (S. 12).
f Sleep-Anzeige
Leuchtet bei aktiviertem Sleep-Timer (S. 15).
g Multifunktionsanzeige
Zeigt verschiedene Informationen an, einschließlich Uhrzeit,
aktuelle Titelnummer oder den Radiosender.
h Beleuchtungssensor
Erkennt die Umgebungsbeleuchtung. Bedecken Sie niemals
diesen Sensor.
c DIMMER
Stellt die Helligkeit des Bedienfelddisplays ein (S. 15).
d AUX
Anschluss für ein externes Gerät.
e Anschluss für FM-Antenne
Anschluss für die mitgelieferte FM-Zimmerantenne oder eine
Außenantenne.
Deutsch
• Die Antenne sollte ausgezogen bzw. gestrafft sein. Ändern Sie bei
a ALARM TYPE
b CLOCK
Wenn Sie die Außenantennenkabel und/oder die Kabel externer Geräte durch den Stab des Ständers führen wollen, lesen Sie bitte dazu die
separate Montageanleitung.
Wechselt den Weckertyp (S. 13).
Wechselt den Anzeigetyp der Uhr und ermöglicht das
Einstellen der Uhrzeit (S. 5).
schlechtem Radioempfang die Höhe, die Ausrichtung oder die
Positionierung der Antenne.
• Bei Verwendung einer Außenantenne anstelle der mitgelieferten FMAntenne ist der Empfang besser.
f Anschlussabdeckung
Entfernen Sie die Anschlussabdeckung, bevor Sie externe
Geräte an AUX und/oder eine FM-Antenne and den
Antennenanschluss anschließen.
3 De
Page 46

NAMEN UND FUNKTIONEN DER TEILE
iPod-Steuertasten
Fernbedienung
2
3
4
5
6
7
8
9
j
k
l
m
1
p
o
n
a Sender des Fernbedienungssignals
b (Netzschalter)
Schaltet das System ein/aus.
c ALARM
Stellt den Wecker ein/aus.
d SNOOZE/SLEEP
Stellt den Sleep-Timer ein oder aktiviert den SchlummerModus des Weckers (S. 14, 15).
e Wiedergabequellentaste
Wählt die Wiedergabequelle.
f FOLDER
Wechselt den Wiedergabeordner während der Wiedergabe einer
Daten-CD oder eines USB-Geräts.
g /
Überspringt Titel/Dateien.
Spult bei gedrückter Taste während der Titel-/Dateiwiedergabe
im Titel/in der Datei vor/zurück.
h
Wiedergabe/Pause.
i
Stoppt die Wiedergabe.
j (Zufallswiedergabe),
(Wiederholungswiedergabe)
Spielt Musik von einem iPod, einer Audio-/Daten-CD oder
einem USB-Gerät im Wiederholungs- bzw. Zufallsmodus ab
(S. 6, 9).
k EQ LOW/MID/HIGH
Passt den Bass, den mittleren Frequenzbereich und die Höhen
an (S. 15).
l PRESET /
Wählt einen voreingestellten FM-Sender.
4 De
m MEMORY
Speichert den FM-Sender (S. 10).
n TUNING /
Sucht einen Sender.
o VOLUME +/–
Stellt die Lautstärke ein.
p MUTE
Schaltet den Ton stumm/hebt Stummschaltung auf.
Page 47

Hinweis
Einstellen der Zeit
Oberseite
SET
Rückseite
Eingestellte Zeit
(blinkt)
CLOCK 2
CLOCK 1
Rückseite
z. B. 10:50 Uhr
Stundenzeiger
der analogen Uhr
Minute
z. B. 10:50 Uhr
Minute
Stunde
AUTO SET BEEP
212
DIMMER
USB LABEL SIDE
VOLUME
SOURCE PRESETALARM SNOOZE
EINSTELLEN DER UHR
1 Stellen Sie den CLOCK-Schalter auf der Rückseite
SOURCE + BEEP
1
SOURCE
CLOCK
ALARM TYPE
SLEEP
auf SET.
2
Umstellen des Uhrentyps
Stellen Sie den CLOCK-Schalter auf der Rückseite auf den gewünschten Uhrentyp.
2 Stellen Sie die Zeit mit / ein.
3 Stellen Sie den CLOCK-Schalter auf der Rückseite
auf CLOCK1 oder CLOCK2.
y
• Wenn Sie in Schritt 2 einen iPod an das iPod-Dock anschließen, wird die
Zeit auf dem iPod auf das Gerät kopiert. Wenn bereits ein iPod an das
iPod-Dock angeschlossen ist, wenn Sie den CLOCK auf SET stellen, wird
die Zeit auf dem iPod nicht kopiert.
• Drücken Sie SNOOZE/SLEEP im Schritt
24-Stunden-Zeitanzeige zu wechseln.
Die Zeiteinstellung wird zurückgesetzt, wenn das Gerät länger als eine
Woche nicht an das Stromnetz angeschlossen ist.
Uhrzeitanzeigemodus 1 (CLOCK 1)
2, um zwischen der 12- und
Deutsch
Uhrzeitanzeigemodus 2 (CLOCK 2)
5 De
Page 48

Hinweise
WIEDERGABE EINES iPod
AUTO SET BEEP
SOURCE + BEEP
SOURCE
DIMMER
CLOCK
ALARM TYPE
212
1
VOLUME
USB LABEL SIDE
SOURCE PRESETALARM SNOOZE
SLEEP
23
Oberseite
Fernbedienung
REPEAT
SHUFFLE
Fernbedienung
Wiedergabe des iPod
Einzelheiten zu den kompatiblen iPod-Modellen finden Sie unter „TECHNISCHE DATEN“ (S. 19).
1 Schließen Sie einen iPod an das iPod-Dock an.
2 Drücken Sie SOURCE und stellen Sie iPod als
Wiedergabequelle ein.
3 Drücken Sie / , um die Wiedergabe des iPod zu
beginnen.
Die Wiedergabe kann entweder mit der Fernbedienung, dem
iPod oder den Tasten auf der Geräteoberseite gesteuert
werden.
Ta s te Funktion
/
Oberseite
Fernbedienung
y
• Sie können den iPod jederzeit entfernen.
• Ist das System ausgeschaltet, schaltet es sich automatisch ein, wenn
Musik/Video auf dem angeschlossenen iPod wiedergegeben wird.
FOLDER
MENU
ENTER
Wiedergabe/Pause
Überspringen
/
Vorspulen/Zurückspulen
(gedrückt halten)
Wiedergabe/Pause
Überspringen
/
Vorspulen/Zurückspulen
(gedrückt halten)
/
/
iPod-Menüsteuerung
Wiederholungs-/Zufallswiedergabe
Der Wiedergabemodus kann mithilfe der Anzeige auf dem Bedienfelddisplay überprüft werden.
• Je nach iPod-Modell kann die Wiederholungs-/Zufallswiedergabe
möglicherweise nicht korrekt ausgeführt werden.
• Je nach iPod-Modell kann die Wiedergabereihenfolge im Wiederholungs-/
Zufallswiedergabemodus abweichen.
Wiederholungswiedergabe
Drücken Sie REPEAT auf der Fernbedienung, um aus den
folgenden Wiedergabemodi zu wählen.
:Ein
: Alle
Keine anzeige: Aus
Zufallswiedergabe
Drücken Sie SHUFFLE auf der Fernbedienung, um aus den
folgenden Wiedergabemodi zu wählen.
: Titel
:Alben
Keine anzeige: Aus
6 De
Page 49

Hinweis
WIEDERGABE VON CDs ODER USB-GERÄTEN
Oberseite
CD
Titelnummer
Titel/Dateien von CDs/USB-Geräten werden folgendermaßen wiedergegeben.
• Wenn die Wiedergabe einer CD/eines USB-Geräts gestoppt wird, beginnt die Wiedergabe beim nächsten Mal am Anfang des zu dem
Stopp-Zeitpunkt wiedergegebenen Titels.
• Wenn Sie bei angehaltener Wiedergabe auf der Fernbedienung drücken, werden die Titel beim nächsten Wiedergabestart
folgendermaßen wiedergegeben:
– Für Audio-CDs: vom ersten Titel der CD.
– Für Daten-CDs/USB-Geräte: vom ersten Titel aus dem Ordner, der den vorher wiedergegebenen Titel enthält.
• Das Gerät schaltet sich 60 Minuten nach dem Wiedergabestopp der CD/des USB-Geräts automatisch ab.
y
Einzelheiten zu abspielbaren Discs und Dateien finden Sie unter „HINWEISE ZU DISCS UND USB-GERÄTEN“ (S. 18).
Wiedergabe einer Audio-CD
1 Drücken Sie SOURCE, um CD als
AUTO SET BEEP
212
DIMMER
USB LABEL SIDE
VOLUME
SOURCE PRESETALARM SNOOZE
SOURCE + BEEP
1
SOURCE
CLOCK
ALARM TYPE
SLEEP
Wiedergabequelle zu wählen.
2 Legen Sie die Audio-CD so in den Disc-Schacht
ein, dass die beschriftete Seite zur Vorderseite des
Geräts zeigt.
Die Wiedergabe startet automatisch. Nach Wiedergabestart
oder Vorspringen zum nächsten Titel wird für kurze Zeit die
Titelnummer angezeigt.
12
Verwenden Sie die folgenden Tasten zur Bedienung des Geräts
während der Titelwiedergabe von Audio-CDs.
Ta s te Funktion
Oberseite
Fernbe-
dienung
Deutsch
/
Wiedergabe/Pause
Überspringen
/
Vorspulen/Zurückspulen
(gedrückt halten)
CD auswerfen
Wiedergabe/Pause
Überspringen
/
Vorspulen/Zurückspulen
(gedrückt halten)
Stopp
Wenn sich das System im Energiesparmodus (☞ S. 2) befindet, können
keine CDs eingelegt oder ausgeworfen werden.
7 De
Page 50

WIEDERGABE VON CDs ODER USB-GERÄTEN
AUTO SET BEEP
SOURCE + BEEP
SOURCE
DIMMER
CLOCK
ALARM TYPE
212
1
VOLUME
USB LABEL SIDE
SOURCE PRESETALARM SNOOZE
SLEEP
12
Oberseite
CD
Ordnernummer
Dateinummer
Wiedergabe einer Daten-CD
1 Drücken Sie SOURCE, um CD als
Wiedergabequelle zu wählen.
2 Legen Sie die Daten-CD so in den Disc-Schacht
ein, dass die beschriftete Seite zur Vorderseite des
Geräts zeigt.
Die Wiedergabe startet automatisch. Nach Wiedergabestart
oder Vorspringen zum nächsten Titel wird für kurze Zeit die
Ordner-/Dateinummer angezeigt.
Verwenden Sie die folgenden Tasten zur Bedienung des Geräts
während der Titelwiedergabe von Daten-CDs.
Ta s te Funktion
/
Oberseite
PRESET
Fernbedienung
FOLDER
Wiedergabe/Pause
Überspringen
/
Vorspulen/Zurückspulen
(gedrückt halten)
Wiedergabeordner wechseln
CD auswerfen
Wiedergabe/Pause
Überspringen
/
Vorspulen/Zurückspulen
(gedrückt halten)
Stopp
Wiedergabeordner wechseln
8 De
Page 51

Wiedergabe eines USB-Geräts
Hinweis
AUTO SET BEEP
SOURCE + BEEP
SOURCE
DIMMER
CLOCK
ALARM TYPE
212
1
VOLUME
USB LABEL SIDE
SOURCE PRESETALARM SNOOZE
SLEEP
21
Oberseite
USB
Ordnernummer
Dateinummer
REPEAT
SHUFFLE
Fernbedienung
WIEDERGABE VON CDs ODER USB-GERÄTEN
1 Drücken Sie SOURCE, um USB als
Wiedergabequelle zu wählen.
2 Schließen Sie ein USB-Gerät an den USB-
Anschluss an.
Die Wiedergabe startet automatisch.
oder Vorspringen zum nächsten Titel wird für kurze Zeit die
Ordner-/Dateinummer angezeigt.
Nach Wiedergabestart
Deutsch
Wenn ein USB-Gerät angeschlossen ist, werden die Titel in folgender
Reihenfolge wiedergegeben:
– Ordner-Wiedergabereihenfolge:
Ordner werden in alphabetischer Reihenfolge der ersten drei
Zeichen des Ordnernamens wiedergegeben. Ordnernamen mit
Zeichen, die nicht zum Alphabet gehören, werden nach den
Ordnern mit Alphabetzeichen im Namen wiedergegeben.
– Datei-Wiedergabereihenfolge:
Dateien werden in chronologischer Reihenfolge wiedergegeben
(älteste Dateien zuerst).
Verwenden Sie die folgenden Tasten zur Bedienung des Geräts
während der Titelwiedergabe von USB-Geräten.
Ta s te Funktion
/
Wiedergabe/Pause
Überspringen
Oberseite
/
Vorspulen/Zurückspulen
(gedrückt halten)
PRESET
Wiedergabeordner wechseln
Wiedergabe/Pause
Überspringen
/
Fernbe-
dienung
Vorspulen/Zurückspulen
(gedrückt halten)
Stopp
FOLDER
y
Sie können das USB-Gerät jederzeit entfernen.
Wiedergabeordner wechseln
Wiederholungs-/Zufallswiedergabe
Der Wiedergabemodus kann mithilfe der Wiedergabe-/Zufallswiedergabe-/Wiederholungswiedergabeanzeige auf dem Bedienfelddisplay
überprüft werden.
Wiederholungswiedergabe
Drücken Sie REPEAT auf der Fernbedienung, um aus den
folgenden Wiedergabemodi zu wählen.
:
Keine anzeige: Wiederholungsmodus ausgeschaltet
Alle Titel in dem Ordner (nur Daten-CD/USB-Gerät)
: Alle Titel
: Ein Titel
y
Wenn die gewählte Quelle Ordner enthält, wird jeder Ordner im
Wiederholungs-/Zufallsmodus wiedergegeben.
Zufallswiedergabe
Drücken Sie SHUFFLE auf der Fernbedienung, um aus den
folgenden Wiedergabemodi zu wählen.
:
Keine anzeige: Zufallsmodus ausgeschaltet
Alle Titel in dem Ordner (nur Daten-CD/USB-Gerät)
: Alle Titel
9 De
Page 52

Hinweis
WIEDERGABE VON FM-RADIOSENDERN
AUTO SET BEEP
SOURCE + BEEP
SOURCE
DIMMER
CLOCK
ALARM TYPE
212
1
VOLUME
USB LABEL SIDE
SOURCE PRESETALARM SNOOZE
SLEEP
12
Oberseite
Empfangsfrequenz
AUTO SET BEEP
SOURCE + BEEP
SOURCE
DIMMER
CLOCK
ALARM TYPE
212
1
VOLUME
USB LABEL SIDE
SOURCE PRESETALARM SNOOZE
SLEEP
234 1
Oberseite
Voreinstellungsnummer
Auswählen des FM-Senders
Wenn Sie einen Sender manuell wählen, wird der Ton in Mono
wiedergegeben.
1 Drücken Sie SOURCE, um FM als
Wiedergabequelle zu wählen.
FM
2
Drücken Sie / , um einen FM-Sender zu suchen.
Art der Sendersuche Bedienung
Oberseite
Fernbe-
dienung
Automatische
Sendersuche
Manuelle
Sendersuche
Automatische
Sendersuche
Manuelle
Sendersuche
Halten Sie oder
gedrückt.
Drücken Sie oder
wiederholt.
Halten Sie
TUNING oder
gedrückt.
Drücken Sie
TUNING oder
wiederholt.
Speichern von FM-Sendern (Voreinstellung)
Verwenden Sie die Voreinstellungsfunktion, um Ihre 5 bevorzugten Radiosender zu speichern.
1 Drücken Sie / , um Ihren bevorzugten FM-
Sender zu suchen.
2 Halten Sie PRESET gedrückt.
Bei Verwendung der Fernbedienung
Halten Sie MEMORY gedrückt.
3 Drücken Sie PRESET und wählen Sie die
Voreinstellungsnummer, unter der Sie den FMSender speichern wollen.
Bei Verwendung der Fernbedienung
4 Halten Sie PRESET gedrückt, um den
Drücken Sie PRESET /.
voreingestellten Sender zu speichern.
Dadurch wird der FM-Sender gespeichert.
Bei Verwendung der Fernbedienung
Drücken Sie MEMORY.
FM
10 De
Page 53

Hinweis
Auswählen eines voreingestellten FM-Senders
Oberseite
AUTO SET
DIMMER
CL
2
1
iPod
VOLUME
USB LAB
SOURCE ALARM SNOOZ
23
Oberseite
AUX
75 Ω
FM ANT
AUX
WIEDERGABE VON EXTERNEN QUELLEN
AUTO SET BEEP
212
DIMMER
USB LABEL SIDE
VOLUME
SOURCE PRESETALARM SNOOZE
1 2
WIEDERGABE VON EXTERNEN QUELLEN
SOURCE + BEEP
1
SOURCE
CLOCK
ALARM TYPE
1 Drücken Sie SOURCE, um FM als
Wiedergabequelle zu wählen.
2 Drücken Sie PRESET wiederholt, um einen
voreingestellten FM-Sender zu wählen.
SLEEP
Schalten Sie das Gerät aus, bevor Sie Audiokabel anschließen.
Entfernen Sie die Anschlussabdeckung, bevor Sie externe Geräte
anschließen.
Bei Verwendung der Fernbedienung
Drücken Sie PRESET /.
Deutsch
1 Schließen Sie das externe Audiogerät mithilfe eines
im Handel erhältlichen Stereo-Klinkensteckers
(3,5 mm) an AUX auf der Rückseite an.
Stellen Sie vor dem Anschluss die Lautstärke dieses Geräts und Ihres
externen Audiogeräts auf leise.
2 Drücken Sie , um das System einzuschalten.
3 Drücken Sie SOURCE und stellen Sie AUX als
Wiedergabequelle ein.
4 Starten Sie die Wiedergabe des angeschlossenen
externen Audiogeräts.
11 De
Page 54

VERWENDEN DER WECKFUNKTION
Das Gerät verfügt über eine Weckfunktion (IntelliAlarm), die zu einer festgelegten Zeit Musikquellen und/oder eine Reihe von Pieptönen
abspielt. Die Weckfunktion verfügt über die folgenden Funktionen.
3 Wecktypen
Wählen Sie aus 3 verschiedenen Wecktypen und kombinieren Sie Musik mit Pieptönen.
Die ausgewählte Audioquelle und der Piepton werden zur gleichen Zeit wiedergegeben. Dieser Modus
empfiehlt sich für einen bestmöglichen Start in den Tag.
SOURCE + BEEP
3 Minuten vor der festgelegten Weckzeit: die Wiedergabe der Musikquelle beginnt leise, und mit
näherrückendem Weckzeitpunkt nimmt die Lautstärke
schrittweise zu.
Weckzeit: ein Piepton wird zusätzlich wiedergegeben.
SOURCE
BEEP
Die gewählte Audioquelle wird zur festgelegten Zeit wiedergegeben. Die Lautstärke beginnt leise und
nimmt bis zur eingestellten Lautstärke schrittweise zu.
Zur festgelegten Zeit wird nur der Piepton wiedergegeben.
Verschiedene Audioquellen
iPod, Audio-CD, Daten-CD, USB-Gerät und Radio können als Quelle gewählt werden. Je nach Audioquelle können außerdem folgende
Wiedergabeverfahren gewählt werden:
Quelle Wiedergabeverfahren Funktion
Eine bestimmte, auf dem iPod gespeicherte Wiedergabeliste kann
wiederholt wiedergegeben werden. Erstellen Sie dafür vorab eine
Wiedergabeliste mit dem Namen „ALARM Yamaha DTA“.
Stellen Sie sicher, dass Sie im Namen der Wiedergabeliste die
Leerstellen und die Groß-/Kleinschreibung beachten.
Wenn die Wiedergabeliste „ALARM Yamaha DTA“ auf Ihrem iPod nicht
gefunden werden kann, gibt das Gerät den Titel wieder, den Sie zuletzt
gehört haben.
iPod
Audio-CD
Daten-CD/
USB-Gerät
FM
Wiedergabeliste*
Fortsetzen
Ausgewählter Titel Der ausgewählte Titel wird wiederholt wiedergegeben.
Fortsetzen Der Titel, den Sie zuletzt gehört haben, wird wiedergegeben.
Ordner Der ausgewählte Titel wird wiederholt wiedergegeben.
Fortsetzen Der Titel, den Sie zuletzt gehört haben, wird wiedergegeben.
Voreingestellter Sender Der ausgewählte voreingestellte FM-Sender wird wiedergegeben.
Fortsetzen Der FM-Sender, den Sie zuletzt gehört haben, wird wiedergegeben.
* Nähere Informationen zum Erstellen einer Wiedergabeliste finden Sie in den Anleitungen für Ihren iPod oder für iTunes.
Testwecker
Sie können den Weckton beim Einstellen der Weckfunktion testen.
Schlummerfunktion
Mithilfe der Schlummerfunktion wird der Weckton nach 5 Minuten erneut wiedergeben.
12 De
Page 55

Hinweise
Hinweis
Einstellen der Weckzeit und des Weckertyps
Oberseite
Weckanzeige
Weckzeit
BEEP
SOURCE+
BEEP
SOURCE
Rückseite
Wecklautstärke
VERWENDEN DER WECKFUNKTION
AUTO SET BEEP
212
DIMMER
USB LABEL SIDE
SOURCE PRESETALARM SNOOZE
VOLUME
17
SOURCE + BEEP
1
SOURCE
CLOCK
ALARM TYPE
SLEEP
2465
1 Halten Sie ALARM gedrückt.
Die Weckanzeige ( ) und die eingestellte Weckzeit
blinken.
2 Drücken Sie / , um die Weckzeit einzustellen.
Bei Verwendung der Fernbedienung
Drücken Sie
/.
3 Wählen Sie den Weckertyp mithilfe des ALARM
TYPE-Schalters auf der Rückseite.
Einzelheiten zu den Weckertypen finden Sie auf S. 12.
• Wenn die gewählte nicht angeschlossen oder eingelegt ist, kann der
gewählte Titel/Ordner nicht wiedergegeben werden.
• Wenn die Audioquelle zum eingestellten Weckzeitpunkt nicht
wiedergegeben werden kann (weil z. B. kein iPod angeschlossen ist),
wird der Piepton wiedergegeben.
5 (wenn ein anderer Weckertyp als BEEP gewählt ist)
Legen Sie den wiederzugebenden Titel, Ordner oder
FM-Sender fest.
Wenn iPod als Quelle festgelegt ist:
Keine Einstellungen erforderlich.
Wenn CD/USB/FM als Quelle festgelegt ist:
Drücken Sie PRESET, um den wiederzugebenden Titel
(Audio-CD), Ordner (Daten-CD/USB-Geräts) oder FMSender auszuwählen.
Bei Verwendung der Fernbedienung
Drücken Sie PRESET /.
y
• Wenn iPod als Quelle festgelegt ist, gibt das Gerät die
Wiedergabeliste „ALARM Yamaha DTA“ zum festgelegten
Weckzeitpunkt wieder. Wenn die Wiedergabeliste auf Ihrem iPod
nicht gefunden werden kann, setzt das Gerät die Wiedergabe mit dem
Titel fort, den Sie zuletzt gehört haben (Fortsetzen).
• Wenn CD/USB als Quelle ausgewählt ist, und „0“ als Titel-/
Ordnernummer eingestellt ist, setzt das Gerät die Wiedergabe mit
dem Titel fort, den Sie zuletzt gehört haben (Fortsetzen).
• Wenn FM als Quelle gewählt ist, und „0“ als Nummer für den
voreingestellten Sender eingestellt ist, setzt das Gerät die Wiedergabe
des FM-Senders fort, den Sie zuletzt gehört haben (Fortsetzen).
6 Drücken Sie VOLUME –/+, um die Wecklautstärke
einzustellen.
CD
Deutsch
4 (wenn ein anderer Weckertyp als BEEP gewählt ist)
Drücken Sie SOURCE und wählen Sie die
Musikquelle.
Es kann eine andere Quelle als AUX ausgewählt werden.
Bei Verwendung der Fernbedienung
Drücken Sie Wiedergabequellentaste um wählen Sie
die Musikquelle.
Wenn Sie iPod/CD/USB gewählt haben, schließen Sie die
Audioquelle an das Gerät an (iPod, USB-Gerät) bzw. legen Sie
die Audioquelle ein (Audio-/Daten-CD).
y
Drücken Sie / , um die Weckfunktion zu testen. rücken Sie /
erneut, um den Test zu beenden.
7 Drücken Sie ALARM, um die Einstellung der
Weckfunktion zu beenden.
Der Wecker ist jetzt gestellt, und die Weckanzeige ( )
leuchtet.
Die Einstellung der Weckfunktion wird komplett gelöscht, wenn das
System vor der vollständigen Beendigung der Einstellung ausgeschaltet
wird.
13 De
Page 56

VERWENDEN DER WECKFUNKTION
AUTO SET BEEP
SOUR
DIMMER
CLOCK
ALARM
212
1
iPod
VOLUME
USB LABEL SIDE
SOURCE ALARM SNOOZE
SLEEP
1
Oberseite
AUTO SET BEEP
SOUR
DIMMER
CLOCK
ALARM
212
1
iPod
VOLUME
USB LABEL SIDE
SOURCE ALARM SNOOZE
SLEEP
2
2
1
Oberseite
Ein-/Ausschalten des Weckers
1 Drücken Sie ALARM.
Bei aktiviertem Wecker leuchtet die Weckanzeige ( ) auf,
und die Weckzeit wird für eine gewisse Zeit angezeigt. Wenn
Sie ALARM erneut drücken, werden die Alarmanzeige
( ) und der Wecker ausgeschaltet.
y
Die Weckzeit bleibt auch dann gespeichert, wenn Sie die Weckfunktion
ausschalten. Wenn die Weckfunktion durch Drücken der ALARM-
Taste erneut eingeschaltet wird, ertönt der Wecker mit den vorher
festgelegten Weckeinstellungen.
Bedienungsvorgänge während der Wiedergabe des Wecktons
Der Weckton wird zur eingestellten Zeit wiedergegeben. Während der Wiedergabe sind folgende Bedienungsvorgänge verfügbar.
1 (wenn Sie den Wecker kurzzeitig ausschalten
wollen) Drücken Sie SNOOZE/SLEEP.
SNOOZE schaltet den Weckton aus und setzt ihn nach 5
Minuten fort.
y
• Wenn SOURCE + BEEP eingestellt ist, drücken Sie SNOOZE/
SLEEP einmal, um den Piepton auszuschalten. Drücken Sie
SNOOZE/SLEEP zweimal, um die Wiedergabe der Quelle zu
beenden. 5 Minuten nach Beendigung der Wiedergabe der
Audioquelle, beginnt deren leise Wiedergabe erneut und der Piepton
wird fortgesetzt.
• Die Weckanzeige blinkt, wenn die Schlummerfunktion aktiviert ist.
2 (wenn Sie den Wecker ausschalten wollen) Drücken
Sie ALARM oder .
y
Sofern Sie den Wecker nicht abstellen, verstummt dieser automatisch
nach 60 Minuten.
14 De
Page 57

Hinweis
VERWENDUNG DES SLEEP-TIMERS
AUTO SET BEEP
SOURC
DIMMER
CLOCK
ALARM T
212
1
iPod
VOLUME
USB LABEL SIDE
SOURCE ALARM SNOOZE
SLEEP
1
Oberseite
1
2
3
Fernbedienung
iPod
:HIGH
:MID
:LOW
Frequenzbereich
Einstellung
Frequenz-
bereich
AUTO21
Rückseite
Sie können die Zeit einstellen, zu der sich das Gerät automatisch ausschaltet.
1 Drücken Sie SNOOZE/SLEEP mehrmals, um die
TONREGELUNG
1 Drücken Sie während der Wiedergabe die EQ-
Ausschaltzeit des Geräts einzustellen.
Der Sleep-Timer kann auf 30, 60, 90 und 120 Minuten
eingestellt werden. Nachdem die Zeit eingestellt wurde, wird
die Sleep-Anzeige ( ) auf dem Bedienfelddisplay angezeigt.
y
Wenn Sie bei aktiviertem Sleep-Timer erneut SNOOZE/SLEEP
drücken, wird die Einstellung des Sleep-Timers abgebrochen.
Ta st en LOW/MID/HIGH auf der Fernbedienung.
Wählen Sie den Frequenzbereich (LOW, MID, HIGH), den Sie
anpassen möchten.
Deutsch
2 Drücken Sie / , um den Frequenzbereich
anzupassen.
Jeder Frequenzbereich kann von –5 bis +5 angepasst werden.
3 Drücken Sie ENTER, um die Einstellung
abzuschließen.
Sie können außerdem die EQ-Taste aus Schritt 1 drücken, um
die Einstellung abzuschließen.
Um die anderen Frequenzbereiche zu ändern, kehren Sie zu
Schritt 1 zurück und Drücken Sie die EQ-Taste des
gewünschten Frequenzbereichs.
EINSTELLEN DER HELLIGKEIT DES BEDIENFELDDISPLAYS
1 Stellen Sie die Helligkeit mithilfe des DIMMER-
Schalters auf der Rückseite ein.
AUTO: passt die Helligkeit des Displays automatisch an
die Umgebungshelligkeit an.
1: heller.
2: dunkler.
Wenn AUTO gewählt ist, wird die Helligkeit des Bedienfelddisplays
mithilfe des Helligkeitssensors (S. 3) automatisch eingestellt. Stellen
Sie sicher, dass der Sensor nicht bedeckt ist.
15 De
Page 58

FEHLERBEHEBUNG
Wenn ein Problem mit diesem Gerät auftritt, prüfen Sie als erstes die folgende Liste. Falls Sie die Störung nicht mithilfe der folgenden
Abhilfemaßnahmen beheben können, oder die Störung nachfolgend nicht aufgelistet ist, schalten Sie dieses Gerät aus, ziehen Sie den
Netzstecker und wenden Sie sich an Ihren nächsten autorisierten Yamaha-Fachhändler oder Yamaha-Kundendienst.
Allgemeines
Problem Mögliche Ursache Lösung
Das Gerät lässt sich nicht einschalten.
Die Lautsprecher bleiben stumm.
Plötzliche Stummschaltung.
Der Ton überschlägt sich/ist verzerrt oder
es gibt ein ungewöhnliches Geräusch.
Das Gerät funktioniert nicht
ordnungsgemäß.
Das System schaltet sich nach dem
Einschalten sofort wieder aus.
Ein Digital- oder Hochfrequenzgerät
erzeugt Störrauschen.
Die Uhreinstellung wurde gelöscht.
Der iPod wird zur Weckzeit nicht
wiedergegeben, obwohl SOURCE auf
iPod gestellt ist.
Die Uhr blinkt und das Gerät kann nicht
bedient werden.
Möglicherweise ist das Netzkabel nicht
ordnungsgemäß angeschlossen.
Möglicherweise ist die Lautstärke auf den
Minimalpegel eingestellt.
Möglicherweise ist eine falsche Eingangsquelle
gewählt.
Der Sleep-Timer (☞ S. 15) ist möglicherweise
aktiviert.
Die Lautstärke der Eingangsquelle ist zu hoch oder
die Lautstärke dieses Geräts ist zu hoch eingestellt
(insbesondere Bass).
Das Gerät erhielt möglicherweise einen starken
elektrischen Schlag, beispielsweise durch Gewitter
oder starke statische Aufladung, oder die
Stromversorgung wurde unterbrochen.
Dieses Gerät ist möglicherweise zu nahe an einem
Digital- oder Hochfrequenzgerät aufgestellt.
Die Stromversorgung des Geräts war länger als
eine Woche unterbrochen.
Der iPod ist nicht fest in das iPod-Dock eingesetzt. Entfernen Sie den iPod vom Gerät und setzen Sie
ALARM TYPE-Schalter steht auf BEEP. Stellen Sie den ALARM TYPE-Schalter auf
Der CLOCK-Schalter auf der Rückseite ist auf
SET gestellt, und das Gerät befindet sich im
Uhreinstellungsmodus.
Schließen Sie das Netzkabel ordnungsgemäß an,
indem Sie die Kabelenden fest in die Steckdose
bzw. in die entsprechende Kabelbuchse am Gerät
einstecken.
Korrigieren Sie den Lautstärkepegel.
Wählen Sie die korrekte Eingangsquelle.
Schalten Sie das System ein geben Sie die Quelle
erneut wieder.
Optimieren Sie die Lautstärke mit VOLUME oder
passen Sie den Bass mit der EQ-Taste (☞ S. 15) an.
Schalten Sie das System aus und ziehen Sie das
Netzkabel. Warten Sie ca. 30 Sekunden, schließen
Sie das Netzkabel wieder an und schalten Sie das
System ein.
Stellen Sie das System in größerer Entfernung zu
derartigen Geräten auf.
Stecken Sie den Netzstecker fest in die
Netzsteckdose und stellen Sie die Uhrzeit erneut
ein (☞ S. 5).
ihn erneut in das iPod-Dock ein (☞ S. 2).
SOURCE + BEEP oder auf SOURCE (☞ S. 13).
Stellen Sie den CLOCK-Schalter auf CLOCK1
oder CLOCK2 (☞ S. 5).
iPod
Problem Mögliche Ursache Lösung
Kein Sound.
Der iPod lädt sich nicht auf.
Die iPod-Anzeige blinkt zweimal (3
Wiederholungen) nach dem Anschließen
des iPod.
CD-Wiedergabe
Problem Mögliche Ursache Lösung
Die Disc kann nicht eingelegt werden.
Einige Tasten funktionieren nicht.
Die Wiedergabe beginnt nicht
unmittelbar nach dem Drücken von
/.
Der iPod ist nicht fest in das iPod-Dock eingesetzt. Entfernen Sie den iPod vom Gerät und setzen Sie
Die Software-Version des iPod wurde nicht
aktualisiert.
Der iPod ist nicht fest in das iPod-Dock eingesetzt. Entfernen Sie den iPod vom Gerät und setzen Sie
Das System ist auf den Energiesparmodus
eingestellt (☞ S. 2).
Der verwendete iPod wird nicht vom Gerät
unterstützt.
Das System ist auf den Energiesparmodus
eingestellt.
Die in das Gerät eingesetzte Disc ist
möglicherweise nicht kompatibel.
Die Disc ist möglicherweise verschmutzt. Wischen Sie die Disc sauber.
Die in das Gerät eingesetzte Disc ist
möglicherweise nicht kompatibel.
Wenn das Gerät von einem kalten an einen warmen
Ort gebracht wurde, hat sich möglicherweise
Kondensation auf der Disc-Leselinse gebildet.
ihn erneut in das iPod-Dock ein (☞ S. 2).
Laden Sie sich die aktuellste iTunes-Version von
der Apple-Webseite runter, und aktualisieren Sie
die iPod-Software auf die aktuellste Version.
ihn erneut in das iPod-Dock ein (☞ S. 2).
Drücken Sie , um den Energiesparmodus
aufzuheben.
Verwenden Sie einen unterstützten iPod (☞ S. 19).
Drücken Sie , um den Energiesparmodus
aufzuheben (☞ S. 2).
Verwenden Sie eine vom Gerät unterstützte Disc
(☞ S. 18).
Verwenden Sie eine vom Gerät unterstützte Disc
(☞ S. 18).
Warten Sie eine oder zwei Stunden, bis sich das
Gerät an die Raumtemperatur angepasst hat, und
versuchen Sie es erneut.
16 De
Page 59

Problem Mögliche Ursache Lösung
Die CD-Anzeige blinkt zweimal (3
Wiederholungen) nach der Ausgabe der
CD.
Im Bedienfelddisplay wird „Err“ angezeigt,
nachdem eine Disc eingesetzt wurde.
USB-Gerät-Wiedergabe
Problem Mögliche Ursache Lösung
Die MP3-/WMA-Datei auf dem USBGerät wird nicht wiedergegeben.
Die USB-Anzeige blinkt zweimal (3
Wiederholungen), nachdem das USBGerät angeschlossen wurde.
Im Bedienfelddisplay wird „Err“
angezeigt, nachdem ein USB-Gerät
angeschlossen wurde.
FEHLERBEHEBUNG
Die in das Gerät eingesetzte Disc ist
möglicherweise nicht kompatibel.
Die Disc ist möglicherweise verschmutzt. Wischen Sie die Disc sauber.
Die Disc enthält keine abspielbaren Dateien. Verwenden Sie eine Disc, die abspielbare Dateien
Die Disc wurde verkehrt herum eingesetzt. Setzen Sie die Disc mit der beschrifteten Seite nach
Beim Gerät ist ein Fehler aufgetreten.
Das USB-Gerät wird nicht erkannt. Schalten Sie das System aus, und schließen Sie das
Ein inkompatibles USB-Gerät wurde an das Gerät
angeschlossen.
Das USB-Gerät enthält keine abspielbaren Dateien. Verwenden Sie ein USB-Gerät, das abspielbare
Ein inkompatibles USB-Gerät wurde an das Gerät
angeschlossen.
Ein Überstrom wurde erkannt.
Verwenden Sie eine vom Gerät unterstützte Disc
(☞ S. 18).
enthält (☞ S. 18, 19).
vorne ein.
Werfen Sie die Disc mit aus.
USB-Gerät erneut an das Gerät an.
Schließen Sie ein Netzteil an, wenn das Gerät
darüber verfügt.
Wenn die oben aufgeführten Lösungen das
Problem nicht beheben, kann das USB-Gerät nicht
mit dem Gerät wiedergegeben werden.
Schalten Sie das System aus und schließen Sie das
USB-Gerät erneut an das Gerät an. Wenn das
Problem dadurch nicht behoben wird, kann das USBGerät nicht mit dem Gerät wiedergegeben werden.
Dateien enthält (☞ S. 18, 19).
Schalten Sie das System aus und schließen Sie das
USB-Gerät erneut an das Gerät an. Wenn das
Problem dadurch nicht behoben wird, kann das USBGerät nicht mit dem Gerät wiedergegeben werden.
Deutsch
FM-Radio-Empfang
Problem Mögliche Ursache Lösung
Zu starkes Rauschen während StereoSendungen.
Der Empfang ist selbst mit Außenantenne
zu schwach. (Der Klang ist verzerrt.)
Fernbedienung
Problem Mögliche Ursache Lösung
Die Fernbedienung funktioniert nicht
ordnungsgemäß.
Die Antenne ist möglicherweise nicht korrekt
angeschlossen.
Der von Ihnen gewählte Rundfunksender ist u. U.
zu weit entfernt oder der Empfang der
Rundfunkwellen ist in Ihrem Gebiet schwach.
Möglicherweise sind Mehrwegreflexionen oder
andere Radio-Interferenzen aufgetreten.
Die Fernbedienung wird möglicherweise außerhalb
Ihrer Reichweite betätigt.
Der Empfänger für das Fernbedienungssignal am
Gerät (☞ S. 3) ist möglicherweise direkter
Sonneneinstrahlung oder Belichtung
(Leuchtstofflampen) ausgesetzt.
Möglicherweise ist die Batterie entladen. Erneuern Sie die Batterien.
Zwischen dem Empfänger für das
Fernbedienungssignal am Gerät und der
Fernbedienung befindet sich ein Hindernis.
Stellen Sie sicher, dass die Antenne korrekt
angeschlossen ist (☞ S. 3).
Versuchen Sie die Signalqualität mithilfe der
manuellen Sendersuche zu verbessern (☞ S. 10)
verwenden Sie eine Mehrkanal-Außenantenne.
Ändern Sie die Höhe, die Ausrichtung oder den
Standort der Antenne.
Einzelheiten zur Reichweite der Fernbedienung
finden Sie im Abschnitt „Verwendung der
Fernbedienung“ (S. 1).
Ändern Sie die Beleuchtung oder die Ausrichtung
des Geräts.
Hindernisse entfernen.
17 De
Page 60

Hinweise
Hinweise
Hinweise
HINWEISE ZU DISCS UND USB-GERÄTEN
Vorsicht
Informationen zu CDs
Das Gerät wurde zur Verwendung mit Audio-CDs, CD-R* und
CD-RW* mit den folgenden Logos entwickelt.
* CD-R/RW mit ISO 9660-Format
y
Dieses Gerät kann Discs wiedergeben, auf denen eines der oben
abgebildeten Logos aufgedruckt ist. Die Disc-Logos sind auf der Disc und
der Disc-Hülle aufgedruckt.
• Legen Sie niemals einen anderen Disc-Typ in dieses Gerät ein. Andernfalls
kann dieses Gerät beschädigt werden.
• CD-R/RW können nicht wiedergegeben werden, wenn sie nicht vorher
finalisiert wurden.
• Manche Discs können je nach Disc-Eigenschaften oder
Aufnahmebedingungen nicht wiedergegeben werden.
• Verwenden Sie niemals Discs mit einer anderen als der Standardform,
z. B. herzförmige Discs.
• Verwenden Sie niemals Discs mit vielen Kratzern auf der Oberfläche.
Handhabung einer Disc
• Berühren Sie nicht die Oberfläche der
Disc. Halten Sie die Disc an ihrem
Rand (und der Mittelbohrung).
• Schreiben Sie niemals mit einem
Bleistift oder einem spitzen
Schreibgerät auf die Disc.
• Bekleben Sie die Disc keinesfalls mit Klebeband, Aufkleber,
Klebstoff usw.
• Verwenden Sie keine Schutzabdeckung zur Vermeidung von
Kratzern.
• Führen Sie nicht mehrere Discs gleichzeitig in den Disc-Schacht
ein. Dies kann sowohl dieses Gerät als auch die Discs
beschädigen.
• Führen Sie keinesfalls Fremdkörper in den Disc-Schacht ein.
• Legen Sie keine gebrochenen, verbogenen oder geklebten Discs
ein.
• Setzen Sie Discs niemals direktem
Sonnenlicht, hohen Temperaturen,
hoher Luftfeuchtigkeit oder starker
Staubentwicklung aus.
Informationen zu USB-Geräten
Dieses Gerät unterstützt USB-Massenspeichergeräte (z. B. FlashSpeicher oder tragbare Audiogeräte), die das Format FAT16 oder
FAT32 verwenden.
• Manche Geräte arbeiten möglicherweise selbst dann nicht korrekt, wenn
sie die Anforderungen erfüllen.
• Schließen Sie keinesfalls andere Geräte als USB-Massenspeichergeräte
(wie USB-Ladestationen oder USB-Hubs), PCs, Kartenleser, externe
Festplatten usw. an.
• Yamaha übernimmt keinerlei Haftung für auftretende Schäden oder
Datenverlust von USB-Geräten, die an dieses Gerät angeschlossen sind.
• Die Abspielbarkeit und Stromversorgung aller Arten von USB-Geräten
können nicht garantiert werden.
Hinweise zu MP3- oder WMA-Dateien
• Das Gerät kann folgende Dateien abspielen.
Datei Bitrate (kbps)
MP3 8 - 320** 16 - 48
WMA 16 - 320** 22,05 - 48
** Sowohl konstante als auch variable Bitraten werden unterstützt.
• Die maximale Anzahl der Dateien/Ordner, die vom Gerät abgespielt
werden können, ist wie folgt:
Daten-CD USB
Maximale Gesamtanzahl Dateien 512 9999
Maximale Ordneranzahl 255 128
Maximale Anzahl von Dateien
pro Ordner
• Urheberrechtlich geschützte Dateien können nicht wiedergegeben werden.
511 255
Abtast-
frequenz (kHz)
• Wischen Sie verschmutzte Discs
mit einem sauberen, trockenen
Tuch von der Mitte ausgehend zum
Rand hin ab. Verwenden Sie
niemals Schallplattenreiniger oder
Farbverdünner.
• Um Störungen zu vermeiden,
sollten Sie keine im Fachhandel
erhältlichen
Objektivreinigungsmittel verwenden.
• Legen Sie nur eine CD in das Gerät ein. Wenn Sie zwei oder
mehr CDs einlegen, können sowohl das Gerät als auch die CDs
beschädigt werden.
18 De
Page 61

TECHNISCHE DATEN
Φ 295 mm
997 mm
410 mm
410 mm
Gewicht: 12,0 kg
587 mm
PLAYER-BEREICH
iPod (Digitalanschluss)
• Kompatible iPod-Modellen
...................................................... iPod touch (1., 2., 3. und 4. Generation)
iPod nano (2., 3., 4., 5. und 6. Generation)
• Kompatible iPhone-Modellen
........................................................................................................iPhone 4
CD
• Medien ................................................................................ CD, CD-R/RW
• Audioformat .......................................................... Audio-CD, MP3, WMA
Laser
• Typ ...............................................................Halbleiterlaser GaAs/GaAlAs
• Wellenlänge ...................................................................................... 790 nm
• Ausgangsleistung ................................................................................ 7 mW
USB
• Audioformat ............................................................................. MP3, WMA
AUX
• Eingang ........................................................3,5-mm-STEREO-Miniklinke
iPod classic
iPhone 3GS
iPhone 3G
iPhone
TUNER
• Empfangsbereich
FM..........................................................................87,50 bis 108,00 MHz
ALLGEMEINES
• Stromversorgung ...........................100 bis 240 V Wechselstrom, 50/60 Hz
• Stromverbrauch ...................................................................................20 W
• Verbrauch bei ausgeschaltetem System .............................................1,5 W
• Verbrauch im Energiesparmodus .................................0,5 W oder weniger
• Abmessungen
Deutsch
Technische Daten können ohne Ankündigung geändert werden.
VORSICHT MIT DEM LASER
Dieses Gerät enthält einen Laser. Um unnötige Augenverletzungen
zu vermeiden, sollten Sie alle Wartungs- und Reparaturarbeiten
einem qualifizierten Wartungstechniker überlassen.
GEFAHR
Sichtbare Laserstrahlen bei geöffneter Abdeckung. Achten Sie
darauf, nicht direkt in den Laserstrahl zu blicken. Wenn dieses
Gerät an die Steckdose angeschlossen ist, schauen Sie nicht durch
den CD-Schacht oder andere Öffnungen in das Innere des Geräts.
Die Laser-Komponente in diesem Produkt kann eine
Strahlung abgeben, die den Grenzwert der Klasse 1 übersteigt.
iPod, iPhone
„Made for iPod“ und „Made for iPhone“ bedeuten, dass ein
elektronisches Zubehör speziell konstruiert ist, sodass es
entsprechend mit einem iPod oder iPhone verbunden werden kann,
und vom Entwickler zertifiziert wurde, um die Standards von
Apple zu erfüllen.
Apple ist nicht verantwortlich für den Betrieb dieses Geräts oder
dessen Einhaltung der Sicherheitsstandards und-vorschriften. Bitte
beachten Sie, dass die Verwendung dieses Zubehörs mit dem iPod
oder iPhone die drahtlose Übertragungsleistung beeinträchtigen
kann.
iPhone, iPod, iPod classic, iPod nano, iPod touch und iTunes sind
Markenzeichen der Apple Inc., eingetragen in den USA und
anderen Ländern.
Verbraucherinformation zur Sammlung und
Entsorgung alter Elektrogeräte und benutzter
Batterien
Befinden sich diese Symbole auf den Produkten, der
Verpackung und/oder beiliegenden Unterlagen, so sollten
benutzte elektrische Geräte und Batterien nicht mit dem
normalen Haushaltsabfall entsorgt werden.
In Übereinstimmung mit Ihren nationalen Bestimmungen
und den Richtlinien 2002/96/EC und 2006/66/EC, bringen
Sie bitte alte Geräte und benutzte Batterien zur
fachgerechten Entsorgung, Wiederaufbereitung und
Wiederverwendung zu den entsprechenden Sammelstellen.
Durch die fachgerechte Entsorgung der Elektrogeräte und
Batterien helfen Sie, wertvolle Ressourcen zu schützen und
verhindern mögliche negative Auswirkungen auf die
menschliche Gesundheit und die Umwelt, die andernfalls
durch unsachgerechte Müllentsorgung auftreten könnten.
Für weitere Informationen zum Sammeln und Wiederaufbereiten
alter Elektrogeräte und Batterien, kontaktieren Sie bitte Ihre
örtliche Stadt- oder Gemeindeverwaltung, Ihren
Abfallentsorgungsdienst oder die Verkaufsstelle der Artikel.
[Entsorgungsinformation für Länder außerhalb
der Europäischen Union]
Diese Symbole gelten nur innerhalb der Europäischen
Union. Wenn Sie solche Artikel ausrangieren möchten,
kontaktieren Sie bitte Ihre örtlichen Behörden oder Ihren
Händler und fragen Sie nach der sachgerechten
Entsorgungsmethode.
Anmerkung zum Batteriesymbol (untere zwei
Symbolbeispiele):
Dieses Symbol kann auch in Kombination mit einem
chemischen Symbol verwendet werden. In diesem Fall
entspricht dies den Anforderungen der Direktive zur
Verwendung chemischer Stoffe.
19 De
Page 62

OBSERVERA: LÄS DETTA INNAN ENHETEN TAS I BRUK.
1 Läs noga denna bruksanvisning för att kunna ha största
möjliga nöje av enheten. Förvara bruksanvisningen nära
till hands för framtida referens.
2 Installera anläggningen på en väl ventilerad plats där det
är svalt, torrt, rent och se till att den inte utsätts för direkt
solljus, värmekällor, vibrationer, damm, fukt och kyla.
Lämna följande mellanrum för ventilation.
Ovansida: 15 cm
Baksida: 2,5 cm
Sidor: 10 cm
3 Placera enheten på behörigt avstånd från andra
elapparater, motorer, transformatorer och annat som kan
orsaka störningar.
4 Utsätt inte enheten för hastiga temperaturväxlingar och
placera den inte på ett ställe där luftfuktigheten är hög
(t.ex. nära en luftfuktare) då fuktbildning i enheten skapar
risk för brand, elstötar, skador på enheten eller
personskador.
5 Placera inte enheten på ett ställe där främmande föremål
kan tränga in i den eller där den kan utsättas för droppar
eller vattenstänk. Placera aldrig det följande ovanpå
enheten:
– Övriga apparater då sådana kan orsaka skador och/
eller missfärgning av enhetens hölje.
– Brännbara föremål (t.ex. stearinljus) då sådana skapar
risk för brand, skador på enheten och/eller
personskador.
– Vätskebehållare som kan falla och spilla vätska över
enheten, vilket skapar risk för elstötar och/eller skador
på enheten.
6 Täck aldrig över enheten med en tidning, duk, gardin
el.dyl. då detta skapar risk för överhettning. En alltför
hög temperatur inuti enheten kan leda till brand, skador
på enheten och/eller personskador.
7 Anslut inte enheten till ett vägguttag förrän samtliga
övriga anslutningar slutförts.
8 Använd aldrig enheten vänd upp och ned. Detta kan leda
till överhettning som orsakar skador.
9 Hantera inte tangenter, reglage och kablar onödigt
hårdhänt.
10 Fatta tag i själva kontakten när nätkabeln kopplas bort
från vägguttaget; dra aldrig i kabeln.
11 Använd aldrig några kemiska lösningar för rengöring då
dessa kan skada ytbehandlingen. Använd en ren, torr
trasa.
12 Använd endast den spänning som står angiven på
enheten. Anslutning till en strömkälla med högre
spänning än den angivna kan orsaka brand, skador på
enheten och/eller personskador. Yamaha åtar sig inget
ansvar för skador beroende på att enheten används med
en spänning utöver den angivna.
13 Koppla bort nätkabeln från vägguttaget för att undvika
skador p.g.a. blixtnedslag om ett åskväder uppstår.
14 Försöka aldrig att utföra egna reparationer. Kontakta en
kvalificerad tekniker från Yamaha om servicebehov
föreligger. Du får inte under några omständigheter ta av
höljet.
15 Koppla bort nätkabeln från vägguttaget om enheten inte
ska användas under en längre tid (t.ex. under semestern).
16 Läs avsnittet ”FELSÖKNING” om vanligt
förekommande driftsproblem innan du förutsätter att
enheten är söndrig.
17 Innan enheten flyttas ska du trycka på för att ställa den
i avstängt läge och sedan koppla bort nätkabeln från
vägguttaget.
18 Kondensation (imma) uppstår, om den omgivande
temperaturen plötsligt ändras. Koppla i så fall loss
nätkabeln från nätuttaget och låt apparaten vila.
19 Vid långvarig användning kan det hända att apparaten
blir väldigt varm. Stäng av systemet och låt enheten
svalna en stund.
20 Installera receivern nära ett nätuttag och där
stickkontakten lätt kan kommas åt.
21 Utsätt inte batterierna för kraftig värme från exempelvis
solljus, eld eller liknande. Följ regionala bestämmelser
vid kassering av förbrukade batterier.
– Förvara batterierna utom räckhåll för barn. Batterier
kan vara farliga för barn som stoppar dem i munnen.
– Om batterierna blir gamla minskar fjärrkontrollens
räckvidd betydligt. Om detta inträffar byter du till två
nya batterier så snart som möjligt.
– Använd inte gamla batterier tillsammans med nya.
– Använd inte olika typer av batterier (t.ex. alkaliska
batterier och manganbatterier) tillsammans. Läs
förpackningen noggrant eftersom dessa typer av olika
batterier kan ha samma form och färg.
– Förbrukade batterier kan läcka. Om batterierna har
läckt, måste du kasta bort dem omedelbart. Undvik att
komma i kontakt med det läckta materialet eller låta
det komma i kontakt med kläder och liknande. Rengör
batteriutrymmet noga innan du sätter i nya batterier.
– Om du planerar att inte använda systemet under en
längre tid bör du ta ut batterierna ur enheten. Annars
finns risk att batterierna slits ut, vilket kan resultera i
läckage som skadar enheten.
– Kasta inte bort batterier med det vanliga
hushållsavfallet. Kasta bort dem enligt gällande lokala
förordningar.
Den här enheten är inte bortkopplad från nätströmmen så länge
den är inkopplad i vägguttaget, även om själva enheten är
avstängd med . Enheten är konstruerad för att förbruka en
mycket liten mängd ström i detta tillstånd.
VARNING
UTSÄTT INTE ENHETEN FÖR REGN ELLER FUKT DÅ DETTA
SKAPAR RISK FÖR BRAND ELLER ELSTÖTAR.
OBSERVERA
Felaktigt byte av batterier medför risk för explosion. Byt endast ut
batterierna mot batterier av samma eller motsvarande typ.
Om den här enheten placeras för nära en teveapparat med CRTskärm (bildrör) inns det en risk för färgstörningar i bilden. Om
detta inträffar ska du flytta enheten längre bort från TV:n.
i Sv
Page 63

INNEHÅLL
ISX-800
Strömkabel Fjärrkontroll Dockskydd
USB-kåpa
FM-antenn
Konsol
Stång
Sockel
Stöd
Kabelklämma
Skruvsats
Anmärkning
Används för att montera stativet.
Läs den separata
Monteringsanvisningen för
information om hur du monterar
stativet.
Anmärkning
Förvara USB-kåpan
utom räckhåll för barn, så
att de inte sväljer den av
misstag.
2 x batterier
(AA, LR6, UM-3)
Bruksanvisning
(denna manual)
Monteringsanvisning
6 m
DELARNAS NAMN OCH FUNKTIONER ..................................2
JUSTERA KLOCKAN................................................................5
LYSSNA PÅ iPod ......................................................................6
LYSSNA PÅ CD OCH USB-ENHET..........................................7
LYSSNA PÅ RADIO ................................................................10
LYSSNA PÅ EXTERNA KÄLLOR...........................................11
ANVÄNDA ALARMFUNKTIONEN..........................................12
ANVÄNDA INSOMNINGSTIMERN..........................................15
TONKONTROLL......................................................................15
JUSTERA LJUSSTYRKAN FÖR FRONTPANELENS
TECKENFÖNSTER..................................................................15
FELSÖKNING..........................................................................16
ANMÄRKNINGAR OM SKIVOR OCH USB-ENHETER..........18
SPECIFIKATIONER.................................................................19
Funktioner
• Spelar upp musik på externa enheter såsom iPod/iPhone-modeller, ljud/data-CD och USB-enheter, samt spelar upp FM-radio.
• Använder din favoritmusik eller signal som alarm. Musiken du väljer spelas upp på valfri volym vid angiven alarmtid så att du får bästa
möjliga start på dagen (IntelliAlarm-funktionen).
• Gör det enkelt att spara och spela upp till fem av dina favoritradiokanaler.
• Trebands equalizer (bas, medium, diskant) som kan ställas in så att musiken låter exakt som du vill.
• Två sorters klockor (med timvisare) som matchar enhetens design.
Om bruksanvisningen
• Med frasen ”iPod” avses genomgående även ”iPhone”.
• Om både enhetens och fjärrkontrollens knappsats kan användas för att styra en funktion används enhetens knappsats i beskrivningen.
Medföljande tillbehör
English Svenska
Använda fjärrkontrollen
Sätt i batterierna i fjärrkontrollen i rätt riktning (+ och –). Rikta fjärrkontrollen mot signalmottagaren (på frontpanelen) och
använd inom den radie som visas nedan.
1 Sv
Page 64

DELARNAS NAMN OCH FUNKTIONER
AUTO SET BEEP
SOURCE + BEEP
SOURCE
DIMMER
CLOCK
ALARM TYPE
212
1
iPod
VOLUME
USB LABEL SIDE
SOURCE PRESETALARM SNOOZE
SLEEP
12345678 jlk9
y
• Din iPod kommer automatiskt att laddas när den är ansluten till dockan. iPoden kommer inte
att laddas om enheten är i strömsparläge.
• Använd en dockadapter som är kompatibel med din iPod. Om du inte använder en adapter
eller om adaptern inte är kompatibel kan detta resultera i en lös eller dålig anslutning som kan
skada kontakten. För mer information om dockadaptrar, se Apples officiella webbplats.
• Om en iPod i skyddshölje ansluts med våld kan kontakten skadas. Avlägsna skyddshöljet
innan du ansluter.
• När iPod-anslutningen inte används bör du sätta på iPod-dockskyddet för att skydda
kontakten.
Dockadapter
Toppanel
a (Ström)
Tryck för att slå på/stänga av systemet. Klockslaget visas på
frontpanelen även när systemet är avstängt.
y
• Tryck och håll ner på enhetens ovansida i mer än 3 sekunder för att
slå över systemet i strömsparläge. I strömsparläget visas ingen
information på frontpanelen. Detta kan sänka strömförbrukningen. För
att avbryta strömsparläget trycker du på igen.
• Alarmfunktionen är fortfarande tillgänglig när systemet är avstängt
eller i strömsparläge.
b iPod-docka
Anslut en iPod.
USB-port
c
Anslut en USB-enhet (s. 9).
VOLUME –/+
d
Justera volymen.
SOURCE
e
Ändra källa för uppspelning.
ALARM
f
Slår på/stänger av alarmet samt tillåter justering av diverse
alarminställningar (s. 13, 14).
SNOOZE/SLEEP
g
Ställ in insomningstimern eller slå över alarmet i snooze-läge
(s. 14, 15).
PRESET
h
Spara/spela upp radiokanaler eller byt uppspelningsmapp (när
du spelar musik från data-CD eller USB-enhet).
/
i
Hoppa över spår/fil eller ställ in radion.
Om du håller inne knappen när ett spår/en fil spelas upp spolar
du fram/tillbaka spåret/filen.
j /
Spela/pausa spåret som spelas upp.
k
Mata ut CD-skivan.
Skivfack
l
Sätt i en CD.
Ansluta en iPod till iPod-dockan
2 Sv
Page 65

Anmärkningar
Frontpanelens teckenfönster
FM
CD
AUX
USB
iPod
ALL
1
2
1
8
56
7
3
4
162 3
4
5
Medföljande
FM-antenn
DELARNAS NAMN OCH FUNKTIONER
1 Indikator för blandad/upprepad/uppspelning
Visar uppspelningsläge (s. 6, 9).
Signalmottagare för fjärrkontroll
b
c Klockindikator
Visar timvisare för klockan (s. 5).
d
Källindikator
Visar vald källa.
e
Alarmindikator
Lyser om alarmet har ställts in (s. 12).
f
Insomningsindikator
Lyser om insomningstimern har ställts in (s. 15).
g
Flerfunktionsindikator
Visar diverse information som klockslag, spårnummer eller
FM-station.
Belysningssensor
h
Känner av omgivande belysning. Täck inte över denna sensor.
Svenska
Bakpanel
c
DIMMER
Justera ljusstyrkan för frontpanelens teckenfönster (s. 15).
d
AUX
Anslutning för extern enhet.
e
Uttag för FM-antenn
Anslutning för den medföljande FM-antennen eller
utomhusantenn.
ALARM TYPE
a
b
Om du drar utomhusantennkabel och/eller extern enhetkabel genom stativets stång, se separat Monteringsanvisning.
Ändrar typ av alarm (s. 13).
CLOCK
Ändrar hur klockslag visas eller låter dig ställa klockan (s. 5).
• Antennen bör sträckas ut. Ändra antennens höjd, riktning eller
placering om radiomottagningen är dålig.
• Mottagningen förbättras om du använder en antenn för utomhusbruk
istället för den medföljande FM-antennen.
f Terminallucka
Avlägsna terminalluckan innan du ansluter externa enheter till
AUX och/eller ansluter FM-antennen till antennuttaget.
3 Sv
Page 66

DELARNAS NAMN OCH FUNKTIONER
Styrning av iPod
Fjärrkontroll
2
3
4
5
6
7
8
9
j
k
l
m
1
p
o
n
a Signalsändare
b (Ström)
Tryck för att slå på/stänga av systemet.
ALARM
c
Aktiverar/stänger av alarmet.
SNOOZE/SLEEP
d
Ställer in insomningstimern eller slår över alarmet i snoozeläge (s. 14, 15).
e
Källknappar
Ändra källa för uppspelning.
f
FOLDER
Ändra uppspelningsmapp för uppspelning av musik på data-CD
eller USB-enhet.
/
g
Hoppa över spår/fil.
Om du håller inne knappen när ett spår/en fil spelas upp spolar
du fram/tillbaka spåret/filen.
h
Spela/pausa.
i
Stoppa uppspelning.
(Upprepa)/ (Blanda)
j
Upprepa/blanda spår från iPod, ljud/data-CD eller USB-enhet
(s. 6, 9).
k
EQ LOW/MID/HIGH
Justera ljudkvaliteten för bas, medium eller diskant (s. 15).
PRESET /
l
Välj en förinställd radiokanal.
m
MEMORY
Spara radiokanal (s. 10).
4 Sv
TUNING /
n
Ställ in radiofrekvens.
VOLUME +/–
o
Justera volymen.
MUTE
p
Stäng av/återställ ljudet.
Page 67

Anmärkning
Tidsinställning
Toppanel
SET
Bakpanel
Inställd tid
(blinkande)
CLOCK 2
CLOCK 1
Bakpanel
T.ex.: 10:50 AM
Analog
timvisare
Minuter
T.ex.: 10:50 AM
Minuter
Timme
AUTO SET BEEP
USB LABEL SIDE
VOLUME
SOURCE PRESETALARM SNOOZE
DIMMER
212
CLOCK
JUSTERA KLOCKAN
1 Slå över CLOCK-reglaget på bakpanelen till SET.
SOURCE + BEEP
1
SOURCE
ALARM TYPE
SLEEP
Växla mellan typ av klocka
Flytta CLOCK-reglaget på bakpanelen för att byta typ av klocka.
2
2 Ställ in tiden med / .
3 Slå över CLOCK-reglaget på bakpanelen till
CLOCK1 eller CLOCK2.
y
• Om du ansluter en iPod till iPod-dockan i steg 2 kopieras aktuell tid från
iPoden till enheten. Om en iPod redan är ansluten till iPod-dockan när
CLOCK slås över på SET kommer iPodens aktuella tid inte att kopieras.
• Tryck på SNOOZE/SLEEP i steg
timmarsvisning.
Tidsinställningarna kommer att förloras om enheten är utan ström i över en
vecka.
Klockvisningsläge 1 (CLOCK 1)
2 för att växla mellan 12- och 24-
Svenska
Klockvisningsläge 2 (CLOCK 2)
5 Sv
Page 68

Anmärkningar
LYSSNA PÅ iPod
AUTO SET BEEP
SOURCE + BEEP
SOURCE
DIMMER
CLOCK
ALARM TYPE
212
1
VOLUME
USB LABEL SIDE
SOURCE PRESETALARM SNOOZE
SLEEP
23
Toppanel
Fjärrkontroll
UPPREPA
BLANDA
Fjärrkontroll
Spela upp från iPod
För information om kompatibla iPod-modeller se ”SPECIFIKATIONER” (s. 19).
1 Anslut en iPod till iPod-dockan.
2 Tryck på SOURCE och ställ in iPod som
uppspelningskälla.
3 Spela upp från iPod genom att trycka på / .
Uppspelningen kan styras med antingen fjärrkontrollen,
iPoden eller enhetens toppanel.
y
• Du kan avlägsna din iPod när du vill.
• Om systemet är avstängt startas det automatiskt när musik/video på iPoden
spelas upp.
Knapp Funktion
Spela/pausa
Hoppa över
Spola framåt/tillbaka
Toppanel
/
/
(tryck och håll inne)
Spela/pausa
Hoppa över
/
Fjärrkon-
troll
Spola framåt/tillbaka
(tryck och håll inne)
FOLDER/
MENU/
iPod menykontroll
ENTER
Upprepad/blandad uppspelning
Uppspelnings
läge kan kontrolleras mot indikatorn i frontpanelens teckenfönster.
• Upprepa/blanda spår fungerar med varierat resultat beroende på vilken typ
• Ordningen som spåren upprepas/blandas i kan skilja sig mellan olika typer
Upprepad uppspelning
Tryck på REPEAT på fjärrkontrollen för att välja
uppspelningsläge utifrån följande:
Ingen visning: Av
Blandad uppspelning
Tryck på SHUFFLE på fjärrkontrollen för att välja
uppspelningsläge utifrån följande:
Ingen visning: Av
av iPod som används.
av iPod.
:Ett
: Alla
: Låtar
:Album
6 Sv
Page 69

Anmärkning
LYSSNA PÅ CD OCH USB-ENHET
AUTO SET BEEP
SOURCE + BEEP
SOURCE
DIMMER
CLOCK
ALARM TYPE
212
1
VOLUME
USB LABEL SIDE
SOURCE PRESETALARM SNOOZE
SLEEP
12
Toppanel
CD
Spårnummer
Nedan beskrivs hur enheten fungerar vid uppspelning av spår/filer från CD/USB-enhet.
• Om CD:n/USB-enheten som spelas upp stoppas kommer spåret som spelades upp att spelas från början nästa gång uppspelning startas.
• Om du trycker på på fjärrkontrollen när uppspelningen är stoppad kommer enheten vid nästa uppspelning att spela upp spår enligt
följande:
– För ljud-CD: från CD:ns första spår.
– För data-CD/USB-enhet: från det första spåret i mappen som innehåller det spår som senast spelades upp.
• Systemet stängs av automatiskt 60 minuter efter att uppspelning av CD/USB-enhet stoppats.
y
Mer information om spelbara skivor och filer finns i ”ANMÄRKNINGAR OM SKIVOR OCH USB-ENHETER” (s. 18).
Lyssna på ljud-CD
1 Tryck på SOURCE och ställ in CD som
uppspelningskälla.
2 Sätt i CD-skivan i skivfacket med etikettsidan i
riktning mot enhetens framsida.
Uppspelningen startar automatiskt.
sekund när uppspelning påbörjas eller när du hoppar över spår.
Spårnumret visas i någon
Svenska
Använd följande knappar för att styra enheten vid uppspelning
av spår från ljud-CD.
Knapp Funktion
/
Spela/pausa
Hoppa över
Toppanel
/
Spola framåt/tillbaka
(tryck och håll inne)
Mata ut CD-skivan
Spela/pausa
Fjärrkon-
troll
Hoppa över
/
Spola framåt/tillbaka
(tryck och håll inne)
Stopp
CD-skivor kan inte sättas i eller matas ut när systemet är i strömsparläge (☞ s. 2).
7 Sv
Page 70

LYSSNA PÅ CD OCH USB-ENHET
AUTO SET BEEP
SOURCE + BEEP
SOURCE
DIMMER
CLOCK
ALARM TYPE
212
1
VOLUME
USB LABEL SIDE
SOURCE PRESETALARM SNOOZE
SLEEP
12
Toppanel
CD
Mappnummer
Filnummer
Lyssna på data-CD
1 Tryck på SOURCE och ställ in CD som
uppspelningskälla.
2 Sätt i CD-skivan i skivfacket med etikettsidan i
riktning mot enhetens framsida.
Uppspelningen startar automatiskt. Mappnummert/filnumret
visas i någon sekund när uppspelning påbörjas eller när du
hoppar över spår.
Använd följande knappar för att styra enheten vid uppspelning
av spår från data-CD.
Knapp Funktion
Spela/pausa
Hoppa över
Spola framåt/tillbaka
(tryck och håll inne)
Mata ut CD-skivan
Spela/pausa
Hoppa över
/
Spola framåt/tillbaka
(tryck och håll inne)
Stopp
Toppanel
Fjärrkon-
troll
/
/
PRESET Byt mapp för uppspelning
FOLDER Byt mapp för uppspelning
8 Sv
Page 71

Lyssna på en USB-enhet
Anmärkning
Toppanel
USB
Mappnummer
Filnummer
REPEAT
SHUFFLE
Fjärrkontroll
AUTO SET BEEP
212
DIMMER
USB LABEL SIDE
VOLUME
SOURCE PRESETALARM SNOOZE
SOURCE + BEEP
1
SOURCE
CLOCK
ALARM TYPE
SLEEP
21
När en USB-enhet är ansluten spelas spåren upp i följande ordning:
– Uppspelningsordning mappar:
Mappar spelas upp i bokstavsordning utifrån mappnamnets
första tre tecken. Mappar som innehåller tecken som inte ingår i
alfabetet spelas upp efter mappar med alfabetiska tecken.
– Uppspelningsordning filer:
filer med äldst skrivdatum spelas upp först.
LYSSNA PÅ CD OCH USB-ENHET
1 Tryck på SOURCE och ställ in USB som
uppspelningskälla.
2 Anslut en USB-enhet till USB-porten.
Uppspelningen startar automatiskt.
visas i någon sekund när uppspelning påbörjas eller när du
hoppar över spår.
Använd följande knappar för att styra enheten vid uppspelning
av spår från USB-enheter.
Knapp Funktion
/
Toppanel
/
PRESET Byt mapp för uppspelning
Fjärrkon-
/
troll
FOLDER Byt mapp för uppspelning
Mappnummert/filnumret
Spela/pausa
Hoppa över
Spola framåt/tillbaka
(tryck och håll inne)
Spela/pausa
Hoppa över
Spola framåt/tillbaka
(tryck och håll inne)
Stopp
Svenska
Upprepad/blandad uppspelning
Uppspelningsläge kan kontrolleras mot indikatorn i frontpanelens teckenfönster.
y
Om vald källa innehåller mappar spelas alla mappar i upprepa/blanda-läget.
y
Du kan avlägsna USB-enheten när du vill.
Upprepad uppspelning
Tryck på REPEAT på fjärrkontrollen för att välja
uppspelningsläge utifrån följande:
:
Alla spår i mappen (endast data-CD/USB-enhet)
: Alla spår
:1 spår
Ingen visning: Upprepningsläget avstängt
Blandad uppspelning
Tryck på SHUFFLE på fjärrkontrollen för att välja
uppspelningsläge utifrån följande:
:
Ingen visning: Blandat läge avstängt
Alla spår i mappen (endast data-CD/USB-enhet)
: Alla spår
9 Sv
Page 72

Anmärkning
LYSSNA PÅ RADIO
AUTO SET BEEP
SOURCE + BEEP
SOURCE
DIMMER
CLOCK
ALARM TYPE
212
1
VOLUME
USB LABEL SIDE
SOURCE PRESETALARM SNOOZE
SLEEP
12
Top panel
Mottagningsfrekvens
AUTO SET BEEP
SOURCE + BEEP
SOURCE
DIMMER
CLOCK
ALARM TYPE
212
1
VOLUME
USB LABEL SIDE
SOURCE PRESETALARM SNOOZE
SLEEP
234 1
Toppanel
Nummer på
förinställningen
Välja FM-station
Om du ställer in en FM-frekvens manuellt kommer ljudet spelas i mono.
Spara radiokanaler (förinställning)
Använd förinställningsfunktionen för att spara dina 5 favoritkanaler.
1 Tryck på SOURCE och ställ in FM som
uppspelningskälla.
FM
2 Tryck på / för att ställa in radiokanalen.
Typ av tuning Användande
Tryck och håll inne
eller .
Tryck på eller flera
gånger.
Tryck och håll inne TUNING
eller .
Tryck på TUNING eller
flera gånger.
Toppanel
Fjärrkon-
troll
Automatisk
inställning
Manuell
inställning
Automatisk
inställning
Manuell
inställning
1 Tryck på / för att ställa in radiokanalen.
2 Håll inne PRESET.
FM
Använda fjärrkontrollen
Håll inne MEMORY.
3 Tryck på PRESET och välj ett
förinställningsnummer för att spara radiokanalen.
Använda fjärrkontrollen
Tryck på PRESET /.
4 Tryck och håll inne PRESET för att spara den
förinställda radiokanalen.
Detta sparar radiokanalen.
Använda fjärrkontrollen
Tryck på MEMORY.
10 Sv
Page 73

Anmärkning
Välja en förinställd radiokanal
Top panel
AUTO SET
DIMMER
CL
2
1
iPod
VOLUME
USB LAB
SOURCE ALARM SNOOZ
23
Toppanel
AUX
75 Ω
FM ANT
AUX
LYSSNA PÅ EXTERNA KÄLLOR
AUTO SET BEEP
212
DIMMER
USB LABEL SIDE
VOLUME
SOURCE PRESETALARM SNOOZE
1 2
SOURCE + BEEP
1
SOURCE
CLOCK
ALARM TYPE
uppspelningskälla.
2 Tryck upprepade gånger på PRESET för att välja
1 Tryck på SOURCE och ställ in FM som
förinställd radiokanal.
Använda fjärrkontrollen
SLEEP
Tryck på PRESET /.
LYSSNA PÅ EXTERNA KÄLLOR
Stäng av systemet innan du ansluter ljudkablar. Avlägsna
terminalluckan innan du ansluter externa enheter.
1 Anslut externa ljudenheter till AUX på bakpanelen
med en vanlig 3,5 mm stereominikabel.
Svenska
Skruva ner volymen på enheten och på den externa ljudenheten innan
anslutning.
2 Tryck på för att starta systemet.
3 Tryck på SOURCE och ställ in AUX som
uppspelningskälla.
4 Starta uppspelning på den anslutna externa
ljudenheten.
11 Sv
Page 74

ANVÄNDA ALARMFUNKTIONEN
Enheten har en alarmfunktion (IntelliAlarm) som spelar upp musikkällor eller signalserier vid utsatt tid enligt en rad olika alternativ.
Alarmfunktionen har följande funktioner:
3 sorters alarm
Välj bland tre sorters alarm som kombinerar musik och signalljud.
Den valda ljudkällan och signalen spelas upp på förinställd tidpunkt. Detta läge rekommenderas för
bästa möjliga start på dagen.
SOURCE + BEEP
3 minuter före utsatt tid: ljudkällans musik börjar tona in och volymen ökar gradvis när alarmtiden
närmar sig.
Tidpunkten för alarm: uppspelning av signalen startar.
SOURCE
BEEP Endast signal spelas upp på den förinställda tiden.
Den valda ljudkällan spelas upp vid utsatt tid. Intoningsvolymen ökar gradvis till den inställda
volymen.
Diverse musikkällor
Du kan välja mellan iPod, ljud-CD, data-CD, USB-enhet samt radio. Följande kan även ställas in beroende på ljudkälla:
Källa Uppspelningsmetod Funktion
En spellista som sparats på iPoden kan spelas upp upprepade
gånger. För att spela upp en spellista måste du skapa en sådan med
Spellista*
iPod
Återuppta uppspelning
Valt spår Det valda spåret spelas upp i upprepningsläge.
Ljud-CD
Återuppta uppspelning Det spår du lyssnade på senast spelas upp.
Mapp Den valda mappen spelas upp i upprepningsläge.
Data-CD/USB
Återuppta uppspelning Det spår du lyssnade på senast spelas upp.
Förinställd kanal Den valda förinställda radiokanalen spelas upp.
FM
Återuppta uppspelning Den radiokanal du lyssnade på senast spelas upp.
titeln ”ALARM Yamaha DTA” i förväg.
Var noga med mellanrum mellan orden och stora och små bokstäver
när du skapar spellistans titel.
Om spellistan ”ALARM Yamaha DTA” inte kan hittas på iPoden
återupptar enheten uppspelning från det senaste spåret du lyssnat
på.
* För information om hur du skapar en spellista, se instruktioner för din iPod eller iTunes.
Testa alarmet
Du kan testa hur alarmet låter när du ställer in alarmfunktionen.
Snooze
Snooze-funktionen möjliggör återuppspelning av alarmet efter 5 minuter.
12 Sv
Page 75

Anmärkningar
Anmärkning
Ställ in tidpunkt och typ av alarm
Toppanel
Alarmindikator
Tidpunkten för alarm
BEEP
SOURCE+
BEEP
SOURCE
Bakpanel
Voly m fö r a la rmet
CD
AUTO SET BEEP
212
DIMMER
USB LABEL SIDE
SOURCE PRESETALARM SNOOZE
VOLUME
17
SOURCE + BEEP
1
SOURCE
CLOCK
ALARM TYPE
SLEEP
2465
1 Håll inne ALARM.
ANVÄNDA ALARMFUNKTIONEN
5 (när andra sorters alarm än BEEP är förvalda)
Ange vilket spår, folder eller radiokanal som ska
spelas.
Om iPod är angiven som källa:
Krävs inga inställningar.
Om CD/USB/FM är förvald källa:
Tryck på PRESET för att välja spår (ljud-CD), mapp (dataCD/USB-enhet) eller radiokanal som ska spelas.
Använda fjärrkontrollen
Tryck på PRESET /.
y
• När förvald källa är iPod spelar enheten upp spellistan ”ALARM
Yamaha DTA” vid utsatt alarmtid. Om denna spellista inte kan hittas
på iPoden återupptar enheten uppspelning från det senaste spåret du
lyssnat på (resume).
• När förvald källa är CD/USB och ”0” är angivet som spår/
mappnummer påbörjas uppspelningen från det spår du senast
lyssnade på (resume).
• När förvald källa är FM och preset-numret är angivet som ”0”
återupptar enheten sändning av den radiokanal du senast lyssnade på
(resume).
6 Ställ in volym för alarmet genom att trycka på
VOLUME –/+
.
Svenska
Alarmindikatorn ( ) och alarmtiden som ställts in blinkar.
2 Tryck på / för att ställa in tidpunkten för
alarm.
Använda fjärrkontrollen
Tryck på /.
3 Välj typ av alarm med ALARM TYPE-reglaget på
bakpanelen.
För information om de olika typerna av alarm, se s. 12.
4 (när annan alarmtyp än BEEP väljs) Tryck på
SOURCE för att välja musikkälla.
Annan källa än AUX kan väljas.
Använda fjärrkontrollen
Tryck på Källknappar för att välja musikkälla.
Om iPod/CD/USB har valts, anslut/sätt i ljudkällan (iPod,
ljud/data-CD, USB-enhet) i enheten.
y
Tryck på / för att testa alarmet. Tryck på / en gång till för
att stoppa testet.
7 Tryck på ALARM för att fullfölja inställningen av
alarmet.
Alarmet är nu inställt och alarmindikatorn ( ) kommer
börja lysa.
Alarminställningen kommer att raderas om systemet stängs av utan att
den avslutats korrekt.
• Om den valda källan inte är ansluten eller isatt kan det valda spåret/
• Om källan inte kan spelas upp vid den inställda tidpunkten för
mappen inte spelas upp.
alarmet (t.ex. p.g.a. att iPoden inte är ansluten), spelas endast signal
upp.
13 Sv
Page 76

ANVÄNDA ALARMFUNKTIONEN
AUTO SET BEEP
SOUR
DIMMER
CLOCK
ALARM
212
1
iPod
VOLUME
USB LABEL SIDE
SOURCE ALARM SNOOZE
SLEEP
1
Toppanel
AUTO SET BEEP
SOUR
DIMMER
CLOCK
ALARM
212
1
iPod
VOLUME
USB LABEL SIDE
SOURCE ALARM SNOOZE
SLEEP
2
2
1
Toppanel
Sätta på/stänga av alarmet
1 Tryck på ALARM.
När alarmet är på tänds alarmindikatorn ( ) och
alarmtiden visas under en kort tid. Om du trycker på ALARM
igen kommer alarmindikatorn ( ) och alarmet att stängas
av.
y
Den inställda alarmtiden sparas även om alarmet stängs av. Om du
sätter igång alarmet igen genom att trycka på ALARM kommer
föregående inställningar för alarm att användas.
När alarmet spelas upp
Vid den inställda tiden spelas alarmet upp. Medan alarmet spelas upp kan du göra följande.
1 (om du vill stoppa alarmet en kort stund) Tryck på
SNOOZE/SLEEP.
SNOOZE stoppar alarmet temporärt i 5 minuter.
y
• När SOURCE + BEEP har angetts, trycker du en gång på SNOOZE/
SLEEP för att stoppa signalen och en gång till för att stoppa källan. 5
minuter efter att ljudkällan stoppats börjar den tona in igen och
signalen återupptas.
• Alarmindikatorn blinkar när snooze-funktionen är aktiverad.
2 (om du vill stänga av alarmet) Tryck på ALARM
eller .
y
Alarmet slutar automatiskt efter 60 minuter om du inte stoppar det.
14 Sv
Page 77

Anmärkning
ANVÄNDA INSOMNINGSTIMERN
AUTO SET BEEP
SOURC
DIMMER
CLOCK
ALARM T
212
1
iPod
VOLUME
USB LABEL SIDE
SOURCE ALARM SNOOZE
SLEEP
1
Toppanel
1
2
3
Fjärrkontroll
iPod
:HIGH
:MID
:LOW
Ton
Inställning
Ton
AUTO21
Bakpanel
Du kan ställa in en tidpunkt då systemet stänger av sig självt.
TONKONTROLL
1 Tryck på SNOOZE/SLEEP ett antal gånger för
att ställa in hur lång tid som ska gå tills systemet
stänger av sig självt.
Insomningstimern kan ställas in till 30, 60, 90 eller 120
minuter. När tiden är inställd visas insomningsindikatorn ( )
i frontpanelens teckenfönster.
y
Om du trycker på SNOOZE/SLEEP när insomningstimern är
aktiverad kommer denna att inaktiveras.
1 Tryck på en av LOW/MID/HIGH EQ-knapparna
på fjärrkontrollen under pågående uppspelning.
Välj tonfrekvens för justering (LOW, MID, HIGH).
Svenska
2 Tryck på / för att justera tonfrekvensen.
Varje tonläge kan justeras från –5 till +5.
3 Tryck på ENTER för att slutföra inställningen.
Du kan även trycka på EQ-knappen som du tryckte på i Steg
1 för att slutföra inställningen.
För att ändra ton för andra ljudfrekvenser, återvänd till steg 1
och tryck på EQ-knappen för att justera önskad frekvens.
JUSTERA LJUSSTYRKAN FÖR FRONTPANELENS TECKENFÖNSTER
1 Justera ljusstyrkan med DIMMER-reglaget på
bakpanelen.
AUTO: anpassar automatiskt ljusstyrkan till
1: ljusare.
2: mörkare.
När Auto är inställt, justeras ljusstyrkan i frontpanelen automatiskt via
belysningssensorn (s. 3). Se till att sensorn ej övertäcks.
omgivningen.
15 Sv
Page 78

FELSÖKNING
Kontrollera först följande lista vid problem med enheten. Om du inte kan lösa ditt problem med hjälp av någon av lösningarna här, eller om
problemet inte finns med nedan, stänger du av enheten och kopplar ur den. Kontakta sedan närmaste auktoriserade Yamahaåterförsäljare eller
servicecenter.
Allmänt
Problem Orsak Lösning
Det går inte att starta enheten.
Inget ljud från högtalarna.
Ljudet stängs plötsligt av.
Ljudet bryts av/har distorsion eller ett
onormalt oljud/störningar hörs.
Enheten fungerar inte som den ska.
Systemet startas, men stängs av direkt.
Digital utrustning eller
högfrekvensutrustning orsakar
störningsljud.
Klockinställningen har raderats.
iPoden spelas inte upp på alarmtiden trots
att SOURCE är inställd på iPod.
Klockan blinkar och enheten fungerar
inte.
Strömkabeln är inte korrekt ansluten. Återanslut strömkabeln i vägguttaget och enheten
Volymen är kanske inställd på lägsta nivån. Justera volymen.
Källan kan vara felaktig. Välj korrekt källa.
Insomningstimern (☞ s. 15) kan ha ställts in. Starta systemet och spela upp källan igen.
Ingångskällans volym är för hög eller enhetens
volym är för hög (särskilt basljudet).
Enheten kan ha utsatts för en stark elektrisk stöt,
exempelvis från ett blixtnedslag eller en stor mängd
statisk elektricitet, eller så fungerar inte
strömtillförseln.
Enheten kanske står för nära den digitala
utrustningen eller högfrekvensutrustningen.
Enheten har varit urkopplad ur vägguttaget i mer än
en veckas tid.
iPoden sitter inte ordentligt i iPod-dockan. Avlägsna iPoden och återanslut i iPod-dockan
ALARM TYPE-reglaget står på BEEP. Ställ ALARM TYPE på SOURCE + BEEP eller
CLOCK-reglaget på bakpanelen står på SET, och
enheten befinner sig i klockinställningsläge.
ordentligt.
Justera volymen med VOLUME eller justera basen
med EQ (☞ s. 15).
Stäng av systemet och dra ur strömkabeln. Vänta i
ungefär 30 sekunder, koppla in strömkabeln igen
och starta systemet.
Placera enheten längre bort från sådan utrustning.
Anslut strömkabeln till vägguttaget igen och ställ
klockan på nytt (☞ s. 5).
(☞ s. 2).
SOURCE (☞ s. 13).
Ställ CLOCK-reglaget på CLOCK1 eller
CLOCK2. (☞ s. 5).
iPod
Problem Orsak Lösning
Inget ljud.
Din iPod laddas inte.
iPod-indikatorn blinkar två gånger i 3
omgångar när iPoden har anslutits.
iPoden sitter inte ordentligt i iPod-dockan. Avlägsna iPoden och återanslut i iPod-dockan
Din iPods programvaruversion har inte uppdaterats. Ladda ner den senaste versionen av iTunes från
iPoden sitter inte ordentligt i iPod-dockan. Avlägsna iPoden och återanslut i iPod-dockan
Systemet är placerat i strömsparläge (☞ s. 2).
Den iPod som används stöds inte av enheten. Använd en kompatibel iPod (☞ s. 19).
(☞ s. 2).
Apples hemsida och uppdatera iPodens
programvara till den senaste versionen.
(☞ s. 2).
Tryck på för att avbryta strömsparläget.
16 Sv
Page 79

Uppspelning av CD
Problem Orsak Lösning
Det går inte att sätta i en skiva.
Vissa knappfunktioner fungerar inte.
Uppspelningen startar inte direkt när du
tryckt på / .
CD-indikatorn blinkar två gånger i tre
omgångar varpå skivan matas ut.
”Err” visas i frontpanelens teckenfönster
när du satt i en skiva.
Uppspelning av USB-enhet
Problem Orsak Lösning
MP3/WMA-filen på USB-enheten spelas
inte upp.
USB-indikatorn blinkar två gånger i tre
omgångar när du har anslutit en USBenhet.
”Err” visas i frontpanelens teckenfönster
när du har anslutit en USB-enhet.
FELSÖKNING
Systemet är placerat i strömsparläge.
Den skiva som satts in i enheten är kanske inte
kompatibel.
Skivan kan vara smutsig. Torka av skivan.
Den skiva som satts in i enheten är kanske inte
kompatibel.
Om enheten förflyttats från en kall till en varm
plats, kan kondens ha bildats på linsen som läser av
skivan.
Den skiva som satts in i enheten är kanske inte
kompatibel.
Skivan kan vara smutsig. Torka av skivan.
Skivan innehåller inga spelbara filer. Använd en skiva som innehåller spelbara filer
Skivan är isatt åt fel håll. Sätt i skivan med etikettsidan framåt.
Ett fel har inträffat i enheten.
USB-enheten kan inte läsas. Stäng av systemet och återanslut USB-enheten till
En inkompatibel USB-enhet är ansluten till
enheten.
USB-enheten innehåller inga spelbara filer. Använd en USB-enhet som innehåller spelbara filer
En inkompatibel USB-enhet är ansluten till
enheten.
En överström har upptäckts.
Tryck på för att avbryta strömsparläge (☞ s. 2).
Använd en skiva som stöds av enheten (☞ s. 18).
Använd en skiva som stöds av enheten (☞ s. 18).
Vänta någon timme tills enheten anpassat sig till
rumstemperaturen och försök sedan igen.
Använd en skiva som stöds av enheten (☞ s. 18).
(☞ s. 18, 19).
Mata ut skivan med .
enheten.
Anslut en nätadapter om en sådan medföljer
enheten.
Om lösningarna ovan inte löser problemet kan det
bero på att USB-enheten inte kan spelas upp på
enheten.
Stäng av systemet och återanslut USB-enheten till
enheten. Om detta inte löser problemet kan det bero
på att USB-enheten inte kan spelas upp på enheten.
(☞ s. 18, 19).
Stäng av systemet och återanslut USB-enheten till
enheten. Om detta inte löser problemet kan det bero
på att USB-enheten inte kan spelas upp på enheten.
Svenska
FM-radiomottagning
Problem Orsak Lösning
För mycket brus vid stereosändning.
Radiomottagningen är svag även med en
utomhusantenn. (Ljudet förvrängs.)
Fjärrkontroll
Problem Orsak Lösning
Fjärrkontrollen fungerar inte som den
ska.
Antennen kan vara felaktigt inkopplad. Se till att antennen är ordentligt ansluten (☞ s. 3).
Radiostationen du valt kan ligga långt ifrån ditt
område, eller så är mottagningen av radiovågorna
svag i ditt område.
Flerfrekvenstransmission eller andra
radiostörningar kan förekomma.
Fjärrkontrollen används kanske utanför sin
räckvidd.
Signalmottagaren på enheten (☞ s. 3) kan vara
utsatt för direkt solljus eller belysning
(fluorescerande lampor).
Batteriet kan vara slut. Byt ut batterierna mot två nya.
Det finns hinder ivägen för fjärrkontrollens signaler
och signalmottagaren.
Försök att ställa in frekvensen manuellt för att
förbättra signalkvaliteten (☞ s. 10) eller använd en
flerkanals utomhusantenn.
Ändra antennens höjd, inriktning eller placering.
För information om fjärrkontrollens räckvidd, se
Använda fjärrkontrollen (s. 1).
Byt belysning eller rikta om enheten.
Flytta undan eventuella hinder.
17 Sv
Page 80

Anmärkningar
Anmärkningar
Anmärkningar
ANMÄRKNINGAR OM SKIVOR OCH USB-ENHETER
Varning
CD-information
Den här enheten är utformad för användning med ljud-CD, CD-R*
och CD-RW* med följande logotyper.
* ISO 9660 format CD-R/RW
y
Denna enhet kan spela upp skivor som är märkta med logotyperna ovan.
Logotypen finns tryckt på skivan och på skivfodralet.
• Sätt inte i någon annan typ av skiva i denna enhet. Detta kan skada
enheten.
• CD-R/RW kan inte spelas upp om de inte slutbehandlats.
• Vissa skivor kan inte spelas upp på grund av aktuell skivkarakteristik eller
inspelningsvillkor.
• Använd aldrig skivor som har okonventionell form, t ex hjärtformade
skivor.
• Använd inte skivor vars yta har många repor.
Skivhantering
• Vidrör inte skivytan. Håll i skivans
ytterkant och i centrumhålet.
• Använd inte en bläckpenna eller en
spetsig märkpenna för att skriva på
skivan.
• Sätt inte tejp, sigill, lim el. dyl. på skivan.
• Använd inte något skydd mot repor.
• Sätt inte in fler än en skiva i skivfacket samtidigt. Detta kan
skada såväl enheten som skivorna.
• Placera inga främmande föremål i skivfacket.
• Sätt inte in en sprucken, skev eller limmad skiva.
• Utsätt inte en skiva för direkt
solljus, hög värme, hög
luftfuktighet eller mycket damm.
Information om USB-enheter
Denna enhet har stöd för USB-masslagringsenheter (t.ex.
flashminnen eller bärbara musikspelare) som använder formaten
FAT16 eller FAT32.
• Vissa enheter kanske inte fungerar ordentligt även om de uppfyller kraven.
• Anslut inga andra enheter än USB-masslagringsenheter (t ex USB-laddare
eller USB-hubbar), datorer, kortläsare, en extern hårddisk m.m.
• Yamaha ansvarar inte för eventuell skada eller förlust av data på USBenheten när den är ansluten till denna enhet.
• Spelbarhet och strömförsörjning till alla slags USB-enheter garanteras
inte.
Om MP3- eller WMA-filer
• Enheten kan spela upp:
Fil Bitfrekvens (kbps)
MP3 8 - 320** 16 - 48
WMA 16 - 320** 22,05 - 48
** Både konstanta och variabla bitfrekvenser kan användas.
• Det maximala antalet filer/mappar som kan spelas upp på enheten är
följande.
Data-CD USB
Maximalt antal filer 512 9999
Maximalt antal mappar 255 128
Maximalt antal filer per mapp 511 255
• Kopieringsskyddade filer kan inte spelas upp.
Samplings-
frekvens (kHz)
• Om en skiva blivit smutsig kan du
torka av den med en ren och torr
trasa, från mitten och ut mot
ytterkanten. Använd inte
skivrengöringsmedel eller thinner.
• Använd inte en separat inköpt
linsrengörare då detta kan resultera
i funktionsfel.
• Sätt endast i en CD i systemet åt gången. Att sätta i två eller flera
CD-skivor kan skada såväl systemet som skivorna.
18 Sv
Page 81

SPECIFIKATIONER
Φ 295 mm
997 mm
410 mm
410 mm
Vikt: 12,0 kg
587 mm
SPELARE
iPod (Digital anslutning)
• Kompatibla iPod-modeller
.......................................... iPod touch (1:a, 2:a, 3:e och 4:e generationens)
• Kompatibla iPhone-modeller
........................................................................................................iPhone 4
iPod nano (2:a, 3:e, 4:e, 5:e och 6:e generationens)
CD
• Media ................................................................................... CD, CD-R/RW
• Ljudformat ............................................................... Ljud-CD, MP3, WMA
Laser
• Typ ................................................................ Halvledarlaser GaAs/GaAlAs
• Våglängd ..........................................................................................790 nm
• Uteffekt ............................................................................................... 7 mW
USB
• Ljudformat ................................................................................ MP3, WMA
AUX
• Ingångskontakt.................................................3,5 mm STEREO-miniuttag
iPod classic
iPhone 3GS
iPhone 3G
iPhone
RADIO
• Mottagningsområde
FM..........................................................................87,50 till 108,00 MHz
ALLMÄNT
• Strömförsörjning .................................Växelström 100 till 240 V, 50/60 Hz
• Effektförbrukning.................................................................................20 W
• Effektförbrukning i avstängt läge........................................................1,5 W
• Effektförbrukning i strömsparläge ................................. 0,5 W eller mindre
• Dimensioner
Svenska
Specifikationerna kan komma att ändras utan föregående meddelande.
LASERSÄKERHET
Denna enhet använder sig av en laser. På grund av risken för
ögonskador bör ingen annan än en kvalificerad reparatör öppna
höljet eller försöka reparera enheten.
FARA
Enheten avger synlig laserstrålning i öppet läge. Undvik direkt
ögonkontakt med strålen. När enheten är ansluten till vägguttag
bör du inte titta in i enheten genom skivfack eller andra öppningar.
Laserkomponenten i denna produkt kan avge en strålning som
överskrider gränsvärdet för klass 1.
iPod, iPhone
”Made for iPod” och ”Made for iPhone” innebär att ett
elektroniktillbehör har konstruerats specifikt för användning med
en iPod eller iPhone och att tillbehöret är certifierat av utvecklaren
i enlighet med Apples funktionsstandarder.
Apple är varken ansvarigt för den här enhetens funktioner eller
dess uppfyllande av säkerhetsstandarder och lagkrav. Observera att
användningen av det här tillbehöret tillsammans med en iPod eller
iPhone kan påverka prestandan för trådlös kommunikation.
iPhone, iPod, iPod classic, iPod nano, iPod touch och iTunes är
varumärken som tillhör Apple Inc., registrerat i USA och andra
länder.
Användarinformation, beträffande insamling
och dumpning av gammal utrustning och
använda batterier
De symboler, som finns på produkterna, emballaget och/
eller bifogade dokument talar om att de använda elektriska
och elektroniska produkterna, samt batterierna, inte ska
blandas med allmänt hushållsavfall. För rätt handhavande,
återställande och återvinning av gamla produkter och
gamla batterier, vänligen medtag dessa till lämpliga
insamlingsplatser, i enlighet med din nationella
lagstiftning och direktiven 2002/96/EC samt 2006/66/EC.
Genom att slänga dessa produkter och batterier på rätt sätt,
kommer du att hjälpa till att rädda värdefulla resurser och
förhindra möjliga negativa effekter på mänsklig hälsa och
miljö, vilka i annat fall skulle kunna uppstå, p.g.a. felaktig
sophantering.
För mer information om insamling och återvinning av
gamla produkter och batterier, vänligen kontakta din
lokala kommun, ditt sophanteringsföretag eller
inköpsstället för dina varor.
[Information om sophantering i andra länder
utanför EU]
Dessa symboler gäller endast inom EU. Om du vill slänga
dessa föremål, vänligen kontakta dina lokala myndigheter
eller försäljare och fråga efter det korrekta sättet att slänga
dem.
Kommentar ang. batterisymbolen (de två
nedersta symbolexemplen):
Denna symbol kan komma att användas i kombination
med en kemisk symbol. I detta fall överensstämmer den
med de krav, som har ställts genom direktiven för den
aktuella kemikalien.
19 Sv
Page 82

ATTENZIONE: PRIMA DI USARE QUEST’UNITÀ.
1 Per assicurarsi le migliori prestazioni dell’unità, leggere
questo manuale per intero. Conservarlo poi in un luogo
sicuro per poterlo riutilizzare al momento del bisogno.
2 Installare l’unità in una posizione ben ventilata, fresco
asciutta e pulita - lontano da luce solare diretta, fonti di
calore, vibrazioni, polvere, umidità e freddo. Per
un’adeguata entilazione mantenere le seguenti distanze.
Sopra: 15 cm
Retro: 2,5 cm
Ai lati: 10 cm
3 Installare quest’unità lontano da elettrodomestici, motori
o trasformatori, perché possono causare ronzi.
4 Non esporre quest’unità a variazioni repentine della
temperatura ambiente e non installarle in stanze molto
umide (ad esempio dove è in uso un umidificatore) per
evitare che in essa si formi condensa, che a sua volta può
causare folgorazioni, incendi, guasti e/o ferite.
5 Evitare di installare l’unità in una posizione dove possano
su di essa cadere oggetti o liquidi. Inoltre, non posare su
di essa:
– Altri componenti, dato che possono causare danni e/o
lo scolorimento della superficie dell’apparecchio.
– Candele o altri oggetti che bruciano, dato che possono
causare incendi, danni all’unità e/o ferite a persone.
– Contenitori di liquidi, dato che possono cadere e
causare folgorazioni all’utente e guasti a quest’unità.
6 Non coprire quest’unità con giornali, tovaglie, tende o
altro per non impedirne la dispersione del calore. Se la
temperatura al suo interno dovesse salire, può causare
incendi, guasti e/o ferite.
7 Non collegare quest’unità ad una presa di corrente sino a
che tutti i suoi collegamenti sono completi.
8 Non usare l’unità capovolta. Potrebbe surriscaldarsi e
guastarsi.
9 Non agire con forza eccessiva su interruttori, manopole e/
o cavi.
10 Per scollegare un cavo, tirare la spina e mai il cavo stesso.
11 Non pulire mai quest’unità con solventi ed altre sostanze
chimiche. Essi possono danneggiarne le finiture. Usare
semplicemente un panno soffice e pulito.
12 Usare solo corrente elettrica del voltaggio indicato. L’uso
di voltaggi superiori è pericoloso e può causare incendi,
guasti e/o ferite. Yamaha non può venire considerata
responsabile di danni risultanti dall’uso di quest’unità
con un voltaggio superiore a quello prescritto.
13 Per evitare danni dovuti a fulmini, scollegare il cavo di
alimentazione dalla presa durante temporali.
14 Non tentare di modificare o riparare quest’unità. Affidare
qualsiasi riparazione a personale qualificato Yamaha. In
particolare, non aprirla mai per alcun motivo.
15 Se si prevede di non dover fare uso di quest’unità per
qualche tempo, ad esempio per andare in vacanza,
scollegarne la spina di alimentazione dalla presa di
corrente.
16 Prima di concludere che l’unità è guasta, non mancate di
leggere la sezione di questo manuale dedicata alla
“RISOLUZIONE DEI PROBLEMI”.
17 Prima di spostare quest’unità, premere il pulsante per
spegnere il sistema, quindi scollegare la spina di
alimentazione CA dalla presa di corrente.
18 Quando la temperatura ambiente cambia
improvvisamente, si forma condensa. Scollegare il cavo
di alimentazione dalla presa di corrente e lasciare
riposare l’apparecchio.
19 Se viene usata a lungo, quest’unità si può surriscaldare.
Spegnere il sistema, quindi lasciare riposare l’unità per
farla raffreddare.
20 Installare quest’unità vicino ad una presa di corrente
alternata dove la spina del cavo di alimentazione possa
venire facilmente raggiunta.
21 Le batterie vanno protette da calore eccessivo, ad
esempio luce solare diretta, fiamme, e così via. In caso di
smaltimento di batterie, rispettare le normative locali.
– Conservare le batterie lontano dalla portata dei
bambini. Le batterie possono essere pericolose se
messe in bocca da un bambino.
– Man mano che le batterie invecchiano, la portata
operativa del telecomando si riduce in modo
considerevole. Se si verifica tale condizione,
appena possibile le batterie con due batterie nuove.
– Non mescolare batterie vecchie e nuove.
– Non usare insieme batterie di tipo differente (ad
esempio alcaline e al manganese). Leggere
attentamente la confezione, dato che questi tipi di
batterie, benché differenti, possono avere la stessa
forma e lo stesso colore.
– Le batterie scariche possono perdere. Se le batterie
perdono, devono essere smaltite immediatamente.
Non toccare il materiale fuoriuscito ed evitare che
venga a contatto con gli indumenti, ecc. Pulire
accuratamente il vano batterie prima di installare delle
batterie nuove.
– Se si pensa di non utilizzare l’unità per un lungo
periodo di tempo, rimuovere le batterie. Esaurendosi,
le batterie potrebbero perdere liquido, con possibili
danni all’unità.
– Non gettare le batterie insieme ai normali rifiuti
domestici. Smaltirle in modo corretto, secondo le
normative locali.
Questa unità non viene scollegata dalla fonte di
alimentazione CA fintanto che essa rimane collegata alla
presa di rete, ciò anche se l’unità viene spenta col
comando . In questo stato l’unità consuma una quantità
minima di corrente.
AVVERTENZA
PER RIDURRE IL RISCHIO DI INCENDI E FOLGORAZIONI,
NON ESPORRE QUEST’UNITÀ A PIOGGIA O UMIDITÀ.
ATTENZIONE
Pericolo di esplosione se la batteria viene installata
scorrettamente. Sostituire solo con un pezzo dello stesso
tipo o equivalente.
Posizionando quest’unità in prossimità di un televisore con
tubo catodico (tubo di Braun), è possibile che si verifichi
una riduzione dei colori dell’immagine. In tal caso,
allontanare l’unità dal televisore.
sostituire
i It
Page 83

INDICE
ISX-800
Cavo di
alimentazione
Telecomando Coperchio della base
Coperchio USB
Antenna FM
Staffa
Asta
Base
Sostegno
Morsetto cavo
Gruppo di viti
Nota
Per assemblare il sostegno
utilizzare questi componenti. Per
informazioni su come assemblare
il sostegno, leggere
separatamente la Guida per
l’assemblaggio.
Nota
Tenere il coperchio USB
fuori dalla portata dei
bambini, onde evitarne
l’ingestione accidentale.
2 x Batterie
(AA, LR6, UM-3)
Manuale di istruzioni
(il presente manuale)
Guida per
l’assemblaggio
6 m
NOME DEI COMPONENTI E RELATIVE FUNZIONI ................2
REGOLAZIONE DELL’OROLOGIO..........................................5
ASCOLTO DELL’iPod...............................................................6
ASCOLTO DI CD E DISPOSITIVI USB.....................................7
ASCOLTO DI STAZIONI RADIO IN FM ..................................10
ASCOLTO DI SORGENTI ESTERNE......................................11
USO DELLA FUNZIONE SVEGLIA.........................................12
USO DEL TIMER PER LO SPEGNIMENTO ...........................15
CONTROLLO TONO ...............................................................15
REGISTRAZIONE DELLA LUMINOSITÀ SUL DISPLAY DEL
PANNELLO ANTERIORE........................................................15
RISOLUZIONE DEI PROBLEMI..............................................16
NOTE SUI DISCHI E I DISPOSITIVI USB ...............................18
DATI TECNICI..........................................................................19
Caratteristiche
• Per ascoltare musica su dispositivi esterni quali i modelli di iPod/iPhone, riprodurre CD audio/dati e da dispositivi USB e sintonizzarsi su
programmi FM.
• Utilizzi la sua musica preferita o imposti un gruppo di tonalità come sveglia. La musica che seleziona viene riprodotta ad un volume che
sceglie, all’orario di sveglia che ha impostato, dandole modo di iniziare la giornata al meglio (funzione IntelliAlarm).
• Può memorizzare/richiamare facilmente fino a cinque stazioni FM preferite.
• È possibile impostare l’equalizzatore tribanda (bassi, mezzitoni, alti) in modo che la musica sia esattamente come la vuole.
• È possibile visualizzare due tipi di orologi (con le lancette) abbinati al modello dell’unità.
Nota sul presente manuale
• Il termine “iPod” utilizzato in tutto il manuale comprende anche “iPhone”.
• Se per attivare una funzione è possibile l’uso sia dei pulsanti di comando dell’unità sia di quelli del telecomando, il manuale descrive le fasi
per l’utilizzo dei pulsanti sull’unità.
Accessori in dotazione
English Français Deutsch Svenska Italiano Español Nederlands Русский
Come utilizzare il telecomando
Inserire le batterie nel telecomando nella direzione corretta (+ e –). Puntare il telecomando al ricevitore del segnale del telecomando
(sul pannello anteriore) e utilizzarlo all’interno della portata
indicata qui sotto.
1 It
Page 84

NOME DEI COMPONENTI E RELATIVE FUNZIONI
AUTO SET BEEP
SOURCE + BEEP
SOURCE
DIMMER
CLOCK
ALARM TYPE
212
1
iPod
VOLUME
USB LABEL SIDE
SOURCE PRESETALARM SNOOZE
SLEEP
12345678 jlk9
y
• Mentre è collegato alla base l’iPod si ricarica. Se l’unità si trova nella modalità di risparmio
energetico l’iPod non si ricarica.
• Verificare che adattatore della base utilizzato sia compatibile con il proprio iPod. Se non si
utilizza l’adattatore oppure se l’adattatore non è compatibile, il collegamento potrebbe essere
lento o insufficiente, con la conseguente possibilità di danni al connettore. Per i dettagli delle
informazioni sull’adattatore della base, visitare il sito web ufficiale Apple.
• Forzare il collegamento della custodia protettiva di un iPod potrebbe danneggiare il
connettore. Rimuovere la custodia protettiva prima del collegamento.
• Quando l’iPod non è in uso, impostare il coperchio della base in modo da proteggere il
connettore.
Adattatore
della base
Pannello superiore
a (Alimentazione)
Premere per accendere/spegnere il sistema. Quando il sistema è
spento, sul pannello anteriore viene visualizzato l’orario.
y
• Tenere premuto nella parte superiore dell’unità per più di 3
secondi per impostare il sistema in modalità di risparmio energetico.
Nella modalità di risparmio energetico non viene visualizzata nessuna
informazione. Questa funzione permette la riduzione di consumo
elettrico. Per annullare la modalità risparmio energetico, premere
nuovamente .
• La funzione sveglia è disponibile anche in modalità di spento/
risparmio energetico.
b iPod base
Collegare un iPod.
c Porta USB
Collegare un dispositivo USB. (P. 9).
d VOLUME –/+
Regolare il volume.
e SOURCE
Commutare sulla sorgente di riproduzione.
Collegamento di un iPod alla base dell’iPod
f ALARM
Spegne/accende la sveglia e consente la regolazione di diverse
impostazioni di allarme (P. 13, 14).
g SNOOZE/SLEEP
Impostare il timer per lo spegnimento o commutare la sveglia
sulla modalità snooze (P. 14, 15).
h PRESET
Memorizzare/richiamare stazioni FM o passare alla cartella di
riproduzione (ascoltando musica su CD dati o dispositivi USB).
i /
Scegliere la traccia/il file da riprodurre, o sintonizzarsi sulla
radio.
Tenendo premuto il pulsante durante la riproduzione di una
traccia/un file si cerca in avanti/indietro nella traccia o nel file.
j /
Riproduzione/pausa della traccia riprodotta.
k
Espulsione del CD.
l Alloggio disco
Inserire un CD.
2 It
Page 85

Note
Display del pannello anteriore
FM
CD
AUX
USB
iPod
ALL
1
2
1
8
56
7
3
4
162 3
4
5
Fornita
Antenna FM
NOME DEI COMPONENTI E RELATIVE FUNZIONI
1 Indicatore di riproduzione/riproduzione
casuale/ripetizione
Visualizza la modalità di riproduzione (P. 6, 9).
b Ricevitore del segnale del telecomando
c Indicatore orologio
Mostra la lancetta delle ore dell’orologio (P. 5).
d Indicatore della sorgente
Visualizza la sorgente selezionata.
e Indicatore della sveglia
Si accende se la sveglia è stata impostata (P. 12).
f Indicatore di spegnimento
Si accende se il timer è stato impostato per lo spegnimento
(P. 15).
g Indicatore multifunzione
Visualizza diverse informazioni, compresa l’ora dell’orologio,
il numero della traccia che viene riprodotta o la stazione FM
ascoltata.
h Sensore dell’illuminazione
Rileva l’illuminazione dell’ambiente. Non coprire il sensore.
Italiano
Pannello posteriore
a ALARM TYPE
b CLOCK
Commuta tra i tipi di allarme (P. 13).
Seleziona la visualizzazione del tipo di orologio o consente
l’impostazione dell’ora (P. 5).
c DIMMER
Regolare la luminosità del display sul pannello anteriore (P. 15).
d AUX
Collega un dispositivo esterno.
e Terminale dell’antenna FM
Collega l’antenna FM fornita o un’antenna esterna.
• Estrarre l’antenna. Se la ricezione radio è insufficiente, modificare
l’altezza, l’orientamento o la posizione dell’antenna.
• Se si utilizza un’antenna per esterni invece dell’antenna FM in
dotazione, la ricezione risulterà migliore.
f Rivestimento del terminale
Rimuovere il rivestimento del terminale prima di collegare
dispositivi esterni a AUX, e/o collegare l’antenna FM al
relativo terminale.
Se l’cavo per antenna da esterni e/o il cavo con dispositivo esterno vengono fatti passare attraverso l’asta del sostegno, leggere l’apposita
Guida per l’assemblaggio.
3 It
Page 86

NOME DEI COMPONENTI E RELATIVE FUNZIONI
iPod tasti di regolazione
Telecomando
1
2
3
4
5
6
7
8
9
j
k
l
m
p
o
n
a Trasmettitore del segnale del telecomando
b (Alimentazione)
Premere per accendere/spegnere il sistema.
c ALARM
Attiva/disattiva la sveglia.
d SNOOZE/SLEEP
Per impostare il timer per lo spegnimento o commutare la
sveglia sulla modalità snooze (P. 14, 15).
e Pulsante della sorgente
Per commutare sulla sorgente di riproduzione.
f FOLDER
Per commutare sulla cartella di riproduzione per l’ascolto di
musica su CD dati o dispositivi USB.
g /
Per scegliere la traccia/il file da riprodurre.
Tenendo premuto il pulsante durante la riproduzione di una
traccia/un file si cerca in avanti/indietro nella traccia o nel file.
h
Riproduzione/pausa.
i
Interruzione della riproduzione.
j (Ripetizione)/ (Riproduzione casuale)
Per riprodurre musica su un iPod, un CD audio/dati o un
dispositivo USB in ripetizione/riproduzione causale (P. 6, 9).
k EQ LOW/MID/HIGH
Regola la qualità sonora dei bassi, dei mezzitoni o degli alti
(P. 15).
l PRESET /
Selezionare una stazione FM preselezionata.
m MEMORY
Memorizzare la stazione FM (P. 10).
4 It
n TUNING /
Sintonizzare la radio.
o VOLUME +/–
Regolare il volume.
p MUTE
Silenziamento/ripresa dell’audio.
Page 87

Nota
Impostazione dell’ora
Pannello superiore
SET
Pannello posteriore
Tempo impostato
(lampeggiante)
CLOCK 2
CLOCK 1
Pannello posteriore
Ad es.: 10:50 AM
Lancetta delle
ore dell’orologio
analogico (ora)
Minuto
Ad es.: 10:50 AM
Minuto
Ora
AUTO SET BEEP
212
1
CLOCK
DIMMER
USB LABEL SIDE
VOLUME
SOURCE PRESETALARM SNOOZE
ALARM TYPE
SLEEP
REGOLAZIONE DELL’OROLOGIO
1 Spostare l’interruttore CLOCK del pannello
SOURCE + BEEP
SOURCE
2
posteriore su SET.
2 Impostare l’ora mediante / .
3 Spostare l’interruttore CLOCK del pannello
posteriore su CLOCK1 o CLOCK2.
y
• Il collegamento dell’iPod alla relativa base al punto 2 copia l’ora
dell’iPod sull’unità. Se l’iPod è già collegato alla relativa base quando
CLOCK è impostato su SET, l’ora dell’iPod non viene copiata.
• Premere SNOOZE/SLEEP al punto
dell’orario da 12 a 24 ore.
Italiano
2 per passare alla visualizzazione
Le impostazioni dell’ora vengono reimpostate se l’unità non viene
alimentata per più di una settimana.
Commutazione da un tipo di orologio all’altro
Per passare a un tipo di orologio ad un altro, spostare l’interruttore CLOCK sul pannello posteriore.
Modalità di visualizzazione
dell’orologio 1 (CLOCK 1)
Modalità di visualizzazione
dell’orologio 2 (CLOCK 2)
5 It
Page 88

Note
ASCOLTO DELL’iPod
AUTO SET BEEP
SOURCE + BEEP
SOURCE
DIMMER
CLOCK
ALARM TYPE
212
1
VOLUME
USB LABEL SIDE
SOURCE PRESETALARM SNOOZE
SLEEP
23
Pannello superiore
Telecomando
REPEAT
SHUFFLE
Telecomando
Riproduzione con l’iPod
Per i dettagli sui modelli di iPod compatibili, fare riferimento a “DATI TECNICI” (P. 19).
1 Collegare l’iPod alla base iPod.
2 Premere SOURCE e impostare l’iPod come
sorgente per la riproduzione.
3 Attivare l’iPod premendo / .
La riproduzione può essere controllata sia con il telecomando,
l’iPod o con il pannello di controllo di questa unità.
Pannello
superiore
Telecomando
Pulsante Funzione
/
Riproduzione/pausa
Salta
/
Passaggio al brano precedente/successivo
(tenere premuto)
Riproduzione/pausa
Salta
Passaggio al brano prece-
/
dente/successivo
(tenere premuto)
FOLDER/
MENU/
Controllo menu dell’iPod
ENTER
Ripetizione/riproduzione casuale
La modalità di riproduzione
y
• L’iPod può essere rimosso in qualsiasi momento.
• Se il sistema viene spento, si riaccende automaticamente al momento della
riproduzione di musica/video sull’iPod.
può essere controllata con l’indicatore sul display del pannello anteriore.
• I tasti di ripetizione/ripetizione casuale possono non funzionare
correttamente a seconda del tipo di iPod utilizzato.
• L’ordine di riproduzione a ripetizione/ripetizione casuale può non
funzionare correttamente a seconda del tipo di iPod utilizzato.
Riproduzione ripetuta
Premere REPEAT sul telecomando per selezionare una modalità
di riproduzione tra le seguenti.
:Uno
: Tutto
:Brani
:Album
Nessuna visualizzazione: Disattiva
Riproduzione casuale
Premere SHUFFLE sul telecomando per selezionare una modalità
di riproduzione tra le seguenti.
Nessuna visualizzazione: Disattiva
6 It
Page 89

Nota
ASCOLTO DI CD E DISPOSITIVI USB
Pannello superiore
CD
Numero brano
Riproducendo brani/file da CD/dispositivi USB, l’unità funziona nella seguente modalità.
• In caso di arresto del CD/del dispositivo USB che viene riprodotto, la traccia riprodotta in quel momento ricomincia alla ripresa della
riproduzione.
• Premendo sul telecomando mentre la riproduzione è interrotta, al successivo avvio l’unità riproduce le tracce come segue:
– Per i CD audio: dal primo brano del CD.
– Per i CD dati/dispositivi USB: dal primo brano della cartella che contiene il brano ascoltato l’ultima volta.
• Il sistema si spegne automaticamente 60 minuti dopo l’interruzione della riproduzione di un CD/dispositivo USB.
y
Per i dettagli sui dischi e i file riproducibili, fare riferimento a “NOTE SUI DISCHI E I DISPOSITIVI USB” (P. 18).
Ascolto di un CD audio
1 Premere SOURCE per impostare il CD come
AUTO SET BEEP
212
DIMMER
USB LABEL SIDE
VOLUME
SOURCE PRESETALARM SNOOZE
SOURCE + BEEP
1
SOURCE
CLOCK
ALARM TYPE
SLEEP
12
sorgente di riproduzione.
2 Inserire il CD audio nell’alloggiamento con il
lato dell’etichetta rivolto verso la parte anteriore
dell’unità.
La riproduzione si avvia automaticamente. Il numero del
brano viene visualizzato per un attimo quando inizia la
riproduzione o si saltano i brani.
Italiano
Per il controllo dell’unità mentre vengono riprodotte tracce su
CD audio, servirsi dei seguenti pulsanti.
Pulsante Funzione
Riproduzione/pausa
/
Pannello
superiore
Salta
/
Passaggio al brano precedente/
successivo (tenere premuto)
Espulsione del CD
Riproduzione/pausa
Telecomando
Salta
/
Passaggio al brano precedente/
successivo (tenere premuto)
Stop
Non è possibile inserire o espellere CD quando il sistema è nella
modalità di risparmio energetico (☞ P. 2).
7 It
Page 90

ASCOLTO DI CD E DISPOSITIVI USB
AUTO SET BEEP
SOURCE + BEEP
SOURCE
DIMMER
CLOCK
ALARM TYPE
212
1
VOLUME
USB LABEL SIDE
SOURCE PRESETALARM SNOOZE
SLEEP
12
Pannello superiore
CD
Numero cartella
Numero file
Ascolto di un CD dati
1 Premere SOURCE per impostare il CD come
sorgente di riproduzione.
2 Inserire il CD dati nell’alloggiamento con il lato
dell’etichetta rivolto verso la parte anteriore
dell’unità.
La riproduzione si avvia automaticamente. Il numero della
cartella/del file brano viene visualizzato per un attimo quando
inizia la riproduzione o si saltano i brani.
Per il controllo dell’unità mentre vengono riprodotte tracce su
CD dati, servirsi dei seguenti pulsanti.
Pulsante Funzione
Riproduzione/pausa
/
Salta
/
Pannello
superiore
Telecomando
PRESET
FOLDER
Passaggio al brano precedente/
successivo (tenere premuto)
Cambio di cartella di riproduzione
Espulsione del CD
Riproduzione/pausa
Salta
/
Passaggio al brano precedente/
successivo (tenere premuto)
Stop
Cambio di cartella di riprodu-
zione
8 It
Page 91

Ascolto di un dispositivo USB
Nota
AUTO SET BEEP
SOURCE + BEEP
SOURCE
DIMMER
CLOCK
ALARM TYPE
212
1
VOLUME
USB LABEL SIDE
SOURCE PRESETALARM SNOOZE
SLEEP
21
Pannello superiore
USB
Numero cartella
Numero file
REPEAT
SHUFFLE
Telecomando
Quando è collegato un dispositivo USB, le tracce vengono riprodotte
nell’ordine che segue:
– Ordine di riproduzione della cartella:
le cartelle vengono riprodotte nell’ordine alfabetico dei primi tre
caratteri nel nome della cartella. La cartella che contiene
caratteri diversi da quelli alfabetici viene riprodotta dopo quelle
con caratteri alfabetici.
– Ordine di riproduzione del file:
i file vengono riprodotti in ordine, partendo da quello con la data
meno recente.
ASCOLTO DI CD E DISPOSITIVI USB
1 Premere SOURCE e impostare l’USB come
sorgente di riproduzione.
2 Collegare un dispositivo USB alla porta USB.
La riproduzione si avvia automaticamente.
cartella/del file brano viene visualizzato per un attimo quando
inizia la riproduzione o si saltano i brani.
Per il controllo dell’unità mentre vengono riprodotte tracce su
dispositivi dati, servirsi dei seguenti pulsanti.
Pulsante Funzione
Riproduzione/pausa
/
Salta
Pannello
superiore
/
PRESET
Passaggio al brano precedente/
successivo (tenere premuto)
Cambio di cartella di riproduzione
Riproduzione/pausa
Salta
/
Telecomando
Passaggio al brano precedente/
successivo (tenere premuto)
Stop
FOLDER
Cambio di cartella di riproduzione
Il numero della
Italiano
y
È possibile rimuovere il dispositivo USB in qualsiasi momento.
Ripetizione/riproduzione casuale
La modalità di riproduzione può essere controllata sul display del pannello anteriore con l’indicatore di riproduzione/riproduzione casuale/
ripetizione.
Riproduzione ripetuta
Premere REPEAT sul telecomando per selezionare una modalità
di riproduzione tra le seguenti.
: Tutte le tracce nella cartella (solo CD
dati/dispositivo USB)
: Tutte le tracce
: 1 traccia
y
Se la sorgente selezionata contiene cartelle, ciascuna viene riprodotta nella
modalità ripetizione/ripetizione casuale.
Nessuna visualizzazione:Modalità ripetizione disattiva
Riproduzione casuale
Premere SHUFFLE sul telecomando per selezionare una modalità
di riproduzione tra le seguenti.
:
: Tutte le tracce
Nessuna visualizzazione: Modalità ripetizione casuale disattiva
Tutte le tracce nella cartella (solo CD dati/
dispositivo USB)
9 It
Page 92

Nota
ASCOLTO DI STAZIONI RADIO IN FM
AUTO SET BEEP
SOURCE + BEEP
SOURCE
DIMMER
CLOCK
ALARM TYPE
212
1
VOLUME
USB LABEL SIDE
SOURCE PRESETALARM SNOOZE
SLEEP
12
Pannello superiore
Frequenza
di ricezione
AUTO SET BEEP
SOURCE + BEEP
SOURCE
DIMMER
CLOCK
ALARM TYPE
212
1
VOLUME
USB LABEL SIDE
SOURCE PRESETALARM SNOOZE
SLEEP
234 1
Pannello superiore
Numero preselezionato
Memorizzare la stazione FM
Se una stazione in FM viene sintonizzata manualmente, il suono è in mono.
Memorizzazione di stazioni FM (preselezioni)
Usare la funzione di preselezione per memorizzare le 5 stazioni preferite.
1 Premere SOURCE e impostare FM come sorgente
per la riproduzione.
FM
2 Premere / per sintonizzare la stazione in FM.
Tipo di sintonizzazione Funzionamento
Tenere premuto
o .
Premere più volte
o .
Tenere premuto
TUNING o .
Premere più volte
TUNING o .
Pannello
superiore
Telecomando
Sintonizzazione
automatica
Sintonizzazione
manuale
Sintonizzazione
automatica
Sintonizzazione
manuale
1 Premere / per sintonizzarsi sulla stazione
preferita in FM.
2 Tenere premuto PRESET.
FM
Uso del telecomando
Tenere premuto MEMORY.
3 Premere PRESET e selezionare il numero
preselezionato per memorizzare la stazione in FM.
Uso del telecomando
Premere PRESET /.
4 Temere premuto PRESET per memorizzare la
stazione preselezionata.
Questo memorizza la stazione FM.
Uso del telecomando
Premere MEMORY.
10 It
Page 93

Nota
Selezione di una stazione FM preselezionata.
Pannello superiore
AUTO SET
DIMMER
CL
2
1
iPod
VOLUME
USB LAB
SOURCE ALARM SNOOZ
23
Pannello superiore
AUX
75 Ω
FM ANT
AUX
ASCOLTO DI SORGENTI ESTERNE
AUTO SET BEEP
212
DIMMER
USB LABEL SIDE
VOLUME
SOURCE PRESETALARM SNOOZE
1 2
SOURCE + BEEP
1
SOURCE
CLOCK
ALARM TYPE
di riproduzione.
2 Premere più volte PRESET per selezionare la
1 Premere SOURCE e impostare FM come sorgente
stazione FM preselezionata.
Uso del telecomando
SLEEP
Premere PRESET /.
ASCOLTO DI SORGENTI ESTERNE
Prima di collegare i cavi audio, spegnere il sistema. Prima di
collegare dispositivi esterni, rimuovere il coperchio del terminale.
1 Collegare il dispositivo audio esterno a AUX sul
pannello posteriore utilizzando un mini spinotto
stereo da 3,5 mm reperibile in commercio.
Italiano
Prima di eseguire il collegamento, abbassare il volume dell’unità e del
dispositivo audio portatile.
2 Premere per accendere il sistema.
3 Premere SOURCE e impostare AUX come
sorgente di riproduzione.
4 Avviare la riproduzione sul dispositivo audio esterno
collegato.
11 It
Page 94

USO DELLA FUNZIONE SVEGLIA
L’unità comprende una funzione di sveglia (IntelliAlarm) che riproduce sorgenti musicali o imposta tonalità all’ora stabilita in una gamma di
metodi diversi. La funzione sveglia ha le seguenti caratteristiche.
3 tipi di sveglia
Selezionare tra 3 tipi di sveglia, combinando musica e tonalità.
La sorgente audio e il segnale acustico selezionati vengono riprodotti all’ora impostata. Questa
modalità viene consigliata per cominciare la giornata al meglio.
SOURCE + BEEP
3 minuti prima dell’ora impostata
Ora della sveglia: si inizia ad avvertire anche una tonalità.
: la musica della sorgente inizia a basso volume, che gradualmente
aumenta all’avvicinarsi dell’ora della sveglia.
SOURCE
BEEP All’ora impostata viene riprodotto soltanto il segnale acustico.
La sorgente audio selezionata viene riprodotta all’ora impostata. Il volume inizia basso e aumenta
gradualmente fino a raggiungere il volume impostato.
Varie sorgenti musicali
È possibile la selezione dell’iPod, di CD audio, CD dati, dispositivi USB e radio. È possibile anche la selezione dei seguenti, a seconda della
sorgente audio:
Sorgente Metodo di riproduzione Funzione
È possibile la riproduzione ripetuta di una playlist specifica memorizzata nell’iPod. Per riprodurre una playlist, crearne prima una nomi-
Playlist*
iPod
Ripresa
Brano selezionato Il brano selezionato viene riprodotto ripetutamente.
CD audio
Ripresa Il brano ascoltato durante l’ultima riproduzione.
Cartella La cartella selezionata viene riprodotta ripetutamente.
CD dati/USB
Ripresa Il brano ascoltato durante l’ultima riproduzione.
Stazione preselezionata Viene riprodotta la stazione radio FM preselezionata scelta.
FM
Ripresa La stazione FM ascoltata durante l’ultima riproduzione.
nandola “ALARM Yamaha DTA”.
Assegnando un nome alla playlist, accertarsi che vi siano spazi tra le
parole, e prendere nota delle lettere maiuscole/minuscole.
Se non è possibile trovare la playlist “ALARM Yamaha DTA” nell’iPod,
l’unità riprende la riproduzione dall’ultimo brano ascoltato.
* Per informazioni sulla creazione di una playlist, fare riferimento alle istruzioni del proprio iPod o iTunes.
Prova sveglia
Quando si imposta la funzione di sveglia è possibile provarne il suono.
Snooze
È possibile abilitare la funzione di snooze per riattivare la sveglia dopo 5 minuti.
12 It
Page 95

Note
Nota
Impostare l’ora e il tipo di sveglia
Pannello superiore
Indicatore della sveglia
Ora della sveglia
BEEP
SOURCE+
BEEP
SOURCE
Pannello posteriore
Volume della
sveglia
USO DELLA FUNZIONE SVEGLIA
AUTO SET BEEP
212
DIMMER
USB LABEL SIDE
SOURCE PRESETALARM SNOOZE
VOLUME
17
SOURCE + BEEP
1
SOURCE
CLOCK
ALARM TYPE
SLEEP
2465
1 Tenere premuto ALARM.
L’indicatore della sveglia ( ) e l’ora impostata della
sveglia lampeggiano.
2 Premere / per impostare l’ora della sveglia.
Uso del telecomando
Premere / .
3 Selezionare il tipo di allarme con l’interruttore
ALARM TYPE sul pannello posteriore.
Per i dettagli sui tipi di sveglia, fare riferimento a P. 12.
• Se la sorgente selezionata non è collegata o inserita, non è possibile
riprodurre la traccia/cartella selezionata.
• Se non è possibile la riproduzione della sorgente all’ora impostata per
la sveglia (ad es. l’iPod non è collegato), viene riprodotta la tonalità.
5 (quando vengono selezionati tipi di sveglia diversi da
BEEP) Specificare la traccia, la cartella o la stazione
in FM da riprodurre.
Se l’iPod è impostato come sorgente:
non sono necessarie impostazioni.
Se la sorgente selezionata è CD/USB/FM:
premere PRESET per selezionare il brano (CD audio), la
cartella (CD dati/dispositivo USB) o la stazione in FM da
riprodurre.
Uso del telecomando
Premere PRESET /.
y
• Se la sorgente impostata è l’iPod, l’unità riproduce la playlist
“ALARM Yamaha DTA” all’ora impostata per la sveglia. Se non è
possibile trovare la playlist nell’iPod, l’unità riprende la riproduzione
dall’ultimo brano ascoltato (ripresa).
• Se viene selezionata CD/USB come sorgente e viene impostato “0”
come numero di traccia/cartella, viene ripreso il brano ascoltato
l’ultima volta (ripresa).
• Se viene selezionata FM come sorgente e viene impostato il numero
“0” come preimpostazione, l’unità riprende la radiodiffusione
trasmettendo l’ultima stazione in FM ascoltata (ripresa).
6 Impostare il volume della sveglia premendo
VOLUME –/+
.
CD
Italiano
4 (Se vengono selezionati tipi di allarme diversi da
BEEP) Premere SOURCE per selezionare la
sorgente musicale.
È possibile selezionare qualsiasi sorgente, ad eccezione di
AUX.
Uso del telecomando
Premere Pulsante della sorgente per selezionare la
sorgente musicale.
Se è stata selezionata iPod/CD/USB, collegare/inserire la
sorgente sonora (iPod, CD audio/dati, dispositivo USB) all’/
nell’unità.
y
Premere / per provare la sveglia. Premere nuovamente /
per arrestare la prova.
7 Premere ALARM per completare l’impostazione
della sveglia.
La sveglia viene impostata e si accende il relativo indicatore
().
L’impostazione della sveglia viene cancellata se il sistema viene spento
senza completarla in modo corretto.
13 It
Page 96

USO DELLA FUNZIONE SVEGLIA
AUTO SET BEEP
SOUR
DIMMER
CLOCK
ALARM
212
1
iPod
VOLUME
USB LABEL SIDE
SOURCE ALARM SNOOZE
SLEEP
1
Pannello superiore
AUTO SET BEEP
SOUR
DIMMER
CLOCK
ALARM
212
1
iPod
VOLUME
USB LABEL SIDE
SOURCE ALARM SNOOZE
SLEEP
2
2
1
Pannello superiore
Attivazione/disattivazione della sveglia
1 Premere ALARM.
Quando la sveglia è attivata, ne viene visualizzato l’indicatore
( ) e per alcuni istanti l’ora. Premendo nuovamente
ALARM, l’indicatore della sveglia ( ) e la sveglia si
spengono.
y
L’ora impostata della sveglia viene salvata anche dopo lo spegnimento
della stessa. Se la sveglia viene nuovamente accesa, premendo ALARM
si attiva con le impostazioni precedenti.
Operazioni durante la riproduzione del suono della sveglia
All’ora impostata per la sveglia, viene riprodotto il relativo suono. Durante la riproduzione sono disponibili le seguenti operazioni.
1 (se si vuole interrompere la sveglia per breve tempo)
Premere SNOOZE/SLEEP.
SNOOZE arresta la sveglia per farla riprendere dopo 5 minuti.
y
• Se si imposta SOURCE + BEEP, premere SNOOZE/SLEEP una
volta per interrompere il segnale acustico e due volte per
interrompere la sorgente audio. 5 minuti dopo l’interruzione, la
sorgente audio riprende a volume basso aumentandolo gradatamente
e il segnale acustico riprende.
• Quando viene attivata la funzione snooze, l’indicatore della sveglia
lampeggia.
2 (se si vuole spegnere la sveglia) Premere ALARM o
.
y
La sveglia si interrompe automaticamente dopo 60 minuti, salvo
interruzione manuale.
14 It
Page 97

Nota
USO DEL TIMER PER LO SPEGNIMENTO
AUTO SET BEEP
SOURC
DIMMER
CLOCK
ALARM T
212
1
iPod
VOLUME
USB LABEL SIDE
SOURCE ALARM SNOOZE
SLEEP
1
Pannello superiore
1
2
3
Telecomando
iPod
:HIGH
:MID
:LOW
Tonalità
Impostazione
Tonalità
AUTO21
Pannello posteriore
È possibile impostare l’ora di spegnimento automatico del sistema.
CONTROLLO TONO
1 Premere SNOOZE/SLEEP alcune volte finché il
sistema non si spegne.
Il timer per lo spegnimento può essere impostato su 30, 60, 90
e 120 minuti. Quando è stato impostato il tempo l’indicatore di
spegnimento appare ( ) sul display del pannello anteriore.
y
Premendo SNOOZE/SLEEP quando il timer di spegnimento è
attivato, le impostazioni di questo vengono cancellate.
1 Premere uno dei pulsanti EQ LOW/MID/HIGH sul
telecomando durante la riproduzione.
Selezionare la tonalità da regolare (LOW, MID, HIGH).
Italiano
REGISTRAZIONE DELLA LUMINOSITÀ SUL DISPLAY DEL PANNELLO
ANTERIORE
2 Premere / per regolare la tonalità.
Ciascuna tonalità può essere regolata da –5 a +5.
3 Premere ENTER per completare le impostazioni.
È anche possibile premere il pulsante EQ premuto al punto 1
per completare le impostazioni.
Per modificare la tonalità di altre frequenze audio, tornare al
punto 1 e premere il pulsante EQ per regolare la frequenza
desiderata.
1 Regolare la luminosità con l’interruttore DIMMER
sul pannello posteriore.
AUTO: regola automaticamente la luminosità per
1: più luminosa.
2: più scura.
Quando viene impostato Auto, la luminosità del pannello anteriore
viene corretta automaticamente con l’apposito sensore (P. 3). Accertarsi
che il sensore non sia coperto.
adattarla all’ambiente circostante.
15 It
Page 98

RISOLUZIONE DEI PROBLEMI
Se c’è un problema nell’unità, verificare innanzitutto l’elenco che segue. Qualora non si riuscisse a risolvere il problema applicando le
soluzioni suggerite, o se il problema non rientra fra quelli elencati qui di seguito, spegnere l’unità e staccare la spina, quindi rivolgersi al più
vicino rivenditore o centro di assistenza autorizzato Yamaha.
Problemi di carattere generale
Problema Causa Soluzione
Impossibile accendere l’unità.
Non esce alcun suono dagli altoparlanti.
La riproduzione del suono cessa
improvvisamente.
Il suono è incrinato/distorto o c’è un
rumore anormale.
L’unità non funziona correttamente.
Il sistema si accende, ma si spegne subito
dopo.
Un’apparecchiatura digitale o ad alta
frequenza causa rumori.
L’impostazione dell’orologio è stata
cancellata.
L’iPod non emette alcun suono durante
l’ora della sveglia anche se SOURCE è
impostato su iPod.
L’orologio lampeggia e l’unità non può
funzionare.
Cavo di alimentazione non fissato bene. Ricollegare fissando bene il cavo di alimentazione
Il volume potrebbe essere regolato sul livello
minimo.
La sorgente in ingresso potrebbe essere errata. Selezionare la sorgente in ingresso corretta.
Potrebbe essere impostato lo spegnimento
(☞ P. 15).
Il volume della sorgente di ingresso è eccessivo, o
il volume di questa unità è eccessivo (specialmente
i bassi).
L’unità potrebbe aver subito una forte scarica
elettrica, per esempio un fulmine o una quantità
eccessiva di elettricità statica, o ci potrebbe essere
stata una caduta di tensione.
L’unità potrebbe essere troppo vicina
all’apparecchiatura digitale o ad alta frequenza.
L’alimentazione dell’unità potrebbe essere stata
interrotta per più di una settimana.
L’iPod non è collegato saldamente all’apposita
base.
L’interruttore ALARM TYPE è impostato su
BEEP.
L’interruttore CLOCK nel pannello posteriore è
impostato su SET e questa unità è in modalità di
impostazione dell’orologio.
alla presa a parete e all’unità.
Regolare il livello del volume.
Accendere il sistema e riprodurre di nuovo la
sorgente di segnale.
Regolare il volume con VOL UME, o regolare i
bassi con EQ (☞ P. 15).
Spegnere il sistema e scollegare il cavo di
alimentazione. Attendere circa 30 secondi,
ricollegare il cavo di alimentazione, quindi
accendere il sistema.
Allontanare ulteriormente l’unità
dall’apparecchiatura.
Collegare bene il cavo di alimentazione alla presa a
parete e regolare di nuovo l’orologio (☞ P. 5).
Rimuovere un iPod dall’unità e quindi collegarlo
nuovamente all’apposita base (☞ P. 2).
Impostare ALARM TYPE su SOURCE + BEEP o
SOURCE (☞ P. 13).
Impostare l’interruttore CLOCK su CLOCK1 o
CLOCK2 (☞ P. 5).
iPod
Problema Causa Soluzione
Nessun suono.
L’iPod non si carica.
L’indicatore dell’iPod lampeggia due
volte, ripetendo per 3 volte, dopo il
collegamento dell’iPod stesso.
Riproduzione di CD
Problema Causa Soluzione
Impossibile inserire il disco.
Alcune operazioni dei pulsanti non
funzionano.
La riproduzione non inizia
immediatamente dopo aver premuto
/.
L’iPod non è collegato saldamente all’apposita
base.
La versione del software dell’iPod non è stata
aggiornata.
L’iPod non è collegato saldamente all’apposita
base.
Il sistema è impostato in modalità di risparmio
energetico (☞ P. 2).
L’iPod in uso non è supportato dall’unità. Utilizzare un iPod supportato (☞ P. 19).
Il sistema è impostato in modalità di risparmio
energetico.
Il disco caricato nell’unità potrebbe non essere
compatibile.
Il disco potrebbe essere sporco. Pulire il disco.
Il disco caricato nell’unità potrebbe non essere
compatibile.
Se l’unità è stata spostata da un posto freddo a uno
caldo, potrebbe essersi formata della condensa
sulla testina di lettura del disco.
Rimuovere un iPod dall’unità e quindi collegarlo
nuovamente all’apposita base (☞ P. 2).
Scaricare l’ultima versione di iTunes dal sito web
di Apple e aggiornare il software di iPod
sull’ultima versione.
Rimuovere un iPod dall’unità e quindi collegarlo
nuovamente all’apposita base (☞ P. 2).
Premere per annullare la modalità di risparmio
energetico.
Premere per annullare la modalità di risparmio
energetico (☞ P. 2).
Utilizzare un disco supportato dall’unità (☞ P. 18).
Utilizzare un disco supportato dall’unità (☞ P. 18).
Aspettare una o due ore fino a che l’unità raggiunge
la temperatura ambiente e riprovare.
16 It
Page 99

Problema Causa Soluzione
Il doppio lampeggio dell’indicatore CD si
ripete 3 volte e il disco viene espulso.
Dopo il caricamento di un disco, viene
visualizzato “Err” nel display del pannello
anteriore.
Il disco caricato nell’unità potrebbe non essere
compatibile.
Il disco potrebbe essere sporco. Pulire il disco.
Il disco non contiene file riproducibili. Utilizzare un disco che contenga file riproducibili
Il disco è stato caricato al contrario. Inserire un disco con il lato dell’etichetta rivolta
Si è verificato un errore nell’unità.
Riproduzione di un dispositivo USB
Problema Causa Soluzione
I file MP3/WMA nel dispositivo USB non
vengono riprodotti.
Dopo la connessione di un dispositivo USB
si ripete per 3 volte il doppio lampeggio
dell’indicatore dell’USB.
Dopo il collegamento di un dispositivo
USB, viene visualizzato “Err” nel display
del pannello anteriore.
Il dispositivo USB non è stato riconosciuto. Spegnere il sistema e ricollegare il dispositivo USB
È stato collegato un dispositivo USB non
compatibile all’unità.
Il dispositivo USB non contiene file riproducibili. Utilizzare un dispositivo USB che contenga file
È stato collegato un dispositivo USB non
compatibile all’unità.
È stato rilevato un eccesso di corrente.
RISOLUZIONE DEI PROBLEMI
Utilizzare un disco supportato dall’unità (☞ P. 18).
(☞ P. 18, 19).
verso il lato più vicino.
Espellere il disco mediante .
all’unità.
Collegare una spina di alimentazione CA, se in
dotazione con il dispositivo.
Se le soluzioni di cui sopra non consentono di
risolvere il problema, non è possibile riprodurre il
dispositivo USB nell’unità.
Spegnere il sistema e ricollegare il dispositivo USB
all’unità. Se tale soluzione non consente di
risolvere il problema, non è possibile riprodurre il
dispositivo USB nell’unità.
riproducibili (☞ P. 18, 19).
Spegnere il sistema e ricollegare il dispositivo USB
all’unità. Se tale soluzione non risolve il problema,
non è possibile riprodurre il dispositivo USB
nell’unità.
Italiano
Ricezione FM della radio
Problema Causa Soluzione
Le trasmissioni stereofoniche sono troppo
disturbate.
Anche con un’antenna per esterni, la
ricezione di onde radio è debole (il suono è
distorto).
Telecomando
Problema Causa Soluzione
Il telecomando funziona male.
L’antenna potrebbe essere collegata in modo
inadeguato.
La stazione radio scelta potrebbe essere lontana
dalla propria posizione, oppure la ricezione delle
onde radio potrebbe essere debole.
Potrebbero verificarsi riflessioni multipercorso o
altre interferenze radio.
Il telecomando potrebbe essere utilizzato fuori dal
suo raggio d’azione.
Il ricevitore del segnale del telecomando (☞ P. 3)
potrebbe essere esposto a luce solare diretta o ad
illuminazione artificiale intensa (lampade a
fluorescenza).
La batteria potrebbe essere scarica. Sostituire le batterie con due batterie nuove.
Ci sono ostacoli tra il ricevitore del segnale del
telecomando dell’unità e il telecomando.
Verificare che l’antenna sia collegata correttamente
(☞ P. 3).
Per migliorare la qualità del segnale, provare con la
sintonizzazione manuale (☞ P. 10) oppure usare
un’antenna multicanale per esterni.
Cambiare l’altezza, la direzione o la posizione
dell’antenna.
Per informazioni sul raggio d’azione del
telecomando, fare riferimento a “Come utilizzare il
telecomando” (P. 1).
Cambiare l’illuminazione o l’orientamento
dell’unità.
Rimuovere gli ostacoli.
17 It
Page 100

Nota
Nota
Nota
NOTE SUI DISCHI E I DISPOSITIVI USB
Attenzione
Informazioni sui CD
Questa unità è progettata per l’uso con CD, CD-R* e CD-RW* con
i seguenti loghi.
* CD-R/RW formato ISO 9660
y
Quest’unità può riprodurre dischi contrassegnati da uno dei loghi sopra
riportati. I loghi sono stampati sui dischi e sulla relativa custodia.
• Non caricare in quest’unità altri tipi di dischi. Farlo potrebbe danneggiarla.
• Un CD-R/RW può essere riprodotto solo se finalizzato.
• Alcuni dischi non possono essere riprodotti a seconda delle caratteristiche
proprie o di registrazione.
• Non usare dischi di forma insolita, ad esempio a forma di cuore.
• Non usare dischi che presentino una superficie particolarmente graffiata.
Trattamento dei dischi
• Non toccare la superficie del disco.
Tenere il disco per i bordi (e il foro
centrale).
• Non usare matite o evidenziatori
appuntiti per scrivere sui dischi.
• Non applicare nastro adesivo, etichette, colla o altro ai dischi.
• Non usare rivestimenti protettivi, per evitare i graffi.
• Non inserire nell’unità più di un disco alla volta. Ciò può causare
danni sia a quest’unità che ai dischi.
• Non inserire corpi estranei nell’alloggiamento per il disco.
• Non caricare dischi incrinati, deformati o sporchi di colla.
• Non esporre i dischi al sole, a
temperature elevate, umidità
eccessiva o polvere.
Informazioni sui dispositivi USB
Questa unità supporta i dispositivi di memoria di massa USB (per
esempio: memoria flash, lettori di file audio portatili) che
utilizzano il formato FAT16 o FAT32.
• Determinati dispositivi potrebbero non funzionare correttamente, neanche
se soddisfano i requisiti.
• Non collegare dispositivi diversi dai dispositivi di memoria di massa USB
(per esempio: caricabatterie USB o hub USB), PC, lettori di schede, dischi
rigidi esterni, ecc.
• La Yamaha declina ogni responsabilità in caso di danni al dispositivo USB
o di perdita di dati dallo stesso, che si dovessero verificare mentre tale
dispositivo è collegato a questa unità.
• La leggibilità e l’alimentazione di ogni genere di dispositivo USB non
possono essere garantite.
Informazioni sui file MP3 o WMA
• L’unità è in grado di riprodurre:
File
MP3 8 - 320** 16 - 48
WMA 16 - 320** 22,05 - 48
** Sono supportate sia la velocità di trasmissione costante che quella
variabile.
• Il numero massimo di file/cartelle visualizzabili nell’unità è il seguente.
Vel o c i t à di
trasmissione (kbps)
CD dati USB
Numero totale massimo di file 512 9999
Numero massimo di cartelle 255 128
Numero massimo di file per
cartella
• Non è possibile riprodurre file protetti da copyright.
511 255
Frequenza di
campionamento
(kHz)
• Se un disco si sporca, passare con
un panno morbido e asciutto dal
centro verso i bordi. Non usare
detergenti per dischi in vinile o
solventi per vernici.
• Per evitare guasti, non usare
detergenti per lenti reperibili in
commercio.
• Inserire nel sistema un solo CD per volta. L’inserimento di due o
più CD può causare danni sia al sistema sia ai CD.
18 It
 Loading...