

Page 1
Digital Grand Piano GT2
The GranTouch weighs more than 100 kg. Yamaha recommend that you consult your dealer before
assembling or disassembling the GranTouch.
Das GranTouch wiegt über 100kg. Yamaha empfiehlt Ihnen, Ihren Hän dler um Rat zu fragen, bevor Sie das
GranTouch zusammenbauen.
Le GranTouch pèse plus de 100kg. Yamaha vous recommande de consulter votre revendeur avant
d’assembler ou de démonter le GranTouch.
El GranTouch pesa más de 100 kg. Yamaha le recomienda que consulte a su proveedor antes de ensamblar o
desensamblar el GranTouch.
Il GranTouch pesa oltre 100 kg. Yamaha consiglia di consultare il proprio rivenditore prima di montare o
smontare il GranTouch.
GranTouchޠ໕࣐IJııϵПпαȄ଼࡛ࠥឋ்Ӷಣ၇ܗܷڤGranTouchȂӒڸ୶୧୧ፚȄ
Рояль GranTouch весит более 100 кг. Компания Yamaha рекомендует Вам перед сборкой или разборкой рояля
GranTouch проконсультироваться с дилером.
Assembly Guide
Zusammenbauanleitung
Guide d’assemblage
Guía de ensamblaje
Guida di montaggio
ಣ၇ࡿࠓ
Руководство по сборке
Page 2

2
Assembly Notes:
Equipment required: 1) Philips crosspoint screwdriver. 2) Large blanket.
•
Follow this assembly procedure carefully to prevent incorrect assembly and possible damage.
•
Use only the screws supplied with the
•
Be careful not to pinch your legs or hands while assembling the
•
The lid, which can be opened, is not fixed to the body in the package. Use caution when you assemble the
•
Be careful not to scratch the surface of the
•
Tighten all screws so that all parts are secure.
•
To
•
disassemble
GranTouch
the
GranTouch
, follow this assembly procedure in reverse order.
. Using screws of the wrong size may damage the
GranTouch
GranTouch
.
.
GranTouch
GranTouch
.
Zusammenbau:
Sie brauchen: 1) einen Kreuzkopfschraubenzieher, 2) eine große Decke.
•
Befolgen Sie die Montageanweisungen sorgfältig, um Fehler und vor allem Beschädigung Ihres Instrumentes zu vermeiden.
•
Verwenden Sie ausschließlich die zum Lieferumfang des
•
Achten Sie beim Zusammenbau darauf, daß Sie weder Ihre Beine noch Ihre Hände einklemmen.
•
Bitte beachten Sie, daß der Klavierdeckel bei Lieferung nicht arretiert ist. Lassen Sie beim Zusammenbau des
•
Verfahren Sie sorgfältig, um Kratzer zu vermeiden.
•
Ziehen Sie alle Schrauben fest an.
•
Um das
•
GranTouch
wieder
auseinanderzunehmen
GranTouch
, befolgen Sie die hier gegebenen Hinweise bitte in umgekehrter Reihenfolge.
gehörigen Schrauben.
GranTouch
die größte Vorsicht walten.
Notes d’assemblage:
Equipement nécessaire: 1) Tournevis en croix. 2) Grande couverture.
•
Suivez les instructions d’assemblage pour éviter un mauvais montage et un endommagement éventuel de l’instrument.
•
Ne vous servez que des vis fournies avec le
•
Veillez à ne pas vous pincer les doigts ou les jambes durant l’assemblage.
•
Le couvercle, qui peut être ouvert, n’est pas fixé au corps de l’instrument dans l’emballage. Soyez donc prudent lorsque vous montez le
•
Veillez à ne pas griffer la surface du
•
Serrez toutes les vis de sorte à ce que toutes les parties soient solidement attachées.
•
•
Pour
démonter
GranTouch
le
, inversez la procédure de montage.
GranTouch
GranTouch
. Si vous utilisez des vis de mauvaise taille, vous risquez d’endommager le
.
.
GranTouch
GranTouch
.
.
Notas sobre el ensamblaje:
Equipos requeridos: 1) Destornillador de punta en cruz Philips 2) Manta grande
•
Siga cuidadosamente este procedimiento de montaje para evitar el ensamblaje incorrecto y posibles daños.
•
Utilice solamente los tornillos suministrados con el
•
Tenga cuidado de no pillarse las piernas ni los brazos cuando ensamble el
•
La tapa, que puede abrirse, no está fijada al cuerpo del paquete. Tenga cuidado cuando ensamble el
•
Tenga cuidado de no rayar la superficie del
•
Apriete todos los tornillos de forma que todas las piezas queden seguras.
•
•
Para
desensamblar
GranTouch
el
, realice este procedimiento en orden inverso.
GranTouch
GranTouch
. La utilización de tornillos de tamaño erróneo podría dañar el
GranTouch
.
.
GranTouch
Note per il montaggio:
Attrezzi necessari: 1) Cacciavite con testa a croce, 2) Grande coperta
•
Seguire con attenzione il procedimento di montaggio per evitare un montaggio errato e possibili danni.
•
Usare solo le viti in dotazione al
•
Fare attenzione a non schiacciarsi le gambe o le mani durante il montaggio del
•
Il coperchio, che può essere aperto, non è fissato al corpo nella confezione. Fre attenzione quando si monta il
•
Fare attenzione a non graffiare la superficie del
•
Serrare tutte le viti in modo che tutte le parti siano assicurate.
•
•
Per
smontare
GranTouch
il
GranTouch
, seguire il procedimento di montaggio in ordine inverso.
. L’uso di viti di misura sbagliata può danneggiare il
GranTouch
GranTouch
.
組裝肴意事項:
所需設備:1)菲利普十字螺絲刀。2)大毛布。
•
為了防止組裝錯誤以及可能發生的損傷,請認真按照以下的順序進行組裝。
•
只允許使用
•
在組裝
•
在封裝中琴蓋不是固定在主體上的而是可以打開的。在組裝
•
肴意不要磕碰
•
擰緊所有的螺釘以確實固定所有的部件。
•
在拆卸
•
GranTouch
GranTouch
GranTouch
GranTouch
所配備的螺釘。使用尺寸不合適的螺釘會損傷
時,肴意不要夾著您的手或腳。
的表面。
時,請按照組裝時相反的順序進行。
GranTouch
GranTouch
時,要千萬小心。
。
GranTouch
.
.
.
GranTouch
GranTouch
.
.
Примечания по сборке:
•
Требуемое оборудование: 1) Крестовая отвертка. 2) Большая подстилка.
•
Для предотвращения неправильной сборки и возможного повреждения строго соблюдайте инструкции данной процедуры по сборке.
•
Используйте только винты, прилагаемые к роялю
дить рояль
•
Будьте осторожны, чтобы не травмировать ноги или руки при сборке рояля
•
Крышка, которую можно открывать, не прикреплена к корпусу в комплекте поставки. Соблюдайте меры предосторожности при
сборке рояля
•
Будьте осторожны, чтобы не поцарапать поверхность рояля
•
Затяните все винты, чтобы надежно закрепить все детали.
•
Для разборки рояля
GranTouch
GranTouch
.
.
GranTouch
следуйте инструкции данной процедуры по сборке в обратном порядке.
GranTouch
. Использование винтов несоответствующего размера может повре-
GranTouch.
GranTouch
.
Page 3
A
B
C
D
E
F
G
H
I
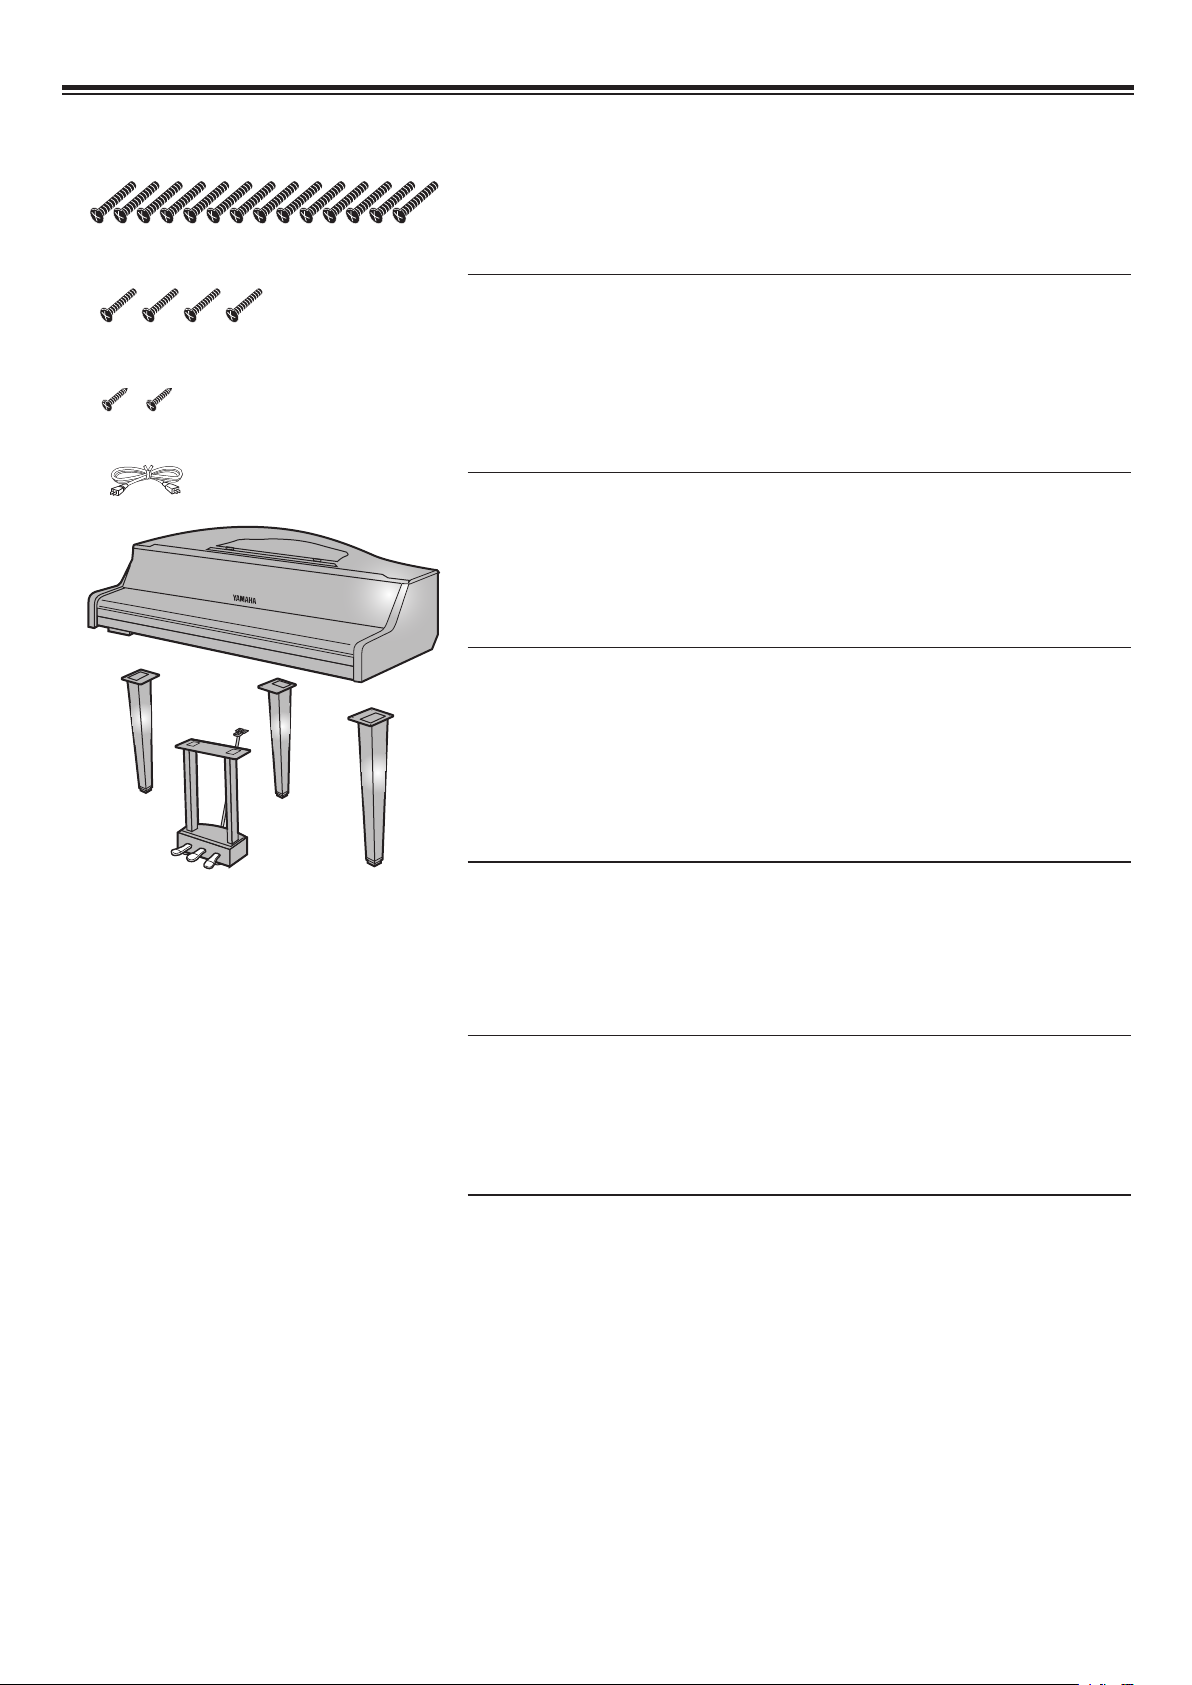
Open the package and make sure that you have all the parts listed below. Con-
F) Left front leg
G) Rear leg
H) Right front leg
I) Pedal unit
Öffnen Sie die Verpackung und schauen Sie nach, ob alle nachstehenden Teile
1.
Unpacking:
sult your dealer if anything is missing.
A) 14 long screws for the front legs and pedal unit
B) 4 medium-length screws for the rear leg
C) 2 short screws for the pedal unit supporting rod
D) AC power cable
E) GranTouch main unit
Auspacken:
vorhanden sind. Andernfalls wenden Sie sich bitte an Ihren Händler.
A) 14 lange Schrauben für die Vorderbeine und die
Pedaleinheit
B) 4 mittellange Schrauben für das Hinterbein
C) 2 kurze Schrauben für die Stützstange der Pedaleinheit
D) Netzkabel
E) GranTouch-Gehäuse
Déballage:
Ouvrez l’emballage et assurez-vous que vous disposez bien de tous les éléments
F) Linkes Vorderbein
G) Hinterbein
H) Rechtes Vorderbein
I) Pedaleinheit
repris ci-dessous. Consultez votre revendeur s’il manque un élément.
A) 14 vis longues pour les pieds avant et le pédalier
B) 4 vis moyennes pour le pied arrière
C) 2 vis courtes pour la tige du pédalier
D) Cordon d’alimentation
E) Corps du
Desembalaje:
GranTouch
Abra el paquete y compruebe si contiene todas las piezas indicadas a conti-
F) Pied avant gauche
G) Pied arrière
H) Pied avant droit
I) Pédalier
nuación. Si falta algo, consulte a su proveedor.
A) 14 tornillos largos para las patas delanteras y la unidad
de pedales
B) 4 tornillos de longitud media para la pata trasera
C) 2 tornillos cortos para la barra de soporte de la unidad de
pedales
D) Cable de alimentación de CC
E) unidad principal del
Disimballaggio:
GranTouch
Aprire lo scatolone e assicurarsi che siano presenti tutte le parti sotto elen-
F) Pata delantera izquierda
G) Pata trasera
H) Pata delantera derecha
I) Unidad de pedales
cate. Consultare il rivenditore se mancasse qualcosa.
A) 14 viti lunghe per le gambe anteriori e l’unità pedali
B) 4 viti medie per la gamba posteriore
C) 2 viti corte per l’asta di sostegno dell’unità pedali
D) Cavo di alimentazione CA
E) Unità principale
開包:打開封裝,查對確認附件一覽表中的所有部件。如果發現有缺件時,請立即和銷售商聯系。
個用在前腿和踏板部位的長螺釘
A)14
個用在后腿的中長螺釘
B)4
個用在踏板部支撐杆的短螺釘
C)2
交流電源線
D)
GranTouch
E)
GranTouch
主體
F) Gamba anteriore sinistra
G) Gamba posteriore
H) Gamba anteriore destra
I) Unità pedali
左前腿
F)
后腿
G)
右前腿
H)
踏板部
I)
Распаковка: Откройте упаковку и убедитесь в наличии перечисленных ниже деталей. Если что-либо отсутствует, свяжитесь со своим дилером.
A) 14длинныхвинтовдляпереднихножекипедального
узла
B) 4винтасреднейдлиныдлязаднейножки
C)2короткихвинтадлярычагаподдержкипедального
узла
D)Кабельпитанияпеременноготока
E) Основнойаппарат
GranTouch
F) Леваяпередняяножка
G)Задняяножка
H)Праваяпередняяножка
I) Педальныйузел
3
Page 4

4
2.
A
B
C
A) Front leg
B) Rear leg
C) Front leg
A) 前腿
B) 后腿
C) 前腿
A) Vorderbein
B) Hinterbein
C) Vorderbein
A) Pata delantera
B) Pata trasera
C) Pata delantera
A) Gamba anteriore
B) Gamba posteriore
C) Gamba anteriore
A) Передняя ножка
B) Задняя ножка
C) Передняя ножка
A) Pied avant
B) Pied arrière
C) Pied avant
(1)
(2)
Upturn the
Place the soft blanket on the floor so that it butts up to a wall. With the keyboard cover
closed, carefully turn the
to prevent it from falling, as shown.
Stellen Sie das
Legen Sie eine weiche Decke so auf den Boden, daß sie bis an eine Wand ragt. Schließen
Sie den Klavierdeckel nötigenfalls, bevor Sie das
Achten Sie darauf, daß der Korpus die Wand berührt, damit das Instrument nicht umfallen
kann. Siehe Abbildung.
Mettez le
Placez une couverture douce sur le sol à côté d’un mur. En veillant à bien fermer le couvercle du clavier, basculez le
ment repose contre le mur pour éviter qu’il ne tombe. Voyez l’illustration.
Puesta vertical del
Coloque una manta blanda en el suelo de forma que se una a la pared. Con la cubierta del
teclado cerrada, dé cuidadosamente la vuelta a la unidad principal del
jarla sobre su borde delantero. Apóyela contra la pared para evitar que se caiga, como indica
la ilustración.
Capovolgere il
Collocare una coperta morbida sul pavimento contro una parete. Con il coperchio della tastiera chiuso, sollevare attentamente il
tro la parete come illustrato per evitare che cada.
支立
靠一面牆在地板上鋪一塊柔軟的毛布。 把鍵盤蓋合好, 小心地翻轉
將其拖至緊靠牆以防倒下,如圖所示。
GranTouch
GranTouch
GranTouch
GranTouch
sur la face avant
GranTouch
GranTouch
GranTouch
senkrecht
GranTouch
main unit onto it’s front edge. Lean it against the wall
GranTouch
sur sa face avant de sorte à ce que le corps de l’instru-
GranTouch
sul suo lato anteriore. Appoggiarlo con-
auf seine Frontseite stellen.
GranTouch
GranTouch
主體使之正面朝下,
hasta de-
3.
Переверните рояль
Поместите мягкую подстилку на пол таким образом, чтобы она соприкасалась со
стеной. Закрыв крышку клавиатуры, осторожно переверните основной аппарат
GranTouch
он не упал, как показано на рисунке.
Attaching the legs
The adjacent illustration shows the orientation of each leg.
1) Attach
2) Attach
Note:
Anbringen der Beine
Bitte entnehmen Sie die Ausrichtung der drei Beine nebenstehender Abbildung.
1) Befestigen Sie das
2) Befestigen Sie die
Achtung: Das
Fixation des pieds
L’illustration ci-contre montre l’orientation de chaque pied.
1) Fixez le
2) Fixez les
Remarque: Le
Fijación de las patas
En la ilustración de la izquierda se muestra la orientación de cada pata.
1) Fije la
2) Fije las
Nota: La
Applicazione delle gambe
L’illustrazione a lato mostra l’orientamento di ciascuna gamba.
1) Applicare la
2) Applicare le
Nota: La
安裝支腿
左側示意圖表示了每個支腿的位置。
用4個中長螺釘來安裝后腿。
1)
安裝2個前腿。每個前腿使用4個長螺釘。
2)
肴意:后腿比前腿長5cm(
Подсоединение ножек
На расположенном рядом рисунке приведена ориентация каждой ножки.
1) Прикрепите
2) Прикрепите
Примечание: задняя ножка на 5 см (1,96 дюйма) длиннее передних ножек.
на его переднюю кромку. Наклоните его в сторону стены для того чтобы
the rear leg
the two front legs
the rear leg
pied arrière
deux pieds avant
pata trasera
dos patas delanteras
pata trasera
gamba posteriore
GranTouch
using the 4
is 5 cm (1.96") longer than
Hinterbein
beiden Vorderbeine
Hinterbein
pied arrière
gamba posteriore
gambe anteriori
заднюю ножку с помощью 4 винтов средней длины.
две передние ножки с помощью 4 длинных винтов на каждую ножку.
ist 5cm länger als die
au moyen des 4
utilizando los 4
es 5 cm más larga que las dos delanteras.
medium-length
using 4
est 5cm plus long que les pieds avant.
è 5 cm più lunga delle gambe anteriori.
1.96”
long screws
mit den 4
vis moyennes
en vous servant de 4
tornillos de longitud media
utilizando los 4
usando le 4
usando 4
)。
screws.
for each leg.
the front legs
mittellangen Schrauben
mit je 4
viti lunghe
langen Schrauben
Vorderbeine
longues vis
tornillos largos
viti medie
.
.
.
pour chaque pied.
.
per ciascuna gamba.
.
para cada pata.
Page 5

4.
(1)
(2)
(3)
(4)
Turning over the
With the legs attached securely, turn over the
Be careful that the keyboard cover doesn’t pinch your fingers.
Stellen Sie das
Nachdem Sie die Beine festgeschraubt haben, können Sie das
Achten Sie darauf, daß Sie sich nicht die Finger am Klavierdeckel einklemmen.
Redresser le
Une fois les pieds bien fixés, redressez le
Veillez à ne pas vous coincer les doigts avec le couvercle du clavier.
Puesta en pie del
Con las patas firmemente fijadas, ponga en pie el
mente colocado sobre sus patas.
Tenga cuidado de que la cubierta del teclado no pille sus dedos.
Raddrizzare il
Con le gambe fissate saldamente, raddrizzare il
sulle gambe.
Fare attenzione a non schiacciarsi le dita con il coperchio della tastiera.
翻轉
GranTouch
確實地裝好支腿后,翻轉
請肴意不能讓鍵盤蓋夾着您的手。
GranTouch
GranTouch
GranTouch
GranTouch
GranTouch
richtig hin
GranTouch
GranTouch
GranTouch
使之穩穩地支立好。
en position normale.
GranTouch
GranTouch
so that it sits correctly on its legs.
GranTouch
de forma que quede correcta-
in modo che sia ben appoggiato
richtig hinstellen.
5.
Переворачивание рояля
Надежно прикрепив ножки, переверните рояль
правильно встал на все ножки.
Будьте осторожны, чтобы не прищемить пальцы крышкой клавиатуры.
Attaching the pedal unit
1) Connect the pedal unit cable to the recessed connector in the
2) Tuck the connector cable into the leg of the pedal unit.
3) Attach the pedal unit using six long screws.
4) Attach the pedal unit supporting rod using the two long screws.
Anbringen der Pedaleinheit
1) Verbinden Sie das Kabel der Pedaleinheit mit dem versenkten Anschluß des
2) Schieben Sie das Kabel in das Bein der Pedaleinheit.
3) Befestigen Sie die Pedaleinheit mit 6 langen Schrauben.
4) Befestigen Sie die Stützstange der Pedaleinheit den beiden kurzen Schrauben.
Fixation du pédalier
1) Branchez le câble du pédalier dans la borne encastrée du
2) Faites passez le câble dans le pied du pédalier.
3) Fixez le pédalier avec six longues vis.
4) Fixez la tige de support du pédalier avec les deux courtes vis.
Fijación de la unidad de pedales
1) Conecte el cable de la unidad de pedales al conector empotrado del
2) Meta el cable del conector en la pata de la unidad de pedales.
3) Fije la unidad de pedales utilizando seis tornillos largos.
4) Fije la barra de soporte de la unidad de pedales utilizando los dos tornillos largos.
Applicazione dell’unità pedali
1) Collegare il cavo dell’unità pedali al connettore incassato sul
2) Far passare il cavo nella gamba dell’unità pedali.
3) Applicare l’unità pedali usando sei viti lunghe.
4) Applicare l’asta di supporto dell’unità pedali usando le due viti corte.
安裝踏板部
踏板部的製動線連接到
1)
將連接器線連掛踏板部腿上。
2)
用6個長螺釘來安裝踏板部。
3)
用2個長螺釘來安裝踏板部支撐杆。
4)
Прикрепление педального узла
1) Подключите кабель педального узла к утопленному разъему в рояле
2) Подогните кабель разъема в ножку педального узла.
3) Прикрепите педальный узел с помощью шести длинных винтов.
4) Прикрепите рычаг поддержки педального узла с помощью двух длинных винтов.
GranTouch
GranTouch
的連接器上。
GranTouch
GranTouch
таким образом, чтобы он
GranTouch
GranTouch
.
GranTouch
.
GranTouch
.
GranTouch
.
.
.
5
Page 6

6
6.
(1)
(2)
Rear leg
Hinterbein
Pied arrière
Pata trasera
Gamba posteriore
后腿
Задняя ножка
Connecting the power cable to the
1) Connect the power cable to the AC inlet on the
2) Fasten the power cable to the
Anschließen des Netzkabels an das
1) Verbinden Sie das Netzkabel mit dem dafür vorgesehenen Anschluß des
2) Befestigen Sie das Netzkabel am
Branchement du cordon d’alimentation au
1) Branchez le cordon d’alimentation à la borne d’alimentation du
illustré.
2) Attachez le cordon d’alimentation au
Conexión del cable de alimentación al
1)
Conecte el cable de alimentación al tomacorriente de CA del
ilustración.
2) Fije el cable de alimentación al
trada.
Collegamento del cavo di alimentazione al
1) Collegare il cavo di alimentazione alla presa CA sul
Fissare il cavo di alimentazione al
2)
連接
GranTouch
如圖所示,將電源線連接到
1)
用電線夾子固定
2)
Подключение кабеля питания к роялю
1) Подключите кабель питания к разъему переменного тока на рояле
показано на рисунке.
2) Прикрепите кабель питания к роялю
ного зажима.
的電源線
GranTouch
GranTouch
GranTouch
GranTouch
GranTouch
GranTouch
GranTouch
GranTouch
的電源線。
GranTouch
using the attached cable clip.
mit dem Kabelclip.
GranTouch
GranTouch
GranTouch
的交流插座上。
GranTouch
en vous servant de la fixation fournie.
utilizando la presilla sujetacables suminis-
GranTouch
con il fermacavo in dotazione.
GranTouch
, as shown.
GranTouch
GranTouch
GranTouch
с помощью прилагаемого кабель-
como se muestra en la
, come illustrato.
GranTouch
comme
GranTouch
.
, как
7.
Setting the adjusters
Set the two adjusters so that the pedal unit is firmly clamped between the
side and the floor. The pedal unit should not move when the pedals are pressed.
Einstellen der Stützschrauben
Stellen Sie die Stützschrauben so ein, daß die Pedaleinheit zwischen der Unterseite des
GranTouch
die Pedaleinheit nicht verrutschen.
Réglage des vis d’ajustement du pédalier
Réglez les vis d’ajustement du pédalier de sorte à le fixer fermement entre le
le sol. Le pédalier ne doit pas bouger lorsque vous enfoncez une pédale.
Regulación de los ajustadores
Regule los dos ajustadores de forma que la unidad de pedales quede firmemente enganchada entre la parte inferior del
cuando se pisen los pedales.
Impostazione dei regolatori
Impostare i due regolatori in modo che l’unità pedali sia fissata saldamente tra il fondo del
GranTouch
設定調詳器
設定兩個調詳器將踏板部牢實地固定在
有松動。
Установка регуляторов
Установите два регулятора таким образом, чтобы педальный узел был плотно зажат
между нижней стороной рояля
гаться при нажатии педалей.
und dem Fußboden eingeklemmt ist. Wann immer Sie die Pedale betätigen, darf
GranTouch
e il pavimento. L’unità pedali non deve muoversi quando si premono i pedali.
y el piso. La unidad de pedales no deberá moverse
GranTouch
GranTouch
底部和地板之間。當踏動踏板時踏板部不能
и полом. Педальный узел не должен дви-
GranTouch
GranTouch
under-
et
Page 7

Final Checklist
8.
Do you have some parts left over?
•
GranTouch
Is the
•
Does the
•
Does the pedal unit move when you press a pedal?
•
Did you connect the pedal unit cable correctly?
•
GranTouch
Is the
•
Abschließende Kontrolle
Bleiben noch ein paar Teile übrig?
•
Steht das
•
Knarrt das
•
bewegt sich die Pedaleinheit, wenn sie ein Pedal betätigen?
•
Haben Sie die Pedaleinheit richtig angeschlossen?
•
GranTouch
Ist das
•
Dernières vérifications
Vous reste-t-il des éléments?
•
GranTouch
Le
•
GranTouch
Le
•
Le pédalier bouge-t-il lorsque vous enfoncez une pédale?
•
Avez-vous correctement branché le câble du pédalier?
•
GranTouch
Le
•
Lista de comprobaciones finales
¿Le han sobrado algunas piezas?
•
¿Está el
•
¿Traquetea el
•
¿Se mueve la unidad de pedales cuando pisa un pedal?
•
¿Ha conectado correctamente el cable dela unidad de pedales?
•
¿Está sucio o marcado el
•
Controllo finale
Sono avanzati dei pezzi?
•
Il
•
Il
•
L’unità pedali si muove quando si preme un pedale?
•
Si è collegato correttamente il cavo dell’unità pedali?
•
Il
•
最后檢查事項
是否忘掉了某些零件?
•
移動
•
搖動
•
在踏動踏板時踏板部是否有松動?
•
是否正確連接好了踏板製動線?
•
GranTouch
•
Список заключительных контрольных вопросов
•
Не оставили ли Вы внутри какие-либо детали?
•
Не стоит ли рояль
нему?
•
Не дребезжит ли рояль
•
Двигается ли педальный узел при нажатии педали?
•
Правильно ли Вы подключили педальный узел?
•
Не загрязнен ли рояль
рук?
GranTouch
GranTouch
GranTouch
GranTouch
GranTouch
GranTouch
close to a door that may bang into it?
GranTouch
GranTouch
GranTouch
是否有灰塵或有記號?
rattle when you try to rock it?
dirty or marked?
in der Nähe einer Tür, die es beschädigen könnte?
, wenn Sie es hin- und herbewegen?
schmutzig oder sind Fingerabdrücke zu sehen?
se trouve-t-il près d’une porte qui risque de le cogner?
fait-il du bruit lorsque vous essayez de le basculer?
est-il sale ou taché?
cerca de una puerta que pueda golpearlo?
GranTouch
è vicino ad una porta che potrebbe sbattergli contro?
emette battimenti quando si cerca di farlo oscillare?
è sporco o segnato?
通過門口時,是否會有和門發生碰撞?
時,是否會有嘎嘎聲?
cuando trata de moverlo?
GranTouch
GranTouch
GranTouch
GranTouch
?
вблизи двери, которая может ударить по
, когда Вы пытаетесь раскачать его?
и не остались ли на нем следы от
Check through the assembly procedure to see what you’ve
→
missed.
Move the
→
Make sure all screws are tightened correctly.
→
Readjust the two pedal unit adjusters.
→
Make sure that it is connected correctly.
→
Remove any dirt and marks using a soft damp cloth.
→
Gehen Sie die Montageanweisungen noch einmal durch, um
→
zu sehen, was Sie vergessen haben.
→
Stellen Sie das
→
Ziehen Sie alle Schrauben fest an.
→
Stellen Sie die Stützschrauben richtig ein.
→
Überprüfen Sie das vorsichtshalber.
→
Reinigen Sie das Instrument mit einem weichen, trockenen
Tuch.
Vérifiez la procédure et repérez ce que vous avez omis de
→
faire.
Déplacez le
→
Assurez-vous que toutes les vis sont convenablement serrées.
→
Réglez les deux vis d’ajustement du pédalier.
→
Assurez-vous qu’il est correctement branché.
→
Nettoyez-le avec un chiffon doux et humide.
→
Compruebe el procedimiento de ensamblaje para ver si se ha
→
olvidado de algo.
Mueva el
→
Cerciórese de que todos los tornillos estén firmemente apre-
→
tados.
Regule los dos ajustadores de la unidad de pedales.
→
Cerciórese de que esté correctamente conectado.
→
Elimine la suciedad y las marcas utilizando un paño suave
→
humedecido.
Controllare il procedimento di montaggio per vedere cosa si
→
è dimenticato.
Spostare il
→
Controllare che tutte le viti siano serrate correttamente.
→
Impostare di nuovo i due regolatori dell’unità pedali.
→
Assicurarsi che sia collegato correttamente.
→
Rimuovere sporco e segni con un panno morbido umido.
→
通過檢查組裝程序來查對忘掉了什么零件。
→
移動
→
確認所有的螺釘是否被確實擰緊。
→
再次調詳兩踏板部的調詳器。
→
→
檢查是否連接正確。
→
用輕軟毛布擦掉污點或記號。
Сверьтесь с процедурой сборки, чтобы определить, что
→
Вы пропустили.
Передвиньте рояль
→
Убедитесь, что все винты правильно затянуты.
→
Отрегулируйте два регулятора педального узла.
→
Убедитесь, что он подключен правильно.
→
Удалите грязь и следы с помощью мягкой ткани.
→
GranTouch
GranTouch
GranTouch
GranTouch
GranTouch
.
GranTouch
.
.
.
。
GranTouch
an einen anderen Ort.
.
7
Page 8

XU758B0
P.O. Box 3, Hamamatsu, 430-8651, Japan
T Printed in Japan
Copyright © 2008 by Yamaha Corporation
 Loading...