

Page 1

ELS-01/01C/01X Version 1.8
New Functions
Yamaha has updated the firmware of ELS-01/01C/01X from Version 1.7 to
Version 1.8. This version provides additional functions and has some changed
LCDs.
This manual provides instructions for the new and updated functions based on
Chapter 7, “Music Data Recorder,” in the ELS-01/01C v1.7 Manual (including
typeU).
Please replace Chapter 7 in your Owner’s Manual with this manual.
The LCD screenshots in this manual are taken from the ELS-01/01C typeU.
New and updated functions in Music Data Recorder.
•Enhancements to the Copy function
The new Copy function can copy individual folders/media as well as
individual songs (pages 34 – 36).
•Added a Search function for songs/folders
Added a [SEARCH] button in the display, and the search can detect the
desired song/folder by using keywords (pages 12 – 14).
EN
ELS-01/01C/01X Version 1.8 New Functions
1
Page 2

ELS-01/01C/01X Version 1.8 New Functions
2
Page 3

7
Music Data Recorder (MDR)
The Music Data Recorder (M.D.R.) is a sophisticated recording system built into the Electone
that lets you record your performances and Registration settings to a USB flash memory or
other external media. If you install the optional floppy disk drive such as the UD-FD01 to the
Electone, you can record your performances/settings to floppy disks.
Before using an external media such as USB flash memory, carefully read “Precautions
when using the USB TO DEVICE terminal” section on page 8.
Contents
1 Calling Up the M.D.R. Display . . . . . . . . . . . . . . . . . 3
2 Using the LCD Display* . . . . . . . . . . . . . . . . . . . . . . 4
• Song Icons . . . . . . . . . . . . . . . . . . . . . . . . . . . . . . . . . . . . . . . . . . . . . 6
• Precautions when using the USB TO DEVICE terminal . . . . . . . . . . . . 8
• Handling the floppy disk drive (FDD) and floppy disks . . . . . . . . . . . . 9
3 Formatting External Media . . . . . . . . . . . . . . . . . . . 10
4 Selecting a Song . . . . . . . . . . . . . . . . . . . . . . . . . . 11
• Search a Song*. . . . . . . . . . . . . . . . . . . . . . . . . . . . . . . . . . . . . . . . . 12
5 Recording . . . . . . . . . . . . . . . . . . . . . . . . . . . . . . 15
• Recording your performance. . . . . . . . . . . . . . . . . . . . . . . . . . . . . . . 15
• Re-recording (Retry) . . . . . . . . . . . . . . . . . . . . . . . . . . . . . . . . . . . . . 16
• Recording each part separately . . . . . . . . . . . . . . . . . . . . . . . . . . . . . 16
• Punch-in Recording . . . . . . . . . . . . . . . . . . . . . . . . . . . . . . . . . . . . . 18
6 Changing the Song Name . . . . . . . . . . . . . . . . . . . . 18
7 Saving Registrations as Registration Data (File) . . . . 21
• Saving Two or More Registration Banks to One Song. . . . . . . . . . . . 21
• Replacing Registrations . . . . . . . . . . . . . . . . . . . . . . . . . . . . . . . . . . 22
* The functions with “*” are new and updated functions.
1
Calling Up the M.D.R. Display
• Next Regist (Registration) Settings (Changing the order of the
Registration data) . . . . . . . . . . . . . . . . . . . . . . . . . . . . . . . . . . . . . . . 23
8 Recalling Recorded Registrations . . . . . . . . . . . . . . 25
9 Playing Back a Song . . . . . . . . . . . . . . . . . . . . . . . 27
• Playing Back the Selected Part(s) . . . . . . . . . . . . . . . . . . . . . . . . . . . 28
• Fast Forward, Rewind and Pause. . . . . . . . . . . . . . . . . . . . . . . . . . . . 29
• Changing the Tempo. . . . . . . . . . . . . . . . . . . . . . . . . . . . . . . . . . . . . 29
• Repeat Playback . . . . . . . . . . . . . . . . . . . . . . . . . . . . . . . . . . . . . . . . 30
10 Displaying the Score . . . . . . . . . . . . . . . . . . . . . . . 32
• Changing the score contents and settings . . . . . . . . . . . . . . . . . . . . . 33
11 Other Functions (Tools) . . . . . . . . . . . . . . . . . . . . . 34
• Song Copy* . . . . . . . . . . . . . . . . . . . . . . . . . . . . . . . . . . . . . . . . . . . 34
• Song Delete. . . . . . . . . . . . . . . . . . . . . . . . . . . . . . . . . . . . . . . . . . . . 37
• Converting to XG. . . . . . . . . . . . . . . . . . . . . . . . . . . . . . . . . . . . . . . . 38
• Converting ELS format to EL . . . . . . . . . . . . . . . . . . . . . . . . . . . . . . . 39
• Converting EL format to ELS . . . . . . . . . . . . . . . . . . . . . . . . . . . . . . . 39
• Checking the Remaining Memory . . . . . . . . . . . . . . . . . . . . . . . . . . . 40
Press the [MDR] button in the panel to call up the M.D.R. display. All operations
related to the M.D.R., such as recording and playing your performances, can be done
in the M.D.R. display.
7
Music Data Recorder (MDR)
DISPLAY SELECT
A.B.C.
VOICE
DISPLAY
FOOT
SWITCH
VOICE EDIT PATTERN SEQUENCE
U.ORGAN
FLUTES
MDR
M.O.C.
UTILITY INTERNET
RHYTHM
PROGRAM
ROTARY SP
L.ORGAN
SPEED
FLUTES
Pressing any button other than the [MDR] button while the M.D.R. display is open
exits from the M.D.R. display. If you exit from the function inadvertently, simply press
the [MDR] button again to recall the M.D.R. display.
All the instructions in this chapter are related to the M.D.R. display. To call up the
M.D.R. functions and the M.D.R. display, press the [MDR] button.
ELS-01/01C/01X Version 1.8 New Functions
NOTE
The items shown in the
display and their order differ
depending on the
connected external media.
3
Page 4

2
Using the LCD Display
The M.D.R. display consists of two display pages: the SONG Page and the TOOLS
Page. In the SONG Page, you can select a song, then play it back or record it. The
TOOLS Page has a variety of song utility operations, such as copy, delete, rename, etc.
Pressing the [SONG] or [TOOLS] button at the top right of the display switches
between the SONG Page and the TOOLS Page.
SONG Page TOOLS Page
1
89)!# $%^&*@
23 5547 76
7
Music Data Recorder (MDR)
Reference Page
Setting a song (page 12)
1 Current Media/Folder
Displays the currently selected media and folder(s). The left side of the indication
(before “:/”) shows the particular media and the right side shows the path with
currently selected folder name at the end. For example, “USB 01:/Folder1/” indicates
that the folder named “Folder1” contained in the USB flash memory is selected.
2 Media/Folder/Song List
Displays the media, folders or songs. Up to 120 folders can be displayed (5 folders at
once).
3 Scroll Buttons
If the Media/folder/Song List contains more than 5 media/folders/songs, you can scroll
through the display with these buttons.
4 SETTINGS
Displays/changes the settings for the currently selected song.
5 UP
Selects the higher layer folder or media. For example, when “USB 01:/Folder1/”
(Folder1 in the USB flash memory) is selected, pressing the [UP] button selects “USB
01:/” (USB flash memory).
ELS-01/01C/01X Version 1.8 New Functions
4
Page 5

6 IN
Selects the next lower (or deeper) layer folder or media. For example, when “USB 01:/
Folder1/” (Folder1 in the USB flash memory) is selected, pressing the [IN] button
selects “USB 01:/Folder1/SONG/” (the SONG folder contained in Folder1 of the
USB flash memory).
7 SEARCH
Search for the song/folder in the selected media.
8 Elapsed Time
Displays the elapsed time when recording/playing back a song (up to 99 min. 59 sec.).
9 Song Control
Controls song recording, playback, etc.
) CUSTOM PLAY
Records/plays back only the performance data of the selected songs. Using this button
does not recall the Registration data.
! SCORE
Displays the selected song’s score.
@ REGIST EDIT
Displays the Regist (Registration) Edit Display for the selected song’s Registration data.
# CREATE FOLDER
Creates a new folder in the Media/Folder/Song List. Up to 120 folders can exist in one
media or within a single upper folder. Pressing this button calls up the New Folder
display in which you can enter the desired name. Enter the name and press the [OK]
button to create a new folder. The method for entering a folder name is the same as
that of the song name. See page 18.
$ CHANGE NAME
Changes the folder/song name.
Reference Page
Search a Song (page 12)
Reference Pages
Recording Your
Performance (page 15)
Playing Back a Song (page
27)
Reference Page
Displaying the Score (page
32)
Reference Pages
Saving Registrations as
Registration Data (File)
(page 21)
Recalling Recorded
Registrations (page 25)
Reference Page
Changing the Song Name
(page 18)
7
Music Data Recorder (MDR)
% COPY
Copies the selected media/folder/song.
^ DELETE
Deletes the selected folder/song.
& CONVERT
Converts the selected song for use on another Electone or other instruments, or
converts songs recorded on another Electone for use on the ELS-01/01C. Songs can be
converted to XG format, EL format or ELS format.
* INFORMATION
Displays available memory when media is selected and displays information such as the
title and composer when a song is selected. The information to be displayed depends
on the songs.
ELS-01/01C/01X Version 1.8 New Functions
Reference Page
Song Copy (page 34)
Reference Page
Song Delete (page 37)
Reference Pages
Converting to XG (page 38)
Converting ELS format to EL
(page 39)
Converting EL format to ELS
(page 39)
Reference Pages
Checking the Remaining
Memory (page 40)
About Protected Songs
(page 26)
5
Page 6

If media cannot be found:
Press the button until the button is grayed out.
1
The Media List will be displayed. If there are more than five media selections,
scroll through the display with the Scroll buttons (page 4) to display the desired
media.
If songs cannot be found:
Check the current media/folder (page 4).
1
NOTE
If the message “Registration
data will be initialized” is
displayed when you select a
folder, press [INITIALIZE]
button (media is not
initialized). The message will
appear when recalling the
protected song.
7
Music Data Recorder (MDR)
If the desired song is stored in the currently displayed folder, use
2
the Scroll buttons (page 4) to display the song.
If the desired song is stored in a different folder, use the
and buttons to select the folder in which the desired
song is stored.
If you are not sure of the folder in which the desired song is stored, search a song
by using SEARCH function.
Song Icons
●●●●●●●●●●●●●●●●●●●●●●●●●●●●●●●●●●●●●●
These icons are shown when you select a media, folder, and song.
Indicates media such as a USB flash memory or floppy disk. This icon is
displayed in the Media/Folder List.
Indicates a folder.
Indicates that write-protect or copy-protect is effective for the media.
ELS-01/01C/01X Version 1.8 New Functions
6
Indicates that performance data is contained in the song.
Indicates an XG-compatible song.
Indicates a Protected Original Song. See page 26 for details.
Indicates a Protected Edit Song. See page 26 for details.
Page 7

Media Contents: Folders, Songs, and Files
Folders:
A folder is a storage location in the media, used to organize multiple songs in
groups. If you’ve saved hundreds of songs to a USB flash memory, it may be difficult
to find the desired song quickly. Organizing your songs in folders, with similar
songs grouped together (for example, according to genre or tempo), makes it easier
to find the songs you want.
Song 1
Song1Song2Song
Song4Song5Song
3
6
Song 2
Folder A
3
Creating folders
Song Song Song
USB flash memory
Song 4
5
6
Folder B
USB flash memory
Songs:
A song is the Electone data for a piece of music, recorded to external media. A single
song can contain a variety of data, including the recorded performance,
Registrations, and so on.
Files:
A file is an element of data in a song. For example, a single song consists of various
files, such as Registration files and performance files. The following files are created
with the M.D.R. (The extension will not appear in the Electone display. They will,
however, be displayed on a computer.)
Files in the song
File Explanation Extension
Performance data This file contains performance data, played on the
keyboards and pedals of the Electone.
Registration data This file contains Registration settings, User Voices,
User rhythms, and Rhythm Sequences.
XG-converted data This file contains XG song data, for which Electone
performance data is converted to XG-compatible
format.
.mid
.b00
.mid
7
Music Data Recorder (MDR)
In addition, one file (extension: .name) is automatically created in each folder for
organization/maintenance of the folder contents. It does not appear on the Electone
display.
ELS-01/01C/01X Version 1.8 New Functions
7
Page 8

Precautions when using the USB TO DEVICE terminal
●●●●●●●●●●●●●●●●●●●●●●●●●●●●●●●●●●●●●●●●●●●●●●●●●●
This instrument features a built-in USB TO DEVICE terminal.
When connecting a USB device to the terminal, be sure to handle
the USB device with care. Follow the important precautions
below.
NOTE
For more information about the handling of USB devices, refer to the
owner’s manual of the USB device.
■ Compatible USB devices
• USB storage devices (flash memory, floppy disk drive, hard
disk drive, etc.)
• USB hub
• USB-LAN adaptor
The instrument does not necessarily support all commercially
available USB devices. Yamaha cannot guarantee operation of
USB devices that you purchase. Before purchasing a USB
device for use with this instrument, please visit the following
web page:
http://www.yamahamusicsoft.com/
Other USB devices such as a computer keyboard or mouse
cannot be used.
■ Connecting USB device
• When connecting a USB device to the USB TO DEVICE
7
Music Data Recorder (MDR)
terminal, make sure that the connector on the device is
appropriate and that it is connected in the proper direction.
Using USB Storage Devices
●●●●●●●●●●●●●●●●●●●●●●●●●●●●●●●●●●●●●●●●●●●●●●●●●●
By connecting the instrument to a USB storage device (external
media), you can save data you’ve created to the connected device,
as well as read data from the connected device.
NOTE
Although CD-R/RW drives can be used to read data to the
instrument, they cannot be used for saving data.
■ The number of USB storage device to
be used
Up to four USB storage devices can be connected to the USB
TO DEVICE terminal. (If necessary, use a USB hub. The
number of USB storage devices that can be used
simultaneously with musical instruments even when a USB
hub is used is a maximum of four.) This instrument can
recognize up to four drives in one USB storage device.
■ Formatting USB storage media
When a USB storage device is connected or media is inserted, a
message may appear prompting you to format the device/
media. If so, execute the Format operation (page 10).
NOTE
The format operation overwrites any previously
existing data. Make sure that the media you are
formatting does not contain important data. Proceed
with caution, especially when connecting multiple
USB storage media.
When the USB unit (UD-USB01) is connected
While holding this button,
pull the unit toward you.
NOTE
When the USB unit (UD-USB01) is connected; during your
performance, make sure to slide the USB unit under the
keyboard. If you leave it in the forward position, there is a danger
of hitting it with your hand and breaking the USB device.
•If you intend to connect two or three devices at the same time
to a terminal, you should use a self-powered USB hub device.
Make sure to connect the USB hub to the USB TO DEVICE
terminal directly. Even if you are using USB unit (UDUSB01), do not connect it to that USB unit. Up to two USB
hubs can be used. If an error message appears while using the
USB hub, disconnect the hub from the instrument, then turn
on the power of the instrument and re-connect the USB hub.
• Though the instrument supports the USB 1.1 standard, you
can connect and use a USB 2.0 storage device with the
instrument. However, note that the transfer speed is that of
USB 1.1.
■ To protect your data (write-protect)
To prevent important data from being inadvertently erased,
apply the write-protect provided with each storage device or
media. If you are saving data to the USB storage device, make
sure to disable write-protect.
■ Connecting/removing USB storage
device
Before removing the media from the device, make sure that the
instrument is not accessing data (such as in the Save, Copy and
Delete operations).
While the instrument is accessing data (such as
during Save, Copy, Delete, Load and Format
operations) or is mounting the USB storage device
(shortly after the connection), do NOT unplug the USB
connector, do NOT remove the media from the device,
and do NOT turn the power off to either device. Doing
so may corrupt the data on either or both devices.
If you are using a USB flash memory which has a
lamp, the lamp will flash when the instrument is
accessing the USB flash memory.
Avoid frequently turning the power on/off to the USB
storage device, or connecting/disconnecting the
device too often. Doing so may result in the operation
of the instrument “freezing” or hanging up.
■ Data Backup
For maximum data security, Yamaha recommends that you
keep two copies of important data on separate USB storage
devices. This gives you a backup if one device is lost or
damaged.
ELS-01/01C/01X Version 1.8 New Functions
8
Page 9

Handling the floppy disk drive (FDD) and floppy disks
●●●●●●●●●●●●●●●●●●●●●●●●●●●●●●●●●●●●●●●●●●●●●●●●●●
If your Electone does not include a UD-FD01 floppy disk drive,
you can install the optional UD-FD01 floppy disk drive to the
Electone.
Be sure to handle floppy disks and treat the disk drive with care.
Follow the important precautions below.
■ Floppy disk compatibility
• 3.5" 2DD and 2HD type floppy disks can be used.
■ Formatting a floppy disk
•If you find that you are unable to use new, blank disks or old
disks that have been used with other devices, you may need to
format them. For details on how to format a disk, see page 10.
Keep in mind that all data on the disk will be lost after
formatting. Make sure to check beforehand whether or not the
disk contains important data.
NOTE
Floppy disks formatted on this device may or may not be
useable as is on other devices.
■ Inserting/removing Floppy Disks
● Inserting a floppy disk into the disk drive
•Hold the disk so that the label of the disk is facing upward and
the sliding shutter is facing forward, towards the disk slot.
Carefully insert the disk into the slot, slowly pushing it all the
way in until it clicks into place and the eject button pops out.
■ Cleaning the disk drive read/write head
• Clean the read/write head regularly. This instrument employs a
precision magnetic read/write head which, after an extended
period of use, will pick up a layer of magnetic particles from
the disks used that will eventually cause read and write errors.
•To maintain the disk drive in optimum working order Yamaha
recommends that you use a commercially-available dry-type
head cleaning disk to clean the head about once a month. Ask
your Yamaha dealer about the availability of proper
headcleaning disks.
■ About floppy disks
● Handle floppy disks with care, and follow these
precautions:
•Do not place heavy objects on a disk or bend or apply pressure
to the disk in any way. Always keep floppy disks in their
protective cases when they are not in use.
•Do not expose the disk to direct sunlight, extremely high or
low temperatures, or excessive humidity, dust or liquids.
•Do not open the sliding shutter and touch the exposed surface
of the floppy disk inside.
•Do not expose the disk to magnetic fields, such as those
produced by televisions, speakers, motors, etc., since magnetic
fields can partially or completely erase data on the disk,
rendering it unreadable.
•Never use a floppy disk with a deformed shutter or housing.
•Do not attach anything other than the provided labels to a
floppy disk. Also make sure that labels are attached in the
proper location.
7
Never insert anything but floppy disks into the disk
drive. Other objects may cause damage to the disk
drive or floppy disks.
● Removing a floppy disk
• After checking that the instrument is not accessing* the floppy
disk, firmly press the eject button at the upper right of the disk
slot all the way in. When the floppy disk is ejected, pull it out
of the drive. If the floppy disk cannot be removed because it is
stuck, do not try to force it, but instead try pressing the eject
button again, or try re-inserting the disk and attempt to eject it
again.
*Access of the disk indicates an active operation, such as
recording, playback, or deletion of data. If a floppy disk is
inserted while the power is on, the disk is automatically
accessed, since the instrument checks whether the disk has
data.
Do not remove the floppy disk or turn off the
instrument itself while the disk is being accessed.
Doing so may result not only in loss of data on the
disk but also damage to the floppy disk drive.
•Be sure to remove the floppy disk from the disk drive before
turning off the power. A floppy disk left in the drive for
extended periods can easily pick up dust and dirt that can cause
data-read and -write errors.
● To protect your data (write-protect tab):
•To prevent accidental erasure of important data, slide the disk’s
write-protect tab to the “protect” position (tab open). When
saving data, make sure that the disk’s write-protect tab is set to
the “overwrite” position (tab closed).
● Data backup
•For maximum data security Yamaha recommends that you
keep two copies of important data on separate floppy disks.
This gives you a backup if one disk is lost or damaged.
Music Data Recorder (MDR)
ELS-01/01C/01X Version 1.8 New Functions
9
Page 10

NOTE
Before purchasing a USB
flash memory device, please
consult your Yamaha dealer,
or an authorized Yamaha
distributor for advice, or see
the Yamaha website (http://
www.yamahamusicsoft.com/).
NOTE
The indications USB 1, USB
2, etc. will be displayed
depending on the number of
the connected media.
3
Formatting External Media
If you find that you are unable to use new, blank external media (such as floppy disks or
USB flash memory) or old one that have been used with other devices, you may need
to format them.
Formatting erases all the data in the media and makes it ready to record. The data
erased by formatting will be lost permanently. Check whether or not the media
contains any important data you wish to keep before executing the operation. Proceed
with caution, especially when connecting multiple USB storage media.
Connect the media to the USB TO DEVICE terminal.
1
Press the [TOOLS] button at the top right of the display to call up
2
the TOOLS Page.
Press the button repeatedly if necessary until the button
3
is grayed out.
NOTE
“USB-FD01” appears in the
display only when a floppy
disk drive has been installed
to the Electone.
7
Music Data Recorder (MDR)
Do not remove the media
while formatting.
Select the desired media you want to format.
4
To format a USB flash memory, select [USB XX] (USB 01, USB 02, etc.).
To format a floppy disk, select [USB-FD01].
Press the [FORMAT] button in the display.
5
A message appears, prompting confirmation of the operation. Select
[FORMAT] to format the media, or [CANCEL] to abort the operation.
ELS-01/01C/01X Version 1.8 New Functions
10
Page 11

4
Selecting a Song
In the M.D.R. display, you can select a blank song to which you want to record your
performance or save the Registration settings, or you can select a desired song for
playback.
In the M.D.R. display, songs in the currently selected media are displayed.
First call up the desired media (and folder, if necessary) in the display, then select the
desired song.
Check the currently selected media at the top of the display.
1
Confirm that the desired media is displayed at the top of the display.
Currently selected media/folder
Do not remove the media
while the instrument is
accessing the media.
(If you are using a USB
flash memory which has a
lamp, the lamp will flash
when the instrument is
accessing the USB flash
memory.)
For information on selecting the desired media, see page 6.
Press desired song button in the display.
2
Referring to the song name and icons, select the desired song. The selected song
button is highlighted in orange.
Song containing data
Blank song (containing no data)
7
Reference Pages
Changing the Song Name
(page 18)
Song Icons (page 6)
Music Data Recorder (MDR)
ELS-01/01C/01X Version 1.8 New Functions
11
Page 12

Reference Pages
Playing Back the Selected
Part(s) (page 28)
Changing the Tempo (page
29)
About the [SETTINGS] button
Pressing the button calls up a display of the currently selected song,
letting you confirm the tempo and parts that are played when playing the song.
When playing back the song (by pressing the [F] (Play) button), only those parts
that are set to “PLAY” in the display actually play at the indicated tempo (over a
range of 50% to 200% of the original tempo when recording). If the song contains
no performance data, all parts are set to “OFF.” Pressing the [PART SAVE] button
saves each part playback setting (the tempo is not saved).
7
Music Data Recorder (MDR)
Search a Song
●●●●●●●●●●●●●●●●●●●●●●●●●●●●●●●●●●●●●●
Search for a desired song by using the Search function
Insert the media containing the desired song/folder.
1
Select the media containing the song/folder.
2
ELS-01/01C/01X Version 1.8 New Functions
12
Page 13

Press the [SEARCH] button in the display.
3
Press the [KEYWORD] button.
4
NOTE
Previous searched data can
be shown on the display.
However, the data does not
appear if you’ve turned off
the power, removed the
media or saved the song
after performing the search
operation.
Previous key word
Enter the folder/song name for searching.
5
If necessary, press the [DELETE] button so that the previous key word can be
deleted, then enter the new key word. (See page 18 for instructions on changing
the song name.)
Press the [OK] button.
6
The search will begin, and the detected folder/song name will be shown on the
display.
NOTE
This function does not
distinguish between capital
and lowercase letters.
NOTE
When searching for XG
songs, entering the
extension “.mid” is
unnecessary.
7
Music Data Recorder (MDR)
ELS-01/01C/01X Version 1.8 New Functions
13
Page 14

Confirm the detected folder/song name.
7
Detected number
Detected folder/song list
Press the desired folder/song.
8
The display will automatically exit from the SEARCH display and the selected
folder/song appears.
If nothing is detected, try the search again by using another name (see step 4 above).
Displayed data number
7
Music Data Recorder (MDR)
ELS-01/01C/01X Version 1.8 New Functions
14
Page 15

5
Recording
Recording your performance
●●●●●●●●●●●●●●●●●●●●●●●●●●●●●●●●●●●●●●
Set the desired Registrations on the Electone. Make all the Electone settings necessary
for the song you will record. This means entering the all Registrations you will need for
the entire performance in the Registration Memory. Make sure also to select the
Registration that you will use at the beginning of the song.
Insert a media to the USB TO DEVICE terminal.
1
Select a blank song for recording your performance.
2
For details on selecting a song, see page 11.
If you want to overwrite an existing song already containing performance data,
you will need to delete it beforehand.
Never attempt to eject the
media or turn the power
off during recording,
reading and playing back.
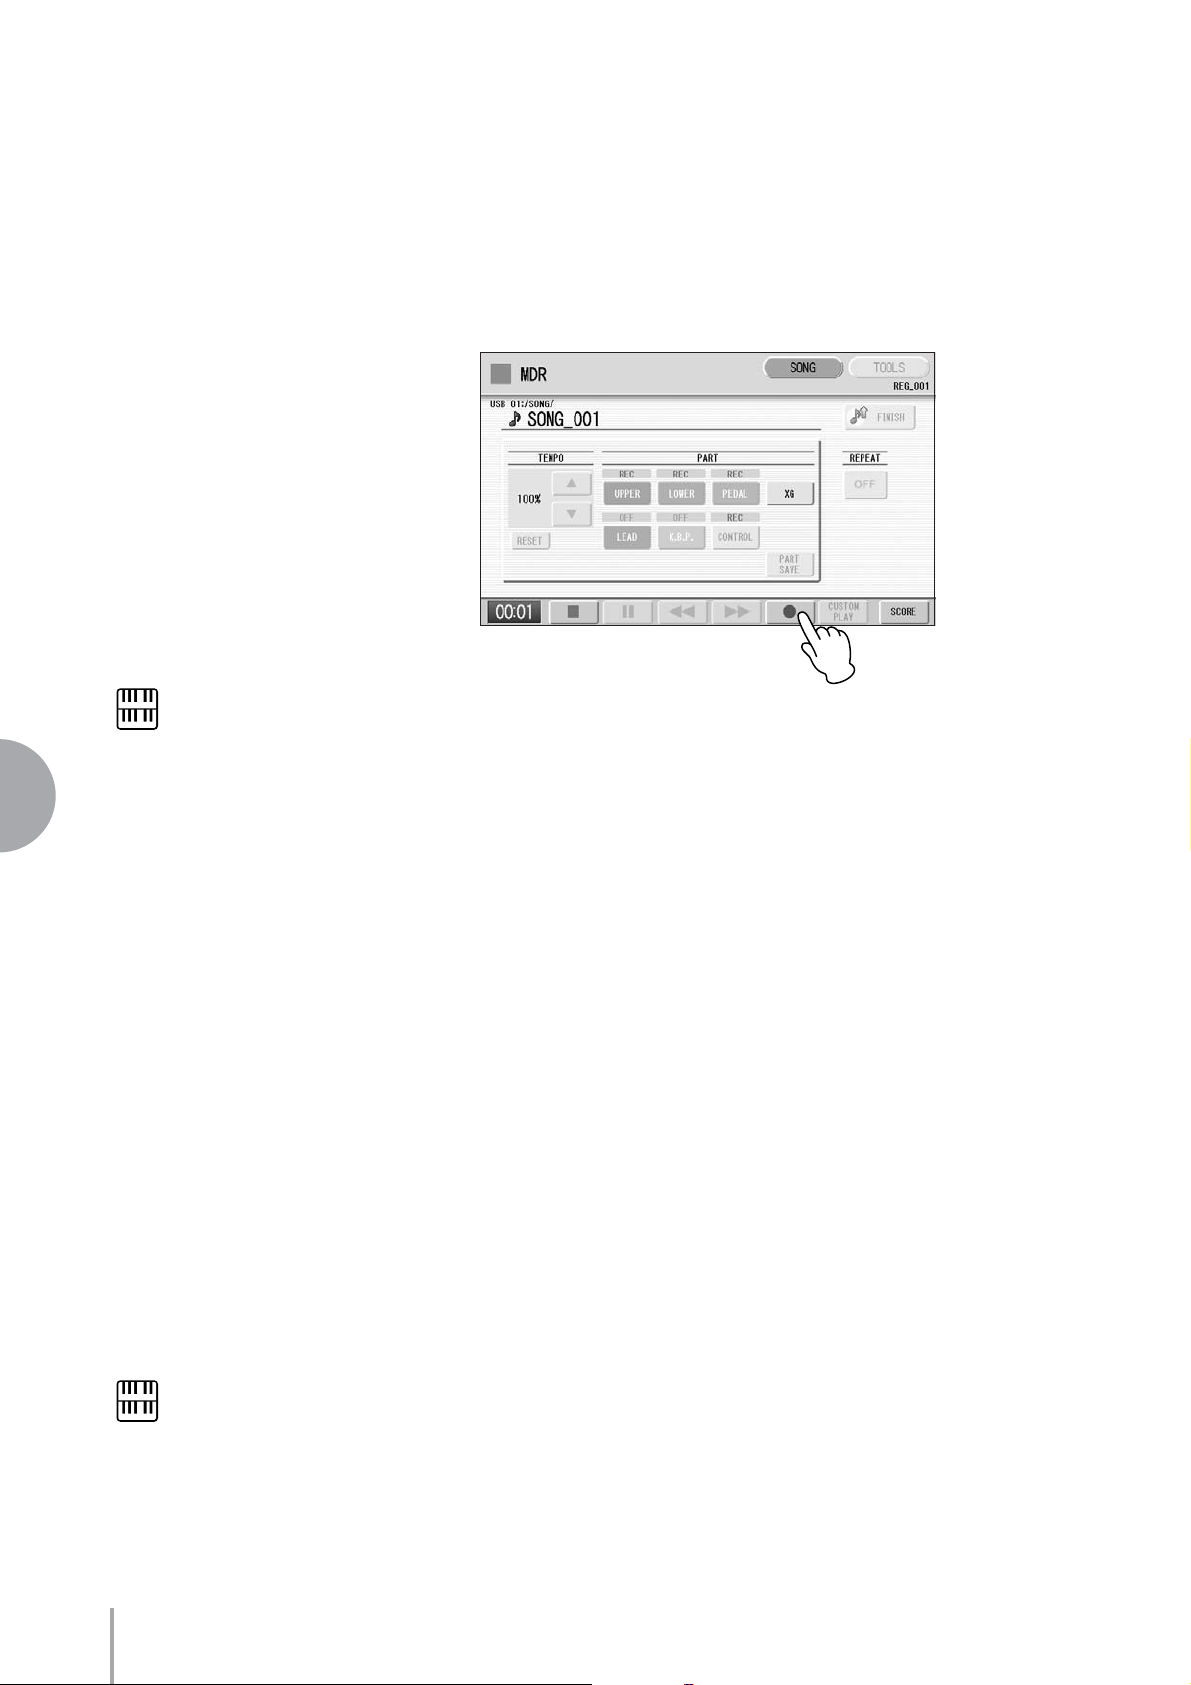
Press the [SONG] button at the top right of the display to call up
3
the SONG Page, then select the [I] (Record) button.
The following display appears, indicating that you can record your performance.
Press the [F] (Play) button.
4
An hourglass icon appears at the bottom left of the display, indicating that
Registration data is currently being read.
After the hourglass disappears, begin playing.
5
NOTE
If a message appears
indicating there is not
enough free space in media,
press the [CANCEL] button,
then delete any
unnecessary songs if
possible or insert new
media. To continue
recording your performance
on media that does not have
enough space, press the
[CONTINUE] button.
7
Music Data Recorder (MDR)
When you finish playing, press the [J] (Stop) button in the
6
display.
The recording is finished and the LCD returns to the M.D.R. display. The song
to which your performance is recorded is automatically named “SONG_XXX”
(XXX indicates song number). You can change the song name as desired. (For
details, see page 18.)
ELS-01/01C/01X Version 1.8 New Functions
Do not remove the media
from the Electone while
data is being recorded
(while the hourglass icon
or other message is
shown).
15
Page 16
Re-recording (Retry)
●●●●●●●●●●●●●●●●●●●●●●●●●●●●●●●●●●●●●●
If you make a mistake during recording, you can re-record the song from the
beginning.
Press the [I] (Record) button while the song is still running.
1
This automatically stops recording and returns you to the starting point of the
song.
NOTE
Pressing the [J] (Stop)
button cancels the rerecording and records the
7
Music Data Recorder (MDR)
previous performance.
Press the [F] (Play) or [CUSTOM PLAY] button to begin re-
2
recording the song.
Re-recording starts from the beginning of the song and replaces the previously
recorded performance with the newly recorded performance.
Recording each part separately
●●●●●●●●●●●●●●●●●●●●●●●●●●●●●●●●●●●●●●
You can also record the parts of your performance independently. This function lets
you record Keyboard Percussion and performance control data, such as Registration
changes and expression pedal operation, separately from the other parts of the song.
Even Keyboard Percussion and Lead Voice 1 Voices can be recorded separately, though,
the Lead Voice 2 Voices will be included in the performance data of the Upper
Keyboard. The following instruction is an example: First, record the chords and bass to
the song using the Lower and Pedalboard, and then record the melody using the Upper
Keyboard.
Follow steps 1 – 3 on page 15 to call up the Rec Standby display.
1
Select the parts for recording.
2
Each pressing of a part button switches the status: PLAY, OFF, and REC.
NOTE
When you record the
Keyboard Percussion, make
sure that the KEYBOARD
PERCUSSION [1] and/or [2]
button is set to on.
ELS-01/01C/01X Version 1.8 New Functions
16
PLAY: Playback the parts that have been recorded.
OFF: Recording or playback is not active.
REC: Records the part.
If you set the Upper part to “REC,” the performance on the Upper Keyboard
(including Lead Voice 1 Voices) is recorded. Setting Lead to “REC,” however,
records only the Lead Voice 1 Voices. You cannot set both Upper and Lead to
“REC” at the same time; neither can the Lower and Keyboard Percussion parts
be recorded at the same time.
Page 17
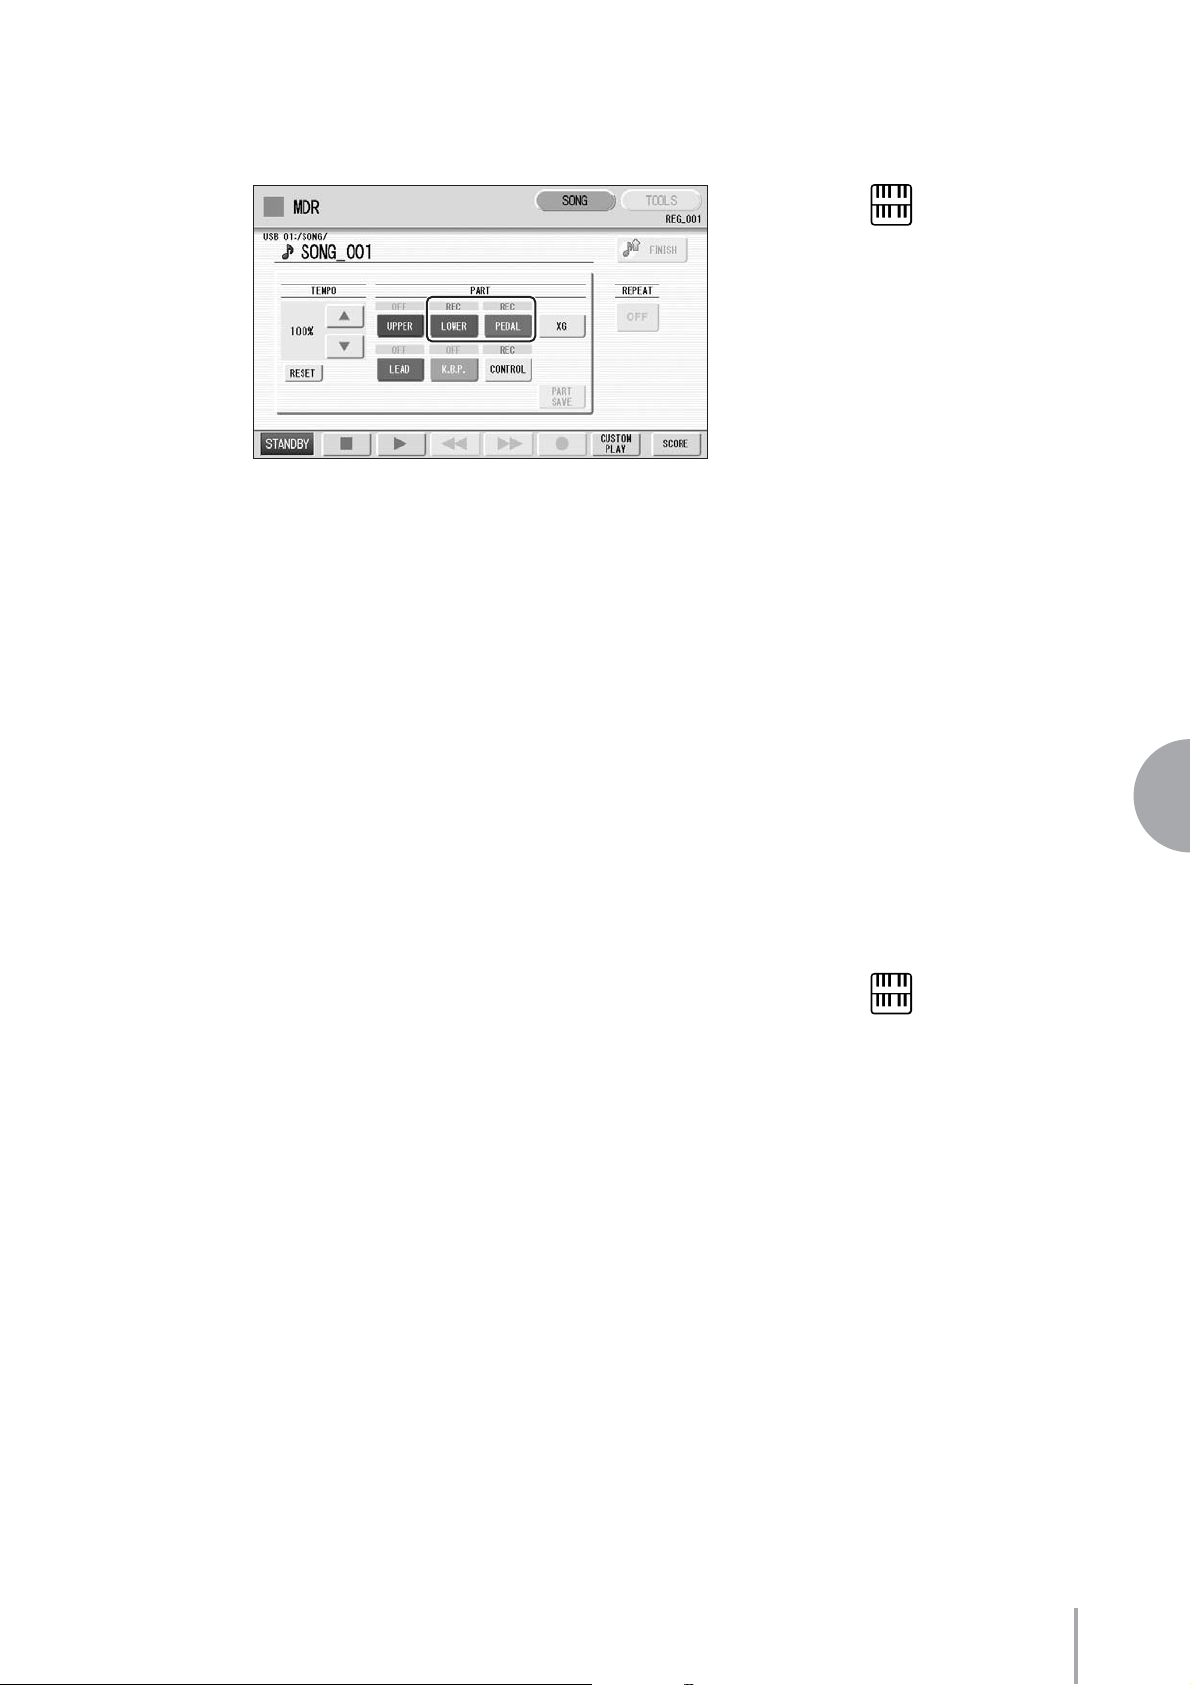
The following setting lets you record only Lower Keyboard and Pedalboard
parts.
Press the [F] (Play) button, and start playing after the
3
hourglass icon disappears.
Press the [J] (Stop) button when you are finished with your
4
performance to stop recording.
Now you’ve recorded the first parts of your performance.
NOTE
You should also set the
Control button to “REC,” in
order to record Registration
changes and expression
pedal operation.
Press the [I] (Record) button to set up recording of the next
5
part—Upper part in this case.
A message appears prompting confirmation of operation. Select
[OVERWRITE] to overwrite and the Rec Standby display appears.
Select the parts for recording.
6
Set the next parts you want to record (in this case, the Upper part) to “REC.”
Also set the part already recorded (in this case Lower and Pedal parts) to “PLAY,”
so you can hear the previously recorded parts as you record new ones.
Change the playback tempo for the selected part.
7
The playback tempo can be set over a range of 50% to 200% of the original.
The original recorded tempo is 100%; values less than 100% result in a slower
tempo while values greater than 100% result in a faster tempo.
Press the [CUSTOM PLAY] button to start recording of the new
8
part or parts (Upper part).
Playback of the previously recorded parts starts immediately.
The [CUSTOM PLAY] button is used here to record only the parts that have
been selected for recording, and plays back only those parts that have been
selected for playback. While you listen to the parts being played back, start
playing the melody on the Upper Keyboard.
NOTE
Use the TEMPO [RESET]
button in the display to reset
the tempo to its original
value (100%).
7
Music Data Recorder (MDR)
When the end of the recorded performance is reached, playback is automatically
stopped. The length of a subsequently recorded part cannot exceed the length of
the previously recorded parts.
ELS-01/01C/01X Version 1.8 New Functions
17
Page 18

Punch-in Recording
●●●●●●●●●●●●●●●●●●●●●●●●●●●●●●●●●●●●●●
This lets you re-record a specific phrase or section which you don’t want to use, either
that of a specific part(s) or all parts.
7
NOTE
This function is best used
when the phrase to be rerecorded has definite
beginning and end points,
with slight pauses before
and after.
Select the song which contains the phrase you want to change.
1
For details on selecting a song, see page 11.
Press the [F] (Play) button to start playback of the song.
2
Press the [K] (Pause) button at the point you want to execute
3
punch-in recording.
Press the [I] (Record) button.
4
The recording display appears, indicating that the Music Data Recorder is ready
to record.
Set the parts which you want to change to “REC” status and
5
other parts to “PLAY.”
Press the [F] (Play) button to start punch-in recording. Play the
6
new phrase, as you want it to be changed.
Press the [J] (Stop) button to quit the punch-in recording as
7
soon as you reach the end of the phrase.
Music Data Recorder (MDR)
NOTE
When you change the name
of an XG song, the
extension (.mid) cannot be
changed.
6
Changing the Song Name
You can name the song, such as giving it a title or indicating the date on which it was
recorded. However, song names of the EL-series Electone, such as the EL-900, cannot
be changed.
Select the song whose name you want to change.
1
For details on selecting a song, see page 11.
Press the [TOOLS] button at the top right of the display to call up
2
the TOOLS Page.
ELS-01/01C/01X Version 1.8 New Functions
18
Page 19

Press the [CHANGE NAME] button.
3
The following display appears.
Move the cursor to the desired point by using the [E][F]
4
buttons in the display or the Data Control dial.
Cursor
Select the desired character type: alphabet, upper or lowercase,
5
or symbol.
Select the desired character for entry.
6
A song name can contain up to 50 characters.
After finished, select [OK] to actually enter the name.
7
The LCD will return to the TOOLS Page display.
DATA CONTROL
or
NOTE
If you select Japanese as
the Language in the Utility
display, you can also select
Japanese language
characters (hiragana and
kanji, normal size katakana,
half size katakana, full size
alphabet, and full size
symbols).
NOTE
An XG song name can
contain up to 46 characters.
7
Music Data Recorder (MDR)
ELS-01/01C/01X Version 1.8 New Functions
19
Page 20

To delete the entered character:
Move the cursor to the character you want to delete.
1
Cursor
or
Press the [DELETE] button at the bottom right in the display.
2
The character is deleted.
DATA CONTROL
7
Music Data Recorder (MDR)
To convert into kanji (Japanese language):
This applies only if you are using the (Kana-Kan) button in Japanese.
When the input “Hiragana” characters are shown in the reverse
1
display (highlighted), press the (kanji-conversion) button
once or several times to convert to the characters into the
appropriate kanji.
• The reversed area can be changed by the [E][F] buttons in the display or
the Data Control dial.
• The converted area can be cleared at once by pressing the (cancel)
button.
To actually enter the change, press the [OK] button or enter the
2
next character. To enter the hiragana character itself (without
converting it), press the (delete) button.
A “name is not available” message may appear when you press the [OK] button to
finish entering the name. If this message appears, the name is invalid and you
should enter another name.
The following names cannot be used. (“xx” indicates numbers.)
NOTE
Songs are ordered in the
following sequence: symbol,
number, alphabet, hiragana,
kanji, other symbols. Names
with an asterisk (*) at the top
are exceptions to this rule.
ELS-01/01C/01X Version 1.8 New Functions
20
MDR_xx.EVT ELS_SONG.NAM MDR_xxx.TMP TMP
MDR_xx.MID MDR_xxx.MID REG_xxx.TMP TMP.E02
MDR_xx.Bxx REG_xxx.B00 ELS_SONG.TMP
MDR_xx.Vxx SONG_xxx SONG_xxx.C02
SONG.NAM
Page 21
7
Saving Registrations as Registration Data (File)
You can also record Registrations by themselves, without recording a performance.
Bulk data, including Registration Memory and Registration Shift settings, Rhythm
Patterns (User rhythms) Rhythm Sequence data, and User Voices, are also saved in the
operation.
First create your original settings you want to save then select
1
the destination (blank song).
For details on selecting a song, see page 11.
Press the [REGIST EDIT] button in the display to call up the
2
Regist (Registration) Edit Display.
Press the [SAVE] button in the display.
3
A message appears, indicating the Registration data is currently being saved.
After the message disappears, exit from the Regist (Registration) Edit Display by
pressing the [CLOSE] button and return to the SONG SELECT Page. The
song to which the Registration is recorded is automatically named “SONG
XXX” (XXX indicates song number).
Saving Two or More Registration Banks to One Song
●●●●●●●●●●●●●●●●●●●●●●●●●●●●●●●●●●●●●●
When you want to use more than 16 Registration numbers, you can save additional
Registration banks to a single song, with the following procedure.
First create the original settings you want to save, then select the
1
destination song.
For details on selecting a song, see page 11.
Press the [REGIST EDIT] button in the display to call up the
2
Regist (Registration) Edit Display.
The Registration data which has previously been saved to the song is shown.
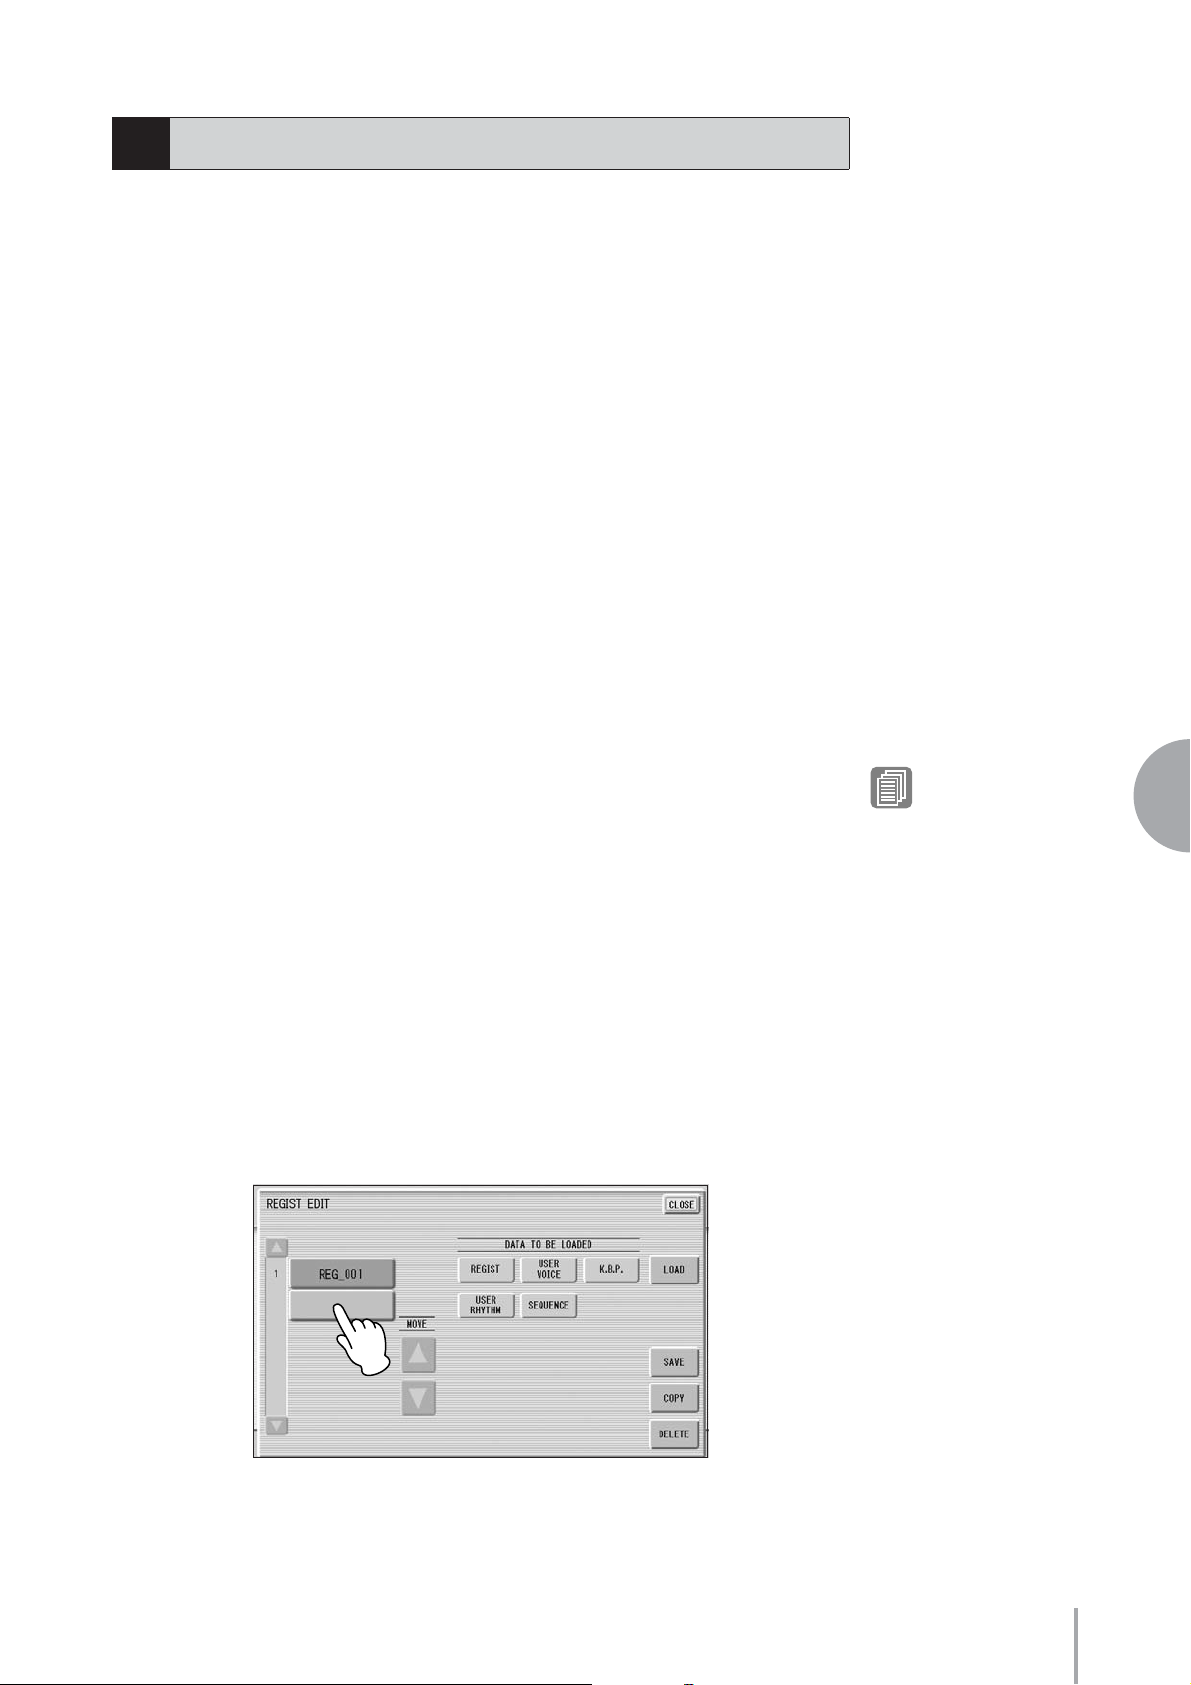
Press the lowest blank (empty) Registration button.
3
Reference Page
Next Regist
Programming a Registration
Sequence
7
Music Data Recorder (MDR)
ELS-01/01C/01X Version 1.8 New Functions
21
Page 22

Press the [SAVE] button.
4
The Registration data will be added.
When you play back this song, the top Registration bank in this display will be
loaded to the Electone. You can also change the order of the Registration bank.
See page 23.
Replacing Registrations
●●●●●●●●●●●●●●●●●●●●●●●●●●●●●●●●●●●●●●
The M.D.R. also lets you change the Registrations of an existing song without
changing the performance data. In advance, you need to create the original Registration
that will replace the old one.
Select the song for which you wish to replace the Registrations.
1
For details on selecting a song, see page 11.
Press the [REGIST EDIT] button in the display to call up the
2
Regist (Registration) Edit Display.
The Registration bank which has been saved to the song is shown.
7
Music Data Recorder (MDR)
Select the Registration bank you wish to replace.
3
Press the [SAVE] button.
4
A message appears, prompting confirmation of overwriting the Registration
bank. Select [OVERWRITE] to overwrite (replace), or select [CANCEL] to
abort the operation.
ELS-01/01C/01X Version 1.8 New Functions
22
Page 23
Next Regist (Registration) Settings (Changing the order of the Registration data)
●●●●●●●●●●●●●●●●●●●●●●●●●●●●●●●●●●●●●●
When playing back a song which uses more than 16 Registration numbers, you can use
two or more Registration banks saved in a single song and recall them one by one as
you play the song. This function is called Next Regist (Registration).
M1
REG_001
If you want to use the Next Regist (Registration) function, you’ll have to make one of
the following settings in advance:
•Set the Registration Shift mode to User, and select Next Regist (Registration) as the
Shift End, in advance.
•Enter the Next Regist (Registration) data in the Registration Sequence.
Save the desired Registrations to a song.
1
For instructions on saving two or more Registration banks to a song, see page
21.
Select the song containing the Registrations for which you want
2
to change the order.
For details on selecting a song, see page 11.
M16 M1 M16
REG_002
NOTE
If the next Registration data
contains User voices and/or
VA custom voices, the
Electone may produce no
sound for a few seconds
while the Registration is
being loaded.
NOTE
If the Next Regist
(Registration) function is
used while the rhythm is
being played back, the
sequence data and User
rhythm will not change.
7
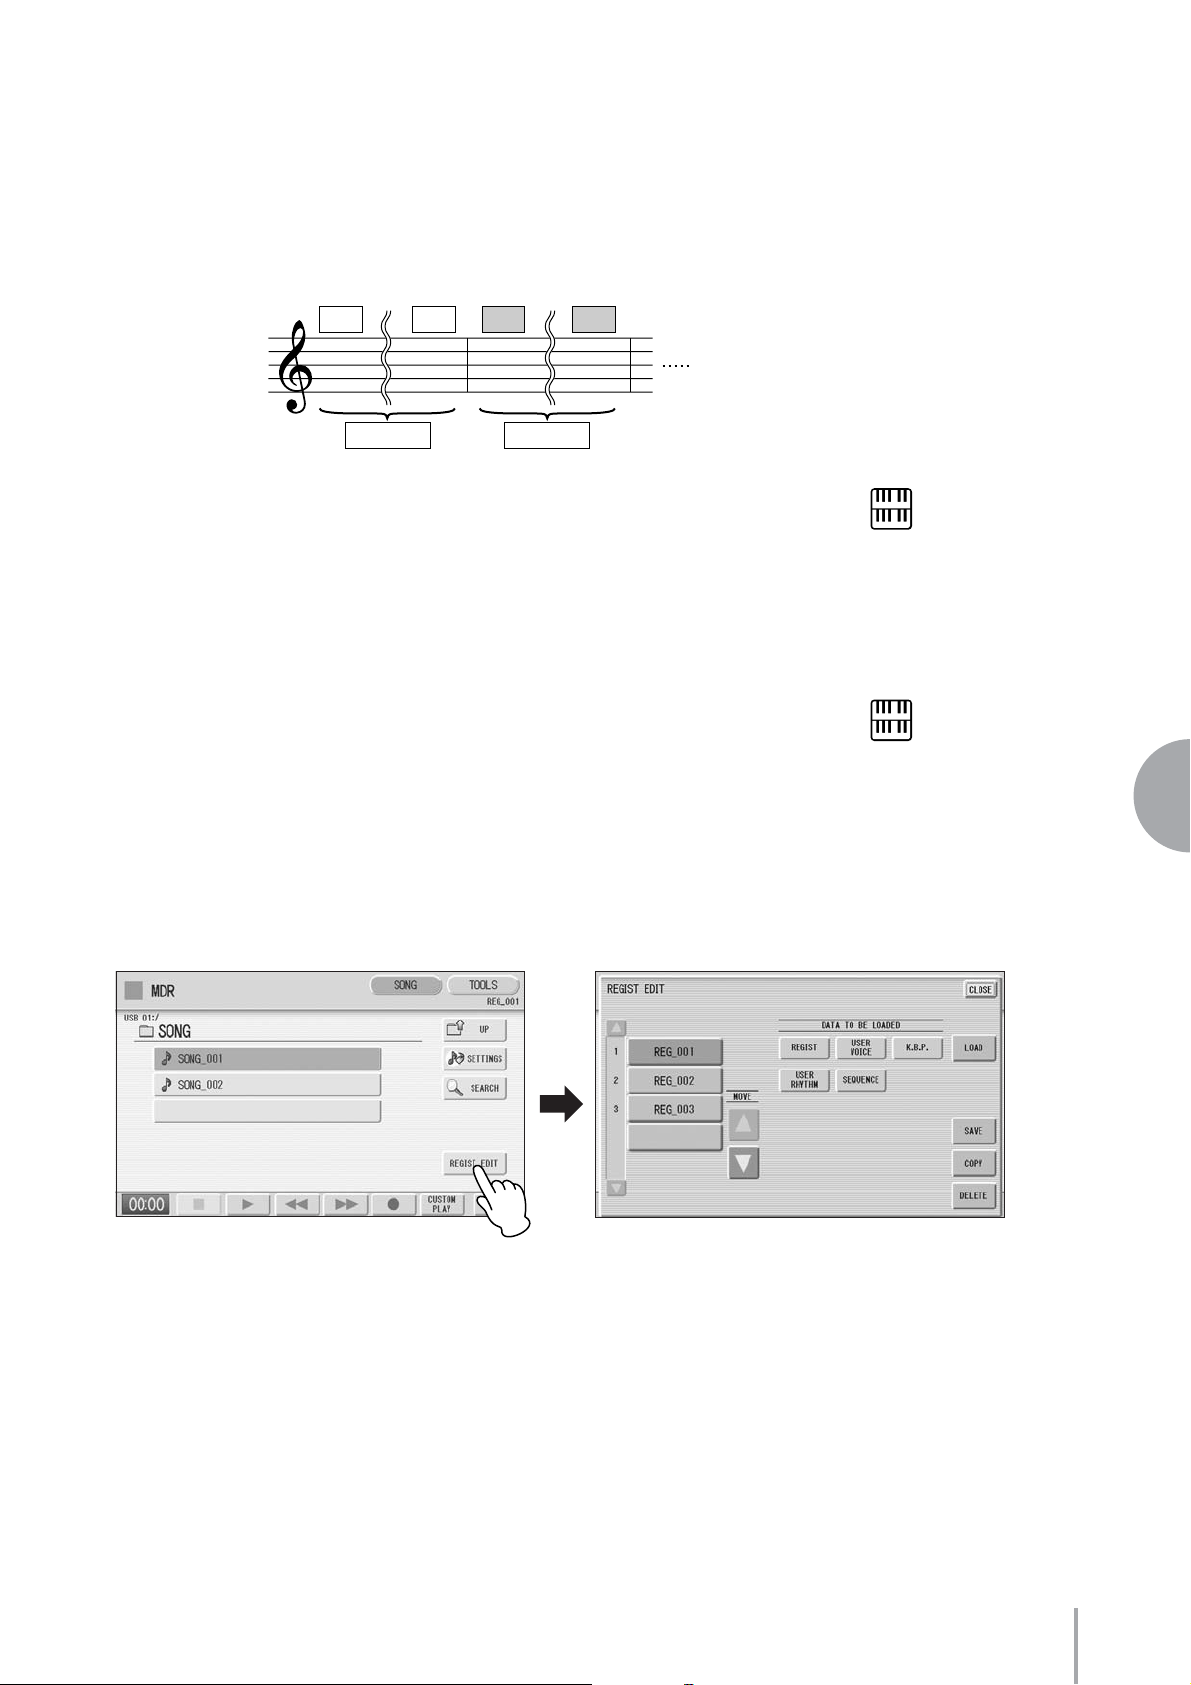
Press the [REGIST EDIT] button in the SONG Page to call up the
3
Regist (Registration) Edit Display.
Change the Registration order, in the order you want to recall.
4
First select the specific Registration bank you want to edit, then move, copy or
delete the selected data as needed to change the order.
Music Data Recorder (MDR)
ELS-01/01C/01X Version 1.8 New Functions
23
Page 24
1
4
5
6
7
7
Music Data Recorder (MDR)
2
3
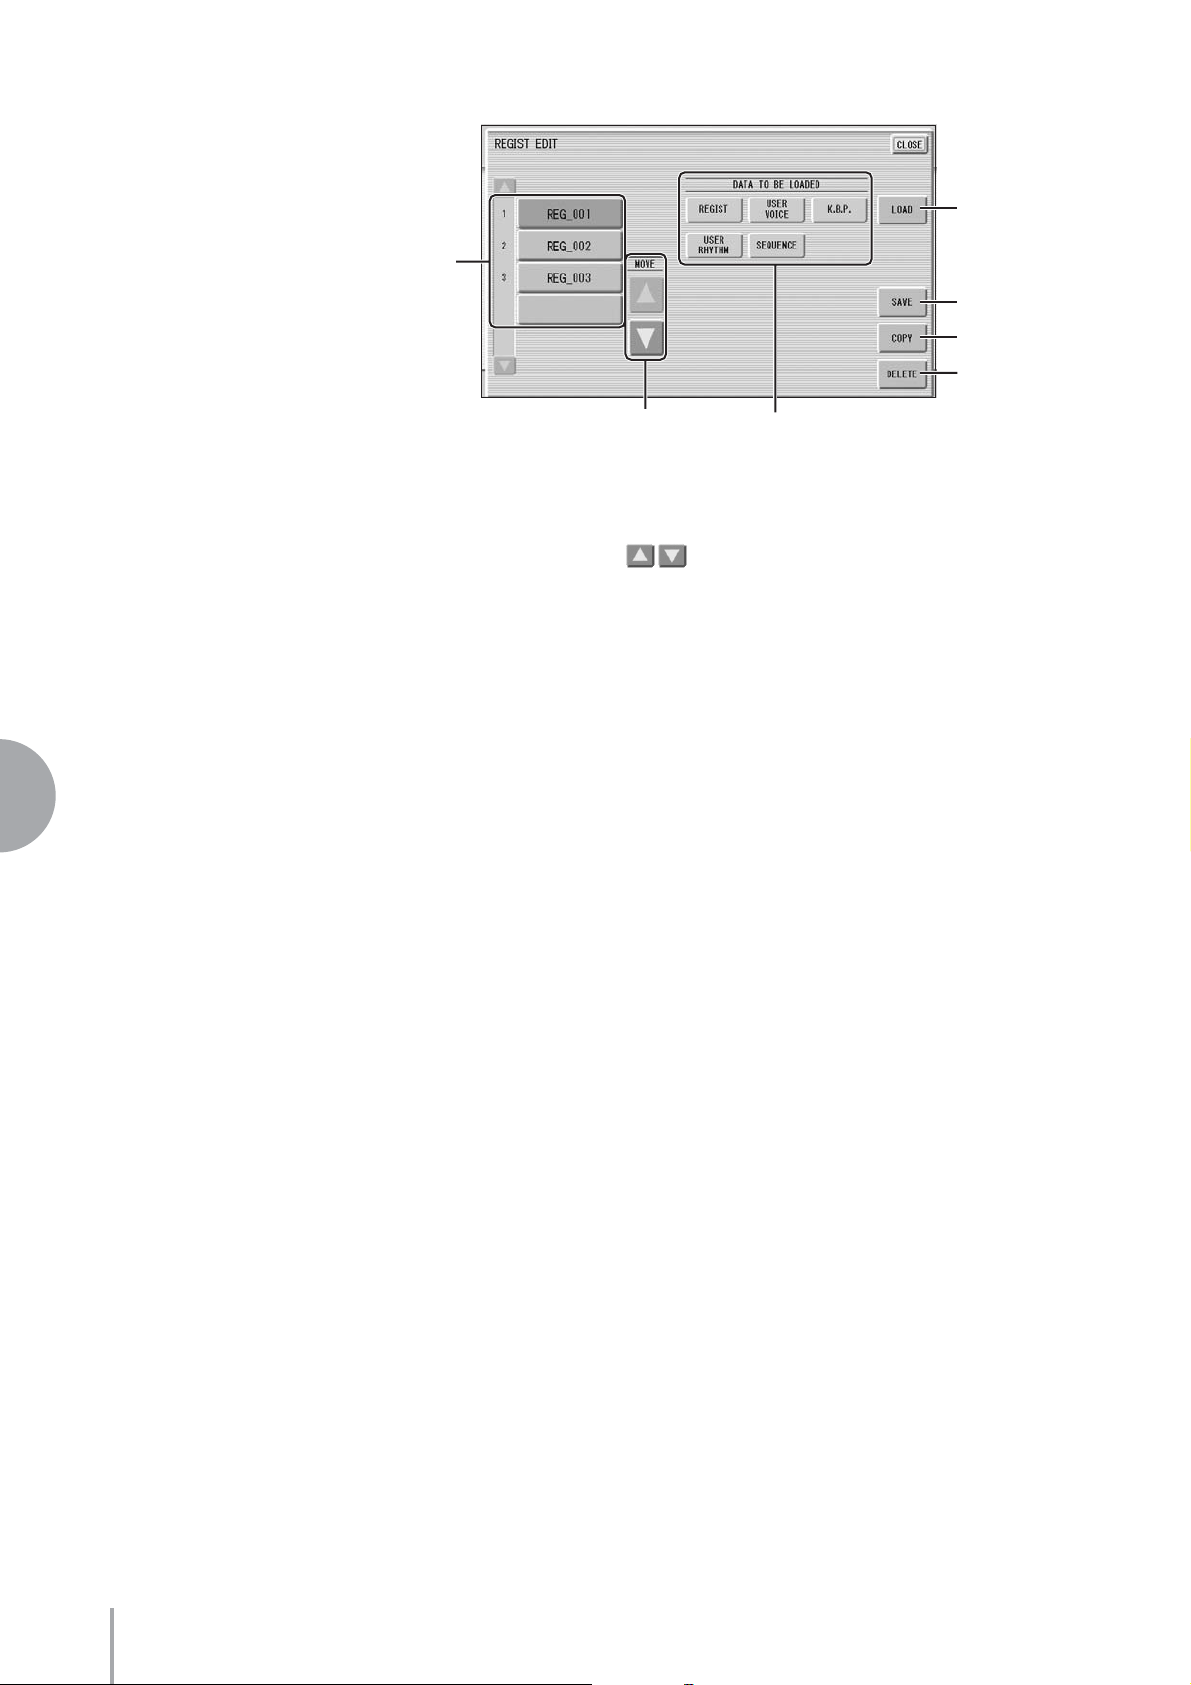
1 Registration Data List
From this list, select the Registration you want to move, copy or delete. The selected
Registration is highlighted in orange. When more than five Registration banks are
saved in the song, a scroll button is available for scrolling through the
Registration Data List.
2 MOVE
Moves the selected Registration bank up or down.
3 DATA TO BE LOADED
When loading the Registration bank to the panel, select the desired data you want to
load. For more information, see page 25.
4 LOAD
Loads the selected Registration bank to the panel/keyboards. After loading, press one of
the Registration Memory button and play the keyboard to check the Registration.
5 SAVE
Saves the current panel settings as a Registration bank in the song. The currently
selected Registration in the Registration Data List (1) will become the destination
location.
6 COPY
Copies the currently selected Registration to the lowest blank location in the
Registration Data List.
7 DELETE
Deletes the currently selected Registration bank in the Registration Data List.
5
ELS-01/01C/01X Version 1.8 New Functions
24
Exit from the Regist (Registration) Edit Display by pressing the
[CLOSE] button at the top right of the display.
Page 25

8
Recalling Recorded Registrations
Registrations (and bulk data) recorded to song numbers can be easily loaded back to
the Electone by the following procedure. The M.D.R. independently recalls the
following five types of data:
• REGIST
• USER VOICE
• K.B.P.
• USER RHYTHM
• SEQUENCE
You can select and recall the desired data independently.
Insert the appropriate media and select the song you want to
1
load back to the Electone.
For details on selecting a song, see page 11.
Press [REGIST EDIT] button in the display to call up the Regist
2
(Registration) Edit Display.
Select the Registration you want to load to the Electone.
3
Using the five “DATA TO BE LOADED” buttons, select the desired
4
data you want to load.
7
Music Data Recorder (MDR)
NOTE
When you load the
Registration data by using
the Next Regist function, all
data will be loaded no
matter which buttons you
select here.
ELS-01/01C/01X Version 1.8 New Functions
25
Page 26

NOTE
If you load a Registration
while a rhythm is playing,
sequence data and User
rhythms in the Registration
data cannot be loaded.
7
Music Data Recorder (MDR)
When you want to edit a
protected song, first
initialize the Registration
Memory, then select the
desired song. If you have
not initialized the
Registration first, the
edited song may not be
saved.
Press the [LOAD] button.
5
A message appears, prompting confirmation of the operation. Press the [LOAD]
button to load the Registration data.
Press [CANCEL] to cancel the operation.
Exit from the Regist (Registration) Edit Display by pressing the
6
[CLOSE] button at the top right of the display.
When you select the protected song, the buttons (DATA TO BE LOADED) may
be unavailable (grayed out). For example, combining a part of one protected song
with another protected song is not allowed.
About Protected Songs
If you buy or download the song data, it may be protected so that you cannot delete
or copy, in order to prevent accidental erasure or protect copyright. This is
“Protected Song.” Protected songs can be saved to a USB flash memory confirmed
by Yamaha.
The protected song can be played back as well as the song you created, but it cannot
be converted to XG format, or EL format. It is not possible to edit the Registration
data in the protected song, nor to overwrite the performance data.
If you want to edit the protected song, first copy it within one media/folder, then
edit the copy. (You cannot copy to another media/folder.) The copy song (called
“protected edit song”) is available only when the original song (called “protected
original song”) exists in the same folder. Be careful not to delete the protected
original song.
Folder
Protected
Original
Song
Protected
Edit Song
ELS-01/01C/01X Version 1.8 New Functions
26
Copy
You can edit this song, only when this is
in the folder that contains protected
You cannot edit this song
To move the protected song in a USB flash memory with a computer, you’ll
need to use the Musicsoft Downloader application. If you move the song
without Musicsoft Downloader, the song cannot be played back. Musicsoft
Downloader can be obtained at the following Internet address: http://
music.yamaha.com/download/
original song.
Page 27

9
Playing Back a Song
The M.D.R. enables you to play back commercially available XG-compatible song data
and MIDI data created with a computer as well as songs recorded on the Electone itself.
Select the song to be played back.
1
For details on selecting a song, see page 11.
Press the [F] (Play) button in the display to load the
2
Registration data.
An hourglass icon appears, indicating the Registration data is loading.
If the song contains more than two Registration banks, the first one will be
loaded. You can check the Registration order in the Regist (Registration) Edit
Display.
If the song contains no performance data, after loading the Registration data, the
LCD returns to the SONG Page.
Playback starts automatically after reading the Registration data
3
(the elapsed time is shown).
In general, all parts recorded to the song are played back; however, you can mute
specific parts and playback only selected parts. For more information, see page
28.
When the end of the recorded performance is reached, playback automatically
stops. You can, however, stop playback in the middle of the song by pressing the
[J] (Stop) button in the display.
Reference Page
Next Regist Settings
(Changing the order of the
Registration data) (page 23)
Reference Page
About the [SETTINGS]
button (page 12)
7
Custom Play
If you want to play back the song without resetting the Registrations, press the
[CUSTOM PLAY] button instead of the [F] (Play) button. This displays the
song time and starts playback immediately.
When you play the song using the Next Regist function, always press the [F]
(Play) button to start the song, not the [CUSTOM PLAY] button.
Music Data Recorder (MDR)
ELS-01/01C/01X Version 1.8 New Functions
27
Page 28

Playing Back the Selected Part(s)
●●●●●●●●●●●●●●●●●●●●●●●●●●●●●●●●●●●●●●
You can also play back selected parts of your recorded performance, while other parts
are temporarily turned off. This function is especially useful for playing a single part,
such as the melody, over previously recorded accompaniment parts.
Reference Page
Setting a song (page 12)
7
Music Data Recorder (MDR)
Reference Page
Converting to XG (page 38)
To play back the selected part(s):
During playback or in the Settings Display, press each part button to turn the part you
want to playback to “PLAY” and the part you want to mute to “OFF.” Each pressing of
a part button switches the status between PLAY and OFF. Pressing the [PART SAVE]
button saves each part’s playback status.
To play back the selected part(s) of XG-compatible song data:
Press the Part [XG] button while XG-compatible song data is being played back.
The following XG Part Setup Display appears.
Press the appropriate channel buttons (e.g., the [CH1] button) to set each channel to
playback or mute. Each pressing of a button switches the status: PLAY and OFF. Set a
part to [PLAY] if you want to play it back and [OFF] if you do not.
The [ALL] button enables you to switch all channels to PLAY/OFF at once.
To set each channel’s volume use the sliders. Each channel’s volume can be adjusted
between 0 and 100.
The [ALL] slider adjusts the overall volume.
ELS-01/01C/01X Version 1.8 New Functions
28
Page 29

Fast Forward, Rewind and Pause
●●●●●●●●●●●●●●●●●●●●●●●●●●●●●●●●●●●●●●
Fast Forward and Rewind:
During playback, press the [H] (Fast forward) button or [G] (Rewind) button and
hold it down until the time reaches the desired position.
Even when the button is released, playback is paused. To resume playback from the
point you’ve advanced or reversed to, press the [F] (Play) button or [CUSTOM
PLAY] button.
Pause:
If you want to temporarily stop playback of the song or songs, press the [K] (Pause)
button.
To resume playback from the point at which the song was paused, press the [F]
(Play) button or [CUSTOM PLAY] button.
Changing the Tempo
●●●●●●●●●●●●●●●●●●●●●●●●●●●●●●●●●●●●●●
You can change the tempo of the song as the song is playing in the M.D.R. display,
either while the song is stopped or while it is playing.
To Change the Tempo:
Use the TEMPO buttons in the display or Data Control dial to change the
tempo. (The TEMPO dial on the panel cannot be used to change the tempo for the
Music Data Recorder.) The range is 50 – 200%. The original recorded tempo is 100%
and values less than 100% indicate slower tempo; values greater than 100% indicate
faster tempo.
7
Music Data Recorder (MDR)
ELS-01/01C/01X Version 1.8 New Functions
29
Page 30

To reset the changed tempo:
Use the TEMPO [RESET] button in the display to reset the tempo to its original value
(100%).
Repeat Playback
●●●●●●●●●●●●●●●●●●●●●●●●●●●●●●●●●●●●●●
This feature allows you to repeatedly play back either all songs on a folder or only one
specific song.
7
Music Data Recorder (MDR)
Select the song you wish to play back.
1
If you wish to play back all songs on a folder, select the first song that will be
played back. For details on selecting a song, see page 11.
Press the [SONG] button at the top right of the display to call up
2
the SONG Page.
Press the button on the panel to call up the Settings
3
Display.
ELS-01/01C/01X Version 1.8 New Functions
30
Page 31

Press the REPEAT button to select the repeat mode.
4
Each press of the button switches the mode.
SINGLE
Repeats the currently selected song again and again.
ALL
Repeats all songs in the currently selected folder in order.
RANDOM
Repeats all songs in the currently selected folder randomly.
REPEAT button
OFF
Cancels repeat playback.
Exit from the Settings Display by pressing the button at
5
the top right of the display.
Press the [F] (Play) button in the SONG Page to begin
6
playback.
7
Music Data Recorder (MDR)
ELS-01/01C/01X Version 1.8 New Functions
31
Page 32
10
The M.D.R. display can display a music notation (score) of the performance data
recorded to media. You can change the size and the number of staffs to be displayed.
While a song is being played back, the cursor moves according to the performance and
the pages are automatically turned.
1
2
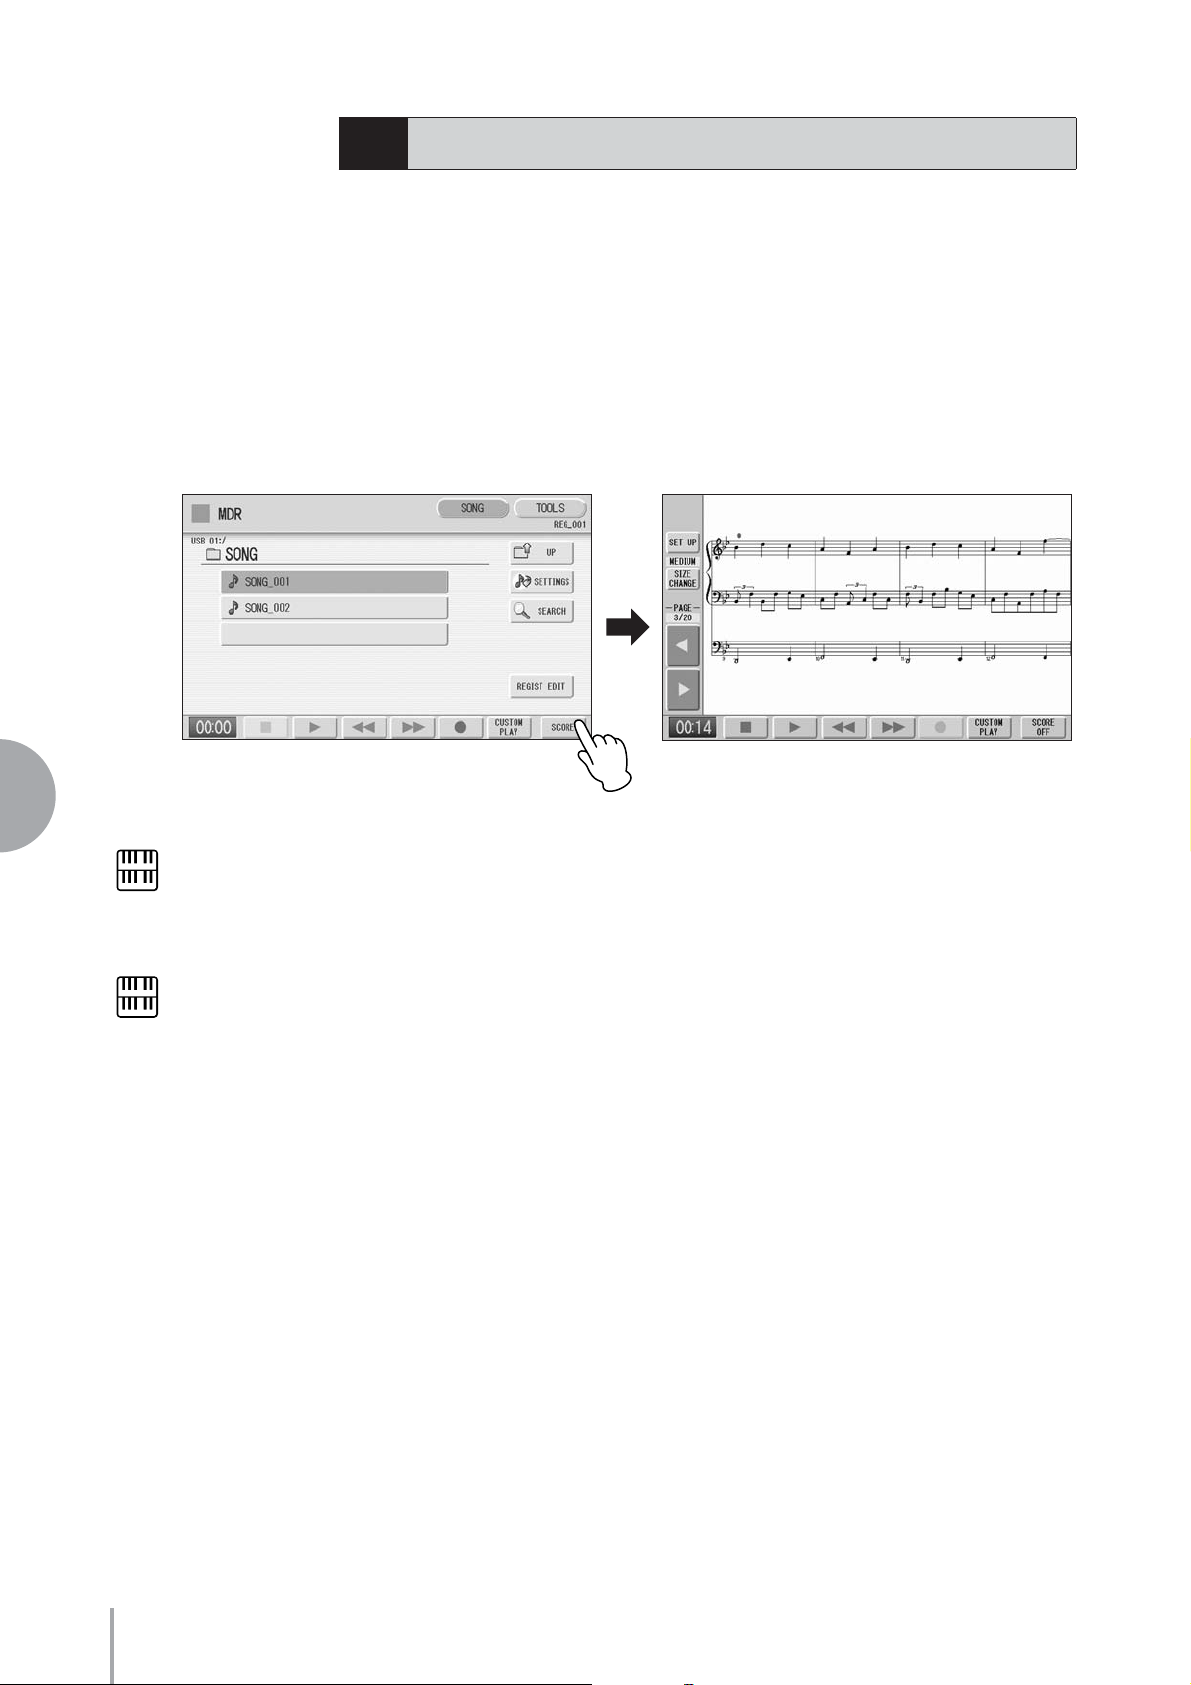
Displaying the Score
Select the song containing performance data.
For details on selecting a song, see page 11.
Press the [SCORE] button in the display.
The currently selected song score will be displayed.
7
Music Data Recorder (MDR)
NOTE
The score size setting
cannot be stored to a
Registration Memory.
NOTE
Scores for protected songs
cannot be displayed,
excepting those songs that
specifically allow score
display.
Press the [F] (Play) button in the display to start playing back
3
the song.
As the song plays back, the cursor moves accordingly and the page is
automatically turned at the appropriate point.
In this condition, pressing the [I] (Record) button in the display lets you
record a song and have the score displayed for you.
The score size can be adjusted by pressing the [SIZE CHANGE] button in the
display. Each press of the [SIZE CHANGE] button alternates the score size in
the following sequence: normal, large, extra large, small, normal, and so on.
Please note that the size cannot be changed while a song is being recorded.
You can manually turn the page, by stopping playing back a song
4
using the [J] (Stop) or [K] (Pause) button, and then pressing
the PAGE [E] or [F] buttons in the display.
Pressing these buttons moves to the previous or next page. The PAGE [F]
button can be assigned to the left foot switch (page 33).
To exit the score, press the [SCORE OFF] button in the display.
5
ELS-01/01C/01X Version 1.8 New Functions
32
Page 33
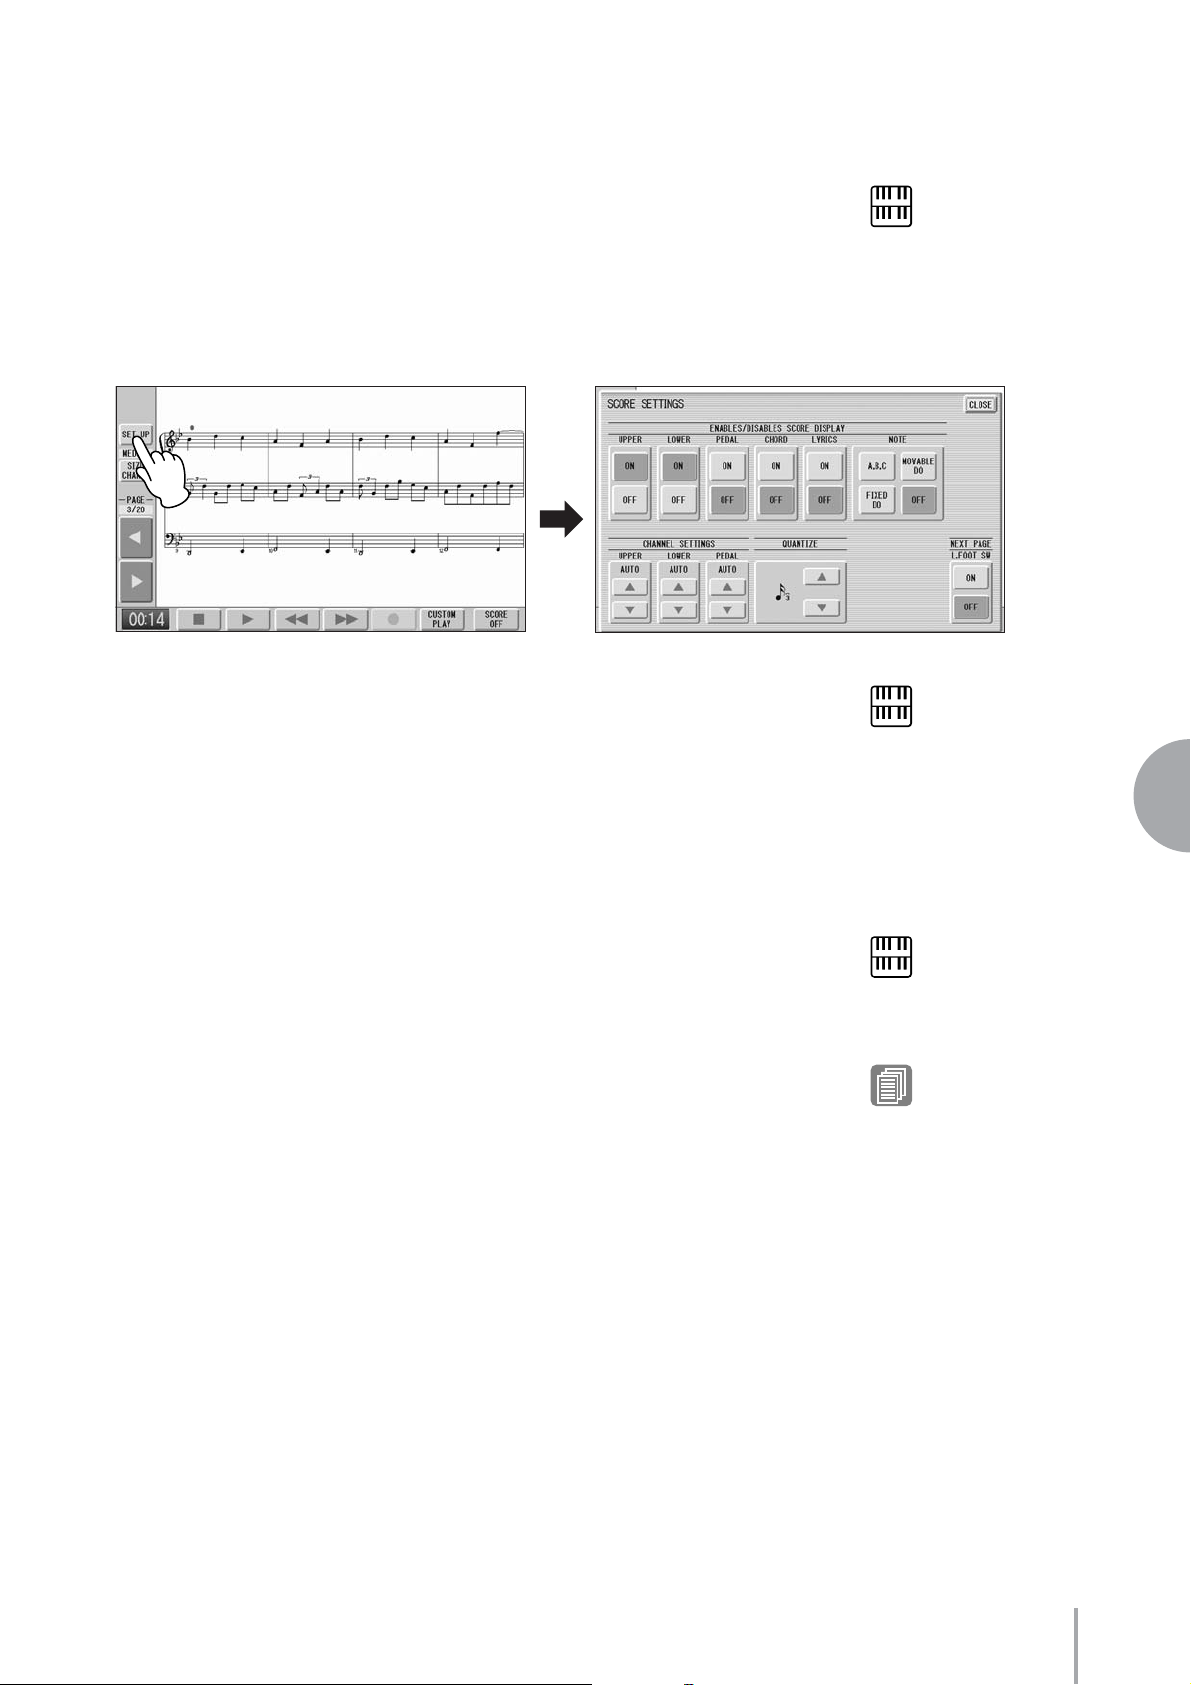
Changing the score contents and settings
●●●●●●●●●●●●●●●●●●●●●●●●●●●●●●●●●●●●●●
The Score Settings Display lets you choose the contents to be displayed. In this display,
you can also assign the Next Page function to the left foot switch:
Display the score.
1
Press the [SET UP] button in the display to call up the Score
2
Settings Display.
NOTE
Please note that the score
settings cannot be changed
while the song is being
recorded. The [SET UP]
button is disabled during
recording.
Change the score settings.
3
To set whether a specific part is displayed or not in the score, press the
appropriate [ON] or [OFF] buttons of each part. Please note that at least one of
the upper keyboard, lower keyboard or pedalboard will be set to [ON].
Available settings for notes and how they will be displayed (NOTE) include [A,
B, C] (conventional C-D-E indications), [FIXED DO] (solfeggio), [MOVABLE
DO] (relative solfeggio) and [OFF].
For the CH SETTINGS, the upper keyboard, lower keyboard and pedalboard
can be assigned to the channels with the [▲] or [▼] button. You can also use the
Data Control dial to select channels after pressing the [▲] or [▼] button.
Selecting [AUTO] automatically assigns parts to the channels according to the
song data.
To set the QUANTIZE value use the [▲] or [▼] button. You can also use the
Data Control dial to select channels after pressing the [▲] or [▼] button. The
shorter the note value is selected, the more precisely the score is displayed.
Setting the NEXT PAGE L. Foot SW [ON] lets you turn the score to the next
page with the left foot switch. You can also turn the score to the next page with
the PAGE [F] button in the display. If rhythm, glide and/or rotary speaker
are assigned to the left foot switch and set on, both the assigned functions and
the Next Page function work.
NOTE
The score display settings
cannot be stored to a
Registration Memory.
Only the left foot switch
setting can be stored to USB
flash memory as
Registration data common
to all Registration Memory
numbers.
NOTE
Setting the NOTE to
[MOVABLE DO] displays
each key note as “Do.”
Reference Page
About Quantize
7
Music Data Recorder (MDR)
Exit from the Score Settings Display by pressing the [CLOSE]
4
button at the top right of the display.
ELS-01/01C/01X Version 1.8 New Functions
33
Page 34
11
Other Functions (Tools)
The TOOLS Page in the M.D.R. display has many functions, such as song copy, song
delete, etc.
NOTE
If the folder already contains
120 XG songs the songs
can not be copied, or if the
folder already contains 120
folders the folder can not be
copied.
NOTE
In the following cases, it
may not be able to copy
even if the number of folder/
XG song has not yet
reached to the maximum
number.
Destination root is selected
and song name/ path are
too long.
NOTE
7
Music Data Recorder (MDR)
Copy operation is
automatically stopped if
there is containing unrecognizable file in MDR.
Song Copy
●●●●●●●●●●●●●●●●●●●●●●●●●●●●●●●●●●●●●●
This function lets you copy a folder/song. You can copy and exchange the data even
between two different media. (Songs created with the EL-series, such as the EL-900,
one by one copy can not be executed.) Make sure to check the remaining memory of
the destination media in advance.
Moving a Protected Song
A protected song can be copied within a folder, but it cannot be copied to another
folder or media. If you specify another folder or media as the copy destination, a
message appears prompting moving of the song—not copying. When the [MOVE]
button is pressed, the protected original song and all protected edit songs which
come from the same protected original song will be moved together. This effectively
“moves” a protected song, but does not “copy” it.
If copy the folder which contains both non-protected songs and protected songs,
the copy operation will be automatically executed for only non-protected songs, and
protected song will be moved (no copy).
To copy a song:
Insert the media that contains a folder/song to be copied and the destination media.
NOTE
If you copy a protected song
to the same folder as the
source song, the copied
song will be the protected
edit song.
To avoid losing your
important data in Media.
Firmly connect the media
to the USB TO DEVICE
terminal.
•To copy within one media
Insert the media that contains a song to be copied.
•To copy a song from USB flash memory to another
Insert both the USB flash memory that contains a song to be copied and the
destination USB flash memory. When there are not enough terminals available, use a
self powered USB hub. If you don’t have a USB hub, you can copy a song by
following the procedure on page 36.
Select the folder/song to be copied.
1
For details on selecting a song, see page 11.
Press the [TOOLS] button at the top right of the display to call up
2
the TOOLS Page.
ELS-01/01C/01X Version 1.8 New Functions
34
Page 35
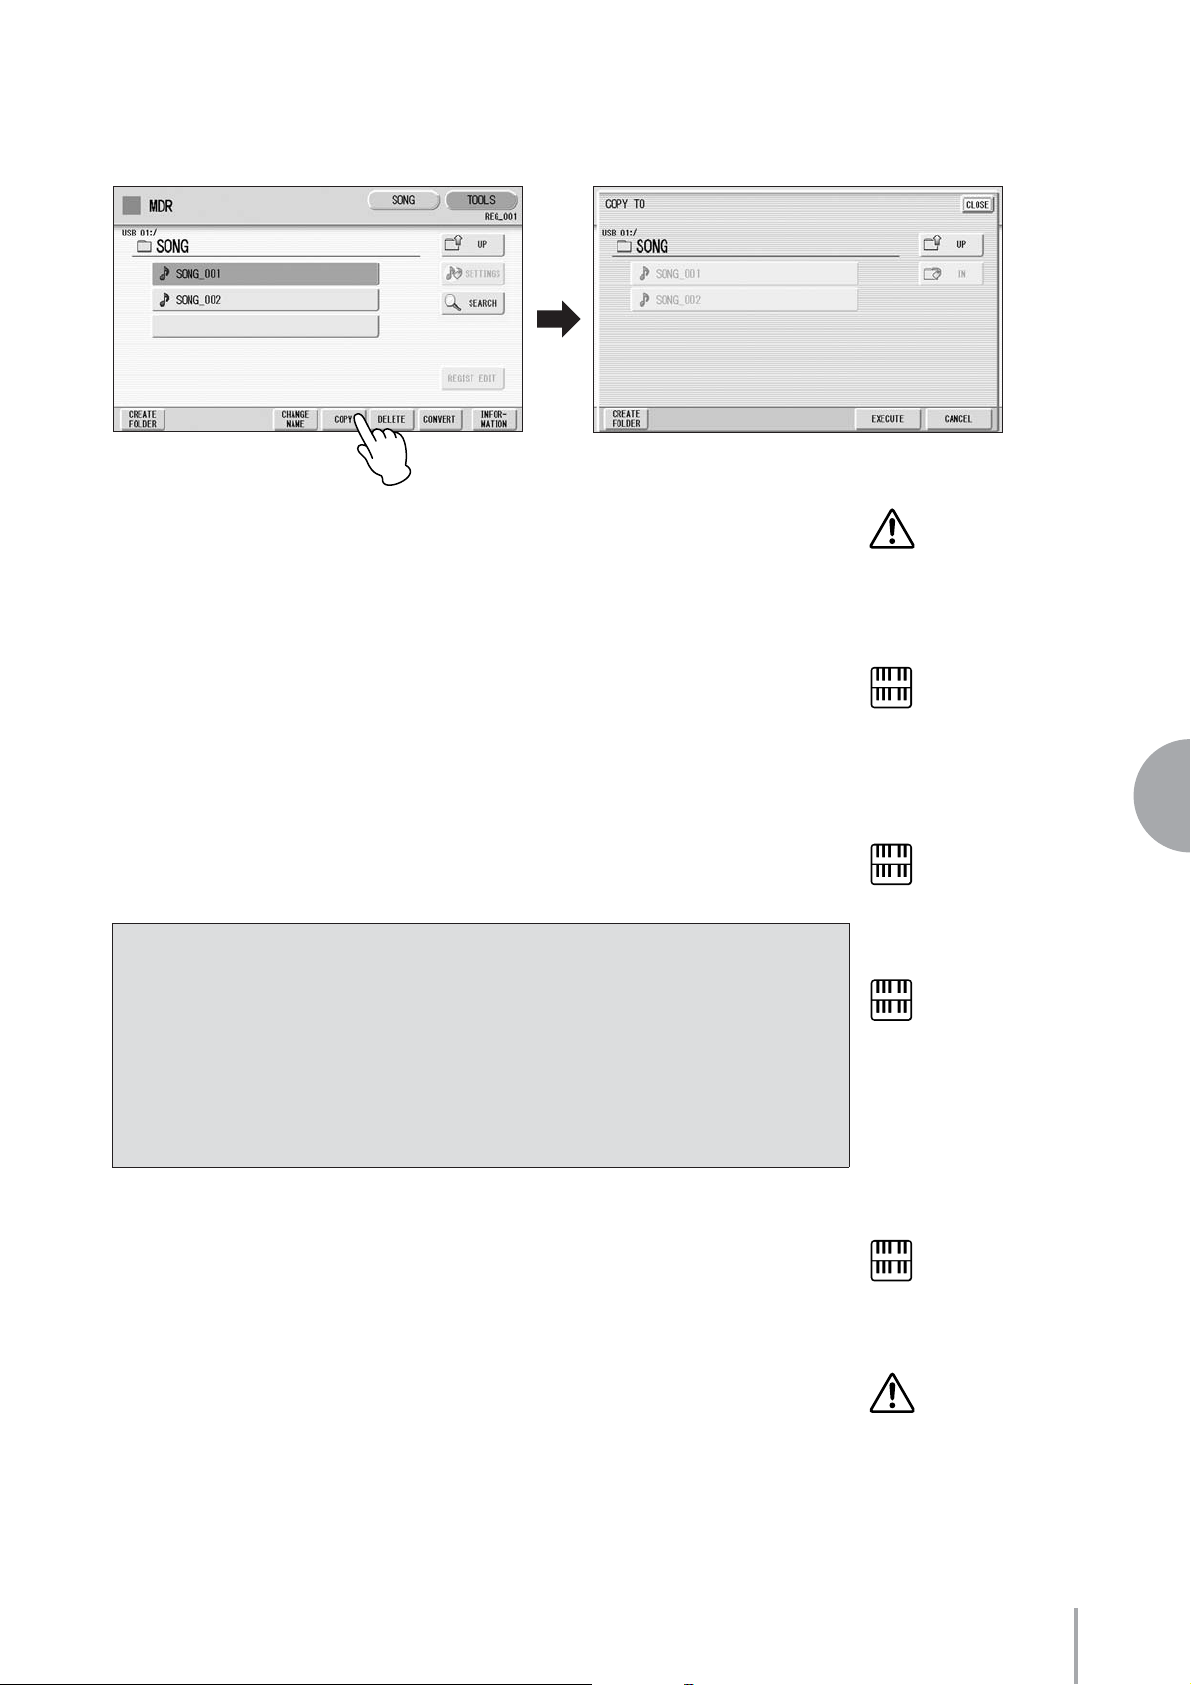
Press the [COPY] button in the display to call up the Copy To
3
Display.
(If necessary) Change the destination.
4
For details on changing the destination, see page 11.
Press the [EXECUTE] button to execute the copy.
5
The folder/song name in the destination is the same as the one of the source
song. If you copy a folder/song to a folder that contains a song whose name is
the same as the source song, the copied name will be “source song name_XXX”
(XXX indicates song number). If you want to change the folder/song name, see
page 18.
If you copy an XG-compatible song to another folder or media that contains a
song with the same name as the source song, a message appears prompting
confirmation of overwriting the song. Selecting [OVERWRITE] overwrites the
XG-compatible song in the destination.
How to cancel the folder-copy operation
If you want to cancel the folder-copy operation while the copy operation is in
progress, press the [CANCEL] button.
However, the operation may take a long time since the stop operation will be
executed only after all files in current folder are copied.
If you cancel the operation, make sure to check which files have been properly
copied and which have not.
Never attempt to eject the
media or turn the power
off during copying (or
moving a protected song).
Data may be lost.
NOTE
While the copy operation is
in progress, the
approximate time of copying
appears on the display;
keep in mind that the actual
time need may differ.
NOTE
If the media copy is
executed, the folder name
“#MEDIA” will be created in
the destination folder.
NOTE
If the message “The source
folder hierarchy is too deep”
is displayed, copy each
folder in the folder, one by
one manually.
If the “Path name is too
long” message is displayed,
change the hierarchy or
rename the folder name
shortly.
7
Music Data Recorder (MDR)
NOTE
The copy operation will
automatically be stopped if
an unrecognizable file is
detected in the folder.
Removing the media
during operation may
result in loss of the data.
Never attempt to remove
the media unless the
“Eject the source media”
message appears.
ELS-01/01C/01X Version 1.8 New Functions
35
Page 36
To copy a song from USB flash memory to another:
It is recommended that you use connect both media (source and destination) to the
USB TO DEVICE terminal. However, if there are not enough terminals available, you
can copy a song by following the procedure below.
The folder copy can not be executed in this procedure.
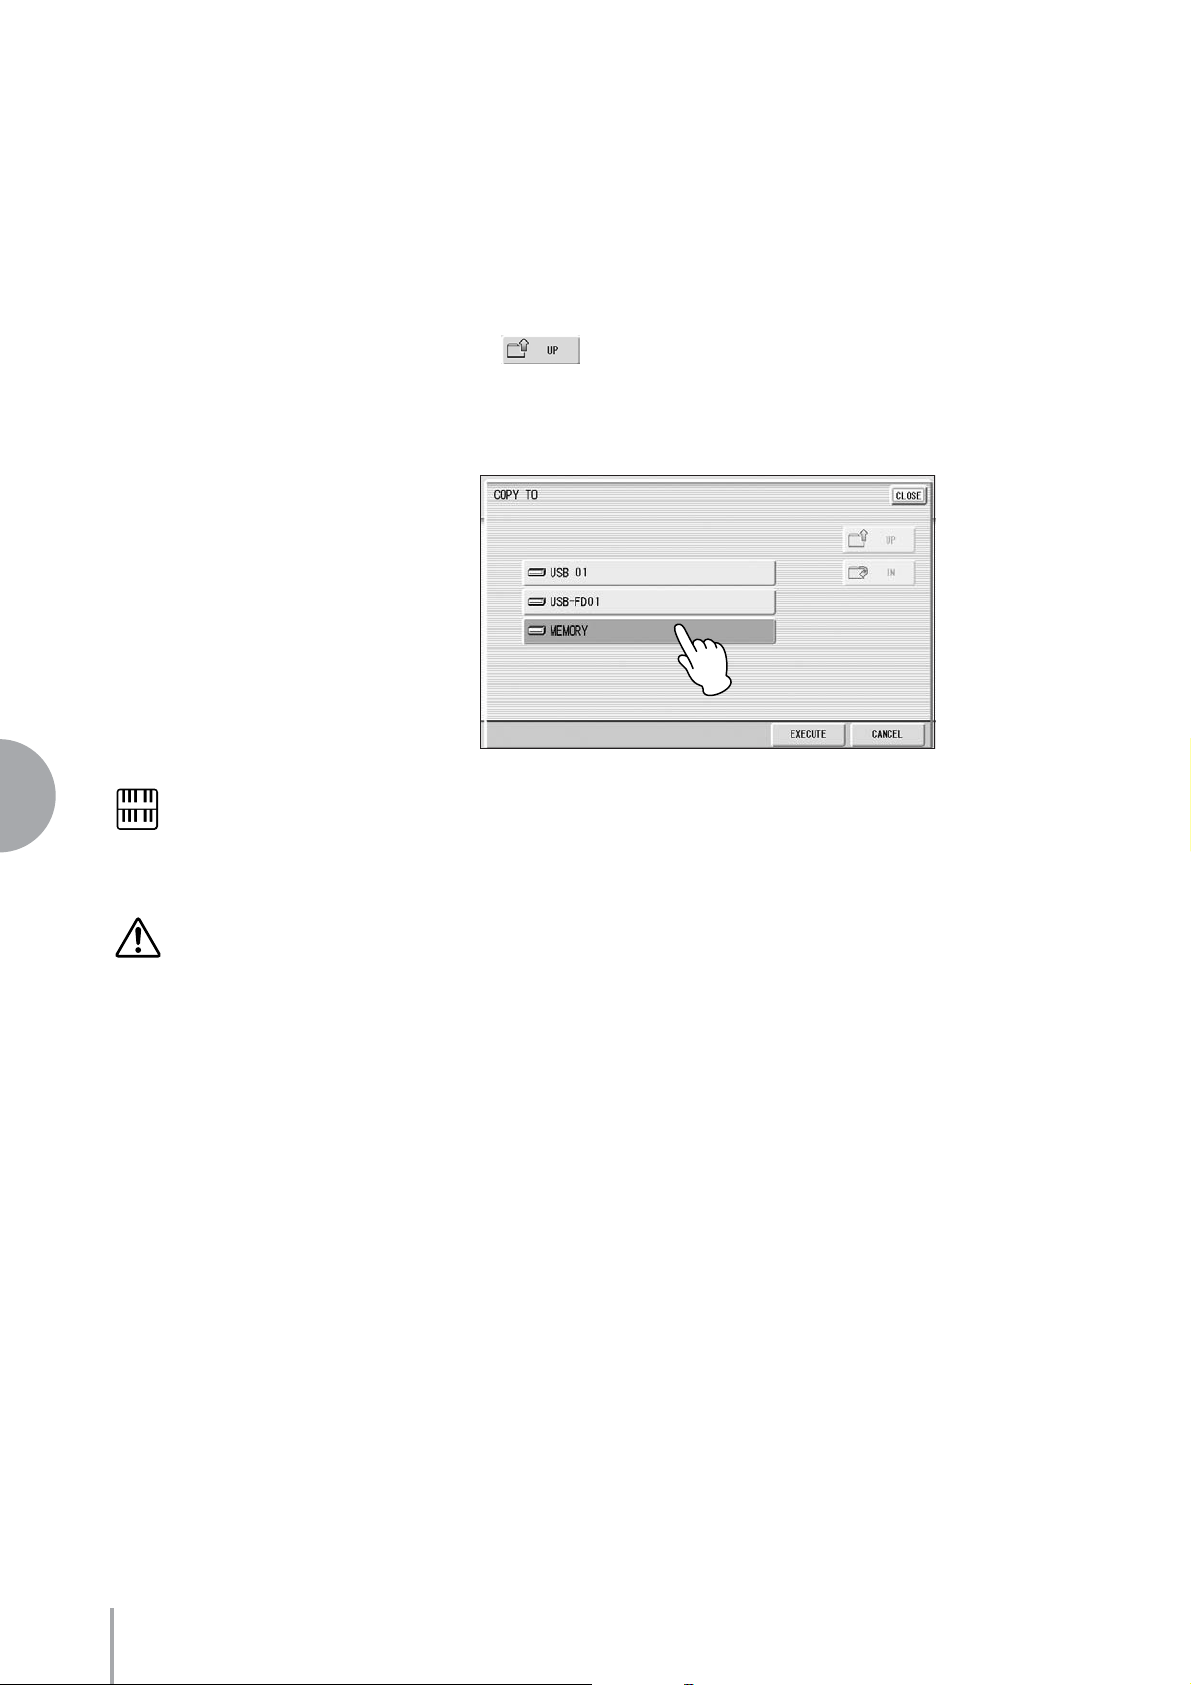
Follow the step 1 – 3 on page 34.
1
Press the button several times until the Media List is
2
displayed.
Select “MEMORY” as the destination.
3
7
Music Data Recorder (MDR)
NOTE
If you want to abort the
operation, press the
[CANCEL] button.
Never attempt to turn the
power off during copying a
protected song. Data may
be lost.
Press the [EXECUTE] button to execute the Song Copy.
4
The song to be copied is copied to the internal memory of the Electone. The
message “Eject the source media” will appear on the display.
Eject the source media.
5
After ejecting the source media, the message “Insert the destination media” will
appear on the display.
Insert the destination media to which you want to copy.
6
Select the destination.
7
For details on specifying the destination, see page 11.
Press the [EXECUTE] button to execute Song Copy. Select
8
[OVERWRITE] to execute or [CANCEL] to abort the operation.
The song is copied with the same name as the source song. If you copy a song to
a folder that contains a song whose name is the same as the source song, the
copied song name will be “source song name_XXX” (XXX indicates song
number).
If you copy an XG-compatible song to another folder or media that contains a
song with the same name as the source song, a message appears prompting
confirmation of overwriting the song. Selecting [OVERWRITE] overwrites the
XG-compatible song in the destination.
If you want to change the song name, see page 18.
ELS-01/01C/01X Version 1.8 New Functions
36
Page 37
Song Delete
●●●●●●●●●●●●●●●●●●●●●●●●●●●●●●●●●●●●●●
You can delete the data of one song. You can specify for deletion only Registration data,
only the performance data, or both of them (entire song). Also, only the songs created
on the ELS-01/01C and XG-compatible songs can be deleted. Songs created on the EL
series instruments such as the EL-900 cannot be deleted.
Select the song to be deleted.
1
For details on selecting a song, see page 11.
Press the [TOOLS] button at the top right of the display to call up
2
the TOOLS Page.
Press the [DELETE] button in the display.
3
A message appears, prompting confirmation of the operation.
Confirm that the song to be deleted is shown in the display. If you want to
change the song, press the [CANCEL] button and select the desired song.
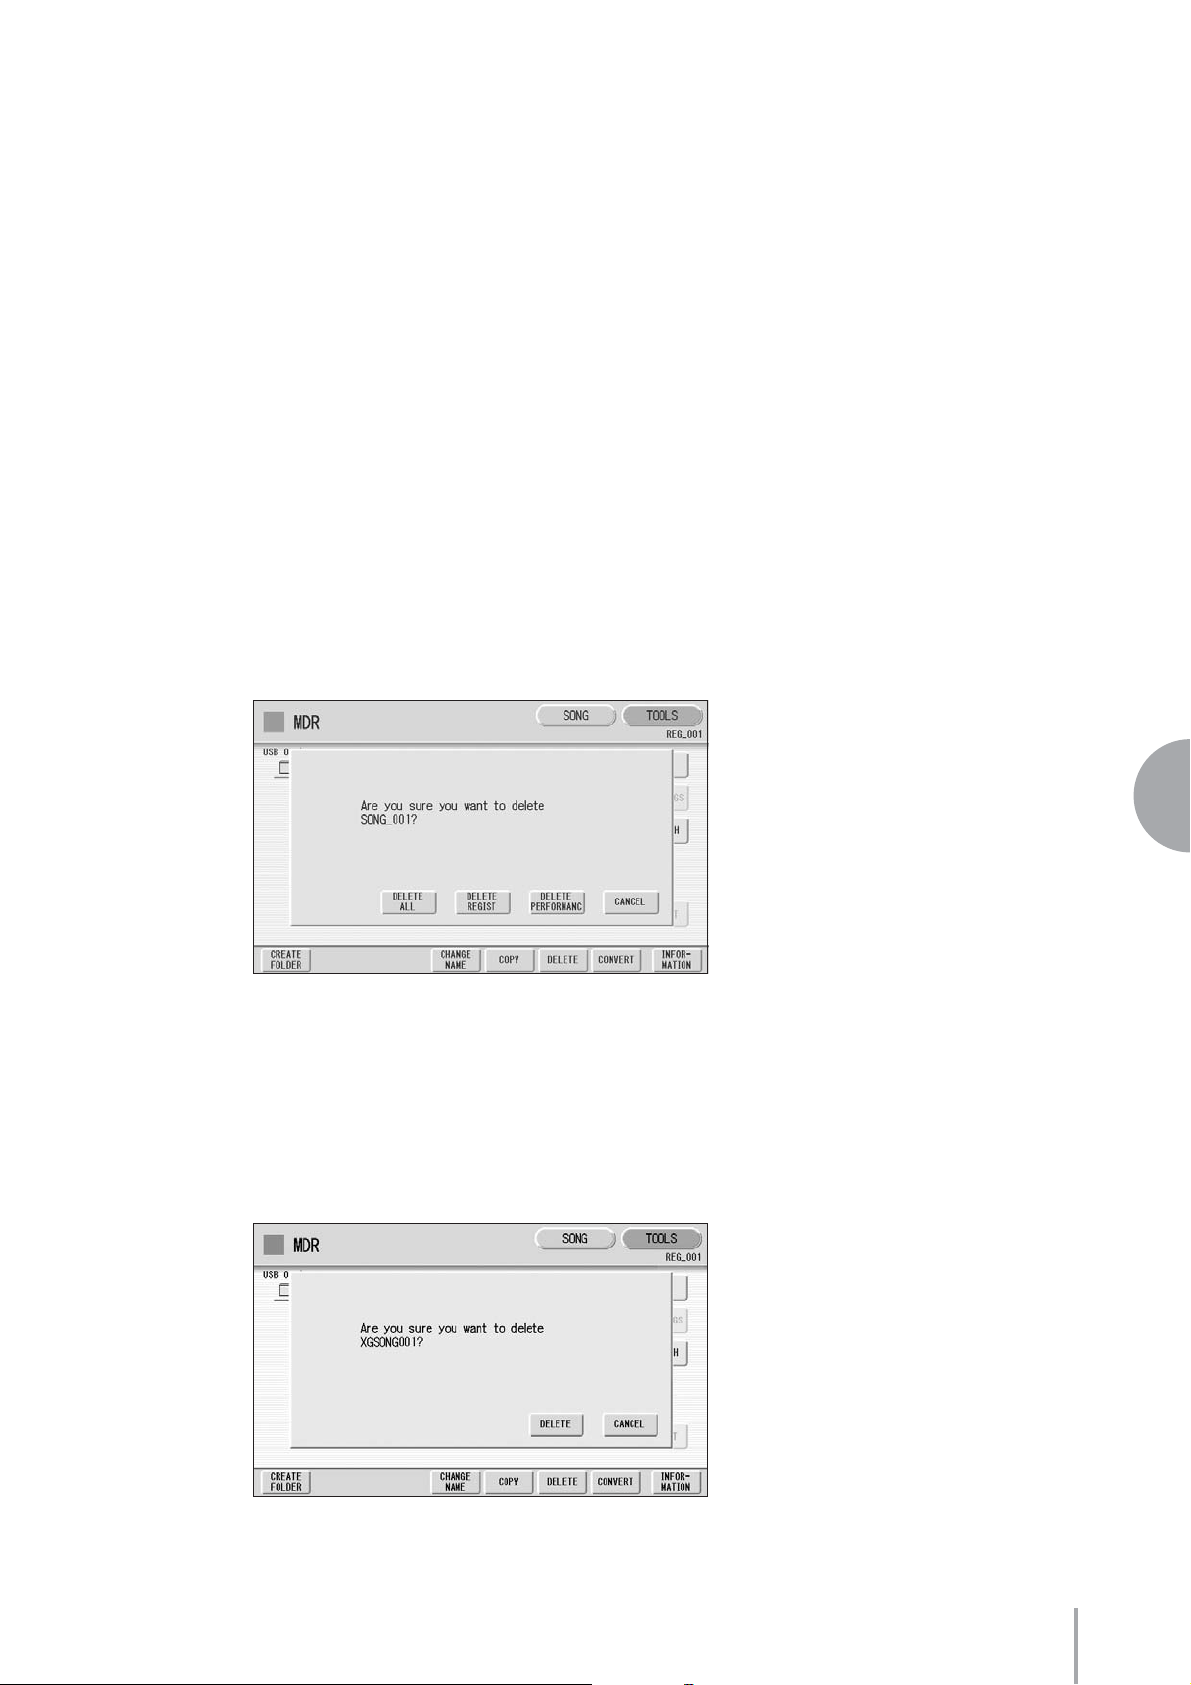
Press the button of the specific data you want to delete
4
(“DELETE ALL,” “DELETE REGIST” or “DELETE
PERFORMANCE”). The selected data will be deleted.
• DELETE ALL: Deletes the entire song.
• DELETE REGIST: Deletes only Registration data in the song.
• DELETE PERFORMANCE: Deletes only performance data in the song.
Pressing [CANCEL] aborts the operation.
When deleting folders, songs with only registration, songs with
only performance data, protected songs or XG-compatible songs:
7
Music Data Recorder (MDR)
Select [DELETE] to actually delete the data, or select [CANCEL] to abort the
operation.
ELS-01/01C/01X Version 1.8 New Functions
37
Page 38
Converting to XG
●●●●●●●●●●●●●●●●●●●●●●●●●●●●●●●●●●●●●●
This function allows you to convert the ELS-01/01C song data to XG format data. You
can playback the data using XG devices. The converted XG song data may sound
differently from the original data.
Confirm that the media should contain enough amount of available memory before
the conversion. The protected songs cannot be converted to XG format.
Select a song to be converted to XG.
1
For details on selecting a song, see page 11.
Press the [TOOLS] button at the top right of the display to call up
2
the TOOLS Page.
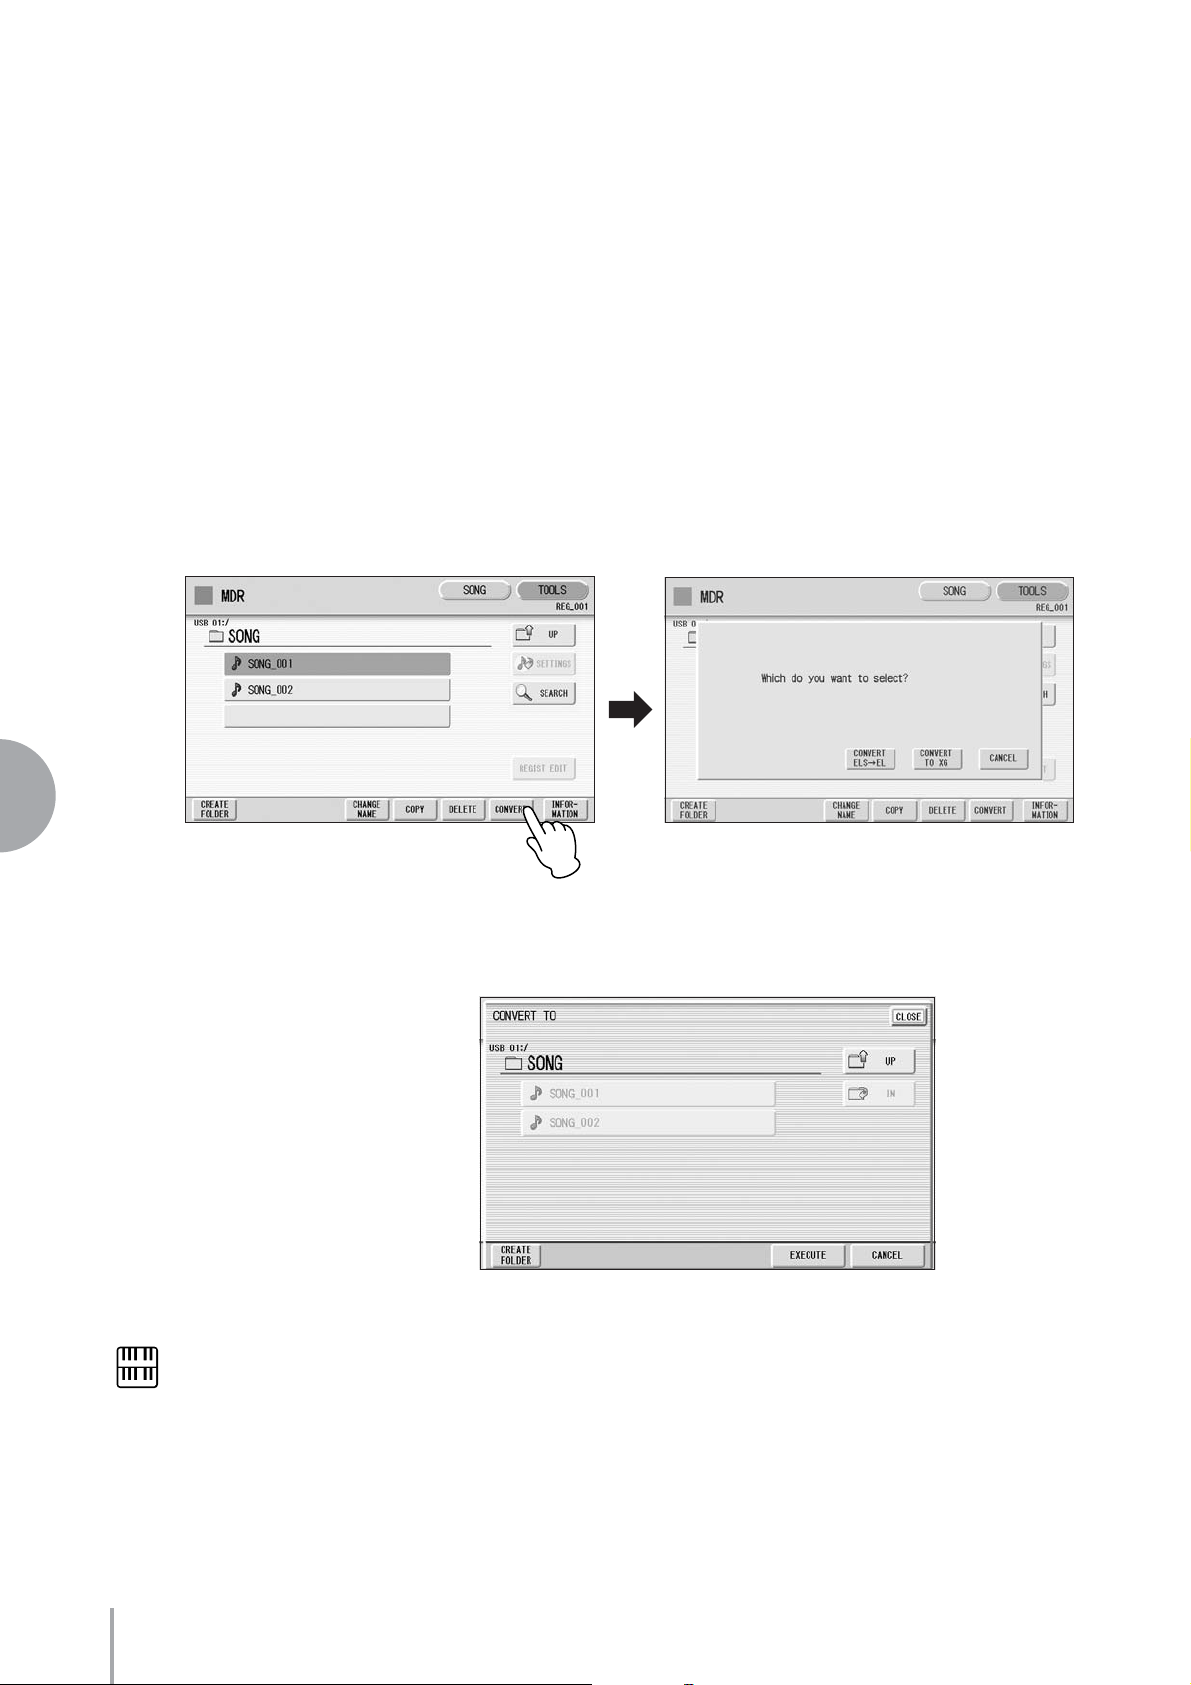
Press the [CONVERT] button.
3
A message “Which do you want to select?” appears.
7
Music Data Recorder (MDR)
NOTE
Playing the keyboard or
pressing the panel controls
during the confirmation of
the conversion will be
recorded to the converted
XG-compatible song.
Press the [CONVERT TO XG] button.
4
The following display appears.
(If necessary) Changes the destination to save the converted
5
song.
For details on changing the destination, see page 11.
Press the [EXECUTE] button.
6
A message appears indicating that the converted data is being checked and the
M.D.R. starts playback of the selected song. When playback is finished, the
display returns to the previous display.
ELS-01/01C/01X Version 1.8 New Functions
38
Page 39

Converting ELS format to EL
●●●●●●●●●●●●●●●●●●●●●●●●●●●●●●●●●●●●●●
You can convert songs created on the ELS-01/01C to EL-series format, and save them
to a floppy disk. The converted data can be used with EL-series Electones, such as the
EL-900. This function is not available for protected songs.
You’ll need to install the optional floppy disk drive such as UD-FD01.
Select the song to be converted to EL-series format.
1
For details on selecting a song, see page 11.
In the TOOLS Page, press the [CONVERT] button.
2
A “Which do you want to select?” message appears.
Reference Page
About Protected Songs
(page 26)
NOTE
User rhythms cannot be
converted to EL format.
Press the [CONVERT ELS ➞ EL] button.
3
If the source song contains two or more Registration banks, you’ll need to make
ready the same number of destination songs to save the converted data.
Insert the floppy disk, then press the [EXECUTE] button in the
4
display.
If the remaining memory of the floppy disk is insufficient, conversion cannot be
executed. (An error message appears and the operation is cancelled.)
Converting EL format to ELS
●●●●●●●●●●●●●●●●●●●●●●●●●●●●●●●●●●●●●●
You can convert the songs in the floppy disk created with an EL-series Electone, such as
the EL-900, to the ELS-01/01C format, and save it to a USB flash memory confirmed
by Yamaha. You’ll need to install the optional floppy disk drive such as UD-FD01.
Depending on the original song, the sound or tempo of the converted song may differ
from the original song, or the Next Song function of the original song may not be
effective.
Insert the floppy disk that contains the song you want to convert
1
to ELS format, then select the source song.
For details on selecting a song, see page 11.
7
NOTE
If the source song’s name
contains full size characters
or Japanese characters,
these characters will be
shown as question marks
(such as “????”).
Music Data Recorder (MDR)
Reference Page
Installing the Floppy Disk
Drive
NOTE
When you convert the
protected EL data to ELS
format, set the write-protect
tab of the EL disk to the
“overwrite” position (tab
closed).
ELS-01/01C/01X Version 1.8 New Functions
39
Page 40
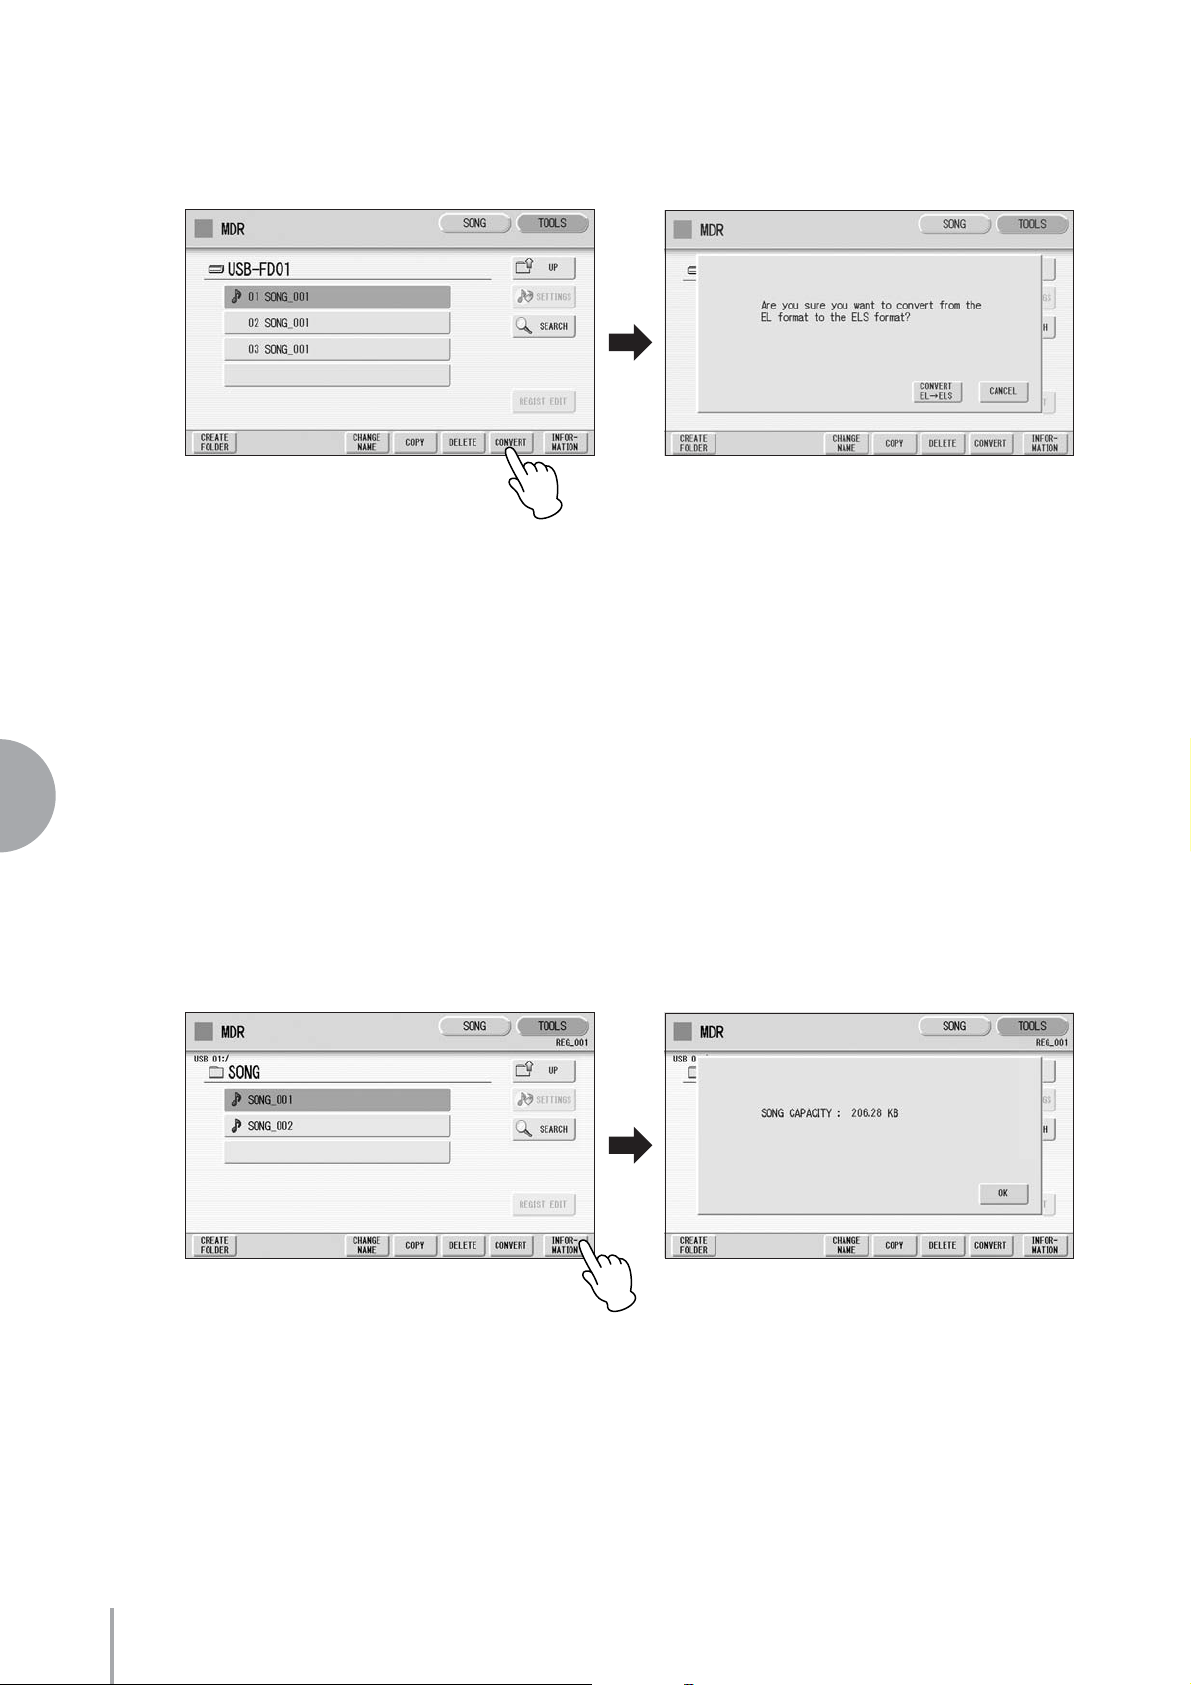
In the TOOLS Page, press the [CONVERT] button.
2
A message appears confirming if you want to convert from the EL format to the
ELS format.
Press the [CONVERT EL ➞ ELS] button in the display, then
3
specify the destination for the converted song.
To use the converted song on the ELS-01/01C, the destination must be USB
flash memory.
Press the [EXECUTE] button in the display to start conversion.
4
If the remaining memory of the USB flash memory is insufficient, conversion
cannot be executed. (An error message appears and the operation is cancelled.)
7
Music Data Recorder (MDR)
Checking the Remaining Memory
●●●●●●●●●●●●●●●●●●●●●●●●●●●●●●●●●●●●●●
In the TOOLS Page, press the [INFORMATION] button. If media is selected, the
remaining memory in the media is shown and if a song is selected, the song data
capacity, title, composer, etc. are shown.
ELS-01/01C/01X Version 1.8 New Functions
40
U.R.G., Digital Musical Instruments Division
© 2009 - 2010 Yamaha Corporation
WT53520 008MWCP**-**B0
Printed in Japan
 Loading...