

CD Receiver
Ampli-Tuner CD
CRX-B370
CRX-B370D
English
Français
Español
EN
Owner’s Manual
FR
Mode d’emploi
ES
Manual de instrucciones

Table of Contents
IMPORTANT SAFETY INSTRUCTIONS ................................................ 3
PRECAUTIONS ....................................................................................... 5
Introduction .......................................................................................... 9
About this manual ....................................................................................................................................... 9
Trademarks ....................................................................................................................................................... 9
Accessories ....................................................................................................................................................... 9
What you can do with this unit ........................................................ 10
Parts name ........................................................................................... 11
Front panel .................................................................................................................................................... 11
Rear panel ...................................................................................................................................................... 12
Front panel display ................................................................................................................................... 13
Remote control ........................................................................................................................................... 14
Preparations ........................................................................................ 15
Connecting speakers .............................................................................................................................. 15
Connecting the antenna ...................................................................................................................... 16
Turning on the power ............................................................................................................................ 17
Using the sleep timer .............................................................................................................................. 17
Listening to music .............................................................................. 18
Listening to CDs ......................................................................................................................................... 18
Playing music on USB memory devices ...................................................................................... 19
Playing music via Bluetooth® connection ................................................................................. 20
Listening to DAB stations (CRX-B370D only) ............................................................................ 21
Listening to FM radio stations ........................................................................................................... 24
Radio Data System (U.K. and Europe models only) .............................................................. 26
Playing music from external devices ............................................................................................ 27
More on playback .............................................................................. 28
Shuffle/Repeat playback ....................................................................................................................... 28
Playback information ............................................................................................................................... 29
Adjusting sound quality ........................................................................................................................ 29
Option menu ................................................................................................................................................ 30
Troubleshooting ................................................................................ 31
General ............................................................................................................................................................. 31
Bluetooth ........................................................................................................................................................ 32
Disc ..................................................................................................................................................................... 33
USB memory devices ............................................................................................................................... 33
DAB reception (CRX-B370D only) .................................................................................................... 34
FM reception ................................................................................................................................................ 34
Messages in the front panel display ............................................................................................... 35
Supported devices/media and file formats .................................. 36
Supported devices/media ................................................................................................................... 36
File format ...................................................................................................................................................... 37
Specifications ..................................................................................... 38
2 En
IMPORTANT SAFETY INSTRUCTIONS
CAUTION
RISK OF ELECTRIC
SHOCK DO NOT OPEN
12 Use only with the cart, stand, tripod, bracket, or table specified by the
manufacturer, or sold with the apparatus. When a cart is used, use caution when
moving the cart/apparatus combination to avoid injury from tip-over.
13 Unplug this apparatus during lightning storms or when unused for long periods of
time.
14 Refer all servicing to qualified service personnel. Servicing is required when the
apparatus has been damaged in any way, such as power-supply cord or plug is damaged, liquid has
been spilled or objects have fallen into the apparatus, the apparatus has been exposed to rain or
moisture, does not operate normally, or has been dropped.
CAUTION: TO REDUCE THE RISK OF
ELECTRIC SHOCK, DO NOT REMOVE
COVER (OR BACK). NO USER-SERVICEABLE
PARTS INSIDE. REFER SERVICING TO
QUALIFIED SERVICE PERSONNEL.
• Explanation of Graphical Symbols
The lightning flash with arrowhead symbol, within an equilateral triangle, is
intended to alert you to the presence of uninsulated “dangerous voltage” within the
product’s enclosure that may be of sufficient magnitude to constitute a risk of
electric shock to persons.
The exclamation point within an equilateral triangle is intended to alert you to the
presence of important operating and maintenance (servicing) instructions in the
literature accompanying the appliance.
1 Read these instructions.
2 Keep these instructions.
3 Heed all warnings.
4 Follow all instructions.
5 Do not use this apparatus near water.
6 Clean only with dry cloth.
7 Do not block any ventilation openings. Install in accordance with the manufacturer’s instructions.
8 Do not install near any heat sources such as radiators, heat registers, stoves, or other apparatus
(including amplifiers) that produce heat.
9 Do not defeat the safety purpose of the polarized or grounding-type plug. A polarized plug has two
blades with one wider than the other. A grounding type plug has two blades and a third grounding
prong. The wide blade or the third prong are provided for your safety. If the provided plug does not
fit into your outlet, consult an electrician for replacement of the obsolete outlet.
10 Protect the power cord from being walked on or pinched particularly at plugs, convenience
receptacles, and the point where they exit from the apparatus.
11 Only use attachments/accessories specified by the manufacturer.
IMPORTANT
Please record the serial number of this unit in the space below.
MODEL:
Serial No.:
The serial number is located on the rear of the unit. Retain this booklet in a safe place for future
reference.
En 3
FCC INFORMATION (USA)
1 IMPORTANT NOTICE: DO NOT MODIFY THIS UNIT!
This product, when installed as indicated in the instructions contained in this manual, meets FCC
requirements. Modifications not expressly approved by Yamaha may void your authority,
granted by the FCC, to use the product.
2 IMPORTANT: When connecting this product to accessories and/or another product use only
high quality shielded cables. Cable/s supplied with this product MUST be used. Follow all
installation instructions. Failure to follow instructions could void your FCC authorization to use
this product in the USA.
3 NOTE: This product has been tested and found to comply with the requirements listed in FCC
Regulations, Part 15 for Class “B” digital devices. Compliance with these requirements provides
a reasonable level of assurance that your use of this product in a residential environment will not
result in harmful interference with other electronic devices.
This equipment generates/uses radio frequencies and, if not installed and used according to the
instructions found in the users manual, may cause interference harmful to the operation of other
electronic devices.
Compliance with FCC regulations does not guarantee that interference will not occur in all
installations. If this product is found to be the source of interference, which can be determined by
turning the unit “OFF” and “ON”, please try to eliminate the problem by using one of the following
measures:
Relocate either this product or the device that is being affected by the interference.
Utilize power outlets that are on different branch (circuit breaker or fuse) circuits or install AC line
filter/s.
In the case of radio or TV interference, relocate/reorient the antenna. If the antenna lead-in is 300
ohm ribbon lead, change the lead-in to coaxial type cable.
If these corrective measures do not produce satisfactory results, please contact the local retailer
authorized to distribute this type of product. If you can not locate the appropriate retailer, please
contact Yamaha Corporation of America A/V Division, 6600 Orangethorpe Avenue, Buena Park,
CA 90620, USA.
The above statements apply ONLY to those products distributed by Yamaha Corporation of
America or its subsidiaries.
COMPLIANCE INFORMATION STATEMENT
(Supplier’s declaration of conformity procedure)
Responsible Party: Yamaha Corporation of America A/V Division
Address: 6600 Orangethorpe Avenue, Buena Park, CA 90620
Telephone: 714-522-9011
Type of Equipment: CD Receiver
Model Name: CRX-B370
This device complies with Part 15 of the FCC Rules.
Operation is subject to the following conditions:
1) this device may not cause harmful interference, and
2) this device must accept any interference received including interference that may cause
undesired operation.
* This applies only to products distributed by YAMAHA CORPORATION OF AMERICA.
FCC/IC NOTICE (U.S.A. and Canada)
This equipment complies with FCC/IC radiation exposure limits set forth for an uncontrolled
environment and meets the FCC radio frequency (RF) Exposure Guidelines and RSS-102 of the IC
radio frequency (RF) Exposure rules. This equipment has very low levels of RF energy that is deemed
to comply without maximum permissive exposure evaluation (MPE).
This transmitter must not be co-located or operated in conjunction with any other antenna or
transmitter.
CAN ICES-3(B)/NMB-3(B)
LASER SAFETY
This unit employs a laser. Due to possible eye injury, only a qualifi ed service person should remove
the cover or attempt to service this device.
DANGER
This unit emits visible laser radiation when open. Avoid direct eye exposure to beam.
When this unit is plugged into the wall outlet, do not place your eyes close to the opening of the disc
tray and other openings to look into inside.
CAUTION
Use of controls or adjustments or performance of procedures other than those specified herein may
result in hazardous radiation exposure.
The laser component in this product is capable of emitting radiation exceeding the limit for Class 1.
4 En
PRECAUTIONS
PLEASE READ CAREFULLY BEFORE USE. BE SURE TO
FOLLOW THESE INSTRUCTIONS.
The precautions listed below are to prevent risk of harm to the
user and others, as well as to prevent property damage, and to
help the user use this unit properly and safely. Be sure to follow
these instructions.
After reading this manual, be sure to keep it in a safe place where it can be
referenced at any time.
• Be sure to request inspections or repairs from the dealer where you
purchased the unit or from qualified Yamaha service personnel.
• Yamaha cannot be held responsible for injury to you or damage of the
products caused by improper use or modifications to the unit.
• This product is for ordinary homes. Do not use for applications
requiring high reliability, such as managing lives, health care or highvalue assets.
WARNING
This content indicates “risk of serious injury or death.”
Laser
• Do not remove the cover for repair. This unit uses a laser. Laser light entering your eyes
may cause visual impairment. Request inspections or repairs from the dealer where you
purchased the unit or from qualified Yamaha service personnel.
• Do not look into the laser source. If there is nothing to block it, this unit emits a visible laser.
Avoid looking at the laser directly. Laser light entering your eyes may cause visual
impairment. When the plug is inserted into the AC outlet, do not place your eyes near
openings of the disk tray or other openings, and do not try to look inside the unit.
Power supply/power cord
• Do not do anything that could damage the power cord.
- Do not place it near a heater.
- Do not bend it excessively or alter it.
- Do not scratch it.
- Do not place it under a heavy object.
Using the power cord with the core of the cord exposed could cause electric shocks or a
fire.
• Never charge this unit if it is wet. Failure to observe this may cause electric shocks or a
terminal circuit shortage and cause a fire or malfunctions.
• Do not touch the power plug or cord if there is a chance of lightning. Failure to observe this
may cause electric shocks.
• Use this unit with the power supply voltage printed on it. Failure to connect to an
appropriate AC outlet may cause a fire, electric shocks, or malfunctions.
• Check the electric plug periodically and remove any dirt or dust which may have
accumulated on it. Failure to observe this may cause a fire or electric shocks.
• When setting up the unit, make sure that the AC outlet you are using is easily accessible. If
some trouble or malfunction occurs, immediately turn off the power switch and disconnect
the plug from the AC outlet. Even when the power switch is turned off, as long as the power
cord is not unplugged from the wall AC outlet, the unit will not be disconnected from the
power source.
• If you hear thunder or suspect approaching lightning, quickly turn off the power switch and
pull the power plug from the AC outlet. Failure to observe this may cause a fire or
malfunctions.
• If not using the unit for long periods of time, be sure to pull the power plug from the AC
outlet. Failure to observe this may cause a fire or malfunctions.
Do not disassemble
• Do not disassemble or modify this unit. Failure to observe this may cause a fire, electric
shocks, injury, or malfunctions. If you notice any irregularities, be sure to request an
inspection or repair from the dealer where you purchased the unit or from qualified Yamaha
service personnel.
Water warning
• Do not expose the unit to rain, use it near water or in damp or wet conditions, or place on it
any containers (such as vases, bottles or glasses) containing liquids which might spill into
any openings or places where water may drop. A liquid such as water getting into the unit
may cause a fire, electric shocks, or malfunctions. If any liquid such as water seeps into the
device, turn off the power immediately and unplug the power cord from the AC outlet. Then,
request an inspection from the dealer where you purchased the unit or from qualified
Yamaha service personnel.
• Never insert or remove an electric plug with wet hands. Do not handle this unit with wet
hands. Failure to observe this may cause electric shocks or malfunctions.
Fire warning
• Do not place any burning items or open flames near the unit, since they may cause a fire.
En 5
Maintenance and care
• Do not use aerosols or spray-type chemicals that contain combustible gas for cleaning or
lubrication. The combustible gas will remain inside the unit, which may cause explosion or
fire.
Battery use
• Do not disassemble a battery. If the contents of the battery get on your hands or in your
eyes, it can cause blindness or chemical burns.
• Do not dispose of batteries in fire. Doing so may result in the battery bursting, causing a fire
or injury.
• Do not attempt to recharge batteries that are not intended to be charged. Charging could
cause the battery to burst or leak, which can cause blindness, chemical burns, or injury.
• If the batteries do leak, avoid contact with the leaked fluid. If the battery fluid should come in
contact with your eyes, mouth, or skin, wash immediately with water and consult a doctor.
Battery fluid is corrosive and may possibly cause loss of sight or chemical burns.
Wireless unit
• Do not use this unit near medical devices or inside medical facilities. Radio waves from this
unit may affect electro-medical devices.
• Do not use this unit within 15 cm (6 in) of persons with a heart pacemaker implant or a
defibrillator implant. Radio waves from this unit may affect electro-medical devices, such as
a heart pacemaker implant or defibrillator implant.
If you notice any abnormality
• If any of the following abnormalities occur, immediately turn off the power and disconnect
the power plug.
- The power cord/plug is damaged.
- An unusual smell or smoke is emitted from the unit.
- Foreign material gets into the interior of the unit.
- There is a loss of sound during use.
- There is a crack or damage in the unit.
Continued use could cause electric shocks, a fire, or malfunctions. Immediately request an
inspection or repair from the dealer where you purchased the unit or from qualified Yamaha
service personnel.
• Be careful not to drop or apply strong impact to this unit. If you suspect the unit may have
been damaged due to dropping or impact, immediately turn off the power and pull the power
plug from the AC outlet. Failure to observe this may cause electric shocks, a fire, or
malfunctions. Immediately request an inspection from the dealer where you purchased the
unit or from qualified Yamaha service personnel.
CAUTION
This content indicates “risk of injury.”
Power supply/power cord
• Do not use an AC outlet where the power plug fits loosely when inserted. Failure to observe
this may cause a fire, electric shocks, or burns.
• When removing the electric plug from the unit or an AC outlet, always hold the plug itself
and not the cord. Pulling by the cord can damage it and cause electric shocks or a fire.
• Insert the power plug firmly all the way into the AC outlet. Using the unit when it is not
plugged in sufficiently can cause dust to accumulate on the plug, causing a fire or burns.
Installation
• Do not place the unit in an unstable position where it might accidentally drop or fall over and
cause injuries.
• Do not block this unit's ventilation holes (cooling slits). This unit has ventilation holes on the
side to prevent the internal temperature from becoming too high. Failure to observe this
may trap heat inside the unit, causing a fire or malfunctions.
• When installing this unit:
- Do not cover it with any cloth.
- Do not install it on a carpet or rug.
- Make sure the top surface faces up; do not install on its sides or upside down.
- Do not use the device in a confined, poorly-ventilated location.
Failure to observe the above may trap heat inside the unit, causing a fire or malfunctions.
Ensure that there is adequate space around the unit: at least 5 cm (2 in) on top, 5 cm (2 in)
on the sides, and 5 cm (2 in) on the rear.
• Do not install the unit in places where it may come into contact with corrosive gases or salt
air or places that have excessive smoke or steam. Doing so may result in malfunction.
• Before moving this unit, be sure to turn off the power switch and disconnect all connection
cables. Failure to observe this may damage the cables or cause you to trip and fall.
• For proper installation of the outdoor antenna, make sure to have it done by the dealer from
where you purchased the unit or by qualified service personnel. Failure to observe this may
cause the installation to fall and result in injury. Installation requires special skills and
experience.
Hearing loss
• Do not use the unit for a long period of time at a high or uncomfortable volume level, since
this can cause permanent hearing loss. If you experience any hearing loss or ringing in the
ears, consult a physician.
• Before connecting the unit to other devices, turn off the power for all devices. Also, before
turning the power of all devices on or off, make sure that all volume levels are set to the
minimum. Failing to do so may result in hearing loss, electric shock, or device damage.
• When turning on the AC power in your audio system, always turn on the unit LAST, to avoid
hearing loss and speaker damage. When turning the power off, the unit should be turned off
6 En

FIRST for the same reason. Failure to observe the above may cause hearing impairment or
speaker damage.
Maintenance
• When storing or discarding batteries, insulate the terminal area by applying tape, or some
other protection. Mixing them with other batteries or metal objects can cause a fire, burns,
or inflammation due to fluid.
• Remove the power plug from the AC outlet before cleaning the unit. Failure to observe this
may cause electric shocks.
Handling caution
• Do not insert your hand or fingers into disk slot of this unit. Failure to observe this may
cause injury.
• Do not insert foreign materials such as metal or paper into disk slot of this unit. Failure to
observe this may cause a fire, electric shocks, or malfunctions. If foreign material gets into
the unit, immediately shut off the power and pull the power plug from the AC outlet and
request an inspection from the dealer where you purchased the unit or from qualified
Yamaha service personnel.
• Do not do the following:
- stand on or sit on the equipment.
- put heavy items on top of the equipment.
- place the equipment in a stack.
- apply unreasonable force to buttons, switches, input/output terminals, etc.
• Avoid pulling the connected cables to prevent injuries or damage to the unit by causing it to
fall.
• Do not operate the unit if the sound is distorting. Prolonged use in this condition could
cause overheating and result in fire.
Battery use
• Always replace all batteries at the same time. Do not use new batteries together with old
ones. Using new ones with old ones could cause a fire, burns, or inflammation due to fluid
leaks.
• Do not use batteries other than specified batteries. Doing so cause fire, burns, or
inflammation due to leakage.
• Do not mix battery types, such as alkaline batteries with manganese batteries, or batteries
from different makers, or different types of batteries from the same maker, since this can
cause a fire, burns, or inflammation due to fluid leaks.
• Keep batteries away from children. A child could accidentally swallow a battery. Failure to
observe this may also cause inflammation due to battery fluid leaks.
• Do not put in a pocket or bag, carry, or store batteries together with pieces of metal. The
battery could short, burst, or leak, causing a fire or injury.
• Always make sure all batteries are inserted in conformity with the +/- polarity markings.
Failure to do so might result in a fire, burns, or inflammation due to fluid leaks.
• When the batteries run out, or if the unit is not to be used for a long time remove the
batteries from the unit to prevent possible leakage of the battery fluid.
NOTICE
Indicates points that you must observe in order to prevent
product failure, damage or malfunction and data loss.
Power supply/power cord
• If not using the unit for a long period of time, be sure to pull the power plug from the outlet.
Even if the [z](Standby/On) switch has been turned off (the screen display is off), a minute
current is still flowing.
Installation
• Do not use this unit in the vicinity of other electronic equipment, such as a TV, radio, or
mobile phone. Failure to observe this may cause this unit or the TV or radio to produce
noise.
• Do not use this unit in a location that is exposed to direct sunlight that becomes extremely
hot, such as near a heater, or extremely cold, or that is subject to excessive dust or
vibration. Failure to observe this may cause the unit's panel to become deformed, the
internal components to malfunction, or for operation to become unstable.
• Install this unit as far away from other electronic equipment as possible.
Digital signals from this unit may interfere with other electronic equipment.
• If using a wireless function, avoid installing this unit near metal walls or desks, microwave
ovens, or other wireless network devices.
Obstructions could shorten the transmission distance.
Connections
• If connecting external units, be sure to thoroughly read the manual for each unit and
connect them in accordance with the instructions.
Failure to properly handle a unit in accordance with the instructions could cause
malfunctions.
• Do not connect this unit to industrial units.
Digital audio interface standards for consumer use and industrial use are different. This unit
has been designed to connect to a consumer-use digital audio interface. Connections to an
industrial-use digital audio interface could not only cause this unit to malfunction, but could
also damage the speakers.
En 7
Handling
• Do not place vinyl, plastic, or rubber products on this unit. Failure to observe this may cause
discoloration or deformation in the panel of this unit.
• If the ambient temperature changes drastically (such as during unit transportation or under
rapid heating or cooling) and there is a chance condensation may have formed in the unit,
leave the unit for several hours without turning on the power until it is completely dry before
use. Using the unit while there is condensation can cause malfunctions.
Maintenance
The model number, serial number, power requirements, etc., may be found on or near the
name plate, which is at the rear of the unit. You should note this serial number in the space
provided below and retain this manual as a permanent record of your purchase to aid
identification in the event of theft.
Model No.
Serial No.
• When cleaning the unit, use a dry, soft cloth. Using chemicals such as benzine or thinner,
cleaning agents, or chemical scrubbing cloths can cause discoloration or deformation.
Batteries
• Be sure to discard used batteries in accordance with local regulations.
About content in this manual
• The illustrations and screens in this manual are for instructional purposes only.
• The company names and product names in this manual are the trademarks or registered
trademarks of their respective companies.
• Software may be revised and updated without prior notice.
(rear_en_01)
8 En

Introduction
Confirm the package contents and useful points of this manual.
About this manual
• Instructions and illustrations used in this manual refer to the CRX-B370D, unless
otherwise specified.
• How to operate this unit is described mainly using the remote control.
• Illustrations may differ from actual item depicted.
• Symbols:
Caution Indicates information that should be read before use to prevent failure
or physical damage.
Note Indicates precautions and supplementary information that should be
read before using the unit.
& References another page or pages that provide additional information.
Trademarks
The Bluetooth® word mark and logos are registered trademarks owned by Bluetooth SIG, Inc. and
any use of such marks by Yamaha Corporation is under license. Other trademarks and trade
names are those of their respective owners.
Accessories
Remote control FM antenna
(for CRX-B370)
Batteries (x 2)
(AA, R6, UM-3)
DAB/FM antenna
(for CRX-B370D)
(For CRX-B370D)
The unit supports DAB/DAB+ tuning.
En 9
What you can do with this unit
Compact and easy to
use with high quality
sound
Sound quality can be adjusted to
suit individual preferences.
(& p. 29 Adjusting sound quality)
10 En
Bluetooth makes it easy
to operate remotely
The unit turns on automatically when
a Bluetooth connection is established.
(& p. 20 Playing music via Bluetooth®
connection)
Greater music
enjoyment
The unit is equipped with a
digital optical input jack and a
stereo mini-jack that enable
connection to external devices.
(& p. 27 Playing music from
external devices)

Parts name
Familiarize yourself with all parts and their functions.
Front panel
1 z (Power) (& p. 17)
The front panel display turns on when the unit is turned on.
2 PHONES
Connect headphones to this jack.
Note
When headphones are connected, there is no sound from the
speakers or subwoofer.
3 USB jack (& p. 19)
4 f/h, j/g (& p. 18, 19)
PRESET </> (& p. 22, 24)
5 a/d (Play/pause) (& p. 18, 19)
6 s (Stop) (& p. 18, 19)
7 INPUT (& p. 18, 19)
Change the input source. (The selected input source is shown in the
front panel display.)
8 Disc tray (& p. 18)
9 VOLUME
Adjust the volume.
A B094 85 6 7321
0 = (Open/close the disc tray) (& p. 18)
A Front panel display (& p. 13)
B Remote control sensor
En 11

Parts name
Rear panel
SPEAKERS
RL
+
–
1 Power cord (& p. 17)
2 Service only jack
Use when the unit requires maintenances.
3 DIGITAL IN jack (optical input) (& p. 27)
4 Antenna jack (& p. 16)
CRX-B370 jack positioning differs from that shown in the illustration.
5 AUX IN jack (mini jack input) (& p. 27)
6 SUBWOOFER OUT jack (& p. 15)
7 SPEAKERS terminals (& p. 15)
12 En
DIGITAL IN DAB/FM
75Ω UNBAL.
AUX IN
SUBWOOFER
OUT
6Ω MIN./SPEAKER
71 3 4 5 62

Front panel display
Parts name
1 2 345 6 7 8
1 Multi information display
Show various information, such as music information and
the radio frequency.
Characters shown in the front panel display are
alphanumerics only.
2 TUNED indicator
Glows when the unit is receiving a signal from an FM
station.
3 2nd indicator
Glows when a secondary DAB station is played.
4 STEREO indicator
Glows when the unit is receiving a signal from an FM
stereo broadcast.
TUNED 2nd
aaaaaaaa
STEREO
vx
MUTE
SLEEP
ALL
1
$
aaaaaaaaaaaaaaaa
5 MUTE indicator
Glows when the sound is muted (& p. 14).
6 SLEEP indicator
Glows when the sleep timer is set (& p. 17).
7 Shuffle/repeat indicator
Glows when the shuffle or repeat function is enabled for
songs in a CD or USB memory device.
8 $ Bluetooth indicator
Show the status of Bluetooth connection.
Note
Changing display brightness
Each press of the DIMMER button on the remote control
(& p. 14) changes the brightness: bright (default), mid dim, or
dim.
En 13
Parts name
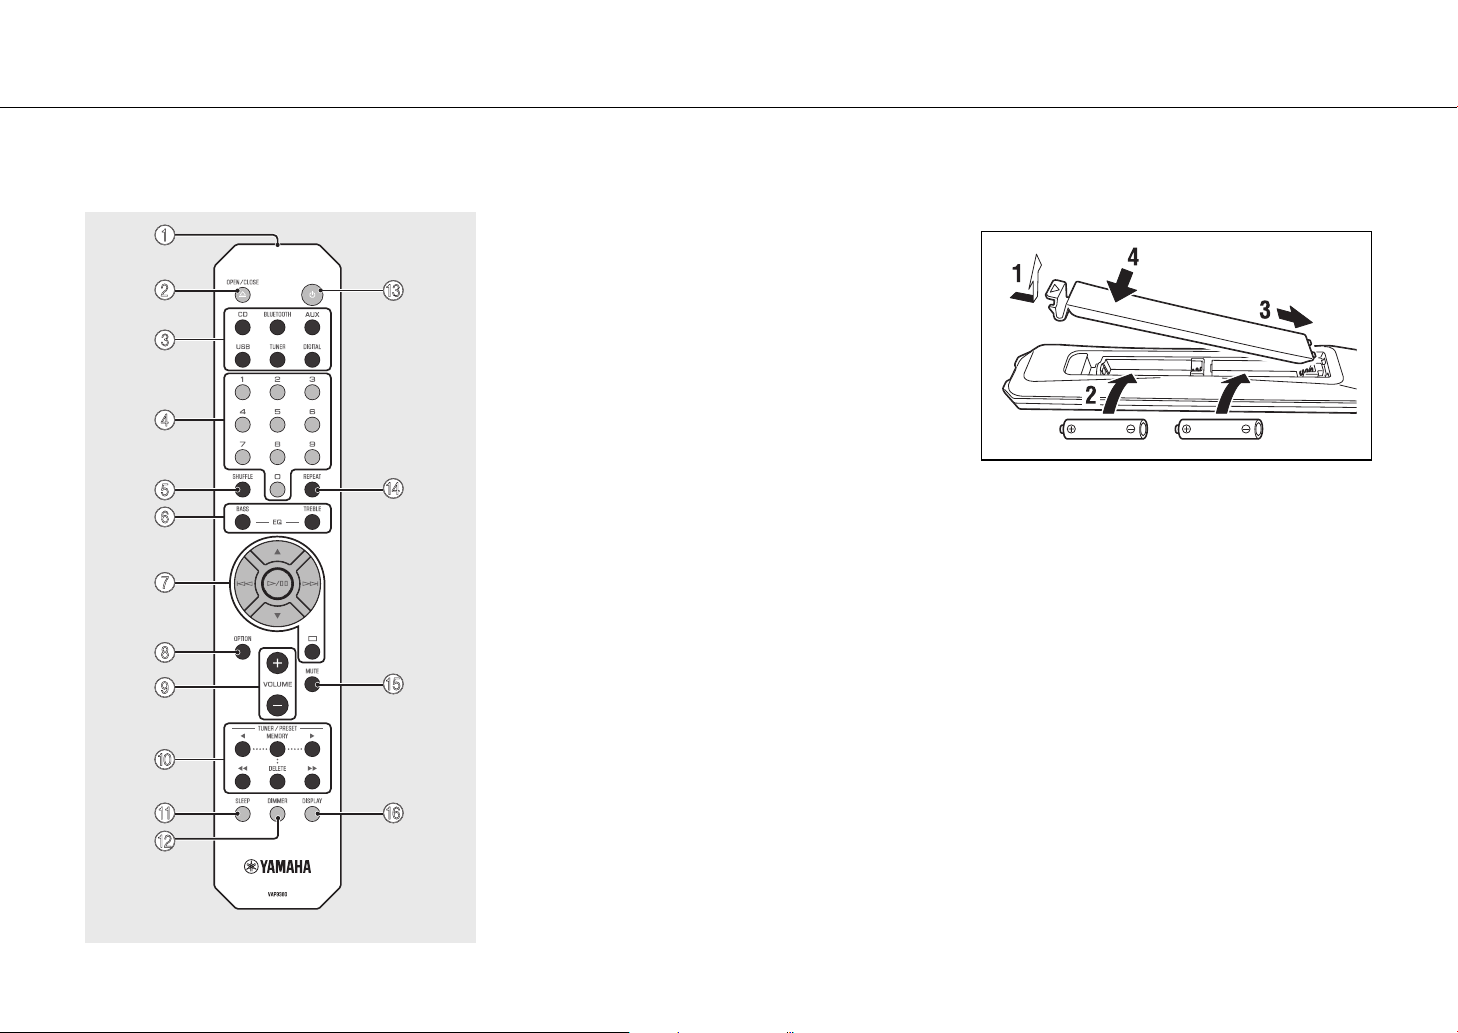
Remote control
1
2
3
4
5
6
7
8
9
0
A
B
C
D
E
F
1 Infrared signal transmitter
2 OPEN/CLOSE = (Open/close the disc tray)
(& p. 18)
3 Input source buttons
Switch the input source.
4 Numeric buttons (& p. 18)
5 SHUFFLE (& p. 28)
6 BASS, TREBLE (& p. 29)
7 Audio control, cursor control buttons (& p. 18,
19)
8 OPTION (& p. 30)
9 VOLUME +/–
Adjust the volume.
0 TUNER/PRESET (& p. 22, 24)
A SLEEP (& p. 17)
B DIMMER (& p. 13)
C z (Power) (& p. 17)
D REPEAT (& p. 28)
E MUTE
Turn mute on or off.
F DISPLAY (& p. 29)
Installing batteries
Check the “+” and “-” of the batteries and insert them in the
correct directions.
Note
Change both batteries when the operation range of the
remote control decreases.
14 En
Preparations
Connect speakers, the antenna, etc. and turn the unit on.
Do not connect the power cord of the unit until you have finished connecting all cables.
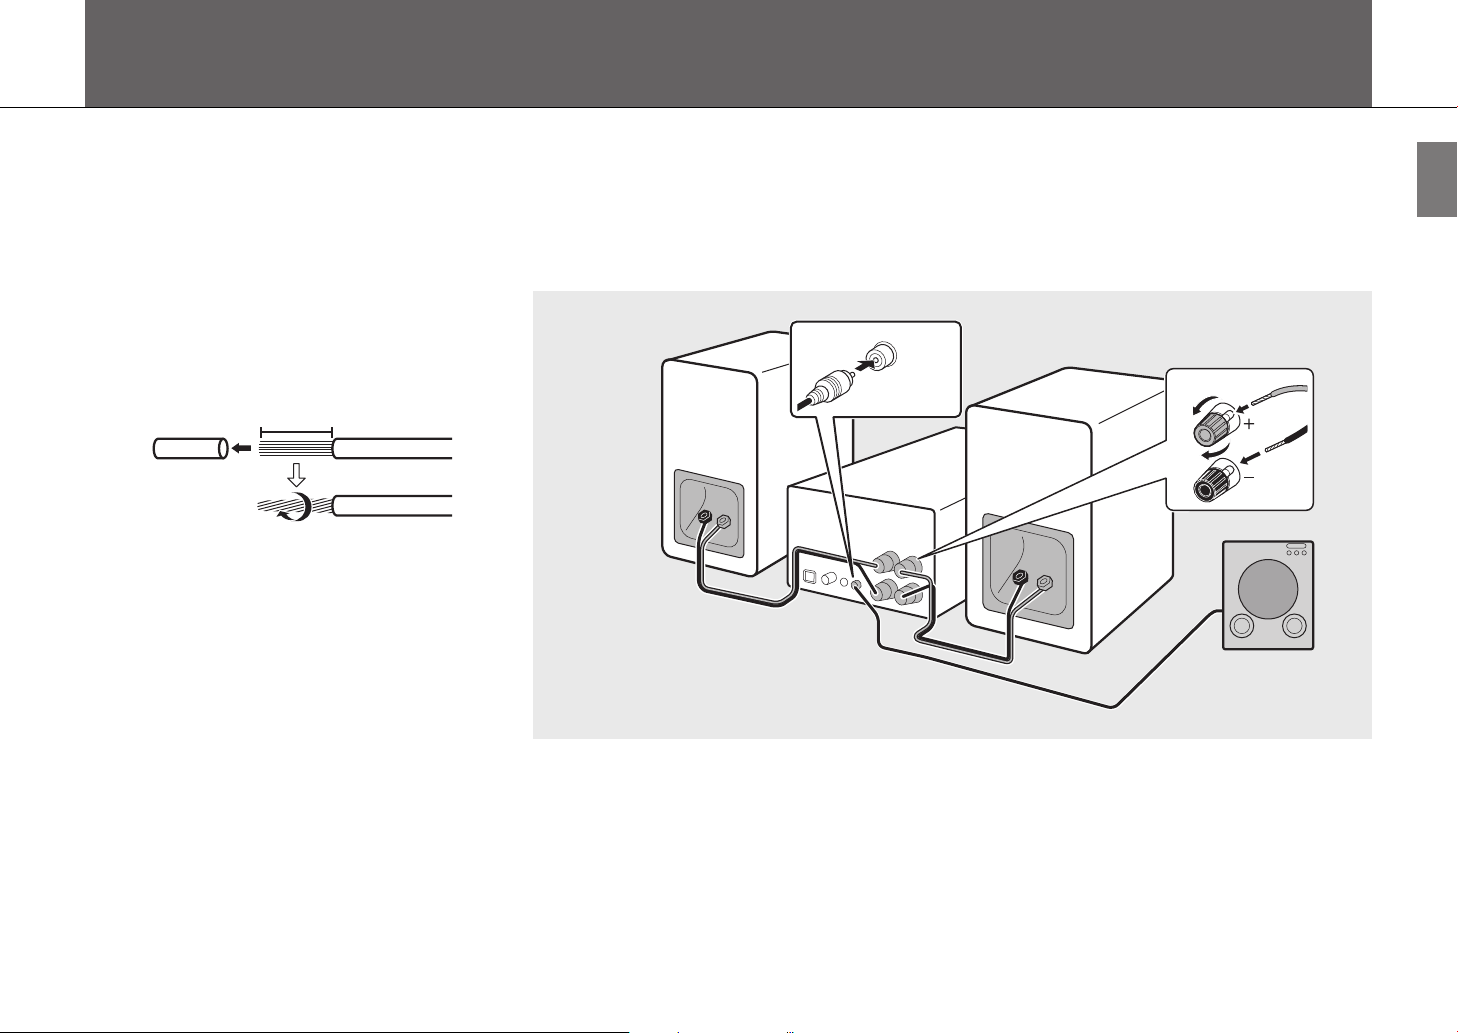
Connecting speakers
1 Remove the insulation from the ends
of the speaker cables to expose the
bare wires.
15 mm (5/8 in.)
2 Connect speakers to the unit, as the
illustration shows.
• Prepare speakers, subwoofer and speaker cables
separately.
• See documentation provided with the speakers
for more information.
Right speaker
Speaker cable
SUBWOOFER
OUT
Left speaker
Monaural pin cable
1
3
2
Subwoofer
Caution
• If the bare speaker wires touch each other or any metal part of the unit, it could damage the unit and/or the speakers.
• Use speakers of at least 6 Ω impedance.
Note
• Make sure that left and right (L, R) connections and polarity (red: +, black: -) are correct. If connections are incorrect, the sound will
be unnatural.
• You can also connect a subwoofer to the unit (it must have a built-in amplifier).
En 15
Preparations
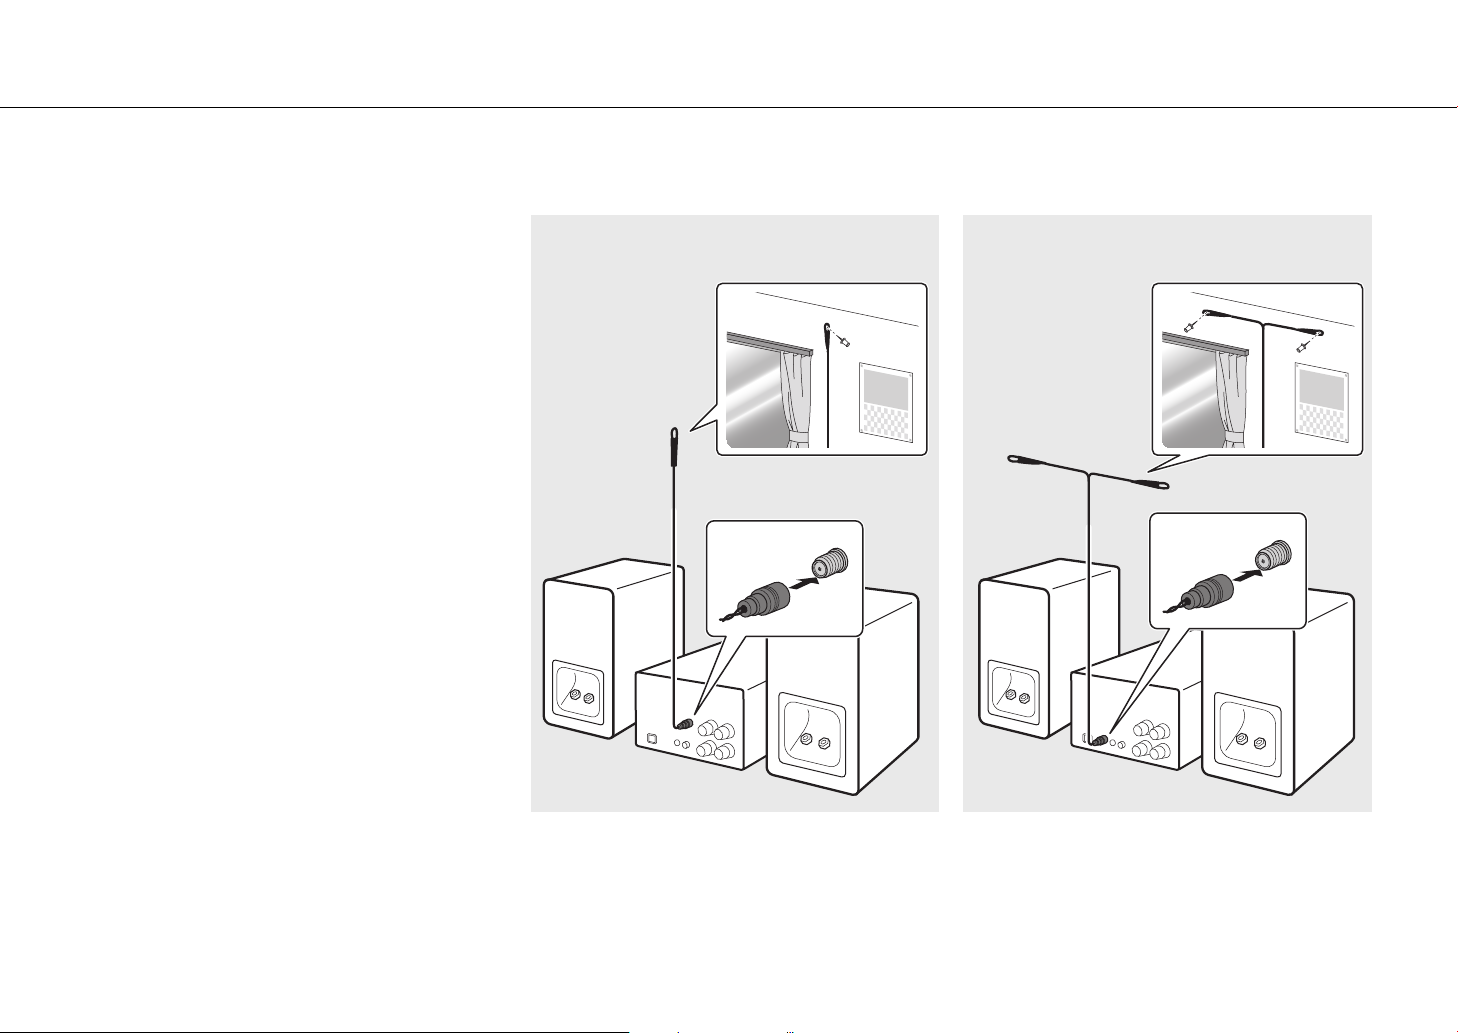
Connecting the antenna
1 Connect the supplied antenna to the
unit.
2 Install it with pins where the unit can
obtain good reception.
CRX-B370 CRX-B370D
2
Supplied antenna
ANTENNA
FM75Ω
UNBAL.
1
Supplied antenna
2
DAB/FM
75ΩUNBAL.
1
16 En
Note
• Be sure to stretch out the antenna as the illustration shows.
• If radio reception with the supplied antenna is not satisfactory, an outdoor antenna (sold separately) may improve reception.

Preparations
Turning on the power
Plug the power cord into a power outlet, and press z.
• The unit turns on.
• Press z again to turn the unit off (standby mode).
1
Within 6 m (20 ft)
2
Reducing power consumption
Auto standby
The unit will automatically enter standby mode (auto standby) if in any of the following
situations:
• BLUETOOTH, CD, or USB is selected as the input source, but no audio is played, and no
operations are performed, for more than 20 minutes.
• An input source other than above is selected, but no operations are performed for
more than 8 hours.
See “Option menu” (& p. 30) to disable the auto standby function.
Using the sleep timer
You can set the time after which the unit automatically enters standby mode. The time can
be selected from 120/90/60/30 min., or OFF.
Press SLEEP repeatedly to select the time.
The SLEEP indicator lights up when the sleep timer is set.
SLEEP
Note
• To cancel the sleep timer, press SLEEP again.
Eco standby
The unit minimizes power consumption in eco standby mode. Disable the BT Standby
(Bluetooth standby) function to enable eco standby (& p. 30).
En 17
Listening to music
Listening to CDs
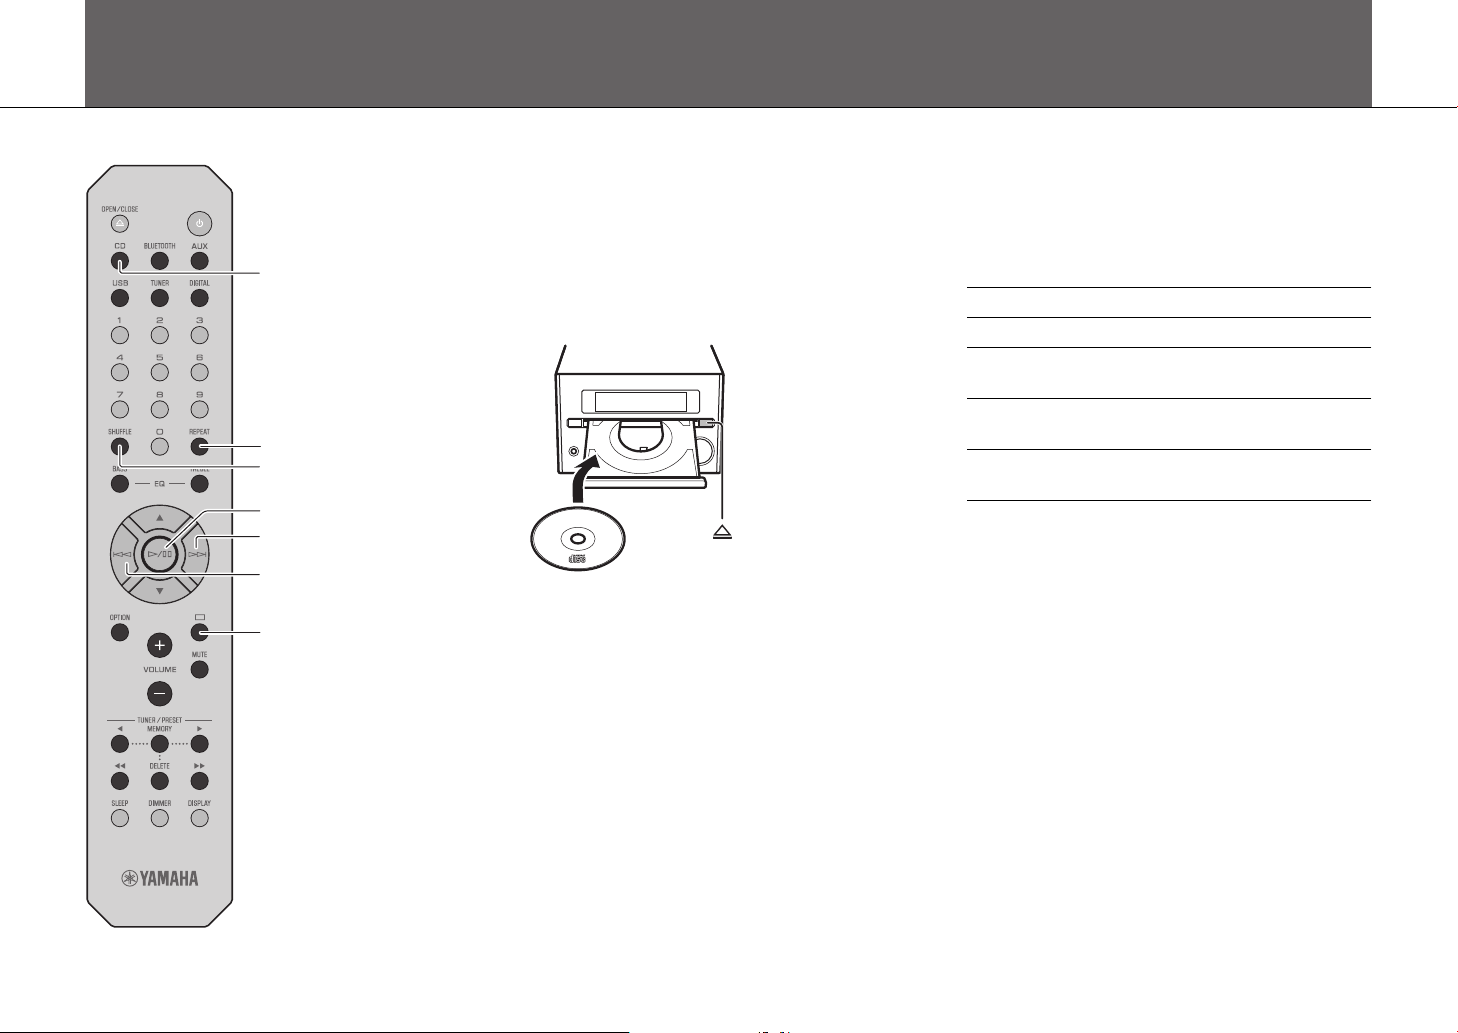
CD
REPEAT
SHUFFLE
a/d
g
f
s
1 Press CD on the remote control.
2 Set a CD in the disc tray.
Press = to open/close the disc tray.
3 Press a/d.
Playback starts.
Use the following buttons to control audio playback. A song
can also be selected using the numeric buttons on the
remote control.
a/d Play/pause
s Stop
f
g
SHUFFLE/
REPEAT
Note
• This unit allows playback of audio CDs, and data CDs in which MP3/
WMA files are recorded. For details on playable CDs, see “Supported
devices/media and file formats” (& p. 36).
• When CD playback is stopped, playback will resume from the
beginning of the song last played. Pressing s (stop) while
playback is stopped will clear resume playback.
• You can cancel the song number selected with the numeric
buttons by pressing s (stop).
• Music files stored on a data CD can be played using the same
operations used to play music stored on a USB memory device
(& p. 19).
• If you turn off the unit with CD selected as the input source and a
CD set in it, the unit automatically plays back the set CD next time
you turn on the unit.
Skip to the beginning of the song being
played back. Press and hold to fast rewind.
Skip to the next song. Press and hold to fast
forward.
& p. 28
18 En
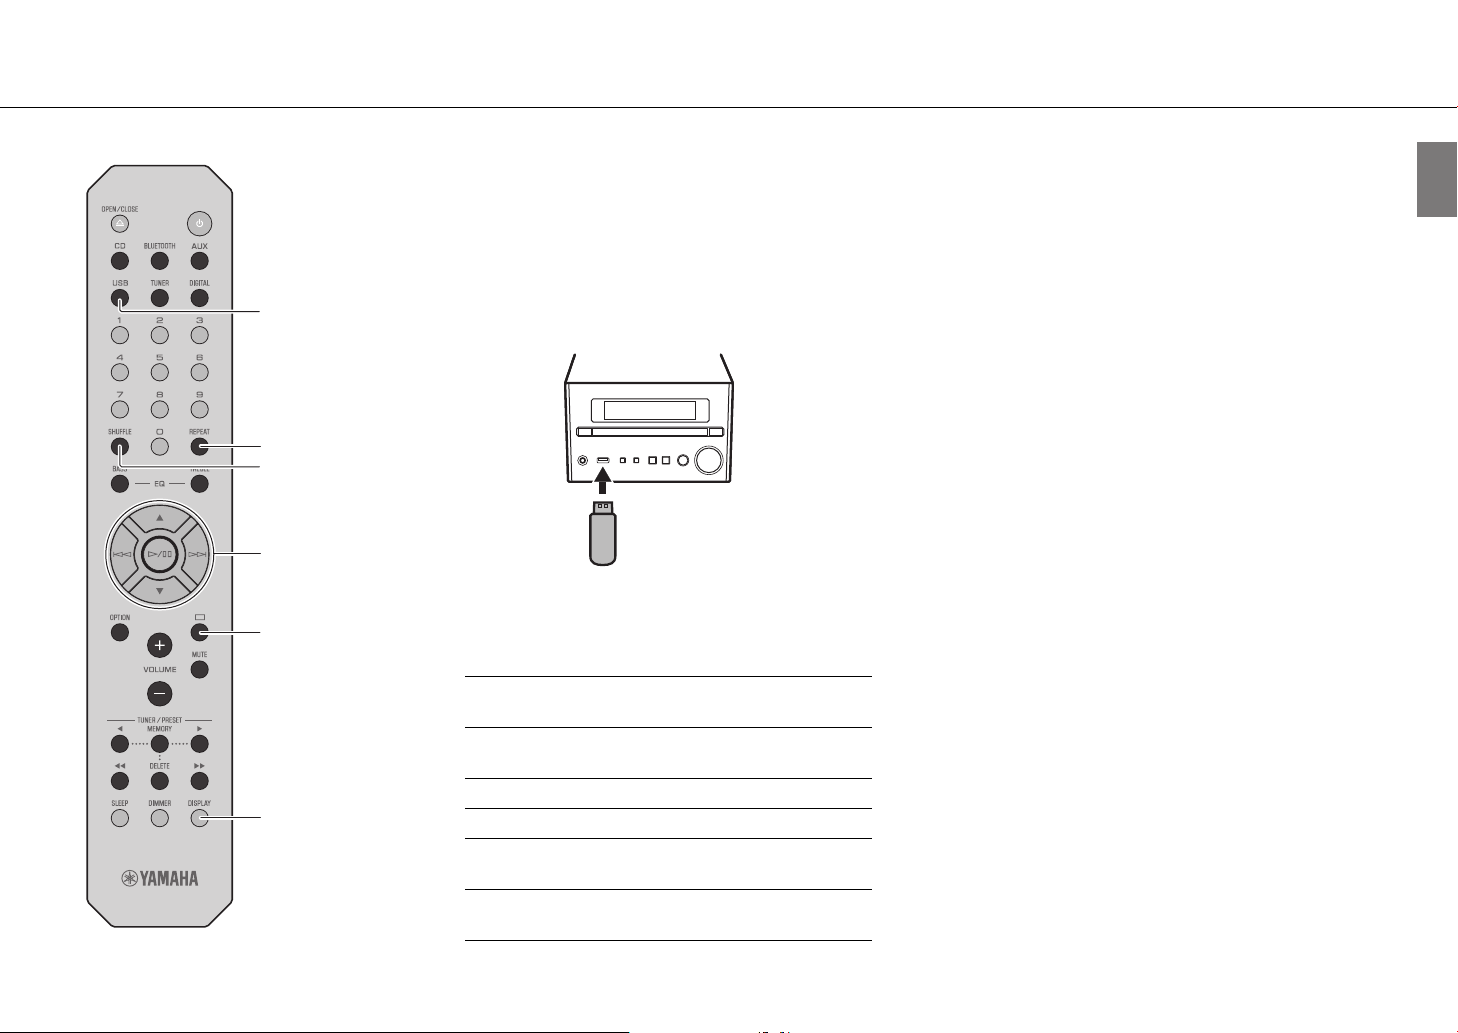
Playing music on USB memory devices
Listening to music
USB
REPEAT
SHUFFLE
w
q
/
a
d
/
g
f
s
DISPLAY
1 Press USB on the remote control.
2 Connect a USB memory device to the USB
jack.
3 Select a song.
Use the following buttons to control audio playback.
q
w
a/d, gConfirm the selected item and proceed to
f Return to the previous item.
s Stop
SHUFFLE/
REPEAT
DISPLAY
Select a folder.
the next level, or start/pause playback.
& p. 28
Display information about the content
being played (& p. 29).
Note
• This unit allows playback from USB memory devices on which
music files are saved. For details on playable USB memory devices,
see “Supported devices/media and file formats” (& p. 36).
• Some USB memory devices may not work properly even if they
meet the requirements. Playability of and power supply to all USB
memory devices are not guaranteed.
• Stop playback before disconnecting the USB memory device.
• A USB memory device is automatically charged as long as it is
connected to the unit except when the unit is in standby mode.
However, some devices may not charge when connected.
• Connect a USB storage device directly to the USB jack of the unit. Do
not use extension cables.
En 19
Listening to music
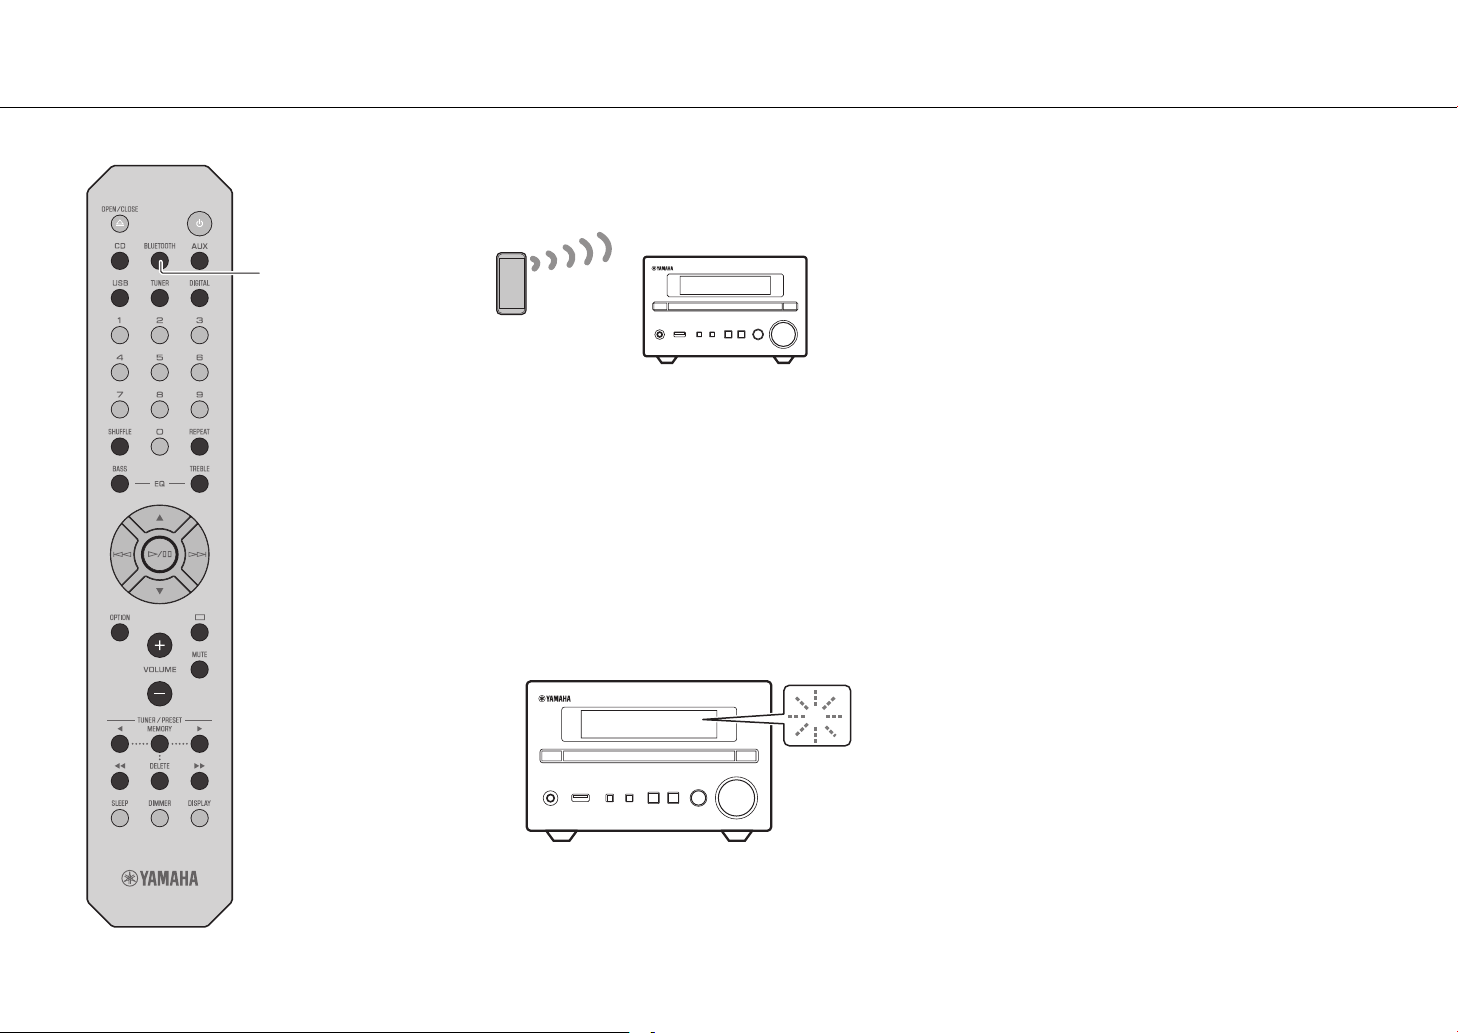
BLUETOOTH
Playing music via Bluetooth® connection
Note
• Decrease the volume of the unit before playback. Otherwise,
playback volume may be too loud.
• If a Bluetooth device has been connected before, the unit will
connect to the last connected device when BLUETOOTH on the
Bluetooth device
This unit
1 Enable the Bluetooth function on your
Bluetooth device.
remote control is pressed.
• If the unit is connected to another device via Bluetooth connection,
press and hold BLUETOOTH at least three seconds to terminate that
connection before connecting to the target device.
• If a passkey is required during the Bluetooth connection, enter the
number “0000.”
• See documentation provided with your Bluetooth device for more
information on Bluetooth connection.
20 En
2 Press BLUETOOTH on the remote control.
3 Select this unit from the Bluetooth device
list on your Bluetooth device.
The $ indicator glows when a connection is established.
$
4 Play music using your Bluetooth device.
Unable to connect the unit to a Bluetooth device
If a Bluetooth connection was not established after following the
instructions shown at left, try the following.
1 If the Bluetooth device has been connected to the unit before,
delete the unit from the list of devices registered with your
Bluetooth device.
2 Press and hold BLUETOOTH on the remote control for at least
three seconds.
- “Pairing” will be shown in the front panel display.
3 Select this unit from the Bluetooth device list on your Bluetooth
device.
- The $ will glow in the front panel display when a connection is
established.
Listening to music
Listening to DAB stations (CRX-B370D only)
Connect the antenna supplied with the unit (& p. 16) to receive DAB stations.
TUNER
a/d
q/w
OPTION
/rr
ee
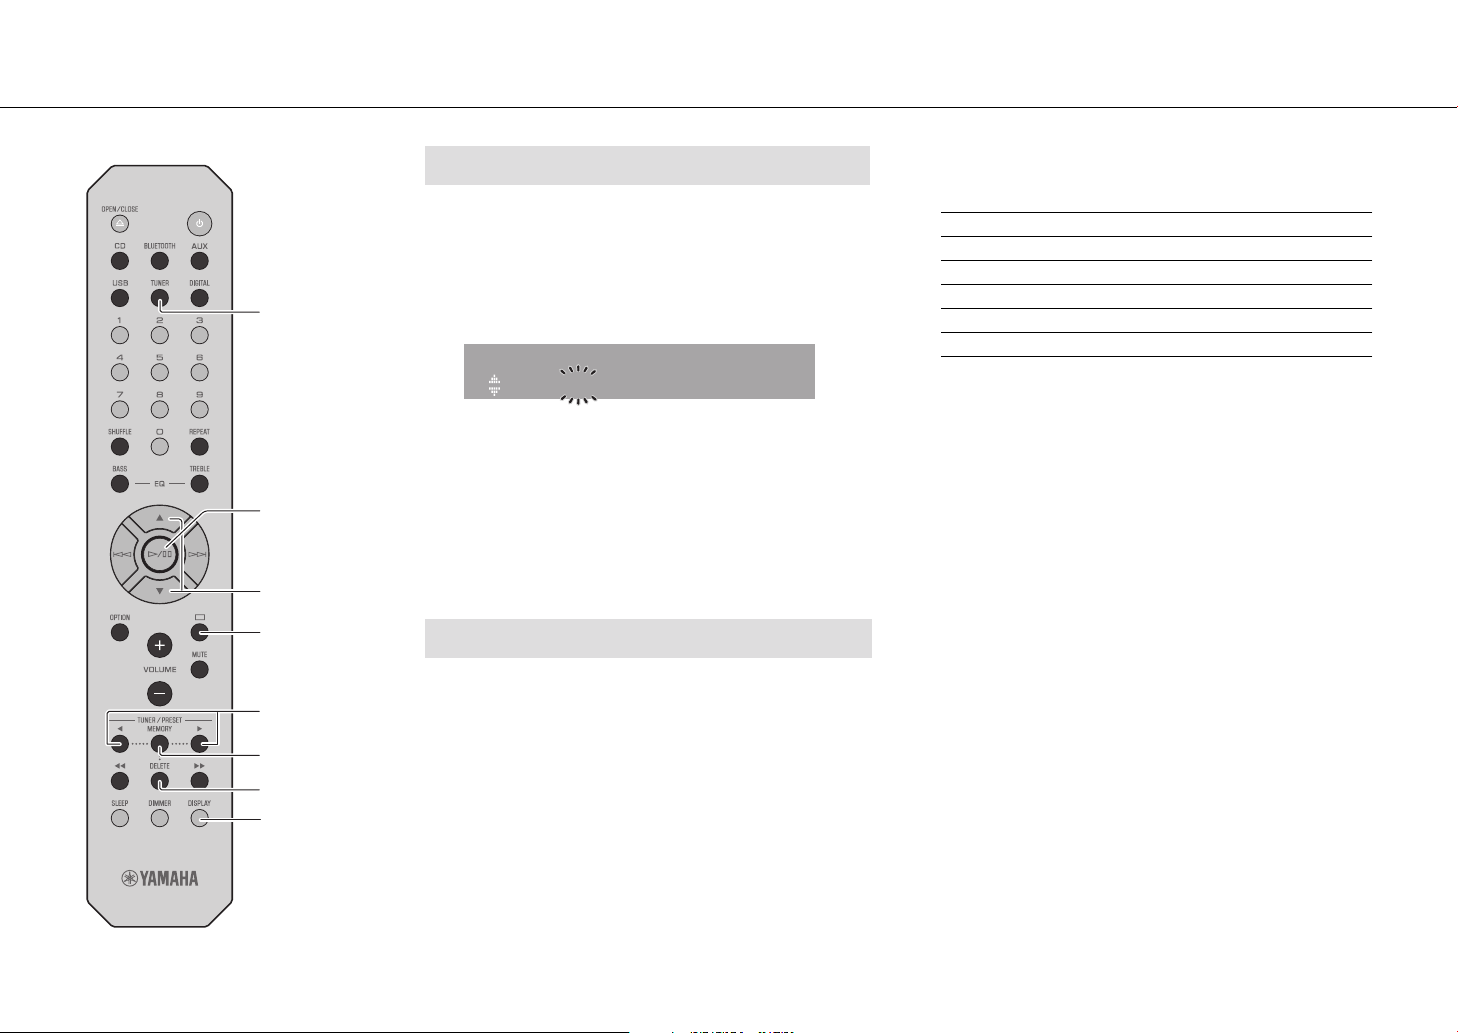
Initial scan
Press TUNER repeatedly to select [DAB].
• Initial scan starts automatically when you select [DAB] for the
first time.
• When scanning is completed, the number of receivable DAB
stations is shown in the front panel display momentarily, and
the first station stored is played.
Tuning in DAB stations
1 Press TUNER repeatedly to select [DAB].
When the unit cannot receive the DAB signal, “Off Air” is
shown in the front panel display.
2 Press ee /rr to select a DAB station.
DAB
STATION1
TUNED 2nd
STEREO
Note
• Initial scan is also available from the option menu.
1 Press OPTION when DAB is selected as the input source.
- The option menu is shown in the front panel display.
2 Press q/w to select [Initial Scan] and press a/d.
- Initial scan starts and finishes automatically.
• If an initial scan is performed, stored DAB station information and
preset DAB stations are cleared.
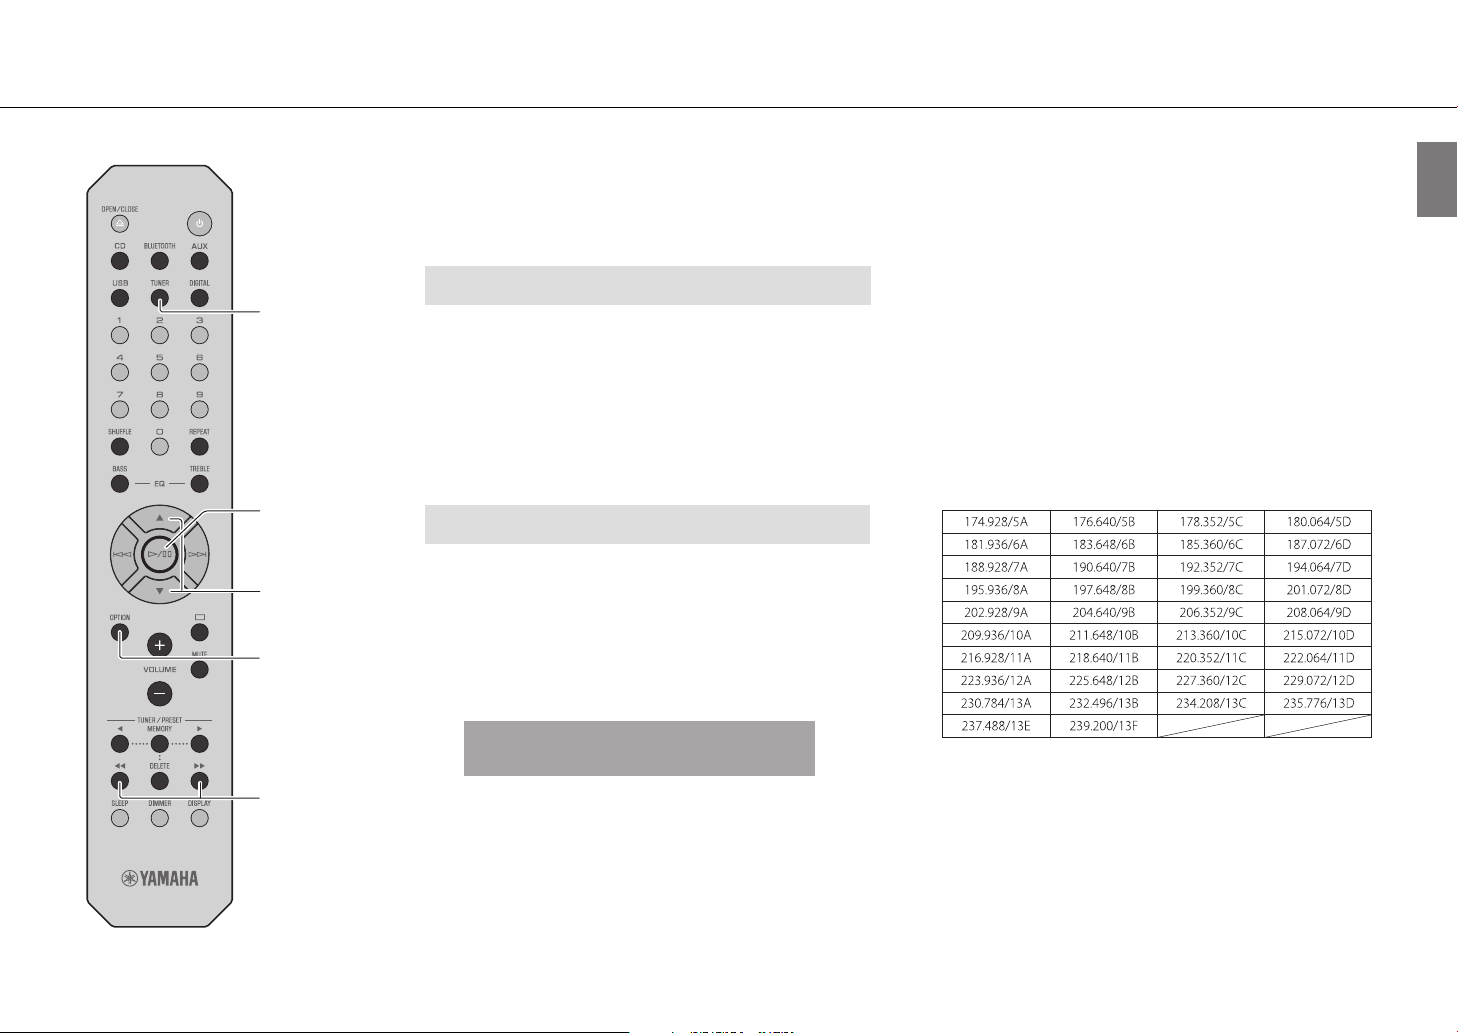
• This unit can receive only Band III DAB frequencies.
Frequency in MHz/Channel label
En 21
Listening to music
TUNER
a/d
q/w
s
e
/r
Presetting DAB stations
Use the preset function to store your favorite 30 DAB stations.
1 Tune in a DAB station (& p. 21) and press
MEMORY.
The preset number flashes in the front panel display.
Memory
DAB01 Station1
2 Press q/w to select the desired preset
number.
3 Press a/d to complete presetting.
To cancel the DAB preset setting, press s.
Selecting preset DAB stations
1 Press TUNER repeatedly to select [DAB].
Note
• DAB station information shown in the front panel display is
switched in the following order each time DISPLAY is pressed.
STATION (default)
DLS (Dynamic Label Segment)
ENSEMBLE
CHANNEL/FREQ (Channel label and frequency)
SIG.Q. (signal quality)
AUDIO FORMAT
Deleting a preset station
1 Press and hold DELETE for at least two seconds with DAB
selected as the input source.
- The preset number flashes in the front panel display.
2 Press q/w to select the preset number for the station to be
deleted.
3 Press a/d.
- The station assigned to the selected preset number is deleted.
22 En
MEMORY
DELETE
DISPLAY
2 Press e/r to select a preset station.
a/d
q/w
Listening to music
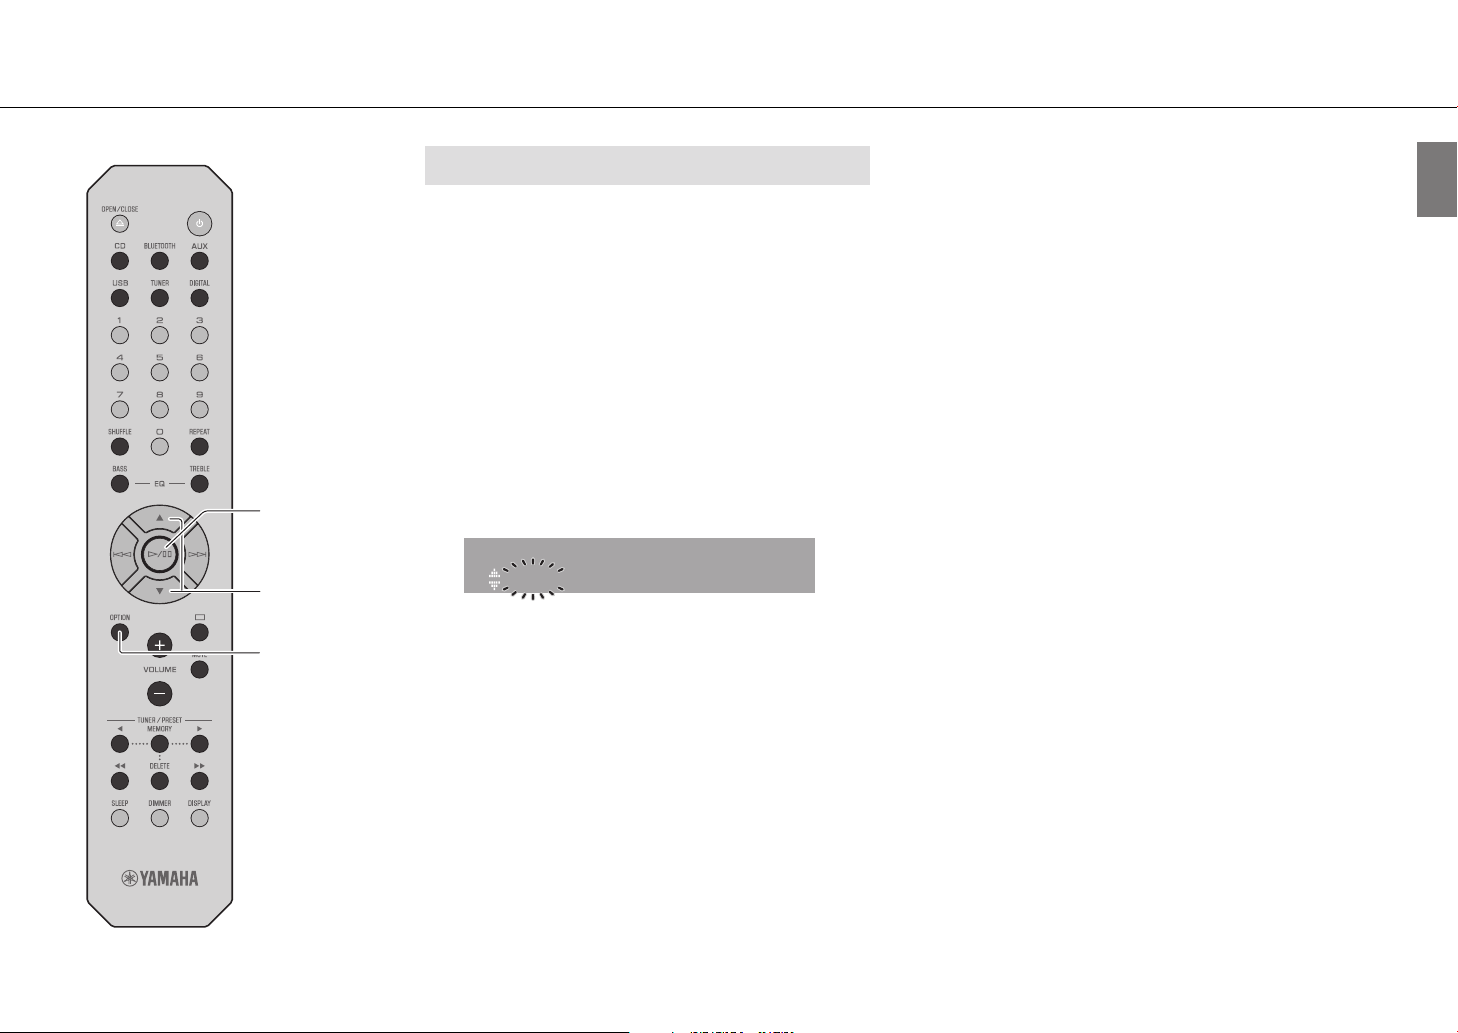
Confirming the reception
You can confirm the DAB signal level. This is useful when setting
up the antenna.
1 Press OPTION when DAB is selected as the
input source.
The option menu is shown in the front panel display.
2 Press q/w to select [DAB Tune Aid] and
press a/d.
3 Press q/w to change the channel label.
The measured DAB signal reception level is displayed.
Tune Aid
12C Level: 90
The level is from 0 (none) to 100 (best).
OPTION
4 Press OPTION to exit the option menu.
Note
• When the DAB signal is weak in [Tune Aid], try adjusting the
position of the antenna to obtain good reception.
En 23
Listening to music
Listening to FM radio stations
Connect the antenna supplied with the unit (& p. 16) to receive FM stations.
TUNER
s
MEMORY
ee /rr
Tuning in FM stations
1 Press TUNER.
2 Press and hold ee or rr until automatic
tuning starts.
Automatic tuning stops when a station is tuned in.
FM
87.50MHz
Note
• If station reception is weak, tune into a station manually by pressing
ee /rr repeatedly. Sound will be heard in monaural.
TUNED
STEREO
Presetting FM stations
Auto preset
The unit tunes in stations with good reception and presets them
automatically.
1 Press TUNER.
2 Press and hold MEMORY at least two
seconds.
3 Press MEMORY.
Auto preset starts, and when it finishes, “Completed!” is
shown in the front panel display.
Note
• Auto preset replaces all stations currently stored with new stations.
• Up to 30 FM stations can be preset.
• Press s to cancel Auto preset.
24 En
Listening to music
TUNER
a/d
/w
q
s
e/r
Manual preset
1 Tune into a station you want to preset
(& p. 24).
2 Press MEMORY.
The preset number flashes in the front panel display.
Memory
FM01 87.50MHz>
3 Press q/w to select the desired preset
number.
4 Press a/d to preset the station.
Note
• To cancel manual preset setting, press s.
Selecting preset FM stations
1 Press TUNER.
2 Press e/r to select a station.
The number of a registered preset can also be selected using
the numeric buttons.
Note
Deleting a preset station
1 Press and hold DELETE at least two seconds when FM is selected
as the input source.
- The preset number flashes in the front panel display.
2 Press q/w to select the preset number of the station to be
deleted.
3 Press a/d.
- The station in the selected preset number is deleted.
MEMORY
DELETE
En 25

Listening to music
Radio Data System (U.K. and Europe models only)
The unit can receive Radio Data System information.
Press DISPLAY when the input source is FM.
Each press of the button changes the information displays shown
below.
PService (Program Service)
PTY (Program Type)
RT (Radio Text)
CT (Clock Time)
Frequency
Note
• If the signal transmission of the Radio Data System station is too
weak, this unit may not be able to receive Radio Data System
information completely. In particular, RT (Radio Text) information
uses a lot of bandwidth, so it may be less available compared to
other types of information.
26 En
DISPLAY
Playing music from external devices
Listening to music
z
AUX
DIGITAL
This unit allows playback from external devices. Use the jacks (DIGITAL IN or AUX IN) according to the device to be
connected (& p. 12).
1 Unplug the power cord of the unit and
connect the external device to the unit.
Use cables sold separately for connection.
2 Plug the power cord of the unit back into
the wall outlet and press z to turn the unit
on.
3 Press AUX or DIGITAL to select the input
source.
4 Play the connected external device.
See documentation provided with the external device for
information on playback.
Note
• Decrease the volume of the unit and the connected external
device before connection. Otherwise, playback volume may be
too loud.
• See documentation provided with the external device for more
information on connecting devices.
DIGITAL IN
DIGITAL IN DAB/FM
AUX IN
75Ω UNBAL.
Digital optical
cable
SUBWOOFER
OUT
SPEAKERS
RL
+
–
6Ω MIN./SPEAKER
AUX IN
3.5mm stereo
mini-plug cable
Audio device equipped
with an optical output jack
Portable music player, etc.
En 27
More on playback
Features such as shuffle/repeat playback, displaying song information, etc. make this unit even more convenient to use.
Shuffle/Repeat playback
Operation is the same for playback of content from USB memory devices and CDs.
REPEAT
SHUFFLE
Shuffle (Random) playback
Press SHUFFLE during playback.
The shuffle indicator in the front panel display switches as shown
below each time SHUFFLE is pressed.
x Shuffle folders*
xALL Shuffle all songs
Goes off The shuffle function is not applied.
* The range of shuffle depends on the media being played back.
Repeat playback
Press REPEAT during playback.
The repeat indicator in the front panel display switches as shown
below each time REPEAT is pressed.
v1 Repeat the song being played.
v Repeat folders*
vALL Repeat all songs
Goes off The repeat function is not applied.
* The range of repeat depends on the playback media.
28 En
More on playback
BASS
TREBLE
a/d
q/w
Playback information
While content from a USB memory device or CD is being played,
the song title, elapsed time, etc. can be shown in the front panel
display.
Press DISPLAY during playback.
Album
Meteora
The display switches in the order shown below each time
DISPLAY is pressed.
Data CD/USB CD
1
Song title
Artist name Remaining time of the song
Album title Remaining time of the disc
Playing time Song title
1
*
If the song title cannot be recognized, the file name may be
displayed.
2
*
Only when an audio CD is played.
3
*
Only when an audio CD encoded with information that can be
displayed is played.
*
Playing time
Artist name
Album title
*
1,*3
*
2
*
2
*
3
*
3
Adjusting sound quality
Adjusting tones (default in bold face)
Use BASS and TREBLE on the remote control to adjust the level at
which high (treble) and low (bass) tones are output while
listening to sound.
(-5 to 0 to +5)
1 Press BASS or TREBLE.
2 Change the level with q/w and press a/d.
Adjusting balance (default in bold face)
Use the option menu to adjust the volume balance of the left and
right speakers (& p. 30).
This setting is not applied when using headphones.
(Lch. +5 to --center-- to Rch.+5)
DISPLAY
Note
• Characters shown in the front panel display are alphanumerics only.
En 29
More on playback
Option menu
q/w
a
d
/
f
OPTION
The option menu allows you to configure the unit to suit how you
will use it.
1 Press OPTION.
The option menu list is shown in the front panel display.
Refer to “Option menu list” (& p. 30).
2 Select a desired option menu with q/w and
press a/d.
Option
BT Standby
3 Change the setting with q/w and press
a/d.
• Repeat step 3 if there is a sub menu.
• Press f to cancel the setting and return to the
previous level.
• Repeat steps 2 and 3 if you want to set another menu
item.
4 Press OPTION to exit the option settings.
Option menu list
Menu Default Function
Scan all receivable DAB
Initial Scan* (& p. 21)
DAB Tune Aid*
(& p. 23)
Balance (& p. 29) center
AutoPowerStdby
(& p. 17)
BT Standby
(Bluetooth standby)
Bluetooth On
InitializeSet
* Only when a DAB station is tuned in (CRX-B370D).
frequencies and register
them in the unit.
Show the level of received
DAB signal.
Adjust the volume balance of
the left and right speakers.
Set the unit to enter standby
On
mode automatically.
When a Bluetooth device is
connected to this unit while
the unit is in standby mode,
On
the unit will be turned on
automatically.
Enable/disable the Bluetooth
function.
Reset to the factory default
settings.
30 En

Troubleshooting
Refer to the table below when the unit does not function properly. If your problem is not listed below or if the instruction below does not help, turn off the unit,
disconnect the power cord, and contact the nearest authorized Yamaha dealer or service center.
First, check that the connectors of each cable are securely inserted in to jacks on each device. Check also that the power cord is plugged into an outlet.
General
Problem Cause Solution
The power cord is not properly connected. Connect the power cord firmly.
The unit enters the standby mode soon
after the power is turned on.
The unit does not operate properly.
No sound.
Sound is heard from the speaker on one
side only.
Noise is heard.
The power suddenly turns off.
There is noise interference from digital or
high-frequency equipment.
The internal microcomputer has frozen due to an external electrical shock
(lightning, excessive static electricity, etc.) or a drop in power supply
voltage.
No appropriate input source has been selected.
Speaker connections are not secure. Secure the connections (& p. 15).
The volume is minimum or mute. Turn up the volume.
The external device or speakers are not connected properly.
This unit is too close to digital or radio-frequency equipment. Move this unit away from such equipment.
The audio cable used to connect the unit and external device may be
defective.
The sleep timer may be set (& p. 17).
Auto Power Standby function is activated (& p. 17).
This unit is too close to the digital or high-frequency equipment. Place this unit farther away from such equipment.
Press and hold z on the front panel for more than 10 seconds to initialize
and reboot the unit. If the problem persists, unplug the unit from the
electrical outlet, wait for at least 30 seconds, and then plug the unit into the
electrical outlet again.
Select an appropriate input source with INPUT on the front panel or the
input source buttons on the remote control (& p. 11, 14).
Connect the external device or speaker cables properly (& p. 15, 27). If the
problem persists, the cables may be defective.
Connect the audio cable firmly. If the problem persists, use another audio
cable.
Turn on the unit and play the source again.
En 31

Troubleshooting
Problem Cause Solution
The remote control does not work or does
not function properly.
Bluetooth
Problem Cause Solution
Unable to connect the unit to a Bluetooth
device.
No sound is played, or sound is
interrupted during playback.
The remote control may be outside its operation range. Operate the remote control within its operation range (& p. 17).
The remote control sensor on this unit may be exposed to direct sunlight or
strong lighting such as an inverter type fluorescent lamp.
The battery may be worn out. Replace the batteries with new ones (& p. 14).
There are obstacles between the sensor of this unit and the remote control. Remove the obstacles.
The [Bluetooth] of the option settings is set to [Off]. Set it to [On].
The unit is already connected to another Bluetooth device.
The unit and the Bluetooth device are too far apart. Move the Bluetooth device closer to the unit.
A device that operates in the 2.4 GHz band (microwave oven, wireless
network device, etc.) is interfering with wireless communication.
The passkey for devices such as a Bluetooth adapter is not “0000”. Use a Bluetooth device with a passkey of “0000.”
The Bluetooth device does not support the Advanced Audio Distribution
Profile (A2DP).
The volume level on the Bluetooth device is set too low. Increase the volume on the Bluetooth device.
The Bluetooth device is not configured to transmit audio signal to this unit. On the Bluetooth device, select this unit as the audio output destination.
The Bluetooth connection has been terminated. Establish the Bluetooth connection again (& p. 20).
A device that operates in the 2.4 GHz band (microwave oven, wireless
network device, etc.) is interfering with wireless communication.
The unit and the Bluetooth device are too far apart. Move the Bluetooth device closer to the unit.
Change the orientation of lighting or the unit, or location of the unit.
Terminate the current Bluetooth connection, and then connect to the new
device (& p. 20).
Move the unit and Bluetooth device farther away from the device. If the
wireless LAN router supports the 5 GHz band, connect network devices to
the network using the 5 GHz band.
Use a Bluetooth device that supports A2DP.
Move the unit and Bluetooth device farther away from the device. If the
wireless LAN router supports the 5 GHz band, connect network devices to
the network using the 5 GHz band.
32 En

Disc
Problem Cause Solution
The disc may be dirty. Wipe the disc clean (& p. 36).
Playback does not start (or stops
immediately) after pressing a/d.
No sound is played, or the sound is
interrupted during playback.
The disc inserted in the unit may not be supported. Use a disc supported by the unit (& p. 36).
If the unit was moved from a cold to warm place, condensation may have
formed on the disc reading lens.
The disc may be dirty. Wipe the disc clean (& p. 36).
The disc inserted in the unit may not be supported. Use a disc supported by the unit (& p. 36).
USB memory devices
Problem Cause Solution
The unit does not detect the USB memory
device.
Folders and files in the USB memory
device cannot be viewed.
No sound is played, or the sound is
interrupted during playback.
The USB memory device is not connected to the USB jack securely.
A USB memory device in a format other than FAT16/32 format is used. Use a USB memory device with FAT16 or FAT32 format.
The data in the USB memory device is protected by encryption. Use a USB memory device without an encryption function.
The music file is not supported by the unit. Play a music file supported by the unit (& p. 37).
Troubleshooting
Wait for an hour or two until the unit adjusts to the room temperature, and
try again.
Turn off the unit, reconnect your USB memory device, and turn the unit on
again (& p. 19).
En 33

Troubleshooting
DAB reception (CRX-B370D only)
Problem Cause Solution
Cannot tune into any DAB stations. The initial scan operations were not performed. Perform the initial scan operations (& p. 21).
The initial scan operations are not
successful and [Not Found] is shown in
the front panel display.
There is noise interference (e.g. hiss,
crackle or jitter)
The DAB station information is not shown
or is inaccurate.
The DAB signals are too weak.
The positioning of the antenna is not optimal for DAB reception.
There is no DAB coverage in your area.
The antenna needs to be repositioned. Readjust the position of the antenna (& p. 16).
The DAB signals are too weak.
The DAB station may be temporarily out of service, or the DAB station
information is not provided by the DAB broadcaster.
Use the DAB Tune Aid feature to conform the best position of the antenna
(& p. 23).
Check with your dealer or WorldDMB online at http://www.worlddab.org
for a listing of the DAB coverage in your area.
Use the DAB Tune Aid feature to conform the best position of the antenna
(& p. 23).
Contact the DAB broadcaster.
FM reception
Problem Cause Solution
The antenna is not connected properly.
FM stereo reception is noisy.
The radio station may be far from your area, or the antenna input is poor.
Automatic tuning does not work. The radio station may be far from your area, or the antenna input is poor.
Cannot select a preset radio station. The preset (memory) may have been erased. Preset radio stations again (& p. 24, 25).
There is distortion, and clear reception
cannot be obtained even with a good FM
antenna or an outdoor antenna.
Multipath reflection or other radio interference may be occurring. Change the height, direction, or placement of the antenna.
Make sure the antenna is connected properly and change the position of
the antenna (& p. 16).
Use a commercially available outdoor antenna. For details, consult a
specialist store.
Use a commercially available outdoor antenna. For details, consult a
specialist store.
Use the manual tuning method (& p. 25).
34 En

Messages in the front panel display
Message Cause Solution
Access Error The unit cannot access the USB memory device.
Disc Error A disc that is not supported by the unit has been inserted. Insert a disc that is supported by the unit.
Loading... The unit is loading the specified file/content. Wait until the unit finishes loading.
No Content
No Disc
Overcurrent
Unknown The unit cannot access the USB memory device.
Unknown Disc A disc that is not recognized by the unit has been inserted. Insert a disc that can be played the unit.
USB Error
The disc or USB memory device does not contain files supported by the
unit.
The disc inserted in the unit may not be supported. Use a disc supported by the unit (& p. 36).
The disc may be dirty, or foreign matter may be attached to it.
Disc is set upside-down. Set the disc with the labeled side facing up.
The connected USB memory device is not supported by the unit. Disconnect the USB memory device, turn off the unit, and turn it on again. If
USB memory device is not connected properly.
The unit cannot play back the songs stored on the USB memory devices for
some reason.
Turn off the unit and reconnect your USB memory device. If the problem
persists, try another USB memory device.
Use a disc or USB memory device that contains files supported by the unit.
Wipe the disc clean. Alternatively, remove foreign matter adhered to the
disc.
this does not solve the problem for the USB memory device, it is not
playable on the unit.
Turn off the unit and reconnect your USB memory device. If the problem
persists, try another USB memory device.
Check if the format of files you are trying to play is supported by the unit
(& p. 37).
Troubleshooting
En 35

Supported devices/media and file formats
Supported devices/media
USB memory devices
• This unit is compatible with USB memory devices that are in FAT16 or FAT32 format. Do
not connect any other type of USB memory devices.
• USB memory devices with encryption cannot be used.
• Operation of all USB memory devices cannot be guaranteed.
Yamaha and suppliers do not accept any liability for the loss of data saved on a USB
memory device connected to the unit. As a precaution, it is recommended to make backup
copies of important files.
Discs
• This unit is designed for use with audio CD, CD-R/RW (ISO 9660 format) with any of the
following logos printed on the disc or the disc jacket.
Audio CD
CD-R/RW*
* Discs which bear one of the following.
FOR CONSUMER
FOR CONSUMER USE
FOR MUSIC USE ONLY
• 8-cm discs are playable with this unit.
Set a disc in the inner recessed area of the disc tray.
Notes on discs
• Do not set any other type of disc other than stated above in this unit. Doing so may
damage the unit.
• CD-R/RW cannot be played back unless finalized. Finalization means the process for
making a disc to be ready for playback on a compatible device.
• Some discs cannot be played back depending on the disc characteristics or recording
conditions.
• Do not use any non-standard shaped discs such as a heart-shaped disc.
• Do not use discs with many scratches or a crack on their surface, or warped/glued discs.
Handling discs
• Do not touch the surface of the disc. Hold a disc by its edge or center
hole.
• Use a soft-tipped pen when writing on the label side of a disc.
• Do not put tape, seal, glue, etc., on a disc.
• Do not use a protective cover to prevent scratches.
• Do not set foreign object on the disc tray.
• Do not set more than one disc in this unit at one time. This could cause damage to both
this unit and the discs.
• If a disc becomes dirty, wipe it with a clean, dry soft cloth from the
center out to the edge. Do not use record cleaner or paint thinner.
• Do not use any lens cleaners as they may cause malfunction.
• Do not expose discs to direct sunlight, high temperature, high
humidity, or dust.
• When a disc is not being used, remove it from this unit and store in
an appropriate case.
36 En

File format
This unit supports the following file formats.
Supported devices/media and file formats
USB
Format
*
WAV
MP3 32/44.1/48 16 8-320 2
WMA 32/44.1/48 16 8-320 2
MPEG-4 AAC-LC 32/44.1/48 16 8-320 2
FLAC
ALAC 32/44.1/48 16/24 - 2
AIFF
* Linear PCM format only
Sampling
frequency (kHz)
32/44.1/48/88.2/
96/176.4/192
32/44.1/48/88.2/
96/176.4/192
32/44.1/48/88.2/
96/176.4/192
• Digital Rights Management (DRM) files cannot be played back.
Quantization
bits (bit)
16/24 - 2
16/24 - 2
16/24 - 2
Bitrate (kbps)
Number of
channels
Disc
Format
MP3 32/44.1/48 16 8-320 2
WMA 32/44.1/48 16 8-320 2
Sampling
frequency (kHz)
Quantization
bits
Bitrate (kbps)
Number of
channels
En 37

Specifications
Input
AUX IN 3.5 mm stereo mini jack
DIGITAL IN Optical jack
Output
SUBWOOFER OUT RCA monaural jack
SPEAKERS L/R PHONES 6.3 mm in diameter
CD
Type Semiconductor laser GaAs/GaAlAs
Laser
Media CD, CD-R/RW
Audio format Audio CD, MP3, WMA
Tuner
Preset memory 30
Tuning range FM
DAB (CRX-B370D only)
Preset Memory 30
Tuning range DAB 174 MHz to 240 MHz (Band III)
Compatibility DAB/DAB+
Wave length 790 nm
Output power 7 mW
U.S.A. and Canada models: 87.5 MHz to 107.9 MHz
Other models: 87.5 MHz to 108.0 MHz
Bluetooth
Bluetooth version Ver. 4.2
Supported profile
Compatible codecs SBC, AAC
Maximum communication range 10 m (33 ft) (without interference)
Amplifier section
Maximum output power 20 W + 20 W (6 Ω, 1 kHz, 10 % THD)
Frequency response 20 Hz to 30 kHz (0±3 dB)
Total harmonic distortion ≤ 0.05 % (2.5 W/6 Ω)
General
Power supply/Frequency AC 100 to 240 V, 50/60 Hz
Power consumption 18 W
Standby power consumption
Dimensions (W × H × D) 180 × 118 × 322 mm (7-1/8 x 4-5/8 x 12-5/8 inch )
Weight 2.7 kg (5.9 lbs.)
The contents of this manual apply to the latest specifications as of the publishing date. To
obtain the latest manual, access the Yamaha website then download the manual file.
A2DP (Advanced Audio Distribution Profile)
AVRCP (Audio/Video Remote Control Profile)
Bluetooth standby off: 0.3 W (ECO)
Bluetooth standby on: 1.5 W
38 En

Table des matières
PRÉCAUTIONS D'USAGE .................................................................... 40
Introduction ........................................................................................ 44
À propos de ce mode d’emploi ....................................................................................................... 44
Marques commerciales ......................................................................................................................... 44
Accessoires .................................................................................................................................................... 44
Possibilités de cet appareil ............................................................... 45
Noms des pièces ................................................................................. 46
Face avant ...................................................................................................................................................... 46
Panneau arrière ........................................................................................................................................... 47
Afficheur du panneau avant ............................................................................................................... 48
Télécommande .......................................................................................................................................... 49
Préparations ........................................................................................ 50
Raccordements des enceintes .......................................................................................................... 50
Branchement de l’antenne ................................................................................................................. 51
Mise sous tension ...................................................................................................................................... 52
Utilisation de la minuterie de mise en veille ............................................................................ 52
Écoute de musique ............................................................................ 53
Écoute de CD ............................................................................................................................................... 53
Lecture de musique sur des dispositifs USB ............................................................................. 54
Lecture de musique via la connexion Bluetooth® ................................................................ 55
Écoute de stations DAB (CRX-B370D uniquement) ............................................................. 56
Écoute de stations de radio FM ........................................................................................................ 59
Système de diffusion de données radio
(modèles britanniques et européens uniquement) ............................................................ 61
Lecture de musique depuis un périphérique externe ....................................................... 62
En savoir plus sur la lecture ............................................................. 63
Lecture aléatoire/répétée ..................................................................................................................... 63
Informations de lecture ......................................................................................................................... 64
Réglage de la qualité sonore .............................................................................................................. 64
Menu des options ..................................................................................................................................... 65
Guide de dépannage ......................................................................... 66
Généralités ..................................................................................................................................................... 66
Bluetooth ........................................................................................................................................................ 67
Disque ............................................................................................................................................................... 68
Dispositifs USB ............................................................................................................................................. 68
Réception DAB (CRX-B370D uniquement) ................................................................................ 69
Réception FM ............................................................................................................................................... 69
Messages sur l’afficheur de la face avant .................................................................................... 70
Périphériques/supports et formats de fichier
pris en charge ..................................................................................... 71
Périphériques/supports pris en charge ....................................................................................... 71
Format de fichier ........................................................................................................................................ 72
Caractéristiques techniques ............................................................ 73
Fr 39

PRÉCAUTIONS D'USAGE
LISEZ ATTENTIVEMENT AVANT DE PROCÉDER À TOUTE
UTILISATION. VEILLEZ À SUIVRE CES INSTRUCTIONS.
Les mises en garde énumérées ci-dessous sont destinées à
prévenir les risques pour l'utilisateur et les tiers, à éviter les
dommages matériels et à aider l'utilisateur à se servir de
l'appareil correctement et en toute sécurité. Assurez-vous de
suivre ces instructions.
Après avoir consulté ce manuel, conservez-le dans un endroit sûr de façon à
pouvoir vous y reporter facilement.
• Veillez à faire inspecter ou réparer l'appareil par le revendeur auprès
duquel vous l'avez acheté ou par un technicien Yamaha qualifié.
• Yamaha ne peut être tenu responsable des dommages corporels et
matériels causés par une mauvaise manipulation de l'instrument ou
par des modifications apportées à l'appareil.
• Ce produit est conçu pour un usage courant dans les résidences
standard. Ne l'utilisez pas pour des applications nécessitant une
haute fiabilité, telles que la gestion des gestes essentiels à la vie, des
soins de santé ou des biens de grande valeur.
AVERTISSEMENT
Alimentation/cordon d'alimentation
• Ne faites rien qui pourrait endommager le cordon d'alimentation.
- Ne le placez pas à proximité d'un radiateur.
- Évitez de le plier excessivement ou de le modifier.
- Évitez de l'érafler.
- Ne placez pas dessus d'objets lourds.
L'utilisation du cordon d'alimentation en ayant le conducteur du cordon exposé pourrait
provoquer des chocs électriques ou un incendie.
• Ne chargez jamais cet appareil s'il est humide. Le non-respect de cette procédure risque
d'entraîner des chocs électriques ou une panne de circuit terminal, et provoquer un
incendie ou des dysfonctionnements.
• En cas de risque d'impact de foudre à proximité de l'appareil, évitez de toucher la fiche
d'alimentation. Le non-respect de cette consigne peut entraîner des chocs électriques.
• Assurez-vous d'utiliser l'appareil avec la tension d'alimentation appropriée, telle
qu'imprimée sur l'appareil. L'absence de raccordement à une prise secteur appropriée
pourrait provoquer un incendie, des chocs électriques ou des dysfonctionnements.
• Vérifiez périodiquement l'état de la prise électrique, dépoussiérez-la et nettoyez-la en
prenant soin de retirer toutes les impuretés qui pourraient s'y accumuler. Le non-respect de
cette consigne peut entraîner un incendie ou des chocs électriques.
• Lors de l'installation de l'appareil, assurez-vous que la prise secteur que vous utilisez est
facilement accessible. En cas de problème ou de dysfonctionnement, désactivez
immédiatement l'interrupteur d'alimentation et retirez la fiche de la prise secteur. Même
lorsque l'interrupteur d'alimentation est en position désactivée, l'appareil n'est pas
déconnecté de la source d'électricité tant que le cordon d'alimentation reste branché à la
prise murale.
• Si vous entendez le tonnerre gronder ou suspectez l'imminence d'un éclair, mettez
immédiatement l'appareil hors tension et débranchez la fiche d'alimentation de la prise
secteur. Le non-respect de cette consigne peut entraîner un incendie ou des
dysfonctionnements.
• Si vous prévoyez de ne pas utiliser l'appareil pendant une longue période de temps,
assurez-vous de retirer la fiche d'alimentation de la prise secteur. Le non-respect de cette
consigne peut entraîner un incendie ou des dysfonctionnements.
Ce contenu indique « un risque de blessures graves ou de mort ».
Laser
• Ne retirez pas le couvercle pour effectuer une réparation. Cet appareil utilise un laser. La
lumière du laser en pénétrant dans vos yeux peut entraîner une déficience visuelle. Faites
inspecter ou réparer l’appareil par le revendeur auprès duquel vous l’avez acheté ou par un
technicien Yamaha qualifié.
• Ne regardez pas directement la source de lumière laser. S’il n’y a rien pour le bloquer, cet
appareil émet un rayon laser visible. Évitez de regarder directement le laser. La lumière du
laser en pénétrant dans vos yeux peut entraîner une déficience visuelle. Lorsque la fiche
est insérée dans la prise secteur, ne placez pas vos yeux près des ouvertures du tiroir de
disque ou d’autres ouvertures, et n’essayez pas de regarder à l’intérieur de l’appareil.
40 Fr
Démontage interdit
• Ne tentez pas de démonter ou de modifier l'appareil. Le non-respect de cette procédure
risque d'entraîner un incendie, des chocs électriques, des blessures ou des
dysfonctionnements. En cas d'anomalie, veillez à faire inspecter ou réparer l'appareil par le
revendeur auprès duquel vous l'avez acheté ou par un technicien Yamaha qualifié.
Avertissement relatif à la présence d'eau
• N'exposez pas l'appareil à la pluie, ne l'utilisez pas près d'une source d'eau ou dans un
milieu humide et ne déposez pas dessus des récipients (tels que des vases, des bouteilles
ou des verres) contenant des liquides qui risqueraient de s'infiltrer par les ouvertures ou de
dégouliner. Toute infiltration de liquide tel que de l'eau à l'intérieur de l'appareil risque de
provoquer un incendie, des chocs électriques ou des dysfonctionnements. Si un liquide, tel
que de l'eau, pénètre à l'intérieur de l'appareil, mettez immédiatement ce dernier hors

tension et débranchez le cordon d'alimentation de la prise secteur. Faites ensuite inspecter
l'appareil par le revendeur auprès duquel vous l'avez acheté ou par un technicien Yamaha
qualifié.
• N'essayez jamais de retirer ou d'insérer une fiche électrique avec les mains mouillées. Ne
manipulez pas l'appareil en ayant les mains mouillées. Le non-respect de cette procédure
risque d'entraîner des chocs électriques ou des dysfonctionnements.
Prévention contre les incendies
• Ne placez pas d'objets brûlants ou de flammes nues à proximité de l'appareil, au risque de
provoquer un incendie.
Entretien et maintenance
• N'utilisez pas d'aérosols ou de produits chimiques de type aérosol contenant du gaz
combustible pour le nettoyage ou la lubrification. Le gaz combustible restera à l'intérieur de
l'appareil, ce qui peut provoquer une explosion ou un incendie.
Utilisation des piles
• Ne démontez pas la pile. Tout contact du contenu des piles avec les mains ou les yeux peut
entraîner la cécité ou provoquer des brûlures chimiques.
• Ne jetez pas les piles au feu. Cela pourrait causer l'explosion des piles et provoquer un
incendie ou des blessures.
• Ne tentez pas de recharger une pile non rechargeable. La charge risque de provoquer une
explosion ou une fuite de la pile, ce qui pourrait causer la cécité, des brûlures chimiques ou
des blessures.
• En cas de fuite du liquide des piles, évitez tout contact avec ce liquide. En cas de contact
avec les yeux, la bouche ou la peau, rincez-vous immédiatement à l'eau claire et consultez
un médecin. Le liquide présent dans les piles est corrosif et peut provoquer la cécité ou des
brûlures chimiques.
Appareil sans fil
• N'utilisez pas cet appareil à proximité d'appareils médicaux ou au sein d'installations
médicales. Les ondes radio transmises par l'appareil peuvent affecter les appareils électromédicaux.
• N’utilisez pas cet appareil à moins de 15 cm des personnes disposant d’un stimulateur
cardiaque ou d’un défibrillateur. Les ondes radio émanant de cet appareil peuvent affecter
le fonctionnement des équipements électro-médicaux tels que les stimulateurs cardiaques
ou les défibrillateurs cardiaques.
En cas d'anomalie
• Si l'un des problèmes suivants se produit, coupez immédiatement l'alimentation et retirez la
fiche d'alimentation.
- Le cordon/la fiche d'alimentation est endommagé(e).
- Une odeur inhabituelle ou de la fumée se dégage de l'appareil.
- Un corps étranger a pénétré à l'intérieur de l'appareil.
- Une brusque perte de son est survenue durant l'utilisation de l'appareil.
- L'appareil est fissuré ou endommagé.
En continuant d'utiliser l'appareil dans ces conditions, vous risquez de provoquer des chocs
électriques, un incendie ou des dysfonctionnements. Faites immédiatement inspecter ou
réparer l'appareil par le revendeur auprès duquel vous l'avez acheté ou par un technicien
Yamaha qualifié.
• Veillez à ne pas faire tomber l'appareil et à ne pas lui appliquer une pression excessive. Si
vous suspectez que l'appareil a pu être endommagé à la suite d'une chute ou d'un impact,
coupez immédiatement l'alimentation et retirez la fiche de la prise secteur. Le non-respect
de cette procédure risque d'entraîner des chocs électriques, un incendie ou des
dysfonctionnements. Faites immédiatement inspecter l'appareil par le revendeur auprès
duquel vous l'avez acheté ou par un technicien Yamaha qualifié.
ATTENTION
Ce contenu indique « un risque de blessures ».
Alimentation/cordon d'alimentation
• N'utilisez pas une prise secteur dans laquelle la fiche d'alimentation ne peut pas s'insérer
fermement. Le non-respect de cette consigne peut entraîner un incendie, des chocs
électriques ou des brûlures.
• Veillez à toujours saisir la fiche elle-même, et non le câble, pour la retirer de l'appareil ou de
la prise secteur. Si vous tirez sur le cordon, vous risquez de l'endommager et de provoquer
des chocs électriques ou un incendie.
• Introduisez complètement la fiche d'alimentation dans la prise secteur. L'utilisation de
l'appareil alors que la fiche d'alimentation n'est pas complètement insérée dans la prise
peut entraîner une accumulation de poussière sur la fiche et provoquer un incendie ou des
brûlures.
Installation
• Ne placez pas l'appareil dans une position instable afin d'éviter qu'il ne tombe ou se
renverse accidentellement et ne provoque des blessures.
• Évitez d'obstruer les orifices de ventilation (fentes de refroidissement) de l'appareil.
L'appareil possède des orifices d'aération sur sa face latérale qui est destinée à le protéger
contre l'élévation excessive de sa température interne. Le non-respect de cette consigne
risque d'entraîner une rétention de chaleur à l'intérieur de l'appareil, susceptible de
provoquer un incendie ou des dysfonctionnements.
• Lors de l'installation de l'appareil :
- Évitez de couvrir l'appareil avec un tissu.
- N'installez pas l'appareil sur une moquette ou un tapis.
- Assurez-vous de disposer l'appareil en orientant sa face supérieure vers le haut ; ne le
placez pas sur le côté ou à l'envers.
- N'utilisez pas l'appareil dans un lieu clos, mal aéré.
Le non-respect de ce qui précède risque d'entraîner une rétention de chaleur à l'intérieur de
l'appareil, susceptible de provoquer un incendie ou des dysfonctionnements. Veillez à
laisser suffisamment d'espace libre autour de l'appareil : au moins 5 cm à la surface, 5 cm
Fr 41

sur les côtés et 5 cm à l'arrière.
• N’installez pas l'appareil dans des endroits où il pourrait entrer en contact avec des gaz
corrosifs ou de l'air à haute teneur en sel ou être exposé à des fumées ou à des vapeurs
excessives. Cela pourrait provoquer des dysfonctionnements.
• Avant de déplacer l'appareil, veillez à désactiver l'interrupteur d'alimentation et à
déconnecter tous les câbles de connexion. Le non-respect de cette consigne peut entraîner
l'endommagement des câbles ou provoquer le trébuchement et la chute de l'utilisateur.
• Pour une installation correcte de l'antenne extérieure, veillez à demander au revendeur
auprès duquel vous avez acheté l'appareil ou à un technicien qualifié. Le non-respect de
cette consigne risque d'entraîner la chute de l'installation et d’entraîner des blessures.
L'installation nécessite des compétences spéciales et de l'expérience.
Perte de capacités auditives
• N'utilisez pas l'appareil de manière prolongée à un niveau sonore trop élevé ou
inconfortable pour l'oreille, au risque d'endommager irrémédiablement votre ouïe. Si vous
constatez une baisse d'acuité auditive ou que vous entendez des sifflements, consultez un
médecin.
• Avant de raccorder l'unité à d'autres appareils, mettez toutes les appareils concernés hors
tension. Et, avant de mettre tous les appareils sous/hors tension, vérifiez que tous les
niveaux de volume sont réglés sur la position minimale. Le non-respect de ces mesures
peut provoquer une perte d'acuité auditive, entraîner un risque d'électrocution ou
endommager l'appareil.
• Lorsque vous mettez le système audio sous tension, allumez toujours l'appareil en
DERNIER pour éviter d'endommager votre ouïe et les haut-parleurs. Lors de la mise hors
tension, vous devez éteindre l'appareil en PREMIER pour la même raison. Le non-respect
des consignes précédentes risque d'entraîner une déficience auditive ou d'endommager le
casque.
Entretien
• Retirez la fiche d'alimentation de la prise secteur avant de procéder au nettoyage de
l'appareil. Le non-respect de cette consigne peut entraîner des chocs électriques.
Précautions d'utilisation
• N'introduisez pas vos mains ou vos doigts à l'intérieur du logement de disque de l'appareil.
Le non-respect de cette consigne peut provoquer des blessures.
• N'insérez pas de corps étranger, tel que du métal ou du papier, à l'intérieur du logement de
disque de l'appareil. Le non-respect de cette procédure risque d'entraîner un incendie, des
chocs électriques ou des dysfonctionnements. En cas de pénétration de corps étrangers à
l'intérieur de l'appareil, coupez immédiatement l'alimentation et retirez la fiche
d'alimentation de la prise secteur et faites inspecter l'appareil par le revendeur auprès
duquel vous l'avez acheté ou par un technicien Yamaha qualifié.
• Évitez de faire ce qui suit :
- Ne vous asseyez pas sur le produit et ne le piétinez pas.
- Ne placez pas d'objets lourds sur le produit.
- Ne disposez pas le produit en pile.
- N'appliquez pas de force excessive sur les boutons, les commutateurs, les bornes
d'entrée/sortie, etc.
• Évitez de débrancher les câbles connectés afin de ne pas causer de blessures ou de
dommages matériels qui pourraient résulter de la chute de l'appareil.
• N'utilisez pas l'appareil en cas de distorsion du son. Une utilisation prolongée dans cet état
peut provoquer une surchauffe, voire un incendie.
Utilisation des piles
• Remplacez toujours toutes les piles en même temps. N’utilisez pas à la fois des piles
neuves avec des piles usagées. L'utilisation de piles neuves avec des piles usagées
pourrait provoquer un incendie, des brûlures ou une inflammation due à des fuites de
liquides.
• N'utilisez pas de piles autres que les piles spécifiées. La fuite du liquide des piles pourrait
provoquer un incendie, des brûlures ou l'apparition de flammes.
• Ne mélangez pas les types de batteries, comme les piles alcalines avec des piles au
manganèse ou des batteries de différents fabricants, ou différents types de piles du même
fabricant, car cela peut provoquer un incendie, des brûlures ou une inflammation due à des
fuites de liquides.
• Gardez les piles hors de portée des enfants. Un enfant pourrait accidentellement avaler une
batterie. Le non-respect de cette consigne peut également provoquer une inflammation due
aux fuites de liquide de la batterie.
• Ne conservez pas les piles dans une poche ou un sac contenant des pièces en métal et
évitez de transporter ou de stocker des piles avec des éléments métalliques. Cela pourrait
court-circuiter les piles, les faire exploser ou déverser leur liquide et provoquer un incendie
ou des blessures.
• Veillez à respecter la polarité (+/-) lors de la mise en place des piles. Le non-respect de ces
instructions risque de provoquer un incendie, des brûlures ou l'apparition de flammes en
raison d'une fuite du liquide des piles.
• Lorsque les piles sont déchargées ou que vous n'utilisez pas l'appareil pendant une longue
période, retirez les piles de l’appareil pour éviter toute fuite du liquide des piles.
• Avant de procéder au stockage ou à la mise au rebut des piles, veillez à isoler la zone des
bornes en appliquant dessus un ruban adhésif ou tout autre type de protection. Si vous
mélangez les piles à d'autres piles ou à des objets métalliques, vous risquez de provoquer
un incendie, des brûlures ou l'apparition de flammes dues à la fuite du liquide des piles.
AVIS
Indique les points que vous devez respecter afin d'éviter toute
défaillance, dommage ou dysfonctionnement du produit et toute
perte de données.
Alimentation/cordon d'alimentation
• Si vous prévoyez de ne pas utiliser l'appareil pendant une longue période de temps,
assurez-vous de retirer le cordon d'alimentation de la prise secteur. Même si l'interrupteur
42 Fr

[z] (veille/alimentation) a été éteint (l'écran est éteint), un courant de faible intensité
continue de circuler dans l'appareil.
Installation
• N'utilisez pas l'appareil à proximité d'autres équipements électroniques, tels qu'un
téléviseur, une radio ou un téléphone mobile. Si vous ne respectez pas cette consigne,
l'appareil, le téléviseur ou la radio risquent de provoquer des interférences.
• N'utilisez pas l'appareil dans un emplacement exposé à la lumière directe du soleil, à une
température très élevée (à proximité d'un appareil de chauffage) ou très basse, à un dépôt
de poussière excessif ou à de fortes vibrations. Le non-respect de cette consigne peut
entraîner la déformation du panneau de l'appareil, le dysfonctionnement de ses
composants internes ou l'instabilité de ses opérations.
• Installez l'appareil aussi loin que possible de tout autre équipement électronique.
Les signaux numériques de cet appareil peuvent interférer avec d'autres équipements
électroniques.
• Si vous utilisez une fonction sans fil, évitez d'installer cet appareil à proximité de parois
métalliques ou de bureaux en métal, de fours à micro-ondes ou d'autres dispositifs de
réseau sans fil.
Les obstructions pourraient raccourcir la distance de transmission.
Connexions
• En cas de connexion d'unités externes, assurez-vous de lire attentivement le mode
d'emploi de l'appareil concerné et reliez-le conformément aux instructions fournies.
La non-conformité aux instructions de manipulation peut provoquer le dysfonctionnement
de l'appareil.
• Ne connectez pas l'appareil à des unités industrielles.
Les normes des interfaces audio numériques varient selon les catégories d'usages (grand
public ou industriels). Cet appareil a été conçu pour une connexion à une interface audio
numérique destinée aux consommateurs. Toute connexion à une interface audio
numérique à usage industriel risque non seulement de provoquer le dysfonctionnement de
l'appareil mais peut aussi endommager les haut-parleurs.
Manipulation
• Ne placez pas de produits en vinyle, en plastique ou en caoutchouc sur l'appareil. Le nonrespect de cette consigne peut provoquer une décoloration ou une déformation du panneau
de cet appareil.
• Si la température ambiante change radicalement (comme pendant le transport de l'appareil
ou dans des conditions de surchauffe ou de refroidissement rapides) et que de la
condensation se forme dans l'appareil, laissez-le hors tension pendant plusieurs heures
jusqu'à ce qu'il soit complètement sec avant de le réutiliser. L’utilisation de l'appareil en cas
de formation de condensation peut entraîner son dysfonctionnement.
lavage chimique peut causer la décoloration ou la déformation de l'appareil.
Piles
• Veillez à mettre au rebut les piles usagées selon la réglementation locale en vigueur.
À propos du contenu de ce manuel
• Les illustrations et les captures d'écran figurant dans ce manuel servent uniquement à
expliciter les instructions.
• Les noms de société et les noms de produit mentionnés dans ce manuel sont des marques
commerciales ou des marques déposées de leurs sociétés respectives.
• Le logiciel peut être révisé et mis à jour sans préavis.
SÉCURITÉ LASER
L’appareil utilise un laser. En raison des risques de blessure des yeux, le retrait du
couvercle ou les réparations de l’appareil devront être confi és exclusivement à un
technicien d’entretien qualifié.
DANGER
Risque d’exposition au laser en cas d’ouverture. Eviter l’exposition directe des yeux au
faisceau. Lorsque cet appareil est branché à la prise de courant, ne pas approcher les yeux
de l’ouverture du plateau changeur et des autres ouvertures pour regarder à l’intérieur.
AVERTISSEMENT
L’utilisation de commandes et l’emploi de réglages ou de méthodes autres que ceux décrits
cidessous, peuvent entraîner une exposition à un rayonnement dangereux.
Le laser de cet appareil peut émettre un rayonnement dépassant les limites de la classe 1.
Le numéro de modèle, le numéro de série, l'alimentation requise, etc., se trouvent sur ou
près de la plaque signalétique du produit, située à l'arrière de l'unité. Notez le numéro de
série dans l'espace fourni ci-dessous et conservez ce manuel en tant que preuve
permanente de votre achat afin de faciliter l'identification du produit en cas de vol.
N° de modèle
N° de série
(rear_fr_01)
Entretien
• Utilisez un chiffon doux et sec pour le nettoyage de l'appareil. L'utilisation de produits
chimiques tels que de la benzène ou du diluant, de produits d'entretien ou de chiffons de
Fr 43

Introduction
Vérifiez le contenu de l’emballage et les points utiles de ce manuel.
À propos de ce mode d’emploi
• Les instructions et les illustrations figurant dans ce manuel se réfèrent au CRX-B370D, sauf
mention contraire.
• Le fonctionnement de cet appareil est décrit principalement en utilisant la
télécommande.
• Les illustrations peuvent varier du véritable article représenté.
• Symboles :
Attention Indique les informations à lire avant utilisation pour prévenir les
défaillances ou les dommages physiques.
Note Indique les précautions et informations complémentaires à lire avant
d'utiliser l'appareil.
& Renvoie à une autre page ou à d’autres pages qui fournissent des
informations supplémentaires.
Marques commerciales
L'expression et les logos Bluetooth® sont des marques déposées de Bluetooth SIG, Inc. et
l'utilisation de ces marques par Yamaha Corporation est sous licence. Les autres marques et
noms de marques sont ceux de leurs propriétaires respectifs.
Accessoires
Télécommande Antenne FM
(pour CRX-B370)
2 piles
(AA, R6, UM-3)
Antenne DAB/FM
(pour CRX-B370D)
(Pour CRX-B370D)
L’appareil prend en charge la syntonisation DAB/DAB+.
44 Fr

Possibilités de cet appareil
La fonction Bluetooth
facilite la commande à
distance
L’appareil s’allume automatiquement
lorsqu’une connexion Bluetooth est
établie.
(& p. 55 Lecture de musique via la
connexion Bluetooth®)
Un plus grand plaisir
musical
Cet appareil est pourvu d’une
prise d’entrée optique
numérique et d’une mini-fiche
stéréo qui permettent la
connexion à des appareils
externes.
(& p. 62 Lecture de musique
depuis un périphérique externe)
Compact et facile à
utiliser avec une
qualité audio élevée
La qualité audio peut être ajustée
selon les préférences individuelles.
(& p. 64 Réglage de la qualité
sonore)
Fr 45

Noms des pièces
Familiarisez-vous avec toutes les pièces et leurs fonctions.
Face avant
1 z (alimentation) (& p. 52)
L’afficheur de la face avant s’allume lorsque l’appareil est mis sous
tension.
2 PHONES
Prise permettant de brancher un casque.
Note
Si un casque est branché, aucun son n’est émis des enceintes ou du
caisson de basse.
3 Prise USB (& p. 54)
4 f/h, j/g (& p. 53, 54)
PRESET </> (& p. 57, 59)
5 a/d (Lecture/pause) (& p. 53, 54)
6 s (Arrêt) (& p. 53, 54)
7 INPUT (& p. 53, 54)
Pour changer la source d’entrée. (La source d’entrée sélectionnée
apparaît sur l’afficheur du panneau avant.)
8 Plateau de chargement du disque (& p. 53)
9 VOLUME
A B094 85 6 7321
Pour régler le volume.
0 = (Ouvrir/fermer le tiroir de disque) (& p. 53)
A Afficheur du panneau avant (& p. 48)
B Capteur de télécommande
46 Fr

Panneau arrière
SPEAKERS
RL
+
–
Noms des pièces
1 Cordon d'alimentation (& p. 52)
2 Prise de service uniquement
À utiliser lorsque l'appareil nécessite une maintenance.
3 Prise DIGITAL IN (entrée optique) (& p. 62)
4 Prise pour antenne (& p. 51)
L’emplacement de la prise CRX-B370 est différent de celui indiqué sur
l’illustration.
5 Prise AUX IN (entrée mini-jack) (& p. 62)
6 Prise SUBWOOFER OUT (& p. 50)
7 Bornes SPEAKERS (& p. 50)
DIGITAL IN DAB/FM
75Ω UNBAL.
AUX IN
SUBWOOFER
OUT
6Ω MIN./SPEAKER
71 3 4 5 62
Fr 47

Noms des pièces
Afficheur du panneau avant
1 2 345 6 7 8
1 Afficheur multifonction
Affiche différentes informations, telles que les
informations musicales et la fréquence radio.
Le panneau avant prend en charge uniquement
l’affichage de caractères alphanumériques.
2 Témoin TUNED
S’allume lorsque l’appareil reçoit un signal provenant
d’une station FM.
3 Témoin 2nd
S’allume lorsqu’une station DAB secondaire est lue.
4 Témoin STEREO
S’allume lorsque l’appareil reçoit un signal provenant
d’une émission FM stéréo.
TUNED 2nd
aaaaaaaa
STEREO
vx
MUTE
SLEEP
ALL
1
$
aaaaaaaaaaaaaaaa
5 Témoin MUTE
S’allume lorsque le son est coupé (& p. 49).
6 Témoin SLEEP
S’allume lorsque la minuterie de mise en veille est réglée
(& p. 52).
7 Témoin de lecture aléatoire/répétée
S’allume lorsque la fonction aléatoire ou répétée est
activée pour les morceaux d’un CD ou d’un dispositif
USB.
8 Témoin $ Bluetooth
Indique le statut de la connexion Bluetooth.
Note
Changement de la luminosité de l’affichage
Chaque pression sur la touche DIMMER de la télécommande
(& p. 49) modifie la luminosité : luminosité forte (par défaut),
moyenne ou faible.
48 Fr

Télécommande
Noms des pièces
1
2
3
4
5
6
7
8
9
0
A
B
C
D
E
F
1 Émetteur de signaux infrarouges
2 OPEN/CLOSE = (Ouvrir/fermer le tiroir de
disque) (& p. 53)
3 Touches de source d'entrée
Changez de source d'entrée.
4 Touches numériques (& p. 53)
5 SHUFFLE (& p. 63)
6 BASS, TREBLE (& p. 64)
7 Touches de commande du son, de commande du
curseur (& p. 53, 54)
8 OPTION (& p. 65)
9 VOLUME +/–
Pour régler le volume.
0 TUNER/PRESET (& p. 57, 59)
A SLEEP (& p. 52)
B DIMMER (& p. 48)
C z (alimentation) (& p. 52)
D REPEAT (& p. 63)
E MUTE
Pour couper ou rétablir le son.
F DISPLAY (& p. 64)
Insertion des piles
Vérifiez les bornes « + » et « - » des piles et insérez-les dans le
bon sens.
Note
Remplacez les deux piles lorsque la portée de la
télécommande diminue.
Fr 49

Préparations
Pour raccorder les enceintes, l’antenne, etc., et mettre l’appareil sous tension.
Ne branchez pas le cordon d’alimentation de l’appareil avant d’avoir fini de raccorder tous les câbles.
Raccordements des enceintes
1 Retirez l’isolation des extrémités des
câbles d’enceinte pour révéler les fils
dénudés.
15 mm
2 Branchez les enceintes à l’appareil,
comme illustré.
• Préparez les enceintes, le caisson de basse et les
câbles d’enceinte séparément.
• Consultez la documentation accompagnant les
enceintes pour en savoir plus.
Enceinte droite
SUBWOOFER
OUT
Enceinte gauche
1
2
3
Câble d’enceinte
Caisson de graves
Câble de broche mono
Attention
• Si les fils dénudés des enceintes entrent en contact les uns avec les autres ou avec toute partie métallique de l’appareil, cela
pourrait endommager l’appareil et/ou les enceintes.
• Utilisez des enceintes dont l’impédance est d’au moins 6 Ω.
Note
• Vérifiez que les raccordements gauche et droit (G, D) et la polarité (rouge : +, noir : -) sont corrects. Si les raccordements sont
incorrects, le son ne sera pas naturel.
• Vous pouvez également raccorder un caisson de basse à l’appareil (celui-ci doit avoir un amplificateur intégré).
50 Fr

Branchement de l’antenne
Préparations
1 Raccordez l’antenne fournie à
l’appareil.
2 Installez-la avec des broches à un
emplacement où l’appareil peut
obtenir une bonne réception.
CRX-B370 CRX-B370D
2
Antenne fournie
ANTENNA
FM75Ω
UNBAL.
1
Antenne fournie
2
DAB/FM
75ΩUNBAL.
1
Note
• Assurez-vous de déployer l’antenne comme illustré.
• Si la réception de la radio avec l’antenne fournie n’est pas satisfaisante, une antenne extérieure (vendue séparément) peut
améliorer la réception.
Fr 51

Préparations
Mise sous tension
Branchez le cordon d’alimentation à une prise secteur et appuyez
sur z.
• L’appareil se met sous tension.
• Appuyez à nouveau sur z pour mettre l’appareil hors tension (mode veille).
1
Dans un rayon de 6 m
2
Réduction de la consommation d’énergie
Veille automatique
L'appareil passe automatiquement au mode veille (veille automatique) dans l'une des
situations suivantes :
• BLUETOOTH, CD ou USB est sélectionné comme source d’entrée, mais aucun son n’est
lu et aucune opération n’est effectuée pendant plus de 20 minutes.
• Une source d’entrée autre que celle ci-dessus est sélectionnée, mais aucune opération
n’est effectuée pendant plus de 8 heures.
Reportez-vous à « Menu des options » (& p. 65) pour désactiver la fonction de veille
automatique.
Veille éco
L’appareil réduit au minimum la consommation d’énergie en mode veille éco. Désactivez
la fonction BT Standby (veille Bluetooth) pour activer la veille éco (& p. 65).
Utilisation de la minuterie de mise en veille
Vous pouvez régler la durée après laquelle l’appareil entre automatiquement en mode
veille. Vous pouvez sélectionner l’une des durées suivantes : 120/90/60/30 min. ou OFF.
Appuyez à plusieurs reprises sur SLEEP pour sélectionner la durée.
Le témoin SLEEP s’allume lorsque la minuterie de mise en veille est réglée.
SLEEP
Note
• Pour annuler la minuterie de mise en veille, appuyez à nouveau sur SLEEP.
52 Fr

Écoute de musique
Écoute de CD
CD
REPEAT
SHUFFLE
a/d
g
f
s
1 Appuyez sur CD de la télécommande.
2 Placez un CD dans le tiroir de disque.
Appuyez sur = pour ouvrir/fermer le tiroir de disque.
3 Appuyez sur a/d.
La lecture démarre.
Servez-vous des touches suivantes pour commander la
lecture audio. Il est également possible de sélectionner un
morceau au moyen des touches numériques de la
télécommande.
a/d Lecture/pause
s Arrêt
Passe directement au début du morceau en
f
g
SHUFFLE/
REPEAT
Note
• Cet appareil permet de lire des CD audio et des CD de données sur
lesquels sont enregistrés des fichiers MP3/WMA. Pour plus
d’informations sur les CD lisibles, reportez-vous à la section
« Périphériques/supports et formats de fichier pris en charge »
(& p. 71).
• Lorsque la lecture du CD s’arrête, la lecture reprend au début du
dernier morceau lu. Une pression sur s (Arrêt) lorsque la lecture du
CD s’arrête annule la reprise de la lecture.
• Vous pouvez annuler le nombre de morceaux sélectionnés avec les
touches numériques en appuyant sur s (Arrêt).
• Les fichiers musicaux stockés sur un CD de données peuvent être
lus en procédant comme pour la musique stockée sur un dispositif
USB (& p. 54).
• Si vous mettez l’appareil hors tension avec un CD sélectionné
comme source d’entrée et un CD inséré dans celui-ci, l’appareil lit
automatiquement le CD inséré lors de la prochaine mise sous
tension.
cours de lecture. Maintenez enfoncée la
touche pour effectuer un recul rapide.
Passe au morceau suivant. Maintenez
enfoncée la touche pour effectuer une
avance rapide.
& p. 63
Fr 53

Écoute de musique
Lecture de musique sur des dispositifs USB
USB
REPEAT
SHUFFLE
w
q
/
a
d
/
g
f
s
DISPLAY
1 Appuyez sur USB de la télécommande.
2 Raccordez un dispositif USB à la prise USB.
3 Sélectionnez un morceau.
Servez-vous des touches suivantes pour commander la
lecture audio.
q
w
a/d,
g
f Revient à l’élément précédent.
s Arrêt
SHUFFLE/
REPEAT
DISPLAY
Sélectionnez un dossier.
Valide l’élément sélectionné et passe au
niveau suivant, ou démarre/met en pause la
lecture.
& p. 63
Affichez les informations sur le contenu
actuellement lu (& p. 64).
Note
• Cet appareil permet de lire à partir de dispositifs USB sur lesquels
sont sauvegardés des fichiers musicaux. Pour plus d’informations
sur les dispositifs USB lisibles, reportez-vous à la section
« Périphériques/supports et formats de fichier pris en charge »
(& p. 71).
• Certains dispositifs USB peuvent ne pas fonctionner correctement,
même s’ils répondent aux conditions requises. Il est possible que
tous les types de dispositifs USB ne soient pas compatibles.
• Arrêtez la lecture avant de débrancher le dispositif USB.
• Les dispositifs USB se chargent automatiquement tant qu’ils sont
raccordés à l’appareil sauf s’il est en mode veille. Toutefois, certains
dispositifs peuvent ne pas se charger lorsqu’ils sont raccordés.
• Raccordez un dispositif de stockage USB directement à la prise USB
de l’unité. N’utilisez pas de câbles de rallonge.
54 Fr

BLUETOOTH
Écoute de musique
Lecture de musique via la connexion Bluetooth®
Note
• Réduisez le volume de l’appareil avant la lecture. Sinon, le
volume de lecture risque d’être trop fort.
• Si un périphérique Bluetooth a été connecté auparavant, l’appareil
Dispositif Bluetooth
Cet appareil
1 Activez la fonction Bluetooth sur votre
périphérique Bluetooth.
2 Appuyez sur BLUETOOTH de la
télécommande.
se connectera au dernier périphérique connecté lorsque vous
appuyez sur BLUETOOTH de la télécommande.
• Si l’appareil est connecté à un autre périphérique via une connexion
Bluetooth, maintenez enfoncé BLUETOOTH pendant au moins trois
secondes pour mettre fin à cette connexion avant de connecter le
périphérique souhaité.
• Si une clé d’accès est requise durant la connexion Bluetooth,
saisissez le numéro « 0000 ».
• Consultez la documentation accompagnant votre périphérique
Bluetooth pour de plus amples informations sur la connexion
Bluetooth.
3 Sélectionnez cet appareil dans la liste des
dispositifs Bluetooth sur votre périphérique
Bluetooth.
Le témoin $ s’allume quand une connexion est établie.
$
4 Lisez la musique sur votre périphérique
Bluetooth.
Impossible de connecter l'appareil à un dispositif Bluetooth.
Si aucune connexion Bluetooth n’est établie après avoir suivi les
instructions indiquées à gauche, essayez ce qui suit.
1 Si le dispositif Bluetooth a déjà été connecté à l’appareil,
supprimez l’appareil dans la liste des périphériques enregistrés
sur votre dispositif Bluetooth.
2 Maintenez enfoncé BLUETOOTH sur la télécommande pendant
au moins trois secondes.
- « Pairing » apparaît sur l’afficheur de la face avant.
3 Sélectionnez cet appareil dans la liste des dispositifs Bluetooth
sur votre périphérique Bluetooth.
- Le $ clignotera sur l’afficheur de la face avant à l’établissement
d’une connexion.
Fr 55

Écoute de musique
Écoute de stations DAB (CRX-B370D uniquement)
Connectez l’antenne fournie avec l’appareil (& p. 51) pour recevoir les stations DAB.
TUNER
a/d
q/w
OPTION
/rr
ee
Initial Scan
Appuyez à plusieurs reprises sur TUNER pour
sélectionner [DAB].
• Le balayage initial démarre automatiquement lorsque vous
sélectionnez [DAB] pour la première fois.
• Une fois le balayage terminé, le nombre de stations DAB
recevables apparaît momentanément sur l’afficheur du
panneau avant, et la première station mémorisée est lue.
Syntonisation de stations DAB
1 Appuyez à plusieurs reprises sur TUNER pour
sélectionner [DAB].
Lorsque l’appareil ne peut pas recevoir le signal DAB, « Off
Air » apparaît sur l’afficheur du panneau avant.
2 Appuyez sur ee /rr pour sélectionner une
station DAB.
DAB
STATION1
TUNED 2nd
STEREO
Note
• Le balayage initial est également disponible dans le menu des
options.
1 Appuyez sur OPTION lorsque DAB est sélectionné comme
source d’entrée.
- Le menu des options apparaît sur l’afficheur du panneau avant.
2 Appuyez sur q/w pour sélectionner [Initial Scan] et appuyez
sur a/d.
- Le balayage initial démarre et s’achève automatiquement.
• Si un balayage initial est effectué, les informations de station DAB
mémorisées et les stations DAB préréglées sont effacées.
• Cet appareil peut uniquement recevoir les fréquences DAB en
bande III.
Fréquence en MHz/Label de canal
56 Fr

Écoute de musique
TUNER
a/d
q/w
s
e
/r
Préréglage de stations DAB
Utilisez la fonction de préréglage pour mémoriser vos 30 stations
DAB favorites.
1 Syntonisez sur une station DAB (& p. 56) et
appuyez sur MEMORY.
Le numéro de préréglage clignote sur l’afficheur du panneau
avant.
Memory
DAB01 Station1
2 Appuyez sur q/w pour sélectionner le
numéro de préréglage souhaité.
3 Appuyez sur a/d pour terminer le
préréglage.
Pour annuler le préréglage DAB, appuyez sur s.
Sélection des stations DAB préréglées
Note
• Les informations de la station DAB indiquées sur l’afficheur de la
face avant changent dans l’ordre suivant chaque fois que DISPLAY
est enfoncé.
STATION (par défaut)
DLS (Dynamic Label Segment)
ENSEMBLE
CHANNEL/FREQ (Label de canal et fréquence)
SIG.Q. (qualité du signal)
AUDIO FORMAT
Suppression d’une station préréglée
1 Maintenez enfoncé DELETE pendant au moins deux secondes
avec DAB sélectionné comme source d’entrée.
- Le numéro de préréglage clignote sur l’afficheur du panneau
avant.
2 Appuyez sur q/w pour sélectionner le numéro de préréglage
pour la station à supprimer.
3 Appuyez sur a/d.
- La station attribuée au numéro de préréglage sélectionné est
supprimée.
MEMORY
DELETE
DISPLAY
1 Appuyez à plusieurs reprises sur TUNER pour
sélectionner [DAB].
2 Appuyez sur e/r pour sélectionner une
station préréglée.
Fr 57

Écoute de musique
Confirmation de la réception
Vous pouvez valider le niveau du signal DAB. Ceci est utile lorsque
vous installez l’antenne.
1 Appuyez sur OPTION lorsque DAB est
sélectionné comme source d’entrée.
Le menu des options apparaît sur l’afficheur du panneau
avant.
2 Appuyez sur q/w pour sélectionner
[DAB Tune Aid] et appuyez sur a/d.
58 Fr
a/d
q/w
OPTION
3 Appuyez sur q/w pour modifier le label de
canal.
Le niveau de réception du signal DAB mesuré s’affiche.
Tune Aid
12C Level: 90
Le niveau est compris entre 0 (aucun) et 100 (le meilleur).
4 Appuyez sur OPTION pour quitter le menu
des options.
Note
• Lorsque le signal DAB est faible dans [Tune Aid], essayez de régler la
position de l’antenne pour obtenir la bonne réception.

Écoute de stations de radio FM
Connectez l’antenne fournie avec l’appareil (& p. 51) pour recevoir les stations FM.
Écoute de musique
TUNER
s
MEMORY
ee /rr
Syntonisation de stations FM
1 Appuyez sur TUNER.
2 Maintenez enfoncé ee ou rr jusqu’à ce
que la syntonisation automatique démarre.
La syntonisation automatique s’arrête lorsqu’une station est
syntonisée.
FM
87.50MHz
Note
• Si la réception de la station est faible,vous pouvez syntoniser une
station manuellement en appuyant à plusieurs reprises sur
ee /rr. Le son sera émis en mono.
TUNED
STEREO
Préréglage de stations FM
Préréglage automatique
L'appareil syntonise des stations bénéficiant d’une bonne
réception et les prérègle automatiquement.
1 Appuyez sur TUNER.
2 Maintenez enfoncée la touche MEMORY
pendant au moins deux secondes.
3 Appuyez sur MEMORY.
Le préréglage automatique démarre, et lorsqu’il s’achève,
« Completed! » apparaît sur l’afficheur du panneau avant.
Note
• Le préréglage automatique remplace toutes les stations
actuellement mémorisées par des neuves.
• Il est possible de régler jusqu’à 30 stations FM.
• Appuyez sur s pour annuler le préréglage automatique.
Fr 59

Écoute de musique
TUNER
a/d
/w
q
s
e/r
Préréglage manuel
1 Syntonisez une station que vous souhaitez
prérégler (& p. 59).
2 Appuyez sur MEMORY.
Le numéro de préréglage clignote sur l’afficheur du panneau
avant.
Memory
FM01 87.50MHz>
3 Appuyez sur q/w pour sélectionner le
numéro de préréglage souhaité.
4 Appuyez sur a/d pour prérégler la
station.
Note
• Pour annuler le préréglage manuel, appuyez sur s.
Sélection des stations FM préréglées
1 Appuyez sur TUNER.
2 Appuyez sur e/r pour sélectionner une
station.
Le numéro d’une station préréglée enregistrée peut
également être sélectionné au moyen des touches
numériques.
Note
Suppression d’une station préréglée
1 Maintenez enfoncé DELETE pendant au moins deux secondes
avec FM sélectionné comme source d’entrée.
- Le numéro de préréglage clignote sur l’afficheur du panneau
avant.
2 Appuyez sur q/w pour sélectionner le numéro de préréglage
de la station à supprimer.
3 Appuyez sur a/d.
- La station sur le numéro de préréglage sélectionné est
supprimée.
60 Fr
MEMORY
DELETE

Écoute de musique
Système de diffusion de données radio (modèles britanniques et européens uniquement)
L’appareil peut recevoir des informations du système de données
radiodiffusées.
Appuyez sur DISPLAY lorsque la source d'entrée
est FM.
Chaque pression sur la touche modifie les affichages
d’informations ci-dessous.
PService (Service de programme)
PTY (Type d’émission)
RT (Radio-texte)
CT (Heure)
Fréquence
Note
• Si le signal provenant de la station de radiodiffusion de données de
service est peu puissant, il est possible que cet appareil ne
parvienne pas à recevoir correctement les informations du système
de diffusion de données radio. C’est notamment le cas des
informations RT (Radio-texte), qui consomment davantage de
bande passante et risquent d’être moins disponibles par rapport à
d’autres types d’informations.
DISPLAY
Fr 61

Écoute de musique
Lecture de musique depuis un périphérique
z
AUX
DIGITAL
externe
Cet appareil permet de lire à partir de périphériques externes. Utilisez les prises (DIGITAL IN ou AUX IN) en fonction du
périphérique à raccorder (& p. 47).
1 Débranchez le cordon d’alimentation de
l’appareil et raccordez le périphérique
externe à l’appareil.
Utilisez des câbles vendus séparément pour les
branchements.
SPEAKERS
RL
+
–
AUX IN
SUBWOOFER
6Ω MIN./SPEAKER
OUT
AUX IN
Câble mini-jack
stéréo de 3,5mm
DIGITAL IN
DIGITAL IN DAB/FM
75Ω UNBAL.
Câble optique
numérique
2 Rebranchez le cordon d’alimentation de
l’appareil à la prise murale et appuyez sur z
pour mettre l’appareil sous tension.
3 Appuyez sur AUX ou DIGITAL pour
sélectionner la source d'entrée.
4 Lisez le périphérique externe raccordé.
Consultez la documentation accompagnant l'appareil
externe pour de plus d'informations sur la lecture.
Note
• Baissez le volume de l’appareil et du périphérique externe
connecté avant la connexion. Sinon, le volume de lecture risque
d’être trop fort.
• Consultez la documentation accompagnant l'appareil externe pour
de plus amples informations sur la connexion d'appareils.
62 Fr
Dispositif audio non pourvu
d’une prise de sortie optique
Lecteur de musique portable, etc.

En savoir plus sur la lecture
Les fonctionnalités comme la lecture répétée/aléatoire, l’affichage des informations sur le morceau, etc. facilitent encore
plus l’utilisation de cet appareil.
Lecture aléatoire/répétée
L’opération est la même pour la lecture de contenus depuis des périphériques USB et des CD.
REPEAT
SHUFFLE
Lecture aléatoire
Appuyez sur SHUFFLE pendant la lecture.
Le témoin de lecture aléatoire de l’afficheur du panneau avant
commute comme suit à chaque fois que vous appuyez sur
SHUFFLE.
x Lecture aléatoire des dossiers*
xALL Lecture aléatoire de tous les morceaux
S’éteint
* La plage de lecture aléatoire dépend du support en cours de
lecture.
La fonction de lecture aléatoire n’est pas
appliquée.
Lecture répétée
Appuyez sur REPEAT pendant la lecture.
Le témoin de lecture répétée de l’afficheur du panneau avant
change comme suit chaque fois que vous appuyez sur REPEAT.
v1 Répète le morceau en cours de lecture.
v Lecture répétée des dossiers*
vALL Lecture répétée de tous les morceaux
S’éteint
* La plage de lecture répétée dépend du support de lecture.
La fonction de lecture répétée n’est pas
appliquée.
Fr 63

En savoir plus sur la lecture
BASS
TREBLE
a/d
q/w
DISPLAY
Informations de lecture
Pendant la lecture de contenus depuis un périphérique USB ou
un CD, le titre du morceau, le temps écoulé, etc. peut être indiqué
sur l’afficheur de la face avant.
Appuyez sur DISPLAY pendant la lecture.
Album
Meteora
L’affichage change dans l’ordre indiqué ci-dessous à chaque fois
que vous appuyez sur DISPLAY.
CD de données/USB CD
1
Titre du morceau
Nom de l’artiste Temps restant du morceau
Titre de l’album Temps restant du disque
Durée de lecture Titre du morceau
1
*
Si le titre du morceau ne peut pas être reconnu, le nom du
fichier peut s’afficher.
2
*
Uniquement lorsqu’un CD audio est lu.
3
*
Uniquement lorsqu’un CD audio ayant des informations
codées affichables est lu.
*
Durée de lecture
Nom de l’artiste
Titre de l’album
2
*
2
*
1,*3
*
3
*
3
*
Réglage de la qualité sonore
Réglage des tonalités (valeurs par défaut en caractères gras)
Utilisez BASS et TREBLE sur la télécommande pour régler le niveau
auquel les tonalités élevées (aiguë) et basses (grave) sont émises
lorsque vous écoutez le son.
(-5 à 0 à +5)
1 Appuyez sur BASS ou TREBLE.
2 Changez de niveau avec q/w, puis appuyez sur a/d.
Réglage de l’équilibre (valeurs par défaut en caractères gras)
Utilisez le menu des options pour régler l’équilibre du volume des
enceintes gauche et droite (& p. 65).
Ce réglage ne s’applique pas lorsque vous utilisez un casque.
(Canal gauche +5 à --centre-- à canal droit +5)
64 Fr
Note
• Le panneau avant prend en charge uniquement l’affichage de
caractères alphanumériques.

Menu des options
En savoir plus sur la lecture
q/w
a
d
/
f
OPTION
Le menu des options vous permet de configurer l’appareil pour
l’adapter à votre façon de l’utiliser.
1 Appuyez sur OPTION.
La liste du menu des options apparaît sur l’afficheur du
panneau avant. Reportez-vous à « Liste du menu des
options » (& p. 65).
2 Sélectionnez un menu des options souhaité
avec q/w, puis appuyez sur a/d.
Option
BT Standby
3 Changez de réglage avec q/w, puis
appuyez sur a/d.
• Recommencez l’étape 3 s’il y a un sous-menu.
• Appuyez sur f pour annuler le réglage et revenir au
niveau précédent.
• Recommencez les étapes 2 et 3 si vous souhaitez régler
un autre élément de menu.
4 Appuyez sur OPTION pour quitter les
réglages des options.
Liste du menu des options
Réglage
Menu
Initial Scan
DAB Tune Aid*
(& p. 58)
Balance (& p. 64) center
AutoPowerStdby
(& p. 52)
BT Standby (veille
Bluetooth)
Bluetooth On
InitializeSet
* Uniquement lorsqu’une station DAB est syntonisée (CRX-B370D).
*
(& p. 56)
par
défaut
On
On
Fonction
Balaye toutes les fréquences
DAB recevables et les
enregistre sur l’appareil.
Affiche le niveau du signal
DAB reçu.
Règle l’équilibre du volume
des enceintes gauche et
droite.
Règle l’appareil pour qu’il entre
automatiquement en mode
veille.
Lorsqu’un dispositif Bluetooth
est connecté à cet appareil
alors qu’il est en mode veille,
il s’allume automatiquement.
Active/désactive la fonction
Bluetooth
Rétablit les paramètres
d’usine par défaut.
Fr 65

Guide de dépannage
Reportez-vous au tableau suivant si l’appareil ne fonctionne pas convenablement. Si l’anomalie constatée n’est pas mentionnée ci-dessous, ou encore si l’action
corrective suggérée est sans effet, mettez l’appareil hors tension, débranchez le cordon d’alimentation et prenez contact avec le revendeur ou le centre d’entretien
Yamaha agréé le plus proche.
Vérifiez tout d’abord que les connecteurs de chaque câble sont correctement insérés dans les prises de chaque appareil. Assurez-vous également que le cordon d’alimentation
est branché à une prise.
Généralités
Anomalies Causes possibles Solution
L’appareil se met en veille peu de temps
après la mise sous tension.
L’appareil ne fonctionne pas
correctement.
Absence de son.
Le son des enceintes n’est reproduit que
d’un côté.
Présence de bruit.
L’appareil s’éteint soudainement.
Un appareil numérique ou un
équipement à haute fréquence génère un
brouillage.
Le cordon d'alimentation n'est pas branché correctement. Branchez correctement le cordon d’alimentation.
Le microprocesseur interne s'est figé en raison d'une décharge électrique
externe (orage, décharge d'électricité statique, etc.) ou d'une baisse
importante de la tension d'alimentation.
Aucune source convenable n’a été sélectionnée.
Les enceintes ne sont pas correctement raccordées. Vérifiez les raccordements (& p. 50).
Le volume est réduit au minimum ou est coupé. Augmentez le niveau de volume.
Les enceintes ou le périphérique externe ne sont pas raccordés
correctement.
Cet appareil est trop proche d’un équipement numérique ou à
radiofréquences.
Le câble audio utilisé pour raccorder l’appareil et l’appareil externe peut
être défectueux.
La minuterie de mise en veille est peut-être réglée (& p. 52).
La fonction de Veille automatique est activée (& p. 52).
Cet appareil est trop proche de l’équipement numérique ou à haute
fréquence.
Maintenez enfoncée la touche z située sur le panneau avant pendant plus
de 10 secondes pour initialiser et redémarrer l’appareil. Si le problème
persiste, débranchez l'appareil de la prise électrique, patientez au moins 30
secondes, puis rebranchez l'appareil dans la prise électrique.
Sélectionnez une source d’entrée appropriée à l’aide de la touche INPUT
située sur le panneau avant ou les touches de sélection de la source
d’entrée de la télécommande (& p. 46, 49).
Raccordez correctement les câbles d’enceinte ou le périphérique externe
(& p. 50, 62). Si le problème persiste, il est possible que les câbles soient
défectueux.
Éloignez cet appareil de cet équipement.
Branchez correctement le câble audio. Si le problème persiste, utilisez un
autre câble audio.
Mettez l’appareil sous tension et relancez la lecture de la source.
Éloignez l’appareil de l’équipement concerné.
66 Fr

Anomalies Causes possibles Solution
La télécommande ne fonctionne pas
correctement, voire pas du tout.
Bluetooth
Anomalies Causes possibles Solution
Impossible de connecter l'appareil à un
périphérique Bluetooth.
Aucun son n'est lu ou le son est
interrompu pendant la lecture.
Guide de dépannage
La télécommande se trouve peut-être en dehors de son rayon d’action. Utilisez la télécommande dans son rayon d’action (& p. 52).
Le capteur de télécommande de l’appareil est peut-être exposé à la lumière
directe du soleil ou à une lampe fluorescente à onduleur.
La pile est peut-être usée. Remplacez les piles par des neuves (& p. 49).
Il y a des obstacles entre le capteur de l’appareil et la télécommande. Éliminez les obstacles.
Le paramètre [Bluetooth] des réglages des options est réglé sur [Off]. Réglez-le sur [On].
L'appareil est déjà connecté à un autre périphérique Bluetooth.
L'appareil et le périphérique Bluetooth sont trop éloignés. Rapprochez le périphérique Bluetooth de l'appareil.
Un dispositif qui fonctionne sur la bande 2,4 GHz (micro-onde,
périphérique réseau sans fil, etc.) perturbe la communication sans fil.
Le code d'accès pour les périphériques comme un adaptateur Bluetooth
n'est pas « 0000 ».
Le périphérique Bluetooth ne prend pas en charge Advanced Audio
Distribution Profile (A2DP).
Le volume sonore du périphérique Bluetooth est trop faible. Augmentez le volume sur le périphérique Bluetooth.
Le périphérique Bluetooth n'est pas configuré pour transmettre des
signaux audio à cet appareil.
La connexion Bluetooth a été arrêtée. Établissez à nouveau la connexion Bluetooth (& p. 55).
Un dispositif qui fonctionne sur la bande 2,4 GHz (micro-onde,
périphérique réseau sans fil, etc.) perturbe la communication sans fil.
L'appareil et le périphérique Bluetooth sont trop éloignés. Rapprochez le périphérique Bluetooth de l'appareil.
Changez l’orientation de l’éclairage ou de l’appareil, ou l’emplacement de
l’appareil.
Mettez fin à la connexion Bluetooth actuelle, puis connectez-vous au
nouveau périphérique (& p. 55).
Éloignez l'appareil et le périphérique Bluetooth encore plus du dispositif. Si
le routeur LAN sans fil prend en charge la bande 5 GHz, connectez les
périphériques réseau au réseau au moyen de la bande 5 GHz.
Utilisez un périphérique Bluetooth dont le code est « 0000 ».
Utilisez un périphérique Bluetooth qui prend en charge A2DP.
Sur le périphérique Bluetooth, sélectionnez cet appareil comme
destination de la sortie audio.
Éloignez l'appareil et le périphérique Bluetooth encore plus du dispositif. Si
le routeur LAN sans fil prend en charge la bande 5 GHz, connectez les
périphériques réseau au réseau au moyen de la bande 5 GHz.
Fr 67

Guide de dépannage
Disque
Anomalies Causes possibles Solution
La lecture ne démarre pas (ou s’arrête
immédiatement) après avoir appuyé sur
a/d.
Aucun son n'est lu ou le son est
interrompu pendant la lecture.
Dispositifs USB
Anomalies Causes possibles Solution
L’appareil ne détecte pas le dispositif USB.
Impossible d’afficher les dossiers et
fichiers du dispositif USB.
Aucun son n'est lu ou le son est
interrompu pendant la lecture.
Le disque est peut-être sale. Essuyez le disque (& p. 71).
Le disque inséré dans l’appareil n’est peut-être pas pris en charge. Utilisez un disque pris en charge par l’appareil (& p. 71).
Si l’appareil est passé d’un endroit froid à un endroit chaud, de la
condensation s’est peut-être formée sur la lentille de lecture.
Le disque est peut-être sale. Essuyez le disque (& p. 71).
Le disque inséré dans l’appareil n’est peut-être pas pris en charge. Utilisez un disque pris en charge par l’appareil (& p. 71).
Le dispositif USB n’est pas correctement raccordé à la prise USB.
Un dispositif USB d’un format différent de FAT16/32 est utilisé. Utilisez un dispositif USB au format FAT16 ou FAT32.
Les données du dispositif USB sont protégées par cryptage. Utilisez un dispositif USB sans fonction de cryptage.
Le fichier musical n’est pas pris en charge par l’appareil. Lisez un fichier musical pris en charge par l’appareil (& p. 72).
Attendez une heure ou deux pour que l’appareil s’habitue à la température
ambiante, puis réessayez.
Mettez l’appareil hors tension, reconnectez votre dispositif USB, puis
remettez l’appareil sous tension (& p. 54).
68 Fr

Réception DAB (CRX-B370D uniquement)
Anomalies Causes possibles Solution
Impossible de syntoniser des stations DAB. Les opérations de balayage initial n’ont pas été effectuées. Effectuez les opérations de balayage initial (& p. 56).
Les opérations de balayage initial ont
échoué et [Not Found] apparaît sur
l’afficheur du panneau avant.
Il y a un brouillage (par exemple un
sifflement, un craquement ou des
vibrations).
Les informations de la station DAB ne
s’affichent pas ou sont inexactes.
Les signaux DAB sont trop faibles.
Le positionnement de l’antenne n’est pas optimal pour la réception DAB.
Il n’y a pas de couverture DAB dans votre région.
L’antenne doit être repositionnée. Réajustez la position de l’antenne (& p. 51).
Les signaux DAB sont trop faibles.
La station DAB est peut-être momentanément hors service, ou les
informations de la station DAB ne sont pas fournies par le radiodiffuseur
DAB.
Utilisez la fonction DAB Tune Aid pour confirmer la meilleure position de
l’antenne (& p. 58).
Vérifiez auprès de votre revendeur ou WorldDMB en ligne sur
http://www.worlddab.org pour obtenir une liste de la couverture DAB dans
votre région.
Utilisez la fonction DAB Tune Aid pour confirmer la meilleure position de
l’antenne (& p. 58).
Contactez le radiodiffuseur DAB.
Réception FM
Anomalies Causes possibles Solution
Vérifiez que l’antenne est correctement raccordée et changez la position de
l’antenne (& p. 51).
Utilisez une antenne extérieure disponible dans le commerce. Pour plus
d’informations, consultez un magasin spécialisé.
Utilisez une antenne extérieure disponible dans le commerce. Pour plus
d’informations, consultez un magasin spécialisé.
Utilisez la méthode de syntonisation manuelle (& p. 60).
Modifiez la hauteur, l’orientation ou l’emplacement de l’antenne.
La réception FM en stéréophonie est
parasitée.
La syntonisation automatique ne
fonctionne pas.
Impossible de sélectionner une station de
radio préréglée.
La réception est mauvaise, même avec
une antenne FM ou une antenne
extérieure de bonne qualité.
L’antenne n’est pas raccordée correctement.
La station de radio est trop éloignée de votre région ou le niveau d’entrée
sur l’antenne est médiocre.
La station de radio est trop éloignée de votre région ou le niveau d’entrée
sur l’antenne est médiocre.
La station préréglée (mémoire) a peut-être été effacée. Préréglez de nouvelles stations de radio (& p. 59, 60).
La réflexion par trajets multiples ou une autre interférence radio peut avoir
lieu.
Guide de dépannage
Fr 69

Guide de dépannage
Messages sur l’afficheur de la face avant
Message Causes possibles Solution
Access Error L’appareil ne parvient pas à accéder au dispositif USB.
Disc Error Un disque non pris en charge par l’appareil a été inséré. Insérez un disque qui soit pris en charge par l’appareil.
Loading... L’appareil est en train de charger le fichier/contenu spécifié. Attendez la fin du chargement de l’appareil.
No Content
No Disc
Overcurrent
Unknown L’appareil ne parvient pas à accéder au dispositif USB.
Unknown Disc Un disque non reconnu par l’appareil a été inséré. Insérez un disque qui peut être lu par l’appareil.
USB Error
Le disque ou le dispositif USB ne contient aucun fichier pris en charge par
l’appareil.
Le disque inséré dans l’appareil n’est peut-être pas pris en charge. Utilisez un disque pris en charge par l’appareil (& p. 71).
Il est possible que le disque soit sale ou que des corps étrangers y soient
collés.
Le disque est placé à l’envers. Placez le disque avec la face imprimée vers le haut.
Le dispositif USB raccordé n’est pas pris en charge par l’appareil. Déconnectez le dispositif USB, mettez l’appareil hors tension, puis
Le dispositif USB n’est pas raccordé correctement.
L’appareil ne peut pas lire les morceaux stockés sur les dispositifs USB pour
une raison quelconque.
Mettez l’appareil hors tension et rebranchez votre dispositif USB. Si
l’anomalie persiste, essayez un autre dispositif USB.
Utilisez un disque ou un dispositif USB qui contient des fichiers pris en
charge par l’appareil.
Essuyez le disque. Vous pouvez également enlever les corps étrangers
collés sur le disque.
remettez-le sous tension. Si cela ne résout pas le problème pour le dispositif
USB, alors celui-ci n’est pas lisible sur l’appareil.
Mettez l’appareil hors tension et rebranchez votre dispositif USB. Si
l’anomalie persiste, essayez un autre dispositif USB.
Vérifiez si le format des fichiers que vous essayez de lire est pris en charge
par l’appareil (& p. 72).
70 Fr

Périphériques/supports et formats de fichier pris en charge
Périphériques/supports pris en charge
Dispositifs USB
• Cet appareil est compatible avec les dispositifs USB au format FAT16 ou FAT32. Ne
raccordez aucun autre type de dispositifs USB.
• Impossible d’utiliser des dispositifs USB avec cryptage.
• Le bon fonctionnement de tous les dispositifs USB ne saurait être garanti.
Yamaha et ses fournisseurs déclinent toute responsabilité concernant la perte des données
enregistrées sur un dispositif USB raccordé à cet appareil. Par mesure de précaution, il est
recommandé d’effectuer des copies de sauvegarde des fichiers importants.
Disques
• Cet appareil est conçu pour une utilisation avec des CD audio, des CD-R/RW (format
ISO 9660) pour lesquels l’un des logos suivants est imprimé sur le disque ou sur sa
pochette.
CD audio
CD-R/RW*
* Disques portant l’une des mentions suivantes :
FOR CONSUMER
FOR CONSUMER USE
FOR MUSIC USE ONLY
• Disques de 8 cm pouvant être lus avec cet appareil.
Placez le disque sur le cercle intérieur du tiroir de disque.
Remarques concernant les disques
• Ne placez pas dans cet appareil d’autre type de disque que ceux susmentionnés. Vous
risqueriez d’endommager l’appareil.
• Les CD-R/RW ne peuvent être lus que s’ils ont été finalisés. La finalisation est le processus
de fabrication d’un disque afin que celui-ci soit prêt à être lu sur un périphérique
compatible.
• Certains disques ne peuvent pas être lus à cause de leurs caractéristiques ou de leurs
conditions d’enregistrement.
• N’utilisez pas de disques qui ne sont pas ronds (en forme de cœur, etc.).
• N’utilisez pas de disques comportant de nombreuses rayures ou une fissure sur leur
surface, ou des disques déformés/collés.
Manipulation des disques
• Ne touchez pas la surface du disque. Tenez le disque par le bord ou
l’orifice central.
• Utilisez un stylo à pointe arrondie pour écrire sur l’étiquette d’un
disque.
• Ne collez pas de ruban, d’étiquette, d’adhésif ou autre sur un disque.
• Ne protégez pas le disque d’une enveloppe pour éviter les rayures.
• Ne placez pas de corps étrangers sur le tiroir de disque.
• Ne placez pas plusieurs disques dans l’appareil en même temps. L’appareil et les disques
risqueraient d’être endommagés.
• Si le disque est sale, essuyez-le avec un chiffon sec, du centre vers la
périphérie. N’utilisez pas d’agent de nettoyage, ni de diluant.
• N’utilisez aucun produit pour nettoyer la lentille, car vous pourriez
entraîner un dysfonctionnement.
• N’exposez pas les disques à la lumière directe du soleil, à une
température ou à une humidité élevée, ou bien à la poussière.
• Lorsque vous n’utilisez pas un disque, retirez-le de l’appareil et rangez-le dans une
pochette adéquate.
Fr 71

Périphériques/supports et formats de fichier pris en charge
Format de fichier
Cet appareil prend en charge les formats de fichier suivants.
USB
Fréquence
Format
*
WAV
MP3 32/44,1/48 16 8-320 2
WMA 32/44,1/48 16 8-320 2
MPEG-4 AAC-LC 32/44,1/48 16 8-320 2
FLAC
ALAC 32/44,1/48 16/24 - 2
AIFF
* Format PCM linéaire uniquement
d’échantillon-
nage (kHz)
32/44,1/48/88,2/
96/176,4/192
32/44,1/48/88,2/
96/176,4/192
32/44,1/48/88,2/
96/176,4/192
• Les fichiers Digital Rights Management (DRM) ne peuvent pas être lus.
Débit binaire
de
quantification
(bits)
16/24 - 2
16/24 - 2
16/24 - 2
Débit binaire
(kbps)
Nombre de
canaux
Disque
Fréquence
Format
MP3 32/44,1/48 16 8-320 2
WMA 32/44,1/48 16 8-320 2
d’échantillon-
nage (kHz)
Débit binaire de
quantification
Débit binaire
(kbps)
Nombre de
canaux
72 Fr

Caractéristiques techniques
Entrée
AUX IN Prise mini-jack stéréo de 3,5 mm
DIGITAL IN Prise optique
Sortie
SUBWOOFER OUT Prise mono RCA
SPEAKERS L/R PHONES 6,3 mm de diamètre
CD
Type Laser semi-conducteur GaAs/GaAlAs
Laser
Support CD, CD-R/RW
Format audio CD audio, MP3, WMA
Syntoniseur
Mémoire préréglée 30
Plage de
syntonisation
DAB (CRX-B370D uniquement)
Mémoire préréglée 30
Plage de
syntonisation
Compatibilité DAB/DAB+
Longueur d’onde 790 nm
Puissance de
sortie
FM
DAB 174 à 240 MHz (bande III)
7 mW
Modèles pour les États-Unis et le Canada :
87,5 MHz à 107,9 MHz
Autres modèles : 87,5 MHz à 108,0 MHz
Bluetooth
Version Bluetooth Ver. 4.2
Profil pris en charge
Codecs compatibles SBC, AAC
Portée de communication maximale 10 m (sans interférence)
Amplificateur
Puissance de sortie maximale 20 W + 20 W (6 Ω, 1 kHz, 10 % THD)
Réponse en fréquence 20 Hz à 30 kHz (0±3 dB)
Distorsion harmonique totale ≤ 0,05 % (2,5 W/6 Ω)
Généralités
Alimentation/Fréquence 100 à 240 VCA, 50/60 Hz
Consommation 18 W
Consommation en veille
Dimensions (L × H × P) 180 x 118 x 322 mm
Poids 2,7 kg
Le contenu de ce mode d’emploi s’applique aux dernières caractéristiques techniques
connues à la date de publication du manuel. Pour obtenir la version la plus récente du
manuel, accédez au site Web de Yamaha puis téléchargez le fichier du manuel concerné.
A2DP (profil de distribution audio avancée)
AVRCP (profil de télécommande audio/vidéo)
Veille Bluetooth désactivée: 0,3 W (ECO)
Veille Bluetooth activée: 1,5 W
Fr 73

Índice
PRECAUCIONES .................................................................................. 75
Introducción ........................................................................................ 79
Acerca de este manual .......................................................................................................................... 79
Marcas comerciales .................................................................................................................................. 79
Accesorios ...................................................................................................................................................... 79
Qué puede hacer con esta unidad .................................................. 80
Nombres de las piezas ....................................................................... 81
Panel delantero .......................................................................................................................................... 81
Panel posterior ............................................................................................................................................ 82
Visualizador del panel delantero ..................................................................................................... 83
Mando a distancia ..................................................................................................................................... 84
Preparativos ........................................................................................ 85
Conexión de los altavoces ................................................................................................................... 85
Conexión de la antena ........................................................................................................................... 86
Encendido de la unidad ........................................................................................................................ 87
Uso del temporizador de apagado ................................................................................................ 87
Escuchar música ................................................................................. 88
Escuchar CD .................................................................................................................................................. 88
Reproducción de música de dispositivos de memoria USB ........................................... 89
Reproducción de música a través de una conexión Bluetooth® ................................. 90
Escuchar emisoras DAB (solo CRX-B370D) ................................................................................ 91
Escuchar emisoras de radio FM ........................................................................................................ 94
Sistema de datos de radio (solo modelos de Reino Unido y Europa) ...................... 96
Reproducción de música de dispositivos externos ............................................................. 97
Más información sobre la reproducción ....................................... 98
Reproducción aleatoria/de repetición ......................................................................................... 98
Información de reproducción ............................................................................................................ 99
Ajuste de la calidad del sonido ......................................................................................................... 99
Menú de opciones ................................................................................................................................. 100
Resolución de problemas ............................................................... 101
Generalidades ........................................................................................................................................... 101
Bluetooth ..................................................................................................................................................... 102
Disco ............................................................................................................................................................... 103
Dispositivos de memoria USB ......................................................................................................... 103
Recepción DAB (solo CRX-B370D) ............................................................................................... 104
Recepción FM ........................................................................................................................................... 104
Mensajes del visor del panel delantero .................................................................................... 105
Dispositivos, soportes y formatos de archivo compatibles ..... 106
Dispositivos y soportes compatibles .......................................................................................... 106
Formatos de archivo ............................................................................................................................. 107
Especificaciones ............................................................................... 108
74 Es

PRECAUCIONES
ANTES DE USAR EL PRODUCTO, ASEGÚRESE ES IMPORTANTE
SEGUIR ESTAS INSTRUCCIONES.
La finalidad de las precauciones siguientes es evitar lesiones al
usuario y otras personas y daños materiales. Además, ayudarán
al usuario a utilizar esta unidad de forma correcta y segura. Es
importante seguir estas instrucciones.
Después de leer este manual, es importante guardarlo en un lugar seguro
donde pueda consultarlo en cualquier momento.
• Asegúrese de solicitar las inspecciones o reparaciones al distribuidor
a quien compró la unidad o al Servicio técnico de Yamaha.
• Yamaha no se responsabiliza por sus lesiones o los daños a sus
productos debidos a uso inapropiado o modificaciones de la unidad.
• Este producto es para hogares corrientes. No lo utilice para
aplicaciones que requieran un alto nivel de fiabilidad, tales como la
gestión de vidas humanas, atención sanitaria o activos de valor
elevado.
ADVERTENCIA
Este contenido está relacionado con “riesgo de lesiones graves
o muerte”.
Alimentación/cable de alimentación
• No realice ninguna acción que pueda dañar el cable de alimentación.
- No lo coloque cerca de una estufa o radiador.
- No lo doble excesivamente ni lo modifique.
- No lo raye.
- No lo coloque bajo ningún objeto pesado.
Usar el cable de alimentación con el cable pelado puede provocar una descarga eléctrica o
un incendio.
• Nunca cargue la unidad si está mojada. Si no sigue estas instrucciones, existe riesgo de
descargas eléctricas o de cortocircuito del terminal, y esto podría provocar incendios o
averías.
• No toque el enchufe ni el cable de alimentación durante una tormenta eléctrica. De no
seguirse estas instrucciones, existe riesgo de descargas eléctricas.
• Use esta unidad con la tensión de alimentación que está impresa en ella. Si no se conecta
a una toma de corriente de CA apropiada, existe riesgo de incendio, descargas eléctricas o
averías.
• Compruebe periódicamente el enchufe y quite la suciedad o el polvo que pudiera haberse
acumulado en él. De no seguirse estas instrucciones, existe riesgo de incendio o
descargas eléctricas.
• Cuando instale la unidad, asegúrese de que se puede acceder fácilmente a la toma de CA
que utilice. Si se produjera algún problema o funcionamiento defectuoso, apague el
interruptor de alimentación y desconecte el enchufe de la toma de CA. Incluso cuando el
interruptor de alimentación esté apagado, si el cable de alimentación no está desenchufado
de la toma de CA de la pared, la unidad no se desconectará de la alimentación.
• Si escucha algún trueno o sospecha que se aproxima una tormenta eléctrica, apague
inmediatamente el interruptor de alimentación y desconecte el enchufe de alimentación de
la toma de corriente de CA. De no seguirse estas instrucciones, existe riesgo de incendio o
averías.
• Si no va a utilizar la unidad durante un período prolongado, asegúrese de desconectar el
enchufe de alimentación de la toma de corriente de CA. De no seguirse estas
instrucciones, existe riesgo de incendio o averías.
No desmonte la unidad
Láser
• No extraiga la tapa para realizar reparaciones. Esta unidad utiliza un láser. Si la luz del
láser incide directamente sobre sus ojos, podrían producirse problemas en la vista. Solicite
una inspección o una reparación al distribuidor a quien compró la unidad o al Servicio
técnico de Yamaha.
• No mire hacia la fuente de luz del láser. Si no hay nada que la bloquee, esta unidad emite
una luz de láser visible. Evite mirar directamente hacia el láser. Si la luz del láser incide
directamente sobre sus ojos, podrían producirse problemas en la vista. Si el enchufe está
conectado a la salida de CA, no acerque los ojos a las aberturas de la bandeja de disco ni
a otras aberturas ni intente mirar dentro de la unidad.
• No desmonte ni modifique nunca esta unidad. De no seguirse estas instrucciones, existe
riesgo de incendio, descargas eléctricas, lesiones o averías. Si observa cualquier
irregularidad, asegúrese de solicitar una inspección o reparación al distribuidor a quien
compró la unidad o al Servicio técnico de Yamaha.
Advertencia sobre el agua
• No exponga la unidad a la lluvia, ni la use cerca del agua o en lugares donde haya mucha
humedad o donde pueda gotear agua, ni le ponga encima recipientes (como jarrones,
botellas o vasos) que contengan líquido, ya que puede derramarse y penetrar en el interior
del aparato. Si cualquier líquido, como el agua, penetra en la unidad, existe riesgo de
incendio, descargas eléctricas o averías. Si entra en el dispositivo cualquier líquido, por
ejemplo agua, apague inmediatamente la alimentación y desenchufe el cable de
Es 75

alimentación de la toma de CA. A continuación, solicite una inspección al distribuidor a
quien compró la unidad o al Servicio técnico de Yamaha.
• Nunca enchufe o desenchufe un cable eléctrico con las manos mojadas. No manipule esta
unidad con las manos húmedas. De no seguirse estas instrucciones, existe riesgo de
descargas eléctricas o averías.
Advertencia sobre el contacto con fuego
• No coloque objetos ardientes ni llamas abiertas cerca de la unidad, ya que existe riesgo de
incendio.
Si continúa usando la unidad, existe riesgo de descarga eléctrica, incendio o avería.
Solicite inmediatamente una inspección o reparación al distribuidor a quien compró la
unidad o al Servicio técnico de Yamaha.
• Asegúrese de que la unidad no se le caiga y no la someta a ningún impacto fuerte. Si
sospecha que la unidad podría estar deteriorada como consecuencia de una caída o un
golpe, apague inmediatamente la alimentación y extraiga el enchufe de alimentación de la
toma de corriente de CA. De no seguirse estas instrucciones, existe riesgo de descargas
eléctricas, incendio o averías. Solicite inmediatamente una inspección al distribuidor a
quien compró la unidad o al Servicio técnico de Yamaha.
Mantenimiento y cuidado
• No utilice aerosoles ni productos químicos por aspersión que contengan gas combustible
para realizar tareas de limpieza o lubricación. El gas combustible permanecerá en el
interior de la unidad, lo que podría provocar explosiones o incendios.
Uso de pilas
• No desmonte nunca una pila. Si el contenido de la pila entra en contacto con sus manos u
ojos, puede sufrir ceguera o quemaduras químicas.
• No tire pilas al fuego. Si lo hiciera, la pila podría explotar con el consiguiente riesgo de
incendio o lesiones.
• No intente recargar pilas que no sean recargables. El proceso de carga podría hacerlas
explotar o provocar una fuga, con el consiguiente riesgo de sufrir ceguera, quemaduras
químicas o lesiones.
• Si las pilas tienen alguna fuga, evite el contacto con el fluido derramado. Si el fluido de la
pila entra en contacto con los ojos, la boca o la piel, lávese inmediatamente con agua y
consulte a un médico. El fluido de las pilas es corrosivo y puede causar pérdida de visión o
quemaduras químicas.
Unidad inalámbrica
• No utilice esta unidad cerca de dispositivos médicos ni dentro de instalaciones sanitarias.
Las ondas de radiofrecuencia de esta unidad pueden afectar a los dispositivos de
electromedicina.
• No utilice la unidad a menos de 15 cm de personas que tengan implantado un marcapasos
o un desfibrilador. Las ondas de radiofrecuencia que emite esta unidad pueden afectar a
los dispositivos de electromedicina implantados, como marcapasos o desfibriladores.
Si observa cualquier anomalía
• Si surge cualquiera de las anomalías siguientes, apague inmediatamente la alimentación y
desconecte el enchufe de alimentación.
- El cable/enchufe de alimentación está deteriorado.
- La unidad emite humo u olores no habituales.
- Algún material extraño ha caído en el interior de la unidad.
- Se produce una pérdida repentina de sonido durante el uso.
- La unidad presenta alguna grieta u otro signo de deterioro.
ATENCIÓN
Este contenido está relacionado con “riesgo de lesiones”.
Alimentación/cable de alimentación
• No utilice una toma de corriente de CA que presente holgura al insertar el enchufe de
alimentación. De no seguirse estas instrucciones, existe riesgo de incendio, descargas
eléctricas o quemaduras.
• Al retirar el enchufe de la unidad o de una toma de CA, tire siempre del enchufe y no del
cable. Tirar del cable puede deteriorarlo, con el consiguiente riesgo de descargas eléctricas
o incendio.
• Inserte el enchufe de alimentación firmemente hasta el fondo en la toma de corriente de
CA. Usar la unidad sin estar debidamente enchufada puede provocar acumulación de
polvo en las patillas, con el consiguiente riesgo de incendio o quemaduras.
Instalación
• No coloque la unidad sobre superficies inestables, donde pueda caerse o volcarse por
accidente y provocar lesiones.
• No bloquee los orificios de ventilación de la unidad (ranuras de refrigeración). Esta unidad
cuenta con orificios de ventilación en la parte lateral para evitar que la temperatura interna
se eleve en exceso. De no seguirse estas instrucciones, el calor quedaría atrapado en el
interior de la unidad, con el consiguiente riesgo de incendio o averías.
• Al instalar esta unidad:
- No tape el dispositivo con ningún tipo de tela.
- No instale el dispositivo sobre moquetas o alfombras.
- Asegúrese de que la superficie superior queda hacia arriba; no instale la unidad sobre
los laterales ni boca abajo.
- No utilice el dispositivo en un lugar demasiado pequeño o mal ventilado.
De no seguirse las instrucciones anteriores, el calor quedaría atrapado en el interior de la
unidad, con el consiguiente riesgo de incendio o averías. Asegúrese de que haya espacio
suficiente alrededor de la unidad: como mínimo 5 cm arriba, 5 cm a los lados y 5 cm detrás.
• No instale la unidad en lugares en los que pueda entrar en contacto con gases corrosivos o
aire salobre, o lugares con exceso de humo o vapor. Si ocurriera, podría dar lugar a un
funcionamiento defectuoso.
76 Es

• Antes de mover esta unidad, asegúrese de desconectar el interruptor de alimentación y
todos los cables de conexión. De no seguirse estas instrucciones, existe riesgo de
deterioro de los cables o de que tropiece con ellos y se caiga.
• Para instalar correctamente la antena de exteriores, asegúrese de que esta tarea corra a
cargo del distribuidor a quien compró la unidad o del Servicio técnico de Yamaha. De lo
contrario, la instalación podría caerse y provocar lesiones. Para su instalación se requieren
cualificaciones especiales y experiencia.
Pérdida auditiva
• No utilice la unidad a un volumen alto o incómodo durante un periodo prolongado, ya que
podría provocarle una pérdida de audición permanente. Si experimenta alguna pérdida
auditiva u oye pitidos, consulte a un médico.
• Antes de conectar la unidad a otros dispositivos, desconecte la alimentación de todos ellos.
Asimismo, antes de encender o apagar los dispositivos, asegúrese de ajustar el nivel de
volumen de todos ellos al mínimo. De no seguirse estas instrucciones, existe riesgo de
pérdida de audición, descarga eléctrica o daños en el dispositivo.
• Cuando encienda la alimentación de CA del sistema de sonido, encienda siempre la unidad
EN ÚLTIMO LUGAR para evitar sufrir pérdida de audición y no provocar daños en los
altavoces. Por el mismo motivo, cuando desconecte la alimentación, apague PRIMERO la
unidad. De no seguirse estas instrucciones, existe riesgo de pérdida auditiva o daños en
los altavoces.
Mantenimiento
• Desconecte el enchufe de alimentación de la toma de CA antes de limpiar la unidad. De no
seguirse estas instrucciones, existe riesgo de descargas eléctricas.
consiguiente riesgo de incendio.
Uso de pilas
• Sustituya siempre todas las pilas al mismo tiempo. No utilice pilas nuevas y viejas juntas. Si
utiliza pilas nuevas y viejas juntas podrían producirse incendios, quemaduras o
inflamaciones debido a las fugas de fluidos.
• No utilice pilas diferentes de las especificadas. Si lo hace, puede provocar un incendio,
quemaduras o llamas provocadas por fugas.
• No mezcle pilas de distintos tipos, como pilas alcalinas y pilas de manganeso, pilas de
diferentes fabricantes ni diferentes tipos de pilas del mismo fabricante, ya que podrían
producirse incendios, quemaduras o inflamaciones debido a las fugas de fluidos.
• Mantenga las pilas fuera del alcance de los niños. Los niños podrían tragarse las pilas por
accidente. Si no se siguen estas instrucciones podrían producirse inflamaciones debido a
las fugas de fluidos de las pilas.
• No introduzca las pilas en un bolsillo o una bolsa, ni las transporte o almacene mezcladas
con trozos de metal. La pila puede cortocircuitarse, explotar o perder fluido, con el
consiguiente riesgo de incendio o lesiones.
• Asegúrese siempre de que todas las pilas están colocadas conforme a las marcas de
polaridad +/-. De no seguirse estas instrucciones, existe riesgo de incendio, quemaduras o
inflamación debidos a fugas de fluidos.
• Cuando se agoten las pilas o la unidad no se vaya a usar durante mucho tiempo, extraiga
las pilas de la unidad para evitar posibles fugas del fluido de las pilas.
• Al guardar o desechar pilas, aísle la zona de los terminales con cinta aislante o con otro
tipo de protección. Si se mezclan con otras pilas o con objetos metálicos, existe riesgo de
incendio, quemaduras o inflamación a causa del fluido.
Precauciones de uso
• No introduzca las manos ni los dedos en la ranura para discos de esta unidad. De no
seguirse estas instrucciones, existe riesgo de lesiones.
• No introduzca ningún material extraño, como un objeto metálico o papel, en la ranura para
discos de esta unidad. De no seguirse estas instrucciones, existe riesgo de incendio,
descargas eléctricas o averías. Si cae algún material extraño en la unidad, apague
inmediatamente la alimentación, desconecte el enchufe de alimentación de la toma de
corriente de CA y solicite una inspección al distribuidor a quien compró la unidad o al
Servicio técnico de Yamaha.
• No haga lo siguiente:
- Subirse o sentarse en el equipo.
- Poner objetos elementos pesados encima del equipo.
- Apilar el equipo.
- Aplicar fuerza más allá de lo razonable a los botones, interruptores, terminales de
entrada/salida, etc.
• No tire de los cables conectados para evitar lesiones o daños en la unidad debidos a
caídas.
• No utilice la unidad si el sonido se escucha distorsionado. Si se utiliza la unidad de forma
prolongada en estas condiciones, podría producirse un recalentamiento, con el
AVISO
Indica puntos que debe observar para evitar averías, daños o mal
funcionamiento del producto, así como pérdidas de datos.
Alimentación/cable de alimentación
• Si no va a utilizar la unidad durante un período prolongado, asegúrese de desconectar el
enchufe de alimentación de la toma de corriente. Aunque el interruptor [z] (En espera/
Encendido) esté apagado (pantalla apagada), seguirá fluyendo una cantidad mínima de
corriente.
Instalación
• No utilice esta unidad en las proximidades de equipos electrónicos, tales como TV, radios o
teléfonos móviles. De no seguirse estas instrucciones, la unidad, el televisor o la radio
podrían emitir ruidos de interferencias.
• No use esta unidad en una ubicación que esté expuesta a la luz solar directa, que alcance
temperaturas demasiado altas (por ejemplo, al lado de una estufa) o bajas ni que esté
Es 77

sometida a cantidades excesivas de polvo o vibraciones. De no seguirse estas
instrucciones, existe riesgo de que el panel de la unidad se deforme, de que sus
componentes internos se averíen o de que el funcionamiento sea inestable.
• Instale la unidad lo más alejada posible de otros equipos electrónicos.
Las señales digitales de esta unidad podrían interferir con otros equipos electrónicos.
• Si usa una función inalámbrica, evite instalar esta unidad cerca de tabiques o mesas de
metal, hornos microondas u otros dispositivos de red inalámbrica.
Las obstrucciones pueden acortar el alcance de la transmisión.
Conexiones
• Si va a conectar unidades externas, asegúrese de leer detenidamente el manual de cada
una de ellas y de conectarlas de acuerdo con las instrucciones.
Manipular la unidad sin atenerse a las instrucciones puede provocar averías.
• No conecte esta unidad a unidades industriales.
Los estándares de las interfaces de audio digital son diferentes para uso personal y para
uso industrial. Esta unidad se ha diseñado para conectarla a una interfaz de audio digital de
uso personal. Conectarla a una interfaz de audio digital de uso industrial no solo podría
provocar una avería en esta unidad, sino también deteriorar los altavoces.
Manipulación
• No coloque productos de vinilo, plástico o caucho sobre esta unidad. De no seguirse estas
instrucciones, el panel de la unidad podría decolorarse o deformarse.
• Si la temperatura ambiente cambia drásticamente (por ejemplo, durante el transporte o al
aplicar rápidamente la calefacción o el aire acondicionado) y existe la posibilidad de que se
haya formado condensación en el interior de la unidad, déjela varias horas sin encenderla
hasta que esté totalmente seca antes de usarla. Usar la unidad mientras contiene
condensación puede producir averías.
Mantenimiento
• Para limpiar la unidad, utilice un paño suave y seco. No use productos químicos como
bencina, disolventes, detergentes o bayetas impregnadas de productos químicos, pues
podrían provocar decoloraciones o deformaciones.
SEGURIDAD CONTRA LA RADIACIÓN LÁSER
Este aparato utiliza rayos láser. Debido a la posibilidad de que se produzcan daños en los
ojos, la extracción de la cubierta del aparato o las reparaciones solamente deberán ser
realizadas por un técnico cualifi cado.
PELIGRO
Este aparato emite radiación láser visible cuando se abre. Evite la exposición directa a los
rayos láser. Cuando se conecte este aparato a una toma de corriente no acerque sus ojos
a la abertura de la bandeja del disco ni a otras aberturas para mirar al interior.
PRECAUCIÓN
El uso de los controles, los ajustes o los procedimientos que no se especifi can enste
manual pueden causar una exposición peligrosa a la radiación.
El componente láser de este producto es capaz de emitir radiación que sobrepasa el límite
establecido para la clase 1.
El número de modelo, el número de serie, los requisitos de alimentación, etc. pueden
encontrarse en la placa de identificación o cerca de ella. Esta placa se encuentra en la
parte posterior de la unidad. Debe tomar nota del número de serie en el espacio
proporcionado a continuación y conservar este manual como comprobante permanente de
su compra para facilitar la identificación en caso de robo.
Nº de modelo
Nº de serie
(rear_es_01)
Pilas
• Asegúrese de desechar las pilas usadas de acuerdo con la normativa local.
Acerca del contenido de este manual
• Las figuras y pantallas de este manual solo tienen propósitos ilustrativos.
• Los nombres de empresas y productos utilizados en este manual son marcas comerciales
o marcas comerciales registradas de sus respectivos titulares.
• El software podría revisarse y actualizarse sin previo aviso.
78 Es

Introducción
Compruebe el contenido del paquete y los puntos más importantes de este manual.
Acerca de este manual
• Las instrucciones e ilustraciones utilizadas en este manual hacen referencia al modelo
CRX-B370D, salvo si se indica lo contrario.
• Las instrucciones de uso de esta unidad utilizan como ejemplo principalmente el mando
a distancia.
• Las ilustraciones pueden no coincidir con el producto real.
• Símbolos:
Atención Indica información que debe leerse antes de usar la unidad para evitar
fallos o daños físicos.
Nota Indica precauciones e información complementaria que deben leerse
antes de usar la unidad.
& Hace referencia a otra página, u otras páginas, que ofrecen
información adicional.
Marcas comerciales
Los logotipos y la marca denominativa Bluetooth® son marcas comerciales registradas propiedad
de Bluetooth SIG, Inc. y cualquier uso de dichas marcas por parte de Yamaha Corporation se
encuentra bajo licencia. Las demás marcas o denominaciones comerciales pertenecen a sus
respectivos propietarios.
Accesorios
Mando a distancia Antena de FM
(para el modelo CRX-B370)
Pilas (x 2)
(AA, R6, UM-3)
Antena DAB/FM
(para el modelo CRX-B370D)
(Para el modelo CRX-B370D)
La unidad admite la sintonización DAB/DAB+.
Es 79

Qué puede hacer con esta unidad
La tecnología Bluetooth
facilita el
funcionamiento remoto
La unidad se enciende de forma
automática cuando se establece una
conexión Bluetooth.
(& p. 90 Reproducción de música a
través de una conexión Bluetooth®)
Disfrute más de su
música
La unidad cuenta con una toma
de entrada óptica digital y un
minijack estéreo que permiten la
conexión a dispositivos externos.
(& p. 97 Reproducción de
música de dispositivos externos)
Compacta y de fácil
uso con una alta
calidad de sonido
Puede ajustar la calidad de sonido
para adaptarla a sus preferencias.
(& p. 99 Ajuste de la calidad del
sonido)
80 Es

Nombres de las piezas
Familiarícese con todas las piezas y sus funciones.
Panel delantero
1 z (encendido) (& p. 87)
El visualizador del panel delantero se enciende cuando se enciende la
unidad.
2 PHONES
Toma para conectar auriculares.
Nota
Cuando se conectan auriculares, ni los altavoces ni el altavoz de
subgraves emiten sonido.
3 Toma USB (& p. 89)
4 f/h, j/g (& p. 88, 89)
PRESET </> (& p. 92, 94)
5 a/d (Reproducción/pausa) (& p. 88, 89)
6 s (Parada) (& p. 88, 89)
7 INPUT (& p. 88, 89)
Cambie la fuente de entrada (la fuente de entrada seleccionada
aparece en el visualizador del panel delantero).
8 Bandeja de disco (& p. 88)
9 VOLUME
A B094 85 6 7321
Ajusta el volumen.
0 = (Abrir/cerrar la bandeja de disco) (& p. 88)
A Visualizador del panel delantero (& p. 83)
B Sensor del mando a distancia
Es 81

Nombres de las piezas
Panel posterior
SPEAKERS
RL
+
–
1 Cable de alimentación (& p. 87)
2 Toma solo para mantenimiento
Para realizar labores de mantenimiento en la unidad.
3 Toma DIGITAL IN (entrada óptica) (& p. 97)
4 Toma de antena (& p. 86)
La distribución de las tomas del modelo CRX-B370 no es idéntica a la
de la ilustración.
5 Toma AUX IN (entrada minijack) (& p. 97)
6 Toma SUBWOOFER OUT (& p. 85)
7 Terminales SPEAKERS (& p. 85)
82 Es
DIGITAL IN DAB/FM
75Ω UNBAL.
AUX IN
SUBWOOFER
OUT
6Ω MIN./SPEAKER
71 3 4 5 62

Visualizador del panel delantero
1 2 345 6 7 8
Nombres de las piezas
1 Visualizador de información múltiple
Muestra diferentes tipos de información, como detalles
sobre la música y la frecuencia de radio.
Los caracteres que aparecen en el visualizador del panel
delantero son únicamente alfanuméricos.
2 Indicador TUNED
Se ilumina cuando la unidad está recibiendo una señal
de una emisora FM.
3 Indicador 2nd
Se ilumina cuando se reproduce una emisora DAB
secundaria.
4 Indicador STEREO
Se ilumina cuando la unidad está recibiendo una señal
de una emisión estéreo FM.
TUNED 2nd
aaaaaaaa
STEREO
vx
MUTE
SLEEP
ALL
1
$
aaaaaaaaaaaaaaaa
5 Indicador MUTE
Se ilumina cuando el sonido se silencia (& p. 84).
6 Indicador SLEEP
Se ilumina cuando el temporizador de apagado está
ajustado (& p. 87).
7 Indicador de reproducción aleatoria/repetición
Se ilumina cuando la función de reproducción aleatoria o
la función de repetición se han activado para las
canciones de un CD o de un dispositivo de memoria USB.
8 Indicador $ Bluetooth
Muestra el estado de la conexión Bluetooth.
Nota
Cambio del brillo del visualizador
Con cada pulsación del botón DIMMER del mando a distancia
(& p. 84), el brillo cambia entre las siguientes opciones:
brillante (opción predeterminada), medio o apagado.
Es 83

Nombres de las piezas
Mando a distancia
1
2
3
4
5
6
7
8
9
0
A
B
C
D
E
F
1 Transmisor de señales infrarrojas
2 OPEN/CLOSE = (Abrir/cerrar la bandeja de
disco) (& p. 88)
3 Botones de fuente de entrada
Cambie la fuente de entrada.
4 Botones numéricos (& p. 88)
5 SHUFFLE (& p. 98)
6 BASS, TREBLE (& p. 99)
7 Control de audio, botones de control de cursor
(& p. 88, 89)
8 OPTION (& p. 100)
9 VOLUME +/–
Ajustan el volumen.
0 TUNER/PRESET (& p. 92, 94)
A SLEEP (& p. 87)
B DIMMER (& p. 83)
C z (encendido) (& p. 87)
D REPEAT (& p. 98)
E MUTE
Activa o desactiva el sonido.
F DISPLAY (& p. 99)
Colocación de las pilas
Fíjese en las marcas “+” y “-” de las pilas e introdúzcalas en la
dirección correcta.
Nota
Cambie las dos pilas cuando la distancia de funcionamiento
del mando a distancia disminuya.
84 Es

Preparativos
Conecte los altavoces, la antena, etc. y encienda la unidad.
No conecte el cable de alimentación de la unidad hasta que haya terminado de conectar todos los cables.
Conexión de los altavoces
1 Retire el aislamiento de los extremos
de los cables de los altavoces para
dejar al descubierto los hilos
expuestos.
15 mm
2 Conecte los altavoces a la unidad, tal y
como muestra la ilustración.
• Prepare los altavoces, el altavoz de subgraves y los
cables de los altavoces por separado.
• Consulte la documentación que se incluye con
los altavoces para obtener más información.
Altavoz derecho
SUBWOOFER
OUT
Altavoz izquierdo
1
2
3
Cable de los altavoces
Altavoz de
subgraves
Cable de clavijas monoaural
Atención
• Si los hilos expuestos de los altavoces entran en contacto entre sí o con cualquier pieza metálica de la unidad, esto podría provocar
daños en la unidad o en los altavoces.
• Utilice unos altavoces con una impedancia mínima de 6 Ω.
Nota
• Asegúrese de que las conexiones izquierda y derecha (L, R) y la polaridad (rojo: +, negro: -) sean correctas. Si las conexiones son
incorrectas, el sonido no será natural.
• También puede conectar un altavoz de subgraves a la unidad (debe tener un amplificador integrado).
Es 85

Preparativos
Conexión de la antena
1 Conecte la antena suministrada a la
unidad.
2 Fíjela con chinchetas en un lugar que
permita obtener una buena recepción.
CRX-B370 CRX-B370D
2
Antena
suministrada
ANTENNA
FM75Ω
UNBAL.
1
Antena suministrada
2
DAB/FM
75ΩUNBAL.
1
86 Es
Nota
• Asegúrese de extender la antena tal y como muestra la ilustración.
• Si la recepción de radio con la antena suministrada no es buena, el uso de una antena exterior (se vende por separado) podría
mejorarla.

Preparativos
Encendido de la unidad
Conecte el cable de alimentación a la toma de corriente y pulse z.
• La unidad se enciende.
• Pulse z de nuevo para apagar la unidad (modo de espera).
1
Menos de 6 m
2
Reducción del consumo de energía
Reposo automático
La unidad activa automáticamente el modo de reposo automático si se da alguna de las
siguientes situaciones:
• Está seleccionado BLUETOOTH, CD o USB como fuente de entrada, pero no se ha
reproducido audio o no se ha realizado ninguna operación durante más de 20
minutos.
• Se ha seleccionado otra fuente de entrada diferente de las anteriores, pero no se ha
realizado ninguna operación durante más de 8 horas.
Consulte la sección “Menú de opciones” (& p. 100) para desactivar la función de reposo
automático.
Reposo de ahorro energético
La unidad reduce al mínimo el consumo de energía durante el modo de reposo de
ahorro energético. Desactive la función BT Standby (reposo Bluetooth) para habilitar el
reposo de ahorro energético (& p. 100).
Uso del temporizador de apagado
Puede definir el tiempo que debe transcurrir hasta que la unidad entre automáticamente
en el modo de reposo. Las opciones de tiempo que puede seleccionar son 120/90/60/30
minutos u OFF.
Pulse SLEEP varias veces para seleccionar la hora.
El indicador SLEEP se ilumina cuando se ajusta el temporizador de apagado.
SLEEP
Nota
• Para cancelar el temporizador de apagado, pulse de nuevo SLEEP.
Es 87

Escuchar música
Escuchar CD
CD
REPEAT
SHUFFLE
a/d
g
f
s
1 Pulse CD del mando a distancia.
2 Introduzca un CD en la bandeja de disco.
Pulse = para abrir/cerrar la bandeja de disco.
3 Pulse a/d.
Se inicia la reproducción.
Utilice los botones siguientes para controlar la reproducción
de audio. También puede seleccionar una canción con los
botones numéricos del mando a distancia.
a/d Reproducción/pausa
s Parada
Salta al principio de la canción que se está
f
g
SHUFFLE/
REPEAT
Nota
• Esta unidad permite la reproducción de CD de audio y CD de datos
con archivos MP3/WMA grabados. Para obtener información sobre
los CD que pueden reproducirse, consulte “Dispositivos, soportes y
formatos de archivo compatibles” (& p. 106).
• Cuando se detiene la reproducción de un CD, la reproducción se
reanuda desde el principio de la última canción reproducida. Si
pulsa s (Parada) con la reproducción detenida, se cancelará la
reanudación de la reproducción.
• Puede cancelar el número de canción seleccionado con los botones
numéricos pulsando s (Parada).
• Los archivos de música almacenados en un CD de datos se pueden
reproducir siguiendo los mismos pasos que se siguen para
reproducir música almacenada en un dispositivo de memoria USB
(& p. 89).
• Si apaga la unidad con el CD seleccionado como fuente de entrada
y con un CD cargado, la unidad reproducirá automáticamente el CD
cargado la próxima vez que encienda la unidad.
reproduciendo. Mantener pulsado para
activar el retroceso rápido.
Salta a la siguiente canción. Mantener
pulsado para activar el avance rápido.
& p. 98
88 Es

Escuchar música
Reproducción de música de dispositivos de memoria USB
USB
REPEAT
SHUFFLE
w
q
/
a
d
/
g
f
s
DISPLAY
1 Pulse USB del mando a distancia.
2 Conecte un dispositivo de memoria USB a la
toma USB.
3 Seleccione una canción.
Utilice los botones siguientes para controlar la reproducción
de audio.
q
w
a/d,
g
f Vuelve a la opción anterior.
s Parada
SHUFFLE/
REPEAT
DISPLAY
Nota
• Esta unidad permite la reproducción desde dispositivos de
memoria USB con archivos de música guardados. Para obtener
información sobre los dispositivos de memoria USB que pueden
reproducirse, consulte “Dispositivos, soportes y formatos de archivo
compatibles” (& p. 106).
• Es posible que algunos dispositivos de memoria USB no funcionen
correctamente aunque cumplan los requisitos. La reproducción y la
alimentación de todos los dispositivos de memoria USB no están
garantizadas.
• Interrumpa la reproducción antes de desconectar un dispositivo de
memoria USB.
• Un dispositivo de memoria USB se carga de forma automática
siempre que esté conectado a la unidad (excepto cuando la unidad
se encuentra en el modo de reposo). Sin embargo, es posible que
algunos dispositivos no se carguen al conectarse.
• Conecte un dispositivo de almacenamiento USB directamente a la
toma USB de la unidad. No use cables prolongadores.
Seleccione una carpeta.
Confirma la opción seleccionada y pasa al
siguiente nivel o inicia/pausa la
reproducción.
& p. 98
Muestra información acerca del contenido
que se está reproduciendo (& p. 99).
Es 89

Escuchar música
Reproducción de música a través de una conexión Bluetooth®
BLUETOOTH
Dispositivo Bluetooth
Esta unidad
1 Active la función Bluetooth del dispositivo
Bluetooth.
2 Pulse BLUETOOTH del mando a distancia.
3 Seleccione esta unidad en la lista de
dispositivos Bluetooth de su dispositivo
Bluetooth.
El indicador $ se ilumina al establecerse una conexión.
$
4 Reproduzca música con su dispositivo
Bluetooth.
Nota
• Baje el volumen de la unidad antes de iniciar la
reproducción. De lo contrario, el volumen de la reproducción
podría ser excesivo.
• Si se ha conectado un dispositivo Bluetooth antes, al pulsar el botón
BLUETOOTH del mando a distancia, la unidad se conectará al último
dispositivo conectado.
• Si la unidad está conectada a otro dispositivo a través de una
conexión Bluetooth, mantenga pulsado BLUETOOTH durante al
menos tres segundos para finalizar dicha conexión antes de
conectar el dispositivo que desea.
• Si durante la conexión Bluetooth se solicita una clave de acceso,
introduzca el número “0000”.
• Consulte la documentación que se incluye con el dispositivo
Bluetooth para obtener más información acerca de la conexión
Bluetooth.
No se puede conectar la unidad a un dispositivo Bluetooth.
Si no se establece una conexión Bluetooth después de seguir las
instrucciones que se muestran a la izquierda, pruebe con los
siguientes pasos.
1 Si el dispositivo Bluetooth ya se ha conectado antes a la unidad,
borre la unidad de la lista de dispositivos registrados en su
dispositivo Bluetooth.
2 Mantenga pulsado BLUETOOTH del mando a distancia durante
al menos tres segundos.
- Aparecerá “Pairing” en el visualizador del panel delantero.
3 Seleccione esta unidad en la lista de dispositivos Bluetooth de
su dispositivo Bluetooth.
- El indicador $ se iluminará en el visualizador del panel delantero
cuando se establezca una conexión.
90 Es

Escuchar emisoras DAB (solo CRX-B370D)
Conecte la antena incluida junto con la unidad (& p. 86) para recibir emisoras DAB.
Escuchar música
TUNER
a/d
q/w
OPTION
/rr
ee
Exploración inicial
Pulse TUNER repetidamente para seleccionar
[DAB].
• La exploración inicial empieza automáticamente al seleccionar
por primera vez [DAB].
• Una vez finalizada la exploración, el número de emisoras DAB
que pueden recibirse aparece en el visualizador del panel
delantero durante unos instantes y se reproduce la primera de
las emisoras almacenadas.
Sintonización de emisoras DAB
1 Pulse TUNER repetidamente para
seleccionar [DAB].
Si la unidad no puede recibir la señal DAB, aparece “Off Air”
en el visualizador del panel delantero.
2 Pulse ee /rr para seleccionar una emisora
DAB.
DAB
STATION1
TUNED 2nd
STEREO
Nota
• También puede realizar una exploración inicial desde el menú de
opciones.
1 Pulse OPTION cuando haya seleccionado DAB como fuente de
entrada.
- Aparece el menú de opciones en el visualizador del panel
delantero.
2 Pulse q/w para seleccionar [Initial Scan] y pulse a/d.
- La exploración inicial empieza y termina automáticamente.
• Si se realiza la exploración inicial, se eliminan la información de las
emisoras DAB almacenadas y las emisoras DAB memorizadas.
• Esta unidad solo puede recibir frecuencias DAB de banda III.
Frecuencia en MHz/identificador de canal
Es 91

Escuchar música
TUNER
a/d
q/w
s
e
/r
Memorización de emisoras DAB
Utilice la función de memorización para guardar sus 30 emisoras
DAB favoritas.
1 Sintonice una emisora DAB (& p. 91) y pulse
MEMORY
El número de memoria parpadea en el visualizador del panel
delantero.
Memory
DAB01 Station1
2 Pulse q/w para seleccionar el número de
memoria que desee.
3 Pulse a/d para completar la
memorización.
Para cancelar la memorización de emisoras DAB, pulse s.
Selección de emisoras DAB memorizadas
Nota
• La información acerca de las emisoras DAB que se muestra en el
visualizador del panel delantero cambia en el orden siguiente cada
vez que pulsa DISPLAY.
STATION (predeterminado)
DLS (segmento de etiqueta dinámico)
ENSEMBLE
CHANNEL/FREQ (identificador de canal y frecuencia)
SIG.Q. (calidad de señal)
AUDIO FORMAT
Eliminación de una emisora memorizada
1 Asegúrese de que DAB está seleccionado como fuente de
entrada y mantenga pulsado DELETE durante al menos dos
segundos.
- El número de memoria parpadea en el visualizador del panel
delantero.
2 Pulse q/w para seleccionar el número de memoria de la
emisora que desee eliminar.
3 Pulse a/d.
- La emisora que tenga asignado el número de memoria
seleccionado se eliminará.
92 Es
MEMORY
DELETE
DISPLAY
1 Pulse TUNER repetidamente para
seleccionar [DAB].
2 Pulse e/r para seleccionar una emisora
memorizada.

Confirmación de la recepción
Tiene la posibilidad de confirmar el nivel de señal DAB. Esta
opción resulta útil al configurar la antena.
1 Pulse OPTION cuando haya seleccionado
DAB como fuente de entrada.
Aparece el menú de opciones en el visualizador del panel
delantero.
2 Pulse q/w para seleccionar [DAB Tune Aid]
y pulse a/d.
Escuchar música
a/d
q/w
OPTION
3 Pulse q/w para modificar el identificador
de canal.
Aparece el nivel de recepción de la señal DAB medida.
Tune Aid
12C Level: 90
El nivel va de 0 (inexistente) a 100 (máximo).
4 Pulse OPTION para salir del menú de
opciones.
Nota
• Si la señal DAB es débil mientras realiza la operación [Tune Aid],
intente ajustar la posición de la antena para obtener una mejor
recepción.
Es 93

Escuchar música
Escuchar emisoras de radio FM
Conecte la antena incluida junto con la unidad (& p. 86) para recibir emisoras FM.
TUNER
s
MEMORY
ee /rr
Sintonización de emisoras FM
1 Pulse TUNER.
2 Mantenga pulsado ee o rr hasta que se
inicie la sintonización automática.
La sintonización automática se detiene cada vez que se
sintoniza una emisora.
FM
87.50MHz
Nota
• Si la recepción de la emisora es débil, pulse ee /rr varias veces
para sintonizar una emisora de forma manual. El sonido será
monoaural.
TUNED
STEREO
Memorización de emisoras FM
Memorización automática
La unidad sintoniza las emisoras con una buena recepción y las
memoriza automáticamente.
1 Pulse TUNER.
2 Mantenga pulsado MEMORY durante al
menos dos segundos.
3 Pulse MEMORY.
Empieza la memorización automática y, una vez finalizada,
aparece “Completed!” en el visualizador del panel delantero.
Nota
• La memorización automática sustituye todas las emisoras ya
guardadas por emisoras nuevas.
• Puede memorizar hasta 30 emisoras FM.
• Pulse s para cancelar la memorización automática.
94 Es

Escuchar música
TUNER
a/d
/w
q
s
e/r
Memorización manual
1 Sintonice la emisora que desee memorizar
(& p. 94).
2 Pulse MEMORY.
El número de memoria parpadea en el visualizador del panel
delantero.
Memory
FM01 87.50MHz>
3 Pulse q/w para seleccionar el número de
memoria que desee.
4 Pulse a/d para memorizar la emisora.
Nota
• Para cancelar la memorización manual, pulse s.
Selección de emisoras FM memorizadas
1 Pulse TUNER.
2 Pulse e/r para seleccionar una emisora.
El número de una memoria registrada también puede
seleccionarse utilizando los botones numéricos.
Nota
Eliminación de una emisora memorizada
1 Mantenga pulsado DELETE durante al menos dos segundos
cuando FM esté seleccionado como la fuente de entrada.
- El número de memoria parpadea en el visualizador del panel
delantero.
2 Pulse q/w para seleccionar el número de memoria de la
emisora que desee eliminar.
3 Pulse a/d.
- La emisora del número de memoria seleccionado se eliminará.
MEMORY
DELETE
Es 95

Escuchar música
Sistema de datos de radio (solo modelos de Reino Unido y Europa)
La unidad puede recibir información a través del sistema de datos
de radio.
Pulse DISPLAY con FM como fuente de entrada
seleccionada.
Cada vez que pulse el botón, la información mostrada cambiará de
la siguiente forma.
PService (Program Service)
PTY (Tipo de programa)
RT (Texto de radio)
CT (Hora del reloj)
Frecuencia
Nota
• Si la transmisión de señal de la emisora del sistema de datos de
radio es demasiado débil, es posible que esta unidad no pueda
recibir información completa del sistema de datos de radio. En
concreto, la información RT (Texto de radio) utiliza mucho ancho de
banda, por que lo que es posible que el ancho de banda disponible
sea menor en comparación con otros tipos de información.
96 Es
DISPLAY

Reproducción de música de dispositivos
Escuchar música
z
AUX
DIGITAL
externos
Esta unidad permite reproducir dispositivos externos. Utilice las tomas (DIGITAL IN o AUX IN) en función del dispositivo
que vaya a conectar (& p. 82).
1 Desconecte el cable de alimentación de la
unidad y conecte el dispositivo externo a la
unidad.
Para establecer las conexiones, utilice cables vendidos por
separado.
SPEAKERS
RL
+
SUBWOOFER
OUT
–
6Ω MIN./SPEAKER
AUX IN
Cable de
miniclavija estéreo
de 3,5mm
DIGITAL IN
DIGITAL IN DAB/FM
AUX IN
75Ω UNBAL.
Cable óptico
digital
2 Vuelva a conectar el cable de alimentación
de la unidad a la toma de corriente y pulse
z para encender la unidad.
3 Pulse AUX o DIGITAL para seleccionar la
fuente de entrada.
4 Reproduzca el dispositivo externo
conectado.
Para obtener información acerca de la reproducción,
consulte la documentación incluida con los dispositivos
externos.
Nota
• Baje el volumen de la unidad y el dispositivo externo
conectado antes de la conexión. De lo contrario, el volumen de
la reproducción podría ser excesivo.
• Para obtener más información acerca de la conexión de
dispositivos, consulte la documentación incluida con los
dispositivos externos.
Dispositivo de audio con
toma óptica de salida
Reproductor de música
portátil, etc.
Es 97

Más información sobre la reproducción
Determinadas funciones, como la reproducción aleatoria/de repetición, la visualización de información sobre las
canciones, etc., convierten a esta unidad en un dispositivo aún más práctico.
Reproducción aleatoria/de repetición
La operación es la misma para reproducir contenido desde dispositivos de memoria USB y desde CD.
REPEAT
SHUFFLE
Reproducción aleatoria
Pulse SHUFFLE durante la reproducción.
El indicador de reproducción aleatoria del visualizador del panel
delantero cambia de la forma mostrada a continuación cada vez
que pulsa SHUFFLE.
x Reproducción aleatoria de carpetas*
xALL
Se apaga
* El intervalo de la reproducción aleatoria depende del soporte
reproducido.
Reproducción aleatoria de todas las
canciones
La función de reproducción aleatoria se
desactiva.
Reproducción de repetición
Pulse REPEAT durante la reproducción.
El indicador de reproducción de repetición del visualizador del
panel delantero cambia de la forma mostrada a continuación cada
vez que pulsa REPEAT.
v1 Repetición de la canción reproducida.
v Repetición de carpetas*
vALL Repetición de todas las canciones
Se apaga
* El intervalo de la repetición depende del soporte reproducido.
La función de reproducción de repetición se
desactiva.
98 Es

Más información sobre la reproducción
BASS
TREBLE
a/d
q/w
DISPLAY
Información de reproducción
Mientras se reproduce el contenido de un dispositivo de memoria
USB o un CD, el título de la canción, el tiempo transcurrido, etc.
pueden aparecer en el visualizador del panel delantero.
Pulse DISPLAY durante la reproducción.
Album
Meteora
La visualización cambia de la forma mostrada a continuación cada
vez que pulsa DISPLAY.
CD/USB de datos CD
Título de la canción*
Nombre del artista Tiempo restante de la canción*
Título del álbum Tiempo restante del disco*
Tiempo de
reproducción
1
*
Si no es posible reconocer el título de la canción, puede que
aparezca el nombre del archivo.
2
*
Solo cuando se reproduce un CD de audio.
3
*
Solo cuando se reproduce un CD de audio con información
codificada que la unidad puede mostrar.
1
Tiempo de reproducción
,
Título de la canción*
Nombre del artista*
Título del álbum*
1
*
3
3
2
2
3
Ajuste de la calidad del sonido
Ajuste de tonos (los valores predeterminados se muestran en
negrita)
Utilice los botones BASS y TREBLE del mando a distancia para
ajustar el nivel al que se emiten los tonos altos (agudos) y bajos
(graves) mientras escucha el sonido.
(De -5 a 0 a +5)
1 Pulse BASS o TREBLE.
2 Modifique el nivel con q/w y pulse a/d.
Ajuste del balance (los valores predeterminados se muestran
en negrita)
Utilice el menú de opciones para ajustar el balance del volumen
en los altavoces derecho e izquierdo (& p. 100).
Este ajuste no se aplica cuando se utilizan auriculares
(izq. +5 a --centro-- a dcho. +5).
Nota
• Los caracteres que aparecen en el visualizador del panel delantero
son únicamente alfanuméricos.
Es 99

Más información sobre la reproducción
Menú de opciones
q/w
a
d
/
f
OPTION
El menú de opciones permite configurar la unidad en función de
sus preferencias.
1 Pulse OPTION.
Aparece la lista del menú de opciones en el visualizador del
panel delantero. Consulte “Lista del menú de opciones”
(& p. 100).
2 Seleccione el menú de opciones que desee
con q/w y pulse a/d.
Option
BT Standby
3 Modifique el ajuste con q/w y pulse a/
d.
• Repita el paso 3 si hay un menú secundario.
• Pulse f para cancelar la operación y volver al nivel
anterior.
• Repita los pasos 2 y 3 si desea ajustar otra opción del
menú.
4 Pulse OPTION para salir de los ajustes de
opciones.
Lista del menú de opciones
Menú
Initial Scan
DAB Tune Aid
(& p. 93)
Balance (& p. 99) center
AutoPowerStdby
(& p. 87)
BT Standby
(Bluetooth standby)
Bluetooth On
InitializeSet
* Solo cuando se ha sintonizado una emisora DAB (CRX-B370D).
*
(& p. 91)
*
Predeter-
minado
Explora todas las frecuencias
DAB que pueden recibirse y
las registra en la unidad.
Muestra el nivel de la señal
DAB recibida.
Ajusta el balance del volumen
en los altavoces derecho e
izquierdo.
Configura la unidad para que
On
acceda al modo de reposo de
forma automática.
Cuando conecta un
dispositivo Bluetooth a la
unidad mientras esta se
On
encuentra en modo de
reposo, la unidad se apaga
automáticamente.
Activa o desactiva la función
Bluetooth.
Restaura los ajustes
predeterminados de fábrica.
Función
100 Es
 Loading...