

Page 1
CD Receiver
CD-ресивер
CRX-B370
English
Русский
EN
Owner’s Manual
RU
Руководство пользователя
Page 2

Table of Contents
PRECAUTIONS ....................................................................................... 3
Introduction .......................................................................................... 7
About this manual ....................................................................................................................................... 7
Trademarks ....................................................................................................................................................... 7
Accessories ....................................................................................................................................................... 7
What you can do with this unit .......................................................... 8
Parts name ............................................................................................. 9
Front panel ....................................................................................................................................................... 9
Rear panel ...................................................................................................................................................... 10
Front panel display ................................................................................................................................... 11
Remote control ........................................................................................................................................... 12
Preparations ........................................................................................ 13
Connecting speakers .............................................................................................................................. 13
Connecting the antenna ...................................................................................................................... 14
Turning on the power ............................................................................................................................ 15
Using the sleep timer .............................................................................................................................. 15
Listening to music .............................................................................. 16
Listening to CDs ......................................................................................................................................... 16
Playing music on USB memory devices ...................................................................................... 17
Playing music via Bluetooth® connection ................................................................................. 18
Listening to FM radio stations ........................................................................................................... 19
Playing music from external devices ............................................................................................ 21
More on playback .............................................................................. 22
Shuffle/Repeat playback ....................................................................................................................... 22
Playback information ............................................................................................................................... 23
Adjusting sound quality ........................................................................................................................ 23
Option menu ................................................................................................................................................ 24
Troubleshooting ................................................................................ 25
General ............................................................................................................................................................. 25
Bluetooth ........................................................................................................................................................ 26
Disc ..................................................................................................................................................................... 27
USB memory devices ............................................................................................................................... 27
FM reception ................................................................................................................................................ 28
Messages in the front panel display ............................................................................................... 29
Supported devices/media and file formats .................................. 30
Supported devices/media ................................................................................................................... 30
File format ...................................................................................................................................................... 31
Specifications ..................................................................................... 32
2 En
Page 3
PRECAUTIONS
PLEASE READ CAREFULLY BEFORE USE. BE SURE TO
FOLLOW THESE INSTRUCTIONS.
The precautions listed below are to prevent risk of harm to the
user and others, as well as to prevent property damage, and to
help the user use this unit properly and safely. Be sure to follow
these instructions.
After reading this manual, be sure to keep it in a safe place where it can be
referenced at any time.
• Be sure to request inspections or repairs from the dealer where you
purchased the unit or from qualified Yamaha service personnel.
• Yamaha cannot be held responsible for injury to you or damage of the
products caused by improper use or modifications to the unit.
• This product is for ordinary homes. Do not use for applications
requiring high reliability, such as managing lives, health care or highvalue assets.
WARNING
This content indicates “risk of serious injury or death.”
Laser
• Do not remove the cover for repair. This unit uses a laser. Laser light entering your eyes
may cause visual impairment. Request inspections or repairs from the dealer where you
purchased the unit or from qualified Yamaha service personnel.
• Do not look into the laser source. If there is nothing to block it, this unit emits a visible laser.
Avoid looking at the laser directly. Laser light entering your eyes may cause visual
impairment. When the plug is inserted into the AC outlet, do not place your eyes near
openings of the disk tray or other openings, and do not try to look inside the unit.
Power supply/power cord
• Do not do anything that could damage the power cord.
- Do not place it near a heater.
- Do not bend it excessively or alter it.
- Do not scratch it.
- Do not place it under a heavy object.
Using the power cord with the core of the cord exposed could cause electric shocks or a
fire.
• Never charge this unit if it is wet. Failure to observe this may cause electric shocks or a
terminal circuit shortage and cause a fire or malfunctions.
• Do not touch the power plug or cord if there is a chance of lightning. Failure to observe this
may cause electric shocks.
• Use this unit with the power supply voltage printed on it. Failure to connect to an
appropriate AC outlet may cause a fire, electric shocks, or malfunctions.
• Check the electric plug periodically and remove any dirt or dust which may have
accumulated on it. Failure to observe this may cause a fire or electric shocks.
• When setting up the unit, make sure that the AC outlet you are using is easily accessible. If
some trouble or malfunction occurs, immediately turn off the power switch and disconnect
the plug from the AC outlet. Even when the power switch is turned off, as long as the power
cord is not unplugged from the wall AC outlet, the unit will not be disconnected from the
power source.
• If you hear thunder or suspect approaching lightning, quickly turn off the power switch and
pull the power plug from the AC outlet. Failure to observe this may cause a fire or
malfunctions.
• If not using the unit for long periods of time, be sure to pull the power plug from the AC
outlet. Failure to observe this may cause a fire or malfunctions.
Do not disassemble
• Do not disassemble or modify this unit. Failure to observe this may cause a fire, electric
shocks, injury, or malfunctions. If you notice any irregularities, be sure to request an
inspection or repair from the dealer where you purchased the unit or from qualified Yamaha
service personnel.
Water warning
• Do not expose the unit to rain, use it near water or in damp or wet conditions, or place on it
any containers (such as vases, bottles or glasses) containing liquids which might spill into
any openings or places where water may drop. A liquid such as water getting into the unit
may cause a fire, electric shocks, or malfunctions. If any liquid such as water seeps into the
device, turn off the power immediately and unplug the power cord from the AC outlet. Then,
request an inspection from the dealer where you purchased the unit or from qualified
Yamaha service personnel.
• Never insert or remove an electric plug with wet hands. Do not handle this unit with wet
hands. Failure to observe this may cause electric shocks or malfunctions.
Fire warning
• Do not place any burning items or open flames near the unit, since they may cause a fire.
En 3
Page 4
Maintenance and care
• Do not use aerosols or spray-type chemicals that contain combustible gas for cleaning or
lubrication. The combustible gas will remain inside the unit, which may cause explosion or
fire.
Battery use
• Do not disassemble a battery. If the contents of the battery get on your hands or in your
eyes, it can cause blindness or chemical burns.
• Do not dispose of batteries in fire. Doing so may result in the battery bursting, causing a fire
or injury.
• Do not attempt to recharge batteries that are not intended to be charged. Charging could
cause the battery to burst or leak, which can cause blindness, chemical burns, or injury.
• If the batteries do leak, avoid contact with the leaked fluid. If the battery fluid should come in
contact with your eyes, mouth, or skin, wash immediately with water and consult a doctor.
Battery fluid is corrosive and may possibly cause loss of sight or chemical burns.
Wireless unit
• Do not use this unit near medical devices or inside medical facilities. Radio waves from this
unit may affect electro-medical devices.
• Do not use this unit within 15 cm (6 in) of persons with a heart pacemaker implant or a
defibrillator implant. Radio waves from this unit may affect electro-medical devices, such as
a heart pacemaker implant or defibrillator implant.
If you notice any abnormality
• If any of the following abnormalities occur, immediately turn off the power and disconnect
the power plug.
- The power cord/plug is damaged.
- An unusual smell or smoke is emitted from the unit.
- Foreign material gets into the interior of the unit.
- There is a loss of sound during use.
- There is a crack or damage in the unit.
Continued use could cause electric shocks, a fire, or malfunctions. Immediately request an
inspection or repair from the dealer where you purchased the unit or from qualified Yamaha
service personnel.
• Be careful not to drop or apply strong impact to this unit. If you suspect the unit may have
been damaged due to dropping or impact, immediately turn off the power and pull the power
plug from the AC outlet. Failure to observe this may cause electric shocks, a fire, or
malfunctions. Immediately request an inspection from the dealer where you purchased the
unit or from qualified Yamaha service personnel.
CAUTION
This content indicates “risk of injury.”
Power supply/power cord
• Do not use an AC outlet where the power plug fits loosely when inserted. Failure to observe
this may cause a fire, electric shocks, or burns.
• When removing the electric plug from the unit or an AC outlet, always hold the plug itself
and not the cord. Pulling by the cord can damage it and cause electric shocks or a fire.
• Insert the power plug firmly all the way into the AC outlet. Using the unit when it is not
plugged in sufficiently can cause dust to accumulate on the plug, causing a fire or burns.
Installation
• Do not place the unit in an unstable position where it might accidentally drop or fall over and
cause injuries.
• Do not block this unit's ventilation holes (cooling slits). This unit has ventilation holes on the
side to prevent the internal temperature from becoming too high. Failure to observe this
may trap heat inside the unit, causing a fire or malfunctions.
• When installing this unit:
- Do not cover it with any cloth.
- Do not install it on a carpet or rug.
- Make sure the top surface faces up; do not install on its sides or upside down.
- Do not use the device in a confined, poorly-ventilated location.
Failure to observe the above may trap heat inside the unit, causing a fire or malfunctions.
Ensure that there is adequate space around the unit: at least 5 cm (2 in) on top, 5 cm (2 in)
on the sides, and 5 cm (2 in) on the rear.
• Do not install the unit in places where it may come into contact with corrosive gases or salt
air or places that have excessive smoke or steam. Doing so may result in malfunction.
• Before moving this unit, be sure to turn off the power switch and disconnect all connection
cables. Failure to observe this may damage the cables or cause you to trip and fall.
• For proper installation of the outdoor antenna, make sure to have it done by the dealer from
where you purchased the unit or by qualified service personnel. Failure to observe this may
cause the installation to fall and result in injury. Installation requires special skills and
experience.
Hearing loss
• Do not use the unit for a long period of time at a high or uncomfortable volume level, since
this can cause permanent hearing loss. If you experience any hearing loss or ringing in the
ears, consult a physician.
• Before connecting the unit to other devices, turn off the power for all devices. Also, before
turning the power of all devices on or off, make sure that all volume levels are set to the
minimum. Failing to do so may result in hearing loss, electric shock, or device damage.
• When turning on the AC power in your audio system, always turn on the unit LAST, to avoid
hearing loss and speaker damage. When turning the power off, the unit should be turned off
4 En
Page 5

FIRST for the same reason. Failure to observe the above may cause hearing impairment or
speaker damage.
Maintenance
• When storing or discarding batteries, insulate the terminal area by applying tape, or some
other protection. Mixing them with other batteries or metal objects can cause a fire, burns,
or inflammation due to fluid.
• Remove the power plug from the AC outlet before cleaning the unit. Failure to observe this
may cause electric shocks.
Handling caution
• Do not insert your hand or fingers into disk slot of this unit. Failure to observe this may
cause injury.
• Do not insert foreign materials such as metal or paper into disk slot of this unit. Failure to
observe this may cause a fire, electric shocks, or malfunctions. If foreign material gets into
the unit, immediately shut off the power and pull the power plug from the AC outlet and
request an inspection from the dealer where you purchased the unit or from qualified
Yamaha service personnel.
• Do not do the following:
- stand on or sit on the equipment.
- put heavy items on top of the equipment.
- place the equipment in a stack.
- apply unreasonable force to buttons, switches, input/output terminals, etc.
• Avoid pulling the connected cables to prevent injuries or damage to the unit by causing it to
fall.
• Do not operate the unit if the sound is distorting. Prolonged use in this condition could
cause overheating and result in fire.
Battery use
• Always replace all batteries at the same time. Do not use new batteries together with old
ones. Using new ones with old ones could cause a fire, burns, or inflammation due to fluid
leaks.
• Do not use batteries other than specified batteries. Doing so cause fire, burns, or
inflammation due to leakage.
• Do not mix battery types, such as alkaline batteries with manganese batteries, or batteries
from different makers, or different types of batteries from the same maker, since this can
cause a fire, burns, or inflammation due to fluid leaks.
• Keep batteries away from children. A child could accidentally swallow a battery. Failure to
observe this may also cause inflammation due to battery fluid leaks.
• Do not put in a pocket or bag, carry, or store batteries together with pieces of metal. The
battery could short, burst, or leak, causing a fire or injury.
• Always make sure all batteries are inserted in conformity with the +/- polarity markings.
Failure to do so might result in a fire, burns, or inflammation due to fluid leaks.
• When the batteries run out, or if the unit is not to be used for a long time remove the
batteries from the unit to prevent possible leakage of the battery fluid.
NOTICE
Indicates points that you must observe in order to prevent
product failure, damage or malfunction and data loss.
Power supply/power cord
• If not using the unit for a long period of time, be sure to pull the power plug from the outlet.
Even if the [z](Standby/On) switch has been turned off (the screen display is off), a minute
current is still flowing.
Installation
• Do not use this unit in the vicinity of other electronic equipment, such as a TV, radio, or
mobile phone. Failure to observe this may cause this unit or the TV or radio to produce
noise.
• Do not use this unit in a location that is exposed to direct sunlight that becomes extremely
hot, such as near a heater, or extremely cold, or that is subject to excessive dust or
vibration. Failure to observe this may cause the unit's panel to become deformed, the
internal components to malfunction, or for operation to become unstable.
• Install this unit as far away from other electronic equipment as possible.
Digital signals from this unit may interfere with other electronic equipment.
• If using a wireless function, avoid installing this unit near metal walls or desks, microwave
ovens, or other wireless network devices.
Obstructions could shorten the transmission distance.
Connections
• If connecting external units, be sure to thoroughly read the manual for each unit and
connect them in accordance with the instructions.
Failure to properly handle a unit in accordance with the instructions could cause
malfunctions.
• Do not connect this unit to industrial units.
Digital audio interface standards for consumer use and industrial use are different. This unit
has been designed to connect to a consumer-use digital audio interface. Connections to an
industrial-use digital audio interface could not only cause this unit to malfunction, but could
also damage the speakers.
En 5
Page 6
Handling
• Do not place vinyl, plastic, or rubber products on this unit. Failure to observe this may cause
discoloration or deformation in the panel of this unit.
• If the ambient temperature changes drastically (such as during unit transportation or under
rapid heating or cooling) and there is a chance condensation may have formed in the unit,
leave the unit for several hours without turning on the power until it is completely dry before
use. Using the unit while there is condensation can cause malfunctions.
Maintenance
The model number, serial number, power requirements, etc., may be found on or near the
name plate, which is at the rear of the unit. You should note this serial number in the space
provided below and retain this manual as a permanent record of your purchase to aid
identification in the event of theft.
Model No.
Serial No.
• When cleaning the unit, use a dry, soft cloth. Using chemicals such as benzine or thinner,
cleaning agents, or chemical scrubbing cloths can cause discoloration or deformation.
Batteries
• Be sure to discard used batteries in accordance with local regulations.
About content in this manual
• The illustrations and screens in this manual are for instructional purposes only.
• The company names and product names in this manual are the trademarks or registered
trademarks of their respective companies.
• Software may be revised and updated without prior notice.
LASER SAFETY
This unit employs a laser. Due to possible eye injury, only a qualifi ed service person should remove
the cover or attempt to service this device.
DANGER
This unit emits visible laser radiation when open. Avoid direct eye exposure to beam.
When this unit is plugged into the wall outlet, do not place your eyes close to the opening of the disc
tray and other openings to look into inside.
CAUTION
Use of controls or adjustments or performance of procedures other than those specified herein may
result in hazardous radiation exposure.
The laser component in this product is capable of emitting radiation exceeding the limit for Class 1.
(rear_en_01)
6 En
Page 7
Introduction
Confirm the package contents and useful points of this manual.
About this manual
• How to operate this unit is described mainly using the remote control.
• Illustrations may differ from actual item depicted.
• Symbols:
Caution Indicates information that should be read before use to prevent failure
or physical damage.
Note Indicates precautions and supplementary information that should be
read before using the unit.
& References another page or pages that provide additional information.
Trademarks
The Bluetooth® word mark and logos are registered trademarks owned by Bluetooth SIG, Inc. and
any use of such marks by Yamaha Corporation is under license. Other trademarks and trade
names are those of their respective owners.
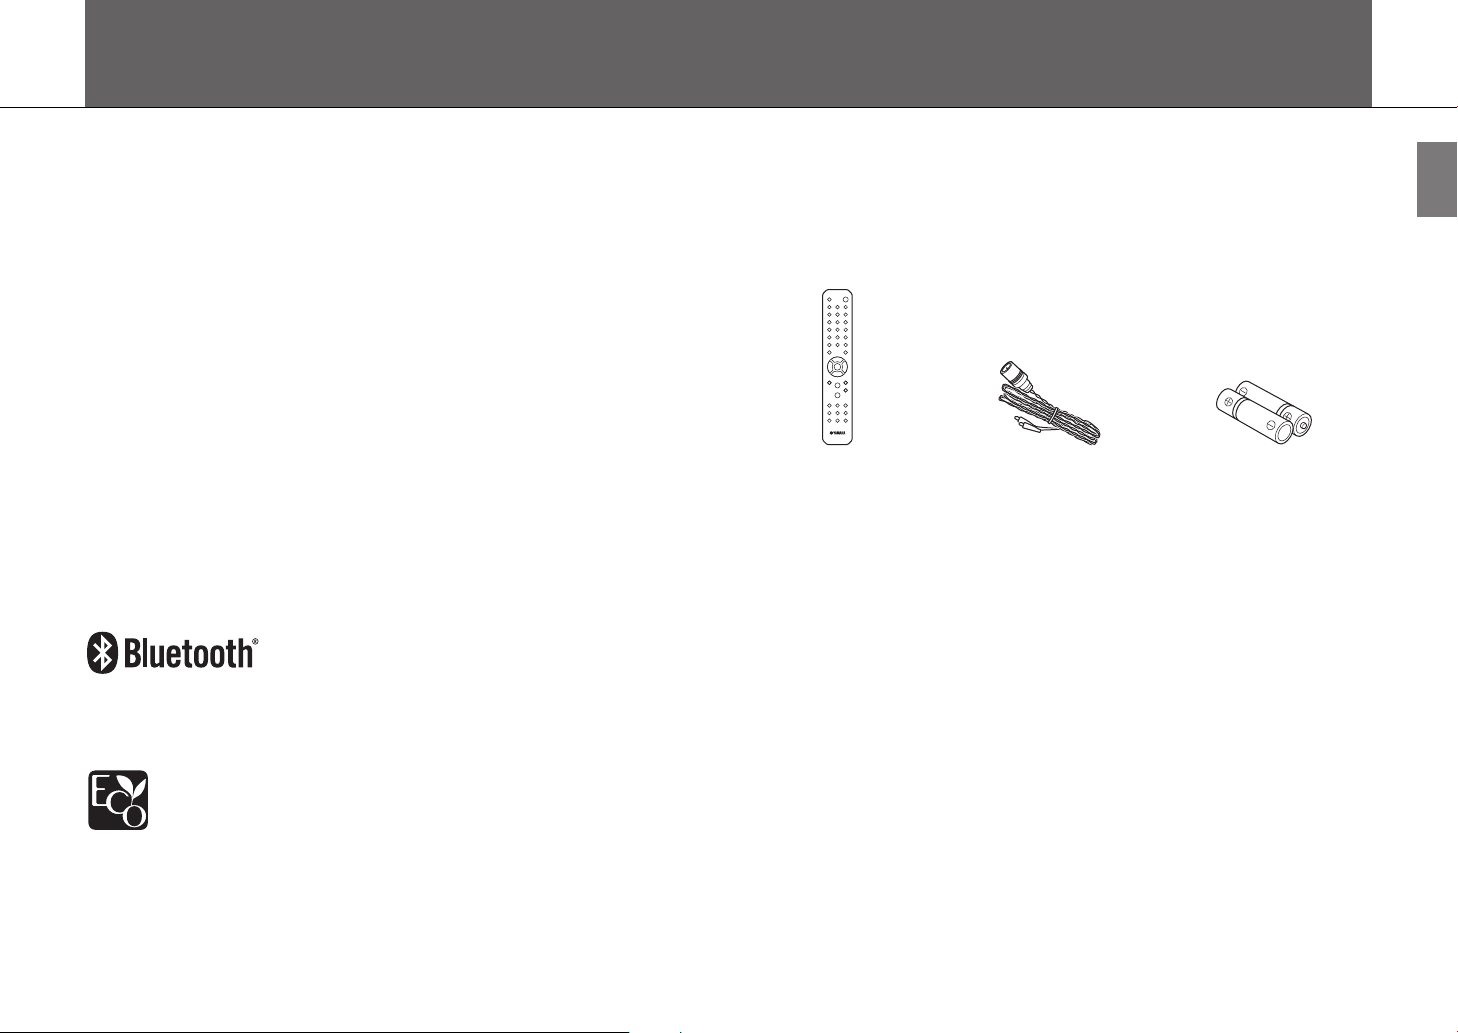
Accessories
Remote control FM antenna Batteries (x 2)
(AA, R6, UM-3)
Yamaha Eco-Label is a mark that certifies products of high environmental performance.
En 7
Page 8

What you can do with this unit
Compact and easy to
use with high quality
sound
Sound quality can be adjusted to
suit individual preferences.
(& p. 23 Adjusting sound quality)
8 En
Bluetooth makes it easy
to operate remotely
The unit turns on automatically when
a Bluetooth connection is established.
(& p. 18 Playing music via Bluetooth®
connection)
Greater music
enjoyment
The unit is equipped with a
digital optical input jack and a
stereo mini-jack that enable
connection to external devices.
(& p. 21 Playing music from
external devices)
Page 9
Parts name
Familiarize yourself with all parts and their functions.
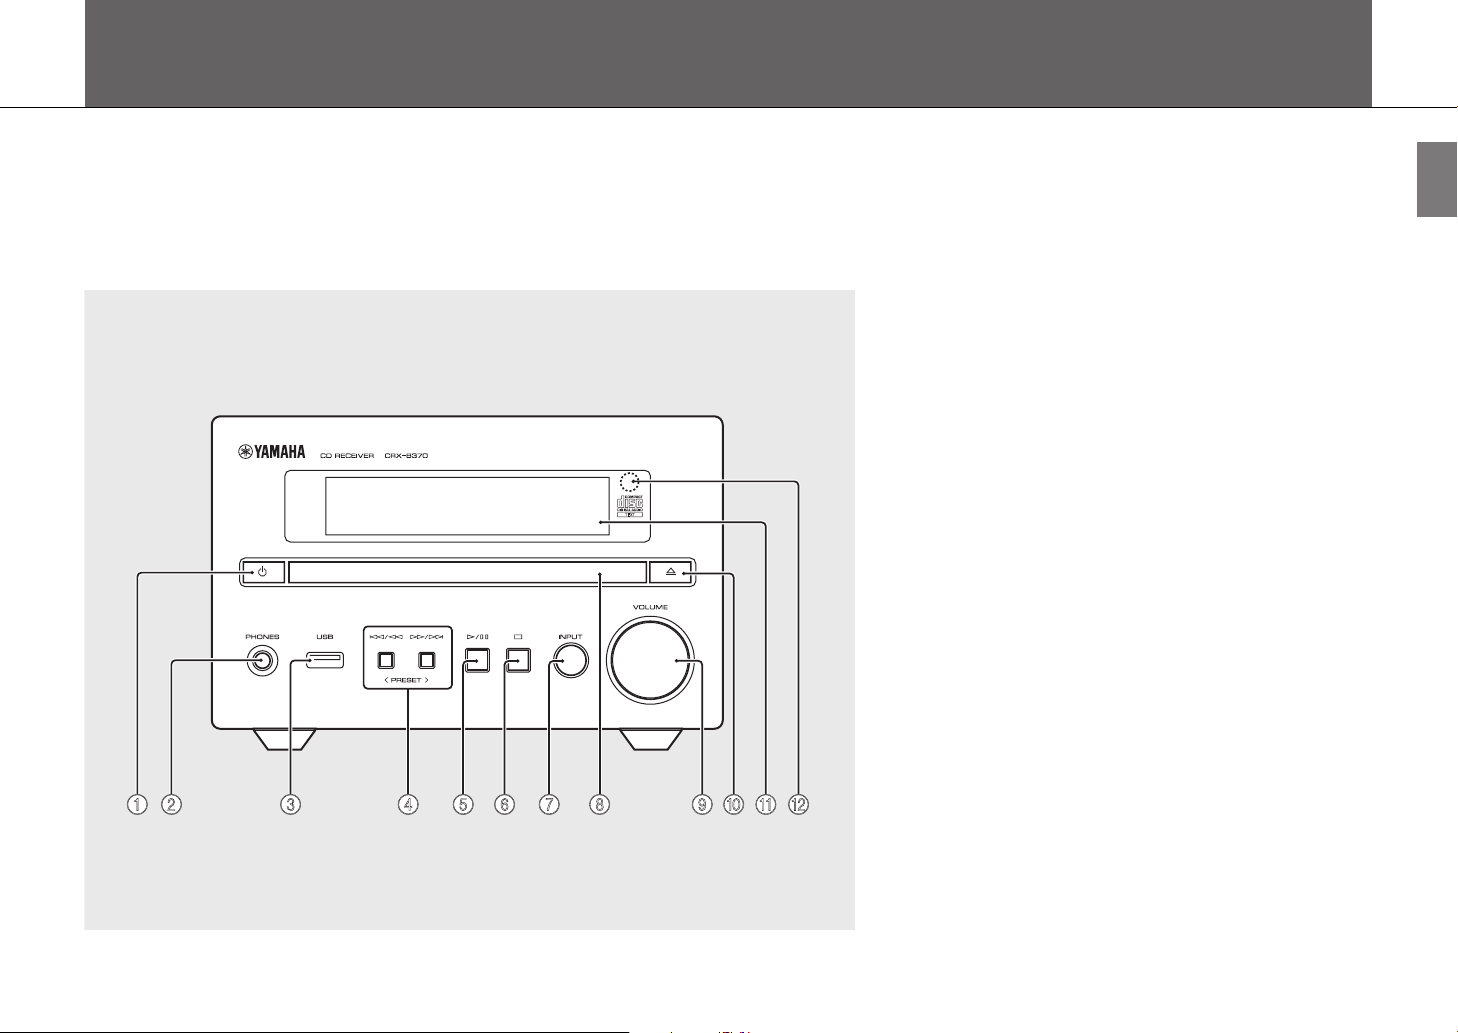
Front panel
1 z (Power) (& p. 15)
The front panel display turns on when the unit is turned on.
2 PHONES
Connect headphones to this jack.
Note
When headphones are connected, there is no sound from the
speakers or subwoofer.
3 USB jack (& p. 17)
4 f/h, j/g (& p. 16, 17)
PRESET </> (& p. 19)
5 a/d (Play/pause) (& p. 16, 17)
6 s (Stop) (& p. 16, 17)
7 INPUT (& p. 16, 17)
Change the input source. (The selected input source is shown in the
front panel display.)
8 Disc tray (& p. 16)
9 VOLUME
Adjust the volume.
A B094 85 6 7321
0 = (Open/close the disc tray) (& p. 16)
A Front panel display (& p. 11)
B Remote control sensor
En 9
Page 10
Parts name
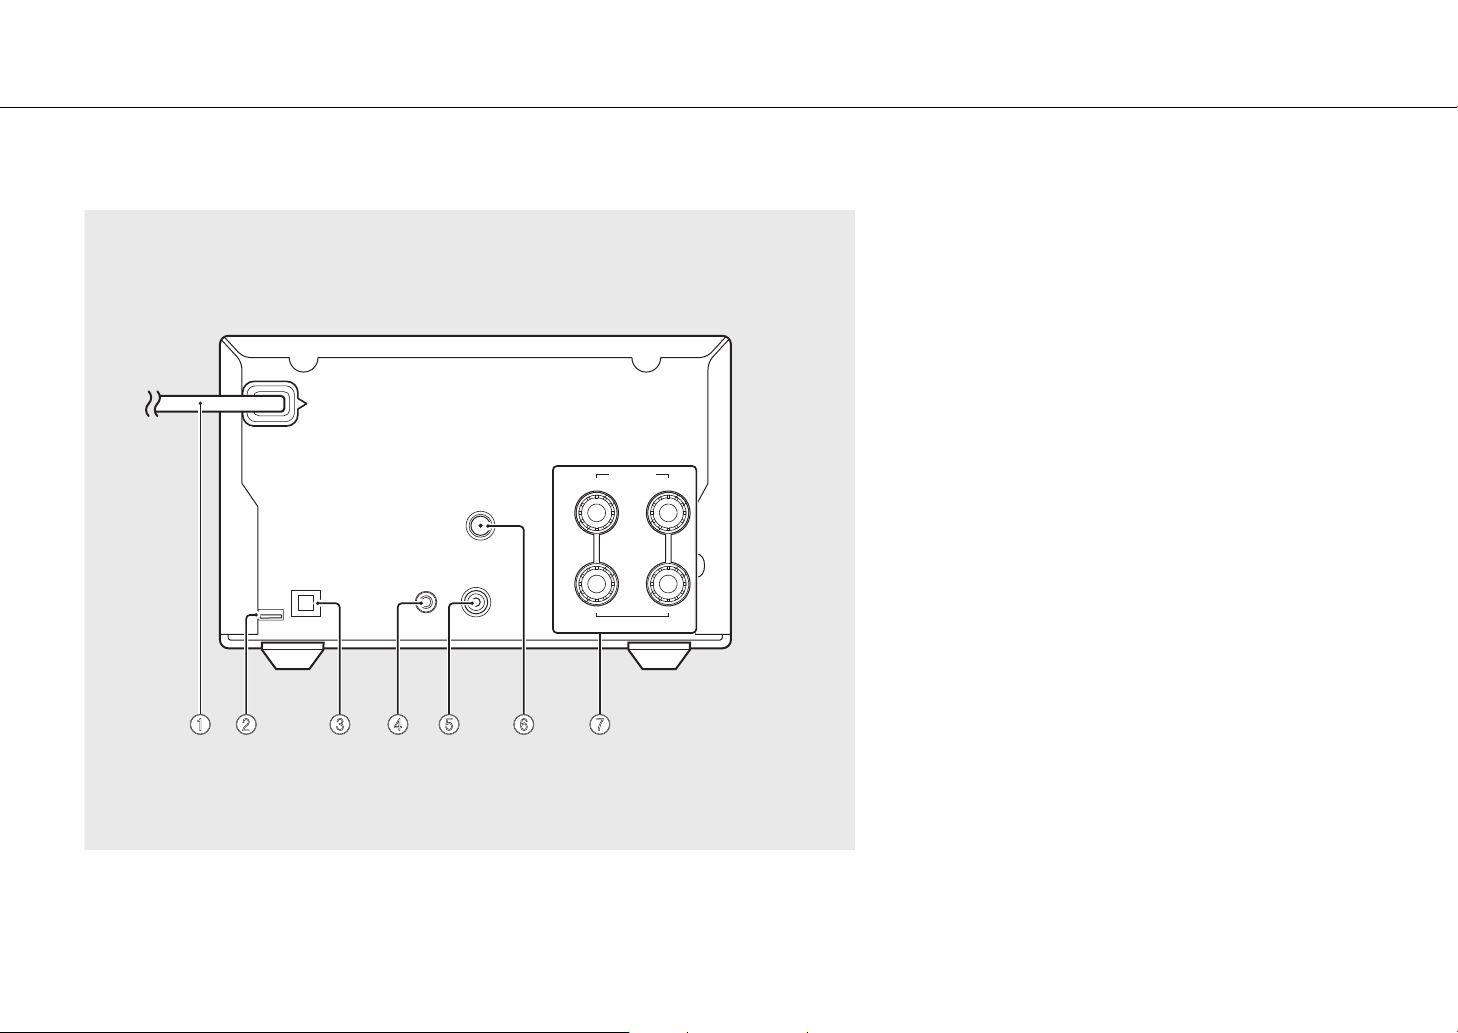
Rear panel
ANTENNA
FM75Ω
UNBAL.
SPEAKERS
RL
+
–
1 Power cord (& p. 15)
2 Service only jack
Use when the unit requires maintenances.
3 DIGITAL IN jack (optical input) (& p. 21)
4 AUX IN jack (mini jack input) (& p. 21)
5 SUBWOOFER OUT jack (& p. 13)
6 ANTENNA jack (& p. 14)
7 SPEAKERS terminals (& p. 13)
10 En
DIGITAL IN
AUX IN
SUBWOOFER
OUT
6Ω MIN./SPEAKER
71 32 4 5 6
Page 11
Front panel display
Parts name
1 2 3 4 5 6 7
1 Multi information display
Show various information, such as music information and
the radio frequency.
Characters shown in the front panel display are
alphanumerics only.
2 TUNED indicator
Glows when the unit is receiving a signal from an FM
station.
3 STEREO indicator
Glows when the unit is receiving a signal from an FM
stereo broadcast.
TUNED
aaaaaaaa
STEREO
vx
MUTE
SLEEP
ALL
1
$
aaaaaaaaaaaaaaaa
4 MUTE indicator
Glows when the sound is muted (& p. 12).
5 SLEEP indicator
Glows when the sleep timer is set (& p. 15).
6 Shuffle/repeat indicator
Glows when the shuffle or repeat function is enabled for
songs in a CD or USB memory device.
7 $ Bluetooth indicator
Show the status of Bluetooth connection.
Note
Changing display brightness
Each press of the DIMMER button on the remote control
(& p. 12) changes the brightness: bright (default), mid dim, or
dim.
En 11
Page 12
Parts name
Remote control
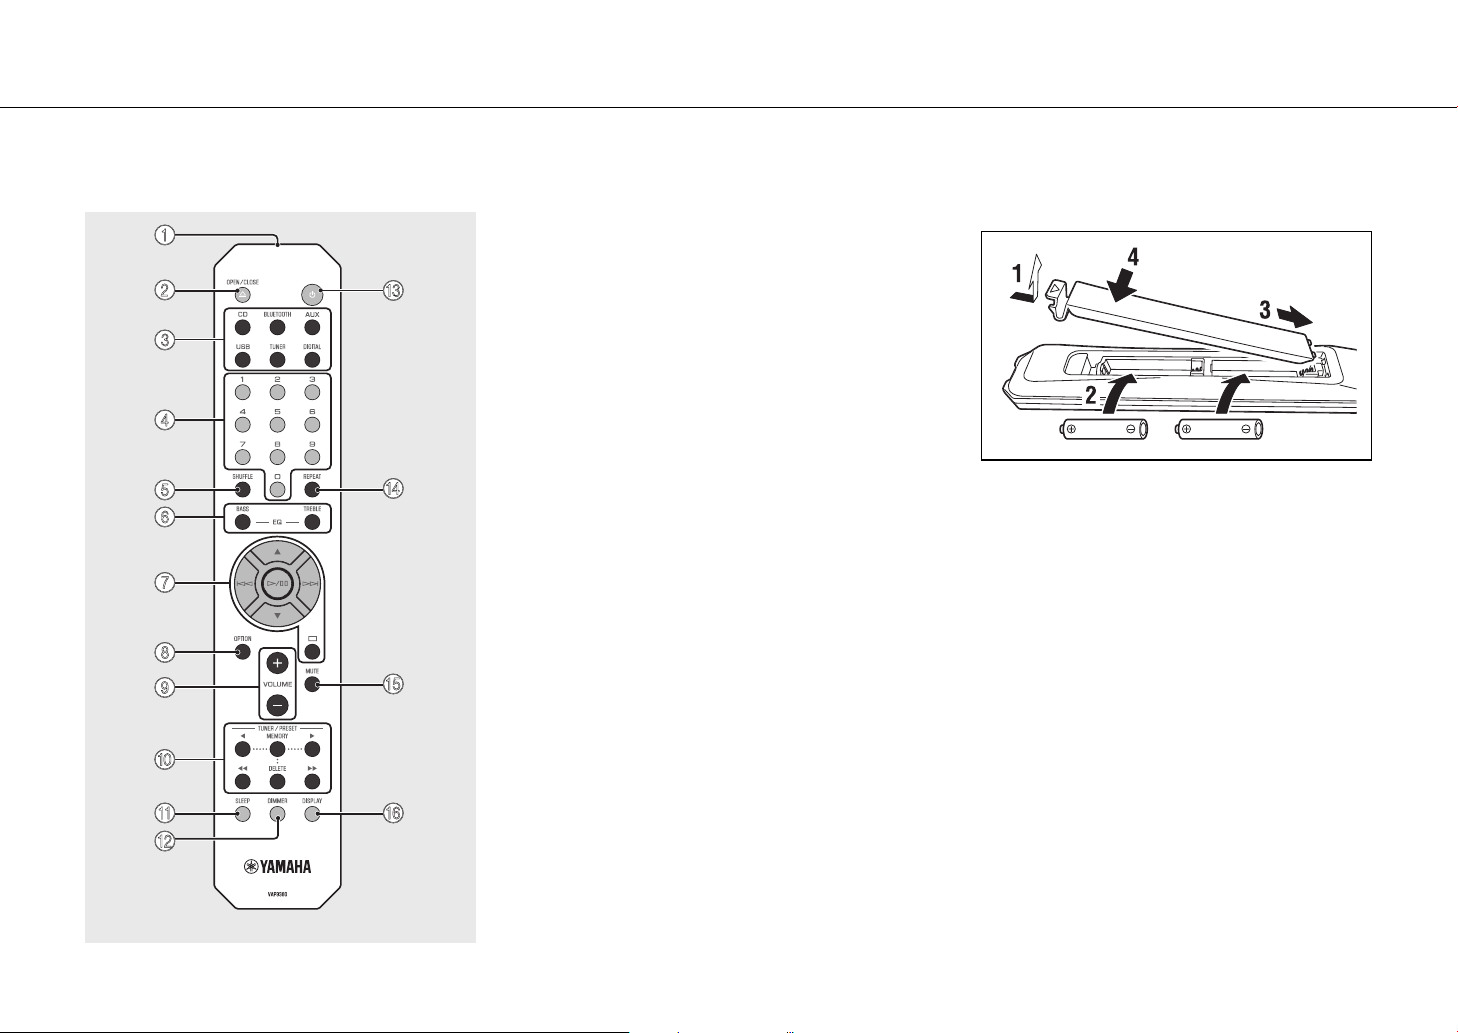
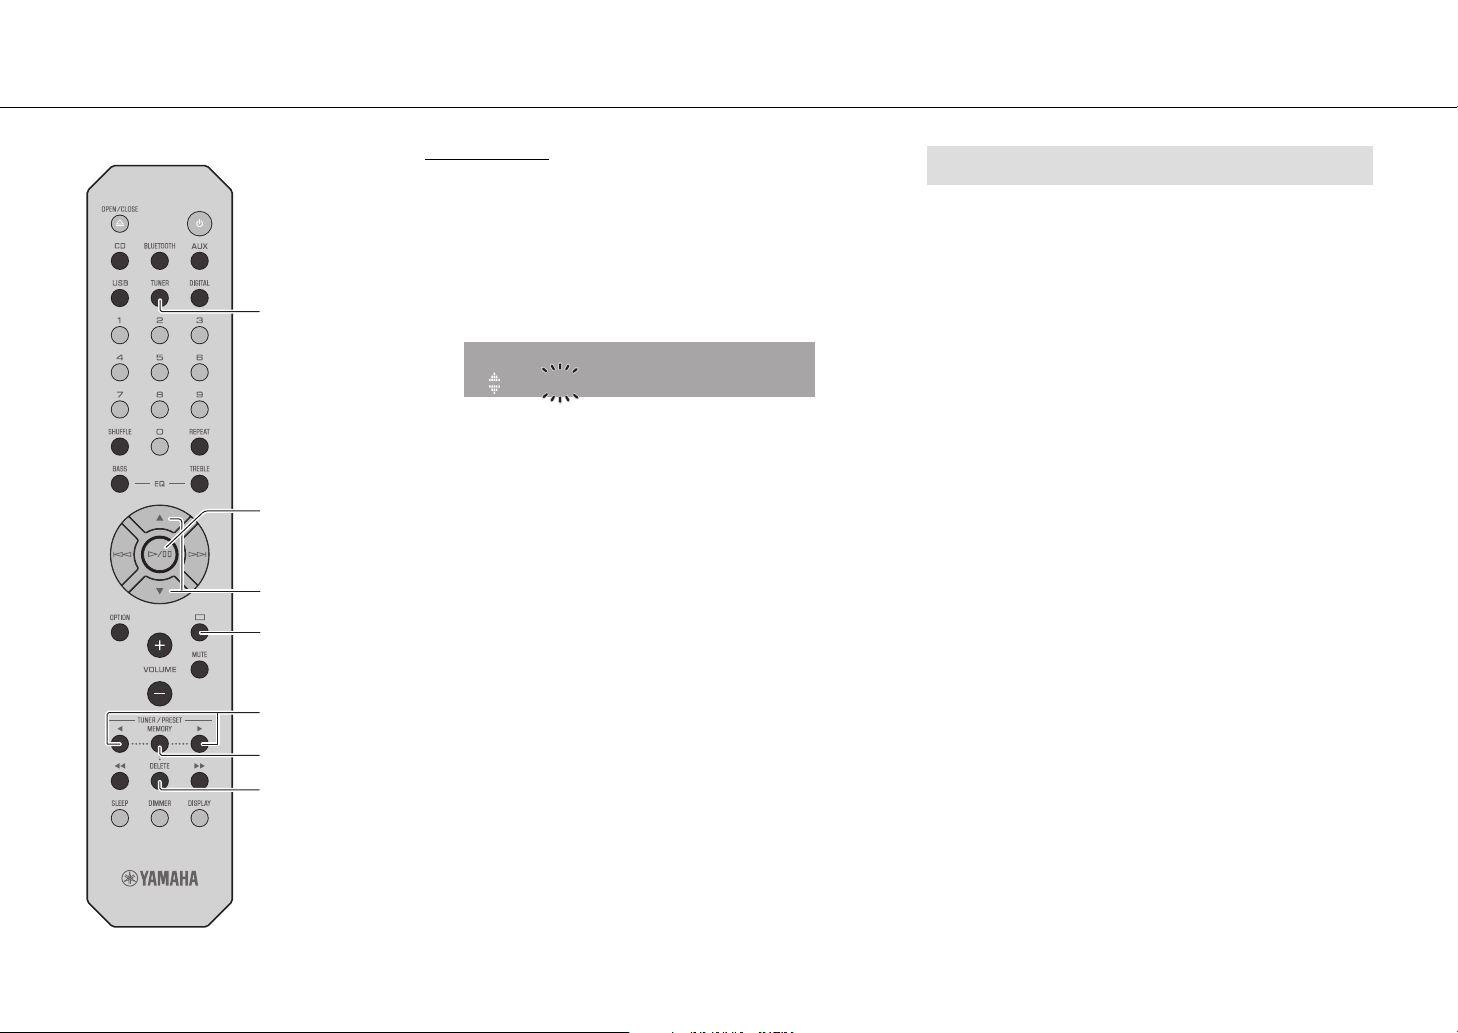
1
2
3
4
5
6
7
8
9
0
A
B
C
D
E
F
1 Infrared signal transmitter
2 OPEN/CLOSE = (Open/close the disc tray)
(& p. 16)
3 Input source buttons
Switch the input source.
4 Numeric buttons (& p. 16)
5 SHUFFLE (& p. 22)
6 BASS, TREBLE (& p. 23)
7 Audio control, cursor control buttons (& p. 16,
17)
8 OPTION (& p. 24)
9 VOLUME +/–
Adjust the volume.
0 TUNER/PRESET (& p. 19)
A SLEEP (& p. 15)
B DIMMER (& p. 11)
C z (Power) (& p. 15)
D REPEAT (& p. 22)
E MUTE
Turn mute on or off.
F DISPLAY (& p. 23)
Installing batteries
Check the “+” and “-” of the batteries and insert them in the
correct directions.
Note
Change both batteries when the operation range of the
remote control decreases.
12 En
Page 13
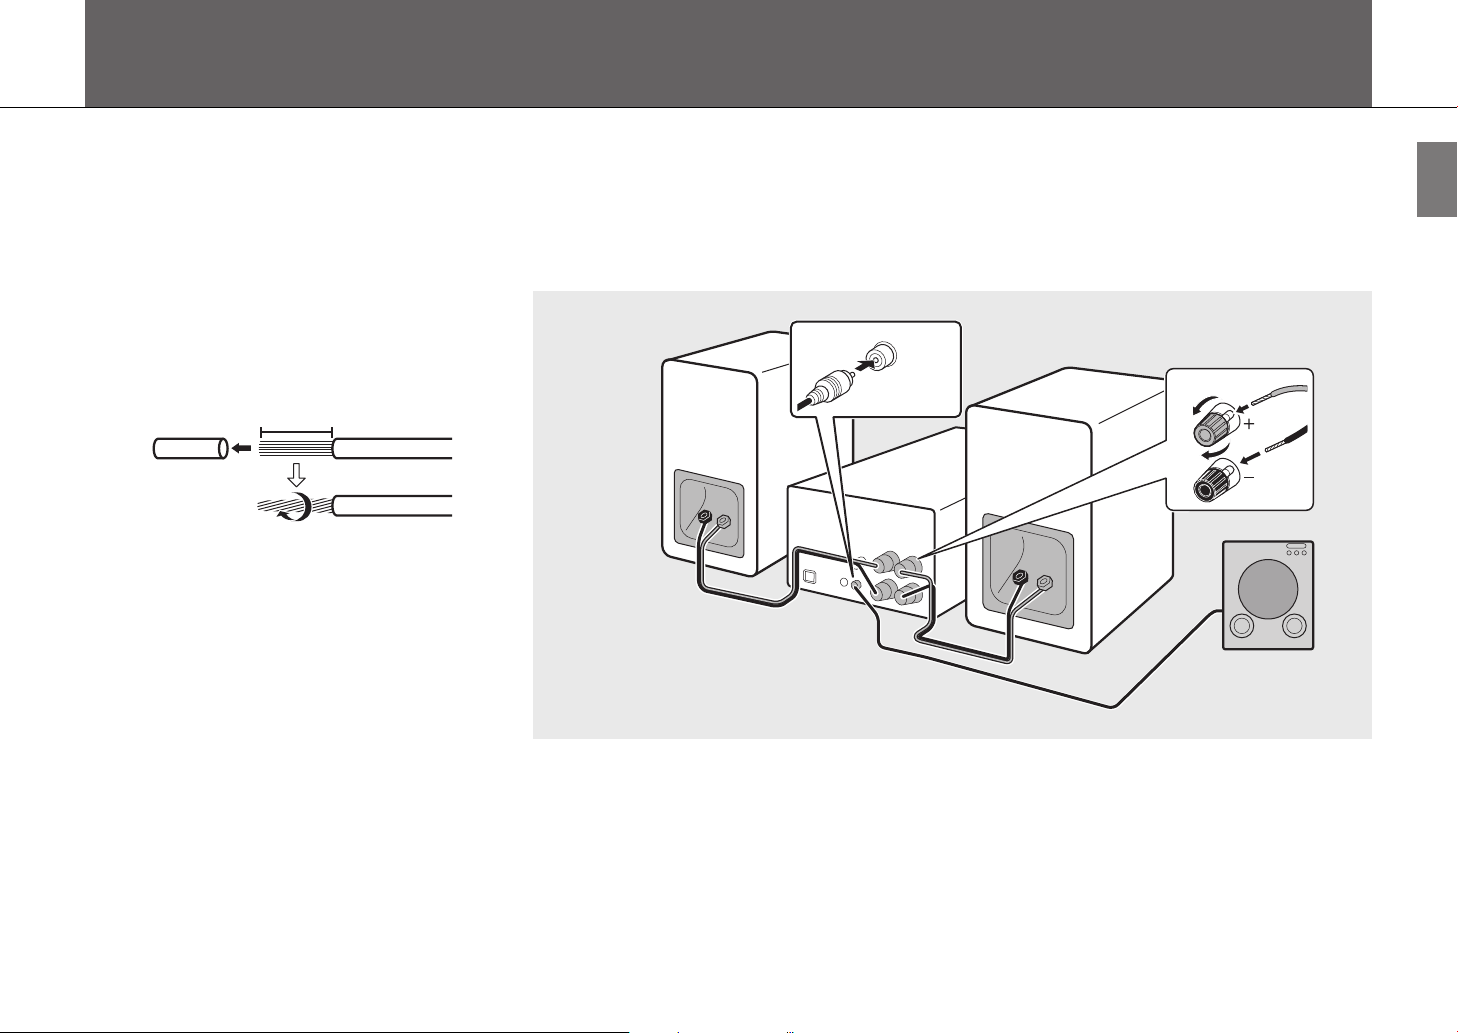
Preparations
Connect speakers, the antenna, etc. and turn the unit on.
Do not connect the power cord of the unit until you have finished connecting all cables.
Connecting speakers
1 Remove the insulation from the ends
of the speaker cables to expose the
bare wires.
15 mm (5/8 in.)
2 Connect speakers to the unit, as the
illustration shows.
• Prepare speakers, subwoofer and speaker cables
separately.
• See documentation provided with the speakers
for more information.
Right speaker
Speaker cable
SUBWOOFER
OUT
Left speaker
Monaural pin cable
1
3
2
Subwoofer
Caution
• If the bare speaker wires touch each other or any metal part of the unit, it could damage the unit and/or the speakers.
• Use speakers of at least 6 Ω impedance.
Note
• Make sure that left and right (L, R) connections and polarity (red: +, black: -) are correct. If connections are incorrect, the sound will
be unnatural.
• You can also connect a subwoofer to the unit (it must have a built-in amplifier).
En 13
Page 14
Preparations
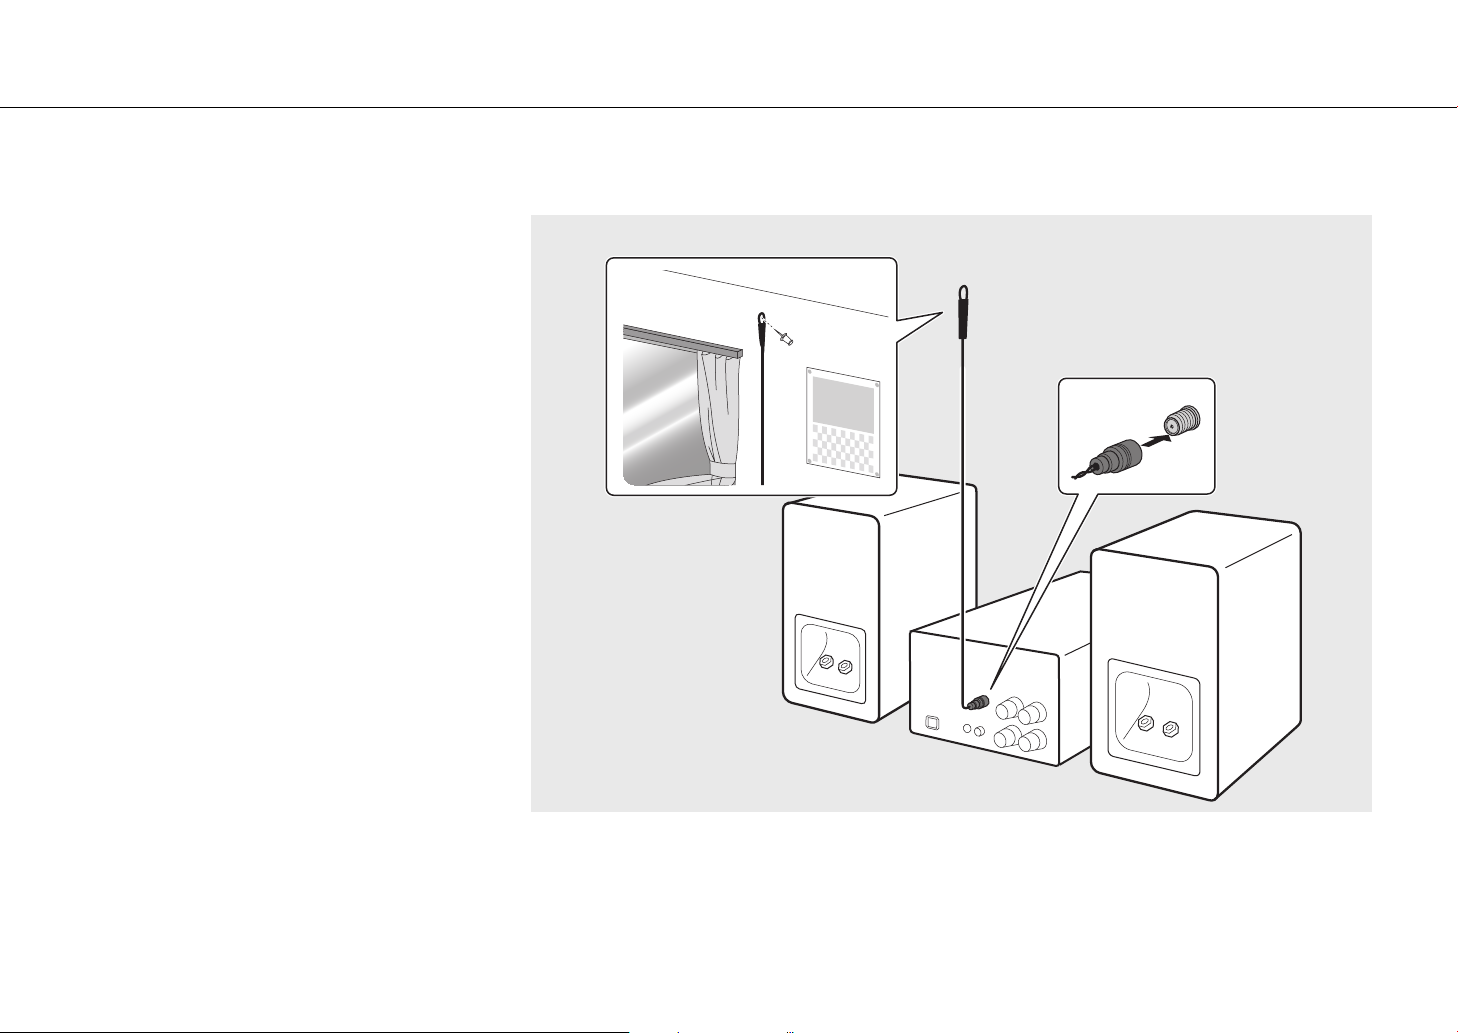
Connecting the antenna
1 Connect the supplied antenna to the
unit.
2 Install it with pins where the unit can
obtain good reception.
2
Supplied antenna
ANTENNA
FM75Ω
UNBAL.
Note
• Be sure to stretch out the antenna as the illustration shows.
• If radio reception with the supplied antenna is not satisfactory, an outdoor antenna (sold separately) may improve reception.
1
14 En
Page 15
Preparations
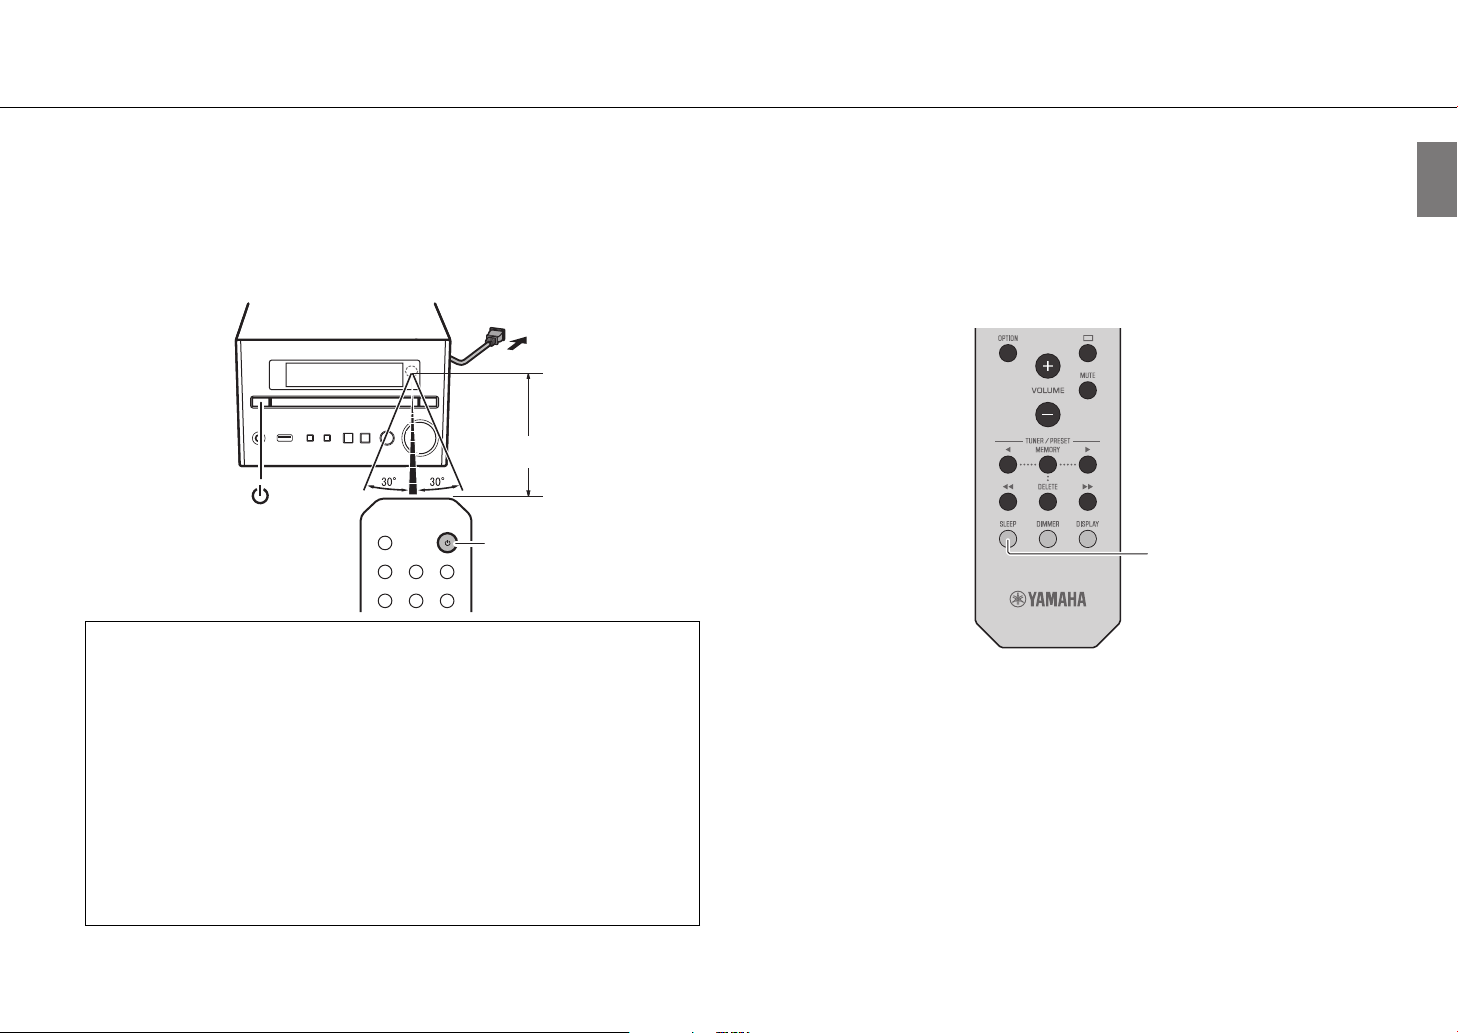
Turning on the power
Plug the power cord into a power outlet, and press z.
• The unit turns on.
• Press z again to turn the unit off (standby mode).
1
Within 6 m (20 ft)
2
Reducing power consumption
Auto standby
The unit will automatically enter standby mode (auto standby) if in any of the following
situations:
• BLUETOOTH, CD, or USB is selected as the input source, but no audio is played, and no
operations are performed, for more than 20 minutes.
• An input source other than above is selected, but no operations are performed for
more than 8 hours.
See “Option menu” (& p. 24) to disable the auto standby function.
Using the sleep timer
You can set the time after which the unit automatically enters standby mode. The time can
be selected from 120/90/60/30 min., or OFF.
Press SLEEP repeatedly to select the time.
The SLEEP indicator lights up when the sleep timer is set.
SLEEP
Note
• To cancel the sleep timer, press SLEEP again.
Eco standby
The unit minimizes power consumption in eco standby mode. Disable the BT Standby
(Bluetooth standby) function to enable eco standby (& p. 24).
En 15
Page 16
Listening to music
Listening to CDs
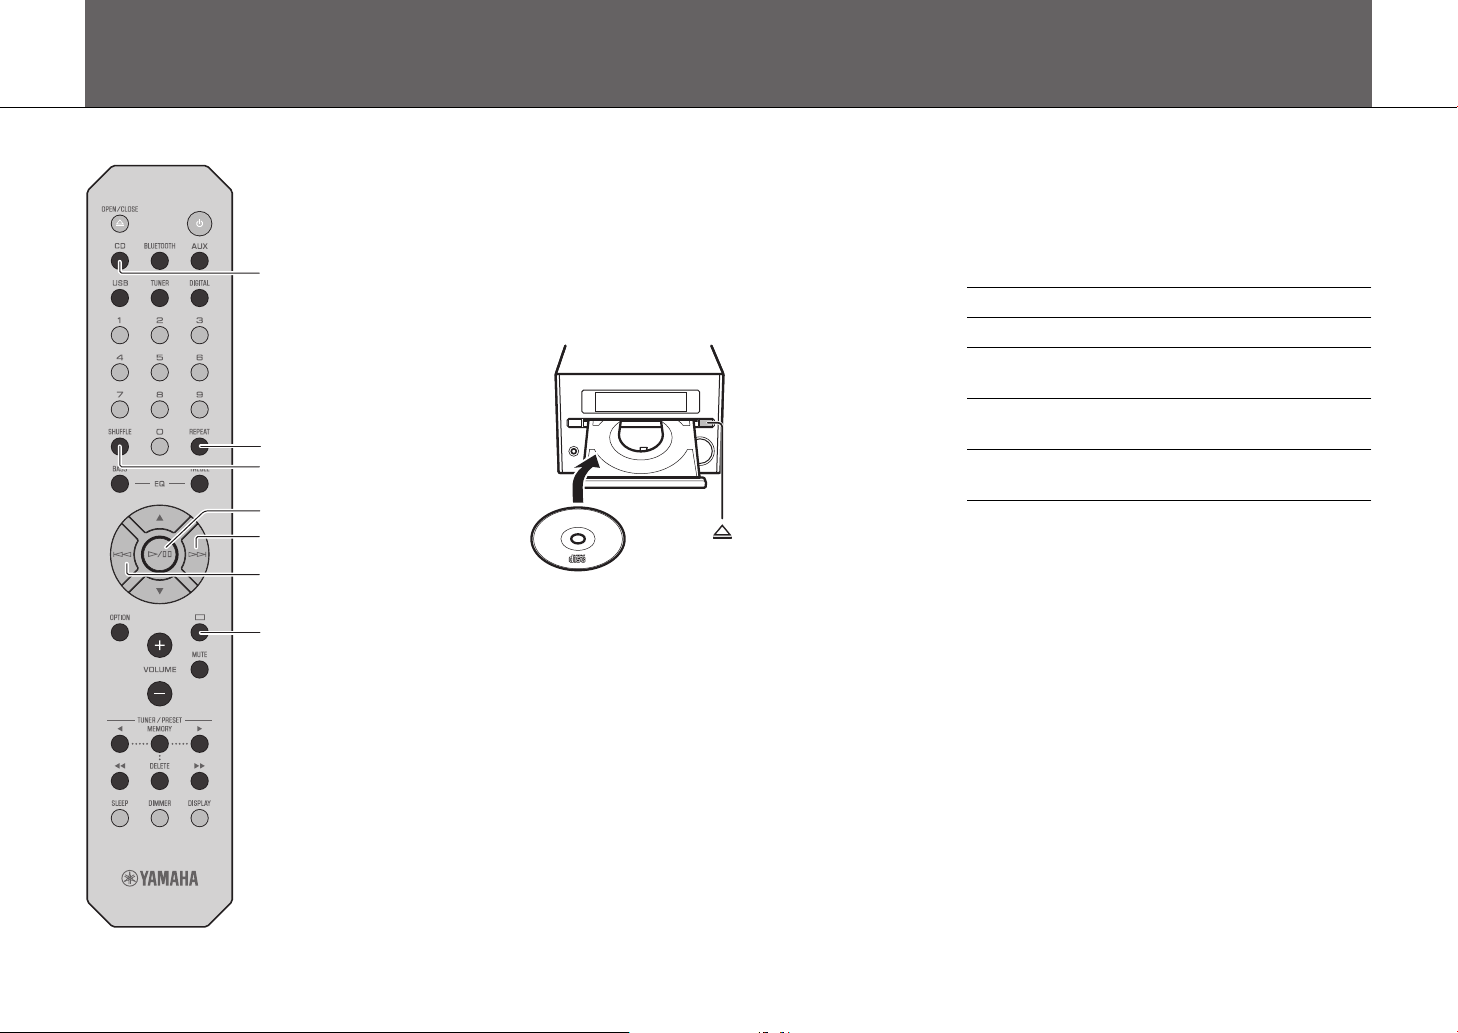
CD
REPEAT
SHUFFLE
a/d
g
f
s
1 Press CD on the remote control.
2 Set a CD in the disc tray.
Press = to open/close the disc tray.
3 Press a/d.
Playback starts.
Use the following buttons to control audio playback. A song
can also be selected using the numeric buttons on the
remote control.
a/d Play/pause
s Stop
f
g
SHUFFLE/
REPEAT
Note
• This unit allows playback of audio CDs, and data CDs in which MP3/
WMA files are recorded. For details on playable CDs, see “Supported
devices/media and file formats” (& p. 30).
• When CD playback is stopped, playback will resume from the
beginning of the song last played. Pressing s (stop) while
playback is stopped will clear resume playback.
• You can cancel the song number selected with the numeric
buttons by pressing s (stop).
• Music files stored on a data CD can be played using the same
operations used to play music stored on a USB memory device
(& p. 17).
• If you turn off the unit with CD selected as the input source and a
CD set in it, the unit automatically plays back the set CD next time
you turn on the unit.
Skip to the beginning of the song being
played back. Press and hold to fast rewind.
Skip to the next song. Press and hold to fast
forward.
& p. 22
16 En
Page 17
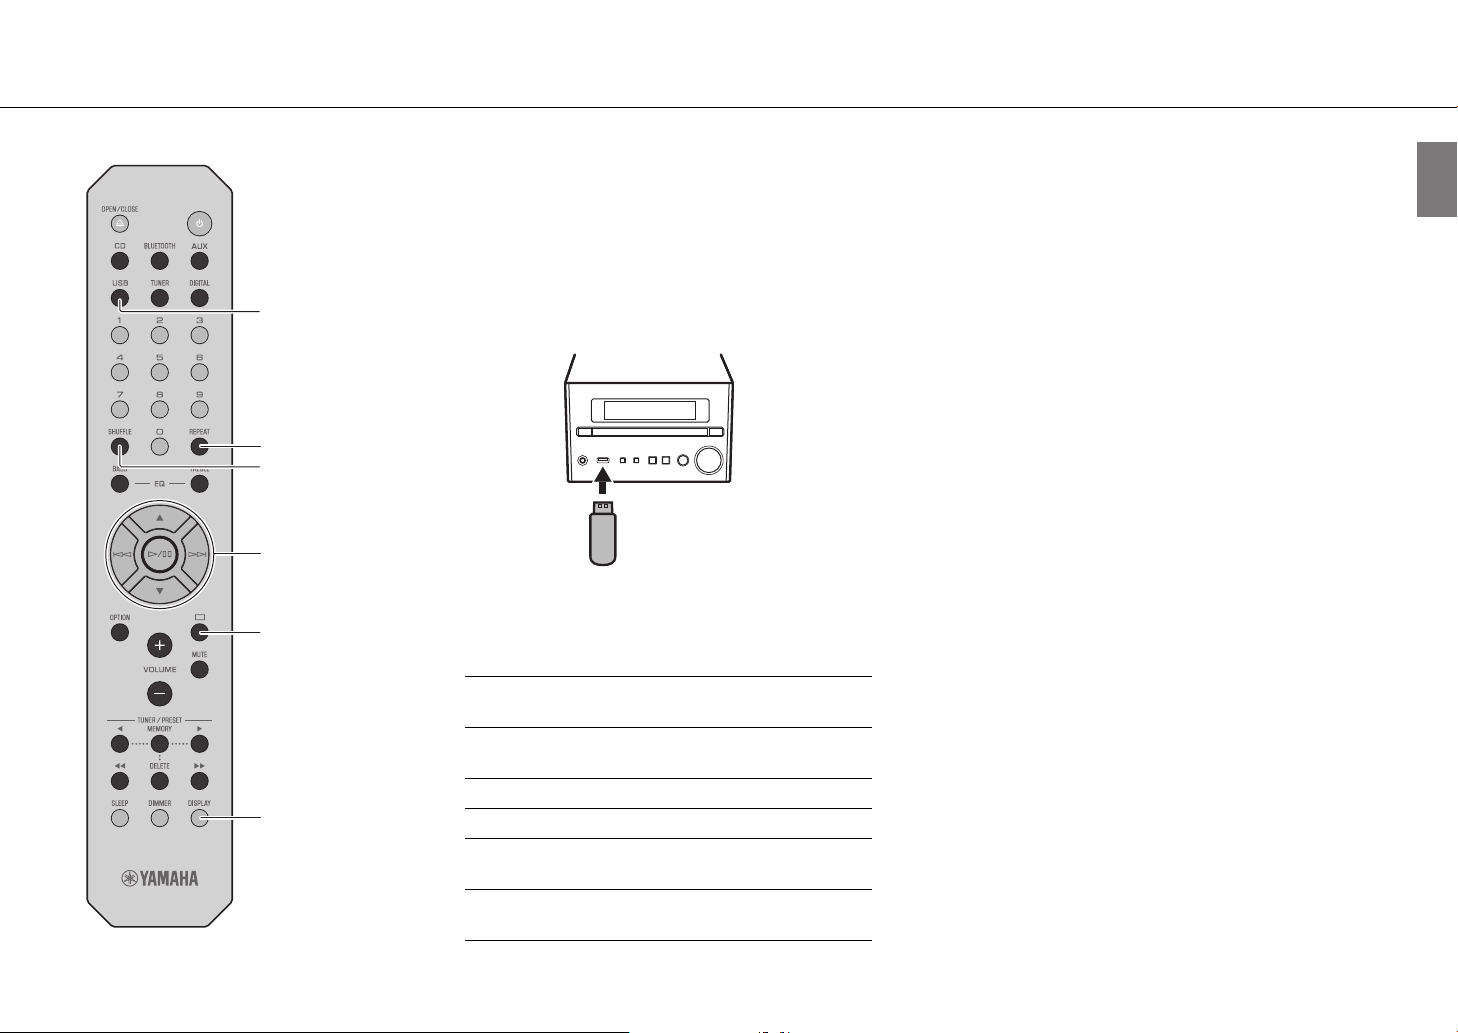
Playing music on USB memory devices
Listening to music
USB
REPEAT
SHUFFLE
w
q
/
a
d
/
g
f
s
DISPLAY
1 Press USB on the remote control.
2 Connect a USB memory device to the USB
jack.
3 Select a song.
Use the following buttons to control audio playback.
q
w
a/d, gConfirm the selected item and proceed to
f Return to the previous item.
s Stop
SHUFFLE/
REPEAT
DISPLAY
Select a folder.
the next level, or start/pause playback.
& p. 22
Display information about the content
being played (& p. 23).
Note
• This unit allows playback from USB memory devices on which
music files are saved. For details on playable USB memory devices,
see “Supported devices/media and file formats” (& p. 30).
• Some USB memory devices may not work properly even if they
meet the requirements. Playability of and power supply to all USB
memory devices are not guaranteed.
• Stop playback before disconnecting the USB memory device.
• A USB memory device is automatically charged as long as it is
connected to the unit except when the unit is in standby mode.
However, some devices may not charge when connected.
• Connect a USB storage device directly to the USB jack of the unit. Do
not use extension cables.
En 17
Page 18
Listening to music
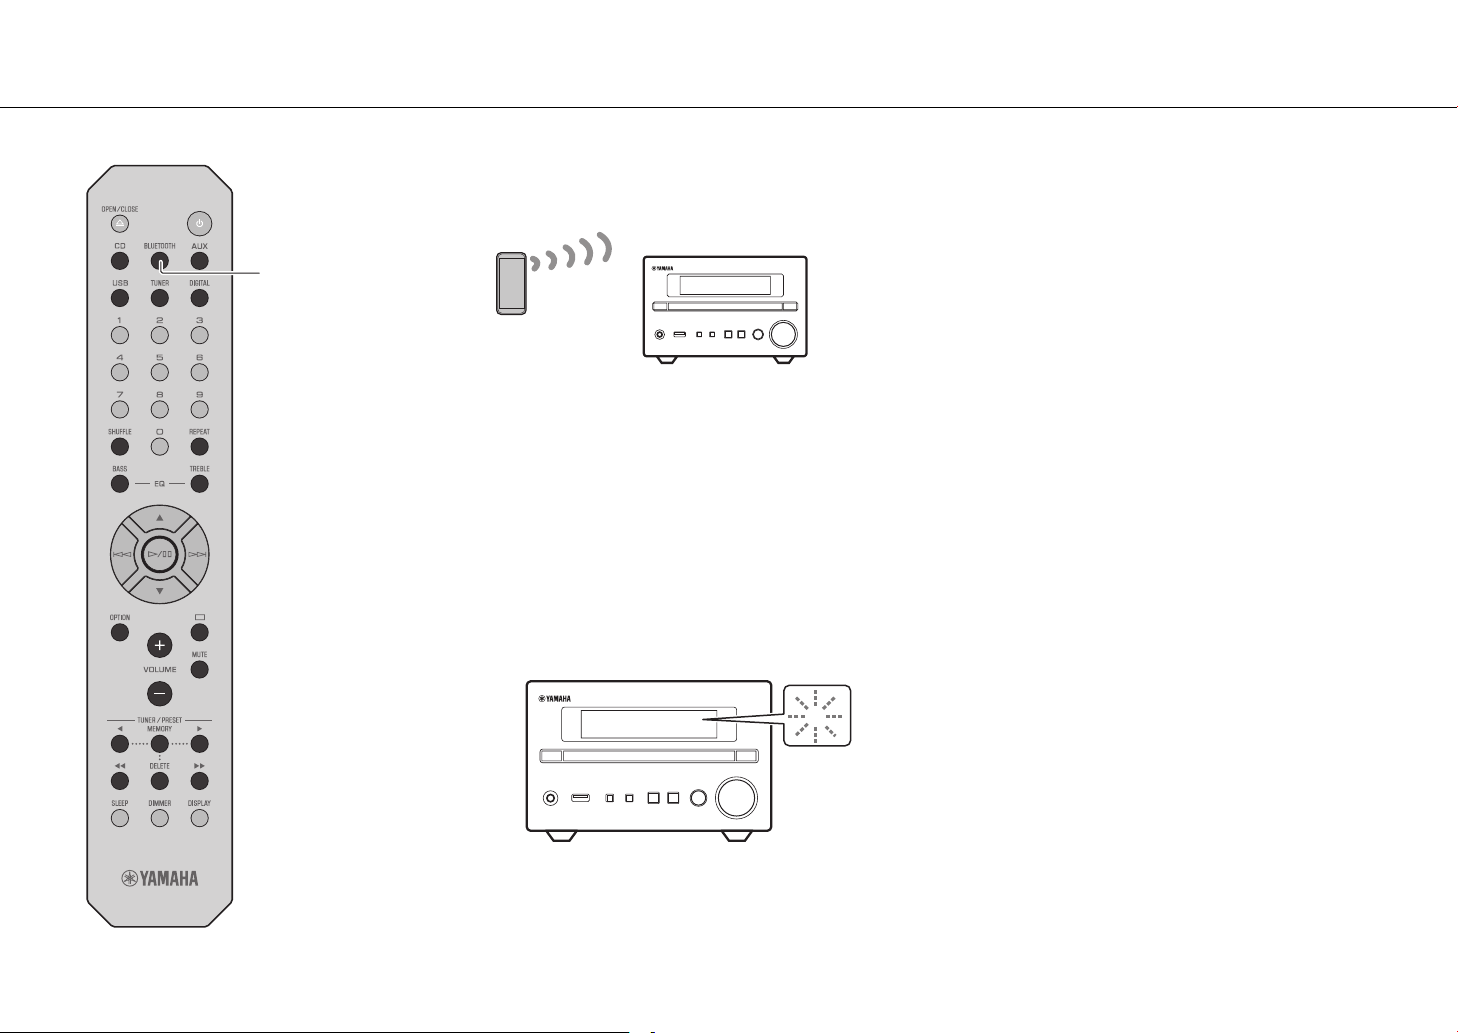
BLUETOOTH
Playing music via Bluetooth® connection
Note
• Decrease the volume of the unit before playback. Otherwise,
playback volume may be too loud.
• If a Bluetooth device has been connected before, the unit will
connect to the last connected device when BLUETOOTH on the
Bluetooth device
This unit
1 Enable the Bluetooth function on your
Bluetooth device.
remote control is pressed.
• If the unit is connected to another device via Bluetooth connection,
press and hold BLUETOOTH at least three seconds to terminate that
connection before connecting to the target device.
• If a passkey is required during the Bluetooth connection, enter the
number “0000.”
• See documentation provided with your Bluetooth device for more
information on Bluetooth connection.
18 En
2 Press BLUETOOTH on the remote control.
3 Select this unit from the Bluetooth device
list on your Bluetooth device.
The $ indicator glows when a connection is established.
$
4 Play music using your Bluetooth device.
Unable to connect the unit to a Bluetooth device
If a Bluetooth connection was not established after following the
instructions shown at left, try the following.
1 If the Bluetooth device has been connected to the unit before,
delete the unit from the list of devices registered with your
Bluetooth device.
2 Press and hold BLUETOOTH on the remote control for at least
three seconds.
- “Pairing” will be shown in the front panel display.
3 Select this unit from the Bluetooth device list on your Bluetooth
device.
- The $ will glow in the front panel display when a connection is
established.
Page 19
Listening to FM radio stations
Connect the antenna supplied with the unit (& p. 14) to receive FM stations.
Listening to music
TUNER
s
MEMORY
ee /rr
Tuning in FM stations
1 Press TUNER.
2 Press and hold ee or rr until automatic
tuning starts.
Automatic tuning stops when a station is tuned in.
FM
87.50MHz
Note
• If station reception is weak, tune into a station manually by pressing
ee /rr repeatedly. Sound will be heard in monaural.
TUNED
STEREO
Presetting FM stations
Auto preset
The unit tunes in stations with good reception and presets them
automatically.
1 Press TUNER.
2 Press and hold MEMORY at least two
seconds.
3 Press MEMORY.
Auto preset starts, and when it finishes, “Completed!” is
shown in the front panel display.
Note
• Auto preset replaces all stations currently stored with new stations.
• Up to 30 FM stations can be preset.
• Press s to cancel Auto preset.
En 19
Page 20
Listening to music
TUNER
a/d
/w
q
s
e/r
Manual preset
1 Tune into a station you want to preset
(& p. 19).
2 Press MEMORY.
The preset number flashes in the front panel display.
Memory
FM01 87.50MHz>
3 Press q/w to select the desired preset
number.
4 Press a/d to preset the station.
Note
• To cancel manual preset setting, press s.
Selecting preset FM stations
1 Press TUNER.
2 Press e/r to select a station.
The number of a registered preset can also be selected using
the numeric buttons.
Note
Deleting a preset station
1 Press and hold DELETE at least two seconds when FM is selected
as the input source.
- The preset number flashes in the front panel display.
2 Press q/w to select the preset number of the station to be
deleted.
3 Press a/d.
- The station in the selected preset number is deleted.
20 En
MEMORY
DELETE
Page 21
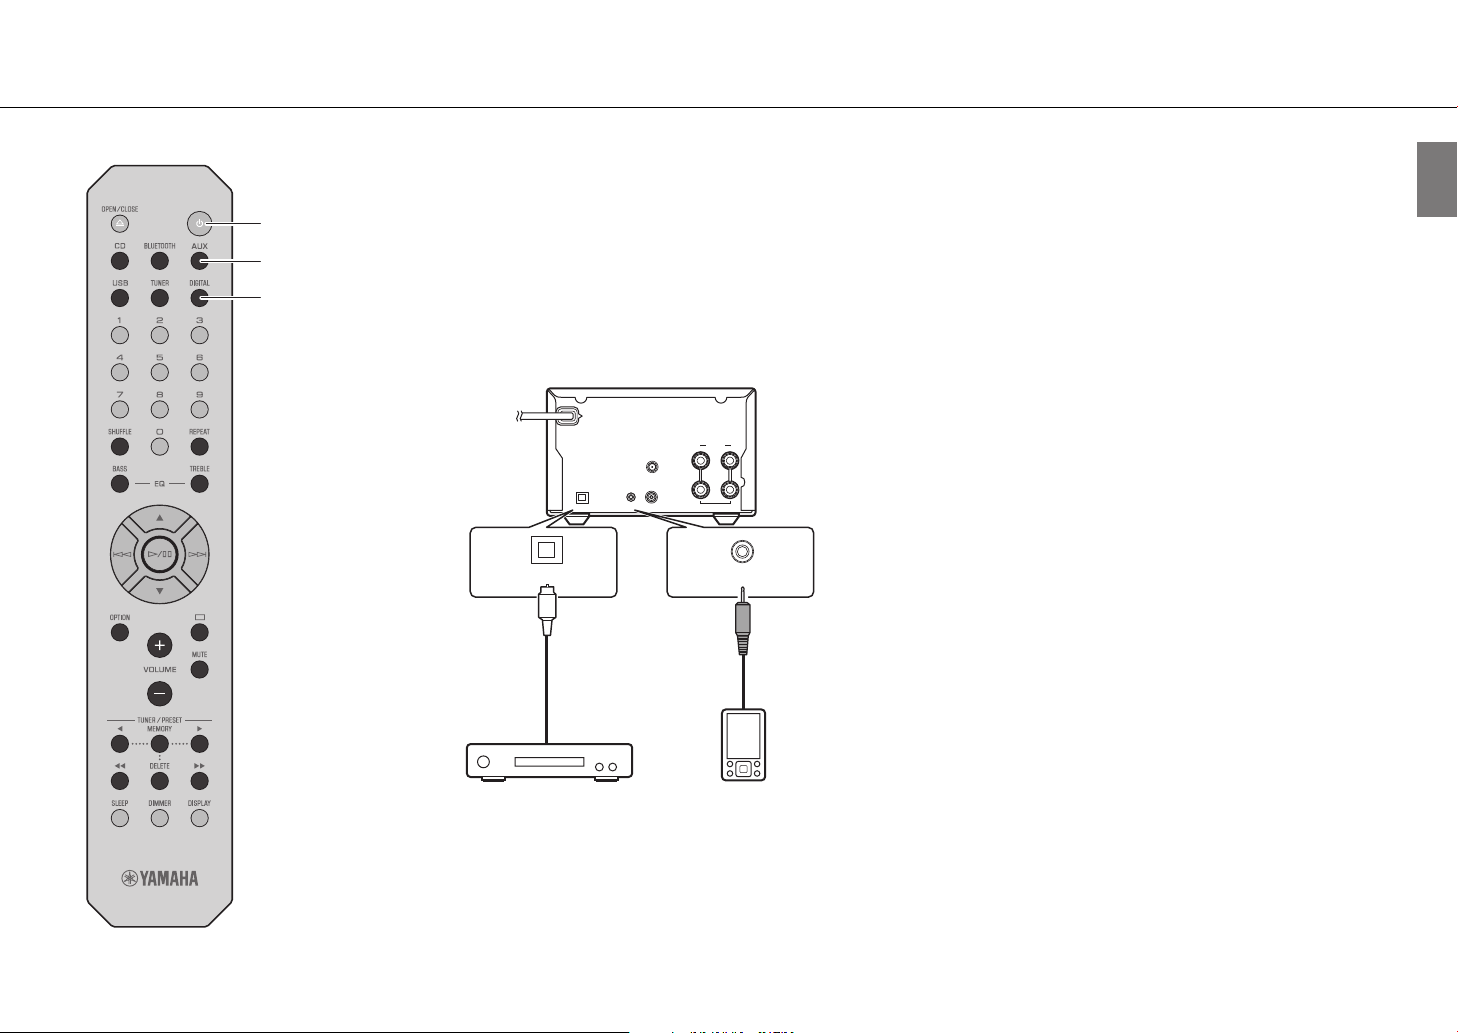
Playing music from external devices
Listening to music
z
AUX
DIGITAL
This unit allows playback from external devices. Use the jacks (DIGITAL IN or AUX IN) according to the device to be
connected (& p. 10).
1 Unplug the power cord of the unit and
connect the external device to the unit.
Use cables sold separately for connection.
2 Plug the power cord of the unit back into
the wall outlet and press z to turn the unit
on.
3 Press AUX or DIGITAL to select the input
source.
4 Play the connected external device.
See documentation provided with the external device for
information on playback.
Note
• Decrease the volume of the unit and the connected external
device before connection. Otherwise, playback volume may be
too loud.
• See documentation provided with the external device for more
information on connecting devices.
DIGITAL IN
ANTENNA
FM75Ω
UNBAL.
DIGITAL IN AUX IN
Digital optical
cable
SUBWOOFER
OUT
SPEAKERS
RL
+
–
6Ω MIN./SPEAKER
AUX IN
3.5mm stereo
mini-plug cable
Audio device equipped
with an optical output jack
Portable music player, etc.
En 21
Page 22

More on playback
Features such as shuffle/repeat playback, displaying song information, etc. make this unit even more convenient to use.
Shuffle/Repeat playback
Operation is the same for playback of content from USB memory devices and CDs.
REPEAT
SHUFFLE
Shuffle (Random) playback
Press SHUFFLE during playback.
The shuffle indicator in the front panel display switches as shown
below each time SHUFFLE is pressed.
x Shuffle folders*
xALL Shuffle all songs
Goes off The shuffle function is not applied.
* The range of shuffle depends on the media being played back.
Repeat playback
Press REPEAT during playback.
The repeat indicator in the front panel display switches as shown
below each time REPEAT is pressed.
v1 Repeat the song being played.
v Repeat folders*
vALL Repeat all songs
Goes off The repeat function is not applied.
* The range of repeat depends on the playback media.
22 En
Page 23

More on playback
BASS
TREBLE
a/d
q/w
Playback information
While content from a USB memory device or CD is being played,
the song title, elapsed time, etc. can be shown in the front panel
display.
Press DISPLAY during playback.
Album
Meteora
The display switches in the order shown below each time
DISPLAY is pressed.
Data CD/USB CD
1
Song title
Artist name Remaining time of the song
Album title Remaining time of the disc
Playing time Song title
1
*
If the song title cannot be recognized, the file name may be
displayed.
2
*
Only when an audio CD is played.
3
*
Only when an audio CD encoded with information that can be
displayed is played.
*
Playing time
Artist name
Album title
*
1,*3
2
*
2
*
3
*
3
*
Adjusting sound quality
Adjusting tones (default in bold face)
Use BASS and TREBLE on the remote control to adjust the level at
which high (treble) and low (bass) tones are output while
listening to sound.
(-5 to 0 to +5)
1 Press BASS or TREBLE.
2 Change the level with q/w and press a/d.
Adjusting balance (default in bold face)
Use the option menu to adjust the volume balance of the left and
right speakers (& p. 24).
This setting is not applied when using headphones.
(Lch. +5 to --center-- to Rch.+5)
DISPLAY
Note
• Characters shown in the front panel display are alphanumerics only.
En 23
Page 24

More on playback
Option menu
q/w
a
d
/
f
OPTION
The option menu allows you to configure the unit to suit how you
will use it.
1 Press OPTION.
The option menu list is shown in the front panel display.
Refer to “Option menu list” (& p. 24).
2 Select a desired option menu with q/w and
press a/d.
Option
BT Standby
3 Change the setting with q/w and press
a/d.
• Repeat step 3 if there is a sub menu.
• Press f to cancel the setting and return to the
previous level.
• Repeat steps 2 and 3 if you want to set another menu
item.
4 Press OPTION to exit the option settings.
Option menu list
Menu Default Function
Balance (& p. 23) center
AutoPowerStdby
(& p. 15)
BT Standby
(Bluetooth standby)
Bluetooth On
InitializeSet
Adjust the volume balance of
the left and right speakers.
Set the unit to enter standby
On
mode automatically.
When a Bluetooth device is
connected to this unit while
the unit is in standby mode,
On
the unit will be turned on
automatically.
Enable/disable the Bluetooth
function.
Reset to the factory default
settings.
24 En
Page 25

Troubleshooting
Refer to the table below when the unit does not function properly. If your problem is not listed below or if the instruction below does not help, turn off the unit,
disconnect the power cord, and contact the nearest authorized Yamaha dealer or service center.
First, check that the connectors of each cable are securely inserted in to jacks on each device. Check also that the power cord is plugged into an outlet.
General
Problem Cause Solution
The power cord is not properly connected. Connect the power cord firmly.
The unit enters the standby mode soon
after the power is turned on.
The unit does not operate properly.
No sound.
Sound is heard from the speaker on one
side only.
Noise is heard.
The power suddenly turns off.
There is noise interference from digital or
high-frequency equipment.
The internal microcomputer has frozen due to an external electrical shock
(lightning, excessive static electricity, etc.) or a drop in power supply
voltage.
No appropriate input source has been selected.
Speaker connections are not secure. Secure the connections (& p. 13).
The volume is minimum or mute. Turn up the volume.
The external device or speakers are not connected properly.
This unit is too close to digital or radio-frequency equipment. Move this unit away from such equipment.
The audio cable used to connect the unit and external device may be
defective.
The sleep timer may be set (& p. 15).
Auto Power Standby function is activated (& p. 15).
This unit is too close to the digital or high-frequency equipment. Place this unit farther away from such equipment.
Press and hold z on the front panel for more than 10 seconds to initialize
and reboot the unit. If the problem persists, unplug the unit from the
electrical outlet, wait for at least 30 seconds, and then plug the unit into the
electrical outlet again.
Select an appropriate input source with INPUT on the front panel or the
input source buttons on the remote control (& p. 9, 12).
Connect the external device or speaker cables properly (& p. 13, 21). If the
problem persists, the cables may be defective.
Connect the audio cable firmly. If the problem persists, use another audio
cable.
Turn on the unit and play the source again.
En 25
Page 26

Troubleshooting
Problem Cause Solution
The remote control does not work or does
not function properly.
Bluetooth
Problem Cause Solution
Unable to connect the unit to a Bluetooth
device.
No sound is played, or sound is
interrupted during playback.
The remote control may be outside its operation range. Operate the remote control within its operation range (& p. 15).
The remote control sensor on this unit may be exposed to direct sunlight or
strong lighting such as an inverter type fluorescent lamp.
The battery may be worn out. Replace the batteries with new ones (& p. 12).
There are obstacles between the sensor of this unit and the remote control. Remove the obstacles.
The [Bluetooth] of the option settings is set to [Off]. Set it to [On].
The unit is already connected to another Bluetooth device.
The unit and the Bluetooth device are too far apart. Move the Bluetooth device closer to the unit.
A device that operates in the 2.4 GHz band (microwave oven, wireless
network device, etc.) is interfering with wireless communication.
The passkey for devices such as a Bluetooth adapter is not “0000”. Use a Bluetooth device with a passkey of “0000.”
The Bluetooth device does not support the Advanced Audio Distribution
Profile (A2DP).
The volume level on the Bluetooth device is set too low. Increase the volume on the Bluetooth device.
The Bluetooth device is not configured to transmit audio signal to this unit. On the Bluetooth device, select this unit as the audio output destination.
The Bluetooth connection has been terminated. Establish the Bluetooth connection again (& p. 18).
A device that operates in the 2.4 GHz band (microwave oven, wireless
network device, etc.) is interfering with wireless communication.
The unit and the Bluetooth device are too far apart. Move the Bluetooth device closer to the unit.
Change the orientation of lighting or the unit, or location of the unit.
Terminate the current Bluetooth connection, and then connect to the new
device (& p. 18).
Move the unit and Bluetooth device farther away from the device. If the
wireless LAN router supports the 5 GHz band, connect network devices to
the network using the 5 GHz band.
Use a Bluetooth device that supports A2DP.
Move the unit and Bluetooth device farther away from the device. If the
wireless LAN router supports the 5 GHz band, connect network devices to
the network using the 5 GHz band.
26 En
Page 27

Disc
Problem Cause Solution
The disc may be dirty. Wipe the disc clean (& p. 30).
Playback does not start (or stops
immediately) after pressing a/d.
No sound is played, or the sound is
interrupted during playback.
The disc inserted in the unit may not be supported. Use a disc supported by the unit (& p. 30).
If the unit was moved from a cold to warm place, condensation may have
formed on the disc reading lens.
The disc may be dirty. Wipe the disc clean (& p. 30).
The disc inserted in the unit may not be supported. Use a disc supported by the unit (& p. 30).
USB memory devices
Problem Cause Solution
The unit does not detect the USB memory
device.
Folders and files in the USB memory
device cannot be viewed.
No sound is played, or the sound is
interrupted during playback.
The USB memory device is not connected to the USB jack securely.
A USB memory device in a format other than FAT16/32 format is used. Use a USB memory device with FAT16 or FAT32 format.
The data in the USB memory device is protected by encryption. Use a USB memory device without an encryption function.
The music file is not supported by the unit. Play a music file supported by the unit (& p. 31).
Troubleshooting
Wait for an hour or two until the unit adjusts to the room temperature, and
try again.
Turn off the unit, reconnect your USB memory device, and turn the unit on
again (& p. 17).
En 27
Page 28

Troubleshooting
FM reception
Problem Cause Solution
The antenna is not connected properly.
FM stereo reception is noisy.
The radio station may be far from your area, or the antenna input is poor.
Automatic tuning does not work. The radio station may be far from your area, or the antenna input is poor.
Cannot select a preset radio station. The preset (memory) may have been erased. Preset radio stations again (& p. 19, 20).
There is distortion, and clear reception
cannot be obtained even with a good FM
antenna or an outdoor antenna.
Multipath reflection or other radio interference may be occurring. Change the height, direction, or placement of the antenna.
Make sure the antenna is connected properly and change the position of
the antenna (& p. 14).
Use a commercially available outdoor antenna. For details, consult a
specialist store.
Use a commercially available outdoor antenna. For details, consult a
specialist store.
Use the manual tuning method (& p. 20).
28 En
Page 29

Messages in the front panel display
Message Cause Solution
Access Error The unit cannot access the USB memory device.
Disc Error A disc that is not supported by the unit has been inserted. Insert a disc that is supported by the unit.
Loading... The unit is loading the specified file/content. Wait until the unit finishes loading.
No Content
No Disc
Overcurrent
Unknown The unit cannot access the USB memory device.
Unknown Disc A disc that is not recognized by the unit has been inserted. Insert a disc that can be played the unit.
USB Error
The disc or USB memory device does not contain files supported by the
unit.
The disc inserted in the unit may not be supported. Use a disc supported by the unit (& p. 30).
The disc may be dirty, or foreign matter may be attached to it.
Disc is set upside-down. Set the disc with the labeled side facing up.
The connected USB memory device is not supported by the unit. Disconnect the USB memory device, turn off the unit, and turn it on again. If
USB memory device is not connected properly.
The unit cannot play back the songs stored on the USB memory devices for
some reason.
Turn off the unit and reconnect your USB memory device. If the problem
persists, try another USB memory device.
Use a disc or USB memory device that contains files supported by the unit.
Wipe the disc clean. Alternatively, remove foreign matter adhered to the
disc.
this does not solve the problem for the USB memory device, it is not
playable on the unit.
Turn off the unit and reconnect your USB memory device. If the problem
persists, try another USB memory device.
Check if the format of files you are trying to play is supported by the unit
(& p. 31).
Troubleshooting
En 29
Page 30

Supported devices/media and file formats
Supported devices/media
USB memory devices
• This unit is compatible with USB memory devices that are in FAT16 or FAT32 format. Do
not connect any other type of USB memory devices.
• USB memory devices with encryption cannot be used.
• Operation of all USB memory devices cannot be guaranteed.
Yamaha and suppliers do not accept any liability for the loss of data saved on a USB
memory device connected to the unit. As a precaution, it is recommended to make backup
copies of important files.
Discs
• This unit is designed for use with audio CD, CD-R/RW (ISO 9660 format) with any of the
following logos printed on the disc or the disc jacket.
Audio CD
CD-R/RW*
* Discs which bear one of the following.
FOR CONSUMER
FOR CONSUMER USE
FOR MUSIC USE ONLY
• 8-cm discs are playable with this unit.
Set a disc in the inner recessed area of the disc tray.
Notes on discs
• Do not set any other type of disc other than stated above in this unit. Doing so may
damage the unit.
• CD-R/RW cannot be played back unless finalized. Finalization means the process for
making a disc to be ready for playback on a compatible device.
• Some discs cannot be played back depending on the disc characteristics or recording
conditions.
• Do not use any non-standard shaped discs such as a heart-shaped disc.
• Do not use discs with many scratches or a crack on their surface, or warped/glued discs.
Handling discs
• Do not touch the surface of the disc. Hold a disc by its edge or center
hole.
• Use a soft-tipped pen when writing on the label side of a disc.
• Do not put tape, seal, glue, etc., on a disc.
• Do not use a protective cover to prevent scratches.
• Do not set foreign object on the disc tray.
• Do not set more than one disc in this unit at one time. This could cause damage to both
this unit and the discs.
• If a disc becomes dirty, wipe it with a clean, dry soft cloth from the
center out to the edge. Do not use record cleaner or paint thinner.
• Do not use any lens cleaners as they may cause malfunction.
• Do not expose discs to direct sunlight, high temperature, high
humidity, or dust.
• When a disc is not being used, remove it from this unit and store in
an appropriate case.
30 En
Page 31

File format
This unit supports the following file formats.
Supported devices/media and file formats
USB
Format
*
WAV
MP3 32/44.1/48 16 8-320 2
WMA 32/44.1/48 16 8-320 2
MPEG-4 AAC-LC 32/44.1/48 16 8-320 2
FLAC
ALAC 32/44.1/48 16/24 - 2
AIFF
* Linear PCM format only
Sampling
frequency (kHz)
32/44.1/48/88.2/
96/176.4/192
32/44.1/48/88.2/
96/176.4/192
32/44.1/48/88.2/
96/176.4/192
• Digital Rights Management (DRM) files cannot be played back.
Quantization
bits (bit)
16/24 - 2
16/24 - 2
16/24 - 2
Bitrate (kbps)
Number of
channels
Disc
Format
MP3 32/44.1/48 16 8-320 2
WMA 32/44.1/48 16 8-320 2
Sampling
frequency (kHz)
Quantization
bits
Bitrate (kbps)
Number of
channels
En 31
Page 32

Specifications
Input
AUX IN 3.5 mm stereo mini jack
DIGITAL IN Optical jack
Output
SUBWOOFER OUT RCA monaural jack
SPEAKERS L/R -
PHONES 6.3 mm in diameter
CD
Type Semiconductor laser GaAs/GaAlAs
Laser
Media CD, CD-R/RW
Audio format Audio CD, MP3, WMA
Tuner
Preset memory 30
Tuning range FM
Wave length 790 nm
Output power 7 mW
U.S.A. and Canada models: 87.5 MHz to 107.9 MHz
Other models: 87.5 MHz to 108.0 MHz
Bluetooth
Bluetooth version Ver. 4.2
Supported profile
Compatible codecs SBC, AAC
Maximum communication range 10 m (33 ft) (without interference)
Amplifier section
Maximum output power 20 W + 20 W (6 Ω, 1 kHz, 10 % THD)
Frequency response 20 Hz to 30 kHz (0±3 dB)
Total harmonic distortion ≤ 0.05 % (2.5 W/6 Ω)
General
Power supply/Frequency AC 100 to 240 V, 50/60 Hz
Power consumption 18 W
Standby power consumption
Dimensions (W × H × D) 180 × 118 × 322 mm (7-1/8 x 4-5/8 x 12-5/8 inch )
Weight 2.7 kg (5.9 lbs.)
The contents of this manual apply to the latest specifications as of the publishing date. To
obtain the latest manual, access the Yamaha website then download the manual file.
A2DP (Advanced Audio Distribution Profile)
AVRCP (Audio/Video Remote Control Profile)
Bluetooth standby off: 0.3 W (ECO)
Bluetooth standby on: 1.5 W
32 En
With an advanced energy saving design, this product achieves a low power
consumption of not more than 1.8 watts when in Bluetooth standby mode.
Page 33

Содержание
МЕРЫ ПРЕДОСТОРОЖНОСТИ ........................................................ 34
Введение ............................................................................................. 39
О данном руководстве ........................................................................................................................ 39
Товарные знаки ........................................................................................................................................ 39
Аксессуары .................................................................................................................................................. 39
Возможности этого аппарата ....................................................... 40
Название компонентов .................................................................. 41
Передняя панель ..................................................................................................................................... 41
Задняя панель ............................................................................................................................................ 42
Дисплей передней панели ............................................................................................................... 43
Пульт ДУ ......................................................................................................................................................... 44
Подготовка ......................................................................................... 45
Подключение колонок ........................................................................................................................ 45
Подключение антенны ........................................................................................................................ 46
Включение питания ............................................................................................................................... 47
Использование таймера сна ........................................................................................................... 47
Прослушивание музыки ................................................................. 48
Прослушивание дисков CD ............................................................................................................. 48
Воспроизведение музыки с USB-накопителя ..................................................................... 49
Воспроизведение музыки через подключение Bluetooth® ...................................... 50
Прослушивание FM-радиостанций ........................................................................................... 51
Воспроизведение музыки с внешних устройств .............................................................. 53
Больше о воспроизведении ......................................................... 54
Воспроизведение в случайном порядке/повторное воспроизведение ....... 54
Информация о воспроизведении ............................................................................................... 55
Регулировка качества звука ............................................................................................................. 55
Меню Опции ................................................................................................................................................ 56
Устранение неполадок ................................................................... 57
Неполадки общего характера ........................................................................................................ 57
Bluetooth ........................................................................................................................................................ 58
Диск ................................................................................................................................................................... 59
USB-накопители ........................................................................................................................................ 59
Прием FM-радиостанций ................................................................................................................... 60
Сообщения на дисплее передней панели ............................................................................ 61
Поддерживаемые устройства/форматы медиафайлов ....... 62
Поддерживаемые устройства/медиафайлы ......................................................................... 62
Форматы файлов ...................................................................................................................................... 63
Технические характеристики ....................................................... 64
Ru 33
Page 34

либо в сервисный центр Yamaha.
МЕРЫ ПРЕДОСТОРОЖНОСТИ
ПЕРЕД ИСПОЛЬЗОВАНИЕМ ВНИМАТЕЛЬНО ПРОЧИТАЙТЕ
ДАННЫЕ УКАЗАНИЯ. СЛЕДУЙТЕ ЭТИМ ИНСТРУКЦИЯМ.
Перечисленные ниже меры предосторожности
предназначены для предотвращения риска причинения
вреда пользователю и другим людям, а также для
предотвращения повреждения имущества и оказания
помощи пользователю по надлежащему и безопасному
использованию данного аппарата. Следуйте этим
инструкциям.
После прочтения храните это руководство в надежном месте, чтобы к
нему можно было обратиться в любое время.
• Для проведения осмотра или ремонта обязательно обращайтесь
к дилеру, у которого был приобретен аппарат, либо в сервисный
центр Yamaha.
• Корпорация Yamaha не несет ответственности за травмы или
повреждения изделий, вызванные неправильной эксплуатацией
или изменением конструкции аппарата, а также за потерю или
повреждение данных.
• Данное устройство предназначено для домашнего
использования. Не используйте его в областях, требующих
высокой надежности, например в сфере жизнеобеспечения,
здравоохранения или при работе с ценными активами.
ПРЕДУПРЕЖДЕНИЕ
Данная информация предупреждает о риске гибели или
получения серьезных травм.
Лазер
• Не снимайте крышку для ремонта. В этом аппарате используется лазер. Лазерный
луч, попавший в глаза, может повредить зрение. Для проведения осмотра или
ремонта обязательно обращайтесь к дилеру, у которого был приобретен аппарат,
• Не смотрите на лазерный источник света. Если аппарат ничем не закрыт, он
излучает видимый лазерный свет. Не смотрите прямо на лазер. Лазерный луч,
попавший в глаза, может повредить зрение. Когда штепсель вставлен в розетку
переменного тока, не приближайте глаза к щелям лотка для дисков или другим
отверстиям и не пытайтесь заглянуть внутрь аппарата.
Источник питания и кабель питания
• Не допускайте повреждений кабеля питания.
- Не располагайте кабель рядом с обогревателями.
- Не скручивайте и не сгибайте его.
- Не царапайте кабель питания.
- Не ставьте на кабель питания тяжелые предметы.
Использование кабеля питания с оголенной центральной жилой может стать
причиной пожара или поражения электрическим током.
• Запрещается заряжать аппарат, если он влажный. Несоблюдение этого указания
может привести к поражению электрическим током, короткому замыканию в
электросхеме, пожару или неисправностям.
• Не прикасайтесь к штепселю или кабелю питания при наличии риска удара молнии.
Несоблюдение этого указания может привести к поражению электрическим током.
• Напряжение источника питания должно соответствовать указанному на нем
значению. Подключение к неправильной розетке переменного тока может стать
причиной пожара, поражения электрическим током или неисправности.
• Периодически проверяйте штепсель и очищайте его от скопившейся пыли и грязи.
Несоблюдение этого указания может привести к пожару или поражению
электрическим током.
• Перед настройкой аппарата убедитесь, что используемая розетка переменного тока
легко доступна. При возникновении какого-либо сбоя или неисправности
немедленно отключите питание с помощью выключателя и отсоедините штепсель
от розетки переменного тока. Даже если выключатель питания находится в
выключенном положении, до тех пор пока штепсель не отсоединен от розетки,
аппарат остается подключенным к источнику питания.
• В случае грома или приближения грозы незамедлительно отключите выключатель
питания и отсоедините штепсель от розетки переменного тока. Несоблюдение этого
указания может привести к пожару или неисправностям.
• Если аппарат не будет использоваться в течение длительного времени, отсоедините
штепсель от розетки переменного тока. Несоблюдение этого указания может
привести к пожару или неисправностям.
Не разбирать
• Не разбирайте аппарат и не изменяйте его конструкцию. Несоблюдение этого
указания может привести к пожару, поражению электрическим током, травмам или
неисправностям. При появлении неполадок обращайтесь для осмотра или ремонта в
место приобретения аппарата или в сервисный центр Yamaha.
34 Ru
Page 35

Беречь от воды
• Не допускайте попадания аппарата под дождь, не пользуйтесь им рядом с водой, в
условиях сырости или повышенной влажности. Не ставьте на аппарат какие-либо
емкости с жидкостью (например, вазы, бутылки или стаканы), которая может
пролиться и попасть в отверстия, а также не пользуйтесь аппаратом там, где на него
может попасть вода. Попадание жидкости, например воды, внутрь аппарата может
стать причиной пожара, поражения электрическим током или неисправности. В
случае попадания в аппарат жидкости, например воды, немедленно отключите
питание и отсоедините кабель питания от розетки переменного тока. Затем
обратитесь для осмотра аппарата в место приобретения или в сервисный центр
Yamaha.
• Ни в коем случае не вставляйте и не вынимайте штепсель мокрыми руками. Не
беритесь за аппарат влажными руками. Несоблюдение этого указания может
привести к поражению электрическим током или неисправностям.
Беречь от огня
• Не размещайте горящие предметы или источники открытого огня рядом с
аппаратом, поскольку это может привести к возгоранию.
Обслуживание и уход
• Не используйте для очистки или смазки аэрозоли или распыляемые химические
вещества, содержащие горючие газы. Горючий газ может остаться внутри аппарата,
что может привести к взрыву или пожару.
аппаратом, могут повлиять на работу электрических медицинских устройств,
например вживленных кардиостимуляторов или дефибрилляторов.
Нештатные ситуации
• При возникновении любой из указанных ниже проблем немедленно отключите
питание и отсоедините кабель питания от электросети.
- Повреждения кабеля питания или штепселя.
- Из аппарата исходит необычный запах или дым.
- Внутрь аппарата попал посторонний предмет.
- Во время работы пропадает звук.
- На аппарате имеются трещины или повреждения.
Продолжение использования может вызвать поражение электрическим током,
пожар или привести к неисправности. Незамедлительно обратитесь для осмотра
аппарата в место его приобретения или в сервисный центр Yamaha.
• Не роняйте и не подвергайте аппарат сильному физическому воздействию. Если
существует вероятность того, что аппарат был поврежден в результате падения или
физического воздействия, немедленно отключите питание и отсоедините штепсель
от розетки переменного тока. Несоблюдение этого указания может привести к
поражению электрическим током, пожару или неисправностям. Незамедлительно
обратитесь для осмотра аппарата в место приобретения или в сервисный центр
Yamaha.
ВНИМАНИЕ
Использование батареек
• Не разбирайте батарейку. Попадание содержимого батарейки в глаза или на руки
может привести к потере зрения или химическому ожогу.
• Не бросайте батарейки в огонь. Это может привести к взрыву батарейки и стать
причиной пожара или травмы.
• Не пытайтесь заряжать батарейки, не предназначенные для перезарядки. Зарядка
может привести к взрыву или протеканию батарейки, что, в свою очередь, может
вызвать потерю зрения, химический ожог или травму.
• Если батарейки все же протекли, избегайте контакта с вытекшим электролитом. В
случае попадания электролита в глаза, рот или на кожу немедленно смойте
электролит водой и обратитесь к врачу. Электролит — это едкое вещество,
способное вызвать потерю зрения или химические ожоги.
Модуль беспроводной связи
• Не используйте аппарат около медицинских приборов и в медицинских
учреждениях. Радиоволны от данного аппарата могут воздействовать на
электрические медицинские устройства.
• Не используйте аппарат ближе, чем в 15 см от людей с имплантированным
кардиостимулятором или дефибриллятором. Радиоволны, генерируемые данным
Данная информация предупреждает о риске получения
травмы.
Источник питания и кабель питания
• Не используйте розетки переменного тока, в которых штепсель держится
ненадежно. Несоблюдение этого указания может привести к пожару, поражению
электрическим током или ожогам.
• Вынимая сетевую штепсель из устройства или розетки переменного тока,
держитесь за сам штепсель. Никогда не тяните за шнур. Это может привести к
повреждению кабеля и стать причиной поражения электрическим током или
пожара.
• Вставляйте штепсель в розетку переменного тока плотно и до упора.
Использование устройства, штепсель которого недостаточно плотно вставлена в
розетку, может вызвать накопление частиц пыли на штепселе и стать причиной
пожара или ожога.
Установка
• Не оставляйте аппарат в неустойчивом положении. Аппарат может случайно упасть
и причинить травму.
Ru 35
Page 36

• Не закрывайте вентиляционные отверстия (охлаждающие прорези) аппарата. Для
предотвращения существенного повышения температуры на нижней панели
аппарата имеются вентиляционные отверстия. Несоблюдение этого указания может
привести к нарушению отвода тепла от аппарата. Это может стать причиной пожара
или неисправностей.
• Во время установки аппарата:
- не накрывайте аппарат тканью;
- не ставьте аппарат на коврики или ковры;
- убедитесь, что верхняя панель направлена вверх и что аппарат не установлен в
перевернутом положении или на боку;
- не пользуйтесь аппаратом в тесных, плохо проветриваемых помещениях.
Несоблюдение приведенных выше указаний может привести к нарушению отвода
тепла от устройства. Это может стать причиной пожара или неисправностей.
Убедитесь, что вокруг аппарата есть достаточное пространство: не менее 5 см
сверху, 5 см по сторона и 5 см сзади.
• Не устанавливайте аппарат там, где на него могут воздействовать агрессивные газы
или соленый воздух, а также в местах с сильной задымленностью или повышенным
содержанием пара. Это может стать причиной неисправности.
• Перед перемещением аппарата отключите выключатель питания и отсоедините все
подключенные кабели. Несоблюдение этого указания может привести к
повреждению кабелей. Кроме того, вы можете споткнуться и упасть.
• Для надлежащей установки внешней антенны она должна осуществляться дилером,
у которого приобретен аппарат, или квалифицированным сервисным персоналом.
Несоблюдение этого указания может привести к падению установки и получению
травмы. Для установки требуется наличие специальных навыков и опыта.
Потеря слуха
• Не следует долго пользоваться аппаратом при высоком или некомфортном уровне
громкости, поскольку это может привести к потере слуха. При ухудшении слуха или
звоне в ушах обратитесь к врачу.
• Перед подключением аппарата к другим устройствам отключите их питание. Также
перед включением или выключением питания любых устройств убедитесь, что все
регуляторы громкости установлены на минимальное значение. В противном случае
это может привести к потере слуха, поражению электрическим током или
повреждению устройства.
• При включении питания аудиосистемы всегда включайте аппарат В ПОСЛЕДНЮЮ
ОЧЕРЕДЬ, чтобы избежать потери слуха и повреждения динамиков. При
выключении питания по этой же причине В ПЕРВУЮ ОЧЕРЕДЬ необходимо
выключать аппарат. Несоблюдение этого указания может привести к потере слуха
или повреждению динамиков.
Техническое обслуживание
• Во время чистки отсоединяйте аппарат от электросети. Несоблюдение этого
указания может привести к поражению электрическим током.
Меры безопасности при эксплуатации
• Не вставляйте руку или пальцы в щель для вставки дисков в аппарат.
Несоблюдение этого указания может привести к травме.
• Не вставляйте посторонние предметы, например металл или бумагу, в щель для
вставки дисков в аппарат. Несоблюдение этого указания может привести к
поражению электрическим током или неисправностям. При попадании посторонних
предметов в аппарат немедленно выключите питание и отсоедините штепсель от
розетки переменного тока и обратитесь за проведением осмотра к дилеру, у
которого был приобретен аппарат, либо в сервисный центр Yamaha.
• Запрещается:
- становиться на оборудование и сидеть на нем;
- ставить на оборудование тяжелые предметы;
- ставить экземпляры оборудования друг на друга;
- применять избыточную силу к кнопкам, переключателям, разъемам вводавывода и т. д.;
• Не тяните за подключенные кабели. Это может привести к травмам или
повреждению аппарата вследствие его падения.
• Не используйте аппарат, если звук искажен. Продолжительное использование
аппарата в таком состоянии может привести к его перегреву и пожару.
Использование батареек
• Всегда заменяйте все батарейки одновременно. Не используйте новые батарейки
вместе со старыми. Использование новых батареек вместе со старыми может стать
причиной пожара, ожогов или воспламенения из-за протекания электролита.
• Используйте батарейки только указанного типа. Несоблюдение этого требования
может стать причиной пожара, ожогов или воспламенения из-за протекания
батарейки.
• Не используйте вместе батарейки разных типов, например, щелочные батарейки
вместе с марганцевыми, или батарейки разных производителей, либо батарейки
разных типов одного производителя, поскольку это может стать причиной пожара,
ожогов или воспламенения из-за протекания электролита.
• Храните батарейки в местах, недоступных для детей. Ребенок может случайно
проглотить батарейку. Несоблюдение этого указания может привести к ожогу из-за
утечки электролита батарейки.
• Не помещайте батарейку в карман или пакет, не носите и не храните батарейку
рядом с металлическими предметами. При коротком замыкании батарейка может
взорваться либо из нее может протечь электролит, став причиной пожара или
травмы.
• Обязательно устанавливайте батарейки в соответствии с отметками +/–,
указывающими полярность. Несоблюдение этого указания может привести к
ожогам или возгоранию вследствие утечки электролита.
• Если батарейки разряжены или если аппарат длительное время не будет
использоваться, то во избежание возможной утечки электролита извлеките
батарейки из аппарата.
36 Ru
Page 37

• При хранении или утилизации батареек изолируйте область полюсов с помощью
клейкой ленты или другого материала. Контакт с другими батарейками или
металлическими предметами может привести к пожару, ожогам или возгоранию изза протекания электролита.
Для бытового и промышленного использования применяются разные цифровые
аудиоинтерфейсы. Этот аппарат предназначен для подключения к бытовому
цифровому аудиоинтерфейсу. Подключение к промышленному цифровому
аудиоинтерфейсу может не только привести к неисправности аппарата, но и
повредить динамики.
УВЕДОМЛЕНИЕ
Указания, которые необходимо соблюдать во избежание
неисправности, повреждения или нарушения работы
изделия, а также потери данных.
Источник питания и кабель питания
• Если аппарат не будет использоваться в течение длительного времени, отсоедините
штепсель от розетки переменного тока. Даже если выключатель [z] (Ожидание/
Включение) выключен (экран выключен), незначительный ток будет продолжать
протекать.
Установка
• Не используйте данный аппарат рядом с другими электронным оборудованием,
например, телевизором, радио или мобильным телефоном. Несоблюдение этого
указания может стать причиной шумов, создаваемых телевизором или
радиоприемником.
• Не используйте этот аппарат в месте, которое подвержено воздействию прямого
солнечного света, может слишком сильно нагреться (например, рядом с
обогревателем) или охладиться либо которое подвержено слишком сильному
воздействию пыли или вибрации. Это может привести к деформации панели
аппарата, вызвать неисправности внутренних компонентов или стать причиной
нестабильной работы.
• Устанавливайте аппарат как можно дальше от другого электронного оборудования.
Цифровые сигналы от аппарата могут создавать помехи для другого электронного
оборудования.
• При использовании беспроводной сети избегайте установки данного аппарата
рядом с металлическими стенами или столами, микроволновыми печами или
другими беспроводными сетевыми устройствами.
Препятствия могут сократить расстояние передачи.
Обращение с аппаратом
• Не ставьте на этот аппарат виниловые, пластмассовые и резиновые предметы. Это
может стать причиной деформации или выцветания панели аппарата.
• Если при резком изменении внешней температуры (например, при транспортировке
аппарата или при быстром нагреве либо охлаждении) есть вероятность образования
конденсата в аппарате, перед использованием оставьте его на несколько часов, не
включая питания, пока он не высохнет полностью. Использование аппарата при
наличии в нем конденсата может привести к его повреждению.
Техническое обслуживание
• Для чистки аппарата пользуйтесь мягкой сухой тканью. Использование химикатов,
таких как бензин или разбавитель, моющих средств или тканей для химической
чистки может привести к деформации или обесцвечиванию.
Батарейки
• Использованные батарейки следует утилизировать в соответствии с местным
законодательством.
О содержании этого руководства
• Иллюстрации и снимки экранов в данном руководстве приведены только в качестве
примеров.
• Названия компаний и изделий в данном руководстве являются товарными знаками
или зарегистрированными товарными знаками соответствующих компаний.
• Программное обеспечение может изменяться и обновляться без предварительного
уведомления.
Подключения
• При подключении внешних устройств обязательно внимательно прочитайте
руководство для каждого устройства и подключите их в соответствии с
инструкциями.
Неправильное подключение аппарата, нарушающее инструкции, может привести к
его неправильной работе.
• Не подключайте этот аппарат к промышленным устройствам.
Ru 37
Page 38

МЕРЫ ПРЕДОСТОРОЖНОСТИ
БЕЗОПАСНОЕ ИСПОЛЬЗОВАНИЕ ЛАЗЕРА
Данное устройство содержит лазер. Из-за опасности травмы глаз, снимать
крышку или обслуживать данное устройство должен только
сертифицированный обслуживающий персонал.
ОПАСНОСТЬ
Данное устройство в открытом состоянии излучает видимые лазерные
лучи.
Не допускайте непосредственного воздействия лазерных лучей на глаза.
Когда данное устройство подключено к розетке, не приближайте глаза к
отверстию лотка диска и другим отверстиям, и не смотрите внутрь
аппарата.
ПРЕДОСТЕРЕЖЕНИЕ
Использование органов управления или произведение настроек или
выполнение процедур, не указанных в данной инструкции, может
отразиться на выделении опасной радиации.
Лазерный компонент данного изделия может выделять радиацию,
превышающую ограниченный уровень радиации для Класса 1.
Номер модели, серийный номер, требования к источнику питания и пр.
указаны на табличке с названием изделия в нижней части устройства или
рядом с ней. Запишите серийный номер в расположенном ниже поле и
сохраните данное руководство как подтверждение покупки; это поможет
идентифицировать принадлежность устройства в случае кражи.
номер модели.
Cерийный номер.
(rear_ru_02)
ȼɚɠɧɨɟ ɩɪɢɦɟɱɚɧɢɟ: ɂɧɮɨɪɦɚɰɢɹ ɨɛ ɭɫɥɨɜɢɹɯ Ƚɚɪɚɧɬɢɢ ɞɥɹ Ʉɥɢɟɧɬɨɜ ɜ Ɋɨɫɫɢɣɫɤɨɣ
Ɏɟɞɟɪɚɰɢɢ [Ɋɭɫɫɤɢɣ]
Ⱦɥɹ ɩɨɥɭɱɟɧɢɹ ɩɨɞɪɨɛɧɨɣ ɢɧɮɨɪɦɚɰɢɢ ɨɛ ɭɫɥɨɜɢɹɯ Ƚɚɪɚɧɬɢɢ ɧɚ ɩɪɨɞɭɤɰɢɸ Yamaha ɜɊɨɫɫɢɢ,
ɭɫɥɨɜɢɹɯ ɝɚɪɚɧɬɢɣɧɨɝɨ ɨɛɫɥɭɠɢɜɚɧɢɹ, ɩɨɠɚɥɭɣɫɬɚ, ɩɨɫɟɬɢɬɟ ɜɟɛ-ɫɚɣɬ ɩɨ ɚɞɪɟɫɭ ɧɢɠɟ
(ɧɚ ɫɚɣɬɟ ɞɨɫɬɭɩɟɧ ɮɚɣɥ ɫ ɭɫɥɨɜɢɹɦɢ ɞɥɹ ɫɤɚɱɢɜɚɧɢɹ ɢ ɩɟɱɚɬɢ) ɢɥɢ ɨɛɪɚɬɢɬɟɫɶ ɜ ɨɮɢɫ
ɩɪɟɞɫɬɚɜɢɬɟɥɶɫɬɜɚ Yamaha ɜ Ɋɨɫɫɢɢ.
https://ru.yamaha.com/ru/support/
ɉɪɨɞɭɤɰɢɹ -DC ɪɟɫɢɜɟɪ ɦɨɞɟɥɢ:
ɋɬɪɚɧɚ ɩɪɨɢɫɯɨɠɞɟɧɢɹ Ɇɚɥɚɣɡɢɹ
ɂɡɝɨɬɨɜɢɬɟɥɶ noitaroproCahamaY
ɇɨɦɢɧɚɥɶɧɨɟ ɧɚɩɪɹɠɟɧɢɟ ɫɦ. ɂɧɫɬɪɭɤɰɢɸ.
ɉɨɬɪɟɛɥɹɟɦɚɹ ɦɨɳɧɨɫɬɶ ɫɦ. ɂɧɫɬɪɭɤɰɢɸ.
Cooɬɜɟɬɫɬɜɭɟɬ ɬɪɟɛɨɜɚɧɢɹɦ ɌɊ Ɍɋ 004/2011
ɋɪɨɤ ɯɪɚɧɟɧɢɹ ɋɪɨɤ ɯɪɚɧɟɧɢɹ ɧɟ ɭɫɬɚɧɨɜɥɟɧ.
ɍɫɥɨɜɢɹ ɞɥɹ ɭɬɢɥɢɡɚɰɢɢ
ɩɪɨɞɭɤɬɨɜ
ɍɫɥɨɜɢɹ ɞɥɹ ɪɟɚɥɢɡɚɰɢɢ
ɩɪɨɞɭɤɬɨɜ
ɇɚɡɜɚɧɢɟ ɢ ɚɞɪɟɫ ɢɦɩɨɪɬɟɪɚ ɧɚ
ɬɟɪɪɢɬɨɪɢɢ ɬɚɦɨɠɟɧɧɨɝɨ ɫɨɸɡɚ
ɍɫɥɨɜɢɟ ɯɪɚɧɟɧɢɹ ȼɨ ɢɡɛɟɠɚɧɢɟ ɞɟɮɨɪɦɚɰɢɢ ɢ ɩɚɧɟɥɢ, ɩɨɜɪɟɠɞɟɧɢɹ
Ⱦɚɬɚ ɢɡɝɨɬɨɜɥɟɧɢɹ
ɋɟɪɢɣɧɵɣ ɧɨɦɟɪ ɢ ɫɬɪɚɧɚ ɩɪɨɢɡɜɨɞɫɬɜɚ ɭɤɚɡɚɧɵ ɧɚ ɡɚɞɧɟɣ ɥɢɛɨ ɧɢɠɧɟɣ ɩɚɧɟɥɢ ɭɫɬɪɨɣɫɬɜɚ.
Ⱦɚɬɚ ɢɡɝɨɬɨɜɥɟɧɢɹ ɨɛɨɡɧɚɱɟɧɚ ɜ ɫɟɪɢɣɧɨɦ ɧɨɦɟɪɟ, ɭɤɚɡɚɧɧɨɦ ɧɚ ɧɢɠɧɟɣ ɢɥɢ ɡɚɞɧɟɣ ɫɬɨɪɨɧɟ
ɢɧɫɬɪɭɦɟɧɬɚ.
(ɉɪɢɦɟɪ ɨɬɨɛɪɚɠɟɧɢɹ
ɫɟɪɢɣɧɨɝɨ ɧɨɦɟɪɚ)
Ʉɨɞ ɝɨɞɚ: ɉɨɫɥɟɞɧɹɹ ɰɢɮɪɚ ɝɨɞɚ ɩɪɨɢɡɜɨɞɫɬɜɚ (ɧɚɩɪɢɦɟɪ: 8=2018)
Ʉɨɞ ɦɟɫɹɰɚ: ɉɟɪɢɨɞ ɩɪɨɢɡɜɨɞɫɬɜɚ (ɧɚɩɪɢɦɟɪ: PR = C Ɏɟɜɪɚɥɹ ɩɨ Ⱥɩɪɟɥɶ)
O: əɧɜɚɪɶ R: Ⱥɩɪɟɥɶ U: ɂɸɥɶ X: Ɉɤɬɹɛɪɶ
P: Ɏɟɜɪɚɥɶ S: Ɇɚɣ V: Ⱥɜɝɭɫɬ Y: ɇɨɹɛɪɶ
Q: Ɇɚɪɬ T: ɂɸɧɶ W: ɋɟɧɬɹɛɪɶ Z: Ⱦɟɤɚɛɪɶ
CRX-B370
10-1 Nakazawa-cho,Naka-ku, Hamamatsu-shi, Shizuoka-ken
430-8650, əɩɨɧɢɹ
ɌɊ Ɍɋ 020/2011
ɋɥɟɞɭɣɬɟ ɦɟɫɬɧɨɦɭ ɨɪɝɚɧɭ ɩɪɚɜɢɥ ɭɬɢɥɢɡɚɰɢɢ ɨɬɯɨɞɨɜ.
ɉɪɚɜɢɥɚ ɢ ɭɫɥɨɜɢɹ ɪɟɚɥɢɡɚɰɢɢ ɧɟ ɭɫɬɚɧɨɜɥɟɧɵ
ɢɡɝɨɬɨɜɢɬɟɥɟɦ ɢ ɞɨɥɠɧɵ ɫɨɨɬɜɟɬɫɬɜɨɜɚɬɶ
ɧɚɰɢɨɧɚɥɶɧɨɦɭɢ/ɢɥɢ ɦɟɫɬɧɨɦɭ ɡɚɤɨɧɨɞɚɬɟɥɶɫɬɜɭ ɫɬɪɚɧɵ
ɪɟɚɥɢɡɚɰɢɢ ɬɨɜɚɪɚ.
ɈɈɈ «əɦɚɯɚ Ɇɸɡɢɤ»
ɝ.Ɇɨɫɤɜɚ, ɭɥɢɰɚ Ʉɢɟɜɫɤɚɹ, ɞɨɦ 7, ɨɮɢɫ 37
ɜɧɭɬɪɟɧɧɢɯ ɤɨɦɩɨɧɟɧɬɨɜ ɢ ɫɛɨɟɜ ɜ ɪɚɛɨɬɟ ɧɟ ɞɟɪɠɢɬɟ
ɨɛɨɪɭɞɨɜɚɧɢɟ ɜ ɩɨɦɟɳɟɧɢɹɯ ɫ ɢɡɛɵɬɨɱɧɨɣ ɜɢɛɪɚɰɢɟɣ, ɚ
ɬɚɤɠɟ ɜ ɦɟɫɬɚɯ, ɝɞɟ ɫɥɢɲɤɨɦ ɩɵɥɶɧɨ, ɯɨɥɨɞɧɨ ɢɥɢ ɠɚɪɤ ɨ.
SER.NO.XXXXXX8-(ɤɨɞ ɝɨɞɚ) PR- (ɤɨɞ ɦɟɫɹɰɚ)
38 Ru
Page 39

Введение
Проверьте содержимое упаковки и ознакомьтесь с полезными инструкциям в данном руководстве.
О данном руководстве
• В основном описаны способы управления данным аппаратом с помощью пульта
дистанционного управления.
• Иллюстрации могут отличаться от фактических изображенных элементов.
• Символы:
Внимание Информация, которую следует прочесть перед
использованием для предотвращения неисправности или
физического повреждения.
Примечание Меры предосторожности и дополнительная информация,
которую следует прочесть перед использованием аппарата.
& Ссылки на другую страницу или страницы, где содержится
дополнительная информация.
Товарные знаки
Текстовый знак и логотипы Bluetooth® являются зарегистрированными товарными знаками,
принадлежащими Bluetooth SIG, Inc., и любое использование этих знаков Yamaha
Corporation осуществляется по лицензии. Другие товарные знаки и фирменные
наименования принадлежат их владельцам.
Аксессуары
Пульт ДУ FM-антенна Батарейки (2 шт.)
(AA, R6, UM-3)
Знак Yamaha Eco — это маркировка, которой сертифицируются изделия высокого
экологического качества.
Ru 39
Page 40

Возможности этого аппарата
Bluetooth упрощает
дистанционное
управление
Аппарат включается автоматически
после установки подключения
Bluetooth.
(& c. 50 Воспроизведение музыки
через подключение Bluetooth®)
Несравненное
удовольствие от
музыки
Аппарат оснащен цифровым
оптическим входным гнездом и
стерео мини-разъемом, через
которые можно подключаться к
внешним устройствам.
(& c. 53 Воспроизведение
музыки с внешних устройств)
Компактный,
простой в
использовании, с
высококачественны
м звуком
Качество звука можно
отрегулировать под
индивидуальные предпочтения.
(& c. 55 Регулировка качества
звука)
40 Ru
Page 41

Название компонентов
Ознакомьтесь со всеми компонентами и их функциями.
Передняя панель
1 z (Питание) (& c. 47)
При включении аппарата включается дисплей передней панели.
2 PHONES
К этому гнезду подключаются наушники.
Примечание
При подключении наушников звук через колонки или сабвуфер
не выводится.
3 Гнездо USB (& c. 49)
4 f/h, j/g (& c. 48, 49)
PRESET </> (& c. 51)
5 a/d (Воспроизведение/пауза) (& c. 48, 49)
6 s (Пауза) (& c. 48, 49)
7 INPUT (& c. 48, 49)
Изменение источника входного сигнала. (Выбранный источник
входного сигнала отображается на дисплее передней панели.)
8 Лоток диска (& c. 48)
9 VOLUME
Регулировка громкости.
A B094 85 6 7321
0 = (Открытие/закрытие лотка диска) (& c. 48)
A Дисплей передней панели (& c. 43)
B Датчик дистанционного управления
Ru 41
Page 42

Название компонентов
Задняя панель
ANTENNA
FM75Ω
UNBAL.
SPEAKERS
RL
+
–
1 Шнур питания (& c. 47)
2 Гнездо для обслуживания только
Используйте при необходимости обслуживания аппарата.
3 Гнездо DIGITAL IN (оптический вход) (& c. 53)
4 Гнездо AUX IN (входное мини-гнездо) (& c. 53)
5 Гнездо SUBWOOFER OUT (& c. 45)
6 Гнездо ANTENNA (& c. 46)
7 Разъемы SPEAKERS (& c. 45)
42 Ru
DIGITAL IN
AUX IN
SUBWOOFER
OUT
6Ω MIN./SPEAKER
71 32 4 5 6
Page 43

Дисплей передней панели
1 2 3 4 5 6 7
Название компонентов
1 Многофункциональный информационный
дисплей
Отображение различной информации, например,
информации о музыке или частоты радиостанции.
На дисплее передней панели отображаются только
буквенно-цифровые символы.
2 Индикатор TUNED
Горит при приеме аппаратом сигнала от FM-станции.
3 Индикатор STEREO
Горит при приеме аппаратом стереофонической FMтрансляции.
TUNED
aaaaaaaa
STEREO
vx
MUTE
SLEEP
ALL
1
$
aaaaaaaaaaaaaaaa
4 Индикатор MUTE
Горит при выключеном звуке (& c. 44).
5 Индикатор SLEEP
Горит при установленном таймере сна (& c. 47).
6 Индикатор повторного воспроизведения/
воспроизведения в случайном порядке
Горит, когда включена функция воспроизведения в
случайном порядке или повторного воспроизведения
для композиций на компакт-диске или USBнакопителе.
7 Индикатор $ Bluetooth
Показывает состояние подключения Bluetooth.
Примечание
Настройка яркости дисплея
Каждое нажатие кнопки DIMMER изменяет яркость
(& c. 44): высокий (по умолчанию), средний или низкий
уровень яркости.
Ru 43
Page 44

Название компонентов
Пульт ДУ
1
2
3
4
5
6
7
8
9
0
A
B
C
D
E
F
1 Передатчик инфракрасного сигнала
2 OPEN/CLOSE = (Открытие/закрытие лотка
диска) (& c. 48)
3 Кнопки источников входного сигнала
Переключение источника входного сигнала.
4 Цифровые кнопки (& c. 48)
5 SHUFFLE (& c. 54)
6 BASS, TREBLE (& c. 55)
7 Кнопки управления воспроизведением,
курсором (& c. 48, 49)
8 OPTION (& c. 56)
9 VOLUME +/–
Регулировка громкости.
0 TUNER/PRESET (& c. 51)
A SLEEP (& c. 47)
B DIMMER (& c. 43)
C z (Питание) (& c. 47)
D REPEAT (& c. 54)
E MUTE
Включение или выключение звука.
F DISPLAY (& c. 55)
Установка батареек
Проверьте полюса батареек “+” и “–” и вставьте их,
правильно сориентировав.
Примечание
При уменьшении рабочего диапазона пульта ДУ замените
обе батарейки.
44 Ru
Page 45

Подготовка
Подключите колонки, антенну и т.п., и включите аппарат.
Не подключайте кабель питания аппарата до тех пор, пока не будут подключены все прочие кабели.
Подключение колонок
1 Снимите изоляционный слой с
концов кабелей колонок до
оголенных проводов.
15 мм
2 Подключите колонки к аппарату, как
показано на иллюстрации.
• Отдельно подготовьте колонки, сабвуфер и
кабели колонок.
• Дополнительные сведения см. в документации,
предоставленной с колонками.
Правый динамик
SUBWOOFER
OUT
Левый динамик
1
2
3
Кабель динамика
Сабвуфер
Монофонический штырьковый
Внимание
• Касание оголенных проводов друг с другом или с любой металлической деталью аппарата может привести к повреждению
аппарата и/или колонок.
• Используйте колонки с импедансом не менее 6 Ω.
Примечание
• Убедитесь, что левая и правая (L, R) колонка установлена правильно и соблюдена полярность (красный: +, черный: -). Если
соединения неверны, звук будет неестественным.
• Вы также можете подключить к аппарату сабвуфер (он должен быть оснащен встроенным усилителем).
Ru 45
Page 46

Подготовка
Подключение антенны
1 Подключите прилагаемую антенну к
аппарату.
2 Установите ее с помощью булавок в
место, обеспечивающее чистый
прием.
2
Прилагаемая антенна
ANTENNA
FM75Ω
UNBAL.
1
46 Ru
Примечание
• Обязательно вытяните антенну, как показано на иллюстрации.
• Если прием радиочастот прилагаемой антенной неудовлетворителен, можно приобрести внешнюю антенну, которая может
улучшить прием.
Page 47

Подготовка
Включение питания
Подключите силовой кабель к розетке и нажмите z.
• Аппарат включится.
• Снова нажмите z для выключения аппарата (режим ожидания).
1
Не более 6 м
2
Снижение энергопотребления
Автоматический переход в режим ожидания
Аппарат автоматически перейдет в режим ожидания (Авто режим ожид.) в любой из
следующих ситуаций:
• В качестве источника входного сигнала выбрано BLUETOOTH, CD или USB, но более
20 минут звук не воспроизводился и с аппаратом не выполнялись никакие
действия.
• Выбран источник входного сигнала, отличный от перечисленных выше, но более 8
часов с аппаратом не выполнялись никакие действия.
См. “Меню Опции” (& c. 56) для отключения функции автоматического перехода в
режим ожидания.
Экономный режим ожидания
Энергопотребление аппарата минимально в экономном режиме ожидания. Чтобы
включить экономный режим ожидания, отключите функцию BT Standby (режим
ожидания Bluetooth) (& c. 56).
Использование таймера сна
Можно установить время отсчета, после которого аппарат перейдет в режим
ожидания. Можно выбрать следующие значения: 120/90/60/30минут или OFF.
Несколько раз нажмите кнопку SLEEP для выбора времени.
Индикатор SLEEP загорается при установленном таймере сна.
SLEEP
Примечание
• Для отмены таймера сна снова нажмите SLEEP.
Ru 47
Page 48

Прослушивание музыки
Прослушивание дисков CD
CD
REPEAT
SHUFFLE
a/d
g
f
s
1 Нажмите кнопку CD на пульте
дистанционного управления.
2 Вставьте CD в лоток для дисков.
Нажмите = для открытия/закрытия лотка для дисков.
3 Нажмите a/d.
Начнется воспроизведение.
Для управления воспроизведением используйте
следующие кнопки. Песню можно также выбрать с
помощью цифровых кнопок на пульте ДУ.
a/d Воспроизведение/пауза
s Остановка
Переход на начало воспроизводимой
f
g
SHUFFLE/
REPEAT
Примечание
• Аппарат поддерживает воспроизведение дисков аудио CD и CD
с данными, на которых записаны файлы MP3/WMA. Для
получения дополнительной информации о воспроизводимых
компакт-дисках см. “Поддерживаемые устройства/форматы
медиафайлов” (& c. 62).
• При остановке воспроизведения CD воспроизведение
возобновится с начала последней проигрываемой песни. При
нажатии s (пауза) во время паузы воспроизведения будут
удалены данные возобновленного воспроизведения.
• Можно отменить номер песни, выбранный с помощью
цифровых кнопок, нажав s (пауза).
• Порядок воспроизведения музыкальных файлов, хранимых на
компакт-диске с данными, такой же, как и при воспроизведении
музыки с USB-накопителя (& c. 49).
• Если отключить аппарат, когда CD выбран в качестве источника
входного сигнала и установлен CD, аппарат автоматически
начнет воспроизведение установленного CD в следующий раз
при включении аппарата.
песни. Нажмите и удерживайте для
быстрой прокрутки назад.
Переход на следующую песню. Нажмите и
удерживайте для быстрой прокрутки
вперед.
& c. 54
48 Ru
Page 49

Прослушивание музыки
Воспроизведение музыки с USB-накопителя
USB
REPEAT
SHUFFLE
w
q
/
a
d
/
g
f
s
DISPLAY
1 Нажмите кнопку USB на пульте
дистанционного управления.
2 Подключите USB-накопитель к гнезду USB.
3 Выберите песню.
Для управления воспроизведением используйте
следующие кнопки.
q
w
a/d,
g
f Возврат к предыдущему пункту.
s Остановка
SHUFFLE/
REPEAT
DISPLAY
Выберите папку.
Подтверждение выбранного пункта и
переход на следующий уровень или
начало либо приостановка
воспроизведения.
& c. 54
Отображение информации о
воспроизводимом содержимом (& c. 55).
Примечание
• Этот аппарат обеспечивает воспроизведение музыкальных
файлов с USB-накопителей. Подробнее о воспроизводимых USBнакопителях USB см. в разделе “Поддерживаемые устройства/
форматы медиафайлов” (& c. 62).
• Некоторые USB-накопители могут не работать должным
образом, даже если они удовлетворяют всем требованиям.
Воспроизведение и обеспечение электропитанием USBнакопителей всех типов не гарантируются.
• Перед отсоединением USB-накопителя остановите
воспроизведение.
• При подключении к аппарату USB-накопитель будет
автоматически заряжаться, кроме тех случаев, когда аппарат
находится в режиме ожидания. Тем не менее, некоторые
устройства могут не заряжаться при подключении.
• Подключите устройство USB прямо к гнезду USB на аппарате. Не
используйте кабельные удлинители.
Ru 49
Page 50

Прослушивание музыки
Воспроизведение музыки через подключение Bluetooth®
BLUETOOTH
Устройство Bluetooth
Данный аппарат
1 Включите функцию Bluetooth на
устройстве Bluetooth.
2 Нажмите кнопку BLUETOOTH на пульте
дистанционного управления.
3
Выберите данный аппарат в списке устройств
Bluetooth на устройстве Bluetooth.
После установления подключения загорится индикатор
$.
$
Примечание
• Перед воспроизведением уменьшите громкость
аппарата. В противном случае уровень громкости
воспроизведения может быть очень высоким.
• Если устройство Bluetooth ранее подключалось, при нажатии на
пульте ДУ кнопки BLUETOOTH аппарат подключится к
последнему подключенному устройству.
• Если устройство подключено через подключение Bluetooth к
другому устройству, то перед подключением к другому
устройству нажмите и не менее трех секунд удерживайте кнопку
BLUETOOTH для завершения текущего подключения.
• Если во время подключения Bluetooth потребуется код доступа,
введите “0000”.
• Дополнительные сведения о подключении Bluetooth см. в
документации устройства Bluetooth.
Не удается подключить аппарат к устройству Bluetooth
Если после выполнения показанных слева инструкций
подключение Bluetooth не установилось, попробуйте выполнить
следующее.
1 Если устройство Bluetooth ранее подключалось к аппарату,
удалите аппарат из списка устройств, зарегистрированных
на устройстве Bluetooth.
2 Нажмите и удерживайте BLUETOOTH на пульте ДУ не менее
трех секунд.
- На дисплее передней панели появится сообщение “Pairing”.
3 Выберите данный аппарат в списке устройств Bluetooth на
устройстве Bluetooth.
- После установления подключения на дисплее передней
панели будет гореть индикатор $.
50 Ru
4 Воспроизведите музыку с помощью
устройства Bluetooth.
Page 51

Прослушивание FM-радиостанций
Для приема FM-станций подключите антенну, поставляемую с аппаратом (& c. 46).
Прослушивание музыки
TUNER
s
MEMORY
ee /rr
Настройка FM-станций
1 Нажмите клавишу TUNER.
2 Нажмите и удерживайте ee или rr, пока
не начнется автоматическая настройка.
Автоматическая настройка остановится после
нахождения радиостанции.
FM
87.50MHz
Примечание
• При плохом приеме радиостанции ее можно подстроить
вручную, нажимая кнопки ee /rr. Звук будет слышен в
монофоническом режиме.
TUNED
STEREO
Предустановка FM-станций
Автоматическая предустановка
На станции с хорошим приемом аппарат настраивается и
запоминает их автоматически.
1 Нажмите клавишу TUNER.
2 Нажмите и не менее двух секунд
удерживайте кнопку MEMORY.
3 Нажмите клавишу MEMORY.
Начнется автоматическая настройка, а после завершения
на дисплее передней панели появится сообщение
“Completed!”.
Примечание
• Автоматическая настройка заменяет все в данный момент
сохраненные станции на новые станции.
• Можно сохранить до 30 FM-станций.
• Чтобы отменить автоматическую настройку, нажмите s.
Ru 51
Page 52

Прослушивание музыки
TUNER
a/d
/w
q
s
e/r
Ручная предустановка
1 Настройтесь на радиостанцию, которую
требуется предустановить (& c. 51).
2 Нажмите клавишу MEMORY.
На дисплее передней панели будет мигать номер
настроенной станции.
Memory
FM01 87.50MHz>
3 Нажмите q/w для выбора необходимого
номера предустановленной станции.
4 Нажмите кнопку a/d для
предустановки радиостанции.
Примечание
• Для отмены настройки ручной предустановки нажмите s.
Выбор предустановленных FM-станций
1 Нажмите клавишу TUNER.
2 Нажмите e/r для выбора станции.
Номер сохраненной предустановки также можно
выбрать с помощью цифровых кнопок.
Примечание
Удаление предустановленной станции
1 В качестве источника входного сигнала должно быть
выбрано “FM”. Нажмите и не менее двух секунд удерживайте
кнопку DELETE.
- На дисплее передней панели будет мигать номер
настроенной станции.
2 Кнопками q/w выберите номер настроенной станции для
удаления.
3 Нажмите a/d.
- Станция с выбранным номером будет удалена.
52 Ru
MEMORY
DELETE
Page 53

Воспроизведение музыки с внешних
Прослушивание музыки
z
AUX
DIGITAL
устройств
Через аппарат можно воспроизводить музыку с внешних устройств. Используйте гнезда (DIGITAL IN или AUX IN) в
соответствии с подключаемым устройством (& c. 42).
1 Отключите кабель питания аппарата и
подключите к аппарату внешнее
устройство.
Для подключений используйте кабели, приобретаемые
отдельно.
SPEAKERS
RL
SUBWOOFER
OUT
+
–
6Ω MIN./SPEAKER
AUX IN
Стереофонический кабель с
мини-штекером
3,5 мм
DIGITAL IN
Цифровой оптический кабель
ANTENNA
DIGITAL IN AUX IN
FM75Ω
UNBAL.
2 Снова подключите кабель питания
аппарата к розетке и нажмите z, чтобы
включить аппарат.
3 Нажмите AUX или DIGITAL, чтобы выбрать
источник входного сигнала.
4 Начните воспроизведение на
подключенном внешнем устройстве.
Сведения о воспроизведении см. в документации на
внешние устройства.
Примечание
• Уменьшите уровень громкости аппарата и
подключенного внешнего устройства перед
подключением. В противном случае уровень громкости
воспроизведения может быть очень высоким.
• Информацию о подключении устройств см. в документации на
внешние устройства.
Аудиоустройство, осна-
щенное оптическим
выходным гнездом
Портативный музыкальный
проигрыватель и т.п.
Ru 53
Page 54

Больше о воспроизведении
Такие функции, как воспроизведение в случайном порядке, повторное воспроизведение, отображение
информации о песне и другие делают данный аппарат еще более удобным для использования.
Воспроизведение в случайном порядке/ повторное воспроизведение
Управление осуществляется одинаково при воспроизведении содержимого как с USB-накопителей, так и с компакт-дисков.
REPEAT
SHUFFLE
Воспроизведение в случайном
(произвольном) порядке
Нажмите SHUFFLE во время воспроизведения.
Индикатор воспроизведения в случайном порядке на дисплее
передней панели будет переключаться как показано ниже при
каждом нажатии кнопки SHUFFLE.
x
xALL
Гаснет
* Диапазон воспроизведения в случайном порядке зависит от
воспроизводимых медиафайлов.
Воспроизведение в случайном порядке
папок*
Воспроизведение в случайном порядке
всех песен
Функция воспроизведения в случайном
порядке не применяется.
Повторное воспроизведение
Нажмите REPEAT во время воспроизведения.
Индикатор повторного воспроизведения на дисплее
передней панели будет переключаться, как показано ниже, при
каждом нажатии кнопки REPEAT.
v1 Повторить воспроизводимую песню.
v Повторить папки*
vALL Повторить все песни
Гаснет
* Диапазон повторного воспроизведения зависит от
воспроизводимых медиафайлов.
Функция повторного воспроизведения не
применяется.
54 Ru
Page 55

Больше о воспроизведении
BASS
TREBLE
a/d
q/w
DISPLAY
Информация о воспроизведении
Во время воспроизведения содержимого с USB-накопителя или
компакт-диска на дисплее передней панели может отображаться
название песни, истекшее время и другая информация.
Нажмите DISPLAY во время воспроизведения.
Album
Meteora
При каждом нажатии кнопки DISPLAY дисплей будет
переключаться как показано ниже.
Компакт-диск с дан-
ными или USB
Название песен*
Имя исполнителя
Название альбома
Время
воспроизведения
1
Если не удается получить название песни, может быть
*
показано имя файла.
2
Только при воспроизведении аудио компакт-диска.
*
3
Только если на воспроизводимом аудио компакт-диске
*
записана информация, которая может быть отображена.
1
Время воспроизведения
Оставшееся время воспроизведения
Оставшееся время воспроизведения
Название песни*
Название альбома*
CD
2
песни*
2
диска*
Имя исполнителя*
,
1
3
*
3
3
Регулировка качества звука
Регулировка тонов (значение по умолчанию выделено
жирным шрифтом)
Для изменения уровней высокочастотного и низкочастотного
тона при прослушивании используйте кнопки пульта ДУ BASS
и TREBLE.
(От -5 до 0 до +5)
1 Нажмите BASS или TREBLE.
2 Измените уровень с помощью q/w, а затем нажмите
a/d.
Регулировка баланса (значение по умолчанию выделено
жирным шрифтом)
Баланс звука левой и правой колонок настраивается через
меню параметра (& c. 56).
Настройка не применяется при использовании наушников.
(Лев. кан. +5 --центр-- Прав. кан. +5)
Примечание
• На дисплее передней панели отображаются только буквенноцифровые символы.
Ru 55
Page 56

Больше о воспроизведении
Меню Опции
q/w
a
d
/
f
OPTION
С помощью меню параметра можно настроить нужный режим
работы аппарата.
1 Нажмите клавишу OPTION.
На дисплее передней панели появится список меню
параметра. См. “Список меню параметра” (& c. 56).
2 Выберите необходимое меню параметра
с помощью q/w и нажмите a/d.
Option
BT Standby
3 Измените настройки с помощью q/w, а
затем нажмите a/d.
• При наличии подменю повторите шаг 3.
• Нажмите f для отмены настройки и возврата на
предыдущий уровень.
• Повторите шаг 2 и 3 для настройки другого элемента
меню.
4 Нажмите OPTION для выхода из меню
настроек параметра.
Список меню параметра
Меню
Balance (& c. 55) center
AutoPowerStdby
(& c. 47)
BT Standby (режим
ожидания Bluetooth)
Bluetooth On
InitializeSet
По умол-
чанию
On
On
Функция
Настройка баланса звука
левой и правой колонки.
Установка автоматического
перехода аппарата в режим
ожидания.
Если при подключении
устройства Bluetooth к
аппарату он находится в
режиме ожидания, аппарат
автоматически включится.
Включение и отключение
функции Bluetooth
Возврат настроек к
заводским значениям по
умолчанию.
56 Ru
Page 57

Устранение неполадок
Если аппарат функционирует неправильно, см. приведенную ниже таблицу. Если вы столкнулись с неисправностью, которая не указана в таблице, или не
смогли исправить ее, следуя инструкциям, выключите данный аппарат, отключите кабель питания и обратитесь к ближайшему официальному дилеру или
в сервисный центр Yamaha.
Во-первых, убедитесь, что штекеры каждого кабеля надежно вставлены в гнезда каждого устройства. Также убедитесь, что кабель питания подключен к розетке.
Неполадки общего характера
Возможная неисправность Вероятная причина Пути решения
Шнур питания подключен неверно. Надежно подключите кабель питания.
Аппарат переходит в режим ожидания
после включения питания.
Аппарат работает ненадлежащим
образом.
Отсутствует звук.
Слышится звучание от динамика только
на одной стороне.
Слышен шум.
Произошло внезапное отключение
питания.
Слышатся шумовые помехи от
цифрового или высокочастотного
оборудования.
Завис внутренний микрокомпьютер из-за электрического воздействия
внешнего характера (молнии, сильного статического электричества и
т.п.) или из-за перепада напряжения электропитания.
Не выбран соответствующий источник.
Динамики подключены ненадежно. Надежно подключите колонки (& c. 45).
Звук находится на минимальном уровне громкости или приглушен. Увеличьте уровень громкости.
Устройство воспроизведения или колонки подключены неправильно.
Данный аппарат слишком близко расположен к цифровому или
радиочастотному оборудованию.
Возможно, неисправен аудиокабель, используемый для соединения
аппарата и внешнего устройства.
Возможно, установлен таймер сна (& c. 47).
Активирована функция автоматического режима ожидания питания
(& c. 47).
Данный аппарат слишком близко расположен к цифровому или
высокочастотному оборудованию.
Нажмите и более 10 секунд удерживайте кнопку z на передней
панели, чтобы выполнить инициализацию и перезагрузку аппарата.
Если проблема сохраняется, отключите аппарат от электрической
розетки, подождите не менее 30 секунд, а затем снова подключите
аппарат к электрической розетке.
Выберите соответствующий источник входного сигнала с помощью
селектора INPUT на передней панели или кнопками источников на
пульте дистанционного управления (& c. 41, 44).
Правильно подключите устройство воспроизведения или колонки
(& c. 45, 53). Если неисправность не была устранена, это означает, что
используемые кабели могут быть неисправны.
Передвиньте аппарат подальше от такого оборудования.
Подключите аудиокабель соответствующим образом. Если проблема
сохранится, используйте другой аудиокабель.
Включите аппарат и воспроизведите источник снова.
Передвиньте аппарат подальше от такого оборудования.
Ru 57
Page 58

Устранение неполадок
Возможная неисправность Вероятная причина Пути решения
Пульт дистанционного управления не
работает или работает ненадлежащим
образом.
Возможно, пульт дистанционного управления находится за пределами
зоны действия.
На датчик дистанционного управления данного аппарата могут
попадать прямые солнечные лучи или яркий свет, например, свет от
инвертированной флуоресцентной лампы.
Возможно, села батарейка. Замените батарейки на новые (& c. 44).
Между датчиком данного аппарата и пультом дистанционного
управления находятся препятствия.
Используйте пульт дистанционного управления в пределах его
рабочего диапазона (& c. 47).
Измените направление освещения, ориентацию или положение
аппарата.
Устраните препятствия.
Bluetooth
Возможная неисправность Вероятная причина Пути решения
Не удается подключить аппарат к
устройству Bluetooth
Во время воспроизведения звук не
воспроизводится или прерывается.
Для пункта [Bluetooth] настройки параметров установлено значение
[Off].
Аппарат уже подключен к другому устройству Bluetooth.
Аппарат и устройство Bluetooth находятся слишком далеко друг от друга.
Устройство, работающее в диапазоне 2,4 ГГц (микроволновая печь,
устройство беспроводной сети и т.п.), создает помехи для
беспроводной связи.
Для таких устройств, как адаптер Bluetooth, используется ключ доступа,
отличный от “0000”.
Устройство Bluetooth не поддерживает Advanced Audio Distribution
Profile (A2DP).
На устройстве Bluetooth установлен слишком низкий уровень громкости.
Устройство Bluetooth не сконфигурировано для передачи
аудиосигнала на данный аппарат.
Соединение по Bluetooth было завершено. Снова установите соединение по Bluetooth (& c. 50).
Устройство, работающее в диапазоне 2,4 ГГц (микроволновая печь,
устройство беспроводной сети и т.п.), создает помехи для
беспроводной связи.
Аппарат и устройство Bluetooth находятся слишком далеко друг от друга.
Установите значение [On].
Завершите текущее соединение по Bluetooth, а затем установите
соединение с новым устройством (& c. 50).
Переместите устройство Bluetooth ближе к аппарату.
Переместите аппарат и устройство Bluetooth дальше от данного устройства.
Если маршрутизатор беспроводной локальной сети поддерживает диапазон
5 ГГц, подключите сетевые устройства к сети в диапазоне 5 ГГц.
Используйте устройство Bluetooth с ключом доступа “0000”.
Используйте устройство Bluetooth, которое поддерживает A2DP.
Увеличьте громкость на устройстве Bluetooth.
На устройстве Bluetooth выберите данный аппарат в качестве адресата
вывода аудиосигнала.
Переместите аппарат и устройство Bluetooth дальше от данного устройства.
Если маршрутизатор беспроводной локальной сети поддерживает диапазон
5 ГГц, подключите сетевые устройства к сети в диапазоне 5 ГГц.
Переместите устройство Bluetooth ближе к аппарату.
58 Ru
Page 59

Диск
Возможная неисправность Вероятная причина Пути решения
После нажатия кнопки a/d
воспроизведение не запускается (или
сразу останавливается).
Во время воспроизведения звук не
слышен или прерывается.
Диск загрязнен. Протрите диск (& c. 62).
В аппарат вставлен несовместимый диск. Используйте диск, поддерживаемый данным аппаратом (& c. 62).
Если аппарат был перенесен из холодного места в теплое, возможно, на
линзе чтения диска образовался конденсат.
Диск загрязнен. Протрите диск (& c. 62).
В аппарат вставлен несовместимый диск. Используйте диск, поддерживаемый данным аппаратом (& c. 62).
Подождите один или два часа, пока аппарат не достигнет комнатной
температуры, а затем повторите попытку.
USB-накопители
Возможная неисправность Вероятная причина Пути решения
Аппарат не обнаруживает USBнакопитель.
Невозможно просмотреть папки и
файлы на USB-накопителе.
Во время воспроизведения звук не
слышен или прерывается.
USB-накопитель ненадежно подключен к гнезду USB.
Используется USB-накопитель формата, отличного от FAT16/32. Используйте USB-накопитель с файловой системой FAT16 или FAT32.
Данные на USB-накопителе защищены шифрованием. Используйте USB-накопитель без функции шифрования.
Музыкальный файл не поддерживается аппаратом.
Выключите аппарат, переподключите USB-накопитель, а затем снова
включите аппарат (& c. 49).
Следует воспроизводить музыкальные файлы, поддерживаемые
данным аппаратом (& c. 63).
Устранение неполадок
Ru 59
Page 60

Устранение неполадок
Прием FM-радиостанций
Возможная неисправность Вероятная причина Пути решения
Убедитесь, что антенна подключена правильно и измените ее
положение (& c. 46).
Используйте приобретаемую отдельно наружную антенну. Для
получения дополнительной информации обратитесь к специалисту
магазина.
Используйте приобретаемую отдельно наружную антенну. Для
получения дополнительной информации обратитесь к специалисту
магазина.
Попробуйте настроиться вручную (& c. 52).
Во время стереофонического приема
FM-радиостанции слышен шум.
Автонастройка не работает.
Не удалось выбрать
предустановленную радиостанцию.
Звук искажается, и не удается получить
чистый прием даже при использовании
исправной FM-антенны или наружной
антенны.
Антенна подключена неправильно.
Выбранная радиостанция находится далеко от места приема или с
антенны поступает слабый сигнал.
Выбранная радиостанция находится далеко от места приема или с
антенны поступает слабый сигнал.
Предустановленные станции удалены из памяти. Заново выполните предустановку радиостанций (& c. 51, 52).
Имеют место многолучевое отражение или другие радиопомехи. Измените высоту, направление или расположение антенны.
60 Ru
Page 61

Устранение неполадок
Сообщения на дисплее передней панели
Сообщение Вероятная причина Пути решения
Access Error Аппарат не может получить доступ к USB-накопителю.
Disc Error Вставлен диск, который не поддерживается аппаратом. Вставьте диск, поддерживаемый данным аппаратом.
Loading... Аппарат загружает специальные файлы/содержимое. Дождитесь окончания загрузки аппарата.
No Content
No Disc
Overcurrent
Unknown Аппарат не может получить доступ к USB-накопителю.
Unknown Disc Вставлен диск, который не распознается аппаратом. Вставьте диск, который можно воспроизвести на аппарате.
USB Error
На диске или USB-накопителе нет файлов, поддерживаемых этим
аппаратом.
В аппарат вставлен несовместимый диск. Используйте диск, поддерживаемый данным аппаратом (& c. 62).
Диск может быть загрязнен, или на нем находятся посторонние
предметы.
Диск загружен верхней стороной вниз. Переустановите диск этикеточной стороной вверх.
Подключенный USB-накопитель не поддерживается аппаратом. Отсоедините USB-накопитель, выключите и снова включите аппарат.
USB-накопитель подключен неправильно.
По какой-то причине аппарат не может воспроизводить песни с USBнакопителей.
Выключите аппарат и переподключите USB-накопитель. Если проблема
сохраняется, попробуйте другой USB-накопитель.
Используйте диск или USB-накопитель, файлы на котором
поддерживаются аппаратом.
Протрите диск. Либо удалите посторонние предметы, которые
прилипли к диску.
Если после этого проблема не устраняется, значит USB-накопитель не
воспроизводится на данном аппарате.
Выключите аппарат и переподключите USB-накопитель. Если проблема
сохраняется, попробуйте другой USB-накопитель.
Убедитесь, что формат файлов, которые вы пытаетесь воспроизвести,
поддерживается аппаратом (& c. 63).
Ru 61
Page 62

Поддерживаемые устройства/форматы медиафайлов
Поддерживаемые устройства/медиафайлы
USB-накопители
• Данный аппарат совместим с USB-накопителями с файловой системой FAT16 или
FAT32. Не подключайте USB-накопители других типов.
• USB-накопители, защищенные шифрованием, не могут использоваться.
• Работа всех USB-накопителей не гарантируется.
Компания Yamaha и ее поставщики не несут ответственности в случае утраты данных,
содержащихся на USB-накопителях, подключаемых к данному аппарату. В качестве
меры предосторожности рекомендуется сделать резервные копии важных файлов.
Диски
• Данный аппарат разработан для использования с дисками аудио CD, CD-R/RW
(формат ISO 9660) с любым из следующих логотипов, напечатанных на диске или
обложке диска.
Аудио CD
CD-R/RW*
* Диски со следующими надписями.
FOR CONSUMER
FOR CONSUMER USE
FOR MUSIC USE ONLY
• Этот аппарат поддерживает воспроизведение дисков диаметром 8 см.
Поместите диск во внутреннюю часть лотка дисковода.
Примечания о дисках
• Не используйте в аппарате любой другой тип дисков, кроме указанных выше. Это
может привести к повреждению аппарата.
• CD-R/RW не удастся воспроизвести без инициализации. Финализация означает
процесс изготовления диска, готового к воспроизведению на совместимом
устройстве.
• В зависимости от характеристик диска или условий записи воспроизведение
некоторых дисков может быть невозможным.
• Не используйте диски нестандартной формы (например, в виде сердца).
• Не используйте диски с множеством царапин или с трещиной на поверхности или
деформированные или склеенные диски.
Обращение с дисками
• Не прикасайтесь к поверхности диска. Держите диск за края или
центральное отверстие.
• Для подписывания дисков со стороны этикетки используйте ручку
с мягким фетровым наконечником.
• Не применяйте к диску клейкую ленту, наклейки, клей и т.д.
• Не используйте защитное покрытие с целью предотвращения возникновения
царапин на диске.
• Не помещайте инородные предметы в лоток для диска.
• Не загружайте одновременно более одного диска в этот аппарат. Это может
привести к повреждению данного аппарата и самих дисков.
• В случае загрязнения диска протрите его чистой, сухой тканью
от центра к краям. Не используйте жидкость для стирания
надписей или разбавитель.
• Очистители линз могут привести к повреждению аппарата,
поэтому их использование запрещено.
• Не подвергайте диски воздействию прямых солнечных лучей,
высокой температуры, высокой влажности или пыльных условий.
• Если диск не используется, извлеките его из аппарата и храните в соответствующем
чехле.
62 Ru
Page 63

Форматы файлов
Данный аппарат поддерживает следующие форматы файлов.
Поддерживаемые устройства/форматы медиафайлов
USB
Формат
*
WAV
MP3 32/44,1/48 16 8-320 2
WMA 32/44,1/48 16 8-320 2
MPEG-4 AAC-LC 32/44,1/48 16 8-320 2
FLAC
ALAC 32/44,1/48 16/24 - 2
AIFF
* Только линейный формат PCM
Частота дискре-
тизации (кГц)
32/44,1/48/88,2/
96/176,4/192
32/44,1/48/88,2/
96/176,4/192
32/44,1/48/88,2/
96/176,4/192
Разрядность
квантования
(бит)
16/24 - 2
16/24 - 2
16/24 - 2
• Файлы управления цифровыми правами (DRM) не удастся воспроизвести.
Скорость
передачи дан-
ных (кбит/с)
Количество
каналов
Диск
Частота дис-
Формат
MP3 32/44,1/48 16 8-320 2
WMA 32/44,1/48 16 8-320 2
кретизации
(кГц)
Разрядность
квантования
Скорость пере-
дачи данных
(кбит/с)
Количество
каналов
Ru 63
Page 64

Технические характеристики
Вход
AUX IN 3,5 мм стерео мини-гнездо
DIGITAL IN Оптический разъем
Выход
SUBWOOFER OUT Монофонический разъем RCA
SPEAKERS L/R -
PHONES 6,3 мм в диаметре
CD
Тип Полупроводниковый лазер GaAs/GaAlAs
Лазер
Медиа CD, CD-R/RW-диски
Формат аудио Аудио CD, MP3, WMA
Тюнер
Память предустановки 30
Диапазон
настройки
Длина волн 790 нм
Выходная
мощность
FM
7 мВт
Модели для США и Канады от 87,5 МГц –
107,9 МГц
Другие модели: 87,5 МГц – 108,0 МГц
Bluetooth
Версия Bluetooth Вер. 4.2
Поддерживаемый профиль
Совместимые кодеки SBC, AAC
Максимальная дальность связи 10 м (без препятствий)
Раздел усилителя
Максимальная выходная мощность
Частотная характеристика от 20 Гц до 30 кГц (0±3 дБ)
Общие нелинейные искажения ≤ 0,05 % (2,5 Вт/6 Ом)
Неисправности общего характера
Источник питания/частота 100–240 В переменного тока, 50/60 Гц
Энергопотребление 18 Вт
Потребляемая мощность в режиме
ожидания
Габариты (Ш × В × Г) 180 × 118 × 322 мм
Вес 2,7 кг
Содержание данного руководства соответствует последним на дату публикации
техническим характеристикам. Для получения последней версии руководства
посетите веб-сайт Yamaha и загрузите файл с руководством.
A2DP (Advanced Audio Distribution Profile)
AVRCP (Audio/Video Remote Control Profile)
20 Вт + 20 Вт (6 Ом, 1 кГц, полный коэф. гарм.
искаж. (THD) 10 %)
Режим ожидания Bluetooth выкл: 0,3 Вт (ECO)
Режим ожидания Bluetooth вкл: 1,5 Вт
64 Ru
Благодаря усовершенствованной энергосберегающей конструкции
данное изделие в режиме ожидания Bluetooth потребляет очень малую
мощность — не более 1,8 ватт.
Page 65

DIGITAL IN
ANTENNA
Software licenses
This product uses the following software.
Лицензии на программное обеспечение
В этом продукте используется следующее программное обеспечение.
Apache License
Version 2.0, January 2004
http://www.apache.org/licenses/
SPEAKERS
RL
SUBWOOFER
OUT
+
–
6Ω MIN./SPEAKER
FM75Ω
UNBAL.
AUX IN
TERMS AND CONDITIONS FOR USE, REPRODUCTION, AND DISTRIBUTION
1. Definitions.
"License" shall mean the terms and conditions for use, reproduction, and distribution as defined
by Sections 1 through 9 of this document.
"Licensor" shall mean the copyright owner or entity authorized by the copyright owner that is
granting the License.
"Legal Entity" shall mean the union of the acting entity and all other entities that control, are
controlled by, or are under common control with that entity. For the purposes of this definition,
"control" means (i) the power, direct or indirect, to cause the direction or management of such
entity, whether by contract or otherwise, or (ii) ownership of fifty percent (50%) or more of the
outstanding shares, or (iii) beneficial ownership of such entity.
"You" (or "Your") shall mean an individual or Legal Entity exercising permissions granted by this
License.
"Source" form shall mean the preferred form for making modifications, including but not limited to
software source code, documentation source, and configuration files.
"Object" form shall mean any form resulting from mechanical transformation or translation of a
Source form, including but not limited to compiled object code, generated documentation, and
conversions to other media types.
"Work" shall mean the work of authorship, whether in Source or Object form, made available
under the License, as indicated by a copyright notice that is included in or attached to the work
(an example is provided in the Appendix below).
"Derivative Works" shall mean any work, whether in Source or Object form, that is based on (or
derived from) the Work and for which the editorial revisions, annotations, elaborations, or other
modifications represent, as a whole, an original work of authorship. For the purposes of this
License, Derivative Works shall not include works that remain separable from, or merely link (or
bind by name) to the interfaces of, the Work and Derivative Works thereof.
"Contribution" shall mean any work of authorship, including the original version of the Work and
any modifications or additions to that Work or Derivative Works thereof, that is intentionally
submitted to Licensor for inclusion in the Work by the copyright owner or by an individual or Legal
Entity authorized to submit on behalf of the copyright owner. For the purposes of this definition,
"submitted" means any form of electronic, verbal, or written communication sent to the Licensor or
its representatives, including but not limited to communication on electronic mailing lists, source
code control systems, and issue tracking systems that are managed by, or on behalf of, the
Licensor for the purpose of discussing and improving the Work, but excluding communication that
is conspicuously marked or otherwise designated in writing by the copyright owner as "Not a
Contribution."
"Contributor" shall mean Licensor and any individual or Legal Entity on behalf of whom a
Contribution has been received by Licensor and subsequently incorporated within the Work.
2. Grant of Copyright License. Subject to the terms and conditions of this License, each Contributor
hereby grants to You a perpetual, worldwide, non-exclusive, no-charge, royalty-free, irrevocable
copyright license to reproduce, prepare Derivative Works of, publicly display, publicly perform,
sublicense, and distribute the Work and such Derivative Works in Source or Object form.
65
Page 66

3. Grant of Patent License. Subject to the terms and conditions of this License, each Contributor
hereby grants to You a perpetual, worldwide, non-exclusive, no-charge, royalty-free, irrevocable
(except as stated in this section) patent license to make, have made, use, offer to sell, sell, import,
and otherwise transfer the Work, where such license applies only to those patent claims
licensable by such Contributor that are necessarily infringed by their Contribution(s) alone or by
combination of their Contribution(s) with the Work to which such Contribution(s) was submitted. If
You institute patent litigation against any entity (including a cross-claim or counterclaim in a
lawsuit) alleging that the Work or a Contribution incorporated within the Work constitutes direct or
contributory patent infringement, then any patent licenses granted to You under this License for
that Work shall terminate as of the date such litigation is filed.
4. Redistribution. You may reproduce and distribute copies of the Work or Derivative Works thereof
in any medium, with or without modifications, and in Source or Object form, provided that You
meet the following conditions:
(a)You must give any other recipients of the Work or Derivative Works a copy of this License; and
(b)You must cause any modified files to carry prominent notices stating that You changed the files;
and
(c)You must retain, in the Source form of any Derivative Works that You distribute, all copyright,
patent, trademark, and attribution notices from the Source form of the Work, excluding those
notices that do not pertain to any part of the Derivative Works; and
(d)If the Work includes a "NOTICE" text file as part of its distribution, then any Derivative Works
that You distribute must include a readable copy of the attribution notices contained within such
NOTICE file, excluding those notices that do not pertain to any part of the Derivative Works, in
at least one of the following places: within a NOTICE text file distributed as part of the
Derivative Works; within the Source form or documentation, if provided along with the
Derivative Works; or, within a display generated by the Derivative Works, if and wherever such
third-party notices normally appear. The contents of the NOTICE file are for informational
purposes only and do not modify the License. You may add Your own attribution notices within
Derivative Works that You distribute, alongside or as an addendum to the NOTICE text from the
Work, provided that such additional attribution notices cannot be construed as modifying the
License.
You may add Your own copyright statement to Your modifications and may provide additional or
different license terms and conditions for use, reproduction, or distribution of Your modifications,
or for any such Derivative Works as a whole, provided Your use, reproduction, and distribution of
the Work otherwise complies with the conditions stated in this License.
5. Submission of Contributions. Unless You explicitly state otherwise, any Contribution intentionally
submitted for inclusion in the Work by You to the Licensor shall be under the terms and conditions
of this License, without any additional terms or conditions. Notwithstanding the above, nothing
herein shall supersede or modify the terms of any separate license agreement you may have
executed with Licensor regarding such Contributions.
6. Trademarks. This License does not grant permission to use the trade names, trademarks, service
marks, or product names of the Licensor, except as required for reasonable and customary use in
describing the origin of the Work and reproducing the content of the NOTICE file.
7. Disclaimer of Warranty. Unless required by applicable law or agreed to in writing, Licensor provides
the Work (and each Contributor provides its Contributions) on an "AS IS" BASIS, WITHOUT
WARRANTIES OR CONDITIONS OF ANY KIND, either express or implied, including, without
limitation, any warranties or conditions of TITLE, NON-INFRINGEMENT, MERCHANTABILITY, or
FITNESS FOR A PARTICULAR PURPOSE. You are solely responsible for determining the
appropriateness of using or redistributing the Work and assume any risks associated with Your
exercise of permissions under this License.
8. Limitation of Liability. In no event and under no legal theory, whether in tort (including negligence),
contract, or otherwise, unless required by applicable law (such as deliberate and grossly negligent
acts) or agreed to in writing, shall any Contributor be liable to You for damages, including any
direct, indirect, special, incidental, or consequential damages of any character arising as a result
of this License or out of the use or inability to use the Work (including but not limited to damages
for loss of goodwill, work stoppage, computer failure or malfunction, or any and all other
commercial damages or losses), even if such Contributor has been advised of the possibility of
such damages.
9. Accepting Warranty or Additional Liability. While redistributing the Work or Derivative Works
thereof, You may choose to offer, and charge a fee for, acceptance of support, warranty,
indemnity, or other liability obligations and/or rights consistent with this License. However, in
accepting such obligations, You may act only on Your own behalf and on Your sole responsibility,
not on behalf of any other Contributor, and only if You agree to indemnify, defend, and hold each
Contributor harmless for any liability incurred by, or claims asser ted against, such Contributor by
reason of your accepting any such warranty or additional liability.
END OF TERMS AND CONDITIONS
FLAC
Copyright © 2000–2009 Josh Coalson
Copyright © 2011–2016 Xiph.Org Foundation
Redistribution and use in source and binary forms, with or without modification, are permitted
provided that the following conditions are met:
- Redistributions of source code must retain the above copyright notice, this list of conditions and the
following disclaimer.
- Redistributions in binary form must reproduce the above copyright notice, this list of conditions and
the following disclaimer in the documentation and/or other materials provided with the distribution.
- Neither the name of the Xiph.org Foundation nor the names of its contributors may be used to
endorse or promote products derived from this software without specific prior written permission.
THIS SOFTWARE IS PROVIDED BY THE COPYRIGHT HOLDERS AND CONTRIBUTORS ``AS
IS'' AND ANY EXPRESS OR IMPLIED WARRANTIES, INCLUDING, BUT NOT LIMITED TO, THE
IMPLIED WARRANTIES OF MERCHANTABILITY AND FITNESS FOR A PARTICULAR PURPOSE
ARE DISCLAIMED. IN NO EVENT SHALL THE FOUNDATION OR CONTRIBUTORS BE LIABLE
FOR ANY DIRECT, INDIRECT, INCIDENTAL, SPECIAL, EXEMPLARY, OR CONSEQUENTIAL
DAMAGES (INCLUDING, BUT NOT LIMITED TO, PROCUREMENT OF SUBSTITUTE GOODS OR
SERVICES; LOSS OF USE, DATA, OR PROFITS; OR BUSINESS INTERRUPTION) HOWEVER
CAUSED AND ON ANY THEORY OF LIABILITY, WHETHER IN CONTRACT, STRICT LIABILITY,
OR TORT (INCLUDING NEGLIGENCE OR OTHERWISE) ARISING IN ANY WAY OUT OF THE
USE OF THIS SOFTWARE, EVEN IF ADVISED OF THE POSSIBILITY OF SUCH DAMAGE.
66
Page 67

67
Page 68

Yamaha Global Site
https://www.yamaha.com/
Yamaha Downloads
https://download.yamaha.com/
Manual Development Group
© 2018 Yamaha Corporation
Published 03/2019 KSEM-B0
10-1 Nakazawa-cho, Naka-ku, Hamamatsu, 430-8650 Japan
VCW6760
 Loading...