

Page 1
1
CRIES
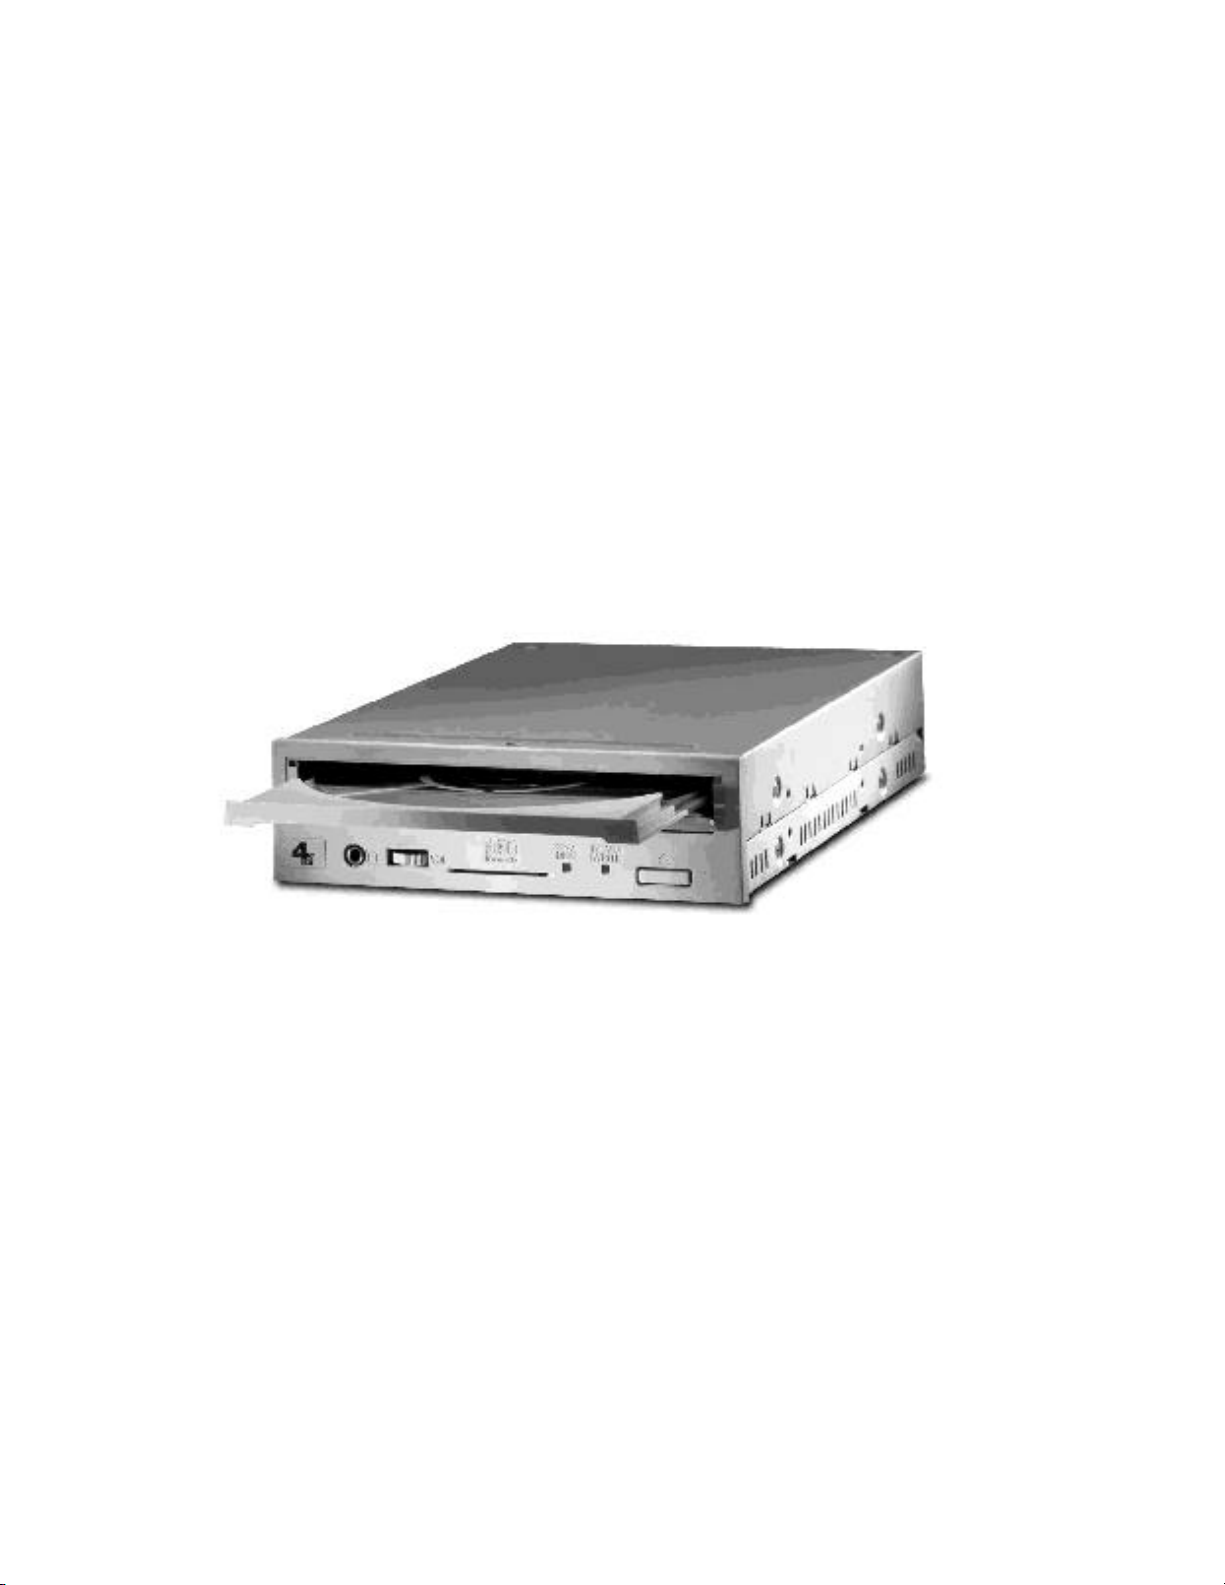
CRW4260ti-PC
YAMAHA
SCSI interface CD-RW drive
Page 2

2
Table of Contents
Before installing the CRW Recorder……………………………………..3
Missing, lost or damaged package items …………………………………3
System requirements ………………………………………………………3
About CD Re-Writeable …………………………………………………..4
About SCSI Controllers …………………………………………………..5
Check Your SCSI Card ……………………………………………………………8
Mechanical installation of your CRW ……………………………………9
Installing the software……………………………………………………..14
Front panel indicator key ………………………………………………..15
Specifications ……………………………………………………………..15
For technical Support…………………………………………………….15
Compliance Information Statement …………………………………….17
Yamaha Warranty ……………………………………………………….18
How CD-R and CD-RW work …………………………………………………….4
System Requirements………………………………………………………………5
Set the CD Recorder SCSI ID number…………………………………………….6
Turn on your PC ………………………………………………………………….13
DirectCD ………………………………………………………………………….14
Easy CD Creator ………………………………………………………………….14
The serial number of my CDR drive is ____________________________________________
Purchase date ________________________________________________________________
Purchased from ______________________________________________________________
Page 3

3
Thank you for purchasing the YAMAHA CD-Recorder. Before you
begin, read this manual carefully to ensure proper installation.
Before
installing the
CRW-Recorder
Missing, lost or
damaged
package items
System
requirements
(recommended
specifications)
PACKAGE CONTENTS
Check the items in the package. You should have the following:
• CRW4260 drive
• “Getting Started” guide
• CD-ROM containing software
• 1 x blank CDR media
• 1 x blank CD-RW media
• 4 x 3mm mounting screws and washers
• Audio cable (CDR audio output to soundcard input)
Call (888) 926-2426
IBM PC Computer - These specifications refer to the drive only.
Included software has differing requirements.
• PC486/100MHz or higher (to write at 2x speed), Pentium
100MHz or faster required for 4x speed writing
• 16MB RAM (Windows 95/NT)
• 3.5 Floppy Disk Drive
• CD-ROM Drive
• High speed SCSI host adapter (Bus master)
Page 4

4
About CD
Re-Writeable
The Yamaha CRW4260 ti-PC is a “multi-function” or “3-in-1” drive.
This means that the drive may be used with CDR (write once) media,
CD-RW (rewriteable) media, or as a CD-ROM drive. Your
CRW4260ti-PC will automatically recognize and accommodate
whatever CD media is inserted.
CD-R CD-RW
Compatibility Nearly all CD-ROM
Cost of media Very low 4-5 X that of CD-R
Erasable Write once - not
Capacity 650MB data / 74 min.
Storage Life 75-200 years 30 years
Maximum recording
speed
Application Archival storage
Drives
Audio CD Players
All but the earliest
DVD Drives
erasable
audio
4 X 2 X
Storage requiring “audit
trail” (medical / financial /
legal records, etc.)
Audio-CD
Distribution of large
data files
CD-RW drives
Multi-Read (MR)
enabled CD-ROM
drives and CD players
(MR drives/players are a
recent development with
a limited installed base)
May be erased and
re-recorded up to
1,000 times
650MB data / 74 min.
audio
Back-up
Supplement to
hard-drive
Page 5

5
HOW CD-R AND CD-RW WORK
CD-R writes data by burning tiny pits into a green, gold or blue dye
layer. The disc is read by a head which is simply looking for the
absence or presence of reflected laser light.
CD-RW writes data by altering the alignment of crystalline structures in
the media. When the disc is read by a laser, these changes in the
crystalline structure alter the phase of the reflected light. The disc can be
“wiped clean” in an erase process that realigns the crystalline elements.
About SCSI Controllers
This kit does not include a SCSI host adapter card. A host adapter card provides the
interface between your PC and various peripheral devices. A wide range of cards is
available with various levels of performance, features, and price. If you plan to add
peripherals such as scanners or external hard-drives you will want a more capable host
adapter. If, on the other hand you plan to use the host adapter only to connect this CDRecorder, a more economical device may be a better choice.
SCSI cards from AdvanSys, Adaptec, BusLogic, Q-Logic, NCR are known to function
properly with this drive.
Visit http://www.yamahayst.com/techsup/recoscsi.html for the latest information on
compatible SCSI cards.
Once you have selected a SCSI host adapter card install it in your computer according to
the manufacturers directions.
System requirements (Recommended specifications)
IBM PC Computer - These specifications refer to the drive only. Included software has
differing requirements.
• PC486/100MHz or higher
• 8MB RAM (Windows 3.X - Note that included software is not compatible with
Windows 3.X.)
• 16MB RAM (Windows 95/NT)
• 3.5 Floppy Disk Drive
• CD-ROM Drive
• High-speed SCSI Host Adapter (Bus master)
Page 6
6
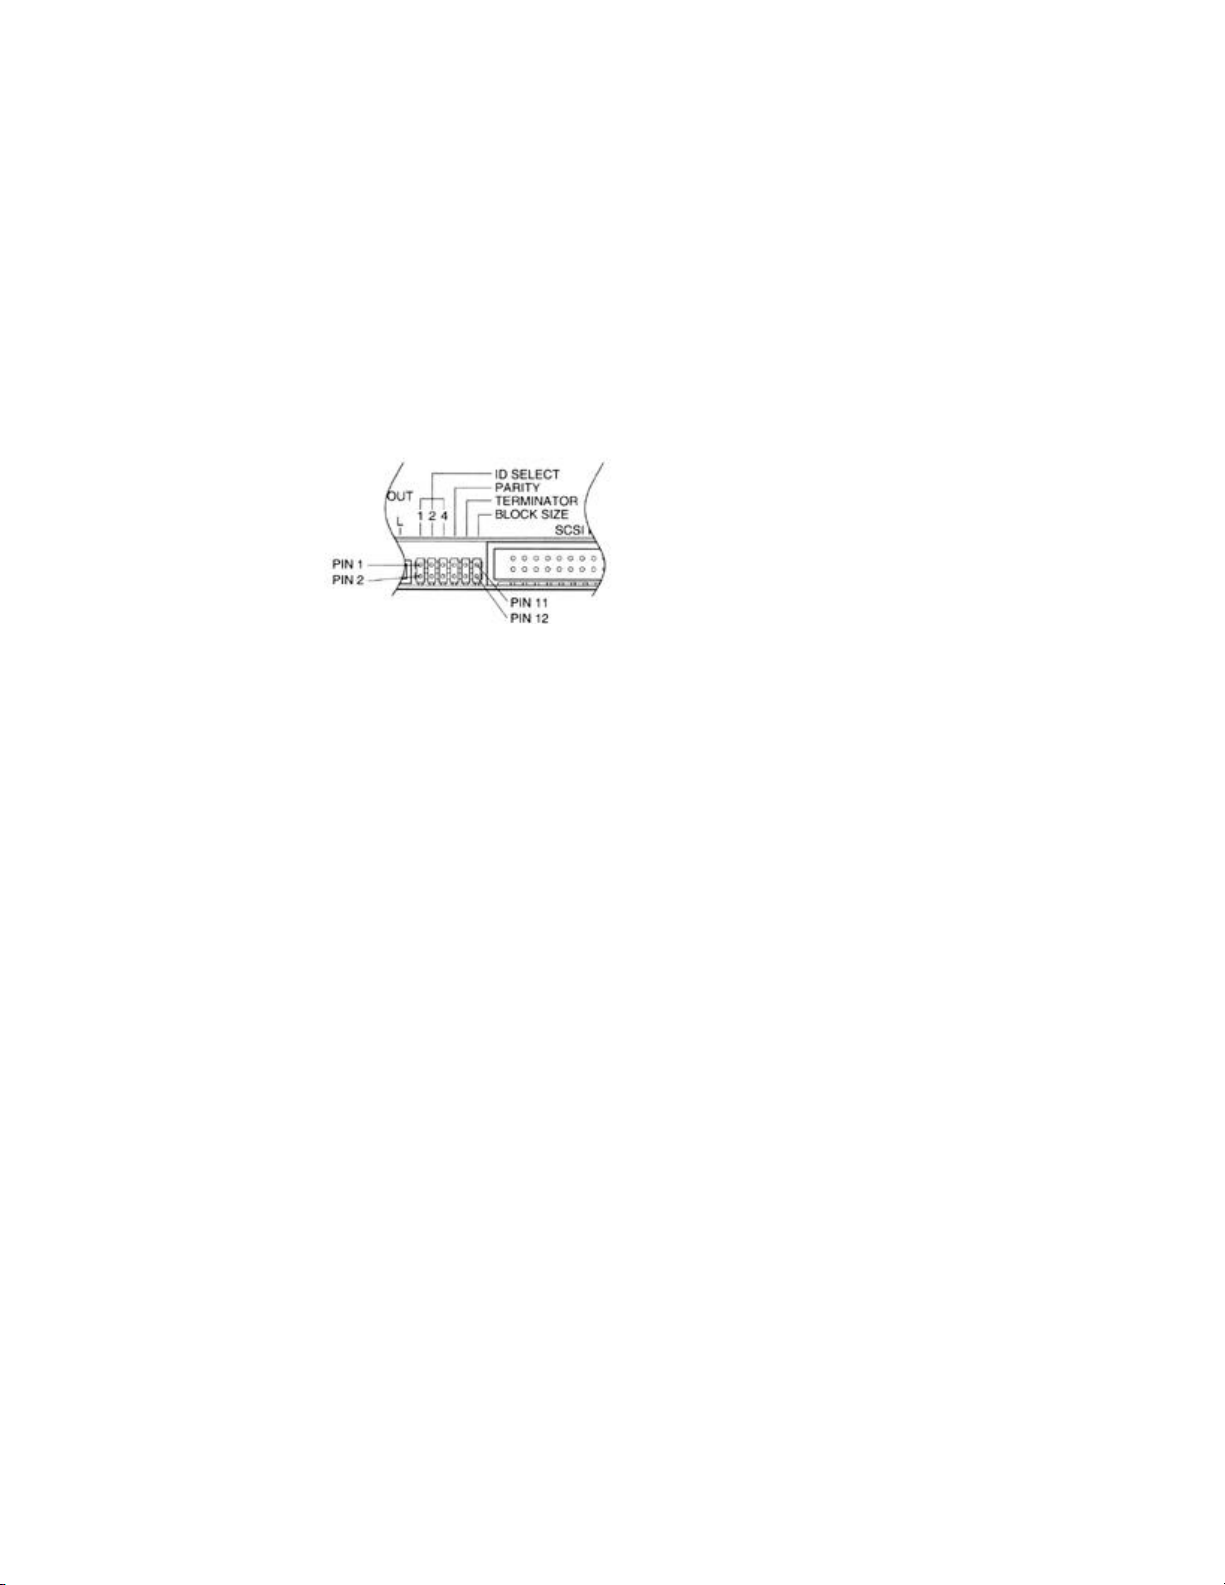
Set the CD-Recorder SCSI ID Number
Set the SCSI ID Number while referring to the SCSI device connection diagram.
The factory setting for the SCSI ID Number ID: 3. For most installations, no adjustment
of the SCSI ID number is necessary.
Note: Turn off the power before setting the SCSI ID number.
CDR Internal Model, SCSI ID setting
Setting the SCSI Terminator
Connect the SCSI Terminator while referring to the SCSI device connection diagram.
If you are connecting multiple SCSI devices and the CD-Recorder is the last device,
turn the SCSI terminator to ON.
If you are connecting the CD-Recorder between SCSI devices, set the SCSI
terminator to OFF. (The factory setting is ON.)
Page 7

7
SCSI Device Connection
D
SCSI ID: 4
SCSI Equipment (HDD)
SCSI Terminator “ON”
Diagram
SCSI ID Number
C
SCSI Card
SCSI Device (HDD)
SCSI Terminator “OFF”
SCSI ID: 1
CDR (external model)
SCSI Terminator “ON”
SCSI ID: 3
SCSI Internal Model
SCSI Terminator “OFF”
BSCSI ID: 2
A
Make sure that all the SCSI devices connected to your PC have a unique SCSI ID
number.
SCSI Terminator
Set the last device's SCSI terminator to ON. All other terminators must be set to OFF.
ex: CDR Internal Model D = "ON" C = "OFF"
ex: CDR External ModelB = "OFF" A = "ON"
Page 8

8
Check your SCSI card
Verify that your SCSI card is properly installed by clicking "Start" then select "Settings"
then click on "Control Panel". The Control Panel will open. Double click on "System"
and you will see the "System Properties" window. Select the "Device Manager" tab and
look for "SCSI controllers". Click on the "+" sign next to "SCSI Controllers". You
should see the name of your SCSI card.
IMPORTANT - If there is an exclamation mark on a yellow background you have a
device conflict - do not install your CD-R until you have resolved the conflict. To resolve
the device conflict:
• Check the Help system in software provided with the SCSI controller.
• Check the documentation provided with your SCSI controller.
• Check Windows Help by clicking "Start" then select "Help" then select the
"Index" tab. Scroll to and select the Index topic "devices, troubleshooting". Then
click "Display" and select "Troubleshooting Hardware Conflicts".
• Contact the manufacturer of the SCSI controller.
Once you have verified that your SCSI controller is correctly installed, proceed to the
installation of the CD-R.
Page 9

9
Mechanical Installation of your CD-R
The installation of a CD-R requires some mechanical skill and the ability to work inside a
computer without damaging interior components. If you are not confident in your ability
to do this work, refer the installation to a competent technician. The installation can be
accomplished with simple tools.
1. Disconnect AC power from the computer.
2. Immediately before touching any electronic components or circuit boards,
discharge static electricity from your body by first touching a metal surface on the
chassis of the computer. Always try to handle circuit boards and cards by the
edges. Avoid touching components or traces.
3. Refer to the documentation provided with your computer for instructions on
opening the computer case. Open the case according to manufacturer's
instructions.
4. Most computers will have a blank cover plate over the empty drive bay. These
plates typically snap into place although some may be secured by screws (see your
Page 10

10
computer's documentation). Remove the cover plate.
Note: The drive bays of most computers will accommodate the CD-R drive directly.
Some computers may require an accessory rail or mounting bracket. These components are
available from the computer manufacturer.
5. Slide the CD-R into the drive bay. If space is tight inside your computer, you may
wish to connect the audio output cable, the power supply cable, and the SCSI
ribbon cable before sliding the CD-R all the way into the bay.
Page 11

11
6. Connect the supplied audio cable to the audio output of the CD-R. Connect the
other end of the audio cable to your soundcard. Some sound cards may have only
one internal audio input which is probably already occupied by the audio output of
your CD-ROM drive. If this is the case, it is best to leave the CD-ROM drive
connected to the soundcard.
Note: Your CD-R will be fully functional without any connection to the soundcard – except
that you will not be able to play an audio CD on the CD-R and hear it through your
soundcard. You will be able to listen to an audio CD via the headphone jack on the CD-R.
And, of course you can still play back an audio CD on your CD-ROM drive.
7. Connect the SCSI Ribbon cable to the CD-R. Note that the CD-R has an arrow on
the right side of the SCSI connector. This arrow should point to the red line on the
SCSI cable. Connect the other end of the ribbon cable to the SCSI controller card.
8. Locate one of the DC power connectors inside your computer (a 4-pin connector
with (usually) a yellow, a red, and two black wires). Connect this cable to the
power supply input of the CD-R.
Page 12

12
9. Slide the CD-R the rest of the way into the bay and install the four 3mm mounting
screws and washers from the sides.
10. Visually inspect the computer and make sure that you have not pulled any other
cables loose, that no cables will be pinched when the case is reinstalled, and that no
wires are obstructing any cooling fans or ventilation.
11. Reinstall the cover on the PC.
12. Connect the power cable to an AC outlet, then switch on your computer. Make
sure that the LED located on the panel of the CD-Recorder is lit.
Page 13

13
Turn on your PC
Operating System recognizes the CD-Recorder
Reconnect any monitor, mouse, keyboard, and AC power cables to your PC.
1. Start your computer in the usual way.
2. Open "My Computer". You should see a new CD drive icon. Insert a CD-ROM
disc into the CD-R drive. Verify that the CD-R drive is reading the disc correctly.
In the figure below, the CD-Recorder is recognized as Drive F:
Page 14

14
Installing the
Software
DIRECT CD
1. Insert the CD-ROM into the drive (either the CRW or
CD-ROM drive).
2. Using “My Computer” or “Windows Explorer” open the disk.
Open and read any “Readme” files in the directory “DirectCD”.
3. On the Windows Taskbar click “Start”, then “Run”. Browse to
and open the directory “DirectCD” and double click on “Setup”.
Verify that the “Run” dialog box reads “[Drive Letter]:\DirectCD\
Setup.exe” and click “OK”.
4. Follow the on screen instructions to install DirectCD.
5. A dialog box will appear; “Would you like to install DirectCD’s
CD-ReWriteable (CD-RW) utilities?”. Select “Yes” and click
“Next”.
6. Click “Yes, adjust read ahead setting”.
EASY CD CREATOR
To install Easy CD Creator:
1. Insert the CD-ROM into the drive (either the CRW or CD-ROM
drive).
2. Using “My Computer” or “Windows Explorer”, open the disk.
Open and read any “Readme” files in the directory “creator”.
3. On the Windows Taskbar click “Start”, then “Run”. Browse to
and open the directory “creator” and double click on “Setup”.
Verify that the “Run” dialog box reads “[Drive Letter]:\creator\
setup.exe” and click “OK”.
4. Follow the on screen instructions to install Easy CD Creator.
Congratulations. You are now ready to make a CD. Thanks for
choosing Yamaha.
Page 15

15
Specifications
Recording modes supported Session at once, packet writing,
disc-at-once, track-at-once and
multisession
Formats supported CD-ROM, CD-ROMXA (both
photo CD and Video CD), CD-I,
CD-DIGITAL AUDIO, CD-EXTRA
and VIDEO CD (note that some
formats may require additional
software available separately)
For technical Support
Interface SCSI
Data Capacity 1.2m/sec: 666MB, 1.4m/sec: 540MB
Record/Read Speed 1xS(real-time), 2xS, 4xS, 6xS (read)
Data Transfer Rate 6xS: 900KB/sec, 4xS: 600KB/sec, 2xS:
300KB/sec, 1xS: 150KB/sec
Burst Transfer Rate 4.2MB/sec (record asynchronous),
3.4MB/sec (read asynchronous)
Data Buffer Size 2MB (500 sectors, Non-Upgradeable)
Access Speed 250ms
Installation Angle Horizontal < ± 15°
Disc Loading Disc Tray
Audio Out (Normal Speed) Frequency range: 20~20,000Hz (Line
Out) Output Level 1Vrms (Line Out)
Power Consumption 11W max. (read/write)
Power Supply 5V:2.0A max. (±5%), 12V:2.2A max.
(±10%)
Operating Environment Temperature: +5°C ~ +40°C
(read/write), Humidity: 25 ~ 80%
Dimensions 146 x 41.3 x 203mm
Weight 1.3kg
Power Supply Non-shielded two-in-one, 50p + 4p
Audio Out MOLEX 53532-04
Internet: http://www.yamaha.com/support.htm
Fax line: (714) 527-5782
Voice line: (888) 926-2426, 8:30AM to 5:00PM
Pacific Time (Monday through Friday)
Page 16

16
COMPLIANCE INFORMATION STATEMENT
(DECLARATION OF CONFORMITY PROCEDURE)
Responsible Party: Yamaha Systems Technology
Address: 100 Century Center Court
San Jose, California 95112
Telephone: (408) 467-2330
FAX: (408) 437-8791
Type of Equipment: CD Recorder
Model Name: CRW4260ti
This device complies with Part 15 of the FCC Rules.
Operation is subject to the following conditions:
1) this device may not cause harmful interference, and
2) this device must accept any interference received including interference that may cause undesired operation.
See user manual instructions of interference to radio reception is suspected.
FCC Information (USA)
1. IMPORTANT NOTICE: DO NOT MODIFY THIS UNIT!
This product, when installed as indicated in the instructions contained in this manual, meets FCC requirements.
Modifications not expressly approved by Yamaha may void your authority, granted by the FCC, to use this product.
2. IMPORTANT: When connecting this product to accessories and/or another product use only high quality shielded
cables. Cable(s) supplied with this product MUST be used. Follow all installation instructions. Failure to follow
instructions could void your FCC authorization to use this product in the USA.
3. NOTE: This product has been tested and found to comply with the requirements listed in FCC regulations, Part 15
for Class “B” digital devices. Compliance with these requirements provides a reasonable level of assurance that your use
of this product in a residential environment will not result in harmful interference with other electronic devices. This
equipment generates/uses radio frequencies and, if not installed and used according to the instructions found in this
manual, may cause interference harmful in all installations. If this product is found to be the source of the interference,
which can be determined by turning the product “OFF” and “ON”, please try to eliminate the problem by using one
of the following measures:
Relocate either this product or the device that is being affected by the interference.
Utilize power outlets that are on different branch (circuit breaker or fuse) circuits or install AC line filter(s).
In the case of radio or TV interference, relocate/reorient the antenna. If the antenna lead-in is 300 ohm ribbon lead,
change the lead-in to coaxial type cable.
If these corrective measures do not produce satisfactory results, please contact the local retailer authorized to distribute
this type of product. If you can not locate the appropriate retailer, please contact Yamaha Corporation of America,
Customer Support, 6600 Orangethorpe Ave., Buena Park, CA 90620
Laser Diode Properties
Material: GaAlAs
Wavelength: 780-790 nm
Emission Duration: Continuous
Laser Output Power: Less than 44.6 µW*
* This output is value measured at a
distance 200mm from the objective lens
surface on the optical pick-up block.
ANSI Class: Class 1
CAUTION
Use of controls or adjustments or performance of
procedures other than those specified herein may
result in hazardous radiation exposure.
CLASS 1 LASER PRODUCT
This compact disc player is classified as a CLASS 1
LASER product. The CLASS 1 LASER PRODUCT
label must be located on the exterior.
YAMAHA
Page 17

17
WARRANTY
LIMITED PARTS & LABOR
As an expression of confidence in the excellence of the design, materials and workmanship involved in all the various aspects of
bringing CRW4260 Series of CD-recordable drives to you, Yamaha Corporation of America (hereinafter referred to as
“Yamaha”) provides the following warranty. Please read the entire text in order that you may become familiar with its terms. If
you should have any questions, please contact the retailer that sold you the drive, or contact Yamaha directly.
CONDITIONS OF LIMITED WARRANTY
CRW4260 CD-RECORDABLE DRIVE
If during the one (1) year period from the date of original purchase, your CRW4260 CD-recordable drive is found on
authorized inspection to have a defect in material or workmanship, Yamaha or an authorized representative will repair such
defect without charge for parts or labor. ROUTINE MAINTENANCE WORK AND THE RESULTS OF NORMAL
WEAR ARE NOT COVERED BY THIS WARRANTY.
ELECTRONIC/ELECTRO-MECHANICAL SYSTEM
For the next one (1) year, Yamaha will replace any individual electronic component (not to be construed to include compound
parts or subassemblies), which by a competent technical entity are adjudged to be defective, without charge for parts. Parts
replaced under this portion of the warranty are warranted for the remainder of the original parts warranty or for 90 days
(whichever period is longer).
Yamaha reserves the right to utilize reconditioned subassemblies as warranty replacements in the repair of the product. In
the event Yamaha determines that the unit cannot be repaired, Yamaha will replace the defective unit with either the same
model product or one that is reasonably equivalent.
Should warranty service be required, your warranty periods will be extended by the number of days that elapse between the
date you report a defect and the date that the unit is repaired.
THIS WARRANTY IS AVAILABLE TO THE ORIGINAL PURCHASER ONLY. Please contact Yamaha directly if you
have any questions regarding the Yamaha limited warranty.
This limited warranty is applicable only in the fifty states of the USA and the District of Columbia. It is not applicable in
the possessions or territories of the USA or in any other country.
THIS LIMITED WARRANTY IS THE ONLY WARRANTY WHICH YAMAHA MAKES WITH RESPECT TO
YOUR CRW4260 SERIES CD-RECORDABLE DRIVE. YAMAHA DISCLAIMS ALL OTHER WARRANTIES
RELATING TO THE DRIVE, INCLUDING THE WARRANTIES OF MERCHANTABILITY AND FITNESS FOR A
PARTICULAR USE. THERE ARE NO WARRANTIES OTHER THAN THE EXPRESS LIMITED WARRANTY
STATED HERE. IN ANY EVENT, YAMAHA SHALL NOT BE LIABLE FOR ANY INCIDENTAL OR
CONSEQUENTIAL DAMAGES. Some states do not allow the exclusion or limitation of incidental or consequential
damages and some states do not allow limitations on how long an implied warranty may last. Therefore, the above limitations
or exclusions may not apply to you. This warranty gives you specific legal rights. You may also have other rights that vary from
state to state. In the event any of the provisions of this warranty are found by statute or by applicable administrative or judicial
entity to be unenforceable, the remaining provisions shall remain in force.
OWNER’S RESPONSIBILITIES
Please read your owner’s manuals completely. The information provided in your owner’s manuals covers installation,
operation, safety precautions and routine maintenance. This warranty does NOT cover expenses incurred due to a lack of
understanding of the functioning of the drive when it is operating as designed.
In order for Yamaha to provide proper warranty service, it is necessary that the purchaser of a CRW4260 Series CD-recordable
drive assume the following responsibilities:
1. Retain proof of purchase documents for the duration of the warranty period. You may be requested by Yamaha to provide
proof of purchase in order to receive warranty service.
2. Permit Yamaha or an authorized representative to provide the applicable warranty service during normal business hours.
EXCLUSIONS
This warranty does not cover the following:
1. Failures that are the result of improper operations, maintenance or repair.
2. Failures that result from abnormal strain, neglect, modification, accidental damage, improper installation or exposure to
extremes in temperature or relative humidity.
3. Products whose trademark, name, or identification numbers have been altered or removed.
4. Radio frequency interference generated by equipment operated in violation of applicable FCC rules.
In the event a local retailer is not available, please do not hesitate to contact Yamaha directly.
YAMAHA
Yamaha Corporation of America, 6600 Orangethorpe Avenue, P.O. Box 6600, Buena Park, CA 90622-6600
(714) 522-9011 www.yamaha.com
QSGCRW4260-rev.1.0
 Loading...