

Page 1

Page 2
(DECLARATION OF CONFORMITY PROCEDURE)
Responsible Party: Yamaha Electronics Corporation, USA.
Address: 6660 Orangethorpe Avenue
Buena Park, CA 90620
Telephone: 714-522-9105
Fax: 714-670-0108
Type of Equipment: CD Recordable/Rewritable Drive
Model Name: CRW3200
CRW3200NB
This device complies with Part 15 of the FCC Rules.
Operation is subject to the following conditions:
1) this device may not cause harmful interference, and
2) this device must accept any interference received including interference that
may cause undesired operation.
See user manual instructions if interference to radio reception is suspected.
FCC INFORMATION (U.S.A.)
1. IMPORTANT NOTICE: DO NOT MODIFY THIS UNIT!
This product, when installed as indicated in the instructions contained in this manual, meets FCC requirements.
Modifications not expressly approved by Yamaha may void your authority, granted by the FCC, to use the product.
2. IMPORTANT: When connecting this product to accessories and/or another product use only high quality shielded cables.
Cable/s supplied with this product MUST be used. Follow all installation instructions. Failure to follow instructions could void
your FCC authorization to use this product in the USA.
3. NOTE: This product has been tested and found to comply with the requirements listed in FCC Regulations, Part 15 for Class
“B” digital devices. Compliance with these requirements provides a reasonable level of assurance that your use of this product
in a residential environment will not result in harmful interference with other electronic devices. This equipment generates/uses
radio frequencies and, if not installed and used according to the instructions found in the users manual, may cause
interference harmful to the operation of other electronic devices. Compliance with FCC regulations does not guarantee that
interference will not occur in all installations. If this product is found to be the source of interference, which can be determined
by turning the product “OFF” and “ON”, please try to eliminate the problem by using one of the following measures:
Relocate either this product or the device that is being affected by the interference.
Utilize power outlets that are on different branch (circuit breaker or fuse) circuits or install AC line filter/s.
In the case of radio or TV interference, relocate/reorient the antenna. If the antenna lead-in is 300 ohm ribbon lead, change
the lead-in to coaxial type cable.
If these corrective measures do not produce satisfactory results, please contact the local retailer authorized to distribute this
type of product. If you can not locate the appropriate retailer, please contact Yamaha Electronics Corporation, USA.
6660 Orangethorpe Avenue, Buena Park, CA 90620 U.S.A.
Page 3

Laser Product Class: Class 1
Laser Diode Properties
Wavelength: 780 – 787 nm
Pulse Durations and Max. Output
at the lens of the Laser Pickup Unit
Read Mode: 0.85 mW (Continuous)
Write Mode: Max. 48 mW
(for 212 ns, Min. Cycle 57.9 ns)
Laserprodukt-Klasse: Klasse 1
Eigenschaften der Laserdiode
Wellenlänge: 780 – 787 nm
Impulsdauer und max. Ausgang an der Linse der
Laser-Abtasteinheit
Lesemodus: 0,85 mW (kontinuierlich)
Schreibmodus: Max. 48 mW
(für 212 ns, Zyklusmin. 57,9 ns)
Classe du produit laser: Classe 1
Caractéristiques de la diode laser
Longueur d’onde: 780 – 787 nm
Durée des impulsions et sortie maximum depuis
la lentille du bloc capteur optique
Mode de lecture: 0,85 mW (continue)
Mode de gravure: max. 48 mW
(pour 212 ns, cycle min. 57,9 ns)
Clase de producto láser: Clase 1
Propiedades del diodo láser
Longitud de onda: 780 – 787 nm
Duración del pulso y potencia de salida máxima
en el objetivo de la unidad captora láser
Modo de lectura: 0,85 mW (continua)
Modo de escritura: máx. 48 mW
(para 212 ns, ciclo mínimo 57,9 ns)
CLASS 1 LASER PRODUCT
LASER KLASSE 1 PRODUKT
LUOKAN 1 LASERLAITE
KLASS 1 LASER APPARAT
PRODUIT LASER DE CLASSE 1
CAUTION
Use of controls or adjustments or performance of
procedures other than those specified herein may result
in hazardous radiation exposure.
ACHTUNG
Halten Sie sich beim Bedienen und Einstellen der
Bedienungselemente sowie bei der Bedienungsabfolge
an die Anleitung, da sonst gefährliche Strahlen austreten
können.
ATTENTION
L’emploi de commandes, de réglages ou un choix de
procédures différents des spécifications de cette
brochure peut entraîner une exposition à d’éventuelles
radiations pouvant être dangereuses.
PRECAUCION
El usar los controles o ajustar o realizar procedimientos
diferentes a los especificados aquí resultará en
peligrosas exposiciones a la radiación.
VARO! AVATTAESSA JA SUOJALUKITUS OHITETTAESSA
OLET ALTTINA NÄKYMÄTTÖMÄLLE
LASERSÄTEILYLLE. ÄLÄ KATSO SÄTEESEEN.
VARNING! OSYNLIG LASERSTRÅLNING NÄR DENNA DEL ÄR
ÖPPNAD OCH SPÄRREN ÄR URKOPPLAD.
BETRAKTA EJ STRÅLEN. STRÅLEN ÄR FARLIG.
CAUTION - VISIBLE AND / OR INVISIBLE LASER RADIATION WHEN OPEN.
AVOID EXPOSURE TO BEAM.
VARNING - SYNLIG OCH / ELLER OSYNLIG LASERSTRÅLNING NÄR DENNA
DEL ÄR ÖPPNAD. STRÅLEN ÄR FARLIG.
VARO ! AVATTAESSA OLET ALTTIINA NÄKYVÄLLE JA / TAI
NÄKYMÄTÖMÄLLE LASERSÄTEILYLLE. ÄLÄ KATSO SÄTEESEEN.
VARNING - SYNLIG OCH / ELLER OSYNLIG LASERSTRÅLNING NÄR DENNA DEL
ÄR ÖPPNAD. BETRAKTA EJ STRÅLEN.
VORSICHT ! SICHTBARE UND / ODER UNSICHTBARE LASERSTRAHLUNG
WENN ABDECKUNG GEÖFFNET. NICHT DEM STRAHL AUSSETZEN.
ATTENTION - RADIATION VISIBLE ET / OU INVISIBLE LORSQUE L’APPAREIL
EST OUVERT. EVITEZ TOUTE EXPOSITION AU FAISCEAU.
DANGER - VISIBLE AND / OR INVISIBLE LASER
RADIATION WHEN OPEN. AVOID DIRECT EXPOSURE
TO BEAM.
COMPLIES WITH 21 CFR CHAPTER 1, SUBCHAPTER J.
Page 4
English
OWNER’S MANUAL
i
Page 5
SAFETY PRECAUTIONS
PLEASE READ THE FOLLOWING WARNINGS AND CAUTIONS CAREFULLY
TO PREVENT PERSONAL INJURY AND DAMAGE TO THE DEVICE.
These precautions explain how to use the device properly and safely, thereby
preventing injury to yourself and others. This section has been sub-divided into a
WARNING section and a CAUTION section, according to the likelihood and nature
of any potential injuries or damage inflicted. They relate to your personal safety,
and also help you prevent the risk of damage to the device. Please read these
sections carefully prior to procee ding .
WARNING
Always follow these basic precautions to avoid short-circuit, damage, fire, or
other hazards, and to avoid serious injury or fatal accident from electrical shock.
●
Do not attempt to open or disa ss emble the device to a vo id th e risk of e lec trical
shock, fire, or malfunction.
●
Do not look directly at the laser source to avoid the risk of eye damage or
blindness.
●
Do not insert fingers or foreign objects into the device to avoid the risk of
electrical shock, fire, malfunction, or personal injury.
ii
●
Do not expos e the d ev ice to high humidity or place liquid containers su ch a s a
flower vase on the device to avoid the risk of electrical shock, fire, or
malfunction.
●
Do not expose the device to temperature outside the range 5 – 40 °C (41 – 104
°F) to avoid the risk of fire, deform ation o f the d e vice pa ne l, or malfunction.
●
Do not expose the device to du sty place to avoid the risk of fire or malfunction.
●
Always follow the owner's manual to set up or connect the devices properly to
avoid the risk of electrical shock, fire, malfunction, or personal injury.
●
If unusual smells, sounds or smoke come from the device, or if foreign objects
such as liquid get into the device, turn off and unplug the computer immediately
to avoid the risk of electrical shock, fire, or malfunction. Contact the store of
purchase or your nearest Yamaha dealer (listed at the back of this manual).
Page 6
●
Be sure that the computer is electrically grounded to avoid the risk of electrical
shock.
●
Prior to cleaning the drive, always unplug the computer or do not handle the plug
with wet hands to avoid the risk of electrical shock.
CAUTION
Always follow these ba sic precau tions to av oid phys ical injury to yourse lf or
others, and damage to the device or other property.
●
Always unplug the c omputer if it will not be used for a prolonge d period of time
or if there is possibility of lightning, to avoid the risk of electrical shock, fire, or
short-circuit.
●
Do not use the device near other electrical appliances such as televisions, radios,
or speakers to avoid the risk o f in terf er ences between ea ch other.
●
Do not place the computer unstably to avoid the risk of malfunction or personal
injury by its falling down.
●
Do not place th e device with a pos sibility of excessive vibration to avoid t h e risk
of damage to written data or malfunction.
●
Place the device horizontally to avoid the risk of d amage to written d a ta.
●
Prior to transp o rting th e device, remove the disc from the disc tray to a void the
risk of damage to written data.
●
Use soft, dry cloths to wipe the device. Do not use benzene, paint thinner,
detergents, or chemically treated wiped cloths, and do not place vinyl, plastic, or
rubber objects on the device to avoid the risk of malfunction or damage to
surface of the device.
●
Do not rest your weight on or place heavy objects on the device, and do not apply
excessive force to the buttons, switches, or connectors to avoid the risk of
damage to the device or personal injury.
●
Do not listen to audio with headphones at high volume for prolonged pe riod of
time to avoid auditory disorder.
iii
Page 7

●
Prior to turning on the c omputer, always minim ize th e vo lu me to avoid auditory disorder
by a sudde n b urst of sound at high volume.
●
Do not place th e device near magn et s o r anything magnetized su ch as a display to avoid
the risk of interferences between each other.
●
Have the device serviced regularly to avoid internal dust buildup that can cause
malfunction, damage or fire. For service information and service charges, contact the
store of purchase or your nearest Yamaha dealer (listed at the back of this manual).
●
This drive is for use only with movable equipment, weighing less than 18 kg.
WARRANTY
YAMAHA AND ITS SUPPLIERS ACCEPT NO LIABILITY FOR ANY PROBLEMS THAT OCCUR
AS A RESULT OF ANY OPERATIONS CARRIED OUT OTHER THAN THOSE STATED IN THE
MANUAL THAT COMES WITH THIS PRODUCT, OR THE LOSS OR THE DAMAGE OF ANY
DATA CAUSED AS A RESULT OF USING THIS PRODUCT.
Precautions for Transportation
Transporting the device unfixed may damage its internal mechanism or circuits.
• Remove the disc from the disc tray of the device.
• Put the device in the o riginal bo x.
Prior to use, check that the complete accessories are included. (Refer to the original box.)
To reduce power consumption of the CRW3200E drive, set your computer to power saving
mode. (P. 36)
©2001 YAMAHA CORPORATION . A ll Rights Reserved.
This document may not, in whole or in part, be copied, photo c opied, reproduced,
translated, transm itted, or reduced to any electronic medium of machine readabl e form
without prior consent in writing from Yamaha.
Windows is a registered trademark of Microsoft Corporation.
SafeBurn™ is a trademark of Yamaha Corporation.
All other trademarks are the property of their respective companies.
iv
Page 8

Table of Contents
Features of the CRW3200E Drive .................................................1
Names and Functions of Parts.....................................................2
Front Panel...............................................................................................2
Rear Panel................................................................................................3
Precautions on Use.................................................................. 4
Handling Discs ........................................................................................4
Copyright.................................................................................................4
Disclaimer of Indemnity..........................................................................4
Useable discs ...........................................................................................5
System Requirements..............................................................................7
Preparing the CRW3200E Drive ................................................... 8
Serial Number..........................................................................................8
1 Decide the Installation Method............................................................9
2 Set the Jumper Switch .......................................................................14
3 Install the CRW3200E Drive.............................................................16
4 Check Recognition of the CRW3200E Drive....................................22
5 Install CD Writing Software..............................................................25
Loading/Ejecting a Disc ...........................................................26
Troubleshooting.....................................................................28
Firmware.............................................................................34
CRW3200E Drive Specifications .................................................35
Technical Notes.....................................................................38
Buffer Underrun Protection Function....................................................38
Writing Methods....................................................................................38
For details about how to install and use the CD writing software, refer to the
documentation that comes with it.
• The information contained in th is manual is subject to ch ange without prior notice.
• Reproduction of this manual, either in part or in full, is expressly forbidden.
v
Page 9
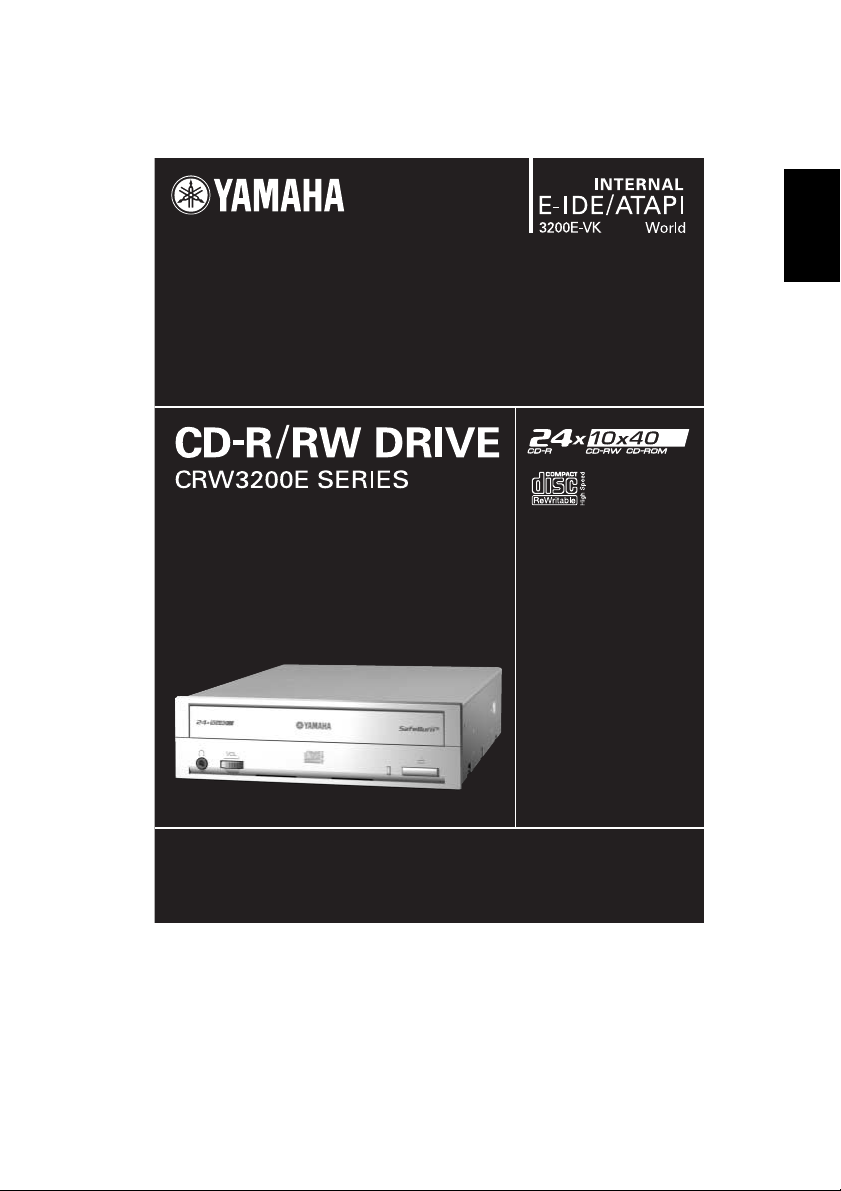
Features of the CRW3200E Drive
High speed writing/reading
The CR W32 00E d rive sup ports up to 24X -speed writing f or CD -R discs, a nd up
to 10X-s p e e d writing/rewriting f o r CD-RW d iscs. In addition, th e drive
supports data reading a nd digital audio d a ta e x tr a c tio n at up to 40X speed.
Tip
• The Partial CAV method permits 24X-speed writing for CD-R discs.
• The CLV method and the 4X – 10X Full CAV method permit 10X-speed writing/
rewriting for CD-RW discs.
SafeBurn™ (Enhance d stab ility writing technology)
The generous 8MB buffer memory provides sufficient data storage to enable
stable disc writing at hig h speeds. Even if data transfer from the computer is
interrupted , the Buffer Und e rrun Protection f unction is activate d to save CD -R
discs from a writing error. (P. 38)
“Optimum Write Speed Con tr o l” adjusts the writing speed to the optimum r a te
for every C D-R disc auto matically. You c a n se t th e maximum writing speed
with you r CD writing software.
Note
• Optimum Write Speed Control can be activated when the maximum writing
speed is set at 12X or more.
• The minimum writing speed to be automa tical ly se lecte d i s 8X. Ma nu ally se t the
optimum writing speed if a writing speed supported by a disc is less than 8X.
High fidelity digital audio
The CRW3200E drive supports extraction of digital audio data at up to 40X
speed us ing CD writing software, a s well as recording digital audio with high
fidelity eve n at 24X-spe e d writing. For h igher quality audio, the CR W3200E
drive provides a digital audio output jack which can be connected to the sound
card with an SPDIF (digital audio) in p ut jack, if your c o mputer has one
installed, w ith a n optional digita l a u dio cable.
Audio Master Quality Recording (High quality aud io writing m ode )
Audio Master Quality Recording enables you to create high quality audio CDs.
This mode is availabl e for CD-R discs with a capacity of 650 MB and 7 0 0 MB.
(P. 40)
Note
Audio CDs that are c re a te d with Audio Master Quality Recording may not be
played back on certain audio recorders and CD-R/RW drives.
CD-MRW (CD Mount Ra inier ReWriting)
CD-M RW is a new standa rd of pac ket w riting. Co mpa red to the ordinar y pack et
writing, C D-MRW provides many usefu l fu n c tions such as background
formattin g . (P . 4 0)
1
Page 10
Names and Functions of Parts
Front Panel
➀➂
➃➄
Disc tray
➀
Holds the disc. It is opened or closed by
pressing the eject button. (P. 26)
Manual eject hole
➁
Forcibly o p e ns the disc tray w h e n th e
tray cannot be opened by pressing the
eject button. (P. 27)
Eject button
➂
Press to open or close the disc tray.
(P. 26)
Headphone jack
➃
Connects headphones or external
speakers to the drive; has stereo minijack specifications.
Headphone volume dial
➄
Controls the volume of the headphon es.
The volume increases as the dial is turned
to the right.
➁
➅
LED
➅
Indicates the operational status of the
CRW3200E drive by its colors and
blinking pa tterns.
Lights or blinks blue
• Lights: Standby (with disc)
• Blinks: Opening/Closing disc tray, or
reading disc information (TOC)
• Blinks rapidly: Playba c k au dio
• Blinks irregularly: Read in g da ta
Lights or blinks purple
• Lights: Standby (no disc) or the disc tray
is open
• Blinks: Accessing for writing or test
writing
• Blinks rapidly: Writing
Blinks orange
• Malfunction
Off
• Power saving (operated via computer
setting)
2
Page 11
Names and Functions of Parts
Rear Panel
➁➀➂ ➃ ➄
DIGITAL AUDIO OUT
➀
Connects to the sound card in the
computer if the sound card has an SPDIF
(digital audio) input jack using an
optional digita l au dio cab le. (P . 20 )
ANALOG AUDIO OUT
➁
Connects to the sound card in the
computer using the included audio cable.
(P. 19)
Jumper switch
➂
Insert a plastic shunt into the switch to
set the con nection of th e IDE to m aster o r
slave. The switch is set at slave by
default. (P. 14)
IDE INTERFACE CONNECTOR
➃
Connects the included 40-pin IDE cable.
(P. 17)
DC INPUT
➄
Conne cts th e 4-pin internal p o wer cable
of the computer. (P. 21)
3
Page 12

Precautions on Use
Handling Discs
To avoid trouble, such as writing error s, loss of record e d d a ta , a nd malfunc tion
of the driv e, ta k e the following pr e ca utions when ha ndling discs.
• Do not place discs in a hot or damp place or w here they will be exposed to
direct sunlight.
• Do n ot touch the dis c su r f a c e. Hold the disc b y the edge whe n handling it.
• Remove du st and d irt from the disc surface. Use an air spray to remov e dust.
The disc surface may be scratched if strongly wiped with a dry cloth.
• Do not stick labels to the disc surface or write anything on it except where
designated.
• Do not clean discs with chemicals or detergents.
• Do not ben d o r drop discs.
Copyright
It is prohibited by law to duplicate copyright material for non-personal use
without th e prior consent of the copyright holder. W h e n copying material with
your C D - R/RW driv e , ta k e d ue care not to in f r in ge the copyright.
Disclaimer of Indemnity
• Yam a ha assumes no lia b ility for the loss of any profits incurred a s a result of
the loss or c orruption of d a ta written on a CD-R or CD-RW, for any loss or
damage caused by or arising out of extraordinary circumstances (including
circumstances that Yamaha has foreseen or could foresee), nor for any
damages incurred or claimed by a third party.
• After h a n dling importa nt data, make a c omparison b e tween the orig inal and
the copied data (to confirm that the data has been copied properly).
• In no event shall Yam aha b e liable for any dam age to discs due to a Buffer
Under ru n Error (P. 38) o r f o r a n y other reaso n, or the inability to use
distributed discs with your drive.
• Yamaha assumes no liability for the inability to write/playback discs because
of their format.
4
Page 13
Precautions on Use
Useable discs
Discs that can be written on
The CRW3200E drive can w rite o n the followin g discs.
For the lates t inform atio n abo ut d iscs prev iously che cked for co mp atibility w ith
the drive, refer to the YAMAHA CD-R/RW Drive website URL:
http://www.yamaha.co.jp/english/product/computer/
CD-R discs
• The CRW3 200E drive ca n write at 1X, 2X, 4X , 8X, 12X, 16X or 24X speed.
• CD-R discs can be played back on a CD-ROM drive or a CD player.
Note
• 24X-speed writing is enabled with Partial CAV method. (P. 6)
• Check the writing speeds your disc supports prior to wr iting.
CD-RW discs
• The CRW3200E drive can write/rewrite at 2X or 4X speed.
• CD-RW discs can be read/played back on a device (e.g. CD-ROM drive)
that supports “CD-RW” discs.
Note
Some discs support only 2X speed.
High Speed CD-RW discs
• The CRW3200E drive can write/rewrite at 4X, 8X or 10X speed.
• High Speed CD-RW discs can be read/played back on a CD-RW drive
that bears the High Speed CD-RW logo or a device (e.g. CD-ROM drive)
that supports “CD-RW” discs.
Note
• When using the packet writin g me thod (P. 40) for writing/rewriting onto High
Speed CD-RW discs, you can select the 4X – 10X Full CAV method. For more
information refer to the documentation that comes with your CD writing
software. (Your CD writing software must support the Full CAV method, as
does the CD Writing software that comes with the CRW3200E drive.)
• The Full CAV method is recommended when opening and editing a file on a
CD-RW disc with an application.
• In order to write, erase, read or play back High Speed CD-RW discs, use a CDR/RW drive that bear s th e Hi g h Spe ed CD-RW logo. When using a CD- RO M
drive to read/play back High Speed CD-RW discs, use a dri ve that supports
CD-RW discs.
If these discs are used with a CD-R/RW drive not bearing the High Speed CDRW logo, the discs may not be recognized, resulting in a computer not
operating properly or other malfunctions occurring.
Refer to the YAMAHA website below prior to attempting to read/play back
these discs on a YAMAHA CD-R/RW drive not bearing t he High Speed CDRW logo.
URL: http://www.yamaha.co.jp/english/product/computer/
5
Page 14
Partial CAV (Constant Angular Velocity)
The CLV (Constant Linear Velocity) method is generally used to write data on a
CD-R disc. In writing using the CLV method, the disc rotation speed is adjusted to
keep the data writing speed (data transfer rate) constant on all parts of the disc.
In contrast, the CAV (Constant Angular Velocity) method exercises control so as to
keep the disc rotation speed constant. Since the CAV method makes it possible to
substantially increase the maximum data transfer rate without straining of the drive,
it is adopted today for most CD-ROM drives.
CD formats define the constant linear density of written data so that the amount of
written data per disc rotation wil l in crea se as th e writin g po int moves from the inner
track to the outer track.
With the CAV method, therefore, data is transferre d at a higher rate when it is
written on the outer tracks of the disc. To achieve 24X-speed writing, the
CRW3200E drive employs the Partial CAV method, which is a combination of the
CAV method for inner tracks and the CLV method for ou ter tracks.
The Partial CAV method controls the disc rotation speed so that the CRW3200E
drive starts writing at 18X speed on inner tracks, increasing the speed to 24X as the
read/write head moves outward and holds the speed at 24X on outer tracks.
Tip
The CRW3200E drive supports 8cm discs.
Note
Use only circular discs. Do not use any irregular shaped discs such as heart-shap ed
or star-shaped discs to avoid the risk of ma lfunction.
6
Page 15

Precautions on Use
System Requirements
The CRW320 0E d rive is designed to operate in the following computer
environment. If your computer does not meet these requirements, the
CRW3200 E drive m ay not write at the maximum speed.
Computer (PC/AT compatible)
• CPU : Pentium II-class or higher, 300 MHz or faster
• RAM: 32MB (64MB or more is recommended)
64 MB or more is required (128 MB is recommended ) for Windows 2000
Professional, while 128 MB or more is required (256 MB is recommended)
for Windows XP.
• An empty 5 ¼-inch drive bay (for installing the CRW 3 200 E drive as an
additional drive into the c o mputer)
• Hard drive space
Writing d ata on a CD -R /RW disc re quires 50M B to 100 M B o f free spa ce as a
working area on the hard drive. When writing d a ta on a CD-R/RW disc a f te r
creating an image file, there must be enough free space on the hard drive to
store the image file in ad dition to the wo rking area (a tota l o f up to 900M B ) .
However, hard drive space for image files is not required when directly
writing o n to a CD-R/R W disc from a hard drive or CD-ROM u sing the
CRW 3200E driv e (o n - th e - fl y writing).
Image file
You can collect the data files to be written on a CD-R/RW disc into a singl e image
file.
The image file is useful for writing the same data onto multiple discs. For details,
refer to the documentation that comes with the CD writing software.
Operating system (OS)
Windo ws 95 (OSR 2 or later), Windows 98, Windows 9 8 Second Editio n,
Windows Me, Windows 200 0 P ro fession al, or Windows XP.
CD writing so ftw a re
The CRW3200E drive require s CD writing software to w rite o nt o a CD-R/RW
disc. The CD writing so f tware is included. If using other CD writing software,
be sure th a t the CD writing so f tware supports th e C RW3200 E drive.
For details a bout installing and using the C D writing software, refer to th e
docume n ta tion that come s with the CD writing software.
7
Page 16

Preparing the CRW3200E Drive
Preparing tools
• Phillip s screwdriver : Use the proper screwdriver
for the screws to install the C RW3200 E drive into
the computer.
• Narrow pliers: Insert and remove the included
plastic shun t for the jumper switch.
Serial Number
The seria l number is prin te d on the label on th e top of your CRW3200 E drive.
When you have a question about the drive, or need user support services, the
serial number is required.
Please write the serial num ber do wn in the space below p rior to installing the
CRW 3 200E drive into your com puter. It will be d if f ic u lt to check the s e ria l
numbe r after ins tallatio n.
Serial Number
Serial number
(10 characters: 3 letters +
7 numbers)
8
Page 17

Preparing the CRW3200E Drive
The following describe s how to install th e C RW3200 E drive on the c o mputer
by taking a tower-type computer for exam ple.
Note
The methods of removing the computer cover or panels and installing an internal
device vary depending on the computer model. Refe r to the documentation that
comes with the computer.
1 Decide the Installation Method
Check the connection of any IDE device installed to decide the installation
method of the CRW3200E drive.
Note
• The CRW3200E drive supports Ultra ATA/33 . Even if the motherboard and the
hard drive support Ultra ATA/66 or Ultr a ATA/100, they are operated by Ultra
ATA/33 as long as they are connected to the CRW3200E drive by the same IDE
cable or the included 40-pi n IDE cable.
• Install the CRW3200E drive horizontally.
Turn off and unplug the computer.
1
While th e computer is tu r n e d on, it is dange r ous to handle th e in te r n a l
computer devices due to the risk of an electrical shock. There is also a risk
of damaging the CRW3200E drive, the computer, etc. Be sure to unplug
the computer prior to h a n dling any intern a l computer de vice.
Remove all peripheral devices and cables connected to the
2
computer prior to removing the computer cover.
Clothes and body can become charged with static electricity.
Discharg e any static electri city by touchin g a metallic part of the case or
power unit.
For mo re information, re f er to the docum e ntation that comes with the
computer.
9
Page 18

Installing the CRW3200E drive as an additional drive
Check the IDE channel (primary/secondary and master/slave) connecting the
CRW3200E drive. (P. 12 – 13)
CRW3200E
Note
An empty 5 ¼-inch dr ive bay is required to install the CRW3200E drive.
Replacing an existing IDE device with the CRW 3 200E drive
Connect th e CR W 32 00E driv e to the cable tha t wa s prev iously con necte d to th e
existing ID E device.
CD-ROM drive, etc.
CRW3200E
Note
When replacing a SCSI device, such as a SCSI type CD-ROM drive, do not connect
the CRW3200E drive to the cable that was previously connected to that SCSI
device. Use the included 40 -pin IDE cable to connect the CRW3200E drive to the
computer.
10
Page 19

Preparing the CRW3200E Drive
Examples of connecting the CR W 32 00E d rive
The following describes how to connect the CRW3 20 0E d rive for exam ple
recommended by Yamaha.
Example 1: As a seco nd ary slave (For ad ditional d rive)
Hard drive (master)
IDE cable (primary) IDE cable (secondary)
CD-ROM drive,
etc. (master)
CRW3200E
drive (slave)
Example 2: As a seco ndary master (For replacing the existing drive with the
CRW3200E drive)
Hard drive (master)
IDE cable (primary) IDE cable (secondary)
CRW3200E
drive (master)
For the best performance of the CRW3200E drive, Yam aha recommends
that the drive be connected as the sole secondary master.
11
Page 20

Note
• The CRW3200E drive is set at slave by default. If you connect the drive as the
sole secondary master, set the dri ve t o master.
• If you connect an IDE device solely to an IDE cable, set the device to master and
connect the drive to the end of the cable.
• If you start up the operating system from a SCSI hard drive, etc., there may be no
IDE device connected to the pri mary. In such a case, Yamaha recommends that
the CRW3200E drive be connected as the primary master.
• You may find that the IDE cable has one connector when you try to connect the
removed device to another connector. In such a case, you are required to prepare
an IDE cable with two connectors.
• You may have to change the master/slave setting to connect the removed device
to another connector. For more details, refer to the documentation that comes
with the device or refer to the manufacturer’s website.
E-IDE
E-IDE (Enhanced-IDE) is a standard for connecting computers to IDE devices such
as hard discs, CD-ROMs and CD-R/RW drives. Most computers have two IDE
connectors (primary and secondary). Each connector can be connected to two
devices with an IDE cable.
Two IDE devices connected by one IDE cable are called “master” and “slave.”
Secondary
Master
Slave
MasterMotherboard Primary
Slave
Continued on next page
12
Page 21

Preparing the CRW3200E Drive
The setting methods for most IDE devices are as follows.
• Hard drive: Change the setting with the jumper switch on the circuit board on
the rear panel or the hard drive bottom panel. You have to set the cable select
(CSEL) on some hard drives.
• CD-ROMs, etc.: Change the setting with the jumper switch on the rear panel.
Note
• When you use the IDE device as a mast er, connect the device to the connector at
the end of the IDE cable, or when yo u use the device as a slave, connect the
device to the middle of the cable.
• When you connect two IDE d evices to one IDE cable, assign each as mast er or
slave respectively. The CRW3200E drive is set at slave by default.
13
Page 22

2 Set the Jumper Switch
Refer to the examples of connecting the CRW3200E drive on page 11, and set
the CRW3200E drive to master /sla v e to support your c omputer environment.
Use narrow pliers to set the plastic shunt at the jumper
switch on the rear panel.
The position into which the plastic shunt is inserted varie s due to the
settings.
Master Slave
(by default)
The CRW3200E drive is set at slave by default.
When replacing an IDE device (master) with the CRW 3200E drive,
set the drive to master.
Continued on next page
14
Page 23

Preparing the CRW3200E Drive
Note
• The function of a plastic sh unt is to electrically connect the jumper switch
contacts. Inserting and removing the pin turn the settings on and off.
• Be sure to turn off the computer prior to setting the jumper switch.
Cable Select (CSEL)
If your computer supports a cable select function, insert a plastic shunt into the cable
select (CSEL) jumper switch so that the computer will automatically adjust the
CRW3200E drive setting to master or slave.
If you have any problems with the CRW3200E drive when set to cable select
(CSEL), set the drive to master or slave.
Refer to the documentation that comes with your computer to find out if it supports
cable select (CSEL) function.
15
Page 24

3 Install the CRW3200E Drive
The following describes h ow to install the CRW320 0E drive as an a d d itio nal
drive for example.
Secure the installation location.
1
Installing the CRW3200 E d rive a s an ad ditional drive
Remove the front cover from the 5 ¼-inch drive bay.
Replacing
Remove all cables co nnected to the C D-ROM or other devic e s to be
replaced. Then remove the device itself from the computer.
Audio cable
IDE cable 4-pin internal
power cable
Note
• Be careful not to damage the various cables connected to the rear panel of
the CD-ROM drive.
• The audio cable is usually caught by the hook at the top of the connector.
Release the hook and remove the connector without using excessive force.
• Do not apply excessive force to the CD-ROM drive or cables.
• Hold the cable by the connector to remov e the cable. Pu lling the cable itself
with excessive force ma y damage the wires inside.
16
Page 25

Preparing the CRW3200E Drive
1
Install the CRW3200E drive carefully into the drive bay
2
and temporarily fasten the screws by hand.
Be sure that there is enough space to connect the 4-pin internal power
cable, 40 -pin ID E cab le, an d audio cable prior to temp orarily fasten ing the
included f our screws to th e f ixe d p o s itio n.
Note
Do not apply excessive fo rce to the CRW3200E drive.
Connect the included 40-pin IDE cable.
3
Connect the included 40-pin IDE cable to the IDE conn ector on the
motherboard and the IDE interface connector on the rear panel of the
CRW 3200E drive . Be sure that the c o lored wire is c onnected to th e firs t
pin of the IDE connector, as shown in the diagram below.
Install the CRW3200E drive
carefully into the drive bay fro m
the front
Motherboard
IDE connector
40-pin IDE
cable provided
Colored wire
Colored wire
17
IDE interface
connector
Page 26

Note
• IDE devices supporting Ultra ATA/66 or Ultra ATA/100 do not operate
with the included 40-pin IDE cable. P re pare proper IDE cables for those
IDE devices.
• You can use an IDE cable that sup ports Ultra ATA/66 to connect to the
CRW3200E drive.
• Use an IDE cable no longer than 45.7 cm (18 in.).
• When two IDE devices are connected to one IDE cable, be sure to assign
each as master/slave respecti vely.
Connect an audio cable if necessary.
4
The sound card of the computer enables you to listen to audio CDs played
back on the CRW3200E d rive. There are two m ethods to connect the
CRW3200E drive and the sound card: analog connection and digital
connection.
Audio CD playback
• Audio is available from the headphones or sp eakers connected to the
headph one jack on the f ro n t panel of the CRW3200E drive (this is
convenient for the computer without a sound card). In such a case,
connecting an audio cable is not required.
• An a udio cable is no t r e q uired to extract an image file from an au dio
CD since data is transferred via the IDE cable.
• If the CRW320 0 E drive is installe d as an addition a l d r ive and the CDROM drive or DVD-ROM drive is already connected to the sound card,
Yamaha recomm ends that audio C D s be p layed back b y the existing
drive.
Continued on next page
18
Page 27

Preparing the CRW3200E Drive
Analog connection
Connect one end of the included audio cable (the end with one connector)
to the analog audio output jack on the rear panel of the CRW3200E drive.
Be sure that the connector is in the correct direction prior to connecting it.
There are two types of connectors at the other end of the audio cable.
Select the one that fits the sound card: Vertical connector (PH) and
Horizontal connector (MPC).
Check the direction of the connector vertically and horizontally prior to
connecting it to the sound card. (Only use one of the two conn ectors, and
leave the other free.)
Analog audio
output jack
Left channel (L)
Ground (G)
Right channel (R)
Audio cable
(included)
19
Vertical connector (PH)
Horizontal
connector
(MPC)
Sound card
Audio input
jack
Note
• Some sound cards have more than one audio input jack, including those
which do not support the specification of th e C RW3200E drive.
• If you cannot hear playback audio from the speakers, refer to the
documentation that comes with the sound card.
Page 28

Digital connection
Digital co nnection enable s you to enjoy higher quality a u dio with less
distortion since the digital signals recorded on the audio CD are output to
the sound card with high f ide lity.
Conne ct the digital audio output jack of the CRW320 0E drive and the
SPDIF ( dig i t al a u dio) input jack o f the sound card with a digital audio
cable. Be sure that the connector is in the correct dire c tion prior to
connectin g it.
Digital audio
output jack
Ground (G)
Signal (D)
Digital audio cable (optional)
Sound card
SPDIF
Note
A digital audio cable with a proper connector and a sound card with an SPDIF
(digital audio) input jack are required.
20
Page 29

Preparing the CRW3200E Drive
Connect the 4-pin internal power cable of the computer
5
(+12V and +5V) to the power co nnector on the rear p anel of
the CRW3200E drive.
Top
Bottom
Note
The 4-pin internal power cable cannot be connected if it is upside down. If the
connector does not connect easil y, check that it is in the correct direction .
Tighten four screws which fastened by hand.
6
Attach the computer cover and reconnect the peripheral
7
devices and cables as before.
Power connector
4-pin internal power cable
21
Page 30

4 Check Recognition of the CRW3200E Drive
Plug in and turn on the computer.
1
Check that the LED o n the front pan el blinks blue, a n d then lights pur p le .
Check that the CRW3200E drive is properly recognized by
2
Windows.
The operation varies depending on your o perating system .
When using W in dows 95/98/98 Second Edition/Me
Select Start on the taskbar, then Settings, Control Panel, System, an d
1
Device Manager tab. The Device Manager dialog box appears.
Note
For Windows Me, if the System icon is not fo und in the Control Panel
window, click view all Control Panel options on the left side of the
window.
LED blinks blue, then
lights purple.
If there is to the left of CD-ROM, click .
2
YAMAHA CRW 3200E should be shown when the CRW3200E drive
has been recognized properly.
“YAMAHA
CRW3200E” is
shown.
Continued on next page
22
Page 31

Preparing the CRW3200E Drive
If the drive name is not shown or there is or mark.
The CRW3200E drive has not been recognized properly. Check the cable
connectio ns an d th e ma ster/sla ve setting s of th e ID E d evice s con necte d to
the computer.
When using Windows 2000 Professional
Select Start on the taskbar, then Settings, Control Panel, Hardware
1
tab, and Device manager. The Device Ma nag er dialog box appears.
If there is to the left of DVD/CD-ROM Drive, click .
2
YAMAHA CRW3200E should be shown when the CRW3200E drive
has been recognized properly.
When using Windows XP
Select Start on the taskbar, then Control Panel, System, Hardware
1
tab, and Device manager. The Device Ma nag er dialog box appears.
Note
If the
Switch to Classic View
If there is to the left of DVD/CD-ROM Drive, click .
2
YAMAHA CRW3200E should be shown when the CRW3200E drive
has been recognized properly.
icon is not found in the
System
Control Panel
on the left side of the window.
window, click
23
Change the DMA setting.
3
The DM A settin g m ay not b e displa y ed , depe n din g on y ou r com p ute r. In
such a case, you can use the CRW3200E drive without changing the
DMA se tting.
Tip
To maximize the performance of the CRW3200E drive, Yamaha recommends
that you also change the DMA setting of your hard drive.
Page 32

When using W in dows 95/98/98 Second Edition/Me
In the Device manager dialog box (P. 22), select YAMAHA
1
CRW3200E Prop erties and then Settings tab.
Check the “DMA”.
2
Check
Note
The CRW3200E drive operation may become unstable, depen ding on your
computer environment. In such a case, uncheck the “DMA”. The
“Simultaneous Data Transfer” setting does not affect CRW3200E drive
operation.
When using Win dows 2000 Professional/XP
Log on to the administrator account.
1
In the Device manager dialog box (P. 23), select the IDE channel
2
(primary/secondary) connected to the CRW3200E d rive and then
Detailed S ettin gs tab.
Set to Transfer Mode.
3
Continued on next page
24
Page 33

Preparing the CRW3200E Drive
Recommended DMA settings (transfer mode settings)
OS Recommended Remarks
Windows 95/98 /
98 Second Edition/Me
Windows 2000
Professional/XP
On Off if operation becomes
unstable
DMA mode PIO mode if operation becomes
unstable
DMA (Direct Memory Access)
DMA is a method that transfers data between various peripheral devices (e.g.,
a hard drive, CD-R/RW drive, etc.) and the computer memory without going
through the CPU in the computer. Using DMA transfer increases not only the
data transfer speed but also the processing speed by decreasing straining of the
CPU.
5 Install CD Writing Software
Install the included CD writing software on your computer.
For details on how to in sta ll CD writing software, refer to th e d oc umentation
that com e s with it.
25
Page 34

Loading/Ejecting a Disc
Prior to the operation, check that the computer is turned on.
Open the disc tray by pressing the eject button.
1
Press the eject button.
Place the disc onto the disc tray properly with its label
2
facing upward.
Or rem ove the disc from the disc tray c a r e fully so not to d a mage it.
Place or remove the disc onto/
from the disc tray properly.
Close the disc tray by pressing the eject button or by gently
3
pushing the disc tray into the computer.
Note
• Place or remove the disc after the disc tray has fully opened. Do not push or
pull the disc tray with ap p lying excess iv e f or c e to avoid damage to the dr iv e
or the disc.
• The d isc tr a y does not ope n while the ap p lic a tio n software pro h ibits ejecting,
including when the drive accesses the disc.
26
Page 35

Loading/Ejecting a Disc
Manually Ejecting a Disc
If the disc tra y fails to op en fo r so m e reaso n, suc h a s a p o w er f ailur e, fo llo w the
steps below to remov e the disc from the drive.
Note
Frequent use of th is operation may cause malfunction of the drive.
Prepare a thin pin-like object, such as a straightened paper
1
clip.
Use an object less than 2 mm in diameter and mo re than 3 cm in length.
Turn off the computer.
2
Insert the thin pin-like object straight into the manual eject
3
hole, and push it in.
When the disc tray opens, remove the disc.
27
Turn on the computer, and close the disc tray.
4
Manual eject
hole
Page 36

Troubleshooting
Refer to the YAMAHA CD-R/RW Drive website fo r the latest supp o r t d a ta,
including information on troubleshooting.
YAMAHA C D-R/RW Drive website URL:
http://www.yamaha.co.jp/english/product/computer/
Europe:
http://www.yamaha-it.de/
The CRW3200E drive is not turn ed on .
1
(The front panel LED does not light.)
Is the computer turned on?
●
Turn on the computer.
Is the 4-pin internal power cable connected properly to the CRW3200E drive?
●
Turn off the computer, and remove the computer cover. Check that the
connector of the 4-pin internal power cable is connected to the CRW3200E
drive in the correct direction , a n d that the 4-pin internal powe r ca ble is fully
connected. (P. 9, 21)
If the CRW3200E drive is connected to another 4-pin internal power cable that
●
properly conducts pow er to an other de vice, is the CR W3 200 E drive turn ed on ?
Turn off the computer. Be sure that the CRW3200E drive is connected to
another 4-pin internal power cable that properly conducts power to another
device, and check that the CRW3200E drive is turned on w hen turning on the
computer. (P. 9, 21)
If the drive is turned on, the computer’s power unit may be dam aged.
If the drive is not turned on, contact the store of purchase or your nearest
Yamaha dealer (listed at the back of this manual).
The CRW3200E drive is not rec ognized by the operating system. (P. 22)
2
Is the IDE cable connected properly to the CRW3200 E drive?
●
Turn off the computer and remove the computer cover. Check that the connector
of the IDE cable connected to the CRW3200E d rive is in the correct direction,
and that th e I DE cable is fully connecte d. (P. 9, 17)
Then check that the pins of the IDE interface connector of the CRW3200E drive
are not bent.
28
Page 37

Troubleshooting
Is the IDE cable connected properly to the motherboard?
●
Check that the connector of the IDE cable is connected to the motherboard in
the correct direction, and that the IDE cable is fully connected. (P. 17)
Is each IDE device set respectively?
●
When one IDE d evice is connected to on e IDE cable, be sure that the device is
set to master or C SE L .
When two IDE devices are connected to one IDE cable, be sure that both
devices are not set to master (or slave).
When th e CRW320 0E drive is set to CSEL, reset it to master or slav e . (P. 14)
When you have the prob lem ev en if each ID E device is set properly as above,
contact the store of purchase or your nearest Yamaha dealer (listed at the back
of this manua l).
The disc tray does not open w hen you p ress the eject b utton.
3
Is the CRW3200E drive turned on?
●
(Does the LED on the front pa nel light?)
Refer to “The CRW3200E drive is not turned on (The front panel LED does not
light).” (Troubleshoo ting Item 1)
Is any CD writing software being us e d?
●
Some CD writing software prohibits ejecting w h ile accessing . (If you are using
such a software program, the disc tray does not open ev en if the eject button is
pressed.) In such a case, follow the steps in the software window to eject the
disc, or quit the CD w ritin g software prior to p r e ssing the eject bu tto n.
Is the disc tray opened when the computer is restarted?
●
Quit all running application software, restart your computer, and press the eject
button of the CRW3200 E drive.
Is the disc tray opened if the IDE cable is removed from the CRW3200E drive?
●
Turn off the computer and remove the ID E cable from the IDE interface
termina l o n the rear panel of the CR W3200E drive. (P. 9, 17 )
Restart the computer, and press the eject button of the CRW3200E drive once
again.
29
Page 38

Turn off the computer, and remove the disc following “Manually Ejecting a
●
Disc.” (P. 27).
If the disc tray is caught in the drive and does not come out, or if it cannot be
opened or closed using the eject button after it is pulled out m anually, contact the
store of purchase or your nearest Yamaha dealer (listed at the back of this manual).
The disc is ejected without order (or it comes out s pontaneously).
4
Is the disc set properly (horizontally) on the disc tray?
●
Set the disc properly, and close the disc tray.
Is the disc dusty or dirty?
●
Remove dust or dirt from the disc using an air spray or a dry soft cloth. To avoid
damaging discs, wipe the disc gently f ro m the center pe r p e ndicular to the edge
of the disc.
Does the drive accept othe r discs (a ud io C D , C D-R O M , b lan k CD-R disc, etc.)?
●
If a specific disc is ejected, the disc itself may be damaged or deformed .
If all discs are ejected, contact the store of purchase or your nearest Yamaha
dealer (listed at the back of this manual).
No data can be read from a disc.
5
Is the disc ejected without order?
●
Refer to “The d isc is e jec te d without orde r (or it comes out spontaneously ).”
(Troubleshooting Item 4)
Is the disc useable with the drive? (P. 5, 3 5)
●
Be sure th a t the disc is compatible with the CRW3200E drive.
Is the disc dusty or dirty?
●
Remove dust or dirt from the disc using an air spray or a dry soft cloth. To avoid
damaging discs, wipe the disc gently f ro m the center pe r p e ndicular to the edge
of the disc.
Can data be read from other discs (audio CD, CD-ROM, etc.)?
●
If no data c a n b e r e a d f r om a specific d i sc , data may be written in a format that
the drive cannot recognize, or the disc itself may be damaged or deformed. Note
that no data can be read from blank discs, and the CRW3200E drive
infrequently fail to rea d data co rrec tly fr om a disc e v en if the disc is c ompatible
with the drive .
30
Page 39

Troubleshooting
Does the LED on the front panel of the CRW3200E drive light correctly when a
●
disc is inserted?
When a d isc is inserted, the L ED will blink blue for a moment and the n light
blue. (P. 2 )
If no data c a n be read from a specific d isc , data may be written in a for mat that
the drive cannot recognize, or the disc may be damaged or d eform ed.
If the LE D on the fron t panel remains p urple (stating tha t the drive cann ot
recognize the disc) no matter what type of disc is inserted, contact the store of
purchase or your nearest Yamaha dealer (listed at the back of this manual).
The playback of an audio CD (CD-DA ) cann ot be h eard.
6
Check th at the volume is not set to the m i n i mum level.
If you cannot hear the playback audio from headph on es or ex ternal speakers
connected to your computer, be sure that the audio cable is properly connected
to the CRW3200E drive and the sound card. (P. 19, 20)
For W indows Me/XP, change th e s ettings as follow s . ( I f Windows Media
Player 7.0 o r later is u sed w ith Wind ow s M e/X P, this p roble m ca n ha ppe n since
the digital pla yback option is a c tiv a te d by default settin g.)
For Windows Me
In the D evice m a nager d ialog box (P. 22 ), select YAMAHA CRW 3200E
1
Properties and then Properties tab.
Uncheck the “Enable digital CD audio for this CD-ROM device” under
2
“Digital CD Playbac k.”
31
Uncheck
(This screen is an exam ple
on Windows Me.)
Page 40

Start “Windows Media Player.” In the m e nu bar, se lect Tools, Options and
3
CD Audio tab.
Uncheck the “Digital playback” in the “Playback Settings” item.
4
Uncheck
(This screen is an
example on Windows
Media Player 7.0.)
For Windows XP
Follow the steps 1 and 2 on the page 31, and uncheck the “Enable digital C D
1
audio for this CD-ROM dev ice.”
Start “Windows Media Player.” In the m e nu bar, se lect Tools, Options,
2
Devices tab, CD-RW Drive, and Properties.
Select “Analog” in the “Playback” item .
3
Select
(This screen is an
example on Windows
Media Player 8.0.)
No data can be read from any CDs, a disc is ejected s pon tane ously, or
7
the LED remains purple whe n a disc is inserted. (The LED does n ot change
from lighting purple to blinking blue an d the n lighting blue.) (P. 2)
Remove the IDE c able from the C RW3200 E d r ive while the 4-pin in te r n a l
power cable is connected to the drive, and insert the disc once again. If no data
can be read from a specific disc or a specific disc is ejected, the disc itself may
be damaged or deformed.
If the LED r em ain s p urp le or a disc is e jecte d, no m a tter what type of d isc (e .g.,
an audio CD, CD-R O M or blank CD, etc.) is inserted, contact the store of
purchase or your nearest Yamaha dealer (listed at the back of this manual).
32
Page 41

Troubleshooting
The error message “Buffer Underrun” is displayed .
8
If your C D writing softw a r e supports Buffe r Underrun Pro te c tion, you must
activate it. F o r more details, re fe r to th e documentation that come s with your
CD writin g sof tw are.
To prevent the occurrence of a buffer underrun and to increase the efficiency of
data writin g , try the following:
– Reduce the data w r iting speed.
– Create an image file on the hard drive.
– Optimize the hard d r ive . ( Defragmenta tion)
– Do not start any application software including screen savers during data
writing.
– Deactivate the power management for the hard drive.
– Set the data transfer mode of any IDE device such as a hard drive or C D -
ROM drive to DMA. (P. 23)
– Deactivate the Windows Active Desktop.
– Quit all memory -re s ide nt software programs.
– Check your CD writing softw a r e se ttin gs with the doc umentation th a t c omes
with it.
Note
A writing error may happen if the drive is vibrated while data is being written on a
CD-R or a CD-RW disc.
Other problems
9
●
Isn’t more than one CD writing software installed on your computer?
Installing more than o ne CD writing software on a computer may cause
instability o f o p e r a tio n. (The CD writing softwa r e th a t come with the
CRW 3200E drive ca n be used together withou t problems.)
●
CD writing software must sup po rt the C RW3200E drive in order to recognize
the drive.
Contact the manufa c tu r e r of y our CD wr iting software to see whethe r th e
software supports the CRW 32 00 E drive.
●
Is the power capacity of your computer sufficient?
The computer may not operate due to insufficient power capacity.
Check the specifications of your computer and its current environment. The pow er
consum p tion o f the C R W 3 20 0E d riv e is 1 1 W d u ring w ritin g /read in g.
33
Page 42

Firmware
Firmware refers to the operating software designed for your C D -R/R W drive. It
is stored in the drive’s fla sh memory so that it can be r e written.
To enha nce operation r e liability, Yamaha continues imp ro v ing the firmw ar e
and make s upda tes availa ble on the in ternet. Y ou can find infor matio n abou t the
latest firmware at the YAMAHA CD-R/RW Drive website.
YAMAHA CD-R/RW Drive website
URL: http://www.yamaha.co.jp/english/product/computer/
Europe: http://www.yamaha-it.de/
These w e bsites contain the la te st YAMA HA CD-R/RW drive u se r support
informatio n including information abo u t the firmware.
Refer to th e website regula rly to check the latest information .
Checking the firmware version in you r CRW 3200E drive
For Windows 95/98/98 Se co nd Edition/Me
In the Device Manager dialog box (P. 22), select YAMAHA CRW3200E to
display the YAMAHA CRW3200E properties dialog box, and then select the
Settings tab.
The revision number
shown here varies
depending on the version
of the firmware in the drive
as set at default.
(This screen is an
example on Windows Me.)
For Windows 2000 P rofessional/X P
The firmware version cannot be displayed using Device Manager. Use your
CD wr iting software to c h e c k the firmware version.
34
Page 43

CRW3200E Drive Specifications
Supported Formats
Write Read Play back
CD-DA
CD TEXT
CD-ROM
*1
Mixed Mode CD-ROM
(CD-ROM+CD-DA)
CD-ROM XA
Photo CD
*1
*1
Video CD
CD-i
CD EXTRA
*1
includes multisession
*2
proper disc required
*3
proper application software required
*4
proper application software may be required depending on the format
*1
●●●
●●●
●●●
●●●
●●●
*2 *3
●
●●●
●●
●●●
*4
●●
*3
—
Writing Methods Disc-at-Once (DAO)
Session-at-Once (SAO)
Track-at-Once (TA O)
Packet Writing
Audio Master Quality Recording (High quality audio writing
mode)
CD-M RW (CD Mount Rainier R ewriting)
Writing/R ea din g
Speed
Writing CD-R 1X , 2X, 4X, 8X, 12X, 16X (CLV),
24X (18X – 24X Par tial C AV)
CD-RW 2X, 4X, 8X, 10X (CLV),
4X – 10X Full CAV (Packet w r iting)
Reading 40X (ma x.) Full CAV
Note) • DATA: 40X (max.)
• CD-D A: 40 X (max .) in audio extraction
• CD-DA: 1X only in audio playback
• Video CD: 10X (max.)
• Session closed disc: 40X (max .)
• Session unclosed disc: 12X (max.)
CD-R 1X, 2X, 4X, 8X, 12X, 16X, 24X (18X – 24X Partia l CAV )
writing: CD-R discs sp ecified in Orange Book Part 2, Ver. 3.1.
Note) Use a CD-R disc that matches the writing sp eed .
CD-RW 2X or 4X writing:
Orange Book Part 3, Vol.1, Version 2.0-compliant discs
4X, 8X, 10X, 4X – 10X F u ll CAV (Packet writing) writing:
Orange Book Part 3, Vol.2, Version 1.0-compliant discs
Note) For 2X writing, Book Part 3, Vol.1, Version 1.0-
compliant discs can be u sed.
35
Page 44

Data Capacity 700 MB (with a 79-minute disc)
650 MB (with a 74-minute disc)
550 MB (with a 63-minute disc)
Maximum recording time in
Audio Master Quality Recording
Data Transfer Rate
(Mode 1)
Interface Enhance d IDE (E-IDE ) /ATAPI
Burst Transfer Rate Program I/O (PIO) mode 4: 16.7 MB/sec
Data Buffer Size 8 MB (3,176 sectors)
Average Access T im e 130 msec. (random access)
Sector Size 2,048 – 2,448 bytes
Installing Style Horizontal
Disc Loading Type Front auto-loading tray type
Audio Out Analog (Lin e Out specifications)
68 min. (700 MB)
63 min. (650 MB)
1X: 150 KB/sec. 12X: 1,800 KB/sec.
2X: 300 KB/sec. 16X: 2,400 KB/sec.
4X: 600 KB/sec. 24X: 3,600 KB/sec.
8X: 1,200 KB/sec. 32X: 4,800 KB/sec.
10X: 1,500 KB/sec. 40X: 6,000 KB/sec.
Multi-word DMA mode 2: 16.7 MB/sec
Ultra DMA mode 2: 33.3 MB/sec (Ultra ATA/33)
• Frequency Band: 20 – 20,000 Hz
• Output level: 700 mVrms
Digital
• SPD IF fo rm a t
• Output level: TTL
Power Consumption 11 W (writing/playback)
4 W (standby)
1 W (during power saving, operated by the computer's
power saving mode)
Power Supply +5 VDC ±5%
+12 VDC ±10%
Operating Environment Temperature : 5 – 40 ºC
Hum id i ty : 25 – 80% RH (no condensation)
Dimensions Width : 148.0 mm
Height : 42.6 mm
Depth : 198.1 mm
Weight 0.9 kg
36
Page 45

CRW3200E Drive Specifications
Safety/EMC Comp liance
The CRW3200E drive conforms to the following specifications.
Country/
Region
USA
Canada
EU
Australia
New Zealand
Taiwan
Japan
Compliance Specifications
Standard Item Name and Number
Safety Electricity UL60950 Information Technology
Laser 21CFR1040.10
FDA Chapter 1,
Subchapter J
EMC/EMI Emission 47CFR15
FCC Part 15, Subpart B
Safety Electricity CSA C22.2 No. 60950 Information Technology
EMC/EMI Emission ICES-003 Class B Computing
Safety Electricity EN60950 Information Technology
Laser EN60825 Class 1 Laser Product
EMC/EMI Emission EN55022 Class B Equipment
Immunity EN55024 Residential, Commercial
EMC/EMI Emission AS/NZ 3548 Class B Equipment
EMC/EMI Emission CNS13438 Class B Equipment
EMC/EMI E mission VCCI Class B Equipment
Remarks
Equipment
Class I Laser Equipment
Class B Computing
Device
Equipment
Device
Equipment
and Light Industrial Areas
Note that the specifications of the CRW32 00E drive are subject to change without
notice due to improvements.
37
Page 46

Technical Notes
Buffer Underrun Protection Function
CD-R/RW drives are equipped with a buffer memory, w hich temporarily stores
data that is being transferred. When the buffer memory becomes empty due to a
delay of data transfer for a ny reason, a w r iting error happ e ns. Such cond ition is
defined as buffer underrun, and such an error is defined as a buffer underrun
error.
Buffer underrun protection is featured in the CRW3200E drive.
When a buffer underrun almost happens, buffer underrun protection temporarily
suspends the writing process. Writing resum e s when enou gh d a ta has
accumulated in the buffer memory. Buffer Underrun Protection in the
CRW 3 200E drive is e x tr e mely accurate, resulting in seamle ss recording bef o re
and after suspension.
Test writing
Test writing is a fu nction to check for the possible occurrence of buffer underrun in
your computer environment. The included CD writing software operates the test
writing function that cannot operate when buff e r underrun protection is activated
(default). The buffer underrun protection should first be deactivated to use test
writing.
Writing Methods
Disc-at-Once (DAO)
This me thod is used to write all data onto a disc in one operation. It wr ite s
multiple pieces of data without placing a space between d a ta, starting with the
innermo s t tr ac k of the disc. Once data is written by this method, no d a ta can be
added to the same disc even if there is free space available on the disc. This
method is useful for making a backup co py of an entire CD.
38
Page 47

Technical Notes
Track-at-Once (TAO)
This meth od is u sed to w rite data on a d isc on a tra ck-by- track ba sis. A trac k can
be defined as the smallest unit of area that contains an ordinary program, image
file, text file, e tc. This meth od e n a b le s y ou to add data to the same d isc , one
track of data at a time, as long as there is free space available on the disc. A disc
that conta ins data written in se ve r a l se ssions is defined a s a multi-session disc.
An area that records data and management inform ation (Lead-in/Lead-out) is
defined as a se ssion. Lead-in a nd Lead-out a re s ig na ls written for stating the
starting and ending po ints of one sessio n.
Note
Ordinary audio CD play er s can only play back single-session discs or the first
session on a multi-session disc. Do not record audio data on the second and
subsequent sessions.
Session-at-Once (SAO)
This meth od is us ed to wr ite data o n a disc on a session -by-ses sion ba sis. Unlik e
Track-at-O nce d escrib ed abo ve, Sess ion-at-O nce e nables you to r ecord m ultip le
tracks onto a dis c at a time . CD E XT RA , for exam ple, use s this me thod to write
multiple pieces of aud io d ata (or m ultiple tracks) in the first session and
informa tion required for c o mputers in the se c o nd session. This method en a b le s
you to add data into the same disc, one session at a time, as long as there is free
space available on the disc. A disc that contains data written in several sessions
by this m e th od is defined as a multi-session disc , lik e a disc written by the
Track-at-Once method.
39
Page 48

Packet Writing
This me thod is used to r e cord data onto a disc on a file-by-file basis. This
method divides a track into small segmen ts c alled “packets” so that data can be
written on a packet-by-p a cket basis, wh ic h means that you can write data in
much the same wa y as you co py data to a flopp y or hard drive. Since the data
can be written easily, p ac ket writing is p roper to daily d a ta backup. Pac k e t
writing also enables yo u to add packets to a disc as long as there is free space
available on the disc.
Note
• Discs need to be formatted for packet writing prior to use.
• Formatting a CD-RW di sc using packet writing soft war e r educes its storage
capacity by about 100 MB since packet writing requires exclusive space for
itself.
• For CD-R discs, deleting data means masking data but not actually removing
data. Therefore, actual free space in a CD-R never be in creased even if data is
deleted.
Audio Master Quality Recording (High quality audio w riting m ode)
This method enables you to record high quality data that can be played back
with the 1 .4m/s linear veloc ity.
Note
• Audio Master Quality Recording (High quality audio writing mode) is enabled
with the 4X speed Disc-a t-Once writing method.
• Maximum recording time is 63 minutes for a 650 MB CD-R disc and 68 minutes
for a 700 MB CD-R disc.
CD-MRW (CD Mount Rainier ReWriting)
This meth od is a n ew stand ard o f pack et w riting for a CD -RW d isc an d su ppo rts
defect control by the driv e , ba ckground fo rmatting, and d i sc e je c tin g during
formatting . It e nables you to u se a CD-RW disc like a flopp y d i sk .
Note
Formatting a CD-RW disc using CD-MRW reduces its storage capacity by about
150 MB since CD-MRW requires exclusive disc space.
40
Page 49

Distributors and Head Offices / Vertriebs- und Hauptgeschäftsstelle
Distributeurs et sièges sociaux / Distribuidores y Casas matrices
If you have any questions, please contact the store of purchase or your nearest Yamaha dealer
listed below. Contact Yamaha Corporation Japan from outside of the listed countries.
Falls Sie weitere Fragen haben, wenden Sie sich an Ihren Fachhändler oder den örtlichen
Yamaha-Händler (eine Liste der Yamaha-Händler befindet sich am Ende dieses Handbuchs).
Aus anderen Ländern als den aufgeführten wenden Sie sich an Yamaha Corporation Japan.
Si vous avez des questions à poser, veuillez prendre contact avec le magasin où vous avez fait
l’achat de l’appareil ou un revendeur de matériel Yamaha le plus proche de votre domicile
parmi ceux énumérés ci-dessous. Prenez contact avec Yamaha Corporation Japan si vous ne
vous trouvez pas dans un des pays mentionnés:
Si tiene alguna duda, póngase en contacto con el establecimiento de adquisición o con su
representante Yamaha más cercano indicado a continuación. En caso de países no
contemplados en la lista, póngase en contacto con Yamaha Corporation Japan:
EUROPE, EASTERN EUROPE and
RUSSIA
Yamaha Elektronik Europa GmbH
IT-Sales Division
Siemensstrasse 22-34,
D-25462 Rellingen, GERMANY
URL: http://www.yamaha-it.de/
TEL: +80092624222
(AUSTRIA, BELGIUM, DENMARK, FINLAND,
FRANCE, GERMANY, HUNGARY, ICELAND,
IRELAND, ITALY, LUXEMBOURG,
NETHERLANDS, NORWAY, PORTUGAL, SPAIN,
SWEDEN, SWITZERLAND, UNITED KINGDOM)
TEL: +80093067
(MONACO)
If you are calling from outside the countries mentioned
above, or if you can’t get through on the Yamaha tollfree number, use the following number instead:
TEL: +3214400793
U.S.A.
Yamaha Electronics Corporation, USA
6660 Orangethorpe Avenue,
Buena Park, CA 90620, U.S.A.
TEL: +1 714 522 9105
FAX: +1 714 670 0108
URL: http://www.yamaha.com/
CANADA
Yamaha Canada Music Ltd.
135 Milner Avenue, Scarborough,
Ontario M1S 3R1, CANADA
TEL: +1 416 298 5664
FAX: +1 416 292 0732
URL: http://www.yamaha.ca/
AUSTRALIA
Yamaha Music Australia Pty., Ltd.
Level 1, 99 Queensbridge Street
Southbank, Victoria 3006
AUSTRALIA
TEL: +61 3 9693 5111
FAX: +61 3 9699 2332
SINGAPORE, MALAYSIA, KOREA,
THAILAND, PHILIPPINES, INDIA,
VIETNAM, CAMBODIA,
MYANMAR, INDONESIA and IRAN
Yamaha Electronics Asia Pte Ltd.
138 Cecil Street
#05-02/03 Cecil Court, Singapore 069538 SINGAPORE
TEL: +65 223 3992
FAX: +65 223 9810
TAIWAN
Yamaha KHS Music Co., Ltd.
11F, No.150, Tun Hua North Rd.
Taipei,TAIWAN R.O.C.
TEL: +886 2 2713 8999
FAX: +886 2 2713 8666
URL: http://www.yamahakhs.com/
JAPAN
Yamaha Corporation
AV & IT Bu siness Group
IT Sales & Marketing Division
10-1 Nakazawa-cho, Hamamatsu-shi, Shizuoka-ken
430-8650, JAPAN
TEL: +81 53 460 3433
FAX: +81 53 460 3489
URL: http://www.yamaha.co.jp/english/
Page 50

 Loading...