

Blu-ray Disc Receiver
BRX-610
TLF
Owner’s Manual
Manual de Instrucciones
Инструкция по эксплуатации
CAUTION: READ THIS BEFORE OPERATING YOUR UNIT.
1 To assure the finest performance, please read this manual
carefully. Keep it in a safe place for future reference.
2 Install this sound system in a well ventilated, cool, dry,
clean place - away from direct sunlight, heat sources,
vibration, dust, moisture, and/or cold. For proper
ventilation, allow the following minimum clearances.
Top: 10 cm
Rear: 10 cm
Sides: 10 cm
3 Locate this unit away from other electrical appliances,
motors, or transformers to avoid humming sounds.
4 Do not expose this unit to sudden temperature changes
from cold to hot, and do not locate this unit in an
environment with high humidity (i.e. a room with a
humidifier) to prevent condensation inside this unit,
which may cause an electrical shock, fire, damage to this
unit, and/or personal injury.
5 Avoid installing this unit where foreign object may fall
onto this unit and/or this unit may be exposed to liquid
dripping or splashing. On the top of this unit, do not
place:
– Other components, as they may cause damage and/or
discoloration on the surface of this unit.
– Burning objects (i.e. candles), as they may cause fire,
damage to this unit, and/or personal injury.
– Containers with liquid in them, as they may fall and
liquid may cause electrical shock to the user and/or
damage to this unit.
6 Do not cover this unit with a newspaper, tablecloth,
curtain, etc. in order not to obstruct heat radiation. If the
temperature inside this unit rises, it may cause fire,
damage to this unit, and/or personal injury.
7 Do not plug in this unit to a wall outlet until all
connections are complete.
8 Do not operate this unit upside-down. It may overheat,
possibly causing damage.
9 Do not use force on switches, knobs and/or cords.
10 When disconnecting the power cable from the wall outlet,
grasp the plug; do not pull the cable.
11 Do not clean this unit with chemical solvents; this might
damage the finish. Use a clean, dry cloth.
12 Only voltage specified on this unit must be used. Using
this unit with a higher voltage than specified is dangerous
and may cause fire, damage to this unit, and/or personal
injury. Yamaha will not be held responsible for any
damage resulting from use of this unit with a voltage
other than specified.
13 To prevent damage by lightning, keep the power cable
and outdoor antennas disconnected from a wall outlet or
this unit during a lightning storm.
14 Do not attempt to modify or fix this unit. Contact
qualified Yamaha service personnel when any service is
needed. The cabinet should never be opened for any
reasons.
15 When not planning to use this unit for long periods of
time (i.e. vacation), disconnect the AC power plug from
the wall outlet.
16 Be sure to read the “TROUBLESHOOTING” section on
common operating errors before concluding that this unit
is faulty.
17 Before moving this unit, press to set this unit to the
standby mode, and disconnect the AC power plug from
the wall outlet.
18 Condensation will form when the surrounding
temperature changes suddenly. Disconnect the power
cable from the outlet, then leave this unit alone.
19 When using this unit for a long time, this unit may
become warm. Turn the power off, then leave this unit
alone for cooling.
20 Install this unit near the AC outlet and where the AC
power plug can be reached easily.
21 The batteries shall not be exposed to excessive heat such
as sunshine, fire or the like.
This unit is not disconnected from the AC power source as long as
it is connected to the wall outlet, even if this unit itself is turned off
by . This state is called the standby mode. In this state, this unit is
designed to consume a very small quantity of power.
WARNING
TO REDUCE THE RISK OF FIRE OR ELECTRIC SHOCK, DO
NOT EXPOSE THIS UNIT TO RAIN OR MOISTURE.
LASER SAFETY
This unit employs a laser. Due to possible eye injury, only a qualified
service person should remove the cover or attempt to service this
device.
DANGER
This unit emits visible laser radiation when open. Avoid direct eye
exposure to beam. When this unit is plugged into the wall outlet, do
not place your eyes close to the opening of the disc tray and other
openings to look into inside.
WARNING
DO NOT TOUCH THIS UNIT WHEN IT IS USED
CONTINUOUSLY AT HIGH VOLUME BECAUSE THE
BOTTOM OF THIS UNIT MAY BECOME HOT. IT MAY LEAD
TO INJURIES SUCH AS BURNS, ETC.
i En

INTRODUCTION
WHAT YOU CAN DO WITH THIS UNIT ......... 2
SUPPLIED PARTS ................................................ 2
ABOUT DISCS AND FILES ................................. 3
Types of discs/files that can be used with this unit ... 3
Loading a disc............................................................ 4
Disc precautions......................................................... 4
Notice for watching 3D video images ....................... 4
PART NAMES AND FUNCTIONS...................... 5
Front panel ................................................................. 5
Remote control........................................................... 6
Rear panel .................................................................. 9
Installing the batteries in the remote control ........... 10
Using the remote control ......................................... 10
PREPARATIONS
CONNECTION..................................................... 11
5.1-channel speaker layout ...................................... 11
Connecting speakers ................................................ 11
Connecting the FM antenna..................................... 12
Connecting iPod....................................................... 12
Connecting to a TV.................................................. 13
Connecting a satellite/cable TV tuner...................... 14
Connecting audio devices (such as a CD or MD
player).................................................................. 14
Connecting a portable digital music player
other than iPod..................................................... 14
NETWORK AND USB CONNECTION............ 15
Connecting to the NETWORK terminal.................. 15
Connecting to the USB port..................................... 15
OTHER CONNECTION ..................................... 16
Connecting the power cable..................................... 16
OPERATIONS
INITIAL WIZARD/EASY SETUP ..................... 17
Setting with the Initial Wizard/Easy Setup.............. 17
BASIC OPERATION........................................... 18
Playing back photo/music/video.............................. 20
Using network content............................................. 22
Using network services............................................ 22
Operation for iPod ................................................... 23
Operation for CDs.................................................... 23
ADVANCED PLAYBACK OPERATION......... 24
On Screen menu....................................................... 24
Status menu.............................................................. 25
Using Bookmark...................................................... 26
Program play............................................................ 26
Using search............................................................. 26
Enjoying BONUSVIEW™ and BD-Live™ ............ 27
LISTENING TO FM RADIO STATIONS ........ 28
Tuning to radio stations ........................................... 28
Presetting radio stations........................................... 28
Selecting preset radio stations (Preset tuning)......... 28
Deleting preset stations............................................ 29
Displaying Radio Data System information (Russia model only)
USING USEFUL FUNCTIONS .......................... 30
Setting the sleep timer ............................................. 30
Operating this unit by TV remote control
(the HDMI control function) ............................... 30
CONTENTS
SETTINGS
SETUP MENU.......................................................32
SOFTWARE UPGRADE .....................................41
ADDITIONAL INFORMATION
TROUBLESHOOTING .......................................42
GLOSSARY...........................................................50
SPECIFICATIONS...............................................51
■ About this manual
• This manual describes how to operate this unit using a
remote control except when it is not available. Some of
these operations are also available using the front panel
buttons.
• Notes contain important information about safety and
operating instructions. y indicates a tip for your
operation.
• “iPod” described in this manual may also refer to
“iPhone”.
• This manual is printed prior to production. Design and
specifications are subject to change in part as a result of
improvements, etc. In case of differences between the
manual and the product, the product has priority.
The icons used in this manual
Icons are used to indicate available buttons/functions for a
particular format.
: BD-Video
BD
DVD
: Audio CD
CD
VIDEO
MUSIC
.. 29
PHOTO
Operation for SETUP menu .................................... 34
General Setting ........................................................ 35
Display Setting ........................................................ 37
Audio Setting........................................................... 39
About the video output formats ............................... 40
Upgrading the software............................................ 41
General..................................................................... 42
Radio reception........................................................ 44
iPod.......................................................................... 44
USB ......................................................................... 45
Disc playback .......................................................... 46
Remote control ........................................................ 47
Network ................................................................... 47
Messages on the screen............................................ 49
Others....................................................................... 49
: DVD-Video, DVD-VR, DVD+VR
: AVCHD, WMV
: MP3, WMA, WAV
: JPEG
INTRODUCTION PREPARATIONS
OPERATIONS SETTINGS
INFORMATION
ADDITIONAL
English
1 En

INTRODUCTION
WHAT YOU CAN DO WITH THIS UNIT
Blu-ray 3D Disc (Blu-ray Disc™)/DVD/CD Playback
Play back commercially-released Blu-ray 3D Discs (BD discs), in addition to DVDs and CDs.
BONUSVIEW™ and BD-Live™ Playback
Download additional contents available via BD-Live™ supported BD discs, and enjoy
secondary audio/video on BONUSVIEW™-supported BD discs.
USB Digital Connection for iPod and iPhone
Direct USB cable connection to an iPod or iPhone enables high quality digital sound without any
degradation caused by digital-to-analog conversion.
Home Network Server (DLNA supported)
Enjoy a variety of PC contents on your TV by connecting to a network server.
*1
*1
*1, 2
YouTube™ Contents Playback (Russia and Asia models only)
Enjoy YouTube™ contents on your TV.
Receiving FM Radio and Radio Data System Information
*1
*2
\ p. 24
\ p. 27
\ p. 19
\ p. 22
\ p. 22
\ p. 28
(Russia model only)
Listen to FM radio. Radio Data System broadcasts provide program information on the front
panel display (Russia model only).
Initial Wizard and Easy Setup \ p. 17
Easily set language, resolution, screen aspect ratio with the Initial Wizard/Easy Setup screen.
Operate with the TV Remote Control (HDMI CEC supported) \ p. 30
HDMI control function (using HDMI cable connection) provides multiple device operation with
a single remote control.
*1For details on playable discs and files, refer to page 3.
2
Network setting is needed to use this function.
*
SUPPLIED PARTS
Make sure you have all of the following items.
Remote control Indoor FM antenna
*3The supplied indoor FM antenna differs depending on your model.
4
*
The power cable differs depending on your model.
Batteries (×2)
(AAA, R03, UM-4)
*3
Composite video
cable (1.5m)
Power cable
*4
2 En
ABOUT DISCS AND FILES
Types of discs/files that can be
used with this unit
• 12 cm and 8 cm discs can be played back in this unit.
Do not use an 8 cm to 12 cm adapter.
• Use discs that conform to compatible standards as
indicated by the presence of official logos on the disc
label. Playback of discs not complying with these
standards is not guaranteed. In addition, the image
quality or sound quality is not guaranteed even if the
discs can be played back.
Disc Type
BD-ROM/BD-R/
BD-RE
DVD-ROM DVD-Video -DVD-R/DVD-R DL/
DVD-RW
DVD+R/DVD+R
DL/DVD+RW
CD-ROM CDDA/HDCD -CD-R/CD-RW CDDA/Data Disc WMV/MP3/WAV/
USB -- WMV/MP3/WAV/
Network -- WMV/MP3/WMA/
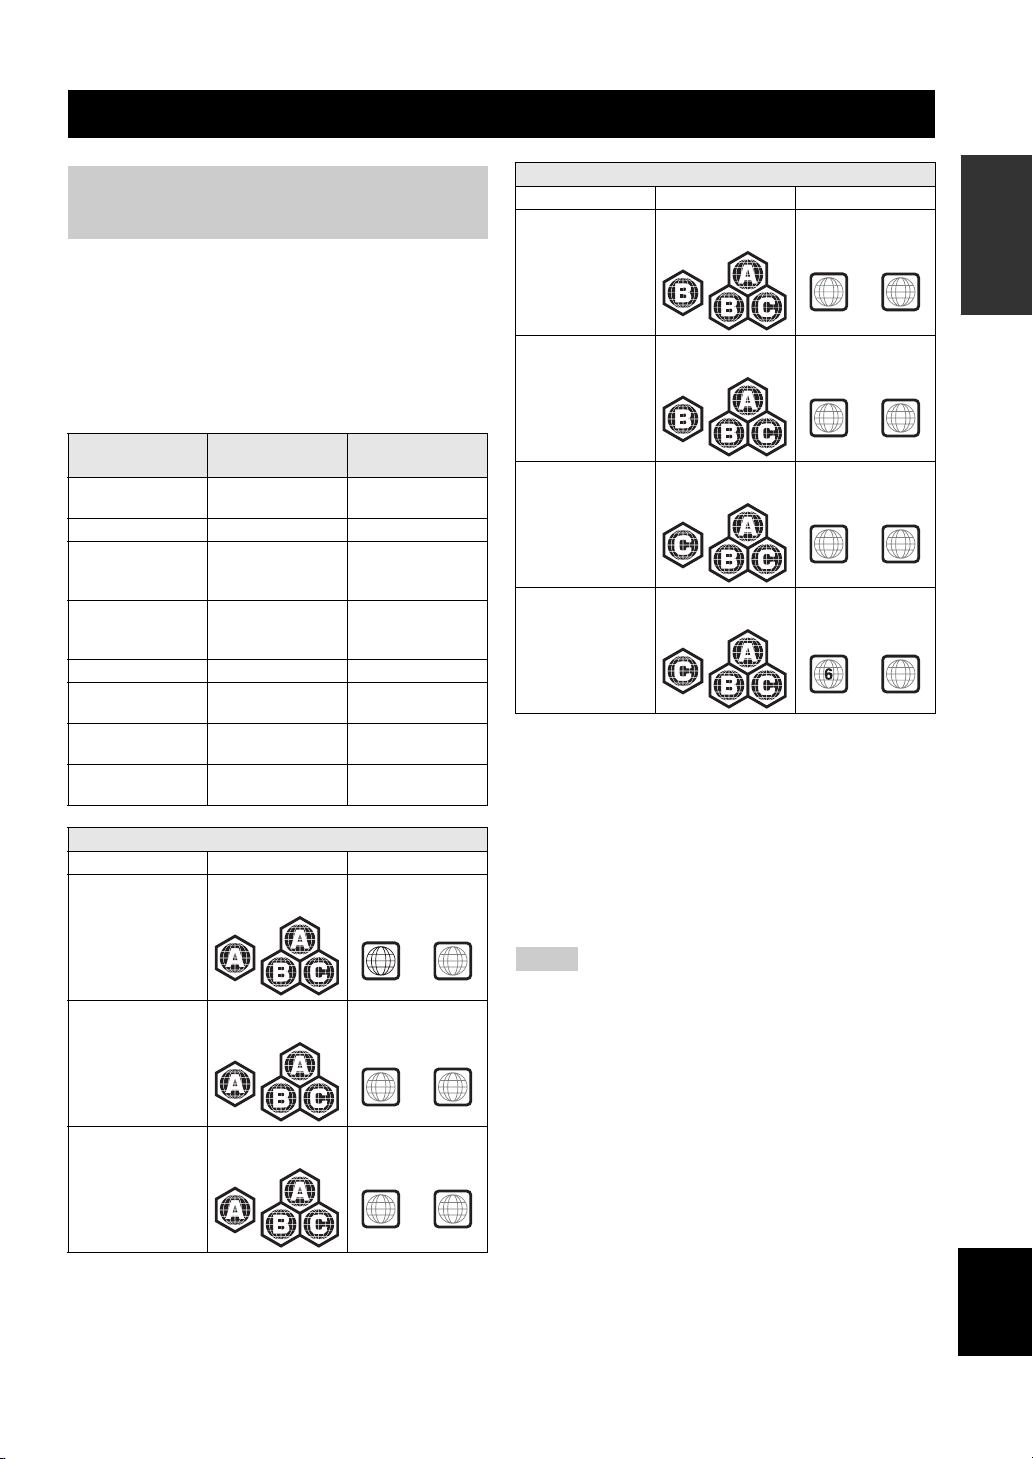
Region management information
Destination BD-Video DVD-Video
U.S.A. and Canada Region code “A” or
Recording
Format
BD-Video --
DVD-Video/DVDVR/AVCHD/Data
Disc
DVD-Video/
DVD+VR/AVCHD/
Data Disc
“ALL”
Data Format
WMV/MP3/WAV/
WMA/JPEG
WMV/MP3/WAV/
WMA/JPEG
WMA/JPEG
WMA/JPEG
WAV/JPEG
Region number “1”
or “ALL”
Region management information
Destination BD-Video DVD-Video
Europe Region code “B” or
“ALL”
Australia Region code “B” or
“ALL”
Russia Region code “C” or
“ALL”
China Region code “C” or
“ALL”
Region number “2”
or “ALL”
2
Region number “4”
or “ALL”
4
Region number “5”
or “ALL”
5
Region number “6”
or “ALL”
ALL
ALL
ALL
ALL
• BD/DVD video players and discs have region codes,
which dictate the regions in which a disc can be played.
• BD/DVD Video operations and functions may be
different from the explanations in this manual and some
operations may be prohibited due to disc
manufacturer’s settings.
• If a menu screen or operating instructions are displayed
during playback of a disc, follow the operating
procedure displayed.
INTRODUCTION
Asia Region code “A” or
Central and South
America
“ALL”
Region code “A” or
“ALL”
1
Region number “3”
or “ALL”
3
Region number “4”
or “ALL”
4
ALL
ALL
ALL
Notes
• Playback for some of the discs in the left side column tables
may not be possible depending on the disc.
• Finalize all recording media that is played back in this unit.
• “Finalize” refers to a recorder processing a recorded disc so that
it will play in other players/recorders as well as this unit. Only
finalized discs will play back in this unit. (This unit does not
have a function to finalize discs.)
• Playback of all files on the disc, USB memory device and
network is not guaranteed.
• A copyright protected file cannot be played back via a USB
memory device and network.
MP3/WMA audio file requirement
• Sampling frequency: within 32 - 48 kHz (MP3/WMA),
LPCM 44.1 kHz/16 bit/Stereo (WAV)
• Bitrate: within 8 - 320 kbps (MP3), 32 - 192 kbps
(WMA)
WMV file requirement
• WMV9, maximum resolution is 1,920 × 1,080.
3 En
English
ABOUT DISCS AND FILES
Loading a disc
• Insert the disc with the label facing up.
• In case of the disc recorded on both sides, face down the
side you want to play back.
Notes
• Playback may begin automatically, depending on the disc and
setting of this unit.
• The menu may be displayed first, depending on the disc.
• The disc load time may vary depending on the disc.
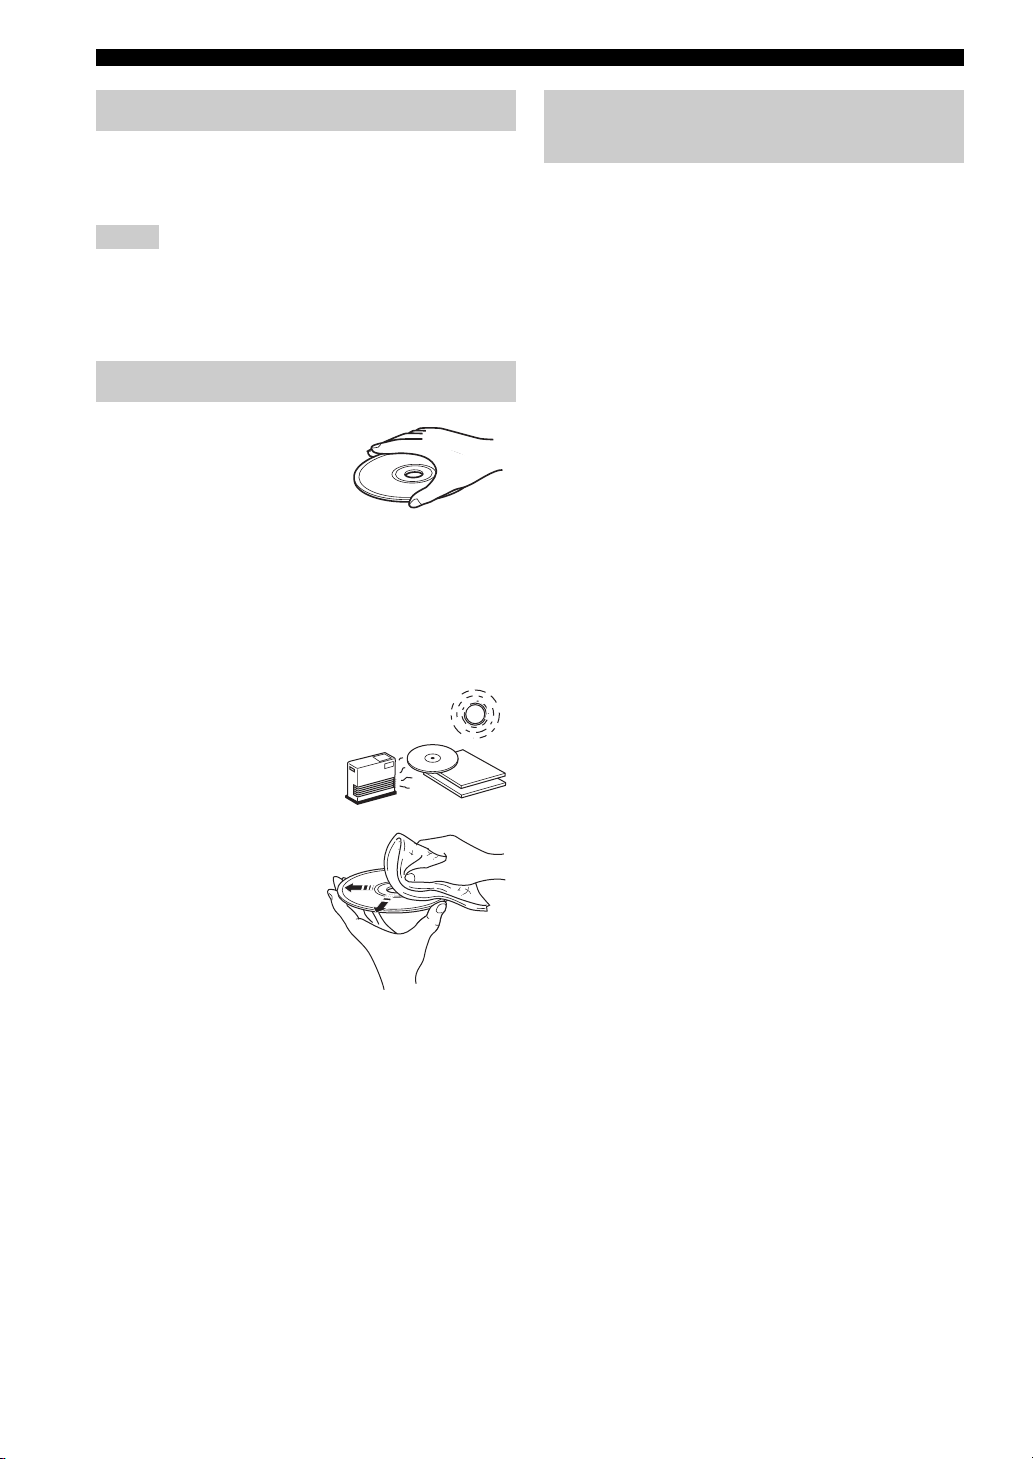
Disc precautions
• Do not touch the surface of the
disc. Hold a disc by its edge
(and the center hole).
• Do not use a pencil or pointed
marker to write on the disc.
• Do not put a tape, seal, glue, etc., on a disc.
• Do not use a protective cover to prevent scratches.
• Do not load more than one disc into this unit at one
time. This can cause damage to both this unit and the
discs.
• Do not insert any foreign objects into the disc slot.
• Do not load a cracked, warped, or glued disc.
• Do not expose a disc to
direct sunlight, high
temperature, high
humidity, or a lot of dust.
Caution
Notice for watching 3D video
images
• Some people may experience discomfort (such as eye
strain, fatigue, or nausea) while watching 3D video
images. We recommend that all viewers take regular
breaks while watching 3D video images.
• If you experience any discomfort, stop watching the 3D
video images until the discomfort subsides. Consult a
doctor if you experience severe discomfort.
• Read the owner’s manuals (BD disc and TV) and/or the
caution messages that appear on the TV carefully.
• The vision of young children (especially those under six
years old) is still under development. Consult your
doctor (such as a pediatrician or eye doctor) before
allowing young children to watch 3D video images.
• Adults should supervise young children to ensure they
follow the recommendations described above.
• If a disc becomes dirty,
wipe it with a clean, dry
cloth from the center out
to the edge. Do not use
record cleaner or paint
thinner.
• To avoid malfunction, do
not use a commercially
available lens cleaner.
4 En
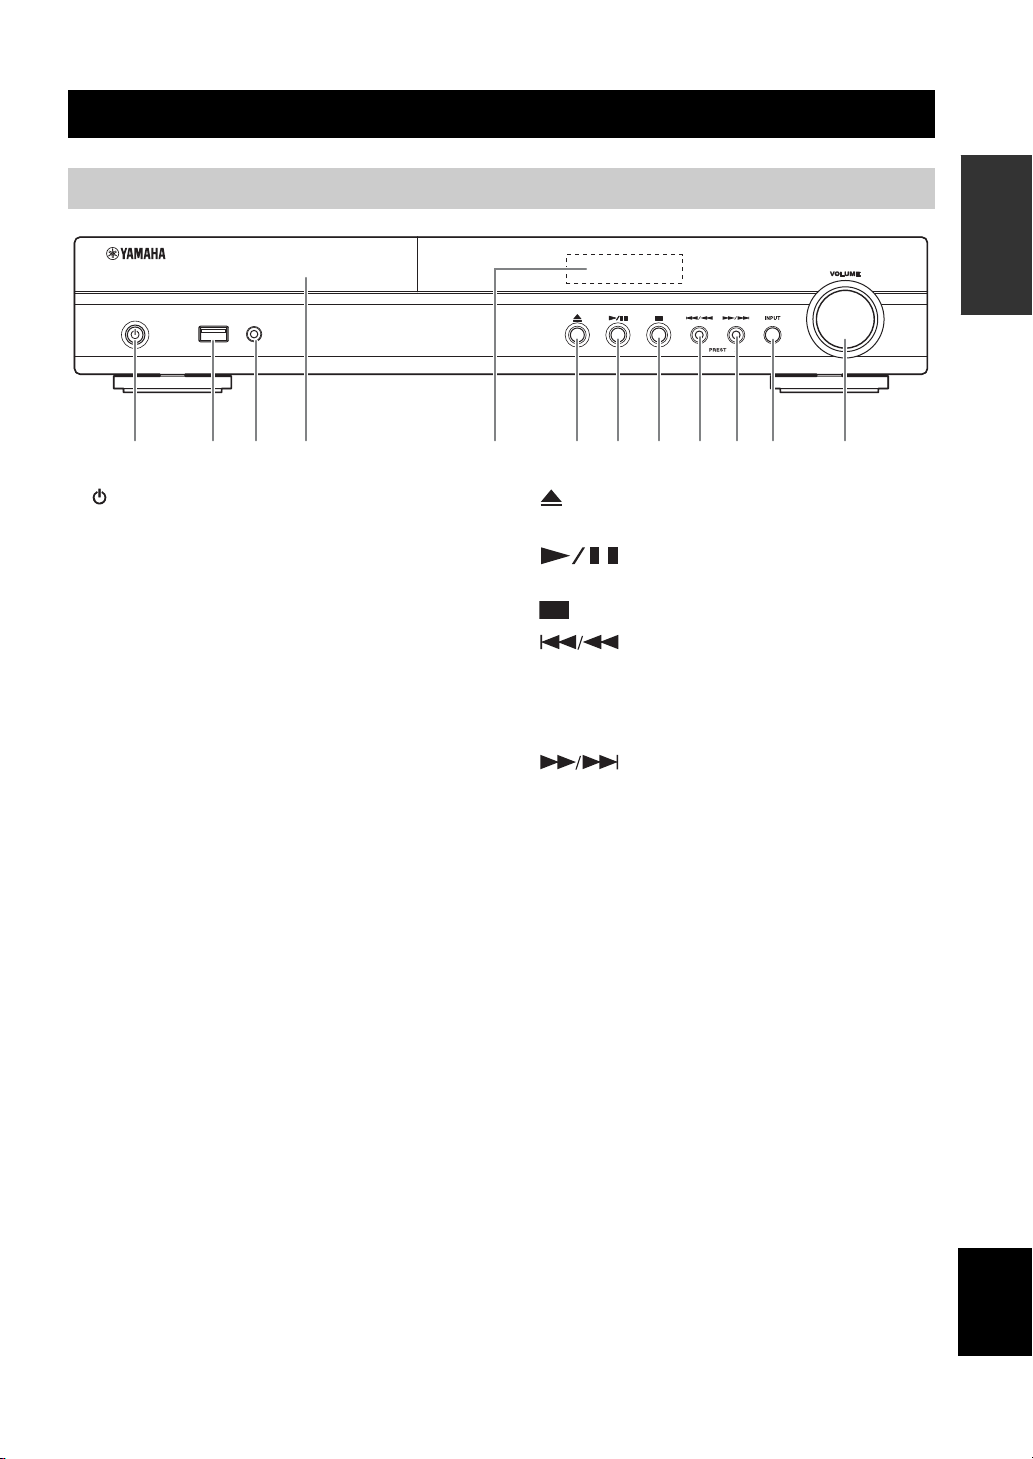
Front panel
PART NAMES AND FUNCTIONS
INTRODUCTION
USB PORTABLE
iPod/iPhone
2 3 4 6 7 8159 0 A B
1 (On/Standby):
Turns this unit on/Sets to standby mode.
y
This unit has an automatic standby function.
• When the source is set to Disc/USB/Network, this unit
automatically switches to standby mode if it is left turned on
for 1 hour without playback or any other operation being
performed.
• When the source is NOT set to Disc/USB/Network, this unit
automatically switches to standby mode if it is left turned on
for between 1 to 8 hours without playback or any other
operation being performed according to the setting in
SETUP menu (p. 35).
2 iPod/iPhone/USB port (p. 12, 15):
Connect your iPod or USB memory device.
3 PORTABLE (p. 14):
Connect a portable digital music player other than
iPod.
4 Disc tray door
5 Front panel display
6 (Eject):
Opens/Closes the disc tray.
7 (Play/Pause):
Starts/Pauses playback.
8 (Stop)
9 (Search backward/Skip backward):
Press to skip backward, and press and hold to search
backward.
PRESET <:
Press to select a preset station.
0 (Search forward/Skip forward):
Press to skip forward, and press and hold to search
forward.
PRESET >:
Press to select a preset station.
A INPUT:
Selects the input source.
B VOLUME:
Turns the volume up/down.
5 En
English
PART NAMES AND FUNCTIONS
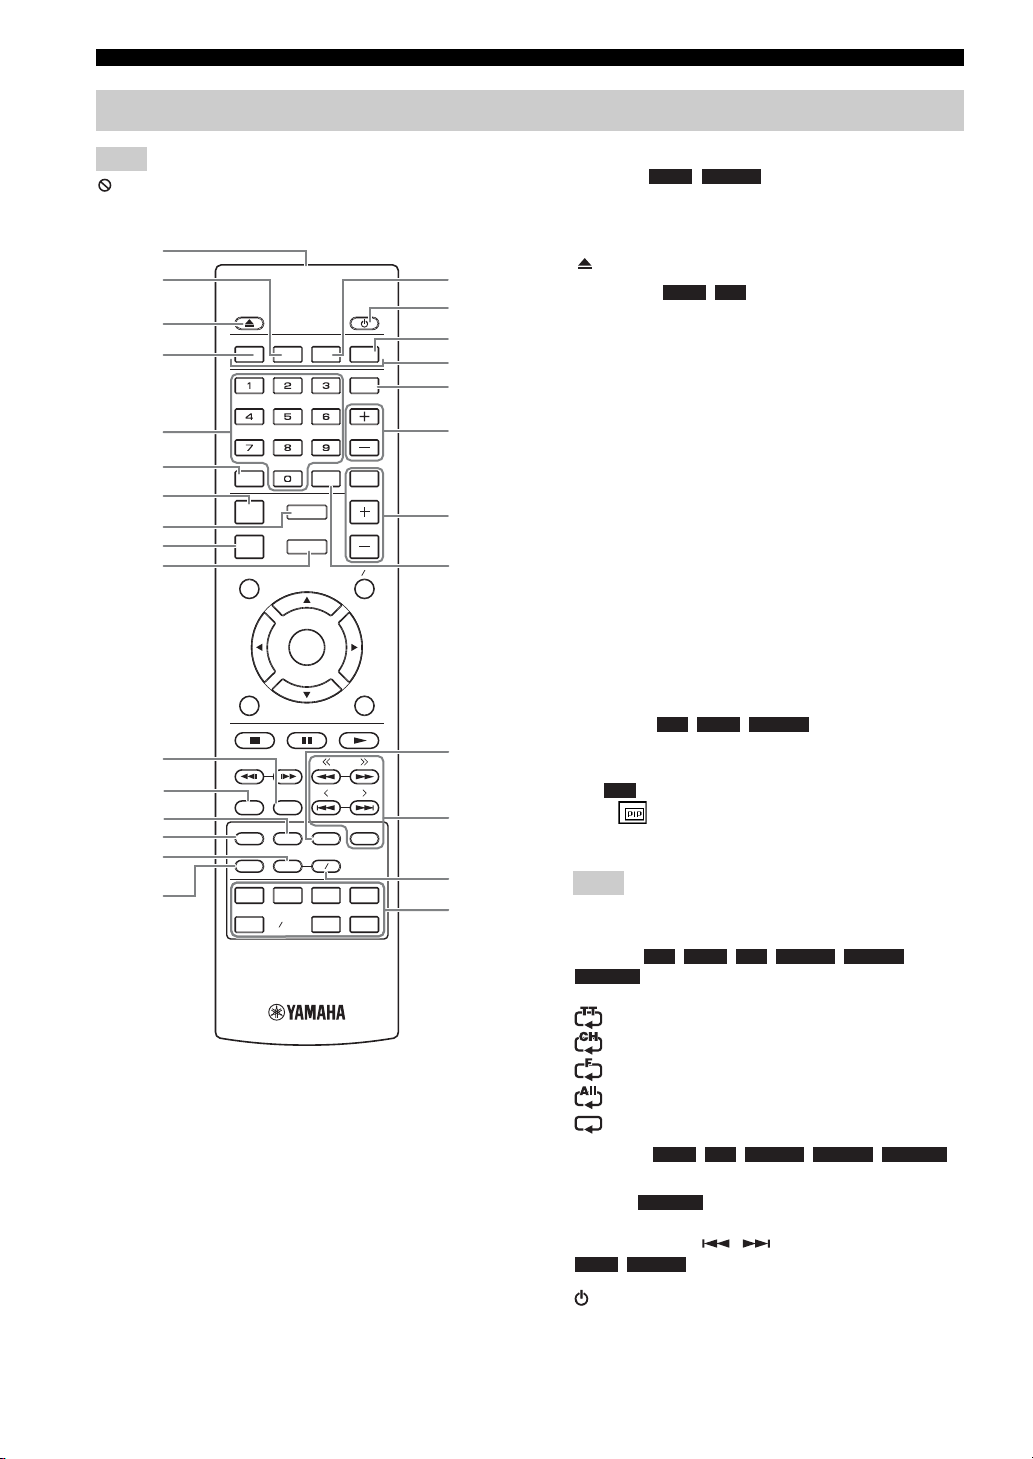
Remote control
Note
will appear on the top left corner of the screen when the
pressed button is not available.
1
2
3
4
5
6
7
8
9
0
A
B
C
D
E
F
PROGRAM MARKER DIGEST ZOOM
SLEEP
SW
MUTESEARCHCLEAR
SETUP
DISPLAY
OPTION
TOP MENU
RETURN ON SCREEN
DIMMER
STATUS
PIP
SUBTITLE
SHUFFLE
REPEAT
iPod
TV
DISC
USB NET
HOME
ENTER
AUDIO
A B
STB
AUX
VOLUME
POP-UP MENU
TUNING
PRESET
MEMORY
TUNER
PORTABLE
G
H
I
J
K
L
M
N
O
P
Q
R
1 Infrared signal transmitter (p. 10)
2 MARKER : Sets Bookmark at a specified
DVD VIDEO
point of a movie (p. 26). After Bookmark is set, press
DIGEST to select the set point you want to jump to. You can
set up to 12 Bookmarks.
3 : Opens/Closes the disc tray.
4 PROGRAM : Sets the order of playback
DVD CD
(p. 26). You can set up to 15 tracks of an audio disc or titles/
chapters of a DVD-Video disc.
5 Numeric buttons: Enters numbers, or during playback,
jumps to the track/chapter corresponding to the number you
input. These buttons may not be available depending on the
disc type and playback condition.
6 CLEAR: Clears entered number/set item.
7 DISPLAY: Switches the information shown on the front
panel display (p. 23, 29).
8 SETUP: Displays SETUP menu screen (p. 32).
9 OPTION: Enters option menu mode (p. 29).
0 HOME: Displays HOME menu screen (p. 20).
A STATUS: Displays the playback information on the screen
(p. 25).
B DIMMER: Changes brightness of the front panel display.
Choose brightness from normal (bright), mid dim, or dim by
pressing this button repeatedly.
C SUBTITLE : Changes subtitle
BD DVD VIDEO
languages (p. 50) if available. You can also select this item
from On Screen menu (p. 24).
D PIP : Turns on/off the Picture in Picture (p. 27). PIP
BD
Mark ( ) is displayed on the screen when this function is
available. You can also select this item from On Screen menu
(p. 24).
Note
PIP Mark is displayed only when [PIP Mark] is set to [On]
(p. 36).
E REPEAT
PHOTO
will change each time you press the button (p. 23, 25).
F SHUFFLE :
Selects shuffle play mode (p. 23, 24).
G DIGEST : Shows 12 photo thumbnails. When
thumbnails are displayed, you can proceed to the next/
previous page with / .
DVD VIDEO
H : Turns this unit on or sets it to standby mode.
BD DVD CD VIDEO MUSIC
: Selects repeat mode. Repeat mode shown below
: Repeats the title being played back.
: Repeats the chapter being played back.
: Repeats the folder being played back.
: Repeats all tracks/files on the disc/folder.
: Repeats the track/file being played back.
DVD CD VIDEO MUSIC PHOTO
PHOTO
: Displays Bookmark select bar (p. 26).
6 En

PART NAMES AND FUNCTIONS
\
I ZOOM : Zooms in/out. The
J Color buttons : Use these buttons according to on-
K SLEEP: Sets to sleep mode (p. 30).
L Subwoofer volume control buttons
M Volume control buttons: Controls the volume level.
N SEARCH : Jumps
O AUDIO : Changes the audio language or
P FM control buttons
Q A/B : Plays back a
DVD VIDEO PHOTO
size of the screen will change each time you press the button
(zoom in/out: 3 steps each).
screen instructions.
: Controls the subwoofer volume
CD VIDEO MUSIC
level (p. 12).
Press MUTE to turn off the volume. Press again to resume
the volume.
to a specified point during playback. For details on this
function, refer to “Using search” (p. 26). You can also select
this item from Status menu (p. 25).
format. You can also select from On Screen menu (p. 24).
TUNING << / >>: Starts manual tuning. Press and hold to
start automatic tuning (p. 28).
PRESET < / >: Selects preset station (p. 28).
MEMORY: Starts preset tuning and stores preset stations
(p. 28).
BD DVD CD VIDEO MUSIC
specific part you want to repeat.
1 Press A/B at the scene where you want to set the start
point. [A-] is displayed on the screen.
2 Press A/B again at the scene where you want to set the end
point. [A-B] is displayed on the screen.
Repeat playback starts.
3 To cancel the repeat playback, press A/B. [A-B]
disappears and the repeat playback is finished.
BD
BD DVD
BD DVD CD VIDEO MUSIC
BD DVD
Note
This function cannot be performed depending on the
specifications of the disc.
R Input select buttons: Selects the input source (p. 18, 28).
INTRODUCTION
Continued to the next page.
English
7 En
PART NAMES AND FUNCTIONS
S
t
U
PROGRAM MARKER DIGEST ZOOM
SLEEP
SW
MUTESEARCHCLEAR
SETUP
DISPLAY
OPTION
TOP MENU
RETURN ON SCREEN
DIMMER
STATUS
PIP
SUBTITLE
SHUFFLE
REPEAT
iPod
TV
DISC
USB NET
HOME
ENTER
AUDIO
A B
STB
AUX
VOLUME
POP-UP MENU
TUNING
PRESET
MEMORY
TUNER
PORTABLE
V
W
X
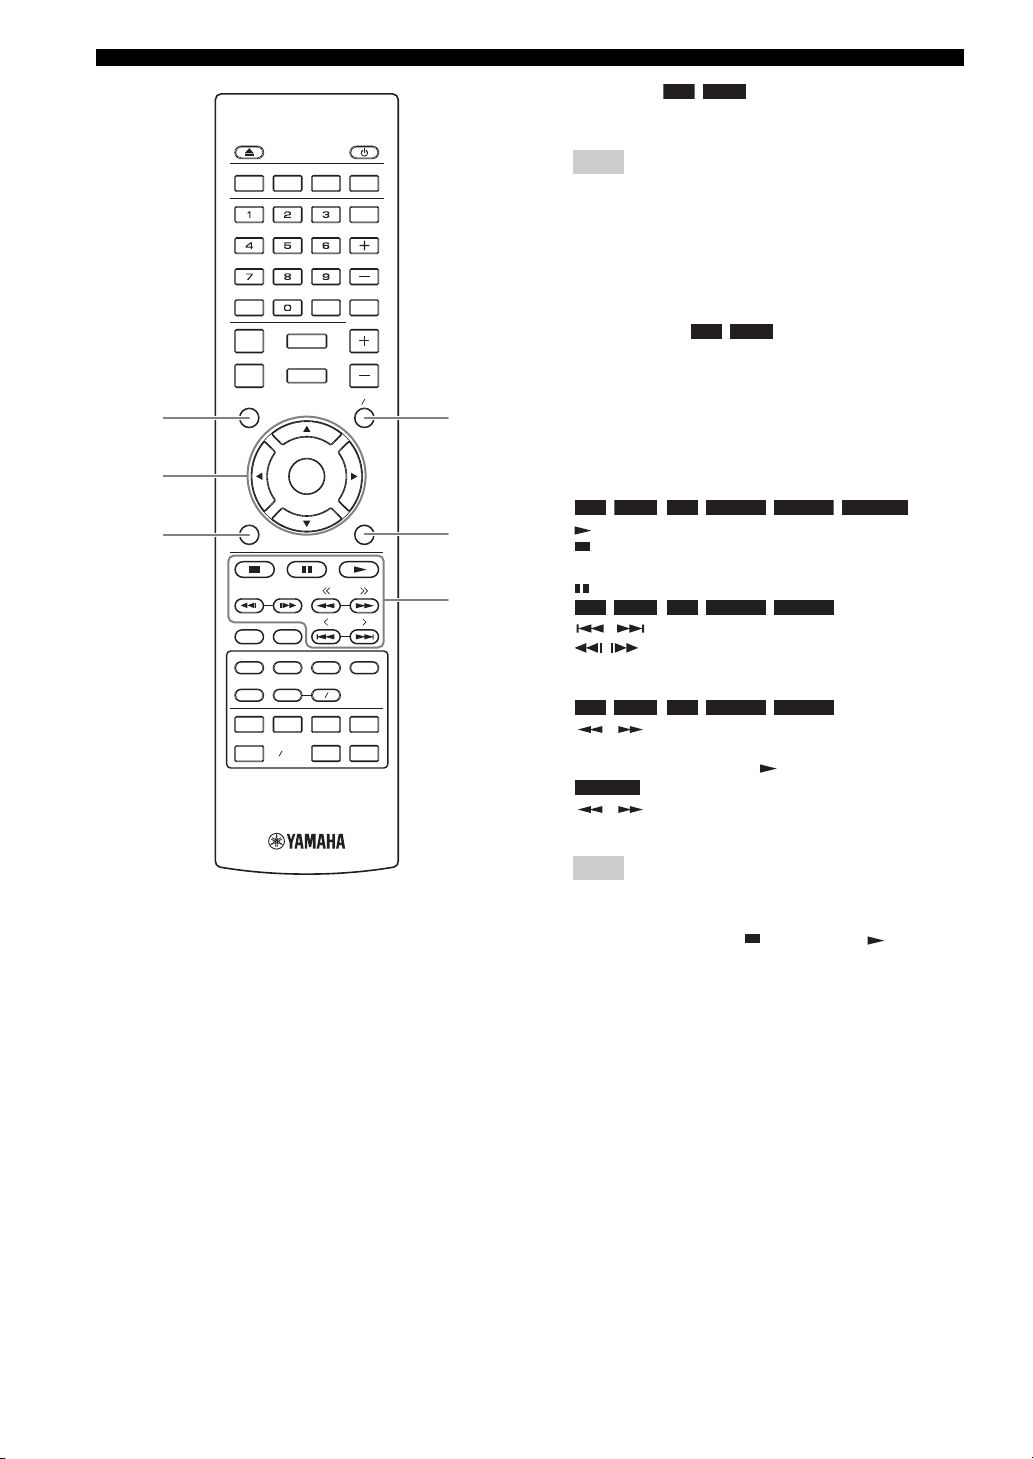
S TOP MENU : Displays the top menu screen
BD DVD
(p. 51) if the disc contains a menu. Select the desired item
using 5 /a /2 /3 and ENTER.
Note
Specific operations may be different depending on the disc.
Follow the instructions of each menu screen.
T Cursor buttons (5/a /2 /3): Moves to select the focused
item.
ENTER: Confirms the focused menu/item.
U RETURN: Returns to the previous menu or screen, etc.
V POP-UP/MENU : Displays pop-up menu. The
menu contents displayed vary depending on the disc. For
details on how to see and operate the pop-up menu, refer to
the manual for the disc. The top menu screen may be
displayed by pressing POP-UP/MENU depending on the
disc.
W ON SCREEN: Displays On Screen menu (p. 24).
X Control buttons
:
BD DVD CD VIDEO MUSIC PHOTO
: Plays back contents.
: Stops playback. To stop playback completely, press this
button twice.
: Pauses playback.
:
BD DVD CD VIDEO MUSIC
/ : Skips backward/forward.
/ : Press for instant search/replay. Instant search
skips the content 30 seconds. Instant replay replays the
content from 10 seconds before.
:
BD DVD CD VIDEO MUSIC
/ : Searches backward/forward. The search speed
will change each time you press the button (search backward/
forward: 5 steps each). Press to resume normal playback.
PHOTO
/ : Changes the speed of a slide show (slower/
faster: 3 steps).
BD DVD
:
8 En
Note
Depending on the disc, this unit resumes playback from the
point where the unit was previously stopped. To play back
from the beginning, press and then press .
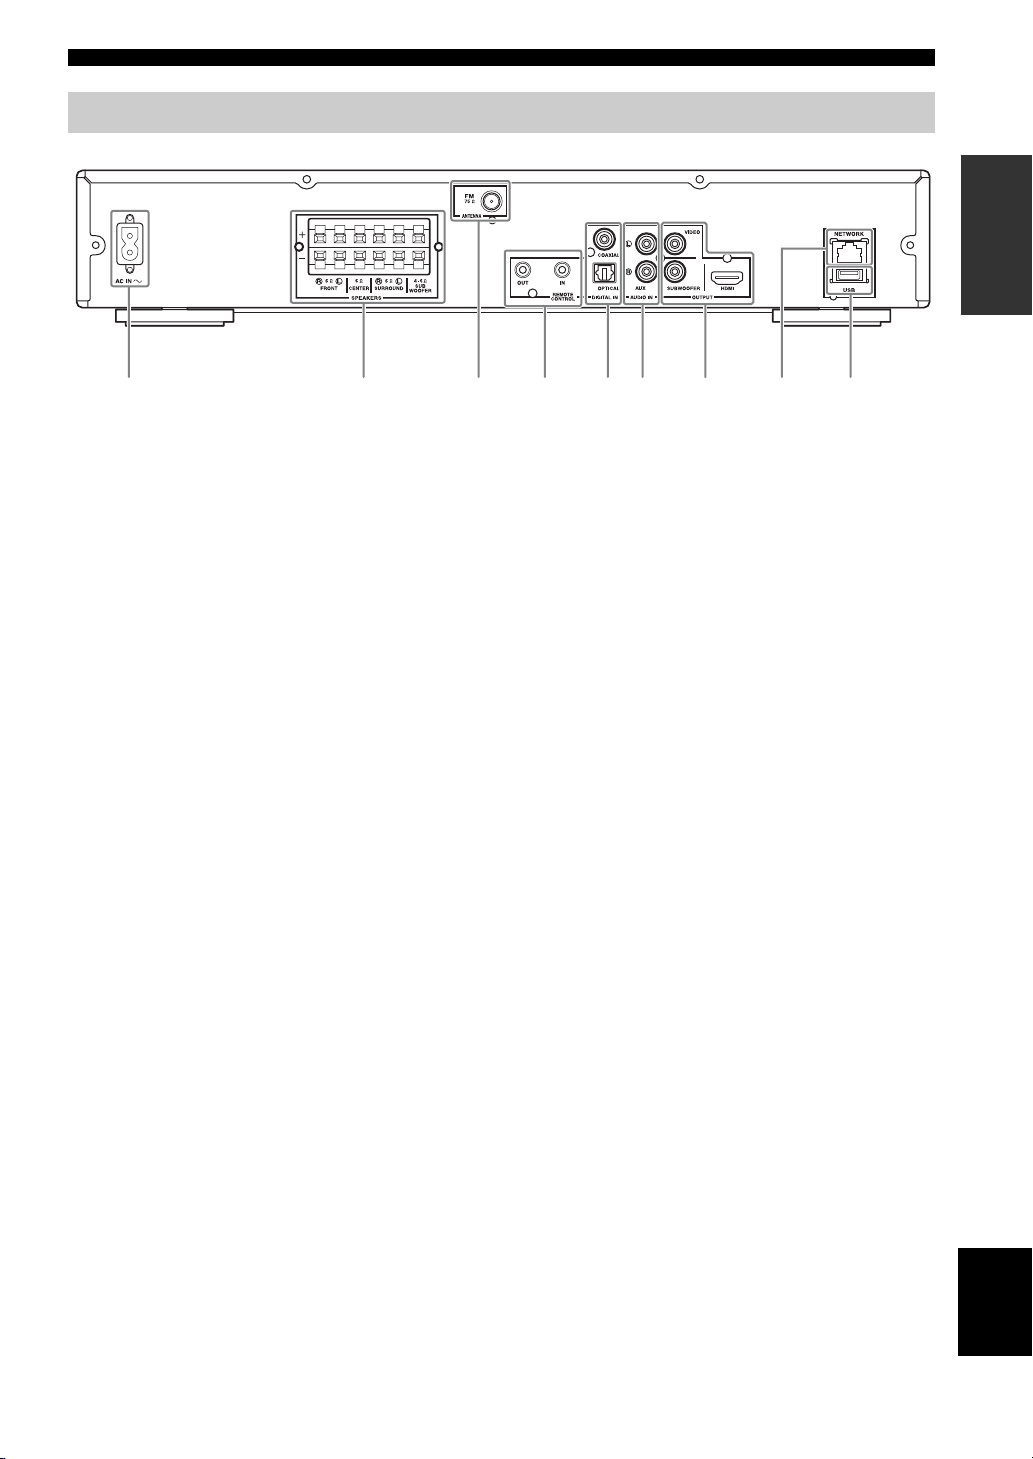
Rear panel
PART NAMES AND FUNCTIONS
INTRODUCTION
2 4 5 6 7 8931
1 AC IN jack (p. 16):
Connect the supplied power cable.
2 SPEAKERS terminals (p. 11):
Connect speakers.
3 ANTENNA jack (p. 12):
Connect an FM antenna.
4 REMOTE CONTROL (IN/OUT) jacks (U.S.A.
and Canada models only):
Connect other components for remote control.
5 DIGITAL IN (COAXIAL/OPTICAL) jacks
(p. 13, 14):
Connect your satellite or cable TV tuner to the
COAXIAL jack. The OPTICAL jack is for the audio
signal from your TV when your TV is not ARC (Audio
Return Channel) supported.
6 AUDIO IN (AUX) jacks (p. 14):
Connect other audio devices such as a CD or MD
player.
7 OUTPUT (VIDEO/SUBWOOFER/HDMI) jacks
(p. 12, 13):
The VIDEO jack outputs analog video signal.
Use the SUBWOOFER jack when you are using an
active subwoofer speaker (built-in amplifier).
Use the HDMI jack to connect to your TV.
8 NETWORK (LAN) jack (p. 15):
Connect your hub or broadband router.
9 USB jack (p. 15):
Connect a USB memory device.
9 En
English
PART NAMES AND FUNCTIONS
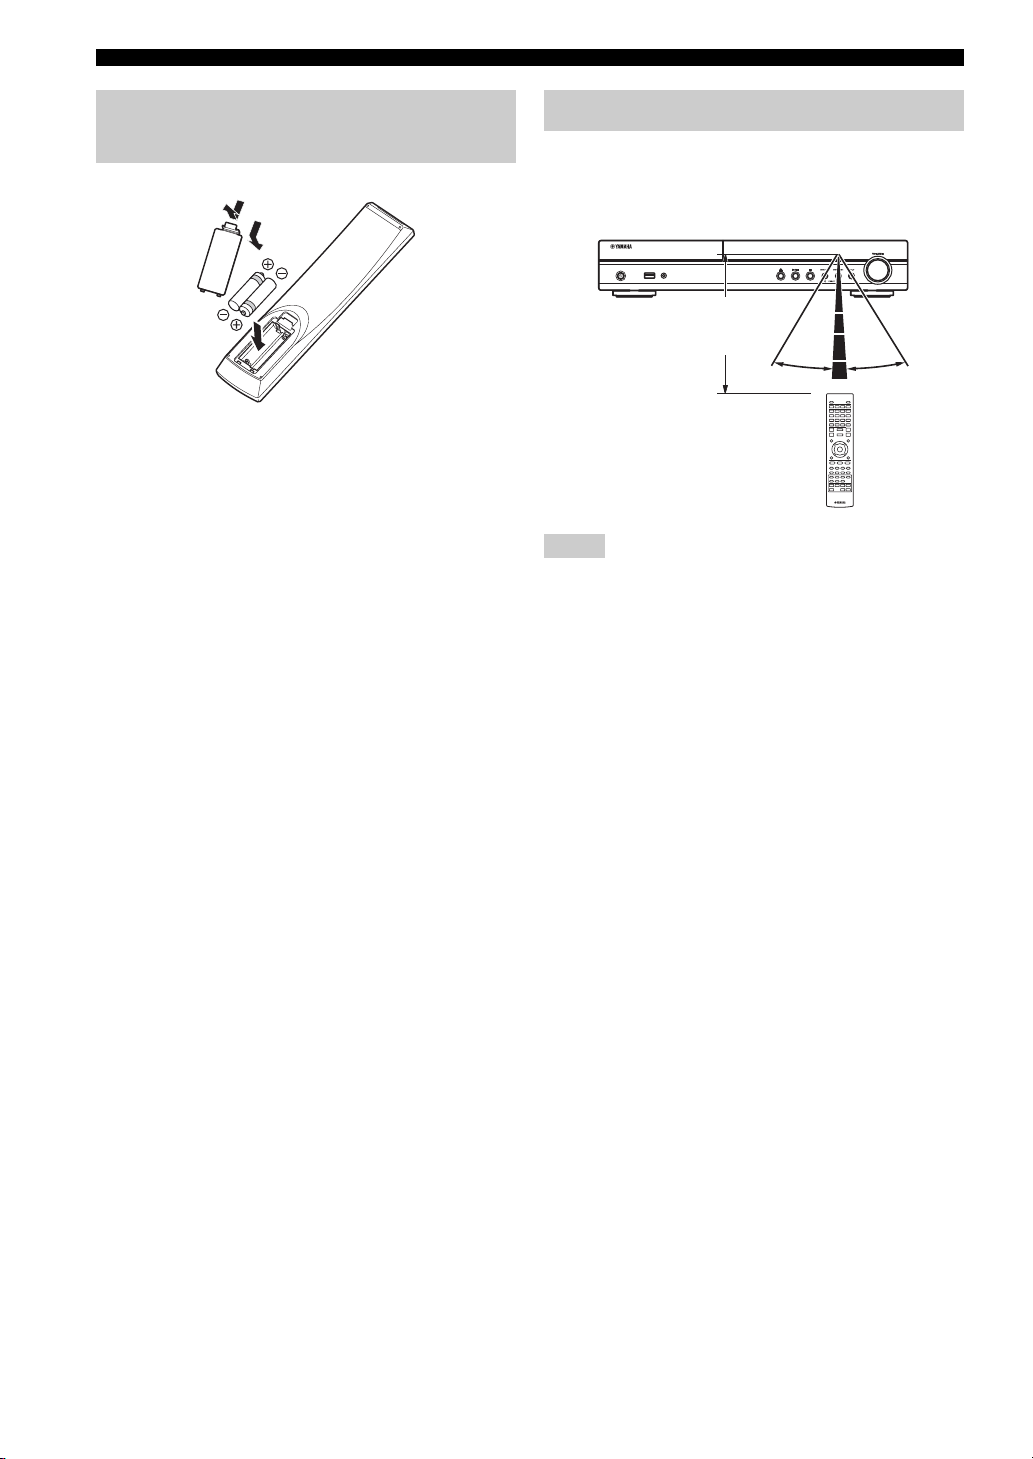
2
Installing the batteries in the
remote control
1
3
2
■ Notes on batteries
• Change both batteries when the operation range of the remote
control decreases.
• Use AAA, R03, UM-4 batteries.
• Make sure that the polarities are correct. Refer to the illustration
inside the battery compartment.
• Remove the batteries if the remote control is not to be used for
an extended period of time.
• Do not use old batteries together with new ones.
• Do not use different types of batteries (such as alkaline and
manganese batteries) together. Read the packaging carefully as
these different types of batteries may have the same shape and
color.
• If the batteries have leaked, dispose of them immediately.
Avoid touching the leaked material or letting it come into
contact with clothing, etc. Clean the battery compartment
thoroughly before installing new batteries.
• Do not throw away batteries with general house waste; dispose
of them correctly in accordance with your local regulations.
• Keep batteries away from children. If a battery is accidentally
swallowed, contact your doctor immediately.
• When not planning to use the remote control for long periods of
time, remove the batteries from the remote control.
• Do not charge or disassemble the supplied batteries.
Using the remote control
The remote control transmits a directional infrared beam.
Be sure to aim the remote control directly at the remote
control sensor on the front panel of this unit during
operation.
USB PORTABLE
iPod/iPhone
Within 6 m
(20 feet)
30˚ 30˚
Notes
• The area between the remote control and this unit must be clear
of large obstacles.
• Do not spill water or other liquids on this remote control.
• Do not drop the remote control.
• Do not leave or store the remote control in the following types
of conditions:
– high humidity, such as near a bath
– high temperature, such as near a heater or a stove
– extremely low temperatures
– dusty places.
• Do not expose the remote control sensor to strong lighting, in
particular, an inverter type fluorescent lamp; otherwise, the
remote control may not work properly. If necessary, position
the system away from direct lighting.
10 En
PREPARATIONS
CONNECTION
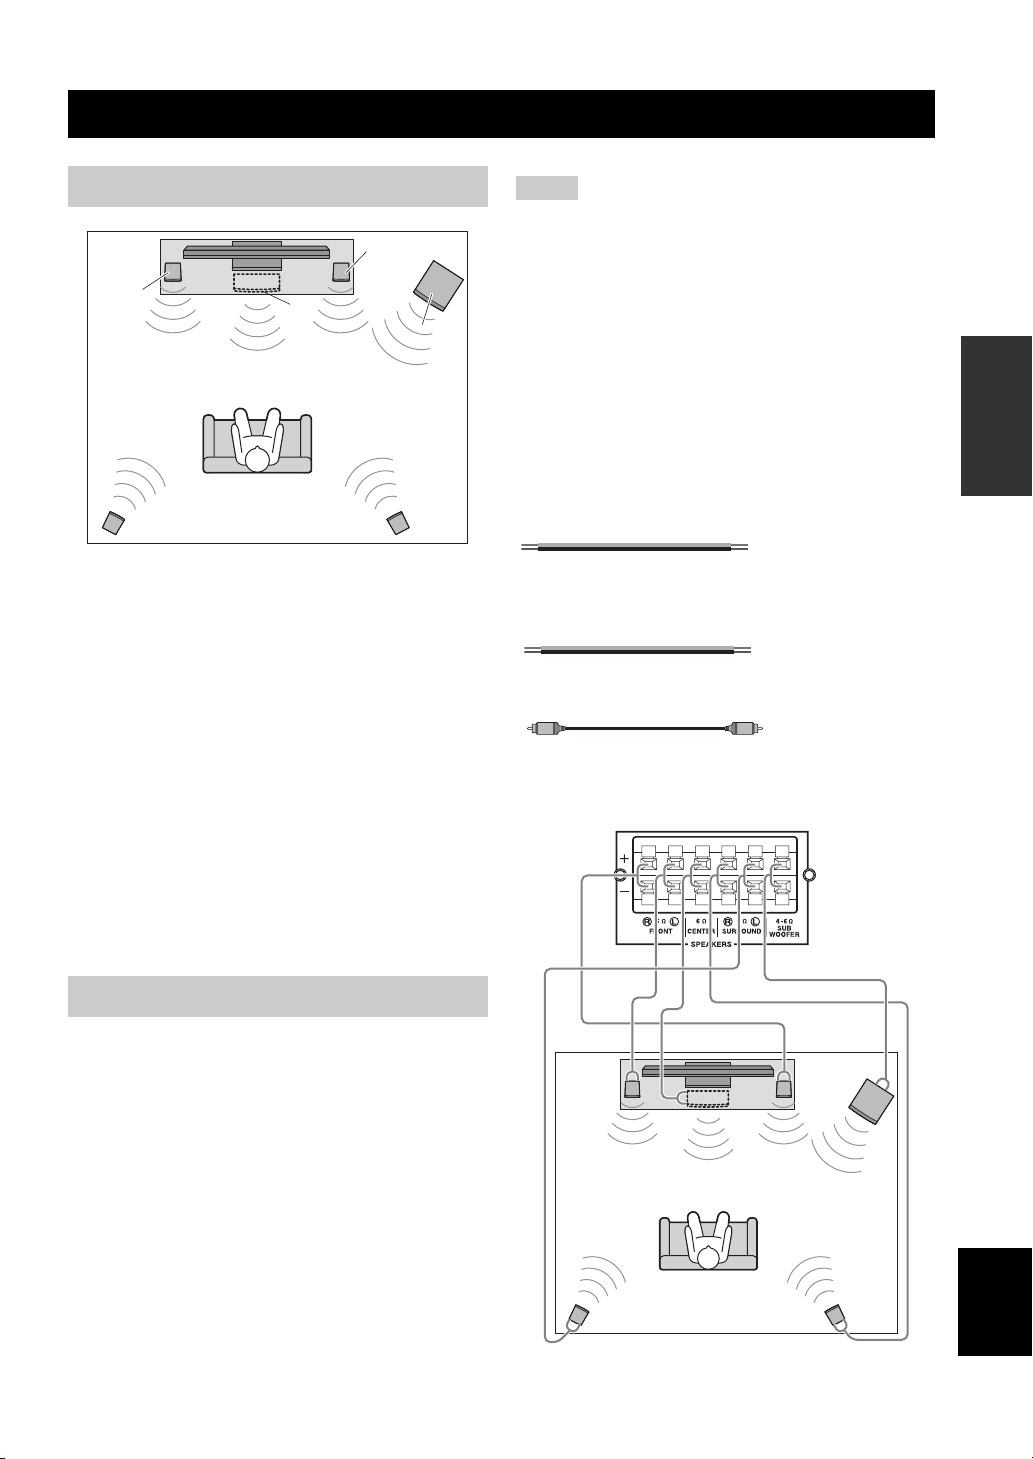
5.1-channel speaker layout
FR
FL
SL
Front speakers (FR and FL):
For the front channel sound (stereo sound) and effect
sound.
Center speaker (C):
For the center channel sound (dialogue, vocals, etc.).
Surround speakers (SR and SL):
For effect and vocal sound from surround channel. The
surround back channel sound is output from the surround
speakers when a disc which has 7.1- or 6.1-channel
sounds is played back.
C
SW
SR
Notes
• Disconnect the power plug before connecting speakers.
• When connecting speakers, use speakers having more than 6Ω
impedance for the front, center and surround speakers, and 4Ω
to 6Ω impedance for a passive subwoofer. For an active
subwoofer (built-in amplifier), you need not be concerned about
impedance.
• When connecting an active subwoofer (built-in amplifier), be
sure turn it off before connecting to the unit.
• Be careful that the core of the speaker cable does not touch
anything or come into contact with the metal areas of the unit.
This may damage the unit or the speakers.
■ Necessary cables (not supplied)
When the subwoofer is passive:
• Speaker cables × 6
+
–
When the subwoofer is active:
• Speaker cables × 5
+
–
• Monaural pin cable (for subwoofer) × 1
The rear panel of this unit
(when the subwoofer is passive)
+
–
+
–
PREPARATIONS
Subwoofer (SW):
For low-frequency effect (LFE) sound and bass sound
from front and surround channels.
Connecting speakers
Connect speakers to the unit.
When you are using a subwoofer speaker, check if it is
active (built-in amplifier, with power cable) or passive
(not built-in amplifier, without power cable). The cable
used for connecting a subwoofer differs depending on the
subwoofer type.
After connecting the speakers, setting according to the
speaker type (size, number of available speakers, etc.) is
required. See page 39 for speaker setting.
English
11 En
CONNECTION
3
4
2
1
■ Connecting speaker cables
Each speaker has two speaker cables. One is for
connecting the – (negative) terminal of the unit and the
speaker, and the other is for the + (positive) terminal. The
cables are different colors, so they do not get mixed up.
Connect the black side to the – (negative) terminal and the
other side to the + (positive) terminal.
2
4
1
3
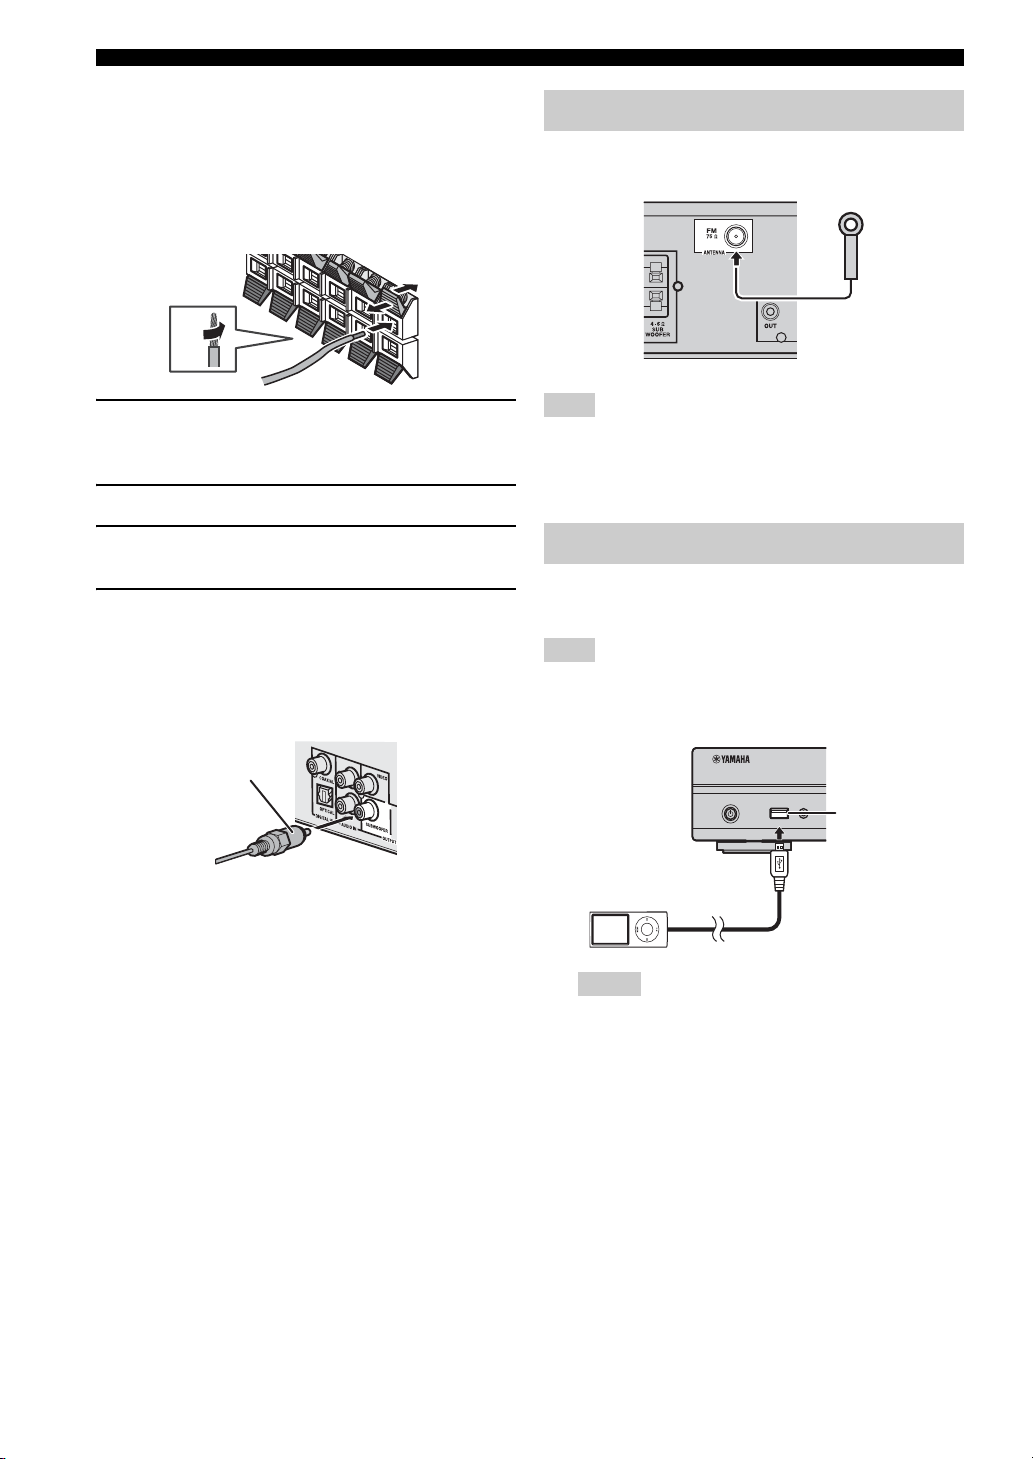
Connecting the FM antenna
You can enjoy listening to FM radio stations by
connecting the supplied indoor FM antenna.
1 Remove approximately 10 mm of insulation from the
end of the speaker cable and twist the bare wire
firmly.
2 Press the tab on the speaker terminal down.
3 Insert the bare wire of the speaker cable into the
terminal.
4 Lift the tab to secure the speaker cable.
■ Connecting an active subwoofer
When connecting an active subwoofer (built-in amplifier),
use a monaural pin cable. Before connecting an active
subwoofer, turn it off.
Monaural pin cable
About subwoofer speaker
• Use the speaker terminal to connect a passive
subwoofer speaker. Use the SUBWOOFER output jack
to connect an active subwoofer speaker (built-in
amplifier).
• You can adjust the subwoofer volume level by using
this unit’s remote control. For an active subwoofer
speaker (built-in amplifier), you can also use the control
on the subwoofer to adjust volume level. Use these
functions to decrease the volume level if strange noise
or sound is output from the subwoofer.
• If you are not using a subwoofer speaker, select SETUP
menu = [Audio Setting] = [Speaker Setting] =
[Configuration] = [SW] = [Disable].
Note
If there is a problem of weak radio wave reception in your area or
you want to improve radio reception, we recommend that you use
commercially available outdoor antennas. For details, consult the
nearest authorized Yamaha dealer or service center.
Connecting iPod
You can enjoy music stored in your iPod by connecting it
to this unit.
Note
This unit is compatible with iPod classic, iPod nano (2nd, 3rd,
4th, 5th and 6th generation), iPod touch (1st, 2nd, 3rd, and 4th
generation), iPhone, iPhone 3G/3GS, and iPhone 4.
USB PORTABLE
iPod/iPhone
Notes
• Make sure the USB cable is connected securely between
your iPod and this unit.
• Connect your iPod to the front USB port of this unit. The
rear USB port is not compatible with your iPod.
USB port
12 En
CONNECTION
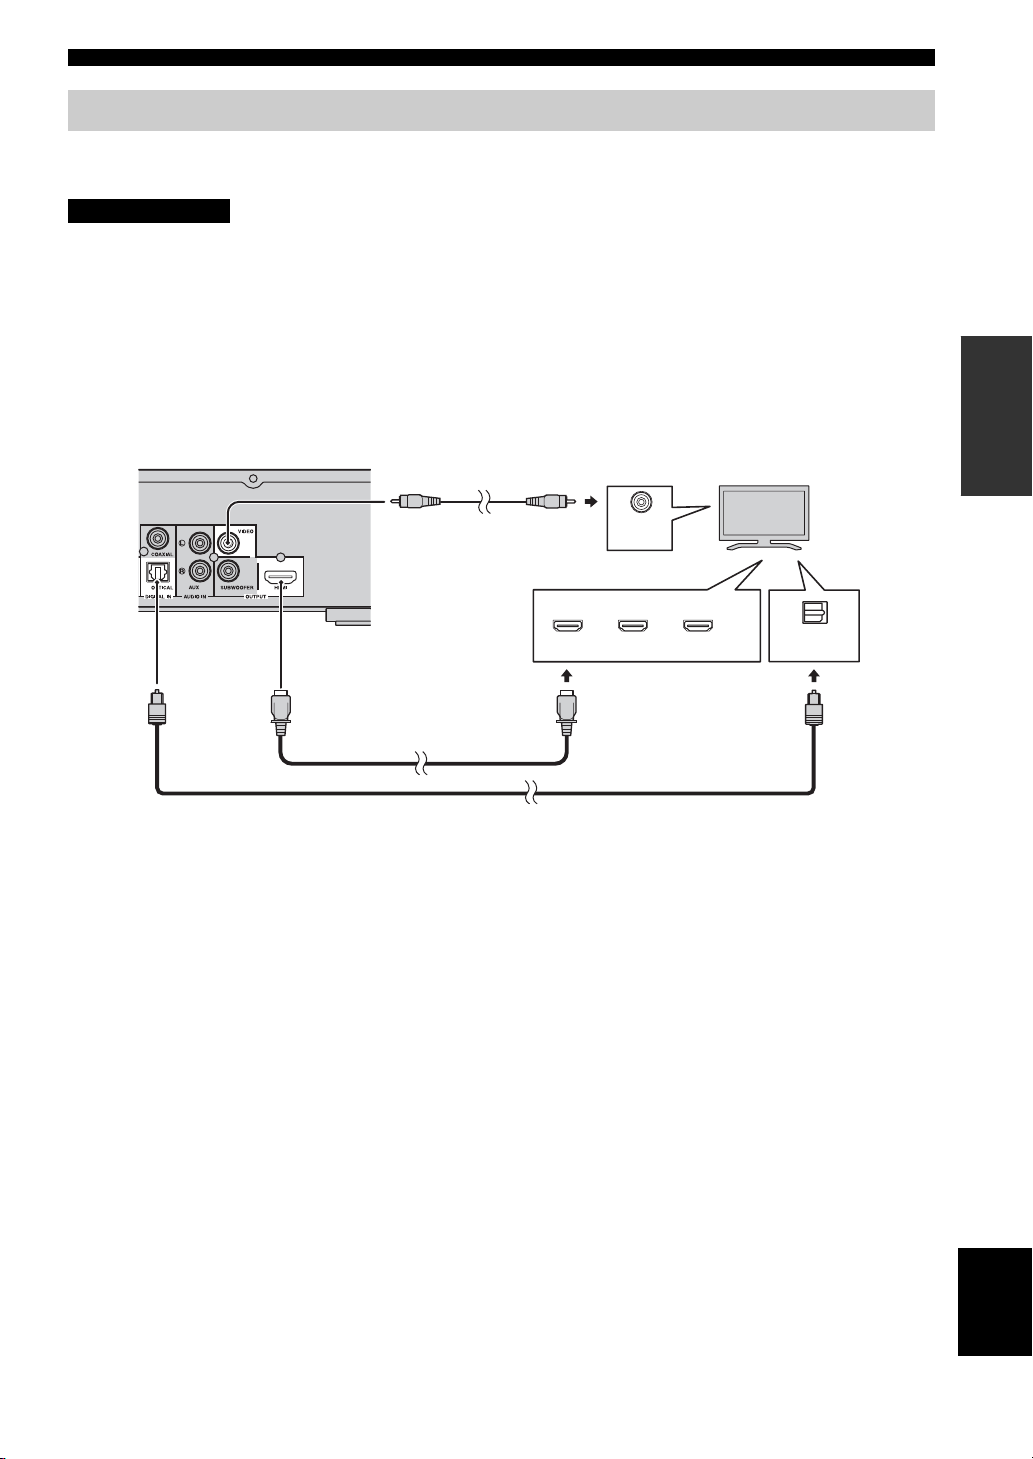
Connecting to a TV
Make sure you refer the following illustration carefully so that connections between this unit and your TV are properly
made.
CAUTION
Do not connect the power cable of this unit until all connections are completed.
1 Connect your TV using an HDMI cable (commercially available). The digital video signal is output from this unit to
your TV. If your TV’s HDMI terminal is ARC (audio return channel) supported, steps 2 to 3 are not necessary since
digital audio signal is output from the TV to the unit through the HDMI cable.
2 Connect your TV using an optical cable (commercially available) to play back TV digital audio through this unit.
3 If an HDMI connection is unavailable, connect your TV using a video pin cable. Analog video signal is output from
this unit to your TV.
PREPARATIONS
This unit
3 Composite video cable
(supplied)
1 HDMI cable
(commercially available)
■ HDMI connection
• You can enjoy high quality digital picture and sound
through the HDMI terminals.
• Firmly connect an HDMI cable (commercially
available) to the HDMI terminal of this unit.
• Use HIGH SPEED HDMI cables that have the HDMI
logo (p. 52).
y
• When you use the HDMI control function, refer to “Operating
this unit by TV remote control (the HDMI control function)”
(p. 30) and “[HDMI Control]” (p. 35).
• For information on the output mode of the HDMI terminal,
refer to “[HDMI]” (p. 39).
• When no picture is displayed, refer to
“TROUBLESHOOTING” (p. 42).
■ Connection for the playback of Blu-ray
3D discs
You need the following equipment and connections to
enjoy BD 3D discs on this unit:
–a TV that has 3D functionality.
– a TV and this unit must be connected with HDMI
cables.
– a BD disc should contain 3D images.
TV
VIDEO
AV INPUT
HDMI IN
1 2 3
(ARC)
OPTICAL
DIGITAL AUDIO OUT
2 Optical cable
(commercially available)
■ About audio return channel (ARC)
supported TV
• You can connect an HDMI cable to the audio return
channel supported terminal (the terminal with “ARC”
indicated) on the TV. In this case, you do not need to
connect an optical cable.
• You need to activate the HDMI control function of this
unit so as to activate audio return channel (ARC) (
What is audio return channel (ARC)?
This function allows digital audio signal to be output from
a TV to this unit through an HDMI cable, without using an
optical cable.
y
If your TV is not ARC supported, connect the TV and this unit
via the OPTICAL jack on the unit.
p. 35).
English
13 En
CONNECTION
USB PORTABLE
iPod/iPhone
■ Video connection
• Firmly connect the composite video cable (supplied) to
the VIDEO jack.
• Refer to page 40 for information on the video output
formats.
Notes
• If you play back the image via VCR, the image may deteriorate
due to the copy guard function.
• To enjoy BD 3D discs on this unit, you need to connect a TV
and this unit using HDMI cables (commercially available).
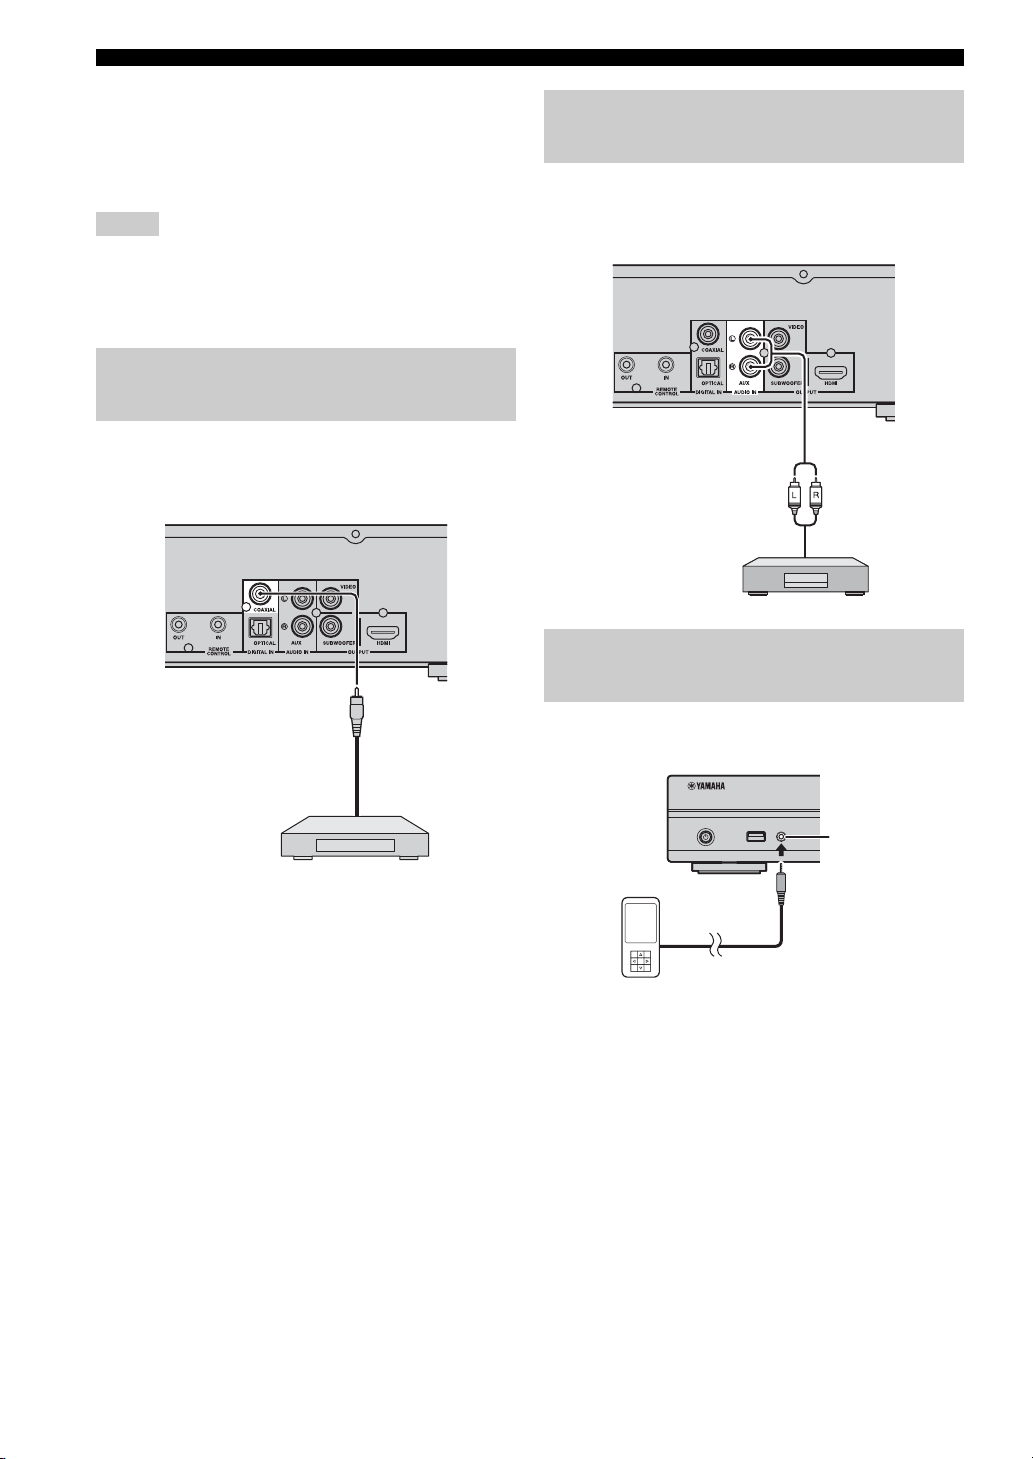
Connecting a satellite/cable TV
tuner
You can connect a satellite or cable TV tuner that is not
HDMI supported using a digital audio pin cable.
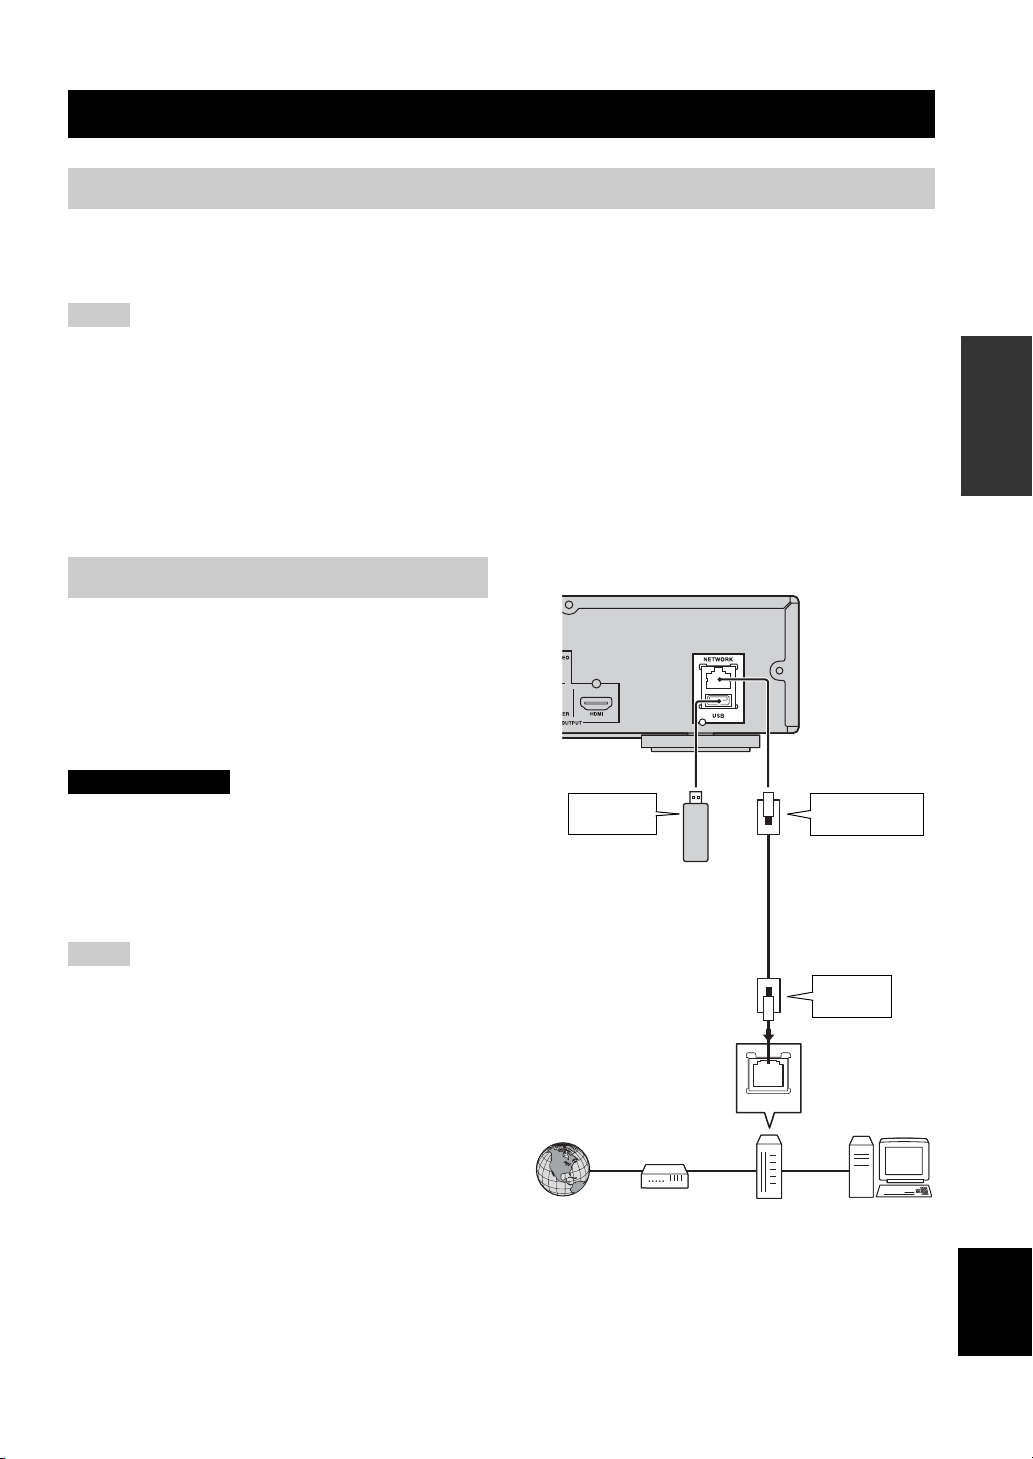
Connecting audio devices (such as
a CD or MD player)
You can connect audio devices (such as a CD player, MD
player, etc.) to the unit.
y
To connect a satellite or cable tuner to TV, you need extra video
pin cables (commercially available).
Connecting a portable digital
music player other than iPod
You can connect a portable digital music player other than
iPod to the front panel of this unit.
PORTABLE
14 En
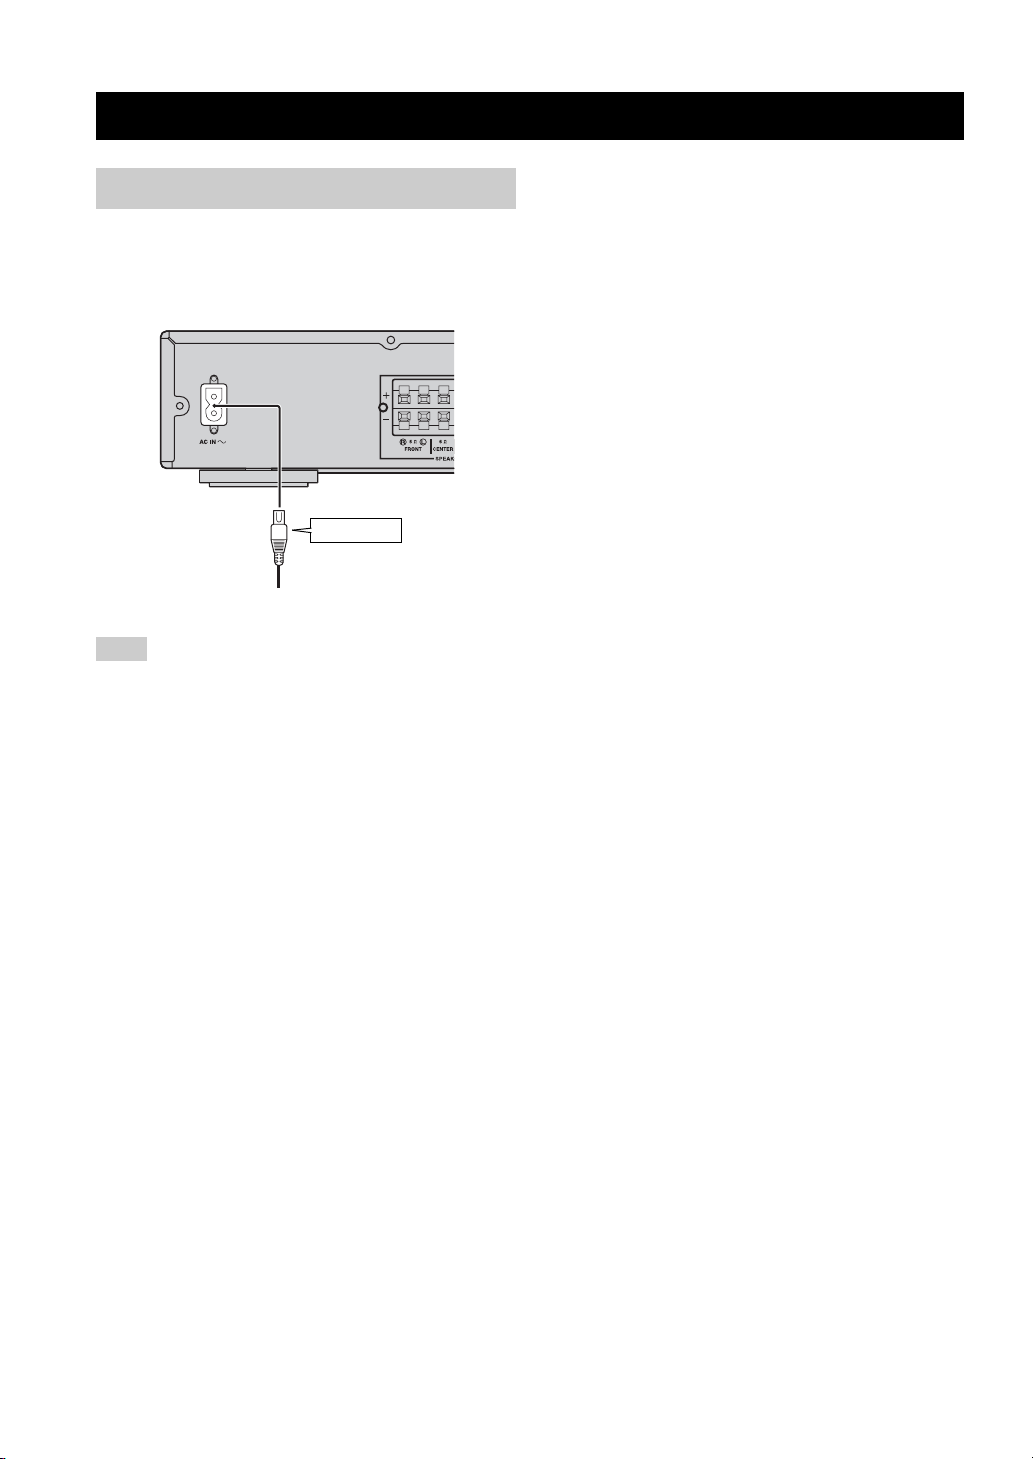
NETWORK AND USB CONNECTION
Connecting to the NETWORK terminal
• PC contents can be played back by connecting this unit to the network.
• You can enjoy a variety of contents with interactive functions by connecting to the internet when playing BD-Live
compatible discs. Refer to page 27 for information on BD-Live functions.
Notes
• Firmly connect a network cable (commercially available) to the NETWORK terminal.
• Use only an STP (shielded twisted pair) network cable.
• When using the internet, a broadband internet connection as shown below is required.
• Connect the other connector of the network cable to the hub/broadband router.
• When using a broadband internet connection, a contract with an internet service provider is required. For more details, contact your
nearest internet service provider.
• Refer to the operation manual of the equipment you have as the connected equipment and connection method may differ depending on
your internet environment.
• Use a network cable/router supporting 10BASE-T/100BASE-TX.
PREPARATIONS
Connecting to the USB port
• You can connect a USB memory device (2 GB or
greater and formatted with FAT 32/16) for BD Local
Storage to the USB port on the rear panel (or front
panel) of this unit to save the BD-Live data (p. 27) or to
upgrade the software of this unit (p. 41).
• Firmly connect a USB memory device (commercially
available) to the USB port.
CAUTION
• Do not remove the USB memory device or unplug the power
cable while the operations for BD-Live or software upgrade are
being performed.
• Do not use a USB extension cable when connecting a USB
memory device to the USB port of this unit. Using a USB
extension cable may prevent the unit from performing correctly.
Notes
• Yamaha cannot guarantee that all brands’ USB memory devices
will operate with this unit.
• For more notes on using USB memory devices, refer to
page 18.
This unit
To USB
port
USB memory
device
(commercially
available)
y
To save BD-Live data on the USB
memory device on the front
panel, set [Local Storage] to
[Front USB] (p. 35).
To NETWORK
terminal
Network cable
(commercially
available)
To LAN
terminal
LAN
Internet
Modem
■ After connecting
• When you set the Network setting manually, refer to “Network” (p. 36).
• To play back the PC contents on your network, refer to “Using network content” (p. 22).
Hub or
broadband router
PC
English
15 En
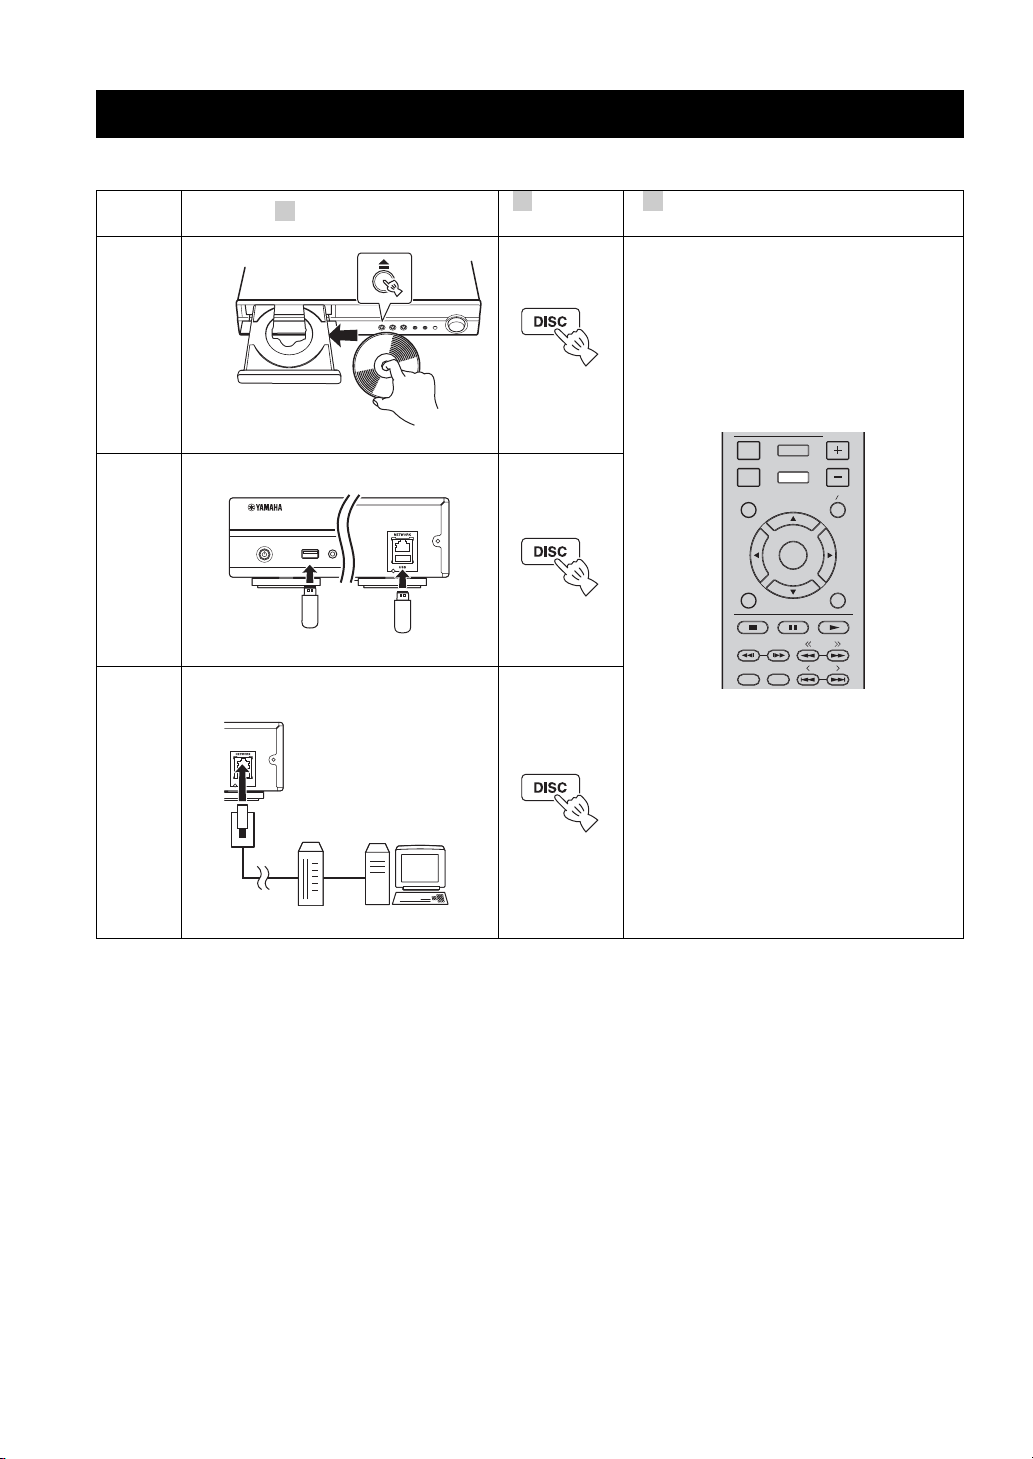
OTHER CONNECTION
Connecting the power cable
After all connections are completed, plug the supplied
power cable into the AC IN on the rear of this unit. Then
plug into AC outlet.
To AC inlet
To AC outlet
Note
TO PREVENT RISK OF ELECTRIC SHOCK, DO NOT
TOUCH THE UN-INSULATED PARTS OF ANY CABLES
WHILE THE POWER CABLE IS CONNECTED.
16 En

OPERATIONS
INITIAL WIZARD/EASY SETUP
Setting with the Initial Wizard/Easy
Setup
Initial Wizard/Easy Setup allows you to set language,
resolution, and screen aspect ratio easily. Initial Wizard
screen is displayed when you turn this unit on for the first
time after purchase or upgrade. Same setting can be
performed from SETUP menu = [System] = [Easy
Setup] (p. 32).
1 When Easy Setup screen is displayed, press ENTER
to start Easy Setup.
2 Press 5/a to select the language you want to display
on the screen, then press ENTER.
4 Press 5 /a to select the screen aspect ratio, then
press ENTER. For details on setting items, refer to
“[TV Screen]” (p. 37).
Easy Setup is completed.
OPERATIONS
5 Press ENTER to exit Easy Setup.
3 Press 5/a to select the resolution, then press
ENTER. For details on setting items, refer to “[Video
Out Select]” (p. 37).
Note
When you connect your TV and this unit via the VIDEO
jack, select [Composite].
Notes
• When no picture is displayed after Initial Wizard/Easy Setup is
completed, refer to “TROUBLESHOOTING” (p. 42).
• A warning message concerning 3D video playback appears
when this unit is turned on. Press ENTER to dismiss the
message or CLEAR to disable it (p. 35).
English
17 En
BASIC OPERATION
Follow the procedures below to play back the source.
1
Set the source
Disc
2 3
Switch the
input
Refer to the following pages for more
operations
USB
p. 20, 23
Front Rear
*1
USB PORTABLE
iPod/iPhone
DISPLAY
OPTION
TOP MENU
RETURN ON SCREEN
p. 15, 20
DIMMER
Network
(PC contents
and
YouTube*2)
p. 15, 22
1
*
· Some devices may not work properly even if they meet the requirements.
· Playability of and power supply to all kind of USB devices are not guaranteed.
· The reading time may exceed 30 seconds depending on the number of files/folders.
· Yamaha and suppliers accept no liability for the loss of data saved on the USB devices connected to this unit.
As a precaution, it is recommended that the files are made backup copies.
*2 Available for Russia and Asia models only.
STATUS
SETUP
HOME
ENTER
VOLUME
POP-UP MENU
TUNING
PRESET
18 En
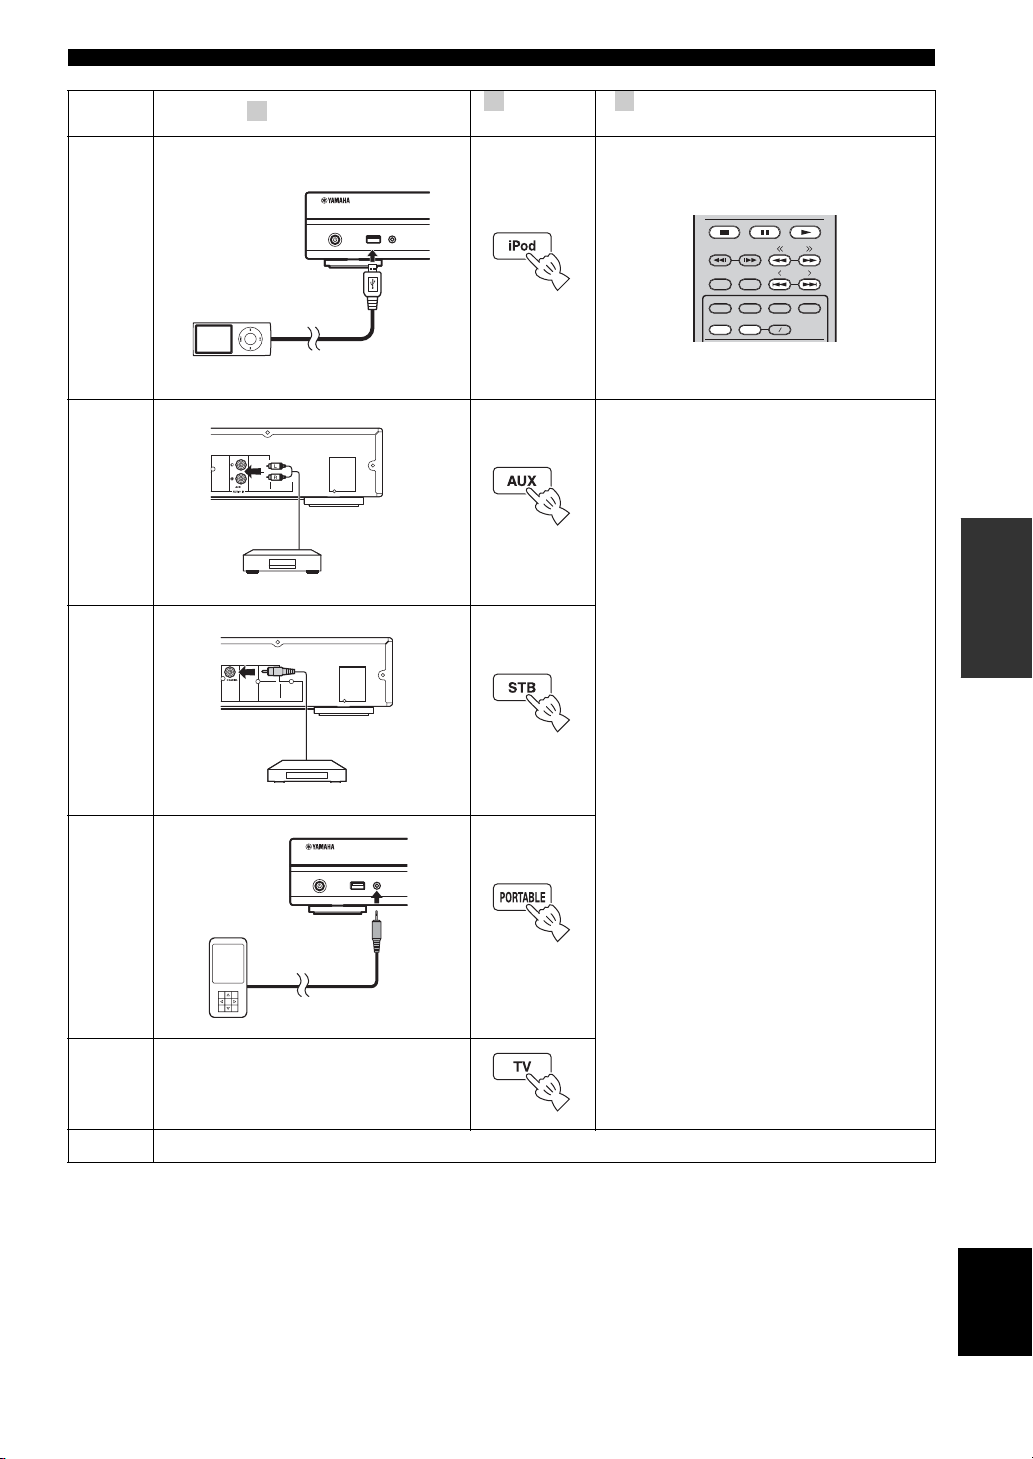
iPod
USB PORTABLE
iPod/iPhone
BASIC OPERATION
2 3
1
Set the source
iPod/iPhone
USB PORTABLE
Switch the
input
*1
Refer to the following pages for more
operations
TUNING
STATUS
SUBTITLE
REPEAT
AUDIO
A B
PRESET
MEMORY
DIMMER
PIP
SHUFFLE
p. 12, 23
AUX
STB
Portable
TV
To AUX
p. 14
To COAXIAL
p. 14
p. 14
To output TV sounds, refer to page 13
for connection.
OPERATIONS
For details on operation, refer to the
instruction manual supplied with the
connected device.
FM
To receive FM radio stations, refer to page 28.
*1Some features may not be available depending on the model or the software version of your iPod.
English
19 En
BASIC OPERATION
Playing back photo/music/video
HOME and MEDIA menus allow you to browse and play
multi-media files on data discs, USB memory devices and
your network.
Note
For details on playable discs and files, refer to page 3.
■ Common operations for playing back
files in a selected folder
Example: Selecting a movie file on a USB memory
device
Note
Stop the playback of the video before you move to MEDIA menu
screen.
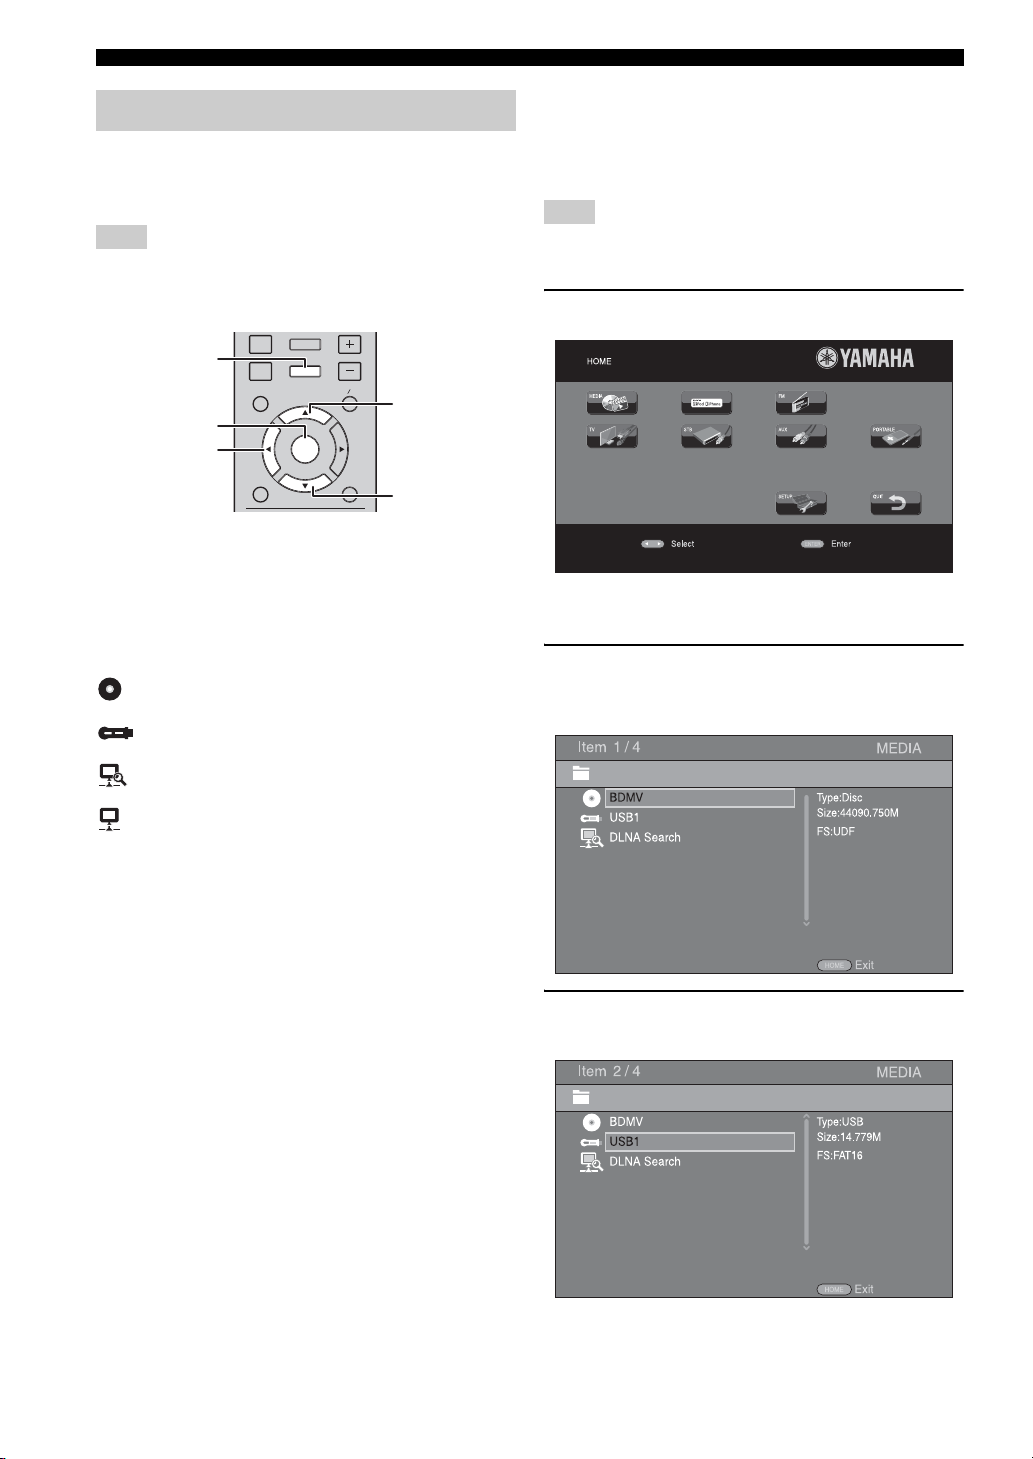
■ Basic operation
DISPLAY
SETUP
HOME
ENTER
OPTION
TOP MENU
2
RETURN ON SCREEN
HOME
ENTER
VOLUME
POP-UP MENU
5
a
5/a : Moves the focus.
2: Returns to the parent folder.
HOME: Moves to/exits HOME menu screen.
ENTER: Confirms the folder/file.
■ Icons on the top of MEDIA menu
: Plays back the disc on the tray, or displays
contents in the data disc.
: Displays contents in the USB memory device
connected to the USB port.
: Searches for a DLNA (p. 22) server on the
network.
: Displays contents on the connected DLNA server.
1 Press HOME to move to HOME menu screen.
y
HOME menu screen may differ depending on the model.
2 Press 2/3 /5 to select [MEDIA], then press
ENTER.
MEDIA screen appears.
20 En
3 Select the item which contains the file you want to
play back, then press ENTER.
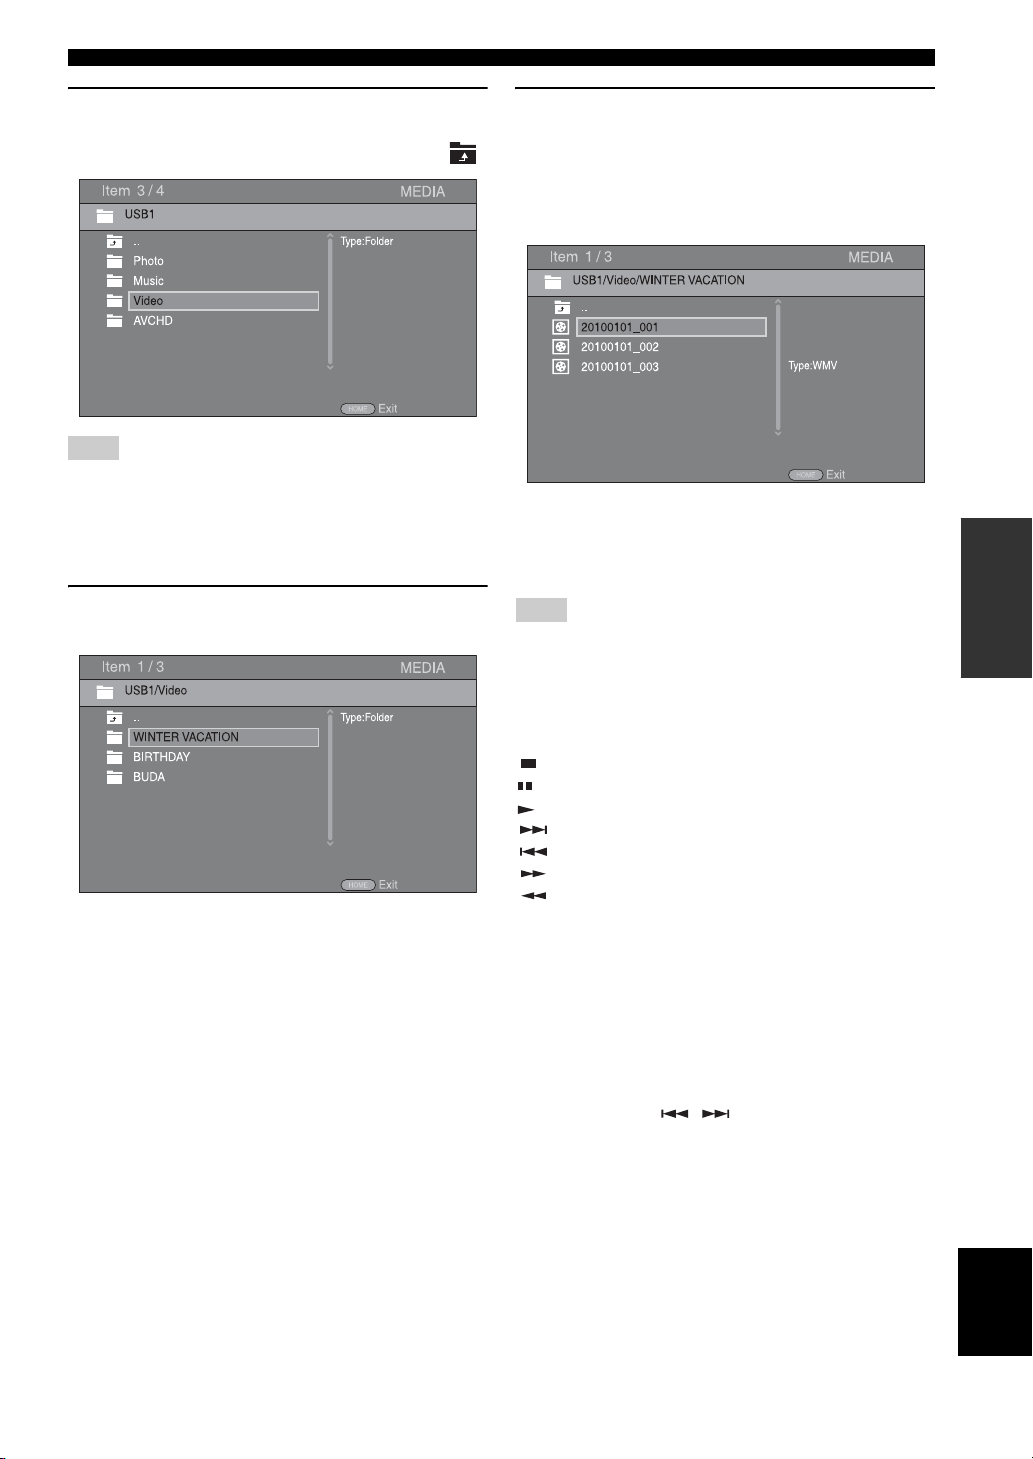
BASIC OPERATION
4 Select the Photo, Music, Video or AVCHD folder
you want to play back, then press ENTER.
To return to the parent folder, press 2 or select .
Note
Note that the only the file type selected on this step will be
displayed in the following step. For example, if you selected the
Photo folder in this step, only photo files are displayed after this
step. When you want to play back other than photo, return to this
step and select file type again.
5 Select the folder(s) containing the file you want to
play back.
6 Select the file you want to play back, then press
ENTER.
When a video file is selected, playback starts.
When a music file is selected, Status menu is
displayed and playback starts.
When a photo file is selected, slide show starts.
y
To enjoy a slide show with music, press HOME to return to
HOME menu screen while music is played back, and select the
photo file.
Note
The displayed file may not be played back depending on the
content.
OPERATIONS
■ Operations for viewing photos
While viewing photos, the buttons on the remote control
work as shown below.
: Stops a slide show and returns to the file browser.
: Pauses a slide show.
: Plays a slide show.
: Moves to a next photo.
: Moves to a previous photo.
: Makes a slide show faster in 3 steps.
: Makes a slide show slower in 3 steps.
5 : Inverts a photo.
a : Reflects a photo.
2 : Rotates a photo counterclockwise.
3 : Rotates a photo clockwise.
ZOOM: Zooms in/out a photo (zoom in/out: 3 steps each).
5/a /2 /3 : Pans in zoom mode when a photo is
larger than the screen.
DIGEST: Switches to thumbnail mode (p. 6). When
thumbnails are displayed, you can proceed to the next/
previous page with / .
English
21 En
BASIC OPERATION
Using network content
■ About DLNA
This unit is a DLNA certified digital media player. You
can manage photo, music and video contents stored on
DLNA servers on your home network.
DLNA (Digital Living Network Alliance) provides easy
sharing of digital media through network in the home, and
you can enjoy digital contents stored on your DLNAserver-software-installed PC or other DLNA compatible
device with your TV via this unit. To connect this unit to
your DLNA servers, some settings for the DLNA server or
device are required. For details, refer to your DLNA
server software or DLNA device.
■ Playing back shared contents
Note
To play back files on your PC, install a DLNA server software,
such as Windows Media Player 12, and share files you want to
play back.
1 Turn on the PC with DLNA server software installed
or the DLNA device connected to your home
network.
2 Press HOME to display HOME menu screen, then
select [MEDIA] to move to MEDIA menu.
The DLNA servers connected to the network are
listed on the screen.
3 Select the file you want to play back.
Notes
• The playback and operating quality may be affected by your
home network condition.
• The files from removable media, such as USB memory devices
or DVD-drive on your media server, may not be shared
properly.
Using network services
You can instantly watch the videos that the following
network services provide.
– YouTube
■ Notices for network services
• Access to content provided by third parties requires a
high speed internet connection and may also require
account registration and a paid subscription.
• Third party content services may be changed,
suspended, interrupted, or discontinued at any time
without notice, and Yamaha disclaims any liability in
connection with such occurrences.
• Some content may only be available for specific
countries and may be presented in specific languages.
• Yamaha does not represent or warrant that content
services will continue to be provided or available for a
particular period of time, and any such warranty,
express or implied, is disclaimed.
Notes
• If your DLNA server is not listed, select [DLNA Search] to find
it.
• Depending on the DLNA server, this unit may need to be
permitted from the server.
• To play the file on the DLNA server, this unit and the server
must be connected to the same access point.
• The file requirements may not always be compatible. There
may be some restrictions depending on file features and DLNA
sever capability.
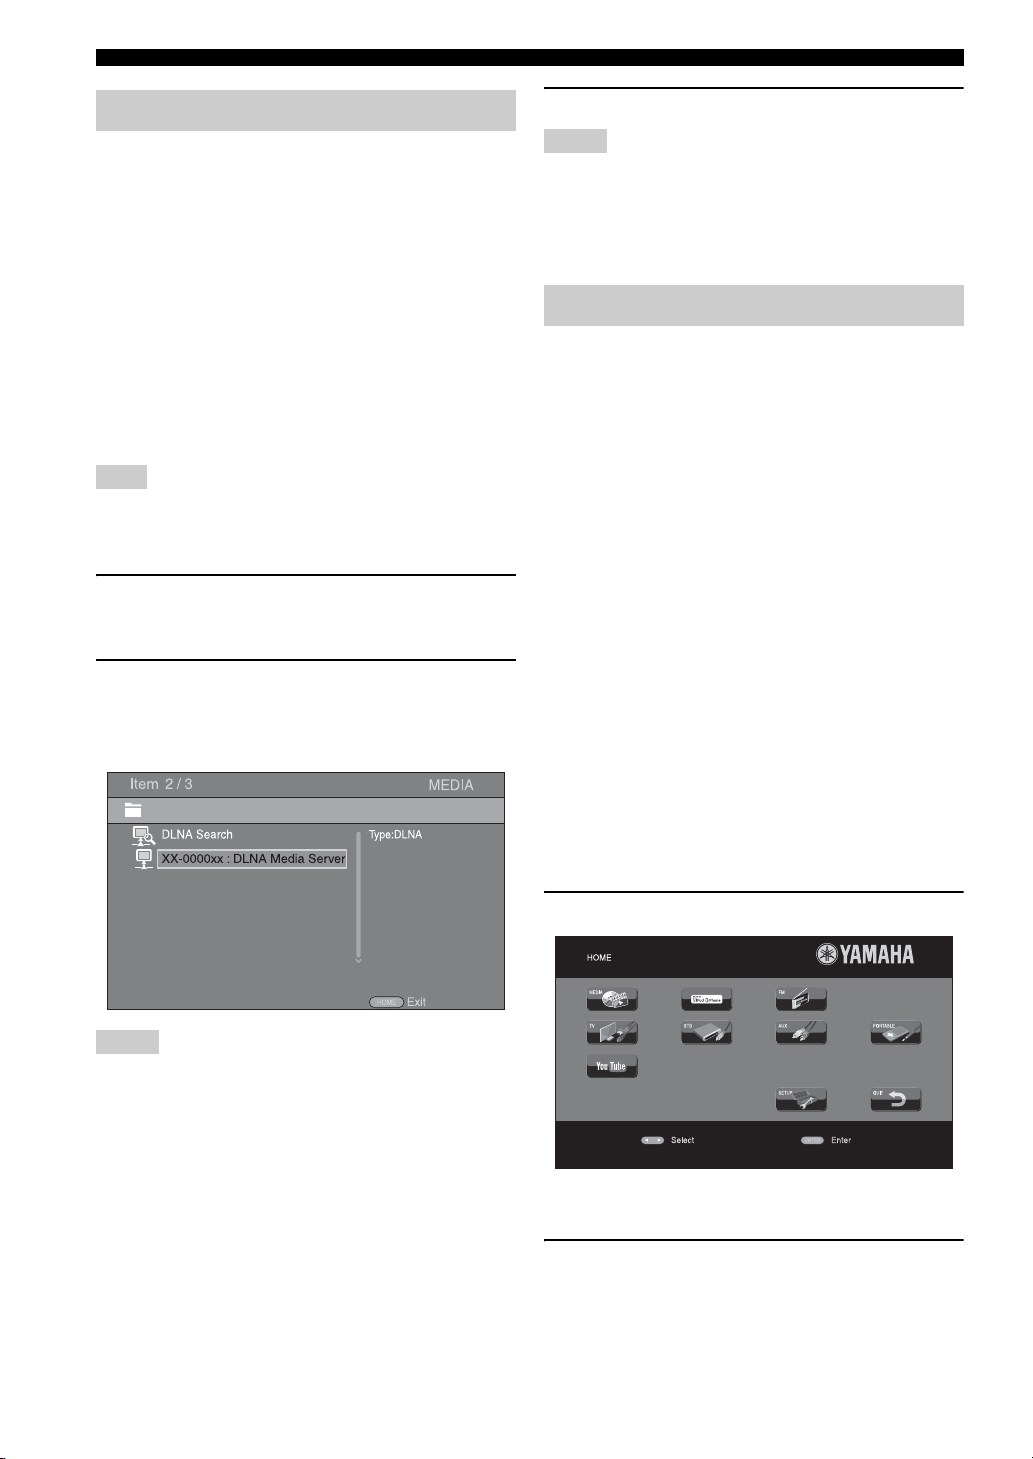
■ Playing videos from YouTube™
You can watch movies from YouTube over the internet
using this unit.
The services may be changed without notice.
1 Press HOME to display HOME menu screen.
y
HOME menu screen may differ depending on the model.
2 Press 5/a /2 /3 to select [YouTube], then press
ENTER.
y
To return to HOME menu screen, press RETURN.
22 En
Operation for iPod
RETURN ON SCREEN
PIP
SUBTITLE
AUDIO
MEMORY
SHUFFLE
REPEAT
DIMMER
STATUS
TUNING
PRESET
A B
VOLUME
SETUP
DISPLAY
HOME
OPTION
ENTER
TOP MENU POP-UP MENU
BASIC OPERATION
■ Repeat play
You can repeat playback as you want.
You can operate playback of your iPod by using the
buttons on the remote control.
DISPLAY
,
REPEAT
SHUFFLE
,
,
Note
Some features may not be compatible depending on the model or
the software version of your iPod.
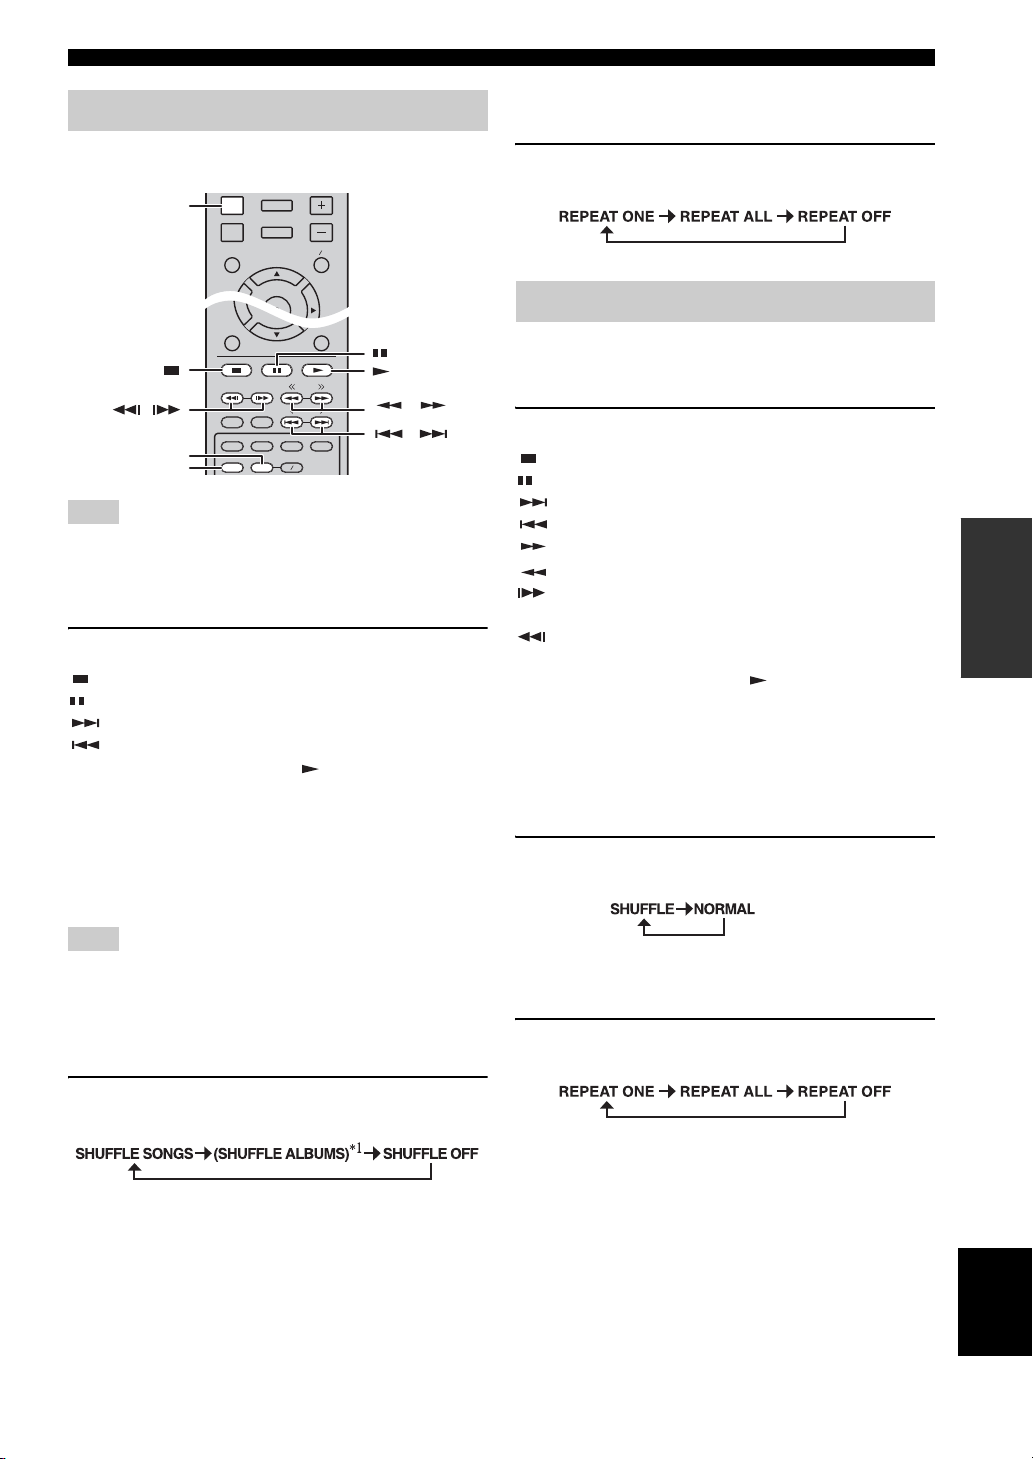
■ Playback controls
1 Press any buttons below during playback.
: Stops playback.
: Pauses playback.
: Skips forward.
: Skips backward.
To start/resume playback, press .
y
Press DISPLAY to display information below on the front panel
display during playback.
• Song name
• Artist name
• Album name
1 Press REPEAT repeatedly for repeat play.
Each press cycles as follows:
Operation for CDs
You can also operate playback of music for CDs.
■ Playback controls
1 Press any buttons below during playback.
: Stops playback.
: Pauses playback.
: Skips forward.
: Skips backward.
: Searches forward.
: Searches backward.
: Press for instant search. Instant search skips the
music 30 seconds.
: Press for instant replay. Instant replay replays the
music from 10 seconds before.
To start/resume playback, press .
y
You can also use the Numeric buttons to enter the number of
the song directly. To clear the entry, press CLEAR.
■ Shuffle play
You can play back in random sequence.
1 Press SHUFFLE repeatedly for shuffle play.
Each press toggles as follows:
OPERATIONS
Note
There are some characters that cannot be displayed on the front
panel display of this unit.
■ Shuffle play
You can play back in random sequence.
1 Press SHUFFLE repeatedly for shuffle play.
Each press cycles as follows:
*1You cannot set ALBUMS when you use an iPod touch and
iPhone.
■ Repeat play
You can repeat playback as you want.
1 Press REPEAT repeatedly for repeat play.
Each press cycles as follows:
English
23 En
ADVANCED PLAYBACK OPERATION
This chapter explains playback of commercially available
BD/DVD/CD discs, and recorded DVD-RW/R discs.
Note
For the basic playback operation, refer to page 6.
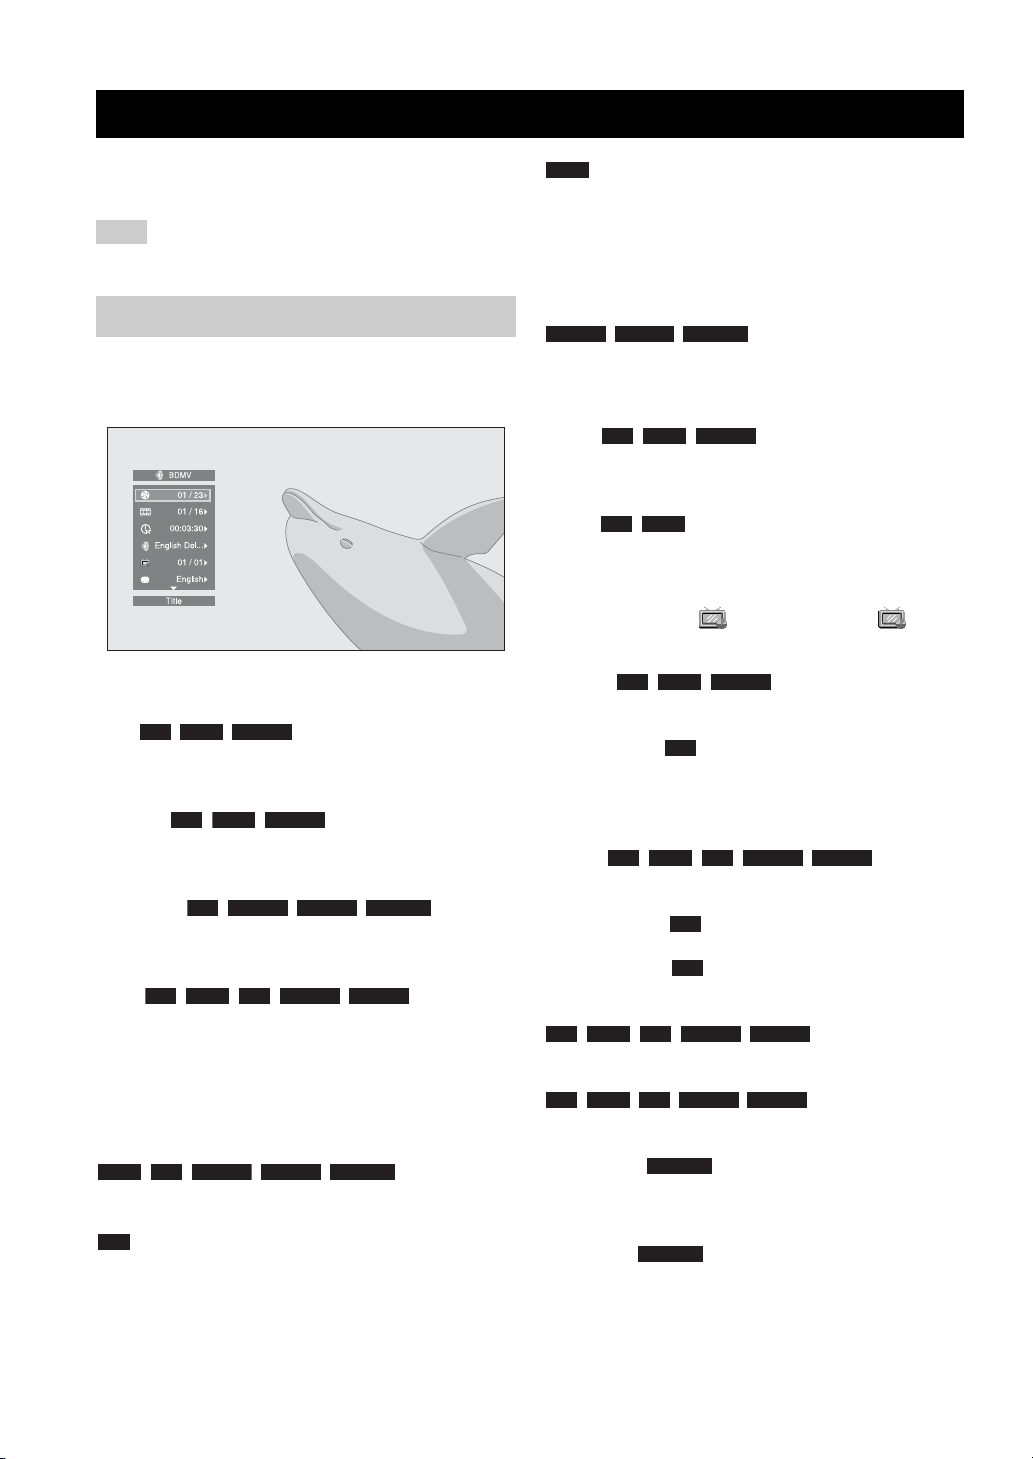
On Screen menu
To display On Screen menu, press ON SCREEN. After
that, press 5/a /2 /3 to select an item, then press
ENTER to operate the desired function.
On Screen menu contains following items.
Title : Shows the title number being
BD DVD VIDEO
played back. You can skip to the desired title by selecting
it from this item.
Chapter : Shows the chapter
number being played back. You can skip to the desired
chapter by selecting it from this item.
Track/File : Shows
track/file number being played back. You can skip to the
desired track/file by selecting it from this item.
Time : Shows the
playback time. Select display type from the following:
Mode/Play Mode
DVD CD VIDEO MUSIC PHOTO
playback mode. You can select playback mode from the
following:
CD
BD DVD VIDEO
CD VIDEO MUSIC PHOTO
BD DVD CD VIDEO MUSIC
– Elapsed playback time of the title, chapter, disc,
track or file.
– Remaining playback time of the title, chapter, disc,
track or file.
: Shows current
–Normal: Normal playback.
– Shuffle: Random playback without repetition.
– Random: Random playback with repetition.
DVD
– Normal
– Shuffle CH (chapter)
– Shuffle TT (title)
– Shuffle All
– Random CH (chapter)
– Random TT (title)
– Random All
VIDEO MUSIC PHOTO
– Normal
– Shuffle F (folder)
– Random F (folder)
Audio : Shows audio language/
BD DVD VIDEO
signal of a BD/DVD disc currently selected. You can
select the desired type of audio.
Angle : Shows the currently-selected angle
BD DVD
number. If the video is recorded with multiple angles, you
can change the angle.
y
When the Angle Mark ( ) is set to [On] (p. 36), is
displayed on the screen when this function is available.
Subtitle : Shows the currently-
BD DVD VIDEO
selected subtitle language when the subtitle is provided.
Subtitle Style : Shows the currently-selected
BD
subtitle style. This function is available only for Video-file
external subtitle. You can select the desired text style of
subtitle.
Bitrate : Shows
BD DVD CD VIDEO MUSIC
bitrate of the audio/video signal.
Second Video : Turns the PIP on/off (p. 6).
Second Audio : Turns the secondary audio on/off.
BD
BD
Ins Search
: Skips 30 seconds.
BD DVD CD VIDEO MUSIC
Ins Replay
: Replays the content
BD DVD CD VIDEO MUSIC
from 10 seconds before.
Slide Show :
PHOTO
Shows slide show speed. You can select the slide show
speed from Slow/Medium/Fast.
Transition : Shows how photo appears on the
PHOTO
screen. You can select the transition type.
24 En
ADVANCED PLAYBACK OPERATION
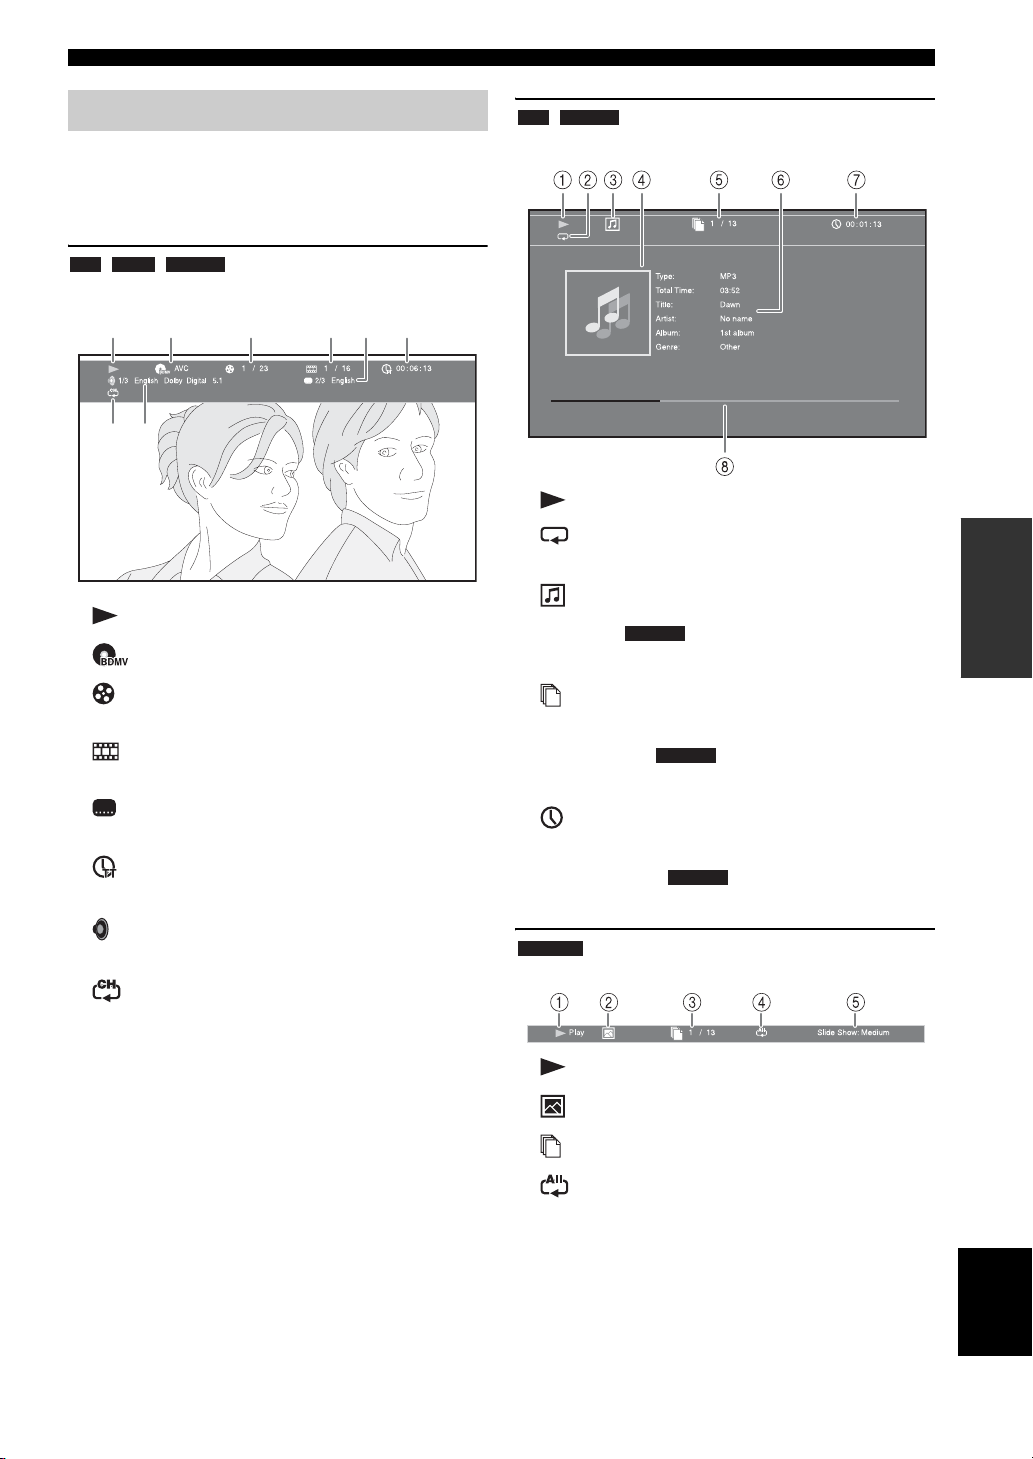
Status menu
This shows various settings, such as subtitles, angle
settings and the title/chapter/track number currently
played back. To display Status menu, press STATUS.
Status menu contains following menus.
BD DVD VIDEO
Example: Icons when playing a BD disc
13
2465
78
1 (Playback status)
2 (Disc type/video file icon)
CD MUSIC
Example: Icons when playing a music file
1 (Playback status)
2 (Repeat mode): Shows current repeat mode
(p. 6).
3 (Disc type/music file icon)
4 (Artwork) : Displays artwork if the file
contains it.
MUSIC
OPERATIONS
3 (Title number being played): You can jump to
specified title with SEARCH button (p. 7).
4 (Chapter number being played): You can
jump to specified chapter with SEARCH button (p. 7).
5 (Subtitle currently selected): You can change
the subtitle language with SUBTITLE button (p. 6).
6 (Elapsed playback time): You can jump to
specified point with SEARCH button (p. 7).
7 (Audio currently selected): You can change the
audio language or format with AUDIO button (p. 7).
8
(p. 6).
(Repeat mode):
Shows current repeat mode
5 (Track/file number being played): You can
jump to specified track with SEARCH button (p. 7).
6 (Information) : Displays music information
if the file contains them.
7 (Elapsed playback time): You can jump to
specified point with SEARCH button (p. 7).
8 (Progress bar) : Shows progress status of
current song.
PHOTO
Example: Icons when viewing a photo file
1 (Playback status)
2 (Photo file icon)
3 (File number being displayed)
4 (Repeat mode): Shows current repeat mode
(p. 6).
5 (Slide show speed)
MUSIC
MUSIC
English
25 En
ADVANCED PLAYBACK OPERATION
Using Bookmark
This allows you to set Bookmark at the specified point of
the video. After Bookmark is set, you can move to the
point you set using this function. You can set up to 12
Bookmarks.
DVD VIDEO
Example: Setting Bookmark when playing back a movie.
1 Press MARKER during playing back the movie to set
Bookmark. Bookmark number and the status are
displayed.
2 After Bookmark is set, press DIGEST to display
Bookmark select bar.
3 Press 2/3 to select the Bookmark you want to play
back, then press ENTER.
Press CLEAR to delete the selected Bookmark.
Note
When playback is finished (e.g., ejecting the disc, pressing
twice), Bookmarks are automatically deleted.
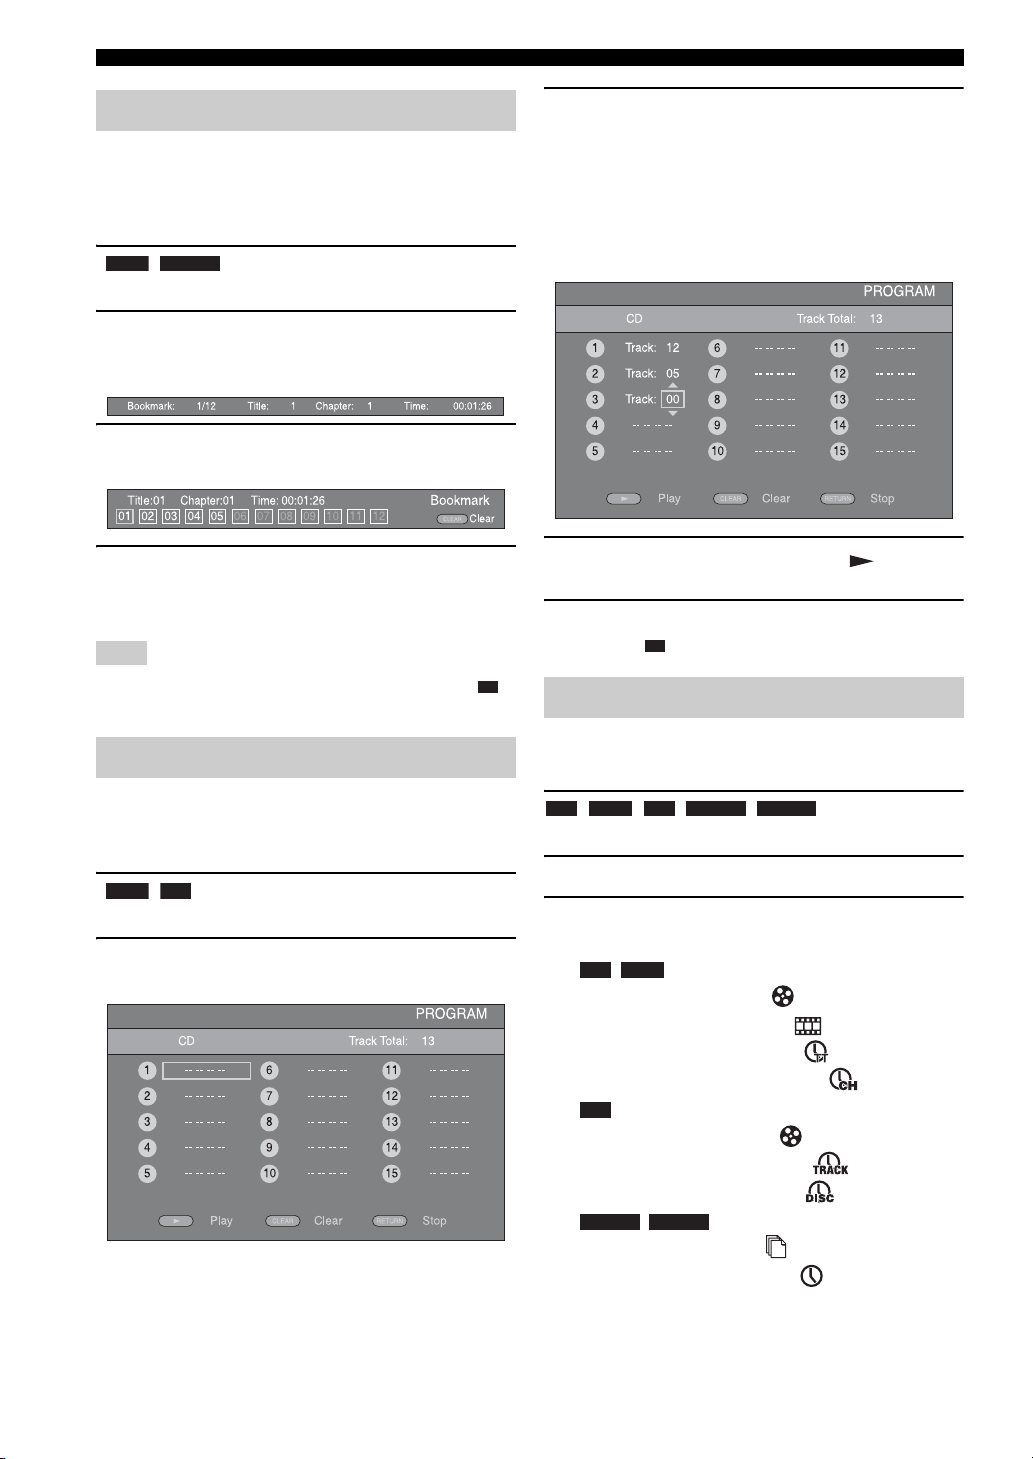
2 Press ENTER to program playback order.
For audio disc, press 5/a to select a desired track,
then press ENTER.
For DVD-Video discs, select a desired title (shown as
TT) and chapter (shown as CH) instead of a track.
To clear a set track, select the track you want to clear,
then press CLEAR.
Press RETURN to cancel the Program play.
3 After programming is finished, press to set and
start program playback.
4 To cancel program play, stop playback completely by
pressing twice.
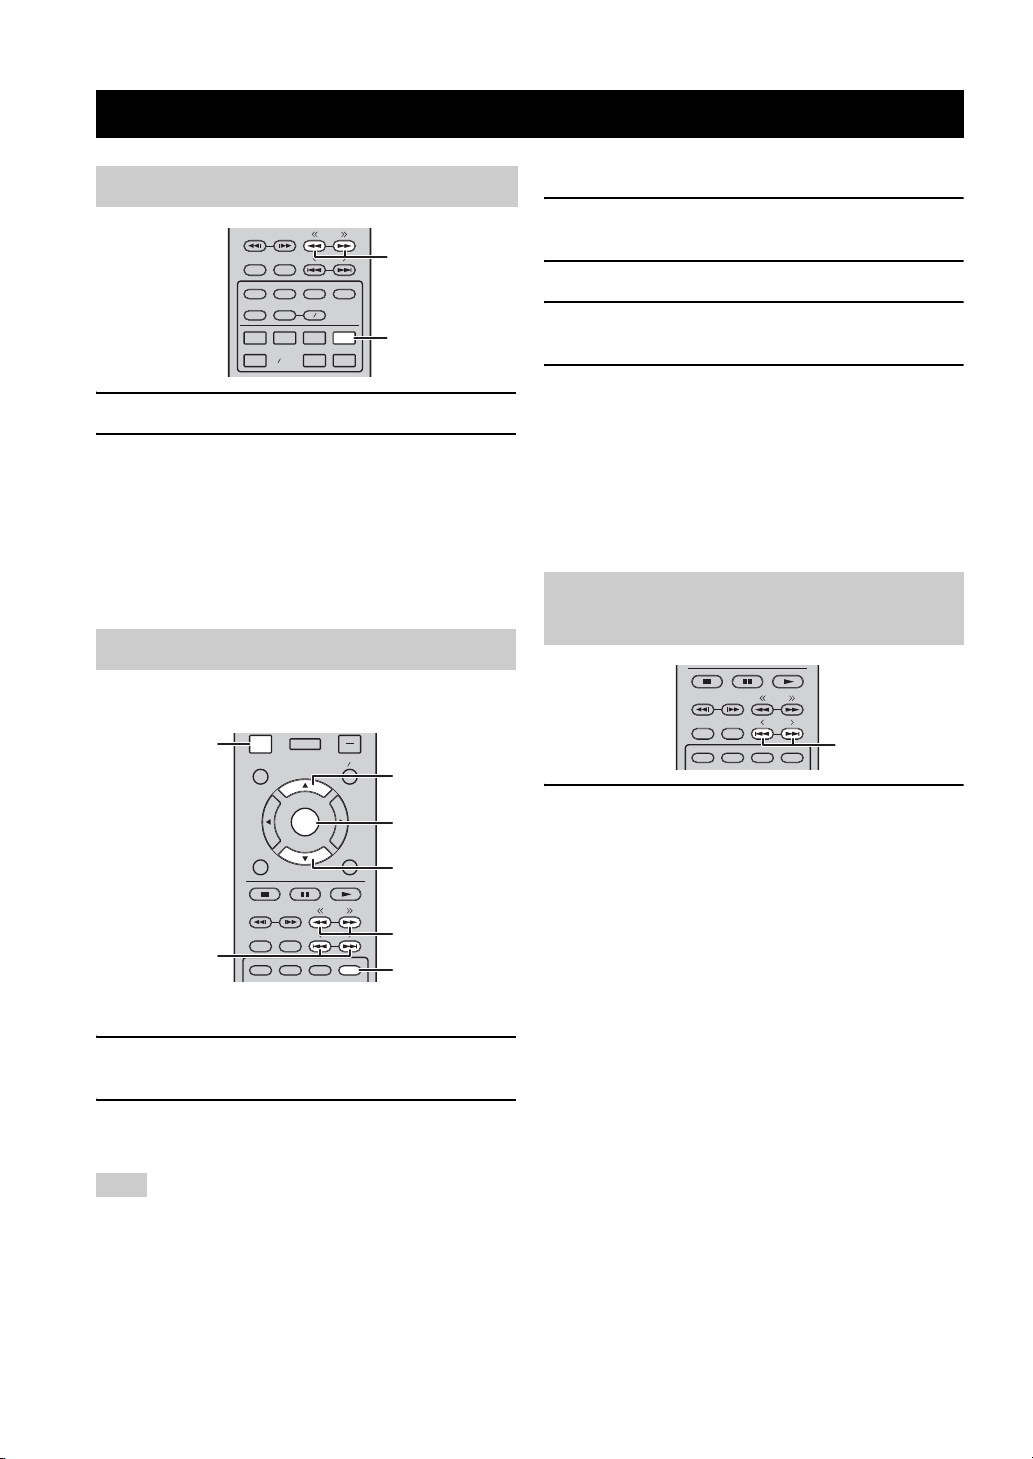
Using search
Program play
This allows you to program playback order of audio disc
tracks or DVD chapters.
You can program up to 15 tracks/chapters.
DVD CD
Example: Programming the playback order of CD tracks
1 Press PROGRAM during playback to display
PROGRAM screen.
This allows you to jump to the specified point during
playback.
BD DVD CD VIDEO MUSIC
Example: Searching to the specified point
1 Press SEARCH during playback. Status bar appears.
2 Press 5/a /2 /3 to select one of the item below,
then press ENTER.
:
BD DVD
– Title number (shown as )
– Chapter number (shown as )
– Elapsed title time (shown as )
– Elapsed chapter time (shown as )
:
CD
– Track number (shown as )
– Elapsed track time (shown as )
– Elapsed disc time (shown as )
:
VIDEO MUSIC
– File number (shown as )
– Elapsed file time (shown as )
26 En
ADVANCED PLAYBACK OPERATION
3 Press 5/a or number buttons to set/adjust the value
of the focused item, and press ENTER to jump to the
specified point.
4 To close the status bar, press STATUS.
Enjoying BONUSVIEW™ and BDLive™
This unit supports BONUSVIEW (p. 50) (BD-ROM
Profile 1 Version 1.1) and BD-Live (p. 50) (BD-ROM
Profile 2) playback functions.
Note
Functions and playback method vary depending on the disc.
Refer to the guidance on the disc or the supplied user’s manual.
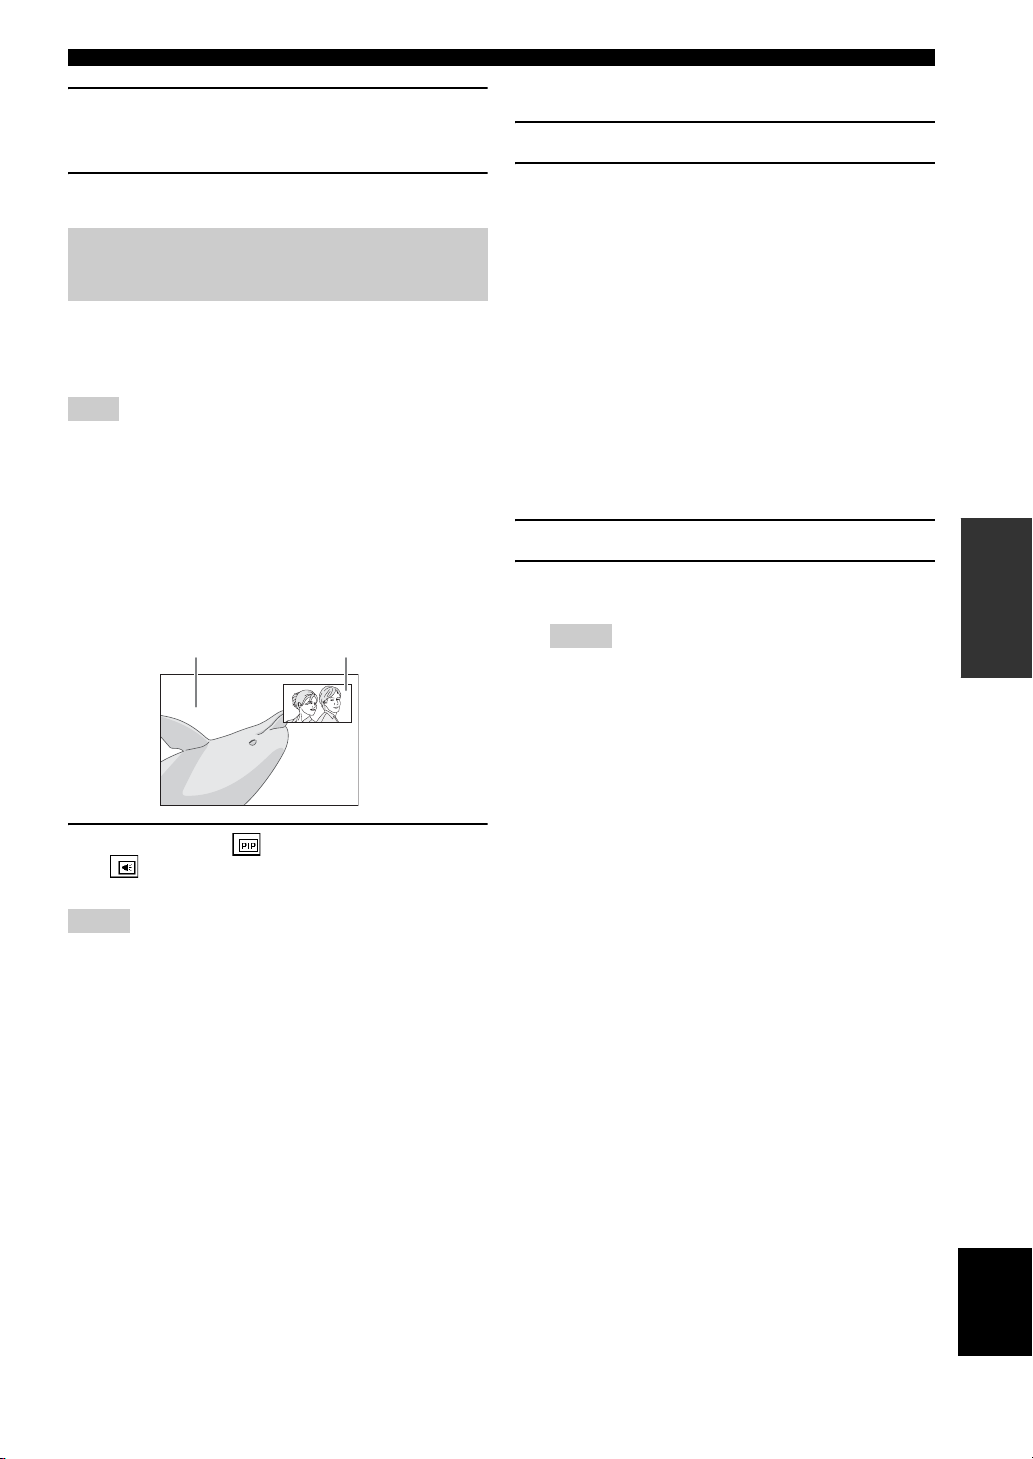
■ Using Picture in Picture function
(secondary audio/video playback)
BD-Video that includes secondary audio and video
compatible with Picture in Picture can be played back
with secondary audio and video simultaneously as a small
video in the corner.
Primary video Secondary video
1 While PIP Mark ( ) or Secondary Audio Mark
( ) is displayed, press PIP to turn the Picture in
Picture function on/off.
Notes
• To listen to secondary audio from a TV connected with an
HDMI cable, make sure that the Audio Output setting (HDMI)
is set to [PCM] (p. 39).
• Depending on the disc, to listen to secondary audio, you may
need to set secondary audio to on from the top menu of the disc
(p. 8).
• The secondary audio and video for Picture in Picture may
automatically play back and be removed depending on the
content. Also, playable areas may be restricted.
■ Using the feature of BD-Live™
1 Set the Network setting (p. 36).
2 Connect the USB memory device to this unit (p. 15).
• BD-Live data is saved in a USB memory device
connected to this unit.
• Connect a USB memory device (2 GB or greater
and formatted with FAT 32/16) supporting USB
2.0 High Speed (480 Mbit/s) to the USB port that
you select on Local Storage (p. 35). The default
setting is the USB port on the rear panel.
• A “BUDA” folder is created automatically in the
USB memory device when necessary.
• If there is insufficient storage space, the data will
not be copied/downloaded. Delete unneeded data
or use a new USB memory device.
• Some time may be required for the data to load
(read/write).
3 Play back the disc.
4 Run BD-Live according to the instructions on the
disc.
Notes
• Regarding playback method of BD-Live contents, etc.,
perform the operations in accordance with the instructions
in the BD disc manual.
• To enjoy BD-Live functions, perform the network
connection (p. 15) and Network settings (p. 36).
• Refer to “[BD-Live Connection]” (p. 36) regarding the
setup to restrict access to BD-Live contents.
• The time required to download the provided programs into
the USB memory device connected to this unit varies
depending on the internet connection speeds and the data
volume of the programs.
• BD-Live programs provided through the internet may not
be able to display the connection depending on the status
(upgrading) of the provider. In such cases, take out the
disc and try again.
• If the BD-Live screen does not appear for a while after
you select the BD-Live function in the BD disc menu, the
USB memory device may not have enough free space. In
such cases, eject the disc from this unit, and then erase the
data in the USB memory device selecting [Format] in
[Local Storage] (p. 35).
OPERATIONS
27 En
English
LISTENING TO FM RADIO STATIONS
Tuning to radio stations
TUNING
MEMORY
TUNER
PORTABLE
<<, >> (TUNING)
TUNER
STATUS
SUBTITLE
REPEAT
TV
USB NET
PRESET
AUDIO
A B
STB
AUX
DIMMER
PIP
SHUFFLE
iPod
DISC
1 Press TUNER.
2 Press and hold << / >> (TUNING).
Automatic tuning starts.
y
If the signal received from the station you want to select is weak,
you can also tune into radio stations manually by pressing << /
>> (TUNING) repeatedly. In this case, the sound will be
monaural.
Presetting radio stations
■ Manual preset tuning
1 Select a favorite radio station by pressing << / >>
(TUNING).
2 Press MEMORY.
3 Select the preset number you want to store to by
pressing 5/a or < / > (PRESET).
4 Press ENTER.
The manual preset is complete.
y
• You can preset up to 30 FM stations.
• To cancel the manual preset while choosing a preset number,
press MEMORY again.
• You can delete a preset station by pressing OPTION →
ENTER to select [PRESET DEL] (p. 29).
Selecting preset radio stations
(Preset tuning)
You can store your favorite FM stations with the preset
function.
HOME
OPTION
<, > (PRESET)
OPTION
TOP MENU
RETURN ON SCREEN
DIMMER
PIP
ENTER
STATUS
SUBTITLE
AUDIO
POP-UP MENU
TUNING
PRESET
MEMORY
5
ENTER
a
<<, >> (TUNING)
MEMORY
■ Automatic preset tuning
1 Press and hold MEMORY for more than 3 seconds in
FM mode.
2 Press ENTER.
Start the automatic preset.
Note
When you perform the automatic preset, all stored stations are
cleared and the new stations are stored.
TUNING
STATUS
SUBTITLE
AUDIO
PRESET
MEMORY
<, > (PRESET)
DIMMER
PIP
1 Select the preset radio station in FM mode by
pressing < / > (PRESET).
y
You can also use the Numeric buttons on the remote control or
< / > (PRESET) on the front panel of this unit to select the preset
radio station.
28 En

LISTENING TO FM RADIO STATIONS
Deleting preset stations
You can delete a preset station by using the option menu
([PRESET DEL]).
DISPLAY
SETUP
VOLUME
HOME
OPTION
1 Press OPTION.
2 Press ENTER.
3 Select the preset number you want to delete by
pressing 5/a .
4 Press ENTER.
5 Press OPTION to exit option menu.
*To delete additional preset number, repeat steps 2 to 4.
y
[PRESET DEL] is displayed on the front panel display only when
the input source is set to FM.
OPTION
TOP MENU
RETURN ON SCREEN
*
POP-UP MENU
ENTER
5
ENTER
a
Displaying Radio Data System
information (Russia model only)
DISPLAY
DISPLAY
1 Press DISPLAY repeatedly while listening.
PS (Program Service)
↓
PTY (Program Type)
↓
RT (Radio Text)
↓
CT (Clock Time)
↓
MONO/STEREO
↓
Frequency
↓
Back to the PS
Note
If the signal transmission of the Radio Data System station is too
weak, this unit may not be able to receive Radio Data System
information completely. In particular, RT (Radio Text)
information uses a lot of bandwidth, so it may be less available
compared to other types of information.
SETUP
VOLUME
HOME
OPTION
TOP MENU POP-UP MENU
OPERATIONS
29 En
English

USING USEFUL FUNCTIONS
Setting the sleep timer
You can set the sleep timer by using the remote control.
The sleep timer sets this unit to standby mode after the
specified time elapses.
PROGRAM MARKER DIGEST ZOOM
SLEEP
SLEEP
SW
1 Press SLEEP repeatedly.
Operating this unit by TV remote
control (the HDMI control function)
You can use the TV remote control to operate this unit if
your TV supports the HDMI control function and is
connected to this unit’s HDMI terminal.
Remote control of TV (Example)
Turns on/off both TV and
this unit.
You can also enjoy the following function.
• When you start playback of DVD/BD discs other than
CD discs on this unit or display HOME/SETUP menu
screen, the input selector of the TV is switched to this
unit automatically (One Touch Play).
*1 When you select this unit to output TV sounds by using the
TV remote control, the unit automatically selects TV as the
input source, and sound can be enjoyed from the speakers
connected to the unit.
Notes
• This unit may be operated by using cursor buttons of TV remote
control for some TVs.
• Even if your TV supports the HDMI control function, some
functions may not be available. For details, refer to the manual
supplied with your TV.
• HDMI control function may not work properly depending on
the TV.
• Functions other than ones shown above may work depending on
the TV.
• In order to make the HDMI control function available, set up
settings for the HDMI control function on ALL components
(this unit, TV, and other components). Certain operation may
also be required.
• Each function may be set independently to activate/deactivate
depending on the TV.
• Refer to the operation manuals supplied with the TV for details
regarding setup.
■ Setting the HDMI control function
1 Turn on all components connected to the TV with
HDMI.
30 En
Controls the volume of
this unit.
Select this unit or TV to
output sounds.
*1
2 Check all components connected with HDMI and
enable the HDMI control function on each
component.
For this unit, set [HDMI Control] to [On] (p. 35).
For external components, refer to the manual
supplied with each component.
y
• The default setting of [HDMI Control] is set to [Off] for
this unit.
• The example of TV settings
– From a setup menu on your TV, select “Link setting” =
“HDMI control setting” (example), then set a setting
such as “HDMI control function” to “ON” (example).
– Setting such as “Speaker priority” should be set to “AV
amplifier”.
3 Turn off the TV and then turn on it again.

■ Registering HDMI components to TV
1 Select this unit as the input source of the TV.
2 Select Disc/USB/Network as the input source of this
unit.
3 Check that the image from this unit is correctly
displayed on the TV.
4 Check that the HDMI control function works (turn on
this unit or adjust the volume level using the TV
remote control).
y
For some HDMI components, you only need to set the HDMI
control function. Registering HDMI components to TV is not
required in this case.
If the HDMI control function is not working
Check the following:
• The TV is connected to the HDMI terminal of this unit.
The HDMI control function is set to [On] in SETUP
menu (p. 35).
• The HDMI control function is enabled on the TV. (Also
check the relative settings such as power interlock
function or speaker priority.)
The HDMI control function is not working even
checking the above
• Turn off this unit and the TV, and then turn them back
on again.
• Unplug the AC power supply cable of this unit, the TV
and external components connected to the TV with
HDMI.
Plug them in again after about 30 seconds.
USING USEFUL FUNCTIONS
OPERATIONS
■ Changing the connection method and
connected components
When the connected components and jacks are changed,
reset this unit with following procedures.
1 Turn off the HDMI control function of the TV and
this unit, turn off all connected devices, and change
the connections.
2 Perform the step 1 to 3 of “Setting the HDMI control
function” (p. 30).
English
31 En

SETTINGS
SETUP MENU
The SETUP menu enables various audio/visual settings and adjustments for functions using the remote control unit.
Menu/Submenu Item Function Page
System Screen Saver Sets screen saver to On/Off. 35
General Setting
Auto Power Off Disc/USB/Net: Sets auto power off mode to On/Off.
Disc Auto Playback Sets this unit to start disc playback automatically. 35
HDMI Control Sets this unit to receive control signal from the remote
Load Default Resets all settings to the default setting except Security
Upgrade Performs upgrade of this unit. 35
Easy Setup Sets language, resolution, screen aspect ratio. 35
Local Storage Displays status of Local Storage, formats Local Storage and
3D Playback
Message
Language OSD Selects the language for On Screen Display. 35
Menu Prioritizes the language for disc menu. 35
Audio Prioritizes the language for audio. 35
Subtitle Prioritizes the language for subtitle. 35
Playback Closed Caption Sets the closed caption to On/Off. 36
Angle Mark Sets to display the Angle Mark when a BD/DVD disc with
PIP Mark Sets to display the PIP Mark when a BD/DVD disc with
Secondary Audio
Mark
Last Memory Sets this unit to remember the last playback position of a disc
Security Change Password Changes password for Parental Control and Country Code. 36
Parental Control Sets the Parental Control depending on the disc content. 36
Country Code Sets your Country Code. 36
Network Internet Connection Sets the internet connection to Enable/Disable. 36
Information Displays network information screen. 36
Connection Test Performs the network connection test. 36
IP Setting Sets the IP setting to Auto/Manual. 36
BD-Live
Connection
DLNA Sets the DLNA to Enable/Disable. 36
Proxy Setting Sets the proxy setting. 36
Other Inputs: Sets auto power off mode to on by hours or Off.
control of your TV.
setting.
selects the front/rear USB port for Local Storage.
Displays a warning message concerning 3D video playback
when this unit is turned on.
multiple angles is played back.
Picture in Picture is played back.
Sets to display the Secondary Audio Mark when a BD/DVD
disc with secondary audio is played back.
when it is set to standby mode or the disc tray is opened.
Sets the BD-Live connection to Permitted/Partial Permitted/
Prohibited.
35
35
35
35
35
36
36
36
36
36
32 En

Menu/Submenu Item Function Page
Display Setting
Audio Setting
SETUP MENU
TV 3D Output Selects 3D or 2D videos. 37
TV Screen Sets the screen aspect ratio of the connected TV, and adjust
Video Out Select Selects the resolution of video output. 37
TV System Selects the TV System from NTSC/PAL/Multi. 37
Color Space Selects Color Space from YCbCr 4:4:4/YCbCr 4:2:2/ Full
HDMI Deep Color Selects HDMI Deep Color from 30 bits/36 bits/Off. 37
HDMI 1080p 24Hz Sets HDMI 1080p 24Hz to Auto/Off. 38
Lip Sync Adjusts the lag between video and audio, such as when the
Video Process Video Mode Adjusts the visual image. 38
Color Adjust Adjusts Brightness/Saturation/Hue for each color. 38
Noise Reduction Sets the level of Noise Reduction. 38
De-interlacing
Mode
Audio Output HDMI Selects the output mode of HDMI terminal from Bitstream/
DRC Sets the DRC (Dynamic Range Compression). 39
Speaker Setting Configuration Sets the audio output from the 5.1 ch surround speaker
2ch Downmix Sets the audio output from SPEAKERS FRONT L/R
Test Tone Outputs the test tone for speaker setup. 39
Subwoofer Size Sets the subwoofer speaker size. 39
Post Process UpMix Multi-channelizes the 2-channel audio signal. 39
the video output.
RGB/RGB.
mouth movement is out of sync with the voice.
Sets how to detect the video signal.
PCM/Off.
terminals.
terminals.
Displays software version and MAC address (p. 50).
37
37
38
38
39
39
39
SETTINGS
System
Information
39
English
33 En

SETUP MENU
VOLUME
HOME
OPTION
ENTER
TOP MENU
RETURN ON SCREEN
POP-UP MENU
SLEEP
MUTESEARCHCLEAR
VOLUME
SETUP
DISPLAY
Operation for SETUP menu
You need to display SETUP menu screen to perform
settings for this unit. The following is the explanation for
basic operations of SETUP menu.
Numeric
buttons
ENTER
2
Example: Setting [Parental Control]
Notes
• Some items cannot be set when the input source is set to other
than Disc/USB/Network. In this case, set the input source to
Disc/USB/Network.
• Some items cannot be set during playback. In this case, press
twice to stop playback completely before setting.
SW
SETUP
5
3
a
3 Select a menu item.
Press 5/a to select [Parental Control], then press
ENTER or cursor 3.
4 Enter your password with Numeric buttons.
– The default password is 0000.
– You cannot move to the next setting screen until
you have input the correct password.
– To change the password, refer to “[Change
Password]” (p. 36).
1 Press SETUP to display SETUP menu screen.
Press 2/3 to select [General Setting], then press
ENTER or a .
2 Select a Submenu.
Press 5/a to select [Security], then press ENTER or
cursor 3.
5 Select a next item.
Press 5/a to select the Parental Control Level for
BD/DVD discs, then press ENTER.
6 Exit the menu screen.
Press 2 to return to the previous menu.
34 En

General Setting
The default settings are marked with “
■ System
[Screen Saver]
You can set the screen saver to [On]/[Off].
When set to [On], this unit will switch to screen saver
mode if there is no operation for 3 minutes.
On*, Off
[Auto Power Off]
You can set auto power off mode to [On]/[Off] when the
input is selected to Disc/USB/Network. When other inputs
are selected, auto power off mode can be set by hours or to
[Off].
Disc/USB/Net: On*, Off
Other Inputs: 1 hour, 2 hours, 4 hours, 8 hours*, Off
[Disc Auto Playback]
You can set [Disc Auto Playback] to [On]/[Off]. When set
to [On], a disc will play back automatically after loading.
On*, Off
[HDMI Control]
You can set this unit to receive control signal from a TV
compatible with the HDMI control function via an HDMI
cable (p. 13).
*
On, Off
y
For details on the HDMI control function, refer to page 30.
Note
When set to [On], power consumption during standby mode
increases due to the HDMI control function.
[Load Default]
You can reset all settings of this unit to default setting
except Security setting (p. 36). For details on default
settings, refer to pages 32-39.
[Upgrade]
You can upgrade the software manually from [USB
Storage] or [Network]. For details on software upgrade,
refer to “SOFTWARE UPGRADE” (p. 41).
[Easy Setup]
You can perform Easy Setup (p. 17).
*
”.
SETUP MENU
[Local Storage]
You can display Local Storage information, format Local
Storage, and select [Front USB]/[Rear USB] to save the
BD-Live data.
To format (empty) the “BUDA” folder in the USB
memory device, select [Information] and press ENTER
when [Format] is focused on the screen.
Front USB, Rear USB
*
y
Local Storage is used as an auxiliary memory when a BD disc is
played back.
[3D Playback Message]
You can turn on or off a warning message concerning 3D
video playback that appears on the TV when this unit is
turned on.
On*, Off
■ Language
[OSD]
You can select the language for On Screen Display which
is the messages or menu displayed on the screen such as
SETUP menu.
English, , , , ,
Svenska Nederlandse
[Menu]
You can prioritize the language for disc menu.
English, , , , , ,
Nederlandse Svenska
Norwegian, , Korean, Japanese, More
[Audio]
You can prioritize the audio language for BD/DVD
playback. For details on setting items, refer to “[Menu]”
(p. 35).
[Subtitle]
You can prioritize the language for Subtitle.
English, , , , , ,
Nederlandse Svenska
Norwegian, , Korean, Japanese, More, Off
The default settings in [Language] differ depending on
your model.
Français Español Deutsch Italiano
, , ,
Français Español Deutsch Italiano
, Portuguese, Danish, , Finnish,
Français Español Deutsch Italiano
, Portuguese, Danish, , Finnish,
SETTINGS
35 En
English

SETUP MENU
■ Playback
[Closed Caption]
You can set to display the closed caption (p. 50) when a
BD/DVD disc with closed caption is played back.
*
On, Off
[Angle Mark]
You can set to display the Angle Mark ( ) when a BD/
DVD disc with multiple angles is played back.
On*, Off
[PIP Mark]
You can set to display the PIP Mark ( ) when a BD
disc with picture in picture (p. 27) is played back.
On*, Off
[Secondary Audio Mark]
You can set to display the Secondary Audio Mark ( )
when a BD disc with secondary audio is played back.
On*, Off
[Last Memory]
You can set whether this unit remembers the last playback
position of a disc when it is set to standby mode or the disc
tray is opened.
On*, Off
Note
Some discs are not compatible with this function.
■ Security
[Change Password]
You can set the password for changing the Parental
Control Level and Country Code. Refer to “[Parental
Control]” (p. 36) and “[Country Code]” (p. 36).
Notes
• The default password is 0000.
• If you forget the password, refer to “TROUBLESHOOTING”
(p. 42) and set all the Security settings to their default settings.
[Parental Control]
In some BD/DVD discs, a control level for disc viewing is
set depending on the age of the viewer. You can set the
Parental Control shown on the screen depending on the
disc content.
The password (refer to “[Change Password]” on page 36)
needs to be entered before the Parental Control Levels is
set.
After you set the Parental Control, when you play back a
disc with level higher than current Parental Control Level,
or you want to change the Parental Control Level, a dialog
box will pop up to ask you to enter the password.
Off*, 1 to 8
[Country Code]
You can set the Country Code you live in. The password
(refer to “[Change Password]” on page 36) needs to be
entered before the Country Code is set. This setting may
be used for rating of the Parental Control and disc
playback.
■ Network
[Internet Connection]
You can set to [Enable] when you use BD-Live (p. 27),
DLNA (p. 22) and software upgrade from the network
(p. 41).
Enable*, Disable
[Information]
You can display network information screen. On this
screen, you can view the information of Interface
(Ethernet), Address Type, IP Address, Subnet Mask,
Default Gateway, and DNS.
[Connection Test]
You can perform an internet connection test. If the test is
failed, please check [IP Setting] (p. 36) and perform the
test again.
[IP Setting]
You can configure the network settings.
Auto* Select to automatically configure the network
Manual Select to configure the network settings (IP Address,
y
• Numeric buttons Enters characters.
• 2/3 Moves the highlight.
• CLEAR Deletes a character.
• ENTER Saves the settings and exits from the menu.
[BD-Live Connection]
You can set access restriction to BD-Live contents.
Permitted Allows all BD-Live discs to connect the network.
Partial
Permitted
Prohibited Prohibits all BD-Live discs to connect the network.
[DLNA]
You can set the DLNA (p. 22) to [Enable]/[Disable].
When you do not use the DLNA function, set to [Disable].
Enable*, Disable
[Proxy Setting]
You can set Proxy Setting. Set to [Disable] for normal use.
Set to [Enable] to set the proxy setting.
Enable Enables proxy host and proxy port setting.
Disable
Proxy Host Sets proxy host.
Proxy Port Sets proxy port.
settings of this unit with the DHCP server.
Subnet Mask, Default Gateway, and DNS) manually.
Allows only discs with owner certification.
*
*
Sets proxy server to disable. Select this item when
proxy server is not used.
36 En

Display Setting
The default settings are marked with “
■ TV
[3D Output]
You can select 3D or 2D video output from this unit.
Auto* This unit automatically selects 3D or 2D videos.
Off This unit always selects 2D videos.
*
”.
SETUP MENU
[Video Out Select]
You can select the video output resolution from
[Composite], [HDMI Auto], [HDMI 1080p], [HDMI
1080i], [HDMI 720p], [HDMI 480p/576p], and [HDMI
480i/576i]. When set to [HDMI Auto], resolution is set to
the maximum resolution according to the connected TV.
For more details on output formats, refer to “About the
video output formats” (p. 40).
Composite, HDMI Auto*, HDMI 1080p, HDMI 1080i, HDMI
720p, HDMI 480p/576p, HDMI 480i/576i
Note
Even if you set [3D Output] to [Auto] and play back a BD 3D
disc, this unit selects 2D images depending on the connection and
the setting of TV, etc (p. 13).
[TV Screen]
You can set the screen aspect ratio of the connected TV,
and adjust the video output.
If you switch your TV (i.e. because you have bought a
new one) and the screen aspect ratio of the connected TV
changes, you will have to change the TV Screen setting.
16:9 Full Select this when this unit is connected to a TV with a
16:9 Normal*Select this when this unit is connected to a TV with a
4:3 Pan Scan Select this when this unit is connected to a TV with a
4:3 Letterbox Select this when this unit is connected to a TV with a
Original
image size
16:9 screen. When a 4:3 aspect ratio video is played
back, the video is displayed as shown below.
16:9 screen. When a 4:3 aspect ratio video is played
back, the video is displayed as shown below.
4:3 screen. When a 16:9 aspect ratio video is played
back, the video is displayed as shown below.
4:3 screen. When a 16:9 aspect ratio video is played
back, the video is displayed as shown below.
On 16:9 (wide screen) TV
16:9 Full 16:9 Normal
Notes
• When you connect your TV and this unit via the VIDEO jack,
select [Composite], [HDMI 480p/576p], or [HDMI 480i/576i].
• To output HD audio (such as Dolby TrueHD or DTS-HD) from
the HDMI terminal, set [Video Out Select] to [HDMI Auto] or
more than [HDMI 720p].
[TV System]
You can select [TV System] from [PAL], [NTSC] and
[Multi]. Set the same TV System as your TV set. For more
details on output formats, refer to “About the video output
formats” (p. 40).
NTSC, PAL*, Multi (Asia, China, Europe and Russia models)
NTSC*, PAL, Multi (U.S.A. and Canada models)
[Color Space]
You can select the Color Space (p. 50) output from
HDMI. This function is available when this unit is
connected with an HDMI cable.
YCbCr 4:4:4*Sets Color Space to YCbCr 4:4:4.
YCbCr 4:2:2 Sets Color Space to YCbCr 4:2:2.
Full RGB When RGB is set and white and black on the screen
are too faint, select this item. This setting is effective
when a connected component supports RGB 0-255
range.
RGB Outputs video signal at normal signal range.
SETTINGS
4:3
Original
image size
16:9
On 4:3 TV
4:3 Pan Scan 4:3 Letterbox
Note
This function is only available on TVs that support this function.
[HDMI Deep Color]
When your TV is compatible with Deep Color (p. 50), set
this item according to your TV. This function is available
when this unit is connected with an HDMI cable.
30 bits, 36 bits, Off
*
37 En
English

SETUP MENU
[HDMI 1080p 24Hz]
This outputs the BD-Video encoded in 24Hz frame rate in
HDMI 1080p 24Hz. Smoother video playback may be
available with this function. This function is available
when your TV supports this function, and this unit is
connected with an HDMI cable. For more details on
output formats, refer to “About the video output formats”
(p. 40).
Auto*, Off
Note
This setting is disabled when output resolution is other than
1080p.
[Lip Sync]
You can set/adjust the Lip Sync (p. 50) function.
Auto* This unit adjusts the Lip Sync function
automatically.
Manual You can adjust the Lip Sync function manually. You
can set the delay of the audio for 2D and 3D contents
independently.
2D
3D
Off This unit does not adjust the Lip Sync function.
■ Video Process
[Video Mode]
You can select [Video Mode] below.
Standard* The image is most natural and well-balanced. This
mode suits for normal use.
Vivid The image is more vivid and sharp.
Cinema The image suits for watching movie in dark room.
Custom You can adjust the visual image manually. Press 5 /
a to select the parameter, then press 2 /3 to adjust
the figure.
Brightness
Adjusts the overall brightness of the image.
Saturation
Adjusts the richness of the color in the projected
image.
Hue
Adjusts the tint of the projected image.
Contrast
Adjusts the bright areas (white levels) in the image.
Sharpness
Adjusts the sharpness of objects in the video.
CTI
Smooths out the edges of color images. Color images
are rendered more distinct.
The default settings are 0.
[Color Adjust]
You can adjust Brightness/Saturation/Hue for each color
(Red/Green/Blue/Yellow/Cyan/Magenta). To use this
function, set [Video Mode] to [Custom]. For details on the
setting items, refer to “[Video Mode]” (p. 38).
The default settings are 0.
[Noise Reduction]
You can set the Noise Reduction to a level of 0 to 3. 0 is
off, and 3 is the maximum level.
0*, 1, 2, 3
[De-interlacing Mode]
You can select how to detect the video signal. Set to
[Auto] for normal use. When horizontal stripping noise
appears on the screen, set this to [Film]/[Video] to remove
the noise.
Auto*, Film, Video
38 En

Audio Setting
The default settings are marked with “
■ Audio Output
[HDMI]
You can select the output mode of the HDMI terminal.
Bitstream, PCM, Off
*
Notes
• To output sound from the speakers, select [Off].
• Sound from your iPod or the audio signal input to the DIGITAL
IN (COAXIAL and OPTICAL) jacks of this unit, cannot be
output to a TV from this unit through the HDMI cable.
• To output HD audio (such as Dolby TrueHD or DTS-HD) from
the HDMI terminal, set [Video Out Select] to [HDMI Auto] or
more than [HDMI 720p] (p. 37).
[DRC]
You can set the DRC (Dynamic Range Compression)
(p. 50) to [On]/[Off]/[Auto]. When set to [Auto], DRC is
automatically turned on for a source with DRC
information in Dolby TrueHD format. DRC makes the
strong sound such as plosive sound lower, and
conversations more audible. It is useful when you watch
movies in the night.
Off*, On, Auto
■ Speaker Setting
[Configuration]
You can set the output of 5.1 ch surround depending on
the connected speakers.
1 Press 5 /a to select a speaker you want to configure,
then press ENTER.
2 Adjust the figures below. Note that some of items are
not displayed depend on the selected speaker.
Size When the woofer section of a speaker is 16 cm
Trim Adjusts the selected speaker’s level (volume
Delay Separately adjusts the timing at which each
Disable When selected speaker is not in use, select
(6-1/2 in) or larger, select [Large]. When
smaller than 16 cm (6-1/2 in), select [Small].
Large, Small*
level).
-6 to +6 dB (in 0.5 dB step)
The default setting is 0 dB.
speaker produces audio so that sounds from the
speakers reach the listening position at the same
time.
0.5 to 10 m (in 0.5 m step)
The default setting is 3 m.
[Yes].
Yes, No*
*
”.
SETUP MENU
3 Press RETURN to go back to speaker selection.
[2ch Downmix]
You can select down mix method to 2-ch from [Stereo] or
[Lt/Rt].
Stereo*, Lt/Rt
[Test Tone]
You can check if the speaker setting is correct by
outputting the test tone.
[Subwoofer Size]
You can select the size for your subwoofer speaker to be
[Small] or [Large]. When your subwoofer driver diameter
is more than 20 cm, or when you feel low-frequency and
bass sound is weak, select [Large].
Small*, Large
■ Post Process
[UpMix]
You can multi-channelize the 2-channel audio signal
(effective on speaker output). To multi-channelize, select
[Dolby PLII] or [DTS NEO:6]. You can select [Cinema]
or [Music] when [DTS NEO:6] is selected. Also you can
select [Movie] or [Music] when [Dolby PLII] is selected.
Off*, Dolby PLII, DTS NEO:6
■ System Information
Software version and MAC address (p. 50) are displayed.
SETTINGS
English
39 En

SETUP MENU
About the video output formats
When [TV System] is set to [NTSC]
HDMI 1080p
24Hz Others
1080p 24 Hz
24Hz Others
1080p 24 Hz
1080p 60 Hz
HDMI 1080p
1080p 50 Hz
HDMI
VIDEO
Resolution Composite
Playback BD
others 1080p 60 Hz
Playback BD
others
480p Max 480i 480p 720p 60 Hz 1080i 60 Hz
480i OFF 480i 480i OFF
HDMI
Auto
HDMI
480i/576i
HDMI
480p/576p
HDMI
720p
HDMI
1080i
When [TV System] is set to [PAL]
HDMI
VIDEO
Resolution Composite
Playback BD
others 1080p 50 Hz
Playback BD
others
576p Max 576i 576p 720p 50 Hz 1080i 50 Hz
576i OFF 576i 576i OFF
HDMI
Auto
HDMI
480i/576i
HDMI
480p/576p
HDMI
720p
HDMI
1080i
When [TV System] is set to [Multi]
When [TV System] is set to [Multi], video signal is output at the same frequency as the source. Refer to the tables above
for details on the frequency setting of the TV and resolution of the output video signal.
While a menu screen such as SETUP menu is displayed, video signal is output at the same frequency as the source.
Notes
• “Max” in the table means that resolution is set to the maximum resolution supported by the connected TV.
• [HDMI 1080p 24Hz] setting is disabled when output resolution is other than [HDMI 1080p].
• No signals are output from the VIDEO jack when output resolution is set to [HDMI Auto], [HDMI 720p], [HDMI 1080i], or [HDMI
1080p].
• When [TV System] is set to [NTSC] and video source is not 60 Hz, the video output signal is converted to 60 Hz.
• When [TV System] is set to [PAL] and video source is not 50 Hz, the video output signal is converted to 50 Hz.
40 En

SOFTWARE UPGRADE
Some of the newly released BD discs cannot be played
back unless you upgrade this unit software to the latest
version. We recommend upgrading the software of this
unit with software upgrade so that the unit is operated
based on the latest software.
To check for the availability of a software upgrade, visit
http://download.yamaha.com/
Note
Do not remove the USB memory device, set this unit to standby
mode or unplug the power cable/LAN cable while the software
upgrade is being performed.
Upgrading the software
1 Prepare for the software upgrade.
When you upgrade the software from [Network]:
Confirm that this unit is connected to the network.
When you upgrade the software from [USB Storage]:
1 Save the upgrade file package to the appropriate
folder on the USB memory device. For more
details, refer to the procedure document attached
with the upgrade file package.
2 Connect the USB memory device.
If the software upgrade is started automatically
when the USB memory is connected, skip step 2
below.
SETTINGS
2 Select the upgrade method and start upgrade from
SETUP menu.
1 Press SETUP to display SETUP menu screen.
2 Select [General Setting] = [System] =
[Upgrade].
3 Select the item which contains the upgrade file
package from [USB Storage]/[Network].
3 Start upgrade by following the on-screen messages.
English
41 En

ADDITIONAL INFORMATION
TROUBLESHOOTING
Refer to the table below when this unit does not function properly. If the problem you are experiencing is not listed below
or if the instruction below does not help, turn off this unit, disconnect the power cable, and contact the nearest authorized
Yamaha dealer or service center.
General
Problem Cause Remedy Page
No power. Press on the front panel to turn on the power.
This unit fails to turn
on or enters standby
mode soon after the
power is turned on.
This unit does not
operate properly.
The disc cannot be
played back.
The power cable is not connected or the
plug is not completely inserted.
This unit has been exposed to a strong
external electric shock (such as lightning
or strong static electricity).
This unit needs to be restarted. Press and hold on the front panel for around 5
The Initial Wizard is not set. Set the Initial Wizard when you turn this unit on for
Connect the power cable firmly.
Set this unit to standby mode, disconnect the power
cable, plug it back in after 30 seconds and then use it
normally.
seconds to restart this unit. To completely restart,
unplug the power cable from the AC outlet for 5 to
10 seconds, plug the power cable to the AC outlet
again, and then turn on this unit.
the first time after purchase or upgrade.
5
16
—
5
17
No sound. No appropriate input source has been
No sound from the
speakers.
No sound or too
small sound from a
specific channel.
selected.
Speaker connections are not secure. Secure the connections.
The mute function is on. Cancel the mute function.
The volume is turned down. Turn up the volume.
Signals this unit cannot reproduce are
being input from a source component,
such as a CD-ROM.
[HDMI Control] is set to [Off]. When connecting ARC (Audio Return Channel)
Audio devices are connected to the
DIGITAL IN jacks of the unit.
[HDMI] for audio output in SETUP menu
is not set to [Off].
The output level of the channel is low. Increase the output level of the channel.
Speaker setting is inappropriate. Adjust speakers by setting [Configuration] under
Select an appropriate input source with INPUT on
the front panel (or the Input select buttons on the
remote control).
Play a source whose signals can be reproduced by
this unit.
supported TV and this unit using an HDMI cable
only, set [HDMI Control] to [On].
There is no dedicated digital audio output terminal
on the unit. The audio signals input to the DIGITAL
IN jacks cannot be output from this unit to the TV.
Set [HDMI] to [Off].
[Speaker Setting] in SETUP menu.
5
11
7
7
3
35
—
39
39
39
42 En

TROUBLESHOOTING
Problem Cause Remedy Page
No picture. Incorrect cable connections. Make sure that the cables are connected correctly.
Make sure that the connected TV is set to the correct
input.
Connect this unit to the TV with VIDEO jack using
the supplied video pin cable.
– If picture is still not displayed with this unit
connected to the VIDEO jack, press and hold
and on the front panel simultaneously
for around 5 seconds when no disc is inserted and
playback is stopped to switch NTSC/PAL.
The power is
suddenly turned off.
Sound is heard from
the speaker on one
side only.
There is noise
interference from
digital or radio
frequency
equipment.
This unit makes a
snapping sound
when starting
playback or loading a
disc.
No sound from the
subwoofer.
Sound from the
subwoofer
connected to the
SUBWOOFER preout jack is distorted.
The system settings
change
automatically.
The HDMI control
function does not
work properly.
The automatic
lipsync is not
effective even [Lip
Sync] is set to [Auto].
TV system is set incorrectly. Press and hold and on the front panel
The sleep timer is set. This is not malfunction. Turn on this unit and play
[Auto Power Off] is set to [On]. Set [Auto Power Off] to [Off].
Incorrect cable connections. Connect the cables properly. If the problem persists,
This unit is too close to the digital or
high-frequency equipment.
The subwoofer is not connected properly. Check that the subwoofer is connected properly.
The level of subwoofer is low. Increase the subwoofer level with the SW
The subwoofer output level from the unit
is too high.
When [HDMI Control] is set to [On],
operations of the TV (for example,
changing channels, etc.) changes the
system settings.
[HDMI Control] is set to [Off]. Set [HDMI Control] to [On].
The HDMI control function is disabled
on your TV.
The TV does not support the automatic
lipsync.
simultaneously for around 5 seconds when no disc is
inserted and playback is stopped to switch NTSC/
PAL. Set resolution properly again when connecting
through HDMI (p. 37).
the source again.
the cables may be defective.
Move this unit farther away from such equipment.
These sounds are not malfunctions of this unit but
are normal operating conditions.
(subwoofer) + button.
Decrease the subwoofer output level with the SW
(subwoofer) - button, then increase the subwoofer
level with the control on the subwoofer itself.
Set [HDMI Control] to [Off] or set the system again
by using its remote control.
Refer to the manual supplied with your TV and
check the setting.
Set [Lip Sync] to [Manual] and then manually adjust
the audio output delay.
13
13
13
—
30
35
11
—
—
11
35
35
—
38
7
7
INFORMATION
ADDITIONAL
43 En
English

TROUBLESHOOTING
Radio reception
Problem Cause Remedy Page
FM stereo reception is
noisy.
The desired station
cannot be tuned into
with the automatic
tuning method.
The preset selecting
function does not
work.
There is distortion,
and clear reception
cannot be obtained
even with a good FM
antenna or an outdoor
antenna.
The antenna is connected improperly. Check the antenna connections.
The characteristics of FM stereo
broadcasts cause this problem when the
transmitter is too far away or the
antenna input is poor.
The signal is too weak. Use a high-quality directional FM antenna.
The preset (memory) has been erased. Preset radio stations again.
Multipath reflection or other radio
interference has occurred.
Try using a high-quality directional FM antenna.
Switch to monaural mode.
Use the manual tuning method.
Change the height, direction, or placement of the
antenna.
iPod
11
—
28
—
28
28
—
Note
In case of a transmission error without a status message appearing on the front panel display of this unit, check the connection to your
iPod (refer to page 12).
Status message Cause Remedy Page
READING This unit is in the middle of recognizing
the connection with the iPod.
UNKNOWN There is a problem with the signal path
from the iPod to this unit.
The iPod being used is not supported by
this unit.
The iPod software is out of date. Update the iPod software version to the latest.
STOP The play back of the iPod is finished.
For example, all the songs in the
selected album have finished being
played back.
NO iPod The iPod was disconnected from this
unit.
Problem Cause Remedy Page
No sound. The power of this unit is off. Connect the power cable correctly.
The iPod software version has not been
updated.
The iPod is in the process of connecting
with this unit.
If the message continues to appear in the front panel
display and playback does not start, connect the iPod
again.
Connect the iPod again.
Only iPod classic, iPod nano (2nd, 3rd, 4th, 5th and
6th generation), iPod touch (1st, 2nd, 3rd, and 4th
generation), iPhone, iPhone 3G/3GS and iPhone 4
are supported.
Connect the iPod and this unit by a USB cable
correctly.
Download the latest iTunes software to update the
iPod software version to the latest.
Please wait for a while.
—
12
12
—
12
12
—
—
44 En

TROUBLESHOOTING
Problem Cause Remedy Page
No sound.
The iPod sounds, but
you cannot operate it
with this unit or the
remote control.
No sound of your
iPod from the TV.
This unit cannot be
operated by the
remote control.
You cannot operate
from the iPod.
The playback
information is not
displayed on the
front panel display.
The iPod does not
charge up.
The iPod is not connected correctly. Connect the iPod and this unit by a USB cable
No sound of your iPod can be output
from this unit to the TV through the
HDMI cable.
The iPod is not supported by this unit. Only iPod classic, iPod nano (2nd, 3rd, 4th, 5th and
The iPod is not connected correctly. Connect the iPod and this unit by a USB cable
The iPod software version is out of date. Update the iPod software version to the latest. If the
The iPod is not connected correctly. Connect the iPod and this unit by a USB cable
The iPod you set is not compatible with
the playback information display.
The iPod is not connected correctly. Connect the iPod and this unit by a USB cable
The iPod is not supported by this unit. Only iPod classic, iPod nano (2nd, 3rd, 4th, 5th and
correctly.
Use the speakers of this unit.
6th generation), iPod touch (1st, 2nd, 3rd, and 4th
generation), iPhone, iPhone 3G/3GS and iPhone 4
are supported.
correctly.
problem cannot be solved, even with the latest
software, reset the iPod.
correctly.
Only iPod classic, iPod nano (2nd, 3rd, 4th, 5th and
6th generation), iPod touch (1st, 2nd, 3rd, and 4th
generation), iPhone, iPhone 3G/3GS and iPhone 4
are supported.
correctly.
6th generation), iPod touch (1st, 2nd, 3rd, and 4th
generation), iPhone, iPhone 3G/3GS and iPhone 4
are supported.
12
—
12
12
—
12
12
12
12
USB
Note
In case of a transmission error without a status message appearing on the front panel of this unit, check the connection to the USB
device (refer to page 15).
Status message Cause Remedy Page
USB ERROR The connected USB device is not
playable on this unit.
The USB device is connected at an
angle.
Problem Cause Remedy Page
The file in the USB
device does not play.
The USB device is not recognized. Connect the USB device again.
Incorrect USB device connections. Connect the USB device again.
The file format is not compatible with
this unit.
If the solutions above do not resolve the
problem, the USB device is not playable
on this unit.
Disconnect the USB device. Change input source
other than USB and select USB as input source
again. Then connect playable USB device again.
Connect an AC adapter if supplied with the device.
Replace the file with a correctly recorded file
playable with this unit.
Try another USB device.
15
15
—
15
—
INFORMATION
ADDITIONAL
3
English
45 En

TROUBLESHOOTING
Disc playback
■ General
Problem Cause Remedy Page
No sound or
distorted sound.
Disc playback does
not start.
Some button
operations do not
work.
Playback does not
start immediately
after pressing
on this unit or on
the remote control.
[No Disc] appears in
the display even
though a disc is in
the disc tray.
Audio is not output,
or images are not
played back properly.
The sampling rate of an audio or video
file is not compatible with this unit.
The disc is not finalized. The CD-R/RW, DVD+R/RW/R DL, and DVD-R/
Disc is loaded upside-down. Remove the disc and then load the disc with the
The disc is defective. Try playing back another disc. If this solves the
The format of the file is not compatible
with this unit.
The disc loaded into this unit is not
compatible.
The disc is dirty. Remove the disc and then wipe the disc clean.
The disc loaded into this unit is not
compatible.
If this unit was moved from a cold to
warm place, condensation has formed on
the disc reading lens.
The disc loaded into this unit is not
compatible.
The disc is dirty. Remove the disc and then wipe the disc clean.
Disc is loaded upside-down. Remove the disc and then load the disc with the
The disc is a copyright-protected disc. The audio may not be output or the images may not
Check that the sampling rate and bit rate of an audio
or video file are compatible with this unit.
Audio may not be output depending on the audio
recording status, such as when audio other than an
audio signal or non-standard audio is recorded for
the audio content.
There is no sound during still mode, slow motion
playback, fast forward and fast reverse.
RW/R DL must be finalized.
labeled side facing up.
problem, the disc you want to play back is defective.
Check that the format of the file is compatible with
this unit.
Use a disc supported by this unit.
Use a disc supported by this unit.
Wait for an hour or two until this unit adjusts to the
room temperature, and try again.
Use a disc supported by this unit.
labeled side facing up.
be played back properly for some discs in which
copyright-protected contents are recorded.
3
3
—
3
—
—
3
3
4
3
—
3
4
—
—
46 En

TROUBLESHOOTING
■ Picture
Problem Cause Remedy Page
Screen freezes and
operation buttons do
not work.
Video is not output
with the desired
resolution.
Wide-screen video
appears vertically
stretched, or black
bands appear at the
top and bottom of the
screen. Or 4:3 video
appears horizontally
stretched.
Square noise
(mosaic) appears on
the screen.
The playback screen
will be disturbed if
DVD video is
recorded to a VCR, or
played back through
a VCR.
This unit needs to be restarted. Turn off the power and turn on the power again.
Resolution is set incorrectly. Set to the desired resolution.
Aspect ratio of your TV is set incorrectly. Change the aspect ratio of your TV.
The disc is a copyright-protected disc. This unit complies with analog copy protection.
Press , then restart playback.
Press and hold on the front panel for around 5
seconds to restart this unit.
Blocks in images may be visible in scenes with rapid
movement due to the characteristics of digital image
compression technology.
Some discs contain a copy prohibiting signal. If you
try to play back such discs through a VCR, or record
to a VCR and play back the signal, the copy
protection will prevent normal playback.
—
—
—
37
37
—
—
Remote control
Problem Cause Remedy Page
The remote control
does not work nor
function properly.
The remote control is operated outside its
operation range.
The remote control sensor on this unit is
exposed to direct sunlight or lighting.
The battery is worn out. Replace the battery with new one.
There are obstacles between the sensor of
this unit and the remote control.
For information on the remote control operation
range, refer to “Using the remote control”.
Change the lighting or orientation of this unit.
Remove the obstacles.
Network
Problem Cause Remedy Page
Cannot connect to
the Internet.
Incorrect cable connections. Connect the Network cable properly.
The connected equipment is turned off. Turn on the connected equipment, such as the
Connections of the broadband router and/
or modem are incorrect.
The network setting is incorrect. Set the proper value(s) in the network setting. Refer
broadband router or modem.
Connect the broadband router and/or modem
correctly.
to “Network”.
10
—
10
—
15
—
—
36
INFORMATION
ADDITIONAL
English
47 En

TROUBLESHOOTING
Problem Cause Remedy Page
Cannot download
BD-Live contents.
Cannot detect the
DLNA server.
Cannot play the file
on the home network
server.
Incorrect cable connections. Connect the Network cable properly.
Incorrect USB device connections. Connect the USB memory device properly. Check
The BD disc does not support BD-Live. Check if the BD disc supports BD-Live.
The network setting is incorrect. Check the setting for [Internet Connection].
The USB memory device is not
compatible.
There is insufficient free space on the
USB memory device.
Incorrect cable connections. Connect the network cable properly.
The connected equipment is turned off. Turn on the connected equipment, such as the
The access point of this unit and the
server are not the same.
The network setting is incorrect. Set the proper value(s) in the network setting. Refer
The DLNA server does not permit this
unit.
The file is not supported by this unit. Make sure the file is playable.
The DLNA setting is incorrect. Check your DLNA server’s setting.
that the USB memory device is connected to the
USB port of this unit.
Connect the USB memory device formatted in
FAT16 or FAT32.
It is recommended to connect the USB memory
device with at least 2 GB of free space. If there is not
enough free space, format the USB memory device.
Refer to the supplied user’s manual of the disc or
consult the disc manufacturer.
broadband router or the server.
Confirm this unit and the server are connected to the
same access point.
to “Network”.
Depending on the DLNA server, this unit may need
to be permitted from the server.
The playback and operating quality may be affected
by your home network condition.
15
15
—
36
15
35
—
15
—
—
36
—
3
36
—
48 En

TROUBLESHOOTING
Messages on the screen
The following messages appear on the TV screen in case the disc you tried to play back is not appropriate or the
operation is not correct.
Error message Cause Remedy Page
Unsupported File The file is not supported by this unit. Refer to “Types of discs/files that can be used with
Wrong region code! The disc is an incompatible region code. Refer to “Region management information”.
Network has FAILED. This unit cannot be connected to the
Network is OK, proxy
has FAILED.
BD-Live connection
is prohibited in
SETUP menu.
No valid upgrade file
is found!
Upgrade has failed
for some reason!
network.
This unit cannot be connected to the
proxy server.
BD-Live connection is prohibited. Refer to “[BD-Live Connection]”.
The upgrade file cannot be found. Check if the upgrade file is in the appropriate folder.
Upgrade is failed. Check if the upgrade file is corrupted or unreadable.
this unit”.
Check connection and Network setting.
Refer to “[Proxy Setting]”.
Others
3
3
15
36
36
36
—
—
Problem Cause Remedy Page
Password is
forgotten.
When no disc is inserted and playback is stopped,
press and hold and on the front panel
simultaneously for around 5 seconds to set all the
Security settings (p. 36) of this unit to their default
settings. After the power is turned off automatically,
press to turn on the power again.
—
INFORMATION
ADDITIONAL
49 En
English

GLOSSARY
AVCHD
AVCHD is a new format (standard) for high definition
video cameras that can be used to record and play highresolution HD images.
BD-Live™
BD-Live is a BD standard that utilizes a network
connection, enabling this unit to go online to download
promotional videos and other data.
BDMV
BDMV (Blu-ray Disc Movie, BD-MV) refers to one of
the application formats used for BD-ROM which is one
of the Blu-ray Disc specifications. BDMV is a recording
format equivalent to DVD-Video of the DVD
specification.
Blu-ray 3D™
Blu-ray 3D enables you to view full high definition 3D
images.
BONUSVIEW™
BONUSVIEW compatible discs let you simultaneously
enjoy video sub-channel for two screens, audio subchannel and sub-titles. A small screen appears within
the main screen during playback (Picture in Picture).
Closed caption
Closed captions are kind of subtitle, and the difference
between subtitles and captions is that subtitles are
intended for hearing persons and captions are for the
hearing impaired. Subtitles rarely show all of the audio.
For example, captions show sound effects (e.g., “phone
ringing” and “footsteps”), while subtitles do not. Before
you select this setting, please ensure that the disc
contains closed caption information.
Color Space
Color Space is a color range that can be represented.
RGB is a color space based on the RGB color model
(red, green and blue) and is typically used for PC
monitors. YCbCr is a color space based on a luminance
signal (Y) and two color difference signals (Cb and Cr).
Deep Color
Deep Color refers to the use of various color depths in
displays, up from the 24-bit depths in previous versions
of the HDMI specification. This extra bit depth allows
HDTVs and other displays go from millions of colors to
billions of colors and eliminate on-screen color banding
for smooth tonal transitions and subtle gradations
between colors. The increased contrast ratio can
represent many times more shades of gray between
black and white. Also Deep Color increases the number
of available colors within the boundaries defined by the
RGB or YCbCr color space.
Dolby Digital
A sound system developed by Dolby Laboratories Inc.
that gives movie theater ambience to audio output when
the product is connected to a Dolby Digital processor or
amplifier.
Dolby Digital Plus
A sound system developed as an extension to Dolby
Digital. This audio coding technology supports 7.1
multi-channel surround sound.
Dolby TrueHD
Dolby TrueHD is a lossless coding technology that
supports up to 8 channels of multi-channel surround
sound for the next generation optical discs. The
reproduced sound is true to the original source bit-forbit.
DRC (Dynamic Range Control)
DRC lets you adjust the range between the loudest and
softest sounds (dynamic range) for playback at average
volume. Use this when it is hard to hear dialog, or
during times when playback may disturb neighbors.
DTS
This is a digital sound system developed by DTS, Inc.
for use in cinemas.
DTS-HD High Resolution Audio
DTS-HD High Resolution Audio is a new technology
developed for the next generation high definition optical
disc format.
HDMI
HDMI (High-Definition Multimedia Interface) is an
interface that supports both video and audio on a single
digital connection. The HDMI connection carries
standard to high definition video signals and multichannel audio signals to AV components such as HDMI
equipped TVs, in digital form without degradation.
Letterbox (LB 4:3)
A screen size with black bars on the top and bottom of
the image to allow viewing of wide-screen (16:9)
material on a connected 4:3 TV.
Linear PCM Sound
Linear PCM is a signal recording format used for Audio
CDs and on some DVD and Blu-ray discs. The sound on
Audio CDs is recorded at 44.1 kHz with 16 bits. (Sound
is recorded between 48 kHz with 16 bits and 96 kHz
with 24 bits on DVD discs and between 48 kHz with 16
bits and 192 kHz with 24 bits on BD discs.)
Lip Sync
Lip Sync, an abbreviation for lip synchronization, is a
technical term that involves both a problem and a
capability of maintaining audio and video signals
synchronized during post-production and transmission.
Whereas the audio and video latency requires complex
end-user adjustments, HDMI incorporates an automatic
audio and video syncing capability that allows devices
to perform this synchronization automatically and
accurately without user interaction.
Mac address
The Mac address is a unique value assigned to a network
device for identification purposes.
Pan Scan (PS 4:3)
A screen size that cuts off the sides of the image to allow
viewing of wide-screen (16:9) material on a connected
4:3 TV.
Subtitles
These are the lines of text appearing at the bottom of the
screen which translate or transcribe the dialog. They are
recorded on many DVD and BD discs.
50 En

GLOSSARY
Top menu
In a BD-Video/DVD-Video, this is the menu for
selecting things like the chapter to be played back and
the subtitle language. In some DVD-Videos, the top
menu may be called the “Title Menu”.
SPECIFICATIONS
PLAYER SECTION
iPod/iPhone
• Supported iPod/iPhone ................................................iPod classic,
iPod nano (2nd, 3rd, 4th, 5th and 6th generation),
iPod touch (1st, 2nd, 3rd, and 4th generation),
iPhone, iPhone 3G/3GS, iPhone 4
disc and file formats
• For supported disc and file formats, refer to page 3.
AUX
• Input connector
AUX..................................................................................... RCA
PORTABLE...............................Stereo L/R: 3.5 mm stereo mini
AMPLIFIER SECTION
• Maximum output power
Front L/R ................. 80 W per channel (1 kHz, 10% THD, 6 Ω)
Center...........................................80 W (1 kHz, 10% THD, 6 Ω)
Surround L/R ........... 80 W per channel (1 kHz, 10% THD, 6 Ω)
Subwoofer................................ 100 W (100 Hz, 10% THD, 4 Ω)
• Input sensitivity/Input impedance
AUX..................................................................... 200 mV/47 kΩ
PORTABLE......................................................... 100 mV/47 kΩ
• Total harmonic distortion
AUX 1 kHz/10 W ............................................................. 0.05 %
TUNER SECTION
• Tuning range
[Canada model].............................................. 87.5 to 107.9 MHz
[Other models]........................................... 87.50 to 108.00 MHz
x.v.Color
x.v.Color reproduces a greater range of color than
before, showing almost all of the colors that the human
eye can detect.
INPUT/OUTPUT
• HDMI output................................................ Type A connector × 1
480i/576i, 480p/576p, 720p, 1080i,
1080p/24Hz, Deep Color, x.v.Color,
3D, ARC (Audio Return Channel) support
• Video output............................................................. 1 Vp-p (75 Ω)
• Digital input ............................................. Optical × 1, Coaxial × 1
Supported format: LPCM 2 ch (up to 48 KHz), Dolby Digital,
DTS
• USB .............................................................. Type A connector × 2
• Ethrnet ..................................................................... 100 BASE-TX
• Other output equipment.................................. Remote IN/OUT × 1
(U.S.A. and Canada models only)
GENERAL
• Power Supply
[U.S.A. and Canada models]............................ AC 120 V, 60 Hz
[Europe model] ....................................AC 220-240 V, 50/60 Hz
[Asia model].........................................AC 220-240 V, 50/60 Hz
[China model] .................................................. AC 220 V, 50 Hz
[Russia model] ..........................................AC 220-240 V, 50 Hz
• Power consumption ................................................................ 72 W
• Standby Power consumption ...................................... 0.5 W or less
• Dimensions (W × H × D, including protrusions)
......................................................................... 435 × 80 × 362 mm
(17 1/8 × 3 1/8 × 14 1/4 in)
• Weight ....................................................................4.5 kg (9.9 lbs.)
Specifications are subject to change without notice.
51 En
INFORMATION
ADDITIONAL
English

SPECIFICATIONS
■ Copyright
• iPhone, iPod, iPod classic, iPod nano, and iPod touch are
trademarks of Apple Inc., registered in the U.S. and other
countries.
“Made for iPod,” and “Made for iPhone” mean that an
electronic accessory has been designed to connect specifically
to iPod, or iPhone, respectively, and has been certified by the
developer to meet Apple performance standards.
Apple is not responsible for the operation of this device or its
compliance with safety and regulatory standards. Please note
that the use of this accessory with iPod and iPhone may affect
wireless performance.
• Audio-visual material may consist of copyrighted works which
must not be recorded without the authority of the owner of the
copyright. Refer to relevant laws in your country.
•
This product incorporates copyright protection technology that is
protected by U.S. patents and other intellectual property rights.
Use of this copyright protection technology must be authorized
by Rovi Corporation, and is intended for home and other limited
viewing uses only unless otherwise authorized by Rovi
Corporation. Reverse engineering or disassembly is prohibited
• This product is licensed under the AVC patent portfolio license
and VC-1 patent portfolio license for the personal and noncommercial use of a consumer to (i) encode video in
compliance with the AVC Standard and VC-1 Standard
(“AVC/VC-1 Video”) and/or (ii) decode AVC/VC-1 Video
that was encoded by a consumer engaged in a personal and
non-commercial activity and/or was obtained from a video
provider licensed to provide AVC/VC-1 Video. No license is
granted or shall be implied for any other use. Additional
information may be obtained from MPEG LA, LLC.
See http://www.mpegla.com.
• Manufactured under license under U.S. Patent Nos: 5,956,674;
5,974,380; 6,226,616; 6,487,535; 7,392,195; 7,272,567;
7,333,929; 7,212,872 & other U.S. and worldwide patents
issued & pending. DTS-HD, the Symbol, & DTS-HD and the
Symbol together are registered trademarks & DTS-HD Master
Audio | Essential is a trademark of DTS, Inc. Product includes
software. © DTS, Inc. All Rights Reserved.
• Blu-ray Disc
BONUSVIEW
Disc Association.
HDMI, the HDMI logo and High-Definition Multimedia
•
Interface are trademarks or registered trademarks of
.
Licensing LLC
• “x.v.Color” and “x.v.Color” logo are trademarks.
• “AVCHD” and the “AVCHD” logo are trademarks of
Panasonic Corporation and Sony Corporation.
TM
, Blu-rayTM, Blu-ray 3DTM, BD-LiveTM,
TM
, and the logos are trademarks of the Blu-ray
.
HDMI
•
Windows Media Player is a registered trademark or trademark of
Microsoft corporation in the United States and/or other countries
YouTube and the YouTube logo are trademarks of Google. Inc
•
• is a trademark of DVD Format/Logo Licensing
Corporation.
Manufactured under license from Dolby Laboratories. Dolby,
•
Pro Logic and the double-D symbol are trademarks of Dolby
Laboratories
.
52 En
.
• Java and all Java-based trademarks and logos are trademarks
or registered trademarks of Sun Microsystems, Inc. in the
United States and/or other countries.
.
• DLNA and DLNA CERTIFIED are trademarks and/or service
marks of Digital Living Network Alliance.

PRECAUCIÓN: LEA LAS INDICACIONES SIGUIENTES ANTES
DE UTILIZAR ESTE APARATO
1 Para asegurar el mejor rendimiento de este aparato, lea
atentamente este manual. Y luego guárdelo en un lugar
seguro para poder consultarlo en el futuro en caso de ser
necesario.
2 Instale esta unidad en un lugar bien ventilado, fresco,
seco y limpio, alejado de la luz directa del sol, fuentes
de calor, vibración, polvo, humedad y/o frío. Para una
adecuada ventilación, permita que el equipo tenga el
siguiente espacio libre mínimo:
Arriba: 10 cm
Atrás: 10 cm
A los lados: 10 cm
3 Coloque este aparato lejos de otros aparatos eléctricos,
motores o transformadores, para evitar así los ruidos de
zumbido.
4 No exponga este aparato a cambios bruscos de
temperaturas, del frío al calor, ni lo coloque en lugares
muy húmedos (una habitación con deshumidificador, por
ejemplo), para impedir así que se forme condensación en
su interior, lo que podría causar una descarga eléctrica,
un incendio, daños en el aparato y/o lesiones a las
personas.
5 Evite instalar este aparato en un lugar donde puedan
caerle encima objetos extraños y/o donde quede expuesto
al goteo o a la salpicadura de líquidos. Encima de este
aparato no ponga:
– Otros componentes, porque pueden causar daños y/o
decoloración en la superficie de este aparato.
– Objetos con fuego (velas, por ejemplo), porque
pueden causar un incendio, daños en el aparato y/o
lesiones a las personas.
– Recipientes con líquidos, porque pueden caerse
y derramar el líquido, causando descargas eléctricas
al usuario y/o dañando el aparato.
6 No tape este aparato con un periódico, mantel, cortina,
etc. para no impedir el escape del calor. Si aumenta la
temperatura en el interior del aparato, esto puede causar
un incendio, daños en el aparato y/o lesiones a las
personas.
7 No enchufe este aparato a una toma de corriente hasta
después de haber terminado todas las conexiones.
8 No ponga el aparato al revés. Podría recalentarse
y posiblemente causar daños.
9 No utilice una fuerza excesiva con los conmutadores,
los controles y/o los cables.
10 Cuando desconecte el cable de alimentación de la toma
de corriente, sujete la clavija y tire de ella; no tire del
propio cable.
11 No limpie este aparato con disolventes químicos porque
podría estropear el acabado. Utilice un paño limpio
y seco para limpiar el aparato.
12 Utilice solamente la tensión especificada en este aparato.
Utilizar el aparato con una tensión superior a la
especificada resulta peligroso y puede producir un
incendio, daños en el aparato y/o lesiones a las personas.
Yamaha no se hará responsable de ningún daño debido
al uso de este aparato con una tensión diferente de la
especificada.
13 Para impedir daños debidos a relámpagos, desconecte el
cable de alimentación y antenas externas de la toma de
corriente durante una tormenta eléctrica.
14 No intente modificar ni arreglar este aparato. Póngase en
contacto con el personal de servicio Yamaha cualificado
cuando necesite realizar alguna reparación. La caja no
deberá abrirse nunca por ninguna razón.
15 Cuando no piense utilizar este aparato durante mucho
tiempo (cuando se ausente de casa por vacaciones, por
ejemplo) desconecte el cable de alimentación de la toma
de corriente.
16 Asegúrese de leer la sección “SOLUCIÓN DE
PROBLEMAS” antes de dar por concluido que su
aparato está averiado.
17 Antes de trasladar este aparato, pulse para ponerlo
en el modo de espera, y luego desconecte el cable de
alimentación de CA de la toma de corriente.
18 La condensación se formará cuando cambie de repente la
temperatura ambiental. Desconecte en este caso el cable
de alimentación de la toma de corriente y no utilice el
aparato.
19 El aparato se calentará cuando la utilice durante mucho
tiempo. Desconecte en este caso la alimentación y luego
no utilice el aparato para permitir que se enfríe.
20 Instale este aparato cerca de la toma de CA y donde se
pueda alcanzar fácilmente la clavija de alimentación.
21 Las baterías no deberán exponerse a un calor excesivo
como, por ejemplo, el que producen los rayos del sol,
el fuego y similares.
Este aparato no se desconecta de la fuente de alimentación de CA si
está conectada a una toma de corriente, aunque la propia aparato
esté apagada con . A este estado se le llama modo de espera.
En este estado, este aparato ha sido diseñada para que consuma
un cantidad de corriente muy pequeña.
ADVERTENCIA
PARA REDUCIR EL RIESGO DE INCENDIO O DESCARGA
ELÉCTRICA, NO EXPONGA ESTE APARATO A LA LLUVIA
NI A LA HUMEDAD.
SEGURIDAD CONTRA LA RADIACIÓN LÁSER
Este aparato utiliza rayos láser. Debido a la posibilidad de que se
produzcan daños en los ojos, la extracción de la cubierta del aparato
o las reparaciones solamente deberán ser realizadas por un técnico
cualificado.
PELIGRO
Este aparato emite radiación láser visible cuando se abre. Evite la
exposición directa a los rayos láser. Cuando se conecte este aparato
a una toma de corriente no acerque sus ojos a la abertura de la bandeja
del disco ni a otras aberturas para mirar al interior.
ADVERTENCIA
NO TOQUE ESTA UNIDAD SI SE UTILIZA DE FORMA
CONTINUA A UN VOLUMEN ELEVADO, YA QUE SU
PARTE INFERIOR PODRÍA ACUMULAR MUCHO CALOR
Y PODRÍA SUFRIR LESIONES O QUEMADURAS.
i Es

CONTENIDO
INTRODUCCIÓN
FUNCIONES DE ESTA UNIDAD........................ 2
PIEZAS INCLUIDAS ............................................ 2
INFORMACIÓN SOBRE DISCOS
Y ARCHIVOS..................................................... 3
Tipos de discos/archivos que se pueden utilizar
con esta unidad ...................................................... 3
Para cargar un disco................................................... 4
Precauciones con los discos....................................... 4
Aviso para ver imágenes de vídeo en 3D .................. 4
NOMBRES Y FUNCIONES
DE LAS OPCIONES .......................................... 5
Panel delantero........................................................... 5
Mando a distancia ...................................................... 6
Panel posterior ........................................................... 9
Colocación de las pilas en el mando a distancia...... 10
Utilización del mando a distancia............................ 10
PREPARACIÓN
CONEXIÓN .......................................................... 11
Disposición de altavoces de 5.1 canales .................. 11
Conexión de los altavoces ....................................... 11
Conexión de la antena FM ....................................... 12
Conexión del iPod.................................................... 12
Conexión de un televisor ......................................... 13
Conexión de un sintonizador de televisión
por satélite o cable............................................... 14
Conexión de dispositivos de audio
(como un CD o un reproductor MD)................... 14
Conexión de un reproductor de música digital
portátil que no sea un iPod .................................. 14
CONEXIÓN DE RED Y USB ............................. 15
Conexión con el terminal NETWORK.................... 15
Conexión al puerto USB.......................................... 15
OTRA CONEXIÓN.............................................. 16
Conexión del cable de alimentación ........................ 16
FUNCIONAMIENTO
ASISTENTE INICIAL/CONFIGURACIÓN
SENCILLA........................................................ 17
Configuración con el Asistente inicial/
Configuración Sencilla ........................................ 17
FUNCIONAMIENTO BÁSICO.......................... 18
Reproducción de Foto/Música/Vídeo ...................... 20
Uso del contenido de red ......................................... 22
Uso de los servicios de red ...................................... 22
Funcionamiento para iPod ....................................... 23
Operaciones con un CD ........................................... 23
FUNCIONAMIENTO DE REPRODUCCIÓN
AVANZADO ..................................................... 24
Menú en pantalla...................................................... 24
Menú de estado ........................................................ 25
Uso de Marcador...................................................... 26
Reproducción de programa...................................... 26
Uso de la búsqueda .................................................. 26
Disfrutar de BONUSVIEW™ y BD-Live™ ........... 27
ESCUCHAR EMISORAS DE RADIO FM .......28
Sintonización de emisoras de radio ......................... 28
Preajuste de emisoras de radio................................. 28
Selección de emisoras de radio presintonizadas
(Sintonización de presintonías) ........................... 28
Eliminación de emisoras presintonizadas................ 29
Visualización de información del sistema de datos
de radio (solo modelo de Rusia).......................... 29
UTILIZACIÓN DE FUNCIONES ÚTILES.......30
Ajuste del temporizador de apagado........................ 30
Control de esta unidad con el mando a distancia
del televisor (función de control HDMI)............. 30
AJUSTES
MENÚ SETUP.......................................................32
Utilización del menú SETUP .................................. 34
Configuración General............................................. 35
Configuración de pantalla........................................ 37
Configuración de audio ........................................... 39
Acerca de los formatos de salida de vídeo............... 40
ACTUALIZACIÓN DE SOFTWARE ................41
Actualización del software ...................................... 41
INFORMACIÓN ADICIONAL
SOLUCIÓN DE PROBLEMAS...........................42
Problemas generales ................................................ 42
Recepción de la radio............................................... 44
iPod.......................................................................... 44
USB ......................................................................... 45
Reproducción de disco............................................. 46
Mando a distancia .................................................... 47
Red........................................................................... 47
Mensajes en pantalla................................................ 49
Otros ........................................................................ 49
GLOSARIO ...........................................................50
ESPECIFICACIONES .........................................51
■ Acerca de este manual
• Este manual describe cómo utilizar esta unidad con un
mando a distancia, excepto cuando éste no se encuentre
disponible. También se puede acceder a algunas de estas
operaciones mediante los botones del panel delantero.
• Las notas contienen información importante acerca de
las instrucciones de seguridad y funcionamiento.
y indica una sugerencia de funcionamiento.
• “iPod” puede hacer referencia también a “iPhone”
en este manual.
• Este manual se ha impreso antes de la fabricación.
El diseño y las especificaciones están sujetos a cambios
en parte como resultado de mejoras, etc. En caso de
diferencias entre el manual y el producto, este último
tiene prioridad.
Iconos utilizados en este manual
Los iconos se utilizan para indicar botones/funciones
disponibles para un formato en concreto.
: Vídeo BD
BD
: Vídeo DVD, DVD-VR, DVD+VR
DVD
: CD de audio
CD
: AVCHD, WMV
VIDEO
: MP3, WMA, WAV
MUSIC
PHOTO
: JPEG
INTRODUCCIÓN PREPARACIÓN
FUNCIONAMIENTO AJUSTES
INFORMACIÓN
ADICIONAL
Español
1 Es

INTRODUCCIÓN
FUNCIONES DE ESTA UNIDAD
Reproducción de discos Blu-ray 3D (Blu-ray Disc™)/DVD/CD
Reproducir un disco Blu-ray 3D (disco BD) comercializado en el mercado, además
de DVD y CD.
Reproducción de BONUSVIEW™ y BD-Live™
Descargar contenidos adicionales disponibles a través de discos BD compatibles con BD-Live™
y disfrutar de audio/vídeo secundario en discos BD compatibles con BONUSVIEW™.
Conexión digital USB para iPod y iPhone
La conexión directa por cable USB a un iPod o iPhone permite obtener un sonido digital de alta
calidad sin las degradaciones provocadas por la conversión de digital a analógico.
Servidor doméstico de red (compatible con DLNA)
Disfrute de numerosos contenidos de su ordenador en el televisor conectándolo a un servidor
de red.
*1
*1
*1, 2
Reproducción de contenidos de YouTube™ (solo modelos de
Rusia y Asia)
Disfrute de los contenidos de YouTube™ en su televisor.
*2
Recepción de radio FM y de información de sistema de datos de radio
*1
\ pág. 24
\ pág. 27
\ pág. 19
\ pág. 22
\ pág. 22
\ pág. 28
(solo modelo de Rusia)
Escuche radios FM. Las emisiones con el sistema de datos de radio (Radio Data System)
facilitan información sobre el programa en el visor del panel delantero (solo modelo de Rusia).
Asistente inicial y Configuración Sencilla \ pág. 17
Configure fácilmente el idioma, la resolución y la relación de aspecto de la pantalla con la
pantalla Asistente inicial/Configuración Sencilla.
Funcionamiento con el mando a distancia del televisor
(compatible con HDMI CEC)
La función de control HDMI (mediante la conexión por cable HDMI) permite utilizar varios
dispositivos con un único mando a distancia.
*1Para obtener información sobre los discos y archivos que se pueden reproducir, consulte la página 3.
2
Para utilizar esta función es necesaria la configuración de red.
*
PIEZAS INCLUIDAS
Asegúrese de que dispone de todos los elementos siguientes.
Mando
adistancia
*3La antena de FM para interior suministrada es diferente en función del modelo.
4
El cable de alimentación varía en función del modelo.
*
Pilas (×2)
(AAA, R03, UM-4)
Antena de FM
para interior
*3
Cable de vídeo
compuesto (1,5 m)
\ pág. 30
Cable de
alimentación
*4
2 Es

INFORMACIÓN SOBRE DISCOS Y ARCHIVOS
Tipos de discos/archivos que se
pueden utilizar con esta unidad
• En esta unidad se pueden reproducir discos de 12 cm
y 8 cm. No utilice un adaptador de 8 cm a 12 cm.
• Utilice discos que sean compatibles con los estándares
que se indican con la presencia de logotipos oficiales
marcados en la etiqueta del disco. La reproducción de
discos que no cumplan con estos estándares no está
garantizada. Además, la calidad de imagen o sonido
no está garantizada incluso si tales discos se pueden
reproducir.
Tipo de disco
BD-ROM/BD-R/
BD-RE
DVD-ROM Vídeo DVD -DVD-R/DVD-R DL/
DVD-RW
DVD+R/DVD+R
DL/DVD+RW
CD-ROM CDDA/HDCD -CD-R/CD-RW CDDA/disco
USB -- WMV/MP3/WAV/
Red -- WMV/MP3/WMA/
Información de gestión de la región
Destino Vídeo BD Vídeo DVD
EE.UU. y Canadá Código de región
Asia Código de región
América Central
ydel Sur
Formato de
grabación
Vídeo BD --
Vídeo DVD/
DVD-VR/AVCHD/
disco de datos
Vídeo DVD/
DVD+VR/AVCHD/
disco de datos
de datos
“A” o “ALL”
“A” o “ALL”
Código de región
“A” o “ALL”
Formato
de datos
WMV/MP3/WAV/
WMA/JPEG
WMV/MP3/WAV/
WMA/JPEG
WMV/MP3/WAV/
WMA/JPEG
WMA/JPEG
WAV/JPEG
Número de región
“1” o “ALL”
1
Número de región
“3” o “ALL”
3
Número de región
“4” o “ALL”
4
ALL
ALL
ALL
Información de gestión de la región
Destino Vídeo BD Vídeo DVD
Europa Código de región
“B” o “ALL”
Australia Código de región
“B” o “ALL”
Rusia Código de región
“C” o “ALL”
China Código de región
“C” o “ALL”
Número de región
“2” o “ALL”
2
Número de región
“4” o “ALL”
4
Número de región
“5” o “ALL”
5
Número de región
“6” o “ALL”
ALL
ALL
ALL
ALL
• Los discos y los reproductores de vídeo BD/DVD
tienen códigos de región, que dictan las regiones en las
que se puede reproducir un disco.
• Las operaciones y funciones de vídeo BD/DVD pueden
ser diferentes de las explicaciones que aparecen en este
manual y algunas operaciones pueden estar prohibidas
debido a las configuraciones del fabricante del disco.
• Si se visualiza una pantalla de menú o instrucciones de
funcionamiento durante la reproducción de un disco,
siga el procedimiento de funcionamiento visualizado.
Notas
• Según el disco, puede que no sea posible la reproducción de
algunos de los discos de las tablas de la columna izquierda.
• Finalice todos los soportes de grabación que se reproduzcan
en esta unidad.
• “Finalizar” hace referencia a un procesamiento del grabador
sobre un disco grabado para que se pueda reproducir en otros
reproductores/grabadores, así como en esta unidad. Solo se
podrán reproducir en la unidad los discos que se hayan finalizado.
(Esta unidad no dispone de una función para finalizar discos.)
• No se garantiza la reproducción de todos los archivos del disco,
dispositivo de memoria USB y red.
• Un archivo con propiedad intelectual protegida no se puede
reproducir a través de un dispositivo de memoria USB o red.
Requisitos de archivos de audio MP3/WMA
• Frecuencia de muestreo: entre 32 – 48 kHz (MP3/WMA)
44,1 kHz/16 bits/estéreo LPCM (WAV)
• Bitrate: entre 8 – 320 kbps (MP3), 32 – 192 kbps (WMA)
Requisitos de archivos WMV
• WMV9, la resolución máxima es 1.920 × 1.080.
INTRODUCCIÓN
Español
3 Es

INFORMACIÓN SOBRE DISCOS Y ARCHIVOS
Para cargar un disco
• Inserte el disco con la etiqueta hacia arriba.
• En el caso de un disco grabado por ambas caras,
ponga boca abajo el lado que desea reproducir.
Notas
• La reproducción puede iniciarse automáticamente, dependiendo
del disco y la configuración de la unidad.
• Es posible que el menú aparezca primero según el disco.
• El tiempo necesario para cargar el disco puede variar
dependiendo del disco.
Precauciones con los discos
• No toque la superficie del disco.
Sujételo por el borde (y por el
orificio del centro).
• No utilice lápices ni rotuladores
de punta fina para escribir en
el disco.
• No ponga cinta, productos sellantes, pegamento ni otros
materiales similares en un disco.
• No utilice una funda protectora para evitar los arañazos.
• No cargue más de un disco en la unidad al mismo
tiempo. Si lo hace, esta unidad y los discos pueden
sufrir daños.
• No introduzca cuerpos extraños en la ranura del disco.
• No cargue discos rotos, deformados ni con pegamento.
• No exponga los discos
a la luz solar directa, altas
temperaturas, niveles altos
de humedad ni entornos
con mucho polvo.
Precaución
Aviso para ver imágenes de vídeo
en 3D
• Algunas personas pueden sufrir molestias (como vista
cansada, fatiga o náuseas) al ver imágenes de vídeo en
3D. Se recomienda a todos los espectadores realizar
pausas periódicas durante la visualización de imágenes
de vídeo en 3D.
• Si sufre alguna molestia, deje de ver las imágenes de
vídeo en 3D hasta que ésta desaparezca. Consulte
con un médico si sufre molestias agudas.
• Lea atentamente los manuales de instrucciones
(televisor y disco BD) y los mensajes de precaución
que aparecen en el televisor.
• La vista de los niños pequeños (especialmente de
los menores de seis años) todavía está en proceso de
desarrollo. Consulte con su médico (como un pediatra
o un oftalmólogo) antes de permitir a niños pequeños
ver imágenes de vídeo en 3D.
• Los niños pequeños deben estar bajo la supervisión
de un adulto para garantizar que siguen las
recomendaciones descritas anteriormente.
• Si un disco se ensucia,
límpielo con un paño
limpio y seco empezando
por el centro y terminando
en el borde. No utilice
productos de limpieza
para discos de vinilo
ni diluyentes.
• Para evitar problemas de
funcionamiento, recomendamos no utilizar productos
de limpieza de lentes comercializados en tiendas.
4 Es

NOMBRES Y FUNCIONES DE LAS OPCIONES
Panel delantero
USB PORTABLE
iPod/iPhone
2 3 4 6 7 8159 0 A B
INTRODUCCIÓN
1 (Encendido/espera):
Enciende la unidad/activa el modo de reposo.
y
Esta unidad cuenta con una función de espera automática.
• Al utilizar Disco/USB/Red como fuente, se activa
automáticamente el modo de espera si la unidad está
encendida durante 1 hora sin reproducir contenidos
ni realizar ninguna otra operación.
• Si NO utiliza Disco/USB/Red como fuente, se activa
automáticamente el modo de espera si la unidad está
encendida durante entre 1 y 8 horas sin reproducir
contenidos ni realizar ninguna otra operación, en función
del ajuste configurado en el menú SETUP (pág. 35).
2 Puerto iPod/iPhone/USB (pág. 12, 15):
Permite conectar un iPod o dispositivo de
memoria USB.
3 PORTABLE (pág. 14):
Permite conectar un reproductor de música digital
portátil que no sea un iPod.
4 Tapa de la bandeja de disco
5 Visor del panel delantero
6 (Expulsar):
Abre/cierra la bandeja portadiscos.
7 (Reproducir/Pausa):
Inicia/pone en pausa la reproducción.
8 (Detener)
9 (Buscar hacia atrás/saltar hacia
atrás): Pulse este botón para saltar hacia atrás
o manténgalo pulsado para buscar hacia atrás.
PRESET <:
Permite seleccionar una emisora presintonizada.
0 (Buscar hacia adelante/saltar hacia
adelante):
Pulse este botón para saltar hacia adelante
o manténgalo pulsado para buscar hacia adelante.
PRESET >:
Permite seleccionar una emisora presintonizada.
A INPUT:
Selecciona una fuente de entrada.
B VOLUME:
Sube o baja el volumen.
5 Es
Español

NOMBRES Y FUNCIONES DE LAS OPCIONES
Mando a distancia
Nota
En la esquina superior izquierda de la pantalla aparecerá
cuando la tecla pulsada no esté disponible.
1
2
3
4
5
6
7
8
9
0
A
B
C
D
E
F
PROGRAM MARKER DIGEST ZOOM
SLEEP
SW
MUTESEARCHCLEAR
SETUP
DISPLAY
OPTION
TOP MENU
RETURN ON SCREEN
DIMMER
STATUS
PIP
SUBTITLE
SHUFFLE
REPEAT
iPod
TV
DISC
USB NET
HOME
ENTER
AUDIO
A B
STB
AUX
VOLUME
POP-UP MENU
TUNING
PRESET
MEMORY
TUNER
PORTABLE
G
H
I
J
K
L
M
N
O
P
Q
R
1 Transmisor de señal infrarroja (pág. 10)
2 MARKER : crea un Marcador en un punto
DVD VIDEO
especificado de una película (pág. 26). Tras definir un
Marcador, pulse DIGEST para seleccionar el punto de ajuste
al que desea saltar. Puede definir hasta 12 marcadores.
3 : abre/cierra la bandeja portadiscos.
4 PROGRAM : establece el orden de
DVD CD
reproducción (pág. 26). Puede configurar hasta 15 pistas de
un disco de audio o títulos/capítulos de un DVD de vídeo.
5 Botones numéricos: permiten introducir números o,
durante la reproducción, saltar a la pista/capítulo
correspondiente al número introducido. Es posible que estos
botones no estén disponibles en función del tipo de disco y la
situación de reproducción.
6 CLEAR: borra el número introducido o elemento
configurado.
7 DISPLAY: cambia la información mostrada en el visor del
panel delantero (pág. 23, 29).
8 SETUP: muestra la pantalla de menú SETUP (pág. 32).
9 OPTION: activa el modo del menú de opciones (pág. 29).
0 HOME: muestra la pantalla de menú HOME (pág. 20).
A STATUS: muestra la información de reproducción en la
pantalla (pág. 25).
B DIMMER: cambia el brillo del visor del panel delantero.
Puede elegir el nivel de brillo entre normal (brillante), medio
apagado o apagado pulsado este botón varias veces.
C SUBTITLE : permite cambiar el
BD DVD VIDEO
idioma de los subtítulos (pág. 51) si está disponible. También
puede seleccionar este elemento desde el menú en pantalla
(pág. 24).
D PIP : permite encender/apagar la función Imagen en
BD
imagen (pág. 27). Marca PIP ( ) se muestra en pantalla
cuando esta función está disponible. También puede
seleccionar este elemento desde el menú en pantalla
(pág. 24).
Nota
Marca PIP se muestra solo cuando la opción [Marca PIP]
está ajustada en [Activar] (pág. 36).
E REPEAT
PHOTO
modo de repetición mostrado a continuación cambiará cada
vez que pulse el botón (pág. 23, 25).
F SHUFFLE :
permite seleccionar el modo de reproducción aleatoria
(pág. 23, 24).
BD DVD CD VIDEO MUSIC
: permite seleccionar el modo de repetición. El
: repite el título que se está reproduciendo.
: repite el capítulo que se está reproduciendo.
: repite la carpeta que se está reproduciendo.
: repite todas las pistas/archivos del disco/carpeta.
: repite la pista/archivo que se está reproduciendo.
DVD CD VIDEO MUSIC PHOTO
6 Es

NOMBRES Y FUNCIONES DE LAS OPCIONES
\
G DIGEST : muestra 12 fotografías en miniatura.
Cuando se muestran las miniaturas, puede ir a la página
siguiente o anterior con / .
DVD VIDEO
(pág. 26).
H : enciende la unidad o activa el modo de reposo.
I ZOOM : amplia/reduce la
imagen. El tamaño de la pantalla cambiará cada vez que
pulse la tecla (ampliar/reducir imagen: 3 pasos cada uno).
J Botones de colores : utilice estos botones siguiendo
las instrucciones en pantalla.
K SLEEP: activa el modo de reposo (pág. 30).
L Botones de control del volumen del altavoz de
graves : controlan
el nivel del volumen del altavoz de graves (pág. 12).
M Botones de control del volumen: controlan el nivel del
volumen.
Pulse MUTE para desactivar el volumen. Púlselo de nuevo
para reanudar el volumen.
N SEARCH : permite
saltar a un punto especificado durante la reproducción. Para
obtener más información sobre esta función, consulte “Uso
de la búsqueda” (pág. 26). También puede seleccionar esta
opción desde el menú Estado (pág. 25).
O AUDIO : permite cambiar el idioma o formato
de audio. También puede seleccionar esta opción desde el
menú en pantalla (pág. 24).
P FM Botones de control
TUNING << / >>: inicia la sintonización manual. Mantenga
pulsado este botón para iniciar la sintonización automática
(pág. 28).
PRESET < / >: permite seleccionar las emisoras
presintonizadas (pág. 28).
MEMORY: inicia la sintonización de presintonías
y memoriza emisoras presintonizadas(pág. 28).
Q A/B : permite
reproducir una parte específica que desee repetir.
1 Pulse A/B en la escena donde desee definir el punto
2 Pulse A/B de nuevo en la escena donde desee definir
3 Para cancelar la reproducción de repetición, pulse A/B.
PHOTO
: muestra la barra de selección Marcador
DVD VIDEO PHOTO
BD
BD DVD CD VIDEO MUSIC
BD DVD CD VIDEO MUSIC
BD DVD
BD DVD CD VIDEO MUSIC
de inicio. [A-] aparecerá en la pantalla.
el punto final. [A-B] aparecerá en la pantalla.
Se inicia la reproducción de repetición.
[A-B] desaparecerá y se detendrá la reproducción de
repetición.
Nota
Es posible que esta función no se pueda utilizar dependiendo
de las especificaciones del disco.
R Botones de selección de entrada: permiten seleccionar
la fuente de entrada (pág. 18, 28).
INTRODUCCIÓN
Continúa en la página siguiente.
Español
7 Es

NOMBRES Y FUNCIONES DE LAS OPCIONES
S
t
U
PROGRAM MARKER DIGEST ZOOM
SLEEP
SW
MUTESEARCHCLEAR
SETUP
DISPLAY
OPTION
TOP MENU
RETURN ON SCREEN
DIMMER
STATUS
PIP
SUBTITLE
SHUFFLE
REPEAT
iPod
TV
DISC
USB NET
HOME
ENTER
AUDIO
A B
STB
AUX
VOLUME
POP-UP MENU
TUNING
PRESET
MEMORY
TUNER
PORTABLE
V
W
X
S TOP MENU : muestra la pantalla del menú
BD DVD
principal (pág. 51) si el disco contiene un menú. Seleccione
la opción deseada con 5/a /2 /3 y ENTER.
Nota
Las operaciones concretas pueden diferir dependiendo del
disco. Siga las instrucciones de cada pantalla de menú.
T Botones de cursor (5 /a /2/3 ): permiten desplazarse
hasta la opción deseada.
ENTER: confirma el menú o la opción señalado.
U RETURN: permite volver al menú o pantalla anterior, etc.
V POP-UP/MENU : muestra el menú
emergente. Los contenidos del menú que se visualiza varían
en función del disco. Para obtener más información sobre
cómo ver y controlar el menú emergente, consulte el manual
del disco. La pantalla del menú principal se puede mostrar
pulsando POP-UP/MENU, dependiendo del disco.
W ON SCREEN: muestra el menú en pantalla (pág. 24).
X Botones de control
:
BD DVD CD VIDEO MUSIC PHOTO
: reproduce el contenido.
: detiene la reproducción. Para detener totalmente
la reproducción, pulse dos veces este botón.
: sitúa la reproducción en pausa.
:
BD DVD CD VIDEO MUSIC
/ : permite saltar hacia atrás/hacia adelante.
/ : pulse este botón para realizar una búsqueda
o una repetición instantánea. La búsqueda instantánea salta
30 segundos en el contenido. La repetición instantánea
reproduce el contenido desde 10 segundos antes.
:
BD DVD CD VIDEO MUSIC
/ : permite realizar búsquedas hacia atrás/hacia
adelante. La velocidad de búsqueda cambiará cada vez que
pulse el botón (buscar hacia atrás/adelante: 5 pasos cada
opción). Pulse para reanudar la reproducción normal.
PHOTO
/ : permite cambiar la velocidad de un pase de
diapositivas (más lento/más rápido: 3 pasos).
BD DVD
:
8 Es
Nota
En función del disco, la unidad reanuda la reproducción
desde el punto en el que se paró anteriormente. Para
reproducir desde el principio, pulse y,después,
pulse .

Panel posterior
NOMBRES Y FUNCIONES DE LAS OPCIONES
INTRODUCCIÓN
2 4 5 6 7 8931
1 Toma AC IN (pág. 16):
Conecte el cable de alimentación suministrado.
2 Terminales SPEAKERS (pág. 11):
Conecte los altavoces.
3 Toma ANTENNA (pág. 12):
Conecte una antena de FM.
4 Tomas REMOTE CONTROL (IN/OUT)
(solo modelos de EE.UU. y Canadá):
Conecte otros componentes controlados a distancia.
5 Tomas DIGITAL IN (COAXIAL/OPTICAL)
(pág. 13, 14):
Conecte su sintonizador de televisión por satélite
o cable a la toma COAXIAL. La toma OPTICAL
corresponde a la señal de audio del televisor si el
televisor no es compatible con ARC (canal de
retorno de audio).
6 Tomas AUDIO IN (AUX) (pág. 14):
Conecte otros dispositivos de audio, como un CD
o un reproductor MD.
7 Tomas OUTPUT (VIDEO/SUBWOOFER/HDMI)
(pág. 12, 13):
La toma VIDEO emite señal de vídeo analógico.
Utilice la toma SUBWOOFER si usa un altavoz
de graves activo (amplificador integrado).
Utilice la toma HDMI para conectar con el televisor.
8 Toma NETWORK (LAN) (pág. 15):
Conecte un concentrador o un router de banda ancha.
9 Toma USB (pág. 15):
Conecte un dispositivo de memoria USB.
9 Es
Español

NOMBRES Y FUNCIONES DE LAS OPCIONES
2
Colocación de las pilas en el
mando a distancia
1
3
2
■ Notas acerca de las pilas
• Cambie las dos pilas cuando la distancia de funcionamiento
del mando a distancia disminuya.
• Utilice pilas AAA, R03 o UM-4.
• Asegúrese de que las polaridades son correctas. Consulte
la ilustración del interior del compartimento de las pilas.
• Retire las pilas si no va a utilizar el mando a distancia durante
un período prolongado.
• No mezcle pilas usadas con pilas nuevas.
• No utilice diferentes tipos de pilas juntas (como, por ejemplo,
pilas alcalinas y de manganeso). Fíjese bien en el embalaje,
ya que estos diferentes tipos de pilas a menudo tienen el
mismo tamaño y color.
• Si una pila tiene fugas, tírela inmediatamente siguiendo las
regulaciones. Nunca toque el líquido que salga de la pila ni
permita que entre en contacto con la ropa. Limpie a conciencia
el compartimento de las pilas antes de colocar pilas nuevas.
• No tire las pilas con los residuos domésticos habituales.
Deséchelas de acuerdo con las normativas de su país.
• Mantenga las pilas fuera del alcance de los niños. Si alguien
ingiere una pila de forma accidental, póngase en contacto
inmediatamente con un médico.
• Si sabe que no va a utilizar el mando a distancia durante un
largo período de tiempo, retire las pilas del mando a distancia.
• No cargue ni desmonte las pilas suministradas.
Utilización del mando a distancia
El mando a distancia transmite una señal mediante un haz
infrarrojo. Oriente siempre el mando a distancia hacia el
sensor del mando a distancia del panel delantero de esta
unidad cuando lo utilice.
USB PORTABLE
iPod/iPhone
6 m de
distancia
30˚ 30˚
Notas
• El espacio entre el mando a distancia y esta unidad debe estar
despejado de obstáculos.
• No vierta agua ni otros líquidos en este mando a distancia.
• No deje caer el mando a distancia.
• No guarde ni deje el mando a distancia en lugares con:
– elevada humedad, como por ejemplo un baño;
– elevada temperatura, como por ejemplo un radiador;
– temperaturas extremadamente bajas;
– Mucho polvo.
• No exponga el mando a distancia a una iluminación excesiva,
como una lámpara fluorescente de inversor, ya que podría
averiarse. Si es necesario, coloque el sistema lejos de fuentes
de iluminación directa.
10 Es

PREPARACIÓN
CONEXIÓN
Disposición de altavoces
de 5.1 canales
FR
FL
SL
Altavoces frontales (FR y FL):
Para el sonido del canal frontal (sonido estéreo) y el
sonido de los efectos.
Altavoz central (C):
Para el sonido del canal central (diálogo, canciones, etc.).
C
SW
SR
Notas
• Desconecte el enchufe de alimentación antes de conectar los
altavoces.
• Al conectar altavoces, utilice altavoces con una impedancia
superior a 6Ω para los altavoces frontales, central y surround
yde 4Ω a 6Ω para un altavoz de graves pasivo. En el caso de un
altavoz de graves activo (amplificador integrado), no es
necesario preocuparse de la impedancia.
• Al conectar un altavoz de graves activo (amplificador integrado),
asegúrese de apagarlo antes de conectarlo a la unidad.
• Procure que el núcleo del cable del altavoz no entre en contacto
con ningún elemento ni con las partes metálicas de la unidad,
ya que podrían dañar la unidad o los altavoces.
■ Cables necesarios (no suministrados)
Cuando el altavoz de graves es pasivo:
• Cables de altavoz × 6
+
–
Cuando el altavoz de graves es activo:
• Cables de altavoz × 5
+
–
• Cable de clavijas monoaural (para altavoz de graves) × 1
+
–
+
–
PREPARACIÓN
Altavoces envolventes (SR y SL):
Para el sonido de los efectos y las canciones desde el canal
envolvente. El sonido del canal posterior envolvente
se emite desde los altavoces envolventes cuando se
reproduce un disco con sonidos de 7.1 o 6.1 canales.
Altavoz de graves (SW):
Para sonidos de efectos de baja frecuencia (LFE)
y sonidos de graves desde los canales envolventes
y frontales.
Conexión de los altavoces
Conecte los altavoces a la unidad.
Si utiliza un altavoz de graves, compruebe si está activo
(amplificador integrado, con cable de alimentación)
o pasivo (amplificador no integrado, sin cable de
alimentación). El cable utilizado para conectar un altavoz
de graves varía en función del tipo de altavoz de graves.
Después de conectar los altavoces, deberá configurarlos
en función del tipo de altavoz (tamaño, número de
altavoces disponibles, etc.). Consulte la página 39 para
obtener información sobre cómo configurar altavoces.
Panel posterior de esta unidad
(cuando el altavoz de graves es pasivo)
Español
11 Es

CONEXIÓN
3
4
2
1
■ Conexión de los cables del altavoz
Cada altavoz tiene dos cables de altavoz. Uno sirve para
conectar el terminal – (negativo) de la unidad y el altavoz
y, el otro, para el terminal + (positivo). Los cables son de
diferentes colores, para que no se confundan. Conecte el
lado negro del terminal – (negativo) y el otro extremo al
terminal + (positivo).
2
4
1
3
Conexión de la antena FM
Puede escuchar emisoras de radio FM conectando la
antena FM para interior suministrada.
1 Pele aproximadamente 10 mm de aislante del
extremo del cable de altavoz y trence los alambres
con firmeza.
2 Baje la lengüeta del terminal del altavoz.
3 Introduzca el alambre del cable de altavoz en el
terminal.
4 Suba la lengüeta para fijar el cable de altavoz.
■ Conexión de un altavoz de graves activo
Al conectar un altavoz de graves activo (amplificador
integrado), utilice un cable de clavijas monoaural. Antes
de conectar un altavoz de graves activo, apáguelo.
Cable de clavijas
monoaural
Acerca del altavoz de graves
• Utilice el terminal de altavoz para conectar un
altavoz de graves pasivo. Utilice la toma de salida
SUBWOOFER para conectar un altavoz de
graves activo (amplificador integrado).
• Puede ajustar el nivel de volumen del altavoz de graves
mediante el mando a distancia de esta unidad. En el
caso de un altavoz de graves activo (amplificador
integrado), también puede usar el control del altavoz
de graves para ajustar el nivel de volumen. Utilice estas
funciones para bajar el nivel de volumen si escucha
ruidos o sonidos extraños procedentes del altavoz de
graves.
• Si no utiliza altavoz de graves, seleccione el
menú SETUP = [Configuración de audio] =
[Ajuste de altavoz] = [Configuración] = [SW] =
[Desactivar].
Nota
Si la recepción de las ondas de radio es débil en su zona o desea
mejorar la recepción, le recomendamos usar antenas exteriores
comercializadas en tiendas. Para obtener más información,
consulte al distribuidor Yamaha o centro de servicio autorizado
más cercano.
Conexión del iPod
Puede disfrutar de la música que tiene en su iPod
conectándolo a esta unidad.
Nota
Esta unidad es compatible con iPod classic, iPod nano (2ª, 3ª, 4ª,
5ª y 6ª generación), iPod touch (1ª, 2ª, 3ª y 4ª generación), iPhone,
iPhone 3G/3GS y iPhone 4.
USB PORTABLE
iPod/iPhone
Notas
• Compruebe que el cable USB que une el iPod con esta
unidad esté bien conectado.
• Conecte el iPod al puerto USB frontal de esta unidad.
El puerto USB posterior no es compatible con el iPod.
Puerto USB
12 Es

CONEXIÓN
Conexión de un televisor
Es importante que tome nota de las indicaciones de esta ilustración para realizar correctamente las conexiones entre esta
unidad y el televisor.
PRECAUCIÓN
No conecte el cable de alimentación de esta unidad hasta que haya realizado todas las conexiones.
1 Conecte el televisor mediante un cable HDMI (de venta en tiendas). La señal de vídeo digital se emite desde esta
unidad a su televisor. Si el terminal HDMI del televisor es compatible con ARC (canal de retorno de audio), los
pasos 2 y 3 no son necesarios, ya que la señal de audio digital se emite del televisor a la unidad a través del
cable HDMI.
2 Conecte el televisor mediante un cable óptico (de venta en tiendas) para reproducir audio digital del televisor a través
de esta unidad.
3 Si la conexión HDMI no está disponible, conecte el televisor mediante un cable de clavijas de vídeo. La señal de
vídeo analógico se emite desde esta unidad a su televisor.
PREPARACIÓN
Esta unidad
3 Cable de vídeo compuesto
(suministrado)
1 Cable HDMI
(de venta en tiendas)
■ Conexión HDMI
• Puede disfrutar de imagen y sonido digital de alta
calidad a través de los terminales HDMI.
• Conecte con firmeza un cable HDMI (de venta en
tiendas) al terminal HDMI de esta unidad.
• Utilice cables HIGH SPEED HDMI que tengan el
logotipo HDMI (pág. 52).
y
• Cuando utilice la función de control HDMI, consulte “Control
de esta unidad con el mando a distancia del televisor (función
de control HDMI)” (pág. 30) y “[Control HDMI]” (pág. 35).
• Para más información sobre el modo de salida del terminal
HDMI, consulte “[HDMI]” (pág. 39).
• Si no se muestra la imagen, consulte “SOLUCIÓN DE
PROBLEMAS” (pág. 42).
■ Conexión para la reproducción de discos
3D de Blu-ray
Debe disponer de los siguientes equipos y conexiones
para disfrutar de discos 3D BD en esta unidad:
– Un televisor con tecnología 3D
– Conexión del televisor y esta unidad mediante
cables HDMI
– Un disco BD con imágenes en 3D
Televisor
VIDEO
AV INPUT
HDMI IN
1 2 3
(ARC)
OPTICAL
DIGITAL AUDIO OUT
2 Cable óptico
(de venta en tiendas)
■ Acerca de los televisores con canal de
retorno de audio (ARC)
• Puede conectar un cable HDMI al terminal compatible
con el canal de retorno de audio (el terminal con la
indicación “ARC”) del televisor. En este caso, no
necesitará conectar un cable óptico.
• Deberá activar la función de control HDMI de esta
unidad para activar el canal de retorno de audio (ARC)
pág. 35).
(
¿Qué es el canal de retorno de audio (ARC)?
Esta función permite reproducir la señal de audio digital
de un televisor a través de esta unidad mediante un cable
HDMI, sin necesidad de utilizar un cable óptico.
y
Si su televisor no es compatible con ARC, conecte el televisor
y esta unidad mediante la toma OPTICAL de esta unidad.
Español
13 Es

CONEXIÓN
USB PORTABLE
iPod/iPhone
■ Conexión de vídeo
• Conecte con firmeza el cable de vídeo compuesto
(suministrado) al terminal VIDEO.
• Consulte página 40 para obtener información sobre
los formatos de salida de vídeo.
Notas
• Si reproduce la imagen mediante una videograbadora, la
imagen puede deteriorarse debido a la función de protección
contra copia.
• Para disfrutar de discos 3D BD en esta unidad, deberá conectar
un televisor y esta unidad con cables HDMI (de venta en
tiendas).
Conexión de un sintonizador de
televisión por satélite o cable
Puede conectar un sintonizador de televisión por satélite
o cable no compatible con HDMI mediante un cable de
clavijas de audio digital.
Conexión de dispositivos de audio
(como un CD o un reproductor MD)
Puede conectar dispositivos de audio (como un CD o un
reproductor MD) a la unidad.
y
Para conectar un sintonizador de televisión por satélite o cable al
televisor, necesitará otros cables de clavijas de vídeo (de venta en
tiendas).
Conexión de un reproductor de
música digital portátil que no
sea un iPod
Puede conectar un reproductor de música digital portátil
que no sea un iPod al panel frontal de esta unidad.
PORTABLE
14 Es

CONEXIÓN DE RED Y USB
Conexión con el terminal NETWORK
• El contenido del PC se puede reproducir conectando esta unidad a la red.
• Puede disfrutar de numerosos contenidos con funciones interactivas gracias a la conexión a Internet al reproducir
discos compatibles con BD-Live. Consulte página 27 para obtener más información sobre las funciones BD-Live.
Notas
• Conecte con firmeza un cable de red (de venta en tiendas) al terminal NETWORK.
• Utilice únicamente un cable de red STP (par trenzado blindado).
• Al utilizar Internet, se necesita una conexión a Internet de banda ancha como se muestra más abajo.
• Conecte el otro conector del cable de red al nodo/enrutador de banda ancha.
• Cuando utilice una conexión a Internet de banda ancha, es necesario un contrato con un proveedor de servicios de Internet. Para más
información, póngase en contacto con su proveedor de servicios de Internet más cercano.
• Consulte el manual de instrucciones del equipo, ya que el equipo conectado y el método de conexión pueden variar dependiendo
de su entorno de Internet.
• Emplee un cable de red/enrutador compatible con 10BASE-T/100BASE-TX.
PREPARACIÓN
Conexión al puerto USB
• Puede conectar un dispositivo de memoria USB (2 GB
o más con formato FAT 32/16) para Almacenamiento
Local BD al puerto USB del panel posterior
(o delantero) de esta unidad para guardar los datos
BD-Live (pág. 27) o para actualizar el software de
esta unidad (pág. 41).
• Conecte un dispositivo de memoria USB (de venta
en tiendas) al puerto USB.
PRECAUCIÓN
• No desconecte el dispositivo de memoria USB ni desenchufe
el cable de alimentación mientras se estén realizando las
operaciones de BD-Live o se esté llevando a cabo la
actualización del software.
• No utilice un cable de extensión USB cuando conecte un
dispositivo de memoria USB al puerto USB de esta unidad. El
uso de un cable de extensión USB puede impedir que la unidad
funcione correctamente.
Notas
• Yamaha no puede garantizar que todas las marcas de
dispositivos de memoria USB funcionen con esta unidad.
• Para obtener más información sobre el uso de dispositivos
de memoria USB, consulte página 18.
Esta unidad
Al puerto
USB
Dispositivo de
memoria USB
(de venta en
tiendas)
y
Para guardar datos de BD-Live en
el dispositivo de memoria USB
conectado al panel frontal, ajuste
[Almacenamiento Local] en
[USB Frontal] (pág. 35).
Al terminal
NETWORK
Cable de red
(de venta en
tiendas)
Al terminal
LAN
LAN
Internet
Módem
Nodo o enrutador
de banda ancha
■ Después de la conexión
• Para configurar el parámetro Red manualmente, consulte “Red” (pág. 36).
• Para reproducir el contenido del PC en su red, consulte “Uso del contenido de red” (pág. 22).
PC
Español
15 Es

OTRA CONEXIÓN
Conexión del cable
de alimentación
Una vez realizadas todas las conexiones, conecte el cable
de alimentación suministrado a la entrada AC IN de la
parte posterior de la unidad. Seguidamente, conéctela
a una toma de CA.
A una entrada de CA
A una toma de CA
Nota
PARA EVITAR EL RIESGO DE DESCARGA ELÉCTRICA,
NO TOQUE LAS PARTES NO AISLADAS DE LOS CABLES
MIENTRAS EL CABLE DE ALIMENTACIÓN ESTÉ
CONECTADO.
16 Es

FUNCIONAMIENTO
ASISTENTE INICIAL/CONFIGURACIÓN SENCILLA
Configuración con el Asistente
inicial/Configuración Sencilla
Asistente inicial/Configuración Sencilla le permite definir
con facilidad el idioma, la resolución y la relación de
aspecto de pantalla. La pantalla Asistente inicial se
muestra cuando enciende la unidad por primera vez
después de la compra o actualización. El mismo ajuste
se puede realizar desde el menú SETUP = [Sistema] =
[Configuración Sencilla] (pág. 32).
1 Cuando se muestre la pantalla Configuración
Sencilla, pulse ENTER para iniciar Configuración
Sencilla.
2 Pulse 5/a para seleccionar el idioma que desea ver
en la pantalla y, después, pulse ENTER.
4 Pulse 5 /a para seleccionar la relación de aspecto
de pantalla y, a continuación, pulse ENTER. Para
obtener más información sobre la configuración de
las opciones, consulte “[Pantalla de TV]” (pág. 37).
La Configuración Sencilla habrá finalizado.
5 Pulse ENTER para salir de Configuración Sencilla.
FUNCIONAMIENTO
3 Pulse 5/a para seleccionar la resolución y,
a continuación, pulse ENTER. Para obtener más
información sobre la configuración de las opciones,
consulte “[Seleccionar Salida de Video]” (pág. 37).
Nota
Si conecta el televisor y esta unidad a través de la toma
VIDEO, seleccione [Compuesta].
Notas
• Si no se muestra la imagen tras completar Asistente inicial/
Configuración Sencilla, consulte “SOLUCIÓN DE
PROBLEMAS” (pág. 42).
• Aparecerá un mensaje de advertencia acerca de la reproducción
de vídeo en 3D cuando esta unidad esté encendida. Pulse
ENTER para descartar el mensaje o CLEAR para desactivarlo
(pág. 35).
17 Es
Español

FUNCIONAMIENTO BÁSICO
Siga los procedimientos que se indican a continuación para reproducir la fuente.
3
Disco
1
Ajustar la fuente
2
Cambiar la
entrada
Consulte las siguientes páginas para
obtener información sobre más
operaciones
USB
pág. 20, 23
Delante Detrás
*1
USB PORTABLE
iPod/iPhone
pág. 15, 20
DISPLAY
SETUP
VOLUME
HOME
OPTION
TOP MENU
RETURN ON SCREEN
DIMMER
STATUS
POP-UP MENU
ENTER
TUNING
PRESET
Red
(Contenidos
de PC
*2
y YouTube
)
pág. 15, 22
1
*
· Es posible que algunos dispositivos no funcionen correctamente aunque cumplan con los requisitos.
· No se garantizan la reproducción y alimentación de todos los tipos de dispositivos USB.
· El tiempo de lectura puede superar los 30 segundos en función del número de archivos/carpetas.
· Yamaha y los distribuidores no se harán responsables de las pérdidas de datos almacenados en dispositivos USB conectados
a esta unidad.
Como medida de precaución, se recomienda realizar copias de seguridad de los archivos.
2
*
Disponible solo en los modelos de Rusia y Asia.
18 Es

iPod
USB PORTABLE
iPod/iPhone
FUNCIONAMIENTO BÁSICO
3
2
1
Ajustar la fuente
USB PORTABLE
iPod/iPhone
*1
Cambiar la
entrada
Consulte las siguientes páginas para
obtener información sobre más
operaciones
TUNING
STATUS
SUBTITLE
REPEAT
AUDIO
A B
PRESET
MEMORY
DIMMER
PIP
SHUFFLE
pág. 12, 23
AUX
STB
Portátil
Televisor
A AUX
pág. 14
A COAXIAL
pág. 14
pág. 14
Para emitir sonidos desde el televisor,
consulte la página 13 en relación con
las conexiones.
FUNCIONAMIENTO
Para obtener más información sobre el
funcionamiento, consulte el manual de
instrucciones suministrado con el
dispositivo conectado.
FM
Para sintonizar emisoras de radio FM, consulte página 28.
*1Es posible que algunas funciones no estén disponibles en función del modelo o de la versión del software de su iPod.
Español
19 Es

FUNCIONAMIENTO BÁSICO
Reproducción de Foto/Música/
Vídeo
Los menús HOME y MEDIA le permiten examinar
y reproducir archivos multimedia en discos de datos,
dispositivos de memoria USB y su red.
Nota
Para obtener información sobre los discos y archivos que se
pueden reproducir, consulte la página 3.
■ Funcionamiento básico
DISPLAY
SETUP
HOME
ENTER
OPTION
TOP MENU
2
RETURN ON SCREEN
HOME
ENTER
VOLUME
POP-UP MENU
5
a
■ Operaciones comunes para la
reproducción de archivos en
una carpeta seleccionada
Ejemplo: selección de un archivo de película en un
dispositivo de memoria USB
Nota
Detenga la reproducción del vídeo antes de desplazarse a la
pantalla de menú MEDIA.
1
Pulse
HOME
para pasar a la pantalla de menú HOME.
5/a : mueve la selección.
2: vuelve a la carpeta principal.
HOME:
permite entrar/salir de la pantalla de menú HOME.
ENTER: confirma la carpeta/archivo.
■ Iconos sobre el menú MEDIA
: reproduce el disco que hay en la bandeja
o muestra el contenido del disco de datos.
: muestra el contenido del dispositivo de memoria
USB conectado al puerto USB.
: busca un servidor DLNA (pág. 22) en la red.
: muestra el contenido del servidor DLNA
conectado.
y
La pantalla de menú HOME puede variar en función del modelo.
2 Pulse 2/3/5 para seleccionar [MEDIA] y,
a continuación pulse ENTER.
Aparece la pantalla MEDIA.
3 Seleccione el elemento que contiene el archivo que
desea reproducir y, a continuación, pulse ENTER.
20 Es

FUNCIONAMIENTO BÁSICO
4 Seleccione la carpeta de Foto, Música, Vídeo
o AVCHD que desea reproducir y, a continuación,
pulse ENTER.
Para volver a la carpeta principal, pulse 2
o seleccione .
Nota
Tenga en cuenta que en el siguiente paso solo se mostrarán los
archivos del tipo que seleccione en este paso. Por ejemplo, si
selecciona la carpeta Foto en este paso, solo se mostrarán
archivos de fotos después de este paso. Si desea reproducir un
tipo de archivo distinto a foto, vuelva a este paso y seleccione
de nuevo el tipo de archivo.
5 Seleccione las carpetas que contienen el archivo que
desea reproducir.
6 Seleccione el archivo que desea reproducir y,
a continuación, pulse ENTER.
Cuando se selecciona un archivo de vídeo se inicia
la reproducción.
Cuando se selecciona un archivo de música,
se muestra la pantalla de estado y se inicia la
reproducción.
Cuando se selecciona un archivo de fotografía
se inicia el pase de diapositivas.
FUNCIONAMIENTO
y
Para disfrutar del pase de diapositivas con música, pulse HOME
para volver a la pantalla de menú HOME mientras se reproduce la
música y seleccione archivo de fotos.
Nota
Es posible que el archivo mostrado no se reproduzca dependiendo
del contenido.
■ Operaciones para visualización de fotos
Mientras se ven fotos, los botones del mando a distancia
funcionan como se indica a continuación.
: detiene un pase de diapositivas y vuelve al
explorador de archivos.
: sitúa en pausa un pase de diapositivas.
: reproduce un pase de diapositivas.
: pasa a la fotografía siguiente.
: pasa a la fotografía anterior.
: acelera un pase de diapositivas en 3 pasos.
: ralentiza un pase de diapositivas en 3 pasos.
5 : invierte una foto.
a : muestra la foto reflejada.
2 : gira una foto en sentido contrario a las agujas del
reloj.
3 : gira una foto en el sentido de las agujas del reloj.
ZOOM: amplía/reduce una foto (ampliar/reducir zoom:
3 pasos cada uno).
5/a /2 /3 : permite desplazarse en modo de
zoom cuando la foto es mayor que la pantalla.
DIGEST: cambia a modo de miniaturas (pág. 7). Cuando
se muestran las miniaturas, puede ir a la página siguiente
o anterior con / .
Español
21 Es

FUNCIONAMIENTO BÁSICO
Uso del contenido de red
■ Acerca de DLNA
Esta unidad es un reproductor multimedia digital
certificado para DLNA. Puede administrar contenido de
fotos, música y vídeo almacenado en servidores DLNA en
su red doméstica.
DLNA (Digital Living Network Alliance) permite
compartir de forma sencilla medios digitales a través de
una red doméstica y puede disfrutar del contenido digital
almacenado en su software, PC instalado, servidor DLNA
u otro dispositivo compatible con DLNA con su televisor
a través de esta unidad. Para conectar esta unidad a sus
servidores DLNA se requieren algunos ajustes del
dispositivo o del servidor DLNA. Para obtener más
información, consulte el software del servidor DLNA
o el dispositivo DLNA.
■ Reproducción de contenido compartido
Nota
Para reproducir archivos en el PC, instale un software de servidor
DLNA, como por ejemplo Windows Media Player 12,
y comparta los archivos que desee reproducir.
1 Encienda el PC con el software de servidor DLNA
instalado o el dispositivo DLNA conectado a su red
doméstica.
2 Pulse HOME para mostrar la pantalla del menú
HOME y, seguidamente, seleccione [MEDIA] para
ir al menú MEDIA.
Los servidores DLNA conectados a la red aparecen
en pantalla.
3 Seleccione el archivo que desee reproducir.
Notas
• La calidad de funcionamiento y reproducción podría verse
afectada por las condiciones de la red doméstica.
• Es posible que los archivos de medios extraíbles, como
dispositivos de memoria USB o unidades de DVD del servidor
de medios, no se compartan correctamente.
Uso de los servicios de red
Puede ver al instante los vídeos ofrecidos por los
siguientes servicios de red.
– YouTube
■ Avisos sobre los servicios de red
• El acceso a contenido suministrado por terceros requiere
una conexión a Internet de alta velocidad y también un
registro de cuenta y una suscripción de pago.
• Los servicios de contenido de terceros pueden modificarse,
suspenderse, interrumpirse o dejar de proporcionarse en
cualquier momento sin previo aviso, y Yamaha no asume
ninguna responsabilidad en relación con dichos sucesos.
• Es posible que parte del contenido solo esté disponible
para países específicos y que se presente en idiomas
específicos.
• Yamaha no manifiesta ni garantiza que los servicios
de contenido se seguirán proporcionando o estarán
disponibles durante un periodo de tiempo concreto,
y declina ofrecer cualquier garantía de este tipo, ya sea
expresa o implícita.
■
Reproducción de vídeos desde YouTube™
Puede ver películas desde YouTube a través de Internet
mediante esta unidad.
Los servicios pueden modificarse sin previo aviso.
Notas
• Si su servidor DLNA no aparece en la lista, seleccione [Buscar
DLNA] para buscarlo.
• Dependiendo del servidor DLNA, es posible que sea necesario
autorizar la unidad desde el servidor.
• Para reproducir el archivo en el servidor DLNA, la unidad
y el servidor deben estar conectados al mismo punto de acceso.
• Es posible que los requisitos de archivo no siempre sean
compatibles. Podría haber algunas restricciones dependiendo
de las características de los archivos y de la capacidad del
servidor DLNA.
22 Es
1
Pulse
HOME
para mostrar la pantalla del menú HOME.
y
La pantalla de menú HOME puede variar en función del modelo.
2 Pulse 5 /a /2 /3 para seleccionar [YouTube] y,
a continuación, pulse ENTER.
y
Para volver a la pantalla de menú HOME, pulse RETURN.

Funcionamiento para iPod
RETURN ON SCREEN
PIP
SUBTITLE
AUDIO
MEMORY
SHUFFLE
REPEAT
DIMMER
STATUS
TUNING
PRESET
A B
VOLUME
SETUP
DISPLAY
HOME
OPTION
ENTER
TOP MENU POP-UP MENU
FUNCIONAMIENTO BÁSICO
■ Repetición de reproducción
Puede repetir la reproducción como desee.
Puede controlar la reproducción de un iPod a través de los
botones del mando a distancia.
DISPLAY
,
REPEAT
SHUFFLE
,
,
Nota
Es posible que algunas funciones no sean compatibles
dependiendo del modelo o de la versión del software de su iPod.
■ Controles de la reproducción
1 Pulse cualquiera de los botones siguientes durante
la reproducción.
: detiene la reproducción.
: sitúa la reproducción en pausa.
: saltar hacia adelante.
: saltar hacia atrás.
Para iniciar o reanudar la reproducción, pulse .
y
Pulse DISPLAY para mostrar la siguiente información en el visor
del panel delantero durante la reproducción.
• Nombre de canción
• Nombre de artista
• Nombre de álbum
1 Pulse varias veces REPEAT para la repetición
de reproducción.
Con cada pulsación se avanza en la siguiente
secuencia:
Operaciones con un CD
También puede controlar la reproducción de los CD.
■ Controles de la reproducción
1 Pulse cualquiera de los botones siguientes durante
la reproducción.
: detiene la reproducción.
: sitúa la reproducción en pausa.
: saltar hacia adelante.
: saltar hacia atrás.
: buscar hacia adelante.
: buscar hacia atrás.
: púlselo para realizar una búsqueda instantánea.
La búsqueda instantánea salta 30 segundos en la música.
: púlselo para realizar una repetición instantánea.
La repetición instantánea reproduce la música desde
10 segundos antes.
Para iniciar o reanudar la reproducción, pulse .
y
También puede usar los botones numéricos para introducir
directamente el número de la canción. Para borrar la entrada,
pulse CLEAR.
■ Reproducción aleatoria
Es posible reproducir en una secuencia aleatoria.
FUNCIONAMIENTO
Nota
Hay algunos caracteres que no se pueden visualizar en el visor del
panel delantero de esta unidad.
■ Reproducción aleatoria
Es posible reproducir en una secuencia aleatoria.
1 Pulse varias veces SHUFFLE para la reproducción
aleatoria.
Con cada pulsación se avanza en la siguiente
secuencia:
*1No es posible ajustar ALBUMS si se utiliza un iPod touch
o un iPhone.
1 Pulse varias veces SHUFFLE para la reproducción
aleatoria.
Con cada pulsación se cambia en la siguiente
secuencia:
■ Repetición de reproducción
Puede repetir la reproducción como desee.
1 Pulse varias veces REPEAT para la repetición
de reproducción.
Con cada pulsación se avanza en la siguiente
secuencia:
23 Es
Español

FUNCIONAMIENTO DE REPRODUCCIÓN AVANZADO
En este capítulo se explica la reproducción de discos BD/
DVD/CD de venta en tiendas y discos DVD-RW/R grabados.
Nota
Para conocer el funcionamiento básico de reproducción, consulte
la página 6.
Menú en pantalla
Para mostrar el menú en pantalla, pulse ON SCREEN.
A continuación, pulse 5/a /2 /3 para seleccionar un
elemento, después pulse ENTER para utilizar la función
deseada.
El menú en pantalla consta de los siguientes elementos.
Título : muestra el número del
título que se está reproduciendo. Puede saltar al título
deseado seleccionándolo desde este elemento.
Capítulo : muestra el número
del capítulo que se está reproduciendo. Puede saltar al
capítulo deseado seleccionándolo desde este elemento.
Pista/Archivo :
muestra el número de la pista o archivo que se está
reproduciendo. Puede saltar a la pista o al archivo deseado
seleccionándolo desde este elemento.
Hora : muestra
el tiempo de reproducción. Seleccione el tipo de
visualización entre los siguientes:
Modo/Modo de reproducción
modo de reproducción actual. Puede seleccionar uno
de los modos de reproducción siguientes:
BD DVD VIDEO
BD DVD VIDEO
CD VIDEO MUSIC PHOTO
BD DVD CD VIDEO MUSIC
– Tiempo de reproducción transcurrido del título,
capítulo, disco, pista o archivo.
– Tiempo de reproducción restante del título,
capítulo, disco, pista o archivo.
: muestra el
DVD CD VIDEO MUSIC PHOTO
CD
– Normal: reproducción normal.
– Shuffle: reproducción aleatoria sin repetición.
– Aleatorio: reproducción aleatoria con repetición.
DVD
– Normal
– Shuffle CH (capítulo)
– Shuffle TT (título)
– Shuffle All
– Aleatorio CH (capítulo)
– Aleatorio TT (título)
– Aleatorio All
VIDEO MUSIC PHOTO
– Normal
– Shuffle F (carpeta)
– Aleatorio F (carpeta)
Audio : muestra el idioma/señal
BD DVD VIDEO
de audio del disco BD/DVD seleccionado actualmente.
Puede seleccionar el tipo de audio deseado.
Ángulo : muestra el número del ángulo
BD DVD
seleccionado actualmente. Si el vídeo se ha grabado con
varios ángulos, puede cambiar el ángulo.
y
Cuando Marca de Angulo ( ) está ajustado en [Activar]
(pág. 36), se muestra en pantalla cuando la función está
disponible.
Subtítulo : muestra el idioma de
BD DVD VIDEO
los subtítulos seleccionados actualmente si hay subtítulos.
Estilo subtítulos : muestra el estilo de los
BD
subtítulos seleccionados actualmente. Esta función solo
está disponible para subtítulos externos de archivo de
vídeo. Puede seleccionar el estilo de texto deseado de
los subtítulos.
Bitrate : muestra la
BD DVD CD VIDEO MUSIC
velocidad de bits de la señal de audio/vídeo.
Video secundario :
Audio secundario : activa o desactiva el audio
activa o desactiva PIP (pág. 6).
BD
BD
secundario.
Búsqueda Ins
: salta 30 segundos.
BD DVD CD VIDEO MUSIC
Repetición Ins
: reproduce el
BD DVD CD VIDEO MUSIC
contenido desde 10 segundos antes.
Pase de diapositivas : muestra la velocidad
PHOTO
del pase de diapositivas. Puede seleccionar la velocidad
del pase de diapositivas entre Lento/Medio/Rápido.
Transición : muestra cómo aparece la foto en
PHOTO
la pantalla. Puede seleccionar el tipo de transición.
24 Es

FUNCIONAMIENTO DE REPRODUCCIÓN AVANZADO
Menú de estado
Muestra varios ajustes, cómo los subtítulos, el ángulo y el
número de título/capítulo/pista reproducido actualmente.
Para mostrar el menú de estado, pulse STATUS. El menú
de estado consta de los siguientes menús.
BD DVD VIDEO
Ejemplo: iconos cuando se reproduce un disco BD
13
2465
78
1 (Estado de reproducción)
2 (Icono de tipo de disco/archivo de vídeo)
3 (Número de título que se reproduce): puede
saltar al título especificado con la tecla SEARCH
(pág. 7).
4 (Número de capítulo que se reproduce):
puede saltar al capítulo especificado con la tecla
SEARCH (pág. 7).
5 (Subtítulos seleccionados actualmente):
puede cambiar el idioma de los subtítulos con la tecla
SUBTITLE (pág. 6).
6 (Tiempo de reproducción transcurrido):
puede saltar al punto especificado con la tecla
SEARCH (pág. 7).
7 (Audio seleccionado actualmente): puede
cambiar el formato o idioma de audio con la tecla
AUDIO (pág. 7).
CD MUSIC
Ejemplo: iconos cuando se reproduce un archivo de
música
14327
65
8
1 (Estado de reproducción)
2 (Modo repetición): muestra el modo de
repetición actual (pág. 6).
3 (Icono de tipo de disco/archivo de música)
4 (Gráficos) : muestra gráficos, si hay en el
archivo.
5 (Número de pista/archivo que se
reproduce): Puede saltar a la pista especificada con
la tecla SEARCH (pág. 7).
6 (Información) : muestra información
musical, si hay en el archivo.
7 (Tiempo de reproducción transcurrido):
puede saltar al punto especificado con la tecla
SEARCH (pág. 7).
8 (Barra de progreso) : muestra el estado de
progreso de la canción actual.
PHOTO
Ejemplo: iconos cuando se visualiza un archivo de
fotografía
MUSIC
MUSIC
MUSIC
FUNCIONAMIENTO
(
Modo repetición
8
repetición actual (pág. 6).
):
muestra el modo de
1 (Estado de reproducción)
2 (Icono de archivo de fotos)
3 (Número de archivo que se muestra)
4 (Modo repetición): muestra el modo de
repetición actual (pág. 6).
5 (Velocidad de pase de diapositivas)
Español
25 Es

FUNCIONAMIENTO DE REPRODUCCIÓN AVANZADO
Uso de Marcador
Le permite establecer un Marcador en un punto
especificado del vídeo. Después de establecer el
Marcador, puede saltar al punto utilizando esta función.
Puede definir hasta 12 marcadores.
DVD VIDEO
Ejemplo: establecer un Marcador al reproducir una
película.
1 Pulse MARKER durante la reproducción de la
película para definir el Marcador. Se muestran
el número de Marcador y el estado.
2 Después de establecer el Marcador, pulse DIGEST
para mostrar la barra de selección de Marcador.
3 Pulse 2/3 para seleccionar el Marcador que desea
reproducir y, a continuación, pulse ENTER.
Pulse CLEAR para borrar el Marcador seleccionado.
Nota
Cuando finaliza la reproducción (por ejemplo, al expulsar el disco
o al presionar dos veces), los marcadores se eliminan
automáticamente.
Reproducción de programa
2 Pulse ENTER para programar el orden de
reproducción.
Para un disco de audio, pulse 5 /a para seleccionar
una pista deseada y, a continuación, pulse ENTER.
Para un disco DVD-Vídeo, seleccione un título
deseado (mostrado como TT) y capítulo (mostrado
como CH) en lugar de una pista.
Para borrar una pista establecida, seleccione la pista
que desea borrar y, a continuación, pulse CLEAR.
Pulse RETURN para cancelar la reproducción del
programa.
3 Una vez finalizada la programación, pulse para
definir e iniciar la reproducción del programa.
4 Para cancelar la reproducción del programa, detenga
la reproducción por completo pulsando dos veces.
Uso de la búsqueda
Esta opción le permite saltar a un punto específico durante
la reproducción.
Esta opción le permite programar el orden de
reproducción de las pistas de un disco de audio
o de los capítulos de DVD.
Puede programar hasta 15 pistas/capítulos.
DVD CD
Ejemplo: programación del orden de reproducción
de pistas de CD
1 Pulse PROGRAM durante la reproducción para ver
la pantalla PROGRAMA.
26 Es
BD DVD CD VIDEO MUSIC
Ejemplo: buscar hasta el punto especificado
1 Pulse SEARCH durante la reproducción. Aparece la
barra de estado.
2
Pulse 5/a/2/3 para seleccionar uno de los
elementos siguientes y, a continuación, pulse
:
BD DVD
– Número de título (mostrado como )
– Número de capítulo (mostrado como )
– Tiempo de título transcurrido (mostrado como )
– Tiempo de capítulo transcurrido (mostrado
como )
:
CD
– Número de pista (mostrado como )
– Tiempo de pista transcurrido (mostrado como )
– Tiempo de disco transcurrido (mostrado como )
:
VIDEO MUSIC
– Número de archivo (mostrado como )
– Tiempo de archivo transcurrido (mostrado
como )
ENTER
.

FUNCIONAMIENTO DE REPRODUCCIÓN AVANZADO
3 Pulse 5/a o las teclas de número para definir
o ajustar el valor del elemento seleccionado y pulse
ENTER para saltar al punto especificado.
4 Para cerrar la barra de estado, pulse STATUS.
Disfrutar de BONUSVIEW™
yBD-Live™
Esta unidad admite las funciones de reproducción de
BONUSVIEW (pág. 50) (BD-ROM Perfil 1 Versión 1.1)
y BD-Live (pág. 50) (BD-ROM Perfil 2).
Nota
Las funciones y el método de reproducción varían según el disco.
Siga las indicaciones del disco o del manual de usuario
suministrado.
■
Utilización de la función Imagen en Imagen
(reproducción de audio/vídeo secundario)
Un Vídeo BD con audio y vídeo secundario compatible
con Imagen en Imagen se puede reproducir con audio
y vídeo secundario simultáneamente como un vídeo
pequeño en la esquina.
Vídeo principal Vídeo secundario
■ Utilización de la función BD-Live™
1 Ajuste la configuración de Red (pág. 36).
2 Conecte el dispositivo de memoria USB a la unidad
(pág. 15).
• Los datos BD-Live se guardan en un dispositivo
de memoria USB conectado a esta unidad.
• Conecte un dispositivo de memoria USB
(2 GB o superior y formateado con FAT 32/16)
compatible con USB 2.0 de alta velocidad
(480 Mbit/s) al puerto USB seleccionado en
Almacenamiento Local (pág. 35). La configuración
predeterminada es el puerto USB del panel trasero.
• La carpeta “BUDA” se crea automáticamente en el
dispositivo de memoria USB, si es necesario.
• Si el espacio de almacenamiento es insuficiente,
los datos no se copiarán/descargarán. Elimine datos
innecesarios o utilice un nuevo dispositivo de
memoria USB.
• Puede que sea necesario algún tiempo para que
se carguen (lectura/escritura) los datos.
3 Reproducción del disco.
4 Ejecute BD-Live siguiendo las instrucciones
del disco.
Notas
FUNCIONAMIENTO
1 Mientras se muestra Marca PIP ( ) o Marca Audio
Secundario ( ), pulse PIP para activar
o desactivar la función Imagen en imagen.
Notas
• Para escuchar audio secundario de un televisor conectado con
un cable HDMI, asegúrese de que la salida de audio (HDMI)
está ajustada en [PCM] (pág. 39).
• Dependiendo del disco, para escuchar audio secundario es
posible que tenga que activar el audio secundario en el menú
principal del disco (pág. 8).
• Dependiendo del contenido, el audio y el vídeo secundario
para Imagen en Imagen podría reproducirse y desaparecer
automáticamente. Además, podrían existir restricciones
respecto a las áreas que pueden reproducirse.
• En relación con el método de reproducción de contenidos
BD-Live, etc., lleve a cabo las operaciones de acuerdo
con las instrucciones del manual del disco BD.
• Para disfrutar de las funciones de BD-Live, realice la
conexión de red (pág. 15) y los ajustes de Red (pág. 36).
• Consulte “[Conexión BD-Live]” (pág. 36) en relación con
la configuración para restringir el acceso a contenidos
BD-Live.
• El tiempo que se necesita para descargar los programas
que se ofrecen al dispositivo de memoria USB conectado
en esta unidad depende de las velocidades de conexión
a Internet y del volumen de datos de los programas.
• Los programas BD-Live suministrados a través de Internet
podrían no ser capaces de mostrar la conexión, en función
del estado (actualización) del proveedor. En tal caso,
extraiga el disco y vuelva a intentarlo.
• Si la pantalla BD-Live no aparece durante un rato después
de seleccionar la función BD-Live en el menú del disco
BD, es posible que el dispositivo de memoria USB no
tenga suficiente espacio libre. En tal caso, expulse el disco
de la unidad y, a continuación, borre los datos del
dispositivo de memoria USB seleccionando [Formato]
en [Almacenamiento Local] (pág. 35).
Español
27 Es

ESCUCHAR EMISORAS DE RADIO FM
Sintonización de emisoras de radio
TUNING
MEMORY
TUNER
PORTABLE
MEMORY
<<, >> (TUNING)
TUNER
5
ENTER
a
<<, >> (TUNING)
MEMORY
STATUS
SUBTITLE
REPEAT
TV
USB NET
PRESET
AUDIO
A B
STB
AUX
DIMMER
PIP
SHUFFLE
iPod
DISC
1 Pulse TUNER.
2 Mantener pulsado << / >> (TUNING).
Comenzará el proceso de sintonización automática.
y
Si la señal recibida de la emisora que desea seleccionar es débil,
también es posible sintonizar emisoras de radio de forma manual
pulsando <</>> (TUNING) varias veces. En este caso, el sonido
será monoaural.
Preajuste de emisoras de radio
Es posible almacenar sus emisoras FM favoritas con la
función de presintonía.
HOME
OPTION
<, > (PRESET)
OPTION
TOP MENU
RETURN ON SCREEN
DIMMER
PIP
ENTER
STATUS
SUBTITLE
POP-UP MENU
TUNING
PRESET
AUDIO
■ Presintonización manual
1 Seleccione una emisora de radio que le guste
pulsando << / >> (TUNING).
2 Pulse MEMORY.
3 Seleccione el número de presintonía en la que desea
guardarla pulsando 5/a o < / > (PRESET).
4 Pulse ENTER.
El proceso de presintonización manual ha terminado.
y
• Es posible presintonizar un máximo de 30 emisoras FM.
• Para cancelar la presintonización manual mientras escoge
un número de presintonía, pulse MEMORY de nuevo.
• Es posible eliminar una emisora presintonizada pulsando
OPTION → ENTER para seleccionar [PRESET DEL]
(pág. 29).
Selección de emisoras de radio
presintonizadas (Sintonización
de presintonías)
TUNING
STATUS
SUBTITLE
AUDIO
PRESET
MEMORY
<, > (PRESET)
DIMMER
PIP
1 Seleccione la emisora de radio presintonizada en el
modo FM pulsando < / > (PRESET).
y
Puede utilizar también los botones numéricos del mando
distancia o < / > (PRESET) en el panel delantero de esta unidad
para seleccionar la emisora de radio presintonizada.
■ Presintonización automática
1 Mantenga pulsado el botón MEMORY durante más
de 3 segundos en el modo FM.
2 Pulse ENTER.
Comenzará la presintonización automática.
Nota
Al realizar la presintonización automática, se borran todas las
emisoras almacenadas y se almacenan emisoras nuevas.
28 Es

ESCUCHAR EMISORAS DE RADIO FM
Eliminación de emisoras
presintonizadas
Es posible eliminar una emisora presintonizada mediante
el menú de opciones ([PRESET DEL]).
DISPLAY
SETUP
VOLUME
HOME
OPTION
1 Pulse OPTION.
2 Pulse ENTER.
3 Seleccione el número de presintonía que desea
eliminar pulsando 5/a .
4 Pulse ENTER.
5 Pulse OPTION para salir del menú de opciones.
* Para eliminar otro número de presintonía, repita los pasos 2 y 4.
OPTION
TOP MENU
RETURN ON SCREEN
*
POP-UP MENU
ENTER
5
ENTER
a
Visualización de información del
sistema de datos de radio (solo
modelo de Rusia)
DISPLAY
DISPLAY
1 Pulse DISPLAY varias veces mientras escucha un
contenido.
PS (Servicio de programa)
↓
PTY (Tipo de programa)
↓
RT (Texto de radio)
↓
CT (Hora del reloj)
↓
MONO/STEREO
↓
Frecuencia
↓
Vuelta al PS
SETUP
VOLUME
HOME
OPTION
TOP MENU POP-UP MENU
FUNCIONAMIENTO
y
[PRESET DEL] aparece en el visor del panel delantero solo si la
fuente de entrada está ajustada en FM.
Nota
Si la transmisión de señal de la emisora del sistema de datos de
radio es demasiado débil, es posible que esta unidad no pueda
recibir información completa del sistema de datos de radio. En
concreto, la información RT (Texto de radio) utiliza mucho ancho
de banda, por lo que es posible que su nivel de disponibilidad sea
menor en comparación con otros tipos de información.
Español
29 Es

UTILIZACIÓN DE FUNCIONES ÚTILES
Ajuste del temporizador de apagado
Puede ajustar el temporizador de apagado con el mando
a distancia. El temporizador de apagado pone esta unidad
en modo de espera una vez transcurrido un tiempo
especificado.
PROGRAM MARKER DIGEST ZOOM
SLEEP
SLEEP
SW
1 Pulse SLEEP varias veces.
Control de esta unidad con el
mando a distancia del televisor
(función de control HDMI)
Puede utilizar el mando a distancia del televisor para
controlar esta unidad si el televisor es compatible con la
función de control HDMI y si está conectado al terminal
HDMI de esta unidad.
Mando a distancia de un televisor (ejemplo)
También puede utilizar la siguiente función.
• Al iniciar la reproducción de discos DVD/BD distintos
de CD en esta unidad o acceder a la pantalla del menú
HOME/SETUP, el selector de entrada del televisor pasa
automáticamente a esta unidad (One Touch Play).
*1 Al seleccionar esta unidad como canal de salida del sonido
del televisor con el mando a distancia del televisor, la unidad
selecciona automáticamente el televisor como fuente de
entrada y el sonido puede escucharse a través de los altavoces
conectados a la unidad.
Notas
• Esta unidad puede controlarse con los botones de cursor
del mando a distancia del televisor en algunos televisores.
• Aunque el televisor sea compatible con la función de control
HDMI, es posible que algunas funciones no estén disponibles.
Para obtener más información, consulte el manual entregado
con el televisor.
• Es posible que la función de control HDMI no funcione
correctamente dependiendo del televisor.
• Otras funciones, aparte de las que se han mencionado
anteriormente, pueden funcionar según el televisor.
• Para que la función de control HDMI esté disponible, configure
los ajustes de la función de control HDMI en TODOS los
componentes (esta unidad, el televisor y otros componentes). Es
posible que también sean necesarias determinadas operaciones.
• Cada función se puede configurar de forma independiente para
activar o desactivar según el televisor.
• Consulte los detalles relacionados con la configuración en los
manuales de instrucciones entregados con el televisor.
■ Ajuste de la función de control HDMI
30 Es
Enciende y apaga el
televisor y esta unidad.
Controla el volumen
de esta unidad.
Permite seleccionar esta
unidad o el televisor
como canal de salida
del sonido.
*1
1 Encienda todos los componentes conectados
al televisor con HDMI.
2 Compruebe todos los componentes conectados con
HDMI y active la función de control HDMI en todos
los componentes.
En esta unidad, ajuste [Control HDMI] en [Activar]
(pág. 35).
En el caso de los componentes externos, consulte
el manual entregado con cada componente.
y
• El ajuste predeterminado de [Control HDMI] es
[Desactivar] en esta unidad.
• Ejemplo de configuración de un televisor
– En el menú de configuración del televisor, seleccione
“Ajuste de enlace” = “Ajuste de controlHDMI”
(ejemplo) y, a continuación, ponga un ajuste como
“Función de controlHDMI” en la posición
“ACTIVADO” (ejemplo).
– En un ajuste del tipo “Prioridad altavoz” debe
seleccionarse una opción como “Amplificador AV”.
3 Apague el televisor y después vuelva a encenderlo.

■ Registro de componentes HDMI en el
televisor
1 Seleccione esta unidad como fuente de entrada del
televisor.
2 Seleccione Disco/USB/Red como fuente de entrada
de esta unidad.
3 Compruebe que la imagen de esta unidad aparezca
correctamente en el televisor.
4 Verifique que la función de control HDMI esté
activada (encienda esta unidad o ajuste el nivel de
volumen con el mando a distancia del televisor).
y
Con algunos componentes HDMI, basta con ajustar la función
de control HDMI. En este caso, no es necesario registrar los
componentes HDMI en el televisor.
UTILIZACIÓN DE FUNCIONES ÚTILES
Si la función de control HDMI no funciona
Realice las siguientes comprobaciones:
• El televisor debe estar conectado al terminal HDMI
de esta unidad. La función de control HDMI debe estar
ajustada en [Activar] en el menú SETUP (pág. 35).
• La función de control HDMI debe estar activada en el
televisor. (Compruebe también los ajustes relativos,
como la función de bloqueo de la alimentación o la
prioridad del altavoz.)
La función de control HDMI sigue sin funcionar
tras realizar las comprobaciones
• Apague esta unidad y el televisor y, después, vuelva
a encenderlos.
• Desconecte el cable de alimentación de CA de esta
unidad, el televisor y los componentes externos
conectados al televisor con HDMI.
Espere unos 30 segundos y vuelva a conectarlo.
■ Cambio del método de conexión y los
componentes conectados
Cuando cambie los componentes conectados y las tomas,
reinicie esta unidad siguiendo los pasos indicados
a continuación.
1 Apague la función de control HDMI del televisor
y de esta unidad, apague todos los dispositivos
conectados y cambie las conexiones.
FUNCIONAMIENTO
2 Realice los pasos del 1 al 3 del apartado “Ajuste de la
función de control HDMI” (pág. 30).
Español
31 Es

AJUSTES
MENÚ SETUP
El menú SETUP permite realizar diversos ajustes y configuraciones audiovisuales en las funciones utilizando el mando
a distancia.
Menú/submenú Elemento Función Página
Sistema Protector de pantalla Ajusta el protector de pantalla en Activar/Desactivar. 35
Configuración
General
Apagado
Automático
Reproducción
Automática Disco
Control HDMI Configura esta unidad para que reciba la señal de control
Cargar
configuracion
por defecto
Actualizar Aplica la actualización de esta unidad. 35
Configuración
Sencilla
Almacenamiento
Local
Mensaje
Reproducción 3D
Idioma OSD Selecciona el idioma del menú en pantalla. 35
Menú Permite dar prioridad al idioma del menú del disco. 35
Audio Permite dar prioridad al idioma del audio. 35
Subtítulo Permite dar prioridad al idioma de los subtítulos. 35
Reproducción Subtítulos Ajusta los subtítulos en Activar/Desactivar. 36
Marca de Angulo Permite mostrar la Marca de Angulo cuando se reproduce
Marca PIP Permite mostrar la Marca PIP cuando se reproduce un disco
Marca Audio
Secundario
Memoria última Configura esta unidad para que recuerde la posición de la
Seguridad Cambiar Contraseña Permite cambiar la contraseña de Control Paterno y Código
Control Paterno Establece el Control Paterno en función del contenido del
Código de país Establece el Código de país. 36
Red Conexión a Internet Permite definir la conexión a Internet en Permitir/Desactivar. 36
Información Muestra la pantalla de información de red. 36
Prueba de conexión Realiza la prueba de conexión de red. 36
Configuración IP Permite definir la configuración IP en Auto/Manual. 36
Conexión BD-Live Permite definir la conexión a BD-Live en Autorizada/
DLNA Permite definir la conexión a DLNA en Permitir/Desactivar. 36
Configuración
Proxy
Disc/USB/Net: ajusta el modo de apagado automático
en Activar/Desactivar.
Otras Entradas: ajusta el modo de apagado automático
por horas o en Desactivar.
Ajusta esta unidad para que inicie automáticamente
la reproducción del disco.
desde el mando a distancia del televisor.
Restablece todos los ajustes a los valores predeterminados,
excepto el ajuste Seguridad. 35
Ajusta el idioma, la resolución y la relación de aspecto de la
pantalla.
Muestra el estado de Almacenamiento Local, formatea
Almacenamiento Local y selecciona el puerto USB delantero
o posterior de Almacenamiento Local.
Muestra un mensaje de advertencia acerca de la reproducción
de vídeo en 3D cuando esta unidad esté encendida.
un disco BD/DVD con varios ángulos.
BD/DVD con Imagen en imagen.
Permite mostrar la Marca Audio Secundario cuando se
reproduce un disco BD/DVD con audio secundario.
última reproducción de un disco cuando se pone en modo
de espera o se abre la bandeja portadiscos.
de país.
disco.
Permitida Parcialmente/Prohibido.
Permite definir la configuración proxy.
35
35
35
35
35
35
36
36
36
36
36
36
36
36
32 Es

Menú/submenú Elemento Función Página
Configuración
de pantalla
Configuración
de audio
Sistema de
Información
MENÚ SETUP
TV Salida 3D Selecciona vídeos en 3D o 2D. 37
Pantalla de TV Ajusta la relación de aspecto de la pantalla del televisor
Seleccionar Salida
de Video
Sistema de TV Permite seleccionar el Sistema de TV entre NTSC/PAL/
Color Space Permite seleccionar Color Space entre YCbCr 4:4:4/
HDMI Deep Color Permite seleccionar HDMI Deep Color entre 30 bits/36 bits/
HDMI 1080p 24Hz Permite definir HDMI 1080p 24Hz en Auto/Desactivar. 38
Sincronismo
de labios
Procesamiento
de Video
Salida de audio HDMI Permite seleccionar el modo de salida del terminal HDMI
Ajuste de
altavoz
Postprocesamiento
Modo de vídeo Ajusta la imagen visual. 38
Ajuste de color Ajusta Brillo/Saturación/Tonalidad para cada color. 38
Reducción de ruido Ajusta el nivel de Reducción de ruido. 38
Modo
desentrelazado
DRC Define el DRC (Control de gama dinámica). 39
Configuración Ajusta la salida de audio desde los terminales de los altavoces
Mezcla descendente
2 Canales
Tono de prueba Emite el tono de prueba para la configuración de los
Tamaño de
Subwoofer
Mezcla ascendente Convierte la señal de audio de 2 canales en multicanal.
conectado y ajusta la salida de vídeo.
Selecciona la resolución de la salida de vídeo.
Multi.
YCbCr 4:2:2/Full RGB/RGB.
Desactivar.
Ajusta el retardo entre vídeo y audio, como por ejemplo
cuando el movimiento de la boca no se corresponde
con la voz.
Ajusta la forma de detectar la señal de vídeo.
entre Bitstream/PCM/Desactivar.
surround de 5.1 canales.
Establece la salida de audio de los terminales SPEAKERS
FRONT L/R.
altavoces.
Ajusta el tamaño del altavoz del subwoofer.
Muestra la versión del software y la dirección MAC
(pág. 51).
37
37
37
37
37
38
38
39
39
39
39
39
39
39
AJUSTES
33 Es
Español

MENÚ SETUP
VOLUME
HOME
OPTION
ENTER
TOP MENU
RETURN ON SCREEN
POP-UP MENU
SLEEP
MUTESEARCHCLEAR
VOLUME
SETUP
DISPLAY
Utilización del menú SETUP
Debe acceder a la pantalla de menú SETUP para realizar
los ajustes en esta unidad. A continuación se explican las
operaciones básicas del menú SETUP.
Botones
numéricos
ENTER
2
Ejemplo: ajuste de [Control Paterno]
Notas
• Algunas opciones no pueden seleccionarse cuando la fuente de
entrada no está ajustada en Disco/USB/Red. En este caso, ajuste
la fuente de entrada en Disco/USB/Red.
• Algunos elementos no se pueden ajustar durante la
reproducción. En este caso, pulse dos veces para detener la
reproducción completamente antes de realizar el ajuste.
SW
SETUP
5
3
a
3 Seleccione un elemento del menú.
Pulse 5 /a para seleccionar [Control Paterno] y,
a continuación, pulse ENTER o el cursor 3.
4 Introduzca la contraseña con los botones
numéricos.
– La contraseña predeterminada es 0000.
– No puede ir a la siguiente pantalla de
configuración hasta que no haya introducido
la contraseña correcta.
– Para cambiar la contraseña, consulte “[Cambiar
Contraseña]” (pág. 36).
1 Pulse SETUP para mostrar la pantalla del
menú SETUP.
Pulse 2/3 para seleccionar [Configuración General]
y, a continuación, pulse ENTER o a .
2 Seleccione un submenú.
Pulse 5/a para seleccionar [Seguridad] y,
a continuación, pulse ENTER o el cursor 3.
5 Seleccione otro elemento.
Pulse 5 /a para seleccionar el nivel de Control
Paterno para discos BD/DVD. A continuación,
pulse ENTER.
6 Salga de la pantalla del menú.
Pulse 2 para volver al menú anterior.
34 Es

Configuración General
Los ajustes predeterminados están marcados con “ * ”.
■ Sistema
[Protector de pantalla]
Puede definir el protector de pantalla en [Activar]/
[Desactivar].
Cuando la opción [Activar] está seleccionada, esta unidad
pasa al modo de protector de pantalla si no se utiliza
durante 3 minutos.
Activar*, Desactivar
[Apagado Automático]
Tiene la opción de configurar el modo de apagado
automático en [Activar]/[Desactivar] cuando la entrada
seleccionada es Disco/USB/Red. Si hay otras entradas
seleccionadas, el modo de apagado automático puede
ajustarse por horas o en [Desactivar].
Disc/USB/Net: Activar*, Desactivar
Otras Entradas: 1 hora, 2 horas, 4 horas, 8 horas*,
Desactivar
[Reproducción Automática Disco]
Puede ajustar [Reproducción Automática Disco] en
[Activar]/[Desactivar]. Cuando está seleccionada la
opción [Activar], el disco se reproducirá automáticamente
después de cargarlo.
Activar*, Desactivar
[Control HDMI]
Puede ajustar esta unidad para que reciba una señal de
control desde un televisor compatible con la función
HDMI a través de un cable HDMI (pág. 13).
Activar, Desactivar
y
Para obtener más información sobre la función de control HDMI,
consulte página 30.
Nota
Cuando está seleccionada la opción [Activar], el consumo de
energía durante el modo de espera aumenta por la función de
control HDMI.
*
MENÚ SETUP
[Almacenamiento Local]
Puede mostrar información de Almacenamiento Local,
formatear Almacenamiento Local y seleccionar [USB
Frontal]/[USB Trasera] para guardar los datos de
BD-Live.
Para formatear (vaciar) la carpeta “BUDA” en el
dispositivo de memoria USB, seleccione [Información]
y pulse ENTER mientras [Formato] está seleccionado
en la pantalla.
USB Frontal, USB Trasera
*
y
Almacenamiento Local se utiliza como memoria auxiliar cuando
se reproduce un disco BD.
[Mensaje Reproducción 3D]
Puede activar o desactivar un mensaje de advertencia
acerca de la reproducción de vídeo en 3D que aparezca
en el televisor cuando esta unidad está activada.
Activar*, Desactivar
■ Idioma
[OSD]
Puede seleccionar el idioma de pantalla, es decir, del
menú o los mensajes mostrados en pantalla como,
por ejemplo, el menú SETUP.
English, , , , ,
Svenska Nederlandse
[Menú]
Puede dar prioridad al idioma del menú del disco.
English, , , , , ,
Nederlandse Svenska
Noruego, , Corea, Japonés, Más
[Audio]
Puede dar prioridad al idioma del audio para la
reproducción de BD/DVD. Para obtener más información
sobre la configuración de las opciones, consulte “[Menú]”
(pág. 35).
[Subtítulo]
Puede dar prioridad al idioma del Subtítulo.
Français Español Deutsch Italiano
, , ,
Français Español Deutsch Italiano
, Portugués, Danés, , Finlandés,
AJUSTES
[Cargar configuracion por defecto]
Puede restablecer todos los ajustes de esta unidad
a la configuración predeterminada, excepto el ajuste
Seguridad (pág. 36). Para obtener información sobre los
ajustes predeterminados, consulte las páginas 32 – 39.
[Actualizar]
Puede actualizar el software de forma manual
desde [Almacenamiento USB] o [Red]. Para obtener
información sobre la actualización de software, consulte
“ACTUALIZACIÓN DE SOFTWARE” (pág. 41).
[Configuración Sencilla]
Puede realizar la Configuración Sencilla (pág. 17).
English, , , , , ,
Nederlandse Svenska
Noruego, , Corea, Japonés, Más, Desactivar
Los ajustes predeterminados de [Idioma] son
diferentes en función del modelo.
Français Español Deutsch Italiano
, Portugués, Danés, , Finlandés,
35 Es
Español

MENÚ SETUP
■ Reproducción
[Subtítulos]
Puede ajustar que se visualicen los subtítulos (pág. 50)
cuando se reproduce un disco BD/DVD con subtítulos.
Activar, Desactivar
[Marca de Angulo]
Puede ajustar la visualización de la Marca de Angulo
( ) cuando se reproduce un disco BD/DVD con
ángulos múltiples.
Activar*, Desactivar
[Marca PIP]
Puede ajustar la visualización de la Marca PIP ( )
cuando se reproduce un disco BD (pág. 27) con Imagen
en imagen.
Activar*, Desactivar
[Marca Audio Secundario]
Puede ajustar la visualización de la Marca Audio
Secundario ( ) cuando se reproduce un disco BD
con audio secundario.
Activar*, Desactivar
[Memoria última]
Puede establecer si esta unidad recuerda la posición de la
última reproducción de un disco cuando se pone en modo
de espera o se abre la bandeja portadiscos.
Activar*, Desactivar
*
[Código de país]
Puede ajustar el Código de país en el que vive. Es
necesario introducir la contraseña (consulte “[Cambiar
Contraseña]” en página 36) antes de ajustar el Código de
país. Este parámetro puede utilizarse para la calificación
de Control Paterno y reproducción de discos.
■ Red
[Conexión a Internet]
Puede definir este elemento en `[Permitir] cuando utilice
BD-Live (pág. 27), DLNA (pág. 22) y actualizar el
software desde la red (pág. 41).
Permitir*, Desactivar
[Información]
Puede mostrar la pantalla de información de red. En esta
pantalla puede ver información de Interfaz (Ethernet),
Tipo de dirección, Dirección IP, Máscara de subred,
Default Gateway y DNS.
[Prueba de conexión]
Puede realizar una prueba de conexión a Internet. Si la
prueba falla, compruebe la [Configuración IP] (pág. 36)
y vuelva a realizar la prueba.
[Configuración IP]
Puede configurar los ajustes de red.
Auto* Seleccione este valor para configurar automáticamente los
ajustes de red de esta unidad con el servidor DHCP.
Manual Seleccione este valor para configurar los ajustes de red
(Dirección IP, Máscara de subred, Default Gateway
y DNS) manualmente.
Nota
Algunos discos no son compatibles con esta función.
■ Seguridad
[Cambiar Contraseña]
Puede ajustar la contraseña para cambiar el nivel de
Control Paterno y Código de país. Consulte “[Control
Paterno]” (pág. 36) y “[Código de país]” (pág. 36).
Notas
• La contraseña predeterminada es 0000.
• Si olvida la contraseña, consulte “SOLUCIÓN DE
PROBLEMAS” (pág. 42) y configure todos los ajustes de
Seguridad en sus valores predeterminados.
[Control Paterno]
En algunos discos de BD/DVD, existe un nivel de control
para la visualización del disco en función de la edad del
espectador. Puede ajustar el Control Paterno mostrado
en pantalla en función del contenido del disco.
Es necesario introducir la contraseña (consulte “[Cambiar
Contraseña]” en página 36) antes de ajustar los niveles
de Control Paterno.
Después de ajustar el Control Paterno, si reproduce un
disco con un nivel más alto del nivel de Control Paterno
actual o si desea cambiar el nivel de Control Paterno,
aparecerá un cuadro de diálogo solicitando que introduzca
la contraseña.
Desactivar*, 1 a 8
y
• Botones numéricos Permiten introducir caracteres.
•2/
3
• CLEAR Permite eliminar un carácter.
• ENTER Permite guardar los valores y salir
Permiten desplazar el elemento resaltado.
del menú.
[Conexión BD-Live]
Puede definir la restricción de acceso al contenido de
BD-Live.
Autorizada Permite que todos los discos de BD-Live se
Permitida
Parcialmente
Prohibido Prohíbe que todos los discos de BD-Live se
conecten a la red.
Permite únicamente los discos con certificación
*
de propietario.
conecten a la red.
[DLNA]
Puede definir la función DLNA (pág. 22) en [Permitir]/
[Desactivar]. Cuando no utilice la función DLNA,
defínala en [Desactivar].
Permitir*, Desactivar
[Configuración Proxy]
Puede definir Configuración Proxy. Defínalo en
[Desactivar] para un uso normal. Seleccione [Permitir]
para definir la configuración del proxy.
Permitir Activa los ajustes del host y el puerto proxy.
Desactivar*Desactiva el servidor proxy. Seleccione esta opción
Host Proxy Define el host proxy.
Puerto proxy Define el puerto proxy.
cuando no utilice el servidor proxy.
36 Es

Configuración de pantalla
Los ajustes predeterminados están marcados con “ * ”.
■ TV
[Salida 3D]
Puede seleccionar salida de vídeo en 3D o 2D desde esta
unidad.
Auto* Esta unidad selecciona automáticamente vídeos
Desactivar Esta unidad siempre selecciona vídeos en 2D.
Nota
Aunque establezca [Salida 3D] en [Auto] y reproduzca un disco
3D de BD, este reproductor selecciona imágenes en 2D en
función de la conexión y del ajuste del televisor, etc. (pág. 13).
[Pantalla de TV]
Puede ajustar la relación de aspecto de la pantalla
del televisor conectado, y ajustar la salida de vídeo.
Si cambia de televisor, por ejemplo porque ha adquirido
uno nuevo, y la relación de aspecto de la pantalla del
televisor conectado cambia, también tendrá que cambiar
el ajuste Pantalla de TV.
16:9 Lleno Selecciónelo cuando conecte la unidad a un televisor
16:9 Normal*Selecciónelo cuando conecte la unidad a un televisor
4:3
Panorámico
4:3 Buzón Selecciónelo cuando conecte la unidad a un televisor
en 3D o 2D.
con pantalla 16:9. Cuando se reproduce vídeo con
una relación de aspecto 4:3, el vídeo se muestra
como aparece en la ilustración.
con pantalla 16:9. Cuando se reproduce vídeo con
una relación de aspecto 4:3, el vídeo se muestra
como aparece en la ilustración.
Selecciónelo cuando conecte la unidad a un televisor
con pantalla 4:3. Cuando se reproduce vídeo con una
relación de aspecto 16:9, el vídeo se muestra como
aparece en la ilustración.
con pantalla 4:3. Cuando se reproduce vídeo con una
relación de aspecto 16:9, el vídeo se muestra como
aparece en la ilustración.
MENÚ SETUP
[Seleccionar Salida de Video]
Puede seleccionar la resolución de salida de vídeo entre
[Compuesta], [HDMI Auto], [HDMI 1080p], [HDMI
1080i], [HDMI 720p], [HDMI 480p/576p] y [HDMI 480i/
576i]. Cuando se define en [HDMI Auto], la resolución
se ajusta a la resolución máxima según el televisor
conectado. Para obtener más información sobre los
formatos de salida, consulte “Acerca de los formatos
de salida de vídeo” (pág. 40).
Compuesta, HDMI Auto*, HDMI 1080p, HDMI 1080i,
HDMI 720p, HDMI 480p/576p, HDMI 480i/576i
Notas
• Si conecta el televisor y esta unidad a través de la toma VIDEO,
seleccione [Compuesta], [HDMI 480p/576p] o [HDMI 480i/576i].
• Para emitir audio HD (como Dolby TrueHD o DTS-HD) desde
un terminal HDMI, configure [Seleccionar Salida de Video]
como [HDMI Auto] o un ajuste superior a [HDMI 720p].
[Sistema de TV]
Puede seleccionar el valor de [Sistema de TV] entre
[PAL], [NTSC] y [Multi]. Ajuste el mismo valor de
Sistema de TV que su televisor. Para obtener más
información sobre los formatos de salida, consulte
“Acerca de los formatos de salida de vídeo” (pág. 40).
NTSC, PAL*, Multi (Modelos de Asia, China, Europa y Rusia)
NTSC*, PAL, Multi (Modelos de EE.UU. y Canadá)
[Color Space]
Puede seleccionar la salida Color Space (pág. 50) desde
HDMI. Esta función está disponible cuando la unidad
se conecta con un cable HDMI.
YCbCr 4:4:4*Permite definir Color Space en YCbCr 4:4:4.
YCbCr 4:2:2 Permite definir Color Space en YCbCr 4:2:2.
Full RGB Si se ha configurado RGB y el blanco y negro de la
pantalla está demasiado difuminado, seleccione este
elemento. Esta opción se aplica si un componente
conectado admite el intervalo RGB 0-255.
RGB Permite la salida de la señal de vídeo con el rango
normal de señal.
AJUSTES
Tamaño
de imagen
original
4:3
Tamaño
de imagen
original
16:9
En televisor 16:9 (pantalla
panorámica)
16:9 Lleno 16:9 Normal
En televisor 4:3
4:3 Panorámico 4:3 Buzón
Nota
Esta función solo está disponible en televisores que admitan
dicha función.
[HDMI Deep Color]
Si su televisor es compatible con Deep Color (pág. 50),
configure esta opción en función de su televisor. Esta
función está disponible cuando la unidad se conecta
con un cable HDMI.
30 bits, 36 bits, Desactivar
*
37 Es
Español

MENÚ SETUP
[HDMI 1080p 24Hz]
Permite la salida del Vídeo BD codificado con una
velocidad de fotogramas de 24 Hz en HDMI 1080p 24Hz.
Con esta función es posible que disponga de una
reproducción de vídeo más suave. Esta función está
disponible si el televisor admite esta función y la unidad
está conectada con un cable HDMI. Para obtener más
información sobre los formatos de salida, consulte
“Acerca de los formatos de salida de vídeo” (pág. 40).
Auto*, Desactivar
Nota
Este parámetro está desactivado cuando la resolución de salida
es diferente de 1080p.
[Sincronismo de labios]
Puede definir o ajustar la función Sincronismo de labios
(pág. 51).
Auto* Esta unidad ajusta automáticamente la función
Sincronismo de labios.
Manual Puede ajustar la función Sincronismo de labios
manualmente. Puede establecer el retraso del audio
para contenido 2D y 3D de forma independiente.
2D
3D
Desactivar Esta unidad no ajusta la función Sincronismo de
labios.
[Ajuste de color]
Ajusta Brillo/Saturación/Tonalidad para cada color (Rojo/
Verde/Azul/Amarillo/Cian/Magenta). Para utilizar
esta función, configure [Modo de vídeo] como
[Particularizado]. Para obtener más información sobre
la configuración de las opciones, consulte “[Modo de
vídeo]” (pág. 38).
Los valores predeterminados son 0.
[Reducción de ruido]
Puede configurar la Reducción de ruido a un nivel entre 0
y 3. 0 equivale a desactivado y 3 es el nivel máximo.
0*, 1, 2, 3
[Modo desentrelazado]
Puede seleccionar cómo detectar la señal de vídeo.
Defínalo en [Auto] para un uso normal. Cuando aparece
en la pantalla un ruido de desgarro horizontal, configure
esta opción en [Película]/[Vídeo] para eliminar el ruido.
Auto*, Película, Vídeo
■ Procesamiento de Video
[Modo de vídeo]
Puede seleccionar [Modo de vídeo] más abajo.
Estándar* La imagen es más natural y equilibrada. Este
Rico La imagen es más viva e intensa.
Cine La imagen es adecuada para ver películas en
Particularizado Puede ajustar la imagen visual manualmente.
modo es adecuado para usos normales.
una habitación a oscuras.
Pulse 5 /a para seleccionar el parámetro y,
a continuación, pulse 2/3 para ajustar la cifra.
Brillo
Ajusta el brillo global de la imagen.
Saturación
Ajusta la riqueza de color de la imagen
proyectada.
Tonalidad
Ajusta el tono de la imagen proyectada.
Contraste
Ajusta las áreas claras (niveles blancos) de la
imagen.
Nitidez
Ajusta la nitidez de los elementos del vídeo.
CTI
Suaviza los bordes de las imágenes en color.
De este modo, las imágenes en color se distinguen
más.
Los valores predeterminados son 0.
38 Es

Configuración de audio
Los ajustes predeterminados están marcados con “ * ”.
■ Salida de audio
[HDMI]
Puede seleccionar el modo de salida del terminal HDMI.
Bitstream, PCM, Desactivar
Notas
• Para emitir sonido desde los altavoces, seleccione [Desactivar].
• El sonido del iPod o la señal de audio emitida a las tomas
DIGITAL IN (COAXIAL y OPTICAL) de esta unidad no
puede emitirse a un televisor desde esta unidad a través del
cable HDMI.
• Para emitir audio HD (como Dolby TrueHD o DTS-HD) desde un
terminal HDMI, configure [Seleccionar Salida de Video] como
[HDMI Auto] o un ajuste superior a [HDMI 720p] (pág. 37).
[DRC]
Puede definir la función DRC (Control de gama dinámica)
(pág. 50) en [Activar]/[Desactivar]/[Auto]. Cuando se
define en [Auto], DRC se enciende automáticamente para
una fuente con información DRC en formato Dolby
TrueHD. DRC hace que los sonidos fuertes, como los
oclusivos, suenen más bajo y que las conversaciones sean
más audibles. Resulta útil cuando se ven películas de noche.
Desactivar*, Activar, Auto
■ Ajuste de altavoz
[Configuración]
Puede ajustar la salida surround de 5.1 canales en función
de los altavoces conectados.
1 Pulse 5 /a para seleccionar el altavoz que desea
configurar y, después, pulse ENTER.
2 Ajuste los datos siguientes. Tenga en cuenta que
algunos elementos no aparecen, en función del
altavoz seleccionado.
Tamaño Si la sección de graves de un altavoz mide
16 cm o más, seleccione [Grande]. Si mide
menos de 16 cm, seleccione [Pequeño].
Grande, Pequeño*
Trim Ajusta el nivel del altavoz seleccionado
(nivel de volumen).
De -6 a +6 dB (en pasos de 0,5 dB)
El ajuste predeterminado es 0 dB.
Retraso Ajusta por separado el momento preciso en
el que cada altavoz emite audio, para que los
sonidos de los altavoces lleguen a la posición
de escucha a la vez.
De 0,5 a 10 m (en pasos de 0,5 m)
El ajuste predeterminado es 3 m.
Desactivar Cuando no se utilice el altavoz seleccionado,
seleccione [Sí].
Sí, No*
*
MENÚ SETUP
3 Pulse RETURN para volver a la selección de
altavoces.
[Mezcla descendente 2 Canales]
Puede seleccionar 2 canales como método de mezcla
descendente desde [Estéreo] o [It/Dt].
*
Estéreo
, It/Dt
[Tono de prueba]
Puede comprobar si la configuración del altavoz
es correcta emitiendo un tono de prueba.
[Tamaño de Subwoofer]
Puede seleccionar un tamaño de subwoofer [Pequeño]
o [Grande]. Si el diámetro del driver del subwoofer es
superior a 20 cm o si el sonido de baja frecuencia y de
graves es débil, seleccione [Grande].
Pequeño*, Grande
■ Post-procesamiento
[Mezcla ascendente]
Permite convertir la señal de audio de 2 canales en
multicanal (eficaz en la salida del altavoz). Para convertir
la señal en señal multicanal, seleccione [Dolby PLII]
o [DTS NEO:6]. Puede seleccionar [Cine] o [Música]
si [DTS NEO:6] está seleccionado. Asimismo, puede
seleccionar [Película] o [Música] cuando [Dolby PLII]
esté seleccionado.
Desactivar*, Dolby PLII, DTS NEO:6
■ Sistema de Información
Se muestran la versión de software y la dirección MAC
(pág. 51).
AJUSTES
Español
39 Es

MENÚ SETUP
Acerca de los formatos de salida de vídeo
Si [Sistema de TV] se define en [NTSC]
HDMI
VIDEO
Resolución Compuesta
Reproducción
de BD
otros 1080p 60 Hz
Reproducción
de BD
otros
480p Máx. 480i 480p 720p 60 Hz 1080i 60 Hz
480i OFF 480i 480i OFF
HDMI
Auto
HDMI
480i/576i
HDMI
480p/576p
HDMI
720p
HDMI
1080i
HDMI 1080p
24 Hz Otros
1080p 24 Hz
1080p 60 Hz
Si [Sistema de TV] se define en [PAL]
HDMI
VIDEO
Resolución Compuesta
Reproducción
de BD
otros 1080p 50 Hz
Reproducción
de BD
otros
576p Máx. 576i 576p 720p 50 Hz 1080i 50 Hz
576i OFF 576i 576i OFF
HDMI
Auto
HDMI
480i/576i
HDMI
480p/576p
HDMI
720p
HDMI
1080i
HDMI 1080p
24 Hz Otros
1080p 24 Hz
1080p 50 Hz
Si [Sistema de TV] se define en [Multi]
Si [Sistema de TV] está configurado como [Multi], la salida de la señal de vídeo tiene la misma frecuencia que la fuente.
Consulte las tablas anteriores para obtener información sobre la configuración de frecuencia del televisor y la resolución
de la señal de vídeo de salida.
Si se muestra una pantalla de menú, como por ejemplo SETUP, la salida de la señal de vídeo tiene la misma frecuencia
que el origen.
Notas
• “Máx.” en la tabla significa que la resolución se ha definido en la resolución máxima admitida por el televisor conectado.
• El parámetro [HDMI 1080p 24Hz] está desactivado cuando la resolución de salida es diferente de [HDMI 1080p].
• No se emiten señales desde la toma VIDEO si la resolución de salida está definida en [HDMI Auto], [HDMI 720p], [HDMI 1080i]
o [HDMI 1080p].
• Cuando [Sistema de TV] se define en [NTSC] y el origen de vídeo no es 60 Hz, la salida de vídeo se convierte a 60 Hz.
• Cuando [Sistema de TV] se define en [PAL] y el origen de vídeo no es 50 Hz, la salida de vídeo se convierte a 50 Hz.
40 Es

ACTUALIZACIÓN DE SOFTWARE
Algunos de los discos BD recién lanzados no se pueden
reproducir a menos que actualice el software de la
unidad a la versión más reciente. Le recomendamos la
actualización para que la unidad funcione con el software
más actual.
Para comprobar la disponibilidad de una actualización
de software, visite
http://download.yamaha.com/
Nota
No saque el dispositivo de memoria USB, no ponga la unidad en
modo de espera ni desenchufe el cable de alimentación o el cable
LAN mientras se lleva a cabo la actualización de software.
Actualización del software
1 Prepare la actualización de software.
Si actualiza el software desde [Red]:
Confirme que la unidad está conectada a la red.
Si actualiza el software desde [Almacenamiento USB]:
1 Guarde el paquete de archivos de actualización en
la carpeta correspondiente en el dispositivo de
memoria USB. Para obtener más información,
consulte el documento de procedimientos adjunto
con el paquete de archivos de actualización.
2 Conecte el dispositivo de memoria USB.
Si la actualización de software se inicia
automáticamente cuando se conecta la
memoria USB, vaya al paso 2 siguiente.
AJUSTES
2 Seleccione el método de actualización e inicie
la actualización desde el menú SETUP.
1 Pulse SETUP para mostrar la pantalla
del menú SETUP.
2 Seleccione [Configuración General] =
[Sistema] = [Actualizar].
3 Seleccione el elemento que contiene el
paquete de archivos de actualización
desde [Almacenamiento USB]/[Red].
3 Inicie la actualización siguiendo los mensajes en
pantalla.
Español
41 Es

INFORMACIÓN ADICIONAL
SOLUCIÓN DE PROBLEMAS
Consulte la tabla de abajo cuando esta unidad no funcione correctamente. Si el problema no está en la lista de abajo o las
instrucciones no sirven de ayuda, apague esta unidad, desconecte el cable de alimentación y póngase en contacto con el
centro de servicio o concesionario autorizado de Yamaha más cercano.
Problemas generales
Problema Causa Remedio Página
No hay alimentación. Pulse en el panel delantero para encender la
Esta unidad no se
enciende o entra en
el modo de espera
poco después de
conectar la
alimentación.
Esta unidad no
funciona
correctamente.
El disco no puede
reproducirse.
No hay sonido. No se ha seleccionado una fuente
Los altavoces no
emiten sonido.
No hay sonido
o el sonido de un
canal concreto es
demasiado débil.
El cable de alimentación no está
conectado o la clavija no está bien
insertada.
Esta unidad ha sido expuesta a una
descarga eléctrica externa fuerte
(rayo o electricidad estática intensa).
Esta unidad debe reiniciarse. Mantenga pulsado en el panel delantero durante
No se ha configurado el Asistente inicial. Configure el Asistente inicial cuando encienda esta
de entrada apropiada.
Las conexiones de los altavoces están
flojas.
La función de silencio está activada. Cancele la función de silencio.
El volumen está bajo. Suba el volumen.
Hay señales que la unidad no
puede reproducir y que recibe de un
componente, como por ejemplo un
CD-ROM.
[Control HDMI] está ajustado
en [Desactivar].
Los dispositivos de audio se conectan
a las tomas DIGITAL IN de la unidad.
[HDMI] para salida de audio en el menú
SETUP no está ajustado en [Desactivar].
El nivel de salida del canal es bajo. Aumente el nivel de salida del canal.
La configuración del altavoz es
incorrecta.
alimentación.
Conecte firmemente el cable de alimentación.
Ponga la unidad en el modo de espera, desconecte el
cable de alimentación, vuelva a conectarlo después
de 30 segundos y, a continuación, utilícela
normalmente.
unos 5 segundos para reiniciar esta unidad. Para
reiniciarla completamente, desenchufe el cable
de alimentación de la toma de CA durante entre
5 y 10 segundos, vuelva a enchufarlo y,
a continuación, encienda la unidad.
unidad por primera vez tras realizar una compra
o actualización.
Seleccione una fuente de entrada apropiada con el
selector INPUT del panel delantero (o los botones
de selección de fuente del mando a distancia).
Asegure las conexiones.
Reproduzca una fuente cuyas señales pueda
reproducir esta unidad.
Al conectar un televisor compatible con ARC (canal
de retorno de audio) y esta unidad con un cable
HDMI, ajuste [Control HDMI] en [Activar].
La unidad no dispone de ningún terminal de salida
de audio digital exclusivo. Las señales de audio
recibidas en las tomas DIGITAL IN no pueden
emitirse de esta unidad al televisor.
Ajuste [HDMI] en [Desactivar].
Ajuste los altavoces mediante [Configuración]
en [Ajuste de altavoz], en el menú SETUP.
5
16
—
5
17
5
11
7
7
3
35
—
39
39
39
42 Es

SOLUCIÓN DE PROBLEMAS
Problema Causa Remedio Página
No hay imagen. Los cables están mal conectados. Asegúrese de que los cables están conectados
El sistema del televisor no está
configurado correctamente.
La unidad se apaga
de forma repentina.
Solo se oye sonido
del altavoz de un
lado.
Hay interferencia de
ruido procedente de
un equipo digital o de
radiofrecuencia.
Esta unidad hace un
sonido de chasquido
cuando comienza la
reproducción o al
cargar un disco.
El altavoz de graves
no emite sonido.
El sonido del altavoz
de graves conectado
a la toma de salida
del preamplificador
SUBWOOFER está
distorsionado.
Los ajustes del
sistema se cambian
automáticamente.
La función de control
HDMI no funciona
correctamente.
El sincronismo de
labios automático
no funciona aunque
[Sincronismo de
labios] esté ajustado
en [Auto].
Está configurado el temporizador de
apagado.
[Apagado Automático] está ajustado
en [Activar].
Los cables están mal conectados. Conecte los cables correctamente. Si el problema
La unidad está demasiado cerca de un
equipo digital o de alta frecuencia.
El altavoz de graves no está conectado
correctamente.
El nivel del altavoz de graves es bajo. Aumente el nivel del altavoz de graves con el botón
El nivel de salida del altavoz de graves de
la unidad es demasiado alto.
Cuando [Control HDMI] está ajustado
en [Activar], al utilizar el televisor
(por ejemplo, al cambiar de canal, etc.)
se cambian los ajustes del sistema.
[Control HDMI] está ajustado en
[Desactivar].
La función de control HDMI está
desactivada en el televisor.
El televisor no es compatible con el
sincronismo de labios automático.
correctamente.
Compruebe que el televisor conectado tiene
seleccionada la entrada correcta.
Conecte esta unidad al televisor con la toma VIDEO
mediante el cable de clavijas de vídeo suministrado.
– Si la imagen sigue sin mostrarse con esta unidad
conectada al terminal VIDEO, mantenga pulsado
y en el panel frontal unos 5 segundos
sin ningún disco insertado y con la reproducción
parada para ir a NTSC/PAL.
Mantenga pulsado y simultáneamente
en el panel frontal durante unos 5 segundos sin
ningún disco insertado y con la reproducción
parada para ir a NTSC/PAL. Vuelva a configurar la
resolución correcta al conectarse a través de HDMI
(pág. 37).
No se trata de ningún error. Encienda esta unidad
y reproduzca la fuente de nuevo.
Ajuste [Apagado Automático] en [Desactivar].
persiste, los cables podrían estar defectuosos.
Separe más la unidad de dicho equipo.
Estos sonidos no indican una avería, sino que son
condiciones normales de funcionamiento de esta
unidad.
Compruebe que el altavoz de graves esté conectado
correctamente.
+ SW (altavoz de graves).
Baje el nivel de salida del altavoz de graves con el
botón - SW (altavoz de graves) y, a continuación,
suba el nivel del altavoz de graves con el control
del altavoz de graves.
Ajuste [Control HDMI] en [Desactivar] o vuelva
a configurar el sistema con el mando a distancia.
Ajuste [Control HDMI] en [Activar].
Consulte el manual entregado con el televisor
y compruebe la configuración.
Ajuste [Sincronismo de labios] en [Manual] y,
a continuación, ajuste el retardo de la salida de
audio manualmente.
13
13
13
—
30
35
11
—
—
11
35
35
—
38
7
INFORMACIÓN
7
ADICIONAL
Español
43 Es

SOLUCIÓN DE PROBLEMAS
Recepción de la radio
Problema Causa Remedio Página
La recepción estéreo
por FM es mala.
La emisora deseada
no se puede sintonizar
con el método
de sintonización
automática.
La función de selección
de presintonía
no funciona.
Hay distorsión y no
se puede obtener
una buena recepción
a pesar de utilizar una
buena antena de FM
o una antena exterior.
La antena no está conectada
correctamente.
Las características de las emisiones
estéreo de FM pueden causar este
problema si el transmisor está demasiado
lejos o la entrada de la antena es mala.
La señal es demasiado débil. Utilice una antena de FM direccional de alta calidad.
Es posible que se haya borrado la
presintonía (memoria).
Se está produciendo reflexión multirruta
o algún otro tipo de interferencia de
radio.
Verifique las conexiones de la antena.
Intente utilizar una antena de FM direccional
de alta calidad.
Active el modo monoaural.
Utilice el método de sintonización manual.
Presintonice las emisoras de radio de nuevo.
Cambie la altura, la dirección o la posición de
la antena.
11
—
28
—
28
28
—
iPod
Nota
En caso de producirse un error de transmisión sin que aparezca un mensaje de estado en el visor del panel delantero de esta unidad,
compruebe la conexión de su iPod (consulte la 12).
Mensaje de estado Causa Remedio Página
READING La unidad está reconociendo la
conexión con el iPod.
UNKNOWN Hay un problema con la trayectoria
de la señal del iPod a esta unidad.
El iPod utilizado no es compatible
con esta unidad.
El software del iPod no está actualizado. Actualice el software del iPod para obtener la
STOP La reproducción del iPod ha terminado.
Por ejemplo, todas las canciones del
álbum seleccionado han terminado
de reproducirse.
NO iPod El iPod está desconectado de esta
unidad.
Problema Causa Remedio Página
No hay sonido. La unidad está apagada. Conecte correctamente el cable de alimentación.
No se ha actualizado la versión del
software del iPod.
El iPod está en proceso de conexión
con esta unidad.
Si el mensaje sigue apareciendo en el visor del panel
delantero y no comienza la reproducción, vuelva
a conectar el iPod.
Vuelva a conectar el iPod.
Esta unidad solo es compatible con el iPod classic,
iPod nano (2ª, 3ª, 4ª, 5ª y 6ª generación), iPod touch
(1ª, 2ª, 3ª y 4ª generación), iPhone, iPhone 3G/3GS
y iPhone 4.
versión más reciente.
Conecte el iPod con esta unidad mediante un
cable USB.
Descargue la versión de iTunes más reciente para
actualizar la versión del software del iPod.
Espere un momento.
—
12
12
—
12
12
—
—
44 Es

SOLUCIÓN DE PROBLEMAS
Problema Causa Remedio Página
No hay sonido.
El iPod emite sonido,
pero no puede
controlarlo con
esta unidad ni con
el mando a distancia.
No se escucha
sonido del iPod
en el televisor.
Esta unidad no
puede controlarse
con el mando
adistancia.
No es posible realizar
funciones de control
desde el iPod.
La información de
reproducción no se
muestra en el visor
del panel delantero.
La batería del iPod
no se carga.
El iPod no está conectado correctamente. Conecte el iPod con esta unidad mediante un
No se puede escuchar sonido del iPod
en un televisor conectado a esta unidad
a través del cable HDMI.
El iPod no es compatible con esta unidad. Esta unidad solo es compatible con el iPod classic,
El iPod no está conectado correctamente. Conecte el iPod con esta unidad mediante un
La versión del software del iPod no se
ha actualizado.
El iPod no está conectado correctamente. Conecte el iPod con esta unidad mediante un
El iPod utilizado no es compatible con
la visualización de información de
reproducción.
El iPod no está conectado correctamente. Conecte el iPod con esta unidad mediante un
El iPod no es compatible con esta unidad. Esta unidad solo es compatible con el iPod classic,
cable USB.
Utilice los altavoces de esta unidad.
iPod nano (2ª, 3ª, 4ª, 5ª y 6ª generación), iPod touch
(1ª, 2ª, 3ª y 4ª generación), iPhone, iPhone 3G/3GS
y iPhone 4.
cable USB.
Actualice el software del iPod para obtener la
versión más reciente. Si no es posible resolver el
problema, ni siquiera con el software más reciente,
restablezca el iPod.
cable USB.
Esta unidad solo es compatible con el iPod classic,
iPod nano (2ª, 3ª, 4ª, 5ª y 6ª generación), iPod touch
(1ª, 2ª, 3ª y 4ª generación), iPhone, iPhone 3G/3GS
y iPhone 4.
cable USB.
iPod nano (2ª, 3ª, 4ª, 5ª y 6ª generación), iPod touch
(1ª, 2ª, 3ª y 4ª generación), iPhone, iPhone 3G/3GS
y iPhone 4.
12
—
12
12
—
12
12
12
12
USB
Nota
En caso de producirse un error de transmisión sin que aparezca un mensaje de estado en el panel delantero de esta unidad, compruebe la
conexión del dispositivo USB (consulte la página 15).
Mensaje de estado Causa Remedio Página
USB ERROR El dispositivo USB conectado no puede
reproducirse en esta unidad.
El dispositivo USB está conectado
en ángulo.
Problema Causa Remedio Página
El archivo del
dispositivo USB no
puede reproducirse.
No se reconoce el dispositivo USB. Vuelva a conectar el dispositivo USB.
Las conexiones del dispositivo USB son
incorrectas.
El formato del archivo no es compatible
con esta unidad.
Si las soluciones anteriores no resuelven
el problema, el dispositivo USB no puede
reproducirse en esta unidad.
Desconecte el dispositivo USB. Cambie a otra fuente
de entrada que no sea USB y vuelva a seleccionar
USB como fuente de entrada. Vuelva a conectar
un dispositivo USB que se pueda reproducir.
Si se suministra un adaptador de CA con el
dispositivo, conéctelo.
Vuelva a conectar el dispositivo USB.
Cambie el archivo por un archivo grabado
correctamente que se pueda reproducir con
esta unidad.
Pruebe con otro dispositivo USB.
15
15
—
15
3
—
45 Es
INFORMACIÓN
ADICIONAL
Español
 Loading...