

Page 1

1
2
3
4
5
6
7
OWNER’S MANUAL
YW100E
4VP-F8199-E2
8
9
Page 2
INTRODUCTION
EAU00001
Welcome to the Yamaha world of motorcycling!
As the owner of a BW’S100, you are benefiting from Yamaha’s vast experience in and newest
technology for the design and the manufacture of high-quality products, which have earned
Yamaha a reputation for dependability.
Please take the time to read this manual thoroughly, so as to enjoy all your BW’S100’s advantages. The owner’s manual does not only instruct you in how to operate, inspect and maintain
your scooter, but also in how to safeguard yourself and others from trouble and injury.
In addition, the many tips given in this manual will help to keep your scooter in the best possible
condition. If you have any further questions, do not hesitate to contact your Yamaha dealer.
The Yamaha team wishes you many safe and pleasant rides. So, remember to put safety first!
Page 3

IMPORTANT MANUAL INFORMATION
Particularly important information is distinguished in this manual by the following notations:
EAU00005
Q
w
cC
NOTE:
The Safety Alert Symbol means ATTENTION! BECOME ALERT! YOUR SAFETY IS
INVOLVED!
Failure to follow WARNING instructions could result in severe injury or death to the
scooter operator, a bystander or a person inspecting or repairing the scooter.
A CAUTION indicates special precautions that must be taken to avoid damage to
the scooter.
A NOTE provides key information to make procedures easier or clearer.
NOTE:
9 This manual should be considered a permanent part of this scooter and should remain with it
even if the scooter is subsequently sold.
9 Yamaha continually seeks advancements in product design and quality. Therefore, while this
manual contains the most current product information available at the time of printing, there
may be minor discrepancies between your scooter and this manual. If there is any question
concerning this manual, please consult your Yamaha dealer.
Page 4
IMPORTANT MANUAL INFORMATION
EW000002
w
PLEASE READ THIS MANUAL CAREFULLY AND COMPLETELY BEFORE OPERATING THIS SCOOTER.
Page 5
IMPORTANT MANUAL INFORMATION
1
2
3
4
5
EAUT1390
YW100E
OWNER’S MANUAL
©2005 by Yamaha Motor Taiwan Co., Ltd.
1st edition, Sep. 2005
All rights reserved.
Any reprinting or unauthorized use
without the written permission of
Yamaha Motor Taiwan Co., Ltd.
is expressly prohibited.
Printed in Taiwan.
6
7
8
9
Page 6
TABLE OF CONTENTS
EAU00009
GIVE SAFETY THE RIGHT OF WAY .................1-1
1
FURTHER SAFE RIDING POINTS FOR THIS
MODEL ..............................................................1-2
DESCRIPTION ...................................................2-1
2
Left view ........................................................ 2-1
Right view .....................................................2-2
Controls / Instruments ................................. 2-3
INSTRUMENT AND CONTROL
3
FUNCTIONS ......................................................3-1
Main switch / Steering lock ......................... 3-1
Indicator lights .............................................. 3-2
Speedometer ................................................3-2
Fuel gauge .................................................... 3-2
Handlebar switches ...................................... 3-3
Front brake lever .......................................... 3-4
Rear brake lever ...........................................3-4
Fuel and oil tanks ......................................... 3-4
Fuel ................................................................3-5
Fuel tank breather hose ...............................3-5
Two-storoke engine oil ................................3-6
Kick starter ....................................................3-6
Seat ...............................................................3-6
Helmet holder ...............................................3-7
Trunk ............................................................. 3-7
Rear carrier ................................................... 3-8
Front trunk .................................................... 3-8
Luggage hook ...............................................3-8
Sidestand ......................................................3-8
Sidestand switch operation check ..............3-9
PRE-OPERATION CHECKS ............................... 4-1
4
5
6
Pre-operation check list ............................... 4-1
OPERATION AND IMPORTANT RIDING
POINTS .............................................................. 5-1
Starting up a cold engine ............................ 5-1
Starting off ....................................................5-2
Acceleration ..................................................5-2
Braking ..........................................................5-2
Engine break-in ............................................5-2
Parking .......................................................... 5-3
PERIODIC MAINTENANCE AND MINOR
REPAIR .............................................................. 6-1
Took kit .......................................................... 6-1
Periodic maintenance and lubrication ........ 6-3
Cowling and panel removal and
installation .................................................... 6-6
Cowling A .....................................................6-6
Panel B .......................................................... 6-7
Spark plug ..................................................... 6-7
Page 7
TABLE OF CONTENTS
Final gear oil replacement ...........................6-9
Air filter cleaning ..........................................6-9
Carburetor adjustment ..............................6-11
Throttle cable free play adjustment .......... 6-11
Tires ............................................................. 6-12
Wheels ........................................................6-14
Front brake adjustment .............................6-14
Rear brake adjustment ............................... 6-14
Checking the front brake pads and
brake shoes ................................................. 6-15
Inspecting the brake fluid level .................6-16
Brake fluid replacement ............................. 6-16
Cable inspection and lubrication .............. 6-16
Throttle cable and grip lubrication ........... 6-17
Autolube pump adjustment ...................... 6-17
Brake lever lubrication ............................... 6-17
Center and sidestand lubrication ..............6-17
Front fork inspection .................................. 6-18
Wheel bearings ..........................................6-18
Steering inspection ....................................6-19
Battery .........................................................6-19
Fuse replacement .......................................6-20
Headlight bulb replacement ...................... 6-21
Turn signal and taillight bulb
replacement ................................................ 6-21
License light bulb replacement ................. 6-22
Troubleshooting .........................................6-23
Troubleshooting chart ............................... 6-24
SCOOTER CARE AND STORAGE ....................7-1
7
8
9
Care ............................................................... 7-1
Storage ..........................................................7-4
SPECIFICATIONS .............................................. 8-1
CONSUMER INFORMATION ...........................9-1
Identification numbers records ...................9-1
Key identification number ...........................9-1
Vehicle identification number .....................9-1
Engine serial number ................................... 9-2
Page 8
TABLE OF CONTENTS
Page 9
Q GIVE SAFETY THE RIGHT OF WAY
Scooters are fascinating vehicles, which can give you an unsurpassed feeling of power and freedom.
However, they also impose certain limits, which you must accept; even the best scooter does not
ignore the laws of physics.
Regular care and maintenance are essential for preserving your scooter’s value and operating condition. Moreover, what is true for the scooter is also true for the rider: good performance depends on
being in good shape. Riding under the influence of medication, drugs and alcohol is, of course, out of
the question. Scooter riders - more than car drivers - must always be at their mental and physical
best. Under the influence of even small amounts of alcohol, there is a tendency to take dangerous
risks.
Protective clothing is as essential for the scooter rider as seat belts are for car drivers and passengers. Always wear a complete motorcycle suit (whether made of leather or tear-resistant synthetic
materials with protectors), sturdy boots, motorcycle gloves and a properly fitting helmet. Optimum
protective wear, however, should not encourage carelessness. Though full-coverage helmets and
suits, in particular, create an illusion of total safety and protection, motorcyclists will always be vulnerable. Riders who lack critical self-control run the risk of going too fast and are apt to take chances.
This is even more dangerous in wet weather. The good motorcyclist rides safely, predictably and
defensively - avoiding all dangers, including those caused by others.
EAU00021
Enjoy your ride!
1-1
Page 10
FURTHER SAFE RIDING POINTS FOR THIS MODEL
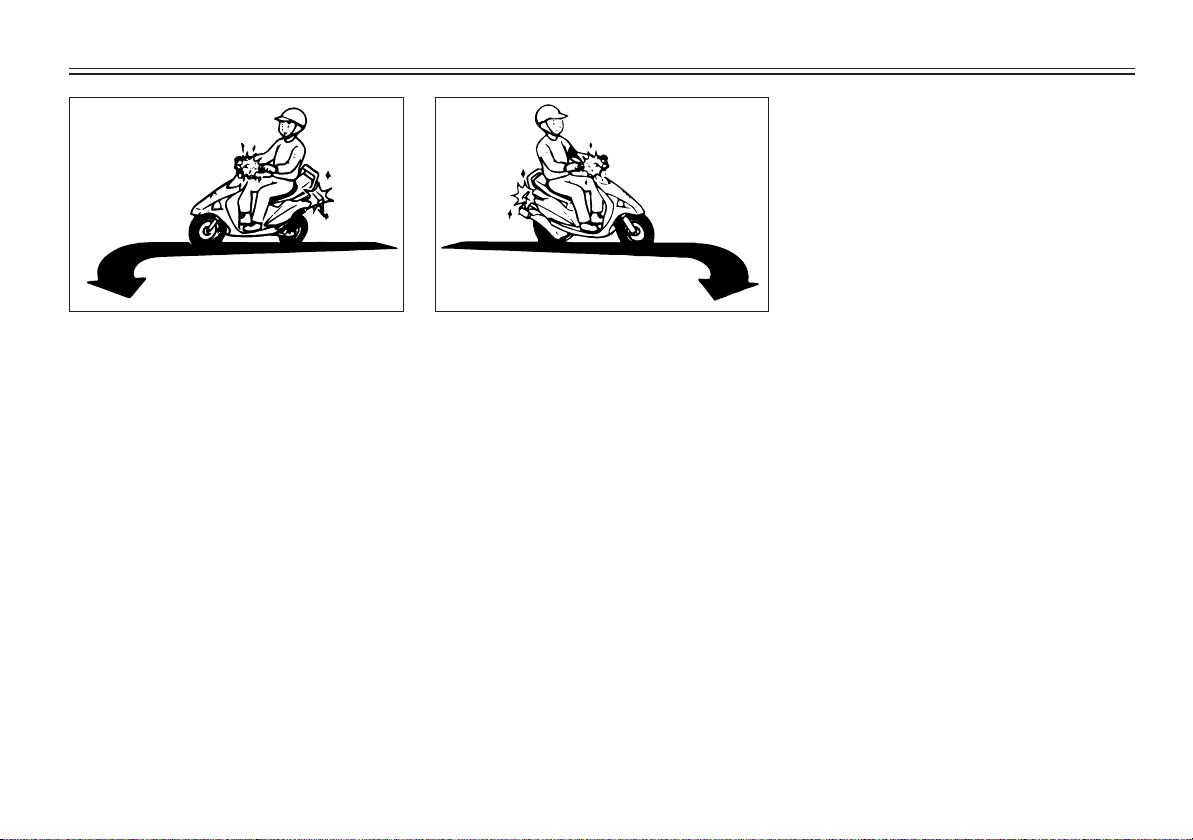
1. Left turn 1. Right turn
EAU02964
8 Be sure to signal clearly when
making turns.
8 Braking can be extremely diffi-
cult on a wet road. Avoid hard
braking, because the scooter
could slide. Apply the brakes
slowly when stopping on a wet
surface.
8 Slow down as you approach a
corner or turn. Once you have
completed a turn, accelerate
slowly.
8 Be careful when passing parked
cars. A driver might not see you
and open a door in your path.
8 Street car rails, iron plates on
road construction sites, and
man-hole covers become extremely slippery when wet.
Slow down and cross them with
caution. Keep the scooter upright. It could slide out from under you.
8 The brake lining could get wet
when you wash the scooter. After washing the scooter, check
the brakes before riding.
8 Always wear a helmet, gloves,
trousers (tapered around the
cuff and ankle so they do not
flap), and a bright colored jacket.
1-2
8 Do not carry too much luggage
on the scooter. An overloaded
scooter is unstable.
Use a strong cord to secure any
luggage to the luggage rack. A
loose load will affect the stability of the scooter and could divert your attention from the
road.
Page 11
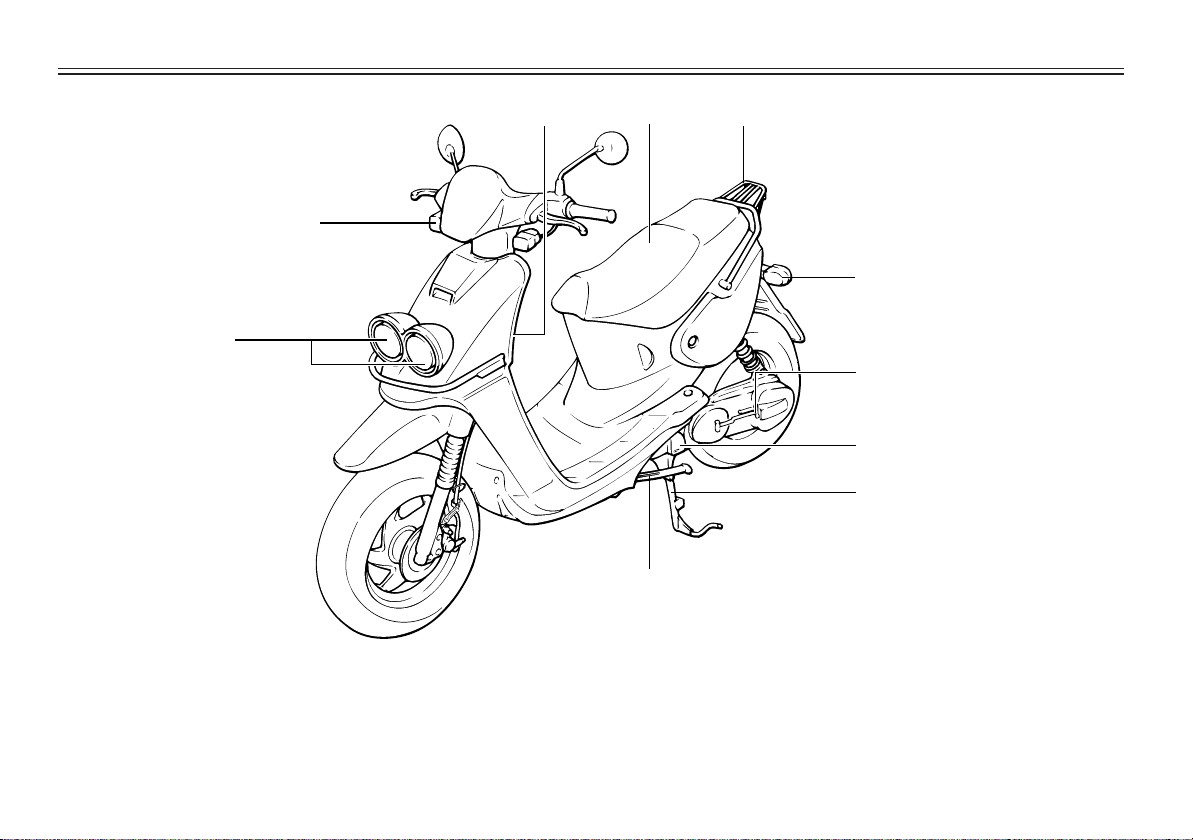
DESCRIPTION
Left view
2
1
1. Headlights (page 6-20)
2. Front turn signal (page 6-21)
3. Luggage hook (page 3-8)
4 Seat (page 3-6)
5. Rear carrier (page 3-8)
3
4
0
6. Rear turn signal (page 6-21)
7. Kick starter (page 3-6)
8. Air filter (page 6-9)
9. Centerstand (page 6-17)
10. Sidestand (page 3-8)
5
6
7
8
9
2-1
Page 12
DESCRIPTION
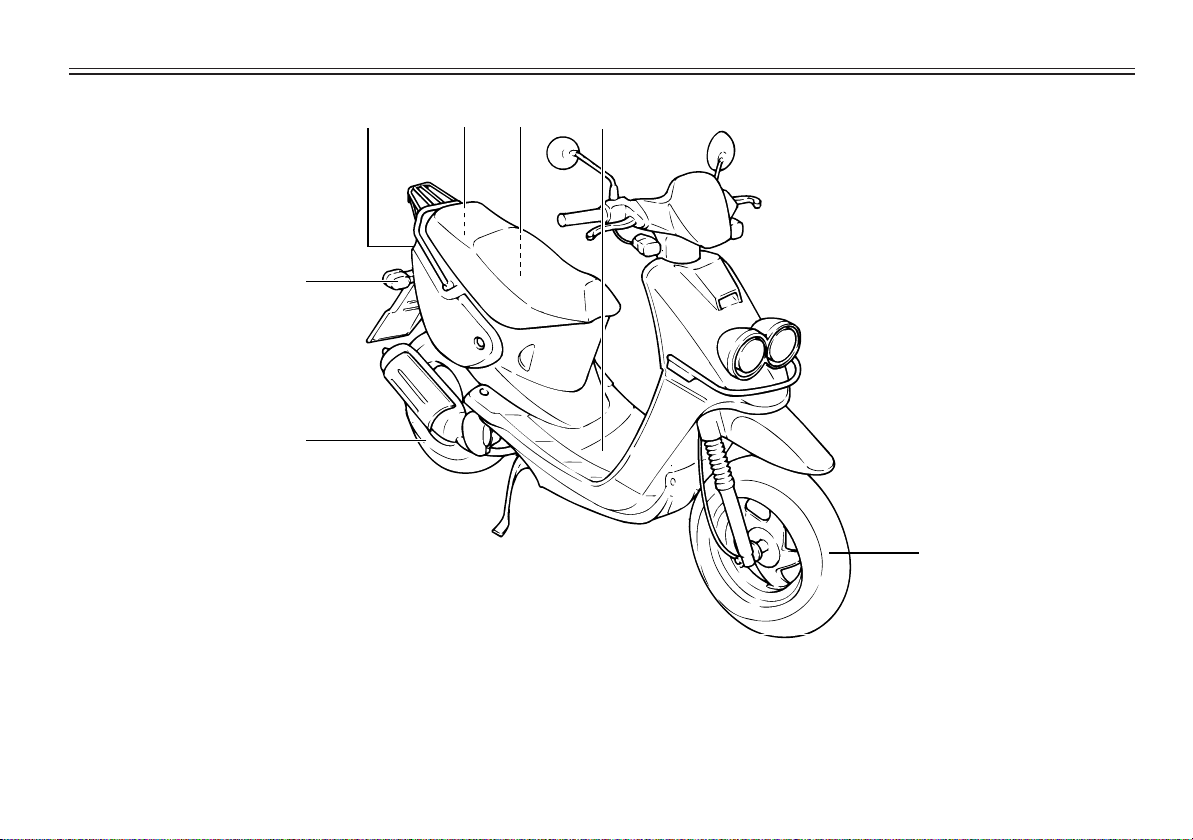
Right view
w
q
11. Rear wheel (page 6-14)
12. Rear turn signal (page 6-21)
13. Taillight (page 6-21)
14. Fuel tank (page 3-5)
15. Trunk (page 3-7)
e
r
t
y
u
16. Battery (page 6-19)
17. Front wheel (page 6-14)
2-2
Page 13
DESCRIPTION
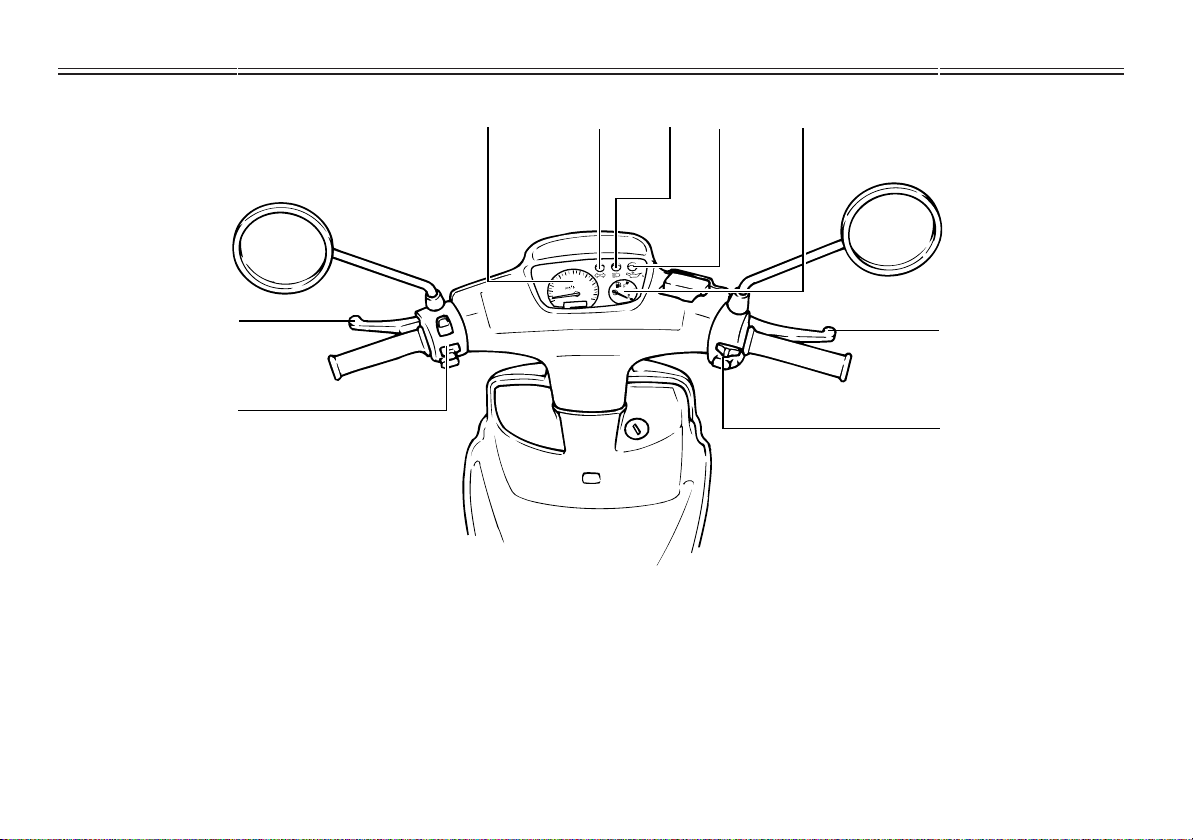
Controls/Instruments
p
i
o
18. Rear brake lever (page 3-4)
19. Left handlebar switches (page 3-3)
20. Speedometer (page 3-2)
21. Turn indicator (page 3-2)
22. High beam indicator (page 3-2)
s
a
80
60
100
40
120
20
140
0
0000001
d
f
g
h
23. Oil level indicator light (page 3-2)
24. Fuel gauge (page 3-2)
25. Front brake lever (page 3-4)
26. Right handlebar switches (page 3-3)
2-3
Page 14
INSTRUMENT AND CONTROL FUNCTIONS
EAU00029
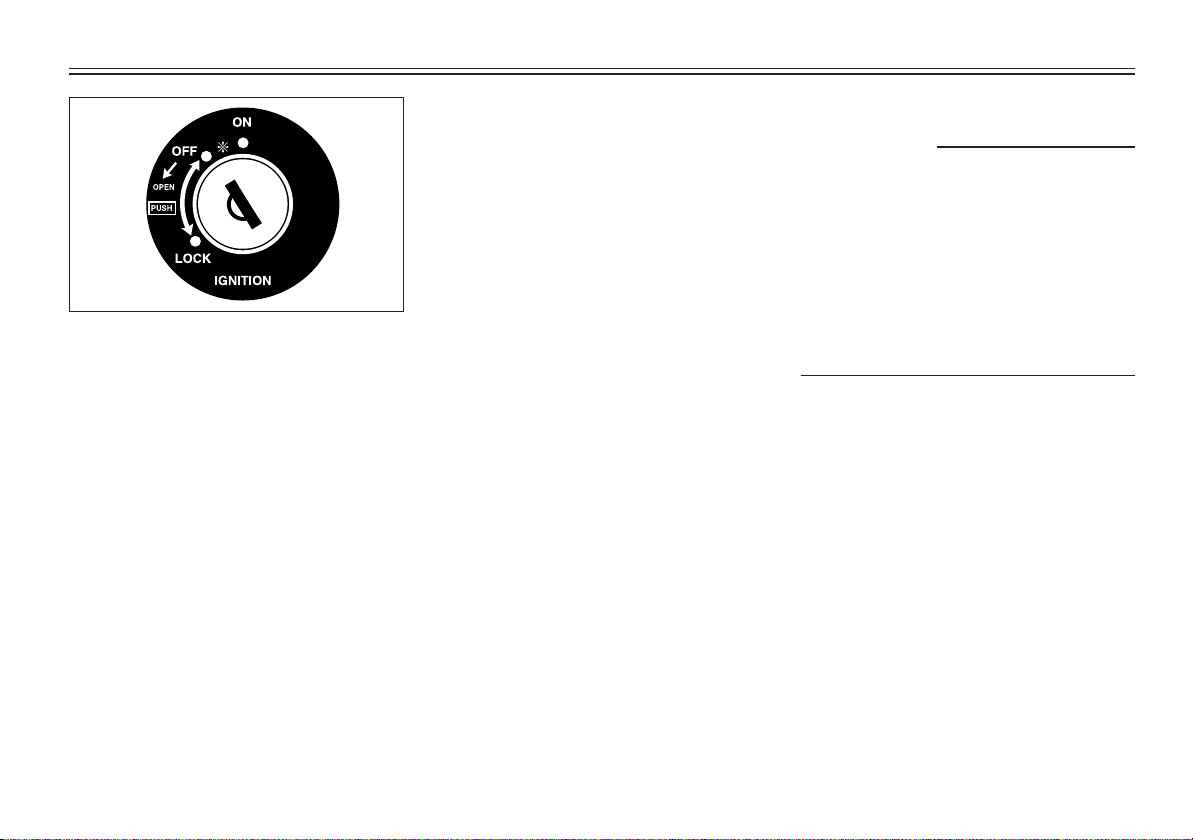
Main switch/Steering lock
The main switch controls the ignition and lighting systems. Its operation is described below.
EAU00036
ON
Electrical circuits are switched on.
The engine can be started. The key
cannot be removed in this position.
EAU00038
OFF
All electrical circuits are switched off.
The key can be removed in this position.
*
EAU02954
The oil level indicator light should
come on. For details about the oil
level indicator light, refer to “Oil
level indicator light” on page 3-2.
EAUT0042
LOCK
The steering is locked in this position and all electrical circuits are
switched off.
The key can be removed in this position.
To lock the steering, turn the handlebars all the way to the left. With the
key at “OFF”, push it into the main
switch and release it, turn it counterclockwise to “LOCK” and remove
it. To unlock the steering, push the
key into the main switch and turn it
to “OFF”.
EW000016
w
Never turn the key to “OFF” or
“LOCK” when the scooter is moving. The electrical circuits will be
switched off which may result in
loss of control or an accident. Be
sure the motorcycle is stopped before turning the key to “OFF” or
“LOCK”.
3-1
Page 15
INSTRUMENT AND CONTROL FUNCTIONS
1 23
80
60
100
40
120
20
140
0
0000001
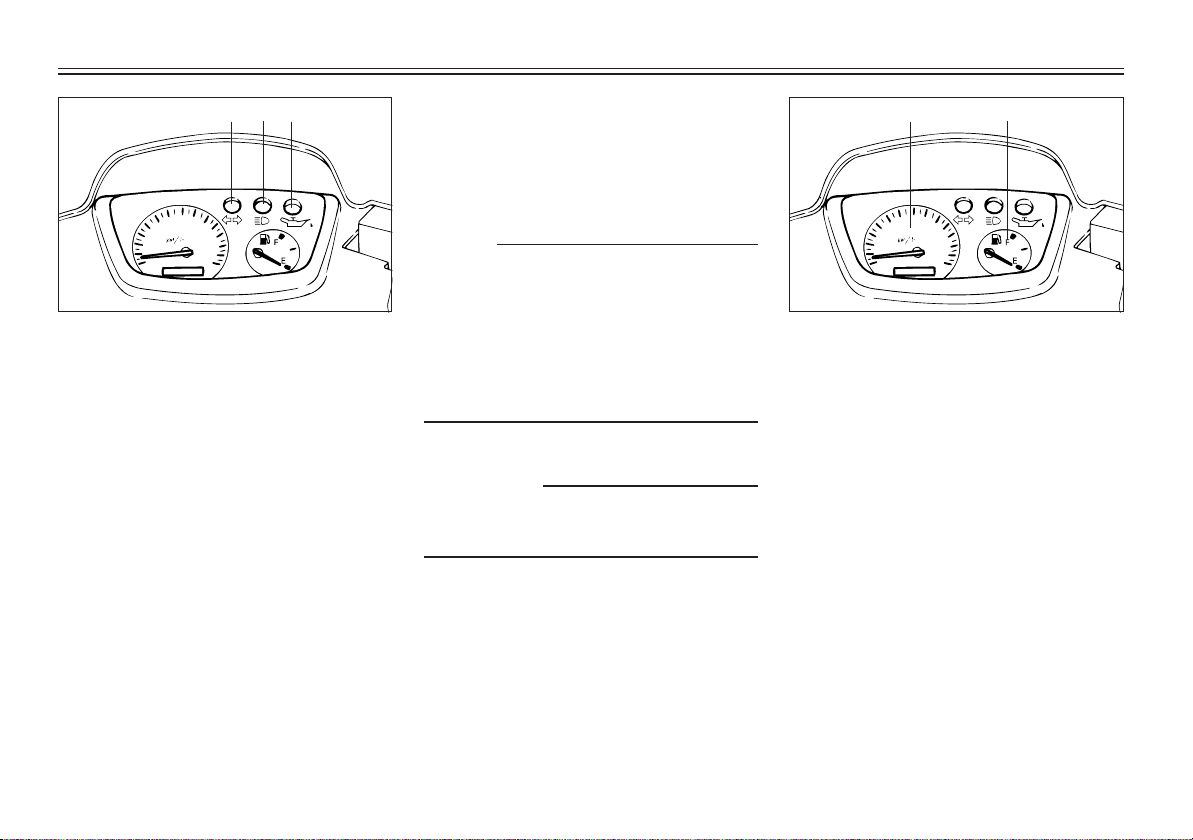
1. Turn indicator light”5”
2. High beam indicator light”&”
3. Oil level indicator light”7”
EAU00056
Indicator lights
EAU00057
Turn indicator light “5”
This indicator flashes when the turn
switch is moved to the left or right.
EAU00063
High beam indicator light “&”
This indicator comes on when the
headlight high beam is used.
EAU02958
Oil level indicator light “7”
The light comes on when the key is
in the “*” position or when there is
little oil in the oil tank during operation. If the oil indicator light comes
on during operation, refill the tank
immediately with Yamalube 2 or 2stroke engine oil (JASO FC grade or
ISO EG-C, EG-D grade). When the
tank is refilled, the indicator light
should go off.
NOTE:
If the oil indicator light does not
come on while the key is in the “*”
position or does not go off when the
oil level is sufficient, have a Yamaha
dealer inspect the oil indicator light
electrical circuit.
EC000000
cC
Do not run the scooter until you
know it has sufficient engine oil.
1 2
80
60
100
40
120
20
140
0
0000001
1. Speedometer
2. Fuel guage
EAU00098
Speedometer
The speedometer shows riding
speed.
This speedometer is equipped with
an odometer.
EAU02950
Fuel gauge
The fuel gauge indicates the quantity of the remaining gasoline in the
tank. The gauge needle moves from
“F” (Full) to “E” (Empty) as the fuel
level decreases. When the needle
reaches the red line, refill the tank at
the earliest opportunity.
3-2
Page 16
INSTRUMENT AND CONTROL FUNCTIONS
123 1 2
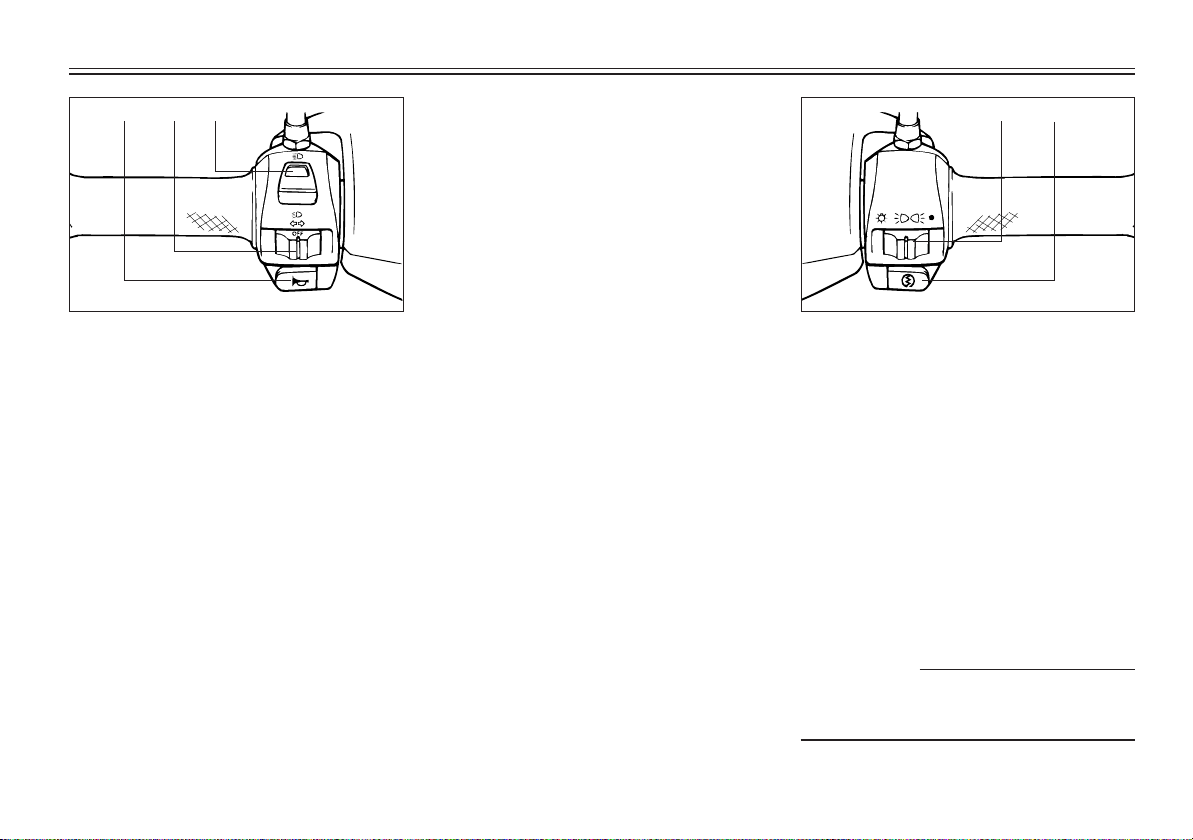
1. Dimmer switch
2. Turn signal switch
3. Horn switch”*”
EAU00118
Handlebar switches
EAU00121
Dimmer switch
Turn the switch to “&” for the high
beam and to “%” for the low beam.
EAU00127
Turn signal switch
To signal a right-hand turn, push the
switch to “6”. To signal a left-hand
turn, push the switch to “4”. Once
the switch is released it will return
to the center position.
To cancel the signal, push the switch
in after it has returned to the center
position.
EAU00129
Horn switch “*”
Press the switch to sound the horn.
1. Light switch
2. Start switch”,”
EAU00134
Lights switch
Turning the light switch to “'”,
turns on the auxiliary light, meter
lights and taillight. Turning the light
switch to “:”, turns the headlight
on also.
EAU00143
Start switch “,“
The starter motor cranks the engine
when pushing the start switch.
EC000005
cC
See starting instructions prior to
starting the engine.
3-3
Page 17
INSTRUMENT AND CONTROL FUNCTIONS
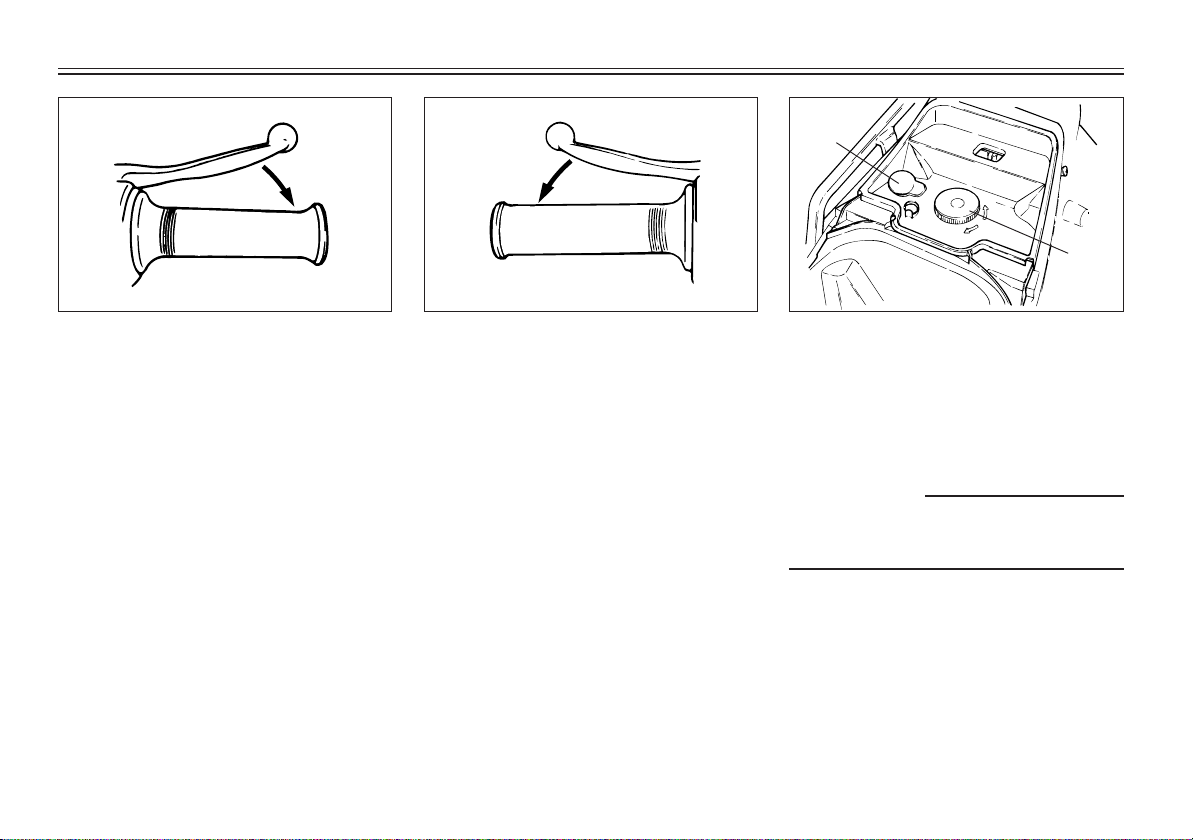
Front brake lever
The front brake lever is located on
the right handlebar. Pull it toward the
handlebar to apply the front brake.
EAU00158
Rear brake lever
The rear brake lever is located on the
left handlebar. Pull it toward the
handlebar to apply the rear brake.
EAU00163
2
1
1. Fuel tank cap 2. Oil tank cap
EAU02966
Fuel and oil tanks
The fuel tank and oil tank are located
under the seat.
EW000025
w
Be sure the caps are properly installed before riding the scooter.
3-4
Page 18
INSTRUMENT AND CONTROL FUNCTIONS
1
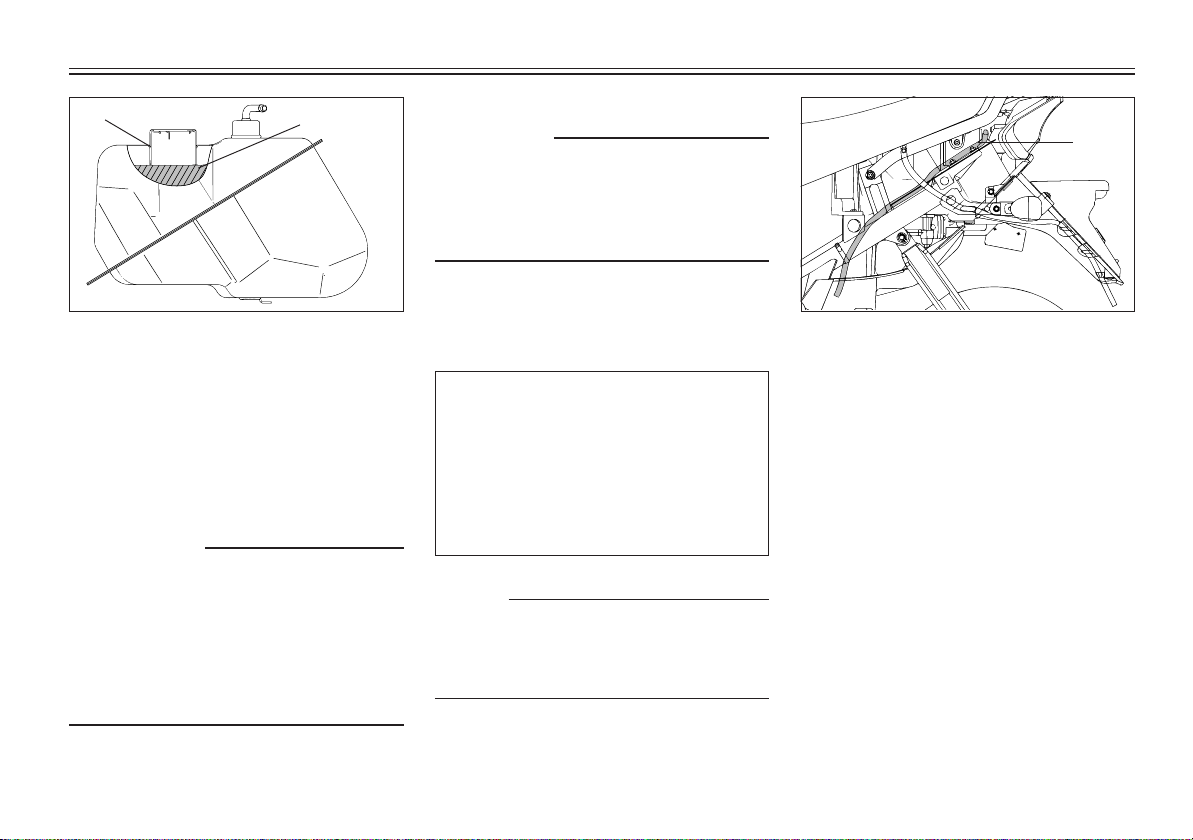
1. Filler tube 2. Fuel level
2
EAU01183
Fuel
Make sure there is sufficient fuel in
the tank. Fill the fuel tank to the bottom of the filler tube as shown in the
illustration.
EW000130
w
Do not overfill the fuel tank. Avoid
spilling fuel on the hot engine. Do
not fill the fuel tank above the bottom of the filler tube or it may overflow when the fuel heats up later
and expands.
EAU00185
cC
Always wipe off spilled fuel immediately with a dry and clean soft
cloth. Fuel may deteriorate painted
surfaces or plastic parts.
EAU00191
Recommended fuel:
Regular unleaded gasoline
with a research octane
number of 91 or higher.
Fuel tank capacity:
Total:
5.7 L
NOTE:
If knocking or pinging occurs, use a
different brand of gasoline or higher
octane grade.
1
1. Breather hose
EAU02955
Fuel tank breather hose
This model is equipped with a fuel
tank breather hose.
Before using this motorcycle:
9 Check the fuel tank breather
hose connection.
9 Check the fuel tank breather
hose for cracks or damage and
replace it if damaged.
9 Make sure the end of the fuel
tank breather hose is not
blocked and clean it if necessary.
3-5
Page 19
INSTRUMENT AND CONTROL FUNCTIONS
Two-stroke engine oil
EAU02956
Make sure there is sufficient twostroke engine oil in the oil tank. Add
the recommended oil as necessary.
Recommended oil:
Yamalube 2 or 2-stroke engine
oil (JASO FC grade or ISO EGC, EG-D grade)
Oil tank capacity:
1.4 L
1
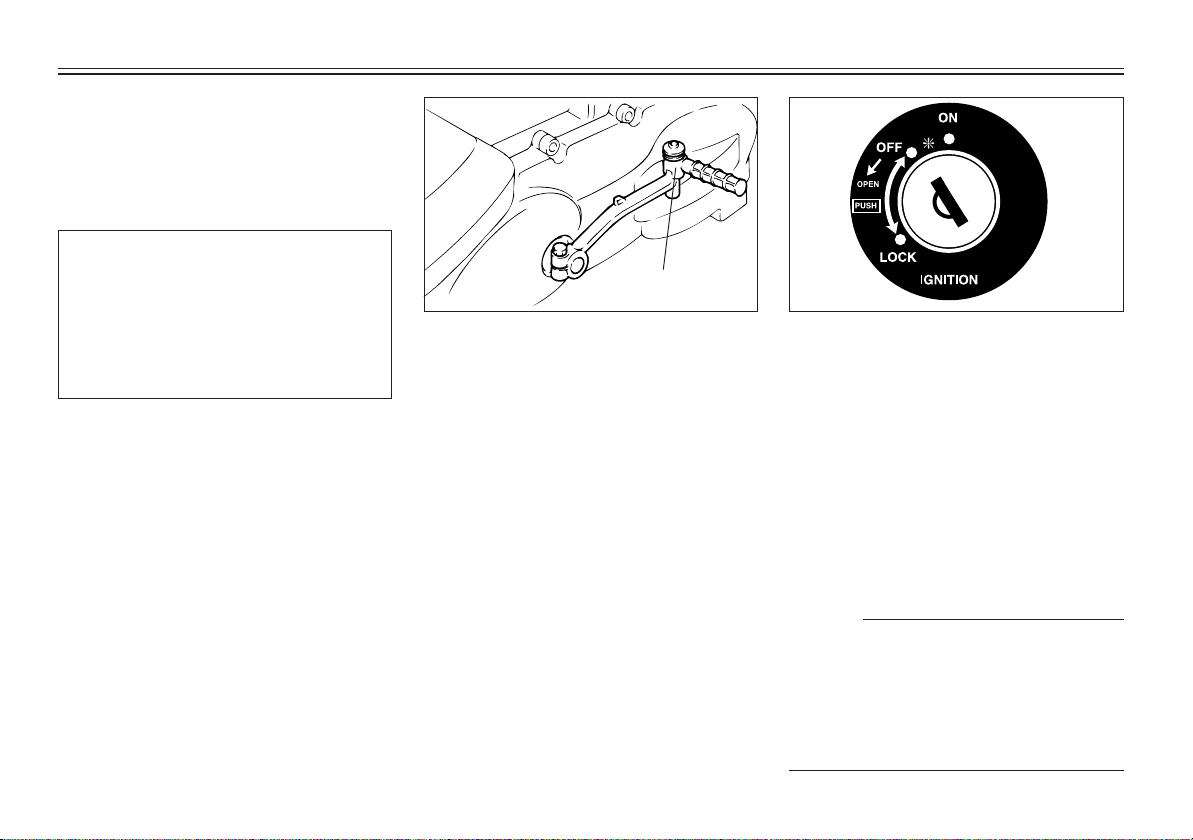
1. Kick starter
EAU00214
Kick starter
Rotate the kick starter away from the
engine. Push the starter down lightly
with your foot until the gears engage, then kick smoothly and forcefully to start the engine.
Seat
EAU02959
To open
Insert the key into the main switch
and turn it counterclockwise. Do not
push inward when turning the key.
To close
Push the seat downward to the original position and remove the key
from the main switch.
NOTE:
9 Place the scooter on the
centerstand before opening the
seat.
9 Make sure the seat is securely
closed before riding the scooter.
3-6
Page 20
INSTRUMENT AND CONTROL FUNCTIONS
1
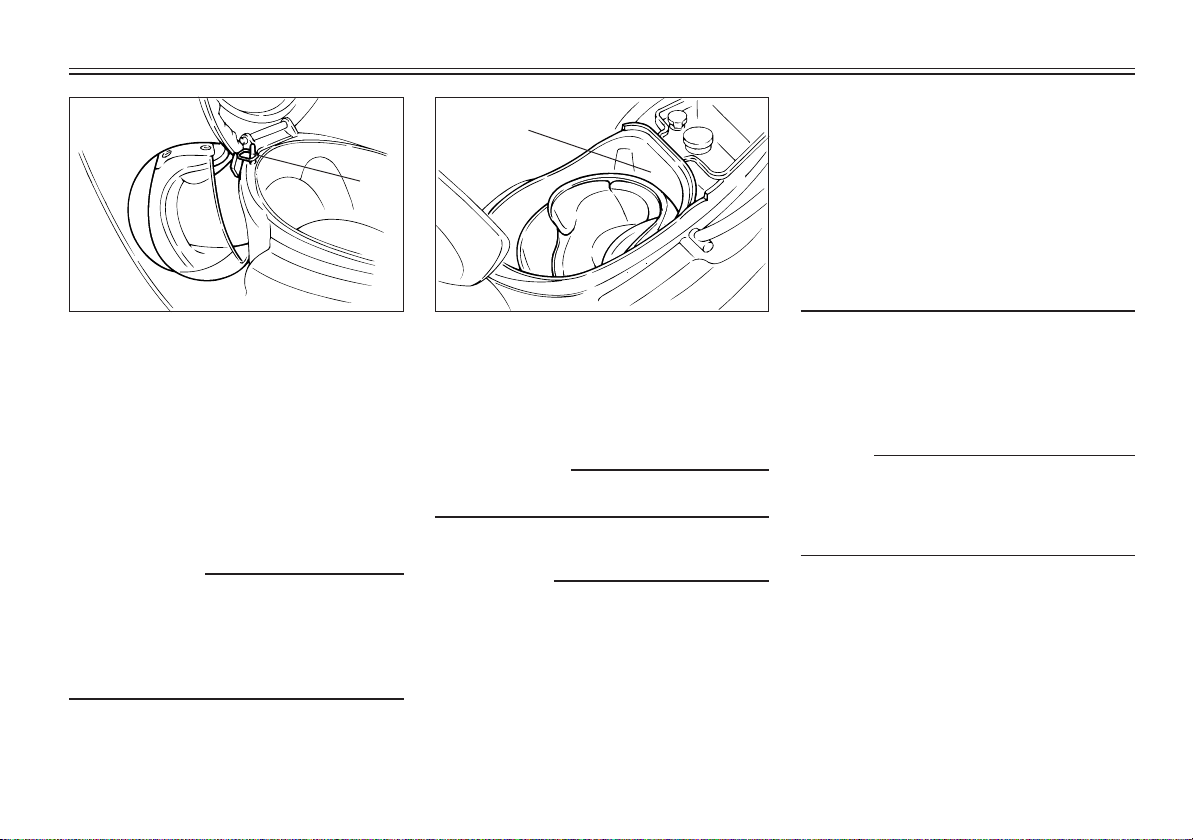
1. Helmet holder 1. Trunk
Helmet holder
The helmet holder is located under
EAU00262
Trunk
The trunk is under the seat.
the seat.
Open the seat and hook the helmet
on the helmet holder. Then lock the
seat.
EW00030
w
Never ride with a helmet in the helmet holder. The helmet may hit objects, causing loss of control and
possibly an accident.
w
Do not exceed the load limit of 5 kg .
cC
Keep the following in mind when
using the trunk.
9 The trunk gets hot inside when
exposed to the sun. Do not put
anything in the trunk susceptible to heat.
1
EAU00268
EW000032
EC000010
9 Put wet articles in a vinyl bag
when storing them in the trunk.
9 The trunk may get wet while
the scooter is being washed.
Put articles in a vinyl bag before
storing them in the trunk.
9 Do not put anything in the trunk
that is valuable or easy to break.
When storing a helmet in the trunk,
place it upside-down with the front
facing forward.
NOTE:
Some helmets cannot be stored in
the trunk because of their size or
shape.
Do not leave your scooter with the
seat open.
3-7
Page 21
INSTRUMENT AND CONTROL FUNCTIONS
1
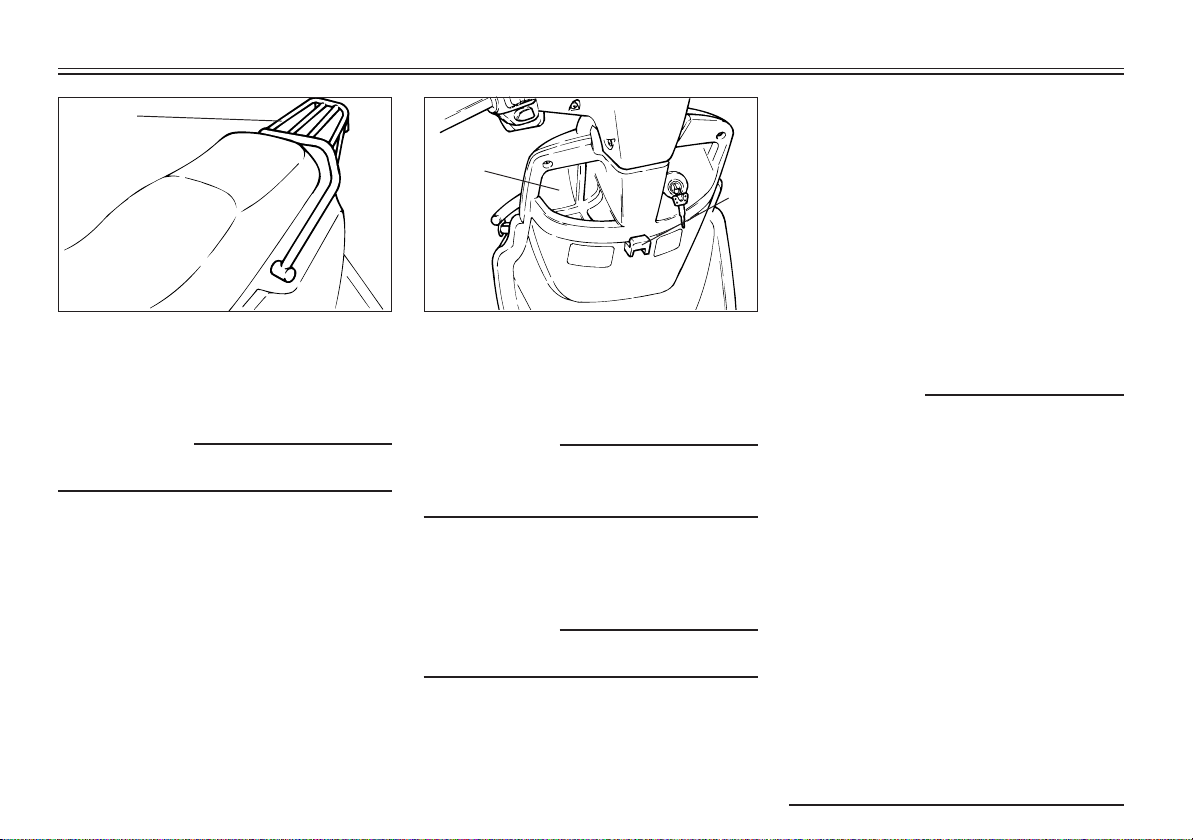
1. Rear carrier
EAU00320
Rear carrier
EW000032
w
Do not exceed the load limit of 5 kg .
1
2
1. Front trunk 2. Luggage hook
Front trunk
EAUT0000
w
Do not exceed the load limit of 1.5
kg.
Luggage hook
EW000032
w
Do not exceed the load limit of 3 kg .
3-8
Sidestand
EAU00330
This model is equipped with an ignition circuit cut-off system. The
scooter must not be ridden when the
sidestand is down. The sidestand is
located on the left side of the frame.
(Refer to page 3-9 for an explanation
of this system.)
EW000044
w
This scooter must not be operated
with the sidestand in the down position. If the stand is not properly retracted, it could contact the ground
and distract the operator, resulting
in a possible loss of control. Yamaha
has designed into this scooter a
lockout system to assist the operator in fulfilling the responsibility of
retracting the sidestand. Please
check carefully the operating instructions listed below and if there
is any indication of a malfunction,
return the scooter to a Yamaha
dealer immediately for repair.
Page 22
EAUT0337
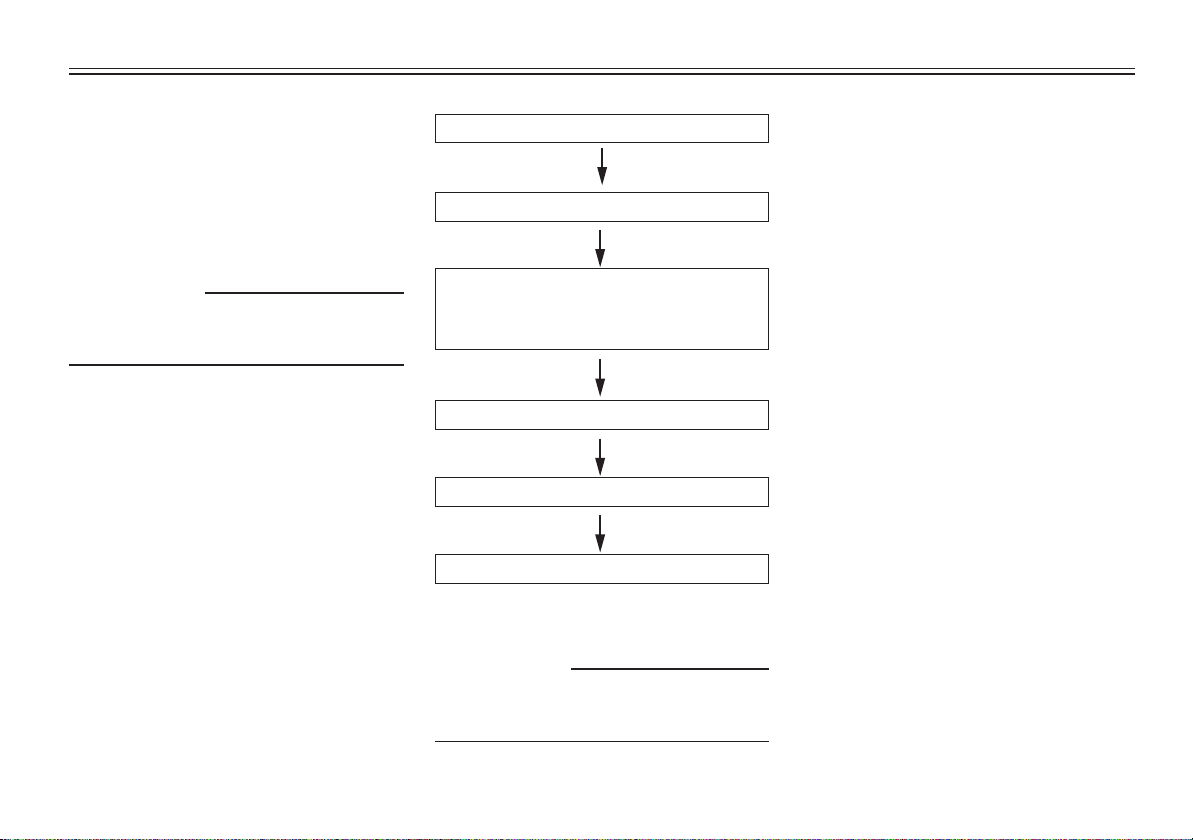
Sidestand switch operation
check
Check the operation of the sidestand
switch against the information below.
EW000046
w
Be sure to use the centerstand during this inspection.
INSTRUMENT AND CONTROL FUNCTIONS
Turn the main switch to “ON” .
Put the sidestand up.
Push the start switch while applying either of the brake levers. The
engine will start.
Put the sidestand down.
If the engine stalls:
The sidestand switch is OK.
EW000045
w
If improper operation is noted, con-
sult a Yamaha dealer immediately.
3-9
Page 23
EAU01114
PRE-OPERATION CHECKS
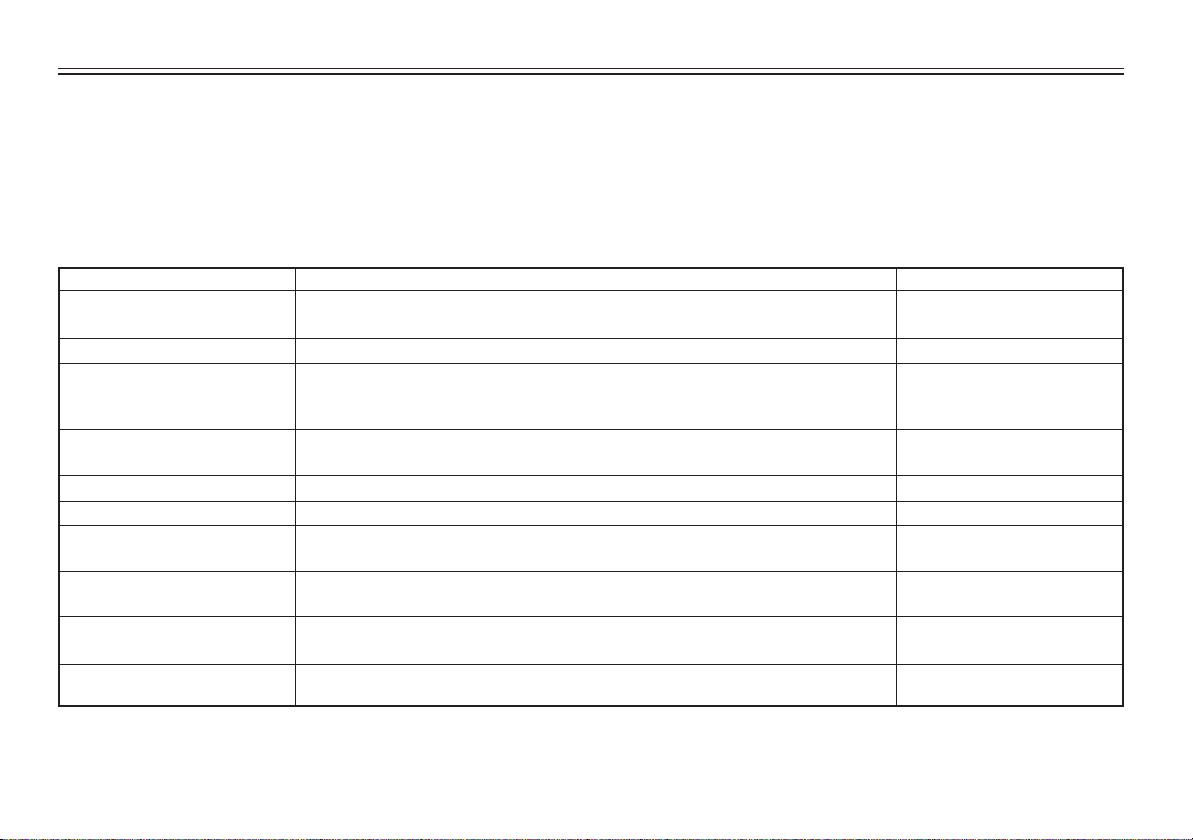
Owners are personally responsible for their vehicle’s condition. Your scooter’s vital functions can start to deteriorate quickly and unexpectedly, even if it remains unused (for instance, if it is exposed to the elements). Any damage, fluid leak or loss of tire pressure could have serious consequences. Therefore, it is very important that, in
addition to a thorough visual inspection, you check the following points before each ride.
EAU00340
PRE-OPERATION CHECK LIST
ITEM CHECKS
Front brake
Rear brake
Throttle grip and housing
Engine oil
Final gear oil
Wheels and tires
Brake levers pivots
Chassis fasteners
Fuel tank
Lights, signals and switches
9 Check operation, free play, fluid level and vehicle for fluid leakage.
9 Fill with DOT 4 (or DOT 3) brake fluid if necessary.
9 Check operation, free play.
9 Check for smooth operation.
9 Lubricate.
9 Adjust throttle cable free play if necessary.
9 Check oil level.
9 Fill with oil if necessary.
9 Check vehicle for leakage.
9 Check tire pressure, wear, damage.
9 Check for smooth operation.
9 Lubricate if necessary.
9 Make sure that all nuts, bolts, and screws are properly tightened.
9 Tighten if necessary.
9 Check fuel level.
9 Fill with fuel if necessary.
9 Check for proper operation.
PAGE
3-4,6-14~6-16
3-4,6-14~6-15
6-11,6-17
3-6
6-9
6-12~6-14
6-17
_
3-4~3-5
3-3
4-1
Page 24
PRE-OPERATION CHECKS
NOTE:
Pre-operation checks should be made each time the scooter is used. Such an inspection can be accomplished in a
very short time, and the added safety it assures is more than worth the time involved.
w
If any item in the Pre-operation Check is not working properly, have it inspected and repaired before operating the
scooter.
4-2
Page 25
OPERATION AND IMPORTANT RIDING POINTS
EAU00372
EAU01118
EW000129
w
9 Before riding this scooter, be-
come thoroughly familiar with
all operating controls and their
functions. Consult a Yamaha
dealer regarding any control or
function that you do not thoroughly understand.
9 Never start your engine or let it
run for any length of time in a
closed area. The exhaust fumes
are poisonous and can cause
loss of consciousness and death
within a short time. Always operate your scooter in an area
with adequate ventilation.
9 For safety, be sure to start the
engine with the centerstand
down.
Starting up a cold engine
EAU02960
1. Turn the main switch to “*”. If
the oil level indicator light
comes on, turn the main switch
to “ON”.
EC000045
cC
If the oil level indicator light does
not come on, ask a Yamaha dealer
to inspect it.
2. Completely close the throttle
grip.
3. Start the engine by pushing the
start switch while applying the
front or rear brake or by kicking
the kick starter.
NOTE:
If the engine fails to start when using the electric starter, release the
start switch, wait a few seconds, then
try again. Each attempt should be as
short as possible to preserve the
battery. Do not crank the engine
more than 5 seconds on any one at-
5-1
tempt. If the engine does not start
with the starter motor, kick the kick
starter to start the engine.
NOTE:
For maximum engine life, always
warm up the engine about 1 ~ 3 minutes before riding your scooter.
Never accelerate hard with a cold
engine.
EC000046
cC
See the “Engine break-in” section
prior to operating the motorcycle for
the first time.
Page 26

OPERATION AND IMPORTANT RIDING POINTS
Starting off
EAU00433
After warming up the engine:
1. Apply the rear brake lever with
your left hand and hold the grab
bar with you right hand. Then
push the scooter off the
centerstand.
2. Sit astride the seat and adjust
the rear view mirrors.
3. Check the oncoming traffic and
use a turn signal.
4. Turn the throttle grip on the
right handlebar slowly and you
will start off. Remember to turn
off the turn signal.
EAU00434
Acceleration
The speed can be adjusted by opening and closing the throttle grip.
Turning it toward you increases the
speed, and turning it in the opposite
direction decreases the speed.
Braking
EAU00435
1. Close the throttle grip.
2. Apply both front and rear brakes
simultaneously with light pressure and increase the pressure
slowly.
EW000057
w
9 Avoid hard or sudden braking.
It may cause the scooter to skid
or overturn.
9 Be sure to apply the brake care-
fully if leaning over to one side.
Improper braking could lead to
a skid.
9 Street car rails, metal plates on
road construction sites, and
man-hole covers become particularly slippery when they get
wet. Cross them slowly and
cautiously.
9 Braking on a wet road is very
difficult.
9 Braking on a hill can be difficult.
Proceed slowly when riding
downhill.
Engine break-in
EAU00436
There is never a more important period in the life of your scooter than
the period between zero and 1,000
km (600 mi). For this reason we ask
that you carefully read the following
material. Because the engine is
brand new, you must not put an excessive load on it for the first 1,000
km (600 mi). The various parts in the
engine wear and polish themselves
to the correct operating clearances.
During this period, prolonged full
throttle operation, or any condition
which might result in excessive
heating of the engine, must be
avoided.
5-2
Page 27
OPERATION AND IMPORTANT RIDING POINTS
EAUT0003
0 ~ 150 km (0 ~ 100 mi)
Avoid operation above 1/3 throttle.
Stop the engine and let it cool for 5
to 10 minutes after every hour of
operation. Vary the speed of the
scooter from time to time. Do not operate it at one set throttle position.
150 ~ 500 km (100 ~ 300 mi)
Avoid prolonged operation above
1/2 throttle.
500 ~ 1,000 km (300 ~ 600 mi)
Avoid cruising speeds in excess of
3/4 throttle.
ECT00060
cC
After 1,000 km of operation, be sure
to replace the final gear oil.
1,000 km (600 mi) and beyond
Avoid prolonged full throttle operation. Vary speeds occasionally.
EC000049
cC
If any engine trouble should occur
during the break-in period, consult
a Yamaha dealer immediately.
EAU00460
Parking
When parking the scooter, stop the
engine and remove the ignition key.
EW000058
w
The exhaust system is hot. Park the
scooter in a place where pedestrians or children are not likely to
touch the scooter.
Do not park the scooter on a slope
or soft ground the scooter may overturn.
5-3
Page 28
EAU00462
PERIODIC MAINTENANCE AND MINOR REPAIR
EAU00464
Periodic inspection, adjustment and
lubrication will keep your scooter in
the safest and most efficient condition possible. Safety is an obligation
of the scooter owner. The maintenance and lubrication schedule chart
should be considered strictly as a
guide to general maintenance and
lubrication intervals. YOU MUST
TAKE INTO CONSIDERATION THAT
WEATHER, TERRAIN, GEOGRAPHICAL LOCATIONS, AND A VARIETY
OF INDIVIDUAL USES ALL TEND TO
DEMAND THAT EACH OWNER ALTER THIS TIME SCHEDULE TO
SHORTER INTERVALS TO MATCH
THE ENVIRONMENT. The most important points of scooter inspection,
adjustment, and lubrication are explained in the following pages.
EW000060
w
If you are not familiar with scooter
service, this work should be done by
a Yamaha dealer.
EAU00466
cC
This scooter is designed for use on
paved road surface only. If this
scooter is operated in abnormally
dusty, muddy or wet conditions, the
air filter should be cleaned or replaced more frequently. Otherwise,
rapid engine wear may result. Consult a Yamaha dealer for proper
maintenance intervals.
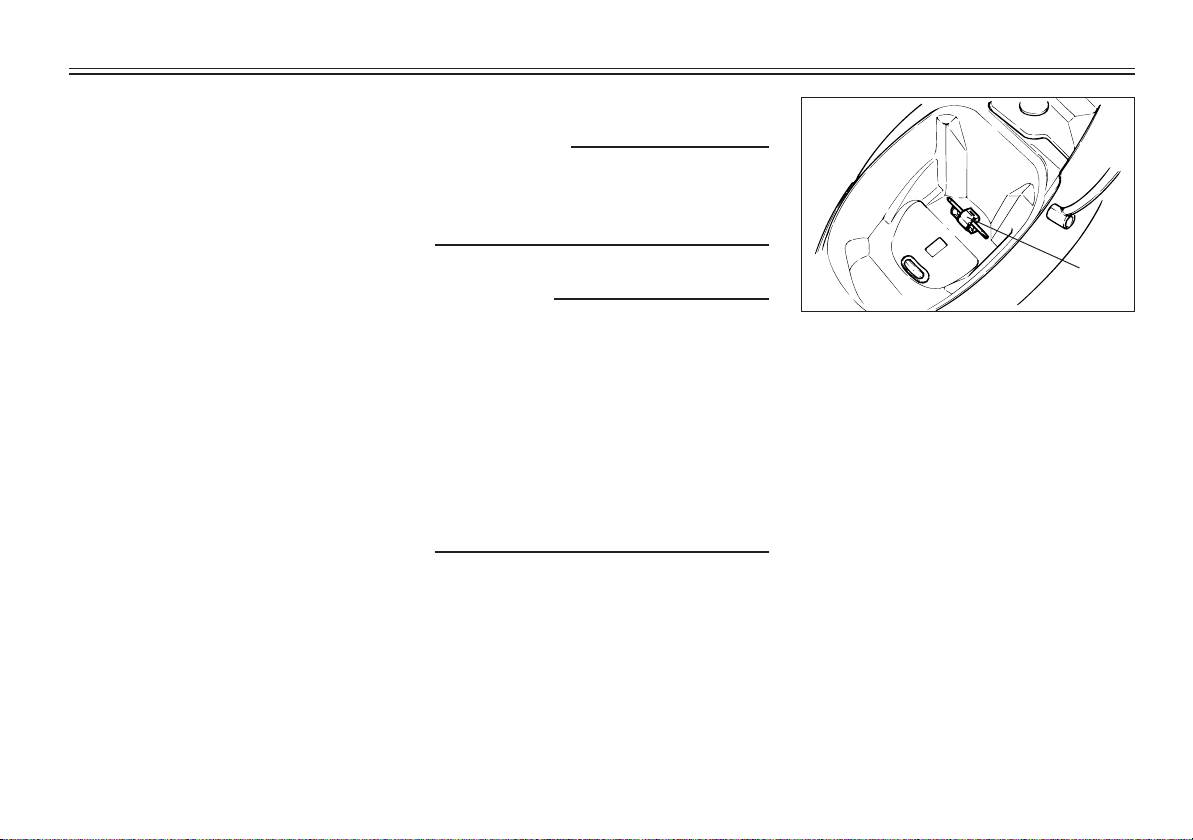
1
1. Tool kit
EAU00469
Tool kit
The service information included in
this manual is intended to provide
you, the owner, with the necessary
information for completing some of
your own preventive maintenance
and minor repairs.
The tools provided in the owner’s
tool kit are to assist you in the performance of periodic maintenance.
However, some other tools such as
a torque wrench are also necessary
to perform the maintenance correctly.
6-1
Page 29
PERIODIC MAINTENANCE AND MINOR REPAIR
NOTE:
If you do not have necessary tools
required during a service operation,
take your scooter to a Yamaha dealer
for service.
EW000063
w
Modifications to this scooter not approved by Yamaha may cause loss
of performance, and render it unsafe
for use. Consult a Yamaha dealer before attempting any changes.
6-2
Page 30
PERIODIC MAINTENANCE AND MINOR REPAIR
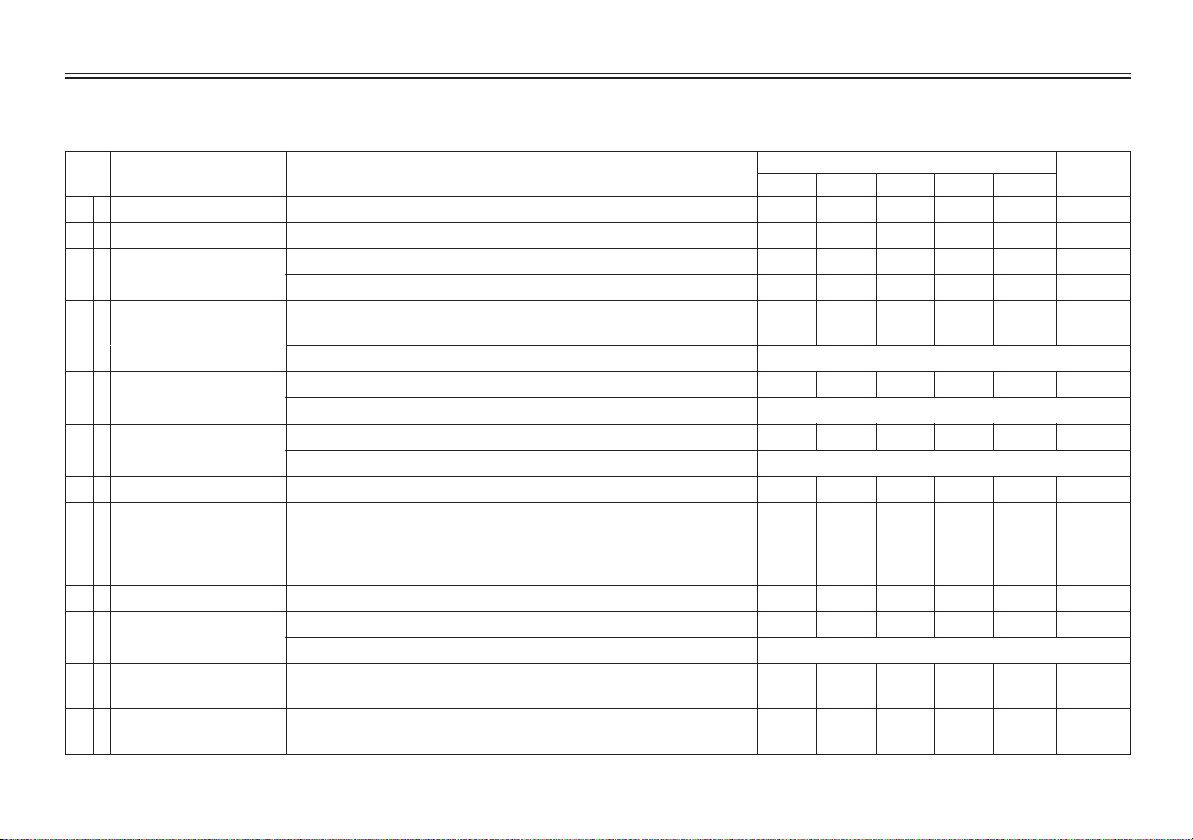
Periodic maintenance and lubrication chart
CHECKS OR MAINTENANCE JOB
1,000 6,000 12,000 18,000 24,000
*
1
Fuel line
2
Spark plug
3
Air filter element
*
4
Front brake
*
5
Rear brake
*
6
Brake hose
*
7
Wheels
*
8
Tires
*
9
Wheel bearings
*
10
Steering bearings
*
11
Chassis fasteners
12
Sidestand/
centerstand
ITEMNo.
9 Check fuel hoses and vacuum hose for cracks or damage.
9 Replace.
9 Clean.
9 Replace.
9 Check operation, fluid level and vehicle for fluid leakage.
(See NOTE on page 6-5.)
9 Replace brake pads.
9 Check operation and adjust brake lever free play.
9 Replace brake shoes.
9 Check for cracks or damage.
9 Replace. (See NOTE on page 6-5.)
9 Check runout and for damage.
9 Check tread depth and for damage.
9 Replace if necessary.
9 Check air pressure.
9 Correct if necessary.
9 Check bearing for looseness or damage.
9 Check bearing play and steering for roughness.
9 Lubricate with lithium-soap-based grease.
9 Make sure that all nuts, bolts and screws are properly tight-
ened.
9 Check operation.
9 Lubricate.
ODOMETER READING(km)
√√√√ √
√√√√ √
√√
√√
√√√√ √√
Whenever worn to the limit
√√√√ √√
Whenever worn to the limit
√√√√ √
Every 4 years
√√√√
√√√√
√√√√
√√√√√
Every 24,000 km
√√√√ √
√√√√ √
EAU00473
ANNUAL
CHECK
6-3
Page 31
PERIODIC MAINTENANCE AND MINOR REPAIR
13
*
Sidestand switch
14
*
Front fork
15
*
Rear shock absorber
assembly
16
*
Carburetor
17
*
Autolube pump
18
Final gear oil
19
*
V-belt
20
*
Front and rear brake
switches
21
Moving parts and
cables
22
*
Lights, signals and
switches
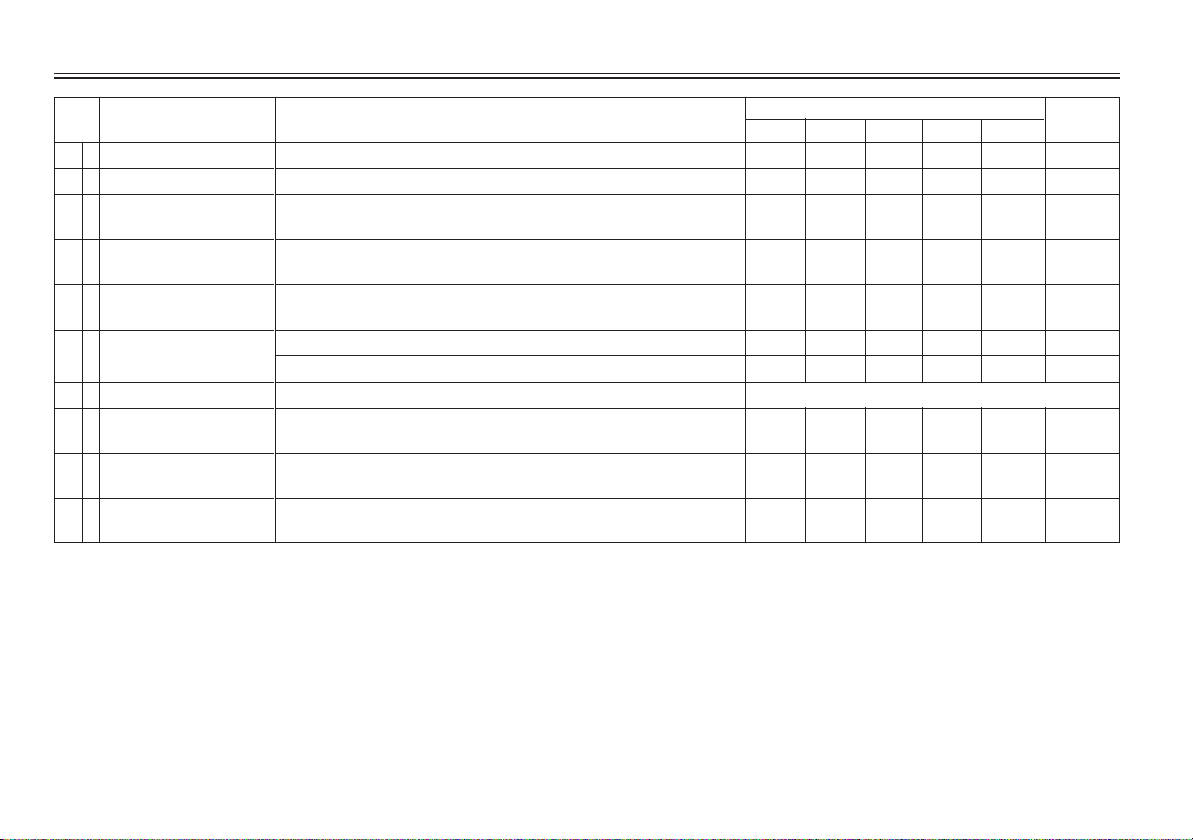
CHECKS OR MAINTENANCE JOBITEMNo.
9 Check operation.
9 Check operation and for oil leakage.
9 Check operation and shock absorber for oil leakage.
9 Check starter (choke) operation.
9 Adjust engine idling speed.
9 Check operation.
9 Bleed if necessary.
9 Check oil level and vehicle for oil leakage.
9 Change.
9 Replace.
9 Check operation.
9 Lubricate.
9 Check operation.
9 Adjust headlight beam.
ODOMETER READING(km)
1,000 6,000 12,000 18,000 24,000
√√√√ √√
√√√√
√√√√
√√√√ √√
√√√√
√√√
√√√
Every 10,000 km
√√√√ √√
√√√√ √
√√√√ √√
ANNUAL
CHECK
6-4
Page 32
PERIODIC MAINTENANCE AND MINOR REPAIR
* Since these items require special tools, data and technical skills, they should be serviced by a Yamaha dealer.
EAU01450
NOTE:
8 The air filter needs more frequent service if you are riding in unusually wet or dusty areas.
8 Hydraulic brake system
9 When disassembling the master cylinder or caliper cylinder, always replace the brake fluid. Check the
brake fluid level regularly and fill as required.
9 Replace the oil seals on the inner parts of the master cylinder and caliper cylinder every two years.
9 Replace the brake hoses every four years or if cracked or damaged.
6-5
Page 33
PERIODIC MAINTENANCE AND MINOR REPAIR
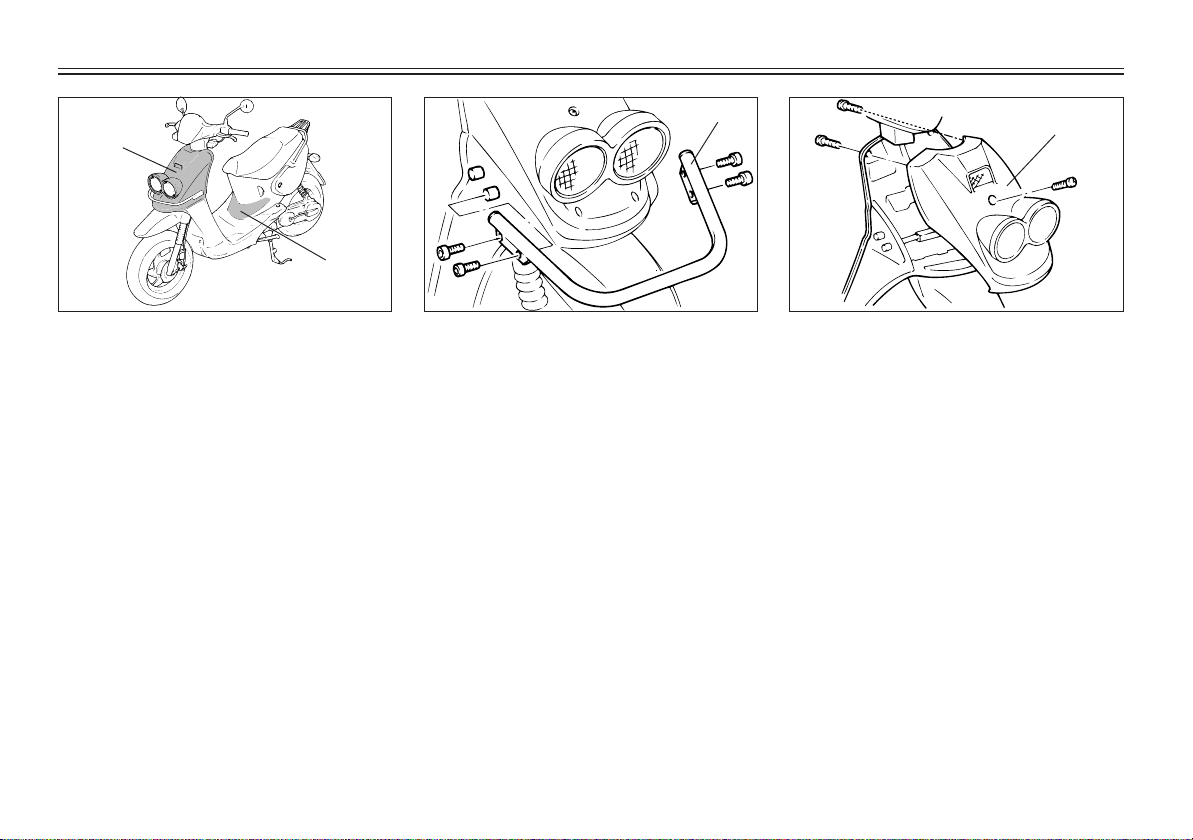
1
2
1. Cowling 2. Panel
EAU01139
Cowling and panel removal
and installation
The cowlings and panels illustrated
need to be removed to perform
some of the maintenance described
in this chapter.
Refer to this section each time a
cowling or panel has to be removed
or reinstalled.
1
1. Protection bar 1. Cowling A
Cowling A
EAUT0483
To remove
1. Remove the front protection bar
by removing the bolts.
2. Remove the cowling screws,
disconnect the headlight leads
coupler and remove the cowling.
1
6-6
Page 34
PERIODIC MAINTENANCE AND MINOR REPAIR
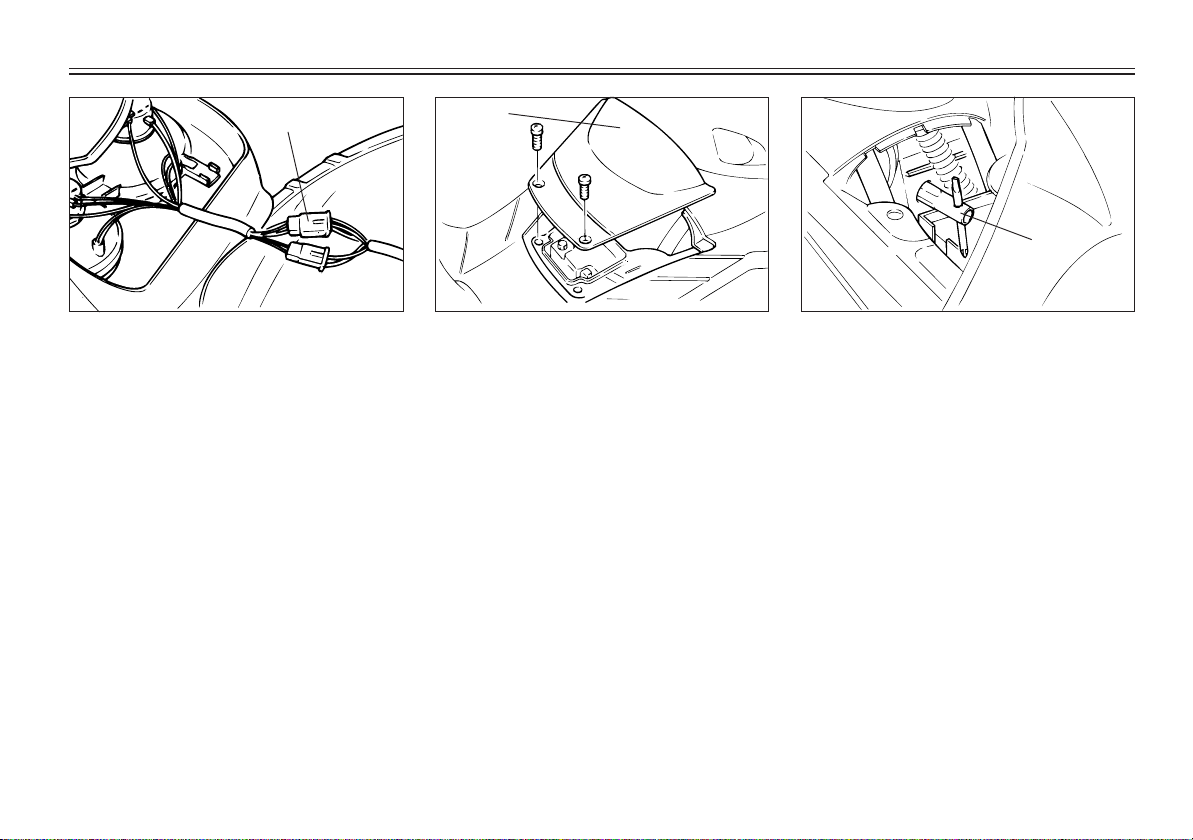
1
1. Headlight leads coupler 1. Panel B
To install
1. Connect the headlight leads
coupler.
2. Place the cowling in the original
position and install the screws.
3. Place the front protection bar in
the original position and install
the bolts.
1
Panel B
To remove
Remove the screws.
To install
Place the panel in the original position and install the screws.
EAU01315
1
1. Spark plug wrench
EAUT1529
Spark plug
Removal
1. Remove panel B. (Refer to page
6-7 for removal and installation
procedures.)
2. Remove the spark plug cap.
3. Use the spark plug wrench in the
tool kit to remove the spark plug
as shown.
Inspection
The spark plug is an important engine component and is easy to inspect. The condition of the spark
plug can indicate the condition of the
engine.
6-7
Page 35
PERIODIC MAINTENANCE AND MINOR REPAIR
The ideal color on the white insulator a round the center electrode is a
medium-to-light tan color for a
scooter that is being ridden normally.
Do not attempt to diagnose such
problems yourself. Instead, take the
scooter to a Yamaha dealer . You
should periodically remove and inspect the spark plug because heat
and deposits will cause any spark
plug to slowly break down and
erode. If electrode erosion becomes
excessive, or if carbon and other
deposits are excessive, you should
replace the spark plug.
Specified spark plug:
BPR7HS (NGK)
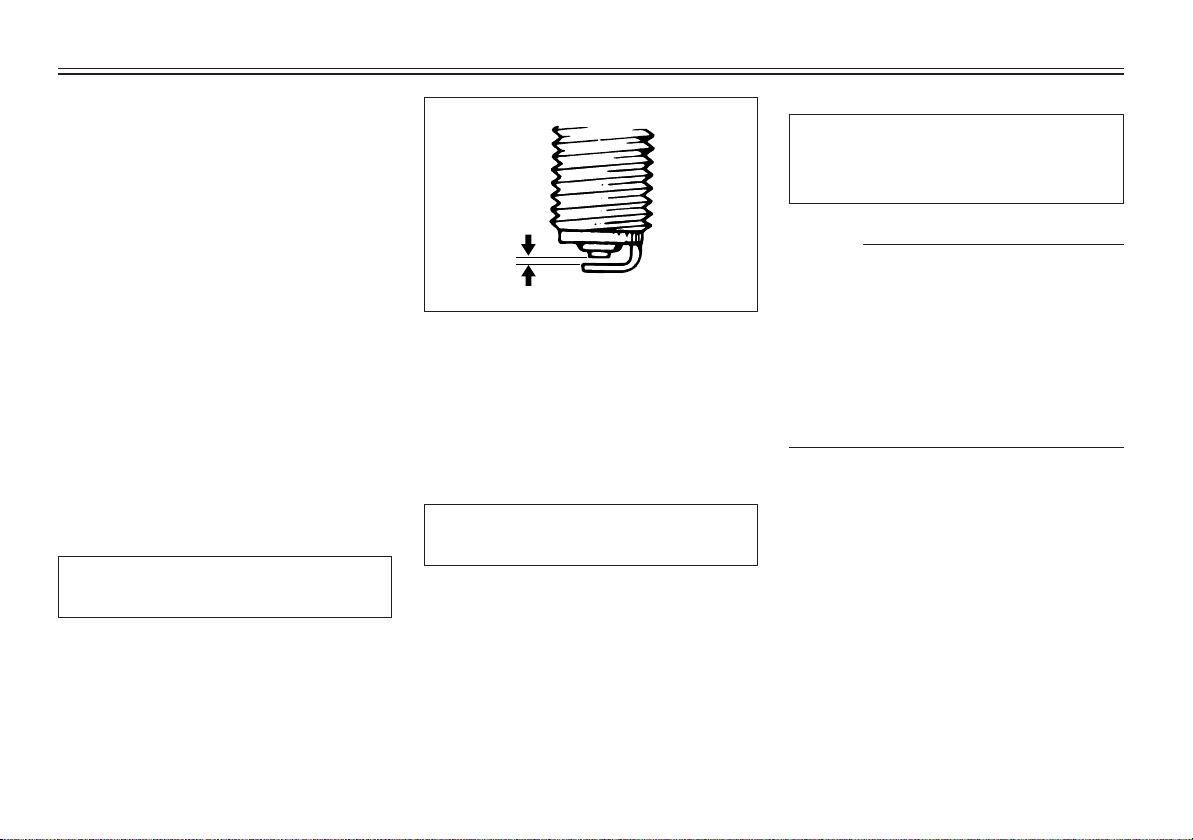
1. Spark plug gap
Installation
1
1. Measure the electrode gap with
a wire thickness gauge and, if
necessary, adjust the gap to
specification.
Spark plug gap:
0.9 ~ 1.0 mm
2. Clean the gasket surface. Wipe
off any grime from the threads.
Tightening torque:
Spark plug:
20 Nm (2.0 mkg)
NOTE:
If a torque wrench is not available
when you are installing a sprark
plug, a good estimate of the correct
torque is 1/4 to 1/2 turn past finger
tight. Have the spark plug tightened
to the specified torque as soon as
possible.
4. Install the panel.
3. Install the spark plug and tighten
it to the specified torque, then
replace the spark plug cap.
6-8
Page 36
PERIODIC MAINTENANCE AND MINOR REPAIR
1
1
1
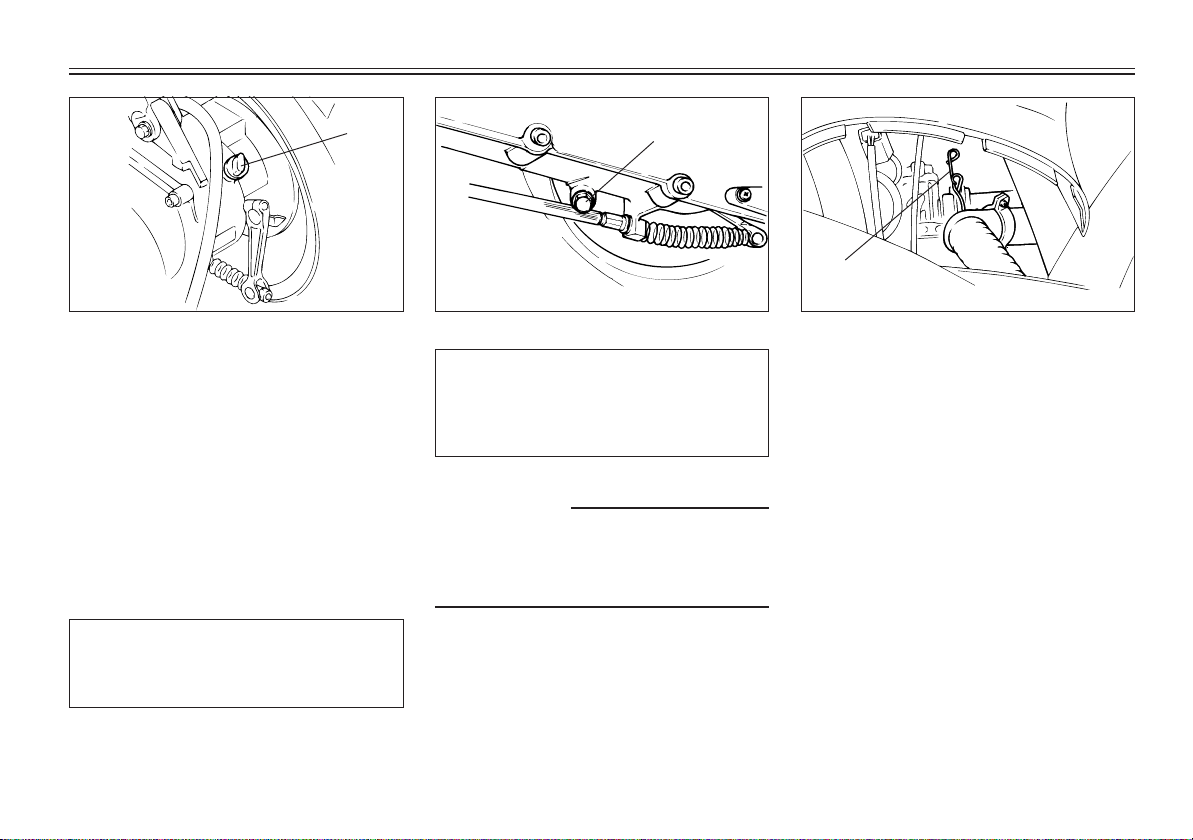
1. Oil filler cap 1. Drain bolt 1. Carburetor joint clamp
Final gear oil replacement
EAU02961
1. Put the scooter on the
centerstand.
2. Place an oil pan under the final
gear case.
3. Remove the oil filler cap and the
drain bolt to drain the oil.
4. Install and tighten the drain bolt
to the specified torque.
Recommended final gear oil:
SAE 85W140 type SE motor oil
Final gear oil quantity:
0.13 L
EW000066
w
Do not let foreign material enter the
final gear case. Be sure oil does not
get on the tire or wheel.
Air filter cleaning
This air filter should be cleaned at
the specified intervals.
It should be cleaned more frequently
if you are riding in unusually wet or
dusty areas.
1. Remove panel B. (Refer to page
6-7 for removal and installation
procedures.)
2. Remove the carburetor joint
Tightening torque:
6. Install the oil filler cap.
clamp.
Drain bolt :
18 Nm (1.8 m.kg)
7. After replacing the final gear oil,
be sure to check for oil leakage.
5. Fill the gear case with the recommended oil.
EAUT0624
6-9
Page 37
PERIODIC MAINTENANCE AND MINOR REPAIR
2
2
3
1
1
1
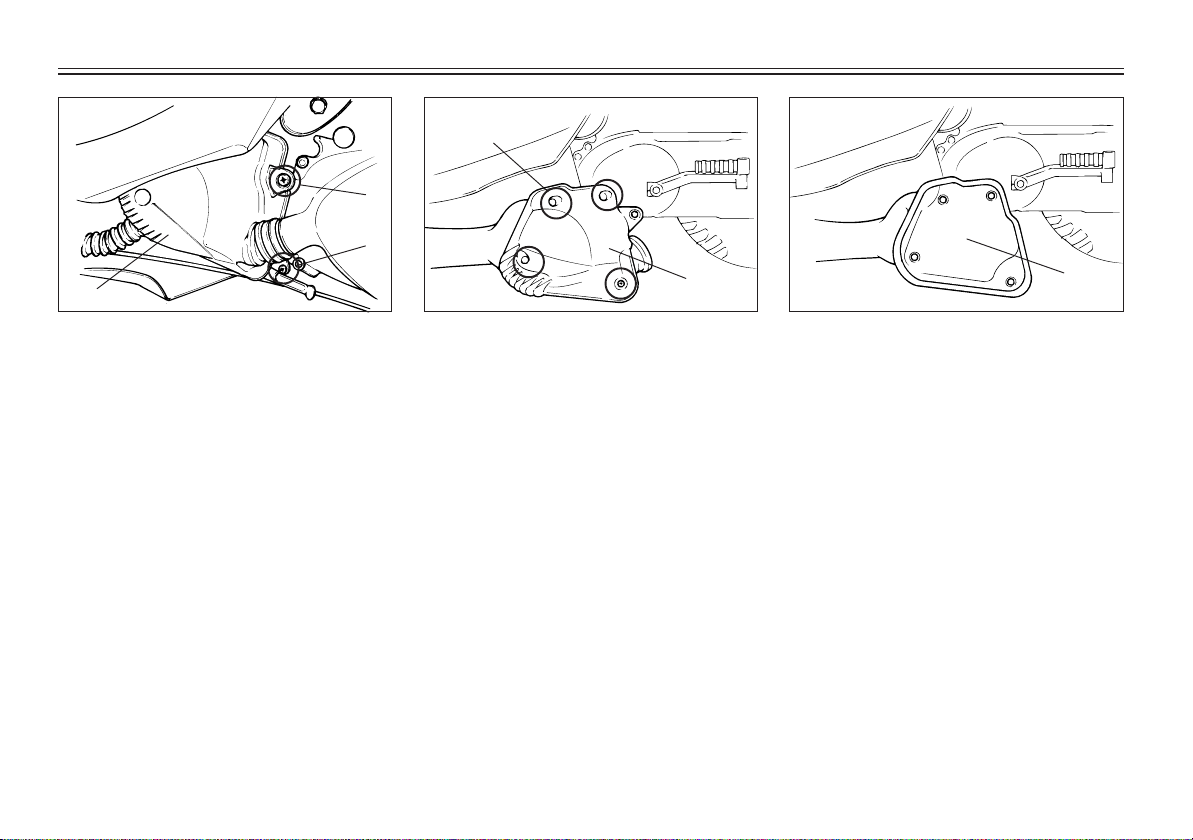
1. Air filter case 2. Bolt 3.Screw
3. Remove the air filter case bolt,
loosen the air filter case joint
screw, and then remove the air
filter case.
1. Air filter cover 2. Screw (×4)
4. Remove the air filter case cover
by removing the screws, and
then remove the air filter element.
6-10
1. Air filter element
5. Wash the air filter element gently, but thoroughly in solvent.
6. Squeeze out the excess solvent
and let the air filter element dry.
Page 38
PERIODIC MAINTENANCE AND MINOR REPAIR
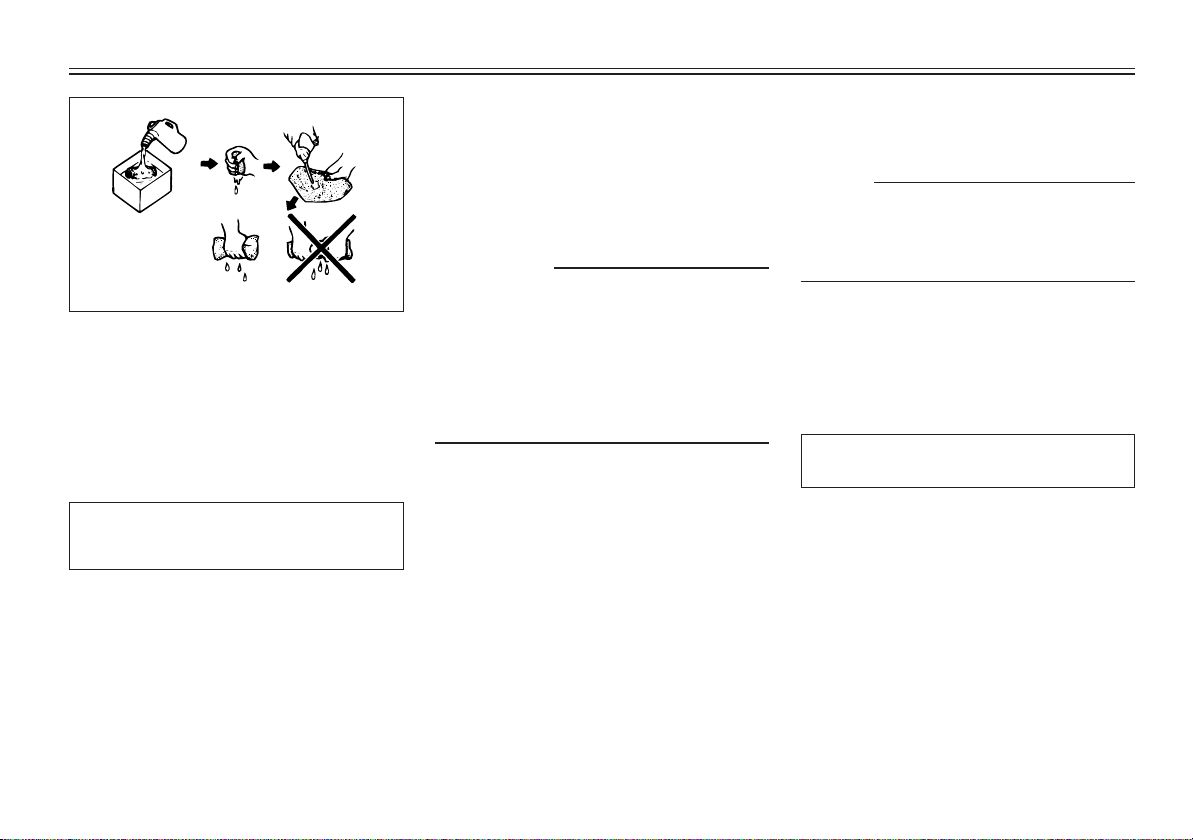
7. Apply oil to the entire surface of
the air filter element and
squeeze out the excess oil. It
should be damp, but not dripping.
Recommended oil:
Engine oil
8. Coat the sealing edges of the air
filter case and air filter case
cover lightly with grease for an
airtight seal.
9. Install the air filter element and
the air filter case cover.
10.Install the air filter case and the
carburetor joint clamp.
11.Tighten the air filter case bolt
and the air filter case joint screw.
12.Install the panel.
EC000082
cC
Make sure the air filter is properly
seated in the air filter case.
The engine should never be run
without the air filter installed. Excessive piston and/or cylinder wear
may result.
EAU00627
Carburetor adjustment
The carburetor is a vital part of the
engine and its emission control system. Adjusting should be left to a
Yamaha dealer with the professional
knowledge, specialized data and
equipment to do so properly.
EAU00634
Throttle cable free play
adjustment
NOTE:
Before checking the throttle cable
free play, the engine idling speed
should be adjusted.
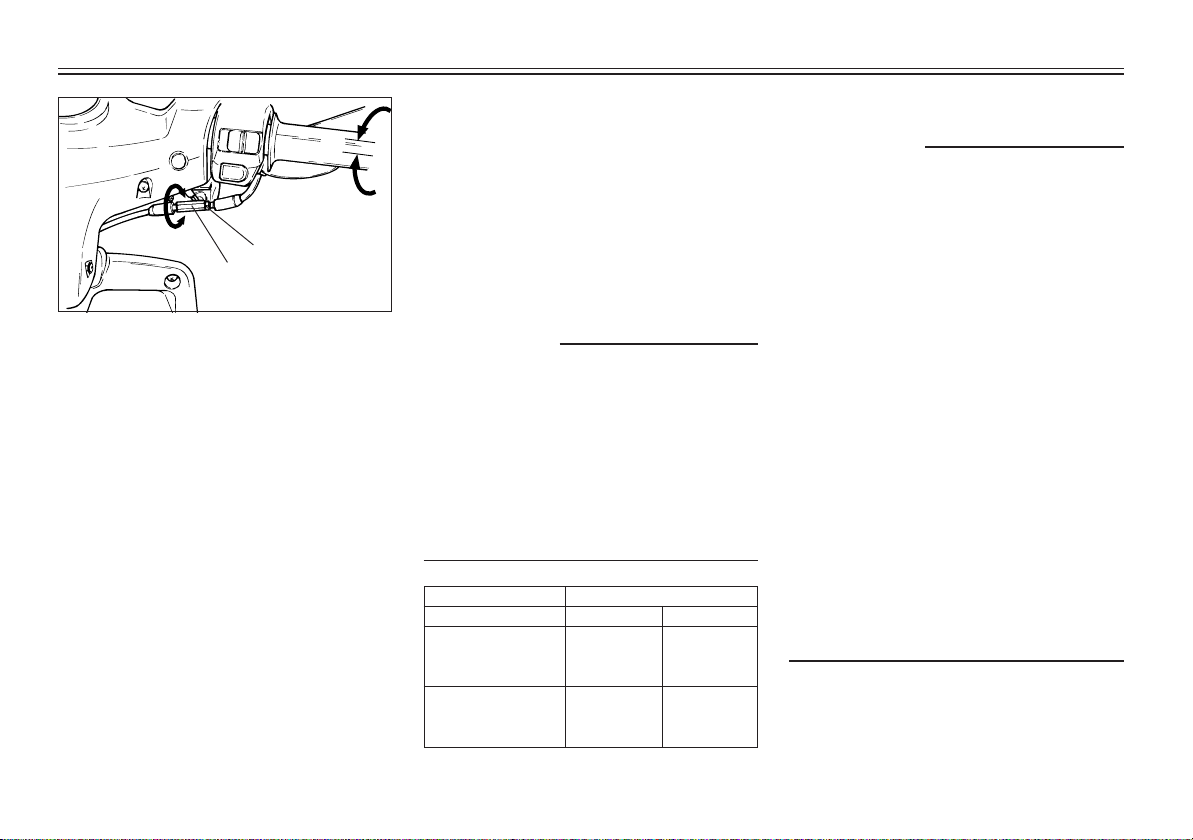
Adjust the throttle cable by turning
the adjusting nut so that specified
free play at the throttle grip is obtained.
Free play:
3 ~ 5 mm
6-11
Page 39
PERIODIC MAINTENANCE AND MINOR REPAIR
3
b
a
1
2
1. Lock nut 2. Adjusting nut
3. Free play
1. Loosen the locknut.
2. Turn the adjusting nut in direc-
tion a to increase free play and
in direction b to decrease free
play.
3. Tighten the locknut.
EAU00661
Tires
To ensure maximum performance,
long service, and safe operation,
note the following:
Tire air pressure
Always check and adjust the tire
pressure before operating the
scooter.
EW000076
w
Tire inflation pressure should be
checked and adjusted when the
temperature of the tire equals the
ambient air temperature. Tire inflation pressure must be adjusted according to total weight of cargo,
rider, and accessories (fairing,
saddlebags, etc. if approved for this
model), and vehicle speed.
Maximum load*: 160 kg
Cold tire pressure: Front Rear
200 kpa 200 kpa
Up to 90 kg (2.00 kgf/cm
2.00 bar) 2.00 bar)
90 kg load ~ 200 kpa 200 kpa
Maximum load* (2.00 kgf/cm
2.00 bar) 2.00 bar)
* Load is the total weight of cargo, rider and acces-
sories.
6-12
2
, (2.00 kgf/cm2,
2
, (2.00 kgf/cm2,
CE-02E
EW000086
w
Proper loading of your scooter is important for several characteristics of
your scooter such as handling, braking, performance and safety. Do not
carry loosely packed items that can
shift. Securely pack your heaviest
items close to the center of the
scooter, and distribute the weight
evenly from side to side.
Check the condition and pressure of
your tires. NEVER OVERLOAD
YOUR SCOOTER. Make sure the total weight of the cargo, rider, and
accessories (fairing, saddlebags, etc.
if approved for this model) does not
exceed the maximum load of the
scooter. Operation of an overloaded
scooter could cause tire damage, an
accident, or even injury.
Page 40
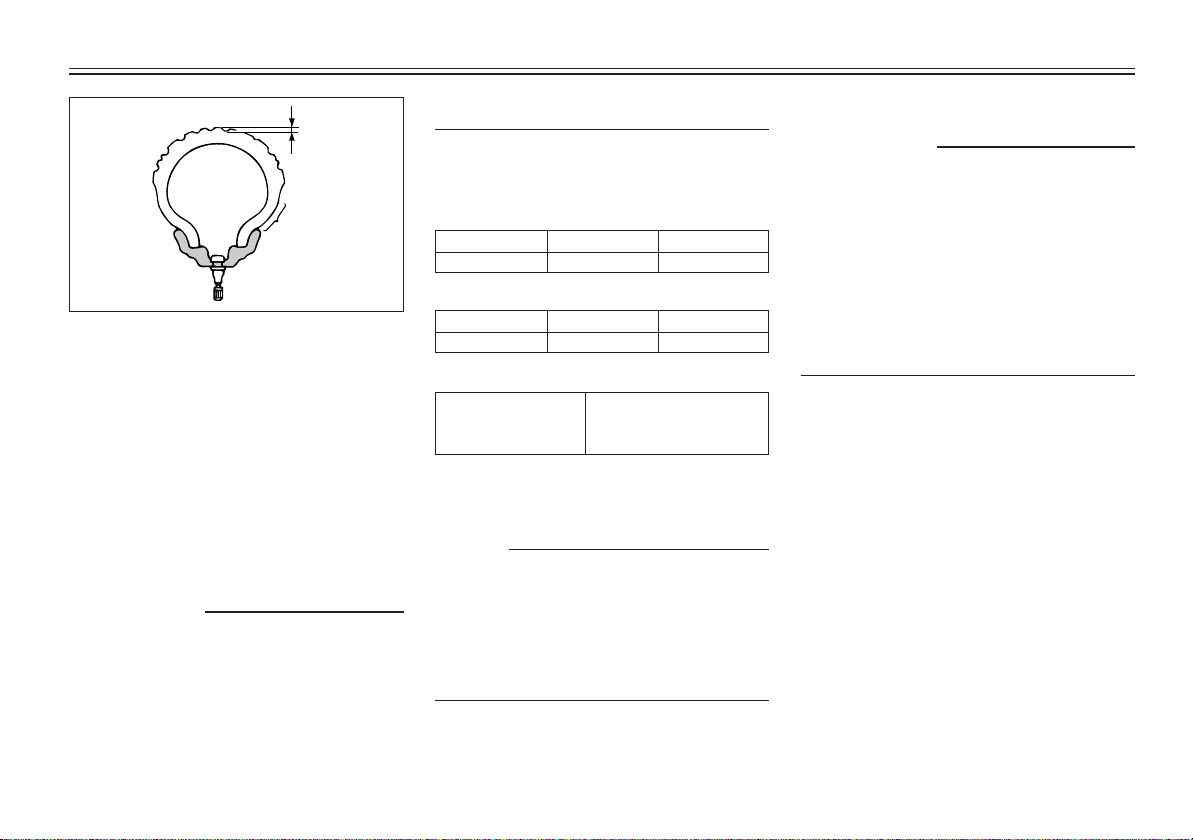
PERIODIC MAINTENANCE AND MINOR REPAIR
1
2
1. Tread depth 2. Side wall
Tire inspection
Always check the tires before operating the scooter. If center tread
depth reaches the limit as shown, if
the tire has a nail or glass fragments
in it, or if the side wall is cracked,
contact a Yamaha dealer immediately and have the tire replaced.
EW000084
w
For safe operation, when tires are
replaced, they must be replaced the
recommended tire. Other rubber
compounds, tread patterns, tube
type tires or different ply rate tires
may result in tire failure and/or
scooter instability.
CE-10E
FRONT
Manufacturer Size Type
CHENG-SHIN 120/90-10 56J
REAR
Manufacturer Size Type
CHENG-SHIN 130/90-10 59J
CE-11E
Minimum tire tread
depth 1.6 mm
(front and rear)
NOTE:
These limits may be different by
regulation from country to country.
If so, conform to the limits specified
by the regulations of your own country.
EAU00683
w
Operating the scooter with excessively worn tires decrease riding stability and can lead to loss of control.
Have excessively worn tires
replaced by a Yamaha dealer immediately. Brakes, tires, and related
wheel parts replacement should be
left to a Yamaha Service Technician.
6-13
Page 41
PERIODIC MAINTENANCE AND MINOR REPAIR
Wheels
EAU00687
To ensure maximum performance,
long service, and safe operation,
note the following:
9 Always inspect the wheels be-
fore a ride. Check for cracks,
bends, or warpage of the
wheels. If any abnormal condition exists in a wheel, consult a
Yamaha dealer.
9 Do not attempt even small re-
pairs to the wheel. If a wheel is
deformed or cracked, it must be
replaced.
9 Tires and wheels should be bal-
anced whenever either one is
changed or replaced. Failure to
have a wheel balanced can result in poor performance, adverse handling characteristics,
and shortened tire life.
9 Ride at moderate speeds after
changing a tire since the tire
surface must first be broken in
for it to develop its optimal characteristics.
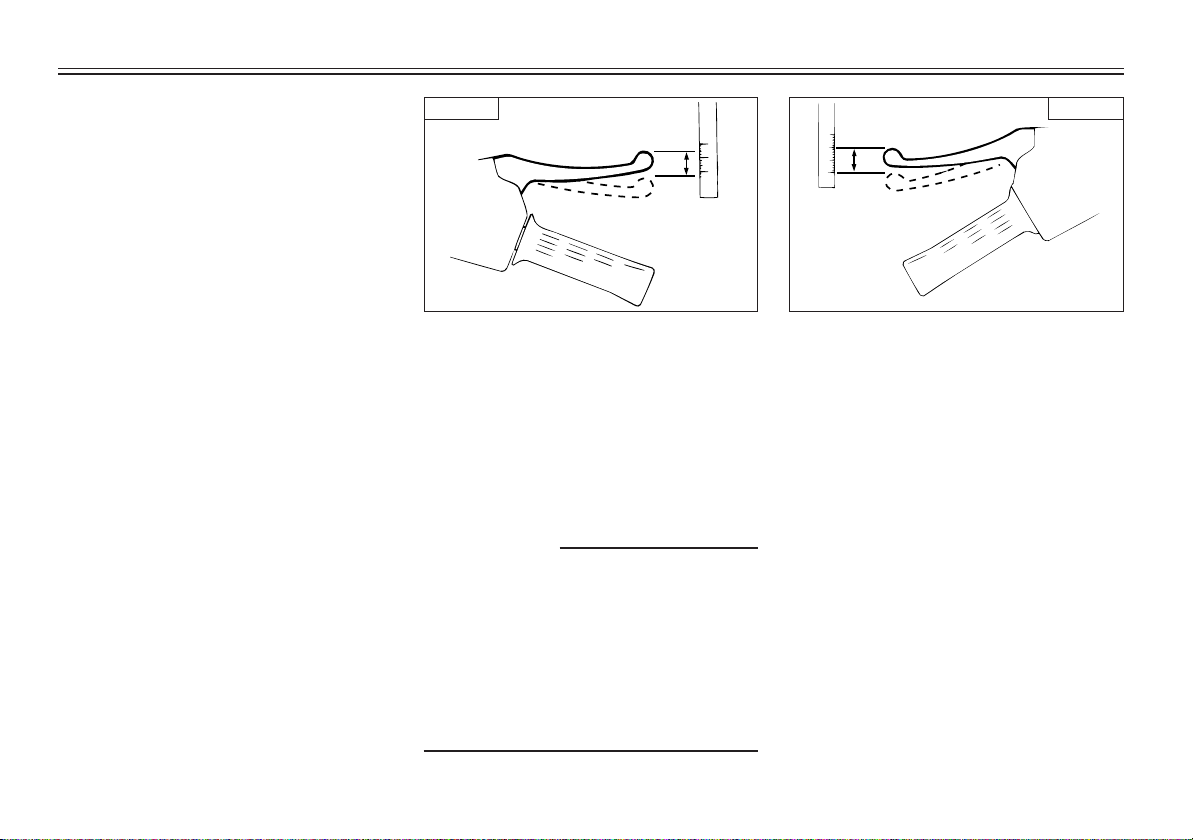
Front Rear
a
a. Free play a. Free play
Front brake adjustment
The front brake lever should have a
free play of 2 ~ 5 mm at the lever
end. If not, ask a Yamaha dealer to
adjust it.
EAU00697
Rear brake adjustment
The rear brake lever free play should
be adjusted to 10 ~ 20 mm at the
brake lever end. Adjustment is accomplished at the brake hub.
EW000100
a
EAU00704
w
An incorrect free play indicates a
hazardous condition in the brake
system. Do not operate the motorcycle until the failure in the
brake system is corrected. Ask a
Yamaha dealer for immediate repairs.
6-14
Page 42
PERIODIC MAINTENANCE AND MINOR REPAIR
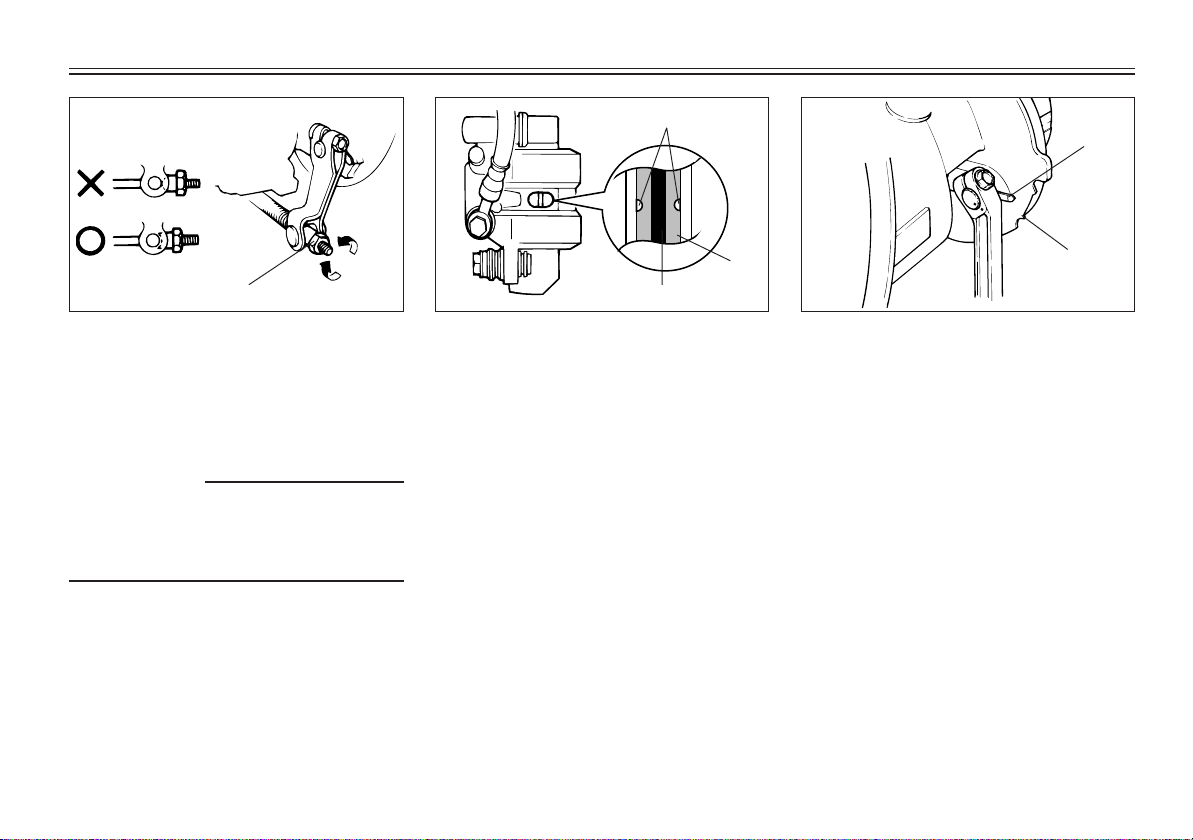
1
1
1
1. Adjusting nut
To adjust, turn the adjusting nut
clockwise to reduce play or counterclockwise to increase play.
EW000101
w
When it is impossible to make the
proper adjustment, ask a Yamaha
dealer.
3
2
1. Wear indicator
2. Brake disk
3. Brake pads
EAU00720
Checking the front brake pads
and rear brake shoes
EAU00723
Front brake
Apply the brake and inspect the wear
indicator.
If the wear indicator is ALMOST in
contact with the disc plate, ask a
Yamaha dealer to replace the pads.
6-15
2
1. Wear indicator
2. Wear limit line
EAU00727
Rear brake
Apply the brake and inspect the wear
indicator.
If the indicator reaches the wear limit
line, ask a Yamaha dealer to replace
the shoes.
Page 43
PERIODIC MAINTENANCE AND MINOR REPAIR
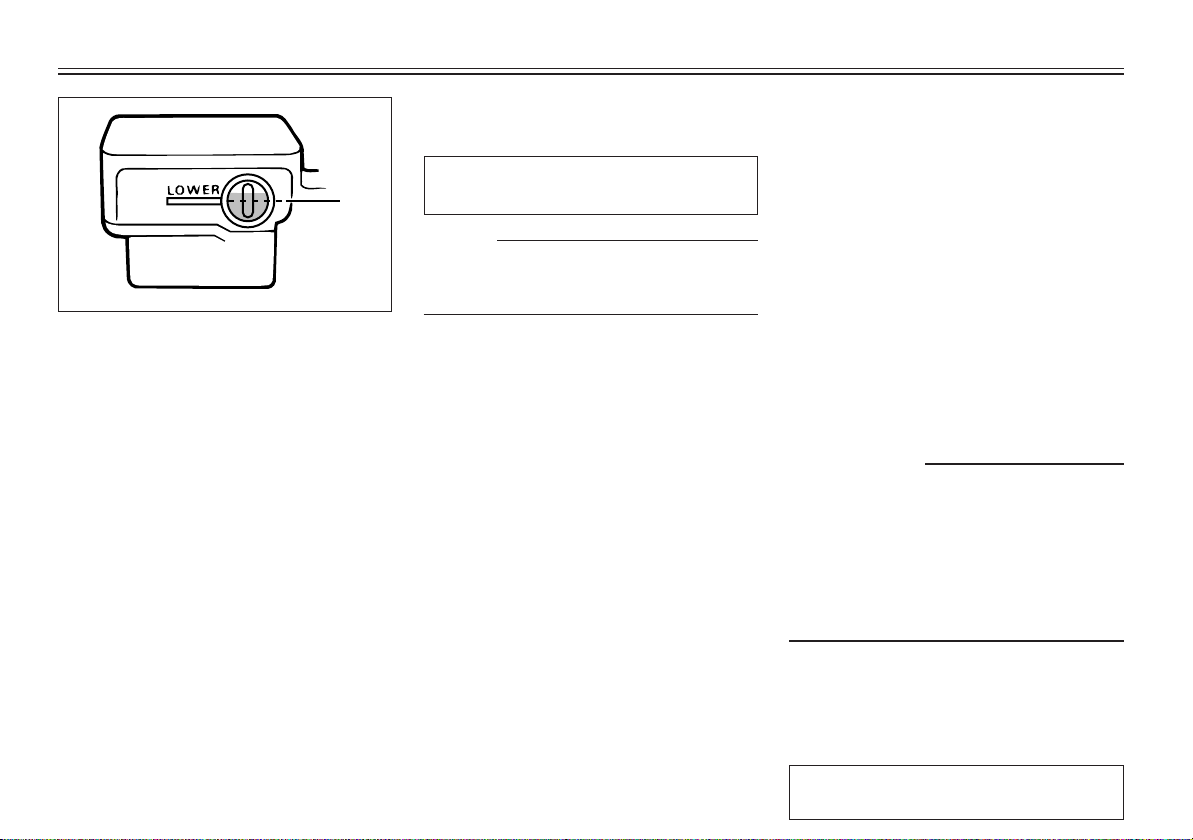
1
1. Minimum level line
EAU00732
Inspecting the brake fluid level
Insufficient brake fluid may let air
enter the brake system, possibly
causing the brakes to become ineffective.
Before riding, check that the brake
fluid is above the minimum level and
fill when necessary.
Observe these precautions:
9 When checking the fluid level,
make sure the top of the master
cylinder is level by turning the
handlebars.
9 Use only the designated quality
brake fluid. Otherwise, the rubber seals may deteriorate, caus-
ing leakage and poor brake performance.
Recommended brake fluid:
DOT 4
NOTE:
If DOT 4 is not available, DOT 3 can
be used.
9 Refill with the same type of
brake fluid. Mixing fluids may
result in a harmful chemical reaction and lead to poor brake
performance.
9 Be careful that water does not
enter the master cylinder when
refilling. Water will significantly
lower the boiling point of the
fluid and may result in vapor
lock.
9 Brake fluid may deteriorate
painted surfaces or plastic parts.
Always clean up spilled fluid immediately.
9 Have a Yamaha dealer check the
cause if the brake fluid level
goes down.
6-16
Brake fluid replacement
EAU00742
The brake fluid should be replaced
only by trained Yamaha service personnel. Have the Yamaha dealer replace the following components during periodic maintenance or when
they are damaged or leaking:
9 oil seals (every two years)
9 brake hoses (every four years)
EAU02962
Cable inspection and lubrication
EW000112
w
Damage to the outer housing of
cables may lead to internal rusting
and interfere with the cable movement. Replace damaged cables as
soon as possible to prevent unsafe
conditions.
Lubricate the cables and cable ends.
If a cable does not operate smoothly,
ask a Yamaha dealer to replace it.
Recommended lubricant:
Engine oil
Page 44
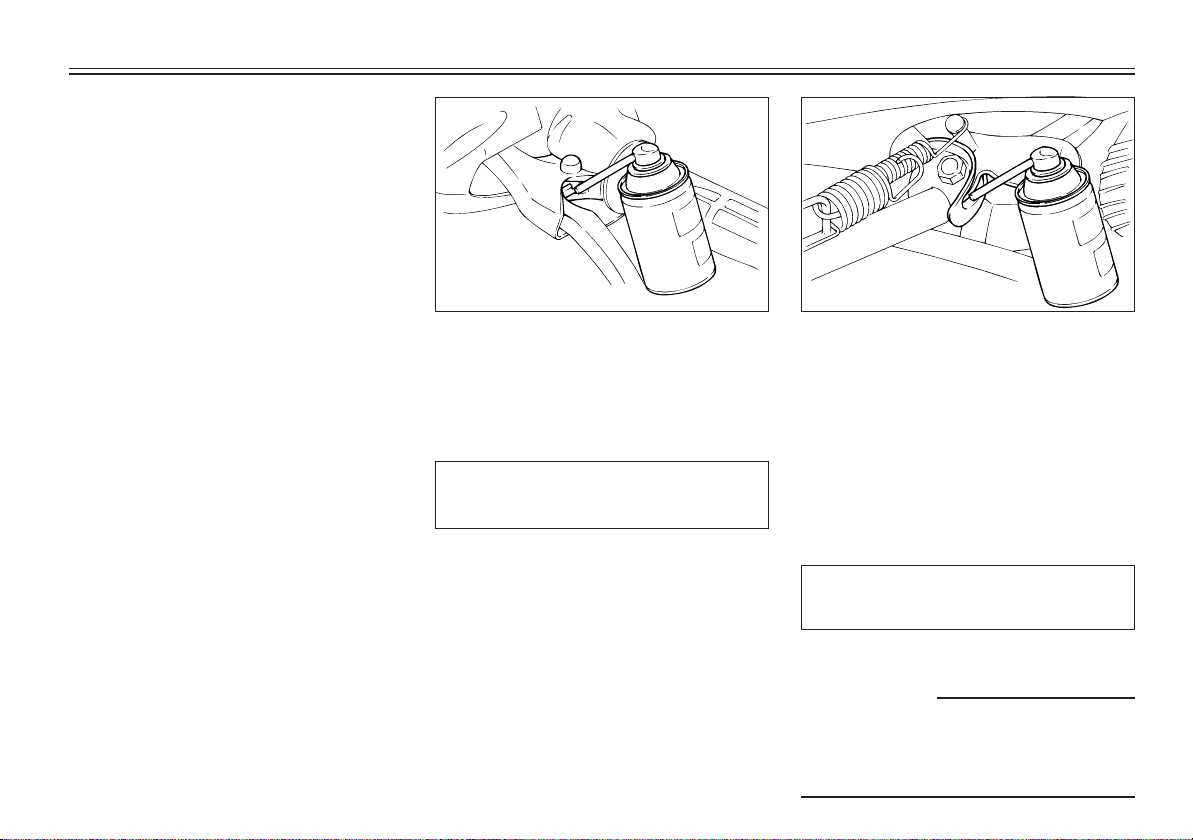
EAU00773
Throttle cable and grip lubrication
The throttle twist grip assembly
should be greased at the time that
the cable is lubricated, since the grip
must be removed to get at the end
of the throttle cable. After removing
the screws, hold the end of the cable
up in the air and put in several drops
of lubricant. With the throttle grip
disassembled, coat the metal surface
of the grip assembly with a suitable
all-purpose grease.
EAU00774
Autolube pump adjustment
The autolube pump is a vital part of
the engine and requires very sophisticated adjustment. Adjusting should
be left to a Yamaha dealer who has
the professional knowledge and experience to do so.
PERIODIC MAINTENANCE AND MINOR REPAIR
Brake lever lubrication
EAU00781
Lubricate the pivoting parts of both
brake levers.
Recommended lubricant:
Engine oil
Center and sidestand lubrication
Lubricate the pivoting and mating
joints.
Check to see that the center and
sidestand move up and down
smoothly.
Recommended lubricant:
Engine oil
w
EAU02965
EW000114
6-17
If the center and/or sidestand does
not move smoothly, consult a
Yamaha dealer.
Page 45
PERIODIC MAINTENANCE AND MINOR REPAIR
Front fork inspection
EAU02939
Visual check
EW000115
w
Securely support the scooter so
there is no danger of it falling over.
Check for scratches or damage on
the inner tube and excessive oil leakage from the front fork.
Wheel bearings
EAU01144
If there is play in the front or rear
wheel hub or if the wheel does not
turn smoothly, have a Yamaha
dealer inspect the wheel bearings.
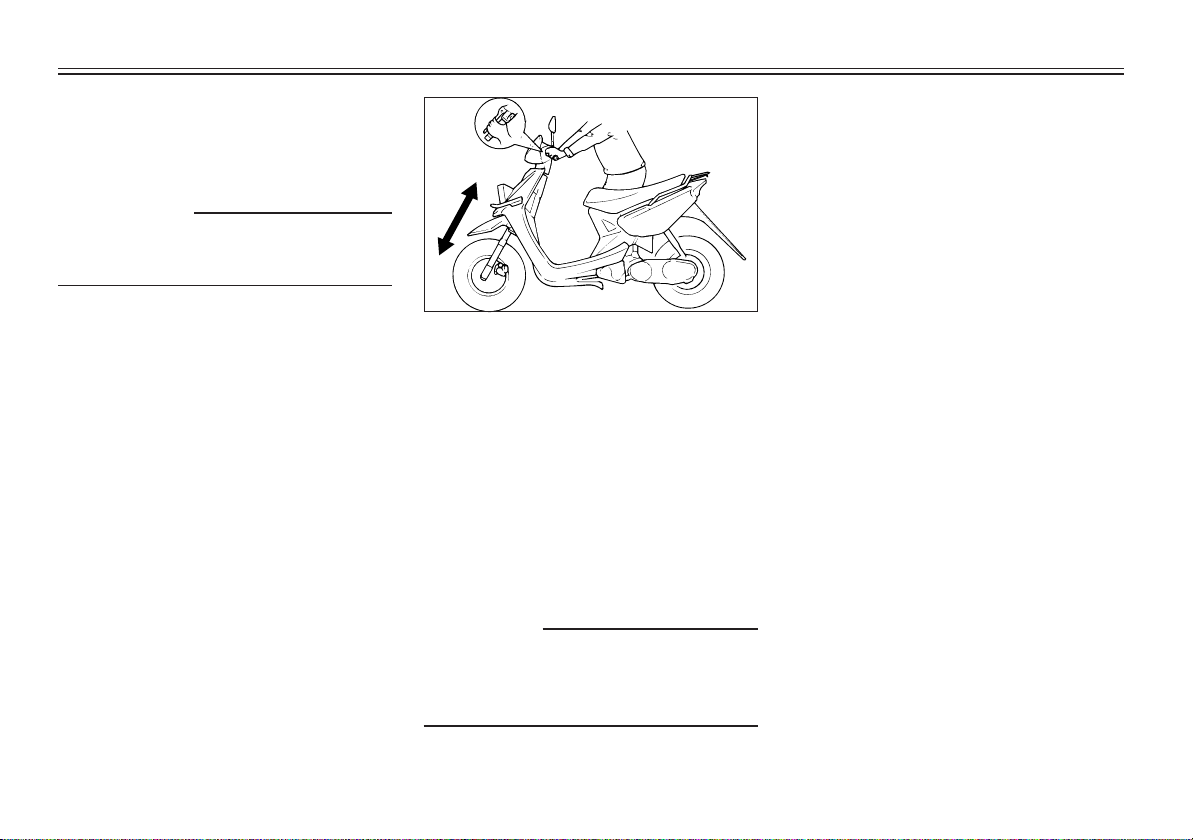
Operation check
1. Place the scooter on a level
place.
2. Hold the scooter in an upright
position and apply the front
brake.
3. Push down hard on the handlebars several times and check if
the fork rebounds smoothly.
EC000098
cC
If any damage or unsmooth movement is found with the front fork,
consult a Yamaha dealer.
6-18
Page 46
PERIODIC MAINTENANCE AND MINOR REPAIR
EC000101
cC
Never try to remove the sealing caps
of the battery cells. The battery will
be damaged.
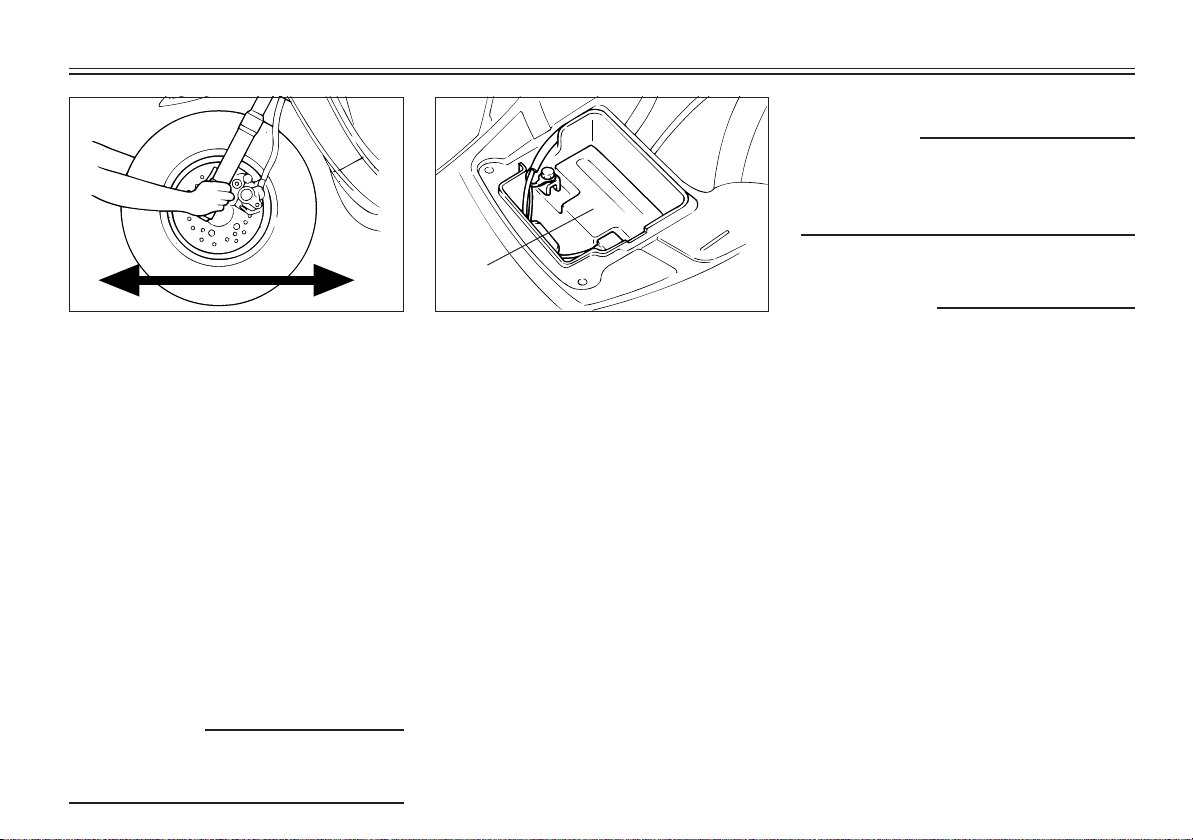
Steering inspection
EAU00794
Periodically inspect the condition of
the steering. Worn out or loose steering bearings may be dangerous.
Place a stand under the engine to
raise the front wheel off the ground.
Hold the lower end of the front forks
and try to move them forward and
backward. If any free play can be felt,
ask a Yamaha dealer to inspect and
adjust the steering. Inspection is
easier if the front wheel is removed.
EW000115
w
Securely support the scooter so
there is no danger of it falling over.
1
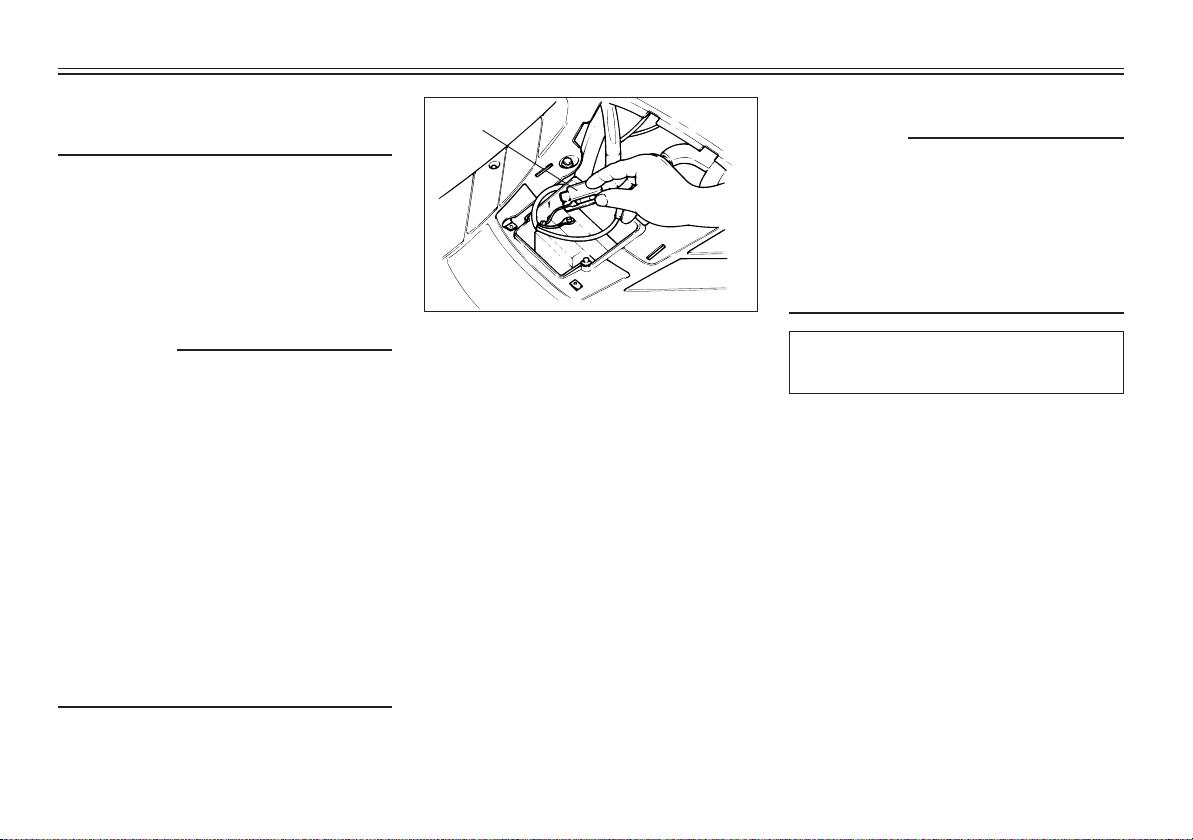
1. Battery
EAUT0800
Battery
The battery is located under the
footboard. Remove panel B to access
the battery. (Refer to page 6-7 for
removal and installation procedures.)
This scooter is equipped with a
sealed battery. Therefore it is not
necessary to check the electrolyte or
fill the battery with distilled water. If
the battery seems to have discharged, consult a Yamaha dealer.
If the scooter is equipped with optional electrical accessories, the battery tends to discharge more quickly,
so be sure to recharge it periodically.
6-19
EW000116
w
Battery electrolyte is poisonous and
dangerous, causing severe burns,
etc. It contains sulfuric acid. Avoid
contact with skin, eyes or clothing.
ANTIDOTE:
EXTERNAL: Flush with water.
INTERNAL: Drink large quantities of
water or milk. Follow with milk of
magnesia, beaten egg, or vegetable
oil. Call a physician immediately.
EYES: Flush with water for 15 minutes and get prompt medical attention.
Batteries produce explosive gases.
Keep sparks, flame, cigarettes etc.,
away. Ventilate when charging or
using in an enclosed space. Always
shield your eyes when working near
Page 47
PERIODIC MAINTENANCE AND MINOR REPAIR
batteries.
KEEP OUT OF REACH OF CHILDREN.
Battery storage
When the scooter is not used for a
month or longer, remove the battery,
fully charge it and store it in a cool,
dry place.
EC000102
cC
Completely recharge the battery before storing. Storing a discharged
battery can cause permanent battery damage.
Use a battery charger designed for
a sealed-type (MF) battery. Using a
conventional battery charger will
cause battery damage. If you do not
have a sealed-type battery charger,
contact your Yamaha dealer.
Always make sure the connections
are correct when reinstalling the
battery.
1
1. Fuse
EAUT0804
Fuse replacement
The fuse case is located beside the
battery. Remove panel B to access
the battery. (Refer to page 6-7 for
removal and installation procedures.)
If the fuse is blown, turn off the main
switch and all other switches. Install
a new fuse of specified amperage.
Turn on the switches and see if all
electrical devices operate. If the fuse
immediately blows again, consult a
Yamaha dealer.
EC000103
cC
Do not use fuses of higher amperage rating than those recommended. Substitution of a fuse of
improper rating can cause extensive
electrical system damage and possibly a fire.
Specified fuse:
7A
6-20
Page 48
PERIODIC MAINTENANCE AND MINOR REPAIR
1
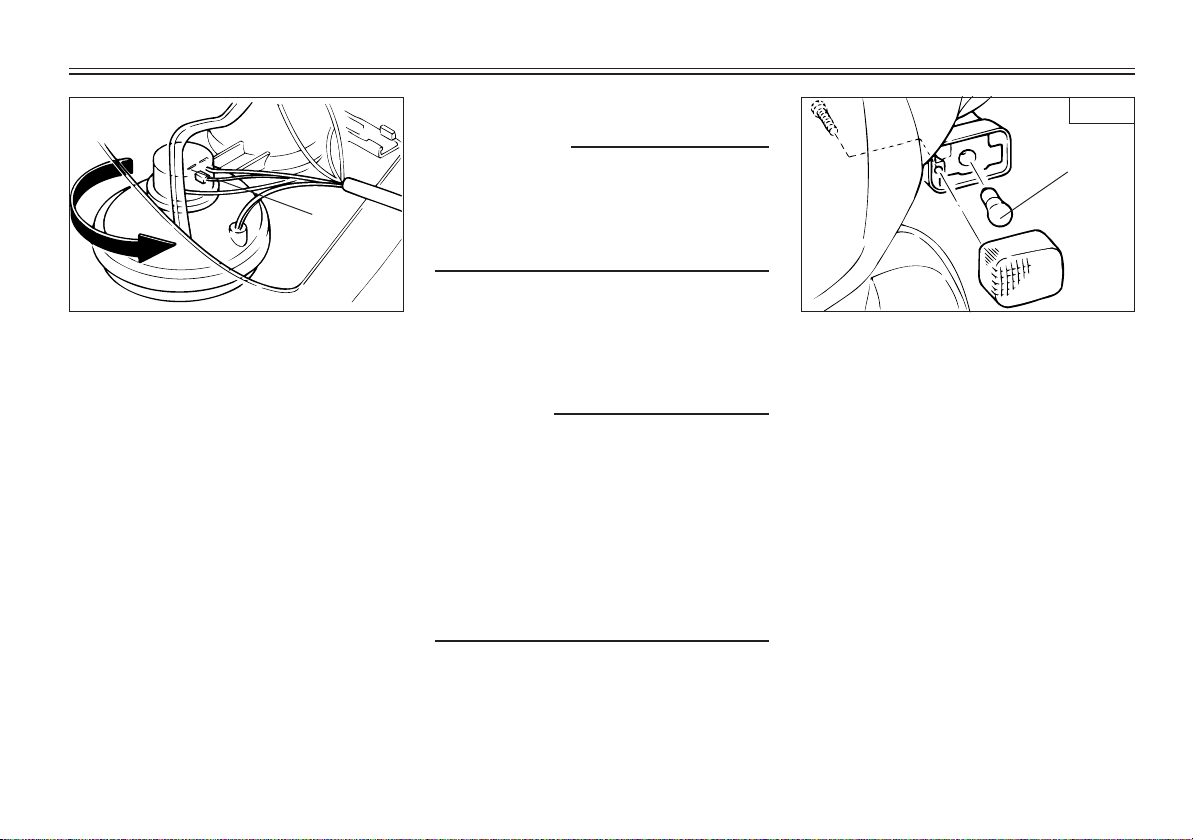
1. Bulb holder
EAUT1528
Headlight bulb replacement
This scooter is equipped with a S1
bulb headlight. If the headlight bulb
burns out, replace it as follows:
1. Remove cowling A. (See page
6-6 for cowling removal and installation procedures.)
2. Turn the bulb holder counterclockwise to remove it and remove the defective bulb.
EW000119
w
Keep flammable products and your
hands away from a bulb while it is
on, as it is hot. Do not touch a bulb
until it cools down.
3. Put a new bulb into position and
secure it in place with the bulb
holder.
EC000105
cC
Avoid touching the glass part of a
bulb. Keep it free from oil; otherwise, the transparency of the glass,
life of the bulb, and luminous flux
will be adversely affected. If oil gets
on a bulb, thoroughly clean it with
a cloth moistened with alcohol or
lacquer thinner.
4. Install the cowling.
If the headlight beam adjustment is
necessary, ask a Yamaha dealer to
make that adjustment.
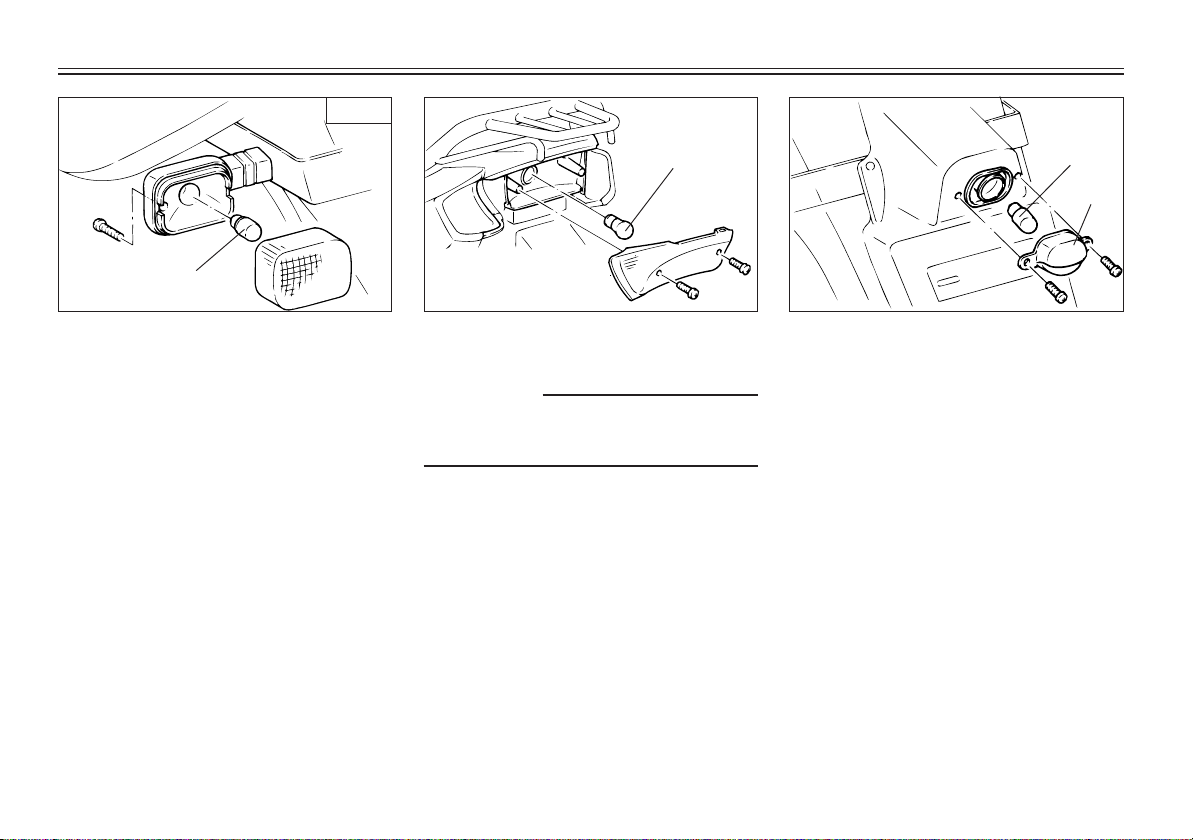
Front
1
1. Turn signal bulb
EAU00855
Turn signal and taillight bulb
replacement
1. Remove the screws and the
lense.
2. Push the bulb inward and turn
it counterclockwise.
6-21
Page 49
PERIODIC MAINTENANCE AND MINOR REPAIR
Rear
1
1. Turn signal bulb
3. Place a new bulb in the socket.
Push the bulb inward and turn
it clockwise until it engages into
the socket.
4. Install the lense and the screws.
1
1. Taillight bulb
EC000108
cC
Do not over-tighten the screws as
the lense may break.
2
1
1. Light cover 2. License light bulb
EAUT1624
License light bulb
replacement
1. Remove the license light cover
by removing the screws.
2. Push the bulb inward and turn
it counterclockwise.
3. Place a new bulb in the socket.
Push the bulb inward and turn
it clockwise until it engages into
the socket.
4. Install the license light cover and
the screws.
6-22
Page 50
PERIODIC MAINTENANCE AND MINOR REPAIR
Troubleshooting
EAU01008
Although Yamaha scooters receive
a rigid inspection before shipment
from the factory, trouble may occur
during operation.
Any problem in the fuel, compression, or ignition systems can cause
poor starting and loss of power. The
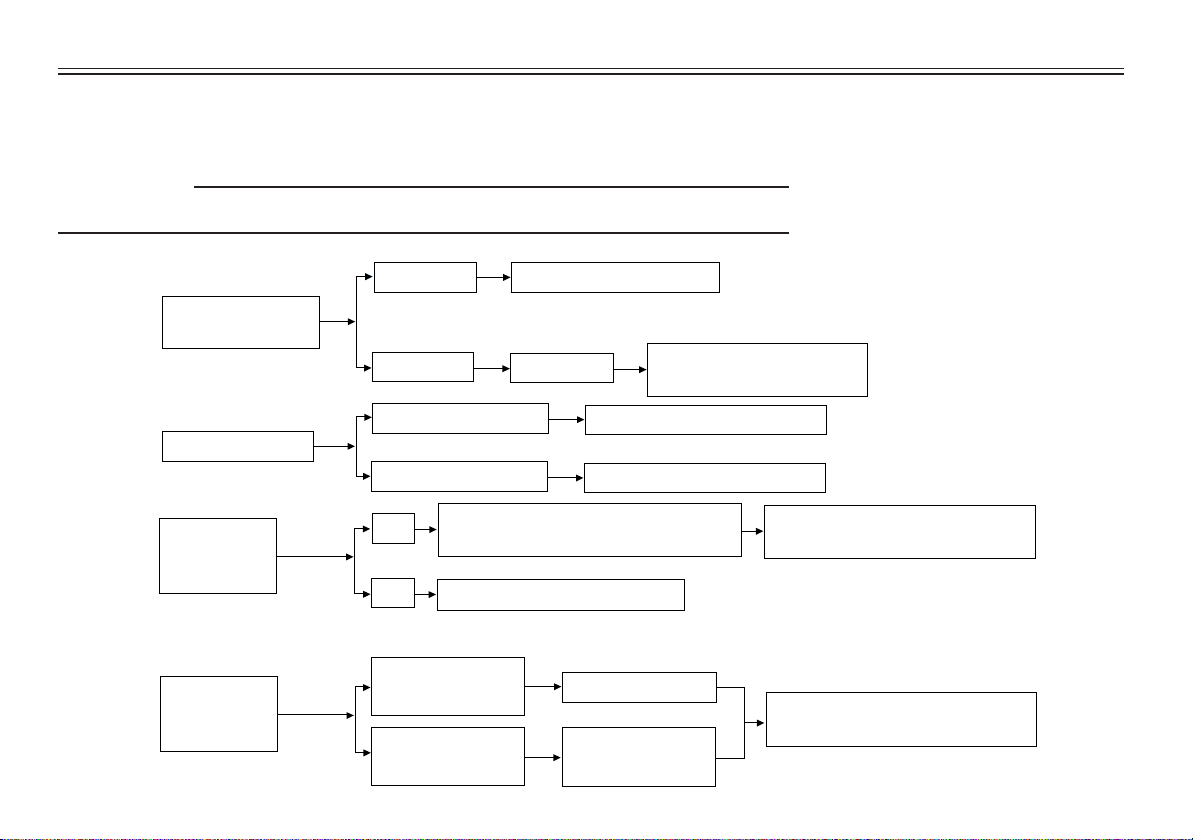
troubleshooting chart describes a
quick, easy procedure for making
checks.
If your scooter requires any repair,
bring it to a Yamaha dealer. The
skilled technicians at a Yamaha dealership have the tools, experience,
and know-how to properly service
your motorcycle. Use only genuine
Yamaha parts on your scooter. Imitation parts may look like Yamaha
parts, but they are often inferior.
Consequently, they have a shorter
service life and can lead to expensive repair bills.
6-23
Page 51
PERIODIC MAINTENANCE AND MINOR REPAIR
Troubleshooting chart
EAU01397
EW000125
w
Never check the fuel system while smoking or in the vicinity of an open flame.
1. Fuel
Check if there is
fuel in the tank
2. Compression
Use electric starter.
3. Ignition
Remove spark
plug and check
electrode.
Enough fuel Go to compression check.
No fuel Supply fuel.
There is compression. Go to ignition check.
No compression. Ask a Yamaha dealer to inspect.
Wet
Dry
Wipe clean with dry cloth and correct
spark gap or replace spark plugs.
Ask a Yamaha dealer to inspect.
Engine doesn’t start, go to
compression check.
4. Battery
Use electric
starter
Engine turns over
quickly.
Engine turns over
slowly.
Battery good.
Engine doesn’t start, ask a Yamaha
dealer to inspect.
Check connections
or recharge.
Engine doesn’t start, go to battery
check.
6-24
Page 52
EAU01522
SCOOTER CARE AND STORAGE
Care
The exposure of its technology
makes a scooter charming but also
vulnerable. Although high-quality
components are used, they are not
all rust-resistant. While a rusty exhaust pipe may remain unnoticed on
a car, it does look unattractive on a
scooter. Frequent and proper care,
however, will keep your scooter
looking good, extend its life and
maintain its performance. Moreover,
the warranty states that the vehicle
must be properly taken care of. For
all these reasons, it is recommended
that you observe the following cleaning and storing precautions.
Before cleaning
1. Cover up the muffler outlet with
a plastic bag.
2. Make sure that all caps and covers as well as all electrical couplers and connectors, including
the spark plug cap, are tightly
installed.
3. Remove extremely stubborn
dirt, like oil burnt onto the crankcase, with a degreasing agent
and a brush, but never apply
such products onto seals, gaskets and wheel axles. Always
rinse the dirt and degreaser off
with water.
Cleaning
After normal use
Remove dirt with warm water, a neutral detergent and a soft clean
sponge, then rinse with plenty of
clean water. Use a tooth and bottle
brush for hard-to-reach parts.
Tougher dirt and insects will come
off more easily if the area is covered
with a wet cloth for a few minutes
before cleaning.
ECA00011
cC
9 Avoid using strong acidic wheel
cleaners. If you do use such
products for hard-to-remove
dirt, do not leave it on any
longer than instructed, then
thoroughly rinse it off with water, immediately dry the area
and apply a corrosion protection spray.
7-1
Page 53
SCOOTER CARE AND STORAGE
9 Improper cleaning can damage
windshields, cowlings, panels
and other plastic parts. Use only
a soft, clean cloth or sponge
with mild detergent and water
to clean plastic.
9 Do not use any harsh chemical
products on plastic parts. Be
sure to avoid using cloths or
sponges which have been in
contact with strong or abrasive
cleaning products, solvent or
thinner, fuel (gasoline), rust removers or inhibitors, brake
fluid, antifreeze or electrolyte.
9 Do not use high-pressure wash-
ers or steam-jet cleaners since
they cause water seepage and
deterioration in the following
areas: seals (of wheel bearings,
swingarm bearings, bearings,
forks and brakes), electric components (couplers, connectors,
instruments, switches and
lights), breather hoses and
vents.
9 For scooters equipped with a
windshield: Do not use strong
cleaners or hard sponges as
they will cause dulling or
scratching. Some cleaning compounds for plastic may leave
scratches on the windshield.
Test the product on a small hidden part of the windshield to
make sure they do not leave any
marks. If the windshield is
scratched, use a quality plastic
polishing compound after
washing.
After riding in the rain, near the sea
or on salt-sprayed roads
Since sea salt or salt sprayed on the
roads in the winter are extremely
corrosive in combination with water,
carry out the following steps after
each ride in the rain, near the sea or
on salt-sprayed roads. (Salt sprayed
in the winter may remain on the
roads well into spring.)
1. Clean your scooter with cold water and soap after the engine has
cooled down.
ECA00012
cC
Do not use warm water since it increases the corrosive action of the
salt.
2. Be sure to apply a corrosion protection spray on all (even
chrome- and nickel-plated)
metal surfaces to prevent corrosion.
7-2
Page 54
SCOOTER CARE AND STORAGE
After cleaning
1. Dry the scooter with a chamois
or an absorbing cloth.
2. Use a chrome polish to shine
chrome, aluminum and stainless-steel parts, including the
exhaust system. (Even the thermally induced discoloring of
stainless-steel exhaust systems
can be removed through polishing.)
3. To prevent corrosion, it is recommended to apply a corrosion
protection spray on all (even
chrome- and nickel-plated)
metal surfaces.
4. Use spray oil as a universal
cleaner to remove any remaining dirt.
5. Touch up minor paint damage
caused by stones, etc.
6. Wax all painted surfaces.
7. Let the scooter dry completely
before storing it or covering it.
EWA00002
w
Make sure that there is no oil or wax
on the brakes and tires. If necessary,
clean the brake discs and linings
with a regular brake disc cleaner or
acetone, and wash the tires with
warm water and mild soap. Then,
carefully test the scooter for its braking performance and cornering behavior.
ECA00013
cC
9 Apply spray oil and wax spar-
ingly and wipe off any excess.
9 Never apply oil or wax on rub-
ber and plastic parts, but treat
them with a suitable care product.
9 Avoid using abrasive polishing
compounds as they wear away
the paint.
NOTE:
Consult a Yamaha dealer for advice
on what products to use.
7-3
Page 55
SCOOTER CARE AND STORAGE
Storage
Short-term
Always store your scooter in a cool,
dry place and, if necessary, protect
it against dust with a porous cover.
ECA00015
cC
9 Storing the scooter in a poorly
ventilated room or covering it
with a tarp while it is still wet
will allow water and humidity
to seep in and cause rust.
9 To prevent corrosion, avoid
damp cellars, stables (because
of the presence of ammonia)
and areas where strong chemicals are stored.
Long-term
Before storing your scooter for several months:
1. Follow all the instructions in the
“Care” section of this chapter.
2. Drain the carburetor float chambers by loosening the drain
bolts; this will prevent fuel deposits from building up. Pour
the drained fuel into the fuel
tank.
3. Only for scooters equipped with
a fuel cock which has an “OFF”
position: Turn the fuel cock to
“OFF”.
4. Fill up the fuel tank and add fuel
stabilizer (if available) to prevent
the fuel tank from rusting and
the fuel from deteriorating.
5. Perform the following steps to
protect the cylinder, piston
rings, etc. from corrosion.
a. Remove the spark plug cap and
spark plug.
b. Pour a teaspoonful of engine
oil into the spark plug bore.
c. Install the spark plug cap onto
the spark plug and place the
spark plug on the cylinder head
so that the electrodes are
grounded. (This will limit sparking during the next step.)
d. Turn the engine over several
times with the starter. (This will
coat the cylinder wall with oil.)
e. Remove the spark plug cap
from the spark plug, install the
spark plug and then the spark
plug cap.
EWA00003
w
When turning the engine over, be
sure to ground the spark plug electrodes to prevent damage or injury
from sparking.
7-4
Page 56

SCOOTER CARE AND STORAGE
6. Lubricate all control cables and
the pivoting points of all levers
and pedals as well as of the
sidestand/centerstand.
7. Check and, if necessary, correct
the tire air pressure, then raise
the scooter so that both of its
wheels are off the ground. Alternatively, turn the wheels a
little every month in order to
prevent the tires from becoming
degraded in one spot.
8. Cover up the muffler outlet with
a plastic bag to prevent moisture from entering.
9. Remove the battery and fully
charge it. Store it in a cool, dry
place and recharge it once a
month. Do not store the battery
in an excessively cold or warm
place (less than 0°C or more
than 30°C). For more information, see “Battery storage” in the
chapter “PERIODIC MAINTENANCE AND MINOR REPAIRS”.
NOTE:
Make any necessary repairs before
storing the scooter.
7-5
Page 57

SPECIFICATIONS
Specifications
EAU01038
Model YW 100E
Dimensions
Overall length 1,890 mm
Overall width 660 mm
Overall height 1,115 mm
Seat height 765 mm
Wheel base 1,270 mm
Ground clearance 119 mm
Minimum turning radius 1,800 mm
Basic weight with oil and full
fuel tank 96 kg
Engine
Engine type Air-cooled 2-stroke
Cylinder arrangement Forward-inclined single cylinder
Displacement 101 cm
Bore × Stroke 52.0 × 47.6 mm
Compression ratio 6.6:1
Starting system Electric / kick starter
Lubrication system Separate lubrication
3
Engine oil
Type Yamalube 2 or 2-stroke
engine oil (JASO FC grade
or ISO EG-C, EG-D grade)
Total amount 1.4 L
Final gear oil
Type SAE 85 W 140
Total amount 0.13 L
Air filter Wet type element
Fuel
Type Regular unleaded gasoline
Fuel tank capacity 5.7 L
Carburetor
Type × quantity VM16SS × 1
Manufacturer Taiwan Mikuni
Spark plug
Type / Manufacturer BPR7HS / NGK
Spark plug gap 0.9 ~ 1.0 mm
Clutch type Dry, centrifugal automatic
8-1
Page 58

SPECIFICATIONS
Transmission
Primary reduction system Helical gear
Primary reduction ratio 3.133
Secondary reduction system Spur gear
Secondary reduction ratio 3.308
Transmission type V-belt automatic
Operation Centrifugal automatic type
Chassis
Frame type Steel tube underbone
Caster angle 26°
Trail 86 mm
Tire Tubeless
Front
Size 120/90-10
Manufacuturer/model CHENG SHIN/56J
Rear
SIZE 130/90-10
Manufacuturer/model CHENG SHIN/59J
Manufacturer/model
Front CHENG SHIN / 56J
Rear CHENG SHIN / 59J
Maximum load* 160 kg
Air pressure
Up to 90 kg load*
Front 200 kpa(2.0 kg / cm2,2.0 bar)
Rear 200 kpa(2.0 kg / cm2,2.0 bar)
90 kg load ~ maximum load*
Front 200 kpa(2.0 kg / cm2,2.0 bar)
Rear 200 kpa(2.0 kg / cm2,2.0 bar)
*Load is total weight of cargo, rider and accessories.
8-2
Page 59

SPECIFICATIONS
Wheels
Type
Front Cast wheel
Rear Cast wheel
Size
Front MT 3.5 × 10
Rear MT 3.5 × 10
Brakes
Front
Type Single disc brake
Operation Right hand operation
Fluid DOT 3 or DOT 4
Rear
Type Drum brake
Operation Left hand operation
Suspension
Front Telescopic fork
Inner tube outer
diameter 30 mm
Rear Unit swing
Shock absorber
Front Coil spring / oil damper
Rear Coil spring / oil damper
Wheel travel
Front 70 mm
Rear 55 mm
Electrical
Ignition system C.D.I.
Charging system
Type A.C. magneto
Standard output 13~14 V / 4,000rpm
Battery
Type YTX 5 L-BS
Voltage, capacity 12 V, 4 AH
Headlight type S1 bulb
Bulb voltage, wattage × quantity
Headlight 12 V, 25 / 25 W × 2
Tail / brake light 12 V, 5 / 21 W × 1
Turn signal light 12 V, 10 W × 4
8-3
Page 60

Auxiliary light 12 V 5 W × 2
License light 12 V 5 W × 1
Meter light 12 V 1.7 W × 1 + 3.4 W × 1
High beam indicator light 12 V 1.7 W × 1
Turn indicator light 12 V 1.7 W × 1
Oil level indicator light 12 V 1.7 W × 1
Fuse 7A
SPECIFICATIONS
8-4
Page 61
CONSUMER INFORMATION
EAU01039
Identification number records
EAU02945
Record the key identification number, vehicle identification number
and engine serial number in the
spaces provided for assistance when
ordering spare parts from a Yamaha
dealer or for reference in case the
vehicle is stolen.
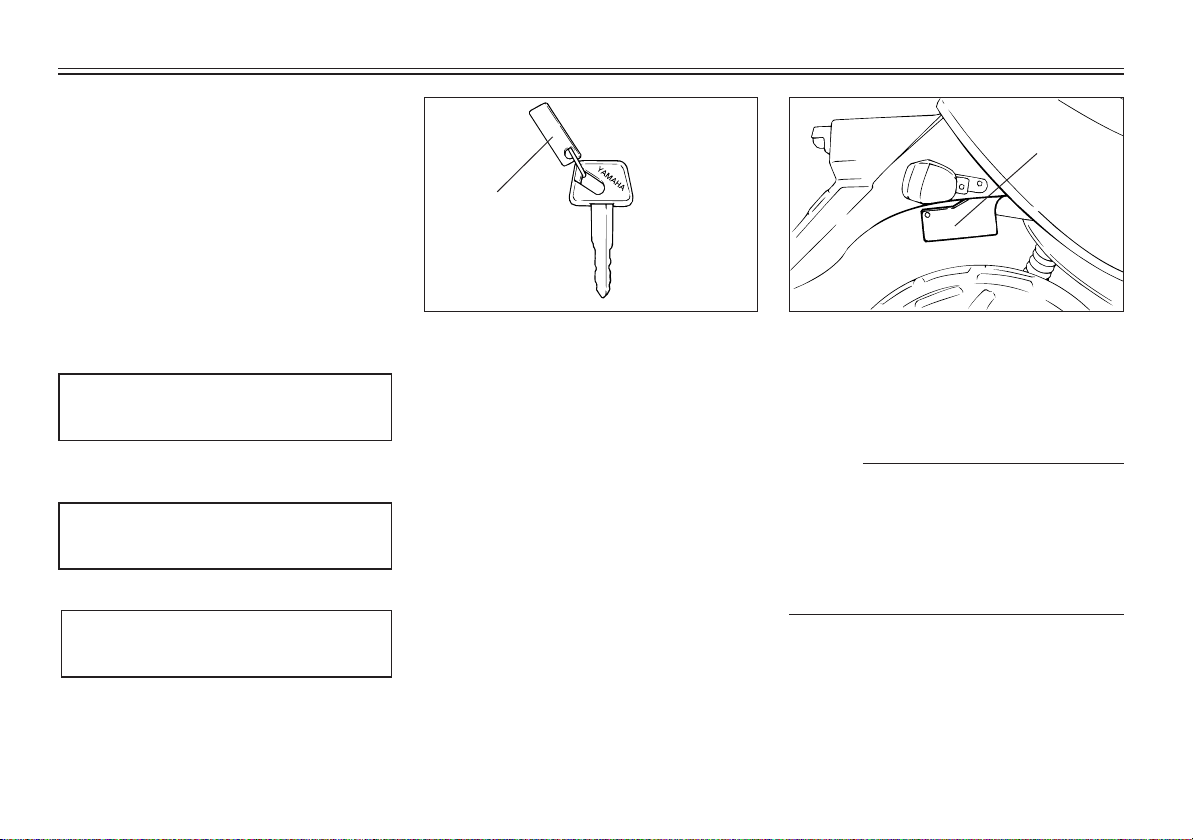
1. KEY IDENTIFICATION NUMBER:
2. VEHICLE IDENTIFICATION
NUMBER:
3. ENGINE SERIAL NUMBER:
1
1. Key identification number
EAU01042
Key identification number
The key identification number is
stamped on the key.
Record this number in the space provided and use it for reference when
obtaining a new key.
1
1. Vehicle identification number
EAU01044
Vehicle identification number
The vehicle identification number is
stamped into the frame.
NOTE:
The vehicle identification number is
used to identify your motorcycle and
may be used to register your motorcycle with the licensing authority in
your state.
9-1
Page 62
1
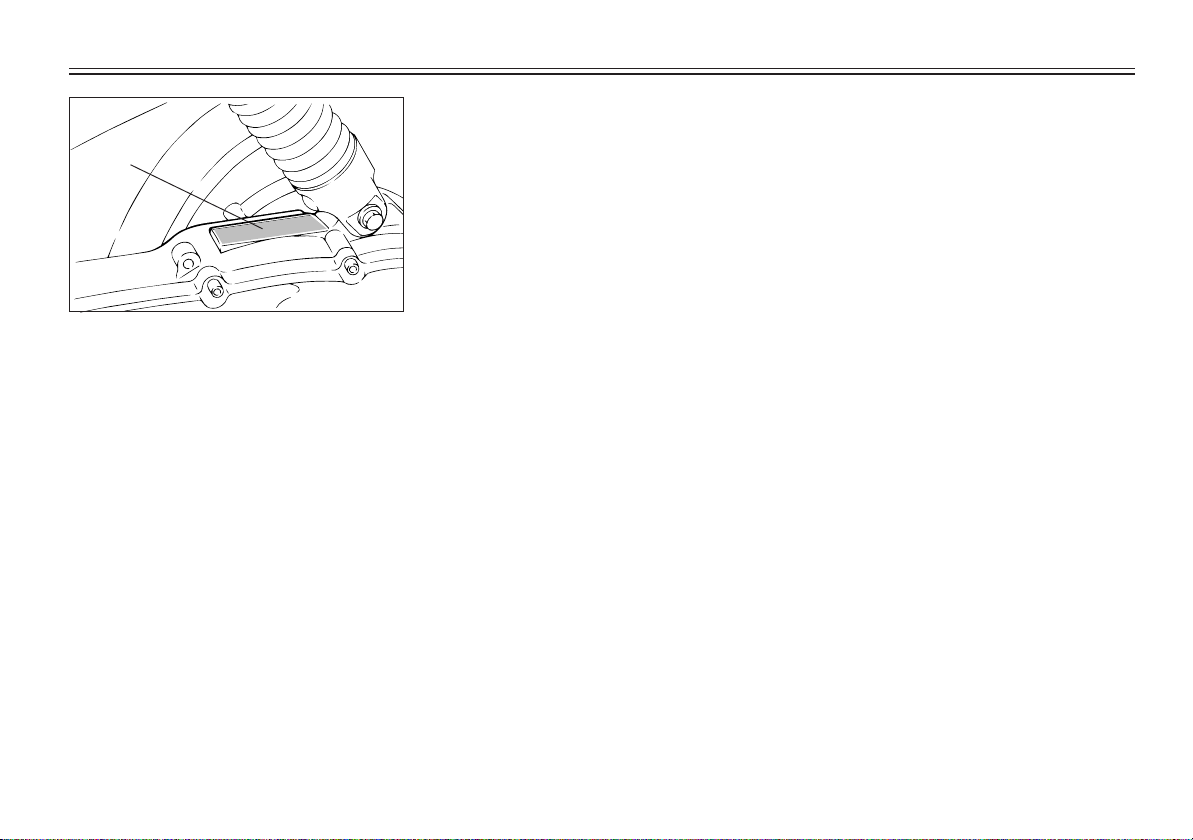
1. Engine serial number
EAU01047
Engine serial number
The engine serial number is stamped
into the crankcase.
CONSUMER INFORMATION
9-2
Page 63

1
2
3
4
5
6
7
8
9
Page 64

1
2
3
4
5
6
7
8
9
YAMAHA MOTOR TAIWAN CO.,LTD
PRINTED IN TAIWAN
2005 .07 - 1 * 1(E) !
 Loading...