

Yamaha BD-S1065 Owners Manual
BLU-RAY DISC PLAYER
LECTEUR DE BLU-RAY
BD-S1065
OWNER’S MANUAL
MODE D’EMPLOI
BEDIENUNGSANLEITUNG
BRUKSANVISNING
G
MANUALE DI ISTRUZIONI
MANUAL DE INSTRUCCIONES
GEBRUIKSAANWIJZING
QUICK

Important notes for users in the
U.K.
Mains plug
This apparatus is fitted with an approved 13 Amp
plug. To change a fuse in this type of plug proceed
as follows:
1 Remove fuse cover and fuse.
2 Fix new fuse which should be a BS1362 5 Amp,
A.S.T.
3 Refit the fuse cover.
If the fitted plug is not suitable for your jack outlets,
it should be cut off and an appropriate plug fitted in
its place.
If the mains plug contains a fuse, this should have a
value of 5 Amp. If a plug without a fuse is used, the
fuse at the distribution board should not be greater
than 5 Amp.
Note: The severed plug must be disposed to avoid a
possible shock hazard should it be inserted into a 13
Amp jack elsewhere.
How to connect a plug
The wires in the mains lead are coloured with the
following code:
blue = neutral (N), brown = live (L).
• As these colours may not correspond with the
colour markings identifying the terminals in your
plug, proceed as follows:
– Connect the blue wire to the terminal marked N
or coloured black
– Connect the brown wire to the terminal marked
L or coloured red.
– Do not connect either wire to the earth terminal
in the plug, marked E (or e) or coloured green (or
green and yellow).
VARO ITUS
Muiden kuin tässä esitettyjen toimintojen säädön tai
asetusten muutto saattaa altistaa vaaralliselle säteilylle tai
muille vaarallisille toiminnoille.
DK
Advarsel: Usynlig laserstråling ved åbning når
sikkerhedsafbrydere er ude af funktion. Undgå utsættelse
for stråling.
Bemærk: Netafbryderen p er sekundært indkoblet og
ofbryder ikke strømmen fra nettet. Den indbyggede netdel
er derfor tilsluttet til lysnettet så længe netstikket sidder i
stikkontakten.
N
Observer: Nettbryteren p er sekundert innkoplet. Den
innebygdenetdelen er derfor ikke frakoplet nettet så lenge
apparatet er tilsluttet nettkontakten.
S
Klass 1 laseraparat
Varning! Om apparaten används på annat sättþän i denna
bruksanvisning specificerats, kan användaren utsättas för
osynlig laserstrålning, som överskrider gränsen för
laserklass 1.
Observera! Strömbrytaren p är sekundärt kopplad och
inte bryter inte strömmen från nätet. Den inbyggda
nätdelen är därför ansluten till elnätet så länge
stickproppen sitter i vägguttaget.
SF
Luokan 1 laserlaite
Varoitus! Laitteen käyttäminen muulla kuin tässä
käyttöohjeessa mainitulla tavalla saattaa altistaa käyttäjän
turvallisuusluokan 1 ylittävälle näkymättömälle
lasersäteilylle.
Oikeus muutoksiin varataan. Laite ei saa olla alttiina
tippu-ja roiskevedelle.
Toiminnanvalitsin p on kytketty toisiopuolelle, eikä se
kytke laitetta irti sähköverkosta. Sisäänrakennettu verkkoosa on kytkettynä sähköverkkoon aina silloin, kun pistok
on pistorasiassa.
e
Before replacing the plug cover, make certain that
the cord grip is clamped over the sheath of the lead not simply over the two wires.
Copyright in the U.K.
Recording and playback of material may require
consent. See Copyright Act 1956 and The
Performer’s Protection Acts 1958 to 1972.
Caution-i En
VARO !
AVATTAESSA JA SUOJALUKITUS
OHITETTAESSA OLET ALTTIINA
NÄKYMÄTTÖMÄLLE LASERSÄTEILYLLE.
ÄLÄ KATSO SÄ TEESEEN.
VARNING!
OSYNLIG LASERSTRÅLNING NÄR DENNA DEL
ÄR ÖPPNAD OCH SPÄRREN ÄR URKOPPLAD.
BETRAKTA EJ STRÅLEN.
CAUTION
Use of controls or adjustments or performance of
procedures other than those specified herein may result
in hazardous radiation exposure.
AVERTISSEMENT
L’utilisation de commandes et l’emploi de réglages ou
de méthodes autres que ceux décrits ci-dessous,
peuvent entraîner une exposition à un rayonnement
dangereux.
VORSICHT
Die Verwendung von Bedienelementen oder die
Einstellung bzw. die Ausführung von anderen als in
dieser Anleitung beschriebenen Vorgängen kann zu
Gefährdung durch gefährliche Strahlung führen.
OBSERVERA
Användning av reglage eller justeringar eller utförande
av åtgärder på annat sätt än så som beskrivs häri kan
resultera i farlig strålning.
ATTENZIONE
L’uso di controlli, regolazioni, operazioni o procedure
non specificati in questo manuale possono risultare in
esposizione a radiazioni pericolose.
PRECAUCIÓN
El uso de los controles, los ajustes o los procedimientos
que no se especifican enste manual pueden causar una
exposición peligrosa a la radiación.
LET OP
Gebruik van bedieningsorganen, instellingen of
procedures anders dan beschreven in dit document kan
leiden tot blootstelling aan gevaarlijke stralen.
IN
DIGITAL OUT
OUT
REMOTE CONTROL
NETWORK
BD STORAGE/
HDMI
USB
SERVICE
CLASS 1 LASER PRODUCT
LASER KLASSE 1 PRODUKT
LUOKAN 1 LASERLAITE
KLASS 1 LASER APPARAT
PRODUIT LASER DE CLASSE 1
CENTER
AC IN
SUBWOOFER
SURROUND
BACK
SURROUND
FRONT
MIXED 2CH
L
RLR
AUDIO OUT VIDEO OUT
COMPONENT
Y
PB COAXIAL
VIDEO PR S VIDEO OPTICAL
CLASS 1 LASER PRODUCT
LASER KLASSE 1 PRODUKT
LUOKAN 1 LASERLAITE
KLASS 1 LASER APPARAT
PRODUIT LASER DE CLASSE 1
Caution-ii En

CAUTION: READ THIS BEFORE OPERATING YOUR UNIT.
1 To assure the finest performance, please read this manual
carefully. Keep it in a safe place for future reference.
2 Install this sound system in a well ventilated, cool, dry, clean
place – away from direct sunlight, heat sources, vibration,
dust, moisture, and/or cold. For proper ventilation, allow the
following minimum clearances.
Top: 10 cm (3-7/8 in)
Rear: 10 cm (3-7/8 in)
Sides: 10 cm (3-7/8 in)
3 Locate this unit away from other electrical appliances,
motors, or transformers to avoid humming sounds.
4 Do not expose this unit to sudden temperature changes from
cold to hot, and do not locate this unit in an environment with
high humidity (i.e. a room with a humidifier) to prevent
condensation inside this unit, which may cause an electrical
shock, fire, damage to this unit, and/or personal injury.
5 Avoid installing this unit where foreign object may fall onto
this unit and/or this unit may be exposed to liquid dripping or
splashing. On the top of this unit, do not place:
– Other components, as they may cause damage and/or
discoloration on the surface of this unit.
– Burning objects (i.e. candles), as they may cause fire,
damage to this unit, and/or personal injury.
– Containers with liquid in them, as they may fall and
liquid may cause electrical shock to the user and/or
damage to this unit.
6 Do not cover this unit with a newspaper, tablecloth, curtain,
etc. in order not to obstruct heat radiation. If the temperature
inside this unit rises, it may cause fire, damage to this unit,
and/or personal injury.
7 Do not plug in this unit to a wall outlet until all connections
are complete.
8 Do not operate this unit upside-down. It may overheat,
possibly causing damage.
9 Do not use force on switches, knobs and/or cords.
10 When disconnecting the power cord from the wall outlet,
grasp the plug; do not pull the cord.
11 Do not clean this unit with chemical solvents; this might
damage the finish. Use a clean, dry cloth.
12 Only voltage specified on this unit must be used. Using this
unit with a higher voltage than specified is dangerous and
may cause fire, damage to this unit, and/or personal injury.
Yamaha will not be held responsible for any damage resulting
from use of this unit with a voltage other than specified.
13 To prevent damage by lightning, keep the power cord
disconnected from a wall outlet or this unit during a lightning
storm.
14 Do not attempt to modify or fix this unit. Contact qualified
Yamaha service personnel when any service is needed. The
cabinet should never be opened for any reasons.
15 When not planning to use this unit for long periods of time
(i.e. vacation), disconnect the AC power plug from the wall
outlet.
16 Be sure to read the “Troubleshooting” section on common
operating errors before concluding that this unit is faulty.
17 Before moving this unit, press p to set this unit to the
standby mode, and disconnect the AC power plug from the
wall outlet.
18 Condensation will form when the surrounding temperature
changes suddenly. Disconnect the power cable from the
outlet, then leave this unit alone.
19 When using this unit for a long time, this unit may become
warm. Turn the power off, then leave this unit alone for
cooling.
20 Install this unit near the AC outlet and where the AC power
plug can be reached easily.
21 The batteries shall not be exposed to excessive heat such as
sunshine, fire or the like.
This unit is not disconnected from the AC power source
as long as it is connected to the wall outlet, even if this
unit itself is turned off by p. This state is called the
standby mode. In this state, this unit is designed to
consume a very small quantity of power.
WARNING
TO REDUCE THE RISK OF FIRE OR ELECTRIC
SHOCK, DO NOT EXPOSE THIS UNIT TO RAIN OR
MOISTURE.
The laser component in this product is capable of
emitting radiation exceeding the limit for Class 1.
LASER Specification:
Class 1 LASER Product
Wave length: 788 nm (CDs)/654 nm (DVDs)/405 nm
(BDs)
Laser power: No hazardous radiation is emitted with the
safety protection
LASER SAFETY
This unit employs a laser. Due to possible eye injury, only a
qualified service person should remove the cover or attempt
to service this device.
DANGER
This unit emits visible laser radiation when open. Avoid
direct eye exposure to beam. When this unit is plugged into
the wall outlet, do not place your eyes close to the opening of
the disc tray and other openings to look into inside.
Caution-iii En

Contents
1
1. INTRODUCTION
About Discs ........................................................ 2
Types of Discs that Can Be Used with This Player........ 2
Discs that Cannot Be Used with This Player.................. 3
Disc Precautions ............................................................. 4
Getting Started ................................................... 5
Supplied accessories ....................................................... 5
The Icons Used in This Operation Manual..................... 5
Copyright ........................................................................ 5
Controls and Functions..................................... 6
Front panel...................................................................... 6
Rear panel ....................................................................... 6
Remote Control............................................................... 7
2. CONNECTION
Introduction to Connections ............................. 8
Video/audio terminal on this Player ............................... 8
Video jacks on this Player (Connect 1, 2, or 3) ..... 8
Audio terminals/jacks on this Player
(Connect 1, 2, or 3) ............................................ 8
Broadband Internet connection....................................... 8
USB device connection .................................................. 8
HDMI Connection ............................................... 9
Connecting to the HDMI Terminal ................................ 9
Video Connections........................................... 10
Connecting to the Component Jacks ............................ 10
Connecting to the S Video or Video Jack..................... 11
Audio Connections .......................................... 12
Connecting to the Digital Audio Jack/Terminal........... 12
Connecting to the Audio Jacks ..................................... 13
Broadband Internet Connection ..................... 14
Connecting to the NETWORK terminal and USB BD
STORAGE/SERVICE terminal ............................... 14
Other Connections........................................... 15
Connecting to the REMOTE CONTROL jacks ........... 15
Connecting the power cable ......................................... 15
3. DISC PLAYBACK
Before Starting Playback................................. 16
Loading the Batteries in the Remote Control ............... 16
Turning the Power On .................................................. 16
Indicators on the front panel display ............................ 16
Setting the on-screen display language ........................ 17
Updating the software of this unit ................................ 17
Setting the audio output................................................ 18
Preparing for BD-LIVE ................................................ 18
Activating the Secondary Audio................................... 18
Controlling the Blu-ray disc player using the HDMI™
control function ........................................................ 18
BD/DVD/CD Playback....................................... 20
Loading a Disc.............................................................. 20
Basic playback operation.............................................. 20
Repeat Playback ........................................................... 21
Using BD/DVD Menus ................................................ 22
Using DVD-R/-RW Menu............................................ 22
Using the Audio CD Playback Menu ........................... 23
Enjoying BONUSVIEW or BD-LIVE ......................... 24
Function Control Screen............................................... 25
Displaying the disc information ................................... 27
JPEG File Playback .......................................... 28
Playing back still images in sequence........................... 28
Playing back still images in a selected folder ............... 28
Playing back Slide Show............................................... 28
Setting slide show speed/repeat playback..................... 28
4. SETTINGS
Settings ............................................................. 29
Common operations ...................................................... 29
Audio Video Settings .................................................... 30
Speaker Settings............................................................ 32
Quick Start .................................................................... 33
Auto Power Off............................................................. 33
HDMI Control............................................................... 33
Playback Setting............................................................ 33
Version.......................................................................... 34
System Reset................................................................. 34
Communication Setup................................................... 34
USB Memory Management .......................................... 36
Software Update............................................................ 37
5. ADDITIONAL INFORMATION
Troubleshooting ............................................... 39
Power ............................................................................ 39
Basic Operation............................................................. 39
Disc Playback................................................................ 39
Picture ........................................................................... 39
Sound ............................................................................ 40
Network......................................................................... 40
Other.............................................................................. 41
Messages Relating to BD disc and DVD disc............... 41
Glossary ............................................................ 42
Specifications ................................................... 43
General.......................................................................... 43
Audio Performance ....................................................... 43
Input/Output .................................................................. 43
(at the end of this manual)
Information about software ....................................i
2
3
4
5
English
1 En
INTRODUCTION
About Discs
■ Types of Discs that Can Be Used with This Player
– The following discs can be played back in this
Player. Do not use an 8 cm (3”) to 12 cm (5”)
adapter.
– Use discs that conform to compatible standards as
indicated by the presence of official logos on the
disc label. Playback of discs not complying with
these standards is not guaranteed. In addition, the
image quality or sound quality is not guaranteed
even if the discs can be played back.
Disc Type
BD video -- Audio + Video
BD-RE DL
BD-R DL
DVD Video Video format Audio + Video
DVD+RW/
DVD+R
DVD+R DL
DVD-R DL
DVD-RW/
DVD-R
Audio CD
CD-RW/CD-R Audio CD
*1 This Player has been designed on the premise of playing back
Audio CDs that comply with CD (Compact Disc) standards. CDs
containing a signal for the purpose of protecting copyrights (copy
control signal) may not be able to be played back with this Player.
*2 Refer to “About the JPEG file format” on page 3.
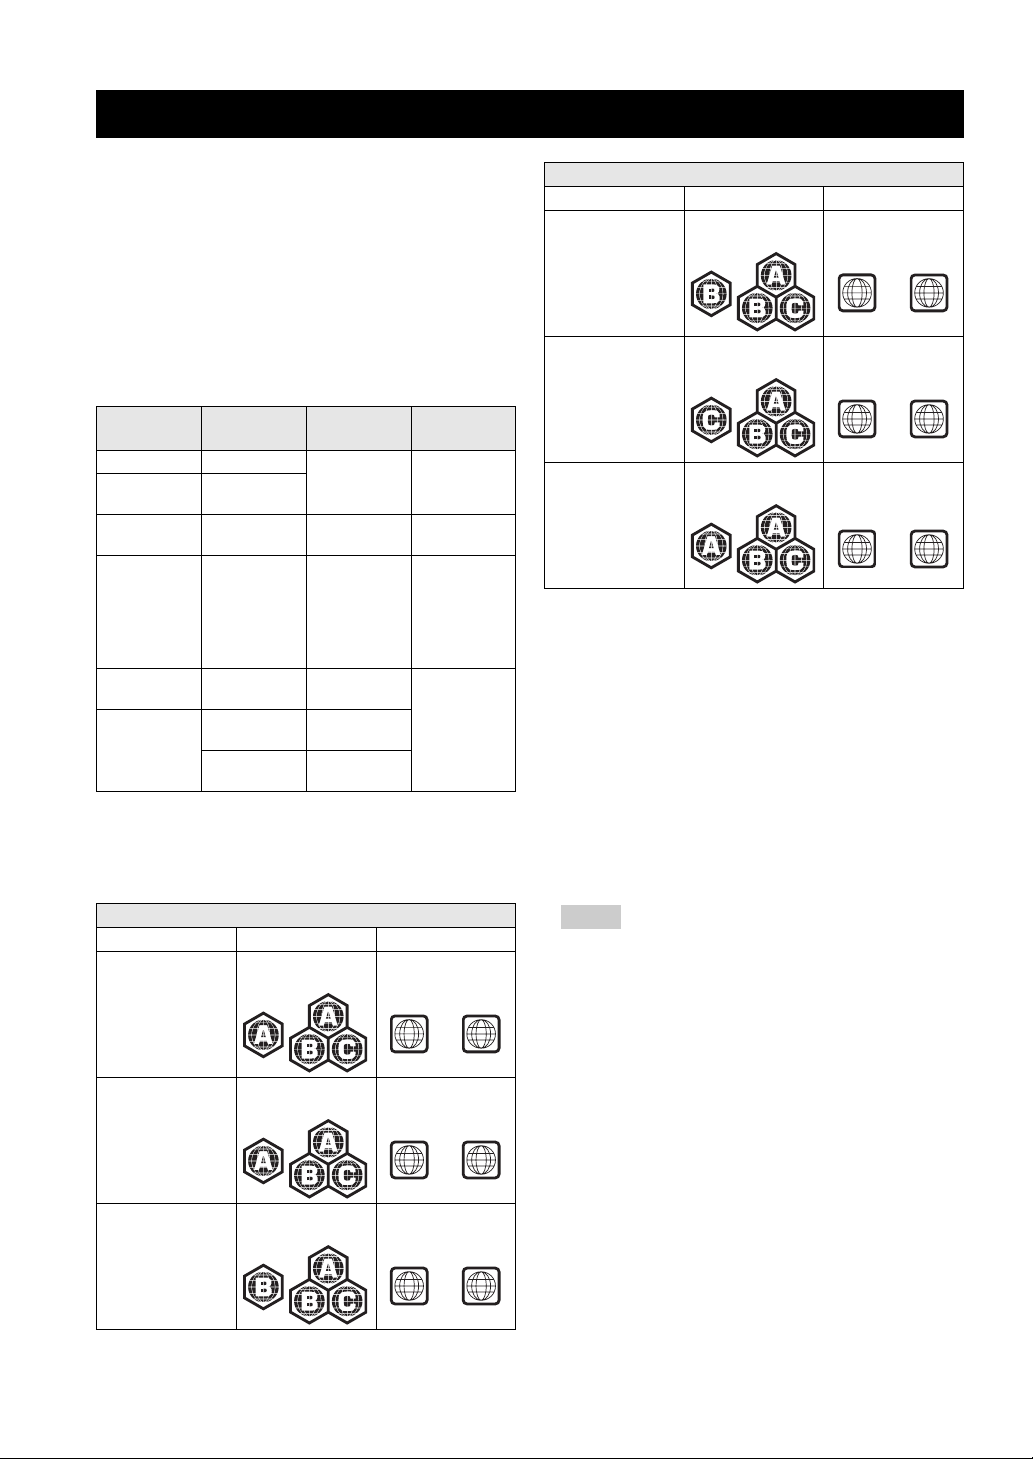
Model BD-Video DVD-Video
U.S.A. and Canada Region code “A” or
South America Region code “A” or
Recording
Format
BDMV format
Video/VR/
AVCHD
format
(finalized disc
only)
*1
Audio CD
(CD-DA)
(CD-DA)
*2
JPEG
Region management information
“ALL”
“ALL”
Contents Disc Size
(Movie)
(Movie)
Audio + Video
(Movie)
Audio 12 cm (5”)
Audio
Still image
(JPEG file)
12 cm (5”)
12 cm (5”)
8 cm (3”)
12 cm (5”)
8 cm (3”)
8 cm (3”)
Region number “1”
or “ALL”
1
Region number “4”
or “ALL”
ALL
Region management information
Model BD-Video DVD-Video
Australia Region code “B” or
“ALL”
Russia Region code “C” or
“ALL”
Asia Region code “A” or
“ALL”
Region number “4”
or “ALL”
4
Region number “5”
or “ALL”
5
Region number “3”
or “ALL”
3
– BD/DVD video players and discs have region codes,
which dictate the regions in which a disc can be
played. For the region codes, refer to “Region
management information”. (p. 2)
– BD/DVD Video operations and functions may be
different from the explanations in this manual and
some operations may be prohibited due to disc
manufacturer's settings.
– If a menu screen or operating instructions are
displayed during playback of a disc, follow the
operating procedure displayed.
– The audio component of a DVD video recorded at 96
kHz (Linear PCM) will be output as 48 kHz audio
during playback.
Notes
– Playback for some of the discs in the left side
column tables may not be possible depending on the
disc.
– “Finalize” refers to a recorder processing a recorded
disc so that it will play in other DVD players/
recorders as well as this Player. Only finalized DVD
discs will play back in this Player. (This Player does
not have a function to finalize discs.)
ALL
ALL
ALL
Europe Region code “B” or
“ALL”
2 En
4
Region number “2”
or “ALL”
2
ALL
ALL
About Discs
■ Discs that Cannot Be Used with This Player
The following discs cannot be played back or will not play
back properly on this Player. If such a disc is mistakenly
played back, speaker damage may occur.
CDG, Video CD, Photo CD, CD-ROM, CD-TEXT,
SVCD, SA-CD, PD, CDV, CVD, DVD-RAM, DVDAudio, BD-RE with the cartridge, CD-MP3, CD-WMA
Discs with unusual shapes cannot be
played.
– Discs with unusual shapes (heart-shaped or
hexagonal discs, etc.) cannot be used. The use of
such discs will cause malfunction.
The following BD/DVD video discs cannot
be played.
– Discs not match the region code/number of this
Player (“Region management information”, p. 2).
– Discs produced illegally.
– Discs recorded for commercial use.
About the JPEG file format
JPEG is a type of file format for storing still-image files
(photos, illustrations, etc.). The Player lets you play JPEG
format still-image files.
File formats that are not compatible.
– Still images in formats other than JPEG (such as
TIFF) cannot be played.
– There may be some files that cannot be played even
if they are in JPEG format.
– Progressive JPEG files cannot be played.
– Moving image files and audio files as well as Motion
JPEG format files cannot be played, even though
they are JPEG files.
Other files that cannot be played back.
– You may not be able to play some still images which
you have created, touched up, copied or otherwise
edited on your computer.
You may experience one or more of the
following symptoms when playing files.
– It may take some time to play files depending on the
number of folders, number of files and volume of
data involved.
– EXIF information will not be displayed. EXIF stands
for Exchangeable Image File Format, and is a
standard for storing interchange information in
image files, especially those using JPEG
compression. (Refer to http://exif.org for more
information.)
When using the unit to play a CD-RW/R disc
with still images stored (recorded)
– With CD-RW/R discs on which still images are
mixed in with music or movies, you will be able to
play only the still images. You may not be able to
play some of these discs at all.
– Multi-session discs cannot be played.
– You may not be able to play some still images you
have processed (rotated or saved by overwriting
other images) using image processing software or
some still images you have imported from the
Internet or e-mail.
– The discs which this Player can play back
(recognize) are limited to the following properties:
Contains EXIF format files
Picture resolution: Between 32x32 and 7680x4320
pixels
Maximum number of folders: 256
Maximum number of files: 256 per folder
File size: 20MB or less
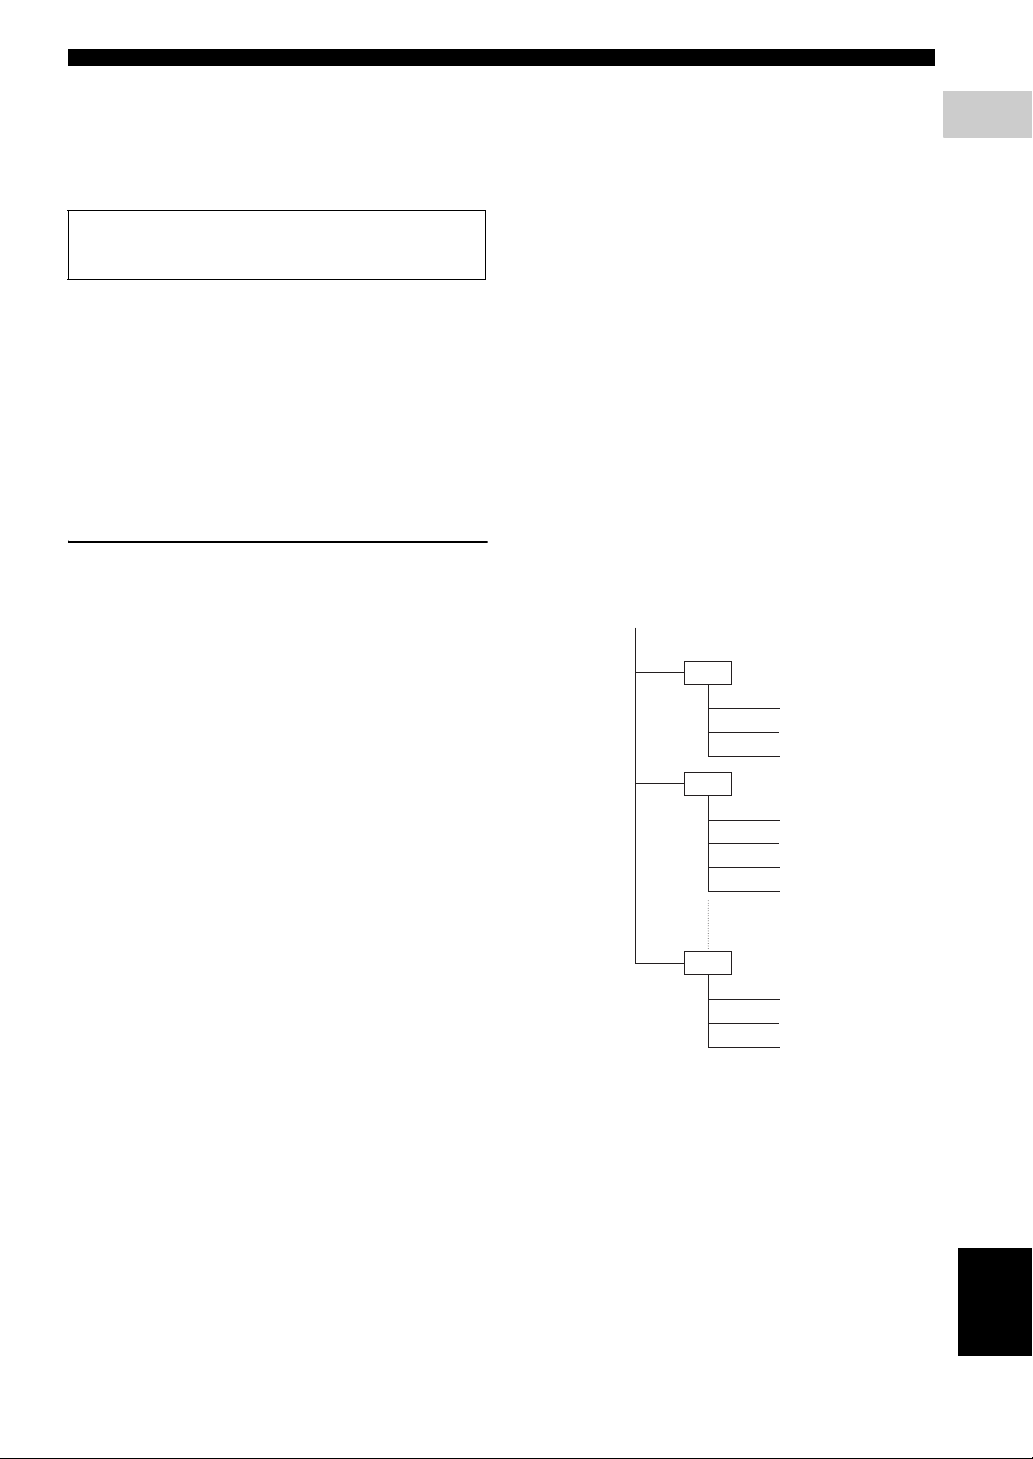
Structure of still images (JPEG) folders
– You can play still images (JPEG) with this unit by
making folder on disc as shown below. Images
situated on the root directly cannot be played back.
Root
01 Folder
001.jpg
002.jpg
003.jpg
02 Folder
004.jpg
005.jpg
006.jpg
007.jpg
256 Folder
254.jpg
255.jpg
256.jpg
1
INTRODUCTION
3 En
English
About Discs
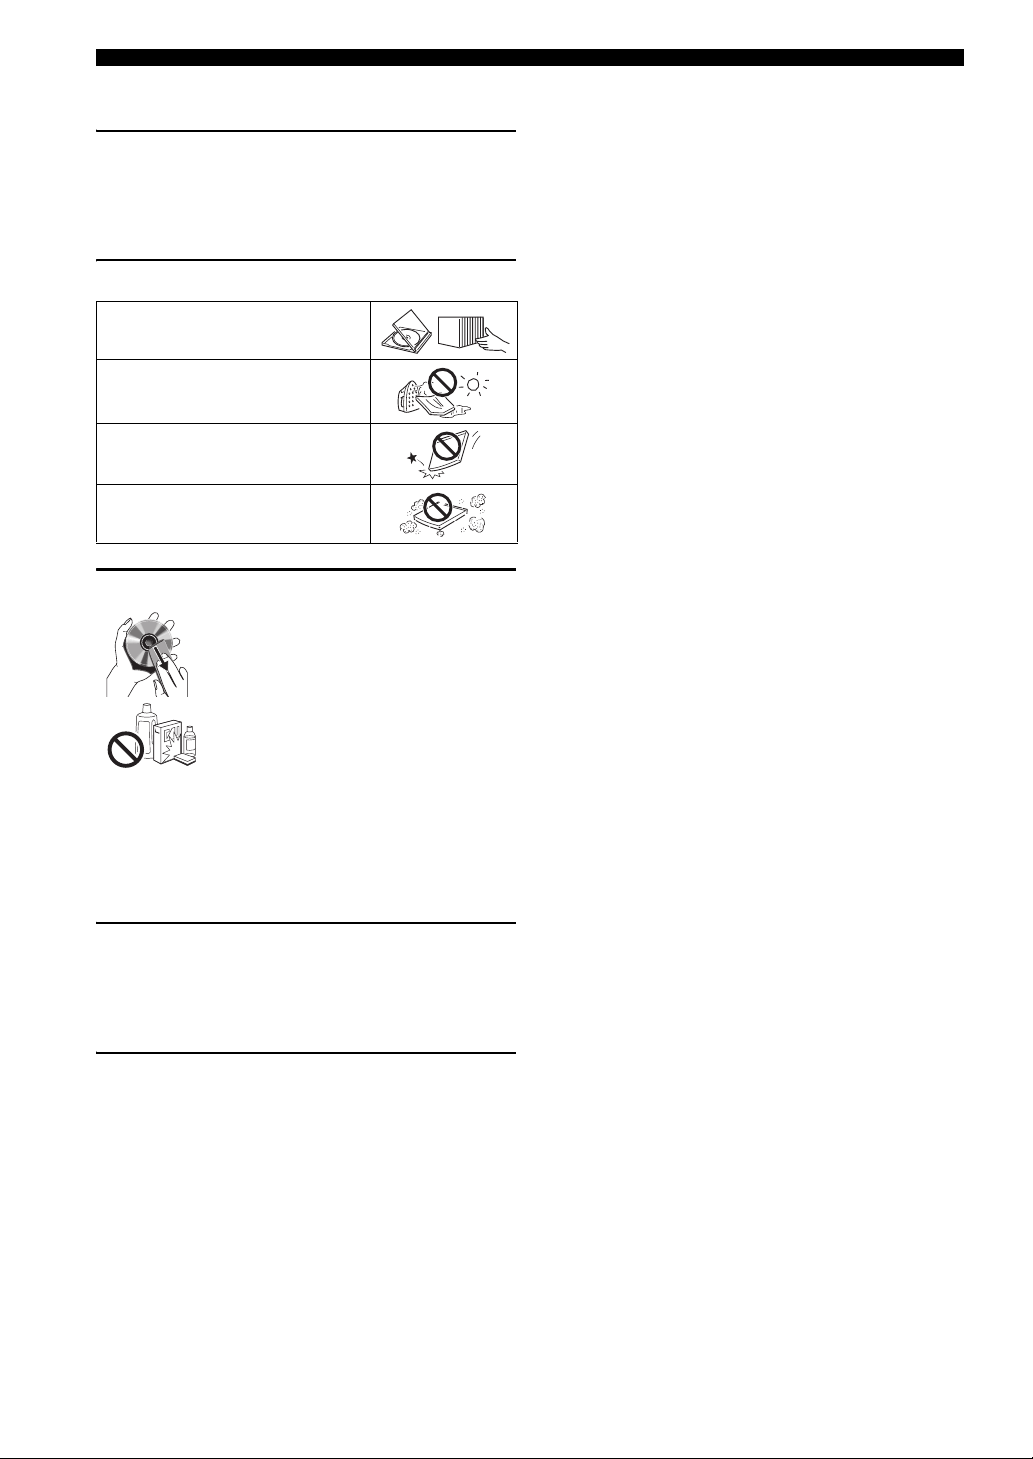
■ Disc Precautions
Be Careful of Scratches and Dust
– BD, DVD and CD discs are sensitive to dust,
fingerprints and especially scratches. A scratched
disc may not be able to be played back. Handle discs
with care and store them in a safe place.
Proper Disc Storage
Place the disc in the center of the disc case
and store the case and disc upright.
Avoid storing discs in locations subject to
direct sunlight, close to heating appliances
or in locations of high humidity.
Do not drop discs or subject them to
strong vibrations or impacts.
Avoid storing discs in locations where
there are large amounts of dust or
moisture.
Handling Precautions
– If the surface is soiled, wipe gently with a
soft, damp (water only) cloth. When
wiping discs, always move the cloth from
the center hole toward the outer edge.
– Do not use record cleaning sprays,
benzene, thinner, static electricity
prevention liquids or any other solvent.
– Do not touch the surface.
– Do not stick paper or adhesive labels to the disc.
– If the playing surface of a disc is soiled or scratched,
the Player may decide that the disc is incompatible
and eject the disc tray, or it may fail to play the disc
correctly. Wipe any dirt off the playing surface with
a soft cloth.
To remove condensation:
– Take out the disc and leave the Player with the
power off until the condensation disappears. Using
the Player when there is condensation may cause
malfunction.
Cleaning the Pick Up Lens
– Never use commercially available cleaning discs.
The use of these discs can damage the lens.
– Request the nearest service center approved by
Yamaha to clean the lens.
Warnings about dew formation
– Condensation may form on pick up lens or disc in
the following conditions:
– Immediately after a heater has been turned on.
– In a steamy or very humid room.
– When the Player is suddenly moved from a cold
environment to a warm one.
When condensation forms:
– It becomes difficult for the Player to read the signals
on the disc and prevents the Player from operating
properly.
4 En
Getting Started
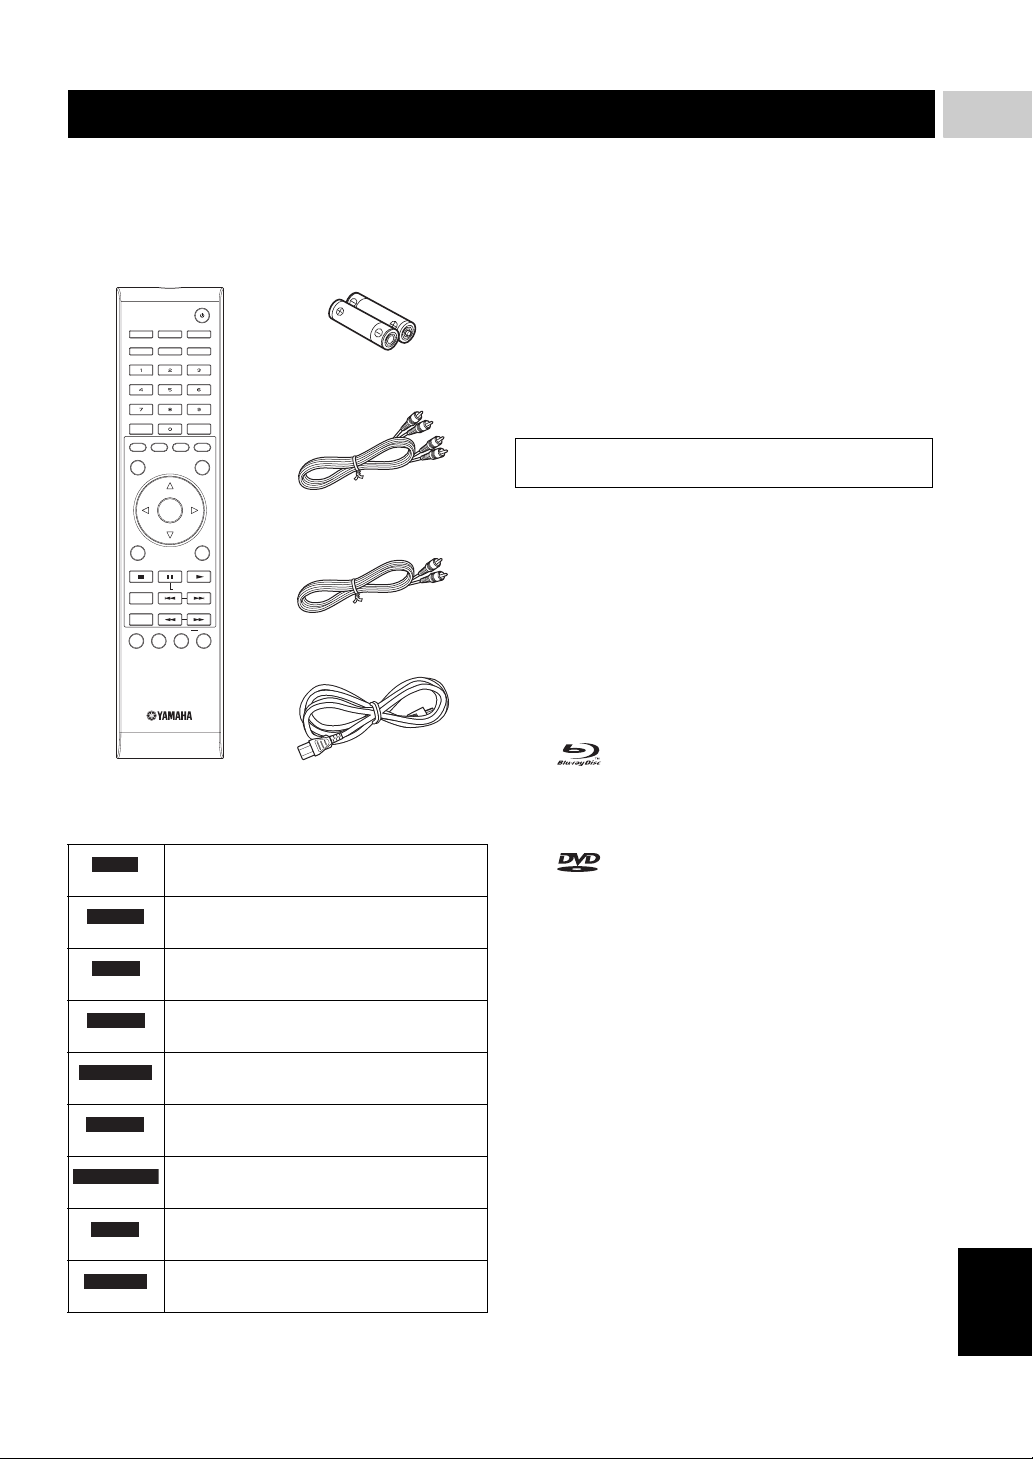
■ Supplied accessories
Make sure the following accessories are provided with the
product.
Remote
control
OPEN/CLOSE
DIMMER
SUBTITLE AUD IO ANGLE
CLEAR
A
B C D
TOP MENU/TITLE LIST
VIDEO-RESET
ENTER
POP UP MENU
Batteries (x2)
(AAA, R03, UM-4)
Audio pin cable
1
INTRODUCTION
■ Copyright
– Audio-visual material may consist of copyrighted
works which must not be recorded without the
authority of the owner of the copyright. Refer to
relevant laws in your country.
– This product incorporates copyright protection
technology that is protected by U.S. patents and
other intellectual property rights. Use of this
copyright protection technology must be authorized
by Macrovision, and is intended for home and other
limited viewing uses only unless otherwise
authorized by Macrovision. Reverse engineering or
disassembly is prohibited.
U.S. Patent Nos. 6,836,549; 6,381,747; 7,050,698;
6,516,132; and 5,583,936
ENTER
EXIT
STATUS
ON SCREEN
SETUP P in P
SLOW/SKIP
SEARCH
REPEAT
RETURN
OFF
Video pin cable
Power cable
■ The Icons Used in This Operation Manual
BD-V
BD-RE
BD-R
DVD-V
DVD-RW
DVD-R
AUDIO CD
CD-R
JPEG
CD-RW
Indicates the functions that can be
performed for BD Video discs.
Indicates the functions that can be
performed for BD-RE discs.
Indicates the functions that can be
performed for BD-R discs.
Indicates the functions that can be
performed for DVD Video discs.
Indicates the functions that can be
performed for DVD-RW discs.
Indicates the functions that can be
performed for DVD-R discs.
Indicates the functions that can be
performed for Audio CDs.
Indicates the functions that can be
performed for CD-R discs in JPEG format.
Indicates the functions that can be performed
JPEG
for CD-RW discs in JPEG format.
– Manufactured under license from Dolby
Laboratories. “Dolby” and the double-D symbol are
trademarks of Dolby Laboratories.
– Manufactured under license under U.S. Patent #’s:
5,451,942; 5,956,674; 5,974,380; 5,978,762;
6,226,616; 6,487,535; 7,392,195; 7,272,567;
7,333,929; 7,212,872 & other U.S. and worldwide
patents issued & pending. DTS is a registered
trademark and the DTS logos, Symbol, DTS-HD and
DTS-HD Master Audio | Essential are trademarks of
DTS, Inc. ©1996-2008 DTS, Inc. All Rights
Reserved.
– is a trademark.
– “BD-LIVE” logo is a trademark of Blu-ray Disc
Association.
– “BONUSVIEW” is a trademark of Blu-ray Disc
Association.
– is a trademark of DVD Format/Logo
Licensing Corporation.
– HDMI, the HDMI logo and High-Definition
Multimedia Interface are trademarks or registered
trademarks of HDMI Licensing LLC.
– “x.v.Color” and “x.v.Color” logo are trademarks.
– “AVCHD” and the “AVCHD” logo are trademarks
of Panasonic Corporation and Sony Corporation.
– Java and all Java-based trademarks and logos are
trademarks or registered trademarks of Sun
Microsystems, Inc. in the United States and/or other
countries.
– This product is licensed under the AVC patent
portfolio license and VC-1 patent portfolio license
for the personal and non-commercial use of a
consumer to (i) encode video in compliance with the
AVC Standard and VC-1 Standard (“AVC/VC-1
Video”) and/or (ii) decode AVC/VC-1 Video that
was encoded by a consumer engaged in a personal
and non-commercial activity and/or was obtained
from a video provider licensed to provide AVC/VC-
1 Video. No license is granted or shall be implied for
any other use. Additional information may be
obtained from MPEG LA, LLC.
See http://www.mpegla.com.
English
5 En
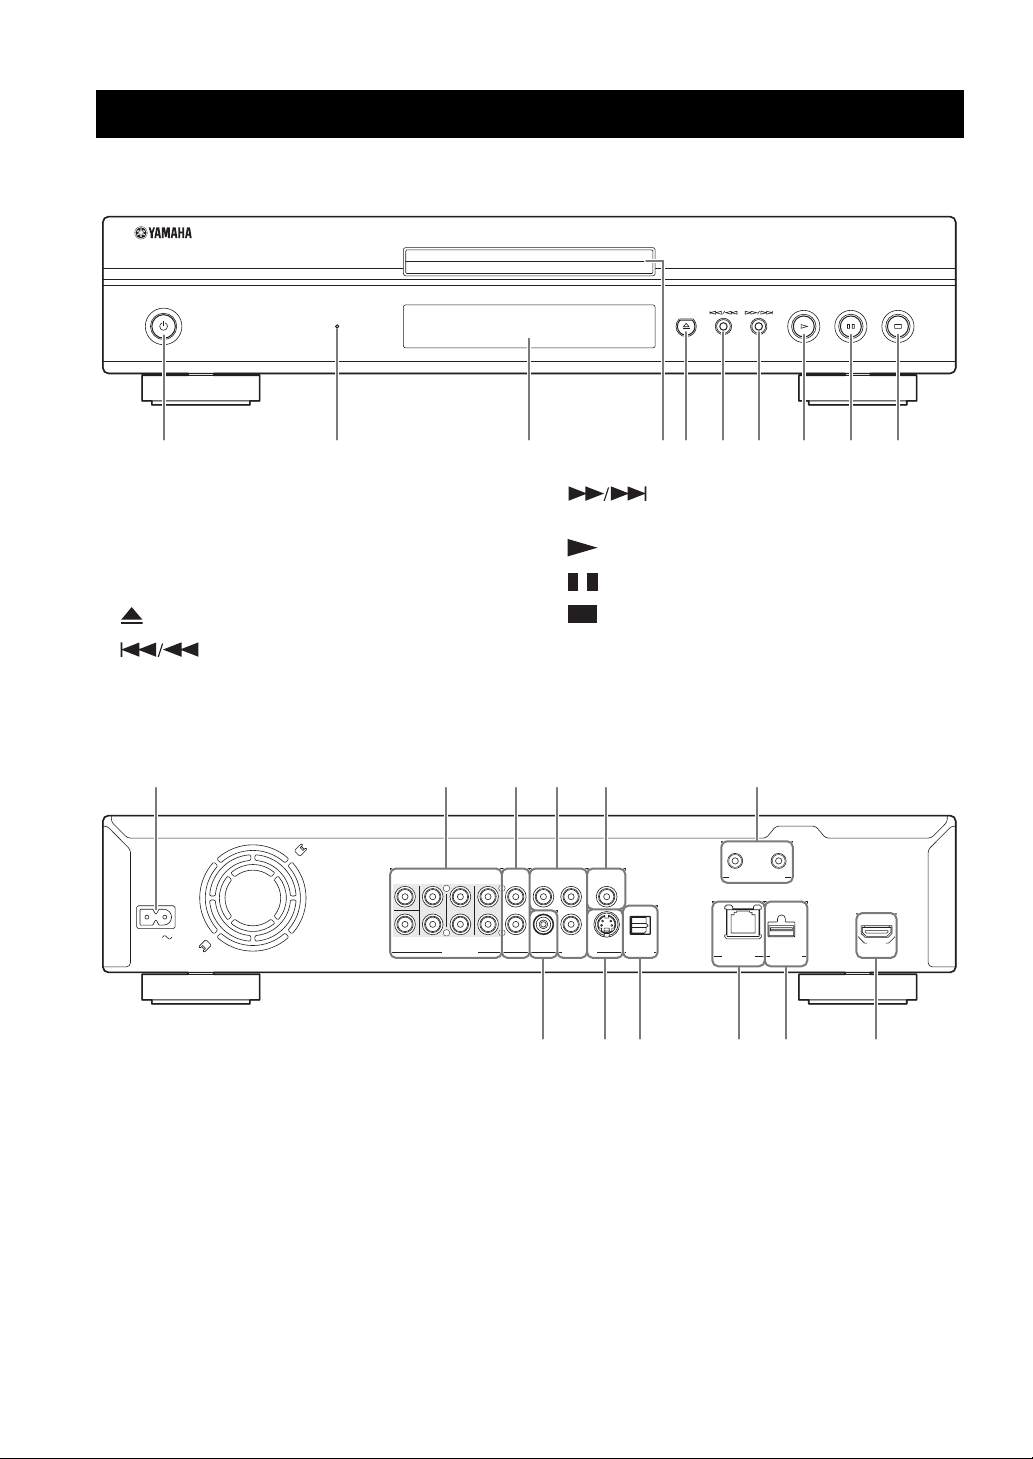
Controls and Functions
■ Front panel
QUICK
1 2 3 54 6 7 8 9 0
1 p (Power) (p. 20)
2 QUICK indicator (p. 33)
3 Front panel display (p. 16)
4 Disc tray (p. 20)
5 (Eject) (p. 20)
6 (Search backward/Skip backward)
(p. 20)
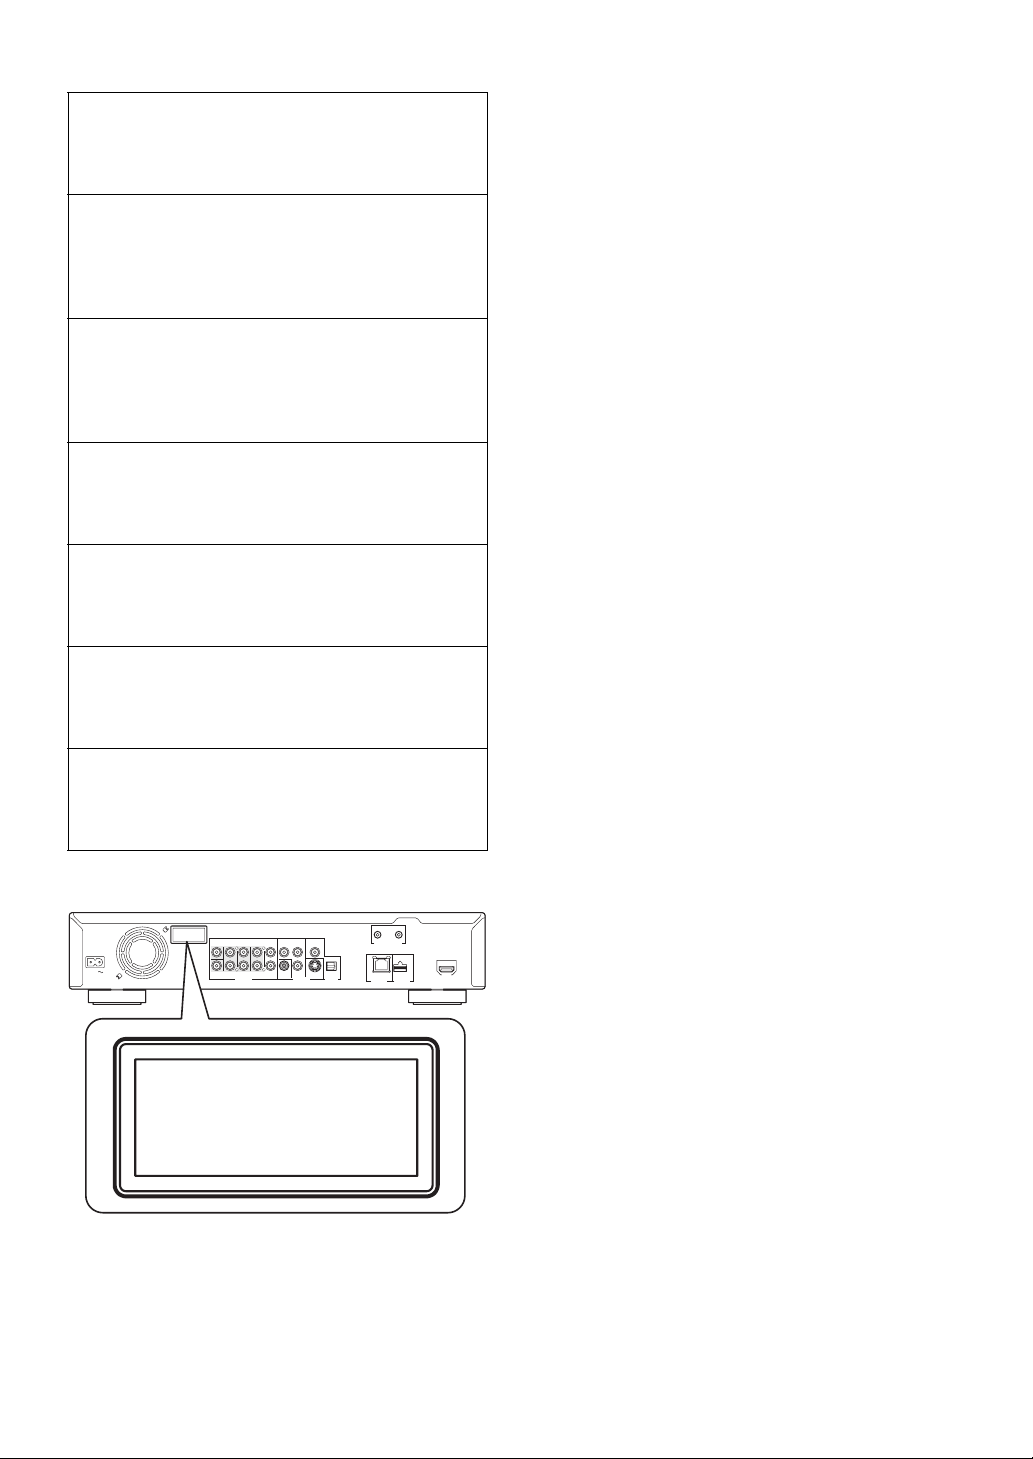
■ Rear panel
SURROUND
CENTER
SURROUND
FRONT
BACK
L
AC IN
R
SUBWOOFER
AUDIO OUT VIDEO OUT
7 (Search forward/Skip forward)
(p. 20)
8 (Play) (p. 20)
9 (Pause) (p. 20)
0 (Stop) (p. 20)
321 5 6
4
OUT
IN
COMPONENT
MIXED 2CH
Y
L
R
VIDEO PR S VIDEO OPTICAL
PB COAXIAL
DIGITAL OUT
REMOTE CONTROL
NETWORK
USB
BD STORAGE/
SERVICE
HDMI
BA0987
1 AC IN (p. 15)
2 AUDIO OUT (8ch discrete) (p. 13)
3 AUDIO OUT (MIXED 2CH) (p. 13)
4 COMPONENT (p. 10)
5 DIGITAL OUT (COAXIAL) (p. 12)
6 REMOTE CONTROL (IN/OUT) (p. 15)
6 En
7 VIDEO (p. 11)
8 S VIDEO (p. 11)
9 DIGITAL OUT (OPTICAL) (p. 12)
0 NETWORK (p. 14)
A USB BD STORAGE/SERVICE (p. 14)
B HDMI (p. 9)
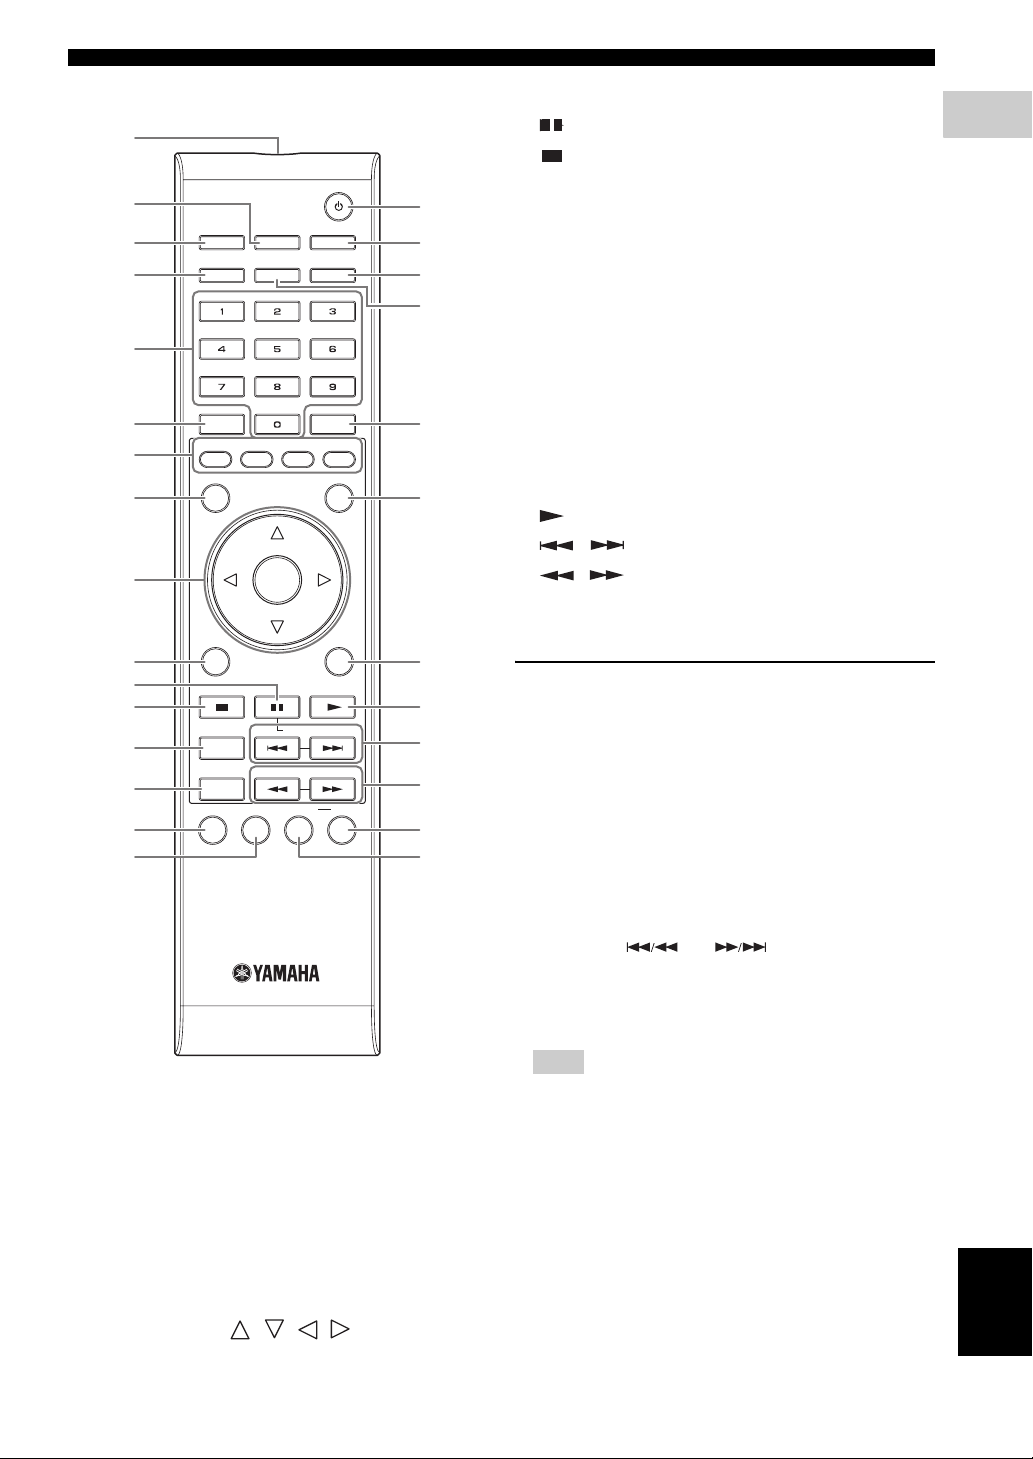
Controls and Functions
■ Remote Control
1
0 EXIT (p. 28, 29, 30)
A (Pause) (p. 20)
B (Stop) (p. 20)
C STATUS (p. 21, 27)
2
3
4
OPEN/CLOSE
DIMMER
VIDEO-RESET
SUBTITLE AUDIO ANGLE
G
H
I
J
D ON SCREEN (p. 26)
E SETUP (p. 17, 28, 29)
F P in P (p. 25)
G p (Power) (p. 16)
H VIDEO-RESET (p. 30, 31)
5
I ANGLE (p. 26)
J AUDIO (p. 26)
6
7
8
CLEAR
A
B C D
TOP MENU/TITLE LIST
ENTER
POP UP MENU
K
L
K ENTER (p. 30, 37)
L POP UP MENU (p. 22)
M RETURN (p. 21, 24, 26, 28, 29)
N (Play) (p. 20)
O / (SLOW/SKIP) (p. 20)
9
ENTER
P / (SEARCH) (p. 20)
Q OFF (p. 21)
EXIT
0
RETURN
M
A
B
C
D
E
STATUS
ON SCREEN
SETUP P in P
SLOW/SKIP
SEARCH
REPEAT
OFF
N
O
P
Q
FR
R REPEAT (p. 21, 26)
ID function
You can change the remote control ID to prevent
unwanted operation of the other Yamaha player such as
DVD player. If you have changed the remote control ID,
make sure that you select the same ID for the main unit.
The default setting is ID1.
1 Remote control setting
To change the ID from ID1 to ID2, press and hold A and 2
simultaneously for 3 seconds.
To change the ID from ID2 to ID1, press and hold A and 1
simultaneously for 3 seconds.
2 Main unit setting
Press and hold and on the front panel
simultaneously for 2 seconds while no disc is inserted in
this Player and the disc tray is closed (current ID is
displayed). Keep pressing and holding the keys for
another 2 seconds to change the ID between ID1 and ID2.
1
INTRODUCTION
1 Infrared signal transmitter (p. 16)
2 DIMMER (p. 16)
3 OPEN/CLOSE (p. 20)
4 SUBTITLE (p. 26)
5 Number buttons (p. 26)
6 CLEAR (p. 29)
7 A, B, C, D (p. 22, 24, 28, 35)
8 TOP MENU/TITLE LIST (p. 22)
9 Cursor buttons ( / / / ), ENTER (p. 17,
30)
Note
– If the remote control is without batteries for a few
minutes or if exhausted batteries remain in the
remote control, the remote control ID is
automatically set to ID1. If you want to use the
remote control in ID2 setting, install new batteries
and set the remote control ID again.
English
7 En
CONNECTION
L
/
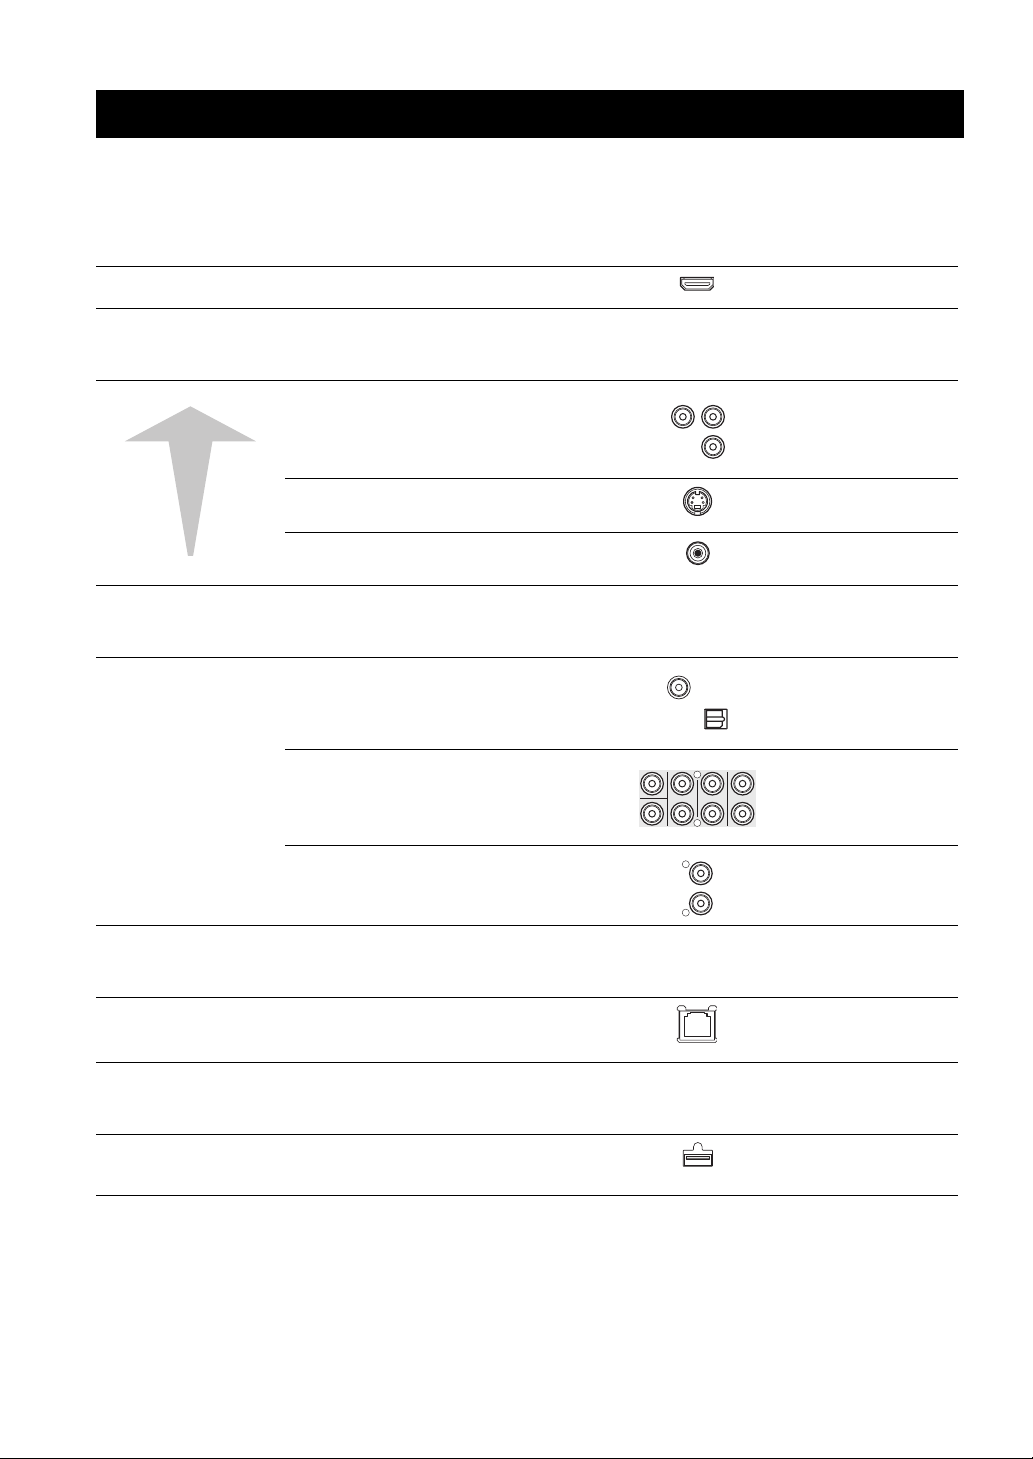
Introduction to Connections
This Player is equipped with the terminals/jacks listed below. Find the corresponding terminal/jack on your video/audio
equipment. We recommend that you use the HDMI terminal which provides high quality digital audio and video on a
single connection. If you use the other terminals/jacks, connect the video first. Then connect the audio.
■ Video/audio terminal on this Player
1 HDMI terminal
HDMI
■ Video jacks on this Player (Connect 1, 2, or 3)
Higher Quality
Standard Quality
1 VIDEO OUT (COMPONENT) jacks
2 VIDEO OUT (S VIDEO) jack
3 VIDEO OUT (VIDEO) jack
COMPONENT
Y
S VIDEO
VIDEO
PB
PR
■ Audio terminals/jacks on this Player (Connect 1, 2, or 3)
CENTER
SUBWOOFER
COAXIAL
SURROUND
BACK
MIXED 2CH
L
R
OPTICA
SURROUND
L
R
FRONT
1 DIGITAL OUT (COAXIAL/
OPTICAL) jack/terminal
2 AUDIO OUT (8ch discrete) jacks
3 AUDIO OUT (MIXED 2CH) jacks
Page 9
Page 10
Page 11
Page 11
Page 12
Page 13
Page 13
■ Broadband Internet connection
NETWORK terminal
NETWORK
Page 14
■ USB device connection
USB BD STORAGE/SERVICE
terminal
USB
BD STORAGE
SERVICE
Page 14
8 En
HDMI Connection
G
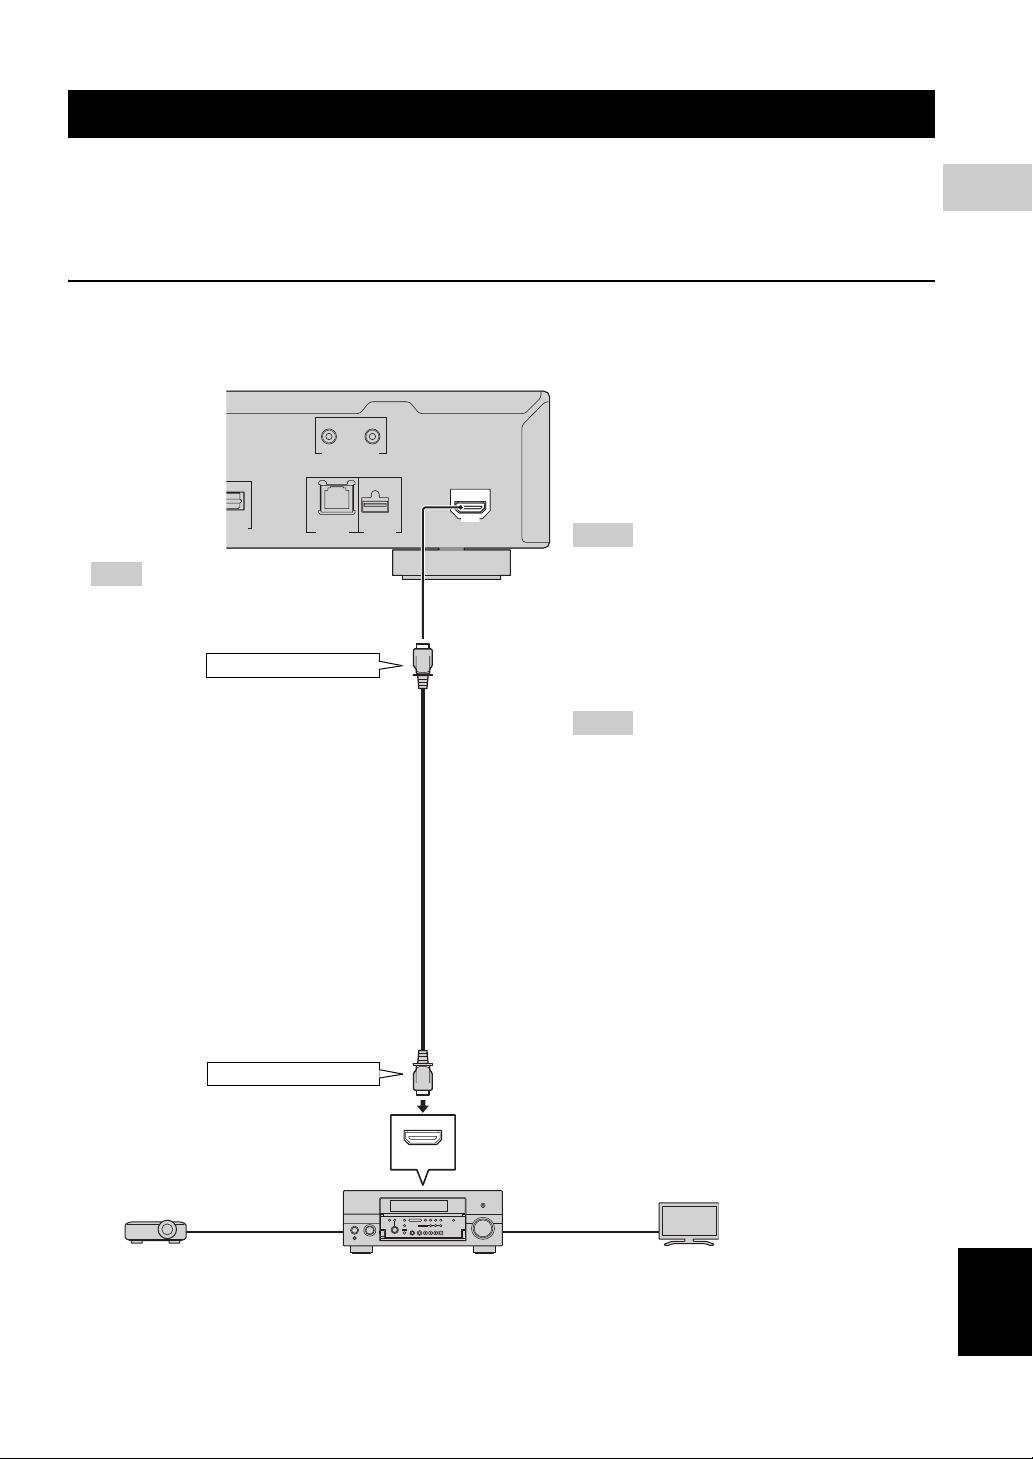
■ Connecting to the HDMI Terminal
– You can enjoy high quality digital picture and sound through the HDMI terminal.
– Firmly connect an HDMI cable (commercially available) to the HDMI terminals (1 and 2).
– See page 38 for information on the audio output formats.
– Use HIGH SPEED HDMI cables that have the HDMI logo (as shown on the cover).
Caution!
Be sure to turn off this Player and the equipment before making any connections.
This Player
OUT
IN
REMOTE CONTROL
2
CONNECTION
PTICAL
ITAL OUT
NETWORK
Hint
– When using an HDMI output, 7.1 ch
Digital Output is available.
1 To HDMI terminal
(commercially available)
HDMI cable
2 To HDMI input terminal
USB
BD STORAGE/
SERVICE
HDMI
HDMI
Hints
– You need to select the “HDMI” in “Settings”
– “Audio Video Settings” – “Video Out
Select” and “HDMI Output” in “Settings” “Audio Video Settings” - “Audio Out” to
output the video/audio signals from the HDMI
terminal. (page 31)
– Refer to the HDMI control function. (Page 18)
Notes
– When you connect this Player to an AV
receiver using the HDMI terminal, make sure
that the AV receiver is connected to a TV
using the HDMI terminal. If the TV is not
equipped with HDMI terminal, connect the
terminal/jacks of this Player other than the
HDMI terminal to the AV receiver for the
video/audio connections.
– When you connect the Player to a TV with an
HDMI cable, “HDMI Video Out” is set to
“Auto”. If you don’t get a stable image, select
the desired resolution*.
When you set “HDMI Video Out” to a setting
other than “Auto”, you can only select
resolutions that are compatible with the
connected TV.
* Refer to “HDMI Video Out” on page 31
regarding the resolutions of the HDMI video
output.
HDMI IN
HDMI
cable
Projector AV receiver
HDMI
cable
TV
English
9 En
Video Connections
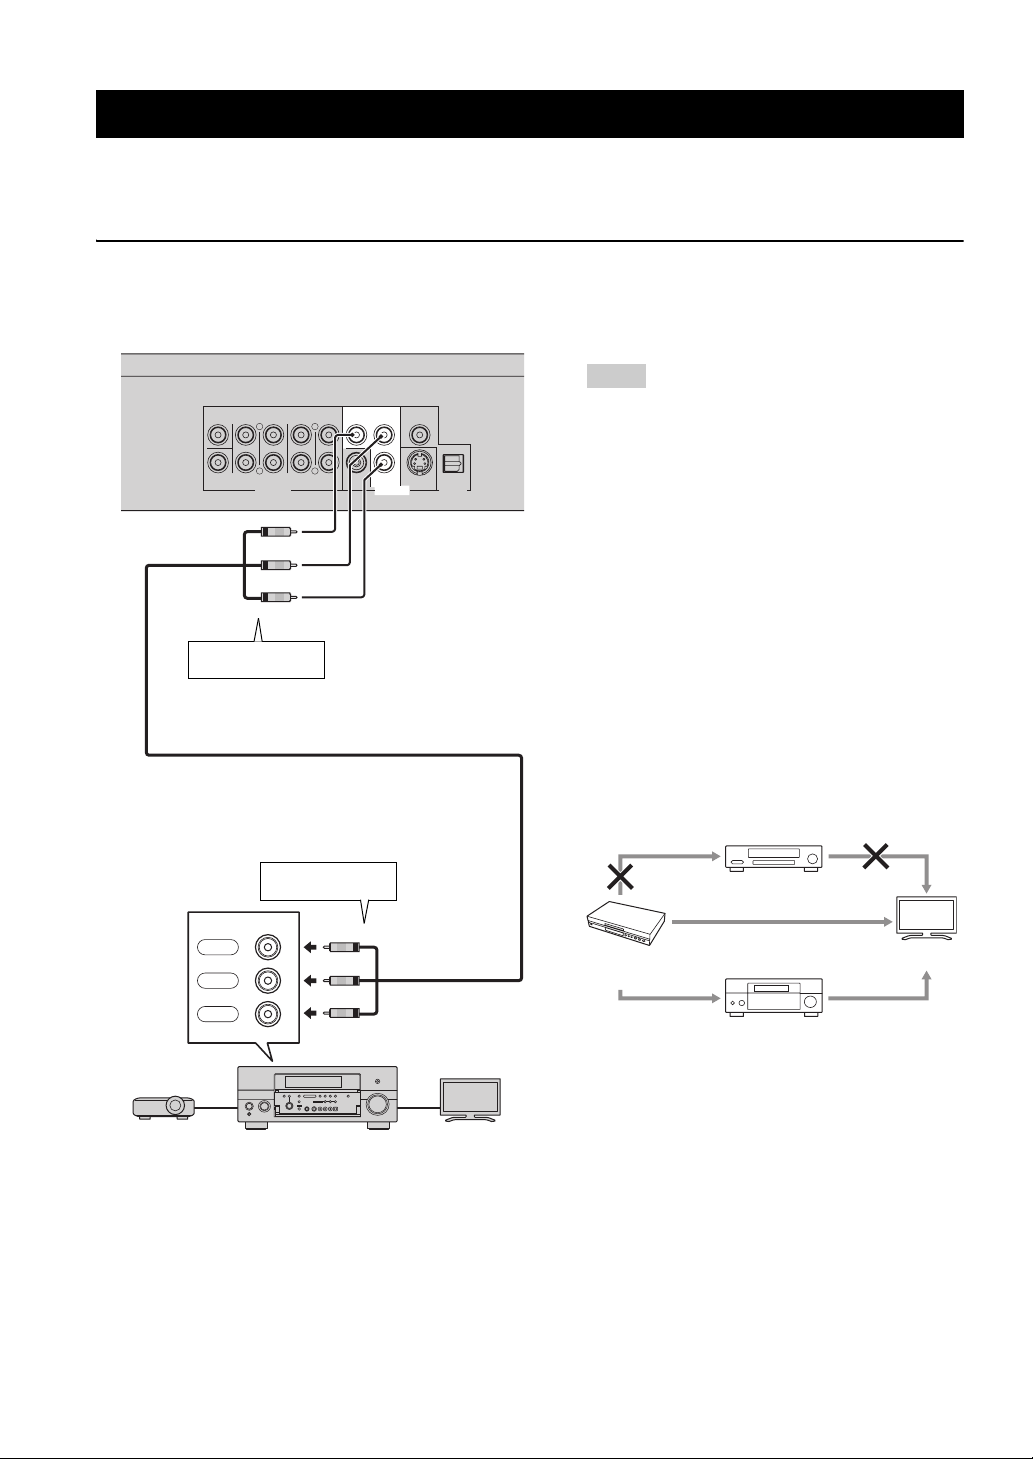
■ Connecting to the Component Jacks
– You can enjoy accurate color reproduction and high quality images through the component jacks.
– Firmly connect a component video cable (commercially available) to the component jacks (1 and 2).
Caution!
Be sure to turn off this Player and the equipment before making any connections.
This Player
Notes
SURROUND
CENTER
BACK
SUBWOOFER
To C O MPONEN T
1
jacks
SURROUND
L
R
AUDIO OUT
(Green)
(Blue)
(Red)
FRONT
MIXED 2CH
L
R
COMPONENT
Y
VIDEO PR
PB
VIDEO OUT
COAXIAL
S VIDEO OPTICAL
DIGITAL OUT
– You need to select “Component” in “Settings” -
“Audio Video Settings” -”Video Out Select” to
output the video signal from the component
jacks. (See page 31.)
– When the priority video output is set to “HDMI”
in “Video Out Select”, the video resolution
which is output from the COMPONENT jacks
is the one set in “HDMI Video Out”.
– When the output from the COMPONENT jacks
is prioritized, set the priority video output to
“Component”.
– If you play back the image via VCR, the image
may deteriorate due to the copy guard function.
– When you watch the program where copyright
is protected, we recommend that the Blu-ray
disc player be connected to LCD TV directly or
via AV receiver.
To C O MPONEN T
2
input jacks
Red
Blue
Green
COMPONENT IN
PR
PB
Y
(Red)
(Blue)
(Green)
Projector AV receiver
Component video cable
(commercially available)
TV
Blu-ray Disc
Player
VCR
Connect directly
TV
AV receiver
10 En
Video Connections
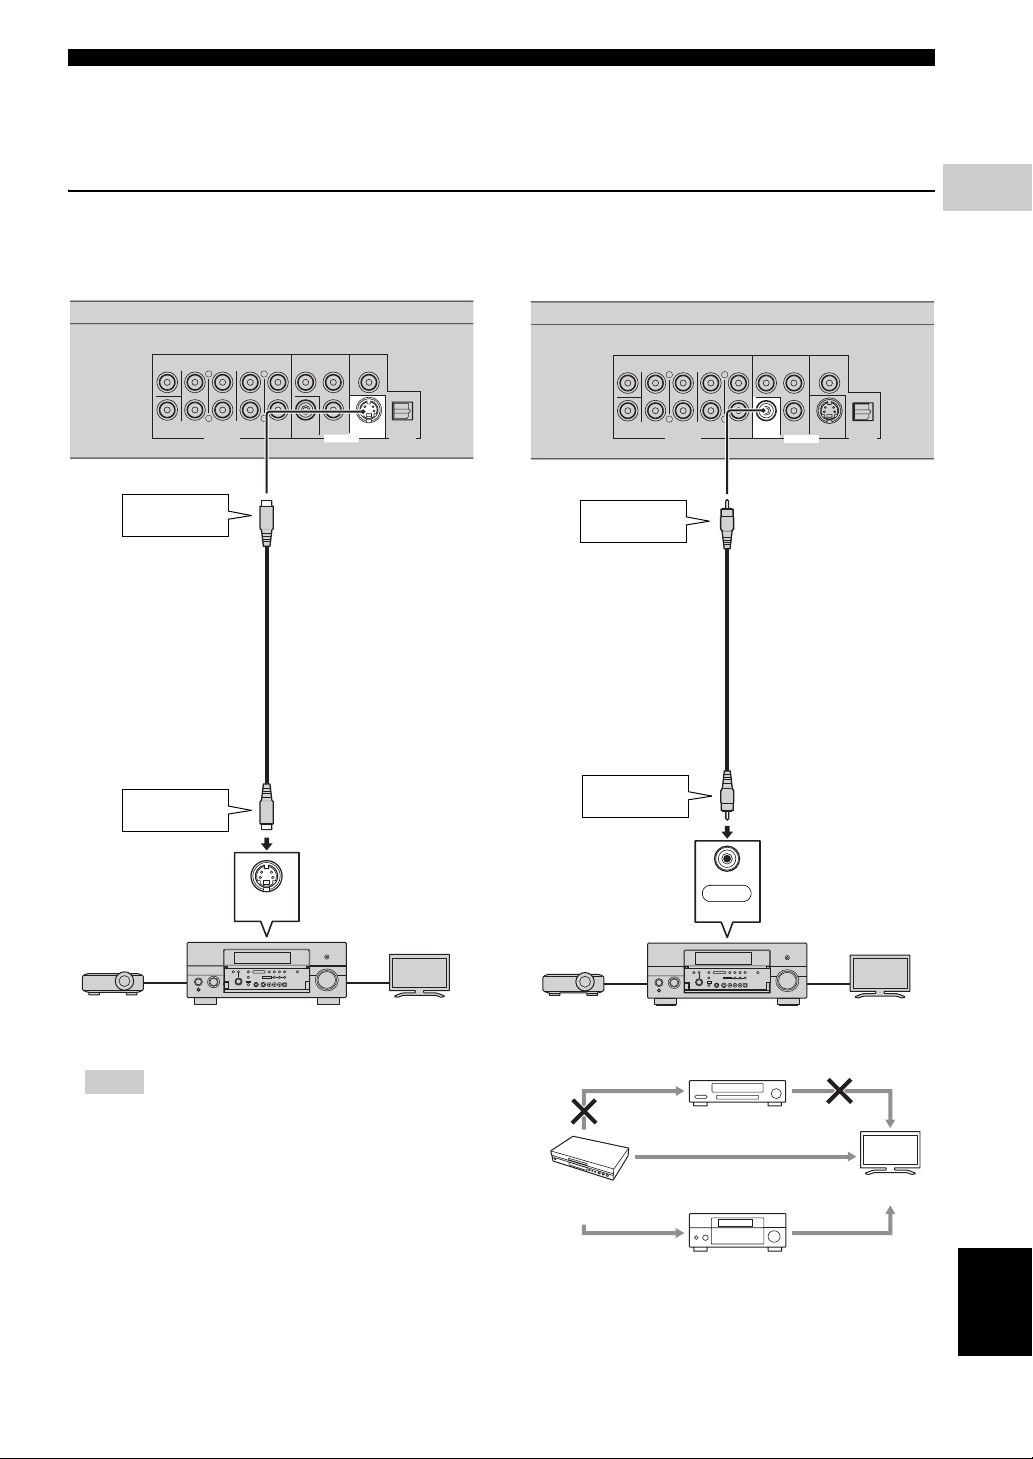
■ Connecting to the S Video or Video Jack
– Connect either the S-video jack or video jack.
– Firmly connect a S-video cable (commercially available) to the S-video jacks or a video pin cable (supplied) to the
video jacks (1 and 2, or 3 and 4).
Caution!
Be sure to turn off this Player and the equipment before making any connections.
2
CONNECTION
This Player
SURROUND
CENTER
SURROUND
BACK
L
R
SUBWOOFER
AUDIO OUT
To S VIDEO
1
jack
S-video cable
(commercially available)
To S VIDEO
2
input jack
FRONT
MIXED 2CH
L
R
VIDEO PR S VIDEO
COMPONENT
Y
PB
VIDEO OUT
COAXIAL
OPTICAL
DIGITAL OUT
This Player
SURROUND
CENTER
SURROUND
BACK
L
R
SUBWOOFER
AUDIO OUT
To VIDEO
3
jack
Video pin cable (supplied)
To VIDEO
4
input jack
FRONT
MIXED 2CH
L
R
(Yellow)
(Yellow)
COMPONENT
COAXIAL
Y
PB
VIDEO PR S VIDEO
VIDEO OUT
OPTICAL
DIGITAL OUT
S VIDEO
S VIDEO IN
Projector AV receiver
TV
Notes
– You need to select “Component” in “Settings” -
“Audio Video Settings” -”Video Out Select” to
output the video signal from the S-video/video jack.
(See page 31.)
– If you play back the image via VCR, the image may
deteriorate due to the copy guard function.
– When you watch the program where copyright is
protected, we recommend that the Blu-ray disc
player be connected to LCD TV directly or via AV
receiver.
VIDEO
Yellow
Yellow
AV INPUT
Projector AV receiver
VCR
Connect directly
Blu-ray Disc
Player
AV receiver
TV
TV
English
11 En
Audio Connections
R
R
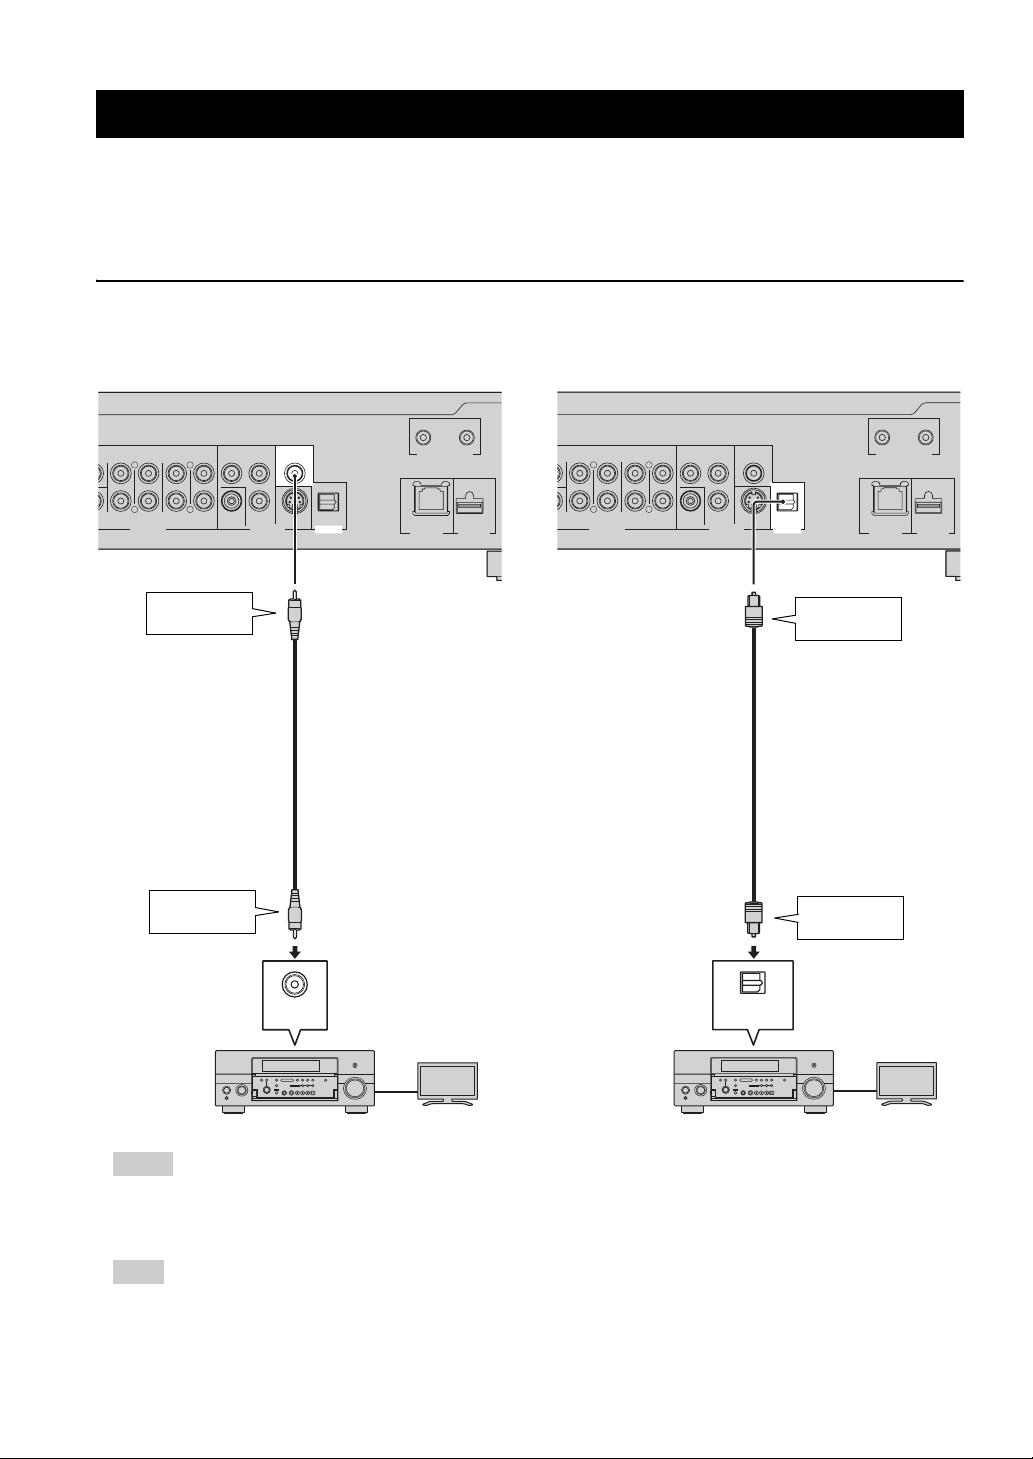
■ Connecting to the Digital Audio Jack/Terminal
– You can connect audio equipment or the TV to the DIGITAL OUT Jack/terminal.
– Firmly connect a digital audio pin cable (commercially available) or optical cable (commercially available) to the
coaxial digital audio jack or optical digital audio terminal (1 and 2, or 3 and 4).
– See page 38 for information on the audio output formats.
Caution!
Be sure to turn off this Player and the equipment before making any connections.
SURROUND
SURROUND
FRONT
BACK
FER
1
MIXED 2CH
L
L
R
R
AUDIO OUT VIDEO OUT
To COAXIAL
jack
Digital audio pin cable
(commercially available)
To COAXIAL
2
input jack
This Player
COMPONENT
Y
PB COAXIAL
VIDEO PR S VIDEO OPTICAL
DIGITAL OUT
OUT
REMOTE CONTROL
NETWORK
IN
USB
BD STORAGE/
SERVICE
SURROUND
SURROUND
FRONT
BACK
FER
MIXED 2CH
L
L
R
R
AUDIO OUT VIDEO OUT
This Player
COMPONENT
Y
PB COAXIAL
VIDEO PR S VIDEO OPTICAL
DIGITAL OUT
Optical cable
(commercially available)
NETWORK
To OPTICAL
terminal
To O PTICAL
input terminal
OUT
REMOTE CONTROL
3
4
IN
USB
BD STORAGE/
SERVICE
COAXIAL
AV INPUT
TVAV receiver
OPTICAL
DIGITAL AUDIO IN
TVAV receiver
Hints
– When using COAXIAL/OPTICAL output, 5.1 ch Digital Output is available. 7.1 ch Digital Output is not available.
– You need to select “Digital Output” in “Settings” - “Audio Video Settings” -”Audio Out” to output the audio signal
from the coaxial or optical jack/terminal. (See page 31.)
Note
– 7.1 ch Audio is available via the HDMI terminal or the 8ch discrete audio jacks.
12 En
Audio Connections
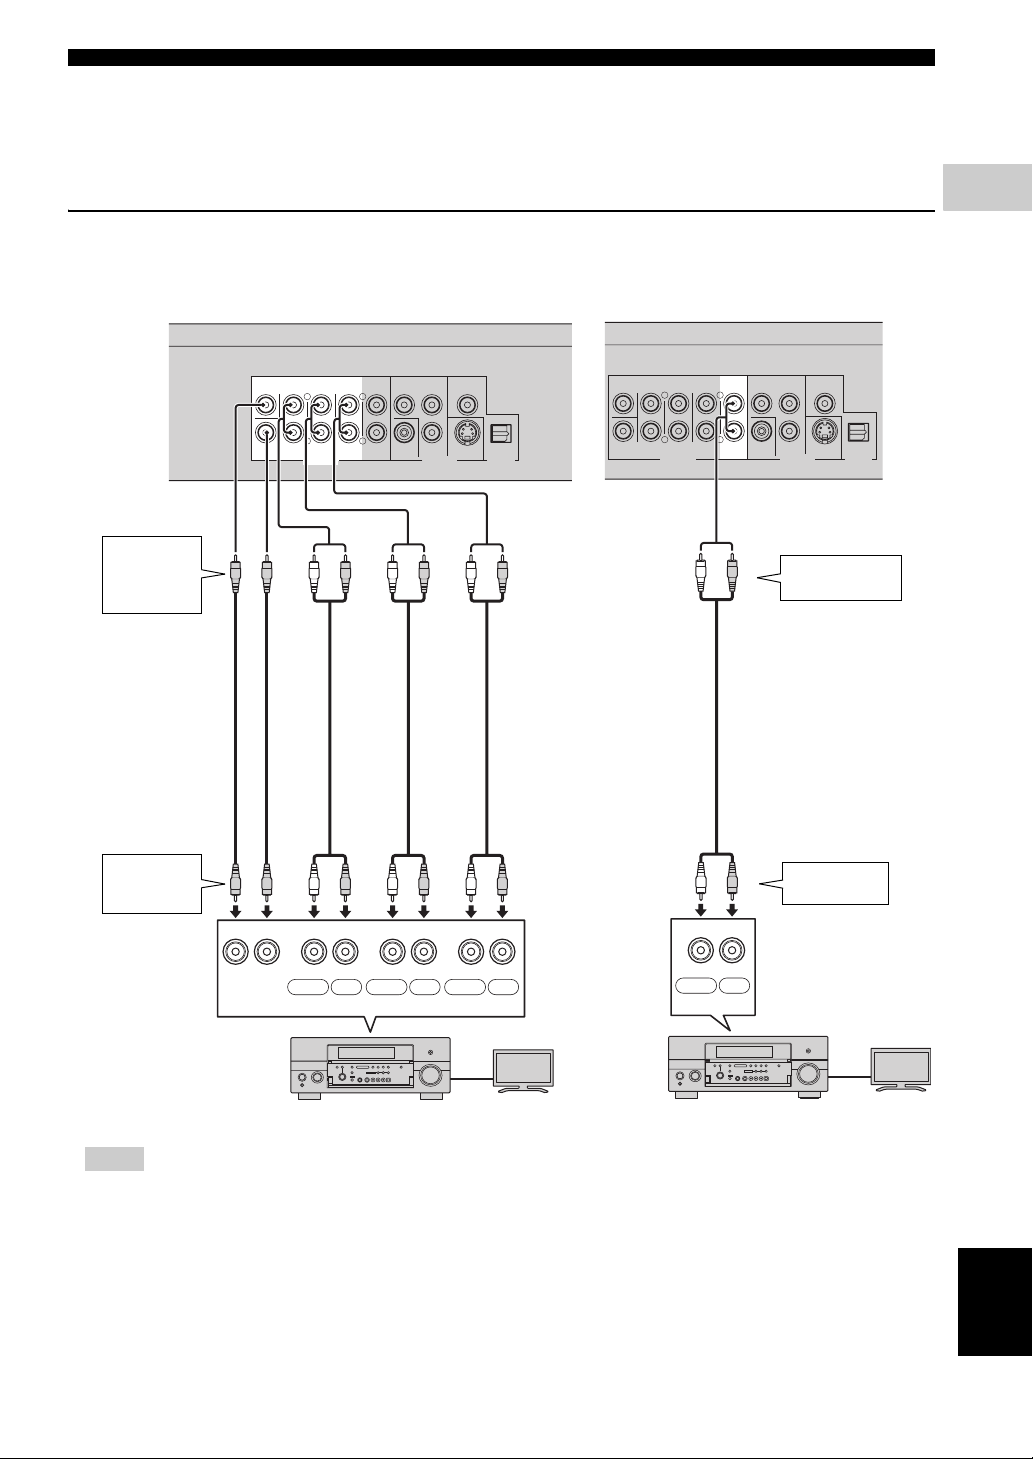
■ Connecting to the Audio Jacks
– You can connect audio equipment or the TV to the AUDIO OUT Jacks.
– Firmly connect an audio pin cable (supplied) or audio pin cables (supplied for 2ch and commercially available for
the other 6ch) to the 2ch audio jacks or 8ch discrete audio jacks (1 and 2, or 3 and 4).
– See page 38 for information on the audio output formats.
Caution!
Be sure to turn off this Player and the equipment before making any connections.
2
CONNECTION
To
AUDIO OUT
1
(8ch discrete)
jacks
Audio pin cables
(supplied for 2ch and
commercially available
for the other 6ch)
To
MULTI CH
2
IN jacks
This Player
SURROUND
CENTER
SURROUND
FRONT
BACK
L
R
SUBWOOFER
AUDIO OUT
(White)
(White)
CENTER SUBWOOFER SURROUND BACK SURROUND
L
R
(Red)
(Red)
MIXED 2CH
(White)
(White)
COMPONENT
Y
VIDEO PR S VIDEO
PB
VIDEO OUT
(Red)
(Red)
COAXIAL
(White)
(White)
FRONT
OPTICAL
DIGITAL OUT
This Player
SURROUND
CENTER
SURROUND
FRONT
BACK
L
R
SUBWOOFER
AUDIO OUT
(Red)
(White)
MIXED 2CH
L
R
(Red)
COMPONENT
COAXIAL
Y
PB
VIDEO PR S VIDEO
VIDEO OUT
To MIXED 2CH
output jack
OPTICAL
DIGITAL OUT
3
Audio pin cable
(supplied)
(Red)
(White)
AUDIO
(Red)
To audio input
jack
4
LR LR LR
White Red White Red White Red
MULTICH IN
TVAV receiver
LR
White Red
AUDIO IN
TVAV receiver
Hints
– You can connect a subwoofer to the SUBWOOFER jack directly. When you connect TV to this Player directly,
connect an active subwoofer such as Yamaha Active Servo Processing Subwoofer System to this jack.
– You need to select “7.1ch Audio Output” in “Settings” - “Audio Video Settings” - “Audio Out” to output the audio
signal from the 8ch discrete jacks. (See page 31.)
– You need to select “2ch Audio Output” in “Settings” - “Audio Video Settings” - “Audio Out” to output the audio
signal from the 2ch audio jacks. (See page 31.)
13 En
English
Broadband Internet Connection
U
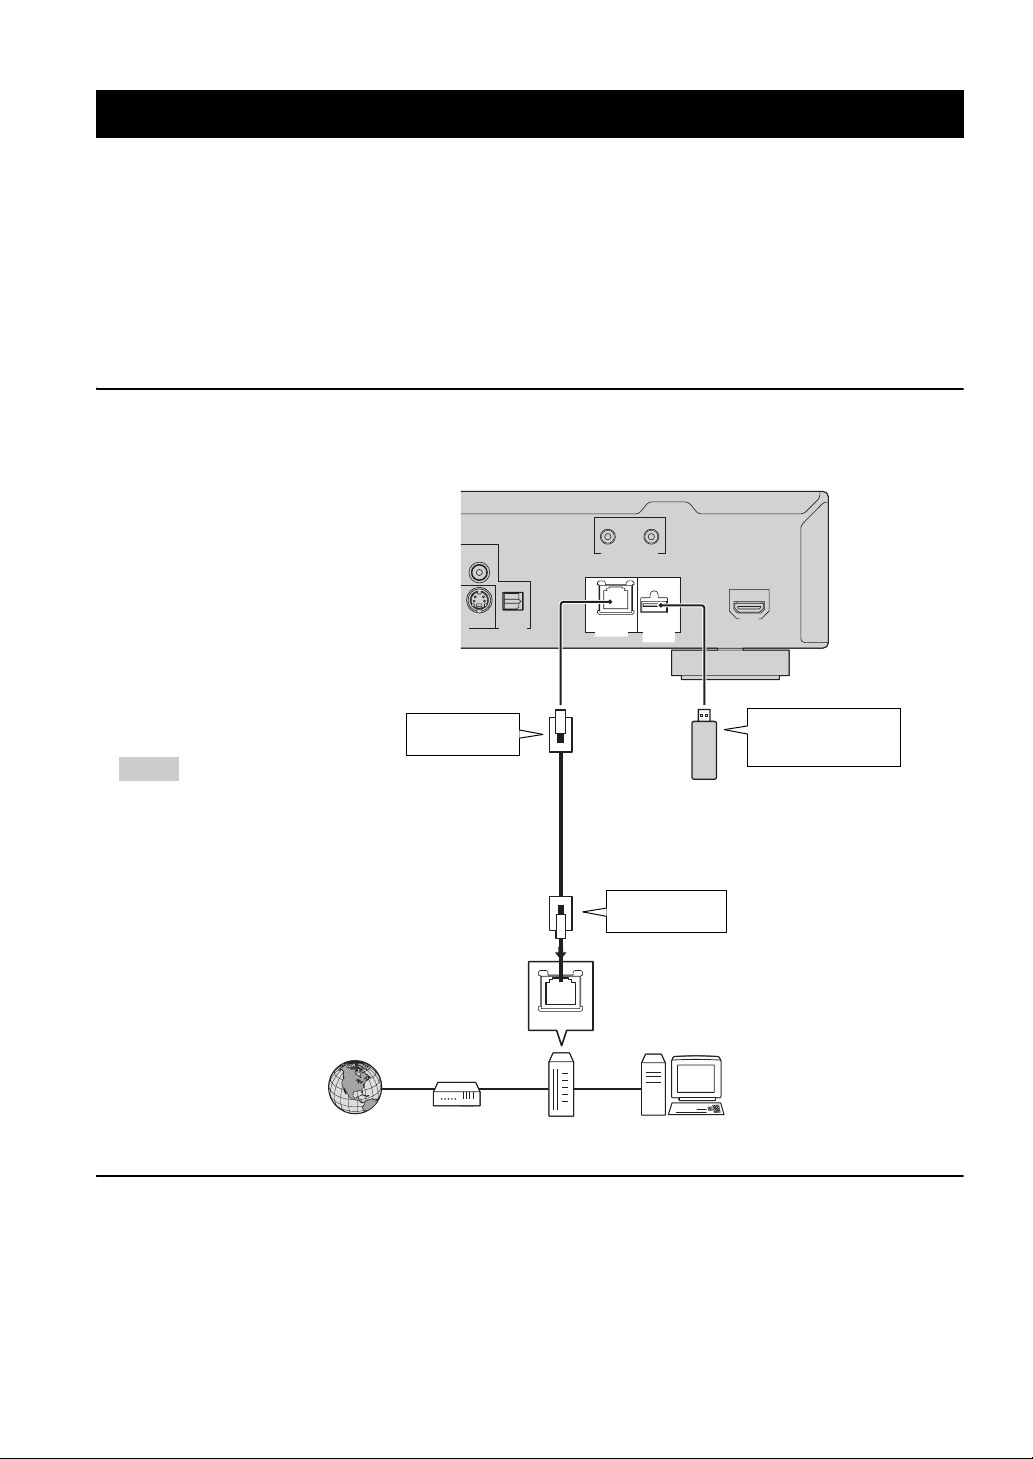
■ Connecting to the NETWORK terminal and USB BD STORAGE/SERVICE terminal
– You can enjoy a variety of contents with interactive functions by connecting to the internet when playing BD-LIVE
compatible discs. Refer to pages 24 and 25 regarding further information on BD-LIVE functions.
– You can connect a USB memory device (2GB or greater and formatted with FAT 32/16) to the USB BD
STORAGE/SERVICE terminal to save the Virtual Package/BD-LIVE data or to update the software of this Player.
– Firmly connect a network cable (commercially available) and a USB memory device (commercially available) to
the NETWORK terminal and USB BD STORAGE/SERVICE terminal (1 and 2, and 3).
– Use only an STP (shielded twisted pair) network cable.
– When using the internet, a broadband internet connection as shown below is required.
Caution!
Be sure to turn off this Player and the equipment before making any connections.
This Player
IN
OUT
COAXIAL
REMOTE CONTROL
1
Notes
– When using a broadband internet
connection, a contract with an internet
service provider is required. For more
details, contact your nearest internet service
provider.
– Refer to the operation manual of the
equipment you have as the connected
equipment and connection method may
differ depending on your internet
environment.
– Use a network cable/router supporting
10BASE-T/100BASE-TX.
Internet
S VIDEO OPTICAL
T
To NETWORK
terminal
Modem
DIGITAL OUT
NETWORK
Network cable
(commercially available)
LAN
Hub or
broadband router
USB
BD STORAGE/
SERVICE
HDMI
To USB BD
STORAGE/SERVICE
terminal
USB memory device
(commercially available)
To LAN terminal
2
PC
3
After connecting
– Perform the communication setting. (Page 34–36)
– Load a BD-LIVE compatible disc and play back the contents. (Page 20–24)
14 En
Other Connections
F
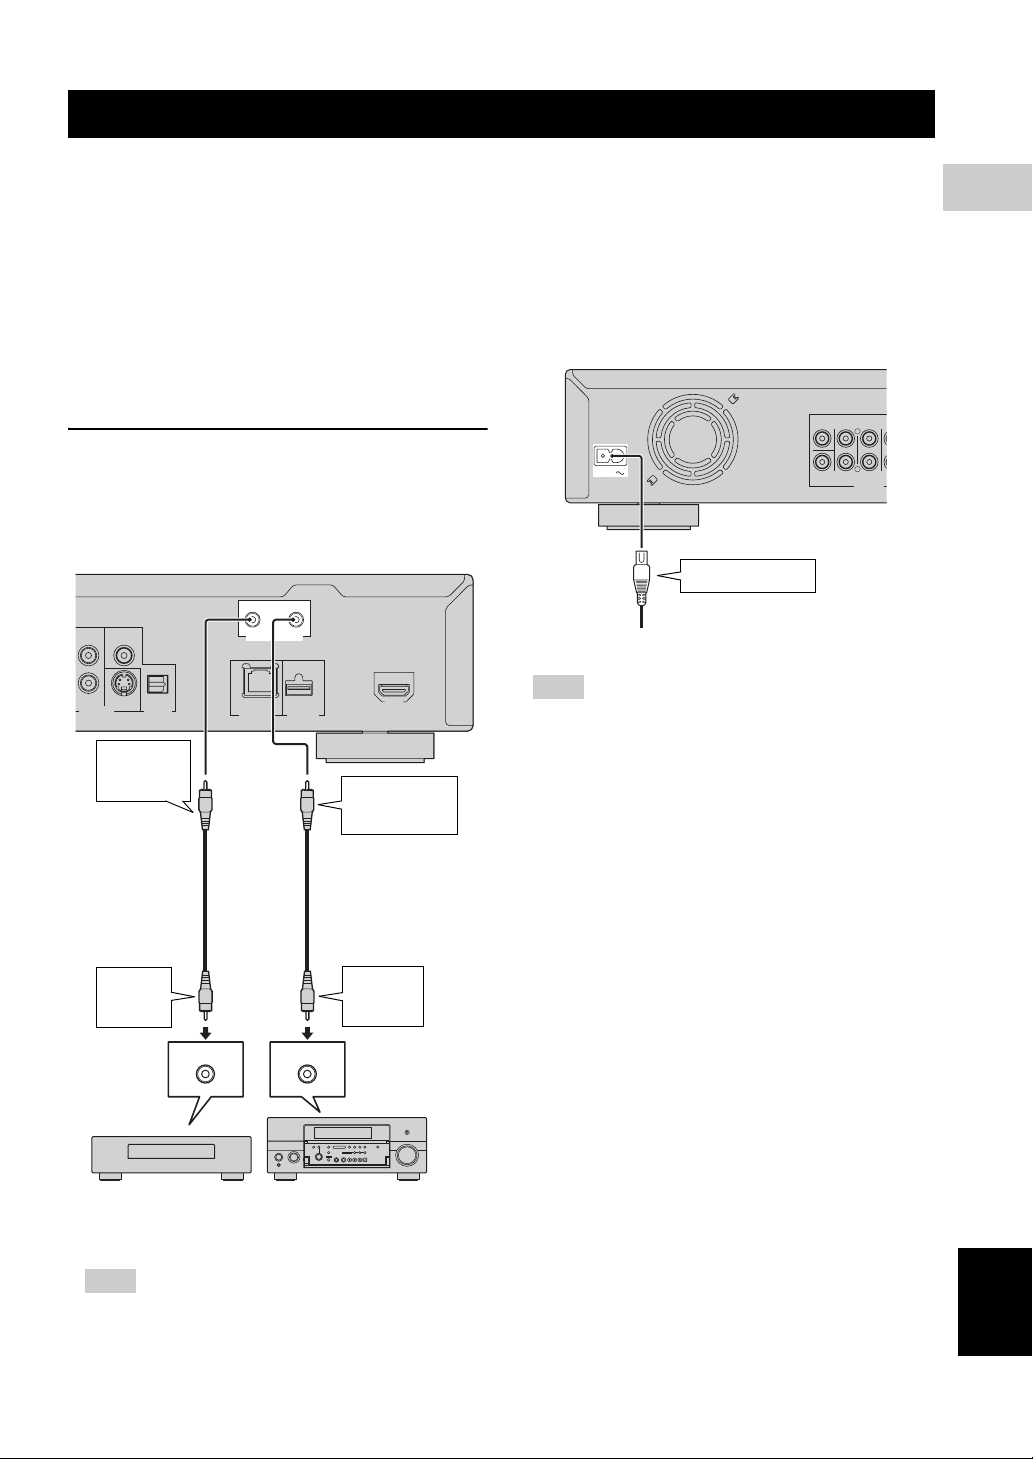
■ Connecting to the REMOTE CONTROL jacks
– You can transmit the remote control signals by
connecting to the REMOTE CONTROL (OUT/IN)
jacks.
– Firmly connect 3.5mm mini plug cables
(commercially available) to the REMOTE
CONTROL (OUT/IN) jacks (1 and 2, or 3 and
4).
– If your AV receiver is a Yamaha product and has the
capability to transmit SCENE control signals, you
can use the SCENE function.
Caution!
Be sure to turn off this Player and the
equipment before making any
connections.
This Player
IN
OUT
NENT
PB COAXIAL
R S VIDEO OPTICAL
P
VIDEO OUT
To R EM OTE
CONTROL
1
(OUT) jack
DIGITAL OUT
REMOTE CONTROL
NETWORK
USB
BD STORAGE/
SERVICE
HDMI
To REMOTE
CONTROL (IN)
jack
– You can connect a Yamaha component (such as
DVD player and CD player) corresponds with the
SCENE function to the REMOTE CONTROL
(OUT) jack of this unit.
■ Connecting the power cable
– Plug the supplied power cable into the AC IN
terminal on the rear of the Player. Then plug into AC
outlet.
AC IN
To AC IN terminal
To AC outlet
Note
– TO PREVENT RISK OF ELECTRIC SHOCK, DO
NOT TOUCH THE UN-INSULATED PARTS OF
ANY CABLES WHILE THE POWER CABLE IS
CONNECTED.
3
CENTER
SUBWOOFER
SURROUND
BACK
SURROUND
L
R
AUDIO OUT
2
CONNECTION
3.5mm mini plug
cable
(commercially
3.5mm mini plug cable
(commercially available)
available)
To r emote
control in
2
jack
REMOTE CONTROL IN
IR flasher or Yamaha
component
REMOTE CONTROL OUT
Infrared signal receiver
or Yamaha component
To r e mote
control out
jack
(such as AV receiver)
Hint
– For details about the SCENE function, refer to the
owner's manual supplied with your Yamaha AV
receiver.
4
English
15 En
DISC PLAYBACK
Before Starting Playback
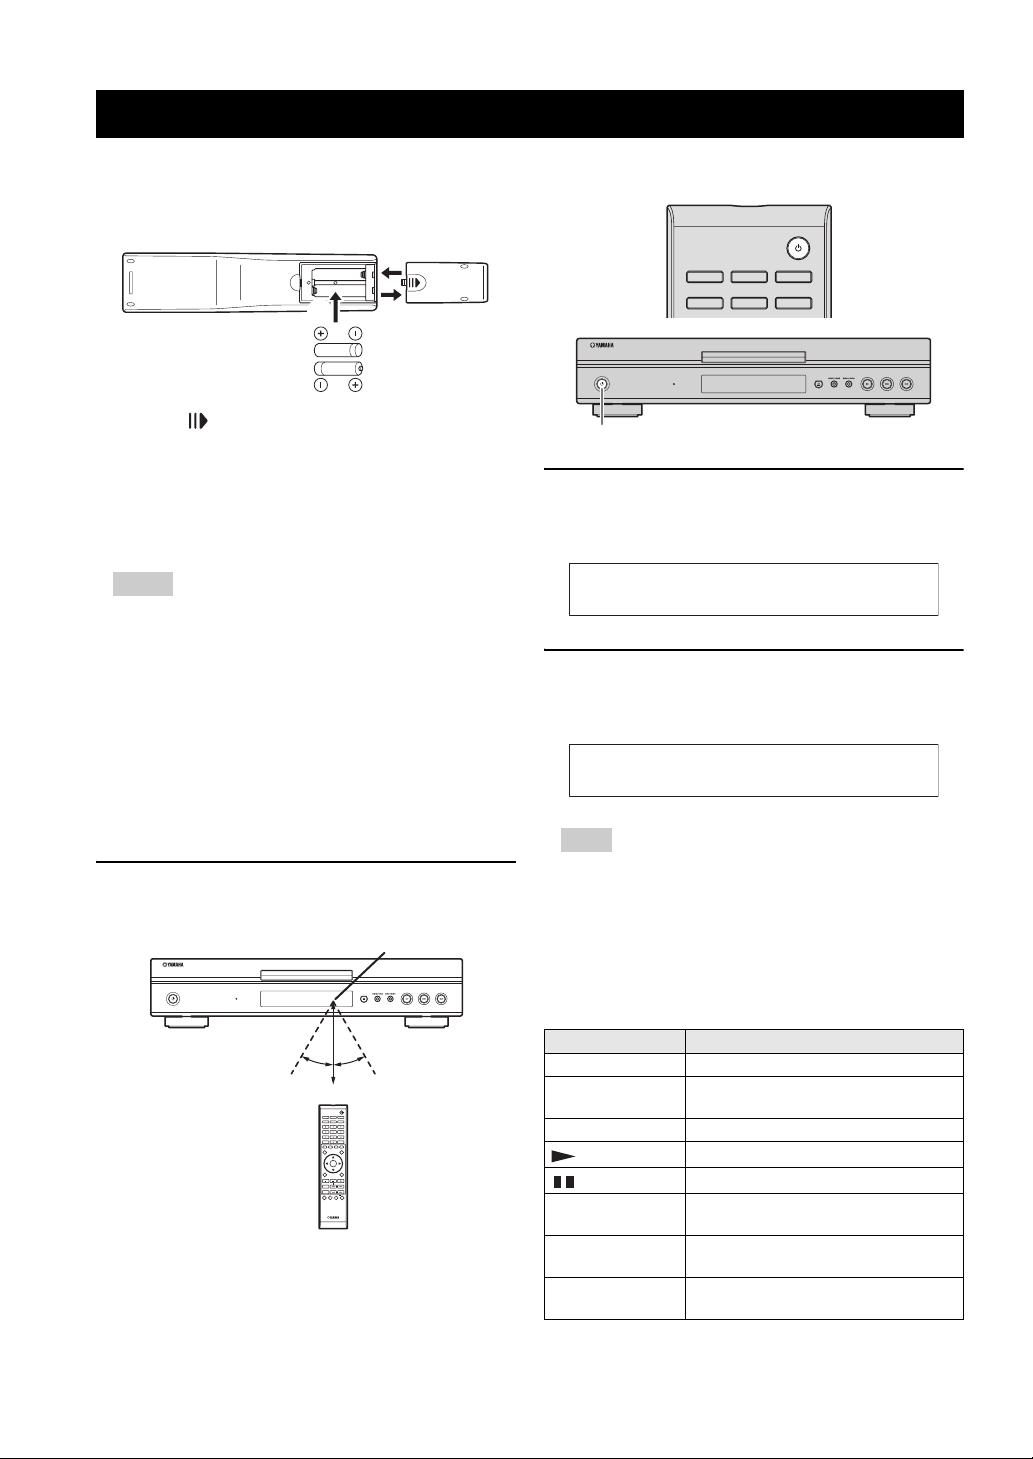
■ Loading the Batteries in the Remote Control
3
2
1 Press the part and slide the battery compartment
cover off.
2 Insert the two supplied batteries (AAA, R03, UM-4),
following the indications (+/–) on the inside of the
compartment.
3 Slide the cover back until it snaps into place.
Notes
– Do not subject the remote control unit to shock,
water or excessive humidity.
– The remote control unit may not function if the
Player's remote sensor is in direct sunlight or any
other strong light.
– Incorrect use of batteries may cause them to leak or
burst. Read the battery warnings and use the
batteries properly.
– Do not mix old and new batteries, or mix different
brands.
– Remove the batteries if you will not use the remote
control unit for an extended period of time.
Approximate operating range of
remote control
Remote control sensor
QUICK
1
■ Turning the Power On
OPEN/CLOSE
DIMMER
VIDEO-RESET
SUBTITLE AU DIO ANGLE
QUICK
p
Turning the power on
Press p on the remote control or on the Player to turn on
the power of the Player.
POWER ON
Entering standby
Press p on the remote control or on the Player to enter
standby.
BYE
Note
– If you press p again immediately after entering
standby, the Player may not turn on. If this happens,
wait for 10 seconds or more and then turn on the
power again.
■ Indicators on the front panel display
16 En
6 m
OPEN/CLOSE
SUBTITLE AUDIO ANGLE
CLEAR
A
TOP MENU/TITLE LIST
EXIT
STATUS
ON SCREEN
SETUP P in P
indicator Descriptions
30˚30˚
DIMMER
VIDEO-RESET
ENTER
B C D
POP UP MENU
ENTER
RETURN
SLOW/SKIP
SEARCH
REPEAT
OFF
BD Lights up when playing back a BD disc.
DVD
Lights up when playing back a DVDVideo disc.
CD Lights up when playing back a CD.
Lights up when playing back.
Lights up when pausing.
TITLE
CHP/TRK
REP S
Lights up when playing back a BD disc
or DVD.
Lights up when playing back a BD disc,
DVD, or CD.
Lights up when playing back track or
chapter repeatedly.

Before Starting Playback
indicator Descriptions
REP ALL
REP A-B
Lights up when playing back disc or title
repeatedly.
Lights up when playing back a section
repeatedly.
Adjusting the brightness of the front
panel display
If you feel that the front panel display is too bright when
watching movies, you can adjust the brightness by
pressing DIMMER repeatedly on the remote control.
■ Setting the on-screen display language
TOP MENU/TITLE LIST POP UP MENU
ENTER
EXIT
STATUS
ON SCREEN
SETUP P in P
SLOW/SKIP
SEARCH
REPEAT
RETURN
OFF
1 Press SETUP to display the Setup Menu screen.
SETUP
2 Press / / / to select “On Screen
Language”, then press ENTER.
Note
– To select the DVD disc language, such as subtitle
language, etc., see page 26.
■ Updating the software of this unit
Some of the newly released BD video discs cannot be
played back unless you update this Player software to the
latest version. We recommend updating the software of
this unit with “Software Update” so that this Player is
operated based on the latest software.
The USB memory device must be clear of all files
except software update data to allow new software
uploading.
To check for the availability of a software update, visit
http://www.yamaha.co.jp/english/product/av/down/
agreement.html.
When a software update is performed, the software
update data must be written onto the USB memory
device in advance using a PC. When software update
data is released, copy the data onto a USB memory
device after downloading it to a PC. Delete unneeded
software update data using a PC after the software
update process is completed.
1 Insert the USB memory device with the update file into
the USB BD STORAGE/SERVICE terminal on rear of
this Player.
2 Press SETUP to display the Setup Menu screen.
3 Press / / / to select “Settings”, then press
ENTER.
4 Press / to select “Software Update”, then
ENTER.
– If you have not yet set the password, go to step 6.
5 Enter the 4-digit number using 0-9.
Enter 4-digit password
3
DISC PLAYBACK
Displays The Title List S ettings
On Screen Language Picture
3 Press / to select the language you want to
display on the screen, then press ENTER.
English
6 Press ENTER to start checking data in the USB
memory device.
Insert USB memory device containing
the software update file.
OK
7 During the data checking, “Checking” blinks.
Now checking the data in USB memory device.
Checking
English
17 En

Before Starting Playback
– The current version of this unit software and the
version of the update file on the USB memory
device are displayed. To update this Player software
with update file, select “Yes”, and press ENTER.
Software update file is detected in the USB memory
device. Start update?
Current Ver. :
Update Ver. :
Yes No
**1234567
**1234567
– If the USB memory device is not properly installed
or the correct update file cannot be found on the
USB memory device, an error message is displayed.
Check the file on the USB memory device, and then
reinsert the USB memory device correctly.
Software update file is not detected in the USB memory device.
Confirm that you have transferred the
file to the USB memory device and retry software update.
Confirm that you have inserted the USB memory device
into the correct terminal.
OK
There is more than one software file
in the USB memory device.
Confirm that only the software update file is
in the USB memory device.
OK
Hint
– You can clear the 4-digit number by pressing
CLEAR.
– You can use ENTER on the lower right of the
Number buttons instead of ENTER in the Cursor
buttons.
– You can also update the software by inserting a CD-
ROM with the update file.
■ Setting the audio output
To output audio correctly, set the audio output suited for
your playback environment with “Audio Out”. Refer to
“Common operations” and “Audio Out” on page 29 and
31.
■ Preparing for BD-LIVE
BD-LIVE is a new feature of Blu-ray Disc that allows you
to download and enjoy movie trailers or bonus features by
using the internet.
1 Connect this player to the internet. (Page 14.)
2 Insert a USB memory device (2GB or greater and
formatted with FAT 32/16) supporting USB High
Speed (480Mbit/s) to the USB BD STORAGE/
SERVICE terminal on the back of this Player.
(Page 14.)
3 Prepare a BD-Video disc compatible with BD-LIVE.
(“Enjoying BONUSVIEW or BD-LIVE” on page 24.)
8 Press ENTER to start updating.
– The screen becomes dark for a while until the update
screen can be displayed. Please wait for the update
screen to appear. Do not unplug the power cable.
The picture will temporarily go dark until
the software update display appears.
Wait several minutes and do not unplug the AC cord.
OK
Now updating
Do not unplug AC cord.
*
Update Version
**1234567-2
30%
9 When the software is successfully updated, a screen is
displayed indicating that the update process is
completed.
– If the update has failed, check the file in the USB
device and try Software Update again.
0 Press p to turn off the Player.
A Remove the USB memory device.
■ Activating the Secondary Audio
When you set “Secondary Audio” in the “Setup Menu” to
“On”, you can enjoy audio of the picture in picture or
audio commentaries of BD-LIVE compatible Blu-ray
discs. Refer to “Common operations” and “Secondary
Audio” on page 29 and 31.
■ Controlling the Blu-ray disc player using the HDMI™ control function
Using the HDMI control function, you can interactively
operate this Player with your TV (HDMI control function
supported).
When you connect this Player to the TV compatible with
the HDMI control function using an HDMI cable and set
“HDMI Control” in the “Setup Menu” to “Yes”, you can
perform the function listed below. (See page 9 and 33 for
connecting to the HDMI terminal and “HDMI Control”.)
• Automatic input select function
When you start playback of this Player, the input
selector of the TV (and an AV receiver if this Player is
connected to the TV via the AV receiver) is switched to
this Player automatically. TV Power may be turned on
automatically depending on the TV.
• Automatic power off function
When you turn off the TV while this Player is in stop
mode and the Setup Menu screen is not displayed, the
power of this Player is also turned off automatically.
18 En

Notes
– HDMI control function may not work properly
depending on the TV.
– Functions other than ones shown above may work
depending on the TV or AV receiver.
– In order to make the HDMI control function
available, set up settings for the HDMI control
function on ALL the components (this Player, TV,
and AV receiver). Certain operation may also be
required.
– Each function may be set independently to activate/
deactivate depending on the TV.
– Refer to the operation manuals supplied with the TV
and/or AV receiver for details regarding setup.
Before Starting Playback
3
DISC PLAYBACK
19 En
English
BD/DVD/CD Playback
D
C
This section explains playback of commercially available
BD Video and DVD Video discs (like movies), CDs, and
recorded DVD-RW/R discs.
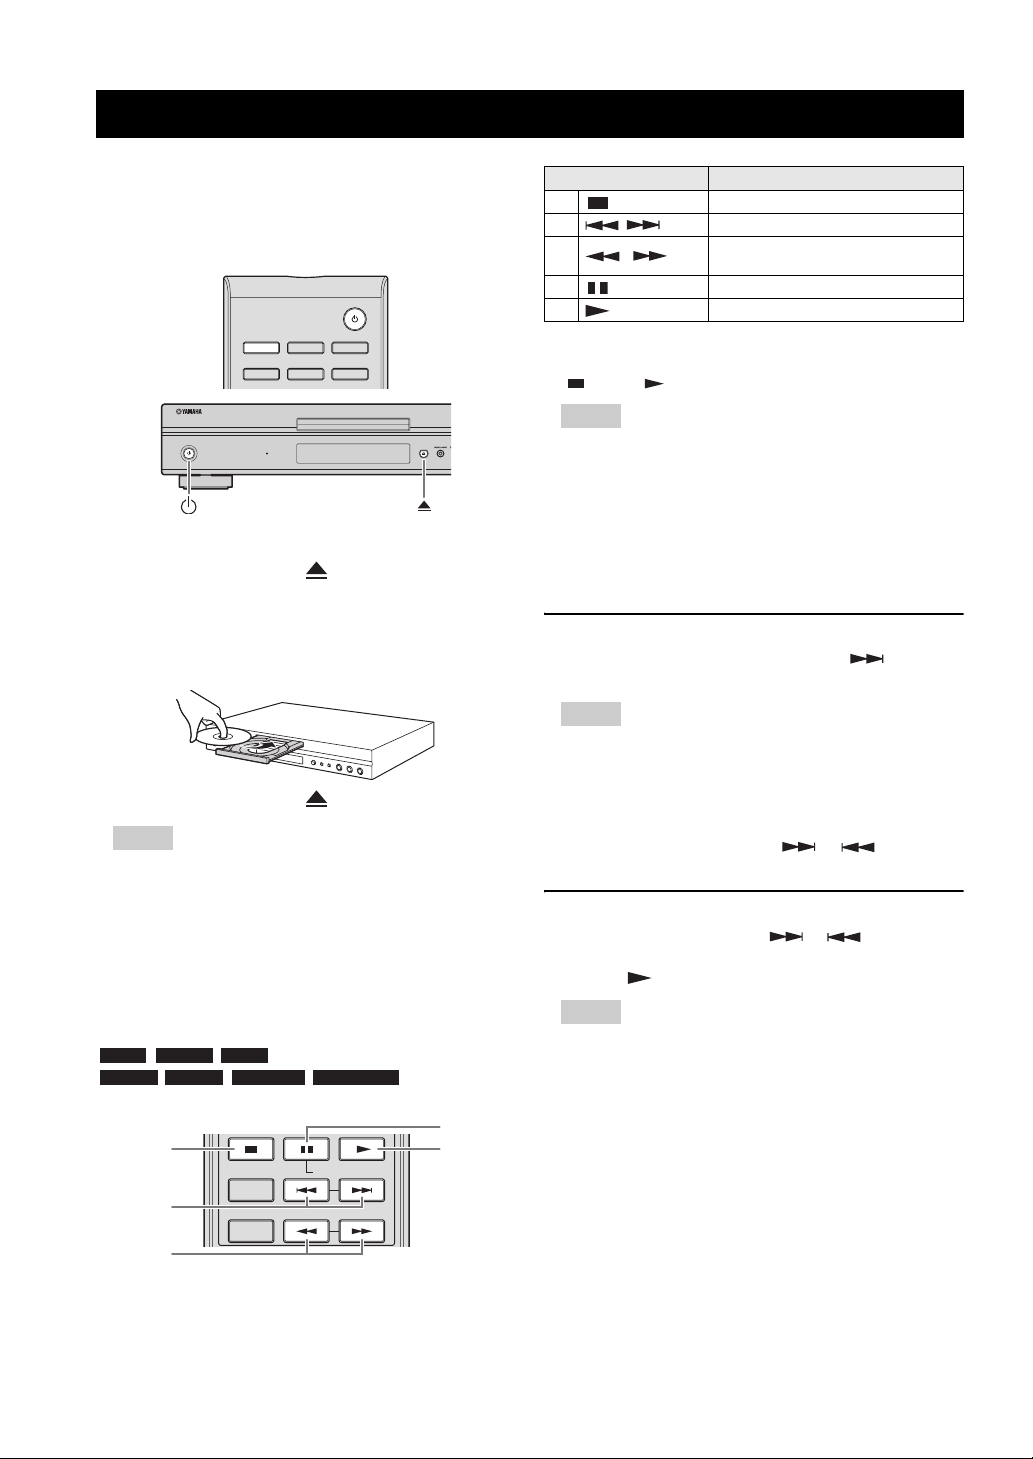
■ Loading a Disc
OPEN/CLOSE
DIMMER
VIDEO-RESET
SUBTITLE AU DIO ANGLE
QUICK
1 Press p to turn on the power.
2 Press OPEN/CLOSE or to open the disc tray.
3 Load a disc on the disc tray.
– Insert the disc with the label face up.
– In case of disc recorded on both sides, face down the
side to play back.
4 Press OPEN/CLOSE or to close the disc tray.
Notes
– Playback may begin automatically, depending on the
disc.
– Playback begins from the first title.
– The menu may be displayed first, depending on the
disc. Perform playback operation by following the
directions on the screen.
– The disc load time may vary depending on the disc.
■ Basic playback operation
BD-V BD-RE BD-R
DVD-V DVD-R DVD-RW AUDIO CD
Buttons Functions
A Pauses or stops playback
B / Skips backward/Skips forward
C /
D Pauses playback
E Playback
*1
The search speed will change each time you press the button.
*2
The Player resumes playback from the point that where the Player
was previously stopped. To playback from the beginning, press
and then .
Search backward/Search forward
*1
(search)
*2
Notes
– This player supports DVD upscaling during DVD
playback.
– Some of the newly released BD video discs cannot
be played back unless you update this Player
software to the latest version. Therefore, it may be
required to update the software of this Player. Refer
to page 37 for more information regarding software
updates for this Player.
Frame Advance Playback
Frame Advance Playback functions when is pressed
during Pause.
Notes
– Frame Advance Playback may not function properly
with discs other than DVD-RW/R (VR format).
– Some BD/DVD Video discs are not compatible with
Frame Advance Playback.
– Frame Advance/Reverse Playback can be performed
for DVD discs by pressing or during
pause.
Slow Playback
Slow Playback functions when or is pressed for
more than 2 seconds during pause.
– Press to return to normal playback.
Notes
– This doesn't work for audio CDs.
– Reverse Slow Playback cannot be performed for BD
video.
A E
SLOW/SKIP
STATUS
B
ON SCREEN
20 En
SEARCH
■ Repeat Playback
BD/DVD/CD Playback
Repeat Playback of a Specified Part
DVD-V DVD-R DVD-RW
AUDIO CD
ENTER
EXIT
STATUS
ON SCREEN
SETUP P in P
SLOW/SKIP
SEARCH
REPEAT
RETURN
OFF
Repeat Playback of a Title or Chapter
1 Play back the title or chapter you want to repeat.
2 Press REPEAT.
3 Press / to select the type of Repeat Playback.
– Playback Title: Repeats the title currently being
played back.
– Playback Chapter: Repeats the chapter currently
being played back.
– Scene Selection: Repeats the specified scene of title
or chapter.
BD-VIDEO
1/3
55/2
00:20 :30
2 English
1
1
On Title Repeat
Scene Selection
5.1ch
Playback Title
Playback Chapter
–Press RETURN to cancel without setting the type of
Repeat Playback.
– For Audio CD, you can select “Playing Disc”,
“Playing Track” and “Specify The Part” as Repeat
Playback options.
4 Press ENTER.
Example: Repeat playback of a title (TITLE)
Note
– Some operations in the following playback function
cannot be performed depending on the specifications
of the disc.
1 Press REPEAT during playback.
2 Press / to select “Scene Selection”, then press
ENTER.
– “Set Start Point” displays.
Playback Title
Scene SelectionPlayback Chapter
Set Start Point
3 Press ENTER at the scene where you want to set the
start point.
– “Set End Point” displays.
4 Press ENTER at the scene where you want to set the
end point.
– You can press to fast forward to the scene
where you want to set the end point. When you reach
the desired scene, simply press and then
ENTER to set the end point. To cancel Repeat
Playback, press OFF.
Notes
– Press , the Repeat Playback is cancelled and the
next chapter being play back.
– Press once, the Repeat Playback is cancelled
and the player returns to the start of current chapter
(track).
– If you press again (within about 5 seconds) the
player will skip to the beginning of the previous
chapter (track).
– For Repeat Playback of a Specified Part, set the start
and end points within the same title.
– Repeat Playback may be forbidden depending on the
disc.
– Repeat Playback of a Specified Part may not work in
multi-angle scenes.
– If you press STATUS, you can confirm the Repeat
Playback status.
3
DISC PLAYBACK
On Title Repeat
5 Press OFF to return to normal playback.
English
21 En
BD/DVD/CD Playback
■ Using BD/DVD Menus
This section explains how to play back a BD/DVD video
disc with a top menu, disc menu or pop-up menu. The
titles listed in the top menu and a disc guide (for options
like subtitles and audio languages) are given in the disc
menu.
TOP MENU/TITLE LIST POP UP MENU
A
ENTER
B
EXIT RETURN
Buttons Functions
TOP MENU/
A
TITLE LIST
B / / / Moves the highlight in the menu screen
C POP UP MENU Displays the pop-up menu screen
D ENTER Selects the highlighted menu item
Displays the top menu screen
Notes
– The procedure explained on this page is the basic
operation procedure. Procedures vary depending on
the BD/DVD video disc, so you may need to follow
the instructions in the BD/DVD video disc manual
or the instructions displayed on the screen.
– With some BD/DVD discs, the top menu may be
referred to as the “Title Menu”. Use TOP MENU/
TITLE LIST on the remote control when the
instructions refer to “Title Menu”.
– If no top menu is available, the TOP MENU/TITLE
LIST button will have no effect.
– The top menu screen may be displayed by pressing
POP UP MENU depending on the DVD.
Using the pop-up menu
BD-V
1 Press POP UP MENU during playback.
– The pop up menu screen is displayed.
– The menu contents displayed vary depending on the
disc. For details on how to see and operate the pop-
up menu, refer to the manual for the disc.
C
D
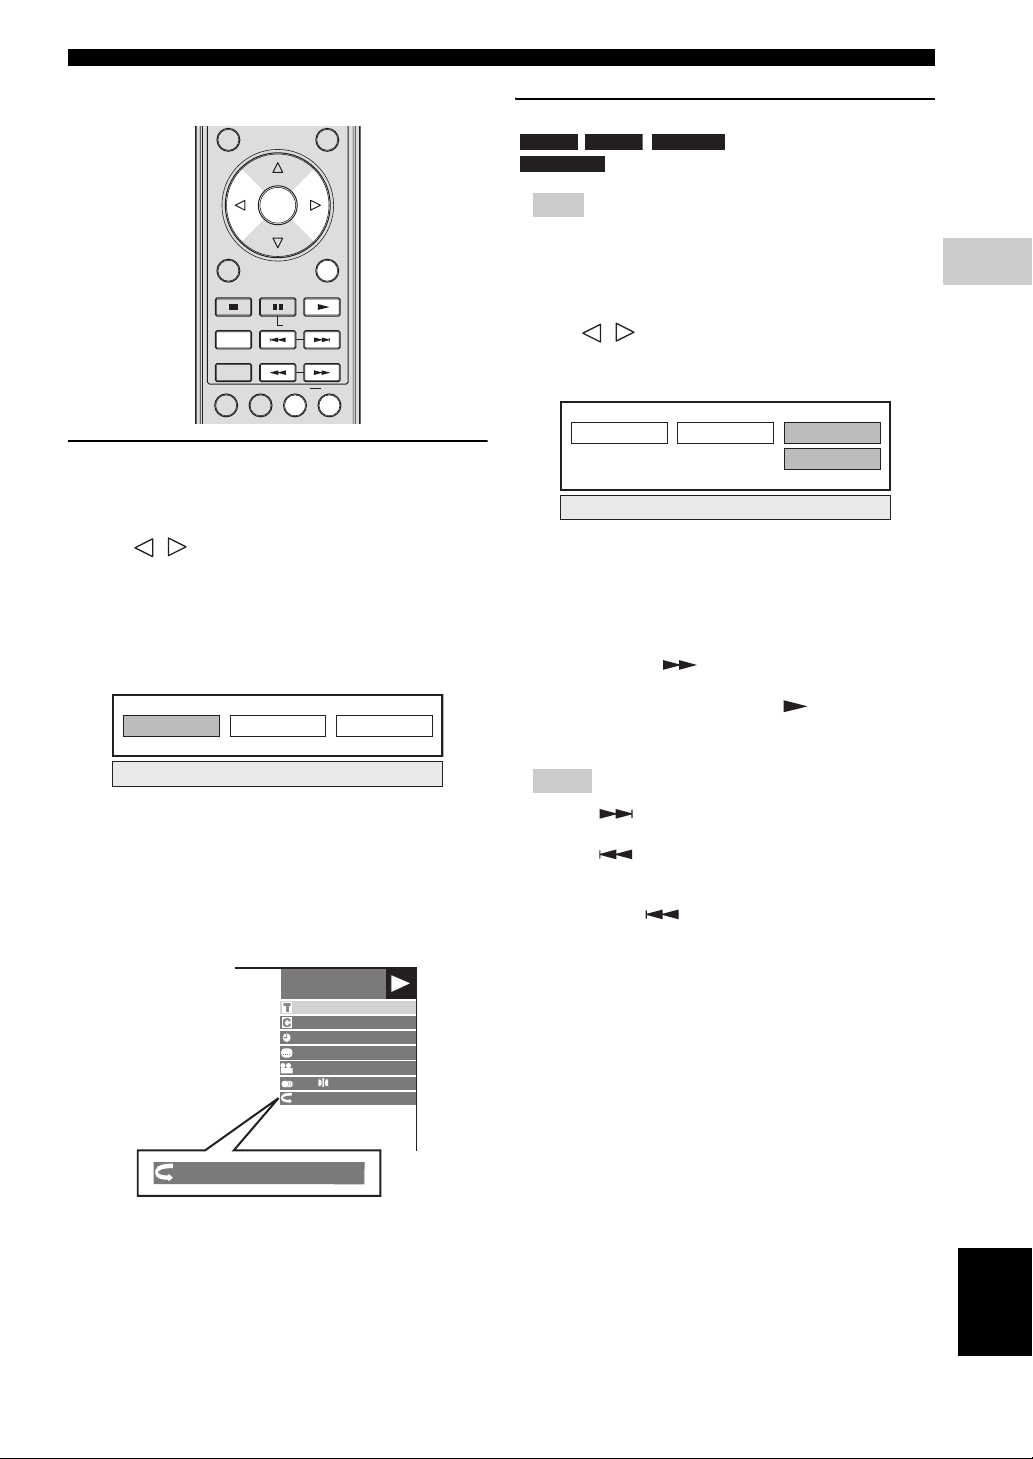
■ Using DVD-R/-RW Menu
DVD-R DVD-RW
You can play back a recorded disc (VR format finalized
disc only).
A
B C D
TOP MENU/TITLE LIST
EXIT
STATUS
ON SCREEN
SETUP P in P
Note
– “Finalize” refers to a recorder processing a recorded
disc so that it will play in other DVD players/
recorders as well as this player. Only finalized DVD
discs will play back in this player. (This player does
not have a function to finalize discs.)
Playback by selecting a title
1 Load a recorded disc.
– The Title List screen is displayed.
Program
1
Program
4
– If the Title List screen is not displayed, press TOP
MENU/TITLE LIST.
2 Press / / / to select the desired title, then
press ENTER.
– When seven or more titles exist, switch pages by
pressing or .
– Playback of the selected title will begin.
You can playback by pressing instead of
pressing ENTER.
3 Press to stop playback.
ENTER
SLOW/SKIP
SEARCH
REPEAT
Program
2
Program
5
POP UP MENU
RETURN
OFF
Program
3
Program
6
Previous
Next
2 Press / / / to select the desired item, then
press ENTER.
3 Press POP UP MENU to exit.
– The pop-up menu will automatically disappear for
some discs.
22 En
Note
– The Title List screen also can be displayed by
pressing TOP MENU/TITLE LIST when playback
is stopped or by pressing ENTER after choosing
“Displays The Title List” in Setup Menu when
playback is stopped.
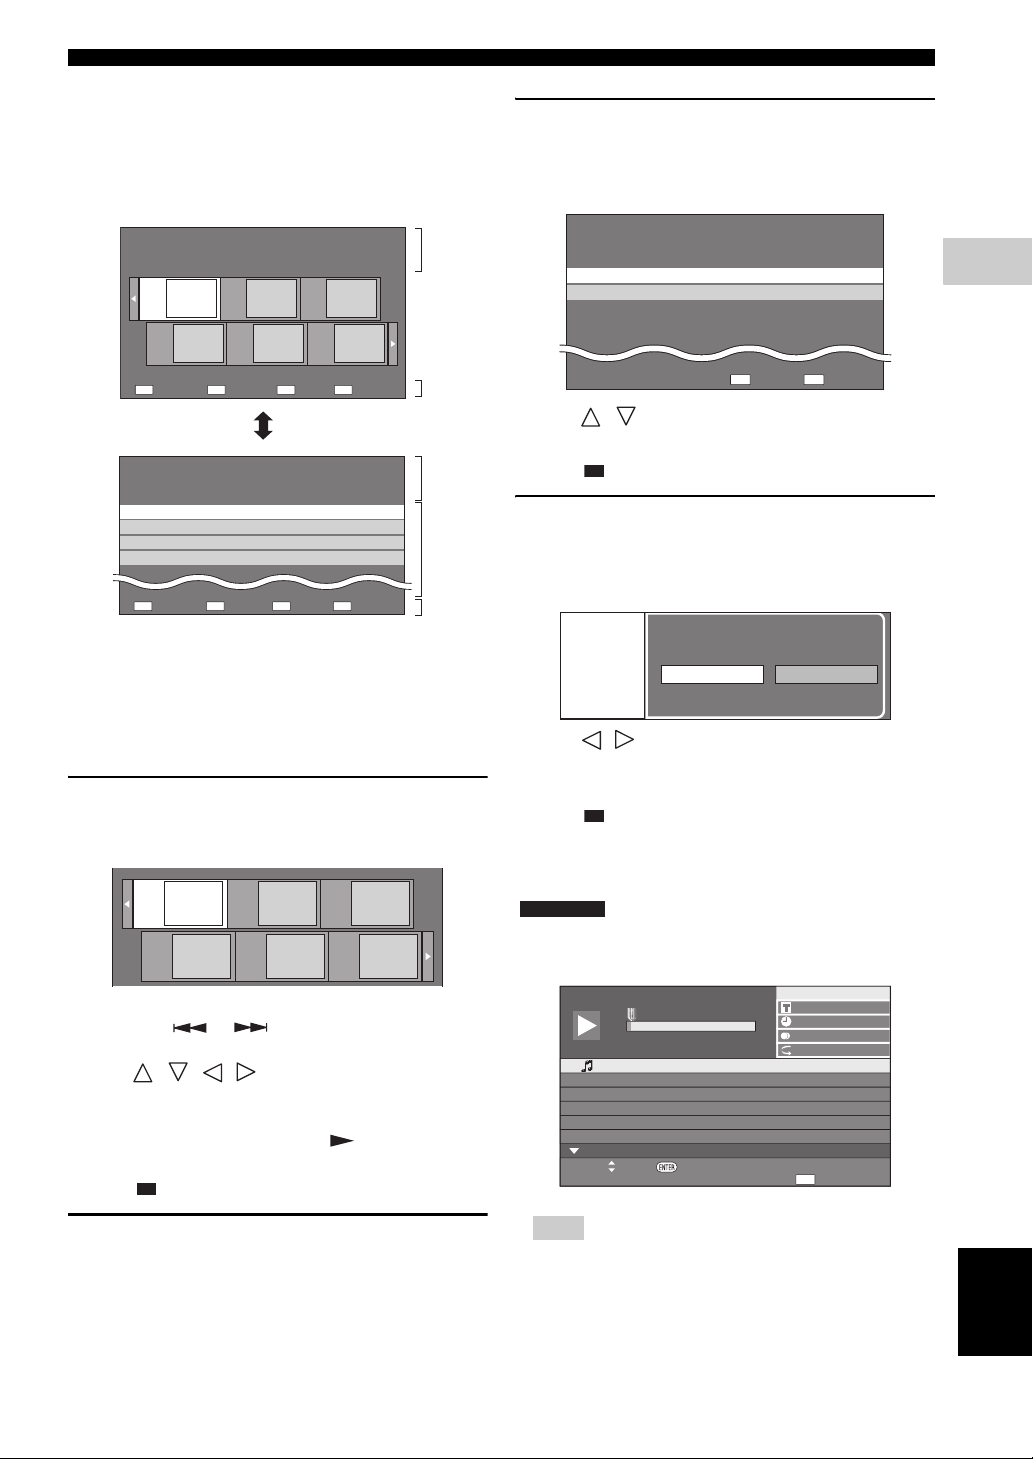
About Title List
– The Title List can be displayed in two types,
Thumbnail and Title List.
– Each time you press A, the screen changes between
Thumbnail and Title List.
Thumbnail
5/21 Fri 9:30 AM 110 Min.
Program
Program
A
Title List
Title List
5/21
Fri 9:30 AM
[From Old]
1 Program 1 5/21 Fri 110 Min.
2 Program 2 6/15 Fri 110 Min.
3 Program 3 7/3 Mon 56 Min.
4 Program 4 9/18 Thu 40 Min.
A
Thumbnail
Program 1
1
Program
2
4
Program5Program
By Chapter
110 Min.
Sorting Playlist Functions
Playlist Functions
Program 1
Program
3
6
DCB
DCB
1
3
1
2
3
1 Information of selected title
2 Title Name
Recording Date
Recording Duration
3 Caption for Color Button
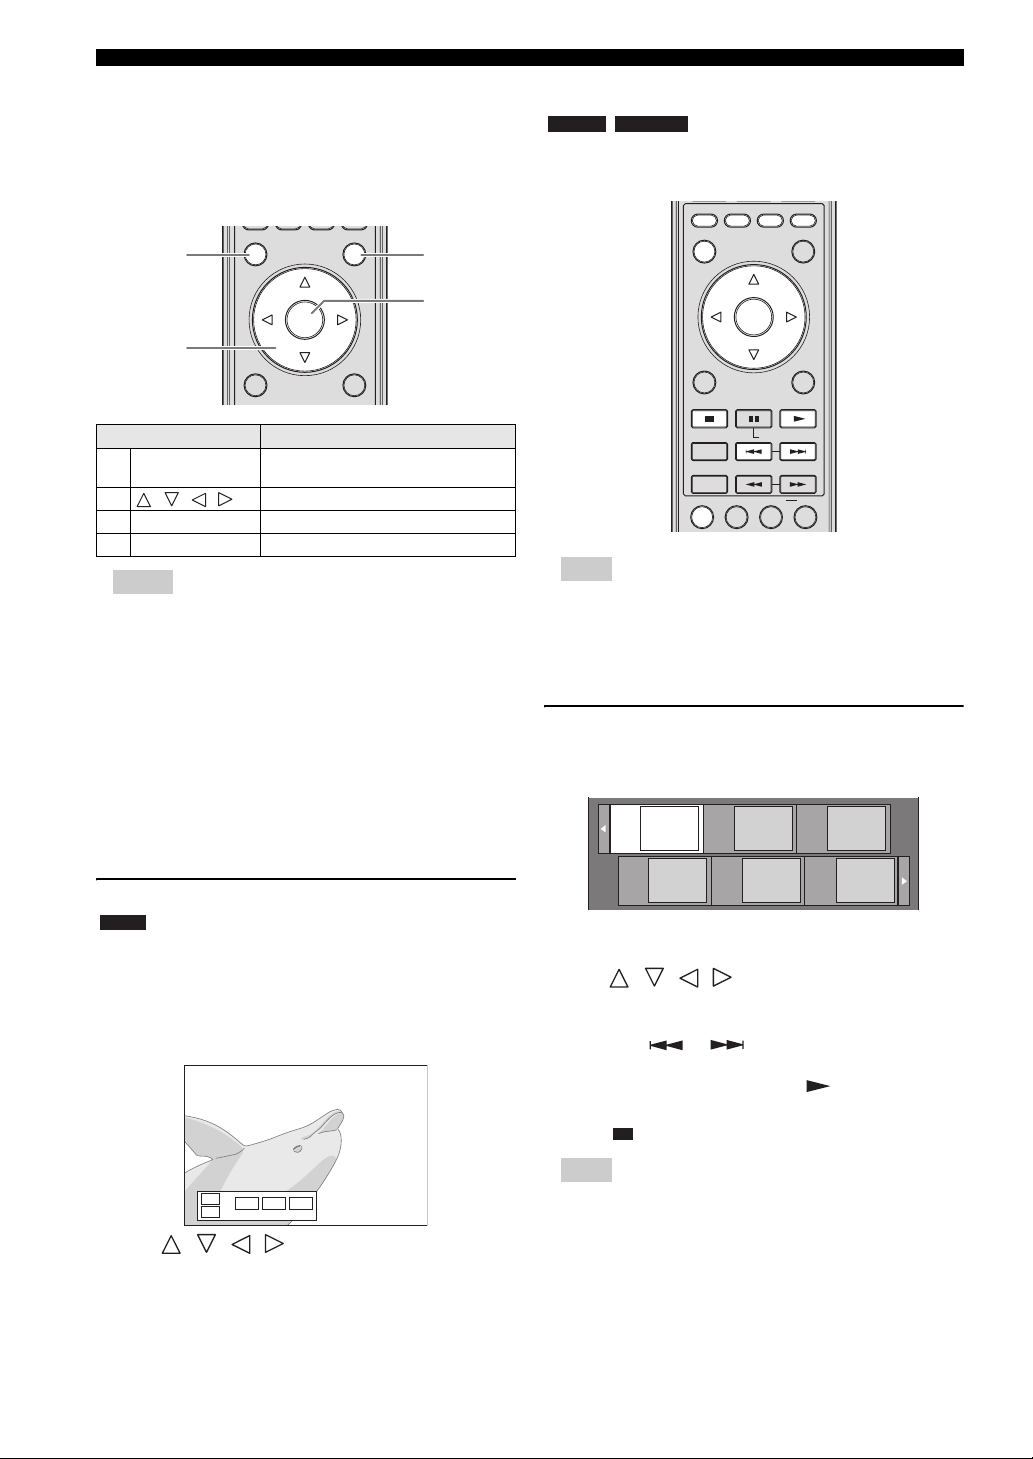
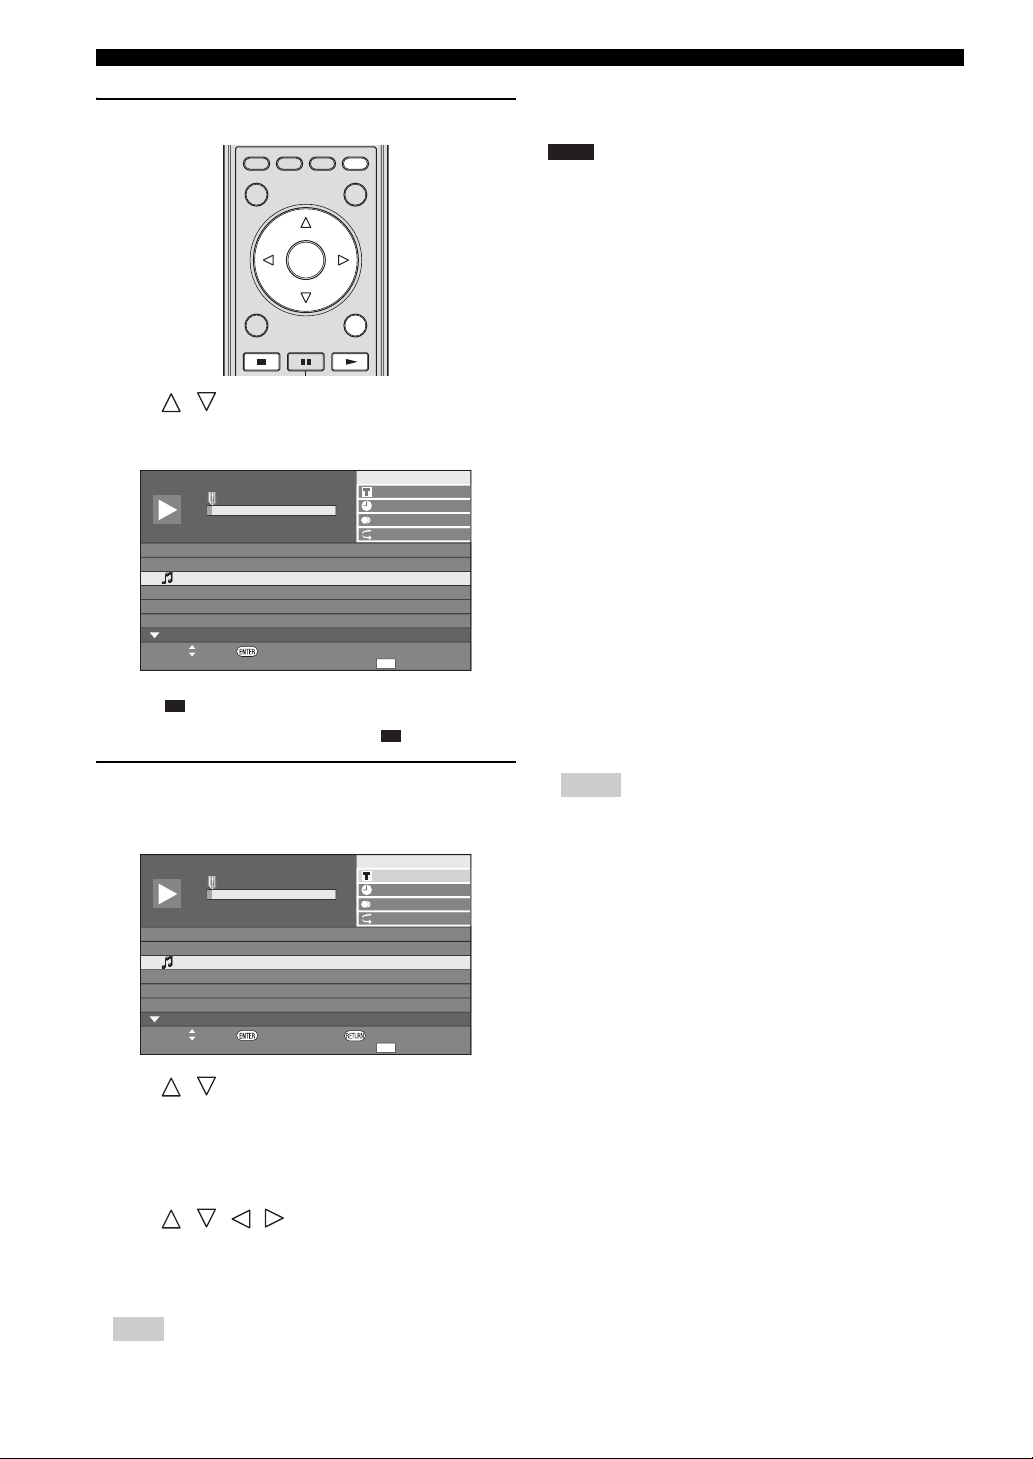
Playback by selecting a chapter
1 Press B while the Thumbnail screen is displayed.
– The chapter screen is displayed.
Chapter
1
Chapter
4
– When seven or more chapters exist, switch pages by
pressing or .
– To return to the Thumbnail screen, press B.
2 Press / / / to select the desired chapter,
then press ENTER.
– Playback of the selected chapter will begin.
You can playback by pressing instead of
pressing ENTER.
3 Press to stop playback.
Chapter
2
Chapter
Chapter
3
5
Chapter
6
BD/DVD/CD Playback
Playback by selecting a Playlist
1 Press C while the Thumbnail or Title List screen is
displayed.
– The Playlist screen is displayed.
5/21 Fri 9:30 AM
1 Program 1 5/21 Fri 110 Min.
2 Program 2 6/15 Fri 110 Min.
Program 1
110 Min.
DC
Original Functions
2 Press / to select the title, then press ENTER.
– Playback of the selected title will begin.
3 Press to stop playback.
Playing back the title you stopped
while being played
1 Press D while the Thumbnail or Title List screen is
displayed.
Playback
From Beginning From Continued
2 Press / to select the type of Playback, then press
ENTER.
– Playback of the title will begin.
3 Press to stop playback.
■ Using the Audio CD Playback Menu
AUDIO CD
When you load an audio CD, following screen is
displayed.
n
o
s
c
n
u
F
t
T
a
0
c
1
k
r
0
0
0
:
1
2
3
4
5
6
0
c
k
a
T
r
T
0
c
k
a
r
T
a
0
c
k
r
T
a
0
c
k
r
T
0
k
a
c
r
T
0
c
k
a
r
Select Enter
5
5
1
1
6
:
5
2
1
0
:
5
3
2
3
:
5
4
0
3
:
4
5
4
4
:
5
6
0
8
:
i
1
2
1
/
0
0
0
0
1
1
:
:
+
R
L
3
1
6
:
O
f
f
1
2
1
/
D
Functions
3
DISC PLAYBACK
Sorting the titles
Each time you press B while the Title List screen is
displayed, the Title List display changes between
displaying the newest title first and the oldest title first.
Note
– The CD screen is displayed only when a compact
disc recorded in the CD-DA format is inserted.
23 En
English
BD/DVD/CD Playback
Playback by selecting a track
A
B C D
TOP MENU/TITLE LIST
EXIT RETURN
POP UP MENU
ENTER
1 Press / to select the track, then press ENTER
during playback or when playback is stopped.
– Playback of the selected track will begin.
n
o
s
c
n
u
F
t
T
a
0
c
3
k
r
0
0
0
:
1
2
3
4
5
6
0
c
k
a
T
r
T
0
c
k
a
r
T
a
0
c
k
r
T
a
0
c
k
r
T
0
c
k
a
r
T
0
c
k
a
r
Select Enter
5
5
1
1
6
:
5
2
1
0
:
5
3
2
3
:
5
4
0
3
:
4
5
4
4
:
5
6
0
8
:
i
3
2
1
/
0
0
0
0
1
1
:
:
+
R
L
3
2
3
:
O
f
f
3
2
1
/
D
Functions
2 Press once to pause playback (resume stop).
3 To stop playback completely, press again.
Using the Function menu
1 Press D when the CD screen is displayed.
– The “Functions” menu is activated.
n
o
s
c
n
u
F
t
T
a
0
c
3
k
r
0
0
0
:
1
2
3
4
5
6
0
c
1
k
a
T
r
T
0
c
2
k
a
r
T
a
0
c
3
k
r
T
a
0
c
4
k
r
T
0
c
5
k
a
r
T
0
c
6
k
a
r
5
5
1
6
:
5
1
0
:
5
2
3
:
5
0
3
:
4
4
4
:
5
0
8
:
i
3
2
1
/
0
0
0
0
1
1
:
:
+
R
L
3
2
3
:
O
f
f
3
2
1
D
Track select
/
ReturnSelect Enter
■ Enjoying BONUSVIEW or BDLIVE
BD-V
This Player is compatible with additional functions of BDVideo, BONUSVIEW (BD-ROM Profile 1 Version 1.1)
and BD-LIVE.
For BD-Video discs compatible with BONUSVIEW, the
functions of Picture in Picture and Virtual Package are
available. For BD-LIVE compatible discs, you can enjoy a
variety of functions via the internet in addition to the
BONUSVIEW functions.
Virtual Package/BD-LIVE data is saved in Local Storage
(USB memory device connected to this Player). To enjoy
these functions, connect a USB memory device (2GB or
greater and formatted with FAT 32/16) supporting USB
2.0 High Speed (480Mbit/s) to the USB BD STORAGE/
SERVICE terminal (page 14) on the back of this player.
– If there is insufficient storage space, the data will not
be copied/downloaded. Delete unneeded data or use
a new USB memory device.
– If a USB memory device containing other data
(previously recorded) is used, the video and audio
may not play back properly.
– If the USB memory device is disconnected from this
player during playback of Virtual Package/BD-LIVE
data, playback of the disc will stop.
– Some time may be required for the data to load
(read/write).
– Refer to “USB Memory Management” on page 36
for erasing the Virtual Package data and the BDLIVE data in the USB memory device.
Notes
– Yamaha cannot guarantee that all brands’ USB
memory devices will operate with this player.
– Do not use a USB extension cable when connecting
a USB memory device to the USB BD STORAGE/
SERVICE terminal of the player. Using a USB
extension cable may prevent the player from
performing correctly.
2 Press / to select the desired setting, then press
ENTER.
– When playback is stopped, only “Track” can be
selected.
– For a description of each setting, see “Functions
which can be set” (page 26).
3 Press / / / to set, then press ENTER.
– Operations vary depending on the setting. Follow the
operation instructions on the screen.
4 Press RETURN or D to exit the “Functions” menu.
Note
– The displayed items vary depending on the disc.
24 En
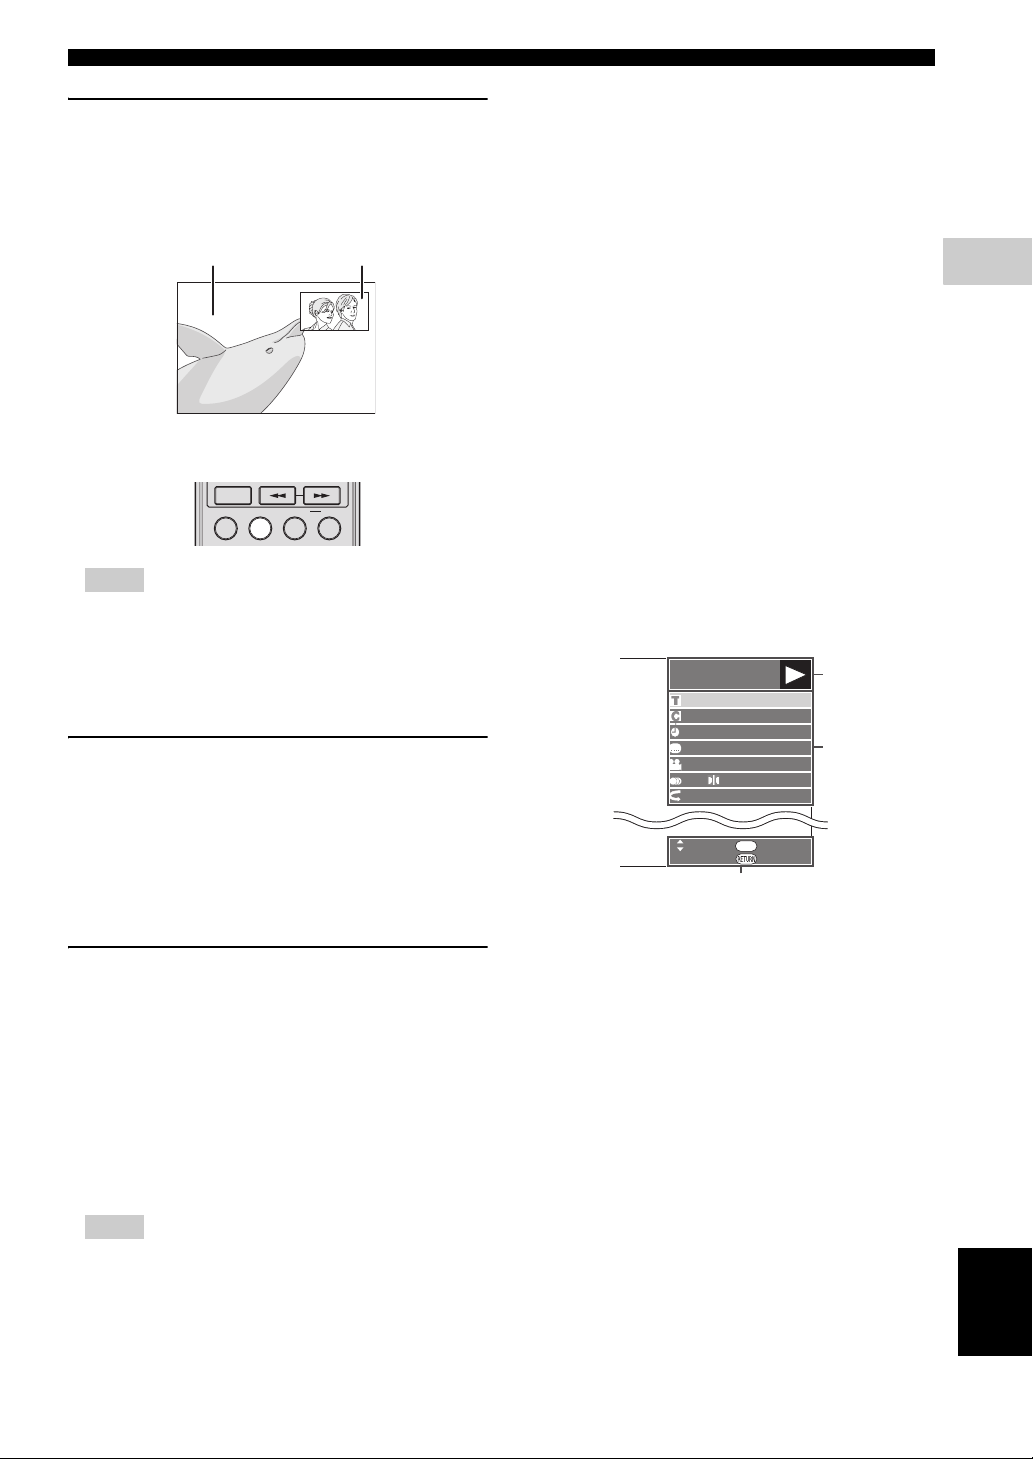
Use of Picture in Picture function
S
Pri
SEARCH
(secondary audio/video playback)
BD-Video that includes secondary audio and video
compatible with Picture in Picture can be played back
with secondary audio and video simultaneously as a small
video in the corner.
mary video
econdary video
Press P in P to turn the Picture in Picture function on or
off.
ON SCREEN
SETUP P in P
REPEAT
OFF
Notes
– To listen to secondary audio, make sure that
“Secondary Audio” is set to “On”. (See page 31.)
– The secondary audio and video for Picture In Picture
may automatically play back and be removed
depending on the content. Also, playable areas may
be restricted.
Virtual Package
For BD-Video discs compatible with Virtual Package,
data is copied from the discs or internet to local storage. It
is automatically copied to the local storage prior to
playback. You can enjoy a variety of additional functions
including secondary video, secondary audio, subtitles,
movie trailers, etc.
– The playback methods vary depending on the disc.
For details, refer to the disc manual.
BD-LIVE
In this Player, a variety of contents with interactive
functions are available through BD-LIVE compatible Bluray discs by connecting to the internet. You can enjoy the
download of bonus features such as latest movie trailers to
the USB memory device, communication compatible BDJ interactive games, etc.
– The available functions differ depending on the disc.
– The BD-LIVE operation methods and contents
displayed vary depending on the programs provided
through the internet. Operate by following the
directions on the screen.
BD/DVD/CD Playback
– Refer to page 33 regarding the setup to restrict
access to BD-LIVE contents.
– The time required to download the provided
programs into the USB memory device connected to
this player varies depending on the internet
connection speeds and the data volume of the
programs.
– BD-LIVE programs provided through the internet
may not be able to display the connection depending
on the status (updating) of the provider. In such
cases, take out the disc and try again.
– If the BD-LIVE screen does not appear for a while
after you select the BD-LIVE function in the BD
disc menu, the USB memory device may not have
enough free space. In such cases, eject the disc from
the player, and then erase the data in the USB
memory device using the Data Erase menu in the
“USB Memory Management” menu. (See the
operation manual on page 36.)
■ Function Control Screen
This allows you to adjust various settings at once, like
subtitles, angle settings and the title selection for Direct
Playback. You can adjust the video and audio to suit your
preferences. The operations are the same for BD and
DVD.
Function control screen
BD-VIDEO
1 / 3
5 5 / 2
0 3 : 0 2 :0 0
2 English
1
1
5 . 1 c h
Off
ENTER
Select Enter
Return
3
1 Playback status display
Shows the operation status and the disc type.
2 Setting items
Selects a title (or track) or chapter for playback, or
performs video/audio settings.
3 Operation guide display
Provides help on remote control button operations.
1
2
3
DISC PLAYBACK
Notes
– Regarding playback method of BD-LIVE contents,
etc., perform the operations in accordance with the
instructions in the BD disc manual.
– To enjoy BD-LIVE functions, perform the
broadband internet connection (page 14) and
communication settings (pages 34–36).
English
25 En

BD/DVD/CD Playback
STATUS
SLOW/SKIP
SEARCH
ON SCREEN
TOP MENU/TITLE LIST POP UP MENU
EXIT RETURN
ENTER
Function control operation procedure
1 Press ON SCREEN during playback.
– The Function Control screen is displayed on the TV.
2 Press / to select the desired setting, then press
ENTER.
– For a description of each setting, see “Functions
which can be set” (page 26).
BD-VIDEO
1/3
5 5 / 2
2 English
1
1
Off
0 3 : 0 2 :0 0
5 . 1 c h
Functions which can be set
OPEN/CLOSE
DIMMER
VIDEO-RESET
SUBTITLE AU DIO ANGLE
CLEAR
A
TOP MENU/TITLE LIST
EXIT
STATUS
ON SCREEN
SETUP P in P
ENTER
B C D
POP UP MENU
ENTER
SLOW/SKIP
SEARCH
REPEAT
RETURN
OFF
3 Press / / / to set, then press ENTER.
– Operations vary depending on the setting. Follow the
operation instructions on the screen.
4 Press RETURN or ON SCREEN to close the
Function Control screen.
Notes
– If “– –” is displayed for an option like title number
or subtitles, the disc has no titles or subtitles which
can be selected.
– The displayed items vary depending on the disc.
– If you access the Function Control screen during
playback of a BD/DVD video, it may be impossible
to operate the BD/DVD video playback. In cases like
this, close the Function Control screen.
Icons Functions Descriptions
– Shows the title number being played
back (or track number when playing
Title/Track
Number (Direct
Title/Track
Skip)
back an audio CD). You can skip to
the start of the title (or track).
– To skip to the start of a selected title
(or track), press the Number
buttons to enter the title (or track)
number when this option is
highlighted.
– Shows the chapter number being
played back. You can skip to the
Chapter Number
(Direct Chapter
Skip)
start of the chapter.
– To skip to the start of a selected
chapter, press the Number buttons
to enter the chapter number when
this option is highlighted.
– Shows the time elapsed from the
beginning of the current disc title (or
track). This lets you skip to a
Playback
Elapsed Time
(Direct Time
Skip)
specific time.
–Press / to select the Hour,
Minute or Second, then press /
or the Number buttons to set the
time. Press ENTER to start
playback at the set time.
26 En
 Loading...