

Yamaha BD-A1000 Owner Manual
BLU-RAY DISC PLAYER
LECTEUR BLU-RAY DISC
BD-A1000
OWNER’S MANUAL
MODE D’EMPLOI
CA
IMPORTANT SAFETY INSTRUCTIONS
Read these operating instructions carefully before using the unit. Follow the safety instructions on the unit and the applicable safety
instructions listed below. Keep these operating instructions handy for future reference.
1 Read these instructions.
2 Keep these instructions.
3 Heed all wa r nings.
4 Follow all instructions.
5 Do not use this apparatus near water.
6 Clean only with dry cloth.
7 Do not block any ventilation openings. Install in accordance
with the manufacturer’s instructions.
8 Do not install near any heat sources such as radiators, heat
registe rs, stoves, or other apparatus (in c luding ampli fiers)
that produce heat.
9 Do not defeat the safety purpose of the polarized or
grounding-type plug. A pol arized plug has two blades with
one wider than the other. A grounding-type pl ug has two
blades and a third ground ing prong. The wide blade or t he
third prong are provided for yo ur safety. If the provided
plug does not fit into your outlet, consult an electrician for
replacem ent of the obsolete outlet.
WARNING:
TO REDUCE THE RISK OF FIRE, ELECTRIC SHOCK OR
PRODUCT DAMAGE,
• DO NOT EXPOSE THIS APPARATUS TO RAIN,
MOISTURE, DRIPPING OR SPLASHING AND
THAT NO OBJECTS FILLED WITH LIQUIDS,
SUCH AS VASES, SHALL BE PLACED ON THE
APPARATUS.
• USE ONLY THE RECOMMENDED
ACCESSORIES.
• DO NOT REMOVE THE COVER (OR BACK);
THERE ARE NO USER SERVICEABLE PARTS
INSIDE. REFER SERVICING TO QUALIFIED
SERVICE PERSONNEL.
10 Protect the power cord from being wa lked o n or pi nched
particular l y at pl ugs , co nvenienc e rec ept acl es, and the p oin t
where they exit from the apparatus.
11 Only use attachments/accessories specified by the
manufacturer.
12 Use only with the cart, stan d, tri pod, bra cke t,
or table specified by the manufacturer, or sold
with the apparatus. When a cart is used, use
caution when moving the cart/apparatus
combination to avoid injury from tip-over.
13 Unplug this apparatus during lightning storms
or when unused for long periods of time .
14 Refer all servicing to qualified service personnel. Servicing
is required when the apparatus has been damaged in any
way, such as power-supply cord or plug is dam a ged, liquid
has been spilled or objects have fallen into the ap paratus,
the apparatus has been exposed to rain or moisture, does not
operate normally, or has been dropped.
CAUTION
Danger of explosion if bat tery is inc orrectl y rep laced. R epl ace onl y
with the same or equivalent type .
The socket outlet shall be installed near the equipment an d easily
accessible. The mains plug of the power supply cord shall remain
readily operable.
To completely disc onnect this apparatus from the AC Mains,
disconnect the power supply cord plug from AC re cept acle .
CAUTION!
DO NOT INSTALL OR PLACE THIS UNIT IN A
BOOKCASE, BUILT-IN CABINET OR IN ANOTHER
CONFINED SPACE.
ENSURE THE UNIT IS WELL VENTILATED. TO
PREVENT RISK OF ELECTRIC SHOCK OR FIRE
HAZARD DUE TO OVERHEATING, ENSURE THAT
CURTAINS AND ANY OTHER MATERIALS DO NOT
OBSTRUCT THE VENTILATION VENTS.
CAUTION!
THIS PRODUCT UTILIZES A LASER.
USE OF CONTROLS OR ADJUSTMENTS OR
PERFORMANCE OF PROCEDURES OTHER THAN
THOSE SPECIFIED HEREIN MAY RESULT IN
HAZARDOUS RADIATION EXPOSURE.
DO NOT OPEN COVERS AND DO NOT REPAIR
YOURSELF.
REFER SERVICING TO QUALIFIED PERSONNEL.
Caution-i En
The lightning fl ash with arrowhead symbol,
within an equilateral triangle, is intended to alert
the user to the presence of uninsulated “dangerous
voltage” within the product’s enclosure that may
be of sufficient m agnitude to consti tute a risk of
electric shock to persons.
The exclamation point within an equilateral
triangle is intended to alert the user to the presence
of important operating and maintenance
(servicing) instructions in the literature
accompanying the appliance.

FCC INFORMATION (for US customers)
1 IMPORTANT NOTICE: DO NOT MODIFY THIS
UNIT!
This product, when installed as indicated in the i nstructions
contained in this manual, meets FCC requirements.
Modifications not expressly approved by Yamaha may void
your authority, granted by the FCC, to use the product.
2 IMPORTANT: When connecting this product to accessories
and/or another product use only high quality shielded cables.
Cable/s supplied with this product MUST be used. Follow
all installation instructions. Failure to follow instructions
could void your FCC authorization to use this product in the
USA.
3 NOTE: This product has been tested and found to comply
with the requirements listed in FCC Regulations, Part 15 for
Class “B” digital devices. Compliance with these
requirements provides a reasonable level of assurance that
your use of this product in a residential environment will not
result in harmful interference with other electronic devices.
This equipment generates/uses radio frequencies and, if not
installed and used according to the instructions found in the
users manual, may cause interference harmful to the
operation of other electronic devices.
Compliance with FCC regulations does not guarantee that
interference will not occur in all installations. If this product
is found to be the source of interference, which can be
determined by turning the unit “OFF” and “ON”, please try
to eliminate the problem by using one of the following
measures:
Relocate either this product or the device that is being
affected by the interference.
Utilize power outlets that are on different branch (circuit
breaker or fuse) circuits or install AC line filter/s.
In the case of radio or TV interference, relocate/reorient the
antenna. If the antenna lead-in is 300 ohm ribbon lead,
change the lead-in to coaxial type cable.
If these corrective measures do not produce satisfactory
results, please contact the local retailer authorized to
distribute this type of product. If you can not locat e t he
appropriate retailer, please contact Yamaha Electronics
Corp., USA 6660 Orangethorpe Ave., Buena Park, CA
90620.
The above statements apply ONLY to those products
distributed by Yamaha Corporation of America or its
subsidiaries.
COMPLIANCE INFORMATION STATEMENT (DECLARATION OF CONFORMITY PROCEDURE)
Responsible Party: Yamaha Electronics Corporation, USA
Address: 6660 Orangethorpe Avenue
Buena Park, CA 90620
Telephone: 714-522-9105
1-800-492-6242 (tol l free)
Fax: 714-228-3390
Type of Equipment: Blu-ray Disc Player
Model Name: BD-A1000
We Want You Listening For A Lifetime
Yamaha and the E le ct ronic Industries Asso ci at ion’s Consumer Elect ronics Group want yo u to get t he m ost out of
your equipment by playing it at a safe level. One that lets the sound come throu gh lo ud and clear without annoying
blaring or distor t io n - and, most importantly, without affect in g your sensitive hearin g.
Since hearing damage from loud sounds is often undetectable until it is too late, Yamaha and the Electronic
Industries Ass ocia tio n’s Con sumer Elec tron ics Grou p rec ommend you to avoi d prol onged expos ure fr om exces si ve
volume levels.
IMPORTANT
Please record the serial number of this unit in the space
below.
MODEL:
Serial No.:
The serial number is located on th e rear of the unit.
Retain this Owner’s Manual in a safe place for future
reference.
• This device complies with Part 15 of the FCC Rules.
• Operation is subject to the following conditions:
– This device may not cause harmful interference.
– This device must accept any interferen ce rec eived including
interference that may cause undesired operati on.
See the “Trouble shooting” section at the end of this manu al if
interference to radio rece pt ion is suspected.
Caution-ii En

CAUTION: READ THIS BEFORE OPERATING YOUR UNIT.
1 To assure the finest performance, please read this manu al
carefully. Keep it in a safe place for future reference.
2 Install this unit in a w ell ventilated, co ol, dry, clean place –
away from dire ct sunlight, heat sources, vi bration, dust,
moisture, and/or cold. For prope r ve ntilation, allow the
following minimum clear ances.
Top: 10 cm (4 in)
Rear: 10 cm (4 in)
Sides: 10 cm (4 in)
3 Locate this unit away from other electrical ap pl iances,
motors, or transformers to avoid humming sounds.
4 Do not expose this unit to sudden temperature changes from
cold to hot, and d o no t lo cat e thi s un i t in an env iro nm ent w ith
high humidity (i.e. a room with a hum id ifi er) to prevent
condensation inside this unit, w hi ch may cause an electrical
shock, fire, damage to this unit, and/or personal injury.
5 Avoid installing this unit where foreign obj ec t may fal l onto
this unit and/or this unit may be exposed to liquid dripping or
splashing. On the top of this unit, do not place:
– Other components, as they may cause damage and/or
discoloration on the surface of this unit.
– Burning objects (i.e. candles), as they may cause fire,
damage to this unit, and/or personal injury.
– Containers with liquid in them, as they may fall and
liquid may cause el ectrical shock to the user and/or
damage to this unit.
6 Do not cover this unit with a newspaper, tablecloth, curt ai n,
etc. in order not to obstruct he at radiation. If the tempera ture
inside this unit rises, it may cause fire, damage to this unit,
and/or personal injury.
7 Do not plug in this unit to a wall outlet un ti l all connections
are complete .
8 Do not operate this unit upside-down. It may overheat,
possibly causing damage.
9 Do not use force on switches, kno bs and /o r cords.
10 When disc o n necting the power cabl e from the wall outlet,
grasp the plug; do not pull th e ca ble.
11 Do not clean this unit with chem ical solvents; this might
damage the finish. Use a clean , dr y cl ot h.
12 Only voltage specified on this unit must be used. Using this
unit with a higher voltage than specified is dangerous and
may cause fire, damage to this unit, and/or personal injury.
Yamaha will not be held responsible for any damage resulting
from use of this unit with a voltage other than specified.
13 To prevent damage by lightn ing, keep the power cable
disconnected from a wall outlet or this unit during a lightning
storm.
14 Do not attempt to modify or fix this unit. Conta ct q ua li fie d
Yamaha service personnel when any service is needed. The
cabinet should never be ope ned for any reasons.
15 When not planning to use this unit for long perio ds of time
(i.e. vacation), disconnec t the A C power plug from the wall
outlet.
16 Be sure to read the “TROUBLESHOOTING” section on
common operating errors before concluding that this unit is
faulty.
17 Before moving this unit, press p to set this u nit to the
standby mode, and disconnec t th e AC power plug from the
wall outlet.
18 Condensation will form when the surrounding temp era ture
changes suddenly. Disconnect the power cable from the
outlet, then leave this unit alone.
19 When using this unit for a long time, this unit may become
warm. Turn the power off, then leave this unit alone for
cooling.
20 Install this unit nea r the AC outlet and where the AC p ower
plug can be reached easily.
21 The batteries shall not be exposed to excess ive heat such as
sunshine, fire or the like.
This unit is not disconnected from the AC power source
as long as it is connected to the wall outlet, even if this
unit itself is turned off by p. This state is called the
standby mode. In this stat e, this unit is designed to
consume a very small quanti ty of power.
WARNING
TO REDUCE THE RISK OF FIRE OR ELECTRIC
SHOCK, DO NOT EXPOSE THIS UNIT TO RAIN OR
MOISTURE.
The laser component in this product is capable of
emitting radiation exceeding the limit for Class 1.
LASER Specification:
Class 1 LASER Product
Wave length: 790 nm (CDs)/655 nm (DVDs)/405 nm (BDs)
Laser output: max. 1 mW
LASER SAFETY
This unit employs a laser. Due to possible eye injury, only a
qualified service p er son should remove the cover or attempt
to service this dev ice.
DANGER
This unit emits visible l as er radiation when open. Av oi d
direct eye exposure to beam. When this unit is plugged into
the wall outlet, do not place your eyes close to the opening of
the disc tray and ot her openings to look into inside.
Caution-iii En

CONTENTS
1
1. INTRODUCTION
WHAT YOU CAN DO WITH THIS PLAYER........ 2
SUPPLIED PARTS............................. ............... .. 2
ABOUT DISCS AND FILES................................. 3
Types of discs/files that can be used wit h this Player .... 3
Loading a disc................ .................. .................. ............. 4
Disc precautions............................................................. 4
CONTROLS AND FUNCTIONS .......................... 5
Front panel....................................... .................. ............. 5
Remote control........................... ................. .................. . 6
2. CONNECTION
INTRODUCTION TO CONNECTIONS.............. 10
Rear panel..................................................................... 10
HDMI CONNECTION........... ............... ............... 12
Connecting to the HDMI terminal................................ 12
VIDEO CONNECTIONS ............... .............. ....... 13
Connecting to the component /video jack..................... 13
AUDIO CONNECTIONS.................................... 14
Connecting to the digital audi o ja ck/terminal............... 14
Connecting to the audio jacks....................................... 15
NETWORK AND USB CONNECTION.......... .... 16
Connecting to the NETWORK terminal and
USB port .............. .................. ................. ................. 16
OTHER CONNECTIONS................................... 17
Connecting to the REM OTE CONT ROL jack s........... 17
Connecting the power cable......................................... 17
3. PLAYBACK
INITIAL WIZARD/EASY SETUP. .............. ......... 18
Setting with the Initial Wizard/Easy Setup................... 18
HOME/MEDIA MENU....................... ............... .. 19
Playing back photo/music/video................................... 19
Using network content............................ .................. .... 21
ADVANCED PLAYBACK OPERATION............ 22
On Screen menu............................................................ 22
Status menu................................................................... 23
Using Bookmark................................ .................. ......... 24
Program play................................................................. 24
Using search............................ .................. .................. . 24
Enjoying BONUSVIEW and BD-Live......................... 25
Using Picture in Picture function
(secondary audio/video playback)........................... 25
Using the feature of BD-Live....................................... 25
4. SETTINGS
SETUP MENU................ ............... ..................... 26
Example of SETUP menu operation............................ 28
General Setting............................................................. 29
Display Setting........................ .................. .................. . 31
Audio Setting................... .................. ........................... 33
System Information...................................................... 33
About the audio output formats...... ..... ..... ..... ... ..... ..... .. 34
About the video output formats...... ..... ..... ..... ... ..... ..... .. 35
SOFTWARE UPGRADE.................................... 36
Upgrading the software ................................................ 36
5. ADDITIONAL INFORMATION
TROUBLESHOOTING ....................................... 37
Power ........... .................. .................................... ........... 37
Basic operation.............................................................. 37
Disc playback................................................................ 37
Picture......................................... .................. ................ 38
Sound........... .................. .................. .................. ........... 38
Network.................................. .. .................. .................. . 39
Messages on the screen................................................. 39
GLOSSARY ....................................................... 40
SPECIFICATIONS ............................................. 41
General.............................. ................. .................. ......... 41
Audio performance............................................ ........... 41
Input/output................. .................. .................. .............. 41
Copyright............................ .................. .................. ...... 42
(at the end of this manual)
Information about software ................. ...................i
■ About this manual
– This manual describes how to operate this Player
using a remote control except when it is not
available. Some of these op erations are also
available using the f ront panel buttons.
– Notes contain important information about safety
and operating instructions. Hint(s) in di cate s a ti p for
your operation.
– This manual is printed prior to production. Design
and specifications are subject to ch ange in part as a
result of improvements, etc. In case of differences
between the manual and the product, the product has
priority.
The icons used in this manual
Icons are used to indicate available buttons/functions for a
particular format.
: BD-Video
BD
: DVD-Video, DVD-VR, DVD+VR, DVD-Audio
DVD
: Audio CD, Super Audi o CD
CD
: AVCHD, WMV, DivX
VIDEO
: MP3, WMA
MUSIC
PHOTO
: JPEG
2
3
4
5
English
1 En
INTRODUCTION
WHAT YOU CAN DO WITH THIS PLAYER
Easy setting for language, resolution, screen aspect ratio \ p. 18
You can perform language and TV settings.
Play back commercially-released BD/DVD/CD/SA-CD/DVD-Audio
*
discs
In addition to BD discs, this Player also suppor ts playback of a variety of other discs.
Play back BONUSVIEW, BD-Live, etc.
You can enjoy additional movies on the latest BD discs.
Play back Video, Music, Photo files on a disc
This Player ca n play back discs you recorded.
*
*
Play back Video, Music, Photo files on a di sc/USB memory device
Files recorded on discs/USB memory devices can be played back with this Player.
Play back Video, Music, Photo files on a Home Network Server*
PC contents can be played back with TV or AV receiver by connect in g t hi s Player to a network
server.
*
**
\ p. 22
\ p. 25
\ p. 19
\ p. 19
\ p. 21
Operation with the remote control of TV, AV receiver, etc. \ p. 29
Connecting devic es with an HDMI cable, you can control devices with a single remote control
using the HDMI Control function.
* For details on playable disc and format, see page 3.
** Network setting is needed to use this function.
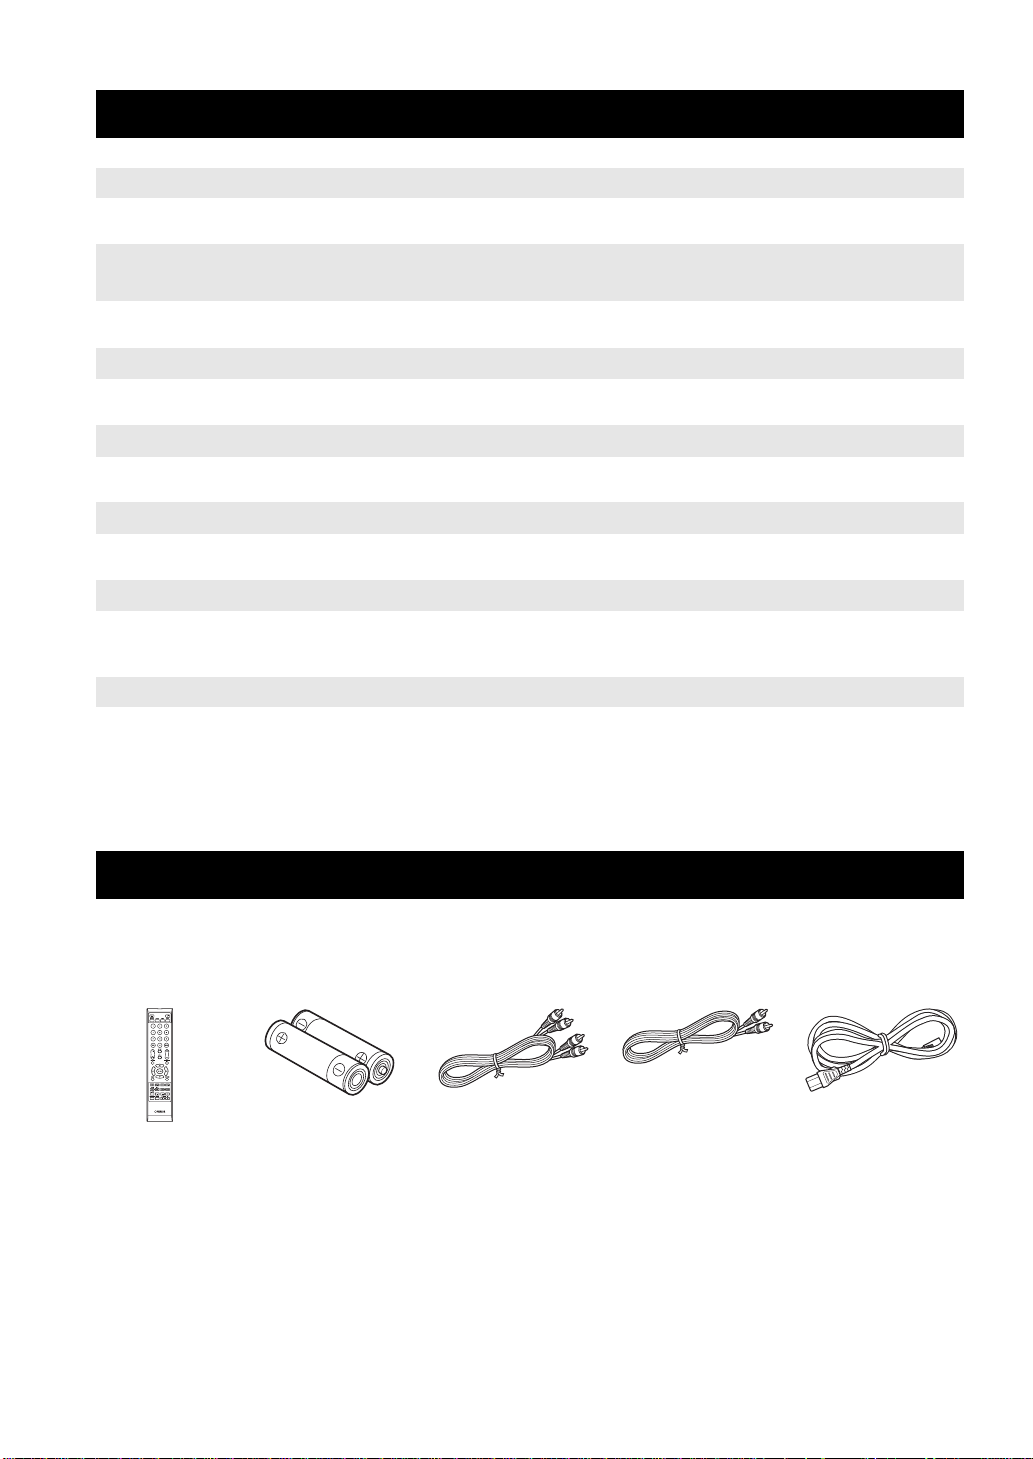
SUPPLIED PARTS
Make sure the following accessori es are provided with the product.
Batteries (×2)
(AAA, R03, UM-4)
2 En
Power cableRemote control Audio pin cable Video pin cable
ABOUT DISCS AND FILES
■ Types of discs/files that can be
used with this Player
– 12 cm (5”) and 8 cm (3”) discs can be played back in
this Player. Do not use an 8 cm (3”) to 12 cm (5”)
adapter.
– Use discs that conform to compatible standards as
indicated by the presenc e of official logos on the
disc label. Playback of discs not complying with
these standards is not guaranteed. In addition, the
image quality or sound quality is not guaranteed
even if the discs can be played back.
Disc Type
BD-ROM/BD-R/
BD-RE
DVD-ROM DVD-Video/DVD-
DVD-R/DVD-R DL/
DVD-RW
DVD+R/DVD+R
DL/DVD+RW
CD-ROM CDDA/HDCD -CD-R/CD-RW CDDA/Data Disc DivX/WMV/MP3/
SA-CD SA-CD -USB -- DivX/WMV/MP3/
Network -- WMV/MP3/WMA/
Recording
Format
BD-Video --
Audio
DVD-Video/DVD-
VR/AVCHD/Data
Disc
DVD-Video/
DVD+VR/AVCHD/
Data Disc
Data Format
--
DivX/WMV/MP3/
WAV/WMA/JPEG
DivX/WMV/MP3/
WAV/WMA/JPEG
WAV/WMA/JPEG
WAV/WMA/JPEG
WAV/JPEG
1
INTRODUCTION
Notes
– Playback for some of the discs in the left side
column tables may not be possibl e depending on the
disc.
– Finalize all recording media that is pl ayed back in
this Player.
– “Finalize” refers to a recorder processing a recorded
disc so that it will play in other players/recorders as
well as this Player. Only finalized discs will play
back in this Player. (This Player does not have a
function to finalize discs.)
– Playback of all files on the disc, USB memory
device and network is not guaranteed.
– A copyright protected file cannot be played back via
USB memory device and network.
MP3/WMA/WAV audio file requirement
– Sampling frequency: within 32 - 48 kHz (MP3/
WMA), LPCM 44.1 kHz/16 bit/Stereo (WAV)
– Bitrate: within 8 - 320 kbps (MP3), 32 - 192 kbps
(WMA)
WMV file requirement
– WMV9, maximum resolution is 1,920 × 1,080.
Region management information
Destination BD-Video DVD-Video
U.S.A. and Canada Region code “A” or
“ALL”
Australia Region code “B” or
“ALL”
Region number “1”
or “ALL”
1
Region number “4”
or “ALL”
4
– BD/DVD Video players and discs have region
codes, which dictate the regions in which a disc can
be played.
– BD/DVD Video operations and functions may be
different from the explanations in this manual and
some operations ma y be prohibited due to disc
manufacturer’s settings.
– If a menu screen or operating instructions are
displayed during playback of a disc, follow the
operating procedure displayed.
ALL
ALL
English
3 En
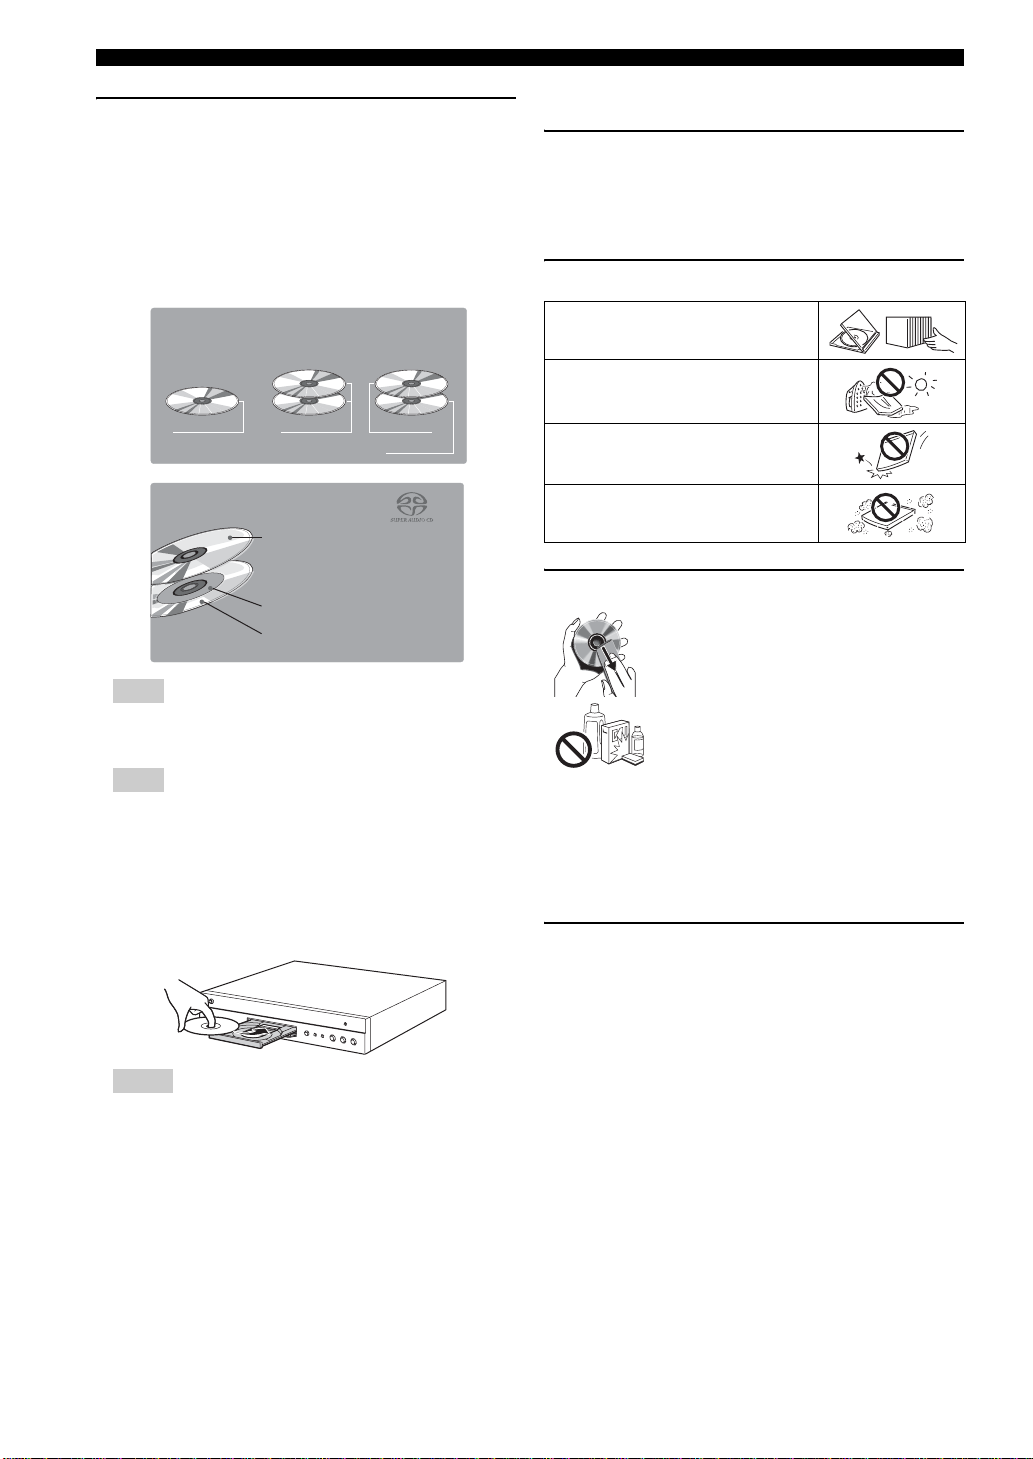
ABOUT DISCS AND FILES
About Super Audio CD (SA-CD)
– Audio format based upon the current CD standards
but includes a greater amount of information that
provides higher quality sound. Th ere are three types
of discs: single layer, dual layer and hybrid discs.
The hybrid disc can be played o n exi s t ing CD
players as well as Super Audio CD players since it
contains both standard audio CD and Super Audio
CD information.
■ Disc precautions
Be careful of scratches and dust
– BD, DVD and CD discs are sensitive to dust,
fingerprints and especially scratches. A scratched
disc may not be able to be played back. Handle discs
with care and store them in a safe place.
Proper disc storage
Super Audio CD disc type
Single layer disc
HD layer
Hybrid Super Audio CD disc
Dual layer disc
HD layer
CD layer that plays on any
1
CD player
High Density layer containing:
- High Quality DSD Stereo
2
- High Quality DSD Multi-channel
3
Hybrid layer disc
CD layer
HD layer
Hint
– This player supports DSD data transmi ssion via
HDMI using a compatible AV receiver.
Note
– This unit does not show the text data included in the
discs on the front panel display.
■ Loading a disc
– Insert the disc with the label face up.
– In case of the disc recorded on both sides, face down
the side to play back.
Place the disc in th e cent er of t he disc cas e
and store the case and disc uprig ht.
Avoid storing discs in locations subj ec t to
direct sunlight, close to heating appliances
or in locations of high humidity .
Do not drop discs or subject them to
strong vibrations or impacts.
Avoid storing discs in locations where
there are large amounts of dust or
moisture.
Handling precautions
– If the surface is soiled, wipe g ently wi th a
soft, damp (water only) cloth. When
wiping discs, always move the cloth from
the center hole toward the outer edge.
– Do not use record cleaning sprays,
benzene, thinner, static electricity
prevention liquids or an y oth e r sol vent.
– Do not touch the surface.
– Do not stick paper or adhesive labels to th e disc.
– If the playing surface of a disc is soiled or scratched,
the Player may decide that the disc is incompatib le
and eject the disc tray, or it may fai l to play the disc
correctly. Wipe any dirt off the playing surfa ce with
a soft cloth.
Cleaning the pick up lens
– Never use commercially available cleaning discs.
The use of these discs can damage th e lens.
– Request the nearest service center approved by
Yamaha to clean the lens.
Notes
– Playbac k ma y begi n aut omatical ly, d ependin g on the
disc and setting of this Player.
– The menu may be displayed first, depending on the
disc.
– The disc load time may vary depending on the disc.
4 En

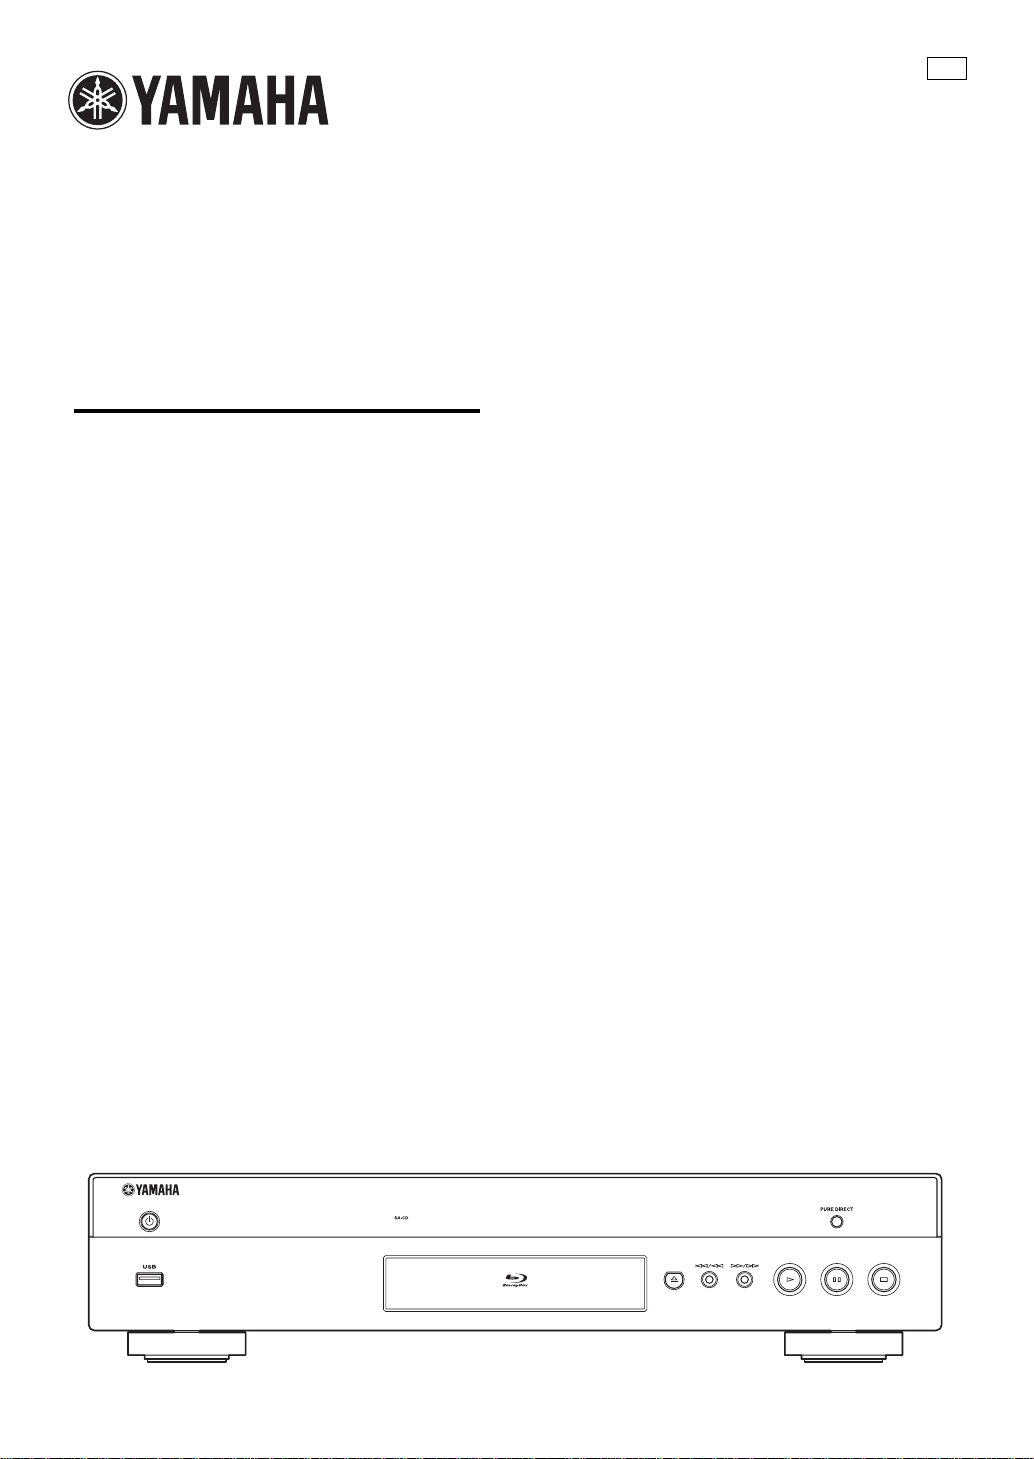
CONTROLS AND FUNCTIONS
■ Front panel
2 5 61 43 7 8 9 0 A B
1 p (On/Standby)
2 USB port (p. 16)
3 SA-CD indicator: Lights up when an SA-CD is
loaded and the SA-CD layer (p. 4) is selected.
4 Front panel display
5 Disc tray (p. 4)
6 (Eject): Opens/closes the disc tray.
7 (Search backward/Skip backward):
Press to skip backward, and press and hold to search
backward.
8 (Search forward/Skip forward):
Press to skip forward, and press and hold to search
forward.
9 (Play)
0 (Pause)
A (Stop)
B PURE DIRECT: Press to change the Pure Direct
mode (p. 7) to mode 1/mode 2/off. This button lights
up when Pure Direct mode is set to mode 1/mode 2.
1
INTRODUCTION
Loading the batteries in the remote
control
3
2
Notes
– Do not subject the remote control unit to shock,
water or excessive humidity.
– The remote control unit may not function if the
Player’s remote sensor is in direct sunlight or any
other strong light.
– Incorrect use of batteries may cause them to leak or
burst. Read the battery warnings and use the
batteries properly.
– Do not mix old and new batteries, or mix different
brands.
– Remove the batteries if you will not use the remote
control unit for an extended period of time.
– Dispose of ba tte rie s acc o rdin g to yo ur r e gio nal
regulations.
1
Approximate operating range of
remote control
Remote control sensor
30˚30˚
6 m (20 ft)
English
5 En
CONTROLS AND FUNCTIONS
■ Remote control
Note
– will appear on the top left corner of the screen
when the pressed button is not available.
1 Infrared signal transmitter: Outputs infrared
signal. Aim this window to the remot e cont rol sens or
(p. 5).
2 MARKER : Sets Bookmark (p. 24) at
DVD
VIDEO
a specified point of a movie. After Bookmark is set, to
select the set point you want to jump to, press
DIGEST. You can set up to 12 Bookmarks.
3 : Opens/closes the disc tray.
4 PROGRAM : Sets the order of playback
DVD CD
(p. 24). You can set up to 15 tracks (for an audio disc)
or titles/chapters (DVD-Video).
5 Color buttons : Use these buttons according to
BD
on-screen instructions.
6 Number buttons: Enters numbers, or during
playback, jumps to the track/chapter corresponding to
the number you input. These buttons may not be
available depending on the disc type and playback
condition.
7 CLEAR: Clears entered number/set item.
8 SETUP: Displays SETUP menu screen (p. 26).
9 PIP : Turns on/off the Picture in Picture (p. 25).
BD
PIP Mark ( ) is displayed on the screen when this
function is av a ilabl e. You can also select th is item f rom
On Screen menu (p. 22).
Note
– PIP Mark is displayed only when the PIP Mark is set
to on (p. 30).
0 2ND AUDIO : Selects the se condary audio of
BD
the Picture in Picture (p. 25) or audio commentaries.
The Secondary Audio Mark ( ) is displayed on the
screen when this function is available (p. 33). You can
also select this item from On Screen menu (p. 22).
Note
– Secondary Audio Mark is displayed only when
Secondary Audio Mark is set to on (p. 30).
6 En

CONTROLS AND FUNCTIONS
\
A TOP MENU : Displays the top menu
screen (p. 41) if the disc contains a menu. Select the
desired item using 5/a /2 /3 and ENTER.
Note
– Specific operations may b e different depending on
the disc. Follow the instruction s of each menu
screen.
B Cursor buttons (5/a /2 /3 ): Moves the focus in
the menu screen.
ENTER: Selects the focused menu/item.
C RETURN: Returns to the previous menu or screen,
etc.
D SUBTITLE : Changes subtitle
languages (p. 41) if available . You can also selec t this
item from On Screen menu (p. 22).
E STATUS: Displays the playback information (p. 23).
F Control buttons
BD DVD CD VIDEO MUSIC PHOTO
/: Searches backward/forward. The search
speed will change each time you press the button
(search backward/forward: 5 steps each). Press to
resume normal play ba c k.
/ :
Press and hold for instant search/replay. Instant search
skips the content 30 seconds. Instant replay replays
the content from 10 seconds befo re.
/: Skips backward/forward.
: Stops playback. To stop playback completely,
press this button twice.
: Pauses playback.
: Plays back contents.
()/ ()
: Performs slow backward/forward. Slow
BD DVD
playback speed will change each time you press the
button (slow backward/forward: 4 steps each).
These buttons also perform frame advance/reverse
playback during pa us e .
Press to resume normal playb ack.
Many DVD-Audio discs include slide show and pag e
turn capabilities. Press / to move to a previous/
next page. This function is only for DVD-Audio.
BD DVD
BD DVD VIDEO
BD DVD CD VIDEO MUSIC
G SA-CD/CD: Switches the playback layer of a hybrid
SA-CD between SA-CD and CD (p. 4).
Hint
– The SA-CD/CD indicator (p. 5) on the front panel
lights up when an SA-CD is loaded and the SA-CD
layer is selected (p. 33).
Notes
– Audio signals are only output from the AUDIO OUT
jacks (p. 11) while the SA-CD layer is selected.
– Audio signals re corded in DSD multi-c hannel format
cannot be played on thi s Pl ayer.
H PURE DIRECT: Changes Pure Direct mode. Pure
Direct mode shown below will change each time you
press the button. Pure Direct mode improves audio
quality. PURE DIRECT on the front panel lights up
when Pure Direct mode is set to mode 1/mode 2.
Mode 1:
sig
audio.
Mode 2: Front panel display is turned off, and video
signals from other than HDMI terminal are not outp ut.
This mode is sui table for watching movies with high
quality sound.
off: Normal play back.
I DIMMER: Changes brightness of the front panel
display in 5 steps.
J DIGEST : Shows 12 photo thumbnails.
When thumbnails are displ ayed, you can proceed to
the next/previous page with / .
DVD VIDEO
(p. 24).
K p: Turns this Player on or sets it to the standby mode.
L ZOOM : Zooms in/out.
The size of the screen will change each time you press
the button (zoom in/out: 3 steps each).
Front panel display is turned of f, and vide o
nals are not output. This mode is suitable listening
PHOTO
: Displays Bookmark select bar
DVD VIDEO PHOTO
1
INTRODUCTION
Notes
– Some BD/DVD discs are not compatib le with frame
advance/reverse playback.
– Depending on the disc, this Player resumes playback
from the point that where the Player was previously
stopped. To play back fro m the beginning, press
and then .
English
Continued to the next page.
7 En
CONTROLS AND FUNCTIONS
M SEARCH :
BD DVD CD VIDEO MUSIC
Jumps to a specified point durin g playback . For details
on this function, refer to “Using search” (p. 24). You
can also select this item from status menu (p. 23).
N HOME: Displays the HOME menu screen (p. 19).
O REPEAT :
BD DVD CD VIDEO MUSIC
Changes repeat mode. Repeat mode shown below will
change each time you press the button.
: Repeats the title be ing played back.
: Repeats the chapter being played back.
: Repeats all tracks/files on the disc/fo lder.
: Repeats the track/file being played back.
P A/B : Plays back
BD DVD CD VIDEO MUSIC
a specific part you want to r epeat.
1 Press A/B at the scene where you want to set the
start point. “A-” is displayed on the screen.
2 Press A/B again at the scene where you want to set
the end point. “A-B” is displayed on the scre en.
Repeat playback starts.
3 To cancel the repeat playback, press A/B. “A-B”
disappears and the repeat playback is finished.
Note
– This function cannot be performed depending on the
specifications of the disc.
Q POP-UP/MENU : Displays po p-up
BD DVD
menu. The menu contents displayed vary depending
on the disc. For details on how to see and operate the
pop-up menu, refer to the manual for the disc.
The top menu screen may be displayed by pressing
POP-UP/MENU depending on the DVD.
R ON SCREEN: Displays On Screen menu (p. 22).
S ANGLE : Changes the camera angle if
BD DVD
video is recorded with multiple angles. The Angle
Mark ( ) is displayed on the screen when this
function is available. You can also select this item
from On Screen menu (p. 22).
Note
– Angle Mark is displayed only when the Angle Mark
is set to on (p. 30).
T AUDIO : Changes the audio language or
BD DVD
format. You can also select this item from On Screen
menu (p. 22).
8 En

CONTROLS AND FUNCTIONS
ID function
You can change the remote control ID to prevent
unwanted operation of the other Yamaha player such as
DVD player. If you have changed the remote control ID,
make sure that you select the same ID for the main unit.
The default setting is ID1.
1 Remote control setting
To change the ID from ID1 to ID2, press and hold
the red color button and 2 of number button
simultaneously for 3 seconds. To change the ID
from ID2 to ID1, press and hold the red color button
and 1 of number but ton simultaneously for 3
seconds.
2 Main unit setting
Press and hold and on the
front panel simultaneously for 2 seconds to disp lay
current ID when:
– No disc is inserted in this Player.
– The disc tray is closed.
– Playback is stopped.
– “NO DISC” is displayed on the front panel
display.
Keep pressing and holdi ng the keys for another 2
seconds to change the ID between ID1 and ID2.
Note
– If the remote control is without batteries for a few
minutes or if exhausted b a tteries remain in the
remote control, the remote control ID is
automatically set to ID1. If you want to use the
remote control in ID2 se tting, install new batteries
and set the remote control ID again.
1
INTRODUCTION
9 En
English
 Loading...