

Yamaha BA-10 User Manual
BASS AMPLIFIER
AMPLIFICATEUR DE GUITARE BASSE
Owner’s Manual
Thank you for purchasing a Yamaha BA-10 Bass Amplifier.
To get the best results and longest life out of your BA-10, we recommend that you carefully read this manual,
and keep it in a safe place for future reference.
Precautions
● To avoid possible damage do not expose the unit to:
• direct sunlight
• very high or low temperature/humidity
• sand or excessive dust
* Especially inside a vehicle, the temperature may rise
excessively — do not leave the BA-10 in your parked car
on a sunny day!
● Before connecting/disconnecting cables or turning the unit on/
off, be sure to set the VOLUME control on the BA-10 to 0.
● Keep the BA-10 away from neon signs or fluorescent lighting to
prevent noise pickup.
● Handle the unit carefully — never apply excessive force to the
controls and avoid dropping the unit.
● For safety, always remove the power plug from the AC wall
outlet if there is any danger of lightning striking in your area.
● To prevent damage and possibly electrical shock, never open
the case and tamper with the internal circuitry.
● Never use solvents such as benzene or thinner to clean the
BA-10. Wipe clean with a soft, dry cloth.
Specifications
Rated Output Power : 7 W
Speaker : 16 cm x1
Controls : VOLUME, TREBLE, BASS, DRIVE switch
Input/Output Terminals : INPUT, PHONES
Power Requirements :
U.S. and Canadian models : 120V, 60Hz
General model : 230V, 50Hz
Dimensions (W x H x D) : 251x 285 x 159 mm (9.8" x 11.2" x 6.3")
Weight : 4 kg (8 lbs 13 oz)
* Specifications and external appearance are subject to change without notice.
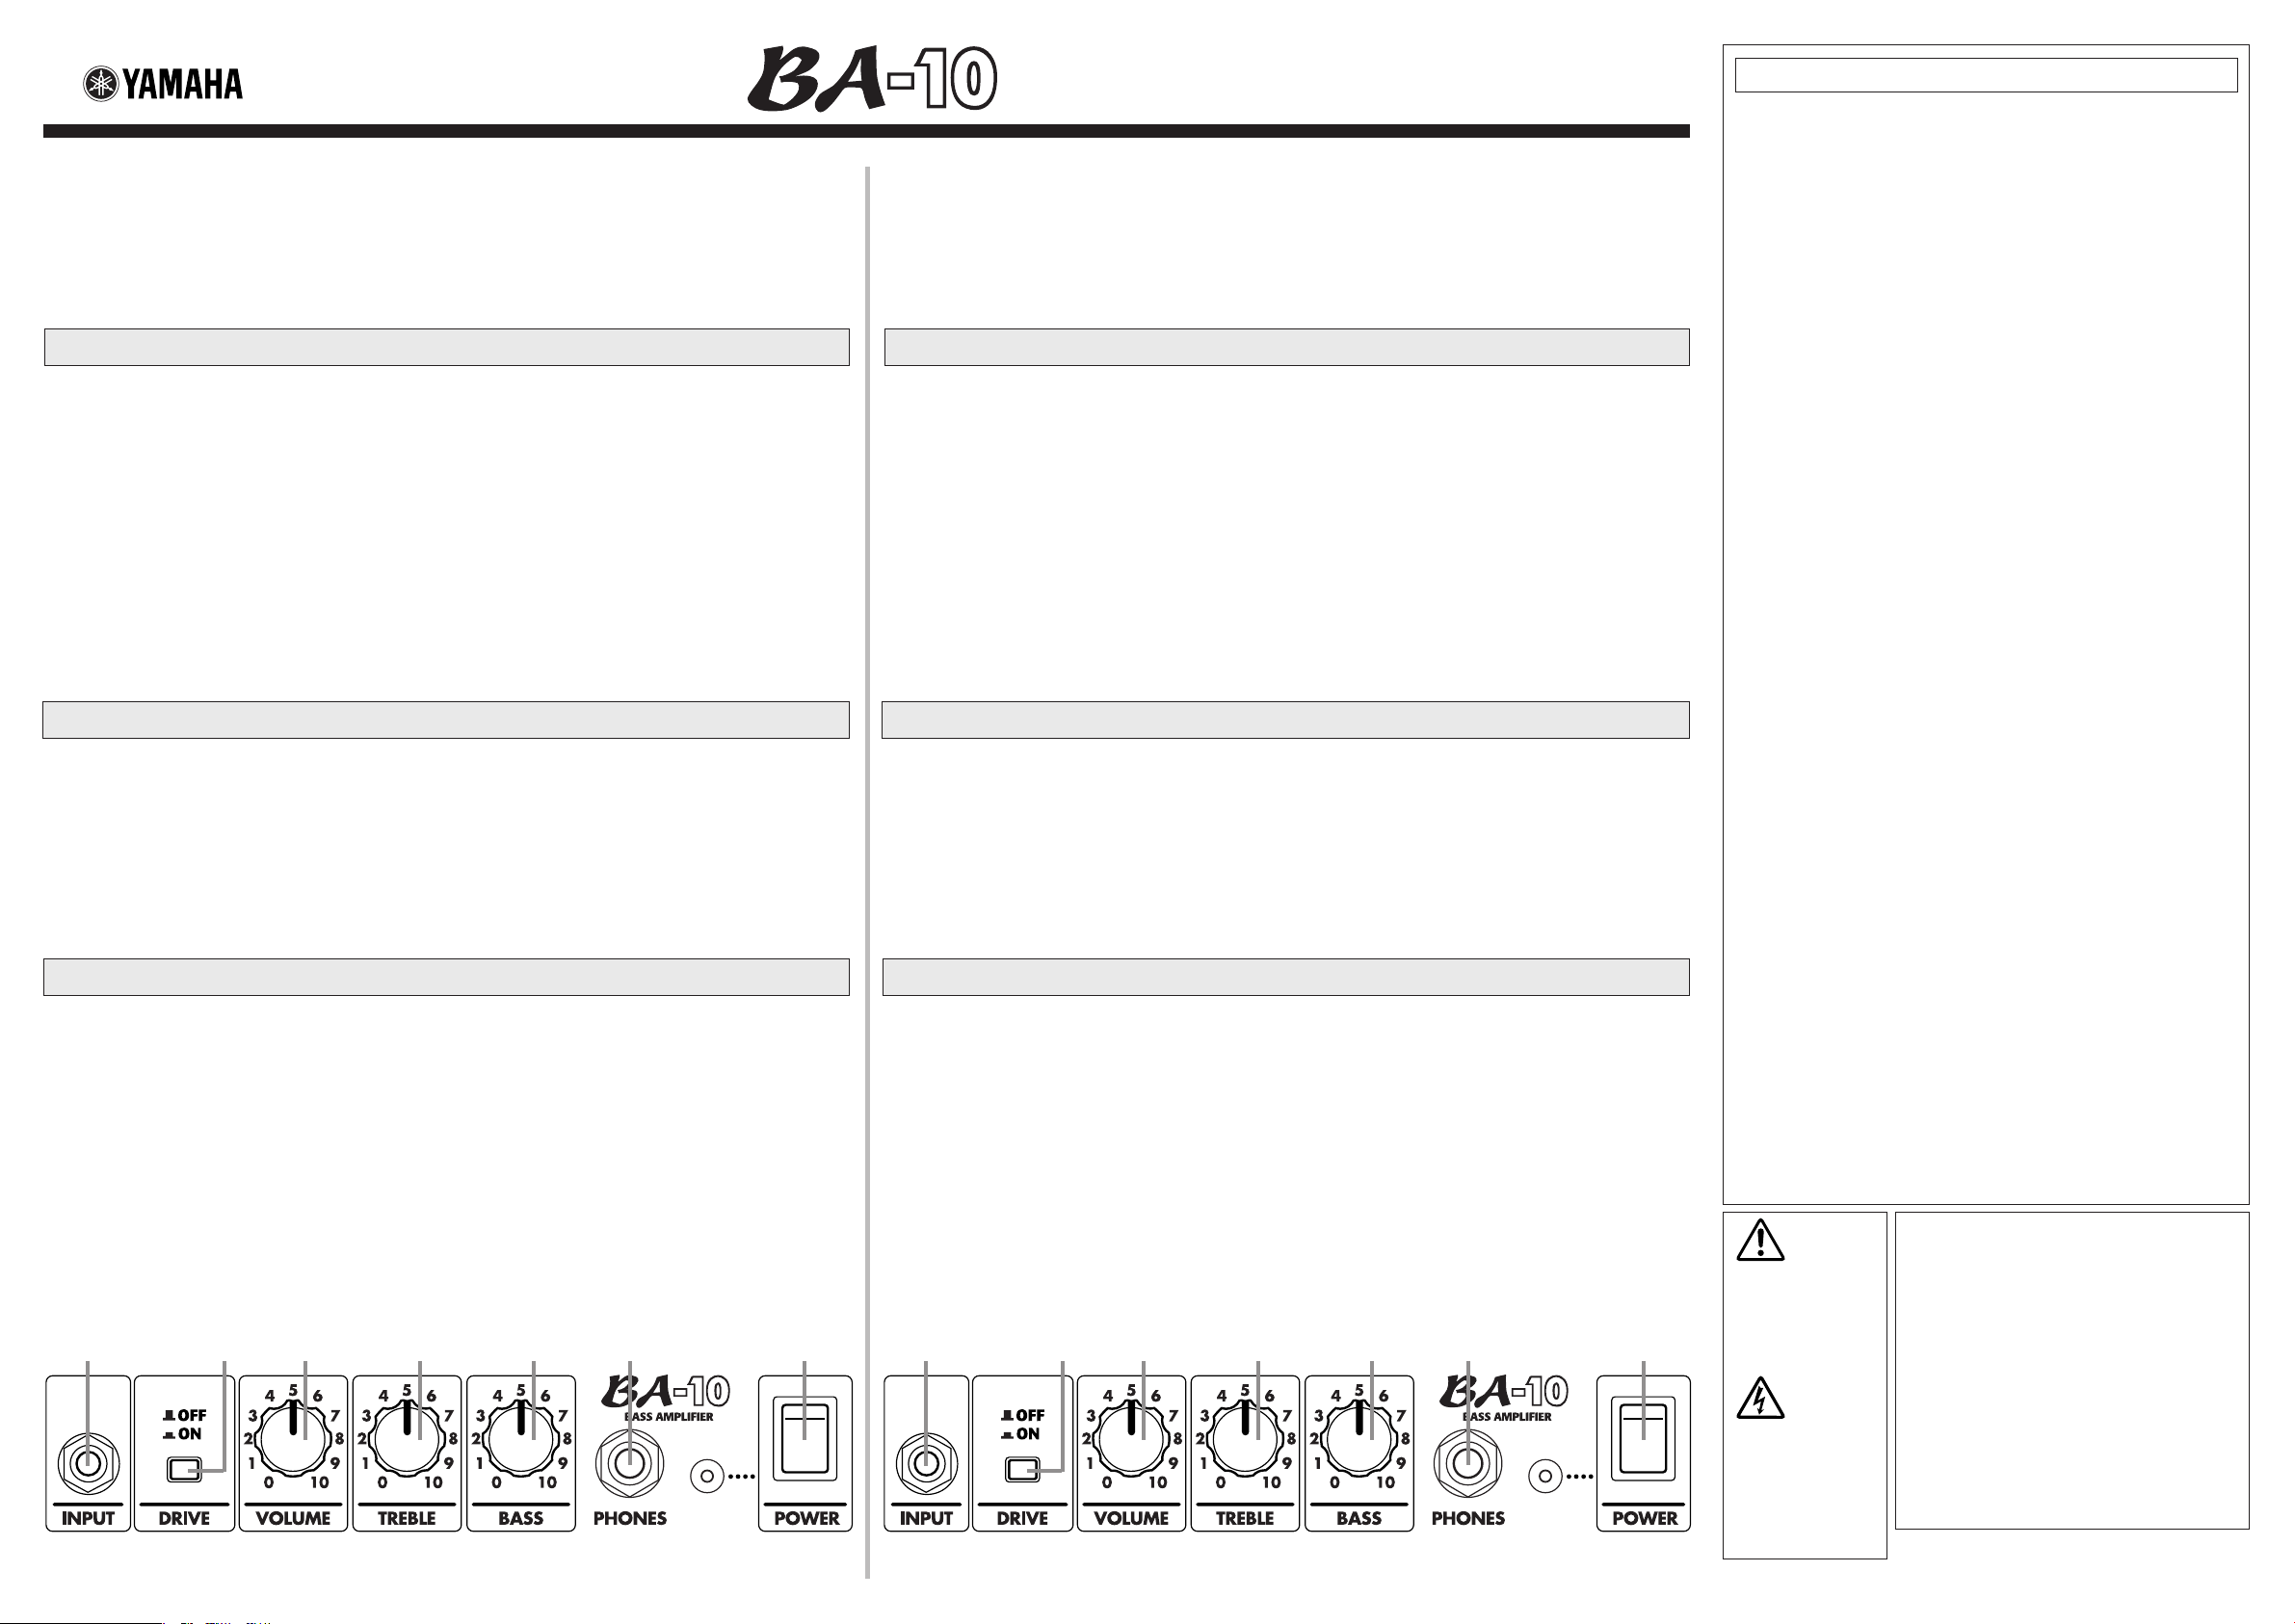
Control Panel
q INPUT
Connect your bass guitar to this jack.
w DRIVE (DRIVE Switch)
Depress the switch (>) to engage the drive mode which boosts
the gain to add powerful distortion to the sound.
When the switch is in the raised position (?), the sound produced by the amplifier is clear, not distorted.
e VOLUME
This knob controls the volume level of the amplifier.
* No sound is produced when the VOLUME knob is set to its “0”
position.
q w e r t y u
r TREBLE
This knob controls the level of the amplifier’s high frequencies.
t BASS
This knob controls the level of the amplifier’s low frequencies.
y PHONES
Connect a pair of headphones to this jack.
* The speaker will produce no sound when a pair of headphones is
connected to this jack.
u POWER
This is the amplifier’s power switch.
When the power is ON, the indicator to the left of the switch
lights.
Mode d’emploi
Nous vous remercions d’avoir fait l’acquisition de l’amplificateur de guitare basse BA-10 Yamaha.
Pour avoir la certitude d’obtenir les meilleurs résultats possibles et assurer à votre BA-10 une longévité optimale,
nous vous recommandons de lire attentivement ce mode d’emploi et par ailleurs, de le conserver dans un
endroit sûr à des fins de consultation ultérieure.
Précautions
● Pour éviter toutes possibilités de dommage, ne soumettez pas
l’appareil aux conditions suivantes :
• en plein soleil
• température/humidité extrêmement élevée ou basse
• sable ou poussière excessive
* La température peut s’élever excessivement à l’intérieur
d’un véhicule fermé : Ne laissez pas le BA-10 dans une
voiture en stationnement en plein soleil.
● Avant de brancher/débrancher les câbles, ou de mettre
l’appareil sous/hors tension, veillez à régler la commande
VOLUME du BA-10 à 0.
● Éloignez le BA-10 des enseignes lumineuses au néon ou des
dispositifs d’éclairage à lampes fluorescentes pour qu’il ne
recueille pas de parasites.
● Manipulez l’appareil avec précaution : n’appliquez jamais une
force excessive sur les commandes et évitez de faire tomber
l’appareil.
● Par mesure de sécurité, premez toujours la précaution de
débrancher la prise d’alimentation secteur de la prise murale
utilisée pour l’alimentation si la foudre risque de tomber dans la
région où vous utilisez votre instrument.
● Pour éviter tout risque d’endommagement voire
d’électrocution, n’ouvrez jamais le coffret ni ne modifiez les
circuits internes.
● N’utilisez jamais de solvants tels que de la benzine ou un
diluant pour nettoyer le BA-10.Utilisez simplement un morceau
d’étoffe souple et sèche pour l’essuyer.
Fiche technique
Puissance de sortie nominale : 7 Weff
Haut-parleur : 16 cm x1
Commandes : VOLUME, TREBLE, BASS, commutateur DRIVE
Bornes d’entrée/sortie : INPUT, PHONES
* Sous réserve de modification des renseignements techniques et de l’aspect extérieur sans préavis.
Conditions d’alimentation :
Modèles pour les États-Unis et le Canada : 120 V, 60 Hz
Modèle général : 230 V, 50 Hz
Dimensions (L x H x P) : 251x 285 x 159 mm
Poids : 4 kg
Panneau de commande
q INPUT
Raccordez votre guitare basse à cette prise.
w DRIVE (commutateur DRIVE)
Enfoncez le commutateur (>) pour passer en mode de commande de manière à amplifier le gain et ajouter une distorsion
supplémentaire au son.
Lorsque le commutateur est en position relevée (?), le son
délivré par l'amplificateur est pur, c'est-à-dire qu'il ne subit
aucune distorsion.
e VOLUME
Ce potentiomètre contrôle le volume de sortie de l'amplificateur.
* Aucun son n'est délivré lorsque le potentiomètre VOLUME est
placé en position "0".
q w e r t y u
r TREBLE
Ce potentiomètre contrôle le niveau des hautes fréquences de
l'amplificateur.
t BASS
Ce potentiomètre contrôle le niveau des basses fréquences
de l'amplificateur.
y PHONES
Raccordez un casque d'écoute à cette prise.
* Le haut-parleur ne délivre plus aucun son quand un haut-parleur
est raccordé à cette prise.
u POWER
Il s'agit de l'interrupteur d'alimentation de l'amplificateur.
Le voyant placé à gauche de l'interrupteur s'allume lorsque
l'appareil est sous tension.
IMPORTANT SAFETY INSTRUCTIONS
INFORMATION RELATING TO PERSONAL INJURY, ELECTRICAL SHOCK,
AND FIRE HAZARD POSSIBILITIES HAS BEEN INCLUDED IN THIS LIST.
WARNING- When using any electrical or electronic product, basic precautions should always be
followed. These precautions include, but are not limited to, the following:
1. Read all Safety Instructions, Installation Instructions, Special Message Section items, and any
Assembly Instructions found in this manual BEFORE making any connections, including connection to the
main supply.
2. Do not attempt to service this product beyond that described in the user-maintenance instructions.
All other servicing should be referred to qualified service personnel.
3. Main Power Supply Verification: Yamaha products are manufactured specifically for the supply
voltage in the area where they are to be sold. If you should move, or if any doubt exists about the supply
voltage in your area, please contact your dealer for supply voltage verification and (if applicable)
instructions. The required supply voltage is printed on the name plate. For name plate location, please refer
to the graphic found in the Special Message Section of this manual.
4. DANGER-Grounding Instructions: This product must be grounded and therefore has been
equipped with a three pin attachment plug. If this product should malfunction, the ground pin provides a
path of low resistance for electrical current, reducing the risk of electrical shock. If your wall socket will
not accommodate this type plug, contact an electrician to have the outlet replaced in accordance with local
electrical codes. Do NOT modify the plug or change the plug to a different type!
5. WARNING: Do not place this product or any other objects on the power cord or place it in a
position where anyone could walk on, trip over, or roll anything over power or connecting cords of any kind.
The use of an extension cord is not recommended! If you must use an extension cord, the minimum wire
size for a 25' cord (or less) is 18 AWG. NOTE: The smaller the AWG number, the larger the current handling
capacity. For longer extension cords, consult a local electrician.
6. Ventilation: Electronic products, unless specifically designed for enclosed installations, should be
placed in locations that do not interfere with proper ventilation. If instructions for enclosed installations are
not provided, it must be assumed that unobstructed ventilation is required.
7. Temperature considerations: Electronic products should be installed in locations that do not
seriously contribute to their operating temperature. Placement of this product close to heat sources such as;
radiators, heat registers etc., should be avoided.
8. This product was NOT designed for use in wet/damp locations and should not be used near water
or exposed to rain. Examples of wet /damp locations are; near a swimming pool, spa, tub, sink, or wet
basement.
9. This product should be used only with the components supplied or; a cart ,rack, or stand that is
recommended by the manufacturer. If a cart, rack, or stand is used, please observe all safety markings and
instructions that accompany the accessory product.
10. The power supply cord (plug) should be disconnected from the outlet when electronic products are
to be left unused for extended periods of time. Cords should also be disconnected when there is a high
probability of lightening and/or electrical storm activity.
11. Care should be taken that objects do not fall and liquids are not spilled into the enclosure through
any openings that may exist.
12. Electrical/electronic products should be serviced by a qualified service person when:
a. The power supply cord has been damaged; or
b. Objects have fallen, been inserted, or liquids have been spilled into the enclosure through
openings; or
c. The product has been exposed to rain; or
d. The product does not operate, exhibits a marked change in performance; or
e. The product has been dropped, or the enclosure of the product has been damaged.
13. This product, either alone or in combination with an amplifier and headphones or speaker/s, may
be capable of producing sound levels that could cause permanent hearing loss. DO NOT operate for a long
period of time at a high volume level or at a level that is uncomfortable. If you experience any hearing loss
or ringing in the ears, you should consult an audiologist.
IMPORTANT: The louder the sound, the shorter the time period before damage occurs.
14. Some Yamaha products may have benches and/or accessory mounting fixtures that are either
supplied as a part of the product or as optional accessories. Some of these items are designed to be dealer
assembled or installed. Please make sure that benches are stable and any optional fixtures (where applicable)
are well secured BEFORE using. Benches supplied by Yamaha are designed for seating only. No other uses
are recommended.
92-469-3
The exclamation point within
the equilateral triangle is intended to alert the user to the
presence of important operating and maintenance (servicing)
instructions in the literature accompanying the product.
The lightning flash with arrowhead symbol, within the equilateral triangle, is intended to
alert the user to the presence of
uninsulated “dangerous voltage” within the product’s enclosure that may be of sufficient
magnitude to constitute a risk of
electrical shock.
PLEASE KEEP THIS MANUAL
IMPORTANT NOTICE FOR THE UNITED KINGDOM
Connecting the Plug and Cord
WARNING: THIS APPARATUS MUST BE EARTHED
IMPORTANT. The wires in this mains lead are coloured in
accordance with the following code:
GREEN-AND-YELLOW : EARTH
BLUE : NEUTRAL
BROWN : LIVE
As the colours of the wires in the mains lead of this apparatus may
not correspond with the coloured markings identifying the terminals
in your plug proceed as follows:
The wire which is coloured GREEN-and-YELLOW must be
connected to the terminal in the plug which is marked by the letter E
or by the safety earth symbol or colored GREEN or GREEN-andYELLOW.
The wire which is coloured BLUE must be connected to the terminal
which is marked with the letter N or coloured BLACK.
The wire which is coloured BROWN must be connected to the
terminal which is marked with the letter L or coloured RED.
• This applies only to products distributed by Yamaha-Kemble Music (U.K.) Ltd.
0207 R0 Printed in Indonesia
BASSVERSTÄRKER
AMPLIFICADOR DE BAJO
AMPLIFICATORE PER BASSO
BASSVERSTERKER
Bedienungsanleitung
Zunächst möchten wir uns bei Ihnen dafür bedanken, daß Sie sich für
den Baßverstärker BA-10 von Yamaha entschieden haben.
Um das Potential Ihres BA-10 über Jahre hinweg voll ausschöpfen zu
können, empfehlen wir Ihnen, diese Anleitung aufmerksam
durchzulesen und dann für später anfallende Fragen gut
aufzubewahren.
Vorsichtsmaßregeln
● Um mögliche Beschädigungen zu verhüten,
schützen Sie das Gerät bitte vor:
• direkter Sonnenbestrahlung
• sehr hoher bzw. niedriger Temperatur/
Luftfeuchtigkeit
• Sand und extremer Staubeinwirkung
* Insbesondere in einem geschlossenen
Fahrzeug kann die Temperatur extrem
ansteigen. Lassen Sie den BA-10 an
einem sonnigen Tag nicht in Ihrem
geparkten Auto liegen!
● Vor dem Anschließen/Abtrennen von Kabeln
bzw. Ein-/Ausschalten des Geräts stellen Sie
den VOLUME-Regler am BA-10 auf 0.
● Neon- und Leuchtstofflampen können
Rauschen induzieren. Halten Sie das Gerät
von solchen Lichtquellen fern.
● Behandeln Sie das Gerät mit Sorgfalt! Zu
hoher Kraftaufwand beim Betätigen der
Bedienelemente sowie Stöße und Fall
können es schwer beschädigen.
● Ziehen Sie zur Sicherheit stets den
Netzstecker aus der Steckdose, wenn ein
Gewitter aufzieht.
● Achten Sie bei Gebrauch auf ausreichenden
Abstand zu Leuchtreklametafeln oder
Leuchtstofflampen, um unerwünschte
Rauscheinstreuungen zu vermeiden.
● Verwenden Sie zum Säubern des BA-10
keine Lösungsmittel wie Benzin oder
Verdünner. Entfernen Sie Staub und
Schmutz mit einem weichen, trockenen
Tuch.
Manual del Usuario
Gracias por la adquisición del Amplificador de Bajo Yamaha BA-10.
Para aprovechar al máximo y conseguir la más larga vida de servicio del
BA-10, le recomendamos que lea con atención este manual y que lo
guarde en un lugar seguro para poderlo consultar cuando sea
necesario.
Precauciones
● Para evitar posibles daños, no exponga el
aparato a:
• la luz directa del sol
• temperaturas o humedad muy altas o bajas
• la arena o al polvo excesivo
* Las temperaturas, especialmente dentro
de los vehículos, pueden subir
excesivamente; no deje el BA-10 dentro
de un vehículo estacionado bajo el sol.
● Antes de conectar/desconectar los cables o
de conectar/desconectar la alimentación del
aparato, asegúrese de ajustar el control
VOLUME del BA-10 a la posición 0.
● Mantenga el BA-10 apartado de anuncios de
neón y luces fluorescentes para evitar la
captación de ruido.
● Manipule el aparato con cuidado, no aplique
nunca fuerza excesiva en los controles, y
evite que se caiga el aparato al suelo.
● Por razones de seguridad, desenchufe
siempre la clavija del cable de alimentación
de la toma de corriente de CA si se corre el
peligro de caída de rayos en su localidad.
● Para evitar daños y posibles descargas
eléctricas, no abra nunca la carcasa ni
manipule los circuitos internos.
● No emplee nunca solventes tales como
bencina o disolvente para limpiar el BA-10.
Límpielo frotando con un paño suave y seco.
Manuale di Istruzioni
Vi ringraziamo per aver acquistato l’amplificatore per basso Yamaha
BA-10.
Per ottenere sempre il massimo dal vostro BA-10 e farlo durare a lungo,
raccomandiamo di leggere attentamente questo manuale e
conservarlo quindi in un luogo sicuro per poterlo consultare in caso di
necessità.
Precauzioni
● Per evitare possibili danni, non esporre l’unità
a:
• luce solare diretta
• temperature e umidità molto alte o molto
basse
• sabbia o polvere eccessive
* alle temperature altissime che si
generano in una vettura parcheggiata
all’aperto, particolarmente d’estate: non
lasciare il BA-10 in automobile!
● Prima di collegare o scollegare cavi o
spegnere o accendere l’unità, portare
sempre il controllo VOLUME del BA-10 su o.
● Per evitare che raccolga rumori, evitare di
posare l’unità vicino ad insegne al neon o luci
a fluorescenza.
● Trattare l’unità con cautela. Non applicare
forza eccessiva ai comandi e non farla
cadere.
● Per la sicurezza, rimuovere sempre la spina
del cavo di alimentazione dalla presa di rete
se vi è pericolo di lampi in zona.
● Per evitare guasti e possibili scosse
elettriche, non aprire mai l’unità e modificare i
suoi circuiti.
● Non usare solventi come benzina o diluenti
per pulire l’BA-10. Usare solo un panno
soffice ed asciutto.
Handleiding
Dank u wel voor het aanschaffen van deze Yamaha BA-10
Bassversterker.
Om de beste resultaten uit uw BA-10 te halen en een lange levensduur
te garanderen, raden wij u aan deze handleiding zorgvuldig door te
lezen en deze op een veilige plaats te bewaren zodat u er later nog
eens iets in op kunt zoeken.
Voorzorgen
● Om mogelijke schade te voorkomen mag u
het toestel niet blootstellen aan:
• direct zonlicht
• zeer hoge of lage temperaturen/vochtigheid
• zand of te veel stof
* In het bijzonder binnenin een voertuig
kan de temperatuur te hoog oplopen Laat de BA-10 niet achter in uw auto op
een zonnige dag!
● Zet de VOLUME knop van de BA-10 op 0
voor u kabels gaat aansluiten/loskoppelen en
voor u het toestel aan/uit zet.
● Houd de BA-10 uit de buurt van neon borden
of fluorescentie (TL) verlichting om ruis te
voorkomen.
● Behandel het toestel met zorg - oefen in geen
geval overdreven kracht uit op de
bedieningsorganen en laat het toestel niet
vallen.
● Trek voor de veiligheid de stekker uit het
stopcontact bij kans op onweer en bliksem in
uw omgeving.
● Om schade en eventuele elektrische
schokken te voorkomen, mag u nooit de
behuizing open maken en met de
schakelingen binnenin knoeien.
● Gebruik nooit oplosmiddelen zoals benzeen
of verdunner om de BA-10 schoon te maken.
Maak het toestel schoon met een zachte,
droge doek.
Technische Daten
Nennausgangsleistung : 7 Weff
Lautsprecher : 16 cm x1
Bedienelemente : VOLUME, TREBLE,
BASS, DRIVE-Schalter
Ein-/Ausgangsbuchsen : INPUT,
PHONES
* Änderungen der technischen Daten und des äußeren
Erscheinungsbilds ohne Vorankündigung vorbehalten.
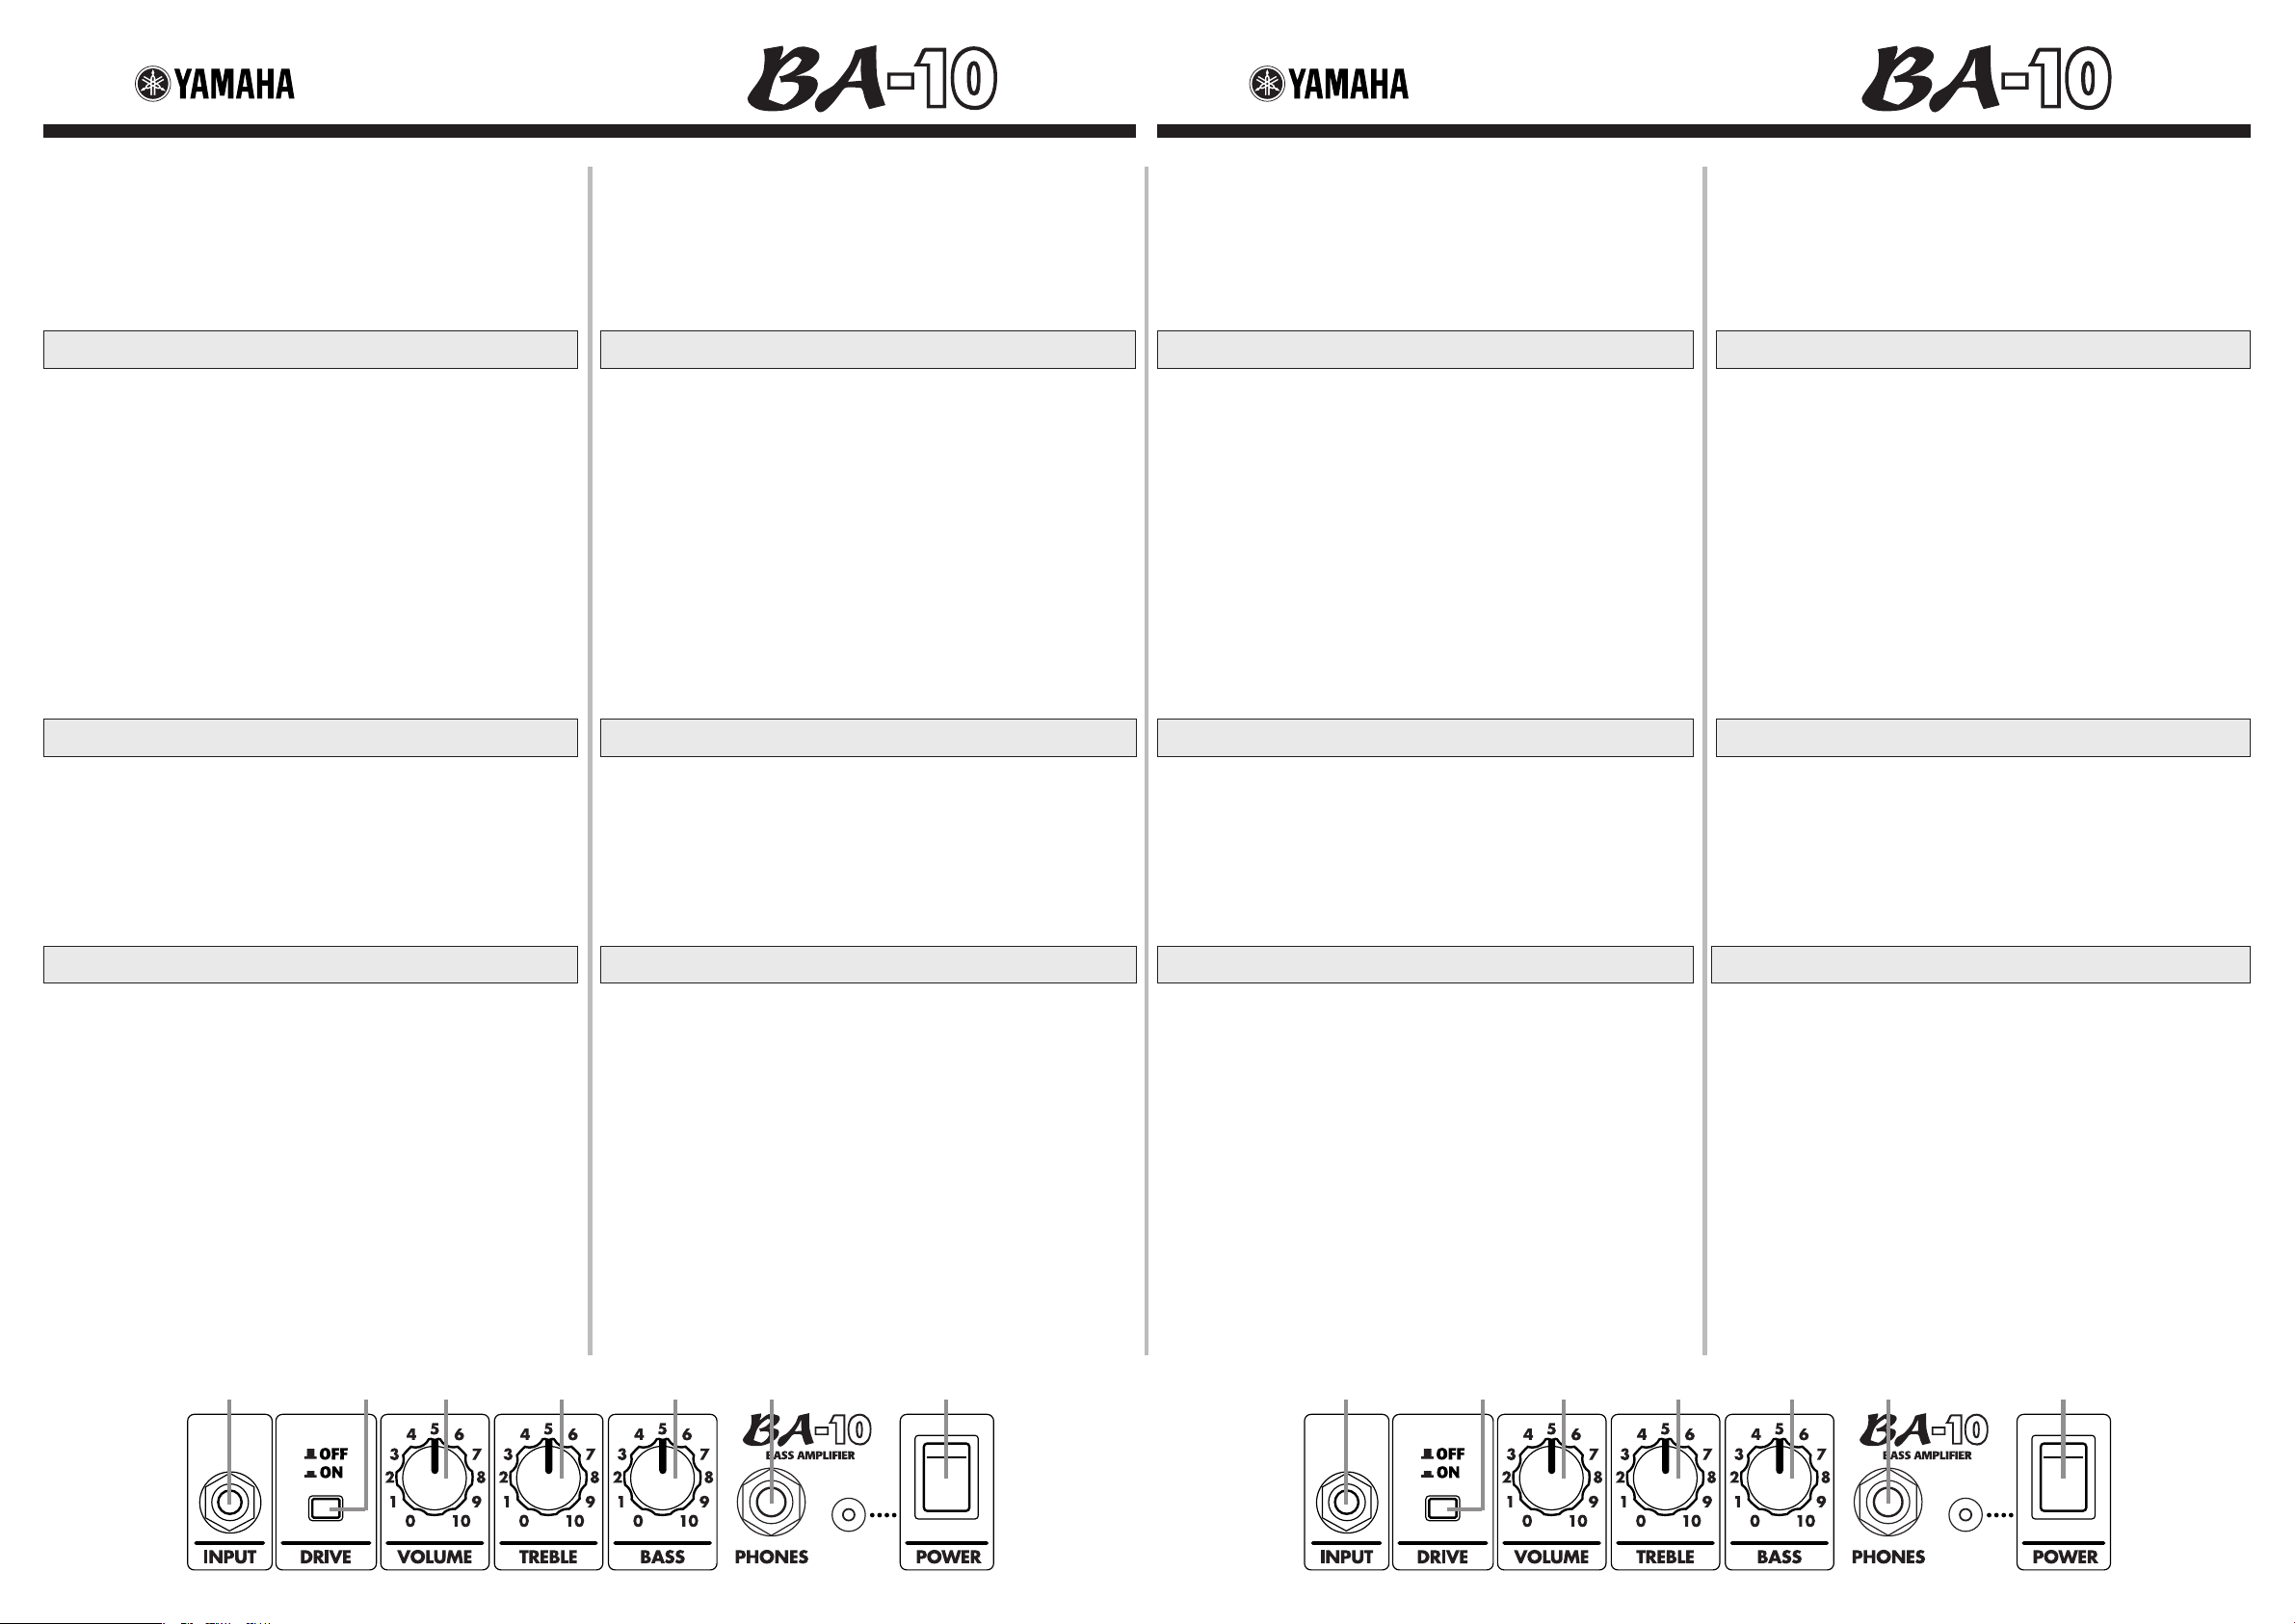
Bedienfeld
q INPUT
Schließen Sie Ihren Baß an diese
Buchse an.
w DRIVE (DRIVE-Schalter)
Drücken Sie diesen Schalter (>), um in
den Drive-Modus zu schalten, der den
Klang durch Anheben der Verstärkung mit
einem kraftvollen Verzerrungseffekt versieht.
Bei ausgerastetem Schalter (
vom Verstärker erzeugte Ton ohne
Klangverzerrung wiedergegeben.
e VOLUME
Mit diesem Regler stellen Sie die Lautstärke des vom Verstärker erzeugten
Tons ein.
* Wenn der VOLUME-Regler auf "0" steht,
ist kein Ton zu hören.
?
) wird der
Netzanschlußwerte :
Modelle für USA und Kanada: 120 V, 60 Hz
Allgemeines Modell: 230 V, 50 Hz
Abmessungen (B x H x T) :
251x 285 x 159 mm
Gewicht : 4 kg
r TREBLE
Mit diesem Regler stellen Sie den Pegel
des oberen Frequenzbbereichs ein.
t BASS
Mit diesem Regler stellen Sie den Pegel
des unteren Frequenzbereichs ein.
y PHONES
An dieser Buchse können Sie Kopfhörer anschließen.
* Solange Kopfhörer angeschlossen sind,
erzeugt der Lautsprecher keinen Ton.
u POWER
Mit diesem Schalter wird der Verstärker
ein- und ausgeschaltet.
Bei eingeschaltetem Verstärker leuchtet
zur Bestätigung die Anzeigelampe links
neben dem Schalter.
Especificaciones
Potencia de salida nominal : 7 W
Altavoz : 16 cm x1
Controles : VOLUME, TREBLE, BASS,
Interruptor DRIVE
Terminales de entrada/salida : INPUT,
PHONES
* Las especificaciones y el diseño están sujetos a cambios sin previo aviso.
Panel de control
q Entrada (INPUT)
Conecte su bajo a esta toma.
w Interruptor DRIVE
Presione el interruptor (>) para activar
los modos DRIVE que acentúan la ganancia para añadir una potente
distorsión al sonido.
Cuando el interruptor está en la posición
liberada (?), el sonido producido por el
amplificador es claro y sin distorsión.
e Volumen (VOLUME)
Este mando controla el nivel de volumen
del amplificador.
* No se produce sonido cuando el mando
VOLUME está en su posición "0".
Fuente de Alimentación :
Modelos de EE.UU. y Canadá: 120V, 60Hz
Modelo General: 230V, 50Hz
Dimensiones (anch x Alt x Prof) :
251x 285 x 159 mm
Peso : 4 kg
r Agudos (TREBLE)
Este mando controla el nivel de las altas
frecuencias del amplificador.
t Graves (BASS)
Este mando controla el nivel de las ba-
jas frecuencias del amplificador.
y Auriculares (PHONES)
Conecte unos auriculares a esta toma.
* El altavoz no producirá sonido cuando se
hayan conectado unos auriculares a esta
toma.
u Alimentación (POWER)
Este es el interruptor de la alimentación
del amplificador.
Cuando la alimentación está conectada
(ON), se enciende el indicador que hay
a la izquierda del interruptor.
Dati tecnici
Potenza dichiarata d’ingresso : 7 W
Altoparlante : 16 cm x1
Comandi :
interruttore DRIVE
Terminali di ingresso/uscita : INPUT,
PHONES
VOLUME, TREBLE, BASS,
* Le specifiche e l’aspetto possono subire variazioni senza preavviso.
Pannello di comando
q Presa INPUT
Collegare il proprio basso a questa presa.
w DRIVE (interruttore DRIVE)
Premere questo pulsante (>) per impostare il modo DRIVE che aumenta il guadagno in modo da aggiungere una forte
distorsione al suono.
Quando l’interruttore è sollevato (posizione ?), il suono prodotto dall’amplificatore è chiaro e non distorto.
e Manopola VOLUME
Questa manopola controlla il volume di
riproduzione dell’amplificatore.
* Se la manopola del volume si trova nella
posizione di zero (0), non viene prodotto
alcun suono.
Alimentazione : 230V, 50Hz
Dimensioni (larg. x alt. x prof.) :
251x 285 x 159 mm
Peso : 4 kg
r Manopola TREBLE
Questa manopola controlla il livello di
emissione delle alte frequenze.
t Manopola BASS
Questa manopola controlla il livello di
emissione delle basse frequenze.
y Presa PHONES
Collegarvi una cuffia.
* Quando a questa presa si collega una
cuffia, l’altoparlante non produce alcun
suono.
u Interruttore POWER
Questo è l’interruttore di alimentazione
dell’amplificatore.
Quando si trova su ON, l’indicatore alla
sinistra dell’interruttore si spegne.
Specificaties
Opgegeven uitgangsvermogen : 7 W
Luidspreker : 16 cm x1
Bedieningsorganen : VOLUME, TREBLE, BASS,
DRIVE schakelaar
Ingangs/uitgangsaansluitingen : INPUT,
PHONES
* Specificaties en uiterlijk kunnen wijzigen zonder dat hier vantevoren kennis van wordt gegeven.
Stroomvoorziening :
Algemeen model : 230V, 50Hz
Afmetingen (B x H x D) :
251x 285 x 159 mm
Gewicht : 4 kg
Regelpaneel
q INPUT
Sluit hierop uw bassgitaar aan.
w DRIVE (DRIVE schakelaar)
Druk deze schakelaar in (>) om de
DRIVE functie in te schakelen, waardoor
het geluid versterkt wordt zodat er een
vette vervorming zal optreden.
Wanneer de schakelaar niet is ingedrukt
(?), wordt het door de versterker geproduceerde geluid niet vervormd.
e VOLUME
Met deze knop kunt u het door de versterker geproduceerde volume regelen.
* Er wordt geen geluid geproduceerd wan-
neer de VOLUME knop op "0" staat.
r TREBLE
Met deze knop kunt u de versterking van de
hoge tonen regelen.
t BASS
Met deze knop kunt u de versterking van
de lage tonen regelen.
y PHONES
Hierop kunt u een hoofdtelefoon aansluiten.
* De luidspreker zal geen geluid produce-
ren wanneer er een hoofdtelefoon is aangesloten op deze aansluiting.
u POWER
Dit is de hoofdschakelaar van de versterker. Wanneer de stroom is ingeschakeld
(ON), zal de indicator links van de schakelaar oplichten.
q w e r t y u
q w e r t y u
 Loading...