

Page 1
OPERATION, SERVICE
& PARTS MANUAL
SINGLE & DOUBLE GIRDER
TOP RUNNING BRIDGES
WITH INDIVIDUAL MOTOR DRIVEN
END TRUCKS
SINGLE GIRDER RATED LOADS:
115 mm (4.5”) thru 305 mm (12.01”)
DOUBLE GIRDER RATED LOADS:
160 mm (6.3”) thru 305 mm (12.01”)
YALE YK &
SHAWBOX SK ONLY
P/N: 11532620 REV. AA September 2018
CMK_12322 Yale Rotating Axle End Truck Parts 11532619-REV AD_mec.indd 1 10/16/18 2:07 PM
Page 2

SINGLE & DOUBLE GIRDER TOP-RUNNING BRIDGES
WITH INDIVIDUAL MOTOR DRIVEN
END TRUCKS
P/N: 11532620 REV. AA September 2018
YALE/SHAWBOX HOIST PARTS AND SERVICES ARE AVAILABLE IN
THE UNITED STATES AND IN CANADA
As a YALE/SHAWBOX Hoist and Trolley user you are assured of reliable repair and parts services
through a network of Master Parts Depots and Service Centers that are strategically located in the
United States and Canada. These facilities have been selected on the basis of their demonstrated
ability to handle all parts and repair requirements promptly and efciently. To quickly obtain the
name of the Master Parts Depot or Service Center located nearest you, call (800) 888-0985, Fax:
(716) 689-5644, visit HYPERLINK "http://www.cmworks.com" www.cmworks.com.
LAS PIEZAS Y REPARACIONES DE LOS POLIPASTOS DE YALE/SHAWBOX ESTÁN
ASEGURADAS EN ESTADOS UNIDOS Y CANADÁ
Como usuario de un polipasto y carro de YALE/SHAWBOX le aseguramos cualquier reparación
o la disponibilidad de cualquier pieza de repuesto a través de una red de almacenes de piezas
de repuesto y centros de servicio situados estratégicamente en Estados Unidos y Canadá. Estas
instalaciones se han seleccionado en base a su capacidad demostrada en la reparación de equipos
y suminstro de piezas de repuesto de forma rápida y ecaz. Para obtener la dirección del almacén
de piezas de repuesto o del centro de servicio más cercano, llame al teléfono (800) 888-0985.
Fax: (716) 689-5644, visita HYPERLINK "http://www.cmworks.com" www.cmworks.com (sólo en
Estados Unidos y Canadá).
LE SERVICE DE RÉPARATION ET DE PIÈCES POUR PALANS YALE/SHAWBOX
EST DISPONIBLE AUX ÉTATS-UNIS ET AU CANADA
Soyez assurés qu'en temps d'utilisateur de palan et treuil YALE/SHAWBOX, d'un service de
réparation et de pièces able par l'entremise d'un réseau de Centres de service et de Dépôts de
pièces maîtresses qui sont stratégiquement situés aux États-Unis et au Canada. Ces établissements
ont été sélectionnés sur une base de leur habileté démontrée à s'occuper promptement et
efcacement des besoins de réparation de pièces. Appelez le (800) 888-0985, Fax: (716) 689-5644,
visite HYPERLINK "http://www.cmworks.com" www.cmworks.com pour obtenir rapidement le
nom du dépôt de pièces maîtresses ou du centre de service situé le plus près.
1
CMK_12322 Yale Rotating Axle End Truck Parts 11532619-REV AD_mec.indd 1 10/16/18 2:07 PM
Page 3

SINGLE & DOUBLE GIRDER TOP-RUNNING BRIDGES
WITH INDIVIDUAL MOTOR DRIVEN
END TRUCKS
P/N: 11532620 REV. AA September 2018
FOREWORD
This manual contains important information to help you install, operate, maintain and service your new top running single or double girder
bridge crane. We recommend that you study its contents thoroughly before putting the bridge crane into use. With proper installation,
application of correct operating procedures, and practicing the recommended maintenance suggestions you will be assured of the maximum
service from your bridge crane.
The bridge cranes described in this manual are intended for indoor service. Bridge cranes to be used for outdoor service require special
considerations.
IMPORTANT
When ordering replacement parts be sure to include Catalog, Part and Serial Numbers of the endtrucks and or drive gearmotor along with
individual part numbers of components needed as identied elsewhere in this manual.
Information given in this manual is subject to change without notice.
2
CMK_12322 Yale Rotating Axle End Truck Parts 11532619-REV AD_mec.indd 2 10/16/18 2:07 PM
Page 4

SINGLE & DOUBLE GIRDER TOP-RUNNING BRIDGES
WITH INDIVIDUAL MOTOR DRIVEN
END TRUCKS
P/N: 11532620 REV. AA September 2018
GENERAL
GENERAL
These top running bridge cranes are designed to operate on parallel
crane runway beams with ASCE Rail from 25# to 105# rail or square
bar. Specic rail range is wheel diameter dependant. Motors are
designed for operation on three phase power supplies from 190 to
415 V-50 Hz and 200 to 575 V-60 Hz. Bridge motors and brakes
are designed and intended strictly for variable frequency control
operated by pushbutton pendant or radio control. Pendant may be
located and suspended from an independent festoon or attached
directly to the hoist and trolley. Standard under running single girder
plug & play crane kits described herein are built to 1 through 15
tonne capacities with spans to 60 feet (18.2 meter). Standard top
running double girder plug & play crane kits described herein are
built to 1 through 20 tonne with spans to 60 feet (18.2 meter). Higher
capacities & spans are available and reviewed upon individual
application. Cranes are designed per CMAA Specications 70 and
74 to meet Class C Moderate Duty Service classication.
BASIC CONSTRUCTION
The basic construction of single and double girder bridges consist
of American Standard S, W Section or fabricated box girder(s) rigidly
connected to the top and side of each endtruck. Each endtruck
has a drive and trailer wheel which run on the runway rails. The
wheels are double anged, at tread with an integral rotating axle
supported by anti-friction bearings. Each endtruck is driven by a
helical gearmotor and brake. This drive engages the drive wheel by a
splined connection.
INSTALLATION
GENERAL
The runways on which these cranes will operate must be sufciently
strong enough to support bridge crane, hoisting equipment and
rated load. Runway rails must be level and parallel. Reference CMAA
70/74 Table 1.4.2-1 for details. Rail joints must be smooth and held
rmly in alignment either by bolted splice bars or by welding. Rails
should be securely fastened to the runway beam.
INSTALLING BRIDGE CRANE
The installation of the crane on the runway shall be performed only
by a qualied crane installer.
For information regarding attaching, lifting and moving the loads
during installation, refer to ANSI B30.2-latest edition, Chapter
2-3 Overhead and Gantry Cranes (Top Running Bridge, Single
or Multiple Girder, Top Running Trolley Hoist; ANSI B30.17-latest
edition, Chapter 17-3 Overhead and Gantry Cranes (Top Running
Bridge, Single Girder, Underhung Hoist) and other applicable codes.
bridge crane at this time so that all wiring connections can be
completed.
TYPICAL CONNECTION OF BRIDGE TO
ELECTRICAL SERVICE
The crane inter-connection diagram is shown in Figure 10.
CAUTION
Verify that the crane is furnished for the same voltage,
frequency and phase as the runway power supply. Crane
voltage is shown on nameplate on bridge panel. Do
not operate crane until "Start Up and Pre-Operational
Inspection" are made.
WARNING
Before attempting any electrical connections the main
power switch feeding the runway conductors must be
LOCKED IN THE OPEN (OFF) POSITION.
NOTICE
A fused disconnect switch or circuit breaker must be
installed and electrically positioned between building
power supply and crane runway conductor system.
This disconnect must be lockable in the open position,
in-sight and in-reach for the crane operator, and clearly
labeled. A second lockable disconnect is required on the
bridge crane, electrically positioned between the runway
conductor system and bridge controls. Refer to Article 610
of NFPA No. 70 National Electric Code, OSHA Regulation
1910.179, ANSI/ASME B30.2 and B30.17, local, state
and provincial standards and regulations for specic
requirements.
CAUTION
In accordance with Article 610 of NFPA No. 70 National
Electric Code a separate bonding conductor must be run
for ground. Grounding through the wheels to girders and
runway steel is not permitted.
RUNWAY CONDUCTORS
Motorized bridge cranes and bridge cranes equipped with a
motorized trolley or hoist require runway conductors. Install
conductors according to manufacturer’s instructions and in
accordance with National, State and Local codes.
RUNWAY COLLECTORS
Install, adjust and align collectors with runway conductors.
Connect collectors to appropriate crane wiring as shown in
Crane Inter-Connection Diagram Figure 10.
NOTICE
A minimum of two collector shoes for each conductor bar
is required when using variable frequency drives (inverters)
on bridge and/or hoist controls, per Section 5.14.7 of
CMAA Specications #70 and #74. Yale•Shaw-Box
standard bridge controls utilize variable frequency drive.
CROSS CONDUCTORS & PUSHBUTTON FESTOON
In most cases, the cross conductors and pushbutton festoon, if
provided, will be installed on your crane as received; however, if
the conductors have been separately shipped, be certain that the
instructions covering installation of these conductors are carefully
followed. Connect all wiring on the crane (main collectors to bridge
3
Before installing the crane on the runway, lock the runway
conductor disconnect switch in the open (off) position.
Prior to the start of any crane erection the building should be
measured to conrm span and clearances. These measurements
should be checked against the corresponding crane measurements
to insure correctness of “t”. After assuring that the crane ts the
building, determine orientation of crane position with respect to
the runway. In addition, verify building and runway power supply to
ensure it matches the power requirements of the crane.
These types of cranes are usually lifted into position on the runway
in one piece. Total weight of this crane should be checked against
lifting equipment selected for erection of this crane.
Immediately after the crane is placed on the runway rails check the
wheel ange clearances to the rail. Clearance between the side
of rail head and inside ange of wheel should be between a total
of 3/4” and 1-1/8”, depending on the wheel and rail combination
and whether or not the truck is centered on the rail. Total wheel
oat should not be less than the 3/4" as recommended by CMAA
Specications #70 and #74.
Note: It is suggested that the trolley and hoist be installed on the
WARNING
CMK_12322 Yale Rotating Axle End Truck Parts 11532619-REV AD_mec.indd 3 10/16/18 2:07 PM
Page 5

SINGLE & DOUBLE GIRDER TOP-RUNNING BRIDGES
WITH INDIVIDUAL MOTOR DRIVEN
END TRUCKS
P/N: 11532620 REV. AA September 2018
INSTALLATION CONTINUED
panel, bridge panel to cross conductors, bridge panel to bridge.
motor) in accordance with the appropriate crane interconnection
wiring diagram as shown in Figure 10. If bridge motors quick
connection plugs are not pre-wired, connect leads on motor cables
from the bridge control panel per Figure 1.
Figure 1. Bridge Gear Motor Quick Connection Plug
CAUTION
Gearmotors provided with this crane kit are intended for
variable frequency control only. The brake used on the
gearmotor is a holding brake with no provision for torque
adjustment. Severe load swing will result without the
controlled deceleration when stopping provided by the
variable frequency control. The use of contactor, across the
line starting, controls is not permitted, will result in damage
and premature failure of these units and void any warranty.
NOTICE
Prior to placing the crane into service, the crane shall
receive an initial inspection. This inspection should be
performed by a qualied person in accordance with
ANSI/ASME B30.2 or B30.17, local, state and provincial
standards and regulations.
and attachments are properly tightened and that all electrical
connections are secure.
5. Inspect and adjust the motor brake air gap. Refer to the
MAINTENANCE SECTION of this manual.
6. The hoist/trolley should be inspected as instructed in the hoist/
trolley manufacturers instruction manual. For a single girder crane
inspect the clearance between the trolley wheels and toe of ange
on bridge girder beam per manufacturers requirements. For a double
girder crane inspect the clearance between wheel anges and the
girder rail per manufacturers requirements. If hoist is equipped with
adjustable limit switches, conrm settings meet the applications
requirements.
7. Inspect the alignment of the trolley end stops to the trolley and the
runway end stops to the bridge endtrucks.
8. Turn power on at both disconnects and mainline. Inspect hoist
for reverse phase condition by ensuring push button operation
corresponds to intended direction of travel and correct if necessary
per manufacturer’s instructions.
9. Operate the crane to verify both motors operate in the same
direction, in both bridge directions.
10. With no load operate hoist/trolley back and forth the full length
of bridge girder and operate the crane the full length of the runway.
During the operation ensure and verify proper clearances from
obstructions per CMAA, ASME B30.2, ASME B30.17 and OSHA
requirements.
11. Load testing the crane should be performed in accordance with
ANSI/ASME B30.2 or B30.17, local, state and/or provincial codes
and regulations. A written report should be prepared during the
performance of this test and placed on le.
OPERATION
OPERATOR QUALIFICATIONS
Safe and efcient crane operation requires skill, extreme care, good
judgment, alertness, concentration and knowledge of and rigid
adherence to proven safety rules and practices. No person should
be permitted to operate a crane or hoist:
1. who does not possess the above characteristics.
2. who is not qualied or has handicaps that could adversely affect
such operation.
3. who has not been properly instructed.
4. who has not been informed and does not have a thorough
knowledge of all applicable safe operating practices, including those
in this book as well as of rigging equipment and practices.
START-UP AND PRE-OPERATIONAL INSPECTION
After the crane has been installed on the runway and the crane,
hoist and trolley has been connected to electrical service but prior to
placing into service, as a minimum the following inspections should
be made by a qualied person.
1. Check the main collector system for proper adjustment to
maintain proper contact with conductors. Check along runway
for possible interference if power is supplied by a cable reel or
festooned cable.
Lock main runway disconnect switch in open position
before attempting to adjust main collectors or conductors.
2. Check the cross and pushbutton festoon conductors for
adjustment, including cable loop depth, and tracking.
3. Check oil level in both drive gearcases and axle bearing grease
ttings (if provided) for proper lubrication. If lubrication is required
refer to the LUBRICATION SECTION of this manual.
4. Inspect crane to make certain that all bolted connections
WARNING
See applicable National, State and Local Safety Codes
and regulations for additional requirements relating to Safe
Operating Practices, including ANSI B30.2 or ANSI B30.17
OPERATING RULES
Operating rules listed below are an earnest effort to encourage
SAFETY and are not intended to take precedence over individual
plant safety rules and regulations or rules set forth by various
applicable codes.
A good operator operates his crane as smoothly as possible and
knows and follows the suggested rules below for safe, efcient
crane handling.
4
NOTICE
- latest edition
CMK_12322 Yale Rotating Axle End Truck Parts 11532619-REV AD_mec.indd 4 10/16/18 2:07 PM
Page 6

SINGLE & DOUBLE GIRDER TOP-RUNNING BRIDGES
WITH INDIVIDUAL MOTOR DRIVEN
END TRUCKS
P/N: 11532620 REV. AA September 2018
OPERATING PRECAUTIONS
WARNING
These bridge cranes are not designed nor intended to be
used for support or transport of people or for transporting
loads over people.
Safe operation of an overhead hoist is the operator’s responsibility.
Listed below are some basic rules that can make an operator aware
of dangerous practices to avoid and precautions to take for his own
safety and the safety of others. Observance of these rules in addition
to frequent examinations and periodic inspection of the equipment
may save injury to personnel and damage to the equipment.
DO NOT load bridge beyond rated capacity.
DO NOT subject bridge crane to side loads. Always center trolley
over load when hoisting.
DO NOT stand and DO NOT cause or allow others to stand or get
under any load the bridge crane is supporting.
DO keep clear, and make sure others keep clear, of any load the
bridge crane is supporting.
DO NOT attempt to operate bridge crane before completing tests
and adjustments.
DO NOT run bridge crane into end stops, other bridge cranes, or
any obstruction on beam. Improper and careless operation can
result in a hazardous condition for operator and load.
ALWAYS be sure load is clear of obstruction before traversing
load.
CAUTION
If bridge crane is mounted on an open-end runway rail, then
end stops must be installed to prevent bridge crane from
running off the end of the runway rail resulting in injury to
the operator and others and damages to the load and other
property. End stops for the trolley must also be installed.
Refer to hoist and trolley instruction manuals for safety warnings
on hoists and trolleys.
Read and comply with ANSI B30.2 or B30.17-latest edition.
Read and comply with all local, state and national safety codes.
GENERAL
Motor driven cranes are usually operated from a pendant push button
station or radio control, which controls the bridge electrically. The
push button may be suspended from the bridge, trolley or hoist. Push
button control stations, supported by a strain cable, have a built-in
interlock to prevent energizing opposing motions at the same time.
CAUTION
Make sure all INSTALLATION AND START-UP
INSPECTION have been made in accordance with
instructions furnished with the HOIST and TROLLEY
before turning on the power.
LEARNING THE CONTROLS
After making certain the crane is completely and properly installed,
with the crane connected to the electrical service and all the
installation and start-up inspections made, the crane operator(s)
should learn and become acquainted with the controls.
On cranes having any or all motions electrically operated, the
operator should locate the runway disconnect and make sure this
switch is locked open (POWER OFF). The operator should now
operate the various push buttons to get the “feel” and determine
that they do not bind or stick in any position. The operator should
become familiar with push button location for their respective
motions as well as the “stop” buttons (normally the top red button),
which operate the crane main line contactor. The mainline contactor
will shut off power to all motions.
WARNING
If any push button binds or sticks in any position - Do
not turn the power on - Determine the cause of the
malfunction and correct it before operating the crane.
LEARNING THE CONTROLS WHILE OPERATING
CRANE WITH NO LOAD
Having inspected and tried the control, the crane operator is now
ready to try the crane under power.
CAUTION
ALWAYS ALLOW THE BRIDGE CRANE TO COME TO
A COMPLETE STOP BEFORE CHANGING DIRECTION.
ABRUPT CHANGE OF BRIDGE DIRECTION WHILE
IN MOTION MAY CAUSE ADVERSE OPERATING
CHARACTERISTICS OR DAMAGE TO BRIDGE AND
DRIVE COMPONENTS.
STEP 1.
Close the crane runway disconnect switch.
STEP 2.
Close the crane disconnect switch mounted on the crane. The
crane main disconnect switch is located in the bridge panel and
is operable from the front of the panel without opening the panel.
The switch is operated by rotating the handle. The “OFF” and “ON”
positions of the switch are marked on the switch assembly.
The bridge control panel also contains a 3-pole mainline contactor.
This contactor is connected in the electrical system on the load side
of the crane main disconnect switch, so that all the crane power
ows through this contactor. The mainline contactor is opened
and closed (turned off and on) by means of the stop button on the
pendant push button station. This stop circuit, as well as other
control circuits, typically operate at 115 volts. This 115 volt control
circuit voltage is obtained from a transformer mounted in the bridge
control panel.
STEP 3.
Turn the stop button clockwise to release the mainline contractor
which will apply power to all control devices. The crane is now ready
for use.
STEP 4.
The drive motors on the endtrucks of this crane are controlled
by inverters, programmable variable frequency control. Standard
programming on Yale•Shaw-Box provided controls is two step
innitely variable. The motion buttons on the pushbutton for the
crane, typically labeled “FWD” and “REV” are two step buttons, for
this programming. The rst step is the initial starting speed of the
crane and it also performs a speed hold function. The second step
of the button performs an acceleration function.
To operate the crane, press the button for desired direction, FWD
or REV, to the rst step. The crane will start moving and accelerate
to its programmed starting speed. Press the same button further to
the second step and the crane will accelerate up to full speed. If the
crane reaches a desired speed during this acceleration, back the
button off to the rst step to hold that speed. If the crane is traveling
too fast and you wish to slow it down, release the motion button
completely and the crane will start to decelerate. Once the desired
slower speed is obtained, press button to the rst step to hold
that speed. To bring the crane to a stop release the motion button
completely, the crane will decelerate to a stop and the holding
brakes will set.
Practice operating the crane in both directions, accelerating to
intermediate and full speeds, decelerating to a slower speed,
and bringing it to a stop. Get acquainted with the operating
characteristics of this crane, acceleration, deceleration and stopping
distances, to ensure smooth load movement, accurate load
positioning, and to minimize load swing.
5
CMK_12322 Yale Rotating Axle End Truck Parts 11532619-REV AD_mec.indd 5 10/16/18 2:07 PM
Page 7

SINGLE & DOUBLE GIRDER TOP-RUNNING BRIDGES
WITH INDIVIDUAL MOTOR DRIVEN
END TRUCKS
P/N: 11532620 REV. AA September 2018
OPERATING PRECAUTIONS CONTINUED
NOTICE
If default settings for the bridge’s variable frequency
control, inverter, does not meet your specic requirements
it can be re-programmed. Programming of the inverter
shall be done by a qualied crane technician per the
manufacturer’s instruction manual. Each crane has a
maximum speed setting based on its capacity, span, duty
classication, etc. Do NOT exceed maximum speed for
which the crane was specified when ordered.
STEP 5.
The trolley motion buttons are typically labeled “Left” and “Right”.
The hoist motion buttons are typically labeled “Up” and “Down”.
Practice and become acquainted with these controls.
NOTICE
Since a variety of hoist/trolley combinations may be used
with this type of bridge crane, refer to the manufacturer’s
instruction manual for this equipment and the specic
details on its operation.
STEP 6.
Once the operator(s) are acquainted and comfortable operating the
crane and the hoist/trolley, they shall learn the Pre-Shift inspection
procedure. Refer to the INSPECTION section of this manual.
WARNING
If, when depressing the hoist "Up" button, the hook should
lower - STOP AT ONCE - Do not attempt to operate
again. Report this condition to the proper supervisor for
correction with the instructions furnished with your hoist
manual by a qualied crane technician.
Set lower limit switches of the hoist and insure proper functioning
per the Hoist Manufacturer's Manual.
When operating the hoist in the up direction CAREFULLY OBSERVE
the relationship of the hook block and the bottom of the hoist frame.
The hoist upper limit switch, when working properly, should cause
the hoist up motion to stop and/or reverse direction.
WARNING
Do not contact or strike the hoist frame with the hook
block. If the hoist motion is not interrupted by the limit
switch, stop the hoist by removing your nger from
the button and/or depressing the STOP button. Do not
attempt further operation until the limit switch is operable.
Consult the Hoist Manufacturer's Instructions.
NOTICE
Jogging is the rapid and repeated pressing of a motion
pushbutton (hoist, trolley or bridge) to get the equipment
to move in short increments or “inching”. Although jogging
may be necessary to position a load, excessive jogging
will cause premature wear and failure of motors, brakes
and controls. It will also cause the motors to quickly
overheat, resulting in their thermal protection to disable
bridge motion until cooled.
WARNING
THIS EQUIPMENT IS NOT DESIGNED OR SUITABLE
AS A POWER SOURCE FOR LIFTING, LOWERING, OR
TRANSPORT OF PERSONS.
OPERATING THE CRANE
Once the crane has successfully passed its Start-up
and Pre-Operational (Initial) inspection, and all the crane
operators have been successfully trained and/or licensed, it
is now ready to be placed into service.
WARNING
Do not operate a crane, hoist or trolley having unusual
vibrations, sounds, warnings or with anything wrong or
apparently wrong. Danger may be present that the crane
operator cannot see. Determine and correct the cause of
the unusual conditions and make certain that the crane
can be operated SAFELY.
STEP 1.
Turn power on to the crane, disconnects and mainline. If not already
done so, perform Pre-Shift Inspection, refer to the Inspection
Section of this manual.
STEP 2.
Move the crane to the load making certain the load hook is high
enough to clear any obstruction in its path. Position the hoist and
trolley so that the load hook is centered over the load. Lower the
load hook for load attachment. For larger sized loads, the use of a
rigging or load director may need to be used to direct the lift and
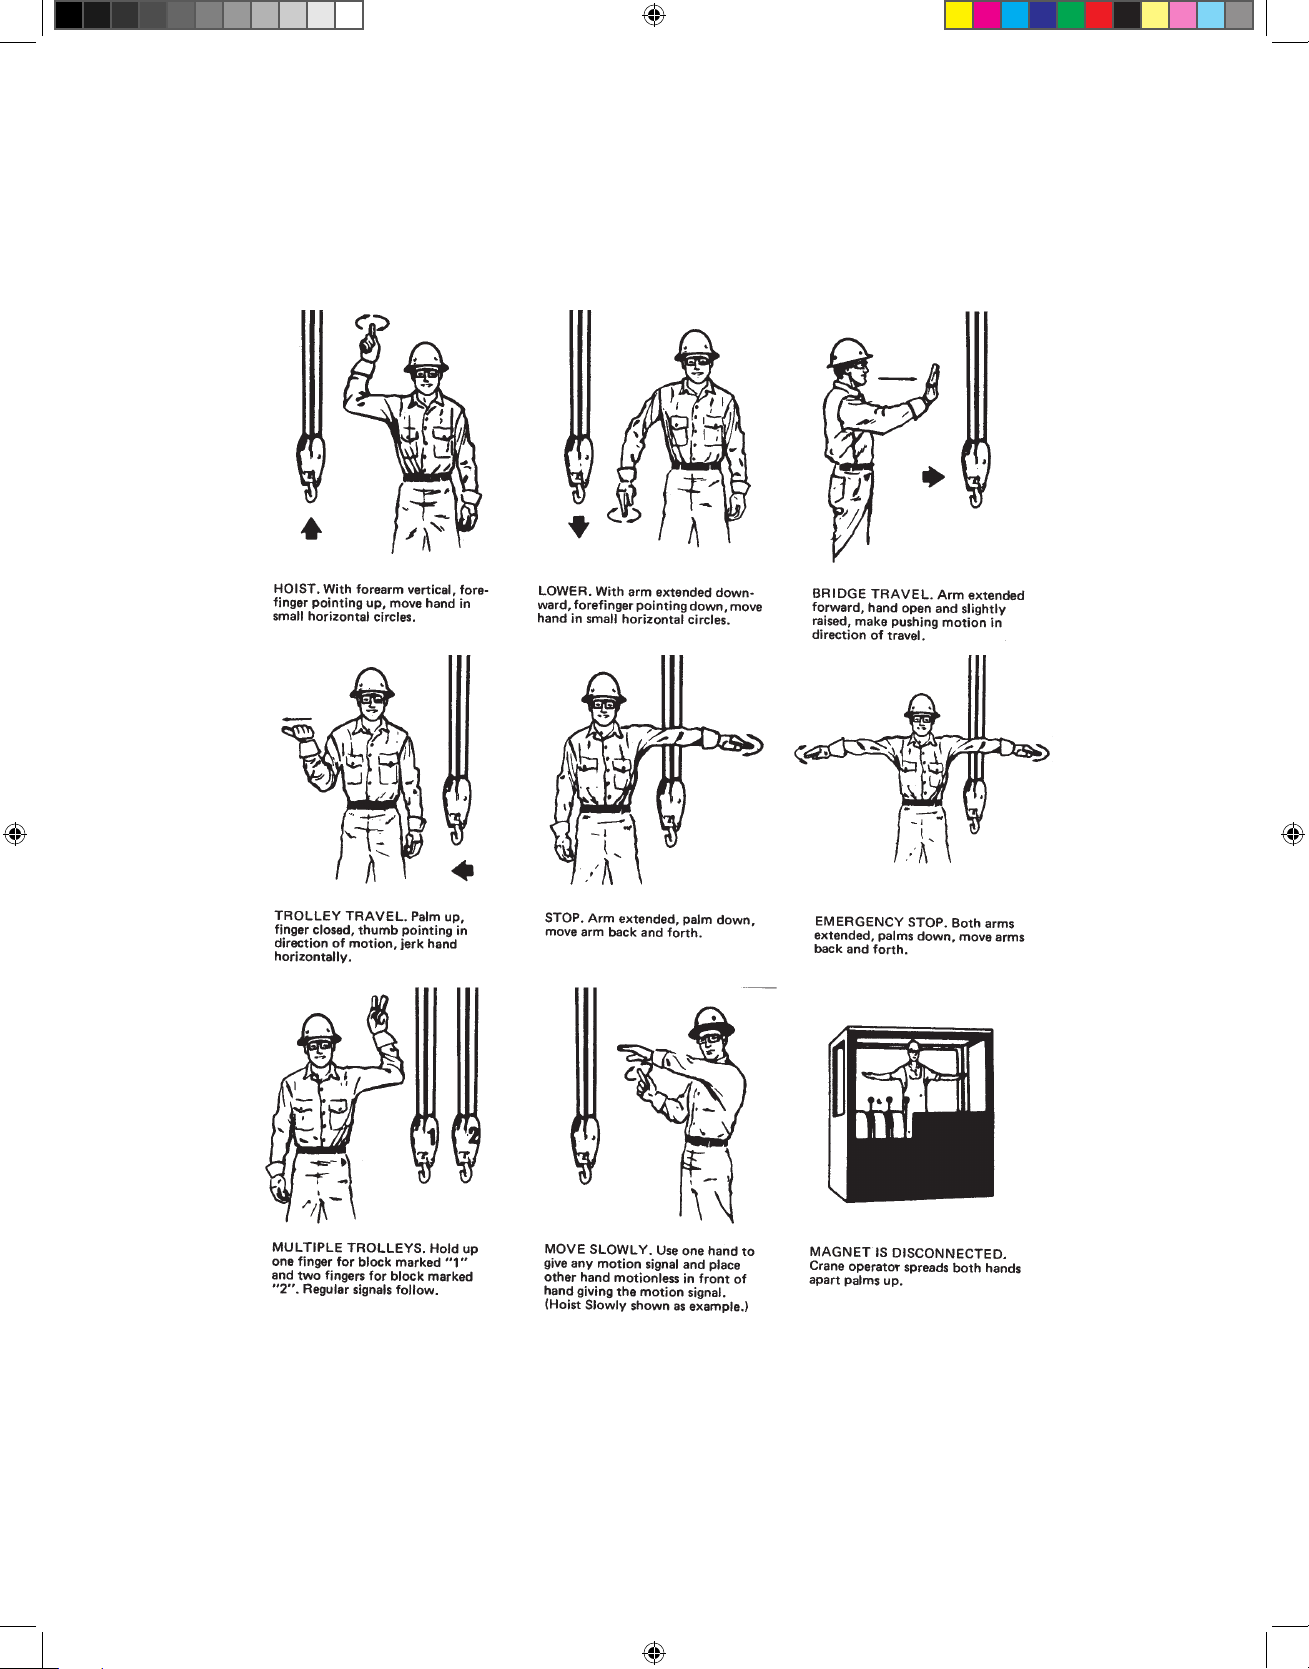
movement of the load. This person should use the proper hand
signals as shown in this manual. The crane operator should respond
only to the signals of the designated person directing the load,
except for emergency stop as shown in Figure 2.
WARNING
Prior to attaching or lifting a load, know the weight of
the load and the below the hook lifting devices (spreader
or lifting beams, magnets, grabs, slings, etc.). The total
weight of the load and lifting devices shall not exceed the
rated capacity of the hoist and/or crane.
STEP 3.
Attach load to load hook. Slowly raise the hook until the slack has
been taken out of the below the hook devices. When the oor man
signals and the operator is satised the load is secure in the sling, lift
the load slowly until clear. Now, hoisting speed can be increased and
maintained until the load is clear of all obstructions or the oor man
gives the signal to stop.
STEP 4.
Starting slowly and increasing speed as distance permits, move
the bridge toward the point where the load is to be lowered.
Decelerate and stop by releasing the push button. Final spotting is
accomplished by pressing the button to the rst step to creep into
position.
STEP 5.
Learn to judge the stopping distance of the bridge and trolley, both
with light and full loads. This will enable you to “spot” loads with the
minimum amount of jogging and excessive load swing.
6
CMK_12322 Yale Rotating Axle End Truck Parts 11532619-REV AD_mec.indd 6 10/16/18 2:07 PM
Page 8
SINGLE & DOUBLE GIRDER TOP-RUNNING BRIDGES
WITH INDIVIDUAL MOTOR DRIVEN
END TRUCKS
P/N: 11532620 REV. AA September 2018
OPERATING PRECAUTIONS CONTINUED
Figure 2. Operator Hand Signals
7
CMK_12322 Yale Rotating Axle End Truck Parts 11532619-REV AD_mec.indd 7 10/16/18 2:07 PM
Page 9

SINGLE & DOUBLE GIRDER TOP-RUNNING BRIDGES
WITH INDIVIDUAL MOTOR DRIVEN
END TRUCKS
P/N: 11532620 REV. AA September 2018
OPERATING PRECAUTIONS INSPECTION
Overhead cranes are subject to four levels of inspection; Initial, Pre-
WARNING
Never leave an unattended load hanging from the crane.
Load must be safely placed on oor prior to the crane
operator leaving the controls.
When crane is not in use, during the work period, it should be
parked in a safe location, such as the end of the bay or a location
that will not interfere with the movement of people, materials and
equipment. Turn power off to the mainline contactor of the crane.
Store the pendant against a wall or column to prevent damage from
trafc. At the end of the work period or day, park crane as described
herein and turn power off at both disconnects.
RESPONSIBILITY FOR SAFE OPERATION
Each crane operator should be held directly responsible for the safe
operation of his crane. The crane operator should STOP the crane
and refuse to handle loads when:
1. there is any doubt as to SAFETY.
2. any unusual vibrations or sounds are noticed before or when
starting the lift or traverse motions.
3. there are arguments or disagreements with the oor man or
hitchers.
4. the operator feels ill or is not alert.
Shift, Frequent and Periodical in accordance with the latest editions
of ANSI/ASME B30.2, B30.17 and CMAA 78. These inspections are
necessary to ensure the equipment is safe for use and operating at
its required performance level. Inspection criteria described herein
are general requirements. Specic inspection criteria will be based
on the options and accessories provided with your crane. Refer to
the manufacturer’s maintenance manual for the hoist/trolley and its
specic inspection criteria.
INITIAL INSPECTION
New, re-installed, altered, repaired and modied cranes shall be
inspected prior to initial use. Inspection of all altered, repaired or
modied cranes may be limited to the provisions affected by the
work as determined by a qualied crane technician. Inspections shall
include, but not limited to, clearances, operating speeds, lubrication,
control settings, safety devices, etc. Refer to START UP and PREOPERATIONAL INSPECTION elsewhere in this manual.
PRE-SHIFT INSPECTION
A pre-shift inspection shall be performed by the crane operator or
designated person at the beginning of each shift, or the rst time
the crane is used during each shift. This is a visual and operational
inspection to ensure the equipment is in good working order. Items
to be checked include limit switches, brakes, electrical equipment
and all safety devices. Crane is to be operated without a load to
check for any unusual sounds, vibrations, or anything that may be
apparently wrong. Any discrepancies or suspected discrepancies
shall be immediately reported to crane operator’s supervisor. Below
is a check list which can be used for this inspection.
PRE-OPERATION INSPECTION CHECKLIST
Tagged Crane
or Hoist
Control Devices
Brakes
Hook
Hook Latch
Wire Rope
Hoist Chain
Reeving
Limit Switches
Oil Leakage
Unusual Sounds
Warning and
Safety Labels
Housekeeping
and Lighting
Check that crane or hoist is not tagged with an
out-of-order sign.
Test run that all motions agree with control
device markings.
Check that all motions do not have excessive
drift and that stopping distance is normal.
Check for damage, cracks, nicks, gouges,
deformations of the throat opening, wear on
saddle or load bearing point, and twist. Refer
to the manual furnished by the original crane
manufacturer.
If a hook latch is required, check for proper
operation.
Check for broken wires, broken strands, kinks,
and any deformation or damage to the rope
structure.
Check for cracks, nicks, gouges, wear and
stretch-check that the chain is in the upper and
lower sprockets and in the chain guide.
Check that the wire rope is properly reeved
and that rope parts are not twisted about each
other.
Check that the upper limit device stops the
lifting motion of the hoist load block before
striking any part of the hoist or crane.
Check for any sign of oil leakage on the crane
and on the oor beneath the crane.
Check for any unusual sounds from the crane
or hoist mechanism while operating the crane
or hoist.
Check that warning and other safety labels are
not missing and are legible.
Check area for accumulation of material to
prevent tripping or slipping. Also check area for
poor lighting.
8
CMK_12322 Yale Rotating Axle End Truck Parts 11532619-REV AD_mec.indd 8 10/16/18 2:07 PM
Page 10

SINGLE & DOUBLE GIRDER TOP-RUNNING BRIDGES
WITH INDIVIDUAL MOTOR DRIVEN
END TRUCKS
P/N: 11532620 REV. AA September 2018
INSPECTION CONTINUED MAINTENANCE
FREQUENT INSPECTION
Frequent inspections are to be performed by a qualied designated
person. Inspection intervals vary by class of service, for Class C
Service cranes they are to be performed monthly at a minimum.
Hooks and wire rope or load chain are to be inspected in monthly
intervals as a minimum and recorded including date, serial/trace
numbers and a signature. Frequent inspections also include a
thorough operational inspection. Items to be inspected include limit
switches, lubrication levels in all gearcases, wheels, bearings, etc.,
brakes, electrical equipment and all safety devices. Crane is to be
operated without a load to check for any unusual sounds, vibrations,
or anything that may be apparently wrong. The designated person
shall determine if conditions found are a hazard and a more detailed
inspection is necessary. Refer to the typical Inspection Schedule and
Maintenance Report found on page 13 in this manual.
NOTICE
Cranes that have been sitting idle for a period between
one to six months shall receive the frequent inspection
prior to its use.
PERIODIC INSPECTION
Periodic inspections are to be performed by a qualied designated
person. Inspection intervals vary by class of service. For Class C
Service crane, they are to be performed annually at a minimum.
Frequency of this inspection may have to be increased based on
the severity of the duty cycle and environmental conditions the
crane is subjected to. A written, dated and signed inspection report
shall be provided and maintained on le. All worn, damaged or
malfunctioning parts are to be repaired or replaced to maintain a
SAFE operational crane. Refer to the typical Inspection Schedule
and Maintenance Report found elsewhere in this manual.
Items to be inspected include but are not limited to:
1. All functional operating mechanisms for misadjustment interfering
with crane operation.
2. Operating parts for excessive wear.
3. All safety devices for malfunction.
4. All connections and mountings for loose bolts, nuts and other
fasteners for tightness.
5. All structural members and welds for deformation, cracks or
corrosion.
6. All electrical apparatus, including control contactors, limit
switches, push button stations for signs of pitted contact points,
wear or deterioration.
7. All hoists and trolleys installed on the crane in accordance with
the manufacturer’s recommendation.
GENERAL
Maintenance services required on top running cranes are, for the
most part, simple periodic inspections and adjustments. Procedures
for lubrication, routine adjustments and replacement of parts, if
required, are described in the following paragraphs.
LUBRICATION
AXLE BEARINGS
Axle bearings on the 4.5" (115 mm) and 6.3" (160 mm) diameter
wheels are permanently lubricated, with no additional lubrication
requirements. Axle bearings on the 7.9" (200 mm) , 10.2" (260 mm)
and 12.01” (305 mm) diameter wheels require periodical lubrication.
To access grease ttings, remove the rail sweep. Fitting is located
on the pilot diameter of each bearing cage, four total per endtruck
as shown in gures 3 & 4. Lubricate with NLGI #2 General Purpose
Grease, every three months. Replace rail sweep upon completion.
Using a torque wrench, tighten all bolts to 72 ft. lbs. torque for all
size end trucks. Frequency of and type of lubrication used may
be adjusted based the severity of the duty cycle and operating
environment.
Figure 3. Trailer Wheel
WARNING
Always lock main switch in the open position (off)
before inspection.
NOTICE
Cranes that have been sitting idle for six months or greater
shall receive a complete periodic inspection prior to its use.
Figure 3. Trailer Wheel
9
CMK_12322 Yale Rotating Axle End Truck Parts 11532619-REV AD_mec.indd 9 10/16/18 2:07 PM
Page 11

SINGLE & DOUBLE GIRDER TOP-RUNNING BRIDGES
WITH INDIVIDUAL MOTOR DRIVEN
END TRUCKS
P/N: 11532620 REV. AA September 2018
MAINTENANCE CONTINUED
GEARMOTOR (Endtruck)
The gearcase lubricant should be changed after 10,000 hours of
use, based on moderate (Class C) service. Lubrication frequency
will need to be increased dependant on the severity of service.
Oil required is Aral Degol BG 220 gear oil (suitable substitutes are
Texaco Pinnacle 220 & Shell Omala 220). Do not mix lubricant types
(this applies in particular to mineral and synthetic lubricants). Too
much lubricant can lead to overheating. Gearcase is not provided
with, nor requires a vent plug.
Motor
Horsepower
0.75 .55 .18
1.0 .75 .18
1.5 1.2 .40
2.0 1.5 .55
3.0 2.2 .55
5.0 3.7 1.2
To change gearcase oil:
1. Disconnect and lock out power supply.
2. Unplug motor connection.
3. Unbolt complete gearmotor from endtruck. Gearmotors weigh up
to approximately 170 lbs.
4. Remove drain/ller plug on top of gearcase as shown in gure 5.
Tip motor to drain oil in to proper container. Properly dispose of
used oil.
5. Fill gearcase with correct amount of oil per chart above and
replace drain/ller plug.
6. Mount complete gearmotor back on endtruck and bolt back into
place.Using a torque wrench, tighten all bolts to 7.5 ft. lbs. torque
for 115 mm (4.5") and 160 mm (6.3") end trucks, 18 ft. lbs. torque
for 200 mm (7.9") and 260 mm (10.2") end trucks and 62 ft. lbs.
torque for 305 mm (12.01") end trucks.
7. Re-install motor plug
8. Turn power back on to crane and test run, checking for any signs
of leaks.
KW
Figure 5. Gearcase Drain/Filler Plug
HOIST & TROLLEY
For hoist and trolley lubrication instructions refer to the
manufacturer’s manuals
WHEEL AND BEARING REMOVAL & REPLACEMENT
Refer to parts illustration Figure 7.
To remove the wheels follow the steps below:
1. Remove load and below the hook devices from hook. Move hoist
and trolley to opposite end of crane from end work is being done.
Gearcase Oil Capacity
(Liters)
WARNING
Make sure that truck is adequately supported so that it
cannot drop when wheel is removed. Due to the weight of
the wheels and bearing cages, make sure that the proper
equipment is in place to safely remove the wheels and
bearing cages from the end truck. Also lock main runway
disconnect switch in the open position (off) when working
on wheels adjacent to runway conductors.
2. Disconnect power and lock out.
NOTICE
MAKE SURE ALL JACKING OR LIFTING OF END TRUCK
FOR WHEEL REMOVAL IS DONE NEAR THE BRIDGE
GIRDER(S) OR SIMULTANEOUSLY AT EACH END OF THE
TRUCK BETWEEN THE WHEEL AND THE GIRDER(S).
JACKING OR LIFTING ONLY ONE END OF THE TRUCK
MAY PERMANENTLY DAMAGE THE CRANE.
3. Remove load from wheel axle. This can be accomplished by
jacking or lifting at the girder(s). Jacking or lifting only one end of
the truck may permanently damage the crane.
4. If working on driver wheel, unplug motor leads from gearmotor
and remove gearmotor from bearing cage. Remove rail sweep
from endtruck and bolts from bearing cages.
5. Jack endtruck to height that will allow bearing cage to roll out
from end of endtruck.
6. Roll wheel, bearings and bearing caps assembly from under
endtruck and remove from runway. Be careful not to drop bearing
caps, bearings and wheel from runway height.
7. Remove bearing caps, bearings should stay on wheel axle.
8. Remove bearings from axle. Depending on the condition of the
bearings and axles, a bearing puller may be required. Be careful
not to damage bearing ts on axle.
9. Inspect axle bearing diameter and wheel tread diameter and
ange for excessive wear, spalling and work hardening on the
tread and ange, nicks and gouges on bearing diameters, etc.
Replace wheel if necessary.
10. Prior to re-assembling bearings to axle, pack the roller bearings
with grease. Use NLGI #2 general purpose grease unless the
severity of the duty cycle and/or operating environment warrants
otherwise. Press bearings onto wheel axle, ensure they are fully
seated.
11. Assemble both bearing caps onto bearings
12. Place wheel assembly onto runway rail and roll it into place in the
endtruck. Orient the grease tting (if provided) on bearing cap,
pointing towards the rail sweep.
13. Carefully lower endtruck, ensuring bearing caps and the
endtruck pilot diameters align properly. Install and tighten
bearing cap bolts. Using a torque wrench, tighten all bolts to
36 ft. lbs. torque for 115 mm (4.5"), 160 mm (6.3") and 200 mm
(7.9") end trucks, 72 ft. lbs. torque for 260 mm (10.2") and 305
mm (12.01") end trucks.
14. Lower endtruck onto runway rail.
15. Re-install rail sweep and gearmotor. Connect motor power plug.
Refer to page 10 for torque specications.
16. Turn power back on to crane and inspect crane for proper
operation.
BRIDGE MOTOR BRAKES
Motor brakes are DC rectied solenoid activated, spring set disc
type brakes. Brake is intended to be used strictly as a holding brake
and does NOT have any torque adjustment for decelerating and
stopping the crane. Deceleration and stopping is to be provided by
the variable frequency (inverter) motor control.
10
CMK_12322 Yale Rotating Axle End Truck Parts 11532619-REV AD_mec.indd 10 10/16/18 2:07 PM
Page 12

SINGLE & DOUBLE GIRDER TOP-RUNNING BRIDGES
WITH INDIVIDUAL MOTOR DRIVEN
END TRUCKS
P/N: 11532620 REV. AA September 2018
MAINTENANCE CONTINUED
Brake Air Gap Inspection for ABM Gearmotors
To inspect brake air gap refer to figure 6:
1. Disconnect and lock out power supply
2. Remove brake cover
3. Carefully roll the o-ring back towards the magnet body exposing
the air gap between the armature plate and magnet. Use feeler
gauge and measure the gap between the armature plate and
magnet. If gap exceeds maximum allowed, replace the brake.
AMB Gearmotors
Motor
Horsepower
KW
0.75 .55
1.0 .75
1.5 1.2
2.0 1.5
3.0 2.2
5.0 3.7
4. Roll o-ring back into place and re-install brake cover.
5. Turn power back on to crane and test brakes for proper
operation.
Brake Air Gap Inspection for Nord Gearmotors
The brake air gap is checked by placing a feeler gage between metal
anchor plate and the brake coil housing. This procedure is identical
even for the larger twin rotor brakes.
Procedure
1. Loosen the xing screws that attach the brake to the motor’s endshield by approximately half a turn.
2. If required, the brake assembly may be loosened slightly from the
motor’s end shield by turning the threaded setting bolts (hollow
screws) that surround the xing screws, counter clockwise, into
the brake coil housing.
3. Depending upon whether or not the air gap needs to be
decreased.
Motor End Bell
Shroud Bolt
Brake Disc
O-Ring
Normal
Air Gap
0.2 mm
(.008 in.)
0.3 mm
(0.12 in.)
Maximum
Air Gap
0.3 mm
(0.12 in.)
0.4 mm
(0.16 in.)
0.9 mm
(.035 in.)
Air Gap
Brake Mounting Bolts
Magnet
Body
Brake Mounting
Bolt Torque
(2.2 ft. lbs)
(7.5 ft. lbs)
Shroud
Plastic Fan
(where applicable)
3 Nm
10 Nm
Retaining Rings
(where applicable)
or increased, turn the xing screws accordingly until the desired
nominal air gap is reached, as measured using the appropriate feeler
gauge. Turning the xing screws clockwise allows the brake coil
housing to be moved towards the anchor plate and reduces the air
gap. Turning the xing screws counter-clockwise allows the brake
coil housing to be moved away from the anchor plate and increases
the air gap.
4. If the setting bolts (hollow screws) were adjusted as suggested in
Step 2, re-secure the brake coil housing rmly against the motor’s
end shield by turning the setting bolts (hollow screws) clockwise,
out of the brake coil housing.
5. Tighten the xing screws to the appropriate torque.
6. Re-check and measure the air gap in multiple locations to check
for appropriate spacing. Repeat the steps as needed until the
desired air gap spacing is uniform and consistent all the way around
the brake.
Nord Gearmotor
Motor
Horsepower
KW
Normal
Air Gap
Maximum
Air Gap
Brake Mounting
Bolt Torque
0.75 - - - -
1.0 .75 0.2 0.6 4.4 lb-ft
1.5 1.2 0.2 0.7 7.4 lb-ft
2.0 1.5 0.2 0.7 7.4 lb-ft
3.0 - - - -
5.0 - - - -
Brake Air Gap Inspection for FIR Gearmotors
Procedure
1. Remove the fan cover
2. Unscrew the (2) screws of the clamp and remove the fan.
3. Remove the retaining ring.
4. Unscrew the (4) M4 screws.
5. Remove the brake cover, with rubber bearing holder and the ball
bearing.
6. Check the air gap (0.4 ÷ 0.5 mm) in different positions, using the
feeler gauge.
7. If the air gap is different than the adjustment range:
a. Maintain locked the rst nut (and the rotor shaft) with the
adjustable spanner.
b. Using a second adjustable spanner, completely unscrew the
second nut.
c. Clean the shaft thread from the old thread-lock.
d. Using the rst adjustable spanner, adjust the air gap (maintain
locked the rotor shaft):
CW rotation = air gap (DECREASE)
CCW rotation = air gap (INCREASE)
e. Check using the feeler gauge in different positions.
f. Put a drop of LOCTITE 270 thread-lock on the shaft thread and
tighten the second nut with not in touch with the rst nut.
g. Do not move/rotate the rst adjustable spanner (rst nut) to the
brake disk lining otherwise the air gap changes. Tighten the
second nut.
h. Check the air gap again (conrm the right adjustment), otherwise
unscrew lightly the second nut, adjust following points d – e and
nish following points g - h.
8. Position the brake cover using a bit of grease and tight the (4) M4
screws.
Figure 6. Motor Brake
11
CMK_12322 Yale Rotating Axle End Truck Parts 11532619-REV AD_mec.indd 11 10/16/18 2:07 PM
Page 13

SINGLE & DOUBLE GIRDER TOP-RUNNING BRIDGES
WITH INDIVIDUAL MOTOR DRIVEN
END TRUCKS
P/N: 11532620 REV. AA September 2018
MAINTENANCE CONTINUED
9. Put the rubber bearing holder in touch with the brake cover.
10. Put the ball bearing in touch with the rubber bearing holder and
lock with the retaining ring.
11. Put the fan and screw the (2) screws of the clamp.
12. Put the fan cover and tighten with (4) M4 screws.
Fir Gearmotor
Motor
horsepower KW
0.75 0.55 0.3 0.4 Not Defined
1.0 0.75 0.4 0.5 Not Defined
1.5 1.2 0.4 0.5 Not Defined
2.0 1.5 0.4 0.5 Not Defined
3.0 2.2 0.4 0.5 Not Defined
5.0 3.6 - - -
Normal
Air Gap
Maximum
Air Gap
Brake Mounting
Bolt Torque
BRAKE RECTIFIER REMOVAL AND REPLACEMENT
Rectier is located inside the motor conduit box cover. To replace
follow these steps:
1. Disconnect and lock out power supply.
2. Unplug motor leads and open conduit box.
3. Remove rectier and unplug wires.
4. Plug wires into replacement rectier.
a. Connect brake leads to DC side of rectier, terminals
marked “+” & “–”.
b. Connect leads from the plug to the AC side, two terminals
marked “~”.
5. Re-assemble in reverse order disassembly.
6. Turn power onto crane and test for proper operation.
BRAKE REMOVAL AND REPLACEMENT
If brake air gap exceeds the maximum allowed, or is not functioning
properly, the brake may need to be replaced. Follow these
instructions.
1. Turn power off to crane and lock out
2. Unplug motor leads, open motor conduit box and disconnect
brake leads from rectier
3. Remove brake cover
4. Remove retaining ring and fan (if applicable).
5. Remove (3) mounting bolts holding brake magnet body in place.
Pull brake leads from motor, remove magnet, brake coil and rotor.
6. Re-assemble in reverse order, and tighten mounting bolts to
specied torque.
7.
Turn power back on to crane and test brakes for proper operation.
ELECTRICAL
1. Gearmotors
a. The bridge gearmotors are inverter duty. If gearmotor requires
any service or repairs, other than what is described in this
manual, the complete gearmotor must be replaced.
b. For hoist and trolley motors, consult the hoist and trolley
literature.
2. Bridge Control Panel.
a. All connections should be checked frequently for tightness.
3. Hoist and Trolley. Panel, brakes, limit switches, etc. Consult hoist
and trolley literature for maintenance and spare parts information.
12
CMK_12322 Yale Rotating Axle End Truck Parts 11532619-REV AD_mec.indd 12 10/16/18 2:07 PM
Page 14

SINGLE & DOUBLE GIRDER TOP-RUNNING BRIDGES
WITH INDIVIDUAL MOTOR DRIVEN
END TRUCKS
P/N: 11532620 REV. AA September 2018
MAINTENANCE CONTINUED
INSPECTION SCHEDULE AND MAINTENANCE REPORT
COMPONENT, UNIT OR PART
and location
COMPONENT, UNIT
OR PART
Motor
Gears & Bearings
Wheels
Trucks
Girders & Connections
Footwalk & Handrail
Motor
Motor Brake
Mechanical Load Brake
Overload Clutch
Couplings
Gears, Shafts & Bearings
Upper Block
Lower Block
Hook & Throat Opening
Hoist Rope
Rope Drum
Guards
Limit Switch
Bridge Panel
Trolley Panel
Hoist Panel
Pushbutton
Wiring
Motor
Brake (When so Equip.)
Couplings
Gears, Shafts & Bearings
Frame
Wheels
Bumpers
Guards
Conductors
Collectors
Monorail Joints
Monorail
Main Conductors
Main Collectors
General Condition
Load Attach. Chains
Rope Slings & Connect.
Change Gearcase Lub.
Grounding Faults
* See text for DAILY & WEEKLY REQUIREMENTS
INSPECTION INTERVAL
*Recommended
Inspection
Interval
MONTHLY
SEMI-ANNUAL
¡
¡
¡
¡
¡
¡
¡
¡
¡
¡
¡
l
l
¡
¡
¡
¡
¡
¡
¡
¡
¡
¡
¡
¡
¡
¡
¡
¡
¡
¡
¡
¡
¡
¡
l
l
¡
(Check column best indicating condition when part
or unit is inspected. Use note column to the right if
GOOD
ANNUAL
CONDITION
condition is not listed below.)
REQUIRED
ADJUSTMENT
REPAIR REQUIRED
REQUIRED
REPLACEMENT
(Loose Parts or Wires)
(Worn or Damaged)
LUBRICATION REQ.
(Low Oil or Grease
Rust or Corrosion)
CORRECTIVE ACTION NOTES
(Indicate corrective action taken during inspection and note
date. For corrective action to be done after inspection, a
designated person must determine that the existing deciency
does not constitute a safety hazard before allowing unit to
operate. When corrective action is completed, describe and
PAINTING
REQUIRED
note date in this column.)
CLEANING OR
¡
¡
X Record Hook Throat Opening
¡
¡
SIGNED & DATED REPORT REQUIRED - OSHA
X MAGNETIC PARTICLE OR EQUIVALENT EXAMINATION REQUIRED.
DATE
13
CMK_12322 Yale Rotating Axle End Truck Parts 11532619-REV AD_mec.indd 13 10/16/18 2:07 PM
Page 15

SINGLE & DOUBLE GIRDER TOP-RUNNING BRIDGES
WITH INDIVIDUAL MOTOR DRIVEN
END TRUCKS
P/N: 11532620 REV. AA September 2018
MAINTENANCE CONTINUED
REPLACEMENT PARTS
The following parts lists and illustrations cover standard model
cranes. Typical units are used as the basis for the exploded parts
illustrations; therefore, certain variations may occur from the parts
information given. For this reason always give the catalog number,
sales order number, model number, motor horsepower, voltage,
phase and frequency when ordering replacement parts. For motors,
gear cases and electrical components, give complete nameplate data.
WARNING
NON-FACTORY AUTHORIZATIONS OR MODIFICATION
OF EQUIPMENT AND USE OF NON-FACTORY REPAIR
PARTS CAN LEAD TO DANGEROUS OPERATION AND
INJURY.
WARNING
Using "commercial" or other manufacturer's parts to repair
the Yale Hoist may cause load loss.
TO AVOID INJURY:
Use only Yale supplied replacement parts. Parts may
look alike but Yale parts are made of specic materials or
processed to achieve specic properties
ORDERING INSTRUCTIONS
The following information must accompany all correspondence
orders for replacement parts:
1. Hoist Model Number from identication plate.
2. Serial number of the hoist stamped below identication
plate.
3. Voltage, phase, hertz from the identication plate.
4. Length of lift.
5. Part number of part from parts list.
6. Number of parts required.
7. Part name from parts list.
NOTE: When ordering replacement parts, it is recommended that
consideration be given to the need for also ordering such items as
gaskets, fasteners, insulators, etc. These items may be damaged
or lost during disassembly or just unt for future use because of
deterioration from age or service.
TO AVOID INJURY:
Do not alter or modify equipment without factory
authorization.
Do use only factory provided replacement parts.
The numbers assigned to the parts of the various assemblies in
the parts lists, may not be the part numbers used in manufacturing
the part. They are identication numbers, that when given with the
catalog number permits us to identify, select or manufacture, and
ship the correct part needed.
NOTES
14
CMK_12322 Yale Rotating Axle End Truck Parts 11532619-REV AD_mec.indd 14 10/16/18 2:07 PM
Page 16

SINGLE & DOUBLE GIRDER TOP-RUNNING BRIDGES
WITH INDIVIDUAL MOTOR DRIVEN
END TRUCKS
P/N: 11532620 REV. AA September 2018
MAINTENANCE CONTINUED
Figure 7. End Truck Assembly
115 mm Truck 160 mm Truck 200 mm Truck 260 mm Truck 305 mm Truck
Ref.
No. Description
Driver Wheel (65 mm tread) 23487501 1 1 23487601 1 1 23487701 1 1 23487801 1 1 - - -
1
Driver Wheel (88 mm tread) - - - 23487603 1 1 23487703 1 1 23487803 1 1 45483903 1 1
Trailer Wheel (65 mm tread) 23487502 1 1 23487602 1 1 23487702 1 1 23487802 1 1 - - -
2
Trailer Wheel (88 mm tread) - - - 23487604 1 1 23487704 1 1 23487804 1 1 45483904 1 1
Part
No.
Quantity
S.G. D.G. S.G. D.G. S.G. D.G. S.G. D.G. S.G. D.G.
Part
No.
Quantity
Part
No.
Quantity
Part
No.
Quantity
Part
No.
Quantity
3 Bearing Cage, Open (Driver) 23487901 1 1 23488001 1 1 23488101 1 1 23488201 1 1 45483801 1 1
4 Bearing Cage, Closed (Trailer) 23487902 3 3 23488002 3 3 23488102 3 3 23488202 3 3 45483802 3 3
5 SHCS 11802705 12 12 11802705 12 12 11802728 12 12 11802718 12 12 11802718 12 12
6 Hi-Collar Lock Washer 11803202 12 12 11803202 12 12 11803202 12 12 11803203 12 12 11803203 12 12
7 Bearing 10378011 4 4 10378016 4 4 10380106 4 4 10380106 4 4 10380108 4 4
8 Grease Fitting - - - - - - NO6099 5 5 NO6099 5 5 NO6099 4 4
Rail Sweep (65 mm tread) 23488701 2 2 23488805 2 2 23488901 2 2 23489001 2 2
9
Rail Sweep (88 mm tread) - - - 23488806 2 2 23488902 2 2 23489002 2 2 45492701 2 2
10 M10-1.50 SHCS 11802729 4 4 11802729 4 4 11802729 4 4 11802729 8 8 11802729 8 8
11 M10 Flat Washer 11803101 4 4 11803101 4 4 11803101 4 4 11803101 8 8 11803101 8 8
12 M10 Hi-Collar Lock Washer 11803203 4 4 11803203 4 4 11803203 4 4 11803203 8 8 11803203 8 8
Bumper - R1 11680704 2 2 11680704 2 - - - - - - - - - -
Bumper - R2 11680701 2 2 11680701 2 2 11680701 2 - - - - - - -
13
Bumper - R3 - - - 11680703 2 2 11680703 2 2 11680703 2 2
Bumper - R4 - - - - - - 11680702 2 2 11680702 2 2 11680702 2 2
Bumper - R5 - - - - - - 11680705 - 2 11680705 - 2 11680705 2 2
Flat Washer - R1 11803102 2 2 11803102 2 - - - - - - - - - -
Flat Washer - R2 11803101 2 2 11803101 2 2 11803101 2 - - - - - - -
14
Flat Washer - R3 - - - 11803101 2 2 11803101 2 2 11803101 2 2
Flat Washer - R4 - - - - - - 11803103 2 2 11803103 2 2 11803103 2 2
Flat Washer - R5 - - - - - - 11803103 - 2 11803103 - 2 11803103 2 2
15 H.S. Hex Head Bolt Cl. 8.8 11802609 12 24 11802609 12 24 11802509 12 24 11802509 14 28 11802509 14 28
16 Hex Nut 12 24 10399109 12 24 10399110 12 24 10399110 14 28 10399110 14 28
17 Washer 11803501 12 24 11803501 12 24 11803502 12 24 11803502 14 28 11803502 14 28
18 Slotted Roll Pin 11807001 2 4 11807001 2 4 11807001 2 4 11807001 2 4 11807001 2 4
19 Hand Hole Cap Plug 10849811 4 8 10849811 4 8 10849811 4 8 10849811 4 8 10849811 2 4
15
CMK_12322 Yale Rotating Axle End Truck Parts 11532619-REV AD_mec.indd 15 10/16/18 2:07 PM
Page 17

SINGLE & DOUBLE GIRDER TOP-RUNNING BRIDGES
WITH INDIVIDUAL MOTOR DRIVEN
END TRUCKS
P/N: 11532620 REV. AA September 2018
MAINTENANCE CONTINUED
Figure 8. Gearmotor
ABM Gearmotor Repair Parts
115 mm Truck
Ref.
No. Description Qty
(0.55 kW, ¾ hp)
Part Number Part Number Part Number Part Number Part Number Part Number
1 Mounting Hardware Kit 1 45152050 45152051 45152052 45152053 45152054
2
3
Brake Rectifier, (380/460V & 575V) 1 45152066
Brake Rectifier, (190/200-230V) 1 45152065
Complete Brake Kit 180VDC, (190/200-230V &
380/460V)
1 45152055 45152059 45152061 45152063
Complete Brake Kit 250VDC, (575V) 1 45152056 45152060 45152062 45152064
4 Fan Kit (where applicable) 1 45152075 45152077 45152078 33295051
5 Shroud Kit 1 45152080 45152082 45152083 33295055
6 Mating Easy Connect Plug (where applicable) 1 11829301
ABM Complete Gearmotor Assembly
190volt-3phase-50Hz, 208/230volt-3phase-60Hz
7
380volt-3phase-50Hz, 460volt-3phase-60Hz 45152003 45152013 45152023 45152033 45152043 451520101
45152001 45152011 45152021 45152031 45152041 451520100
1
575volt-3phase-60Hz 45152004 45152014 45152014 45152034 45152044 451520102
Nord Gearmotor Repair Parts
160 mm Truck
(0.75 kW, 1 hp)
200 mm Truck
(1.2 kW, 1½ hp)
260 mm Truck
(1.55 kW, 2 hp)
260 mm Truck
(2.2 kW, 3 hp)
305 mm Truck
(3.7 kW, 5 hp)
16
CMK_12322 Yale Rotating Axle End Truck Parts 11532619-REV AD_mec.indd 16 10/16/18 2:07 PM
Page 18

SINGLE & DOUBLE GIRDER TOP-RUNNING BRIDGES
WITH INDIVIDUAL MOTOR DRIVEN
END TRUCKS
P/N: 11532620 REV. AA September 2018
MAINTENANCE CONTINUED
Ref.
No. Description Qty
115 mm Truck
(0.55 kW, ¾ hp)
Part Number Part Number Part Number Part Number Part Number Part Number
160 mm Truck
(0.75 kW, 1 hp)
200 mm Truck
(1.2 kW, 1½ hp)
260 mm Truck
(1.55 kW, 2 hp)
260 mm Truck
(2.2 kW, 3 hp)
305 mm Truck
(3.7 kW, 5 hp)
1 Mounting Hardware Kit 1 45328550 45328551 45328552 45328553 N/A
2 Rectifier Repair Part, (208V) 1 45328565 N/A
Rectifier Repair Part, (190/230 280/460V) 45328566 N/A
Rectifier Repair Part, (575V) 1 45328567 N/A
3 Brake Repair Kit, (208V) 1 45328553 45328555 45328557 N/A
Brake Repair Kit, (190/230 280/460V) 45328553 45328555 45328557 N/A
Brake Repair Kit, (575V) 1 45328554 45328556 N/A
N/A Brake Release Handle 1 45328560 45328561 N/A
4 Fan Kit (where applicable) 1 45328575 45328577 45328578 N/A
5 Shroud Kit 1 45328580 45328582 45328583 N/A N/A
6 Mating Easy Connect Plug (where applicable) 1 11829301
Nord Complete Gearmotor Assembly
208-3phase-60Hz
190volt-3phase-50Hz, 230volt-3phase-60Hz 380volt-
7
3phase-50Hz, 460volt-3phase-60Hz
45328502 45328512 45328522 45328532 45328542 N/A
1
45328503 45328513 45328523 45328533 45328543 N/A
575volt-3phase-60Hz 45328504 45328514 45328524 45328534 45328544 N/A
FIR Gearmotor Repair Parts
Ref.
No. Description Qty
115 mm Truck
(0.55 kW, ¾ hp)
Part Number Part Number Part Number Part Number Part Number Part Number
160 mm Truck
(0.75 kW, 1 hp)
200 mm Truck
(1.2 kW, 1½ hp)
260 mm Truck
(1.55 kW, 2 hp)
260 mm Truck
(2.2 kW, 3 hp)
305 mm Truck
(3.7 kW, 5 hp)
1 Mounting Hardware Kit 1 45319150 45319151 45319152 45319153 45319153 N/A
2 Rectifier Repair Part, (190V) 1 45319165 45319167 45319165 N/A
Rectifier Repair Part, (208/230V) 1 45319165 45319167 45319165 N/A
Rectifier Repair Part, (380V) 1 45319165 N/A
Rectifier Repair Part, (460V) 1 45319165 N/A
Rectifier Repair Part, (575V) 1 45319166 N/A N/A N/A
3 Brake Repair Kit, (190V) 1 45319156 43519159 45319161 N/A
Brake Repair Kit, (208/230V) 1 45319156 43519159 45319161 N/A
Brake Repair Kit, (380V) 1 45319155 43519159 45319158 N/A
Brake Repair Kit, (460V) 1 45319155 43519159 45319158 N/A
Brake Repair Kit, (575V) 1 45319157 43519160 45319158 N/A
N/A Brake Release Handle 1 N/A N/A N/A N/A N/A N/A
4 Fan Kit (where applicable) 1
5 Shroud Kit 1 N/A
45319175 45319177 45319178
N/A
6 Mating Easy Connect Plug (where applicable) 1 11829301
FIR Complete Gearmotor Assembly
190volt-3phase-50Hz
45319101 45319111 45319121 45319131 45319141 N/A
208/230volt-3phase-60Hz 45319101 45319111 45319121 45319131 45319141 N/A
7
380volt-3phase-50Hz 45319103 45319113 45319123 45319133 45319143 N/A
1
460volt-3phase-60Hz 45319103 45319113 45319123 45319133 45319143 N/A
575volt-3phase-60Hz 45319104 45319114 45319124 45319134 45319144 N/A
17
CMK_12322 Yale Rotating Axle End Truck Parts 11532619-REV AD_mec.indd 17 10/16/18 2:07 PM
Page 19

SINGLE & DOUBLE GIRDER TOP-RUNNING BRIDGES
WITH INDIVIDUAL MOTOR DRIVEN
END TRUCKS
P/N: 11532620 REV. AA September 2018
MAINTENANCE CONTINUED
1
10 3 8 5
9
Description
Reference
Number
2
Part Number
9
4
7
Figure 9. Electrical Enclosure.
Quantity
Required
1 1 Fused Disconnect Switch
33353201 30 AMP Switch
33353202 60 AMP Switch
33353203 100 AMP
3 Replacement Fuses - 600V
11695210 10 AMP
11695212 12 AMP
11695220 20 AMP
11695225 25 AMP
11695230 30 AMP
11695235 35 AMP
11695250 50 AMP
11695260 60 AMP
11695270 70 AMP
11695280 80 AMP
11695290 90 AMP
2 1 Main Fuse Base
11695303 30 AMP
11695313 60 AMP
11695323 100 AMP
3 Replacement Fuses - 600V
11695210 10 AMP
11695212 12 AMP
11695220 20 AMP
11695225 25 AMP
11695230 30 AMP
6
18
CMK_12322 Yale Rotating Axle End Truck Parts 11532619-REV AD_mec.indd 18 10/16/18 2:07 PM
Page 20

SINGLE & DOUBLE GIRDER TOP-RUNNING BRIDGES
WITH INDIVIDUAL MOTOR DRIVEN
END TRUCKS
P/N: 11532620 REV. AA September 2018
MAINTENANCE CONTINUED
Figure 9. Electrical Enclosure (Continued)
Reference
Number
Part Number
Quantity
Required
Description
11695235 35 AMP
11695245 45 AMP
11695250 50 AMP
11695270 70 AMP
11695280 80 AMP
3 1 Mainline Contactor
33311033 30 AMP
33311036 60 AMP
33311037 80 AMP
4 1 Bridge Fuse Base
11695303 30 AMP
11695313 60 AMP
3 Fuses - 600V
11695202 2 AMP
11695203 3 AMP
11695204 4 AMP
11695205 5 AMP
11695206 6 AMP
11695208 8 AMP
11695210 10 AMP
11695212 12 AMP
11695215 15 AMP
11695220 20 AMP
11695225 25 AMP
11695230 30 AMP
11695240 40 AMP
5 1 Variable Frequency Drive
45199723 2 HP, 230V
45199724 3 HP, 230V
45199725 5 HP, 230V
45199726 7.5 HP, 230V
45199727 10 HP, 230V
45199742 2 HP, 460V
45199743 3 HP, 460V
45199744 5 HP, 460V
45199745 7.5 HP, 460V
45199746 10 HP, 460V
45334652 2 HP, 575V
45334653 3 HP, 575V
45334654 5 HP, 575V
45334655 7.5 HP, 575V
45334656 10 HP, 575V
6 33310931 1 Brake Relay (For VFC Control)
33311996 Surge Surpressor
7 11696402 1 Brake Fuse Base
2 Replacement Fuses
11696320 8 AMP
8 1 Fused Transformer
22946722 150VA, 208/277V
22946721 150VA 230/460V
22946732 300VA, 208/277V
22946731 300VA 230/460V
3 Fuses - 600V
11696310 1.4 AMP
11696312 2 AMP
11696314 3 AMP
11696316 4 AMP
9 11741010 3 Terminal Boards
10 11785601 1 Ground Lug
19
CMK_12322 Yale Rotating Axle End Truck Parts 11532619-REV AD_mec.indd 19 10/16/18 2:07 PM
Page 21

SINGLE & DOUBLE GIRDER TOP-RUNNING BRIDGES
WITH INDIVIDUAL MOTOR DRIVEN
END TRUCKS
P/N: 11532620 REV. AA September 2018
MAINTENANCE CONTINUED
FIGURE 10 - INTERCONNECTION WIRING DIAGRAM
20
CMK_12322 Yale Rotating Axle End Truck Parts 11532619-REV AD_mec.indd 20 10/16/18 2:07 PM
Page 22

SINGLE & DOUBLE GIRDER TOP-RUNNING BRIDGES
WITH INDIVIDUAL MOTOR DRIVEN
END TRUCKS
P/N: 11532620 REV. AA September 2018
RECOMMENDED SPARE PARTS
Certain parts of your crane will, in time, require replacement under normal wear conditions. It is suggested that the following parts
be purchased for your crane as spares for future use.
1 Set of Wheel Bearings
1 Set of Fuses
Note: When ordering parts always furnish Hoist Serial Number, Catalog Number, Motor Horsepower, Voltage, Phase, Frequency
and Rated Load of Hoist on which the parts are to be used.
PARTS AND SERVICES ARE AVAILABLE IN THE UNITED STATES AND IN CANADA
Parts for your hoist or trolley are available from your local authorized repair station. For the name of the nearest parts or service
center, visit our website www.cmworks.com or call the Columbus McKinnon customer service department at (800) 888-0985.
Notes
21
CMK_12322 Yale Rotating Axle End Truck Parts 11532619-REV AD_mec.indd 21 10/16/18 2:07 PM
Page 23

SINGLE & DOUBLE GIRDER TOP-RUNNING BRIDGES
WITH INDIVIDUAL MOTOR DRIVEN
END TRUCKS
P/N: 11532620 REV. AA September 2018
Notes
22
CMK_12322 Yale Rotating Axle End Truck Parts 11532619-REV AD_mec.indd 22 10/16/18 2:07 PM
Page 24

WARRANTY
LIMITATION OF WARRANTIES, REMEDIES AND DAMAGES
INDEMNIFICATION AND SAFE OPERATION
Buyer shall comply with and require its employees to comply with
directions set forth in instructions and manuals furnished by Seller and shall
use and require its employees to follow such instructions and manuals and
to use reasonable care in the use and maintenance of the Goods and any
Replacement Parts. Buyer shall not remove or permit anyone to remove any
warning or instruction signs on the Goods or Replacement Parts. In the event
of personal injury or damage to property or business arising from the use of
the Goods or Replacement Parts, Buyer shall within 48 hours thereafter give
Seller written notice of such injury or damage. Buyer shall cooperate with
Seller in investigating any such injury or damage and in the defense of any
claims arising therefrom.
If Buyer fails to comply with this section or if any injury or damage is caused,
in whole or in part, by Buyer’s failure to comply with applicable federal or
state laws, rules or regulations safety requirements, Buyer shall indemnify and
hold Seller harmless against any claims, loss or expense for injury or damage
arising from the use of the Goods and/or Replacement Parts.
CMCO Warranty (HOISTS)
A. Columbus McKinnon Corporation (“Seller”) warrants to the original end
user (“Buyer”) that, for a period of one (1) year from the date of Seller’s
delivery of the goods (collectively, the “Goods”) to the carrier, the Goods
will be free from defects in workmanship and materials. . In addition,
Seller warrants to Buyer that, for a period of one (1) year from the date
of their delivery by Seller to the carrier, any aftermarket or replacement
parts, accessories or components purchased by Buyer with respect to
any Goods (collectively, “Replacement Parts”) will be free from defects in
workmanship and materials.
B. IN THE EVENT OF ANY BREACH OF ANY SUCH WARRANTY,
SELLER’S SOLE OBLIGATION SHALL BE EXCLUSIVELY LIMITED
TO, AT THE OPTION OF SELLER, REPAIR OR REPLACEMENT, F.O.B.
SELLER’S POINT OF SHIPMENT, OF ANY GOODS OR REPLACEMENT
PARTS THAT SELLER DETERMINES TO HAVE BEEN DEFECTIVE OR,
IF SELLER DETERMINES THAT SUCH REPAIR OR REPLACEMENT
IS NOT FEASIBLE, TO A REFUND OF THE PURCHASE PRICE UPON
RETURN OF THE OR REPLACEMENT PARTS TO SELLER. NO CLAIM
AGAINST SELLER FOR ANY BREACH OF (i) SUCH WARRANTY WITH
RESPECT TO THE ELECTRICAL COMPONENTS OF ANY GOOD OR
ANY REPLACEMENT PARTS, SHALL BE VALID OR ENFORCEABLE
UNLESS BUYER’S WRITTEN NOTICE THEREOF IS RECEIVED BY
SELLER WITHIN ONE (1) YEAR FROM THE DATE OF SELLER’S
DELIVERY TO THE CARRIER AND (ii) SUCH WARRANTY WITH RESPECT
TO THE MECHANICAL COMPONENTS OF ANY GOOD SHALL BE
VALID OR ENFORCEABLE UNLESS BUYER’S WRITTEN NOTICE
THEREOF IS RECEIVED BY SELLER WITHIN ONE (1) YEAR FROM
THE DATE THE DATE ANY ALLEGED CLAIM ACCRUES. EXCEPT FOR
THE WARRANTIES SET FORTH ABOVE, SELLER MAKES NO OTHER
WARRANTIES WITH RESPECT TO THE GOODS OR ANY REPLACEMENT
PARTS, WHETHER EXPRESSED OR IMPLIED, INCLUDING ANY
WARRANTIES OF MERCHANTABILITY, FITNESS FOR A PARTICULAR
PURPOSE, QUALITY AND/OR THOSE ARISING BY STATUTE OR
OTHERWISE BY LAW OR FROM ANY COURSE OF DEALING OR USE OF
TRADE, ALL OF WHICH ARE HEREBY EXPRESSLY DISCLAIMED.
C. IN NO EVENT SHALL SELLER BE LIABLE TO BUYER OR ANY THIRD
PARTY WITH RESPECT TO ANY GOOD OR REPLACEMENT PART,
WHETHER IN CONTRACT, TORT OR OTHER THEORY OF LAW, FOR
LOSS OF PROFITS OR LOSS OF USE, OR FOR ANY INCIDENTAL,
CONSEQUENTIAL, SPECIAL, DIRECT OR INDIRECT DAMAGES,
HOWSOEVER CAUSED. SELLER’S MAXIMUM LIABILITY TO BUYER
WITH RESPECT TO THE GOODS OR ANY REPLACEMENT PART
SHALL IN NO EVENT EXCEED THE PRICE PAID BY BUYER FOR THE
GOODS OR REPLACEMENT PART THAT ARE THE SUBJECT OF THE
APPLICABLE CLAIM.
D. Seller shall not be liable for any damage, injury or loss arising out of the
use of the Goods or any Replacement Part if, prior to such damage, injury
or loss, such Goods or Replacement Parts are: (1) damaged or misused
following Seller’s delivery to the carrier; (2) not maintained, inspected, or
used in compliance with applicable law and Seller’s written instructions
and recommendations; or (3) installed, repaired, altered or modied (a) with
any part or accessory other than those supplied by Seller or (b) without
compliance with such laws, instructions or recommendations.
E. This warranty is limited and provided only to the original end user. Each
Good and Replacement Part must be registered within sixty (60) days
of receipt of each product to establish eligibility. Please register at
www.cmworks.com/hoist-warranty-registration or submit registration card
via US mail.
F. Any action against Seller for breach of warranty, negligence or otherwise
in connection with the electrical components of any Good must be
commenced by Buyer within one (1) year after: (a) the date any alleged
claim accrues; or (b) the date of delivery of the Goods to Buyer, whichever
is earlier. Any action against Seller for breach of warranty, negligence or
otherwise in connection with the mechanical components of any Good
must be commenced by Buyer within one (1) year after the date any
alleged claim accrues. . Any action against Seller for breach of warranty,
negligence or otherwise in connection with any Replacement Part must
be commenced by Buyer within one (1) year after: (y) the date any alleged
claim accrues; or (z) the date of delivery of the Replacement Part to Buyer,
whichever is earlier.
G. This warranty is contingent upon Buyer’s proper maintenance and care
of the Goods and/or Replacement Parts, and does not extend to normal
wear and tear. Seller reserves the right, at its option, to void this warranty
in the event of Buyer’s use with the Goods and/or Replacement Parts of
parts or accessories other than those supplied by Seller.
WARNING
Alterations or modifications of equipment and use of non-Seller
replacement parts can lead to dangerous operation and injury.
TO AVOID INJURY:
• Do not alter or modify equipment.
• Do use only replacement parts manufactured by Seller.
USA: Ph: (800) 888.0985 • (716) 689.5400 • Fax: (716) 689.5644 • www.cmworks.com
CANADA: Ph: (877) 264.6478 • Fax: (877) 264.6477 • www.cmworks.com
UK: Ph: +44 1244 375375 • Fax: +44 1244 377403 • www.cmco.eu
© 2018 Columbus McKinnon Corporation. All Rights Reserved.
CMK_12322 Yale Rotating Axle End Truck Parts 11532619-REV AD_mec.indd 23 10/16/18 2:07 PM
P/N: 11532620 REV. AA September 2018
 Loading...