

Page 1
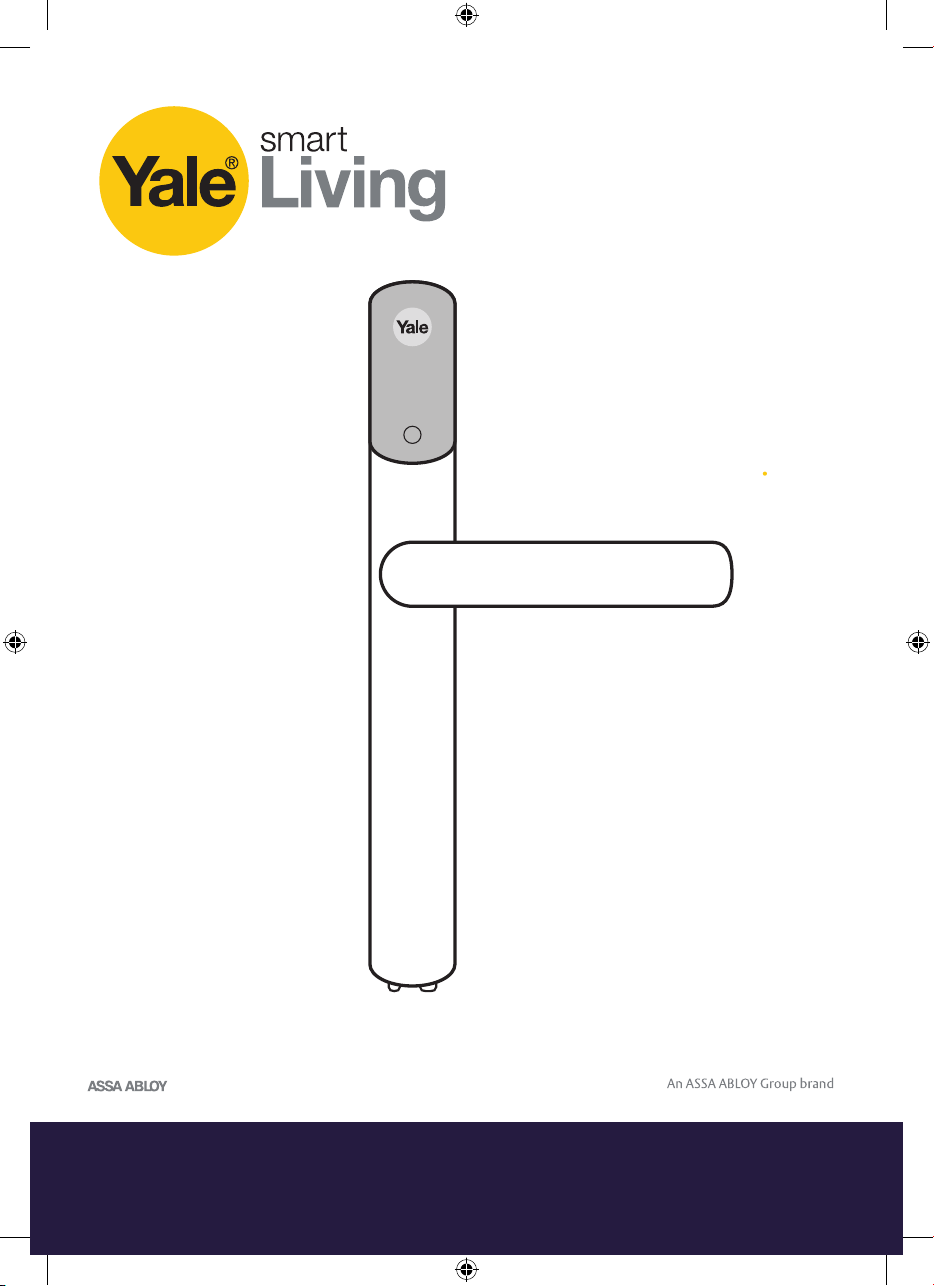
Conexis® L1
Manual
The Secure, Keyless
Smart Door Lock
The smarter way to protect your home
•
Page 2
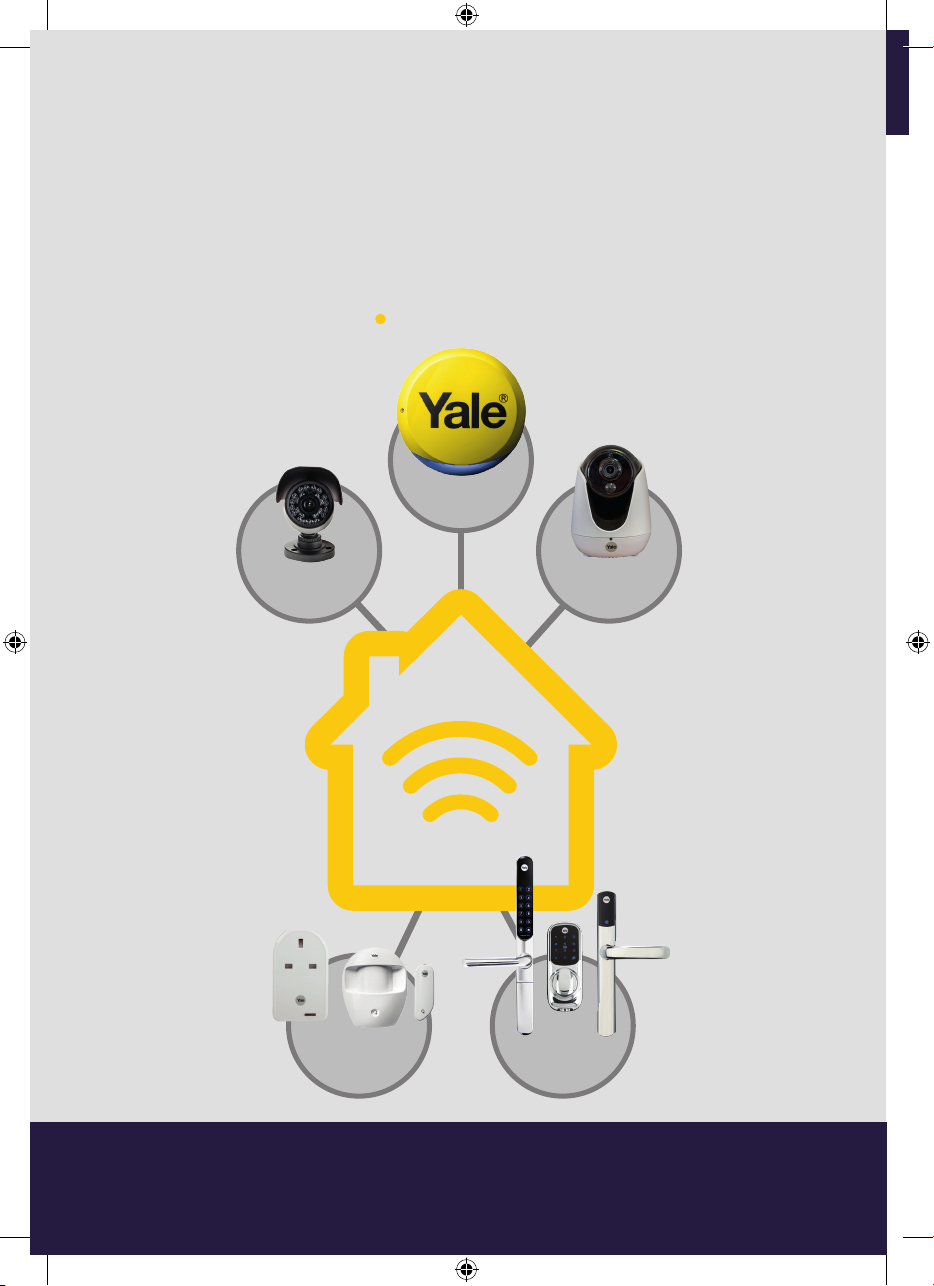
Discover
Our Range of
Products
ALARMS
®
Yale
Secure, monitor and control
your home with a range of smart
security devices from Yale.
Whether it’s a Smart Door Lock,
an Alarm or CCTV system, Yale
Smart Living products put you in
control of your home security.
www.yale.co.uk/smart-living
Connected
CCTV
ACCESSORIES
HOME VIEW
CAMERAS
SMART DOOR
LOCKS
2
The smarter way to protect your home
•
Page 3
Introduction
Thank you for choosing the Yale Conexis® L1 Smart Door Lock.
This simple to install product has been designed with the user
in mind. Please read this manual completely before using the
Yale Conexis
®
L1 Smart Door Lock.
Contents
Installation 4
Unlock With Cards/Tags 17
Yale Lock App 18
Create Mobile Key Account 19
Adding Cards/Tags Via App 20
Unlock With Yale App 21
®
Locking The Conexis
Battery Indicator 23
Pairing With A Third Party Gateway 24
L1 Smart Door Lock 22
Factory Reset 25
Search for Conexis® L1 Installation Video
on You Tube
For more information on this product
and Yale Smart Living Range visit
www.yale.co.uk/smart-living
Consumer Support: info@yale.co.uk
Tel: 01902 364606
Hereby, ASSA ABLOY UK Ltd declares that the Conexis® L1 Smart Door Lock is in compliance with Directive 2014/53/EU.
The full text of the EU declaration of conformity is available at the following internet address:
www.yale.co.uk/declaration-of-conformity
2
The 2 year guarantee for this
product is active from the date
of purchase (A copy of this
guarantee is available on our
website).
3
Page 4
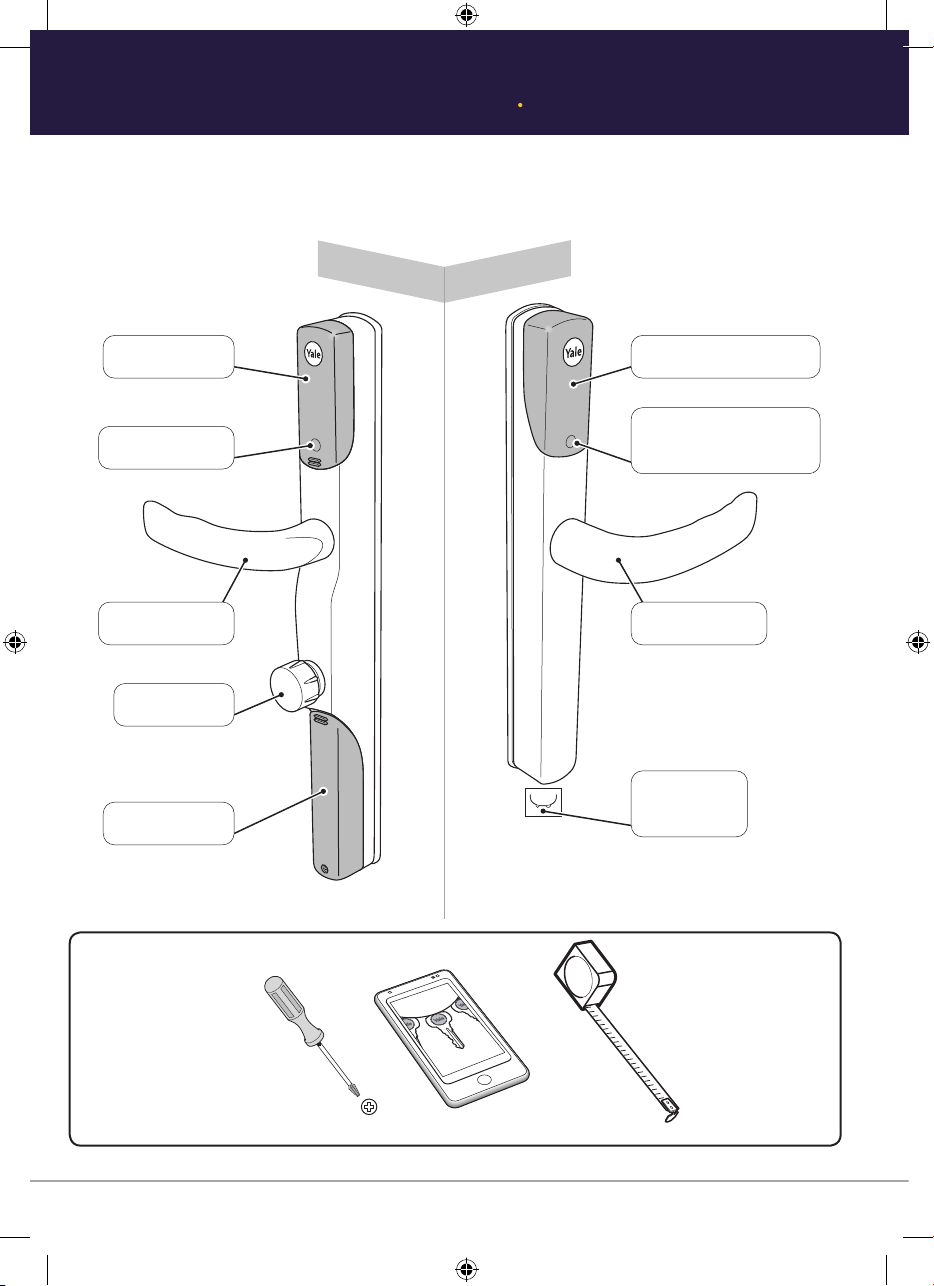
INSIDE
OUTSIDE
Radio Cover
Battery Cover
Lever Handle
Inside LED
Thumbturn
Key Card/Tag Reader
Lever Handle
Bluetooth Wakeup
Button and LED
Backup 9V
contacts
ConexisTM L1 Smart Door Lock
OUTSIDE
Key Card/Tag Reader
Lever Handle
Bluetooth Wakeup
Button and LED
Backup 9V
contacts
Radio Cover
Inside LED
Lever Handle
Thumbturn
Battery Cover
INSIDE
OUTSIDE
Key Card/Tag Reader
Bluetooth Wakeup
Button and LED
Lever Handle
Backup 9V
contacts
Tools Required
4
Page 5
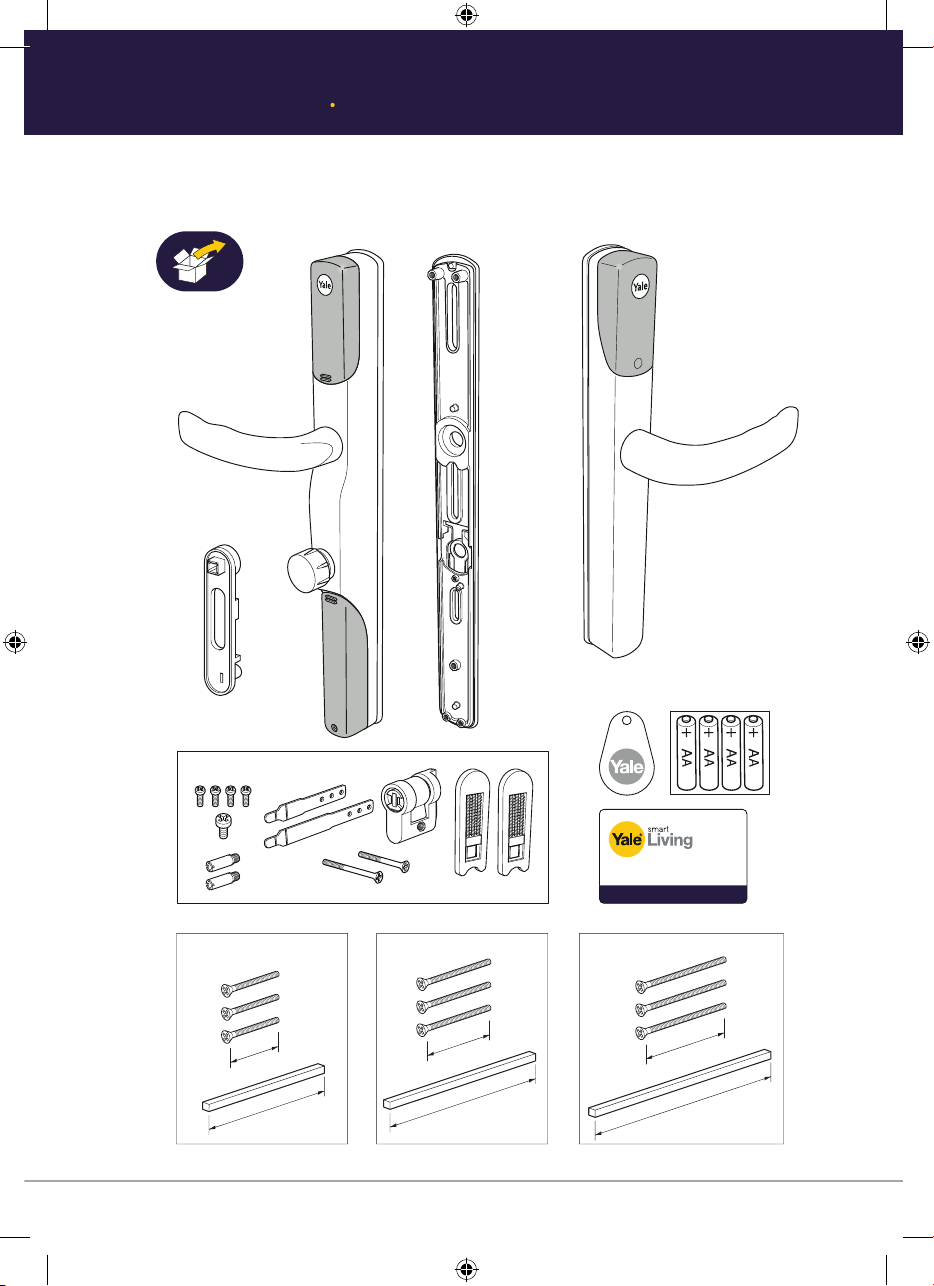
(03)
Inside The Box
(03)
The smart way to protect your home.
Fixing Pack A
4x AA Alkaline
Fixing Pack A
The smart way to protect your home.
Fixing Pack BFixing Pack CFixing Pack D
55mm
145mm
70mm
160mm
80mm
170mm
4x AA Alkaline
5
Page 6
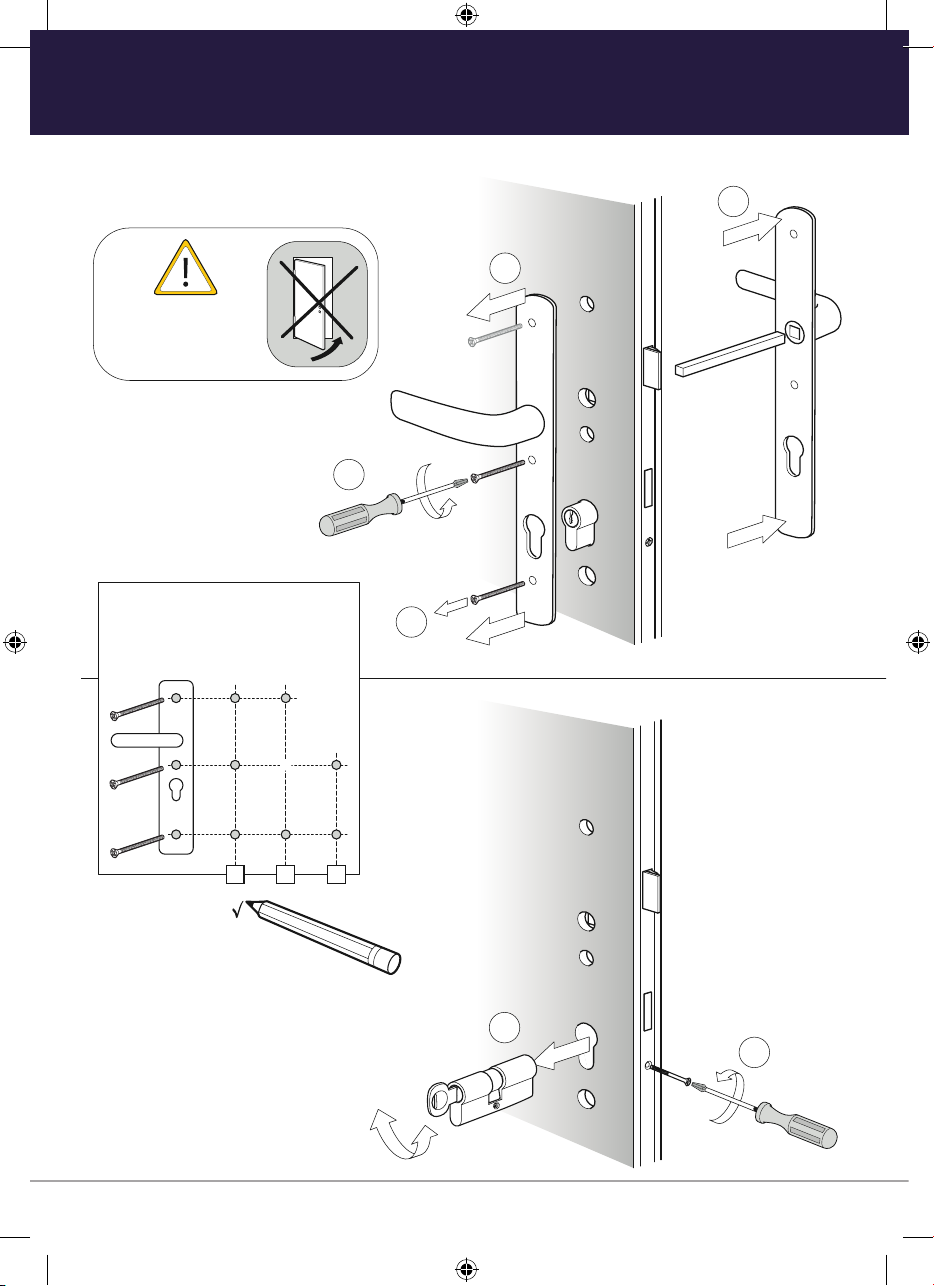
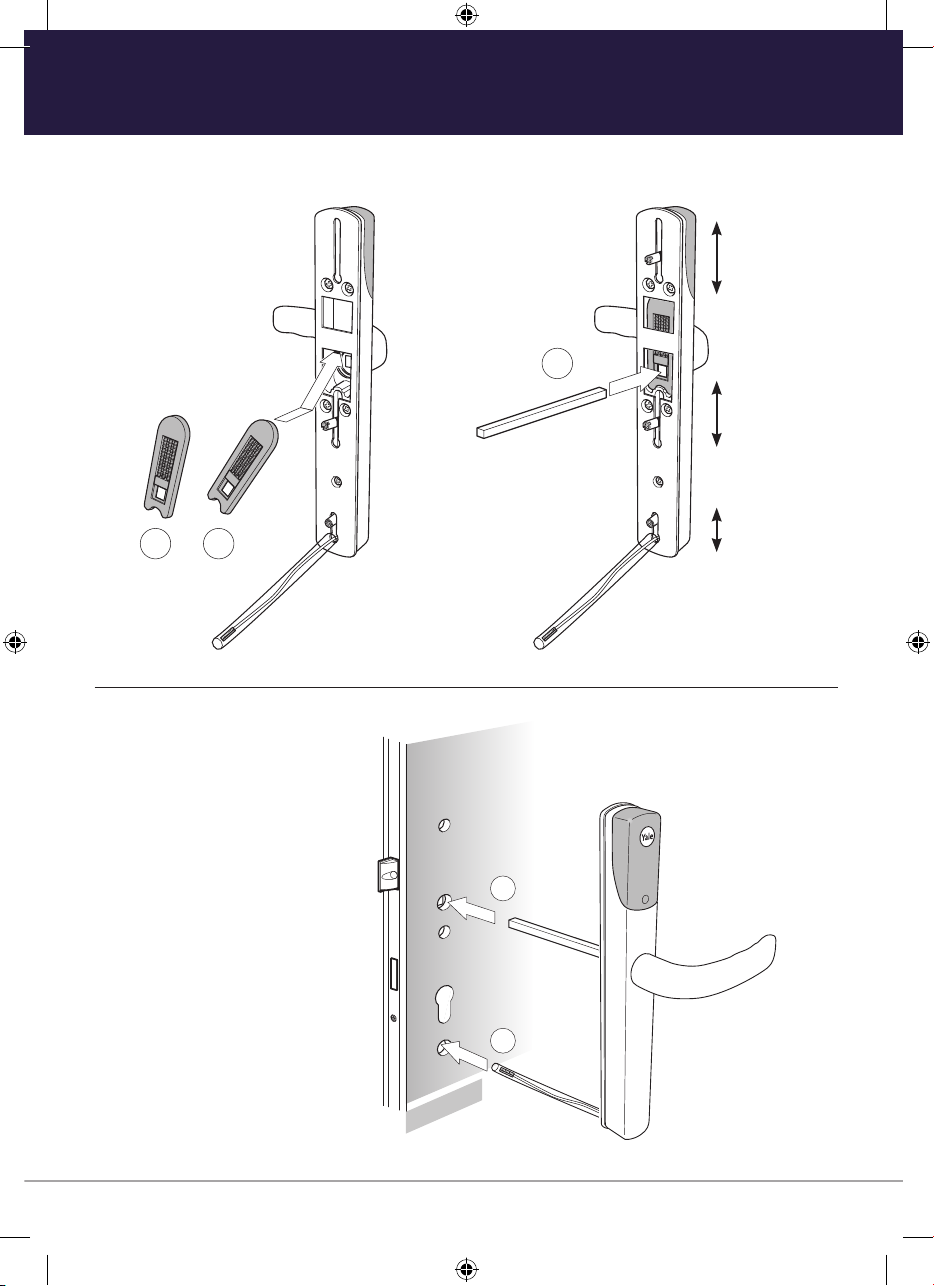
Remove the Current Handle
Do not close door
until installation
is complete.
•
1
Please make a note of
your current fixing screws.
You should have 2 or 3 as
below.
2
4
3
Remove the cylinder
6
2
1
Page 7
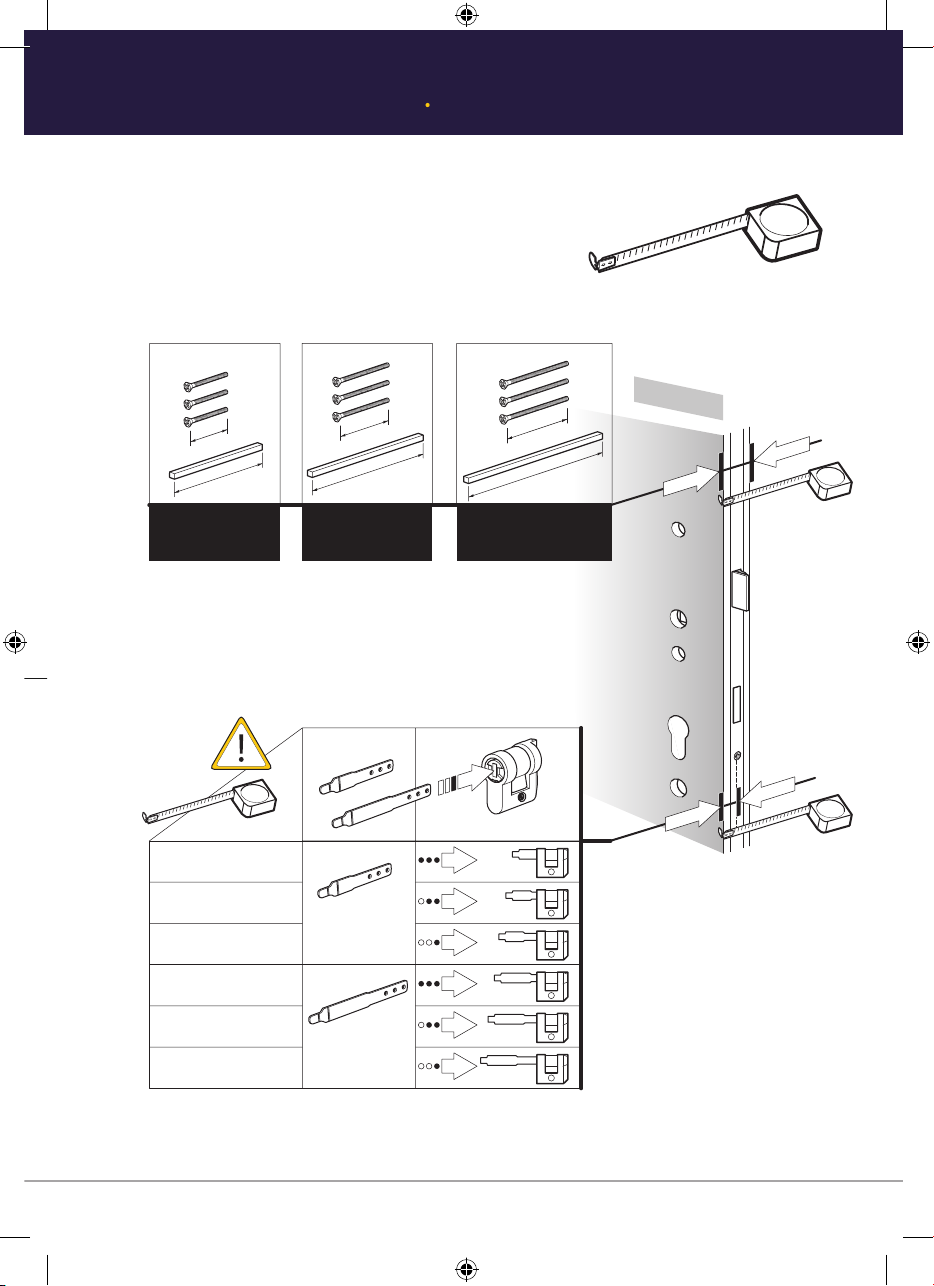
(05)
Measuring Your Door
Please measure the thickness of the door
and the distance between the centre of the
lock and the inside of the door to select
the correct xing pack and tailbar.
Fixing Pack BFixing Pack C
55mm
145mm
Door thickness Door thickness
44-50mm 58-65mm 70mm
70mm
160mm
Fixing Pack D
Door thickness
21mm - 26mm
26mm - 31mm
Short
31mm - 36mm
36mm - 41mm
Tailbar
INSIDE
80mm
170mm
41mm - 46mm
46mm - 51mm
Long
Tailbar
7
Page 8
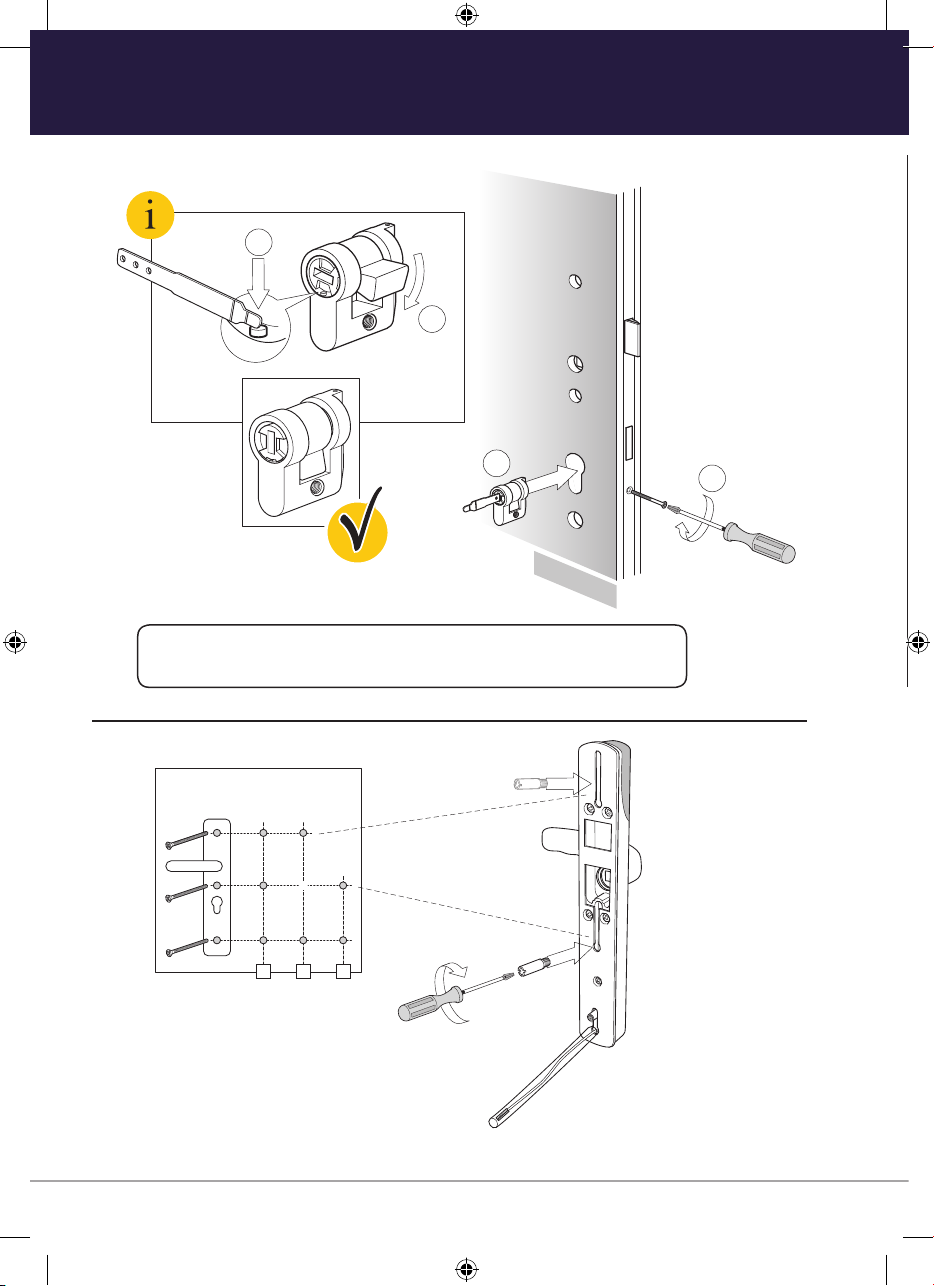
(07)
3
1
x2
2
Install lock Actuator
1
2
INSIDE
1
2
•
1
2
1
Tip:
After installing actuator make sure it is not tilted in the door.
Please screw lug into
position to line up with
previous handle xing
screws (see page 6).
2
INSIDE
8
Page 9
(07)
(07)
3
1
x2
2
Fit External Handle
x2
•
Lugs can be
slid up and
down to t
current xing
holes.
3
2
Slide the lug up
or down to align
with the holes in
the door.
1
2
1
OUTSIDE
9
Page 10

1
2
No longer
required
INSIDE
Fit Internal Fixing Plate
•
2
Note
Insert xing screws
to line up with
previous handle
screws.
1
3
2
1
No longer
INSIDE
required
Tip:
Slightly
removing
the external
handle from
outside the
door can
help line up
the xing
screws.
Do not fully
tighten.
10
Page 11
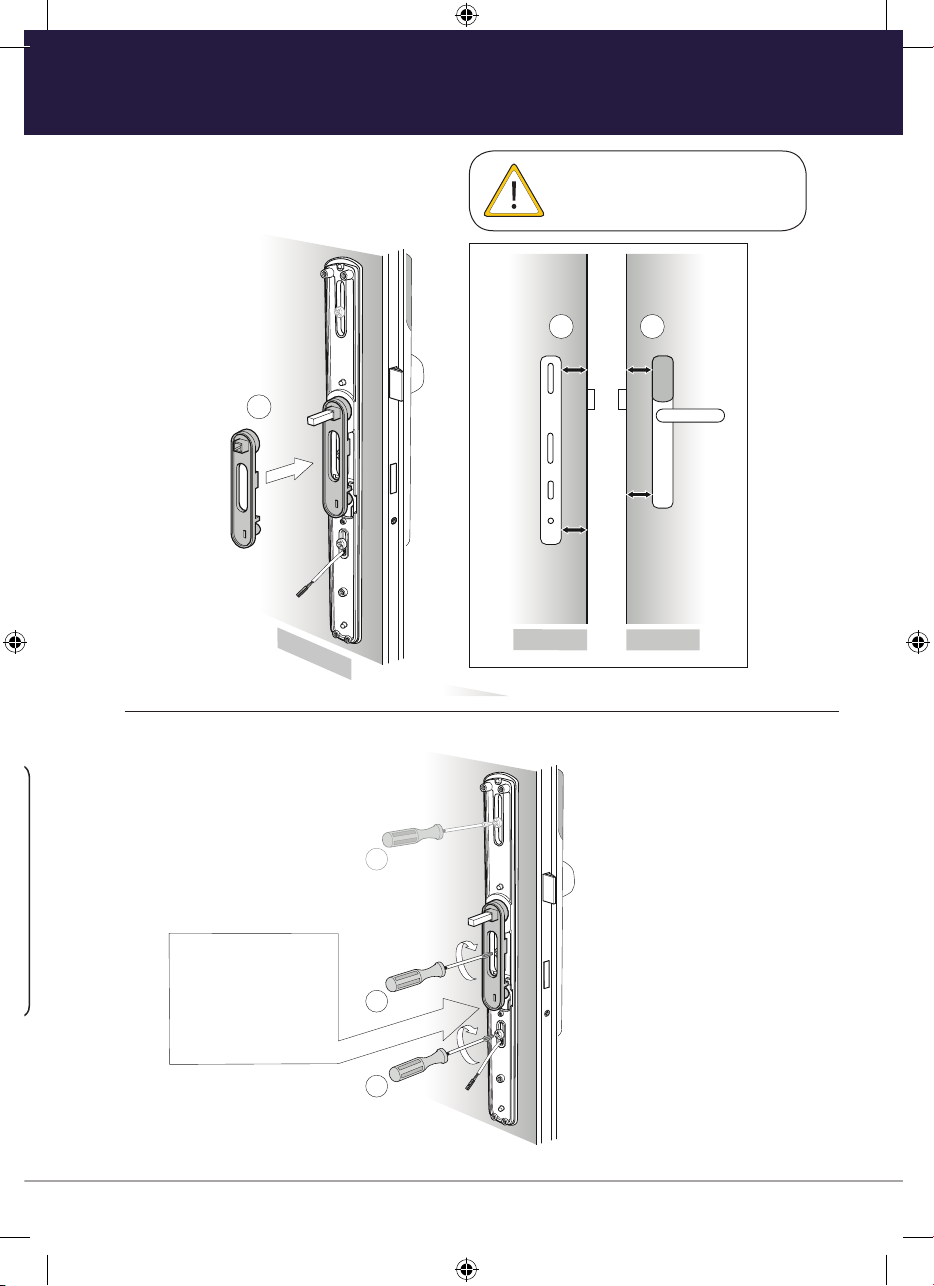
(09)
(09)
1
INSIDE
OUTSIDE
2 3
INSIDE
Unit Alignment
•
Make sure handle is parallel
to door on both sides.
2 3
1
INSIDE
INSIDE
OUTSIDE
6
Please ensure that
alignment tool is
at against the
door as screws are
tightened.
4
5
11
Page 12

1
2
Red
Red
No longer
required
Fitting Internal Handle
•
No longer
required
Red
Red
1
2
Make sure arrows are
facing up
1
12
3
Do not turn
thumbturn until
installation is
complete (page 16)
2
Please make sure cable is
tucked into allocated slot
when fitting handle.
Page 13

(11)
Installation Guide
1
Loosely
tighten
3
2
4
Do not turn
thumbturn until
installation is
complete (page 16)
Make sure handle
operates freely
once screws are
tightened.
1
Check seal!
Then tighten screws
2
3
4
13
Page 14

Alkaline
Batteries
2
1
Only
Handing Procedure
•
2
1
Hold R Button
for 15 sec.
“Beep Beep”
2
2
Push Down
& Release
“Beep Beep”
Push Up
& Release
“Beep Beep
Beep
”
1
Alkaline
Batteries
Only
14
Motor should lock & unlock
Page 15
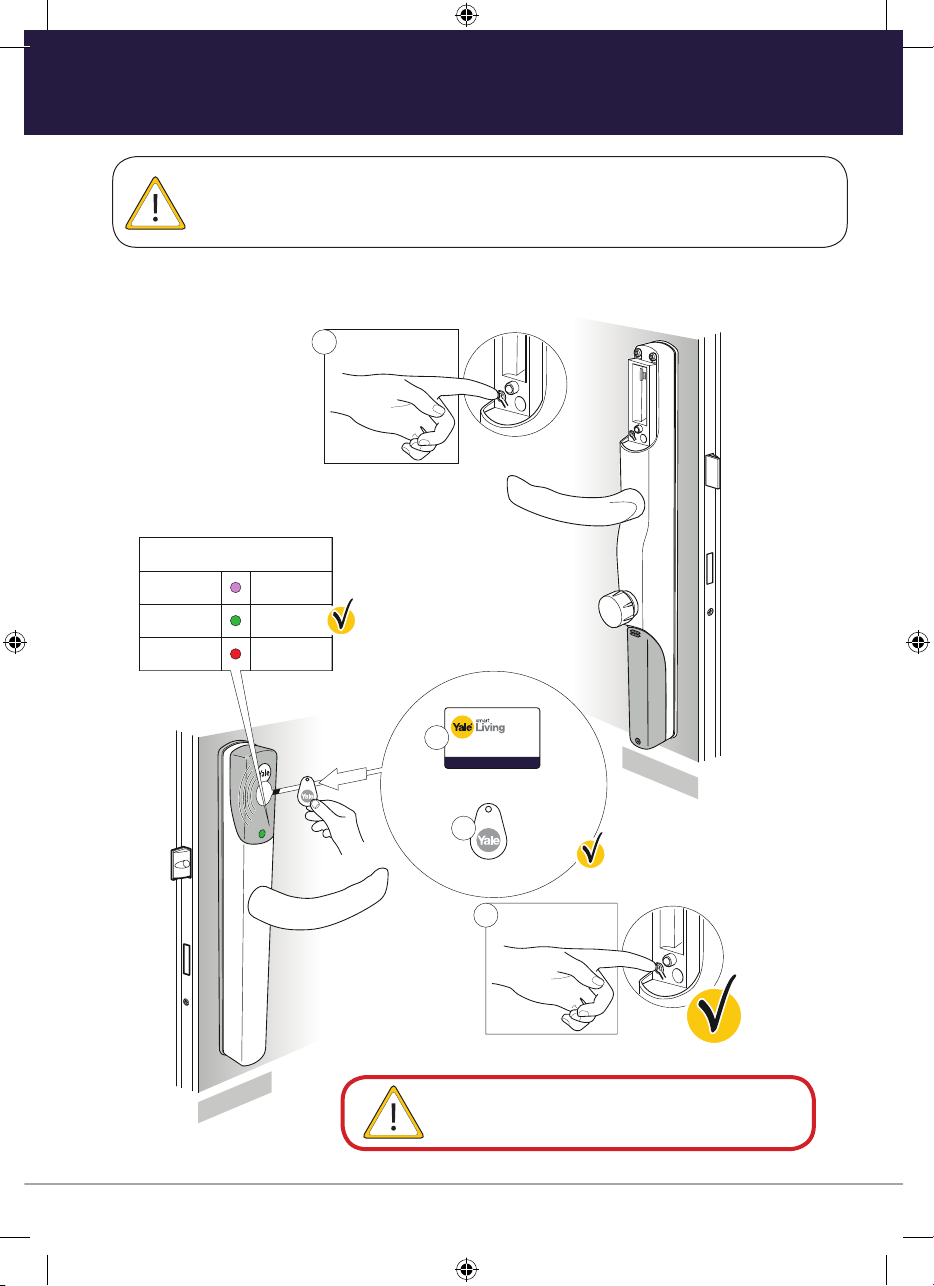
3
The smart way to protect your home.
2
“Beep”
Learn
Press “R”
Button to Finish
Success
Timeout
PURPLE
GREEN
RED
Mode
3
or
Pairing of Initial Credential
Initial pairing mode is designed to allow you to pair 1 Card or Tag before you connect
a smartphone to your lock. Further cards or tags can be added through the app once
installation is complete.
1
Press “R”
•
Button to Start
“Beep Beep”
Mode
Learn
Success
Timeout
PURPLE
GREEN
RED
OUTSIDE
Place card/
tag just below
Yale badge
2
The smart way to protect your home.
or
3
“Beep”
Press “R”
3
Button to Finish
“Beep Beep Beep”
Please keep this card/tag on you as your backup
credential at all times when leaving the house.
INSIDE
15
Page 16

Installation Checklist
Before shutting your door in frame, please test the
following things...
While the door is open, lift the lever handle to lock.
A
Make sure the motor operates smoothly.
Test to make sure the lever handle cannot be
B
pushed down.
Push the thumbturn in on the inside handle and
C
turn 180 degrees to unlock the door.
Push the lever handle down and make sure
D
it returns by itself.
Lift the lever handle to lock again.
E
Tap one of the paired Cards/Tags on the outside
F
handle under the Yale logo. Make sure it unlocks
and the lever handle can be pushed down.
Your installation is now complete.
If you have issues with any of the above, please contact:
Consumer Support: info@yale.co.uk Tel: 01902 364606
16
Page 17

The smart way to protect your home.
1
The smart way to protect your home.
Unlock With Cards/Tags
1
The smart way to protect your home.
OUTSIDE
2
Green Green
The smart way to protect your home.
Green
Place card/tag just
below Yale badge
3
Green
17
Page 18

(15)
(15)
YALE LOCK
LOCK
1
LOCK
Download App
(15)
YALE LOCK
LOCK
Create Account
1
2
LOCK
Download App
Yale Lock App
(15)
1. Search on app store
2.
1
3.
2
Download App
LOCK
Create Account
LOCK
Conexis® L1
YALE LOCK
YALE LOCK
LOCK
E-mail
E-mail
Password
Password
Password Reset
Create Account
Send Feedback
18
Login
Login
First name
First name
Last name
Last name
E-mail
E-mail
Password
Password
Confirm Password
Password
Questions
What time of the day were you born?
(hh:mm)
Answer
User Registration
Page 19
Create App Key
A
dd N
L
ock
Create Mobile Key
make it turn blue
1
YALE
Add New Lock
Your key ring is currently empty. A user may
send you a key using your account e-mail:
your-name@email.co.uk
Or press ‘Add New Key’ and configure your
own Yale lock.
OUTSIDE
2
Name your lock
A lock would typically be named by its
location or purpose.
E.g. Front Door
Cancel OK
QWERTYUIOP
QWERTYUIOP
SDFGHJKL
SDFGHJKL
A
A
ZXCVBNM
ZXCVBNM
123
123
4
Purple
Add New Lock
ew
spacereturn
spacereturn
Press “R”
3
Button to Start
Touch Purple light to
6
INSIDE
te
5
mple
o
c
tion
ca
o
Key rev
Blue
Only one phone can be paired to lock. This phone can then share the key to other users
by tapping key & press manage users.
19
Page 20

(17)
Adding Cards/Tags via App
Press the Bluetooth
Wakeup Button
(17)
Adding Cards/Tags via App
OUTSIDE
Purple
6
Cards/Tags
C
ard
s
/
T
a
g
s
Cards/Tags
Cancel OK
Name
QWERTYUIOP
A
ZXCVBNM
spacereturn
123
SDFGHJKL
QWERTYUIOP
A
ZXCVBNM
spacereturn
123
SDFGHJKL
Details
Cards/Tags
Audit
Lock Name
Settings
Date & Time
Lock Menu
Add New Lock
Lock ‘name’
Show Cards/Tags
Cards/Tags
New Card/Tag
Add New Lock
Lock ‘name’
1
2
3
5
4
Blue
Adding Additional Cards / Tags Via App
•
Lock ‘name’
Cards/Tags
Cards/Tags
Name
Cancel OK
QWERTYUIOP
QWERTYUIOP
A
A
SDFGHJKL
SDFGHJKL
ZXC VBNM
ZXC VBNM
123
123
space return
space return
Add New Lock
1
Green
OUTSIDE
4
6
Lock ‘name’
Lock Menu
Details
Cards/Tags
Audit
Lock Name
Settings
Date & Time
The smart way to protect your home.
Add New Lock
2
Press the Bluetooth
wakeup button
Blue
7
Your Card/Tag ‘name’
5
Cards/Tags
Cards/Tags
New Card/Tag
3
Purple
users updated
“Beep Beep”
New Card/Tag
Your initial card/tag will appear as user 1 once a card/tag has been added through the app.
20
Page 21

Unlock With Yale App
Unlock with Yale App
Your Smartphone must already have a mobile key for the lock to use this feature. If you’re setting up the lock for the first
time please follow instructions on page 19, or the lock owner can send you a key.
1
3 4
2
OUTSIDE
LOCK
Key revocation complete
Blue
90°
Key revocation complete
Green
Twist the phone 90º and back
up or press activate key button
to use the mobile key.
& Go
Green
TM
21
Page 22

(19)
Locking
(19)
“Beep beep beep”
Locking
Locking The Conexis® L1 Smart Door Lock
“Beep beep beep”
22
Checking
Page 23
Battery Indicator
Low Battery
OUTSIDE
No Battery
Green
“Beep beep beep Beep beep beep be be be be be”
Key
r
e
vocation complete
1
2
Alkaline
Batteries
2
Key revocation complete
Green
9V
Backup 9V
contacts
1
23
Page 24

(21)
“Connecting to a home automation system is a two way process and may require the
compatible home automation system to be configured to look for a new device, please
consult the manual that came with the system for more information.
Pairing with a third party gateway.
Insert
Connection
Module
(21)
(21)
Press “R”
3 times
3
Insert
Connection
Module
(21)
Insert
Connection
Module
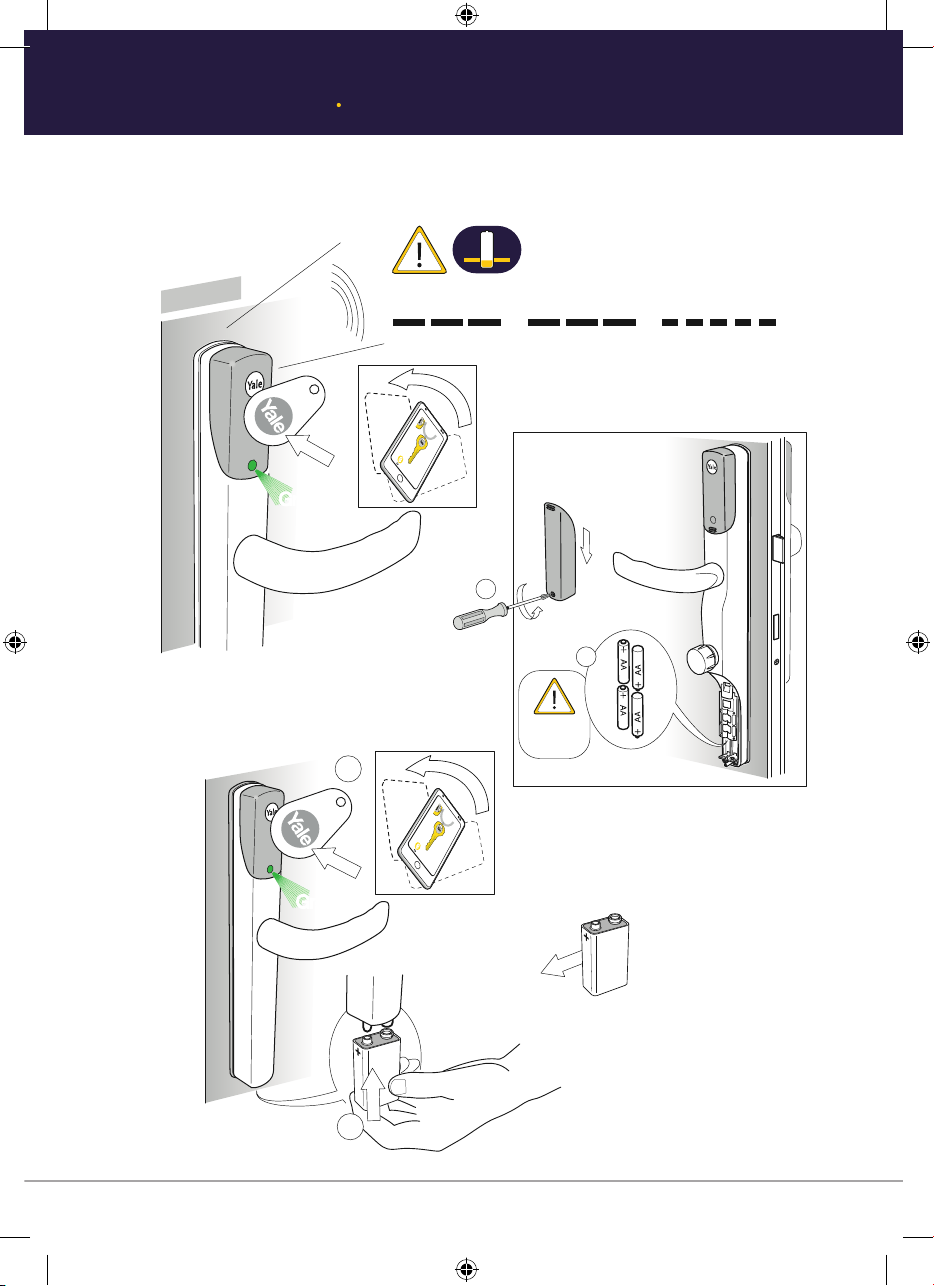
Pairing With A Third Party Gateway
Connecting to a home automation system is a two-way process and may require the compatible
home automation system to be configured to look for a new device. Please consult the manual that
came with the system for more information.
1
2
Insert
Connection
Module
3
Press “R”
3 times
3
24
2
1
Removing The Lock From A System
The lock may need to be removed from a home
automation system before being added to a new system.
To do this, please carry out the following:
1. Put the existing system into ‘Device Exclusion Mode’
2. Press “R” Button 3 times within 1.5 seconds
Page 25

Factory reset
Factory reset
1
2
3
4
5
Disconnect
inside handle completely.
Remove batteries.
Factory Reset
1
2
Disconnect
inside handle completely.
Remove batteries.
Press and
hold “R”
1
Insert batteries while
pressing button R
Hold until “beep”
3
5
4
2
3
Remove batteries
and install following
installation instructions.
25
Page 26
Notes
26
Page 27
Notes
27
Page 28

THE YALE BRAND, with its unparalleled
global reach and range of products, reassures
more people in more countries than any other
consumer locking solution
THE ASSA ABLOY GROUP is the world’s
leading manufacturer and supplier of locking
solutions, dedicated to satisfying end-user
needs for security, safety and convenience
.
.
/YaleUK /YaleSecurity
The smarter way to protect your home
/YaleSecurityUK
Issue No. 1B
•
 Loading...