

Page 1
A-C FIRE PUMP SYSTEMS
INSTRUCTION MANUAL
AC2516
Series 1580 In-Line Mounted
Centrifugal Fire Pumps
Installation, Operation and Service Instructions
INSTALLER: PLEASE LEAVE THIS MANUAL FOR THE OWNER’S USE.
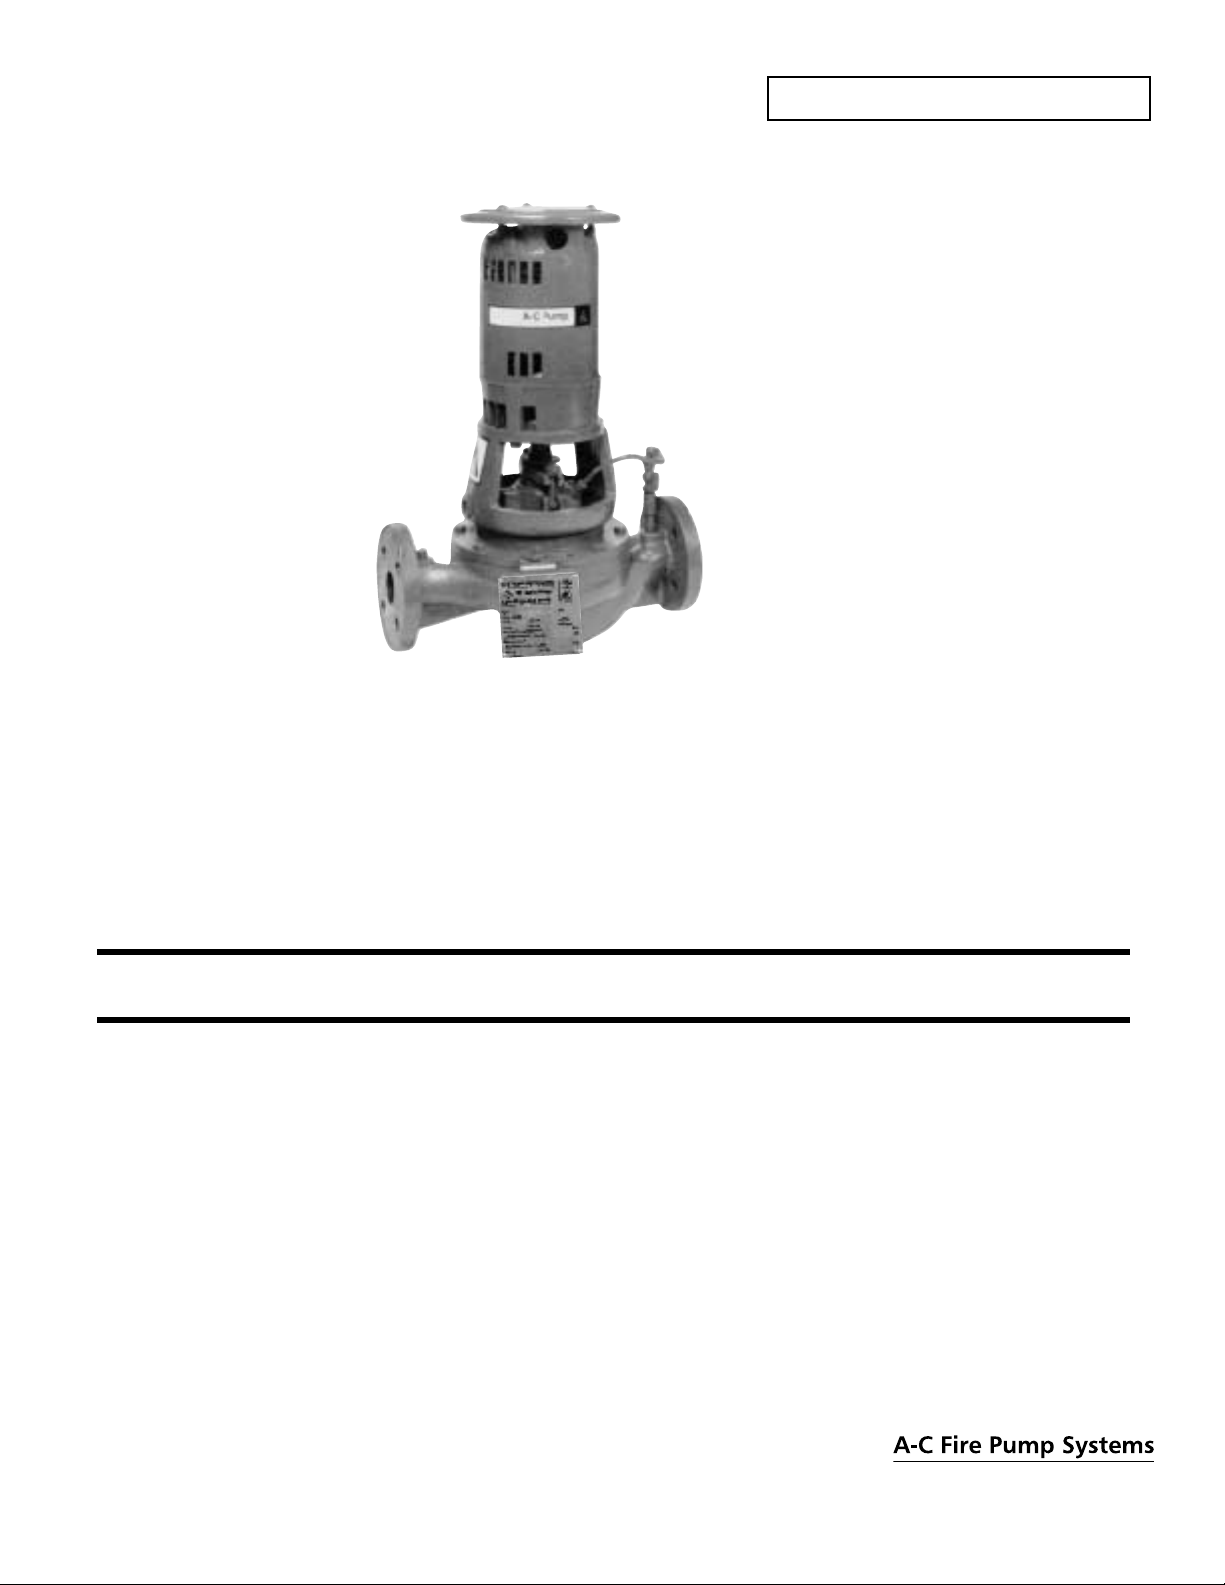
DESCRIPTION
The Series 1580 Inline Centrifugal Fire Pump is a close
coupled pump which features – high efficiency, rugged
construction, and in-line mounting. These features make
installation, operation and service easy to perform.
OPERATIONAL LIMITS
Unless special provisions have been made for your pump by
A-C Fire Pump Systems, the operational limits for Series
1580 Pumps are as follows:
SEAL OPERATING LIMITS
PACKING
PH Limitations 7-9; Temperature Range 0 to +200°F
For use on open or closed systems which require a large
amount of m akeup water, as well as systems wh ich are
subjected to widely varying chemical conditions and solids
buildup.
MAXIMUM WORKING PRESSURE
Listed on pump nameplate.
Page 2
SAFETY
INSTRUCTIONS
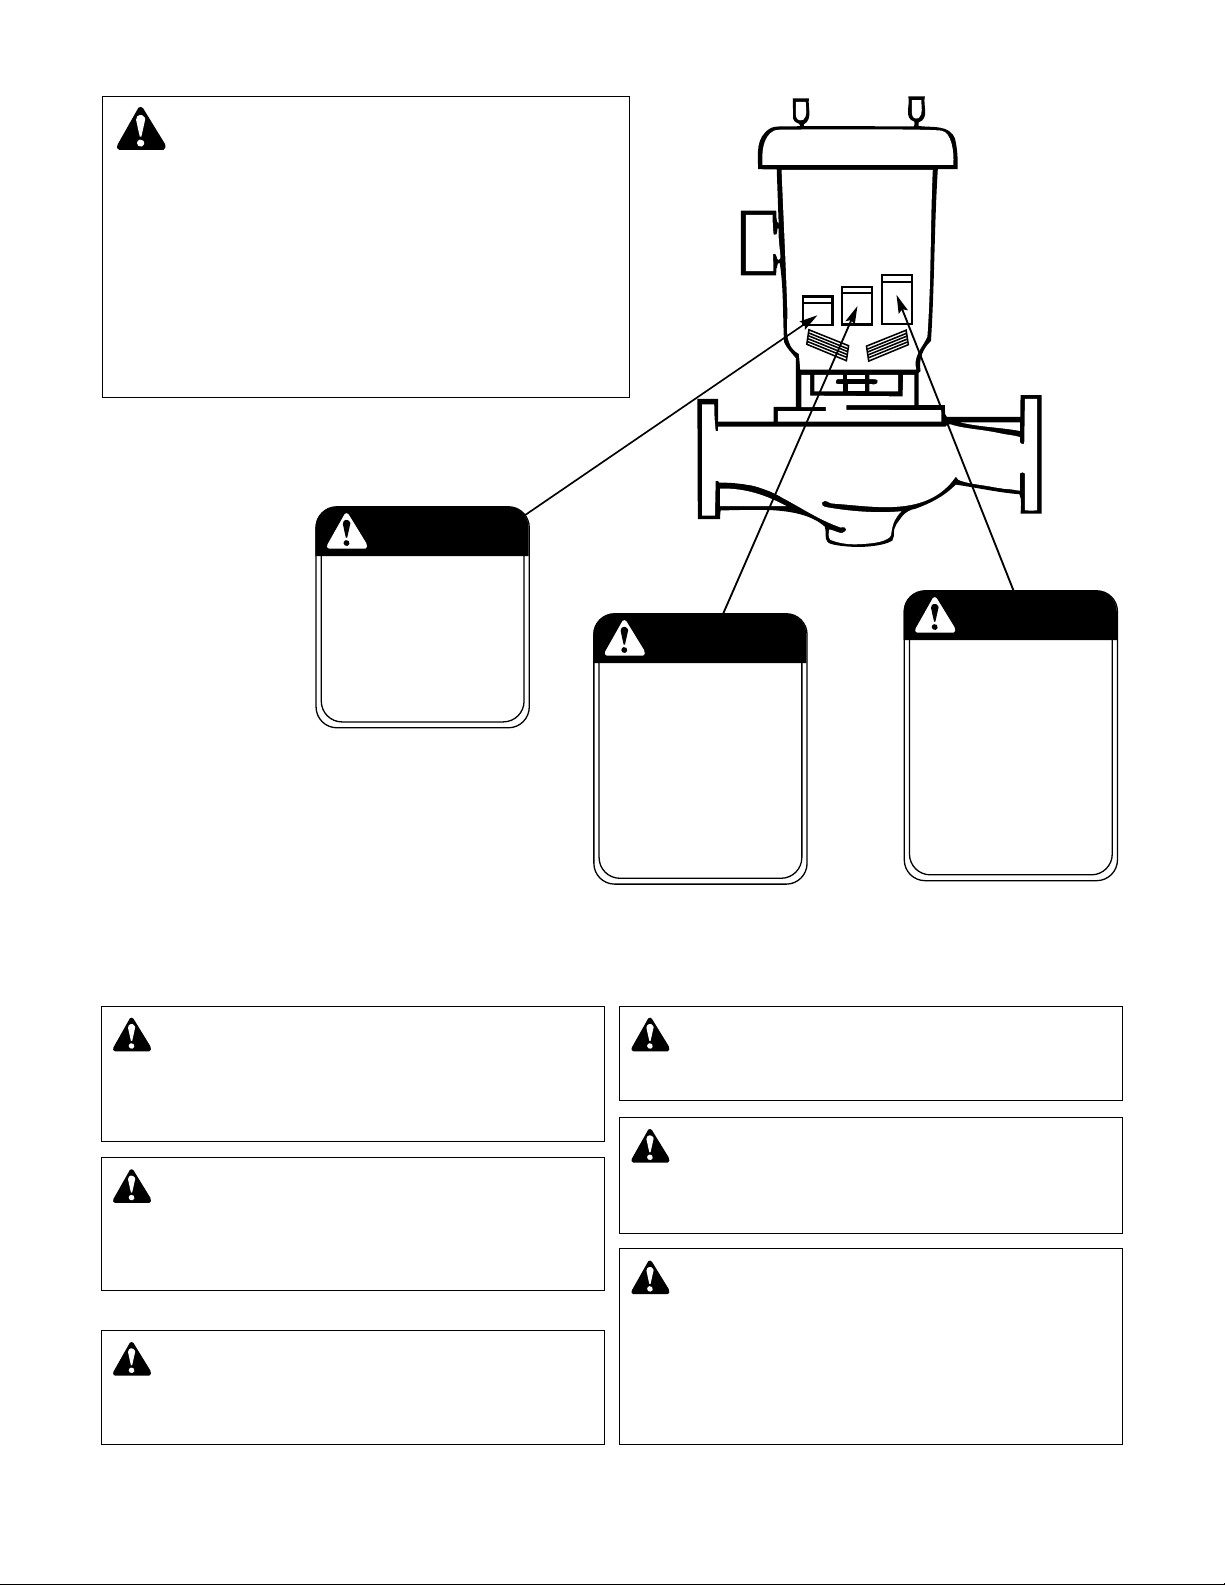
This safety alert symbol will be used in this manual and on
the unit safety instruction decals to draw attention to safety
related instructions. When used, the safety alert symbol
means ATTENTION! BECOME ALERT! YOUR SAFETY IS
INVOLVED! FAILURE TO FOLLOW THESE INSTRUCTIONS
MAY RESULT IN A SAFETY HAZARD.
Your Series 1580 Inline Mounted Centrifugal Fire Pump
should have the following safety instructions decals approximately as shown. If the decals are missing or are illegible
contact your local A-C Fire Pump Systems representative
for a replacement.
WARNING
EYEBOLTS OR LIFTING
LUGS IF PROVIDED ARE
FOR LIFTING ONLY THE
COMPONENTS TO WHICH
THEY ARE ATTACHED.
FAILURE TO FOLLOW
INSTRUCTIONS COULD
RESULT IN INJURY
OR DEATH.
P70643
CAUTION
DO NOT RUN PUMP DRY,
SEAL DAMAGE MAY OCCUR.
INSPECT PUMP SEAL
REGULARLY FOR LEAKS,
REPLACE AS REQUIRED.
FOR LUBRICATION
REQUIREMENTS, CONSULT
SERVICE INSTRUCTIONS.
FAILURE TO FOLLOW
INSTRUCTIONS COULD
RESULT IN INJURY OR
PROPERTY DAMAGE.
P70644
Fig. 1
WARNING
ROTATING COMPONENTS
DISCONNECT AND LOCKOUT
POWER BEFORE SERVICING.
DO NOT OPERATE WITHOUT
ALL GUARDS IN PLACE.
CONSULT INSTALLATION
AND SERVICE INSTRUCTION
SHEET BEFORE OPERATING
OR SERVICING.
FAILURE TO FOLLOW
INSTRUCTIONS COULD
RESULT IN INJURY
OR DEATH.
P70642
ADDITIONAL SAFETY REQUIREMENTS:
ELECTRICAL SAFETY:
WARNING: Electrical Shock Hazard
Electronical connections to be made by a qualified
electrician in accordan ce with all applicable codes,
ordinances, and good practices. Failure to follow these
instructions could result in serious personal injury or death,
and property damage.
WARNING: Electrical Overload Hazard
Three phase motors must have properly sized heaters
to provide overload and under voltage protection. Single
phase motors have built-in overload protectors. Failure to
follow these instructions could result in serious personal
injury or death, and property damage.
THERMAL SAFETY:
WARNING: Extreme Temperature Hazard
If pump, motor, or piping are operating at extremely
high or low temperature, guarding or insulation is required.
Failure to follow these instructions could result in serious
personal injury or death, and property damage.
2
MECHANICAL SAFETY:
WARNING: Unexpected Startup Hazard
Disconnect and lockout power before servicing.
Failure to follow these instructions could result in serious
personal injury or death, and property damage.
WARNING: Excessive System Pressure Hazard
The maximum working pressure of the pump is listed
on the nameplate, do not exceed this pressure. Failure to
follow these instructions could result in serious personal
injury or death, and property damage.
WARNING: Excessive Pressure Hazard
Volumetric Expansion
The heating of water and other fluids causes volumetric
expansion. The associated forces may cause failure of
system components an d release of high temperature
fluids. This will be prevented by installing properly sized
and located compression tanks and pressure relief valves.
Failure to follow these instructions could result in serious
personal injury or death, and property damage.
Page 3

PUMP LOCATION
Locate the pump so there is sufficient r
maintenance and service. If the use of a hoist or tackle is
needed, allow ample head room.
WARNING: Falling Object Hazard
Eyebolts or lifting lugs if provided are for lifting only
the components to which they are attached. Failure to follow these instructions could result in serious personal injury
or death, and property damage.
If lifting of the entire pump is required, do so with slings placed
around the pump assembly as shown in Fig. 2A. Or if your
pump configuration looks like Fig. 2B, connect a nylon sling,
wire rope or chain to the brace ribs on the motor adapter.
one sling for each rib. Attach all slings together at least 2 ft,
above the top of the pump.
CAUTION: Some pumps may have the center of
gravity at, or slightly above, the lift point. This may
create a tipping hazard. To avoid this hazard securely bind
the lifting lines to the side of the motor using a strap or
chain wrapped securely around the top of the motor. Unit
should only be lifted vertically. Failure to follow these
instructions could result in serious personal injury or
death, and property damage.
oom for inspection,
Use
Special precautions to avoid sound and vibration transmission
should be taken if the pump is to be located near a noise sen
sitive ar
ea, a sound specialist should be consulted.
If the pump is not on a closed system, it should be placed as
near as possible to the source of the liquid supply, and located
to permit installation with the fewest number of bends or
elbows in the suction pipe.
The installation must be evaluated to determine that the Net
Positive Suction Head Available (NPSHA) meets or exceeds
the Net Positive Head Requir
ed (NPSHR), as stated by the
pump performance curve.
-
Fig. 2A Fig. 2B
24" Min.
Nylon Sling
Chain or
Wire Rope
Securing Strap
Choker Hitch
all Braces
3
Page 4

PIPING
Always install a section of straight pipe between the suction
side of the pump and first elbow or install an A-C Fire
Pump Systems Suction Diffuser. This reduces turbulence of
the suction by straightening out the flow of liquid before it
enters the pump. The length should be equal to five times the
diameter of the pipe.
Be sure to eliminate any pipe-strain on the pump. Support the
suction and discharge pipes independently by use of pipe
hangers or ground supports close to the pump. A support can
be bolted to the underside of the pump body but it must be so
constructed as to allow freedom of movement with the normal
expansion of the piping.
If the pump is to be mounted in vertical piping with the motor
in the horizontal position provide adequate support to prevent
strain on pump parts and piping. It is not recommended that
pump be mounted with the motor vertically downward. Do not
use motor lift rings as a means of suspending the pump.
Line up the piping so that the bolt-holes in the pump flanges
match the bolt-holes in the pipe flanges. DO NOT ATTEMPT
TO SPRING THE SUCTION OR DISCHARGE LINES INTO
POSITION. Bearing wear will result if suction or discharge lines
ar e forced into position. The code for Press ure Piping
(A.S.A.B. 31.1) lists many types of supports available for various applications.
As a rule, ordinary wire or band hangers are not adequate to
maintain
rigid support for the suction and discharge lines.
Where considerable temperature changes are anticipated,
fittings for absorbing expansion should be installed in the
system in such a way as to avoid strain on the pump.
On an open system with suction-lift, use a foot-valve of equal
or greater area than the pump suction piping. Prevent clogging
by using a strainer at the suction inlet next to the foot-valve.
The strainer should have an area three times that of the
suction pipe with a mesh hole diameter of no less than
An A-C Fire Pump Systems Check Valve installed in the discharge line will serve to protect the pump from water hammer,
as an isolation valve for servicing and for throttling.
alignment. It is very important to provide a strong,
1
/4".
NOTES:
1. The pipeline should have isolation valves around the pump
and have a drain valve in the suction pipe.
ROTATION
Pump rotation is clockwise when viewed from back of the
motor. An arrow is provided to show direction of rotation.
GENERAL INSTRUCTIONS
1. Keep the motor properly lubricated.
2. When there is a danger of freezing, drain the pump.
3. Inspect pump regularly for leaky seals or gaskets and loose
or damaged components. Replace or repair as required.
LUBRICATION
Your Series 1580 Inline Fire Pump has been lubricated at the
factory, future lubrication should be in accordance with the
motor manufacturers instructions.
4
Page 5

PRIMING AND STARTING
Shaft
Slinger
Packing Gland
Cover Plate
Cap Screw
Impeller
Washer
Volute Cap
Screw
Flush Line
Impeller Key
Bracket
Gland Bolt
Packing Rings
Lantern Ring
Drip Drain
Cover Plate
Volute Gasket
Impeller
Lock Washer
Impeller
Impeller Cap Screw
Volute
Shaft Sleeve
CAUTION: Seal Damage Hazard
Do not run pump dry, seal damage may occur. Failure
to follow these instructions could result in property damage
and/or moderate personal injury.
Before starting the pump, the pump body must be full of
liquid. Manual priming may be required if the system does not
automatically fill the pump body with liquid. Vent plugs are
provided on the pump body to vent the air. While venting the
air from the pump body
few times by hand.
The pump should be started with the dischar
and the suction valve fully open. After the pump is up to operating speed the discharge valve should be opened slowly.
IMPORTANT: The pump should never be operated with the
suction valve closed or thr
tion. Cavitation will cause the pump performance to fall-off
and also, overtime, can cause impeller and/or casing damage.
, the pump shaft should be rotated a
ottled. This could result in cavita-
FIGURE 5
CROSS SECTION OF SERIES 1580 INLINE MOUNTED CENTRIFUGAL FIRE PUMP
ge valve closed
NOTE: On 6x6x91/2 and 6x6x11 there will be volute and stuff
box wear rings.
5
Page 6

SERVICE INSTRUCTIONS
WARNING: Unexpected Startup Hazard
Disconnect and lock out power before servicing.
Failure to follow these instructions could result in serious
personal injury or death, and property damage.
1. Close valves on suction and discharge sides of pump. (If
no valves have been installed, it will be necessary to drain
the system).
Caution: Extreme Temperature Hazard
Allow pump temperature to reach acceptable level
before proceeding. Open drain valve, do not proceed until
liquid stops coming out of drain valve. If liquid does not
stop flowing from drain valve isolation valves are not sealing and should be repaired before proceeding. After liquid
stops flowing from drain valve, leave drain valve open and
continue. Remove the drain plug located on the bottom of
the pump volute. Do not reinstall plug or close drain valve
until reassembly is completed. Failure to follow these
instructions could result in moderate personal injury or
property damage.
2. Loosen volute capscrews, do not remove them. Using capscrews in the jack screw holes start to remove the pump
assembly from the volute.
WARNING: Excessive System Hazard
Make certain the internal pressure is relieved before
continuing. Failure to follow these instructions could result
in serious personal injury or death, and property damage.
3. Remove seal flushing tube, if used.
Remove the volute capscrews and remove the pump
assembly from the volute.
4. Remove the impeller capscrew, lock washer and washer.
Remove the impeller.
STUFFING BOX CONSTRUCTION
WITH PACKING
1. Remove hex nuts from packing gland and remove coverplate capscrews. Remove coverplate from bracket.
2. Remove packing rings from the stuffing box.
3. Check condition of shaft sleeve and replace if scor
otherwise damaged. Note: Replace gasket between sleeve
and impeller as well if damaged.
4. Insert two packing rings in the stuffing box followed by the
lantern ring and then the remaining two pieces of packing.
Make certain that the packing joints are staggered 90
degrees.
5.
Install, but do not tighten the packing gland.
6. On the 6x6x91/2 and the 6x6x11 pumps the volute and
coverplate have rings. Inspect and replace if necessary.
7. Install coverplate over the pump shaft, tighten capscrews
(per torque chart).
8. Tighten packing gland to compress packing.
9. Install impeller, impeller gasket, impeller washer, lock washer
and capscrew, then tighten (per torque chart).
10. Install new volute gasket then install pump assembly into
volute. Tighten volute capscrews (per torque chart). Install
seal flushing tube. Install drain plug, close drain valve.
11. Open isolation valves, inspect pump for leaks, if not leaking
return pump to service. (See note for packing adjustment.)
ed or
NOTE:
Before starting pump, back off packing gland nuts or screws
until glands are loose. Re-tighten with fingers until glands are
just snug against the first packing ring. After pump is running
at first start, water may run freely from packing. This is normal
and should be allowed to continue for a period of time before
further tightening of the glands. Take up gland bolts uniformly,
one flat at a time.
An adequate leakage rate is not one single valve for all pumps
and installations, but is the amount required to provide adequate cooling and lubrication. The required leakage will be
largely influenced by operating pressure, fluid temperature,
shaft speed, etc.
For fluid temperatures in the range of 32° to 190°F, average
leakage rates of 60 to 80 drops per minute are recommended.
However, each individual pump and installation will have
unique operating conditions that will result in broadly variable
leakage rate requirements.
At fluid operating temperatures near the upper limit of 190°F,
the maximum temperature rise of the leakage is particularly
important. A packed pump should never operate with steam
forming at the gland. This necessarily limits the temperature
rise to a maximum of about 20°F. If the formation of steam
persists at higher leakage rates, cooling water must be provided
by means of an external supply, or a heat exchanger used to
cool the by-pass flush.
6
Page 7

CAPSCREW TORQUE (FOOT-POUND)
CAPSCREW HEAD
TYPE MARKING
1
/4
5
/16
CAPSCREW DIAMETER
3
/8
7
/16
1
/2
5
/8
3
/4
7
/8 1
SAE Grade 2 6 13 25 38 60 120 190 210 300
Brass
Stainless Steel or 4 10 17
27 42 83 130 200 300
SAE Grade 5 10 20 35 60 90 180 325 525 800
SAE Grade 8 13 28
DEALER SERVICING
If trouble occurs that cannot be rectified contact your local
A-C Fire Pump Systems representative. He will need the following information in order to give you assistance.
1. Complete nameplate data of pump and motor.
RECOMMENDED SPARE PARTS
The pumps covered by this manual have been designed and
built with certain replaceable wearing parts. The recommended
inventory of spare parts depends upon the installation and the
importance of continued operation.
For normal service, with repairs to be made in the field, the fol
lowing parts are r
Parts should be order
sible since circumstances beyond the control of the company
ecommended for stock.
1 set of packing rings (complete)
1 shaft sleeve
2 sets of wearing rings (if provided)
1 set of gaskets
1 lantern ring
ed as far in advance of their use as pos-
46 75 115 225 370 590 895
2. Suction and discharge pipe pressure gauge readings.
3. Ampere draw of the motor.
4. A sketch of the pump hook-up and piping.
RECOMMENDED SPARE PARTS
may reduce existing stock. Not all parts ar
be manufactured for each or
der.
To facilitate rapid handling of your order for spare parts, be
sure to include the following information:
-
1. Serial number of the pump.
2. Quantity of each part.
3. Name of part.
4. Material desired. (Parts will be furnished in original
materials unless specified as a material change. All material
substitutions should be discussed with the factory.)
e stocked and must
7
Page 8

TUV
DIN ISO 9001
ISO 9001
Certified
© COPYRIGHT 1970, 2000
PRINTED IN U.S.A. 4-00
USA
Bell & Gossett
8200 N. Austin Avenue
Morton Grove, IL 60053
Phone: (847) 966-3700
Facsimile: (847) 966-9052
http://www.bellgossett.com
INTL.
Bell & Gossett / Export Dept.
8200 N. Austin Avenue
Morton Grove, IL 60053
Phone: (847) 966-3700
Facsimile: (847) 966-8366
http://www.bellgossett.com
CANADA
Fluid Products Canada
55 Royal Road
Guelph, Ontario,
N1H 1T1, Canada
Phone: (519) 821-1900
 Loading...