

Page 1

User Guide
700N00032
WorkCentre XK50cx
Page 2

Xerox Corporation
1350 Jefferson Road
Rochester, NY 14625
United States of America
©2000 by Xerox Corporation®, The Document Company ®, the stylized X,
WorkCentre, and the identifying product names and numbers herein are
trademarks of Xerox Corporation. Xerox Canada Ltd. and Xerox Europe are
licencees of all the trademarks. Copyright protection claimed includes all forms and
matters of copyrightable materiasl and information now allowed by statutory or
judicial law or hereinafter granted, including without limitation, material generated
from the software programs which are displayed on the screen such as icons, screen
display tools, etc. Product names used in this guide may be trademarks or registered
trademarks of their respective companies and are hereby acknowledged. All nonXerox brands and product names are trademarks or registered trademarks of their
respective companies.
Publication number: 700N00032
Page 3

TABLE OF CONTENTS
Table of Contents
USER GUIDE
Safety Notes vi
Where Do I Find It viii
1. INTRODUCING THE WORKCENTRE XK50cx 1-1
Component Location 1-2
Control Panel Functions 1-4
Using the Number Keypad 1-6
Editing Numbers or Names 1-7
Inserting a Pause 1-7
Using the XK50cx Menu 1-8
Menu Options 1-9
Reviewing System Data Options 1-9
System Data Options 1-11
System ID 1-14
Date and Time 1-15
System Setup 1-17
Memory Clear 1-21
Fax Menu Options 1-21
Maintenance 1-21
Receive Mode 1-22
Reports 1-22
User Guide
iii
Page 4

TABLE OF CONTENTS
Collate 1-23
Loading Paper 1-24
Loading Envelopes 1-26
Using the Automatic Document Feeder 1-26
Paper Selection 1-27
Paper Types 1-28
Paper Guidelines 1-29
Guidelines for Special Media 1-30
2. THE BASICS: PRINTING AND COPYING 2-1
Copying a Document 2-2
Special Copy Features 2-3
Collating 2-4
Printing 2-5
Printer Settings 2-6
Control Program 2-6
3. SENDING A FAX 3-1
Preparing Documents for Faxing 3-2
How to Send a Fax 3-3
Canceling a Fax 3-4
Setting Resolution and Contrast 3-5
Contrast 3-6
Sending A Fax After Talking 3-7
Confirming Fax Transmission 3-8
Advanced Fax Features 3-8
iv
4. RECEIVING A FAX 4-1
Receive Modes 4-2
Adjusting Ringer Volume 4-4
Advanced Fax Features 4-4
5. HOW TO SCAN PHOTOS AND DOCUMENTS 5-1
Easy Scanning 5-2
Advanced Scanning 5-4
User Guide
Page 5

TABLE OF CONTENTS
6. MAINTAINING YOUR XK50cx 6-1
Cleaning the XK50cx 6-2
Maintaining Ink Cartridges 6-3
Cartridge Alignment 6-10
7. TROUBLESHOOTING 7-1
Document Jams 7-2
Paper Jams While Printing 7-3
Tips for Avoiding Paper Jams 7-4
LCD Display Error Messages 7-5
7-9
User Guide
v
Page 6

SAFETY NOTES
Safety Notes
Your WorkCentre XK50cx and supplies are designed and tested to meet strict safety
requirements. Included are safety agency examination and approval and compliance to
established environmental standards. Please read the following instructions carefully
before operating the WorkCentre XK50cx, and refer to them as needed to ensure the
continued safe operation of your WorkCentre.
Follow
Symbols Used:
Unplug
materials specifically designated for this product. Use of other materials may result in
poor performance and could create a hazardous situation.
Do not
cleaning methods. Never spray anything onto or inside of the WorkCentre XK50cx.
Use
of reach of children.
Do not
Do not
WorkCentre XK50cx may fall, causing personal injury or serious damage to the machine.
This product
grounded power outlet. This is a safety feature. To avoid risk of electric shock, contact
your electrician to replace the receptacle if you are unable to insert the plug into the outlet.
Never use an adapter to connect the WorkCentre to a power source receptacle that lacks
a ground connection terminal.
The WorkCentre XK50cx
the label. If you are not sure of the type of power available, consult your local power
company.
all warnings and instructions marked on or supplied with the product.
= Caution = Warning
the WorkCentre XK50cx from the wall outlet before cleaning. Always use
use aerosol cleaners. Follow the instructions in this User Guide for proper
supplies or cleaning materials only as directed. Keep all supplies and materials out
use the WorkCentre XK50cx near water, in wet locations, or outdoors.
place the WorkCentre XK50cx on an unstable cart, stand, or table. The
is equipped with a grounding type plug. The plug will fit only into a
should be operated from the type of power source indicated on
vi
Do not
where people will step on the cord.
The power supply cord
WorkCentre XK50cx is installed near an outlet and is easily accessible.
User Guide
allow anything to rest on the power cord. Do not locate the WorkCentre XK50cx
is the disconnect device for this equipment. Ensure that the
Page 7

SAFETY NOTES
Slots and openings
provided for ventilation. To ensure reliable operation of the WorkCentre and to protect it
from overheating, these openings must not be blocked or covered. The WorkCentre
XK50cx should never be located near or over a radiator or heat register. The WorkCentre
XK50cx should not be placed in a built-in installation unless proper ventilation
is provided.
Never
dangerous voltage points or short out parts which could result in a fire or electric shock.
Never
Never
operator serviceable areas within the covers of the WorkCentre XK50cx.
Never
unsafe areas. Covers, guards, and interlock switches are provided to ensure that the
machine will not operate with covers opened.
Use of an extension cord with this WorkCentre is not recommended or authorized.
Avoid
harmful, they may cause an annoying afterimage. Always keep the document cover
closed during operation and storage.
If you need additional safety information concerning the WorkCentre or Xerox supplied
materials, you may call Xerox at 1-800 TEAM XRX (1-800-832-6979) from within the
United Sates. From outside the United States please contact your local Xerox Helpline.
push objects of any kind into the slots of the WorkCentre XK50cx as they may touch
spill liquid of any kind on the WorkCentre XK50cx.
remove covers or guards that require a tool for removal. There are no casual
defeat interlock switches. This Machine is designed to restrict operator access to
direct viewing of the document lights. The lamps are bright and, while not
in the cabinet and in the back and sides of the WorkCentre are
User Guide
vii
Page 8

Where Do I Find It
WORKCENTRE
WORKCENTRE XK50
W
ORK
C
ENTRE
WORKCENTRE XK50
WORKCENTRE
WORKCENTRE XK50cx
WORKCENTRE
WORKCENTRE XK50
WHERE DO I FIND IT
In addition to this User Guide, your WorkCentre XK50cx comes
complete with an Install Guide, CD, and a Warranty. If you do not see
what you are looking for in this User Guide, check below to find the
information.
Install Guide
•Getting Started
•Basic Functions
CD
•Installation Program
•Scanning and Printer Drivers
•Pagis Pro 3.0 (Textbridge Pro)
•Electronic User Guide which covers:
•Advanced Fax Procedures
•Printer Settings and Scanning
•Machine Specifications
•Paper Specifications
•Regulatory and Safety Information
•Tips for Diagnosing Problems
Warranty
•Warranty Information
viii
User Guide
Page 9

Chapter One
Thank you for choosing the Xerox
WorkCentre XK50cx, the dependable and
efficient All-In-One machine that handles
your Small Business or Home Office tasks
with ease. Using the WorkCentre you
can:
• Send and receive faxes.
• Print high resolution color or blackand-white documents.
• Scan photographs, paper documents,
book pages, and virtually any object
which can be placed on the flatbed
scanning surface. The images
produced can be copied or converted
to fully editable electronic
documents or pictures.
See the XK50cx Install Guide for
thorough step-by-step instructions on
setting up the WorkCentre, installing the
software, and basic printing, copying, and
scanning.
1
INTRODUCING THE
WORKCENTRE XK50cx
1
User Guide
1
.1
Page 10

COMPONENT LOCATION
Component Location
1
Take a moment to familiarize yourself with the XK50cx components and their location.
Document
Input Tray
Automatic
Document
Feeder
Document
Guide
Control
Panel
Document
Output Tray
1
.2
User Guide
Paper Exit Tray
Scanner Module
Page 11

COMPONENT LOCATION
Automatic Paper
Feeder with Extension
AC Power Cord
Connector
USB
Connector
Parallel
Connector
1
Document
Glass Cover
Telephone
Connections
EXT
LINE
User Guide
1
.3
Page 12

CONTROL PANEL FUNCTIONS
Control Panel Functions
Use to select paper
type for copying
Use to adjust contrast
level prior to copying,
faxing or scanning
Use to select
copy, fax and
scan quality
Use to adjust
copy size from
25 to 400%, or to
set Clone and
Autofit options
The display shows the current
status of the XK50cx and guides
the user through various tasks
using a menu system for each
operation
Use to choose
special functions
Use to move to a higher
level in the menu
1
.4
Use to select color
or mono for copy,
fax or scan mode
User Guide
Moves to a lower
level in the menu
Use to start
PC scanning
Lights when an
error occurs
Left and right arrow keys move cursor
directionally
Up and down arrow keys move to next or last
menu item and use to adjust audible volume
Also moves cursor in Edit mode and with
Menu and Start buttons to setup special
functions and print lists
Page 13

CONTROL PANEL FUNCTIONS
Use to dial to enter a
letter or to choose special
Use to display
current job status
Use to redial last phone number called
or to add a pause when storing a
number in the phone book memory
functions in combination
with the Menu button
Use to enter into
fax sending mode
Use to dial calls and send
fax documents by entering
a 2 digit number
Use to dial number
manually (inter-active dial)
1
Start a job
Use to stop an
operation at any time
or delete digits while in
edit mode. Any
operation originating
on a PC should be
stopped on the PC
User Guide
1
.5
Page 14
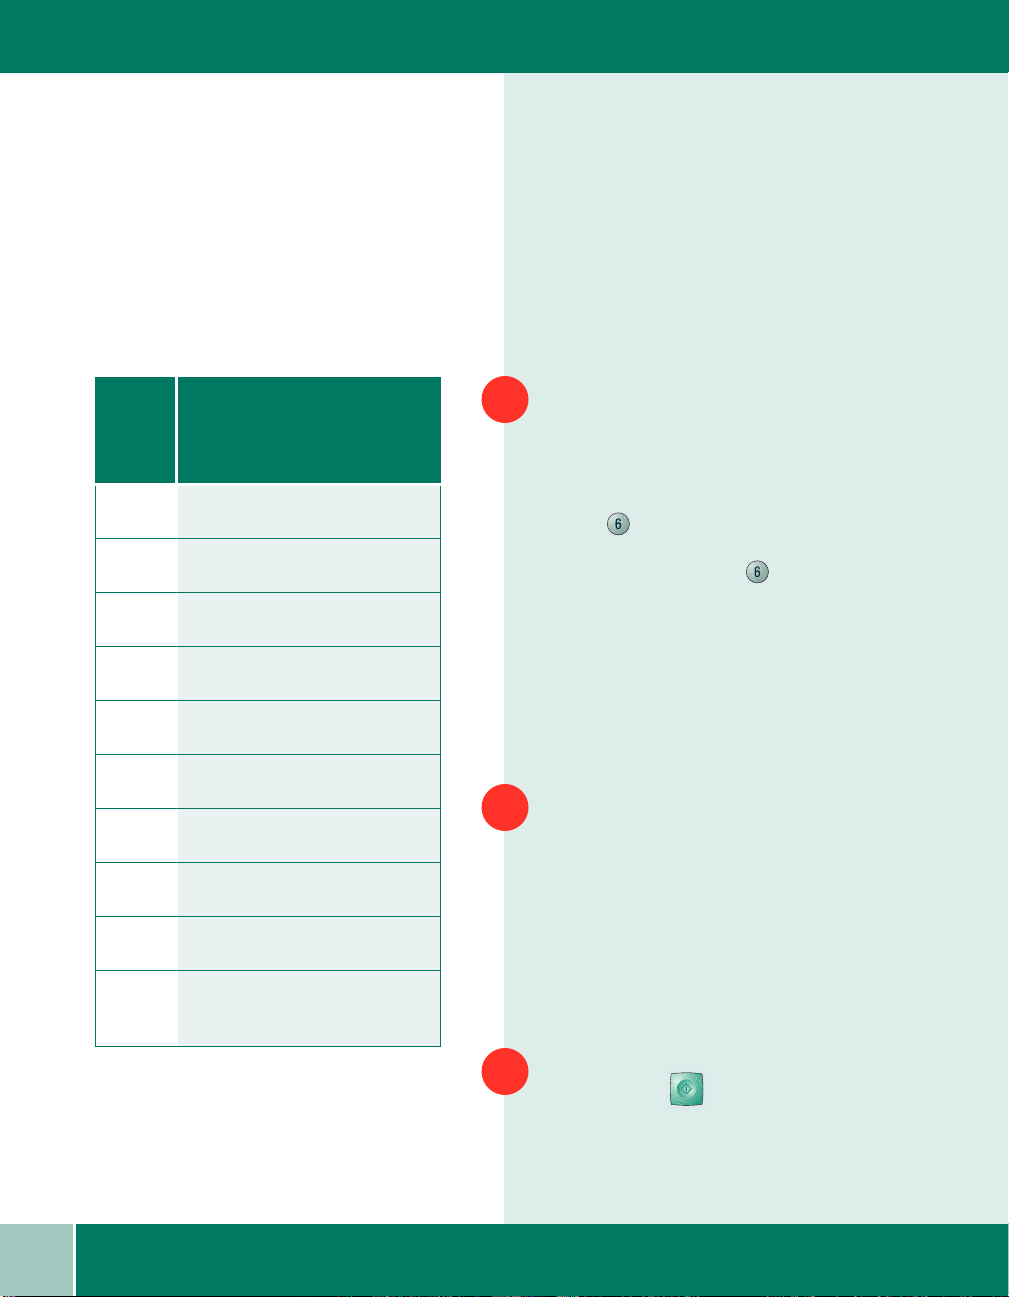
USING THE NUMBER KEYPAD
Assigned
Key
1 1
2 A > B > C > 2
3 D > E > F > 3
4 G > H > I > 4
5 J > K > L > 5
numbers, letters
or characters
Using the Number Keypad
To complete some tasks you will need to
enter names and numbers. For example,
when you set up your machine; and for
setting up Speed Dial numbers.
Entering Alphanumeric Characters
When prompted to enter a letter, locate
1
the button labeled with the character you
want. Press the button repeatedly until
the correct letter appears in the display.
For example, to enter the letter O,
press (labeled MNO).
Each time you press the display shows
a different letter, first M, then N and O,
and finally 6.
You can enter special characters (space,
plus sign, etc.). See
Assignments
.
1
Keypad Character
1
.6
6 M > N > O > 6
7 P > Q > R > S > 7
8 T > U > V > 8
9 W > X > Y > Z > 9
0 + > - > , > . > ’ > / >
* > # > & > 0
User Guide
To enter additional letters, repeat Step 1.
2
If the next letter is printed on the same
button, move the cursor by pressing
Right arrow
labeled with the letter you want.
The cursor moves right and the next
letter appears in the display.
When you finish entering letters,
, then press the button
3
press
Start
Page 15

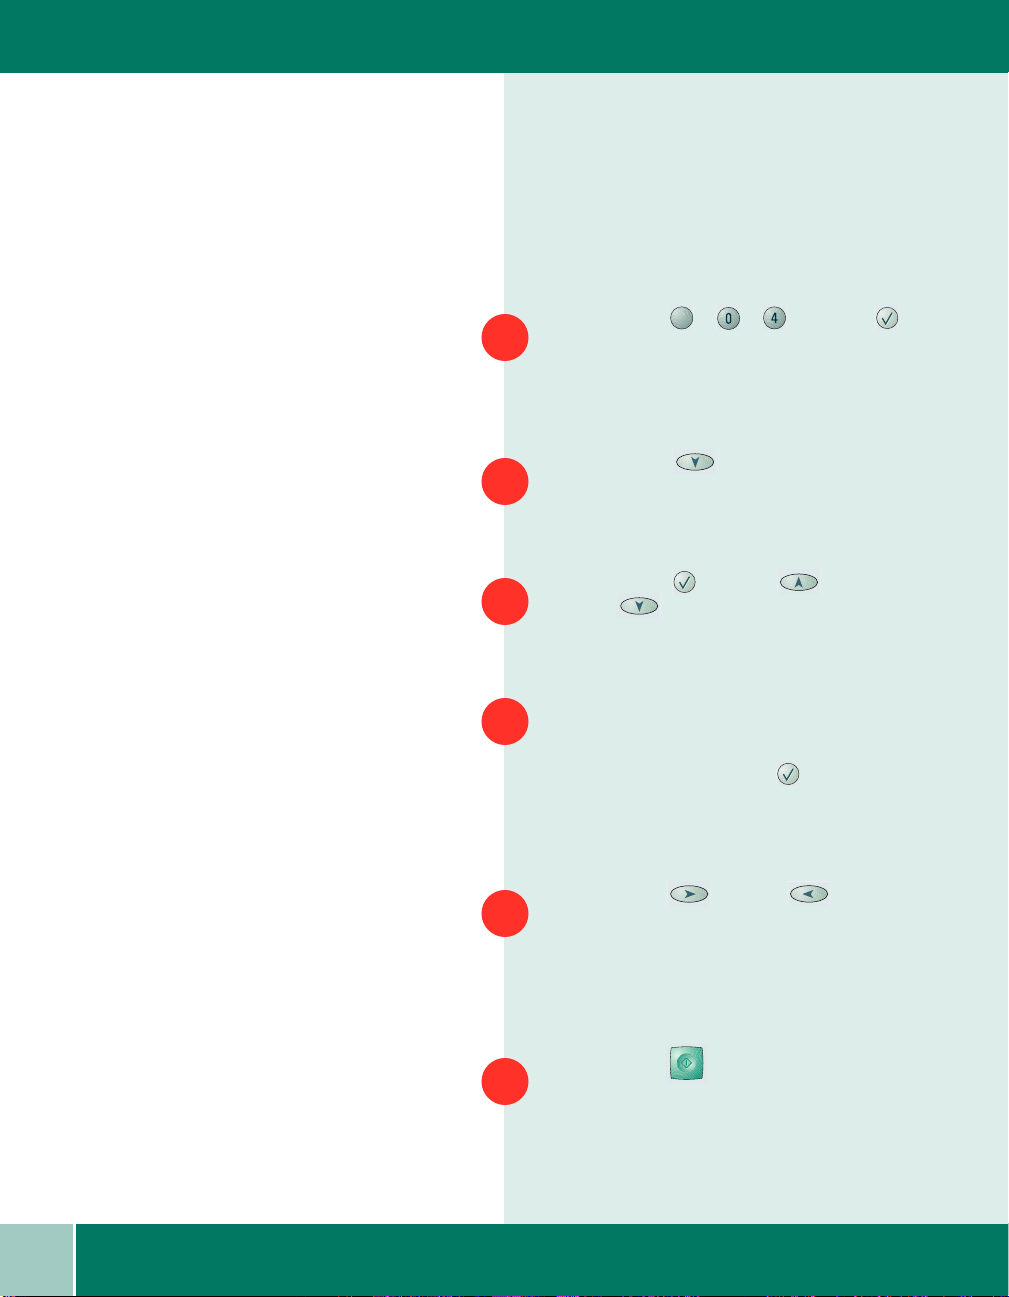
EDITING NUMBERS OR NAMES
Editing Numbers or Names
If you make a mistake, move the cursor
under the wrong character by pressing
Left
number to change or press
Stop
Inserting a Pause
With some telephone systems, you must
dial an access code (9 for example) and
listen for a second dial tone. In such
cases, you must insert a pause in the
telephone number. You can insert a
pause when you are setting up a Speed
Dial Number.
or
Right
to delete the character.
Press the correct
Clear/
To insert a pause, press
at the appropriate place while entering
the telephone number. A “P” will appear
in the display at the corresponding
location.
Pause/Redial
1
User Guide
1
.7
Page 16

USING THE XK50CX MENU
Using the XK50cx Men
Your WorkCentre XK50cx has various
pre-set features you can change using the
Menu. This section covers:
• System Data Options
• System ID
• Date and Time
• Clock Mode
• System Setup Options
• Ringer Volume
• Speaker Volume
• Default Settings
• Menu Clear
• Maintenance Options
• Reports
Fax options are described in Chapter
Three, Sending a Fax, and Chapter Four,
Receiving a Fax.
u
1
.8
User Guide
Page 17

MENU OPTIONS
Menu Options
Your WorkCentre XK50cx has various
preset features which you can change.
This section describes all XK50cx menu
options except for Faxing, which is
described in later chapters and in the
Electronic User Guide.
Reviewing System Data Options
You can review the current System Data
Option settings by printing a System Data
report:
Press
Menu
+ + +
Select
1
Press
Right
SYSTEM DATA appears in the display.
Press Start
or
Left
until
1
2
3
User Guide
1
.9
Page 18

REVIEWING SYSTEM DATA OPTIONS
Setting a System Data Option
System Data options are listed on the
following page. To change a System Data
option:
Press Menu + + + Select
1
Scroll through the options by pressing
2
Down or Up repeatedly.
When the option you want appears in the
3
display, enter the number for the desired
setting.
1.10
User Guide
Press Start to store your choice in
4
memory.
You can exit from the System Data setup
mode at any time and return to normal
operation by pressing Clear/Stop
Page 19

SYSTEM DATA OPTIONS
1
System Data Options
Option Description
PAPER SIZE The paper size - Letter, A4, or Legal.
MESSAGE CONFIRM A report showing whether the transmission was successful, how
many pages were sent, and more. Options are ON, OFF or ERR
(prints only when a transmission is not successful).
AUTO JOURNAL A report with detailed information about the previous 40
communications operations, including time and dates. Optional
settings are ON or OFF.
REMOTE RCV CODE The remote receive code allows you to initiate fax reception from
an extension phone plugged into the XK50cx EXT jack. If you pick
up the extension phone and hear fax tones, enter the Remote Code
and press Start. The Remote Code is preset to *9* at the factory.
Settings range from 0 to 9.
1
DIAL MODE The type of telephone dial system on your telephone, either tone
(Touch Tone) or pulse (Rotary).
ECM MODE Error Correction Mode compensates for poor line quality. Options
are ON or OFF. If the line quality is poor, transmission time may be
increased when ECM is enabled.
RX REDUCTION When receiving a document as long or longer than the paper
installed in your machine, the machine can reduce the size of the
document to fit the paper size in the XK50cx. Use this feature if you
want to automatically reduce an incoming page. If the XK50cx
cannot reduce the document to fit onto one page, the document is
divided and printed in actual size on two or more pages. With
VERTICAL ONLY RX reduction enabled, the XK50cx reduces an
incoming document along the vertical axis only.
User Guide
1.11
Page 20

SYSTEM DATA OPTIONS
Option Description
DISCARD SIZE When receiving a document as long or longer than the paper
installed in your machine, you can set the fax machine to discard
any excess at the bottom of the page. If the received page is outside
the margin you set, it will print on two sheets of paper at the actual
size.
If the document is within the margin, and the Auto Reduction
feature is turned ON, it will be reduced to fit into the appropriate
size paper (Discard does occur). If the Auto Reduction feature is
turned OFF or fails, the data within the margin will be discarded.
Settings range from 0 to 30 mm.
REDIAL INTERVAL The XK50cx can automatically redial a remote fax machine if it
was busy. Intervals from 1 to 15 minutes can be entered.
REDIALS Specifies the number of redial attempts (from 0 to 9) the XK50cx
will attempt.
1.12
ANSWER ON RINGS Specifies the number of times the XK50cx rings (1 - 7) before
answering an incoming call.
SEND FROM MEMORY When enabled, all fax transmission documents are automatically
scanned into memory. It will not be necessary to wait until
documents in the Automatic Document Feeder are sent before you
can send or store other fax jobs.
LOCAL ID When enabled, the XK50cx automatically prints the page number
and date and time of reception at the bottom of each page of a
received document.
CONT POLL REPORT You can configure your WorkCentre XK50cx to automatically poll
and retrieve faxes from unattended fax machines. When enabled, a
multi-communication report is printed every time continuous
polling ends. The report will contain the results for each registered
station. Set to ON or OFF.
User Guide
Page 21

SYSTEM DATA OPTIONS
Option Description
FAX PRINT QUALITY Specifies the print quality of incoming faxes, Letter Quality (LQ) or
Draft.
CLOCK MODE Specifies 12 or 24 hour time display.
DRPD MODE LEARN Distinctive Ring Pattern Detection Mode Learn enables your
machine to "learn" a ring pattern you designate to be answered as
a fax. Useful when a single telephone line is used to answer several
different telephone numbers with different ringing patterns. Turn
ON or OFF. Not available in all locations (when activated).
USB MODE USB mode selections are 1.Fast and 2.Slow. Fast is the default
mode. Some PC users may experience poor USB implementation in
the default mode. If this occurs, select the 2.Slow mode in order to
achieve successful results.
1
User Guide
1.13
Page 22

SYSTEM ID
System ID
In some countries you are required by
law to indicate your fax number on any
fax you send. The System ID, containing
your telephone number and name (or
company name), will be printed at the top
of each page sent from your machine.
Press Fax
1
1
Press Menu + + + Select
2
Enter your fax telephone number and
3
press Select
1.14
Note: If there is a number previously
registered, it appears in the display.
User Guide
Enter your name or company name by
4
pressing the numeric keypad buttons
until the letter you want appears in the
LCD display. Move from letter to letter by
pressing Right or Left
Press Start
5
Page 23

DATE AND TIME
Date and Time
If you are setting up the machine for the
first time, or if the machine has not been
operated for an extended period of time,
SET DATE AND TIME, and PRESS START
will appear on the LCD display.
Press Menu + + + Select
A flashing cursor prompts you to enter the
date. Use the keypad to enter the current
date and time using either a MMDDYYYY
or DDMMYYYY date format. If you make a
mistake, use Right or Left to
manually move the cursor to a digit you
wish to change. Use Up and
Down to select AM or PM.
Press Start
1
2
1
3
User Guide
1.15
Page 24

DATE AND TIME
Setting the Clock Mode
You can configure your machine to
display time using either a 12 hour or 24
hour format.
Press Menu + Select
1
Press Up 3 times. CLOCK MODE
2
appears in the LCD display.
Press Right until either 12 hour or
3
24 hour mode is selected.
1.16
Press Start
4
User Guide
Page 25

SYSTEM SETUP
System Setup
Through the System Setup menu on the
LCD panel, you can change the following:
• Ringer Volume (Off, Low, Medium,
High)
• Default settings for the following:
• Quality: sets the default resolution
to Draft, Normal, or Best.
• Lighten/darken: sets the default
image contrast to darken, normal,
lighten, fax photo.
• Reduce/Enlarge: sets the printed
image size. Default is 100%.
Enter a smaller value to reduce
(25%-99%), or a larger value to
enlarge (101% - 400%). You can
also select Autofit (automatically
fits the image to the paper size) or
Clone (fits multiple copies on
one sheet).
• Color/B&W: sets default printing
mode to either Color or B&W
(black and white)
• Paper type: sets the default paper
type to: Premium, Glossy,
Transparency, Plain.
• Wake-up Mode: Copy Mode. This
is an automatic setting and can not
be changed by the user.
Note: Whenever a document is sent or
copied the default contrast and resolution
mode will be activated unless otherwise
changed by using the Quality or Lighten/
Darken button on the control panel.
1
• Sound control (Alarm Sound or
Key Press Sound can be turned Off
or On)
• LCD panel language (English or
French)
User Guide
1.17
Page 26

SYSTEM SETUP
Setting Ringer Volume, Sound
Control and Language
To set the Ringer Volume, Sound Control
or Language, perform the following steps:
Press Menu + + + Select
1
Press Up or Down until the
2
desired option appears.
Press Select
3
1.18
User Guide
Press Right or Left to display
4
the setting options for the feature you
have selected.
Press Start
5
Page 27

Adjusting Speaker Volume
SYSTEM SETUP
Press On-Hook Dial to adjust the
speaker volume. If you cannot hear a dial
tone, check the phone connection.
Press Up or Down until the
desired volume level 1 - 4 is displayed.
Press On-Hook Dial to return to
standby mode.
1
2
3
1
User Guide
1.19
Page 28
SYSTEM SETUP
Changing the Default Settings
To display or change default printer
settings:
Press Menu + + + Select
1
The LCD display indicates RINGER
VOLUME.
Press Down DEFAULT
2
SETTINGS? appears in the LCD display.
Press Select Use Up or
3
Down to scroll through the options.
1.20
User Guide
To display or change any current setting
4
for any of the five menu options, choose a
feature (the selected item number will
blink) and press Select The default
setting for your selection will be
displayed.
Press Right or Left to display
5
the setting options for the feature you
have selected. Use the number keypad to
enter any numbered setting.
Press Start once you have selected
6
your preferred default setting options.
Page 29

MEMORY CLEAR
Memory Clear
You can clear the following XK50cx
memory stores:
• System ID
• System Data
• Phonebook and Schedule Job
• Transmit and Receive Journal
Fax Menu Options
Menus 6 through 11 are used to set
various fax options, and are described in
Chapter Three.
• Delay Send
• Memory Send
• Priority Send
• Polling
• Add/Cancel
• Group Dial
Maintenance
See Chapter Six for a complete
description of maintenance options.
1
User Guide
1.21
Page 30

RECEIVE MODE
Receive Mode
The XK50cx is set to automatically
answer incoming calls. See Chapter Four,
Receiving a Fax, for information on other
receive modes.
Reports
Your XK50cx can print reports or lists
containing useful information such as
System Data or Scheduled Jobs.
To Print Reports/Lists
Press Menu + + + Select
1
1.22
User Guide
Press Right until the desired report
2
appears in the LCD.
Press Start to print the report.
3
The following reports are available:
MSG. CONFIRM
Contains information about faxes sent.
TX JOURNAL
Details fax transmission activities.
RX JOURNAL
Contains details on faxes received.
Page 31

COLLATE
PHONE BOOK
Lists Speed Dial and Group Dial numbers.
SYSTEM DATA
A report containing the current settings of
all user selectable options.
SCHEDULE JOB
Provides information about documents
stored for Delayed Send, Priority Send,
Memory Send, TX Polling, and
Continuous Polling.
HELP LIST
Lists basic machine functions and
commands.
Collate
See Chapter Two for a complete
description of Collating.
1
User Guide
1.23
Page 32

LOADING PAPER
Loading Paper
For best results, use high quality
Xerographic copy paper or inkjet paper.
Using the Automatic Paper Feeder
Paper Guide
Extension
Tray
Automatic Paper
Feeder
Note: If you experience problems feeding
paper, place the media into the Paper Feeder
one sheet at a time.
Note: If envelopes jam while printing, try
reducing the number of envelopes in the
Automatic Paper Feeder.
You can stack paper, envelopes, card
stock, labels, or transparencies in the
Automatic Paper Feeder to feed
automatically. The Automatic Paper
Feeder can hold a maximum of 100 sheets
of 20 lb plain paper, or 10 envelopes or
other print media. Depending upon
media thickness, maximum capacity may
be reduced.
Pull the Extension Tray on the Automatic
1
Paper Feeder all the way up.
Prepare the print material for loading by
2
flexing paper or fanning envelopes. Do
not fold or crease the paper.
For transparencies, be sure to use
transparency stock approved for use with
inkjet printers. Refer to the packaging for
the transparency stock to determine the
print side. Hold the transparencies by the
edges and avoid touching the print side.
Be careful not to scratch or leave
fingerprints on the print side.
1.24
User Guide
Fan the stack of transparencies to prevent
3
feeding failures.
Page 33

LOADING PAPER
Load the print material in the Automatic
Paper Feeder. Ensure that the right edge
of the media is in contact with the right
side of the Automatic Paper Feeder. Do
not exceed the rated capacity. Do not mix
different types of print media.
Load paper or transparencies with the
print side facing you.
Load letterhead paper with the design
side face-up. The top edge of the sheet
with the logo should enter the printer
first.
4
While squeezing the tab on the Paper
Guide, move the guide to the right. Slide
the paper guide until it lightly touches the
side of the stack of print media. Do not
press the paper guide too tightly to the
edge of the print media; the guide may
bend the media or provide too much
resistance when feeding.
5
Note: When you print a file from your PC
using the Automatic Paper Feeder, make
sure that you select the source and the
correct paper size from your software
application before starting your print job.
1
User Guide
1.25
Page 34

LOADING ENVELOPES
Loading Envelopes
Note: Do not feed stamped envelopes.
Note: Never use envelopes with clasps,
snaps, windows, coated linings, or
self-adhesive seals. These envelopes may
severely damage the printer.
Automatic
Document Feeder
Automatic
Paper Feeder
Load envelopes with the address side
facing up. The end of the envelope where
the stamp will later be placed must enter
the Automatic Paper Feeder last.
The right edge of the envelope must align
with the right edge of Automatic Paper
Feeder. Squeeze the Paper Guide and
move it to the right until it lightly touches
the envelope.
Using the Automatic Document
Feeder
Use the Automatic Document Feeder
(ADF) to feed up to 30 documents (face
up) into the XK50cx at any one time.
Adjust the document guide on the ADF to
1
match the width of the document.
1.26
User Guide
Insert the media until DOCUMENT
2
READY appears in the display.
Press Start
3
The media will then feed into the
machine.
Page 35

PAPER SELECTION
Paper Selection
One of the most important things you can
do to assure the best possible printing
performance of your machine is to select
the correct paper. Your machine produces
letter quality print on most plain bond
papers, including cotton bond and
photocopying papers; it does not require
special ink jet papers. However, the print
quality varies with different paper types.
Be sure to test a type of paper before you
purchase a large quantity.
1
User Guide
1.27
Page 36

PAPER TYPES
Paper Types
Option Description
Plain Paper The machine supports paper sizes of letter, legal, and A4 in portrait
orientation. You can use regular copier paper, cotton bond papers, and
typical letterhead. Always use paper without curls, folds, staples, or
damaged edges.
Inkjet Paper Paper developed specifically for printing with inkjet printers.
Coated Paper Paper developed for high quality printing with minimal or no smearing
or running when in contact with water or damp surfaces.
Glossy Paper A high gloss, thicker paper that produces the look and feel of a
photograph. Use this paper to produce photo-realistic prints from your
printer.
Transparencies Your transparencies should be products designed for use in Ink Jet
products, with excellent contrast, sharpness, and color quality. The
transparency is placed in the machine with the image side up.
Iron-on Transfers Use inkjet T-shirt transfers to create and personalize T-shirts,
sweatshirts, aprons, tablecloths, napkins, tote bags, and anything else
your imagination allows! Use on any cotton or cotton/poly blend fabric.
Your image is printed in mirror image so when you iron it onto the
T-shirt, the image is viewed correctly.
1
1.28
Card Stock You can create greeting cards, business cards, invitations,
announcements, and more.
Labels Use Label products designed for use with Ink Jet products. Label stock
can be 8-1/2 x 11 or A4 size material.
User Guide
Page 37

PAPER GUIDELINES
Paper Guidelines
When selecting or loading paper,
envelopes, or other special media, keep
these guidelines in mind:
• Attempting to print on damp, curled,
wrinkled, or torn paper can cause
paper jams and poor print quality.
• Use only high quality inkjet or copier
grade paper. Avoid paper with
embossed lettering, perforations, or
texture that is too smooth or too
rough.
• Store paper in its ream wrapper until
ready to use. Place cartons on pallets
or shelves, not on the floor. Do not
place heavy objects on top of the
paper, whether it is packaged or
unpackaged. Keep it away from
moisture, or other conditions that can
cause it to wrinkle or curl.
• During storage, moisture-proof wrap
(any plastic container or bag) should
be used to prevent dust and moisture
from contaminating your paper.
1
1
• Always use paper and other media
that conform with those listed under
Specifications in Appendix A.
• Use only well-constructed envelopes
with sharp, well creased folds.
• DO NOT use envelopes with clasps
and snaps.
• DO NOT use envelopes with
windows, coated linings, selfadhesive seals, or other synthetic
materials.
User Guide
1.29
Page 38

GUIDELINES FOR SPECIAL MEDIA
• DO NOT use damaged or poorly
made envelopes.
Guidelines for Special Media
Be sure to read any instructions that come
with your special paper. These
instructions provide important
information regarding how to achieve the
highest print quality with these papers.
• It is recommended that you feed
special paper types one sheet at a
time.
• For transparencies and glossy photo
paper, follow these guidelines:
• Let the printed sheets dry completely
before storing them.
• When a printed sheet has dried
completely, cover the printed side
with a sheet of plain (not coated)
paper before storing it; this is
recommended even if you place the
sheets in a clear file or plastic holder.
• Do not leave the film in the paper
tray for long periods of time. Dust
and dirt may accumulate on the film
resulting in spotty printing.
1.30
• To avoid smudging caused by
fingerprints, handle transparency
film and coated paper carefully.
• To avoid fading, do not expose the
printed film to prolonged sunlight.
• Store unused media flat. Do not
remove papers from their protective
packaging until you are ready to
use them.
User Guide
Page 39

GUIDELINES FOR SPECIAL MEDIA
• Store unused media at temperatures
between 59 and 86 degrees
Fahrenheit (15 to 30 degrees
Centigrade). The relative humidity
should be between 10% and 70%.
• If the print density of your page is
very high, light paper stock may curl
slightly due to the large amount of
ink. If you need to print dense
graphics, try printing on heavier
stock.
• Do not use thicker paper than meets
the specifications for this machine.
Printing with a paper that is thick
enough to come in contact with the
print head nozzles may damage the
cartridge.
1
User Guide
1.31
Page 40

1.32
User Guide
Page 41

Chapter Two
This chapter provides basic instructions
for printing and copying documents.
2
THE BASICS: PRINTING
AND COPYING
2
User Guide
2.1
Page 42

COPYING A DOCUMENT
Copying a Document
The WorkCentre XK50cx is a high quality
copier that offers the following features:
• Adjustable Quality and Contrast
• Selectable Paper Type
• Enlarge/Reduce
• Multiple Copies
• Collating
• Black and White/Color Mode
selection
When you make a copy you can use the
Control Panel buttons to change these
settings.
Feed the document to be copied face up
1
into the Automatic Document Feeder
using light forward pressure until
DOCUMENT READY appears in the LCD
display.
Or
Place a single document on the flatbed
scanner face down with the edges aligned
to the green guides on the scanner.
Adjust any settings as desired using the
2
buttons on the Control Panel.
Enter the number of copies you would
3
like to make using the number keypad.
2.2
User Guide
Page 43

SPECIAL COPY FEATURES
Press Start to begin copying.
Special Copy Features
You can set the following special features
by pressing Reduce/Enlarge on the
Control Panel:
• Press Reduce/Enlarge until
CLONE appears in the LCD. This
prints multiple image copies on a
single page. The number of images is
determined by the original image
size.
• Press Reduce/Enlarge until
AUTO-FIT appears in the LCD. This
automatically reduces or enlarges the
original image to fit on the paper.
4
• Press Reduce/Enlarge then press
Left or Right to set the
percent from 25% to 400%.
After making one of these special copy
feature selections, you can begin copying.
2
User Guide
2.3
Page 44

COLLATING
Collating
When on, the machine sorts the copy job.
For example 2 copies of a 3 page job will
print one complete document followed
by the second complete document.
(eg. 1,2,3 then 1,2,3)
To set collating:
Press Menu + + + Select
1
Press Right or Left to set
2
collating to OFF or ON.
3
Press Start
2.4
User Guide
Page 45

PRINTING
Printing
You can use the XK50cx with all Windows
programs. Be sure to set the XK50cx as
the default printer for all your Windows
95/98, Windows 2000, or Windows NT 4.0
operations.
Most Windows software programs allow
you to make changes to the printer
settings. This includes settings that
determine how a print job looks, such as
page size, paper orientation (landscape
or portrait), and margins.
Note: Printer Properties dialog box buttons
and options include:
OK: click when you have finished making
changes.
Cancel: click if you want to exit without
making any changes.
Help: click to view online help about printer
settings.
The following steps describe the typical
process to print from a Windows
environment:
Make sure the XK50cx is properly
connected to your computer, and that you
have installed the XK50cx software. See
the Install Guide for details.
From your Windows software program,
choose Print or Print Setup from the File
menu. Make sure the WorkCentre
XK50cx is the selected printer. Click on
the Properties or Setup button if you
want to make any adjustments that are
appropriate for printing your document.
"?": click to activate the context-sensitive
help. Position the ? cursor over the setting in
question, and click to see a pop-up window
explanation.
Defaults: click to reset all settings to the
1
default value.
About: click to view the software version
and creation date.
2
2
User Guide
2.5
Page 46

PRINTER SETTINGS
Click on OK to close the Properties
3
dialog box.
After making any necessary changes to
4
the printing parameters, click on OK to
start the print job.
Printer Settings
For information about Windows 95/98
and NT4.0/2000 Printer Settings, see the
Electronic User Guide.
Control Program
For information about the WorkCentre
XK50cx Control Program, please see the
the Electronic User Guide.
2.6
User Guide
Page 47

Chapter Three
This chapter explains how to use the
XK50cx to send a fax. Advanced fax
features and procedures are described in
the Electronic User Guide.
You can fax a document by placing it in
the Automatic Document Feeder (ADF)
or directly on the document glass,
pressing Fax and entering the remote
fax number using the control panel.
Or, you can use the machine’s features
such as polling, delayed transmission,
memory transmission, priority
transmission, and group dialing for
advanced fax sending.
3h
SENDING A FAX
3
User Guide
3.1
Page 48

PREPARING DOCUMENTS FOR FAXING
Note: If your document falls into any of these
categories, use the document glass only.
Preparing Documents for Faxing
Use the following guidelines to prepare
your documents for faxing
• Do not attempt to feed the following
types of documents into the
Automatic Document Feeder:
• carbon-paper or carbon-backed
paper
• coated paper
• onion skin or thin paper
• wrinkled or creased paper
• curled or rolled paper
• torn paper
• Remove all staples and paper clips
before feeding the document.
• Make sure any glue, ink or
correction fluid on the paper is
completely dry before loading the
document.
• Do not load documents containing
different sizes or weights of paper.
3.2
User Guide
Page 49

HOW TO SEND A FAX
How to Send a Fax
To fax a document using the Automatic
Document Feeder (ADF):
Adjust the document guide on the ADF to
match the width of the document.
Slide the document face up into the ADF
until DOCUMENT READY appears in the
LCD display.
Press Fax
Use the keypad to dial the number of the
remote fax machine.
1
2
3
4
3
Press Start
5
User Guide
3.3
Page 50

CANCELING A FAX
To fax a document from the document
glass:
Place the document face down on the
1
document glass, and lower the top.
Press Fax
2
Use the keypad to dial the number of the
3
remote fax machine.
3.4
Press Start
4
The document scans into memory. The
display asks if you want to send another
page. Press or When (NO) is
pressed, the fax is sent.
Canceling a Fax
To cancel a fax press Clear/Stop at
any time during the transmission.
User Guide
Page 51

SETTING RESOLUTION AND CONTRAST
Setting Resolution and Contrast
When sending typical text based
documents,the default resolution and
contrast settings produce good results.
However, if you send documents that are
of poor quality, or contain photographs,
you can adjust the resolution and
contrast to ensure a higher quality.
Resolution
Mode Recommended for:
Draft
Normal
Documents with normal
sized characters.
Documents containing
small characters or thin
lines, or for sending
documents printed using
a dot-matrix printer.
Press Quality to increase sharpness
and clarity. The document types
recommended for quality settings are
described in the table on this page.
Best
Note: Best Resolution mode is not available
if the Send From Memory feature is set to
ON. If Send From Memory is set to ON, all
documents will be stored to memory in
Normal mode.
If the XK50cx is set to Best Resolution mode
and the remote fax machine does not
support Best Resolution, the XK50cx will
transmit using the highest resolution mode
supported by the remote fax machine.
Documents containing
extremely fine detail.
Photo mode scanning and
Best modes are enabled
only if the remote
machine also supports
Best resolution. (See the
Note below)
3
User Guide
3.5
Page 52

CONTRAST
Contrast
Mode
Darken
Normal
Lighten
Fax
Photo
Note: You can set the default resolution
and contrast. The default mode will be in
effect when a document is sent or copied
unless you change the setting for an
individual operation. The machine will
automatically revert to default settings
after the operation is completed.
Recommended for:
Documents containing
light print or faint pencil
markings.
Faxing most documents.
Documents containing
dark print.
Photographs or
documents containing
color or shades of gray.
Press Lighten/Darken to
compensate for the brightness or
darkness of your faxed document. By
pressing Lighten/Darken repeatedly
after loading a document, you can
choose between DARKEN, NORMAL,
LIGHTEN, or FAX PHOTO.
3.6
User Guide
Page 53

SENDING A FAX AFTER TALKING
Sending A Fax After Talking
If you have a phone connected to the EXT
jack, you can send a fax after speaking
with a person at the remote site.
When finished talking, instruct the person
at the remote location to start their fax
machine and hang up.
The remote fax machine will send the
initial fax tones.
Press Fax
Wait until you hear the fax tone from the
remote fax machine.
Slide the document into the Automatic
Document Feeder until DOCUMENT
READY appears in the display.
1
2
3
3
4
Press Start and replace your
handset.
5
User Guide
3.7
Page 54

CONFIRMING FAX TRANSMISSION
Confirming Fax Transmission
You can verify that a fax was sent
correctly by printing a Message
Confirmation Report.
Press Menu + + + Select
1
MSG. CONFIRM appears in the LCD
display.
Press Start to print the report.
2
3.8
Advanced Fax Features
See the Electronic User Guide for
advanced fax features and procedures.
User Guide
Page 55

Chapter Four
Your WorkCentre XK50cx, can
automatically answer, receive and print
all incoming faxes.
See the Electronic User Guide for
advanced fax features and procedures.
4
RECEIVING A FAX
4
User Guide
4.1
Page 56

RECEIVE MODES
Note: During PC file printing, an
incoming fax will be received and stored
in memory.
Receive Modes
You can configure your machine to FAX,
TEL or ANS/FAX mode.
Press Menu + + + Select
1
Press Right or Left to display
2
the following Receive Mode options:
• FAX: The machine answers an
incoming call and immediately goes
into fax receive mode.
4.2
• TEL: In TEL mode, automatic fax
answering and reception is turned
off. To receive a fax manually, pick
up the external phone handset or
press OHD to accept the call and
then press Start
• ANS/FAX: Use if attaching an
answering machine to the to the
XK50cx. If the XK50cx senses a fax
tone, it automatically switches to
FAX mode.
User Guide
Page 57

RECEIVE MODES
• DRPD: Distinctive Ring Pattern
Detection is a telephone company
service that allows you to use a single
telephone line to answer many
different telephone numbers. The
calling number is identified by a
distinctive ringing pattern consisting
of various combinations of long and
short rings.
Note: DRPD only appears as a menu
option if t has been set up (if a number has
been "learned"). See System Data Options
in Chapter One.
Press
Receiving Manually in TEL Mode
If you have an external phone connected
to the EXT jack, you can answer voice
phone calls and receive faxes manually.
Answer an incoming call by picking up
the external phone.
If you hear a fax tone, or if the person
calling asks you to receive a fax,
press Start
You may also press the characters
+ + on the telehone to initiate
reception.
Replace the external phone handset. The
machine begins receiving and returns to
Standby mode when reception is
complete.
3
Note: The characters * 9 * (star-nine-star)
are preset at the factory as the default
remote receive start code for machines
operated with a telephone connected to the
1
EXT jack. The asterisks in the code are fixed
characters, but the number can be changed.
See System Data Options in Chapter One.
2
3
4
User Guide
4.3
Page 58

ADJUSTING RINGER VOLUME
Note: To change the number of rings
before the machine answers an incoming
call, see System Data Options in Chapter
One.
Adjusting Ringer Volume
You can adjust the ringer volume to
LOW, MED, HIGH or OFF.
Press Menu + + + Select
1
RINGER VOLUME ? displays.
Use Up or Down to set the
2
ringer volume.
4.4
Press Clear/Stop to accept and exit.
3
User Guide
Page 59

ADVANCED FAX FEATURES
Advanced Fax Features
See the Electronic User Guide for
advanced fax features and procedures.
User Guide
4
4.5
Page 60

4.6
User Guide
Page 61

Chapter Five
Your WorkCentre XK50cx is equipped
with a True Color Quality Scanner
capable of reproducing color charts,
photographs, graphics or printed text.
These images can be copied or scanned
directly into your PC workstation using
the WorkCentre TWAIN Scanner
Program, and edited with the Pagis Pro
software included with your XK50cx.
5
HOW TO SCAN PHOTOS
AND DOCUMENTS
Note: TWAIN provides compatibility across
an array of scanning software applications
(such as the TWAIN Scanner program) and
scanners (such as the XK50cx, a TWAIN
compliant scanner).
5
User Guide
5.1
Page 62

EASY SCANNING
Note: To use this function, the XK50cx must
be connected to your PC with a USB cable.
The WorkCentre TWAIN Scanner Program
The WorkCentre TWAIN Scanner
program is used to scan documents and
photographs. You can decide what
portion of a document you want to scan,
adjust the brightness and contrast, color
balance, resolution, and many other
advanced scanner settings.
These settings are fully described in the
Scanner Program’s Help.
Easy Scanning
To use the XK50cx Scan Button on the
Control Panel:
Load the document face up into the
1
Automatic Document Feeder
(DOCUMENT READY appears in the
LCD) or place the document face down on
the document glass.
5.2
User Guide
Make sure the Scan to PC program is
2
running. Click the Windows Start button
then select Programs ➔
WorkCentre XK50cx ➔ Scan to PC.
Use the Control Panel buttons to
3
adjust Quality, Lighten/Darken, or
Color/B&W settings to suit your
requirements.
Press Scan on the XK50cx.
Xerox
4
Page 63

EASY SCANNING
CONNECTING... appears on the LCD
display as the XK50cx connects to the PC.
Next, the XK50cx scans the document.
PC-SCANNING appears in the LCD
display, and the scanned image appears in
Microsoft Paint.
If you would like to configure Pagis Pro or
another program as the default scanning
application, run the Scan to PC
application.
Double click the Scan to PC icon in the
Windows Taskbar (typically in the lower
right hand corner of your screen).
Click the Add Application button, and
specify the desired application. Click OK
when done.
For other Scan to PC options, click the
Scan to PC Preference tab. For more
information about scanning, please see
the Pagis Pro User Guide and the Xerox
WorkCentre TWAIN Scanner program
Help.
For additional instructions, refer to the
Pagis Pro User Guide.
5
6
7
Note: To open the User Guide, click the
Windows Start button, then Programs
Pagis Pro3.0➔Documentation➔User Guide.
5
➔
User Guide
5.3
Page 64

ADVANCED SCANNING
Advanced Scanning
Note: If you are using another scanning
application, refer to the documentation
provided by the manufacturer.
Note: Note: You can also place a document
in the Automatic Document Feeder.
This topic covers advanced scanning with
Pagis Pro.
Place a single document or photograph
1
face down on the document glass with the
edges aligned to the green guides on the
scanner.
Start Pagis Pro on your PC. Click the
2
Windows Start button, then Programs➔
Pagis Pro 3.0 ➔Pagis.
From the Pagis inbox, click the Scan
3
button (at the top of the Inbox screen).
The Pagis Scan Tool - Scanner displays.
The Pagis Scan Tool opens to the
Scanner tab.
The Scanner Setup Wizard opens
4
automatically. Follow the onscreen
instructions to select Xerox WorkCentre
XK50cx as the Scanning Source.
5.4
Note: To open the User Guide, click the
Windows Start button, then Programs
Pagis Pro3.0➔Documentation➔User Guide.
User Guide
➔
Click Finished when done to redisplay
5
the Pagis Scan Tool.
Click the Pagis Scan tool Prescan button.
6
This will perform a preliminary scan and
display the WorkCentre TWAIN Scanner
program.
For additional instructions, refer to the
Pagis Pro User Guide.
Page 65

Chapter Six
This section describes maintenance
procedures for:
• Cleaning the Automatic Document
Feeder and document glass
• Maintaining Ink Cartridges
6m
MAINTAINING YOUR
XK50cx
6
User Guide
6.1
Page 66

CLEANING THE XK50CX
Cleaning the XK50cx
Automatic
Document
Feeder
Document Glass
To keep your machine working properly,
the Automatic Document Feeder and
Document Glass must be cleaned
periodically. If they are dirty, copies and
documents sent to another fax machine
may not be clear.
Power off the WorkCentre XK50cx by
1
unplugging it from the wall outlet.
Lift the Automatic Document Feeder
2
gently on the Panel Cover assembly. The
Automatic Document Feeder will raise
and click into position.
Carefully lift the Automatic Document
3
Feeder to expose the rollers.
6.2
User Guide
Wipe all roller surfaces with a soft cloth
4
dampened with water.
Page 67

MAINTAINING INK CARTRIDGES
Clean the document glass with a soft cloth
and glass cleaner. Do not spray the
cleaner directly onto the document glass.
Always spray the cleaner onto the cloth.
5
Caution: Never spray liquid directly onto
the document glass. Spray liquid onto the
cloth first.
Close the Automatic Document Feeder
Top Cover firmly until it clicks into place.
Maintaining Ink Cartridges
To get the maximum benefit from your
ink cartridges:
• Do not remove an ink cartridge from
its packaging until you are ready to
install it.
• Do not refill the ink cartridge. The
warranty will not cover damage
caused by using refilled cartridges.
• Store the ink cartridge in the same
environment as the printer.
• Do not remove an ink cartridge from
the printer except to replace it.
Immediately replace the ink
cartridge. The ink cartridge will not
print correctly if removed from the
machine and left exposed for an
extended period.
6
• Do not swap the color cartridge with
the black cartridge. The color
cartridge should be installed in the
Left carrier and the black cartridge
should be installed in the Right
carrier.
User Guide
6
6.3
Page 68

MAINTAINING INK CARTRIDGES
• If you have an opened ink cartridge
you are not currently using and do
not have an available print cartridge
storage unit, store it in an airtight
plastic bag. Do not leave it exposed to
the air for an extended period; this
promotes drying out and clogging of
the print nozzles.
Print Cartridge Clean Head Process
You should test the print cartridge when
the print is not clear or image
information is missing. The problem
may be caused by blocked nozzles on the
ink cartridge.
The Clean Head process cleans the ink
cartridge by purging the nozzles. Then it
prints a test so you can see the results.
Use the Clean Head process:
6.4
• When you suspect the nozzles are
clogged.
• When characters are not printing
completely.
To run the Clean Head process from the
PC, select Clean Print Nozzles.
User Guide
Page 69

MAINTAINING INK CARTRIDGES
Cleaning the Print Heads
The Clean Head process cleans the print
nozzles and removes any deposits that
may impair printing functions.
To clean the heads:
Press Menu + + + Select
The LCD display indicates SELF TEST ?
Press Up CLEAN HEAD ? appears in
the LCD display.
Press Start
PRINTING... appears on the LCD display.
The WorkCentre XK50cx prints a head
cleaning test pattern. Notice the series of
diagonal lines across the top and bottom
of the test pattern. Breaks within a line of
the same color indicate a clogged nozzle.
Try running the Clean Head process
again if you see breaks in the diagonal
lines.
1
2
333
6
User Guide
6.5
Page 70

MAINTAINING INK CARTRIDGES
Wiping the Ink Cartridge Nozzles and
Contacts
If print quality does not improve after
repeating the Clean Head process, the
problem may be caused by dried ink on
the ink cartridge nozzles or contacts.
To clean the nozzles and contacts:
Remove the ink cartridge. See Installing
1
Ink Cartridges later in this section
Use a clean, lint free cloth, dampened
2
with water only, to gently clean the entire
copper colored area, including the
nozzles and contacts. To dissolve any
dried ink, hold the damp cloth against the
nozzles for about three seconds. Gently
blot and wipe dry.
6.6
User Guide
If you are cleaning a color ink cartridge,
be especially careful to wipe the nozzles
in only one direction so the colors do not
mix.
Allow the copper-colored area to dry,
3
then reinstall the ink cartridge and repeat
the Clean Head process.
If print quality still has not improved,
replace the ink cartridge.
Page 71

MAINTAINING INK CARTRIDGES
Installing Ink Cartridges
The WorkCentre XK50cx is a dual
cartridge Inkjet printer. You must use a
black and a color ink cartridge.
For the following Xerox print cartridges,
please contact your nearest Xerox dealer:
• Hi capacity ink cartridge (8R7881)
• Color Print Cartridge (8R12591)
When you notice the print becomes light
or INK LOW appears in the display,
replace the apporopriate cartridge(s).
The Ink Cartridge includes the ink supply
and the print head. Each time you replace
the ink cartridge you are replacing the
print head as well.
To install Ink Cartridges:
Lift the Scanner Module until the spring
loaded support arm raises and fully
supports the Module.
The Cartridge Carrier will automatically
move to the access docking position.
Locate the Ink Cartridge holder inside the
printer. The Black Ink Cartridge holder is
located on the right side of the Cartridge
Carrier Assembly and the Color Ink
Cartridge is located on the left side of the
Carrier Assembly.
1
2
6
User Guide
6.7
Page 72

MAINTAINING INK CARTRIDGES
Remove the old cartridge(s) by pulling
13
the top toward you until there is a click.
Remove the cartridge(s) from the Carrier.
Carefully unwrap the new Ink
4
Cartridge(s) and remove the sealing tape.
Slowly pull straight out on the tab located
at the end of the Ink Cartridge.
Electrical Contacts
Note: Avoid touching the electrical
contacts on the cartridge.
Ensure that there are no pieces of tape
remaining on the cartridge.
Slide the new Ink Cartridge down into the
5
holder and push it forward until it clicks
into place.
Lower the Scanner Module support arm
6
and Module to the closed position.
CARTRIDGE CHANGED? appears in the
display.
Press Select
7
6.8
User Guide
Page 73

MAINTAINING INK CARTRIDGES
Press Down and choose from LEFT,
RIGHT or BOTH. Press Select when
your choice appears in the display.
The display prompts you to confirm
RIGHT CARTRIDGE? NEW BLACK and/or
LEFT CARTRIDGE? NEW COLOR.
8
Press Select to confirm your choice(s).
OR
If you have returned an old cartridge to
the Carrier, press Right and
Select .The machine returns to READY
TO COPY mode without printing an
Alignment Test Pattern.
If you installed a new cartridge, the
machine prints a Cartridge Alignment
Test Pattern and CARTRIDGE MAINT.
appears in the LCD display. See Cartridge
Alignment later in this chapter.
9
Caution: Do not power off the machine until
the Cartridge Carrier Assembly has moved
back into the docking position. If no menu
choices are made, the Carrier Assembly will
automatically return to the docking position
after about one minute.
User Guide
6
6.9
Page 74

CARTRIDGE ALIGNMENT
Cartridge Alignment
You should print the cartridge alignment
test if vertical lines or characters appear
crooked. The cartridge alignment test
will straighten the vertical lines.
Arrange Alignment
To align the cartridge using the control
panel of your WorkCentre:
Press Menu + + + Select
1
Press Down
2
ARRANGE ALIGNMENT? appears in
the the display.
6.10
User Guide
Press Select A Cartridge Alignment
3
pattern sheet prints and the Cartridge
Maintenance setup menu appears on the
LCD display. The letter on the right end
of the lower line in the display
corresponds to alignment test pattern A.
The range of numbers in the center of the
display line indicates the range of valid
selection choices. The flashing number
on the left side of the display indicates the
line from print pattern A that is currently
selected as optimal.
Page 75

CARTRIDGE ALIGNMENT
Enter the number of the line which
appears the straightest from pattern A
(example - for the second line, enter 02)
Press Down to confirm your
selection. The setup screen for the
Alignment B test pattern is displayed.
4
Repeat step 4 for Alignment test patterns
B through F.
Press Start to return to normal
operation.
5
6
6
User Guide
6.11
Page 76

6.12
User Guide
Page 77

Chapter Seven
This section describes Troubleshooting
procedures for:
• Document Jams
• Paper Jams While Printing
• Tips for Avoiding paper Jams
• LCD Display Error Messages
For help diagnosing common printer,
print quality, paper feeding and scanning
problems, please see the Electronic
User Guide.
7m
TROUBLESHOOTING
User Guide
7
7.1
Page 78

DOCUMENT JAMS
Document Jams
ADF
Top Cover
ADF Top
Cover Lip
Automatic Document
Feeder (ADF)
If a document jams while it is feeding
through the ADF, DOCUMENT JAM
appears in the LCD display.
Raise the ADF assembly by pulling up
1
lightly on the sides of the assemby until it
clicks into the raised position.
Open the ADF Top Cover by pulling up
2
gently on the Top Cover Lip.
Carefully remove the jammed document.
3
Close the Top Cover and lower the ADF
4
assembly until it clicks into the closed
position.
7.2
User Guide
Page 79

PAPER JAMS WHILE PRINTING
e
Paper Jams While Printing
If paper jams occur, PAPER JAM appears
in the LCD display. Follow the steps
below to clear jam. To avoid tearing
paper, pull the jammed paper out gently
and slowly.
If jammed in the Paper Feed Area at the
rear of the machine:
Remove the stack of paper (if necessary).
Remove the jammed paper by gently
pulling it straight up.
After you remove the jammed paper,
reload the stack of paper back into the
Automatic Paper Feeder with the print
side facing you. Before loading, ensure
the edges of the stack of paper are even
and straight.
Paper Jam
1
2
3
Adjust the paper guide to match the width
of the paper.
If the paper jams as it exits to the printer
exit tray, PAPER JAM will appear on the
display. Remove the jammed paper by
pulling gently on the paper.
4
If there is resistance when you try to pull th
paper out, use gentle, continuous force to
remove it. If the paper does not remove
easily when you pull, stop pulling.
Paper Jam
User Guide
7
7.3
Page 80

TIPS FOR AVOIDING PAPER JAMS
Tips for Avoiding Paper Jams
By carefully selecting print materials and
loading them properly, you should be
able to avoid most paper jams. If jams do
occur, follow the steps outlined in the
previous sections. If jams occur
frequently, make sure that you are
following these tips to avoid jams.
• Make sure you are loading paper
properly (See Chapter 1) and that the
adjustable paper guide is positioned
correctly.
• Do not overload the paper. Never
exceed the maximum capacity of 100
sheets of paper in the Automatic
Paper Feeder.
• Flex, fan, and straighten paper
before loading it.
7.4
• Do not load wrinkled, creased, damp,
highly curled, or previously stapled
paper.
• Do not mix paper types.
• Use only recommended print paper.
• Ensure that the recommended print
side is facing up when loading paper
into the feeder.
• Store print materials in an acceptable
environment. See Paper Guidelines in
Chapter One for paper storage tips.
User Guide
Page 81

LCD DISPLAY ERROR MESSAGES
7
LCD Display Error Messages
LCD Display Meaning Solution
(L) CART. EMPTY
(R) CART. EMPTY
ALL CART. EMPTY
CHANGE BLACK
INK
CHANGE COLOR
INK
DUPLICATED
WITH _ _
RETRY REDIAL? The machine is
The ink cartridge is not
correctly installed in
the machine.
The indicated ink
cartridge is low or out
of ink.
The number entered is
already stored in
another speed dial
location. The two
dashes refer to the
speed dial number you
enter.
waiting for the
programmed interval
to automatically redial
a previously busy
station.
Following the procedure in Installing Ink
Cartridges in the WorkCentre XK50cx
Installation Guide, remove and re-install
the print cartridge.
Install a new ink cartridge.
Check the number and enter under
another location.
You can press the Start button to redial
immediately, or the Clear/Stop
cancel the redial operation.
button to
7
DOCUMENT JAM The document is
jammed in the
Automatic Document
Feeder.
COVER OPEN
CLOSE COVER
The cover is not
securely latched.
Refer to “Clearing Jams” to remove any
jammed paper.
Press down on the cover until it clicks in
place.
User Guide
7.5
Page 82

LCD DISPLAY ERROR MESSAGES
LCD Display Meaning Solution
GROUP NOT
AVAILABLE
B&W ONLY VALID!
GO ON?
MEMORY FULL The machine’s
NO. NOT ASSIGNED The Speed Dial
You have tried to select
a group location where
only a single location
number can be used.
The Group Location
Feature is not
available.
You have tried to store
color or photo mode
documents into
memory, however
there is not enough
memory. The mode is
automatically changed
to give the best results.
memory is full.
location you tried to
use has no number
assigned to it.
No action required
No action required
Delete unnecessary documents.
Retransmit after more memory becomes
available.
Split the transmission into more than one
operation.
Dial the number manually with the
number keypad.
Program the number to a Speed Dial
location and try again.
7.6
NO PAPER The paper feed tray is
User Guide
empty.
If the machine runs out of paper, it will
restart printing when more paper is
loaded.
Page 83

LCD DISPLAY ERROR MESSAGES
LCD Display Meaning Solution
PAPER JAM Paper jammed inside
the unit.
POLLING ERROR The remote FAX
machine you want to
poll is not ready to
respond to your poll.
POLL - CODE
ERROR
SYSTEM ERROR Internal system errors
NO ANSWER Did not detect a fax
LINE BUSY Remote line was busy. Try operation again or at a later time.
When setting up to poll
another FAX machine,
you have used an
incorrect poll code.
detected.
tone after all retry
attempts.
Press the Clear/Stop button and clear the
jam. Refer to Paper Jams in this chapter.
The remote operator should know in
advance that you are polling and have
their FAX unit loaded with the original
document.
Verify and enter the correct poll code.
Look for obvious error conditions. If the
problem persists, power the machine off
and on. Keep in mind that any
documents in memory may be lost.
Check with the remote operator to
ensure the remote machine is working
properly.
7
SEND ERROR
OR
RECEIVE ERROR
CHECK CARTRIDGE An error detected with
UNLOCK SCANNER
THEN PRESS STOP
Errors detected at the
beginning, during or
end of the
transmission.
the ink cartridge.
The scanner lock tab is
in the lock position.
This is normally caused by a poor
telephone line connection. Try the
operation again, or try the operation
from another telephone outlet.
The ink cartridge(s) may not be correct
for the XK50cx. Check and reinstall or
replace cartridge.
Unlock the scanner as described in the
Install Guide.
User Guide
7.7
Page 84

LCD DISPLAY ERROR MESSAGES
7.8
User Guide
Page 85

INDEX
Index
USER GUIDE
This comprehensive index includes the
Install Guide, this User Guide, and the
electronic User Guide. The following
abbreviations are used in this index to
reference these documents:
[IG] = Install guide
[UG] = User Guide
[e-UG] = electronic User Guide
(Located on your CD)
A
adding a document to a
scheduled fax.......................... [e-UG]
adding documents to the job
to be polled.............................. [e-UG]
advanced fax features ............ [e-UG]
adjusting ringer volume .... [UG],4-4
aligning the ink cartridges .... [e-UG]
User Guide
I-1
Page 86

INDEX
alignment, cartridge...........[IG], 1-9
alphanumeric characters,
entering ............................. .[UG], 1-6
ANS/FAX receive mode .....[UG], 4-2
answer on rings .................[UG],1-12
auto journal ....................... [UG],1-11
automatic redial...................... [e-UG]
B
Basic Functions...................[IG], 2-1
basic scanning......................... [e-UG]
being polled by a remote
machine (POLL TX) ............... [e-UG]
black-and-white...................... [e-UG]
C
Canadian certification............ [e-UG]
canceling
a fax.............................. [UG], 3-4
continuous polling........... [e-UG]
scheduled fax ...................[e-UG]
job waiting to be polled... [e-UG]
a scheduled fax ................[e-UG]
cartridge alignment..............[IG], 1-4
checking staus of a fax........... [e-UG]
cleaning
the print heads .......... [UG], 6-5
the print nozzles .............[e-UG]
the XK50cx ................ [UG]. 6-2
color
cartridge ...........................[e-UG]
scanner specifications..... [e-UG]
clock mode ......................... [UG],1-13
collating.............................. [UG], 2-4
component location.......... [UG], 1-2
front view.................... [UG], 1-2
rear and side view...... [UG], 1-5
connect
to a telephone and PC with
a fax/data modem............. [eUG]
to a telephone and a PC
with a modem ..................[e-UG]
to a telephone and an
answering machine .........[e-UG]
to a telephone and
answering machine and
a PC with a modem.......... [e-UG]
connections, making .......... [IG], 1-3
connectivity guidelines,
telephone................................. [e-UG]
control panel ....................... [IG], 1-4
functions .......................[UG], 1-4
Control Program, The
WorkCentre............................. [e-UG]
copying a document ...........[UG[, 2-2
special copy features ...[UG], 2-3
copier specifications...............[e-UG]
D
date and time......................[UG],1-15
default printer settings...... [UG],1-20
delay send................................[e-UG]
dial mode............................ [UG],1-11
dialing speed dial number .....[e-UG]
discard size......................... [UG] 1-12
dpi............................................. [e-UG]
document copying ..............[UG], 2-2
document jams.................... [UG], 7-2
DRPD (Distinctive Ring
Pattern Detection)......[UG], 1-15, 4-3
E
EC certification .......................[e-UG]
ECM (Error Correction)
mode ...................................[UG],1-11
editing numbers or
names.................................. [UG], 1-7
equivalence number,
ringer .......................................[e-UG]
error messages on LCD .....[UG], 7-5
I-2
User Guide
Page 87

INDEX
Europe, Safety and legal
requirements for Xerox .........[e-UG]
F
fax
number, redialing ........... [e-UG]
print quality................. [UG],1-13
problems........................... [e-UG]
receiving a....................[IG], 2-6
receive mode................ [UG], 4-2
transmission,
confirming.................... [UG], 3-8
faxing
canceling ......................[UG], 3-4
confirming fax
transmission................. [UG], 3-8
how to send a fax......... [UG], 3-2
preparing a
document...................... [UG], 3-2
sending a fax ..................[IG], 2-4
sending a fax after
talking........................... [UG], 3-7
setting contrast ............ [UG], 3-6
setting resolution......... [UG], 3-5
FCC regulations ......................[e-UG]
features, menu.................... [UG], 1-8
functions, control panel ..... [UG], 1-4
G
general specification ..............[e-UG]
getting started .......................[IG], 1-1
getting more information.....[IG], 2-8
group dial ................................[e-UG]
group dialing, storing speed
dial numbers for .....................[e-UG]
group number .........................[e-UG]
I
Industry Canada...................... [e-UG]
information, getting more... [IG], 2-8
ink cartridges .......[UG], 6-3, 6-4, 6-5
aligning............................. [e-UG]
alignment......................[UG]6-10
installing .......................[UG], 6-7
part numbers ................[UG], 6-7
wiping nozzles and
contacts .........................[UG], 6-6
introduction ......................[e-UG]
inserting a pause................. [UG], 1-7
installing ink cartridges ...... [IG], 1-6
installing ink cartridges..... [UG], 6-7
installing software ............. [IG], 1-11
K
keypad button assignments[UG], 1-6
L
language, setting................ [UG],1-18
LCD display error
messages ............................[UG], 7-5
legal requirements for Xerox
Europe, Safety and.................. [e-UG]
lists, printing .....................[UG], 1-22
loading envelopes............. [UG], 1-26
loading paper .....................[UG],1-24
automatic document
feeder........................... [UG], 1-26
automatic paper
feeder........................... [UG], 1-24
local ID............................... [UG], 1-12
M
machine,
personalizing your............ [IG], 1-10
machines, remote ...................[e-UG]
maintaining .......................[UG], 6-3
maintenance....................... [UG], 6-5
ink cartridge
alignment.....................[UG],6-10
I-3
User Guide
Page 88

INDEX
ink cartridge
nozzle test ...................[UG], 6-4
ink cartridges............... [UG], 6-3
wiping nozzles and
contacts ........................[UG], 6-6
making connections ............[IG], 1-3
memory, redial........................ [e-UG]
memory send .......................... [e-UG]
memory transmission ............ [e-UG]
menu
features ........................ [UG], 1-8
options you can
change.......................... [UG], 1-9
pre-set features ........... [UG], 1-8
system data
options ................. [UG], 1-9, 1-11
message confirm................ [UG],1-11
message confirm..................... [e-UG]
N
nozzle test........................... [UG], 6-4
number keypad
editing numbers or
names ..........................[UG], 1-7
entering alphanumeric
characters ................... [UG], 1-6
inserting a pause........ [UG], 1-7
key assignments ......... [UG], 1-6
number keypad, using...... [UG], 1-6
number, ringer
equivalance .............................[e-UG]
number-dialing, speed dial.... [e-UG]
number-storing, speed dial ... [e-UG]
O
on-hook dial button, using..... [e-UG]
options, setting user ............IG], 1-12
overview ............................. [UG], 5-2
P
Pagis Pro ..................................[e-UG]
start ...................................[e-UG]
panel, control ...................... [IG], 1-4
paper
feeding problems.............. [e-UG]
guidelines..................... [UG],1-29
special media
guidelines..................... [UG],1-30
loading.......................... [IG], 1-6
loading......................... [UG], 1-24
types............................. [UG], 1-28
paper jams
tips for avoiding..........[UG], 7-4
while printing .............[UG], 7-3
paper selection..................[UG], 1-27
paper size...........................[UG[, 1-11
pause, redial/ ..........................[e-UG]
part numbers
ink cartridges ............ [UG], 6-7
personalizing your
machine....................... [IG], 1-10
phonebook............................... [e-UG]
photo ........................................ [e-UG]
plain paper fax
specification ............................[e-UG]
poll code ..................................[e-UG]
polling remote machines .......[e-UG]
polling, transmission.............. [e-UG]
press job status........................ [e-UG]
preparation.......................... [IG], 1-2
preparing fax documents... [UG], 3-2
pre-set menu features ........[UG], 1-8
print quality problems............[e-UG]
printed reports ..................[UG], 1-22
printing ...................................[e-UG]
printing ...............................[UG], 2-5
reports or lists .............[UG],1-22
printing and scanning..[IG], 2-7
printer language .....................[e-UG]
I-4
User Guide
Page 89

INDEX
printer problems..................... [e-UG]
printer specifications..............[e-UG]
priority send ............................[e-UG]
Q
quality problems, print...........[e-UG]
R
receive mode..............[UG], 1-22, 4-2
recieve modes .........................[e-UG]
receive modes
ANS/FAX .....................[UG], 4-2
DRPD ............................[UG], 4-3
FAX ...............................[UG], 4-2
TEL ...............................[UG], 4-2
receiving a fax.................... [IG], 2-6
redial interval..................... [UG],1-12
redials ................................[UG],1-12
redialing...................................[e-UG]
redialing a fax number........... [e-UG]
redial memory, searching......[e-UG]
redial/pause ............................[e-UG]
regulatory information,
safety and................................. [e-UG]
remote machines ....................[e-UG]
remote machines, polling ......[e-UG]
remote RCV code ..............[UG], 1-11
reports................................[UG], 1-22
reports, printing................ [UG], 1-22
requirements for Xerox Europe,
safety and legal .......................[e-UG]
resolution............................ [UG], 3-5
retry redial...............................[e-UG]
ringer equivalence
number ....................................[e-UG]
ringer volume.....................[UG], 4-4
ringer volume, setting ......[UG],1-18
RX reduction ......................[UG],1-11
S
safety and legal requirements
for Xerox Europe ....................[e-UG]
safety and regulatory
information..............................[e-UG]
safety notes......................... [UG], vi
symbols used ............... [UG], vi
safety symbols ....................[UG], vi
scan button ......................... [UG], 5-2
scanning
advanced......................[UG], 5-4
easy...............................[UG], 5-2
scanning...................................[e-UG]
scanning problems .................[e-UG]
scheduled fax, canceling........[e-UG]
scheduling a fax ......................[e-UG]
searching through
redial memory.........................[e-UG]
send header requirements.....[e-UG]
send from memory ............[UG],1-12
sending a fax ......................[UG], 3-3
sending a fax ...................... [IG], .2-4
sending a fax after
talking ..................................[UG], 3-7
sending
group dial fax ...................[e-UG]
priority fax ........................[e-UG]
setting language................[UG], 1-18
setting user options........... [IG], 1-12
sharing .....................................[e-UG]
software, installing ........... [IG], 1-11
sound control......................[UG],1-18
speaker volume..................[UG],1-19
special copy features .........[UG], 2-3
special media guidelines...[UG],1-30
specifications, copier.............. [e-UG]
speed/dial ................................[e-UG]
speed dial key..........................[e-UG]
speed dial number ..................[e-UG]
dialing ...............................[e-UG]
User Guide
I-5
Page 90

INDEX
storing............................... [e-UG]
stand-alone fax machine
without a PC............................ [e-UG]
standby operation ................... [e-UG]
canceling ..........................[e-UG]
start Pagis Pro .........................[e-UG]
storing speed dial numbers for
group dialing........................... [e-UG]
system data options ......[UG]1-9,1-11
answer on rings ................[UG], 1-12
auto journal ................[UG], 1-11
clock mode.................. [UG], 1-13
continuous poll report[UG], 1-12
dial mode ....................[UG], 1-11
discard size ................. [UG], 1-12
DRPD (Distinctive Ring
Pattern Detection)...... [UG], 1-13
ECM (Error Correction)
mode............................ [UG], 1-11
fax print quality ..........[UG], 1-13
local ID........................ [UG], 1-12
message confirm ........[UG], 1-11
paper size.................... [UG], 1-11
redial interval .............[UG], 1-12
redials.......................... [UG], 1-12
remote RCV code........ [UG], 1-11
RX reduction............... [UG], 1-11
send from memory..... [UG], 1-12
system ID, setting .............[UG], 1-14
system options
setting date and time. [UG], 1-15
default printer
settings ........................ [UG], 1-20
language...................... [UG], 1-18
ringer volume............. [UG], 1-18
sound control.............. [UG], 1-18
speaker volume ..........[UG], 1-19
system ID ....................[UG], 1-14
system requirements.............. [e-UG]
T
tel receive mode..................[UG], 4-2
telephone connectivity
guidelines ................................[e-UG]
The WorkCentre
Control Program .....................[e-UG]
The WorkCentre TWAIN
Scanner Program ....................[e-UG]
time, setting date and........ [IG], 1-5
time,setting date and......... [UG],1-15
tone switching......................... [e-UG]
transmission polling............... [e-UG]
troubleshooting....................... [e-UG]
TWAIN .....................................[e-UG]
types of paper.................... [UG], 1-28
U
user options, setting ......... [IG], 1-12
W
Windows 2000 .........................[e-UG]
Windows 95/98........................ [e-UG]
Windows NT 4.0...................... [e-UG]
WorkCentre Control
Program, The ..........................[e-UG]
WorkCentre TWAIN
Scanner program, The ...........[e-UG]
I-6
User Guide
 Loading...