

Page 1

XDPE/400
User Documentation
Version 2.1.4
September 2001
720P94604
Page 2

Xerox welcomes your suggestions and feedback on this
document. You can contact us by e-mail or FAX at:
E-mail: USA 3260 TechDoc.Xerox@Orlando.so.xerox.com
FAX: 407-869-2098 (Attention: Documentation)
©2001 by Xerox Corporation. All rights reserved.
Copyright protection claimed includes all forms and matters of
copyrightable material and information now allowed by statutory
or judicial law or hereinafter granted, including without limitation,
material generated from the software programs that are
displayed on the screen, such as icons, screen displays, looks,
etc.
Produced in the United States of America.
Xerox®, The Document Company®, the digital X®, and the
identifying product names and numbers herein are trademarks of
Xerox Corporation.
All non-Xerox brands and product names are trademarks or
registered trademarks of their respective companies.
Companies, names, and data used in examples herein are
fictitious unless otherwise noted.
Changes are periodically made to this document. Changes,
technical inaccuracies, and typographic errors will be corrected
in subsequent editions.
This document was created using FrameMaker document
publishing software. The typefaces are Arial and Monotype.com.
Page 3

Table of contents
Section One: Introduction to XDPE/400
1. Getting Started
XDPE/400 system overview...............................................................................................1-4
AS/400 printing.....................................................................................................1-4
Printing with XDPE/400 .........................................................................................1-6
XDPE/400 features and functions.......................................................................................1-7
Printer control commands......................................................................................1-7
High-end printing and processing ...........................................................................1-7
Resource management .........................................................................................1-8
Monitoring output queues ......................................................................................1-9
Supported printers............................................................................................................1-9
Xerox Production Print Mode printers......................................................................1-9
Xerox Distributed Print Mode printers.................................................................... 1-10
Xerox Printer Control Language printers ............................................................... 1-10
Xerox PostScript printers.....................................................................................1-11
Generic printer devices .......................................................................................1-11
2. New and updated XDPE/400 features
New features in XDPE/400 2.1.4 ........................................................................................2-1
Generic device support .........................................................................................2-1
OS/400 5.1 support...............................................................................................2-1
VIPP 2001 compliance..........................................................................................2-1
N-series printers in VIPP mode support...................................................................2-2
Revised parameters..............................................................................................2-2
New features in XDPE/400 2.1.3 ........................................................................................2-3
VIPP page-level support........................................................................................2-3
PCL euro font support ........................................................................................... 2-3
OS/400 4.5.0 support............................................................................................2-3
Added printer support............................................................................................2-3
Revised parameters..............................................................................................2-4
XDPE/400 2.1.3 distributed on CD-ROM.................................................................2-5
User documentation distributed on CD-ROM ...........................................................2-5
New features in XDPE/400 2.1.2 ........................................................................................2-6
VIPP job-level support...........................................................................................2-6
Xerox extended job ticket support...........................................................................2-6
OS/400 4.3.0 and 4.4.0 support..............................................................................2-6
Added PCL printer support ....................................................................................2-7
Euro font certification ............................................................................................2-7
Revised parameters..............................................................................................2-7
New commands....................................................................................................2-8
XDPE/400 User Documentation (9/2001) iii
Page 4

Table of contents
New features in XDPE/400 2.1.1 ........................................................................................2-9
Trailer separator page support ............................................................................... 2-9
Duplex extended support.......................................................................................2-9
OS/400 4.2.0 compliance ......................................................................................2-9
Added printer support..........................................................................................2-10
New and revised parameters ............................................................................... 2-10
New features in XDPE/400 2.1......................................................................................... 2-12
Banner page enhancements ................................................................................ 2-12
Added PCL printer support ..................................................................................2-12
Revised parameters............................................................................................2-12
New features in XDPE/400 2.0......................................................................................... 2-14
Multi-up printing..................................................................................................2-14
Report distribution for multi-part print jobs .............................................................2-14
42XX internal interface enhancements .................................................................. 2-15
PCL packet enhancements..................................................................................2-15
Network print support ..........................................................................................2-15
Spool file processing without printer device ...........................................................2-16
Banner page enhancements ................................................................................ 2-16
New and revised parameters ............................................................................... 2-16
Section Two: Installing and Customizing XDPE/400
3. Migration actions
XDPE/400 2.1.4 migration actions......................................................................................3-1
Installation considerations......................................................................................3-1
OS/400 version requirements.................................................................................3-2
Converting from XDPE/400 2.0..........................................................................................3-2
4. Installation requirements
Requirements ..................................................................................................................4-1
AS/400 system requirements .................................................................................4-1
Security requirements ........................................................................................... 4-2
Printer requirements .............................................................................................4-3
Supported printer/interface box configurations .........................................................4-9
Interface settings ................................................................................................4-11
OS/400 device description...................................................................................4-11
Migration issues .............................................................................................................4-12
Displaying your XDPE/400 library and folder information.........................................4-12
Recording your current global values....................................................................4-12
Collecting changes you made to XDPE/400 objects ............................................... 4-13
Customizing XDPE/400 default commands............................................................4-13
XDPE/400 User Documentation (9/2001) iv
Page 5

Table of contents
5. Installing XDPE/400
Creating an XDPE/400 user profile.....................................................................................5-2
Backing up your current XDPE/400 system.........................................................................5-3
Installing the base files......................................................................................................5-4
Recreating your XDPEFLR object changes.........................................................................5-6
Resetting your global values..............................................................................................5-6
Restoring your customized XDPE/400 application library objects...........................................5-6
Installing corrective maintenance .......................................................................................5-6
Removing your old version of XDPE/400 ............................................................................5-7
Adding the XDPE/400 application library to your library list ...................................................5-7
6. Customizing XDPE/400
Work with Global Values screens.......................................................................................6-1
Changing global values .........................................................................................6-1
Work with Global Values (first screen).....................................................................6-2
Work with Global Values (second screen) ............................................................... 6-6
Work with Global Values (fourth screen)................................................................6-10
Work with Global Values (fifth screen)...................................................................6-14
Separator page customization .........................................................................................6-20
Monitor Queue-generated separator pages ...........................................................6-20
Separator page contents formatting......................................................................6-20
Generating separator pages in VIPP mode............................................................6-26
Monitor Queue job log.....................................................................................................6-28
XDPE/400 command customization.................................................................................. 6-29
Example 1..........................................................................................................6-29
Example 2..........................................................................................................6-31
Using A4 paper for NPS and DocuSP printers (PCL mode only)..........................................6-31
7. Performing an installation verification procedure
IVP requirements .............................................................................................................7-2
XPPM IVP............................................................................................................7-2
PCL IVP ..............................................................................................................7-2
VIPP IVP .............................................................................................................7-3
Starting Monitor Queue.....................................................................................................7-4
Executing the IVP.............................................................................................................7-5
Creating XDPE/400 IVP parameters .......................................................................7-6
Verifying your output.........................................................................................................7-6
IVP sample output............................................................................................................7-7
DJDE Direct Mode IVP......................................................................................................7-7
DJDE Indirect Mode IVP .................................................................................................7-21
DJDE Combined Mode IVP ............................................................................................. 7-27
XES Direct Mode IVP......................................................................................................7-37
XES Indirect Mode IVP ...................................................................................................7-43
XES Combined Mode IVP ...............................................................................................7-49
XDPE/400 User Documentation (9/2001) v
Page 6

PCL Direct Mode IVP......................................................................................................7-55
PCL Indirect Mode IVP....................................................................................................7-59
PCL Combined Mode IVP ...............................................................................................7-65
VIPP Direct Mode IVP.....................................................................................................7-71
VIPP Indirect Mode IVP ..................................................................................................7-77
VIPP Combined Mode IVP ..............................................................................................7-83
Section Three: Printing Documents with XDPE/400
8. Print job configuration
Choosing a command generation method...........................................................................8-1
Setting the command generation method............................................................................8-3
Using the Packet data (PACKETDATA) parameter...................................................8-3
Configuring your printer file................................................................................................8-4
Creating Xerox printer control packets................................................................................8-4
Downloading resources.....................................................................................................8-5
Starting Monitor Queue.....................................................................................................8-6
Table of contents
9. XDPE/400 commands and menus
Commands......................................................................................................................9-1
Menus.............................................................................................................................9-3
Command group menus........................................................................................9-3
Task-specific menus .............................................................................................9-4
10. Creating and modifying printer files
Creating Xerox printer files..............................................................................................10-1
Setting general spooling parameters ..................................................................... 10-1
Setting the Packet data (PACKETDATA) parameter...............................................10-2
Setting Xerox printing features (Indirect method)....................................................10-4
Examples of creating Xerox printer files ................................................................10-4
Managing Xerox printer files ............................................................................................10-6
Changing Xerox printer files.................................................................................10-6
Overriding Xerox printer files.............................................................................. 10-14
11. Modifying spool files
Changing the command generation method ......................................................................11-1
Changing formatting and job processing attributes.............................................................11-1
Examples of changing spool file attributes.........................................................................11-5
Example 1..........................................................................................................11-6
Example 2..........................................................................................................11-6
Example 3..........................................................................................................11-6
XDPE/400 User Documentation (9/2001) vi
Page 7

Table of contents
12. DJDE command generation
Using DJDE control commands .......................................................................................12-2
Indirect method ..............................................................................................................12-3
Modifying printer file parameters...........................................................................12-4
Direct method ................................................................................................................12-7
Default DJDE packet...........................................................................................12-7
Combined method..........................................................................................................12-8
Application order of DJDE commands...................................................................12-8
Creating and managing DJDE packets .............................................................................12-9
Packet name syntax............................................................................................12-9
Using the Create DJDE packet menu....................................................................12-9
Using the Change DJDE packet menu ................................................................ 12-17
Using the DJDE packet Text List utility................................................................12-19
Using the OS/400 Source Entry Utility (SEU).......................................................12-26
13. XES command generation
Using XES control commands .........................................................................................13-1
File processing mode (PROCMODE) restriction.................................................................13-2
Indirect method ..............................................................................................................13-3
Modifying printer file parameters...........................................................................13-4
Direct method ................................................................................................................13-7
Default XES packet.............................................................................................13-7
Combined method..........................................................................................................13-8
Application order of XES control commands ..........................................................13-8
Creating and managing XES packets ...............................................................................13-9
Creating XES packets .........................................................................................13-9
Changing XES packets ..................................................................................... 13-19
Deleting XES packets ....................................................................................... 13-21
Generic packets...........................................................................................................13-22
How generic packets are processed ................................................................... 13-22
Creating a generic packet ASCII file ...................................................................13-24
14. XES color command generation
Creating XES color packets.............................................................................................14-2
Packet name syntax............................................................................................14-2
Packet creation procedure...................................................................................14-3
Packet parameters..............................................................................................14-6
Packet default color values ..................................................................................14-7
IBM color command names .................................................................................14-9
Changing XES color packets .........................................................................................14-11
Starting XES color processing .......................................................................................14-12
XDPE/400 User Documentation (9/2001) vii
Page 8

Table of contents
15. PCL command generation
Using PCL control commands..........................................................................................15-1
File processing mode (PROCMODE) restriction.................................................................15-2
Indirect method ..............................................................................................................15-3
Modifying printer file parameters...........................................................................15-4
Direct method ................................................................................................................15-8
Default Xerox PCL packet....................................................................................15-8
Combined method..........................................................................................................15-9
Application order of PCL control commands ..........................................................15-9
Creating and managing Xerox PCL packets ....................................................................15-10
Creating Xerox PCL packets..............................................................................15-10
Changing Xerox PCL packets ............................................................................15-27
Deleting Xerox PCL packets ..............................................................................15-30
Displaying Xerox PCL packets ...........................................................................15-31
Working with Xerox PCL packet macro invocation types .......................................15-34
Generic packets...........................................................................................................15-37
Creating a generic packet ASCII file ...................................................................15-37
Inserting generic packets...................................................................................15-38
Example of using a generic packet for constant back forms................................... 15-40
Xerox PCL printer tray selection.....................................................................................15-45
DC265LP and DC255LP printer tray selection ..................................................... 15-46
N32 and N24 printer tray selection......................................................................15-47
NPS and DocuSP printer tray selection...............................................................15-48
Printer tray selection for other PCL printers .........................................................15-50
16. Xerox job ticket packet generation
Job ticket processing ......................................................................................................16-1
Internal job ticket commands................................................................................16-2
Processing conflicts ............................................................................................16-3
Order of precedence ...........................................................................................16-3
Separator page considerations.............................................................................16-4
Creating and managing extended job ticket packets...........................................................16-5
Rules for creating extended job ticket packets .......................................................16-5
Creating extended job ticket packets.....................................................................16-6
Changing, displaying, and printing extended job ticket packets................................16-8
Deleting extended job ticket packets...................................................................16-10
17. VIPP command generation
VIPP functionality supported............................................................................................17-2
General processing requirements and considerations ........................................................17-2
Generating VIPP command elements...............................................................................17-3
Indirect method...................................................................................................17-4
Direct method...................................................................................................17-10
Combined method ............................................................................................17-11
PostScript DSC packets................................................................................................17-13
Creating a PostScript DSC packet...................................................................... 17-13
Inserting DSC packets through the FONT ID printer file parameter......................... 17-13
XDPE/400 User Documentation (9/2001) viii
Page 9

Table of contents
Samples provided by XDPE/400 ....................................................................................17-14
Using the XDPE/400 VIPP resource commands .............................................................. 17-15
Creating VIPP resources or PostScript DSC packets............................................17-15
Editing, displaying, or printing a VIPP resource or PostScript DSC packet.............. 17-24
Deleting a VIPP resource or DSC packet ............................................................ 17-27
18. Using Monitor Queue
Monitor Queue operation.................................................................................................18-2
Starting a Monitor Queue session ....................................................................................18-4
Monitor Queue parameters..................................................................................18-6
WAITTIME processing notes..............................................................................18-21
Examples of starting a Monitor Queue session .................................................... 18-22
Displaying a Monitor Queue session............................................................................... 18-24
Changing a Monitor Queue session................................................................................ 18-26
Ending a Monitor Queue session ...................................................................................18-28
Parameters ...................................................................................................... 18-29
Non-zero WAITTIME.........................................................................................18-29
Clearing multiple Monitor Queue sessions...........................................................18-30
Resetting a Monitor Queue session................................................................................18-31
Monitor Queue messages ............................................................................................. 18-32
19. Managing print operations
Monitor Queue processing modes....................................................................................19-1
*JOB mode processing........................................................................................19-2
*PAGE mode processing.....................................................................................19-6
Working with Monitor Queue jobs................................................................................... 19-10
Field descriptions.............................................................................................. 19-11
Job accounting.............................................................................................................19-12
20. Remote/Network printing
Supported printer/interface box configurations...................................................................20-3
Local and remote printer configurations.................................................................20-3
Network printer configurations..............................................................................20-3
Considerations...............................................................................................................20-6
Using generic packets (XES and PCL modes) .......................................................20-6
Interfaces...........................................................................................................20-6
Using Host Print Transform with TCP/IP ...........................................................................20-7
Customizing Host Print Transform ........................................................................20-7
Setting up TCP/IP support ............................................................................................... 20-8
Creating the sending TCP/IP output queue............................................................20-8
Starting the sending writer ................................................................................. 20-12
Starting a Monitor Queue session....................................................................... 20-14
Remote/Network resource downloading..........................................................................20-16
XDPE/400 User Documentation (9/2001) ix
Page 10

Table of contents
21. Resource management
Copying resources to the XDPEFLR resource folder..........................................................21-3
Copying resources from an AS/400 database file ...................................................21-3
Copying resources from a PC ..............................................................................21-4
Downloading resources manually (DJDE, XES, and PCL modes) ........................................ 21-5
Example of downloading resources manually ........................................................ 21-5
Downloading PCL macros ...................................................................................21-8
Downloading PCL fonts..................................................................................... 21-10
Downloading resources manually (NPS and DocuSP printers in VIPP mode) ..................... 21-12
Downloading VIPP or PostScript resources .........................................................21-13
Downloading resources manually (N-series printers in VIPP mode) ................................... 21-17
Example of downloading resources manually ...................................................... 21-17
Downloading resources automatically............................................................................. 21-19
4213 environment saving ..............................................................................................21-19
Using euro fonts with your PCL print jobs........................................................................21-20
Changes to your AS/400 system ........................................................................ 21-20
XDPE/400 and your Xerox PCL printer ............................................................... 21-24
Euro font considerations....................................................................................21-26
22. List processing
Creating a list source member .........................................................................................22-2
Creating a Xerox resource list..........................................................................................22-4
Parameters ........................................................................................................22-5
Configuring a list processing job.......................................................................................22-6
Example of using list processing to download resources.....................................................22-7
Creating a source list of resources........................................................................22-7
Creating a Xerox resource list..............................................................................22-7
Downloading the resources..................................................................................22-9
Multiple printer list support.............................................................................................22-10
Downloading PCL fonts and macros using a resource list.................................................22-11
23. Logical processing
Logical processing considerations....................................................................................23-3
Restarting a PCL constant back print job...............................................................23-3
Logical processing considerations and restrictions .................................................23-3
Duplex printing ...................................................................................................23-5
Placement of XES forms......................................................................................23-6
Performance considerations ................................................................................23-6
Creating logical processing packets..................................................................................23-7
Packet name syntax............................................................................................23-7
Packet creation procedure...................................................................................23-8
Packet parameters..............................................................................................23-9
Changing logical processing packets.............................................................................. 23-13
Starting logical processing............................................................................................. 23-15
XDPE/400 User Documentation (9/2001) x
Page 11

Table of contents
24. Multi-part printing
Creating a multi-part packet.............................................................................................24-3
Considerations ...................................................................................................24-5
Example of a multi-part packet .............................................................................24-6
Changing a multi-part packet...........................................................................................24-8
Deleting a multi-part packet.............................................................................................24-9
Starting multi-part processing ........................................................................................24-10
25. Multi-up printing
DJDE multi-up generation ...............................................................................................25-1
XES multi-up generation .................................................................................................25-5
Requirements.....................................................................................................25-6
Creating multi-up XES packets.............................................................................25-7
PCL multi-up generation................................................................................................ 25-15
Indirect method................................................................................................. 25-15
Direct method...................................................................................................25-15
Requirements...................................................................................................25-16
Creating multi-up PCL packets...........................................................................25-17
VIPP multi-up generation .............................................................................................. 25-27
Indirect method................................................................................................. 25-28
Direct method...................................................................................................25-29
Requirements...................................................................................................25-29
26. Troubleshooting
Monitor Queue solutions .................................................................................................26-1
Job does not print ...............................................................................................26-1
Multiple Monitor Queue session database errors.................................................... 26-2
Monitor Queue Diagnostic Utility...........................................................................26-4
Switching from A4 size paper to US letter size paper is unsuccessful ....................... 26-5
XDPM (XES) solutions and considerations........................................................................26-6
Duplex job using Flex i-data box prints simplex......................................................26-6
Considerations when using generic packets .......................................................... 26-7
PCL solutions, considerations, and limitations ...................................................................26-8
Multiple copies do not print with DEVCLS set to *NET ............................................26-8
NPS printer will not print duplex............................................................................26-9
Jobs sent to network printers do not print some special characters ........................ 26-10
Problems using three-hole paper with 4220/4230 printers .....................................26-11
Considerations when using generic packets ........................................................ 26-12
Known PCL limitations ...................................................................................... 26-14
VIPP solutions ............................................................................................................. 26-16
Jobs print with incorrect line spacing................................................................... 26-16
Job sent to NPS printer shows “ineligible” status.................................................. 26-16
DP65 jobs print additional, incomplete copies when using trailer pages .................. 26-16
NPS printer will not print duplex..........................................................................26-17
LPP duplex jobs print simplex ............................................................................26-18
Multiple copy jobs print incorrectly when using trailer pages..................................26-19
XDPE/400 User Documentation (9/2001) xi
Page 12

27. Messages
XDPE/400 message details .............................................................................................27-1
Locating error messages.................................................................................................27-3
Using the WRKMONQJOB command ...................................................................27-4
Accessing the on-screen display ..........................................................................27-6
Accessing DSPJOBLOG .....................................................................................27-7
Accessing the QUSRSYS/QEZJOBLOG output queue ...........................................27-7
Section Four: Appendices
A. XDPE/400-supported interface boxes
3X Twinax Printstation interface........................................................................................ A-1
42XX INTERNAL interface ............................................................................................... A-3
4450 INTERNAL interface................................................................................................ A-4
Agile 5250 OPTIMA interface............................................................................................ A-4
XPPM mode........................................................................................................ A-4
XDPM mode ....................................................................................................... A-5
BARR interface ............................................................................................................... A-6
Flex i-data 5250 C/RS-Xerox interface............................................................................... A-8
XPPM considerations........................................................................................... A-9
XDPM considerations........................................................................................... A-9
IBM AS/400 Client Access interface .................................................................................A-10
Smart interface...............................................................................................................A-11
Solimar interface ............................................................................................................A-11
Spur/USAII interface.......................................................................................................A-12
Table of contents
B. XDPE/400 distributed samples and resources
SAMPLE file contents ...................................................................................................... B-1
XDPEFLR resource folder................................................................................................ B-2
XDPEFLR contents (letter version)........................................................................ B-3
XDPEFLR contents (A4 version) ........................................................................... B-6
C. Processing notes
Spool file scanning .......................................................................................................... C-1
SCS commands .................................................................................................. C-2
Multi-up processing.............................................................................................. C-3
Logical processing and color processing................................................................ C-3
Color processing.................................................................................................. C-3
D. SCS commands for the 5225 and 5219 printers
SCS commands .............................................................................................................. D-1
Set FID through GFID SCS command in 5219 printer emulation mode.................................. D-3
XDPE/400 User Documentation (9/2001) xii
Page 13

Section Five: Glossary
Section Six: Index
Table of contents
XDPE/400 User Documentation (9/2001) xiii
Page 14

Table of contents
XDPE/400 User Documentation (9/2001) xiv
Page 15

Section One: Introduction to XDPE/400
XDPE/400 is a print management facility for use on an IBM AS/400. As
such, XDPE/400 provides enhanced document formatting and printer
control for many of your daily printing requirements. It uses standard
OS/400 screens and procedures and does not require any changes to
your application programs.
This document provides the information you need to install and print
documents with XDPE/400. Also included are the information and
procedures you may need when migrating from an older version of
XDPE/400 to XDPE/400 2.1.4.
XDPE/400 documentation is delivered in PDF format on a CD-ROM. It is
designed to be viewed online; however, page layouts have been
maintained so that you can duplex print all or part of the documentation
as necessary.
Page 16

Introduction to XDPE/400 (9/2001)
Page 17

1. 1 Getting Started
This chapter contains the following information:
• A brief description of this manual and how to use it
• An overview of AS/400 and XDPE/400 printing
• The major features and functions offered by the Xerox Document
Print Executive for the IBM AS/400 (XDPE/400) software
The product information and instructions presented herein apply only to
XDPE/400 Version 2, Release 1, Modification 4.
NOTE: Xerox only supports the XDPE/400 features and functions
documented in the user documentation, XDPE/400 maintenance
bulletins, or help displays. Do not assume support is provided if it is
not explicitly documented.
Before you begin
Before you install the XDPE/400 software, make sure you meet the
installation requirements discussed in this manual. Before you begin to
use the XDPE/400 software, verify that XDPE/400 has been installed and
the IVP run successfully.
To install the XDPE/400 software, you must know how to use standard
AS/400 CL commands, including CRTUSRPRF, ADDIRE, RSTLIB, and
RSTDLO. For information about these commands, refer to the OS/400 CL
Reference and the OS/400 Printer Device Programming.
In addition, you should be familiar with the basic AS/400 printing
concepts, the Xerox printers supported by XDPE/400, and any twinax
interface boxes you want to use with these Xerox printers. If you will be
using network-attached printers, you should also be familiar with basic
networking concepts. Refer to the OS/400 Printer Device Programming
for a complete explanation of the AS/400 printing process.
Introduction to XDPE/400 (9/2001) 1-1
Page 18

About this manual
Getting Started
This document is divided into these sections:
• Section One: Introduction to XDPE/400 provides an introduction to
the XDPE/400 software and provides an overview of the new
features and enhancements distributed with XDPE/400.
• Section Two: Installing and Customizing XDPE/400 provides the
information you should consider before migrating from an earlier
version of XDPE/400 to 2.1.4, along with the information you need to
install XDPE/400, configure your AS/400 to print with XDPE/400,
and perform the installation verification procedure (IVP).
• Section Three: Printing Documents with XDPE/400 provides the
information you need to print AS/400-generated documents on Xerox
printers. These topics are discussed:
— Configuring your AS/400 print jobs to print using XDPE/400
— Managing printer and spool files
— Using XDPE/400 to create printer control packets
– Dynamic job descriptor entry (DJDE) control packets
– Xerox escape sequence (XES) control packets
– XES color control packets
– PCL control packets
– Xerox extended job ticket packets
– VIPP Job Descriptor Tickets (JDTs)
— Managing your printer resources
— Using the XDPE/400 high-end processing and printing features
– List processing
– Logical processing
– Multi-part printing
– Multi-up printing
— Using the Monitor Queue to monitor and process your print jobs
— Using XDPE/400 to print to local, remote, or network printers
— Troubleshooting procedures for problem diagnosis and
correction
— Displaying messages generated by XDPE/400
• Section Four: Appendices provides information about supported
twinax interface boxes; lists the samples and resources distributed
with XDPE/400; provides information about the implementation of
multi-up processing, logical processing, and color processing; and
provides a list of the SCS commands for the 5225 and 5219 printers.
• Section Five: Glossary provides a glossary of the terms used within
the documentation as they relate to XDPE/400.
• Section Six: Index contains indexed information to help you locate
specific topics.
Introduction to XDPE/400 (9/2001) 1-2
Page 19

Conventions used in this manual
These conventions are used in this manual:
• The name of the main XDPE/400 printer control batch job is Monitor
Queue. This manual does not distinguish between XDPE/400 and
the Monitor Queue when referring to the Monitor Queue functions.
• Keywords for command parameters and attributes in non-procedural
text appear in UPPERCASE letters. For example, ENDMONQ.
• Spool file attributes and parameter names in non-procedural text are
documented as they appear on your AS/400 display. In most cases,
they appear in Initial uppercase letters. For example, Separator
page source.
• Variable information appears in italics. For example, tape device
name.
• Commands and keywords within procedures and examples appear
in UPPERCASE BOLD characters. For example, STRMONQ.
• Document titles appear in italics.
• References to other chapters within this document are enclosed in
quotes.
Getting Started
• Blue text within the body of a PDF file is used to indicate an active
link to the named section or feature.
NOTE: A note is a hint that assists you in performing a task or
understanding the text. For greater emphasis, notes appear in blue text.
CAUTION: A caution notifies you that an action or omission may
result in damage to your equipment, software, or data. For greater
emphasis, cautions appear in red text.
Introduction to XDPE/400 (9/2001) 1-3
Page 20

XDPE/400 system overview
XDPE/400 is a print management facility for use on an IBM AS/400. As
such, XDPE/400 provides enhanced document formatting and printer
control for many of your daily printing requirements. It uses standard
OS/400 screens and procedures and does not require any changes to
your application programs.
These are some of the tasks you can perform on a Xerox printer with
XDPE/400:
• Merge data with an electronic form
• Print multiple copies of a job
• Print on both sides of the sheet of paper (duplex printing)
• Print multiple page images on a single sheet of paper (multi-up
printing)
• Print in color
AS/400 printing
Getting Started
To print on an AS/400 system to a locally-attached printer, these elements
are required:
• Application — A program that merges variable data with the
information in the printer file to create a spool file.
• Printer file — An object containing parameters that determine how a
print job should be created.
• Spool file — A file containing data that is ready for printing.
• Output queue — An object containing a list of spool files waiting to
be processed.
• Printer writer — An AS/400 object that formats the spool file and
sends it to a local print device.
Figure 1-1 illustrates these elements.
Introduction to XDPE/400 (9/2001) 1-4
Page 21
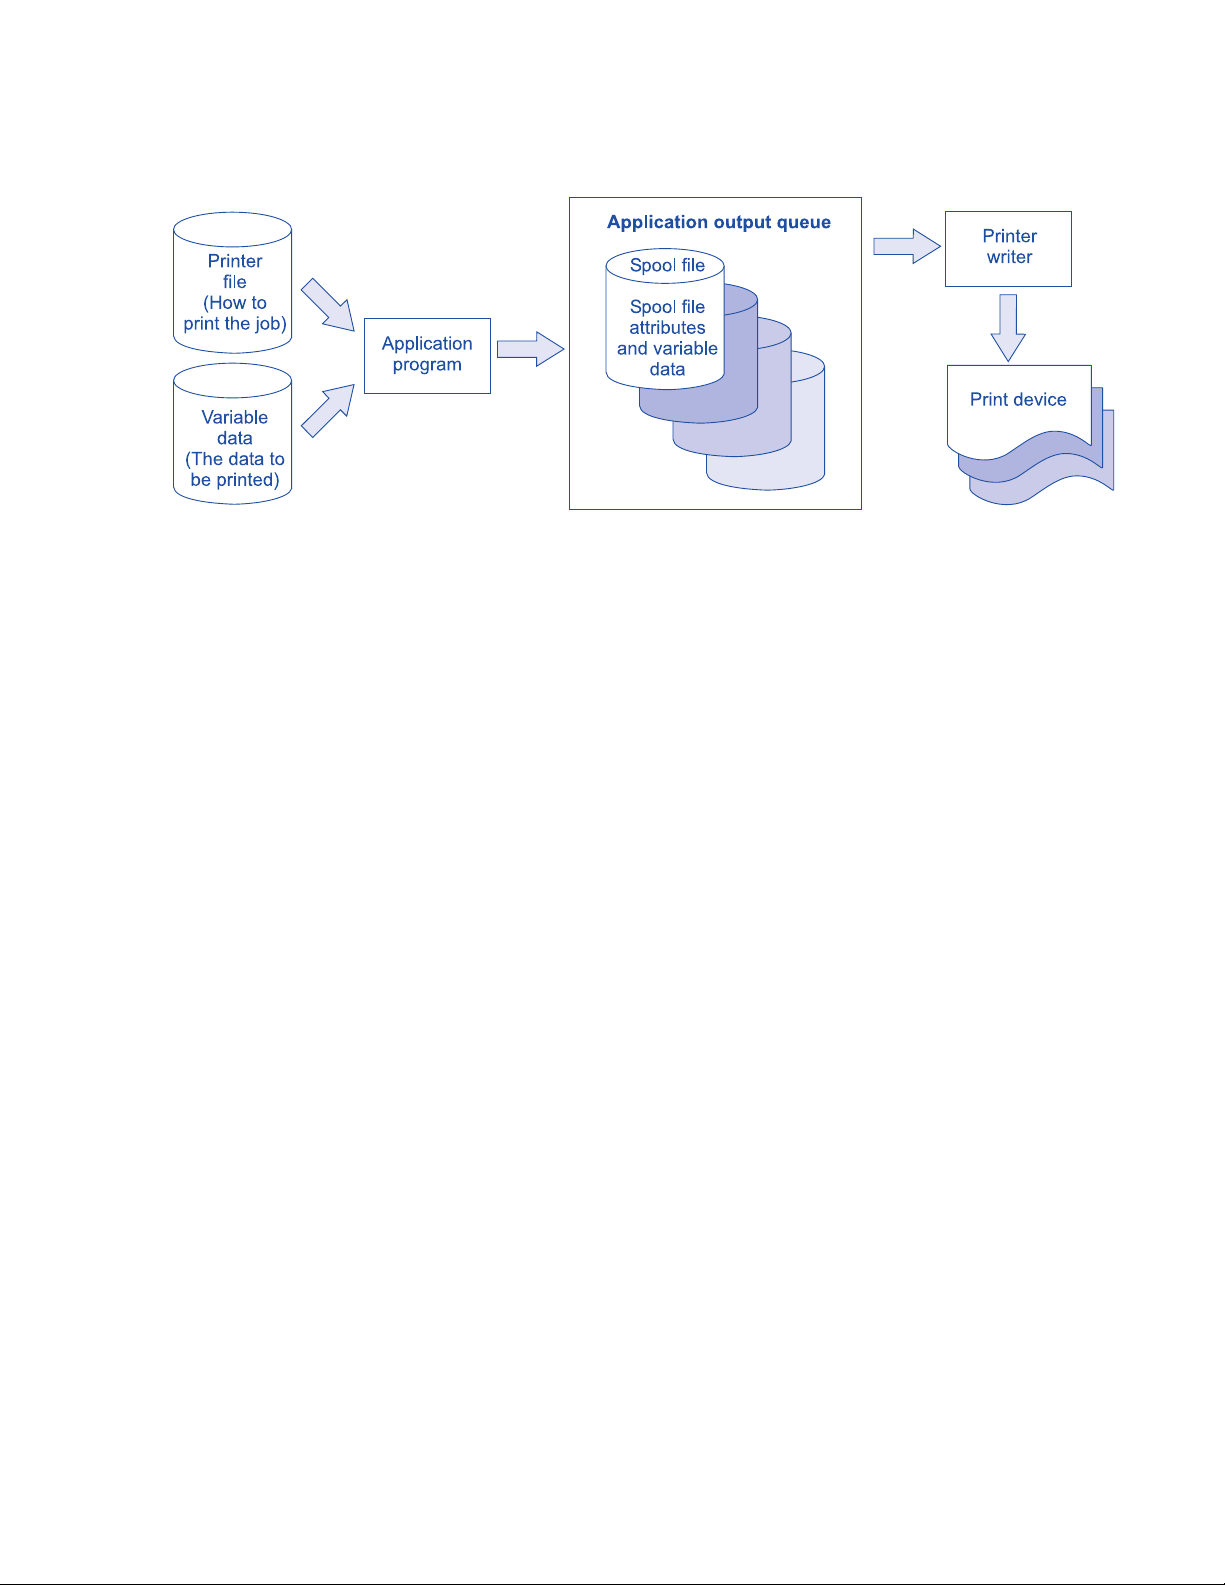
Getting Started
Figure 1-1. AS/400 printing elements
In most common forms of local printing on the AS/400, an application
program creates a printer file or references a printer file that you have
created. The application merges the printer file specifications with your
data, such as a report, to create a spool file.
The spool file contains attributes that are created from the printer file.
These attributes specify how the job should be printed. The spool file is
placed in an output queue where the printer writer sends it to the printer
or over a network.
Refer to the OS/400 Printer Device Programming for a complete
explanation of the AS/400 printing process.
Network printing is similar to local printing, but with some important
differences. For information on network printing, refer to chapter 20 in
Section Three: Printing Documents with XDPE/400.
Introduction to XDPE/400 (9/2001) 1-5
Page 22
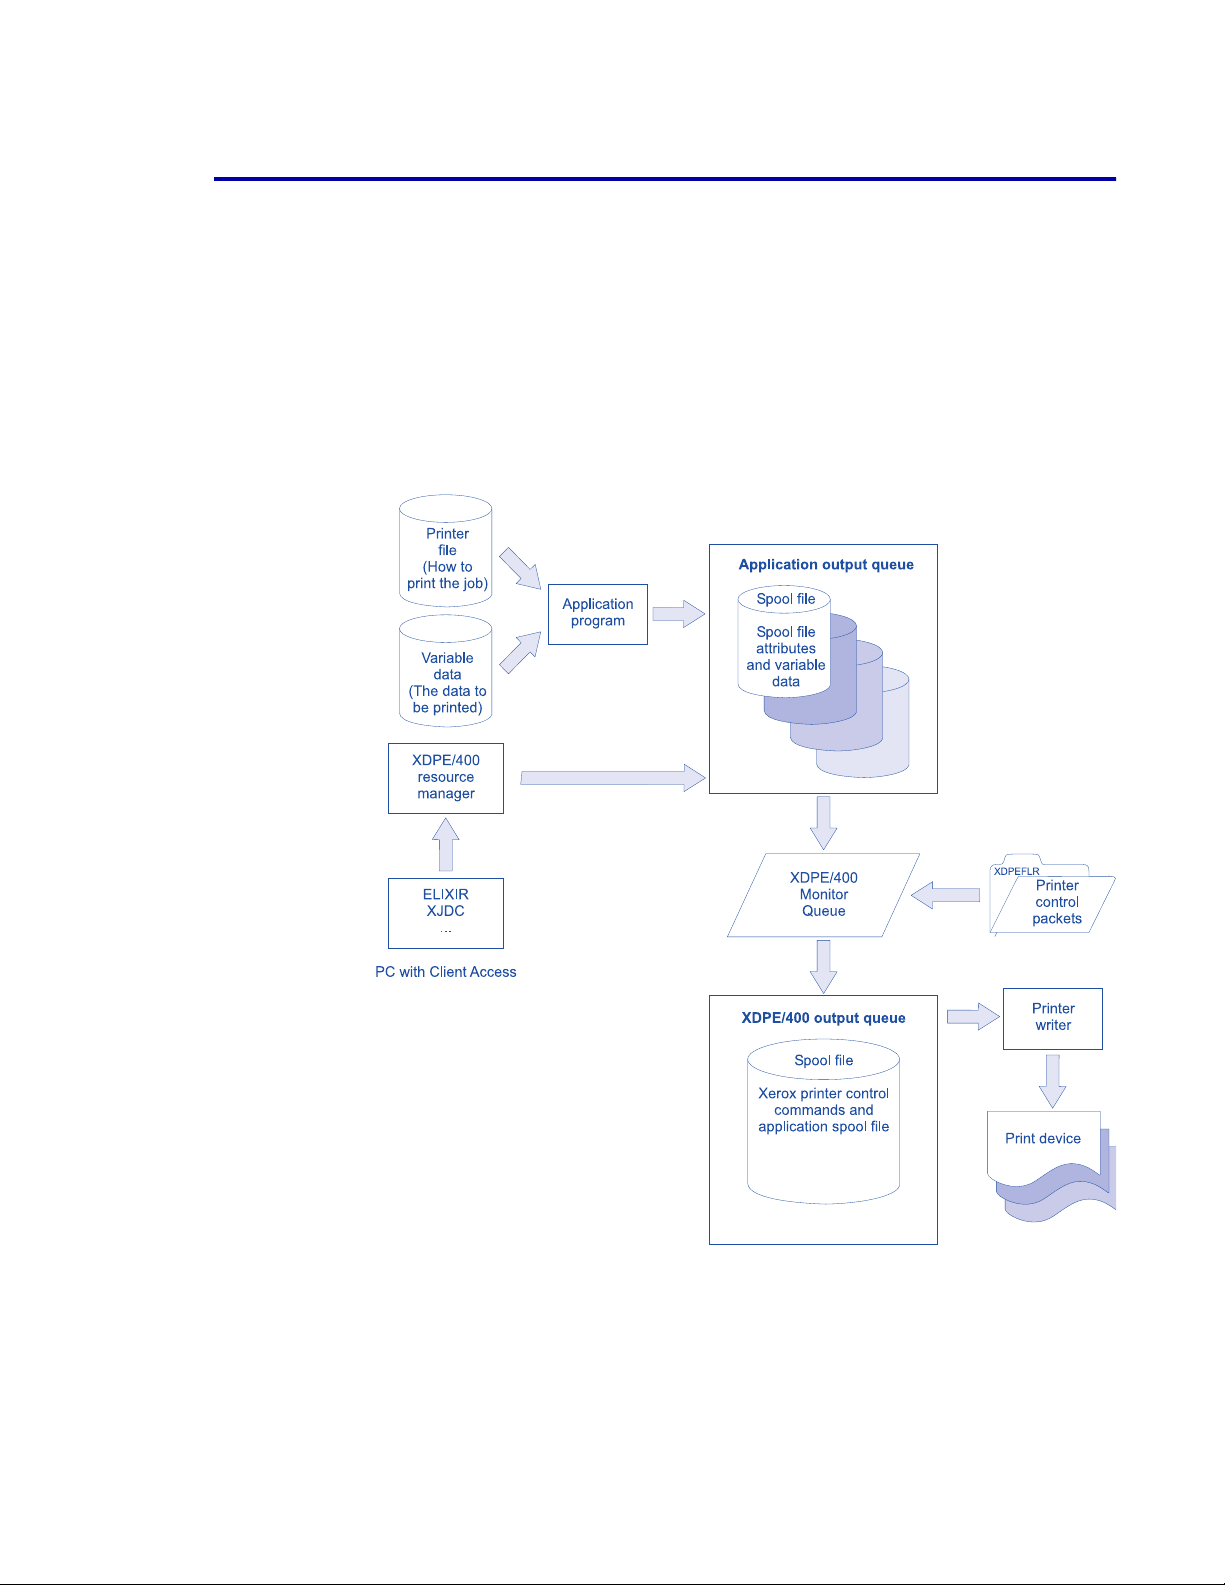
Printing with XDPE/400
The part of XDPE/400 that processes print jobs is called the Monitor
Queue. Monitor Queue is used in conjunction with the AS/400 printer
writer to process spool files for printing on Xerox printers.
The Monitor Queue takes spool files placed in the application output
queue, processes them, and places them in the processed output queue.
From there they are written to the printer by the printer writer, as shown
in figure 1-2.
For information about how XDPE/400 operates, see Section Three:
Printing Documents with XDPE/400.
Figure 1-2. XDPE/400 and AS/400 printing elements
Getting Started
Introduction to XDPE/400 (9/2001) 1-6
Page 23

XDPE/400 features and functions
XDPE/400 is fully compatible with the AS/400 and works within the
AS/400 printing architecture to provide post-processing for your AS/400
print jobs. XDPE/400 automatically tailors your print jobs to the specific
Xerox printer you are using. XDPE/400 supports DJDE, XES, PCL, VIPP
(PostScript), and extended job ticketing data streams.
Using XDPE/400, you can modify your print jobs as much or as little as
you want, often without having to know any printer control languages.
XDPE/400 provides a facility to create, manage, and download printer
control packets and other processing and printing resources.
A variety of connectivity options are available. XDPE/400 can monitor
multiple output queues automatically, processing jobs for both network
and locally-attached printers.
Printer control commands
XDPE/400-generated printer control commands allow you to control
printer functions, such as:
• Fonts
• Electronic form names
• Paper type
•Ink color
• Margin settings
• Number of copies
• Simplex or duplex printing
• Multi-up printing
• Back overlay
• Page orientation (even if the orientation is not supported by the IBM
printer that the Xerox printer is emulating)
For simple applications, XDPE/400 can generate printer control
commands for your jobs automatically without having to change your
application program.
Getting Started
High-end printing and processing
XDPE/400’s high-end printing and processing capabilities allow you to
fully utilize XDPE/400 and your printer, or to change a job after it has been
processed by the application. XDPE/400 provides an easy way to utilize
these features by including Xerox printer control commands in your line
mode documents using packets. A packet is a collection of printer control
commands.
In most cases, you can create printer control packets using familiar
OS/400 screens without having to learn Xerox printer programming
languages or the syntax for Xerox printer control commands.
If you plan to print to a Xerox XPPM printer, you need to create DJDE
packets. Likewise, if you plan to print to an XDPM, PCL, or PostScript
printer, your packets need to consist of XES, PCL, or VIPP commands,
respectively.
Introduction to XDPE/400 (9/2001) 1-7
Page 24

Depending on your printer type and printer language, you can use
XDPE/400 to create processing packets for these high-end functions:
• List processing
• Logical processing
• Multi-part printing
• Multi-up printing
List processing
List processing allows you to create a list of objects to be processed with
a job. You can list:
• Printer resources to be downloaded (fonts, forms, PDEs, macros,
etc.)
• Printer control packets and a control character to specify the mode
of command generation
• Logical processing packets
Logical processing
Getting Started
Logical processing allows you to dynamically change print specifications
on page boundaries within a job. XDPE/400 will search the print data for
a user-specified text string. When a match is found, the printer control
packet you specified will be inserted into the job on that page.
Multi-part printing
Multi-part printing allows you to print multiple versions of a single job. You
can specify different processing modes, packets, and destinations for
each version, tailoring each to your needs.
Multi-up printing
Multi-up printing prints multiple logical pages on a physical page. With
XDPE/400, you can print up to 32,767 logical pages on each physical
page, depending on the capabilities of your printer.
Resource management
For XPPM, XDPM, or PCL printers, XDPE/400 provides a series of menus
for your use in managing printer resources. These resource management
menus allow you to manually download resources to the printer. Or you
can use list processing to download resources for your jobs automatically.
Depending on the printer type, the printer resources can consist of fonts,
forms, images, logos, JDLs, PDLs, FSLs, JSLs, and macros.
For PostScript printers, XDPE/400 provides commands that allow you to
manually download VIPP or PostScript resources to the printer. The
printer resources can consist of fonts, forms, images, Job Descriptor
Tickets (JDTs), encoding tables, segments, and VIPP core and setup
files.
Introduction to XDPE/400 (9/2001) 1-8
Page 25

Monitoring output queues
Supported printers
Getting Started
An XDPE/400 batch job called the Monitor Queue monitors your
application output queue for spool files that are ready to be processed for
printing. When one of these spool files is found, XDPE/400 generates
printer control commands and sends these commands to the printer with
your spool file.
You can start multiple sessions of Monitor Queue, but each session must
monitor a different output queue. Each session operates independently
and can be set up specifically for the needs of that session. For example,
you can have a session printing to a 4235 printer in XPPM mode running
concurrently with a session printing to a 4220 printer in PCL mode via a
network.
XDPE/400 supports these types of Xerox printers and data streams:
• Xerox Production Print Mode (XPPM) printers using data streams
containing dynamic job descriptor entries (DJDEs)
• Xerox Distributed Print Mode (XDPM) printers using data streams
containing Xerox Escape Sequences (XESs)
• Printer Control Language (PCL) printers using PCL data streams
• PostScript printers using Variable Data Intelligent PostScript
PrintWare (VIPP) data streams
Xerox Production Print Mode printers
These Xerox Production Print Mode (XPPM) printers accept data streams
containing dynamic job descriptor entries (DJDEs) as printer control
commands. The abbreviated model numbers in parenthesis are used in
place of the complete model number names in all other references in this
manual.
• 9790
• 9700
• 8790
• 8700
• 4890
• 4850
• 4635
• 4450
• 4235
• 4135
• 4090
• 4050
• 3700
• DocuPrint 180 LPS (180 LPS)
• DocuPrint 96 (DP96)
• DocuPrint 92C LPS (92C LPS)
Introduction to XDPE/400 (9/2001) 1-9
Page 26

Xerox Distributed Print Mode printers
These Xerox Distributed Print Mode (XDPM) printers accept data streams
containing Xerox Escape Sequences (XESs) as printer control
commands:
• 4700
• 4235
• 4213 II
• 4030
• 3700
Xerox Printer Control Language printers
These Xerox Printer Control Language (PCL) printers process PCL data
streams. The abbreviated model numbers in parenthesis are used in
place of the complete model number names in all other references in this
manual.
• 4230/MRP (4230)
• 4220/MRP (4220)
• 4219/MRP (4219)
• 4215/MRP (4215)
• Document Centre 265LP (DC265LP)
• Document Centre 255LP (DC255LP)
• DocuPrint 4890 NPS (4890 NPS)
• DocuPrint 4850 NPS (4850 NPS)
• DocuPrint 4635 NPS (4635 NPS)
• DocuPrint 4520/4520mp (4520)
• DocuPrint 4517/4517mp (4517)
• DocuPrint 4512/4512mp (4512)
• DocuPrint 4090 NPS (4090 NPS)
• DocuPrint 4050 NPS (4050 NPS)
• DocuPrint 180 NPS (180 NPS)
• DocuPrint 96 NPS (DP96NPS)
• DocuPrint 92C NPS (92C NPS)
• DocuPrint 65 (DP65)
• DocuPrint N32 (N32)
• DocuPrint N24 (N24)
References to NPS printers refer to these NPS printer models: 4890 NPS,
4850 NPS, 4635 NPS, 4090 NPS, 4050 NPS, 180 NPS, DP96NPS, and
92C NPS.
References to DocuSP printers refer to the DP65 printer.
Getting Started
Introduction to XDPE/400 (9/2001) 1-10
Page 27

Xerox PostScript printers
These Xerox PostScript printers process Variable Data Intelligent
PostScript PrintWare (VIPP) data streams. The abbreviated model
numbers in parentheses are used in place of the complete model number
names in all other references in this manual.
• DocuPrint 4890 NPS (4890 NPS)
• DocuPrint 4850 NPS (4850 NPS)
• DocuPrint 4635 NPS (4635 NPS)
• DocuPrint 4090 NPS (4090 NPS)
• DocuPrint 4050 NPS (4050 NPS)
• DocuPrint 180 NPS (180 NPS)
• DocuPrint 96 NPS (DP96NPS)
• DocuPrint 92C NPS (92C NPS)
• DocuPrint 65 (DP65)
• DocuPrint N4025 (N4025)
• DocuPrint N3225 (N3225)
• DocuPrint N2825 (N2825)
• DocuPrint N2125 (N2125)
• DocuPrint N2025 (N2025)
• DocuPrint N40 (N40)
• DocuPrint N32 (N32)
• DocuPrint N24 (N24)
• DocuPrint N17 (N17)
References to NPS printers refer to these NPS printer models: 4890 NPS,
4850 NPS, 4635 NPS, 4090 NPS, 4050 NPS, 180 NPS, DP96NPS, and
92C NPS.
References to DocuSP printers refer to the DP65 printer.
References to N-series printers refer to these N-series printer models:
N4025, N3225, N2825, N2125, N2025, N40, N32, N24, and N17.
Getting Started
Generic printer devices
Generic printer device support is available for the following data streams:
• LCDS
•PCL
• PCL with Xerox Job Tickets
• VIPP
Generic printer devices provide the ability to use new printers during the
time period between the introduction of the printer and the implementation
and verification of support for the printer in XDPE/400.
Generic device support capabilities are limited to the functional
capabilities common to all currently supported LCDS, PCL, and VIPP
printers.
Advanced features may be implemented by using generic packets, DSC,
or by adding entries to job tickets.
Introduction to XDPE/400 (9/2001) 1-11
Page 28

Getting Started
Introduction to XDPE/400 (9/2001) 1-12
Page 29

2. 2 New and updated XDPE/400 features
This chapter describes the new and updated features included in version
2.1.4 of XDPE/400. The enhancements made for versions 2.1.3, 2.1.2,
2.1.1, 2.1, and 2.0 also are listed here to help those users migrating from
previous versions of XDPE/400.
All features and enhancements listed in this chapter are documented
within this manual. Information added or modified for XDPE/400 2.1.4 is
marked with change bars in the margin; editorial and formatting changes
are not marked.
New features in XDPE/400 2.1.4
XDPE/400 offers several new features and enhancements for 2.1.4.
These new features and enhancements include:
• Generic device support
• OS/400 5.1 compliance
• VIPP 2001 compliance
• N-series printers in VIPP mode support
• Revised parameters
Generic device support
XDPE/400 now supports the use of generic devices. Monitor Queue and
resource download commands have been modified to allow users to
specify non-specific print devices. Generic device types are:
• *DOCUSP
•*LCDS
•*NPS
•*PCL
• *VIPP
•*XJT
OS/400 5.1 support
XDPE/400 2.1.4 supports OS/400 5.1.
VIPP 2001 compliance
XDPE/400 2.1.4 supports VIPP 2001.
Introduction to XDPE/400 (9/2001) 2-1
Page 30

New and updated XDPE/400 features
N-series printers in VIPP mode support
XDPE/400 now supports the following N-series printers:
• DocuPrint N4025 (N4025)
• DocuPrint N3225 (N3225)
• DocuPrint N2825 (N2825)
• DocuPrint N2125 (N2125)
• DocuPrint N2025 (N2025)
• DocuPrint N40 (N40)
• DocuPrint N32 (N32)
• DocuPrint N24 (N24)
• DocuPrint N17 (N17)
The following downloadable printer resources have been added:
• DNLDVIPENC — Downloads VIPP encoding tables
• DNLDVIPFNT — Downloads VIPP font resources
• DNLDVIPFRM — Downloads VIPP form resources
• DNLDVIPIMG — Downloads VIPP image resources
• DNLDVIPJDT — Downloads VIPP JDT resources
NOTE: List processing support of VIPP-enabled printers is limited to
N-series printers. The list processing feature does not support
resource downloads or the use of generic files for DocuSP and NPS
printers in VIPP mode.
Revised parameters
This section lists the parameters that have been revised for XDPE/400
2.1.4 processing. For more information on these parameters, refer to
Section Three: Printing Documents with XDPE/400.
Monitor Queue parameters
• Printer model (MODEL) — Specifies the printer model to be used
during your Monitor Queue session.
XPPM download resource (DNLDxxxRSC) parameters
• Printer model (MODEL) — Specifies the model number of the Xerox
printer to download the resource.
PCL download resource (DNLDxxxRSC) parameters
• Printer model (MODEL) — Specifies the model number of the Xerox
printer to download the resource.
Introduction to XDPE/400 (9/2001) 2-2
Page 31

New features in XDPE/400 2.1.3
New features and enhancements for 2.1.3 include:
• VIPP page-level support
• PCL euro font support
• OS/400 4.5.0 compliance
• Added printer support
• Revised parameters
• XDPE/400 2.1.3 distributed on CD-ROM
• User documentation distributed on CD-ROM
VIPP page-level support
XDPE/400 now supports the processing of VIPP data streams for
PostScript printers on a page-level basis. Page-level support offers the
use of Job Descriptor Tickets (JDTs) at page boundaries using the
XDPE/400 logical processing feature.
VIPP now supports both the logical processing and list processing
features. However, the list processing feature currently does not support
either the downloading of resources or the use of generic files in VIPP
mode.
New and updated XDPE/400 features
PCL euro font support
XDPE/400 is certified to process PCL jobs utilizing Xerox printer-resident
and downloadable euro fonts. The NPS, N32, and N24 PCL printers
support resident fonts.
OS/400 4.5.0 support
XDPE/400 2.1.3 supports OS/400 4.5.0. The following IBM maintenance
must be applied:
• Cumulative maintenance C0231450
• PTF SF63410
Added printer support
XDPE/400 now supports these printers:
• XPPM printer — DocuPrint 92C LPS (92C LPS)
• PCL/PostScript printer — DocuPrint 92C NPS (92C NPS)
Note these considerations when using the 92C NPS printer:
• Automatic tray selection is based on the page size.
• Resource downloading is not supported, except embedded within a
print job.
Introduction to XDPE/400 (9/2001) 2-3
Page 32

Revised parameters
This section lists the parameters that have been revised for XDPE/400
2.1.3 processing. For more information on these parameters, refer to
Section Three: Printing Documents with XDPE/400.
Global value parameters
• Source file translation table (RESLIB) — Specifies the name of the
ASCII-to-EBCDIC translation table for the QDCXLATE API to use
when downloading source files (FSL or JSL) and multi-up packets to
Xerox printers.
• PC/Support translation table (PCSLIB) — Specifies the name of the
translation table that the system uses when constructing printer
language commands, multi-up data, XES data, and XES resources
for local and network processing. XDPE/400 converts all printer
commands and data from EBCDIC to ASCII and writes them to an
ASCII spool file.
New and updated XDPE/400 features
Logical processing (LPP) parameters
• When to apply (WHEN) — Specifies when and where to insert the
printer control packet. *TOP is supported in VIPP mode; *BOTTOM
is not supported in VIPP mode.
Monitor Queue parameters
• Printer model (MODEL) — Specifies the printer model to be used
during your Monitor Queue session.
• Workstation customizing object (WSCST) — For network printing,
this parameter specifies the workstation customizing object that
contains the Host Print Transform table to be used for this Monitor
Queue session.
PCL font parameters
• Font file name (PCLFONTS) — Specifies the name of the file in the
XDPEFLR/PCLFONTS folder that contains the font definition to be
downloaded. PCLFONTS can also specify a list name, preceded by
the at sign (@), that contains the names of multiple resources to be
downloaded.
Introduction to XDPE/400 (9/2001) 2-4
Page 33

New and updated XDPE/400 features
PCL packet parameters
• Font selection by attributes (FONT) — Selects the initial page font to
be used for the page by PCL font attributes. You must explicitly
specify all seven attributes to make sure the font you want matches
a font that is resident on the printer. If an exact match is not found,
the default printer font is used.
XPPM download resource (DNLDxxxRSC) parameters
• Printer model (MODEL) — Specifies the model number of the Xerox
printer to download the resource.
XDPE/400 2.1.3 distributed on CD-ROM
XDPE/400 is now distributed on CD-ROM, in ISO 9660 format. The
XDPE/400 installation instructions have been modified to support the new
CD-ROM media, as well as the existing media types. See Section Two:
Installing and Customizing XDPE/400 for the updated installation
instructions.
User documentation distributed on CD-ROM
The XDPE/400 documentation is now available on CD-ROM, in ISO 9660
format. The documentation is saved in Portable Document Format (PDF),
which requires Adobe Acrobat Reader for viewing and printing. Acrobat
Reader 4.0 is included on the CD-ROM.
Introduction to XDPE/400 (9/2001) 2-5
Page 34

New features in XDPE/400 2.1.2
New features and enhancements for 2.1.2 include:
• VIPP job-level support
• Xerox extended job ticket support
• OS/400 4.3.0 and 4.4.0 compliance
• Additional PCL printers supported
• Euro font certification
• Revised parameters
• New commands
VIPP job-level support
XDPE/400 now supports the processing of VIPP data streams for
PostScript printers on a job-level basis.
For additional information about VIPP command elements, refer to the
Xerox Variable Data Intelligent PostScript PrintWare (VIPP) Reference
Manual. See the PostScript Language Reference Manual for information
on PostScript command elements.
New and updated XDPE/400 features
Xerox extended job ticket support
XDPE/400 now supports the use of Xerox extended job ticket packets for
setting up complex print jobs on PCL printers. This feature functions on
NPS and DocuSP printers in PCL mode with job ticket processing enabled
on the printer controller.
Extended job ticket packet processing is supported using the Direct and
Combined command generation methods. The Indirect command
generation method is not supported.
It is the responsibility of the user to know and understand the job ticket
command syntax and usage. For more information, refer to Xerox
Production Systems Job Ticket Programming Guide.
For a list of options available on your NPS and DocuSP printers, refer to
the Xerox Production Systems Job Ticket Programming Guide.
OS/400 4.3.0 and 4.4.0 support
XDPE/400 2.1.2 supports OS/400 4.3.0 and 4.4.0. The following IBM
corrective maintenance must be applied:
• PTF SF52738 for OS/400 4.3.0
• PTF SF51099 if you will be running an NPS printer in PCL mode
using NPS version 1.6 or higher, or in VIPP mode using any NPS
version
Introduction to XDPE/400 (9/2001) 2-6
Page 35

Added PCL printer support
XDPE/400 2.1.2 supports these additional PCL network printers:
• DocuPrint 96 NPS (DP96NPS)
• DocuPrint 65 (DP65)
Note these considerations when using the DP96NPS or DP65 printer:
• Automatic tray selection is based on the page size.
• Resource downloading is not supported, except embedded within a
print job.
NOTE: XDPE/400 capabilities are limited to the current level of PCL
support in XDPE/400 and to the functional abilities of the printers.
Euro font certification
New and updated XDPE/400 features
XDPE/400 is certified to process DJDE and XES jobs utilizing the Xerox
Euro fonts. PostScript jobs utilizing the type 1 Euro fonts with
extension.pfb also have been certified. PCL and all other PostScript jobs
are not yet certified.
Revised parameters
This section lists the parameters that have been revised for XDPE/400
2.1.2 processing.
Monitor Queue parameters
• Printer model (MODEL) — Specifies the model to be used during
your Monitor Queue session.
• Printer mode (MODE) — Specifies the mode in which the printer will
operate.
• Workstation customizing object (WSCST) — For network printing,
this parameter specifies the workstation customizing object that
contains the Host Print Transform table to be used for your Monitor
Queue session.
PCL packet parameters
• Job ticket processing (XTICKET) — New parameter that allows for
the specification of extended job ticket processing subparameters,
which are valid for NPS and DocuSP printers only.
• Paper type (PAPERTYPE) — Selects the source tray based on the
paper type. This parameter applies to the N32, N24, NPS, and
DocuSP printers only.
Introduction to XDPE/400 (9/2001) 2-7
Page 36

New commands
This section lists commands that have been added for XDPE/400 2.1.2
processing.
Xerox extended job ticket commands
• Create Xerox Job Ticket (CRTXTCK) — Allows you to create a Xerox
• Change Xerox Job Ticket (CHGXTCK) — Allows you to edit, display,
• Delete Xerox Job Ticket (DLTXTCK) — Allows you to delete a Xerox
VIPP commands
• Create VIPP Resource (CRTVIPRSC) — Allows you to create a
New and updated XDPE/400 features
extended job ticket packet.
or print a Xerox extended job ticket packet.
extended job ticket packet.
VIPP resource.
• Change VIPP Resource (CHGVIPRSC) — Allows you to edit,
display, or print a VIPP resource or DSC packet.
• Delete VIPP Resource (DLTVIPRSC) — Allows you to delete a VIPP
resource or DSC packet.
• Download VIPP Resource (DNLDVIPRSC) — Allows you to
download a VIPP or PostScript resource.
Introduction to XDPE/400 (9/2001) 2-8
Page 37

New features in XDPE/400 2.1.1
New features and enhancements for 2.1.1 include:
• Trailer separator page support
• Duplex extended support
• OS/400 4.2.0 compliance
• Additional PCL and XPPM printers supported
• New and revised parameters
Trailer separator page support
XDPE/400 now has the ability to produce trailer separator pages. A trailer
page is a separator page that prints at the end of a job.
Trailer separator pages are enabled at the Monitor Queue level. The
Process separator page (BANNER) Monitor Queue parameter has been
modified to add the options TRAILER and BOTH. The existing option YES
directs the Monitor Queue to produce only banner pages; TRAILER
directs the Monitor Queue to produce only trailer pages; and BOTH
directs the Monitor Queue to print both banner and trailer pages.
This enhancement does not affect current banner separator page
processing. A trailer separator page template is included in
XDPE212\XDPEBANNER\TRAILER.
New and updated XDPE/400 features
Duplex extended support
XDPE/400 duplex extended support allows you to choose between two
duplexing standards for PCL jobs — either the standard defined by
Hewlett Packard’s PCL or by IBM’s OS/400. You can select the duplex
standard of your choice through the Duplex standard (DUPLEXSTD)
global value.
OS/400 4.2.0 compliance
XDPE/400 2.1.1 has been modified to support OS/400 version 4.2.0. If
you are running XDPE/400 on OS/400 version 4.2.0, all modules in the
XDPE/400 application library must be converted to run within the 64-bit
RISC architecture of OS/400 4.2.0. Depending on the configuration of
your AS/400 system, the XDPE/400 application library may be converted
automatically during installation.
Introduction to XDPE/400 (9/2001) 2-9
Page 38

Added printer support
XDPE/400 2.1.1 supports these additional printers:
• PCL printers
— Document Centre 265LP
— Document Centre 255LP
— DocuPrint 180 NPS
— DocuPrint N32
— DocuPrint N24
• XPPM printers
— DocuPrint 180 LPS
— DocuPrint 96
New and revised parameters
Several parameters have been added or revised for XDPE/400 2.1.1
processing.
New and updated XDPE/400 features
Monitor Queue parameters
• Printer model (MODEL) — Specifies the printer model to be used
during your Monitor Queue session.
• Process separator page (BANNER) — Specifies the type of
separator pages to be printed with your jobs, either
AS/400-generated or XDPE/400-generated.
• Separator page source (BANNERSRC) — Specifies the source tray
for the selection of separator pages, both banners and trailers.
• Data page source (DATASRC) — Specifies the source tray for the
selection of data pages.
Global Values
• Source drawer assignments (DRAWER) — Maps values in the
Source drawer (DRAWER) printer file parameter to Xerox source
trays.
• Duplex standard (DUPLEXSTD) — Specifies the duplex standard to
be set for all PCL data streams processed through XDPE/400, as
defined by either HP or IBM.
XPPM download resource (DNLDxxxRSC) parameters
• Printer model (MODEL) — Specifies the model number of the Xerox
printer to download the resource.
Introduction to XDPE/400 (9/2001) 2-10
Page 39

New and updated XDPE/400 features
Download PCL macro (DNLDPCLMAC) parameters
• Printer model (MODEL) — Specifies the printer model number.
• Macro name (MACRONAME) — Specifies the macro name to use in
subsequent PCL macro management commands.
Download PCL font (DNLDPCLFNT) parameters
• Printer model (MODEL) — Specifies the printer model number.
• Font name (FONTNAME) — Specifies the font name to use in
subsequent PCL font management commands. This parameter
applies only to the N32 and N24 printers.
Printer file parameters for PCL processing
• DUPLEX — Specifies whether to print the output on one side
(simplex) or on both sides (duplex) of the page.
• DRAWER — Specifies the source drawer from which paper is fed
into the printer.
• PAGESIZE — Specifies the length and width of the page to be
printed.
PCL packet parameters
• Print on both sides of sheet (DUPLEX) — Specifies whether to print
on both sides or on one side of a sheet.
• Source tray (TRAY) — Selects the correct paper tray on a job or
page level.
• Margin setting (MARGIN) — Assigns page margin settings.
• Font selection by alphanumeric font name (FONTNAME) — Allows
for the invocation of a pre-loaded font.
• Paper type (PAPERTYPE) — Selects the source tray based on
paper type.
Introduction to XDPE/400 (9/2001) 2-11
Page 40

New features in XDPE/400 2.1
Enhancements for 2.1 include:
• Banner page enhancements
• Additional PCL printers supported
• Revised parameters
Banner page enhancements
In preparation for the year 2000 compliance, the sample banner page
templates supplied with XDPE/400 have been updated to accommodate
the updated field size of a four-digit year. The banner templates included
with XDPE/400 are located in the SAMPLE file in the XDPE/400
application library.
Added PCL printer support
XDPE/400 2.1 supports these additional network printers in PCL mode:
• DocuPrint 4890 NPS
• DocuPrint 4850 NPS
• DocuPrint 4635 NPS
• DocuPrint 4520/4520mp
• DocuPrint 4517/4517mp
• DocuPrint 4512/4512mp
• DocuPrint 4090 NPS
• DocuPrint 4050 NPS
New and updated XDPE/400 features
Revised parameters
Several parameters have been revised for XDPE/400 2.1 processing.
Monitor Queue parameters
• Printer model (MODEL) — Specifies the printer model to be used
during this Monitor Queue session.
• Separator page source (BANNERSRC) — Specifies the source tray
for printing banner pages.
• Data page source (DATASRC) — Specifies the source tray for
printing data pages.
Introduction to XDPE/400 (9/2001) 2-12
Page 41

New and updated XDPE/400 features
Global Values
• Source drawer assignments (DRAWER) — Maps values in the
Source drawer (DRAWER) printer file parameter to Xerox source
trays.
PCL macro and PCL font parameters
• Printer model (MODEL) — Specifies the printer model.
PCL packet parameters
• Source tray (TRAY) — Selects the correct paper tray on a job or
page level.
Introduction to XDPE/400 (9/2001) 2-13
Page 42

New features in XDPE/400 2.0
New features and enhancements for 2.0 include:
• Multi-up printing
• Report distribution for multi-part print jobs
• 42XX internal interface enhancements
• PCL packet enhancements
• Network print support
• Spool file processing without printer device
• Banner page enhancements
• New and revised parameters and fields
Multi-up printing
Multi-up printing allows you to print multiple pages of output on one
physical page. XDPE/400 now has two levels of multi-up functionality. In
addition to the *INDIRECT method of multi-up generation allowing up to 4
logical pages per physical side, you may now print up to 32,767 logical
pages per physical page in *DIRECT mode using the enhanced multi-up
printing features for XES and PCL packets.
Multi-up printing using *DIRECT mode is controlled by the Number of
pages per side (PAGESPSIDE) XES or PCL packet parameter and the
Multi-up packet name (PCLMUP or XESMUP) packet parameter. The
PAGESPSIDE parameter specifies the number of logical pages to place
on a page, while the PCLMUP or XESMUP parameter specifies the
multi-up packet to use. These values work together to create the desired
output.
New and updated XDPE/400 features
Report distribution for multi-part print jobs
Processing for multi-part print jobs has been enhanced to allow you to
specify an output queue and library for each item on the packet list. This
enables you to send each spool file to a different output queue. Note,
however, that each output queue must support the data stream type you
specify in the Monitor Queue.
NOTE: Because only one printer/interface box configuration can be
specified for a Monitor Queue session, all of the printer/interface
boxes linked to the output queues you specify in a multi-part job must
support this configuration.
Also, you can now print multi-part packets in conjunction with TCP/IP and
Host Print Transform to send PCL ASCII spool files to network-attached
printers.
Introduction to XDPE/400 (9/2001) 2-14
Page 43

New and updated XDPE/400 features
42XX internal interface enhancements
The MRP feature allows you to set the i-data Y36 command through
XDPE/400. This enhancement applies only to the 42XX i-data interface
box used with the 4230, 4220, 4219, and 4215 printers.
The Y36 command determines how the interface box handles IBM SCS
control codes that are sent to it. A value for MRP internal interface (MRP)
can be entered in both the Monitor Queue and PCL packets. If a value is
entered for the MRP internal interface (MRP) Monitor Queue parameter,
that value is used as the default for that Monitor Queue session. If the
Monitor Queue encounters a PCL packet that contains a value for the
MRP internal interface parameter other than *NONE, that value overrides
the MRP parameter value in the Monitor Queue for the duration of the job
using that PCL packet. When the job has finished processing, XDPE/400
resets the MRP parameter to the default Monitor Queue value.
For more information about this feature, refer to the i-data Twinax
XES/PCL Interface Controller for Xerox Printers Programmer’s Guide.
PCL packet enhancements
In addition to enhanced MRP processing, the *COR option was added for
the Paper Orientation field on the Create Xerox PCL Packets menu. This
option selects Computer Output Reduction (COR) processing, which
reduces output by 70 percent to fit on a letter-sized page in landscape
orientation.
XDPE/400 reduces the logical page size using these processing options:
• Substitutes the original fonts with smaller fonts
— 14 pitch for 10 pitch fonts
— 15 pitch for 12 pitch fonts
— 20 pitch for 15 pitch fonts
— 27 pitch for 17 pitch fonts
• Reduces the vertical line spacing to 70 percent of the full size
• Modifies the top and left margins to 1/2 inch
For more information on the *COR option, refer to the i-data Twinax
XES/PCL Interface Controller for Xerox Printers Programmer’s Guide.
Network print support
In addition to the implementation of TCP/IP in XDPE/400, you may now
print documents over the network using TCP/IP and the Host Print
Transform (HPT) feature.
HPT is an IBM OS/400 utility that converts an EBCDIC SCS data stream
into an ASCII data stream. XDPE/400 uses HPT internally to transform the
spool files for use with ASCII printers.
Introduction to XDPE/400 (9/2001) 2-15
Page 44

New and updated XDPE/400 features
Spool file processing without printer device
You may now process spool files independently of the actual printing of
those files. Previously, you were required to specify a printer writer that
was connected to an active printer that had to be available at the time of
processing.
With this enhancement, XDPE/400 can process spool files when the
processing resources are available, and print the files when the printers
are available.
Banner page enhancements
The &PRINTEXT variable data token was added to banner page
processing. When used, this token prints on the bottom of each page of
printed output and on the separator page. The field width is 30 characters,
and the data is taken from the spool file attribute.
New and revised parameters
Several parameters have been added and revised for XDPE/400 2.0
processing.
Monitor Queue parameters
• Device class (DEVCLS) — Specifies the class of printing device,
whether it is printing locally, printing over a network to an SCS
EBCDIC-configured printer, or printing over a network to an ASCII
printer.
• MRP internal interface (MRP) — For a 42XX i-data interface box
attached to a 4230, 4220, 4219, or 4215 printer only, specifies the
Y36 command to use for determining how the interface box handles
IBM control codes that are sent to it.
• Printer model (MODEL) — Specifies the printer model to be used
during this Monitor Queue session.
• Printer writer (WTR) — Specifies the name of the printer writer or
device description file assigned to Monitor Queue.
• Workstation customizing object (WSCST) — Specifies the name of
the workstation customizing object that contains the HPT tables you
wish to use for this Monitor Queue session.
• Library — Specifies the name of the library where the WSCST is
located.
Introduction to XDPE/400 (9/2001) 2-16
Page 45

XES packet parameters
• Multi-up packet name (XESMUP) — Specifies the name of the
multi-up packet that contains the relevant font and positioning
information for this job.
• Number of copies (COPIES) — Specifies the number of copies of a
job to be printed.
• Number of pages per side (PAGESPSIDE) — Specifies the number
of logical pages to be printed on each physical page.
• MRP internal interface (MRP) — For a 42XX i-data interface box
attached to a 4230, 4220, 4219, or 4215 printer only, specifies the
Y36 command to use for determining how the interface box handles
IBM control codes that are sent to it.
• Multi-up packet name (PCLMUP) — Specifies the name of the
multi-up packet that contains the relevant font and positioning
information for this job.
• Number of pages per side (PAGESPSIDE) — Specifies the number
of logical pages to be printed on each physical page.
• Paper orientation (ORIENT) — Specifies the page orientation to use
when printing the document.
New and updated XDPE/400 features
Multi-part packet parameters
• Output queue — Specifies the queue where the spool file created by
the multi-part printer control packet is sent.
• Library — Specifies the name of the library where the output queue
is located.
Introduction to XDPE/400 (9/2001) 2-17
Page 46

New and updated XDPE/400 features
Introduction to XDPE/400 (9/2001) 2-18
Page 47

Section Two: Installing and Customizing XDPE/400
Page 48

Installing and Customizing XDPE/400 (9/2001)
Page 49

3. 3 Migration actions
This chapter contains information and/or procedures you may need when
migrating from an older version of XDPE/400 to XDPE/400 2.1.4. The
following topics are covered:
• XDPE/400 2.1.4 migration actions
• Converting from XDPE/400 2.0
If you are converting from any version of XDPE/400 to XDPE/400 2.1.4,
make sure you read “XDPE/400 2.1.4 migration actions.” If you are
converting from XDPE/400 2.0, you also need to read “Converting from
XDPE/400 2.0.”
XDPE/400 2.1.4 migration actions
If you are converting to XDPE/400 2.1.4 from any version of XDPE/400,
read and consider all the information in this section carefully before
applying the XDPE/400 2.1.4 base tape.
Installation considerations
Note these considerations when installing XDPE/400 2.1.4:
• The name of the XDPE/400 application library will change to
XDPE214.
• All XDPE/400 objects in the XDPE/400 application library will be
replaced.
• Public authority for XDPE/400 folders, subfolders, and documents
will be set to the minimum authority needed for XDPE/400
processing.
• If you will be printing *INDIRECT or *COMBINED IVPs on A4 paper
using an NPS or DocuSP printer, issue this command before running
the first IVP:
CHGPRTF
FILE(XDPE214/XIVPRTF)
PAGESIZE(70 124 *ROWCOL)
Installing and Customizing XDPE/400 (9/2001) 3-1
Page 50

OS/400 version requirements
Your AS/400 system must have the following:
• OS/400 version 4.4.0, 4.5.0, or 5.1
• These OS/400 PTFs:
— For 4.4.0, no OS/400 PTFs are required.
— For 4.5.0, apply cumulative maintenance C0231450 and PTF
SF63410.
— For 5.1, no OS/400 PTFs are required.
Converting from XDPE/400 2.0
If you are converting to XDPE/400 2.1.4 from 2.0, read and consider the
following before applying the XDPE/400 2.1.4 base tape.
• All source samples included with XDPE/400, including workstation
customizing objects and banner templates, are now located in a file
called SAMPLE in the XDPE/400 application library.
Migration actions
• In preparation for the year 2000 compliance, the XDPE/400 banner
templates have been updated to allow for a four-digit year instead of
a two-digit year. The field width of the &DATE, &FILEDATE, and
&JOBDATE data tokens has been increased from 8 characters to 10
characters.
If you have a customized banner page template you want to use
instead of the samples supplied with XDPE/400, you should allow for
the additional size of these fields.
Installing and Customizing XDPE/400 (9/2001) 3-2
Page 51

4. 4 Installation requirements
This chapter describes the system requirements and migration issues that
need to be addressed before installing XDPE/400.
Requirements
Before you install XDPE/400, make sure that your AS/400 system and
Xerox printer configuration are ready to work with XDPE/400.
XDPE/400 runs in IBM-supported OS/400 environments. When IBM
releases new operating system release levels, XDPE/400 will be updated
to ensure compatibility. Conversely, when IBM withdraws support for an
operating system release level, Xerox also will withdraw support of that
release level six months later. Contact your local Xerox representative or
review the bulletin accompanying your latest maintenance to verify
specific supported software release levels.
AS/400 system requirements
To install and run XPDE/400, your AS/400 system must meet these
requirements:
• OS/400 version 4.4.0, 4.5.0, or 5.1. These IBM PTFs are required:
— For 4.4.0, no PTFs are required.
— For 4.5.0, apply cumulative maintenance C0231450 and PTF
SF63410.
— For 5.1, no PTFs are required.
• Twinaxial workstation controller or TCP/IP
• A minimum of 35 megabytes (MB) of available disk storage
• At least one of these devices:
— CD-ROM drive
— 1/4-inch cartridge tape drive
— 8-mm cartridge tape drive
— 1/2-inch 3480 or 3490 tape drive
— 1/2-inch reel-to-reel tape drive (1600 bpi)
NOTE: XDPE/400 is distributed on CD-ROM. Other media types
are available upon request.
Installing and Customizing XDPE/400 (9/2001) 4-1
Page 52

Security requirements
The following sections list security requirements for running XDPE/400.
Requirements are provided for level 30 and lower, and for levels 40 and
50. These requirements apply to all levels:
• To use XDPE/400, your user profile does not require *JOBCTL and
*SPLCTL special authority. The XDPEUSR user profile has
*JOBCTL and *SPLCTL special authorities, which are adopted for
every Monitor Queue session. Refer to OS/400 Advanced Series
Security — Basic for more information about security
implementation.
• You must be entered in the system directory and have *JOBCTL and
*SPLCTL special authority to start, change, end, or reset a Monitor
Queue session. Refer to “Creating an XDPE/400 user profile” in
chapter 5 for instructions on enrolling a user in the system directory.
• Time slice (TIMESLICE) and Run priority (RUNPTY) global values
require *JOBCTL special authority to change.
Determining your security level
Installation requirements
The security requirements for using XDPE/400 depend on the security
level of your system. Use this command to determine your system’s
security level:
DSPSYSVAL SYSVAL(QSECURITY)
Requirements for level 30 and lower
In this document, it is assumed that XDPE/400 users have Public
authority (*PUBLIC). For security levels up to and including 30, the
security requirements for XDPE/400 users are as follows:
• You must have *USE authority to the XDPEUSR user profile object
(*USERPRF). You can verify or change this authority using the Edit
Object Authority (EDTOBJAUT) command.
• You must have at least *USE authority to the MONQJOBD job
description object (*JOBD) in the XDPE/400 application library. You
can verify or change this authority using the Edit Object Authority
(EDTOBJAUT) command.
• You must have at least *USE authority to all the objects in XDPEFLR
required for each job. You can verify this authority using the Display
DLO Authority (DSPDLOAUT) command or change this authority
using the Change DLO Authority (CHGDLOAUT) command.
• You must have these authorities for the output queue to be
monitored:
— The *OUTQ object requires *OBJMGT special authority and
*CHANGE authority. You can verify or change this authority
using the Edit Object Authority (EDTOBJAUT) command.
— The Authority to check (AUTOCHK) parameter must be
*DTAAUT. You can verify or change this authority using either
the Create Output Queue (CRTOUTQ) or Change Output Queue
(CHGOUTQ) commands.
Installing and Customizing XDPE/400 (9/2001) 4-2
Page 53

Installation requirements
• You must have *CHANGE and *OBJMGMT authority to the
XDPEMQSESS file. You can verify or change this authority using the
Edit Object Authority (EDTOBJAUT) command.
• To work with XDPE/400, you must have *USE authority for specific
IBM-supplied programs (API objects of the type *PGM). Consult your
security administrator for any security-related issues before
changing the authorities to the following programs.
Spool file APIs User space APIs HFS APIs Other APIs
QSYS/QSPCRTSP
QSYS/QSPGETSP
QSYS/QSPOPNSP
QSYS/QSPPUTSP
QSYS/QSPCLOSP
Requirements for levels 40 and 50
QSYS/QUSCRTUS
QSYS/QUSCHGUS
QSYS/QUSDLTUS
In addition to the security requirements for security levels up to and
including 30, security levels 40 and 50 require that the XDPEUSR user
profile have *SAVSYS special authority as well as authorization to these
objects in the QSYS library:
• RSTLIB (type *CMD)
• RSTDLO (type *CMD)
Every user, other than XDPEUSR, who wants to start a Monitor Queue
session must be enrolled in the system directory.
To enroll a user in the system directory, enter this command and press
ENTER:
ADDDIRE
USRID(user address)
USRD('Monque Starter')
USER(userid)
QSYS/QHFOPNDR
QSYS/QHFOPNSF
QSYS/QHFDLTSF
QSYS/QHFRDDR
QSYS/QHFRNMSF
QSYS/QHFCLODR
QSYS/QHFCLOSF
QSYS/QHFRDSF
QSYS/QHFWRTSF
QSYS/QWCRSVAL
QSYS/QSYRUSRI
where
user address Directory address of the user profile
userid User ID, which can contain up to 8 characters
Printer requirements
This section lists the software release levels required for each printer
supported by XDPE/400.
Installing and Customizing XDPE/400 (9/2001) 4-3
Page 54

Xerox Production Print Mode printers
Table 4-1 lists the XPPM printers supported by XDPE/400 and the printer
software versions supported for each of the printers.
Table 4-1. XPPM printers
Xerox printer Printer software versions
3700 5.3 and higher
4050 2.1 and higher
4090 3.0 and higher
4135 3.5 and higher
1
4235
4450 2.1 and higher
4635 8.3 and higher
1.5 and higher
Installation requirements
4850 3.7 and higher
4890 4.0 and higher
8700 10 and higher
8790 2.1 and higher
9700 10 and higher
9790 2.1 and higher
180 LPS V3C2 R2.4 and higher
DP96 V3C2 R2.4 and higher
92C LPS V5.4 R1.3 and higher
1
Refer to the “4235 mode switching” section of this chapter.
Installing and Customizing XDPE/400 (9/2001) 4-4
Page 55

Xerox Distributed Print Mode printers
Table 4-2 lists the XDPM printers supported by XDPE/400 and the printer
software versions supported for each of the printers.
Table 4-2. XDPM printers
Xerox printer Printer software versions
4700 1.0 and higher
1
4235
4213 II 2.1
4030 1.0
3700 2.6 and higher
1
Refer to the “4235 mode switching” section of this chapter.
1.0 and higher
Installation requirements
Installing and Customizing XDPE/400 (9/2001) 4-5
Page 56

Xerox Printer Control Language printers
Table 4-3 lists the PCL printers supported by XDPE/400 and the printer
software versions supported for each of the printers.
Table 4-3. Xerox PCL printers
Xerox printer Printer software versions
4890 NPS 1.4.2 and higher
1.6.1c and higher for resident euro fonts
4850 NPS 1.4.2 and higher
1.6.1c and higher for resident euro fonts
4635 NPS 1.4.2 and higher
1.6.1c and higher for resident euro fonts
4520 4.03 and higher
4517 1.00.56-0075 and higher
4512 M
Installation requirements
4230 2.20 and higher
4220 2.20 and higher
4219 2013.109 Rel. 4 and higher
4215 2013.109 Rel. 4 and higher
4090 NPS 1.4.2 and higher
1.6.1c and higher for resident euro fonts
4050 NPS 1.4.2 and higher
1.6.1c and higher for resident euro fonts
180 NPS 1.5 and higher
1.6.1c and higher for resident euro fonts
92C NPS 1.6.1 and higher
1.6.1c and higher for resident euro fonts
DC265LP 5.06 and higher
DC255LP 5.06 and higher
DP96NPS 1.5.4 and higher
1.6.1c and higher for resident euro fonts
DP65 DocuSP 1.05.05
N32 1.82.06 and higher
1.87 and higher for resident euro fonts
N24 1.82.06 and higher
1.87 and higher for resident euro fonts
Installing and Customizing XDPE/400 (9/2001) 4-6
Page 57

Xerox PostScript printers
Table 4-4 lists the PostScript printers supported by XDPE/400 to run in
VIPP mode and provides the printer and VIPP software versions
supported by XDPE/400 for each printer.
Table 4-4. Xerox PostScript printers
Installation requirements
Printer software
Xerox printer
4890 NPS 1.5.4 and higher 2.0, 2.1 and higher
4850 NPS 1.5.4 and higher 2.0, 2.1 and higher
4635 NPS 1.5.4 and higher 2.0, 2.1 and higher
4090 NPS 1.5.4 and higher 2.0, 2.1 and higher
4050 NPS 1.5.4 and higher 2.0, 2.1 and higher
180 NPS 1.5.4 and higher 2.0, 2.1 and higher
92C NPS 1.6.1 and higher 2.0, 2.1 and higher
DP96NPS 1.5.4 and higher 2.0, 2.1 and higher
DP65 1.10.05 and higher 2.1 and higher
N4025 1.12.02 and higher 2.1 and higher
N3225 1.12.02 and higher 2.1 and higher
N2825 1.12.02 and higher 2.1 and higher
versions supported
VIPP software
versions supported
N2125 1.12.02 and higher 2.1 and higher
N2025 1.1202 and higher 2.1 and higher
N40 1.87 and higher 2.1 and higher
N32 1.87 and higher 2.1 and higher
N24 1.87 and higher 2.1 and higher
N17 1.86 and higher 2.1 and higher
Installing and Customizing XDPE/400 (9/2001) 4-7
Page 58

4235 mode switching
The Xerox 4235 release 1.5 printer allows you to switch from one print
language (XPPM, XDPM, HP, XS) to another without reconfiguring the
printer. You can override the current print language with another desired
language by embedding Mode Switch (=MCK=) command strings in the
beginning of your data stream and enabling Emulation Mode Switching on
the printer.
If you do not enable Emulation Mode Switching, the 4235 prints the Mode
Switch commands as text instead of interpreting them as commands. For
detailed information on enabling Emulation Mode Switching, refer to the
“System configuration” chapter of the Xerox 4235 Laser Printing Systems
System Administrator Guide.
NOTE: When running jobs to the 4235 in XPPM mode, be sure the
JSL contains only DJDEs supported for the 4235 in XPPM mode.
Refer to 4235 Laser Printing Systems XPPM PDL/DJDE Reference
for more information.
Installation requirements
Generic printer devices
Table 4-5 lists the data streams and related printer language levels
supported by generic printer devices.
Table 4-5. Generic printer devices
Printer designation Minimum software level
*DOCUSP PCL version 5
*LCDS N/A
*NPS PCL version 5
*PCL PCL version 5
*VIPP VIPP version 2.1
*XJT PCL version 5
Installing and Customizing XDPE/400 (9/2001) 4-8
Page 59

Supported printer/interface box configurations
XDPE/400 allows printing to three different device classes: local, remote
(via TCP/IP), and network (via TCP/IP and HPT). The printer/interface box
configurations supported for each type are listed in the following sections.
For more information about configuring your interface box for XDPE/400,
refer to appendix A, “XDPE/400-supported interface boxes.”
Local and remote printing
If you use XDPE/400 with either the local or remote device classes, you
must use a twinaxial-connected interface box to convert the print data
stream for the printer. XDPE/400 supports these twinax-to-Xerox printer
interface boxes:
• 3X Twinax Printstation
• 42XX INTERNAL
• 4450 INTERNAL
• Agile 5250 OPTIMA
•BARR
• Flex i-data 5250 C/RS-Xerox
• IBM AS/400 Client Access (PC Support)
•MPI
•Smart
• Solimar
• Spur/USAll
Table 4-6 shows supported configurations for local and remote printing.
I
Table 4-6. Interface boxes for XDPE/400-supported printers
Installation requirements
Printers
Modes
4230, 4220,
4700, 4213,
4235, 3700
XPPM Flex, Agile, Smart,
3X (4235 only)
XDPM Flex, Agile, MPI,
PCSUPP,
3X (4235 only)
PCL None None None PCSUPP,
4030 II
None INTERNAL None Spur/USAII, Solimar, BARR
Flex, Agile,
MPI,
PCSUPP
4450
None None None
4219, 4215,
*PCL
INTERNAL
9790, 9700, 8790, 8700, 4890,
4850, 4635, 4135, 4090, 4050,
180 LPS, 92C LPS,
DP96,*LCDS
None
Installing and Customizing XDPE/400 (9/2001) 4-9
Page 60

Network printing
Network printing uses TCP/IP in conjunction with the IBM feature called
Host Print Transform (HPT). The HPT feature included with XDPE/400
allows printing to ASCII format printers without an SCS interface box.
These printers are supported with this feature:
• 4890 NPS
• 4850 NPS
• 4635 NPS
• 4520
• 4517
• 4512
• 4230
• 4220
• 4219
• 4215
• 4090 NPS
• 4050 NPS
• 180 NPS
• 92C NPS
• DC265LP
• DC255LP
• DP96NPS
•DP65
• N4025
• N3225
• N2825
• N2125
• N2025
•N40
•N32
•N24
•N17
• *DOCUSP
•*NPS
•*PCL
• *VIPP
•*XJT
Installation requirements
NOTE: When installing the interface for your NPS printer in PCL mode,
you must set the Enable Xerox job ticket processing option to YES.
Table 4-7 shows supported configurations for network printing.
Table 4-7. Interface boxes for XDPE/400-supported network printers
4520, 4517, 4512,
4230, 4220,
4219, 4215,
Mode
PCL PCSUPP,
PostScript — — PCSUPP PCSUPP
*PCL
INTERNAL
DC265LP,
DC255LP,
N32/N24, *PCL
PCSUPP PCSUPP —
4890 NPS, 4850 NPS, 4635 NPS,
4090 NPS, 4050 NPS, 180 NPS,
92C NPS, DP96 NPS, DP65, N32,
N24, *DOCUSP, *NPS, *VIPP, *XJT
N4025, N3225,
N2825, N2125,
N2025, N40, N17
Installing and Customizing XDPE/400 (9/2001) 4-10
Page 61

Interface settings
Verify that the interface between your AS/400 system and your Xerox
printer is set up to emulate an IBM printer and to convert SNA character
mode data. Table 4-8 shows the available interface emulation for each
printer mode. Refer to your specific printer manual for the correct
emulation setting for your printer.
For XPPM mode printers, be sure the Spur or the Solimar interface box is
set to emulate the 5225.
Also verify that the AS/400 can print to the Xerox printer using the AS/400
printer writer.
Table 4-8. Interface emulation by printer mode
Printer type Interface emulation
XPPM IBM 5219
XDPM IBM 3812, IBM 5219, or IBM 5225 ASCII
1
or IBM 5225
Installation requirements
Interface data
conversion
EBCDIC
PCL For twinax only:
PostScript Not applicable Not applicable
1
Setup depends on the interface being used.
OS/400 device description
You must create a device description for your non-network or twinax
locally-attached Xerox printer. If your AS/400 is set up to automatically
configure devices upon connection, the system creates the device
description as soon as you plug in the printer. The OS/400 system value
QAUTOCFG specifies whether devices that are added to the system are
configured automatically.
You can refer to your OS/400 device description when you run sample
jobs at the end of installation.
ASCII
IBM 3812, IBM 5219, or IBM 5225
Installing and Customizing XDPE/400 (9/2001) 4-11
Page 62

Migration issues
Displaying your XDPE/400 library and folder information
Installation requirements
If you do not currently have any version of XDPE/400 installed on your
AS/400, skip to chapter 5, “Installing XDPE/400.”
You can display the software information for your current XDPE/400
library and folder. Enter DSPXDPEVER and press ENTER to:
• Display the name, release level, and maintenance (PTF) level of
your XDPE/400 library and folder
• Display the format (A4 or LETTER) and ID number of your
XDPE/400 folder
For users running XDPE/400 2.1.0 or later, if you need to obtain this
information on a specific XDPE/400 library, press F4 instead of ENTER.
The system prompts you to type in the library name of your choice.
Recording your current global values
If you currently have any version of XDPE/400 installed on your AS/400,
it is imperative that you perform these steps to record your current global
values; they will not be reflected in the version of XDPE/400 you are
installing.
Step 1. Enter WRKGBLVAL to display the Work With Global Values screen.
Step 2. Record your current values for the parameters on the first screen, either
by using the PRINT SCREEN key on your keyboard to print an image of
each screen, or by writing them down.
Step 3. Page forward to display the next screen of global values. Record the
values as you did for the first screen.
Step 4. Repeat steps 2 and 3 until you have recorded the parameters for all 5 of
the Work With Global Values screens.
Installing and Customizing XDPE/400 (9/2001) 4-12
Page 63

Installation requirements
Collecting changes you made to XDPE/400 objects
If you currently have any version of XDPE/400 installed on your AS/400,
be aware that if you altered any objects in the subfolders that were
originally distributed with XDPE/400, your alterations will be overwritten
when you install this new version of XDPE/400.
You will be instructed later to create a backup copy of your XDPEFLR
resource folder. Refer to appendix B for a list of the subfolders contained
in XDPEFLR.
Take time now to determine which of your site objects have been altered
and not renamed. For these objects, determine what alterations you have
made to them. After you install the new XDPEFLR, if you want to use the
objects as before, you must make your alterations to the objects in the
new XDPEFLR.
To facilitate easier installation of XDPEFLR updates in the future, do not
alter objects in XDPEFLR subfolders that are distributed with the
XDPE/400 software. Instead, make a renamed copy of the object, then
make your alterations in the renamed copy.
Customizing XDPE/400 default commands
If you are a current user of XDPE/400 and have altered any of the
XDPE/400 command objects without creating a CL program for those
modifications, the changes you made will not be reflected in the version
of XDPE/400 you are installing.
Take time now to verify which commands you have changed in your
current version. To incorporate those changes in the version you are
currently installing, add them at the conclusion of the installation
procedure. See chapter 6 for more information on customizing XDPE/400
commands.
Installing and Customizing XDPE/400 (9/2001) 4-13
Page 64

Installation requirements
Installing and Customizing XDPE/400 (9/2001) 4-14
Page 65

5. 5 Installing XDPE/400
This chapter contains the procedures needed to prepare for and install
XDPE/400. It contains instructions for both new XDPE/400 sites as well
as for sites that are already using XDPE/400.
Installing XDPE/400 is a process that you can complete using standard
OS/400 procedures. The basic steps are:
• Creating an XDPE/400 user profile
• Backing up your current XDPE/400 system
• Installing the XDPE/400 software
• Restoring your customized XDPEFLR objects
• Resetting your global values
• Restoring your customized XDPE/400 application library objects
XDPE/400 software consists of the XDPE/400 application library and a
folder of resources, called XDPEFLR. Figure 5-1 shows these two
components.
Figure 5-1. XDPE/400 software components
Installing and Customizing XDPE/400 (9/2001) 5-1
Page 66

Creating an XDPE/400 user profile
Skip this section if you have an earlier version of XDPE/400 installed on
your system.
To install XDPE/400 software, you must know how to use standard
OS/400 commands, including CRTUSRPRF, ADDDIRE, RSTLIB, and
RSTDLO. For information about these commands, refer to the OS/400 CL
Reference.
Perform these steps to create an XDPE/400 user profile:
Step 1. Sign on with a user profile that has *SECADM special authority.
Step 2. Create the XDPE/400 user profile by entering this command:
CRTUSRPRF
USRPRF(XDPEUSR)
TEXT('XDPE User')
SPCAUT(*JOBCTL *SAVSYS *SPLCTL)
Step 3. Enroll the XDPEUSR in the system directory by entering this command:
Installing XDPE/400
ADDDIRE
USRID(XDPEUSR address)
USRD('XDPE User')
USER(XDPEUSR)
where
address Directory address of the XDPEUSR profile. If a unique
directory address is needed for site-specific network
communications, follow your site’s addressing standard. If
no specific network addressing is necessary, use
XDPEUSR.
Step 4. Grant *USE authority for the DMPOBJ command and its command
processing program to the XDPEUSR user profile by entering these
commands:
GRTOBJAUT
OBJ(DMPOBJ)
OBJTYPE(*CMD)
USER(XDPEUSR)
AUT (*USE)
GRTOBJAUT
OBJ(QSCDOBJ)
OBJTYPE(*PGM)
USER(XDPEUSR)
AUT (*USE)
Installing and Customizing XDPE/400 (9/2001) 5-2
Page 67

Backing up your current XDPE/400 system
Skip this section if you do not currently have XDPE/400 installed on your
AS/400.
If you currently have any version of XDPE/400 installed on your AS/400,
it is imperative that you perform the following steps to back up your
current XDPE/400 system.
Step 1. Enter this command to save your current XDPE/400 application library to
tape:
SAVLIB
LIB(library)
DEV(device)
SEQNBR(*END)
LABEL(*LIB)
where
library The name of the XDPE/400 application library is XDPEvrm,
where
• v is the version number
• r is the release number
• m is the modification number
Installing XDPE/400
device Name of the device on which the tape is mounted.
Step 2. Enter this command to save your current XDPEFLR folder to tape:
SAVDLO
DLO(*ALL)
FLR(XDPEFLR)
DEV(device)
SEQNBR(*END)
LABEL(label)
where
device Name of the device on which the tape is mounted.
label A label that you will use again when you restore your saved
XDPEFLR objects from tape.
Installing and Customizing XDPE/400 (9/2001) 5-3
Page 68

Installing the base files
Follow these instructions to install the base files from tape or CD-ROM.
Before you begin, ensure that all users are no longer using XDPE/400
functions or do not have the XDPE/400 application library or folders
allocated.
CAUTION: Once you begin this installation process, do not start
Monitor Queue until you are instructed to do so. Doing so may result
in later Monitor Queue abends. Instructions for starting Monitor
Queue are provided in chapter 7.
Step 1. Sign on as XDPEUSR.
NOTE: If you currently have XDPE/400 installed on your system,
verify that there are no user libraries in the library list.
Installing XDPE/400
Step 2. Mount the XDPE/400 installation tape or CD-ROM on an accessible drive.
NOTE: Viewing the contents of the CD-ROM is not required.
However, if you use the DSPOPT VOL(*ALL) DEV(OPT01) command
to display the CD contents, you may receive message OPT1825,
“Optical indexes are incorrect for optical device OPT01.” If this
message appears, replace *ALL in the command line with either
*MOUNTED or with the volume serial number of the CD.
Step 3. Download the distribution materials from tape or CD-ROM by entering this
command:
NOTE: LODRUN requires *SAVSYS authority.
LODRUN
DEV(device)
where
device One of these values:
• *OPT — Specifies the default CD-ROM device
• *TAP — Specifies the default tape device
• name — Specifies the OS/400 device name of the tape
device or CD-ROM device
The following prompt will display:
Reply page format, *A4 or *US, to install base maintenance or reply
*NO.
Installing and Customizing XDPE/400 (9/2001) 5-4
Page 69

Installing XDPE/400
If you reply *A4 or *US, the installation will automatically restore the
XDPE/400 executable objects and resource folder. No other action is
required. Skip steps 4 and 5 and go to the next section.
If you want to complete the installation at a later time, reply *NO. This will
allow you to manually restore the XDPE/400 executable objects and
resource folder at your convenience. Follow steps 4 and 5 when you are
ready to complete the installation.
Step 4. Restore the XDPE/400 executable objects by entering this command:
RSTLIB
SAVLIB(library)
DEV(*SAVF)
SAVF(BBxxxx/library)
where
library The name of the XDPE/400 application library is XDPEvrm,
where
• v is the version number
• r is the release number
• m is the modification number
BBxxxx The volume serial number found on the installation tape or
CD-ROM.
Step 5. Restore the XDPE/400 resource folder, XDPEFLR, by entering this
command:
RSTDLO
DLO(*ALL)
SAVFLR(XDPEFLR)
DEV(*SAVF)
SAVF(BBxxxx/label)
where
BBxxxx The volume serial number found on the installation tape or
CD-ROM.
label One of these values:
• XDPEFLRLET — Specifies 8.5 by 11 inch (letter size) paper
support
• XDPEFLRLA4 — Specifies A4 paper support
Installing and Customizing XDPE/400 (9/2001) 5-5
Page 70

Recreating your XDPEFLR object changes
For any objects originally distributed with XDPE/400 to which you have
made alterations, such as JSLs or packets, recreate the alterations in the
new version of the object(s).
To facilitate easier installation of XDPEFLR updates in the future, do
not alter objects in XDPEFLR subfolders that are distributed with the
XDPE/400 software. Instead, make a renamed copy of the object,
then make your alterations in the renamed copy.
Resetting your global values
If you had XDPE/400 installed on your system before this installation, you
now need to reset your global values that you recorded in the “Recording
your current global values,” section in chapter 4.
Installing XDPE/400
Restoring your customized XDPE/400 application library objects
Copy any previously customized objects that were maintained in the old
XDPE/400 application library to the new XDPE/400 application library.
NOTE: Before restoring your customized objects, we recommend that
you first rename them so as not to write over the newly installed
version.
Installing corrective maintenance
If there is any maintenance included with your version of XDPE/400, you
should install it at this time. See the maintenance bulletin accompanying
the corrective maintenance for the installation procedure.
Installing and Customizing XDPE/400 (9/2001) 5-6
Page 71

Installing XDPE/400
Removing your old version of XDPE/400
If you currently have an older version of XDPE/400 installed on your
AS/400, it is recommended that you remove it after installing and testing
the new version of XDPE/400. Use the DLTLIB command to delete the
XDPE/400 application library.
CAUTION: Do not delete the XDPEFLR resource folder. XDPEFLR is
used with every version of XDPE/400.
Adding the XDPE/400 application library to your library list
The XDPE/400 application library must be in the library list before anyone
can use XDPE/400 commands. This must be done each time anyone logs
on the system. To add the XDPE/400 library to the user library list, enter
this command:
ADDLIBLE
LIB(library)
where
library The name of the XDPE/400 application library is XDPEvrm,
where
• v is the version number
• r is the release number
• m is the modification number
There are a couple of alternatives to adding the XDPE/400 library to the
user library list each time anyone logs on the system. These options need
only be set up one time, but must be done by the system administrator
with the proper authorities. The options are:
• Add the XDPE/400 library to the job description for a group of users
with the Create Job Description (CRTJOBD) or Change Job
Description (CHGJOBD) OS/400 command.
• Add the XDPE/400 library to the QUSRLIBL system value for all
users with the Change System Value (CHGSYSVAL) OS/400
command.
Installing and Customizing XDPE/400 (9/2001) 5-7
Page 72

Installing XDPE/400
Installing and Customizing XDPE/400 (9/2001) 5-8
Page 73

6. 6 Customizing XDPE/400
This chapter contains the procedures to configure and customize your
system. These topics are discussed:
Setting up the global parameter values that the Monitor Queue uses for each session
• Customizing and using separator pages generated by AS/400 and
XDPE/400
• Using the Monitor Queue job log
• Customizing XDPE/400 commands
Work with Global Values screens
This section describes how to access the Work with Global Values
screens. You define the XDPE/400 global values to customize XDPE/400.
The system uses these global values to initialize Monitor Queue at the
start of a Monitor Queue session. All methods of printer control packet
generation use the XDPE/400 global values.
The XDPE/400 global value command (WRKGBLVAL) allows you to set
default parameters for the AS/400 during installation. You can modify
these parameters at any time after the initial installation without
reinstalling XDPE/400.
Changing global values
Follow these steps to display the Work with Global Values screens and
change the global values. The five Work with Global Values screens are
shown on the following pages, along with information about each
parameter.
Step 1. Enter WRKGBLVAL and press ENTER. The first Work with Global Values
screen displays some of the current global values.
Step 2. Enter the appropriate values for each field and press ENTER.
Step 3. Press the Page Up or Page Down keys to display the remaining Work
with Global Values screens, and enter the appropriate values.
Installing and Customizing XDPE/400 (9/2001) 6-1
Page 74

Work with Global Values (first screen)
This section describes the parameters that appear on the first Work with
Global Values screen, as shown in figure 6-1.
Figure 6-1. Work with Global Values screen (first screen)
Work with Global Values (UPDTGLOBAL)
Work with Global Values (UPDTGLOBAL)
Work with Global Values (UPDTGLOBAL)Work with Global Values (UPDTGLOBAL)
Type choices, press Enter.
IDEN Prefix (a string) . . . . . DJDE
Offset . . . . . . . . . . 2___ 0-211
Skip . . . . . . . . . . . 7___ 0-211
RSTACK String (a string) . . . . RSTACK
Offset . . . . . . . . . 0___ 0-211
JDE or PDE? . . . . . . . . . . *PDE *JDE, *PDE
JDE/PDE name creation mode . . . *NAME *NAME, *AUTO
JDE/PDE id for portrait:
one page per physical side . . ONEPOR JDE/PDE id, *NONE
two pages per physical side. . TWOPOR JDE/PDE id, *NONE
four pages per physical side . FORPOR JDE/PDE id, *NONE
JDE/PDE id for landscape:
one page per physical side . . ONELAN JDE/PDE id, *NONE
two pages per physical side. . TWOLAN JDE/PDE id, *NONE
four pages per physical side . FORLAN JDE/PDE id, *NONE
Run priority . . . . . . . . . . 40 1-99
Customizing XDPE/400
More...
F3=Exit F4=Prompt F5=Refresh F12=Cancel F13=How to use this display
F24=More keys
IDEN parameters
The IDEN statement notifies the printing system that DJDE records may
be part of the input data stream. It also describes the characteristics of a
DJDE record so that the system can identify DJDEs and locate the DJDE
parameters. The IDEN statement syntax and interpretation are described
in the corresponding printer PDL/DJDE reference manual.
When the printer finds this character string, it recognizes it as a DJDE
record and examines the rest of the record for DJDE options. OFFSET
specifies where in the record to look for the IDEN PREFIX. SKIP specifies
where to look for the position of the DJDE parameters.
The following example of an IDEN statement uses the parameters
provided in the default centralized printer online JSL:
IDEN PREFIX='DJDE',SKIP=7,OFFSET=2;
NOTE: XDPE/400 IDEN global values must match the IDEN values in the
JDE/JDL that is invoked on the printer with the START command. If you
change the global values while a Monitor Queue session is active, you
must end or reset the session before the global values can take effect.
Installing and Customizing XDPE/400 (9/2001) 6-2
Page 75

Customizing XDPE/400
IDEN Prefix (IPREFIX) Specifies the character string used to identify DJDE records in the print
data stream. The syntax of the parameter is:
PREFIX=string
PREFIX specifies a string of up to 10 characters that Xerox printers use
to recognize DJDE records. Any record within the data stream that
contains this string, at the location specified by the offset parameter, is
recognized and processed as a DJDE record.
You also can use hexadecimal values to represent text strings. To use a
hexadecimal value, enclose the string in single quotes and precede it with
an X. For example, you can enter the string ABC as X'C1C2C3'.
IDEN Offset (IOFFSET) Defines the starting position of the DJDE prefix string. The syntax of the
parameter is:
OFFSET=value
OFFSET specifies the number of bytes (counting from 0) from the
beginning of the user portion of the record to the beginning of the prefix
string constant of the DJDE record.
IDEN Skip (ISKIP) Defines the starting position of the DJDE parameters within the DJDE
record. The syntax of the parameter is:
SKIP=value
SKIP specifies the number of bytes (counting from 0) from the beginning
of the user portion of the record to the beginning of the DJDE options. This
value may be negative.
RSTACK parameters
For DJDE data streams, the RSTACK, CRITERIA, and TABLE statements
provide the test criteria the printer uses to detect an end-of-report. An
end-of-report is the point in a spool file after which there are no more
pages to print.
This is an example of an RSTACK statement:
T1:TABLE CONSTANT=('RSTACK');
C1:CRITERIA CONSTANT=(0,6,EQ,T1);
RSTACK TEST=C1,DELIMITER=YES;
NOTE: The XDPE/400 RSTACK global values must match the
RSTACK values in the JDE/JDL that is invoked on the printer with the
START command. If you change the global values while a Monitor
Queue session is active, you must end or reset the session before the
global values can take effect.
Installing and Customizing XDPE/400 (9/2001) 6-3
Page 76

Customizing XDPE/400
RSTACK String (RSTRING) Defines the character string that is used to test for an end-of-report. The
TABLE command uses the character string as a character constant for the
logical processing statements.
The syntax of the parameter is:
label: TABLE CONSTANT=('string');
where
label Specifies the TABLE command that defines the string to use for
comparison.
string Specifies a constant used to detect the end of a report.
You also can use hexadecimal values to represent text strings. To use a
hexadecimal value, enclose the string in single quotes and precede it with
an X. For example, you can enter the string ABC as X'C1C2C3'.
RSTACK Offset (ROFFSET) Specifies the location of the RSTACK string in the print data record.
ROFFSET is the number of bytes (counting from 0) relative to the start of
the record of the character constant that detects the end of the record.
This is specified in a CRITERIA statement in the JSL.
The syntax of the parameter is:
label: CRITERIA CONSTANT=(offset,length,comparison,label);
where
label Specifies the TABLE command that defines the string to use
for comparison.
offset Position of the comparison string from the start of the user
data portion of the print record.
length Number of bytes to compare.
comparison Type of comparison to perform.
For this parameter, you must specify where the RSTACK string starts as
well as its length.
Installing and Customizing XDPE/400 (9/2001) 6-4
Page 77

Customizing XDPE/400
JDE/PDE ID parameters
The JDE/PDE statement specifies the JDE or PDE to use when printing a
DJDE job. It provides the page formatting information for the job.
XDPE/400 allows you to specify whether a JDE DJDE or a PDE DJDE is
generated. The PDE-specific fields apply to both JDEs and PDEs.
JDE or PDE (JDEPDE) Specifies whether XDPE/400 generates a job descriptor entry (JDE) or a
page description entry (PDE) when printing a job.
JDE/PDE name creation
mode (JDEPDEMODE)
JDE/PDE id for portrait
(PDLIDP)
JDE/PDE id for landscape
(PDLIDL)
Run priority parameter
Specifies whether the JDE/PDE name is selected from the JDE/PDE
name list or created from the spool file attributes. You can use one of
these values:
• *NAME — The JDE/PDE name is selected from the PDLIDP and the
PDLIDL lists.
• *AUTO — The JDE/PDE name is created from these spool file
attributes: pages per side, page size (width), and page rotation.
Specifies the JDE/PDE IDs for portrait orientation. This list defines the
JDEs/PDEs to use for one-up, two-up, and four-up printing. JDEs/PDEs
provide the formatting information, such as the fonts to use, upper-left
corner coordinates of the logical page, and the page orientation. The
syntax of the parameter is:
portrait-jde-name or portrait-pde-name
Specifies the JDE/PDE IDs for landscape orientation. This list defines the
JDEs/PDEs to use for one-up, two-up, and four-up printing. JDEs/PDEs
provide the formatting information, such as the fonts to use, upper-left
corner coordinates of the logical page, and the page orientation. The
syntax of the parameter is:
landscape-jde-name or landscape-pde-name
XDPE/400 provides parameters to specify a run-time priority (RUNPTY)
and the maximum amount of processor time allocated to a Monitor Queue
session over other jobs running in the QSPL subsystem (TIMESLICE).
The Run priority (RUNPTY) parameter is shown on the first Work with
Global Values screen; the Time slice (TIMESLICE) parameter is shown on
the second screen.
NOTE: The Time slice (TIMESLICE) and Run priority (RUNPTY)
global values require *JOBCTL special authority to change.
Run priority (RUNPTY) Specifies the run-time priority for all Monitor Queue jobs that are started
after this value has been set. This value represents the relative
importance of a Monitor Queue job.
Run priority is a number between 1 (highest priority) and 99 (lowest
priority).
Installing and Customizing XDPE/400 (9/2001) 6-5
Page 78

Work with Global Values (second screen)
This section describes the parameters that appear on the second Work
with Global Values screen, as shown in figure 6-2.
Figure 6-2. Work with Global Values screen (second screen)
Work with Global Values (UPDTGLOBAL)
Work with Global Values (UPDTGLOBAL)
Work with Global Values (UPDTGLOBAL)Work with Global Values (UPDTGLOBAL)
Type choices, press Enter.
Time slice . . . . . . . . . . . 2100_____ 1-9999999 milliseconds
Source file translation table . *XDPEDFT_ Name, *XDPEDFT
Library . . . . . . . . . . . *LIBL__ Name, *LIBL
Source file rcrd avrg length . . 10__ 3-72
PC/Support translation table . . *XDPEDFT_ Name, *XDPEDFT
Library . . . . . . . . . . . *LIBL__ Name, *LIBL
Customizing XDPE/400
More...
F3=Exit F4=Prompt F5=Refresh F12=Cancel F13=How to use this display
F24=More keys
Time slice (TIMESLICE) Specifies the maximum amount of processor time allocated to Monitor
Queue jobs before other jobs are run. TIMESLICE is a number between 1
and 9999999 milliseconds.
NOTE: To change the TIMESLICE and Run priority (RUNPTY) global
values requires *JOBCTL special authority.
Source file translation table
(RESLIB)
A required parameter that specifies the name of the ASCII-to-EBCDIC
translation table for the QDCXLATE API to use when downloading source
files (FSL or JSL) and multi-up packets to Xerox printers. You can use
these values:
• table-name — Specifies the name of the EBCDIC translation table to
be used.
• *XDPEDFT — Specifies the default EBCDIC translation table
provided with OS/400.
Installing and Customizing XDPE/400 (9/2001) 6-6
Page 79

Customizing XDPE/400
Library Specifies the name of the library containing the ASCII-to-EBCDIC
translation table. You can use these values:
• library-name — Specifies the name of the library containing the
translation table.
• *LIBL — Uses the library list of the job to locate the translation table.
Source file rcrd avrg length
(RECSIZE)
PC/Support translation table
(PCSLIB)
Identifies the average size of the source file in records. The file size used
in the FILE=DJDE size field is the size of the source file in bytes, divided
by RECSIZE.
A required parameter that specifies the name of the translation table that
the system uses when constructing printer language commands, multi-up
data, XES data, and XES resources for local and network processing.
XDPE/400 converts all printer commands and data from EBCDIC to ASCII
and writes them to an ASCII spool file.
The OS/400 API QDCXLATE uses this translation table to translate
resources from EBCDIC to ASCII. The format of the table must be
compatible with the QDCXLATE requirements.
You can use these values:
• table-name — Specifies the name of the ASCII translation table to
be used. This may be the name of one of the tables provided by
XDPE/400 or OS/400, or the name of a user-created table.
XDPE/400 provides tables XASCII1140 and XASCII1142.
XASCII1140 is compatible with these code pages:
— ASCII code pages 850 and 1051
— EBCDIC code page 37
— Euro-enabled ASCII code pages 858 and 1252
— Euro-enabled EBCDIC code pages 1140, 1141, 1144 through
1149
XASCII1142 is compatible with these code pages:
— ASCII code pages 850 and 1051
— EBCDIC code page 37
— Euro-enabled ASCII code pages 858 and 1252
— Euro-enabled EBCDIC code pages 1142 and 1143
For information on the tables provided with OS/400, see OS/400
International Application Development and OS/400 National
Language Support. For information on creating user translation
tables, see OS/400 CL Reference.
• *XDPEDFT — Specifies the default ASCII translation table provided
with XDPE/400. This translation table is compatible with these code
pages:
— ASCII code pages 850 and 1051
— EBCDIC code page 37
— Euro-enabled ASCII code pages 858 and 1252
— Euro-enabled EBCDIC code pages 1140, 1141, 1144 through
1149
Library Specifies the name of the library containing the EBCDIC-to-ASCII
translation table. You can use these values:
• library-name — Specifies the name of the library containing the
translation table.
• *LIBL — Uses the library list of the job to locate the translation table.
Installing and Customizing XDPE/400 (9/2001) 6-7
Page 80

Customizing XDPE/400
Work with Global Values (third screen)
This section describes the parameters that appear on the third Work with
Global Values screen, as shown in figure 6-3.
Figure 6-3. Work with Global Values screen (third screen)
Work with Global Values (UPDTGLOBAL)
Work with Global Values (UPDTGLOBAL)
Work with Global Values (UPDTGLOBAL)Work with Global Values (UPDTGLOBAL)
Type choices, press Enter.
Attribute include/exclude flags:
Copy count . . . . . . . . . . *YES *YES, *NO
Duplex . . . . . . . . . . . . *YES *YES, *NO
Front overlay . . . . . . . . . *YES *YES, *NO
Back overlay. . . . . . . . . . *YES *YES, *NO
Font id/Multiple up attributes *YES *YES, *NO
Job name . . . . . . . . . . . *YES *YES, *NO
Priority. . . . . . . . . . . . *YES *YES, *NO
Pre-drilled paper . . . . . . . *YES *YES, *NO, *ALL
DJDE termination mode . . . . . *YES *YES, *NO
Margins . . . . . . . . . . . . *YES *YES, *NO
Accounting code . . . . . . . . *NO_ *YES, *NO
More...
F3=Exit F4=Prompt F5=Refresh F12=Cancel F13=How to use this display
F24=More keys
Spool file attribute parameters
Attribute include/exclude
flag (INHIBLST)
These parameters identify a set of global flags that include or exclude the
spool file attributes to use when creating printer control packet
parameters.
Specifies the spool file attributes to include or exclude when creating
printer control packet parameters. If you include these spool file
attributes, XDPE/400 generates the DJDE, XES, PCL, or VIPP commands
listed in table 6-1.
To include an attribute for a print job, enter *YES. To exclude an attribute,
enter *NO.
Installing and Customizing XDPE/400 (9/2001) 6-8
Page 81

Table 6-1 DJDE, XES, PCL, and VIPP commands created or inserted
Customizing XDPE/400
Attribute
flags
Spool file
attributes
Copy count Copies
(COPIES)
Duplex Print on both
sides
(DUPLEX)
Front
overlay
Front side
overlay
(FRONTOVL)
Back
overlay
Font id/
Back side
overlay
(BACKOVL
1
Font id PDE or JDE Generic XES Generic PCL PostScript DSC
Multiple up
attributes
Pages per side
(MULTIUP)
Job name Job name
(JOB)
DJDE
commands
COPIES +C (copy
XES
commands
count)
PCL
commands
VIPP commands or
PostScript DSC
— VIPP
SETCYCLECOPY
DUPLEX +zy (plex) &l#S VIPP DUPLEX_off,
DUPLEX_on, or
TUMBLEDUPLEX_on
BFORM/FORM
1
+zx (cycle
Macro #82 VIPP SETFORM
forms)
BFORM +zx (cycle
Macro #83 VIPP SETBFORM
forms)
)
XESMUP PCLMUP VIPP TWOUP or
SETMULTIUP
— Inserts job
——
name into the
+Q (print job)
command
Priority Output priority
— Inserts job
(OUTPTY)
Pre-drilled
paper
Pre-drilled
paper
SHIFT +R (special
(DRILLED)
DJDE
termination
mode
Align page
(ALIGN))
‘,END;’ at the
end of
XDPE/400generated
DJDEs
Margins (printer file
BEGIN A command
attribute)
Accounting
code
1
The DJDE used depends on the global value settings.
(part of user
profile)
ACCT DEPT — — —
——
priority into the
+J (job priority)
command
&l#U VIPP SHIFT
paper enable)
———
VIPP SETMARGIN
sequence for
top and left
margins
A command
sequence for
top and left
margins
Installing and Customizing XDPE/400 (9/2001) 6-9
Page 82

Use these values for the DJDE termination mode global value:
• *NO — A DJDE END command is placed at the end of every DJDE
packet, regardless of the ALIGN spool file attribute.
• *YES — The value for the generation of a DJDE END command is
taken from the ALIGN spool file attribute.
Work with Global Values (fourth screen)
This section describes the parameters that appear on the fourth Work with
Global Values screen, as shown in figure 6-4.
Figure 6-4. Work with Global Values screen (fourth screen)
Work with Global Values (UPDTGLOBAL)
Work with Global Values (UPDTGLOBAL)
Work with Global Values (UPDTGLOBAL)Work with Global Values (UPDTGLOBAL)
Type choices, press Enter.
Source drawer assignments:
Drawer 1 . . . . . . . . . . *NONE_ *NONE, *MAIN, *AUX, *AUTO...
Drawer 2 . . . . . . . . . . *NONE_ *NONE, *MAIN, *AUX, *AUTO...
Drawer 3 . . . . . . . . . . *NONE_ *NONE, *MAIN, *AUX, *AUTO...
Drawer 4 . . . . . . . . . . *NONE_ *NONE, *MAIN, *AUX, *AUTO...
Drawer 5 . . . . . . . . . . *NONE_ *NONE, *MAIN, *AUX, *AUTO...
Drawer 6 . . . . . . . . . . *NONE_ *NONE, *MAIN, *AUX, *AUTO...
Drawer *E1 . . . . . . . . . *NONE_ *NONE, *MAIN, *AUX, *AUTO...
Predrilled shift support
Front side - long edge . . . +0 -300 to +300
Back side - long edge . . . +0 -300 to +300
Front side - short edge. . . +0 -300 to +300
Back side - short edge . . . +0 -300 to +300
Multiple-printer resource list *YES *YES, *NO
Back side overlay as BFORM . . *YES *YES, *NO
Solimar control mode . . . . . *NO_ *YES, *NO
Customizing XDPE/400
More...
F3=Exit F4=Prompt F5=Refresh F12=Cancel F13=How to use this display
F24=More keys
Source drawer assignments
(DRAWER)
Allows you to map source drawers or bins specified by the Source drawer
(DRAWER) printer file parameter to Xerox printer source trays.Tray
selection may vary depending on your printer setup. If a printer does not
support a tray, the default tray will automatically be used.
NOTE: This parameter has no effect on NPS, DocuSP, or generic
printers in PCL or VIPP mode. For PCL printers, the effect of this
parameter varies depending on the printer used. Refer to the “Xerox
PCL printer tray selection,” section in chapter 15 for more information
on tray selection methods for the different PCL printers.
Installing and Customizing XDPE/400 (9/2001) 6-10
Page 83

Customizing XDPE/400
XDPE/400 allows you to specify values for the 1, 2, 3, 4, 5, 6, and E1
source drawer assignment subparameters only.
NOTE: Source drawer assignment subparameters Drawer 5 and
Drawer 6 are valid for PCL printers only.
When a valid value of *NONE is specified, XDPE/400 uses the value
specified by the Data page source (DATASRC) Monitor Queue parameter.
Predrilled shift support
(SHIFT)
Specifies the values to use in shifting the combined form and data images
on a page to allow for binding or predrilled paper. If a shift is selected by
either a packet parameter or a printer file parameter, the amount of shift
is taken from this global value.
The valid value range is -300 to +300. The value entered is used
according to these printer types:
Printer mode and type Units used
DJDE (centralized/XPPM) 300 dots per inch (dpi)
XES/XDPM 300 dots per inch (dpi)
PCL 300 dots per inch (dpi)
converted to decipoints (1/720
inch)
VIPP (PostScript) 300 dots per inch (dpi)
The Predrilled shift support (SHIFT) values are processed by XDPE/400
in this manner:
• For XPPM (DJDE) printers, XDPE/400 maps the front long and back
long values to the SHIFT DJDE command. The minimum and
maximum values for DJDE are -75 and +75, respectively. If you enter
a value outside of this range, the minimum or maximum value will be
used. For a complete discussion of these values, refer to the
appropriate PDL/DJDE reference manual.
• For XDPM (XES) printers, all values are on the SHIFT XES (zys)
command. The minimum and maximum values for XES are -75 and
+75, respectively. If you enter a value outside of this range, the
minimum or maximum value will be used. For a complete discussion
of these values, refer to the appropriate XES reference manual.
• For PCL printers, XDPE/400 maps the front and back values to the
Left (long edge) Offset Registration command for portrait and the
Top (short edge) Offset Registration command for landscape. The
value in dots (1/300 inch) is converted to PCL decipoints (1/720
inch). For example, a valid value of 75 would be converted to 180
decipoints (1/4").
Installing and Customizing XDPE/400 (9/2001) 6-11
Page 84

Customizing XDPE/400
• For PostScript (VIPP) mode printers, all values are mapped into a
VIPP SHIFT command as shown below.
VIPP SHIFT
Predrilled shift support (SHIFT)
global value
Front side - long edge Xfront
Back side - long edge Xback
Front side - short edge Yfront
Back side - short edge Yback
The unit type from the most recently issued VIPP SETUNIT command
is used. The default is dots (1/300th inch). XDPE/400 does not
perform any unit conversion.
command
parameter
Multiple-printer resource list
(MPRLST)
Indicates how the system responds when a resource download list
contains resources that are incompatible with the printer mode.
NOTE: This parameter has no effect in VIPP mode.
You can specify one of these values:
• *YES — XDPE/400 creates download lists without examining the
printer mode.
• *NO — XDPE/400 ignores resources that are not compatible with the
printer mode.
Selecting *NO allows you to create a resource list that can be used on
different types of printers:
• If the resource list is used by Monitor Queue, the system takes the
printer mode from the STRMONQ command specification.
• If the resource list is used by a download command, the system
determines the printer mode by referring to the name of the folder
that contains the list.
— If the resource list is in the XDPEFLR/FONTS folder, the system
assumes that the printer is operating in XPPM mode.
— If the resource list is in the XDPEFLR/XESFONTS folder, the
system assumes that the printer is operating in XDPM mode.
— If the resource list is in the XDPEFLR/PCLFONTS folder, the
system assumes that the printer is operating in PCL mode.
Installing and Customizing XDPE/400 (9/2001) 6-12
Page 85

Customizing XDPE/400
Back side overlay as BFORM
(DJDEBFR)
Solimar control mode
(SOLIMODE)
Specifies how the spool file attribute is interpreted when creating a DJDE.
You can use one of these values:
• *YES — Uses back side overlay as the form name in the BFORM=
DJDE command.
• *NO — Uses back side overlay as the form name in the FORMS=
DJDE command that is inserted into the print data stream before the
even numbered pages.
Specifying *NO will force page level processing if the File processing
mode (PROCMODE) Monitor Queue parameter is set to *AUTO.
Specifies whether to insert control strings into the print data stream for
use by the Solimar interface box. These strings contain job information,
such as the name of the spool file being processed. This information can
be displayed on the Solimar host terminal. You can use one of these
values:
• *YES — Inserts a control string before the prepend file and after the
postpend file.
• *NO — Does not insert control strings into the print data stream for
use by the Solimar interface box.
Installing and Customizing XDPE/400 (9/2001) 6-13
Page 86

Work with Global Values (fifth screen)
This section describes the parameters that appear on the fifth Work with
Global Values screen, as shown in figure 6-5.
Figure 6-5. Work with Global Values screen (fifth screen)
Work with Global Values (UPDTGLOBAL)
Work with Global Values (UPDTGLOBAL)
Work with Global Values (UPDTGLOBAL)Work with Global Values (UPDTGLOBAL)
Type choices, press Enter.
XDPE control character mapping:
At-sign (@) . . . . . . . . . . @ Character value, *PLUS...
Number-sign (#) . . . . . . . . # Character value, *PLUS...
Ampersand (&) . . . . . . . . . *AMP Character value, *PLUS...
Plus-sign (+) . . . . . . . . . *PLUS Character value, *PLUS...
Average spool file size . . . . . 20 1-1354 Pages
Memory buffer size . . . . . . . . 32
Multiple copies of sep. pages . . *YES *YES, *NO
Duplex standard. . . . . . . . . . *HP *HP, *IBM
VIPP special packet data . . . . . *DFLT *NONE, *DFLT, *XDPE, *BLNK
8, 16, 32, 64, 128
Customizing XDPE/400
Bottom
F3=Exit F4=Prompt F5=Refresh F12=Cancel F13=How to use this display
F24=More keys
XDPE control character
mapping (CNTCHAR)
Allows you to specify the special characters XDPE/400 uses for special
processing functions. The four control character options are the at sign
(@), the number sign (#), the ampersand sign (&), and the plus sign (+).
You can input these characters as hexadecimal, octal, BCD, ASCII, or
EBCDIC character constants.
• At-sign (@) — Value used by the XDPE/400 list processing function
to specify that the entry following is the name of a resource list. This
character is used in the User data (USRDTA) or Form type
(FORMTYPE) field of a spool file or in the resource file name field of
a download resource command. Refer to chapter 21 in Section
Three: Printing Documents with XDPE/400 for more information.
• Number-sign (#) — Value used by XDPE/400 to specify that jobs are
to be processed with the Always generate (ALWAYS) Monitor Queue
parameter set to *DIRECT. This character is used in the User data
(USRDTA) or Form type (FORMTYPE) field of a spool file. Refer to
chapter 11 in Section Three: Printing Documents with XDPE/400 for
more information.
Installing and Customizing XDPE/400 (9/2001) 6-14
Page 87

Customizing XDPE/400
• Ampersand (&) — Value used by XDPE/400 separator page
processing to identify the variable data tokens used for separator
page templates. For more information on separator pages, refer to
“Separator page customization” later in this chapter and chapter 26
in Section Three: Printing Documents with XDPE/400.
• Plus-sign (+) — Value used by XDPE/400 to specify that jobs are to
be processed with the Always generate (ALWAYS) Monitor Queue
parameter set to *COMBINED. This character is used in the User
data (USRDTA) or Form type (FORMTYPE) field of a spool file.
Refer to chapter 11 in Section Three: Printing Documents with
XDPE/400 for more information.
You can specify one of these values for each of the four control character
options:
• Character value — Special character in single quotes.
• *PLUS — Use this special value to represent the plus sign (+).
• *LESS — Use this special value to represent the less than sign (<).
• *GREATER — Use this special value to represent the greater than
sign (>).
• *QUESTION — Use this special value to represent the question
mark (?).
Average spool file size
(FILESIZE)
Memory buffer size
(BUFFER)
Multiple copies of sep.
pages (MULCPYSEP)
• *AMP — Use this special value to represent the ampersand (&).
Indicates the average size of the spool file that the Monitor Queue
processes. This only applies to page level spool file processing.
XDPE/400 uses the FILESIZE and BUFFER global values to determine
the size of the internal workspace for processing spool files. If the
FILESIZE value is smaller than the BUFFER value, the BUFFER value is
used instead of any calculated value. A page as defined here is 12K in
size. The valid values range from 1 through 1354 pages.
Specifies an estimate of how many buffers Monitor Queue should use
during a session. Memory buffer size only applies to page level spool file
processing. XDPE/400 uses the FILESIZE and BUFFER global values to
determine the size of the internal workspace for processing spool files. If
the FILESIZE value is smaller than the BUFFER value, the BUFFER value
is used instead of any calculated value. Each memory buffer is 4K in size.
The valid values are 8, 16, 32, 64, and 128.
Specifies whether a job that is printed in XPPM mode will have a copy of
the separator page printed with every copy of the job. This parameter
does not affect the number of separator pages that are printed if you are
printing in XDPM or PCL mode, or if the job is printed using separator
pages generated by OS/400. You can specify one of these values:
• *YES — Prints a copy of the XDPE/400-generated pages with every
copy of every job.
• *NO — Prints a copy of the XDPE/400-generated separator pages
only on the first page of the first job.
Installing and Customizing XDPE/400 (9/2001) 6-15
Page 88

Customizing XDPE/400
Duplex standard
(DUPLEXSTD)
VIPP special packet data
(SPECPACK)
Specifies the duplex standard to be set for all PCL data streams
processed through XDPE/400, as defined by either Hewlett Packard (HP)
or IBM.
Xerox and printer twinax interface manufacturers use different standards
to translate IBM SCS print commands into PCL with regard to duplexing.
Therefore, when you send the same PCL duplex job through the IBM
OS/400 writer (outside of XDPE/400) and through XDPE/400, you may get
different results, depending on the orientation and what type of plexing
you desire. The Duplex standard (DUPLEXSTD) global value allows you
to choose which duplex standard you want to use for PCL jobs.
You can specify one of these values:
• *HP — Uses the HP standard for printing PCL jobs (default). When
either portrait or landscape orientation is specified, duplex output is
generated with long-edge binding and tumble duplex output is
generated with short-edge binding.
• *IBM — Uses the IBM standard for printing PCL jobs. When portrait
orientation is specified, duplex output is generated with long-edge
binding and tumble duplex output is generated with short-edge
binding. When landscape orientation is specified, duplex output is
generated with short-edge binding and tumble duplex output is
generated with long-edge binding.
Specifies the action to be taken when Monitor Queue detects a VIPP
special packet data name. The VIPP special packet data values affected
are *STD, XDPE, and blank.
You can specify one of these values:
• *NONE — Monitor Queue will ignore all VIPP special packet data
values. No JDT will be used. If XDPE is specified, *INDIRECT
processing will be used for the spool file.
• *DFLT — Monitor Queue will use a JDT with the name of default.jdt
when the VIPP special packet data field contains the value *STD.
• *XDPE — Monitor Queue will use a JDT with the name of xdpe.jdt
when the VIPP special packet data field contains the value XDPE.
• *BLNK — Monitor Queue will use a JDT with the name of default.jdt
when the VIPP special packet data field contains blanks.
Installing and Customizing XDPE/400 (9/2001) 6-16
Page 89

Customizing XDPE/400
Portrait printing using the HP or IBM duplexing standard
NOTE: The Duplex standard (DUPLEXSTD) global value has no
effect on portrait printing. Both values produce the same result.
When you specify *YES for either the DUPLEX printer file parameter or
DUPLEX packet parameter, and Duplex standard is set to *HP or *IBM,
the result will be duplex with long-edge binding, as shown in this figure:
When you specify *TUMBLE for either the DUPLEX printer file parameter
or DUPLEX packet parameter, and Duplex standard is set to *HP or *IBM,
the result will be tumble duplex with short-edge binding, as shown below:
Installing and Customizing XDPE/400 (9/2001) 6-17
Page 90

Customizing XDPE/400
Landscape printing using the HP duplexing standard
When you specify *YES for either the DUPLEX printer file parameter or
DUPLEX packet parameter, and Duplex standard is set to *HP, the result
will be duplex with long-edge binding, as shown in this figure:
When you specify *TUMBLE for either the DUPLEX printer file parameter
or DUPLEX packet parameter, and Duplex standard is set to *HP, the
result will be tumble duplex with short-edge binding, as shown in this
figure:
Installing and Customizing XDPE/400 (9/2001) 6-18
Page 91

Customizing XDPE/400
Landscape printing using the IBM duplexing standard
When you specify *YES for either the DUPLEX printer file parameter or
DUPLEX packet parameter, and Duplex standard is set to *IBM, the result
will be duplex with short-edge binding, as shown in this figure:
When you specify *TUMBLE for either the DUPLEX printer file parameter
or DUPLEX packet parameter, and Duplex standard is set to *IBM, the
result will be tumble duplex with long-edge binding, as shown in this
figure:
Installing and Customizing XDPE/400 (9/2001) 6-19
Page 92

Separator page customization
XDPE/400 allows you to print using separator pages created by
XDPE/400 or by the OS/400 printer writer. You can select XDPE/400 or
the OS/400 printer writer through the Process separator page (BANNER)
Monitor Queue parameter.
If you use XDPE/400 to create your separator pages, the Process
separator page (BANNER) Monitor Queue parameter also allows you to
specify whether to generate a banner page, a trailer page, or both for each
job. Banner pages are separators that are generated at the beginning of
the file. Trailer pages are separators that are generated at the end of the
file.
NOTE: Unless specifically stated, all references to separator pages
apply to both banner and trailer pages. Also note that the OS/400
printer writer generates banner pages only.
Banner pages that are OS/400-generated print after any printer control
commands generated by XDPE/400 are applied. Banner pages that are
generated by XDPE/400 print before any user-specified printer control
commands are applied.
The number of separator pages generated by XDPE/400 or the OS/400
printer writer is determined by the File separators (FILESEP) Monitor
Queue parameter and the File separators (FILESEP) spool file attribute.
You can change the fixed text portion and the variable text portion format
of the separator pages.
Customizing XDPE/400
Monitor Queue-generated separator pages
When Monitor Queue generates separator pages, the control comes from
several sources:
• File separators (FILESEP) Monitor Queue parameter
• File separators (FILESEP) spool file attribute
If the FILESEP Monitor Queue parameter is a numeric value, the number
of separators it specifies is generated. If the value of FILESEP is *FILE,
Monitor Queue checks the File separators (FILESEP) spool file attribute
to determine how many separator pages to generate. This number is the
same if OS/400 generated the separator pages.
Separator page contents formatting
When a Monitor Queue session starts, Monitor Queue looks for two
members, one called BANNER and one called TRAILER, in the
XDPEBANNER file in the XDPE/400 application library. Each member
contains a template that defines the format for the contents of the
separator pages.
Installing and Customizing XDPE/400 (9/2001) 6-20
Page 93

Customizing XDPE/400
Modifying the banner and trailer templates
A separator page template is a series of text lines, one for each line of the
separator page. The text lines may contain fixed text and variable data
tokens. Variable data tokens are used to specify where to insert the
variable data into the text line. Refer to table 6-2 for more information
about variable data tokens.
The templates for the separator pages generated by XDPE/400 are in the
XDPE/400 application library. If you want to change the format of the
banner page, you must create a new banner template and replace the
XDPEBANNER/BANNER member with the new template. If you want to
change the format of the trailer page, you must create a new trailer
template and replace the XDPEBANNER/TRAILER member with the new
template. The SAMPLE file contains copies of the separator pages that
you can copy and edit using SEU.
NOTE: The appearance of the trailer page may change depending on
the print instructions you specified as part of your job.
When you create a separator page template for XDPE/400, you must
observe these rules:
• The minimum length of a separator line is 10 characters.
• The maximum length of a separator line is 150 characters, including
the variable data portion of the line.
• The character “&,” which specifies the start of a token, can be used
as part of the fixed text. A misspelled token is unrecognized and is
printed as fixed data. For more information on the “&” (ampersand)
character, see the XDPE control character mapping (CNTCHAR)
global value description earlier in this chapter.
• Tokens can appear in any order or in any position on a line.
• The same token can be used more than once.
• A maximum of 50 tokens can be used on a separator page. Any
number of tokens may appear on a line as long as the total does not
exceed the maximum for one page.
After you have created a new separator page template using SEU, you
must convert the source physical file member to a data physical file
member and place it in the XDPEBANNER file.
Installing and Customizing XDPE/400 (9/2001) 6-21
Page 94

Customizing XDPE/400
To convert a source physical file member to a data physical file member
so you can use it as a separator page template, enter this command:
CPYF
FROMFILE(user-library-name/file-name)
TOFILE(library/XDPEBANNER)
FROMMBR(member-name)
TOMBR(separator-type)
MBROPT(*REPLACE)
FMTOPT(*CVTSRC)
where
library The name of the XDPE/400 application library is
XDPEvrm, where
• v is the version number
• r is the release number
• m is the modification number
separator-type The type of separator page template you are converting;
enter BANNER for a banner page template or TRAILER
for a trailer page template.
Variable data tokens
Variable data tokens specify where to insert variable data into a line of
text. Table 6-2 lists the symbols and information that you need to generate
a separator page.
Installing and Customizing XDPE/400 (9/2001) 6-22
Page 95

Customizing XDPE/400
Table 6-2. Variable data tokens
Symbols Description Parameter source Field width
&DATE Current date System value 10
&TIME Current local time System value 8
&JOBNAME Job name Spool file attribute 10
&JOBNUMBER Job number Spool file attribute 6
&USERNAME User name Spool file attribute 10
&SPLFNAME Spool file name Spool file attribute 10
&SPLFNUMBER Spool file number Spool file attribute 4
&FORMTYPE Form type field contents Spool file attribute 10
&USRDTA User data field contents Spool file attribute 10
&PAGES Total number of pages Spool file attribute 4
&STRPAGE Initial page printed Spool file attribute 4
&ENDPAGE Last page printed Spool file attribute 4
&COPIES Total number of copies Spool file attribute 4
&OUTQUEUE Output queue name Monitor Queue 10
&OUTQLIB Output queue library Monitor Queue 10
&FILEDATE File open date Spool file attribute 10
&FILETIME Time that the file was opened Spool file attribute 8
&WRITER Printer writer name WTR Monitor Queue 10
&PGMNAME Program name that opened the file Spool file attribute 10
&PGMLIB Program library name that opened file Spool file attribute 10
&ACCTCODE Accounting code Spool file attribute 15
&JOBTIME Time that the job entered the system System value 8
&JOBDATE Date that the job entered the system System value 10
&USRTXT User text portion from user profile User profile 50
&PRINTEXT Print text — prints on bottom of each page
of printed output and on separator page
Spool file attribute 30
Installing and Customizing XDPE/400 (9/2001) 6-23
Page 96

Customizing XDPE/400
Date and time format
The date and time separators used in the separator pages are the
site-specific separator characters, QDATESEP and QTIMESEP. The date
format is the site-specific format, QDATFMT. If Monitor Queue cannot
retrieve one of the date and time or format and separator values, a default
is substituted for that value, as shown in table 6-3. QDATESEP,
QTIMESEP, and QDATFMT are OS/400 system values.
Table 6-3. Default separator values
Parameter Default
QDATESEP :
QTIMESEP /
QDATEFMT MDY
Installing and Customizing XDPE/400 (9/2001) 6-24
Page 97

Sample banner page template
The following example shows the BANXDPEN banner page template.
************** Xerox Document Print Executive **************
* *
* XX XX DDDDDDDDD PPPPPPPPPPP EEEEEEEEEEEE *
* XX XX DDDDDDDDDD PPPPPPPPPPPP EEEEEEEEEEEE *
* XX XX DD DD PP PP EE *
* XX XX DD DD PP PP EE *
* XX XX DD DD PP PP EE *
* XXXX DD DD PPPPPPPPPPPP EEEEEEEE *
* XXXX DD DD PPPPPPPPPPP EEEEEEEE *
* XX XX DD DD PP EE *
* XX XX DD DD PP EE *
* XX XX DD DD PP EE *
* XX XX DDDDDDDDDD PP EEEEEEEEEEEE *
* XX XX DDDDDDDDD PP EEEEEEEEEEEE *
* *
* Job name . . . . . . . &JOBNAME *
* Job number . . . . . . &JOBNUMBER *
* Job date . . . . . . . &JOBDATE *
* Job time . . . . . . . &JOBTIME *
* User name . . . . . . . &USERNAME *
* &USRTXT *
* Current date . . . . . &DATE *
* Current time . . . . . &TIME *
* Spool file name . . . . &SPLFNAME *
* Spool file number . . . &SPLFNUMBER *
* Form type . . . . . . . &FORMTYPE *
* User data . . . . . . . &USRDTA *
* Number of pages . . . . &PAGES *
* Number of copies . . . &COPIES *
* Starting page . . . . . &STRPAGE *
* Ending page . . . . . . &ENDPAGE *
* Output queue . . . . . &OUTQUEUE *
* Output queue library . &OUTQLIB *
* File date . . . . . . . &FILEDATE *
* File time . . . . . . . &FILETIME *
* Printer writer . . . . &WRITER *
* Program name . . . . . &PGMNAME *
* Program library . . . . &PGMLIB *
* Accounting code . . . . &ACCTCODE *
* Print Text . . . . . . &PRINTEXT *
* *
* XX XX DDDDDDDDD PPPPPPPPPPP EEEEEEEEEEEE *
* XX XX DDDDDDDDDD PPPPPPPPPPPP EEEEEEEEEEEE *
* XX XX DD DD PP PP EE *
* XX XX DD DD PP PP EE *
* XX XX DD DD PP PP EE *
* XXXX DD DD PPPPPPPPPPPP EEEEEEEE *
* XXXX DD DD PPPPPPPPPPP EEEEEEEE *
* XX XX DD DD PP EE *
* XX XX DD DD PP EE *
* XX XX DD DD PP EE *
* XX XX DDDDDDDDDD PP EEEEEEEEEEEE *
* XX XX DDDDDDDDD PP EEEEEEEEEEEE *
* *
************** Xerox Document Print Executive **************
Customizing XDPE/400
Installing and Customizing XDPE/400 (9/2001) 6-25
Page 98

Generating separator pages in VIPP mode
XDPE/400 provides a Job Descriptor Ticket (JDT), called XDPSPR.JDT,
for PostScript printers that run in VIPP mode. This JDT is stored in the
XDPEFLR/JDTLIB folder.
XDPE/400 uses XDPSPR.JDT when creating separator pages for the
Direct and Combined methods. XDPSPR.JDT defines the overall page
layout format (such as orientation, margins, etc.) for banner and trailer
pages.
If you want to generate separator pages, you must download
XDPSPR.JDT to this printer controller directory on your PostScript printer:
/usr/xgfc/jdtlib/
Use the Download VIPP Resource (DNLDVIPRSC) or (DNLDVIPJDT)
commands for the N-series printers to download XDPSPR.JDT. For
instance, use the DNLDVIPRSC command for the DOCUSP and NPS
printers; use DNLDVIPJDT for the N-series printers. Refer to chapter 21
in Section Three: Printing Documents with XDPE/400 for a list of the
commands and more information on how to use the download commands.
NOTE: You may want to review the contents of XDPSPR.JDT before
downloading it to the printer controller directory. You can use the
Change VIPP Resource (CHGVIPRSC) command to review or
change the contents of XDPSPR.JDT. Refer to chapter 17 in Section
Three: Printing Documents with XDPE/400 for instructions about how
to use this command. If you want to customize the contents of
XDPSPR.JDT before downloading, see “Customizing the separator
page layout (VIPP mode only)” below.
Customizing XDPE/400
Installing and Customizing XDPE/400 (9/2001) 6-26
Page 99

Customizing XDPE/400
Customizing the separator page layout (VIPP mode only)
If you want to change the page layout of the separator pages, you must
modify XDPSPR.JDT and then download it to the printer controller.
NOTE: XDPSPR.JDT controls the page layout only. If you need to
change the fixed or variable text portion of a VIPP separator page,
see “Modifying the banner and trailer templates” earlier in this
chapter.
Perform these steps if you want to change XDPSPR.JDT:
Step 1. Make a copy of XDPSPR.JDT before modifying it.
Step 2. Edit XDPSPR.JDT using the Change VIPP Resource (CHGVIPRSC)
command. Refer to chapter 17 in Section Three: Printing Documents with
XDPE/400 for instructions on how to use this command.
CAUTION: Unpredictable results may occur if you specify the VIPP
SETCYCLECOPY command in XDPSPR.JDT and then generate
trailer pages for multiple copy print jobs. If you need to generate
trailer pages for multiple copy print jobs, use the File separators
(FILESEP) Monitor Queue parameter. Refer to chapter 18 and
chapter 26 for information about FILESEP and instructions on how to
troubleshoot and resolve this condition.
Step 3. Use the Download VIPP Resource (DNLDVIPRSC) command or
(DNLDVIPJDT) command for N-series to download XDPSPR.JDT to this
printer controller directory on your PostScript printer:
/usr/xgfc/jdtlib/
Refer to chapter 21 for instructions on how to use this command.
Installing and Customizing XDPE/400 (9/2001) 6-27
Page 100

Monitor Queue job log
Monitor Queue uses the job description MONQJOBD in the XDPE/400
application library. This job description defines a message logging level
of 4 and a message severity level of 30.
A message level of 4 specifies that all messages with a severity level
greater than or equal to the specified message severity are to be logged.
Because not all messages have a severity greater than 30, not all Monitor
Queue messages are logged.
To change the Monitor Queue message logging parameters, type this
command and press ENTER before Monitor Queue is started:
CHGJOBD
where
library The XDPE/400 application library name of the
Customizing XDPE/400
JOBD(library/MONQJOBD)
LOG(message-level message-severity *NOLIST)
library is XDPEvrm, where
• v is the version number
• r is the release number
• m is the modification number
message-level The type of message logging.
message-severity The severity of the messages logged.
Installing and Customizing XDPE/400 (9/2001) 6-28
 Loading...