

Page 1

Xi70c User Guide
701P99508
4/99
Page 2

FCC Compliance in the USA
WARNING: This equipment has been tested and found to comply with the
limits for a Class B digital device pursuant to Part 15 of the FCC Rules.
These limits are designed to provide reasonable protection against harmful
interference in a residential installation. This equipment generates, uses
and can radiate radio frequency energy and, if not installed and used in
accordance with the instructions, may cause harmful communications.
However, there is no guarantee that interference will not occur in a
particular installation. If this equipment does cause harmful interference to
radio or television reception, which can be determined by turning the
equipment off and on, the user is encouraged to try to correct the
interference by one or more of the following measures:
• Reorient or relocate the receiving antenna.
• Increase the separation between the equipment and the receiver.
• Connect the equipment into an outlet on a different circuit than the
receiver.
• Consult the dealer or an experienced radio/TV technician for help.
Changes or modifications to this equipment not specifically approved by the
Xerox Corporation may void the authority granted by the FCC to operate
this equipment.
Shielded cables must be used with this equipment to maintain compliance
with FCC regulations.
ENERGY STAR
As an ENERGY STAR® Partner, Xerox Corporation
has determined that this product meets the ENERGY
STAR® guidelines for energy efficiency.
© 4/1999 by Xerox Corporation. All rights reserved.
Copyright protection claimed includes all forms and matters of copyrighted
material and information now allowed by statutory or judicial law or
hereinafter granted, including without limitation material generated from the
software programs that are displayed on the screen such as icons, screen
display looks, etc.
XEROX®, The Document Company®, and the stylized X are registered
trademarks of Xerox Corporation and Xerox Canada Ltd. is a licensee of all
the trademarks.
Product names used in this guide may be trademarks or registered
trademarks of their respective companies and hereby acknowledged.
ENERGY STAR is a U.S. registered mark.
Page 3

Information
Service
In the USA and Canada
If you are unable to solve a WorkCentre Xi Series problem using this guide
or the Printer Driver Online Help, do one of the following:
Browse to: http://www.xerox.com
Call: 1 – 800 – TEAM – XRX (1 – 800 – 832 – 6979)
Call from a telephone near your PC and the WorkCentre. Make sure that
both your PC and your WorkCentre are turned on. Before calling, make
sure you have the following information:
• WorkCentre serial number
• Purchase date from your purchase receipt
• Description of the problem
• Windows operating system version (Windows 3.1, 95, 98 or NT4.0)
Supplies
To order supplies for your WorkCentre, call or visit your local retailer. If
your store does not stock these items, you may call:
Xerox SupplyNet toll free at:
1 – 800 – 822 – 2200
Black Cartridge – 8R7903
Color Cartridge – 8R7904
Page 4

Information
How to obtain a French User Guide
Au Canada et aux États-Unis, pour obtenir la version française du présent
guide d´utilisation, veuillez composer:
1 – 800 – TEAM – XRX (1 – 800 – 832 – 6979)
À l´extérieur des États-Unis et du Canada, veuillez communiquer avec
votre représentant Xerox.
It's Illegal
In the USA
It is against US law to copy copyrighted material without permission of the
copyright owner unless the copying falls within the "Fair Use" or library
reproduction rights of the copyright law. Further information on these U.S.
provisions may be obtained from the Copyright Office, Library of Congress,
Washington, D.C. 20550, or telephone the Copyright Office at (202) 7079100 and ask for circular 21. Copying of other items may be prohibited. If
you have any questions, seek legal advice.
In Canada
In Canada it is against the law to copy copyrighted material without
permission of the copyright owner, unless the copying falls within the
private study, research or criticism provision of the copyright law. Copying
of other items may be prohibited. If you have any questions, seek legal
advice.
Page 5

Table of Contents
Safety Notes................................................................................................ 1
Helpful Hints............................................................................................... 3
Unpacking................................................................................................... 4
Getting to Know Your WorkCentre........................................................... 5
Installation .................................................................................................. 7
Removing shipping material.................................................................. 7
Installing paper trays............................................................................. 7
Loading paper ....................................................................................... 8
Connecting your WorkCentre ............................................................... 9
Choosing a language .......................................................................... 10
Installing print cartridges..................................................................... 10
Aligning the print cartridges ................................................................ 12
Control Panel............................................................................................ 14
Buttons and light indicators................................................................. 14
Liquid crystal display (LCD) ................................................................ 19
Software Installation................................................................................ 20
System requirements.......................................................................... 20
Software installation procedure (Windows
Loading application software............................................................... 24
DOS environment ............................................................................... 26
Uninstalling Software .......................................................................... 28
Copy/Print Media...................................................................................... 29
Paper formats and types..................................................................... 29
Driver settings..................................................................................... 32
Precautions......................................................................................... 33
Clearing paper jams............................................................................ 34
Using your WorkCentre as a Copier....................................................... 35
Simple copying.................................................................................... 35
Customizing your copy output............................................................. 36
environment)................. 21
i
Page 6

Table of Contents
Copying extra-large documents.......................................................... 40
Xi70c Bypass Tray.............................................................................. 41
Using your WorkCentre as a Printer ...................................................... 42
Customizing your print output ............................................................. 42
Information about the driver settings................................................... 43
Selecting WorkCentre as your output device...................................... 44
On-line Documentation ....................................................................... 45
Printer Monitor .................................................................................... 46
Using your WorkCentre as a Scanner.................................................... 49
Scanner Screens ................................................................................ 49
Maintenance ............................................................................................. 50
General care ....................................................................................... 50
Print cartridge care and precautions................................................... 50
Replacing the print cartridges ............................................................. 51
Cleaning the print cartridges............................................................... 52
Moving your WorkCentre .................................................................... 54
Service................................................................................................ 54
Troubleshooting....................................................................................... 55
Problems with paper ........................................................................... 55
Problems with print ............................................................................. 56
Problems when printing ...................................................................... 56
Problems when copying...................................................................... 59
Problems when scanning.................................................................... 61
Status and Error Messages..................................................................... 62
Product Characteristics........................................................................... 65
One Year Limited Hardware Warranty.................................................... 68
ii
Page 7

Safety Notes
Your WorkCentre and supplies have been designed and tested to meet
strict safety requirements. These include safety agency examination and
approval and compliance to established environmental standards. Please
read the following instructions carefully before operating the WorkCentre
and refer to them as needed to ensure the continued safe operation of your
WorkCentre.
Follow all warnings and instructions marked on or supplied with the
product.
Symbology:
Unplug this WorkCentre from the wall outlet before cleaning. Always use
materials specifically designated for this WorkCentre. Use of other
materials may result in poor performance and could create a hazardous
situation.
Do not use aerosol cleaners. Follow the instructions in this User Guide for
proper cleaning methods. Always unplug from the electrical outlet prior to
cleaning.
Never use supplies or cleaning materials for purposes other than for which
they were intended. Keep all supplies and materials out of reach of
children.
Do not use this WorkCentre near water, wet locations, or outdoors.
Do not place this WorkCentre on an unstable cart, stand, or table. The
WorkCentre may fall, causing personal injury or serious damage to the
WorkCentre.
This product is equipped with a 3-wire grounding type plug (e.g., a plug
having a third grounding pin). This plug will fit only into a grounding-type
power outlet. This is a safety feature. To avoid risk of electric shock,
contact your electrician to replace the receptacle if you are unable to insert
the plug into the outlet. Never use a grounding adapter plug to connect the
WorkCentre to a power source receptacle that lacks a ground connection
terminal.
= High Voltage, ! = Warning
This WorkCentre should be operated from the type of power source
indicated on the marking label. If you are not sure of the type of power
available, consult your local power company.
Do not allow anything to rest on the power cord. Do not locate the
WorkCentre where persons will step on the cord.
1
Page 8

Safety Notes
The ON/OFF switch does not electrically disconnect the machine from
the power supply. The power supply cord is the disconnect device for this
equipment. Insure that installation is near the outlet and is easily
accessible.
Your machine is equipped with an energy saving device to conserve
power when the machine is not in use. The machine may be left on
continuously.
Slots and Openings in the cabinet and in the back and sides of the
WorkCentre are provided for ventilation. To ensure reliable operation of
the WorkCentre and to protect it from overheating, these openings must
not be blocked or covered. The WorkCentre should never be located near
or over a radiator or heat register. This WorkCentre should not be placed
in a built-in installation unless proper ventilation is provided.
Never push objects of any kind into the slots of the WorkCentre as they
may touch dangerous voltage points or short out parts which could result in
a fire or electric shock.
Never spill liquid of any kind on the WorkCentre.
Never remove covers or guards that require a tool for removal. There are
no casual operator serviceable areas within these covers.
Never defeat interlock switches. Machines are designed to restrict
operator access to unsafe areas. Covers, guards and interlock switches
are provided to ensure that the machine will not operate with covers
opened.
Use of an extension cord with this WorkCentre is not recommended
or authorized.
Avoid direct viewing of the document lights. The lamps are bright and,
while not harmful, they may cause an annoying afterimage. Always keep
the document cover closed during operation and storage.
If you need safety information concerning the WorkCentre Xi or Xerox
supplied materials, you may call the following toll-free number.
In the United States or Canada: 1-800-828-6571
2
Page 9

Helpful Hints
Care of your WorkCentre
• Avoid removing the ink jet cartridges from the WorkCentre unless
they are to be replaced.
• Do not place heavy objects on any surface of the WorkCentre.
• Take care not to place liquids on or near the WorkCentre.
• Avoid placing clips or staples on any WorkCentre surface.
Maintenance
• Clean the Document Glass daily and as required.
• Do not apply cleaning liquids or sprays directly to the WorkCentre;
apply to the cloth first.
• Store paper in a dry area, on a flat surface and in a closed cabinet.
• Wrap partially-used reams of paper tightly.
WorkCentre location
For reliable WorkCentre operation and copy quality, Xerox recommends:
• Place your WorkCentre in a well-ventilated room, positioning it so that
you do not block any ventilation slots or openings, as described in the
safety notes.
• Recommended environment:
– Temperature: 60
° to 95°F / 15° to 35°C.
– Humidity: 20% to 80%.
• Place the WorkCentre on a flat, level surface.
• Avoid locations that subject the WorkCentre to:
– Direct sunlight.
– Extreme changes in temperature or humidity.
3
Page 10
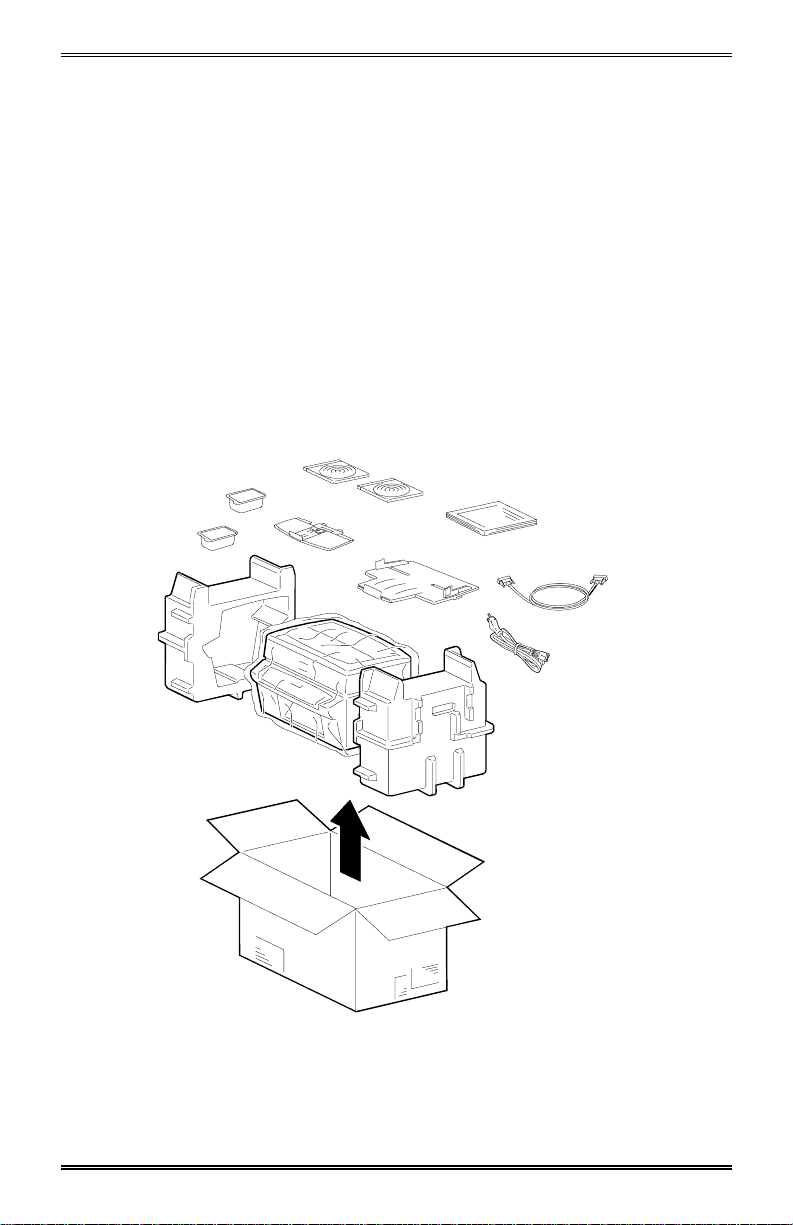
Unpacking
Important: Keep the carton and all the packing materials in case you have
to repack or ship your WorkCentre. As soon as you have unpacked your
WorkCentre and its accessories, check that all the parts have been
delivered and are undamaged. The packing carton should contain:
1 Your WorkCentre
2 Two print cartridges (color and black)
3 Installation and software application CDs
4 User documentation
5 Input Tray
6 Output Tray
7 Parallel cable
8 Power cord
3
2
5
4
6
1
If anything is missing or damaged, call 1-800-Team-XRX
(1-800-832-6979).
7
8
4
Page 11
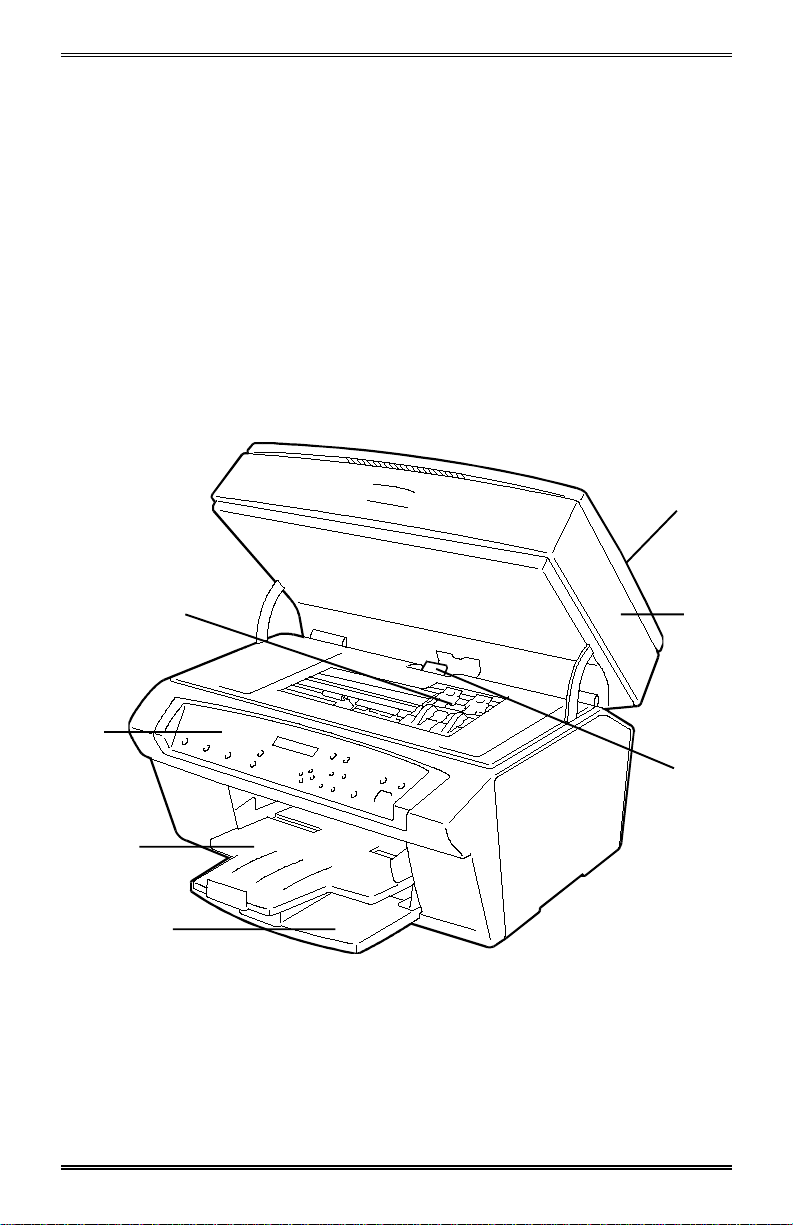
Getting to Know Your WorkCentre
The following illustrations show the main parts of your WorkCentre: those
which you should familiarize yourself with before continuing Installation.
Front view
1Print cartridge carriage (in loading position with cartridges inserted)
2Control panel
3Output tray / with bypass for Xi70c
4Input tray
5Paper jam release
6Scanner module (open)
7Document glass cover (closed)
7
1
2
3
4
6
5
5
Page 12

Getting to Know Your WorkCentre
Rear/Side view
8 Power cord socket
9 WorkCentre serial number
10 Parallel cable port
11 Main ON/OFF switch
8
9
10
6
11
Page 13
Installation
Removing shipping material
1. Raise the document cover, remove the sheet of cardboard from the
document glass and then close the document cover.
2. Raise the scanner module to access the print cartridge carriage area.
3. Remove the tape that blocks the print cartridge carriage in its rest
position, pulling on the red REMOVE BEFORE USE tab.
4. Close the scanner module.
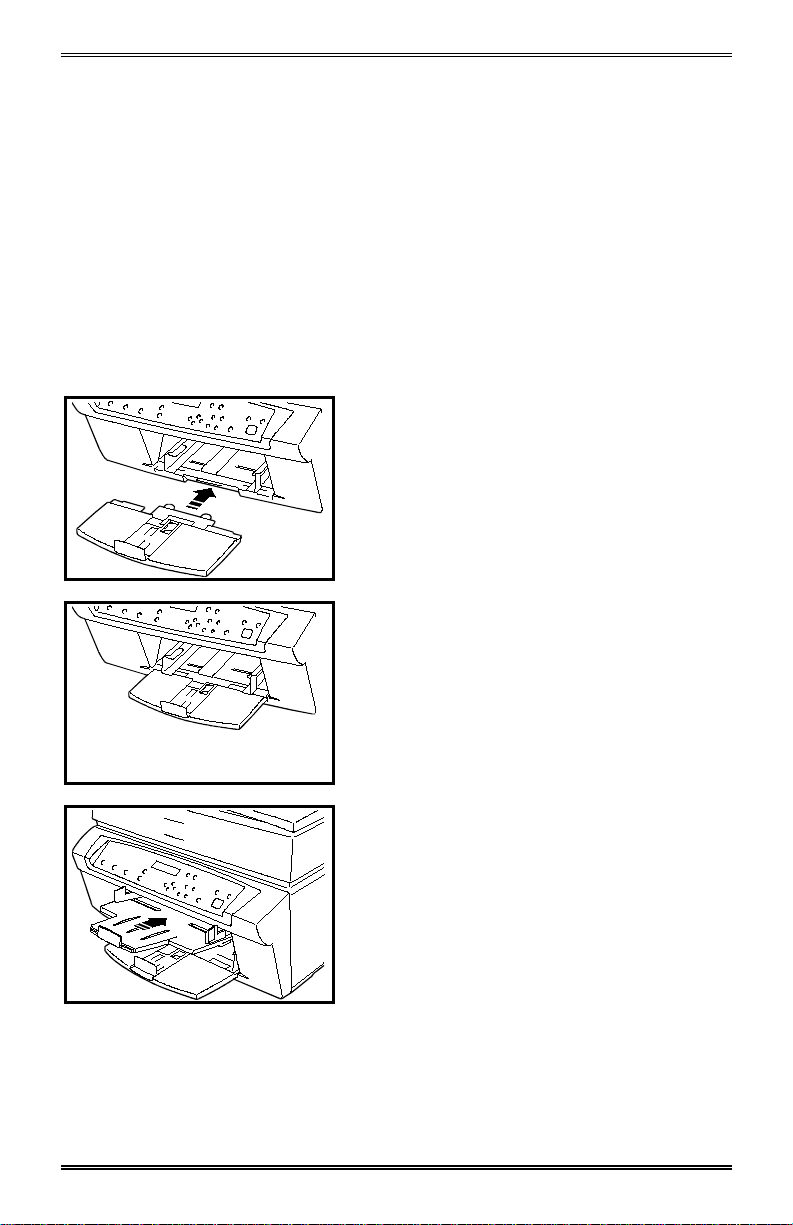
Installing paper trays
1. Install the input tray in lower front of
the WorkCentre so that it slides
completely into the slots on the
underside of the bottom cover.
2. Install the output tray in the lateral
guides in the paper output area, above
the input feed tray.
7
Page 14
Installation (continued)
Loading paper
1. Raise the output tray, to simplify
access to the automatic feeder.
2. Pull out the adjustable paper length
guide on the input tray and make sure
that its adjustable side guides are
completely open.
Note the maximum fill indicators on
the side guides.
3. After fanning the paper thoroughly,
load it as a single stack on the input
tray, inserting it carefully until it stops
inside the machine.
The surface to be printed should be
face downwards in the paper tray. This
is especially important for ink jet media
which is coated on one side.
4. Close the side guides against the
paper margins and the paper length
guide against the trailing edge. Make
sure the paper height is below the
maximum fill line on the side
guides.
8
Page 15
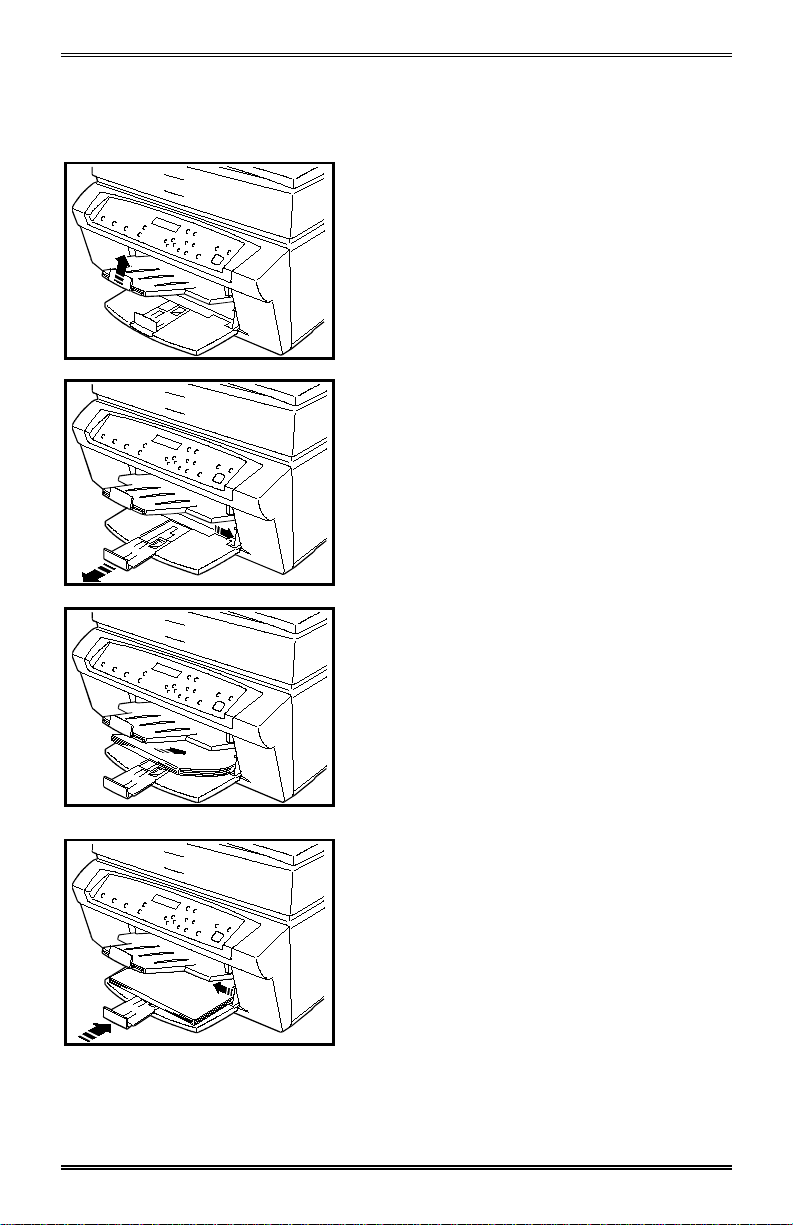
Installation (continued)
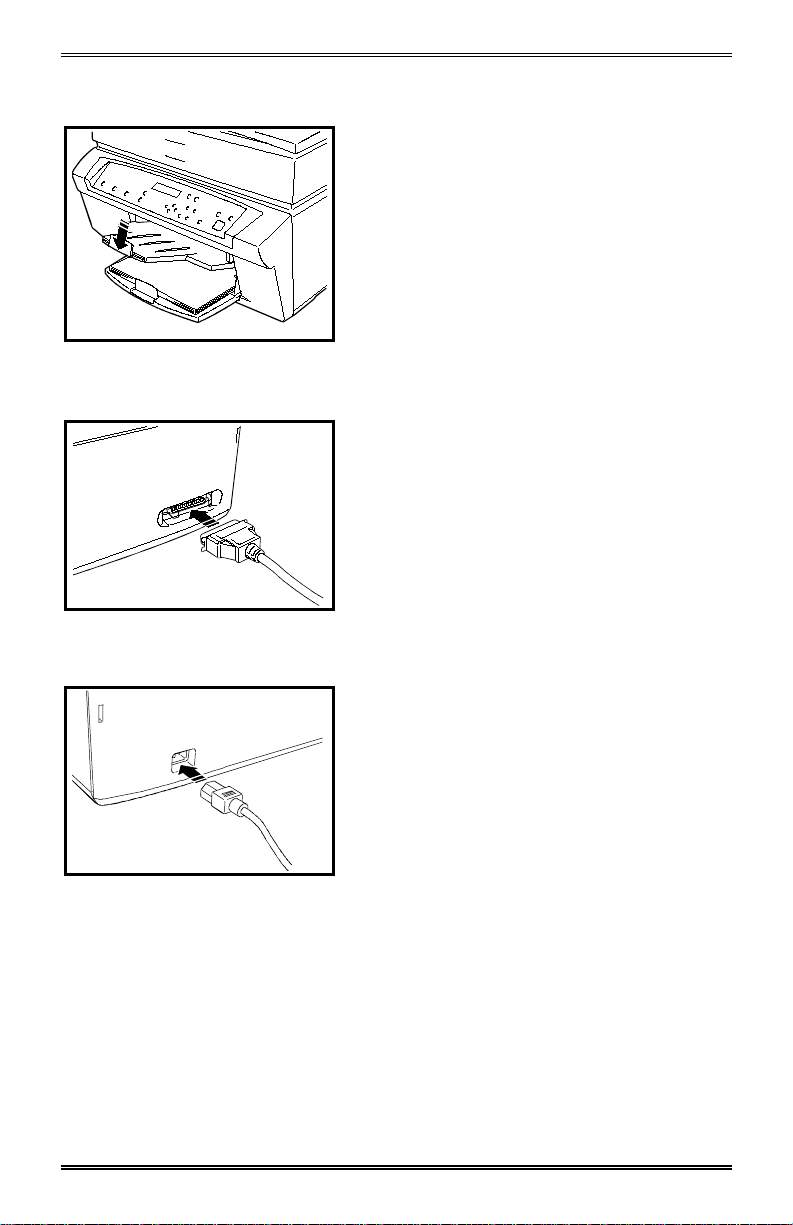
Connecting your WorkCentre
5. Lower the output tray to its operating
position.
During WorkCentre operation, the side
guides on the output tray must remain
open and the paper length guide
should be positioned to accommodate
the paper size used (LETTER, LEGAL,
A4 are marked on the paper length
guide).
Be sure to power off the WorkCentre
and PC.
1. Plug the connector of the parallel
cable that comes with your
WorkCentre into the socket on the
rear of the machine and close the
spring clips on it.
2. Connect the other end of the parallel
cable to the appropriate port on your
computer.
3. Insert the power cord in the
receptacle on the rear of the machine.
4. Plug the other end of the power cord
into a nearby wall outlet.
The outlet should only supply
power to your WorkCentre and not
be shared.
9
Page 16

Installation (continued)
5. Press the ON/OFF switch, on the left
side of your WorkCentre to switch it
on.
Your WorkCentre will take a few
moments to execute an initialization
cycle; the liquid crystal display (LCD)
on the control panel shows
INITIALIZING. As soon as
initialization is completed, the LCD will
show LANGUAGE: ENGLISH.
Choosing a language
Press OK button for English
Press > or < navigation button for a different language and confirm it by
pressing the OK button.
The LCD will now show INSERT CARTRIDGES.
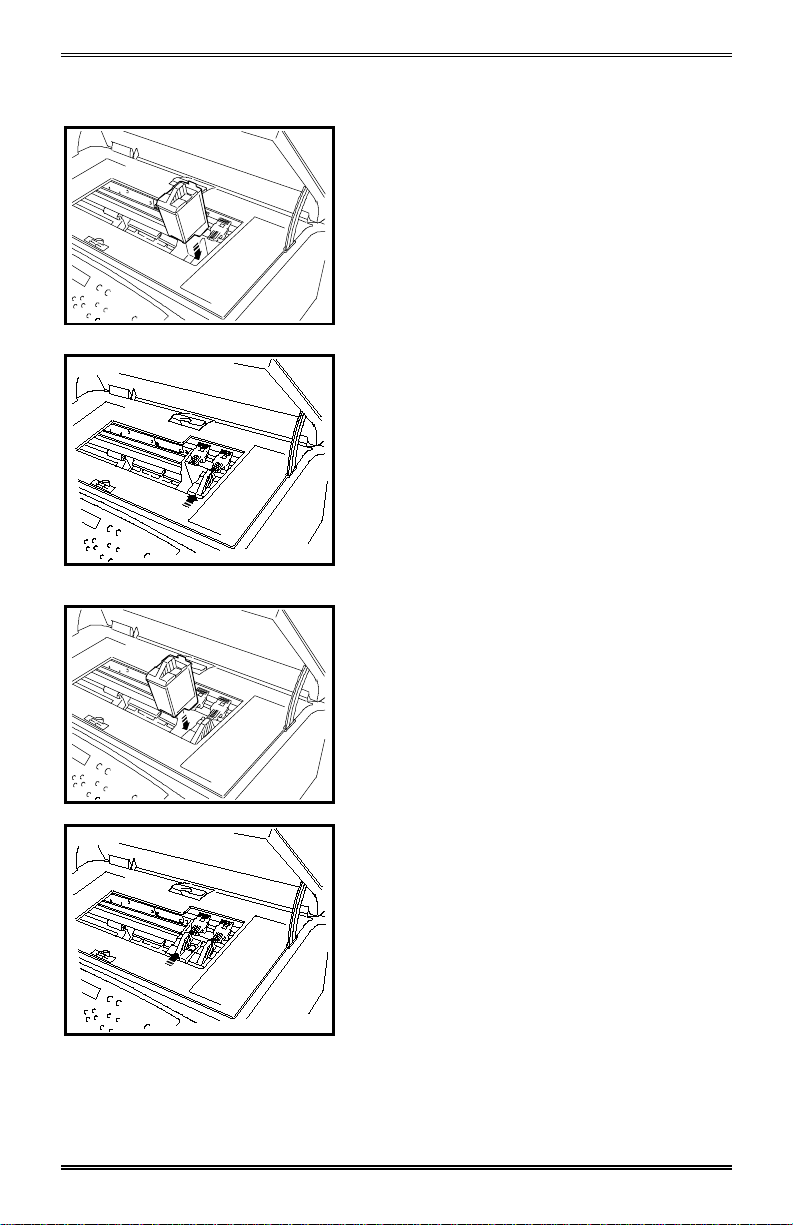
Installing print cartridges
1. Open the scanner module; the print
carriage will move to the cartridge
loading position.
10
2. Open the sealed print cartridge
container of the black print cartridge
and remove the print cartridge.
3. Remove the protective film.
Do not touch the electrical contacts
(gold-colored part) or the printing jets
or rest the print cartridge on either of
them.
Page 17
Installation (continued)
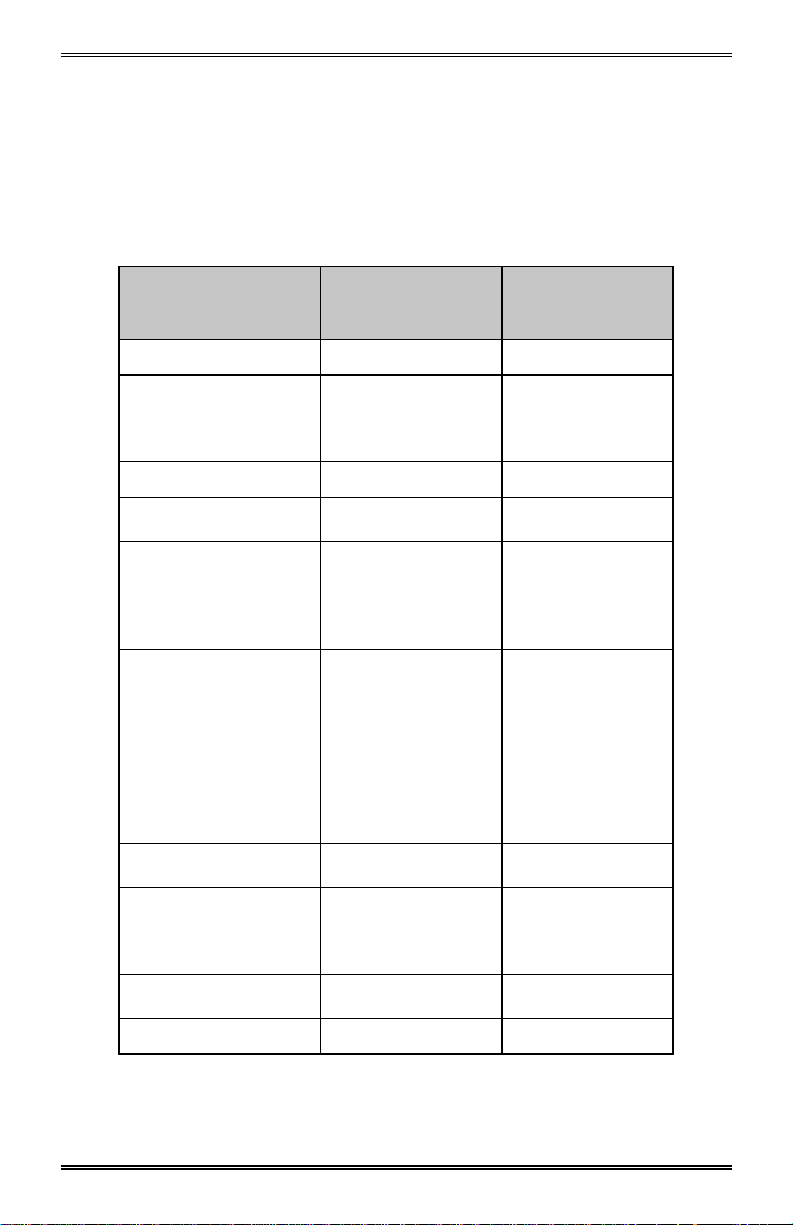
4. With the gold-colored electrical
contacts facing the rear of the
WorkCentre, install the print cartridge
in the right-hand location, making sure
that the top of the print cartridge
matches the corresponding label on
the adjacent cover.
5. To seat the print cartridge correctly,
push it down and towards the rear of
machine until it clicks into place.
6. Now open the sealed print cartridge
container of the color print cartridge
and repeat the installation operation
described above, use the left-hand
location adjacent to it’s corresponding
label.
7. Close the scanner module and press
the “10” button on the control panel to
answer “YES” to the new cartridge
questions (both black and color
cartridge) and to align the print heads.
11
Page 18

Installation (continued)
The LCD shows PLEASE WAIT followed by PRINTHEADS
INITIALIZATION while the WorkCentre initializes the print heads (this takes
at least one minute). As soon as the initialization cycle is completed, the
WorkCentre will execute the print cartridge alignment.
If you have trouble with the print cartridge installation see the
Maintenance section in this User’s Guide.
Aligning the print cartridges
Note: If you disrupt the alignment procedure, the WorkCentre will
assume default settings.
1. The LCD shows the scrolling message BIDIRECTIONAL ALIGNMENT
and the WorkCentre prints a test sheet entitled “Test 1: Bidirectional
alignment.”
2. The LCD shows the message B/W ALIGN SELECT: G” (default value).
If the alignment corresponding to “G” on the test sheet looks the best,
press OK; if not, select a different value using the navigation button <
or > and then press OK.
3. The LCD shows the message “COLOR ALIGN SELECT: 7” (default
value).
If the alignment corresponding to “7” looks the best, press OK; if not,
select a different value using the navigation button < or > and then
press OK.
4. The LCD shows the scrolling message PRINT HEAD ALIGNMENT and
the WorkCentre prints another test sheet entitled “Test 2: Print head
alignment.”
5. The LCD shows the message “HORIZONTAL ALIGN SELECT: G”
(default value).
If the alignment corresponding to “G” on the test sheet looks the best,
press OK; if not, select a different value using the navigation button <
or > and then press OK.
6. The LCD shows the message “VERTICAL ALIGN SELECT: 9” (default
value).
If the alignment corresponding to “9” looks the best, press OK; if not,
select a different value using the navigation button < or > and then
press OK.
12
Page 19

Installation (continued)
7. The LCD shows ALIGNMENT CONFIRMATION.
The WorkCentre prints another test piece entitled “Alignment
confirmation” and then exits automatically to READY.
This function (ALIGN PRINT HEAD) is generally run from the tool menu; it
can also be operated from the Printer Monitor once the WorkCentre printer
driver is installed (see Printer Monitor), but it must then be followed on the
control panel.
Your WorkCentre is now ready to operate as a copier.
If you want to continue with the installation of the software, go to the
specific section in this User’s guide.
Note that if you switch on your PC now, in Windows 95/98 environments a
screen indicating “New Hardware Found” will be displayed. Just press the
Cancel button on this screen.
13
Page 20

Control Panel
The control panel has buttons and lights that are used to control and
display the conditions of the WorkCentre. The messages on the LCD
indicate the current operating condition of your WorkCentre.
1 3 92 4 5 86 7 10 11 12
Buttons and light indicators
1 - Copy Quality Button
In standby: selects an image quality value.
Light indicators: Shows the image quality selected (Best, Normal, Draft)
2 - Color Intensity Button
In standby: selects a copy quality value.
Light indicators: Shows the copy quality selected (more or less contrast).
C
3 - Reduction/Enlargement Buttons
In standby: selects a fixed scaling value.
Light indicators: Shows the copy scale selected.
4 - UP and DOWN 25% / 400% ARROW Buttons
In standby: increases/decreases the copy percentage.
5 - Group of four light indicators on printer image
• COLOR CARTRIDGE light indicator (left)
Signals ink level low or no cartridge present
on = low ink or no cartridge
off = cartridge detected
14
Page 21

Control Panel (continued)
• JAM light indicator (center)
Signals paper jam
on = jam detected
off = jam removed/no jam
• B/W CARTRIDGE light indicator (right)
Signals ink level low or no cartridge present
on = low ink or no cartridge
off = cartridge detected
• PAPER light indicator (lower center)
On copy/print command, tests for paper
on = no paper detected
off = paper present
6 - Cluster of four NAVIGATION Buttons
Up/Down: Scrolls up and down the Copy Features or Tools menu
parameters.
Left/Right: Scrolls through choices for a particular parameter in a menu.
Enabled only when either the Tools or the Features menu is active; scrolls
up and down categories and left and right parameters
7 - Two buttons
• “10” Button
In standby: sets the number of copies, increasing/decreasing by 10.
• “1” Button
In standby: sets the number of copies, increasing/decreasing the
quantity by 1.
8 - Group of four function buttons
Button
Validates a choice for a parameter; enabled only when either the
Tools or the Copy Features menu is active
Exit Button
Causes exit from the activated menu; enabled only when either the
Tools or the Copy Features menu is active
15
Page 22

Control Panel (continued)
Copy Features Button
Accesses the functions in the Copy Features menu.
TOOLS Button
The Tools menu contains a series of control functions that allow
you to maintain the efficiency of your WorkCentre.
How to access
With the WorkCentre in stand-by (READY TO COPY.....100%.....1),
press the Tools button on the control panel.
How to operate within the menu
∧
1. To move through the menu, use the navigation buttons
control panel.
2. To select the function displayed or to confirm a selection made within
the function, press the OK button on the control panel.
3. To make a selection within the function, use the navigation buttons < or
> on the control panel.
Menu items
PRINT HEAD ALIGNMENT
This function should be run whenever you insert, remove or replace a
print cartridge (see Installation and Replacing the print cartridges).
Pressing OK on the control panel when this function displayed on the
LCD initiates the operation.
or ∨ on the
PRINT HEAD CLEANING
Pressing OK on the control panel when this function displayed on the
LCD causes a print cartridge cleaning cycle to be executed. The LCD
displays CLEANING... during the operation.
RESTORE FACTORY SETTINGS
Pressing OK on the control panel when this function displayed on the
LCD causes the WorkCentre setup values defined in the factory to be
restored, clearing any customized settings you may have made.
16
Page 23
Control Panel (continued)
DEFAULT SET
Pressing OK on the control panel when this function is displayed on the
LCD allows you to set customized default values.
When you press OK, the LCD will show START DEFAULT and the first
default value flashes.
LCD message Default value
Other values
(flashing)
START DEFAULT COLOR B/W
AUTO CLEAR TIME 60 SEC 30 SEC
90 SEC
120 SEC
OFF
INK LEV. WARNING OFF ON
IMAGE QUALITY NORMAL BEST
DRAFT
RETURN TO PRINT AUTOMATIC OFF
2 MIN
5 MIN
15 MIN
30 MIN
LANGUAGE ENGLISH FRANCAIS
ITALIANO
ESPANOL
DEUTSCH
PORTOGUES
CZECH
POLISH
HUNGARIAN
NEDERLANDS
SLEEP MODE OFF 12 MIN
8 HOURS
POWER SAVE MODE OFF 45 SEC
90 SEC
2 MIN
5 MIN
ZOOM R/E PRESET ENTRY : 100% ENTRY : 25 %(min)
ENTRY : 400%(max)
DRY DELAY TIME OFF ON
17
Page 24

Control Panel (continued)
PRINT DEFAULT PAGE
Pressing OK on the control panel when this function is displayed on the
LCD makes a copy of the document currently on the document glass.
The LCD displays COPYING... during the operation.
PRINT TEST PAGE
Pressing OK on the control panel when this function is displayed on the
LCD prints a test page. The LCD displays PRINTING... during the
operation. The print test page contains technical information on the
printer emulation and firmware version, the black and color print
cartridge tests and the currently saved setup values.
LANGUAGE: ENGLISH
START DEFAULT: COLOR
IMAGE QUALITY: NORMAL
ZOOM R/E PRESET: 100%
AUTO CLEAR TIME: 60 SEC
INK LEVEL WARNING: OFF
SLEEP MODE: OFF
POWER SAVE MODE: OFF
DRY DELAY TIME: OFF
COUNTER PAGE: (1)
This parameter contains the counter settings for the number of pages
printed, and the consumption (in ink droplets) of the print cartridges
(cyan, magenta and yellow for the color cartridge, and black).
How to exit
To exit from any function or from the entire Tools menu, press the EXIT
button on the control panel.
9 - ON LINE Button
Interrupts/resumes the current print job. Allows copying during a print job.
Light indicator between the two symbols:
on = connect to PC
off = print job paused
blinking = data transmission to/from PC
18
Page 25

Control Panel (continued)
10 – Color or Black/White toggle button
Selects type of job output.
Two light indicators above button:
color on = color copy
b/w on = b/w copy
11 - Button with light indicator
• START
Starts a copy job
Can also be used to pause a print job in order to initiate a copy job.
Press after correcting an error condition.
• READY light indicator
(above START button):
on = ready to copy/standby/power save
off = copying (busy) or in error condition (LCD error message displayed)
blinking = sleep mode
12 - CLEAR (STOP)
Aborts the current copy quantity to one or default.
In standby: resets the copy Quantity
In standby: pressed twice, clears job with user settings, restoring default
settings.
Liquid crystal display (LCD)
The 16-character, 2-line liquid crystal display shows the WorkCentre
operating condition (machine status and error messages). It also shows
and allows selection of the various programmable and machine-care
features contained in the Copy Features by pressing the appropriate
buttons on the control panel.
19
Page 26

Software Installation
Your WorkCentre has been shipped with the software needed to perform
printing, scanning and PC fax. It includes award winning Pagis Pro 2.0 and
MGI PhotoSuite software. Windows Operating Systems 3.1x, 95, 98, and
NT4.0 are supported. Windows 3.1x users are supported by TextBridge
Pro.
This software includes:
• Pagis Pro 2.0, a scanning suite
• MGI PhotoSuite, a photo editor
• Installation CD which contains a scanner driver and a printer driver.
Also included are on-line documentation files, and a printer monitor
for easy access to printing status and printer care.
The installation CD also contains a printer set-up utility program
(CONFIG.EXE), for personalized printer settings under DOS (see DOS
environment).
System requirements
For Windows
For Windows
For Windows
All configurations require at least a VGA monitor and a parallel IEEE 1284
ECP interface connection.
The drivers and documentation files copied to your hard disk during
software installation will occupy approximately 20 Mbytes of disk
space.
If your PC does not have a CD-ROM drive:
If you do not have a CD-ROM drive you can create 3.5 inch diskettes from
the create disk utility on this installation CD. You will need to locate a
computer that has both a CD-ROM drive and a 3.5-inch diskette drive. To
create the diskettes follow the procedure given on the Installer introductory
screens.
3.1x: PC 486 or better; at least 8 Mbytes RAM.
95: PC 486 or better; at least 16 Mbytes RAM.
NT: Pentium; at least 16 Mbytes RAM
20
Page 27

Software Installation (continued)
Software installation procedure (Windows
Before installing any software, read carefully the Terms and conditions of
the user license displayed as the first page of the specified software install
procedure and make sure that the WorkCentre is connected to your
computer as per the installation instructions.
First install the drivers located in the Installation CD. Once you have
completed the installation of the printer driver and scanner driver, the
WorkCentre is fully functional, however, you may then choose to install the
Pagis Pro 2.0 and MGI PhotoSuite CDs. All Software can be installed
using the following instruction sets for your particular operating system.
Windows
Suggestion: Switch off your WorkCentre now, and repower it only after
completing software installation.
1. Start Windows
2. If your WorkCentre is powered, Windows
WorkCentre as “new” and display the message New Hardware
Found.
3. Click the Cancel button on the screen.
4. Insert the CD in the CD drive of your computer; the installation program
starts automatically. Click on Xerox WorkCentre Software; then follow
the instructions displayed on your computer screen, choosing the
drivers you wish to install.
95/Windows 98
on your computer.
environment)
will recognize the
5. After installing the required drivers, select Restart now to exit and
reboot your PC or select Back to return to the introductory screen.
When you quit the Installer program, you will be asked to restart
Windows
Windows
1. Start Windows
2. Insert the installation CD in your computer’s CD ROM drive.
3. Open Main in Program Manager.
4. If you want to install the printer driver, continue as follows:
.
3.1/3.11
on your computer.
21
Page 28

Software Installation (continued)
5. Open Printers in Control Panel
a. Click on Add>>, select Install Unlisted or Updated Printer in the
List of Printers and then click on Install… .
b. Using Browse, select your CD drive (usually “d”).
The list of language directories opens.
c. Select the appropriate language and click OK.
The language directory opens to show “\printer” and “\scanner”.
Select “printer” and click OK.
d. “Xerox WorkCentre Series Xi” is now in the List of Printers in the
Add Unlisted or Updated Printer dialogue box. Click OK;
installation of the printer driver starts.
e. Once installation is completed, “Xerox WorkCentre Series Xi” will be
in the Installed Printer dialogue box.
6. If you want to install the scanner driver, continue as follows:
a. Open File Manager
b. Select your CD drive (usually “d”).
The list of language directories opens.
c. Select the appropriate language and click OK.
The language directory opens to show “\printer” and “\scanner”.
d. Select “scanner” and click OK.
e. Access “disk1”
f. Click on “setup.exe”; installation of the scanner driver starts.
When the driver installation is completed, you will be asked to restart
Windows
WorkCentre, you should reply “yes” (Restart); if you intend to continue
installing software, you should reply “no” and restart only when you have
finished installing all the software.
22
. If you wish to start operating immediately with your
Page 29

Software Installation (continued)
The WorkCentre driver icon will be inserted automatically in the Printers
folder/group in Settings/Program Manager. It allows immediate access to
the Printer Monitor, Scanner Monitor, On-line Documentation,
Uninstaller and information files whenever these are required.
You can now access and use all the features of your WorkCentre.
23
Page 30

Software Installation (continued)
Loading application software
To install Pagis Pro 2.0 software:
Note: If you have a previous version of Pagis Pro or TextBridge Pro on
your PC, you should uninstall them before installing Pagis Pro 2.0.
1. Close any applications that you may already be running.
2. Insert the Pagis Pro 2.0 CD into your CD-ROM drive
Autorun should start automatically, otherwise, search the CD and click
on matisse.dbd.
3. Click Install the Software.
An installation message appears followed by the Pagis Welcome
dialogue.
4. Click Next.
5. A Choose Destination Location dialogue appears.
Browse for a new destination directory only if necessary.
Otherwise, accept the default destination directory: C:\Program
Files\Xerox\Pagis.
6. Click Next.
7. Choose the set-up you prefer. Select ‘typical setup’ unless you are an
advanced user and would like to choose the options to install.
8. Click Next.
9. Select Program Folders if you wish to add program icons and click
Next. Pagis Pro will begin copying files.
10. Select the files to Add as Shortcuts to the Pagis Send to Directory.
Select as many as/all files and click OK.
11. Once the software is successfully installed, you may select a scanner
driver.
Choices include scanners from both ISIS and Twain
Once you have made your selection, click OK.
24
Page 31

Software Installation (continued)
12. It is recommended that you update the Pagis Index – this will update
the default Pagis Index so your documents can be easily retrieved.
Note: This may take several minutes.
13. Restart your computer. When Windows
Bar and Send To Bar should appear on your desktop.
Now that you have installed Pagis Pro 2.0, here are a few tips for setting up
your desktop:
• You can place your Tool Bar anywhere on your Windows desktop.
• Pagis Pro 2.0 has been placed in your start-up group.
• Your Pagis “Send To” bar can be moved and sized to meet your
particular needs.
• You can also add other applications to the Send To bar simply by using
the Windows
“Send To” menu.
95 standard functions for adding applications to the
95 comes up, the Pagis Tool
25
Page 32

Software Installation (continued)
DOS environment
Although optimized for operation in a Windows
will also operate in DOS, recognizing PCL III + command codes. This
means that you can print from any DOS application that supports this
command code set.
The installation CD supplied with your printer also contains a printer set-
up utility program (CONFIG.EXE), which allows you to personalize the
printer settings, if your application driver does not already contain the
settings you require.
The programmable features available through CONFIG.EXE are the
following:
Parameter
(Identifier)
PaperFormat
PerSkip
TextScale
Bimdensity
Terminator
Quality
WidthType
TypeStyle
A4, A5, US Letter, US Legal, US Executive,
COM-10, DL, C6, C5, B6
User-defined: min. 4 x 5.8 in; max. 8.5 x 14 in
Off (no bottom margin - BOF)
On (BOF = 12.7 mm)
Off
On
75, 150, 300 (dots per inch)
Normal (CR=CR;LF=LF;FF=FF)
AutoLF (CR=CR+LF;LF=LF;FF=FF)
AutoCR (CR=CR+LF;LF=LF;FF=CR+FF)
AutoCRLF (CR=CR+LF;LF=LF+CR; FF=CR+FF)
LQ (Letter Quality)
NLQ (Near Letter Quality)
DRAFT (Draft)
Off (nominal character size)
HalfWidth
HalfHeight
HalfWidth
HalfWidthHeight
1 (Courier Upright Port. 10cpi 12pt))
Value(s) (Qualifier)
environment, your printer
26
Page 33

Software Installation (continued)
Parameter
(Identifier)
Charset
Orientation
Value(s) (Qualifier)
1- CP 437 International
2 - PC 8 Denmark/Norway
3 - CP 850 Multilingual
4 - ECMA-94 Latin 1
5 - Roman 8
6 - Legal
7 - ISO 2 - IRV
8 - ISO 4 - United Kingdom
9 - ISO 6 - ASCII
10 - ISO 10 - Sweden
11 - ISO 11 - Sweden Names
12 - ISO 14 - JIS ASCII
13 - ISO 15 - Italy
14 - ISO 16 - Portugal
15 - ISO 17 - Spain
16 - ISO 21 - Germany
17 - ISO 60 - Norway 1
18 - ISO 61 - Norway 2
19 - ISO 69 - France
20 - CP 860 Portugal
21 - UNIX International
22 - CP 863 French Canadian
23 - PC Abicomp International
24 - PC Abicomp Portugal
25 - CP 852
26 - CP 857 Turkey
27 - CP 866 Cyrillic
28 - CP 210 Greece
29 - CP 851 Greece
30 - CP 862 Hebrew
Portrait
Landscape
How to change the printer settings in DOS environment
With your WorkCentre connected and switched on, insert the CD
containing the config.exe program in the CD drive on your PC and, from
the DOS prompt, type d:\config.exe, where “d:\” is the CD drive pathname.
Follow the instructions displayed on your PC screen.
27
Page 34

Software Installation (continued)
Uninstalling Software
If you have problems printing or scanning that are not solved with normal
care operations, it may be necessary to re-install the driver(s).
To do this, you must first uninstall the driver(s), by clicking on the specific
Uninstall icon(s) created when you first loaded the software. This allows a
complete and correct removal of all the files loaded from the CD and/or
created in your PC during software installation, permitting a correct reinstallation (see Software Installation).
28
Page 35

Copy/Print Media
Paper formats and types
Your WorkCentre can handle the following:
1. Paper sizes:
Format Size Top
Margin
Single Sheets
A4 size 8.27 x 11.7 in
210 x 297 mm
A5 size 5.85 x 8.27 in
148.5 x 210 mm
U.S. letter 8.5 x 11 in
216 x 279 mm
U.S. legal 8.5 x 14 in.
216 x 356 mm
U.S. Executive 7.25 x 10.5 in.
184 x 267 mm
U.S. Folio 5.5 x 8.5 in.
215.9 x 330.2 mm
U.S. Statement 5.5 x 8.5 in.
139.7 x 215.9 mm
B5 size 7.2x10.1 in.
182 x 256 mm
Card Stock
U.S. cards. 4x6 4 x 6 in
102 x 152 mm
U.S. cards 5x8 5 x 8 in.
127 x 203 mm
A6 cards 4.1 x 5.83 in
105 x 149 mm
Envelopes
U.S. # 10 4.12 x 8.88 in
105 x 225 mm
C5 6.38 x 9.0 in
162.0 x 228.8 mm
DL 4.33 x 8.66 in.
110 x 220 mm
C6 4.46 x 6.37 in
114 x 162 mm
0.04 inch
1.00 mm
0.04 inch
1.00 mm
0.04 inch
1.00 mm
0.04 inch
1.00 mm
0.04 inch
1.00 mm
0.04 inch
1.00 mm
0.04 inch
1.00 mm
0.04 inch
1.00 mm
0.04 inch
1.00 mm
0.04 inch
1.00 mm
0.04 inch
1.00 mm
0.04 inch
1.00 mm
0.04 inch
1.00 mm
0.04 inch
1.00 mm
0.04 inch
1.00 mm
Bottom
Margin
0.71 inch
18.00 mm
0.71 inch
18.00 mm
0.71 inch
18.00 mm
0.71 inch
18.00 mm
0.71 inch
18.00 mm
0.71 inch
18.00 mm
0.71 inch
18.00 mm
0.71 inch
18.00 mm
0.71 inch
18.00 mm
0.71 inch
18.00 mm
0.71 inch
18.00 mm
0.71 inch
18.00 mm
0.71 inch
18.00 mm
0.71 inch
18.00 mm
0.71 inch
18.00 mm
Left
Margin
0.13 inch
3.30 mm
0.13 inch
3.30 mm
0.25 inch
6.35 mm
0.25 inch
6.35 mm
0.13 inch
3.30 mm
0.13 inch
3.30 mm
0.13 inch
3.30 mm
0.167 inch
4.2 mm
0.13 inch
3.30 mm
0.13 inch
3.30 mm
0.13 inch
3.30 mm
0.4 inch
10.16 mm
0.4 inch
10.16 mm
0.4 inch
10.16 mm
0.4 inch
10.16 mm
Right
Margin
0.13 inch
3.30 mm
0.13 inch
3.30 mm
0.25 inch
6.35 mm
0.25 inch
6.35 mm
0.13 inch
3.30 mm
0.13 inch
3.30 mm
0.13 inch
3.30 mm
0.167 inch
4.2 mm
0.13 inch
3.30 mm
0.13 inch
3.30 mm
0.13 inch
3.30 mm
0.4 inch
10.16 mm
0.4 inch
10.16 mm
0.4 inch
10.16 mm
0.4 inch
10.16 mm
29
Page 36

Copy/Print Media (continued)
Format Size Top
Margin
B6 4.92 x 6.93 in
125 x 176 mm
B6 Envelope 6.93 x 9.84 in
176 x 250 mm
Monarch 3.875 x 7.50 in
98.43 x 190 mm
User-defined
Minimum 3.875 x 5.85 in
98.43 x 148.5 mm
Maximum 8.5 x 14 in
215.9 x 355.6 mm
0.04 inch
1.00 mm
0.04 inch
1.00 mm
0.04 inch
1.00 mm
0.04 inch
1.00 mm
0.04 inch
1.00 mm
Bottom
Margin
0.71 inch
18.00 mm
0.71 inch
18.00 mm
0.71 inch
18.00 mm
0.71 inch
18.00 mm
0.71 inch
18.00 mm
Left
Margin
0.4 inch
10.16 mm
0.4 inch
10.16 mm
0.4 inch
10.16 mm
0.25 inch
6.35 mm
0.25 inch
6.35 mm
Right
Margin
0.4 inch
10.16 mm
0.4 inch
10.16 mm
0.4 inch
10.16 mm
0.25 inch
6.35 mm
0.25 inch
6.35 mm
Single sheets
See Loading paper in Installation for instructions on how to insert
standard size single sheets in your WorkCentre.
Note cards
Your printer can handle two types of note cards: plain paper and
photographic paper. You can insert plain paper cards either in packs of up
to 50 in the input tray or 5 at a time in the bypass tray. You can insert
photographic paper cards in packs of up to 25 in the input tray (Xi70 only)
or one at a time in the bypass tray.
Envelopes
You can insert 21 lb/80 g/m
2
envelopes either in packs of up to 25 in the
input tray or one a time through the bypass tray.
You MUST use the intermediate rear guide if you use the input tray. The
envelopes must be inserted with their short side as the leading edge, the
printing side face down and the sealing flap to the left.
30
Page 37

Copy/Print Media (continued)
2. Paper types:
For optimum printing quality, you should always use the printing media
specifically indicated by the manufacturer (see Supplies for recommended
media types). Use of non-recommended printing media may result in
incorrect paper feed and/or poor print quality.
Plain
Use good quality, bond office or inkjet paper.
Special copy/print media
For all types of special media, always read the instructions included
with the media pack.
Coated
This type of paper has a very smooth finish on the side to be used for
printing. You can insert it either in packs of up to 50 sheets in the input tray
or one at a time in the bypass tray.
Glossy
This is similar to that used in the photographic industry. You can insert it
either in packs of up to 25 in the input tray or one at a time in the bypass
tray.
Photographic
This type of paper has a sophisticated glossy coating, and gives a
professional finish to your print job. You can insert it either in packs of up
to 25 in the input tray or one at a time in the bypass tray.
Transparencies
Always use those specifically indicated for ink jet printers; they are
designed to absorb the ink correctly. You can insert them either in packs of
up to 50 in the input tray or one at a time in the bypass tray.
T-shirt/ textile transfers
Always use those specifically indicated for ink jet printers; they are
designed to absorb the ink correctly. You can insert them 5 at a time in the
input tray or one at a time in the bypass tray.
31
Page 38

Copy/Print Media (continued)
3. Paper weights
Main and Bypass ADF
min max
2
g/m
lb. g/m
Cut sheet paper
Accepted paper cut sheet weight: 60 16 150 40
Recommended paper cut sheet weight: 70 19 90 24
Envelope
Accepted envelope weight: 60 16 90 24
Recommended envelope weight: 70 19 80 21
Note card
Accepted note card weight: 100 27 150 40
Recommended note card weight: 100 27 135 36
Banner
Accepted banner weight: 70 19 120 33
Recommended banner weight: 80 21 100 27
Transparencies
Use transparencies specified for inkjet
printers.
2
lb.
Use of paper with cut sheet weight in the range 60 - 70 g/m2 (included) is
recommended for text only.
Driver settings
Once you have loaded the copy/print media in your WorkCentre, you
should select its size and type in the Copy Features menu (see Using your
WorkCentre as a Copier) or the Printer Monitor (if you have loaded the
printer driver and are Using your WorkCentre as a Printer).
32
Page 39

Copy/Print Media (continued)
Precautions
• Sub-standard paper can affect the quality of printing.
• Make sure the paper feeds smoothly, and that it is not held too tightly or
too loosely.
• The paper/envelope must not be curled, crumpled or torn, otherwise it
may jam or even not feed. Always use paper in perfect condition and
within the specifications defined.
• Printing on both sides of the paper may increase the risk of misfeeds or
paper jams and may cause smudging.
• You should NEVER try to print on the flap side of envelopes.
• Print ONLY on the side of special media specifically indicated as the
printing surface.
• If you remove the paper from or add paper to the input tray, you MUST
repeat the entire paper loading operation.
• When using user-defined/non-standard size formats, remember to
select the appropriate paper type in your printer driver (see the On-line
Documentation loaded with your printer driver).
For all types of special printing media, always read the instructions included
with the media pack.
Remember that heavily printed pages tend to curl and thus not stack
correctly. They also tend to stain the rear of the page stacked over
them, as they require longer to dry. You can either select the specific
option (Dry Delay Time) in the Default Set menu in Tools or in the
Printer Monitor or remove these pages as soon as they are expelled
from the WorkCentre and leave them to dry singly before handling
them.
33
Page 40

Copy/Print Media (continued)
Clearing paper jams
1. Remove any documents from the
output tray and then remove the
output tray itself.
2. Remove the paper from the input tray, and check it for
imperfect/damaged sheets of paper that must be removed.
3. Raise the scanner module on the
WorkCentre.
4. Open the jam release behind the print
cartridge area.
5. Remove the jammed page(s) from the
WorkCentre, pulling them out through
the input/output area.
6. Close the scanner module (the jam
release closes with the cover).
7. Reload paper in the input tray and re-insert the output tray.
34
Page 41

Using your WorkCentre as a Copier
Simple copying
With your WorkCentre installed and switched on with READY TO COPY on
the LCD:
1. Open the document glass cover.
2. Place the original you wish to copy on
the document glass, aligning it correctly
with the scale at the glass edge.
3. Close the document glass cover.
4. Select the number and type of copies you require using the control
panel (see next section for more details).
5. Press START.
35
Page 42

Using your WorkCentre as a Copier (continued)
Customizing your copy output
You can customize your copy output directly from the Control Panel or by
changing the Default Settings in the Copy Features menu as explained
later in this section.
Using the Control Panel
Selections made directly from the control panel are not memorized and will
be lost if you press the Clear button twice, after the time-out set in the
Default menu (Auto Clear Time) or when you switch off your WorkCentre.
1 32 4 5
1. Copy Quality
This feature allows you to select BEST, NORMAL or DRAFT copy quality,
according to the type of output you require (Shown by lights).
DRAFT is possible ONLY if you have selected PLAIN paper.
C
2. Copy Intensity
This feature enables you to lighten or darken black & white, and saturate or
soften color on the copies you make. It has five values (Shown by lights).
3. Reduction/Enlargement
Preset
Using the FIXED SCALE button, you can select one of the six values
indicated above the button on the control panel (Shown by lights).
100% one to one copying (default value)
36
Page 43

Using your WorkCentre as a Copier (continued)
Auto automatic adjustment of the original to a full page on the output
copy, with allowance for default margins. (LCD shows 93% for
LETTER, 94% for A4)
Customer zoom R/E/ Poster/ Clone function
100% Default setting, can be changed. Refer to tools Default Set
section.
Poster Enlarges the original and divides up the output of your
original into a number of sections (maximum: 400%, 5 x 5
format, yielding 25 sheets - default setting).
Use this feature to create different size posters from
standard page-size originals.
Clone: Fits on the currently selected paper size as many images of
the original as the paper size will hold. (maximum: 100%,
yielding 1 per page - default setting).
You can use this feature to reproduce your business card,
invitations, standard size photographs, etc.
For Poster/ Clone do the following:
Select quantity of output, press START
Press zoom R/E to select desired output, then press start
Reduction / Enlargement
8.5>5.5 or A4>A5 reduction (LCD shows 78% for LETTER, 70% for
A4)
5.5>8.5 or A5>A4 enlargement (LCD shows 129 % for LETTER,
141% for A4)
400% Max enlargement (LCD shows 400%)
4. Variable
You can select the reduction/enlargement percentage you require, using
the UP/DOWN ARROW 25%/400% button (the LCD will show the
percentage selected).
5. Color or Black/White copies
Using this button you can select color or black and white copying (Shown
by lights).
The default values for the individual features will be restored as soon as the
WorkCentre control panel shows READY or when you switch the
WorkCentre on again.
37
Page 44

Using your WorkCentre as a Copier (continued)
Using the Copy Features menu
C
5 6
1 2 3
The Copy Features menu contains a number of parameters that you may
wish to customize for your standard output. Once you have selected and
confirmed the settings you require, these can be memorized as default
values and will be restored whenever you switch on or restart your
WorkCentre.
How to access
With the WorkCentre in stand-by (READY TO COPY.....100%.....1), press
the Copy Features button (4) on the control panel. The LCD will show
PAPER TYPE: PLAIN (default value) or the last value selected and saved
as the default.
4
How to navigate within the Copy Features menu
• To select another PAPER TYPE, press the navigation button > (2) on
the control panel to display the next choice in the menu (PHOTO ON
PLAIN). Pressing the navigation button < will move you back to the
previous choice.
• To move directly to the next parameter in the Copy Features menu,
∨
press the navigation button
LETTER. Pressing the navigation button
(1); the LCD will show PAPER SIZE:
∧
will move you back to the
previous parameter.
• To confirm a new PAPER TYPE choice, press the navigation button < or
> until the paper type you require is displayed on the LCD, then press
the OK button (3). The next parameter in the menu is then displayed
(PAPER SIZE: LETTER).
Summary: to move through the Copy Features menu, use the navigation
∨
buttons
or ∧ to move from one parameter to the next. To select a choice
within a parameter, use the navigation buttons < or >. The menu
parameters and choices are cyclic; once you reach the last item, you return
automatically to the first.
38
Page 45

Using your WorkCentre as a Copier (continued)
How to exit
To exit from the Copy Features menu, press the EXIT button (5) on the
control panel. The parameter choices selected and confirmed with OK will
remain valid until you select and confirm another value. The LCD will show
READY TO COPY.....100%.....1
How to restore the factory default values
You can restore the original default values at any time, selecting the
RESTORE FACTORY DEFAULTS in the Tools menu (6).
Copy Features menu items (BOLD = DEFAULT value)
• PAPER TYPE (Choices: PLAIN, PHOTO ON PLAIN,
TRANSPARENCY, COATED, PHOTO, TRANSFER)
• PAPER SIZE (Choices: LETTER, LEGAL, STATEMENT, PHOTO,
4X6, A4, A5, A6)
• COLOR ADJUSTMENT (Choices: NORMAL, PALE, SATURATED)
• BACKGRND REMOVAL (Choices: ON, OFF)
Which PAPER TYPE should you select:
• Use PLAIN for simple documents, letters and business graphics.
• Use PHOTO ON PLAIN to print photographs on plain paper.
• Use TRANSPARENCY to create films for overhead projectors.
• Use COATED for quality color images and computer art.
• Use PHOTO to create final output of your photographs.
• Use TRANSFER to make pictures and patterns for iron-on transfers.
39
Page 46

Using your WorkCentre as a Copier (continued) Copying extra-large documents
If the document you wish to copy does
not fit on the document glass, you can
remove the document cover, lifting it
straight upwards. You will be able to
copy ONLY the part of the document that
is actually on the document glass.
Once you have finished copying, you
MUST replace the document cover,
fitting the attachment hinges in their
seats and lowering the cover straight
down on to the WorkCentre body.
40
Page 47

Using your WorkCentre as a Copier (continued) Xi70c Bypass Tray
The exit tray doubles as a feed tray for up to five standard weight
(80 gr/m
in type and size from those in the main feeder.
Special media and envelopes should be fed one at a time. If you use
envelopes, before inserting them, make sure the edges and closing flap are
well creased, and that the flap lies flat. See media section for descriptions.
Operating steps:
1. Remove any printed documents from the exit tray and open the lateral
4. If you are using the WorkCentre in copier mode, place original face
Remove the copy from the output tray as soon as it exits from the
WorkCentre. If you do not remove the output it may be displaced back into
the WorkCentre.
2
) sheets of media and can be used to insert media that is different
and rear guides completely.
2. Load maximum five pieces of media
face down on the tray aligning its
leading edge against the feed rollers.
3. Close the adjustable margin guides
against the edges.
down on document glass and press START.
If you are using the WorkCentre in printer mode, select “Manual Paper
Source” in the Paper/ Output tab in the properties screen.
41
Page 48

Using your WorkCentre as a Printer
To use your WorkCentre as a printer, you must first:
1. Install it completely (see Installation AND Software Installation)
2. Make sure that it is switched on and on-line (the light indicator between
the PC and WorkCentre symbols on the control panel must be ON and
the LCD must show READY TO COPY.
3. Make sure the settings in the printer driver correspond to your
requirements.
4. Make sure that the WorkCentre is selected as the output device for your
print job.
You should now:
1. Open a word processing/desktop publisher application.
2. Open or create the document you wish to print, edit and save it.
3. Select the Print command in your application.
A window showing the WorkCentre print job characteristics opens.
4. Select the paper type, size and source, number of copies, etc. that you
require (see next section for details), make sure that your WorkCentre
is selected as the printer to use and click OK.
Customizing your print output
Always make sure that the Paper Type and Paper Size features in your
printer driver correspond to the type of printing media you intend to use. In
particular, the color calibration in the driver is set specifically for each of the
different types of media handled, so an incorrect setting may result in
degraded output quality.
1. To access the printer driver settings:
• Windows
From Control Panel in the Main group of the Program Manager,
select Printers.
Highlight your WorkCentre icon and click on Setup in the File menu.
• Windows
Click Start in your Desktop window, click Printers, right-click the
WorkCentre printer driver icon, and click Properties to access the
driver properties.
42
3.1/3.11
95/98
Page 49

Using your WorkCentre as a Printer (continued)
2. Click the Paper/Output tab.
The screen that opens contains all of the parameters that allow you to
set up your print job.
A full description of these features is given in the on-line documentation
loaded when you installed your printer driver.
3. To confirm any new modification you make to the parameter choices,
click Apply at the bottom of the screen.
4. To save your customized settings, click OK to exit from the Properties
tab. To abandon the Properties tab without saving any changes you
may have made, click Cancel.
The Printer Monitor button gives immediate access to job status and
printer care functions.
The Defaults button at the bottom of the screen restores the original
factory default settings.
Information about the driver settings
There are several ways of accessing information available for the
parameters in the Paper/Output tab:
• point your icon on any parameter for more than 3 seconds, a hotspot
indicating the parameter function will be displayed. It disappears as
soon as the icon is moved.
• select the parameter required and then right click your mouse.
• select ? in the top right hand corner of the tab and drag it on to the
parameter required.
• click the HELP button in the lower right hand corner of the tab; in this
case you access the complete section dealing with the entire Settings
tab.
43
Page 50

Using your WorkCentre as a Printer (continued)
Selecting WorkCentre as your output device
As a rule, you will have already defined the WorkCentre as your default
output device when you installed the printer driver. If you did not, you can
do so now:
In Windows
1. Double click Print Manager in the Main group of the Program
Manager,
2. Click Option and then Printer Setup… ,
3. Highlight your WorkCentre printer name in the Installed Printers box
and click on the Set as Default Printer button (your WorkCentre
printer name appears in the Default Printer box),
4. Click the Close button.
In Windows
printer icon, click Printers, then Set as Default.
If you do not want to set the WorkCentre as a default printer, you can select
it when you initiate your print job.
3.1/3.11:
95/98, by clicking Start then Printers; double-click your
44
Page 51

Using your WorkCentre as a Printer (continued) On-line Documentation
The installation CD containing the WorkCentre driver software also
contains On-line Documentation. This documentation contains additional
information on the WorkCentre features and functions, and print cartridge
and paper handling. It is structured in two parts: How do I and
Troubleshooting.
The information contained in the How do I and Troubleshooting is
organized in topics; e.g. Paper, Print cartridges, etc., and can be printed
screen by screen.
To access the On-line Documentation, click on the specific icon in the
Printer group created when you loaded the software, or on the specific
button (How do I or Troubleshooting) in the Printer Monitor screens.
45
Page 52

Using your WorkCentre as a Printer (continued) Printer Monitor
What is the Printer Monitor
The Printer Monitor is an on-screen aid with an extensive, user-friendly
HELP feature. It contains a series of functions that are designed to help
you during the use of your WorkCentre as a printer. It can be viewed by
clicking on the specific icon and allows you to:
• view the printer operating status on your PC screen during a print job. It
indicates the proportion of the document printed and any error
messages (Job Status),
• perform care functions, to maintain optimum working conditions (Printer
Care).
How to access the Printer Monitor
Under Windows
You can access the Printer Monitor from your printer driver group at any
time, by double-clicking its icon.
Under Windows
You can access the Printer Monitor in either of the following ways:
1. Click Start, highlight Programs and then the printer name in the sub-
menu which opens.
2. Click the Printer Monitor icon.
OR
1. Click Start, highlight Settings, and then click Printers in the sub-menu
which opens.
2. Click your printer name to highlight it.
3. Click your right mouse button.
4. Select the option Run the Printer Monitor in the menu which opens.
3.1/3.11:
95/Windows 98:
46
Page 53

Using your WorkCentre as a Printer (continued)
Printer Monitor features
Job Status
Click on the Job Status tab at the top of the screen to display the current
condition of the WorkCentre (printing, idle, error condition).
Printer Care tab
Click the Printer Care tab at the top of the screen, to access the following
care functions:
Ink cartridge:
Two images (one for each print cartridge)
These images give an indication of the ink level in the corresponding
cartridge. The indication given will be reliable ONLY if you pressed the “10”
button on the control panel when you inserted the new print cartridge.
Align
Click Align to print the test pages that confirm the accuracy of bidirectional printing after replacing one/both of the print cartridge(s).
You must then follow the instructions displayed on the WorkCentre control
panel, using the control panel buttons to select/confirm the alignment
values (this feature requires at least two sheets of paper).
Clean
Click Clean before changing the print cartridge if you notice deterioration in
the print quality.
Follow the instructions displayed.
Activate dry delay time
Click Dry delay time if you are printing photographs, high-density graphics
or concentrated black texts.
This feature programs a pause between the printing of two successive
pages, allowing the first page to dry before the next page is printed. The
pause can be overridden, by pressing START on the control panel.
Print Test
Click Print test to print a page of the printer’s functional characteristics
(firmware release, print cartridge tests, current settings).
Follow the instructions displayed; the print test requires at least one sheet
of paper.
47
Page 54

Using your WorkCentre as a Printer (continued)
How Do I
Click How do I to open the On-line help feature.
This feature explains, in a series of specific topics (“How to handle...paper,
print cartridges”, etc.), how to operate your printer successfully.
Troubleshooting
Click Troubleshooting to open the On-line troubleshooting feature.
This feature explains how to solve some operating problems (“no paper”,
“paper jam”, poor print quality, etc. conditions)
48
Page 55

Using your WorkCentre as a Scanner
To use your WorkCentre as a scanner, you must first:
• Install it completely (see Installation AND Software Installation)
• Make sure that it is switched on and is on-line (the light indicator
between the PC and WorkCentre symbols on the control panel must be
ON and the LCD must show READY TO COPY.
You should now:
1. Open an application (example used: MGI PhotoSuite).
2. Highlight Get Photo From in File on the menu bar and click on Select
Source.
3. Select your WorkCentre scanner from the list of scanners displayed.
4. Highlight Get Photo From in File on the menu bar and click on
Camera/Scanner.
5. The scanner driver opens.
6. You can now scan an original document from your WorkCentre or
acquire an image from a file already loaded in your PC.
Scanner Screens
Your WorkCentre scanner monitor has three pages: Basic, Image Quality
and About.
The Basic page appears automatically after your WorkCentre and graphics
application are started up. The Image Quality and About pages are
hidden; to see them, click on Image Quality and About tabs at the top of
the scanner application screen.
For a full description of all the features on these three screen pages and
further information on your scanner, access the On Line Help file in the
scanner driver and consult the documentation supplied with your specific
scanner application program.
49
Page 56

Maintenance
Your WorkCentre is designed to require only minimum maintenance.
However, everyday use will give rise to the need for a number of simple
care operations.
General care See Safety Notes and Helpful Hints at the beginning of this manual.
Print cartridge care and precautions
• Always keep the print cartridges sealed in their containers until they are
to be used.
• Remember to remove the protective tape before inserting the print
cartridge in the printer.
• Take care to insert the print cartridge in the correct seat on the print
cartridge carriage (color, left; black, right).
• Take care not to get ink on your clothes; the ink in the print cartridge
stains.
• Do NOT attempt to refill the print cartridge with ink, as this damages the
print cartridge and the printer.
• DO NOT shake the print cartridge. If it does not print, do the cleaning
operations described in Cleaning the print cartridges.
• If you think that the number of pages printed with the current print
cartridge is fewer than usual, try cleaning it. If the end of ink condition
persists, the print cartridge is empty and requires replacing.
• To guarantee that the print cartridge carriage is in its rest position
when you shut down your WorkCentre, always switch off the
WorkCentre before you switch off the computer. When the
WorkCentre is powered, the print cartridge carriage will
automatically return to its rest position and go into standby mode
after approximately two minutes of inactivity.
50
Page 57

Maintenance (continued)
Replacing the print cartridges
1. With the printer idle (in standby), raise
the scanner module: the print cartridge
carriage moves to the cartridge loading
position.
2. Press the appropriate lever to release the required cartridge.
3. Pulling upwards by the thumb and finger grip, remove the required
cartridge.
4. Insert a new print cartridge of the SAME type (black and/or color). See
Inserting the print cartridges for the complete print cartridge insertion
procedure (including the Align function).
51
Page 58

Maintenance (continued)
• Make sure the print cartridge carriage is in the cartridge loading position
(right side of the machine, with release levers accessible).
• Check that the print cartridge/seat is clean and free of foreign material.
• Make sure you are inserting the print cartridge in the correct seat.
• NEVER force the print cartridge into the seat; if you have difficulty
inserting it, always remove it completely and repeat the entire insertion
operation.
Cleaning the print cartridges
The print cartridges are cleaned automatically at regular intervals while the
printer is powered. This operation clears the print cartridge jets, ensuring
the ink flow. If you have a problem with the printing quality that is not
solved by this automatic nozzle clearing operation, you can do the same
operation, using the Clean function in the Printer Care tab in Printer
Monitor (see the specific paragraph in Printer Monitor).
If you have a problem with the printing quality that is not solved by the
Clean function:
Clean the electrical contacts.
1. Raise the scanner module; release and remove the print cartridge that
is causing the problem.
2. Clean the electrical contacts (gold
part) on the print cartridge and in the
housing on the print cartridge carriage
with a slightly damp lint-free cloth,
taking care not to touch the print
cartridge jets.
52
Page 59

Maintenance (continued)
3. Re-insert the print cartridge in the printer and close the scanner
module.
4. Run the Print test page to check the print quality.
Clean the print jets.
This operation should ONLY be attempted as a last resort, before
changing the print cartridge.
1. Dampen a lint-free cloth with distilled water; squeeze it slightly to
remove any excess water.
2. Raise the scanner module; release and remove the print cartridge that
is causing the problem.
3. Holding the print cartridge with the jets
facing downwards, blot it against the
lint-free cloth, pressing lightly.
4. Repeat the blotting operation a few times on different areas of the lintfree cloth, to clean the jets.
5. Reinsert the print cartridge in the WorkCentre and close the scanner
module.
6. Run the print test to check the print quality.
53
Page 60

Maintenance (continued)
Moving your WorkCentre
If you should need to move or relocate your WorkCentre, follow these
precautions:
• Always make sure that the print cartridge carriage is in its rest position.
To ensure this, always switch off your WorkCentre BEFORE switching
off your PC.
• Disconnect all cables.
• Repack your WorkCentre in its original carton whenever possible.
• Do not to drop your WorkCentre.
Service
If you need service assistance, before calling make sure you have the
following information available:
• the name of your WorkCentre model,
• its serial number,
• the date of purchase.
54
Page 61

Troubleshooting
If you have problems operating your WorkCentre, or are unable to perform
the operation you require, first check that you have followed correctly the
instructions given in this manual or the section How to... in the On-Line
Guide loaded with the drivers. If, after repeating the procedure, you still
have a problem, consult the following Problems and solutions table or
further information on the specific topic in Troubleshooting in the On-Line
Guide.
During normal operation, an error condition will be signaled on the LCD
and/or by the corresponding light indicators and/or an error message on
your PC screen.
If you detect serious mechanical damage to or a failure in the WorkCentre,
do not attempt to repair it yourself! CALL 1-800-Team-XRX (1-800-832-
6979).
Problem Solution
Missing or damaged parts.
WorkCentre is not powered
(the READY light indicator is
not lit).
Printer Status Monitor not
active
Problems with paper
• Check the box thoroughly.
• Contact your Xerox help line immediately.
• Check that the WorkCentre is connected
properly to the electrical power supply
socket.
• Check that the WorkCentre is switched on.
• Try the WorkCentre in a different wall outlet,
if still no power, call 1-800-Team-XRX.
• Check that the parallel cable between the
WorkCentre and the computer is connected
correctly to both ports. Use the parallel
cable supplied with your WorkCentre or a
standard, bi-directional IEEE 1284-type
parallel cable.
• Switch off the WorkCentre, wait a few
seconds and then switch the WorkCentre on
again. If the Status monitor does not
respond, switch off and disconnect
completely the WorkCentre and call 1-800Team-XRX.
Input PAPER light indicator is
flashing.
Paper Jam light is on
• There is no paper in the paper tray.
Load paper, following the instructions given in
“Loading paper” in Installation.
• Reference: “Clearing Paper Jam “ in the
manual.
• Check that the paper is positioned correctly
in the input tray.
55
Page 62

Media is not feeding or
misfeeding into WorkCentre
Media is not exiting the
WorkCentre
Printout is slanted or skewed
Problems with print
• Check that the size and weight of the paper
you are using are within the limits allowed.
• Make sure the correct paper size, type and
source is selected in the Paper/Output tab
of the Printer Status Monitor and/or in the
Features menu.
• Check that the media is within the
specifications.
• Fan media thoroughly before reloading into
the input tray.
• Make sure the lateral and rear guides on
input tray are positioned correctly against
the paper edges.
• Make sure the correct settings in Copy
Feature menu/Properties in WorkCentre
printer driver for the currently loaded paper.
• Remove the sheet(s) that have caused the
jam; remove all the media from the input
tray; check for and removed damaged or
curled paper; reload media in input tray.
• Make sure you have selected the
WorkCentre as the output device.
• Make sure that the paper is of a
manufacturer approved type and that it is
loaded correctly in the paper tray and that
the adjustable lateral and rear guides are
properly closed against the paper.
Load only ONE type of paper at a time in the
paper tray and make sure this type is
selected in the corresponding Properties
dialog box in your WorkCentre driver.
Lines / dots are missing or
faint from the copied/printed
characters
Problems when printing
Print test did not run
56
• Remove and re-insert the print cartridges,
making sure they are placed correctly in the
carriage.
• Perform aligning the cartridge process.
• Run the Clean function: if the quality does
not improve, remove and clean the print
head(s) manually, then print a test page to
verify the print cartridge(s) condition, and if
empty, replace cartridge(s).
Remember to align the print cartridges
whenever you replace them.
• Switch off the WorkCentre, wait a few
seconds and then switch it on again.
Repeat the correct button sequence (see
“Tools menu “ in Control Panel or click the
Page 63

WorkCentre produces a
blank page
Incorrect text/image
placement on page:
Colors not aligned correctly
Text or graphics are cut off at
the edges of the page
Poor print quality:
Printout is faded or colors are
dull
Colors are bleeding/
smearing into each other
Character outlines in the text
are not smooth
appropriate button in the Printer Care tab in
the Printer Monitor).
• Make sure the protective tape has been
removed from the print cartridge.
• Perform aligning the cartridge process.
• Make sure margin settings for the
document do not exceed the print line
length for the paper size you are using.
• Check that the document you are printing
will fit on the paper size you are using.
• Check that the page orientation selected is
the correct one.
• Select print preview option prior to print to
verify your desired output.
Make sure the adjustable lateral and rear paper
guides of the paper tray are closed properly
against the paper.
• Make sure you are not printing in draft
mode.
• Check that the Paper Type setting selected
in the Properties dialog box of your
WorkCentre driver corresponds to the
paper/media you are using.
Check Problems with Print in Troubleshooting
section.
Always use manufacturer-approved paper
types and printing media.
• Make sure that Paper Type and Print
Quality settings are compatible. Some
Paper Types (such as Transparency) and
Print Quality (such as Best) require more
ink than others. For example, if you are
printing on transparencies, make sure you
have chosen Transparency as your Paper
Type.
• Always give the printed document time to
dry. If necessary, remove it from the output
tray as soon as it exits from the WorkCentre
and leave it to dry elsewhere before
handling it.
• When printing documents with high page
coverage and certain media types
(particularly transparencies), you should
select the Dry Delay Time feature.
• Make sure you are printing on the correct
surface of the print media.
• If the printed page is wrinkling due to too
much ink, try reducing the Print Quality
setting.
• Check the type of font you are using in your
57
Page 64

White streaks document. Using TrueType fonts you can
Page content is incomplete /
incorrect:
Meaningless characters
printed
Wrong fonts printed
Colors not reproduced
correctly
Printing job is taking too long
ensure that your WorkCentre is able to print
smooth character outlines. When selecting
a font for your document, look for the
TrueType icon.
• Paper that is heavily textured or does not
accept ink well can cause graphics and text
to print poorly.
Always use manufacturer-approved paper
types and printing media.
• Align the print cartridges.
Check Problems with Print in Troubleshooting
section.
• Check that your WorkCentre is selected as
the current printer. Open the Printers
folder, click the WorkCentre icon and then,
from the File menu, click Set As Default.
• Check that your document file is not
corrupted.
• Try turning the WorkCentre off for a few
seconds, delete all print jobs from the print
queue on your computer. Switch on the
WorkCentre and try printing again. If this
doesn't correct the problem, turn it and the
computer off for a few seconds, turn them
both back on (WorkCentre first), and then
try printing again.
• Check whether the font that is printing
incorrectly is available in your software
program (by looking in the Text Font drop-
down list) and that it is a TrueType font.
When selecting a font, always look for the
TrueType icon.
• Make sure you correctly format the fonts
you're using. E.g.: in a paint program,
format the words in the font size you want;
do not enlarge them by dragging and sizing.
• Check that the media on which you are
printing is that selected in the driver
settings.
• Grayscale may be selected in the
WorkCentre Properties dialog box. To print
in color, change this setting.
• Select Automatic in Image Settings in the
WorkCentre Properties dialog box.
Check Problems with Print in Troubleshooting
section.
• If a document is already printing, your new
job will be queued, and will start after the
other jobs in the queue are finished. Check
58
Page 65

Problems when copying
the print queue by double clicking your
WorkCentre printer icon.
You can change the queue order by
selecting and dragging your print job up the
queue of waiting jobs.
• Change the speed and quality of your print
job: Best (Quality) is the slowest setting but
has the highest quality. Draft is the fastest
setting and has the lowest quality.
• When you print on transparency film and
photo paper or if the Dry Delay Time is
activated, the printing process is slower, to
allow the ink to dry.
• If you selected the wrong paper type, it may
slow down the print process. Select the
paper type setting that corresponds to the
content of the input tray OR remove the
paper currently in the input tray and load
that corresponding to the paper type
setting.
No pages copied/
Blank page copied
Settings made on control
panel are not retained when
the Clear/Stop button is
pressed or when the
WorkCentre is switched on
Copying job is taking too long
• Make sure the protective tape covering the
cartridge nozzle is removed.
• Make sure the document you are copying is
placed print-side down on the document
glass.
• Check Problems with Print in
Troubleshooting section.
To save your current settings as defaults:
• Press the Tools Menu button until “Set
Defaults” appears.
• Choose the appropriate settings using the
navigation buttons on the front panel.
• Press OK button to memorize the settings.
• Press EXIT button.
The control panel light indicators will now show
the settings you have made.
• If a document is printing, your copy job will
be queued, and will start after the print job
is finished. The LCD indicates that the
WorkCentre is printing.
• Change the speed and quality of your copy
job: Best is the slowest setting but has the
highest quality. Draft is the fastest setting
and has the lowest quality.
• When you copy on to transparency and
photo paper or if the Dry Delay Time is
activated, the copy process is slower.
• Check to make sure you have selected
color or black/white copies. Color copies
59
Page 66

will take longer.
Poor quality copies:
Copies are faded, colors are
dull or white streaks
Repetitive patterns are visible
on the copy
Paper wrinkled and very wet
Incorrect image placement on
page or edges cut off
Copies are crooked
Problems when scanning
• Make sure that the paper type selected on
the front panel display is the same as the
type of paper actually loaded in your
WorkCentre.
• Press the Copy Quality button to select
better copy quality.
• Press the Copy Intensity button to select
better copy intensity.
• Clean the glass and/or the underside of the
copier cover with a soft, damp cloth. Some
types of originals, such as newsprint or
newspaper photos do not copy well. To
optimize quality, place a sheet of clear,
clean film on the copier glass, and then
place the original face down on top of the
film.
Check Problems with Print in Troubleshooting
section.
• When material is reprinted, repetitive
patterns may be visible on the copy. Try to
eliminate the patterns by reducing the copy
size or by placing the document at an angle
on the glass.
• Make sure that the paper type selected on
the LCD is the same as the type of paper
actually loaded in your WorkCentre.
Check Problems with Print in Troubleshooting
section.
• Change the Paper Type setting OR load the
input tray with paper indicated by the
current setting.
• Make sure the original is aligned both
horizontally and vertically with the scale at
the edge of the document glass.
• The enlargement ratio currently selected is
making the copy too large or too small.
Correct the setting.
• The paper size setting currently selected
does not correspond to that loaded in the
input tray. Load the correct paper size OR
change the setting.
• Align the original correctly against the scale
at the edge of the document glass.
Preview of the scanned
document does not appear
on screen.
60
• Make sure the copy or print job is complete
before scanning.
• Place the original face down and align it
Page 67

Scan quality is poor:
Printout is faded or colors are
dull
Repetitive patterns are visible
when the scanned picture is
printed
Diagonal lines
look ragged
correctly against the registration edge of the
document glass.
• Select WorkCentre as the default scanner.
• Clean the glass and/or the underside of the
scanner cover with a soft, damp cloth.
• Some types of originals, such as newsprint
or newspaper photos do not scan well. To
optimize quality, place a sheet of clear,
clean film on the scanner glass, and then
place the original face down on top of the
film.
Check Problems with Print in Troubleshooting
section.
• The scanner lamp requires replacing.
Call your local Xerox help line. DO NOT
attempt to change the lamp yourself.
• Your Xerox Twain driver allows you to
differentiate between images types. Always
select the type that corresponds to or most
closely fits the image you wish to scan.
Some images are composed of small
printed dots at various frequencies, i.e.,
newspaper, magazine, etc. Please choose
the Image Quality tab and then select the
Descreen feature for your type of input
document.
• Make sure that your WorkCentre is selected
as your current printer. If you are printing to
a printer other than WorkCentre, you must
select that printer type within the scanning
software.
• Re-position your original on the document
glass and utilize the print preview screen to
ensure lines appear as they should.
Refer to your On-Line help files on your
software CD.
61
Page 68

Status and Error Messages
Status messages
WorkCentre status Message on LCD
Stand-by mode - Off-line condition
stand-by READY TO COPY
scale % No of copies
stand-by and power saver
condition
sleep LCD off
Copy mode - Off-line condition
copying COPYING
Print mode - On-line condition
PC connected READY TO COPY
Printing PRINTING <=> READY TO COPY
Copy operation started during a
print job
Copying while a print job is paused COPYING
ON LINE button pressing during a
print job
OFF LINE READY TO COPY
OFF LINE and copy COPYING
Scan mode - On-line condition
PC connected READY TO COPY
SCANNING SCANNING
READY TO COPY
scale % No of copies
scale % No in
progress/quantity
scale % No of copies
scale % No of copies
PLEASE WAIT
SUSPENDING PRINT
scale % No in
progress/quantity
PLEASE WAIT
SUSPENDING PRINT
scale % No of copies
scale % No in progress/quantity
scale % No of copies
62
Page 69

Status Codes
WorkCentre Status Code Solution
System Error 1 Check that nothing is blocking the print
cartridge carriage. Switch off WorkCentre,
wait five seconds, then switch on again. If
“SYSTEM ERROR 1” persists on LCD, call
1-800-Team-XRX for service.
System Error 2 Check that nothing is blocking the paper
feed path, that there is no paper jam and
that the paper in the input tray is loaded
correctly. Switch off WorkCentre, wait five
seconds, then switch on again. If
“SYSTEM ERROR 2” persists on LCD, call
1-800-Team-XRX for service.
System Error 3 Ensure that the print heads are inserted
correctly as explained in section Installing
Print Cartridge. Remove them and
reinsert them if necessary. Follow
Cleaning the Electrical Contacts process
in the maintenance section in your user
guide. (Never touch the contact points with
your fingers.)
When replacing print cartridges, be sure to
press “10” for recognizing “NEW
CARTRIDGE”. Never replace your current
print cartridge with a used cartridge. If
“SYSTEM ERROR 3” persists on LCD, call
1-800-Team-XRX for service.
System Error 4,5 Call 1-800-Team-XRX for service.
System Error 6 Check that WorkCentre and your PC are
connected correctly. Check that the
scanner driver is installed. Check that your
PC is not busy with some other task.
Switch off WorkCentre, wait five seconds,
then switch on again. If “SYSTEM ERROR
6” persists on LCD, call 1-800-Team-XRX
for service.
System Error 7 Switch off WorkCentre, wait five seconds,
then switch on again. If “SYSTEM ERROR
7” persists on LCD, call 1-800-Team-XRX
for service.
63
Page 70

Error messages
WorkCentre status Message on LCD
Stand-by mode - Off-line condition
Cover open CLOSE COVER
Change cartridge and close cover NEW CARTRIDGE?
YES = 10 NO = 1
no print cartridges (both) INSERT CARTRIDGE
no black print cartridge INSERT BLACK CARTRIDGE
no color print cartridge INSERT COLOR CARTRIDGE
<=> READY TO B/W COPY
Other brand of print cartridge WRONG CARTRIDGE
Copy mode - Off-line condition
Cover open CLOSE COVER
Paper jam CLEAR PAPER JAM
no paper/paper misfeed CHECK PAPER
PRESS START
Wrong print cartridge WRONG CARTRIDGE
Any button pressed during copy
operation
CLEAR pressed PLEASE WAIT
Print mode - On-line condition
Cover open CLOSE COVER
Change cartridge and close cover NEW CARTRIDGE?
Paper jam CLEAR PAPER JAM
no paper/paper misfeed CHECK PAPER
Wrong print cartridge WRONG CARTRIDGE
TOOLS pressed during print job PRINTING
Scan mode - On-line condition
Cover open CLOSE COVER
Any button pressed during scan
operation
COPYING
BUSY
CANCELING COPY
YES = 10 NO = 1
PRESS START
BUSY
SCANNING
BUSY
64
Page 71

Product Characteristics
Basic Features
Description
Scanner warm-up
Time
Output Technique
Print cartridges
Paper Handling
Automatic Feeder
Capacity (A4/Letter
size)
Bypass Feeder
Capacity
Output Tray
Capacity
Paper Type
Paper Weight
Desk-top color copier, flatbed scanner and
thermal ink-jet printer with PC software drivers
From power off: 45 seconds
From lamp at power save: 15 seconds
For best results: 3 min
Thermal ink jet, with water-resistant ink
Black non-refillable
Three-color non-refillable
Automatic or manual through automatic feeder
Manual through input tray
2
Plain paper: up to 150 sheets (80 g/m
- 21 lb.
paper)
2
Envelopes: up to 25 envelopes (80 g/m
paper)
Transparencies: up to 50 pieces
Up to 5 pieces (from A5 to A4/Letter size)
2
50 printed sheets (80 g/m
– 21 lb. paper)
Plain office paper
Transparencies
High resolution glossy/coated papers
Envelopes
Note cards
T-shirt transfers
2
Single sheets: 60 to 135 g/m
Envelopes: 75 to 90 g/m
Note cards: 110 to 200 g/m
(16 - 36 lb.)
2
(20 -24 lb.)
2
(29 - 53 lb.)
Special printing media (Coated, Glossy): up to
2
150 g/m
Transparencies: 90 - 125
Continuous (banner): 75 g/m
(40 lb.)
µm
2
(20 lb.)
65
Page 72

Paper Size
Graphic Resolution
Product
Certification
Recommended
Operating
Environment
Sound level
Electrical
Characteristics
Single sheets: A4, A5, US Letter, US Legal, US
Executive, A6, B5, Folio, Statement
Envelopes: COM-10, DL, C6, C5, B6, B5
Envelope, Monarch
Note cards: 4 x 6 in, 5 x 8 in, A6
User-defined: min. 4 x 5.8 in; max. 8.5 x 14 in
Up to 1200 x 1200 dpi
For USA and Canada
Safety regulations:
UL 1950/478
Electromagnetic compatibility:
FCC part 15 Class B Certified
o
Temperature: 60 to 95
F - 15 to 35 o C
Relative Humidity: 20% - 80%
< 49 dB in high quality printing mode
Power supply voltage:
115 VAC - 120 VAC +/- 10%; 50 - 60 Hz
220 VAC - to 240 VAC +/- 10%; 50 - 60 Hz
Power absorbed:
WorkCentre off - max. 1 watt
WorkCentre in sleep mode – 4.5 watt
typical printer operation – 20 watt
typical scanner operation - 37 watt
Physical
Characteristics
Copier Module
Copying Speed
Counter
Multicopies
Auto start
Printer Module
66
Height 13 in(330mm)
Width 18 in(457mm)
Depth 15in (381mm)
Weight 22 lbs. (10 kg)
Black: Draft – 8 copies per minute
Normal - 5 copies per minute
Best - 3 copies per minute
Color Draft – 4 copies per minute
Normal - 2 copies per minute
Best - 0.8 copies per minute
Total number of pages printed
up to 50
copy job programmed during initialization
Page 73

Throughput
Note: This value may vary depending on the print
mode, the software application and/or the type of
computer used.
Windows environment: up to 8 pages per
minute (black)
Resident Emulation
Printer Memory
Interface
Scanner Module
Technology
Light source
Scanning method
Scan speed
B/W, Grayscale 12 seconds for A4 size page
Color 24 seconds for A4 size page
Max. scan size
Software modules
PCL III + (and extended graphic command set)
2 Mbytes incorporated RAM
0.5 Mbytes input buffer
Parallel (Centronics) IEEE 1284
Charged-coupled device (CCD)
Cold cathode fluorescent lamp
Flatbed - 1 pass
A4 / US Letter
Twain driver, Scan Manager
67
Page 74

One Year Limited Hardware Warranty
If you are not satisfied with the performance of the Xerox WorkCentre Xi70c
covered by this warranty, Xerox warrants that, upon your request, it will be
repaired or replaced, at your option, during the warranty period.
This warranty applies only to the first end-user purchaser of a Xerox
WorkCentre Xi70c unit that is purchased and used in the United States or
Canada. It is not valid for subsequent purchasers. The warranty period for
your Xerox WorkCentre commences on the date you purchased it and expires
one year thereafter.
IMPORTANT: THIS WARRANTY APPLIES ONLY TO XEROX UNITS
PURCHASED AND USED IN THE UNITED STATES OR CANADA. THIS
WARRANTY GIVES YOU SPECIFIC LEGAL RIGHTS, AND YOU MAY
ALSO HAVE OTHER RIGHTS THAT VARY FROM STATE TO STATE OR
PROVINCE TO PROVINCE.
Proof of Purchase
To obtain a replacement or repair, proof of purchase is required. Within 10
days of purchase, register on-line at www.teamxrx.com or complete and mail
the enclosed registration card to Xerox Corporation, Attn.: Team XRX, PO
Box 9604-7994, Webster, NY 14580-7994. You can also fax your registration
card to
1-800-594-5023. When you make your claim, you must present your original
receipt or bill of sale to establish your da te of purc hase.
If you have a problem with your unit
The answers to many problems may be found in the documentation provided
with your unit (check the Troubleshooting section). Other sources for help
include: (1) Xerox' website http://www.teamxrx.com; (2) "fax back" service for
answers to commonly asked questions -- available via 1-800-TEAM-XRX
(1-800-832-6979) 24 hours a day, 7 days a week; (3) our trained, Customer
Support Representatives at 1-800-832-6979 available 8 a.m. – 8 p.m. EST
M-F, 8 a.m. – 3 p.m. EST Saturday. Before you call, please be ready to
provide the serial number, date of purchase and a description of the problem.
How is a replacement obtained?
Our replacement program is the easiest and quickest way to provide you with
a fully operational unit. Upon your authorization to accept a replacement unit
and with appropriate security (credit card authorization - Mastercard, Visa or
American Express), we will, at no cost to you, pro mptly ship a u nit to replac e
your unit. The replacement unit we ship to you may be reconditioned by Xerox.
The unit that needs service must be packed and returned to us. Upon its
receipt, we will release y our cre dit card s ecurity.
How is warranty repair service obtained?
If you prefer that we repair your unit instead of replacing it with another unit, our
Customer Service Representative will explain how to obtain repair service
under this warranty. Please save the original packaging materials to facilitate
shipment.
What must you do?
Your unit is designed to perform with a minimum amount of user maintenance.
You are, however, responsible for the required user maintenance described in
the User Guide provided with your unit. (This required user maintenance
includes replacement of the ink jet cartridge, clearing paper misfeeds, cleaning
the unit and other routine and preventive maintenance.)
68
Page 75

One Year Limited Hardware Warranty
What the warranty does not cover
This warranty covers only defects in materials and workmanship provided by
Xerox and does not cover equipment damage or malfunction from misuse,
abuse, accident, act of God, defect in non-Xerox supplies, use with
incompatible hardware or software, or non-Xerox alteration, modification or
upgrade. Improper return shipping, packaging or shipping damage is not
covered, unless the unit is packaged and shipped in accordance with Xerox
replacement procedures or via an authorized Xerox Service Access Center.
Replacement of the ink jet cartridge and other supplies are customer
maintenance responsibilities and are not covered by this warranty.
Replacement and repair are your only remedies
YOUR ONLY REMEDY UNDER THIS WARRANTY IS THE
REPLACEMENT OR REPAIR OF YOUR ELIGIBLE UNIT AS DESCRIBED
ABOVE. NEITHER THIS WARRANTY NOR ANY OTHER WARRANTY,
EXPRESS OR IMPLIED, INCLUDING, BUT NOT LIMITED TO, THE
IMPLIED WARRANTIES OF MERCHANTABILITY AND FITNESS FOR A
PARTICULAR PURPOSE, SHALL EXTEND BEYOND THE ONE YEAR
WARRANTY PERIOD. UNDER NO CIRCUMSTANCES SHALL XEROX BE
LIABLE FOR ANY SPECIAL INCIDENTAL, INDIRECT OR PUNITIVE
DAMAGES OR FOR ANY CONSEQUENTIAL DAMAGES, EVEN IF
XEROX KNOWS OR IS INFORMED THAT SUCH DAMAGES ARE
POSSIBLE.
IMPORTANT: SOME STATES DO NOT ALLOW THE EXCLUSION OR
LIMITATION OF INCIDENTAL OR CONSEQUENTIAL DAMAGES, SO THE
ABOVE EXCLUSION OR LIMITATION MAY NOT APPLY TO YOU.
No reseller is authorized to modify the terms of this warranty. Any additional
warranty offered by a reseller is the sole responsibility of that reseller.
Service after your one year warranty expires
When your one year warranty expires, you can obtain Xerox Post Warranty
coverage by calling 1-800-TEAM-XRX (1-800-832-6979). We recommend
you call 90 days prior to warranty expiration to ensure continuous service
coverage.
69
 Loading...