

Page 1

XC353/355/356
Page 2
Table of Contents
Safety Notes ...........................................................................................1
Unpacking...............................................................................................4
Getting to Know Your Copier................................................................5
Rear View.............................................................................................6
Underside View.....................................................................................6
Installation.............................................................................................. 7
XC351...................................................................................................7
XC353/ XC355/ XC356..........................................................................7
Control Panel........................................................................................ 10
XC351.................................................................................................10
XC353/ XC355/ XC356........................................................................10
Paper Specifications............................................................................11
Paper Storage..................................................................................... 11
Specification Chart..............................................................................11
Making Copies on the XC351............................................................... 12
Making Copies on the XC353, XC355 and XC356...............................13
Copy Quality......................................................................................... 15
Two-Sided Copying..............................................................................16
Setting Copy Exposure Range ............................................................ 17
Paper Supply Indicator (XC353, XC355 and XC356)......................18
Misfeed Removal...........................................................................19
Paper Feed Slot.................................................................................. 19
Exit Area............................................................................................. 19
Internal Area....................................................................................... 20
Toner Cartridge ...............................................................................22
Toner Cartridge Replacement..............................................................22
Toner Cartridge Yield ........................................................................... 24
Drum Cartridge Replacement .............................................................. 25
i
Page 3

Problem Solving ................................................................................... 28
Problem Solving Chart ........................................................................ 28
Status Code Chart ..............................................................................30
Copier Maintenance ............................................................................. 31
Document Glass and Cover................................................................31
Lens.................................................................................................... 31
Packing the Copier............................................................................... 32
Technical Data...................................................................................... 34
ii
Page 4

Safety Notes
Your copier and supplies have been designed and tested to meet strict
safety requirements. These include safety agency examination and
approval, and compliance to established environmental standards. Please
read the following instructions carefully before operating the copier and
refer to them as needed to ensure the continued safe operation of your
copier.
Follow
product.
Symbology:
Unplug
materials specifically designated for this copier. Use of other materials
may result in poor performance and could create a hazardous situation.
Do not
proper cleaning methods.
Never
they were intended. Keep all supplies and materials out of reach of
children.
Do not
Do not
may fall, causing personal injury or serious damage to the copier.
This product
having a third grounding pin). This plug will fit only into a grounding-type
power outlet. This is a safety feature. To avoid risk of electric shock,
contact your electrician to replace the receptacle if you are unable to insert
the plug into the outlet. Never use a grounding adapter plug to connect
the copier to a power source receptacle that lacks a ground connection
terminal.
all warnings and instructions marked on or supplied with the
= High Voltage, = Heated Surface.
this copier from the wall outlet before cleaning. Always use
use aerosol cleaners. Follow the instr uc tions in this User Guide f or
use supplies or cleaning materials for purposes other than what
use this copier near water, wet locations, or outdoors.
place this copier on an unstable cart, stand, or table. The copier
is equipped with a 3-wire grounding type plug (e.g., a plug
This copier
on the marking label. If you are not sure of the type of power available,
consult your local power company.
should be operated from the type of power source indicated
1
Page 5

Safety Notes
Do not
where persons will step on the cord.
The power supply cord
Insure that installation is near the outlet and is easily accessible.
Your machine
power when the machine is not in use. The machine may be left on
continuously.
Slots and Openings
copier are provided for ventilation. To ensure reliable operation of the
copier and to protect it from overheating, these openings must not be
blocked or covered. The copier should never be located near or over a
radiator or heat register. This copier should not be placed in a built-in
installation unless proper ventilation is provided.
Never
touch dangerous voltage points or short out parts which could result in a
fire or electric shock.
Never
Never
no casual operator serviceable areas within these covers.
Never
operator access to unsafe areas. Covers, guards, and interlock switches
are provided to ensure that the machine will not operate with covers
opened.
allow anything to rest on the power cord. Do not locat e the copi er
is the disconnect device for this equipment.
is equipped with an energy saving device to conserve
in the cabinet and in the back and sides of the
push objects of any kind into the slots of the copier as they may
spill liquid of any kind on the copier.
remove covers or guards that require a tool for removal. There are
defeat interlock switches. Machines are designed to restrict
Use of an extension cord with this copier is not recommended or
authorized.
requirements if an extension cord is to be used. Ensure that the total
ampere ratings of the products plugged into the extension cord do not
exceed the extension cord ampere rating. Also, make sure that the total
amperage of all products plugged into the wall outlet does not exceed the
outlet rating.
2
Users should check building codes and insurance
Page 6

Safety Notes
Avoid
while not harmf ul, they m ay cause an annoying aft erim age. Always keep
the document cover closed during operation and storage.
Avoid
Do not
on the photoreceptor will result in poor copy quality and may shorten the
service life.
Do not
area, as you may be burned.
Ozone:
ozone produced is dependent on copy volume and is heavier than air.
Providing the correct environmental parameters, as specified in the Xerox
installation procedures, will ensure that concentration levels meet safe
limits.
This equipment complies with Council Directive 89/336/EEC,
approximation of the laws of the Member States related to
electromagnetic compatibility and Council DIrective 73/23/EEC
ammended by Council Directive 93/68/EEC, approximation of the laws of
the Member States related to low voltage equipment.
direct v iewing of t he document lights. T he lamps are bright and,
exposing the drum cartridge to light for extended periods of time.
touch the red photoreceptor. Scratches or smudges that appear
put your hands into the fuser area, located just inside the exit tray
This product produces ozone during normal operation. The
3
Page 7
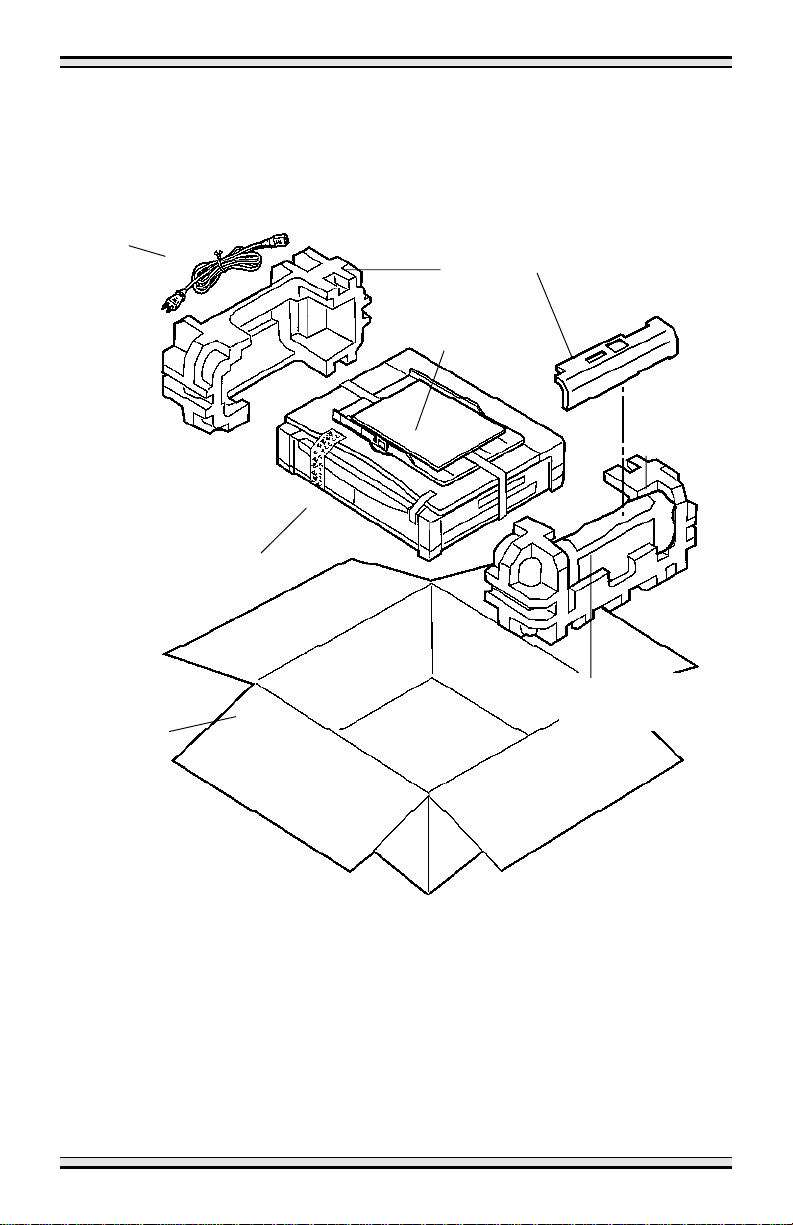
Unpacking
S
C
U
P
m
P
m
IMPORTANT:
Power
Cord
Carton
Save the carton and packing materials for future use.
acking
aterial
ser Guide
acking
aterial
Copier
tarter Toner
artridge
4
Page 8
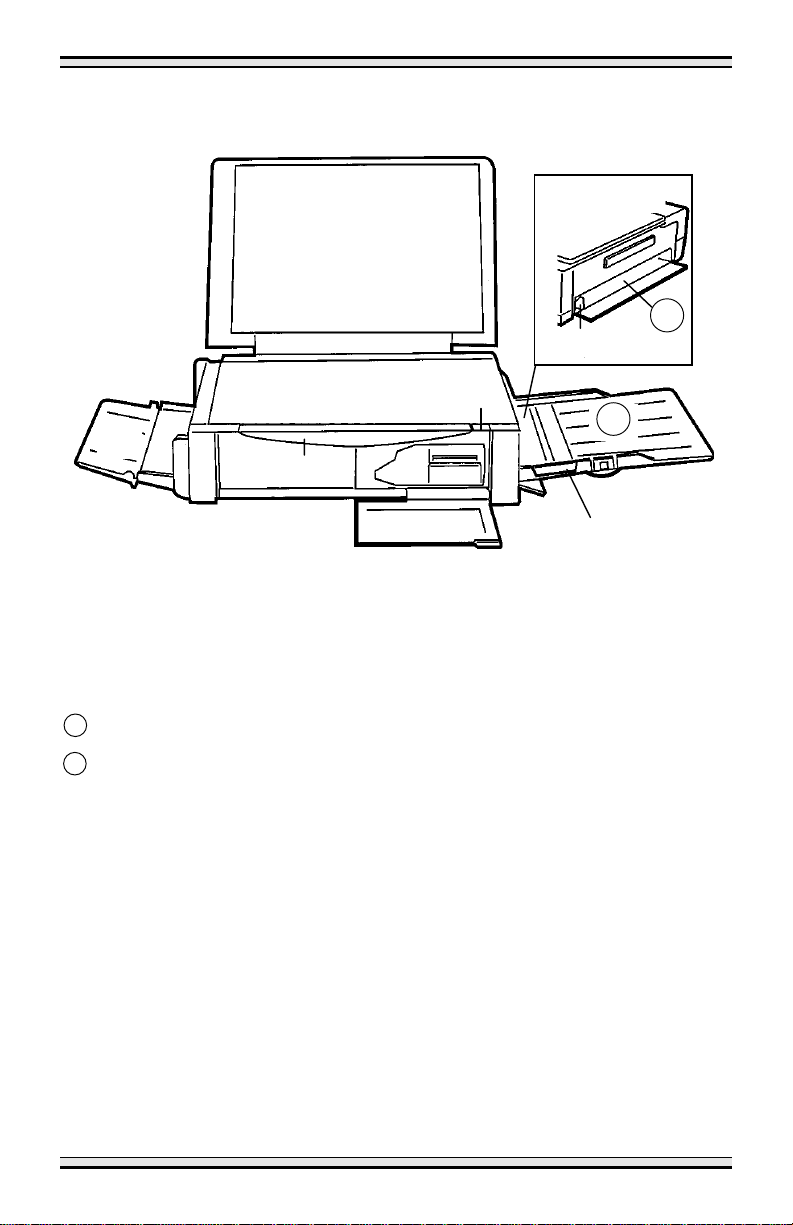
Getting to Know Your Copier
X
4
➀
C351
B
➄
➈
➇
➀
Document Cover
➁
Document Glass
➂
Front Cover Open Button
4A
Paper Tray (XC353/ XC355/ XC356)
4B
Paper Feed Slot (XC351)
➄
Paper Guide
➅
Front Cover
➆
Starter Toner Cartridge
➇
Control Panel
➈
Exit Tray (XC353/ XC355/ XC356)
➁
➆
➅
➂
4A
➄
5
Page 9
Getting to Know Your Copier
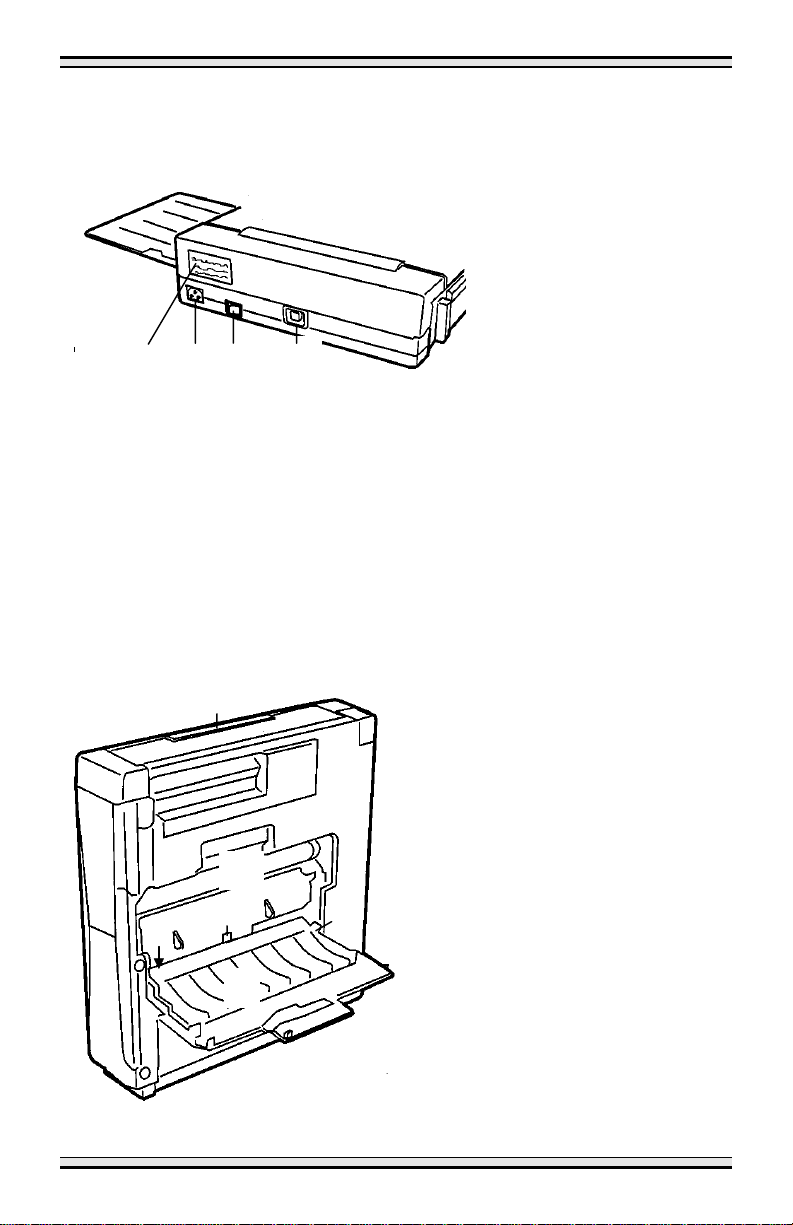
Rear View
➀
➁
Serial Number
➀
Power Cord Socket
➁
On/Off Switch
➂
Document Glass Release Button
➃
Underside View
➃➂
➀
➁
➄
➅
➂
Handle
➀
Drum Cartridge
➁
Bottom Cover Release Lever
➂
Bottom Cover
➃
Drum Cartridge Release Lever
➄
Fusing Area
➅
➃
6
Page 10
Installation
3
3
For reliable copier operation and copy quality, Xerox recommends:
•
Place your copier in a well-ventilated room.
•
Recommended environment:
– Temperature: 50° to 90°F / 10° to 32°C.
– Humidity: 20% to 85%.
•
Place the copier on a flat, level surface.
•
Avoid locations that subject the copier to:
– Direct sunlight.
– Extreme changes in temperature or humidity.
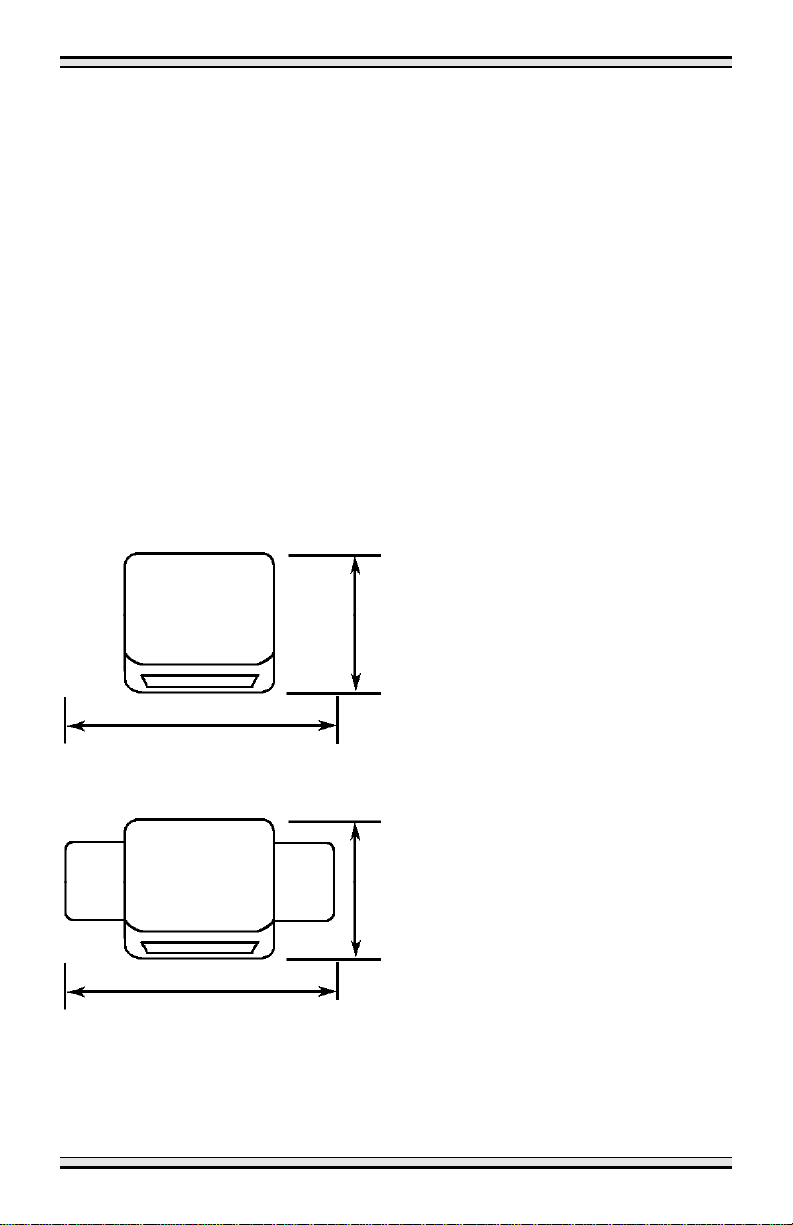
After selecting a location that meets the conditions, ensure that there is
sufficient space around the copier.
XC351
53 mm
725 mm
XC353/ XC355/ XC356
53 mm
XC355 – 725 mm, XC356 – 803 mm
7
Page 11
Installation
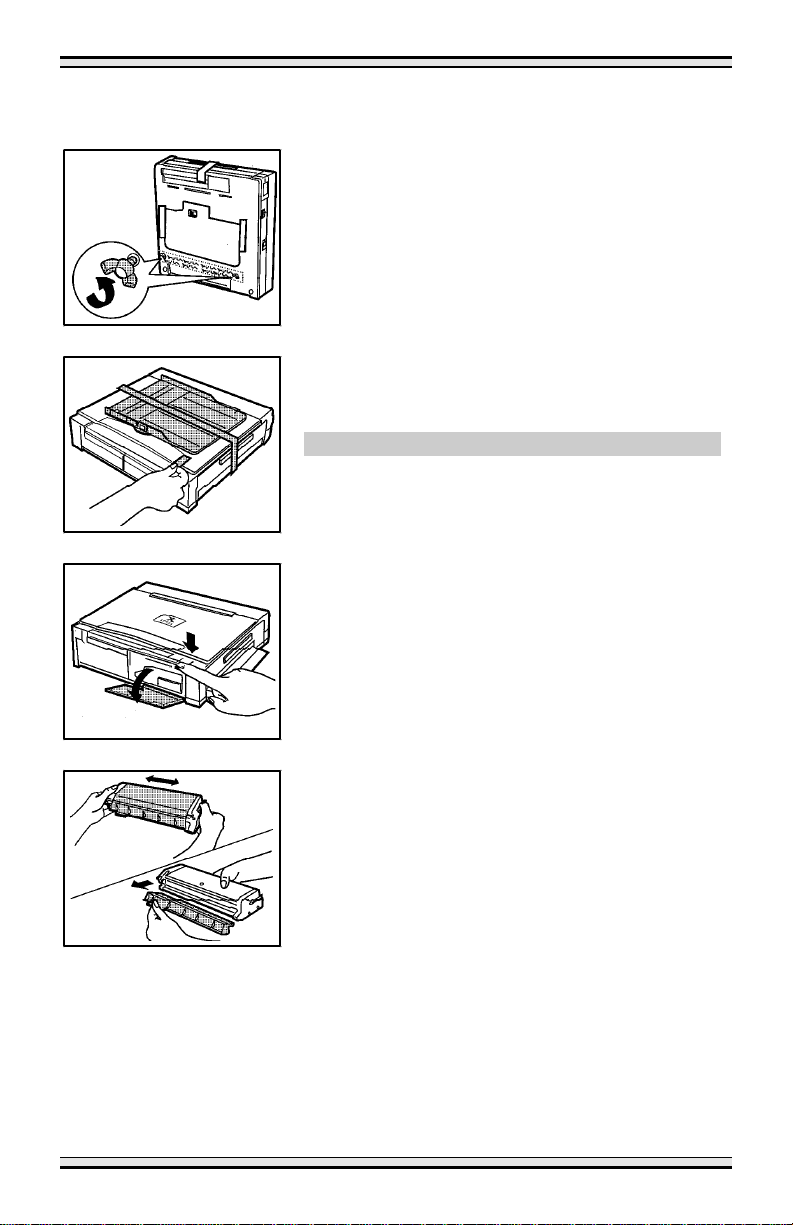
1. Remove the copier from the bag.
2. Remove the thumbscrews, tape and the
label from the bottom of the copier.
Failure to remove the thumbscrew will
Note:
cause a paper jam when operating the copier.
3. Remove all the pieces of tape from the
copier and then place the copier on a level
surface.
XC351 skip to step 5
4. Remove the paper tray from the top of the
copier.
5. Press the button to open the front cover.
6. Vigorously shake the toner cartridge
horizontally several times.
7. Remove the toner cartridge cover.
8
Page 12

Installation
8. Slide the toner cartridge in until it locks in
place.
9. Close the front cover.
XC351 skip to step 12
10. Install the paper tray by inserting it at an
upward angle into the grooves on the side
of the paper feed slot.
11. Open and unfold the exit tray.
12. Plug the power cord into the copier and
then into an earthed outlet.
Ensure that the power cord is inserted
Note:
firmly.
13. Turn the power on.
Wait approximately 1 minute for the
Note:
Ready indicator to light.
CAUTION:
and left sides of the copier are free of
obstructions which may prevent movement of
the document glass.
Ensure that the areas to the right
9
Page 13

Control Panel
➇
➇
XC351
➀
➁
XC353/ XC355/ XC356
➀
➁
➀
Misfeed indicator:
Misfeed Removal
➁
Toner Cartridge Replacement Indicator:
Replacement
➂
Exposure Settings:
Save (not XC353), Light, Manual or Dark.
➃
Exposure Button:
selected exposure setting.
➄
Quantity Display:
➅
Copy Quantity Button:
20 copies.
➂
section.
section.
➃ ➄
Lights when a misfeed occurs. Refer to the
There are five exposure settings: Auto, Toner
Successive pushes of the button will change the
Copy quantity or status codes appear in this area.
Select up to 9 copies, or “C” mode for up to
➂
➅
➃
➆
Refer to
➈
Toner Cartridge
➆
Clear/Stop Button:
quantity. If the key is pressed twice, all programming will be cleared.
➇
Ready Indicator:
ready to make copies. When the light is flashing, after Start is pressed,
the copier is warming up and copying will begin automatically.
➈
Start Button:
10
Press this key to stop the copier or to clear copy
When the light is ON (not flashing), the copier is
Press this key to begin copying.
Page 14

Paper Specifications
Paper Storage
For reliable copier operation and copy quality, Xerox recommends that the
paper be stored:
•
On a flat surface
•
In a closed container
•
In a low humidity area
•
Tightly wrapped, if the ream is partially used.
Paper affected by humidity, and curled paper can cause jams and
Note:
copy quality problems.
Specification Chart
Copy Paper Input Paper Tray
Paper sizes XC351, XC353 and XC355: A6 to A4
XC356: A6 to 216x356 mm
Paper weights Optimum: 75 gsm
Range: 60 to 90 gsm
Capacity (75 gsm) XC351: Single sheet feed
XC353: 30 sheets
XC355/ XC356: Approximately 50 sheets
Letterhead Paper Yes
Predrilled Paper Yes
Labels * Yes (Max 1)
Transparencies * Yes (Max 1)
* Use labels and transparencies specifically designed for copiers.
11
Page 15

Making Copies on the XC351
The Auto Start feature allows you to program the copier while it is warming
up. You can select the exposure setting, insert a sheet of paper, and walk
away from the copier. Copying will start automatically as soon as the
copier is warmed up.
1. Turn the power on.
2. Open the document cover.
3. Place the original
right corner
of the document glass.
face down
in the
upper
4. Set the paper guide to the width of the
copy paper.
5. Insert a sheet of paper into the paper feed
slot.
•
Copying will start automatically.
•
90 seconds after the last copy is made
the copier enters Auto Power Saver
Mode and the Ready indicator starts
flashing. Copying is possible in the Auto
Power Saver Mode, but the first copy
may take a few seconds longer than
usual.
6. Remove the copies one at a time.
12
•
Wait for the ready indicator to light
before inserting the next sheet of paper.
•
1 minute after the last copy is made, the
exposure setting will return to the auto
mode.
Page 16

Making Copies on the XC353, XC355 and XC356
The Auto Start feature allows you to programme any feature while the
copier is warming up. You can programme all the features, press the Start
button, and walk away from the copier. Copying will start automatically as
soon as the copier is ready.
1. Turn the power on.
2. Open the document cover.
3. Place the original
right corner
of the document glass.
face down
in the
upper
4. Set the paper guide to the width of the
copy paper.
5. Place paper in the paper tray.
•
Do not fill above the MAX line.
•
Special paper and heavy paper must be
fed individually.
6. Ensure that the exit tray is fully opened.
13
Page 17

Making Copies on the XC353, XC355 and XC356
7. To make 1 to 9 copies, press the Copy
Quantity button to set the number of
copies.
8. To make more than 9 copies, press the
Copy Quantity button until C is displayed.
The copier will now make up to 20 copies.
If there are less than 20 sheets of paper in
the paper tray, the copier will make copies
until the tray is empty and the P appears in
the copy quantity display.
9. Press Start when the Ready indicator
lights.
•
When making the first copies after
turning the power switch on, copying will
start a few seconds after pressing Start.
•
To stop copying, press the Stop/Clear
button.
•
1 minute after the last copy is made, the
exposure setting will return to the auto
mode, and the copy quantity will return
to 1.
•
90 seconds after the last copy is made
the copier enters Auto Power Saver
Mode and the Ready indicator starts
flashing. Copying is possible in the Auto
Power Saver Mode, but the first copy
may take a few seconds longer than
usual.
14
Page 18

Copy Quality
Copy Contrast
To compensate for light or dark originals there are five copy contrast
settings to choose from (4 for XC353). Each time the Exposure button is
pressed, the selection will scroll to the next selection:
1 – Auto, 2– Manual, 3 – Light, 4 – Dark, 5 – Toner Save (not XC353).
In
selects the exposure based on the original
darkness and background.
Select
to cancel the Auto mode. Manual is useful for
copying originals with text and photos.
Select
quality.
Select
quality.
Select
lower the cost of copying by decreasing
overall copy density on each page.
mode, the copier automatically
Auto
Manual
Light
Dark
Toner Save
mode (no indicators will light)
mode to lighten the overall copy
mode to darken the overall copy
(not XC353) mode to
15
Page 19

Two-Sided Copying
1. Place side 1 original
document glass and make a copy.
2. Place side 2 original
document glass in the
orientation from side 1 original.
3. Place the copy of side 1
paper tray/ paper feed slot.
•
Remove each two-sided copy promptly.
Do not let the copies stack up.
face down
face down
opposite
face down
on the
on the
in the
16
Page 20

Setting Copy Exposure Range
The exposure settings, Light, Auto and Dark can be adjusted. This can be
useful when copies are consistently too dark or too light. These new
settings will remain until they are manually changed again.
In the following procedure, it is important to complete step 2
Note:
immediately after step 1, as the copier will return to the ready mode in
approximately 10 seconds.
1. Press and hold the Exposure button
until the indicator for the current
exposure setting starts to flash
(approximately 10 seconds).
2. Press and release the Exposure button
until the flashing light is under the
indicator for the appropriate exposure
range.
Approximately 5 seconds after selecting the appropriate indicator the
exposure indicator will go out, the auto and ready indicators will light, and
the new copy exposure range will be set.
XC353, XC355 and XC356 Copiers only
Pressing the Stop/Clear button will have no effect during this
Note:
procedure.
17
Page 21

Paper Supply Indicator
P
will flash in the
1.
when the paper tray is empty or the paper
has not fed correctly.
2. If there is no paper in the paper tray, add
paper and press
If you turn the power off, all settings
Note:
will be cleared.
3. If the paper has not fed correctly, carefully
remove it and press
copying.
•
If the misfed paper is difficult to remove,
remove the paper tray first (XC353/
XC355/ XC356).
•
Do not reuse paper that has misfed.
(XC353, XC355 and XC356)
Copy Quantity
to finish copying.
Start
to finish
Start
display
18
Page 22
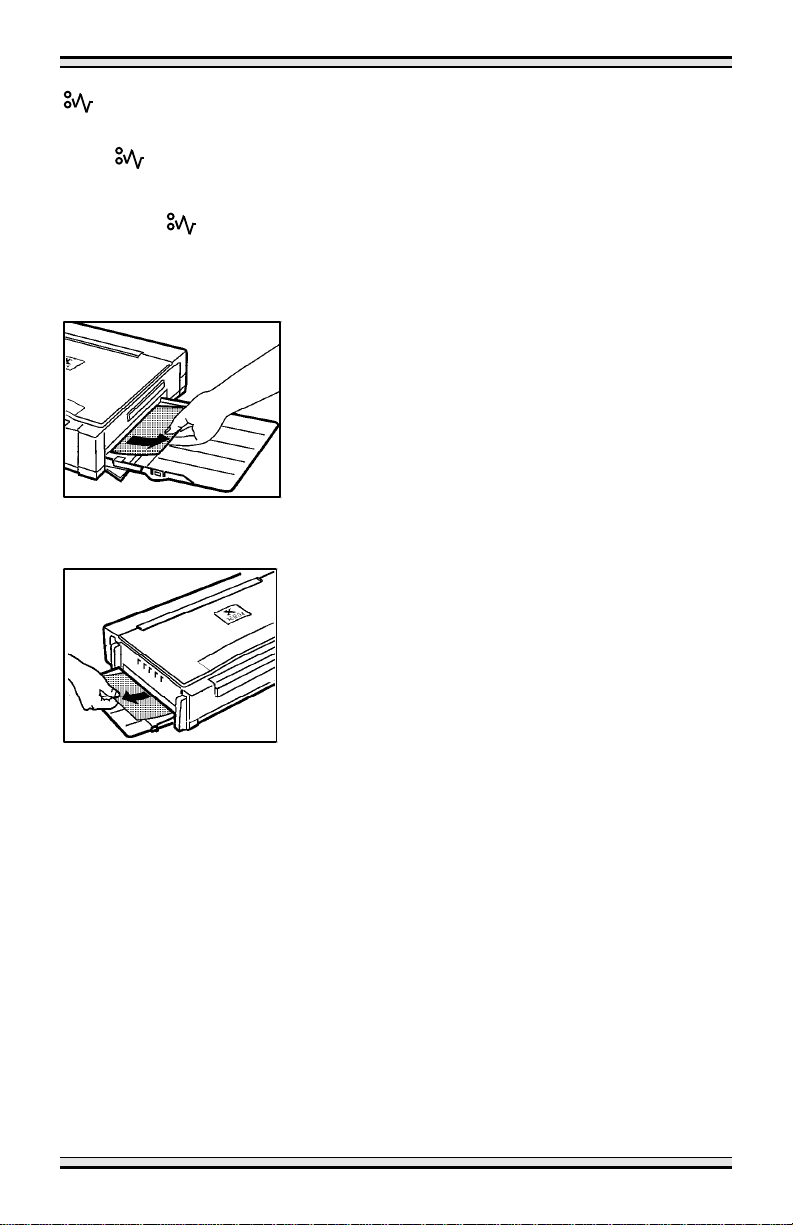
Misfeed Removal
If the
misfeed.
Note:
surface.
The
Misfeed
Misfeed
Paper Feed Slot
Exit Area
indicator flashes, follow the steps below to clear the
indicator will light if the copier is not on a level
1. Carefully remove the misfed paper.
•
If the misfed paper is difficult to remove,
remove the paper tray first (XC353/
XC355/ XC356).
2. Turn the power off and then on to clear the
misfeed indicator.
1. Carefully remove the misfed paper.
2. Turn the power off and then on to clear the
Misfeed indicator.
Do not use paper that has misfed.
Note:
19
Page 23

Misfeed Removal
Internal Area
1. Turn the power off.
2. Press and hold the document glass
release button on the rear of the copier
and return the document glass to the
centre of the copier.
XC351 skip to step 5
3. Fold up the exit tray.
4. Remove the paper tray.
5. Lift the copier by the handle and stand it
on the exit area.
•
The document cover should be closed to
prevent damage.
20
6. Push the tab to the right to open the
bottom cover.
Page 24

Misfeed Removal
Internal Area
CAUTION:
Be careful not to touch any parts inside the
bottom cover.
Be careful not to touch the shiny surface of
the copy cartridge or expose it to the light for
an extended period of time.
7. Carefully remove the misfed paper.
•
If the paper accidentally tears, be sure
to remove all of the pieces.
8. Close the bottom cover securely.
9. Return the copier to the normal position.
Note:
copier is in the vertical position the misfeed
indicator may flash.
10. Turn the power on.
11. If the misfeed indicator still flashes, repeat
If the power is turned on whilst the
steps 1 to 10.
21
Page 25

Toner Cartridge
When insufficient toner is detected at the start of copying, the toner
cartridge replacement indicator will light and the copier searches for toner
for up to 1 minute. During this time the document glass will slide back and
forth. If the copier still detects insufficient toner, the indicator will start
flashing. The copier will not operate until the toner cartridge is replaced.
During multiple sheet copying of a dark original, the toner cartridge
replacement indicator may flash and the copier may stop even though
toner remains in the cartridge. If this occurs, turn the power off and on
again, and restart copying.
A few more copies may be made by using the following procedure.
Note:
Vigorously shake the cartridge horizontally several times, tap the top of
the cartridge (label side), with your hand then reinsert the cartridge into the
copier.
Toner Cartridge Replacement
1. Turn the power off.
2. Press the front cover open button and
open the front cover.
3. Press down on the catch and remove the
toner cartridge.
22
4. Vigorously shake the new toner cartridge
horizontally several times and then
remove the cover.
•
Return the empty cartridge to Xerox for
recycling.
Page 26

Toner Cartridge Replacement
4. Slide the new toner cartridge in until it
locks in place.
5. Close the front cover.
6. Turn the power on.
•
After installing a new toner cartridge and
pressing the start button, the document
glass will move back and forth, and the
toner cartridge replacement indicator will
light for up to 1 minute before copying
starts.
23
Page 27

Toner Cartridge Yield
Low printed Medium High printed Very high printed
area area area area
The main factor affecting toner cartridge yield is the printed area of a
document. The graph is a sample representation of how the number of
copies per cartridge decreases as the printed area increases.
Other factors which can affect the toner cartridge yield are:
•
The size of the document being copied.
•
Dark backgrounds.
•
Leaving the platen cover open.
•
Double sided copying.
•
High humidity.
To get the most from your toner cartridge:
•
Always copy with the document cover closed.
•
Leave the copier on during the day. Switch off the copier at the end
of the working day.
•
Copy with the exposure control set to Auto exposure unless you need
to adjust for the background of your original.
•
Operate the copier in a dry environment whenever possible.
24
Page 28

Drum Cartridge Replacement
The useful life of the drum cartridge is approximately 10,000 copies. At
9,700 copies, the Toner Save, Exposure settings, and Ready indicators
will flash slowly when the power is turned on, indicating that the
replacement cartridge will be needed soon. Copies can still be made.
After a further 300 copies, the Ready Indicator will go out, the Toner Save
and Contrast Indicators will flash, and the copier will stop operating until
the cartridge is replaced.
1. Turn the power off.
2. Press the front cover open button and
open the front cover.
3. Press down on the catch and remove the
toner cartridge.
XC351 skip to step 6
4. Fold up the exit tray.
5. Remove the paper tray.
6. Lift the copier by the handle and stand it
on the exit area on the bottom.
7. Push the bottom cover tab to the right to
open the cover.
8. Push the release lever to the left and
remove the bottom cover.
25
Page 29

Drum Cartridge Replacement
9. Push the drum cartridge release lever up
to release the drum cartridge.
10. Remove the drum cartridge.
➀
11.
Install the top of the new drum
cartridge along the grooves on both sides.
➀
➁
Rotate the drum cartridge in until it
12.
clicks into position.
➀
➁
➀
13. Remove the black cover from the drum
cartridge.
14. Reinstall the bottom cover by placing the
tab at the lower left into the hole in the
➀
copier as shown
right side at a angle
➁
15. Close the bottom cover.
16. Return the copier to the normal position.
XC351 skip to step 19
17. Reinstall the paper tray.
, and by inserting the
➁
.
26
Page 30

Drum Cartridge Replacement
18. Unfold and open the exit tray.
19. Push the toner cartridge in until it locks in
place. Close the front cover.
Perform the following steps to reset the
copier.
20. While holding the Exposure button, turn
the power on.
•
All indicators, except the Ready
indicator, will light.
21. Release and then press and hold the
exposure button until the three exposure
indicators light.
If the three exposure indicators do not
Note:
light, turn the power off and repeat steps 20
and 21.
The centre exposure indicator will stay lit (the
outside lights will go out) and the Ready
indicator will light. The reset is complete.
27
Page 31

Problem Solving
Problem Solving Chart
The following chart lists some conditions that may occur and the
recommended solutions. Follow the suggested solutions until the problem
is corrected. Refer to the
code information. If the problem persists, please call your local Xerox
helpline or representative for assistance.
Condition Possible Causes
Copier does not
work.
Copier is on, but
does not copy
Blank copies Is the original face down on the document glass?
Light or dark copies Is the exposure control adjusted correctly? (Refer
Copies are striped
or lined or poor
quality.
Copy paper
misfeeds
frequently.
Status Code Chart
Is the copier plugged in?
Is the power switch on?
Is the toner cartridge installed correctly?
Are any of the indicators lit? (Refer to
.)
Chart
Is the copier out of paper?
to
Copy Quality
Is the document glass or the document cover dirty?
Is the lens dirty?
(Refer to
Is the paper exit blocked?
Is the paper guide adjusted to the correct paper
width?
Does the paper level in the paper tray exceed the
maximum height line? (XC353/ XC355/ XC356)
Is the copy paper damp?
Is special copy paper being used?
Is there a small piece of paper caught in the
copier?
Copier Maintenance
.)
in this section for status
Status Code
.)
28
Page 32

Problem Solving
Problem Solving Chart
Condition Possible Causes
Image rubs off the
copy easily.
There are fewer
copies from the
toner cartridge than
expected.
Copier takes longer
than usual to make
the first copy and/or
makes a clicking
sound.
The document
cover moves back
and forth but no
copies are made.
Is the copy paper too heavy?
Is the copy paper damp?
Is there a misfeed in the fusing area? (Refer to
Misfeed Removal
Have the two thumbscrews been removed from the
bottom of the copier? (Refer to
Originals contain pictures, solids, or heavy lines.
Originals are forms, newsletters, books etc.
The copier is being turned on and off frequently.
The document cover is being left open while
making copies.
Toner supply may be low. Shake the toner
cartridge.
The copier is searching for toner. Refer to the
Toner Cartridge Replacement
.)
Installation
section.
.)
29
Page 33

Problem Solving
Status Code Chart
Status
Code
L1 – L8
H2 – H4
Suggested Solution
XC353, XC355 and XC356 Only
Ensure that there is paper in the tray.
Paper may not have fed correctly. (Refer to
Supply Indicator
Switch the power OFF. Wait approximately 5 seconds.
Then switch the power ON. If the status code continues, call
for service.
Copy paper has misfed. (Refer to
When the toner cartridge replacement indicator appears, the
toner cartridge will need to be replaced soon. (Refer to
Toner Cartridge
The Toner Save (not XC353), Copy Contrast, and
Ready indicators flash to warn you that the drum
cartridge will need to be replaced soon. (Refer to
Drum Cartridge Replacement
All lights, except the Ready indicator light. Switch
the power OFF. Wait approximately 5 seconds.
Switch the power ON. If the status code remains,
call for service.
.)
XC353, XC355 and XC356 Only
Misfeed Removal
.)
.)
XC351 Only
Paper
.)
30
Page 34

Copier Maintenance
Correct care is essential in order to get good quality copies.
Document Glass and Cover
Marks on the document glass or inside
Note:
the document cover will appear on the copy.
1. Wipe the document glass and cover with a
soft, clean cloth.
If necessary, dampen the cloth with
Note:
Lens
water or glass cleaner.
benzene, or any other volatile cleaning
agents.
If the copies have streaks or blotches,
Note:
the lens may be dirty.
1. Turn the power switch off.
2. Press and hold the document glass
release button and slide the document
glass all the way to the left.
DO NOT
use thinner,
3. Using a standard cotton swab wipe the full
length of the lens.
31
Page 35

Packing the Copier
1. Turn the power off.
2. Disconnect the power cord.
3. Open the cover and remove the toner
cartridge.
•
Reinstall the cover on the toner
cartridge and place it in the box.
4. Close the front cover.
XC351 skip to step 7
5. Remove the paper tray.
32
6. Fold up the exit tray.
Page 36

Packing the Copier
7. Use the handle to stand the copier upright.
8. Never position the copier with the handle
facing the side or bottom. This will cause
toner to leak. Tape the bottom cover
closed.
9. Lower the copier. Place the paper tray on
top of the copier (XC353/ XC355/ XC356).
10. Tape the document cover, paper tray, and
exit tray, closed.
•
Only the XC353, XC355 and XC356 will
have a paper tray and exit tray.
11. Using the original packaging, pack the
copier in the carton as shown in the
Unpacking
section.
33
Page 37

Technical Data
Type Portable desktop
Copy Speed Approximately 3 copies per minute
First Copy Out Time 19 seconds (warm)
24 seconds (cold)
Copy Ratio 1:1 ±1%
Original Size XC351/ XC353/ XC355: Maximum A4
XC356: Maximum 216 mm 356 mm
Copy Size XC351/ XC353/ XC355: A6 to A4
XC356: A6 to 216x356mm
Exposure System Slit exposure with moving Document Glass
Paper Capacity XC351: Single copy
XC353: 30 sheets @ 90 gsm
XC355/ XC356: 50 sheets @ 75 gsm
Multicopy XC351: Single copy
XC353/ XC355/ XC356: 1 to 9 copies +C (up to
20), with auto repeat function
Power Supply 220 - 240v
Ozone 0.002 ppmas
Power Consumption 0.7 KW Maximum
Weight XC351: 6.5 kg
XC353 XC355: 7 kg
XC356: 7.25 kg
Copier dimensions Copier Width Depth Height
XC351 362 mm 353 mm 98 mm
XC353/
XC355
XC356 455 mm 353 mm 98 mm
378 mm 353 mm 98 mm
34
Page 38

Page 39

Xerox Limited
Multimedia Professional Services
P.O. Box 17
Bessemer Road
Welwyn Garden City
Hertfordshire AL7 1HE
UK
602P24430
 Loading...