

Page 1

Table of contents
Table of contents
FCC compliance in the USA
EME compiance in Canada
Introduction
Welcome
Supplies
Service
Safety notes..............................................................................................................................................................1
How to obtain...........................................................................................................................................................3
The French or Spanish user guide.........................................................................................................................3
Another language for the XC33D message display................................................................................................3
Another paper tray different in size.........................................................................................................................3
How to use this guide..............................................................................................................................................4
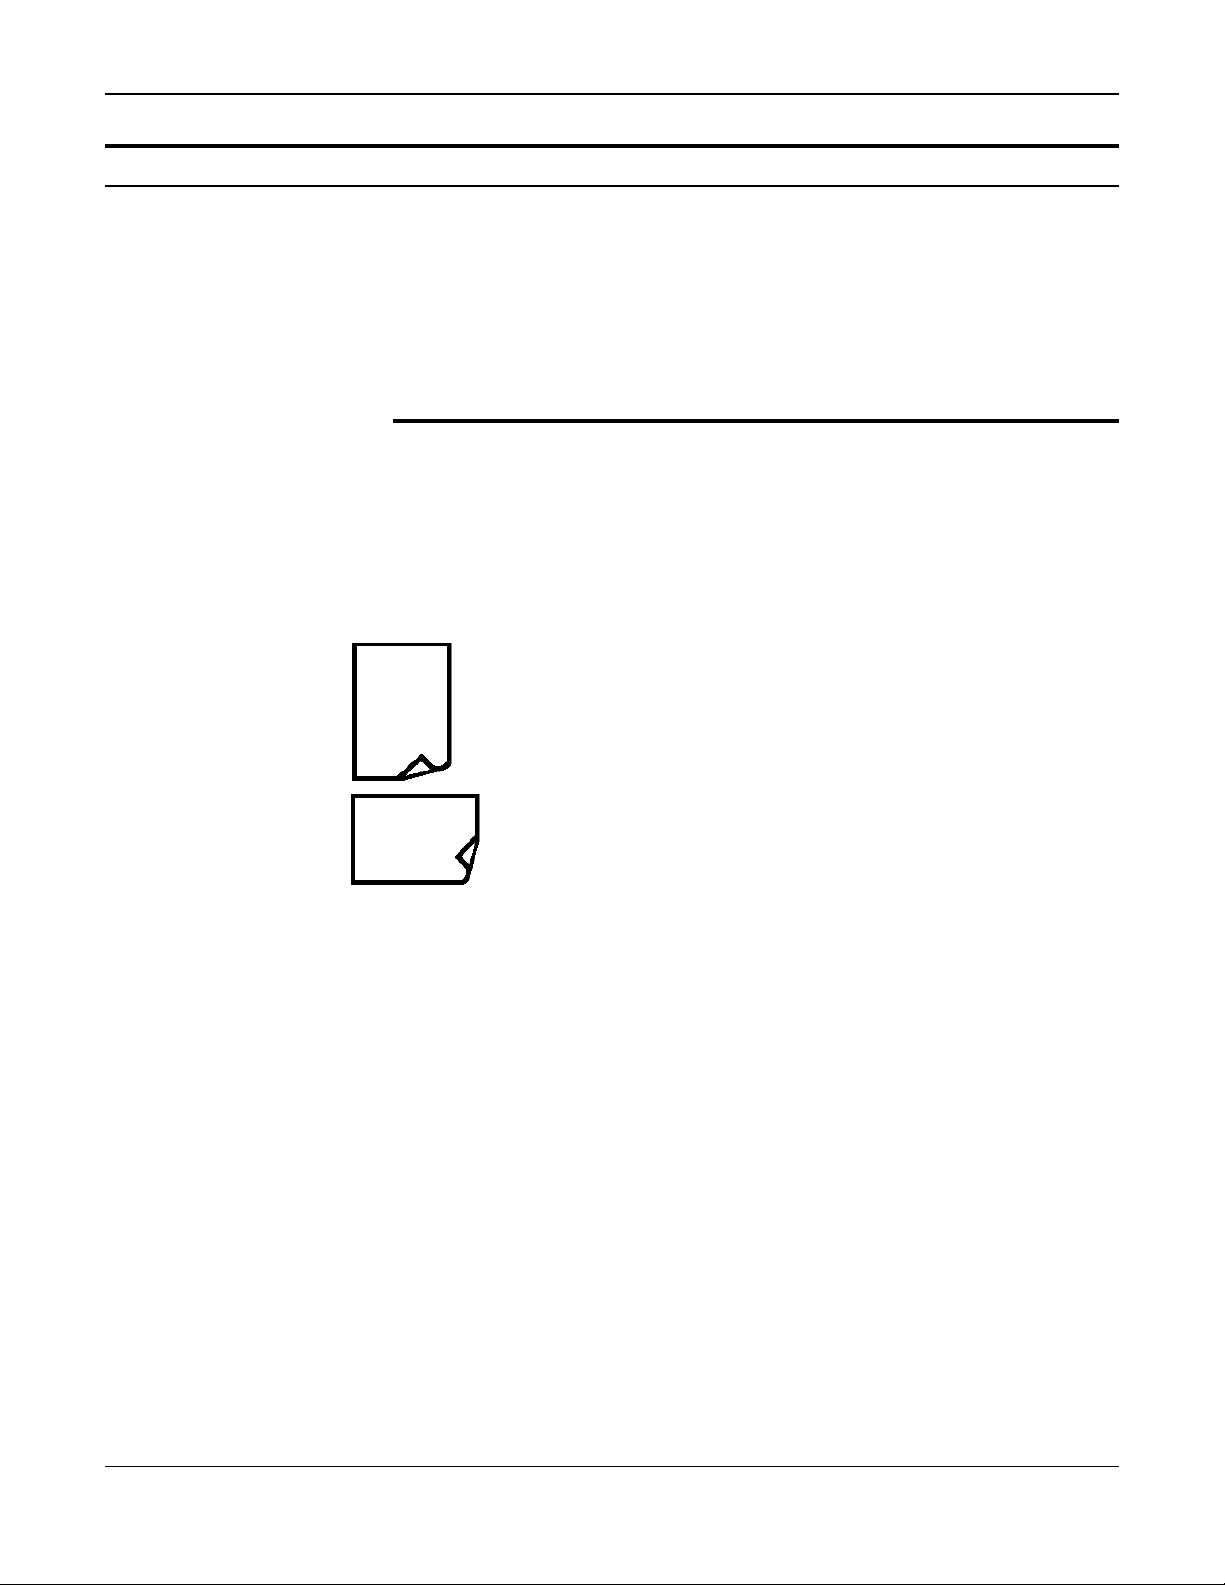
Manual terminology................................................................................................................................................4
Helpful hints.............................................................................................................................................................6
Floor space requirements.......................................................................................................................................7
Getting to know your copier...................................................................................................................................8
Identifying the external parts..................................................................................................................................8
Copier.................................................................................................................................................................8
Copier right side................................................................................................................................................10
Identifying the internal parts..................................................................................................................................11
Identifying the control panel components.............................................................................................................12
About the copier information system....................................................................................................................16
Message display (XC23/XC33).........................................................................................................................16
Message display (XC33D)................................................................................................................................17
Copier diagram.................................................................................................................................................18
Labels...............................................................................................................................................................18
Normal copy mode...............................................................................................................................................19
Power saver mode................................................................................................................................................20
XC23/XC33.......................................................................................................................................................20
XC33D..............................................................................................................................................................20
Paper.......................................................................................................................................................................21
Helpful hints..........................................................................................................................................................21
Specification chart for the trays............................................................................................................................22
Specification chart for the ADF/DADF..................................................................................................................23
Specification chart for the 10-bin sorter stapler....................................................................................................24
Loading the paper trays........................................................................................................................................25
Paper trays 1, 2 and 3..........................................................................................................................................25
Paper tray 5..........................................................................................................................................................26
Bypass tray...........................................................................................................................................................27
Standard paper stock........................................................................................................................................27
Special paper stock..........................................................................................................................................27
Switching the paper trays.....................................................................................................................................29
Making copies........................................................................................................................................................30
Originals...............................................................................................................................................................30
What is an original?..........................................................................................................................................30
XC23/XC33/XC33D User Guide i
Page 2

Table of contents
Check the originals...........................................................................................................................................30
Using the document glass....................................................................................................................................31
Using the automatic document feeder (ADF).......................................................................................................32
Using the duplex automatic document feeder (DADF).........................................................................................33
Making copies with mixed-size originals...........................................................................................................34
Using the bypass tray...........................................................................................................................................35
How to use the basic copying features...............................................................................................................37
Paper supply.........................................................................................................................................................38
Manual..............................................................................................................................................................39
Auto...................................................................................................................................................................40
Reduce/enlarge....................................................................................................................................................41
Auto...................................................................................................................................................................42
Preset................................................................................................................................................................43
Variable.............................................................................................................................................................44
Copy density.........................................................................................................................................................45
Exposure mode.................................................................................................................................................46
Photo.............................................................................................................................................................46
Manual...........................................................................................................................................................47
Auto exposure...............................................................................................................................................48
Copy lighter/darker............................................................................................................................................49
Original copy (XC33D)......................................................................................................................................50
21...................................................................................................................................................................51
22...................................................................................................................................................................52
12...................................................................................................................................................................53
11...................................................................................................................................................................54
Manual 2 sided copying........................................................................................................................................55
Job interrupt..........................................................................................................................................................57
How to use the added copying features..............................................................................................................58
Special features....................................................................................................................................................59
Stapling.................................................................................................................................................................60
Auto stapling.....................................................................................................................................................60
Manual stapling.................................................................................................................................................61
Stapling without copying...................................................................................................................................61
Collated................................................................................................................................................................62
Book mode...........................................................................................................................................................63
Margin shift...........................................................................................................................................................64
Edge deletion........................................................................................................................................................65
Customizing your copier.......................................................................................................................................66
Identifying the special features.............................................................................................................................66
How to change the special feature settings..........................................................................................................68
Total copy counter.................................................................................................................................................72
Copier care.............................................................................................................................................................73
Ordering supplies.................................................................................................................................................73
Replacing the drum cartridge...............................................................................................................................73
Replacing the toner cartridge...............................................................................................................................75
Toner cartridge yield.........................................................................................................................................77
ii XC23/XC33/XC33D User Guide
Page 3

Table of contents
Cleaning the document glass and cover..............................................................................................................78
Adding staples......................................................................................................................................................79
Cleaning the ADF/DADF belt................................................................................................................................81
Problem solving.....................................................................................................................................................82
Problem solving charts.........................................................................................................................................83
General.............................................................................................................................................................83
Misfeeds............................................................................................................................................................84
Copy quality......................................................................................................................................................85
XC33D problem solving messages......................................................................................................................86
Status code list.....................................................................................................................................................87
Clearing the status codes.....................................................................................................................................89
A1-A3 (XC23/XC33).........................................................................................................................................89
A1-A3 (XC33D).................................................................................................................................................91
C1-C4, C8.........................................................................................................................................................93
C9.....................................................................................................................................................................95
E1-E3................................................................................................................................................................96
F1......................................................................................................................................................................98
F9......................................................................................................................................................................99
Calling for service...............................................................................................................................................101
Relocating the copier..........................................................................................................................................101
Technical data......................................................................................................................................................102
3-year limited warranty........................................................................................................................................106
In the USA..........................................................................................................................................................106
In Canada...........................................................................................................................................................108
It’s illegal...............................................................................................................................................................110
In the USA..........................................................................................................................................................110
In Canada...........................................................................................................................................................110
Xerox retail total satisfaction guarantee............................................................................................................111
In USA and Canada............................................................................................................................................111
Material safety data sheet...................................................................................................................................112
XC23/XC33/XC33D User Guide iii
Page 4

Table of contents
NOTES:
iv XC23/XC33/XC33D User Guide
Page 5

Safety notes
Your copier and supplies meet strict safety requirements. These requirements include safety
agency examination and approval and compliance to any established environmental standards.
Please read the following instructions carefully before operating the copier, and refer to these
instructions, as required, in order to ensure the continued safe operation of your copier.
Safety notes
Follow
Unplug
specifically designated for the copier. Use of any other materials may result in poor performance
and may create a hazardous situation.
Do not
methods.
Never
all supplies and materials out of the reach of children.
Do not
Do not
personal injury or serious damage to the copier.
This product
third grounding pin). This plug fits into a grounding-type power outlet only. This is a safety feature.
If you cannot insert the plug into the outlet, contact your electrician in order to replace the
receptacle; this ensures that you will avoid the risk of electric shock. Never use a ground adapter
plug to connect the copier to a power source receptacle which lacks a ground connection terminal.
This copier
label. If you are uncertain as to the available power type, consult your local power company.
Do not
on the cord.
The power supply cord
the copier is near the outlet and that the outlet is easily accessible.
all the warnings and instructions which are marked on or supplied with the product.
the copier from the wall outlet before cleaning it. Always use the materials which are
use aerosol cleaners. Follow the instructions in this user guide for the proper cleaning
use any supplies or cleaning materials for purposes other than what they are intended. Keep
use the copier near water, wet locations, or outdoors.
place the copier on an unstable cart, stand, or table. The copier may fall, and thereby cause
is equipped with a three-wire, grounding-type plug (in other words, a plug having a
should be operated from the type of power source which is indicated on the marking
allow anything to rest on the power cord. Do not locate the copier where persons will step
is the disconnect device for this equipment. Ensure that the installation of
Your copier
not in use. The copier may be left on continuously.
Slots and openings
in the back and the sides of the copier cabinet. In order to ensure the reliable operation of the
copier and to protect it from overheating, these openings must not be blocked or covered. Do not
place the copier near or over a radiator or heat register. Do not place the copier in a built-in
installation unless proper ventilation is provided.
XC23/XC33/XC33D User Guide 1
is equipped with an energy saving device which conserves power when the copier is
in the copier cabinet provide ventilation; these slots and openings are located
Page 6

Safety notes
Never
push objects of any kind into the slots of the copier; these objects may touch dangerous
voltage points or cause parts to short out. The resulting affect may be a risk of fire or electric shock.
Never
spill liquid of any kind on the copier.
Never
remove any covers or guards which require a tool for removal. There are no operator
serviceable areas within these covers.
Never
defeat the interlock switches. These copiers do not allow the operator access to any unsafe
areas. Covers, guards, and interlock switches are provided in order to ensure that the copier does
not operate with the covers opened.
The use of an extension cord with this copier is NOT recommended or authorized.
If an
extension cord must be used, always check the building codes and insurance requirements first.
Ensure that the total ampere ratings of the products plugged into the extension cord do not exceed
the extension cord ampere rating. Also, ensure that the total amperage of all the products plugged
into the wall outlet does not exceed the outlet rating.
Avoid
viewing directly the document lights. The lamps are bright and while not harmful, may cause
an annoying afterimage. Always keep the document cover closed.
Avoid
exposing the drum cartridge to light for extended periods of time.
Do not
touch the red photoreceptor. Scratches or smudges on the photoreceptor result in poor
copy quality and may shorten the service life.
Do not
put your hands into the fuser area, which is located inside the exit tray area. Inserting your
hands into the fuser area may cause burns.
Ozone:
This product produces ozone during normal operation. The produced ozone depends on
the copy volume, and the produced ozone is heavier than air. Providing the correct environmental
parameter, such as specified in the XEROX installation procedures, ensures that the concentration
levels meet the safe limits.
If additional information concerning ozone is required, request the XEROX publication number
600P83222
828-6571
, “Ozone.” Obtain this publication by calling (in the United States and Canada)
.
If you need additional safety information
concerning the copier or any XEROX supplied materials,
1-800-
call the following toll-free number:
In the United States and Canada:
2 XC23/XC33/XC33D User Guide
1-800-828-6571
Page 7

How to obtain
How to obtain
The French or Spanish user guide
Au Canada et aux États-Unis, pour obtenir la version française
du présent guide d´utilisation, veuillez composer:
1–800–TEAM–XRX(1–800–832–6979)
À l´extérieur des États-Unis et du Canada, veuillez communiquer
avec votre représentant XEROX.
Para obtener la versión en español dentro de los Estados Unidos
y Canadá llame al:
1–800–TEAM–XRX(1–800–832–6979)
Fuera de los Estados Unidos y Canadá llame a su representante
local de XEROX.
Another language for the XC33D message display
In the United States and Canada to obtain a Spanish or French
version of the XC33D message display call:
1-800-TEAM-XRX (1-800-832-6979)
Aux Etats-Unis et au Canada, pour obtenir un affichage en
Français des messages du XC33D, appeler le
1-800-TEAM-XRX (1-800-832-6979)
À l´extérieur des États-Unis et du Canada, veuillez communiquer
avec votre représentant XEROX.
Para obtener la versión en español del visor de mensajes de la
XC33D en los Estados Unidos o el Canadá, llame al :
1-800-TEAM-XRX (1-800-832-6979)
Fuera de los Estados Unidos y Canadá llame a su representante
local de XEROX.
Another paper tray different in size
In order to obtain another paper tray for a different paper size, or
to obtain instructions on how to adjust your paper tray, in the
United States and Canada please call:
1-800-TEAM-XRX (1-800-832-6979)
Additional paper trays are available in the following sizes
5.5x8.5in.SEF A5 SEF
5.5x8.5in.LEF A5 LEF
11x17in.SEF B4 SEF
A4 SEF B5 LEF
A4 LEF A3 SEF
other
XC23/XC33/XC33D User Guide 3
Page 8
How to use this guide
How to use this guide
Most information applies to all models. When information applies
to a specific model, the model number is shown in parentheses
following the unique information.
Some copier models may have optional accessories. Any one or
more of these accessories may or may not be installed on your
copier model.
Manual terminology
This section identifies and defines the specific words, symbols,
and acronyms which are used in this guide. Read this section in
order to become familiar with the terminology used in this guide.
Original
An original is the document or documents from which a copy
or copies are made. These documents can be paper,
magazine, photograph, or book.
Long edge feed (LEF)
This symbol indicates that your originals or copy paper must
be placed in the long edge feed direction. When the symbol
on the left or the acronym LEF is shown, arrange your
originals or copy paper in the long edge feed direction.
Short edge feed (SEF)
This symbol indicates that your originals or copy paper must
be placed in the short edge feed direction. When the symbol
on the left or the acronym SEF is shown, arrange your
originals or copy paper in the short edge feed direction.
ADF (available on some models)
The automatic document feeder (ADF) is an optional
accessory which automatically feeds one-sided originals on
to the document glass.
DADF (XC33D)
The XC33D duplex automatic document feeder (DADF)
automatically feeds 1 or 2 sided originals on to the document
glass.
XC23/XC33/XC33D User Guide 4
Page 9
How to use this guide
Image
Image refers to the information area on your original or copy
which contains text or graphics.
Landscape
This term refers to the orientation of the lines or type or the
top of an illustration on your original as being parallel to the
long edge of the paper.
Portrait
The term refers to the orientation of the lines or type or the
top of an illustration on your original as being parallel to the
short edge of the paper.
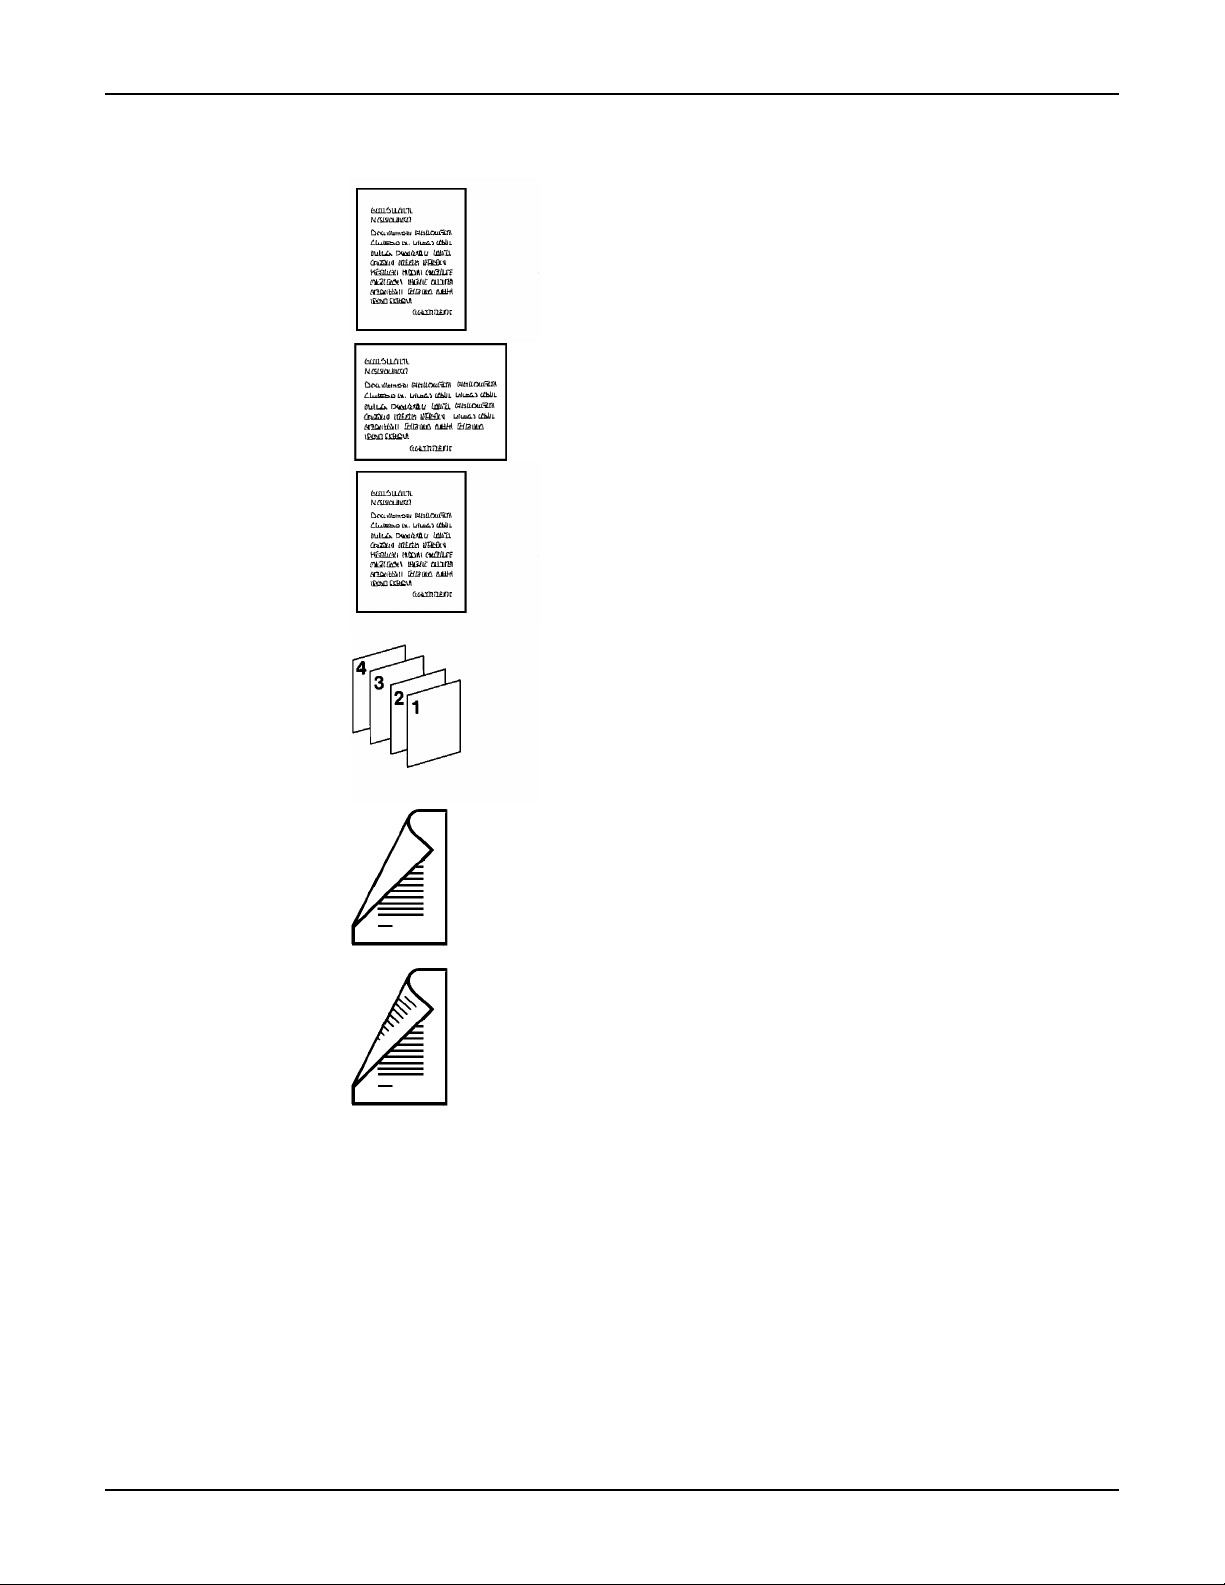
Collated
Collated refers to copy sets which are delivered to the output
area in the same sequence as the original set.
1 sided
1 sided implies that the originals or copies have an image on
one side only.
2 sided
2 sided implies that the originals or copies have an image on
both sides.
XC23/XC33/XC33D User Guide 5
Page 10

Helpful hints
Helpful hints
Care of your copier:
Maintenance:
Copier location:
Do not place heavy objects on any surface of the copier.
Ensure that liquids are not placed near or spilled onto the
copier.
Do not place paper clips or staples on the copier surface.
As required, refer to the section entitled
Copier care
.
Clean the document glass daily.
Do not apply cleaning liquids or sprays directly on to the
copier; first apply the liquid onto a cloth.
Store copy paper on a flat surface in a dry area and in an
enclosed cabinet.
Tightly wrap any partially used reams of paper.
For reliable copier operation and copy quality, XEROX
recommends the following:
Place your copier in a well-ventilated room.
Ensure that the environmental conditions are:
Temperature: 50
o
F-95oF(10oC-35oC)
Relative humidity: 15-85%
Note:
If the temperature is at 95oF(35oC), humidity
should be below 47.5%; if humidity is at 85%
temperatures should be below 82
o
F(27.8oC).
Place the copier on a flat level surface:
Ensure that the copier is level; this provides
optimum performance
Avoid locations that subject the copier to:
Direct sunlight
Extreme changes in the temperature or humidity
After selecting a location that meets the conditions listed
above, ensure there is sufficient floor space around the
copier for service (refer to the section entitled
space requirements
, in this section).
Floor
XC23/XC33/XC33D User Guide 6
Page 11
Floor space requirements
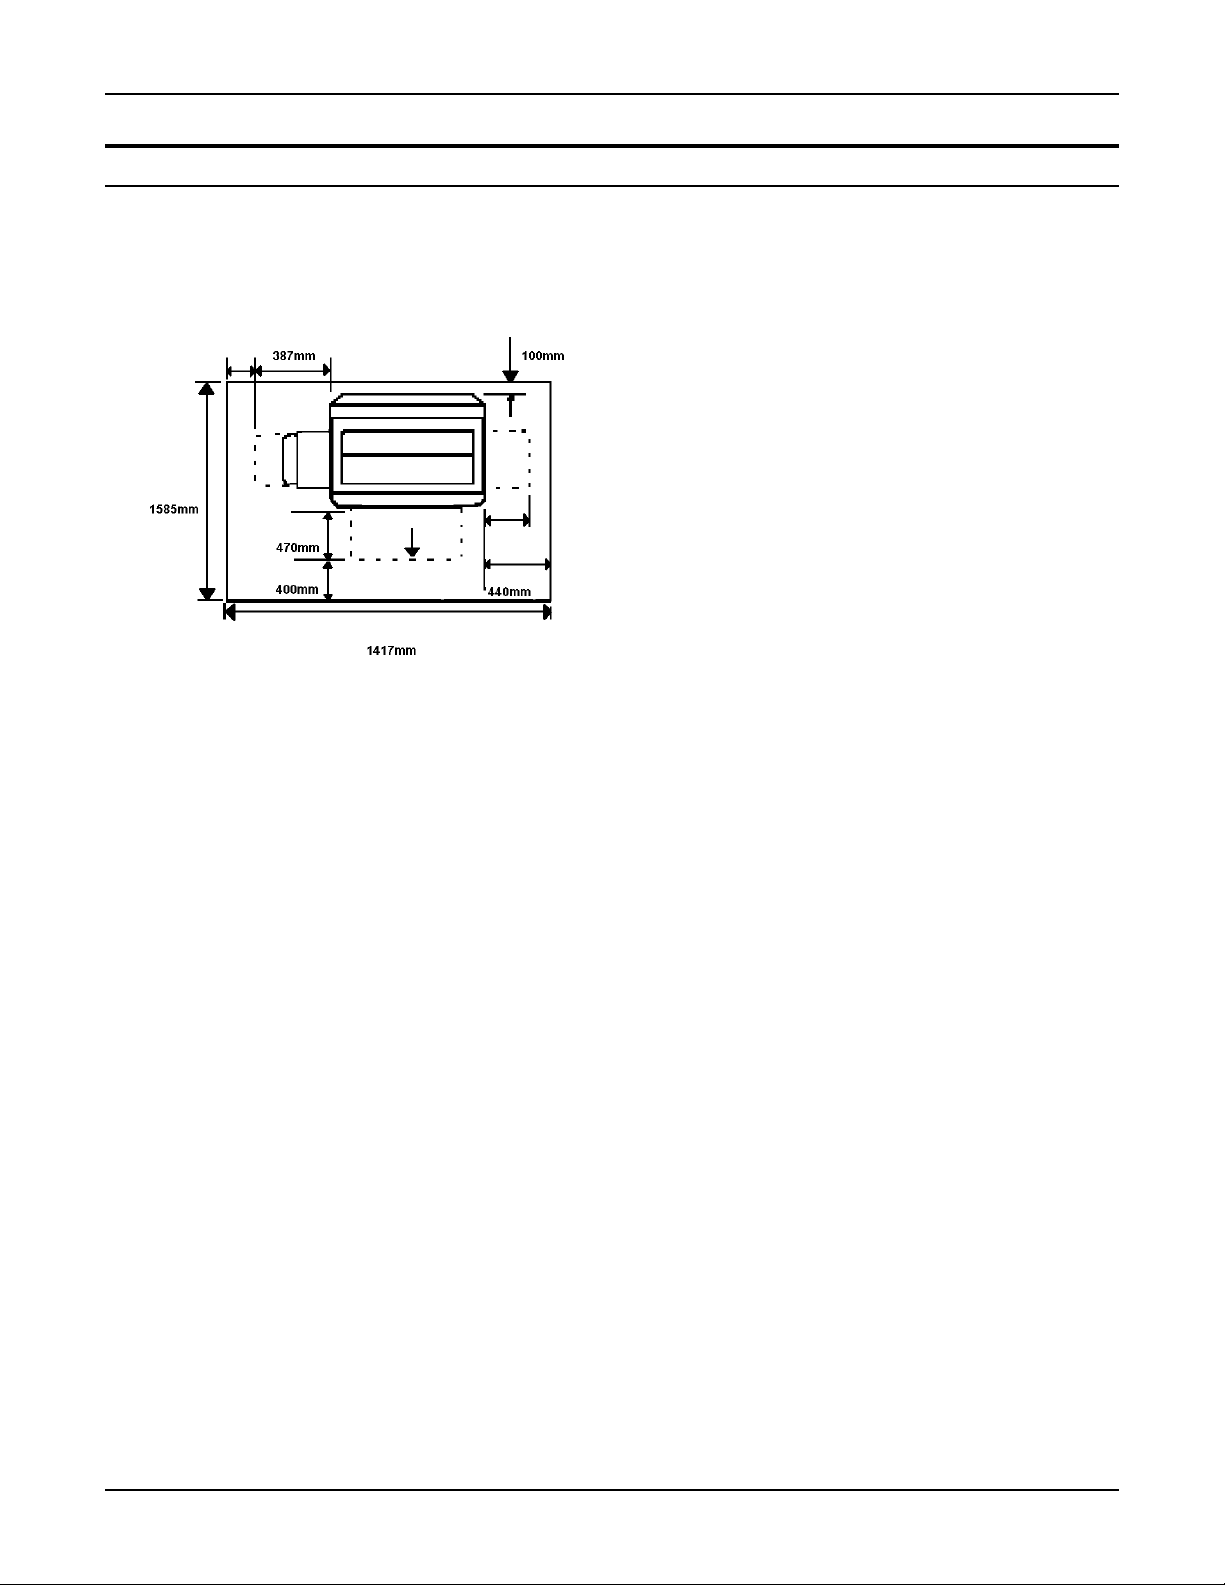
Floor space requirements
When choosing a new location, specific floor requirements must
be met in order to allow room for service. Consider the
following guidelines:
62.3 in.
0.8 in.
200mm
15.2 in.
18.5 in.
15.7 in.
55.7 in.
11.8 in.
300mm
17.3 in.
3.9 in.
The new location must provide minimum
clearances around the copier. These clearances
are shown in the diagram.
The flooring in the new location must be
adequate to support the weight of the copier and
accessories, and be reasonably level.
The new location must be well ventilated and
maintain an even temperature. Extreme
temperature or humidity changes can affect the
copy quality.
Avoid locations where the copier will be exposed
to direct sunlight.
Power source receptacles must be properly
grounded.
XC23/XC33/XC33D User Guide 7
Page 12
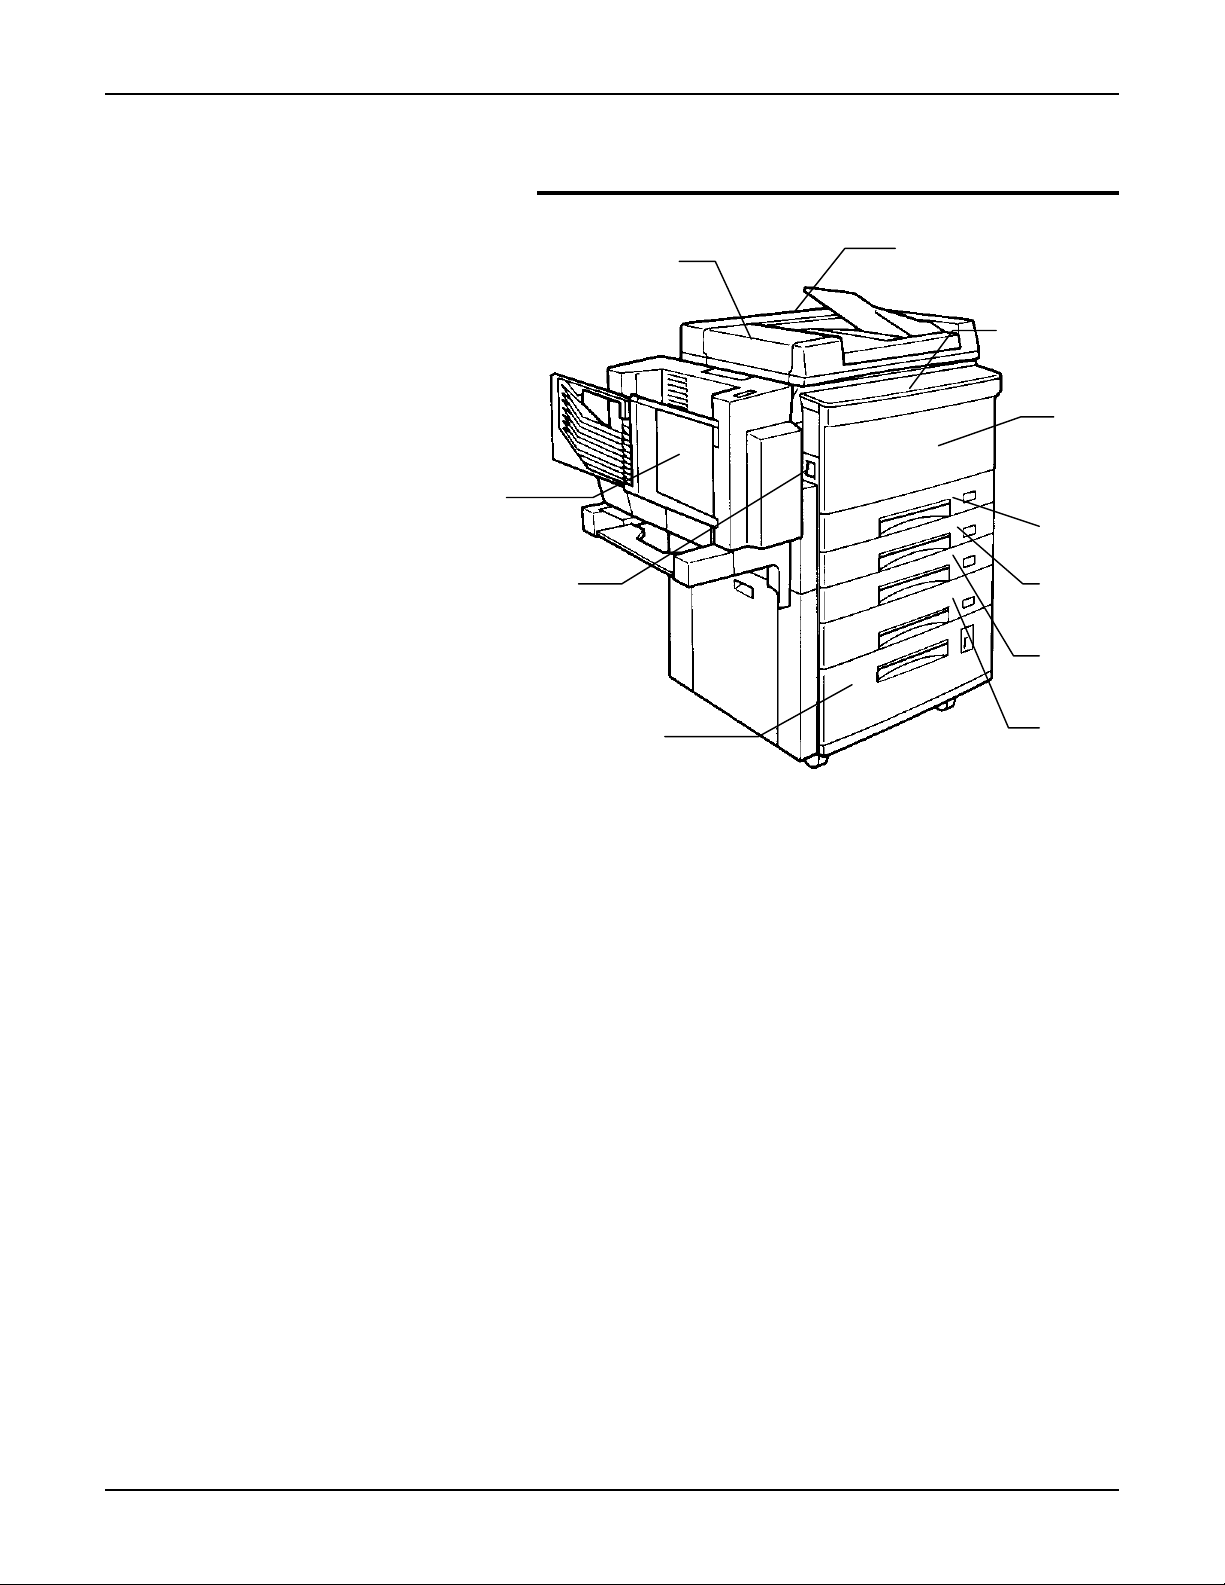
Getting to know your copier
Getting to know your copier
Identifying the external parts
This section discusses the location, name, and function of the
various copier components. The following copier components
are discussed:
External parts
Control panel
Internal parts
Information system
Copier
Document cover
Copy
output
tray
Power on/off
switch
Storage Space
(available on some models)
Serial number
(at rear of copier)
Control panel
Front
cover
Tray 1
Tray 2
Tray 3
8 XC23/XC33/XC33D User Guide
Page 13
Copier
Getting to know your copier
ADF (available on some models)
10-bin sorter
(available on some models)
Power on/off
(available on some models)
DADF (XC33D)
switch
Tray 5
Serial number
(at rear of copier)
Control panel
Front
cover
Tray 1
Tray 2
Tray 3
Tray 4
(XC33D)
XC23/XC33/XC33D User Guide 9
Page 14
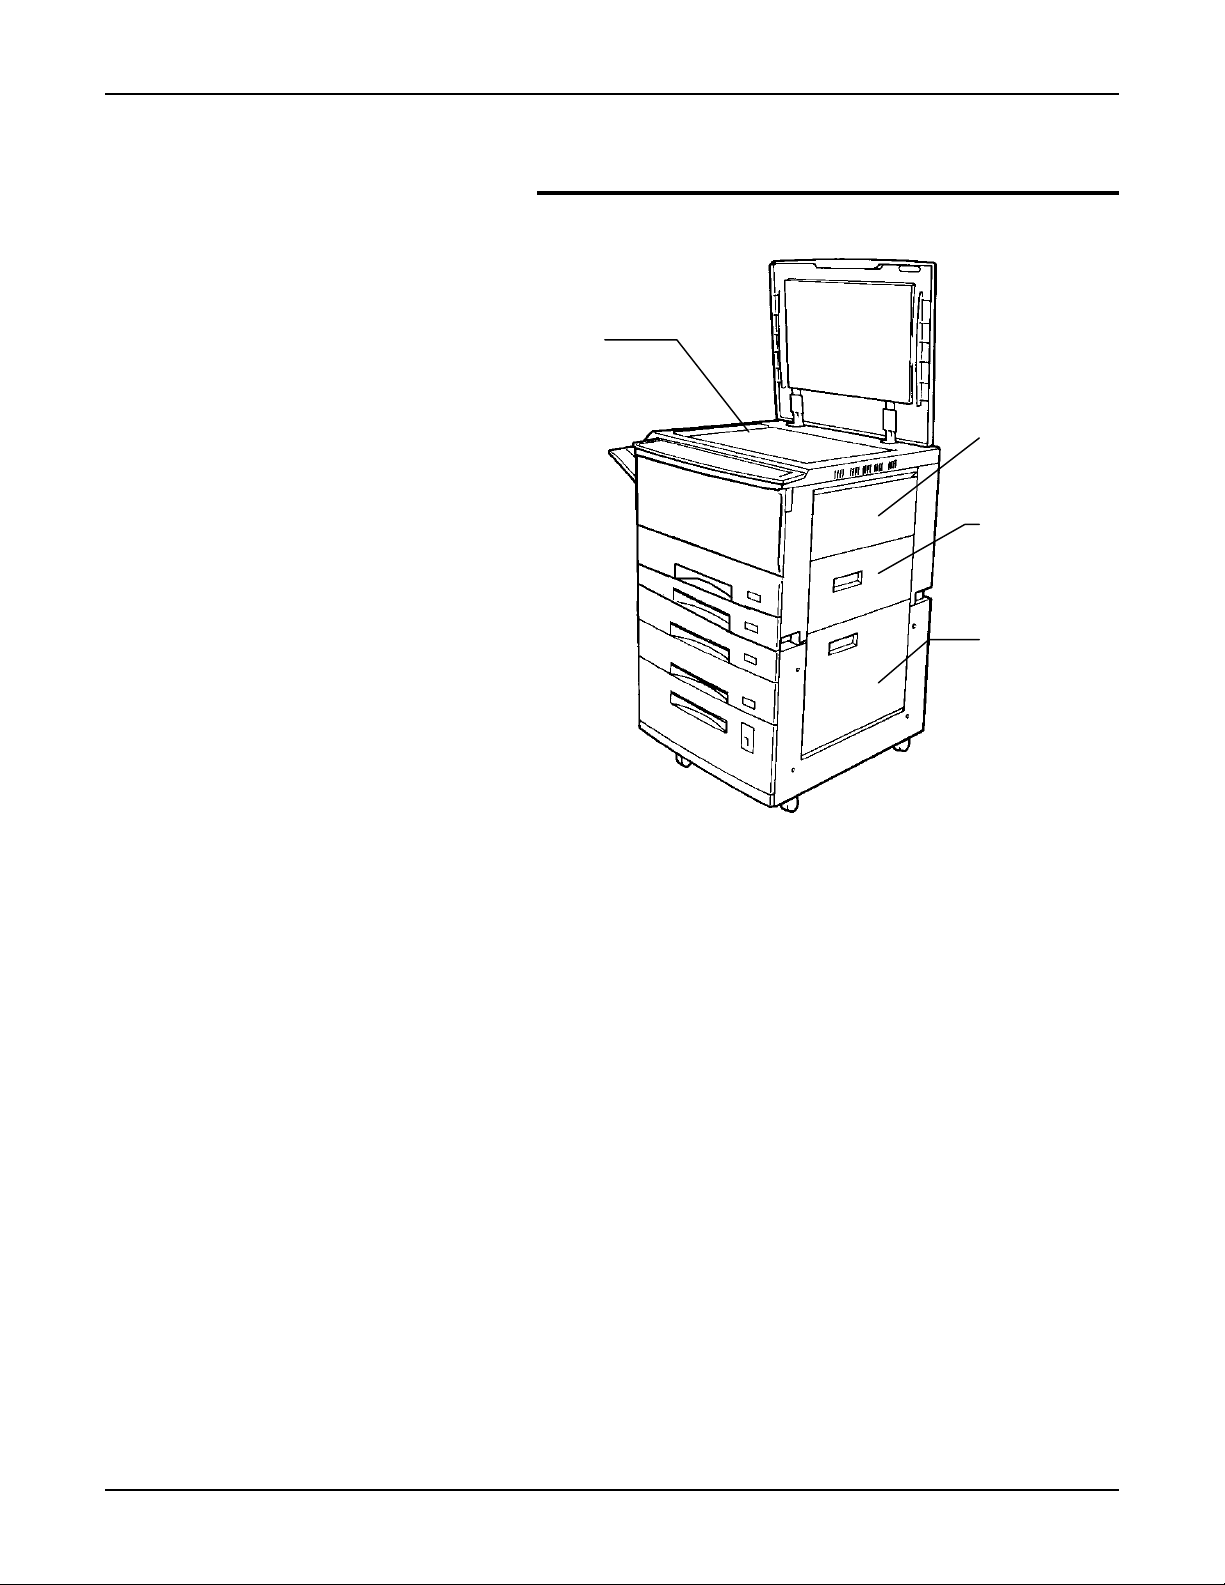
Getting to know your copier
Copier right side
Document glass
Bypass tray
Right upper
cover
Right lower
cover
10 XC23/XC33/XC33D User Guide
Page 15
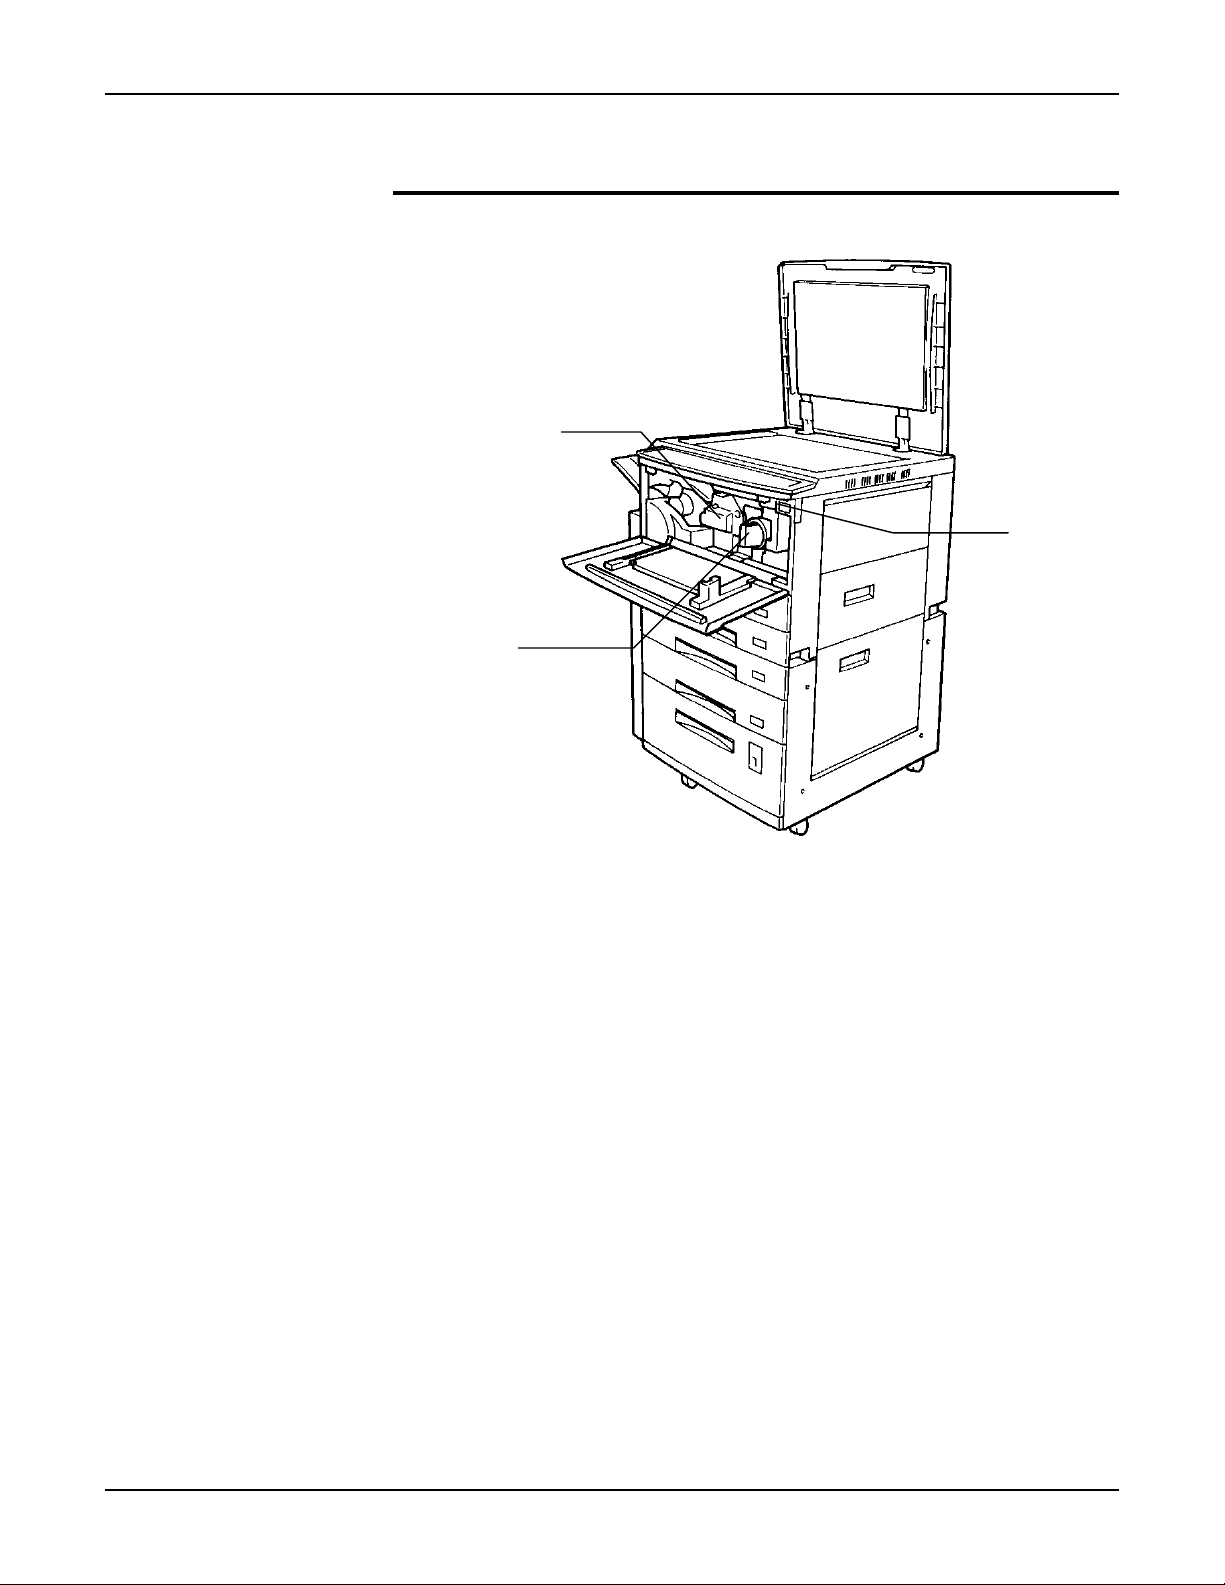
Identifying the internal parts
Drum cartridge
Toner cartridge
Getting to know your copier
Total
copy
counter
XC23/XC33/XC33D User Guide 11
Page 16
Getting to know your copier
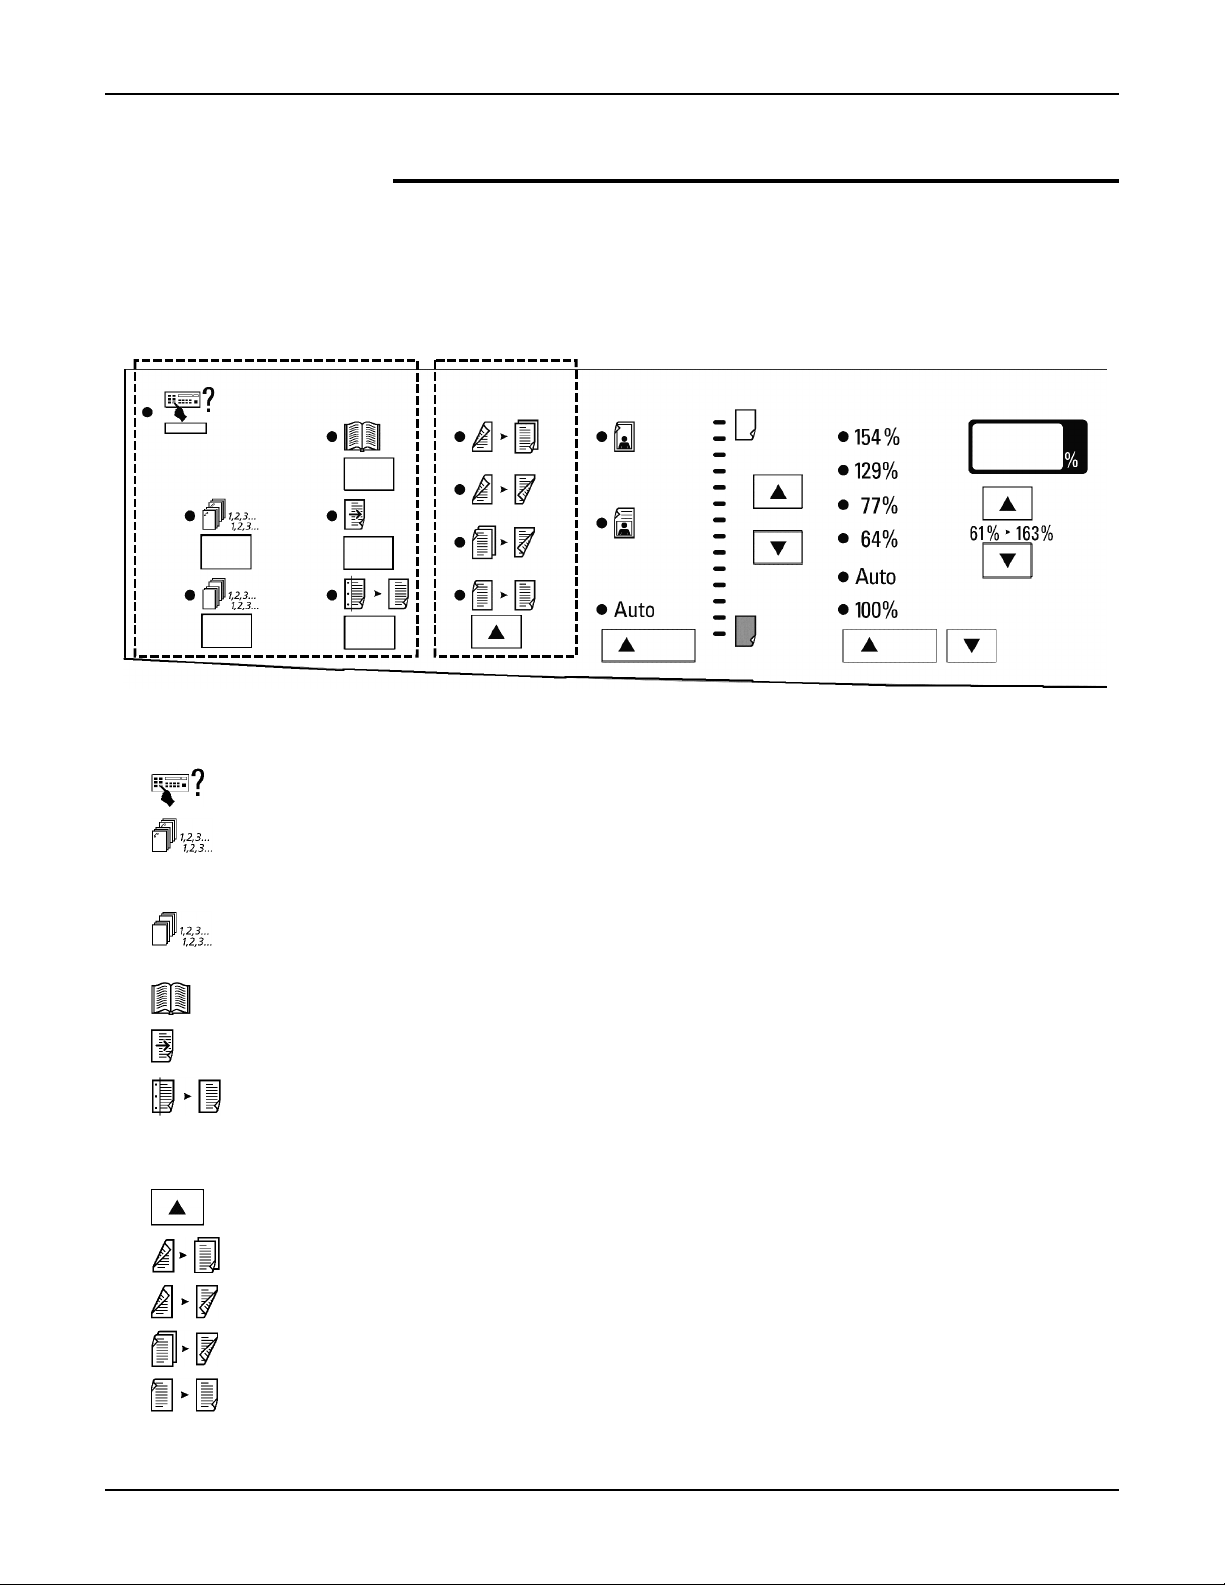
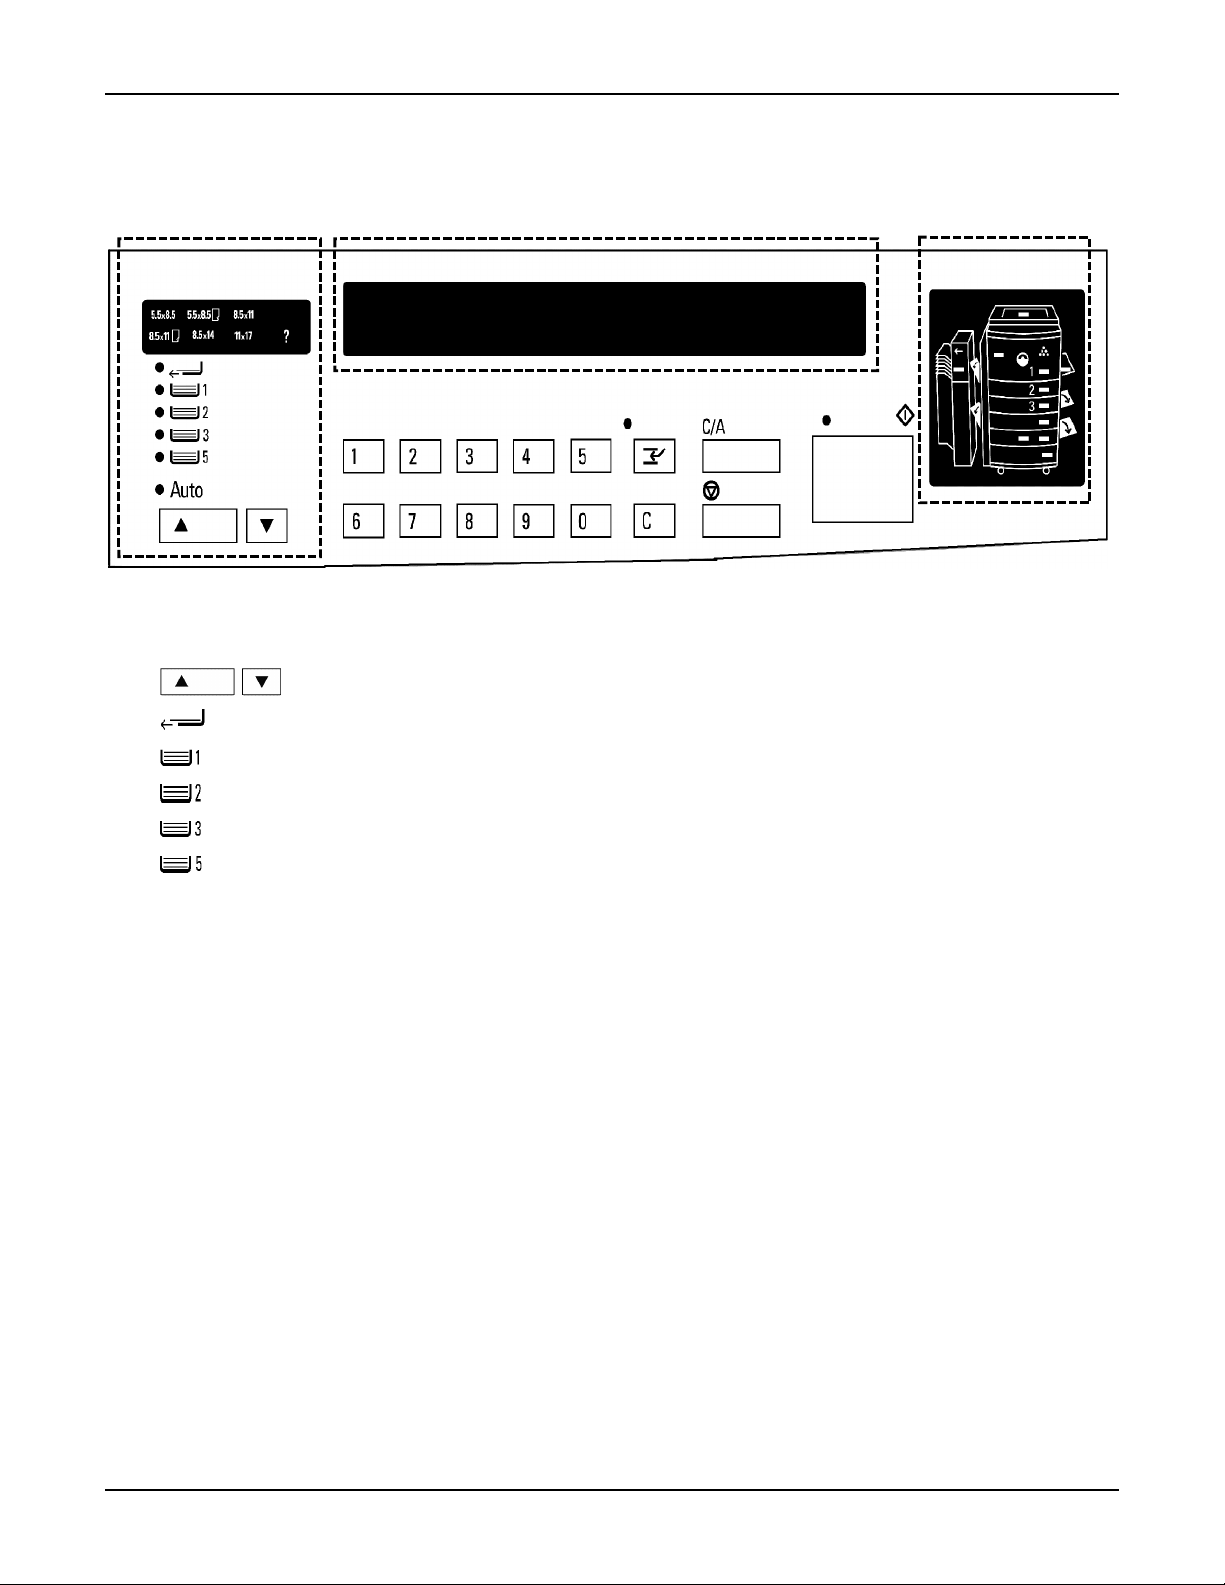
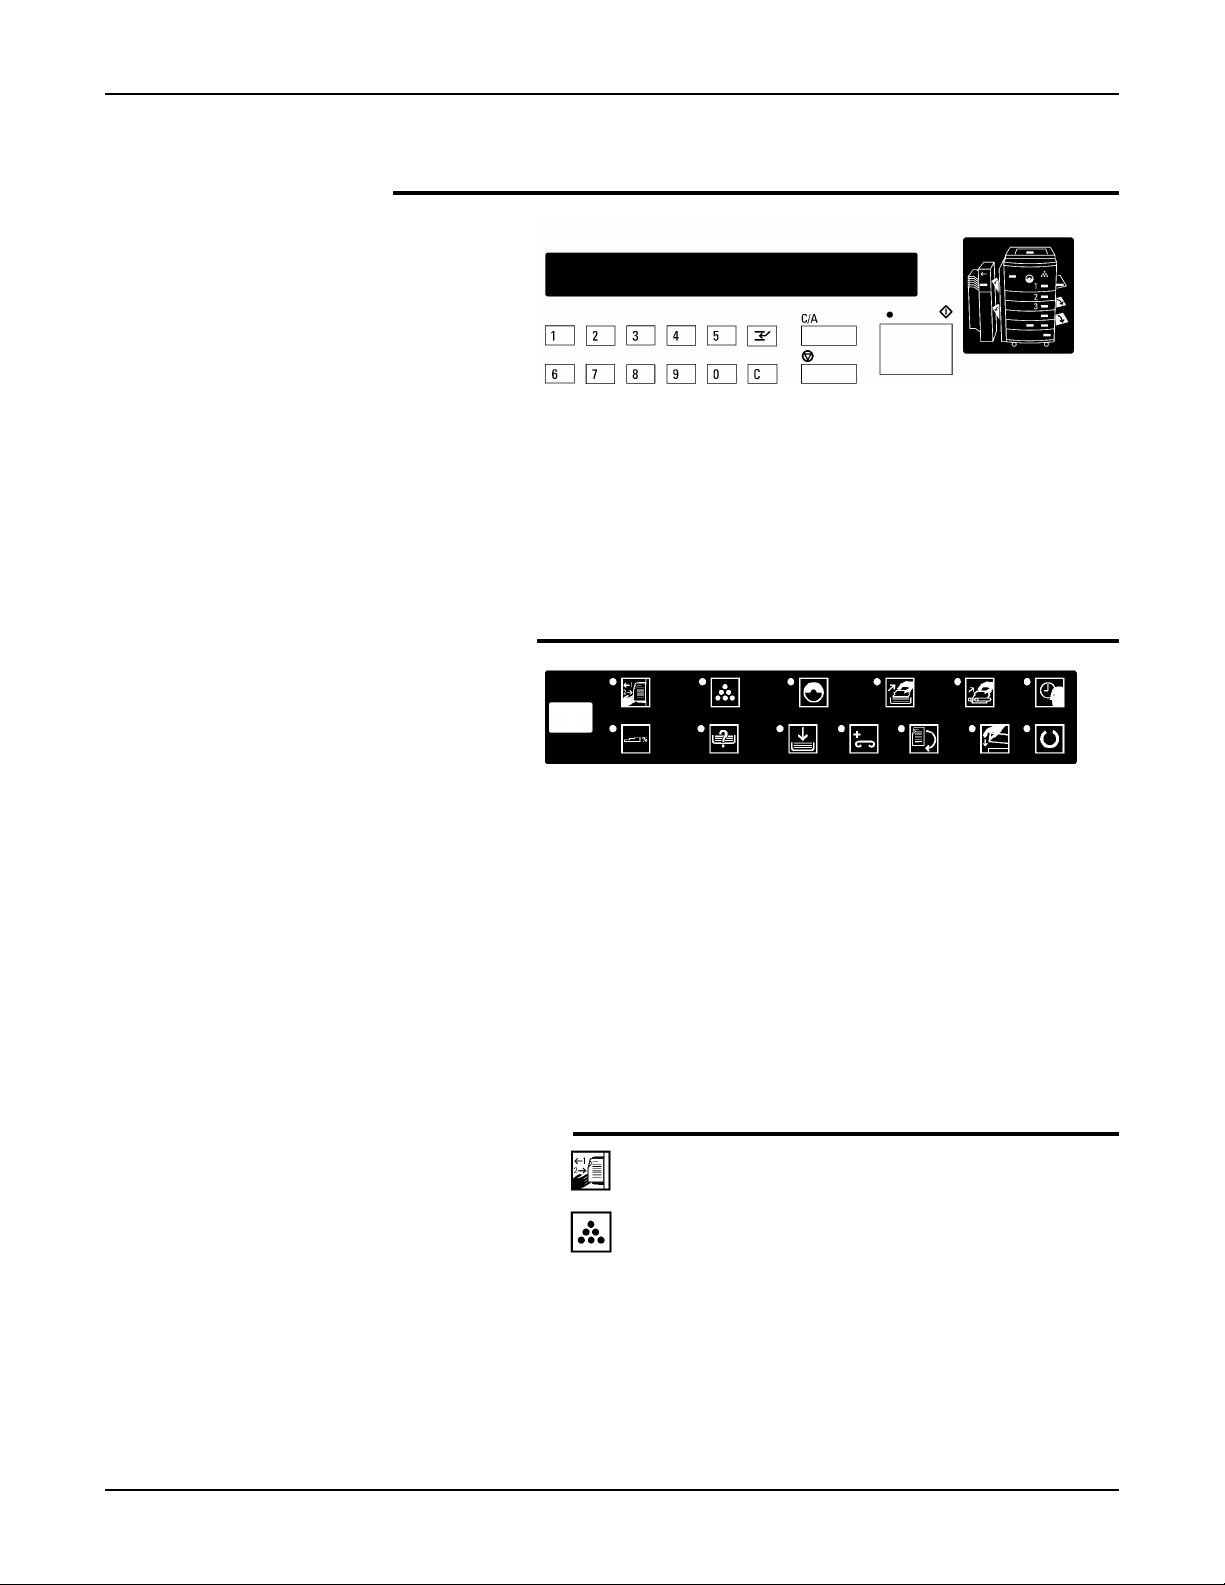
Identifying the control panel components
The control panel contains buttons and indicator lights which
control and display the conditions of the copier.
When an indicator light becomes lit, this informs you of your
control panel selections.
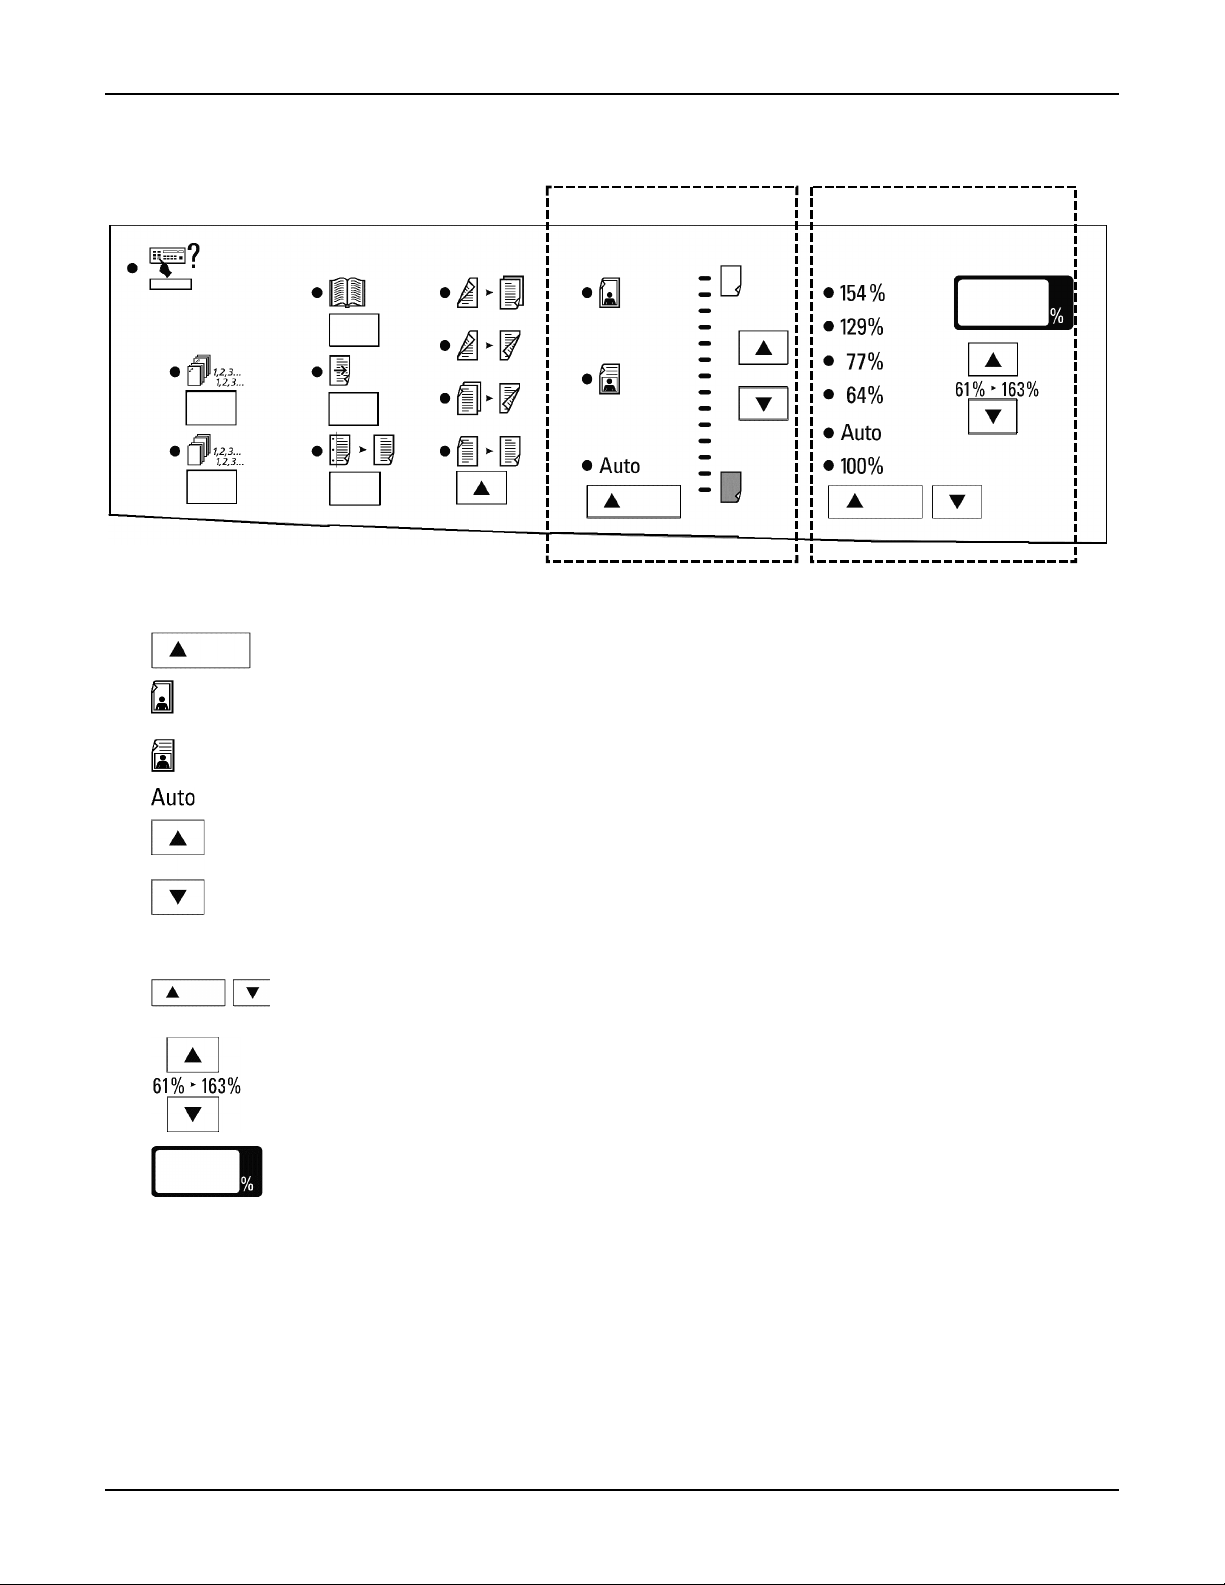
Added features area
Note:
To select a feature in the added feature area, press the button below the feature.
Special features:
Stapling:
Collated:
Select this feature to automatically staple and collate copy sets; the copy sets are
delivered to the sorter/stapler. This feature is enabled only on machines with the 10bin sorter stapler.
Select this feature to collate the output copies. This feature is enabled only on
machines which have the 10-bin sorter stapler option.
Select this feature to access, view, or change the copier default settings.
Book mode:
Margin shift:
Edge deletion:
Originalcopy area (XC33D only)
Originalcopy button:
21:
Select this option for one-sided copies from two-sided originals.
22:
Select this option for two-sided copies from two-sided originals.
12:
Select this option for two-sided copies from one-sided originals.
11:
Select this option for one-sided copies from one-sided originals.
12 XC23/XC33/XC33D User Guide
Select this feature to copy both pages of an open book or magazine.
Select this feature in order to produce a left-binding margin on the copy.
Select this feature to delete any unwanted images from the edge of the copy.
Press this button to select the desired copy output option.
Page 17
Getting to know your copier
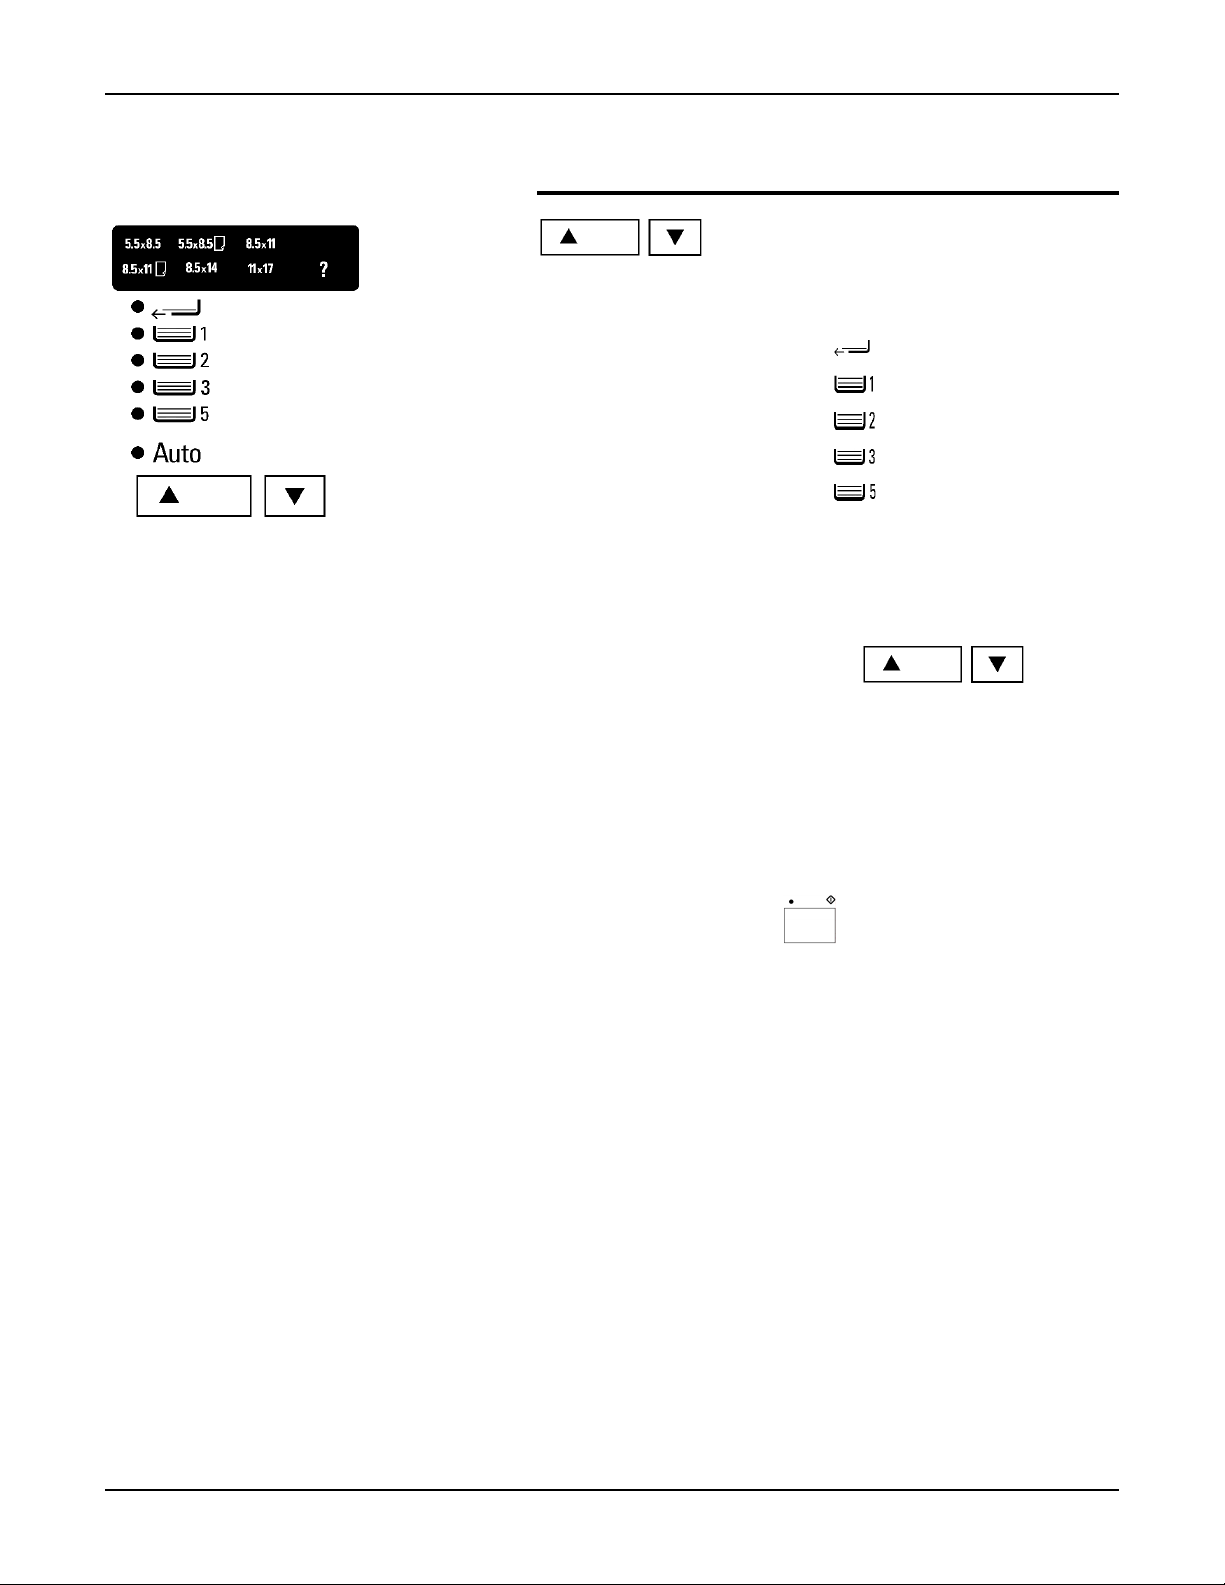
Paper supply area
Paper supply buttons:
Bypass tray:
Tray 1:
Tray 2:
Tray 3:
Select this option when using special paper stock.
Select this option when using copy paper from tray 1.
Select this option when using copy paper from tray 2.
Select this option when using copy paper from tray 3.
Press either one of these buttons to select the desired paper tray.
Message display:
Copier diagram:
Tray 5 (available on some models):
This area displays the following information: copy quantity, icon messages (for
XC23/XC33) or word messages (for XC33D), or instructions about the copier operation,
copier maintenance, and status codes.
When a specific copier area requires attention, this diagram displays the specific copier
area with a flashing indicator light.
Select this option when using copy paper from tray 5.
XC23/XC33/XC33D User Guide 13
Page 18
Getting to know your copier
Copy density area
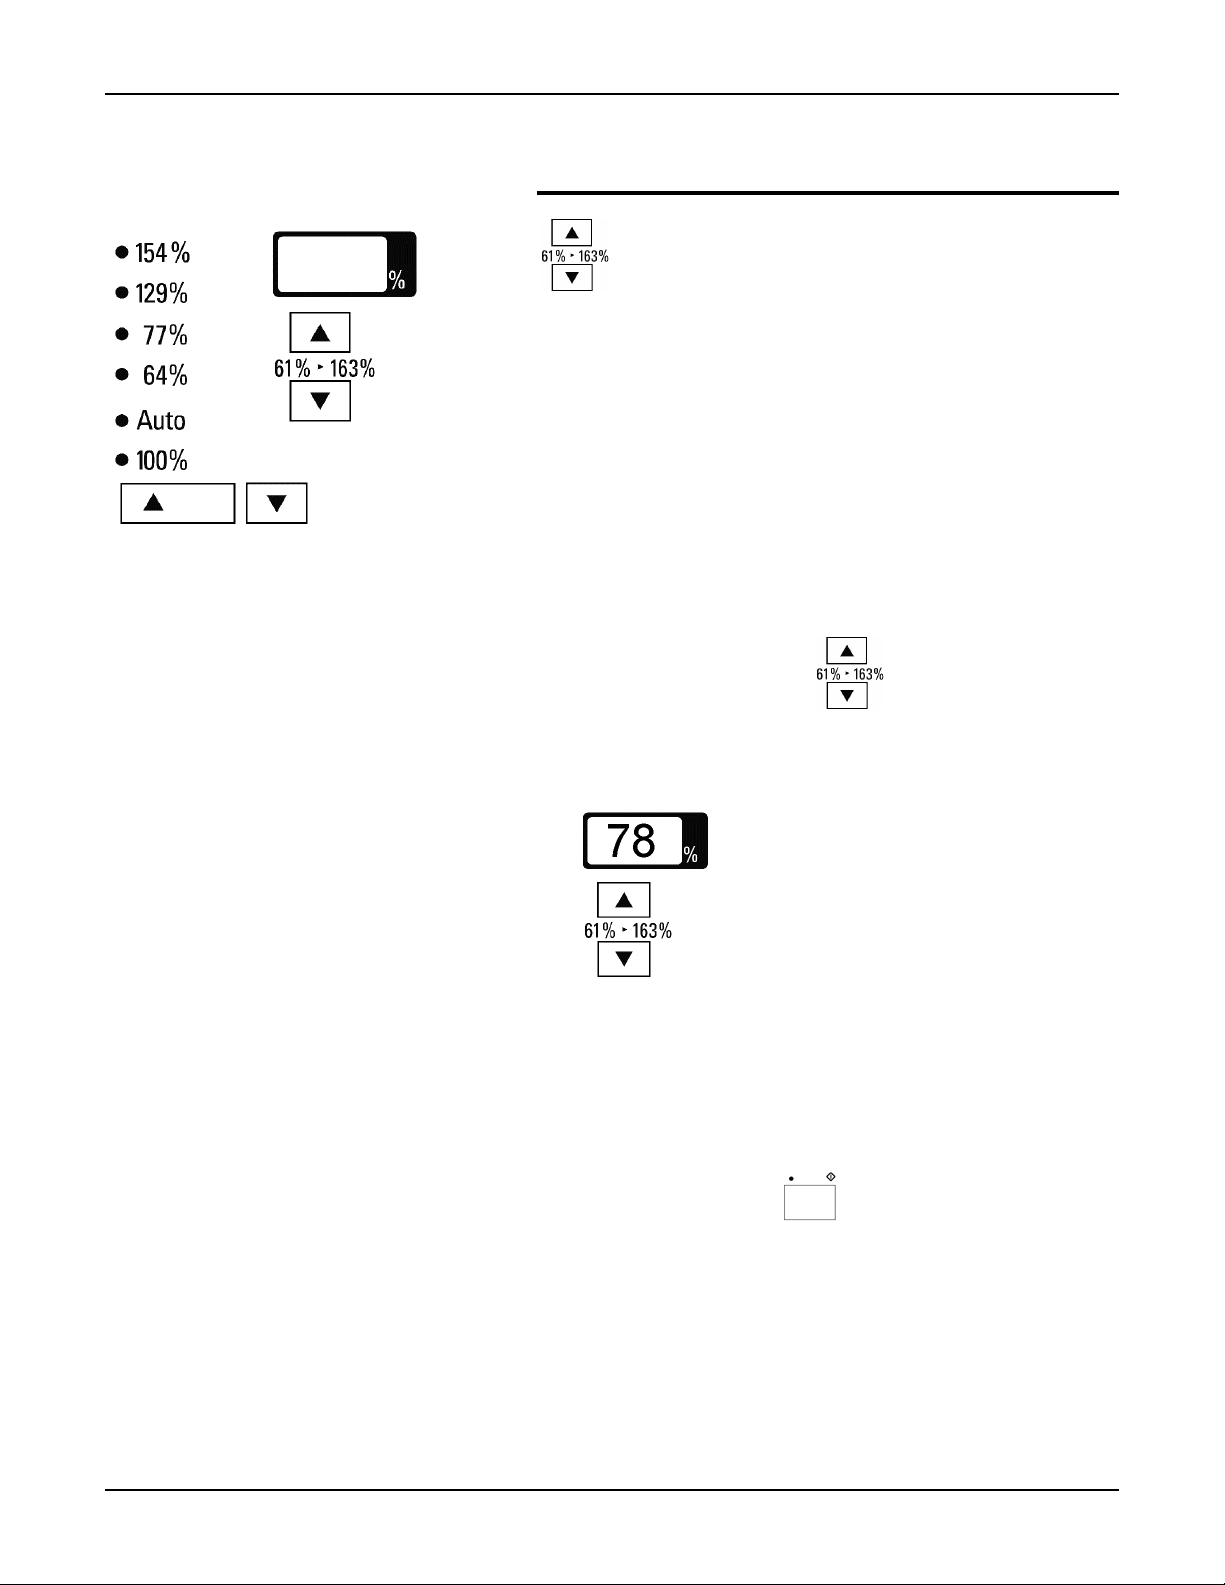
Reduce/enlarge area
Exposure mode button:
Photo mode:
Manual mode:
Auto mode:
Copy lighter/darker buttons:
Preset buttons:
Variable buttons:
Variable window display:
Select this mode when using originals which are photographs, magazine
pages, or newspaper pages.
Select this mode when your originals contain mainly text.
Select this mode when your originals contain color or dark backgrounds.
Press either one of these two buttons to select a specific, preset,
reduce/enlarge (R/E) ratio.
Press either one of these buttons in order to increase or decrease the
Press this button to select the desired exposure mode.
reduce/enlarge (R/E) ratio; each press of the button increases or
decreases the percentage in 1% increments.
This area displays the selected R/E percentage.
Press either one of these two buttons in order to have lighter
or darker copies; this is especially useful when your originals
are colored paper or contain light or dark areas on them.
14 XC23/XC33/XC33D User Guide
Page 19
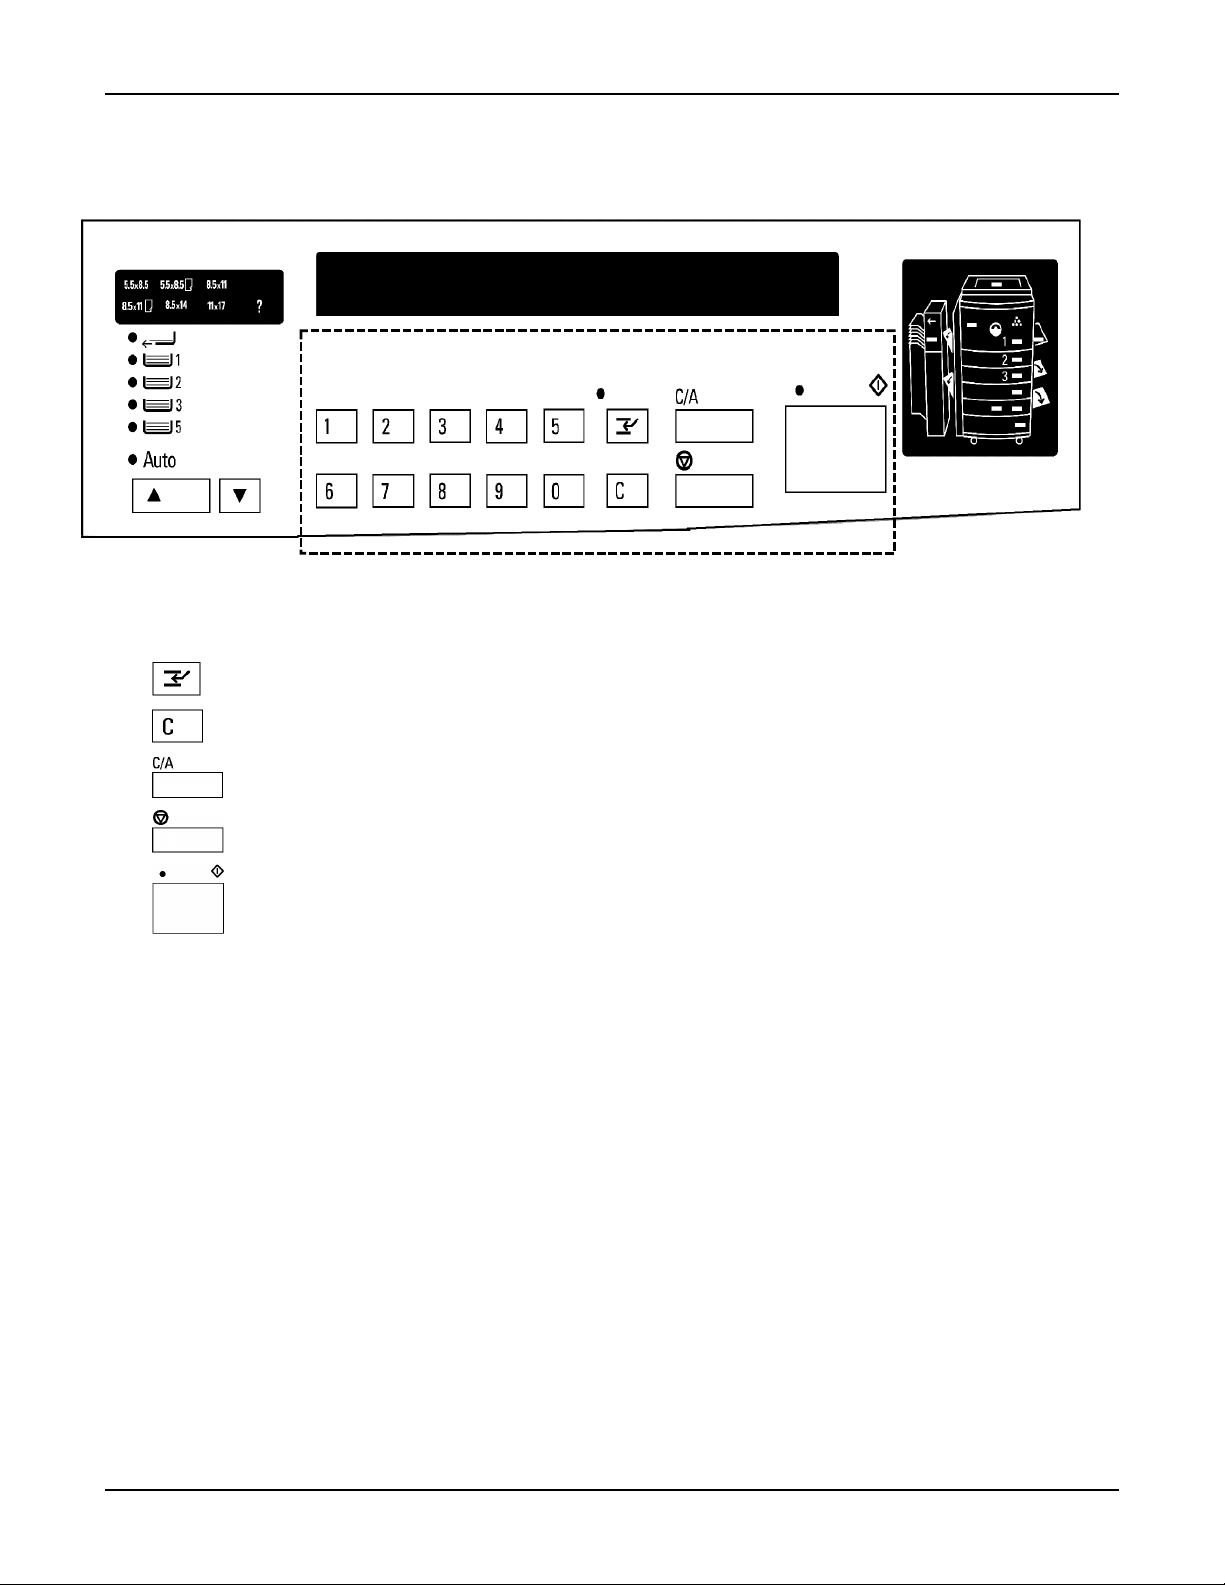
Ten-key panel:
Getting to know your copier
Press one or more number buttons in order to select the desired number of copies; you
may choose a maximum of 99 copies.
Interrupt button:
Clear button:
Clear All button:
Stop button:
Start button:
Press this button in order to clear the copy quantity.
Press this button in order to stop the operation of the copier.
Press this button in order to begin the copy process.
Press this button in order to interrupt a copy job which is currently in progress.
Press this button in order to clear all current copier selections.
XC23/XC33/XC33D User Guide 15
Page 20
Getting to know your copier
About the copier information system
Your copier has a comprehensive information system which
makes your job easier. Read this section to become familiar with
its components and how they work together.
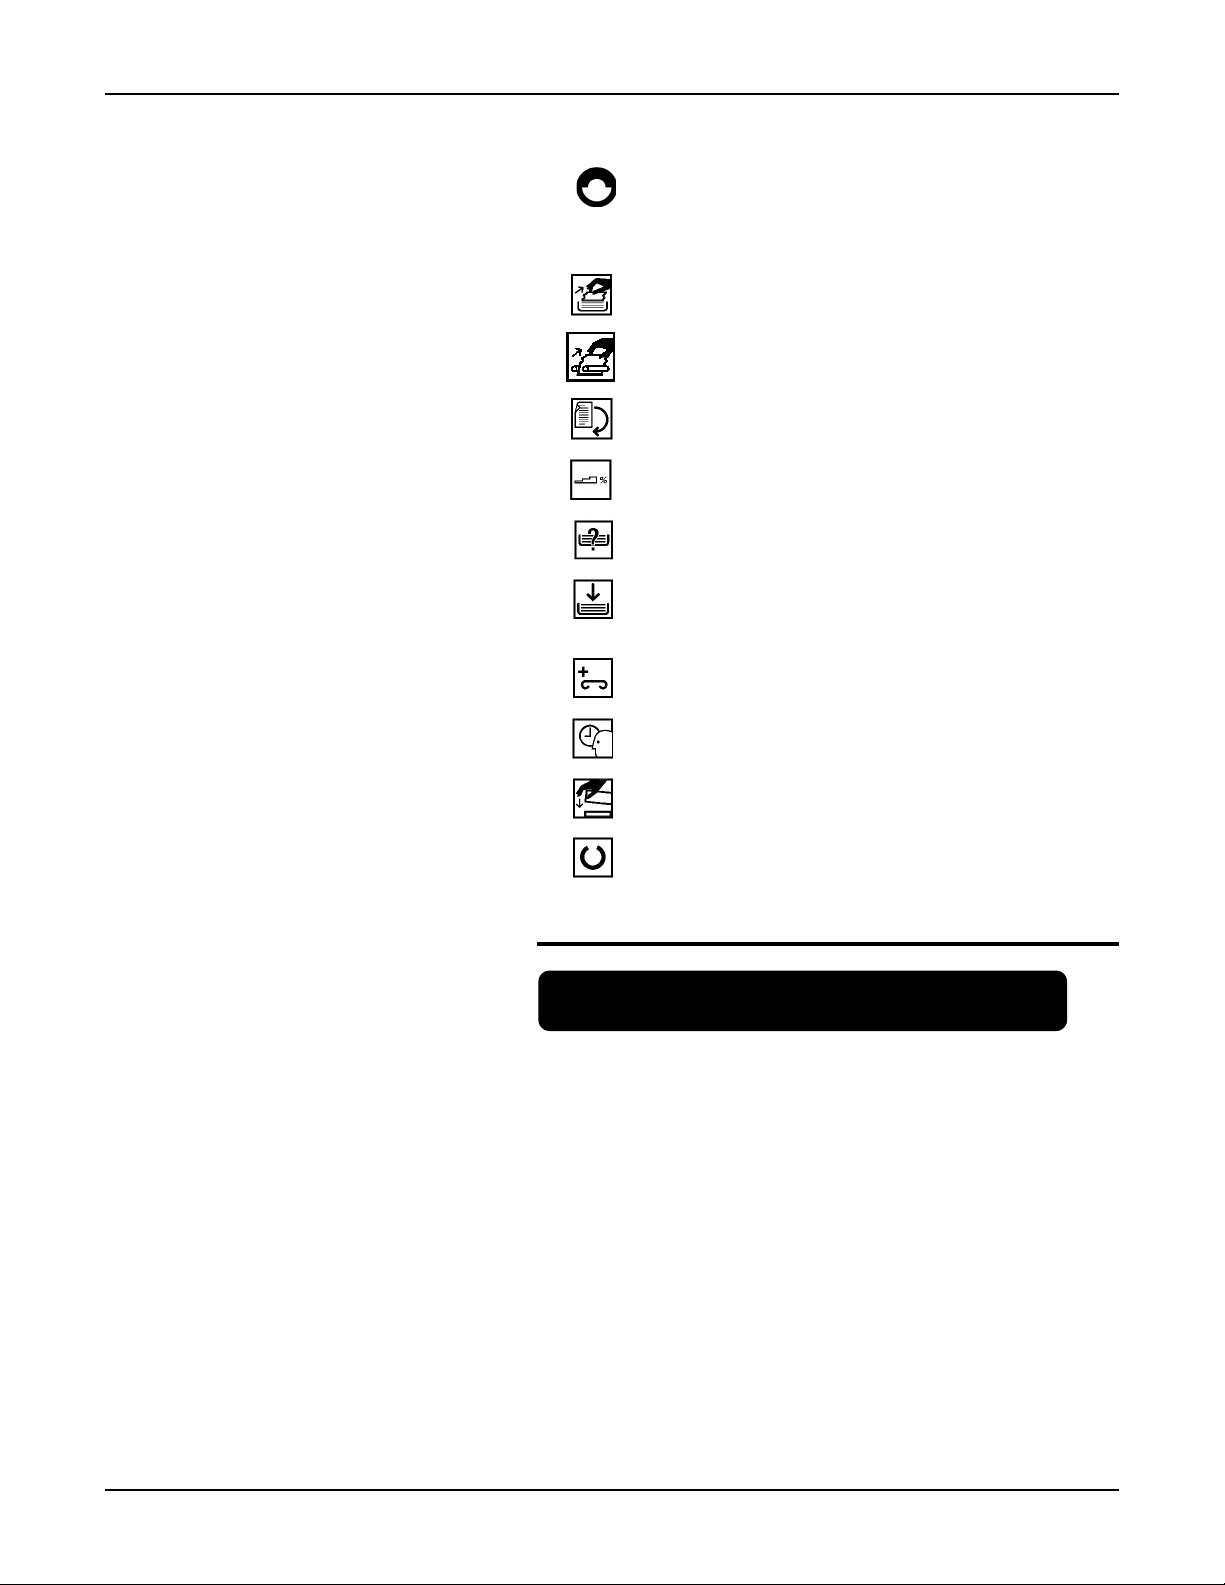
The information system contains the following components:
1. Message display
2. Copier diagram
Message display (XC23/XC33)
The XC23/XC33 copier message display above provides the
main source of information to you.
It displays the copy quantity, provides you with icon information
on the copier maintenance and operation. It also displays status
codes that assist you with fixing a copier problem.
If an icon becomes lit, it provides status information about the
copier. Ensure all the icon information is performed. For
detailed description of the icons, refer to the
this section.
When status code information appears on the message display,
refer to the section entitled
instructions.
Problem solving
Icon descriptions
for information and
in
Icon descriptions
Reload the originals in the ADF/DADF.
When the toner supply becomes low, the toner
indicator flashes. When the indicator is lit
continuously you must change the toner
cartridge.
16 XC23/XC33/XC33D User Guide
Page 21
Getting to know your copier
When the drum cartridge has 5000 copies
remaining, the drum indicator becomes lit. When
the indicator flashes you must change the drum
cartridge.
The current paper tray that is being used has a
paper misfeed. Clear the misfeed.
There is a paper misfeed inside the copier or in
the paper exit area. Clear the misfeed.
Turn the original clockwise.
Select a reduce or enlarge ratio.
Select paper tray.
Add copy paper to the indicated paper tray.
(Refer to the flashing indicator on the copier
diagram)
The 10-bin sorter stapler is out of staples. Add
staples.
Please wait; the copier is warming up.
Close the indicated cover. (Refer to the flashing
indicator on the copier diagram)
Ready to copy.
Message display (XC33D)
1
The XC33D 2x40 LCD copier message display above
provides the main source of information.
It displays the copy quantity and provides you with
information and instructions on copier operation,
maintenance, and status codes.
The message information is displayed, as needed, to let you
know the status of the copier. Always perform all messages.
Press Start to continue
When problem messages appear, refer to the section
entitled
XC23/XC33/XC33D User Guide 17
Problem solving
.
Page 22
Getting to know your copier
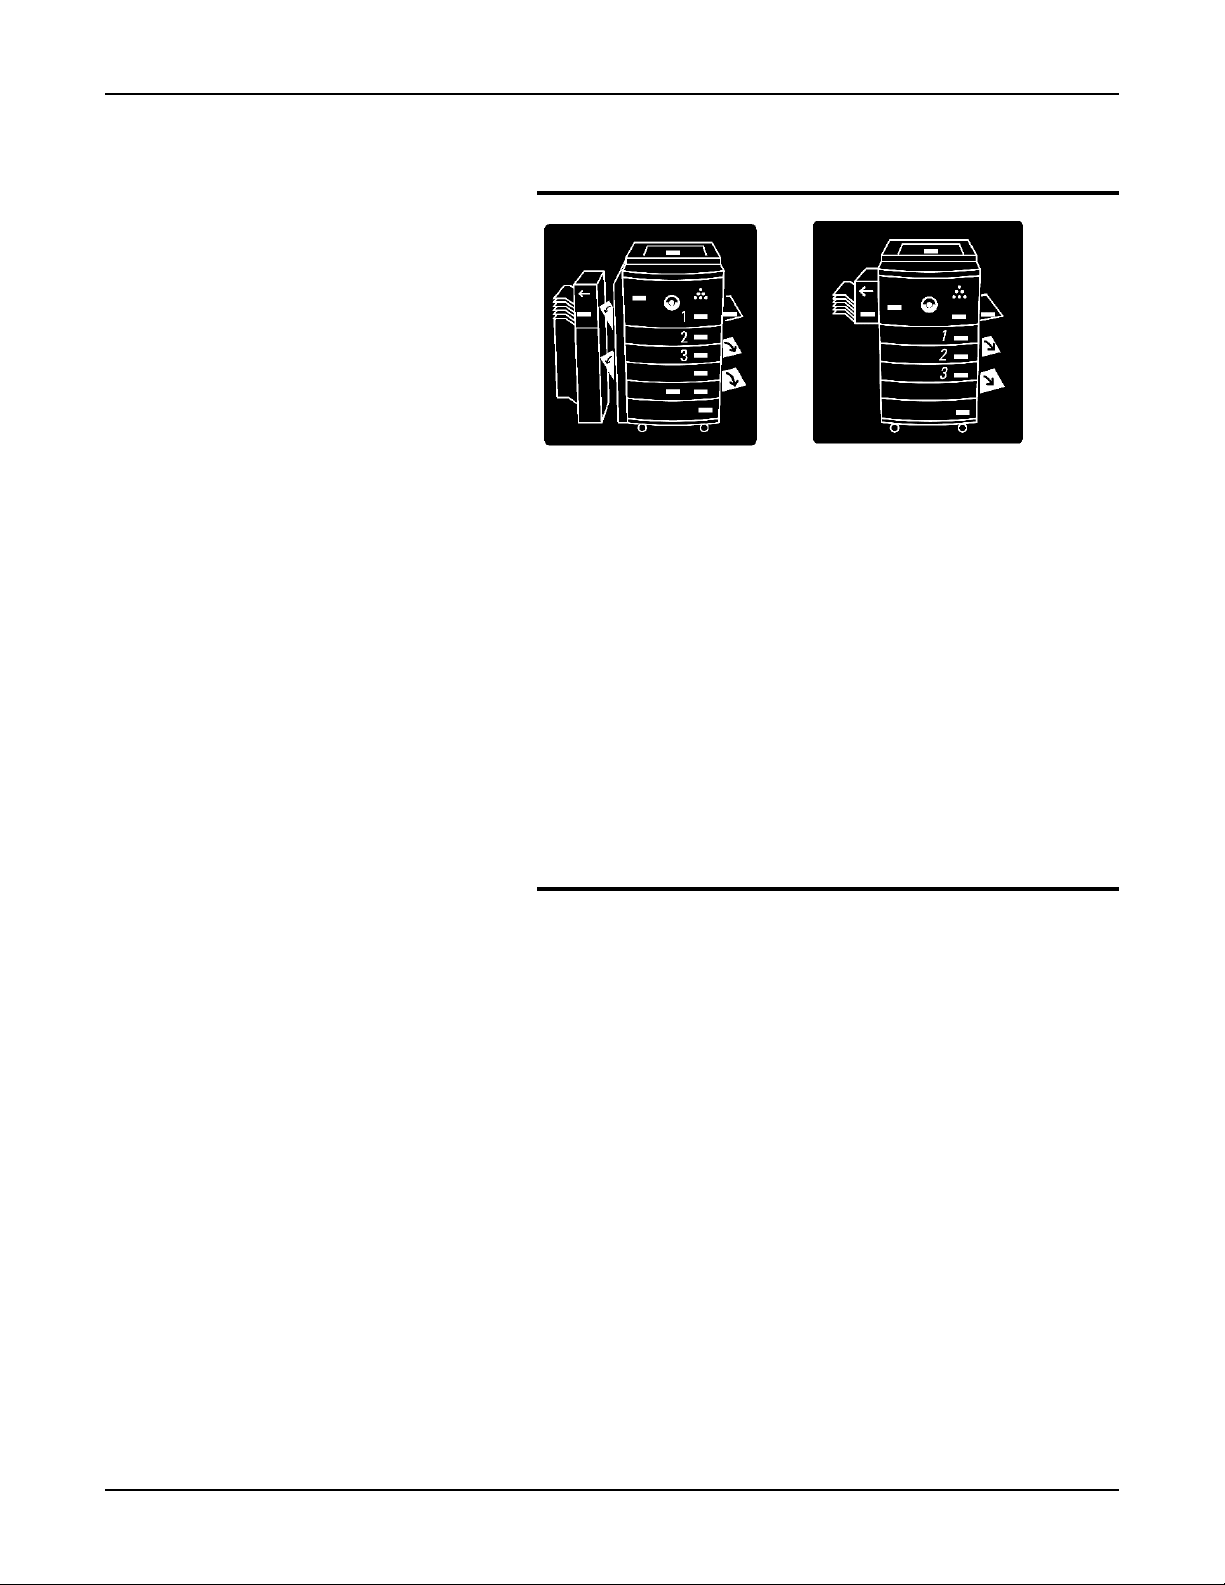
Copier diagram
XC33D XC23/XC33
The copier diagram illustrates the various areas of the copier and
contains various location indicators.
When a location indicator lights, it informs you of an area that
requires attention.
The location indicators provide information on the following
items:
paper jams
cartridge replacement
empty paper trays
open covers
Labels
There are many labels located throughout the copier and paper
trays that provide instructions to assist you with a variety of tasks.
18 XC23/XC33/XC33D User Guide
Page 23
Normal copy mode
XC23/XC33 only
When the copier is switched on, the copier enters a warm-up
Getting to know your copier
cycle and the
warm up cycle, the copier does not respond to the
button. Copying may begin when the
becomes lit,
normal copy mode.
XC33D only
When the copier is switched on, the copier enters a warm-up
cycle and the message "
appears on the message display.
During the warm up cycle, the copier does not respond to the
Start
button. Copying may begin when the message "
to Copy
indicates that the copier is in the normal copy mode.
Automatic Clear
This copier automatically returns to the normal copy mode
approximately sixty (60) seconds after a job is completed; the
automatic clear feature is enabled at the factory. The feature
can be deactivated by referring to the section entitled
Customizing your copier
The automatic clear settings are preset at the factory and are as
follows:
Please wait
, this icon indicates that the copier is in the
" appears on the message display; this message
icon becomes lit,
Ready to copy
Please wait...Copier warming up
.
. During the
Start
icon
Ready
"
Copy density
Reduce/enlarge
Paper supply
Copy quantity
Note:
The factory default settings may be changed in order to
meet your specific copying needs. Refer to the section entitled
Customizing your copier
XC23/XC33/XC33D User Guide 19
Auto
100%
Auto
1
for more information.
Page 24

Getting to know your copier
Power saver mode
In the power saver (low power) mode, the copier automatically
switches to low power after the copier is idle for a predetermined
time period. This feature is not activated when shipped from the
factory. You can activate this mode and set a desired time
period; refer to the section entitled
When the copier is in the power saver mode, simply press the
Start
button, and the copier enters the warm-up cycle.
For detailed information on your specific copier model, refer to
the appropriate copier model below.
XC23/XC33
When the XC23/XC33 power saver mode occurs, this
symbol "
message display.
- -
Customizing your copier
" appears in the copy quantity area of the
.
Press Start to continue
Press the
mode.
Start
button,
, to return to the normal copy
XC33D
When the XC33D power saver mode occurs, the message
shown to the left appears in the message display area.
Press the
mode.
Start
button,
, to return to the normal copy
20 XC23/XC33/XC33D User Guide
Page 25

Paper
This section provides useful paper hints and paper specification
information on the following copier components:
Helpful hints
Note:
and copy quality problems.
For reliable copier operation and good copy quality, XEROX
recommends the following:
Store paper:
on a flat surface. in a closed container.
in a low humidity area. if the ream is partially
Paper trays
ADF/DADF
10-bin sorter stapler
Humidity curls paper, and curled paper may cause jams
used, tightly wrap the
unused portion.
Paper
Paper handling:
Do not load loose paper
which has not been stored in
a tightly wrapped container.
Ensure that the paper loaded
in the tray is the same size
as that which is indicated on
the tray.
The following materials cannot be loaded in the trays:
Paper with ripped or torn
edges, paper containing
pasted areas;
Paper with embossed
letterhead;
Transparencies; Vellum paper;
Multipart forms; Bound documents
Do not use folded or
wrinkled paper.
Ensure that the paper
is loaded correctly into
the proper paper tray.
Paper containing
staples or paper clips;
Carbon-backed
materials;
such as books or
magazines.
XC23/XC33/XC33D User Guide 21
Page 26
Paper
Specification chart for the trays
The paper specification chart provides information about the
paper size and paper feed direction for each paper tray. Refer to
the appropriate specification chart.
Note:
XEROX recommends using 20 lb. bond paper for optimal
performance.
The XDL23/XDL33 copier is not equipped with paper tray 4.
The XDL33D copier uses paper tray 4 for the 2 sided copy
operation only.
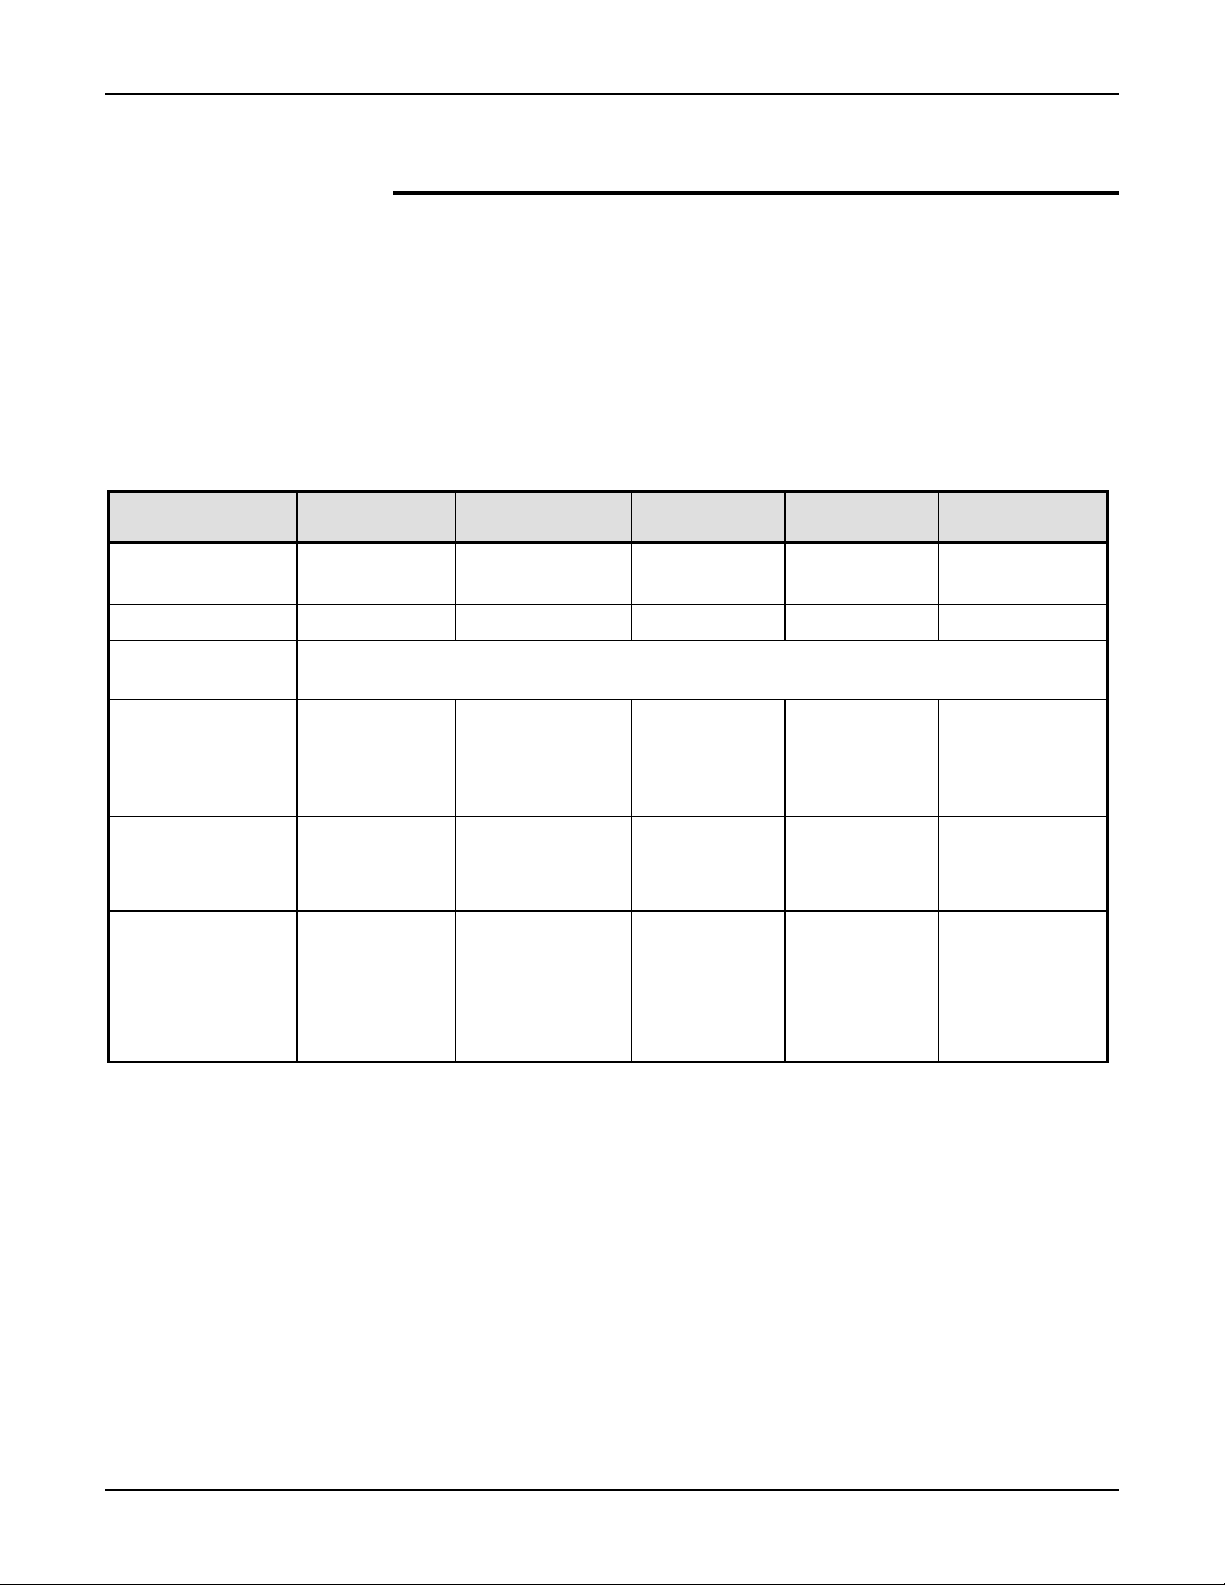
Copy paper Tray 1 Tray 2 Tray 3 Tray 5 Bypass Tray
Paper size
range
Default setting
Additional paper
trays*
5.5x8.5in./A5
to 11x17in./A3
8.5x11in. LEF 8.5x14in. SEF 8.5x11in. SEF 8.5x11in. LEF N/A
5.5x8.5in. SEF, 5.5x8.5in. LEF, 11x17in. SEF, B4 SEF, B5 LEF, A5 SEF, A5 LEF, A3
SEF, A4 SEF, A4 LEF, other**.
5.5x8.5in./A5 to
11x17in./A3
5.5x8.5in./A5
to 11x17in./A3
Paper weights
Optimum
Range
Paper capacity
8.5x11in./A4
20lb(80gm
2
)
Labels and
20lb/80gm
16-24lb/60-
2
90gm
2
20lb/80gm
16-24lb/60-
90gm
250 sheets 250 sheets 250 sheets 1000 sheets 50 sheets
No No No No Yes (fan the
2
2
20lb/80gm
16-24lb/60-
90gm
2
2
transparencies
***
* Additional paper tray sizes available, in the United States and Canada, call
6979)
.
5.5x8.5in./A5
to 11x17in./A3
20lb/80gm
16-24lb/60-
90gm
2
2
5.5x8.5in./A5 to
11x17in./A3
20lb/80gm
16-32lb/60-
120gm
2
2
labels or
transparencies
before placing
them in the
Bypass Tray.)
1-800-TEAM-XRX (1-800-832-
** “Other” indicates that odd-size papers can be accommodated.
*** XEROX recommends the use of labels and transparencies which are designed for copiers (high temperatures)
only.
22 XC23/XC33/XC33D User Guide
Page 27
Specification chart for the ADF/DADF
This specification chart provides information about the paper
types which may be used with the ADF/DADF multisheet feeder.
Note:
ADF (available on some models)
DADF (XC33D)
ADF DADF
Paper
Paper size
Paper weights
Paper capacity
Copy quantity
Labels and
transparencies
Bound books
or magazines
5.5x8.5in./A5 to 11x17in./A3 5.5x8.5in./A5 to 11x17in./A3
16-24lb/60-90gm
2
16-24lb/60-90gm
2
30 sheets 50 sheets
99 max 99 max for:
11 one-sided to one-sided
21 two-sided to one-sided
30 max for:
12 one-sided to two-sided
22 two-sided to one-sided
No; Use the document glass
for copying.
No; Use the document glass
for copying.
No; Use the document glass
for copying.
No; Use the document glass
for copying.
XC23/XC33/XC33D User Guide 23
Page 28
Paper
Specification chart for the 10-bin sorter stapler
This specification chart provides information about the paper
types which may be used with the 10-bin sorter stapler.
Note:
The 10-bin sorter stapler is available on some models.
Top bin capacity Paper size Stapled sheet
capacity
100 sheets 5.5x8.5in./A5 to 10x14in./B4
15 sheets max
11x17in./A3
10 sheets max
Bins 2- 10
capacity
30 sheets
Paper size Stapled sheet
capacity
5.5x8.5in./A5 to
15 sheets max
8.5x11in./A4
25 sheets
8.5x14in./216x355mm to
15 sheets max
10x14in./B4
10 sheets
11x17in./A3
10 sheets max
Paper weights
16-24lb/60-90gm
Paper weights
16-24lb/60-90gm
2
2
24 XC23/XC33/XC33D User Guide
Page 29
Loading the paper trays
Paper trays 1, 2 and 3
Loading the paper trays
When making copies, you can add paper to any tray that is not in
use. When a paper tray is empty, the paper tray indicator flashes
until the tray is loaded with paper.
For detailed information on the paper specifications for trays 1, 2
Paper
and 3, refer to the section entitled
Note:
change the paper size of a tray, contact, in the United States and
Canada,
Procedure:
1. Pull open the desired paper tray.
2. Press on the bottom plate until it clicks.
Each paper tray is fixed to a specific paper size. To
1-800-TEAM-XRX (1-800-832-6979)
.
.
3. Place the copy paper in the tray. Ensure that the paper
is placed under the two snubbers.
Note:
Do not fill the tray above the
4. Close the paper tray.
MAX
line.
XC23/XC33/XC33D User Guide 25
Page 30
Loading the paper trays
Paper tray 5
Paper tray 5 stores and feeds a maximum of 1000 sheets of
20lb/80gm
2
paper. Use this tray when running high volume copy
jobs; in other words, use this tray when you have to make a large
quantity of copies. The 1000 sheet capacity reduces the number
of times that paper must be added to the tray.
For detailed information on the paper specifications for paper tray
Paper
5, refer to the section entitled
Note:
Paper tray 5 is available on some models.
:
The factory default setting for paper tray 5 is 8.5x11in.
Note
.
LEF. To change the paper size of a tray, contact, in the United
States and Canada,
1-800-TEAM-XRX (1-800-832-6979)
.
Procedure:
1. Pull open the paper tray.
2. Place the copy paper into the tray.
Note:
Do not fill the tray above the
3. Close the paper tray.
MAX
line.
26 XC23/XC33/XC33D User Guide
Page 31

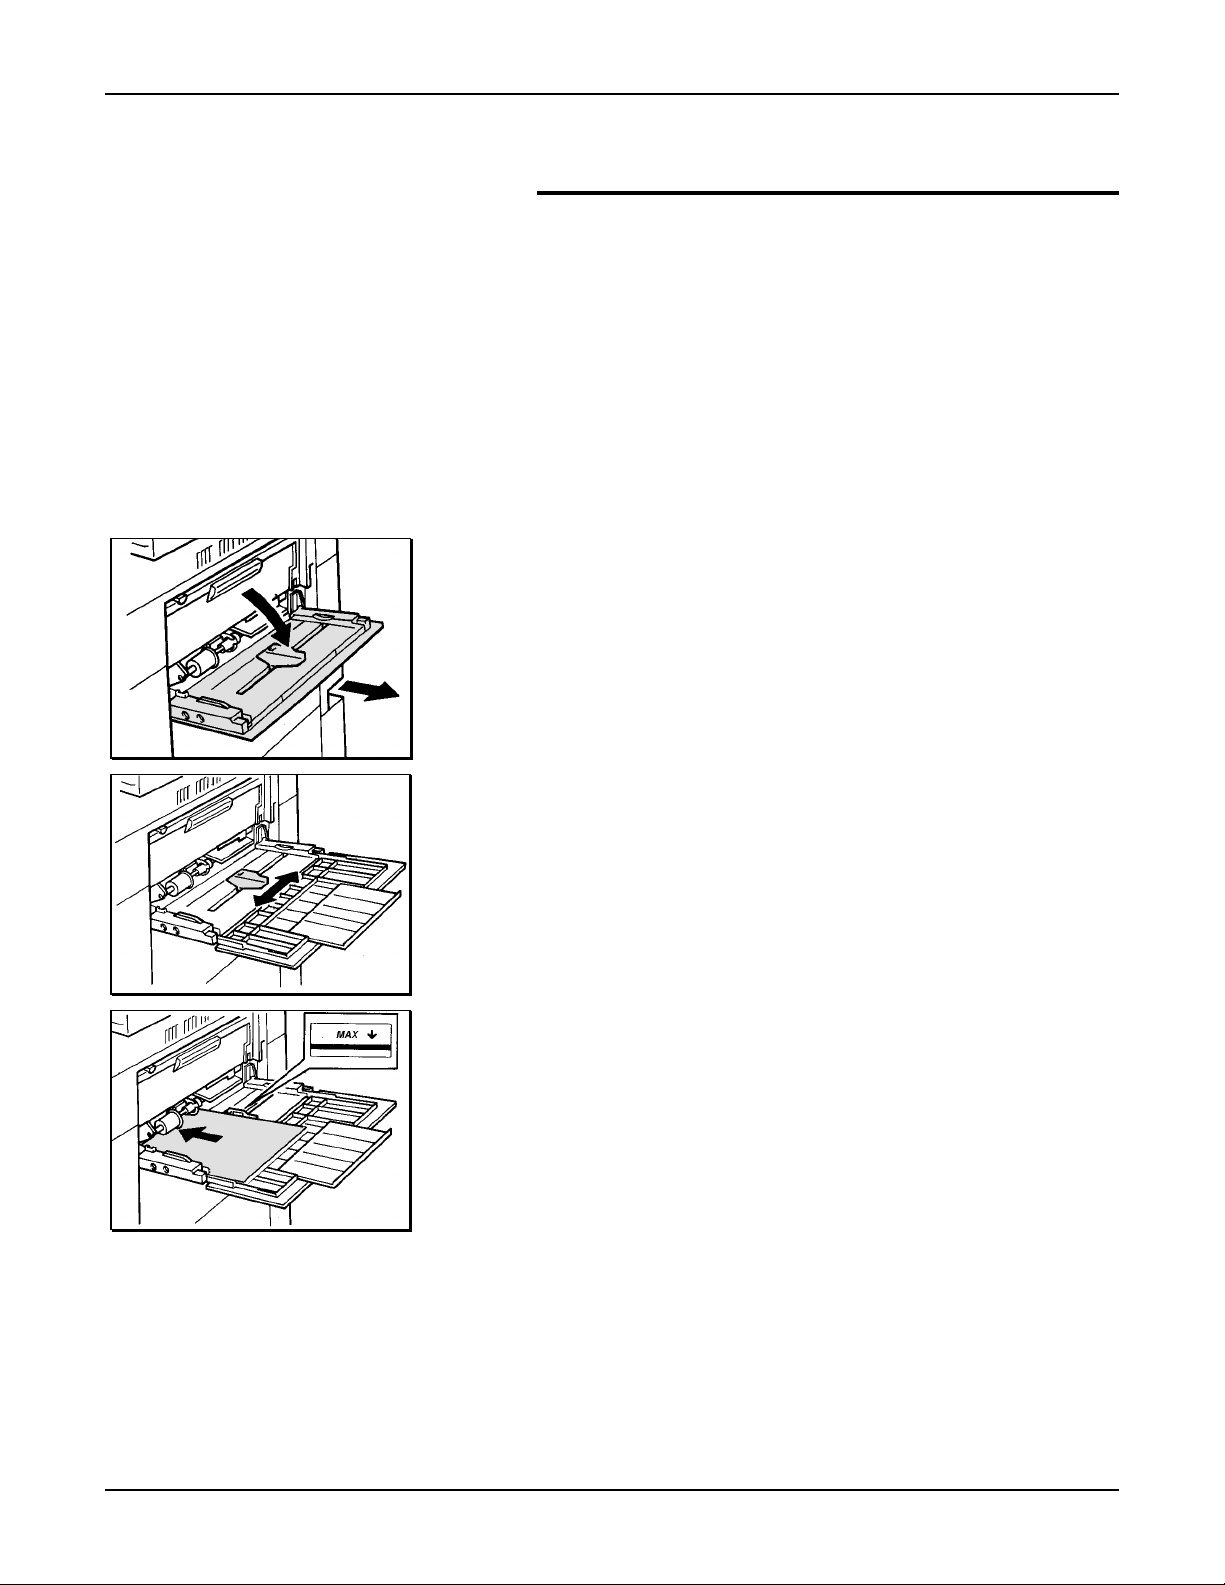
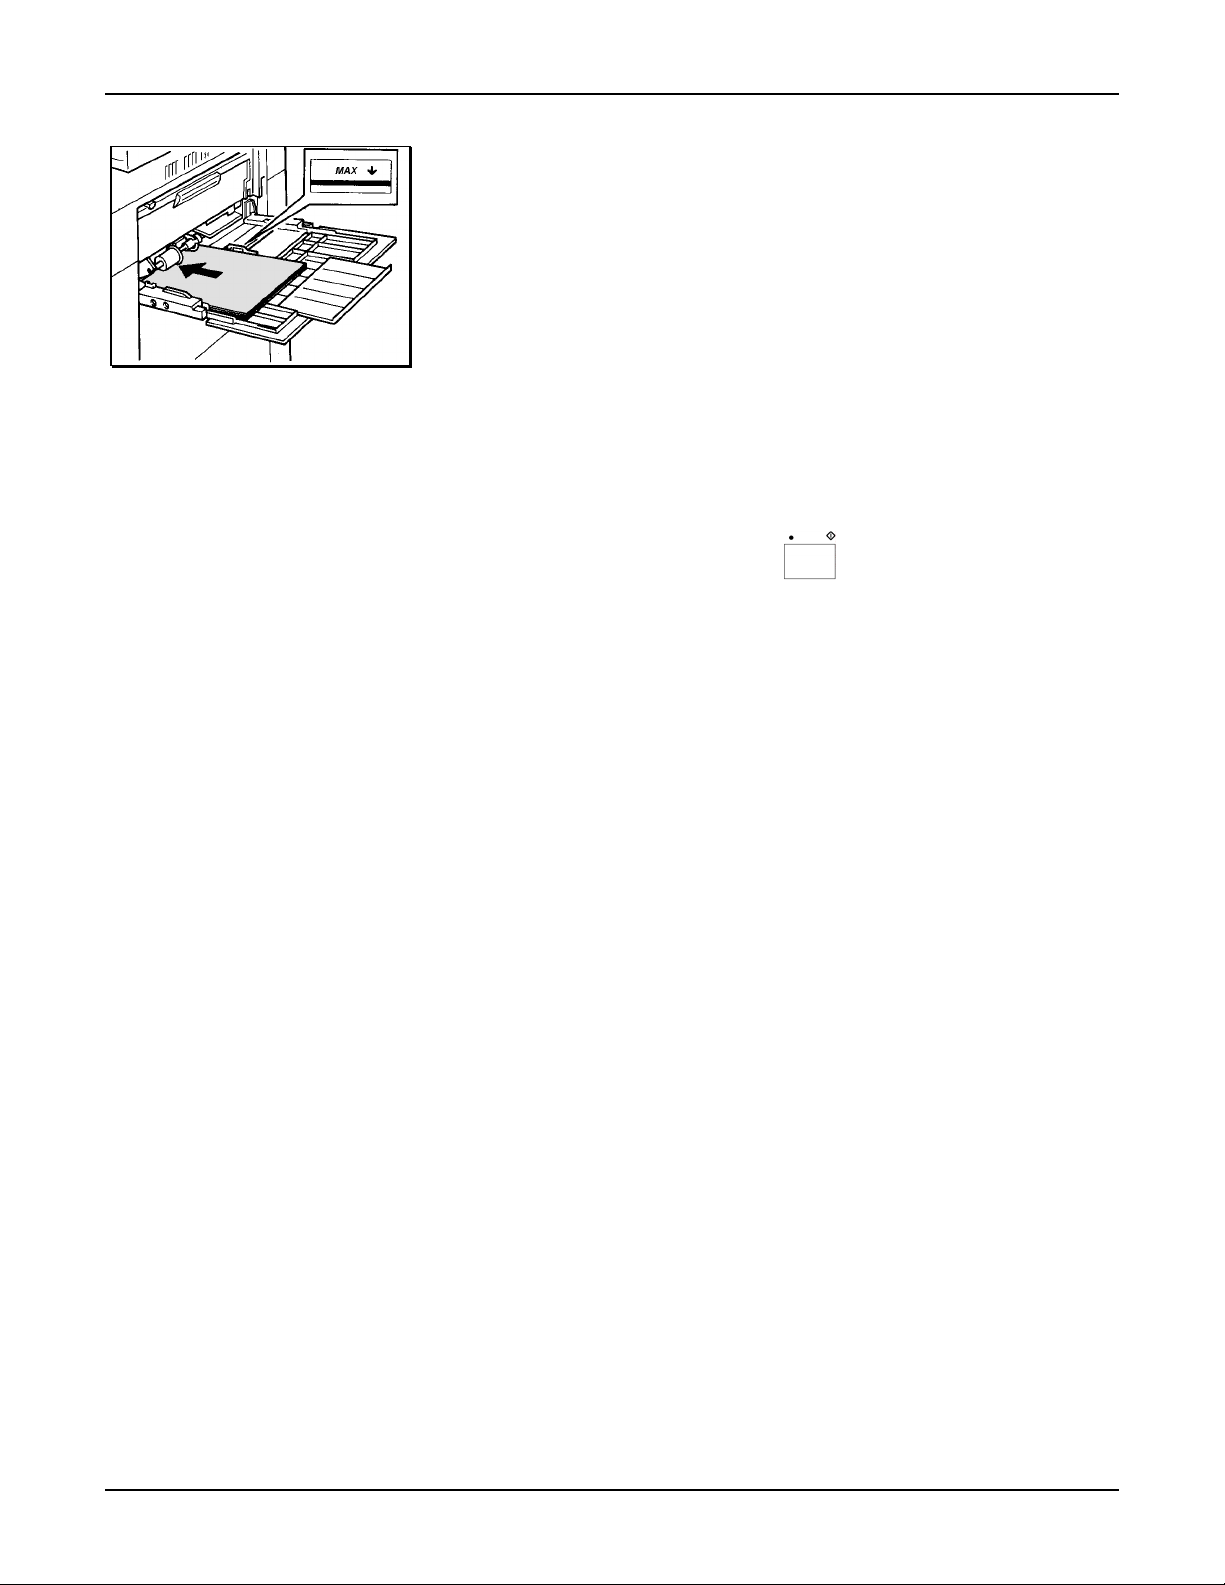
Bypass tray
Loading the paper trays
The bypass tray allows you to make copies on standard or
special paper stock. Refer to the appropriate paper stock for the
specific loading procedure. For detailed information on the
bypass tray paper specifications, refer to the section entitled
Paper
.
Standard paper stock
Procedure:
1. Open the bypass tray door.
2. Slide out the extension tray until you reach the desired
paper length.
3. Adjust the paper guide to the desired paper width.
4. Place only the recommended amount of copy paper into
the tray. Ensure the copy paper is placed along the
paper guide, gently slide the stack into the copier until
the stack stops.
Note:
Do not fill the tray above the
MAX
line.
XC23/XC33/XC33D User Guide 27
Page 32
Loading the paper trays
Special paper stock
The bypass tray can hold a small stack of the following special
paper stock:
Transparencies
Labels
Use transparencies and labels specifically designed for copiers
(high temperature).
Note:
The stack of special paper stock must be fanned before
loading it in the Bypass Tray.
Do not fill above the MAX line.
Procedure:
1. Open the bypass tray door.
2. Slide out the extension tray until you reach the desired
paper length.
3. Adjust the paper guide to the desired paper width.
4. Fan a small stack of the special paper stock
loading it in the Bypass Tray.
5. Place the small stack of the special paper stock onto the
tray, along the paper guide, and then gently slide the
sheet into the copier until it stops.
before
28 XC23/XC33/XC33D User Guide
Page 33

Switching the paper trays
Change the paper size of a tray by ordering an additional paper
tray that is set to another size and placing that tray into your
desired tray location.
To order another paper size tray call In the United States and
Canada:
Use the following procedure in order to switch a tray.
Procedure:
Note:
1. Slide out the tray to be changed until it stops.
2. Lift the front side of the tray and remove it.
3. Store the tray in a convenient location.
1-800-TEAM-XRX (1-800-832-6979)
Paper trays 1, 2, and 3 are interchangeable.
Loading the paper trays
.
4. While holding the front side of the desired tray, insert the
tray under both guides of the empty tray slot.
5. Close the tray.
XC23/XC33/XC33D User Guide 29
Page 34

Making copies
Making copies
Originals
What is an original?
Originals are documents that are used to make copies. These
documents can be in the form of paper, magazine, photograph,
or book.
Check the originals
Before you make copies, always check the originals for the
following:
any damage unusual weight unusual size
unusual shape staples paper clips
If you would like to use the ADF or DADF, ensure the originals
are in good condition, and all the staples and paper clips have
been removed. Use the document glass to make copies from
transparencies, facsimile paper, or originals having other unusual
characteristics. For reliable copier operation, use originals within
the following ranges:
Paper weight range: 16 to 24 lb. (60 to 90 gsm)
Paper size range: 5.5 x 8.5 inch to 11 x 17 inch (A5 to A3)
30 XC23/XC33/XC33D User Guide
Page 35
Using the document glass
You can use the document glass to make a copy of a delicate or
damaged original or to make copies of a reliable original.
Note:
The ADF is available on some models, the DADF is
available with the XC33D model only.
Procedure:
1. Open the document cover or ADF/DADF.
Making copies
2. Place the original,
and register it against the left rear corner of the glass.
3. Close the document cover or ADF/DADF.
Caution:
excessive force to press down on the document cover or
ADF/DADF.
4. Select any desired basic and/or added copy features.
(Refer to the sections entitled
When copying a thick original, do not use
copying features
features
5. Enter the copy quantity.
Note:
6. Press the
.)
99 maximum
Start
face down
or
How to use the added copying
button,
, on the document glass
How to use the basic
.
XC23/XC33/XC33D User Guide 31
Page 36

Making copies
Using the automatic document feeder (ADF)
Use the automatic document feeder (ADF) to copy a stack of 1
sided originals. Once the
feed automatically to the document glass from the ADF. The
bottom original is fed first.
Note:
The ADF is available on some models.
For the reliable operation of the ADF, use standard size paper;
refer to the section entitled
the ADF.
Procedure:
1. Raise the original catch tray.
2. Adjust the guide to the desired paper width.
Start
button is pressed, the originals
Paper
. See the specification chart for
3. Place the originals,
4. Lower the original catch tray.
Note:
When the original catch tray is lowered, the ADF
indicator becomes lit.
5. Ensure that the guide touches the edge of the originals.
6. Select the desired basic and/or added copy features.
(Refer to the sections entitled
copying features
features
7. Enter the copy quantity.
Note:
8. Press the
.)
99 maximum
Start
face up
, in the ADF.
How to use the basic
or
How to use the added copying
button,
.
32 XC23/XC33/XC33D User Guide
Page 37

Making copies
Using the duplex automatic document feeder (DADF)
Use the duplex automatic document feeder (DADF) to copy a
stack of 1 sided or 2 sided originals. Once the
pressed, the originals feed automatically to the document glass
from the DADF. The bottom original is fed first.
For reliable operation of the DADF, use standard size paper;
Paper
refer to section entitled
DADF.
Procedure:
1. Raise the original catch tray.
2. Adjust the guide to the desired paper width.
. See the specification chart for the
Start
button is
3. Place the originals,
4. Lower the original catch tray.
Note:
When the original catch tray is lowered, the DADF
indicator becomes lit.
5. Ensure the guide touches the edge of the originals.
6. Select the desired basic and/or added copy features.
(Refer to the sections entitled
copying features
features
7. Enter the copy quantity.
Note:
30 maximum for 12 and 22 copying
8. Press the
.)
99 maximum for 11 and 21 copying
Start
face up
, in the DADF.
How to use the basic
or
How to use the added copying
button,
.
XC23/XC33/XC33D User Guide 33
Page 38

Making copies
Making copies with mixed-size originals
The ADF and DADF allows you to copy a stack of originals which
contain different paper sizes (this stack of originals must be on
standard paper stock).
Note:
In order to copy a stack of originals which contain different
paper sizes, you must activate the “
sizes
” special feature (program 32). Refer to the section entitled
Customizing your copier
Procedure:
1. Align the originals at edges A and B (as shown in the
illustration to the left).
2. Raise the original catch tray.
in order to activate this copier setting.
Multisheet feeder mixed
3. Place the stack of originals,
ensure that the stack of originals is in the SEF direction.
4. Lower the original catch tray.
Note:
In order to have each copy on the same paper
size as each original, select
paper supply auto
In order to have all the copies on the same
paper size, select the
option and then select a specific
auto).
The bypass tray cannot be selected for this copy
operation.
5. Select the desired basic and/or added copy features.
(Refer to the sections entitled
copying features
features
6. Enter the copy quantity.
Note:
30 maximum for 12 and 22 copying
.)
99 maximum for 11 and 21 copying
or
How to use the added copying
face up
option.
, in the ADF/DADF;
100%
and select the
reduce/enlarge auto
paper tray
How to use the basic
(not
7. Press the
34 XC23/XC33/XC33D User Guide
Start
button,
.
Page 39
Using the bypass tray
Use the bypass tray to run short copy jobs, to use a different
copy paper size, or to copy onto special paper stock.
For detailed information on how to load copy paper into the
bypass tray, refer to the section entitled
the paper specifications, refer to the section entitled
Procedure:
1. Open the document cover or ADF/DADF.
Making copies
Loading the trays
Paper
and for
.
2. Place the original,
and register it against the left rear corner of the glass.
3. Open the bypass tray door.
4. Slide out the extension tray to the desired paper length.
5. Adjust the paper guide to the desired paper width.
face down
, on the document glass
XC23/XC33/XC33D User Guide 35
Page 40
Making copies
6. Place the required amount of copy paper into the bypass
tray until it stops (do not force).
Note:
Do not fill above the
MAX
line.
7. If required, select the desired basic copying features.
(Refer to the section entitled
copying features
Note:
When using the bypass tray the following copier
.)
How to use the basic
features become inactive:
Added copying features
Reduce/enlarge auto option
Originalcopy feature
8. Enter the copy quantity.
9. Press the
Start
button,
.
10. When the copy job is complete, ensure the extension
tray is pushed back into the bypass tray.
11. Close the bypass tray door.
36 XC23/XC33/XC33D User Guide
Page 41

How to use the basic copying features
With the copier default settings you can make copies by loading
originals, entering the copy quantity, and pressing the
button.
How to use the basic copying features
Start
Before pressing the
copying features that will enhance your copy jobs.
This section provides detailed information on how to use the
basic copying features.
The following basic copying features are discussed:
Paper supply
Reduce/enlarge
Copy density
Originalcopy
Manual 2 sided copying
Job interrupt
Start
button, you can select various basic
XC23/XC33/XC33D User Guide 37
Page 42

How to use the basic copying features
Paper supply
Use this feature to select the paper tray of your choice or to
have the copier automatically select the appropriate tray.
This feature has the following options:
Note:
becomes lit, it informs you of the paper size that is in your
tray selection. When an odd-paper size tray is selected the
question mark becomes lit.
Manual
Auto
When one of the paper size indicators below
38 XC23/XC33/XC33D User Guide
Page 43
How to use the basic copying features
Manual
Select this option when you require a specific paper tray.
This option has the following selections:
Bypass tray,
Tray 1,
Tray 2,
Tray 3,
Tray 5 ,
Note:
Paper tray 5 is available on some models.
Procedure:
1. Ensure your originals are loaded in the appropriate
copier location.
2. Press the
select the desired paper tray.
3. If required, select the desired basic and/or added
copying features.
(Refer to the sections entitled
copying features
features
4. Enter the copy quantity.
5. Press the
Paper supply
or
.)
Start
button,
button,
How to use the basic
How to use the added copying
.
, to
XC23/XC33/XC33D User Guide 39
Page 44

How to use the basic copying features
Auto
Select this option when you desire the copier to select the
appropriate paper tray size.
The automatic tray selection depends on the size of the
original and the selected reduce/enlarge ratio.
Note:
With this option you cannot select the
reduce/enlarge auto
Procedure:
1. Ensure your originals are loaded in the appropriate
copier location.
option.
2. Ensure the
3. If required, select the desired basic and/or added
copying features.
(Refer to the sections entitled
copying features
features
4. Enter the copy quantity.
5. Press the
Paper supply
or
.)
Start
button,
is set to
How to use the basic
How to use the added copying
.
.
40 XC23/XC33/XC33D User Guide
Page 45

Reduce/enlarge
Use this feature to reduce or enlarge the image on the
copies.
This feature has the following options:
How to use the basic copying features
Auto
Preset
Variable
XC23/XC33/XC33D User Guide 41
Page 46

How to use the basic copying features
Auto
Select this option when you desire the copier to automatically
select the reduce/enlarge ratio to match the selected paper
size.
Procedure:
1. Ensure your originals are loaded in the appropriate copier
location.
2. Press the
3. If required, select the desired basic and/or added copying
features.
Note:
following is selected:
(Refer to the sections entitled
copying features
features
4. Enter the copy quantity.
5. Press the
Reduce/enlarge
.
You cannot select the option if one of the
The bypass tray
A tray with a special size paper
The book mode feature
Paper supply auto option,
button,
.
How to use the basic
or
How to use the added copying
.)
Start
button,
.
, to
42 XC23/XC33/XC33D User Guide
Page 47

How to use the basic copying features
Preset
The preset set option provides you with five preset ratios.
Select a preset ratio when your copy job requires one of the
five following reduce/enlarge ratios (refer to the preset ratio
chart below):
154%
129%
77%
64%
100%
Procedure:
1. Ensure your originals are loaded in the appropriate
copier location.
2. Press the
select the desired preset ratio.
3. If required, select the desired basic and/or added
copying features.
(Refer to the sections entitled
copying features
features
4. Enter the copy quantity.
5. Press the
Preset Original Output
154% 5.5x8.5 LEF 8.5x11 LEF
129% 5.5x8.5 SEF 8.5x11 SEF
77% 8.5x11 SEF 5.5x8.5 SEF
64% 8.5x11 LEF 5.5x8.5 LEF
Preset ratio
.)
Start
Preset Ratio Chart
8.5x11 SEF 11x17 SEF
button,
or
How to use the added copying
button,
How to use the basic
.
, to
11x17 SEF 8.5x11 SEF
XC23/XC33/XC33D User Guide 43
Page 48
How to use the basic copying features
Variable
Select this option when you need to increase or decrease the
reduction or enlargement ratio by 1% increments. You may
select any percentage from 61% to 163%.
This option is useful when your original and/or copy paper
size is not a standard size.
Procedure:
1. Ensure your originals are loaded in the appropriate
copier location.
2. Press the
increment.
Note
display (example the ratio 78).
3. If required, select the desired basic and/or added
copying features.
(Refer to the sections entitled
copying features
features
4. Enter the copy quantity.
5. Press the
Variable
:
The variable ratio is displayed in the window
.)
Start
button,
or
How to use the added copying
button,
, to the desired
How to use the basic
.
44 XC23/XC33/XC33D User Guide
Page 49

Copy density
Originals may be poor in quality or printed on colored paper.
Use this feature to improve the copies of these documents.
This feature has the following options:
How to use the basic copying features
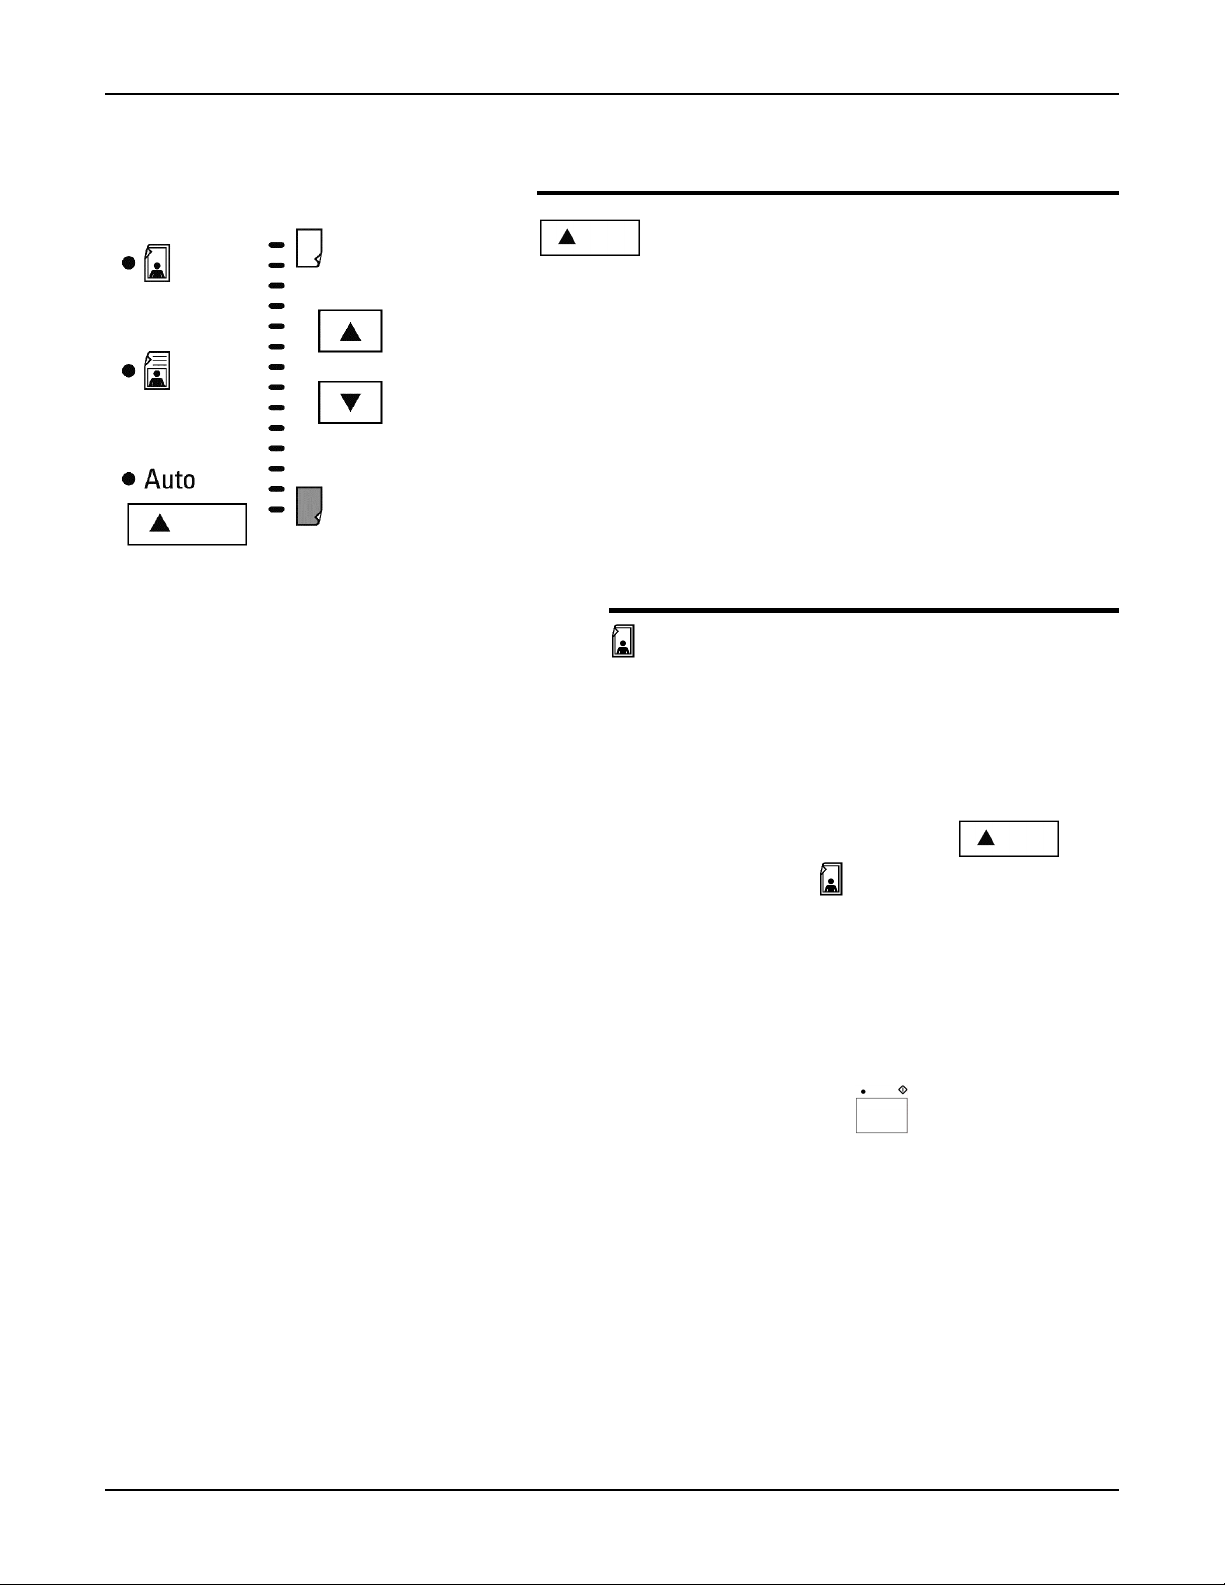
Exposure mode
Copy lighter/darker
XC23/XC33/XC33D User Guide 45
Page 50
How to use the basic copying features
Exposure mode
The exposure mode option improves the copy quality of your
originals by adjusting the copy density.
This option has three mode selections:
Photo
Manual
Auto exposure
Note:
Along with the appropriate mode selection you can
also improve the quality of your copies by using the Copy
lighter/darker option. If needed, refer to the section entitled
Copy lighter/darker.
Photo
Select the photo mode to enhance the copies of
photographs, magazines and newspapers.
Procedure:
1. Ensure your originals are loaded in the
appropriate copier location.
2. Press the
to the photo mode,
3. If required, select the desired basic and/or
added copying features.
(Refer to the sections entitled
basic copying features
copying features.
4. Enter the copy quantity.
5. Press the
Exposure mode
.
or
)
Start
button,
button,
How to use the
How to use the added
.
,
46 XC23/XC33/XC33D User Guide
Page 51

How to use the basic copying features
Manual
Select the manual mode when your originals mainly
contain text. The manual mode allows you to adjust
the background areas to your desired copy density.
Procedure
1. Ensure your originals are loaded in the
appropriate copier location.
2. Press the
to the manual mode,
3. If required, select the desired basic and/or
added copying features.
(Refer to the sections entitled
basic copying features
copying features
4. Enter the copy quantity.
5. Press the
:
Exposure mode
.)
Start
button,
button,
.
How to use the
or
How to use the added
.
,
XC23/XC33/XC33D User Guide 47
Page 52

How to use the basic copying features
Auto exposure
When the auto exposure mode is selected the copier
automatically adjusts the copy contrast to the copy
density of the original. Use this option when copying
originals with a colored or dark background.
Procedure:
1. Ensure your originals are loaded in the
appropriate copier location.
2. Ensure the
3. If required, select the desired basic and/or
added copying features.
(Refer to the sections entitled
basic copying features
copying features
4. Enter the copy quantity.
5. Press the
Exposure mode
or
.)
Start
button,
is set to
How to use the
How to use the added
.
.
48 XC23/XC33/XC33D User Guide
Page 53

How to use the basic copying features
Copy lighter/darker
You can vary the copy contrast of your copies in small
increments. Select this option to lighten or darken the
contrast of your copies.
Procedure:
1. Ensure your originals are loaded in the appropriate
copier location.
2. Press the
desired light or dark selection.
3. If required, select the desired basic and/or added
copying features.
(Refer to the sections entitled
copying features
features
4. Enter the copy quantity.
5. Press the
Copy lighter/darker
or
How to use the added copying
.)
Start
button,
button,
How to use the basic
.
, to the
XC23/XC33/XC33D User Guide 49
Page 54

How to use the basic copying features
Original ->copy (XC33D)
The XC33D copier allows you to use 1 or 2 sided originals to
create either 1 or 2 sided copies.
This feature has the following options:
21 two-sided to one-sided
22 two-sided to two -sided
12 one-sided to two -sided
11 one-sided to one-sided
50 XC23/XC33/XC33D User Guide
Page 55
How to use the basic copying features
21
Select this option when you are copying 2 sided originals to 1
sided copies.
Procedure:
1. Ensure your originals are loaded in the DADF.
2. Press the
3. If required, select the desired basic and/or added copying
features.
(Refer to the sections entitled
copying features
Originalcopy
or
How to use the added copying
button,
, to 21, .
How to use the basic
features.
4. Enter the copy quantity.
5. Press the
Start
button,
.
XC23/XC33/XC33D User Guide 51
Page 56

How to use the basic copying features
22
Select this option when you are copying 2 sided originals to 2
sided copies.
Procedure:
1. Ensure your originals are loaded in the DADF.
2. Press the
3. If required, select the desired basic and/or added
copying features.
(Refer to the sections entitled
copying features
features.
4. Enter the copy quantity.
5. Press the
Originalcopy
.
or
)
Start
button,
button,
How to use the basic
How to use the added copying
.
, to 22,
52 XC23/XC33/XC33D User Guide
Page 57

How to use the basic copying features
12
Select this option when you are copying 1 sided originals to 2
sided copies.
Procedure:
1. Ensure your originals are loaded in the DADF.
2. Press the
3. Enter the number of the originals.
4. Press the
5. If required, select the desired basic and/or added
copying features.
(Refer to the sections entitled
copying features
Originalcopy
.
Start
button,
or
button,
.
, to 12,
How to use the basic
How to use the added copying
features.
6. Enter the copy quantity.
7. Press the
Start
button,
.
XC23/XC33/XC33D User Guide 53
Page 58

How to use the basic copying features
11
Select this option when you are copying 1 sided originals to 1
sided copies.
Procedure:
1. Ensure your originals are loaded in the DADF.
2. Press the
3. If required, select the desired basic and/or added
copying features.
(Refer to the sections entitled
copying features
Originalcopy
.
or
button,
How to use the basic
How to use the added copying
, to 11,
features).
4. Enter the copy quantity.
5. Press the
Start
button,
.
54 XC23/XC33/XC33D User Guide
Page 59
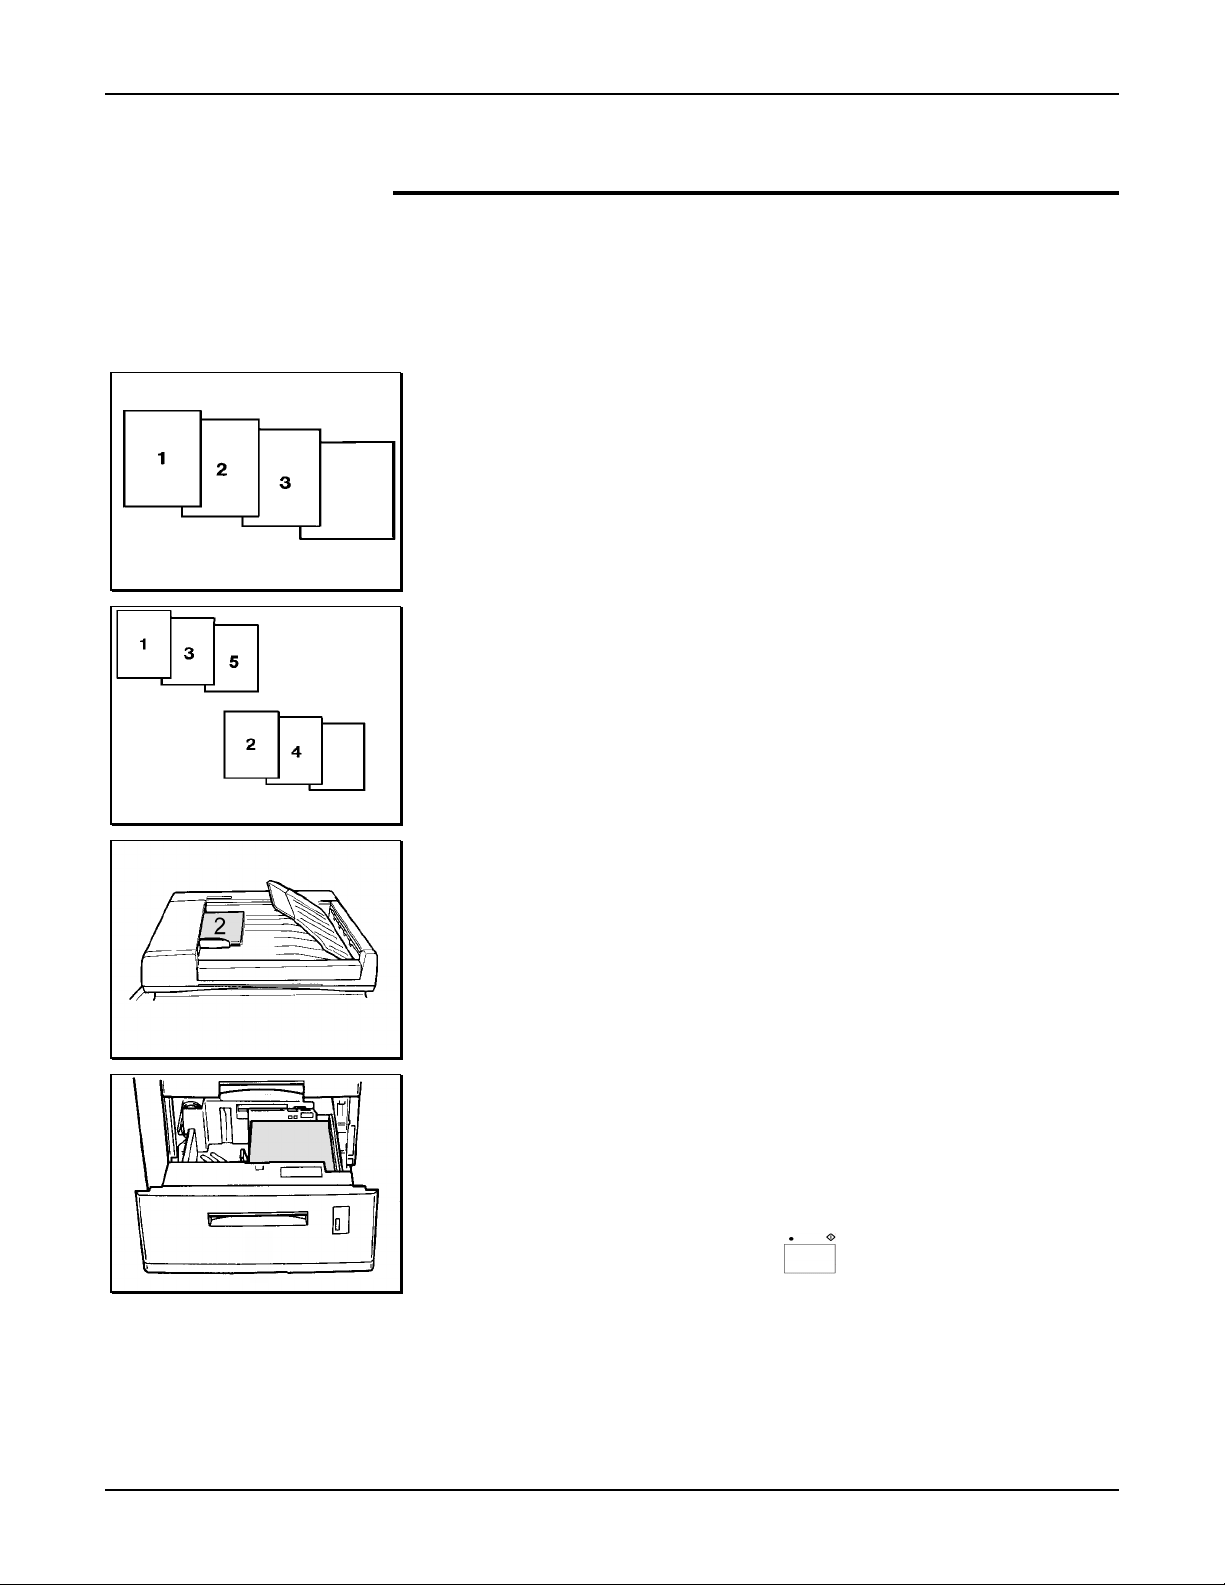
Manual 2 sided copying
Copiers which are equipped with an ADF can produce multiple 2
sided copies from 1 sided originals.
The ADF is available on certain models; for more information,
call (in the United States and Canada):
1-800-TEAM-XRX (1-800-832-6979)
1. Count the number of originals. If you have an odd
number of originals, add a blank sheet of paper to the
end of the stack (as shown in the illustration to the left).
2. Separate into two piles the odd-numbered originals from
the even-numbered originals (for example: 1, 3, 5…; 2,
4, 6…).
How to use the basic copying features
Note:
3. Place the even-numbered originals (2, 4, 6…) in the
4. Select a paper tray which contains the same size as your
5. Enter the desired copy quantity.
6. Press the
The “odd-numbered originals” and “even-
numbered originals” (shown in the illustration to the left)
do not
printed on the originals. The terms refer to the total
number of documents in your document stack.
ADF. Ensure that the originals are
originals. Ensure that the paper in the tray is in the same
direction as your originals. (If your originals are SEF the
paper in the tray must be SEF. If your originals are LEF
the paper in the tray must be LEF.
refer to actual page numbers which may be
Start
button,
face up
.
.
XC23/XC33/XC33D User Guide 55
Page 60

How to use the basic copying features
7. Remove the copies from the output device, and reorder
them so that the last copy is first and the first copy is
last: …6, 4, 2.
Note:
If your copy quantity is more than one copy, y ou
must reorder the copies as follows: 6, 6, 6…, 4, 4, 4…,
2, 2, 2… Ensure that all the last copies (6, 6, 6…) are on
the top of the stack.
8. Load the reordered copies into the same paper tray as
the one used in Step 4. The copies must be
face up
and
the bottom of the image must be placed toward the front
of the tray.
9. Place the odd-numbered originals (1, 3, 5…) in the ADF.
Ensure that the originals are
face up
and in the
LEF
direction.
10. Select the paper tray which contains the reordered,
even-numbered copies.
11. Select the same copy quantity as you did in Step 5.
12. Press the
Start
button,
.
13. Remove your 2 sided copies from the output device.
56 XC23/XC33/XC33D User Guide
Page 61

Job interrupt
Select this feature when you need to interrupt the job you are
running to perform a different job, and desire to go back to
the first running job without reprogramming it.
How to use the basic copying features
Note:
You cannot interrupt a copy job that has the auto
stapling feature selected,
Procedure:
1. Press the
to come to a complete stop.
Note:
originals may be delivered to the original catch tray.
2. Remove your original from the document glass or unload
the
a convenient location.
3. If you are using the ADF/DADF, remove the copied
originals from the original catch tray making sure they do
not get mixed up with the uncopied originals.
4. Place the second copy job original on the document
glass or in the ADF/DADF.
5. If needed, select the desired basic and/or added copying
features.
(Refer to the sections entitled
copying features
features
6. Enter the copy quantity.
Interrupt
If you are using the ADF/DADF some uncopied
uncopied
.)
button,
originals from the ADF/DADF and place in
or
How to use the added copying
.
and wait for the copier
How to use the basic
7. Press the
8. Press the
9. Remove the second copy job original and copies.
10. Replace your original on the document glass or reload all
uncopied
ADF/DADF. Ensure the
sequence is correct.
11. Press the
XC23/XC33/XC33D User Guide 57
Start
button,
Interrupt
originals from the first copy job into the
Start
button,
button,
.
.
uncopied
.
original order
Page 62

How to use the added copying features
How to use the added copying features
Along with the basic copying features, the XC23/XC33/
XC33D copier also provides additional copying features you
can include with your copy jobs.
This section provides detailed information on how to use the
added copying features.
The following added copying features are discussed:
Special features
Stapling
Collated
Book mode
Margin shift
Edge deletion
58 XC23/XC33/XC33D User Guide
Page 63

Special features
Select this feature to access, view or change the factory
default settings.
For detailed information about each of the copier default
settings and how to change them, refer to the section entitled
Customizing your copier
How to use the added copying features
.
XC23/XC33/XC33D User Guide 59
Page 64
How to use the added copying features
Stapling
This copier operation allows you to staple copy sets that are
sent to the 10-bin sorter stapler.
For detailed information about the sorter bin capacity and
Paper
paper specifications, refer to the sections entitled
Technical data
The 10-bin sorter stapler provides the following stapling
operations:
Note:
The 10-bin sorter stapler is available on some
models.
.
Auto stapling
Manual stapling
Stapling without copying
or
Auto stapling
Select this operation when you desire the sorter to
automatically staple the copy sets that are sent to the sorter
bins.
Note:
The auto stapling mode also requires the copier to be
equipped with an ADF/DADF.
Procedure:
1. Ensure your originals are placed in the ADF/DADF.
:
Note
11x17/A3 10 sheets max
2. If needed, select the desired basic and/or added copying
features.
(Refer to the sections entitled
copying features
features
Note:
using the document glass or when the bypass tray is
selected.
3. Select the
4. Enter the copy quantity.
5.5x8.5in./A5 to 10x14in./B415 sheets max
How to use the basic
or
How to use the added copying
.)
You cannot use the auto stapling operation when
Stapling
button,
.
Note:
10 max
5. Press the
60 XC23/XC33/XC33D User Guide
Start
button,
.
Page 65

How to use the added copying features
Manual stapling
Select this operation when you need to have the copy sets
stapled after the copy job has been completed and the copy
sets are still in the sorter bins.
Procedure:
1. Ensure the copy job is complete.
2. Do not remove the copy sets from the sorter bins.
3. Press the
Caution:
operation is complete.
Manual stapler
Do not remove any copy sets until the staple
button, , on the sorter.
Stapling wi thout copying
Select this operation when you need to staple a set of sheets
quickly, or need to test the stapler.
Procedure:
1. Place a set of sheets up against the front edge of the top
sorter bin.
2. Press the
XC23/XC33/XC33D User Guide 61
Manual stapler
button, , on the sorter.
Page 66
How to use the added copying features
Collated
Select this feature when you need to have collated copy sets
delivered to the sorter bins. Each copy set is delivered in the
order the originals were placed in the ADF/DADF or from the
document glass.
For detail information on the sorter bin capacity refer to the
Paper
or
sections entitled
Note:
The collated feature requires the copier to be
equipped with the 10-bin sorter stapler.
Procedure:
1. Ensure your originals are placed in the ADF/DADF.
2. If needed, select the desired basic and/or added copying
features.
Technical data
.
(Refer to the sections entitled
copying features
features
3. Press the
4. Enter the copy quantity.
Note:
5. Press the
.)
5.5x8.5in./A5 to 8.5x11in./A4 30 max
8.5x14in./216x353mm to 10x14in./B4 25 max
11x17in./A3 10 max
or
Collated
Start
button,
How to use the added copying
button,
How to use the basic
.
.
62 XC23/XC33/XC33D User Guide
Page 67
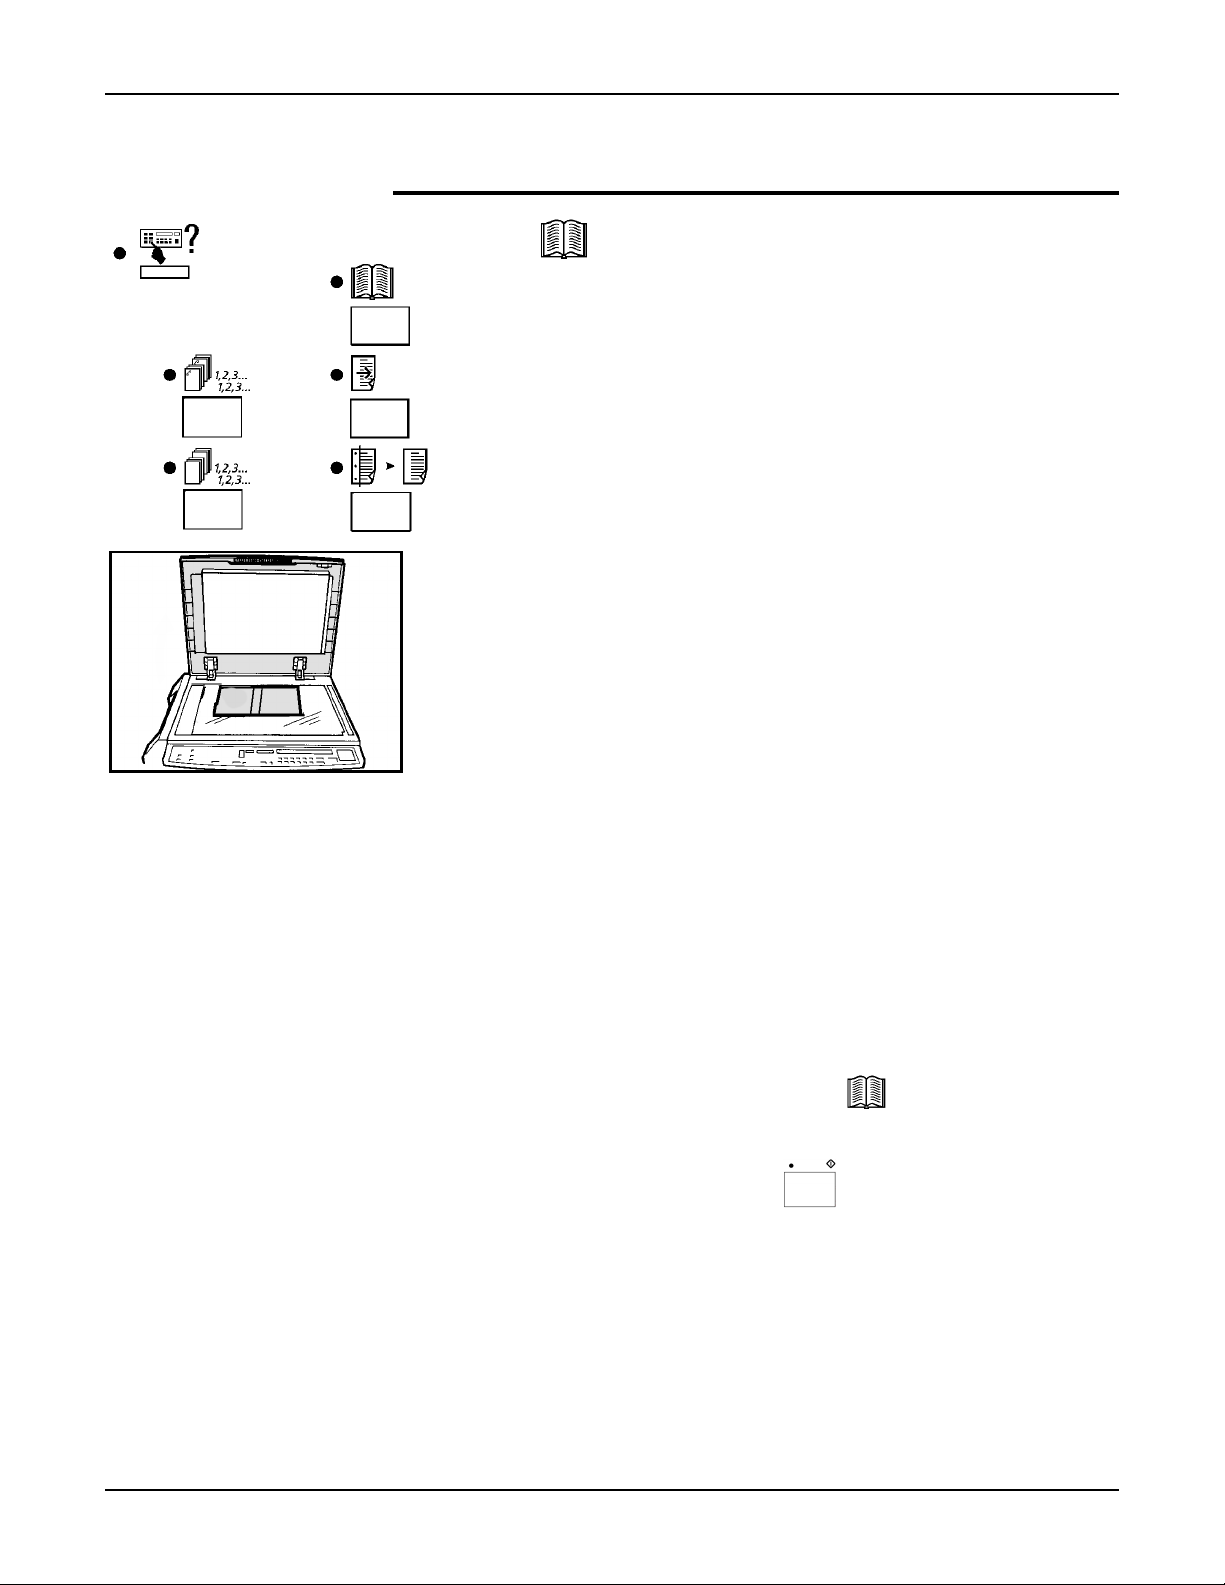
Book mode
How to use the added copying features
Select this feature to copy facing pages of a book or
magazine.
To change the fixed paper size of a tray, contact
TEAM XRX (1-800-832-6979)
Note:
options cannot be activated when the book mode feature is
selected.
Procedure:
1. Raise the document cover or ADF/DADF cover.
2. Place the book or magazine, face down, on the
document glass and register it with the spine of the book
lined up with 8.5 and against the top of the glass.
3. Lower the document cover or ADF/DADF cover.
force the document cover or the ADF/DADF cover onto
the book or magazine.
4. Select the desired paper tray.
Note:
paper supply auto
The
The bypass tray can not be selected.
.
or the
reduce/enlarge auto
1-800-
Do not
5. If needed, select the desired basic and/or added copying
features.
(Refer to the sections entitled
copying features
features
6. Press the
7. Enter the copy quantity.
8. Press the
XC23/XC33/XC33D User Guide 63
.)
or
How to use the added copying
Book mode
Start
button,
button,
How to use the basic
.
.
Page 68

How to use the added copying features
Margin shift
Select this feature to move the copy image to the right and
leave a staple or punch margin on the left edge of the copy.
Note:
The factory default is set to a 10mm margin shift. To
change the default, refer to the section entitled
Customizing
your copier.
Procedure:
1. Ensure your originals are loaded in the appropriate
copier location.
2. Press the
Note:
3. If required, select the desired basic and/or added
copying features.
(Refer to the sections entitled
copying features
Margin shift
The bypass tray can not be selected.
button,
or
How to use the added copying
.
How to use the basic
features.)
4. Enter the copy quantity.
5. Press the
Start
button,
.
64 XC23/XC33/XC33D User Guide
Page 69

Edge deletion
Select this feature to delete unwanted images on the edge of
a copy (example: punched holes).
Note:
To change the default, refer to the section entitled
Customizing your copier
Procedure:
1. Ensure your originals are loaded in the appropriate
How to use the added copying features
The factory default is set to a 10mm edge deletion.
.
copier location.
2. Press the
Note:
3. If required, select the desired basic and/or added
copying features.
(Refer to the sections entitled
copying features
features
4. Enter the copy quantity.
5. Press the
Edge deletion
The bypass tray can not be selected.
button,
How to use the basic
or
How to use the added copying
.)
Start
button,
.
.
XC23/XC33/XC33D User Guide 65
Page 70
Customizing your copier
Customizing your copier
Identifying the special features
The XC23/XC33/XC33D copier allows you to customize the
special features. The special features contain various copier
settings that are set in the factory.
This section provides a description of the special feature settings
and how to change them.
Special feature Program
Number
Tray
This default sets the tray that is selected when the copier is in the
normal copy mode or when the
Automatic clear
This default allows you to activate or deactivate the time (60
seconds) it takes the copier to return to the normal copy mode after
the copy cycle is complete.
Auto tray switch
This default allows you to activate or deactivate the copier from
automatically switching to two or more trays loaded with the same
paper size for continuous feeding.
Power saver
This default allows you to change the period of idle time required for
the copier to go into the low power mode.
Copy cartridge life
Clear all
button is pressed.
20
21
22
24 0 - deactivate
81 N/A
Option number and option
(default is in bold)
Bypass
Tray 1
Tray 2
Tray 3
Tray 5
Auto
0 - Deactivate
1 - Activate
0 - Deactivate
1 - Activate
1 - 4min.
2 - 6min.
3 - 10min.
4 - 18min.
5 - 32min.
6 - 62min.
7 - 122min.
8 - 242min.
9 - 482min.
This displays the remaining drum cartridge life on the message
display.
Enable accessory kits
rd
Enables the Card Reader (XEROX or 3
66 XC23/XC33/XC33D User Guide
party)
91 0 - Deactivate
1 - Activate
Page 71

Customizing your copier
Special feature Program
number
Reduce/enlarge
25
This default sets the reduce/enlarge ratio that is selected when the
copier is in the normal copy mode or when the
Clear all
button is
pressed.
Original size
28
This default sets the paper tray that is used when no original size is
detected by the
paper supply auto
Multisheet feeder mixed sizes
reduce/enlarge auto
or
options.
32 0 - Deactivate
This default allows you to activate or deactivate the feature of
copying different size originals with the ADF or DADF.
Default priority tray
This default sets the paper tray that is used when the
auto
option is selected.
Density mode
paper supply
33
45 0 - Auto
This default sets the density mode that is selected when the copier is
in the normal copy mode or when the
Clear all
button is pressed.
Option number and option
(default is in bold)
154%
129%
77%
64%
Auto
100%
Auto
8.5x11in. SEF
8.5x11in. LEF
8.5x14in. SEF
11x17in. SEF
1 - Activate
Bypass
Tray 1
Tray 2
Tray 3
Tray 5
Auto
1 - Manual
2 - Photo
Edge delete
This default allows you to change the edge deletion setting by 1mm
increments from 0-16mm.
Margin shift
This default allows you to change the margin shift setting by 1mm
increments from 0-16mm.
52 10mm
51 10mm
XC23/XC33/XC33D User Guide 67
Page 72

Customizing your copier
How to change the special feature settings
To change the special features, find the name of the feature and
follow the associated instructions.
Note:
To customize more than one feature, follow the
instructions of the other special feature before exiting to the
normal copy mode.
Program Special feature name Option Instructions on how to change the setting
20
33
Tray
Default priority tray
1. Press the
2. Enter the program number.
3. Press the
4. Press the
5. Press the
6. Press the
,or the
program the setting and exit to the normal
copy mode.
Special features
Start
button,
Paper supply
, to the desired tray.
Start
button,
Special features
Clear all
button, , to
button, .
.
button,
.
button,
68 XC23/XC33/XC33D User Guide
Page 73

Customizing your copier
Program Special feature name Option Instructions on how to change the setting
28 Original Size
1. Press the
Special features
button, .
2. Enter the program number.
3. Press the
4. Press the
Start
button,
Paper supply
button,
, and watching the size
LED, select the desired original size.
Note:
When Auto is selected, the select
paper tray icon or message will appear.
5. Press the
6. Press the
,or the
Start
button,
Special features
Clear all
button, , to
button,
.
.
program the setting and exit to the normal
copy mode.
XC23/XC33/XC33D User Guide 69
Page 74

Customizing your copier
Program Special feature name Option Instructions on how to change the setting
21
22
91
Automatic clear
Auto tray switch
Enable accessory
0 to deactivate
1 to activate
kits
32
Multisheet feeder
mixed sizes
81 Copy cartridge life N/A
1. Press the
Special features
button,
.
2. Enter the program number.
3. Press the
Start
button,
.
4. Press 0 to deactivate or press 1 to activate.
5. Press the
6. Press the
or the
Start
button,
Special features
Clear all
button,
.
button,
, to
,
program the setting and exit to the normal
copy mode.
1. Press the
Special features
button,
.
2. Enter the program number.
3. Press the
Start
button,
remaining copy life of the cartridge is
displayed on the message display.
4. Press the
or the
Special features
Clear all
button,
the normal copy mode.
The
button,
, to exit to
,
70 XC23/XC33/XC33D User Guide
Page 75
Customizing your copier
Program Special feature name Option Instructions on how to change the setting
24
45
52
51
Power saver
Density mode
Edge delete
Margin shift
25 Reduce/enlarge
Number Selection
0 deactivate
14min.
26min.
3 10min.
4 18min.
5 32min.
6 62min.
7 122min.
8 242min.
9 482min.
Number Selection
0Auto
1Variable
2 Photo
0 - 16mm
0 - 16mm
1. Press the
Special features
button,
2. Enter the program number.
3. Press the
Start
button,
.
4. To change the preset value, press the
desired number using the keypad,
5. Press the
6. Press the
or the
Start
button,
Special features
Clear all
button,
button,
(0-9)
.
, to
program the setting and exit to the normal
copy mode.
1. Press the
Special features
button, .
2. Enter the program number.
.
.
,
3. Press the
4. Press the
Start
button,
Reduce/enlarge
.
button,
, to the desired ratio.
5. Press the
6. Press the
Clear all
or the
Start
button,
Special features
button,
.
button,
program the setting and exit to the normal
copy mode.
,
, to
XC23/XC33/XC33D User Guide 71
Page 76

Total copy counter
Total copy counter
The XC23/XC33/XC33D copier is equipped with a total copy
count meter. The counter allows the operator to access the total
number of copies made on the copier.
To view the total number of copies made, open the front cover
and locate the total copy counter.
Total copy
counter
Front cover
72 XC23/XC33/XC33D User Guide
Page 77

Copier care
Ordering supplies
To order supplies for your copier, call your local retailer. If
your store does not stock these items, call the US and
Canada XEROX supply net toll free at:
Toner cartridge: 6R910
Drum cartridge: 13R546
Staples: 8R7906
Replacing the drum cartridge
When the drum cartridge nears its end of life, the drum indicator
becomes lit;
approximately 5000 copies remaining.
. This occurs when the drum cartridge has
Copier care
1-800-822-2200
You can continue to make copies until the indicator begins to
flash and a J7 status code is displayed. When this occurs the
copier will not operate until the cartridge is replaced. Use the
following procedure to change the cartridge.
Procedure:
1. Switch the copier off.
2. Open the copier front cover.
3. Lift up on the copier release lever and open the copier.
4. Press the drum cartridge release button and gently slide
the cartridge out halfway.
Caution:
hot.
Never touch the fuser area. It is extremely
XC23/XC33/XC33D User Guide 73
Page 78

Copier care
5. Hold onto the drum cartridge handle and slide the
cartridge out of the copier.
Note:
Help the environment by recycling your used
drum cartridge. Refer to the XEROX green team
brochure packed with the drum cartridge for instructions
on how to return the used cartridge to XEROX.
6. Unpack the new drum cartridge and place on a flat
surface.
7. Remove the protective material.
Note:
To help prevent copy quality problems, never
touch the shiny surface of the drum.
8. Position the drum cartridge guide onto rail, making sure
not to touch the surface of the drum.
9. Slide the cartridge into the copier. Ensure the cartridge
is installed correctly.
10. Close the copier
11. Close the copier front cover.
12. Switch the copier on.
13. Ensure the drum indicator is off,
74 XC23/XC33/XC33D User Guide
..
Page 79

Replacing the toner cartridge
When the toner supply becomes low, the toner indicator flashes,
. You can continue to make copies until the toner indicator is
lit continuously and a J1 status code is displayed. When this
occurs the copier will not operate until the cartridge is replaced.
Use the following procedure to change the cartridge.
Note:
For toner consumption information, refer to
cartridge yield
Procedure:
1. Switch the copier off.
2. Open the copier front cover.
3. Place a sheet of paper on top of the cover to catch any
loose toner.
in this section.
Copier care
Toner
4. Press and hold the toner cartridge release button.
5. Rotate the empty cartridge in the direction of the arrow
until it stops.
6. Slide the cartridge out gently.
Note:
Help the environment by recycling your used
toner cartridges. Refer to the XEROX green team
brochure packed with the toner cartridges for instructions
on how to return the used cartridges to XEROX.
XC23/XC33/XC33D User Guide 75
Page 80

Copier care
7. Unpack the new toner cartridge and shake it several
times.
Note:
Do not pull the protective seal off at this time.
8. Place the new cartridge on the holder and insert the tab
on the end of the cartridge into the cutout.
9. While holding the cartridge with the protective seal up in
one hand, remove the seal toward you and slide in the
cartridge halfway.
10. When you have peeled the seal as far as the line
position, fold back the seal and remove the folded seal
toward you.
11. Hold the tab and push the cartridge all the way in, then
rotate it counterclockwise until it clicks.
Note:
You can not rotate the cartridge until it is pushed
in all the way.
12. Remove the sheet of paper on the copier front cover.
13. Switch the copier on.
14. Ensure the toner indicator is off,
Note:
If the toner indicator did not turn off, do not pull
.
the cartridge out and try to reinsert it. Please call 1-800TEAM-XRX (in the United States and Canada) for further
assistance.
76 XC23/XC33/XC33D User Guide
Page 81
Copier care
Toner cartridge yield
The main factor affecting toner cartridge yield is the printed
area of a document. The graph is a sample representation
of how the number of copies per cartridge decreases as the
printed area increases.
Other factors which can affect the toner cartridge yield
are:
The size of the document being copied.
Dark backgrounds.
Leaving the platen cover open.
The number of times the copier is switched on and off.
Double sided copying will use more toner per ream of
paper.
High humidity.
To get the most from your toner cartridge:
Always copy with the document cover closed.
Leave the copier on during the day. Switch off the copier
at the end of the working day.
Copy with the exposure control set to Auto exposure
unless you need to adjust for the background of your
original.
Operate the copier in a dry environment whenever
possible.
XC23/XC33/XC33D User Guide 77
Page 82

Copier care
Cleaning the document glass and cover
Keeping the document glass and document cover clean helps
ensure the best possible copies. XEROX suggests that you clean
the document glass at the start of each day and during the day
as needed.
Caution:
the copier.
Note:
ADF/DADF belt cleaning section to clean the belt.
Procedure:
1. Slightly dampen a soft lint-free cloth or paper towel with
2. Open the document cover or ADF/DADF.
Do not
For copiers equipped with the ADF/DADF refer to the
water.
pour or spray water directly onto any part of
3. Wipe the surface of the document glass until it is clean
and dry.
4. Wipe the underside of the document cover until it is
clean and dry (skip this step if there is an ADF/DADF on
the copier).
5. Close the document cover or ADF/DADF.
78 XC23/XC33/XC33D User Guide
Page 83

Adding staples
This section provides you with detailed information on how to add
staples to the 10-bin sorter stapler. If needed, use the spare
staple compartment, inside the sorter front cover, to store up to
five boxes of staples.
Spare staple
compartment
To order staples for your copier, (in the United States and
Canada) call XEROX SupplyNet toll at:
Procedure:
Note:
designed for the 10-bin sorter stapler (reorder part number
8R7906).
Copier care
1-800-822-2200
XEROX recommends that you use staples which are
1. Switch the copier off.
2. Open the sorter stapler front cover.
3. Press the stapler release handle to unlock the stapler.
4. Slide out the stapler until it stops.
5. Open the upper stapler section and load the staples.
Note:
You can load a maximum of 100 staples.
XC23/XC33/XC33D User Guide 79
Page 84

Copier care
6. Close the upper stapler section.
7. Slide the stapler back into the sorter until it clicks.
Ensure the stapler is in the correct position.
8. Close the sorter stapler front cover.
9. Switch the copier on.
10. Position a sheet of paper along the front edge of the top
bin.
11. Press the
Manual stapler
button,
. Ensure the
paper is stapled properly.
Note
: If needed, press the
Manual stapler
button,
, repeatedly until the stapler operates.
80 XC23/XC33/XC33D User Guide
Page 85

Cleaning the ADF/DADF belt
Keeping the ADF/DADF belt clean helps prevent ADF/DADF
misfeeds. XEROX suggests that you clean the belt as needed.
Note:
This procedure is for copiers which are equipped with the
ADF/DADF.
Copier care
Caution:
Procedure:
1. Switch the copier off.
2. Slightly dampen a soft lint-free cloth or paper towel with
3. Raise the ADF/DADF.
4. Cover the document glass to prevent water from spilling
5. Wipe the exposed surface of the belt until it is clean.
6. Pull the belt from the right to left to expose dirty sections
Do not
water.
on the glass.
of the belt.
pour or spray water directly on the belt.
7. Repeat the cleaning procedure until the entire belt is
clean and dry.
8. Close the ADF/DADF.
9. Switch the copier on.
XC23/XC33/XC33D User Guide 81
Page 86

Problem solving
Problem solving
This section provides you with copier problems that may occur,
their recommended solutions, and other information to assist you
when solving problems.
The following topics are discussed:
Problem solving charts
XC33D problem solving messages
Status code list
Clearing the status codes
Call for service
Relocating the copier
82 XC23/XC33/XC33D User Guide
Page 87

Problem solving charts
The problem solving charts list copier problems that may occur
and their suggested solutions.
Follow the suggested solutions until the problem is corrected. If
the problem persists, call the following number for assistance.
In the United States and Canada:
Problem solving
1-800-TEAM-XRX (1-800-832-6979)
sites at:
The following charts are available:
General
Misfeeds
Copy quality
http://www.teamxrx.com
General
Problem Suggested solutions
(XC23/XC33)
The Ready to copy indicator light does not
come on.
(XC33D)
The message
to continue
does not appear.
Ready to copy
Press Start
or
Ensure the power cord is plugged into the receptacle
correctly.
Ensure the power switch is set to the on position.
Check GFI Switch.
Ensure the power cord is plugged into the receptacle
correctly.
Ensure the power switch is set to the on position.
Check GFI Switch.
or visit the XEROX web
Copies are not copied on the desired paper
size.
XC23/XC33/XC33D User Guide 83
If the Auto option is selected in paper supply, then:
Clean the document glass.
Clean the underside of the document cover, or the
ADF/DADF belt.
If your original is a transparency, place a sheet of
white copy paper over the original.
If the Auto option is not selected in paper supply, then:
Ensure the original is correctly positioned against the
registration guide on the document glass.
Select the desired
ratio
, press the
Start
paper tray
button.
reduce/enlarge
and
Page 88

Problem solving
Misfeeds
Problem Suggested solutions
Documents or paper is misfed.
Paper misfeeds or wrinkles occur repeatedly.
If a status code appears (XC23/XC33) or a message
(XC33D), refer to the appropriate section entitled
the status codes
messages
Ensure the paper trays and bypass trays are firmly in
place.
Ensure the paper trays and the bypass tray are not filled
above the
Turn the paper stack around and/or over in the selected
paper tray.
Replace the paper in the selected paper tray with paper
from a new package.
If there are corner snubbers in the selected paper tray
ensure the paper is under the snubbers.
Remove any partially feed paper from the trays.
Fan all four edges of the paper in the selected paper tray.
Ensure the proper paper specifications are used in the
trays, refer to the section entitled
Remove a few sheets from the top and the bottom of the
stack in the selected paper tray.
(XC23/XC33) or
(XC33D).
MAX
lines.
XC33D problem solving
Paper
.
Clearing
Documents do not feed in when using the
ADF/DADF.
The corner of a document is folded when
using the ADF/DADF.
Documents misfed repeatedly when using the
ADF/DADF.
Do not leave the paper in high humidity areas for
extended periods of time.
Paper should be kept in the original wrapper and stored
flat in a dry environment when not in use.
If a status code appears (XC23/XC33) or message
(XC33D), refer to the appropriate procedure in the section
entitled
Clearing the status codes
XC33D problem solving messages
Ensure all the ADF/DADF covers are closed.
Ensure the proper original paper specifications are used
in the ADF/DADF, refer to the section entitled
Ensure the originals are not curled. Make a copy of any
damaged original and reload the new and uncurled
original in the ADF/DADF.
Ensure the guide in the ADF/DADF is touching the edge
of the originals.
Ensure the proper original paper specifications are used
in the ADF/DADF, refer to the section entitled
(XC23/XC33) or
(XC33D).
Paper
Paper
.
.
84 XC23/XC33/XC33D User Guide
Page 89

Copy quality
Problem Suggested solutions
Problem solving
Copies appear dark.
Copies are light overall.
Copy images are partially deleted.
Clean the document glass.
Ensure the proper exposure mode is selected, refer to
the section entitled
features
Lighten the copy, press the
button to a lighter selection. If needed, refer to the
section entitled
If your original is a transparency, place a sheet of
white copy paper over the original.
Ensure the proper exposure mode is selected, refer to
the section entitled
features
Darken the copy, press the
button to a darker selection. If needed, refer to the
section entitled
Inspect the original, ensure the original is good.
Turn the stack of paper over in the selected paper
tray.
Replace the paper in the selected paper tray with
paper from a new package.
.
.
How to use the basic copying
copy lighter/darker
How to use the basic copying features
How to use the basic copying
copy lighter/darker
How to use the basic copying features
.
.
Copy images are distorted or skewed.
Clean the document glass.
Do not leave the paper in high humidity areas for
extended periods of time.
Inspect the original, ensure the original is good.
Ensure the position of the original is placed on the
document glass or the ADF/DADF correctly.
Ensure the paper is loaded correctly in the selected
paper tray. Reload the paper.
Ensure all the paper trays and the bypass tray are
firmly in place.
If using the ADF/DADF, ensure the guide is touching
the edge of the originals.
XC23/XC33/XC33D User Guide 85
Page 90

Problem solving
XC33D problem solving messages
If a problem occurs, a typed message is displayed on the
message display and an indicator starts to flash on the control
panel.
The flashing indicator informs you of the area that needs
attention. Follow all the messages to correct the problem.
You can also view the status code that is associated with the
copier problem by pressing the 0 button.
Once the status code appears you can refer to the status code
procedure in the section entitled
solve the copier problem.
Note:
When the status code appears, use the first two
characters to identify the status code. (Example F1-1, you would
go to the F1 status code procedure.)
Clearing the status codes
to
86 XC23/XC33/XC33D User Guide
Page 91
Status code list
The status code list provides you with a list of all the copier status
codes, identifies the problem, and provides suggested solutions
for the code.
Follow the suggested solutions until the problem is corrected. If
the problem persist, call the following number for assistance.
In the United States and Canada:
Problem solving
1-800-TEAM-XRX (1-800-832-6979)
Status code Problem and suggested solutions
A1-A3 Document misfeed in the ADF/DADF, refer to the appropriate A1-A3 status code
procedure in the section entitled
A5 The ADF/DADF cover is open. Close the cover.
A6 Remove originals from the ADF/DADF. Reorder and reload the originals and press the
Start
button.
A8 The ADF/DADF original catch tray is in the raised position. Lower the original catch
tray.
C1-C4 Paper misfeed, refer to the C1-C4 status code procedure in the section entitled
Clearing the status codes
procedure.
C8 Paper misfeed, refer to the C8 status code procedure in the section entitled
the status codes
C9 Paper misfeed in the bypass tray, refer to the C9 status code procedure in the section
entitled
E1-E3 There is a paper misfeed inside the copier or in the paper exit area, refer to the E1-E3
status code procedure in the section entitled
E5 The copier front cover is open. Close the cover.
Clearing the status codes
. If the status code remains perform the E1-E3 status code procedure.
. If the status code remains perform the E1-E3 status code
Clearing the status codes
.
Clearing the status codes
.
.
.
Clearing
E6 The copier right upper or right lower cover is open. Close the cover.
F1 Remove the misfed sheet in the sorter, refer to the F1 status code procedure in the
section entitled
F5 The sorter is unlatched to the copier or the sorter stapler cover is open. Latch the
sorter and/or close the sorter stapler cover.
F9
An excessive number of sheets to staple by the 10-bin sorter stapler, remove the
sets of copies. Reduce the number of sheets and try again.
The stapler is not correctly set in position. Open the sorter front cover and reset
the stapler, refer to the F9 status code procedure in the section entitled
the status codes
XC23/XC33/XC33D User Guide 87
Clearing the status codes.
Clearing
.
Page 92

Problem solving
Status code list
H1 Problem with paper tray 5. Try reloading the paper. Do not fill above the MAX line.
Switch the copier off and then on. You can use another tray for copying. If status code
continues, call for service.
H6 Problem in the ADF/DADF. Remove all the originals. Switch the copier off and then
on. Reload the originals. You can use the document glass for copying. If status code
continues, call for service.
When the toner cartridge replacement indicator flashes, the toner cartridge will need to
be replaced soon. Be sure to have a replacement cartridge in stock.
J1 Replace the toner cartridge, refer to the appropriate procedure in the section entitled
Copier care
J3 The drum cartridge is not in place. Open the front cover and reinstall the cartridge,
refer to the J7,
When the drum cartridge replacement indicator appears, the drum cartridge will need
to replaced in approximately 5,000 copies. After the approximate 5,000 copies, the J7
status code will appear and the copier will stop.
J7 Replace the drum cartridge, refer to the appropriate procedure in the section entitled
Copier care
J8 The wrong drum cartridge was installed. Open the front cover and install the proper
cartridge, refer to the J7,
drum cartridge, 13R546 is installed.
.
, procedure in the section entitled
.
, procedure in the section entitled
(continued)
Copier care
.
Copier care
. Ensure
L6
U1-U4, U6-U8 Switch the copier off. Wait approximately one (1) minute, then switch the copier on. If
XEROX card or key counter is not loaded. Install the XEROX card or key counter.
the status code continues, call for service.
88 XC23/XC33/XC33D User Guide
Page 93

Clearing the status codes
Refer to the appropriate procedure to clear the displayed status
code. If the problem persists, call the following number for
assistance.
In the United States and Canada:
Problem solving
1-800-TEAM-XRX (1-800-832-6979)
.
A1-A3 (XC23/XC33)
A
codes appear whenever the ADF has trouble feeding an
original.
1. Raise the original catch tray.
2. Remove the originals from the ADF.
3. Remove any misfed original.
4. Lower the original catch tray.
5. Open the left ADF cover.
6. Remove any misfed original.
7. Close the left ADF cover.
XC23/XC33/XC33D User Guide 89
Page 94
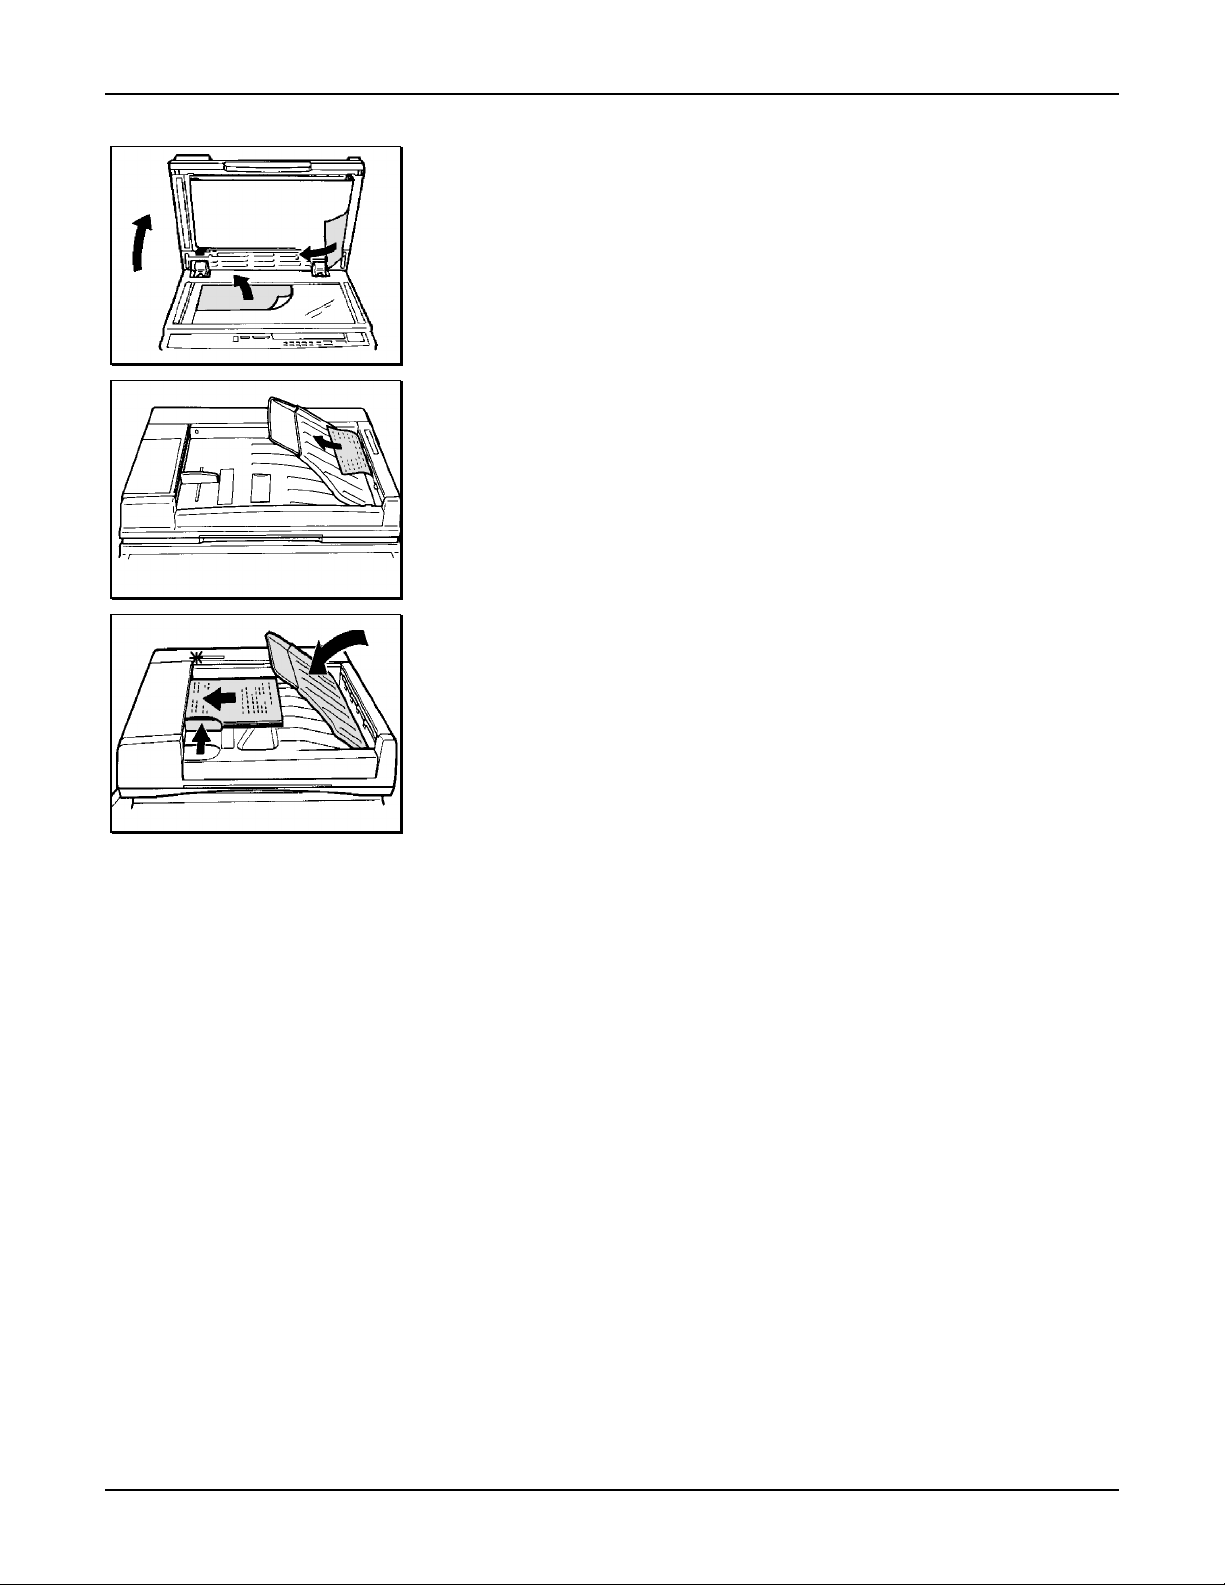
Problem solving
8. Raise the ADF.
9. Remove any misfed original from the document glass or
in the ADF.
10. Close the ADF.
11. Remove any misfed original in the ADF exit area.
12. Reload the originals.
Note:
Do not
reload any damaged original in the ADF.
Make a new copy of any damaged original.
13. Ensure the ADF guide is touching the edge of the
originals.
14. Lower the original catch tray.
15. Ensure the
Ready to copy
lamp on the ADF is lit.
90 XC23/XC33/XC33D User Guide
Page 95

Problem solving
A1-A3 (XC33D)
A
codes appear whenever the DADF has trouble feeding an
original.
1. Open the left DADF cover.
2. Remove any misfed original.
3. Open the left inside cover.
4. Raise the original catch tray.
5. Remove all the originals.
6. Lower the original catch tray.
7. Close the left inside cover.
8. Close the left DADF cover.
XC23/XC33/XC33D User Guide 91
Page 96

Problem solving
9. Raise the DADF.
10. Remove any misfed original from the document glass or
in the DADF.
11. Close the DADF.
12. Open the right DADF cover.
13. Remove any misfed original in the DADF exit area.
14. Close the right DADF cover.
15. Reload the originals.
Note:
Do not
reload any damaged original in the DADF.
Make a new copy of any damaged original.
16. Ensure the DADF guide is touching the edge of the
originals.
17. Lower the original catch tray.
18. Ensure the
Ready to copy
lamp on the DADF is lit.
92 XC23/XC33/XC33D User Guide
Page 97

Problem solving
C1-C4, C8
C
codes appear whenever the copier has trouble feeding a sheet
of paper from a paper tray.
For XC23/XC33/XC33D
1. If one of the right cover indicators is flashing, open the
appropriate cover.
Note:
2. Close any open cover.
3. Open the appropriate tray (refer to the flashing indicator
If the paper is not accessible from the right upper
cover opening, open the copier front cover and remove
the misfed paper.
on the copier diagram).
4. Remove any misfed paper.
5. Reload the paper in the misfed paper tray. This is for
6. Ensure the paper is loaded correctly.
7. Close the paper tray.
For XC33D only
Note
:
perform step 2 (the tray 4 procedure, next page). When
completed continue to step 4 on this page.
trays 1, 2, 3, and 5 only.
Note:
If status code C3 remains, perform the E1-E3
status code procedure.
: If the tray 4 indicator is flashing,
XC23/XC33/XC33D User Guide 93
Page 98

Problem solving
For XC33D only
Note:
Perform all steps for the XC33D copier.
1. If a left cover indicator is flashing, perform the following:
If the machine is equipped with a sorter, pull back on
the sorter release lever and move the sorter to the left
until it stops.
If needed, open the appropriate left side cover (refer
to the flashing indicator on the copier diagram).
Remove any misfed paper.
Close any open cover.
Ensure the sorter is in its original position. Pull back
on the sorter release lever and slide the sorter to the
original position.
2. If the paper tray 4 indicator is flashing perform the
following:
Open tray 4.
Open the metal cover (on left side of tray).
Remove any misfed paper.
Close the metal cover.
Open the plastic cover (on right side of tray).
Remove any misfed paper.
Close the plastic cover.
Close tray 4.
94 XC23/XC33/XC33D User Guide
Page 99

Problem solving
C9
C
codes appear whenever the copier has trouble feeding a sheet
of paper from the paper tray. The C9 code appears when there
is a feeding problem with the bypass tray.
1. Remove any misfed paper in the bypass tray and
remove any remaining paper from the tray.
2. Open the copier front cover.
3. Lift up on the copier release lever and open the copier.
4. If there is any misfed paper inside the copier, pull it out
toward the copy output device.
5. Close the copier.
6. Close the copier front cover.
7. Reload the copy paper into the bypass tray correctly.
Note:
Ensure the copy paper is not above the
MAX
line.
XC23/XC33/XC33D User Guide 95
Page 100
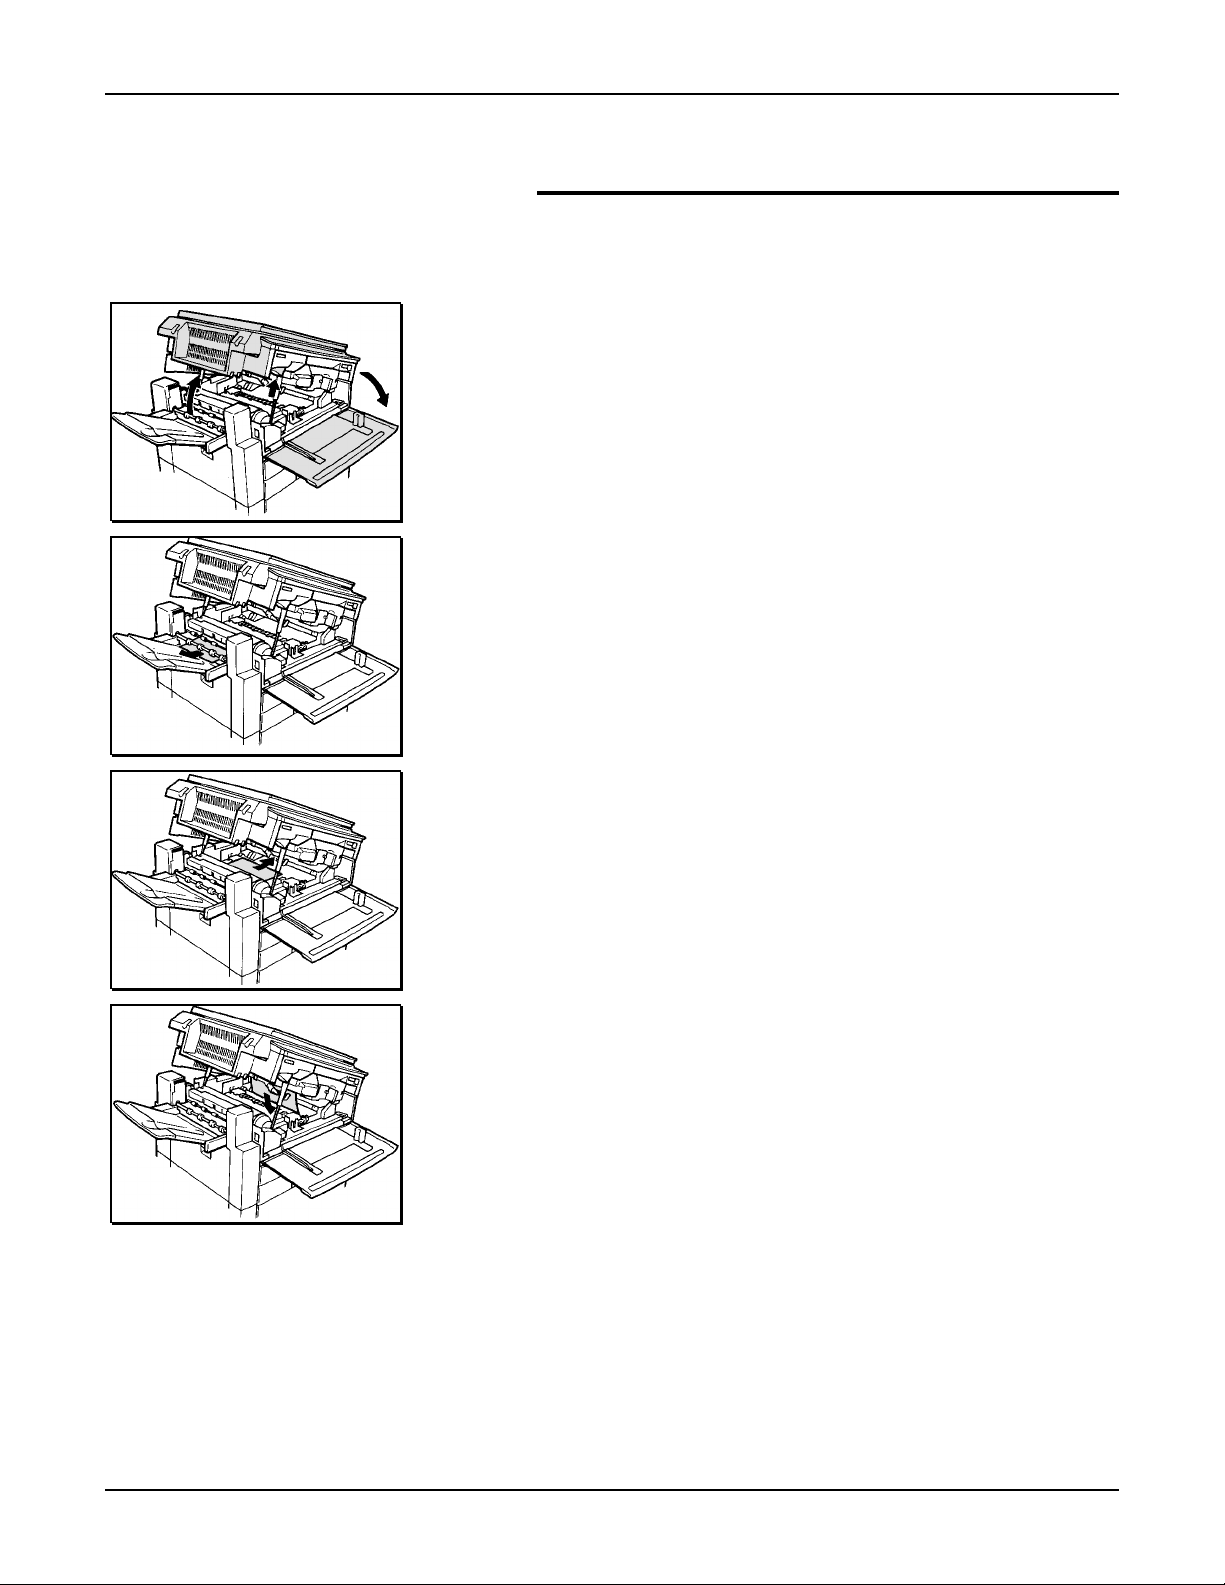
Problem solving
E1-E3
E
codes appear whenever the copier has trouble feeding a sheet
of paper inside the copier or trouble feeding paper through the
copier exit area.
1. Open the copier front cover.
2. Lift up on the copier release lever and open the copier.
3. If the lead edge of the misfed paper is accessible from
the copy output tray, pull the paper out toward the tray.
Caution:
machine to cool before removing the misfed paper.
4. If the trail edge of the misfed paper is accessible from
the inside, pull it out toward the bypass tray.
5. If the misfed paper is in the location shown in the figure
to the left, pull it out in the direction of the arrow.
Note:
touch the shiny surface of the drum.
The fuser area is extremely hot, allow the
To help prevent copy quality problems, never
96 XC23/XC33/XC33D User Guide
 Loading...