

Page 1

XC 800, XC1000,
XC1200 Series
User Guide
701P96454
10/97
Page 2

Table of Contents
Safety Notes................................................................................................ 1
How to obtain a French or Spanish User Guide ..................................... 4
Copier Equipment Listing ......................................................................... 4
Helpful Hints ............................................................................................... 5
Getting to Know Your Copier.................................................................... 6
Installation .................................................................................................. 7
Control Panel............................................................................................ 12
Power Reduction / Auto Clear................................................................. 14
Energy Star ............................................................................................... 14
Copy Paper Specifications...................................................................... 15
Loading Copy Paper.......................................................................... 16
Flashing
Making Copies on the Document Glass ................................................ 18
Making Copies on the Set Document Feeder (XC865/ XC1044/ XC1045/
XC1255) ..................................................................................................... 19
Copy Quality ............................................................................................. 20
Reduction/Enlargement........................................................................... 22
Copying Oversized Documents .............................................................. 23
Book Mode (XC830/ XC865/ XC1040/ XC1044/ XC1045/ XC1250/
XC1255) ..................................................................................................... 23
Paper Tray Bypass (XC820/ XC830/ XC865/ XC1020/ XC1044/ XC1250/
XC1255) ..................................................................................................... 24
Alternate Paper Tray (XC810/ XC1040/ XC1045).................................... 25
Two-Sided Copying.................................................................................. 27
Customizing Your Copier ........................................................................ 28
Programmable Features......................................................................... 28
Programmable Feature Settings 0 – 9, 11 and 12.................................. 31
Programmable Feature Setting 10 ......................................................... 32
.............................................................................................. 17
i
Page 3

Copier Care ............................................................................................... 33
Cleaning the Document Glass and Cover .............................................. 33
Cleaning the Transfer Corotron .............................................................. 34
Clearing the Paper Path .................................................................... 35
A1 – A2 Set Document Feeder Misfeed................................................ 36
Toner Cartridge Replacement.......................................................... 37
Toner Cartridge Yield............................................................................... 38
Drum Cartridge Replacement .......................................................... 39
Problem Solving....................................................................................... 40
Problem Solving Chart............................................................................ 40
Status Code Chart .................................................................................. 42
Servicing Your Copier ............................................................................. 43
In the USA and Canada.......................................................................... 43
Ordering Supplies .................................................................................... 43
Packing the Copier................................................................................... 44
Technical Data.......................................................................................... 45
3-Year Limited Warranty.......................................................................... 47
In the USA .............................................................................................. 47
In Canada ............................................................................................... 49
It's Illegal ................................................................................................... 51
In the USA .............................................................................................. 51
In Canada ............................................................................................... 51
Xerox Guarantee....................................................................................... 52
Material Safety Data Sheet ...................................................................... 53
ii
Page 4

FCC Compliance in the USA
WARNING: This equipment has been tested and found to comply with the
limits for a Class B digital device pursuant to Part 15 of the FCC Rules.
These limits are designed to provide reasonable protection against harmful
interference in a residential installation. This equipment generates, uses
and can radiate radio frequency energy and, if not installed and used in
accordance with the instructions, may cause harmful communications.
However, there is no guarantee that interference will not occur in a
particular installation. If this equipment does cause harmful interference to
radio or television reception, which can be determined by turning the
equipment off and on, the user is encouraged to try to correct the
interference by one or more of the following measures:
• Reorient or relocate the receiving antenna.
• Increase the separation between the equipment and the receiver.
• Connect the equipment into an outlet on a different circuit than the
receiver.
• Consult the dealer or an experienced radio/TV technician for help.
EME Compliance in Canada
This Class B digital apparatus meets all requirements of the Canadian
Interference-Causing Equipment regulations.
©1997, 1998 XEROX CORPORATION. XEROX®, The Document
Company®, the stylized X, and the identifying product names and numbers
herein are registered trademarks of XEROX CORPORATION. Xerox
Canada Ltd. is the licensee of all the trademarks. All non-Xerox brands
and product names are trademarks or registered trademarks of their
respective companies.
Page 5

Introduction
Congratulations on acquiring your new Xerox Copier. The features, ease
of operation, and reliability of the copier allow you to concentrate on your
business and leave the copying to your copier and Team Xerox experts.
Supplies
To order supplies for your copier, call or visit your local retailer. If your
store does not stock these items, you may call the following number.
In the United States and Canada:
Xerox SupplyNet toll free at: 1 – 800 – 822 – 2200
Toner Cartridge: 6R881
Copy Cartridge: 13R544
Information
To get answers for any other questions you might have regarding your
copier, to register your warranty by phone, or for assistance with the
installation of your copier you may call:
1 – 800 – TEAM – XRX (1 – 800 – 832 – 6979)
Service
A Customer Service Support Representative will assist you in keeping your
copier operational and, if required, will arrange for service. Call our experts
at:
1 – 800 – TEAM – XRX (1 – 800 – 832 – 6979)
The following information will be needed when you call Xerox:
Machine Type: XC ______________________
Machine serial number: __________________
(Located on the back cover of the copier to the right of the power
supply.)
Visit the Xerox Web site at: http://www.xerox.com/soho.html
Page 6

Safety Notes
Your copier and supplies have been designed and tested to meet strict
safety requirements. These include safety agency examination and
approval, and compliance to established environmental standards. Please
read the following instructions carefully before operating the copier and
refer to them as needed to ensure the continued safe operation of your
copier.
Follow all warnings and instructions marked on or supplied with the
product.
Symbology:
Unplug this copier from the wall outlet before cleaning. Always use
materials specifically designated for this copier. Use of other materials may
result in poor performance and could create a hazardous situation.
Do not use aerosol cleaners. Follow the instructions in this User Guide for
proper cleaning methods.
Never use supplies or cleaning materials for purposes other than what they
were intended. Keep all supplies and materials out of reach of children.
Do not use this copier near water, wet locations, or outdoors.
Do not place this copier on an unstable cart, stand, or table. The copier
may fall, causing personal injury or serious damage to the copier.
This product is equipped with a 3-wire grounding type plug (e.g., a plug
having a third grounding pin). This plug will fit only into a grounding-type
power outlet. This is a safety feature. To avoid risk of electric shock,
contact your electrician to replace the receptacle if you are unable to insert
the plug into the outlet. Never use a grounding adapter plug to connect the
copier to a power source receptacle that lacks a ground connection
terminal.
This copier should be operated from the type of power source indicated on
the marking label. If you are not sure of the type of power available,
consult your local power company.
= High Voltage, = Heated Surface.
Do not allow anything to rest on the power cord. Do not locate the copier
where persons will step on the cord.
The power supply cord is the disconnect device for this equipment.
Insure that installation is near the outlet and is easily accessible.
1
Page 7

Safety Notes
Your machine is equipped with an energy saving device to conserve
power when the machine is not in use. The machine may be left on
continuously.
Slots and Openings in the cabinet and in the back and sides of the copier
are provided for ventilation. To ensure reliable operation of the copier and
to protect it from overheating, these openings must not be blocked or
covered. The copier should never be located near or over a radiator or
heat register. This copier should not be placed in a built-in installation
unless proper ventilation is provided.
Never push objects of any kind into the slots of the copier as they may
touch dangerous voltage points or short out parts which could result in a
fire or electric shock.
Never spill liquid of any kind on the copier.
Never remove covers or guards that require a tool for removal. There are
no casual operator serviceable areas within these covers.
Never defeat interlock switches. Machines are designed to restrict
operator access to unsafe areas. Covers, guards, and interlock switches
are provided to ensure that the machine will not operate with covers
opened.
Use of an extension cord with this copier is not recommended or
authorized. Users should check building codes and insurance
requirements if an extension cord is to be used. Ensure that the total
ampere ratings of the products plugged into the extension cord do not
exceed the extension cord ampere rating. Also, make sure that the total
amperage of all products plugged into the wall outlet does not exceed the
outlet rating.
Avoid direct viewing of the document lights. The lamps are bright and,
while not harmful, they may cause an annoying afterimage. Always keep
the document cover closed during operation and storage.
Avoid exposing the drum cartridge to light for extended periods of time.
Do not touch the red photoreceptor. Scratches or smudges that appear on
the photoreceptor will result in poor copy quality and may shorten the
service life.
2
Page 8

Safety Notes
Do not put your hands into the fuser area, located just inside the exit tray
area, as you may be burned.
Ozone: This product produces ozone during normal operation. The ozone
produced is dependent on copy volume and is heavier than air. Providing
the correct environmental parameter, as specified in the Xerox installation
procedures, ensure that concentration levels meet safe limits.
If you need additional safety information concerning the copier or Xerox
supplied materials, you may call the following toll-free number.
In the United States or Canada: 1 – 800 – 828 – 6571
3
Page 9
How to obtain a French or Spanish User Guide
Au Canada et aux États-Unis, pour obtenir la version française du présent
guide d´utilisation, veuillez composer:
1 – 800 – TEAM – XRX (1 – 800 – 832 – 6979)
À l´extérieur des États-Unis et du Canada, veuillez communiquer avec
votre représentant Xerox.
Para obtener la versión en español dentro de los Estados Unidos y Canadá
llame al:
1 – 800 – TEAM – XRX (1 – 800 – 832 – 6979)
Fuera de los Estados Unidos y Canadá llame a su representante local de
Xerox.
Copier Equipment Listing
Copier
Number
Paper Tray
Capacity
Paper Tray
Bypass
Alternate
Paper Tray
Book
Mode
Set
Document
Feeder
XC810 100 sheets — multi-sheet no no
XC820 100 sheets single sheet — no no
XC830 100 sheets single sheet — yes no
XC865 100 sheets single sheet — yes yes
XC1020 250 sheets single sheet — no no
XC1040 250 sheets — multi-sheet yes no
XC1044 250 sheets single sheet — yes yes
XC1045 250 sheets — multi-sheet yes yes
XC1250
2
×250
single sheet — yes no
sheets
XC1255
2
×250
single sheet — yes yes
sheets
4
Page 10
Helpful Hints
Care of your copier
• Do not place heavy objects on any surface of the copier.
• Take care not to place liquids on or near the copier.
• Avoid placing clips or staples on any copier surface.
Maintenance
• Clean the Document Glass daily and as required.
• Do not apply cleaning liquids or sprays directly to the copier; apply to
the cloth first.
• Store copy paper in a dry area, on a flat surface, and in a closed
cabinet.
• Wrap partially-used reams of paper tightly.
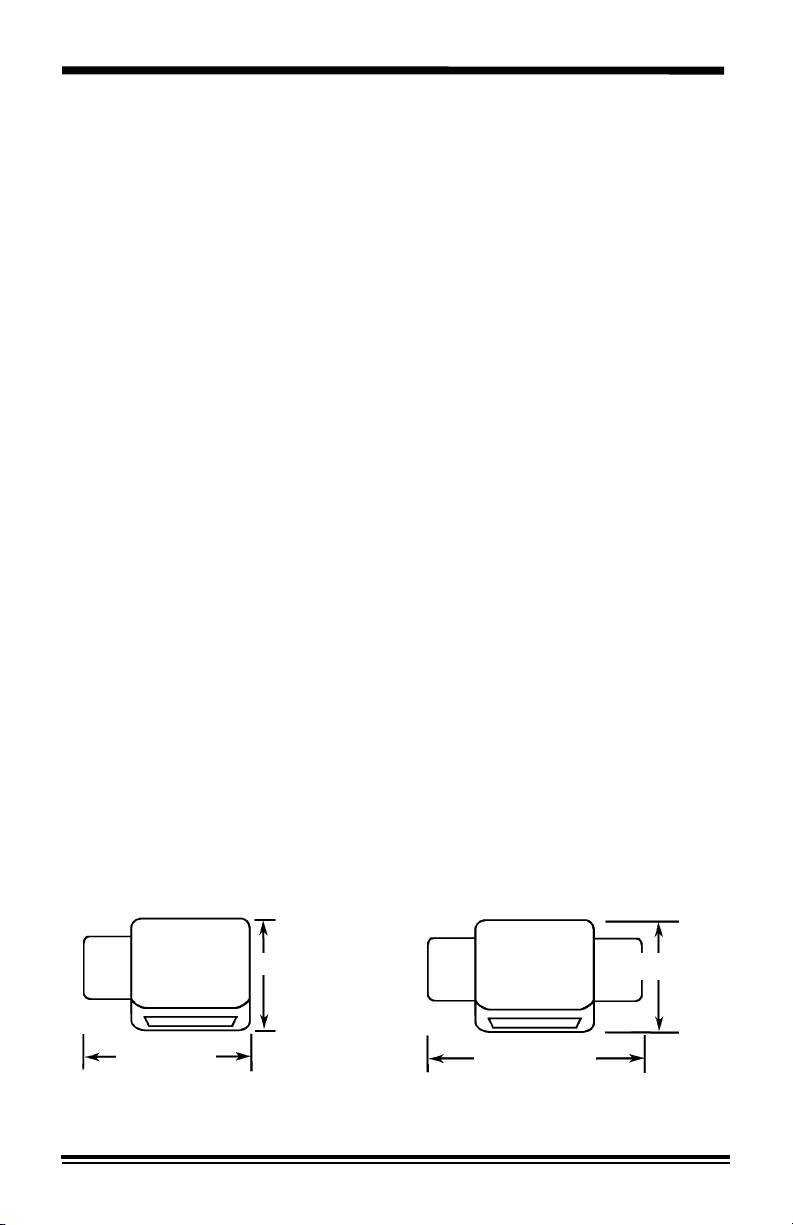
Copier location
For reliable copier operation and copy quality, Xerox recommends:
• Place your copier in a well-ventilated room.
• Recommended environment:
– Temperature: 50
– Humidity: 20% to 85%.
° to 90°F / 10° to 32°C.
• Place the copier on a flat, level surface.
• Avoid locations that subject the copier to:
– Direct sunlight.
– Extreme changes in temperature or humidity.
After selecting a location that meets the conditions listed above, ensure
that there is sufficient space around the copier.
XC820/830/865/1020/1044/1250/1255
20.5" (521mm)
29" (737mm)
XC810/1040/1045 copiers
20.5" (521mm)
36.7" (932mm)
5
Page 11
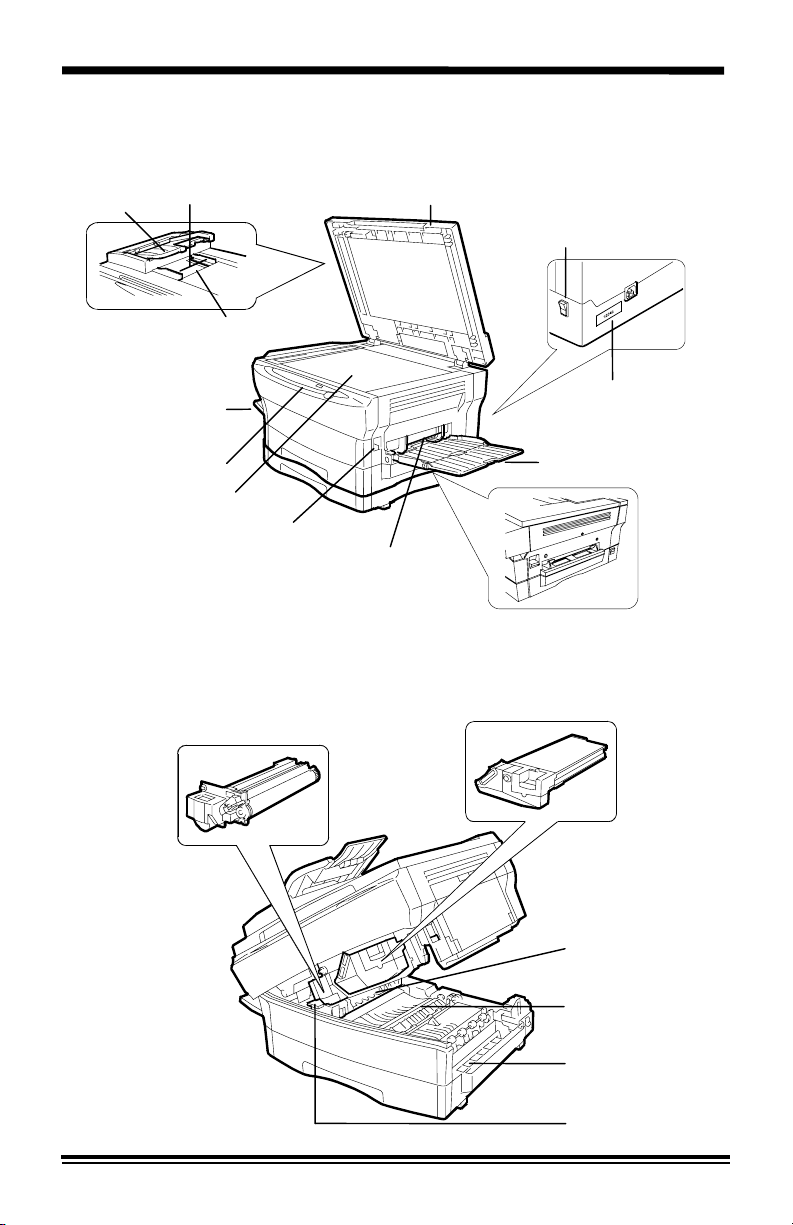
Getting to Know Your Copier
r
r
r
SDF Exit Tray
Control Panel
Document Glass
SDF Original Guides
SDF Input Tray
Exit Tray
Release Lever
Drum Cartridge
Document Cove
Power Switch
Serial Number
Alternate Paper Tray
Paper Guides
Paper Tray Bypass
Toner Cartridge
Fuse
Transfer corotron
Transfer corotron
cleane
Fuser lever
6
Page 12
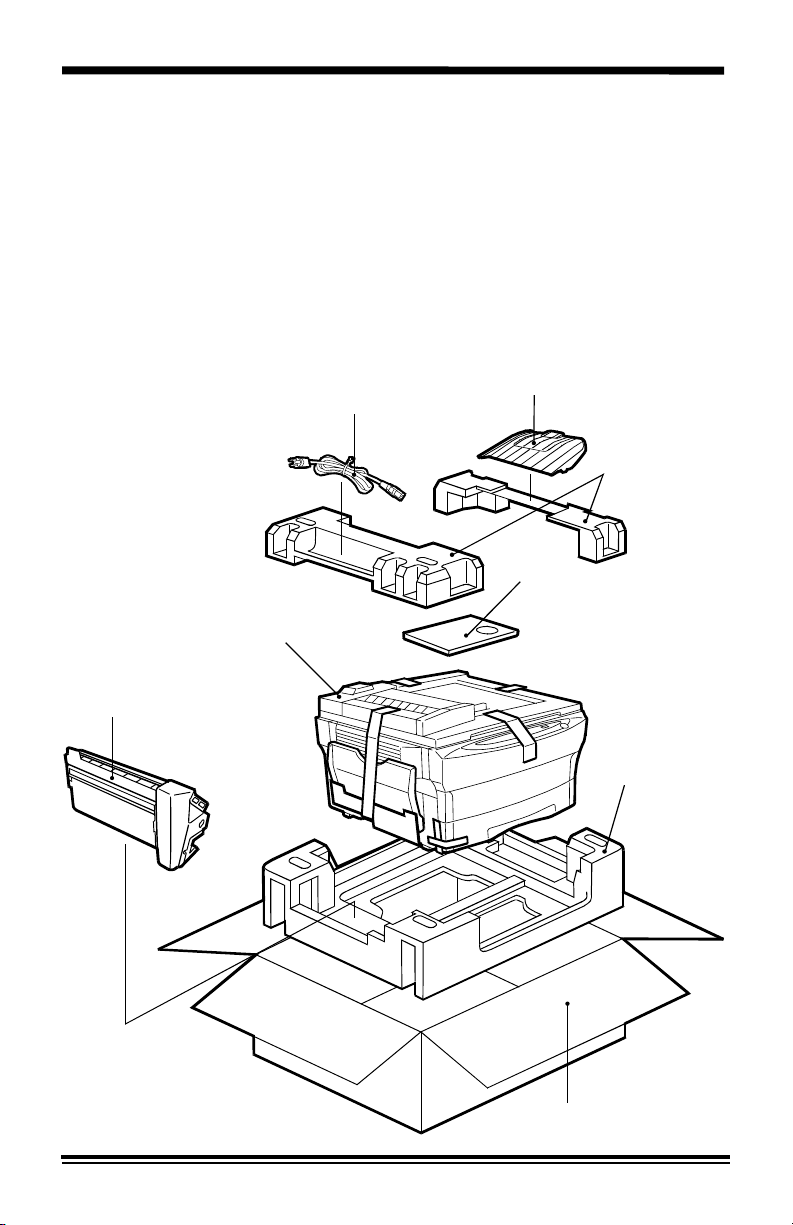
Installation
As you unpack the copier, familiarize yourself with its contents. After the
copier is installed, and the Ready Indicator is lit, the copier is ready to make
copies.
IMPORTANT: Save the carton and packing materials. They should be
used to repack the copier if it has to be shipped for servicing or in case you
move.
SDF Exit Tray
Power Cord
Packing
material
User Guide
Copier
Starter Toner
Cartridge
Carton
Packing
material
7
Page 13

Installation
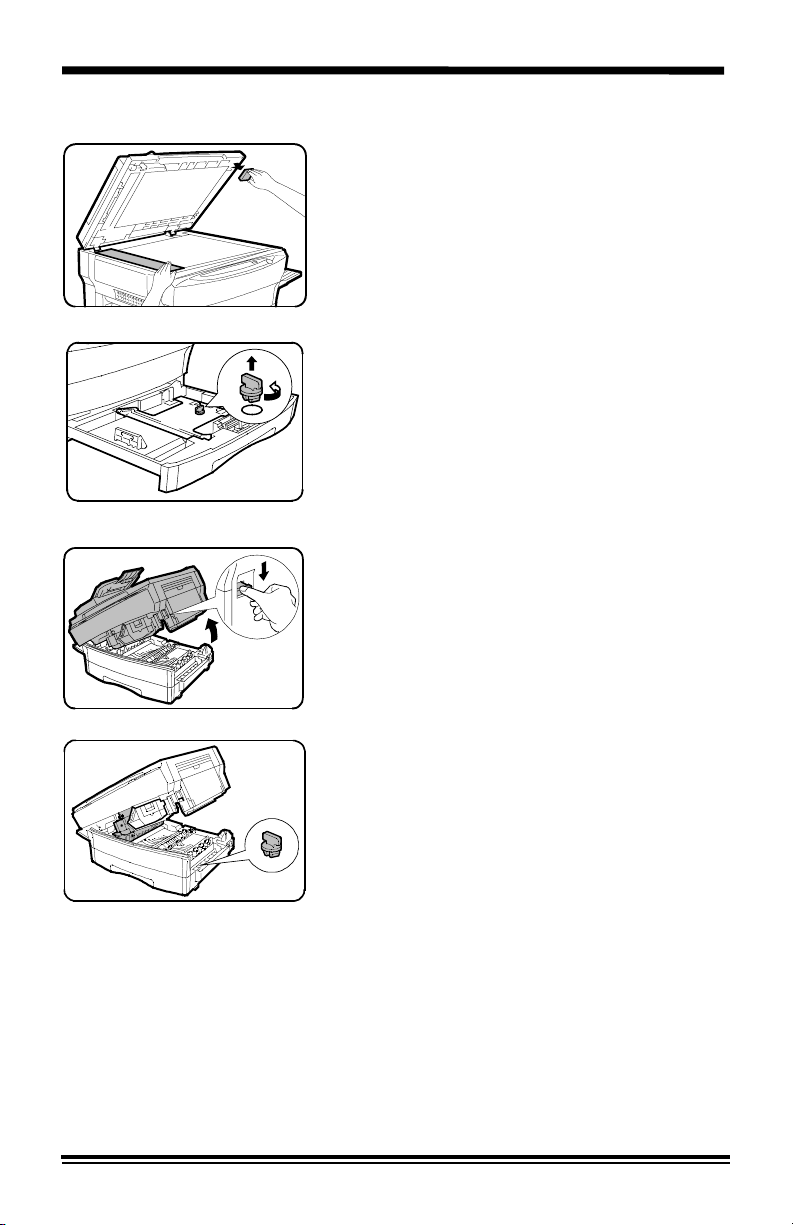
1. Remove the copier from the bag.
2. Hold the exit tray (left side) in position
while you remove the tape. Remove the
cardboard from under the exit tray. Lower
the exit tray.
CAUTION: If the exit tray is not fully opened
during copying, a paper misfeed or improper
fusing may occur.
Step 3 for XC810/ XC1040/ XC1045
copiers only
3. Remove the tape from alternate paper
tray on the right side of the copier. Lower
and unfold the tray.
4. Remove all remaining pieces of tape from
the copier.
1. Remove the protective material and the
shipping pins from the right and left sides
of the copier.
Note: A coin, or other suitable object, may
be inserted into the screw slot.
CAUTION: The copier will malfunction if the
two shipping pins are not removed.
6. Store the shipping pins with their heads
down in the holders on the underside of
the exit tray.
Note: Save the shipping pins. They will be
needed if the copier has to be shipped for
service or moved.
8
Page 14
Installation
7. Open the document cover and remove the
packing material.
13. Lift and pull open the paper tray. Turn
and remove the pressure plate lock.
CAUTION: Paper will misfeed if the pressure
plate lock is not removed.
For the XC1250 and XC1255 copiers only
Note: Be sure to remove the pressure plate
lock from both paper trays.
9. Press the release lever to open the copier.
14. Store the pressure plate lock in the
location shown.
Note: Save the pressure plate lock. It will
be needed if the copier has to be shipped for
servicing or moved.
11. Load copy paper into the tray.
• Refer to the Loading Copy Paper
section for additional information.
• Do not fill above the max line.
12. Push the paper tray firmly back into the
copier.
(continued)
9
Page 15
Installation
13. Remove the starter toner cartridge from
the bag. Vigorously shake the cartridge to
loosen the toner.
• Thoroughly shaking the cartridge will
assure maximum copies per cartridge.
• Xerox has included a Starter Toner
Cartridge for your convenience.
Purchased replacement toner
cartridges will yield approximately twice
the number of copies.
14. Remove the toner cartridge cover.
10. Slide the toner cartridge into the copier
until it locks into place.
11. Close the copier by gently pushing down
the upper half.
Step 17 for XC865/ XC1044/ XC1045/
XC1255 copiers only
10
17. Inset the front tab of the SDF exit tray into
the front notch. Slide the tray to the front,
and then insert the rear tabs into the rear
notches.
Page 16
Installation
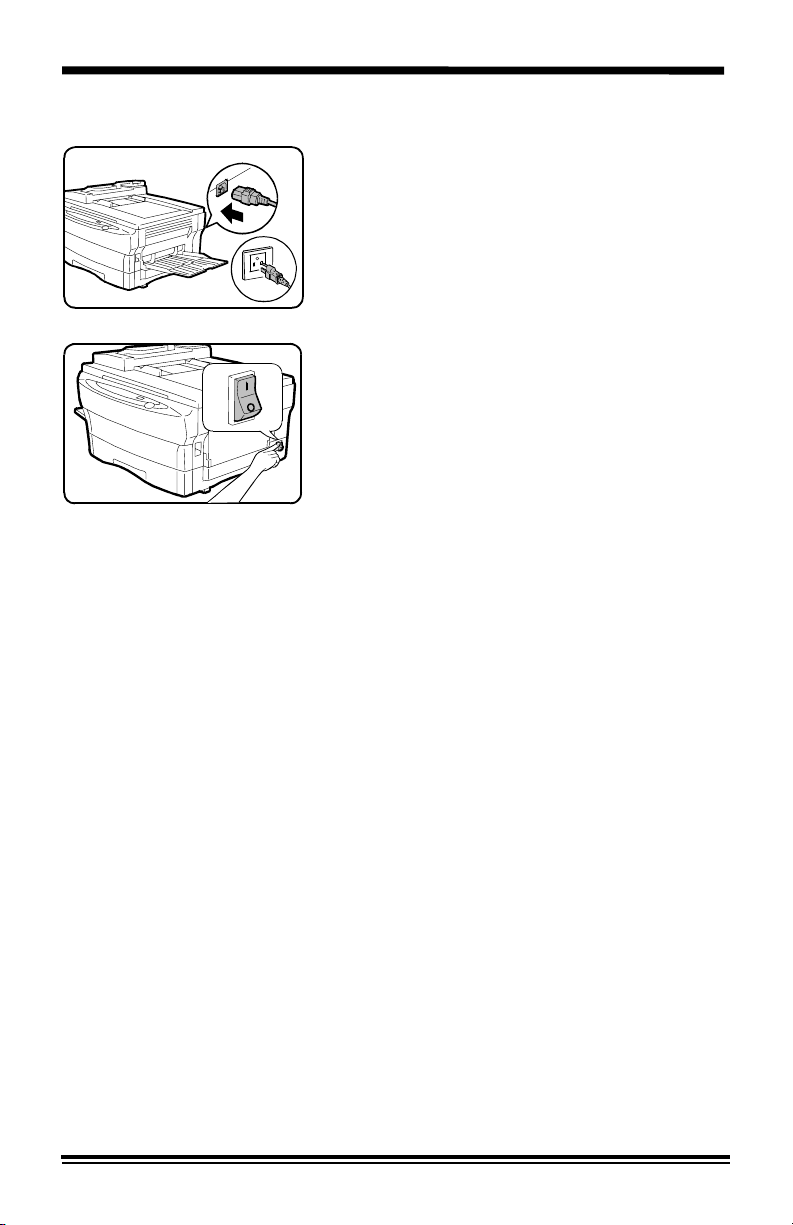
18. Plug the power cord into the copier and
then into a grounded outlet.
1. Turn on the power switch. In
approximately two seconds the ready
indicator will light. Copying is now
possible.
Note: Save the carton and packing
materials. They should be used to repack the
copier if it has to be shipped for servicing or
moved.
11
Page 17
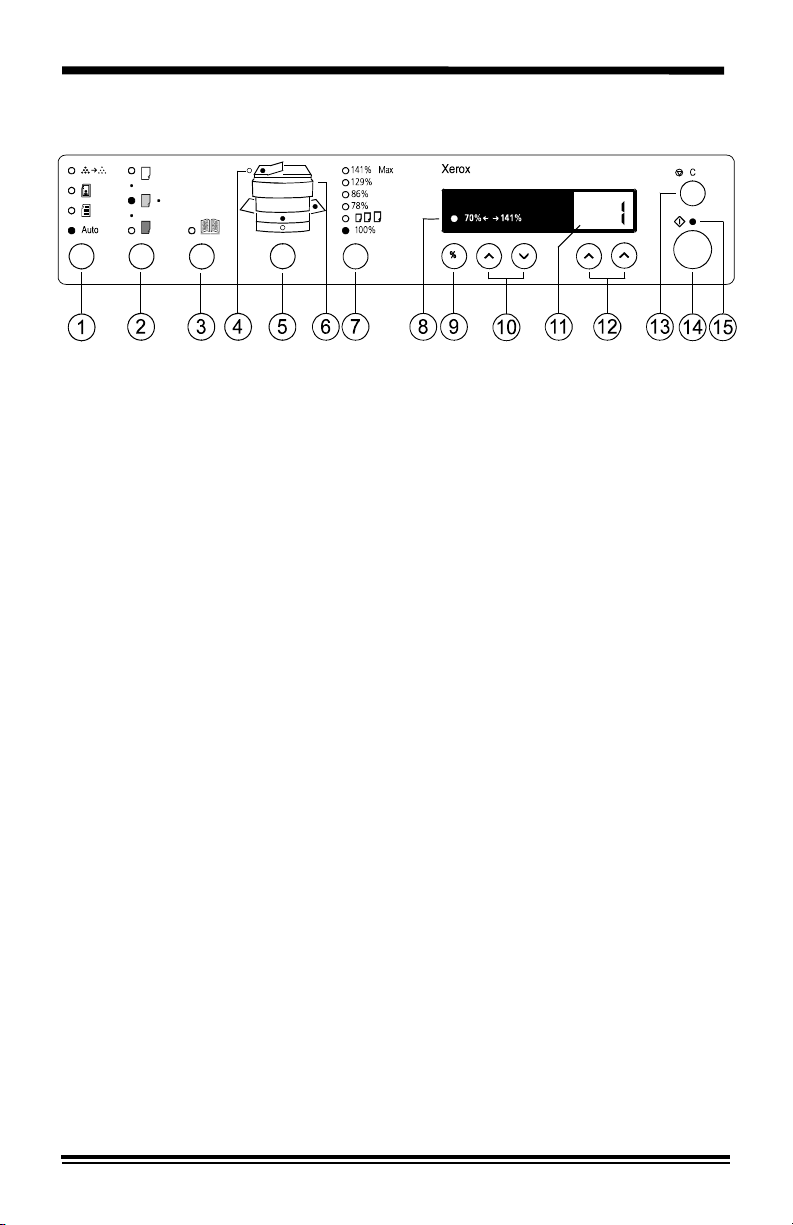
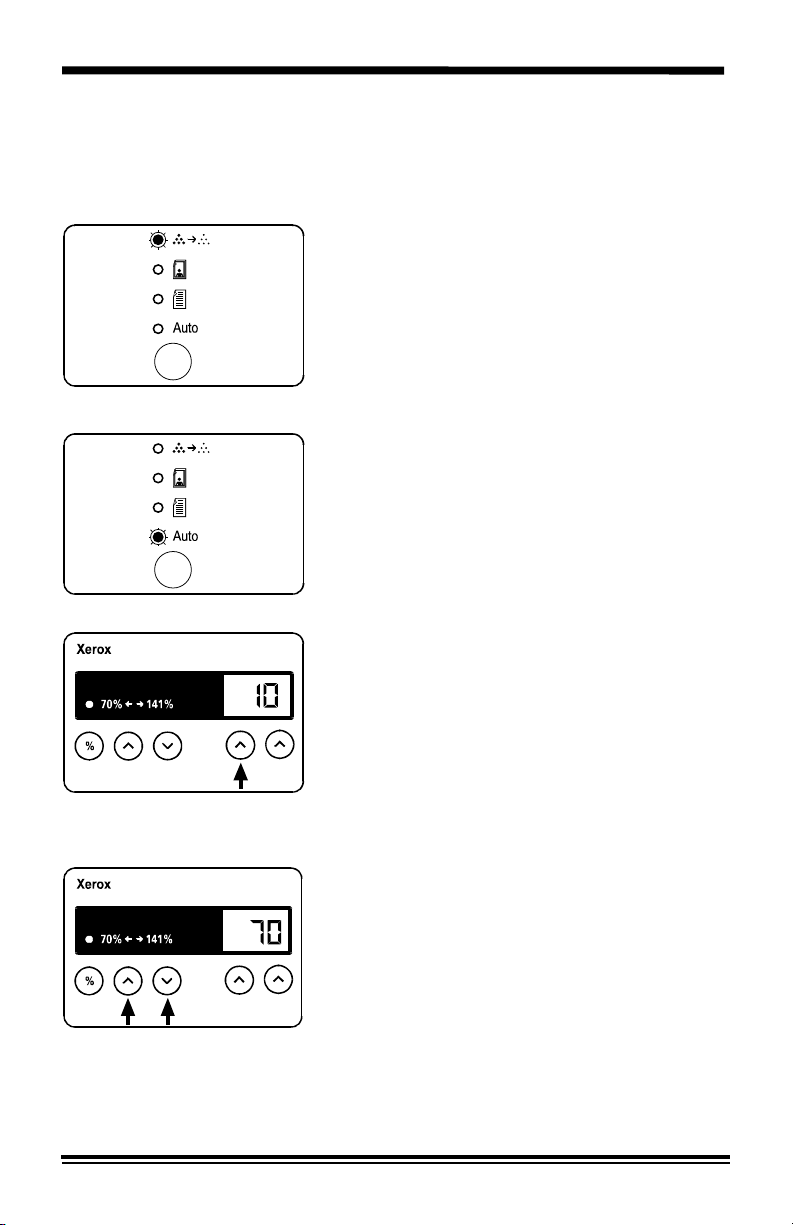
Control Panel
The control panel has keys and lights that are used to control and display
the conditions of the copier.
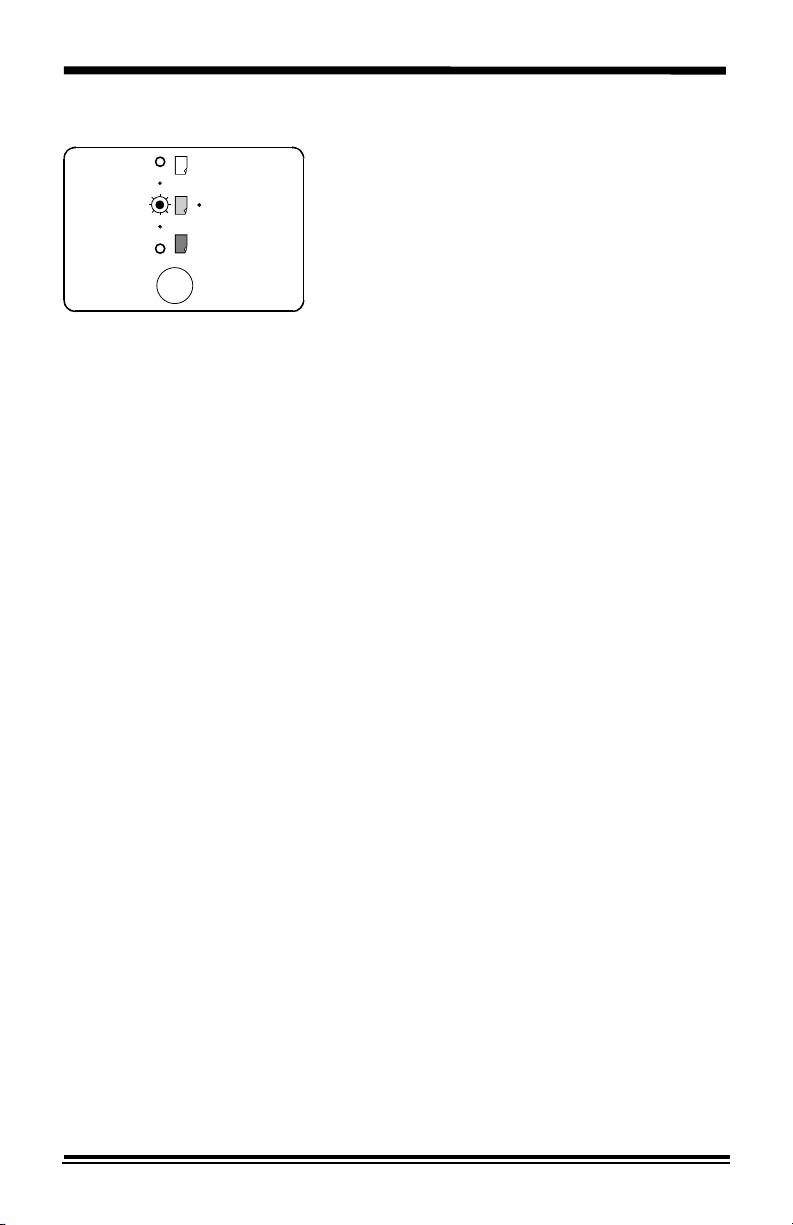
1. Exposure Mode: The exposure mode is used to adjust the amount of
background that will be copied. Select the best exposure mode for
your job.
Auto contrast – for originals with a colored background.
Text – for originals that contain mainly text.
Photo – for copying photographs.
Toner Save – lowers the cost of copying by decreasing the overall
copy density. The copy quality is reduced, but it is still very readable
for proofs and rough drafts.
2. Copy Contrast: Press the contrast keys to lighten or darken copies
while in the Text, Photo, or Toner Save settings.
• The copy Lighter/Darker feature is unavailable when Auto contrast
is selected.
• There are 5 contrast settings represented by 3 indicator lights. The
indicators light up one or two at a time to represent the selected
setting. Successive pushes of the keys will change the indicator
lights in successive order. Darkest, normal and lightest settings
are depicted by one light. When 2 indicators are lit, the copy
contrast will be mid point between the darker setting and the lighter
setting.
3. Book Mode (XC830/ XC865/ XC1040/ XC1044/ XC1045/ XC1250/
XC1255): Select book mode when you want to make copies from a
bound document.
4. SDF Misfeed Indicator: This indicator will light when a misfeed
occurres in the SDF.
12
Page 18

Control Panel
5. Paper Supply Selection (XC810/ XC1040/ XC1045/ XC1250/ XC1255):
Press to change the selected paper supply. The selected paper supply
location will be indicated by a green light on the copier diagram.
6. Copier Diagram: Helps you locate areas that require your attention.
The indicators will flash in the area requiring attention.
7. Preset Reduction/Enlargement: Press this key to select any of the
preset reductions or enlargements.
• The (customer settable) percentage has been set at the
factory for 70%. Refer to Customizing Your Copier for
information about changing this percentage.
8. Variable Percentage Indicator: The indicator will light when a variable
percentage is selected.
9. %: Press this key to display the selected reduction/enlargement.
10. Variable Percentage: Press the down key to decrease the
percentage. Press the up key to increase the percentage. Any
percentage from 70% to 141% may be selected.
• The indicator above the % key will light when a variable percentage
is selected.
11. Display Window: Copy quantity, reduction/enlargement settings, and
status codes appear in this area.
12. Quantity Keys: Select up to 100 copies. Press the ones key (right
key) to increase the quantity by one. Press the tens key (left key) to
increase the quantity by 10.
• To display the number of copies requested during the copy run
press the tens key.
• Press the Clear key to clear the selected quantity.
13. Clear/Stop: Press this key to stop the copier while making copies or
to clear copy quantity. If the key is pressed consecutively, all
programming will be cleared.
14. Start: Press this key to begin copying.
• The display will change to 1 and increases by 1 as each copy is
made.
15. Ready Indicator: When the light is ON (not flashing), the copier is
ready to make copies. When the light is flashing after the Start key is
pressed, the copier is warming up and the copy cycle will begin
automatically.
13
Page 19

Power Reduction / Auto Clear
Power Reduction Modes automatically reduce power consumed by the copier when the copier has not been used for a set period of time. There are two modes of power reduction; Power Save, and Power Shut-off.
Power Save Mode – In this mode, the fuser is maintained at a lower heat level, thereby saving power. The Ready Indicator will flash and the other indicators will remain on. To copy from the Power Save mode select the desired features and press Start. The copies will be made automatically.
Power Shut-Off Mode – This mode saves more power than the Power Save Mode, but requires more time before copying can begin. When the copier enters the power shut-off mode the Ready Indicator will flash and the other indicators will turn off. To copy from the power shut-off mode, press the Start button, then, select the desired features and press Start again. The copies will be made automatically.
Auto Clear – This copier is enabled at the factory to return to the Normal Copy Mode approximately one minute after a job is completed. Unless otherwise programmed, the Normal copy Mode settings are as follows:
• Copy Quality – Auto
• Copy lighter/darker – Normal
• Priority Tray – Tray 1
• Priority Magnification – 100%
• Quantity Selected – 1
Note: Time periods for the Power Shut-Off, Power Save, and Auto Clear
modes can be modified to meet your specific copying needs. Refer to
Customizing Your Copier section of this User Guide for information about
changing these settings.
Energy Star
Your Xerox copier has been designed to
comply with the guidelines of the Energy Star
program of the Environmental Protection
Agency. This is undertaken by Xerox
Corporation with the aim of saving energy
through the better management of machine
power. This feature automatically reduces
power used by the copier after a specific time
period of non-use. If the copier is in one of
the Power Reduction modes and you want to
make copies, press Start.
14
Page 20

Copy Paper Specifications
Paper Storage
Note: Paper affected by humidity, and curled paper can cause jams and
copy quality problems.
For reliable copier operation and good copy quality, Xerox recommends
that paper be stored:
• on a flat surface.
• in a closed container.
• in a low humidity area.
• tightly wrapped, if the ream is partially used.
The Specifications Chart below gives you information about the types of
paper that can be used at each of the copy paper input areas.
Copy Paper Input Paper Tray 1 and
Paper Tray 2
Paper Sizes
5.5
×8.5" to 8.5×14" /
A5 to 216
×356mm
Alternate Paper Tray/
Paper Tray Bypass
×5.5" to 8.5×14" /
3.5
A6 to 216
×356mm
Paper Weights
Optimum
Range
20 lb / 80 gsm
15 – 24 lb /
56 – 90 gsm
20 lb / 80 gsm
14 – 34 lb /
52 – 130 gsm
Paper Capacities
Copy, letterhead, and
20 lb / 80 gsm
20 lb / 80 gsm
predrilled
XC820/XC830/XC865
XC810
XC1020/ XC1044
XC1040/ XC1045
XC1250/ XC1255
Labels and
100 sheets
100 sheets
250 sheets
250 sheets
×250 sheets
2
No Yes (1 at a time)
single sheet
50 sheets
single sheet
50 sheets
single sheet
Transparencies *
* Use labels and transparencies specifically designed for copiers (high
temperatures).
15
Page 21

Loading Copy Paper
will flash in the copy quantity display and the green indicator in the
copier diagram will flash when:
• a paper tray is empty.
• paper has not fed all the way into the copier.
• a paper tray is not closed properly.
If the paper has misfed, open the paper tray indicated by the flashing green
light on the copier diagram and remove the misfed paper.
• Do not reuse the misfed paper.
• Ensure that the paper is under the corner snubbers.
• Close the paper tray. Press Start to make the remaining copies.
1. Lift and pull open the paper tray.
Steps 3 and 4 for XC1250/ XC1255
copiers only
If paper is difficult to remove...
16
2. Open the right access door.
3. Remove any misfed paper. Close the
right access door.
1. Push down on the shiny plate until it locks
in position.
Note: The procedures for loading paper into
tray 1 and tray 2 are identical.
Page 22

Loading Copy Paper
5. Adjust the paper guides to the desired
paper size.
• Squeeze the side guide.
• Lift and insert the rear guide.
• When adding 14" paper, remove the
rear guide and store it in the pocket in
front of the side guide.
4. Fan the copy paper and insert it into the
tray.
• Ensure that the paper corners are under
the corner snubbers.
• Do not fill above the max fill line.
5. Close the Paper Tray.
6. To cancel the blinking P without restarting
copying, press the Clear button, or press
Start to continue copying.
Flashing
When the Alternate Paper Tray runs out of paper, or the paper misfeeds,
P will flash in the display and the green indicator in the copier diagram
the
will flash.
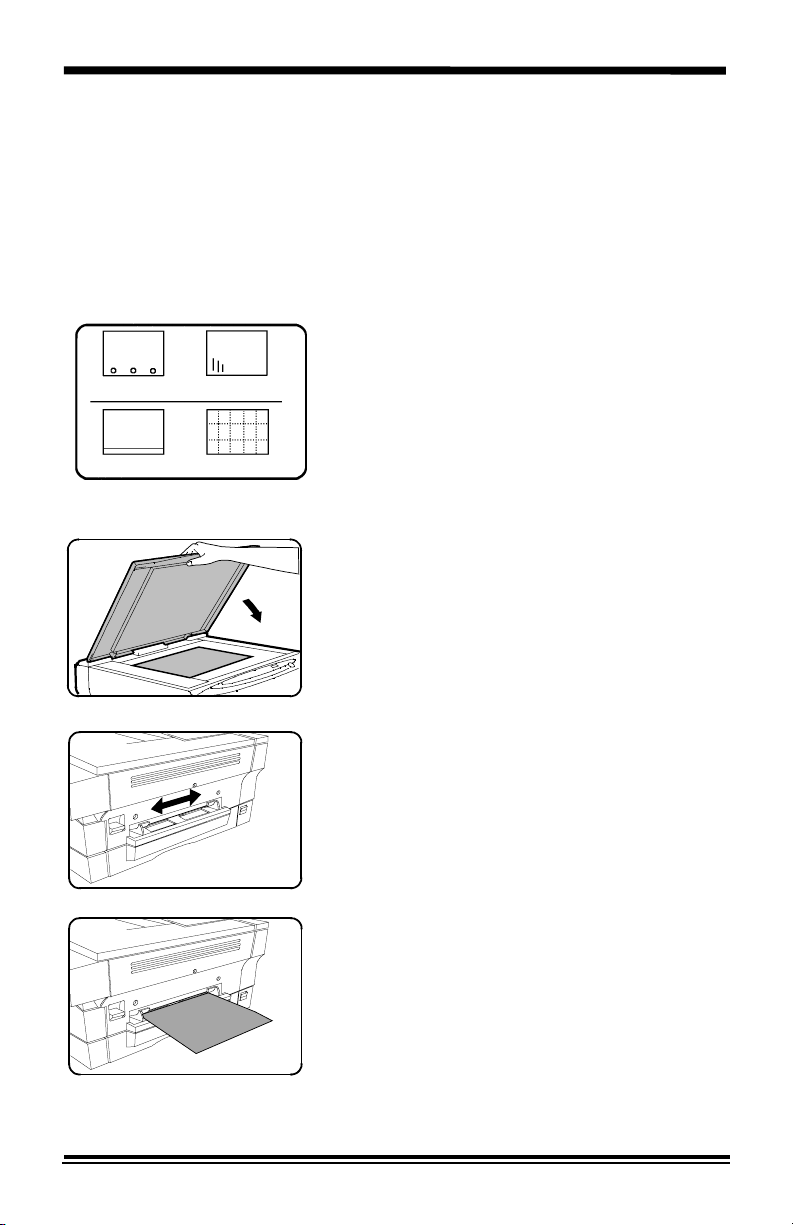
Alternate Paper Tray (XC810/ XC1040/ XC1045)
1. Add paper if the Alternate Paper Tray is
empty.
1. If paper has misfed, remove it by carefully
pulling the edge of the paper in direction
of the arrow.
2. Press Start to continue copying.
17
Page 23

Making Copies on the Document Glass
1. Select the desired copy features from the
control panel.
2. Select the number of copies.
• Press the left key to increase the
quantity by 10. Press the right key to
increase the quantity by 1.
• To clear the selected quantity, press the
clear key.
1. Lift the Document Cover.
2. Place the original face down and align it
with the registration guide on the
document glass.
Note: Writing that is very close to the leading
or trailing edge of the original may not copy.
Turning the original around on the document
glass may help.
18
5. Close the Document Cover.
Note: Leaving the cover open while copying
will affect copy quality and toner
consumption.
6. Press Start to begin copying.
• The number in the display window
returns to 1 and advances as each copy
is made.
Page 24

Making Copies on the Set Document Feeder
(XC865/ XC1044/ XC1045/ XC1255)
Use the Set Document Feeder (SDF) to make one collated copy of
originals. The SDF holds up to 20 originals (20 lb/80 gsm) in one job.
Ensure originals are in good condition, and that all staples and paper clips
have been removed. Use the document glass to make copies from
transparencies, facsimile paper, or originals having other unusual
characteristics. For reliable copying operation, use originals within the
following ranges:
Paper weight range: 16 to 24 lb/60 to 90 gsm
Paper size range: 5.5
The SDF comes from the factory with the Auto Start feature enabled.
Refer to Customizing Your Copier section of this User Guide for
information about changing this setting.
×8.5"/A5, 8.5×11"/A4 and 8.5×14"/216×353 mm
1. Select the required paper tray.
2. Select the desired copy features from the
control panel.
• The maximum copy quantity is 1.
Reinsert the originals into the SDF for
each set required.
1. Adjust the paper guide to the original size.
Note: Writing that is very close to the leading
or trailing edge of the original may not copy.
Turning the original around in the SDF may
help.
4. Insert up to 20 originals face down into the
SDF until the green SDF light on the
copier diagram comes on.
• When copying originals that are larger
than 8.5
tray located on the SDF.
×11"/A4, fold out the extension
19
Page 25

Copy Quality
Input documents may be of poor quality, printed on colored paper or a
photograph. The Exposure mode features described on this page can be
used to improve the copies of these documents.
Auto
Use Auto when copying from originals with a
colored background.
Note: When Auto is selected, the copier
automatically varies the contrast of your
copies. Lighter/Darker settings are not
available.
Text
Use Text to copy documents containing
mostly text.
Photo
20
Use Photo when the originals are
photographs.
Toner Save
Toner Save mode lowers the cost of copying
by decreasing overall copy density on each
page. This feature can be used when
making draft copies.
Page 26
Copy Quality
Copy Contrast
You can vary the copy contrast of your copies
in small increments when Text, Photo, or
Toner Save settings are selected.
Note: When Auto is selected the copy
contrast settings are not available.
Press the copy contrast key to lighten or
darken copies while in the Text, Photo, or
Toner Save settings.
• There are 5 contrast settings represented
by 3 indicator lights. The indicators light up
one or two at a time to represent the
selected setting. Successive pushes of the
key will change the indicators in
successive order. Darkest, normal and
lightest settings are depicted by one
indicator. When 2 indicators are lit, the
copy contrast will be mid point between the
darker setting and the lighter setting.
21
Page 27

Reduction/Enlargement
Preset %
Press the Preset % key to quickly select one
of the 6 preset percentages. The customer
settable percentage (
the factory for 70%. Refer to Customizing
Your Copier for information about changing
the default percentage.
Variable Percentage
Press the Variable Percentage key to
increase or decrease the reduction or
enlargement by 1% increments. You may
select any percentage from 70 – 141%.
Press the % key to display the current
percentage. When a variable percentage is
selected the light above the % key is lit.
Display Window
Preset or variable reduction/enlargement
percentages appear in the Display Window at
the time selections are made. After a few
seconds, the reduction/enlargement percent
is replaced with the number of copies
selected. Press the % key to recall the
current reduction/enlargement ratio.
) has been set at
22
Page 28

Copying Oversized Documents
The document cover may be removed in order to position an oversized
document on the document glass.
Note: If your copier is equipped with a Set Document Feeder, the cover
cannot be removed.
1. Lift the document cover straight up.
Note: Do not leave the cover off for extended
periods of time.
2. Reattach the document cover by reversing
the above step.
Book Mode (XC830/ XC865/ XC1040/ XC1044/ XC1045/ XC1250/
XC1255)
This feature is useful when you want to copy facing pages of a document
onto separate sheets of paper. The maximum book size is 10
1. Align the center of the document with the
book symbol at the center front of the
document glass and the green arrow on
the left registration guide.
×14" / B4.
2. Select Book mode, and other desired
features.
• 50 is the maximum copy quantity in
book mode.
• XC830/ XC865/ XC1044/ XC1250/
XC1255 copiers only: the Paper Tray
Bypass cannot be used in conjunction
with the Book mode.
3. Press Start.
• The left page will be copied first, then
the right page will be copied.
23
Page 29
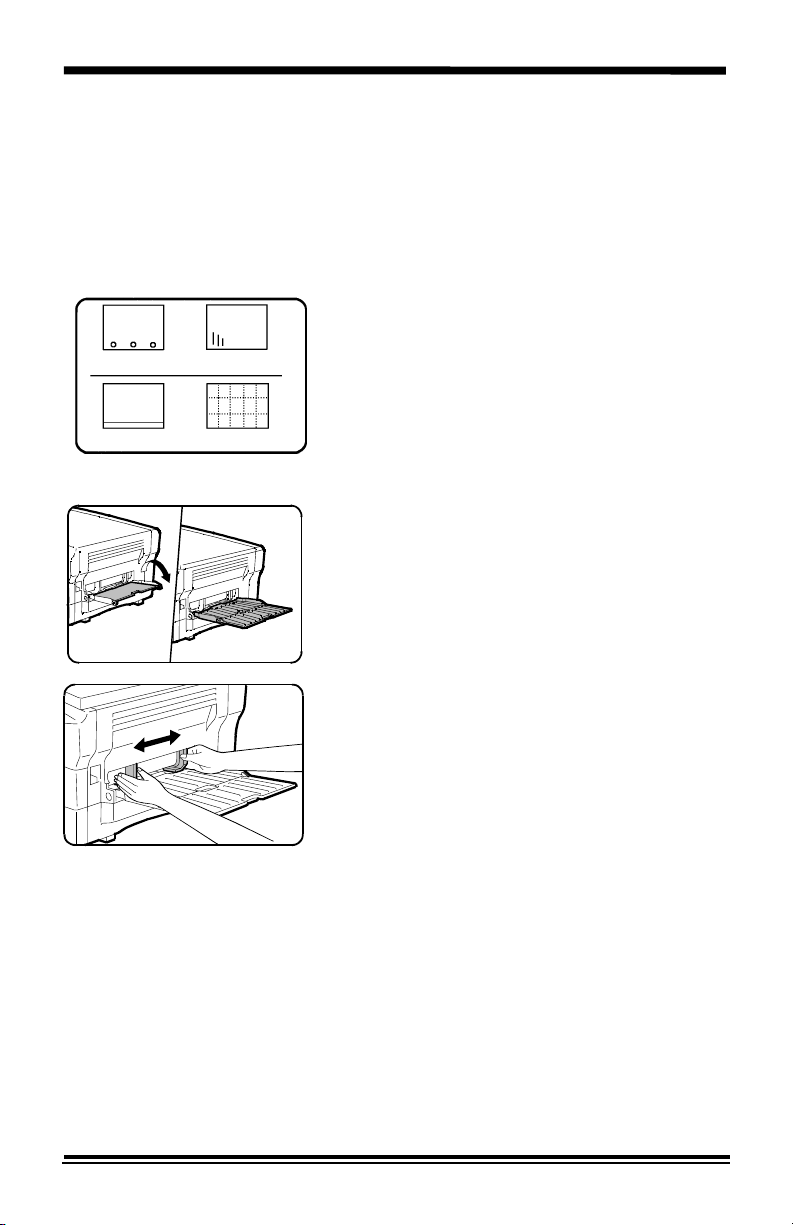
Paper Tray Bypass (XC820/ XC830/ XC865/ XC1020/ XC1044/
XC1250/ XC1255)
Use the Paper Tray Bypass to copy onto paper that is different from that
loaded in the paper tray and to copy onto special stock such as labels or
transparencies.
The minimum copy size is 3.5
8.5
×14" / 216×356mm.
×5.5"/ A6. The maximum copy paper size is
Predrilled paper: holes toward the front of
the copier.
Letterhead paper: face up with the top
toward the left.
Transparencies: one sheet at a time.
Labels: face up, one sheet at a time.
• Use labels and transparencies specifically
designed for copiers (high temperatures).
1. Place the original face down and align it
with the registration guide on the
document glass and close the document
cover.
XC865/ XC1044/ XC1255 copiers only
Unless the SDF auto start has been disabled,
the Paper Tray Bypass cannot be selected.
2. Adjust the bypass guide to the width of the
copy paper.
24
2. Insert a single sheet of copy paper into the
paper tray bypass.
• The paper will feed automatically.
• When copying continuously, insert the
next copy paper as soon as the
previous sheet has fed.
Page 30
Alternate Paper Tray (XC810/ XC1040/ XC1045)
The alternate paper tray can be used to feed multiple sheets of standard
paper, or it can be used to feed single sheets of special or heavy papers
such as note cards, transparencies, and labels.
The alternate paper tray holds up to 50 sheets of (standard weight) copy
paper ranging in size from 3.5
×5.5" to 8.5×14"/ A6 to 216×356mm.
Predrilled paper: holes toward the front of
the copier.
Letterhead paper: face up with the top
toward the left.
Transparencies: one sheet at a time.
Labels: face up, one sheet at a time.
• Use labels and transparencies specifically
designed for copiers (high temperatures).
1. Lower the alternate paper tray, located on
the right side of the copier.
2. Unfold the paper support extension as
shown.
1. Adjust the guides to the width of the copy
paper.
(continued)
25
Page 31

Alternate Paper Tray (XC810 / XC1040/ XC1045)
4. Insert the copy paper all the way into the
alternate paper tray until it stops (do not
force).
• 50 sheets max.
Note: When loading transparencies or labels
insert one sheet at a time.
5. Press the Paper Supply button to select
the alternate paper tray.
6. Select other required features.
1. Place the original face down and align it
with the registration guide on the
document glass and close the document
cover, or place it in the SDF.
8. Press the Start button.
Note: When the Alternate Paper Tray runs
out of paper, the green indicator in the copier
diagram flashes and the display will show a
flashing P. To continue copying, add more
paper and press Start.
26
Page 32

Two-Sided Copying
1. Place side 1 original face down on the
Document Glass, with the TOP toward the
LEFT. Lower the document cover.
Note: 16 lb / 60 gsm copy paper is not
recommended for two-sided copying.
2. Select quantity required.
3. Press Start to make side 1 copy.
1. Remove the first original and place the
second original face down on the
Document Glass with the TOP toward the
RIGHT, and lower the document cover.
2. Remove side 1 copy from the output tray
and insert it face down, TOP toward the
RIGHT, into the paper tray bypass /
alternate bypass tray.
XC810/ XC1040/ XC1045 copiers only
6. Select the alternate paper tray.
7. Press Start.
27
Page 33
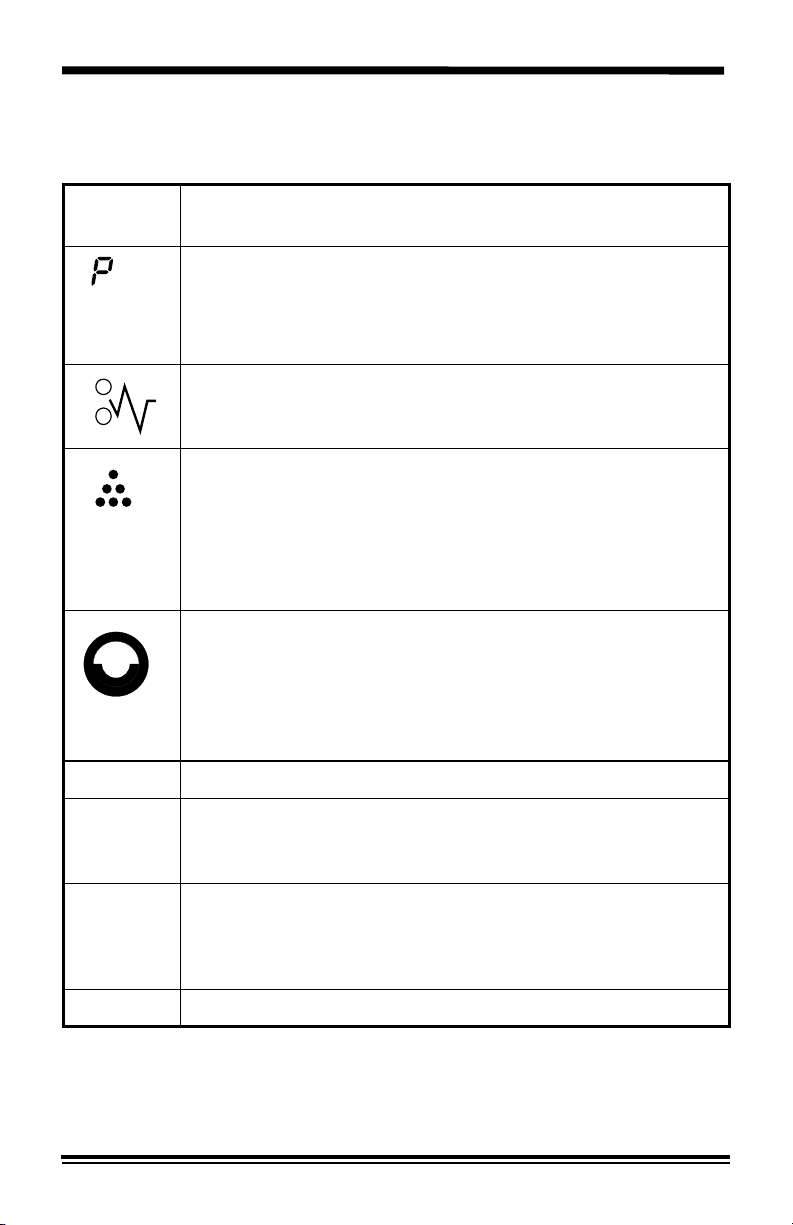
Customizing Your Copier
Programmable Features
The default settings for various copier features may be changed to suit your
individual copying needs. All of these features remain set until this process
is repeated.
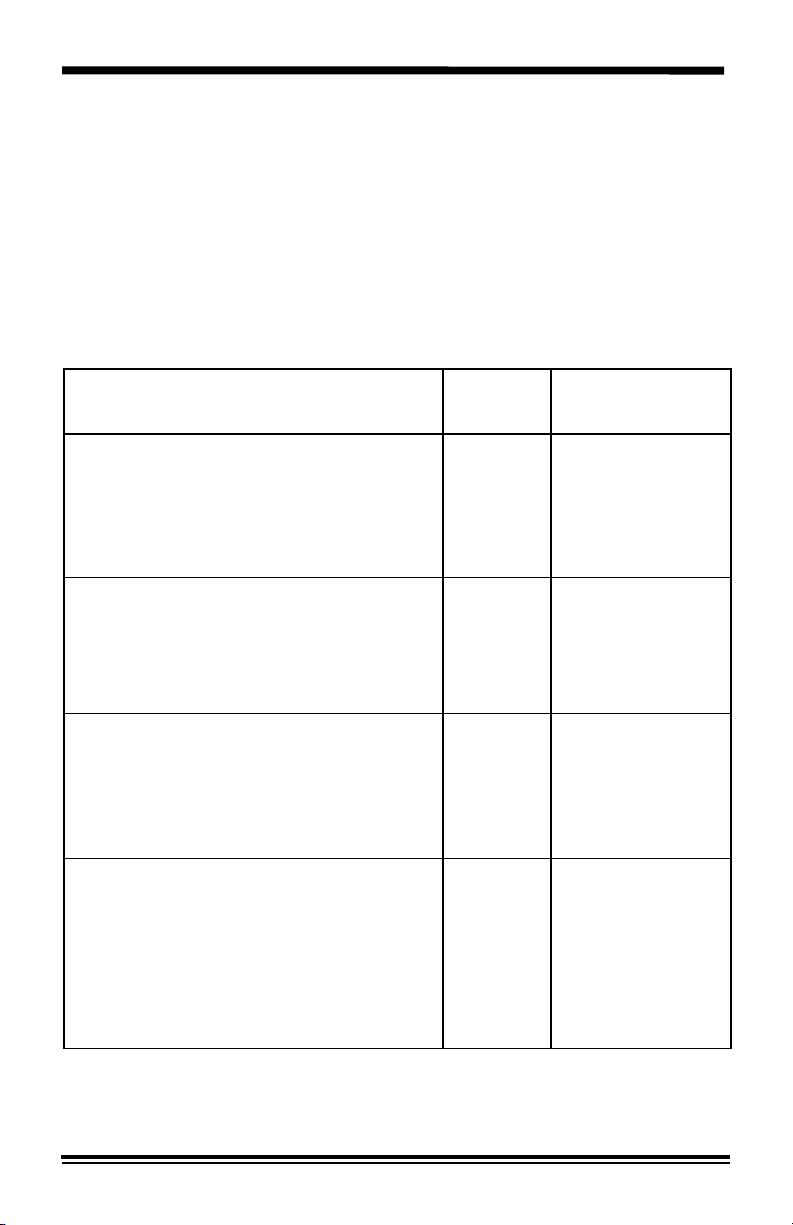
Each of the programmable features, along with its program number and
options are contained in the chart below. The procedure to change the
default settings follows the chart.
Feature Program
Priority Tray: This feature allows you
to set the default paper tray. At power
on or auto clear the copier will return to
the selected priority paper tray.
(Models XC810, XC1040, XC1045,
XC1250, and XC1255 only.)
Auto Clear Time Out: This feature
allows you to select the time it takes for
the copier to return to the normal copy
mode after a copy cycle is complete.
(All models.)
Time Out to Power Save: When
enabled, this feature automatically
reduces power used by the copier if the
copier has not been used for the set
period of time.
(All models.)
Time Out to Power Shut-Off: When
enabled, this feature significantly
reduces power used by the copier if the
copier has not been used for the set
period of time.
(All models.)
Option Number
Number
0 0 – Main Tray *
10 – Off
20 – Off
3 0 – 2 minutes
* Factory Setting
1 – Alternate
Paper Tray
2 – Second Tray
1 – 30 seconds
2 – 60 seconds *
3 – 90 seconds
4 – 120 seconds
1 – 45 seconds
2 – 90 seconds *
3 – 2 minutes
4 – 5 minutes
1 – 5 minutes *
2 – 15 minutes
3 – 30 minutes
4 – 60 minutes
5 – 120 minutes
6 – Off
28
Page 34

Feature Program
Default Magnification: This feature
allows you to make copies slightly larger
or smaller than the original, or the same
size.
(All models.)
Default Exposure: This feature allows
you to select the default Exposure
mode.
(All models.)
Manual Document Glass Exposure
Adjustment: The copy exposure range
may be adjusted when the copy image
is consistently too light or too dark.
(All models.)
Paper Trail Edge Deletion: The trail
edge deletion can be turned off to
accommodate originals that have print
to the very bottom edge. When Off,
another 4 mm will copy, however the
image quality may deteriorate as it gets
closer to the bottom edge.
(All models.)
Option Number
Number
* Factory Setting
4 0 – 100% *
1 – 99%
2 – 101%
5 0 – Auto
Exposure *
1 – Text
6 0 – +4 steps light
1 – +3 steps light
2 – +2 steps light
3 – +1 step light
4 – Normal *
5 – +1 step dark
6 – +2 steps dark
7 – +3 steps dark
8 – +4 steps dark
70 – On *
1 – Off
Paper Tray Bypass Auto Start: When
enabled, the copier will begin to copy as
soon as paper is fed into the paper tray
bypass.
(Models XC820, XC830, XC865, XC1020,
XC1044, XC1250, and XC1255 only.)
Set Document Feeder Auto Start:
When enabled, the SDF will begin to
copy as soon as paper is placed in the
SDF.
(Models XC865, XC1044, XC1045, and
XC1255 only.)
80 – On *
1 – Off
90 – On *
1 – Off
29
Page 35

Feature Program
R/E Preset: This feature allows you to
set a specific preset reduction or
enlargement setting for the
(All models.)
key.
Auto Paper Tray Switching: When
enabled, the copier will automatically
Number
10 70 – 141%
11 0 – On
Option Number
* Factory Setting
Default 70% *
1 – Off *
switch to another paper tray when the
selected tray runs out of paper.
(Models XC1250 and XC1255 only.)
Set Document Feeder Exposure
Adjustment: The copy exposure range
may be adjusted when the copy image
is consistently too light or too dark.
(Models XC865, XC1044, XC1045, and
XC1255 only.)
12 0 – +4 steps light
1 – +3 steps light
2 – +2 steps light
3 – +1 step light
4 – Normal *
5 – +1 step dark
6 – +2 steps dark
7 – +3 steps dark
8 – +4 steps dark
Note: The procedures written in this manual are based on the factory
default settings.
30
Page 36
Programmable Feature Setting 10
Use the following procedure to change the preset Reduction/Enlargement
default setting. This feature allows you to set a specific preset reduction or
enlargement between 70 – 141%.
1. Select the Toner Saver mode.
1. Press again and hold the Exposure Mode
key for approximately 4 to 6 seconds.
• The light next to Auto mode will light.
• The lights within the Copier Diagram
will flash.
1. Press the 10’s unit key until the number
10 is displayed.
32
2. Press Start.
• The current reduction/enlargement
setting will flash.
1. Press the variable percentage keys until
the desired percentage is displayed.
2. Press Start to store the selection.
3. Press the Clear key to continue making
other changes. Press the Exposure mode
key to return to the copy mode.
Page 37

Copier Care
Cleaning the Document Glass and Cover
Keeping the document glass clean helps ensure the best possible copies.
Xerox suggests that you clean the document glass at the start of each day
and during the day as needed.
CAUTION: Do not pour or spray water directly onto any part of the copier.
For XC810/ XC820/ XC830/ XC1020/
XC1040/ XC1250 copiers only
1. Slightly dampen a soft lint-free cloth or
paper towel with water.
2. Lift the
3. W ipe the surface of the document glass
until it is clean and dry.
4. W ipe the underside of the white document
cover until it is clean and dry.
5. Close the document cover.
For XC865/ XC1044/ XC1045/ XC1255
1. Slightly dampen a soft lint-free cloth or
paper towel with water.
2. Lift the
3. W ipe the surface of the document glass
and the SDF glass until each is clean and
dry.
4. W ipe the underside of the white document
cover and the SDF roller until each is
clean and dry.
5. Close the SDF cover.
document cover.
copiers only
SDF cover.
33
Page 38

Copier Care
Cleaning the Transfer Corotron
If copies start getting streaks or blotches, the transfer corotron may be
dirty.
1. Press the release lever to open the copier.
2. Remove the green transfer corotron
cleaner from inside the copier (on the
right-hand side near the front) and insert it
into the transfer corotron unit.
34
2. W ipe the corotron wire with the transfer
cleaning tool as shown.
3. Replace the cleaner and close the upper
half of the copier.
Page 39

Clearing the Paper Path
If the Misfeed Indicator blinks and the copier stops, a paper misfeed has
occurred.
Be careful not to damage the Photoreceptor or the Corotron during the
clearance of a misfeed. Also take care not to touch the Fuser.
1. Press the release lever to open the copier.
2. Carefully remove the misfed paper.
Warning: The fusing area is hot. Take care
when removing paper from the fuser area.
3. Lift the fuser lever to remove a misfeed in
the fuser area.
• If the paper rips, be sure to remove all
the pieces of paper.
1. Close the copier by gently pushing down
the upper half.
• Ensure that the misfeed indicator has
gone out.
35
Page 40

A1 – A2 Set Document Feeder Misfeed
When a misfeed occurs in the SDF, the red SDF misfeed indicator flashes
on the Copier Diagram, and an A1 or A2 status code will flash in the display
window. The status code indicates the number of originals that must be
returned to the SDF after clearing the misfeed.
A1 status code- refeed the last original.
A2 status code- refeed the last 2 originals.
This code will disappear when copying is resumed or the clear key is
pressed.
Details for clearing the three types of SDF misfeeds are given below.
SDF Input Misfeed
1. Pull the misfed original(s) toward the right
to remove them from the SDF input tray.
Refeed the number of originals indicated.
2. Open and close the document cover to
clear the misfeed indicator.
3. Press Start to continue copying.
SDF Exit Misfeed
1. Remove all originals from the SDF exit
tray. Refeed the number of originals not
copied.
SDF Roller Misfeed
36
2. Open and close the document cover to
clear the misfeed indicator.
3. Press Start to continue copying.
1. Open the document cover and turn the
green roller rotating knob in the direction
of the arrow to remove any misfed
originals. Refeed the number of originals
indicated.
2. Open and close the document cover to
clear the misfeed indicator.
3. Press Start to continue copying.
Page 41

Toner Cartridge Replacement
The Toner Indicator on the Copier Diagram will light when the toner supply
is low. Copies can continue to be made, but you should have a
replacement cartridge in stock. Copies may gradually become lighter until
the copier stops and the indicator begins to blink. In many cases, there is
not a noticeable difference between the first copy and the last copy from a
toner cartridge. The copier, however, may take longer than usual to start
copying. When this occurs the toner cartridge must be replaced. The
copier will not operate until the toner cartridge is replaced.
1. Press the release lever to open the copier.
2
1
1. Press down on the green lever (1) on the
front of the old toner cartridge and pull the
cartridge out (2).
Note: Help the environment by recycling
your used toner cartridge. Refer to the Xerox
Green Team brochure packed with the Toner
Cartridge for instructions on returning the
used Toner Cartridge to Xerox.
3. Shake the new toner cartridge horizontally
four or five times and then remove the
cover.
4. Save the box and the cover for shipping.
1. Slide the new toner cartridge in until it
locks in place.
2. Close the copier by gently pushing down
the upper half.
• Wait approximately two seconds for the
ready indicator to light.
37
Page 42
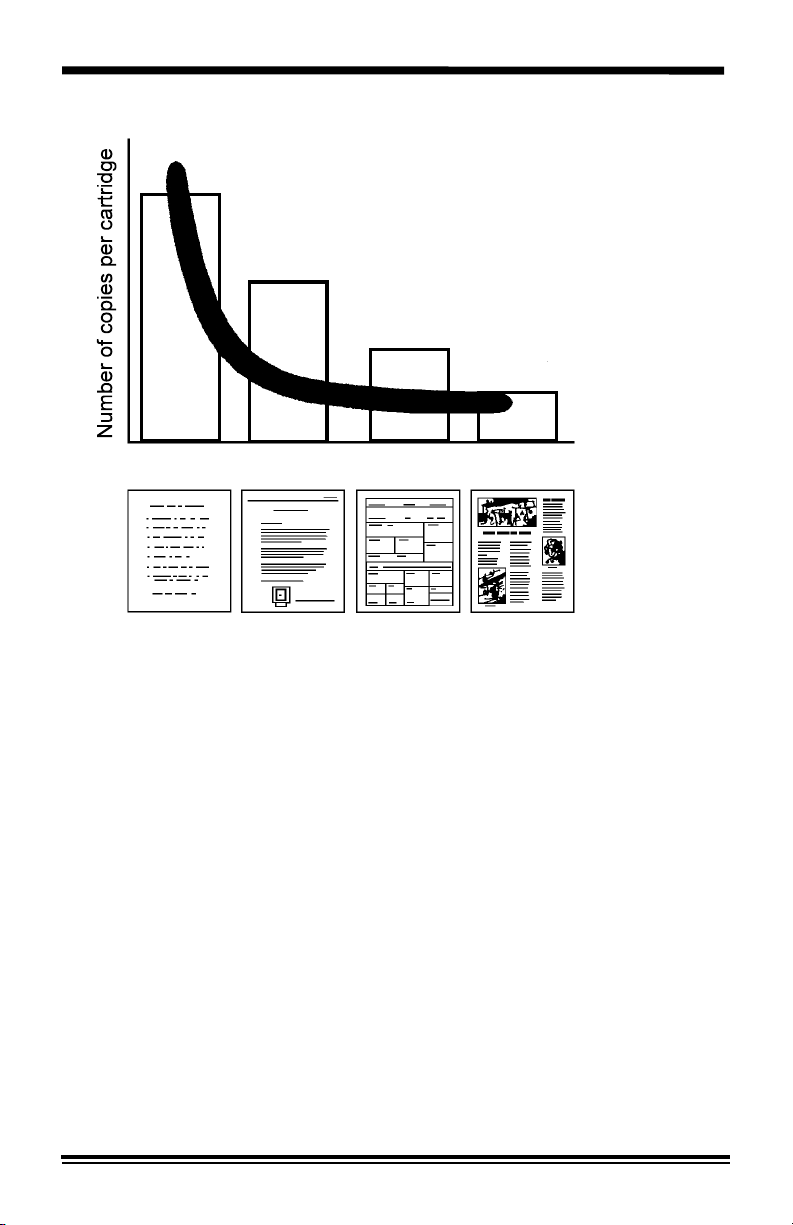
Toner Cartridge Yield
Low printed Medium High printed Very high printed
area area area area
The main factor affecting toner cartridge yield is the printed area of a
document. The graph is a sample representation of how the number of
copies per cartridge decreases as the printed area increases.
Other factors which can affect the toner cartridge yield are:
• The size of the document being copied.
• Dark backgrounds.
• Leaving the platen cover open.
• The number of times the copier is switched on and off.
• Double sided copying will use more toner per ream of paper.
• High humidity.
To get the most from your toner cartridge:
• Always copy with the document cover closed.
• Leave the copier on during the day. Switch off the copier at the end
of the working day.
• Copy with the exposure control set to Auto exposure unless you need
to adjust for the background of your original.
• Operate the copier in a dry environment whenever possible.
38
Page 43

Drum Cartridge Replacement
The useful life of the drum cartridge is approximately 12,000 copies. The
drum cartridge indicator on the copier diagram lights when the drum is near
the end of life. Copies can continue to be made, but you should have a
replacement cartridge in stock. After approximately 1,000 copies, the
Ready indicator will go out, the drum cartridge indicator will blink, and the
copier will stop operating until the drum cartridge is replaced.
Does not apply in some areas of Latin America.
2
1
1. Press the release lever to open the copier.
2. Press down on the green lever (1) on the
front of the toner cartridge and pull out the
cartridge (2).
Note: The toner cartridge must be removed
before removing the Drum Cartridge.
3. Pull out the drum cartridge.
Note: Help the environment by recycling
your used Drum Cartridge. Refer to the
Xerox Green Team brochure packed with the
Drum Cartridge for instructions on returning
the used Drum Cartridge to Xerox.
4. Remove the cover from the new Drum
Cartridge.
2. Slide the new Drum Cartridge in place,
making sure not to touch the surface of
the drum.
3. Reinstall the Toner Cartridge.
4. Close the copier by gently pushing down
the upper half.
39
Page 44

Problem Solving
Problem Solving Chart
The following chart lists some conditions that may occur and the
recommended solutions. Follow the suggested solutions until the problem
is corrected. Refer to the Status Code Chart in this section for status code
information. If the problem persists, please call the following number for
assistance:
In the United States and Canada:
1 – 800 – TEAM – XRX (1 – 800 – 832 – 6979)
Condition Suggested solutions
Copier does not
come on, Ready
indicator does not
light.
Copies are too
light or too dark.
Smears, lines,
marks, or spots
on copies.
Copy image is
skewed.
Blank copies.
Check that the copier is plugged into an
electrical receptacle.
Ensure that there is power to the receptacle
and that the copier power is switch ON.
If the original is light, select the lower copy
contrast position to darken the background of
the copies.
If the original is dark, select the upper copy
contrast position to lighten the background of
the copies.
If defects are on the original, press the copy
contrast key to lighten the background of your
copies.
If no defects are on the original, clean the
document glass and underside of the
document cover. (Refer to Copier Care.)
If the above solutions do not help, clean the
transfer corotron. (Refer to Copier Care.)
Ensure that original is positioned correctly on
document glass.
Check that copy paper is loaded correctly.
Ensure that the original is face down on the
document glass.
Check for a broken corotron wire. Refer to
Copier Care section for the location of the
corotron wire.
40
Page 45

Condition Suggested solutions
Image rubs off
the copy easily.
Frequent copy
paper jams.
The three trouble
indicators are lit
in the copier
diagram.
Replace the paper in the tray with paper from
a new package.
In high humidity areas do not leave paper in
the copier for extended periods of time.
Fan the stack of paper, then turn it over in the
tray.
Replace paper in paper tray with a fresh
supply.
Check/adjust paper guides.
Ensure that the paper is the proper paper
weight. 20 lb / 80 gsm bond paper is
recommended.
Check for copy paper or pieces of copy paper
remaining in the copier after a paper jam has
been cleared. (Refer to Clearing the Paper
Path.)
The machine is in the program mode. Press
the Exposure mode key to exit.
Toner yield is
lower than
expected and the
Toner Indicator is
on.
Fewer copies
from the Toner
Cartridge than
expected.
Toner may be lodged in the cartridge.
Remove the toner cartridge. Shake the toner
cartridge and tap along the top of the toner
cartridge over a waste receptacle. Take care
not to touch the exposed toner on the left side
of the cartridge.
Originals contain pictures, solids, or heavy
lines.
Originals are forms, newsletters, books etc.
The copier is being turned on and off
frequently.
The document cover is being left open while
copies are being made. (Refer to the Toner
Cartridge Yield section.)
41
Page 46
Problem Solving
Status Code Chart
Status
Code
CH
Suggested Solution
Ensure that there is paper in the selected paper tray.
Ensure that the Paper Tray is closed properly.
Paper may not have fed all the way into the copier. (Refer
to Loading Copy Paper and Flashing
Copy paper has misfed. (Refer to Clearing the Paper
Path.)
When the toner cartridge replacement indicator appears,
the toner cartridge will need to be replaced soon. Be sure
to have a replacement cartridge in stock.
Copies will gradually become lighter until the copier stops
and the indicator begins to blink. When this occurs the
toner cartridge must be replaced.
When the drum cartridge replacement indicator appears,
the drum cartridge will need to be replaced soon. Be sure
to have a replacement cartridge in stock. In approximately
1,000 copies, the Ready indicator will go out, the drum
cartridge indicator will blink, and the copier will stop
operating until the drum cartridge is replaced.
Install toner cartridge.
P.)
A1 – A2
U2 – U5
L1 – L5
H2 – H4
L1 Ensure left shipping screw is removed.
42
Remove misfed paper from the Set Document Feeder.
Refer to
detailed instructions.
Switch OFF the Main Power. Wait approximately 5
seconds. Then switch ON the Main Power. If the Status
Code continues, call for service.
A1 – A2 Set Document Feeder Misfeed for
Page 47

Servicing Your Copier
In the USA and Canada
Should you be unable to resolve a problem after using the Problem Solving
section of this manual, place a call to the Xerox Customer Support Center
at:
1 – 800 – TEAM – XRX
(1 – 800 – 832 – 6979)
The Customer Support Representative can solve many problems over the
phone. Please have the following information available before calling:
–
The copier model number: XC ______________
(on the control panel)
–
The serial number ________________________
(Located on the back cover of the copier to the right of the power
supply.)
–
The purchase date from your purchase receipt (required for warranty
service).
–
A description of the problem.
– Status Code (if any) displayed on the control panel.
Ordering Supplies
To order supplies for your copier, call or visit your local retailer. If your
store does not stock these items, you may call:
Xerox SupplyNet toll free at:
1 – 800 – 822 – 2200
Toner Cartridge – 6R881
Drum Cartridge –13R544
43
Page 48

Packing the Copier
1. Disconnect the power cord.
Note: When carrying the copier, do not hold
onto the exit tray and do not insert your hand
into the exit tray.
2. Remove the SDF exit tray.
2
1
2. Press the release lever to open the copier.
3. Remove the toner cartridge.
4. Close the copier.
1. Open the paper tray(s), and remove the
copy paper.
2. Attach the pressure plate lock(s). Firmly
close the paper tray.
Note: The pressure lock storage
compartment is just inside the open copier.
8. Replace the shipping pins into the right
and left sides of the copier.
Note: The shipping pins are stored on the
underside of the exit tray.
XC810/ XC1040/ XC1045 copiers only
Note: Insert foam between the shipping pin
head and the alternate paper tray to protect
the tray.
9. Fold up the exit tray and the alternate
paper tray (XC810/ XC1040/ XC1045
copiers only).
10. Securely tape the exit tray, alternate paper
tray, and the document cover closed.
11. Pack the copier by reversing the
Unpacking instructions. (Refer to
Installation.)
44
Page 49
Technical Data
Original Size
Copy Ratio Percentages 1:1 ± 1%
Copy Paper Size and Weight Tray 1 and Tray 2
Copy Rate
XC810/XC820/XC830/XC865
XC1040/XC1020/
XC1044/XC1045
XC1250/XC1255
Paper Tray Capacity
XC820/XC830/XC865
XC810
XC1020/XC1044
XC1040/XC1045
XC1250/XC1255
First copy output time 8 seconds (warm) 20 seconds
Electrical Requirements
Maximum 10
Preset: 70*, 78, 86,100,129,141
Zoom: 70 – 141
5.5
×8.5 to 8.5×14"/A5 to
216
16 - 24 lb / 60 - 90 gsm
Bypass Tray
3.5
×5.5" to 8.5×14"/
A6 to 216
14 – 34 lb / 52 – 130 gsm
8 copies/minute (8. 5
smaller)
10 copies/minute (8.5
smaller)
12 copies/minute (8.5
smaller)
Paper Tray Paper Tray Bypass
100 1
100 50
250 1
250 50
2
×250 1
(cold)
AC 120V ± 10%, 50/60 Hz, 9.5A
AC 220/240V ± 10%, 50/60 Hz, 5A
×14" / B4
*customer settable
×356mm
×356mm
×11" / A4 and
×11" / A4 and
×11" / A4 and
45
Page 50

Technical Data
Machine Dimensions
XC820/XC830/XC810
XC865
XC1040/XC1020
XC1044/XC1045
XC1250
XC1255
Machine Weight
XC820/XC830/XC810
XC865
XC1040/XC1020
XC1044/XC1045
XC1250
XC1255
Power Consumption Max: 1.1kW
Width
×Depth×Height
20.1
×18.5×9.6" / 510×470×245mm
20.1
×18.5×11.2" / 510×470×285mm
×18.5×10.6" / 510×470×270mm
20.1
21.7
×18.5×12.2" / 550×470×310mm
20.1
×18.5×14.1" / 510×470×359mm
21.7
×18.5×15.7" / 550×470×400mm
(Includes Drum and Toner Cartridge)
41.1 lbs / 18.7kg
47.8 lbs / 21.7 kg
42.8 lbs / 19.0kg
49.5 lbs / 22.5kg
49.7 lbs / 22.6kg
56.4 lbs / 25.6kg
Standby: 35 Watts
Shut-off: 5 Watts
46
Page 51

3-Year Limited Warranty
In the USA
TOTAL SATISFACTION GUARANTEE:
Xerox warrants that if you are not totally satisfied with the performance of the Xerox Copier
which this warranty statement accompanies, at your option and upon your request, Xerox will
exchange or repair it at any time within three (3) years after your purchase.
IMPORTANT: This warranty applies only to Xerox copiers purchased and used in the United
States. This warranty gives you specific legal rights, and you may also have other rights
which vary from state to state.
PROOF OF PURCHASE:
To obtain an exchange or repair, proof of purchase is required. You must, within 10 days
after purchase, mail the enclosed registration card to Xerox Corporation Desktop
Products Group, P.O. Box 431, East Rochester, New York 14445-9983. Also, when you
make a warranty claim, you must present your original receipt or bill of sale to establish your
date of purchase.
IF YOU HAVE A PROBLEM:
The first step is to call our trained Customer Support Representative at 1-800-TEAM-XRX,
(1-800-832-6979). Many problems can be resolved over the phone. Before you call please
be ready to provide the model of your copier, its serial number, date of purchase, a
description of the problem, and a valid credit card number, should it be required (Mastercard,
Visa or American Express).
HOW IS EXCHANGE OBTAINED?
Our exchange program is the easiest and quickest way to provide you with a fully
operational copier. If you are not satisfied with the performance of your copier, you
may request an exchange unit. Upon your authorization to accept an exchanged unit
and with appropriate security (credit card authorization) we will, at no cost to you,
promptly ship a copier in exchange for your defective unit. The exchange unit we ship
to you will, at our option, be new or reconditioned by Xerox. You must then pack and
return your defective unit to us. Upon its receipt, we will release your credit card
security.
HOW IS WARRANTY REPAIR SERVICE OBTAINED?
If you prefer that we repair your copier instead of exchanging it for another unit, our Customer
Service Representative will explain how to obtain repair service under this warranty. Please
save the original packaging materials in order to facilitate shipment.
WHAT YOU MUST DO:
Your copier is designed to perform with a minimum amount of user maintenance. You are,
however, responsible for the required user maintenance described in the User Guide
provided with your copier. This required user maintenance includes the replacement of dry
ink (toner) cartridges, drum (copy) cartridges, or film cartridges, and clearing paper misfeeds,
cleaning the unit and other routine and preventive maintenance.
47
Page 52

3-Year Limit Warranty
WHAT THE WARRANTY DOES NOT COVER:
This warranty covers only defects in materials and workmanship provided by Xerox and does
not cover equipment damage or malfunction from misuse, abuse, accident, act of God,
defect in non-Xerox supplies, or non-Xerox alteration, modification or upgrade. Improper
return shipping, packaging or shipping damage is not covered unless the unit is packaged
and shipped in accordance with Xerox exchange procedures or via an authorized Xerox
Service Access Center. Replacement of drum cartridges, dry ink cartridges, film cartridges
and other supplies are customer maintenance responsibilities and are not covered by this
warranty. Scheduled maintenance, as described in the user guide (including that required
when a service indicator is "on") is not covered by this warranty. This limited warranty,
provided by Xerox, is only for copiers purchased and used in the United States.
EXCHANGE AN D RE PAIR ARE YOU R ON LY REM EDIES:
Your only remedy under this warranty is the exchange or repair of your copier as described
above. Xerox will not be liable for any incidental or consequential damages resulting
from your use of or inability to use your copier even if we know such damages are
possible.
IMPORTANT: Some states do not allow the exclusion or limitation of incidental or
consequential damages, so the above limitation or exclusion may not apply to you.
NO OTHER WARRANTY IS MADE BY XEROX:
No other warranty is made by Xerox. Any implied warranty of merchantability is limited
to the duration of this express limited warranty and thereafter is disclaimed. No other
warranty of any kind or type, whether express or implied will apply after the 3 year
period. Xerox expressly disclaims any implied warranty of fitness for a particular
purpose.
IMPORTANT: Some states do not allow limitations on how long an implied warranty lasts, so
the above limitation may not apply to you.
No reseller is authorized to modify the terms of this warranty. Any additional warranty offered
by a reseller is the sole responsibility of the reseller. This warranty is offered only to the first
end-user purchaser and is not valid for subsequent purchasers. The warranty period for an
exchange copier expires three years after the date you purchased the copier which this
warranty statement accompanies.
SERVICE AFTER YOUR THREE YEAR WARRANTY EXPIRES:
After your three year warranty expires you can obtain a low cost Xerox Maintenance
Agreement by simply calling 1-800-TEAM XRX (1-800-832-6979). We recommend you call
90 days prior to warranty expiration to assure continuous service coverage.
If you have questions about this warranty, phone us toll free at:
1-800-TEAM XRX (1-800-832-6979)
Please record your: Model XC: __________________________
48
Serial No: __________________________
Date Purchased:_____________________
Page 53

3-Year Limited Warranty
In Canada
TOTAL SATISFACTION GUARANTEE:
Xerox warrants that if you are not satisfied with the performance of the Xerox Copier which
this warranty statement accompanies, at your option and upon your request, Xerox will repair
or replace it at any time within three (3) years after your purchase. The replacement unit we
ship to you will be fully reconditioned by Xerox.
IMPORTANT: This warranty applies only to Xerox copiers purchased and used in Canada.
PROOF OF PURCHASE:
To obtain a repair or replacement, proof of purchase is required. You must, within 10 days
after purchase, mail the enclosed registration card to Canadian Retail Operations,
Xerox Canada Ltd, P.O. Box 3020, Stn LCD, Malton, Mississauga L4T9Z9. Also, when
you make a warranty claim, you must present your original receipt or bill of sale to establish
your date of purchase.
IF YOU HAVE A PROBLEM:
The first step is to call our trained Customer Support Representative at 1-800-TEAM XRX
(1-800-832-6979). Many problems can be resolved over the phone. Before you call please
be ready to provide the model of your copier, its serial number, date of purchase, and a
description of the problem.
HOW IS WARRANTY SERVICE OBTAINED?
Our Customer Support Representative will explain how to obtain repair/replacement service
under this warranty. Please save the original packaging materials in order to facilitate
shipment.
WHAT YOU MUST DO:
Your copier is designed to perform with a minimum amount of user maintenance. You are,
however, responsible for the required user maintenance described in the User Guide
provided with your copier. This required user maintenance includes the replacement of toner
(dry ink) cartridges, drum (copy) cartridges, or film cartridges, and clearing paper misfeeds,
cleaning the unit and other routine and preventive maintenance.
49
Page 54

3-Year Limited Warranty
WHAT THE WARRANTY DOES NOT COVER:
This warranty covers only defects in materials and workmanship provided by Xerox and does
not cover equipment damage or malfunction from misuse, abuse, accident, act of God,
defect in non-Xerox supplies, or non-Xerox alteration, modification or upgrade. Improper
return shipping, packaging or shipping damage is not covered unless the unit is packaged
and shipped in accordance with Xerox exchange procedures or via an authorized Xerox
Service Access Center. Replacement of drum cartridges, dry ink cartridges, film cartridges
and other supplies are customer maintenance responsibilities and are not covered by this
warranty. Scheduled maintenance, as described in the user guide (including that required
when a service indicator is "on") is not covered by this warranty. This limited warranty,
provided by Xerox is only for copiers purchased and used in Canada.
REPAIR OR REPLACEMENT ARE YOUR ONLY REMEDIES:
Your only remedy under this warranty is the repair or replacement of your copier as described
in this warranty. Xerox will not be liable for any incidental or consequential damages
resulting from your use of or inability to use your copier even if we know such
damages are possible.
NO OTHER WARRANTY IS MADE BY XEROX:
No other warranty is made by Xerox. Any implied warranty of merchantability is
limited to the duration of this express limited warranty and thereafter is disclaimed. No
other warranty of any kind or type, whether express or implied will apply after the 3
year period. Xerox expressly disclaims any implied warranty of fitness for a particular
purpose.
No reseller is authorized to modify the terms of this warranty. Any additional warranty offered
by a reseller is the sole responsibility of the reseller. This warranty is offered only to the first
end-user purchaser and is not valid for subsequent purchasers. The warranty period for a
replacement copier expires three years after the date you purchased the copier which this
warranty statement accompanies.
SERVICE AFTER YOUR THREE YEAR WARRANTY EXPIRES:
After your three year warranty expires you can obtain a low cost Xerox Maintenance
Agreement by simply calling 1 – 800 – TEAM – XRX (1 – 800 – 832 – 6979). We
recommend you call 90 days prior to warranty expiration to assure continuous service
coverage.
If you have questions about this warranty, phone us toll free at:
– 800 – TEAM – XRX (1 – 800 – 832 – 6979)
1
Please record your: Model XC: __________________________
Serial No: __________________________
Date Purchased:_____________________
50
Page 55

It's Illegal
In the USA
It is against US law to copy copyrighted material without permission of the
copyright owner unless the copying falls within the "Fair Use" or library
reproduction rights of the copyright law. Further information on these U.S.
provisions may be obtained from the Copyright Office, Library of Congress,
Washington, D.C. 20550, or telephone the Copyright Office at (202) 7079100 and ask for circular 21. Copying of other items may be prohibited. If
you have any questions, seek legal advice.
In Canada
In Canada it is against the law to copy copyrighted material without
permission of the copyright owner, unless the copying falls within the
private study, research or criticism provision of the copyright law. Copying
of other items may be prohibited. If you have any questions, seek legal
advice.
51
Page 56

Xerox Guarantee
Xerox Retail Total Satisfaction Guarantee
In the USA and Canada
At Xerox we are committed to the highest quality in the design,
manufacture and service of all we sell. We measure our success by one
standard: Total Customer Satisfaction.
Taking this commitment one step further, we now offer this exclusive Xerox
Total Satisfaction Guarantee:
If you are not satisfied with your Xerox equipment, at your request, Xerox
will replace it without charge to you with an identical model or a machine
with comparable features and capabilities.
The term of the Xerox Total Satisfaction Guarantee is three years from
purchase date.
This Xerox Total Satisfaction Guarantee applies to Xerox equipment
acquired by you from an Authorized Xerox Retailer and continuously
maintained by Xerox or its authorized representatives under our
manufacturers warranty. This guarantee applies to all equipment acquired
on or after September 5, 1990 and is not applicable to equipment damaged
or destroyed due to reasons beyond the control or responsibility of Xerox.
We make this extraordinary offer to clearly demonstrate that at Xerox our
measure of quality is our customers' satisfaction.
Refer to the product warranty discussed earlier in this manual for additional
details or call the following number:
1 - 800 - TEAM - XRX
(1 - 800 - 832 - 6979)
52
Page 57

Material Safety Data Sheet
XEROX Material Safety Data Sheet MSDS No: A-0602
Date: 7/18/96
Revision: 9/24/97
Distributor: Xerox Corporation
Rochester, NY 14644
Section I - Product Identification
Trade Names/Synonyms: XC810/XC820/XC830/XC1020/XC1040 Part No.: WH:
6R881
XC1044/XC1045/XC1245/XC1250 FX: 6R890
XC1255/XC865 Black Toner Cartridge
Chemical Name: None
WHMIS Status: This is not a WHMIS controlled product.
Ingredients (% by wt.)
Iron Powder (>85%)
Styrene Acrylate Copolymer (<15%)
Carbon Black (<1%)
Section II - Emergency and First Aid
Primary Route of Entry:
Inhalation
Eyes:
Flush thoroughly with water.
Skin:
Wash skin thoroughly with soap and water.
Inhalation:
Remove from exposure.
Ingestion:
Dilute stomach contents with several glasses
of water.
Telephone #(s):
Safety Information: (800)828-6571
Health Emergency: (716)422-2177
Transportation Emergency: (716)422-1230
CAS No.
7439-89-6
25767-47-9
1333-86-4
Symptoms of Overexposure:
Minimal respiratory tract irritation may occur
as with exposure to large amounts of any
non-toxic dust.
Medical Conditions Generally Aggravated
by Exposure:
None when used as described by product
literature.
Additional Information:
None
602E24580
53
Page 58

XEROX Trade Name: XC810/XC820/XC830/XC1020/XC1040 MSDS No.: A-
0602
This material has been evaluated by Xerox Corporation. The toxicity data presented below is
for toner only and based on test results of similar xerographic toner materials.
Oral LD
50
Dermal LD
toxic.
Inhalation LC
Eye Irritation: Not an irritant.
Skin Sensitization:Not a sensitizer.
Skin Irritation: Not an irritant.
Human Patch: Non-sensistizing, non-irritating.
Mutagenicity: No mutagenicity detected in Ames
Carcinogens: None present
Aquatic LC
Additional Information: The results obtained from a Xerox sponsored Chronic Toner
Inhalation Study, demonstrated no lung change in rats for the lowest (1mg/m³) exposure level
(i.e. the level most relevant to potential human exposure). A very slight degree of fibrosis
was noted in 25%
of fibrosis was noted in all the animals at the highest (16 mg/m³) exposure level. These
findings are attributed to "lung overloading", a generic response to excessive amounts of any
dust retained in the lungs for a prolonged period. This study was conducted using a special
test toner to comply with EPA testing protocol. The test toner was ten times more respirable
than commercially available Xerox toner, and would not be functionally suitable for Xerox
equipment.
1
Test results specific to this product. 2XEL-Xerox Exposure Limit
N.A. - Not Applicable N.E. -None Established N.D. -Not Determined
Appearance/Odor: Black powder/odorless
Boiling Point: N.A.
Solubility in Water: Negligible
Evaporation Rate: N.A.
Vapor Density (Air=1): N.A.
Volatile: N.A. (%Wgt) N.A. (%Vol.)
XC1044/XC1045/XC1245/XC1250/XC1255/XC865 Black Toner Cartridge
Section III - Toxicology and Health Information
5 mg/m
3
(total dust)
3
3
(respirable dust)
3
(respirable dust)
: >5 g/kg (rats) practically non-toxic.
: >5 g/kg (rabbits) practically non-
50
: >5 mg/l (rats, 4 hr
50
exposure)practically non-toxic.
>20 mg/l (rats, calculated 1 hr
exposure) non-poisonous, DOT.
1
test.
: >1125 mg/l (rainbow trout),non-
50
TLV: 10mg/m
PEL: 15 mg/m
STEL: N.E.
Ceiling: N.E.
2
: 2.5 mg/m3 (total dust)
XEL
0.4 mg/m
toxic.
of the animals at the middle (4mg/m³) exposure level, while a slight degree
Section IV - Physical Data
Softening Range: N.A.
Melting Point: N.A.
Specific Gravity (H2O=1): 1.1(Toner) /
4.7 (Developer)
Vapor Pressure@20oC (mm Hg): N.A.
pH: N.A.
Volatile Organics: N.D.
(total dust)
54
602E24580
Page 59

XEROX Trade Name: XC810/XC820/XC830/XC1020/XC1040 MSDS No.: A-
0602
Flash Point (Method Used): N.A.
Flammable Limits : LEL: 1.2% UEL: 9.6%
NFPA 704: Health - 0, Fire -1, Reactivity - 0
Extinguishing Media: Foam, dry chemical, CO
Special Fire Fighting Procedures: Avoid inhalation of smoke. Wear protective clothing and
Fire and Explosion Hazards: Toner is a combustible powder. Like most organic
Stability: Stable
Hazardous Polymerization: Will Not Occur
Hazardous Decomposition Products: CO and NO
Incompatibility (Materials to Avoid): None
Respiratory Protection: None required under normal use.
Eye Protection: None required.
Protective Gloves: None required.
Other: None
Handling and Storage: None
Conditions to Avoid: Avoid prolonged inhalation of excessive dust.
For spills or Leakage: Sweep up or vacuum spilled toner/developer and transfer into a
Waste Disposal Method: This material is not a hazardous waste according to Federal
XC1044/XC1045/XC1245/XC1250/XC1255/XC865 Black Toner Cartridge
Section V - Fire and Explosion Data
, water fog.
2
self-contained breathing apparatus.
materials in powder form, it can form explosive mixtures
when dispersed in air.
Section VI -Reactivity Data
x
Section VII - Special Protection Information
Section VIII - Special Precautions
Section IX - Spill, Leak, and Disposal Procedures
sealable waste container.
Regulation 40 CFR 261. State and local waste disposal
requirements may however be more restrictive. Consult with the
appropriate State and local authorities for specific information.
Incinerate only in a closed container.
Section X - Transportation Information
Proper Shipping Hazard
UN ID# Packing Exception
Name Class Group may apply
D.O.T. N.A. (Not Regulated)
I.A.T.A. N.A.
I.M.O. N.A.
The MSDS may not be the latest version. To obtain the latest version you may call
1-800-828-6571, or visit their Web site at: http://ids.xbs.xerox.com/ehs/msds/
55
 Loading...