

Page 1

Xe88qrg.bk Page 1 Thursday, February 17, 2000 4:25 PM
User
Guide
701P33173
WorkCentre XE88
USER GUIDE
Page 2

Xe88qrg.bk Page 2 Thursday, February 17, 2000 4:25 PM
Prepared by:
Xerox Industrial Design Human Interface
Graphic Design
Jefferson Road
Henrietta
New York
©2000 by Xerox Limited. All rights reserved.
Copyright protection claimed includes all forms and matters of copyrightable
material and information now allowed by statutory or judicial law or hereinafter
granted, including without limitation, material generated from the software
programs which are displayed on the screen, such as icons, screen displays,
looks, etc.
®
Xerox
and all Xerox products mentioned in this publication are registered
trademarks of the Xerox Corporation.
Product names and trademarks of other companies are also acknowledged.
Changes are periodically made to this document. Changes, technical inaccuracies
and typographical errors will be corrected in subsequent editions.
Publication number: 701P33173
Page 3

Xe88qrg.bk Page iii Thursday, February 17, 2000 4:25 PM
Table of Contents
USER GUIDE
Where do I find it? v
1. INTRODUCTION 1-1
WorkCentre Features 1-2
2. COPIER FEATURES 2-1
Paper Specifications 2-1
Loading Media 2-3
Control Panel 2-6
Copy Quality 2-6
Copy Contrast 2-7
Reduction/Enlargement Presets 2-7
Reduction/Enlargement 2-7
Indicators 2-8
On-line/Off-line Button 2-9
Ready Indicator Light Start 2-10
Clear 2-10
Message display 2-10
Programmable Feature Settings 2-11
Settings 0 - 7, 14 and 15 2-11
User Guide
iii
Page 4

Xe88qrg.bk Page iv Thursday, February 17, 2000 4:25 PM
Setting 10 2-13
Power Reductions 2-18
Power Save 2-18
Power Shut-Off 2-18
Auto Clear 2-19
Two-Sided Copying 2-19
Copying While Printing 2-20
3. PRINTING 3-1
4. SCANNING 4-1
Overview 4-1
TWAIN Scanner Driver 4-2
Starting the TWAIN Scanner 4-3
Scanning with TextBridge Pro 4-4
Scanning with other Software 4-6
5. TROUBLESHOOTING 5-1
E1 Jams at the Paper Tray 5-2
E2 Jams Inside the WorkCentre 5-3
E3 Jams at the Paper Exit Area 5-4
WorkCentre Fault Codes 5-5
Problems and Solutions 5-6
6. CLEANING AND MAINTENANCE 6-1
Cleaning the Outside 6-1
Cleaning the Glass and Cover 6-2
Cleaning the Drum Cartridge 6-3
To clean the drum surface 6-3
Service 6-4
7. CONSUMABLES 7-1
Copy/Print Count 7-2
Toner Cartridge Yield 7-2
Storage 7-3
Replacing the Toner Cartridge 7-4
Drum Cartridge Life 7-6
Replacing the Drum Cartridge 7-6
iv
User Guide
Page 5
Xe88qrg.bk Page v Thursday, February 17, 2000 4:25 PM
WHERE DO I FIND IT?
Where do I find it?
In addition to this User Guide, your WorkCentre XE88 comes
complete with a Getting Started Guide, CD-ROM, and a Warranty
Card. If you do not see what you are looking for in this User Guide,
check below to find where you can locate the information.
Getting Started
• Getting Started
•Setup
• Installation
• Connections
• Quick Procedures
CD-ROM
• WorkCentre Installation program
• Print and TWAIN Scan drivers
• TextBridge Pro 8.0 with Tour Guide and Online Help
Warranty Card
• Warranty Information
User Guide
v
Page 6

Xe88qrg.bk Page vi Thursday, February 17, 2000 4:25 PM
vi
User Guide
Page 7

Xe88qrg.bk Page 1 Thursday, February 17, 2000 4:25 PM
Chapter One
1
The WorkCentre is compact and easy to use.
It is specially designed to provide you with
high quality and high performance copying,
printing, and black and white scanning.
This guide tells you how to set up, operate,
maintain, and get the best performance from
your WorkCentre.
INTRODUCTION
1
User Guide
1.1
Page 8
Xe88qrg.bk Page 2 Thursday, February 17, 2000 4:25 PM
WORKCENTRE FEATURES
WorkCentre Features
The copy speed for the WorkCentre XE 88
is 8 copies per minute. The maximum
print speed for the Digital WorkCentre is
8 prints per minute. The WorkCentre
features a high-capacity paper tray for
easy loading of paper, envelopes, label
sheets and transparencies.
Some of the other advanced features
which can be selected from the control
panel of this WorkCentre include:
• Copy ratio: two reduction values, two
enlargement values, one customerprogrammable value
• Zoom R/E ratio range: 50 to 200%
• Copy Quality modes: Automatic,
Text, Photo, Toner Saver
• Programmable defaults
• Fault indicators and error message
display
• Scanning in black and white
1.2
User Guide
Page 9

Xe88qrg.bk Page 1 Thursday, February 17, 2000 4:25 PM
Chapter Two
2
Paper Specifications
For reliable WorkCentre operation and good
copy/print quality, Xerox recommends that
paper be stored appropriately:
• on a flat surface.
• in a closed container.
• in a low humidity area.
• tightly wrapped, if the ream is partially
used.
COPIER FEATURES
Selecting Media
Note: Paper affected by humidity, and
curled paper can cause jams and copy/
print quality problems.
2
User Guide
2.1
Page 10
Xe88qrg.bk Page 2 Thursday, February 17, 2000 4:25 PM
PAPER SPECIFICATIONS
Paper Input Paper Tray
Sizes 3 7/8 x 5 7/8 to 8 ½ x 14 in.
(98 to 216 x 315/330 mm)
Weights: Optimum
Range
Capacities:
Copy, letterhead, and predrilled
Labels and Transparencies * Yes (1 at a time )
Envelopes (one at a time) COM-10 (4.1 x 9.5 in. / 216 x 279 mm)
20 lb / 80 g/m²
14 - 34 lb
52 - 130 g/m²
20 lb / 80 g/m²
XE86: 200 sheets
XE88: 250 sheets
Monarch (3.87 x 7.5 in. / 98.5 x 191 mm)
C5 (6.4 x 9.16 in. / 162 x 229 mm)
DL (4.4 x 8.8 in. / 110 x 220 mm)
* Use labels and transparencies specifically designed for copiers (high temperatures).
Caution: Do not insert paper with metallic attachments such as staples or paper clips, nor
place anything on top of the WorkCentre. They get stuck in the paper feeding mechanism and
will scratch the drum and damage other parts of the WorkCentre mechanism.
2.2
User Guide
Page 11
1
2
1
2
Xe88qrg.bk Page 3 Thursday, February 17, 2000 4:25 PM
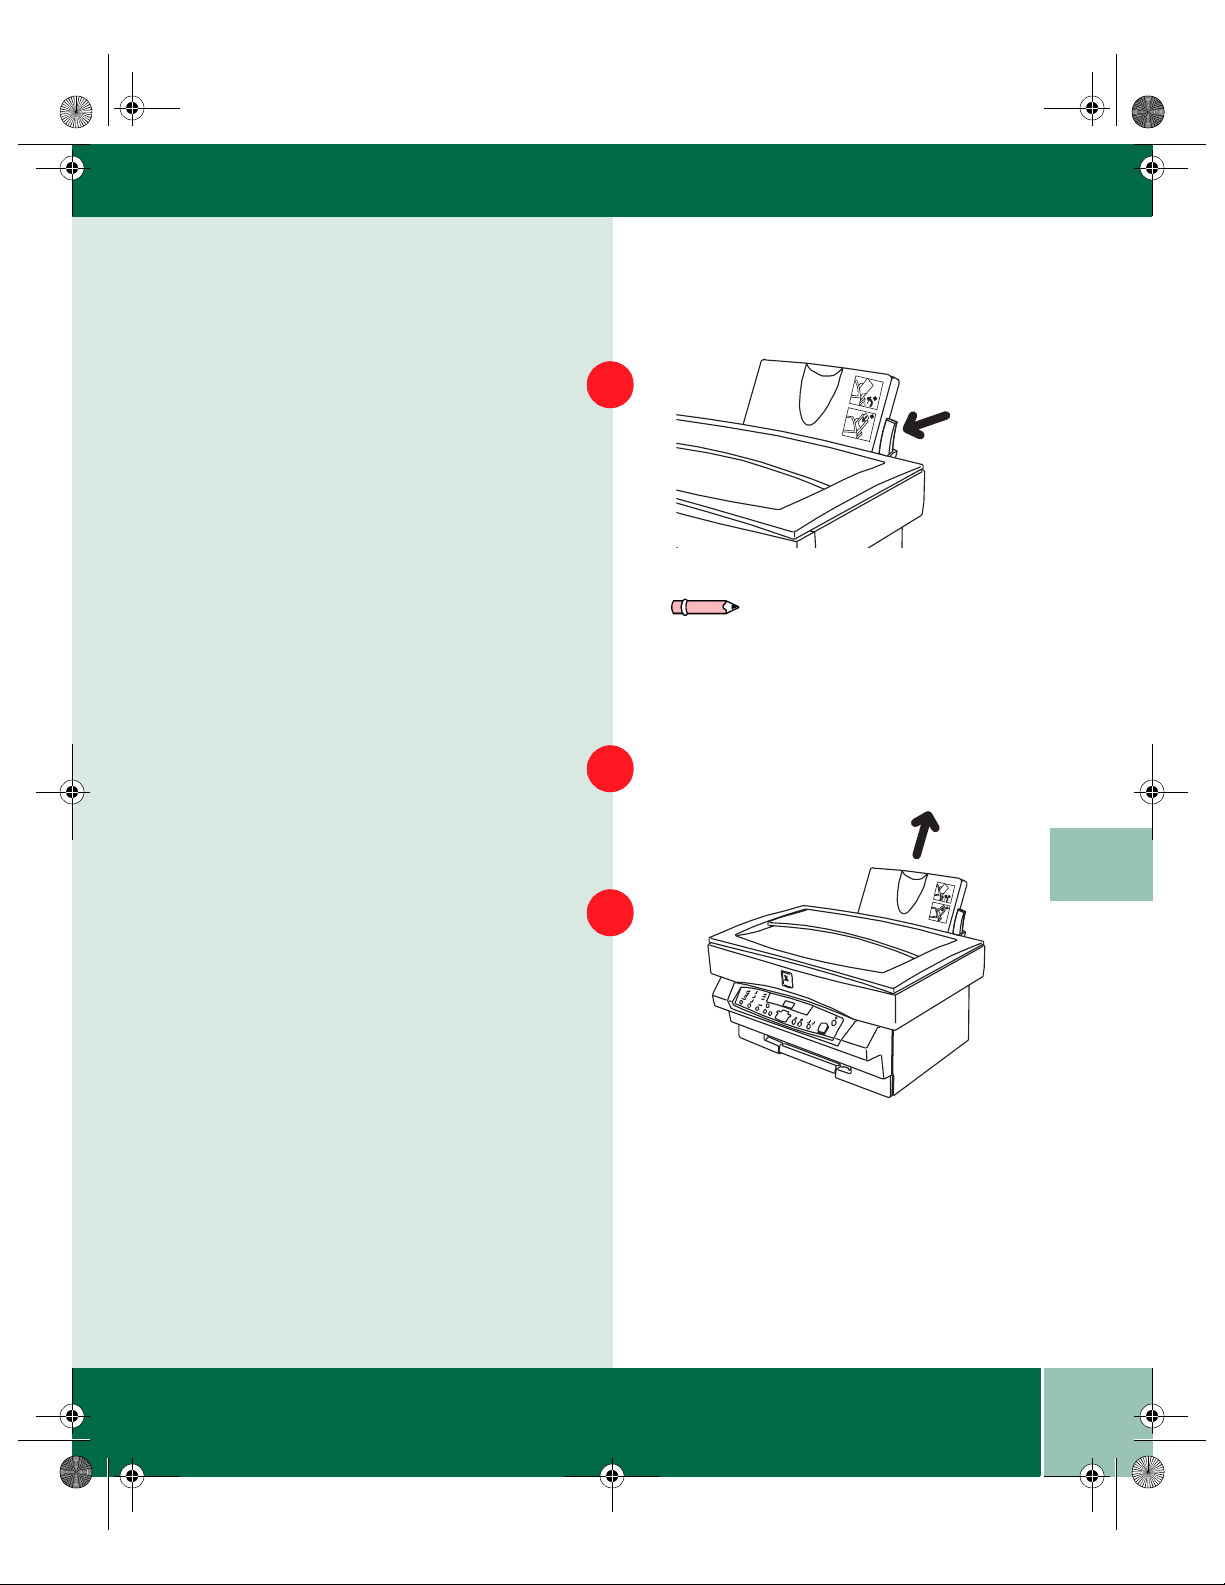
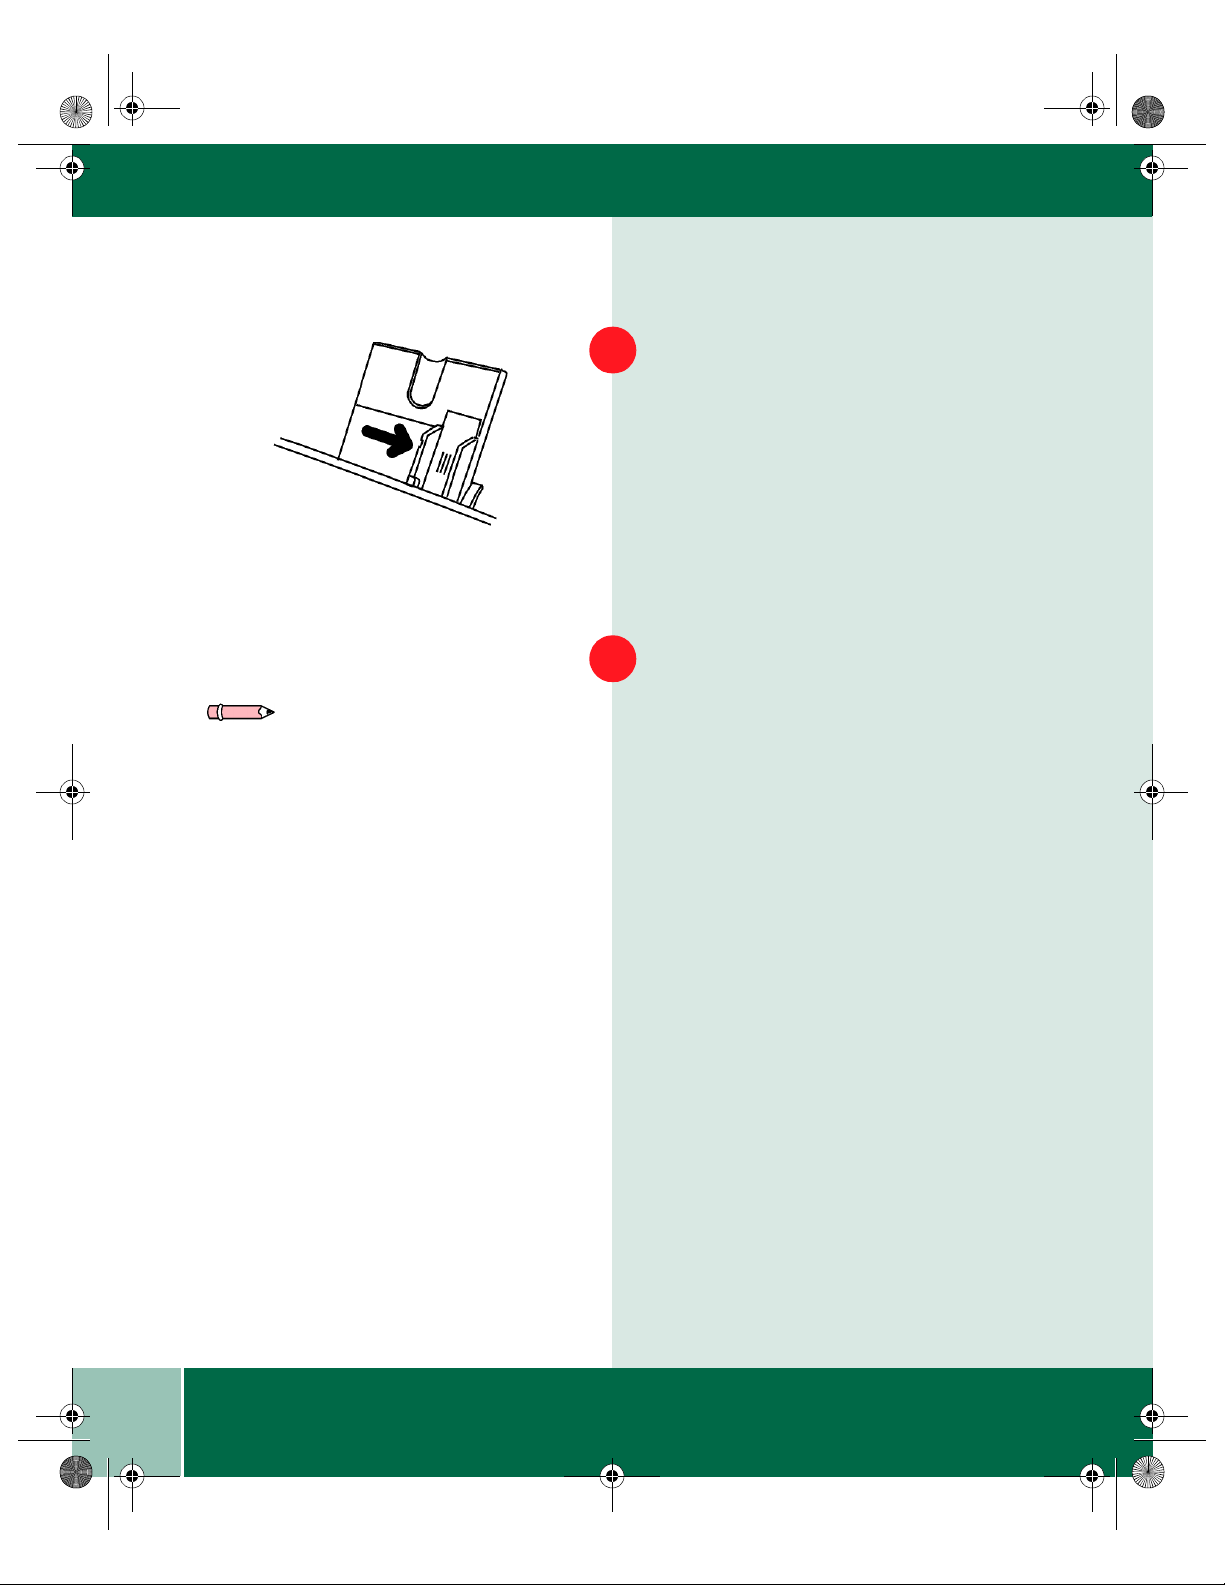
LOADING MEDIA
Loading Media
Pull the paper release lever at the right of the
paper tray toward you until it locks into place.
If you are using extra-long paper
such as legal
size, raise the paper support to hold the paper
once it has been inserted.
Place the paper into the paper tray with the
side to be printed facing toward you. Adjust
the position of the paper so that its right edge
is up against the right paper guide.
1
Note: E1 and E2 paper jams will occur
if the release lever does not lock into
place during paper loading.
2
2
3
User Guide
2.3
Page 12
Xe88qrg.bk Page 4 Thursday, February 17, 2000 4:25 PM
LOADING MEDIA
Move the left paper guide until it is resting
4
gently against the left edge of the paper.
The paper tray can be filled to the MAX
line with standard weight paper (16 to 24
lbs.
Note: It is recommended that you load
and print one envelope or
transparency at a time.
Gently
The paper will be clamped by the paper
feed roller inside the printer.
If printing onto an envelope:
push the paper release lever back.
5
Ensure that the side to be printed on is
facing upwards (as shown by the imprint
on the paper tray) and the flap on the
reverse side is closed and at the right
when looking from the front of the
printer. Leave a gap of approximately
1/32 in. (1 mm) between the paper guide
and the left edge of the envelope.
2.4
User Guide
Page 13
Xe88qrg.bk Page 5 Thursday, February 17, 2000 4:25 PM
LOADING MEDIA
Push the paper release lever back. The paper
will be clamped by the paper feed roller inside
the printer.
Do not reuse the misfed paper.
6
Note: Paper jams (E1) may
occur if:
• the paper lever is not used.
• the paper tray is overstacked.
Do not use materials that:
• are composed with glues, inks and
adhesive that could discolor, scorch, or
melt when heat is applied
• have cellophane windows, peel-off
adhesive strips
• are heavily textured, coated or embossed
• are cotton paper composed of more than
25% of recycled paper.
• the space between the paper guide
and the left edge of the paper is
greater than 1 mm.
• the paper guide is pushing the
paper so hard that the paper
buckles.
• the paper is not stored properly
and absorbs moisture from the air
(replace the paper).
2
User Guide
2.5
Page 14

C
O
Xe88qrg.bk Page 6 Thursday, February 17, 2000 4:25 PM
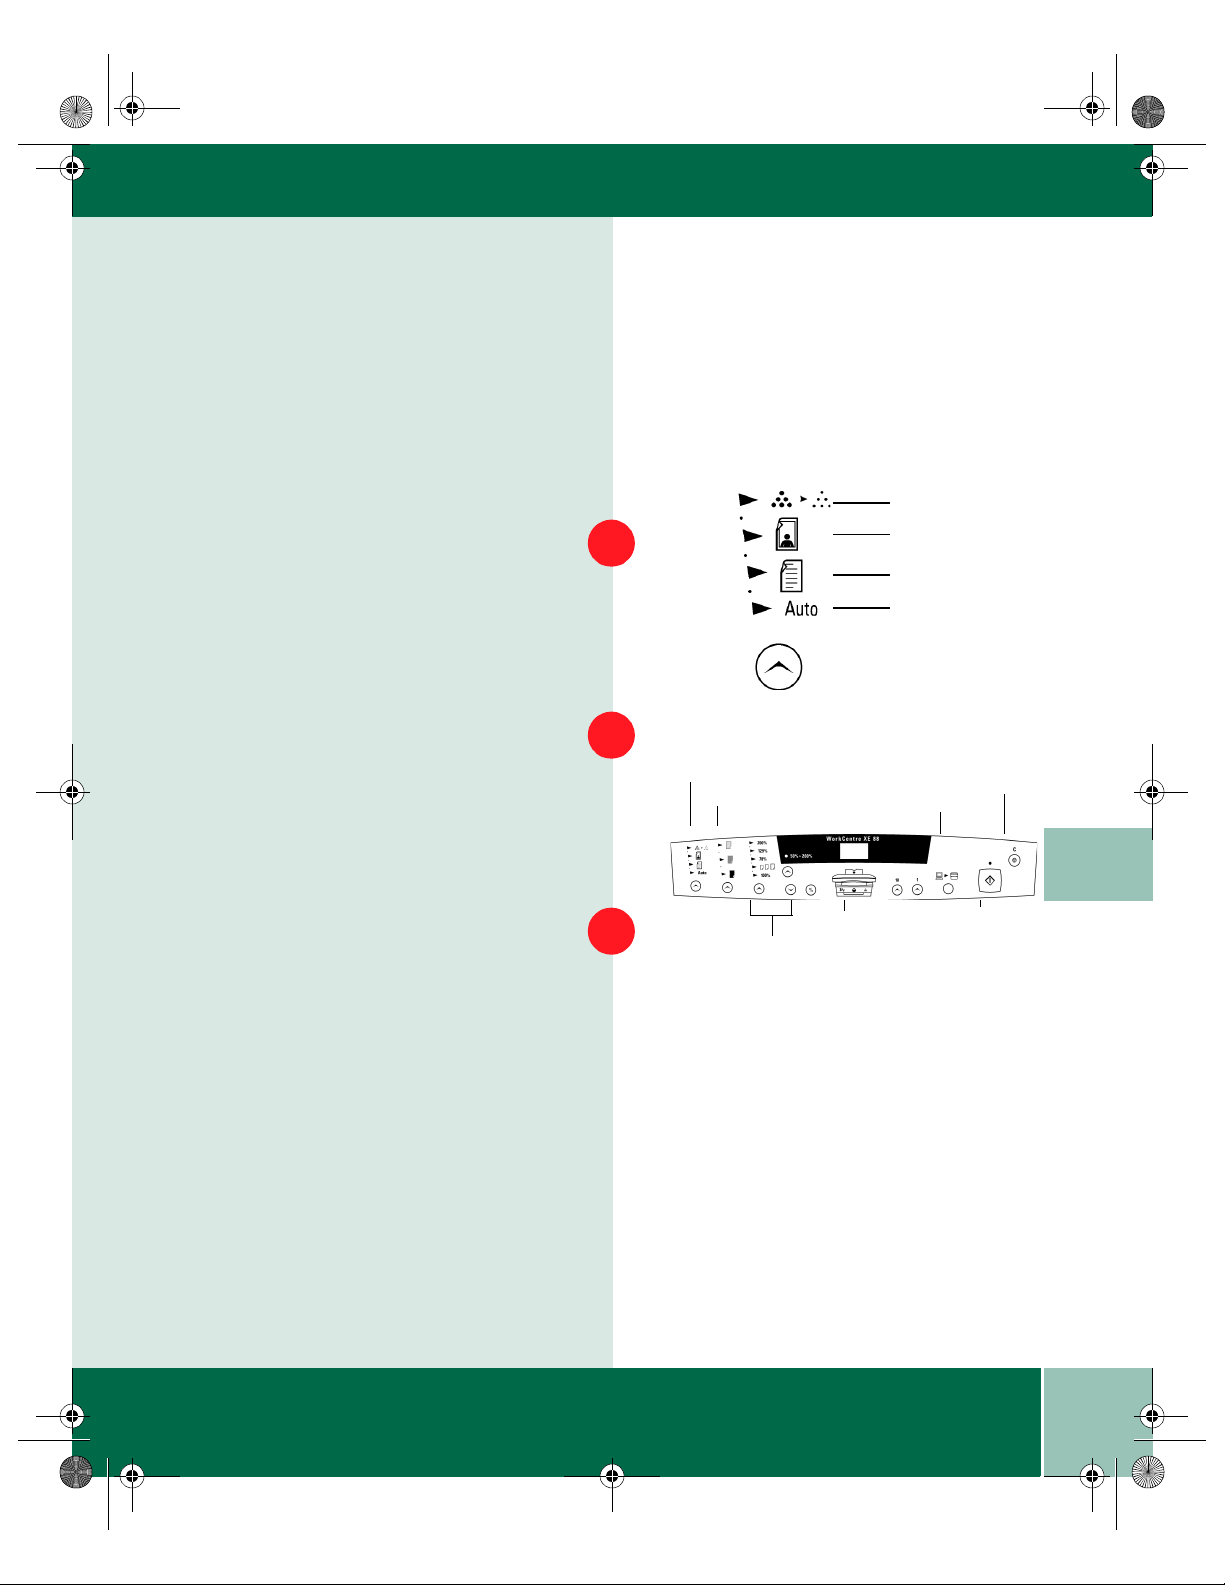
CONTROL PANEL
opy Quality
Copy Contrast
Reduce/Enlargement
Indicators
n-Line/
Off-Line
Clear
Ready
Note: When Auto is selected, the copier
automatically varies the contrast of
your copies. Lighter/Darker settings
are not available.
Toner Saver
Photo
Text
Auto
Control Panel
Copy Quality
Select Auto Exposure, Text, Photo or
Toner Saver.
Use Auto when copying from originals
with a colored background. (Auto is the
default setting.)
Use Text to copy documents containing
mostly text. If you copy primarily text
documents, you can change the default to
Text mode for darker copies.
Use Photo when the originals are
photographs.
Toner Saver mode lowers the cost of
copying by decreasing overall copy density
on each page. Use this feature when
making draft copies.
2.6
User Guide
Page 15
Xe88qrg.bk Page 7 Thursday, February 17, 2000 4:25 PM
REDUCTION/ENLARGEMENT PRESETS
Copy Contrast
Adjust the exposure from lighter to darker for
Text, Photo and Toner Saver. The indicators
light up one or two at a time to represent the
selected setting. There are 5 variations
represented by 3 lights.
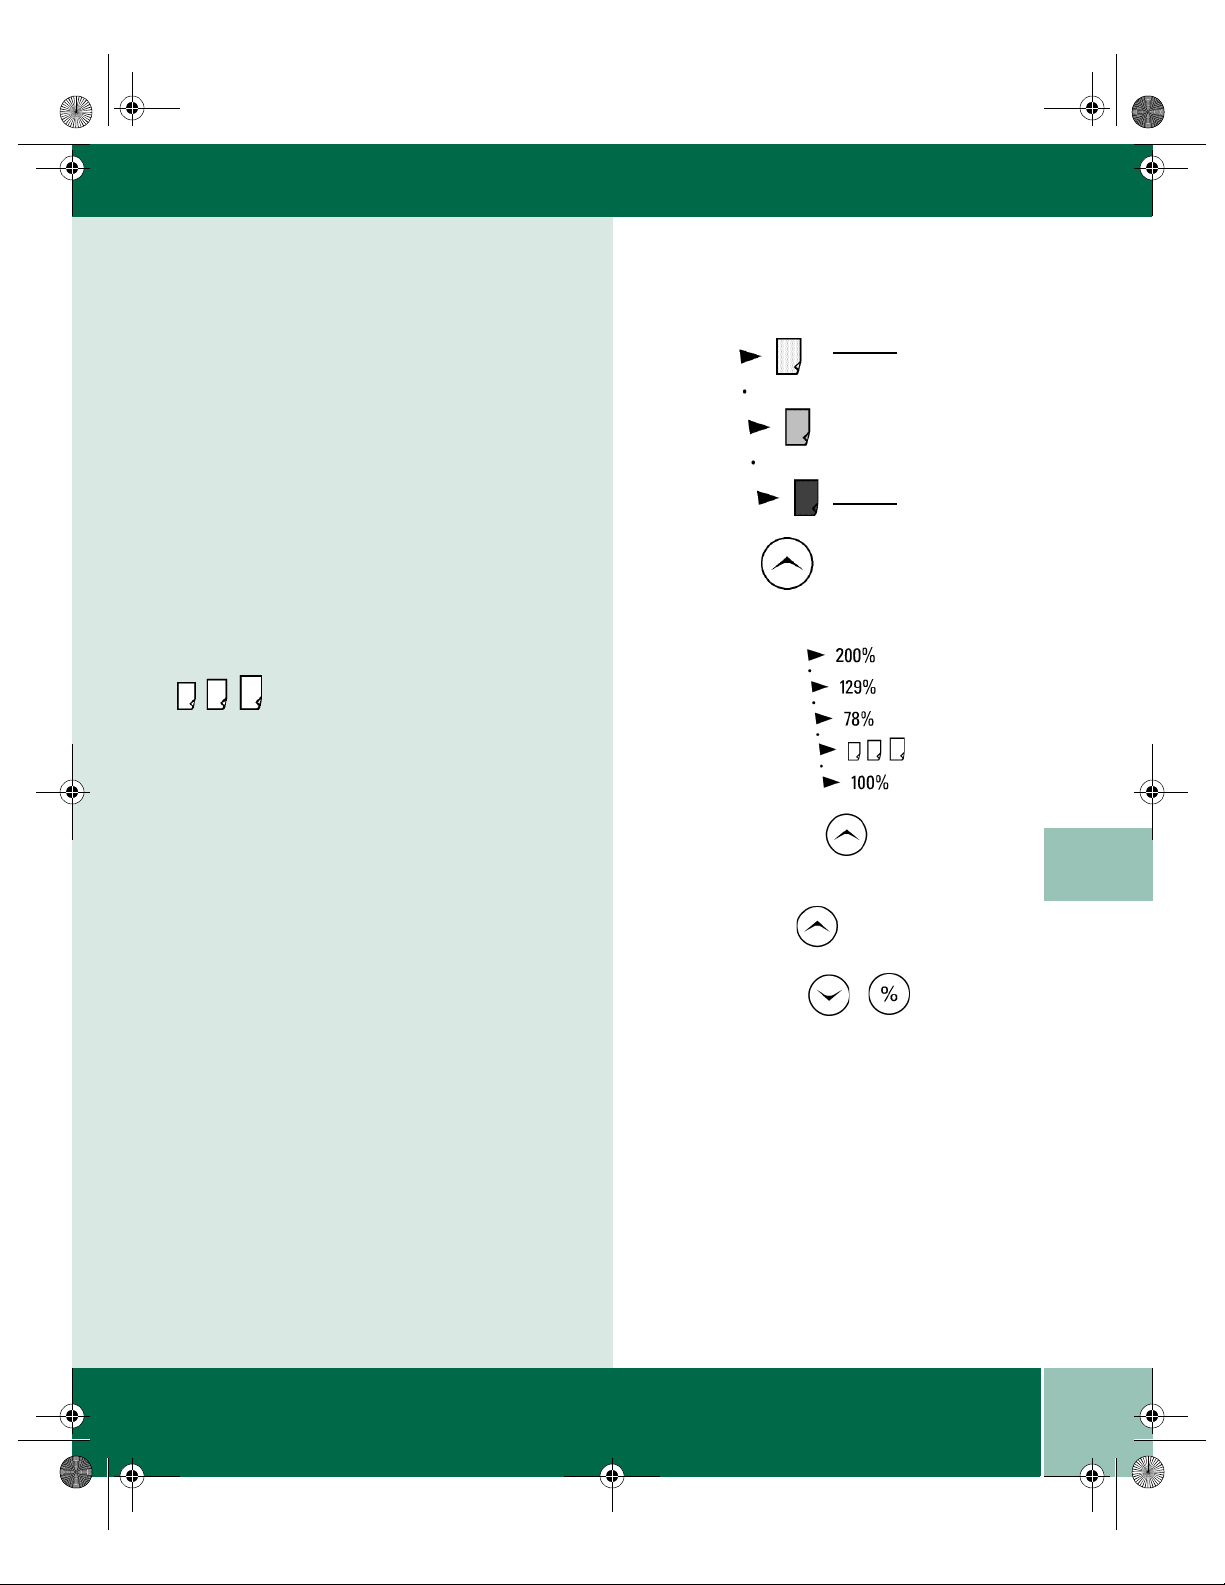
Reduction/Enlargement Presets
Lightest
Darkest
is preset at 50% and is customer
programmable. 78%, 129% and 200% are
standard reduction/enlargement options.
(Refer to Programmable Feature Setting 10)
Reduction/Enlargement
The down and up arrows reduce and enlarge
in 1% increments. The % button indicates the
present percent chosen when pressed.
2
User Guide
2.7
Page 16
Xe88qrg.bk Page 8 Thursday, February 17, 2000 4:25 PM
INDICATORS
Paper Tray Indicator
Jam Drum Toner
Indicators
The paper tray indicator blinks when the
paper tray is out of paper. The indicator
light is green.
The jam indicator blinks when a jam
occurs and a fault code will appear. The
indicator light is red.
The drum indicator is on when the drum
is near end of life and blinks when the
drum is at end of life. The indicator light
is red.
The toner indicator comes on when the
toner is low. The indicator light is red.
2.8
User Guide
Page 17
Xe88qrg.bk Page 9 Thursday, February 17, 2000 4:25 PM
INDICATORS
On-line/Off-line Button
Alternates between the On-line and Off-line
status.
The On-line/Off-line button can be pressed to
interrupt a print job to run a copy job. When
the copy job is complete, touch the
On-line/Off-line button to revert to print
mode, or the machine will revert to print
mode automatically after 1 minute.
• When the light is on, the WorkCentre is
ready.
• When the light is off, there is no
communication to or from the PC.
Note: The time for mode reversion is
programmable. See Programmable
Feature Settings later in this chapter.
• When the light is blinking, data is being
received from the PC.
2
User Guide
2.9
Page 18
Xe88qrg.bk Page 10 Thursday, February 17, 2000 4:25 PM
WorkCentre XE 88
50% 200%
INDICATORS
Ready Indicator Light Start
Press to start copying.
Clear
• Stops a copy job in progress after
completing the copy being made.
• Changes the copy quantity to one
after the entire job is complete.
• Displays copy count information
(refer to Copy Count).
Message display
Indicators light up when there is a fault.
The fault codes will appear in the Message
Display.
2.10
User Guide
Page 19
Xe88qrg.bk Page 11 Thursday, February 17, 2000 4:25 PM
PROGRAMMABLE FEATURE SETTINGS
Programmable Feature Settings
Settings 0 - 7, 14 and 15
To change the programmable features in the
chart on the following pages, follow the steps
below.
Select the Toner Saver.
1
Toner Saver
Photo
Text
Auto
Press again and hold the Copy Quality button
for approximately 4 to 6 seconds.
• The light next to Auto will light.
• The lights within the WorkCentre
Diagram will f lash.
From the Programmable Features Chart on
page 2.11, select the Program Number of the
feature to be changed. Enter the selection
using the 10 button.
2
3
Copy Quality
Copy Contrast
Reduce/Enlargement
Indicators
On-Line/
Off-Line
Clear
2
Ready
User Guide
2.11
Page 20

N
Xe88qrg.bk Page 12 Thursday, February 17, 2000 4:25 PM
PROGRAMMABLE FEATURE SETTINGS
ote: To continue making other
changes, press the Clear button and
repeat steps 3 - 6.
Press Start. The current setting for that
4
program will flash.
Press the 1 button until the option
number you want is displayed.
5
Press Start to store the selection.
6
Press the Copy Quality button to return to
7
the copy mode.
2.12
User Guide
Page 21

Xe88qrg.bk Page 13 Thursday, February 17, 2000 4:25 PM
PROGRAMMABLE FEATURE SETTINGS
Setting 10
Use the following procedure to change the
preset Reduction/Enlargement default
setting. This feature allows you to set a
specific preset reduction or enlargement
between 50-200%.
Select the Toner Saver by using the Copy
Quality button.
Press again and hold the Copy Quality butt on
for approximately 4 to 6 seconds.
• The light next to Auto will light.
• The lights within the WorkCentre
Diagram will f lash.
Press the 10 button until the number 10 is
displayed.
Press Start. The current reduction/
enlargement setting will flash.
1
2
3
4
2
User Guide
2.13
Page 22

Xe88qrg.bk Page 14 Thursday, February 17, 2000 4:25 PM
PROGRAMMABLE FEATURE SETTINGS
Press the Variable Percentage buttons
5
until the desired percentage is displayed.
Press Start to store the selection.
6
Press the Clear button to continue
7
making other changes. Press the Copy
Quality button to return to the copy.
2.14
User Guide
Page 23

Xe88qrg.bk Page 15 Thursday, February 17, 2000 4:25 PM
PROGRAMMABLE FEATURE SETTINGS
Program
Number
1 Auto Clear time-out 0 - Off
2 Time-out to Power Save
(Part of Power Saver )
3 Time-out to Power Shut-off
(Part of Power Saver )
Program
Option Number/
Option
(Default is bold)
1 - 30 seconds
2 - 60 seconds
3 - 90 seconds
4 - 120 seconds
0 - Off
1 - 45 seconds
2 - 90 seconds
3 - 2 minutes
4 - 5 minutes
0 - 2 minutes
1 - 5 minutes
2 - 15 minutes
3 - 30 minutes
4 - 60 minutes
5 - 120 minutes
6 - Off
2
User Guide
2.15
Page 24

Xe88qrg.bk Page 16 Thursday, February 17, 2000 4:25 PM
PROGRAMMABLE FEATURE SETTINGS
Program
Number
4 Default Magnification: This
feature allows you to make
copies slightly larger or
smaller than the original, or
the same size.
5 Default Copy Quality: This
feature allows you to select
the default Copy Quality
mode.
6 Copy Contrast Adjustment:
The copy contrast range may
be adjusted when the copy
image is consistently too light
or too dark.
Program
Option Number/
Option
(Default is bold)
0 - 100%
1 - 99%
2 - 101%
0 - Auto
1 - Text
2 - Photo
3 - Toner Saver
0 - Lightest:-4
1 - -3
2 - -2
3 - -1
4 - Nominal
5 - +1
6 - +2
7 - +3
8 - Darkest:+4
2.16
User Guide
Page 25

Xe88qrg.bk Page 17 Thursday, February 17, 2000 4:25 PM
PROGRAMMABLE FEATURE SETTINGS
Program
Number
7 Paper Trail Edge Void (4
mm): The trail edge void can
be turned off to accommodate
originals that have print to
the very bottom edge. When
Off, another 4 mm will copy;
however, the image quality
may deteriorate as it gets
closer to the bottom edge.
10 Zoom R/E Preset 50-200% in 1% increments
14 Return to Print Mode time-out
Program
Option Number/
Option
(Default is bold)
0 - On
1 - Off
(default: 50%)
0 -1 minute
1 - 1.5 minutes
2 - 2 minutes
3 - 2.5 minutes
4 - 3 minutes
5 - Off, infinite time out
2
For assistance in changing the preset values refer to Programmable Feature Settings.
User Guide
2.17
Page 26

Xe88qrg.bk Page 18 Thursday, February 17, 2000 4:25 PM
POWER REDUCTIONS
Power Reductions
There are two modes of power reduction:
Power Save, and Power Shut-off.
Power Save
In this mode, the fuser is maintained at a
lower heat level, thereby saving power.
The Ready Indicator will flash and the
other indicators will remain on. To copy,
press Start. The copies will be made
automatically.
Note: Time periods for the Power ShutOff, Power Save, and Auto Clear can be
modified to meet your specific copying
needs. Refer to the Programmable
Features Settings section of this User
Guide for information about changing
these settings.
Power Shut-Off
This mode saves more power than the
Power Save Mode, but requires more time
before copying can begin. When the
copier enters the power shut-off, the
Ready Indicator will flash and the other
indicators will turn off. To copy from the
power shut-off, press the Start button,
then select the desired features and press
Start again.
2.18
User Guide
Page 27

Xe88qrg.bk Page 19 Thursday, February 17, 2000 4:25 PM
TWO-SIDED COPYING
Auto Clear
This WorkCentre is enabled at the factory to
return to the Normal Copy mode
approximately one minute after a job is
completed.
• Copy Quality - Auto
• Copy lighter/darker - Normal
• Priority Magnification - 100%
•Quantity Selected - 1
Adjust the side guide within 1/32 in.
Two-Sided Copying
Place one original face down on the
Document Glass, with the TOP toward the
LEFT. Lower the document cover.
Select quantity.
Press Start to make side 1 copy.
1
2
3
Note: 16 lb/60 g/m2 paper is not
recommended for two-sided copying.
Note: Failure to follow this procedure
will cause paper jams and copy quality
defects.
2
User Guide
2.19
Page 28

Xe88qrg.bk Page 20 Thursday, February 17, 2000 4:25 PM
COPYING WHILE PRINTING
Remove the first original and place the
4
second original face down on the Document Glass with the TOP toward the
RIGHT, and lower the document cover.
Remove side 1 copy from the output tray
5
and insert it face down, BOTTOM toward
the TOP OF THE PAPER TRAY.
Select a quantity of one.
6
Press Start.
7
Note: When you complete the copy job,
the factory preset is 1 minute before it
reverts to print mode, or you may touch
the On-line/Off-line button to take it
back to print mode. The machine will
resume printing if pages are pending.
Copying While Printing
To copy a job while the machine is
printing:
Set up the copy job while the machine is
1
printing.
Press Start. The current page will finish
2
printing, then the copy job will start.
2.20
User Guide
Page 29

Xe88qrg.bk Page 1 Thursday, February 17, 2000 4:25 PM
Chapter Three
3
Printing
From your Windows application file menu,
choose Printer Setup (or the equivilant).
Select the WorkCentre XE printer. Click OK.
Click on the Print Button.
PRINTING
1
Note: For help wi th Printer Setup, refer
to the documentation that came with
your Windows software application.
2
3
3
User Guide
3.1
Page 30

Xe88qrg.bk Page 2 Thursday, February 17, 2000 4:25 PM
Note: Windows 95/98 Shortcut:
Right-click on My Computer-Select
Properties-click on Device Manageropen the Ports (click on the + sign). If
ECP is enabled, the printer port will be
called ECP Printer Port {LPT1}.
Note: If ECP mode is not enabled, print
speed will be reduced and the scanning
feature will not function.
Enabling High Speed Printer
Communications
To ensure high-speed print performance,
the WorkCentre XE88 was designed to
take advantage of high-speed parallel port
communications between your personal
computer and your WorkCentre. This can
be accomplished by enabling the
Extended Capabilities Port (ECP) mode
for your personal computer parallel port
(LP1, LPT2 etc.).
If your personal computer does not
appear to have ECP mode enabled, do the
following:
Check the documentation for your
1
personal computer for a description of
this feature. Look particularly for BIOS
and/or CMOS settings.
If necessary, call the manufacturer of
your personal computer. Be prepared
2
with the model and serial numbers.
3.2
You may need to add an ECP Board to your
personal computer to allow your personal
computer to operate in this mode.
User Guide
Page 31

Xe88qrg.bk Page 1 Thursday, February 17, 2000 4:25 PM
Chapter Four
4
Overview
The WorkCentre TWAIN Scanner Program is
an image-scanning program that operates
under various image-editing and OCR
(Optical Character Recognition)
applications. The WorkCentre TWAIN
Scanner Driver may be used with any TWAINcompliant application software. The scanner
program software will operate the
WorkCentre black and white scanner.
The TWAIN standard allows many software
packages access to the same scanner.
Examples of some TWAIN-compliant software
packages are: ScanSoft Pagis Pro, ScanSoft
TextBridge Pro, and Adobe PhotoShop.
TextBridge Pro is provided with your
WorkCentre.
SCANNING
Note: If ECP mode is not enabled, print
speed will be reduced and the scanning
feature will not function.
4
Note: For questions concerning
TextBridge applications, consult
TextBridge online help.
User Guide
4.1
Page 32

Xe88qrg.bk Page 2 Thursday, February 17, 2000 4:25 PM
TWAIN SCANNER DRIVER
Note: Your WorkCentre scans in
black and white only.
TWAIN Scanner Driver
The TWAIN standard is an image data transfer
protocol developed to allow one software
package to use many devices. Some examples
of TWAIN-compliant devices are: flatbed
scanners, drum scanners, digital cameras,
and video frame grabbers.
The WorkCentre TWAIN Scanner Driver
provides the following array of scanning
controls and previewing options:
• Image type
•Resolution
•Control brightness
To access these features, the WorkCentre
TWAIN Scanner window opens when Acquire
(or a similar selection) is selected from the
File menu of a TWAIN-compliant image
editing application.
With this array of image previewing and
scanning functions, you can see the results of
the changes you made to an image, before you
save the images you create.
4.2
User Guide
Page 33

Xe88qrg.bk Page 3 Thursday, February 17, 2000 4:25 PM
STARTING THE TWAIN SCANNER
Starting the TWAIN Scanner
The WorkCentre TWAIN Scanner window will
be displayed when you choose the WorkCentre
to scan documents or photographs from the
TWAIN-compliant image editing application.
There are two ways to start the TWAIN
Scanner application:
• TextBridge Pro
• Other TWAIN-compliant software.
User Guide
4
4.3
Page 34

Xe88qrg.bk Page 4 Thursday, February 17, 2000 4:25 PM
SCANNING WITH TEXTBRIDGE PRO
Note: OCR software was loaded
during installation.
Note: For more advanced scanning
information, please refer to the
TextBridge Pro Online help.
On your computer, begin at the Start
menu:
Start →→→→Programs →→→→TextBridge Pro 8.0
→Τ
→ΤextBridge Help
→Τ→Τ
1
2
Scanning with TextBridge Pro
From the Start menu, select Programs
→→→→TextBridge Pro 8.0 →→→→TextBridge Pro 8.0
From the File menu, click on Select Scanner.
A list of supported scanners will be displayed.
From the list, select Xerox WorkCentre
3
(TWAIN). Click OK.
From the Process menu, select Auto. A Page
4
Type dialog will be displayed.
Select the desired page type and select
5
Scanner as the Page Source. Click OK.
4.4
User Guide
Page 35

N
Xe88qrg.bk Page 5 Thursday, February 17, 2000 4:25 PM
SCANNING WITH TEXTBRIDGE PRO
The Xerox WorkCentre XE TWAIN Scanner
screen displays. Select the appropriate scan
options for the document or photograph to be
scanned. After adjusting the settings in the
scan window, you can do a prescan of the
image before making a final scan. To scan:
a) Place the document on the
document glass.
b) Click the Prescan button.
The WorkCentre scans the image and a
preview appears in the scanner window.
Adjust the scan options as desired on the Basic
screen before initiating the final scan.
6
7
Click the Scan button. The WorkCentre scans
the image and an updated image displays with
TextBridge Pro.
To scan another page, click More pages.
When you have scanned all of your pages, click
No More.
8
9
Your TWAIN Scanner has two tabs:
ote:
The
The
you click on "About".
tab appears automatically.
Basic
tab is hidden and appears when
About
4
User Guide
4.5
Page 36

Xe88qrg.bk Page 6 Thursday, February 17, 2000 4:25 PM
SCANNING WITH OTHER SOFTWARE
Scanning with other Software
Start Windows.
1
Start the TWAIN-compliant image-editing
2
software.
In most programs, choose the Select Source
3
option from the File menu.
the list, select Xerox WorkCentre
From
4
(TWAIN). Click OK.
Open the File menu and select Acquire/Scan.
5
The WorkCentre TWAIN Scanner window
appears.
4.6
User Guide
Page 37

Xe88qrg.bk Page 7 Thursday, February 17, 2000 4:25 PM
SCANNING WITH OTHER SOFTWARE
Select the appropriate scan options for the
document or photograph to be scanned.
After adjusting the settings in the scan
window, you can do a preliminary preview
scan of the image before making a final
scan. To launch a preview scan:
a) Place the document on the
document glass.
b) Click the Prescan button.
The WorkCentre scans the image and a
preview appears in the scanner window.
6
Adjust the scan options as desired before
initiating the final scan.
Click the Scan button. The WorkCentre scans
the image and an updated image displays.
7
8
4
User Guide
4.7
Page 38

Xe88qrg.bk Page 8 Thursday, February 17, 2000 4:25 PM
4.8
User Guide
Page 39

Xe88qrg.bk Page 1 Thursday, February 17, 2000 4:25 PM
Chapter Five
5
This section describes Troubleshooting
procedures for:
• Clearing jams
• Error Messages
Refer to the specific subsection for a
description of problems and associated
solutions.
TROUBLESHOOTING
5
User Guide
5.1
Page 40

1
2
1
2
Xe88qrg.bk Page 2 Thursday, February 17, 2000 4:25 PM
E1 JAMS AT THE PAPER TRAY
E1 Jams at the Paper Tray
Pull the paper release lever at the right of
1
the paper tray toward the front of the
WorkCentre.
Remove all the paper, including the
2
jammed paper, from the paper tray.
Straighten the edges of the paper and
3
then reinsert it into the paper tray.
Push the paper release lever back again to
4
secure the paper.
Caution: If the jammed paper will not
come out easily, do not pull too hard, as
you may tear or damage the copying/
printing mechanism. In such cases, go
to the inside of the WorkCentre. Lift the
toner CRU handle to release the force on
the paper.
5.2
User Guide
Page 41

1
2
1
2
Xe88qrg.bk Page 3 Thursday, February 17, 2000 4:25 PM
E2 JAMS INSIDE THE WORKCENTRE
E2 Jams Inside the WorkCentre
Open the front door by pushing in on the front
door latches on each side of the front door and
pulling towards you.
Lift the toner cartridge handle.
Remove the toner cartridge.
Caution: Do not touch the shiny green
surface of the drum.
Remove the drum cartridge.
Remove any paper that may be inside the
WorkCentre.
1
2
3
4
5
5
User Guide
5.3
Page 42

1
2
Xe88qrg.bk Page 4 Thursday, February 17, 2000 4:25 PM
E3 JAMS AT THE PAPER EXIT AREA
Install the drum cartridge.
6
Install the toner cartridge.
7
Close the front cover.
8
E3 Jams at the Paper Exit Area
To reduce the pressure on the paper, open
1
the front door by pushing in the latches on
both sides of the front door.
With the front door partially open, remove
2
any paper that may be in the paper exit
area.
5.4
User Guide
Page 43

Xe88qrg.bk Page 5 Thursday, February 17, 2000 4:25 PM
WORKCENTRE FAULT CODES
WorkCentre Fault Codes
Fault codes are listed below. If the error persists, call 1-800-832-6979.
Fault Code Customer Action
E7, H2 - H4
L2 - L6, U2
L1 Remove the shipping screw and turn the power off, then on.
P (Flashing) The paper feed tray is empty. Load paper using the paper release lever.
C1 The front door of the machine is open. Close the front door.
CH The toner cartridge is not installed in the machine. Install the toner cartridge.
Toner indicator
light
Drum indicator
light
J2 Replace the drum cartridge.
Jam indicator
light
E1, E2, E3
Switch the main power off, wait 5 seconds and switch the power on. Repeat two
or three times.
When the toner cartridge replacement indicator appears, the toner cartridge will
need to be replaced soon. You may extend the life of the toner cartridge by
shaking it from side to side.
The drum indicator is on when the drum is near end of life (1,000 pages
remaining) and blinks when the drum is at end of life (refer to Drum Cartridge
Life).
E1 Clear paper jam in the paper feed tray.
E2 Clear paper jam inside of the machine.
E3 Clear paper jam in the paper exit area.
5
User Guide
5.5
Page 44

Xe88qrg.bk Page 6 Thursday, February 17, 2000 4:25 PM
PROBLEMS AND SOLUTIONS
Problems and Solutions
Problem WorkCentre Suggested Solution
WorkC entre does
not come on,
Ready indicator
does not light.
Copies are too light
or too dark.
Smears, lines,
marks, or spots on
copies.
Check that the copier is plugged into an electrical receptacle.
Ensure that there is power to the receptacle and that the WorkCentre power
switch is ON.
- If the original is light, select the lower copy contrast position to darken the
background of the copies or change the copy quality mode to Text. (If you copy
mostly text, you can change the default copy quality to Text mode.)
- If the original is dark, select the upper copy contrast position to lighten the
background of the copies.
- If the original is not light, but copies come out too light, you may be out of toner,
or the paper may be too humid. Try fresh paper.
- If defects are on the original, press the copy contrast button to lighten the
background of your copies.
- If the defects are in the same place on every page, clean the document glass and
inside the document cover. (Refer to
- If the defects occur two or three times on each copy, you may have a substance
stuck to the drum cartridge. (Refer to
Cleaning the WorkCentre.
Cleaning the Drum Cartridge.
)
)
5.6
User Guide
Page 45

Xe88qrg.bk Page 7 Thursday, February 17, 2000 4:25 PM
PROBLEMS AND SOLUTIONS
Problem WorkCentre Suggested Solution
Image rubs off the
copy easily.
The three trouble
indicators are
flashing in the
copier diagram.
Jam Drum Toner
Frequent copy
paper jams.
E1 E2 E3
- Replace the paper in the tray with paper from a new package.
- Check that paper weight is 14 - 34 lbs.
- In high humidity areas do not leave paper in the WorkCentre for extended
periods of time.
The machine is in the program mode. Press the Copy Quality mode button to exit.
- Ensure that the paper lever is pulled toward the front of the WorkCentre before
loading the paper.
- Fan the stack of paper, then turn it over in the tray.
- Replace paper in paper tray with a fresh supply.
- Check/adjust paper guides.
- Ensure that the paper is the proper paper weight. 20 lb / 80 gsm bond paper is
recommended.
User Guide
5
5.7
Page 46

Xe88qrg.bk Page 8 Thursday, February 17, 2000 4:25 PM
PROBLEMS AND SOLUTIONS
Problem WorkCentre Suggested Solution
All of the page is
blank.
Part of the page is
blank.
The WorkCentre
does not print.
Printing is too slow. - Try closing other applications before printing.
Incorrect fonts Use the fonts dialog box in the Control Panel to enable True Type fonts.
Unable to Scan Hardware Detect
Error
- The toner cartridge may be empty. This is indicated by the toner indicator light.
Try removing the toner cartridge from the machine and shaking it from side to
side to redistribute the toner.
- Make sure that the originals are face down on the document glass.
- Try to make a copy. If copying does not work, check the toner cartridge.
- Use the IEEE-1284 parallel port cable supplied with the machine and check
the connections.
- Test printer after removing any pass through devices. If printing is still not
possible, replace the cable.
- Check the printer settings in the Windows Control Panel to make sure that the
print job is being sent to the correct port. (For Example: LPT1.)
- Uninstall, then reinstall the WorkCentre printing software.
- Check that the computer meets the minimum specifications.
- Reduce the resolution setting from 600 dpi to 300 dpi.
For scanning to work via a Parallel Port connection, the PC Parallel Port must be
in ECP mode. Refer to Enabling High Speen Printer Communications in the
Printing chapter.
5.8
Unable to Scan Unable to
communicate with
device
User Guide
- Check power and cable connections to the WorkCentre.
- For USB connections, check the USB/LPT devices in the device manager.
Page 47

Xe88qrg.bk Page 1 Thursday, February 17, 2000 4:25 PM
Chapter Six
6
Cleaning the Outside
Clean the outside surfaces of the WorkCentre
by wiping them with a soft, clean, lint-free
cloth.
• Keep the front cover closed when
cleaning the outside of the WorkCentre.
• You can dampen the cloth slightly with
water, but be careful not to let any water
drip onto the WorkCentre or inside it.
CLEANING AND
MAINTENANCE
Warning: Always unplug the power
cord before cleaning any part of the
WorkCentre.
6
User Guide
6.1
Page 48

Xe88qrg.bk Page 2 Thursday, February 17, 2000 4:25 PM
CLEANING THE GLASS AND COVER
Cleaning the Glass and Cover
Keeping the document glass clean helps
ensure the best possible copies. Xerox
suggests that you clean the document
glass at the start of each day and during
the day as needed.
Caution: Do not pour or spray water
directly onto any part of the
WorkCentre.
Slightly dampen a soft lint-free cloth or
1
paper towel with water.
Lift the document cover.
2
Wipe the surface of the document glass
3
until it is clean and dry.
Wipe the underside of the white
4
document cover until it is clean and dry.
Close the document cover.
5
6.2
User Guide
Page 49

Xe88qrg.bk Page 3 Thursday, February 17, 2000 4:25 PM
CLEANING THE DRUM CARTRIDGE
Cleaning the Drum Cartridge
If some of the print is missing, or black spots
appear, you may need to clean the surface of
the drum. Otherwise, it may become
damaged and will have a serious effect on the
print quality.
Caution: Because the drum surface is very
sensitive, you must take extreme care when
cleaning it.
• Do not let the drum surface come into
contact with fingerprints, water, alcohol
or other solvents that will damage the
drum surface.
• Do not touch the drum surface with the
edges of the rolled-up paper.
To clean the drum surface
Unplug the power cord.
Remove the toner cartridge. (Refer to
Replacing the Toner Cartridge).
1
2
6
User Guide
6.3
Page 50

Xe88qrg.bk Page 4 Thursday, February 17, 2000 4:25 PM
Note: Be sure to hold the rolled-up
paper at a right angle to the cartridge.
SERVICE
Remove the drum cartridge. (Refer to
3
Replacing the Drum Cartridge).
Take a sheet of clean paper and roll it into
4
a tube. Roll it tightly so that the diameters
of the holes at each end are less than the
thickness of your little finger.
Holding the drum cartridge as shown,
5
gently rub the surface of the drum with
the rolled-up paper to remove any
particles of toner caking on the drum into
a wastebasket or onto a prepared surface.
Replace the drum cartridge.
6
Replace the toner cartridge.
7
Service
It is important that you speak with a
service representative to resolve any
persistent problem. The service
representative will direct you as to what
action must be taken.
The WorkCentre cannot be shipped for
service without the authorization of a
service representative.
For frequently asked questions, visit the
Xerox Web site at: http://www.xerox.com
or in the US or Canada call our experts at:
1 - 800 - TEAM - XRX (1 - 800 - 832 - 6979)
6.4
User Guide
Page 51

Xe88qrg.bk Page 1 Thursday, February 17, 2000 4:25 PM
Chapter Seven
7
The toner cartridge and the drum cartridge
in your WorkCentre are "consumable" parts.
This means that after a certain period of use,
these parts will need to be replaced. The part
numbers for these parts are as follows.
Toner Cartridge: Part Number: 6R916
Drum Cartridge: Part Number: 13R553
CONSUMABLES
Note: Replacement of drum
cartridges, toner cartridges, and other
supplies are customer maintenance
responsibilities and are not covered by
the warranty.
See the warranty card.
7
User Guide
7.1
Page 52

Xe88qrg.bk Page 2 Thursday, February 17, 2000 4:25 PM
COPY/PRINT COUNT
Copy/Print Count
For Copy/Print Count, press and hold the
Clear button. The display will flash
numbers three at a time and will repeat
until letting go of the Clear button.
(Example: If the machine flashes 002 123
this equates to 2,123 copies/prints, or if
the machine flashes 014 356 this equates
to 14,356 copies/prints.).
Toner Cartridge Yield
Note: The main factor affecting toner
cartridge yield is the printed area of a
document.
The graph shows how the number of
copies/prints per cartridge decreases as
the printed area increases.
Factors which can affect the toner
cartridge yield are:
• The size of the document being
copied/printed.
•Dark backgrounds.
• High humidity.
To get the most from your toner cartridge:
• Always copy with the document cover
closed.
• Use Toner Saver Mode.
7.2
User Guide
Page 53

Xe88qrg.bk Page 3 Thursday, February 17, 2000 4:25 PM
Storage
The toner cartridge and drum cartridge
should always be stored in sealed opaque bags
to protect them from direct sunlight. The
toner cartridge and the drum cartridge should
be stored at temperatures between 0°C
(32°F) and 40°C (104°F).
Caution: Do not store the toner cartridge
and drum cartridge in the following places:
STORAGE
• Direct sunlight
•Dusty places
• Places which experience extreme
changes in humidity
• Places where corrosive gases are present
• Places where the air is particularly salty
7
User Guide
7.3
Page 54

1
2
Xe88qrg.bk Page 4 Thursday, February 17, 2000 4:25 PM
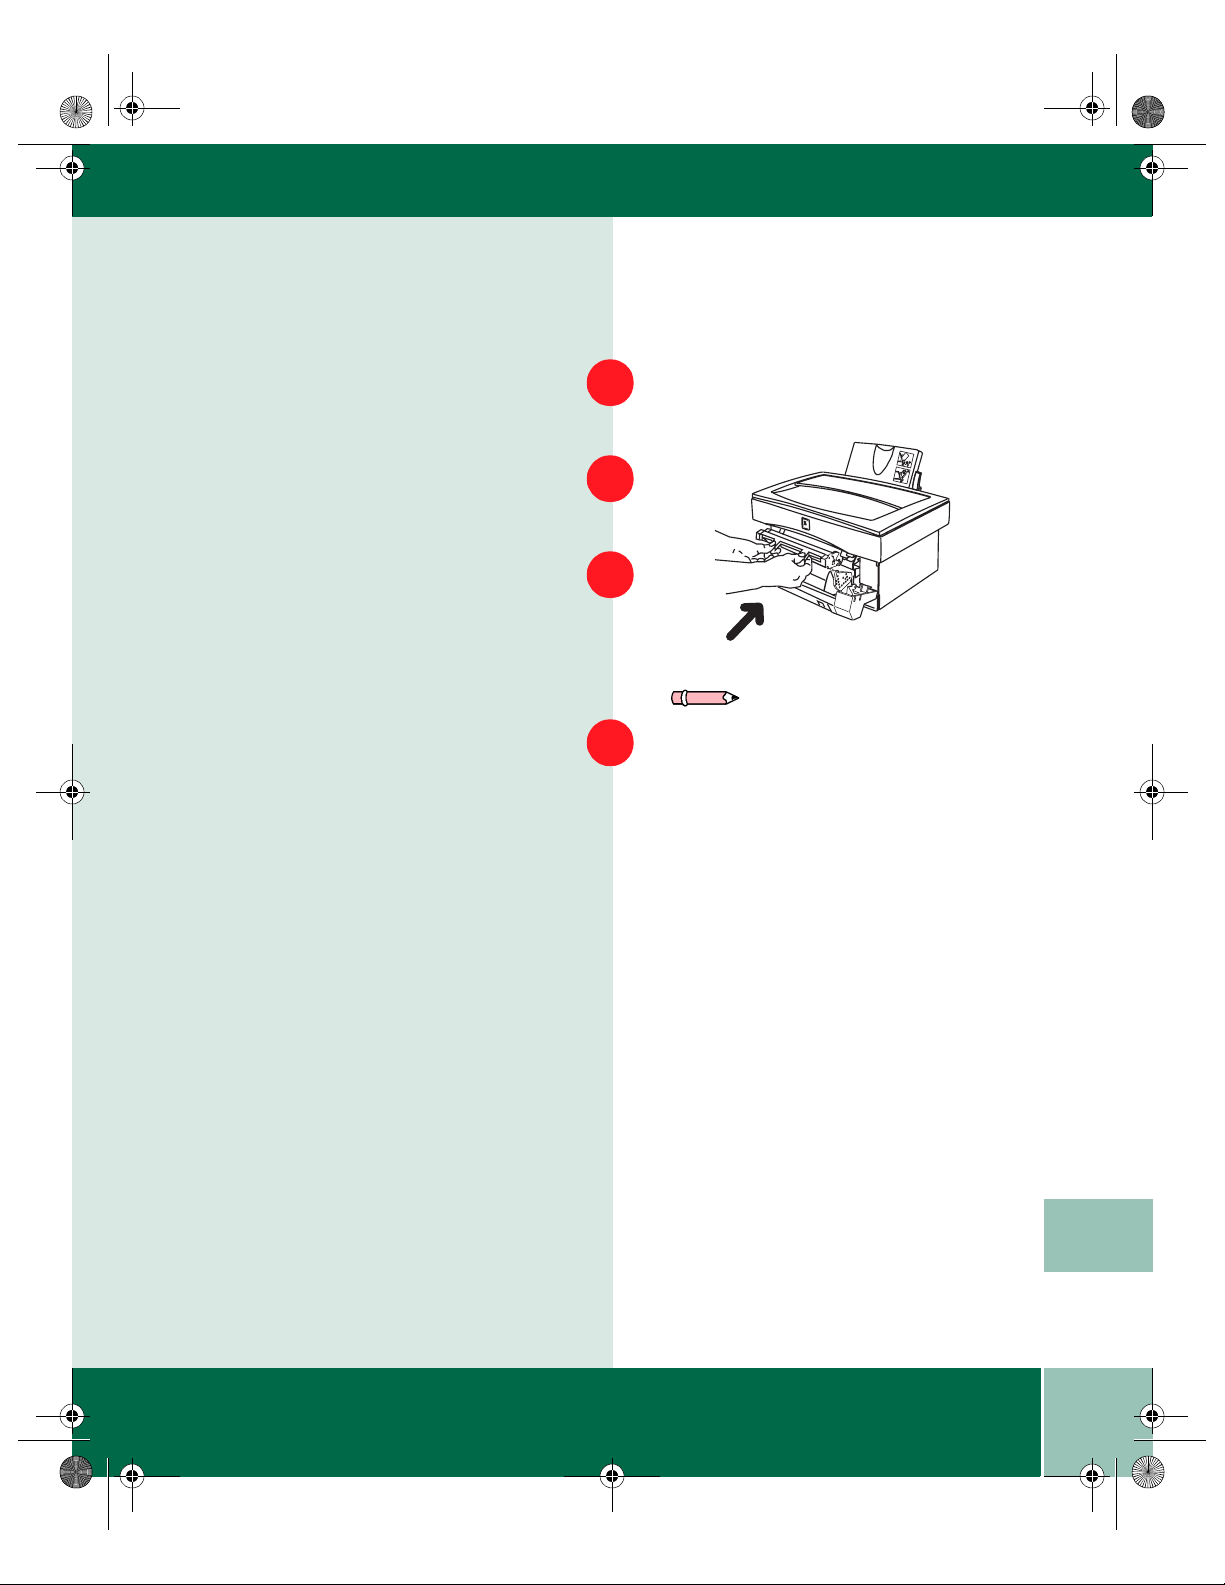
REPLACING THE TONER CARTRIDGE
Replacing the Toner Cartridge
If you notice that the print quality
is becoming more and more faint, remove
the toner cartridge and shake it gently
from side to side to distribute the toner
evenly through the cartridge. If there are
thin lines around the toner cartridge
roller, it is probably time to replace the
toner cartridge. The order number for
the toner cartridge is 6R916.
Open the front door by pushing in on the
1
front door latches on each side of the front
door.
Gently pull out the toner cartridge as
2
shown below. The toner cartridge will
slide out along the runners. Do not pull it
all the way out of the WorkCentre.
7.4
User Guide
Page 55

1
2
Xe88qrg.bk Page 5 Thursday, February 17, 2000 4:25 PM
REPLACING THE TONER CARTRIDGE
When the toner cartridge is near the end of
the runners, hold the handle to support the
toner cartridge, and then pull it clear of the
WorkCentre.
3
Recycle the toner cartridge by returning it to
Xerox.
Replace the toner cartridge. Hold the handle
of the toner cartridge so that the stamped
markings on top of the cartridge are facing
upward.
Gently insert the toner cartridge inside the
WorkCentre.
Push where indicated (in the illustration)
until the toner cartridge is fully inside the
WorkCentre and the handle springs back.
4
5
Note: Help the environment by
recycling your used drum cartridge.
Use the recycle sticker packed with the
drum cartridge for instructions on
returning the used drum cartridge to
Xerox.
6
7
7
User Guide
7.5
Page 56
Xe88qrg.bk Page 6 Thursday, February 17, 2000 4:25 PM
DRUM CARTRIDGE LIFE
Drum Cartridge Life
The rated life for the drum cartridge is
approximately 18,000 pages. When the
drum light comes on, there are 1,000
more pages able to be copied/printed
until drum end of life. The order number
for the drum cartridge is 13R553.
Replacing the Drum Cartridge
Note: Let the WorkCentre cool before
performing the procedure.
Ensure that you follow steps 1 through 14
(it is essential that you complete all 14
steps in order for the WorkCentre to
operate). If you have a J2 fault code and
the drum indicator is blinking, the drum
cartridge has reached end of life. The
order number for the drum cartridge is
13R553.
Caution: Handle the drum cartridge
very gently during installation to avoid
any possible damage to the drum
surface.
7.6
User Guide
Page 57

1
2
Xe88qrg.bk Page 7 Thursday, February 17, 2000 4:25 PM
REPLACING THE DRUM CARTRIDGE
Open the front cover by pulling it forward.
1
Place some scrap paper on a nearby level
surface.
Gently pull out the toner cartridge. Do not
pull it all the way out of the WorkCentre.
Hold the handle to support the toner
cartridge, and then pull it clear of the
WorkCentre.
Place the toner cartridge on the scrap paper
prepared in step 2.
2
3
4
Warning: The fusing unit beneath the
drum cartridge becomes very hot when
the WorkCentre is in use. Be careful not
to touch the fusing unit when removing
the drum cartridge.
5
7
User Guide
7.7
Page 58

1
2
Xe88qrg.bk Page 8 Thursday, February 17, 2000 4:25 PM
REPLACING THE DRUM CARTRIDGE
Hold the tabs on the drum cartridge
6
handle between your thumbs and index
fingers, and gently pull the drum
cartridge up and out in a circular motion
to lift it clear of the WorkCentre.
Caution: The new drum cartridge is
sealed with a sheet of black protective
paper to shield the drum from light. To
prevent damage to the drum surface, do
not remove the protective paper until
you have inserted the cartridge into the
WorkCentre.
Remove the new drum cartridge from the
7
plastic bag and set it down on a clean,
uncluttered and level surface.
7.8
User Guide
Page 59
1
2
Xe88qrg.bk Page 9 Thursday, February 17, 2000 4:25 PM
REPLACING THE DRUM CARTRIDGE
Place the used cartridge into the empty bag,
and seal the bag.
Hold the tabs on the new drum cartridge
handle between your thumbs and index
fingers. Slide the drum cartridge along the
runners into the WorkCentre.
Carefully remove the sheet of black protective
paper from the drum cartridge, making sure
not to leave any torn pieces of paper in the
WorkCentre.
Replace the toner cartridge. Hold the handle
of the toner cartridge so that the stamped
markings on top of the cartridge are facing
upward.
8
9
10
11
Note: Help the environment by
recycling your used drum cartridge.
Use the recycle sticker packed with the
drum cartridge for instructions on
returning the used drum cartridge to
Xerox.
7
User Guide
7.9
Page 60

1
2
Xe88qrg.bk Page 10 Thursday, February 17, 2000 4:25 PM
REPLACING THE DRUM CARTRIDGE
12
Gently insert the toner cartridge inside
the WorkCentre.
13
14
Push where indicated (in the illustration)
until the toner cartridge is fully inside the
WorkCentre and the handle springs back.
Ensure that the WorkCentre power is on.
You must hold in the button indicated and
close the cover at the same time.
Continue to hold the button for three
seconds, then release the button. The
three Copy Contrast LEDs will flash and
return to ready state. If the J2 code is still
present, repeat this step.
7.10
User Guide
 Loading...