

Xerox WorkCentre XD105, WorkCentre XD102, WorkCentre XD103f, WorkCentre XD104, WorkCentre XD105f User Manual
...Page 1

Page 2

FCC Compliance in the USA
WARNING: This equipment has been tested and found to comply with the
limits for a Class B digital device pursuant to Part 15 of the FCC Rules.
These limits are designed to provide reasonable protection against harmful
interference in a residential installation. This equipment generates, uses
and can radiate radio frequency energy and, if not installed and used in
accordance with the instructions, may cause harmful communications.
However, there is no guarantee that interference will not occur in a
particular installation. If this equipment does cause harmful interference to
radio or television reception, which can be determined by turning the
equipment off and on, the user is encouraged to try to correct the
interference by one or more of the following measures:
•
Reorient or relocate the receiving antenna.
•
Increase the separation between the equipment and the receiver.
•
Connect the equipment into an outlet on a different circuit than the
receiver.
•
Consult the dealer or an experienced radio/TV technician for help.
Changes or modifications to this equipment not specifically approved by the
Xerox Corporation may void the authority granted by the FCC to operate
this equipment.
Shielded cables must be used with this equipment to maintain compliance
with FCC regulations.
ENERGY STAR
As an ENERGY STAR® Partner, Xerox Corporation
has determined that this product meets the ENERGY
STAR® guidelines for energy efficiency.
© 2/1999 by Xerox Corporation. All rights reserved.
Copyright protection claimed includes all forms and matters of copyrighted
material and information now allowed by statutory or judicial law or
hereinafter granted, including without limitation material generated from the
software programs that are displayed on the screen such as icons, screen
display looks, etc.
XEROX®, The Document Company®, and the stylized X are registered
trademarks of Xerox Corporation and Xerox Canada Ltd. is a licensee of all
the trademarks.
Product names used in this guide may be trademarks or registered
trademarks of their respective companies and hereby acknowledged.
ENERGY STAR is a U.S. registered mark.
Page 3

Information
To get answers for any other questions you might have regarding your
WorkCentre, to register your warranty by phone, or for assistance with the
installation of your WorkCentre you may call:
1 – 800 – TEAM – XRX (1 – 800 – 832 – 6979)
Supplies
To order supplies for your WorkCentre, call or visit your local retailer or visit
their Web site. If your store does not stock these items, you may call the
following number.
In the United States and Canada:
Xerox SupplyNet toll free at: 1 – 800 – 822 – 2200
Toner Cartridge: 6R914
Drum Cartridge: 13R551
Service
A Customer Service Support Representative will assist you in keeping your
WorkCentre operational and, if required, will arrange for service. Call our
experts at:
1 – 800 – TEAM – XRX (1 – 800 – 832 – 6979)
The following information will be needed when you call Xerox:
Machine Type: XD _______________________
Machine serial number: __ __ __ and the __ __ __ __ __ __.
(Product Code) (Serial number)
The serial number is located on the back cover of the WorkCentre, to the
left of the power cord.
Xerox Corporation
Rochester, New York
Manufactured in Japan
XEROX
Visit the Xerox Web site at: http://www.teamxrx.com
PRODUCT CODE : V8Y
RATING : 120 V-60 hz
AW
MANUFACTURED : SSK
1998 APRIL
000000
Product code
Serial Number
Page 4

Information
How to obtain a French User Guide
Au Canada et aux États-Unis, pour obtenir la version française du présent
guide d´utilisation, veuillez composer:
1 – 800 – TEAM – XRX (1 – 800 – 832 – 6979)
À l´extérieur des États-Unis et du Canada, veuillez communiquer avec
votre représentant Xerox.
It's Illegal
In the USA
It is against US law to copy copyrighted material without permission of the
copyright owner unless the copying falls within the "Fair Use" or library
reproduction rights of the copyright law. Further information on these U.S.
provisions may be obtained from the Copyright Office, Library of Congress,
Washington, D.C. 20550, or telephone the Copyright Office at (202) 7079100 and ask for circular 21. Copying of other items may be prohibited. If
you have any questions, seek legal advice.
In Canada
In Canada it is against the law to copy copyrighted material without
permission of the copyright owner, unless the copying falls within the
private study, research or criticism provision of the copyright law. Copying
of other items may be prohibited. If you have any questions, seek legal
advice.
Page 5
i
Table of Contents
Servicing Your WorkCentre .....................................................................iv
Ordering Supplies.....................................................................................iv
Safety Notes................................................................................................1
Helpful Hints...............................................................................................4
Getting to Know Your WorkCentre...........................................................5
Installation ..................................................................................................6
Control Panel............................................................................................10
Power Reduction / Auto Clear................................................................. 12
Auto Copy Function................................................................................. 12
Paper Specifications................................................................................13
Loading Paper.................................................................................... 14
Flashing
..............................................................................................15
Making Copies on the Document Glass ................................................16
Making Copies on the Single Pass Feeder
(XD103f/ 105f/ 120f/ 125f)......................................................................... 17
Making Copies on the Automatic Document Feeder(XD130df/155df).18
Manual Two-Sided Copying (XD130df/155df only) ...............................20
Image Quality............................................................................................21
Reduction/Enlargement........................................................................... 22
Copying Oversized Documents..............................................................23
Book Mode (XD104 only).........................................................................23
Paper Tray Bypass (XD100/102/103f/120f/125/125f only)......................24
Alternate Paper Tray (XD104/105f/130df/155df only) ............................25
Two-Sided Copying (for all models except the 130df/155df)...............26
Envelopes .................................................................................................27
Page 6

ii
Table of Contents
Customizing Your WorkCentre...............................................................28
Programmable Features......................................................................... 28
Programmable Feature Settings 0 – 9 and 11 – 18................................32
Programmable Feature Setting 10 .........................................................33
WorkCentre Care......................................................................................34
Cleaning the Document Glass and Cover ..............................................34
Cleaning the Corotron Wire....................................................................34
Single Pass Feeder Misfeed/Automatic Document Feeder...35
– E2 Clearing the Paper Path .......................................................... 36
Toner Cartridge Replacement ......................................................39
J2 Drum Cartridge Replacement.................................................... 40
Counter access.........................................................................................41
Total copies/prints remaining on the drum cartridge ..............................41
Printer Driver Software Installation........................................................42
WorkCentre XD Properties (Printer Driver)............................................44
Displaying the Driver Properties dialog from an application...................44
Displaying the Properties dialog from the Start Menu ............................ 45
Displaying the Properties dialog from the Xerox Printer Services Program
(Status Monitor)......................................................................................45
Properties Tabs ......................................................................................46
On-Line Help...........................................................................................46
?
Printer Driver Help (Windows 95/98 and NT) ...................................46
Page 7

iii
Table of Contents
Creating WorkCentre XD Floppy Disk Installation Diskettes............... 47
Enabling High Speed Printer Communications ....................................48
Problem Solving.......................................................................................49
Problem Solving Chart............................................................................49
Status Code Chart..................................................................................51
Printing Solution Chart............................................................................52
Technical Data..........................................................................................55
Page 8

iv
Servicing Your Wor kCentre
In the USA and Canada
Should you be unable to resolve a problem after using the Problem Solving
section of this manual, place a call to the Xerox Customer Support Center
at:
1 – 800 – TEAM – XRX
(1 – 800 – 832 – 6979)
The Customer Support Representative can solve many problems over the
phone. Please have the following information available before calling:
–
The WorkCentre model number: XD _________
(on the control panel)
–
The serial number ________________________
(Located on the back cover of the WorkCentre to the left of the
power supply.)
–
The purchase date from your purchase receipt (required for warranty
service).
–
A description of the problem.
– Status Code (if any) displayed on the control panel.
Ordering Supplies
To order supplies for your WorkCentre, call or visit your local retailer. If
your store does not stock these items, you may call:
Xerox SupplyNet toll free at:
1 – 800 – 822 – 2200
Toner Cartridge – 6R914
Drum Cartridge –13R551
Page 9

1
Safety Notes
Your WorkCentre and supplies have been designed and tested to meet
strict safety requirements. These include safety agency examination and
approval, and compliance to established environmental standards. Please
read the following instructions carefully before operating the WorkCentre
and refer to them as needed to ensure the continued safe operation of your
W orkCentre.
Follow all warnings and instructions marked on or supplied with the
product.
Symbology:
= High Voltage, = Heated Surface,
!
= Warning
= Laser Caution use of controls or adjustments or performance of
procedures other than those specified herein may result in hazardous
radiation exposure.
Unplug this WorkCentre from the wall outlet before cleaning. Always use
materials specifically designated for this WorkCentre. Use of other
materials may result in poor performance and could create a hazardous
situation.
Do not use aerosol cleaners. Follow the instructions in this User Guide for
proper cleaning methods.
Never use supplies or cleaning materials for purposes other than what they
were intended. Keep all supplies and materials out of reach of children.
Do not use this WorkCentre near water, wet locations, or outdoors.
Do not place this WorkCentre on an unstable cart, stand, or table. The
WorkCentre may fall, causing personal injury or serious damage to the
W orkCentre.
This product is equipped with a 3-wire grounding type plug (e.g., a plug
having a third grounding pin). This plug will fit only into a grounding-type
power outlet. This is a safety feature. To avoid risk of electric shock,
contact your electrician to replace the receptacle if you are unable to insert
the plug into the outlet. Never use a grounding adapter plug to connect the
WorkCentre to a power source receptacle that lacks a ground connection
terminal.
Page 10

2
Safety Notes
This WorkCentre should be operated from the type of power source
indicated on the marking label. If you are not sure of the type of power
available, consult your local power company.
Do not allow anything to rest on the power cord. Do not locate the
WorkCentre where persons will step on the cord.
The power supply cord is the disconnect device for this equipment.
Insure that installation is near the outlet and is easily accessible.
Your machine is equipped with an energy saving device to conserve
power when the machine is not in use. The machine may be left on
continuously.
Slots and Openings in the cabinet and in the back and sides of the
WorkCentre are provided for ventilation. To ensure reliable operation of
the WorkCentre and to protect it from overheating, these openings must
not be blocked or covered. The WorkCentre should never be located near
or over a radiator or heat register. This WorkCentre should not be placed
in a built-in installation unless proper ventilation is provided.
Never push objects of any kind into the slots of the WorkCentre as they
may touch dangerous voltage points or short out parts which could result in
a fire or electric shock.
Never spill liquid of any kind on the WorkCentre.
Never remove covers or guards that require a tool for removal. There are
no casual operator serviceable areas within these covers.
Never defeat interlock switches. Machines are designed to restrict
operator access to unsafe areas. Covers, guards, and interlock switches
are provided to ensure that the machine will not operate with covers
opened.
Use of an extension cord with this WorkCentre is not recommended
or authorized.
Avoid direct viewing of the document lights. The lamps are bright and,
while not harmful, they may cause an annoying afterimage. Always keep
the document cover closed during operation and storage.
Avoid exposing the drum cartridge to light for extended periods of time.
Page 11

3
Safety Notes
Do not touch the green photoreceptor. Scratches or smudges that appear
on the photoreceptor will result in poor copy quality and may shorten the
service life.
Do not put your hands into the fuser area, as you may be burned.
Ozone: This product produces ozone during normal operation. The ozone
produced is dependent on copy volume and is heavier than air. Providing
the correct environmental parameter, as specified in the Xerox installation
procedures, ensure that concentration levels meet safe limits.
If you need additional safety information concerning the WorkCentre or
Xerox supplied materials, you may call the following toll-free number.
In the United States or Canada: 1 – 800 – 828 – 6571
Page 12

4
Helpful Hints
Care of your WorkCentre
•
Do not place heavy objects on any surface of the WorkCentre.
•
Take care not to place liquids on or near the WorkCentre.
•
Avoid placing clips or staples on any WorkCentre surface.
Maintenance
•
Clean the Document Glass daily and as required.
•
Do not apply cleaning liquids or sprays directly to the WorkCentre;
apply to the cloth first.
•
Store paper in a dry area, on a flat surface, and in a closed cabinet.
•
Wrap partially-used reams of paper tightly.
WorkCentre location
For reliable WorkCentre operation and copy quality, Xerox
recommends:
•
Place your WorkCentre in a well-ventilated room.
•
Recommended environment:
– Temperature: 50° to 90°F / 10° to 32°C.
– Humidity: 20% to 85%.
•
Place the WorkCentre on a flat, level surface.
•
Avoid locations that subject the WorkCentre to:
– Direct sunlight.
– Extreme changes in temperature or humidity.
Page 13
5
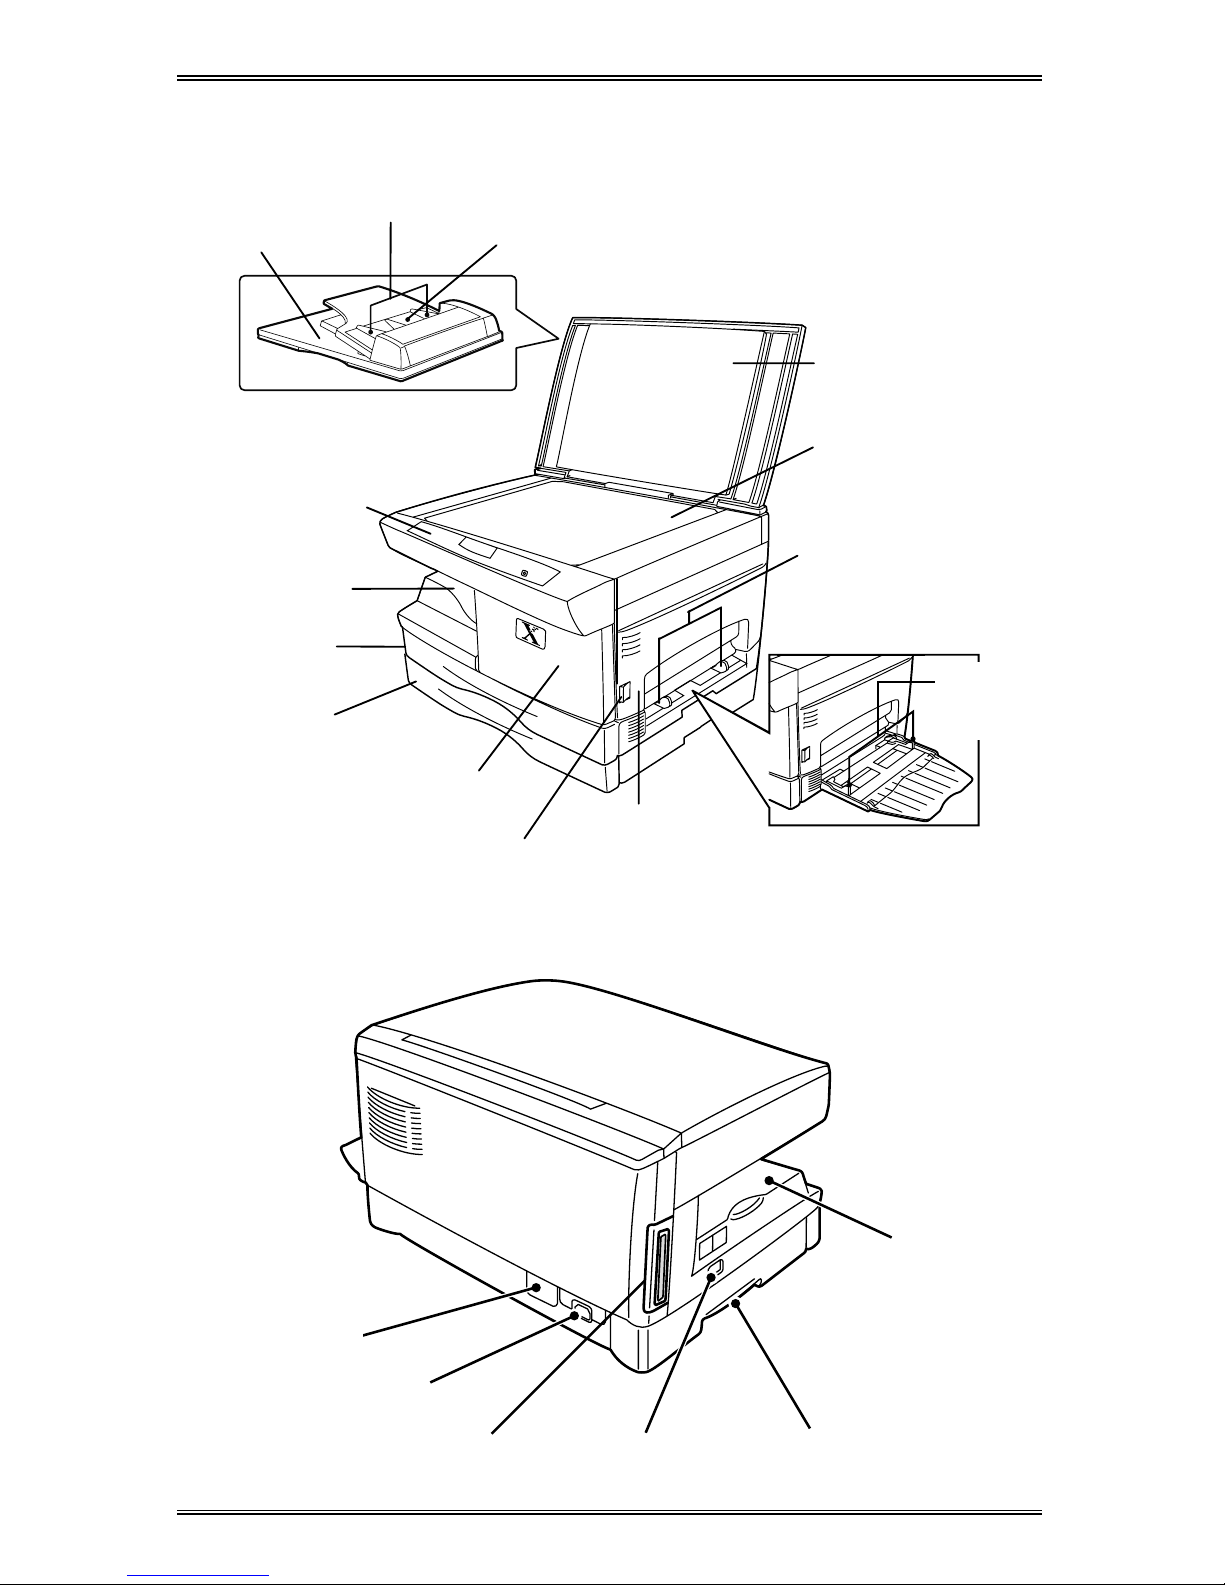
Getting to Know Your WorkCentre
Document glass
Front cover
Control panel
Exit tray
Paper tray 1
Document cover
Release
latch
Alternate paper tray
XD104/ 105f/ 130df/
155df only
Exit tray
Serial number
Parallel port
Lift area
Power switch
Power connection
Paper
guides
Paper tray bypass
paper guides
Side cover
Original exit
area
Original feeder tray
Original guides
SPF XD103f/ 105f/ 120f/125f
ADF XD130df/ 155df only
Paper tray 2
XD120f/130df/
155df only
Page 14
6
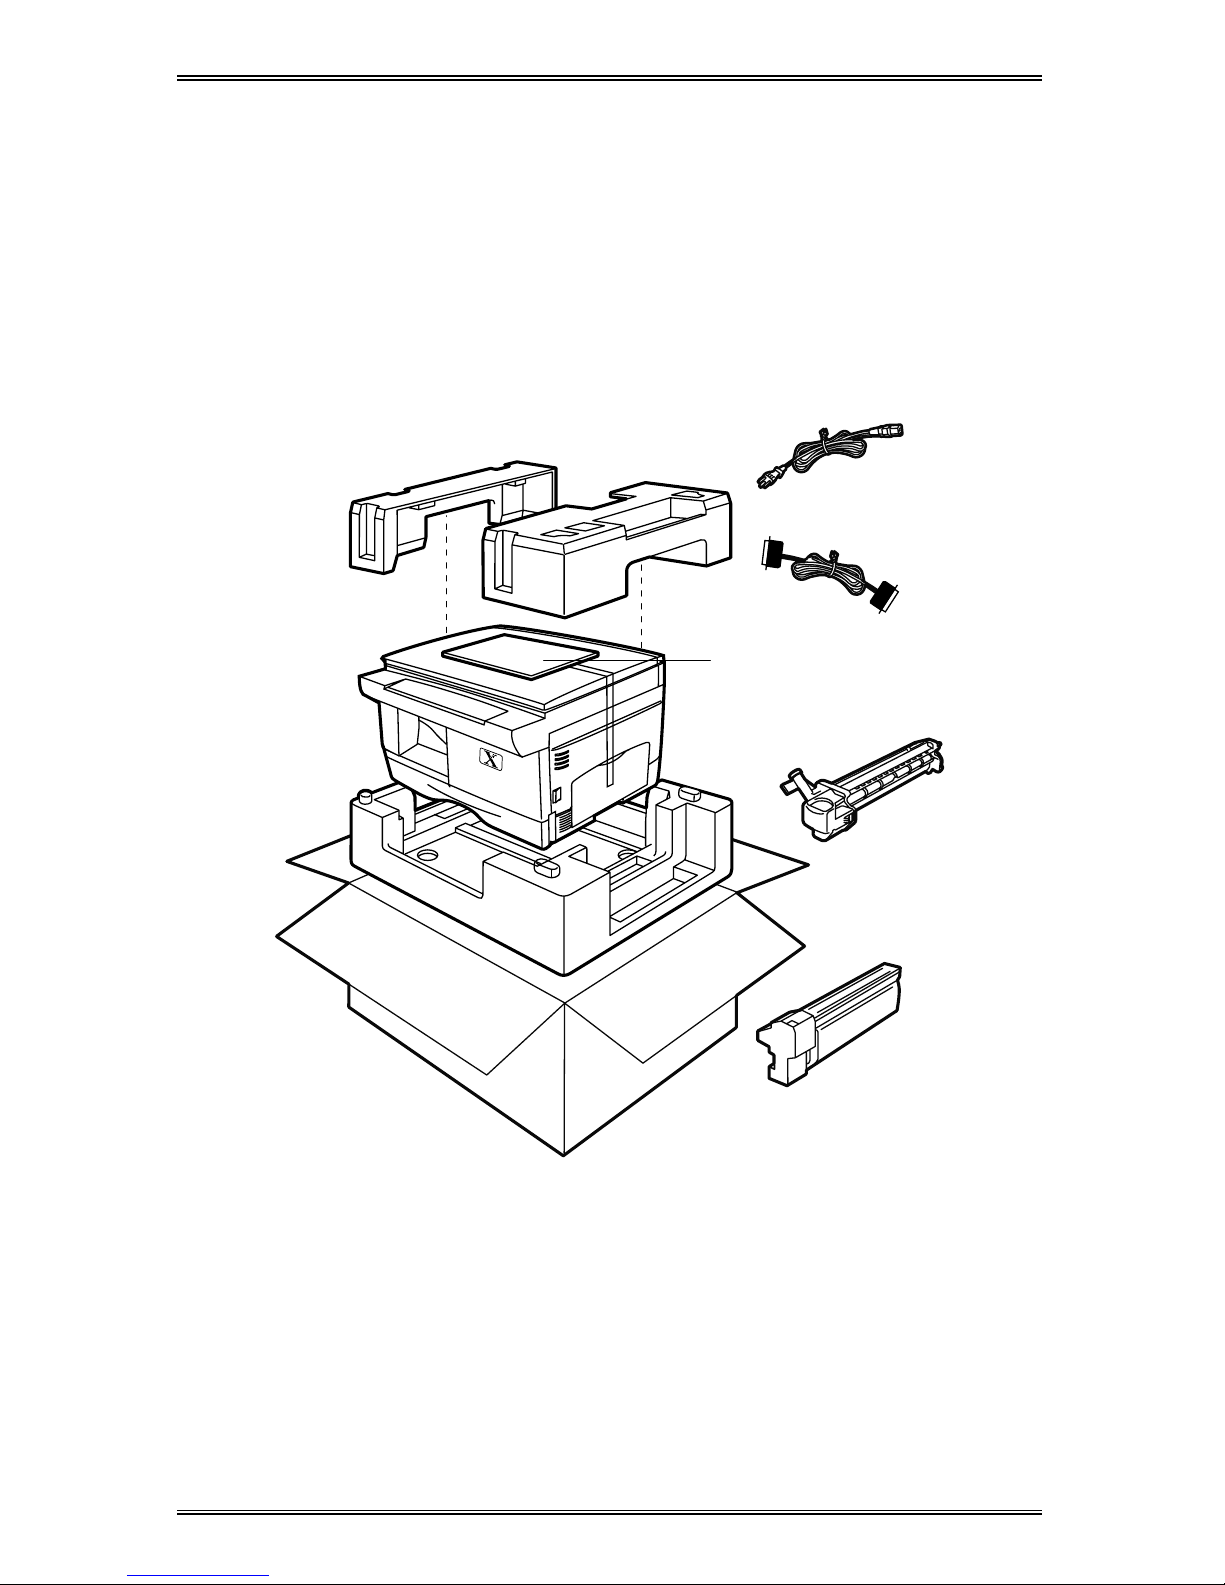
Installation
As you unpack the WorkCentre, familiarize yourself with its contents. After
the WorkCentre is installed, and the Ready Indicator is lit, the WorkCentre
is ready to make copies.
IMPORTANT:
Save the carton and packing materials. They should be
used to repack the WorkCentre if it has to be shipped for servicing or in
case y ou move.
* Note:
To ensure reliability of the WorkCentre use the IEEE-1284
compliant parallel cable that is supplied with the machine. Only cables
labeled “IEEE-1284” can be used with your WorkCentre.
Drum cartridge
(installed in the
machine)
Packing material
Power cord
Starter toner
cartridge
IEEE-1284
Parallel Cable
*
User documentation/
Installation CD
Page 15
7
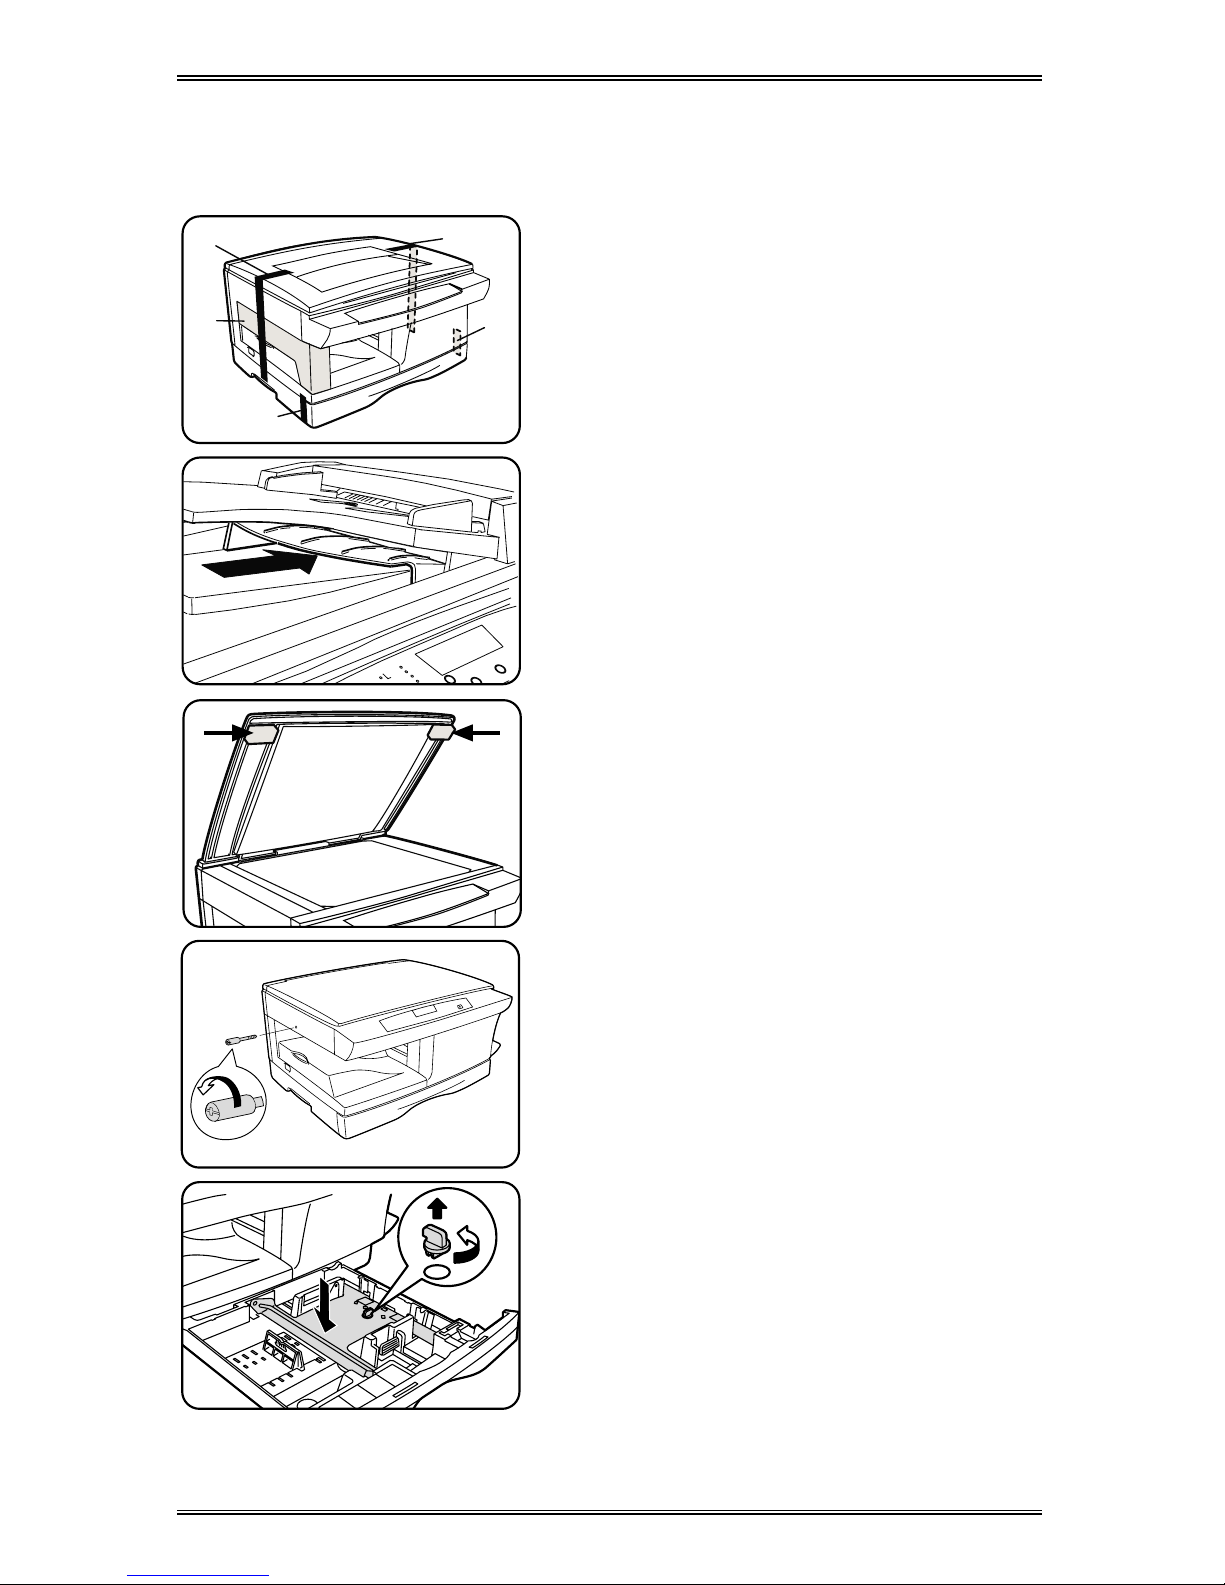
Installation
(continued)
Follow the steps below to properly set up your Xerox WorkCentre.
A
D
C
E
B
1. Remove the bag from the WorkCentre.
2. Remove the pieces of tape
A, B, C, D,
and the packing material E.
XD130df/155df copier only
Remove the tape and the packing material
supporting the clear plastic 2-sided tray.
XD130df/155df copier only
To ensure the 2-sided tray is in the correct
position, gently push it in the direction
shown by the arrow.
3. Open the document cover and remove
the packing materials shown.
4. Unscrew and remove the shipping
screw from the left side of the
W orkCentre.
CAUTION:
The WorkCentre will
malfunction if the shipping screw is not
removed.
5. Lift and pull open the paper tray. Turn
and remove the paper tray button.
CAUTION:
Paper will misfeed if the paper
tray button is not removed.
For the XD
120f/
130df/
155df copier
only
Note:
Be sure to remove the pressure
plate lock from both paper trays.
Page 16

8
Installation
(continued)
6. Secure the paper tray button and the
shipping screw in the locations shown.
•
Turn the paper tray button to secure
its storage position.
Note:
Save the paper tray button and the
shipping screw. They will be needed if the
WorkCentre has to be moved.
7. Load paper into the tray.
•
Refer to the
Loading Paper
section
for additional information.
•
Do not fill above the max line.
8. Push the paper tray firmly back into the
W orkCentre.
Note:
Ensure that the alternate paper tray
is lowered (XD 104/
130df/
155df only).
9. Press the release lever to open the side
cover.
10. Remove the Caution tape from the
cover.
11. Remove the two red fuser pins by
pulling the string upward one at a time.
•
Discard the fuser pins.
Note:
Misfeeds will occur if the fuser pins
are not removed.
CAUTION:
Ensure that the side cover is
always open before opening the front
cover.
12. Press the front cover release buttons to
open the front cover.
Page 17

9
Installation
(continued)
13. Remove the starter toner cartridge from
the silver bag. Vigorously shake the
cartridge to loosen the toner.
•
Thoroughly shaking the cartridge will
assure maximum copies per
cartridge.
•
Xerox has included a Starter Toner
Cartridge. Purchased replacement
toner cartridges will yield
approximately three times the
number of copies.
14. Remove the toner cartridge cover.
1
2
3
15. Slide the toner cartridge into the
WorkCentre until it locks into place.
16. Close the front cover and the side
cover.
Skip to the Printer Driver Software
Installation section in this User Guide to
set up the WorkCentre XD for printing.
17. Plug the power cord into the
WorkCentre and then into a grounded
outlet.
18. Turn on the power switch. In
approximately two seconds the ready
indicator will light. Copying is now
possible.
Note:
Save the carton and packing
materials. They should be used to repack
the WorkCentre if it has to be shipped for
servicing or moved.
Page 18
10
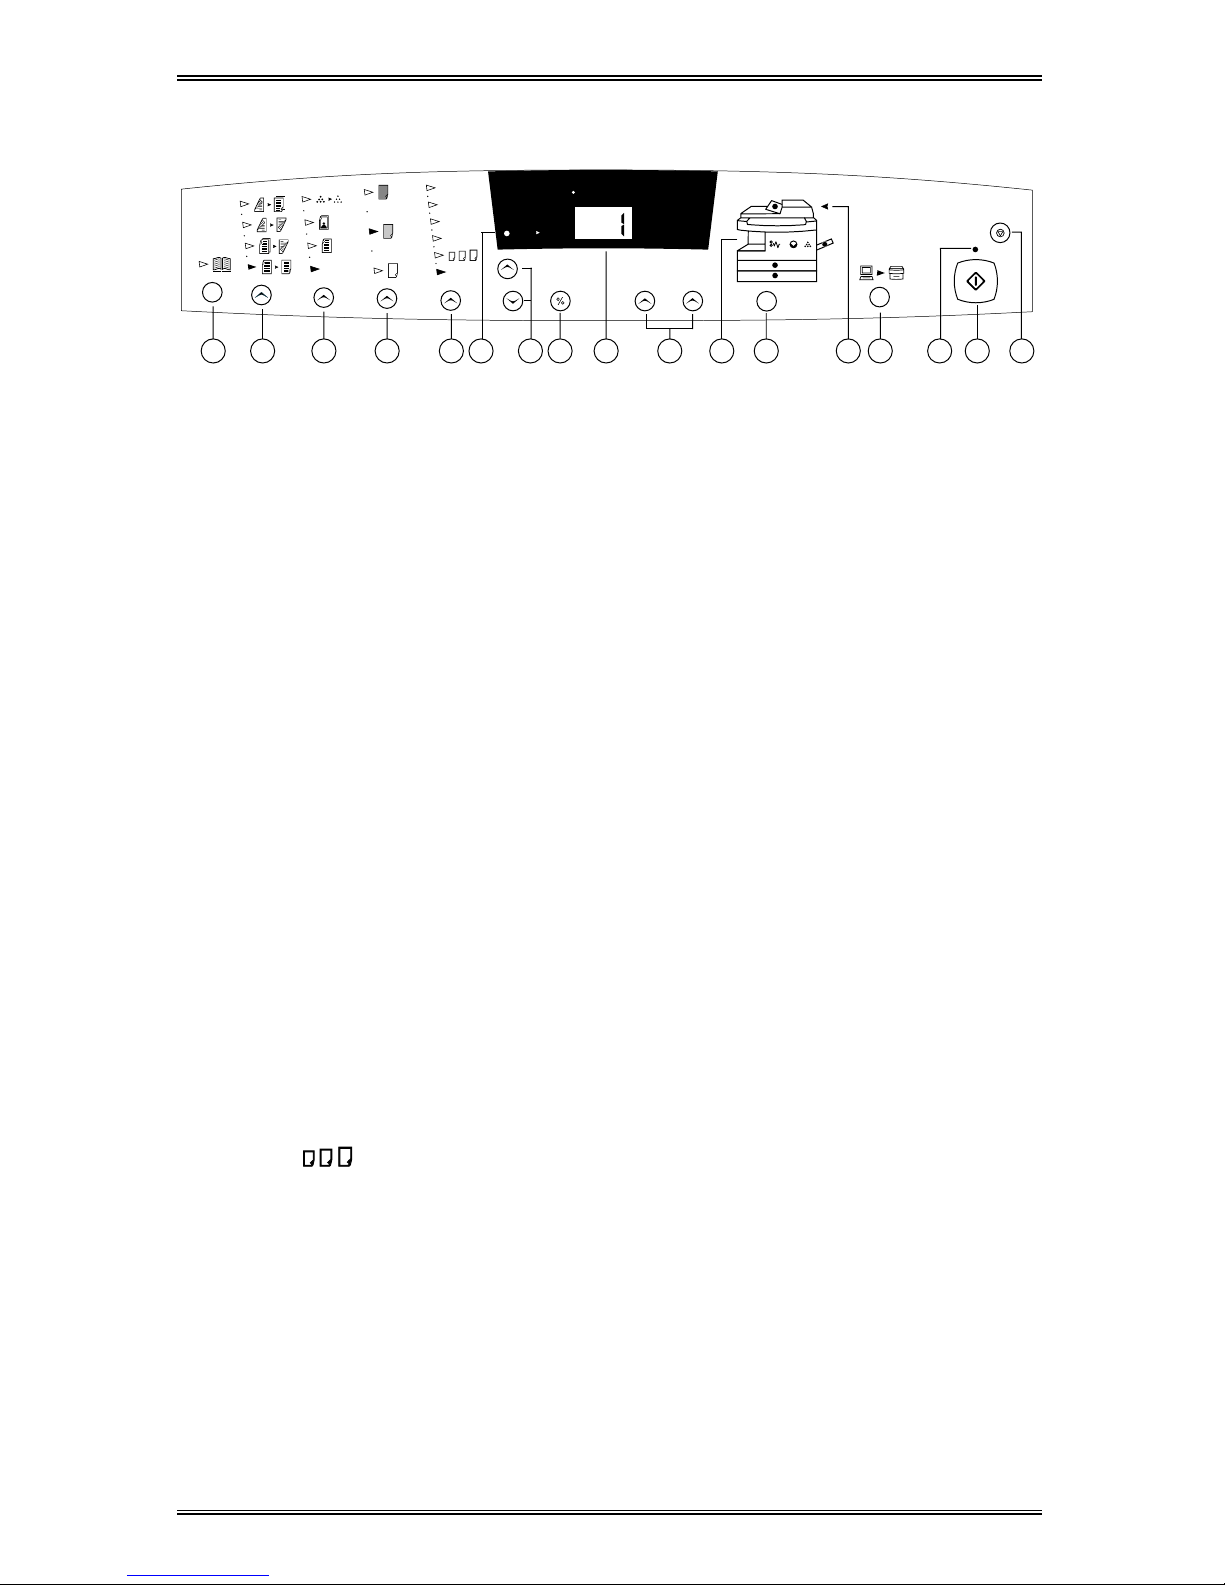
Control Panel
The control panel has keys and lights that are used to control and display
the conditions of the WorkCentre.
1. Book Mode (XD104 only): Select book mode when you want to make
copies from a bound document.
2. 1-Sided/2-Sided Mode (XD130df/155df only): Use the 2-Sided copy
feature to make one or two-sided copies from one or two-sided
originals. Refer to the Making Copies on the Automatic Document
Feeder section for detailed information.
3. Image Quality Mode: The image quality mode is used to maximize
copy quality.
Auto– for originals with a colored background or mixed text and
graphics.
Text – for originals that contain mainly text.
Photo – for copying photographs.
Toner Save – decreases the overall copy density.
4. Copy Contrast: Press the contrast keys to lighten or darken copies
while in the Text, Photo, or Toner Save settings. Refer to the Image
Quality section for detailed information.
5. Preset Reduction/Enlargement: Press this key to select any of the
preset reductions or enlargements.
•
The (customer settable) percentage has been set at the factory
for 50%. Refer to Customizing Your WorkCentre for information
about changing this percentage.
6. Percentage Indicator: The indicator will light when any reduction or
enlargement setting is selected.
78%
Auto
86%
100 %
129%
200% Ma x
50% 200%
D
O
C
U
M
E
N
T
10
1
W
o
r
k
C
e
n
t
r
e
C
134567810 1416171592 1311 12
Page 19

11
Control Panel
7. Variable Percentage: Press the down key to decrease the
percentage. Press the up key to increase the percentage. Any
percentage from 50% to 200% may be selected.
8. %: Press this key to display the reduction/enlargement percentage
selected.
9. Display Window: Copy quantity, reduction/enlargement settings, and
status codes appear in this area.
10. Quantity Keys: Select up to 100 copies. Press the 1 key to increase
the quantity by one. Press the 10 key to increase the quantity by 10.
•
To display the number of copies requested during the copy run press
the 10 key.
•
Press the Clear key to clear the selected quantity.
11. WorkCentre Diagram: Helps you locate areas that require your
attention. The indicators will flash in the area requiring attention. For
additional information refer to the Problem Solving section.
12. Paper Supply Selection (XD104/ 105f/ 120f/ 130df/ 155df only):
Press to change the selected paper supply. The selected paper supply
location will be indicated by a green light on the WorkCentre diagram.
13. SPF/ADF Misfeed Indicator: This indicator will light when a misfeed
occurs in the SPF or the ADF.
14. On-line/Off-line Key: Press this button to alternate between On-line
and Off-line status. When the light is lit, the printer is On-line.
15. Ready Indicator: When the light is ON (not flashing), the WorkCentre
is ready to make copies. When the light is flashing after the Start key
is pressed, the WorkCentre is warming up and the copy cycle will begin
automatically.
16. Start: Press this key to begin copying.
•
The display will change to 1 and increases by 1 as each copy is
made.
17. Clear/Stop: Press this key to stop the WorkCentre while making
copies or to clear copy quantity. If the key is pressed twice quickly, all
programming will be cleared.
Page 20

12
Power Reduction / Auto Clear
Power Reduction Modes automatically reduce power consumed by the
WorkCentre when the WorkCentre has not been used for a set period of
time. There are two modes of power reduction; Power Save, and Power
Shut-off.
Power Save Mode – The Ready Indicator will flash and the other indicators
will remain on. To copy from the Power Save mode select the desired
features and press Start. The copies will be made automatically.
Power Shut-Off Mode – When the WorkCentre enters the power shut-off
mode the Ready Indicator will flash and the other indicators will turn off. To
copy from the power shut-off mode, press the Start button, then, select the
desired features and press Start again. The copies will be made
automatically.
Auto Clear – This WorkCentre is enabled at the factory to return to the
Normal Copy Mode approximately one minute after a job is completed.
Unless otherwise programmed, the Normal copy Mode settings are as
follows:
• Copy Quality – Auto
• Copy Lighter/Darker – Normal
• Priority Tray – Tray 1
• Priority Magnification – 100%
• Quantity Selected – 1
Note: Time periods for the Power Shut-Off, Power Save, and Auto Clear
modes can be modified to meet your specific copying needs. Refer to
Customizing Your WorkCentre section of this User Guide for information
about changing these settings.
Auto Copy Function
This function provides the ability to program a copy job while the copier is
warming up, or to pause a print job to enable copying.
1. Program the copy job.
2. Press Start.
•
The current page will be completed if printing is in process.
3. When the copy job is completed, press the On-line/Off-line button to
immediately return to the print job.
Page 21

13
Paper Specifications
Paper Storage
Note: Paper affected by humidity, and curled paper can cause jams and
copy quality problems.
For reliable copier operation and good copy quality, Xerox recommends
that paper be stored:
•
on a flat surface.
•
in a closed container.
•
in a low humidity area.
•
tightly wrapped, if the ream is partially used.
The Specifications Chart below provides information about the types of
paper that can be used at each of the paper input areas.
Paper Input Paper Tray 1 and 2 Alternate Paper Tray/
Paper Tray Bypass
Paper Sizes
5.5×8.5" to 8.5×14" /
A5 to 216×356mm
3.5×5.5" to 8.5×14" /
A6 to 216×356mm
Paper Weights
Optimum
Range
20 lb / 80 gsm
15 – 24 lb /
56 – 90 gsm
20 lb / 80 gsm
14 – 34 lb /
52 – 130 gsm
Paper Capacities
Copy, letterhead, and
predrilled
XD100/125/125f
XD102/103f
XD104/105f
XD120f
XD130df/ 155df
20 lb / 80 gsm
250 sheets
200 sheets
250 sheets
2×250 sheets
2×250 sheets
20 lb / 80 gsm
single sheet
single sheet
multi-sheet
single sheet
multi-sheet
Labels, Envelopes,
and Transparencies *
No Yes (1 at a time)
* Use labels, envelopes, and transparencies specifically designed for
copiers and laser printers (high temperatures).
Page 22

14
Loading Paper
will flash in the copy quantity display and the green indicator in the
copier diagram will flash when:
•
a paper tray is empty.
•
paper misfeeds: paper has not fed all the way into the copier.
•
a paper tray is not closed properly.
If the paper has misfed, open the paper tray indicated by the flashing green
light on the copier diagram and remove the misfed paper.
•
Do not reuse the misfed paper.
•
Ensure that the paper is under the corner snubbers.
•
Close the paper tray.
•
If copying, press the Start key to make the remaining copies.
•
If printing, the job will automatically resume when paper is added.
1. Lift and pull open the paper tray.
2. Push down on the pressure plate until it
locks in position.
Note: The procedures for loading paper
into tray 1 and tray 2 are identical.
3. Adjust the paper guides to the desired
paper size.
•
Squeeze the side guide.
•
Lift and insert the rear guide.
•
When adding paper larger than
8.5×11/A4, remove the rear guide
and store it in the pocket in front of
the side guide.
Page 23

15
Loading Paper
4. Fan the paper and insert it into the tray.
•
Ensure that the paper corners are
under the corner snubbers.
•
Do not fill above the max fill line.
5. Close the paper tray.
6. If copying, press Start to continue. If
printing, the job will automatically
resume.
•
To cancel the flashing P without
restarting copying, press the Clear
button.
Flashing
When the Alternate Paper Tray runs out of paper, or the paper misfeeds,
the
P
will flash in the display and the green indicator in the copier diagram
will flash.
Alternate Paper Tray (XD104/ 105f/ 130df/ 155df only)
1. Add paper if the Alternate Paper Tray is
empty.
2. If paper has misfed, remove it by
carefully pulling the edge of the paper in
the direction of the arrow.
3. If copying, press the Start key to
continue.
If printing, press the On-line/Off-line key
to continue.
Page 24

16
Making Copies on the Document Glass
78%
Auto
86%
100 %
129%
200% Ma x
50% 200%
D
O
C
U
M
E
N
T
10
1
W
o
r
k
C
e
n
t
r
e
C
1. Ensure that the WorkCentre is Off-line.
•
The light between the two icons will
be off.
2. Select the desired copy features from
the control panel.
3. Select the number of copies.
•
Press the 10 to increase the quantity
by 10. Press the 1 key to increase
the quantity by 1.
•
To clear the selected quantity, press
the Clear key.
4. Lift the Document Cover.
5. Place the original face down and align
it with the registration guide on the
document glass.
6. Close the Document Cover.
Note: Leaving the cover open while
copying will affect copy quality and toner
consumption.
7. Press Start to begin copying.
•
The number in the display window
returns to 1 and advances as each
copy is made.
Page 25

17
Making Copies on the Single Pass Feeder
(XD103f/
105f/ 120f/ 125f)
Use the Single Pass Feeder(SPF) to make one collated copy of originals.
The SPF holds up to 30 originals (20 lb/80 gsm) in one job. Ensure
originals are in good condition, and that all staples and paper clips have
been removed. Use the document glass to make copies from
transparencies, facsimile paper, or originals having other unusual
characteristics. For reliable copying operation, use originals within the
following ranges:
Paper weight range: 16 to 24 lb/60 to 90 gsm
Paper size range: 5.5×8.5"/A5, 8.5×11"/A4 and 8.5×14"/216×353 mm
The SPF comes from the factory with the Auto Start feature enabled. Refer
to Customizing Your Copier section of this User Guide for information
about changing this setting.
78%
Auto
86%
100 %
129%
200% Ma x
50% 200%
D
O
C
U
M
E
N
T
10
1
W
o
r
k
C
e
n
t
r
e
C
1. Select the required paper tray.
2. Select the desired copy features from
the control panel.
•
The maximum copy quantity is 1.
Reinsert the originals into the SPF for
each set required.
3. Adjust the paper guide to the original
size.
Note: Writing that is very close to the
leading or trailing edge of the original may
not copy. Turning the original around in
the SPF may help.
4. Insert up to 30 originals face up into the
SPF until the green SPF light on the
copier diagram comes on.
Page 26

18
Making Copies on the Automatic Document
Feeder
(XD130df/155df)
The Automatic Document Feeder (ADF) allows you to automatically make
single sided or two-sided copies. The ADF holds up to 30 originals
(20 lb/80 gsm). Ensure originals are in good condition, and that all staples
and paper clips have been removed. Use the document glass to make
copies from transparencies, facsimile paper, or originals having other
unusual characteristics. For reliable copying operation, use originals within
the following ranges:
Paper weight range: 16 to 24 lb/60 to 90 gsm
Paper size range: 5.5×8.5"/A5 (Short Edge feed only)
8.5×11"/A4 and 8.5×14"/216×353 mm
The ADF comes from the factory with the Auto Start feature disabled.
Refer to Customizing Your WorkCentre section of this User Guide for
information about changing this setting.
Note: Automatic two-sided copying is available only in the copying mode,
not the print mode.
The available copy options are:
Icon Original Copy
Max
Quantity
(2!1)
Two-sided Single sided 100 sets
(2!2)
Two-sided Two-sided 1 set
(1!2)
Single sided Two-sided 1 set
(1!1)
Single sided Single sided 100 sets
Single sided original to single sided copies (1
!!!!
1)
This mode will create single sided copies from your originals.
1. Place the originals face up in the ADF.
2. Select the
icon (1 to 1) and any additional features
and the desired quantity.
3. Press Start to begin copying.
The WorkCentre will produce the requested number of
uncollated (1,1,1…2,2,2…3,3,3…) single sided sets.
Page 27

19
Making Copies on the Automatic Document
Feeder
(XD130df/155df)
Single sided originals to two-sided copies (1
!!!!
2)
This mode will create two-sided copies from your single sided
originals.
1. Place the originals face up in the ADF.
2. Select the
icon (1 to 2) and any additional
features.
•
The maximum copy quantity is 1. Reinsert the originals
into the ADF for each set required.
3. Press Start to begin copying.
The WorkCentre will produce one set of two-sided copies.
Two-sided originals to two-sided copies (2
!!!!
2)
This mode will create two-sided copies from your two-sided
originals.
1. Place the originals face up in the ADF.
2. Select the
icon (2 to 2) and any additional features.
•
The maximum copy quantity is 1. Reinsert the originals
into the ADF for each set required.
3. Press Start to begin copying.
The WorkCentre will produce one set of two-sided copies.
Two-sided originals to single sided copies (2
!!!!
1)
This mode will create single sided copies from your two-sided
originals.
1. Place the originals face up in the ADF.
2. Select the
icon (2 to 1) and any additional features
and the desired quantity.
3. Press Start to begin copying.
The WorkCentre will produce the number of uncollated single
sided sets that you requested.
Page 28

20
Manual Two-Sided Copying
(XD130df/155df only)
Important Tip: The WorkCentre has been configured to copy onto
8.5×11/A4 paper. When copying onto any other paper size the image may
not be placed properly. The default paper size for both paper trays is
8.5×11/A4.
You may want to change the default setting for one or both of the trays if
you find the factory settings do not meet your needs. Refer to
Customizing Your WorkCentre for information about changing the default
paper size.
Xerox
1
1. Place side 1 original face down on
the Document Glass, with the TOP
toward the LEFT. Lower the
document cover.
Note: 16 lb / 60 gsm copy paper is not
recommended for two-sided copying.
2. Select the desired 1-Sided/2-Sided
mode.
3. Select the quantity.
4. Press Start to make side 1 copies.
•
After scanning side 1, the light next
to the selected mode will flash to let
you know that the WorkCentre is
ready to scan side two.
Xerox
2
5. Remove the side 1 original and place
the side 2 original face down on the
Document Glass with the TOP toward
the LEFT. Lower the document
cover.
6. Press Start.
Page 29

21
Image Quality
The image quality features described on this page can be used to improve
copies of documents printed on colored paper, photographs, or are of poor
quality.
Auto
Auto:
Use Auto when copying from originals with a colored
background or mixed text and graphics.
Note: When Auto is selected, the copier automatically varies the
contrast of your copies. Lighter/Darker settings are not available.
Text:
Use Text to copy documents containing mostly text.
Photo:
Use Photo when the originals are photographs.
Toner Save:
Toner Save mode lowers overall copy density on each
page. This feature can be used when making draft copies.
Copy Contrast
You can vary the copy contrast of your
copies in small increments when Text,
Photo, or Toner Save settings are
selected.
Note: When Auto is selected the copy
contrast settings are not available.
Press the copy contrast key to lighten or
darken copies while in the Text, Photo, or
Toner Save settings.
There are 5 contrast settings represented by 3 indicator lights. The
indicators light up one or two at a time to represent the selected setting.
Successive pushes of the key will change the indicators in successive
order. Darkest, normal and lightest settings are depicted by one indicator.
When 2 indicators are lit, the copy contrast will be mid point between the
darker setting and the lighter setting.
Toner
S
ave
Photo
Auto
Text
Page 30

22
Reduction/Enlargement
Preset Reduction/Enlargement
Press the Preset Reduction/Enlargement
key to quickly select one of the 6 preset
percentages. The customer settable
percentage (
) has been set at the
factory for 50%. Refer to Customizing
Your WorkCentre for information about
changing the default percentage.
50% 200%
D
O
C
U
M
E
N
T
10
W
o
r
k
C
e
n
t
r
e
88
Variable Percentage
Press the Variable Percentage key to
increase or decrease the reduction or
enlargement by 1% increments. You may
select any percentage from 50 – 200%.
Press the % key to display the current
percentage. When any reduction or
enlargement is selected the variable
percent indicator will light.
50% 200%
D
O
C
U
M
E
N
T
10
1
W
o
r
k
C
e
n
t
r
e
Display Window
Preset or variable reduction/enlargement
percentages appear in the Display Window
at the time selections are made. After a
few seconds, the reduction/enlargement
percent is replaced with the number of
copies selected. Press the % key to recall
the current reduction/enlargement ratio.
Reduction/Enlargement Referenc e Table
Original Size Copy Size % To Use
5.5 × 8.5 8.5 × 14
154%
5.5 × 8.5 8.5 × 11
129%
8.5 × 14 8.5 × 11
78%
8.5 × 11 5.5 × 8.5
64%
A4 A3 141%
B4 A4 81%
A4/ A3 A5/ A4 71%
Page 31

23
Copying Oversized Documents
The document cover may be removed in order to position an oversized
document on the document glass.
Note: If your copier is equipped with a Set Document Feeder or Automatic
Document Feeder, the cover cannot be removed.
1. Lift the document cover straight up.
Note: Do not leave the cover off for
extended periods of time.
2. Reattach the document cover by
reversing the above step.
Book Mode
(XD104 only)
This feature is useful when you want to copy facing pages of a document
onto separate sheets of paper. The maximum book size is 10×14" / B4.
1. Align the center of the document with
the book symbol at the center front of
the document glass and the green
arrow on the left registration guide.
Auto
2. Select Book mode, and other desired
features.
•
50 is the maximum copy quantity in
book mode.
3. Press Start.
•
The left page will be copied first, then
the right page will be copied.
Page 32

24
Paper Tray Bypass
(XD100/102/103f/120f/125/125f only)
Use the Paper Tray Bypass to copy onto paper that is different from that
loaded in the paper tray and to copy onto special stock such as envelopes,
labels, or transparencies. Stock is fed one sheet at a time into the Paper
Tray Bypass.
The minimum copy size is 3.5×5.5"/ A6. The maximum copy paper size is
8.5×14" / 216×356mm.
Load special stock as follows:
Predrilled paper: holes toward the rear of the copier.
Letterhead paper: face down with the top toward the left.
Envelopes: flap side up and toward the rear.
Labels: face down.
Transparencies: removable stripe face up and toward the rear.
•
Use labels, transparencies, and envelopes specifically designed for
copiers (high temperatures).
1. Place the original face down and align
it with the registration guide on the
document glass and close the
document cover.
XD103f/120f/125f copiers only
Unless the SPF auto start has been
disabled, the paper tray bypass cannot
be selected.
2. Adjust the bypass guide to the width of
the copy paper.
3. Insert a single sheet of paper into the
paper tray bypass.
•
The paper will feed automatically.
•
When copying continuously, insert
the next copy paper as soon as the
previous sheet has fed.
Page 33

25
Alternate Paper Tray
(XD104/105f/130df/155df only)
The alternate paper tray can be used to feed multiple sheets of standard
paper, or it can be used to feed single sheets of special or heavy papers
such as note cards, transparencies, and labels.
The alternate paper tray holds up to 50 sheets of 20 lb/ 80 gsm paper
ranging in size from 3.5×5.5" to 8.5×14"/ A6 to 216×356mm.
Load special stock as follows:
Predrilled paper: holes toward the rear of the copier.
Letterhead paper: face down with the top toward the left.
Envelopes: flap side up and toward the rear, one at a time.
Labels: face down, one at a time.
Transparencies: removable stripe face up and toward the rear, one at a
time.
•
Use labels, transparencies, and envelopes specifically designed for
copiers (high temperatures).
1. Place the original face down and align
it with the registration guide on the
document glass.
2. Lower the alternate paper tray, located
on the right side of the copier.
3. Unfold the paper support extension as
shown.
4. Adjust the guides to the width of the
copy paper.
5. Insert the copy paper all the way into
the alternate paper tray until it stops (do
not force).
•
50 sheets max.
Note: When loading envelopes, labels, or
transparencies insert one at a time.
6. Press the Paper Supply button to select
the alternate paper tray.
7. Select other required features.
8. Press the Start button.
Page 34

26
Two-Sided Copying
(for all models except the XD130df/155df)
Xerox
1
Xerox
1
1. Place side 1 original face down on the
Document Glass, with the TOP toward the
LEFT. Lower the document cover.
Note: 16 lb / 60 gsm copy paper is not
recommended for two-sided copying.
2. Select quantity required.
3. Press Start to make side 1 copies.
Xerox
2
Xerox
1
4. Remove the first original and place the
second original face down on the
Document Glass with the TOP toward the
RIGHT, and lower the document cover.
XD100/102/103f/120f/125/125f
5. Remove the side 1 copies from the output
tray and insert one of the copies face up,
TOP toward the RIGHT, into the paper tray
bypass. Continue feeding the Side 1
copies until all the two sided copies are
made.
XD104/105f
5. Remove the Side 1 copies from the output
tray and insert the copies face up, TOP
toward the RIGHT, into the alternate paper
tray.
6. Select the alternate paper tray.
7. Press Start.
Page 35

27
Envelopes
Various types and sizes of envelopes can be printed/copied on the
WorkCentre XD using the bypass tray or alternate paper tray.
Selecting Envelopes
The construction of envelopes is critical to printing performance and varies
widely. Use high-quality envelopes that are thin and sharply creased. Test
a few envelopes before you purchase large quantities.
Sizes: Minimum: 3 x 5” / 76 x 127mm
Maximum 8.5 x 14” / 216 x 356mm
Hints: Try to avoid printing over the area where the envelope’s three
back flaps meet.
Printing/Copying on an envelope:
1. Load one envelope at a time into the paper tray bypass or alternate
paper tray.
•
Make sure that the leading edge of the envelope is straight and
firmly creased.
•
For the best print quality, position margins no closer than .5”/
13mm from the edges of the envelope.
2. Slide the envelope into the bypass, flap side up and toward the rear.
Caution: The types of envelopes described below can severely damage
your machine.
•
Never use envelopes with clasps, snaps, windows, coated linings,
exposed self-stick adhesives, or other synthetic materials.
•
Never use envelopes with glues, inks, and adhesives that could
discolor, scorch, or melt when heat is applied.
•
Never try to print on both sides of an envelope. Jamming and
damage can result.
Envelope Storage:
Proper storage of envelopes helps ensure successful feeding and printing.
•
Envelopes should be protected from moisture. Excessive moisture
can cause wrinkles and sealed flaps.
•
Envelopes should be stored flat. Air can become entrapped during
printing and cause creases to form. Flat storage helps prevent air
entrapment.
Page 36

28
Customizing Your Work Centr e
Programmable Features
The default settings for various machine features may be changed to suit
your individual needs. All of these features remain set until this process is
repeated.
Each of the programmable features, along with its program number and
options are contained in the chart below. The procedure to change the
default settings follows the chart.
Note: The procedures written in this manual are based on the factory
default settings.
Feature Program
Number
Option Number
* Factory Setting
Priority Tray: This feature allows you
to set the default paper tray. At power
on or auto clear, the copier will return
to the selected priority paper tray.
(Model XD104/105f/120f//130df/155df
only.)
00 –
Main paper tray *
1 –
Alternate paper
tray
2 -
Second paper
tray
Auto Clear Time Out: This feature
allows you to select the time it takes
for the copier to return to the normal
copy mode after a copy cycle is
complete.
10 – Off
1 – 30 seconds
2 – 60 seconds *
3 – 90 seconds
4 – 120 seconds
Time Out to Power Save: When
enabled, this feature automatically
reduces power used by the copier if
the copier has not been used for the
set period of time.
20 – Off
1 – 45 seconds
2 – 90 seconds *
3 – 2 minutes
4 – 5 minutes
Time Out to Power Shut-Off: When
enabled, this feature significantly
reduces power used by the copier if
the copier has not been used for the
set period of time.
3 0 – 2 minutes
1 – 5 minutes *
2 – 15 minutes
3 – 30 minutes
4 – 60 minutes
5 – 120 minutes
6 – Off
Default Magnification: This feature
allows you to make copies slightly
larger or smaller than the original, or
the same size.
4 0 – 100% *
1 – 99%
2 – 101%
Page 37

29
Feature Program
Number
Option Number
* Factory Setting
Default Image Quality: This feature
allows you to select the default Image
Quality mode.
5 0 – Auto Exposure *
1 – Text
2 – Photo
Auto Contrast Adjustment: The
copy contrast range may be adjusted
when the copy image is consistently
too light or too dark in the Auto Image
Quality mode.
6 0 – Lightest
1 – Lighter
2 – Normal *
3 – Darker
4 – Darkest
Paper Trail Edge Deletion: The trail
edge deletion can be turned Off to
accommodate originals that have print
to the very bottom edge. When Off,
another 4 mm will copy, however the
image quality may deteriorate as it
gets closer to the bottom edge.
When this feature is On each time the
paper tray is opened edge deletion is
disabled for the first copy. Edge
deletion is enabled for the following
copies.
70 – On *
1 – Off
Paper Tray Bypass Auto Start:
When enabled, the copier will begin to
copy as soon as paper is fed into the
paper tray bypass.
(Models XD100/102/103f/120f/125/125f
only.)
80 – On *
1 – Off
Single Pass Feeder Auto Start:
When enabled, the SPF will begin to
copy as soon as paper is placed in
the SPF.
(Models XD103f/ 105f/ 120f/ 125f only.)
90 – On *
1 – Off
Automatic Document Feeder Auto
Start: When enabled, the ADF will
begin to copy as soon as paper is
placed in the ADF.
(Models XD130df/155df only.)
90 – On
1 – Off*
Reduction/Enlargement Preset:
This feature allows you to set a
specific preset reduction or
enlargement setting for the
key.
10 50 – 200%
Default 50% *
Page 38

30
Feature Program
Number
Option Number
* Factory Setting
Auto Paper Tray Switching: When
enabled, the copier will automatically
switch to another paper tray when the
selected tray runs out of paper.
(Model XD104/ 105f/ 120f/ 130df/ 155df
only.)
11 0 – On
1 – Off *
Single Pass Feeder Contrast
Adjustment/Automatic Document
Feeder: The copy exposure range
may be adjusted when the copy
image is consistently too light or too
dark.
(Models XD103f/ 105f/ 120f/ 125f/ 130df/
155df only.)
12 0 – lightest
1 – lighter
2 – Normal *
3 – darker
4 – darkest
Return to Print Mode: This feature
allows you to select the time it takes
for the copier to return to the print
mode after a copy job is complete.
14 0 – 60 seconds *
1 – 90 seconds
2 – 120 seconds
3 – 150 seconds
4 – 180 seconds
5 – Off - no time out
Default 1-sided/2-sided Mode: This
feature allows you to select the default
copy mode.
(Models XD130df/155df only.)
17 0 – 1 to 1 *
1 – 1 to 2
2 – 2 to 2
3 – 2 to 1
Page 39

31
Feature Program
Number
Option Number
* Factory Setting
Default copy paper size for 2-sided copying from the document
glass:
Top paper tray default: This
feature allows you to select the
default copy paper size for the
upper paper tray.
(Models XD130df/155df only.)
18
0 – 8.5 × 14
1 – 8.5 × 13
2 – 8.5 × 12.4
3 – A4/ 210 × 297mm
4 – 8.5 × 11 *
5 – B5/ 182 × 257mm
6 – 5.5 × 8.5
7 – A5/ 148 × 210mm
Lower paper tray default: This
feature allows you to select the
default copy paper size for the lower
paper tray.
(Models XD130df/155df only.)
19
0 – 8.5 × 14
1 – 8.5 × 13
2 – 8.5 × 12.4
3 – A4/ 210 × 297mm
4 – 8.5 × 11 *
5 – B5/ 182 × 257mm
6 – 5.5 × 8.5
7 – A5/ 148 × 210mm
Page 40

32
Programmable Feature Settings 0 – 9 and 11 – 18
To change the programmable features, find the Program Number and the
desired Option Number in the Programmable features chart on the
previous pages. Follow the instructions below.
Note: The WorkCentre must be off-line and in the Ready mode.
1. Select the Toner Saver mode.
2. Press again and hold the Image Quality
key for approximately 4 to 6 seconds.
•
The light next to Auto mode will light.
•
The lights within the WorkCentre
Diagram will flash.
50% 200%
10
1
W
o
r
k
C
e
n
t
r
e
3. Press the 10 key to select the Program
Number of the feature to be changed.
•
You will not be given the choice to
change an option if your machine
does not have the feature.
4. Press Start.
•
The current setting for that program
will flash.
50% 200%
10
1
W
o
r
k
C
e
n
t
r
e
5. Press the 1 key until the option number
you want is displayed.
6. Press Start to store the selection.
7. Press the Clear key to continue making
other changes. Press the Image
Quality key to return to the copy mode.
Page 41

33
Programmable Feature Setting 10
Use the following procedure to change the preset Reduction/Enlargement
default setting (
). This feature allows you to set a specific preset
reduction or enlargement between 50 – 200%.
1. Select the Toner Saver mode.
2. Press again and hold the Image Quality
key for approximately 4 to 6 seconds.
•
The light next to Auto mode will light.
•
The lights within the WorkCentre
Diagram will flash.
50% 200%
10
1
W
o
r
k
C
e
n
t
r
e
3. Press the 10 key until the number 10 is
displayed.
4. Press Start.
•
The current reduction/enlargement
setting will flash.
50% 200%
D
O
C
U
M
E
N
T
10
1
W
o
r
k
C
e
n
t
r
e
5. Press the variable percentage keys until
the desired percentage is displayed.
6. Press Start to store the selection.
7. Press the Clear key to continue making
other changes. Press the Image
Quality key to return to the copy mode.
Page 42

34
WorkCentre Care
Cleaning the Document Glass and Cover
Keeping the document glass clean helps ensure the best possible copies.
Xerox suggests that you clean the document glass at the start of each day
and during the day as needed.
CAUTION: Do not pour or spray water directly onto any part of the copier.
1. Slightly dampen a soft lint-free cloth or
paper towel with water.
2. Wipe the surface of the document glass
until it is clean and dry.
3. Wipe the underside of the white
document cover until it is clean and dry.
4. Close the document cover.
Cleaning the Corotron Wire
If copies start getting streaks or blotches, the corotron wire may be dirty.
Note: Ensure that the alternate paper tray
is lowered (XD104/ 105f/ 130df/ 155df
only).
1. Press the release latch to open the side
cover.
2. Remove the green corotron wire
cleaner from inside the copier (near the
front corner of the machine).
3. Insert the corotron cleaner into the
corotron wire unit.
4. Wipe the corotron wire with the corotron
cleaning tool as shown.
5. Replace the cleaner and close the side
cover.
Page 43

35
Single Pass Feeder Misfeed/Automatic
Document Feeder
When a misfeed occurs in the feeder, the red SPF/ADF misfeed indicator
flashes on the Copier Diagram, and an A1 or A2 status code will flash in
the display window. The status code indicates the number of originals that
must be returned to the feeder after clearing the misfeed.
A1 status code- refeed the last original.
A2 status code- refeed the last 2 originals.
This code will disappear when copying is resumed or the clear key is
pressed.
Details for clearing the three types of feeder misfeeds are given below.
Input Misfeed
1. Open the feeding roller cover and pull
the original gently to the left and out of
the document feeder tray.
2. Close the feeding roller cover.
3. Open and close the document cover to
clear the misfeed indicator.
4. Press Start to continue copying.
Exit Misfeed
1. Open the document cover and turn the
roller knob to remove the misfed
original from the exit area.
If paper cannot be easily removed, skip
to the Roller Misfeed.
2. Close the document cover.
3. Press Start to continue copying.
Roller Misfeed
1. Open the document cover and turn the
roller knob to remove the misfed
original from the document feeder tray
or the exit area. If the original is difficult
to remove, gently remove it from under
the feeding roller.
2. Close the document cover.
3. Press Start to continue copying.
Page 44

36
– E2 Clearing the Paper Path
When a paper misfeed occurs the red misfeed indicator flashes on the
copier diagram, and an E2 status code will flash in the display window.
Paper misfeeds may occur in the areas shown below. Follow the steps
below to locate and clear the misfeed.
Paper Feed Area
Note: Ensure that the alternate paper tray
is lowered (XD104/ 105f/ 130df/ 155df
only).
1. Press the release lever to open the side
cover.
Caution: Do not touch the shiny drum
cartridge surface. Scratches or smudges
will result in poor copy quality.
Do not remove paper through the bypass.
Unfused toner may adhere in the area,
resulting in smudged copies.
2. Carefully remove the misfed paper in
the direction shown.
Steps 3 – 5 for XD120f/130df/155df only
3. Lower the right side tray 2 access door.
4. Remove the misfed paper.
5. Close the access door.
If paper cannot be removed, skip to the
Fuser Area.
6. Closer the side cover.
Fuser Area
Paper Feed Area
Exit Area
Page 45

37
– E2 Clearing the Paper Path
(continued)
Fuser Area
Warning:
The fuser area is hot. Take
care when removing paper from the fuser
area.
Note: Ensure that the alternate paper tray
is lowered (XD104 105f/ 130df/ 155df
only).
1. Press the release lever to open the side
cover.
2. Pull down on the fuser lever.
•
This will release pressure on the
paper.
paper is not seen in this area skip to the
Exit Area.
Caution: Do not pull paper up through the
fusing unit. Unfused toner may adhere
in the area, resulting in smudged
copies.
3. Remove the sheet of paper, in the
direction shown.
4. Push up on the fuser lever.
5. Close the side cover.
Page 46

38
– E2 Clearing the Paper Path
(continued)
Exit Area
1
2
Note: Ensure that the alternate paper tray
is lowered (XD104/105f/130df/155df only).
1. Press the release lever to open the side
cover.
2. Press the front cover release buttons to
open the front cover.
3. Pull down on the fuser lever.
•
This will release pressure on the
paper.
4. Turn the knob in the direction of the
arrow to move the paper to the exit
area.
5. Gently pull the paper out through the
exit area.
6. Push up on the fuser lever.
7. Close the front cover and side cover.
Page 47

39
Toner Cartridge Replacement
The toner indicator on the copier diagram will light when the toner supply is
low. Approximately 10 more copies can be made, but you should have a
replacement cartridge in stock. When the J1 status code is displayed, the
machine will stop operating until the toner cartridge is replaced.
1
2
Note: Ensure that the alternate paper tray
is lowered (XD104/105f/130df/155df only).
1. Press the release lever to open the side
cover.
2. Press the front cover release buttons to
open the front cover.
3. Press down on the green lever on the
front of the old toner cartridge and pull
the cartridge out.
Note: Help the environment by recycling
your used toner cartridge. Refer to the
recycling brochure packed with the Toner
Cartridge for details.
1
2
4. Shake the new toner cartridge
horizontally four or five times and then
remove the cover.
•
Save the box and the cover for
shipping.
1
2
3
5. Slide the new toner cartridge in until it
locks in place.
6. Close the front cover and the side
cover.
•
Wait for the ready indicator to light.
Page 48

40
J2 Drum Cartridge Replacement
The useful life of the drum cartridge is approximately 18,000 copies. The
drum cartridge indicator on the machine diagram lights when the drum is
near the end of life. Approximately 1,000 more copies can be made, but
you should have a replacement cartridge in stock. When the J2 Status
Code is displayed, the machine will stop operating until the drum cartridge
is replaced.
C
B
A
Note: Ensure that the alternate paper tray
is lowered (XD104/105f/130df/155df only).
1. Press the release lever to open the side
cover (A).
2. Press the front cover release buttons to
open the front cover (B).
3. Press the green button (C) on the front
of the toner cartridge and pull out the
cartridge.
Note: The toner cartridge must be
removed before removing the drum
cartridge.
4. Pull out the drum cartridge.
Note: Help the environment by recycling
your used drum cartridge. Refer to the
recycling brochure packed with the drum
cartridge for details.
5. Remove the cover from the new drum
cartridge.
CAUTION: Do not touch the shiny surface
of the drum.
6. Slide the new drum cartridge in place,
making sure not to touch the surface of
the drum.
7. Reinstall the toner cartridge.
8. Close the front cover and the side
cover.
Page 49

41
Counter access
Total copies/prints remaining on the drum cartridge
This counter displays the total number of copies/prints remaining on the
drum in the machine. The count can be used to determine when to reorder
a new drum cartridge.
The count will be displayed in the display window as a sequence of 23 digit values.
Example 1: 10,145 copies/prints will be displayed as 010 followed by 145
Example 2: 361 copies/prints will be displayed as 000 followed by 361
1. Select the Toner Saver mode.
2. Press again and hold the Image Quality
key for approximately 4 to 6 seconds.
•
The light next to Auto mode will light.
•
The lights within the WorkCentre
Diagram will flash.
C
3. Press and hold the Clear key for 5
seconds.
•
The count will continually be
displayed until the Clear key is
released. There will be a slight
pause at the end, before displaying
the count again.
4. Press the Image Quality key to return to
the copy mode.
Page 50

42
Printer Driver Software Installation
The printer driver software is the program which runs the printer. It
converts the data in the file you want to print into information that the printer
can understand. It also controls communication between the printer and
computer as the data is printed.
You will need the following PC hardware and software in order to use the
printer driver:
WorkCentre XD Series
Computer type IBM PC/AT or Compatible Computer
Operating system Windows 3.1x, Windows 95/98,
Windows NT 4.0
CPU 486DX 66 MHz or better
RAM 8 MB or more
IEEE-1284 parallel
cable
To ensure reliability use the IEEE-1284
compliant parallel cable that is supplied with
the machine. Only cables labeled “IEEE-1284”
can be used with your WorkCentre.
Note: If you are using some of the computer’s memory as a RAM drive,
the printer driver may not be able to allocate the correct amount of
memory. In such a case, reduce the size of the RAM disk, or do not use
a RAM disk.
If your PC does not have a CD-ROM Drive:
If you have access to a computer with a CD-ROM drive and a floppy disk
drive, the WorkCentre XD CD-ROM has a program to create a set of
installation diskettes.
There are several options available to you. Refer to the order sheet that is
packaged with the WorkCentre XD. This sheet explains how you can:
•
order floppy diskettes from Xerox.
•
download the necessary software from the WEB.
Note: Refer to Creating WorkCentre XD Floppy Disk Installation
Diskettes section in this User Guide for instructions on making your own
floppy diskettes.
Installation Notes:
The Printer Driver Installation software cannot be installed using the
Control Panel/Printers for Win 3.1x or the Add Printer Wizard for Win
95/98/NT4.0. Please use one of the following methods depending on your
operating system.
Page 51

43
Printer Driver Software Installation
1. Ensure that the computer and the
WorkCentre are turned off.
2. Plug the IEEE-1284 cable into the
parallel port on the WorkCentre.
3. Plug the other end of the IEEE-1284
cable into the computer.
4. Ensure that the power cord is plugged into the WorkCentre and then
into a grounded outlet.
•
Do not attach your WorkCentre to a pass-through port of another
device (scanner, CD-ROM drive, tape drive, Zip
™
drive or external
disk).
5. Turn on the PC.
Note: Close all applications before installing the printer driver.
6. Start Windows on your computer.
7. Insert the WorkCentre XD CD-ROM into the CD-ROM Drive.
Go to step 8 of the Installation procedure for the software version
that you are running.
Installation for Windows 3.1x
(continued from step 7)
8. Choose File from the menu bar in Program Manager, and then choose
the Run… command.
9. Type D:\SETUP (or the appropriate drive letter depending on your CD-
ROM Drive) in the command line box. Click on the OK button to
proceed.
10. Follow the on-screen instructions.
11. When the install is complete, restart Windows and turn on the
W orkCentre.
Installation for Windows NT 4.0 or 95/98
(continued from step
7)
8. Click on the Start button and then choose the Run menu option.
9. Type D:\SETUP (or the appropriate drive letter depending on your CD-
ROM Drive) in the command line box. Click on the OK button to
proceed.
10. Turn on the WorkCentre.
11. Follow the on-screen instructions.
•
If you wish to print a test page, ensure paper is loaded and then click
the Yes button.
Page 52

44
WorkCentre XD Properties (Printer Driver)
The purpose of this section is to provide information about how to access
and use the options in the Xerox WorkCentre XD Printer Driver Properties
dialog. Use the Xerox WorkCentre XD Properties dialog to change the
settings used for printing.
There are several ways to display the Printer Driver dialog, including:
•
Displaying the Driver Properties dialog from an application
•
Displaying the Properties dialog from the Start Menu
•
Displaying the Properties dialog from the Xerox Printer Services
Program (Status Monitor)
Displaying the Driver Properties dialog from an
application
Control of the driver settings is provided from the Xerox WorkCentre
XD Properties (Printer Driver) dialog box. The new driver settings will
be active while the application is open. The driver settings will return to
the prior values when the application is exited.
Access to the Properties dialog will vary depending upon the
application that is in use.
Note: The application may override any options that are selected
using the Properties Dialog.
Windows 95/98 and NT:
1. Click Print on the application’s File menu
2. If not selected, select the Xerox Document WorkCentre XD printer
3. Click the Properties button
4. Change the print options and click OK
Windows 3.1x:
1. Click Print on the application’s File menu
2. Click the Printer Setup button
3. If not selected, select the Xerox Document WorkCentre XD printer
4. Click the Options button
5. Change the print options and click OK
Page 53

45
WorkCentre XD Properties (Printer Driver)
Displaying the Properties dialog from the Start Menu
Windows 95/98 and NT
1. On the Start Menu, click Settings. On the Settings submenu, click
Printers.
2. Right click on the XEROX Document WorkCentre XD printer icon
and click Properties, or click Properties from the File menu.
Windows 3.1
1. Double click Main Program Group
2. Double click Control Panel Program Group
3. Double click Printers Program
4. Select Xerox Document WorkCentre XD
5. Press Setup
Displaying the Properties dialog from the Xerox Printer
Services Program (Status Monitor)
Windows 95/98 and NT
1. Click on the Properties button in the Xerox Printer Services window
Windows 3.1
1. Click on the Properties button in the Xerox Printer Services window
2. This will display the Windows Printer Program
3. Select Xerox Document WorkCentre XD
4. Press Setup
Page 54

46
WorkCentre XD Properties (Printer Driver)
Properties Tabs
The WorkCentre XD Printer Driver Properties dialog contains four tabs
from which you can make selections that best suits your printing
requirements. Below is a brief description of each tab.
Note: Refer to On-line Help for detailed information.
Paper/Output — to select desired paper source (tray), number of copies,
paper size, document orientation (portrait or landscape), image shift, and
output collation.
Image Quality — to change the output type (Normal, Photograph, Text,
Advanced), Lighten/Darken, contrast and resolution.
DOS Emulation — to configure the host-based DOS emulation control
parameters. This is used to support printing for DOS applications running
in a Windows environment.
About — to display the driver version and copyright information.
On-Line Help
The WorkCentre XD Series Printer Driver includes a comprehensive online help system, designed to answer all your questions about using the
Xerox WorkCentre XD Properties dialog.
The help system is your on-line user guide, providing complete introductory
and reference information. It also provides troubleshooting information, in
case you should run into any problems.
When you have a question simply click on the Help button on the Xerox
WorkCentre XD Properties dialog.
The main Help Topics window will be displayed.
?
Printer Driver Help
(Windows 95/98 and NT)
To view an explanation of any field or button in the dialog window:
1. Click the
?
icon located in the upper right corner of the dialog window,
and release the mouse button.
•
The cursor will change to a question mark.
2. Place the question mark on the field or button that you want defined,
and release the mouse button.
•
The on-line Help file will display information on the selected subject.
Page 55

47
Creating WorkCentre XD Floppy Disk Installation
Diskettes
If floppy diskettes are required to install the WorkCentre Printer Driver
Software, the user can order floppy diskettes or create a set of diskettes
from CD-ROM.
To create a set of WorkCentre XD Printer Driver floppy Diskettes, find a PC
that has a floppy diskette drive with a CD-ROM drive and follow the
procedure below. Four or five blank high density diskettes will be required.
Windows 3.1x:
1. Insert the WorkCentre CD-ROM into the CD-ROM Drive.
2. Choose File from the menu bar in Program Manager, and then
choose the Run… command.
3. Type D:\MAKEDISK\MAKEDISK.EXE (or the appropriate drive
letter depending on your CD-ROM Drive) in the command line box.
Click on the OK button to proceed.
4. Follow the on-screen instructions.
Windows 95/98 and Windows NT 4.0:
1. Insert the WorkCentre CD into the CD-ROM Drive.
2. Click on the Start button and then choose the Run menu option.
3. Type D:\MAKEDISK\MAKEDISK.EXE (or the appropriate drive
letter depending on your CD-ROM Drive) in the command line box.
Click on the OK button to proceed.
4. Follow the on-screen instructions.
To use the Floppy Disk Installation Disks created, follow the same
procedure for your operating system but refer to the floppy disk drive (A: B:)
rather than the CD-ROM drive (D:).
Page 56

48
Enabling High Speed Printer Communi cations
Your Xerox WorkCentre XD Digital Copier/Printer has been designed to provide
excellent copy and print quality with high productivity. To ensure the highest print
performance, the Xerox WorkCentre XD Digital Copier/Printer was designed to
take advantage of high speed parallel port communications between your personal
computer and your Xerox WorkCentre XD Digital Copier/Printer. This can be
accomplished by enabling the
Extended Capabilities Port (ECP)
mode for your
personal computer parallel port (LPT1, LPT2 etc.).
What is ECP?
ECP is a particular type of personal computer interface for printers that was
established by the IEEE-1284 standard. Personal computers with this type of
printer interface can enable printing up to four times faster than personal
computers without ECP.
How do you know if ECP is enabled on your computer?
Many computers will give a status of the printer port settings through the
Windows™ control panel and printer settings folders. Others may give the status
by special software on the personal computer to view BIOS settings or CMOS
settings. When you install the Xerox WorkCentre XD Digital Copier/Printer driver
software on your personal computer, the install software will automatically check
your personal computer for you. If your personal computer is not running in ECP
mode, the driver software will remind you that higher printing performance would
be achieved if ECP were enabled.
How will your printing performance be affected if you do not have an ECP
compatible personal computer, or if you do not enable ECP mode?
Since the rated print speed of the Xerox WorkCentre XD Digital Copier/Printer has
been verified with ECP mode, the only effect you may notice is a slight reduction in
the print speed.
Are there any other requirements for ECP mode?
Always use an approved IEEE-1284 compliant cable (as the one supplied with
your Xerox WorkCentre XD Digital Copier/Printer). Never use (scanners, CD
devices, tape drives, switch boxes, etc.) attached to the same port as the XD
series operate. Each device should be on a separate parallel port (LPT1, LPT2
etc.) for the greatest reliability.
What can you do if your personal computer does not appear to have ECP
mode enabled?
1) Check your personal computer documentation for a description of this feature.
Particularly look for BIOS and/or CMOS settings, etc.
2) Call your personal computer’s manufacturer. Be prepared with the model
number and serial number.
3) Contact a computer sales or service near you, and inquire about an ECP board
option for your personal computer that will allow your personal computer to
operate in this mode.
Page 57

49
Problem Solving
Problem Solving Chart
The following chart lists some conditions that may occur and the
recommended solutions. Follow the suggested solutions until the problem
is corrected. Refer to the Status Code Chart in this section for status code
information. If the problem persists, please refer to the Information
section for the appropriate telephone numbers.
Condition Suggested solutions
Ready indicator
does not light.
Check that the WorkCentre is plugged into an
electrical receptacle.
Ensure that there is power to the receptacle
and that the WorkCentre power is in the ON
position.
Copies are too
light or too dark.
If the original is light, select the lower copy
contrast position to darken the background of
the copies.
If the original is dark, select the upper copy
contrast position to lighten the background of
the copies.
Smears, lines,
marks, or spots
on copies.
If defects are on the original, press the copy
contrast key to lighten the background of your
copies.
If no defects are on the original, clean the
document glass and underside of the
document cover. (Refer to WorkCentre
Care.)
If the above solutions do not help, clean the
corotron wire. (Refer to WorkCentre Care.)
Copy image is
skewed.
Ensure that original is positioned correctly on
document glass.
Check that copy paper is loaded correctly.
Blank copies.
Ensure that the original is face down on the
document glass.
Check for a broken corotron wire. Refer to
WorkCentre Care section for the location of
the corotron wire.
Page 58

50
Condition Suggested solutions
Image rubs off
the copy easily.
Replace the paper in the tray with paper from
a new package.
In high humidity areas do not leave paper in
the WorkCentre for extended periods of time.
Frequent copy
paper jams.
Fan the stack of paper, then turn it over in the
tray.
Replace paper in paper tray with a fresh
supply.
Check/adjust paper guides.
Ensure that the paper is the proper paper
weight. 20 lb / 80 gsm bond paper is
recommended.
Check for copy paper or pieces of copy paper
remaining in the WorkCentre after a paper
jam has been cleared. (Refer to Clearing the
Paper Path.)
The three trouble
indicators are lit
in the
W orkCentre
diagram.
The machine is in the program mode. Press
the Image Quality key to exit.
Toner yield is
lower than
expected and the
Toner Indicator is
on.
Toner may be lodged in the cartridge.
Remove the toner cartridge. Shake the toner
cartridge and tap along the top of the toner
cartridge over a waste receptacle. Take care
not to touch the exposed toner on the left side
of the cartridge.
Fewer copies
from the Toner
Cartridge than
expected.
Originals contain pictures, solids, or heavy
lines.
Originals are forms, newsletters, books etc.
The WorkCentre is being turned on and off
frequently.
The document cover is being left open while
copies are being made. (Refer to the Toner
Cartridge Yield section.)
Page 59

51
Problem Solving
Status Code Chart
Status
Code
Suggested Solution
Ensure that there is paper in the selected paper tray.
Ensure that the Paper Tray is closed properly.
Paper may not have fed all the way into the WorkCentre.
(Refer to Loading Paper and Flashing
P
.)
E2
Copy paper has misfed. (Refer to Clearing the Paper
Path.)
J1 The toner indicator on the copier diagram will light when the
toner supply is low. Approximately 10 more copies can be
made, but you should have a replacement cartridge in
stock. When the J1 status code is displayed, the machine
will stop operating until the toner cartridge is replaced.
J2 The drum cartridge indicator on the machine diagram lights
when the drum is near the end of life. Approximately 1,000
more copies can be made, but you should have a
replacement cartridge in stock. When the J2 status code is
displayed, the machine will stop operating until the drum
cartridge is replaced.
C1 The front or side cover is open. Close the cover.
CH Install the toner cartridge.
A1 – A2 Remove misfed paper from the Single Pass Feeder. Refer
to A1 – A2 Single Pass Feeder Misfeed/Automatic
Document Feeder for detailed instructions.
L1 Ensure that the shipping screw is removed.
E7
H2 – H4
L3 – L5
U2 – U5
Switch OFF the Main Power. Wait approximately 5
seconds. Switch ON the Main Power. If the status code
continues, call for service.
Page 60

52
Problem Solving
Printing Solution Chart
Problem Probable Cause Remedy
The
W orkCentre
does not print
The IEEE-1284 Parallel
cable is not connected
properly.
Check the cable connection.
The IEEE-1284 parallel
cable is defective.
Check the cable with a
computer and printer that
work. If printing is still not
possible, replace the cable.
The port setting is
incorrect.
Check the printer settings in
the Windows Control Panel to
make sure that the print job is
being sent to the correct port.
(For Example: LPT1.)
The toner and drum
cartridges are not installed
properly.
Check that the toner and
drum cartridges are installed
properly.
The printer driver may not
be installed properly.
Reinstall the WorkCentre
printing software.
The parallel port cable
specifications may not be
correct.
Use the IEEE-1284 parallel
port cable supplied with the
machine or replace it with an
IEEE-1284 compliant cable.
Half of the
page is blank
The page layout is too
complex.
Reduce the resolution setting
from 600 dpi to 300 dpi.
Install more RAM in the
computer.
The page orientation may
be incorrect.
Change the page orientation
in the printer setup dialog.
There may be too many
applications open.
Try closing other applications
before printing.
Reduce resolution from
600 dpi to 300 dpi.
Install more RAM in the
computer.
Page 61

53
Problem Probable Cause Remedy
The computer CPU
specification may be
incorrect.
Check that the computer
meets the minimum
specification.
Printing is too
slow
The computer parallel port
may not be set for high
speed communications.
If your computer is equipped
with an ECP parallel port,
enable this mode of
operation. Refer to the
Enabling High Speed
Printer Communications
section and your computers
user guide.
If using Windows 3.1x, the
background printing item
in the options menu of
print manager may be set
incorrectly.
Select Background Printing
from the options menu of
print manger.
If using Windows 95, the
spool setting may be set
incorrectly.
Point to the Start Task bar
and then click Settings then
Printers. Click the Xerox
Document WorkCentre XD
with the right mouse button.
Click Properties and then
spool settings on the details
tab. Select the desired
setting from the available
choices.
Computer may not have
enough memory (RAM).
Install more RAM in your
computer.
Print Job to large Reduce resolution from 600
dpi to 300 dpi.
Irregular faded
patches of
print
There is a paper quality
problem.
Use only paper that meets
the specifications required by
the printer.
Toner may be unevenly
distributed.
Remove the toner cartridge
and shake it gently to evenly
distribute the toner. Then
reinstall the toner cartridge.
Black staining There is a paper quality
problem.
Use only paper that meets
the specifications required by
the WorkCentre.
Page 62

54
Problem Probable Cause Remedy
Character
voids
The paper may be too dry. Try printing with a different
batch of paper.
Background
scatter
The paper may be too
damp.
Try printing with a different
batch of paper. Do not open
packages of paper until
necessary so that the paper
does not absorb too much
moisture from the air.
Printing over uneven
surfaces.
If printing onto envelopes,
change your printing layout to
avoid printing over areas that
have overlapping seams on
the reverse side.
Missing
characters
The paper may be too
damp.
Try printing with a different
batch of paper. Do not open
packages of paper until
necessary so that the paper
does not absorb too much
moisture from the air.
Back of
printout is dirty
The transfer roller may be
dirty.
Print a few blank pages to
clean the transfer roller.
Incorrect fonts TrueType fonts may be
disabled.
Use the Fonts dialog box in
the Control Panel to enable
TrueType fonts.
Faded
graphics
Toner may be low. Remove the toner cartridge
and shake it gently to evenly
distribute the toner. Then
reinstall the toner cartridge.
Ensure that you have a spare
toner cartridge.
Page 63

55
Technical Data
Original Size: Maximum 10×14" / B4
Copy Ratio Percentages:1:1 ± 1%
Preset: 50*, 78, 86,100,129, 200 customer settable
Zoom: 50 – 200
Paper Size and Weight
Tray 1 and Tray 2
5.5×8.5 to 8.5×14"/ A5 to 216×356mm
15 - 24 lb / 56 - 90 gsm
Paper Tray Bypass
3.5×5.5" to 8.5×14"/ A6 to 216×356mm
14 – 34 lb / 52 – 130 gsm
Copy Rate (8.5×11" / A4 and smaller)
XD100/102/103f/104/105f: 10 copies/minute
XD120f/125/125f: 12 copies/minute
XD 130df: 13 copies/minute
XD155df: 15 copies/minute
Print Rate (8.5×11" / A4 and smaller): 8 prints/minute
Paper Tray Capacity Paper Tray Paper Tray Bypass
XD100/103f/125/125f: 250 1
XD102: 200 1
XD104/105f: 250 50
XD120f: 2×250 1
XD130df/155df: 2×250 50
First copy output time: 9 seconds (warm) 23 seconds (cold)
Electrical Requirements: AC 120V ± 10%, 50/60 Hz, 9.5A
Machine Dimensions Width × Depth × Height
XD100/ 102/ 125: 20.4 × 17.76 × 11.9"/ 51.8 × 45.1 × 30.3cm
XD104 20.4 × 17.76 × 11.5”/ 51.8 × 45.1 × 29.3cm
XD103f/105f/125f: 20.4 × 19.06 × 14.9"/ 51.8 × 48.4 × 37.9cm
XD120f/130df/155df: 20.4 × 19.06 × 18.3"/ 51.8 × 48.4 × 46.4cm
Machine Weight (Includes Drum and Toner Cartridge)
XD100/102/104/125: 40.9 lbs / 18.6kg
XD103f/105f/125f: 48.5 lbs / 22kg
XD120f: 55 lbs / 25kg
XD130df/155df: 57.2 lbs / 26kg
Power Consumption: Max: 1.0kW
Shut off mode: 20 Watts
 Loading...