

Page 1

®
Print and Fax
Drivers Guide
For Macintosh
Release 5.58
Page 2

May 18, 2004
Xerox Corporation
Global Knowledge and Language Services
800 Phillips Road, Bldg. 0845-17S
Webster, New York 14580
USA
Copyright © 2003, 2004 by Xerox Corporation. All rights reserved.
XEROX®, The Document Company®, the digital X®, CentreWare®, and the
identifying product names and numbers herein are trademarks of XEROX
CORPORATION.
Other product names and images used in this guide may be trademarks or registered
trademarks of their respective companies and are hereby acknowledged.
ii
Page 3

Table of
Contents
Chapter 1 CentreWare Printer Drivers for Macintosh . . . . . . 1-1
CentreWare Printer Drivers . . . . . . . . . . . . . . . . . . . . . . . . . . . . . . . . . . 1-2
Macintosh Printer Utility . . . . . . . . . . . . . . . . . . . . . . . . . . . . . . . . . . . . 1-2
Printer Driver Documentation . . . . . . . . . . . . . . . . . . . . . . . . . . . . . . . . 1-2
CentreWare Print and Fax Drivers Guide for Macintosh . . . . . . . . . . . . . 1-2
Help System . . . . . . . . . . . . . . . . . . . . . . . . . . . . . . . . . . . . . . . . . . . . . . . 1-2
CentreWare Printer Driver Support . . . . . . . . . . . . . . . . . . . . . . . . . . . . 1-3
Internet Support . . . . . . . . . . . . . . . . . . . . . . . . . . . . . . . . . . . . . . . . . . . . 1-3
Telephone Support . . . . . . . . . . . . . . . . . . . . . . . . . . . . . . . . . . . . . . . . . . 1-3
DC Tips . . . . . . . . . . . . . . . . . . . . . . . . . . . . . . . . . . . . . . . . . . . . . . . . . . 1-3
Chapter 2 Installing Macintosh Printer Drivers . . . . . . . . . . . 2-1
Workstation Requirements . . . . . . . . . . . . . . . . . . . . . . . . . . . . . . . . . . 2-2
Understanding the Printer Driver/PPD Options . . . . . . . . . . . . . . . . . . 2-3
Xerox Custom Printer Driver and PPD . . . . . . . . . . . . . . . . . . . . . . . . . . 2-3
Generic PPD . . . . . . . . . . . . . . . . . . . . . . . . . . . . . . . . . . . . . . . . . . . . . . . 2-3
Custom Printer Driver Installation . . . . . . . . . . . . . . . . . . . . . . . . . . . . 2-4
Installing the Custom Printer Drivers and PPDs . . . . . . . . . . . . . . . . . . . 2-5
Setting Up and Configuring the PostScript Driver . . . . . . . . . . . . . . . . . . 2-6
Installing Generic PPDs . . . . . . . . . . . . . . . . . . . . . . . . . . . . . . . . . . . . 2-8
Generic Print Emulation PPDs . . . . . . . . . . . . . . . . . . . . . . . . . . . . . . . . . 2-8
Installing PPDs in Mac 8.6-9.x Environments . . . . . . . . . . . . . . . . . . . . . 2-8
Installing PPDs in Mac OS X Environments . . . . . . . . . . . . . . . . . . . . . . 2-9
Setting Up and Configuring Generic PPDs . . . . . . . . . . . . . . . . . . . . . . 2-10
Enabling LPR Printing . . . . . . . . . . . . . . . . . . . . . . . . . . . . . . . . . . . . 2-11
Uninstalling Printer Drivers and PPDs . . . . . . . . . . . . . . . . . . . . . . . . 2-12
Uninstalling Custom Printer Drivers . . . . . . . . . . . . . . . . . . . . . . . . . . . 2-12
Uninstalling PPD Files . . . . . . . . . . . . . . . . . . . . . . . . . . . . . . . . . . . . . . 2-13
CENTREWARE PRINT AND FAX DRIVERS GUIDE iii
Page 4

Chapter 3 Using Macintosh Printer Drivers . . . . . . . . . . . . . . 3-1
Accessing Print Options . . . . . . . . . . . . . . . . . . . . . . . . . . . . . . . . . . . . 3-2
Custom Printer Driver Options . . . . . . . . . . . . . . . . . . . . . . . . . . . . . . . 3-3
Accounting . . . . . . . . . . . . . . . . . . . . . . . . . . . . . . . . . . . . . . . . . . . . . . . . 3-3
Adjusting Brightness . . . . . . . . . . . . . . . . . . . . . . . . . . . . . . . . . . . . . . . . 3-4
Adjusting Resolution . . . . . . . . . . . . . . . . . . . . . . . . . . . . . . . . . . . . . . . . 3-4
Background Printing . . . . . . . . . . . . . . . . . . . . . . . . . . . . . . . . . . . . . . . . 3-5
Banner Sheets . . . . . . . . . . . . . . . . . . . . . . . . . . . . . . . . . . . . . . . . . . . . . . 3-6
Color Correction . . . . . . . . . . . . . . . . . . . . . . . . . . . . . . . . . . . . . . . . . . . . 3-7
Delayed Print . . . . . . . . . . . . . . . . . . . . . . . . . . . . . . . . . . . . . . . . . . . . . . 3-8
Finishing Options . . . . . . . . . . . . . . . . . . . . . . . . . . . . . . . . . . . . . . . . . . . 3-9
Offset Printing . . . . . . . . . . . . . . . . . . . . . . . . . . . . . . . . . . . . . . . . . 3-10
Collating/Stapling . . . . . . . . . . . . . . . . . . . . . . . . . . . . . . . . . . . . . . . 3-10
Hole Punching . . . . . . . . . . . . . . . . . . . . . . . . . . . . . . . . . . . . . . . . . 3-11
Booklet Printing . . . . . . . . . . . . . . . . . . . . . . . . . . . . . . . . . . . . . . . . 3-12
Font Options . . . . . . . . . . . . . . . . . . . . . . . . . . . . . . . . . . . . . . . . . . . . . . 3-13
Job Logging . . . . . . . . . . . . . . . . . . . . . . . . . . . . . . . . . . . . . . . . . . . . . . 3-14
N-Up Printing . . . . . . . . . . . . . . . . . . . . . . . . . . . . . . . . . . . . . . . . . . . . . 3-14
Printing Covers . . . . . . . . . . . . . . . . . . . . . . . . . . . . . . . . . . . . . . . . . . . . 3-15
Print to File Option . . . . . . . . . . . . . . . . . . . . . . . . . . . . . . . . . . . . . . . . . 3-16
Print Quality . . . . . . . . . . . . . . . . . . . . . . . . . . . . . . . . . . . . . . . . . . . . . . 3-17
Sample Set (Proof Print) . . . . . . . . . . . . . . . . . . . . . . . . . . . . . . . . . . . . 3-18
Secure Print . . . . . . . . . . . . . . . . . . . . . . . . . . . . . . . . . . . . . . . . . . . . . . 3-19
Setting the Output Destination . . . . . . . . . . . . . . . . . . . . . . . . . . . . . . . . 3-20
Transparency Separators . . . . . . . . . . . . . . . . . . . . . . . . . . . . . . . . . . . . 3-21
Two-Sided Printing . . . . . . . . . . . . . . . . . . . . . . . . . . . . . . . . . . . . . . . . 3-21
Working With Watermarks . . . . . . . . . . . . . . . . . . . . . . . . . . . . . . . . . . 3-22
Enabling Watermark Printing . . . . . . . . . . . . . . . . . . . . . . . . . . . . . . 3-22
Printing Watermarks . . . . . . . . . . . . . . . . . . . . . . . . . . . . . . . . . . . . . 3-22
Creating or Editing Watermarks . . . . . . . . . . . . . . . . . . . . . . . . . . . . 3-24
Chapter 4 Macintosh Printer Utility . . . . . . . . . . . . . . . . . . . . . 4-1
Workstation Requirements . . . . . . . . . . . . . . . . . . . . . . . . . . . . . . . . . . 4-2
Installing the Macintosh Printer Utility . . . . . . . . . . . . . . . . . . . . . . . . . 4-2
Using the Macintosh Printer Utility . . . . . . . . . . . . . . . . . . . . . . . . . . . 4-3
Uninstalling the Macintosh Printer Utility . . . . . . . . . . . . . . . . . . . . . . 4-5
Chapter 5 Problem Solving . . . . . . . . . . . . . . . . . . . . . . . . . . . . 5-1
Troubleshooting a Problem . . . . . . . . . . . . . . . . . . . . . . . . . . . . . . . . . . 5-2
iv CENTREWARE PRINT AND FAX DRIVERS GUIDE
Page 5

Index . . . . . . . . . . . . . . . . . . . . . . . . . . . . . . . . . . . . . . . . . . . . . . . . .1-I
CENTREWARE PRINT AND FAX DRIVERS GUIDE v
Page 6

vi CENTREWARE PRINT AND FAX DRIVERS GUIDE
Page 7

1
CentreWare Printer Drivers for
Macintosh
The CentreWare printer drivers enable printing from a Macintosh workstation to a
Xerox system in a network environment. They contain a variety of feature options
that enable you to customize your print jobs.
Integrated fax capabilities vary with each Xerox system. Not all Xerox printers
support both network printing and LAN fax submitted from the desktop. Check your
product-specific literature for more details. Other network fax options can be
configured with different models, using third-party software applications.
CentreWare 5.58 provides enhanced support for the WorkCentre Pro (WCP) C2128/
C2636/C3545 systems. It also includes watermark and booklet printing plug-in
modules.
1-1
Page 8

CentreWare Printer Drivers
Features supported in this release include stapling, offsetting, hole punching, booklet
fold, booklet staple, and watermark printing.
CentreWare Macintosh Printer Drivers include the following components:
Custom printer drivers
Custom PostScript Printer Description files (PPDs)
Generic PPDs
Macintosh Printer Utility
The Macintosh Printer Utility is a CentreWare application that enables network
administrators to:
Rename and rezone Xerox systems that are configured for AppleTalk
connectivity
Query the characteristics of a printer
Print a list of fonts installed on a printer
Send PostScript files or portions of PostScript code to a printer.
This utility requires a Macintosh Operating System 8.1 or higher.
Printer Driver Documentation
CentreWare Print and Fax Drivers Guide for Macintosh
This guide is intended for administrators who install and configure CentreWare
Printer drivers. The guide also contains information, focused for general users, on
printing and faxing options available with the drivers.
The CentreWare Print and Fax Drivers Guide is available on the CentreWare Print and
Fax Drivers CD in electronic (PDF) format.
Help System
The CentreWare custom printer driver and PPD for Macintosh supports balloon help.
Simply enable balloon help on your system and help will be available.
1-2 CentreWare Printer Drivers for Macintosh
Page 9

CentreWare Printer Driver Support
Internet Support
Please consult the Xerox Web site (http://www.Xerox.com), and follow the product
links for your Xerox system. The Web site contains product support information,
product overviews, and updates. Printer drivers can also be downloaded from this
site.
Telephone Support
For additional assistance, you may contact the Xerox Welcome Center by telephone
to speak with a Product Support Analyst. Locate your product’s serial number, and
record it in the space below before you make your call.
WorkCentre Pro Serial Number
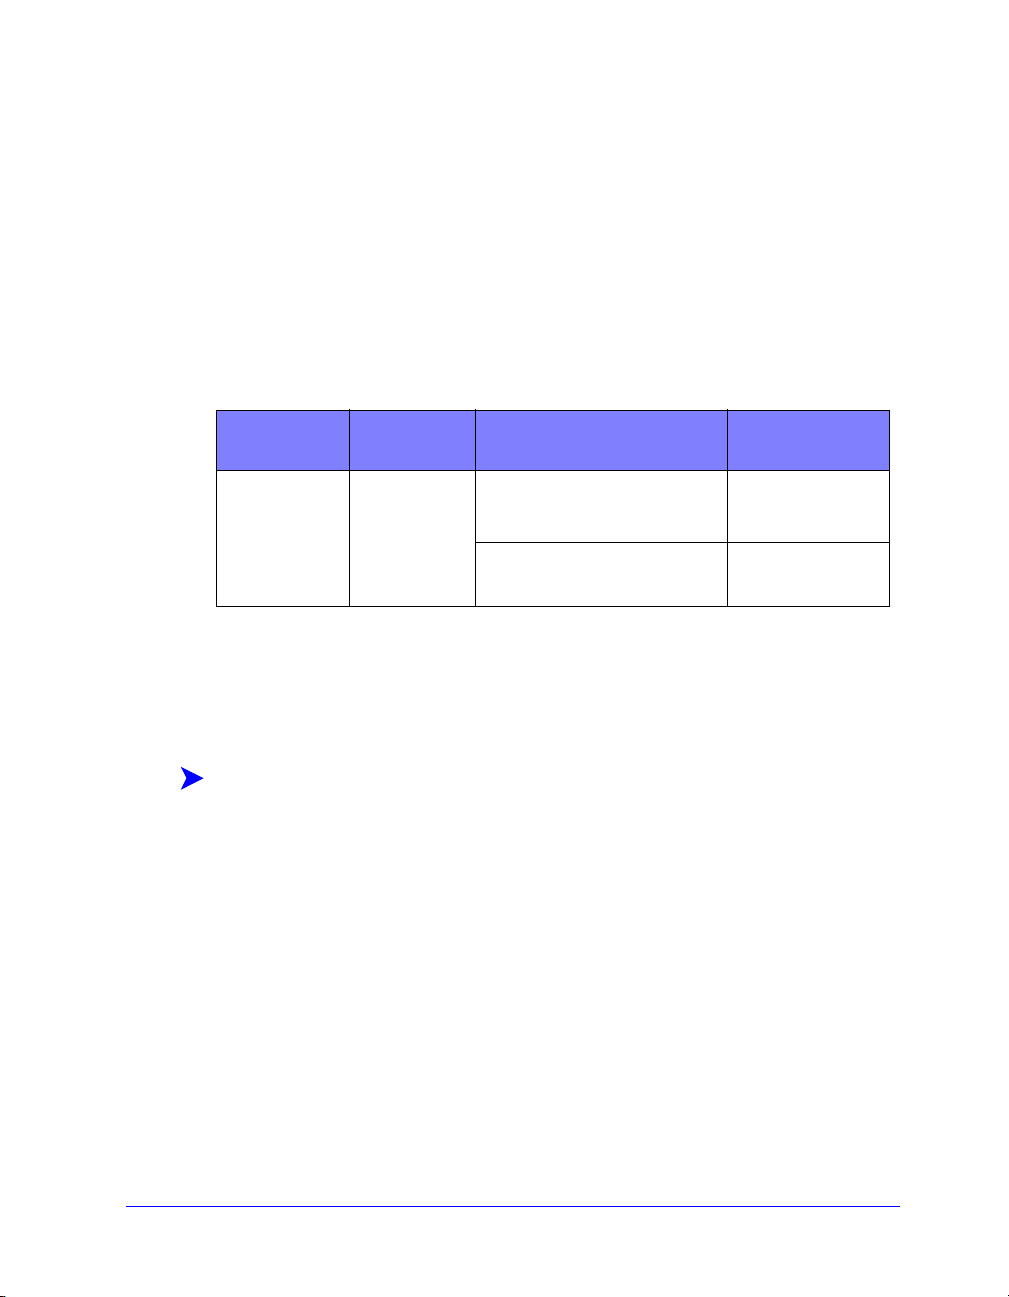
The Xerox Welcome Center telephone numbers are listed in the following table. If the
Welcome Center telephone number for your country is not listed, it will be provided
to you when your Xerox system is installed. For future reference, please record the
telephone number in the space provided below.
Welcome Center Telephone Numbers
UNITED STATES 800-821-2797
CANADA 800-939-3769 (800-93-XEROX)
DC Tips
Additional tips and technical information for printer drivers are available at the Xerox
Web s i te,
Tip s cover specific issues that may require special procedures or application notes
regarding the operation and configuration of your Xerox system.
www.Xerox.com. Locate your product and access the DC Tips link. DC
CentreWare Printer Driver Support 1-3
Page 10

1-4 CentreWare Printer Drivers for Macintosh
Page 11

2
Installing Macintosh Printer Drivers
The CentreWare Print and Fax Drivers CD contains a variety of custom printer driver
and PostScript Printer Description (PPD) file combinations that support printing to a
Xerox system from a Macintosh workstation.
This chapter explains how to install the printer drivers and PPDs for your Xerox
system. In general, the directions apply to OS 9 unless OS 10 is specified.
What’s in this chapter:
Workstation Requirements. . . . . . . . . . . . . . . . . . . . . . . . . . . . . . . . . . . . . 2-2
Understanding the Printer Driver/PPD Options . . . . . . . . . . . . . . . . . . . 2-3
Custom Printer Driver Installation . . . . . . . . . . . . . . . . . . . . . . . . . . . . . . 2-4
Installing Generic PPDs . . . . . . . . . . . . . . . . . . . . . . . . . . . . . . . . . . . . . . 2-8
Enabling LPR Printing . . . . . . . . . . . . . . . . . . . . . . . . . . . . . . . . . . . . . . 2-11
Uninstalling Printer Drivers and PPDs . . . . . . . . . . . . . . . . . . . . . . . . . 2-12
2-1
Page 12

Workstation Requirements
The minimum hardware requirements for the Macintosh printer drivers are:
4 MB of memory
NOTE: The CentreWare Macintosh printer drivers will not operate on Macintosh
68K computers.
6.2 MB of hard disk space
CD-ROM drive or access to a network
The following table shows the CentreWare 5.58 custom printer drivers and PPDs that
are available in specific Macintosh environments. Note that only generic PPDs are
available for OS X systems.
CentreWare 5.58
Macintosh Operating Systems
WorkCentre and
WorkCentre Pro (WCP)
Printer Driver/PPDs
Custom PostScript OS 8.6 to 9.x
Generic PPD OS 8.6 to 9.x
Table 2-1: Macintosh Printer Drivers and PPD Files
OS X
2-2 Installing Macintosh Printer Drivers
Page 13

Understanding the Printer Driver/PPD Options
A PostScript Printer Description (PPD) file is a readable text file that provides a
uniform approach for specifying special features for printer drivers that interpret
PostScript. Generic PPDs do not support all of the special features of Xerox systems,
but can be used to enable all basic features and many advanced PostScript printing
capabilities.
Xerox Custom Printer Driver and PPD
A custom printer driver/custom PPD is available for each supported Xerox system.
Using these printer drivers and PPDs enables you to take full advantage of the custom
print options available for your Xerox system. When you install the custom printer
driver on a workstation, the custom PPD is also installed.
Generic PPD
A generic PPD is also available for each supported Xerox system. The generic PPD is
provided for the convenience of those users who don’t want to install an additional
driver on their systems or who want to print using the Adobe PostScript 8.x or the
Apple LaserWriter 8.x printer drivers. Keep in mind that the generic PPDs support
limited print options, such as stapling, duplexing, adjusting image quality, and
resolution. They do not enable you to use some of the special print options supported
in the custom driver, such as printing transparencies, banner pages, or covers.
NOTE: Do not use the generic PPDs with the Xerox custom driver. They should
only be used in conjunction with the Adobe PostScript 8.x printer driver or the
Apple LaserWriter 8.x printer driver.
Understanding the Printer Driver/PPD Options 2-3
Page 14

Custom Printer Driver Installation
The Xerox installation program installs the custom printer driver and PPD. The
following table lists the custom Macintosh printer driver installation file for each
Xerox system in this release. The printer drivers are located in separate folders within
the ...\DRIVERS\MAC folder on the CentreWare Print and Fax Drivers CD.
Xerox System Printer Driver Folder Installation File
Name
WCP C2128
WCP C2636
WCP C3545
Table 2-2: Macintosh Printer Driver Installation Files
WCP345\PS_345_9.x
Xerox WCP 2128
Xerox WCP 2636
Xerox WCP 3545
2-4 Installing Macintosh Printer Drivers
Page 15

Installing the Custom Printer Drivers and PPDs
Ensure that the printer driver you want to install is available either locally or on a
mounted network drive. If you are installing from a CD-ROM, double-click the CD
icon when it is displayed on your desktop.
To locate and execute the printer driver installation file:
1 Browse the CD contents or directory structure to locate the Drivers folder.
Double-click Drivers > Mac.
2 Double-click the folder for your Xerox system.
3 Double-click the folder PS_xxx_9.x folder, where xxx represents your printer
model. See
4 Double-click the Xerox printer installation icon. An introductory ReadMe
appears.
5 Click Continue to begin the installation.
6 Click Agree to accept the licensing terms.
7 Click Install to begin the installation. Follow the directions in the installation
program.
8 You are prompted that the installation is successful. Click OK.
The installation is complete.
Table 2-2 on page 2-4 for details.
NOTE: A dialog opens with a .PDF copy of the Print and Fax Drivers Guide. This
guide provides an introduction to the printer drivers and explains how to use the
many printing features and options available to you.
Continue with Setting Up and Configuring the PostScript Driver on page 2-6.
Custom Printer Driver Installation 2-5
Page 16

Setting Up and Configuring the PostScript Driver
The custom printer driver installation automatically installs a custom PPD file in the
Printer Descriptions folder. Follow the procedure below to associate the printer driver
with the Xerox system and to configure the driver.
To set up and configure custom PPDs:
1 In the Apple Chooser, select the Laser Writer 8 driver. Ensure that you are in the
appropriate AppleTalk zone. If your computer is connected to a network with
only one zone, there will not be any zones available.
2 In the Select a PostScript Printer list, select the AppleTalk name for you Xerox
system.
3 Click Create. In the dialog that appears, select the Custom PPD for your Xerox
system. If the PPD is not immediately available, browse to: System
Folder\Extensions\Printer Descriptions.
4 Click Select PPD and select the Custom PPD for your Xerox system. Click
Open.
5 Select Configure and choose your printer’s Installable Options. Click OK.
NOTE: If you have Bi-Directional capabilities, click Auto Configure to
search, or manually enter the appropriate information.
Bi-Directional communication automatically updates the printer driver with
the printer’s installed options and reports specific information about the
printer’s operational status.
6 Click OK. Close the Chooser. A new printer icon appears on the desktop.
7 Open a document in an application and select File > Print.
8 From the print options menu, select Plug-In Preferences.
9 Select the box next to Print Time Filters.
10 Select the box next to the custom PPD you are using. Make sure only one Custom
PPD is selected. Optionally, you can also select the watermark plug-in.
11 Click Save Settings and OK to save the PPD assignment.
12 Click Cancel or Print to close the dialog.
2-6 Installing Macintosh Printer Drivers
Page 17

The Macintosh custom printer driver and custom PPD setup is complete. The Xerox
system becomes your default printer.
Custom Printer Driver Installation 2-7
Page 18
Installing Generic PPDs
Generic Print Emulation PPDs
The Generic PPDs can be installed and used for printing with Apple LaserWriter
printer drivers or Adobe PostScript (PS) printer drivers. Generic PPDs are also
provided for OS X systems.
The following table lists the Macintosh Generic PPD files that are available with this
release. The PPD files are located in separate folders within the ..\DRIVERS\MAC
folder on the CentreWare Print and Fax Drivers CD.
Xerox
System
WCP C2128
WCP C2636
WCP C3545
File Type Folder Installation File
Name
Generic PS 3
PPD
OS 8.6 - OS X
\WCP345\GenericPPD_345_8.6-9x XRXC2128.PPD
XRXCP2636.PPD
XRXC3545.PPD
\WCP345\GenericPPD_345_Xv10.x WCP 345.DMG
WCP 345.DMG
Table 2-3: Macintosh PPD Files
Installing PPDs in Mac 8.6-9.x Environments
There is no installation program for installing PPDs in Mac 8.6-9.x environments.
The files must be copied to the appropriate directory on your system.
To install PPDs in Mac 8.6-9.x environments:
1 Locate the desired PPD files on the CentreWare CD from Table 2-3 on page 2-8.
2 Copy the files to the following directory:
[HD]:/System Folder/Extensions/Printer Descriptions
The PPD is available for use with the printer driver.
2-8 Installing Macintosh Printer Drivers
Page 19

Installing PPDs in Mac OS X Environments
Xerox supplies an installation program for installing generic PPDs in OS X
environments.
To install generic PPDs in Mac OS X:
1 Browse the CentreWare CD to locate the .DMG file for the PPD you want to
install. Refer to
2 Double-click the .DMG file.
You will see two .PKG files—one to install the PPD for you printer and one to
install the booklet/watermark plug-in.
3 Double-click the .PKG file associated with your printer and follow the
instructions in the installation program.
4 If you want to install the booklet/watermark plug-in, double-click the
WCP_Plugins.PKG file in the installation program window and follow the
instructions provided.
NOTE: To install the booklet/watermark plug-in you must have
Administrator privileges with Root access.
The PPD files are copied to:
[Root] /Library/Printers/PPD Plugins/Xerox.Booklet.Plugin
Table 2-3 on page 2-8 for details.
[Root] /Library/Printers/PPD Plugins/Xerox.Watermark.Plugin
[Root] /Library/Printers/PPDs/Contents/Resources/<language>
Installing Generic PPDs 2-9
Page 20

Setting Up and Configuring Generic PPDs
NOTE: Do not use the generic PPDs with the Xerox custom printer drivers.
To set up and configure the generic PPDs:
1 In the Apple Chooser, select the LaserWriter 8 printer driver or the Adobe PS
printer driver. Ensure that you are in the appropriate AppleTalk zone. If your
computer is connected to a network with only one zone, there will not be any
zones available.
2 In the Select a PostScript Printer list, select the AppleTalk name for the Xerox
system that you want to use.
3 Click Create. In the dialog that opens, select a PPD for your Xerox system.
4 Click Select.
5 Click Setup and select the Custom PPD for your Xerox system.
6 Select Installable Options.
NOTE: If you have Bi-Directional capabilities, click Auto Configure to search, or
manually enter the appropriate information.
Bi-Directional communication automatically updates the printer driver with the
printer’s installed options and reports specific information about the printer’s
operational status.
7 Click OK. Close the Chooser. A new printer icon appears on the desktop.
8 Open a document in an application and select File > Print to test the print
capability.
2-10 Installing Macintosh Printer Drivers
Page 21

Enabling LPR Printing
LPR (aka IP) printing is supported through the common PrintingLib. LPR printing is
set up via the Desktop Printer Utility in OS 9 and via the Print Center in OS X. The
following procedure outlines setup in OS 9.
NOTE: Version 1.2 of the Desktop Printer Utility (DTPU) is available from Apple
and ships with Mac version 8.6 or higher. DTPU, version 1.2 does not work with the
Mac OS prior to version 8.5.
To set up LPR printing in Mac OS 9:
1 Double-click the Hard Drive icon.
2 Double-click the Apple Extras > Apple LaserWriter Software folders. The
location may vary based on the version of OS9.x that you own.
3 Double-click the Desktop Printer Utility. The New Desktop Printer dialog
appears.
NOTE: If the Desktop Printer Utility icon is grayed out, restart your computer and
begin again with Step 1.
4 Select a printer driver to use for LPR printing from the drop-down menu.
5 Select Printer (LPR) from the options to create a desktop printer using LPR
printing. Click OK.
A dialog appears that allows you to:
confirm or change the PPD file.
confirm or change the LPR printer selection.
If you have not specified the LPR printer to which you are printing (using
domain name or IP address), click Change. A dialog opens for you to type in the
domain name or IP address of your internet printer. Click Verify, then OK.
6 Click Create. Choose a name with which to save your desktop printer.
7 Select the printer name. The Open button changes to Save.
8 Click Save. A desktop printer icon appears on your desktop. Close all open
dialog boxes.
Enabling LPR Printing 2-11
Page 22

Uninstalling Printer Drivers and PPDs
Uninstalling Custom Printer Drivers
You must manually uninstall printer drivers to remove the files from your system.
You should always uninstall existing drivers prior to installing updated versions.
To uninstall the custom printer drivers:
1 Select Chooser from the Apple menu, and ensure that the printer driver you want
to delete is not the default driver.
2 Drag the desktop icons for the printers that you want to delete to the Trash.
3 Open the System folder and double-click Printing Plug-ins. Locate the files
specific to Xerox system. Refer to the following file names.
Xerox WCP C2128
Xerox WCP C2636
Xerox WCP C3545
Xerox Watermark
4 Select the files that you want to remove and drag them to the Trash.
5 Open the Printer Descriptions folder located in the Extensions folder, and
select the PPD files for your Xerox system:
WCP C2128
WCP C2636
WCP C3545
6 Move the file to the Trash, and empty the Trash.
The driver uninstallation is complete.
2-12 Installing Macintosh Printer Drivers
Page 23

Uninstalling PPD Files
To uninstall PPD files, you must manually delete them from the system.
To uninstall PPD files:
1 Select Find from the File menu.
2 In the text field, enter the name of the PPD file you want to locate and press
Enter.
3 Select the file on the hard drive and move it to the Trash.
4 Empty the Trash. The PPD is uninstalled.
Uninstalling Printer Drivers and PPDs 2-13
Page 24

2-14 Installing Macintosh Printer Drivers
Page 25

3
Using Macintosh Printer Drivers
This chapter summarizes the procedures for using the custom printer drivers for your
Xerox system. These procedures are based on printing from Microsoft Word using a
Mac OS 9. The specific procedures for printing from other applications may vary.
NOTE: The custom driver is not available for OS X systems. You may use the
generic PPD to print from OS X systems.
What’s in this chapter:
Accessing Print Options . . . . . . . . . . . . . . . . . . . . . . . . . . . . . . . . . . . . . . 3-2
Custom Printer Driver Options. . . . . . . . . . . . . . . . . . . . . . . . . . . . . . . . . 3-3
3-1
Page 26

Accessing Print Options
This section discusses how to access and use the printer driver features for your
Xerox system. Most of the Xerox-specific options are contained in the Xerox Options
dialog.
NOTE: Printing option availability varies based the capabilities of your Xerox
system.
To access printer driver options:
1 From your application, select File > Print. The application Print dialog appears.
Choose the Xerox system from the Printer drop-down list.
2 From the print options menu, select Xerox Options.
Figure 3-1: Xerox Options Dialog
3-2 Using Macintosh Printer Drivers
Page 27

Custom Printer Driver Options
Accounting
CentreWare Accounting enables organizations to track Xerox system use by
individual users and by account numbers. The printer collects and stores account
information as jobs are submitted, making cost tracking and reporting an integral part
of the print submission process.
Both the Xerox system and the CentreWare printer driver must be configured for
accounting.
To enable accounting:
1 From your application, select File > Print.
2 From the print options menu, select Xerox Options.
3 Select the Output tab.
4 Select Accounting or Auditron to enable the feature.
To use accounting:
1 Click Print. Your application now requests the User ID and Account ID for the
job in the dialog that appears.
2 Type in the User ID and Account ID (if issued one by a System Administrator).
Also select the Account Type, if applicable.
3 Click OK to exit the dialog and print your document.
Custom Printer Driver Options 3-3
Page 28

Adjusting Brightness
This option lightens or darkens the printed image of your documents.
To lighten or darken appearance of your print job:
1 From your application, select File > Print.
2 From the print options menu, select Xerox Options.
3 Select the Options tab.
4 From the Image Quality menu, select a lighten or darken level.
5 Click Print.
NOTE: Not available for color products.
Adjusting Resolution
This option specifies the dpi (dots per inch) at which your documents are printed. A
higher dpi prints a clearer or crisper image.
To set the resolution for a printed document:
1 From your application, select File > Print.
2 From the print options menu, select Xerox Options.
3 Select the Options tab.
4 From the list box, select a Resolution option.
5 Click Print.
NOTE: Not available for color products.
3-4 Using Macintosh Printer Drivers
Page 29

Background Printing
This option allows you to continue using your application or workstation while your
document prints. Otherwise, you have to wait for your document to print and then
resume working.
To set up background printing:
1 From your application, select File > Print.
2 From the printer options menu, select Background Printing.
3 From the Print in options, select Background.
NOTE: This options is enabled by default. Disabling the option would
allow for faster printing.
Custom Printer Driver Options 3-5
Page 30

Banner Sheets
Banner sheets contain user and print job information. They print before each
document, separating printed documents in the output trays. Banner sheets can be
configured (enabled or disabled) in several places, including the CentreWare printer
driver, the Xerox System, an application, or network software.
The CentreWare printer driver default is to print a banner sheet with each document
printed. When banner-sheet printing is also enabled at the Xerox Systems’s control
panel, a banner sheet will always print. Disabling the option in either the driver or the
Xerox System’s control panel will prevent banner sheets from printing.
Third-party software applications can also have banner sheet options that enable
printing of banner sheets with one or all print jobs.
Additionally, network software can be configured to always print banner sheets with
each print job. Some organizations may require the use of banner sheets due to overall
print volume.
NOTE: See your Network or System Administrator if you have disabled banner
sheet printing and a banner sheet is still being printed with your documents.
To deselect a banner sheet for a print job:
1 From your application, select File > Print.
2 From the print options menu, select Xerox Options.
3 Select the Options tab.
4 Remove the checkmark in the Request Banner Sheet box to deselect the option.
5 Click Save Settings to keep the setting for all print jobs.
3-6 Using Macintosh Printer Drivers
Page 31

Color Correction
Color Correction gives you the ability to adjust the color rendering in printed output
to meet your specific needs. Choose among the following modes:
Automatic—optimizes the appearance of your printed document. This option
produces bright, solid colors and should be used for mixed documents or
documents with graphics that include charts and graphs.
sRGB—produces output to most accurately match your monitor's color RGB
display. (not available for all drivers)
Fax Friendly—optimizes the output for transmission via facsimile.
Black and White—transforms all color data to equivalent gray levels. Color
variances are portrayed by varying the density of the gray.
None—No color correction will be applied to the print job.
NOTE: Color correction is not available for black and white Xerox systems.
To set color correction options:
1 From your application, select File > Print.
2 From the print options menu, select Xerox Options.
3 Select the Options Tab.
4 Choose a Color Correction option.
5 Click Print.
Custom Printer Driver Options 3-7
Page 32

Delayed Print
This option selects a specific time for your document to print. You can specify a time
up to 24 hours from the time the job is submitted to print.
To delay the printing of your job:
1 From your application, select File > Print.
2 From the print options menu, select Xerox Options.
3 Select the Output tab.
4 From the Job Type list box, select Delayed Print.
5 Set the time of day for the print job, then click AM or PM.
6 Click Print. The job is held at the Xerox system then printed at the specified
time.
3-8 Using Macintosh Printer Drivers
Page 33
Finishing Options
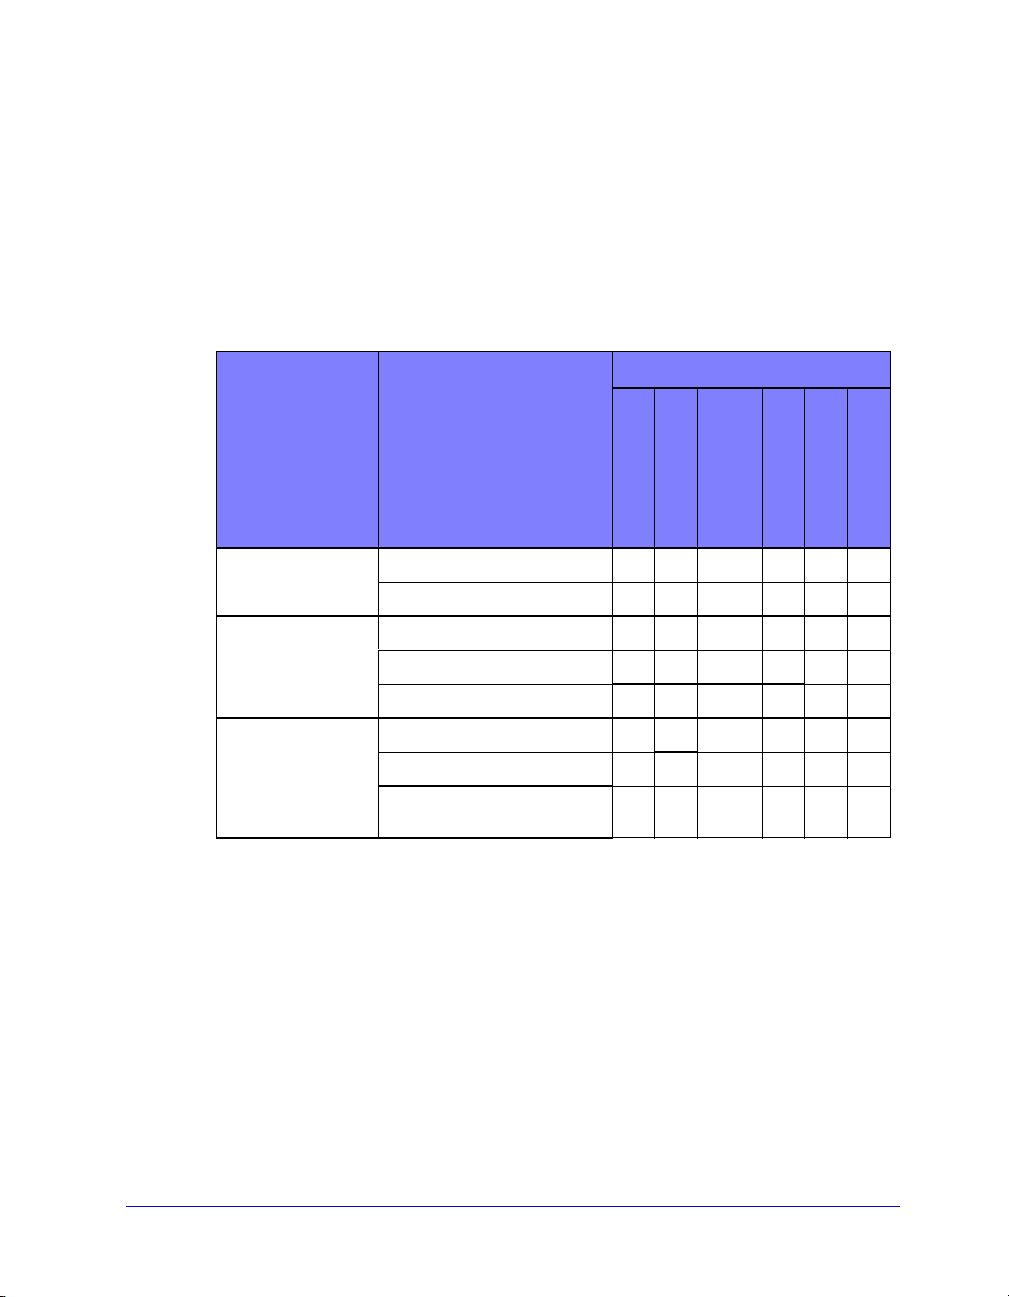
Finishing options for your Xerox system include hole punching, offsetting, stapling,
and booklet printing.
Table 2-1 lists the available finisher units and the finishing options each offers. The
finisher units are mutually exclusive, that is, only one finisher unit may be installed at
a time. Check with your Xerox representative to determine which finisher units are
available for your Xerox system.
Output Unit/ Output
Destination
Office
Finisher
Advanced Office
Finisher
Professional
Finisher
Top Tr ay x x x x x x
Stacker Tray OK OK OK x x x
Top Tr ay x OK x x x x
Stacker Tray 1 OK OK OK OK x x
Stacker Tray 2 OK OK OK OK x x
Top Output Tray x OK x x x x
Stacker Tray OK OK OK OK x x
Booklet Maker Bin (only shown
when booklet fold is selected)
Table 3-1: Finisher Options
Available Finishing Options
Offset Stacking
Punch
Corner/Rear/
Dual Staple
Multiple Staple
Booklet Fold
x x x x OK OK
Booklet Staple
Custom Printer Driver Options 3-9
Page 34

Offset Printing
This option enables you to print multiple document sets so each printed set is slightly
offset from one another in the output bin. Offsetting often makes it easier to sort and
handle documents when you are printing several copies. Offsetting is selected by
default. To disable Offsetting, deselect the Request Set Offsetting box on the Options
tab of the Xerox Options dialog.
To enable offset document delivery:
1 From your application, select File > Print.
2 From the print options menu, select Xerox Options.
3 Select the Options tab.
4 Select the Request Set Offset check box.
5 Click Print.
Collating/Stapling
This option is used to select collated and/or stapled printed documents. General
stapling options include one or two staples. Some Xerox systems support stapling
multiple staples, depending on the media size and type of finisher you have installed.
Collated delivers two or more copies of a document as separate document sets
(1,2,3...1,2,3...). Uncollated prints and delivers two or more copies of a document as
separate sets of each page (1, 1, 1...2, 2, 2...3, 3, 3...).
Collated, 1 Staple places a staple in the upper left corner for both Long Edge
Feed (LEF) and Short Edge Feed (SEF) portrait or landscape documents.
Collated, 2 Staples places two staples on the same edge of the page.
Collated, 4 Staples applies four staples to your document depending on the
media size. This option is available only when the supporting finisher is installed
and configured.
NOTE: Stapling positions may vary depending on other selections, such as
rotation or N-Up (multiple pages on a single sheet) settings.
3-10 Using Macintosh Printer Drivers
Page 35

To request collated and stapled output:
1 From your application, select File > Print.
2 From the print options menu, select Xerox Options.
3 Select the Output tab.
4 From the Staple/Output Options menu, select a Stapled and/or Collated option.
5 Click Print.
Hole Punching
The hole punch mechanism creates two, three, or four holes depending on how your
finisher is equipped. The number of holes created by the punch cannot be changed
through your software.
NOTE: A finisher that supports hole punching must be selected as an installed
option in the Chooser before using this option.
To request hole punching:
1 From your application, select File > Print.
1 From the print options menu, select Xerox Options.
2 Select the Output tab.
3 From the Fold/Punch Options list box, select a hole punch option.
4 Click Print.
Custom Printer Driver Options 3-11
Page 36

Booklet Printing
Booklet Finishing
Booklet finishing provides the capability to print documents so the printed output is
folded like a booklet. Booklets can be stapled or not stapled. Booklet finishing is only
available when using Short Edge Feed page orientation.
To fold or staple booklets:
1 Select File > Print.
2 From the print options, select Xerox Options.
3 Select the Output tab.
4 Choose one of the options from the Staple/Output Options and one of the fold
options from the Fold/Punch Options.
NOTE: Booklet Fold and Booklet Staple+Fold are dynamic options. When
Booklet is selected as a Page Set Up option, a fold option automatically appears in
the Fold menu,. Available fold options will vary based on the selected Staple/
Output option.
For example, if the setting in the Staple/Output Options is Collated, 2 Staples, then
only the Booklet Staple+Fold option is listed as a Fold option. If the setting in the
Staple/Output Options is Collated, then only the Booklet Fold option is listed as a
Fold option.
5 Click Print.
NOTE: Up to five sheets can be folded. If more than five sheets are requested in
a job, folding will be disabled and the job will be delivered to another output tray.
3-12 Using Macintosh Printer Drivers
Page 37

Font Options
The font options enable you to specify the preferred font format that is downloaded to
the printer. You can control whether required fonts will be downloaded and whether
or not Type 42 formats will be generated.
To specify font download preferences:
1 From your application, select File > Print.
2 From the print options menu, select Font Settings.
3 Select Annotate font keys if you want font keys to be annotated in PostScript
output.
4 Select your preferred font download format: Type 1 or True Type fonts.
5 Select Always download needed fonts if you want to ensure that required fonts
are always downloaded to the printer.
6 Select Never generate Type 42 format if you do not want the printer to use
TrueType 42 fonts.
7 Click Print.
Custom Printer Driver Options 3-13
Page 38

Job Logging
Job Logging enables you to specify how PostScript errors will be handled when they
occur.
To specify PostScript error handling policies:
1 From your application, select File > Print.
2 From the print options menu, select Job Logging.
3 Select a PostScript error handling method.
4 Indicate whether you want to generate job copies or job logs.
5 Verify the Job Documentation folder in which job documents will be saved. Click
Change to change the folder.
6 Click Print.
N-Up Printing
This option prints more than one page of a document on one side of a sheet of paper.
To print multiple page images on a single page:
1 From your application, select File > Print.
2 From the print options menu, select Layout.
3 Select the desired number of Pages Per Sheet.
4 Select the Layout Direction to specify whether the multiple images should be
read horizontally or vertically.
5 Select a Border type if you want to draw lines between the different pages
images.
6 Click Print.
3-14 Using Macintosh Printer Drivers
Page 39

Printing Covers
This option specifies a front and/or back cover for your printed documents. You can
also select the paper type and color for the covers.
To specify a cover, paper type, and color:
1 From your application, select File > Print.
2 From the print options menu, select Xerox Options.
3 Select the Paper tab.
4 From the Covers menu, select an option.
5 From the Type menu, select a paper type.
6 From the Color menu, select a paper color.
Ensure that the selected paper has been placed into one of the paper trays of the
Xerox system.
7 Click Print.
NOTE: For single-sided printing, the first and last pages of your document will
print on the covers.
For two-sided printing, the first page of your document is printed on the front of
the cover and the second page is printed on the back of the front cover. You
should insert a blank page (page 2) if you do not want the back of the front cover
to be printed.
If the document contains an odd number of pages, insert a blank page before the
last page to be printed. This will ensure that the last page of your document will
always print on the back of the back cover page.
Custom Printer Driver Options 3-15
Page 40

Print to File Option
This option prints your document to a PostScript or Encapsulated PostScript (EPS)
file. The selections allow you to specify the level of printing speed or portability
preferences for the PostScript or EPS file.
To send your output to a PostScript or EPS file:
1 From your application, select File > Print.
2 From the Destination menu, select File.
3 From the print options menu, select Save as File.
4 From the Save as File menu, choose Postscript Job or an EPS File option.
5 Select a PostScript Level to indicate PostScript compatibility requirements.
6 If applicable, select a Data Format.
7 Indicate whether you want to save Fonts in the file.
8 Click Save Settings if you want to save these options for future print jobs.
9 Click Save to print your document to the file.
3-16 Using Macintosh Printer Drivers
Page 41

Print Quality
The Print Quality/Image Quality options enable you to control the quality of the
printed output.
Enhanced—used for color print jobs. (PostScript only)
Stand ard—produces quality black and white or color documents.
Toner Saver—enables you to conserve toner by printing in draft mode. This
setting is recommended for verifying document content and layout of black and
white print jobs.
NOTE: The Print Quality options vary somewhat from driver to driver.
To specify print quality:
1 From your application, select File > Print.
2 From the print options menu, select Xerox Options.
3 Select the Options tab.
4 Select the Draft Mode check box to enable draft printing.
5 Click Print.
Custom Printer Driver Options 3-17
Page 42

Sample Set (Proof Print)
This option enables you to send a multiple-set job to the Xerox system, print one copy
of the document, and hold the remaining sets in the Xerox system print queue until
after you proofread the sample.
To print a sample set:
1 From your application, select File > Print.
2 From the print options menu, select Xerox Options.
3 Select the Output tab.
4 From the Job Type list box, select Sample Set.
5 Print your document. One copy of your job prints as a sample for the entire job.
The rest of the job is held at the Xerox system.
6 Check the printed document sample before continuing the print job.
To complete the job:
1 Go to the Xerox system control panel and press Job Status.
2 Press the name of your print job to select it.
3 Press Release to continue printing the job or Delete to delete the job.
3-18 Using Macintosh Printer Drivers
Page 43

Secure Print
This feature enables you to print confidential documents by automatically holding
your print job in the printer’s internal queue until you are ready to retrieve it.
To send a Secure Print job, you need an identification number. This number,
comprised of four to ten digits (determined by your system administrator), can be any
numeric value using the numbers 0 through 9.
To print a confidential document:
1 From your application, select File > Print.
2 From the print options menu, select Xerox Options.
3 Select the Output tab.
4 From the Job Type list box, select Secure Print.
5 Enter an identification number for Password.
6 Click Print. Your print job is help within the printer’s internal queue until you
release it at the Xerox system’s control panel.
To release the job:
1 Go to the Xerox system. Access the control panel, and press Job Status.
2 Press the name of your print job to select it.
3 Press Release to release the job for printing.
4 Enter your Secure Print ID on the numeric keypad, and press Enter. Your
document prints.
Custom Printer Driver Options 3-19
Page 44

Setting the Output Destination
Your Xerox system enables you to specify the output bin or location to which your
document is printed.
To specify the output destination:
1 From your application, select File > Print.
2 From the print options menu, select Xerox Options.
3 Select the Output tab.
4 Select a destination from the Output Destination pull-down menu.
5 Click Print.
3-20 Using Macintosh Printer Drivers
Page 45

Transparency Separators
This option enables you to specify whether paper separator pages will be inserted
between each transparency sheet in your print job.
To insert transparency separators:
1 From your application, select File > Print.
2 From the print options menu, select Xerox Options.
3 Select the Options tab.
4 From the Transparency Separators menu, select None or Blank.
5 Click Color if you want to use colored paper for the separator pages.
6 Click Print.
Two-Sided Printing
This option enables you to print on both sides of a piece of paper. You can print the
document like a book, 2-Sided (Long Edge) or like a calendar, 2-Sided (Short
Edge).
To print two-sided documents:
1 From your application, select File > Print.
2 From the print options menu, select Xerox Options.
3 Select the Output tab.
4 From the 2-Sided Printing list box, select 2-Sided (Short Edge) or 2-Sided
(Long Edge).
5 Click Print.
Custom Printer Driver Options 3-21
Page 46

Working With Watermarks
Enabling Watermark Printing
Before you can access the watermark printing options, you must enable the Xerox
Watermark plug-in. Refer to Steps
PostScript Driver on page 2-6 for specific procedures.
NOTE: To properly select and use bitmap watermarks, the watermark application
must have Read access to the entire path in which the bitmap resides. Although
you may be able to browse to and view a bitmap image, it cannot be used as a
watermark unless the watermark application has identical permissions to the same
path. It may be helpful to place any bitmaps to be used as watermarks in the Public
folder in your home directory.
Printing Watermarks
The Watermark option enables you to create and print foreground/background text or
images on the first page or every page of a document. The Watermark definitions you
create can be used on any document.
The Watermark list box contains a list of all the watermarks currently available. If you
select a watermark from this list, it prints on your document.
NOTE: Some applications may not support Watermark printing.
7 through 12 in Setting Up and Configuring the
3-22 Using Macintosh Printer Drivers
Page 47

To print a watermark:
1 From your application, select File > Print.
2 From the print options menu, select Xerox Watermark.
3 On the Watermark dialog, select the desired watermark from the watermark list
and any other print options you would like to apply to this watermark.
First Page Only prints the watermark only on the first page of the
document.
Print in Foreground prints the watermark so that it appears on top of any
text or graphics on the document page. Deselecting this option prints the
watermark behind any graphics or text.
4 If you want to edit an existing watermark, select a watermark from the watermark
list and click Edit.
5 If you want to create a new watermark, click New.
6 If you want to delete a watermark from the list, select the watermark and click
Delete.
7 Click Print to close the dialog.
Custom Printer Driver Options 3-23
Page 48

Creating or Editing Watermarks
When you click New or Edit on the Watermark dialog, the Watermark Editor opens.
The Watermark Editor enables you to define the specific characteristics for a
watermark. Any settings you apply to the watermark are displayed in the preview
graphic.
To create or edit a watermark:
1 For a new watermark, type a watermark name in the Name field. This is the name
that will be used to identify the watermark.
2 In the Content group box, do one of the following:
Select Tex t and type the desired watermark text in the Text field. If you want
to change the text appearance, click Font and select a new font, size, etc.
Select Pict and indicate the image to be used for the watermark. Click Select
File to locate the file on your system.
3 Use the slider or the scroll box to indicate the angle at which the watermark
should be displayed on the page.
0 indicates that the text will be displayed on a horizontal line.
-90 slants the text to the right on a 90 degree angle.
90 slants the text to the left on a 90 degree angle.
4 Use the slider or scroll box to modify watermark density. Density adjusts the
depth of the shade of the text or bitmap images. You can use the slider control or
the numeric field to adjust the density setting. A 100% density setting will print
solid text. Settings below 100% reduce the amount of dry ink used to render the
images.
5 Use the Horizontal and Vertical position settings to modify the location in
which the watermark appears on the printed page. Click Center to center the
watermark.
6 When you are finished, click Save to close the Watermark Editor and return to
the Watermark dialog.
3-24 Using Macintosh Printer Drivers
Page 49

4
Macintosh Printer Utility
The Macintosh Printer Utility is a CentreWare application that enables network
administrators to rename and rezone Xerox systems that are configured for AppleTalk
connectivity. With this utility, you may also query the characteristics of a printer, print
a list of fonts installed on a printer, and send PostScript files or portions of PostScript
code to a printer. Use the Macintosh Printer Utility any time you want to make
changes to the AppleTalk Zone and Printer Name from a Macintosh workstation.
What’s in this chapter:
Workstation Requirements. . . . . . . . . . . . . . . . . . . . . . . . . . . . . . . . . . . . . 4-2
Installing the Macintosh Printer Utility . . . . . . . . . . . . . . . . . . . . . . . . . . 4-2
Using the Macintosh Printer Utility . . . . . . . . . . . . . . . . . . . . . . . . . . . . . 4-3
Uninstalling the Macintosh Printer Utility . . . . . . . . . . . . . . . . . . . . . . . . 4-5
4-1
Page 50

Workstation Requirements
The following are the minimum requirements for the installation and operation of the
Macintosh Printer Utility:
At least 800 KB available hard drive space
Macintosh Operating Systems 7.6 through 9.x
CD-ROM drive or access via a network
Installing the Macintosh Printer Utility
Use the following procedure to install the Macintosh Printer Utility. The installation
consists of copying the utility to your workstation.
To install the Macintosh Printer Utility:
1 Place the CentreWare Print and Fax Drivers CD into the appropriate drive.
2 Browse to ...\Drivers\Mac\Printer Utility Mac 8.6-9.x.
3 Locate the Xerox Printer Utility and puReadMe files.
4 Copy these files to your desktop or to your hard drive.
4-2 Macintosh Printer Utility
Page 51

Using the Macintosh Printer Utility
To use the Macintosh Printer Utility:
1 Double-click the Xerox Printer Utility icon on your desktop to start the Printer
Utility.
2 Click on the desired AppleTalk Zone to obtain a list of the known PostScript
printers.
Figure 4-1: Macintosh Printer Utility
3 Click Help to access more information about the utility features. In general, the
utility allows you to:
Query the characteristics of the printer
Print a list of fonts installed on the printer
Send PostScript files or portions of PostScript code to the printer
Change the AppleTalk zone to which the printer responds
Using the Macintosh Printer Utility 4-3
Page 52

Rename the printer
NOTE: Use only alphanumeric characters when renaming the printer.
The characters: # TAB . ( ) - ; are not supported. If they are used for the
name, the printer will be unavailable.
You must restart the Xerox system if you make any changes to the
settings.
4-4 Macintosh Printer Utility
Page 53

Uninstalling the Macintosh Printer Utility
To uninstall the Macintosh Printer Utility:
1 Locate the Xerox Printer Utility files on your desktop or hard drive.
2 Select the Xerox Printer Utility and puReadMe files and drag them to the
Trash.
3 Access the System Folder, select Preferences, and delete the Xerox WCP Utility
Preferences.
NOTE: If you have not used the Macintosh Printer Utility, the Xerox WCP Utility
Preferences will not have been created in the Preferences folder and you will not
have to delete this utility file.
4 Empty the Trash.
Uninstalling the Macintosh Printer Utility 4-5
Page 54

4-6 Macintosh Printer Utility
Page 55

5
Problem Solving
Application, device, and network errors can occur in a variety of printing situations.
In many cases, simply restarting the application, the workstation, or the printer will
resolve the problem.
What’s in this chapter:
Troubleshooting a Problem . . . . . . . . . . . . . . . . . . . . . . . . . . . . . . . . . . . . 5-2
5-1
Page 56

Troubleshooting a Problem
When a problem persists, document the error messages and gather information to
define the problem. The following problem-solving procedures are recommended:
Accurately define the problem. When, where, and how does the problem occur?
Reproduce the problem. Can the problem be reproduced consistently or is it an
intermittent problem?
Ask other users if they have encountered the problem, and keep a log to track
problem occurrences.
Examine the data for trends and the common attributes that may be related to the
problem. For example, does the problem occur only with a specific printer or on
a specific workstation/network configuration?
Review the product documentation, including the README files and the
Problem Solving topics, to see if any similar problems are documented.
If a cause and solution to the problem cannot be identified, call the Xerox Welcome
Center to report the error information. Provide the support representative with the
documentation that you have gathered to define the problem.
5-2 Problem Solving
Page 57

Index
A
Accessing Macintosh Printer Utility 3
Accounting 3
B
Background Printing 5
Banner Sheet 6
Booklet Finishing
Folding 12
Stapling 12
Brightness Control 4
C
Collate 10
Configuring Macintosh Custom PPDs 6
Covers 15
Customer Tips 3
D
Delayed Printing 8
Documentation 2
F
Finishing Options
Booklet Printing 12
Hole Punching 11
Stapling 10
Font Options 13
G
Generic PPD
Availability 3
Configuring 10
Getting Help
Customer Tips 3
Online 3
Via Phone 3
H
Help system 2
I
Installing
Custom PPDs 5
Generic PPDs 8
Macintosh Printer Drivers 1
Macintosh Printer Utility 2
IP Printing 11
J
Job Logging 14
L
LPR Printing 11
GETTING STARTED WITH ADMIN SERVICES INDEX-I
Page 58

M
Macintosh
Custom PPD Files 3
Custom Printer Driver 3
Generic PPD 3
Understanding Driver/PPD Options 3
Macintosh PPD Files
Configuring
Generic PPDs 10
Xerox Custom PPDs 6
Installing
Custom PPDs 5
Generic PPD 8
Macintosh Printer Driver 4
Macintosh Printer Driver Features
Accounting 3
Background Printing 5
Banner Sheet 6
Booklet Finishing 12
Booklet Fold 12
Brightness 4
Collate/Uncollate 10
Covers 15
Delayed Print 8
Font Options 13
Hole Punching 11
Job Logging 14
N-Up printing 14
Offset Printing 10
Output Destination 20
Print Quality 17
Print to PostScript File 16
Resolution 4
Sample Set (Proof Print) 18
Secure Print 19
Staple 10
Transparency Separators 21
Two-Sided Printing 21
Macintosh Printer Drivers 1
Availability by OS 2
Features and Options 2
File Names 4
Installing 4
Uninstalling 12
Using 1
Workstation Requirements 2
Macintosh Printer Utility 2, 1
Accessing 3
Installing 2
Uninstalling 5
Workstation Requirements 2
N
N-Up Printing 14
O
Offset Printing 10
Online support 3
Output Destination 20
P
Phone support 3
Print and fax drivers
Documentation 2
New Features 2
Online help 2
Print Quality 17
Print to Postscript File 16
Printer Utility
Macintosh 1
Printing
Duplex (Two-Sided) 21
Features and Options 2
via LPR (aka IP) 11
Watermarks 22
INDEX-II GETTING STARTED WITH ADMIN SERVICES
Page 59

Problem Solving 2
Proof Print 18
R
Resolution 4
S
Sample Set 18
Secure Print 19
Staple 10
T
Transparency Separators 21
Troubleshooting a Problem 2
Two-Sided Printing 21
U
Uninstalling
Custom Drivers and PPDs 12
Macintosh Printer Utility 5
PPD Files 13
Using
Macintosh Printer Drivers 1
W
Watermarks 22
Creating/Editing 24
Enabling watermark plug-in 22
Printing 22
Welcome Centre 3
Workstation Requirements
Macintosh Printer Drivers 2
Macintosh Printer Utility 2
X
Xerox Welcome Center 3
INDEX-III GETTING STARTED WITH ADMIN SERVICES
Page 60

IV
 Loading...