

Page 1

Version 5.0
July 2011
Xerox® Printer Access Facility (XPAF)
User Guide
Page 2

©2011 Xerox Corporation. All Rights Reserved. Unpublished rights reserved under the copyright laws of the United States. Contents
of this publication may not be reproduced in any form without permission of Xerox Corporation.
XEROX® and XEROX and Design® are trademarks of Xerox Corporation in the United States and/or other countries.
Changes are periodically made to this document. Changes, technical inaccuracies, and typographic errors will be corrected in
subsequent editions.
Document version 5.0: July 2011
Page 3

Table of Contents
Table of Contents
Section One:
Introduction to XPAF
1. Getting started. . . . . . . . . . . . . . . . . . . . . . . . . . . . . . . . . . . . . . . . . . . . . . . . 1-1
XPAF User Documentation . . . . . . . . . . . . . . . . . . . . . . . . . . . . . . . . . . . . . . . . . . . . . . . . . . . . .1-1
Conventions used. . . . . . . . . . . . . . . . . . . . . . . . . . . . . . . . . . . . . . . . . . . . . . . . . . . . . . . . . . . . .1-3
Supported printers . . . . . . . . . . . . . . . . . . . . . . . . . . . . . . . . . . . . . . . . . . . . . . . . . . . . . . . . . . . .1-7
XPAF subsystems . . . . . . . . . . . . . . . . . . . . . . . . . . . . . . . . . . . . . . . . . . . . . . . . . . . . . . . . . . . .1-9
Supported data streams. . . . . . . . . . . . . . . . . . . . . . . . . . . . . . . . . . . . . . . . . . . . . . . . . . . . . . .1-12
Parameter and keyword processing hierarchy . . . . . . . . . . . . . . . . . . . . . . . . . . . . . . . . . . . . .1-16
Section Two:
Installing and Customizing XPAF
2. Installation requirements . . . . . . . . . . . . . . . . . . . . . . . . . . . . . . . . . . . . . . . . 2-1
Installation materials. . . . . . . . . . . . . . . . . . . . . . . . . . . . . . . . . . . . . . . . . . . . . . . . . . . . . . . . . . .2-1
SMP/E level . . . . . . . . . . . . . . . . . . . . . . . . . . . . . . . . . . . . . . . . . . . . . . . . . . . . . . . . . . . . . . . . .2-1
Hardware . . . . . . . . . . . . . . . . . . . . . . . . . . . . . . . . . . . . . . . . . . . . . . . . . . . . . . . . . . . . . . . . . . .2-2
Printer support . . . . . . . . . . . . . . . . . . . . . . . . . . . . . . . . . . . . . . . . . . . . . . . . . . . . . . . . . . . . . . .2-5
IBM host requirements. . . . . . . . . . . . . . . . . . . . . . . . . . . . . . . . . . . . . . . . . . . . . . . . . . . . . . . . .2-8
Installation service macro worksheets . . . . . . . . . . . . . . . . . . . . . . . . . . . . . . . . . . . . . . . . . . . .2-10
3. SMP/E installation . . . . . . . . . . . . . . . . . . . . . . . . . . . . . . . . . . . . . . . . . . . . . 3-1
Installing the base product . . . . . . . . . . . . . . . . . . . . . . . . . . . . . . . . . . . . . . . . . . . . . . . . . . . . . .3-1
Installing maintenance . . . . . . . . . . . . . . . . . . . . . . . . . . . . . . . . . . . . . . . . . . . . . . . . . . . . . . . .3-28
Installing usermods . . . . . . . . . . . . . . . . . . . . . . . . . . . . . . . . . . . . . . . . . . . . . . . . . . . . . . . . . .3-41
Installing user exits. . . . . . . . . . . . . . . . . . . . . . . . . . . . . . . . . . . . . . . . . . . . . . . . . . . . . . . . . . .3-43
4. Installing resources . . . . . . . . . . . . . . . . . . . . . . . . . . . . . . . . . . . . . . . . . . . . 4-1
Checklist for installing resources . . . . . . . . . . . . . . . . . . . . . . . . . . . . . . . . . . . . . . . . . . . . . . . . .4-2
Step 1 – Set up stage 1 job . . . . . . . . . . . . . . . . . . . . . . . . . . . . . . . . . . . . . . . . . . . . . . . . . . . . .4-3
Step 2 – Generate stage 2 jobs . . . . . . . . . . . . . . . . . . . . . . . . . . . . . . . . . . . . . . . . . . . . . . . . .4-13
Step 3 – Submit resource installation jobs. . . . . . . . . . . . . . . . . . . . . . . . . . . . . . . . . . . . . . . . .4-14
5. Customizing your system . . . . . . . . . . . . . . . . . . . . . . . . . . . . . . . . . . . . . . . 5-1
Overview . . . . . . . . . . . . . . . . . . . . . . . . . . . . . . . . . . . . . . . . . . . . . . . . . . . . . . . . . . . . . . . . . . .5-1
XPAF User Guide i
Page 4

Table of Contents
Procedures. . . . . . . . . . . . . . . . . . . . . . . . . . . . . . . . . . . . . . . . . . . . . . . . . . . . . . . . . . . . . . . . . .5-4
Preparing the operating system . . . . . . . . . . . . . . . . . . . . . . . . . . . . . . . . . . . . . . . . . . . . . . . . . .5-6
Tuning your system . . . . . . . . . . . . . . . . . . . . . . . . . . . . . . . . . . . . . . . . . . . . . . . . . . . . . . . . . .5-15
Installing XPAF extended JCL . . . . . . . . . . . . . . . . . . . . . . . . . . . . . . . . . . . . . . . . . . . . . . . . . .5-18
Defining XPAF to JES . . . . . . . . . . . . . . . . . . . . . . . . . . . . . . . . . . . . . . . . . . . . . . . . . . . . . . . .5-23
Selecting initialization parameters . . . . . . . . . . . . . . . . . . . . . . . . . . . . . . . . . . . . . . . . . . . . . . .5-29
Preparing the printer PDL. . . . . . . . . . . . . . . . . . . . . . . . . . . . . . . . . . . . . . . . . . . . . . . . . . . . . .5-30
Create/Modify paper-related tables . . . . . . . . . . . . . . . . . . . . . . . . . . . . . . . . . . . . . . . . . . . . . .5-34
Setting up your printers . . . . . . . . . . . . . . . . . . . . . . . . . . . . . . . . . . . . . . . . . . . . . . . . . . . . . . .5-34
Setting up printer profiles . . . . . . . . . . . . . . . . . . . . . . . . . . . . . . . . . . . . . . . . . . . . . . . . . . . . . .5-35
Installing multiple copies of XOSF . . . . . . . . . . . . . . . . . . . . . . . . . . . . . . . . . . . . . . . . . . . . . . .5-37
Verifying the installation . . . . . . . . . . . . . . . . . . . . . . . . . . . . . . . . . . . . . . . . . . . . . . . . . . . . . . .5-39
6. Setting up system-level features . . . . . . . . . . . . . . . . . . . . . . . . . . . . . . . . . . 6-1
Enabling banner page processing . . . . . . . . . . . . . . . . . . . . . . . . . . . . . . . . . . . . . . . . . . . . . . . .6-1
Using SMF recording . . . . . . . . . . . . . . . . . . . . . . . . . . . . . . . . . . . . . . . . . . . . . . . . . . . . . . . . .6-13
Printing to disk and/or file. . . . . . . . . . . . . . . . . . . . . . . . . . . . . . . . . . . . . . . . . . . . . . . . . . . . . .6-17
Tailoring the DCF/SCRIPT environment . . . . . . . . . . . . . . . . . . . . . . . . . . . . . . . . . . . . . . . . . .6-19
7. Coding the XPAF user exits. . . . . . . . . . . . . . . . . . . . . . . . . . . . . . . . . . . . . . 7-1
Coding the XOAF user exit (XOAFUSEC) . . . . . . . . . . . . . . . . . . . . . . . . . . . . . . . . . . . . . . . . . .7-1
Coding the XOSF user exits. . . . . . . . . . . . . . . . . . . . . . . . . . . . . . . . . . . . . . . . . . . . . . . . . . . . .7-4
User exit descriptions. . . . . . . . . . . . . . . . . . . . . . . . . . . . . . . . . . . . . . . . . . . . . . . . . . . . . . . . .7-14
XPAF, PSF, and JES user exit cross-reference. . . . . . . . . . . . . . . . . . . . . . . . . . . . . . . . . . . . .7 -38
8. Message logging . . . . . . . . . . . . . . . . . . . . . . . . . . . . . . . . . . . . . . . . . . . . . . 8-1
z/OS system logging . . . . . . . . . . . . . . . . . . . . . . . . . . . . . . . . . . . . . . . . . . . . . . . . . . . . . . . . . .8-1
XPAF system logging. . . . . . . . . . . . . . . . . . . . . . . . . . . . . . . . . . . . . . . . . . . . . . . . . . . . . . . . . .8-3
9. Setting up multiple CPUs. . . . . . . . . . . . . . . . . . . . . . . . . . . . . . . . . . . . . . . . 9-1
Checklist for setting up multiple CPUs. . . . . . . . . . . . . . . . . . . . . . . . . . . . . . . . . . . . . . . . . . . . .9-1
Step 1 – Copy files to file from host CPU. . . . . . . . . . . . . . . . . . . . . . . . . . . . . . . . . . . . . . . . . . .9-2
Step 2 – Offload files from file to remote CPU . . . . . . . . . . . . . . . . . . . . . . . . . . . . . . . . . . . . . . .9-3
Step 3 – Install the extended JCL keywords on the remote CPU . . . . . . . . . . . . . . . . . . . . . . . .9-5
Step 4 – Submit the print job . . . . . . . . . . . . . . . . . . . . . . . . . . . . . . . . . . . . . . . . . . . . . . . . . . . .9-5
10. XPAF printer support . . . . . . . . . . . . . . . . . . . . . . . . . . . . . . . . . . . . . . . . . 10-1
Centralized printer models . . . . . . . . . . . . . . . . . . . . . . . . . . . . . . . . . . . . . . . . . . . . . . . . . . . . .10-1
Decentralized printer models . . . . . . . . . . . . . . . . . . . . . . . . . . . . . . . . . . . . . . . . . . . . . . . . . . .10-1
PCL-capable printer models. . . . . . . . . . . . . . . . . . . . . . . . . . . . . . . . . . . . . . . . . . . . . . . . . . . .10-2
VIPP-enabled printers . . . . . . . . . . . . . . . . . . . . . . . . . . . . . . . . . . . . . . . . . . . . . . . . . . . . . . . .10-2
XPAF User Guide ii
Page 5

Table of Contents
11. Setting up centralized printers . . . . . . . . . . . . . . . . . . . . . . . . . . . . . . . . . . 11-1
Connections to host and communication protocols . . . . . . . . . . . . . . . . . . . . . . . . . . . . . . . . . .11-1
Running in channel attached ONLINE mode . . . . . . . . . . . . . . . . . . . . . . . . . . . . . . . . . . . . . . .11-1
Using BARR/SNA RJE. . . . . . . . . . . . . . . . . . . . . . . . . . . . . . . . . . . . . . . . . . . . . . . . . . . . . . . .11-2
12. Setting up decentralized printers. . . . . . . . . . . . . . . . . . . . . . . . . . . . . . . . 12-1
13. Setting up PCL-capable printers . . . . . . . . . . . . . . . . . . . . . . . . . . . . . . . . 13-1
Preparing resources. . . . . . . . . . . . . . . . . . . . . . . . . . . . . . . . . . . . . . . . . . . . . . . . . . . . . . . . . .13-2
Printing to PCL-capable printers . . . . . . . . . . . . . . . . . . . . . . . . . . . . . . . . . . . . . . . . . . . . . . . .13-3
Modifying document processing. . . . . . . . . . . . . . . . . . . . . . . . . . . . . . . . . . . . . . . . . . . . . . . . .13-5
14. Overview of the PDF Transform . . . . . . . . . . . . . . . . . . . . . . . . . . . . . . . . 14-1
Configuring XPAF. . . . . . . . . . . . . . . . . . . . . . . . . . . . . . . . . . . . . . . . . . . . . . . . . . . . . . . . . . . .14-2
PDF Font Substitution . . . . . . . . . . . . . . . . . . . . . . . . . . . . . . . . . . . . . . . . . . . . . . . . . . . . . . . .14-3
Encrypting PDF Documents. . . . . . . . . . . . . . . . . . . . . . . . . . . . . . . . . . . . . . . . . . . . . . . . . . . .14-6
Points to note . . . . . . . . . . . . . . . . . . . . . . . . . . . . . . . . . . . . . . . . . . . . . . . . . . . . . . . . . . . . . . .14-7
Known issues. . . . . . . . . . . . . . . . . . . . . . . . . . . . . . . . . . . . . . . . . . . . . . . . . . . . . . . . . . . . . . .14-8
15. Printing via TCP/IP . . . . . . . . . . . . . . . . . . . . . . . . . . . . . . . . . . . . . . . . . . 15-1
TCP/IP printing methods . . . . . . . . . . . . . . . . . . . . . . . . . . . . . . . . . . . . . . . . . . . . . . . . . . . . . .15-1
Sending print jobs via TCP/IP . . . . . . . . . . . . . . . . . . . . . . . . . . . . . . . . . . . . . . . . . . . . . . . . . .15-3
16. Additional features. . . . . . . . . . . . . . . . . . . . . . . . . . . . . . . . . . . . . . . . . . . 16-1
Enabling XJCF simulation processing . . . . . . . . . . . . . . . . . . . . . . . . . . . . . . . . . . . . . . . . . . . .16-4
Setting up XDS. . . . . . . . . . . . . . . . . . . . . . . . . . . . . . . . . . . . . . . . . . . . . . . . . . . . . . . . . . . . .16-15
Connection to FTP servers/websites . . . . . . . . . . . . . . . . . . . . . . . . . . . . . . . . . . . . . . . . . . . .16-22
Support for Emtex V-Services print servers. . . . . . . . . . . . . . . . . . . . . . . . . . . . . . . . . . . . . . .16-25
17. Performing an installation verification procedure. . . . . . . . . . . . . . . . . . . . 17-1
Running the XPAF IVP. . . . . . . . . . . . . . . . . . . . . . . . . . . . . . . . . . . . . . . . . . . . . . . . . . . . . . . .17-1
Running the CMA-SPOOL or CA-SPOOL IVP. . . . . . . . . . . . . . . . . . . . . . . . . . . . . . . . . . . . . .17-1
Running the XDS IVP. . . . . . . . . . . . . . . . . . . . . . . . . . . . . . . . . . . . . . . . . . . . . . . . . . . . . . . . .17-1
What does the IVP test?. . . . . . . . . . . . . . . . . . . . . . . . . . . . . . . . . . . . . . . . . . . . . . . . . . . . . . .17-2
Setup requirements . . . . . . . . . . . . . . . . . . . . . . . . . . . . . . . . . . . . . . . . . . . . . . . . . . . . . . . . . .17-3
Executing the XPAF IVP . . . . . . . . . . . . . . . . . . . . . . . . . . . . . . . . . . . . . . . . . . . . . . . . . . . . . .17-5
Executing the CMA-SPOOL or CA-SPOOL IVP . . . . . . . . . . . . . . . . . . . . . . . . . . . . . . . . . . .17-10
Executing the XDS IVP . . . . . . . . . . . . . . . . . . . . . . . . . . . . . . . . . . . . . . . . . . . . . . . . . . . . . .17-15
Verifying your output . . . . . . . . . . . . . . . . . . . . . . . . . . . . . . . . . . . . . . . . . . . . . . . . . . . . . . . .17-20
Line-mode processing IVP sample output . . . . . . . . . . . . . . . . . . . . . . . . . . . . . . . . . . . . . . . .17-20
DJDE processing IVP sample output. . . . . . . . . . . . . . . . . . . . . . . . . . . . . . . . . . . . . . . . . . . .17-22
XES processing IVP sample output . . . . . . . . . . . . . . . . . . . . . . . . . . . . . . . . . . . . . . . . . . . . .17-24
Page Format processing IVP sample output . . . . . . . . . . . . . . . . . . . . . . . . . . . . . . . . . . . . . .17-25
XPAF User Guide iii
Page 6

Table of Contents
Page Format processing IVP sample output . . . . . . . . . . . . . . . . . . . . . . . . . . . . . . . . . . . . . .17-26
AFP processing IVP sample output . . . . . . . . . . . . . . . . . . . . . . . . . . . . . . . . . . . . . . . . . . . . .17-28
AFP processing IVP sample output . . . . . . . . . . . . . . . . . . . . . . . . . . . . . . . . . . . . . . . . . . . . .17-29
Pass-through processing IVP sample output. . . . . . . . . . . . . . . . . . . . . . . . . . . . . . . . . . . . . .17-32
Pass-through processing IVP sample output. . . . . . . . . . . . . . . . . . . . . . . . . . . . . . . . . . . . . .17-33
Section Three:
Managing Resources with XPAF
18. Accessing XOAF . . . . . . . . . . . . . . . . . . . . . . . . . . . . . . . . . . . . . . . . . . . . 18-1
Using ISPF panels . . . . . . . . . . . . . . . . . . . . . . . . . . . . . . . . . . . . . . . . . . . . . . . . . . . . . . . . . . .1 8-1
Using TSO/batch commands . . . . . . . . . . . . . . . . . . . . . . . . . . . . . . . . . . . . . . . . . . . . . . . . . .18-13
19. XPAF resources. . . . . . . . . . . . . . . . . . . . . . . . . . . . . . . . . . . . . . . . . . . . . 19-1
Fonts . . . . . . . . . . . . . . . . . . . . . . . . . . . . . . . . . . . . . . . . . . . . . . . . . . . . . . . . . . . . . . . . . . . . .19-2
Forms. . . . . . . . . . . . . . . . . . . . . . . . . . . . . . . . . . . . . . . . . . . . . . . . . . . . . . . . . . . . . . . . . . . . .19-8
Images . . . . . . . . . . . . . . . . . . . . . . . . . . . . . . . . . . . . . . . . . . . . . . . . . . . . . . . . . . . . . . . . . . .19-11
Logos . . . . . . . . . . . . . . . . . . . . . . . . . . . . . . . . . . . . . . . . . . . . . . . . . . . . . . . . . . . . . . . . . . . .19-18
Printer-resident resource lists. . . . . . . . . . . . . . . . . . . . . . . . . . . . . . . . . . . . . . . . . . . . . . . . . .19-20
Print description language . . . . . . . . . . . . . . . . . . . . . . . . . . . . . . . . . . . . . . . . . . . . . . . . . . . .19-28
Page formats . . . . . . . . . . . . . . . . . . . . . . . . . . . . . . . . . . . . . . . . . . . . . . . . . . . . . . . . . . . . . .19-33
20. XPAF tables. . . . . . . . . . . . . . . . . . . . . . . . . . . . . . . . . . . . . . . . . . . . . . . . 20-1
Paper-related tables. . . . . . . . . . . . . . . . . . . . . . . . . . . . . . . . . . . . . . . . . . . . . . . . . . . . . . . . . .20-2
Font tables . . . . . . . . . . . . . . . . . . . . . . . . . . . . . . . . . . . . . . . . . . . . . . . . . . . . . . . . . . . . . . . .20-16
Color cross-reference tables . . . . . . . . . . . . . . . . . . . . . . . . . . . . . . . . . . . . . . . . . . . . . . . . . .20-34
Color conversion table . . . . . . . . . . . . . . . . . . . . . . . . . . . . . . . . . . . . . . . . . . . . . . . . . . . . . . .20-35
21. Loading resources to a native library. . . . . . . . . . . . . . . . . . . . . . . . . . . . . 21-1
Loading centralized fonts . . . . . . . . . . . . . . . . . . . . . . . . . . . . . . . . . . . . . . . . . . . . . . . . . . . . . .21-2
Loading centralized forms . . . . . . . . . . . . . . . . . . . . . . . . . . . . . . . . . . . . . . . . . . . . . . . . . . . . .21-5
Loading centralized images . . . . . . . . . . . . . . . . . . . . . . . . . . . . . . . . . . . . . . . . . . . . . . . . . . . .21-7
Loading centralized logos. . . . . . . . . . . . . . . . . . . . . . . . . . . . . . . . . . . . . . . . . . . . . . . . . . . . . .21-9
Loading decentralized fonts . . . . . . . . . . . . . . . . . . . . . . . . . . . . . . . . . . . . . . . . . . . . . . . . . . .21-11
Loading decentralized forms . . . . . . . . . . . . . . . . . . . . . . . . . . . . . . . . . . . . . . . . . . . . . . . . . .21-13
Loading decentralized images . . . . . . . . . . . . . . . . . . . . . . . . . . . . . . . . . . . . . . . . . . . . . . . . .21-15
Loading PDL. . . . . . . . . . . . . . . . . . . . . . . . . . . . . . . . . . . . . . . . . . . . . . . . . . . . . . . . . . . . . . .21-17
22. Converting resources . . . . . . . . . . . . . . . . . . . . . . . . . . . . . . . . . . . . . . . . 22-1
Converting centralized fonts to decentralized fonts . . . . . . . . . . . . . . . . . . . . . . . . . . . . . . . . . .22-1
Converting centralized logos to decentralized fonts. . . . . . . . . . . . . . . . . . . . . . . . . . . . . . . . .22-25
Converting Xerox fonts to IBM format . . . . . . . . . . . . . . . . . . . . . . . . . . . . . . . . . . . . . . . . . . .22-28
XPAF User Guide iv
Page 7

Table of Contents
Converting IBM AFP page segments to Xerox .IMG and/or RES format. . . . . . . . . . . . . . . . .22-32
23. Managing resource lists. . . . . . . . . . . . . . . . . . . . . . . . . . . . . . . . . . . . . . . 23-1
Managing resident font lists . . . . . . . . . . . . . . . . . . . . . . . . . . . . . . . . . . . . . . . . . . . . . . . . . . . .23-1
Managing a PCL font list . . . . . . . . . . . . . . . . . . . . . . . . . . . . . . . . . . . . . . . . . . . . . . . . . . . . . .23-7
Managing resident form lists . . . . . . . . . . . . . . . . . . . . . . . . . . . . . . . . . . . . . . . . . . . . . . . . . . .23-8
Managing resident image lists . . . . . . . . . . . . . . . . . . . . . . . . . . . . . . . . . . . . . . . . . . . . . . . . .23-14
Managing resident logo lists. . . . . . . . . . . . . . . . . . . . . . . . . . . . . . . . . . . . . . . . . . . . . . . . . . .23-20
24. Managing XPAF tables . . . . . . . . . . . . . . . . . . . . . . . . . . . . . . . . . . . . . . . 24-1
Maintaining paper-related tables . . . . . . . . . . . . . . . . . . . . . . . . . . . . . . . . . . . . . . . . . . . . . . . .24-1
Maintaining font tables . . . . . . . . . . . . . . . . . . . . . . . . . . . . . . . . . . . . . . . . . . . . . . . . . . . . . . .24-15
Updating IBM font characteristics information . . . . . . . . . . . . . . . . . . . . . . . . . . . . . . . . . . . . .24-40
Deleting a font table or table entry . . . . . . . . . . . . . . . . . . . . . . . . . . . . . . . . . . . . . . . . . . . . . .24-45
Maintaining color cross-reference tables . . . . . . . . . . . . . . . . . . . . . . . . . . . . . . . . . . . . . . . . .24-48
Maintaining the color conversion table. . . . . . . . . . . . . . . . . . . . . . . . . . . . . . . . . . . . . . . . . . .24-52
25. Managing custom fonts . . . . . . . . . . . . . . . . . . . . . . . . . . . . . . . . . . . . . . . 25-1
Using custom Xerox fonts . . . . . . . . . . . . . . . . . . . . . . . . . . . . . . . . . . . . . . . . . . . . . . . . . . . . .25-1
Using custom replica fonts . . . . . . . . . . . . . . . . . . . . . . . . . . . . . . . . . . . . . . . . . . . . . . . . . . . .25-2
26. Displaying printer status information . . . . . . . . . . . . . . . . . . . . . . . . . . . . . 26-1
Displaying the status of printers. . . . . . . . . . . . . . . . . . . . . . . . . . . . . . . . . . . . . . . . . . . . . . . . .26-1
27. Managing XPAF libraries. . . . . . . . . . . . . . . . . . . . . . . . . . . . . . . . . . . . . . 27-1
Displaying a directory of library members . . . . . . . . . . . . . . . . . . . . . . . . . . . . . . . . . . . . . . . . .27-1
Browsing a copy of a member . . . . . . . . . . . . . . . . . . . . . . . . . . . . . . . . . . . . . . . . . . . . . . . . . .27-4
Deleting a member. . . . . . . . . . . . . . . . . . . . . . . . . . . . . . . . . . . . . . . . . . . . . . . . . . . . . . . . . . .27-6
Reloading a member to a native library . . . . . . . . . . . . . . . . . . . . . . . . . . . . . . . . . . . . . . . . . . .27-7
28. Supported IBM character sets. . . . . . . . . . . . . . . . . . . . . . . . . . . . . . . . . . 28-1
Proportionally spaced character sets. . . . . . . . . . . . . . . . . . . . . . . . . . . . . . . . . . . . . . . . . . . . .28-1
Uniformly spaced character sets . . . . . . . . . . . . . . . . . . . . . . . . . . . . . . . . . . . . . . . . . . . . . . . .28-3
29. Character mapping tables . . . . . . . . . . . . . . . . . . . . . . . . . . . . . . . . . . . . . 29-1
Table naming conventions . . . . . . . . . . . . . . . . . . . . . . . . . . . . . . . . . . . . . . . . . . . . . . . . . . . . .29-1
Xerox code page tables (XCP1 through XCP19). . . . . . . . . . . . . . . . . . . . . . . . . . . . . . . . . . . .29-2
Centralized-to-decentralized font conversion character mapping tables . . . . . . . . . . . . . . . . . .29-3
30. XRFBATCH utility . . . . . . . . . . . . . . . . . . . . . . . . . . . . . . . . . . . . . . . . . . . 30-1
Setting up XRFBATCH. . . . . . . . . . . . . . . . . . . . . . . . . . . . . . . . . . . . . . . . . . . . . . . . . . . . . . . .30-1
Executing XRFBATCH. . . . . . . . . . . . . . . . . . . . . . . . . . . . . . . . . . . . . . . . . . . . . . . . . . . . . . . .30-6
Sample JCL . . . . . . . . . . . . . . . . . . . . . . . . . . . . . . . . . . . . . . . . . . . . . . . . . . . . . . . . . . . . . . . .30-6
XPAF User Guide v
Page 8

Table of Contents
Section Four:
Printing Documents with XPAF
31. General information. . . . . . . . . . . . . . . . . . . . . . . . . . . . . . . . . . . . . . . . . . 31-1
How does XPAF select the document processing mode? . . . . . . . . . . . . . . . . . . . . . . . . . . . . .31-1
Printing pass-through documents to PCL-capable printers . . . . . . . . . . . . . . . . . . . . . . . . . . . .31-5
Downloading resources . . . . . . . . . . . . . . . . . . . . . . . . . . . . . . . . . . . . . . . . . . . . . . . . . . . . . . .31-9
Using system-level features. . . . . . . . . . . . . . . . . . . . . . . . . . . . . . . . . . . . . . . . . . . . . . . . . . .31-10
32. Printing line-mode documents. . . . . . . . . . . . . . . . . . . . . . . . . . . . . . . . . . 32-1
Data stream definition . . . . . . . . . . . . . . . . . . . . . . . . . . . . . . . . . . . . . . . . . . . . . . . . . . . . . . . .32-1
XPAF support. . . . . . . . . . . . . . . . . . . . . . . . . . . . . . . . . . . . . . . . . . . . . . . . . . . . . . . . . . . . . . .32-1
Preparing resources. . . . . . . . . . . . . . . . . . . . . . . . . . . . . . . . . . . . . . . . . . . . . . . . . . . . . . . . . .32-1
Using resources . . . . . . . . . . . . . . . . . . . . . . . . . . . . . . . . . . . . . . . . . . . . . . . . . . . . . . . . . . . . .32-2
Modifying document processing. . . . . . . . . . . . . . . . . . . . . . . . . . . . . . . . . . . . . . . . . . . . . . . . .32-2
Using advanced features . . . . . . . . . . . . . . . . . . . . . . . . . . . . . . . . . . . . . . . . . . . . . . . . . . . . . .32-2
Printing documents. . . . . . . . . . . . . . . . . . . . . . . . . . . . . . . . . . . . . . . . . . . . . . . . . . . . . . . . . . .3 2-2
Processing line-mode documents as DJDE or AFP documents . . . . . . . . . . . . . . . . . . . . . . . .32-3
Troubleshooting problems . . . . . . . . . . . . . . . . . . . . . . . . . . . . . . . . . . . . . . . . . . . . . . . . . . . . .32-4
33. Printing DJDE documents . . . . . . . . . . . . . . . . . . . . . . . . . . . . . . . . . . . . . 33-1
Data stream definition . . . . . . . . . . . . . . . . . . . . . . . . . . . . . . . . . . . . . . . . . . . . . . . . . . . . . . . .33-1
XPAF support. . . . . . . . . . . . . . . . . . . . . . . . . . . . . . . . . . . . . . . . . . . . . . . . . . . . . . . . . . . . . . .33-2
Preparing resources. . . . . . . . . . . . . . . . . . . . . . . . . . . . . . . . . . . . . . . . . . . . . . . . . . . . . . . . . .33-3
Using resources . . . . . . . . . . . . . . . . . . . . . . . . . . . . . . . . . . . . . . . . . . . . . . . . . . . . . . . . . . . . .33-7
Modifying document processing. . . . . . . . . . . . . . . . . . . . . . . . . . . . . . . . . . . . . . . . . . . . . . . .33-10
Using advanced features . . . . . . . . . . . . . . . . . . . . . . . . . . . . . . . . . . . . . . . . . . . . . . . . . . . . .33-11
Printing documents. . . . . . . . . . . . . . . . . . . . . . . . . . . . . . . . . . . . . . . . . . . . . . . . . . . . . . . . . .33-17
Converting DJDE documents to XES documents . . . . . . . . . . . . . . . . . . . . . . . . . . . . . . . . . .33-18
Troubleshooting problems . . . . . . . . . . . . . . . . . . . . . . . . . . . . . . . . . . . . . . . . . . . . . . . . . . . .33-25
34. Printing XES documents . . . . . . . . . . . . . . . . . . . . . . . . . . . . . . . . . . . . . . 34-1
Data stream definition . . . . . . . . . . . . . . . . . . . . . . . . . . . . . . . . . . . . . . . . . . . . . . . . . . . . . . . .34-1
XPAF support. . . . . . . . . . . . . . . . . . . . . . . . . . . . . . . . . . . . . . . . . . . . . . . . . . . . . . . . . . . . . . .34-2
Preparing resources. . . . . . . . . . . . . . . . . . . . . . . . . . . . . . . . . . . . . . . . . . . . . . . . . . . . . . . . . .34-3
Using resources . . . . . . . . . . . . . . . . . . . . . . . . . . . . . . . . . . . . . . . . . . . . . . . . . . . . . . . . . . . . .34-6
Modifying document processing. . . . . . . . . . . . . . . . . . . . . . . . . . . . . . . . . . . . . . . . . . . . . . . . .34-7
Using advanced features . . . . . . . . . . . . . . . . . . . . . . . . . . . . . . . . . . . . . . . . . . . . . . . . . . . . . .34-8
Verifying your print environment. . . . . . . . . . . . . . . . . . . . . . . . . . . . . . . . . . . . . . . . . . . . . . . .34-10
Printing documents. . . . . . . . . . . . . . . . . . . . . . . . . . . . . . . . . . . . . . . . . . . . . . . . . . . . . . . . . .34-10
Converting XES documents to PCL or PDF documents . . . . . . . . . . . . . . . . . . . . . . . . . . . . .34-11
XPAF User Guide vi
Page 9

Table of Contents
35. Printing page-formatted documents. . . . . . . . . . . . . . . . . . . . . . . . . . . . . . 35-1
Data stream definition . . . . . . . . . . . . . . . . . . . . . . . . . . . . . . . . . . . . . . . . . . . . . . . . . . . . . . . .35-1
XPAF support. . . . . . . . . . . . . . . . . . . . . . . . . . . . . . . . . . . . . . . . . . . . . . . . . . . . . . . . . . . . . . .35-1
Preparing resources. . . . . . . . . . . . . . . . . . . . . . . . . . . . . . . . . . . . . . . . . . . . . . . . . . . . . . . . . .35-2
Using resources . . . . . . . . . . . . . . . . . . . . . . . . . . . . . . . . . . . . . . . . . . . . . . . . . . . . . . . . . . . . .35-6
Modifying document processing. . . . . . . . . . . . . . . . . . . . . . . . . . . . . . . . . . . . . . . . . . . . . . . . .35-9
Using advanced features . . . . . . . . . . . . . . . . . . . . . . . . . . . . . . . . . . . . . . . . . . . . . . . . . . . . .35-10
Verifying your print environment. . . . . . . . . . . . . . . . . . . . . . . . . . . . . . . . . . . . . . . . . . . . . . . .35-12
Printing documents. . . . . . . . . . . . . . . . . . . . . . . . . . . . . . . . . . . . . . . . . . . . . . . . . . . . . . . . . .35-12
Converting page-formatted documents to other formats . . . . . . . . . . . . . . . . . . . . . . . . . . . . .35-13
Troubleshooting problems . . . . . . . . . . . . . . . . . . . . . . . . . . . . . . . . . . . . . . . . . . . . . . . . . . . .35-13
36. Printing AFP documents . . . . . . . . . . . . . . . . . . . . . . . . . . . . . . . . . . . . . . 36-1
Data stream definition . . . . . . . . . . . . . . . . . . . . . . . . . . . . . . . . . . . . . . . . . . . . . . . . . . . . . . . .36-1
XPAF support. . . . . . . . . . . . . . . . . . . . . . . . . . . . . . . . . . . . . . . . . . . . . . . . . . . . . . . . . . . . . . .36-2
Preparing resources. . . . . . . . . . . . . . . . . . . . . . . . . . . . . . . . . . . . . . . . . . . . . . . . . . . . . . . . . .36-2
Using resources . . . . . . . . . . . . . . . . . . . . . . . . . . . . . . . . . . . . . . . . . . . . . . . . . . . . . . . . . . . . .36-7
Modifying document processing. . . . . . . . . . . . . . . . . . . . . . . . . . . . . . . . . . . . . . . . . . . . . . . .36-13
AFP structured fields . . . . . . . . . . . . . . . . . . . . . . . . . . . . . . . . . . . . . . . . . . . . . . . . . . . . . . . .36-14
Using advanced features . . . . . . . . . . . . . . . . . . . . . . . . . . . . . . . . . . . . . . . . . . . . . . . . . . . . .36-18
Verifying your print environment. . . . . . . . . . . . . . . . . . . . . . . . . . . . . . . . . . . . . . . . . . . . . . . .36-30
Printing documents. . . . . . . . . . . . . . . . . . . . . . . . . . . . . . . . . . . . . . . . . . . . . . . . . . . . . . . . . .36-30
Converting AFP documents to Metacode or XES documents . . . . . . . . . . . . . . . . . . . . . . . . .36-31
Troubleshooting problems . . . . . . . . . . . . . . . . . . . . . . . . . . . . . . . . . . . . . . . . . . . . . . . . . . . .36-37
37. Printing VIPP documents. . . . . . . . . . . . . . . . . . . . . . . . . . . . . . . . . . . . . . 37-1
Data stream definition . . . . . . . . . . . . . . . . . . . . . . . . . . . . . . . . . . . . . . . . . . . . . . . . . . . . . . . .37-1
XPAF support. . . . . . . . . . . . . . . . . . . . . . . . . . . . . . . . . . . . . . . . . . . . . . . . . . . . . . . . . . . . . . .37-1
Preparing resources. . . . . . . . . . . . . . . . . . . . . . . . . . . . . . . . . . . . . . . . . . . . . . . . . . . . . . . . . .37-1
Using resources . . . . . . . . . . . . . . . . . . . . . . . . . . . . . . . . . . . . . . . . . . . . . . . . . . . . . . . . . . . . .37-2
Modifying document processing. . . . . . . . . . . . . . . . . . . . . . . . . . . . . . . . . . . . . . . . . . . . . . . . .37-2
Using advanced features . . . . . . . . . . . . . . . . . . . . . . . . . . . . . . . . . . . . . . . . . . . . . . . . . . . . . .37-2
Printing documents. . . . . . . . . . . . . . . . . . . . . . . . . . . . . . . . . . . . . . . . . . . . . . . . . . . . . . . . . . .3 7-2
Verifying your print environment. . . . . . . . . . . . . . . . . . . . . . . . . . . . . . . . . . . . . . . . . . . . . . . . .37-3
Creating a VIPP command file member. . . . . . . . . . . . . . . . . . . . . . . . . . . . . . . . . . . . . . . . . . .37-4
38. Using XPAF extended features . . . . . . . . . . . . . . . . . . . . . . . . . . . . . . . . . 38-1
Using XJCF simulation processing. . . . . . . . . . . . . . . . . . . . . . . . . . . . . . . . . . . . . . . . . . . . . . .38-1
Printing documents through XDS. . . . . . . . . . . . . . . . . . . . . . . . . . . . . . . . . . . . . . . . . . . . . . . .38-4
Redirecting XOSF-converted datasets to other printers. . . . . . . . . . . . . . . . . . . . . . . . . . . . . .38-15
39. Using XRCBATCH. . . . . . . . . . . . . . . . . . . . . . . . . . . . . . . . . . . . . . . . . . . 39-1
Processing performed . . . . . . . . . . . . . . . . . . . . . . . . . . . . . . . . . . . . . . . . . . . . . . . . . . . . . . . .39-1
XPAF User Guide vii
Page 10

Table of Contents
Specifying file attributes . . . . . . . . . . . . . . . . . . . . . . . . . . . . . . . . . . . . . . . . . . . . . . . . . . . . . . .39-2
Section Five:
XPAF Parameter and Keyword Reference
40. Initialization parameters. . . . . . . . . . . . . . . . . . . . . . . . . . . . . . . . . . . . . . . 40-1
Specifying initialization parameters . . . . . . . . . . . . . . . . . . . . . . . . . . . . . . . . . . . . . . . . . . . . . .40-1
Coding initialization parameters. . . . . . . . . . . . . . . . . . . . . . . . . . . . . . . . . . . . . . . . . . . . . . . . .40-2
Overriding specifications . . . . . . . . . . . . . . . . . . . . . . . . . . . . . . . . . . . . . . . . . . . . . . . . . . . . . .40-3
Parameter definitions . . . . . . . . . . . . . . . . . . . . . . . . . . . . . . . . . . . . . . . . . . . . . . . . . . . . . . . . .40-4
41. Printer profile parameters . . . . . . . . . . . . . . . . . . . . . . . . . . . . . . . . . . . . . 41-1
Specifying printer profile parameters . . . . . . . . . . . . . . . . . . . . . . . . . . . . . . . . . . . . . . . . . . . . .41-1
Coding printer profile parameters. . . . . . . . . . . . . . . . . . . . . . . . . . . . . . . . . . . . . . . . . . . . . . . .41-2
Parameter definitions . . . . . . . . . . . . . . . . . . . . . . . . . . . . . . . . . . . . . . . . . . . . . . . . . . . . . . . . .41-3
42. Standard IBM JCL keywords. . . . . . . . . . . . . . . . . . . . . . . . . . . . . . . . . . . 42-1
Specifying IBM JCL keywords . . . . . . . . . . . . . . . . . . . . . . . . . . . . . . . . . . . . . . . . . . . . . . . . . . 42-1
Coding IBM JCL keywords. . . . . . . . . . . . . . . . . . . . . . . . . . . . . . . . . . . . . . . . . . . . . . . . . . . . .42-1
Standard IBM JCL support. . . . . . . . . . . . . . . . . . . . . . . . . . . . . . . . . . . . . . . . . . . . . . . . . . . . .42-1
43. XPAF extended JCL keywords . . . . . . . . . . . . . . . . . . . . . . . . . . . . . . . . . 43-1
Specifying XPAF extended JCL keywords. . . . . . . . . . . . . . . . . . . . . . . . . . . . . . . . . . . . . . . . .43-1
Coding XPAF extended JCL keywords . . . . . . . . . . . . . . . . . . . . . . . . . . . . . . . . . . . . . . . . . . .43-1
XPAF extended JCL support . . . . . . . . . . . . . . . . . . . . . . . . . . . . . . . . . . . . . . . . . . . . . . . . . . .43-2
44. Parameter and keyword summary. . . . . . . . . . . . . . . . . . . . . . . . . . . . . . . 44-1
Summary table. . . . . . . . . . . . . . . . . . . . . . . . . . . . . . . . . . . . . . . . . . . . . . . . . . . . . . . . . . . . . .44-1
Section Six:
XPAF Messages
45. Message overview. . . . . . . . . . . . . . . . . . . . . . . . . . . . . . . . . . . . . . . . . . . 45-1
ISPF messages . . . . . . . . . . . . . . . . . . . . . . . . . . . . . . . . . . . . . . . . . . . . . . . . . . . . . . . . . . . . .45-1
XPAF system messages . . . . . . . . . . . . . . . . . . . . . . . . . . . . . . . . . . . . . . . . . . . . . . . . . . . . . .45-3
Message format . . . . . . . . . . . . . . . . . . . . . . . . . . . . . . . . . . . . . . . . . . . . . . . . . . . . . . . . . . . . .45-6
How to interpret XPAF messages . . . . . . . . . . . . . . . . . . . . . . . . . . . . . . . . . . . . . . . . . . . . . . .45-8
Message conventions. . . . . . . . . . . . . . . . . . . . . . . . . . . . . . . . . . . . . . . . . . . . . . . . . . . . . . . . .45-9
LDM messages . . . . . . . . . . . . . . . . . . . . . . . . . . . . . . . . . . . . . . . . . . . . . . . . . . . . . . . . . . . .45-10
MSF messages . . . . . . . . . . . . . . . . . . . . . . . . . . . . . . . . . . . . . . . . . . . . . . . . . . . . . . . . . . . .45-23
THM messages . . . . . . . . . . . . . . . . . . . . . . . . . . . . . . . . . . . . . . . . . . . . . . . . . . . . . . . . . . . .45-30
XPAF User Guide viii
Page 11

Table of Contents
UFL messages. . . . . . . . . . . . . . . . . . . . . . . . . . . . . . . . . . . . . . . . . . . . . . . . . . . . . . . . . . . . .45-32
UFT messages. . . . . . . . . . . . . . . . . . . . . . . . . . . . . . . . . . . . . . . . . . . . . . . . . . . . . . . . . . . . .45-36
UIL messages . . . . . . . . . . . . . . . . . . . . . . . . . . . . . . . . . . . . . . . . . . . . . . . . . . . . . . . . . . . . .45-46
UIX messages . . . . . . . . . . . . . . . . . . . . . . . . . . . . . . . . . . . . . . . . . . . . . . . . . . . . . . . . . . . . .45-48
UJL messages . . . . . . . . . . . . . . . . . . . . . . . . . . . . . . . . . . . . . . . . . . . . . . . . . . . . . . . . . . . . .45-50
ULL messages . . . . . . . . . . . . . . . . . . . . . . . . . . . . . . . . . . . . . . . . . . . . . . . . . . . . . . . . . . . . .45-53
ULR messages. . . . . . . . . . . . . . . . . . . . . . . . . . . . . . . . . . . . . . . . . . . . . . . . . . . . . . . . . . . . .45-56
UPL messages. . . . . . . . . . . . . . . . . . . . . . . . . . . . . . . . . . . . . . . . . . . . . . . . . . . . . . . . . . . . .45-57
UTB messages. . . . . . . . . . . . . . . . . . . . . . . . . . . . . . . . . . . . . . . . . . . . . . . . . . . . . . . . . . . . .45-63
XAE messages. . . . . . . . . . . . . . . . . . . . . . . . . . . . . . . . . . . . . . . . . . . . . . . . . . . . . . . . . . . . .45-69
XAM messages . . . . . . . . . . . . . . . . . . . . . . . . . . . . . . . . . . . . . . . . . . . . . . . . . . . . . . . . . . . .45-71
XAU messages. . . . . . . . . . . . . . . . . . . . . . . . . . . . . . . . . . . . . . . . . . . . . . . . . . . . . . . . . . . . .45-84
XCC messages . . . . . . . . . . . . . . . . . . . . . . . . . . . . . . . . . . . . . . . . . . . . . . . . . . . . . . . . . . . .45-97
XCD messages . . . . . . . . . . . . . . . . . . . . . . . . . . . . . . . . . . . . . . . . . . . . . . . . . . . . . . . . . . .45-101
XCN messages . . . . . . . . . . . . . . . . . . . . . . . . . . . . . . . . . . . . . . . . . . . . . . . . . . . . . . . . . . .45-105
XDI messages . . . . . . . . . . . . . . . . . . . . . . . . . . . . . . . . . . . . . . . . . . . . . . . . . . . . . . . . . . . .45-109
XDS messages. . . . . . . . . . . . . . . . . . . . . . . . . . . . . . . . . . . . . . . . . . . . . . . . . . . . . . . . . . . .45-145
XEI messages . . . . . . . . . . . . . . . . . . . . . . . . . . . . . . . . . . . . . . . . . . . . . . . . . . . . . . . . . . . .45-160
XFC messages. . . . . . . . . . . . . . . . . . . . . . . . . . . . . . . . . . . . . . . . . . . . . . . . . . . . . . . . . . . .45-171
XFS messages. . . . . . . . . . . . . . . . . . . . . . . . . . . . . . . . . . . . . . . . . . . . . . . . . . . . . . . . . . . .45-179
XFU messages. . . . . . . . . . . . . . . . . . . . . . . . . . . . . . . . . . . . . . . . . . . . . . . . . . . . . . . . . . . .45-184
XIN messages . . . . . . . . . . . . . . . . . . . . . . . . . . . . . . . . . . . . . . . . . . . . . . . . . . . . . . . . . . . .45-187
XIS messages . . . . . . . . . . . . . . . . . . . . . . . . . . . . . . . . . . . . . . . . . . . . . . . . . . . . . . . . . . . .45-195
XJC messages. . . . . . . . . . . . . . . . . . . . . . . . . . . . . . . . . . . . . . . . . . . . . . . . . . . . . . . . . . . .45-198
XJD messages. . . . . . . . . . . . . . . . . . . . . . . . . . . . . . . . . . . . . . . . . . . . . . . . . . . . . . . . . . . .45-200
XJS messages . . . . . . . . . . . . . . . . . . . . . . . . . . . . . . . . . . . . . . . . . . . . . . . . . . . . . . . . . . . .45-201
XLC messages. . . . . . . . . . . . . . . . . . . . . . . . . . . . . . . . . . . . . . . . . . . . . . . . . . . . . . . . . . . .45-203
XLD messages. . . . . . . . . . . . . . . . . . . . . . . . . . . . . . . . . . . . . . . . . . . . . . . . . . . . . . . . . . . .45-208
XLW messages . . . . . . . . . . . . . . . . . . . . . . . . . . . . . . . . . . . . . . . . . . . . . . . . . . . . . . . . . . .45-209
XOA messages . . . . . . . . . . . . . . . . . . . . . . . . . . . . . . . . . . . . . . . . . . . . . . . . . . . . . . . . . . .45-211
XOAF messages . . . . . . . . . . . . . . . . . . . . . . . . . . . . . . . . . . . . . . . . . . . . . . . . . . . . . . . . . .45-226
XPA messages. . . . . . . . . . . . . . . . . . . . . . . . . . . . . . . . . . . . . . . . . . . . . . . . . . . . . . . . . . . .45-240
XPC messages. . . . . . . . . . . . . . . . . . . . . . . . . . . . . . . . . . . . . . . . . . . . . . . . . . . . . . . . . . . .45-240
XPD messages. . . . . . . . . . . . . . . . . . . . . . . . . . . . . . . . . . . . . . . . . . . . . . . . . . . . . . . . . . . .45-244
XPFE messages. . . . . . . . . . . . . . . . . . . . . . . . . . . . . . . . . . . . . . . . . . . . . . . . . . . . . . . . . . .45-271
XPL messages. . . . . . . . . . . . . . . . . . . . . . . . . . . . . . . . . . . . . . . . . . . . . . . . . . . . . . . . . . . .45-294
XPS messages. . . . . . . . . . . . . . . . . . . . . . . . . . . . . . . . . . . . . . . . . . . . . . . . . . . . . . . . . . . .45-295
XRC messages . . . . . . . . . . . . . . . . . . . . . . . . . . . . . . . . . . . . . . . . . . . . . . . . . . . . . . . . . . .45-300
XRD messages . . . . . . . . . . . . . . . . . . . . . . . . . . . . . . . . . . . . . . . . . . . . . . . . . . . . . . . . . . .45-315
XRF messages. . . . . . . . . . . . . . . . . . . . . . . . . . . . . . . . . . . . . . . . . . . . . . . . . . . . . . . . . . . .45-327
XSJ messages . . . . . . . . . . . . . . . . . . . . . . . . . . . . . . . . . . . . . . . . . . . . . . . . . . . . . . . . . . . .45-338
XSL messages. . . . . . . . . . . . . . . . . . . . . . . . . . . . . . . . . . . . . . . . . . . . . . . . . . . . . . . . . . . .45-339
XSV messages. . . . . . . . . . . . . . . . . . . . . . . . . . . . . . . . . . . . . . . . . . . . . . . . . . . . . . . . . . . .45-345
XPAF User Guide ix
Page 12

Table of Contents
XTB messages. . . . . . . . . . . . . . . . . . . . . . . . . . . . . . . . . . . . . . . . . . . . . . . . . . . . . . . . . . . .45-346
XTC messages. . . . . . . . . . . . . . . . . . . . . . . . . . . . . . . . . . . . . . . . . . . . . . . . . . . . . . . . . . . .45-348
XTD messages. . . . . . . . . . . . . . . . . . . . . . . . . . . . . . . . . . . . . . . . . . . . . . . . . . . . . . . . . . . .45-357
XTW messages . . . . . . . . . . . . . . . . . . . . . . . . . . . . . . . . . . . . . . . . . . . . . . . . . . . . . . . . . . .45-361
XUC messages . . . . . . . . . . . . . . . . . . . . . . . . . . . . . . . . . . . . . . . . . . . . . . . . . . . . . . . . . . .45-364
XUX messages. . . . . . . . . . . . . . . . . . . . . . . . . . . . . . . . . . . . . . . . . . . . . . . . . . . . . . . . . . . .45-370
XVW messages . . . . . . . . . . . . . . . . . . . . . . . . . . . . . . . . . . . . . . . . . . . . . . . . . . . . . . . . . . .45-372
XWR messages . . . . . . . . . . . . . . . . . . . . . . . . . . . . . . . . . . . . . . . . . . . . . . . . . . . . . . . . . . .45-377
XXQ messages . . . . . . . . . . . . . . . . . . . . . . . . . . . . . . . . . . . . . . . . . . . . . . . . . . . . . . . . . . .45-382
Section Seven:
XPAF Operator Guide
46. JES2 printer commands . . . . . . . . . . . . . . . . . . . . . . . . . . . . . . . . . . . . . . 46-1
Starting a printer. . . . . . . . . . . . . . . . . . . . . . . . . . . . . . . . . . . . . . . . . . . . . . . . . . . . . . . . . . . . .46-1
Halting a printer . . . . . . . . . . . . . . . . . . . . . . . . . . . . . . . . . . . . . . . . . . . . . . . . . . . . . . . . . . . . .46-2
Stopping or draining a printer. . . . . . . . . . . . . . . . . . . . . . . . . . . . . . . . . . . . . . . . . . . . . . . . . . .46-2
Restarting a printer. . . . . . . . . . . . . . . . . . . . . . . . . . . . . . . . . . . . . . . . . . . . . . . . . . . . . . . . . . .46-2
Displaying a printer’s status . . . . . . . . . . . . . . . . . . . . . . . . . . . . . . . . . . . . . . . . . . . . . . . . . . . .46-3
Setting printer characteristics. . . . . . . . . . . . . . . . . . . . . . . . . . . . . . . . . . . . . . . . . . . . . . . . . . .46-3
Interrupting a document . . . . . . . . . . . . . . . . . . . . . . . . . . . . . . . . . . . . . . . . . . . . . . . . . . . . . . .46-4
Restarting a document. . . . . . . . . . . . . . . . . . . . . . . . . . . . . . . . . . . . . . . . . . . . . . . . . . . . . . . .46-4
Backspacing a document. . . . . . . . . . . . . . . . . . . . . . . . . . . . . . . . . . . . . . . . . . . . . . . . . . . . . .46-4
Forward spacing a document. . . . . . . . . . . . . . . . . . . . . . . . . . . . . . . . . . . . . . . . . . . . . . . . . . .46-5
Retransmitting a document . . . . . . . . . . . . . . . . . . . . . . . . . . . . . . . . . . . . . . . . . . . . . . . . . . . .46-5
Releasing a print job from the JES queue . . . . . . . . . . . . . . . . . . . . . . . . . . . . . . . . . . . . . . . . .46-5
Canceling a document being transmitted from JES. . . . . . . . . . . . . . . . . . . . . . . . . . . . . . . . . .46-6
47. JES3 printer commands . . . . . . . . . . . . . . . . . . . . . . . . . . . . . . . . . . . . . . 47-1
Starting an XPAF FSS for JES3. . . . . . . . . . . . . . . . . . . . . . . . . . . . . . . . . . . . . . . . . . . . . . . . .47-1
Starting a printer. . . . . . . . . . . . . . . . . . . . . . . . . . . . . . . . . . . . . . . . . . . . . . . . . . . . . . . . . . . . .47-2
Terminating a printer . . . . . . . . . . . . . . . . . . . . . . . . . . . . . . . . . . . . . . . . . . . . . . . . . . . . . . . . .47-2
Interrupting and retransmitting a document . . . . . . . . . . . . . . . . . . . . . . . . . . . . . . . . . . . . . . . .47-3
Backspacing or forward spacing a document. . . . . . . . . . . . . . . . . . . . . . . . . . . . . . . . . . . . . . .47-4
Canceling output . . . . . . . . . . . . . . . . . . . . . . . . . . . . . . . . . . . . . . . . . . . . . . . . . . . . . . . . . . . .47-4
Querying JES3 for job information . . . . . . . . . . . . . . . . . . . . . . . . . . . . . . . . . . . . . . . . . . . . . . .47-5
48. XPAF-exclusive operator commands. . . . . . . . . . . . . . . . . . . . . . . . . . . . . 48-1
Displaying the subsystem name for an XOSF started task . . . . . . . . . . . . . . . . . . . . . . . . . . . .48-1
Displaying the status of active print jobs . . . . . . . . . . . . . . . . . . . . . . . . . . . . . . . . . . . . . . . . . .48-2
Displaying the status of active tasks . . . . . . . . . . . . . . . . . . . . . . . . . . . . . . . . . . . . . . . . . . . . .48-3
Terminating an individual task on the printer . . . . . . . . . . . . . . . . . . . . . . . . . . . . . . . . . . . . . . .48-4
XPAF User Guide x
Page 13

Table of Contents
Terminating the XPAF FSS . . . . . . . . . . . . . . . . . . . . . . . . . . . . . . . . . . . . . . . . . . . . . . . . . . . .48-5
Forcing the XOSF address space to terminate . . . . . . . . . . . . . . . . . . . . . . . . . . . . . . . . . . . . .48-6
Turning SMF recording on and off . . . . . . . . . . . . . . . . . . . . . . . . . . . . . . . . . . . . . . . . . . . . . . .48-7
Turning z/OS system logging on and off . . . . . . . . . . . . . . . . . . . . . . . . . . . . . . . . . . . . . . . . . .48-7
Turning XOSF logging on and off. . . . . . . . . . . . . . . . . . . . . . . . . . . . . . . . . . . . . . . . . . . . . . . .48-8
Refreshing the XLOG dataset . . . . . . . . . . . . . . . . . . . . . . . . . . . . . . . . . . . . . . . . . . . . . . . . . .48-8
Switching the XLOG to an alternate dataset . . . . . . . . . . . . . . . . . . . . . . . . . . . . . . . . . . . . . . .48-9
Displaying the active XLOG . . . . . . . . . . . . . . . . . . . . . . . . . . . . . . . . . . . . . . . . . . . . . . . . . . . .48-9
Turning intensive logging on and off . . . . . . . . . . . . . . . . . . . . . . . . . . . . . . . . . . . . . . . . . . . .48-10
Enabling messages . . . . . . . . . . . . . . . . . . . . . . . . . . . . . . . . . . . . . . . . . . . . . . . . . . . . . . . . .48-10
Suppressing messages . . . . . . . . . . . . . . . . . . . . . . . . . . . . . . . . . . . . . . . . . . . . . . . . . . . . . .48-11
49. XDS-exclusive operator commands . . . . . . . . . . . . . . . . . . . . . . . . . . . . . 49-1
Defining an optional subsystem command character. . . . . . . . . . . . . . . . . . . . . . . . . . . . . . . . .49-1
Displaying XDS control blocks in use. . . . . . . . . . . . . . . . . . . . . . . . . . . . . . . . . . . . . . . . . . . . .49-2
Interrupting a printer. . . . . . . . . . . . . . . . . . . . . . . . . . . . . . . . . . . . . . . . . . . . . . . . . . . . . . . . . .49-3
Restarting a printer. . . . . . . . . . . . . . . . . . . . . . . . . . . . . . . . . . . . . . . . . . . . . . . . . . . . . . . . . . .49-3
Terminating XDS with XOSF . . . . . . . . . . . . . . . . . . . . . . . . . . . . . . . . . . . . . . . . . . . . . . . . . . .49-3
Section Eight:
Xerox Page Format Editor
User Guide
50. Page format overview . . . . . . . . . . . . . . . . . . . . . . . . . . . . . . . . . . . . . . . . 50-1
What is a page format? . . . . . . . . . . . . . . . . . . . . . . . . . . . . . . . . . . . . . . . . . . . . . . . . . . . . . . .50-1
Concepts and terms. . . . . . . . . . . . . . . . . . . . . . . . . . . . . . . . . . . . . . . . . . . . . . . . . . . . . . . . . .50-2
Page format uses. . . . . . . . . . . . . . . . . . . . . . . . . . . . . . . . . . . . . . . . . . . . . . . . . . . . . . . . . . . .50-6
Components of a page format . . . . . . . . . . . . . . . . . . . . . . . . . . . . . . . . . . . . . . . . . . . . . . . . . .50-9
Creating and generating a page format . . . . . . . . . . . . . . . . . . . . . . . . . . . . . . . . . . . . . . . . . .50-15
Invoking a page format. . . . . . . . . . . . . . . . . . . . . . . . . . . . . . . . . . . . . . . . . . . . . . . . . . . . . . .50-15
51. Introduction to the page format editor . . . . . . . . . . . . . . . . . . . . . . . . . . . . 51-1
Panel conventions . . . . . . . . . . . . . . . . . . . . . . . . . . . . . . . . . . . . . . . . . . . . . . . . . . . . . . . . . . .51-1
System Services menu. . . . . . . . . . . . . . . . . . . . . . . . . . . . . . . . . . . . . . . . . . . . . . . . . . . . . . . .51-5
Xerox Page Format Editor menu . . . . . . . . . . . . . . . . . . . . . . . . . . . . . . . . . . . . . . . . . . . . . . . .51-6
52. Allocating page format datasets . . . . . . . . . . . . . . . . . . . . . . . . . . . . . . . . 52-1
Setting up your configuration . . . . . . . . . . . . . . . . . . . . . . . . . . . . . . . . . . . . . . . . . . . . . . . . . . .52-2
Maintaining your configuration . . . . . . . . . . . . . . . . . . . . . . . . . . . . . . . . . . . . . . . . . . . . . . . . . .52-5
53. Selecting a page format. . . . . . . . . . . . . . . . . . . . . . . . . . . . . . . . . . . . . . . 53-1
Specifying a page format . . . . . . . . . . . . . . . . . . . . . . . . . . . . . . . . . . . . . . . . . . . . . . . . . . . . . .53-1
XPAF User Guide xi
Page 14

Table of Contents
54. Using copy modification options . . . . . . . . . . . . . . . . . . . . . . . . . . . . . . . . 54-1
Selecting a copy modification. . . . . . . . . . . . . . . . . . . . . . . . . . . . . . . . . . . . . . . . . . . . . . . . . . .54-1
Specifying copy modification parameters. . . . . . . . . . . . . . . . . . . . . . . . . . . . . . . . . . . . . . . . . .54-3
55. Using page layout options. . . . . . . . . . . . . . . . . . . . . . . . . . . . . . . . . . . . . 55-1
Selecting a page layout . . . . . . . . . . . . . . . . . . . . . . . . . . . . . . . . . . . . . . . . . . . . . . . . . . . . . . .55-1
Selecting page layout parameters . . . . . . . . . . . . . . . . . . . . . . . . . . . . . . . . . . . . . . . . . . . . . . .55-4
Specifying global parameters. . . . . . . . . . . . . . . . . . . . . . . . . . . . . . . . . . . . . . . . . . . . . . . . . . .55-4
Specifying line data parameters. . . . . . . . . . . . . . . . . . . . . . . . . . . . . . . . . . . . . . . . . . . . . . . . .55-6
Specifying font list parameters. . . . . . . . . . . . . . . . . . . . . . . . . . . . . . . . . . . . . . . . . . . . . . . . .55-22
56. Generating a page format . . . . . . . . . . . . . . . . . . . . . . . . . . . . . . . . . . . . . 56-1
Generation procedure . . . . . . . . . . . . . . . . . . . . . . . . . . . . . . . . . . . . . . . . . . . . . . . . . . . . . . . .56-1
57. Copying page format source members . . . . . . . . . . . . . . . . . . . . . . . . . . . 57-1
Specifying the copy source . . . . . . . . . . . . . . . . . . . . . . . . . . . . . . . . . . . . . . . . . . . . . . . . . . . .57-1
58. Updating Xerox font characteristics information . . . . . . . . . . . . . . . . . . . . 58-1
Specifying font characteristics . . . . . . . . . . . . . . . . . . . . . . . . . . . . . . . . . . . . . . . . . . . . . . . . . .58-1
59. Page format examples. . . . . . . . . . . . . . . . . . . . . . . . . . . . . . . . . . . . . . . . 59-1
List report . . . . . . . . . . . . . . . . . . . . . . . . . . . . . . . . . . . . . . . . . . . . . . . . . . . . . . . . . . . . . . . . . .59-1
Statement report. . . . . . . . . . . . . . . . . . . . . . . . . . . . . . . . . . . . . . . . . . . . . . . . . . . . . . . . . . . . .59-6
Mail merge . . . . . . . . . . . . . . . . . . . . . . . . . . . . . . . . . . . . . . . . . . . . . . . . . . . . . . . . . . . . . . . .59-15
Section Nine:
Appendices
A. Defining and initializing native libraries. . . . . . . . . . . . . . . . . . . . . . . . . . . . . A-1
Executing an LDMUTIL function. . . . . . . . . . . . . . . . . . . . . . . . . . . . . . . . . . . . . . . . . . . . . . . . . .A-1
Initializing a native library. . . . . . . . . . . . . . . . . . . . . . . . . . . . . . . . . . . . . . . . . . . . . . . . . . . . . . .A-4
Offloading data from a native library . . . . . . . . . . . . . . . . . . . . . . . . . . . . . . . . . . . . . . . . . . . . . .A-5
Reloading data that has been offloaded. . . . . . . . . . . . . . . . . . . . . . . . . . . . . . . . . . . . . . . . . . . .A-6
Verifying the space bitmap in a library . . . . . . . . . . . . . . . . . . . . . . . . . . . . . . . . . . . . . . . . . . . . .A-7
Listing directory entries . . . . . . . . . . . . . . . . . . . . . . . . . . . . . . . . . . . . . . . . . . . . . . . . . . . . . . . .A-8
Listing library statistics . . . . . . . . . . . . . . . . . . . . . . . . . . . . . . . . . . . . . . . . . . . . . . . . . . . . . . . . .A-9
Expanding the size of a native library. . . . . . . . . . . . . . . . . . . . . . . . . . . . . . . . . . . . . . . . . . . . .A-10
B. Uploading resources from file to host . . . . . . . . . . . . . . . . . . . . . . . . . . . . . . B-1
Sample JCL . . . . . . . . . . . . . . . . . . . . . . . . . . . . . . . . . . . . . . . . . . . . . . . . . . . . . . . . . . . . . . . . .B-1
XPAF User Guide xii
Page 15

Table of Contents
C. Resource management parameters . . . . . . . . . . . . . . . . . . . . . . . . . . . . . . .C-1
Parameters related to font resource management. . . . . . . . . . . . . . . . . . . . . . . . . . . . . . . . . . . C-2
Parameters related to form resource management . . . . . . . . . . . . . . . . . . . . . . . . . . . . . . . . . . C-4
Parameters related to image resource management. . . . . . . . . . . . . . . . . . . . . . . . . . . . . . . . . C-6
Parameters related to logo resource management . . . . . . . . . . . . . . . . . . . . . . . . . . . . . . . . . . C-8
Parameters related to list resource management . . . . . . . . . . . . . . . . . . . . . . . . . . . . . . . . . . . C-9
Parameters related to PDL resource management . . . . . . . . . . . . . . . . . . . . . . . . . . . . . . . . . C-10
Parameters related to page format resource management . . . . . . . . . . . . . . . . . . . . . . . . . . . C-10
Parameters related to paper-related tables . . . . . . . . . . . . . . . . . . . . . . . . . . . . . . . . . . . . . . . C-11
Parameters related to color cross-reference tables and color conversion table . . . . . . . . . . . C-12
Section Ten: Glossary
Glossary . . . . . . . . . . . . . . . . . . . . . . . . . . . . . . . . . . . . . . . . . . . . . . . . . . . . . .G-1
Index . . . . . . . . . . . . . . . . . . . . . . . . . . . . . . . . . . . . . . . . . . . . . . . . . . . . . . . . . .I-1
XPAF User Guide xiii
Page 16

Table of Contents
XPAF User Guide xiv
Page 17

Section One: Introduction to XPAF
Xerox Printer Access Facility (XPAF) software is a host-resident software
product that enhances the capabilities and use of Xerox printers in the
IBM z/OS environment. XPAF retrieves data streams from JES, a
third-party spool, or Xerox Direct Print Services ( XDS) and prepares them
for printing on a Xerox printer.
Xerox only supports the XPAF features and functions described in the
user documentation that acco mpanies the software. Do not assum e
support is provided if it is not explicitly documented.
This document provides the information you need to in stall, man age, an d
print documents with XPAF. Additional sections found in the
documentation include a complete list of the parameters and keywords
used, error messages generated by XPAF, guides for opera tors and page
format editor users, a glossary, and an index.
XPAF documentation is delivered in PDF format. It is designed to be
viewed online; however, page layouts have been maintained so that you
can duplex print all or part of the documentation as necessary.
Section One: Introduction to XPAF
Page 18

Section One: Introduction to XPAF
Page 19

1. 1 Getting started
This chapter provides a brief description of th e documentation an d the
conventions used.
XPAF User Documentation
XPAF User Documentation has been reformatted for this release of XPAF
(5.0). When you use this document online you will find that cross
references (in light blue text) within the document are active links to the
referenced areas of the documentation, and that the index and table of
contents also provide active links directly to the subject matter.
This document is divided into the following sections:
• Section One: Introduction to XPAF provides an overview of this
document and XPAF.
Getting started
• Section Two: Installing and Customizing XPAF describes how to
install the XPAF software on your system and tailor it to meet your
site’s specific requirements. It also describes how to set up your
printers and perform an installation verification. This section is
designed for the systems programmer responsible for installing and
customizing the XPAF software.
• Section Three: Managing Resources with XPAF describes how to
load, create, convert, and update XPAF resources. This section is
intended for the system administrator who will be responsible for
managing and maintaining XPAF system resources.
• Section Four: Printing Documents with XPAF describes how to print
line-mode, DJDE, XES, page-formatted, AFP, pass-through, and
VIPP documents. This section is intended for the systems
programmer, application programmer, or anyone who needs to print
documents with XPAF.
• Section Five: XPAF Parameter and Keyword Reference describes
the initialization parameters, printer profile parameters, and JCL
keywords available to tailor an XPAF system, printer, or job to your
specific needs. This section is intended for the systems programmer,
application programmer, or anyone who needs to print documents
with XPAF.
Section One: Introduction to XPAF 1-1
Page 20

Getting started
• Section Six: XPAF Messages explains the informational, warning,
and error messages that XPAF issues. This section is intended for
systems programmers or application programmers who must
reference messages sent to the XOAF or XOSF log files.
• Section Seven: XPAF Operator Guide describes the JES2, JES3,
XPAF-exclusive, and XDS-exclusive commands available to a host
console operator when printing with XPAF. This section is intended
for console operators, system administrators, systems programmers,
and any other personnel interested in the operator commands for
XPAF.
• Section Eight: Xerox Page Format Editor User Guide describes how
to create and maintain page formats using XPAF facilities. This
section is intended for anyone who wants to format line-mode data
streams that are printed through XPAF.
• Section Nine: Appendices provides instructions on using the
LDMUTIL utility to define and initialize your native resource libraries
and sample JCL to use for uploading resources from a file to the
host system. It also identifies the initialization and printer profile
parameters related to managing resources.
• Section Ten: Glossary provides a glossary of the terms used within
the documentation as they relate to XPAF.
• Index contains indexed information to help you locate specific topics.
Section One: Introduction to XPAF 1-2
Page 21

Conventions used
Notes
Getting started
General conventions are used for these elements:
• Notes
• Cautions
• Messages
• JCL
• Screen panels
• Parameters, keywords, and commands
• Library, dataset, and DD names
• Sample data
Each element is described below.
A note is a hint that assists you in performing a task or understanding the
text.
Cautions
Messages
JCL
NOTE: For greater emphasis, notes appear in blue text.
A caution notifies you that an action or omission may result in damage to
your equipment, software, or data.
CAUTION: For greater emphasis, cautions appear in red text.
Messages displayed on the console are presented in uppercase,
nine-point Monotype.com font. For example:
XDI3514I XOSF SYSTEM SMF RECORDING TURNED OFF
JCL listings and console displays longer than five lines are enclosed in
shaded frames similar to this example:
Section One: Introduction to XPAF 1-3
Page 22

//job-name JOB job-information
//LDMINIT EXEC PGM=LDMUTIL,REGION=2048K
//STEPLIB DD DSN=library-name,DISP=SHR
//SYSPRINT DD SYSOUT=A
//LDMPRINT DD SYSOUT=A
//LDMPARM DD *
INITIALIZE library-name
Screen panels
Getting started
These conventions are used in JCL definitions:
• Constant data is shown in uppercase type. You must code constant
data exactly as shown.
• Variable data is shown in lowercase, italicized type. Replace the
italicized variables with your site’s values.
Information displayed on an ISPF panel is enclosed in a frame similar to
this example:
Xerox Output Administrative Facility
Load Centralized Forms to a Nativ e Library
COMMAND ===>
INPUT
Dataset Name:
Member Name:
OUTPUT
Dataset Name:
Member Name:
Partial panels that show sample field entries a ppear between double lines
similar to this example:
Unit Measure: IN
LPI: 6
INPUT OUTPUT P RINT
OPTION START LENGTH ACROSS DOWN DIR FONT COLOR CONSTANT
_ 1___ 6___ .3_____ 1.1____ A ______ DEF N
_ 1___ 6___ .7_____ 8.92___ A ______ DEF N
_ 9___ 29__ 1.0____ 1.1____ A ______ DEF N
_ 9___ 29__ 1.8____ 8.4____ A ______ DEF N
Section One: Introduction to XPAF 1-4
Page 23

Parameters, keywords, and commands
These conventions are used in the syntax definitions for initialization
parameters, printer profile parameters, IBM JCL keywords, XPAF
extended JCL keywords, TSO/batch commands, and operator
commands.
Table 1-1. Syntax conventions
Convention Description Example
Getting started
NOTE: Commas and parentheses are part of a statement’s definition
and must be included exactly as indicated.
Required text Uppercase indicates text that must be
entered exactly as shown.
Variable text Lowercase italics represent an entry for
which you must supply a value.
Numeric variable A lowercase italicized “n” indicates a
numeric variable. The number of n’s shown
represents the maximum positional value of
the numeric variable.
Abbreviation Characters in small capital letters are
optional and can be abbreviated. In this
example, the value EBCDIC can be
abbreviated as E.
No entry needed The word “blank” indicates that a blank (that
is, no value) is an acceptable value.
Select an entry from a list Braces { } indicate that one of the enclosed
vertically-stacked items is required.
Optional entry Square brackets [ ] indicate that the
enclosed text is optional.
FONTLIB=CFONTLIB
OPHLQ=prefix
CONROUTE=nnn
MODE=E
IMAGEOUTIMP=blank
DEFLINE=
OPWRITER=(DISK[,ONLY])
BCDIC
LINE
DJDE
PAGE
⎩⎭
⎫
⎪
⎬
⎪
Multiple values An ellipses (...) indicates that the preceding
item can be repeated. In this example, as
many as eight colors can be specified.
COLORIMG=(color1[,...,color8])
Section One: Introduction to XPAF 1-5
Page 24

Library, dataset, and DD names
Library names are referenced by their low level qualifier only, not the ir full
dataset name (for example, XPFSAMP). Add the high level qualifier used
at your site to determine the full dataset name of a library reference.
Dataset names can be 1- to 44-characters long. Unless otherwise noted,
dataset names and member names must follow standard z/OS naming
conventions.
XPAF uses several initialization and printer profile parameters that name
DD statements in your XOSF start-up proc. These parameters’ default
values match the low level qualifier names for the datasets to which they
point. For example, by default the PAPTBLDD initialization parameter
names the TABLELIB DD statement that points to the prefix.TABLELIB
dataset.
You may change any of the supplied DD names and dataset names in
your XOSF start-up proc. However, when describing a native library, the
XPAF documentation references the default name. So, if you have
changed the default dataset name, substitute your library name for the
library name in the XPAF documentation. Refer to Section Five: XPAF
Parameter and Keyword Reference for detailed description of these
parameters.
Getting started
Sample data
Sample JCL, messages, reports, and IVPs shown within this document
reference a fictional company, Rainbow Office Supplies, its employees,
and its customers. Rainbow Office Supplies, its logo, the names of its
employees and customers, and any data used in the examples are
fictitious. Any similarity to actual companies or pe rsons is purely
coincidental.
Section One: Introduction to XPAF 1-6
Page 25

Supported printers
Getting started
XPAF supports these printer types:
• Centralized printers are high-volume printers, which are either
channel-attached or remotely attached to the host.
Channel-attached printers are directly attached to a host computer
by input/output channels. Remotely-attached printers are physically
connected to a host computer via TCP/IP or a telecommunications
line.Centralized printers also are referred to as LCDS, DJDE, or
Metacode printers.
• PCL-capable printers are mid-volume printers, which are generally
remotely-attached to the host via TCP/IP.
• VIPP-enabled printers are print devices on which VIPP software
resides. VIPP documents must be sent to a VIPP-enabled print
device.
Table 1-2. XPAF-supported Xerox printers
Printer Model
Centralized PCL-capable
DP 4890 LPS
DP 4850 LPS
DP 4650 LPS
DP 4635 LPS
DP 4635MX LPS
DP 4135 LPS
DP 4090 LPS
DP 4050 LPS
DP 180 EPS
DP 180 LPS
DP 96 LPS
DP 92C LPS
DocuSP Family with
the LCDS
Decomposer
Free Flow Print
Server with the
LCDS Decomposer
Creating PDF Documents
XPAF can also convert Linemode, LCDS, XES and AFP documents into
PDF files which can then be e-mailed to a recipient, stored on a server or
sent to a printer.
DocuSP or FreeFlow
Print Server family of
products
Phaser Family
WorkCenter Family
DT 6180
DT 6155
DT 6135
DT 6115
DT 6100
Section One: Introduction to XPAF 1-7
Page 26

Limitations of support
XPAF supports up to 64 printers per functional subsystem (FSS). The
capabilities of XPAF are limited to the functional abilities of the printer. For
example, if a printer does not support duplex printing, XPAF cannot
duplex a document sent to that printer.
Getting started
Section One: Introduction to XPAF 1-8
Page 27
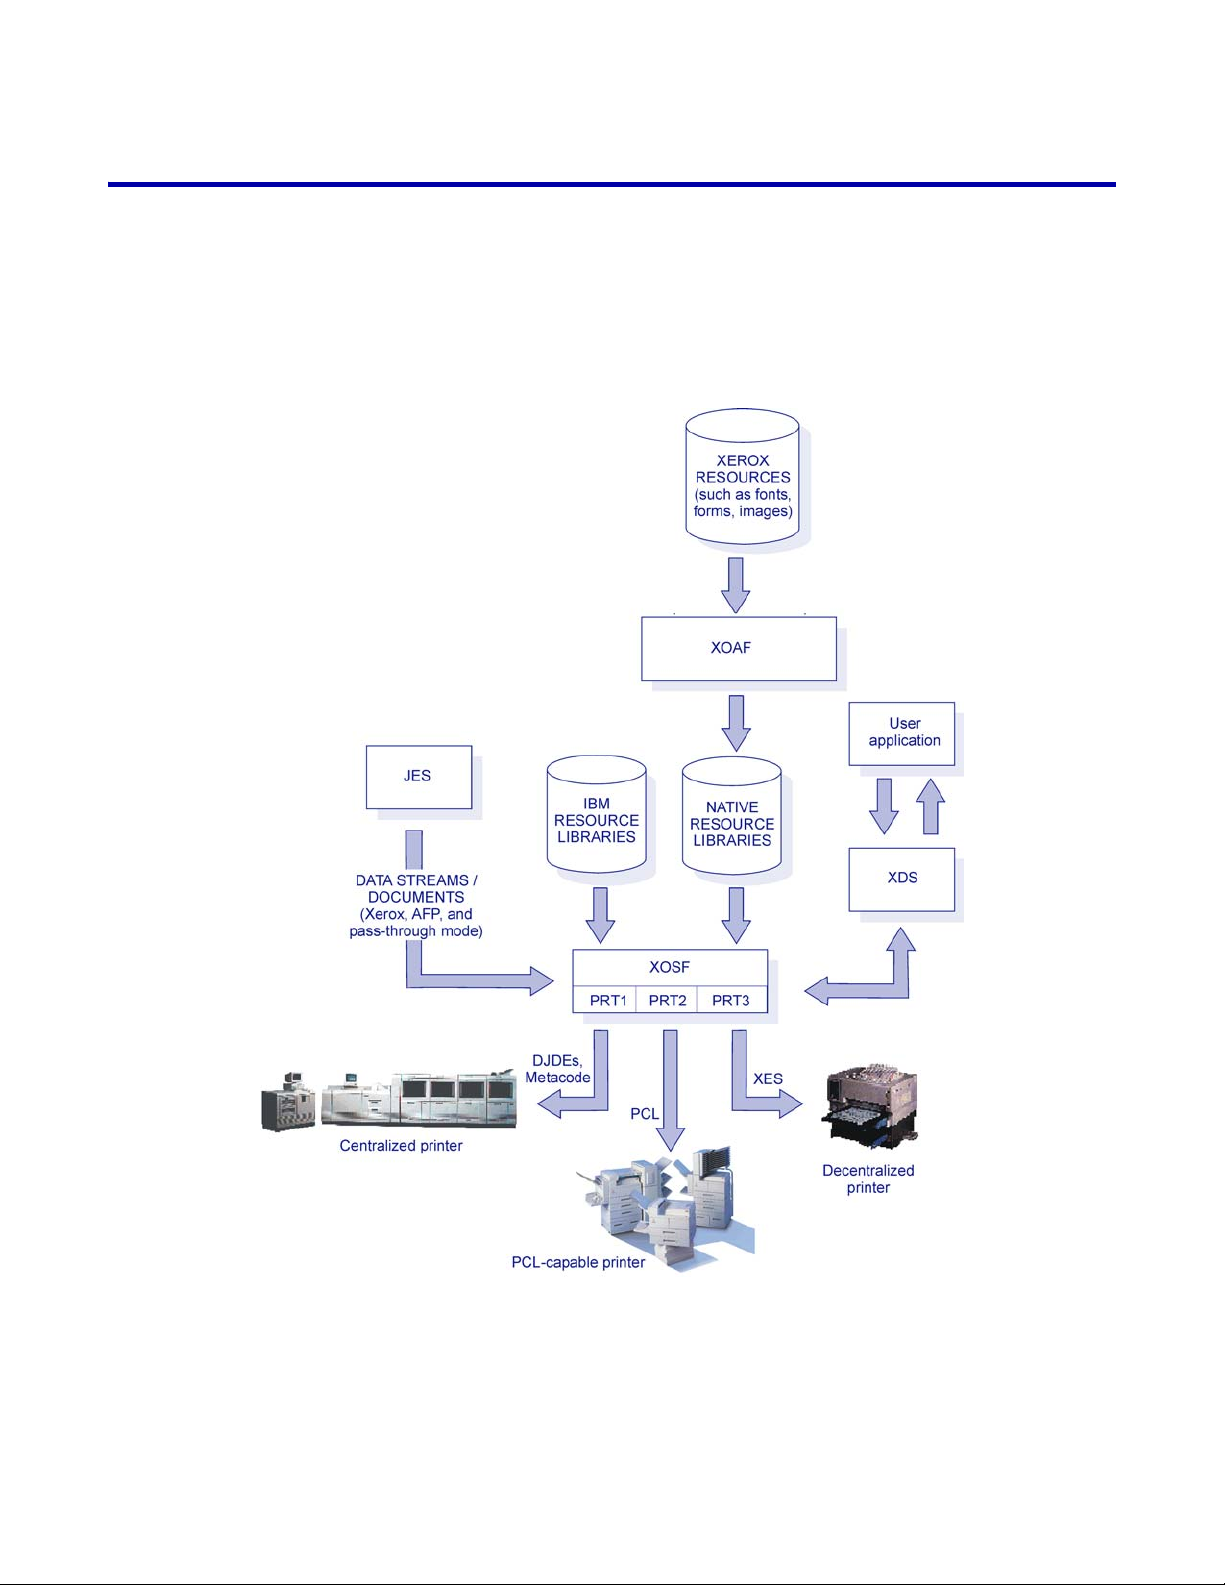
XPAF subsystems
Getting started
XPAF is composed of two subsystems:
• Xerox Output Administrative Facility (XOAF)
• Xerox Output Services Facility (XOSF)
Figure 1-1 provides an overview of the relationship of the two
subsystems.
Figure 1-1. XPAF subsystems
Section One: Introduction to XPAF 1-9
Page 28

Xerox Output Administrative Facility
XOAF contains the functions and utilities that you use to prepare the
resources and supporting lists and tables needed during the printing
operation. Resources are fonts, forms, images, or logos that are required,
in addition to data, to print a document. A resource can be stored either
on the printer, in a library on the host, or inline in the data stream.
For more information about using XOAF utilities, refer to Section Three:
Managing Resources with XPAF.
Xerox Output Services Facility
XOSF interfaces with z/OS to accept documents from JES, convert them
into a format suitable for the intended printer, and transmit them to the
printer.
XOSF provides these functions:
• Host system interface
• Document processing
• Document transmission and printing
Getting started
Host system interface
XOSF interfaces with the host-resident z\OS operating system to accept
documents from JES. XOSF operates as an z\OS-based functional
subsystem (FSS) to obtain a data stream from the JES spool and maintain
control of the printer. Additionally , you can install XDS to invoke XOSF
directly without JES or any other sp ooling subsyste m.
For the host console operator, the interface to Xerox printers through
XOSF remains the same as JES-controlled printers. For example, an
operator can start, stop, and interrupt a printer. The operator a lso can use
operator commands unique to XPAF to make inquiries to the system for
status, state, and activity levels. For more information refer to Section
Seven: XPAF Operator Guide.
Document processing
XOSF document processing is governed by the type of data stream and
the type of printer selected for printing. The supported data streams are
discussed later in this chapter. The supported printers are discussed in
Section Two: Installing and Customizing XPAF.
In most cases, XOSF performs a process called resource conditioning.
This process ensures that all resources required to print the document are
available before sending the data stream to the printer.
During XOSF processing, some data streams may require a conversion of
the print commands to a format recognized by the Xerox printer.
Depending on the data stream type being processed and the printer being
used, a data stream may be converted into one of the following kinds of
Xerox data streams:
• Metacode data streams for printing on centralized printers. A
Metacode data stream consists of ASCII print reco rds that inc lude
carriage control commands, along with special codes known as
Section One: Introduction to XPAF 1-10
Page 29

Getting started
metacodes, to define absolute positioning, or ientation, and font
indexing.
• XES data streams for printing on decentralized printers. XES control
codes are prefixed by a user-defined key which signals the printer to
recognize the character or characters that follow it as an escape
sequence.
• PCL data streams for printing on PCL-capable printers. PCL data
streams contain characters called escape sequences which signal
the printer to recognize the character or characters that follow it as a
print command.
• PDF data streams for printing on PDF printers or sending via e-mail.
PDF is a portable document open standard that contains a complete
description of the document that includes test, fonts, and images.
If a document already is form atted for t he data str eam type req uired by
the printer, conversion is not required. XPAF ca n send this type of data
stream directly to the printer after resource conditioning is complete. This
is known as native mode processing.
Other data streams can be sent to th e printer witho ut conditio ning or
conversion. This is called pass-through processing. For example, an XES
document that does not require resource conditioning can be sent directly
to a decentralized XES printer without XPAF altering the data stream.
For more information about document processing, refer to Section Four:
Printing Documents with XPAF.
Document transmission
After XOSF performs any necessary conversions and resource
conditioning, XOSF sends the docu ment and t ailored pr inter instru ctions
to the printer.
Section One: Introduction to XPAF 1-11
Page 30
Supported data streams
XPAF accepts these types of data streams:
• Line-mode
•DJDE
• XES
• Page-formatted
•AFP
•VIPP
• Other (in pass-through mode)
XPAF’s data stream support is summarized by printer type in the table
below and discussed on the pages that follow. Refer to Section Four:
Printing Documents with XPAF for deta iled information abou t how XPAF
processes each data stream type.
Getting started
Data stream type
Centralized
printers
Decentralized
printers
PCL-capable
printers
PDF
printers
Line-mode YES YES YES YES
DJDE YES YES
1
XES NO YES YES
Page-formatted YES
AFP YES
1
1
VIPP NO NO
Other (in
NO YES
YES
YES
1
1
3
YES
YES
YES
YES
YES
1
1
1
1
2
3
YES
YES
YES
YES
NO
YES
pass-through
mode)
1
Requires conversion.
2
Requires a VIPP-enabled printer.
3
Pass-through data streams are neither converted nor conditioned.
NOTE: You can enhance the look of your data streams by using
XPAF extended JCL to add print formatting commands and selecting
XPAF options at the time that your print job executes. XPAF provides
extended JCL keywords for use with most of the supported data
streams. For detailed information about the extended JCL keywords
available, refer to Section Five: XPAF Parameter and Keyword
Reference.
1
1
1
1
3
Section One: Introduction to XPAF 1-12
Page 31

Line-mode data streams
Line-mode (or 3211) data streams consist only of carriage control
commands and data. You can send line-mode data streams through
XPAF to any supported centralized, PCL-capable or PDF printer.
If you enhance the look of your line-mode data streams by using extended
JCL keywords, XPAF no longer considers the data stream as a line-mode
data stream. XPAF will process it as the relevant data stream type.
DJDE data streams
DJDEs are control statements that specify how a document should be
printed on a centralized printer. DJDE processing enables certain printer
parameters to be changed from one job, page, or record boundary to the
next. For example, you can use the COPIES DJDE to specify the number
of copies of a report to be printed.
You can generate DJDE data streams in one of two ways:
• Format a line-mode data stream using standard IBM and XPAF
extended JCL.
Getting started
• Code DJDEs directly in a data stream or use an application to
produce a data stream containing DJDEs. In addition, you can
modify the initial DJDE packet using standard IBM and XPAF
extended JCL.
You can print DJDE documents on centralized, decentralized,
PCL-capable, and PDF printers. During document processing, XPAF uses
extended JCL keywords to insert DJDEs. The document is then
conditioned and processed as follows:
• If the document is sent to a centralized printer, no further processing
is required.
• If the document is sent to a PCL-capable printer, XPAF converts the
DJDE commands to XES commands, then converts the XES
commands to PCL commands.
• If the document is sent to a PDF printer, XPAF converts the DJDE
commands to XES commands, then converts the XES commands to
PDF commands.
Section One: Introduction to XPAF 1-13
Page 32

XES data streams
XES data streams contain printer commands prefixed with user-defined
keys which dynamically change pa rameters fo r decentralized printers.
You can print XES documents on PCL-capable and PDF printers.
• If the document is sent to a PCL-capable printer, XPAF converts the
XES commands to PCL commands before sending the document to
the printer.
• If the document is sent to a PDF printer, XPAF converts the XES
commands to PDF commands before sending the document to the
printer.
Page-formatted data streams
Page-formatted data streams are line-mode data str eams that have been
formatted using a Xerox page format. You can print page-formatted
documents on centralized, decentralized, PCL-capable or PDF printers.
• If the document is sent to a centralized printer, XPAF converts the
page format settings to Metacode commands.
Getting started
• If the document is sent to a PCL-capable printer, XPAF converts the
• If the document is sent to a PDF printer, XPAF converts the page
AFP data streams
AFP data streams can consist of:
• Sequences of variable-length records called structured fields
• Fixed- or variable-length records that contain both line-mode data
• Line-mode data formatted using AFP JCL keywords
You can print AFP documents on centralized, decentralized, PCL-capable
or PDF printers.
• If the document is sent to a centralized printer, XPAF converts the
• If the document is sent to a PCL-capable printer, XPAF converts the
page format settings to XES commands, then converts the XES
commands to PCL commands.
format settings to XES commands, then converts the XES
commands to PDFcommands.
and structured fields
AFP commands to Metacode commands.
AFP commands to XES commands, then converts the XES
commands to PCL commands.
• If the document is sent to a PDF printer, XPAF converts the DJDE
commands to XES commands, then converts the XES commands to
PDF commands.
Section One: Introduction to XPAF 1-14
Page 33

VIPP data streams
Variable Intelligent PostScript Printware (VIPP) data streams are
line-mode data streams that have VIPP commands inserted at the
beginning of the application. VIPP applications are sent to a
VIPP-enabled printer for processing.
Data streams in pass-through mode
You can send a data stream specifying pass-through mode to any
XPAF-supported decentralized, PCL-capable or PDF printer if the printer
supports the printer command language of the data stream. For example,
the data stream for a PCL document does not require a print command
conversion by XPAF before being sent to a PCL-capable printer.
XPAF does not perform any conversion, conditioning, or validation on
resources included in a pass-through document. All of the information
required to print the document must be contained within the data stream
because the data stream is sent directly to the printer without being
altered.
Getting started
CAUTION: Unpredictable results may occur when:
• printing a pass-through document through XPAF to a non-Xerox
printer
• a pass-through data stream contains commands that are not
supported by the target printer.
Section One: Introduction to XPAF 1-15
Page 34

Parameter and keyword processing hierarchy
XPAF allows you to tailor your printing environment by providing control
at three levels: system, printer, and job.
Level Description
XPAF provides control at the system level through the use
of required initialization parameters. Initialization
System
parameters specify z\OS and JES information, DD
statement names, DJDE formats and defaults, and other
processing options.
Getting started
Printer
Job
During XPAF processing, printer profile parameters override initialization
parameters, and extended JCL keywords override initialization and/or
printer parameters.
Processing also can be affected by printer settings, specified JDL, and
settings in the JES parameters or XOSF start-up proc. For more
information refer to Section Five: XPAF Parameter and Keyword
Reference.
XPAF provides control at the individual printer level
through the use of printer profile parameters.
XPAF provides control at the job level through the use of
two types of keywords:
• Standard IBM JCL keywords that are supported by
XPAF
• Extended JCL keywords that are unique to XPAF and
establish job- and output-specific values
Section One: Introduction to XPAF 1-16
Page 35

Section Two: Installing and Customizing XPAF
This section is a programming guide for installing XPAF in an IBM z/OS
environment. Written for systems programmers, it provides step-by-step
instructions for installing and customizing the XPAF system.
XPAF installation procedures are described in sequential order. Whether
you are installing XPAF for the first time or reinstalling XPAF, you should
start at the beginning and proceed sequentially.
As the systems programmer responsible for installing and customizing the
XPAF system software, you should have experience installing host
software products. You also should have experience using Xerox printers.
Section Two: Installing and Customizing XPAF
Page 36

Page 37

2. 2 Installation requirements
This chapter describes the hardware and software required to install and
use XPAF successfully. It addresses these topics:
• Installation materials
•SMP/E level
• Hardware
• Printer support
• IBM host requirements
NOTE: Because XPAF may have some module names that are
common with other Xerox host software products, you must install
XPAF in its own CSI.
Installation requirements
Installation materials
The XPAF installation materials include an installation file in TSO
Transmit format.
Refer to “Checklist for installing resources” in chapter 4, “Installing
resources” for a list of the resource files and their contents.
Media
The XPAF 5.0 software is downlo adable from the Xerox corpor ate
website,
http://www.support.xerox.com/support/xpaf/software/enus.html
Content
The installation file is TSO Transmit output dataset of a single PDS,
referred to as the XMTPDS. The XMTPDS contains all the necessary files
to install the base product, latest maintenance and all resources.
SMP/E level
You must install XPAF using SMP/E Release 5 or higher.
Section Two: Installing and Customizing XPAF 2-1
Page 38

Hardware
Disk allocation
Installation requirements
XPAF operates on any processor capable of running z/OS.
If you load both the centralized and decentralized libraries onto your
system, XPAF needs approximately 640 cylinders on single density 3380
disk drives. XPAF uses the storage as follows:
XOAF/XOSF 1220
SMP/E files 621
Resources 7759 (AFP and native mode)
Total tracks 9600 (640 cylinders)
Tables 2-1 through 2-3 show the approximate minimum space
requirements for all of the files created and used during XPAF installation.
The space figures shown in these tables reflect installation on single
density 3380 disks and may vary according to your DASD type. You may
increase any of these values based on your site’s installation and
environment.
Table 2-1. XPAF SMP/E installation library requirements
Tracks
Dataset name DSORG
CSI VSAM 63 V 24 – 143 22528 (CISZ)
SMPLOG PS 60 VB 510 3200
SMPLOGA PS 20 VB 510 3200
SMPMTS PO 26 FB 80 27920
SMPPTS PO 402 FB 80 27920
SMPSCDS PO 60 FB 80 27920
SMPSTS PO 20 FB 80 27920
(approx.)
RECFM LRECL BLKSIZE
Section Two: Installing and Customizing XPAF 2-2
Page 39

Installation requirements
Table 2-2. XPAF target, distribution, and operational library requirements
Tracks
Dataset name DSORG
AXPFCLIB PO 28 FB 80 27920
AXPFLOAD PO 377 U — 6144
AXPFMAC PO 60 FB 80 27920
AXPFMLIB PO 8 FB 80 27920
AXPFPLIB PO 64 F B 80 27920
AXPFSAMP PO 132 FB 80 27920
AXPFSLIB PO 8 FB 80 27920
INSTLIB PO 45 FB 80 27920
STAGE2 PO 30 FB 80 27920
(approx.)
RECFM LRECL BLKSIZE
XINPARM PO 4 FB 80 27920
XOAFLOG PS 3 VB 256 27998
XOSFLOG PS 5 VB 256 27998
XPFCLIB PO 28 FB 80 27920
XPFLOAD PO 221 U — 23200
XPFLPA PO 14 U — 23200
XPFMAC PO 15 FB 80 27920
XPFMLIB PO 8 FB 80 27920
XPFPLIB PO 64 FB 80 27920
XPFSAMP PO 132 FB 80 27920
XPFSLIB PO 8 FB 80 27920
XPFTOOLS PO 11 FB 80 27920
Section Two: Installing and Customizing XPAF 2-3
Page 40

Installation requirements
Table 2-3. XPAF resource file requirements
Tracks
Dataset name DSORG
AFPFONTS PO 78 VB M 8205 27998
(approx.)
RECFM LRECL BLKSIZE
CFONTLIB VSAM
1
2925 N/A 4089 4096 (CISZ)
CFORMLIB VSAM 30 N/A 4089 4096 (CISZ)
CIMGLIB VSAM 135 N/A 4089 4096 (CISZ)
CLOGOLIB VSAM 7 N/A 4089 4096 (CISZ)
DFONTLIB VSAM 2925 N/A 4089 4096 (CISZ)
DFORMLIB VSAM 28 N/A 4089 4096 (CISZ)
DIMGLIB VSAM 120 N/A 4089 4096 (CISZ)
IVPDATA PO 10 FBA 172 27864
IVPRESC PO 7 VBM 8205 27998
IVPXOAF PO 3 F B 128 27904
PAGEFORM PO 14 VBM 8205 27998
PDLLIB VSAM 13 N/A 2041 2048 (CISZ)
PFONTLIB VSAM 1260 N/A 4089 4096 (CISZ)
PFORMLIB VSAM 4 N/A 4089 4096 (CISZ)
PIMGLIB VSAM 30 N/A 4089 4096 (CISZ)
TABLELIB VSAM 255 N/A 4089 4096 (CISZ)
XWRLIB VSAM 6 N/A 2041 2048 (CISZ)
1
IDCAMS allocation for native VSAM files, used to store native resources, must meet these requirements:
VSAM files must be allocated in records.
The maximum number of records allowed in a VSAM file is 524,280.
VSAM files may span multiple volumes and extents.
Once a VSAM file is initialized, no secondary extents or additional candidate volumes can be acquired.
The CISZ must be one of these values: 512, 1024, 2048, or 4096.
The RECSIZ must be 7 less than the CISZ: 505, 1017, 2041, or 4089.
A sample IDCAMS allocation statement is shown in figure 2-1. For additional information concerning IDCAMS,
refer to your IBM DFP product guides.
Section Two: Installing and Customizing XPAF 2-4
Page 41

Printer support
Centralized printers
Installation requirements
XPAF supports centralized, decentralized, and PCL-capable printers. The
tables in this section provide the minimum supported software release
levels for centralized printers, decentralized printers, PCL-capable
printers, and interface devices.
The capabilities of XPAF are limited to the functional abilities of the
printer. For example, if a printer does not print duplex, XPAF cannot
duplex a document sent to that printer.
This table lists the minimum supported release levels for centralized
printers.
NOTE: Throughout this document, references made to highlight color
printers refer to the 4890 and 4850 printers. Note that the 4890 NPS
and 4850 NPS printers do not support highlight color when printing
from XPAF.
Printer Minimum software levels
4890/4850 V3.7/V4.0
4650/4090/4050 V2.1 (with the HIP52.TSK file and required XPAF patches)
V3.5 (latest patch level) plus any XPAF-specific patches
V3.0 (without XNS support)
4635 V3A
4635MX V3A
4135 V3.6
180 EPS V1.10
180 LPS V3C2 Release 1.4
96 LPS V3A
92C LPS V5.4
DocuSP with the LCDS
decomposer
Free Flow Print Server
with the LCDS
decomposer
Any supported release
Any supported release
Section Two: Installing and Customizing XPAF 2-5
Page 42

Installation requirements
Image requirements for centralized printers
To print images such as line art and photographs, centralized printers
must be equipped with the Xerox Graphics Handling Option subsystem or
Graphics Video Generator.
To print AFP and Xerox images such as page segments, overlays with
shading, and .IMG resources, all centralized printers must be equipped
with additional graphics processing memory. Depending on printe r model
and operating system, centralized printers must be equipped with one of
three Xerox graphics processing memory options:
• Graphics Handling Option (GHO)
• Graphics Video Generator (GVG)
• Graphics Video Generator II (GVGII)
The extra graphics memory is required because of the way XPAF
processes and transforms data streams that contain AFP and Xerox
images.
GHO, GVG, and GVGII consist of hardware, accompanying firmware, and
software. These options ena ble centr alized print ers to stor e, merge , and
print AFP and Xerox images in a text document at 300 dpi. Different
memory options are available, depending on your printer model:
• Two GHO memory options are available for the 9790, 9700, 8790,
8700, 4090, and 4050: either 2 or 8 megabits.
• Two GVG memory options are available for the 4650, 4135, and
4090: either 32 (option package 38P) or 256 megabits (option
package 39P).
• Two levels of GVGII memory are available for the 4850: either 32 or
256 megabits.
The larger memory options are recommended for pr inting documents that
contain complex images or large numbers of images per page.
The printer’s operating system provides support for the various graphics
memory options. For detailed information about grap hics memory options
for a specific printer, contact your local Xerox representative.
If your printer is equipped with any of the thr ee grap hics memory options,
you must specify GHO in the FEATURE printer profile parameter to
indicate that the printer has additional graphics memory. For information
about the FEATURE printer profile parameter defaults, refer to Section
Five: XPAF Parameter and Keyword Reference.
PCL-capable printers
This table lists the minimum supported release levels for PCL-capable
printers.
Printer Minimum software levels
6100 V1.3
6115 V1.3
Section Two: Installing and Customizing XPAF 2-6
Page 43

Installation requirements
Printer Minimum software levels
6135 V1.3
6155 V1.3
6180 V1.3
4900 V2013.115
4050 NPS V1.4
4090 NPS V1.4
4635 NPS V1.4
4850 NPS V1.4
4890 NPS V1.4
180 EPS V1.10
180 NPS V1.4
155 NPS V1.7
115 NPS V1.7
100 NPS V1.7
96 NPS V1.5
92C NPS V5.4
DocuSP enabled printer Any supported level
Free Flow Print Server enabled
printer
Software emulation modes
For all PCL-capable printers, XPAF supports PCL emulation mode. For
PCL-capable printers that also support HPGL, PostScript, and XES,
XPAF supports those emulation modes only when printing pass-through
documents.
For more information on the various printer command languages
supported by each printer, refer to chapter 10, “XPAF printer support.”
Any supported level
Section Two: Installing and Customizing XPAF 2-7
Page 44

IBM host requirements
To install and run XPAF, your host operating environment must include
specific software products at supported releas e levels.
Operating environments and JES levels
XPAF operates in all IBM-supported z/OS JES2 and JES3 environments.
When new host operating environments are released, XPAF will be
updated to ensure compatibility. Conversely, when IBM withdraws
support for a software release level, Xerox also will withdraw support for
that release level. Contact you r local Xerox re presentative o r review the
bulletin accompanying your latest maintenance file to verify specific
supported release levels.
IBM host products
Installation requirements
These IBM host software products may be insta lled on your system.
Printer application products
XPAF can print applications created by these products at the specified
minimum release levels:
• DCF Version 1.3.1
• GDDM Version 2.1
• PMF Ve rsion 1.1.0
• PPFA Version 1.1.0
Section Two: Installing and Customizing XPAF 2-8
Page 45

System application products
XPAF can coexist with these products at the specified minimum release
levels:
• DFP Version 2.3.0
• ISPF Version 2.3
• NCP Version 2
• NTO BSC 3780 Version
(required to use XPAF with VTAM bisynchronous printers)
• TCP/IP Version 3.2.0
• TSO/E Version 1.4
•VTAM:
— Version 2.1:
PTF — UZ71704 (APAR OZ77159)
PTF — UZ75791 (APAR OZ80058)
PTF — UZ79846 (APAR OZ83529)
— Version 2.2:
PTF — UZ71705 (APAR OZ77159)
Installation requirements
— Version 3.3
Resource protection
If your site uses multiple operating systems with global resource sharing
(such as shared DASD), you sh ould provide some type of resource
protection such as IBM’s Global Resource Serialization (GRS) when
using XPAF.
Section Two: Installing and Customizing XPAF 2-9
Page 46

Installation requirements
Installation service macro worksheets
Use these worksheets to build your installation service macro (ISM)
definitions. ISMs are used to install the XPAF base product, XPAF
resources, user exits, and XPAF maintenance software. All applicable
parameters are required unless identified as optional.
Before you begin installing XPAF, record your site-specific values in these
worksheets.
#GENDFLT worksheet
The #GENDFLT macro allows you to specify default values and other
information that is used for va rious parameters of other installation
service macros. The values you enter for the parameters in this macro
become the default values when you leave those same parameters bla nk
in other macros.
Macro Parameter Description Site values
#GENDFLT DUNIT Default UNIT value for installation
DVOLSER Default VOLSER of DASD device
EIHLQ High level qualifier for the installation
XMTPDS
HLQ Optional. Default high-level qualifier
for other ISM macros
LOADSIZE Block size of execution libraries
OCLASS Stage 2 print output class fo r
statements sent to the printer
OPTIONS Specify default options to use for
installing XPAF
SMS Optional. Default SMS Storage
and/or Management Class for
non-VSAM datasets
SMSVSAM Optional. SMS Storage and/or
Management Class for non-VSAM
cluster definitions
SRCLIB Optional. Dataset name of
user-modifiable source
Section Two: Installing and Customizing XPAF 2-10
Page 47

Installation requirements
#GENJBCD worksheet
The #GENJBCD macro specifies job card values and optionally a JES2
JOBPARM card on all stage 2 jobs generated. This macro is optional and,
if not included, the @JOBCARD member is used to genera te job car ds a t
the beginning of each stage 2 job.
All JOBCD and JOBPARM entries must begin and end with a single quote.
If a quote is required within the text, it must be entered as two single
quotes.
Macro Parameter Description Site values
#GENJBCD JOBCD1 Optional. Job card parameters fo r first
job card
JOBCD2 Optional. Continued job card
parameters from JOBCD1
JOBCD3 Optional. Continued job card
parameters from JOBCD2
JOBNAME Optional. JOB name for all job cards
generated during stage 1
JOBOPT Optional. Stage 1 macro options for
generating JCL on stage 2 jobs
JOBPARM Optional. JOBPARM card parameters
for installation /*JOBPARM card
JOBVARY Optional. Use a variable JOBNAME
on each job of generated stage 2
JCL?
Section Two: Installing and Customizing XPAF 2-11
Page 48

Installation requirements
#GENJES worksheet
The #GENJES macro generates the JES values (if applicable) used to
create JES-specific samples and allocate installation SMP/E datasets.
Macro Parameter Description Site values
#GENJES JESFSSID Optional. JES functional subsystem
ID
JESMAC Optional. Name of the IBM-supplied
macro library name for JES
JESPROD JES product used to install XPAF
JESUMAC Optional. Library used to assemble
JES source or exits
JESLVL JES level being run on host operating
systems
Section Two: Installing and Customizing XPAF 2-12
Page 49

Installation requirements
#GENPROD worksheet
The #GENPROD macro assigns values to required parameters to install
XPAF. The values you enter for this macro are used to generate SMP/E
jobs, XPAF sample parameters, and sample JCL.
Macro Parameter Description Site values
#GENPROD DUNIT UNIT value for non-VSAM datasets
DVOLSER VOLSER of DASD device
HLQ Optional. Prefix for non-VSAM
datasets
HLQLPA Optional. XPFLPA high-level qualifier
in Master Catalog
HLQMST Optional. XPFLOAD and XPFLPA
high-level qualifier in Master Catalog
OPTIONS Specify installation options for XPAF
PRODUCT Name of product being installed
PRODVRM Version, release, and modification
level for this product
SMS Optional. Default SMS Storage
and/or Management Class for
non-VSAM datasets
SMSVSAM Optional. SMS Storage and/or
Management Class for non-VSAM
cluster definitions
UMODJOFT Optional. SMP/E name used to install
JES offset table
Section Two: Installing and Customizing XPAF 2-13
Page 50

Installation requirements
#GENSMP worksheet
The #GENSMP macro supplies the stage 1 SMP/E processing with
user-specified values. These values help define and initialize the SMP/E
structure and are used to maintain XPAF and its associated function.
Macro Parameter Description Site values
#GENSMP DUNIT UNIT value for non-VSAM datasets
DVOLSER VOLSER of DASD device
DWORK UNIT value used for DWORK file
allocation during SMP/E execution
HLQ Prefix for non-VSAM datasets
HLQVSAM Prefix for VSAM datasets
MTS Include SYSTEM MTS in all MTS DD
concatenations?
RELEASE Current SMP/E release version
SMS Optional. Default SMS Storage and/or
Management Class for non-VSAM
datasets
SMSVSAM Optional. SMS Storage and/or
Management Class for non-VSAM
cluster definitions
USERHLQ Prefix used for generation of SMP
dataset names of USEROPT option 2
or 3 is selected
USEROPT Level of allocation for required SMP/E
datasets
VSMVOL Use specified volume serial number
for generated VSAM file definitions
#GENUXIT and #UEXIT worksheets
The #GENUXIT and #UEXIT macros create stage 2 jobs that use SMP/E
to assemble and link your user-exit source code into the load library you
specify that is accessible by XPAF. All information pertaining to your exits
is entered in parameters of these macros.
Section Two: Installing and Customizing XPAF 2-14
Page 51

Installation requirements
Macro Parameter Description Site values
#GENUXIT UMPFX Default SYSMOD ID prefix
USEC Optional. Generate stage 2 for this
exit?
USECLNKLB Optional. Load library name linked by
SMP/E to user security module
USECSMID Optional. SYSMOD ID
UXLNKLB Optional. Load library linked by
SMP/E to exit modules
UXMAC Optional. Defines user macro library
UXPFX Optional. Default source member and
load module name prefix
UXSRCLB PD S library for exit source code
#UEXIT (01,)
(02,)
(03,)
(04,)
(05,)
(06,)
(07,)
(08,)
(09,)
(10,)
(11,)
(12,)
(30,)
(31,)
(32,)
Section Two: Installing and Customizing XPAF 2-15
Page 52

Installation requirements
#GENEND worksheet
The #GENEND macro specifies generation variables for XPAF, resource
installation, and maintenanc e.
Macro Parameter Description Site values
#GENEND STAGE2 Optional. Place stage 2 jobs and
control statements in INSTLIB?
TYPE Type of stage 2 jobs to generate
#GENRSC worksheet
The #GENRSC macro supplies the stage 1 processing with values
needed to define, initialize, and load the XPAF resource files.
Macro Parameter Description Site values
#GENRSC DUNIT UNIT value for non-VSAM datasets
during resource allocation
DVOLSER VOLSER of DASD device used to
allocate XPAF resource files
HLQ Prefix for all XPAF resource datasets
during file allocation
HLQfile Prefix for dataset names from
resource files
HLQVSAM Prefix used for all VSAM resource
datasets during resource file
allocation
IVP Offload IVP datasets with other
resource datasets
OPTIONS Identify resource installation option s
SIZCFONT Specify the size of the CFONTLIB
allocated by the resource allocation
job
SIZCFORM Specify the size of the CFORMLIB
allocated by the resource allocation
job
SIZCIMG Specify the size of the CIMGLIB
allocated by the resource allocation
job
Section Two: Installing and Customizing XPAF 2-16
Page 53

Installation requirements
Macro Parameter Description Site values
#GENRSC
(continued)
SIZDFONT Specify the size of the DFONTLIB
allocated by the resource allocation
job
SIZDFORM Specify the size of the DFORMLIB
allocated by the resource allocation
job
SIZDIMG Specify the size of the DIMGLIB
allocated by the resource allocation
job
SIZLOGO Specify the size of the CLOGOLIB
allocated by the resource allocation
job
SIZPDL Specify the size of the PDLLIB
allocated by the resource allocation
job.
SIZPFONT Specify the size of the PFONTLIB
allocated by the resource allocation
job
SIZPFORM Specify the size of the PFORMLIB
allocated by the resource allocation
job
SIZPIMG Specify the size of the PIMGLIB
allocated by the resource allocation
job
SMS Optional. Default SMS Storage
and/or Management Class for
non-VSAM datasets
SMSVSAM Optional. SMS Storage and/or
Management Class for non-VSAM
cluster definitions
VSMVOL Use spec ified volume serial number
for generated VSAM resource file
definitions
VSMVOLCF Optional (if SMSVSAM or DVOLSER
specified). VOLSER of the DASD
volume used to allocated native
centralized font library
VSMVOLDF Optional (if SMSVSAM or DVOLSER
specified). VOLSER of the DASD
volume used to allocated native
decentralized font library
Section Two: Installing and Customizing XPAF 2-17
Page 54

Installation requirements
#GENMNT worksheet
The #GENMNT macro generates SMP/E jobs to install product
maintenance, which is performed only when you receive a preventive or
corrective maintenance file. Information from other macros also is used
for installing maintenance software.
Macro Parameter Description Site values
#GENMNT HOLDFILE Optional. Generate SMPHOLD
controls in the stage 2 RECEIVE job?
SMPSRCID Optional. Specify the SMP/E
SOURCEID assigned to all PTFs and
APARs received
EIHLQ Highlevel qualifier of the downloaded
SMPPTFIN data set
Section Two: Installing and Customizing XPAF 2-18
Page 55

3. 3 SMP/E installation
This chapter lists the different SMP/E installation procedures required for
installing XPAF, including steps for installing:
• The base product
• Product maintenance
• User modifications
•User exits
Use the checklists supplied to record your progress as you perform each
step.
Installing the base product
The procedure for installing the base product file for XPAF 5.0 is listed
here. These steps explain how to:
• Complete the pre-installation worksheets
• Perform a system backup of all XPAF related libraries
• Unload the installation library
• Set up and execute the stage 1 job
• Generate and execute stage 2 jobs
• Perform the SMP/E installation
Perform these steps in sequential order.
SMP/E installation
Before you begin
Before you begin the XPAF insta llation, review these items .
Experience level
To install XPAF you should have systems programming expe rience and a
working knowledge of z/OS, JES2 and/or JES3, SMP/E, VSAM, and
ISPF/PDF. If you encounter any unfamiliar terms, refer to the appropriate
IBM reference manual for more information. If you need further help
installing this product, contact your local Xerox service representative.
Section Two: Installing and Customizing XPAF 3-1
Page 56

Required security access levels
These security levels are required:
• Have either update access to the LPA library or authority to create
new libraries in the Master Catalog.
• Have alter access to LDM files based on how your security system
handles VSAM control interval processing. For example, RACF
security requires CONTROL authority to access files managed by
control interval processing.
• Have update access to SYS1.PARMLIB, SYS1.PROCLIB, the
VTAMLST dataset, and the XOSF log datasets.
• Have update access to the JES2 and/or JES3 parameters library.
• Have read access to any datasets required by XPAF.
You must also be able to issue z/OS and JES operator commands.
System modifications
Ensure that no local usermods are app lied that alter z/OS or JES contro l
blocks and/or JES processing flow . JES control b locks can ha ve
user-added fields without affecting the operation of the system. However,
if you remove fields in JES control blocks or alter their field lengths, XPAF
may not function properly.
SMP/E installation
Checklist for installing the base product
As you complete each step, enter the completion date in the checklist
table to track and record your progress. Each step is ex plained later in this
chapter.
NOTE: Review the maintenance bulletin accompanying the most
current maintenance file to determine if you need to run any special
procedures before installing the base p roduct.
Section Two: Installing and Customizing XPAF 3-2
Page 57

Step Action
1 Complete the pre-installation worksheets
2 Perform a system backup
3 Unload the installation library
4 Allocate stage 2 library
5 Set up stage 1 job
A Edit the #GENDFLT parameters in GENINST
B Edit the #GENJBCD parameters in GENINST
C Edit the #GENJES parameters in GENINST
D Edit the #GENPROD parameters in GENINST
SMP/E installation
Date
completed
E Edit the #GENSMP parameters in GENINST
F Edit the #GENEND parameters in GENINST
6 Print installation service macros (optional)
7 Generate stage 2 jobs
8 Submit SMP/E installation jobs
A Submit IJOB101
B Submit IJOB102
C Submit IJOB103
D Submit IJOB104
E Submit IJOB105
F Submit IJOB106
G Submit IJOB107
H Submit IJO B108
9 Perform post-installation steps
A Convert C LIST files (optional)
B Refresh LLA address space for XDS (optional)
Section Two: Installing and Customizing XPAF 3-3
Page 58

SMP/E installation
Step 1 – Complete the pre-installation worksheets
Before you begin the installation process, you and your Xerox service
representative or systems analyst will participate in a site-planning visit.
During this visit, you will help the service representative complete the
pre-installation worksheets for the installation service macros, which help
define your site’s environment to XPAF. These worksheets and a
description of the parameters a ssociated wit h the installatio n service
macros can be found at the end of this chapter.
Step 2 – Perform a system backup
Before you unload the installation library, you should perform normal
backup procedures for:
• Any previous versions of XPAF
• System libraries such as PARMLIB s, PROCLIBs, LPALST libraries,
and ISPF libraries
Step 3 – Electronic Installation
Step 1.Download the file XPAF50EI.FULL.XMTPDS.XMT from the Xerox
website at http://www.support.xerox.com/support/xpaf/software/enus.html
Step 2.Allocate a dataset, referred to in the following steps as 'xmit.in', to
receive the XPAF50EI.FULL.XMTPDS.XMT file using the following
specification:
RECFM=FB LRECL=80 SPACE= (CYL, 350, 35)
Step 3.Binary transfer the XPAF50EI.FULL.XMTPDS.XMT file into the
'xmit.in' dataset created in step 1
Step 4.Issue the 'TSO RECEIVE' command on the 'xmit.in' dataset to
restore the XMTPDS PDS. Due to the large file size, this step may take
several minutes to complete.
Section Two: Installing and Customizing XPAF 3-4
Page 59

SMP/E installation
TSO RECEIVE INDA(xmit.in)
INMR901I Dataset XEROX.XPAF50.XMTPDS from MKEAN on NJEXE01
INMR906A Enter restore parameters or 'DELETE' or 'END' +
da('yourhlq.XPAF50.XMTPDS')
IEBCOPY MESSAGES AND CONTROL
IEB1135I IEBCOPY FMID HDZ1A10 SERVICE LEVEL UA46465 DATED 20090319
IEB1035I MKEAN $$$X40 $$$X40 07:59:51 FRI 12 MAR 2010 PARM='WO
COPY INDD=((SYS00100,R)),OUTDD=SYS00098
IEB1013I COPYING FROM PDSU INDD=SYS00100 VOL=DATA02 DSN=SYS10071.T07
IEB1014I TO PDS OUTDD=SYS00098 VOL=DATA01 DSN=yourhlq.XPAF40
IEB167I FOLLOWING MEMBER(S) LOADED FROM INPUT DATA SET REFERENCED BY
IEB154I @RESTORE HAS BEEN SUCCESSFULLY LOADED
IEB154I AFPFONTS HAS BEEN SUCCESSFULLY LOADED
IEB154I BASEPTFI HAS BEEN SUCCESSFULLY LOADED
IEB154I CFONTLIB HAS BEEN SUCCESSFULLY LOADED ...
IEB154I XPDLMSG HAS BEEN SUCCESSFULLY LOADED
IEB1098I 27 OF 27 MEMBERS LOADED FROM INPUT DATA SET REFERENCED BY
IEB144I THERE ARE 390 UNUSED TRACKS IN OUTPUT DATA SET REFERENCED BY
IEB149I THERE ARE 18 UNUSED DIRECTORY BLOCKS IN OUTPUT DIRECTORY
IEB147I END OF JOB - 0 WAS HIGHEST SEVERITY CODE
INMR001I Restore successful to dataset 'yourhlq.XPAF50.XMTPDS'
***
Step 5.Edit XMTPDS(@RESTORE), to insert a valid job card and specify
the correct names and high level qualifiers, then submit the job
//MYJOB JOB <INSERT A VALID JOB CARD>
//*
//* JCL TO RUN THE REXX EXEC TO RESTORE THE XPAF 5.0 INSTALLATION FILES
//*
//* THE RESTORE REXX TAKES TWO PARAMETERS
//* - THE FULLY QUALIFIED DSN OF THE XMTPDS
//* - THE HIGH LEVEL QUALIFIER FOR THE XPAF INSTALATION
//*
//*
//INFO EXEC PGM=IKJEFT01,DYNAMNBR=25
//ISPPROF DD DUMMY
//ISPPLIB DD DUMMY
//ISPMLIB DD DUMMY
//ISPTLIB DD DUMMY
//ISPSLIB DD DUMMY
//SYSPRINT DD SYSOUT=Z
//SYSPROC DD DISP=SHR,DSN=YOURHLQ.XMTPDS <== THIS DATASET
//SYSTSPRT DD SYSOUT=*
//SYSTSIN DD *
RESTORE YOURHLQ.XMTPDS YOURHLQ
//
Section Two: Installing and Customizing XPAF 3-5
Page 60

Step 4 – Allocate stage 2 library
All output from stage 1 is considered the stage 2 library. Xerox
recommends using a separate stage 2 library instead of INSTLIB be cause
it offers these advantages:
• The names of installation macros are not displayed when you view
the directory during stage 2 processing .
• The INSTLIB member has fewer members.
Allocate the stage 2 library using either TSO or the $STG2ALO member
in INSTLIB. The library must have the same high-level qualifier(s) as the
INSTLIB.
• If you use TSO, allocate the stage 2 library with these attributes:
RECFM FB
LRECL 80 bytes
BLKSIZE any multiple of 80
Directory blocks 30
Space 40 tracks of 3380 space or equivalent
SMP/E installation
• If you use the $STG2ALO member to allocate the stage 2 library,
make these changes:
— Add a valid job card to the start of the job.
— Go to the end of the job and change the HLQ paramet er to
reflect your site's dataset high-level qualifier for INSTLIB.
For further information on allocating your stage 2 library, refer to “Step 7
– Generate stage 2 jobs” later in this chapter.
Section Two: Installing and Customizing XPAF 3-6
Page 61

Step 5 – Set up stage 1 job
Stage 1 consists of setting up the installation service macros (ISMs) to
reflect your site’s dataset naming conventions, operating system
specifics, and dataset placements for generating stage 2 jobs.
The $GENINST member of the INSTLIB dataset contains the macro call
for each ISM used to install the base product. Edit this member to specify
your site-specific values for the parameters in each macro call.
NOTE: Each parameter in $GENINST is in Assembly Language
Macro format. You must include continuation characters in column 72
and commas between parameters. If the value you specify contains
commas, periods, equal signs, or other special characters, you must
enclose the string in single qu otation marks. If you need to code a
single quotation mark within a string, they must be coded as two
single quotation marks.
CAUTION: Do not edit the actual macro members in the INSTLIB
dataset. Edit only the $GENINST member in INSTLIB.
SMP/E installation
GENINST contains the specifications used by the various ISMs when
generating the stage 2 jobs via ASMUPD. This job then generates the
stage 2 jobs, which you submit to install the base product.
Step 5A – Edit the #GENDFLT parameters in $GENINST
In the $GENINST member of INSTLIB, locate the parameters used in
calling the #GENDFLT macro. Enter your site’s values for each
parameter.
The #GENDFLT macro allows you to specify default values and other
nonspecific values required for installation. Throughout this installation
process, you have the option to fill in a parameter or leave it blank, in
which case the default value is used. This macro sets the default values
for the parameters that you leave blank in other macros.
Example:
#GENDFLT
DUNIT=, X
DVOLSER=, X
EIHLQ=prefix, X
HLQ=prefix, X
LOADSIZE=23200, X
OCLASS=, X
OPTIONS=, X
SMS=, X
SMSVSAM=, X
SRCLIB=prefix.SOURCE
Section Two: Installing and Customizing XPAF 3-7
Page 62

SMP/E installation
#GENDFLT parameter definitions
This table provides a description for each parameter in the #GENDFLT
macro.
Parameter Description
DUNIT Specifies the default UNIT value for allocating non-VSAM datasets during
installation.
Default: None
DVOLSER Specifies the defa ult volume serial ID of the DASD device on which product
datasets will be allocated.
Default: None
EIHLQ The high level qualifier of the XMTPDS installation file
Default: None
HLQ (optional) Identifies the default high-level qualifier used by other installation macros which
require a high-level qualifier . For example , if you leav e the HLQ p arameter
blank in the #GENPROD macro, it defaults to the high-level qualifier you specify
here.
Default: None
LOADSIZE Spe cifies the user-designated block size of the instal lation-generated execution
libraries (XPFLOAD and XPFLPA).
Defaults:
XPFLOAD Uses DCB attributes of SYS1.LINKLIB
XPFLPA Uses DCB attributes of SYS1.LPALIB
If you specify ABLK in the OPTIONS parameter, these defaults are overridden
by the user-specified system defaults.
OCLASS Specifies the print output class that is generated on all stage 2 SYSOUT DD
statements.
Section Two: Installing and Customizing XPAF 3-8
Page 63

SMP/E installation
Parameter Description
OPTIONS Identifies which default options to use when installing XPAF.
Valid values:
ABLK Specifies whether to use the Automatic Blocking feature available
with DFP V3 and higher. This feature allows you to allocate
non-VSAM datasets without specifying a block size. When a
dataset is allocated, a default block size will be assigned based on
its record format. The default is set by the technical staff at your
site.
ASUB Indicates whether installation jobs are submitted automatically or
manually. For example, if you specify this option, XPAF
automatically submits the next job in a series of jobs when the
current job has completed with a successful return code.
This option applies to installation jobs (IJOBnnn), maintenance
jobs (MPJOBnnn), resource jobs (RJOBnnn), and user
modification jobs (UMJOBnnn) generated by the installation
process.
PQ Generat es the product qualifier in dataset names during the
installation process. This qualifier consists of the values found in
the PRODUCT and PRODVRM parameters in the #GENPROD
macro.
SMS
(optional)
Example:
OPTIONS=(ABLK,ASUB,PQ)
Specifies the default SMS Storage and/or Management Class used for all
non-VSAM allocated datasets generated by the installation process. Using this
parameter signals the generation of SMS keywords in the DD statements. This
allows your system to place the datasets in user-def ined storage areas
controlled by the operating system.
The default class assignments can be overridden by specifying the SMS
parameter in the macro responsible for the dataset generation (#GENSMP or
#GENPROD).
Valid values:
YES SMS uses the system ACS routines for allocation of datasets.
storclass SMS uses the user-defined storage class for allocation of
datasets.
mgmtclass SMS uses the user-defined management class for allocation
of datasets.
Default: None
Examples:
SMS=storclass
SMS=(storclass,mgmtclass)
SMS=(,mgmtclass)
Section Two: Installing and Customizing XPAF 3-9
Page 64

Parameter Description
SMP/E installation
SMSVSAM
(optional)
SRCLIB
(optional)
Specifies the SMS Storage and/or Management Class used for all SMP VSAM
cluster definitions generated by the installation process. Using this parameter
signals the generation of SMS keywords in the DEFINE statements. This allows
your system to place the datasets in user-defined storage areas controlled by
the operating system.
The default class assignments can be overridden by specifying the SMS
parameter in the #GENSMP macro.
Valid values:
YES SMS uses the system ACS routines for allocation of datasets.
storclass SMS uses the user-defined storage class for allocation of
datasets.
mgmtclass SMS uses the user-defined management class for allocation
of datasets.
Default: None
Examples:
SMSVSAM=storclass
SMSVSAM=(storclass,mgmtclass)
SMSVSAM=(,mgmtclass)
Specifies the fully qualified dataset name of the PDS used for user-modifiable
source supplied with XPAF. If this parameter is specified, all
installation-supplied sample members that you must edit and change are copied
into this library by the installation process. Using this optional library eliminates
the risk of overlaying a user-modified source member with product
maintenance.
Default: None
Section Two: Installing and Customizing XPAF 3-10
Page 65

SMP/E installation
Step 5B – Edit the #GENJBCD parameters in $GENINST
In the $GENINST member of INSTLIB, locate the parameters used in
calling the #GENJBCD macro. Enter your site’s values for each
parameter.
The #GENJBCD macro allows you to specify either a job card name and
parameters that will be generated on the stage 2 job cards or an alternate
method of supplying this information. Use either of these options:
• To generate job cards on each stage 2 job with your site-specific
information, enter the data in the parameters contained in the
$GENINST member.
• To supply JCL to be generated at the beginning of all stage 2 jobs,
edit the @JOBCARD macro in INSTLI B, and create the protot ype
JCL exactly as it is required with a REPRO statement ahead of each
JCL card (refer to the @JOBCARD macro in INSTLIB for an
example). To invoke this action, specify JOBOPT=REPRO in the
#GENJBCD section of the $GENI NST member of INSTLIB. All other
parameters for this macro are then ignored.
You also can specify that no job card JCL is generated on stage 2
jobs. To invoke this action, specify JOBOPT=NOJBCD in the
#GENJBCD section of the $GENINST member in INSTLIB. All other
parameters for this macro are then ignored.
NOTE: If you do not specify values for any of the #GENJBCD
parameters, no job card will be generated.
Example:
#GENJBCD
JOBCD1='(E475,9901),''INSTALL'',CLASS=X,', X
JOBCD2='MSGCLASS=X,NOTIFY=BRODR', X
JOBCD3=, X
JOBNAME=USERJB, X
JOBOPT=, X
JOBPARM='LINECT=50', X
JOBVARY=
Result:
//USERJB JOB (E475,9901),'INSTALL',CLASS=X,MSGCLASS=X,
// NOTIFY=BRODR
/*JOBPARM LINECT=50
To include a single quote for the job card output, you must code two single
quotes.
Section Two: Installing and Customizing XPAF 3-11
Page 66

#GENJBCD parameter definitions
This table provides a description for each parameter in the #GENJBCD
macro.
Parameter Description
SMP/E installation
JOBCD1
(optional)
JOBCD2
(optional)
JOBCD3
(optional)
JOBNAME
(optional)
JOBOPT
(optional)
Specifies the job card parameters you supply to be placed on the first job card.
If the job parameters are continued on another card, a comma must be placed
at the end of the last parameter on the card. The // and JOB statement ar e
supplied by installation macros.
Default: None
Specifies continued job card parameters from JOBCD1. The
// and JOB statement are supplied by installation macros.
Default: None
Specifies continued job card parameters from JOBCD2. The
// and JOB statement are supplied by installation macros.
Default: None
Specifies the JOB name that is placed on all job cards generated during stage
1. The maximum parameter length is eight characters and, if the JOBVARY
option is used, the name must be less than eight characters.
Default: None
Specifies options to the stage 1 macros that control the generation of the JCL
on stage 2 jobs.
Valid values:
NOJBCD Suppresses all job card JCL generation on stage 2 jobs.
REPRO Instructs stage 1 processing to use the @JOBCARD facility
described in the installation procedure to generate the stage 2
job card JCL.
Default: NOJBCD
JOBPARM
(optional)
JOBVARY
(optional)
Specifies JOBPARM card parameters you supply to be placed on the
installation /*JOBPARM card. If you omit this parameter or leave it blank, no
/*JOBPARM is generated. The /*JOBPARM is supplied by installation macros.
Default: None
Varies the JOBNAME on each job of the stage 2 JCL generated by the stage 1
macros.
Valid values:
YES Each JOBNAME will have a unique suffix in the stage 2 JCL. If the
job name supplied by the JOBNAME parameter is eigh t characters,
no name variance occurs.
NO The job name you supply in the JOBNAME parameter is used as
is for all stage 2 jobs.
Default: NO
Section Two: Installing and Customizing XPAF 3-12
Page 67

SMP/E installation
Step 5C – Edit the #GENJES parameters in $GENINST
In the $GENINST member of INSTLIB, locate the parameters used in
calling the #GENJES macro. Enter your site’s values for each parameter.
The #GENJES macro supplies stage 2 jobs and sample members with
information about your JES environment. Some information in this macro
is also used in conjunction with the #GENSMP macro in setting up the
SMP/E installation jobs.
Example:
#GENJES
JESFSSID=XOSF, X
JESMAC=, X
JESPROD=JES2, X
JESUMAC=, X
JESLVL=
#GENJES parameter definitions
This table provides a description for each parameter in the #GENJES
macro.
Parameter Description
JESFSSID
(optional)
Specifies the JES functional subsystem ID. You should allow this parameter to
use its default value.
Default: XOSF
JESMAC
(optional)
Allows you to override the IBM-supplied macro library name for the version of
JES you are using. Enter the na me you want t o use.
Default: SYS1.SHASMAC (JES2)
SYS1.SIATMAC (JES3)
JESPROD Identifies the JES product under which you are installing XPAF. Refer to
“Defining XPAF to JES” in chapter 5, “Customizing your system” for instru ctions
concerning activating XPAF with JES.
Valid values:
JES2 JES2 support is generated.
JES3 JES3 support is generated.
Default: None
Section Two: Installing and Customizing XPAF 3-13
Page 68

Parameter Description
SMP/E installation
JESUMAC
(optional)
Defines the library used when you assemble your JES source or exits. If you are
using a modified version of the JES macro library, enter that library’s dataset
name as the value for this parameter.
Default: None
JESLVL Indicates the JES level being used for systems running the z/OS host operating
system. If specified, this value will be used as the mid-level qualifier for the JES
macro names generated by #GENJES.
Valid values: A 1 to 8-character value indicating the version, release, and
modification level of the JES software.
Default: None
Example: JESLVL=V1R1M0
Step 5D – Edit the #GENPROD parameters in $GENINST
In the $GENINST member of INSTLIB, locate the parameters used in
calling the #GENPROD macro. Enter your site’s values for each
parameter.
This macro assigns values to installation parameters used to generate
SMP/E installation jobs.
Example:
#GENPROD
DUNIT=, X
DVOLSER=, X
HLQ=prefix, X
HLQLPA=master-prefix, X
HLQMST=, X
OPTIONS=, X
PRODUCT=XPAF, X
PRODVRM=500 X
SMS=, X
SMSVSAM=, X
UMODJOFT=XUM0001
Section Two: Installing and Customizing XPAF 3-14
Page 69

SMP/E installation
#GENPROD parameter definitions
This table provides a description for each parameter in the #GENPROD
macro.
Parameter Description
DUNIT Specifies the UNIT value for allocating non-VSAM XPAF datasets during
installation. This parameter is required unless SMS is used for allocating
product datasets or you specify the DUNIT parameter in the #GENDFLT macro.
Default: None
DVOLSER Specifies the volume serial ID of the DASD device used for allocating XPAF
target and distribution libraries. This parameter is required unless you use SMS
for allocation or you specify the DVOLSER parameter in the #GENDFLT macro.
Default: None
HLQ
(optional)
HLQLPA
(optional)
HLQMST
(optional)
Specifies the high-level qualifier for all non-VSAM XPAF datasets allocated
during installation. These libraries consist of target and distr ibu tio n libra ries for
executing and maintaining XPAF. The HLQLPA or HLQMST, if specified,
override HLQ for XPFLOAD and XPFLPA.
Default: The value specified for the HLQ parameter in the #GENDFLT macro. If
you do not specify the HLQ parameter in the #GENDFLT or
#GENPROD macros, an error message is issued and the assembly
terminates.
Specifies a high-level qualifier that will be used to catalog the XPFLPA dataset
in the Master Catalog of your system during XPAF installation. This high-level
qualifier is assigned to the XPFLPA to expedite installation and customization.
If you specified HLQMST, this parameter is ignored.
Default: None
Specifies a high-level qualifier that will be used to catalog the XPFLPA dataset
in the Master Catalog of your system during XPAF installation. This high-level
qualifier is assigned to the XPFLOAD and XPFLPA to expedite installation and
customization.
Default: None
CAUTION: Both HLQMST and HLQLPA specify high-level qualifiers that
are cataloged in the Master Catalog. If you have multiple systems with
multiple catalogs, these datasets must be cataloged in all Master Catalogs
for all systems on which XPAF or on which jobs containing XPAF extended
JCL are submitted.
Section Two: Installing and Customizing XPAF 3-15
Page 70

SMP/E installation
Parameter Description
OPTIONS Indicates that one or both of these options be used:
• Install Xerox Direct Print Services (XDS) elements as part of the XPAF
LPA library. If not specified, the XDS FMID will not be installed and XDS
will not be available for use.
• Bypass running the SMP/E APPLY and ACCEPT CHECK jobs IJOB105
and IJOB107. If you specify this option, you also must specify ASUB in the
#GENDFLT macro.
Valid values:
XDS Installs the XDS FMID.
NOCHK Does not submit installation jobs IJOB105 and IJOB107.
Default: None
Examples:
OPTIONS=XDS
OPTIONS=(XDS,NOCHK)
PRODUCT Identifies the software product you ar e installing. Enter XPAF to generate XPAF
installation jobs.
Valid values:
XFG The XPAF Forms Generator.
XPAF The base XPAF product including the AFP, PCL and PDF
transforms
XPAFLITE Install XPAF-Lite, a version of XPAF that does not include any
transforms, but will process LCDS and Linemode datastreams
to LCDS capable printers
XPAFLPDF XPAF-Lite with the additional DJDE to PDF transform
XPAFLPCL XPAF-Lite with the additional DJDE to PCL transform
Default: XPAF
PRODVRM Identifies the version, release, and modification level of the base product. Th is
field is a maximum of 3 bytes. If the value ends in zeros, they may be omitted.
The file volume serial number of the base file being installed is generated from
this value.
Default: 400
Section Two: Installing and Customizing XPAF 3-16
Page 71

Parameter Description
SMP/E installation
SMS
(optional)
SMSVSAM
(optional)
Specifies the SMS Storage and/or Ma nagement Cla ss used for all SMP
non-VSAM allocated datasets generated by the installation process. Using this
parameter signals the generation of SMS keywords in the DD statements. This
allows your system to place the datasets in user-def ined storage areas
controlled by the operating system.
This parameter overrides any default class assignment specified in the
#GENDFLT macro.
Valid values:
YES SMS uses the system ACS routines for allocation of datasets.
storclass SMS uses the user-defined storage class for allocation of
datasets.
mgmtclass SMS uses the user-defined management class for allocation
of datasets.
Default: None
Examples:
SMS=storclass
SMS=(storclass,mgmtclass)
SMS=(,mgmtclass)
Specifies the SMS Storage and/or Management Class used for all SMP VSAM
cluster definitions generated by the installation process. Using this parameter
signals the generation of SMS keywords in the DD statements. This allows your
system to place the datasets in user-defined storage areas controlled by the
operating system.
UMODJOFT
(optional)
This parameter overrides any default class assignment specified in the
#GENDFLT macro.
Valid values:
YES SMS uses the system ACS routines for allocation of datasets.
storclass SMS uses the user-defined storage class for allocation of
datasets.
mgmtclass SMS uses the user-defined management class for allocation
of datasets.
Default: None
Examples:
SMS=storclass
SMS=(storclass,mgmtclass)
SMS=(,mgmtclass)
Specifies the name SMP/E uses to install the JES offset table. This usermod
supplies XPAF with the correct JES control block offsets required for JES
communication.
Default: XUM0 001
Section Two: Installing and Customizing XPAF 3-17
Page 72

SMP/E installation
Step 5E – Edit the #GENSMP parameters in $GENINST
In the $GENINST member of INSTLIB, locate the parameters used in
calling the #GENSMP macro. Enter your site’s values for each parameter.
The #GENSMP macro supplies stage 2 SMP/E jobs with all the necessary
information for the successful installation of XPAF.
You have several SMP/E options available for installing XPAF. For more
information on these options, refer to “#GENSMP parameter definitions”
later in this chapter.
Example:
#GENSMP
DUNIT=3380, X
DVOLSER=VOL004, X
DWORK=SYSDA, X
HLQ=prefix, X
HLQVSAM=, X
MTS=, X
RELEASE=5, X
SMS=, X
SMSVSAM=, X
USERHLQ=, X
USEROPT=1, X
VSMVOL=
#GENSMP parameter definitions
This table provides a description for each parameter in the #GENSMP
macro.
Parameter Description
DUNIT
(optional)
DVOLSER Specifies the volume serial ID of the DASD device used for allocating the XPAF
DWORK
(optional)
Specifies the UNIT value used for allocating non-VSAM SMP/E datasets and
the SMPTLIB during installation. This parameter is required unless the DUNIT
parameter in the #GENDFLT macro is specified. If you omit this parameter, a
value of SYSALLDA is assigned to facilitate allocation of the SMPTLIB.
Default: SYSALLDA
SMP/E files. If an SMS or DUNIT value is specified, this value is used for VSAM
file allocation only. This parameter is required unless the DVOLSER parameter
in the #GENDFLT macro is specified.
Default: None
Specifies the UNIT value used for SMP SYSUTx and SMPWRKx file allocation
during SMP/E execution. This parame ter is optional only if you specify a value
for either the #GENDFLT parameter DUNIT or the #GENSMP parameter
DUNIT.
Default: If you omit this parameter, the value you specified for DUNIT is used.
If you leave this parameter blan k, it defaults t o SYSDA.
Section Two: Installing and Customizing XPAF 3-18
Page 73

Parameter Description
SMP/E installation
HLQ
(optional)
HLQVSAM
(optional)
MTS
(optional)
Specifies the HLQ for all SMP/E non-VSAM datasets allocated during XPAF
installation.
Default: The value specified for the HLQ parameter in the #GENDFLT macro.
Specifies the HLQ for all SMP/E VSAM datasets allocated during XPAF
installation.
Default: The v alue you specif ied for the HLQ parameter in this macr o or its
default if you did not specify one.
Instructs the installation process to include the SYSTEM MTS in all MTS DD
concatenations. Use this parameter if you are installing XPAF on a system that
frequently contains JES changes in an APPLY status.
Valid values:
YES Concatenates the default name (SYS1.SMPMTS) to MTS
DD statements.
NO Does not concatenate SYS1.SMPMTS to MTS DD
statements.
dataset-name Identifies the fully qualified name of the system SMPMTS
dataset to be concatenated to MTS DD statements.
Default: YES
RELEASE
(optional)
CAUTION: Use caution if XPAF is installed on a t est system with JES
changes APPLYd but not ACCEPTed and then moved to a production
system where the changes have not been introduced. If the test system has
introduced a change to the JES control block, you must reassemble
XDIOFTAB before executing the prod uct.
Specifies the current release of SMP/E your system is using to install XPAF.
SMP/E release levels 5 and higher are supported by XPAF.
If you change release levels after your initial XPAF installation, this value does
not need to be changed.
Default: 5
Section Two: Installing and Customizing XPAF 3-19
Page 74

Parameter Description
SMP/E installation
SMS
(optional)
SMSVSAM
(optional)
Specifies the default SMS Storage and/or Management Class used for all
non-VSAM allocated datasets generated by the installation process. Using this
parameter signals the generation of SMS keywords in the DD statements. This
allows your system to place the datasets in user-def ined storage areas
controlled by the operating system.
This parameter overrides any default class assignment specified in the
#GENDFLT macro.
Valid values:
YES SMS uses the system ACS routines for allocation of datasets.
storclass SMS uses the user-defined storage class for allocation of
datasets.
mgmtclass SMS uses the user-defined management class for allocation
of datasets.
Default: None
Examples:
SMS=storclass
SMS=(storclass,mgmtclass)
SMS=(,mgmtclass)
Specifies the SMS Storage and/or Management Class used for all SMP VSAM
cluster definitions generated by the installation process. Using this parameter
signals the generation of SMS keywords in the DEFINE statements. This allows
your system to place the datasets in user-defined storage areas controlled by
the operating system.
This parameter overrides any default class assignment specified in the
#GENDFLT macro.
Valid values:
YES SMS uses the system ACS routines for allocation of datasets.
storclass SMS uses the user-defined storage class for allocation of
datasets.
mgmtclass SMS uses the user-defined management class for allocation
of datasets.
Default: None
Examples:
SMS=storclass
SMS=(storclass,mgmtclass)
SMS=(,mgmtclass)
USERHLQ Specifies the HLQ used for the generation of SMP dataset names if USEROPT
option 2 or 3 is selected. This parameter is required only if USEROPT is set to
a value other than 1. This entry is ignored if USEROPT=1. The HLQ specified
is then appended to the standard IBM SMP low level qualifier name where it is
used throughout the installation process.
Default: None
Section Two: Installing and Customizing XPAF 3-20
Page 75

Parameter Description
SMP/E installation
USEROPT
(optional)
VSMVOL Indicates whether to use the volume serial num ber specified here as the
Specifies the level of allocation for re quired SMP/E datasets. Depen ding on the
option specified, all, some, or none of these datasets will be allocated by the
installation process.
Valid values:
1 All SMP datasets required for product installation and maintenance will
be allocated by the installation process.
2 User-specified CSI and SMPPTS datasets will be used and all other
required SMP datasets will be allocated by the installation process.
The HLQ for the CSI and SMPPTS is specified by the USERHLQ
parameter.
3 All SMP required datasets are supplied by the user and will not be
allocated by the installation process. The HLQ for all SMP datasets is
specified by the USERHLQ parameter. All SMP dataset names in the
installation process will be generated with the IBM standard low level
qualifiers (such as SMPLOGA, SMPMTS, and SMPSCDS).
Default: 1
SMPCSI dataset for the VSAM file definitions generated by the #GENSMP
macro. This parameter is required unless you specify the SMSVSAM or
DVOLSER parameters.
Default: None
Step 5F – Edit the #GENEND parameters in $GENINST
In the $GENINST member of INSTLIB, locate the parameters used in
calling the #GENEND macro. Review the default values specified for each
parameter.
The #GENEND macro specifies generation variables. The TYPE
parameter in this macro specifies the type of stage 2 output you want to
generate. Refer to “Step 7 – Generate stage 2 jobs” later in this chapter
for more information on this parameter.
Example:
#GENEND
STAGE2=YES, X
TYPE=INSTALL
If you need to recreate a p ortion of the TYPE=INSTA LL output, you can
specify the UMOD subset para meter of the I NSTALL comman d. This
parameter recreates the UMJOBxxx jobs for installing usermods.
Section Two: Installing and Customizing XPAF 3-21
Page 76

#GENEND parameter definitions
This table provides a description for each parameter in the #GENEND
macro.
Parameter Description
SMP/E installation
STAGE2
(optional)
Specifies whether the stage 2 jobs and control statements will be placed by
stage 1 into a library other than INSTLIB.
Valid values:
YES The stage 1 processing will plac e the stage 2 jobs and control
statements into a dataset with the same high-level qualifier as the
XPAF INSTLIB. The low-level qualifier is STAGE2.
NO All stage 2 jobs and control statements will be placed into the
XPAF INSTLIB by stage 1 processing.
Default: YES
TYPE Specifies the type of stage 2 jobs that are generated as output from stage 1
installation jobs.
Valid values:
INSTALL Generates stage 2 jobs to install XPAF. This value is used with
the #GENINST macro.
MNT Generates stage 2 jobs to install product maintenance using
SMP/E. This value is used with the #GENMNT macro.
RSC Generates stage 2 jobs to install resources.
UXIT Generates stage 2 jobs to install user exits you create. This
value is used with the #GENUXIT macro.
Default: None
Step 6 – Print the installation service macros (optional)
After you enter your site-specific values for the ISMs in GENINST, you
can print the file so you have a record of those value(s).
Use the IEBGENER utility to print GENINST, as shown in this sample job:
//job-name JOB job-information
//*
//* PRINT MEMBER FROM PDS
//*
//PRINTMEM PROC NAME=
//PRINTMEM EXEC PGM=IEBGENER
//SYSUT1 DD DISP=SHR,DSN=prefix.INSTLIB(&NAME)
//SYSUT2 DD SYSOUT=X
//SYSPRINT DD DUMMY
//SYSIN DD DUMMY
//PRINTMEM PEND
//PRDETAL EXEC PRINTMEM,NAME=$GENINST
Section Two: Installing and Customizing XPAF 3-22
Page 77

Step 7 – Generate stage 2 jobs
Use the $ASMUPD member in INSTLIB to generate the jobs used to
install the base product. When you submit ASMUPD, it generates stage 2
jobs and sample parameters based on your entries in stage 1. You can
direct these jobs and sample parameters into a separate stage 2 library
(the default) or into INSTLIB.
To generate stage 2 jobs, follow the procedure in one of these two
options.
Option 1: Using a separate stage 2 library
1. Specify STAGE2=YES in the #GENEND macro section of the
$GENINST member in INSTLIB. This indicates you are setting up
the stage 2 jobs to process with a stage 2 library named
prefix.STAGE2.
2. Edit the $ASMUPD member in INSTLIB:
a. Add a valid job card to the start of the job.
SMP/E installation
b. Go to the end and change the HLQ parameter on the EXEC card
to reflect your site's dataset high-level qualifier for INSTLIB.
c. Note that the STAGE2 parameter defaults to ‘STAGE2’. This is
the low-level qualifier for the stage 2 library and should not be
changed.
d. SAVE the member before submitting it as a job.
3. Submit ASMUPD to generate the stage 2 jobs.
Valid return code: 00
If you receive a return code other than 00, review the MNOTES in the
assembly output listing for further information. A return code of 01
through 04 is considered a warning, which you may review before
continuing. A return code of 08 is considered an error, indica ting that
you must perform an action before continuing.
After stage 1 has completed successfully, stage 2 installation jobs an d
sample parameters are available in the stage 2 library.
Section Two: Installing and Customizing XPAF 3-23
Page 78

Option 2: Using INSTLIB
1. Specify STAGE2=NO in the #GENEND macro section of the
$GENINST member in INSTLIB. This indicates you are setting up all
stage 2 jobs to use INSTLIB.
2. Edit the $ASMUPD member in INSTLIB:
a. Add a valid job card to the start of the job.
b. Go to the end of the file and change the HLQ parameter on the
EXEC card to reflect your site's dataset high-level qualifier for
XPAF INSTLIB.
c. Change the STAGE2 parameter from the default value ‘STAGE2’
to ‘INSTLIB’.
d. SAVE the member before submitting it as a job.
3. Submit ASMUPD to generate the stage 2 jobs.
Valid return code: 00
If you receive a return code other than 00, review the MNOTES in the
assembly output listing for further information. Return codes 01
through 04 are warnings; return code 08 indicates an error.
SMP/E installation
After the ASMUPD job has run and completed successfully, stage 2
installation jobs and sample parameters are available in INSTLIB.
Step 8 – Submit SMP/E installation jobs
You can find the JCL for ea ch job listed below in the st age 2 library a fter
stage 1 is complete. Submit the SMP/E jobs in the specified order to
ensure XPAF is properly installed. IJOB101 through IJOB108 require no
JCL modifications for proper execution and should be submitted as is.
If you have to reinstall XPAF from the beginning, first use job DJOB101
(supplied in the stage 2 library) to delete all the datasets allocated by the
XPAF installation.
NOTE: Some of these installation jobs can generate more than
10,000 lines of output. Therefore, choose an appropriate SYSOUT
class.
Also, some of these installation jobs have a long run time. Therefore,
choose an appropriate job CLASS.
Section Two: Installing and Customizing XPAF 3-24
Page 79

Step 8A – Submit IJOB101
IJOB101 performs these functions:
• Allocates non-VSAM SMP/E datasets needed to install and maintain
XPAF and associated functions.
• Allocates the SMPCSI needed to install and maintain XPAF and
associated functions. This allocation occurs only if the #GENSMP
parameter USEROPT=1.
• Copies GLOBAL definitions to the stage 1 library when a separate
stage 2 library is used. This step is generated if you specified
STAGE2=YES in the #GENEND parameter.
Valid return code: 00
Step 8B – Submit IJOB102
IJOB102 performs these functions:
• Generates a dummy job if the #GENSMP parameter USERSOPT
does not equal 1.
SMP/E installation
• Initializes the SMPCSI by copying the GIMZPOOL data from your
system macro library.
• Defines and initializes a target and distribution library zone for XPAF
and associated functions.
• Adds the OPTION member to the global zone to be used when
installing or maintaining XPAF and assoc iated functions.
• Adds DD definitions to these zones.
Valid return code: 00
Section Two: Installing and Customizing XPAF 3-25
Page 80

Step 8C – Submit IJOB103
IJOB103 allocates the target and distribution libraries needed to install
and maintain XPAF.
Valid return code: 00
Step 8D – Submit IJOB104
IJOB104 RECEIVEs XPAF functions from the base product distribution
file.
Valid return code: 00
Step 8E – Submit IJOB105
IJOB105 runs an APPLY CHECK on XPAF functions.
Valid return code: 00
SMP/E installation
Step 8F – Submit IJOB106
IJOB106 APPLYs XPAF functions.
Valid return code: 00
Step 8G – Submit IJOB107
IJOB107 runs an ACCEPT CHECK on XPAF functions.
Valid return code: 00
Step 8H – Submit IJOB108
IJOB108 runs ACCEPTs on XPAF functions.
Valid return code: 04
Section Two: Installing and Customizing XPAF 3-26
Page 81

Step 9 – Perform post-installation steps
After you submit the last installation job, continue with your installation
process:
• If you received XPAF software maintenance (preventive, level set, or
corrective files) with your base product file, install that software at
this point in the installation procedure. For instructions, refer to
“Installing maintenance” later in this chapter.
• If you did not receive a maintenance file with the base product file,
install the XPAF usermods. For instructions, refer to “Installing
usermods” later in this chapter.
Also, you may need to perform the steps described here. Review these
steps before continuing with the installation and perform any necessary
tasks.
Step 9A – Convert CLIST files (optional)
When you customize your system, you can convert CLIST files in the
XPFCLIB dataset from FB to VB format. After copying any CLIST
members you must edit and r emove line nu mbers if th ey are pres ent.
SMP/E installation
Step 9B – Refresh LLA address space for XDS (optional)
To install XDS elements, you must refresh the z/OS Library Lookaside
address space after the installation is complete. To refresh this address
space, enter this command:
MODIFY LLA,REFRESH
This command updates the z/OS lookaside list with the addresses of the
most current XDS modules.
Section Two: Installing and Customizing XPAF 3-27
Page 82

Installing maintenance
Periodically, Xerox distributes XPAF software maintenance in the form of
a preventive or corrective SMPPTF IN file. These files provide
enhancements and/or fixes to problems reported against XPAF between
releases of the product.
This section contains the basic procedures for installing maintenance
software, which you must repeat each time you receive a maintenance
file. The maintenance bulletin that accompanies the maintenance file
describes any procedures you may need to perform before or after
installing the file. You should review the maintenance bulletin before
performing the procedures in this section.
If conflicts exist between the instructions in this section and those in the
maintenance bulletin, use the information in the maintenance bulletin.
For the number of the most recent XPAF maintenance bulletin, call Xerox
Technical Support.
Applicability of instructions
When installing software maintenance, you can be categorized as one of
three types of customers:
• NEW customers are installing the base XPAF software for the first
time.
SMP/E installation
• CURRENT customers have previously installed XPAF and have
installed the latest preventive maintenance on their system.
• NOT CURRENT customers are existing XPAF customers who may
have installed some corrective or preventive maintenance on their
system but have not yet installed the latest preventive maintenance.
The heading for each maintenance installation step indicates to which
type of customer the step applies. When reviewing the maintenance
installation steps, refer to the section heading to determine whether the
step applies to your site.
Section Two: Installing and Customizing XPAF 3-28
Page 83

Scheduling and tracking your installation
This table lists the activities to be performed during the maintenance
process. Perform these procedures in the order shown.
As you complete each step, enter the completion date in the checklist
table to track and record your progress. Each step is ex plained later in this
chapter.
Step Action
1 Perform pre-installation steps
A Review maintenance bulletin for special
instructions
B Verify contents of the maintenance package
C Verify software levels
D Perform SMP/E housekeeping
SMP/E installation
Date
completed
E Install maintenance to modules in the LPA
2 Set up stage 1 job
A Verify previous maintenance
B Update $GENMNT in INSTLIB
3 Generate stage 2 jobs
4 Code the SYSTEM HOLD bypass JCL
5 Execute stage 2 jobs
A Edit and submit MPJOB101
B Edit and submit MPJOB102
C Edit and submit MPJOB103
D Edit and submit MPJOB104 (optional)
E Edit and submit MPJOB105 (optional)
6 Perform post-installation procedures
A Complete applicable post-installation
instructions
B Perform an IPL, if necessary
C Verify the maintenance installation
Section Two: Installing and Customizing XPAF 3-29
Page 84

Step 1 – Perform pre-installation procedures
Perform these steps to prepare your system before installing a corrective
or preventive maintenance.
Step 1A – Review the maintenance bulletin (New, Current, Not Current)
The maintenance bulletin contains information that relates specifically to
the maintenance you are installing. Before you begin, read through the
bulletin to determine if there are any steps that must be performed before
installing the maintenance.
Step 1B – Verify software levels (New, Current, Not Current)
You must have the XPAF V5R0M00 base product installed on your system
before you apply XPAF 5.0 maintenance.
SMP/E installation
Section Two: Installing and Customizing XPAF 3-30
Page 85

SMP/E installation
Step 1C – Perform SMP/E housekeeping (New, Current, Not Current)
Before you install XPAF maintenance, complete these additional steps.
1. Back up all XPAF SMP/E, target, and distribution library datasets.
2. Perform an SMP/E Query with List to determine if the XPAF base
software and any previous XPAF maintenance have been accepted.
• If you have already accepted the base product and previous
maintenance, skip this step.
• If you have not accepted previous maintenance, run MPJOB104
and MPJOB105 to accept previous ly applied PTFs . You must
specify BYPASS(HOLDSYSTEM) on the ACCEPT.
3. Compress all SMP/E, target, and DLIB partitioned datasets.
4. Back up all XPAF datasets again.
5. If you have modified any members within XPFSAMP and are using
the members as source, save that source in a library other than
XPFSAMP.
Step 1D – Install maintenance to modules moved to LPA (New, Current, Not Current)
If you receive maintenance that updates one or more modules which have
been moved to the LPA, you have two options:
• Install that maintenance directly to the LPA, as described below.
• Move the LPA-eligible module(s) to the LPA after you install the
maintenance, as described in “Step 6 – Perform post-installation
procedures” later in this chapter.
Refer to “Tuning your system” in chapter 5, “Customizing your system” for
a list of the modules which can be moved to the LPA.
Section Two: Installing and Customizing XPAF 3-31
Page 86

Change the target library for LPA-eligible modules
Before you RECEIVE and APPLY the maintenance, use the SMP/E
UCLIN facility to inform SMP/E that the modules will be moved to a new
target library. Use the SMP/E control statements provided in this example:
SET BOUNDARY (XPFTLIB) .
UCLIN .
/* REPEAT THE NEXT STATEMENT ONE TIME FOR EACH MODULE MOVED
TO XPFLPA, SUBSTITUTING THE MODULE NAME FOR lmodname */
REP LMOD (lmodname) SYSLIB (XPFLPA) .
ENDUCL .
Ensure that the dataset pointed to by the XPFLPA DD is large enough to
contain all the LPA-eligible modules. If you allocate a dataset the same
size as XPFLOAD, you will have sufficient space.
Step 2 – Set up stage 1 job
SMP/E installation
You generate the jobs to install XP AF softwar e maintenanc e and its
associated functions in the same manner you generated the installation
jobs for the base file. The stage 1 procedure requires you to complete the
#GENMNT macro parameters in the $GENMNT member to generate the
stage 2 jobs for software maintenance processing.
Complete these steps to execute the stage 1 job to generate the stage 2
maintenance jobs. Refer to the information in the main tenance bulle tin
that accompanies the maintenance for more file-specific instructions.
Step 2A – Verify previous maintenance (Current, Not Current)
Verify that all previous maintenance except APARs has been ACCEPTED
by SMP/E with MPJOB105.
Section Two: Installing and Customizing XPAF 3-32
Page 87

SMP/E installation
Step 2B – Edit $GENMNT in INSTLIB (New, Current, Not Current)
Edit the GENMNT member in the INSTLIB dataset. This member contains
the parameters used in calling two macros: #GENMNT and #GENEND.
The #GENMNT macro parameters supply stage 2 maintenance jobs with
information required for successfully installing maintenance to XPAF and
its associated functions. All members containing stage 2 jobs created by
this macro begin with the prefix MPJOB.
Example:
#GENMNT X
HOLDFILE=YES, X
SMPSRCID=, X
EIHLQ=
In this sample of the #GENMNT macro, rep lace the vols er variable with
the VOLSER of the maintenance file you are installing.
The TYPE parameter in the #GENEND section of $GENMNT specifies
TYPE=MNT to instruct the installation service macros to generate the
stage 2 jobs that will apply maintenance to XPAF. Do not change this
value.
For more information on the #GENEND macro parameters, refer to
“#GENEND parameter definitions” earlier in this chapter.
Section Two: Installing and Customizing XPAF 3-33
Page 88

#GENMNT parameter definitions
This table provides a description for each parameter in the #GENMNT
macro.
Parameter Definition
SMP/E installation
HOLDFILE
(optional)
SMPSRCID
(optional)
EIHLQ Defines the dataset high level qualifier for the SMPPTFIN dataset.
Used when a HOLDDATA file is supplied on the maintenance file. Refer to the
maintenance bulletin that accompanies the maintenance file for instructions on
using this parameter with the file.
Valid values:
YES Generates an SMPHOLD DD statement and the HOLDDATA
SMP/E keyword in the stage 2 maintenance file RECEIVE job.
NO Does not generate SMPHOLD controls on the stage 2 RECEIVE
job.
Default: NO
Specifies the SMP/E SOURCEID to be assigned to all PTFs or APARs received
from the software maintenance file and is used by SMP/E for maintenance
selection.
Default: None (no SOURCEID is generated).
Default: None
Section Two: Installing and Customizing XPAF 3-34
Page 89

SMP/E installation
Step 3 – Execute stage 1 job (New, Current, Not Current)
Edit the $ASMUPD member in INSTLIB as necessary. Then, complete
these steps:
1. Specify $GENMNT for the INSTYPE parameter.
2. Submit this job to generate stage 2 jobs. When stage 1 has
completed successfully, all stage 2 installation jobs and sample
parameters have been placed in the stage 2 library.
3. If you used INSTLIB for stage 2, reedit the library to refresh the
directory and display the new members. If you used a separate
library for stage 2, edit that library to display the member list.
Step 4 – Code the SYSTEM HOLD bypass JCL (New, Current, Not Current)
When installing software maintenance, you should use the system hold
bypass feature. If you do not use system hold bypass, any fixes that have
a ++HOLD, and any fixes associated with those on hold, will not be
APPLYd. The valid return codes are 08 or less.
To bypass a system hold, perform these steps:
1. Examine the maintenance bulletin for special instructions relating to
fixes in HOLD status.
2. Depending on the installation step you are performing, edit the
MPJOB102 (APPLY CHECK) or MPJOB103 (APPLY) member to
remove the /* and */ characters from this line:
/* BYPASS(HOLDSYSTEM) */
3. Execute the stage 2 jobs to install the software maintena nce. The
fixes you removed from system hold bypass will be APPLYd along
with the other fixes.
NOTE: If you do not remove the /* and */ characters in the file, a
return code of 12 is issued to indicate that fixes in SYSTEM HOLD
were bypassed. If you do remove the characters, a return code of 04
is issued to indicate that fixes in SYSTEM HOLD were applied.
Section Two: Installing and Customizing XPAF 3-35
Page 90

Step 5 – Execute stage 2 jobs
After you complete the stage 1 maintenance jobs, the jobs to RECEIVE,
APPLY, and ACCEPT XPAF maintenance are located in the stage 2 JCL
library and can be submitted for execution as is. The jobs are located in
member names MPJOB101 through MPJOB105.
For MPJOB102 through MPJOB105, if you receive a return code of 08,
examine the messages from S MP/E to confirm that the return code was
caused by missing prerequisite maintenance.
NOTE: To ensure the integrity of interrelated fixes, Xerox
recommends that you RECEIVE and APPLY all fixes on a
maintenance file. Ensure that any previous maintenance has been
ACCEPTed before APPLYing a maintenance file.
If you experience a problem with your software, you must APPLY all fixes
on the current maintenance level before reporting the problem to Xerox
Technical Support.
SMP/E installation
Step 5A – Edit and submit MPJOB101 (New, Current, Not Current)
This job RECEIVEs PTF maintenance for XPAF functions.
Valid return code: 00
Step 5B – Edit and submit MPJOB102 (New, Current, Not Current)
This job runs an APPLY CHECK on software maintenance for functions
received in step 1.
Valid return code: 00 and 04. A return code of 0 4 indicates tha t a
system hold bypass was encountered.
Step 5C – Edit and submit MPJOB103 (New, Current, Not Current)
This job APPLYs the software maintenance to the functions for whic h
maintenance was RECEIVEd in step 1.
Valid return code: 00 and 04. A return code of 0 4 indicates tha t a
system hold bypass was encountered.
Step 5D – Edit and submit MPJOB104 (New, Current, Not Current)
This job runs an ACCEPT CHECK on software maintenance for fun ctions
RECEIVEd in step 1. This job is optional.
Section Two: Installing and Customizing XPAF 3-36
Page 91

Valid return code: 00 and 04. A return code of 0 4 indicates tha t a
system hold bypass was encountered.
Step 5E – Edit and submit MPJOB105 (New, Current, Not Current)
This job ACCEPTs the software maintenance to the functions for which
maintenance was RECEIVEd in step 1. This job is optional.
Valid return code: 00 and 04. A return code of 0 4 indicates tha t a
system hold bypass was encountered.
Step 6 – Perform post-installation procedures
After you have installed the main tenance file, review this section to
determine which of the procedures applies to your site.
Step 6A – Complete applicable post-installation instructions
SMP/E installation
This section contains instructions for special procedures that you may
need to perform, depending on which XPAF options you use. After you
install maintenance, review this information to determine if any of the
procedures apply to your site.
Convert CLIST files (New, Current, Not Current)
When you customize your system after applying a maintenance file, you
may convert CLIST files in the XPFCLIB dataset from FB to VB format.
After copying any CLIST members you must edit and remove line
numbers if they are present
Update sample source code (Current, Not Current)
If you have made changes to any sample source distribu ted in XPFSAMP,
examine the new samples for changes that affect your source. If there are
differences, you must recustomize, reassemble, and link-edit the sample
source code.
Update sample macros (Current, Not Current)
If the maintenance file includes updates to any of the sample macros,
perform these tasks:
1. Change the macro you are currently using to match the new sample.
2. Reassemble and link-edit your user exits.
Also, review any other new macros in the sample macro library for
applicability to your environment.
Section Two: Installing and Customizing XPAF 3-37
Page 92

SMP/E installation
Update JES offset table (Current, Not Current)
If the maintenance includes updates to the JES offset table (XDIOFTAB),
before you start printers that use XPAF, run UMJOB101 to reassemble
and link-edit XDIOFTAB. If you have applied usermod XUM0001, you
must reapply it.
Update TABLELIB (Current, Not Current)
If the maintenance file includes updates to the TABLELIB, unload the
appropriate file from the file. For customers defaulting to letter size pa per,
unload the file that contains the letter size TABLELIB updates. For
customers defaulting to A4 size paper, unload the file that contains the A4
TABLELIB updates.
For complete instructions on unloading these files, refer to the bulletin
accompanying the maintenance file.
Update PROFILES member (Current, Not Current)
If you have made changes to the PROFILES member in XPFSAMP and
have stored those changes in your sample library, perform these steps:
1. Examine the new sample for changes that affect your system.
2. Recustomize your printer profiles as required.
3. Store the profiles in the dataset specified by the PROFD D
initialization parameter.
Update user exits (Current, Not Current)
If you have made changes to any of the user exits and have stored those
changes in XPFSAMP:
1. Examine the new samples for changes that affect your system.
2. Recustomize the sample exits in XPFSAMP as required.
3. Submit the appropriate UXJOBnn to reassemble and link-edit the
user exits.
NOTE: If you are using the JES2 user exits XRXJ2X4 and XRXJ2X6,
you must restart the JES2 MAS system with a WARM START for the
new exits to take effect.
Section Two: Installing and Customizing XPAF 3-38
Page 93

SMP/E installation
Move modules to the LPA (Current, Not Current)
After you install the maintenance, select the ISPF option to MOVE (not
COPY) LPA-eligible modules from XPFLOAD to an LPALST library that
has been previously defined and authorized for use.
Update JDT modules (Current, Not Current)
The JDT modules in the LPA may have been modified by the
maintenance. After you have dynamically loaded the JDT modules into
the MLPA, implement the changes to the JDTs by specifying the REDO
option on the PARM parameter of the EXEC statement in the extended
JCL proc. Otherwise, you must IPL with a CLPA.
Use XJCF simulation (Current, Not Current)
If you use XJCF simulation pro cessing, be sure to perf orm the follo wing
step:
• Reassemble and link-edit the XJCFSIM table into the XPFLOAD
library.
Install maintenance for XDS (New, Current, Not Current)
All software maintenance for XDS is shipped on the maintenance files for
XPAF. After you apply maintenance to XDS modules, you must refresh
the z/OS Library Lookaside address space using this command:
MODIFY LLA,REFRESH
This command updates the z/OS lookaside list with the addresses of the
most current XDS modules.
Section Two: Installing and Customizing XPAF 3-39
Page 94

SMP/E installation
Step 6B – Perform an IPL (New, Current, Not Current)
Once the software maintenance is installed, you may need to perform an
IPL with CLPA on your system. An IPL will:
• Add required modules to the LPA
• Authorize required XOSF libraries
• Update the z/OS link list
• Update the PPT
• Update the Subsystem Name Table
• Define printers to z/OS
• Invoke updated JES parameters
• Make extended JCL support available, if requested
If you are familiar with the procedure for restarting JES and/or z/OS
without performing an IPL, you may use that procedure.
Step 6C – Verify the maintenance installation (Current, Not Current)
If you have applied maintenanc e to an existi ng XPAF syste m, you can
verify the accuracy of your software maintenance installation by executing
an IVP. For more information about performing an IVP, refer to chapter
17, “Performing an installation verification procedure.”
If you are installing a new XPAF system, do not execute the IVPs at this
time. Continue with the remaining installation steps, then perform the IVP
as explained in chapter 17, “Performing an installation verification
procedure.”
Section Two: Installing and Customizing XPAF 3-40
Page 95

Installing usermods
SMP/E installation
A user modification (usermod) is supplied with XPAF to allow you to
customize the tables used by XP AF; for exam ple, the JES offset table.
You must install the usermod for the JES offset table to make XPAF
operational.
The JCL required to install userm ods is generated during stage 1 of the
base XPAF installation. The generated JCL can be submitted without
change. All usermod JCL members in the stage 2 dataset have a prefix of
UMJOB. Each usermod is set up specifying REDO, so you can resubmit
the original SMP/E APPLY JCL to reinstall the usermod.
CAUTION: If you make any modifications to your JES system, such
as installing maintenance to JES, you must resubmit the job to
APPLY with a REDO the JES offset table. Failure to resubmit this job
may cause XOSF to abend or create unpredictable results.
When applying software maintenance to your system, refer to the
accompanying maintenance bulletin to find out whether you need to
resubmit a usermod installation job. Follow any special instructions in the
user instructions.
Checklist for installing usermods
As you complete each step, enter a check in the checklist table to track
and record your progress.
Step Action Completed
1 Submit UMJOB100
2 Submit UMJOB101
Step 1 – Submit UMJOB100
UMJOB100 uses SMP/E to RECEIVE all XPAF-required usermods.
Submit UMJOB100 as is.
Valid return code: 00
Section Two: Installing and Customizing XPAF 3-41
Page 96

Step 2 – Submit UMJOB101
UMJOB101 performs an SMP/E APPLY of the JES offset table. This table
supplies XPAF with the correct JES control block offsets for processing at
your site. Do not make any changes to this table.
Submit UMJOB101 as is.
Valid return code: 00
Any time you upgrade your operating system or apply maintenance to
your system that changes this table, you must submit this job to REDO the
usermod. You must also modify your existing UMJOB101 JCL to include
the correct JES2 or JES3 dataset name. Refer to the bulletin
accompanying the maintenance file for the correct dataset names.
CAUTION: The stage 1 assembly is performed without the SMPMTS
dataset, which is used for JES maintenance, included in the SYSLIB
statement. If JES maintenance has been APPLYd but not
ACCEPTed, the JES offsets in this USERMOD module may be
incorrect. Incorrect JES offsets may cause XPAF to fail or abend
upon initialization or at document print time.
SMP/E installation
If such a failure occurs, add the SMPMTS dataset that contains the
JES maintenance to the SYSLIB concatenation for the system on
which XPAF is running. Then resubmit UMJOB101.
Changing the default USERMOD name
You can change the default USERMOD name (XUM0001) using the
UMODJOFT parameter of the #GENPROD macro, which you completed
during base product installation. If you change the name of the default
usermod after it has been installed, you must perform these steps:
1. Regenerate the stage 1 output.
2. RESTORE and REJECT the default usermod using SMP/E.
3. Resubmit UMJOB100 and UMJOB101.
Section Two: Installing and Customizing XPAF 3-42
Page 97

Installing user exits
Available user exits
SMP/E installation
This section lists the available XOAF and XOSF optional user exits and
describes the procedure used for installing them.
• For XOAF, XPAF uses an administrative security exit.
• For XOSF, XPAF uses 10 different FSA exits, a message exit, a
command exit, and a refr esh security exit.
The procedure for coding these exits is described in chapter 7, “Coding
the XPAF user exits.”
Table 3-1 identifies the available sample user exits and exit installation
jobs. Enter a check in the Installed column for each user exit that you
install successfully.
NOTE: There are multiple versions of the source code for user exits
02, 03, and 05. However, you can only install one version of each exit
on your system.
Table 3-1. Available user exits
Source member
Exit point
01 XUXIT01 FSA initialization UXJOB01
02 XUXIT02 Dataset begin UXJOB02
02 XUXIT02A Dataset begin UXJOB02
02 XUXIT02C Dataset begin UXJOB02
03 XUXIT03 JES record read UXJOB03
03 XUXIT03A JES record read UXJOB03
03 XUXIT03C JES record read UXJOB03
03 XUXIT03D JES record read UXJOB03
04 XUXIT04 XOSF dataset open U XJOB04
05 XUXIT05 Separator page UXJOB05
05 XUXIT05A Separator page U XJOB05
name
Function
Stage 2
member name
Installed
05 XUXIT05B Separator page U XJOB05
06 XUXIT06 Resource access UXJOB06
Section Two: Installing and Customizing XPAF 3-43
Page 98

Table 3-1. Available user exits (Continued)
SMP/E installation
Source member
Exit point
07 XUXIT07 Resource download begin UXJOB07
08 XUXIT08 Resource download end UXJOB08
09 XUXIT09 SMF record UXJOB09
10 XUXIT10 FSA termination U XJOB10
11 XUXIT11 XOSF da taset close UXJOB11
12 XUXIT12 Writer d ata option U XJOB12
30 XUXIT30 Message suppression UXJOB30
31 XUXIT31 Operator command suppression UXJOB31
32 XUXIT32 Refresh security UXJOB32
— XOAFUSEC XOAF security exit UXJOBSEC
name
Function
member name
User exits for XDS
Stage 2
Installed
There are no user exits specific to XDS. All valid XOSF user exits in the
XDS data stream are honored as the data stream passes through XOSF.
Section Two: Installing and Customizing XPAF 3-44
Page 99

Checklist for installing user exits
After you have coded your user exits, you are ready to install them by
following the procedures in this chapte r. As you complete each step, enter
the completion date in the checklist table to track and record your
progress.
Step Action
1 Set up stage 1 job
A Edit $GENUXIT in INSTLIB
B Edit the UEXIT parameters in GENUXIT
2 Generate stage 2 jobs
A Edit ASMUPD
B Submit ASMUPD
SMP/E installation
Date
completed
3 Execute stage 2 jobs
A Submit UXJOB00
B Submit the user exit APPLY jobs
Step 1 – Set up stage 1 job
Use the #GENUXIT macro parameters in the $GENUXIT member of
INSTLIB to generate stage 2 jobs that use SMP/E to assemble and link
your user exit source code into a load library you specify. This load library
must be accessible to XPAF.
The stage 2 member names are generated with UXJOB as the prefix and
the exit number as the suffix. For example, the name of the stage 2
member that contains the JCL to install user exit 05 is UXJOB05.
Complete the steps in this section to set up and execute stage 1 jobs for
user exits.
Section Two: Installing and Customizing XPAF 3-45
Page 100

Step 1A – Edit $GENUXIT in INSTLIB
Edit the $GENUXIT member in INSTLIB and complete the parameters
used in calling the #GENUXIT macro. Enter the parameter values you
predefined in your pre-installation worksheets.
If you need to access a private macro library that was not defined to
SMP/E during XPAF installation, you must specify the UXMAC parameter
in the #GENUXIT section. This causes a SYSLIB DD statement to be
generated in each stage 2 user exit SMP/E job that contains all the
required macro libraries. It also overrides the standard SYSLIB defined by
the DDDEF statement when you installed XPAF.
Example:
#GENUXIT X
UMPFX=, X
USEC=, X
USECLNKLB=, X
USECSMID=, X
UXLNKLB=, X
UXMAC=, X
UXPFX=, X
UXSRCLB=
SMP/E installation
Parameter Description
UMPFX
(optional)
USEC
(optional)
#GENUXIT parameter definitions
This table provides a description for each parameter in the #GENUXIT
macro.
Specifies a 5-character name that is used as the defa ult SYSMOD-ID prefix
generated to install user exits. The number of the exit you re qu est is a ppende d
to this character string to create a unique SYSMOD ID for each user exit you
request. The character string XUX00 is generated as a default if you do not
assign a value to this paramet er.
Default: XUX00
Specifies whether the XOAF TSO user security exit will be installed. The name
of this exit must be XOAFUSEC. XPFSAMP contains a sample of this exit. You
should copy the sample to the library specified in the UXSRCLB parameter
before you make any change s to it.
Valid values:
YES The stage 2 JCL is generated to install this user exit. Member
name is UXJOBSEC.
NO Stage 2 JCL is not generated to install this user exit.
Default: NO
Section Two: Installing and Customizing XPAF 3-46
 Loading...