

Page 1

Host Forms Description Language 3.2
for IBM MVS
Creating Forms
XEROX
HFDL 3.2
August 1995
720P30610
Page 2

Xerox Corporation
701 South Aviation Boulevard
El Segundo, California 90245
©1995 by Xerox Corporation. All rights reserved.
Copyright protection claimed includes all forms and matters of
copyrightable material and information now allowed by statutory
or judicial law or hereinafter granted, including without limitation,
material generated from the software programs which are
displayed on the screen such as icons, screen displays, looks, etc.
Printed in the United States of America.
Xerox® and all Xerox products mentioned in this publication are
trademarks of Xerox Corporation. Products and trademarks of
other companies are also acknowledged.
IBM® and all IBM products mentioned in this publication are
trademarks of International Business Machines Corporation.
Changes are periodically made to this document. Technical
updates will be included in subsequent editions.
Page 3

Table of contents
Introduction vii
About this manual vii
Contents vii
Conventions viii
Related publications viii
Xerox publications viii
IBM publications ix
1. Overview 1–1
HFDL features 1–1
Prerequisites 1–2
Operating environment 1–2
Hardware requirements 1–2
Software requirements 1–2
Xerox laser printer support 1–2
Centralized printers 1–2
Decentralized printers 1–3
Contrasting HFDL with a typical forms application 1–3
Forms you can create with HFDL 1–4
2. Planning your forms 2–1
Determining format 2–1
Page orientation 2–1
Page frames 2–2
System page 2–2
Physical page 2–3
Virtual page 2–3
Form origin 2–3
Positioning form elements 2–4
Grids 2–5
X and Y coordinates 2–5
Negative coordinates 2–6
Unit value 2–6
Data types 2–6
Forms data 2–6
HOST FORMS DESCRIPTION LANGUAGE 3.2 FOR IBM MVS CREATING FORMS iii
Page 4

HOST FORMS DESCRIPTION LANGUAGE
Variable data 2–6
Fonts 2–7
Fixed and proportionally spaced fonts 2–7
Font orientation 2–7
Font orientation when using short–edge paper feed 2–8
Virtual keyboard and font character maps 2–9
Virtual keyboard character maps 2–10
Font character maps 2–11
Adding color to forms 2–11
Ink color availability and control 2–11
Choosing paper size 2–12
Forms design ruler 2–12
Ruler scales 2–12
Suggested uses 2–13
3. Using HFDL commands 3–1
Creating forms with HFDL commands 3–1
Available specifications 3–1
Command format 3–2
Reserved words 3–2
Special characters 3–2
Understanding the command syntax flow charts 3–3
Setting up your form 3–3
FORM command 3–4
PAPER command 3–4
LANDSCAPE/PORTRAIT command 3–5
GRID command 3–7
FONT command 3–8
ICATALOG command 3–9
PALETTE command 3–9
INK command 3–10
Inkname format 3–11
IRESULT command 3–12
Description commands 3–12
LINE command 3–13
BOX command 3–14
TEXT AT command 3–17
TEXT IN BOX command 3–21
LOGO command 3–25
GRAPHIC command 3–26
SECTION command 3–27
iv HOST FORMS DESCRIPTION LANGUAGE 3.2 FOR IBM MVS CREATING FORMS
Page 5

TABLE OF CONTENTS
DO SECTION command 3–28
COLUMN command 3–30
INTERWORD command 3–30
The interword gap formula 3–30
Specifying the base gap 3–31
Specifying the interword multiplier 3–31
Using SPACING and INTERWORD together 3–31
DOT LEADER command 3–32
LET command 3–33
Relative coordinate 3–33
COMMENT command 3–34
END command 3–35
4. Creating a sample form 4–1
Setting up the form 4–2
Using the sample description command 4–3
5. Managing and printing sample forms 5–1
JCL requirements 5–1
Using the COMPILE command 5–1
Command coding conventions 5–1
Command syntax 5–1
Command syntax examples 5–5
Batch processing COMPILE commands 5–5
HFDL compiler JCL 5–6
Downloading and printing a sample 5–10
Accessing compiled forms 5–12
Editing an existing form 5–12
Specifying monochrome forms 5–12
6. Messages 6–1
Message indicators 6–1
Appendices
A. System considerations A–1
Line density limits A–1
Local density and page setup errors A–1
Boxes and their image A–2
Text in boxes A–2
Using lines within sections A–2
B. FMT grid format properties B–1
C. Approved abbreviations for reserved words C–1
D. Comparison of HFDL and FDL D–1
HOST FORMS DESCRIPTION LANGUAGE 3.2 FOR IBM MVS CREATING FORMS v
Page 6

HOST FORMS DESCRIPTION LANGUAGE
E. Supported paper sizes E–1
Glossary GLOSSARY–1
Index INDEX–1
vi HOST FORMS DESCRIPTION LANGUAGE 3.2 FOR IBM MVS CREATING FORMS
Page 7

About this manual
Introduction
This manual describes the Host Forms Description Language
(HFDL) and how you use it to create an electronic version of
your form. The HFDL commands and statements you use
comprise the Forms Source Language (FSL). The host computer
compiles the FSL and stores it in the database. Using the
resources management utilities, you can access and print your
forms on Xerox laser printing systems (LPS) connected to your
host computer.
This manual is designed for users who are familiar with the MVS
operating system and have experience using Xerox printers. For
more information, refer to the “Overview” chapter.
This manual describes HFDL commands and statements, and how
to plan and lay out your forms.
Contents
Before using this manual, become familiar with its contents and
conventions.
This manual contains the following sections:
Chapter 1 “Overview” describes the HFDL features, operating environment,
and hardware and software requirements. It also lists supported
Xerox laser printing systems and common forms you can create
and manage with HFDL.
Chapter 2 “Planning your forms” describes how to plan and design forms.
It shows you how to determine page orientation and format, add
colors, select paper size, and use the design ruler.
Chapter 3 “Using HFDL commands” describes the available commands and
how to set up your forms. It also contains the command
statement conventions and definitions you use to create the FSL
and examples of the JCL.
Chapter 4 “Creating a sample form” describes how to create a form using
HFDL.
Chapter 5 “Managing and printing sample forms” describes how to compile,
store, and download forms to the printer.
Chapter 6 “Messages” lists the error messages that may appear during
forms compilation.
Appendix A “System considerations” describes the printer limitations you may
encounter during the creation of complex forms.
Appendix B “FMT grid format properties” lists the grid and origin
substitutions you can use for the supported paper sizes.
HOST FORMS DESCRIPTION LANGUAGE 3.2 FOR IBM MVS CREATING FORMS vii
Page 8

HOST FORMS DESCRIPTION LANGUAGE
Appendix C “Approved abbreviations for reserved words” lists the
Appendix D “Comparison of HFDL and FDL” compares the commands
Appendix E “Supported paper sizes” lists the paper sizes that HFDL supports.
Conventions
“Supported paper sizes” appendix References to chapters, sections, and appendices appear in
ICATALOG Commands, operands, and parameters that you enter appear in
abbreviations you can use for reserved words.
available for FDL, HFDL 2.1D, HFDL 3.1, and HFDL 3.2.
For detailed lists of virtual keyboard maps and font character
maps used with HFDL, see the “Virtual keyboard and font
character maps” appendix in the
Xerox Print Resources
Manager/Host Forms Description Language 3.2 for IBM MVS
Managing Resources
This manual uses the following conventions:
In this manual, the word "character" refers to an "alpha-numeric
character," except where noted.
quotation marks.
bold.
manual.
Host Forms Description Language 3.2
for IBM MVS Creating Forms
Related publications
Xerox publications
Document names, library names, variable information, and user–
defined data you enter appears in
LPI System commands and parameters appear in uppercase letters.
Notes are hints that help you perform a task or understand the
text.
CAUTION: Cautions appear immediately before any action that
may destroy the data stored on your network or damage your
equipment. Make sure you understand the potential impact of
the action before you perform it.
You can find additional information related to HFDL in the
following publications.
Xerox related publications include the following:
Publication Number
italic.
Xerox 871 Communications
Module System Guide
600P86733
Xerox 3700 Laser Printing System
Release Five Series Reference Manual
720P84320
Xerox 4235 Laser Printing System
Operations Guide
720P82510
Xerox 4235 Laser Printing System Production
Print Mode PDL/DJDE Reference
720P82530
Xerox 4235 Laser Printing System Operator
Maintenance and Problem Solving Guide
viii HOST FORMS DESCRIPTION LANGUAGE 3.2 FOR IBM MVS CREATING FORMS
720P82540
Page 9

INTRODUCTION
Publication Number
Xerox 4235 Laser Printing System
Xerox Distributed Print Mode
XES Printer Command Reference
720P82520
Xerox 9790/8790 Laser Printing Systems
Reference Manual
720P90000
Xerox Host Forms Description Language 3.2
for IBM MVS Installation Guide
720P30600
IBM publications
Xerox LPS Forms Creation Guide
Xerox LPS Operations Reference
Xerox LPS PDL/DJDE Reference
Xerox LPS Print Descriptio
n
Language Quick Reference Card
720P90081
720P90041
720P90051
720P60681
Xerox LPS Standard
Font Library User Guide
Xerox LPS Tape Formats Manual
720P86174
720P86175
Xerox Print Resources Manager/
Host Forms Description Language 3.2
for IBM MVS Managing Resources
720P30560
Xerox Print Resources Manager/
Host Forms Description Language 3.2
for IBM MVS Installation Guide
IBM publications related to the HFDL include the following:
720P30550
IBM MVS/ESA JCL Reference
IBM MVS/ESA User’s Guide
IBM MVS/XA JCL Reference
IBM MVS/XA User’s Guide
IBM MVS/XA JCL
HOST FORMS DESCRIPTION LANGUAGE 3.2 FOR IBM MVS CREATING FORMS ix
Page 10

HOST FORMS DESCRIPTION LANGUAGE
x HOST FORMS DESCRIPTION LANGUAGE 3.2 FOR IBM MVS CREATING FORMS
Page 11

HFDL features
1. Overview
The Host Forms Description Language (HFDL) operates in a
standard IBM/MVS environment that includes Xerox high–speed,
high–volume centralized printers. You use Xerox Print Resources
Manager (XPRM) to store form files and resources in the XPRM
database.
This chapter describes the HFDL features, prerequisites,
operating environment, and the supported printers. Refer to the
Xerox Print Resources Manager/Host Forms Description Language
3.2 for IBM for MVS Managing Resources
information.
HFDL, combined with XPRM, provides the following features:
manual for more
• Flexible language statement syntax. The syntax allows you
to quickly and easily develop your form electronically. The
syntax is similar to the source language that resides on the
Xerox laser printing system (LPS) printer and that the Forms
Description Language (FDL) compiler uses. HFDL also
allows additional command extensions, such as dot leaders,
which the FSL compiler does not support.
• More online printer time. Through HFDL and XPRM, you
have the ability to compile and store forms on your host
computer, freeing up your Xerox laser printer for other
printing jobs.
• Powerful utilities. The XPRM utilities allow you to manage
your resources through a system interface. These utilities
allow you to access stored forms for updating, downloading
to printers, or deleting.
• Additional flexibility. You have the ability to download
host–generated forms, which were compiled in different
formats, to specific laser printers.
• Increase in several FDL limits.
• Standard entries. You have the ability to enter standard
HFDL reserved words and identifiers in uppercase or
lowercase letters.
• Host system interface. XPRM provides an enhanced
resource management capability through a host system
interface. This allows you to take advantage of the
enhanced features offered by the new family of Xerox laser
printers such as the Xerox 4135 LPS Printer, the Xerox 4235
LPS Printer, the Xerox 4700 Color Document Printer, and
the Xerox 4850 HighLight Color LPS Printer.
HOST FORMS DESCRIPTION LANGUAGE 3.2 FOR IBM MVS CREATING FORMS 1–1
Page 12

HOST FORMS DESCRIPTION LANGUAGE
Prerequisites
• Conversion from .FRM to metacode. This feature is
implemented as a stand-alone utility program. For details
see Appendix D.
HFDL also allows you to take advantage of the added
features of the Xerox 4650 Printer (600 dpi forms).
You should have a working knowledge of your Multiple Virtual
Storage (MVS) operating system, and be able to perform the
following procedures:
• Create and edit a text file on your system.
• Use JCL to compile a job on your system.
• Use JCL to access a file through your resource management
interface, and download your selected file to your Xerox
laser printing system.
Operating environment
Hardware requirements
Software requirements
Xerox laser printer support
The host computer, peripheral devices, printers, and software
make up your printing system. This section describes the
hardware and software requirements to operate HFDL.
HFDL 3.2 operates on IBM S/370 and S/390 series computers
running the MVS/XA or MVS/ESA operating system.
HFDL operates in batch mode under the IBM MVS/ESA and
MVS/XA operating systems. It does not use operating system
features specific to any MVS release level. Any specific
requirements for your site are provided during installation and
described in the
MVS Installation Guide.
HFDL supports Xerox centralized and decentralized printers.
Host Forms Description Language 3.2 for IBM
Centralized printers
Centralized printers are high–speed, high–volume printers
generally used in central locations for printing data processing
output from mainframe computers. They may be attached to the
host computer by an S/370 channel or attached remotely by an
871 Communications Module (CM) or BARR SNA.
Table 1–1 lists the centralized printers that HFDL supports and
the associated operating system software (OSS).
1–2 HOST FORMS DESCRIPTION LANGUAGE 3.2 FOR IBM MVS CREATING FORMS
Page 13

OVERVIEW
Table 1–1. Supported centralized printers
Centralized printers OSS version
4050 V2.1, V3.5, or V3.8
4090 V2.1, V3.5, or V3.8
4135 V3.6
4650 V3.5 or V3.8
4850 V3.7, V3.8, or V5.0
4890 V4.0 or V5.0
8790 V2.1 or V3.9
9790 V2.1 or V3.9
Decentralized printers
HFDL also supports some Xerox decentralized printers. These
printers are generally in remote locations away from the
mainframe. An SNA/RJE communications link or a BSC/RJE
communications link connects them to the host. Also, the Xerox
Flex Box protocol converter allows you to connect the Xerox
4235 printer to the host.
Table 1–2 lists the decentralized printers that HFDL supports and
the associated OSS.
Table 1–2. Supported decentralized printers
Decentralized printers OSS version
3700 V5.2
4235 V1.2 or V1.5
4700 V1.0 (XES mode)
HFDL 3.2 generates forms on the Xerox 4235 and Xerox 4700
printers operating in XES mode.
Contrasting HFDL with a typical forms application
HFDL allows you to create electronic versions of your forms,
compile them, store them in your system database, and
download them to your printer as needed. This eliminates the
need to stock large quantities of preprinted forms.
(XPPM and XDPM modes)
Once you download your form to a Xerox LPS, the printer
merges your form with variable data. This capability allows you
to create, store, and print any number of forms, in any order, on
plain paper.
In a typical forms application that does not use HFDL, you have
to prepare and load preprinted forms (often printed in large
quantities) on a printer connected to a computer. You can load
HOST FORMS DESCRIPTION LANGUAGE 3.2 FOR IBM MVS CREATING FORMS 1–3
Page 14

HOST FORMS DESCRIPTION LANGUAGE
only one set of forms at a time, and must remove and replace
any forms currently loaded with the preprinted forms you want.
The typical forms application usually requires a stock of
preprinted forms. If there are different forms, storage costs can
be high. If you have to modify preprinted forms, you usually
must discard old versions, making your costs even higher.
Forms you can create with HFDL
The following list provides examples of general business forms
you can create with HFDL:
• Bar codes
• Billing statements and invoices
• Calendars
• Checklists
• Financial statements
• Floor plans
• Flow diagrams
• Marketing surveys
• Order forms
• Organizational charts
• Packing and shipping slips
• Production and inventory control forms
• Reorder lists
• Reports
• Routing forms
• Schedules
• Status report forms.
Depending on your business, you may need to create forms to
meet specific industry standards. HFDL allows you to create the
following types of specialized forms:
• Bank statements
• Government compliance forms
• Insurance forms
• Tax return forms.
1–4 HOST FORMS DESCRIPTION LANGUAGE 3.2 FOR IBM MVS CREATING FORMS
Page 15

Determining format
2. Planning your forms
This chapter describes the parameters you must determine and
specify when designing your form.
Careful planning and design are critical to creating electronic
versions of your forms. Form planning and design specify such
things as page size, orientation, layout, fonts, inks, and highlight
colors.
For additional information about designing complex forms and
Xerox laser printer capabilities, refer to the “System
considerations” appendix.
Before you create a form with HFDL command statements, you
must plan its layout, content, and appearance according to the
requirements described in the following sections.
Page orientation
The orientation of a page is either portrait or landscape. Figure
2–1 shows these orientations.
Figure 2–1. Page orientation
PORTRAIT
LANDSCAPE
The landscape orientation, sometimes called the horizontal
format, refers to a page whose horizontal side is longer than its
vertical side.
The portrait orientation, sometimes called a vertical format, refers
to a page whose vertical side is longer than its horizontal side.
Use the portrait orientation for text material such as letters,
manuals, reports, and forms that need the tall vertical format.
HOST FORMS DESCRIPTION LANGUAGE 3.2 FOR IBM MVS CREATING FORMS 2–1
Page 16
HOST FORMS DESCRIPTION LANGUAGE
aaaaaaaaaaaaaaaaaaaaaaaaaaaaaaaaaaa
a
a
a
a
a
a
a
a
a
a
a
a
a
a
a
a
a
a
a
a
a
a
a
a
a
a
a
a
a
a
a
a
a
a
a
a
a
a
a
a
a
a
a
a
a
a
a
a
a
a
a
a
a
a
a
a
a
a
a
a
a
a
a
a
a
a
a
a
a
a
a
a
a
a
a
a
a
a
a
a
a
a
a
a
a
a
a
a
a
aaaaaaaaaaaaaaaaaaaaa
a
a
a
a
a
a
a
a
a
a
a
a
a
a
a
a
a
a
a
a
a
a
a
a
a
a
a
a
a
a
a
a
a
a
a
a
a
a
a
a
a
a
a
a
a
a
a
a
a
a
a
a
a
a
a
a
a
a
a
a
a
a
a
a
a
a
a
aaaaaaaaaaaaaaaaaaaaaaaaaaaaaaa
a
a
a
a
a
a
a
a
a
a
a
a
a
a
a
a
a
a
a
a
a
a
a
a
a
a
a
a
a
a
a
a
a
a
a
a
a
a
a
a
a
a
a
a
a
a
a
a
a
a
a
a
a
a
a
a
a
a
a
a
a
a
a
a
a
a
a
a
a
a
a
a
a
a
a
a
a
a
a
a
a
a
a
a
Page frames
Landscape format is ideal for forms, spreadsheets, and reports
that require columns across the page. For example, the
landscape orientation is appropriate for a Gantt chart that lists six
or twelve months horizontally, and lists the tasks vertically.
Large paper size forms in short edge feed (SEF) made for the
Xerox 4135 printer require you to specify the FONTS command
in the opposite orientation. For example, for a portrait
orientation, use landscape fonts, and for a landscape orientation,
use portrait fonts. Make sure you specify the orientation you
want. For example, for a portrait form, specify PORTRAIT for the
orientation, and for a landscape form, specify LANDSCAPE.
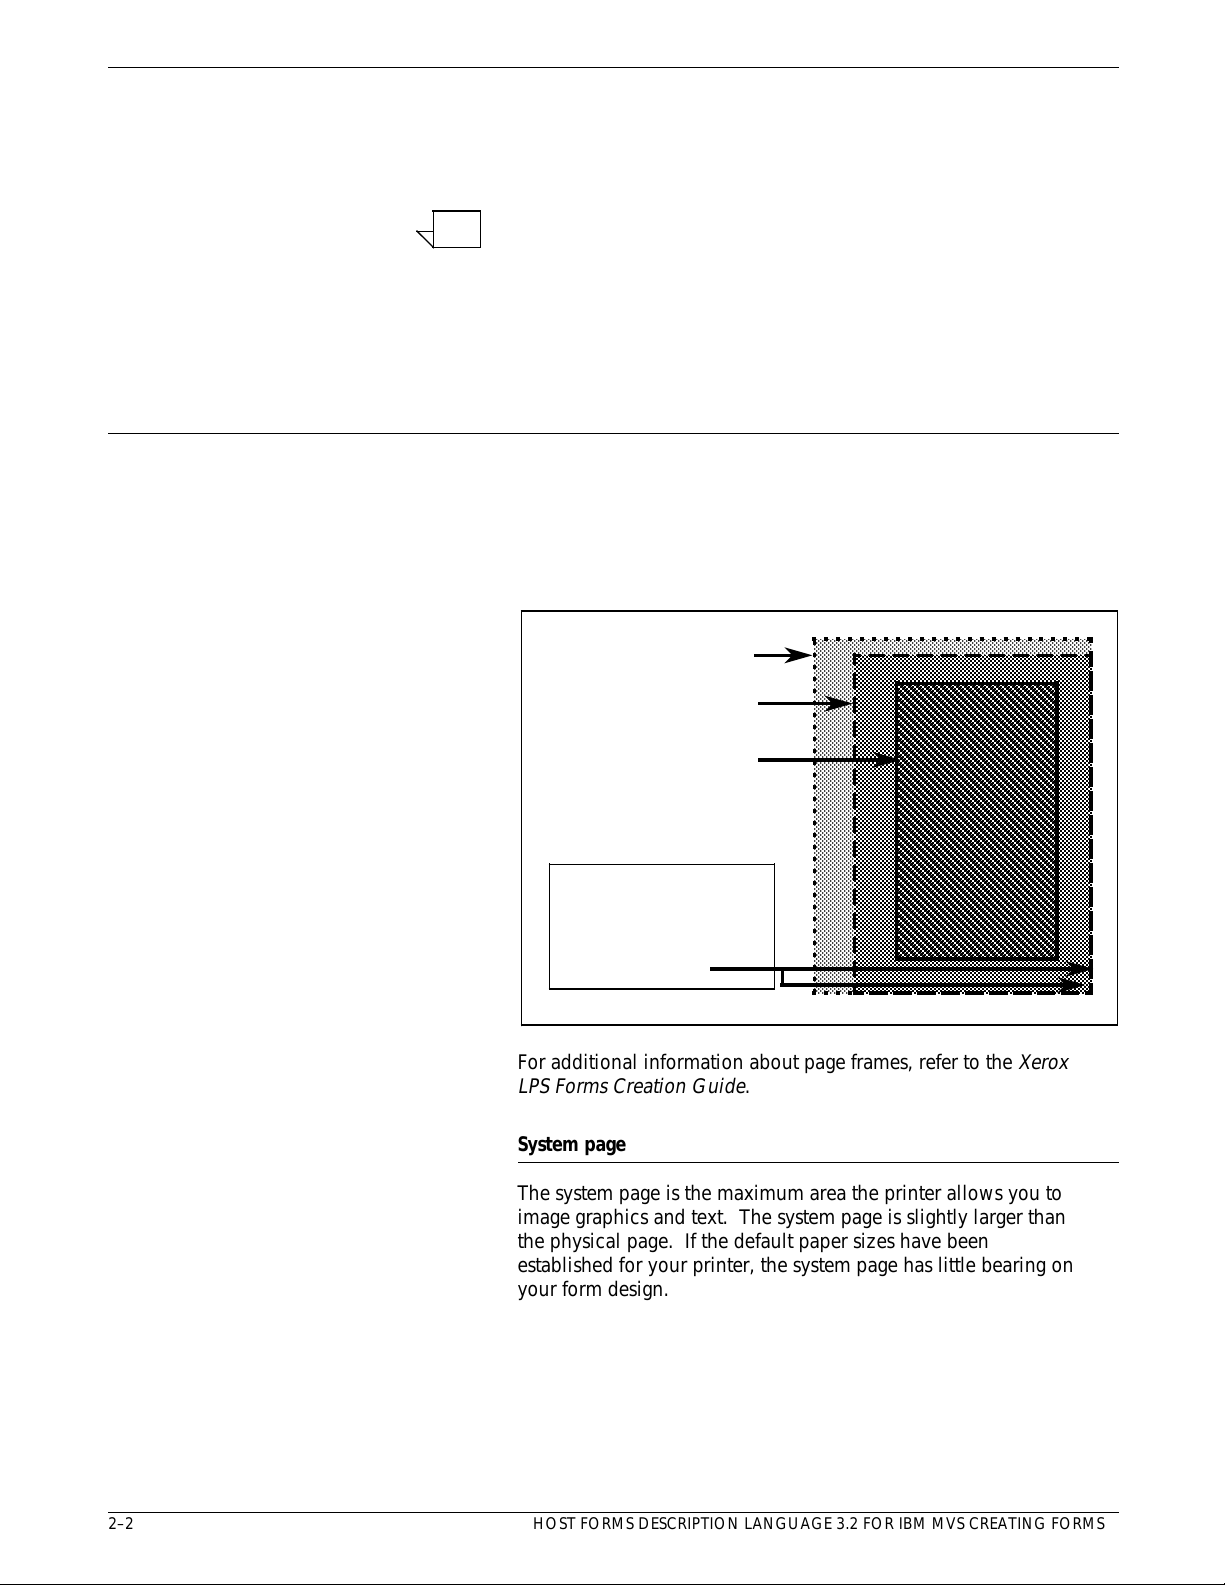
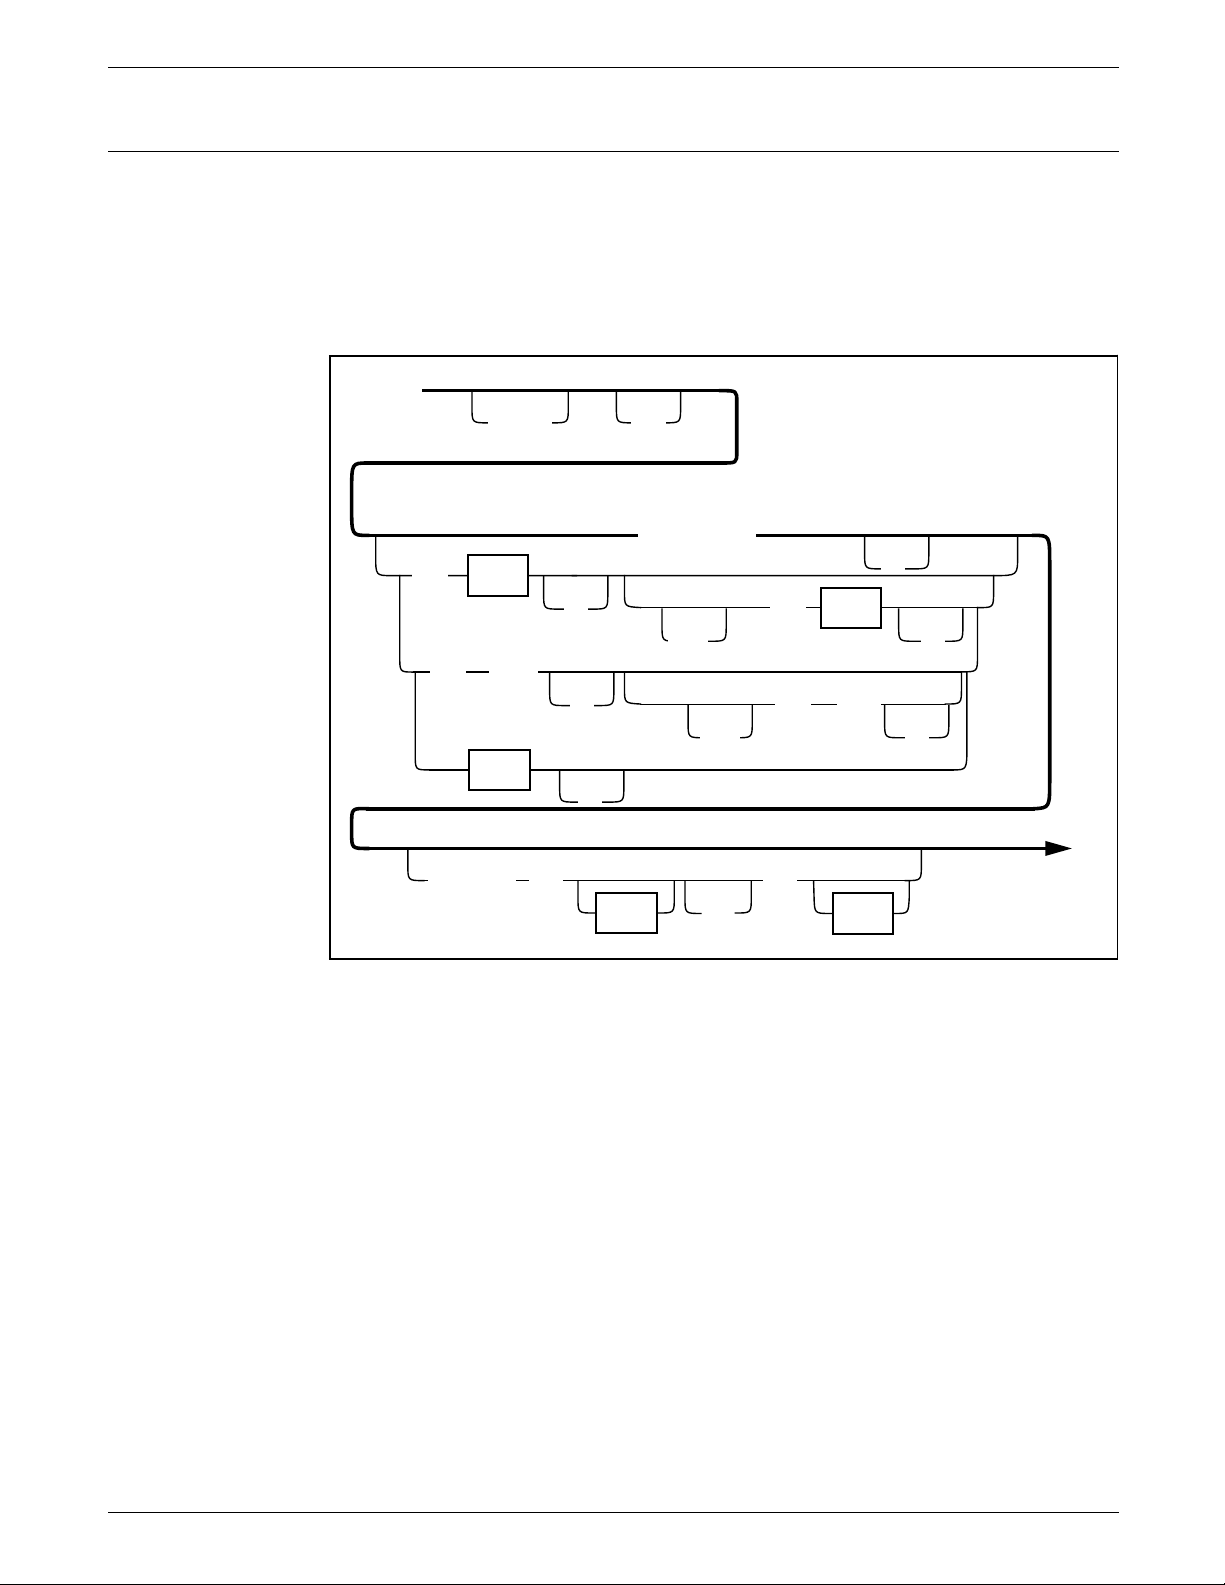
The page frame is a set of boundaries associated with a page as a
unit of printing or imaging. There are three types of page
frames: system, physical, and virtual. Figure 2–2 shows the
relationship between the system, physical, and virtual page.
Figure 2–2. Page frames
2–2 HOST FORMS DESCRIPTION LANGUAGE 3.2 FOR IBM MVS CREATING FORMS
aaaaaaaaaaaaaaaaaaaaaaaaaaaaaaaaa
SYSTEM PAGE
PHYSICAL PAGE
VIRTUAL PAGE
NOTE CORRESPONDING
EDGES OF PHYSICAL AND
SYSTEM PAGES. THIS IS
IMPORTANT WHEN
CONSIDERING
EDGE–MARKING.
aaaaaaaaaaaaaaaaaaaaaaaaaaaaaaaaa
aaaaaaaaaaaaaaaaaaaaaaaaaaaaaaaaa
aaaaaaaaaaaaaaaaaaaaaaaaaaaaa
aaaaaaaaaaaaaaaaaaaaaaaaaaaaaaaaa
aaaaaaaaaaaaaaaaaaaaaaaaaaaaa
aaaaaaaaaaaaaaaaaaaaaaaaaaaaaaaaa
aaaaaaaaaaaaaaaaaaaaaaaaaaaaa
aaaaaaaaaaaaaaaaaaaaaaaaaaaaaaaaa
aaaaaaaaaaaaaaaaaaaaaaaaaaaaa
aaaaaaaaaaaaaaaaaaaaaaaaaaaaaaaaa
aaaaaaaaaaaaaaaaaaaaaaaaaaaaaaaaa
aaaaaaaaaaaaaaaaaaaaaaaaaaaaaaaaa
aaaaaaaaaaaaaaaaaaaaaaaaaaaaaaaaa
aaaaaaaaaaaaaaaaaaaaaaaaaaaaaaaaa
aaaaaaaaaaaaaaaaaaaaaaaaaaaaaaaaa
aaaaaaaaaaaaaaaaaaaaaaaaaaaaaaaaa
aaaaaaaaaaaaaaaaaaaaaaaaaaaaaaaaa
aaaaaaaaaaaaaaaaaaaaaaaaaaaaaaaaa
aaaaaaaaaaaaaaaaaaaaaaaaaaaaaaaaa
aaaaaaaaaaaaaaaaaaaaaaaaaaaaaaaaa
aaaaaaaaaaaaaaaaaaaaaaaaaaaaaaaaa
aaaaaaaaaaaaaaaaaaaaaaaaaaaaaaaaa
aaaaaaaaaaaaaaaaaaaaaaaaaaaaaaaaa
aaaaaaaaaaaaaaaaaaaaaaaaaaaaaaaaa
aaaaaaaaaaaaaaaaaaaaaaaaaaaaaaaaa
aaaaaaaaaaaaaaaaaaaaaaaaaaaaaaaaa
aaaaaaaaaaaaaaaaaaaaaaaaaaaaaaaaa
aaaaaaaaaaaaaaaaaaaaaaaaaaaaaaaaa
aaaaaaaaaaaaaaaaaaaaaaaaaaaaaaaaa
aaaaaaaaaaaaaaaaaaaaaaaaaaaaaaaaa
aaaaaaaaaaaaaaaaaaaaaaaaaaaaaaaaa
aaaaaaaaaaaaaaaaaaaaaaaaaaaaaaaaa
aaaaaaaaaaaaaaaaaaaaaaaaaaaaaaaaa
aaaaaaaaaaaaaaaaaaaaaaaaaaaaaaaaa
aaaaaaaaaaaaaaaaaaaaaaaaaaaaaaaaa
aaaaaaaaaaaaaaaaaaaaaaaaaaaaaaaaa
aaaaaaaaaaaaaaaaaaaaaaaaaaaaaaaaa
aaaaaaaaaaaaaaaaaaaaaaaaaaaaaaaaa
aaaaaaaaaaaaaaaaaaaaaaaaaaaaaaaaa
aaaaaaaaaaaaaaaaaaaaaaaaaaaaaaaaa
aaaaaaaaaaaaaaaaaaaaaaaaaaaaaaaaa
aaaaaaaaaaaaaaaaaaaaaaaaaaaaaaaaa
aaaaaaaaaaaaaaaaaaaaaaaaaaaaaaaaa
aaaaaaaaaaaaaaaaaaaaaaaaaaaaaaaaa
aaaaaaaaaaaaaaaaaaaaaaaaaaaaaaaaa
aaaaaaaaaaaaaaaaaaaaaaaaaaaaaaaaa
aaaaaaaaaaaaaaaaaaaaaaaaaaaaaaaaa
aaaaaaaaaaaaaaaaaaa
aaaaaaaaaaaaaaaaaaaaaaaaaaaaa
aaaaaaaaaaaaaaaaaaa
aaaaaaaaaaaaaaaaaaaaaaaaaaaaa
aaaaaaaaaaaaaaaaaaa
aaaaaaaaaaaaaaaaaaaaaaaaaaaaa
aaaaaaaaaaaaaaaaaaa
aaaaaaaaaaaaaaaaaaaaaaaaaaaaa
aaaaaaaaaaaaaaaaaaa
aaaaaaaaaaaaaaaaaaaaaaaaaaaaa
aaaaaaaaaaaaaaaaaaa
aaaaaaaaaaaaaaaaaaaaaaaaaaaaa
aaaaaaaaaaaaaaaaaaa
aaaaaaaaaaaaaaaaaaaaaaaaaaaaa
aaaaaaaaaaaaaaaaaaa
aaaaaaaaaaaaaaaaaaaaaaaaaaaaa
aaaaaaaaaaaaaaaaaaa
aaaaaaaaaaaaaaaaaaaaaaaaaaaaa
aaaaaaaaaaaaaaaaaaa
aaaaaaaaaaaaaaaaaaaaaaaaaaaaa
aaaaaaaaaaaaaaaaaaa
aaaaaaaaaaaaaaaaaaaaaaaaaaaaa
aaaaaaaaaaaaaaaaaaa
aaaaaaaaaaaaaaaaaaaaaaaaaaaaa
aaaaaaaaaaaaaaaaaaa
aaaaaaaaaaaaaaaaaaaaaaaaaaaaa
aaaaaaaaaaaaaaaaaaa
aaaaaaaaaaaaaaaaaaaaaaaaaaaaa
aaaaaaaaaaaaaaaaaaa
aaaaaaaaaaaaaaaaaaaaaaaaaaaaa
aaaaaaaaaaaaaaaaaaa
aaaaaaaaaaaaaaaaaaaaaaaaaaaaa
aaaaaaaaaaaaaaaaaaa
aaaaaaaaaaaaaaaaaaaaaaaaaaaaa
aaaaaaaaaaaaaaaaaaa
aaaaaaaaaaaaaaaaaaaaaaaaaaaaa
aaaaaaaaaaaaaaaaaaa
aaaaaaaaaaaaaaaaaaaaaaaaaaaaa
aaaaaaaaaaaaaaaaaaa
aaaaaaaaaaaaaaaaaaaaaaaaaaaaa
aaaaaaaaaaaaaaaaaaa
aaaaaaaaaaaaaaaaaaaaaaaaaaaaa
aaaaaaaaaaaaaaaaaaa
aaaaaaaaaaaaaaaaaaaaaaaaaaaaa
aaaaaaaaaaaaaaaaaaa
aaaaaaaaaaaaaaaaaaaaaaaaaaaaa
aaaaaaaaaaaaaaaaaaa
aaaaaaaaaaaaaaaaaaaaaaaaaaaaa
aaaaaaaaaaaaaaaaaaa
aaaaaaaaaaaaaaaaaaaaaaaaaaaaa
aaaaaaaaaaaaaaaaaaa
aaaaaaaaaaaaaaaaaaaaaaaaaaaaa
aaaaaaaaaaaaaaaaaaa
aaaaaaaaaaaaaaaaaaaaaaaaaaaaa
aaaaaaaaaaaaaaaaaaa
aaaaaaaaaaaaaaaaaaaaaaaaaaaaa
aaaaaaaaaaaaaaaaaaa
aaaaaaaaaaaaaaaaaaaaaaaaaaaaa
aaaaaaaaaaaaaaaaaaa
aaaaaaaaaaaaaaaaaaaaaaaaaaaaa
aaaaaaaaaaaaaaaaaaa
aaaaaaaaaaaaaaaaaaaaaaaaaaaaa
aaaaaaaaaaaaaaaaaaa
aaaaaaaaaaaaaaaaaaaaaaaaaaaaa
aaaaaaaaaaaaaaaaaaa
aaaaaaaaaaaaaaaaaaaaaaaaaaaaa
aaaaaaaaaaaaaaaaaaa
aaaaaaaaaaaaaaaaaaaaaaaaaaaaa
aaaaaaaaaaaaaaaaaaaaaaaaaaaaa
aaaaaaaaaaaaaaaaaaaaaaaaaaaaa
aaaaaaaaaaaaaaaaaaaaaaaaaaaaa
aaaaaaaaaaaaaaaaaaaaaaaaaaaaa
For additional information about page frames, refer to the
LPS Forms Creation Guide
.
Xerox
a
a
a
a
a
a
a
a
a
a
a
a
a
a
a
a
a
a
a
a
a
a
a
a
a
a
a
a
a
a
a
a
a
a
a
a
a
a
a
a
a
a
a
a
a
a
a
a
a
a
a
a
a
a
a
a
a
a
a
a
a
a
a
a
a
a
a
a
a
a
a
a
a
a
a
a
a
a
System page
The system page is the maximum area the printer allows you to
image graphics and text. The system page is slightly larger than
the physical page. If the default paper sizes have been
established for your printer, the system page has little bearing on
your form design.
Page 17

PLANNING YOUR FORMS
If you decide to place marks along the edge of the physical page
(edge–marking) in your form, be familiar with the edge–marking
limitations. To accommodate edge–marking, the system page
must be larger than the physical page. Since the system page
boundaries correspond to at least two edges of the physical page
boundaries for all paper sizes, you can only use edge–marking on
the two edges of the physical page that do not correspond to
the system page.
The product guide for each printer contains specific information
about edge–marking.
Physical page
CAUTION: Unexpected results occur if you plan a form for a
physical page paper size that is not available.
The physical page is the actual paper size. On a Xerox LPS, you
define the default size of the physical page during system
generation (SYSGEN). During planning, you must consider the
default paper size or other paper sizes available for your printer.
See the “Supported paper sizes” appendix for more information.
Form origin
Virtual page
The virtual page is the area you specify for printing. The virtual
page can be as large as the physical page (actual paper size), but
can never be larger than the physical page. If you do not specify
the virtual page size, the defined (planned) area of the virtual
page is the same as the physical page.
Since the Xerox 4700 Color Document Printer has a limitation on
the print area of the physical page, make sure that the virtual
page does not include the area the printer grippers cover. Refer
to your printer documentation for more information on print area
limitations.
All form data described by HFDL is positioned on the page
relative to a point, called the form origin
.
The form origin is a
reference point from which you place all elements on a form
using HFDL commands. The form origin is a point that is offset
from the upper left corner of the virtual page. You can specify
this point during form description. If you do not define a virtual
page and specify a form origin, the default form origin is the
origin of the physical page.
HOST FORMS DESCRIPTION LANGUAGE 3.2 FOR IBM MVS CREATING FORMS 2–3
Page 18

HOST FORMS DESCRIPTION LANGUAGE
Figure 2–3 shows the location of the form origin of the virtual
page in relation to the actual page size.
Figure 2–3. Form origin location
LANDSCAPE FORM ORIGIN
FORM ORIGIN OFFSET FROM
VIRTUAL PAGE
LANDSCAPE PAGE
PORTRAIT FORM ORIGIN
FORM ORIGIN OFFSET FROM VIRTUAL PAGE
Positioning form elements
VIRTUAL PAGE (USER DEFINED)
PORTRAIT PAGE
DEFAULT SIZE= ACTUAL PAPER SIZE
(PHYSICAL PAGE)
You can place the following elements on a form with HFDL:
• Boxes
• Fixed text
• Images
• Lines
• Logos and signatures
• Sections.
x
You locate an element by determining the horizontal (
y
vertical (
form. These coordinates (
) distance from the upper–left corner (origin) of the
x, y
) comprise the origin of the
) and
document. The form origin (upper left corner of the page) is
always (0,0).
Form element Element origin
Vertical ruled line Top of the line at the midpoint of the
thickness of the line.
Horizontal ruled line Left end of the line at the midpoint
of the thickness of the line.
Box (outlined) Upper–left corner of the box at the
midpoint of the thickness of the
outline.
Box (shaded) Upper–left corner of the box.
2–4 HOST FORMS DESCRIPTION LANGUAGE 3.2 FOR IBM MVS CREATING FORMS
Page 19

Grids
PLANNING YOUR FORMS
Form element Element origin
Fixed text (single line) Upper–left corner of the first
character cell when the line appears
upright.
Fixed text Upper edge of the topmost character
(multiple lines) cell and the leftmost edge of the
leftmost character cell when viewed
in an upright position.
Graphics Upper–left corner of the image.
Logos and signatures Upper–left corner of the first
character cell.
Sections (of a form) Upper–left corner of the section.
You specify the location of a form element (alphanumeric
character, line, or box) on a page in terms of its horizontal and
vertical displacement from the form origin. You can use these
units of measure to define this displacement:
• Characters per inch (cpi) horizontally
• Dots per inch (300 dpi)
• Linear units (inches or centimeters)
• Lines per inch (lpi) vertically
• Xdots (600 dpi).
X and Y coordinates
If you draw a horizontal and vertical line through the form origin
x
to create
expressed as
provide the
x
for
and y coordinates, the location of the form origin is
y
=0, x=0. When specifying both coordinates,
y
value first. Figure 2–4 shows the correct placement
and y coordinates.
Figure 2–4. X and Y coordinates
0,0
x
0,0
PORTRAIT
LANDSCAPE
x
y
HOST FORMS DESCRIPTION LANGUAGE 3.2 FOR IBM MVS CREATING FORMS 2–5
y
Page 20

HOST FORMS DESCRIPTION LANGUAGE
Data types
If you draw additional lines horizontally and vertically away from
the form origin so that each additional line is one unit of
measure apart, you create a grid. You can now position form
elements by specifying a grid position.
Negative coordinates
You can use negative x and y values to place the form elements
above and to the left of the form origin. You can only specify
negative values within the system page boundaries.
Unit value
You can specify the unit of measure you want to use to position
form elements on the page. However, predefined formats
automatically select the grid values for you. The “FMT grid
format properties” appendix lists the predefined grid format
properties for various page sizes.
There are two types of data: forms data and variable data. Make
sure you consider them when you create forms for printing on
Xerox LPS printers.
Forms data
Forms data is the information on a form that remains the same,
such as form titles and column titles. Typically, fixed–length
forms data changes only when you modify the form. Forms data
is the only data you enter in the design process.
When designing a column size you must consider the amount of
variable data the column accommodates, not the size of the
fixed–length column title.
Variable data
Variable data is the data you overlay in the space provided by the
designed form. Variable data varies in length. An example of
variable data is a name and address.
You must allow sufficient space in the columns to accommodate
the variable data. Otherwise, variable data may be invalid or
unusable. For example, if you do not provide sufficient space for
an address, the zip code could be truncated. Spacing for
variable data is extremely important and is more accurately
calculated with fixed spacing of the font characters.
2–6 HOST FORMS DESCRIPTION LANGUAGE 3.2 FOR IBM MVS CREATING FORMS
Page 21

Fonts
Fixed and proportionally spaced fonts
PLANNING YOUR FORMS
Fonts are character sets, each having a unique typeface (Times,
Roman or Helvetica), type size (points), and type style (normal,
bold, or italic).
Fonts must reside in the host database and on the printer.
Check with your System Administrator to identify the fonts
available on your printer. If you specify a font that does not
reside in the host database, you receive an error message when
you compile the form.
You can use fixed and proportionally spaced fonts on Xerox LPS
printers. Each character occupies an area of the form cell called
a character cell. With fixed fonts, all character cells in the set are
the same width. With proportional fonts, character cells vary in
width.
Usually, you use fixed fonts for variable data and proportional
spacing for forms data. Figure 2–5 shows examples of fixed and
proportional spacing.
Font orientation
Figure 2–5. Character spacing
CHARACTER CELL
PROPORTIONAL SPACINGFIXED SPACING
In addition to typeface, style, and size, you can also define fonts
by their orientation:
• Landscape
• Portrait
• Inverse landscape
• Inverse portrait.
HOST FORMS DESCRIPTION LANGUAGE 3.2 FOR IBM MVS CREATING FORMS 2–7
Page 22
HOST FORMS DESCRIPTION LANGUAGE
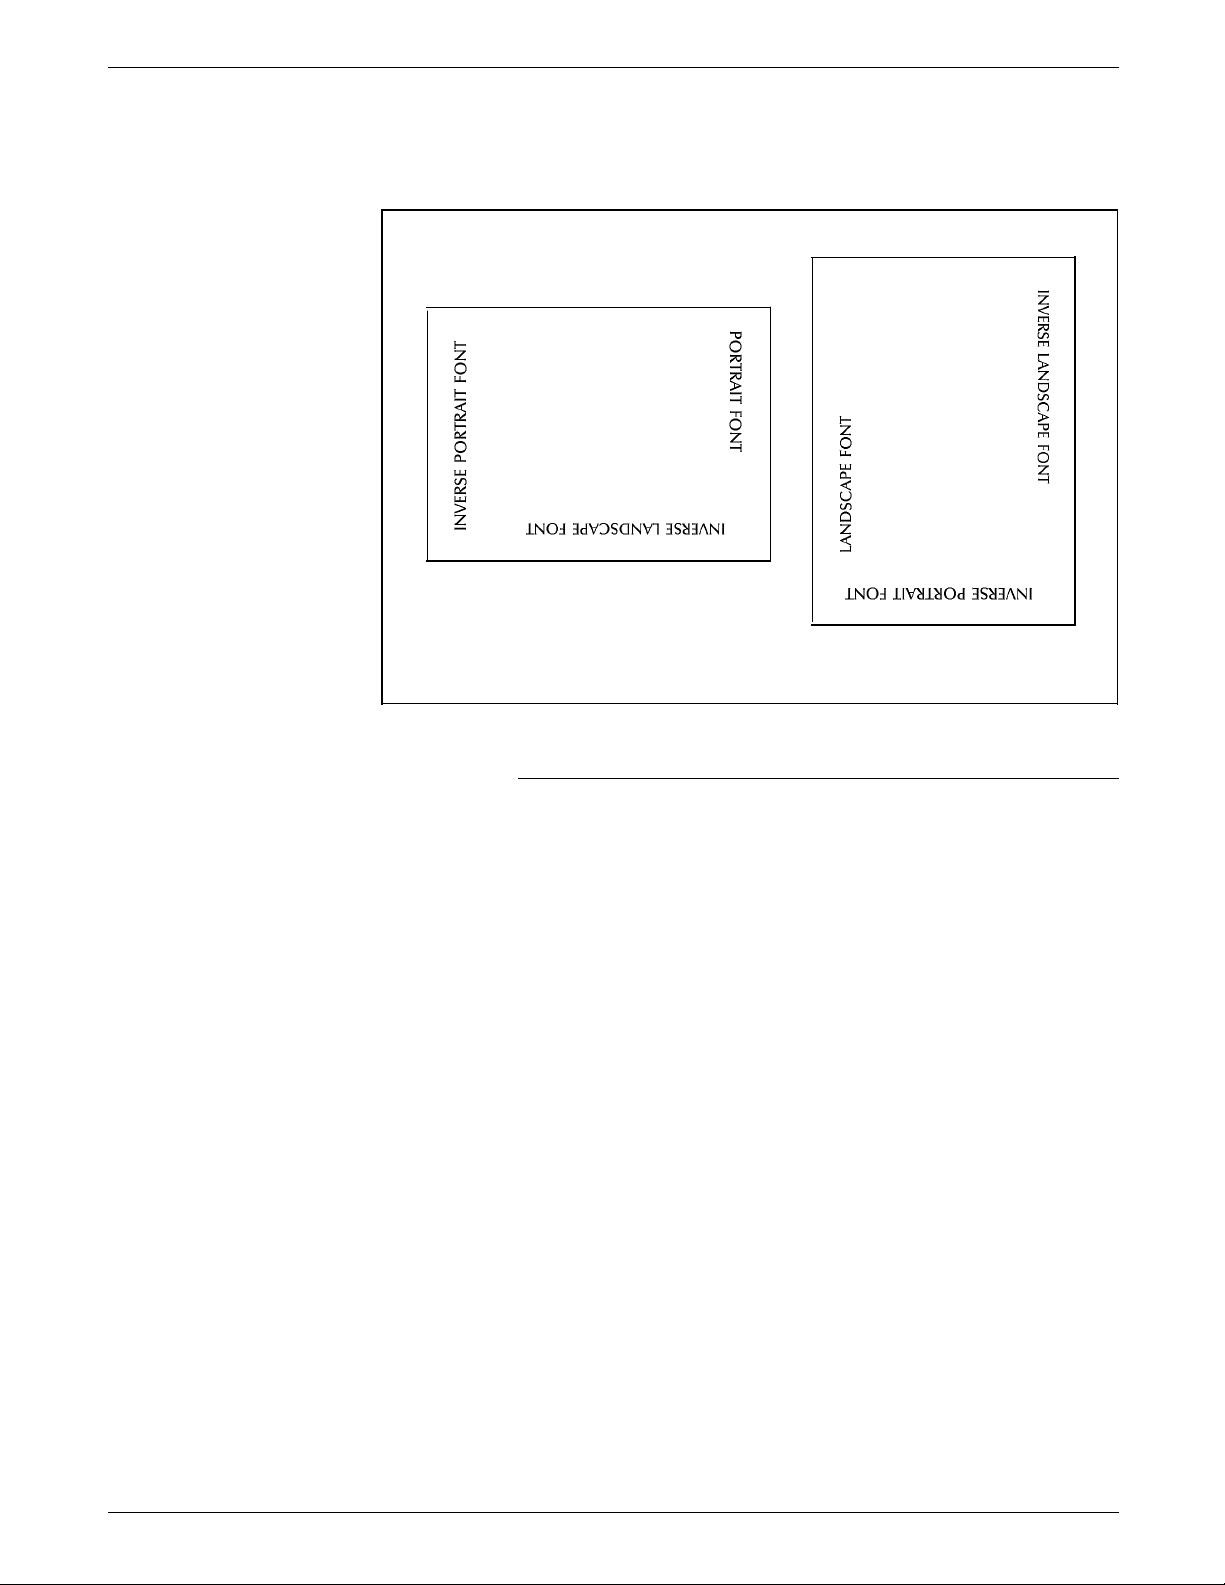
Figure 2–6 shows the font orientations relative to the physical
page.
Figure 2–6. Font orientation
PORTRAIT FONT
LANDSCAPE FONT
LANDSCAPE PAGE
PORTRAIT PAGE
Font orientation when using short–edge paper feed
Normally, stock feeds into the printer moving in the direction of
the page length. You assign each job a font with a landscape
orientation (characters align along the long edge of the page) or
a font with a portrait orientation (characters align along the short
edge of the page).
Some printers, such as the Xerox 4135 LPS, support paper sizes
up to 14.33 by 17 inches by allowing the stock to feed into the
printer moving in the direction of the page width. This is the
short edge feed (SEF) option. This reversal of the feed edge
reverses the font orientation the job must use. When printing a
landscape document using the SEF option, specify portrait fonts.
When printing a portrait document using the SEF option, specify
landscape fonts.
2–8 HOST FORMS DESCRIPTION LANGUAGE 3.2 FOR IBM MVS CREATING FORMS
Page 23

Virtual keyboard and font character maps
You can create virtual keyboard and font character maps and
store them in the XPRM database after installation. During the
compilation of forms, you can set the compiler to use the
character maps to enable keyboard–to–font character mapping.
Use the KEYBOARD parameter of the COMPILE command to
specify the keyboard map you want to use. The keyboard
characters are mapped to the corresponding graphic
representations of the characters in the Xerox printer fonts. For
more information on setting the compiler, refer to the “Using the
COMPILE command” section in the “Managing and printing
sample forms” chapter.
Normally, mapping is not required in the United States, but it is
required in the following situations:
• When there are differences between your terminal keyboard
configurations
• To accommodate varying character sets
• To accommodate the internal organization of characters
within different fonts.
PLANNING YOUR FORMS
Keyboard emission
Keyboard
character
"
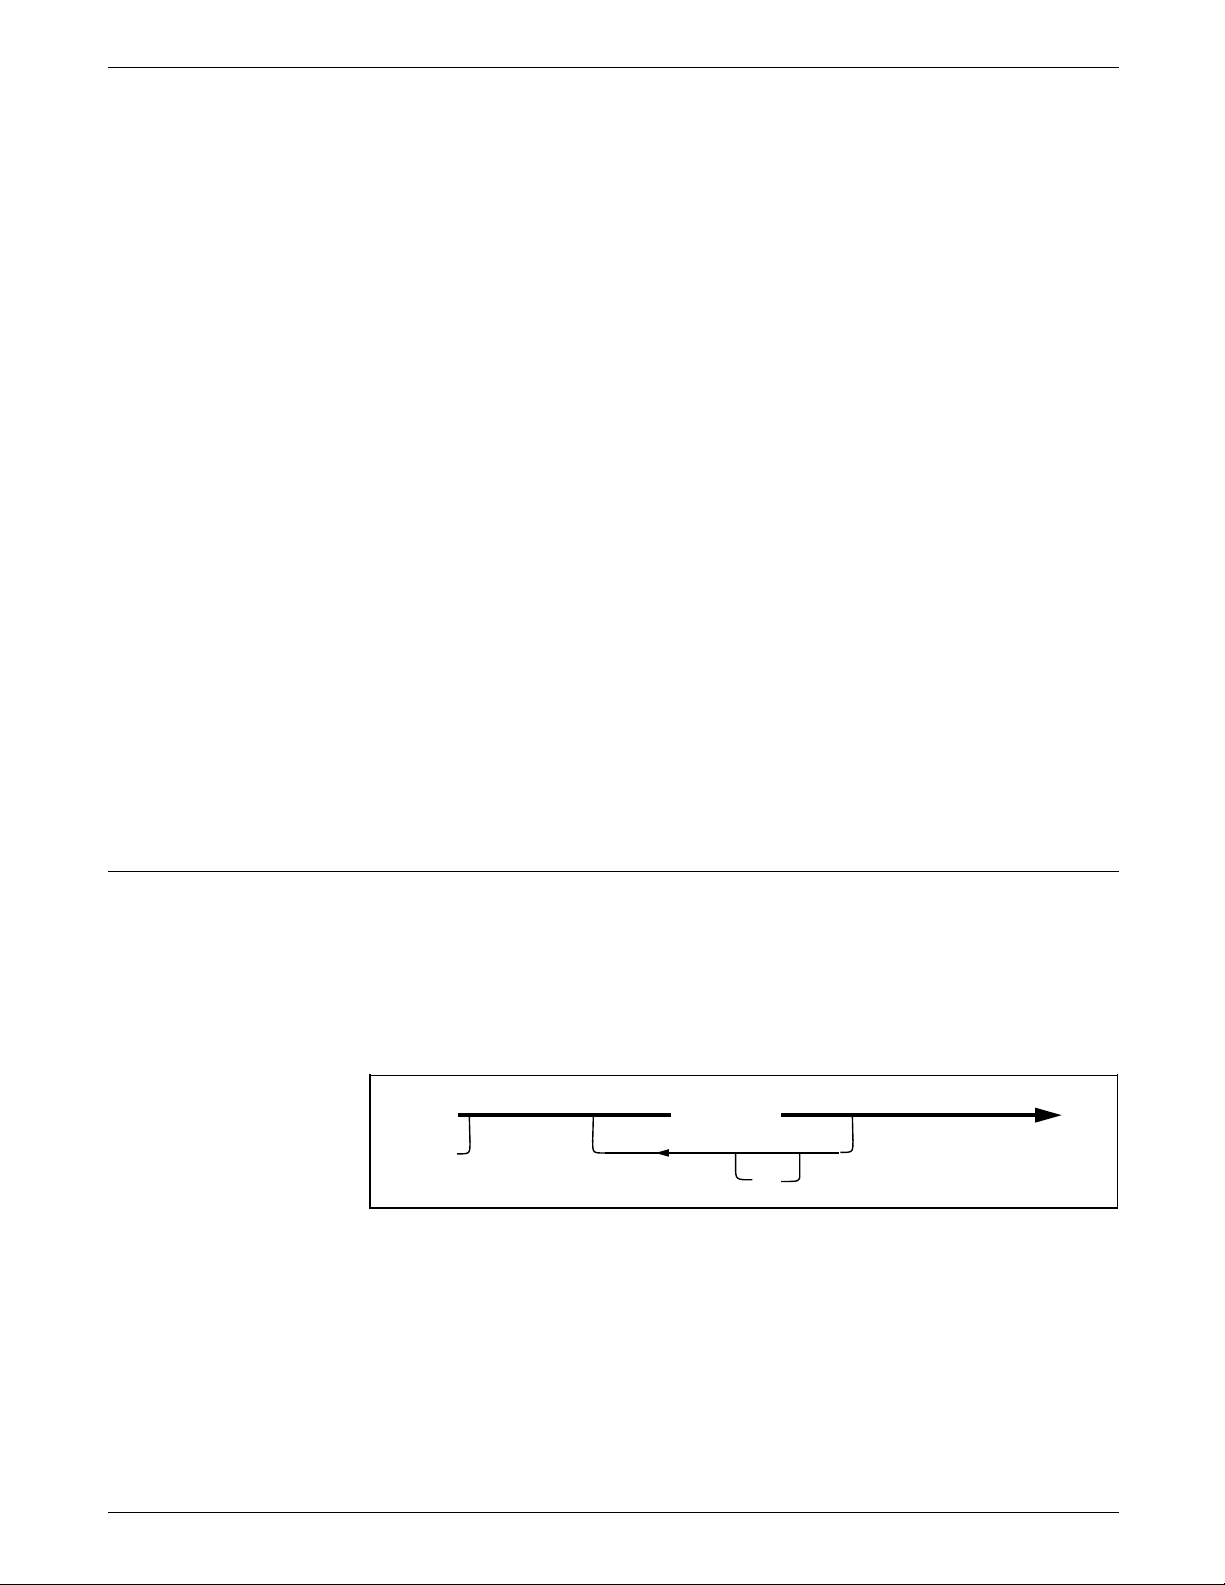
You must use a keyboard character map to access a font
character map. In the United States, use the U.S. English
keyboard character map.
Generally, you map the keyboard character to the corresponding
character in each font used in the form. Figure 2–7 shows this
process. In the example, the neutral double quote (") on the
keyboard is mapped to the neutral double quote in the font.
Figure 2–7. Mapping process
Virtual keyboard
character map
EBCDIC
Hexadecimal
code point
7F 000/042
Keyboard
table
7F
Xerox
character
identifier
Xerox
character
identifier
Font character map
ASCII
Hexadecimal
code point
F2000/042
Font
character
that prints
"
HOST FORMS DESCRIPTION LANGUAGE 3.2 FOR IBM MVS CREATING FORMS 2–9
Page 24

HOST FORMS DESCRIPTION LANGUAGE
Keyboard emission
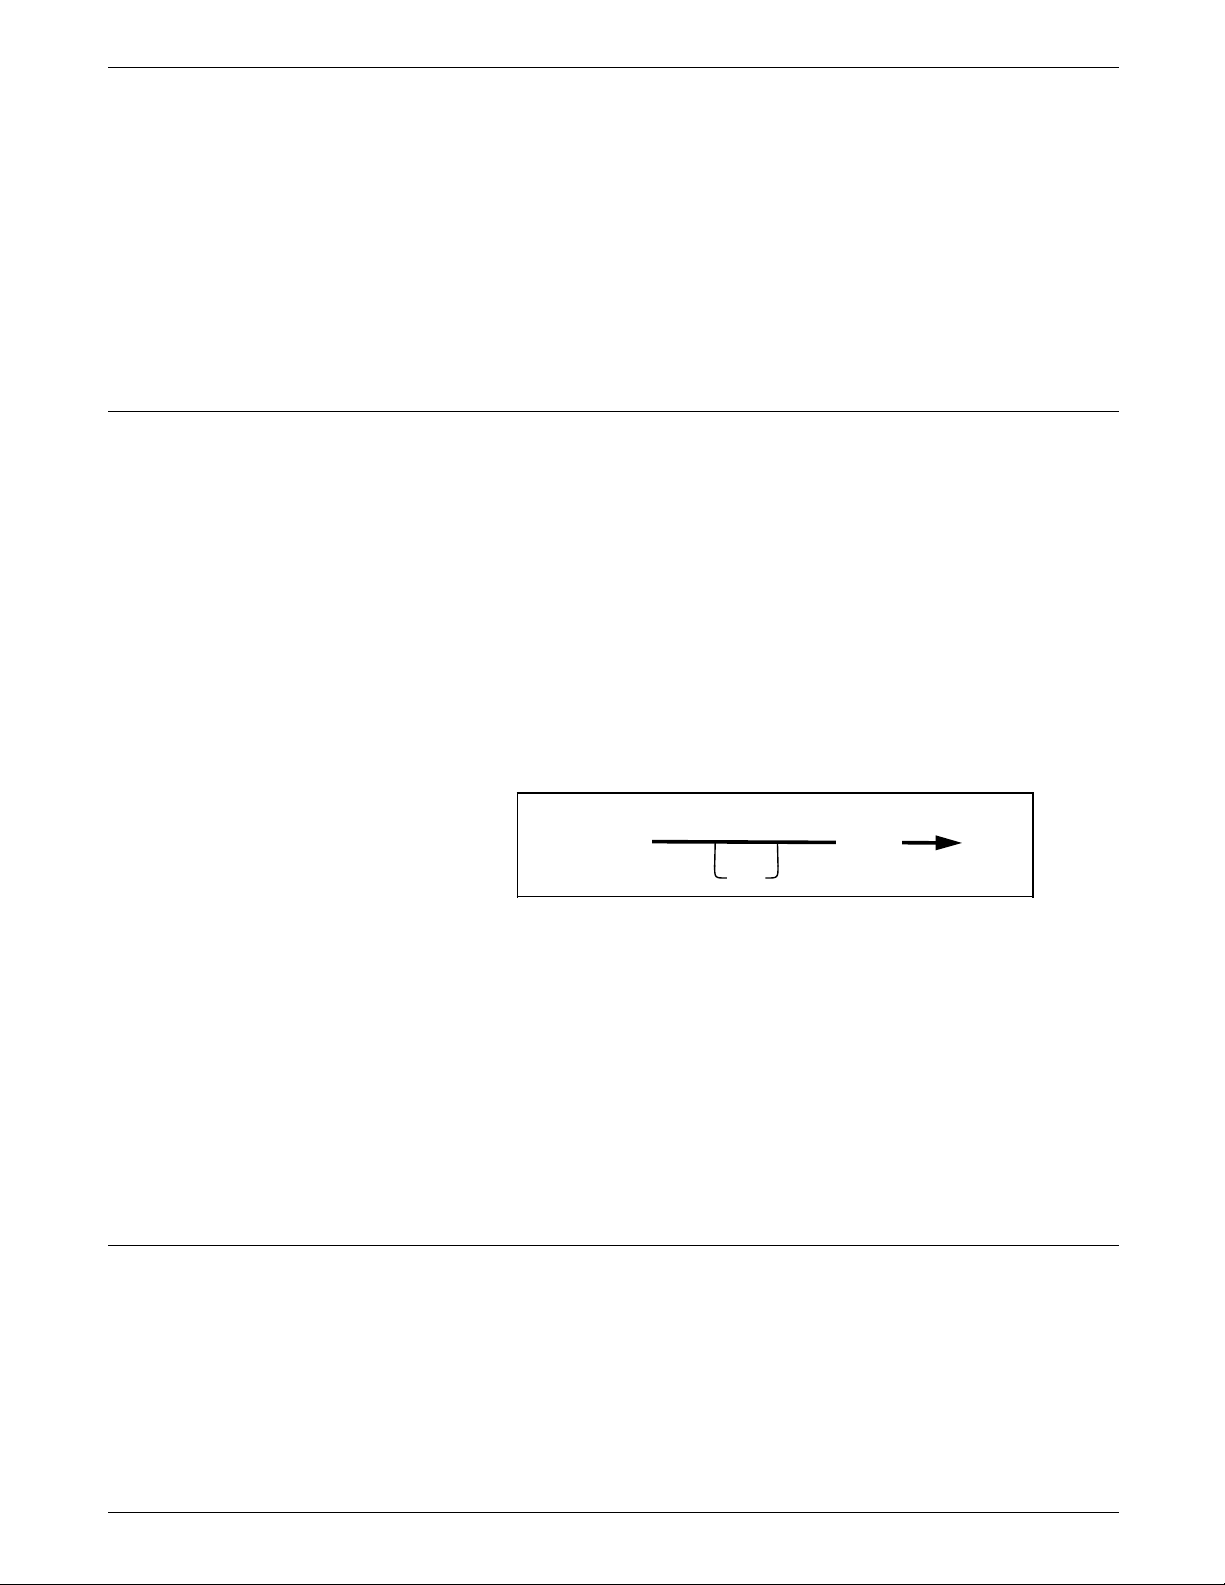
You can also use the mapping process to assign a different
character to a key. Figure 2–8 shows you how to map a little
used keyboard character, such as the cent sign (¢), to a new font
character required in your form, the fraction one–half ( ).
Figure 2–8. Mapping to a different font character
Virtual keyboard
character map
Font character map
Keyboard
character
¢
Hexadecimal
code point
4A
Keyboard
table
Virtual keyboard character maps
Xerox
character
identifier
Xerox
character
identifier
000/2754A 000/275
ASCII
code point
1F
Font
character
that prints
You cannot map the following keyboard characters to a different
character: A to Z, a to z, and 0 to 9.
When you press a key on the terminal keyboard, it emits a
unique code. This special code is referred to as a hexadecimal
code point.
A specific hexadecimal code point corresponds to the same
character, regardless of the keyboard you are using. For
example, hexadecimal code point C1 always corresponds to an
uppercase A.
Keyboards may vary from country to country, so there are a few
hexadecimal code points that correspond to different characters
depending on the keyboard you are using. For example, on a
U.S. English keyboard, hexadecimal code point 4A corresponds
to the cent symbol (¢); on a UK English keyboard, hexadecimal
code point 4A corresponds to the dollar symbol ($). U.S. English
is the default keyboard, but you can customize a virtual keyboard
character map for each unique keyboard configuration you need.
A unique Xerox character identifier is assigned to each character
in the Xerox centralized and decentralized fonts. The printer
uses the Xerox character identifier to locate the graphic
representation of the character. The Xerox character identifier
matches the hexadecimal code point to the character it
represents. For example, the Xerox character identifier 0/101
corresponds to the uppercase A.
For more information on keyboard character maps, see the
“Virtual keyboard and font character maps” appendix in the
Xerox
Print Resources Manager/Host Forms Description Language 3.2
for IBM MVS Managing Resources
2–10 HOST FORMS DESCRIPTION LANGUAGE 3.2 FOR IBM MVS CREATING FORMS
manual.
Page 25

Font character maps
Adding color to forms
PLANNING YOUR FORMS
Once the compiler equates a keyboard code point to a Xerox
character identifier, another translation must locate the graphic
representation of the character within the font. A font character
map identifies the location of each graphic character within a
font. The graphic representation is the actual bitmap that prints
the character in the form. Usually the character is in ASCII
format. For example, hexadecimal code point 41 is the ASCII
code for the uppercase A.
Some character sets may not support all font graphic characters.
For example, Character Set E does not contain the left brace ({).
For more information on font character maps, see the “Virtual
keyboard and font character maps” appendix in the
Xerox Print
Resources Manager/Host Forms Description Language 3.2 for
IBM MVS Managing Resources
manual.
The Xerox highlight color LPS printers and the Xerox 4700 Color
Document Printer allow you to use color to emphasize important
parts of your form. With a highlight color printer, you can use
different shades of a single color to highlight parts of your form.
The 4700 printer uses full color technology, which allows you to
choose from a wide selection of colors. The following examples
show typical color enhancements for forms:
• Highlighted titles
• Highlighted columns representing totals or important results
• Lines setting off groups of columns or items or used as a
border for your form
• Boxes filled with any of the colors and tints available in the
ink catalog.
You use the HFDL command statements to control color. For
more information, refer to the “Using HFDL commands” chapter.
On a highlight color printer, text, lines, and box borders always
print in the primary color of the printer, even if you specify a
different color, tint, and so on.
You can send a form using red, blue, or green palettes to either
a highlight color printer or a full color printer. To convert red,
blue, and green highlight colors to full color versions, recompile
the form with VERSION=XC on the COMPILE command. The
full–color palette is available only on the 4700 printer.
Ink color availability and control
When planning colors, you should determine if your company
has any regulations and controls for using colors on forms. You
may need to use a specific ink list, which contains an ink catalog,
palette, and ink for items such as logos and form titles. Contact
your System Administrator to determine the available ink colors.
HOST FORMS DESCRIPTION LANGUAGE 3.2 FOR IBM MVS CREATING FORMS 2–11
Page 26

HOST FORMS DESCRIPTION LANGUAGE
Choosing paper size
Forms design ruler
For additional information regarding default ink palettes, catalogs,
color models, ink priority and substitutions, and modifying
output, refer to the
Once you determine the actual page size (physical page)
available for your printer, you can specify any size within the
physical page size for your form.
Contact your System Administrator to determine available paper
sizes.
For a list of paper sizes for the family of Xerox laser printers, refer
to the “Supported paper sizes” appendix.
Careful spacing and form measurements can help ensure a
smooth conversion to an electronic format. As an option, a
design ruler can be ordered to measure character and line
spacing on your draft form or paper original. Contact your
appropriate Xerox customer representative for ordering
information.
Xerox LPS PDL/DJDE Reference Manual.
Ruler scales
The design ruler is approximately 15 inches long, with eight
scales, four on each side. The scales are defined as follows:
Side 1 Scale 1 (10/INCH)—Output character spacing. You can also use
this scale to measure inches, graduated in tenths.
Scale 2 (6/INCH)—Output line spacing for 6 lines per inch (lpi).
Scale 3 (8/INCH)—Output line spacing for 8 lpi.
Scale 4 (12/INCH)—Output line spacing for 12 characters per
inch (cpi) or 12 lpi.
Side 2 Scale 5 (13.6/INCH)—Default output character spacing for 13.6
characters per inch (cpi).
Scale 6 (8.1/INCH)—Default output line spacing for 66 lines per
landscape page.
Scale 7 (10.7/INCH)—Output line spacing on for 88 lines per
landscape page.
Scale 8 (15/INCH)—Output line spacing for 15 cpi or 15 lpi.
2–12 HOST FORMS DESCRIPTION LANGUAGE 3.2 FOR IBM MVS CREATING FORMS
Page 27

Suggested uses
PLANNING YOUR FORMS
You can use the design ruler for character spacing or line
spacing. For example, you can use scale 1 for 10 characters per
inch (cpi) or 10 lines per inch (lpi). Typically, you use side 1 of
the ruler for measuring impact–printed computer output reports
in which the character spacing is 10 cpi (scale 1) and line spacing
is 6 lpi (scale 2) or 8 lpi (scale 3). You use side 2 for measuring
LPS output.
The default spacing for the LPS is 13.6 cpi (scale 5) and 8.1 lpi
(scale 6). These defaults allow optimal readability for the
standard format of 132 columns by 66 lines.
HOST FORMS DESCRIPTION LANGUAGE 3.2 FOR IBM MVS CREATING FORMS 2–13
Page 28

HOST FORMS DESCRIPTION LANGUAGE
2–14 HOST FORMS DESCRIPTION LANGUAGE 3.2 FOR IBM MVS CREATING FORMS
Page 29

3. Using HFDL commands
You use the Host Forms Description Language (HFDL) keyword
commands to translate your form design into a format for the
host computer. The command set representing your form
becomes the Forms Source Language (FSL), which the host
compiles and stores. You can download the compiled form to a
Xerox LPS or XES printer. This chapter describes the HFDL
commands and their functions.
Creating forms with HFDL commands
The HFDL command language syntax is usually the same as the
Forms Description Language (FDL) command language syntax.
You should be familiar with the FDL commands and how to use
them at the printer.
For more information on FDL commands and printer usage
to the
the “Troubleshooting syntax errors” section in the
Notes
Xerox Laser Printing Systems Forms Creation Guide
HFDL Release
.
,
and
refer
Available specifications
The “Comparison of HFDL and FDL” appendix in this manual
compares the commands for HFDL 2.1D, HFDL 3.1, HFDL 3.2,
and FDL.
The HFDL commands allow you to specify the following features:
• Form name identifies the forms you are developing.
• Page orientation specifies a page as portrait or landscape.
• Font selection specifies the fonts you want to use.
• Vertical and horizontal grid positions specify grid position
and position form elements in line printer measurements
(line number and character position) or inches, centimeters,
dots, and xdots.
• Highlight and full color enhance graphs, charts, forms, and
other publications.
• Shading mixes color with black to produce shades of a
primary color (red, green, or blue).
• Caption position specifies locations of captions on a page
or selects automatic placement within a specified area.
• Logo and graphic position specifies the location of
selected logos and graphics on a page.
HOST FORMS DESCRIPTION LANGUAGE 3.2 FOR IBM MVS CREATING FORMS 3–1
Page 30

HOST FORMS DESCRIPTION LANGUAGE
Command format
Each HFDL command consists of a command identifier,
parameters, and reserved words associated with the function.
The following conventions apply:
• A semicolon (;) terminates a command.
• A comment line begins with the word COMMENT, followed
by a comment and semicolon (;).
• A blank space separates reserved words and parameters.
• Commas are legal only as shown in the command syntax
flow charts.
Command information appears within the first 72 columns of
each record. Commands can continue for multiple records;
however, there is a limit of 4,096 characters allowed in one text
block. Multiple commands can appear in one record if you
separate them with semicolons.
The system ignores records containing all blanks. You can use
them to separate command statements.
Reserved words
Special characters
Reserved words appear in bold uppercase text in the command
syntax flow charts in this chapter. You can abbreviate many
n
reserved words to the first three characters (except FMT
n
you must specify the integer
abbreviations for reserved words” appendix for the list of
abbreviations you can use. Avoid using reserved words as
section or form names.
Use the following special characters to meet certain requirements
within the command statements:
• A single quote (’) encloses a text string, for example, ’This
is a font count’ produces “This is a font count” in the
printed version. When you use a reserved word such as
“font” in a string, it is not processed as a command.
• A pound symbol (#) within a text string shifts the text
between uppercase and lowercase characters, and vice
versa. Each string begins with an uppercase character. For
example, F#IRST produces “First” in the printed version.
To shift back to uppercase characters, you must enter
another pound symbol (#) character in the text string. For
example, R#EV#A produces “RevA” in the printed version.
). Refer to the “Approved
, where
You can substitute the pound symbol (#) with any other
character by using the SHIFT operand at the COMPILE
command. Refer to the "Command Syntax" section in the
"Managing and printing sample forms" chapter for
information on how to use this operand.
• An exclamation point (!) specifies a character in the font
character set, not the keyboard character. Enter an
exclamation point (!) and the ASCII hexadecimal code point
for the character you want to print. For example, 65!7B
3–2 HOST FORMS DESCRIPTION LANGUAGE 3.2 FOR IBM MVS CREATING FORMS
Page 31

produces 65°. No mapping or translation is done to these
characters.
You can substitute the exclamation point (!) with any other
character by using the LITERAL operand at the COMPILE
command. Refer to the "Command Syntax" section in the
"Managing and printing sample forms" chapter for
information on how to use this operand.
• Special characters print only if you type them twice in
succession. For example, ‘IT’’S HERE!!’ produces “IT’S
HERE!” in the printed version.
Understanding the command syntax flow charts
Many HFDL statements offer several options. This chapter
represents HFDL command syntax in the form of flow charts,
which allow you to visualize the main command statement and
the way options branch from that statement.
If you want to enter a command in its short form, without
options, follow the main command line in the flow chart until
you reach a semicolon. Otherwise, follow the branching below
the main command line to include any parameters you want.
USING HFDL COMMANDS
Setting up your form
The main command line contains the required words and
operands. Under the command line, or under a branching line,
you can use optional words to clarify the command. Parameters
that are vertically stacked (one above the other) under the main
command line or under a branching line indicate choices for that
particular parameter. Ellipses (...) indicate multiple occurrences
of the preceding parameter.
Words, characters, or phrases shown in lowercase are variables.
Replace these variables with names or values that you have
selected.
Before you enter commands to describe a form, you enter setup
commands to specify the following:
• FORM specifies the name and resolution of the form.
• PAPER specifies the paper size.
• LANDSCAPE/PORTRAIT specifies page orientation and
virtual page size.
• GRID specifies grid unit and form origin.
• FONTS specifies fonts.
• ICATALOG and PALETTE specifies ink catalog and palette.
• INK specifies inks and colors valid only when using Xerox
color printers.
• IRESULT specifies results when objects imaged with
different inks overlap on Xerox highlight color printers only.
The name parameter of the FORM command is required. The
other commands are optional. If you do not specify the optional
HOST FORMS DESCRIPTION LANGUAGE 3.2 FOR IBM MVS CREATING FORMS 3–3
Page 32

HOST FORMS DESCRIPTION LANGUAGE
aaaaaaaaaaaaaaaaaaaaaaaaaaaaaaaaaaaaaaaaaaaaaaaaaaaaaaaaaaaaaaaaaaa
a
a
a
a
a
a
a
a
a
a
a
a
a
a
a
a
a
FORM command
commands, the defaults are used. If you want to include text on
the form, you must specify the FONT command.
You must first specify the FORM command when you describe
your form. You must also completely contain it in the first
record of the form description.
Enter a form name between one and six characters. This is the
only required parameter in the FORM command. FORM must
be the first command of the form file and must precede any
comments. Once the form is compiled, this name identifies the
form stored on the printer.
Figure 3–1 shows the command syntax flow.
Figure 3–1. FORM command syntax
PAPER command
name
aaaaaaaaaaaaaaaaaaaaaaaaaaaaaaaaaaaaaaaaaaaaaaaaaaaaaaaaaaaaaaaaa
aaaaaaaaaaaaaaaaaaaaaaaaaaaaaaaaaaaaaaaaaaaaaaaaaaaaaaaaaaaaaaaaa
, 300
aaaaaaaaaaaaaaaaaaaaaaaaaaaaaaaaaaaaaaaaaaaaaaaaaaaaaaaaaaaaaaaaa
aaaaaaaaaaaaaaaaaaaaaaaaaaaaaaaaaaaaaaaaaaaaaaaaaaaaaaaaaaaaaaaaa
aaaaaaaaaaaaaaaaaaaaaaaaaaaaaaaaaaaaaaaaaaaaaaaaaaaaaaaaaaaaaaaaa
Parameters
aaaaaaaaaaaaaaaaaaaaaaaaaaaaaaaaaaaaaaaaaaaaaaaaaaaaaaaaaaaaaaaaa
aaaaaaaaaaaaaaaaaaaaaaaaaaaaaaaaaaaaaaaaaaaaaaaaaaaaaaaaaaaaaaaaa
aaaaaaaaaaaaaaaaaaaaaaaaaaaaaaaaaaaaaaaaaaaaaaaaaaaaaaaaaaaaaaaaa
RESOLUTION
name
identifies the name you want to use for the form. The
form name must be from one to six characters.
IS
600
SPI
name
required parameter, but you can omit the remainder of the
FORM command.
RESOLUTION: You can specify the resolution (300 or 600 SPI)
or leave the resolution blank. IS and SPI are optional. The 600
SPI resolution is only valid on the Xerox 4650 LPS.
Default 300 SPI if you do not specify SPI. There are no defaults for the
name
form
.
Examples Long form:
FORM NEWFOR, RESOLUTION IS 600 SPI;
Short form:
FORM NEWFOR;
Use the PAPER command to specify the paper size for your
form. This command replaces the ALIN option (from HFDL
version 2.1).
a
a
a
a
a
a
a
a
is a
;FORM
If you specified a predefined form using the GRID command, the
paper size is determined automatically and you do not need to
use the PAPER command.
If you use the PAPER command to specify a paper size at run
time, make sure the paper size matches the size specified in the
JDE or JDL for the variable data.
Before printing your form, verify that the printer contains the
correct paper size. Use the printer status key on the printer
console. An error message displays if a paper size mismatch
occurs at run time. The job aborts and your form does not print.
3–4 HOST FORMS DESCRIPTION LANGUAGE 3.2 FOR IBM MVS CREATING FORMS
Page 33
USING HFDL COMMANDS
Refer to the output statement PAPER SIZE command in the
Xerox LPS PDL/DJDE Reference
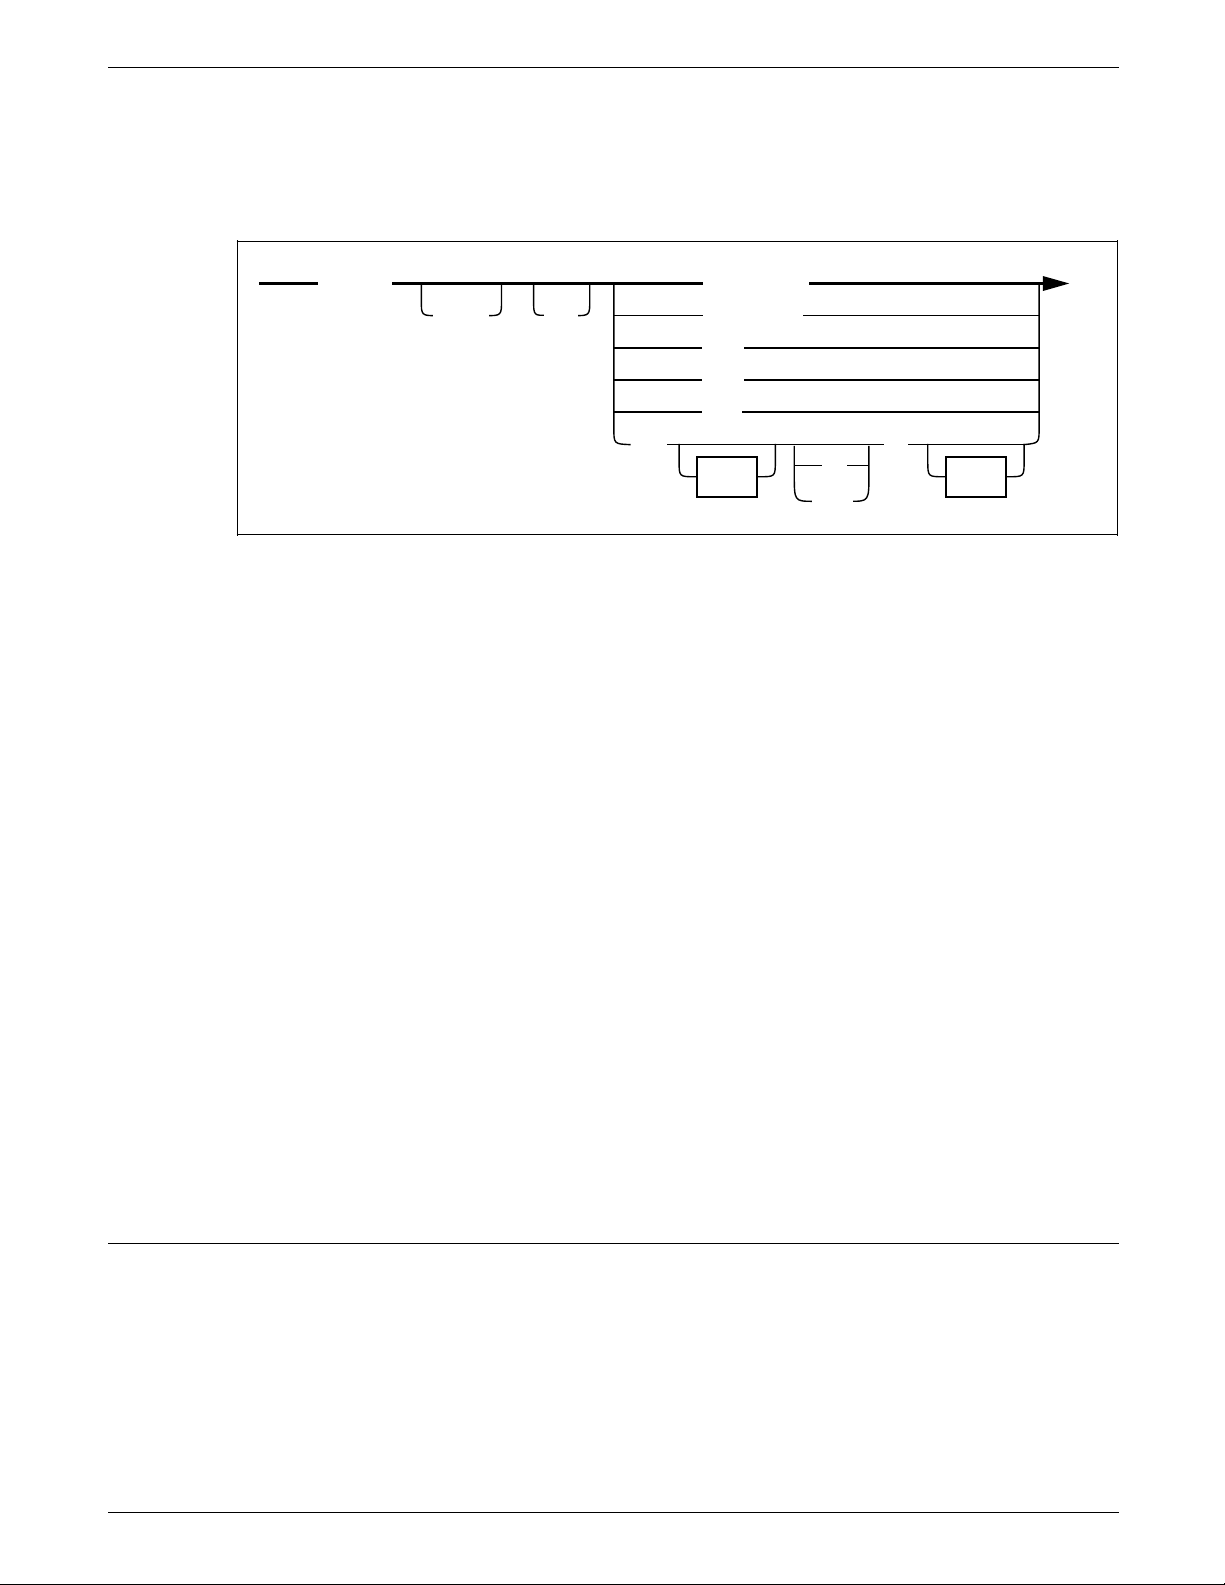
Figure 3–2 shows the command syntax flow.
Figure 3–2. PAPER command syntax
manual.
PAPER
SIZE IS
w
Parameters SIZE and IS are optional words you can use for clarity in the long
form of the language coding.
USLETTER, USLEGAL, A3, A4, and B4 are the standard paper
sizes you can use with the Xerox LPS.
Width (w) and length (l) represent the decimal paper size for
printers that allow you to print forms in nonstandard paper sizes.
units
indicates the unit of measure you want to use when
specifying the size of the page. The
INCHES, CENTIMETERS, DOTS, and XDOTS. You can use two
decimal places when you specify inches and centimeters. You
must express DOTS and XDOTS in integers.
USLETTER
USLEGAL
A3
A4
B4
,
l
BY
units
you can choose are
unitsunits
;
Default Inches, if you do not specify units.
Examples Long form:
LANDSCAPE/PORTRAIT command
Refer to the “Supported paper sizes” appendix for more
information.
If you do not specify the PAPER command and a predefined
format is not defined in the GRID command, HFDL assumes
USLETTER.
PAPER SIZE IS USLETTER;
PAPER SIZE IS 8.5 INCHES BY 11 INCHES;
Short form:
PAPER USLETTER;
Use the LANDSCAPE/PORTRAIT command to specify the
orientation of the form, and the size and origin of the virtual
page.
If you specified the predefined format in the GRID command,
the form orientation is established automatically and you do not
need to use the LANDSCAPE/PORTRAIT command.
HOST FORMS DESCRIPTION LANGUAGE 3.2 FOR IBM MVS CREATING FORMS 3–5
Page 34
HOST FORMS DESCRIPTION LANGUAGE
PORTRAIT
Figure 3–3 shows the command syntax flow.
Figure 3–3. LANDSCAPE/PORTRAIT command syntax
PAGE
SIZE IS
n
units
;LANDSCAPE
,
n
WIDE HIGH
Parameters LANDSCAPE specifies the landscape form orientation. If you
BY
only specify LANDSCAPE, grid units and form origin correspond
to the standard grid format (FMT1).
PORTRAIT specifies the portrait form orientation. If you only
specify PORTRAIT, grid units and form origin correspond to the
standard grid format for the portrait page (FMT6), unless you
change them with the GRID command.
Refer to the “FMT grid format properties” appendix for more
information.
PAGE, SIZE, and IS specifies the width and height of the virtual
page.
The value you use to specify the special page size is n. You must
use positive numbers and you cannot exceed the size specified
in the PAPER SIZE command. You can use two decimal places
when you specify inches. You must express DOTS and XDOTS
as integers.
units
indicates the unit of measure you want to use when
specifying the size of the virtual page. The
are INCHES, CENTIMETERS, DOTS, and XDOTS. You can use
two decimal places when you specify inches and centimeters.
You must express DOTS and XDOTS as integers.
units
units
you can choose
Defaults If you do not use the LANDSCAPE/PORTRAIT command, HFDL
uses these defaults:
• LANDSCAPE (orientation)
• FMT1 (grid units and form origin)
• 8.5 by 11 inches (virtual page)
units
• INCHES (if you do not specify
Examples Long form:
PORTRAIT PAGE SIZE IS 8.5 INCHES WIDE BY 11 INCHES HIGH;
Short form:
PORTRAIT;
It allows HFDL to default to the FMT6 predefined format.
3–6 HOST FORMS DESCRIPTION LANGUAGE 3.2 FOR IBM MVS CREATING FORMS
).
Page 35
GRID command
GRID
n
n
USING HFDL COMMANDS
Use the GRID command to specify the dimensions of the grid
unit and the location of the form origin with respect to the
virtual page origin. All HFDL description commands create and
place form elements (lines and boxes) relative to the form origin.
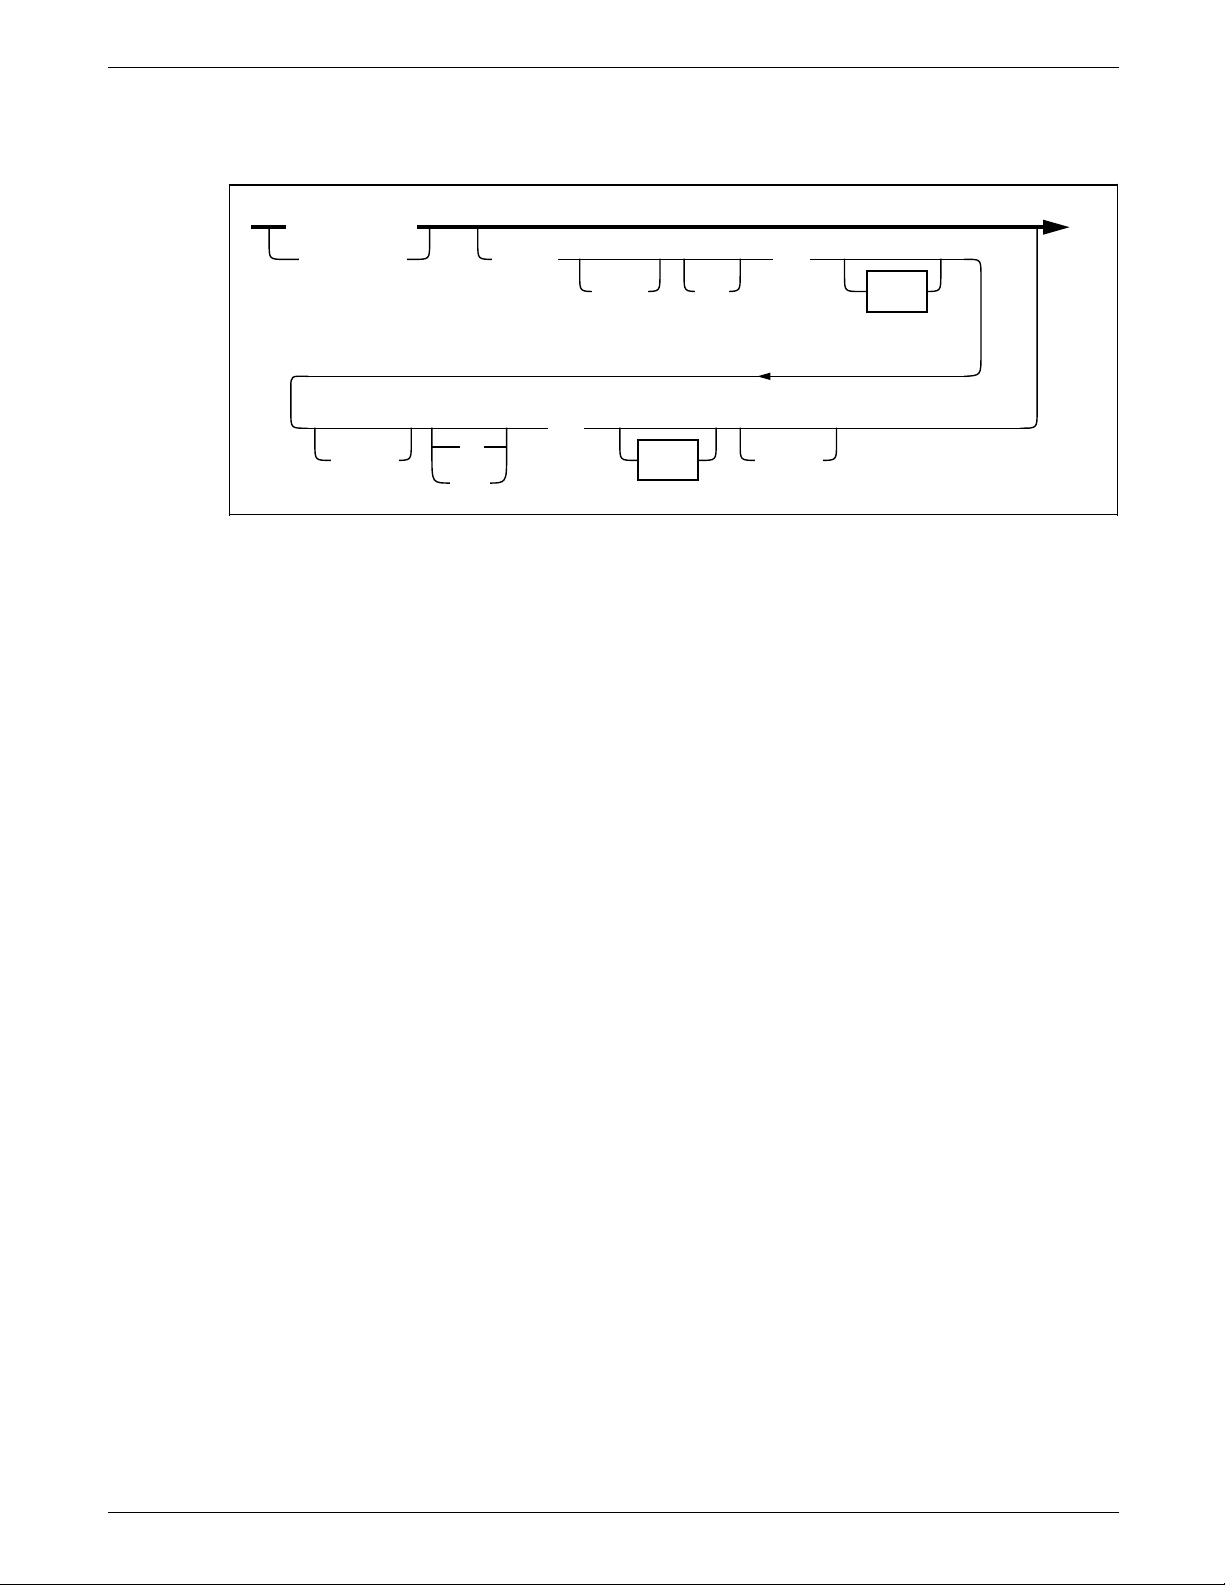
Figure 3–4 shows the command syntax flow.
Figure 3–4. GRID command syntax
ISUNIT
format – id
,
units
,
BY
CPI
,
BY
units
n
n
units
,
LPI
,
,
ORIGIN
units units
Parameters UNIT and IS are optional words you can use as a lead–in to the
format – id
The name of the predefined format that you have selected is
format – id
for more information.
The size of the grid unit is
units (for example, 6 inches). If you specify inches or
centimeters, the value represents one side of a square grid unit.
If you only specify one DOTS or XDOTS parameter, the grid unit
is the same number of dots both horizontally and vertically.
CPI specifies the number of characters per inch for the
horizontal size of the grid unit.
LPI specifies the number of lines per inch for the vertical size of
the grid unit.
ORIGIN specifies the origin of the form relative to the virtual
page origin. ORIGIN establishes the 0.0 X and Y coordinates.
and
units
identifiers.
. Refer to the “FMT grid format properties” appendix
x y
,
n
, expressed in positive numbers of
;
HOST FORMS DESCRIPTION LANGUAGE 3.2 FOR IBM MVS CREATING FORMS 3–7
Page 36
HOST FORMS DESCRIPTION LANGUAGE
The GRID sizes must fall into the boundaries of the physical
page. The smallest grid allowed is 1 XDOT by 1 XDOT. The
largest grid allowed is 1 physical page by 1 physical page.
Y
specifies the form origin offset downward from the top–left
corner of the virtual page.
X
specifies the form origin offset to the right of the left edge of
the virtual page.
units
indicates the unit of measure you want when specifying the
units
offset origin. The
XDOTS. You can use two decimal places when you specify
inches and centimeters. You must express DOTS and XDOTS in
integers.
Defaults Predefined format FMT1, if you do not specify the GRID or
LANDSCAPE/PORTRAIT commands.
Predefined format FMT6, if you specify PORTRAIT
(LANDSCAPE/PORTRAIT command), but not GRID. If you
specify a predefined format, all GRID format parameters are
automatically provided, unless you change them with the
ORIGIN parameters.
INCHES, if you do not specify
are INCHES, CENTIMETERS, DOTS, and
units
.
FONT command
A value of 1, if you omit an
XDOTS.
Examples Long form:
GRID UNIT IS 12 CPI BY 8 LPI ORIGIN 0.18 INCH 0.66 INCH;
Short form:
GRID FMT1;
You cannot specify any text in your form until you specify the
fonts you are going to use with the FONT command. Check
with your System Administrator for the fonts available for your
forms.
Figure 3–5 shows the command syntax flow.
Figure 3–5. FONT command syntax
FONTS
font name
n
value when you specify DOTS or
,
;FONT
Parameters
3–8 HOST FORMS DESCRIPTION LANGUAGE 3.2 FOR IBM MVS CREATING FORMS
Font name
Font name
card and a maximum 20-character string for a decentralized font
card. Use a blank space or a comma to separate multiple font
names. There is a maximum of 32 fonts per form.
Do not confuse font names with the FONT command. You can
specify up to 32 font names in a HFDL command structure, such
as font1, font2, through font32. You can specify only one
FONT command in an HFDL command structure.
identifies the standard or custom font for your form.
is a maximum 6-character string for a centralized font
Page 37
ICATALOG command
When you compile a form in LPS format, fonts convert to
uppercase. When you compile a form in XES format, fonts do
not convert. The system accepts them in uppercase and
lowercase. Refer to the “Managing and printing sample forms”
chapter.
Defaults None.
Examples Long form:
FONT Font1;
There is no short form.
Use the ICATALOG command to specify the ink catalog to be
used on highlight and full color printers.
The ink catalog is a file that contains color information. It resides
on highlight color printers and in the XPRM database. You can
list all the ink catalogs stored in your XPRM database by using the
LIST COLORMAP command. Refer to the “Resource
management” chapter in the
Managing Resources
USING HFDL COMMANDS
XPRM/HFDL 3.2 for IBM MVS
manual.
Full color printers require the ink catalog name. If you do not
specify a catalog for a highlight color printer, the printer uses its
default catalog.
Figure 3–6 shows the command syntax flow.
Figure 3–6. ICATALOG command syntax
name
ICATALOG
IS
Parameter
Default Printer default catalog and palette, if you do not specify the
Examples Long form:
name
represents the ink catalog to use for color information.
Your ink catalog name must not exceed six alphanumeric
characters. You cannot use spaces.
ICATALOG (highlight color only).
ICATALOG IS CAT1;
Short form:
ICATALOG CAT1;
;
PALETTE command
Use the PALETTE command to specify the ink palette to use for
color information on highlight and full color printers. The ink
palette is a subset of inks in the ink catalog.
Full color printers require the palette name. If you do not
specify a palette for a highlight color printer, the printer uses its
default palette.
You can list all the pallete names stored in your XPRM database
by using the LIST COLORMAP command. Refer to the “Resource
HOST FORMS DESCRIPTION LANGUAGE 3.2 FOR IBM MVS CREATING FORMS 3–9
Page 38
HOST FORMS DESCRIPTION LANGUAGE
INK command
management” chapter in the
Managing Resources
Figure 3–7 shows the command syntax flow.
Figure 3–7. PALETTE command syntax
PALETTE
Parameter
Default Printer default catalog and palette, if you do not specify the
Examples Long form:
name
represents the ink palette you use for ink information.
Your palette name must not exceed 32 alphanumeric characters,
including spaces.
PALETTE (highlight color only).
PALETTE IS ’PAL1’;
Short form:
PALETTE ’PAL1’;
manual.
IS
XPRM/HFDL 3.2 for IBM MVS
'name'
;
INKS
The INK command is only valid on Xerox highlight color and full
color printers. This command specifies all of the inks and colors
you use when you create a form on Xerox highlight color and full
color printers. The inks you specify with the INK command are
referenced as an index number when you use the LINE, TEXT and
BOX commands. They are not referenced as their identification
name.
The ICATALOG and PALETTE commands must precede the INK
command, as the printer uses the palette and catalog specified in
these commands. If you do not specify a catalog or palette for a
highlight color form, the printer uses its default catalog and
palette.
Ink index numbers begin with 1 for the first ink you specify, 2 for
the second, and so forth. This numbered list of ink names is the
ink list you use for your form. The ink you selected for a specific
description command is identified by the associated ink number
found in the ink list. This command follows the FONT
command. The maximum number of ink names that can be
defined is 255.
Figure 3–8 shows the command syntax flow.
Figure 3–8. INK command syntax
inkname
NOSUBSTITUTION
;INK
,
3–10 HOST FORMS DESCRIPTION LANGUAGE 3.2 FOR IBM MVS CREATING FORMS
Page 39

USING HFDL COMMANDS
Parameters
Default The printer default ink, if you do not specify the INK (highlight
Example Long form:
Inkname
you use a reserved word such as BLACK as an ink name, you
must enclose it in single quotes: ’BLACK’. You must also enclose
ink names with embedded blanks in single quotes.
NOSUBSTITUTION specifies that ink substitutes are not allowed
for this ink. If you do not specify this parameter, the printer
attempts to substitute another ink. Full color printers ignore this
parameter.
color only).
INKS RED, PINK;
There is no short form.
Inkname format
This format describes a variety of ways you can specify an ink.
Use this statement to describe forms you are compiling for Xerox
highlight color or full color printers.
Figure 3–9 shows the inkname syntax.
Figure 3–9. Inkname syntax
identifies all of the inks you use to create your form. If
‘color’
palette
catalog
Once you establish an INK command parameter (catalog, palette,
or ink color), it remains in effect until you change it or another
parameter overrides it. A color or palette name containing one
or more blank spaces requires quotes around the name.
Defaults The user catalog specified in the ICATALOG command, if you do
not specify a catalog in the INK command.
System default catalog, if you do not specify a default catalog
(highlight color only).
The palette you specify in the PALETTE command, if you do not
specify a palette in the INK command.
System default palette, if you do not specify a default palette
(highlight color only).
When the ink color begins with a digit, you must specify it within
quotes.
Examples This example shows you how to use the single quotes in
describing specific inks:
.
’palette’
.
color
RED or ‘RED’
PAL1.‘RED’, or ‘PAL1’.‘RED’, or PAL1.RED
CAT1.PAL1.‘RED’, or CAT1.‘PAL1’.‘RED’, or CAT1.‘PAL1’.RED, or
CAT1.PAL1.RED
HOST FORMS DESCRIPTION LANGUAGE 3.2 FOR IBM MVS CREATING FORMS 3–11
Page 40
HOST FORMS DESCRIPTION LANGUAGE
;IRESULT
IS
DEFAULT
BLACK
COLOR
IRESULT command
Parameters DEFAULT uses the printer default IRESULT, which may be BLACK
The color result you receive from overlapping objects is either
black or color for the entire page. The IRESULT command allows
you to specify the result when objects imaged with different inks
overlap. The IRESULT command appears in the HFDL, FDL, and
PDL OUTPUT statements and DJDE. You can use the IRESULT
command only on a Xerox highlight color printer.
Figure 3–10 shows the command syntax flow.
Figure 3–10. IRESULT command syntax
or COLOR.
BLACK specifies a black pixel to print when you place two
objects with different inks that overlap, and black and highlight
pixels coincide.
Description commands
COLOR specifies a color pixel to print when you place two
objects with different inks that overlap, and black and highlight
pixels coincide.
Default DEFAULT, if you do not enter the command.
Examples Long form:
IRESULT IS BLACK;
Short form:
IRESULT COLOR;
Because the IRESULT command is a highlight color command,
the Xerox 4700 printer ignores it.
Once you complete the setup commands, you can use the
following commands in any sequence to enter descriptive data:
• LINE
• BOX
• TEXT AT
• TEXT IN BOX
• LOGO
• GRAPHIC
• SECTION
• DO SECTION
• COLUMN
• INTERWORD
• DOT LEADER
• LET
3–12 HOST FORMS DESCRIPTION LANGUAGE 3.2 FOR IBM MVS CREATING FORMS
Page 41

LINE command
USING HFDL COMMANDS
• COMMENT
• END.
You must place coordinates within the boundaries of the physical
page. If coordinates stay within the physical page, but extend
beyond the virtual page, HFDL issues a warning message. The
size of the lines table, currently set at 1,500, determines the
maximum number of lines and boxes. Text must fit on the
physical page. You can enter up to 4,096 characters in a text
block.
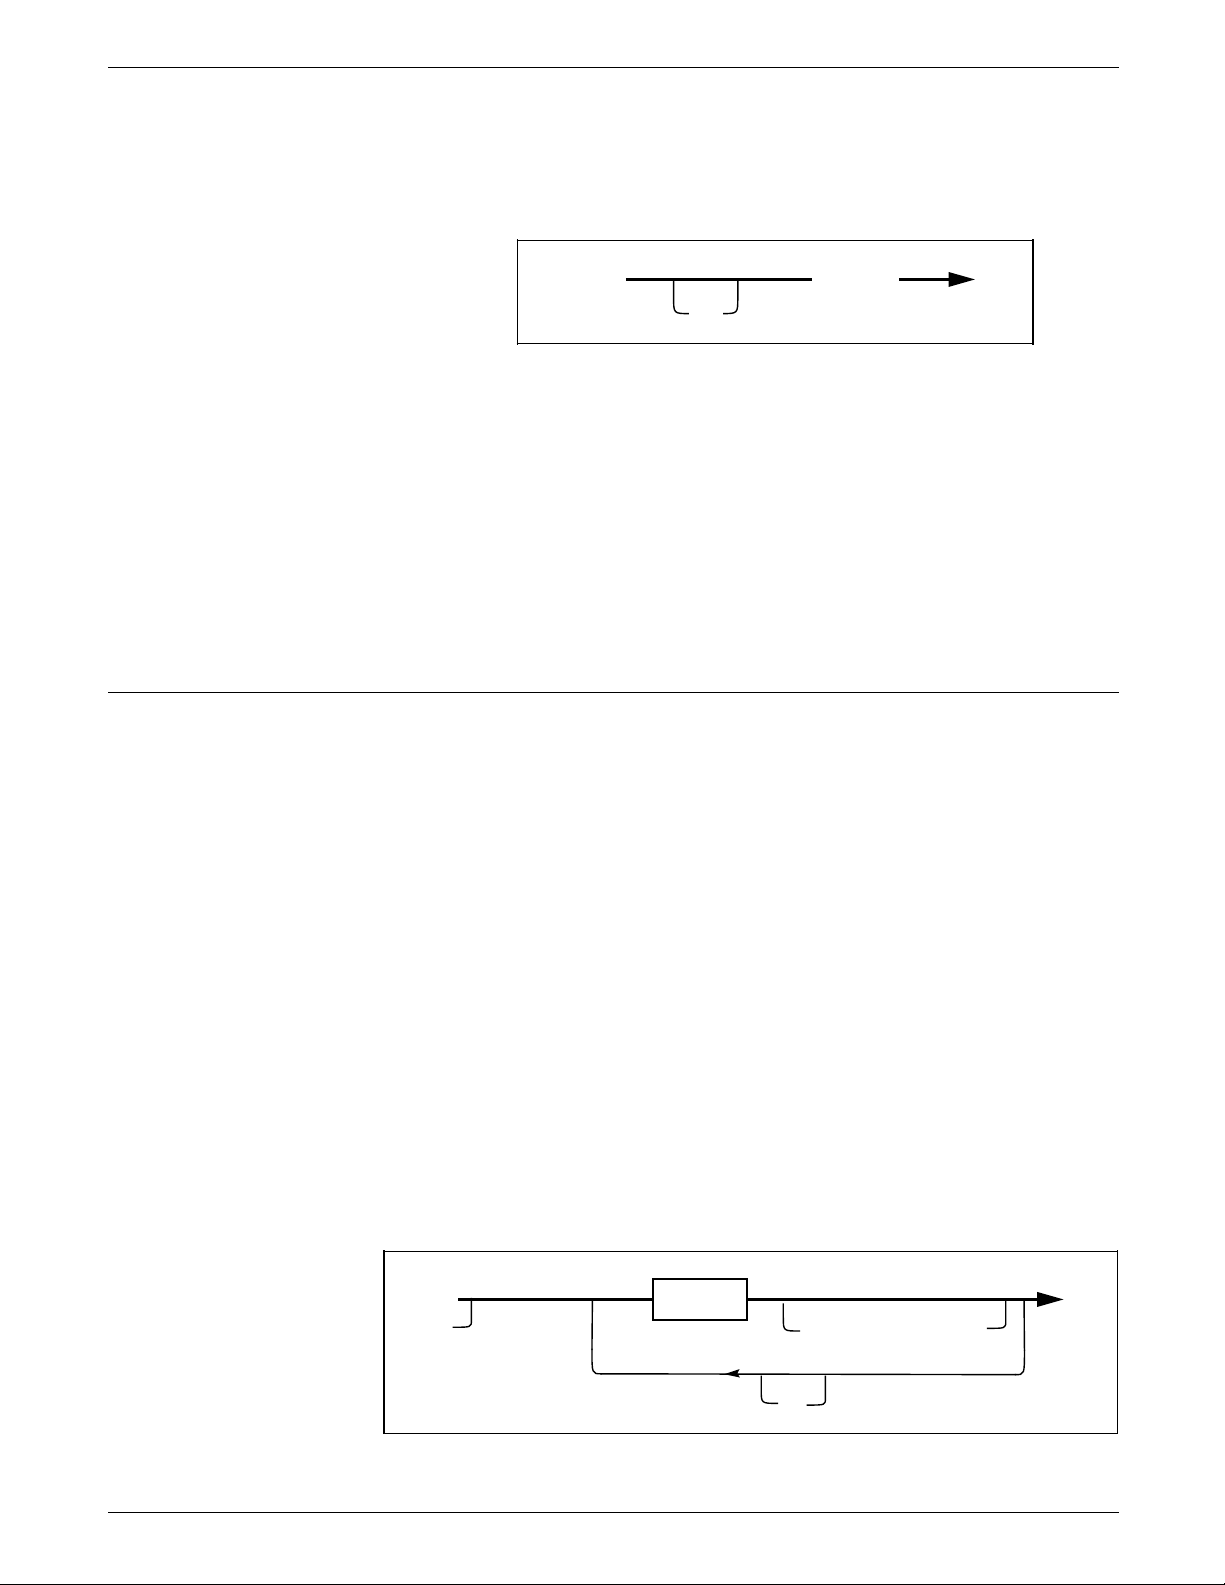
Use the LINE command to specify one or more lines in the same
direction on your form.
Figure 3–11 shows the LINE command syntax.
Figure 3–11. LINE command syntax
AT
C
IN
AND
o
units
DRAW
n
HORIZONTAL
LINE
LINES
VERTICAL
units
FROM
C
s
HAIRLINE
TO
units
USINGUSING SOLID
C
e
units
INK
n
0
BROKEN
DOTTED
1
2
;
REPEAT HORIZONTALLY
VERTICALLY
EVERY
AT
C
i
units
C
a
units
,
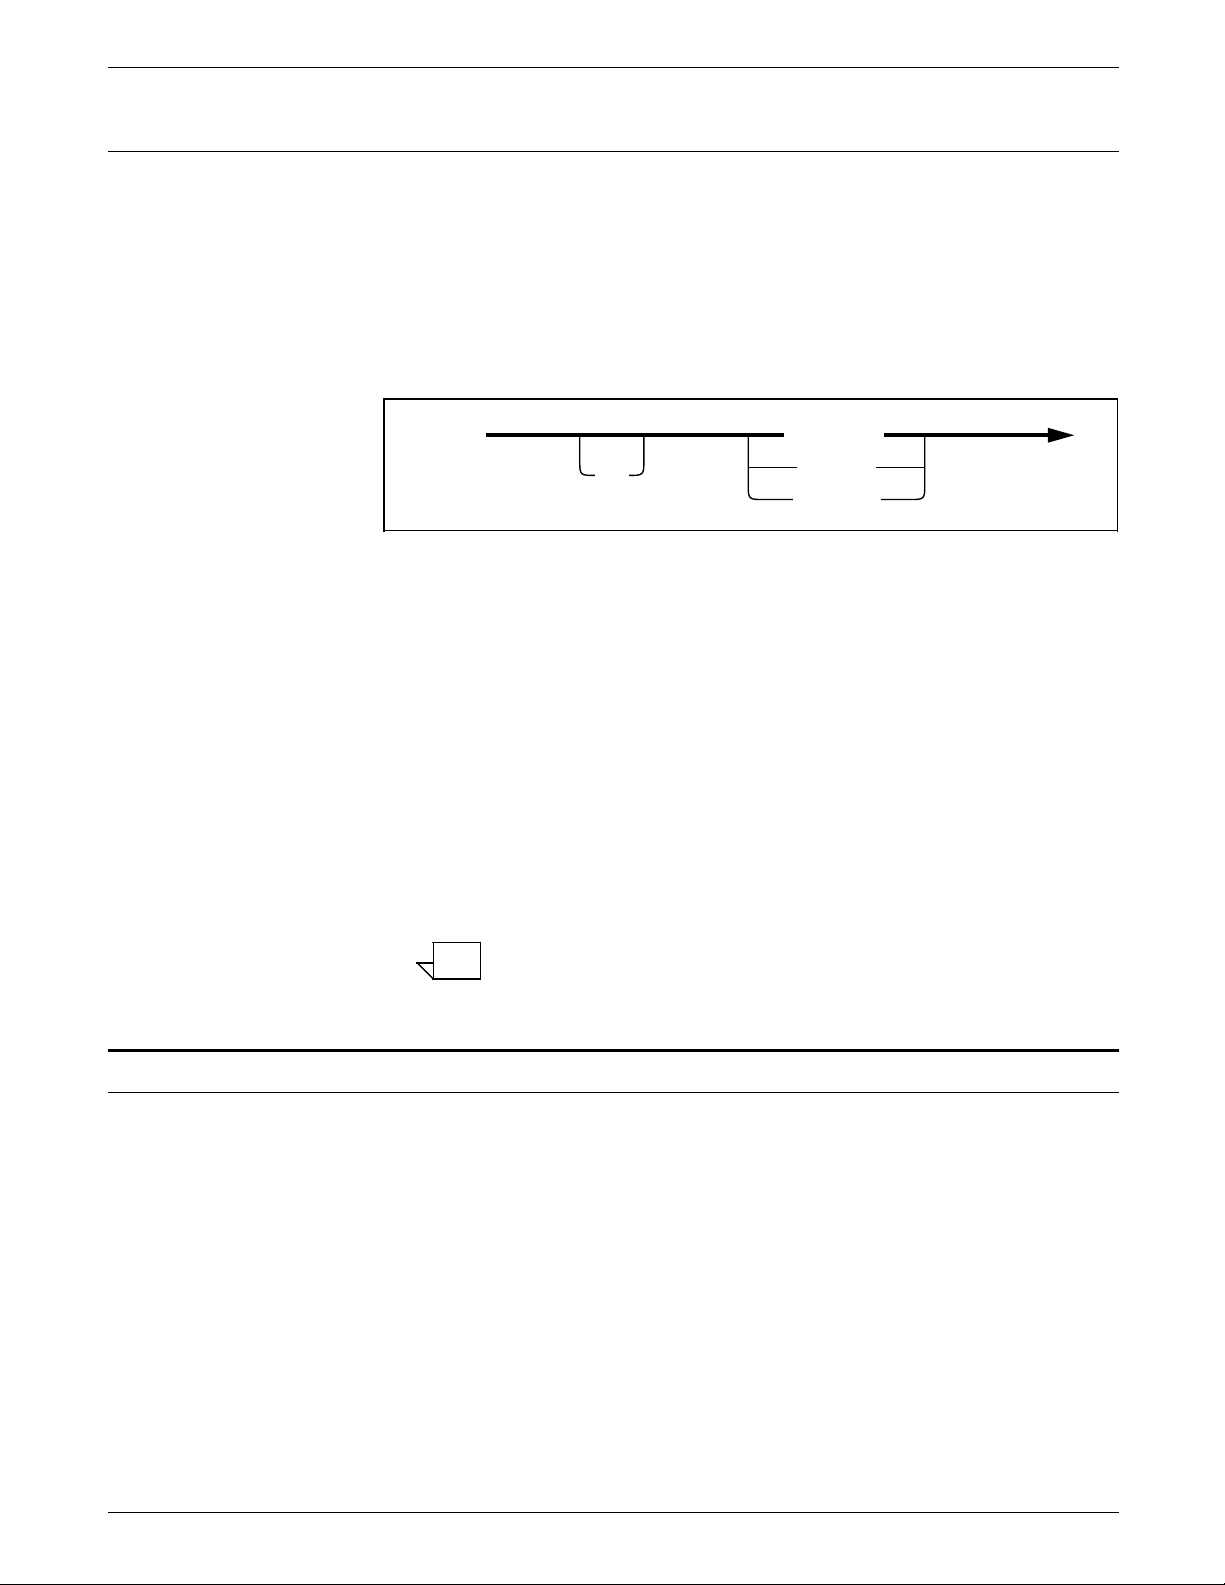
Parameters Co allows you to specify a line origin location on the form grid,
measured from the origin AT location, the point at which the line
begins. If the line is horizontal, C
y
vertical direction (
HOST FORMS DESCRIPTION LANGUAGE 3.2 FOR IBM MVS CREATING FORMS 3–13
–axis coordinate); if the line is vertical, C
represents the origin in the
o
o
Page 42

HOST FORMS DESCRIPTION LANGUAGE
represents the origin in the horizontal direction (x–axis
coordinate).
units
indicates the unit of measure for specifying the line origin.
units
The
are INCHES, CENTIMETERS, DOTS, and XDOTS. You
can use two decimal places when you specify inches and
centimeters. You must express DOTS and XDOTS in integers.
DRAW is an optional reserved word.
n
The number of lines you want drawn on your form is
.
HORIZONTAL or VERTICAL specifies the direction of your lines.
LINES specifies that this reserved word is required.
units
IN
command. IN
is a shorthand method of specifying units for the entire
units
overrides all other units used. For example,
if you want to draw a line using inches but specify grid FMT1, IN
units
uses inches as the grid for all units in the specific LINE
statement.
FROM, TO specifies the coordinate at the coordinate start (C
point and the coordinate end (C
) point.
e
SOLID, BROKEN, or DOTTED specifies the type of line you want
to draw.
HAIRLINE, 0 point (invisible), 1 point, or 2 points specifies the
thickness of the line you want to draw.
n
specifies the ink color index from the ink list for a Xerox
INK
highlight or full color LPS printer.
REPEAT specifies that you want a selected line repeated
according to the following commands.
HORIZONTALLY or VERTICALLY specifies the orientation of the
lines you want repeated.
EVERY C
increment (C
AT C
coordinate (C
indicates that you want a line repeated at the
i
) you have specified.
i
indicates that you want the line repeated at the absolute
a
) you have specified.
a
Defaults HORIZONTAL, if you do not specify a line orientation.
SOLID, if you do not specify a line type.
1, if you do not specify a line weight.
VERTICALLY, if you do not specify the REPEAT orientation.
)
s
Examples Long form:
AT 3 INCHES DRAW 5 HORIZONTAL LINES IN INCHES FROM 4
INCHES TO 10 INCHES USING SOLID 1 USING INK 3 AND
REPEAT HORIZONTALLY EVERY 0.50 INCHES;
Short form:
AT 3 5 LINES 4 TO 10 REPEAT EVERY 0.50;
BOX command
Use the BOX command to describe the size and shape of a box
on your form. Similar to lines, you can repeat boxes at fixed
intervals or at specified locations. The origin of the box is its
upper left corner at the midpoint of the thickness of the outline.
If you are using the 4850 HighLight Color or 4700 LPS printer,
3–14 HOST FORMS DESCRIPTION LANGUAGE 3.2 FOR IBM MVS CREATING FORMS
Page 43

USING HFDL COMMANDS
the BOX command allows you to outline the frame of the box in
color.
Figure 3–12 shows the BOX command syntax flow.
Figure 3–12. BOX command syntax
AT
C
y
units
,
C
x
units
DRAW
p
IN
units units units
USING SOLID
BROKEN
DOTTED
AND
SHADING
WIDE
HAIRLINE
0
1
2
FILL
,
BY
USING
USING
BOX
n
BOXES
q
HIGH
n
INK
INK
n
USING
AND
REPEAT
HORIZONTALLY
VERTICALLY
LIGHT
MEDIUM
HEAVY
EVERY
AT C
;
C
i
units
a
units
,
HOST FORMS DESCRIPTION LANGUAGE 3.2 FOR IBM MVS CREATING FORMS 3–15
Page 44

HOST FORMS DESCRIPTION LANGUAGE
Parameters Cy specifies the y–axis coordinate for the box origin location.
specifies the x–axis coordinate for the box origin location.
C
x
units
indicates the unit of measure for specifying the box origin.
units
The
are INCHES, CENTIMETERS, DOTS, and XDOTS. You
can use two decimal places when you specify inches and
centimeters. You must express DOTS and XDOTS in integers.
n
The number of boxes you want to draw is
units
IN
command. IN
is a shorthand method of specifying units for the entire
units
overrides all other units used. For example,
.
if you want to draw a box using inches but specify grid FMT1, IN
INCHES uses inches as the grid for all units in the specific BOX
statement.
The width of the box you have specified is
p.
The height of the box you have specified is q.
SOLID, BROKEN, or DOTTED specifies the type of line.
HAIRLINE, 0 point (invisible), 1 point, or 2 points specifies the
thickness of the line for your box.
n
specifies the INK number you selected from the ink list to
INK
draw the line in color for use on a Xerox highlight or full color
LPS printer. You may specify the same, or different, ink numbers
for the outline of the box.
n
FILL and INK
specifies the ink you want to use to fill a box.
The box fill can be a color or a tint of color. The ink you specify
must be defined in the ink list of the INK command.
SHADING specifies shadowing: LIGHT, MEDIUM, or HEAVY.
REPEAT specifies that you want a box repeated according to the
following commands.
HORIZONTALLY or VERTICALLY specifies the orientation of the
repeated boxes.
EVERY C
increment (C
AT C
indicates that you want a box repeated at the
i
) you have specified.
i
indicates the absolute x or y coordinate where you want
a
the box repeated in a horizontal or vertical direction.
Defaults SOLID, if you do not specify the line type.
1, if you do not specify the line weight or shading.
0, if you do not specify the line weight but do specify shading.
MEDIUM, if you do not specify the degree of SHADING.
HORIZONTALLY, if you do not specify the REPEAT orientation.
When you specify a box and shade with one command and do
not specify a line type for your box, your box will be shaded but
you will not have a line around it.
Examples Long form:
AT 4,6 DRAW 4 BOXES 14 WIDE BY 4 HIGH USING SOLID
HAIRLINE INK 2 AND REPEAT EVERY 5;
Short form:
AT 4,6 BOX 14 WIDE BY 4 HIGH;
3–16 HOST FORMS DESCRIPTION LANGUAGE 3.2 FOR IBM MVS CREATING FORMS
Page 45

TEXT AT command
USING HFDL COMMANDS
Use the TEXT AT command to incorporate text into your form.
To include text in a form, you must specify at least one font.
You use the FONT setup command to specify the font, and you
can only specify one FONT command. The fonts you specify
with the FONT command are referenced as an index number.
They are not referenced as their font name. Font index numbers
begin with 1 for the first font you specify, 2 for the second, and
so on.
The number of fonts you can specify for a form depends on the
point size, how many fonts you use, and the size of the font
memory of the printer. Once you specify a font index number in
a TEXT command, it remains in effect until you specify a new font
index.
When you use multiple text segments within a TEXT AT
command and they reference different font indexes, the last font
you use remains in effect until you specify a new font index.
HOST FORMS DESCRIPTION LANGUAGE 3.2 FOR IBM MVS CREATING FORMS 3–17
Page 46

HOST FORMS DESCRIPTION LANGUAGE
HORIZONTAL
VERTICAL
ALIGNED
TEXT
LEFT
RIGHT
CENTER
TOP
BOTTOM
JUSTIFIED
Figure 3–13 shows the TEXT AT command syntax flow.
Figure 3–13. TEXT AT command syntax
n
SPACED PER LINE
units
POINTS
LPI
COLUMN
IN
USING
AT C
’text’
FONT
n
INK
n
AND USING
y
units
,
C
x
units
;
DOT
LEADER
USING
FONT
n
NEW
LINE
3–18 HOST FORMS DESCRIPTION LANGUAGE 3.2 FOR IBM MVS CREATING FORMS
Page 47

USING HFDL COMMANDS
Parameters HORIZONTAL or VERTICAL specifies the direction of the text
relative to the page orientation.
n units
SPACED defines the amount of vertical space (in
) a line
of text occupies. If you specify a value (not zero), it replaces the
line spacing value of the font being used for this TEXT AT
command. An LPI value specifies line height in terms of lines
per inch. All other specifications are actual line height
units
measurements. The n
value must be positive. The units are
INCHES, CENTIMETERS, CPI, LPI, DOTS, and XDOTS. You can
use two decimal places when you specify inches and centimeters.
You must express DOTS and XDOTS in integers. POINTS
specifies that you want the TEXT SPACED in n POINTS (1/72
inch).
ALIGNED specifies the text justification alignment (LEFT, RIGHT,
CENTER, TOP, BOTTOM, JUSTIFIED). See the
Printing Systems Forms Creation Guide
for alignment examples.
Xerox Laser
You can center multiple horizontal strings beneath each other or
right– or left–justify them. You can center multiple vertical
strings alongside each other or align them on the top or bottom.
The JUSTIFIED alignment mode allows you to justify text. In
simple justification (with no COLUMN), you must specify where
the lines break. You can justify lines by finding the longest line
in a block of lines, then justify other text strings to this length.
This method of justification is best for justifying small blocks of
text or when you must justify the last line of a paragraph. You
can use the JUSTIFIED parameter with the INTERWORD SPACE
and the COLUMN SIZE IS commands. In this mode, text begins
at the coordinates you specify and extends to the right column
boundary. Line breaks occur automatically. Enter text in one
continuous string without line breaks.
Example JUSTIFIED parameters:
TEXT JUSTIFIED AT 1,1 ‘This is a sample’
This produces the following text on the form:
This is a sample
of justified text
in block format.
You specify IN COLUMN for any alignment mode and use it with
the COLUMN SIZE IS command. Line breaks occur automatically
when you use TEXT ALIGNED IN COLUMN or TEXT JUSTIFIED
IN COLUMN. You can enter a complete paragraph of text in
one continuous string. A quote indicates the end of a paragraph
rather than a line break. The system ignores multiple line breaks.
Columns do not have a fixed location on the page. You place
them relative to the TEXT command you specify. The horizontal
coordinate you specify sets the left column boundary. You set
the right column boundary to the sum of the column width and
the left column boundary.
You can include a maximum of 4096 characters in one
continuous text string.
‘of justified text’ ‘in block format.’;
HOST FORMS DESCRIPTION LANGUAGE 3.2 FOR IBM MVS CREATING FORMS 3–19
Page 48

HOST FORMS DESCRIPTION LANGUAGE
Example Text justified in a column:
COLUMN 1 INCH WIDE;
TEXT JUSTIFIED IN COLUMN AT 1,1
‘four four four five five five six six six’
This produces the following text on the form:
four four four
five five five
six six six
n
FONT
specifies the index number of the font you selected.
Refer to the FONT command for additional information.
n
specifies the index number of the ink color you selected
INK
from the ink list to use with a Xerox highlight or full color LPS
printer. The specified INK is in effect for this command and not
for subsequent TEXT commands.
defines the coordinate you selected on the y–axis where the
C
y
text origin is located.
defines the coordinate you selected on the x–axis where the
C
x
text origin is located.
‘text’
specifies a text string that appears exactly as you enter it
(except for special characters).
DOT LEADER specifies dot leaders you have selected to place
between text or at a column boundary. Dot leaders extend the
full width of the column you specify in the COLUMN command,
’text’
unless interrupted by a
string. You can place dot leaders
between two text strings and a right boundary previously defined
by you in the COLUMN command. If you place dot leaders
between two text strings, the right most text string aligns with
the right column boundary.
Do not use DOT LEADER in the JUSTIFIED mode. DOT LEADER
overrides any alignment mode and places the text flush with the
column boundaries.
n
USING FONT
specifies a change of font for the next body of
text which is not the dot leader string. When you specify dot
leaders and a change of fonts together, the DOT LEADER
n
keywords must precede the FONT
keywords.
NEW LINE specifies a new line to follow a text string. You can
only use the NEW LINE keyword once between text strings.
NEW LINE is similar to a blank text string (’ ’). If you want to use
multiple blank lines between text strings, use multiple blank text
strings (’ ’ ’ ’ ’ ’), not NEW LINE. NEW LINE is ignored if it is not
n
used with DOT LEADER or FONT
.
Defaults HORIZONTAL and CENTER, if you do not specify the orientation
and alignment for the TEXT AT command.
Use the font index of the last TEXT command, if USING FONT is
not entered. If you omit FONT in all TEXT commands, FONT1
from the FONT list is used.
units
DOTS, if you do not specify
.
If a TEXT command containing a dot leader is not preceded by a
COLUMN command, the system uses a default column width of
6.5 inches (portrait) or 9.5 inches (landscape).
3–20 HOST FORMS DESCRIPTION LANGUAGE 3.2 FOR IBM MVS CREATING FORMS
Page 49

USING HFDL COMMANDS
Single dots repeated, if you do not use a DOT LEADER
command to specify the DOT LEADER text string.
Examples The following is an example of a DOT LEADER used between
two text strings:
TEXT AT 1,1 ’John Doe’ DOT LEADER ’987–6543’;
This produces the following text on the form:
John Doe......................................................987–6543
The following is an example of a DOT LEADER following a text
string and ending at the column boundary:
TEXT AT 1,1 ’Sales Tax’ DOT LEADER NEW LINE ‘Total Now
Due’ DOT LEADER;
This produces the following text on the form:
Sales Tax ......................................................................
Total Now Due..............................................................
The following is an example of the long form of the TEXT AT
command:
HORIZONTAL TEXT SPACED 12 POINTS PER LINE ALIGNED
CENTER IN COLUMN USING FONT 1 AND USING INK 1 AT 1,
1 ’Phone List’ NEW LINE ’John Doe’ DOT LEADER ’987–6543’;
TEXT IN BOX command
The following is an example of the short form:
TEXT SPACED 12 POINTS PER LINE ALI CEN INK 1 AT 1,1
’Phone List’ NEW LINE ’John Doe’ DOT LEA ’987–6543’;
This produces the following text on the form:
Phone List
John Doe . . . . . . . . . . . . . . . . . . . . . . . . . . .987–6543
Use the TEXT IN BOX command to incorporate text into a box
on your form. The command syntax format designates the
proper type and placement of text in a box according to the
planned form. This command format is similar to the TEXT AT
command, except it includes those parameters necessary to
designate the placement of text in a box.
You must define a box with matching coordinate values before
you can reference it in a TEXT IN BOX command. You can
create boxes and adjoining boxes with BOX commands, LINE
commands, or both.
HOST FORMS DESCRIPTION LANGUAGE 3.2 FOR IBM MVS CREATING FORMS 3–21
Page 50
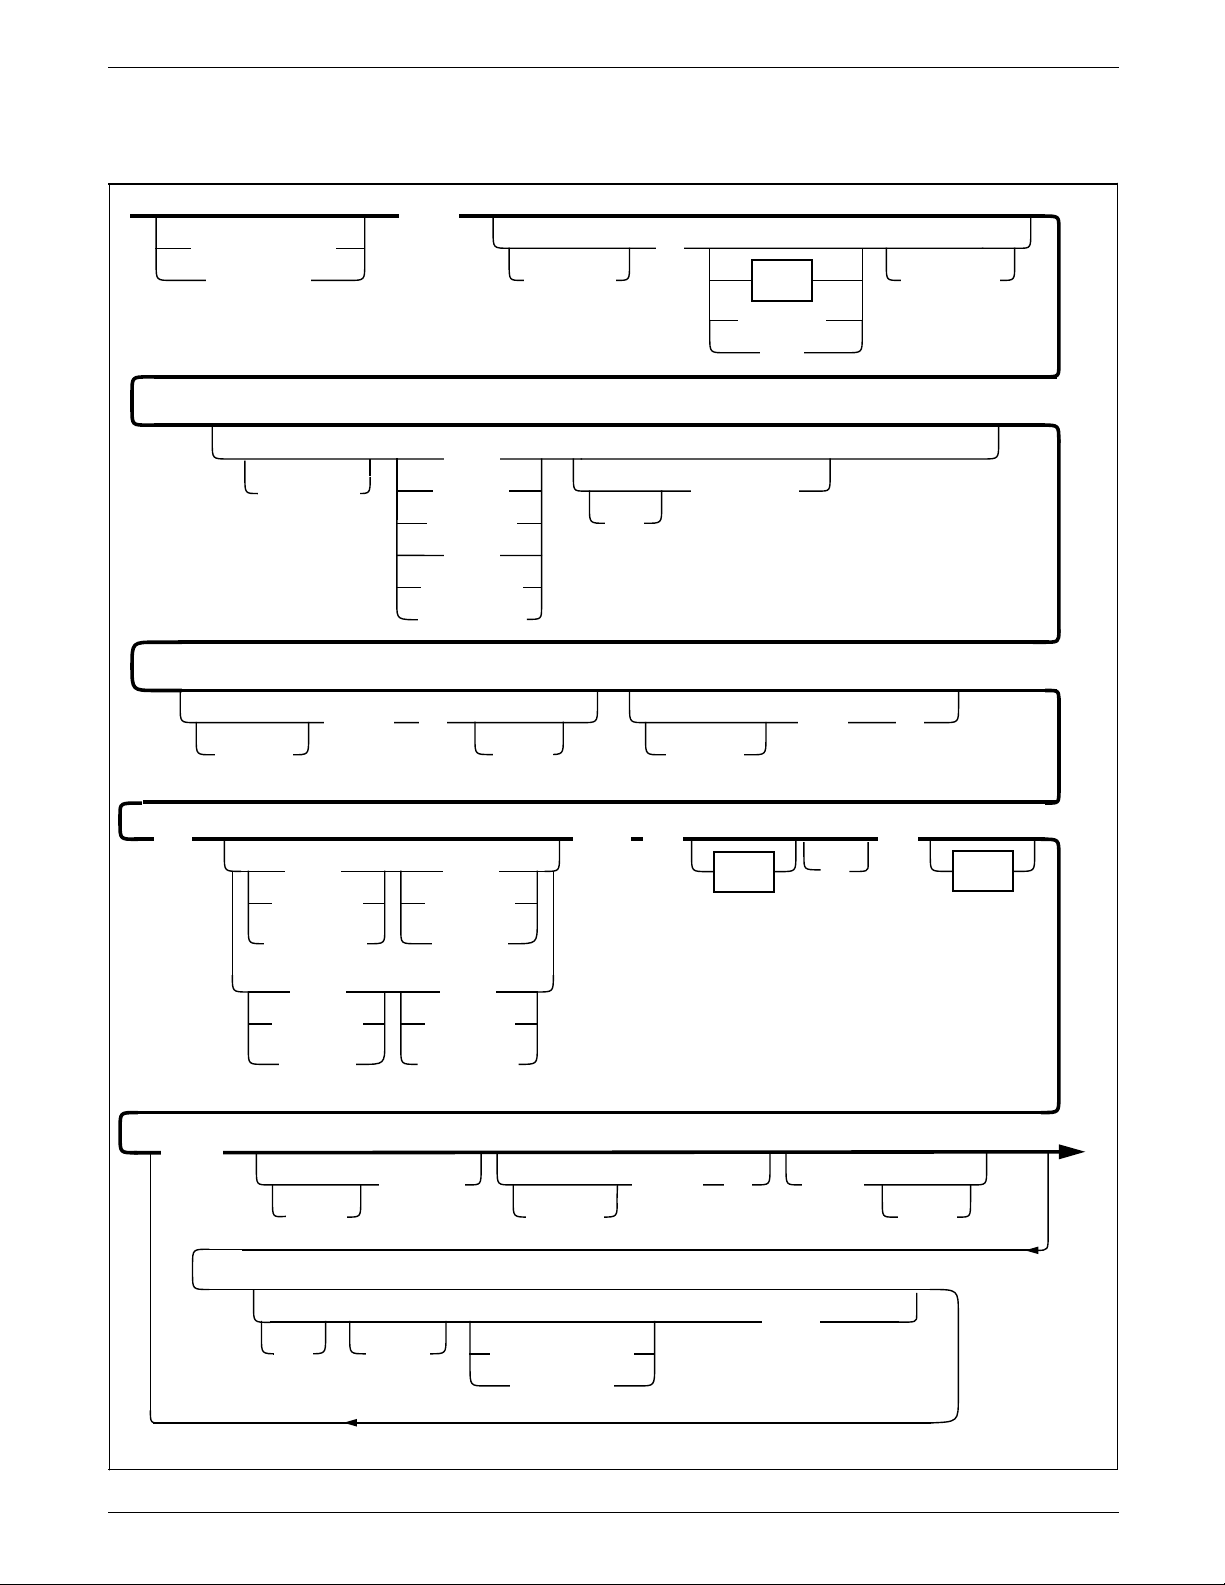
HOST FORMS DESCRIPTION LANGUAGE
HORIZONTAL
VERTICAL
ALIGNED
TEXT
LEFT
RIGHT
CENTER
TOP
BOTTOM
JUSTIFIED
Figure 3–14 shows the TEXT IN BOX command syntax flow.
Figure 3–14. TEXT IN BOX command syntax
n
SPACED PER LINE
units
POINTS
LPI
COLUMN
IN
FONT
USING
IN C
n
AND
BOX
TOP LEFT
CENTER
BOTTOM
LEFT
CENTER
RIGHT
CENTER
RIGHT
TOP
CENTER
BOTTOM
‘text‘
FONT
DOT
USING
USING
y
units
n
INK
NEWLEADER
n
C
x
,
units
;
LINE
BOX
IN NEXT
HORIZONTAL
VERTICAL
3–22 HOST FORMS DESCRIPTION LANGUAGE 3.2 FOR IBM MVS CREATING FORMS
Page 51
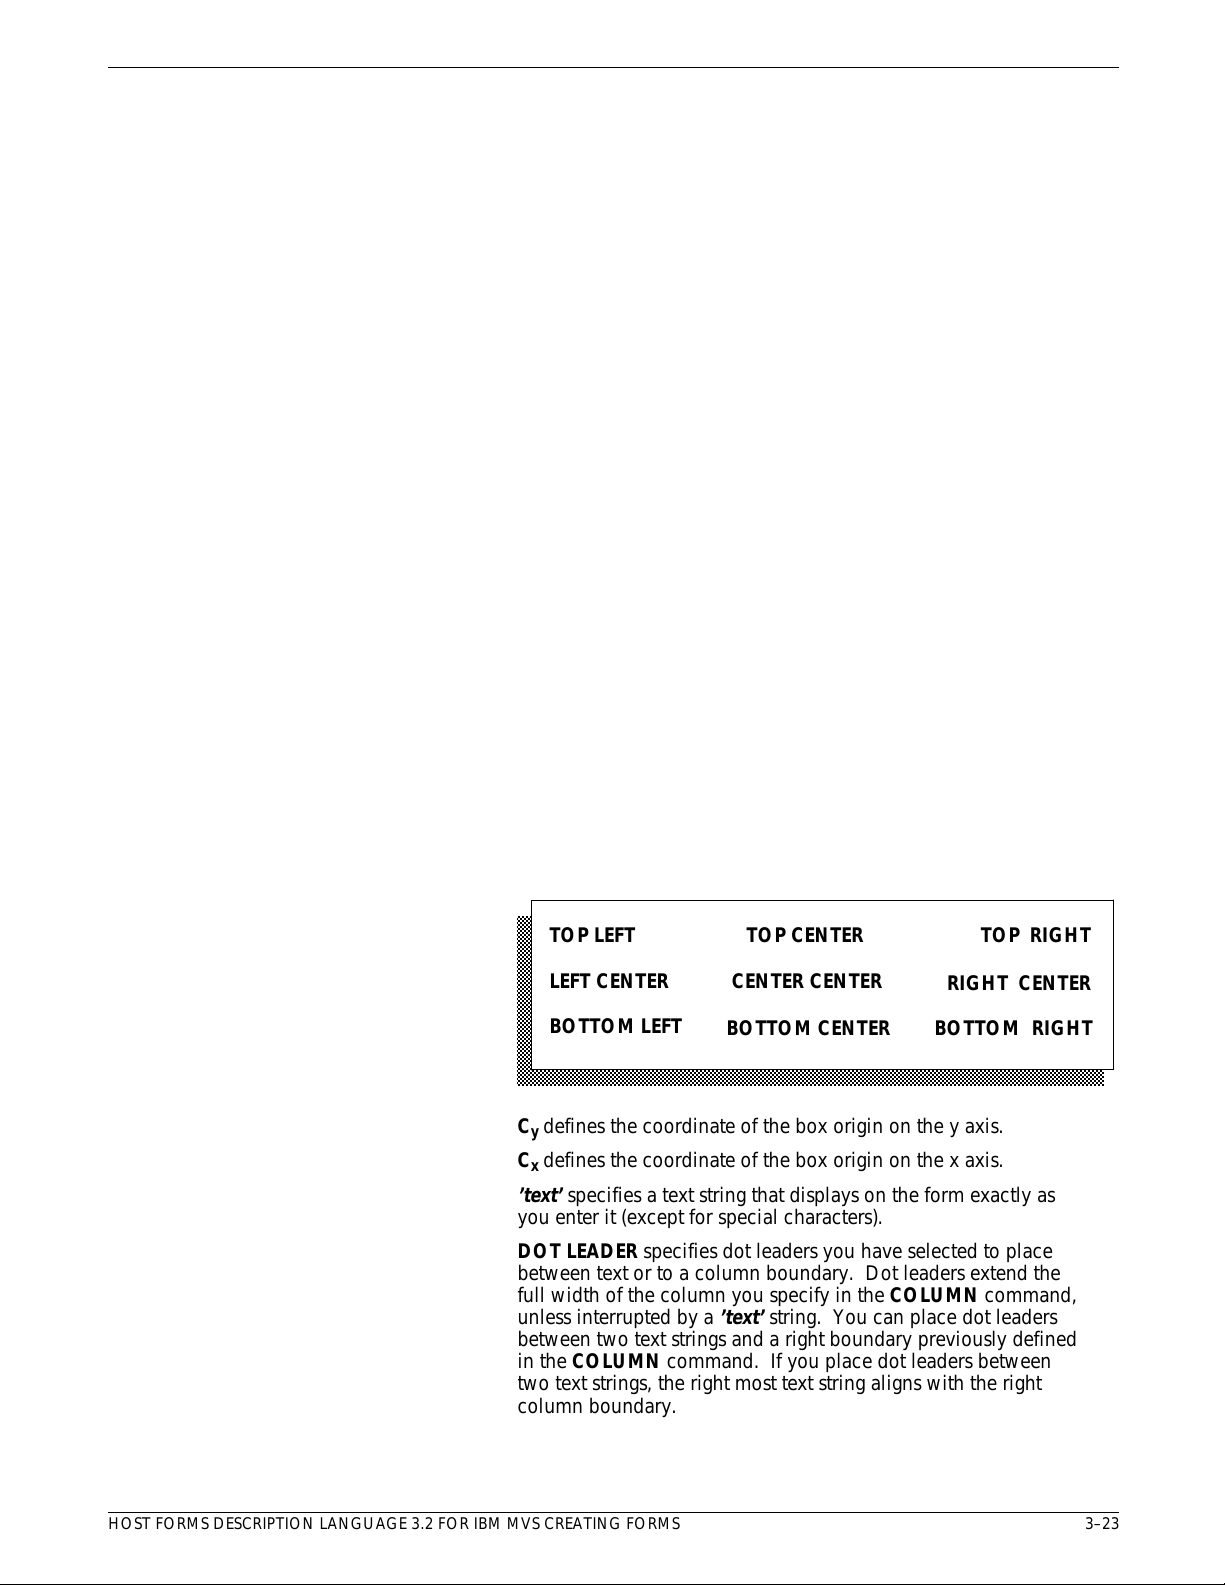
USING HFDL COMMANDS
aaaaaaaaaaaaaaaaaaaaaaaaaaaaaaaaaaaaaaaaaaaaaaaaaaaaaaaaaaaaaaaaaaaaaaaaaaa
a
a
a
a
a
a
a
a
a
a
a
a
a
a
a
a
a
a
a
a
a
a
a
a
a
a
a
a
a
a
a
a
a
a
a
a
a
a
a
a
Parameters HORIZONTAL or VERTICAL specifies the text orientation of the
text within the box. Do not confuse TEXT alignment with TEXT
placement in the box. You can align horizontal text LEFT or
RIGHT. You can align vertical text TOP or BOTTOM.
n units
SPACED defines the amount of vertical space (in
) you
want a line of text to occupy. If you specify a value (not 0), it
replaces the line spacing value of the font being used for this
TEXT AT command. All specifications except LPI are actual line
height measurements. An LPI value specifies line height in lines
n units
per inch. The
units
are INCHES, CENTIMETERS, DOTS, and XDOTS. You can
value you specify must be positive. The
use two decimal places when you specify inches and centimeters.
You can express DOTS and XDOTS only in integers. POINTS
n
specifies that you want the TEXT SPACED in
POINTS (1/72
inch).
ALIGNED specifies that you want the text aligned LEFT, RIGHT,
CENTER, TOP, BOTTOM, JUSTIFIED. See the
Printing Systems Forms Creation Guide
for alignment examples.
Xerox Laser
The ALIGNED and JUSTIFIED commands including IN COLUMN,
are not recommended with the TEXT IN BOX command. These
are more appropriate with the TEXT AT command. If you want to
use JUSTIFIED IN COLUMN, refer to the “TEXT AT command”
section for a description of how to use these parameters.
n
FONT
specifies the index number of the font you selected.
Refer to the “FONT command” section for additional
information.
n
specifies the index number of the ink color you selected
INK
from the ink list to use with a Xerox highlight or full color LPS
printer. The specified INK is in effect for this command and not
for subsequent TEXT IN BOX commands.
IN specifies the position in a box where you want to place the
text. There are nine positions as follows:
aaaaaaaaaaaaaaaaaaaaaaaaaaaaaaaaaaaaaaaaaaaaaaaaaaaaaaaaaaaaaaaaaaaaaaaaa
aaaaaaaaaaaaaaaaaaaaaaaaaaaaaaaaaaaaaaaaaaaaaaaaaaaaaaaaaaaaaaaaaaaaaaaaa
TOP LEFT TOP CENTER TOP RIGHT
aaaaaaaaaaaaaaaaaaaaaaaaaaaaaaaaaaaaaaaaaaaaaaaaaaaaaaaaaaaaaaaaaaaaaaaaa
aaaaaaaaaaaaaaaaaaaaaaaaaaaaaaaaaaaaaaaaaaaaaaaaaaaaaaaaaaaaaaaaaaaaaaaaa
aaaaaaaaaaaaaaaaaaaaaaaaaaaaaaaaaaaaaaaaaaaaaaaaaaaaaaaaaaaaaaaaaaaaaaaaa
aaaaaaaaaaaaaaaaaaaaaaaaaaaaaaaaaaaaaaaaaaaaaaaaaaaaaaaaaaaaaaaaaaaaaaaaa
aaaaaaaaaaaaaaaaaaaaaaaaaaaaaaaaaaaaaaaaaaaaaaaaaaaaaaaaaaaaaaaaaaaaaaaaa
aaaaaaaaaaaaaaaaaaaaaaaaaaaaaaaaaaaaaaaaaaaaaaaaaaaaaaaaaaaaaaaaaaaaaaaaa
LEFT CENTER
aaaaaaaaaaaaaaaaaaaaaaaaaaaaaaaaaaaaaaaaaaaaaaaaaaaaaaaaaaaaaaaaaaaaaaaaa
aaaaaaaaaaaaaaaaaaaaaaaaaaaaaaaaaaaaaaaaaaaaaaaaaaaaaaaaaaaaaaaaaaaaaaaaa
aaaaaaaaaaaaaaaaaaaaaaaaaaaaaaaaaaaaaaaaaaaaaaaaaaaaaaaaaaaaaaaaaaaaaaaaa
aaaaaaaaaaaaaaaaaaaaaaaaaaaaaaaaaaaaaaaaaaaaaaaaaaaaaaaaaaaaaaaaaaaaaaaaa
aaaaaaaaaaaaaaaaaaaaaaaaaaaaaaaaaaaaaaaaaaaaaaaaaaaaaaaaaaaaaaaaaaaaaaaaa
aaaaaaaaaaaaaaaaaaaaaaaaaaaaaaaaaaaaaaaaaaaaaaaaaaaaaaaaaaaaaaaaaaaaaaaaa
BOTTOM LEFT
aaaaaaaaaaaaaaaaaaaaaaaaaaaaaaaaaaaaaaaaaaaaaaaaaaaaaaaaaaaaaaaaaaaaaaaaa
aaaaaaaaaaaaaaaaaaaaaaaaaaaaaaaaaaaaaaaaaaaaaaaaaaaaaaaaaaaaaaaaaaaaaaaaa
aaaaaaaaaaaaaaaaaaaaaaaaaaaaaaaaaaaaaaaaaaaaaaaaaaaaaaaaaaaaaaaaaaaaaaaaa
aaaaaaaaaaaaaaaaaaaaaaaaaaaaaaaaaaaaaaaaaaaaaaaaaaaaaaaaaaaaaaaaaaaaaaaaa
aaaaaaaaaaaaaaaaaaaaaaaaaaaaaaaaaaaaaaaaaaaaaaaaaaaaaaaaaaaaaaaaaaaaaaaaa
aaaaaaaaaaaaaaaaaaaaaaaaaaaaaaaaaaaaaaaaaaaaaaaaaaaaaaaaaaaaaaaaaaaaaaaaa
C
defines the coordinate of the box origin on the y axis.
y
defines the coordinate of the box origin on the x axis.
C
x
’text’
specifies a text string that displays on the form exactly as
CENTER CENTER
BOTTOM CENTER
RIGHT CENTER
BOTTOM RIGHT
you enter it (except for special characters).
DOT LEADER specifies dot leaders you have selected to place
between text or to a column boundary. Dot leaders extend the
full width of the column you specify in the COLUMN command,
unless interrupted by a
between two text strings and a right boundary previously defined
in the COLUMN command. If you place dot leaders between
two text strings, the right most text string aligns with the right
HOST FORMS DESCRIPTION LANGUAGE 3.2 FOR IBM MVS CREATING FORMS 3–23
column boundary.
’text’
string. You can place dot leaders
Page 52
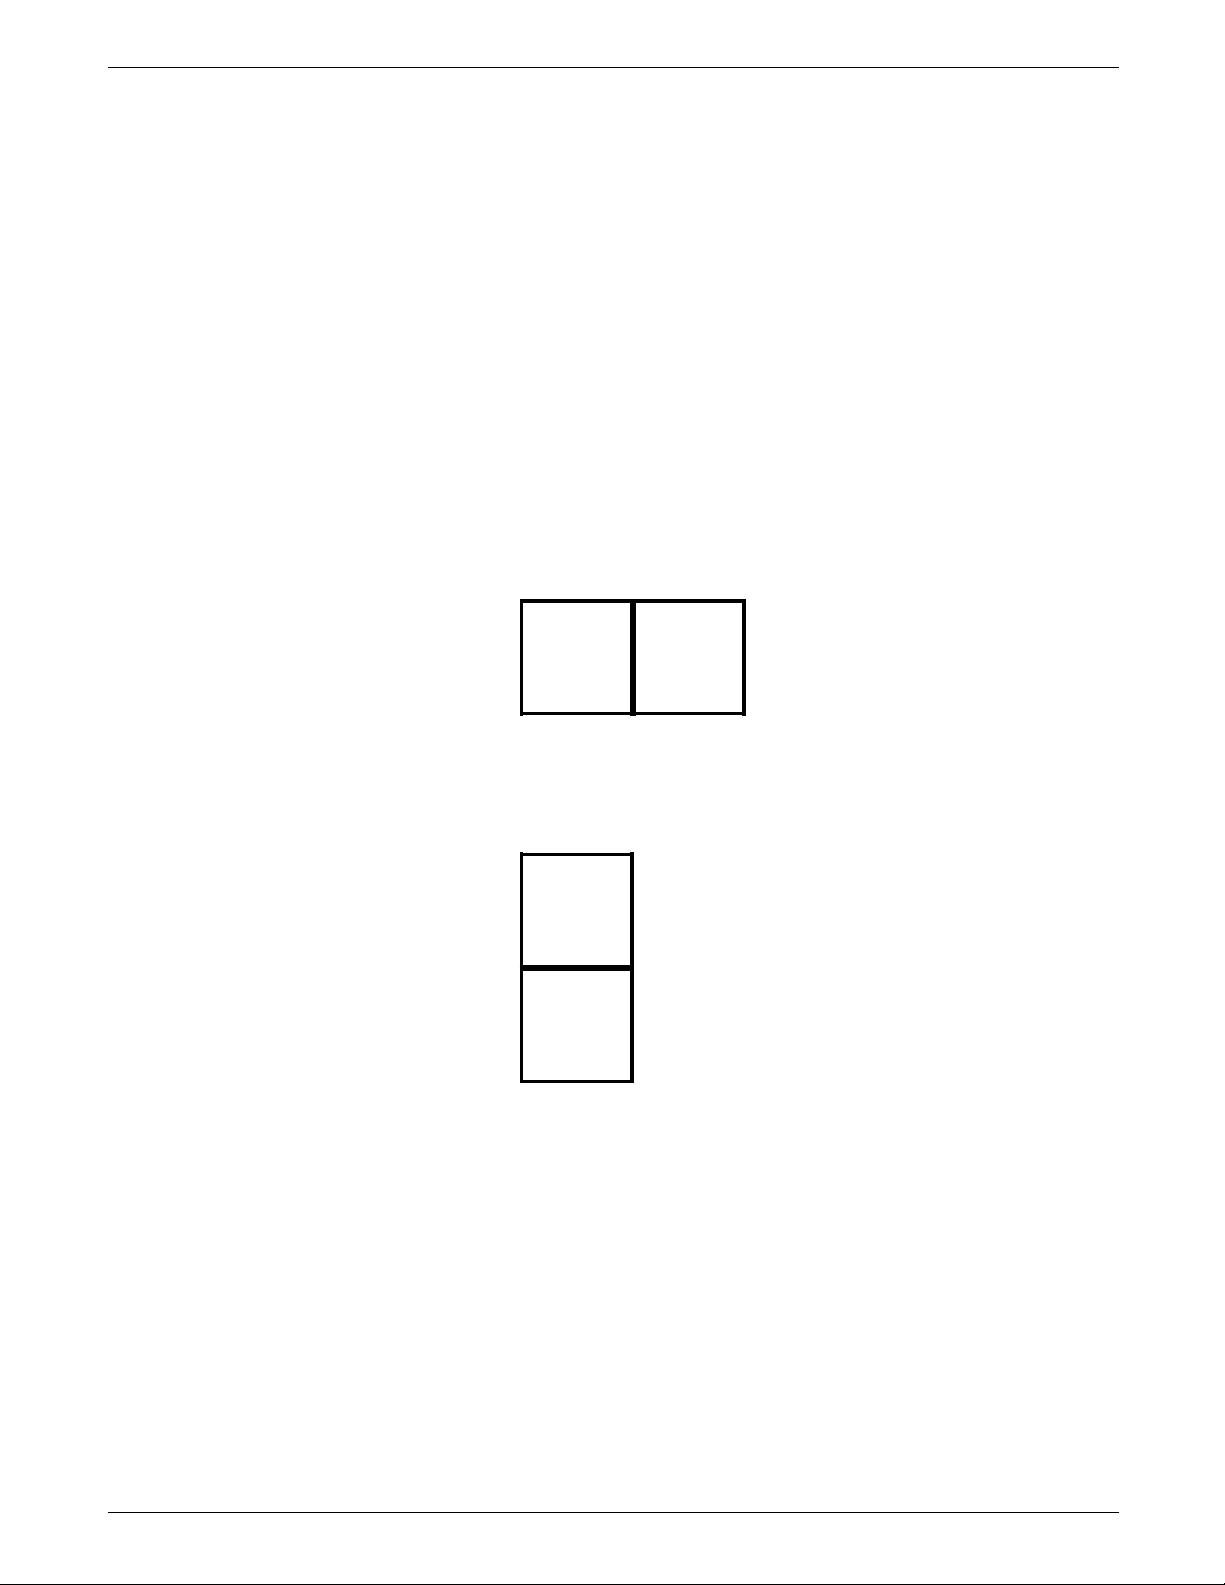
HOST FORMS DESCRIPTION LANGUAGE
Do not use DOT LEADER in the JUSTIFIED mode. DOT LEADER
overrides any alignment mode and places the text flush with the
column boundaries.
n
USING FONT
specifies a change of font for the next body of
text which is not the dot leader string. When you specify dot
leaders and a change of fonts together, the DOT LEADER
n
keywords must precede the FONT
keywords.
NEW LINE specifies a new line to follow a text string. You can
only use the NEW LINE keyword once between text strings.
NEW LINE is similar to a blank text string (’ ’). If you want to use
multiple blank lines between text strings, use multiple blank text
strings (’ ’ ’ ’ ’ ’), not NEW LINE. NEW LINE is ignored if it is not
n
used with DOT LEADER or FONT
.
IN NEXT HORIZONTAL or VERTICAL BOX specifies the text to
place in an adjacent box (horizontally or vertically). Adjacent
boxes must have a common, congruent side. For example, IN
NEXT HORIZONTAL BOX... produces the results shown in Figure
3–15.
Figure 3–15. IN NEXT HORIZONTAL BOX
IN NEXT VERTICAL BOX... produces the results shown in Figure
3–16.
Figure 3–16. IN NEXT VERTICAL BOX
Defaults HORIZONTAL, if you do not specify the box orientation. The
same applies for [IN] [NEXT] [HORIZONTAL/VERTICAL] [BOX...];
The font index of the last FONT command, if USING FONT is
not entered. If you omit FONT in all text commands, then FONT
1 from the FONT list is used.
units
DOTS, if you do not specify
.
CENTER, if you do not specify the alignment. The same applies
for the IN [TOP, .......BOTTOM] BOX.... for text placement
within a box.
3–24 HOST FORMS DESCRIPTION LANGUAGE 3.2 FOR IBM MVS CREATING FORMS
Page 53
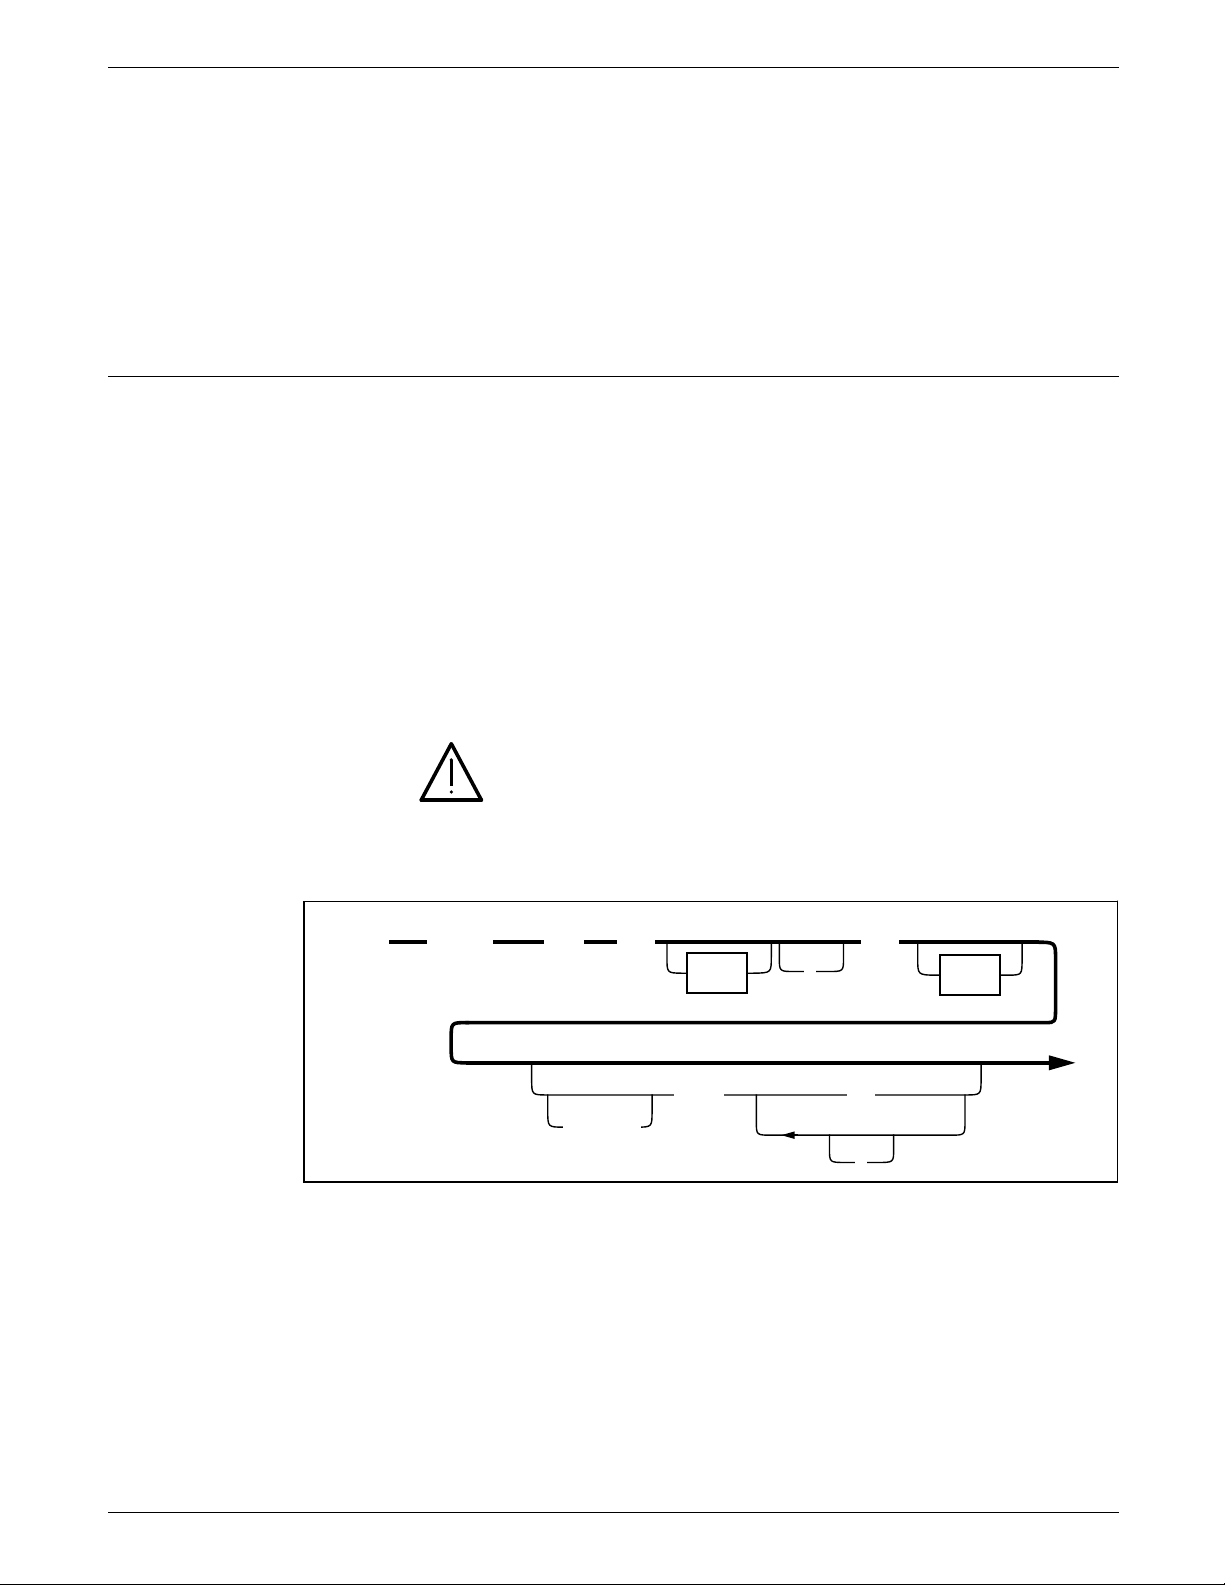
LOGO command
Examples Long form:
HORIZONTAL TEXT SPACED 12 POINTS PER LINE USING FONT 1
AND USING INK 1 IN CENTER CENTER BOX 4 3 ‘FIRST’
‘NATIONAL’ ‘TRUST’ IN NEXT HORIZONTAL BOX ‘FIRST’
‘DEPOSIT’ ‘INSURANCE’;
Short form:
TEXT 12 POINTS INK 1 IN BOX 4 3 ‘FIRST’ ‘NATIONAL’ ‘TRUST’
BOX ‘FIRST’ ‘DEPOSIT’ ‘INSURANCE’;
Use the LOGO command to place logos in the form. The logo
is a special font of one or more characters, which carries with it
the relative position of the characters to make up the logo.
Although a logo may comprise many characters, it is positioned
as a single unit. There is an option that overrides the colors
given to a color logo file. For example, if you reference a logo
in a color other than blue on a blue form, you must specify
’USING INK
logo. If you do not use this option, the printer requests an ink
substitution prior to printing the form. Logos you specify in a
form you are printing on a Xerox highlight color LPS printer must
be in color format. You receive a ‘LOGO NOT FOUND’ message
if you reference a black and white logo in a highlight color (HC)
form. The command format designates the proper placement of
a logo according to the planned form.
USING HFDL COMMANDS
n
’ to override the existing color specification of the
LOGO
name
Parameters
CAUTION: The XPRM database does not support XES logos. To
include a logo on an XES form, you must convert the logo to a
font and load it into the XPRM database as a font.
Figure 3–17 shows the LOGO command syntax flow.
Figure 3–17. LOGO command syntax
AT
C
y
units
,
INK
C
x
units
n
USING
,
name
identifies the unique file name (or font identifier) for the
logo. A logo name may consist of one to six characters.
defines the y–axis coordinate for the logo origin location.
C
y
defines the x–axis coordinate for the logo origin location.
C
x
units
indicates the unit of measure for placement of the logo.
units
The
are INCHES, CENTIMETERS, DOTS, and XDOTS. You
can use two decimal places when you specify inches and
centimeters. You must express DOTS and XDOTS in integers.
;
HOST FORMS DESCRIPTION LANGUAGE 3.2 FOR IBM MVS CREATING FORMS 3–25
Page 54
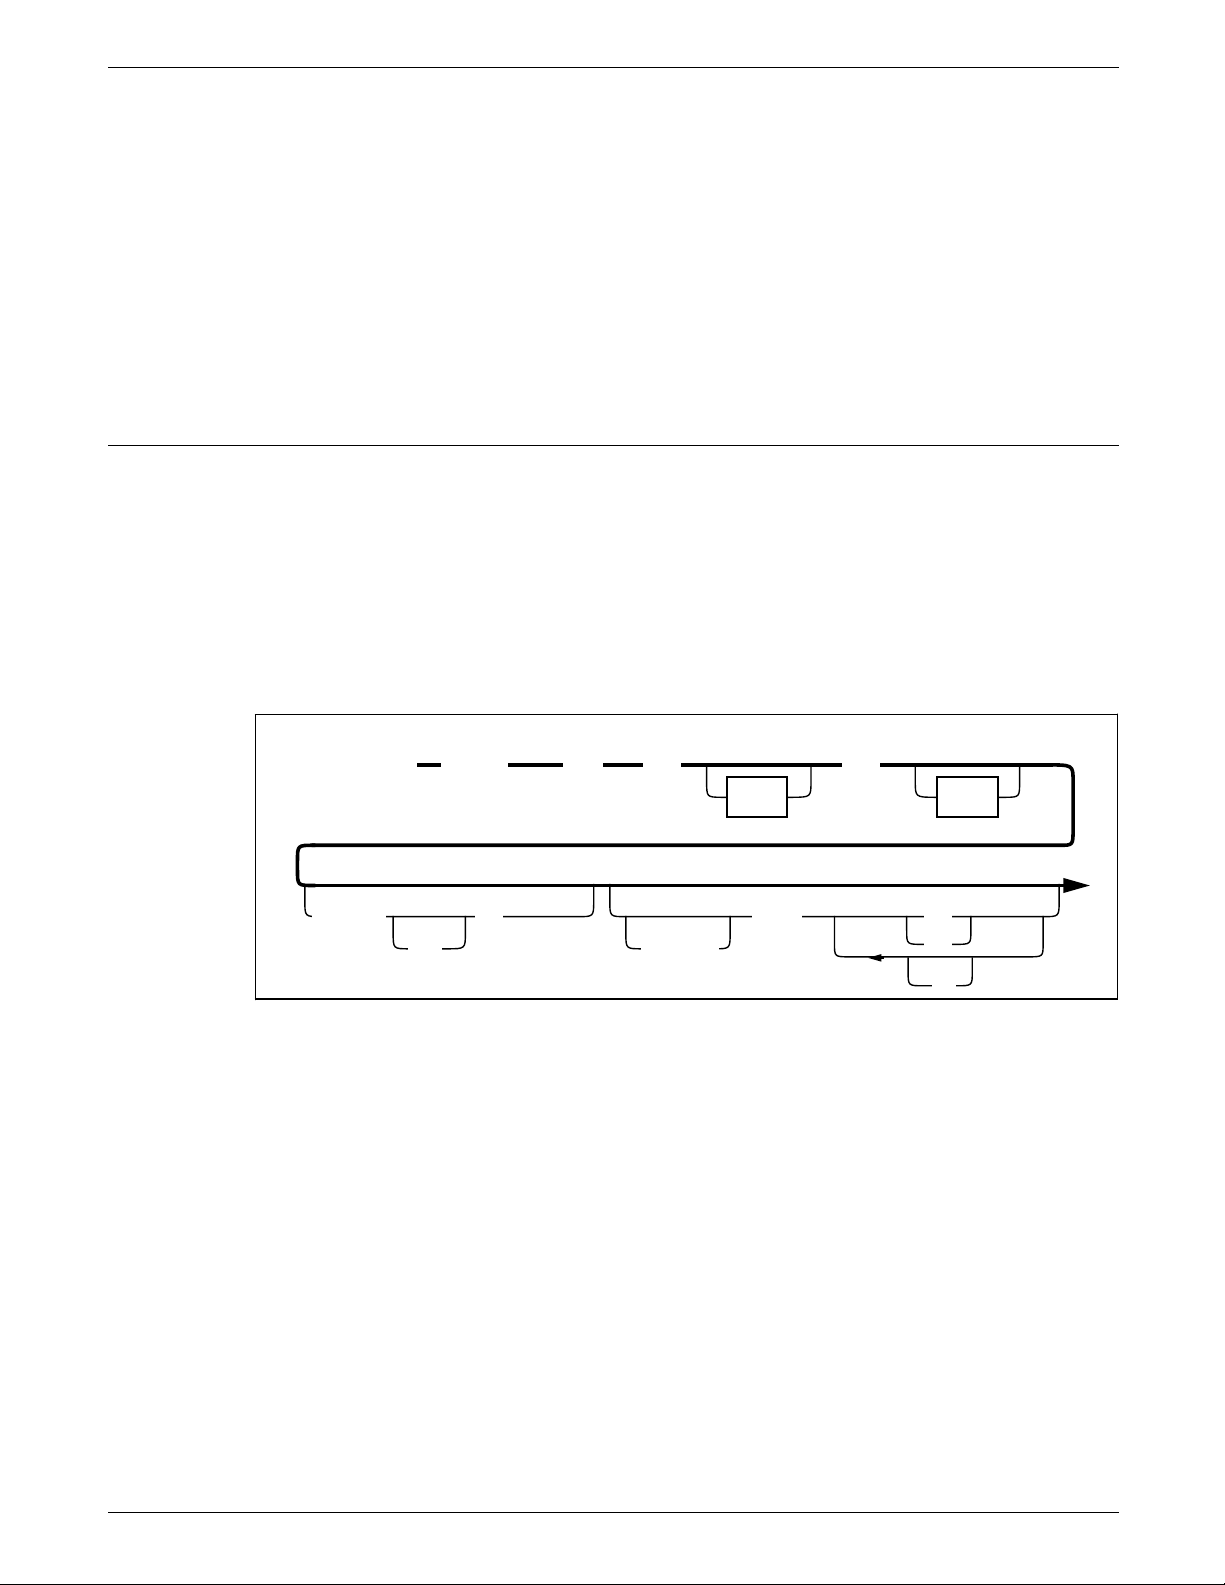
HOST FORMS DESCRIPTION LANGUAGE
GRAPHIC command
INK n specifies the ink number from the ink list that overrides
the corresponding ink specified in the ink list of the logo file. If
the logo has a NOSUBSTITUTION flag, then ink overrides are
not allowed (highlight color only).
When you incorporate a logo into your form, make sure you do
not exceed the font memory capacity.
Default None.
Examples Long form:
LOGO NEW1 AT 1,1 USING INK 3;
There is no short form.
A form may consist only of graphic images. You can have up to
16 images per page. Xerox highlight color LPS printers allow you
to print colored graphics on your form. For highlight color
forms, you can also override any ink specified in the ink list of a
color graphic file.
You must specify each graphic associated with a form in the
forms source language (FSL) file with the GRAPHIC command.
Figure 3–18 shows the command syntax flow.
GRAPHIC
SCALE
Parameters
name
n
Figure 3–18. GRAPHIC command syntax
AT
C
y
C
x
unitsunits
INK
USINGIS
n
,
,
name
identifies the IMG or XES graphic file name you specify.
This is the name of the graphic stored on the printer.
defines the coordinate on the y–axis to locate the logo origin.
C
y
defines the coordinate on the x–axis where you want the logo
C
x
origin located.
units
indicates the unit of measure for placement of the graphic.
units
The
can use two decimal places when you specify inches and
centimeters. You must express DOTS and XDOTS in integers.
are INCHES, CENTIMETERS, DOTS, and XDOTS. You
;
n
SCALE
have selected. The scaling factor value
specifies the scaling of the printed graphic that you
n
must be an integer.
You can only scale on a factor from 1 to 8.
n
specifies the ink number from the ink list which overrides
INK
the corresponding ink list of the graphic (highlight color only).
Default None.
3–26 HOST FORMS DESCRIPTION LANGUAGE 3.2 FOR IBM MVS CREATING FORMS
Page 55

SECTION command
Examples Long form:
GRAPHIC SYMBOL AT 1,1 SCALE IS 4 USING INK 3;
There is no short form.
Use the SECTION command when a form consists of identical
blocks of commands. You can save time by defining one section
and then repeating it at the locations you want.
You can also use this command to define an entire form as a
section. Within the section, you can use any other command,
statement, or specification except another SECTION command,
DO SECTION command, FORM command, or END command.
Figure 3–19 shows the SECTION command syntax flow.
Figure 3–19. SECTION command syntax
BEGIN
USING HFDL COMMANDS
name
;SECTION
LINE COMMAND SECTION
BOX COMMAND
TEXT AT COMMAND
TEXT IN BOX COMMAND
GRAPHIC COMMAND
LOGO COMMAND
GRID COMMAND
INTERWORD COMMAND
DOT LEADER COMMAND
COLUMN COMMAND
LET COMMAND
END
ENDSECTION
;
Parameter
Default None.
HOST FORMS DESCRIPTION LANGUAGE 3.2 FOR IBM MVS CREATING FORMS 3–27
name
specifies the name of the SECTION you want to use to
invoke the SECTION command. You may define and invoke
more than one section, but you must terminate each section with
the command END SECTION or ENDSECTION before you define
another section. Do not use a reserved word or keyword as a
name
section name.
is a maximum 16-character string.
Page 56

HOST FORMS DESCRIPTION LANGUAGE
SECTION definitions The BEGIN SECTION command informs the compiler that what
Examples Long form:
BEGIN SECTION NUSEC; LOGO NEW0 AT 0,0 USING INK 2;
TEXT AT 1,1 USING FONT 3 AND INK 1 ’Acme Weather Balloons’
END SECTION;
There is no short form.
follows includes the END SECTION command and lines up to
form a logical collection of commands that may be invoked as
needed to build a complete form.
Most HFDL commands may be found within a SECTION and
these commands are documented in the SECTION command
description. The key point to remember is that coordinates
within the SECTION definition are relative to 0, 0. Also, if the
GRID command is specified, then the GRID is only valid within
the bounds of the defining SECTION. The GRID command is a
local variable and it's scope is that of the defining SECTION.
Other statements within the section will then use the local GRID
command to determine the placement of lines, boxes, text, etc.
Remember that these placement values are still relative to 0, 0.
The final placement of the elements is defined by the DO
SECTION command.
SECTION invocation A SECTION is invoked by using the DO SECTION command.
DO SECTION command
This command names the desired SECTION as well as the origin
of the SECTION. The AT parameter takes on the role of the
ORIGIN command for the SECTION and is used to determine
the final placement of lines, boxes, text, etc. The final placement
is computed as follows:
xFinal=xOrigin + xValue * xGrid
and
yFinal=yOrigin + yValue * yGrid
xValue and yValue are taken from the selected command.
xGrid and yGrid are taken from the active GRID command.
xOrigin and yOrigin are taken from the DO SECTION command
that invokes the section.
If a GRID command has not been defined within the SECTION,
the GRID that is in effect for the FORM is used.
Use the DO SECTION command to invoke a defined section.
You must first define a section before you can invoke it. You can
repeat sections at absolute or incremental coordinates. You can
also repeat a section in the same location. This command is
useful for sections containing relative coordinates.
Figure 3–20 shows the DO SECTION command syntax flow.
3–28 HOST FORMS DESCRIPTION LANGUAGE 3.2 FOR IBM MVS CREATING FORMS
Page 57
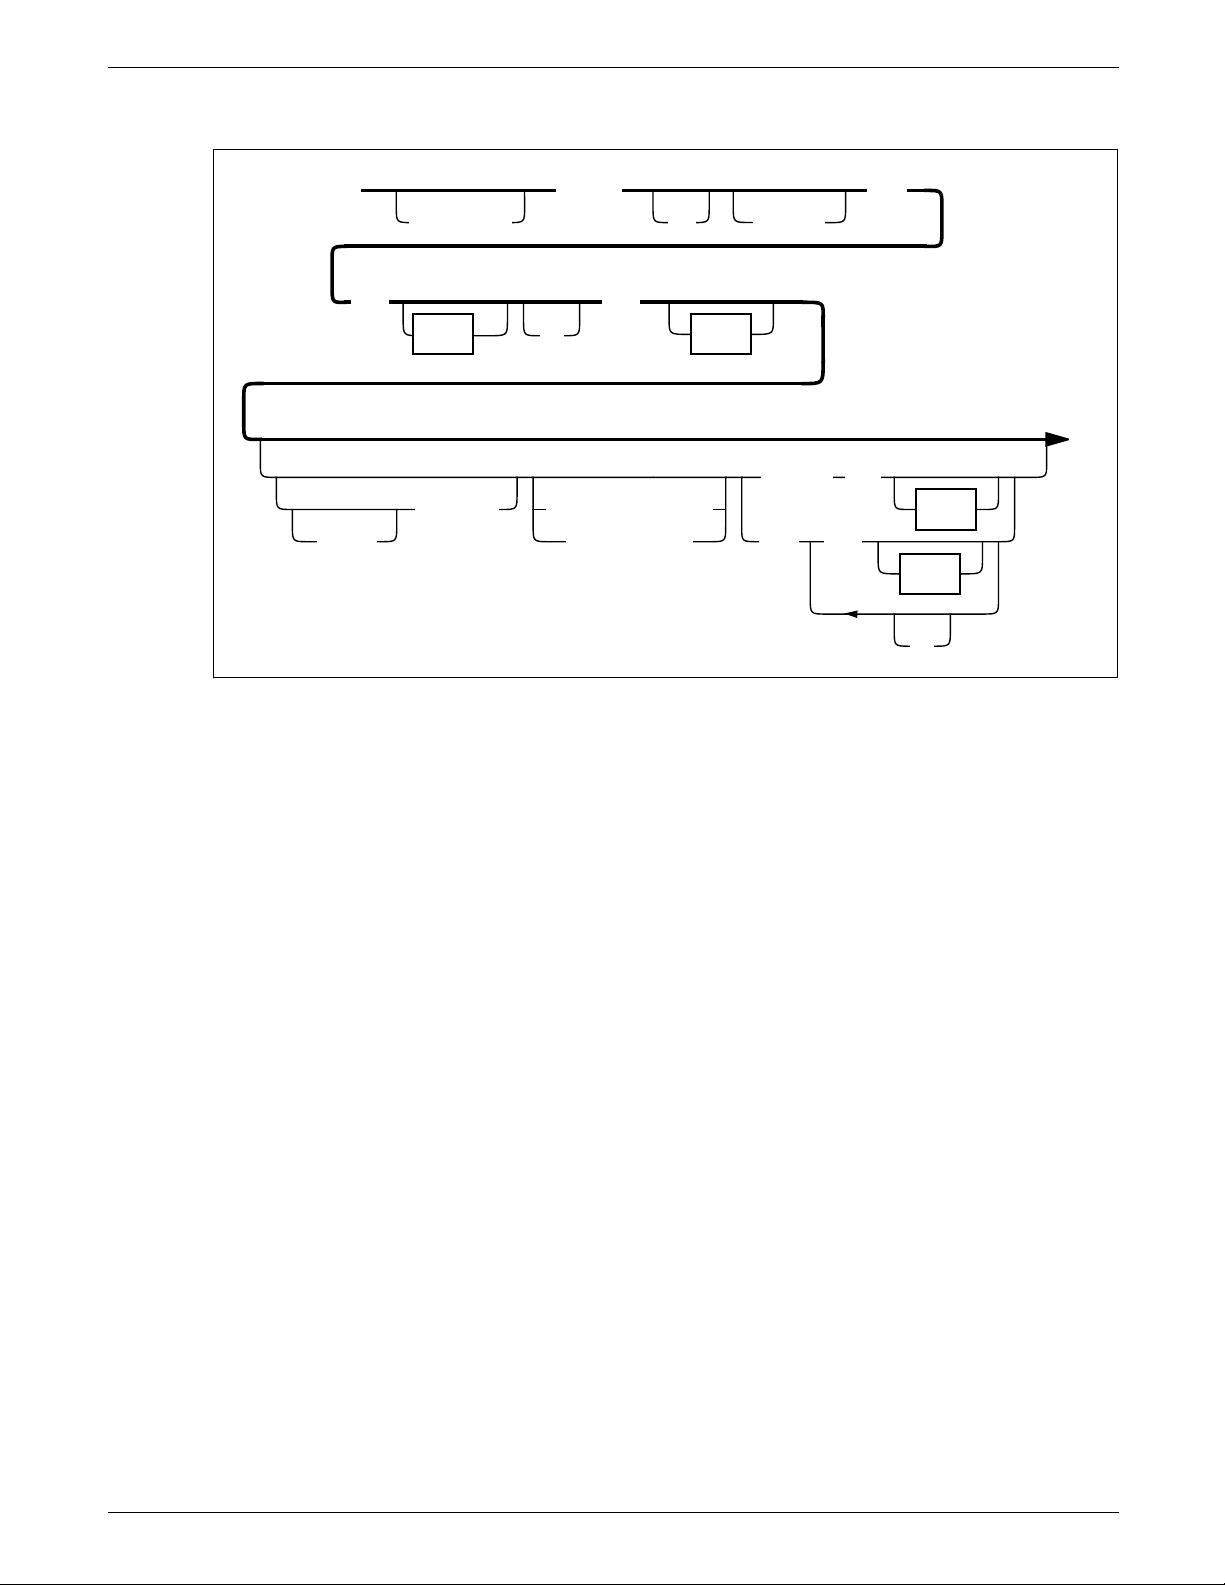
USING HFDL COMMANDS
Figure 3–20. DO SECTION command syntax
DO
AND
SECTION
C
y
units units
REPEAT
Parameters
name
n
C
x
TIMES
AT
,
HORIZONTALLY
VERTICALLY
EVERY
AT C
C
i
units
a
units
,
name
specifies the name of the section you want to invoke.
n
TIMES specifies the number of times you want the section
repeated.
;
specifies the y–axis where you want the section origin
C
y
located.
specifies the x–axis where you want the section origin located.
C
x
units
indicates the unit of measure for placement of the section
units
origin. The
are INCHES, CENTIMETERS, DOTS, and
XDOTS. You can use two decimal places when you specify
inches and centimeters. You must express DOTS and XDOTS in
integers.
REPEAT specifies the number of times you want a section
repeated in the orientation you specified.
HORIZONTALLY or VERTICALLY specifies the orientation of the
lines you want repeated.
EVERY C
indicates that you want to repeat a section at the
i
increment you have specified.
indicates that you want to repeat the section at the
AT C
a
absolute coordinate you have specified.
Default VERTICALLY, if you specified REPEAT.
Examples Long form:
DO SECTION NUSEC 3 TIMES AT 1,1 AND REPEAT
HORIZONTALLY EVERY 4;
Short form:
DO NUSEC 3 AT 1,1 REPEAT HORIZONTALLY EVERY 4;
HOST FORMS DESCRIPTION LANGUAGE 3.2 FOR IBM MVS CREATING FORMS 3–29
Page 58

HOST FORMS DESCRIPTION LANGUAGE
COLUMN command
Parameters
Use the COLUMN command to establish the column width
when you specify TEXT ALIGNED JUSTIFIED IN COLUMN. You
can also use the COLUMN command to establish a right
boundary for the DOT LEADER command.
units
indicates the unit of measure for the column width. The
units
are INCHES, CENTIMETERS, DOTS, and XDOTS. You can
use two decimal places when you specify inches and centimeters.
You can express DOTS and XDOTS only in integers.
Figure 3–21 shows the COLUMN command syntax flow.
Figure 3–21. COLUMN command syntax
COLUMN
INTERWORD command
n
units
Defaults The default units specified for the GRID command, if you do not
units
specify
Column width of 6.5 inches (portrait) or 9 inches (landscape), if
you do not specify column width using the COLUMN command.
Examples Long form:
COLUMN SIZE IS 3.8 INCHES WIDE;
Short form:
COLUMN IS 3.8 IN WIDE;
The INTERWORD command specifies the interword multiplier
used to determine the interword gap.
The interword gap formula
The interword gap is the blank space between words in printed
text. It is determined in HFDL with this formula:
.
WIDESIZE IS
;
interword gap = interword multiplier
where
base gap
• the width of ASCII code point X’20’, usually a “blank”
• an EN space, which is 1/2 the point size of the font
interword multiplier
• the value specified by the INTERWORD command
• 1.0, if no INTERWORD command is specified.
HFDL uses the interword gap you specify as the minimum value.
For fully justified text, HFDL adjusts the interword gap when
needed.
3–30 HOST FORMS DESCRIPTION LANGUAGE 3.2 FOR IBM MVS CREATING FORMS
is one of these values, based on the first named font:
is one of these values:
*
base gap
Page 59

USING HFDL COMMANDS
Specifying the base gap
The base gap for text not fully justified is always ASCII code
point X‘20’, the “blank”.
The base gap for fully justified text is determined by the
SPACING operand of the COMPILE command. If SPACING is
specified in the JCL for such a job, the base gap is the EN space.
If SPACING is specified in the JCL for a job which does not
include fully justified text, SPACING is not used, and the base
gap remains ACSII code point X‘20’, the “blank”.
For an example of how to specify the SPACING operand, refer to
the “Command syntax” section of the “Managing and printing
sample forms” chapter of this manual.
Specifying the interword multiplier
The INTERWORD command specifies the interword multiplier in
the formula above. The command is not an FDL command; it will
not work on a form compiled at the printer.
Figure 3–22 shows the syntax for the INTERWORD command.
INTERWORD
Figure 3–22. INTERWORD command syntax
n
SPACE
n
is the interword multiplier used to determine the interword
IS
gap. This value is multiplied by the base gap.
Examples:
INTERWORD SPACE IS 0.8;
INTERWORD 0.8;
Using SPACING and INTERWORD together
For justified text, use the SPACING operand of the COMPILE
command along with the INTERWORD command to specify the
size of the interword gap.
Table 3-1 illustrates how the two parameters work together to
determine the interword gap.
;
HOST FORMS DESCRIPTION LANGUAGE 3.2 FOR IBM MVS CREATING FORMS 3–31
Page 60

HOST FORMS DESCRIPTION LANGUAGE
Table 3-1. Determining interword
The interword
multiplier:
applied to the base
gap, specified by:
equals an
interword gap of:
INTERWORD .5 no SPACING operand 0.5 * the width of
ASCII code point
X‘20’
INTERWORD .5 COMPILE SPACING
1
0.5 * the EN space
INTERWORD 1.0 no SPACING operand 1.0 * the width of
ASCII code point
X‘20’
INTERWORD 1.0 COMPILE SPACING
(no INTERWORD
no SPACING operand (1.0) * the width of
command specified,
defaults to 1.0)
(no INTERWORD
COMPILE SPACING
1
1.0 * the EN space
ASCII code point
X‘20’
1
(1.0) * the EN space
command specified,
defaults to 1.0)
1
Valid for fully justifed text only
DOT LEADER command
Use the DOT LEADER command to define the character string
you specify when you use DOT LEADER in the TEXT AT
command. The text string portion of the TEXT AT command
allows for DOT LEADER requests.
Figure 3–23 shows the command syntax flow.
Figure 3–23. DOT LEADER command syntax
’
DOT LEADER
USING
FONT
n
string’
Parameters ’string’ specifies the type of dot leader you want to use. Strings
cannot exceed 12 characters.
n
USING FONT
specifies the font you want to use for the dot
leader characters.
Defaults Single dots of the font currently in use, if you do not specify a
font and you use DOT LEADER in the TEXT command.
Examples Long form:
DOT LEADER USING FONT 1 ’*’;
;
*****************************
3–32 HOST FORMS DESCRIPTION LANGUAGE 3.2 FOR IBM MVS CREATING FORMS
Page 61

LET command
USING HFDL COMMANDS
Sample strings you can use are as follows:
’ .’ produces . . . . . . . . . . . . . . . . . . . . . . . . .
’*’ produces *****************************
’–.’ produces –.–.–.–.–.–.–.–.–.–.–.–.–.–.–.–.–.–.–.–.–.–.
’xo’ produces xoxoxoxoxoxoxoxoxoxoxoxoxoxoxoxo
Use the LET command to define variable names. You can specify
all x and y coordinates with either literal values or variable names.
If you use variable names, you must first define them with the
LET command. The LET command allows an
n
to equal an
alphabetic character and may be up to 16 characters in length.
You can define up to 50 variables for each form (two to ten
variables for each form is typical). You can define the maximum
number of variables in one LET statement or in individual
statements. You can place LET statements anywhere in the form
following the FORM statement, and you can redefine variables
any number of times.
You can only set variables to a specific numeric amount. You
cannot specify units in the LET statement. However, you can
specify units (if needed) when the variable is used as a
coordinate. For example, if variable Y1 is set to 3 in a LET
statement and a line is drawn at Y1 inches, it is drawn at 3
inches. If the grid units are dots and no units are specified, then
the line Y1 is drawn at 3 dots.
value. Variable names must begin with an
identifier
(variable)
Figure 3–24 shows the LET command syntax flow.
Figure 3–24. LET command syntax
LET =
Parameters
Default None.
Examples Long form:
identifier = identifier
select for the LET command. The first
variable and the second
LET X1 = 5.5, X2 = 4.0, Y1 = 3.0;
There is no short form.
Relative coordinate
You can specify all coordinates as literal values or variables. You
must first define variables in the LET statement. Refer to the “LET
command” section for additional information. If you use
variables outside of the LET command, they are called relative
coordinates. These coordinates can also have a positive or a
negative value. This allows you to place text items relative to
one another. If you want to shift the whole block of text up or
identifier
identifier
n
,
specifies the variable name and value you
identifier
identifier
specifies the variable value n.
specifies the
;
HOST FORMS DESCRIPTION LANGUAGE 3.2 FOR IBM MVS CREATING FORMS 3–33
Page 62

HOST FORMS DESCRIPTION LANGUAGE
down, you only have to change the initial values. You can shift
text automatically when you add or delete text items.
HFDL uses spaces to delimit keywords. Therefore, relative
coordinates must not contain spaces between the variable name
Y1 and the value +.5.
Figure 3–25 shows the variable syntax flow.
Figure 3–25. Relative coordinate syntax
n
identifier
–
+
–
n
COMMENT command
Parameters
Default None.
Examples The following examples show the long form of the relative
identifier
coordinate.
+ or – specifies a positive or negative value that you can apply
to the
coordinate variables.
In this example, you can define the Y coordinate as the value of
Y1 plus 3 centimeters:
AT Y1+3 CM
In this example, you can define the Y coordinate as the value of
Y2 minus 4.5 grid units:
AT Y2–4.5
There is no short form.
In the examples above, the value of Y1 and Y2 change. When
you refer to Y1 in the FSL, it is 3 larger. Likewise, Y2 is 4.5
smaller.
Use the COMMENT command to retain a record of your
comments in the source statement. Comments do not appear
on the form, and the compiler ignores them. You do not need
to enclose the COMMENT command text in single quotes.
is the variable name you specify for the relative
n
value.
Figure 3–26 shows the COMMENT command syntax flow.
Figure 3–26. COMMENT command syntax
text
Parameter
Default None.
3–34 HOST FORMS DESCRIPTION LANGUAGE 3.2 FOR IBM MVS CREATING FORMS
text
specifies the comment text string you want to include in the
HFDL command statement.
;COMMENT
Page 63

END command
USING HFDL COMMANDS
Examples Long form:
COMMENT ***HFDL IS ABLE TO DESCRIBE MANY TYPES OF
FORMS***;
There is no short form.
Use the END command to terminate a form description.
Figure 3–27 shows the command syntax flow.
Figure 3–27. END command syntax
END
Parameter END specifies an end–of–file condition from the source input
disk file or from the input data stream.
Default There is no default for the END command. It is an optional
command.
Example Long form:
FORM HFDL1; ..................; END;
There is no short form.
;
HOST FORMS DESCRIPTION LANGUAGE 3.2 FOR IBM MVS CREATING FORMS 3–35
Page 64

HOST FORMS DESCRIPTION LANGUAGE
3–36 HOST FORMS DESCRIPTION LANGUAGE 3.2 FOR IBM MVS CREATING FORMS
Page 65
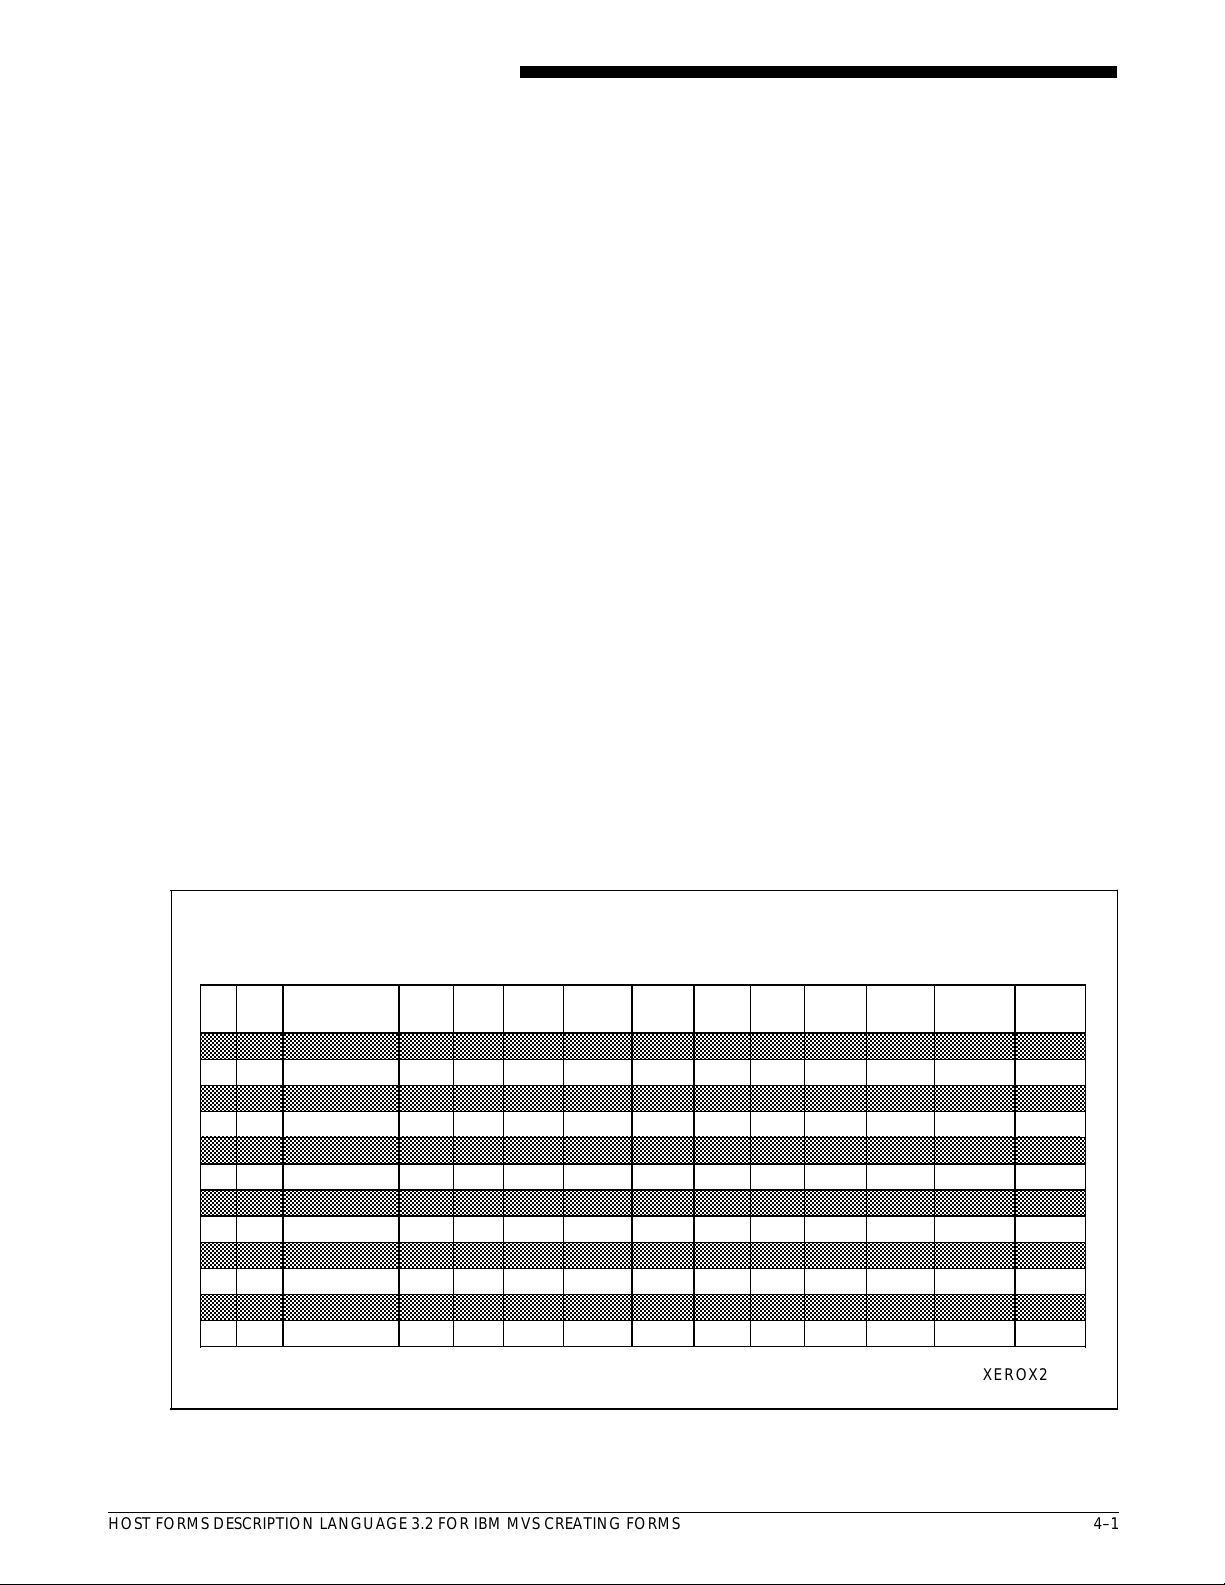
4. Creating a sample form
aaaaaaaaaaaaaaaaaaaaaaaaaaaaaaaaaaaaaaaaaaaaaaaaaaaaaaaaaaaaaaaaaaaaaaaaaaaaaaaaaaaaaaaaaaaaaaaaaaaaaaaaaaaaaaa
a
a
a
a
a
a
a
aaaaaaaaaaaaaaaaaaaaaaaaaaaaaaaaaaaaaaaaaaaaaaaaaaaaaaaaaaaaaaaaaaaaaaaaaaaaaaaaaaaaaaaaaaaaaaaaaaaaaaaaaaaaaaa
a
a
a
a
a
aaaaaaaaaaaaaaaaaaaaaaaaaaaaaaaaaaaaaaaaaaaaaaaaaaaaaaaaaaaaaaaaaaaaaaaaaaaaaaaaaaaaaaaaaaaaaaaaaaaaaaaaaaaaaaa
a
a
a
a
a
aaaaaaaaaaaaaaaaaaaaaaaaaaaaaaaaaaaaaaaaaaaaaaaaaaaaaaaaaaaaaaaaaaaaaaaaaaaaaaaaaaaaaaaaaaaaaaaaaaaaaaaaaaaaaaa
a
a
a
a
a
a
a
aaaaaaaaaaaaaaaaaaaaaaaaaaaaaaaaaaaaaaaaaaaaaaaaaaaaaaaaaaaaaaaaaaaaaaaaaaaaaaaaaaaaaaaaaaaaaaaaaaaaaaaaaaaaaaa
a
a
a
a
a
a
a
aaaaaaaaaaaaaaaaaaaaaaaaaaaaaaaaaaaaaaaaaaaaaaaaaaaaaaaaaaaaaaaaaaaaaaaaaaaaaaaaaaaaaaaaaaaaaaaaaaaaaaaaaaaaaaa
a
a
a
a
a
a
a
This chapter describes how to create a simple form electronically
using the Host Forms Description Language (HFDL). The forms
shown in the following figures are examples only and appear
smaller than the actual forms.
The steps on the following pages include both long and short
forms of commands. The long form of a command may include
optional keywords and system default values that you may omit
as you become familiar with the forms creation process.
To make the form description easier to read, you can enter a
comment before each command. For example, before specifying
column headings, you might enter the following:
COMMENT DEFINE TITLES;
The program does not read comments.
You can enter HFDL commands on the same line or you can
enter each command on a separate line to make your form
description easier to read. You must end each command with a
semicolon. Refer to the “Using HFDL commands” chapter for
complete information on HFDL commands and their parameters
and defaults.
Figure 4–1 shows the landscape form that you can create using
the procedures in this chapter.
Figure 4–1. Sample electronic form
COMPOSITE INVENTORY STOCK STATUS REPORT
CATNOITEM
NO DESCRIPTION
aaaaaaaaaaaaaaaaaaaaaaaaaaaaaaaaaaaaaaaaaaaaaaaaaaaaaaaaaaaaaaaaaaaaaaaaaaaaaaaaaaaaaaaaaaaaaaaaaaaaaaaaaaaaa
aaaaaaaaaaaaaaaaaaaaaaaaaaaaaaaaaaaaaaaaaaaaaaaaaaaaaaaaaaaaaaaaaaaaaaaaaaaaaaaaaaaaaaaaaaaaaaaaaaaaaaaaaaaaa
aaaaaaaaaaaaaaaaaaaaaaaaaaaaaaaaaaaaaaaaaaaaaaaaaaaaaaaaaaaaaaaaaaaaaaaaaaaaaaaaaaaaaaaaaaaaaaaaaaaaaaaaaaaaa
aaaaaaaaaaaaaaaaaaaaaaaaaaaaaaaaaaaaaaaaaaaaaaaaaaaaaaaaaaaaaaaaaaaaaaaaaaaaaaaaaaaaaaaaaaaaaaaaaaaaaaaaaaaaa
aaaaaaaaaaaaaaaaaaaaaaaaaaaaaaaaaaaaaaaaaaaaaaaaaaaaaaaaaaaaaaaaaaaaaaaaaaaaaaaaaaaaaaaaaaaaaaaaaaaaaaaaaaaaa
aaaaaaaaaaaaaaaaaaaaaaaaaaaaaaaaaaaaaaaaaaaaaaaaaaaaaaaaaaaaaaaaaaaaaaaaaaaaaaaaaaaaaaaaaaaaaaaaaaaaaaaaaaaaa
aaaaaaaaaaaaaaaaaaaaaaaaaaaaaaaaaaaaaaaaaaaaaaaaaaaaaaaaaaaaaaaaaaaaaaaaaaaaaaaaaaaaaaaaaaaaaaaaaaaaaaaaaaaaa
aaaaaaaaaaaaaaaaaaaaaaaaaaaaaaaaaaaaaaaaaaaaaaaaaaaaaaaaaaaaaaaaaaaaaaaaaaaaaaaaaaaaaaaaaaaaaaaaaaaaaaaaaaaaa
aaaaaaaaaaaaaaaaaaaaaaaaaaaaaaaaaaaaaaaaaaaaaaaaaaaaaaaaaaaaaaaaaaaaaaaaaaaaaaaaaaaaaaaaaaaaaaaaaaaaaaaaaaaaa
aaaaaaaaaaaaaaaaaaaaaaaaaaaaaaaaaaaaaaaaaaaaaaaaaaaaaaaaaaaaaaaaaaaaaaaaaaaaaaaaaaaaaaaaaaaaaaaaaaaaaaaaaaaaa
aaaaaaaaaaaaaaaaaaaaaaaaaaaaaaaaaaaaaaaaaaaaaaaaaaaaaaaaaaaaaaaaaaaaaaaaaaaaaaaaaaaaaaaaaaaaaaaaaaaaaaaaaaaaa
aaaaaaaaaaaaaaaaaaaaaaaaaaaaaaaaaaaaaaaaaaaaaaaaaaaaaaaaaaaaaaaaaaaaaaaaaaaaaaaaaaaaaaaaaaaaaaaaaaaaaaaaaaaaa
aaaaaaaaaaaaaaaaaaaaaaaaaaaaaaaaaaaaaaaaaaaaaaaaaaaaaaaaaaaaaaaaaaaaaaaaaaaaaaaaaaaaaaaaaaaaaaaaaaaaaaaaaaaaa
aaaaaaaaaaaaaaaaaaaaaaaaaaaaaaaaaaaaaaaaaaaaaaaaaaaaaaaaaaaaaaaaaaaaaaaaaaaaaaaaaaaaaaaaaaaaaaaaaaaaaaaaaaaaa
aaaaaaaaaaaaaaaaaaaaaaaaaaaaaaaaaaaaaaaaaaaaaaaaaaaaaaaaaaaaaaaaaaaaaaaaaaaaaaaaaaaaaaaaaaaaaaaaaaaaaaaaaaaaa
aaaaaaaaaaaaaaaaaaaaaaaaaaaaaaaaaaaaaaaaaaaaaaaaaaaaaaaaaaaaaaaaaaaaaaaaaaaaaaaaaaaaaaaaaaaaaaaaaaaaaaaaaaaaa
aaaaaaaaaaaaaaaaaaaaaaaaaaaaaaaaaaaaaaaaaaaaaaaaaaaaaaaaaaaaaaaaaaaaaaaaaaaaaaaaaaaaaaaaaaaaaaaaaaaaaaaaaaaaa
REOR
POINT
REOR
QTY
OPEN
STOCK
VENDOR
RECEIPTS
STOCK
ORDERS
COMM
STOCK
SALES
ISSUES
BACK
ORDERS
VENDOR
RETURNS
STOCK
TRANSFERS
XEROX2
CURRENT
STOCK
a
a
a
a
a
a
a
a
a
a
a
a
a
a
a
a
a
HOST FORMS DESCRIPTION LANGUAGE 3.2 FOR IBM MVS CREATING FORMS 4–1
Page 66

HOST FORMS DESCRIPTION LANGUAGE
Setting up the form
Follow these steps to set up the basic elements of your form:
1. Use the FORM command to specify both a unique form
name that identifies the form to the system and a
resolution.
In this example, the form name is XEROX2 and the
resolution is 300 SPI.
FORM XEROX2, RESOLUTION IS 300 SPI;
2. Specify the physical paper size.
This example specifies U.S. letter size:
PAPER SIZE IS USLETTER;
3. Specify the grid unit and form origin. The form origin
should coincide with variable data origin and form grid units
should correspond with the character and line spacing of
the variable data.
The example below shows the long form of the command
using FMT1 values:
GRID UNIT IS 13.6 CPI 8.1 LPI ORIGIN .18 IN .66 IN;
This example shows the short form of the command:
GRID FMT1;
You do not need to use the LANDSCAPE/PORTRAIT
command to specify page orientation and virtual page size if
you specify a predefined format in the GRID command.
4. Specify the fonts you want to use.
In this example, you specify a large font (UN214A) for the
report title, a smaller font (UN107A) for the column
headings, and a very small font (UN104A) for the form
identifier:
FONTS UN214A, UN107A, UN104A;
When you refer to these fonts in later descriptive
commands, the first font specified (UN214A) is identified as
FONT 1, the second as FONT 2, and the third as FONT 3.
This example shows entering all of these setup commands
in their long form:
FORM XEROX2 RESOLUTION IS 300 SPI;
PAPER SIZE IS USLETTER;
GRID UNIT IS 13.6 CPI 8.1 LPI ORIGIN .18 IN .66 IN;
FONTS UN214A, UN107A, UN104A;
4–2 HOST FORMS DESCRIPTION LANGUAGE 3.2 FOR IBM MVS CREATING FORMS
Page 67
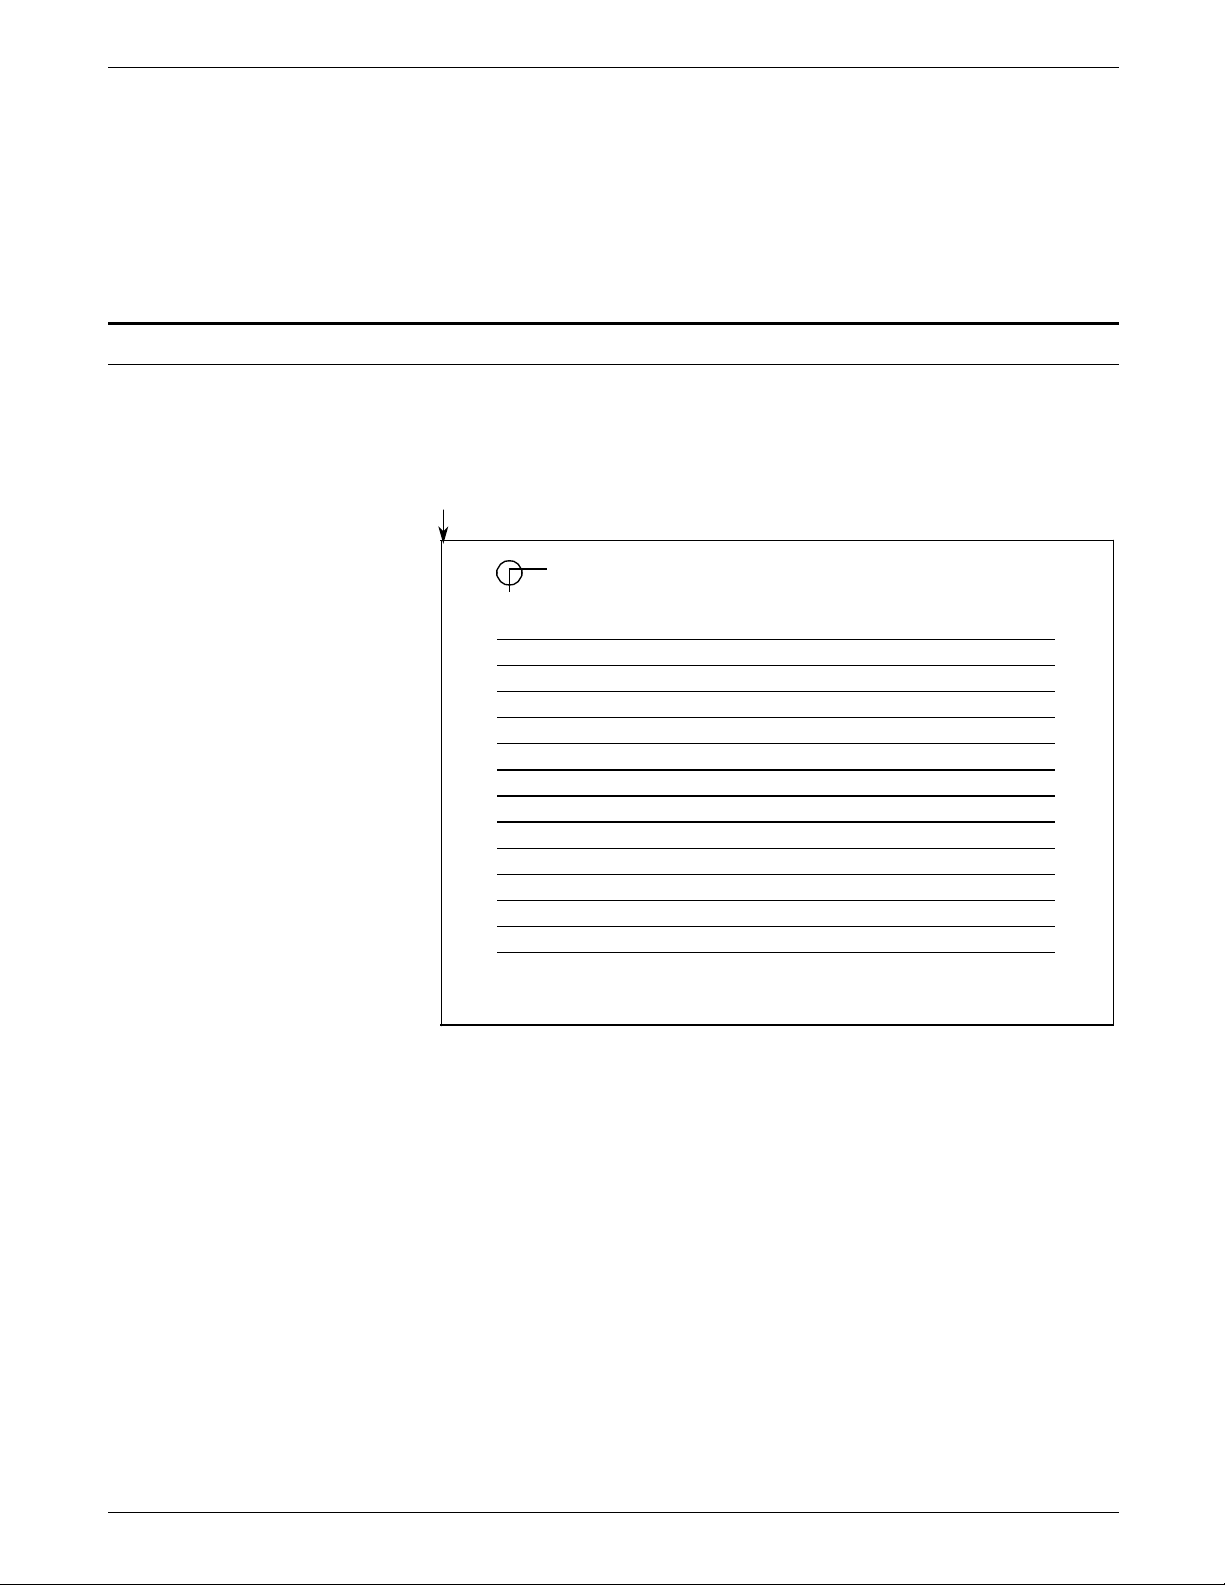
Since the sample form uses the default resolution, default
physical page size, and default grid format, you can omit these
commands. This example shows entering all of the setup
commands required in their short form:
FORM XEROX2;
FONTS UN214A, UN107A, UN104A;
Using the sample description command
After you finish setting up the sample form, follow these steps to
enter descriptive data:
1. Draw 14 parallel horizontal lines as shown.
Physical and virtual page origin
Form origin (0,0)
-1
7
11
15
CREATING A SAMPLE FORM
132
55
59
The following example shows the long form of the LINE
command:
AT 7 DRAW 14 HORIZONTAL LINES FROM –1 TO 132
USING SOLID 1 AND REPEAT VERTICALLY EVERY 4;
The LINE command draws lines in a horizontal direction
under character row 7 and every fourth row thereafter,
beginning two character positions to the left of character
position 1 and ending at character position 132.
SOLID 1 specifies the appearance of the lines, which are
solid and one point wide. Make sure that you stay within
the boundaries of the system page when you specify a
negative character position.
VERTICALLY is the default direction of the repetition
process when printing is horizontal, since the usual intent is
to draw parallel lines.
HOST FORMS DESCRIPTION LANGUAGE 3.2 FOR IBM MVS CREATING FORMS 4–3
Page 68
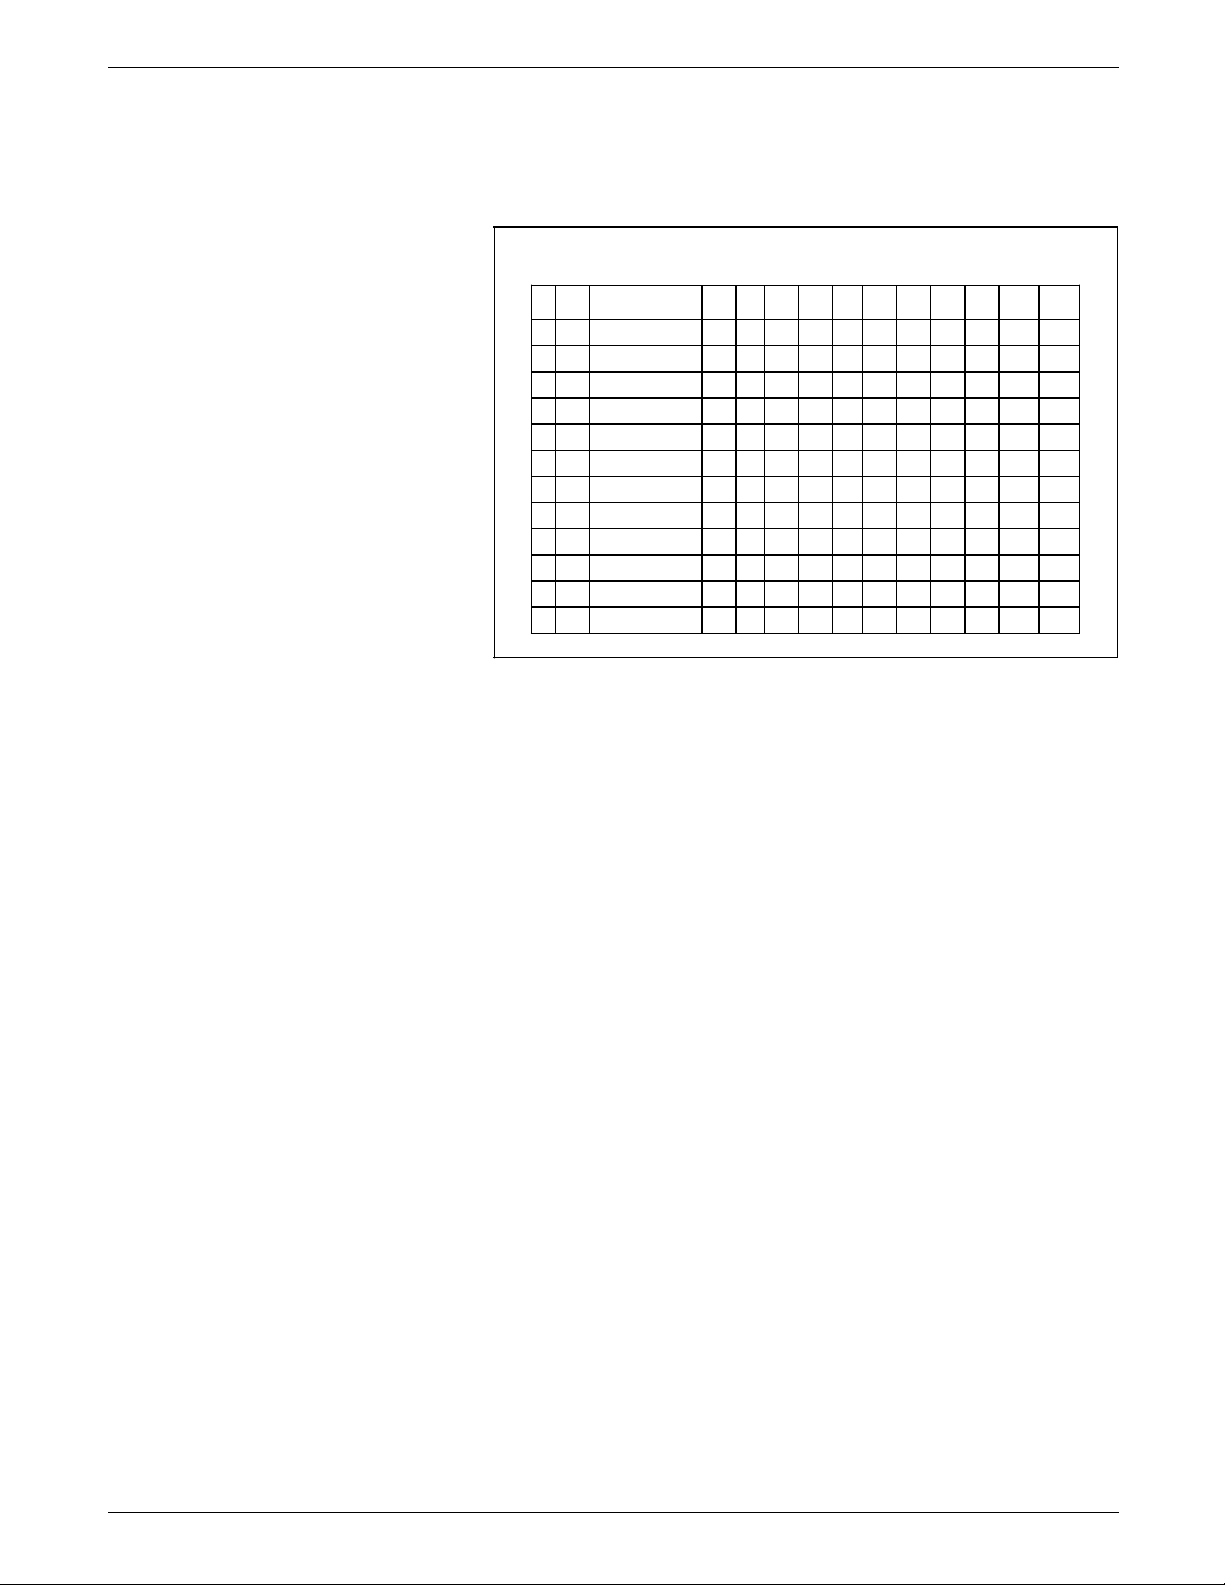
HOST FORMS DESCRIPTION LANGUAGE
If you omit optional keywords and system defaults, the
short form of the command looks like this example:
AT 7 14 LINES –1 TO 132 EVERY 4;
2. Draw 15 parallel vertical lines as shown.
-1 4 12 39 48 55 64 72 79 87 96 104 112 121 132
7
59
This example shows the long form of the LINE command:
AT –1 DRAW VERTICAL LINES FROM 7 TO 59 USING SOLID
1 AND REPEAT HORIZONTALLY AT 4, 12, 39, 48, 55, 64, 72,
79, 87, 96, 104, 112, 121, 132;
The LINE command draws lines in a vertical direction,
beginning at character position –1 and repeated at the
specified intervals, with each line extending from character
row 7 to character row 59. HORIZONTALLY is the default
direction of the repetition process when printing is vertical.
The following example, which omits optional keywords and
system defaults, is the short form of the command:
AT –1 VERTICAL LINES 7 TO 59 AT 4, 12, 39, 48, 55, 64, 72,
79, 87, 96, 104, 112, 121, 132;
3. Use the BOX command to draw an invisible box and center
it above the table.
This example shows the long form of the command:
AT 2, –1 DRAW 1 BOX 133 WIDE BY 5 HIGH USING SOLID
0;
The BOX command draws an invisible box 133 grid units
wide by 5 grid units high under character row 2, beginning
two character positions to the left of character position 1.
Use SOLID 0 as the thickness of the box line when you
want to draw an invisible box. Notice that the horizontal
sides of the box begin and end at the same character
positions as the horizontal lines of the table.
This example shows the short form of the command:
AT 2, –1 BOX 133, 5 SOLID 0;
4–4 HOST FORMS DESCRIPTION LANGUAGE 3.2 FOR IBM MVS CREATING FORMS
Page 69

CREATING A SAMPLE FORM
4. Position the title in the center of the invisible box.
This example shows the long form of the TEXT IN BOX
command:
HORIZONTAL TEXT ALIGNED CENTER USING FONT 1 IN
CENTER BOX 2, –1 ’COMPOSITE STOCK INVENTORY
STATUS REPORT’;
The TEXT IN BOX command places the title COMPOSITE
STOCK INVENTORY STATUS REPORT in the center of the
box whose upper left corner begins at character row 2, at
character position –1. FONT 1 is UN214A, the first font you
specified with the FONT command; FONT 2 is UN107A, the
second font specified.
5. Specify the column headings.
This example shows the long form of the command:
HORIZONTAL TEXT ALIGNED CENTER USING FONT 2
IN CENTER BOX 7, –1 ’CAT’ ’NO’
IN NEXT HORIZONTAL BOX ’ITEM’ ’NO’
IN NEXT HORIZONTAL BOX ’DESCRIPTION’
IN NEXT HORIZONTAL BOX ’REOR’ ’POINT’
IN NEXT HORIZONTAL BOX ’REOR’ ’QTY’
IN NEXT HORIZONTAL BOX ’OPEN’ ’STOCK’
IN NEXT HORIZONTAL BOX ’VENDOR’ ’RECEIPTS’
IN NEXT HORIZONTAL BOX ’STOCK’ ’ORDERS’
IN NEXT HORIZONTAL BOX ’COMM’ ’STOCK’
IN NEXT HORIZONTAL BOX ’SALES’ ’ISSUES’
IN NEXT HORIZONTAL BOX ’BACK’ ’ORDERS’
IN NEXT HORIZONTAL BOX ’VENDOR’ ’RETURNS’
IN NEXT HORIZONTAL BOX ’STOCK’ ’TRANSFERS’
IN NEXT HORIZONTAL BOX ’CURRENT’ ’STOCK’;
This command places a column heading in each column of
the table, using FONT 2. The system automatically centers
column headings.
The TEXT IN BOX command simplifies the task of placing
text in a series of adjacent boxes. You only need to specify
the coordinates of the upper–left corner of the first box.
Subsequently, when you enter a BOX command, the system
automatically recognizes the coordinates of a box directly
to the right of the current box. The keywords IN NEXT
HORIZONTAL are optional. It is also possible to specify the
box directly below the current box, however, you must
enter the keywords IN NEXT VERTICAL.
HOST FORMS DESCRIPTION LANGUAGE 3.2 FOR IBM MVS CREATING FORMS 4–5
Page 70

HOST FORMS DESCRIPTION LANGUAGE
This example shows the short form of the command:
TEXT FONT 2 IN BOX 7, –1 ’CAT’ ’NO’
BOX ’ITEM’ ’NO’
BOX ’DESCRIPTION’
BOX ’REOR’ ’POINT’
BOX ’REOR’ ’QTY’
BOX ’OPEN’ ’STOCK’
BOX ’VENDOR’ ’RECEIPTS’
BOX ’STOCK’ ’ORDERS’
BOX ’COMM’ ’STOCK’
BOX ’SALES’ ’ISSUES’
BOX ’BACK’ ’ORDERS’
BOX ’VENDOR’ ’RETURNS’
BOX ’STOCK’ ’TRANSFERS’
BOX ’CURRENT’ ’STOCK’;
6. Apply shading to the form.
This example shows the long form of the command:
At 11, –1 DRAW 6 BOXES 133 WIDE BY 4 HIGH USING
SHADING MEDIUM AND REPEAT VERTICALLY EVERY 8;
This command draws six shaded boxes 133 grid units wide
by 4 grid units high and an identical series of shaded boxes
every eighth row. The coordinates of the upper left corner
of the first box are character row 11, character position –1.
This example shows the short form of the command:
AT 11, –1 6 BOXES 133, 4 SHADING VERTICALLY EVERY 8;
7. Place the form’s identifier and date of issue at the bottom
of the form.
This example shows the long form of the command:
HORIZONTAL TEXT USING FONT 3 AT 61, –1 ’XEROX2
(5/93)’;
This command places the words XEROX2 (5/93) at character
row 61, character position –1, or on the line immediately
below the table, flush with the left edge of the table. Font
3 is UN104A, the third font specified in the FONT
command.
This example shows the short form of the command:
TEXT FONT 3 AT 61, –1 ’XEROX2 (5/93)’;
8. Terminate the form description with an END command, as
follows:
END;
4–6 HOST FORMS DESCRIPTION LANGUAGE 3.2 FOR IBM MVS CREATING FORMS
Page 71

JCL requirements
5. Managing and printing
sample forms
When you have created your form design using Host Forms
Description Language (HFDL) commands, you can compile, batch
process, store, and print a sample of it. After this process
completes, your form becomes available for use. This chapter
describes the COMPILE command and the job control language
(JCL) to invoke the HFDL compiler.
During installation, your System Administrator or system installer
modifies the items in your JCL, as appropriate, for your specific
site.
You enter items in the JCL that are specific to your job when you
are ready to compile your form with HFDL. If you are not
familiar with the items you need to change in the JCL, contact
your System Administrator.
Using the COMPILE command
Command coding conventions
Command syntax
You use the COMPILE command to indicate how you want to
compile the form. The COMPILE command is the only
command available for compiling forms.
Use the following conventions when you code the COMPILE
command:
• Follow the command syntax carefully.
• Enter operands in uppercase or lowercase characters.
• Type operands in the first 72 columns of a record.
• Abbreviate as indicated by the capital letters.
Figure 5–1 shows the COMPILE command syntax flow.
Figure 5–1. COMPILE command syntax
COMPILE FSL=DDname[(name)] optional other parameters
HOST FORMS DESCRIPTION LANGUAGE 3.2 FOR IBM MVS CREATING FORMS 5–1
Page 72

HOST FORMS DESCRIPTION LANGUAGE
Parameters FSL is the only valid resource you can use.
FSL=DDname
[(PDS member name)] where DDname = XFFSL
and PDS member name is the member name of the PDS where
the FSL is stored. The DDname can be either a sequential or a
partition data set. When the DDname is sequential, the PDS
member name is not applicable.
Operands LISt produces the full compiler listing. To specify no listing,
delete this operand.
VERsion=Other specifies the form version you want to compile.
2 produces a form suitable for the version 2 and version 3
printers (4050, 4090, 4135, 4650, 8790, 9790). HC produces a
form suitable for a Xerox highlight color LPS printer. X1 or XC
produces a form suitable for Xerox decentralized printers. The
default is 2.
Form versions are not significant unless you are creating a
highlight color form or an XES form. Version HC only prints on a
Xerox highlight color printer. You should use version HC for
compiling any form that you will use on a highlight color printer,
even if it is a black and white form. When you specify VERS=2
or VERs=10 and you have referenced color anywhere in the
form, VERSION is automatically set to HC. When you specify
VERs=X1 and you have referenced color anywhere in the form,
VERSION is automatically set to XC. Version XC only prints on a
Xerox full color decentralized printer.
OBJect specifies that the database stores the compiled form.
The default is not to store the compiled form in the database.
SPACING is used for fully justified text. It specifies the base gap
used in this formula to determine the interword gap:
interword gap = interword multiplier * base gap
If you include this operand for the COMPILE command, the base
gap is the EN space. The EN space is 1/2 the point size of the
first named font.
If you omit this operand, the base gap is the width of ASCII code
point X’20’. This code point is usually a “blank”, and is always
derived from the first named font.
This operand is valid for fully justified text only.
The INTERWORD command specifies the interword multiplier in
the interword gap formula above. Table 5-1 illustrates how the
INTERWORD command and the SPACING operand work together
to determine the interword gap for fully justified text.
5–2 HOST FORMS DESCRIPTION LANGUAGE 3.2 FOR IBM MVS CREATING FORMS
Page 73
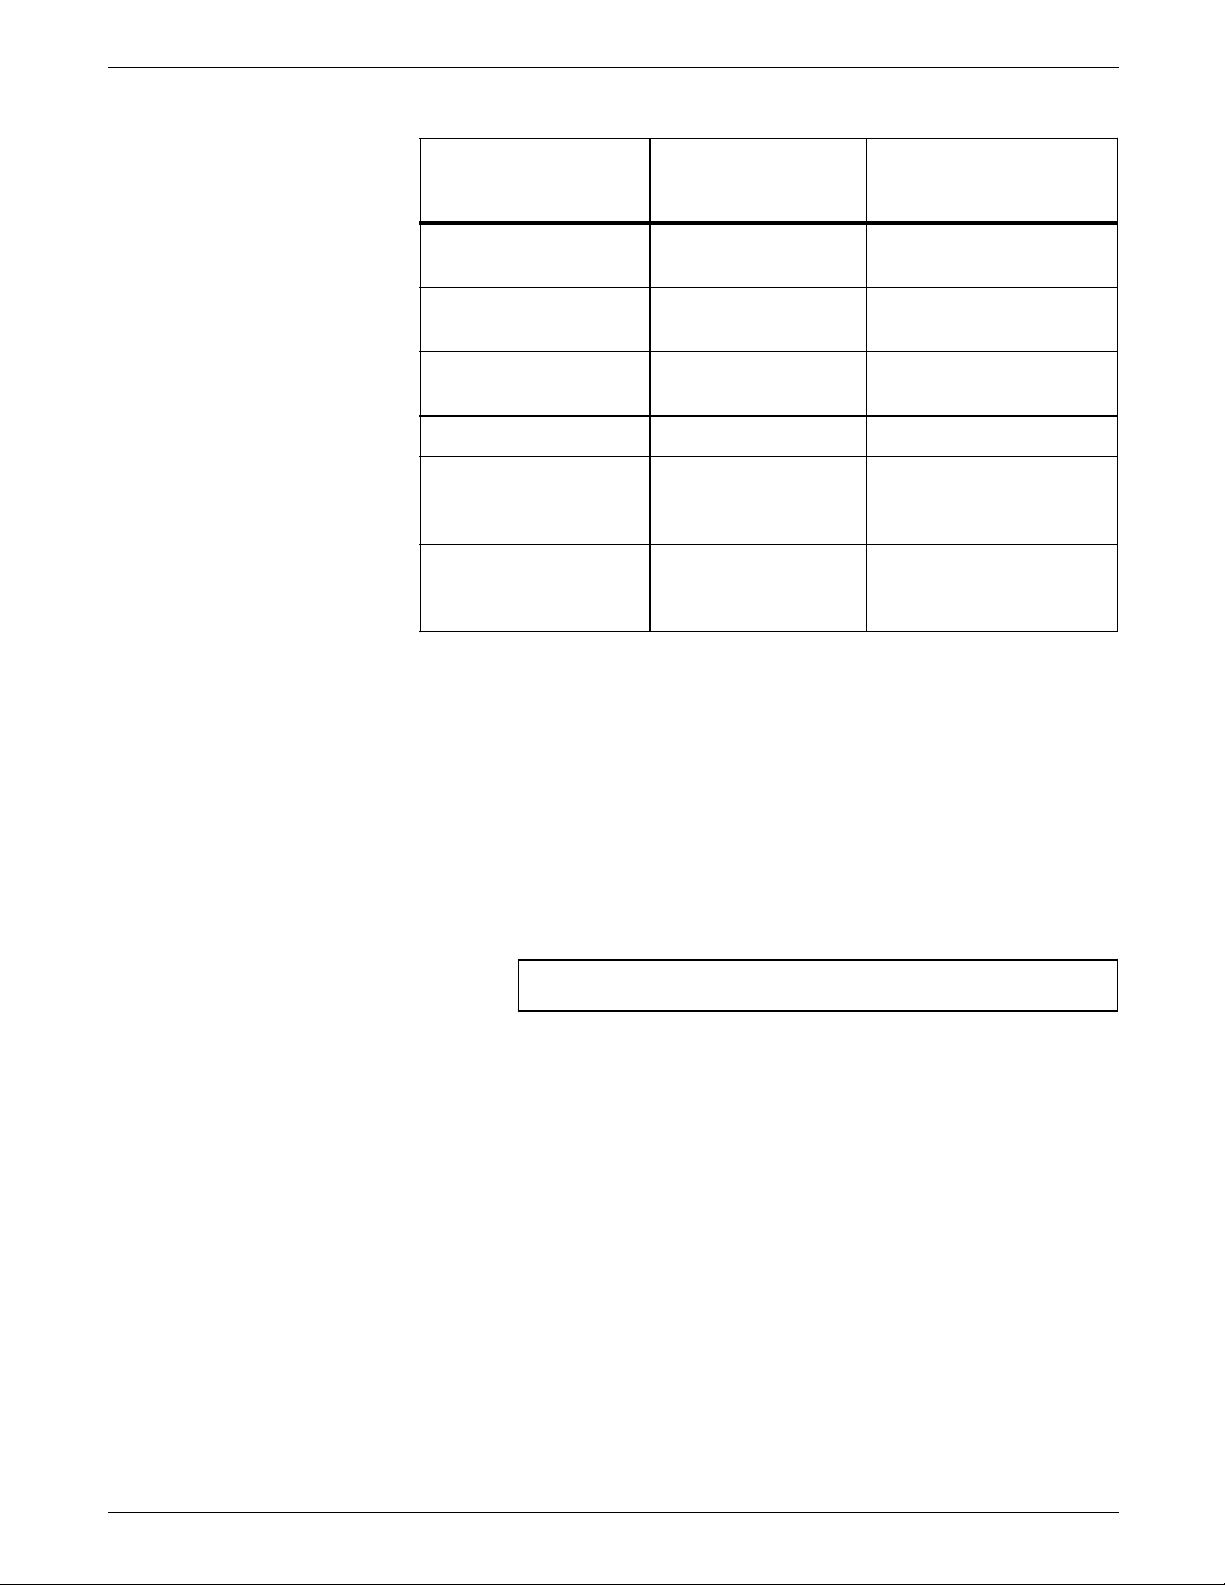
MANAGING AND PRINTING SAMPLE FORMS
Table 5-1. Determining interword gap
The interword
multiplier:
applied to the base
gap, specified by:
equals an
interword gap of:
INTERWORD .5 no SPACING operand .5 * the width of ASCII
code point X‘20’
INTERWORD .5 COMPILE SPACING
1
.5 * the EN space
INTERWORD 1.0 no SPACING operand 1.0 * the width of ASCII
code point X‘20’
INTERWORD 1.0 COMPILE SPACING
(no INTERWORD
no SPACING operand (1.0) * the width of ASCII
command specified,
1
1.0 * the EN space
code point X‘20’
defaults to 1.0)
(no INTERWORD
COMPILE SPACING
1
(1.0) the EN space
command specified,
defaults to 1.0)
1
Valid for fully justifed text only
HFDL uses the interword gap you specify as the minimum value.
For fully justified text, HFDL adjusts the interword gap when
needed.
For the INTERWORD command description and syntax, refer to
the “Using HFDL commands” chapter of this manual.
The example in Figure 5-2 shows MYFORM being compiled with
SPACING specified. The EN space will be used along with the
value specified by the INTERWORD FSL command to determine
the interword gap for this form.
Figure 5-2. SPACING compile syntax
COMPILE FSL=XFFSL(MYFORM) VERSion=HC SPACING
GROup=name specifies a user–assigned optional “name” to the
form. This allows you to group forms in the database for
subsequent listing, downloading, and so on. For example, list all
forms with GROUP=MEDINS. The maximum size of the field is
8 bytes.
KEYboard=name specifies the keyboard map you want to use in
the compilation of the form. name is a maximum 8-character
string. The compiler retrieves the requested keyboard map and
associated font map. Then the compiler maps the characters
entered on the form to the corresponding graphic
representations in the Xerox printer fonts. If no keyboard name
is entered, no keyboard mapping occurs. The font characters are
translated directly from EBCDIC to ASCII and then located in the
font based on their ASCII value. For more information, refer to
Xerox Print Resources Manager/Host Forms Description
the
Language 3.2 for IBM MVS Managing Resources
manual.
HOST FORMS DESCRIPTION LANGUAGE 3.2 FOR IBM MVS CREATING FORMS 5–3
Page 74

HOST FORMS DESCRIPTION LANGUAGE
MEMber=selection specifies which member(s) you want to
compile. Specify only one member by using the exact member
name for selection. Specify a group of members by using a
DOS style command such as * and ?. Specify all members in the
partition data set by substituting selection with *.
FORm=selection specifies which member(s) you want to
compile in a multi-form file. Specify only one form by using the
exact form name for selection. Specify a group of forms by
using a DOS style command such as * and ?. Specify all forms in
the partition data set by substituting selection with *.
LITeral=character specifies a user-assigned character for
introducing a literal. A literal is a character from the font
character set, as opposed to a keyboard character. The character
must be coded in ASCII hexadecimal after the literal character.
The default literal introduction character is the exclamation point.
To use the exclamation point as a normal keyboard character
without having to key it twice in succession, override the default
literal introduction using this operand.
Table 5-2 shows an example of how a different literal
introduction character can be used to make frequent keying of
the exclamation point easier:
Table 5-2. Coding alternative literal introduction
characters
To print:
When literal intro is
!, key:
When literal intro is
&, key:
65% 65!25 65&25
SOLD! SOLD!! SOLD!
The code point for % is 25.
SHIFT=character specifies a user-assigned character for shifting
text between uppercase and lowercase. The default shift
character is the # character. To use the # character as a normal
keyboard character without having to key it twice in succession,
override the default shift using this operand.
Table 5-3 shows an example of how a different shift character can
be used to make frequent keying of a normal # character easier:
Table 5-3. Coding alternative shift characters
To print:
When shift
character is #, key:
When shift
character is *, key:
RevA R#EV#A R*EV*A
#4 ##4 #4
PAPersize=name specifies the default paper size you want for
your form. name is one of the following values: LT, LG, A4, A3,
or B4.
5–4 HOST FORMS DESCRIPTION LANGUAGE 3.2 FOR IBM MVS CREATING FORMS
Page 75

Command syntax examples
MANAGING AND PRINTING SAMPLE FORMS
Figure 5–3 shows an example of the command you use to
compile a form called MYFORM where the DDname is XFFSL and
the database will store the compiled form.
Figure 5–3. Sample COMPILE syntax
COMpile FSL=XFFSL(MYFORM) LISt OBJect
This example compiles MYFORM with a full compiler report in
version 2 format.
The example in Figure 5–4 shows compiling MYFORM without a
compiler listing. This example compiles MYFORM with no
compiler listing in the HC form format. The database does not
store the compiled form.
Figure 5–4. Highlight color COMPILE syntax
COMPILE FSL=XFFSL(MYFORM) VERsion=HC
Batch processing COMPILE commands
The example in Figure 5–5 shows how to compile a number of
member names that are MMBRxx in a partition data set XFFSL.
For each member that matches the indicated criteria, only a form
name starting with FORM will be compiled. All the forms are
compiled for the 4700 printer.
Figure 5–5. Multiple member and multiple form COMPILE
syntax
COM FSL=XFFSL VER=XC MEM=MMBR?? FOR=FORM*
The example in Figure 5–6 shows how to compile a form stored
in a sequential data set XFFSL with the user definable literal
character set to "$" and the shift character set to "@." The form
is compiled for the decentralized printers.
Figure 5–6. User definable literal and shift COMPILE
syntax
COMPILE FSL=XFFSL VER=X1 LITERAL=$ SHIFT=@ OBJECT
Batch processing allows you to perform multiple sets of
COMPILE commands in one step. You use the BATCH
command instead of the COMPILE command. You can also
perform nested batch processing, in which a batch command is
nested within another batch command. Figure 5–7 shows the
BATCH command syntax.
HOST FORMS DESCRIPTION LANGUAGE 3.2 FOR IBM MVS CREATING FORMS 5–5
Page 76

HOST FORMS DESCRIPTION LANGUAGE
Figure 5–7. BATCH command syntax
BATCH DDname[(PDS member name)]
The
PDS member name
identifies the file that contains the
COMPILE commands. The PDS member must be in the same
data set as the FSLs you are compiling.
If you are compiling forms in the XYZFORMS data set, and the
DDname is XFFSL, you can create the batch command statement.
Figure 5–8 shows an example of the BATCH command with
XFFSL as the DDname and BATCH01 as the PDS member name.
Figure 5–8. Sample BATCH command
BATCH XFFSL (BATCH01)
The XYZFORMS data set contains the BATCH01 PDS member,
which contains the COMPILE commands for the forms you are
compiling.
An example of the batchfile is:
HFDL compiler JCL
COMPILE FSL=XFFSL(XYZFM1) LIST OBJECT VER=2
COMPILE FSL=XFFSL(XYZFM2) LIST OBJECT VER=HC
COMPILE FSL=XFFSL(XYZFM3) LIST OBJECT VER=X1
COMPILE FSL=XFFSL(XYZFM3) LIST OBJECT VER=XC
The Virtual Storage Access Method (VSAM) data sets store the
HFDL compiler resources (fonts, logos, forms, and colormaps).
These, along with printer device definitions, comprise the XPRM
database.
Table 5–4 identifies the DDnames that the compiler uses to
reference data sets for centralized printers. You must include a
DD statement for each in your compiler invocation JCL.
Table 5–4. Resource DDnames for centralized printers
DDname Description
XSFNTATT Data set containing font and logo attributes.
XSFORMS Data set containing forms. Each record contains a
resource occurrence in Xerox LPS printer file format
– .FRM or .FR6.
XSSUPTAB Data set containing database references.
XSFRMATT Data set containing form attributes.
5–6 HOST FORMS DESCRIPTION LANGUAGE 3.2 FOR IBM MVS CREATING FORMS
Page 77

MANAGING AND PRINTING SAMPLE FORMS
Table 5–5 identifies the DDnames that the compiler uses to
reference data sets for decentralized printers.
Table 5–5. Resource DDnames for decentralized printers
DDname Description
XSFNTATT Data set containing font and logo attributes.
XSFORMS Data set containing forms. Each record contains a
resource occurrence in Xerox LPS printer file
format – XES.
XSFRMATT Data set containing form attributes.
XSCLRATT Data set containing color attributes.
XSSUPTAB Data set containing database references.
Centralized and decentralized resources are in the same data
sets.
Table 5–6 identifies the DDnames and the statements required in
addition to the resource data sets for centralized printers.
Table 5–6. HFDL execution DDnames for centralized
printers
DDname Description
SYSPRINT Writes the compiler listings when the LIST
parameter of the COMPILE command is coded.
Compile errors and the copyright message are
written to SYSPRINT as well.
SYSTERM Indicates a malfunction. Contact your system
administrator. Information is not written to this
DDname under normal conditions.
XFLOG Condition codes log for all forms compiled. This
file is useful when you compile forms and would
like to find out quickly which form causes the
program to return the condition code to other
than 0.
FSL
DDname
Data set containing the forms source language
that is input to the compiler (FSL). This data set
may be a sequential disk file or a member of a
partitioned data set (PDS).
XFINP Temporary data set that the compiler uses.
XFIFF Temporary data set that the compiler uses.
XFFRM Temporary data set that the compiler uses.
XFTMP Temporary data set that the compiler uses.
HOST FORMS DESCRIPTION LANGUAGE 3.2 FOR IBM MVS CREATING FORMS 5–7
Page 78

HOST FORMS DESCRIPTION LANGUAGE
Table 5–7 identifies the DDnames and the statements required in
addition to the resource data sets for decentralized printers.
Table 5–7. HFDL execution DDnames for decentralized
printers
DDname Description
SYSPRINT Writes the compiler listings when the LIST
parameter of the COMPILE command is coded.
Compile errors and the copyright message are
written to SYSPRINT as well.
SYSTERM Indicates a malfunction. Contact your system
administrator. Information is not written to this
DDname under normal conditions.
XFLOG Condition codes log for all forms compiled. This
file is useful when you compile forms and would
like to find out quickly which form causes the
program to return the condition code to other
than 0.
FSL
DDname
Data set containing the forms source language
that is input to the compiler (FSL). This data set
may be a sequential disk file or a member of a
partitioned data set (PDS).
XFINP Temporary data set that the compiler uses.
XFIFF Temporary data set that the compiler uses.
XFFRM Temporary data set that the compiler uses.
XFTMP Temporary data set that the compiler uses.
XFIFO Temporary data set that the compiler uses.
You must customize the HFDL compiler job control language
(JCL) to meet the standards and conventions for your MVS
installation. The minimum changes that you should make follow
below.
• Modify the JOB statement to meet installation standards.
• Modify the DSNAMEs in the DD statements for the resource
data sets, execution data sets, and XSSUPTAB to meet
installation standards.
• Modify the UNIT name for the temporary data sets.
• Modify the EXEC statement for each compilation for specific
form names and parameters governing the compile.
• Do not remove the COND parameter as shown in step 2 in
Figure 5–10. These parameters are required for proper
condition code handling.
For complex forms, increase your region size and temporary data
set space allocation to avoid ABENDS.
5–8 HOST FORMS DESCRIPTION LANGUAGE 3.2 FOR IBM MVS CREATING FORMS
Page 79

MANAGING AND PRINTING SAMPLE FORMS
If you want to download and print a form sample following the
compilation, the DDnames listed in Table 5–8 are required.
Table 5–8. Data sets required to download and print
DDnames Description
XSUIN XPRM Utility commands are read from the file
specified by the XSUIN DD statement. XSUIN may
specify either instream data or reference a
sequential data set or a member of a partitioned
data set (PDS).
XSUACTL All messages from the XPRM utility are written to
XSUACTL.
XSSUPTAB Identifies the data set that contains the printer
device definitions.
Printer
DDname
A DD statement for a printer to which the utility
will download and sample the form. For more
information on this DDname see the
Xerox Print
Resources Manager/Host Forms Description
Language 3.2 for IBM MVS Managing Resources
manual.
HOST FORMS DESCRIPTION LANGUAGE 3.2 FOR IBM MVS CREATING FORMS 5–9
Page 80

HOST FORMS DESCRIPTION LANGUAGE
//LOGONIDX JOB ’RUN HFDL COMPILER’,REGION=8M user job card parameters
//*
/*JOBPARM LINE=0
//STEP1 EXEC PGM=HFDL32,PARM=’COMPILE FSL=XFFSL(XVERL) LIST OBJECT’
//STEPLIB DD DSN=HFDL.V3R2M00.LOAD,DISP=SHR
// DD DSN=XPRM.V3R2M00.SASCRDLB.C550,DISP=SHR
// DD DSN=XPRM.V3R2M00.LOAD,DISP=SHR
//SYSPRINT DD SYSOUT=*
//SYSTERM DD SYSOUT=*
//* ****The following data sets are specific to the form compiler
//* ----Condition codes log for all files compiled
//XFLOG DD SYSOUT=*
//* ----The fsl source file is a customer defined pds or seq
//XFFSL DD DSN=HFDL.SOURCE.FSL,DISP=SHR
//* ----The inp file is a temporary file
//XFINP DD DSN=&&INP,DISP=(NEW,PASS),UNIT=SYSDA,
// SPACE=(TRK,(10,1)),DCB=(RECFM=FB,LRECL=80,BLKSIZE=3200)
//* ----The iff file is a temporary file
//XFIFF DD DSN=&&IFF,DISP=(NEW,PASS),UNIT=SYSDA,
// SPACE=(TRK,(10,1)), DCB=(RECFM=FB,LRECL=320,BLKSIZE=10240)
//* ----The compiled forms are temporary files until stored
//* in the database
//XFFRM DD DSN=&&FRM,DISP=(NEW,PASS),UNIT=SYSDA,
// SPACE=(TRK,(10,10,10)),DCB=(RECFM=F,LRECL=128,BLKSIZE=128)
//XFTMP DD DSN=&&TMP,DISP=(NEW,PASS),UNIT=SYSDA,
// SPACE=(TRK,(10,1)),DCB=(RECFM=FB,LRECL=320,BLKSIZE=10240)
//* *****The following data sets are the resource data sets
//* ---- XSFNTATT is a VSAM dataset containing FONT and LOGO
//* ATTRIBUTES
//XSFNTATT DD DSN=XPRM.V3R2M00.XSFNTATT,DISP=SHR
//* ---- XSFORMS is a VSAM dataset containing FORMS
//XSFORMS DD DSN=XPRM.V3R2M00.XSFORMS,DISP=SHR
//* ---- XSFRMATT is a VSAM dataset containing FORM ATTRIBUTES
//XSFRMATT DD DSN=XPRM.V3R2M00.XSFRMATT,DISP=SHR
//XSSUPTAB DD DSN=XPRM.V3R2M00.XSSUPTAB,DISP=SHR
//*
//* *****THE JCL FOR DOWNLOAD AND SAMPLE VIA XPRMUTIL GOES HERE
Figure 5–9 shows an example of the JCL you use to compile a
form and store it in the database.
Figure 5–9. Invoking the HFDL compiler
Downloading and printing a sample
If you want to download and print a sample of the form, run the
XPRMUTIL job step immediately following the compile step.
Figure 5–10 shows an example of a JCL you use to compile,
store, download, and sample a form on the printer.
5–10 HOST FORMS DESCRIPTION LANGUAGE 3.2 FOR IBM MVS CREATING FORMS
Page 81

MANAGING AND PRINTING SAMPLE FORMS
Figure 5–10. Downloading and printing a sample
//LOGONIDX JOB ’RUN HFDL COMPILER’,REGION=8M user job card parameters
//*
/*JOBPARM LINE=0
//STEP1 EXEC PGM=HFDL32,PARM=’COMPILE FSL=XFFSL(XVERL) LIST OBJECT’
//STEPLIB DD DSN=HFDL.V3R2M00.LOAD,DISP=SHR
// DD DSN=XPRM.V3R2M00.SASCRDLB.C550,DISP=SHR
// DD DSN=XPRM.V3R2M00.LOAD,DISP=SHR
//SYSPRINT DD SYSOUT=*
//SYSTERM DD SYSOUT=*
//* ****The following data sets are specific to the form compiler
//* ----Condition codes log for all files compiled
//XFLOG DD SYSOUT=*
//* ----the fsl source file is a customer defined pds or seq
//XFFSL DD DSN=HFDL.SOURCE.FSL,DISP=SHR
//* ----the inp file is a temporary file
//XFINP DD DSN=&&INP,DISP=(NEW,PASS),UNIT=SYSDA,
// SPACE=(TRK,(10,1)),DCB=(RECFM=FB,LRECL=80,BLKSIZE=3200)
//* ----the iff file is a temporary file
//XFIFF DD DSN=&&IFF,DISP=(NEW,PASS),UNIT=SYSDA,
// SPACE=(TRK,(10,1)),DCB=(RECFM=FB,LRECL=320,BLKSIZE=10240)
//* ----The compiled forms are temporary files until stored
//* in the database
//XFFRM DD DSN=&&FRM,DISP=(NEW,PASS),UNIT=SYSDA,
// SPACE=(TRK,(10,10,10)),DCB=(RECFM=F,LRECL=128,BLKSIZE=128)
//XFTMP DD DSN=&&TMP,DISP=(NEW,PASS),UNIT=SYSDA,
// SPACE=(TRK,(10,1)),DCB=(RECFM=FB,LRECL=320,BLKSIZE=10240)
//* ****The following data sets are the resource data sets
//* ---- XSFNTATT is a VSAM dataset containing FONT and LOGO
//* ATTRIBUTES
//XSFNTATT DD DSN=XPRM.V3R2M00.XSFNTATT,DISP=SHR
//* ---- XSFORMS is a VSAM dataset containing FORMS
//XSFORMS DD DSN=XPRM.V3R2M00..XSFORMS,DISP=SHR
//* ---- XSFRMATT is a VSAM dataset containing FORM ATTRIBUTES
//XSFRMATT DD DSN=.XPRM.V3R2M00.XSFRMATT,DISP=SHR
//XSSUPTAB DD DSN=.XPRM.V3R2M00.XSSUPTAB,DISP=SHR
//*
//* ****THE FOLLOWING JCL IS FOR DOWNLOAD AND SAMPLE
//STEP2 EXEC PGM=XPRMUTIL,COND=(8,LE,STEP1)
//STEPLIB DD DSN=XPRM.V3R2M00.LOAD,DISP=SHR
// DD DSN=XPRM.V3R2M00.SASCRDLB.C500,DISP=SHR
//SYSPRINT DD SYSOUT=*
//SYSTERM DD SYSOUT=*
//XSUACTL DD SYSOUT=* ACTIVITY LOG
//XSFONTS DD DSN=XPRM.V3R2M00.XSFONTS,DISP=SHR
//XSFNTATT DD DSN=XPRM.V3R2M00.XSFNTATT,DISP=SHR
//XSFORMS DD DSN=XPRM.V3R2M00.XSFORMS,DISP=SHR
//XSFRMATT DD DSN=XPRM.V3R2M00.XSFRMATT,DISP=SHR
//XSSUPTAB DD DSN=XPRM.V3R2M00.XSSUPTAB,DISP=SHR
//ddnamea DD SYSOUT=*,DCB=(RECFM=FBA),
// DEST=prtrid
//XSUIN DD *
REPRO FORM WHERE(NAME=XVERL) OUTDEV(HCPRNTR) SAMPLE;
//*
HOST FORMS DESCRIPTION LANGUAGE 3.2 FOR IBM MVS CREATING FORMS 5–11
Page 82

HOST FORMS DESCRIPTION LANGUAGE
Accessing compiled forms
Editing an existing form
Specifying monochrome forms
Use the XPRMUTIL utility to access a compiled form for deletion,
sample printing, or downloading to Xerox LPS printers. If you are
not familiar with this utility, contact your System Administrator or
refer to the
Description Language 3.2 for IBM MVS Managing Resources
manual
If you want to edit an existing form, select the forms source
language (FSL) with your ISPF editor, make the necessary
changes, and then compile your edited form with HFDL.
Xerox Print Resources Manager/Host Forms
.
Specifying the monochrome mode for a Xerox highlight color
LPS printer allows you to process monochrome forms (using only
the black primary color) much faster and at a higher quality than
printing forms in version 2 or 10 format. If you use the
monochrome mode, you also reduce the toner consumption of a
Xerox highlight color LPS printer. You can specify the
monochrome mode in the input Parm (VERSION=HC) if you
want to compile and print a monochrome form on a Xerox
highlight color LPS printer.
To print a monochrome form on a Xerox full color printer, you
specify the version X1.
5–12 HOST FORMS DESCRIPTION LANGUAGE 3.2 FOR IBM MVS CREATING FORMS
Page 83

Message indicators
6. Messages
This chapter lists the error messages that appear when problems
occur, an indication of the cause of the message, and the action
you can perform to correct the problem.
The letters in the error numbers indicate the severity of the error
as follows:
• E (error) indicates a syntax or similar error.
•F (fatal) indicates a serious error that can prevent you from
compiling your form or may abnormally end (ABEND) your
session.
• I (informative) indicates the status or activity of the system
where no action is needed by the operator.
• W (warning) indicates an error in the description of your
form. It also indicates the action you may be required to
take to correct the problem.
XFG6001F No parameters found
Indication There were no parameters in the EXEC statement of the JCL.
There is nothing to compile.
Action Correct and recompile the form.
XFG6002F Unidentified parameter keyword <parameter keyword>
Indication The parameter keyword encountered could not be identified.
Action Correct and recompile the form.
XFG6003F Unidentified parameter value <parameter value>
Indication A parameter value entered in the EXEC statement is invalid.
Action Correct and recompile the form.
XFG6004F No FSL specified
Indication No FSL file specified in the JCL parm.
Action Modify the JCL to include the FSL you want to compile.
HOST FORMS DESCRIPTION LANGUAGE 3.2 FOR IBM MVS CREATING FORMS 6–1
Page 84

HOST FORMS DESCRIPTION LANGUAGE
XFG6005W Group name too long, using <name>
Indication The group name used exceeds the maximum 8 characters
allowed.
Action None required. The system truncates the identifier at 8
characters.
XFG6006W Member/Form name <name> is too long
Indication The member or form name specified in the parm statement is
too long. The member name is only 8 characters or less, and the
form name is only 6 or less.
Action Correct the member/form name in the parm statement.
XFG6007F DDname <name> is not defined
Indication The DDname is not defined in the JCL.
Action Modify the JCL to include the missing DDname.
XFG6008F Dsname <name> does not exist
Indication The Dsname defined by the DDname does not exist in the
system.
Action Check and modify the JCL.
XFG6009F Invalid paper size specified <paper size>
Indication the paper size incountered could no be identified.
Action Make sure that the paper size value is one of the following: LT,
LG, A3, A4, or B4, and then rerun the job.
XFG6010F Keymap id too long <keymap id>
Indication The compiler parsed a keymap id that exceeded the maximum
eight characters.
Action Specify a keymap id that is eight characters or less.
XFG6011F Cannot open batch file <file name>
Indication There is a serious system error. The compiler was not able to
open the immediate IFF file created by the compiler.
Action Verify that the file name is correct and rerun the job. If the
problem persists, contact your System Administrator.
XFG6012F Batch files nested too deep
Indication The maximum number of nested batch files is now only 4.
Action Correct the batch file such as the deepest nested level to 4 or
less.
6–2 HOST FORMS DESCRIPTION LANGUAGE 3.2 FOR IBM MVS CREATING FORMS
Page 85

XFG6013F Cannot open FSL
Indication There is a serious system error. The compiler was not able to
open the input FSL file.
Action Verify that the file name is correct and rerun the job. If the
problem persists, contact your System Administrator.
XFG6014F Cannot open scratch file <file name>
Indication There is a serious system error. The compiler was not able to
obtain a scratch file used during compilation.
Action Verify that the file name is correct and rerun the job. If the
problem persists, contact your System Administrator.
XFG6020I There are N forms compiled
Indication There are n forms compiled in this job, either through multi-form
or multi-member selection.
Action None.
MESSAGES
XFM8nnn Internal Failure
Indication There is a serious internal error.
Action Contact your System Administrator and indicate the error
number. These are the descriptions of the possible error
numbers:
error
numbers
-000 FRM Generator completed successfully
-001 Invalid <grid record> format
-002 Memory Allocation Error
-003 Open File Error
-004 Invalid <IFF version> record format
-005 Invalid <device code> record format
-006 Invalid <resolution> record format
-007 Invalid <form version> record format
-008 Invalid <orientation> record format
Description
-009 Invalid <size record> format
-010 Invalid <origin record> format
-011 Invalid <page number record> format
-012 FRM Generator failed
HOST FORMS DESCRIPTION LANGUAGE 3.2 FOR IBM MVS CREATING FORMS 6–3
Page 86

HOST FORMS DESCRIPTION LANGUAGE
error
Description
numbers
-013 Invalid <line record> format
-014 Invalid <box record> format
-015 Invalid <text record> format
-016 Invalid <font record> format
-017 Invalid <logo record> format
-018 Invalid <graphic record> format
-019 Invalid <picture record> format
-020 Data overflow
-021 Insufficient input parameters
-022 Resources overflow
-023 Error writing FRM file
-024 Not found
-025 Error opening IFF file
XFP1001W Discarding excess FDL
Indication Excess FSL statements were found beyond the END statement.
Action Verify that these statements do not belong in the form, then
XFP1002W Semicolon expected
Indication A semicolon was expected in the statement. The compiler
-026 Error opening FRM file
-027 Invalid <name record> format
-028 Unexpected IFF command sequence
-029 Invalid <ink> command format
-030 Invalid <palette/catalog> command format
-031 Invalid <ink priority> command format
move or delete them.
inserted one and continued with the compile.
Action None required.
6–4 HOST FORMS DESCRIPTION LANGUAGE 3.2 FOR IBM MVS CREATING FORMS
Page 87

XFP1003W Character not in FDL alphabet
Indication A character was found in the FSL statements that does not exist
in the FSL alphabet. The character was ignored.
Action Verify that the character does not belong in the FSL statements,
then move or delete it.
XFP1004W DRAW N and REPEAT EVERY disagree, using 2
Indication The number of lines entered for the DRAW command must be
greater than 1. The compiler substituted 2 for the invalid existing
number.
Action Enter the correct values and recompile the form.
XFP1005W Undefined Section Name <name>, command ignorned
Indication The section name used has not been defined.
Action Verify that the section name was spelled correctly or make sure
the section is defined prior to invoking it with the DO SECTION
command.
MESSAGES
XFP1006W Invalid line weight, using HAIRLINE
Indication An invalid line weight was entered. The compiler substituted a
value of HAIRLINE.
Action If HAIRLINE is not the value you want, correct the FSL and
recompile the form.
XFP1007W Invalid border weight, using HAIRLINE
Indication An invalid border weight was entered for a box. The compiler
substituted a value of HAIRLINE.
Action If HAIRLINE is not the value you want, enter a valid border
weight.
XFP1008W Possible missing or unmatched quotes
Indication The compiler cannot detect a closing quote.
Action Make sure that all quotes in the preceding commands in your FSL
are matched.
XFP1009E 600 spi cannot be used with highlight color form
Indication There is no Xerox printer support for highlight color in 600 spi
mode.
Action Use 300 spi for color forms or use black and white mode for 600
spi.
HOST FORMS DESCRIPTION LANGUAGE 3.2 FOR IBM MVS CREATING FORMS 6–5
Page 88

HOST FORMS DESCRIPTION LANGUAGE
XFP1010W Box not found
Indication A box with the origin specified, or the NEXT BOX could not be
found.
Action Recalculate the box coordinates. To ensure the box is found,
use dot coordinates for the box origin.
XFP1012W Unexpected fraction, using integer
Indication A fraction was entered where an integer was expected. The
integer part of the number is used.
Action Change fraction to an integer value and recompile the form.
XFP1014W Invalid resolution, using 300 spi
Indication An invalid resolution was entered in the RES statement.
Action Change the resolution to 300 or 600 spi.
XFP1015W Unexpected end of text (terminating code expected)
Indication The terminating code character is missing at the end of the text
string. If you entered the text correctly, this could indicate a
damaged file.
Action Reenter the text with the terminating code. If the problem
persists, contact your System Administrator.
XFP1016W Text will not fit in column
Indication The entered text is too long to fit in the specified column.
Action Reduce the length of the text string or increase the size of the
column to fit the text. Otherwise the text will not be printed.
XFP1018W Text might not fit in box
Indication The entered text block exceeds or is equal to the dimensions of
the box in which it is to be placed.
Action Check the printed form. If text crosses the boundary of the box,
reduce the length of the text string or increase the size of the
box to fit the text.
XFP1020W Missing END statement
Indication End of file was found with no END statement.
Action No action is required, since the END statement is optional. You
may want to add the END statement and recompile.
6–6 HOST FORMS DESCRIPTION LANGUAGE 3.2 FOR IBM MVS CREATING FORMS
Page 89

XFP1021W Setup command out of sequence
Indication A setup command (FORM/RESOLUTION, FONT, GRID,
LANDSCAPE/PORTRAIT, INK, ICATALOG, or PALETTE) was
entered after a formatting command (such as LINE, TEXT, BOX).
Action Place the setup command with the rest of the setup commands
at the beginning of the form source and after the
FORM/RESOLUTION command.
XFP1022W Identifier name too long, using <name>
Indication An identifier was used that exceeds the maximum 16 characters
allowed.
Action None required. The system truncates the identifier at 16
characters.
XFP1024W Section name too long, using <name>
Indication The section name used exceeds the maximum 16 characters
allowed.
MESSAGES
Action None required. The system truncates the section name at 16
characters.
XFP1025W Logos not supported for XES forms
Indication You used the LOGO command while generating an XES form. In
this release, logos are treated as fonts in XES forms.
Action Do not use the LOGO command while generating XES forms or,
if possible, enter the logo as a font.
XFP1026W Catalog name too long, using <six-character catalog name>
Indication The catalog name used exceeds the maximum six characters
allowed.
Action None required. The system truncates the catalog name at six
characters.
XFP1027W Dot Leader too big for column
Indication You specified a dot leader that exceeds the column setting.
Action Change the dot leader or the column setting.
XFP1028W Text String Longer than 256 characters
Indication A text string contains more than the maximum 256 characters.
Action Reduce the size of the text string.
HOST FORMS DESCRIPTION LANGUAGE 3.2 FOR IBM MVS CREATING FORMS 6–7
Page 90

HOST FORMS DESCRIPTION LANGUAGE
XFP1029W No substitution allowed for Logo <logo name>
Indication You entered the USING INK parameter in the LOGO command
when the NO SUBSTITUTION flag was set for the specified logo
in the logo resource.
Action Do not use the USING INK parameter with this logo.
XFP1030W Can not close data base
Indication The compiler is not able to close the database because it is being
used by another user.
Action Try again in a few minutes. If the problem persists, note the
return code number and contact your System Administrator.
XFP1031W Palatte name too long, using <thirty-two-character palatte name>
Indication The palatte name used exceeds the maximum thirty-two
characters allowed.
Action None required. The system truncates the palatte name at
thirty-two characters.
XFP1032W Column off right of physical page
Indication The specified column width exceeds the physical page boundary.
Action Resize the column width to fit the physical page boundary.
XFP3001E Syntax error on <command segment>
Indication The specified command segment contains a syntax error.
Action Correct the error and recompile the form.
XFP3002E DRAW N and REPEAT AT counts disagree
Indication The DRAW and REPEAT AT counts do not agree.
Action Correct and recompile the form.
XFP3003E N TIMES and REPEAT AT counts disagree
Indication The number of TIMES and the REPEAT AT counts do not agree.
Action Correct and recompile the form.
XFP3004E Horizontal text inconsistent with top/bottom
Indication Horizontal text is aligned TOP or BOTTOM instead of LEFT or
RIGHT.
Action Correct the text direction with the proper alignment.
6–8 HOST FORMS DESCRIPTION LANGUAGE 3.2 FOR IBM MVS CREATING FORMS
Page 91

XFP3005E Vertical text inconsistent with left/right
Indication Vertical text is aligned LEFT or RIGHT instead of TOP or
BOTTOM.
Action Correct the text direction with the proper ALIGNMENT.
XFP3006E Identifier exceeds 6 characters
Indication An identifier name, such as FORM name, exceeded six
characters.
Action Correct the identifier name and recompile the form.
XFP3007E Stacked text and justify conflict
Indication Stacked text cannot be justified.
Action Remove the JUSTIFY and recompile the form.
XFP3008E Setup command not allowed within section
MESSAGES
Indication One of the setup commands such as FONT or INK was found
within a section.
Action Move the setup command to the beginning part of the FSL.
XFP3009E Code point <code point> in font <font name> has a zero width
Indication Some of the characters in this font have a zero width value.
Action Reload the font.
XFP3010E DO SECTION not allowed within section
Indication A DO SECTION command was found within a section.
Action Remove the DO SECTION command and recompile the form.
XFP3011W Ambiguous positioning of <position>, <position> given. <position>,
<position> used
Indication Ambiguous positioning of text in a box such as Left, Left instead
of Left with Bottom, Center, or Top.
Action Correct the ambiguous position.
XFP3012E BEGIN SECTION not allowed within section
Indication A BEGIN SECTION command was found within a section.
Action Remove the command or end the current section.
HOST FORMS DESCRIPTION LANGUAGE 3.2 FOR IBM MVS CREATING FORMS 6–9
Page 92

HOST FORMS DESCRIPTION LANGUAGE
XFP3014E Value out of range
Indication A zero value or a value that exceeds page limits was
encountered.
Action Correct the value to one within the valid limits.
XFP3015E Keyword out of context/sequence
Indication You sequenced a keyword incorrectly.
Action Enter the keyword in the correct order.
XFP3016E FONT command not defined
Indication Text is referenced in the form and no FONT command was
specified.
Action Enter the FONT command with the valid fonts you want to use in
the form.
XFP3017E Invalid font index
Indication The font index in the TEXT command is outside the range of
those defined in the FONT command.
Action Correct the font number to a value within the range of fonts
defined, or define a new font if the font is missing from the font
list.
XFP3018E INK command not defined
Indication Inks are referenced in the form and there is no INK command
specified.
Action Enter the INK command with the valid inks you want to use in
the form.
XFP3019E Invalid ink index
Indication The ink index referenced in a LINE, TEXT, BOX, GRAPHIC, or
LOGO command is outside the range of those defined in the
INK command.
Action Correct the ink number so that it is within the range of inks
defined or define a new ink if the ink is missing from the ink list.
XFP3020E Line off (top/bottom/left/right) of physical page
Indication The line went off either the top, bottom, left, or right of the
physical page.
Action Correct the line coordinates so that it does not extend beyond
the physical page.
6–10 HOST FORMS DESCRIPTION LANGUAGE 3.2 FOR IBM MVS CREATING FORMS
Page 93

XFP3021E Font name <font name> exceeds 20 characters
Indication The font name exceeded the 20 character maximum length.
Action Use a valid font name, which should consist of 20 characters or
less.
XFP3024E Line end coordinate <= start coordinate
Indication The line ending coordinate is less than or equal to the line
starting coordinate.
Action Correct the line coordinates and recompile the form.
XFP3030E Box off (top/bottom/left/right) of physical page
Indication The box went off either the top, bottom, left, or right of the
physical page.
Action Correct the box coordinates so the box does not extend beyond
the physical page.
MESSAGES
XFP3034E Box width is zero
Indication The width of the box was zero.
Action Correct the box width and recompile the form.
XFP3035E Box height is zero
Indication The height of the box was zero.
Action Correct the box
height and recompile the form.
XFP3040W Text off (top/bottom/left/right) of physical page
Indication The text went off either the top, bottom, left, or right of the
physical page.
Action Correct the text coordinates so the text does not extend beyond
the physical page.
XFP3050W Logo off (top/bottom/left/right) of physical page
Indication The logo went off either the top, bottom, left, or right of the
physical page.
Action Correct the logo coordinates so the logo does not extend
beyond the physical page.
XFP4001F Unexpected end of file
Indication The END statement was encountered before any description
commands. There is nothing to compile.
Action Move the END command to the last line of the FSL and
recompile the form.
HOST FORMS DESCRIPTION LANGUAGE 3.2 FOR IBM MVS CREATING FORMS 6–11
Page 94

HOST FORMS DESCRIPTION LANGUAGE
XFP4006F Cannot open FSL
Indication There is a serious system error. The compiler was not able to
open the input FSL file.
Action Verify that the file name is correct and rerun the job. If the
problem persists, contact your System Administrator.
XFP4009F Cannot open IFF
Indication There is a serious system error. The compiler was not able to
open the immediate IFF file created by the parser.
Action Contact your System Administrator.
XFP4010F Grid format not defined <format name>
Indication The format specified in the GRID command does not exist.
Action Correct and recompile the form.
XFP4012F Too many fonts specified
Indication The FONT command specified more than the limit of 32 fonts.
Action Delete the number of fonts used so the maximum of 32 is not
exceeded and recompile the form.
XFP4014F Cannot open scratch file <file name>
Indication There is a serious system error. The compiler was not able to
obtain a scratch file used during compilation.
Action Verify that the file name is correct and rerun the job. If the
problem persists, contact your System Administrator.
XFP4020F (300/600) spi font not found <font list name>
Indication One of the fonts in the indicated font list is not a 300 or 600 spi
font.
Action Load the necessary font into the font database or correct the
FONT command with the correct name and recompile the form.
XFP4022W Logo not found <logo name>
Indication The logo specified in the LOGO command was not found in the
database.
Action Correct the name of the logo or load the required logo into the
database and recompile the form.
XFP4023F Undefined font index
Indication A font index was referenced in a TEXT command that was not
defined in the font list.
Action Correct the TEXT command to the correct reference from the
font list.
6–12 HOST FORMS DESCRIPTION LANGUAGE 3.2 FOR IBM MVS CREATING FORMS
Page 95

XFP4030F Database access fault: mode =<return code>
Indication There is a serious system error. The compiler was not able to
access the resource database for the reason based on the return
code.
Action Contact your System Administrator with the return code (rc)
number. These are the descriptions of the possible return codes:
MESSAGES
Return
Description
code
-161 Allocation error
-162 Fatal error doing BLOB add
-163 Fatal error deallocating resource
-164 File corrupted
-165 Fatal file system error
-166 Fatal file system error (see error codes)
-167 Missing segment, no BLOB access
-168 DB dictionary not successfully loaded
-169 Programming error detected
-170 Duplicate record
-171 End of file
-172 Record does not exist
-173 Operation successful
-174 Error deleting attribute record
-175 Error updating attribute record
-176 Error deleting BLOB, attribute record deleted
-177 BLOB maximum size has been exceeded
-178 In mass delete, record not deleted, OPEN error
-179 Could not access BLOB for READWRITE
-180 Unable to move BLOB data
-181 Data list not found
-182 Duplicate resource
-183 Resources to deallocate not allocated
-184 File already opened
-185 File does not exist
-186 Non-secured file not open for READWRITE
HOST FORMS DESCRIPTION LANGUAGE 3.2 FOR IBM MVS CREATING FORMS 6–13
Page 96

HOST FORMS DESCRIPTION LANGUAGE
Return
Description
code
-187 File not open
-188 File system warning (see error codes)
-189 Identifier already exists
-190 Invalid array specification
-191 Invalid array starting position
-192 Invalid buffer length
-193 Invalid buffer pointer
-194 Invalid value, buffer pointer
-195 Invalid CID
-196 Invalid data list resource
-197 Invalid data set name
-198 Invalid element data
-199 Invalid element for resource
-200 Invalid element type
-201 Invalid element pointer
-202 Invalid file organization
-203 Invalid file type
-204 Invalid file handle
-205 Invalid variable, identifier pointer
-206 Invalid key length
-207 Invalid offset pointer
-208 Invalid array size pointer
-209 Invalid key pointer
-210 Invalid mode
-211 Invalid logical operator
-212 Invalid logical operator pointer
-213 Invalid query resource
-214 Invalid query syntax
-215 Query syntax incomplete
-216 Invalid relational operator
-217 Invalid relational operator
6–14 HOST FORMS DESCRIPTION LANGUAGE 3.2 FOR IBM MVS CREATING FORMS
Page 97

MESSAGES
Return
Description
code
-218 Invalid read mode
-219 Invalid resource
-220 Invalid resource pointer variable
-221 Invalid return pointer variable
-222 Invalid security type flag
-223 Invalid element value
-224 Lock request failed
-225 Validation check failed
-226 Maximum query lists has been exceeded
-227 Maximum data lists has been exceeded
-228 Missing data on a retrieval request
-229 Missing segment number
-230 Security request made on resource with no
BLOBs
-231 Updates to key elements not allowed
-232 None of the selected set of records updated in
mass modification
-233 Updates to protected elements not allowed
-234 No record found for request
-235 Unable to open files
-236 Partial set of records updated in mass
modification
-237 Query list not found
-238 Query stack full
-239 “Wait for lock” value out of range
-240 Record buffer size exceeded
-241 Record maximum size has been exceeded
-242 Record truncated
-243 Request for data beyond end of array
-244 Resource not allocated for READWRITE
-245 Access security denied
-246 Secured file not open for READWRITE
HOST FORMS DESCRIPTION LANGUAGE 3.2 FOR IBM MVS CREATING FORMS 6–15
Page 98

HOST FORMS DESCRIPTION LANGUAGE
Return
Description
code
-247 Outstanding resource sharing already exists
-248 Access security errors detected but processing
continued
-249 Data stack full
-250 Duplicate element in list
-251 Duplicate automatically generated data list
-252 Verification routine has detected an invalid
element value
-253 Data dictionary not loaded
-254 Caller supplied an invalid resource name
-255 Caller supplied an invalid element name
-256 Caller supplied too many occurrences of
element values to be validated
-257 Invalid identifier variable value
-258 No current position established for resource,
transaction invalid
-259 No current record established for resource,
transaction invalid
-260 A single record must be specified for
transaction
-261 Requested resource not allocated for reading
-262 Resource requested not allocated for use
-263 Caller supplied NULL file pointer for data
dictionary list file
-264 Database dictionary and database data set are
incompatible
-265 Attribute file only opened
-266 Attribute and two BLOB files opened
-267 Attribute file and secured BLOB opened
-268 Attribute file and non-secured BLOB opened
-269 Invalid access type requested for resource
-270 Invalid resource count
-271 All physical files opened successfully
6–16 HOST FORMS DESCRIPTION LANGUAGE 3.2 FOR IBM MVS CREATING FORMS
Page 99

MESSAGES
Return
Description
code
-272 Physical files containing attribute records
opened
-273 Physical files containing attribute and secured
BLOB opened
-274 Physical files containing attribute and nonsecured BLOB opened
-275 Partial deallocation has occurred
-276 No outstanding resource sharing currently
exists
-277 Database verification KEY1
-278 Database verification DD name
-279 Database verification file segment
-280 Database verification key size
-281 Database verification record size
-282 Database verification version
-283 Database verification revision
-284 Database verification resource name
-285 Database verification element segment
-286 Database verification number of elements
-287 Database verification element name
-288 Database verification element tag
-289 Database verification element type
-290 Database verification element flag
-291 Database verification element size
-292 Could not access BLOB for READ
-293 Invalid query length size
XFP4034F Invalid graphic scale factor
Indication An incorrect graphic scaling factor was entered. The scaling
factor must be an integer in the range 1 to 8.
Action Correct the scaling factor and recompile the form.
HOST FORMS DESCRIPTION LANGUAGE 3.2 FOR IBM MVS CREATING FORMS 6–17
Page 100

HOST FORMS DESCRIPTION LANGUAGE
XFP4040F Text string exceeds buffer limits
Indication The text string entered exceeded the text buffer limits of 4096
characters.
Action Shorten the text string by breaking the text up into two or more
TEXT commands.
XFP4050F Keyboard map not found
Indication The keyboard map specified in the compile command line was
not in the resource database.
Action Correct the keyboard map name if it is incorrect or add the
specified keyboard map to the resource database.
XFP4051F Keyboard map error: rc= <return code>
Indication The compiler could not find a valid font character map in the
database.
Action Load font character maps into the database for the fonts used in
this form.
XFP4052F Keymap id too long <keymap id>
Indication The compiler parsed a keymap id that exceeded the maximum
eight characters.
Action Specify a keymap id that is eight characters or less.
XFP4053F Maximum number of inks allowed (255) exceeded
Indication Your FSL uses more than the maximum 255 inks (colors) allowed.
Action Reduce the number of inks in your FSL to 255 or less.
XFP4054F Cannot reassign identifier to itself
Indication You made an invalid use of the LET command. An identifier
cannot be on both the right–hand and left–hand side of the
assignment statement.
Action Remove the identifier from the right–hand side of the assignment
statement.
XFP4062F Invalid LPS tape label
Indication There is a serious system error. The compiler was not able to
process the tape label of the compiled form it just created.
Action Contact your System Administrator.
XFP4063F Data List Error
Indication There is a serious system error.
Action Contact your System Administrator.
6–18 HOST FORMS DESCRIPTION LANGUAGE 3.2 FOR IBM MVS CREATING FORMS
 Loading...