

Page 1

Version 1.0, December 2007
Phaser 5335
Printing
Guide
Page 2

Xerox Corporation
Global Knowledge & Language Services
800 Phillips Road
Building 218-01A
Webster, New York 14580
©Copyright 2007 by Xerox Corporation. All Rights Reserved.
Printed in the United States of America.
Copyright protection claimed includes all forms and matters of copyrighted material and information now allowed by statutory or judicial law or
hereinafter granted, including without limitation, material generated from the software programs that are displayed on the screen such as styles,
templates, icons, screen displays, looks, etc.
XEROX®, Phaser, and all Xerox product names and product numbers mentioned in this publication are the trademarks of XEROX CORPORATION.
Other company brands and product names may be trademarks or registered trademarks of the respective companies and are also acknowledged.
Adobe, the Adobe logo, Acrobat, Acrobat Reader, PostScript, Adobe PostScript 3, and the PostScript logo are either registered trademarks or
trademarks of Adobe Systems Incorporated in the United States and/or other countries.
Microsoft, Windows, Windows NT, and Windows Server are either registered trademarks or trademarks of Microsoft Corporation in the United States
and/or other countries.
Permission has been obtained from Microsoft Corporation for use of software screen shots.
NetWare is a registered trademark of Novell, Inc.
Macintosh, Mac OS, AppleTalk, EtherTalk, and TrueType are trademarks of Apple Computer, Inc., registered in the U.S. and other countries.
Solaris, SunOS, and NIS (Network Information Services) are either registered trademarks or trademarks of Sun Microsystems, Inc.
RSA is registered trademarks of RSA Security Inc.
BSAFE is registered trademarks of RSA Security Inc. in the United States and/or other countries.
All product/brand names are trademarks or registered trademarks of the respective holders.
Document information: Version 1.0
1 - January 2008
Page 3

Contents
Preface ....................................................................................................... v
1 Installing and Configuring the PostScript® Driver on Windows NT 4.0 / 2000
/ XP / Server 2003 / Vista ........................................................................... 1
2 Installing and Configuring the PostScript Driver on Macintosh ................ 13
3 Installing and Configuring the PostScript Driver on Linux ........................ 29
Conventions ............................................................................................................ vi
User License Agreement for Linux Printer Driver .................................................. vii
GNU GENERAL PUBLIC LICENSE Version 2, June 1991 .................................... ix
About the Software .................................................................................................. 1
Installing the Print Driver ......................................................................................... 2
Configuring the Print Driver ..................................................................................... 4
Using the Online Help ............................................................................................ 11
Hardware/Software Requirements ........................................................................13
Installing the Print Driver ....................................................................................... 14
[Printer Info] window .............................................................................................. 18
[Print window ......................................................................................................... 19
Before Installing the Print Driver ............................................................................ 30
Installing the Print Driver ....................................................................................... 31
Uninstalling the Print Driver ...................................................................................36
Printer Settings ...................................................................................................... 37
Printer Driver Setting ltems .................................................................................... 39
Error Message List ................................................................................................49
4 Using PCL Emulation ............................................................................... 51
About PCL Emulation ............................................................................................ 51
Emulation Mode .....................................................................................................51
About Fonts ...........................................................................................................52
Supported Fonts .................................................................................................... 52
Paper Eject Function ............................................................................................. 54
5 Setting the PCL Mode .............................................................................. 55
Control Panel Menus .............................................................................................55
PCL Mode Menu ....................................................................................................56
Setting the PCL Mode Menu .................................................................................57
PCL Mode Reports/Lists ........................................................................................60
6 Using ESC/P Emulation ........................................................................... 63
About ESC/P Emulation ........................................................................................63
About Fonts ...........................................................................................................65
Paper Eject Function ............................................................................................. 66
Print Features in the ESC/P Mode ........................................................................67
Multiple Up (ESC/P) .............................................................................................. 67
Form Overlay .........................................................................................................67
7 Setting the ESC/P Mode .......................................................................... 69
Control Panel Menus .............................................................................................69
Contents iii
Page 4

Setting the ESC/P Mode Menu .............................................................................. 71
ESC/P Mode Reports/Lists .................................................................................... 80
8 ESC/P Mode Reference Materials ........................................................... 81
Zoom Ratio Tables ................................................................................................81
Output Size and Printing Columns/Rows ..............................................................87
9 Appendix .................................................................................................. 91
Built-in Fonts ..........................................................................................................91
Notes and Restrictions .......................................................................................... 95
iv Contents
Page 5

Preface
Thank you for purchasing the Phaser 5335.
This guide describes the software included on the Software CD-ROM and how to
install and configure a PostScript print driver on your computer.
To get the most out of this printer and to use it effectively, make sure to read this
guide before use.
This guide assumes you are familiar with your operating system (Microsoft®
Windows® or Macintosh® Mac OS®, Linux), network environment, and the basic
operation of the printer.
v
Page 6
Conventions
The following conventions are used throughout this guide:
Square brackets ([ ]) Indicates the names of windows, dialog boxes, tabs,
buttons, features, menus, setting items, and options that
appear on your computer screen.
Example
• You can also browse the folder by clicking [Browse].
Greater-than sign
(>)
Italic typeface Indicates references to other sections and chapters.
NOTE A statement that provides additional information.
Indicates the hierarchies of the menus, setting items,
and options that appear on your computer screen.
Example:
• [RGB Color Temperature] can be configured when the
[Paper/Output] tab > [Output Color] is set to [Color].
Example:
• See Print Driver Properties on page 10 to configure the
print driver.
Example:
NOTE: Clicking the [Defaults] button restores the
defaults.
vi
Page 7

User License Agreement for Linux Printer Driver
Before using the Linux printer driver (the “Software”), please read the following
“License Agreement”. Proceed to use the Software only if you agreed to the license
agreement.
License Agreement
1. Proprietary Rights
All intellectual properties, including but not limited to copyrights of the Software, are
retained by Xerox Corporation. (“Xerox”).
2. License
Under this agreement, you are granted a non-exclusive, non-transferable license to
use the Software for the purpose of using with compatible Xerox products.
3. Cautions and Limitations
When using the Software, please observe the cautions and limitations items of the
Software that are clearly stated on the service site of Xerox.
4. Restrictions
You are not permitted to (1) assign, sublicense, sell, rent, lease, convey, or transfer the
Software to any third party by any tangible media such as floppy disk, magnetic tape,
or CD-ROM; (2) distribute the Software on a network or by a telephone line available
to the public; or (3) alter, modify, decompile, disassemble, reverse-engineer, or create
derivative works based on the whole or any part of the Software. However, modules of
the Software provided that are based on the GNU General Public License, shall follow
the rules of this License.
5. Term
This agreement is effective upon installing the Software until you terminate the
agreement by destroying the Software. This agreement will also terminate if you fail to
abide by any terms of this agreement. In case of termination, you must promptly
destroy the Software.
6. Limited Warranties
The Software is supplied strictly on an “as is” basis without warranty on any kind, either
expressed or implied, including but not limited to any warranty of merchantability or
fitness for a particular purpose, with respect to the Software. You are responsible for
choosing, maintaining and matching other hardware and software components in
combination of the Software. In no event, shall Xerox, Xerox channel partners,
authorized dealers and their third party suppliers be liable for any loss or damage
including incidental or consequential loss or damage, arising from use of or inability to
use Software, or any modification of the Software.
7. Limitation of Liability
In no event shall Xerox or its licensors be liable (1) for any direct, indirect, special,
punitive or consequential damages (including, but not limited to, damages for loss of
business profits, business interruption, loss of programs or information, and the like)
even if Xerox shall have been advised of the possibility of such damages, and
regardless of the form of action, whether in contract, tort or otherwise; or (2) for any
claim attributable to errors, omissions, or other inaccuracies in or destructive properties
of the Software.
vii
Page 8

8. Export Control
You are not allowed to export the Software in part or whole, directly or indirectly, in
violation of any restrictions, laws, or regulations imposed by the government of Japan
or any other relevant countries, and are required to obtain necessary approval prior to
exporting the Software.
9. Governing Law, Jurisdiction and Entire Agreement
This agreement shall be governed by and construed in accordance with the laws of
Japan. All disputes which may arise between the parties in connection with this
agreement shall be subject to final and exclusive jurisdiction at Tokyo District Court in
Japan. This agreement constitutes the sole understanding of the parties about this
subject matter and terminates and supersedes all prior understanding or agreements
on the subject matter hereof.
10. Free Software Module Licensed Under GPL
The Software contains a free software module, listed as below, which is licensed under
GNU General Public License Version 2:
/usr/lib/cups/filter/pstopdffx
/usr/lib/cups/filter/pdftopdffx
/usr/lib/cups/filter/pdftopjlfx
These modules are free software. You may use, modify and distribute the modules
according to GNU General Public License Version 2, and its revised terms and
conditions, provided by Free Software Foundation. Xerox thinks that these modules
could be useful. However there is no warranty for the programs. GNU General Public
License Version 2 is attached hereunder.
Would you read carefully the terms and conditions, please.
"GNU GENERAL PUBLIC LICENSE Version 2, June 1991 (p.x)"
viii
Page 9

GNU GENERAL PUBLIC LICENSE Version 2, June 1991
Copyright (C) 1989, 1991 Free Software Foundation, Inc. 59 Temple Place, Suite
330, Boston, MA 02111-1307 USA Everyone is permitted to copy and distribute
verbatim copies of this license document, but changing it is not allowed.
Preamble
The licenses for most software are designed to take away your freedom to share
and change it. By contrast, the GNU General Public License is intended to
guarantee your freedom to share and change free software--to make sure the
software is free for all its users. This General Public License applies to most of the
Free Software Foundation's software and to any other program whose authors
commit to using it. (Some other Free Software Foundation software is covered by
the GNU Library General Public License instead.) You can apply it to your
programs, too.
When we speak of free software, we are referring to freedom, not price. Our
General Public Licenses are designed to make sure that you have the freedom to
distribute copies of free software (and charge for this service if you wish), that you
receive source code or can get it if you want it, that you can change the software or
use pieces of it in new free programs; and that you know you can do these things.
To protect your rights, we need to make restrictions that forbid anyone to deny you
these rights or to ask you to surrender the rights. These restrictions translate to
certain responsibilities for you if you distribute copies of the software, or if you
modify it.
For example, if you distribute copies of such a program, whether gratis or for a fee,
you must give the recipients all the rights that you have. You must make sure that
they, too, receive or can get the source code. And you must show them these terms
so they know their rights.
We protect your rights with two steps: (1) copyright the software, and (2) offer you
this license which gives you legal permission to copy, distribute and/or modify the
software.
Also, for each author's protection and ours, we want to make certain that everyone
understands that there is no warranty for this free software. If the software is
modified by someone else and passed on, we want its recipients to know that what
they have is not the original, so that any problems introduced by others will not
reflect on the original authors' reputations.
Finally, any free program is threatened constantly by software patents. We wish to
avoid the danger that redistributors of a free program will individually obtain patent
licenses, in effect making the program proprietary. To prevent this, we have made
it clear that any patent must be licensed for everyone's free use or not licensed at
all.
The precise terms and conditions for copying, distribution and modification follow.
GNU GENERAL PUBLIC LICENSE TERMS AND CONDITIONS FOR
COPYING,DISTRIBUTION AND MODIFICATION
0. This License applies to any program or other work which contains a notice placed
by the copyright holder saying it may be distributed under the terms of this General
Public License. The "Program", below, refers to any such program or work, and a
"work based on the Program" means either the Program or any derivative work
under copyright law: that is to say, a work containing the Program or a portion of it,
ix
Page 10

either verbatim or with modifications and/or translated into another language.
(Hereinafter, translation is included without limitation in the term "modification".)
Each licensee is addressed as "you"
Activities other than copying, distribution and modification are not covered by this
License; they are outside its scope. The act of running the Program is not restricted,
and the output from the Program is covered only if its contents constitute a work
based on the Program (independent of having been made by running the Program).
Whether that is true depends on what the Program does.
1. You may copy and distribute verbatim copies of the Program's source code as
you receive it, in any medium, provided that you conspicuously and appropriately
publish on each copy an appropriate copyright notice and disclaimer of warranty;
keep intact all the notices that refer to this License and to the absence of any
warranty; and give any other recipients of the Program a copy of this License along
with the Program. You may charge a fee for the physical act of transferring a copy,
and you may at your option offer warranty protection in exchange for a fee.
2. You may modify your copy or copies of the Program or any portion of it, thus
forming a work based on the Program, and copy and distribute such modifications
or work under the terms of Section 1 above, provided that you also meet all of these
conditions:
a) You must cause the modified files to carry prominent notices stating that you
changed the files and the date of any change.
b) You must cause any work that you distribute or publish, that in whole or in part
contains or is derived from the Program or any part thereof, to be licensed as a
whole at no charge to all third parties under the terms of this License.
c) If the modified program normally reads commands interactively when run, you
must cause it, when started running for such interactive use in the most ordinary
way, to print or display an announcement including an appropriate copyright notice
and a notice that there is no warranty (or else, saying that you provide a warranty)
and that users may redistribute the program under these conditions, and telling the
user how to view a copy of this License. (Exception: if the Program itself is
interactive but does not normally print such an announcement, your work based on
the Program is not required to print an announcement.)
These requirements apply to the modified work as a whole. If identifiable sections
of that work are not derived from the Program, and can be reasonably considered
independent and separate works in themselves, then this License, and its terms, do
not apply to those sections when you distribute them as separate works. But when
you distribute the same sections as part of a whole which is a work based on the
Program, the distribution of the whole must be on the terms of this License, whose
permissions for other licensees extend to the entire whole, and thus to each and
every part regardless of who wrote it.
Thus, it is not the intent of this section to claim rights or contest your rights to work
written entirely by you; rather, the intent is to exercise the right to control the
distribution of derivative or collective works based on the Program.
In addition, mere aggregation of another work not based on the Program with the
Program (or with a work based on the Program) on a volume of a storage or
distribution medium does not bring the other work under the scope of this License.
3. You may copy and distribute the Program (or a work based on it, under Section
2) in object code or executable form under the terms of Sections 1 and 2 above
provided that you also do one of the following:
a) Accompany it with the complete corresponding machine-readable source code,
which must be distributed under the terms of Sections 1 and 2 above on a medium
customarily used for software interchange; or,
x
Page 11

b) Accompany it with a written offer, valid for at least three years, to give any third
party, for a charge no more than your cost of physically performing source
distribution, a complete machine readable copy of the corresponding source code,
to be distributed under the terms of Sections 1 and 2 above on a medium
customarily used for software interchange; or, c) Accompany it with the information
you received as to the offer to distribute corresponding source code. (This
alternative is allowed only for non commercial distribution and only if you received
the program in object code or executable form with such an offer, in accord with
Subsection b above.)
The source code for a work means the preferred form of the work for making
modifications to it.
For an executable work, complete source code means all the source code for all
modules it contains, plus any associated interface definition files, plus the scripts
used to control compilation and installation of the executable. However, as a
special exception, the source code distributed need not include anything that is
normally distributed (in either source or binary form) with the major components
(compiler, kernel, and so on) of the operating system on which the executable runs,
unless that component itself accompanies the executable.
If distribution of executable or object code is made by offering access to copy from
a designated place, then offering equivalent access to copy the source code from
the same place counts as distribution of the source code, even though third parties
are not compelled to copy the source along with the object code.
4. You may not copy, modify, sublicense, or distribute the Program except as
expressly provided under this License. Any attempt otherwise to copy, modify,
sublicense or distribute the Program is void, and will automatically terminate your
rights under this License. However, parties who have received copies, or rights,
from you under this License will not have their licenses terminated so long as such
parties remain in full compliance.
5. You are not required to accept this License, since you have not signed it.
However, nothing else grants you permission to modify or distribute the Program or
its derivative works. These actions are prohibited by law if you do not accept this
License. Therefore, by modifying or distributing the Program (or any work based on
the Program), you indicate your acceptance of this License to do so, and all its
terms and conditions for copying, distributing or modifying the Program or works
based on it.
6. Each time you redistribute the Program (or any work based on the Program), the
recipient automatically receives a license from the original licensor to copy,
distribute or modify the Program subject to these terms and conditions. You may
not impose any further restrictions on the recipients' exercise of the rights granted
herein. You are not responsible for enforcing compliance by third parties to this
License.
7. If, as a consequence of a court judgment or allegation of patent infringement or
for any other reason (not limited to patent issues), conditions are imposed on you
(whether by court order, agreement or otherwise) that contradict the conditions of
this License, they do not excuse you from the conditions of this License. If you
cannot distribute so as to satisfy simultaneously your obligations under this License
and any other pertinent obligations, then as a consequence you may not distribute
the Program at all. For example, if a patent license would not permit royalty free
redistribution of the Program by all those who receive copies directly or indirectly
through you, then the only way you could satisfy both it and this License would be
to refrain entirely from distribution of the Program.
xi
Page 12

If any portion of this section is held invalid or unenforceable under any particular
circumstance, the balance of the section is intended to apply and the section as a
whole is intended to apply in other circumstances.
It is not the purpose of this section to induce you to infringe any patents or other
property right claims or to contest validity of any such claims; this section has the
sole purpose of protecting the integrity of the free software distribution system,
which is implemented by public license practices. Many people have made
generous contributions to the wide range of software distributed through that
system in reliance on consistent application of that system; it is up to the author/
donor to decide if he or she is willing to distribute software through any other system
and a licensee cannot impose that choice.
This section is intended to make thoroughly clear what is believed to be a
consequence of the rest of this License.
8. If the distribution and/or use of the Program is restricted in certain countries either
by patents or by copyrighted interfaces, the original copyright holder who places the
Program under this License may add an explicit geographical distribution limitation
excluding those countries, so that distribution is permitted only in or among
countries not thus excluded. In such case, this License incorporates the limitation
as if written in the body of this License.
9. The Free Software Foundation may publish revised and/or new versions of the
General Public License from time to time. Such new versions will be similar in spirit
to the present version, but may differ in detail to address new problems or concerns.
Each version is given a distinguishing version number. If the Program specifies a
version number of this License which applies to it and "any later version", you have
the option of following the terms and conditions either of that version or of any later
version published by the Free Software Foundation. If the Program does not specify
a version number of this License, you may choose any version ever published by
the Free Software Foundation.
10. If you wish to incorporate parts of the Program into other free programs whose
distribution conditions are different, write to the author to ask for permission. For
software which is copyrighted by the Free Software Foundation, write to the Free
Software Foundation; we sometimes make exceptions for this. Our decision will be
guided by the two goals of preserving the free status of all derivatives of our free
software and of promoting the sharing and reuse of software generally.
NO WARRANTY
11. BECAUSE THE PROGRAM IS LICENSED FREE OF CHARGE, THERE IS NO
WARRANTY FOR THE PROGRAM, TO THE EXTENT PERMITTED BY
APPLICABLE LAW. EXCEPT WHEN OTHERWISE STATED IN WRITING THE
COPYRIGHT HOLDERS AND/OR OTHER PARTIES PROVIDE THE PROGRAM
"AS IS" WITHOUT WARRANTY OF ANY KIND, EITHER EXPRESSED OR
IMPLIED, INCLUDING, BUT NOT LIMITED TO, THE IMPLIED WARRANTIES OF
MERCHANTABILITY AND FITNESS FOR A PARTICULAR PURPOSE.
THE ENTIRE RISK AS TO THE QUALITY AND PERFORMANCE OF THE
PROGRAM IS WITH YOU. SHOULD THE PROGRAM PROVE DEFECTIVE, YOU
ASSUME THE COST OF ALL NECESSARY SERVICING, REPAIR OR
CORRECTION.
12. IN NO EVENT UNLESS REQUIRED BY APPLICABLE LAW OR AGREED TO
IN WRITING WILL ANY COPYRIGHT HOLDER, OR ANY OTHER PARTY WHO
MAY MODIFY AND/OR REDISTRIBUTE THE PROGRAM AS PERMITTED
ABOVE, BE LIABLE TO YOU FOR DAMAGES, INCLUDING ANY GENERAL,
SPECIAL, INCIDENTAL OR CONSEQUENTIAL DAMAGES ARISING OUT OF
THE USE OR INABILITY TO USE THE PROGRAM (INCLUDING BUT NOT
LIMITED TO LOSS OF DATA OR DATA BEING RENDERED INACCURATE OR
xii
Page 13

LOSSES SUSTAINED BY YOU OR THIRD PARTIES OR A FAILURE OF THE
PROGRAM TO OPERATE WITH ANY OTHER PROGRAMS), EVEN IF SUCH
HOLDER OR OTHER PARTY HAS BEEN ADVISED OF THE POSSIBILITY OF
SUCH DAMAGES.
END OF TERMS AND CONDITIONS
How to Apply These Terms to Your New Programs
If you develop a new program, and you want it to be of the greatest possible use to
the public, the best way to achieve this is to make it free software which everyone
can redistribute and change under these terms.
To do so, attach the following notices to the program. It is safest to attach them to
the start of each source file to most effectively convey the exclusion of warranty;
and each file should have at least the "copyright" line and a pointer to where the full
notice is found.
<one line to give the program's name and a brief idea of what it does.>
Copyright (C) <year> <name of author>
This program is free software; you can redistribute it and/or modify it under the
terms of the GNU General Public License as published by the Free Software
Foundation; either version 2 of the License, or (at your option) any later version.
This program is distributed in the hope that it will be useful, but WITHOUT ANY
WARRANTY; without even the implied warranty of MERCHANTABILITY or
FITNESS FOR A PARTICULAR PURPOSE. See the GNU General Public License
for more details.
You should have received a copy of the GNU General Public License along with
this program; if not, write to the Free Software Foundation, Inc., 59 Temple Place,
Suite 330, Boston, MA 02111-1307 USA
Also add information on how to contact you by electronic and paper mail. If the
program is interactive, make it output a short notice like this when it starts in an
interactive mode:
Gnomovision version 69, Copyright (C) year name of author
Gnomovision comes with ABSOLUTELY NO WARRANTY; for details type `show
w'.
This is free software, and you are welcome to redistribute it under certain
conditions; type `show c' for details.
The hypothetical commands `show w' and `show c' should show the appropriate
parts of the General Public License. Of course, the commands you use may be
called something other than `show w' and `show c'; they could even be mouseclicks or menu items--whatever suits your program.
You should also get your employer (if you work as a programmer) or your school,
if any, to sign a "copyright disclaimer" for the program, if necessary. Here is a
sample; alter the names:
Yoyodyne, Inc., hereby disclaims all copyright interest in the program
`Gnomovision' (which makes passes at compilers) written by James Hacker.
<signature of Ty Coon>, 1 April 1989
Ty Coon, President of Vice
This General Public License does not permit incorporating your program into
proprietary programs. If your program is a subroutine library, you may consider it
more useful to permit linking proprietary applications with the library. If this is what
you want to do, use the GNU Library General Public License instead of this License.
------------------------------------------------------------------------------------------------------------
xiii
Page 14

xiv
Page 15

1 Installing and Configuring the
®
PostScript
Driver on Windows NT
4.0 / 2000 / XP / Server 2003 / Vista
This chapter contains the following information:
• About the Software
– Included Software
– Hardware/Software Requirements
• Installing the Print Driver
– Installation Procedure
• Configuring the Print Driver
– [Device Settings] tab
– [Configuration] tab
– [Advanced] tab
– [Paper/Output] tab
– [Layout] tab
• Using the Online Help
About the Software
There are two CD-ROMs delivered with your printer:
Software CD-ROM - This CD-ROM contains all the print drivers available for the
printer.
Documentation CD-ROM - This CD-ROM contains all the documentation for the
printer.
This section describes the software for Windows NT 4.0, 2000, Windows XP, and
Windows Server 2003 included on the Software CD-ROM.
Included Software
The following items are included on the Software CD-ROM and are required to print
PostScript documents from Windows NT 4.0, 2000, Windows XP, Windows Server
2003, or Windows Vista.
PPD files and print driver - The PPD files and PostScript print driver (which has
added Xerox unique features to Microsoft PScript 5.0) for Windows NT 4.0, 2000,
Windows XP, Windows Server 2003, and Windows Vista.
Readme.txt - Describes the precautions that must be followed when using the print
driver. Be sure to read this before using the print driver.
Installing and Configuring the PostScript® Driver on Windows NT 4.0 / 2000 / XP / Server 2003 / Vista 1
Page 16

Hardware/Software Requirements
The system requirements for the print driver for Windows NT 4.0, 2000, Windows
XP, Windows Server 2003, or Windows Vista are as follows:
Computer System
Personal computer on which the Windows NT 4.0, 2000, Windows XP, Windows
Server 2003, or Windows Vista is installed.
Basic Software
• Windows NT 4.0 (with SP6)
• Windows 2000 Professional
• Windows 2000 Server
• Windows 2000 Advanced Server
• Windows XP Professional Edition
• Windows XP Home Edition
• Windows XP Professional x64 Edition
• Windows Server 2003
• Windows Server 2003 x64 Edition
• Windows Vista
Installing the Print Driver
This section describes how to install the print driver on Windows NT 4.0, 2000,
Windows XP, Windows Server 2003, or Windows Vista.
The following procedure uses Windows XP as an example.
Note: To cancel the installation, click [Cancel] in a dialog box displayed during the
installation. To cancel the settings in a dialog box and return to the previous dialog box,
click [Back].
Installation Procedure
1. Start Windows XP.
NOTE: When installing the print driver, you must log on as a Power User group
member or as an administrator. Refer to the Windows XP documentation for
information about the Power User group.
From the [Start] menu, select [Settings] and click [Printers and Faxes].
2.
– Windows NT 4.0 / 2000 - Start > Settings > Printers
– Windows XP / Windows Server 2003 - Start > Printers and Faxes
– Windows Vista - Start button > Control Panel > Hardware and Sound >
Printers
3. In the [Printers and Faxes] or [Printers] window, double-click [Add Printer].
4. Click [Next].
2 Installing and Configuring the PostScript® Driver on Windows NT 4.0 / 2000 / XP / Server 2003 / Vista
Page 17

5.
If the printer is directly connected to your computer or over a network in a
TCP/IP (LPD) environment, select [Local printer attached to this computer].
Otherwise, select [A network printer, or a printer attached to another
computer]. After selecting the connection method, click [Next].
In this example, we will select [Local printer attached to this computer].
NOTE: When [Local printer attached to this computer] is selected, clear the
[Automatically detect and install my Plug and Play printer] check box. When [A
network printer, or a printer attached to another computer] is selected, specify the
printer in the [Connect to printer] dialog box.
Select the port you want to use and click [Next].
6.
When the printer is installed in a TCP/IP(LPD) environment:
a. Click [Create a new port].
b. Select [Standard TCP/IP Port] from the [Type of port] list and click [Next].
c. Click [Next].
7. Enter the IP address of the printer in [Printer Name or IP Address] and click
[Next].
Click [Finish] in the displayed dialog box.
8. Insert the Software CD-ROM into your CD-ROM drive.
9. Click [Have Disk].
10. In the [Copy manufacturer’s files from:] box, enter the drive in which the CD-
ROM is located (example: "E:"). After the drive name, enter
“\Eng\PS\Win2000_XP” and click [OK].
NOTE: Click [Browse] to view the CD-ROM contents. Other languages available are
French (\Fra
\PS\Win2000_XP).
(Spa
11.
From [Printers], select the model of your printer and click [Next].
12. Enter a name for your printer, specify whether to use the printer as the default
\PS\Win2000_XP), Russian (\Rus\PS\Win2000_XP), and Spanish
printer, and click [Next].
13. Select [Do not share this printer] and click [Next].
14. Specify whether to print a test page and click [Next].
15. Click [Finish].
The installation begins.
16. Check if the printer is added to the [Printers] window.
This completes the installation of the print driver. Remove the CD-ROM from the
CD-ROM drive.
To configure the print driver, see "Configuring the Print Driver" (P. 4).
Store the CD-ROM in a safe place.
Installing and Configuring the PostScript® Driver on Windows NT 4.0 / 2000 / XP / Server 2003 / Vista 3
Page 18

Configuring the Print Driver
This section describes the printer-specific features in the following tabs in the print
driver properties.
• [Device Settings] tab
• [Configuration] tab
• [Advanced] tab
• [Paper/Output] tab
• [Layout] tab
Note: Refer to the online help for information about other tabs.
To view the [Device Settings] or [Configuration] tab, select the printer icon in the
[Printers] window, and click [Properties] from the [File] menu.
To view the [Advanced], [Paper/Output], or [Layout] tab, select the printer icon in
the [Printers] window, and click [Printing Preferences] from the [File] menu.
[Device Settings] Tab
The following explains [Installable Options] on the [Device Settings] tab. To print
properly, make sure to correctly configure [Installable Options].
Select an item you want to configure from [Installable Options], and select its option
from the menu that appears on the right.
Setting Items
Memory - Sets the memory capacity of the printer.
Paper Tray Configuration - Sets the paper tray configuration of the printer.
Hard Disk - Sets whether or not the hard disk is installed in the printer.
Duplex Module - Sets whether or not the duplex unit is installed in the printer.
4 Installing and Configuring the PostScript® Driver on Windows NT 4.0 / 2000 / XP / Server 2003 / Vista
Page 19
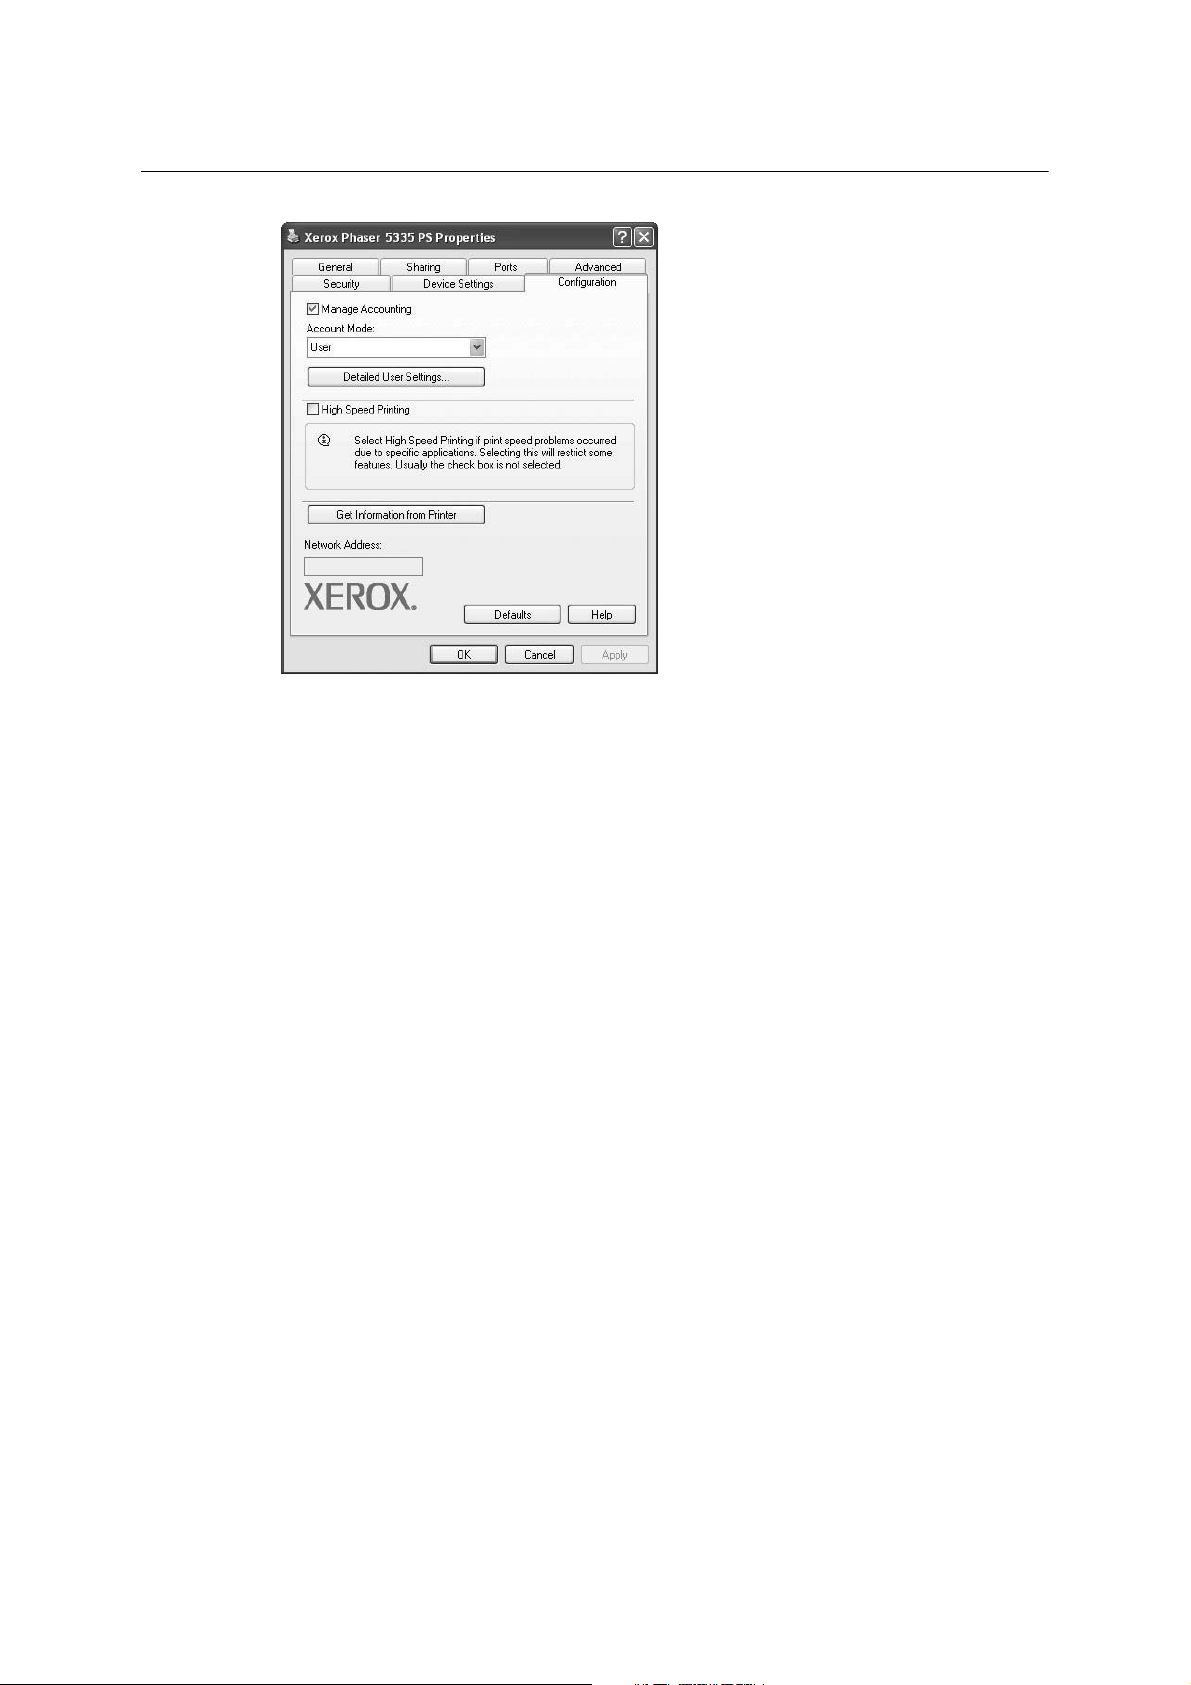
[Configuration] Tab
The following explains how to configure the [Configuration] tab.
Note: Click the [Defaults] button to restore the defaults.
Setting Items
Manage Accounting - Selecting the check box uses the auditron feature.
Account Mode - Sets whether to allow all users or only the administrator to
change the auditron settings.
NOTE: If the user who is logged onto the computer does not have access rights to the
printer settings, [Account Mode] is grayed out and cannot be changed. When the [High
Speed Printing] check box is selected, [Account Mode] is set to [Administrator] and is
grayed out. Clearing the check box allows you to change the setting.
Detailed User Settings - Displays the [Detailed User Settings] dialog box.
Use Default User Settings - Sets whether or not to use the auditron settings
in this dialog box every time you request a print job.
Prompt User for Settings - Selecting this check box displays the [Enter User
Details] dialog box every time you request a print job. Your job will be printed if
you enter the user ID and password in the dialog box.
NOTE: When the [High Speed Printing] check box is selected, [Prompt User for
Settings] is grayed out and cannot be changed.
- Specify User ID - Sets the method of specifying a user ID.
- User ID - Sets a user ID with up to 32 alphanumeric characters.
NOTE: The user ID must be the same as that registered on the printer.
Otherwise, your job will not be printed.
- Password - Sets the password for the user ID using 4 to 12 alphanumeric
characters. The password is optional; you can leave it blank.
- Display Previous User Details - Selecting the check box saves the
settings in the [Enter User Details] dialog box and displays them as the
defaults the next time you display the dialog box.
- Hide User ID (***) - Selecting the check box hides the user ID behind
asterisks.
Installing and Configuring the PostScript® Driver on Windows NT 4.0 / 2000 / XP / Server 2003 / Vista 5
Page 20

[Advanced] Tab
The following explains how to configure the [Advanced] tab in the Printing
Preferences dialog box.
Select an item you want to configure, and select its option from the menu that
appears on the right.
High Speed Printing - Increases the print speed of applications that directly
create PostScript files. This feature should not be used in normal
circumstances.
Get Information from Printer - If the printer is networked using TCP/IP or IPX,
clicking [Get Information from Printer] updates [Installable Options] on the
[Device Settings] tab. Clicking the button also obtains the printer’s address and
displays it in [Network Address].
When your printer is a local printer, [Get Information from Printer] cannot be
used, and you must manually set the information on the print driver.
To use this feature, enable the printer’s SNMP port.
Setting Items
Transparency Separators
Separator Paper Supply - Sets the paper tray for separators when using the
Transparency Separators feature. Selecting [Auto Paper Select] uses the
paper tray selected on the printer.
Print on Separators - Sets whether or not to print on separators. Selecting
[Blank Separators] inserts blank separators. Selecting [Printed Separators]
prints the same contents printed on transparencies to separators.
Images
Image Quality - Sets the print quality of your document. [High Speed]
increases print speed but decreases print quality. [High Resolution] clearly
prints fine lines.
Halftone - Sets the type of halftone screen to be used when printing.
6 Installing and Configuring the PostScript® Driver on Windows NT 4.0 / 2000 / XP / Server 2003 / Vista
Page 21

Image Enhancement - Sets whether or not to use the Image Enhancement
feature. Selecting [On] artificially enhances resolution by smoothing out the
edges of images. Images (bitmaps) that consist of rough dots may not be
reproduced with smooth gradations. In such case, set this feature to [Off].
Selecting [On] or [Off] does not affect print speed.
Halftone Screen Lock - Sets whether or not to enable the halftone setting
on the printer. Selecting [On] prioritizes the printer’s halftone setting over the
setting specified by an application.
Details
Image Rotation 180 Degrees - Selecting the check box rotates the
landscape or portrait pages in your document by 180 degrees. When the
[Layout] tab > [Multiple-Up] is set to an option other than [1 Page Up], this
rotates all pages by 180 degrees.
Reverse Printing - Selecting [On] prints your document in reverse order.
NOTE: [Reverse Printing] is available only on Windows NT 4.0/2000/XP, and
appears when [Enable advanced printing feature] is selected under the
[Advanced] tab in the Properties dialog box. Disabling [EMF Spooling] on the
[Advanced] tab in the Printing Preferences dialog box automatically sets
[Reverse Printing] to [Off].
Skip Blank Pages - Sets whether or not to skip blank pages during printing.
Draft Mode - Selecting [On] uses less toner and thus the colors become
lighter. Use this feature to save toner when printing documents that do not
require high image quality.
Substitute Tray - Sets what action to take when the paper of the size you
requested is not loaded in the printer.
- Printer Default - Uses the settings configured on the printer.
- Display Message - Displays a message on the control panel that
prompts you to load the paper. Your document will not be printed until you
load the paper in the printer.
- Use Closest Size (Reduce to Fit) - Uses the paper of the nearest size
and prints the document at 100% magnification or at a reduced
magnification if necessary.
- Use Closest Size (100%) - Uses the paper of the nearest size and prints
the document at 100% magnification.
- Use Larger Size (Reduce to Fit) - Uses the paper of a larger size and
prints the document at 100% magnification or at a reduced magnification
if necessary.
- Use Larger Size (100%) - Uses the paper of a larger size and prints the
document at 100% magnification.
- Select Tray 1 (Bypass) - Feeds the paper from Tray 1 (Bypass) tray
when it is not loaded in the paper trays.
Custom Paper Auto Orientation - If printing on user-defined paper,
selecting [On] corrects the orientation of the paper. If your document was
printed 90 degrees rotated on the paper, set this feature to [On].
EMF Spooling - Sets the spooling format of your print data. Selecting
[Available] spools the print data in EMF (Enhanced Meta File) format, which
minimizes the processing time. Selecting [Not Available] spools the print data
in RAW format, which increases the processing time as the data conversion
takes time. If you experience any problem by setting this feature to
[Available], set it to [Not Available].
Installing and Configuring the PostScript® Driver on Windows NT 4.0 / 2000 / XP / Server 2003 / Vista 7
Page 22
About - Displays the version information of the print driver.
Help - Displays the online help for the print driver.
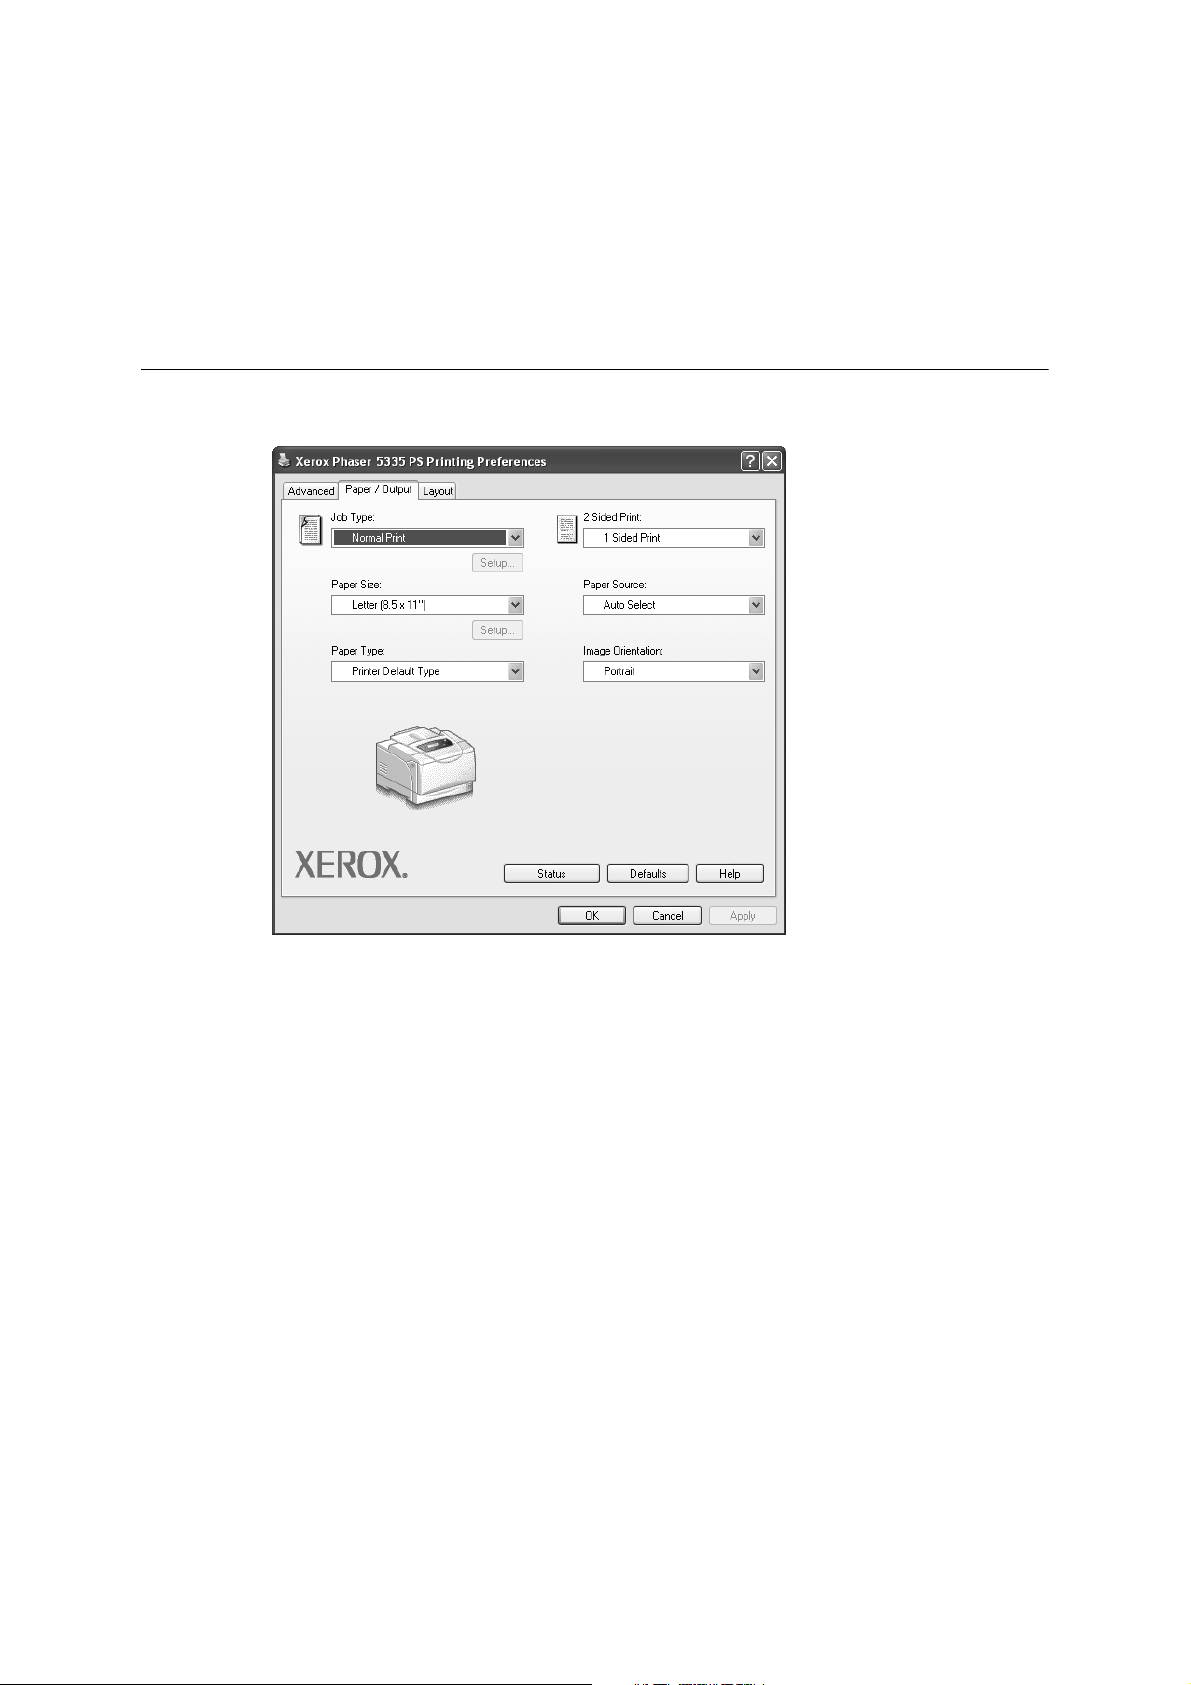
[Paper/Output] Tab
The following explains how to configure the [Paper/Output] tab in the Printing
Preferences dialog box.
NOTE: On Windows NT 4.0/2000/XP, [EMF Spooling] appears when [Enable
advanced printing feature] is selected under the [Advanced] tab in the
Properties dialog box. Enabling [Reverse Printing] automatically sets [EMF
Spooling] to [Available].
Setting Items
Job Type - Sets the type of your print job to [Normal Print], [Secure Print], or
[Sample Set].
Setup - This button becomes active when [Job Type] is set to [Secure Print]
or [Sample Set]. Clicking the button displays the [Secure Print] or [Sample
Set] dialog box.
Normal Print - Prints a job without using the Secure Print or Sample Set
feature.
Secure Print - Temporarily stores a print job in the printer, rather than
printing it immediately, until you manually start the printing from the control
panel.
Sample Set - Allows you to print a proof copy of a multi-set job and prints
the entire sets once the print result has been verified. If you set the print
quantity to 1, this setting automatically changes to [Normal Print].
NOTE: To select [Secure Print] and [Sample Set], the [Device Settings] tab >
[Hard Disk] must be set to [Available].
User ID - Sets the user ID for the Secure Print or Sample Set feature with
up to 8 alphanumeric characters.
8 Installing and Configuring the PostScript® Driver on Windows NT 4.0 / 2000 / XP / Server 2003 / Vista
Page 23

Password - Sets the password associated with the user ID for the Secure
Print feature. The password can be up to 12 alphanumeric characters.
Asterisks (***) appear instead of text as you enter the password in this text
box.
NOTE: [Password] appears only on the [Secure Print] dialog box.
Retrieve Document Name - Sets the method of naming the document
that will be stored in the printer using the Secure Print or Sample Set
feature. [Auto Retrieve] automatically retrieves the document name from
the application from which the document will be printed. If the name
exceeds 12 alphanumeric characters, only the first 12 characters will be
valid.
Document Name - When [Retrieve Document Name] is set to [Enter
Document Name], enter the document name with up to 12 alphanumeric
characters.
2 Sided Print - Sets whether to print your job 1-sided or 2-sided. When
printing 2-sided, select [2 Sided] or [2 Sided, Flip on Short Edge].
Paper Size - Sets the paper size of your document.
Setup - This button becomes active when [Paper Size] is set to [PostScript
Custom Size]. Clicking the button displays the [Custom Size Settings] dialog
box, in which you can set a custom paper size.
Paper Source - Sets the paper tray to be used for printing the document.
Image Orientation - Specifies the orientation to be printed. Select either
[Portrait] or [Landscape].
Paper Type - Sets the type of paper to be used for printing your document.
Selecting [Printer Default Type] uses the paper type selected on the printer.
[Layout] Tab
The following explains how to configure the [Layout] tab in the Printing Preferences
dialog box.
Installing and Configuring the PostScript® Driver on Windows NT 4.0 / 2000 / XP / Server 2003 / Vista 9
Page 24

Setting Items
Multiple-Up - Prints multiple pages onto one sheet of paper.
NOTE: [Multiple-Up] is displayed only when the [Device Settings] tab > [Duplex
Module] is set to [Available] and the [Advanced] tab > [Enable advanced
printing feature] is selected.
Draw Outlines - Prints a border around each page when using the [MultipleUp] feature.
Fit to New Paper Size - Sets the size of the output paper. When this setting
is different from [Paper Size] on the [Paper/Output] tab, your document will
be reduced/enlarged to fit to the paper size selected here.
Using the Online Help
The following explains how to use the online help.
1. Click the button on the print driver dialog box. The [?] mark appears next
to your mouse pointer. Then, click an item you need help with. The description
of the item pops up. When you are finished reading the description, click
anywhere on the pop-up window to close it.
2. Click the [Help] button on the print driver dialog box. The description of the tab
that is currently displayed appears.
10 Installing and Configuring the PostScript® Driver on Windows NT 4.0 / 2000 / XP / Server 2003 / Vista
Page 25

2 Installing and Configuring the
PostScript Driver on Macintosh
This chapter contains the following information:
• About the Software
– Included Software
– Hardware/Software Requirements
• Installing the Print Driver
– Installation Procedure
• Configuring the Print Driver
– [Device Settings] tab
– [Configuration] tab
– [Advanced] tab
– [Paper/Output] tab
– [Layout] tab
Hardware/Software Requirements
The system requirements for the Macintosh print driver is as follows.
Operating System
• Mac OS X version 10.3.9 to 10.4.7 (*1)
(*1): Operating system requirement and specification may change without prior
notice. Please refer to the Xerox home page.
Interface
• USB*2
• Ethernet (compatible protocol: LPR, Bonjour (Rendezvous))
(*2): USB interface is required as standard
Installing and Configuring the PostScript Driver on Macintosh 13
Page 26

Installing the Print Driver
Prerequisites (for use in Network environment)
To use this printer in a Network environment via Ethernet connection, ensure the
following settings are in place before installing the print driver.
On Macintosh On the machine
IP address settings and TCP/IP settings
in [System Preferences] window are set
up.
NOTE: • For details on setting up the printer, refer to the printer manual.
• For details on configuring Macintosh, refer to the Macintosh manual.
Downloading the Print Driver
Please download the Mac OS X print driver from the Xerox website to your
Macintosh.
Installer File name Description
Print Driver XeroxPhaser5335_Print_Installer.dmg Print Driver for Macintosh
Installation Procedure
The two procedures that follow detail how to install the downloaded print driver or
the print driver available on the Software CD-ROM.
• IP address is set up
• LPD protocol is enabled.
(Factory default: Enable)
• Bonjour protocol is enabled.
(Only when Bonjour is used: Factory default: Enable)
The Xerox home page URL: http://www.support.xerox.com
Downloaded Driver Installation Procedure
Install the downloaded Macintosh print driver onto your Macintosh.
Important: To install print driver on Mac OS X, please log in as an Administrator.
1. Double-click the [XeroxPhaser5335_Print_Installer.dmg] icon.
2. Double-click the [XeroxPhaser5335 Print Installer] program icon to launch the
installer.
3. The [Authenticate] screen appears. Type the passcode and click [OK].
4. The XeroxPhaser5335 Print Installer window displays. Click [Continue].
5. Read the contents in the [Software License Agreement] screen and click
[Continue].
6. Click [Agree].
7. Select the destination for installation and click [Continue].
8. Click [Install]. Installation begins.
14 Installing and Configuring the PostScript Driver on Macintosh
Page 27

9.
Once the screen that indicates the completion of installation appears, click
[Quit].
Installation of print driver is completed. Proceed to the "Adding Printer" section.
Software CD-ROM Driver Installation Procedure
Install the Macintosh print driver from the Software CD-ROM onto your Macintosh.
Important: To install print driver on Mac OS X, please log in as an Administrator.
1. Insert the Software CD-ROM into your CD-ROM driver. The [Phaser5335] icon
appears on your desktop.
2. Double-click the [Phaser5335] icon. The [Phaser5335] window appears.
3. Double-click the [Mac OS X] icon. The [Mac OS X] window appears.
4. Double-click the [XeroxPhaser5335_Print_Installer.dmg] icon.
5. Double-click the [XeroxPhaser5335 Print Installer] program icon to launch the
installer.
6. The [Authenticate] screen appears. Type the passcode and click [OK].
7. The XeroxPhaser5335 Print Installer window displays. Click [Continue].
8. Read the contents in the [Software License Agreement] screen and click
[Continue].
9. Click [Agree].
10. Select the destination for installation and click [Continue].
11. Click [Install]. Installation begins.
12. Once the screen that indicates the completion of installation appears, click
[Quit].
Installation of print driver is completed. Proceed to the "Adding Printer" section.
Adding a Printer (OS X 10.3)
Add this printer in the [Printer List] window.
1. Check that the printer is on.
If you are using the USB connection, make sure your Macintosh and the printer
is connected properly via USB cable.
2. Open the [Applications] folder, followed by the [Utilities] folder, and then
double-click the [Printer Setup Utility] icon.
The [Printer List] window appears.
3. Follow the procedure below to add this printer to the [Printer List] window.
Installing and Configuring the PostScript Driver on Macintosh 15
Page 28

For USB connection
NOTE: Once the USB cable is connected and the printer is on, this printer will be added
automatically to the list. If this happens, delete the printer manually and follow the
procedure below to add the printer.
Click [Add] on the [Printer List] window.
1.
2. On the pop-up menu sheet displayed, select [USB] and then select the Phaser
5335 from the list.
3. Make sure this print driver is selected on the [Printer Model] pop-up menu.
If it does not appear, select [Xerox] from the pop-up menu, and then select this
printer from the list of model names displayed.
4. Click [Add].
5. Make sure this printer is added to the [Printer List] window.
After that, change the configuration settings for options according to the
description in "[Printer Info] window" (P. 19) when the options are installed.
If the options are not installed, close the [Printer List] window.
For LPR connection
1. Click [Add] on the [Printer List] window.
2. Select [IP Printing] from the pop-up menu of the displayed sheet.
3. Select [LPD/LPR] from the [Printer Type] pop-up menu, and then type the IP
address of this printer in [Printer Address].
4. Select [Xerox] from the [Printer Model] pop-up menu. Select this printer from
the list of model names displayed and then click [Add].
5. Make sure this printer is added to the [Printer List] window.
After that, change the configuration settings for options according to the
description in "[Printer Info] window" (P. 19) when the options are installed.
If the options are not installed, close the [Printer List] window.
For Rendezvous (Bonjour) connection
1. Click [Add] on the [Printer List] window.
2. Select [Rendezvous] from the pop-up menu of the displayed sheet.
Select this printer from the list.
3. Make sure this print driver is selected on the [Printer Model] pop-up menu.
4. Click [Add].
5. Make sure this printer is added to the [Printer List] window.
After that, change the configuration settings for options according to the
description in "[Printer Info] window" (P. 19) when the options are installed.
If the options are not installed, close the [Printer List] window.
16 Installing and Configuring the PostScript Driver on Macintosh
Page 29

The printer is now ready for use on Mac OS X 10.3.
You can simply use the [Print] command on your software applications to send
a print job to this printer.
Adding a Printer (OS X 10.4)
Add this printer in [Printer List] window.
1. Check that the printer is on.
If you are using a USB connection, make sure your Macintosh and the printer
is connected properly via USB cable.
2. Open the [Applications] folder, followed by the [Utilities] folder, and then
double-click on [Printer Setup Utility] icon.
The [Printer List] window appears.
3. Follow the procedure below to add this printer to the [Printer List] window.
For USB and Bonjour connection
NOTE: Once the USB cable is connected and the printer is on, this printer will be
added automatically to the list. If this happens, delete the printer manually and follow
the procedure below to add the printer.
Click [Add] on the [Printer List] window.
1.
2. Click [Default Browser] on the [Printer Browser] window.
3. Select this printer from the list. (Check if [USB] or [Bonjour] is shown under
[Connection].)
4. Make sure this print driver is selected on the [Print Using] pop-up menu.
If it does not appear, select [Xerox] from the pop-up menu, and then select this
printer from the list of model name that is displayed.
5. Click [Add].
6. Make sure this printer is added to the [Printer List] window.
For LPR connection
1. Click [Add] on the [Printer List] window.
2. Click [IP Printer] on the [Printer Browser] window.
3. Select [Line Printer Daemon - LPD] on the [Protocol] pop-up menu and enter
the IP address in [Address].
4. Make sure this print driver is selected on the [Print Using] pop-up menu.
If it does not appear, select [Xerox] from the pop-up menu, and then select this
printer from the list of model name that is displayed.
5. Click [Add].
Installing and Configuring the PostScript Driver on Macintosh 17
Page 30

6. On the displayed sheet, specify the options that are installed and click
[Continue].
If no option is installed, click [Continue] without making any changes.
7. Make sure this printer is added to the [Printer List] window.
The printer is now ready for use on Mac OS X 10.4.
Use the [Print] command on your software applications to send a print job to this
printer.
18 Installing and Configuring the PostScript Driver on Macintosh
Page 31

[Printer Info] window
You can specify installable options.
1. On Mac OS X 10.2.8, click [Printers] on the [Print Center] menu and select
[Show Info].
On Mac OS X 10.3.9 and 10.4, click [Printers] on the [Printer Setup Utility]
menu bar, and select [Show Info].
2. Select [Installable Options] and set the options installed on the printer.
List of setting items
[Memory]
Sets the memory capacity of the printer.
[Paper Tray Configuration]
Sets the paper tray configuration
[Hard Disk]
Sets whether or not the hard disk is installed in the printer
[Duplex Module]
Sets whether or not the duplex unit is installed in the printer.
Installing and Configuring the PostScript Driver on Macintosh 19
Page 32

[Print window]
Specify the settings for the print job.
List of setting items
[Printer]
Select the printer at the output destination.
[Presets]
Saves the common print job settings to be used for future print jobs. Select [Save
As...] to save the settings. Once selected, the print job will be printed in the saved
print job settings.
You can edit or delete the registered contents.
NOTE: Selecting [Standard] will reset all values to their respective defaults.
Switching items displayed
Switch the setting items that are displayed in the Print window.
Select any of the following categories to display the setting items under that
category.
• "[Copies & Pages] window" (P. 20)
• "[Layout] window" (P. 21)
• "[Output Options] window (for OS X 10.3 only)" (P. 21)
• "[Scheduler] window" (P. 22)
• "[Paper Handling] window" (P. 22)
• "[Cover Page] window (for OS X 10.4 only)" (P. 23)
• "[Job Control] window" (P. 24)
• "[Job Type] window" (P. 25)
• "[Printer Features] window" (P. 26)
[Copies & Pages] window
This window appears when [Copies & Pages] is selected in "Switching items
displayed" (P. 20).
Specify the number of copies and the pages to print.
List of setting items
[Copies]
Specify the number of copies to print.
[Collated]
Specify the collation setting.
Select the check box to enable this feature.
[Pages]
Specify the pages to print.
20 Installing and Configuring the PostScript Driver on Macintosh
Page 33

Select [All] to print all pages.
Alternatively, specify the range of pages to print by entering the page number in
[From:] and [to:].
[Layout] window
This window appears when [Layout] is selected in "Switching items displayed"
(P. 20).
You can specify the layout of the document to print.
List of setting items
[Pages per Sheet]
Prints 2, 4, 6, 9 or 16 consecutive pages of the document on a single page of paper.
You can verify your setting on the image displayed on the left.
[Layout Direction]
Specify the order in which the images are allocated on the physical page when
[Pages per Sheet] is selected.
You can verify your setting on the image displayed on the left.
[Border]
Specify whether to add a border for each logical page on the paper when [Pages
per Sheet] is selected.
You can verify your setting on the image displayed on the left.
[Two Sided Printing] (for OS X 10.3) / [Two-Sided] (for OS X 10.4)
Performs 2 sided printing.
You can perform 2 sided printing with [Long-edged binding] or [Short-edged
binding].
You can verify your setting on the image displayed on the left.
[Output Options] window (for OS X 10.3 only)
This window appears when [Output Options] is selected in "Switching items
displayed" (P. 20).
Set up this option if you are not producing the print job on paper.
List of setting items
[Save as File]
Specify whether to send the print job to the printer or save it to file.
When the check box is selected, the [Print] button will change to [Save...] button.
Click the [Save...] button to display the [Save As] dialog box. Specify the file name
and the destination, and save the print job to file.
If the check box is not selected, the print job will be sent for printing on paper.
[Format]
To save the print job as file, specify the format.
Installing and Configuring the PostScript Driver on Macintosh 21
Page 34

[Scheduler] window
This window appears when [Scheduler] is selected in "Switching items displayed"
(P. 20).
Specify the time to print the document and the priority of the document.
List of setting items
[Print Document]
Specify the time to print the document.
Select [Now], [At], or [On Hold].
If [Now] is selected, click the [Print] button to print the document.
If [At] is selected, specify a time to print the document later.
If [On Hold] is selected and the [Print] button is activated, the print job will be put on
hold.
[Priority]
Specify the output priority.
When there are multiple documents to be printed, document with higher priority will
be printed first.
Select [Urgent], [High], [Medium], or [Low].
[Paper Handling] window
This window appears when [Paper Handling] is selected in "Switching items
displayed" (P. 20).
Specify the order in which the pages are printed and the pages to print.
NOTE: The contents displayed maybe different depending on the version of your operating
system.
For Mac OS X 10.3
List of setting items (for OS X 10.3)
[Reverse page order]
Specify order in which the pages are printed.
If the check box is selected, the pages will be printed in reverse order.
[Print]
Specify the pages to print.
For Mac OS X 10.4
List of setting items (for OS X 10.4)
[Page Order]
Specify order in which the pages are printed.
Select [Automatic], [Normal], or [Reverse].
When [Automatic] is selected, the pages will be printed in the normal order.
When [Normal] is selected, the pages will be printed in the normal order.
When [Reverse] is selected, the pages will be printed in the reverse order.
22 Installing and Configuring the PostScript Driver on Macintosh
Page 35

[Print]
Specify the pages to print.
Select [All Pages], [Odd numbered pages], or [Even numbered pages].
[Destination Paper Size]
Specify the actual output paper size apart from that specified in [Paper Size] under
"[Print window]" (P. 20).
Select either [Use documents paper size] or [Scale to fit paper size].
If [Use documents paper size] is selected, the size specified in [Paper Size] under
"[Print window]" (P. 20) will be used for printing.
The current paper size is displayed on the right of the radio button.
If [Scale to fit paper size] is selected, the job will be printed on the paper size
specified
[Scale down only]
Specify whether to enlarge the image when the [Destination Paper Size] and the
document paper size indicated in [Paper Size] under "[Print window]" (P. 20) are
different.
If the check box is selected and the size specified in [Destination Paper Size] is
larger than that specified in [Paper Size] under"[Print window]" (P. 20), the
document will be printed in its document paper size indicated in [Paper Size] under
"[Print window]" (P. 20).
If the check box is not selected, the document will be enlarged up to the size
specified in [Destination Paper Size].
If the [Destination Paper Size] is smaller, the document will be reduced to fit the size
specified in [Destination Paper Size] and printed regardless of the [Scale down
only] check box setting.
[Cover Page] window (for OS X 10.4 only)
This window appears when [Cover Page] is selected in "Switching items displayed"
(P. 20).
Specify the settings for cover page.
List of setting items
[Print Cover Page]
Specify whether to add a cover page to the document to be printed.
Select [None], [Before document], or [After document].
[Cover Page Type]
Select the contents to be printed on the cover page.
NOTE: You can choose to add the cover page before or after the document by selecting
[Before document] or [After document] under [Print Cover Page].
[Billing Info]
Enter any text to be printed on the cover page.
Installing and Configuring the PostScript Driver on Macintosh 23
Page 36

[Job Control] window
This window appears when [Job Control] is selected in "Switching items displayed"
(P. 20).
Specify the settings for cover page.
List of setting items
[Account Mode]
Select whether to allow general users to modify user authentication settings in the
[Detailed User Settings] dialog box or restrict general users to use only the user
authentication settings set up by the Administrator.
Select either [Administrator] or [User].
[User Settings] button
Displays "[User Settings] window" (P. 24).
You can configure various settings for user authentication during printing.
[User Settings] window
This window appears when you click the [User Settings] button.
You can configure various settings for user authentication during printing.
List of setting items
Use Default User Details / Prompt User for Settings
Specify the method used to enter the authentication details.
If you have selected [Use Default User Details], the authentication details specified
in the [User Settings] window will be used for printing.
If you have selected [Prompt User for Settings], the [Enter User Details] dialog box
will appear prior to printing. Printing will start only after authentication details such
as Job Owner Name and Passcode are entered.
Specify Job Owner Name
Select the method to specify Job Owner Name.
If [Use Login Name] is selected, the login name of the current user will be used as
the Job Owner Name.
If [Enter Job Owner Name] is selected, the name entered in [User ID] will be used
for login.
[Job Owner Name]
Enter the User ID that identifies the user who has sent a print job.
You can enter up to 32 alphanumeric characters.
Important: If [Passcode] is specified, make sure the User ID entered is registered on the
machine. Confirm the User ID with your machine administrator. If User ID and Passcode
do not match those registered on the machine, the print job will fail to print.
[Passcode]
Set up a passcode for the User ID specified.
Enter 4 to 12 alphanumeric characters to set up as the passcode.
24 Installing and Configuring the PostScript Driver on Macintosh
Page 37

Important: The passcode must be the same as the one registered on the machine. If you
have entered a wrong passcode, your job will not be printed. Confirm the passcode with
your machine administrator.
[Job Type] window
This window appears when [Job Type] is selected in "Switching items displayed"
(P. 20).
Specify the type of job to print.
List of setting items
[Job Type]
Select from [Normal Print], [Secure Print] and [Sample Set].
If [Normal Print] is selected, the print job will be processed normally.
If [Secure Print] is selected, the document to be printed will be saved in the printer's
hard disk.
Set up the User ID, document name, and passcode (optional), and save the
document to the printer for printing.
If [Sample Set] is selected to print multiple copies of the document, only one set of
the document will be printed first.
The remaining sets of document will be saved in the printer's hard disk under the
User ID and document name specified here.
Important: [Secure Print] and [Sample Set] are available only when the [Hard Disk] check
box on "[Printer Info] window" (P. 19) is selected.
[User Name]
Specify the User Name for Secure Print and Sample Set.
You can enter up to 8 alphanumeric characters.
NOTE: This setting is available when either [Secure Print] or [Sample Set] is selected for
[Job Type].
[Enter a 0 to 12 Digit Secure Print Passcode]
Specify the passcode for Secure Print.
You can enter up to 12 numeric characters as the passcode.
If none is entered, no passcode will be set up.
NOTE: This setting is available when [Secure Print] is selected for [Job Type].
[Document Name]
Specify the type of document name for Secure Print and Sample Set.
Select [Enter Document Name] or [Use Existing Name].
If [Use Existing Name] is selected, the name of the printing document becomes the
document name.
If [Enter Document Name] is selected, the text entered in [Document Name]
becomes the document name.
Installing and Configuring the PostScript Driver on Macintosh 25
Page 38

NOTE: This setting is available when either [Secure Print] or [Sample Set] is selected for
[Job Type].
[Printer Features] window
This window appears when [Printer Features] is selected in "Switching items
displayed" (P. 20).
Set up the individual features of the printer.
The displayed items vary depending on the options installed on the printer. Make
sure to set these items after configuring [Installable Options].
List of setting items
[Resolution]
Sets the print resolution to [l200dpi] or [600dpi]. [l200dpi] achieves better print
quality than [600dpi], but may take longer to print.
NOTE: On Macintosh OS X, [Resolution] appears when [Feature Sets] is set to [Set 1].
[Tray 1 (MPT) Feed Orientation]
Sets the orientation of the paper when printing from Tray 1 (Bypass). When loading
the paper with one of the short edges facing into Tray 1, select [Portrait]. When
loading the paper with one of the long edges facing into Tray 1, select [Landscape].
If the orientation can only be one way or the other depending on the paper size, the
actual orientation of the paper overrides this setting.
NOTE: On Macintosh OS X, [Tray 1 (MPT) Feed Orientation] appears when [Feature Sets]
is set to [Set 1].
[Collated]
Sets whether or not to collate multiple page documents.
NOTE: On Macintosh OS X, [Collated] appears when [Feature Sets] is set to [Set 1].
[Paper Type]
Sets the paper type to be use when printing. [Printer Default Type] uses the paper
type selected on the printer.
NOTE: On Macintosh OS X, [Paper Type] appears when [Feature Sets] is set to [Set 1].
[Separator Paper Supply]
Sets the paper tray for separators when using the Transparency Separators
feature. Selecting [Auto Paper Select] uses the paper tray selected on the printer.
NOTE: On Macintosh OS X, [Separator Paper Supply] appears when [Feature Sets] is set
to [Set 1].
[Print on Separators]
Sets whether or not to print on separators. Selecting [Off] inserts blank separators.
Selecting [On] prints the same contents printed on transparencies to separators.
NOTE: On Macintosh OS X, [Print on Separators] appears when [Feature Sets] is set to
[Set 1].
26 Installing and Configuring the PostScript Driver on Macintosh
Page 39

[Substitute Tray]
Sets what action to take when the paper of the size you requested is not loaded in
the printer.
Printer Default - Uses the settings configured on the printer.
Display Message - Displays a message on the control panel that prompts you to
load the paper. Your document will not be printed until you load the paper in the
printer.
Use Closest Size (Reduce to Fit) - Uses the paper of the nearest size and prints
the document at 100% magnification or at a reduced magnification if necessary.
Use Closest Size (100%) - Uses the paper of the nearest size and prints the
document at 100% magnification.
Use Larger Size (Reduce to Fit) - Uses the paper of a larger size and prints the
document at 100% magnification or at a reduced magnification if necessary.
Use Larger Size (100%) - Uses the paper of a larger size and prints the document
at 100% magnification.
Select Tray 1 (Bypass) - Feeds the paper from the Tray 1 (Bypass) when it is not
loaded in the paper trays.
NOTE: On Macintosh OS X, [Substitute Tray] appears when [Feature Sets] is set to [Set
1].
[Custom Paper Auto Orientation]
If printing on user-defined paper, enabling this feature corrects the orientation of the
paper. If your document was printed 90 degrees rotated on the paper, select the
check box.
NOTE: On Macintosh OS X, [Custom Paper Auto Orientation] appears when [Feature
Sets] is set to [Set 2].
[Image Enhancement]
Sets whether or not to use the Image Enhancement feature. Enabling this feature
artificially enhances resolution by smoothing out the edges of images. Images
(bitmaps) that consist of rough dots may not be reproduced with smooth gradations.
In such case, leave this check box blank. Enabling or disabling this feature does not
affect print speed.
NOTE: On Macintosh OS X, [Image Enhancement] appears when [Feature Sets] is set to
[Set 2].
[Draft Mode]
Enabling this feature prints with less toner and thus the colors become lighter. Use
this feature to save toner when printing documents that do not require high image
quality.
NOTE: On Macintosh OS X, [Draft Mode] appears when [Feature Sets] is set to [Set 2].
[Skip Blank Pages]
Sets whether or not to skip blank pages during printing.
NOTE: On Macintosh OS X, [Skip Blank Pages] appears when [Feature Sets] is set to [Set
2].
Installing and Configuring the PostScript Driver on Macintosh 27
Page 40

[Halftone Screen Lock]
Sets whether to enable or disable the halftone setting on the printer. Enabling this
feature prioritizes the halftone setting on the printer over the setting specified from
an application.
NOTE: On Macintosh OS X, [Halftone Screen Lock] appears when [Feature Sets] is set to
[Set 2].
[Image Quality]
Sets whether to print in [Standard] or [High Resolution] mode.
NOTE: On Macintosh OS X, [Image Quality] appears when [Feature Sets] is set to [1
Graphics].
[Halftone]
Sets the type of halftone screen to be used when printing.
NOTE: On Macintosh OS X, [Halftone] appears when [Feature Sets] is set to [1 Graphics].
28 Installing and Configuring the PostScript Driver on Macintosh
Page 41

3 Installing and Configuring the
PostScript Driver on Linux
This chapter contains the following information:
• About the Software
– Included Software
– Hardware/Software Requirements
• Installing the Print Driver
– Installation Procedure
• Configuring the Print Driver
– [Device Settings] tab
– [Configuration] tab
– [Advanced] tab
– [Paper/Output] tab
– [Layout] tab
• Using the Online Help
NOTE: This manual uses the operations of Turbolinux 10 F as examples. For other
systems, the displays may be different.
NOTE: This manual uses the operations of ApeosPort-II C4300 as examples. For other
devices, the displays may be different.
Installing and Configuring the PostScript Driver on Linux 29
Page 42

Before Installing the Print Driver
Check the following contents before installing the print driver.
Environments Confirmed for Operation
Environments that are confirmed for the operations of the Linux print driver are as
follows. This print driver uses CUPS (Common UNIX Printing System) as the
printing system.
Distribution and CUPS Version (*1)
• RedHat Enterprise Linux WS Version 4 : CUPS Version 1.1.22rc1
• Turbolinux 10 F.: CUPS Version 1.1.19
• Turbolinux FUJI.: CUPS Version 1.1.23
• SUSE Linux 9.3 Professional : CUPS Version 1.1.23
• SUSE Linux 10.1 : CUPS Version 1.1.23
NOTE: (*1): For details on the newest operating environment, refer to readme.txt.
Hardware Environment
•PC
A personal computer installed with a x86-compatible, 32-bit CPU and operated
by various distributions
• Memory capacity
Compliant with the specifications recommended by the distribution (at least
512MB for Turbolinux, and 256 MB for RedHat Enterprise Linux)
Interface
• Parallel
• USB (*2)
• Ethernet (supported protocol: LPR (TCP/IP))
NOTE: (*2): The USB interface must be equipped as the standard. (However, this does not
include the warranty of all operations of devices supporting USB.)
Checking the Network Environment
Check the following settings before installing the print driver when using the device
in a network environment (LPR protocol) connected by Ethernet:
At the computer At the device
Settings for IP address, and for using TCP/IP
environment are configured.
• The device settings can be checked by printing the Functions Setting List.
• IP address is set
• LPD protocol is enabled (Factory default:
Enable)
• For details on the Functions Setting List, refer to the manual that comes with the
device.
• For details on the way to configure the computer, refer to the manual that comes
with the computer.
30 Installing and Configuring the PostScript Driver on Linux
Page 43

Installing the Print Driver
An installer (RPM package) for this printer is provided for the installation of the
Linux print driver on the computer. You can use this installer to install and upgrade
the print driver.
After installing the print driver, create the print queue.
Downloading the Installer
There are two types of installer (RPM package), as follows. You can download
these files from the Xerox website to your computer.
Installer File Name Remarks
Print driver Xerox-Phaser-5335-x.x-x.noarch.rpm The software of the Linux print driver.
NOTE: X.X-X stands for the version of the installer.
The URL of the Xerox website where you can locate and download the printer driver
follows.
http://www.support.xerox.com
Installing / Upgrading the Print Driver
From the command line of the terminal software, specify the RPM package to install
or upgrade the print driver.
NOTE: The procedure to newly install a print driver is explained here as an example. To
upgrade an installed print driver, replace “-ivh” in the rpm command options with “-Uvh” in
steps 3 and 5.
Activate the terminal, and log in as a super user.
1.
NOTE: Activation method of the terminal varies with the distribution. Refer to the manual of
each distribution.
2.
If necessary, shift the current directory to the directory with the saved RPM
package.
NOTE: When operating on a directory that is different from the directory with the saved
RPM package, specify the path up to the RPM package for steps 3 and 5.
3.
To install the print driver itself, enter the following command (where “x.x-x” is
the installer version).
# rpm -ivh Xerox-Phaser-5335-x.x.x.noarch.rpm
The following screen is displayed and the installation of the print driver itself is
completed.
# rpm -ivh Xerox-Phaser-5335-x.x.x.noarch.rpm
Preparing...###########################[100%]
1:fxlinuxprint###########################[100%]
#
Installing and Configuring the PostScript Driver on Linux 31
Page 44

4. To reload and restart CUPS, enter the following commands.
# /etc/init.d/cups reload
# /etc/init.d/cups restart
NOTE: Depending on the distribution, the reload and restart commands may be
entered as follows. For details, refer to the manual of the various distributions.
# /etc/rc.d/init.d/cups reload
# /etc/rc.d/init.d/cups restart
Next, proceed to "Setting the CUPS Password (For SUSE Only)" (next item) if you
are using SUSE (CUPS Version1.1.23 and later) and to "Creating a Print Queue (P.
33)" for the rest.
Setting the CUPS Password (For SUSE Only)
To use SUSE (CUPS Version1.1.23 and later), execute the following commands on
the terminal hardware and set the CUPS password beforehand.
1. Activate the terminal and log in as a super user.
NOTE: Activation method of the terminal varies with the distribution. Refer to the
manual of each distribution.
2.
Enter the following command.
# lppasswd -g sys -a root
3. Enter the CUPS password.
Enter Password:
Enter Password again:
#exit
exit
Next, proceed to "Creating a Print Queue" (next item).
When requested for a password in step 5 of the following procedure, "Creating
a Print Queue", enter the password configured here.
32 Installing and Configuring the PostScript Driver on Linux
Page 45

Creating a Print Queue
To use the printer in Linux environment, you must create a print queue after
installing the print driver.
NOTE: The following procedure explains how to create a print queue from the CUPS web
management site (http://localhost:631/) using a web browser.
1.
Check that the device is switched on.
When using parallel and USB connection, check also that the computer and the
device is correctly connected by interface cable.
2. Activate a web browser, and enter the following URL at the address column to
access the CUPS web management site.
http://localhost:631/
NOTE: Depending on the distribution used, the screen characters may get garbled.
When it happens, select from the [View] menu, [Encoding] and check the encoding
that is selected. You need to do this when toggling the page.
The CUPS web management site is displayed.
3. Click [Printers] or [Manage Printers].
4. Click [Add Printer].
5. When requested, enter the user name (root) and password (CUPS password
for SUSE) for administrator.
6. Enter the various items for [Name], [Location] and [Description], and click
[Continue].
NOTE: You can enter any thing for [Location] and [Description].
7.
Depending on the connection type, add printer according to one of the
following procedures.
• "LPR Connection (P. 34)"
• "USB or Parallel Connection (P. 34)"
Installing and Configuring the PostScript Driver on Linux 33
Page 46

LPR Connection
1. From the [Device] menu, select [LPD/LPR Host or Printer], and click
[Continue].
2. Enter “lpd://(printer IP address) / (queue name)” at [Device URI], and click
[Continue].
The following graphic illustrates the entry when the printer IP address is
“192.168.1.100” and the queue name, “queue_1”.
NOTE: Enter any name for the queue name.
Select [Xerox] from [Make], and click [Continue].
3.
4. Select the driver to be used from [Model], and click [Continue].
5. Check that the next message is displayed in the following screen.
The print queue is created.
USB or Parallel Connection
1. From the [Device] menu, select [USB Printer #1] or [Parallel Port #1]
according to the connection method, and click [Continue].
34 Installing and Configuring the PostScript Driver on Linux
Page 47

NOTE: When activating a computer that is switched on and connected to the printer
by USB or parallel cable, the printer name is displayed after [USB Printer #1] or
[Parallel Port #1]. Select them.
“1” of “#1” may differ according to the environment used.
2.
Select [Xerox] from [Make], and click [Continue].
3. Select the driver to be used from [Model], and click [Continue].
4. Check that the next message is displayed in the following screen.
The print queue is created.
Installing and Configuring the PostScript Driver on Linux 35
Page 48

Uninstalling the Print Driver
Use the installer (RPM package) explained in the previous section to uninstall a
print driver that has been installed.
After uninstalling the print driver, delete the print queue too.
To Uninstall the Print Driver
Specify the RPM package from the command line of the terminal software to
uninstall.
1. Activate the terminal and log in as super user.
NOTE: Activation method of the terminal varies with the distribution. Refer to the
manual of each distribution.
2.
If necessary, shift the current directory to the directory with the saved RPM
package.
NOTE: When operating on a directory that is different from the directory with the
saved RPM package, specify the path up to the RPM package for steps 3 and 4.
3.
To uninstall the print driver itself, enter the following command (where “x.x.x-x”
is the installer version).
# rpm -e Xerox-Phaser-5335-x.x.x.noarch
The print driver is uninstalled.
Next, proceed to "To Delete the Print Queue" (P. 36).
To Delete the Print Queue
After deleting the print driver, delete also the unnecessary print queue.
NOTE: The following procedure explains how to delete a print queue from the CUPS
web management site (http://localhost:631/) using a web browser.
1.
Activate a web browser, and enter the following URL at the address column to
access the CUPS web management site.
http://localhost:631/
NOTE: Depending on the distribution used, the screen characters may get garbled.
When it happens, select from the [View] menu, [Encoding] and then select the
appropriate encoding. You need to do this when toggling the page.
The CUPS web management site is displayed.
2. Click [Printers] or [Manage Printers].
3. Click [Delete Printer] under the printer (print queue) to be deleted.
4. As a confirmation message is displayed, click [Continue].
5. Check that the next message is displayed in the following screen.
The print queue is deleted.
36 Installing and Configuring the PostScript Driver on Linux
Page 49

Printer Settings
There are two methods to set up the printer:
• from the CUPS Web management site (http://localhost:631/) through a Web
browser
• from the Printer setting screen using the prepared application.
Printer Setting (Setting from the CUPS Web Management Site)
1. Access the CUPS Web Management Site, and click [Printers] or [Manage
Printers].
2. Click [Configure Printer].
3. If you are prompted to enter a username and password, type user name for
administrator name (usually "root") and password (CUPS password in case of
SUSE, and RedHatES4).
4. The Printer setting screen appears. Set up the printer.
Installing and Configuring the PostScript Driver on Linux 37
Page 50

Printer Setting (Setting from Application)
NOTE: For printer setting from application, interfaces may be different depending on
applications. This section describes how to set the printer using "Kwrite" dialog as an
example.
Select [Print] from the [File] menu and open the [Print] dialog.
1.
2. Select CUPS from [Print system currently used:] setting items and click
[Properties].
3. The [Properties] dialog appears. Click the [Driver Settings] tab. The window
displaying the printer settings appears. Set up the printer.
4. If the application has no [Driver Settings] tab, the printer cannot be set up from
the application. In this case, set up the printer from the CUPS Web
management site.
38 Installing and Configuring the PostScript Driver on Linux
Page 51

Printer Driver Setting ltems
This section describes the printer driver setting items.
Printer Driver Setting ltems
The printer driver settings consist of the following groups.
• [Graphics]
• [Extra]
• [General]
•[JCL]
• [Options Installed]
• [Banner]
• [PSBinary Protocol]
[Graphics] Setting
The options are listed in the table below.
Name Control
Halftone Drop-down menu
Image Quality Drop-down menu
[Halftone] Drop-downDrop-down Menu
The options are listed in the table below.
Option Default
Type 1 – Fine Dots
Type 1 – Thick Dots
Type 3 – Fine Dots
Type 3 – Thick Dots
i
[Image Quality] Drop-down Menu
The options are listed in the table below.
Option Default
Standard
High Resolution
i
Installing and Configuring the PostScript Driver on Linux 39
Page 52

[Extra] Setting
The options are listed in the table below.
Name Control
Custom Paper Auto
Orientation
Draft Mode Radio button
Halftone Screen Lock Radio button
Image Enhancement Radio button
Print on Separators Radio button
Resolution Drop-down menu
Separator Paper Supply Drop-down menu
Skip Blank Pages Radio button
Substitute Tray Drop-down menu
Tray 1 (MPT) Feed
Orientation
Radio button
Drop-down menu
[Custom Paper Auto Orientation] Radio Button
The options are listed in the table below.
Option Default
Off
On
i
[Draft Mode] Radio Button
The options are listed in the table below.
Option Default
Off
On
i
[Halftone Screen Lock] Radio Button
The options are listed in the table below.
Option Default
Off
On
i
[Image Enhancement] Radio Button
The options are listed in the table below.
Option Default
Off
On
i
40 Installing and Configuring the PostScript Driver on Linux
Page 53

[Print on Separators] Radio Button
The options are listed in the table below.
Option Default
Blank Separators
Printed Separators
i
[Resolution] Drop-down Menu
The options are listed in the table below.
Option Default
600 dpi
1200 dpi
i
[Separator Paper Supply] Drop-down Menu
The options are listed in the table below.
Option Default
No Separators
Auto Paper Select
Tray 1 (MPT)
Tray 2
Tray 3
i
Tray 4
Tray 5
[Skip Blank Pages] Radio Button
The options are listed in the table below.
Option Default
Off
On
i
Installing and Configuring the PostScript Driver on Linux 41
Page 54

[Substitute Tray] Drop-down Menu
The options are listed in the table below.
Option Default
Printer Default
Display Message
Use Closest Size (Reduce to Fit)
Use Closest Size (100%)
Use Larger Size (Reduce to Fit)
Use Larger Size (100%)
Select Tray 1 (MPT)
i
[Tray 1 (MPT) Feed Orientation] Drop-down Menu
The options are listed in the table below.
Option Default
Landscape
Landscape (Rotated)
Portrait
Portrait (Rotated)
i
[General] Setting
The components of this setting are listed in the table below.
Name Control
2 Sided Print Drop-down menu
Collated Radio button
Media Size Drop-down menu
Paper Tray Drop-down menu
Paper Type Drop-down menu
[2 Sided Print ] Drop-down Menu
The options are listed in the table below.
Option Default
1 Sided Print
2 Sided Print
2 Sided, Flip on Short Edge
i
42 Installing and Configuring the PostScript Driver on Linux
Page 55

[Collated ] Radio Button
The options are listed in the table below.
Option Default
Off
On
i
[Media Size ] Drop-down Menu
The options are listed in the table below.
Option Default
A3 (297x420mm)
B4 (257x364mm)
A4 (210x297mm)
A5 (148x210mm)
B5 (182x257mm)
Letter (8.5x11”) (default)
8.5x13”
Legal (8.5x14”)
Tabloid (11x17”)
Executive (7.25x10.5”)
i
Statement(5.5x8.5”)
No. 10 Envelope
Monarch (3.875x7.5”)
C5 Envelope
DL Envelope
Postcard (100x148mm)
Postcard (148x200mm)
Custom Size
Installing and Configuring the PostScript Driver on Linux 43
Page 56

[Paper Tray ] Drop-down Menu
The options are listed in the table below.
Option Default
Auto Select
Tray 1 (MPT)
Tray 2
Tray 3
Tray 4
Tray 5
i
NOTE: Unlike the Windows driver, there is no constraint with [Auto Select].
[Paper Type ] Drop-down Menu
The options are listed in the table below.
Option Default
Printer Default Type
Plain Paper
Heavyweight1 (106-169 g/m2)
Heavyweight2 (170-216 g/m2)
Transparencies
i
Custom 1
Custom 2
Custom 3
Custom 4
Custom 5
[JCL] Setting
The components of this setting are listed in the table below.
Name Control
Document Name Drop-down menu
Job Type Drop-down menu
Password Drop-down menu
User ID Drop-down menu
44 Installing and Configuring the PostScript Driver on Linux
Page 57

[Document Name] Drop-down menu
The options are listed in the table belowf
Option Default
-
Document 1
Document 2
Document 3
Document 4
Document 5
i
[Job Type] Drop-down Menu
The options are listed in the table below.
Option Default
Normal Print
Secure Print
i
[Password] Drop-down Menu
The options are listed in the table below.
Option Default
-
i
1947
3729
4197
6835
9284
[User ID] Drop-down Menu
The options are listed in the table below.
Option Default
-
User 1
User 2
User 3
User 4
User 5
i
Installing and Configuring the PostScript Driver on Linux 45
Page 58

[Options Installed] Setting
The components of this setting are listed in the table below
Option Default
Duplex Module Radio button
Hard Disk Radio button
Memory Drop-down menu
Paper Tray Configuration Drop-down menu
[Duplex Module] Radio Button
The options are listed in the table below.
Option Default
Not Available
Available
i
NOTE: Unlike the Windows driver and Mac driver, the default is the full configuration.
[Hard Disk] Radio Button
The options are listed in the table below.
Option Default
Not Available
Available
i
NOTE: Unlike the Windows driver and Mac driver, the default is the full configuration.
[Memory] Drop-down Menu
The options are listed in the table below.
Option Default
Standard 64 MB
320 MB
576 MB
i
NOTE: Unlike the Windows driver and Mac driver, the default is the full configuration.
46 Installing and Configuring the PostScript Driver on Linux
Page 59

[Paper Tray Confuguration] Drop-down Menu
The options are listed in the table below.
Option Default
2-Tray
3-Tray
4-Tray
5-Tray
i
NOTE: Unlike the Windows driver and Mac driver, the default is the full configuration.
[Banners] Setting
The components of this setting are listed in the table below
Option Default
Starting Banner Drop-down menu
Ending Banner Drop-down menu
[Starting Banner] Drop-down Menu
The options are listed in the table below.
Option Default
None
Classified
i
Confidential
Secret
Standard
Top Secret
Unclassified
[Ending Banner] Drop-down Menu
The options are listed in the table below.
Option Default
None
Classified
Confidential
Secret
Standard
Top Secret
Unclassified
i
Installing and Configuring the PostScript Driver on Linux 47
Page 60

[PS Binary Protocol] Drop-down Menu
The options are listed in the table below.
Option Default
None
TBCP
i
48 Installing and Configuring the PostScript Driver on Linux
Page 61

Error Message List
When data cannot be sent to the device due to some reasons when printing, use
the [Manage Printers] of the CUPS web management site to check the message
displayed in [Printer Status] of the device.
The following messages are some examples of messages displayed at the
computer. Even if the cause of the error message is the same, the message
displayed may differ according to the connection between the device and the
computer.
Reference: For details on the messages displayed on the device control panel, refer
to the manual that comes with the device.
Installing and Configuring the PostScript Driver on Linux 49
Page 62

Error
Location
Error Status Connection
Error Message
(Messages displayed on Printer State (printer status) of the
CUPS Web Screen (http://localhost:631/printers)
• Power off
• No connection
• Printer is off or
printer is
disconnected
before data is
transferred to the
printer after print
command
• Other errors
(Errors occur while
the printer cannot
accept transferred
data.)
IP (LPR) The following message appears:
(Printer State:) processing, accepting jobs.
"Attempting to connect to host xxx.xxx.xxx.xxx (Printer IP address)
for printer
***(Printer queue name)"
After a while, either of the following message appears:
(Printer State:) processing, accepting jobs.
"Unable to connect to printer; will retry in 30 seconds ... :
Connection timed out”
or
(Printer State:) processing, accepting jobs.
"Network host xxx.xxx.xxx.xxx (Printer IP address) is busy, down
unreachable; will retry in 30 seconds ..."
(It depends on network environment which message appears.)
#This message is displayed until data can be transferred to the
printer.
USB The following message appears, and printer queue stops.
(#This message is displayed until data can be transferred to the
printer.)
(Printer State:) idle, accepting jobs.
"Unable to open USB device ***(USB Device URI): No such
device"
Printer
• Printer is off or
printer is
disconnected
while data is
transferred to the
printer after print
command.
• No paper
• No toner
• Cover open
• Cassette open
• Other errors
(Errors occur while
the printer cannot
accept transferred
data.)
Parallel The following message appears.
(#This message is displayed until data can be transferred to the
printer.)
(Printer State:) processing, accepting jobs.
"processing, accepting jobs."
IP (LPR) The following message appears.
(#This message is displayed until data can be transferred to the
printer.)
(Printer State:) processing, accepting jobs.
"Spooling LPR job, xx% complete ...".
USB The following message appears, and printer queue stops.
(#This message is displayed until data can be transferred to the
printer.)
(Printer State:) idle, accepting jobs.
"Unable to open USB device ***(USB Device URI): No such
device"
Parallel The following message appears.
(#This message is displayed until data can be transferred to the
printer.)
(Printer State:) processing, accepting jobs.
"processing, accepting jobs."
IP (LPR)
USB
Parallel
Data is transferred to the printer, and PC completes print job
properly.
(No error message appears.)
50 Installing and Configuring the PostScript Driver on Linux
Page 63

4 Using PCL Emulation
This chapter explains the PCL emulation of the printer.
About PCL Emulation
Print data is data written based on certain rules (grammars). These rules
(grammars) are called "print languages".
The printer supports two types of print languages: page description language and
emulation. Page description language is a language that describes images on a
page basis. Emulation is the ability of this printer to imitate print results of other
printers.
Emulation Mode
When printing data written in a language other than the page description languages
supported by the printer, switch the printer to an emulation mode. The printer has multiple
emulation modes and PCL is one of them. In the PCL emulation mode, the printer emulates
the following printer.
Emulation Mode Emulated Printer
PCL emulation mode (PCL mode) HP-CLJ4600
Host Interfaces and Emulation
Each host interface supports different print languages. The following host interfaces support
PCL emulation:
• Parallel port
• LPD port
• NetWare port
•SMB port
• IPP port
• USB port
• Port9100 port
NOTE: To use a NetWare, SMB, or IPP port, the network expansion card (optional) must
be installed.
Switching Print Languages
The machine supports multiple emulation modes and can switch between multiple
print languages.
There are three methods of switching print languages.
Using PCL Emulation 51
Page 64

Switching Languages by Commands
If the printer receives a command that explicitly tells which language to use, the
printer switches to that language.
Switching Languages Automatically
The printer examines data received by its host interface and automatically
determines and switches to the appropriate language.
Switching Languages by Interface
The printer can be programmed to switch to a particular language for a particular
host interface. This can be done by setting a language for each interface on the
control panel.
Mode Menu Screen
The menu items for the emulation modes can be accessed from the mode menus.
To access the mode menu for the PCL emulation mode, press the <Menu> button
and select [Print Language] > [PCL]. The following is the first screen of the PCL
mode menu.
Reference: For more information about the setting items of the PCL mode menu,
refer to "5 Setting the PCL Mode" (P. 55).
About Fonts
This section explains the fonts that can be used in the PCL emulation mode.
Supported Fonts
The following fonts can be used in the PCL emulation mode.
NOTE: The PCL 5 fonts can be used also by downloading it on the hard disk (optional).
The supported fonts and their print samples can be viewed on the [PCL Font List]. For
information about the PCL 5 fonts, refer to the section [PCL Font List] in the User Guide.
52 Using PCL Emulation
Page 65

Outline Fonts
•CG Times
• CG Times Italic
• CG Times Bold
• CG Times Bold Italic
• Univers Medium
• Univers Medium Italic
•Univers Bold
• Univers Bold Italic
• Univers Medium Condensed
• Univers Medium Condensed Italic
• Univers Condensed Bold
• Univers Condensed Bold Italic
• Antiq Olive
• Antiq Olive Italic
• Antiq Olive Bold
• CG Omega
• CG Omega Italic
• CG Omega Bold
• CG Omega Bold Italic
• Garamond Antiqua
• Garamond Kursiv
• Garamond Halbfett
• Garamond Kursiv Halbfett
• Courier
• Courier Italic
• Courier Bold
• Courier Bold Italic
• CourierPS Oblique
• CourierPS Bold
• CourierPS Bold Oblique
• SymbolPS
• Palatino Roman
• Palatino Italic
• Palatino Bold
• Palatino Bold Italic
• ITC Bookman Light
• ITC Bookman Light Italic
• ITC Bookman DemiBold
• ITC Bookman DemiBold Italic
• Helvetica Narrow
• Letter Gothic
• Leter Gothic Italic
• Letter Gothic Bold
• Albertus Medium
• Albertus Extra Bold
• Clarendon Condensed Bold
• Coronet
•Marigold
•Arial
• Arial Italic
•Arial Bold
• Arial Bold Italic
• Times New Roman
• Times New Roman Italic
• Times New Roman Bold
• Times New Roman Bold Italic
• Symbol
• Wingdings
• Times Roman
• Times Italic
• Times Bold
• Times Bold Italic
• Helvetica
• Helvetica Oblique
• Helvetica Bold
• Helvetica Bold Oblique
• CourierPS
• Helvetica Narrow Oblique
• Helvetica Narrow Bold
• Helvetica Narrow Bold Oblique
• New Century Schoolbook Roman
• New Century Schoolbook Italic
• New Century Schoolbook Bold
• New Century Schoolbook Bold Italic
• ITC Avant Garde Book
• ITC Avant Garde Book Oblique
• ITC Avant Garde DemiBold
• ITC Avant Garde DemiBold Oblique
• ZapfChancery Medium Italic
• ZapfDingbats
Bitmap Font
• LinePrinter
Using PCL Emulation 53
Page 66

Paper Eject Function
The section explains the paper eject function of the printer.
Forcibly Ejecting the Remaining Data
In the PCL emulation mode, the printer does not eject a job unless it receives a full
page worth of data. When the host interface is Parallel or USB, and if only a portion
of a page is received, the printer does not eject the page. The printer waits for the
data and shows [Data Wait] on the display until the time set under [Time-out]
elapses.
In such situation, you can forcibly print the page without waiting for the time-out
period to elapse.
Use the following steps when forcibly ejecting the data remained in the printer.
NOTE: If you send a job to the printer while the display says [Data Wait], the job may not
be printed successfully.
Send a job to the printer after forcibly ejecting the current job or after the time-out period
has elapsed.
Reference: For information about the [Time-out] feature, refer to the ‘User Guide’.
1. Press the <OK/Eject> button when the
display is in the state shown on the right.
<OK/Eject> button
The printing starts.
When the printing is finished, the display
reads [Ready to print].
Important: When [Print Mode] (common menu) is set to [Auto], you cannot force-eject a
job since the display does not show [Data Wait].
54 Using PCL Emulation
Page 67

5 Setting the PCL Mode
This chapter explains the PCL Mode settings of the printer.
Control Panel Menus
There are two types of control panel menus: the mode menus and common menus.
The mode menus are the menus that relate to the emulation modes. The common
menu are the menus for all the other features of the printer.
Common Menus Mode Menus
Press the <Menu> button
ESC/P
extension
menu items
PCL
extension
menu items
PostScript
extension
menu items
Common Menu Item Related to the PCL Mode
The common menu item that relates to the PCL emulation mode is as follows:
Reference: For more information about the common menu items, refer to the ‘User
Guide’.
Network / Port
To display this item, select [Admin Menu] > [Network / Port].
This item allows you to set the ports to be used in the PCL emulation mode.
• Port Status (Parallel/LPD/NetWare/SMB/IPP/USB/Port9100)
Enables the ports to be used in the PCL emulation mode. By default, all ports are
set to [Enable].
• Print Mode (Parallel/LPD/NetWare/SMB/IPP/USB/Port9100)
Sets the print mode of each port to [PCL] or [Auto]. By default, all ports are set to
[Auto].
NOTE: [Print Mode] allows you to set the method of processing data received from host
interfaces. If you set this to [PCL], the printer will not auto-switch languages as described
in "Switching Languages Automatically" (P. 52).
Setting the PCL Mode 55
Page 68

PCL Mode Menu
The PCL mode menu allows you to configure the PCL emulation mode.
The settings of the PCL mode menu can be modified even when the printer is
printing. The changes you made, however, will be applied not to the job being
printed, but from a job after it.
The mode menu is organized into the following structure.
mode menu > items > optional values
NOTE: Some "items" may be divided into item 1, item 2, item 3....
(They will be simply referred to as “items” unless otherwise noted.)
PCL Paper Tray Auto
Tray 1
Tray 2
Output Size A4
A3
A5
Orientation Portrait
Landscape
Mode Menu Items Optional Values
The above is a portion of the hierarchical structure of the PCL mode menu.
Reference: For information about the setting items of the PCL mode menu, refer to "
Setting the PCL Mode Menu" (P. 57).
56 Setting the PCL Mode
Page 69

Setting the PCL Mode Menu
This section explains the items in the PCL mode menu and how to configure them.
PCL Mode Menu Items
The items that can be set in the PCL mode menu are as follows:
Paper Tray
Sets the paper tray to be used when printing.
The following options are available:
[Auto] (default)
When [Auto] is selected, the printer searches for the paper tray that contains the
paper that matches the [Output Size] setting and automatically feeds paper from
that paper tray.
[Tray 1] (Bypass Tray)
[Tray 2] (default)
[Tray 3]
[Tray 4]
[Tray 5]
NOTE: When [Auto] is selected, and if the paper of the same size is loaded in more than
one paper tray, the printer selects a tray based on the tray priority setting of a common
menu.
[Tray 3] - [Tray 5] are displayed only if the 550 sheet feeders (optional) are installed.
Output Size
Sets the size of the paper to be used when printing.
The following options are available:
[A4] (default)
[A3], [A5], [B4], [B5]
[8.5 x 11], [8.5 x 13], [8.5 x 14], [11 x 17], [5.5 x 8.5], [7.25 x 10.5]
[Env 3.9 x 7.5], [Env 4.1 x 9.5], [Env 110 x 220mm], [Env 162 x 229mm]
[100 x 148mm], [148 x 200 mm], [Env 120 x 235 mm], [Env 105 x 235 mm]
[Custom]
When [Custom] is selected, set the print orientation to [Portrait (Y)] or [Landscape
(X)].
Orientation
Sets the print orientation to [Portrait] (default) or [Landscape].
2 Sided
Sets whether or not to print 2 sided by selecting [On] or [Off] (default).
When [On] is selected, set the binding orientation to [Flip Long Edge] (default) or
[Flip Short Edge].
NOTE: This item appears only when the duplex unit (optional) is installed.
Font
Sets the font to be used when printing. The default is [Courier].
Setting the PCL Mode 57
Page 70

Symbol Set
Sets the font for symbols. The default is [ROMAN-8].
Font Size
Sets the font size within the range of 4.00 to 50.00 pt in increments of 0.25 pt. The
default is [12.00].
Font Pitch
Sets the font pitch (number of characters per inch) within the range of 6.00 to 24.00
cpi in increments of 0.01 cpi. The default is [10.00].
Form Line
Sets the form line (number of lines within one form) within the range of 5 to 128 lines
in increments of 1. The default is [64].
Quantity
Sets the number of copies to be printed within the range of 1 to 999. The default is
[1 Set(s)].
Image Enhance
Image Enhance is a feature that artificially increases resolution by smoothing out
transitions between black and white and reducing jagged appearance. Set whether
or not to enable Image Enhance by selecting [On] (default) or [Off].
HexDump
HexDump is a feature that prints the contents of data in ASCII codes (hexadecimal
format). Set whether or not to enable HexDump by selecting [Enable] or [Disable]
(default).
Draft Mode
Enabling Draft Mode uses less toner when printing. This mode increases print
speed but decreases print quality. Set whether or not to enable Draft Mode by
selecting [Enable] or [Disable] (default).
Line Termination
Sets the line termination control codes. Set how you want the printer to interpret
CR, LF and FF control codes. The optional values and their interpretations are as
follows:
Optional
Values
Off (default) CR LF FF
Add-LF CR + LF LF FF
Add-CR CR CR + LF CR + FF
CR
InterpretationLFInterpretation
FF
Interpretation
CR-XX CR + LF CR + LF CR + FF
58 Setting the PCL Mode
Page 71

Setting the PCL Mode Menu
The following example shows how to set the paper size of the PCL emulation mode
to [B5].
Ready to print
1. Press the <Menu> button.
Menu
Print Language
Print Language
ESC/P
Print Language
PCL
PCL
Paper Tray
2. Press the < > button.
3. Press the < > or < > button a few times.
4. Press the < > button.
PCL
Output Size
Output Size
Output Size
Output Size
Ready to print
5. Press the < > or < > button a few times.
6. Press the < > button.
A4 *
7. Press the < > or < > button a few times.
B5
8. Press the <OK/Eject> button.
B5 *
9. Press the <Menu> button.
Setting the PCL Mode 59
Page 72

PCL Mode Reports/Lists
This section explains the reports/lists that relate to the PCL emulation mode.
NOTE: Refer to the ‘User Guide‘ for information about other reports/lists.
Printer Settings
Lists the settings configured on the control panel, including the PCL settings.
To print this report/list, select [Report/List] > [Printer Settings] on the control panel.
PCL Font List
Lists the fonts that can be used in the PCL emulation mode and their print samples.
To print this report/list, select [Report/List] > [PCL Font List] on the control panel.
PCL Macro List
Lists the PCL macros downloaded on the printer's hard disk (optional). It shows the
macro name, macro ID, and the number of bytes of each macro.
To print this report/list, select [Report/List] > [PCL Macro List] on the control panel.
60 Setting the PCL Mode
Page 73

Mode Menu (PCL)
)
Ready to print
<Menu> button
Optional
Default (bold frame
Tray 1 is the Bypass Tray
<OK/Eject>
<OK/Eject>
4.00 - 50.00 Unit: 0.25
6.00 - 24.00 Unit: 0.01
5-128 Unit: 1
1-999 sets Unit: 1 set
Page 74

Page 75

6 Using ESC/P Emulation
About ESC/P Emulation
This chapter explains the ESC/P emulation of the printer.
Print data is data written based on certain rules (grammars). These rules
(grammars) are called "print languages".
The printer supports two types of print languages: page description language and
emulation. Page description language is a language that describes images on a
page basis. Emulation is the ability of this printer to imitate print results of other
printers.
Emulation Mode
To print data written in a language other than the page description languages
supported by the printer, switch the printer to an emulation mode. The printer has
multiple emulation modes and ESC/P is one of them. In the ESC/P emulation mode,
the printer emulates the following printer.
Emulation Mode Emulated Printer
ESC/P emulation mode (ESC/P mode) VP-1000
Host Interfaces and Emulation
Each host interface supports different print languages. The following host interfaces
support ESC/P emulation:
• Parallel port
• LPD port
• NetWare port
•SMB port
• IPP port
• USB port
• Port9100 port
NOTE: To use a NetWare, SMB, or IPP port, the network expansion card (optional) must
be installed.
Using ESC/P Emulation 63
Page 76

Switching Print Languages
The printer supports multiple emulation modes and can switch between multiple
print languages.
There are three methods of switching print languages.
Switching Languages by Commands
If the printer receives a command that explicitly tells which language to use, the
printer switches to that language.
Switching Languages Automatically
The printer examines data received by its host interface and automatically
determines and switches to the appropriate language.
Switching Languages by Interface
The printer can be programmed to switch to a particular language for a particular
host interface. This can be done by setting a language for each interface on the
control panel.
Mode Menu Screen
The menu items for the emulation modes can be accessed from the mode menus.
To access the mode menu for the ESC/P emulation mode, press the <Menu>
button and select [Print Language] > [ESC/P]. The following is the first screen of the
ESC/P mode menu.
Reference: For information about the setting items of the ESC/P mode menu, refer to "7
Setting the ESC/P Mode" (P. 69).
64 Using ESC/P Emulation
Page 77

About Fonts
This section explains the fonts that can be used in the ESC/P emulation mode.
Supported Fonts
The following outline fonts can be used in the ESC/P emulation mode.
NOTE: The supported fonts and their print samples can be viewed on the [Font List]. For
information about supported fonts, refer to the [Font List] section in the User Guide.
Western Fonts
• Roman
• Sans Serif
•OCR-B
User-Defined Characters (External Characters)
The ESC/P emulation mode allows you to use user-defined characters (external
characters).
User-defined characters are stored in the memory (if the optional hard disk is not
installed) and are erased when the printer is switched off.
If the hard disk is installed, user-defined characters are stored in the hard disk and
are retained even when the printer is switched off.
User-defined characters are stored as bitmap fonts and cannot be shared among
different print languages.
Font Cache
Outline fonts of up to a certain size can be cached to improve print speed. When
printing outline fonts, the printer converts them into bitmap fonts. This process can
be eliminated by storing converted bitmap fonts into the memory. This is called “font
caching”.
The stored bitmap fonts are erased if you switch the printer off or initialize the
system.
Using ESC/P Emulation 65
Page 78

Paper Eject Function
This section explains the paper eject function of the printer.
Forcibly Ejecting the Remaining Data
In the ESC/P emulation mode, the printer does not eject a job unless it receives a
full page worth of data. When the host interface is Parallel or USB, and if only a
portion of a page is received, the printer does not eject the page. The printer waits
for the data and shows [Data Wait] on the display until the time set under [Time-out]
elapses.
In such situation, you can forcibly print the page without waiting for the time-out
period to elapse.
Use the following steps when forcibly ejecting the data remained in the printer.
NOTE: If you send a job to the printer while the display says [Data Wait], the job may not
be printed successfully.
Send a job to the printer after forcibly ejecting the current job or after the time-out period
has elapsed.
Reference: For information about the [Time-out] feature, refer to the ‘User Guide’.
1. Press the <OK/Eject> button when the
display is in the state shown on the right.
<OK/Eject/> button
The printing starts.
When the printing is finished, the display
reads [Ready to print].
Important: When [Print Mode] (common menu) is set to [Auto], you cannot force-eject a
job since the display does not show [Data Wait].
66 Using ESC/P Emulation
Page 79

Print Features in the ESC/P Mode
The following print features can be used in the ESC/P emulation mode.
Multiple Up (ESC/P)
Multiple Up is a feature that prints multiple pages onto one sheet of paper.
In the ESC/P emulation mode, you can perform 2-up printing.
Form Overlay
Form Overlay is a feature that allows you to store forms in the printer and merge
them with print data when printing. When using this feature, select a form you want
to use on the control panel.
Barcode (ESC/P)
The ESC/P emulation mode allows you to use barcodes. The following barcode
standards are supported:
•OCR-B
About Forms
• JAN code
• CODE39
• NW7 (CODABAR)
• Industrial 2 of 5
• ITF (Interleaved 2 of 5)
•CODE128
• Customer barcode
• QR code
The following number of forms can be registered in the ESC/P emulation mode.
ESC/P
Hard disk installed 64
Hard disk not installed 64
NOTE: If you attempt to register a form when the printer already has the maximum number
of forms, or when the memory is not sufficient to store the form, the printer does not
register the form without showing any error.
Whether forms have been registered successfully can be checked by printing out the [User
Defined List]. For information about the [User Defined List], refer to the [User Defined List]
section in the User Guide.
Using ESC/P Emulation 67
Page 80

68 Using ESC/P Emulation
Page 81

7 Setting the ESC/P Mode
Control Panel Menus
There are two types of control panel menus: the mode menus and common menus.
The mode menus are the menus that relate to the emulation modes. The common
menus are the menus for all the other features of the printer.
Common Menus Mode Menus
Press the <Menu> button
ESC/P
extension
menu items
PCL
extension
menu items
PostScript
extension
menu items
Common Menu Items for the ESC/P Mode
The common menu items that relate to the ESC/P emulation mode are as follows:
Reference: For more information about the common menu items, refer to the 'User
Guide'.
Network / Port
To display this item, select [Admin Menu] > [Network / Port].
This item allows you to set the ports to be used in the ESC/P emulation mode.
• Port Status (Parallel/LPD/NetWare/SMB/IPP/USB/Port9100)
Enables the ports to be used in the ESC/P emulation mode. By default, all ports
are set to [Enable].
• Print Mode (Parallel/LPD/NetWare/SMB/IPP/USB/Port9100)
Sets the print mode of each port to [ESC/P] or [HexDump]. By default, all ports
are set to [Auto].
NOTE: [Print Mode] allows you to set the method of processing data received from host
interfaces. If you set this to [ESC/P], the printer will not auto-switch languages.
Setting the ESC/P Mode 69
Page 82

Delete Form
To display this item, select [Admin Menu] > [Init/Del Data] > [Delete Form].
This item allows you to delete ESC/P forms registered in the printer. If there is no
form registered in the printer, [Not registered] appears instead of [Delete Form].
• Delete ESCP Form
Deletes ESC/P forms registered in the printer.
ESC/P Mode Menu
The ESC/P mode menu allows you to configure the ESC/P emulation mode.
The settings of the ESC/P mode menu can be modified even when the printer is
printing. The changes you made, however, will be applied not to the job being
printed, but from a job after it.
The mode menu is organized into the following structure:
mode menu > menu items > items > optional values
NOTE: Some "menu items" do not have items.
Some "items" may be divided into item 1, item 2, item 3...
(They will be simply referred to as "items" unless otherwise noted.)
ESC/P Features Menu Paper Tray Auto
Tray 1
Tray 2
Output Size A4
A3
A5
Document Size Portrait
Landscape
A4 Portrait
Stored Prog.Menu At startup Factory Defaults
No.01 - 05
Retrieve Factory Defaults
No.01 - 05
Mode Menu Menu Items Items Optional Values
The above is a portion of the hierarchical structure of the ESC/P mode menu.
Reference: For information about the setting items of the ESC/P mode menu, refer to
"Setting the ESC/P Mode Menu" (P. 71).
70 Setting the ESC/P Mode
Page 83

Setting the ESC/P Mode Menu
This section explains the items in the ESC/P mode menu and how to configure
them.
ESC/P Mode Menu Items
The items that can be set in the ESC/P mode menu are as follows:
Features Menu
Paper Tray
Sets the paper tray to be used when printing.
The following options are available:
[Tray 1] (Bypass Tray)
[Tray 2] (default)
[Tray 3]
[Tray 4]
[Tray 5]
[Auto]
When [Auto] is selected, the printer searches for the paper tray that contains the
paper that matches the [Output Size] setting and automatically feeds paper from
that paper tray.
NOTE: [Tray 2] - [Tray 5] display the size of the paper loaded in each tray next to the tray
names.
When [Auto] is selected, and if the paper of the same size is loaded in more than one
paper tray, the printer selects a paper tray based on the tray priority setting of a common
menu.
[Tray 3] - [Tray 5] are displayed only if the 550 sheet feeders (optional) are installed.
Output Size
Sets the size of the paper to be used when printing. This can be set only when
[Paper Tray] is set to [Auto] or [Tray 1] (Bypass Tray). Only the sizes for cut sheets
can be selected.
The following options are available:
[A4] (default)
[A3]
[A5]
[B4]
[B5]
[11 x 17]
[8.5 x 13] (Available only when [Paper Tray] is set to [Tray 1] (Bypass Tray))
[8.5 x 14]
[8.5 x 11]
[100 x 148mm] (Available only when [Paper Tray] is set to [Tray 1] (Bypass Tray))
Setting the ESC/P Mode 71
Page 84

NOTE: When [Zoom Mode] is set to [Fixed %] or [Whole Output Size], the printer
automatically determines the zoom ratio based on the [Document Size] and [Output Size]
settings.
When [2 Pages Up] is enabled, the zoom ratio will be 1/2 of the zoom ratio determined
from [Document Size] and [Output Size].
[Output Size] cannot be set when [Paper Tray] is set to [Tray 1], [Tray 2], [Tray 3], or [Tray
4]. In such case, [Output Size] displays the paper size set for the selected paper tray.
Document Size
Sets the size and orientation of the document to be printed.
The following options are available:
[Portrait] (default)
[Landscape]
[A4 Portrait], [A4 Landscape], [A3 Portrait], [A3 Landscape], [A5 Portrait], [A5
Landscape], [B4 Portrait], [B4 Landscape], [B5 Portrait], [B5 Landscape],
[100 x 148mm P], [100 x 148mm L]
[11x17 Portrait], [11x17 Landscape]
[8.5x14 Portrait], [8.5x14 Landscape]
[8.5x13 Portrait], [8.5x13 Landscape]
[8.5x11 Portrait], [8.5x11 Landscape]
[R15x12 Landscape] (continuous form paper: 15 x 12; 136 columns/72 rows)
[R15x11 Landscape] (continuous form paper: 15 x 11; 136 columns/66 rows)
[R10x12 Portrait] (continuous form paper: 10 x 12; 80 columns/72 rows)
[R10x11 Portrait] (continuous form paper: 10 x 11; 80 columns/66 rows)
NOTE: When [Zoom Mode] is set to [Fixed %] or [Whole Output Size], the printer
automatically determines the zoom ratio based on the [Document Size] and [Output Size]
settings.
When [2 Pages Up] is enabled, the zoom ratio will be 1/2 of the zoom ratio determined
from [Document Size] and [Output Size].
The paper orientation you select here is that of the document to be printed. The orientation
will not affect the orientation of the paper in the selected paper tray.
When [Portrait] or [Landscape] is selected, [Document Size] will be the size selected for
[Output Size].
Quantity
Sets the number of copies to be printed within the range of 1 (default) to 250.
72 Setting the ESC/P Mode
Page 85

NOTE: If the printer receives a job that specifies print quantity, that quantity will be applied
to the job instead of the quantity set here. After the job is printed, the quantity set on the
control panel also changes to the quantity specified by the job. However, if the job is
requested through a NetWare or LPD port, the quantity on the control panel does not
change to the quantity specified by the job.
Holding down the < > or < > button scrolls through the options in a circular fashion.
Simultaneously pressing the < > and < > buttons displays the default value.
Zoom Mode
Fixed % (default)
Automatically reduces or enlarges the document based on [Document Size] and
[Output Size] so that the printable area of [Document Size] fits into that of [Output
Size]. If the sizes specified for [Document Size] and [Output Size] are the same, the
document will be printed at 100% zoom ratio. When [2 Pages Up] is enabled, two
pages will be printed onto the printable area of one page.
Variable %
Allows you to set the desired zoom ratio. You can set different zoom ratios for X and
Y directions within the range of 45 to 210% in increments of 1%. The default is
[P 100% L 100%].
Whole Output Size
Automatically calculates the zoom ratio based on [Document Size] and [Output
Size] and prints the document so that the physical size of [Document Size] fits into
the printable area of [Output Size].
NOTE: When continuous-form paper is selected for [Document Size], [Fixed %] and
[Whole Output Size] derive the same print result.
Use the < > or < > button when entering the value for [Variable %].
Holding down the < > or < > button scrolls through the options in a circular fashion.
Simultaneously pressing the < > and < > buttons displays the default value.
2 Sided Print
Sets whether or not to print 2 sided.
The following options are available:
[1 Sided] (default)
Prints only on one side of paper.
[Head to Head]
Prints on both sides of paper. This prints the reverse side of paper so that the
finished document opens like a book.
[Head to Toe]
Prints on both side of paper. This prints the reverse side of paper so that the
finished document opens like a calendar.
2 Pages Up
This feature prints two pages of data onto one page. Two pages can be printed side
by side or one on top of the other.
The following options are available:
[1 Page Up] (default)
Does not perform 2 Pages Up.
Setting the ESC/P Mode 73
Page 86

[Left -> Right]
Performs 2 Pages Up. This prints the first page of your document on the left or top
half of a page.
[Right -> Left]
Performs 2 Pages Up. This prints the first page of your document on the right or
bottom half of a page.
Important: When the orientation of [Document Size] is set to landscape, [Left -> Right]
and [Right -> Left] derive the same print result.
Tray1-Wait User
This feature allows you to request bypass printing and manually start printing by
pressing the <OK/Eject> button on the control panel. Set whether or not to enable
this feature by selecting [On] or [Off] (default).
Font
Alphanumeric
Sets the font for single-byte characters (ANK) to [Roman] (default) or [Sans Serif].
NOTE: This setting is not affected by extension commands sent from users.
Reference: "About Fonts" (P. 65)
Page Position
Sets the paper position by enabling or disabling the cut sheet feeder setting.
The following options are available:
[CSF Off] (default)
Disables the cut sheet feeder setting.
[CSF On]
Enables the cut sheet feeder setting.
Adjust Position
This feature allows you to adjust the printable area in vertical or horizontal direction
and move the margins.
Up/Down Adj
Adjusts the position of the printable area in vertical direction. The position can be
adjusted within the range of -250 to 250 mm in increments of 1 mm. The default is
[0mm].
If entering the value in inches, enter it within -9.8 to 9.8" in increments of 0.1". The
default is [0.0"].
Left/Right Adj
Adjusts the position of the printable area in horizontal direction. The position can be
adjusted within the range of -250 to 250 mm in increments of 1 mm. The default is
[0mm].
If entering the value in inches, enter it within -9.8 to 9.8" in increments of 0.1". The
default is [0.0"].
74 Setting the ESC/P Mode
Page 87

NOTE: The part of data that falls outside the printable area will not be printed even if you
adjust the position of the printable area. Also, the part of data that falls outside the printable
area due to the adjustment of the printable area will not be printed.
Holding down the < > or < > button scrolls through the options in a circular fashion.
Simultaneously pressing the < > and < > buttons displays the default value.
Ruled Line
Sets the method for printing double-byte ruled lines.
The following options are available:
[Image] (default)
Prints double-byte ruled lines as images. This eliminates misalignment between
ruled lines and images.
[Font]
Prints double-byte ruled lines using built-in fonts. This gives a uniform appearance
to ruled lines and texts.
Print Control
Skip Blank Pages
Sets whether or not to skip blank pages during printing.
The following options are available:
[On] (default)
Skips blank pages.
[Off]
Does not skip blank pages.
NOTE: Pages that only contain white images or spaces entered with external characters
will be printed as blank pages even when [Skip Blank Pages] is set to [On].
When [On] is selected, and if [2 Sided Print] or [2 Pages Up] is enabled, blank pages will
be skipped during printing.
Image Enhance
Image Enhance is a feature that artificially enhances resolution by smoothing out
transitions between black and white and reducing jagged appearance. Set whether
or not to enable Image Enhance by selecting [On] (default) or [Off].
Character Range
Sets whether or not to extend the position of the right margin.
The following options are available:
[Normal] (default)
Sets the right margin at column 136 at 10 cpi.
[Extended]
Depending on the zoom ratio setting, this extends the position of the right margin
when there is enough space to the right of column 136 at 10 cpi and prints also in
that extended area.
Setting the ESC/P Mode 75
Page 88

NOTE: When [Character Range] is changed from [Extended] to [Normal], the left and right
margins will be reset to the defaults.
When the right margin is set by a command, the position specified by the command will be
the right edge.
Character Mode
Character Mode is a feature that sends printer control commands in characters
instead of in hexadecimal numbers. When sending printer control commands from
an IBM host computer through a computer that supports Character Mode, set the
start character string to "&$%&" or "$?!#".
The following options are available:
[Off] (default)
Disables Character Mode.
["&$%&" Entry]
Uses "&$%&" as the start character string.
["$?!#" Entry]
Uses “$?!#" as the start character string.
ESC/P Switch
NOTE: The values for [Text], [Minimum Text], [Char. Code Table], [Page Length], and [1
inch Skip] are not affected by extension commands sent from users.
Text
Sets the print quality mode to [High Quality] (default) or [Draft].
NOTE: This only changes the status of the setting and not the actual print quality.
This setting is affected by “Text” commands sent from users.
Minimum Text
Sets whether or not to reduce the size of single-byte characters when printing.
The following options are available:
[Off] (default)
Prints single-byte characters without reducing their sizes.
[On]
Prints single-byte characters in reduced sizes.
Char. Code Table
If the Chinese font kit is installed, select the type of character code table for singlebyte characters. The options are [Graphics] (default) and [Slant].
Page Length
Sets the length of one page (printable area) to [11 Inches] (default) or [12 Inches].
76 Setting the ESC/P Mode
Page 89

1 inch Skip
Sets whether or not to leave 1-inch space between pages.
The following options are available:
[Off] (default)
Does not leave 1-inch space between pages.
[On]
Leaves 1-inch space between pages. The printer skips a space between cut sheets
as it skips over the perforation on continuous-form paper.
NOTE: This feature is available when [Page Position] is set to [CSF Off].
Feed Position
Sets the position where printing starts by the length from the top edge of paper. The
options are [8.5 mm] (default) and [22 mm]. If setting this value in inches, select
[0.3"] (default) or [0.9"].
CR Functions
Sets how to handle CR command.
The following options are available:
[CR] (default)
Performs a carriage return only.
[CR/LF]
Performs a carriage return and then a line-feed.
0 Style
Sets the character style of "0" (zero).
The following options are available:
[0] (default)
Uses "0" without a slash (normal style zero).
[]
Uses "0" with a slash through it.
Specify Extension
Sets whether or not to enable the extension specified by selecting [Enable] or
[Disable] (default). When the extension is enabled, printing can be controlled using
text codes.
NOTE: An extended command is prefixed with an extender followed by command
identification data and parameter data (if necessary). An extension is the first 2 bytes of an
extended command (ESC (1BH in hexadecimal) followed by a ";" (semicolon or 3 BH in
hexadecimal)).
Extension
Sets the extension (first 2 bytes) of an extended command if you want to enable
printing by text codes. The codes between 0x21 and 0x7d are valid. The default is
[&%].
Setting the ESC/P Mode 77
Page 90

NOTE: An extended command is prefixed with an extender followed by command
identification data and parameter data (if necessary). An extension is the first 2 bytes of an
extended command (ESC (1BH in hexadecimal) followed by a ";" (semicolon or 3 BH in
hexadecimal)).
Form Overlay
Performs Form Overlay if you select a form registered in the ESC/P mode (No. 01 - 64). The
default is [Off].
NOTE: This setting is not affected by extension commands sent from users.
If you delete a form after selecting it, it still appears on the menu, but disappears, if you
switch the screens using < > or < >. If you delete the form, this setting changes to [Off].
If you select this feature when there is no form registered in the printer, the display shows
[Not registered].
Stored Prog. Menu
This menu allows you to store the settings in the NV memory (No. 01 - 05) and recall
them whenever you want.
At startup
The [At startup] memory is NV memory (No. 01 to 05) stored under [Store] and
recalled when the power is switched off or when the system is initialized.
Enter the number of NV memory you want to recall.
The default is [Factory Defaults], which recalls the factory default settings.
Retrieve
Recalls and retrieves the settings stored in the printer.
Enter the number of memory you want to recall.
The default is [Factory Defaults], which recalls the factory default settings.
Store
There are two types of memory: ROM that stores the factory default settings and
NV memory (No. 01 to 05) that stores the user-defined settings.
The NV memory (No. 01 to 05) allows you to store the settings of mode menus in
groups.
By storing the settings, you can easily recall them and do not need to enter them
every time you switch on the printer.
The stored settings will be retained until you initialize the NV memory or delete the
settings.
Delete
Deletes the settings stored in the NV memory.
Set the number of memory to be deleted.
NOTE: When no setting is stored in the NV memory, [No.01] - [No.05] do not appear on the
display, and [Not registered] appears instead.
78 Setting the ESC/P Mode
Page 91

Settings the ESC/P Mode Menu
The following example shows how to set the document size of the ESC/P mode to
[A3 Portrait].
Ready to print
1. Press the <Menu> button.
Menu
Print Language
2. Press the < > button.
Print Language
ESC/P
3. Press the < > button.
ESC/P
Features Menu
4. Press the < > button.
Features Menu
Paper Tray
5. Press the < > or < > button a few times.
Features Menu
Document Size
6. Press the < > button.
Document Size
Portrait *
7. Press the < > or < > button a few times.
Document Size
A3 Portrait
8. Press the <OK/Eject> button.
Document Size
A3 Portrait *
9. Press the <Menu> button.
Ready to print
Setting the ESC/P Mode 79
Page 92

ESC/P Mode Reports/Lists
This section explains the reports/lists that relate to the ESC/P emulation mode.
NOTE: Refer to the ‘User Guide‘ for information about other reports/lists.
Printer Settings
Lists the settings configured on the control panel, including the ESC/P settings.
To print this report/list, select [Report/List] > [Printer Settings] on the control panel.
Font List
Lists the fonts that can be used on the printer, including the fonts for the ESC/P
emulation mode.
To print this report/list, select [Report/List] > [Font List] on the control panel.
User Defined List
Lists the registered forms, logos, and the usage status of the user-defined region.
To print this report/list, select [Report/List] > [User Defined] on the control panel.
ESC/P Logical Printers List
Lists the values of the settings stored in the NV memory No. 01 to 05.
To print this report/list, select [Report/List] > [ESC/P Logical] on the control panel.
80 Setting the ESC/P Mode
Page 93

8 ESC/P Mode Reference Materials
Zoom Ratio Tables
NOTE: Some of the following output sizes may not be available depending on the model of
your printer.
Zoom Ratios - Fixed
Document
Size
A3
A4
A5
B4
B5
Output
Size
Long
Edge
Short
Edge
Long
Edge
Short
Edge
Long
Edge
Short
Edge
Long
Edge
Short
Edge
Long
Edge
Short
Edge
A3 A4 A5 B4 B5 11x17 8.5x14 8.5x13 8.5x11 Postcard
100 70 49 86 60 103 84 78 66 100
10070488660 94 72 72 72 100
143 100 70 123 86 147 120 112 94 48
143 100 69 123 86 135 103 103 103 45
204 143 100 177 123 210 172 160 135 69
207 145 100 178 124 195 149 149 149 65
116 81 57 100 70 119 98 90 76 100
116 81 56 100 70 109 83 83 83 100
164 116 81 143 100 171 140 130 109 56
164 116 81 143 100 156 120 120 120 53
11 x 17
8.5 x 14
8.5 x 13
Long
Edge
Short
Edge
Long
Edge
Short
Edge
Long
Edge
Short
Edge
97 68 48 84 59 100 82 76 64 100
106 74 51 92 64 100 77 77 77 100
119 83 58 102 72 122 100 93 78 100
139 97 67 120 84 131 100 100 100 100
128 90 63 111 77 132 108 100 84 100
139 97 67 120 84 131 100 100 100 100
ESC/P Mode Reference Materials 81
Page 94

Document
Size
Output
Size
A3 A4 A5 B4 B5 11x17 8.5x14 8.5x13 8.5x11 Postcard
8.5 x 11
Postcard
15 x 1
15 x 2
10 x 11
10 x 12
Long
Edge
Short
Edge
Long
Edge
Short
Edge
Long
Edge
Short
Edge
Long
Edge
Short
Edge
Long
Edge
Short
Edge
Long
Edge
Short
Edge
152 106 74 131 92 156 128 119 100 100
139 97 67 120 84 131 100 100 100 100
100 100 145 100 178 100 100 100 100 100
100 100 153 100 190 100 100 100 100 100
119 83 58 103 72 122 100 93 78 100
10372508962 97 74 74 74 100
119 83 58 103 72 122 100 93 78 100
95 66 46 81 57 89 68 68 68 100
147 103 72 127 89 151 124 115 97 50
142 99 68 122 85 133 102 102 102 45
135 95 66 117 81 139 114 105 89 46
142 99 68 122 85 133 102 102 102 45
Unit: %
NOTE: When the zoom ratio of either the long edge or short edge is not within 45 - 210%,
the zoom ratio of both the long edge and short edge will be 100%.
Zoom Ratios - Fixed (When 2 Pages Up is Enabled)
Document
Size
A3
A4
A5
Output
Size
Long
Edge
Short
Edge
Long
Edge
Short
Edge
Long
Edge
Short
Edge
A3/2 A4/2 A5/2 B4/2 B5/2
70 49 100 60 100 66 50 50 50 100
70 48 100 60 100 72 59 54 45 100
100 70 48 86 60 94 72 72 72 100
100 69 48 86 59 103 84 78 65 100
143 100 69 123 86 135 103 103 103 45
145 100 69 124 86 149 121 112 94 47
11x17/28.5x14/28.5x13/28.5x11/2Postcard
/2
82 ESC/P Mode Reference Materials
Page 95

Document
Size
Output
Size
A3/2 A4/2 A5/2 B4/2 B5/2
11x17/28.5x14/28.5x13/28.5x11/2Postcard
/2
B4
B5
11 x 1 7
8.5 x 14
8.5 x 13
8.5 x 11
Long
Edge
Short
Edge
Long
Edge
Short
Edge
Long
Edge
Short
Edge
Long
Edge
Short
Edge
Long
Edge
Short
Edge
Long
Edge
Short
Edge
81 57 100 70 49 76 58 58 58 100
81 56 100 70 48 83 68 63 53 100
116 81 56 100 70 109 83 83 83 100
116 80 55 100 69 120 98 90 76 100
68 48 100 59 100 64 49 49 49 100
74 51 100 64 100 77 62 58 48 100
83 58 100 72 50 78 60 60 60 100
97 67 100 84 57 100 82 75 63 100
90 63 100 77 54 84 64 64 64 100
97 67 100 84 57 100 82 75 63 100
106 74 51 92 64 100 77 77 77 100
97 67 46 84 57 100 82 75 63 100
Postcard
15 x 11
15 x 12
10 x 11
10 x 12
Long
Edge
Short
Edge
Long
Edge
Short
Edge
Long
Edge
Short
Edge
Long
Edge
Short
Edge
Long
Edge
Short
Edge
100 145 100 178 124 100 149 149 149 65
100 153 105 190 131 100 185 172 144 71
83 58 100 72 100 78 60 60 60 100
72 50 100 62 100 74 60 56 47 100
83 58 100 72 100 78 60 60 100 100
66 46 100 57 100 68 55 51 100 100
103 72 50 89 62 97 74 74 74 100
99 68 47 85 59 102 83 77 64 100
95 66 46 81 57 89 68 68 68 100
99 68 47 85 59 102 83 77 64 100
Unit: %
ESC/P Mode Reference Materials 83
Page 96

NOTE: When the zoom ratio of either the long edge or short edge is not within 45 - 210%,
the zoom ratio of both the long edge and short edge will be 100%.
Zoom Ratios - Whole Output Size
Document
Size
A3
A4
A5
B4
B5
Output
Size
Long
Edge
Short
Edge
Long
Edge
Short
Edge
Long
Edge
Short
Edge
Long
Edge
Short
Edge
Long
Edge
Short
Edge
A3 A4 A5 B4 B5 11x17 8.5x14 8.5x13 8.5x11 Postcard
98 69 48 85 59 101 83 77 64 100
97 68 47 84 58 91 70 70 70 100
138 97 68 120 84 142 117 108 91 100
137 96 66 118 82 129 99 99 99 100
196 137 96 169 118 201 165 153 129 66
195 136 94 168 117 183 140 140 140 62
113 79 55 98 68 116 95 88 74 100
112 78 54 97 67 105 81 81 81 100
160 112 78 138 97 165 135 125 105 54
158 110 76 136 95 149 114 114 114 50
11 x 1 7
8.5 x 14
8.5 x 13
8.5 x 11
Postcard
Long
Edge
Short
Edge
Long
Edge
Short
Edge
Long
Edge
Short
Edge
Long
Edge
Short
Edge
Long
Edge
Short
Edge
95 67 47 82 57 98 80 74 63 100
10372508962 97 74 74 74 100
116 81 57 100 70 119 98 90 76 100
133 93 64 115 80 125 96 96 96 100
125 87 61 108 75 128 105 97 82 100
133 93 64 115 80 125 96 96 96 100
147 103 72 127 89 151 124 115 97 100
133 93 64 115 80 125 96 96 96 100
100 195 136 100 168 100 100 100 183 94
100 201 139 100 173 100 100 100 207 91
84 ESC/P Mode Reference Materials
Page 97

Document
Size
Output
Size
A3 A4 A5 B4 B5 11x17 8.5x14 8.5x13 8.5x11 Postcard
Long
Edge
15 x 11
Short
Edge
Long
Edge
15 x 12
Short
Edge
Long
Edge
10 x 11
Short
Edge
Long
Edge
10 x 12
Short
Edge
135 95 66 117 81 139 105 114 89 46
142 99 68 122 85 133 102 102 102 45
135 95 66 117 81 139 105 114 89 46
142 99 68 122 85 133 102 102 102 45
147 103 72 127 89 151 115 124 97 50
142 99 68 122 85 133 102 102 102 45
147 103 72 127 89 151 124 115 97 50
142 99 68 122 85 133 102 102 102 45
NOTE: When the zoom ratio of either the long edge or short edge is not within 45 - 210%,
the zoom ratio of both the long edge and short edge will be 100%.
Zoom Ratios - Whole Output Size (When 2 Pages Up is Enabled)
Unit: %
Document
Size
A3
A4
A5
B4
B5
Output
Size
Long
Edge
Short
Edge
Long
Edge
Short
Edge
Long
Edge
Short
Edge
Long
Edge
Short
Edge
Long
Edge
Short
Edge
A3/2 A4/2 A5/2 B4/2 B5/2
69 48 100 59 100 64 49 49 100 100
68 47 100 58 100 70 57 53 100 100
97 68 47 84 58 91 70 70 70 100
96 66 46 82 57 99 80 74 62 100
137 96 66 118 82 129 99 99 99 100
136 84 65 117 80 140 114 106 88 100
79 55 100 68 48 74 57 57 57 100
78 54 100 67 46 81 66 61 51 100
112 78 54 97 67 105 81 81 81 100
110 76 53 95 65 114 93 86 72 100
11x17/28.5x14/28.5x13/28.5x11/2Postcard
/2
ESC/P Mode Reference Materials 85
Page 98

Document
Size
Output
Size
A3/2 A4/2 A5/2 B4/2 B5/2
11x17/28.5x14/28.5x13/28.5x11/2Postcard
/2
11 x 17
8.5 x 14
8.5 x 13
8.5 x 11
Postcard
15 x 11
Long
Edge
Short
Edge
Long
Edge
Short
Edge
Long
Edge
Short
Edge
Long
Edge
Short
Edge
Long
Edge
Short
Edge
Long
Edge
Short
Edge
67 47 100 57 100 63 48 48 48 100
72 50 100 62 100 74 60 56 47 100
81 47 100 70 49 76 58 58 58 100
93 50 100 80 55 96 78 72 61 100
87 61 100 75 52 82 63 63 63 100
93 64 100 80 55 96 78 72 61 100
103 89 100 89 72 97 74 74 74 100
93 80 100 80 55 96 78 72 61 100
195 136 94 168 117 183 140 140 140 62
201 139 96 173 119 207 169 156 131 65
95 66 46 81 57 89 68 68 68 100
99 68 47 85 59 102 83 77 64 100
15 x 12
10 x 11
10 x 12
Long
Edge
Short
Edge
Long
Edge
Short
Edge
Long
Edge
Short
Edge
95 66 46 81 57 89 68 68 68 100
99 68 47 85 59 102 83 77 64 100
10372508962 97 74 74 74 100
99 68 47 85 59 102 83 77 64 100
10372508962 97 74 74 74 100
99 68 47 85 59 102 83 77 64 100
Unit: %
NOTE: When the zoom ratio of either the long edge or short edge is not within 45 - 210%,
the zoom ratio of both the long edge and short edge will be 100%.
86 ESC/P Mode Reference Materials
Page 99

Output Size and Printing Columns/Rows
NOTE: Some of the following output sizes may not be available depending on the model of
your printer.
Feed Position - 22 mm
Portrait Landscape
Output Size
Column Row Column Row
A3 113 92 161 63
B4 97 78 139 53
A4 79 63 113 42
B5 68 53 97 35
A5 54 42 79 27
Postcard 35 30 54 19
11 x 17 106 94 166 58
8.5 x 14 81 76 136 43
8.5 x 13 81 70 126 43
8.5 x 11 81 58 106 43
Feed Position - 8.5 mm
Output Size
A3 113 95 161 66
B4 97 82 139 56
A4 79 66 113 45
B5 68 56 97 39
A5 54 45 79 31
Postcard 35 30 54 19
11 x 17 106 98 166 62
8.5 x 14 81 80 136 47
8.5 x 13 81 74 126 47
8.5 x 11 81 62 106 47
Portrait Landscape
Column Row Column Row
ESC/P Mode Reference Materials 87
Page 100

NOTE: The above values are based on 10 cpi character pitch and 6 lpi line pitch.
The zoom ratios for both the long edge and short edge are 100%.
Whole Output Size
Portrait Landscape
Output Size
Column Row Column Row
A3 116 99 165 70
B4 101 85 143 60
A4 82 70 116 49
B5 71 60 101 42
A5 58 49 82 34
Postcard 39 34 58 23
11 x 17 110 102 170 66
8.5 x 14 85 84 140 51
8.5 x 13 85 78 130 51
8.5 x 11 85 66 110 51
NOTE: The above values are based on 10 cpi character pitch and 6 lpi line pitch.
15” Continuous-Form-Paper Mode (Landscape Fixed/Flush Left)
Portrait Landscape
Output Size
Column Row Column Row
All supported paper sizes 136 66 136 72
NOTE: The above values are based on 10 cpi character pitch and 6 lpi line pitch.
10” Continuous-Form-Paper Mode
Portrait Landscape
Output Size
Column Row Column Row
All supported paper sizes 80 66 80 72
88 ESC/P Mode Reference Materials
 Loading...