How it Works
Log In / Sign Up
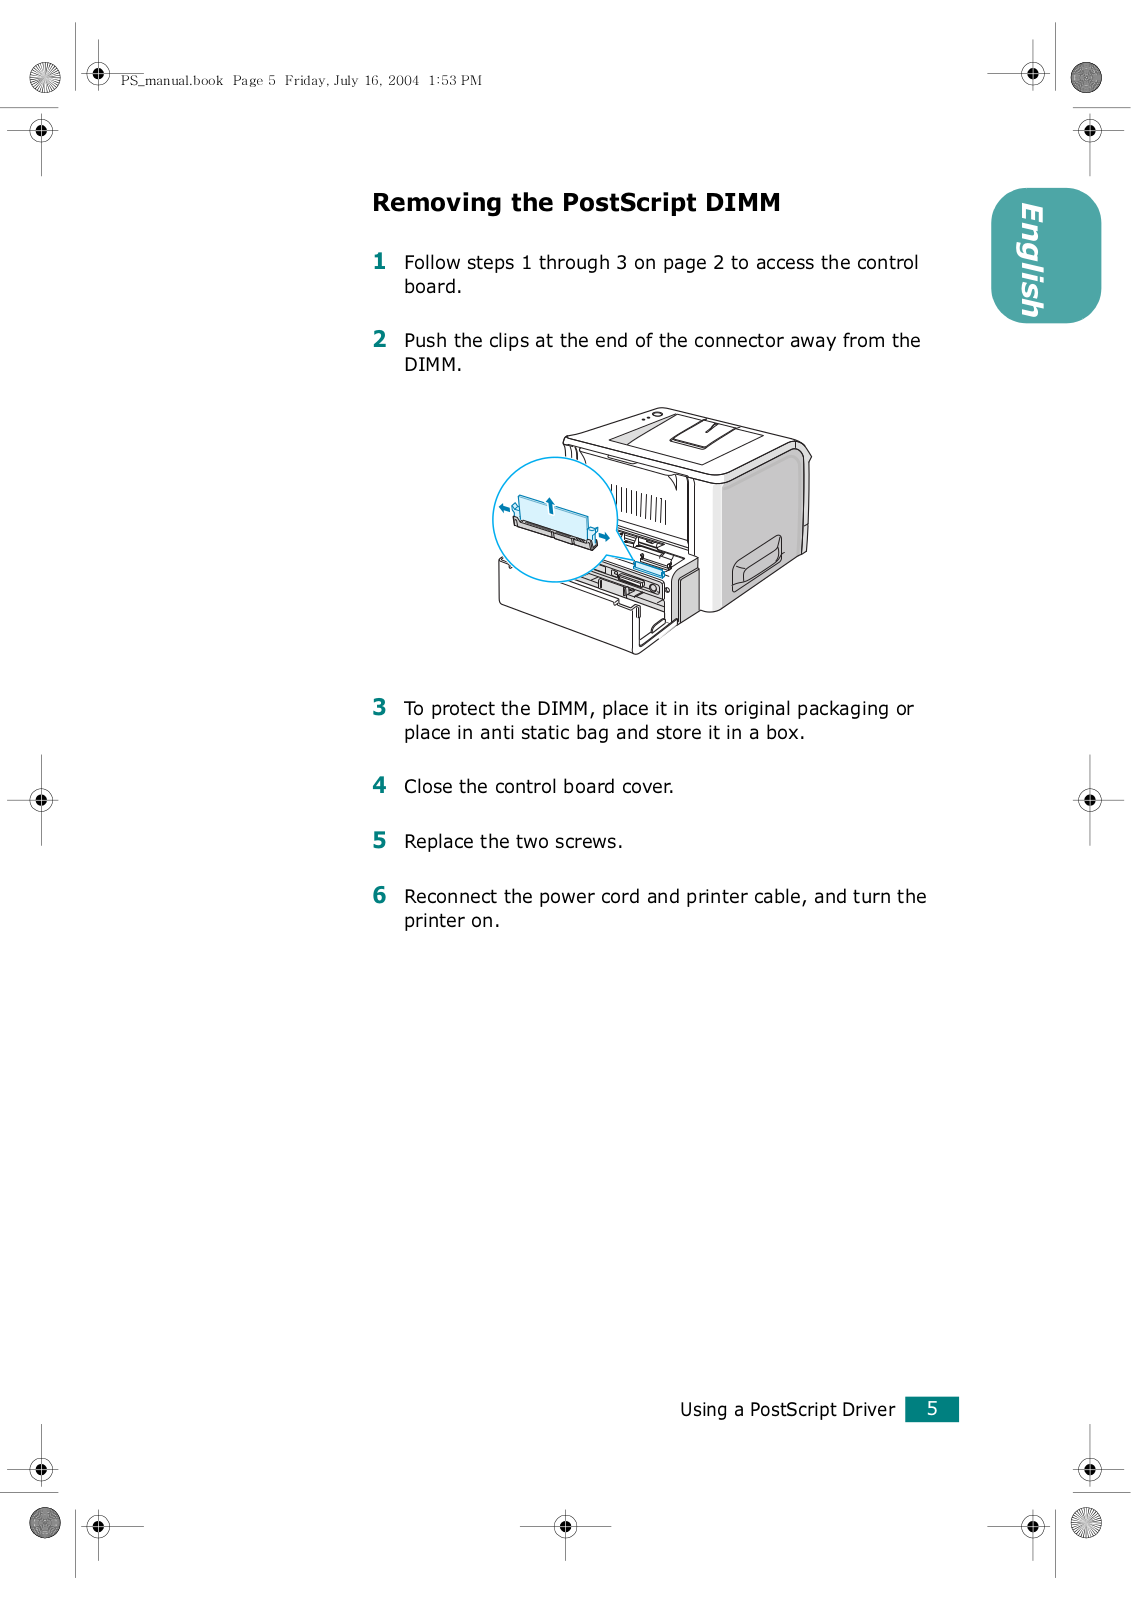
Buy Points
How it Works
FAQ
Contact Us
Questions and Suggestions
Users
Xerox
Loading...
P
PH7500
Phase 6200
Phaser
Phaser 016-1368-00
Phaser 016-1369-00
Phaser 016-1414-00
Phaser 016-1415-00
Phaser 016-1417-00
Phaser 016-1418-00
Phaser 016-1419-00
Phaser 016-1420-00
Phaser 1235
25
Phaser 1235DT
Phaser 1235DX
Phaser 1235N
PHASER 140
2
Phaser 200i
6
Phaser 2135
31
Phaser 2135DT
2
Phaser 2135DX
2
Phaser 2135N
2
PHASER 220
4
Phaser 220e
Phaser 220i
Phaser 300
Phaser 300i
Phaser 3010
13
Phaser 3020
6
Phaser 3020BI
18
Phaser 3040
16
Phaser 3040B
Phaser 3052
9
PHASER 3052NI
9
Phaser 3100MFP
27
PHASER 3100MFP/S
2
Phaser 3100MFP_X
2
Phaser 3110
3
Phaser 3115
2
PHASER 3116
8
Phaser 3117
13
Phaser 3120
Phaser 3121
4
Phaser 3124
5
Phaser 3124/B
Phaser 3125
6
Phaser 3125/B
Phaser 3125/N
2
PHASER 3130
25
Phaser 3140
8
PHASER 3150
21
Phaser 3155
6
Phaser 3160
4
Phaser 3160B
5
Phaser 3160N
5
Phaser 3200
Phaser 3200MFP
8
Phaser 3200MFPB
2
Phaser 3200MFPN
2
Phaser 3210
4
Phaser 3250
34
Phaser 3250D
7
Phaser 3250DN
6
Phaser 3250V/DN
PHASER 3260
35
Phaser 3260DI
8
Phaser 3260DNI
8
Phaser 3300
3
Phaser 3300MFP
10
Phaser 3310
5
PHASER 3320
41
Phaser 3320DN
3
Phaser 3330
27
Phaser 340
5
Phaser 3400
30
PHASER 3400B
Phaser 3420
5
Phaser 3425
10
Phaser 3428
8
Phaser 3428D
Phaser 3428DN
PHASER 3435
19
Phaser 3435DN
4
PHASER 3450
13
Phaser 3450B
2
Phaser 3450D
2
Phaser 3450DN
2
Phaser 3500
20
Phaser 3500B
4
Phaser 3500DN
3
Phaser 3500N
4
PHASER 360
5
Phaser 3600
28
Phaser 3600B
9
Phaser 3600DN
12
Phaser 3600N
2
Phaser 3600V_N
3
PHASER 3610
71
Phaser 3610DN
2
Phaser 3610N
2
Phaser 820
Loading...
Loading...
Nothing found
PHASER 3150
Networking Manual
42 pgs
1.88 Mb
0
Product Data Sheet
2 pgs
106.29 Kb
0
Service Manual
57 pgs
4.14 Mb
0
Service Manual
8 pgs
142.47 Kb
0
Service Manual
116 pgs
9.36 Mb
0
Setup Manual
2 pgs
1.74 Mb
0
Specifications
2 pgs
278.33 Kb
0
User Guide
152 pgs
5.95 Mb
0
User Guide [nl]
152 pgs
6.24 Mb
0
User manual
152 pgs
4.35 Mb
0
User Manual
152 pgs
5.86 Mb
0
User Manual [cz]
152 pgs
4.77 Mb
0
User Manual [de]
152 pgs
5.78 Mb
0
User Manual [es]
130 pgs
7.04 Mb
0
User Manual [es]
152 pgs
5.45 Mb
0
User Manual [hu]
151 pgs
4.99 Mb
0
User Manual [it]
152 pgs
5.79 Mb
0
User Manual [it]
152 pgs
5.77 Mb
0
User Manual [pl]
153 pgs
4.56 Mb
0
User Manual [pt]
152 pgs
6.06 Mb
0
User Manual [tr]
153 pgs
6.83 Mb
0
Table of contents
Loading...
Xerox PHASER 3150 User Manual [es]
...
Xerox User Manual [es]
Download
Specifications and Main Features
Frequently Asked Questions
User Manual
Download
Loading...
+
hidden pages
Unhide
You need points to download manuals.
1 point = 1 manual.
You can buy points or you can get point for every manual you upload.
Buy points
Upload your manuals
 Loading...