

Page 1

EE
ElixirScan
User Guide
June 1999
Version 4.00
Page 2

Elixir Technologies Corporation
P.O. Box 1559
Ojai, CA 93024
Copyright 1999 by Elixir Technologies Corporation.
All rights reserved.
June 1999
Version 4.00
Printed in the United States of America
Trademarks and Service Marks/Company:
Elixir/Elixir Technologies Corporation
IBM, Personal Computer AT, PS/2, and all IBM products mentioned in this publication/International Business Machines
MS-DOS, Microsoft Mouse, Windows/Microsoft Corporation
Recognita Plus/SZKI/Recognita Corporation
TextBridge, and all other Xerox products mentioned in
this publication are trademarks of Xerox Corporation
All other product names and trade names used herein
are trademarks of their respective owners.
Copyright protection claimed includes all forms and
matters of copyrightable material and information now
allowed by statutory or judicial law or hereinafter
granted, including without limitation, material generated from the software programs which are displayed
on the screen such as icons, screen display looks,
etc.
Changes are periodically made to this document.
Changes, technical inaccuracies, and typographic errors will be corrected in subsequent editions.
Page 3

The following notes and cautions apply to ElixirScan
version 4.00.
Scanned input quality
ElixirScan accepts scanned .PCX files as input. Due
to general scanning limitations, Elixir cannot guarantee error-free output generated from scanned input.
To ensure the best possible input (and therefore,
output):
scan a clean form (not a photocopy or FAX copy)
scan forms with 6 point or larger text at 300 dpi
scan forms with text smaller than 6 points at 400
dpi
Notes and cautions
Starting ElixirScan from the Elixir Desktop
After starting ElixirScan from the ElixirScan icon on
the Elixir Desktop, you may receive a sharing violation
error message upon attempting subsequent file conversions. If this occurs, close the Elixir Desktop and
restart it again.
Page 4

Table of contents
Notes and cautions
1. Introduction 1-1
ElixirScan environment 1-1
Customer support 1-2
Elixir Web site support 1-3
Elixir training 1-4
Hardware and software requirements 1-4
Hardware 1-4
Software 1-4
Who should use this guide 1-5
Conventions 1-5
Display conventions 1-5
Typographical conventions 1-6
Mouse operations 1-7
On-line Help 1-8
Using Online documentation 1-10
Accessing online guides 1-10
Navigating in online guides 1-11
Word find 1-12
Page scrolling 1-12
Zoom in/out 1-13
Printing online guides 1-13
Organization of this guide 1-14
Before installation 1-14
ELIXIRSCAN USER GUIDE v
Page 5

TABLE OF CONTENTS
Release notes 1-15
Product Registration 1-15
Elixir Product Registration screen 1-16
Using the internet 1-17
Registering as a new customer via
the internet 1-17
Downloading via the internet to a
non-Elixir PC 1-18
Contacting Elixir (no internet
connection) 1-20
Soft key customers running Win-
dows for Workgroups 3.1 or 3.11 1-20
Installation 1-21
Installing Elixir applications 1-21
Full installation 1-22
Custom installation 1-23
Adding applications 1-24
Adding newly licensed applications 1-24
Starting ElixirScan 1-25
Exiting ElixirScan 1-25
2. ElixirScan basics 2-1
ElixirScan overview 2-1
Electronic form storage 2-1
The Elixir solution 2-2
Advantages of using ElixirScan 2-2
ElixirScan features 2-3
Files generated by ElixirScan 2-3
Using ElixirScan with other Elixir
products 2-4
ElixirScan basics 2-5
Overview of features 2-6
Menu bar 2-6
Toolbar 2-6
Edit panel 2-7
Description area 2-7
vi ELIXIR TECHNOLOGIES CORPORATION
Page 6

TABLE OF CONTENTS
Setting defaults 2-8
Default Directory Setup 2-9
Process Options 2-11
OCR options 2-14
Output Control 2-14
Default Text Properties 2-16
Spell Checker Setup 2-18
Adding personal dictionary 2-20
Editing personal dictionary 2-21
Font Mapping Setup 2-22
Font table considerations 2-23
Key Mapping Setup 2-29
3. Starting form recognition 3-1
Starting form recognition 3-1
Form Scan Control dialog box 3-2
Input Options 3-3
Output Options 3-3
Process control buttons 3-4
4. Editing .FSC files 4-1
Loading a .FSC file 4-1
Editing supports 4-3
View buttons 4-4
Edit support buttons 4-5
Editing a .FSC file 4-7
Form element types 4-8
Selecting a form element type 4-8
Selecting individual form elements 4-9
Editing operations 4-10
Changing form element
types 4-10
Deleting form elements 4-11
Breaking up 4-11
Joining form elements (and
text) 4-11
ELIXIRSCAN USER GUIDE vii
Page 7

TABLE OF CONTENTS
Aligning form elements 4-12
Editing OCR results 4-13
Changing the properties of
form elements 4-17
Saving .FSC and .ELX files 4-20
Capturing graphics 4-21
Index INDEX-1
viii ELIXIR TECHNOLOGIES CORPORATION
Page 8

1. Introduction
ElixirScan is a powerful Windows-based application
that analyzes bit-mapped raster images, divides each
image into its constituent elements (such as lines,
boxes, shades, and text) and converts the image to
Elixir (.ELX) format. You can use ElixiForm or ElixirForm for AFP™ to edit Elixir-format files in What-yousee-is-what-you-get mode (see the "ElixirScan environment" section of this chapter for more information).
ElixirScan allows you to electronically regenerate your
existing (paper) forms using most commerciallyavailable scanners, and to edit, update, and store the
forms on your PC. The current release of ElixirScan
allows you to import black-and-white PCX and Elixir
(.LP3) images.
ElixirScan environment
ElixirScan is designed to work with either the Elixir
Desktop for AFP™, or the ElixiSys Desktop, both of
which are Windows-based Elixir Desktops.
Although the Elixir Desktop is not required to run ElixirScan, it is required if you intend to view or print your
output. You will also need the Elixir Desktop if you
plan on converting the .ELX output generated from
ElixirScan to a number of different AFP, Xerox, and
PostScript formats.
ELIXIRSCAN USER GUIDE 1-1
Page 9

INTRODUCTION
Elixir products you can use with ElixirScan are:
ElixirForm for AFP or ElixiForm, a Windowsbased WYSIWYG forms creation package that
allows you to create boilerplate Elixir (.ELX)
forms. Installing ElixiForm or ElixirForm for AFP
allows you to view or edit form elements in a form
that is converted to .ELX format using ElixirScan.
Combining one of the packages above with the
Elixir Desktop allows you to convert and print
Elixir forms to a number of different output
formats.
ElixirImage for AFP or ElixiGraphics, a fullfeature, Windows-based, bitmap editor that allows you to create and edit Elixir-format graphics.
You can use ElixirScan to convert forms saved as
Elixir-format graphics (.LP3 files) to Elixir form
format (.ELX files).
Customer support
If you have purchased your Elixir product directly from
Elixir Technologies then contact the support center for
your region at the number listed below.
North and South America:
+1 805 641 5900 ext. 3
Asia Pacific
+92 (0) 51 206182
Europe
+420 2 2431 13877
The U.S.A. Elixir Customer Support Center provides
telephone technical assistance for Elixir users Monday
through Friday from 6:30 a.m. to 5:00 p.m. Pacific
Standard Time.
1-2 ELIXIR TECHNOLOGIES CORPORATION
Page 10

If you have any problems running or using Elixir PrintDriver or associated Elixir applications, contact the
support center in your region for help. An Elixir product specialist will answer your call and ask for the following information:
your name, organization, telephone number and
address.
the name and version number of the Elixir
application.
a complete description of the problem, including
any error messages displayed on your monitor or
printed at your printer.
You can contact Elixir support by accessing the
Elixir World Wide Web page (and selecting [Contact Support]) at http://www.elixir.com. Please
complete the question form.
Elixir Web site support
The Elixir Web site at http://www.elixir.com offers the
following resources:
INTRODUCTION
Raise a question for Elixir Support.
Find answers in the list of Frequently Asked
Questions.
Review the latest Tips and Techniques for in-
creasing productivity using Elixir software.
Download new releases and the latest patches.
View Release Notes for the latest available
features.
Learn in the user newsgroup how others are us-
ing Elixir products.
Sign up for an Elixir Learning Program.
ELIXIRSCAN USER GUIDE 1-3
Page 11

INTRODUCTION
Elixir training
Elixir Technologies corporation offers training for the
full range of Windows-based family of products. For
more information contact:
Elixir Learning
(805) 641-5900 Ext. 130
Hardware and software requirements
The following sections describe hardware and software requirements for running ElixirScan.
Hardware
Recommended PC configuration: Pentium (or
100% compatible), with at least 133 MHz processor
(or the fastest commercially available processor); 32
MB RAM, 500+ MB hard drive, one CD-ROM drive.
Additional requirements:
any monitor with driver software supporting Windows in VGA or SVGA
any Windows-compatible mouse.
Software
Software requirements: Microsoft Windows 95, Win-
dows 98, or Windows NT 4.0 or later.
While we make every effort to ensure the proper op-
eration of our software, some problems cannot be resolved due to differences in the operating systems.
At this time, we do not support OS/2.
1-4 ELIXIR TECHNOLOGIES CORPORATION
Page 12

We recommend having one of the versions of the
Elixir Desktop described in the "ElixirScan environment" section of this chapter and ElixiForm or ElixirForm for AFP™ if you intend to edit forms and
overlays from the Elixir Desktop.
Who should use this guide
This user guide is intended for users familiar with Windows. You should be familiar with your PC peripherals and have access to reference manuals for your PC
software and hardware, and your printer.
Conventions
Most of the following conventions are the same or
similar to Windows conventions.
display conventions
INTRODUCTION
typographical conventions
mouse operations
Display conventions
The Elixir Desktop, ElixirForm, ElixirFont and ElixirImage all adhere to Microsoft Windows conventions
for using menus, menu commands, dialog boxes,
command buttons, icons and mouse. See your Windows manual for more information.
ELIXIRSCAN USER GUIDE 1-5
Page 13

INTRODUCTION
Typographical conventions
The following typographical conventions are used
throughout this guide and other Elixir product guides.
Keystrokes are shown enclosed in < > (angle
brackets). For example:
<Enter>
Key combinations are denoted by a plus sign be-
tween keys. For example:
<Shift> + <F1> indicates to simultaneously press
the <Shift> and the <F1> keys.
Menu titles are shown in
. Menu options are
bold
enclosed in [ ] (square brackets). For example:
Select [New] from the
File
menu.
Commands, options, actions, and parameters
that require description are shown in bold followed on the next line by the description. For example:
Delete
Deletes the selected files.
Steps in a procedure are shown in numbered bold
paragraphs. For example:
1. At the prompt, enter the file name and
extension.
Comments relating to a step (such as this paragraph) are shown in regular text following the bold
paragraph.
Commands you enter at the DOS prompt are
shown in larger text. Within DOS commands,
variable names and keys you press are shown in
italics. For example:
CD \ELIXIR <Enter>
1-6 ELIXIR TECHNOLOGIES CORPORATION
Page 14

Mouse operations
You can perform most operations in Elixir applications
by using the mouse. The terminology is similar to
other Windows based applications.
Mouse operations are performed using the left or right
mouse buttons, depending on the specific task.
The following mouse related terms are used in this
guide:
click
to momentarily press and release the left mouse button once. A right mouse button click is specified
where necessary. For example,
Click on the right mouse button to finish entering text.
double-click
to click the left mouse button twice in rapid
succession.
drag
to click and hold the mouse on an item and move the
item with the mouse.
INTRODUCTION
drag and drop
to drag an item as above, then release the mouse button, once the item is positioned over a the area. If the
selected object is a file and the destination is a directory, the file copies to the directory.
object
a selectable item on the screen.
open
to point and double-click on an icon -- the effect of this
operation depends on the icon.
point
to move the mouse to position the screen pointer on
an area of the screen.
select
to point to an object and click the mouse -- this usually
highlights the object.
ELIXIRSCAN USER GUIDE 1-7
Page 15

INTRODUCTION
On-line Help
<Alt>click
to hold down the <Alt> key while pressing the left
mouse button -- this allows you to select a range of
files in a window.
<Ctrl>click
to hold down the <Ctrl> key while pressing the left
mouse button -- this allows you to select individual
files from a group in a window.
<Shift>click
to hold down the <Shift> key while clicking the mouse
-- this allows you to select more than one object at a
time.
Elixir software uses the Microsoft Windows Help program to provide on-line Help for all functions.
For more information about Windows Help, select the
[How to Use Help] option in the Help menu, or see
your Microsoft Windows documentation.
The Help files included with your Elixir software include graphics created using screen drivers with large
fonts. If you use a screen driver with small fonts, the
Help file graphics may not display clearly. For optimum graphics display, use a screen driver with large
fonts.
You can display on-line Help in the following ways:
Bubble Help
Click on an icon with the right mouse button to view its
properties (if applicable) or to display "bubble help."
Bubble help is a short description of the icon function
that displays in a bubble extending from the icon.
1-8 ELIXIR TECHNOLOGIES CORPORATION
Page 16

INTRODUCTION
Quick Help
Enable the quick function by selecting the quick help
option in the Usage Switches (or Preferences -- for
ElixirImage) dialog box. When you move the screen
pointer over an icon on the screen, a short description
of the icon function displays in the message area of
the screen. During certain operations a message
about the function you are performing also displays in
the message area. To see these operational messages, disable quick help.
Context sensitive Help
To use this function, click on an icon and press <F1>.
If available, the appropriate Help topic displays. If no
specific topic is available, the Help table of contents
displays.
Help menu
Select [Help] from the top pull-down menu and choose
one of the displayed topics.
Dialog box Help
Click on the [Help] button in a dialog box to view an
associated Help topic. Under Windows 95 and Windows NT, right-click on a dialog box option to display
an associated Help topic.
Help pop-ups and jumps
Within Help topic text, words or phrases underlined in
green are pop-ups or jumps. When you click on a
pop-up topic, a box displays within the current Help
topic with additional information. When you click on a
jump, a different, associated Help topic displays.
Help hypergraphics
Hypergraphics are special graphics within Help files
that contain "hot spots". Hot spots are either pop-up
topics or jumps. Hypergraphics in Elixir Help are most
commonly dialog boxes with option hot spots (pop-up
definitions), toolboxes with tool hot spots (topic
jumps), and menus with option hot spots (topic jumps
or pop-up definitions).
Move the cursor over a hypergraphic until a hand displays, then click on this hot spot to display a pop-up
topic, or a "jump". To close a pop-up topic, click the
mouse button. To return to the original Help topic
from a jump, click on <Back> in the Help file menu.
ELIXIRSCAN USER GUIDE 1-9
Page 17

INTRODUCTION
Using Online documentation
This section describes how to use PDF online documentation, including navigating through the online
guides and printing the guides. Acrobat Reader is
provided with the online documentation. Information
about using the Acrobat Exchange program is included for users who have licenses for that program.
Accessing online guides
The PDF online documentation is copied to the
drive:\Elixir\help\pdf directory during the installation. If
you didn't choose to copy the PDF online documentation during the installation, you can view a complete
list of the files by clicking on the Windows [Start] button and selecting Programs>Elixir Applications>Elixir
PrintDriver for AFP. Once the application is launched,
click on the Help menu and select Release Notes.
Wordpad displays a current list of supporting documents and the directories where they can be found on
CD-ROM.
When the appropriate PDF file is accessed the Acrobat Reader program is launched and the List of Online
Guides is displayed. Click on a guide to view its table
of contents and jump to individual chapters.
The following list of PDF files and associated document names are installed in the drive:\Elixir\help\pdf
directory.
StartAFP.pdf - AFP Getting Started Guide
StartXRX.pdf - Getting Started User Guide
DeskAFP.pdf - Elixir Desktop and Converters for
AFP User Guide
DeskXRX.pdf - ElixiSys Desktop User Guide
FormAFP.pdf - ElixirForm User Guide
FormXRX.pdf - ElixiForm User Guide
FontAFP.pdf - ElixirFont User Guide
1-10 ELIXIR TECHNOLOGIES CORPORATION
Page 18

INTRODUCTION
FontXRX.pdf - ElixiFont User Guide
ImageAFP.pdf - ElixirImage User Guide
GraphXRX.pdf - ElixiGraphics User Guide
PdAFP.pdf - Elixir PrintDriver for AFP User Guide
PDXRX.pdf - Elixir PrintDriver User Guide
PdNT.pdf - Elixir PrintDriver for NT User Guide
PHXRX.pdf - PageHandler User Guide
DTAG.pdf - DocuTag User Guide
DMerge.pdf - DataMerge User Guide
AppVIPP.pdf - Elixir AppBuilder for VIPP User
Guide
AppAFP.pdf - Elixir AppBuilder for AFP User
Guide
Transfmr.pdf - Elixir Transformer Suite User
Guide
Viewer.pdf - ElixirViewer User Guide
Elxscan.pdf - ElixiScan User Guide
Navigating in online guides
After loading a PDF document in Acrobat Reader or
Exchange program (as described above), you can
navigate through the online guide by clicking on the
following:
TOC chapter titles - jumps to the beginning of the
chapter indicated.
[Next Page] or [Previous Page] in the Toolbar - jumps
to the next or previous page of the online guide (alternatively, you can use the <Page Up> and <Page
Down> keys).
[Go Back] in the Toolbar - returns to your previous
location.
ELIXIRSCAN USER GUIDE 1-11
Page 19

INTRODUCTION
[First Page] in the Toolbar - returns to the opening
screen of the online guide.
Word find
This option finds a key word or phrase in the current
document.
To use Word Find in a document:
1. Click on the [Find] icon in the Toolbar.
2. Enter the desired search text and click on
[Find].
The Acrobat Find dialog box closes and the first
occurrence of the text is highlighted.
3. To find more occurrences of the same text,
click on the [Find] icon in the Toolbar and
then click on [Find Again] in the Find dialog
box.
Page scrolling
You can move a document on the screen to view portions of it not visible in the window, or read a document which contains article threads by clicking the
mouse to scroll through the document without using
the scroll bar.
To move a document on the screen for viewing (functional only when the document displays wider than the
document window):
1. Click on the [Hand] icon in the Toolbar.
2. Hold down the mouse button and drag the
cursor in the desired direction.
1-12 ELIXIR TECHNOLOGIES CORPORATION
Page 20

INTRODUCTION
To follow the flow of text in a document that contains
article threads (automatic text flows):
1. Click on the [Hand] icon in the Toolbar.
2. If the document contains article threads, a
“down” arrow displays on the Hand icon.
3. Position the hand-shaped cursor over a
paragraph and click on the paragraph to begin
reading.
4. Continue clicking to follow the flow of text.
Zoom in/out
To magnify the size of the page display, click on the
Zoom icon in the Toolbar, then click in the Work area.
Each click resizes the view by a factor of two.
To reduce the size of the page display, click on the
Zoom icon in the Toolbar, then hold down the <Ctrl>
key and click in the Work area.
You can also click on the [%] button at the bottom of
the screen and select a zoom percentage from the
pop-up list.
Printing online guides
You can print individual chapters or an entire book to
PostScript or HP printers:
1. Open the file.
2. Select File>Print.
The Print dialog box displays.
3. Select your printing options and click on [OK].
Help menu. Pull down the Help menu and select
one of the displayed topics.
<F1> key. Press <F1> form anywhere on the
main screen to display the ElixirScan Help
contents.
ELIXIRSCAN USER GUIDE 1-13
Page 21

INTRODUCTION
Organization of this guide
This user guide consists of a table of contents and
four chapters. The chapters include:
Chapter 1, "Introduction," introduces ElixirScan
and describes the purpose and content of this
user guide.
Chapter 2, "ElixirScan basics," describes
ElixirScan features and how to set ElixirScan
defaults.
Chapter 3, Starting form recognition," describes
how to start form recognition.
Chapter 4, "Editing .FSC files," describes how to
check and edit the results of form recognition, as
well as how to edit and capture graphics..
Before installation
ElixirScan installation is a simple procedure that takes
approximately 10 minutes.
Complete the software licensing process (See the
"Product Registration" section).
Verify that at least 3 MB is available on the hard
disk drive on which you want to install ElixirScan.
You may want to use the DOS XCOPY /S/E command to make a backup copy of the installation
diskette before starting installation.
1-14 ELIXIR TECHNOLOGIES CORPORATION
Page 22

Release notes
Release notes appear at the beginning of the Elixir
software install process, so that you can review each
entry before performing the complete installation.
Once the software is installed, release notes can be
accessed from the Help menu of the application. Release notes are formatted for viewing in Notepad or
Wordpad. They have a txt file extension and are
found in the drive:\ELIXIR \RELNOTES directory.
INTRODUCTION
The ElixirScan installation process is interactive.
You are prompted to enter information about your
system during the installation process.
Before you begin installation, you should know the
drive on which you want to install ElixirScan.
Product Registration
Elixir products no longer require ElixiKey hardware devices attached to your parallel port. Elixir products
now utilize soft key technology. This new licensing
process validates your license agreement with Elixir
and places a file (password.epw if an Elixir customer,
or License.dat if a Xerox customer) on your
workstation.
Version 4.00 implements Elixir's new licensing process and discontinues use of the current hard keys. All
customers must register/re-register software license(s) by using the Elixir registration program provided
with the software.
Each product installed is assigned to a specific pc.
This pc number, your customer number, and password are required. This information is provided when
you purchase Elixir software or when you upgrade to
version 4.00 of Elixir products.
ELIXIRSCAN USER GUIDE 1-15
Page 23
If you are an Elixir customer, registration can be completed automatically if you have an internet connection
on your workstation. If you are a Xerox customer you
must contact Xerox to register your products.
This section describes the registration process for
those customers who have purchased their Elixir
products form Elixir Technologies.
The following scenarios describe the registration
process for Elixir customers. Xerox Corporation will
provide a separate document that describes registering your products with Xerox.
you are a new customer and will use Soft Key
registration
you are an existing customer and will change to
Soft Key registration
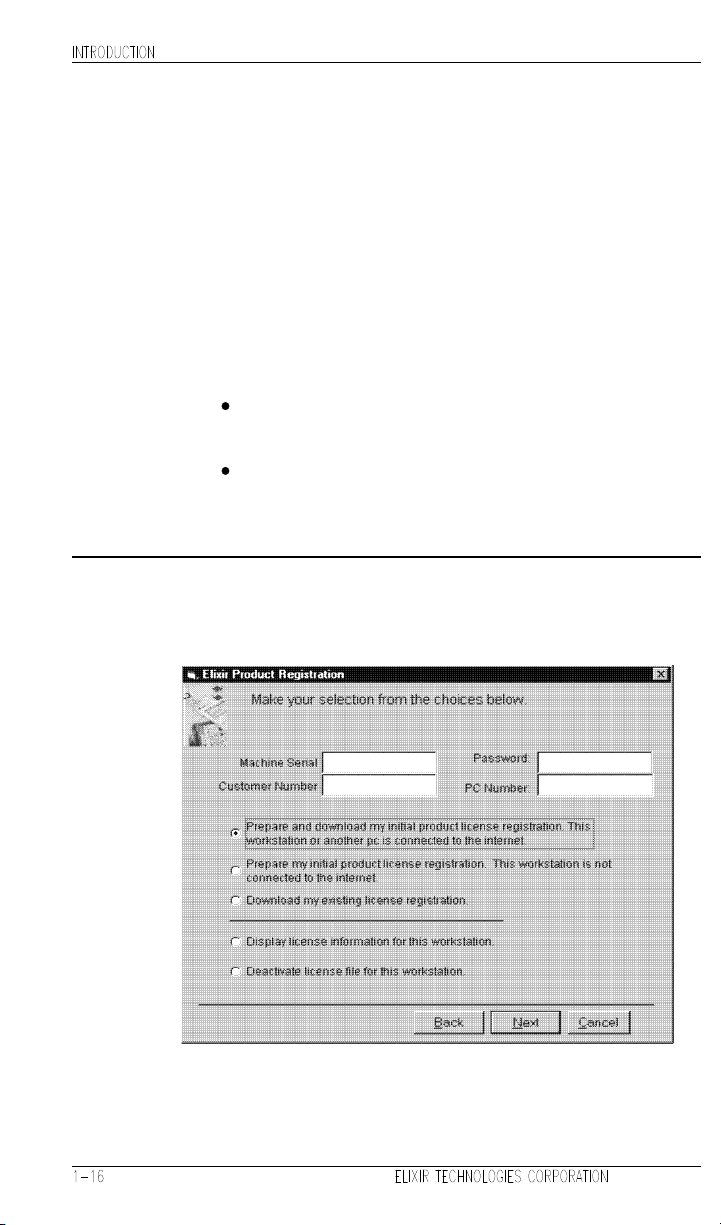
Elixir Product Registration screen
Make your selections according to your needs and go
to the appropriate section for further procedures.
Figure 2-1. Elixir Product Registration screen
Page 24

Using the internet
You can register and download all registration files via
the Elixir Product Registration program. There are
two ways to register your products using the Internet:
down load the product registration file directly to
the Elixir PC via the Internet (see "Registering as
a new customer via the internet")
download the product registration file to another
machine and move it to the Elixir PC (see "Downloading via the internet to a non-Elixir PC")
Registering as a new customer via the internet
You will receive a "Customer Activation Letter" with
your product(s) ordered. The registration process
should be completed before installing your software.
The installation CD will launch and install the Registration Program.
To install the registration program on your Elixir PC:
INTRODUCTION
1. In the Software Registration screen, click on
[Next].
2. Select the drive and click on [Next].
3. In the Start Registration Process screen, click
on [Install].
The password file will be installed and your system configured.
To complete registration:
1. In the Elixir Product Registration "Welcome"
screen, select [Next].
Your machine serial number displays.
2. Enter your customer number (from Activation
Letter), then click on [Next].
ELIXIRSCAN USER GUIDE 1-17
Page 25

INTRODUCTION
3. Enter your password and the PC number you
want to register, then click on [Next].
4. Select [Prepare and download my initial
product license registration. This workstation
or another pc is connected to the internet]
from the Registration Option menu, then click
on [Next].
5. In the Download Password screen, click on
[Yes].
The system displays your customer information
and you must verify that it is correct.
6. When the screen displays the registration
information, click on [Save]. You may also
print this screen for reference or to send to
Elixir.
The application installation process will begin, see the
"Installation" section.
Downloading via the internet to a non-Elixir PC
You will receive a "Customer Activation Letter" with
your product(s) ordered. The registration process
should be completed before installing your software.
The installation CD will launch and install the Registration Program.
To install the registration program on your Elixir PC:
1. In the Software Registration screen, click on
[Next].
2. Select the drive and click on [Next].
3. In the Start Registration Process screen, click
on [Install].
The password file will be installed and your system configured.
1-18 ELIXIR TECHNOLOGIES CORPORATION
Page 26

INTRODUCTION
To complete registration:
1. In the Elixir Product Registration "Welcome"
screen, select [Next].
Your machine serial number displays.
2. Enter your customer number (from Activation
Letter), then click on [Next].
3. Enter your password and the PC number you
want to register, then click on [Next].
4. Select [Prepare and download my initial
product license registration. This workstation
or another pc is connected to the internet]
from the Registration Option menu, then click
on [Next].
5. In the Download Password screen, click on
[No].
6. In the How to Contact Elixir screen, click on
[Print] and take the printout to the pc
connected to the internet.
7. Access the Elixir Web site at
http:\\www.elixir.com. and click on [Product
Registration].
8. In the Customer Information screen, enter
your Customer Number and Password, then
click on [Submit Form].
9. In the Elixir Customer Menu, click on
[Download a New License File].
10. In the Customer Information screen, enter
your PC Number and Machine Serial Number,
then click on [Submit Form].
11. In the Elixir Technologies screen, click on
[Click here to download your password].
12. Save the password.epw file to diskette and
copy it to your Elixir PC in the \ELIXIR
directory.
ELIXIRSCAN USER GUIDE 1-19
Page 27

INTRODUCTION
The application installation process will begin, see the
"Installation" section.
Contacting Elixir (no internet connection)
If you have no internet access at your site you must
contact Elixir and provide the serial number of the pc
where you will install the Elixir software. Elixir will provide a registration file (password.epw) that you must
copy to the Elixir pc.
Copy the password.epw file to \Elixir and start the
installation.
Select [Prepare my initial product license registration.
This workstation is not connected to the Internet] from
the Registration Option menu, then click on [Next].
The application installation process will begin, see the
"Installation" section.
Soft key customers running Windows for Workgroups 3.1 or 3.11
Since Windows 3.1/3.11 does not have internet capability, you must contact Elixir to obtain your password
file. After installation of Elixir software, the installation
program verifies that the operating system is 3.1 or
3.11, runs passwd16.exe, and provides your machine
serial number.
To complete registration:
1. Enter your customer number, password and
PC number, then print out a copy of this
screen.
2. Fax, email, or mail Elixir the display printout.
Elixir will generate a password.epw file and
send it to you on diskette.
3. Load the password.epw file in the \ELIXIR
directory.
The application installation process will begin, see the
"Installation" section.
1-20 ELIXIR TECHNOLOGIES CORPORATION
Page 28

Installation
INTRODUCTION
This section describes how to install Elixir software
using the [Full] and [Custom] options. Installing additional Elixir applications to an existing version is also
explained.
Note: The software registration process must be completed (See the "Product Registration" section).
For information about starting Elixir applications after
installation, refer to the "Introduction" chapter.
During installation, the log file, XWIN.log, is created in
the drive:\Elixir directory. XWIN.log contains a list of
all directories and files copied or created, including information pertinent to the installation. It can be accessed, using Notepad or Wordpad.
If you have any problems running Elixir software after
installation, refer to Appendix A, "Operational and error messages", or the "Troubleshooting" section of the
Elixir Getting Started Guide for more information.
Installing Elixir applications
Elixir provides a simple, interactive procedure for installing Elixir applications.
During installation you can select [Full] or [Custom]
installation.
Selecting a [Full] installs all Elixir applications and
demonstration files on the same drive. If you
have a previous version of Elixir software, this option overwrites the existing version.
Selecting a [Custom] installation allows you to
choose the Elixir applications and options (such
as Elixir demonstration files) you want installed,
as well as where you want certain options installed. For example, You may want the PDF
documentation in a different directory than the application.
ELIXIRSCAN USER GUIDE 1-21
Page 29

INTRODUCTION
Full installation
You can also install Elixir program files (required
to run Elixir), and data files (files that you create
or files such as the Elixir demonstration files), in
separate drives and directories.
To begin installation:
You can quit installation at any time, by pressing the
<Esc> key.
1. Close all active applications.
2. Insert the CD in your CD-ROM drive.
3. In the "Welcome" screen, click on [Next].
The Release Notes? screen displays.
4. Select [Read Release Notes Now] to display
them in Wordpad (or Notepad), or click on
[Next] to proceed with the installation.
The Product Selection screen displays.
5. Select the applications you want to install and
click on [Next].
The Selected Products screen displays.
6. Verify the listed applications and click on
[Next]. If you need to delete or add to the list,
click on [Back] and reselect.
7. Verify your user information and click on
[Next].
8. In the Select Install Type screen, select [Full]
and click on [Next].
9. Select the drive on which you want Elixir
software installed, then click on [Next].
10. Select the Programs Folder in which you want
Elixir software installed (Elixir Applications is
the default), then click on [Next].
1-22 ELIXIR TECHNOLOGIES CORPORATION
Page 30

11. In the Backup Replaced Files screen, click on
12. In the Start Copying Files screen, click on
13. Once installation is complete, click on [Exit
Custom installation
To begin installation:
You can quit installation at any time, by pressing the
<Esc> key.
1. Close all active applications.
2. Insert the CD in your CD-ROM drive.
INTRODUCTION
[Yes], if you want to make back-up copies of
all files replaced during installation and select
the directory where the back-up files will be
placed. Then click on [Next].
[Install].
Installation begins.
Installer].
3. In the "Welcome" screen, click on [Next].
The Release Notes? screen displays.
4. Select [Read Release Notes Now] to display
them in Wordpad (or Notepad), or click on
[Next] to proceed with the installation.
The Product Selection screen displays.
5. Select the applications you want to install and
click on [Next].
The Selected Products screen displays.
6. Verify the listed applications and click on
[Next]. If you need to delete or add to the list,
click on [Back] and reselect.
7. Verify your user information and click on
[Next].
ELIXIRSCAN USER GUIDE 1-23
Page 31

INTRODUCTION
8. In the Select Install Type screen, select
[Custom] and click on [Next].
9. In the Configuration Only? screen:
Selecting [Yes] allows you to load Configuration, Program, and Data files into any resident directory.
Selecting [No] allows you to deselect options
you do not wish installed.
10. Select the Programs Folder in which you want
Elixir software installed (Elixir Applications is
the default), then click on [Next].
11. In the Backup Replaced Files screen, click on
[Yes], if you want to make back-up copies of
all files replaced during installation and select
the directory where the back-up files will be
placed. Then click on [Next].
12. In the Start Copying Files screen, click on
[Install].
Installation begins.
13. Once installation is complete, click on [Exit
Installer].
Adding applications
If you did not install all of the Elixir options while performing the Custom installation procedure, you can do
so at any time by following the steps described in the
"Custom installation" section of this chapter.
Adding newly licensed applications
If you purchase additional Elixir products, Elixir will
update your password file. You can access the Product Registration program from your program group
and re-download your initial product registration password file to activate your new products.
1-24 ELIXIR TECHNOLOGIES CORPORATION
Page 32

Starting ElixirScan
After installation, double-click on the ElixirScan icon in
the Elixir Applications program group to start the
application.
The ElixirScan main screen displays.
INTRODUCTION
Figure 1-1. ElixirScan main screen
Exiting ElixirScan
To exit ElixirScan pull down the Exit menu and click
on [OK] in the dialog box that displays. Alternatively,
press <Alt> + <X>.
ELIXIRSCAN USER GUIDE 1-25
Page 33

2. ElixirScan basics
This chapter presents an overview of ElixirScan and
includes information on setting ElixirScan defaults.
You should read this section before performing any
conversion operations.
ElixirScan overview
This section presents an overview of ElixirScan and
includes information on the following:
electronic form storage
ElixirScan form recognition
ElixirScan advantages
ElixirScan features
files generated by ElixirScan
using ElixirScan with other Elixir products
Electronic form storage
With the advent and recent price reduction in mass
electronic storage, organizations which use paper
forms to store various kinds of data have shown interest in electronically storing this information. Storing
information electronically has the advantage of highspeed accessibility, retrieval, and printing.
Previously, companies that wanted to store existing
forms electronically had two options available. One
was to manually recreate each form using some type
of form creation package, and the other was to scan
the form and store it as a bitmapped image.
ELIXIRSCAN USER GUIDE 2-1
Page 34

ELIXIRSCAN BASICS
The drawback to manually recreating forms is that it is
extremely time consuming, especially for large corporations which typically process hundreds of forms.
The drawbacks to bitmap storage are:
Large storage space is required.
Bitmaps are difficult to edit, because form
elements such as boxes, lines, and text require adding or deleting individual pixels.
Bitmaps print slowly.
The Elixir solution
ElixirScan uses Elixir's R2V (Raster-to-Vector) technology to recognize rasterized form elements on a
scanned form and convert them to editable text and
vectorized lines, boxes, and shades.
ElixirScan only converts black-and-white .PCX or .LP3
(Elixir) images.
Advantages of using ElixirScan
The advantages of using ElixirScan are:
Bitmapped form elements are converted into vectorized lines, boxes, and shades which can be edited through simple click and drag operations.
Bitmapped text is converted into ASCII text which
can be edited from the keyboard by inserting or
deleting individual characters.
ElixirScan provides editing features to help you
verify and correct the results of form recognition.
2-2 ELIXIR TECHNOLOGIES CORPORATION
Page 35

ElixirScan enables you to save the results of form
recognition as an Elixir form file (.ELX) which you
can view, edit and (depending on the version of
the Elixir Desktop you have) convert into AFP,
Xerox, or PostScript printer formats.
Your printers maintain their printing speed.
ElixirScan features
ElixirScan includes the following helpful features:
recognition of lines, boxes, shades, text, and
graphics
batch processing which enables you to convert a
group of files at one time
Recognita Plus OCR package for text recognition
editing features to correct the results of form
recognition
Files generated by ElixirScan
ELIXIRSCAN BASICS
After form recognition, ElixirScan generates the following two files, depending on the defaults you set
(see the "Setting defaults" section of this chapter for
more information):
A .FSC (form scan cells) file which ElixirScan
uses to store the results of form recognition.
Also, you can edit this file in ElixirScan and save it
as a .ELX file using the editing features described
in the "Editing .FSC files" chapter.
If you do not have an ElixiKey, ElixirScan generates a .FSX file which you can use to view the results of form recognition on the PC screen. This
file is not printable and cannot be converted to
.ELX format.
ELIXIRSCAN USER GUIDE 2-3
Page 36

ELIXIRSCAN BASICS
An Elixir-format form file (.ELX) which you can
view, print, and edit using ElixirForm for AFP or
ElixiForm. Depending on the version of the Elixir
Desktop installed on your PC, you can convert the
Elixir form file into a number of different AFP,
Xerox, and PostScript printer formats.
Using ElixirScan with other Elixir products
This section provides a procedural overview of how to
use ElixirScan with other Elixir products to convert a
form (stored as an image in .PCX or .LP3 format) to
an .ELX file which you can convert into AFP, Xerox, or
PostScript printer formats. Using ElixirScan in detail
is described in subsequent chapters.
1. Set the appropriate parameters and start the
form recognition process to convert your
image file(s) to form format (.FSC).
To set default parameters, see the "Setting defaults" section of this chapter.
To start form recognition, see the "Starting form
recognition" chapter of this user guide.
2. Use the procedures described in the "Editing
.FSC files" chapter of this user guide to verify
the results of form recognition and manually
edit form elements that are not recognized
correctly.
3. Use the procedures described in the "Starting
form recognition" or "Editing .FSC files"
chapter of this user guide to save the results
of form recognition as a .ELX file.
4. Use ElixiForm or ElixirForm for AFP to add
form elements such as lines, boxes, shades,
and text to the .ELX file created above.
5. Convert the .ELX file to the appropriate AFP,
Xerox, or PostScript printer format using the
appropriate Elixir Desktop.
2-4 ELIXIR TECHNOLOGIES CORPORATION
Page 37

ElixirScan basics
This section provides an overview of ElixirScan features which you can access from the main screen.
The ElixirScan main screen is shown in the following
figure. A Work area displays at the center. The Menu
bar and Toolbar display above the Work area, and the
Edit panel displays to the left of the Work area.
Menu Bar Toolbar
Edit panel
ELIXIRSCAN BASICS
Work area
Description area
Figure 2-1. ElixirScan main screen
ELIXIRSCAN USER GUIDE 2-5
Page 38

ELIXIRSCAN BASICS
Overview of features
This section gives you an overview of ElixirScan features and refers you to other chapters where features
are explained in detail.
Menu bar
The ElixirScan Menu bar contains the following menus
and commands:
Exit
Clicking on Exit (or pressing <Alt> + <X>) allows you
to exit ElixirScan.
Scan
Clicking on Scan (or pressing <Alt> + <S>) brings up
the ElixirScan Control dialog box from which you can
start form recognition (see the "Starting form recognition" chapter of this user guide).
Edit
The options in this menu allow you to load and save
.FSC files, and to save your .FSC file as a .ELX file.
Edit menu operations are described in the "Editing
.FSC files" chapter of this user guide.
Preferences
The options in this menu allows you to set the default
settings described in the "Setting defaults" section of
this chapter.
Help
This menu allows you to access the on-line help
options.
Toolbar
The Toolbar contains two groups of buttons: the view
buttons on the left, and the edit support buttons on the
right.
The view buttons allow you to change the view settings when displaying an image or .FSC file (see the
"Editing .FSC files" chapter for a description of these
buttons).
2-6 ELIXIR TECHNOLOGIES CORPORATION
Page 39

ELIXIRSCAN BASICS
The edit support buttons allow you to rotate an image
or .FSC file and zoom in and out (see the "Editing
.FSC files" chapter for a description of these buttons).
Placing the cursor over any icon in the Toolbar displays a description of the icon function in the description area (see the "Description area" section of this
chapter).
Edit panel
The Edit panel allows you to perform the editing functions described in the "Editing .FSC files" chapter.
Figure 2-2. Edit panel
Position the cursor over any icon in the Edit panel to
display a description of the icon function in the description area.
Description area
This area displays a description of any of the icon
functions in the Toolbar or Edit panel. Position the
cursor over any icon to display a description of the
icon function.
ELIXIRSCAN USER GUIDE 2-7
Page 40

ELIXIRSCAN BASICS
The description area also displays the name of a
loaded .FSC file, the position of the cursor (in x and y
coordinates), and the number of form elements selected for editing (see the "Editing .FSC files" chapter).
Setting defaults
ElixirScan provides you with a series of easy-to-use
dialog boxes to set up defaults for form recognition.
To access the Preferences menu, select Prefer-
ences from the Menu bar (or press <Alt> + <P>); the
Preferences menu displays.
Figure 2-3. Preferences menu
From the Preferences menu, you can control the following default options:
Default Directory Setup
Process Options
OCR Options
Output Control
Default Text Properties
Spell Checker Setup
Font Mapping Setup
Key Mapping Setup
All of the above options are described in the following
sections of this chapter.
To set a default option from the Preferences dialog:
2-8 ELIXIR TECHNOLOGIES CORPORATION
Page 41

1. Select an option by clicking on it or by
pressing its associated underlined hotkey.
For example, the hotkey for the Default Directory
Setup option is <D>.
Hotkeys are mentioned throughout the following
chapters where appropriate.
2. In the displayed dialog box, make the desired
selections or entries and click on [OK] to save
your changes, or on [Cancel] to abandon your
changes.
You can specify file paths by typing the path and
filename in the appropriate option, or by clicking
on the [D] button to select the directory and filename from the Find Directory dialog box.
Default Directory Setup
To set Default Directory Setup options select [Default
Directories] or press <D> to display the Default Directory Setup dialog box.
ELIXIRSCAN BASICS
Figure 2-4. Default Directory Setup dialog box
Input Images
Specify the directory in which the image files to be
converted to form format are located.
ELIXIRSCAN USER GUIDE 2-9
Page 42

ELIXIRSCAN BASICS
Form Output
Specify the directory to which you want .ELX files
saved; the default directory is
drive:\ELIXIR\FORMS\ELIXIR\DEMO\.
Select [Suppress Output] if you do not want to generate a .ELX file.
FSC Output
Specify the directory to which you want .FSC files written; the default directory is
drive:\ELIXIR\FORMS\FSC.
Select [Suppress Output] if you do not want to generate a .FSC file.
Good Images
Specify a directory and select [Move to above dir] if
you want the image files that are successfully converted to .FSC and/or .ELX files moved to a directory
other than the one specified in the [Input Images] option.
Select [Retain] to leave all image files in the Input Im-
ages directory.
Select [Delete] to delete all successfully converted image files from the [Input Images] directory.
Bad Images
Specify a directory and select [Move to above dir], if
you want image files that are not successfully converted to .FSC and/or .ELX files moved to a directory
other than the one specified in the [Input Images] option.
Select [Retain] to leave the image files in the [Input
Images] directory.
Select [Delete] to delete all image files that were not
successfully converted to .FSC and/or .ELX format
from the [Input Images] directory.
2-10 ELIXIR TECHNOLOGIES CORPORATION
Page 43

ELIXIRSCAN BASICS
Elixir Fonts
Elixir form files (.ELX) do not actually contain fonts;
instead, fonts are referenced on the form from the
drive:\ELIXIR\FONTS\ELIXIR\ directory when a form
is printed. When ElixirScan writes an .ELX file it puts
pointers in the file that reference this directory.
We recommend that you do not change this directory.
If you must change this directory, change the directory
from which fonts are referenced in ElixiForm or ElixirForm for AFP to the same directory; otherwise fonts
may not print correctly on your form.
To view fonts in ElixiForm or ElixirForm for AFP, you
must first generate screen versions of the font using
the Elixir Desktop (see the appropriate Elixir Desktop
user guide for details).
Elixir KMPs
You can map your keyboard to any available mapping
table in drive:\ELIXIR\FONTS\MAPS.
Elixir Logos
You can capture Elixir image files (.LP3) in ElixirScan
Edit mode or import them into ElixiForm or ElixirForm
for AFP. The default directory is
drive:\ELIXIR\PICS\PRINTER\.
Spell Checker
Specify the directory in which your spell checker is located. The default is drive:\ELIXIR\SPELL.
Process Options
To set Process Options, select [Process Options] or
press <P> to display the Process Options dialog box.
ELIXIRSCAN USER GUIDE 2-11
Page 44

ELIXIRSCAN BASICS
Figure 2-5. Process Options dialog box
Process Type
Select [Pause after each image] if you want ElixirScan to pause between each file conversion.
Select this option if you are processing a group of files
and plan to change process options between file
conversions.
Files to Select
Select [Process all files in directory] if you want ElixirScan to convert all the files in the Input Images directory to .ELX and/or .FSC files (this feature is also
referred to as batch processing).
Input Type
Click on the down arrow and specify the type of file
you want to convert: [ELIXIR] or [PCX].
Main Text Orientation in input
Select [Autodetect] (the default) for automatic detection of page orientation. To specify orientation, select
[Portrait], [Landscape], [Inverse Portrait] or [Inverse
Landscape] orientation.
Time Limit
Specify the maximum time (in minutes) you want ElixirScan to take when converting an image.
2-12 ELIXIR TECHNOLOGIES CORPORATION
Page 45

ELIXIRSCAN BASICS
The maximum image conversion time is 180 minutes.
Processing time depends on the complexity of the
form.
Default Resolution
ElixirScan uses certain internal constants based on an
image's resolution when performing form recognition.
In the [Default Resolution] option, specify the resolution of the image file(s) being converted. The default
resolution setting is 300 dpi.
Select [use default] if your input image resolution is
300 dpi.
If you do not know the input image resolution select
[use value in file] to use the resolution in the file.
Select [prompt] if you want ElixirScan to display a dialog box showing the resolution of your image. When
the dialog box appears you will have the choice of
processing the image at the current resolution or canceling form recognition.
Batch/Log
ElixirScan is capable of processing more than one
form at a time. To perform this operation, you can
manually specify multiple files in a directory or you can
write a batch file that specifies multiple directories.
To reference a batch file, specify the name of your
batch file in the [Batch/Log] option. You can also click
on the [D] button to select the directory and filename
from the Find Filename dialog box.
Select [Do Batch/Log process at start-up] if you want
ElixirScan to read your batch file and process all of the
files in it automatically when you start ElixirScan.
For batch file examples, refer to the on-line help.
ELIXIRSCAN USER GUIDE 2-13
Page 46

ELIXIRSCAN BASICS
OCR options
ElixirScan includes the third-party Recognita Plus™
Optical Character Recognition (OCR) program to recognize text. Text recognition consists of converting
bitmapped text into ASCII text, which you can edit by
inserting or deleting individual characters from the
keyboard.
To select an OCR option, click on [OCR Options] or
press <C> to display the OCR dialog box.
Figure 2-6. OCR options dialog box
OCR option
Click on the down arrow and select [NONE] or
[RECOGNITA]
[NONE] turns off text recognition.
Selecting [RECOGNITA] turns on text recognition.
Output Control
To set Output Control options, select [Output Control]
or press <U> to display the Output Control dialog box.
2-14 ELIXIR TECHNOLOGIES CORPORATION
Page 47

ELIXIRSCAN BASICS
Figure 2-7. Output Control Options dialog box
Shift ELX output (in 300 dpi dots)
This option allows you to shift your .ELX print output
horizontally (x) and vertically (y).
A positive x value shifts .ELX output to the right and a
negative x value shifts .ELX output to the left by the
number of dots specified.
A positive y value shifts .ELX output upward and a
negative y value shifts .ELX output downward by the
number of dots specified.
Scale ELX output (in percent)
This option allows you to resize your .ELX output in independent horizontal (x) and vertical (y) percentages
which you specify in the (x) or (y) option.
A positive x value scales the .ELX file to the right and
a negative x value scales the .ELX file to the left by
the number of dots specified.
A positive y value scales the .ELX file upward and a
negative y value scales the .ELX file downward by the
number of dots specified.
Exclude following element types in output
This option allows you to exclude a form element type
([rule], [shade], [box], [text line]) from your .ELX and/or
.FSC output. Specify the type of element you want to
exclude by selecting the element.
ELIXIRSCAN USER GUIDE 2-15
Page 48

ELIXIRSCAN BASICS
Enable text blocking properties
This option enables ElixirScan to interpret multiple text
lines, bounded by a box (for example, text in a table
cell), as a text block rather than as individual lines of
text.
ELX character set
If the characters of ELX forms in European languages
do not display correctly, click on the down arrow to
change the character set and then regenerate the
ELX file. The default character set of ElixirScan is
ANSI. ASCII is the IBM PC Extended character set.
Add control message line in ELX output
Selecting this option adds a text line which includes
the operator name, the filename and time and date information to the top of your .ELX output file.
Operator
This is a control feature which allows you to specify
the name of the person (operator) converting images
to .ELX format. The name displays on your .ELX
output.
Default Text Properties
To set Default Text Properties options, select [Default
Text Props] or press <T> to display the Default Text
Properties dialog box.
Figure 2-8. Default Text Properties
dialog box
Text property changes will only take effect if you have
a matching entry in your font table (see the "Font Mapping Setup" section of this chapter for more
information).
2-16 ELIXIR TECHNOLOGIES CORPORATION
Page 49

ELIXIRSCAN BASICS
When applying the following options to text, you will
not see your changes. To see your changes, save
them to your .ELX file (as described in the "Editing
.FSC files" section of chapter 4) and view the .ELX file
in ElixiForm or ElixirForm for AFP.
size
Specify a point size.
lpi
Specify the number of lines of text per inch you want.
wrap
Specify [On] or [Off].
[On] creates boxed text when you select a [box posi-
tion] (see the [box position] option). Boxed text is
bound by columns which you can size in ElixirScan,
ElixiForm, or ElixirForm for AFP.
[Off] creates free text. Free text is not bound by columns; only by the width of the form.
justification
If you select [On] in the [wrap] option, specify the justification as follows:
Select [Left] for left justification
Select [Center] for center justification
Select [Right] for right justification
Select [Full] for full justification
These options have no affect on text when you select
[Off] in the [wrap] option.
box position
If you select [On] in the [wrap] option, selecting a box
position creates boxed text. Specify the vertical positioning of the text inside the box as [Top], [Center], or
[Bottom].
Use this option with the [justification] option to place
the text in nine positions within the box.
ELIXIRSCAN USER GUIDE 2-17
Page 50

ELIXIRSCAN BASICS
Spell Checker Setup
Before you can spell check your .FSC file you must
set up your spell checker. Select [Spell Checker
Setup] or press <S> to display the Spell Checker
Setup dialog box.
Figure 2-9. Spell Checker Setup dialog box
Languages
To specify a language, type the language name or
click on the down arrow and choose a language from
the drop-down list. Currently, ElixirScan supports
English, Spanish and French (for additional language
support call Elixir).
Dialect
To specify a dialect, type the dialect name or click on
the down arrow and choose a dialect from the dropdown list. Currently, the only dialect supported is
American.
Lexicon Supplements
This option allows you to select the type of writing
([Business], [Medical], [Legal], or [Science]) used in
your .FSC file. This ensures that standard rules for
business, medical, legal, or science writing are applied during spell checking. This option only applies to
English Standard.
2-18 ELIXIR TECHNOLOGIES CORPORATION
Page 51

ELIXIRSCAN BASICS
Processing Correction Defaults
Select the [Provide Alts. If not found] option to display
alternatives for a word that is not found in the spell
check dictionary.
Select the [Provide Alts. From Personal Dic] option to
display alternatives from your personal dictionary (see
the [Personal Dictionary] option) for a word that is not
found in the spell check dictionary.
Select the [Perform Space Insertion] option to insert
missing spaces between incorrectly entered words.
For example, the spell checker changes "andthe" to
"and the" if you select this option.
Select the [Remove Final Period] option to automatically remove the period from the end of a word before
examining it. For example, the spell checker changes
"and.." to "and."
Personal dictionary
This option allows you to add one or more of your own
dictionaries to the spell checker (see the "Adding personal dictionary" section). You can also add or delete
words from your personal dictionary, see the "Editing
personal dictionary" section for more information.
Adding personal dictionary
To add a personal dictionary to the spell checker:
1. Click on [Add].
The Find Filename dialog box displays.
ELIXIRSCAN USER GUIDE 2-19
Page 52

ELIXIRSCAN BASICS
Figure 2-10. Find Filename dialog box
2. Select the directory and filename for your
dictionary.
3. Click on [OK] or press <Enter>.
If you added the wrong dictionary or want to remove a dictionary from the list, highlight the appropriate dictionary and click on [Remove].
Editing personal dictionary
To edit a personal dictionary:
1. Select the dictionary you want to edit from the
Personal Directories list.
2. Click on [Edit].
The Edit Personal Dictionary dialog box displays.
2-20 ELIXIR TECHNOLOGIES CORPORATION
Page 53

ELIXIRSCAN BASICS
Figure 2-11. Edit Personal Dictionary
dialog box
3. Enter the word you want to add, delete, or
verify in the [Edit word] option or select a
word from the word list.
4. Select one of the following options:
Click [Add] to add the word to your dictionary.
The word is also added to the word list.
Click [Delete] to remove the word from your dictionary. The word is also deleted from the word
list.
Click [Verify] to verify that the word is in the dictionary. The message area at the bottom of the
dialog box displays a message indicating the results of the search.
Click [Display] to refresh the display of the words
in the word list.
The [Wild] option is reserved for future use.
5. Click on [OK] or press <Enter>.
ELIXIRSCAN USER GUIDE 2-21
Page 54

ELIXIRSCAN BASICS
Font Mapping Setup
Font Mapping Setup allows you to map OCR fonts to
Elixir fonts using Elixir font tables or your own font table. This is important because you need to have Elixir
versions of fonts on your form (.ELX file) in order for
the fonts on your form to print correctly.
A font mapping table is a file that has a set of mapping
rules. Each rule has a typeface constraint, a style
constraint, and a font name.
When ElixirScan is given a set of font characteristics
(typeface, style, size), it scans the current font table
for the first mapping rule that satisfies the characteristics and then extracts the font name from the font
table.
The font mapping table provided with ElixirScan (an
ASCII file named FONTS1.STP in the
drive:ELIXIR\ELXSCAN directory) maps OCR fonts to
corresponding Elixir fonts in the
drive:\ELIXIR\FONTS\ELIXIR directory. This file is
named following standard DOS conventions.
The drive:\ELIXIR\FONTS\ELIXIR\ directory contains
generic Elixir fonts (.HDR).
: To open your form in ElixirForm, ensure
Note
Screen versions of your fonts are present. For procedures to generate Sreen fonts, see your Desktop User
Guide.
Once OCR fonts are mapped to corresponding Elixir
fonts, you can use the Elixir Desktop to convert your
.ELX file to a number of different AFP, Xerox, or PostScript formats (depending on the version of the Elixir
Desktop you have).
You can also create and load your own font table.
Your font table can have any name (using DOS conventions), but must reside in the
drive:ELIXIR\ELXSCAN directory.
The lines in your font table must be in the same format as the lines shown in the "Font table considerations" section of this chapter.
2-22 ELIXIR TECHNOLOGIES CORPORATION
Page 55

ELIXIRSCAN BASICS
Font table considerations
Due to the different positioning conventions used for
AFP and Xerox fonts, you must insert one of the following key words: AFP or XEROX (in upper case) as
the first line of your font table. This ensures proper
font orientation in .ELX output files.
Inserting AFP as the first line of your font table
ensures that OCR fonts are mapped to Elixir fonts
using AFP font positioning criteria: bounded box
(X0) fonts or unbounded box (X1-X4) fonts.
Bounded box font orientation is adjusted using
internal constants inside ElixirScan.
For unbounded font orientation, ElixirScan automatically replaces the second letter of the font
name with one of the following numerical values:
"1" for across (0°), "2" for down (90°), "3" for back
(180°), or "4" for up (270°).
Inserting XEROX as the first line of your font table
ensures that OCR fonts are mapped to Elixir
fonts with Xerox font positioning criteria.
For correct font orientation, ElixirScan automatically replaces the last letter of the font with one of
the following letters: P (portrait), L (landscape), I
(inverse portrait), or J (inverse landscape).
If you do not insert keywords into your font table, OCR
fonts are mapped to Elixir fonts using Xerox font positioning criteria, unless all of the font names in your
font table begin with X0 or X1.
If all font names begin with X0, ElixirScan assumes
the font table is an AFP table and maps OCR fonts to
Elixir bounded box (X0) fonts.
If all font names begin with X1, ElixirScan assumes
the font table is an AFP table and maps OCR fonts to
Elixir unbounded box fonts.
Font table structure
The lines in a font table are written in the following
format:
ELIXIRSCAN USER GUIDE 2-23
Page 56

ELIXIRSCAN BASICS
typeface style size fontname
where:
typeface is the font family (for example, Times or Hel-
vetica) of the OCR font.
style is the type of print (for example, Bold or Italic) of
the OCR font.
size is the point size of the OCR font.
fontname is the Elixir font to which you want the OCR
font mapped.
Note: During initial Form Recognition, the OCR pack-
age only recognizes font size - as a result this is the
only criteria used in the initial font mapping. However,
typeface and style can be specified after initial processing (see "Font Mapping" procedures section).
Font Mapping Procedures
Since typeface and style characteristics are ignored
during Form Recognition, adding these attributes to
your text requires the following post-processing:
1. After Form Recognition open your .FSC file.
2. Select a block of text and (using the Edit
panel or the Default Text Properties dialog
box) change the properties of the text.
The properties you specify are matched against
the entries in your font table until a true condition
is reached.
Example
You have setup your font table as follows:
- - <=12 HE12NP
TImes B >= - TR14BP
During initial processing a block of your text is
recognized as being 12 points so it is mapped to
the corresponding Elixir HE12NP font.
However, after Form Recognition you want the
selected text block to be a Times font which you
have mapped to the Elixir TR14BP font.
2-24 ELIXIR TECHNOLOGIES CORPORATION
Page 57

ELIXIRSCAN BASICS
To do this, change the properties in the Edit
Panel or the Default Font Properties Setup dialog
box so that it matches the second condition in
your font table. Since your Times entry does not
specify a point size, change the typeface property
to Times to satisfy the second statement of your
font table which maps the font to the Elixir
TR14BP font.
When your font is mapped to a new Elixir font, the
name of the font in the Elixir fontname box
changes.
3. Save your changes (pull down the Edit menu
and select the appropriate save option).
Save options are described in the "Saving .FSC
and .ELX files" section of the Editing .FSC files
chapter).
Editing
You can use ElixirScan to edit a font table. To edit a
font table using ElixirScan:
1. Select [Font Mapping Setup] from the
Preferences menu to display the Font
Mapping Setup dialog box.
Figure 2-12. Font Mapping Setup dialog box
2. Click on [Load] to make the table displayed in
the [Filename] option the current font table.
3. Click on [Edit] to display the Edit Font Table
dialog box.
ELIXIRSCAN USER GUIDE 2-25
Page 58

ELIXIRSCAN BASICS
Xerox and AFP
buttons
Edit area
Edit area
buttons
Font table
Scrollbar
Figure 2-13. Edit Font Table dialog box
4. Click on the [Xerox] or [AFP] button to insert
XEROX or AFP as the first line of your font
table.
5. Select a line from the font table and then click
on the [Get] button.
The font line's components (typeface, style, size,
and fontname) are displayed in the edit area.
Use the scrollbar to scroll through the font table.
6. Edit the individual components of the line.
Typeface
Click on the down arrow and select a typeface for
the OCR font. Selecting the dash (-) specifies an
indeterminate font face; this enables font mapping of an OCR font whose font face the OCR
program did not recognize.
Style
Click on the down arrow and select a style for the
OCR font. Selecting the dash (-) specifies an indeterminate style; this enables font mapping of an
OCR font whose font style the OCR program did
not recognize.
2-26 ELIXIR TECHNOLOGIES CORPORATION
Page 59

ELIXIRSCAN BASICS
size
Click on the down arrow and select a point size
for the OCR font. Alternatively, click inside the
size box and type a value.
Specify whether the OCR font must be equal [=],
greater than or equal to [>=], or less than or equal
to [<=] the point size specified in the size box by
selecting those options.
fontname
Click on the [D] button to display the Find Filename dialog box and select an Elixir font from the
ELIXIR\FONTS\ELIXIR directory. The OCR font
is mapped to the Elixir font you specify. Note that
Elixir fonts have a .HDR extension.
7. Click on one of the Edit area buttons.
[Insert before]. Click on this button to create a
new line in the font table (using the information in
the edit area) and insert this line in front of the
currently selected font line.
[Append]. Click on this button to create a new
line in the font table (using the information in the
edit area) and insert this line as the last line of
your font table.
[Replace]. Click on this button to replace the currently selected line in the font table with the line
displayed in the edit area.
[Remove]. Click on this button to remove the currently selected line from the font table.
[Unused font]. Click on this button to find a fontname that is not used anywhere in the current
font table from the directory specified as an Elixir
font directory in the Default Directories dialog box.
8. Click on [OK] or press <Enter> to save your
changes.
The Font Mapping Setup dialog box redisplays.
9. Click on [Save] to save the currently loaded
table as your new font table and then click on
[OK] or press <Enter>.
ELIXIRSCAN USER GUIDE 2-27
Page 60

ELIXIRSCAN BASICS
To accommodate your organization's font naming
convention, you can specify any fontname in a line entry (6 character maximum). Each line can have up to
4 entries, with each name separated by commas (for
example: 000001, 000002, 000003, 000004).
For example, if your organization calls the Helvetica,
24 point fonts Adam (portrait fontname), Bob (landscape fontname), Eve (inverse portrait fontname) and
Alice (inverse landscape fontname), you would enter:
Helvetica - >=24 Adam, Bob, Eve, Alice
rather than:
Helvetica - >=24 HE24NP
For correct font orientation, the order for the font-
names must be:
Portrait fontname
Landscape fontname
Inverse portrait fontname
Inverse landscape fontname
Prior to the addition of this process (and when using
the Efont factory), the last letter of the fontname was
changed to P, L, I or J, depending upon the orientation
of the font in the font table.
Key mapping
Select [Key Mapping Setup] or press <K> to display
the Hotkeys Setup dialog box. Hot keys are keys that
you press to give you quick access to options or
commands.
To view the list of all the ElixirScan functions that can
have a hot key:
1. Select [Key Mapping Setup] from the
Preferences menu.
The Hotkeys Setup dialog box displays.
2-28 ELIXIR TECHNOLOGIES CORPORATION
Page 61

ELIXIRSCAN BASICS
Figure 2-14. Hotkeys Setup dialog box
2. Click on [Load] to make the table displayed in
the [Filename] option the current hot keys
table.
3. Click on [Edit] to display the Edit Hotkeys
dialog box.
Figure 2-15. Edit Hotkeys dialog box
4. Select a hot key from the hot key table or
select one from the drop-down list in the [key]
option.
5. Select [Shift], [Control], or [Alt] to assign a
key combination for an option.
ELIXIRSCAN USER GUIDE 2-29
Page 62

ELIXIRSCAN BASICS
For example, if you select p in the [Key] option
and also select [Shift], the hot key combination is
<Shift> + <p>.
6. Click on [OK] or press <Enter>.
The Hotkeys Setup window redisplays.
7. Click on [Save] to save the current key
mapping table or on [Reset] to return to the
default key mapping table.
8. Click on [OK] or press <Enter>.
2-30 ELIXIR TECHNOLOGIES CORPORATION
Page 63

3. Starting form
recognition
This chapter describes how to start form recognition
using the Form Scan Control dialog box.
Starting form recognition
ElixirScan uses Elixir's R2V (Raster-to-Vector) technology to recognize rasterized form elements on a
scanned form and convert them to editable text and
vectorized lines, boxes, and shades.
ElixirScan converts only black-and-white .PCX or .LP3
(Elixir) images.
Form recognition generates the following files, depending on the defaults you set, or the parameters
you specify in the Form Scan Control dialog box:
ElixirScan uses a .FSC (form scan cells) file to
store the results of form recognition. You can edit
this file in ElixirScan and save it as a .ELX file using the editing features described in the "Editing
.FSC files" chapter.
You can view, print, and edit an Elixir-format file
(.ELX) and edit it using ElixirForm for AFP or
ElixiForm. Depending on the version of the Elixir
Desktop installed on your PC, you can convert the
Elixir form file into a number of different AFP,
Xerox, and PostScript printer formats.
If you have not specified default settings for ElixirScan, you may want to do so now (see the "ElixirScan basics" chapter).
ELIXIRSCAN USER GUIDE 3-1
Page 64

STARTING FORM RECOGNITION
To start form recognition:
1. Select Scan from the menu bar or press <Alt>
+ <S> to display the Form Scan Control dialog
box.
2. Set the appropriate parameters in the Form
Scan Control dialog box (see the "Form Scan
Control dialog box" section of this chapter for
a description of parameters).
Note that the parameters you set in the Form
Scan Control dialog box override any default
settings.
3. Click on [Start Recognition] or press <S> to
start form recognition.
When an image file is converted to .FSC and/or
.ELX format the Message area displays the message "Conversion successful."
Form Scan Control dialog box
This section describes the parameters and process
control buttons in the Form Scan Control dialog box.
Message area
Figure 3-1. Form Scan Control dialog box
3-2 ELIXIR TECHNOLOGIES CORPORATION
Page 65

STARTING FORM RECOGNITION
Input Options
Dir
Specify the name of the directory where image files to
be converted to .FSC and/or .ELX files are located.
File(s)
Specify the file(s) you want converted (you can use a
wildcard) to .FSC and/or .ELX format.
Select [All files in directory] if you want all the files in
the [Dir] directory converted.
Select [Pause after each image] if you want ElixirScan
to pause between file conversions when converting
more than one file. This allows you to change options
between files.
OCR option
ElixirScan includes the third-party Recognita Plus™
OCR software package for Text Recognition. Text
Recognition consists of converting bitmapped text into
ASCII text, which you can edit by inserting or deleting
individual characters from the keyboard.
To turn Text Recognition on, click on the down arrow
and select [RECOGNITA].
To turn Text Recognition off, click on the down arrow
and select [NONE].
Output Options
Forms
Specify the directory to which you want .ELX file(s)
written; the default directory is
drive:\ELIXIR\FORMS\ELIXIR\DEMO\.
If you do not want to generate .ELX file(s), select
[Suppress Output].
FSCs
Specify the directory to which you want .FSC file(s)
written; the default directory is
drive:\ELIXIR\FORMS\FSC.
If you do not want to generate .FSC file(s), select
[Suppress Output].
ELIXIRSCAN USER GUIDE 3-3
Page 66

STARTING FORM RECOGNITION
If you want to use ElixirScan in edit mode, you need to
generate FSCs.
Good Images
Select [Retain], [Move to], or [Delete].
[Retain] leaves all image files in the input directory
specified in [Dir].
[Move to] moves all image files that are successfully
converted to .FSC and/or .ELX files to the directory
specified in the [Move to] option.
[Delete] deletes all image files that are successfully
converted to .FSC and/or .ELX files.
Bad Images
Select [Retain], [Move to], or [Delete].
[Retain] leaves all image files that are not successfully
converted to .FSC and/or .ELX files in the input directory specified in [Dir].
[Move to] moves all image files that are not successfully converted to .FSC and/or .ELX files to the directory specified in the [Move to] option.
[Delete] deletes all image files that are not successfully converted to .FSC and/or .ELX files.
Process control buttons
The Form Scan Control dialog box contains the following process control buttons: [Start Recognition], [Abort
Now], [Pause after this image], and [Resume].
[Start Recognition] or pressing <S> starts form
recognition.
[Abort Now] or pressing <A> allows you to cancel form
recognition.
[Pause after this image] or pressing <P> allows you to
pause between the image being converted and the
next image when converting more than one file. This
allows you to change parameters between files.
3-4 ELIXIR TECHNOLOGIES CORPORATION
Page 67

STARTING FORM RECOGNITION
[Resume] or pressing <R> allows you to resume form
recognition after pausing.
ELIXIRSCAN USER GUIDE 3-5
Page 68

4. Editing .FSC files
A .FSC file (ElixirScan's own form format file) stores
the results of form recognition and can be edited using
the procedures described in this chapter. Although
you cannot print a .FSC file, you can save this file as a
.ELX file which you can be print and convert to a number of different formats using the Elixir Desktop.
Editing a .FSC file consists of the following procedures which are described in subsequent sections of
this chapter:
loading the .FSC file you want to edit
editing the .FSC file
and saving the .FSC file
Loading a .FSC file
When you load a .FSC file you have the option of
loading the original image (or raster) next to the .FSC
file for comparison.
To load a raster or .FSC file, pull down the Edit menu
and select [Open]. The Open Raster/Form Elements
dialog box displays.
ELIXIRSCAN USER GUIDE 4-1
Page 69

EDITING .FSC FILES
Figure 4-1. Open Raster/Form Elements
dialog box
To load a raster, select the [Raster Image] option,
specify the filename and directory in the raster filename and directory options, and then click on [OK].
The raster displays in the Raster Image window. Alternatively you can click on the [D] button and specify
a filename and directory using the Find Filename dialog box.
To load a .FSC, select the [FSC (Form Elements)] option, specify the filename and directory in the form elements filename and directory options, and then click
on [OK]. The .FSC file displays in the Form Elements
window. Alternatively you can click on the [D] button
and specify a filename and directory using the Find
Filename dialog box.
The following figure displays a raster and .FSC file
loaded side by side in separate windows. You can
open or close these windows, or change the way they
display by using the view buttons in the Toolbar (see
the "Editing supports" section of this chapter for details).
4-2 ELIXIR TECHNOLOGIES CORPORATION
Page 70

EDITING .FSC FILES
View window View buttons Edit support buttons
Description area
Figure 4-2. Raster and .FSC loaded side by side
You can zoom in or out of a raster or .FSC file, or rotate the raster or .FSC file by using the edit support
buttons in the Toolbar (see the "Editing supports" section of this chapter for details).
To scroll through a raster or .FSC file, click on the up
and down or left and right arrows next to the view window or use the arrow keys.
The description area displays the .FSC filename, the
position of the cursor (in x and y coordinates), and the
number of form elements selected for editing (see the
"Editing" section of this chapter).
Editing supports
Editing support tools affect the way raster and .FSC
files display on the screen. These tools also allow you
to display the Text window. The editing support tools
are divided into two sets of features: the view buttons
and the edit support buttons.
ELIXIRSCAN USER GUIDE 4-3
Page 71

EDITING .FSC FILES
View buttons
Clicking on the view buttons at the left of the Toolbar
(or using keyboard shortcuts) allows you to open and
close, and to reposition the Form Elements, Raster
Image, and Text windows. The view buttons are described below.
Form Elements (<Alt> + <F>)
This feature toggles between opening and closing the
Form Elements window. Closing this window erases
any FSC data in memory associated with it.
Raster Image (<Alt> + <R>)
This feature toggles between opening and closing the
Raster Image window. Closing this window erases
any raster data in memory associated with it.
Text (<Alt> + <T>)
This feature toggles between opening and closing the
Text window. Opening the text window allows you to
edit the results of text recognition (see the "Editing
OCR results" section of this chapter). Closing this
window does not affect any FSC data.
Form Elements top (<Alt> + <1>)
This feature positions the Form Elements window over
the Raster Image window. Click on the [Form/Raster]
button to toggle between displaying the Form Elements or Raster Image window.
Form and Raster side by side (<Alt> + <2>)
This feature positions the Form Elements and Raster
Image windows side by side.
Raster below (<Alt> + <3>)
This feature positions the Raster Image window below
the Form Elements window.
Form/Raster and Text (<Alt> + <4>)
This feature positions the Text window below the
Form Elements window. Click on the [Form/Raster]
button to toggle between showing the Form Elements
or Raster Image window.
All (<Alt> + <5>)
This feature positions the Form Elements and Raster
Image windows side by side, and the Text window below the Form Elements and Raster windows.
4-4 ELIXIR TECHNOLOGIES CORPORATION
Page 72

EDITING .FSC FILES
Optimize/same (<Alt> + <6>)
This feature optimizes the size of the Form Elements,
Raster Image, and Text windows so that they all display at the same size.
Optimize/all
This feature optimizes the size of the Form Elements,
Raster Image, and Text windows so that they all display on the screen.
Form/Raster
This feature allows you to toggle between displaying
the Form Elements or the Raster Image window.
Edit support buttons
Clicking on the edit support buttons on the right of the
Toolbar (or using keyboard shortcuts) allows you to
zoom in or out of a raster or .FSC, and rotate the
raster or .FSC. The edit support buttons are described below.
Center selection
This feature positions the raster or .FSC file so that a
selected form element (see the "Editing a .FSC file"
section of this chapter) is displayed at the center of
the corresponding Raster Image or Form Elements
window. Alternatively, you can <Alt>-click any area of
the raster or .FSC file to display the area you click on
at the center of the corresponding Raster Image or
Form Elements window.
Fit (<Alt> + <->)
This feature resizes a raster or .FSC file so that all of
its contents display in the corresponding Raster Image
or Form Elements window. This feature only affects
the way a raster or .FSC file displays in its corresponding window; it does not change the size of the
file on disk.
Actual size (<Alt> + <=>)
This feature displays a raster or .FSC file at actual
size in the corresponding Raster Image or Form Elements window.
ELIXIRSCAN USER GUIDE 4-5
Page 73

EDITING .FSC FILES
Zoom in (<Alt> + <I>)
This feature allows you to magnify the display of a
raster or .FSC file.
Zoom out (<Alt> + <O>)
This feature allows you to reduce the display of a
raster or .FSC file.
Rotate left
This feature rotates a raster or .FSC file to the left in
90 degree increments.
This option changes the raster or .FSC file on disk.
Rotate right
This feature rotates a raster or .FSC file to the right in
90 degree increments.
This option changes the raster or .FSC file on disk.
Flip
This option flips the raster or .FSC file 180 degrees.
This option changes the raster or .FSC file on disk.
Editing a .FSC file
The following sections describe ElixirScan editing features and procedures.
Editing operations in ElixirScan allow you to perform
the following:
change the attributes of form elements
delete form elements
breakup or join form elements
align form elements
edit OCR results
change the properties of form elements
Note: ElixirScan does not allow you to create form
elements. To create form elements you must use
ElixiForm or ElixirForm for AFP.
4-6 ELIXIR TECHNOLOGIES CORPORATION
Page 74

EDITING .FSC FILES
Editing operations are performed by selecting options
in the Edit panel, or clicking in appropriate boxes in
the Edit panel and typing numerical values. The icons
available in the Edit panel may change depending on
the form element selected for editing.
Click on icons
Click inside box and
enter a value
Figure 4-3. Edit panel
To edit a .FSC file:
1. Select the type of form element you want to
edit.
2. Select individual form elements to edit.
3. Edit the form element(s) using the edit panel
or the Edit pull-down menu.
Click on the OOPS button to undo an edit
operation.
4. Save the .FSC file using one of the options
described in the "Saving .FSC and .ELX files"
section of this chapter.
These procedures are described in detail in the following sections of this chapter.
ELIXIRSCAN USER GUIDE 4-7
Page 75

EDITING .FSC FILES
Form element types
The form recognition process recognizes four types of
form elements:
Lines
Boxes
Shades
Text
Graphics are not recognized as form elements in this
process. If you want to designate a selected area on
your form as graphic, you must manually select the
area in your .FSC file and save it as a graphic (see the
"Capturing graphics" section for more information).
Selecting a form element type
Before you edit form elements in your .FSC file, you
must first select the type of form element to edit by
clicking on one of the following Type options in the
Edit Control panel (all the following options are on by
default):
Lines. Select this option to edit horizontal and vertical
lines.
Boxes. Select this option to edit boxes.
Shades. Select this option to edit shades.
Text. Select this option to edit text.
Graphics. Select this option to edit graphics.
All. Select this option to edit all lines, boxes, shades,
text and graphics.
Multiple elements can be selected simultaneously..
4-8 ELIXIR TECHNOLOGIES CORPORATION
Page 76

Selecting individual form elements
After you select the type of form element you want to
edit, select individual form elements (of the type specified) in any of the following ways:
Click on a form element to select it.
Click and drag the mouse on your .FSC file to
draw a temporary selection box in the Work area.
Stretch the box while drawing it to enclose the
form elements you want to edit. When you release the mouse button the selection box no
longer displays. To deselect the selected form
elements, <Shift>-drag over the same area.
Click on one of the following Select icons (or use
keyboard shortcuts) to highlight the element:
EDITING .FSC FILES
First (<Ctrl> + <1>).
This option selects the first
form element of the type specified.
Previous (<Ctrl> + <<>).
This option selects the
previous form element of the type specified.
Next (<Ctrl> + <>>).
This option selects the next
form element of the type specified.
Last (<Ctrl> + <9>).
This option selects the last
form element of the type specified.
This option selects all the form elements of
All.
the type specified.
Shift-click on form elements to select more than
one form element. To select form elements without shift-clicking, use the selection buffer icons to
create a selection buffer.
A selection buffer contains single or groups of
form elements which can be highlighted for editing or viewing purposes. To create a selection
buffer:
Click on the Empty icon to ensure that there
1.
are no form elements in the selection buffer.
ELIXIRSCAN USER GUIDE 4-9
Page 77

EDITING .FSC FILES
2.
3.
Editing operations
This section describes ElixirScan editing operations in
step-by-step detail.
Changing form element types
ElixirScan allows you to change the type of a selected
form element. For example, if a line is recognized as
a shade by ElixirScan, you can select the shade and
change its type to that of a line.
Click on the form element you want to add to
the selection buffer and then click on the Add
icon. To keep adding additional form
elements to the selection buffer, repeat this
step for each form element added.
Click on the Replace button to select all the
items in the selection buffer.
This highlights all the form elements in the selection buffer.
If you want to remove a form element from the
selection buffer, click on the Remove button.
To change a form element type:
1. Select a form element.
Click on the [type] button.
2.
The Change Type dialog box displays.
Figure 4-4. Change Type
dialog box
4-10 ELIXIR TECHNOLOGIES CORPORATION
Page 78

EDITING .FSC FILES
3. Select an element from the Change Type
dialog box and then click on [OK].
The original form element is changed to the type
specified.
Deleting form elements
To delete form elements, select the form elements
you want to delete and click on the [Delete] option; the
form elements are deleted.
Breaking up
The [Break up] option splits a text block. To use this
option, select the text block you want to split and select the [Break up] feature.
Joining form elements (and text)
The [Join] option allows you to combine two or more
selected form elements into one element.
To join form elements:
1. Select a group of two or more elements that
you want to join into one element.
2. Select the [Join] option.
The Change Type dialog box displays.
3. Select the type of form element you want the
elements joined as and then click on [OK].
The group of elements becomes one element of
the selected type.
To join single lines of text into a text block:
1. Select the group of text lines you want to join.
2. Select the [Join] option.
ELIXIRSCAN USER GUIDE 4-11
Page 79

EDITING .FSC FILES
The lines of text display as a box, indicating that
the text is now a block of text (or boxed text).
See the [Box Position] option of the "Editing OCR
results" section of this chapter, for more details
on Box text options.
Aligning form elements
This option aligns form elements to begin at the same
point as the leftmost, rightmost, topmost, or bottommost form element in a selected group.
Select an option to align the left, right, top or bottom
edge of all the selected elements to the leftmost, rightmost, topmost or bottommost position of the selection.
The other three edges remain the same.
To align form elements, select the elements you want
to align. Select the [Align left], [Align right], [Align top]
or [Align bottom] option you want to use - the option
button starts to flash. Select the object you want the
others to align to and click on the flashing button.
Editing OCR results
This operation allows you to edit text recognition by
changing the text properties of a block of text to match
entries in your font table. To change text properties:
1. Select a block of text to edit.
If you are running ElixirScan on a high resolution
monitor additional icons display in the edit panel.
These icons allow you to set text properties and
correspond to the options described for the Text
Properties dialog box.
If you are running ElixirScan on a VGA monitor,
additional icons do not display in the Edit panel;
however, you can still change text properties by
accessing the Text Properties dialog box and selecting the appropriate options. Select [Props]
from the Edit menu to display the Text Properties
dialog box.
4-12 ELIXIR TECHNOLOGIES CORPORATION
Page 80

EDITING .FSC FILES
Figure 4-5. Text Properties dialog box
When applying the following options to text, you
will not see your changes. To see your changes,
save your changes to your .ELX file as described
in the "Saving .FSC and .ELX files" section of this
chapter and view the .ELX file in ElixiForm or ElixirForm for AFP.
Also, the property changes you make to your font
do not display if you do not have the font mapped
to an Elixir font with the same properties (see the
"Font Mapping Setup" section of the "ElixirScan
basics" chapter for more information).
face
Specify a font typeface (i.e. Helvetica, Times)
style
Specify a style (i.e. Normal, Italic, Bold)
size
Specify a point size.
fontname
The name of the Elixir font (in
drive:\ELIXIR\FONTS\ELIXIR) you want your
OCR font mapped to.
justification
If you select [On] in the [wrap] option, specify the
justification as follows:
Select [Left] for left justification
Select [Center] for center justification
ELIXIRSCAN USER GUIDE 4-13
Page 81

EDITING .FSC FILES
Select [Right] for right justification
Select [Full] for full justification
These options have no affect on text when you
select [Off] in the [wrap] option.
box position
If you select [On] in the [wrap] option, selecting a
box position creates boxed text. Specify the vertical positioning of the text inside the box as [Top],
[Center], or [Bottom].
Use this option with the [justification] option to
place the text in nine positions within the box.
lpi
Specify the number of lines of text per inch you
want.
wrap
Specify [On] or [Off].
[On] creates boxed text when you select a [box
position] (see the [box position] option). Boxed
text is bound by columns which you can size in
ElixirScan, ElixiForm, or ElixirForm for AFP.
[Off] creates free text. Free text is not bound by
columns; only by the width of the form.
2. Click on the Text option to display the Text
Edit window.
The text displays in two separate lines in the Text
Edit window.
Figure 4-6. Text Edit window
4-14 ELIXIR TECHNOLOGIES CORPORATION
Page 82

EDITING .FSC FILES
The Raster line displays the text as an image
(raster).
The Text line displays the text as recognized by
ElixirScan.
You can reposition the Text Edit window by using
the appropriate view feature, or by clicking in the
window header and dragging the window.
3. Edit the text using any of the following
methods:
Use the arrow keys to position the cursor to
the left or right of the text displayed in the
Text line; use the <Delete> key to remove
text that is positioned to the right of the cursor; or use the <Backspace> key to remove
text that is to the left of the cursor.
Highlight the text you want to edit in the Text
line (by clicking and dragging the mouse) and
use any of the options described directly
above.
Apply one of the following Text Edit window
options to the Raster line or the Text line:
[Split]
Use this option to split a text block into two
text blocks. Place the cursor in the Raster
line where you want the text block split and
then select the [Split] option. The text is split
in both the Raster line and Text line.
[Remove]
This option removes a non-character image
from the Raster line. Select the noncharacter image in the Raster line and then
select the [Remove] option. The noncharacter image is removed from the Raster
line and the Change Type dialog displays to
allow you to select a correct type for the noncharacter image.
ELIXIRSCAN USER GUIDE 4-15
Page 83

EDITING .FSC FILES
[Rotate]
Select this option to rotate the character images inside the Raster line window counterclockwise in 90° increments. This operation
only affects the display of the Raster line window and does not alter the raster data in any
way.
[OCR]
Select this option to apply the current OCR to
the text image in the Raster line. The OCR
used is the one specified in the Preferences
menu.
[Restore]
Select this option to restore the original text
contents of the current Text line. This operation only affects the text contents and any
changes to the text line attributes (typeface,
point size, etc.) are not lost.
[Spell]
After you set up your spell checker (described
in the "ElixirScan basics" chapter), select this
option to spell check your .FSC file. The following dialog box displays.
Figure 4-7. Spelling dialog box
Click on [Replace] (or press <R>) to replace a
word that was not in the dictionary with the
highlighted word from the suggestion box.
Click on [Ignore] (or press <I>) to continue on
to the next word.
Click on [Suggest] (or press <S>) to display
alternative words in the suggestion box.
4-16 ELIXIR TECHNOLOGIES CORPORATION
Page 84

EDITING .FSC FILES
If a word is not found in the dictionary, you
can add it to your personal dictionary.
To add a word to your personal dictionary:
1. Click on the down arrow and select a
personal dictionary.
2. Click on [Add to] or press <A>.
Changing the properties of form elements
You can change the properties for a selected form
element by selecting the element and then selecting
[Props] from the
menu. The property box for the
Edit
form element selected displays. You can also change
properties for a selected element by using the value
boxes.
Property boxes
If you are running ElixirScan on a high resolution
monitor, selecting a form element displays additional
property icons in the Edit panel which correspond to
the options described for the property boxes below.
To change the properties of a selected line (rule), select [Props] from the
menu to display the Rule
Edit
Properties dialog box.
Figure 4-8. Rule Properties dialog box
style
Select [Solid], [Dashed], or [Dotted] as your line style.
thickness
Select [Thin], [Medium], or [Thick] as your line
thickness.
To change the properties of a selected box, select
[Props] from the
menu to display the Box Proper-
Edit
ties dialog box.
ELIXIRSCAN USER GUIDE 4-17
Page 85

EDITING .FSC FILES
Figure 4-9. Box Properties dialog box
style
Select [Solid], [Dashed], or [Dotted] as your box style.
thickness
Select [Thin], [Medium], or [Thick] as the border thickness for your box.
To change the properties of a selected shade, select
[Props] from the Edit menu to display the Shade
Properties dialog box.
Figure 4-10. Shade Properties dialog box
shade style
Select [Light], [Medium], or [Dark] as your shade style.
Value boxes
The value boxes in the Edit panel allow you to set
width (w), height (h), left (l), right (r), top (t), and bottom (b) values for selected form elements. To change
any value, click in the appropriate box and type a new
value.
By clicking on the unit of measure button directly
above the height box, you can change the unit of
measure for all value boxes to centimeters, dots,
inches or points.
The width box allows you to specify a new width for
selected form elements.
The height box allows you to specify a new height for
selected form elements. This value determines the
amount of spacing between form elements.
4-18 ELIXIR TECHNOLOGIES CORPORATION
Page 86

The left box allows you to specify the amount of space
you want between the selected form element(s) and
the left side of the form.
The right box allows you to specify the amount of
space you want between the selected form element(s)
and the right side of the form.
The top box allows you to specify the amount of space
you want between the selected form ele-ment(s) and
the top of the form.
The bottom box allows you to specify the amount of
space you want between the selected form element(s) and the bottom of the form.
Saving .FSC and .ELX files
To save changes made during any editing operation
described in the preceding sections of this chapter,
pull down the Edit menu and select one of the following options:
EDITING .FSC FILES
[Save]
Saves any edits to your current .FSC file. This file is
saved to the directory specified in the Default Directory Setup dialog box or the directory specified under
[Output Options] in the Form Scan Control dialog box.
[Save As]
Saves any edits made during editing to a new .FSC
file.
[Save Form]
Saves any edits to your .ELX file. If you selected
[Suppress Output] as a default in the Default Directory
Setup dialog box or in the Form Scan Control dialog
box, this option generates a .ELX file. The file is
saved to the directory specified in the Default Directory Setup dialog box or the directory specified under
[Output Options] in the Form Scan Control dialog box.
ELIXIRSCAN USER GUIDE 4-19
Page 87

EDITING .FSC FILES
Capturing graphics
Graphics (i.e. logos) on a scanned form are not recognized by ElixirScan during the form recognition
process.
If you want to designate a selected area on your form
as graphic, you must manually select the area in your
.FSC file and save it as a graphic. To do this:
1. Select the area on your .FSC file you want
designated as a graphic.
Click on the [type] button; if you selected a
2.
group of form elements, click on the [Join]
option.
The Change Type dialog box displays.
Figure 4-11. Change type dialog box
3. Select [graphic] from the list of displayed
form elements.
4. Click on [OK] or press <Enter>.
5. Pull down the Edit menu and select [Props] or
press <Cntrl> + <P>.
The Graphics Properties dialog box displays.
Figure 4-12. Graphics property dialog box
4-20 ELIXIR TECHNOLOGIES CORPORATION
Page 88

EDITING .FSC FILES
6. Specify a filename for your graphic in the
[Filename] option or click on the D button to
select the filename from the Find Filename
dialog box.
7. Click on [Capture] and then click on [OK] or
press <Enter>.
The area you selected is now saved as a graphic
in drive:\ELIXIR\PICS\PRINTER.
If you save this file as a .ELX file, the selected
area on your form displays and prints as a
graphic.
ELIXIRSCAN USER GUIDE 4-21
Page 89

Index
A
Acrobat Reader, documentation, 1-10
Actual size button, 4-6
aligning form elements,
4-12
All button, 4-5
B
basics, 2-1, 2-5
before installation, 1-14
boxed text, 4-12
Boxes button, 4-9
breaking up form elements, 4-11
Bubble Help, 1-8
C
capturing graphics, 4-21
Center Selection button,
4-5
changing form element
properties, 4-17
Context sensitive Help,
1-9
conventions, 1-5
display, 1-5
mouse, 1-7
typographical, 1-6
customer support, 1-2
D
Default Directory
Bad Images, 2-10
Elixir Fonts, 2-11
Elixir KMPs, 2-11
Elixir Logos, 2-11
Form Output, 2-10
FSC Output, 2-10
Good Images, 2-10
Input Images, 2-10
setup, 2-9
Spell Checker, 2-11
default installation
first time, 1-22
Default Text Properties
box position, 2-18
justification, 2-18
lpi, 2-17
size, 2-17
wrap, 2-17
deleting form elements,
4-11
description area, 2-7
Desktop
installation, 1-21
Dialog box Help, 1-9
documentation
accessing, 1-10
Acrobat Reader,
1-10
directory, 1-10
navigating, 1-11
printing, 1-13
scrolling, 1-12
using, 1-10
word find, 1-12
zoom in/out, 1-13
E
edit, 2-6
ELIXIRSCAN USER GUIDE INDEX-1
Page 90

INDEX
edit panel, 2-7
Edit support buttons, 4-5
Actual size, 4-6
Fit, 4-6
Flip, 4-6
Rotate left, 4-6
Rotate right, 4-6
Selection/Center,
4-5
Zoom in, 4-6
Zoom out, 4-6
editing
form elements, 4-10
OCR results, 4-13
editing FSC files
features, 4-7
procedures, 4-7
tools, 4-3
electronic form storage,
2-1
Elixir applications
conventions, 1-5
Help, 1-8
Elixir training, 1-4
Elixir Web site support,
1-3
environment, 1-1
exiting ElixirScan, 1-25,
2-6
F
aligning, 4-12
all, 4-9
boxes, 4-9
breaking up, 4-11
changing properties,
4-17
changing the type,
4-10
defined, 4-8
deleting, 4-11
editing, 4-10
graphics, 4-9
joining, 4-11
lines, 4-9
selecting, 4-9
shades, 4-9
text, 4-9
Form Elements button,
4-4
Form Recognition, 2-2
Input Options, 3-3
Output Options, 3-3
parameters, 3-2
Process control but-
tons, 3-4
starting, 3-1
FSC file
definition, 4-1
editing, 4-1
loading, 4-1
FSX file, 2-3
features, 2-3
files generated
ELX, 2-3
FSC, 2-3
FSX, 2-3
Fit button, 4-6
Flip button, 4-6
Font Mapping Setup,
2-22
editing, 2-26
mapping proce-
dures, 2-25
overview, 2-23
table structure, 2-24
Form/Raster button, 4-5
form elements
INDEX-2 ELIXIR TECHNOLOGIES CORPORATION
G
graphics, capturing, 4-21
Graphics button, 4-9
H
hardware requirements,
1-4
Help, 2-6
Help, on-line, 1-8
Help hypergraphics, 1-9
Help menu, 1-9
Help pop-ups and
jumps, 1-9
Page 91

I
Input Options
Dir, 3-3
Files(s), 3-3
OCR options, 3-3
installation, 1-21
custom, 1-23
default, 1-22, 1-23
first time installation,
1-21
introduction, 1-1
J
joining form elements,
4-11
K
Key Mapping setup,
2-29
L
licensing software, 1-15
Lines button, 4-9
loading a raster file, 4-1
loading an FSC file, 4-1
INDEX
add control
message, 2-16
character set, 2-16
enable text blocking,
2-16
exclude element
types, 2-16
Operator, 2-16
Output Control, 2-14
scale output, 2-15
shift output, 2-15
on-line documentation
accessing, 1-10
Acrobat Reader,
1-10
directory, 1-10
navigating, 1-11
printing, 1-13
scrolling, 1-12
using, 1-10
zoom in/out, 1-13
Optimize/all button, 4-5
Optimize/same button,
4-5
Output Options
Bad Images, 3-4
Forms, 3-3
FSCs, 3-3
Good Images, 3-4
overview, 2-1
M
menu bar, 2-6
edit, 2-6
exit, 2-6
Help, 2-6
preferences, 2-6
scan, 2-6
mouse, 1-7
O
OCR editing results,
4-13
OCR Options
ELIXIRSCAN USER GUIDE INDEX-3
P
preferences, 2-6
Preferences menu, 2-8
printing
documentation, 1-13
Process Options
Batch/Log, 2-13
Files to Select, 2-12
Input Type, 2-12
Process Type, 2-12
Resolution, 2-13
Text Orientation,
2-12
Time Limit, 2-12
property boxes, 4-18
Page 92

INDEX
Q
Quick Help, 1-9
R
R2V, 2-2, 3-1
Raster below, 4-4
Raster Image button,
4-4
registering software,
1-15
Release notes, 1-15
requirements
hardware, 1-4
software, 1-4
Rotate left button, 4-6
Rotate right button, 4-6
S
saving
ELX file, 4-20
FSC file, 4-20
scan, 2-6
selecting a form element
type, 4-8
selecting individual form
elements, 4-9
setting defaults
Default Directory
Setup, 2-9
Default Text Proper-
ties, 2-16
Font Mapping
Setup, 2-22
Key Mapping Setup,
2-29
menu, 2-8
OCR Options, 2-14
Process Options,
2-11
Shades button, 4-9
software registration,
1-15
software requirements,
1-4
Spell Checker Setup
Correction Defaults,
2-19
Dialect, 2-19
dialog box, 2-18
Languages, 2-19
Lexicon, 2-19
Personal dictionary,
2-20
starting ElixirScan, 1-25
starting form
recognition, 3-1
support, customer, 1-2
Support, Web site, 1-3
T
Text button, 4-4, 4-9
toolbar, 2-6
training, 1-4
V
value boxes, 4-19
View buttons, 4-4
All, 4-5
Form/Raster, 4-5
Form/Raster and
Tex, 4-5
Form and Raster
side by side, 4-4
Form Elements, 4-4
Form Elements top,
4-4
Optimize/all, 4-5
Optimize/same, 4-5
Raster below, 4-4
Raster Image, 4-4
Text, 4-4
W
word find, 1-12
X
XWIN.log
INDEX-4 ELIXIR TECHNOLOGIES CORPORATION
Page 93

installation, 1-21
Z
Zoom in, 4-6
zoom in/out, 1-13
Zoom out, 4-6
INDEX
ELIXIRSCAN USER GUIDE INDEX-5
 Loading...