

Page 1

EE
Elixir PrintDriver
for NT
User Guide
June 1999
Version 4.00
Page 2

Elixir Technologies Corporation
P.O. Box 1559
Ojai, CA 93024
Copyright © 1999 by Elixir Technologies Corporation.
All rights reserved.
June 1999
Version 4.00
Printed in the United States of America
Trademarks and Service Marks/Company:
Adobe Type Manager/Adobe Systems Incorporated
Ami Pro/Lotus Development Corporation
Elixir/Elixir Technologies Corporation
HP, LaserJet+/Hewlett Packard Company
IBM, Personal Computer, AT, AFP, and all other IBM
products mentioned in this publication are trademarks
of International Business Machines.
LapLink/Travelling Software, Inc.
Logitech/Logitech, Inc
MS-DOS, Word, Windows/Microsoft Corporation
All other product names and trade names used herein
are trademarks of their respective owners.
Copyright protection claimed includes all forms and
matters of copyrightable material and information now
allowed by statutory or judicial law or hereinafter
granted, including without limitation, material generated from the software programs which is displayed
on the screen such as icons, screen display looks,
etc.
Changes are periodically made to this document.
Changes, technical inaccuracies, and typographic errors will be corrected in subsequent editions.
Page 3

Table of contents
1. Introduction 1-1
Supported applications 1-1
PrintDriver overview 1-2
Printing and AFP printers 1-2
The PrintDriver solution 1-2
Customer support 1-3
Elixir Web site support 1-4
Elixir training 1-5
Hardware and software requirements 1-5
Hardware 1-5
Software 1-6
Who should use this guide 1-6
Conventions 1-6
Display conventions 1-7
Typographical conventions 1-7
Mouse operations 1-8
On-line Help 1-9
Using Online documentation 1-10
Accessing online guides 1-10
Navigating in online guides 1-12
Word find 1-12
Page scrolling 1-13
Zoom in/out 1-13
Printing online guides 1-14
ELIXIR PRINTDRIVER FOR NT USER GUIDE iii
Page 4

TABLE OF CONTENTS
Organization of this guide 1-14
Using PrintDriver with Elixir Desktop 1-15
Before installing 1-16
Release notes 1-16
Product Registration 1-17
Elixir Product Registration screen 1-18
Using the internet 1-18
Registering as a new customer via
the internet 1-19
Downloading via the internet to a
non-Elixir PC 1-20
Contacting Elixir (no internet
connection) 1-21
Soft key customers running Win-
dows for Workgroups 3.1 or 3.11 1-22
Installation 1-22
Installing Elixir applications 1-23
Full installation 1-24
Custom installation 1-25
Adding applications 1-26
Adding newly licensed applications 1-26
Activating the Elixir PrintDriver 1-27
Adding the Elixir PrintDriver to your
system 1-27
Checking installation 1-28
Checking the Services 1-28
2. Elixir PrintDriver basics 2-1
Elixir PrintDriver design 2-1
Accessing the PrintDriver setup dialog box 2-1
Elixir PrintDriver setup 2-2
PrePrint options 2-2
META setup 2-2
AFPDS setup 2-6
FSL/FRM (Xerox only) 2-8
iv ELIXIR TECHNOLOGIES CORPORATION
Page 5

TABLE OF CONTENTS
OGL Setup (AFP only) 2-9
OGL extended options 2-11
Image services 2-13
Text services 2-14
Color Services (Xerox only) 2-17
Font generation 2-18
Font Mapping 2-19
Messages to file 2-20
3. Font options 3-1
Overview of font options 3-1
Converting TrueType and ATM fonts 3-2
Font Generation 3-3
Mapping TrueType and ATM fonts 3-4
Editing the AFP font mapping table 3-4
Editing the Xerox font mapping table
3-7
Using the mapping table 3-9
4. Using Elixir PrintDriver 4-1
Creating a print file 4-1
Setting options in Elixir PrintDriver 4-1
Selecting Elixir PrintDriver 4-1
Selecting fonts 4-2
Adding lines, boxes and shapes 4-3
Adding graphics 4-3
Embedding bit-mapped
graphics 4-3
Referencing graphics 4-4
Starting the conversion 4-4
Uploading files to a production
printer 4-5
5. File transfer (Xerox) 5-1
Moving online Xerox-labeled files 5-2
Configuring the file transfer package
5-2
ELIXIR PRINTDRIVER FOR NT USER GUIDE v
Page 6

TABLE OF CONTENTS
Moving and printing online metacode files 5-11
Moving and printing offline metacode 5-26
Uploading files to the host 5-2
Uploading Xerox-labeled
files with IBM 3270 or IRMA
FT/3270 5-3
Uploading files with IRMA
FT/TSO 5-4
Downloading files from the host to
the printer 5-5
Uploading the
ENDFILE.END file 5-6
Preparing the JCL 5-6
Using the HOSTCOPY
utility 5-7
Using the DJDE FILE
command 5-10
Uploading metacode files to the host
5-12
Uploading with IBM 3270 or
IRMA FT/3270 5-12
Uploading with IRMA
FT/TSO 5-13
Setting up default online JSL 5-14
Using the METSTA.JSL or
METSTC.JSL 5-16
Setting up Elixir online JSL 5-16
Preparing online black and
white JSL 5-17
Preparing online color JSL 5-20
Compiling the JSLs on the printer 5-23
Copying metacode files to the
printer 5-23
Copying files from the host
using a JCL file 5-24
Copying files using a Data-
Ware card 5-25
Preparing offline ELIXIR.JSL 5-26
vi ELIXIR TECHNOLOGIES CORPORATION
Page 7

TABLE OF CONTENTS
ELIXIR.JSL 5-26
Preparing offline ELIXIC.JSL 5-29
ELIXIC.JSL 5-29
Uploading with 871 5-34
Printing offline Xerox-labeled files 5-34
Using diskettes to move .MET files 5-35
Using tape to move files 5-35
Offline control files 5-36
Mounting the tape 5-36
Compiling FSL files 5-36
Printing FRM files 5-36
SPUR 5-37
6. File transfer (AFP) 6-1
PC-to-MVS host file transfer 6-1
Installation 6-2
Pre-transfer considerations 6-2
Uploading with IBM 3270 or IRMA
FT/3270 6-2
Uploading with IRMA FT/TSO 6-2
Output directory information 6-3
Using IBM 3270 or IRMA FT/3270 6-3
Uploading text files 6-4
Using IRMA FT/TSO 6-5
Uploading files with FT/TSO 6-5
Parameters for uploading
object-format AFP files 6-6
Uploading the file with
FT/TSO 6-6
Converting the host file to
VBM format 6-7
Converting FB to VBM format 6-8
PC-to-IBM AS/400 file transfer 6-8
Creating a host library and file 6-9
Create a PC file descriptor file and
path 6-9
ELIXIR PRINTDRIVER FOR NT USER GUIDE vii
Page 8

TABLE OF CONTENTS
Uploading files 6-11
Processing uploaded files 6-12
Fonts 6-12
Page segments 6-13
Overlays 6-13
AFPDS 6-13
7. Elixir utilities 7-1
Using the utilities 7-2
ElixiDisk Utilities (Xerox only) 7-2
XDIR 7-3
XCPY 7-5
Copying from hard disk to
Xerox-format diskette 7-5
XDEL 7-7
Limitations/Conditions 7-7
DISP 7-9
DSK2TAP 7-10
HPEDIT 7-11
IC 7-12
MAKEKRNE 7-14
MET2871 7-14
METACOMP 7-15
PACK 7-15
SHOWBLOK 7-16
SPUR 7-17
SPUR utility 7-17
Using SPUR for online metacode
files 7-18
Using SPUR for Xerox 128-byte
header files 7-18
STRIP 7-19
A. Limitations and solutions A-1
Application compatibility A-1
Reverse text A-3
viii ELIXIR TECHNOLOGIES CORPORATION
Page 9

TABLE OF CONTENTS
Rotated text A-3
Xerox font orientation A-3
Circles and diagonal lines A-3
Color text strings A-4
Underlined text A-4
Typographers quotes A-4
Graphics formats A-5
Using large fonts A-5
Font support A-6
White objects on black objects A-6
Converting multi-color graphics (Xerox) A-7
Converting colored text (Xerox) A-7
B. Operational and error messages B-1
C. AFP Text mapping C-1
Mapping files C-1
Country Keyboard maps C-1
Default code page C-2
Glossary GLOSSARY-1
Index INDEX-1
ELIXIR PRINTDRIVER FOR NT USER GUIDE ix
Page 10

1. Introduction
This user guide describes Elixir PrintDriver for NT edition, one of many Elixir products that support the conversion of Windows application documents to AFPDS
(IBM's Advanced Function Printing (AFP) datastream), Xerox metacode, and Elixir pages.
Their are two Elixir PrintDriver for NT products. Elixir
PrintDriver (NT) for Xerox and Elixir PrintDriver (NT)
for AFP.
Elixir PrintDriver is a tool that allows you to convert a
Windows-based document into AFPDS and metacode
formats simply by selecting [Print] from a supported
Windows application with Elixir PrintDriver set as the
printer. The document is then ready for transferring
and printing on a high-speed AFP or Xerox printer.
Supported applications
Elixir PrintDriver supports the following applications:
Microsoft Word 7.0 and 97
Corel WordPerfect 7.0 and 8.0
Corel Ventura 7.0
Lotus Ami Pro 3.0 and 3.1
Adobe PageMaker 5.0 and 6.5
Lotus WordPro96
Adobe FrameMaker 5.0 and 5.5
ELIXIR PRINTDRIVER FOR NT USER GUIDE 1-1
Page 11

INTRODUCTION
Elixir PrintDriver may also be used with other applications, however, it has not been fully tested for compatibility. We are continuing to test other software
packages and will add to this list in future releases.
See the "Limitations and solutions" appendix for information about using PrintDriver with supported applications.
PrintDriver overview
The following section provides a brief overview of AFP
and Xerox printing and Elixir PrintDriver.
Printing and AFP printers
Previously, creating and editing documents for printing
on AFP or Xerox printers was the responsibility of applications personnel working on mainframe computers
who defined elements using Overlay Generation Lan-
guage (OGL) or Forms Source Language (FSL).
These languages describe the location of line, shape,
text and image elements as well as page size and
layout.
Limitations to this approach are:
Defining and revising an OGL/FSL document is
complicated and time-consuming.
Changes to the document are not apparent when
adding OGL/FSL statements.
The completed OGL/FSL file must be compiled
and proof printed on the high-speed printer.
The PrintDriver solution
With Elixir PrintDriver, anyone who can use a Windows application such as Microsoft Word or Ami Pro,
can convert a Windows-based document into AFP or
Xerox printer format directly from a Windows application menu.
1-2 ELIXIR TECHNOLOGIES CORPORATION
Page 12

The user installs PrintDriver, depending on the product purchased, composes a document in a Windowsbased documentation package, and selects the [Print]
option.
Elixir PrintDriver generates:
Xerox fonts, IMG, LGO, FSL, FRM, and metacode
AFP bounded and unbounded fonts, OVE, OGL,
AFPDS, and PSEGs
Elixir format fonts, images, and forms
Elixir PrintDriver saves each resource in a separate
directory providing easy access for transfer to a host
environment, Xerox printer, or AFP printer.
Customer support
If you have purchased your Elixir product directly from
Elixir Technologies then contact the support center for
your region at the number listed below.
INTRODUCTION
North and South America:
+1 805 641 5900 ext. 3
Asia Pacific
+92 (0) 51 206182
Europe
+420 2 2431 13877
The U.S.A. Elixir Customer Support Center provides
telephone technical assistance for Elixir users Monday
through Friday from 6:30 a.m. to 5:00 p.m. Pacific
Standard Time.
If you have any problems running or using Elixir PrintDriver or associated Elixir applications, contact the
support center in your region for help. An Elixir product specialist will answer your call and ask for the following information:
ELIXIR PRINTDRIVER FOR NT USER GUIDE 1-3
Page 13

INTRODUCTION
your name, organization, telephone number and
address.
the name and version number of the Elixir
application.
a complete description of the problem, including
any error messages displayed on your monitor or
printed at your printer.
You can contact Elixir support by accessing the Elixir
World Wide Web page (and selecting [Contact Support]) at http://www.elixir.com. Please complete the
question form.
Elixir Web site support
The Elixir Web site at http://www.elixir.com offers the
following resources:
Raise a question for Elixir Support.
Find answers in the list of Frequently Asked
Questions.
Review the latest Tips and Techniques for in-
creasing productivity using Elixir software.
Download new releases and the latest patches.
View Release Notes for the latest available
features.
Learn in the user newsgroup how others are us-
ing Elixir products.
Sign up for an Elixir Learning Program.
1-4 ELIXIR TECHNOLOGIES CORPORATION
Page 14

Elixir training
Elixir Technologies Corporation offers training for the
full range of Windows-based products. For more information, contact:
Elixir Learning
(805) 641-5900 ext. 6
Hardware and software requirements
The following sections describe hardware and software requirements for running Elixir PrintDriver.
Hardware
Recommended PC configuration: Pentium (or
100% compatible), with at least 133 MHz processor
(or the fastest commercially available processor); 32
MB RAM, 500+ MB hard drive, one CD-ROM drive.
INTRODUCTION
Additional hardware requirements:
any monitor with driver software supporting Windows in VGA or SVGA.
any Windows compatible mouse.
Optional requirements
Any PC-to-mainframe or communications board
that supports binary file transfers (such as IBM
PC3270, IRMA FT/3270, or AS/400 PC communications packages).
For users with compatible PCs, the ElixiDisk utilities described in the "Stand-alone utilities" chapter also allow transferring Xerox metacode files
between your PC and Xerox production printers.
ELIXIR PRINTDRIVER FOR NT USER GUIDE 1-5
Page 15

INTRODUCTION
Software
Due to hardware and BIOS differences, PS/2 systems and some IBM-compatible PCs do not support this function.
AFP or Xerox production printer
Tape unit for offline Xerox transfers
Software requirements:
or later.
While we make every effort to ensure the proper op-
eration of our software, some problems cannot be resolved due to differences in the operating systems.
Who should use this guide
This guide is intended for users familiar with Windows
and with AFP or Xerox printer and font management
operations.
Users should be familiar with PC peripherals and have
access to reference manuals for PC software and
hardware, and for the AFP or Xerox printer(s) used.
Conventions
This section describes the following:
Microsoft Windows NT 4.0
display conventions
typographical conventions
mouse operations.
1-6 ELIXIR TECHNOLOGIES CORPORATION
Page 16

Display conventions
Elixir PrintDriver adheres to Microsoft Windows conventions for using menus, menu commands, dialog
boxes, command buttons, icons, and a mouse. See
your Windows manual for more information.
Typographical conventions
The following typographic conventions are used
throughout this guide.
Keystrokes are shown enclosed in < >(angle
brackets). For example, <Enter>.
Key combinations are denoted by a plus sign between keys. For example, <Shift> + <F1> indicates to simultaneously press the <Shift> and the
<F1> keys.
Menu titles are shown in bold. Menu options are
enclosed in [ ] (square brackets). For example,
Pull down the File menu and select [Print].
INTRODUCTION
Command buttons that you press are also enclosed in [ ] (square brackets). For example,
Click on [Job Print Ticket].
Commands, options, actions, and parameters
that require description are shown in bold followed on the next line by the description. For example:
drive
Specify the output drive for the resources.
Steps in a procedure are shown in numbered bold
paragraphs. For example:
1. Click on [Resources] in the Conversion
Properties dialog box.
Comments relating to a step (such as this paragraph) are shown in regular text following the bold
paragraph.
ELIXIR PRINTDRIVER FOR NT USER GUIDE 1-7
Page 17

INTRODUCTION
Mouse operations
You can perform most operations in Elixir applications
by using the mouse. The terminology is similar to
other Windows-based applications.
Most operations are performed using the left mouse
button.
The following mouse-related terms are used in this
guide:
click
to momentarily press and release the left mouse button once.
double-click
to click the left mouse button twice in rapid
succession.
Commands you enter at the DOS prompt are
shown in larger text. Within DOS commands,
variable names are shown in italics. For example:
CD \ELIXIR <Enter>
object
a selectable item on the screen.
open
to point and double-click on an object. The effect of
this operation depends on the object.
point
to move the mouse to position the screen pointer on
an area of the screen.
select
to point to an object and click the left mouse button.
This usually highlights the object.
1-8 ELIXIR TECHNOLOGIES CORPORATION
Page 18

On-line Help
INTRODUCTION
Elixir software uses the Microsoft Windows Help program to provide on-line Help for Elixir PrintDriver
functions.
For more information about Windows Help, select the
[How to Use Help] option in the Help menu, or see
your Microsoft Windows documentation.
The Help files included with your Elixir software include graphics which were created using screen drivers with large fonts. If you use a screen driver with
small fonts, the Help file graphics may not display
clearly. For optimum graphics display, use a screen
driver that uses large fonts (also called 8514 fonts).
Using on-line Help
You can access on-line Help by clicking on the [Help]
button in a dialog box to view an associated Help
topic, or click the right mouse button on an option in a
dialog box to display Help about that option.
Help pop-ups and jumps
Within Help topic text, words or phrases underlined in
green are pop-ups or jumps. When you click on a
pop-up topic, a box displays within the current Help
topic with additional information. When you click on a
jump, a different, associated Help topic displays.
Help hypergraphics
Hypergraphics are special graphics within Help files
that contain "hot spots". Hot spots are either pop-up
topics or jumps. Hypergraphics in Elixir Help are most
commonly dialog boxes with option hot spots (pop-up
definitions).
Move the cursor over a hypergraphic until a hand displays, then click on this hot spot to display a pop-up
topic, or a "jump". To close a pop-up topic, click the
mouse button. To return to the original Help topic
from a jump, click on <Back> in the Help file menu.
ELIXIR PRINTDRIVER FOR NT USER GUIDE 1-9
Page 19

INTRODUCTION
Searching for a different topic
If you want to jump to a Help topic that is not displayed on your screen, click on the [Contents] button
at the top of the Help screen to display a list of available topics and make your selection. You can also
click on the [Search] button at the top of the screen
and select a related topic.
Using Online documentation
This section describes how to use PDF online documentation, including navigating through the online
guides and printing the guides. Acrobat Reader is
provided with the online documentation. Information
about using the Acrobat Exchange program is included for users who have licenses for that program.
Accessing online guides
The PDF online documentation is copied to the
drive:\Elixir\help\pdf directory during the installation. If
you didn't choose to copy the PDF online documentation during the installation, you can view a complete
list of the files by clicking on the Windows [Start] button and selecting Programs>Elixir Applications>Elixir
PrintDriver for AFP. Once the application is launched,
click on the Help menu and select Release Notes.
Wordpad displays a current list of supporting documents and the directories where they can be found on
CD-ROM.
When the appropriate PDF file is accessed the Acrobat Reader program is launched and the List of Online
Guides is displayed. Click on a guide to view its table
of contents and jump to individual chapters.
The following list of PDF files and associated document names are installed in the drive:\Elixir\help\pdf
directory.
StartAFP.pdf - AFP Getting Started Guide
StartXRX.pdf - Getting Started User Guide
1-10 ELIXIR TECHNOLOGIES CORPORATION
Page 20

INTRODUCTION
DeskAFP.pdf - Elixir Desktop and Converters for
AFP User Guide
DeskXRX.pdf - ElixiSys Desktop User Guide
FormAFP.pdf - ElixirForm User Guide
FormXRX.pdf - ElixiForm User Guide
FontAFP.pdf - ElixirFont User Guide
FontXRX.pdf - ElixiFont User Guide
ImageAFP.pdf - ElixirImage User Guide
GraphXRX.pdf - ElixiGraphics User Guide
PdAFP.pdf - Elixir PrintDriver for AFP User Guide
PDXRX.pdf - Elixir PrintDriver User Guide
PdNT.pdf - Elixir PrintDriver for NT User Guide
PHXRX.pdf - PageHandler User Guide
DTAG.pdf - DocuTag User Guide
DMerge.pdf - DataMerge User Guide
AppVIPP.pdf - Elixir AppBuilder for VIPP User
Guide
AppAFP.pdf - Elixir AppBuilder for AFP User
Guide
Transfmr.pdf - Elixir Transformer Suite User
Guide
Viewer.pdf - ElixirViewer User Guide
Elxscan.pdf - ElixiScan User Guide
ELIXIR PRINTDRIVER FOR NT USER GUIDE 1-11
Page 21

INTRODUCTION
Navigating in online guides
After loading a PDF document in Acrobat Reader or
Exchange program (as described above), you can
navigate through the online guide by clicking on the
following:
TOC chapter titles - jumps to the beginning of the
chapter indicated.
[Next Page] or [Previous Page] in the Toolbar - jumps
to the next or previous page of the online guide (alternatively, you can use the <Page Up> and <Page
Down> keys).
[Go Back] in the Toolbar - returns to your previous
location.
[First Page] in the Toolbar - returns to the opening
screen of the online guide.
Word find
This option finds a key word or phrase in the current
document.
To use Word Find in a document:
1. Click on the [Find] icon in the Toolbar.
2. Enter the desired search text and click on
[Find].
The Acrobat Find dialog box closes and the first
occurrence of the text is highlighted.
3. To find more occurrences of the same text,
click on the [Find] icon in the Toolbar and
then click on [Find Again] in the Find dialog
box.
1-12 ELIXIR TECHNOLOGIES CORPORATION
Page 22

INTRODUCTION
Page scrolling
You can move a document on the screen to view portions of it not visible in the window, or read a document which contains article threads by clicking the
mouse to scroll through the document without using
the scroll bar.
To move a document on the screen for viewing (functional only when the document displays wider than the
document window):
1. Click on the [Hand] icon in the Toolbar.
2. Hold down the mouse button and drag the
cursor in the desired direction.
To follow the flow of text in a document that contains
article threads (automatic text flows):
1. Click on the [Hand] icon in the Toolbar.
2. If the document contains article threads, a
“down” arrow displays on the Hand icon.
3. Position the hand-shaped cursor over a
paragraph and click on the paragraph to begin
reading.
4. Continue clicking to follow the flow of text.
Zoom in/out
To magnify the size of the page display, click on the
Zoom icon in the Toolbar, then click in the Work area.
Each click resizes the view by a factor of two.
To reduce the size of the page display, click on the
Zoom icon in the Toolbar, then hold down the <Ctrl>
key and click in the Work area.
You can also click on the [%] button at the bottom of
the screen and select a zoom percentage from the
pop-up list.
ELIXIR PRINTDRIVER FOR NT USER GUIDE 1-13
Page 23

INTRODUCTION
Printing online guides
You can print individual chapters or an entire book to
PostScript or HP printers:
1. Open the file.
2. Select File>Print.
The Print dialog box displays.
3. Select your printing options and click on [OK].
Organization of this guide
This user guide contains the following chapters and
appendices:
Chapter 1, "Introduction," provides an introduction to
PrintDriver, describes the contents of this user guide
and explains the installation process.
Chapter 2, "Elixir PrintDriver basics," describes how to
set the options and defaults when using Elixir
PrintDriver.
Chapter 3, "Font options," describes how to convert
and map TrueType and ATM fonts, and how to import
AFP, Xerox, and Elixir format fonts for use in a Windows document.
Chapter 4, "Using Elixir PrintDriver," describes how to
create a document in a Windows application and print
to a file using Elixir PrintDriver.
Chapter 5, "File transfer," describes how to upload
files from your PC to a host environment for processing and subsequent delivery to AFP or Xerox printers.
Chapter 6, "Stand-alone utilities," describes how to
use the stand-alone utilities provided with Elixir
PrintDriver.
Appendix A, "Limitations and solutions," describes
limitations of PrintDriver and provides solutions to
some common problems.
1-14 ELIXIR TECHNOLOGIES CORPORATION
Page 24

Appendix B, "Operational and error messages," lists
all the operational and error messages issued by
PrintDriver.
Appendix C, "Text mapping," provides a list of country
keyboard mapping files and AFP default code pages.
Glossary
Index
Using PrintDriver with Elixir Desktop
If you already have Elixir Desktop on your PC, please
note the following:
If you have a PrintDriver Option ElixiKey and you
also connect your Elixir Desktop ElixiKey, you can
output files to production printer and other formats. See the ElixiKey section in this chapter for
more information about ElixiKeys.
INTRODUCTION
If you want to view and edit resources created by
Elixir PrintDriver, make sure you install Elixir
PrintDriver on the same drive as your Elixir Desktop
Backup your .EXE and .DLL files before installing.
If you custom installed Elixir Desktop on a drive
other than drive:\ELIXIR, replace drive:\ELIXIR
with your custom program directory whenever you
see drive:\ELIXIR mentioned in this guide.
Before installing
Complete the software licensing process (See the
"Product Registration" section).
Log on to your NT system as the local administrator
(not the network administrator) so that you can
ELIXIR PRINTDRIVER FOR NT USER GUIDE 1-15
Page 25

INTRODUCTION
activate and start the Elixir PrintDriver you install after
the software.
If you plan to use any other Elixir products with Elixir
PrintDriver, make sure you know the drive where they
are installed. This is the drive where you must install
Elixir PrintDriver.
Caution: If you have a previous version of Elixir PrintDriver installed on your computer, make sure it is not
set as the default printer when you install the new
version.
To avoid any possible conflicts, exit all other applications while installing Elixir PrintDriver.
Release notes
Release notes appear at the beginning of the Elixir
software install process, so that you can review each
entry before performing the complete installation.
Once the software is installed, release notes can be
accessed from the Help menu of the application. Release notes are formatted for viewing in Notepad or
Wordpad. They have a txt file extension and are
found in the drive:\ELIXIR \RELNOTES directory.
1-16 ELIXIR TECHNOLOGIES CORPORATION
Page 26

Product Registration
Elixir products no longer require ElixiKey hardware devices attached to your parallel port. Elixir products
now utilize soft key technology. This new licensing
process validates your license agreement with Elixir
and places a file (password.epw if an Elixir customer,
or License.dat if a Xerox customer) on your
workstation.
Version 4.00 implements Elixir's new licensing process and discontinues use of the current hard keys. All
customers must register/re-register software license(s) by using the Elixir registration program provided
with the software.
Each product installed is assigned to a specific pc.
This pc number, your customer number, and password are required. This information is provided when
you purchase Elixir software or when you upgrade to
version 4.00 of Elixir products.
If you are an Elixir customer, registration can be completed automatically if you have an internet connection
on your workstation. If you are a Xerox customer you
must contact Xerox to register your products.
INTRODUCTION
This section describes the registration process for
those customers who have purchased their Elixir
products form Elixir Technologies.
The following scenarios describe the registration
process for Elixir customers. Xerox Corporation will
provide a separate document that describes registering your products with Xerox.
you are a new customer and will use Soft Key
registration
you are an existing customer and will change to
Soft Key registration
ELIXIR PRINTDRIVER FOR NT USER GUIDE 1-17
Page 27
INTRODUCTION
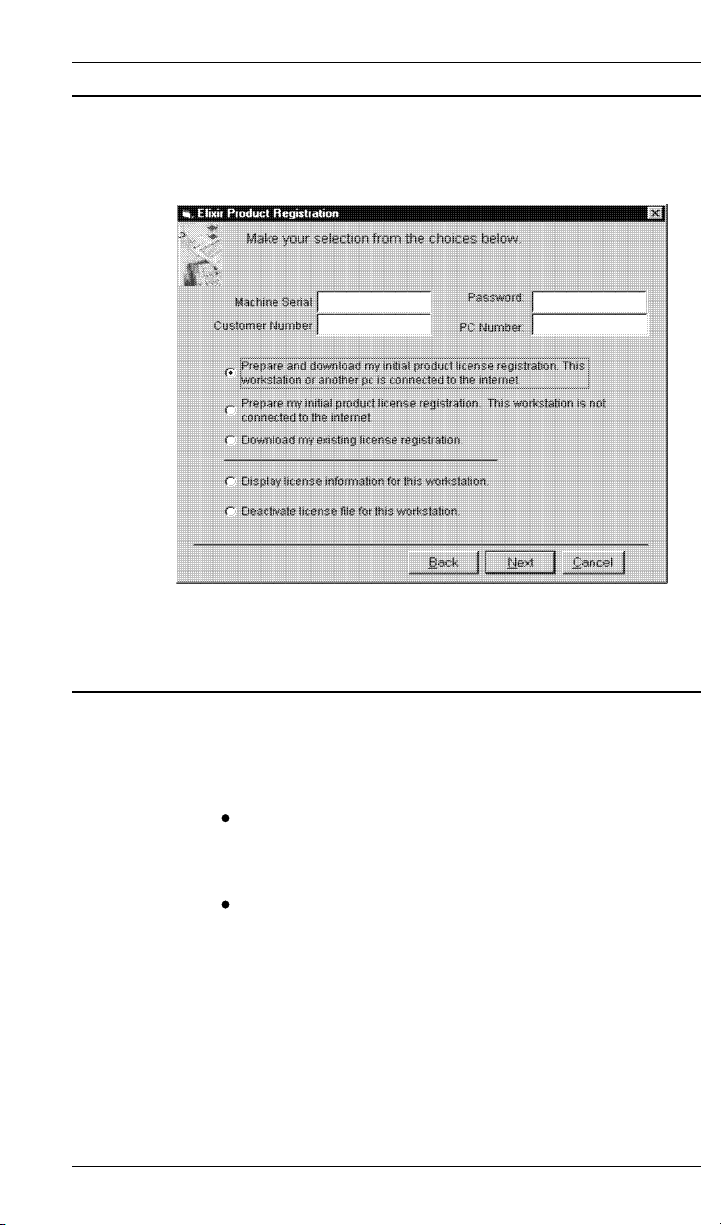
Elixir Product Registration screen
Make your selections according to your needs and go
to the appropriate section for further procedures.
Figure 2-1. Elixir Product Registration screen
Using the internet
You can register and download all registration files via
the Elixir Product Registration program. There are
two ways to register your products using the Internet:
down load the product registration file directly to
the Elixir PC via the Internet (see "Registering as
a new customer via the internet")
download the product registration file to another
machine and move it to the Elixir PC (see "Downloading via the internet to a non-Elixir PC")
1-18 ELIXIR TECHNOLOGIES CORPORATION
Page 28

Registering as a new customer via the internet
You will receive a "Customer Activation Letter" with
your product(s) ordered. The registration process
should be completed before installing your software.
The installation CD will launch and install the Registration Program.
To install the registration program on your Elixir PC:
1. In the Software Registration screen, click on
[Next].
2. Select the drive and click on [Next].
3. In the Start Registration Process screen, click
on [Install].
The password file will be installed and your system configured.
To complete registration:
1. In the Elixir Product Registration "Welcome"
screen, select [Next].
INTRODUCTION
Your machine serial number displays.
2. Enter your customer number (from Activation
Letter), then click on [Next].
3. Enter your password and the PC number you
want to register, then click on [Next].
4. Select [Prepare and download my initial
product license registration. This workstation
or another pc is connected to the internet]
from the Registration Option menu, then click
on [Next].
5. In the Download Password screen, click on
[Yes].
The system displays your customer information
and you must verify that it is correct.
ELIXIR PRINTDRIVER FOR NT USER GUIDE 1-19
Page 29

INTRODUCTION
6. When the screen displays the registration
information, click on [Save]. You may also
print this screen for reference or to send to
Elixir.
The application installation process will begin, see the
"Installation" section.
Downloading via the internet to a non-Elixir PC
You will receive a "Customer Activation Letter" with
your product(s) ordered. The registration process
should be completed before installing your software.
The installation CD will launch and install the Registration Program.
To install the registration program on your Elixir PC:
1. In the Software Registration screen, click on
[Next].
2. Select the drive and click on [Next].
3. In the Start Registration Process screen, click
on [Install].
The password file will be installed and your system configured.
To complete registration:
1. In the Elixir Product Registration "Welcome"
screen, select [Next].
Your machine serial number displays.
2. Enter your customer number (from Activation
Letter), then click on [Next].
3. Enter your password and the PC number you
want to register, then click on [Next].
4. Select [Prepare and download my initial
product license registration. This workstation
or another pc is connected to the internet]
from the Registration Option menu, then click
on [Next].
1-20 ELIXIR TECHNOLOGIES CORPORATION
Page 30

INTRODUCTION
5. In the Download Password screen, click on
[No].
6. In the How to Contact Elixir screen, click on
[Print] and take the printout to the pc
connected to the internet.
7. Access the Elixir Web site at
http:\\www.elixir.com. and click on [Product
Registration].
8. In the Customer Information screen, enter
your Customer Number and Password, then
click on [Submit Form].
9. In the Elixir Customer Menu, click on
[Download a New License File].
10. In the Customer Information screen, enter
your PC Number and Machine Serial Number,
then click on [Submit Form].
11. In the Elixir Technologies screen, click on
[Click here to download your password].
12. Save the password.epw file to diskette and
copy it to your Elixir PC in the \ELIXIR
directory.
The application installation process will begin, see the
"Installation" section.
Contacting Elixir (no internet connection)
If you have no internet access at your site you must
contact Elixir and provide the serial number of the pc
where you will install the Elixir software. Elixir will provide a registration file (password.epw) that you must
copy to the Elixir pc.
Copy the password.epw file to \Elixir and start the
installation.
Select [Prepare my initial product license registration.
This workstation is not connected to the Internet] from
the Registration Option menu, then click on [Next].
ELIXIR PRINTDRIVER FOR NT USER GUIDE 1-21
Page 31

INTRODUCTION
The application installation process will begin, see the
"Installation" section.
Soft key customers running Windows for Workgroups 3.1 or 3.11
Since Windows 3.1/3.11 does not have internet capability, you must contact Elixir to obtain your password
file. After installation of Elixir software, the installation
program verifies that the operating system is 3.1 or
3.11, runs passwd16.exe, and provides your machine
serial number.
To complete registration:
1. Enter your customer number, password and
PC number, then print out a copy of this
screen.
2. Fax, email, or mail Elixir the display printout.
Elixir will generate a password.epw file and
send it to you on diskette.
3. Load the password.epw file in the \ELIXIR
directory.
The application installation process will begin, see the
"Installation" section.
Installation
This section describes how to install Elixir software
using the [Full] and [Custom] options. Installing additional Elixir applications to an existing version is also
explained.
Note: The software registration process must be completed (See the "Product Registration" section).
For information about starting Elixir applications after
installation, refer to the "Introduction" chapter.
1-22 ELIXIR TECHNOLOGIES CORPORATION
Page 32

During installation, the log file, XWIN.log, is created in
the drive:\Elixir directory. XWIN.log contains a list of
all directories and files copied or created, including information pertinent to the installation. It can be accessed, using Notepad or Wordpad.
If you have any problems running Elixir software after
installation, refer to the "Troubleshooting" section of
the Elixir Getting Started Guide for more information.
Installing Elixir applications
Elixir provides a simple, interactive procedure for installing Elixir applications.
During installation you can select [Full] or [Custom]
installation.
Selecting a [Full] installs all Elixir applications and
demonstration files on the same drive. If you
have a previous version of Elixir software, this option overwrites the existing version.
INTRODUCTION
Selecting a [Custom] installation allows you to
choose the Elixir applications and options (such
as Elixir demonstration files) you want installed,
as well as where you want certain options installed. For example, You may want the PDF
documentation in a different directory than the application.
You can also install Elixir program files (required
to run Elixir), and data files (files that you create
or files such as the Elixir demonstration files), in
separate drives and directories.
ELIXIR PRINTDRIVER FOR NT USER GUIDE 1-23
Page 33

INTRODUCTION
Full installation
To begin installation:
You can quit installation at any time, by pressing the
<Esc> key.
1. Close all active applications.
2. Insert the CD in your CD-ROM drive.
3. In the "Welcome" screen, click on [Next].
The Release Notes? screen displays.
4. Select [Read Release Notes Now] to display
them in Wordpad (or Notepad), or click on
[Next] to proceed with the installation.
The Product Selection screen displays.
5. Select the applications you want to install and
click on [Next].
The Selected Products screen displays.
6. Verify the listed applications and click on
[Next]. If you need to delete or add to the list,
click on [Back] and reselect.
7. Verify your user information and click on
[Next].
8. In the Select Install Type screen, select [Full]
and click on [Next].
9. Select the drive on which you want Elixir
software installed, then click on [Next].
10. Select the Programs Folder in which you want
Elixir software installed (Elixir Applications is
the default), then click on [Next].
1-24 ELIXIR TECHNOLOGIES CORPORATION
Page 34

11. In the Backup Replaced Files screen, click on
12. In the Start Copying Files screen, click on
13. Once installation is complete, click on [Exit
Custom installation
To begin installation:
You can quit installation at any time, by pressing the
<Esc> key.
1. Close all active applications.
2. Insert the CD in your CD-ROM drive.
INTRODUCTION
[Yes], if you want to make back-up copies of
all files replaced during installation and select
the directory where the back-up files will be
placed. Then click on [Next].
[Install].
Installation begins.
Installer].
3. In the "Welcome" screen, click on [Next].
The Release Notes? screen displays.
4. Select [Read Release Notes Now] to display
them in Wordpad (or Notepad), or click on
[Next] to proceed with the installation.
The Product Selection screen displays.
5. Select the applications you want to install and
click on [Next].
The Selected Products screen displays.
6. Verify the listed applications and click on
[Next]. If you need to delete or add to the list,
click on [Back] and reselect.
7. Verify your user information and click on
[Next].
ELIXIR PRINTDRIVER FOR NT USER GUIDE 1-25
Page 35

INTRODUCTION
8. In the Select Install Type screen, select
[Custom] and click on [Next].
9. In the Configuration Only? screen:
Selecting [Yes] allows you to load Configuration, Program, and Data files into any resident directory.
Selecting [No] allows you to deselect options
you do not wish installed.
10. Select the Programs Folder in which you want
Elixir software installed (Elixir Applications is
the default), then click on [Next].
11. In the Backup Replaced Files screen, click on
[Yes], if you want to make back-up copies of
all files replaced during installation and select
the directory where the back-up files will be
placed. Then click on [Next].
12. In the Start Copying Files screen, click on
[Install].
Installation begins.
13. Once installation is complete, click on [Exit
Installer].
Adding applications
If you did not install all of the Elixir options while performing the Custom installation procedure, you can do
so at any time by following the steps described in the
"Custom installation" section of this chapter.
Adding newly licensed applications
If you purchase additional Elixir products, Elixir will
update your password file. You can access the Product Registration program from your program group
and re-download your initial product registration password file to activate your new products.
1-26 ELIXIR TECHNOLOGIES CORPORATION
Page 36

Activating the Elixir PrintDriver
To activate the Elixir PrintDriver, you must add it to
your system.
Adding the Elixir PrintDriver to your system
To add the Elixir PrintDriver on your system:
1. Click on the [Start] button, select [Settings]
and [Printers].
2. In the Printers dialog box double-click on
[Add Printer].
The Add Printer Wizard dialog box displays.
3. Select [My Computer], then click on [Next].
The Port Name dialog box displays.
Note: If [Disk] does not exist, click on [Add Port].
In the list of Available Printer Ports, select "Local
Port" and then click on [New Port]. In the Port
Name dialog, enter [Disk] and then click on [OK].
Close the Printer ports dialog to return to the Port
selection dialog box. Ensure that the new port
disk is selected and click on [Next].
INTRODUCTION
4. Select [Disk] and click on [Next].
The Add Printer Wizard dialog box displays with
lists of manufacturers and printer names.
5. Click on [Have Disk] and specify the following
directory in the Install From Disk dialog box,
then click on [OK].
C:\ELIXIR\PDNT
Note: If you have installed Windows NT under a
directory other than WINNT, substitute that directory name in the above command.
The Add Printer Wizard dialog box displays listing
the PrintDrivers. Select ELXPRINT.INF
ELIXIR PRINTDRIVER FOR NT USER GUIDE 1-27
Page 37

INTRODUCTION
6. Select the dpi of the printer you are using for
production printing (240/300/600 dpi for
AFPDS or 300 dpi for metacode), then click on
[Next].
Note: If you use both 240 and 300 dpi, you must
repeat this printer installation process, selecting
the desired additional printer definition.
7. In the Add Printer Wizard dialog box (showing
the PrintDriver you selected), select [Replace
existing driver], then click on [Next].
8. In the Add Printer Wizard dialog box (asking if
you would like your Windows-based
programs to use this printer as the default
printer), select [No].
9. In the Add Printer Wizard dialog box (asking if
you would like the PrintDriver shared), select
[Not shared], then click on [Next].
10. In the Add Printer Wizard dialog box (asking if
you would like to print a test page), select
[No], then click on [Finish].
Checking installation
You can check that Elixir PrintDriver is installed by
clicking on the Start button and selecting
Settings/Printers. [Elixir PrintDriver on DISK] displays
in the list of installed printers.
Checking the Services
To check that the Elixir PrintDriver is started:
1. Click on the [Start] button, select [Settings]
and [Control Panel].
2. In the Control Panel dialog box select
[Services]
3. The Elixir PrintDriver should be started
(automatic). If not started, in the Services
dialog box select the Elixir Driver, then click
on [Startup].
1-28 ELIXIR TECHNOLOGIES CORPORATION
Page 38

INTRODUCTION
4. In the Service/Elixir Driver dialog box select
[Automatic] as the Startup Type.
5. In the Log On As: section, select [System
Account] and check [Allow Service to Interact
with Desktop] , then click on [OK].
6. In the Services dialog box select the Elixir
Driver, then click on [Start].
The Status in the Services dialog box changes to
Started.
ELIXIR PRINTDRIVER FOR NT USER GUIDE 1-29
Page 39

2. Elixir PrintDriver basics
This chapter describes Elixir PrintDriver and how to
set up the options and default settings.
Elixir PrintDriver design
Elixir PrintDriver provides you with a series of easy-touse dialog boxes to set up your print job options, select your output format and specify the directories for
your resources. You can display a dialog box by clicking on a button in the PrintDriver setup dialog box.
See the "Accessing the PrintDriver setup dialog box"
section in this chapter for more information.
If a dialog box displays a [Help] button, you can click
on this button to display information about any option
in that box, or to access the comprehensive on-line
Help program provided with Elixir PrintDriver. For
more information about on-line Help, see the "Introduction" chapter.
Accessing the PrintDriver setup dialog box
You can access the Elixir PrintDriver setup dialog box
in two ways:
Double-click on \ELIXIR\PDNT\UKDIALOG.EXE
or
1. Click on the [Start] button, select [Settings]
and [Printers].
2. In the Printers dialog box double-click on the
Elixir PrintDriver.
The Elixir PrintDriver NT 4.0-(240/300 dpi) Properties dialog box displays.
ELIXIR PRINTDRIVER FOR NT USER GUIDE 2-1
Page 40

ELIXIR PRINTDRIVER BASICS
3. Click on the Advanced tab and highlight Elixir
PrintDriver NT-(240/300 dpi) Document
Settings.
4. Click on [About Elixir PrintDriver].
The Elixir PrintDriver setup dialog box displays.
Elixir PrintDriver setup
From the Elixir PrintDriver setup dialog box, you can
control the PrintDriver Configuration and Output File
Formats.
PrePrint options
The PrePrint Options dialog box displays the default
output directories for:
Elixir, AFPDS, OGL, and OVE (AFP only)
If AFPDS is selected, OGL and OVE are grayed
out).
Elixir, FSL, and FRM (Xerox only)
You can redirect the output options as necessary.
META setup
To specify the options for metacode output, click on
[META Setup]. The Conversion Properties dialog box
displays and contains the following options:
DJDE
prefix
Specify the Dynamic Job Descriptor Entry (DJDE) prefix up to 50 characters. The default is $DJDE$.
DJDE
Offset
Specify the number of characters or spaces present
before the first character of the DJDE string.
2-2 ELIXIR TECHNOLOGIES CORPORATION
Page 41

ELIXIR PRINTDRIVER BASICS
DJDE
Skip
Specify the total number of characters or spaces to
skip before reading a command.
Color Settings
Select [Color] for HighLight color or [BW] for black and
white.
If you select [Color] and your printer does not support
it, your file will print in black and white.
Presentation
Select [Duplex] to print on both sides of the paper or
[Simplex] to print on one side of the paper.
Metacode Type
Select [Off-line] for tape, [On-line] for host connected,
or [XNS/DISK] copying the .MET file to a diskette.
Text Justification
[Inter-Word] justifies text by adding or deleting spaces
between words.
[Inter-Character] justifies text by adding or deleting
spaces between characters. Note that selecting [InterWord] reduces complexity so that forms print
faster, while selecting [InterChar] may make the form
more readable but print slower.
[Optimize] select this option to reduce the size of the
file and the text placement statements at the printer.
Note that if you use this option, you can convert the
file to Elixir format using the ElixiSys Desktop or ElixiSys Desktop for Highlight color but you cannot edit the
converted text.
[Ignore Kerning]
Xerox production printers do not support left kerning.
When converting Elixir forms to metacode (if supported by the product you are using), the left-kerned
fonts are individually positioned on the print output.
Note that deselecting this option results in files that
may be too large for your production printer. Check
your production printer manual for font size limitations.
ELIXIR PRINTDRIVER FOR NT USER GUIDE 2-3
Page 42

ELIXIR PRINTDRIVER BASICS
OTEXT
Click to open the Output Messages for Operator dialog box. You can input instructional messages that
display when the operator runs the job at the printer.
Resources
Click to open the Metacode Resources dialog box.
Color
Select a Palette Catalog Name (XEROX or XEROX1)
and a Printer Palette Name (color options display according to the catalog chosen).
Fonts
Include Fonts
Select [Always] to download fonts each time you
print. Select [Only used] to download only fonts
used in your document. Select [Never] to use
only those fonts resident on the printer (no fonts
are downloaded).
Font Type: select [9700] or [5Word].
Images on Page
Format: Select [IMG] or [Fonts] (to tile the image
into a font).
Download Options: Select [Embed Always] to include the image within the data stream (for IMG
only). Not selecting this option includes only a reference to the image. Select [Use Graphics on
Printer] if you have already loaded your graphics
onto the printer's disk. Select [Download Graphics] to download (searches the \PICS directory)
the graphics to the printer.
Select [Delete after Job] to delete the image from
the printer's disk after use, or leave unselected to
save the image on the printer's disk.
Selecting [Image Compression] compresses duplicate and blank lines and optimizes for white
space.
Copies
Specify the number of copies you want to generate.
2-4 ELIXIR TECHNOLOGIES CORPORATION
Page 43

AFPDS setup
ELIXIR PRINTDRIVER BASICS
JDE
Specify the Job Descriptor Entry you want to use from
the Elixir JSL. You can use up to 6 characters. The
default JDE is DFAULT.
Feed Direction
When generating forms greater than 14.33" high for a
cut sheet printer (4135/4635) environment, selecting
the [ShortEdge] option will produce an output form in
the correct orientation for those printers.
Select the [LongEdge] option for continuous feed
printers (377CF and 430CF) and paper sizes up to 17"
x 17".
Select [Default] when:
both dimensions are less than or equal to 14.33" - no
rotation change will occur (long edge)
using opposite resources (short edge) when one dimension is greater than 14.33"
To specify the options for AFPDS output, click on
[AFPDS Setup]. The Conversion Properties dialog
box displays and contains the following options:
Text Justification
[Inter-Word] justifies text by adding or deleting spaces
between words.
[Inter-Character] justifies text by adding or deleting
spaces between characters. Note that selecting [InterWord] reduces complexity so that forms print
faster, while selecting [InterChar] may make the form
more readable but print slower.
Resolution
Specify [240 Pels] or [300 R-Units], depending on your
installation.
Rotate Pages
Select the degree of rotation for the output document,
depending on your printer:
ELIXIR PRINTDRIVER FOR NT USER GUIDE 2-5
Page 44

ELIXIR PRINTDRIVER BASICS
IBM AFP cutsheet printers and continuous
form (Group 3) printers
Portrait source document with text going
across the page, select [0].
Portrait source document with text going back
across the page, select [180].
Landscape source document with text going
down the page, select [90].
Landscape source document with text going
up the page, select [270].
To print a portrait source document in tumble
mode, select [0] rotation and specify [Duplex]
[Tumble] in the FORMDEF.
IBM AFP continuous form printers (3800)
Portrait source document with printer set up
for Narrow Forms, select [0].
Portrait source document with printer set up
for Wide Forms, select [90].
Landscape source document with printer set
up for Narrow Forms, select [90] or [270].
Landscape source document with printer set
up for Wide Forms, select [0].
Record Format
Select the format for the output:
[VBM] produces variable-blocked-machine
format files for uploading to an MVS host using IBM 3270 or IRMA FT/3270.
[AS400] produces 1024 byte blocked machine format files for uploading to an AS/400
using IBM PC support/client support.
[IRMA] produces fixed-length record files for
uploading to an MVS host using IRMA
FT/TSO.
2-6 ELIXIR TECHNOLOGIES CORPORATION
Page 45

ELIXIR PRINTDRIVER BASICS
[AFPDS] produces pure AFPDS files with no
special formatting.
Select [VSE] for Elixir PrintDriver to ignore the
DEFAULT.FAM and DEFAULT.SAM files for
DDNAME and FILETYPE.
Floating offsets
Select the number of dots to shift the output. Negative values are allowed.
[Horizontal] shifts the output right by the
specified number of dots for a portrait orientation and shifts output down for landscape
orientation.
[Vertical] shifts the output down by the specified number of dots for a portrait orientation
and shifts output right for landscape
orientation.
Resource
Click to open the AFPDS Resources dialog box.
Fonts
Include Fonts
Select [Always] to download fonts each time you
print. Select [Only used] to download only fonts
used in your document. Select [Never] to use
only those fonts resident on the printer (no fonts
are downloaded).
Font Type: select [Bounded] if you have an IBM
3812, 3816, 3820, 3825, 3827, 3835, or 3900
printer. Select [Unbounded] if you have an IBM
3800 printer.
Images
Include Images: Select [Always] to include the
image within the data stream. Not selecting this
option includes only a reference to the image.
Select [Never] if you have already loaded your
graphics onto the printer's disk.
ELIXIR PRINTDRIVER FOR NT USER GUIDE 2-7
Page 46

ELIXIR PRINTDRIVER BASICS
Image Compression compresses duplicate and
blank lines and optimizes for white space. Select
[IOCA] optimally compress images using IOCA
CCITT 4 compression. Note that IOCA CCITT 4
compression may not be compatible with some
printers. Check your printer manual. Select
[GOCA Raw] to convert images to GOCA format.
FSL/FRM (Xerox only)
Click on [FSL/FRM] to select options for these formats. The FSL/FRM Setup dialog box displays and
contains the following options:
Printer
Select the output printer's system format: Select
[87/97XX V10] if you are using 8700 or 9700 series
printers or [4XXX V2.2+] for any other production
printer. The default is [87/97XX V10].
Optimize - FRM - excludes conversion back to
Elixi format
Select this option to reduce the size of the file and the
text placement statements at the printer. Note that if
you use this option, you can convert the file to Elixir
format using the ElixiSys Desktop or ElixiSys Desktop
for Highlight color but you cannot edit the converted
text.
OGL Setup (AFP only)
Click on [OGL Setup] to select options for this format.
The OGL Setup dialog box displays and contains the
following options:
Units
Select the unit of measurement for the resolution of all
the resources produced by Elixir PrintDriver: fonts, images and forms.
Target Environment
This option controls the DDNAME/FILETYPE options
that are written to the OGL when the fonts or page
segments are called out.
2-8 ELIXIR TECHNOLOGIES CORPORATION
Page 47

ELIXIR PRINTDRIVER BASICS
Select [MVS] for Elixir PrintDriver to look in
\ELIXIR\FONTS\MAPS\DEFAULT.FAM (for
fonts) or
\ELIXIR\PICS\MAPS\DEFAULT.SAM (for
page segments) and use the MVS_defaultddname parameter when building the
font/page segment list at the beginning of the
OGL.
Select [VM] for Elixir PrintDriver to use the
VM_default_filetype parameter.
Select [VSE] for Elixir PrintDriver to ignore the
DEFAULT.FAM and DEFAULT.SAM files for
DDNAME and FILETYPE.
Rotate Pages
Select the degree of rotation for the output document,
depending on your printer:
IBM AFP cutsheet printers and continuous
form (Group 3) printers
Portrait source document with text going
across the page, select [0].
Portrait source document with text going back
across the page, select [180].
Landscape source document with text going
down the page, select [90].
Landscape source document with text going
up the page, select [270].
To print a portrait source document in tumble
mode, select [0] rotation and specify [Duplex]
[Tumble] in the FORMDEF.
IBM AFP continuous form printers (3800)
Portrait source document with printer set up
for Narrow Forms, select [0].
Portrait source document with printer set up
for Wide Forms, select [90].
ELIXIR PRINTDRIVER FOR NT USER GUIDE 2-9
Page 48

ELIXIR PRINTDRIVER BASICS
Floating Offsets
Select the number of pels to shift the output. Negative
values are allowed.
OGL extended options
From the Source OGL Options dialog box, click on
[OGL Extended Options]. The OGL Extended Options
dialog box displays and contains the following options:
Landscape source document with printer set
up for Narrow Forms, select [90] or [270].
Landscape source document with printer set
up for Wide Forms, select [0].
[Horizontal] shifts the output right by the
specified number of pels for a portrait orientation and shifts output down for landscape
orientation.
[Vertical] shifts the output down by the specified number of pels for a portrait orientation
and shifts output right for landscape
orientation.
Include job ID banner
The job ID banner contains the Job ID specified in the
Job Print Ticket dialog box. Select this option if you
want to include a job ID banner in the file conversion.
Include Description Text
Select this option if you want to include the information
entered in the [Job Databasing] option in the Job Print
Ticket dialog box. This specialized comment is included after the Job ID banner.
EBCDIC OGL (for binary transfer)
Select the format for the OGL:
Select this option to generate OGL in EBCDIC format which can be transferred directly
to the host system with no translation.
Deselect this option to generate OGL in ASCII format which is then translated to EBCDIC
format by your file-transfer utility during upload as a text file.
2-10 ELIXIR TECHNOLOGIES CORPORATION
Page 49

ELIXIR PRINTDRIVER BASICS
Font Assignment
Select the font assignment:
Select [Auto] to map fonts from their coded
font names without the Xn prefix.
Select [Mapped] to map font names using the
mapping table specified in the [Map Table]
option.
Note that you can use this table to assign individual DDNAMES to fonts.
The default mapping table is DEFAULT.FAM
and is stored in drive:\ELIXIR\FONTS\MAPS.
You can use any ASCII editor to edit this file.
If you want to use another mapping file, backspace over the current file name and enter a
new name.
Pseg assignment
Select the page segment assignment:
Select [Auto] to map page segment image
names from external file names to sixcharacter internal names without the 'S1'
prefix.
Select [Mapped] to map pseg names using
the mapping table specified in the [Map Table] option.
Note that you can use this table to assign
DDNAMES to psegs.
The default mapping table is DEFAULT.SAM
and is stored in drive:\ELIXIR\PICS\MAPS.
You can use any ASCII editor to edit this file.
If you want to use another mapping file, backspace over the current file name and enter a
new name.
Once compiled, the psegs are stored inside
the overlay.
ELIXIR PRINTDRIVER FOR NT USER GUIDE 2-11
Page 50

ELIXIR PRINTDRIVER BASICS
Control
Build the CONTROL statement to use in OGL source
files.
Document storage:
Messages:
Select [noSTORE] if you do not want the
document stored in a library.
Select [STORE] to store the document in a
library.
Select [REPLACE] to store the document in a
library and replace any existing document
with the same name.
Select [ALL] to view every message the system generates while processing your
document.
Select [WARN] to view only the warning messages generated as a result of your document's processing.
Select [ERROR] to view only the error messages generated as a result of OGL/370
processing.
Summary display:
Select [noSUMMARY] if you do not want the
summary to display as part of the source
listing.
Select [SUMMARY] to display a statistical
summary as part of the source listing.
Image services
To select options for supported images (PCX, TIF, or
BMP), click on [Image services]. The Image Services
dialog box displays and contains the following options:
Rasterize as single image
If this option is deselected, each image will convert
separately.
2-12 ELIXIR TECHNOLOGIES CORPORATION
Page 51

ELIXIR PRINTDRIVER BASICS
Select to convert objects to images, Then:
Select [All graphic objects] to convert all the graphical
objects (lines, boxes, images) to a single image instead of individual objects. This option is useful if
your document contains rotated text, a large number
of graphics on a page, or unsupported image types.
Select [Each page] to convert an entire page to a single image (including lines, text, and images). Note
that all graphical elements must be in a supported format: PCX, TIF or BMP.
Compression to (Xerox only)
Check this box to optimally compress images for .FSL
.FRM and metacode.
Image parameters (AFP only)
Select a compression format:
Select [IOCA CCITT 4] to compress images
using IOCA CCITT 4 compression. Note that
IOCA CCITT 4 compression may not be compatible with some printers. Check your printer
manual.
Select [IOCA] to convert images to IOCA
format.
Select [GOCA Raw] to convert images to
GOCA format.
Graphic tag support
Select if, in your Windows application, you marked the
location of .LP3 tags by adding tag position marker
(%%n).
Text services
Make sure you set up the options in the Text Services
dialog box before you convert any fonts using Elixir
PrintDriver. To check the default selections, select
[Text Services]. The Text Services dialog box displays and contains the following options:
ELIXIR PRINTDRIVER FOR NT USER GUIDE 2-13
Page 52

ELIXIR PRINTDRIVER BASICS
Text Mapping
Remap Text
Note: When you make any changes to the [Remap
Text] option, you must regenerate all fonts in your
document and reload those fonts on the printer.
When this option in selected, you can map the Windows ANSI character set to any other character set or
to other existing character sets.
A character set, or AFP code page, is a unique set of
characters. Windows uses the standard ANSI character set, also known as Windows Latin 1, and translates all keyboard entries as ANSI code characters.
DOS in the United States uses the 437 character set.
Other systems or countries may use other character
sets.
When this option is deselected, all characters in the
Windows character set are converted without remapping to another character set.
The default is deselected.
To remap text to other character sets, you need to
specify a Windows Map and a Country Keyboard Map
reflecting the character set.
Text Mapping
Windows Map
The [Windows Map] is a mapping file which defines
the characters in the Windows character set and their
position (in hex) in the character set.
Most users should use T100ANSI (AFP) or X100ANSI
(Xerox). If you are using the Eastern European version of Windows, you should use T/X10EEURO.
Text Mapping
Country Keyboard Map
The [Country Keyboard Map] is a mapping file that assigns positions corresponding to the country keyboard
you want to map them to.
2-14 ELIXIR TECHNOLOGIES CORPORATION
Page 53

ELIXIR PRINTDRIVER BASICS
If [Remap Text] is selected, you may get the “Match
not found, char n” error message during conversion
since not all characters in the Windows ANSI character set are present in other character sets. You can
edit the country keyboard mapping file to include any
missing characters. You should not get this error if
[Remap Text] is deselected.
Note: If you edit your document in any Elixir Forms
application, for example ElixiForm, and the [Remap
Text] option was deselected when you converted it using Elixir PrintDriver, specify [None] for the [Keyboard
Mapping] option in the Elixir Forms application. If [Remap Text] was selected when you converted your
document, you must select the same keyboard mapping used with Elixir PrintDriver.
Country Keyboard Maps
The following is a list of .KMP files provided with Elixir
PrintDriver without the prefix (T for AFP, X for Xerox).
.KMP Description
100ANSI.KMP Windows ANSI
1000437.KMP Personal Computer for US
English, UK English, and
European languages using
the IBM character set.
1000850.KMP PC Multilingual 1 for IBM PC
multinational keyboards
10EEURO.KMP European Windows
10XICSB.KMP Xerox International Character
Set - B
1EBCDIC.KMPIBM host (EBCDIC)
Default Code Page
The [Default Code Page] is the Elixir representation of
the host T1 code page member and is used to assign
host (EBCDIC) code points to GCIDs. This file is essential in the conversion of outputs to EBCDIC format,
and is used whether [Remap Text] is selected or not.
ELIXIR PRINTDRIVER FOR NT USER GUIDE 2-15
Page 54

ELIXIR PRINTDRIVER BASICS
Tags
Tag Support
Select if, in your Windows application, you marked the
location of data tags by adding tag position marker
(%%n). The external tag attribute file ([Tag File]) lists
the .TAG files that specify the attributes associated
with each tag position marker.
Tags
ElixiTag Support
Select if ,in your Windows application, you used ElixiTag to generate data tags.
Use TT or ATM outline font in Form
Select if you want to view the TT/ATM fonts in your
document when opened in the Elixir Forms
application.
8 Char Job ID
Select if you want to use up to eight characters to
name ELX job ID's.
Color Services (Xerox only)
The use of color in your document is determined by
the printer you use for printing the final document. If
you select color and your printer does not support it,
your file will print in black and white.
Select [Highlight color] to use highlight color in
your document for printing on a 4850 or 4890
printer. When you select this option, you must
also specify the [Printer Palette Name] and
[Printer Catalog Name] options.
Select [Black and white] to use only black and
white in your document for printing on any of the
supported Xerox printers.
Printer Catalog Name
Select [XEROX] or [XEROX1]. If you select
[XEROX1], you can then select from the following
highlight colors: red, blue, green, cyan, magenta, cardinal, royal, violet, brown, ruby or gray. Note that only
red, green and blue are supported for graphics.
Printer Palette Name
Select [RED], [GREEN], or [BLUE].
2-16 ELIXIR TECHNOLOGIES CORPORATION
Page 55

Font generation
ELIXIR PRINTDRIVER BASICS
When you print a document containing TrueType or
ATM fonts, and Xerox or AFP versions have not been
previously generated, the Font Generation dialog box
displays.
To preview this dialog box before you print your document, click on [Font Generation]. The Font Generation dialog box displays.
The Font Generation dialog box contains the following
options:
Select [Generate Elixir Raster Font] if you prefer to
use Elixir fonts to view and edit the document in ElixiForm (part of the Elixir Desktop). You can also view
and edit the document using TrueType fonts.
Disabling regeneration of fonts - Certain Windows
Note:
products allow you to customize TrueType and ATM fonts,
such as expanding or contracting them. To avoid overwriting previously generated fonts that were not created using
customizing features you can disable regeneration of these
fonts. To do so edit WIN.INI (in Windows sub-directory) by
adding the following line to the [Elixir PrintDriver,DISK] section of the WIN.INI: ELX_REGEN_PSW=0. When this line
is present, the option to regenerate fonts will no longer be
active.
Generation Range (Xerox-only)
This option allows you to specify the character range
in a font. For example, if you are using a font larger
than 24 points, you can limit the font range in order to
keep the file size below the printer's maximum file
size. Note that the maximum file size for 9700 font
files is 128 KB (or 64 KB for older Xerox printers). If
you do not limit the font range and the file exceeds the
printer limit, Elixir PrintDriver truncates the font
automatically.
If your printer supports 5Word fonts, this is unnecessary. Supported 5Word printers are 41xx, 46xx, and
48xx.
ELIXIR PRINTDRIVER FOR NT USER GUIDE 2-17
Page 56

ELIXIR PRINTDRIVER BASICS
To specify a range of fonts, backspace over the numbers in the windows, and enter the numbers that correspond to the font's decimal position in the Windows
ANSI character set. For example, if you want to generate only numbers, enter 48 to 57. If you want to
generate only lower case letters, enter 97 to 122. See
your Windows guide for character tables.
GCID list (AFP only)
The GCID (Graphic Character IDentifier) is the identifier associated with each character in an AFP font.
The GCID list displays the current GCID mapping file
name. This option allows you to specify the name of a
custom GCID map that is referenced when converting
non-AFP fonts to AFP fonts. The default is C0ANSI.
Font Mapping
If you want to use the font mapping table when you
print your document, click on [Font Mapping]. The
Font Mapping dialog box displays.
The Font Mapping dialog box contains the following
option:
Use font mapping table
Elixir PrintDriver provides mapping tables which allows you to map the TrueType and ATM fonts in your
document to Xerox/AFP versions of the fonts, rather
than convert them.
Select this option to use the font mapping table or deselect this option if you do not want to use the font
mapping table.
The font mapping tables are named FMAPXRX.FMP
(Xerox) and FMAPAFP.FMP (AFP), and are stored in
drive:\ELIXIR\DESKTOP\SYSTEM\.
Information about editing the font mapping table is described in the "Font options" chapter.
Messages to file
Select this option to send error messages to
drive:\Elixir\pderr.log. No error messages will appear
during during conversion.
2-18 ELIXIR TECHNOLOGIES CORPORATION
Page 57

3. Font options
This chapter provides details on the three methods of
creating text in your Windows document for subsequent printing on Xerox or AFP production printers.
Overview of font options
Before you can print a Windows document on a production printer, you must ensure that the fonts in your
document are in Xerox or AFP format. You can do
this in one of two ways:
Create text in your document using TrueType and
ATM fonts, and convert your fonts to the proper
format using the Font Generation dialog box.
See the "Converting TrueType and ATM fonts"
section in this chapter for more information.
Create text in your document using TrueType and
ATM fonts, and use the Elixir PrintDriver mapping
table to map your fonts to the proper format fonts.
See the "Mapping TrueType and ATM fonts" section in this chapter for more information.
Note that at the beginning of each section there is a
step-by-step overview of how to use each option and
references to sections providing more detailed
information.
ELIXIR PRINTDRIVER FOR NT USER GUIDE 3-1
Page 58

FONT OPTIONS
Converting TrueType and ATM fonts
If you are using TrueType and/or ATM fonts in your
document, when you select [Print], Elixir PrintDriver
displays a dialog box that allows you to specify options
(click on [Setup] and [Font Generation]) for generating
versions of each font.
When using this option to convert your TrueType and
ATM fonts, make sure the [Use Font Mapping Table]
option in the Font Mapping dialog box is deselected.
See the "Mapping TrueType and ATM fonts" section in
this chapter for more information.
To generate Xerox, AFP, and/or Elixir versions of
fonts from TrueType and ATM fonts:
1. Create your document by selecting any
available TrueType and ATM fonts from the
font list in your Windows application.
2. Select [Print] with [Elixir PrintDriver on Disk]
selected as the printer.
If there are fonts in the document that have not
been previously generated by Elixir PrintDriver,
the Font Generation dialog box displays.
See the "Font Generation" section in this chapter
for detailed information
3. Specify options in the Font Generation dialog
box and click on [OK].
Elixir PrintDriver generates the font and, unless otherwise specified, the Font Generation dialog box displays for the next ungenerated font.
When all the fonts are generated, Elixir PrintDriver
generates the print files in the specified directories.
3-2 ELIXIR TECHNOLOGIES CORPORATION
Page 59

Font Generation
FONT OPTIONS
The Font Generation dialog box allows you to specify
options for generating Xerox/AFP and Elixir versions
of the TrueType and ATM fonts in your document.
You may want to display the Font Generation dialog
box for a font that was previously generated if you
generated only Elixir fonts and you now want to generate Xerox/AFP fonts, or if you made a change to the
keyboard mapping in the Text Services dialog box.
The Font Generation dialog box contains the following
options:
[Generate Elixir Raster Font]
Select this option if you prefer to use Elixir fonts to
view and edit the document in ElixiForm (part of the
Elixir Desktop). You can also view and edit the document using TrueType fonts.
Generation Range
This option allows you to specify the character range
in a font. For example, you may want to generate only
numbers or only lower case letters.
To specify a range of fonts, backspace over the numbers in the windows, and enter the numbers that correspond to the font's decimal position in the Windows
ANSI character set. For example, if you want to generate only numbers, enter 48 to 57. If you want to
generate only lower case letters, enter 97 to 122. See
your Windows guide for character tables.
GCID list (AFP only)
The GCID (Graphic Character IDentifier) is the identifier associated with each character in an AFP font.
The GCID list displays the current GCID mapping file
name. This option allows you to specify the name of a
custom GCID map that is referenced when converting
non-AFP fonts to AFP fonts. The default is C0ANSI.
ELIXIR PRINTDRIVER FOR NT USER GUIDE 3-3
Page 60

FONT OPTIONS
Mapping TrueType and ATM fonts
Elixir PrintDriver provides a mapping table which allows you map the TrueType and ATM fonts in your
document to Xerox/AFP versions of the fonts.
To map TrueType and ATM fonts to AFP/Xerox fonts:
1. Create your document using any available
TrueType and/or ATM fonts from the font list
in your Windows application.
2. Using a text editor, edit the font mapping table
to include the fonts you have in your
document.
See the "Editing the (AFP/Xerox) font mapping table" section in this chapter.
3. Select the [Use Font Mapping Table] option in
the Font Mapping dialog box.
Note that if this option is deselected when you
print your document, Elixir PrintDriver generates
Xerox/AFP versions of all TrueType and ATM
fonts using the Font Generation dialog box. See
the "Converting TrueType and ATM fonts" section
in this chapter for information about the Font
Generation dialog box.
4. Select [Print] with Elixir PrintDriver set as
your printer.
Elixir PrintDriver replaces all occurrences of a
TrueType or ATM font with the Xerox/AFP font it
is mapped to in the font mapping table.
Editing the AFP font mapping table
Use any text editor to edit the font mapping table,
drive:\ELIXIR\DESKTOP\SYSTEM\FMAPAFP.FMP,
to contain the names of the TrueType and ATM fonts
in your document, the font attributes and the AFP
fonts they are mapped to.
When editing the mapping table, note the following:
3-4 ELIXIR TECHNOLOGIES CORPORATION
Page 61

FONT OPTIONS
All the fonts in your document must be listed in
the font mapping table. If your document contains fonts that are not listed in the table, Elixir
PrintDriver uses the Font Generation dialog box
to generate the fonts.
See the "Converting TrueType and ATM fonts"
section in this chapter for information about the
Font Generation dialog box.
To ensure correct text placement, make sure that
AFP fonts have the same character metrics as
the Windows fonts they are mapped to.
Always add an additional blank line (carriage return and line feed) to the end of the list.
Make sure that you have Elixir screen versions of
all AFP fonts that are in the mapping table. Elixir
screen fonts are stored in
drive:\ELIXIR\FONTS\SCREEN\DEMO.
The following table shows an example of the font
mapping table.
%%Elixir_Font_Services_Table: February 23 - 1995
%keyidx,DOSFILE,Logical Internal name,External TypeFace name,
%LSize,PtSize,Bold,ItalObq,Weight,Width,Dir,Rot,FontName
fmap=1, None, Helvetica, None, None, 10, None, None, Med, None, 0, 0,
X0H2100C
fmap=2, None, Helvetica, None, None, 12, None, None, Med, None, 0, 0,
X0H210BC
fmap=3, None, Helvetica, None, None, 12, None, Italic, Med, None, 0, 0,
X0H310BC
fmap=4, None, Helvetica, None, None, 12, None, None, Bold, None, 0, 0,
X0H410BC
fmap=5, None, Helvetica, None, None, 12, None, Italic, Bold, None, 0, 0,
X0H510BC
fmap=6, None, Helvetica, None, None, 16, None, None, Med, None, 0, 0,
X0H210FC
fmap=7, None, Helvetica, None, None, 16, None, None, Bold, None, 0, 0,
X0H410FC
fmap=8, None, Times New Roman, None, None, 8, None, None, Med, None,
0, 0, X0N2108C
fmap=9, None, Times New Roman, None, None, 8, None, Italic, Bold, None,
0, 0, X0N5108C
ELIXIR PRINTDRIVER FOR NT USER GUIDE 3-5
Page 62

FONT OPTIONS
fmap=10, None, Times New Roman, None, None, 12, None, None, Med,
None, 0, 0, X0N210BC
fmap=11, None, Times New Roman, None, None, 12, None, Italic, Med,
None, 0, 0, X0N310BC
fmap=12, None, Times New Roman, None, None, 12, None, None, Bold,
None, 0, 0, X0N410BC
fmap=13, None, Times New Roman, None, None, 12, None, Italic, Bold,
None, 0, 0, X0N510BC
fmap=14, None, Courier, None, None, 8, None, None, Bold, None, 0, 0,
X044108C
fmap=15, None, Courier, None, None, 8, None, Italic, Bold, None, 0, 0,
X045108C
fmap=16, None, Courier, None, None, 12, None, None, Med, None, 0, 0,
X04210BC
fmap=17, None, Courier, None, None, 12, None, Italic, Med, None, 0, 0,
X04310BC
fmap=18, None, Courier, None, None, 12, None, None, Bold, None, 0, 0,
X04410BC
fmap=18, None, Courier, None, None, 12, None, Italic, Bold, None, 0, 0,
X04510BC
(insert blank line here)
You can use an ASCII editor to edit the file as follows.
Note that only the seven bold positions above are
relevant.
Keyidx
Assign a unique number for the font, for example
FMAP = [number] where number is a unique number.
Logical Internal Name
Enter the font name, for example [Arial].
PtSize
Enter the point size, for example [10] .
ItalObq
Enter [Italic] if the font is italic or [None] if it is not italic.
Weight
Enter the weight of the font, [Bold] or [Med].
Dir
Specify the direction of the font, [0], [90], [180] or
[270].
FontName
Enter the file name of the mapped font, for example
[XOH2100C].
3-6 ELIXIR TECHNOLOGIES CORPORATION
Page 63

Editing the Xerox font mapping table
Use any text editor to edit the font mapping table,
drive:\ELIXIR\DESKTOP\SYSTEM\FMAPXRX.FMP,
to contain the names of the TrueType and ATM fonts
in your document, the font attributes and the Xerox
fonts they are mapped to.
When editing the mapping table, note the following:
All the fonts in your document must be listed in
the font mapping table. If your document contains fonts that are not listed in the table, Elixir
PrintDriver uses the Font Generation dialog box
to generate the fonts.
See the "Converting TrueType and ATM fonts"
section in this chapter for information about the
Font Generation dialog box.
To ensure correct text placement, make sure that
Xerox fonts have the same character metrics as
the Windows fonts they are mapped to.
Always add an additional blank line (carriage return and line feed) to the end of the list.
FONT OPTIONS
Make sure that you have Elixir screen versions of
all Xerox fonts that are in the mapping table.
Elixir screen fonts are stored in
drive:\ELIXIR\FONTS\SCREEN\DEMO.
The following table shows an example of the font
mapping table.
%%Elixir_Font_Services_Table: 1.0 September 1993
%keyidx,DOSFILE,Logical Internal name,External TypeFace name,
%LSize,PtSize,Bold,ItalObq,Weight,Width,Dir,Rot,FontName
ELIXIR PRINTDRIVER FOR NT USER GUIDE 3-7
Page 64

FONT OPTIONS
%---------------------------------------------------------------------------------------fmap=0,None,Arial,None,None,8,None,None,Med,None,0,P,HE08NP;
fmap=1,None,Arial,None,None,12,None,None,Bold,None,0,P,HE12BP;
fmap=2,None,Helv,None,None,10,None,None,Bold,None,0,P,HE10BP;
fmap=3,None,Helv,None,None,12,None,None,Bold,None,0,P,HE12BP;
(insert blank line here)
You can use an ASCII editor to edit the file as follows.
Note that only seven positions are relevant.
Keyidx
Assign a unique number for the font, for example
FMAP = [number] where number is a unique number.
Logical Internal Name
Enter the font name, for example [Arial].
PtSize
Enter the point size, for example [8] .
ItalObq
Enter [Italic] if the font is italic or [None] if it is not italic.
Weight
Enter the weight of the font, [Bold] or [Med].
Rot
Specify the rotation of the font, [P] for portrait or [L] for
landscape.
FontName
Enter the file name of the mapped font, for example
[HE08NP].
Using the mapping table
To use the font mapping table to map your TrueType
and ATM fonts to AFP/Xerox fonts:
1. Click on [Font Mapping] in the Elixir
PrintDriver setup dialog box.
The Font Mapping dialog box displays.
2. Select [Use Font Mapping Table].
3. Click on [OK].
3-8 ELIXIR TECHNOLOGIES CORPORATION
Page 65

FONT OPTIONS
When you print your document, Elixir PrintDriver maps
all occurrences of a TrueType or ATM font to the
AFP/Xerox font specified in the font mapping table.
Note that if this option is deselected when you print
your document, Elixir PrintDriver generates
AFP/Xerox versions of all TrueType and ATM fonts
using the Font Generation dialog box. See the "Converting TrueType and ATM fonts" section in this chapter for information about the Font Generation dialog
box.
ELIXIR PRINTDRIVER FOR NT USER GUIDE 3-9
Page 66

4. Using Elixir PrintDriver
The following chapter describes how to use Elixir
PrintDriver to generate print files ready for transferring
to a Xerox or AFP printer. See the "Introduction"
chapter for a list of supported applications.
Creating a print file
Elixir PrintDriver allows you to convert Windows based
documents into Xerox or AFP format ready for printing
on production printers. You can add text and tables,
draw shapes and import images into your document
using the standard features available in Windows
applications.
If you are creating a document on one PC and converting the same document on another PC, make sure
the fonts used to create the document are present on
both PCs.
Setting options in Elixir PrintDriver
This chapter assumes you have already set up the
Elixir PrintDriver options as described in the "Elixir
PrintDriver basics" chapter.
Selecting Elixir PrintDriver
You must select Elixir PrintDriver as the printer for the
document before you compose your document. This
assures correct formatting of your document and allows you to select any imported Xerox and Elixir format fonts directly from the font selector in your
application.
ELIXIR PRINTDRIVER FOR NT USER GUIDE 4-1
Page 67

USING ELIXIR PRINTDRIVER
See the "Font options" chapter for information on importing Xerox and Elixir format fonts.
Note for AFP users only: The format of a document
created using 240 dpi fonts changes if it is created using 300 dpi fonts. Therefore, you must select Elixir
PrintDriver as the printer for the document and select
the correct job resolution before you compose your
document to assure correct formatting of your document. See the "Elixir PrintDriver basics" chapter for
information about the job resolution option.
You can install Elixir PrintDriver software on any machine without the ElixiKey. However, you can only
setup PrintDriver options and convert documents on
the machine where the ElixiKey is attached.
See the "Introduction" chapter for information on
ElixiKeys.
To select Elixir PrintDriver for the document:
1. Access the list of installed printers using the
printer setup option in your application.
See your application documentation for information on how to access the Printer dialog box. Select [Elixir PrintDriver on DISK] from the list of
printers
2. Select [Elixir PrintDriver on DISK] from the
list of printers
3. Click on [OK].
Selecting fonts
To use TrueType or ATM fonts already installed on
your PC, select the font name from the file selector in
your Windows application and enter text from the keyboard. See your Windows application guide for information on selecting fonts.
4-2 ELIXIR TECHNOLOGIES CORPORATION
Page 68

For TrueType and ATM fonts to print on a Xerox/AFP
printer, Xerox/AFP versions of each font must be generated. Elixir PrintDriver does this for you when you
convert your document by selecting [Print] with the
Elixir PrintDriver set as the printer. You can also set
up a font mapping table to map your TrueType and
ATM fonts to Xerox/AFP fonts. See the "Font Options" chapter for more information on setting up your
font options.
Adding lines, boxes and shapes
Elixir PrintDriver allows you to print lines, boxes and
shapes. Use the tools available in your Windows application to create these elements in your document.
Circles and diagonal lines are not supported on Xerox
printers. If you want to use a circle or diagonal line in
your document, select the [Graphics] option in the Image Services dialog box so that all graphical objects
become a single image. For information about this
option, see the "Elixir PrintDriver basics" chapter.
Some Windows applications may output lines, boxes
and shapes as graphics. See the "Limitations and solutions" appendix for specific product information.
USING ELIXIR PRINTDRIVER
Adding graphics
Elixir PrintDriver allows you to add graphics to your
document by placing the graphic on the page, or by
referencing an Elixir (.LP3) graphic that is on your PC.
Embedding bit-mapped graphics
To embed a .PCX, .TIF or .BMP graphic in your document, follow the instructions in your Windowsapplication manual.
Referencing graphics
You can place a graphics reference in your document
by entering $$filename where filename is the name of
an Elixir (.LP3) graphic which is in
drive:\ELIXIR\PICS\PRINTER.
ELIXIR PRINTDRIVER FOR NT USER GUIDE 4-3
Page 69

USING ELIXIR PRINTDRIVER
If you do not have an Elixir (.LP3) version of your
graphic, embed the PCX, TIF or BMP image in the
document and convert the document using Elixir PrintDriver. This will create an .LP3 and .TXT file which
you can then reference in subsequent documents.
When PrintDriver converts your file, the upper lefthand corner of the referenced graphic is placed on the
page where the filename reference displays. Make
sure there is enough space for the graphic to display.
If you are referencing graphics in a metacode file,
make sure you select the appropriate [Image on Page]
option in the metacode Conversion
Properties/Resources dialog box before you generate
the metacode file.
See the "Elixir PrintDriver basics" chapter for information on generating metacode with embedded or referenced graphics.
Starting the conversion
When you select [Print] from your application with
Elixir PrintDriver selected as the printer for the document, the Elixir PrintDriver dialog box displays. This
allows you to check or to change the configuration
prior to starting your conversion. See the 'Elixir PrintDriver basics" chapter for configuration options.
Click on [Start conversion] to create your print file.
Uploading files to a production printer
See the appropriate file transfer chapter for information on how to upload your files from your PC to a host
computer for printing on a production printer.
4-4 ELIXIR TECHNOLOGIES CORPORATION
Page 70

5. File transfer (Xerox)
This chapter describes how to use several popular file
transfer packages to transfer files between your PC
and a host computer running the IBM MVS operating
system.
Files for printing on channel-attached Xerox production printers can be stored on a host computer.
When you transfer FSL, FRM, or metacode files to the
printer for printing, you must also transfer any resources referenced in your documents.
FRM, FSL, logo, image, and font files are also referred to as Xerox-labeled files, because the files contain 128-byte Xerox headers (or labels).
In an offline environment, tape and Xerox-format diskettes are used to move files. In an online environment,
PC/host file transfer packages are used to move files.
Supported file transfer packages include the IBM
3270, IRMA FT/3270, and IRMA FT/TSO.
Elixir currently provides the following sets of JSL in the
drive:\ELIXIR directory:
ELXONL.JSL = Black and white online metacode
ELXONC.JSL = Color online metacode
METSTA.JSL = Black and white online metacode
METSTC.JSL = Color or black and white online
metacode
ELIXIR.JSL = Black and white offline metacode
ELIXIC.JSL = Color offline metacode
ELIX2.JSL = FRM and FSL
ELIXIR PRINTDRIVER FOR NT USER GUIDE 5-1
Page 71

FILE TRANSFER (XEROX)
Moving online Xerox-labeled files
The following sections describe how to transfer Xeroxlabeled files from a PC (through an IBM host running
MVS) to a production printer.
To move online Xerox-labeled files, you need to do
the following:
1. Configure one of the supported file transfer
utilities.
2. Upload the files to the MVS host.
3. Download all files from the host computer to
your production printer using either the
HOSTCOPY utility or the DJDE FILE command
in the Job JSL.
The above steps are described in the following
sections.
Configuring the file transfer package
To upload Xerox-labeled files from your PC to an MVS
host, we recommend one of the following file transfer
packages: IBM 3270, IRMA FT/3270, or IRMA
FT/TSO.
Make sure the card for the appropriate file transfer
package is installed on your PC, and that the corresponding file transfer software is installed both on your
PC and on the MVS host.
Uploading files to the host
The following sections describe how to upload Xeroxlabeled files from your PC to an MVS host using IBM
3270, IRMA FT/3270, and IRMA FT/TSO.
5-2 ELIXIR TECHNOLOGIES CORPORATION
Page 72

FILE TRANSFER (XEROX)
Uploading Xerox-labeled files with IBM 3270 or
IRMA FT/3270
The IBM 3270 and IRMA FT/3270 file transfer packages are similar. Both require that you first prepare
the host for receiving Xerox-labeled files by allocating
a dataset with the following DCB specifications:
DCB=(LRECL=128,BLKSIZE=128,RECFM=FB)
This specifies a Xerox-labeled file with a record length
of 128 bytes, block length of 128 bytes, and fixedblock (FB) record format.
Upload a Xerox-labeled file by typing the following
command at the DOS prompt:
SEND [path]pcfilename 'hostfilename'
<Enter>
path
is the optional DOS pathname
pcfilename
is the name of the Xerox-labeled file on your PC, including extension.
hostfilename
is the host dataset receiving the file (hostfilename
must be enclosed in single quotes).
'hostfilename' can refer to either a physical sequential
or a partitioned dataset.
For example, if transferring to a physical sequential
dataset, 'hostfilename' may be as follows:
'CM.EIO.DATA.UPLOAD'
If transferring to a partitioned dataset, 'hostfilename'
can include the stem name of the files being transferred, enclosed in parentheses, as part of the dataset
name as follows:
'CM.EIO.DATA.UPLOAD(filename)'
ELIXIR PRINTDRIVER FOR NT USER GUIDE 5-3
Page 73

FILE TRANSFER (XEROX)
Uploading files with IRMA FT/TSO
The following section describes how to select the
transfer parameters and upload files using IRMA
FT/TSO.
To start IRMA FT/TSO, type: FTTSO <Enter> at the
DOS prompt. The IRMA FT/TSO screen displays.
To select the transfer parameters:
1. Use the <Tab> key to move the cursor into the
2. Type a name under which you want to save
3. Press <F5>
data entry field following [Transfer type:]
the file transfer parameters (described in step
4).
The
Transfer parameters
menu displays in the
bottom right corner of the screen.
4. Use the <Tab> key to move between transfer
parameter fields and enter the following
values:
Xerox-labeled files:
Block size: 128
Record size: 128
Record format: FB
Line numbers: Position: 0 Length: 0
Code table: STD
Transfer mode: BINARY
Expand TABs: NO
Truncate spaces: NO
U/L case: ASIS
Space Units: TRKS
Primary qty: 1
Secondary qty: 2
To upload the files:
1. Enter the name of the PC file you want to
upload and press <Tab>.
Optionally, precede the file name with a DOS directory path.
5-4 ELIXIR TECHNOLOGIES CORPORATION
Page 74

2. Enter the name of the host dataset to which
you want to upload the file and press <Tab>.
3. Enter the appropriate transfer type.
4. Press <F1> to upload the file.
Downloading files from the host to the printer
This section describes how to download files from the
host computer to the production printer using either
the HOSTCOPY utility or the DJDE FILE= command.
Using the HOSTCOPY utility involves the following
steps:
1. Upload the ENDFILE.END file.
2. Prepare the JCL.
3. Make sure all of the files used in the job are
resident on the printer.
4. Reboot the printer.
FILE TRANSFER (XEROX)
5. Download the files using HOSTCOPY.
6. Reboot the printer again.
7. Start the print job.
Using the FILE command involves the following steps:
1. Upload the ENDFILE.END file.
2. Prepare the JCL.
3. Add the DJDE FILE= statement to the data file.
The files are dynamically downloaded at print
time.
The advantages of using the FILE command rather
than HOSTCOPY to download files are:
Using the FILE command frees up disk space on
the printer.
ELIXIR PRINTDRIVER FOR NT USER GUIDE 5-5
Page 75

FILE TRANSFER (XEROX)
Uploading the ENDFILE.END file
After uploading Xerox-labeled PC files, upload the
ENDFILE.END file (copied to the drive:\ELIXIR directory during installation) to the host. Use the procedure
described in the "Uploading with IBM 3270 or IRMA
FT/3270" section of this chapter.
Preparing the JCL
Files do not have to be resident on the printer,
therefore an additional level of security can be
maintained.
Using the DJDE FILE= command does not require switching the printer from production mode
to HOSTCOPY mode and saves valuable printer
time.
Files are downloaded during print time assuring
the current and correct versions of the files are
used. When using HOSTCOPY, it is important to
check that all files resident on the printer and
used for the job are the correct versions.
After uploading Xerox-labeled files and the
ENDFILE.END file to the host, use the IBM
IEBGENER utility to build a JCL dataset for sending
the files to a channel-attached printer.
An example of a JCL dataset is given below. Modify
the JCL to include the names of the files you want to
send to the printer.
- - - - - - - - - - - - - - - - - - - - - - - - - - - - - - - - - - - - - -
//00D42DA JOB (8200,Z200-Z20001),'LARACEY
7-1994',CLASS=A
//MSGCLASS=J,NOTIFY=00D42D,USER=00D42D,PRTY=4
/* JOBPARM L=9999
//*
//* JCL to send a Xerox-labeled file to a 9700 series printer
//*
//XRX9700 OUTPUT DEST=R269
//*
//* This step copies the file UN110E.FNT
//* to the Xerox printer's output destination
//* class
//*
5-6 ELIXIR TECHNOLOGIES CORPORATION
Page 76

FILE TRANSFER (XEROX)
//STEP1 EXEC PGM=IEBGENER
//SYSPRINT D SYSOUT=*
//SYSUT1 DD UNIT=DISK,DISP=OLD,
//DSN=00D42D.0Z200.UN110E.FNT.DATA,
//DCB=(LRECL=128,BLKSIZE=128,RECFM=FB)
//SYSUT2 DD SYSOUT=O
//*
//* This step copies the ENDFILE.END file
//* to the Xerox printer's output destination
//* class to terminate the HOSTCOPY procedure
//*
//STEP2 EXEC PGM=IEBGENER
//SYSPRINT D SYSOUT=*
//SYSUT1 DD UNIT=DISK,DISP=OLD,
//DSN=00D42D.0Z200.ENDFILE.END.DATA,
//DCB=(LRECL=128,BLKSIZE=128,RECFM=FB)
//SYSUT2 DD SYSOUT=O
//OUTPUT=*.XRX9700
//SYSIN DD DUMMY
//*
- - - - - - - - - - - - - - -- - - - - - - - - - - - - - - - - - - - - -
Using the HOSTCOPY utility
If you are using the HOSTCOPY utility to download
files, you must place the printer in HOSTCOPY mode
and download the files.
Placing the printer in HOSTCOPY mode
To place a channel-attached, production printer in
HOSTCOPY mode, follow these steps:
1. Type:
OFFLINE <Enter>
to switch the printer to offline.
2. Press the printer BOOT button.
The printer console displays the following:
READY
$
3. At the $ prompt, enter:
ELIXIR PRINTDRIVER FOR NT USER GUIDE 5-7
Page 77

FILE TRANSFER (XEROX)
4. Enter the following command:
5. Enter:
BD <Enter>
The printer console displays a command menu
with the following system prompt:
ENTER COMMAND
HOSTCOPY <Enter>
The following message displays:
*SYSGEN RUNNING FOR HOSTCOPY ON-
LY*THIS IS A FILE COPYING PROCEDURE,
NOT A SYSGEN CONTINUE OR ABORT? ENTER 'C' OR 'A'
C <Enter>
The printer displays the following message:
WAITING TO READ FILES FROM HOST
The printer is now in HOSTCOPY mode and ready to
accept files from the host.
Copying Xerox-labeled files to the printer
After placing the printer in HOSTCOPY mode, run the
JCL job to send the Xerox-labeled and ENDFILE.END
files to your printer.
Note that ENDFILE.END must be the last file you
send to the printer.
The following message displays at the printer console
indicating that files are being received:
CREATING FILE XXXXXX.YYY
xxxxxx
is the file stemname.
yyy
is the file extension.
5-8 ELIXIR TECHNOLOGIES CORPORATION
Page 78

FILE TRANSFER (XEROX)
When the printer detects the ENDFILE.END file, the
following message displays:
END OF TAPE FOUND
IS ANOTHER TAPE TO BE SENT? Y OR N
If you want to send more files, type Y <Enter>.
If you are done transferring files, type N <Enter>.
The printer displays the following:
VARY OFFLINE AT HOST, THEN ENTER C
Enter C to stop the copy-to-printer operation.
Reboot the printer.
The Xerox-labeled files are now installed on the pro-
duction printer.
Using the DJDE FILE command
If you are using the DJDE FILE= command to download the files, you must embed the commands in the
dataset. The FILE command causes files to be dynamically downloaded to the printer at print time. The
command syntax is as follows:
FILE=filename, filetype [[,[f][,[s][,n]]
filename
is a one- to six-character file name.
filetype
is a three character file symbol for the appropriate file;
LGO, IMG, or FNT.
f
is C (for card-image format) or L (for tape format, the
default).
s
is D (to delete files after printing) or P (to keep the
files after printing, the default).
ELIXIR PRINTDRIVER FOR NT USER GUIDE 5-9
Page 79

FILE TRANSFER (XEROX)
n
is the maximum number of card-images (default =
120).
After adding the FILE command to your print stream
using a utility such as IEBGENER, enter a START
command at the printer console to run the print job.
Each resource will be downloaded to the printer.
See your Xerox Laser Printing System Reference
Manual for more information.
Moving and printing online metacode files
The following section describes how to move and print
online metacode files.
To print online metacode files:
1. Upload the file to the host.
2. Set up the metacode online JSL on the
printer.
You can set up the default online JSL or you can
copy and compile the METSTA.JSL or
METSTC.JSL.
3. Set up the Elixir online JSL.
4. Compile the JSLs on the printer.
5. Copy the file to your printer.
The fixed blocked online metacode file has the following format for each 540 byte block:
Bytes 0 to 3 - Block length (hex).
Bytes 4 to 7 - Length of first metacode record (hex).
Bytes 8 to n - First metacode record, where n is 7
plus the length specified in bytes 4 to 7.
5-10 ELIXIR TECHNOLOGIES CORPORATION
Page 80

Bytes n +1 to 540 - The remainder of each 540 byte
block consists of a series of four byte record descriptor words followed by a corresponding metacode
record.
The record descriptor words specify the length of each
metacode record. The end of each 540 byte block
may be padded with hex zeros.
Uploading metacode files to the host
To upload metacode files from your PC to an MVS
host, use a file transfer package such as IBM 3270,
IRMA FT/3270, or IRMA FT/TSO.
Make sure the card for the appropriate file transfer
package is installed on your PC, and that the corresponding file transfer software is installed on both your
PC and the MVS host.
Uploading with IBM 3270 or IRMA FT/3270
The IBM 3270 and IRMA FT/3270 file transfer packages require that you first prepare the host for receiving metacode files by allocating a data set with the
following DCB specifications:
FILE TRANSFER (XEROX)
DCB=(LRECL=540,BLKSIZE=540,RECFM=FB)
This specifies a file with a record length of 540 bytes,
block length of 540 bytes, and fixed-block (FB) record
format.
You then upload a metacode file by typing the following command at the DOS prompt:
SEND [path]pcfilename 'hostfilename'
<Enter>
path
is the optional DOS path
pcfilename
is the name of the metacode file on your PC, including
extension.
ELIXIR PRINTDRIVER FOR NT USER GUIDE 5-11
Page 81

FILE TRANSFER (XEROX)
hostfilename
is the host dataset receiving the file (hostfilename
must be enclosed in single quotes).
'hostfilename' can refer to either a physical sequential
or a partitioned dataset.
For example, if transferring to a physical sequential
dataset, 'hostfilename' may be as follows:
'CM.EIO.DATA.UPLOAD'
If transferring to a partitioned dataset, 'hostfilename'
can include the stem name of the files being transferred, enclosed in parentheses, as part of the dataset
name as follows:
'CM.EIO.DATA.UPLOAD(filename)'
Uploading with IRMA FT/TSO
Use the following procedure to upload a Xerox-format
file with IRMA FT/TSO:
Type FTTSO <Enter> at the DOS prompt to start the
FT/TSO file transfer software and display the IRMA
FT/TSO screen shown in the previous figure.
Change the file transfer parameters as follows:
1. Use the <Tab> key to move the cursor into the
data entry field following [Transfer type:].
2. Type a name under which you want to save
Xerox-labeled file transfer parameters
(described in step 4).
3. Press <F5>
The
Transfer Parameters
menu displays in the
bottom right corner of the screen.
4. Use the <Tab> key to move the cursor
between transfer parameter fields and enter
the following values:
5-12 ELIXIR TECHNOLOGIES CORPORATION
Page 82

FILE TRANSFER (XEROX)
Block size: 540
Record size: 540
Record format: FB
Line numbers: Position: 0 Length: 0
Code table: STD
Transfer mode: BINARY
Expand TABs: NO
Truncate spaces: NO
U/L case: ASIS
Space units: TRKS
Primary qty: 1
Secondary qty: 2
To upload files with IRMA FT/TSO:
1. Enter the name of the PC file you want to
upload and press <Tab>
Optionally, precede the file name with a DOS directory path.
2. Enter the name of the host dataset to which
you want to upload and press <Tab>.
3. Enter the appropriate transfer type for
sending Xerox-labeled files (binary).
4. Press <F1> to upload the file.
Setting up default online JSL
The following is an example of an default online JSL
file. The default JSL used at your installation will be
different. The bold text represents changes or additions that must be made to ensure compatibility with
Elixir generated online metacode.
To ensure that no other jobs referencing this default
JSL are affected by these changes, you may want to
copy the default JSL to a new name prior to making
these edits. For documentation purposes, we will
continue to refer this file as the default JSL.
ELIXIR PRINTDRIVER FOR NT USER GUIDE 5-13
Page 83

FILE TRANSFER (XEROX)
- - - - - - - - - - - - - - - - - - - - - - - - - - - - - - - - - - - - - - -
DFAULT:JDL
VFU1: VFU ASSIGN=(1,1),TOF=1,BOF=66;
PDEDFT: PDE BEGIN=(1,.5),PMODE=LANDSCAPE,
IDEN PREFIX=`$DJDE$',SKIP=10,
TBAN1:TABLE CON=(`START JOB',`START STC',`START TSU');
TBAN2: TABLE CON=(`END JOB'; `END STC';`END TSU');
CBAN1: CRITERIA CONSTANT=(3,9,EQ,TBAN1);
CBAN2: CRITERIA CONSTANT=(4,8,EQ,TBAN2);
RAXT: TABLE CONSTANT=X`1111111111111111';
ROFT: TABLE CONSTANT=X`1212121212121212';
RSTK: TABLE CONSTANT=X`1313131313131313';
RAX: CRITERIA CONSTANT=(1,8,EQ,RAXT);
ROF: CRITERIA CONSTANT=(1,8,EQ,ROFT);
RST: CRITERIA CONSTANT=(1,8,EQ,RSTK);
BANNER
TEST=(CBAN1,OR,CBAN2),HCOUNT=1,
LINE DATA=(0,400),VFU=VFU1,FCB=IGNORE,
DUPLEX=YES,FORMAT=PDEDFT;
DFLT: JDE;
END;
- - - - - - - - - - - - - - - - - - - - - - - - - - - - - - - - - - - - - - -
FONTS=(LO112B);
ACCT USER=NONE;
VOLUME HOST=IBMONL,CODE=EBCDIC;
OFFSET=1,OPRINFO=NO;
RECORDLENGTH=200;
RSTACK TEST=RST,DELIMITER=YES;
TOUNT=1, HJOBNO=(13,4);
UCSB=IGNORE,FONTINDEX=(0,ZERO);
OUTPUT GRAPHICS=YES,PURGE=YES,
OFFSET=NONE,
Make sure that the following statements are correctly
specified in your default JSL:
JDL on the first line must be the same name as
the compiled default JSL currently on your printer.
If you renamed your default JSL, use that name
here.
CODE=EBCDIC
OPRINFO=NO
RSTK: TABLE CONSTANT=X`1313131313131313';
RST: CRITERIA CONSTANT=(1,8,EQ,RSTK);
5-14 ELIXIR TECHNOLOGIES CORPORATION
Page 84

RSTACK TEST=RST,DELIMITER=YES;
To print .IMG files:
Specify GRAPHICS = YES in the OUTPUT
statement
Ensure that a graphics handling option is installed
on your printer.
Using the METSTA.JSL or METSTC.JSL
To use the METSTA.JSL (black and white) or
METSTC.JSL (color or black and white), copy and
compile it on the printer. See "Compiling the JSLs on
the printer".
Setting up Elixir online JSL
Elixir PrintDriver includes two online JSL files,
ELXONC.JSL for color and ELXONL.JSL for black
and white. These JSL files include JDE commands
for running color jobs and also for standard, legal and
A4 paper size. If you want to add additional JDE commands, you can edit the JSL files using one of two
methods:
FILE TRANSFER (XEROX)
Load JSL "as is" onto the printer and edit from the
printer console
or
Edit the JSL on the PC using an ASCII text editor
and then load it onto the printer.
Note that if you edit the JSL on your PC, you must do
the following:
1. Run the STRIP.EXE utility against the file
using the -strip parameter to remove the
trailing spaces and line numbers.
2. Edit and save the file.
3. Run the STRIP.EXE utility against the file
using the -pad parameter to add trailing
spaces and line numbers.
ELIXIR PRINTDRIVER FOR NT USER GUIDE 5-15
Page 85

FILE TRANSFER (XEROX)
4. Load and compile the JSL files on your Xerox
Preparing online black and white JSL
The ELXONL.JSL file listed below is supplied with
Elixir PrintDriver and is copied to the drive:\ELIXIR directory during installation as an example of a black
and white online Elixir .JSL file. This file and the default online JDL file, format the online metacode
printout.
ELXONL.JSL
The following is a listing of the ELXONL.JSL provided
with Elixir PrintDriver. The bold text represents
changes or additions that must be made to ensure
compatibility with Elixir generated online metacode
and your default JSL.
- - - - - - - - - - - - - - - - - - - - - - - - - - - - - - - - - - - - - - - - - - - - - - - - -
-
ELIXIR: JDL
VFELX: VFU ASSIGN=(1,1),ASSIGN=(12,255),TOF=1,
PDELX: PDE BEGIN=(0,0),PMODE=POR,
RAXT: TABLE CONSTANT=X`1111111111111111';
ROFT: TABLE CONSTANT=X`1212121212121212';
RSTK: TABLE CONSTANT=X`1313131313131313';
RAX: CRITERIA CONSTANT=(1,8,EQ,RAXT);
ROF: CRITERIA CONSTANT=(1,8,EQ,ROFT);
RST: CRITERIA CONSTANT=(1,8,EQ,RSTK);
ACCT USER=NONE;
printer.
When switching between online and offline metacode jobs, the appropriate Elixir JSL files need to
be recompiled.
BOF=255;
FONTS=(UN104B);
VOLUME HOST=IBMONL,LABEL=NONE,
CODE=NONE;
LINE DATA=(0,400),VFU=VFELX,
PCCTYPE=IBM3211,OVERPRINT=PRINT,
MARGIN=0,FCB=IGNORE;
OUTPUT GRAPHICS=YES,PURGE=YES,
OFFSET=NONE,
DUPLEX=YES,FORMAT=PDELX;
RAUX TEST=RAX;
ROFFSET TEST=ROF;
5-16 ELIXIR TECHNOLOGIES CORPORATION
Page 86

FILE TRANSFER (XEROX)
RSTACK TEST=RST,DELIMITER=YES;
IDEN PREFIX=X`5BC4D1C4C55B',SKIP=10,
OFFSET=1,OPRINFO=NO;
RECORD LENGTH=1032;
DFLT: JDE;
END;
- - - - - - - - - - - - - - - - - - - - - - - - - - - - - - - - - - - - - - Make sure that the following statements are correctly
specified in ELXONL.JSL:
JDL on the first line must be ELIXIR
HOST=IBMONL
CODE=NONE
DATA=(0,N) (where N is 200 or greater and
equals the value specified in the default JSL)
PREFIX=X`5BC4D1C4C55B' (see below)
OFFSET=a, SKIP=b (see below)
GRAPHICS=YES (if a graphics handling option is
installed and .IMG files are used - otherwise,
NONE).
Initially, the IDEN statement in the ELXONL.JSL file
contains the following values:
PREFIX=X'5BC4D1C4C55B'
OFFSET=1
SKIP=10
Modify the above values as described below:
PREFIX is the EBCDIC hexadecimal representation of
the PREFIX parameter specified for IDEN in the default online JCL file (shown as $DJDE$ in the default
online JCL listing). The value specified for the PREFIX= statement in your ELXONL.JSL must be specified in EBCDIC hexadecimal notation and must
exactly match the values specified in your default JSL.
ELIXIR PRINTDRIVER FOR NT USER GUIDE 5-17
Page 87

FILE TRANSFER (XEROX)
The maximum length of the PREFIX is 20 characters.
If it is less than 20 characters, it is padded out with
spaces. This will not affect the printing of the metacode file.
Set OFFSET and SKIP to the values specified in the
default JSL on your printer (shown as 1 and 10 in the
default JSL example). OFFSET is the leading number
of space characters before the $DJDE$ Prefix string.
SKIP is the total number of characters specified before the beginning of DJDE control characters, including leading spaces.
For example, if PREFIX = $DJDE$, SKIP=10, and
OFFSET=1, specify the $DJDE$ Prefix String in the
Setup menu as follows:
b$DJDE$bbb
where each b is one space character.
Preparing online color JSL
The ELXONC.JSL file listed below is an abbreviated
version of the JSL file supplied with Elixir PrintDriver.
This file is copied to the drive:\ELIXIR directory during
installation as an example of a highlight color online
Elixir .JSL file. The supplied version of the JSL also
includes jobs for the new highlight colors and additional page sizes. This file and the default online JDL
file format the online metacode printout.
ELXONC.JSL
In the following example, the bold text represents
changes or additions that must be made to ensure
compatibility with Elixir generated online metacode
and your default JSL.
- - - - - - - - - - - - - - - - - - - - - - - - - - - - - - - - - - - - - - - - - - - - - - - - -
-
ELIXIR: JDL
VFELX: VFU ASSIGN=(1,1),ASSIGN=(12,255),TOF=1,
BOF=255;
PDELX: PDE BEGIN=(0,0),PMODE=POR,
FONTS=(UN104B);
RED1: IDR ICATALOG=XEROX,
5-18 ELIXIR TECHNOLOGIES CORPORATION
Page 88

FILE TRANSFER (XEROX)
PALETTE='PICTORIAL',
ILIST = ('BLACK','RED');
BLUE1: IDR ICATALOG=XEROX,
PALETTE='PICTORIAL',
ILIST = ('BLACK','BLUE');
GREEN1: IDR ICATALOG=XEROX,
PALETTE='PICTORIAL',
ILIST = ('BLACK','GREEN');
RAXT: TABLE CONSTANT=X`1111111111111111';
ROFT: TABLE CONSTANT=X`1212121212121212';
RSTK: TABLE CONSTANT=X`1313131313131313';
RAX: CRITERIA CONSTANT=(1,8,EQ,RAXT);
ROF: CRITERIA CONSTANT=(1,8,EQ,ROFT);
RST: CRITERIA CONSTANT=(1,8,EQ,RSTK);
VOLUME HOST=IBMONL,LABEL=NONE,CODE=NONE;
LINE DATA=(0,400),VFU=VFELX,
PCCTYPE=IBM3211,OVERPRINT=PRINT,
MARGIN=0,FCB=IGNORE;
OUTPUT GRAPHICS=YES,PURGE=YES,
OFFSET=NONE,
DUPLEX=YES,FORMAT=PDELX,
XMP=REPORT;
ACCT USER=NONE;
RAUX TEST=RAX;
ROFFSET TEST=ROF;
RSTACK TEST=RST,DELIMITER=YES;
IDEN PREFIX=X`5BC4D1C4C55B',SKIP=10,
OFFSET=1,OPRINFO=NO;
RECORD LENGTH=1032;
DFLT: JDE;
RED: JOB;
OUTPUT IDR=RED1,IRESULT=BLACK,XMP=REPORT;
ABNORMAL ERROR=CONTINUE,
IMISMATCH=CONTINUE,ISUBSTITUTE=ANY;
BLUE: JOB;
OUTPUT
IDR=BLUE1,IRESULT=BLACK,XMP=REPORT;
ABNORMAL ERROR=CONTINUE,
IMISMATCH=CONTINUE,ISUBSTITUTE=ANY;
GREEN:JOB;
OUTPUTIDR=GREEN1,IRESULT=BLACK,
XMP=REPORT;
ABNORMAL ERROR=CONTINUE,
IMISMATCH=CONTINUE,ISUBSTITUTE=ANY;
END;
- - - - - - - - - - - - - - - - - - - - - - - - - - - - - - - - - - - - - - Make sure that the following statements are correctly
specified in ELXONC.JSL:
ELIXIR PRINTDRIVER FOR NT USER GUIDE 5-19
Page 89

FILE TRANSFER (XEROX)
Initially, the IDEN statement in the ELXONC.JSL file
contains the following values:
PREFIX=X'5BC4D1C4C55B'
OFFSET=1
SKIP=10
Modify the above values as described below:
JDL on the first line must be ELIXIR
HOST=IBMONL
CODE=NONE
DATA=(0,N) (where N is 200 or greater and
equals the value specified in the default JSL)
PREFIX=X`5BC4D1C4C55B' (see below)
OFFSET=a, SKIP=b (see below)
GRAPHICS=YES (if a graphics handling option is
installed and .IMG files are used - otherwise,
NONE).
PREFIX is the EBCDIC hexadecimal representation of
the PREFIX parameter specified for IDEN in the default online JCL file (shown as $DJDE$ in the default
online JCL listing). The value specified for the PREFIX= statement in your ELXONC.JSL must be specified in EBCDIC hexadecimal notation and must
exactly match the values specified in your default JSL.
The maximum length of the PREFIX is 20 characters.
If it is less than 20 characters, it is padded out with
spaces. This will not affect the printing of the metacode file.
Set OFFSET and SKIP to the values specified in the
default JSL on your printer (shown as 1 and 10 in the
default JSL example). OFFSET is the leading number
of space characters before the $DJDE$ Prefix string.
SKIP is the total number of characters specified before the beginning of DJDE control characters, including leading spaces.
5-20 ELIXIR TECHNOLOGIES CORPORATION
Page 90

For example, if PREFIX = $DJDE$, SKIP=10, and
OFFSET=1, specify the $DJDE$ Prefix String in the
Setup menu as follows:
b$DJDE$bbb
where each b is one space character.
Compiling the JSLs on the printer
Before running your print job, compile the JSLs at the
printer.
Compile the edited default online JSL, METSTA.JSL,
or METSTC.JSL, and the Elixir online JSL at the
printer. Run the compiling command PDL, followed
by the JSL file name.
Elixir color online JSL compile example:
PDL ELXONC.JSL <Enter>
METSTA.JSL example:
FILE TRANSFER (XEROX)
PDL METSTA.JSL <Enter>
Copying metacode files to the printer
To print metacode files, place the printer online and
prepare the printer to receive the files by typing:
STA ,DFAULT <Enter> (for Elixir and default on-
line JSLs)
or
STA ,METSTA <Enter> (black and white)
or
STA ,METSTC <Enter> (color)
Then, either run the JCL job for copying files from
your host to the printer or use a DataWare card to
copy files directly from the PC to the printer.
ELIXIR PRINTDRIVER FOR NT USER GUIDE 5-21
Page 91

FILE TRANSFER (XEROX)
Note that if you want to use a paper size that is not
listed in the supplied Elixir JSL, you can either edit the
JSL to include the paper size or perform a minisysgen on the printer to support the appropriate paper
size.
Copying files from the host using a JCL file
The following is an example of a JCL file:
- - - - - - - - - - - - - - - - - - - - - - - - - - - - - - - - - - - - - - - - - - - //00D42DA JOB (8200,Z200-Z20001),`LARACEY
7-1994',CLASS=A,
//MSGCLASS=J,NOTIFY=00D42D,USER=00D42D,PRTY=4
/* JOBPARM L=9999
//*
//* JCL TO SEND ELIXIR ONLINE METACODE TO 9790 AND
9700
//*
//XRX9700 OUTPUT DEST=R269
//STEP1 EXEC PGM=IEBGENER
//SYSPRINT DD SYSOUT=*
//SYSUT1DDUNIT=DISK,DISP=OLD,
//DSN=O0D42D.0Z200.IM5816.MET.DATA,
//DCB=(LRECL=536,BLKSIZE=540,RECFM=VBM)
//SYSUT2 DD SYSOUT=O,
// OUTPUT=*.XRX9700
//SYSIN DD DUMMY
//*
- - - - - - - - - - - - - - - - - - - - - - - - - - - - - - - - - - - - - - Note that the fixed block file created by Elixir Print-
Driver contains nearly all the attributes of a variableblocked machine (VBM) file. However, in an IBM MVS
host environment, the metacode file must be converted to VBM format by coding the DCB parameter
for the input (SYSUT1) file as follows:
DCB=(LRECL=536, BLKSIZE=540, RECFM=VBM).
Note also that the VBM format requires the record
length to be four bytes less than the block size.
5-22 ELIXIR TECHNOLOGIES CORPORATION
Page 92

FILE TRANSFER (XEROX)
Specifying the DCB parameters, as described previously, causes the MVS system catalog to view the online metacode dataset as a VBM file instead of an FB
file, which was the record format specified when the
file was uploaded. The IEBGENER utility then treats
the dataset as a VBM file, and sends each variable
length record within the file down the channel to the
printer.
Note that online metacode can be delivered to printers
attached to host computers with operating environments other than MVS. It is up to the user to determine the correct upload procedure for their
environment, as well as a means of delivering the
metacode records to the printer.
In VM and DOS environments, you will have to write
your own EXEC or equivalent utility to extract each
variable length metacode record from the 540 byte
blocks of metacode records contained within the online metacode dataset.
Copying files using a DataWare card
The DataWare PC interface card connects a PC directly to a Xerox production printer using bus and tag
connectors.
The DataWare PC interface card allows you to send
online metacode files and Xerox files with 128-byte
header records generated by Elixir PrintDriver to your
Xerox printer.
To use the DataWare card, add the following device
driver in your PC CONFIG.SYS file.
DEVICE=CHANNEL.SYS unit address
unit
is the DataWare I/O port you are using (0 - 3), normally 0.
address
is the hexadecimal value of the address of the printer
on the I/O channel (between 0 and FE), normally 0F.
ELIXIR PRINTDRIVER FOR NT USER GUIDE 5-23
Page 93

FILE TRANSFER (XEROX)
Make sure you specify the full DOS pathname for
CHANNEL.SYS in your CONFIG.SYS file (for example, C:\DATAWARE\CHANNEL.SYS 0 0F).
For proper DataWare card operation, other parameters may be required in the CONFIG.SYS file. For details, see your DataWare documentation.
To copy files to the printer through the DataWare
card, type the following at the PC:
COPY /B [ path] filename ;CHAN <Enter>
filename
can be any Elixir-generated online metacode file or a
Xerox file with a 128-byte header record.
path
is the optional fully-qualified DOS directory search
path for filename.
Moving and printing offline metacode
This section describes how to move and print offline
metacode files using tape.
You can copy Xerox metacode to and from any
9-track, 1600 BPI tape drive using the Overland TX-8
controller card. The tape devices supported are the
Qualstar 1052 and the Qualstar 1260.
Preparing offline ELIXIR.JSL
The ELIXIR.JSL file listed below is supplied with Elixir
PrintDriver and is copied to drive:\ELIXIR during
installation.
5-24 ELIXIR TECHNOLOGIES CORPORATION
Page 94

FILE TRANSFER (XEROX)
ELIXIR.JSL
The following pages list the ELIXIR.JSL file provided
with Elixir PrintDriver, required for printing black and
white offline metacode on Xerox printers. The bold
text represents critical fields that must exactly match
the entries specified in Elixir PrintDriver prior to generation of offline metacode.
ELIXIR: SYSTEM;
PCCXPS: PCC
INITIAL=TOF,DEFAULT=(IGN,PSP0),
ASSIGN=(X'31',IGN,SK1PSPO);
VFXPS1: VFU ASSIGN=(1,1),TOF=1,BOF=255;
PDFLT: PDE BEGIN=(0,0),PMODE=POR,FONTS=(UN104B);
RAXT: TABLE CONSTANT=X'1111111111111111';
ROFT: TABLE CONSTANT=X'1212121212121212';
RSTK: TABLE CONSTANT=X'1313131313131313';
RT: TABLE CONSTANT=A'$RAUX$';
RAX: CRITERIA CONSTANT=(1,8,EQ,RAXT);
ROF: CRITERIA CONSTANT=(1,8,EQ,ROFT);
RST: CRITERIA CONSTANT=(1,8,EQ,RSTK);
RC: CRITERIA CONSTANT=(1,6,EQ,RT);
VOLUME HOST=IBMOS,LABEL=NONE,CODE=NONE;
LINE
DATA=(1,400),VFU=VFXPS1,PCCTYPE=PCCXPS,
OVERPRINT=PRINT,MARGIN=0;
OUTPUT GRAPHICS=YES,PURGE=YES,
DUPLEX=YES,FORMAT=PDFLT;
ACCT USER=NONE;
RAUX TEST=RAX;
ROFFSET TEST=ROF;
RDELETE TEST=ROF;
IDEN
PREFIX=(X'2024444A444524202020'),OFFSET=1,
SKIP=10, OPRINFO=NO;
BLOCK LENGTH=1032,OFFSET=0,LTHFLD=2,
PREAMBLE=4;
RECORDSTRUCTURE=VB,LENGTH=1028,LTHFLD=2,
PREAMBLE=4;
DFLT: JDE;
END;
------------------------------------------------------------------------------------------
-
ELIXIR PRINTDRIVER FOR NT USER GUIDE 5-25
Page 95

FILE TRANSFER (XEROX)
Make sure that the following statements are correctly
specified in ELIXIR.JSL
Initially, the IDEN statement in the ELIXIR.JSL file
contains the following values:
PREFIX=(X'2024444A444524202020')
OFFSET=1
SKIP=10
Set the IDEN PREFIX statement in ELIXIR.JSL to
match the PREFIX string used for Dynamic Job
Descriptor Entries (DJDEs) at your site.
The value you specify for the [$DJDE$ Prefix
String] option in the Elixir PrintDriver Meta Options dialog box must also match this value.
PREFIX=(X`2024444A444524202020') (see
below)
OFFSET=a, SKIP=b (see below)
GRAPHICS=YES (if a graphics handling option is
installed and .IMG files are used - otherwise,
NONE).
Modify the above values as described below:
PREFIX is the ASCII hexadecimal representation of
the PREFIX parameter specified to match the prefix
string used for Dynamic Job Descriptor Entries
(DJDE) at your site.
The maximum length of the PREFIX is 20 characters.
If it is less than 20 characters, it is padded out with
spaces. This will not affect the printing of the metacode file.
Set OFFSET and SKIP values to match the offset and
skip values used for Dynamic Job Descriptor Entries
(DJDE) at your site. OFFSET is the leading number
of space characters before the $DJDE$ Prefix string.
SKIP is the total number of characters specified before the beginning of DJDE control characters, including leading spaces.
5-26 ELIXIR TECHNOLOGIES CORPORATION
Page 96

For example, if PREFIX = $DJDE$, SKIP=10, and
OFFSET=1, specify the $DJDE$ Prefix String in the
Setup menu as follows:
b$DJDE$bbb
where each b is one space character.
Preparing offline ELIXIC.JSL
The ELIXIC.JSL file listed below is an abbreviated version of the JSL file supplied with Elixir PrintDriver.
This file is copied to the drive:\ELIXIR directory during
installation as an example of a highlight color offline
Elixir JSL file. The supplied version of the JSL also
includes jobs for the new highlight colors and additional page sizes.
ELIXIC.JSL
The following pages list the ELIXIC.JSL file provided
with Elixir PrintDriver, required for printing highlight
color offline metacode on Xerox printers. The bold
text represents critical fields that must exactly match
the entries specified in Elixir PrintDriver prior to generation of offline metacode.
FILE TRANSFER (XEROX)
ELIXIR: SYSTEM;
PCCXPS: PCC
INITIAL=TOF,DEFAULT=(IGN,PSP0),
ASSIGN=(X'31',IGN,SK1PSPO);
VFXPS1: VFU ASSIGN=(1,1),TOF=1,BOF=255;
PDFLT: PDE BEGIN=(0,0),PMODE=POR,FONTS=(UN104B);
RED1: IDR ICATALOG=XEROX,
PALETTE='PICTORIAL',
ILIST = ('BLACK','RED');
BLUE1: IDR ICATALOG=XEROX,
PALETTE='PICTORIAL',
ILIST = ('BLACK','BLUE');
GREEN1: IDR ICATALOG=XEROX,
PALETTE='PICTORIAL',
ILIST = ('BLACK','GREEN');
RAXT: TABLE CONSTANT=X'1111111111111111';
ROFT: TABLE CONSTANT=X'1212121212121212';
RSTK: TABLE CONSTANT=X'1313131313131313';
RT: TABLE CONSTANT=A'$RAUX$';
RAX: CRITERIA CONSTANT=(1,8,EQ,RAXT);
ELIXIR PRINTDRIVER FOR NT USER GUIDE 5-27
Page 97

FILE TRANSFER (XEROX)
ROF: CRITERIA CONSTANT=(1,8,EQ,ROFT);
RST: CRITERIA CONSTANT=(1,8,EQ,RSTK);
RC: CRITERIA CONSTANT=(1,6,EQ,RT); VOLUME
DATA=(1,400),VFU=VFXPS1,PCCTYPE=PCCXPS,
OVERPRINT=PRINT,MARGIN=0;
OUTPUT GRAPHICS=YES,PURGE=YES,
ACCT USER=NONE;
RAUX TEST=RAX;
ROFFSET TEST=ROF;
RDELETE TEST=ROF;
IDEN PREFIX=(X'2024444A444524202020'),OFFSET=1,
BLOCK LENGTH=1032,OFFSET=0,LTHFLD=2,
RECORDSTRUCTURE=VB,LENGTH=1028,LTHFLD=2,
DFLT: JDE;
RED: JOB;
OUTPUT IDR=RED1,IRESULT=BLACK;
ABNORMAL ERROR=CONTINUE,IMISMATCH=CONTINUE, ISUBSTITUTE=ANY;
BLUE: JOB;
OUTPUT IDR=BLUE1,IRESULT=BLACK;
ABNORMAL ERROR=CONTINUE,IMISMATCH=CONTINUE, ISUBSTITUTE=ANY;
GREEN: JOB;
OUTPUT IDR=GREEN1,IRESULT=BLACK;
ABNORMAL ERROR=CONTINUE, IMISMATCH=CONTINUE,
RLEG: JOB;
OUTPUT IDR=RED1, IRESULT=BLACK,
ABNORMAL ERROR=CONTINUE,IMISMATCH=CONTINUE, ISUBSTITUTE=ANY
BLEG: JOB;
OUTPUT IDR=BLUE1, IRESULT=BLACK,
ABNORMAL ERROR=CONTINUE,IMISMATCH=CONTINUE, ISUBSTITUTE=ANY
GLEG: JOB;
OUTPUT IDR=GREEN1, IRESULT=BLACK,
ABNORMAL ERROR=CONTINUE,IMISMATCH=CONTINUE, ISUBSTITUTE=ANY
RA4: JOB;
OUTPUT IDR=RED1, IRESULT=BLACK,
HOST=IBMOS,LABEL=NONE,CODE=NONE;
LINE
DUPLEX=YES,FORMAT=PDFLT;
SKIP=10, OPRINFO=NO;
PREAMBLE=4;
PREAMBLE=4;
ISUBSTITUTE=ANY;
PAPERSIZE=USLEGAL;
PAPERSIZE=USLEGAL;
PAPERSIZE=USLEGAL;
PAPERSIZE=A4;
5-28 ELIXIR TECHNOLOGIES CORPORATION
Page 98

FILE TRANSFER (XEROX)
ABNORMAL ERROR=CONTINUE,IMISMATCH=CONTINUE, ISUBSTITUTE=ANY
BA4: JOB;
OUTPUT IDR=BLUE1, IRESULT=BLACK,
PAPERSIZE=A4;
ABNORMAL ERROR=CONTINUE,IMISMATCH=CONTINUE, ISUBSTITUTE=ANY
GA4:JOB;
OUTPUT IDR=GREEN1, IRESULT=BLACK,
PAPERSIZE=A4;
ABNORMAL ERROR=CONTINUE,IMISMATCH=CONTINUE, ISUBSTITUTE=ANY
END;
------------------------------------------------------------------------------------------
-
All lines after the DFLT: JDE; statement must be
added at the end of all .JSL files when preparing the
JSL for printing on highlight color printers or printing
on USLEGAL and A4 paper sizes.
Make sure that the following statements are correctly
specified in ELIXIC.JSL
Set the IDEN PREFIX statement in ELIXIC.JSL to
match the PREFIX string used for Dynamic Job
Descriptor Entries (DJDEs) at your site.
The value you specify for the [$DJDE$ Prefix
String] option in the Elixir PrintDriver Meta Options dialog box must also match this value.
PREFIX=(X`2024444A444524202020') (see
below)
OFFSET=a, SKIP=b (see below)
GRAPHICS=YES (if a graphics handling option is
installed and .IMG files are used - otherwise,
NONE).
Initially, the IDEN statement in the ELIXIC.JSL file
contains the following values:
PREFIX=(X'2024444A444524202020')
OFFSET=1
SKIP=10
Modify the above values as described below:
ELIXIR PRINTDRIVER FOR NT USER GUIDE 5-29
Page 99

FILE TRANSFER (XEROX)
PREFIX is the ASCII hexadecimal representation of
the PREFIX parameter specified to match the prefix
string used for Dynamic Job Descriptor Entries
(DJDE) at your site.
The maximum length of the PREFIX is 20 characters.
If it is less than 20 characters, it is padded out with
spaces. This will not affect the printing of the metacode file.
Set OFFSET and SKIP values to match the offset and
skip values used for Dynamic Job Descriptor Entries
(DJDE) at your site. OFFSET is the leading number
of space characters before the $DJDE$ Prefix string.
SKIP is the total number of characters specified before the beginning of DJDE control characters, including leading spaces.
For example, if PREFIX = $DJDE$, SKIP=10, and
OFFSET=1, specify the $DJDE$ Prefix String in the
Setup menu as follows:
b$DJDE$bbb
where each b is one space character.
Command to print...
STA DFLT,ELIXIR
STA RED,ELIXIR letter size using red toner
STA BLUE,ELIXIR letter size using blue toner
STA GREEN,ELIXIR letter size using green toner
STA CYAN,ELIXIR letter size using cyan toner
STA MAGEN,ELIXIR letter size using magenta
STA CARDN,ELIXIR letter size using cardinal
STA ROYAL,ELIXIR letter size using royal toner
5-30 ELIXIR TECHNOLOGIES CORPORATION
toner
toner
Page 100

FILE TRANSFER (XEROX)
STA VIOLET,ELIXIR letter size using violet toner
STA BROWN,ELIXIR letter size using brown toner
STA RUBY,ELIXIR letter size using ruby toner
STA GRAY,ELIXIR letter size using gray toner
STA RLEG,ELIXIR legal size using red toner
STA BLEG,ELIXIR legal size using blue toner
STA GLEG,ELIXIR legal size using green toner
STA CYLEG,ELIXIR legal size using cyan toner
STA MAGLEG,ELIXIR legal size using magenta
STA CARLEG,ELIXIR legal size using cardinal
STA ROYLEG,ELIXIR legal size using royal toner
STA VIOLEG,ELIXIR legal size using violet toner
STA BRLEG,ELIXIR legal size using brown toner
STA RUBLEG,ELIXIR legal size using ruby toner
STA GRLEG,ELIXIR legal size using gray toner
STA RA4,ELIXIR A4 size using red toner
STA BA4,ELIXIR A4 size using blue toner
STA GA4,ELIXIR A4 size using green toner
STA CYA4,ELIXIR A4 size using cyan toner
STA MAGA4,ELIXIR A4 size using magenta toner
toner
toner
STA CARA4,ELIXIR A4 size using cardinal toner
STA ROYA4,ELIXIR A4 size using royal toner
ELIXIR PRINTDRIVER FOR NT USER GUIDE 5-31
 Loading...