

Page 1

EE
Elixir Forms Editor
Desktop User Guide
June 1999
Version 4.00
Page 2

Elixir Technologies Corporation
P.O. Box 1559
Ojai, CA 93024
Copyright © 1999 by Elixir Technologies Corporation. All rights
reserved.
June 1999
Version 4.00
Printed in the United States of America
Trademarks and Service Marks/Company:
Bitstream/Bitstream, Inc.
Elixir/Elixir Technologies Corporation
HP, PCL, XGF, XSOP LaserJet/Hewlett Packard Company
IBM, Personal Computer, AT, PS/2, AFP, and all other IBM
products mentioned in this publication are trademarks of International Business Machines
IRMA/Digital Communications Associations, Inc.
MS-DOS, Microsoft Mouse, Windows/Microsoft Corporation
PaintBrush/Z-Soft Corporation
Copyright protection claimed includes all forms and matters of
copyrightable material and information now allowed by statutory or judicial law or hereinafter granted, including without limitation, material generated from the software programs which is
displayed on the screen such as icons, screen display looks,
etc.
Changes are periodically made to this document. Changes,
technical inaccuracies, and typographic errors will be corrected
in subsequent editions.
Page 3

Table of contents
1. Introduction 1-1
Customer support 1-2
Elixir training 1-2
Who should use this guide 1-3
Conventions 1-3
Display conventions 1-3
Typographical conventions 1-3
On-line Help 1-4
Organization of this guide 1-6
Starting the Elixir Forms Editor Desktop 1-7
Exiting the Elixir Forms Editor Desktop 1-8
Notes and cautions 1-8
2. Desktop basics 2-1
Common Windows operating system 2-1
Desktop layout 2-1
Icons 2-2
Elixir folder icons 2-3
Forms folder 2-3
Fonts folder 2-3
Graphics folder 2-3
Documents folder 2-3
Jobs folder 2-3
Clipboard icon 2-3
User Files icon 2-4
ELIXIR FORMS EDITOR DESKTOP USER GUIDE iii
Page 4

TABLE OF CONTENTS
ElixirForm application icon 2-4
Other Elixir application icons 2-4
User Tools icon 2-4
Diskette icon 2-4
Printers icon 2-5
Scanners icon 2-5
Dispatcher icon 2-5
Converter icon 2-5
Trashbin icon 2-5
Viewer icon 2-6
Sub-window menus 2-6
Backup button 2-6
Filter menu 2-7
Selection menu 2-8
View menu 2-9
Accessing DOS 2-11
Exiting the Desktop 2-12
3. Elixir folders 3-1
Folders and DOS directories 3-1
Elixir folder structure 3-2
Forms folder 3-5
Elixir Forms folder 3-5
Input Forms folder 3-6
Output Forms folder 3-6
Fonts folder 3-7
Elixir Fonts folder 3-8
Input Fonts folder 3-8
Output Fonts folder 3-9
Graphics folder 3-10
Elixir Images folder 3-11
Input Images folder 3-11
Output Images folder 3-12
Documents folder 3-13
iv ELIXIR TECHNOLOGIES CORPORATION
Page 5

TABLE OF CONTENTS
Elixir Documents folder 3-13
Input Documents folder 3-14
Output Documents folder 3-14
Jobs folder 3-15
Elixir Docs Jobs 3-15
Elixir Data Jobs 3-16
4. Desktop configuration 4-1
System configuration 4-2
Desktop usage switches 4-4
User privileges 4-7
Diagnostics 4-9
Creating a directory 4-10
Converter properties 4-11
Resetting System menu options 4-12
Refreshing the screen 4-13
Selecting toolsets 4-13
5. Additional Desktop features 5-1
Opening icons 5-1
Opening a folder icon 5-2
Opening Elixir files 5-2
Opening the ElixirForm icon 5-3
Opening device icons 5-3
Diskette icon 5-3
Printers icon 5-3
Scanners icon 5-3
Opening other icons 5-4
User Tools icon 5-4
User Files icon 5-4
Dispatcher icon 5-4
Converter icon 5-4
Viewer icon 5-4
Displaying Icon properties 5-5
Files 5-5
ELIXIR FORMS EDITOR DESKTOP USER GUIDE v
Page 6

TABLE OF CONTENTS
Displaying Elixir file formats 5-6
Displaying a logo 5-7
Copying files 5-8
Copying files to Elixir folders 5-9
Copying files to a DOS directory 5-9
Copying files from a DOS directory 5-10
Copying files to a DOS-format
diskette 5-11
Copying files from a DOS-format
diskette 5-12
Copying files to a DOS-Elixir format
diskette 5-12
Copying files from a DOS Elixir-
format diskette 5-14
Copying files from Output to Input
folders 5-14
Copying Elixir form files 5-15
Creating a .PUB file 5-15
Copying a .PUB file to a diskette 5-17
Restoring a .PUB file from a diskette 5-18
Using the Elixir Scheduler Desktop 5-19
Scheduler setup 5-20
Scheduler Desktop examples 5-24
Scheduler example 1 5-24
Scheduler example 2 5-25
Viewing files 5-26
Viewing Elixir graphics files 5-27
6. Peripheral devices 6-1
Diskette drive 6-1
Scanner device 6-3
Configuration 6-3
Using scanners 6-6
Using the Elixir HP print driver 6-6
7. File conversions 7-1
General procedures 7-1
vi ELIXIR TECHNOLOGIES CORPORATION
Page 7

TABLE OF CONTENTS
Elixir folders 7-3
Forms folder 7-3
Fonts folder 7-4
Graphics folder 7-4
Documents folder 7-4
Jobs Folder 7-5
Initial converter setup 7-5
File conversion procedures 7-8
Converting forms 7-9
Converting Elixir forms to HP PCL
format 7-10
Converting Elixir forms to PostScript 7-12
Converting forms to Elixir graphics
files 7-15
Converting Elixir forms to PDF
format 7-16
Converting Elixir forms to XGF
format 7-20
Converting Elixir forms to XSOP
format 7-22
Converting fonts 7-23
Converting fonts to HP PCL format 7-24
Generating fonts from outlines 7-25
Font naming conventions 7-29
Generating Elixir fonts 7-31
Generating non-Elixir fonts 7-32
Regenerating screen fonts 7-32
Adding HP PCL fonts to Windows
applications 7-32
Converting graphics 7-33
Converting Elixir graphics to Tiles in
a Font format 7-34
Converting Elixir graphics to PCX
and TIFF formats 7-35
Restrictions and limitations 7-37
ELIXIR FORMS EDITOR DESKTOP USER GUIDE vii
Page 8

TABLE OF CONTENTS
Converting Elixir graphics to BMP
format 7-37
8. Accessing DOS files and applications 8-1
Desktop tools 8-1
User Tools icon 8-1
User Files icon 8-1
Dispatcher icon 8-1
Creating an application icon 8-2
Creating an icon 8-2
Starting the application 8-5
Displaying icon properties 8-5
User Tools example 8-5
Creating an icon for Ventura Publisher 8-5
Checking the properties of
the Ventura Publisher icon 8-6
Starting and exiting Ventura
Publisher 8-7
Accessing DOS directories 8-7
Changing directories 8-9
Copying files between
subdirectories 8-9
Linking files to applications 8-10
Linking files to an already-defined
User Tool 8-10
Linking files to a new application 8-11
Checking tool properties 8-11
Opening linked files 8-11
Starting DOS executables 8-12
Starting batch files 8-12
Using the Dispatcher icon 8-13
Setting up Dispatcher commands 8-14
Executing Dispatcher commands 8-17
Copying files to the
Dispatcher 8-17
viii ELIXIR TECHNOLOGIES CORPORATION
Page 9

TABLE OF CONTENTS
Executing commands from
the Dispatcher icon 8-17
Dispatcher example 8-18
Using the Dispatcher to run Elixir
utilities 8-20
DOS menu 8-21
9. Stand-alone utilities 9-1
Using the utilities 9-1
DISP 9-2
ELXINV 9-3
ELXWDATA 9-5
FONTCHG 9-5
FONTMAP 9-7
FORMPRN 9-8
FSIMG 9-10
HPEDIT 9-12
IC 9-13
LP32ELX 9-14
SHOWBLOK 9-15
SHOWELX 9-16
A. Keyboard shortcuts A-1
Desktop A-1
Windows A-2
By option name A-3
B. Additional files and directories B-1
Elixir mapping table directories B-1
PostScript mapping table directory B-1
Contour fonts mapping table
directory B-2
Bitstream Facelift fonts mapping
directory B-2
C. The Elixir Desktop menu bar C-1
File menu C-1
Open (<F2>) C-2
ELIXIR FORMS EDITOR DESKTOP USER GUIDE ix
Page 10

TABLE OF CONTENTS
System menu C-6
Special menu C-8
DOS menu C-9
Window menu C-10
Copy (<Ctrl> + <C>) C-2
New C-3
Duplicate C-3
Delete (<Del>) C-3
Properties (<F2>) C-4
Print (<Ctrl>+<P>) C-4
View C-4
Formats C-5
Convert (<Ctrl> + <V>) C-5
Transform C-5
Dispatch (<Ctrl> + <I>) C-5
Close (<F3>) C-5
Exit Elixir (<Alt> + <F4>) C-5
System Config <Alt> + <F6> C-6
Usage Switches C-6
User Privileges C-6
Diagnostics <Alt> + <F5> C-7
Make Directory <Ctrl> + <M> C-7
Converter Props C-7
Reset to Defaults C-7
Refresh C-7
Toolset C-7
Close All (<F4>) C-8
Efont Factory C-8
Install Fonts C-8
Scheduler Setup (<Alt> + <F2>) C-9
Scheduler Action (<Alt> + <F3>) C-9
DOS Command (<Ctrl> + <D>) C-9
Cascade C-10
x ELIXIR TECHNOLOGIES CORPORATION
Page 11

TABLE OF CONTENTS
Tile C-10
Arrange Icons C-10
Message C-10
Help menu C-11
D. Local printers D-1
Printing an Elixir form D-1
Printing a non-Elixir form D-3
Creating a .DAT file for proof-printing D-4
Creating a new .DAT file in the Elixir
Documents folder D-4
Copying the .ELX files to the Elixr
Documents folder D-5
Viewing and editing a .DAT file D-6
Proof-printing a .DAT file D-6
Glossary GLOSSARY-1
Index INDEX-1
ELIXIR FORMS EDITOR DESKTOP USER GUIDE xi
Page 12

1. Introduction
This guide describes the Elixir Forms Editor Desktop,
the Windows-based operating environment for launching and using Elixir applications such as Elixir Forms
Editor, Elixir AppBuilder for AFP and Elixir AppBuilder
for XGF.
Additionally, the Desktop has numerous productivityenhancing features, including those which enable you
to:
convert files to icons
link files to applications, thereby allowing you to
start an application and load a file in one step
define icons for DOS or Windows-based applica-
tions you want to launch from the Desktop, such
as word processors, desktop publishers and
spreadsheets.
Because this guide describes all functions and features of the Desktop, certain options described herein
may not apply to your specific configuration. In such
cases, unavailable options display in gray (not black)
on menus and dialog boxes, and some screens and
icons may not display at all.
See the Elixir Forms Editor Getting Started Guide for
detailed installation information.
ELIXIR FORMS EDITOR DESKTOP USER GUIDE 1-1
Page 13

INTRODUCTION
Customer support
Elixir customer support centers provide telephone
technical assistance for Elixir users during business
hours.
If you have purchased your Elixir product directly from
Elixir Technologies then contact one of the support
center hotlines.
See the Elixir Forms Editor Getting Started Guide for
information about contacting your support center.
Elixir training
Elixir Technologies Corporation offers training for the
complete range of our Windows-based family of software products. For more information, contact:
Elixir Learning
(805) 641-5900 ext. 6
Who should use this guide
This guide serves users needing first-time or ongoing
reference information about the Elixir Forms Editor
Desktop.
Users should already be familiar with Microsoft Windows operations, printer and font management operations and PC peripherals, and have access to reference manuals for related PC software and hardware.
1-2 ELIXIR TECHNOLOGIES CORPORATION
Page 14

Conventions
This section describes the following:
display conventions
typographical conventions
Display conventions
ElixirForm adheres to Microsoft Windows conventions
for using menus, menu commands, dialog boxes,
command buttons, icons and the mouse. See your
Windows manual for more information.
Many shortcut keys in the new Windows-based product are different from those in previous GEM versions.
This is because the standard Windows oper- ating environment predefines certain functions to keys (for example, <F1> is always used for Help). See the
"Keyboard shortcuts" appendix for a list of keyboard
shortcuts.
Typographical conventions
INTRODUCTION
The following typographical conventions are used
throughout this guide:
Keystrokes are shown enclosed in < > (angle
brackets). For example:
<Enter>.
Key combinations are denoted by a plus sign be-
tween keys. For example:
<Shift> + <F1> indicates simultaneously pressing
the <Shift> and <F1> keys.
Menu titles are shown in bold. Menu options are
enclosed in [ ] (square brackets). For example:
Select [New] from the File menu.
ELIXIR FORMS EDITOR DESKTOP USER GUIDE 1-3
Page 15

INTRODUCTION
Commands, options, actions and parameters that
require description are shown in bold, followed on
the next line by the description. For example:
Delete
Deletes the selected files.
Steps in a procedure are shown in numbered bold
paragraphs. For example:
1. At the prompt, enter the file name and
extension.
Comments relating to a step (such as this paragraph) are shown in regular text following the bold
paragraph.
Commands you enter at the DOS prompt display
in larger text. Within DOS commands, variable
names and keys you press are shown in italics.
For example:
CD \ELIXIR <Enter>
On-line Help
Elixir software uses the Microsoft Windows Help program to provide on-line Help for all functions.
For more information about Windows Help, select the
[How to Use Help] option in the Help menu, or see
your Microsoft Windows documentation.
The Help files included with your Elixir software include graphics created using screen drivers with large
fonts. If you use a screen driver with small fonts, the
Help file graphics may not display clearly. For optimum graphics display, use a screen driver with large
fonts.
You can display on-line Help in the following ways:
1-4 ELIXIR TECHNOLOGIES CORPORATION
Page 16

INTRODUCTION
Bubble Help
Click on an icon with the right mouse button to view its
properties (if applicable) or to display "bubble help."
Bubble help is a short description of the icon function
that displays in a bubble extending from the icon.
Quick Help
Enable the quick function by selecting the quick help
option in the Usage Switches (or Preferences -- for
ElixirImage) dialog box. When you move the screen
pointer over an icon on the screen, a short description
of the icon function displays in the message area of
the screen. During certain operations a message
about the function you are performing also displays in
the message area. To see these operational messages, disable quick help.
Context sensitive Help
To use this function, click on an icon and press <F1>.
If available, the appropriate Help topic displays. If no
specific topic is available, the Help table of contents
displays.
Help menu
Select [Help] from the top pull-down menu and choose
one of the displayed topics.
Dialog box Help
Click on the [Help] button in a dialog box to view an
associated Help topic. Under Windows 95 and Windows NT, right-click on a dialog box option to display
an associated Help topic.
Help pop-ups and jumps
Within Help topic text, words or phrases underlined in
green are pop-ups or jumps. When you click on a
pop-up topic, a box displays within the current Help
topic with additional information. When you click on a
jump, a different, associated Help topic displays.
ELIXIR FORMS EDITOR DESKTOP USER GUIDE 1-5
Page 17

INTRODUCTION
Help hypergraphics
Hypergraphics are special graphics within Help files
that contain "hot spots". Hot spots are either pop-up
topics or jumps. Hypergraphics in Elixir Help are most
commonly dialog boxes with option hot spots (pop-up
definitions), toolboxes with tool hot spots (topic
jumps), and menus with option hot spots (topic jumps
or pop-up definitions).
Move the cursor over a hypergraphic until a hand displays, then click on this hot spot to display a pop-up
topic, or a "jump". To close a pop-up topic, click the
mouse button. To return to the original Help topic
from a jump, click on <Back> in the Help file menu.
Organization of this guide
This guide contains the following chapters and
appendices:
Chapter 1, “Introduction,” presents an overview of
Desktop functions, features and documentation.
Chapter 2, “Desktop basics,” describes the layout and
basic operation of the Desktop.
Chapter 3, “Elixir folders,” describes the Elixir directory structure and how to use the Desktop to organize
and manage forms, fonts, images, documents and
jobs.
Chapter 4, “Desktop configuration,” describes how to
customize the Desktop.
Chapter 5, “Additional Desktop features,” describes
further capabilities built into the Desktop.
Chapter 6, “Peripheral devices,” describes how to
configure and use PC diskette drives, scanners and
printers.
Chapter 7, “File conversions,” describes how to perform various file conversions.
1-6 ELIXIR TECHNOLOGIES CORPORATION
Page 18

INTRODUCTION
Chapter 8, “Accessing DOS files and applications,”
describes tools that allow you to access DOS and link
DOS files to applications.
Chapter 9, “Standalone utilities,” explains the program
utilities supplied with the Desktop software package.
“Glossary,” provides an alphabetic listing of the terms
and definitions used in this guide.
Appendix A, “Keyboard shortcuts,” describes all Desktop keyboard shortcuts (fast keys).
Appendix B, “Additional files and directories,” explains
the functions and use of related files not described
elsewhere in this guide.
Appendix C, “The Desktop menu bar,” describes operations accessed from Desktop pull-down menus.
Appendix D, "Local Printers," describes Desktop operations related to proof-printing on HP and PostScript
printers.
Starting the Elixir Forms Editor Desktop
To start the Desktop, double-click on the Elixir Forms
Editor Desktop icon in the Program Manager Elixir Applications window.
The Elixir Forms Editor Desktop displays.
ELIXIR FORMS EDITOR DESKTOP USER GUIDE 1-7
Page 19
INTRODUCTION
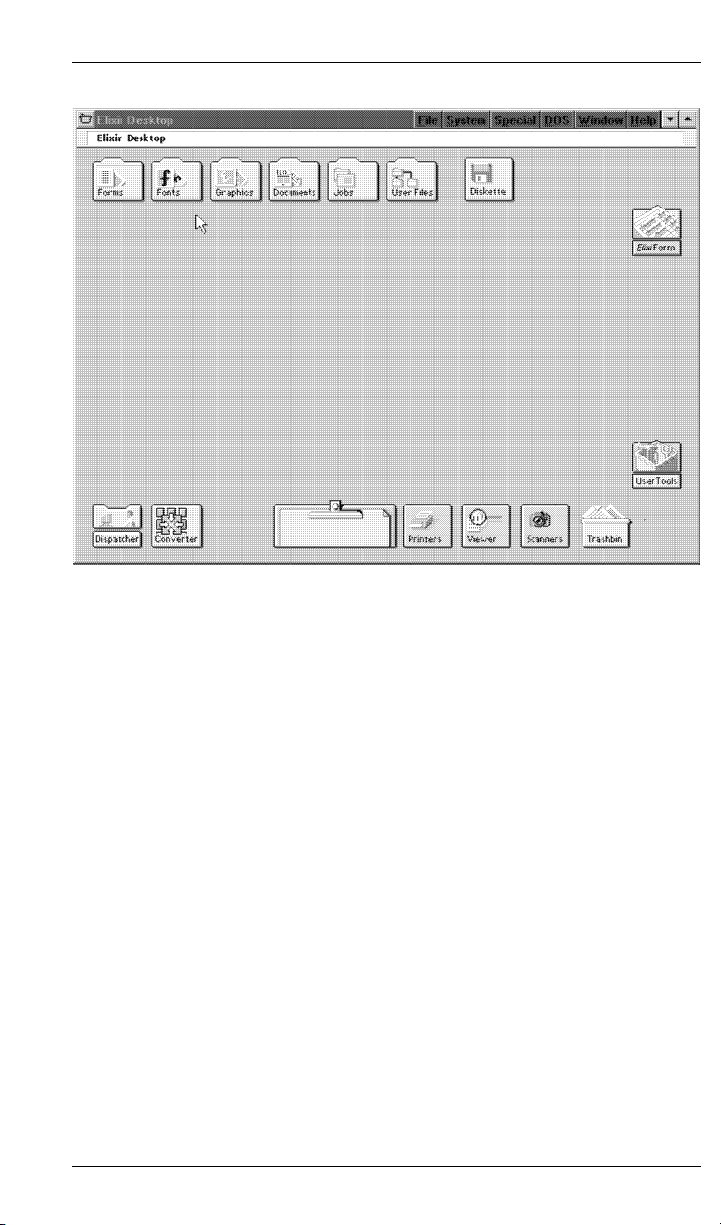
Figure 1-1. Elixir Forms Editor Desktop
An arrow shaped screen pointer also displays.
If you are using a monochrome monitor and have diffi-
culty reading Title bar text, select [Usage Switches]
from the System menu. Then, in the Usage Switches
dialog box, select [Monochrome Monitor].
An Elixir logo may also display at the center of your
screen. The logo disappears when you press a key on
the keyboard or a mouse button.
Note that you cannot move icons on the Desktop.
1-8 ELIXIR TECHNOLOGIES CORPORATION
Page 20

Exiting the Elixir Forms Editor Desktop
To exit the Elixir Desktop or any of its associated applications, perform one of the following:
Double-click on the Close button at the top left of
any Elixir application.
Press <Alt> + <F4>.
Press <Alt> + <X>.
Select [Exit] from the File menu.
Click on the [X] at the top right corner of the appli-
cation window.
Notes and cautions
The following notes and cautions apply to the Elixir
Forms Editor Desktop User Guide, version 3.11.
INTRODUCTION
The ELXWDATA.BAT program expects that the
Windows directory is located at C:\WINDOWS. If
it is not, edit this .BAT file to point to your Windows directory.
Help files include graphics created using screen
drivers with large fonts. If you use a screen driver
with small fonts, Help file graphics may not display clearly. For optimum graphics display, use a
screen driver with large fonts.
Installing a BWCC.DLL file in a directory other
than drive:\WINDOWS\SYSTEM may cause errors when you perform operations such as copying files from the User Files icon to Elixir folders.
Elixir installs a BWCC.DLL file dated 1993 or later
in your drive:\WINDOWS\SYSTEM directory during installation. Other programs may also install
BWCC.DLL files in different directories. Remove
these other versions of the BWCC.DLL file from
your system to prevent errors.
ELIXIR FORMS EDITOR DESKTOP USER GUIDE 1-9
Page 21

INTRODUCTION
Elixir tests its software using HP Windows printer
drivers for proof printing. Other printer drivers are
not supported and may produce unpredictable results when used with Elixir software.
1-10 ELIXIR TECHNOLOGIES CORPORATION
Page 22

2. Desktop basics
This chapter describes the Elixir Forms Editor Desktop layout and basic operation. Later chapters describe more advanced Desktop operations.
Common Windows operating system
The Elixir Forms Editor Desktop uses the standard
Windows interface for display and use of operational
elements such as icons, command buttons, tools,
menus, dialog boxes and mouse.
See your Windows manual for complete information.
Desktop layout
The Elixir Forms Editor Desktop comprises two main
display areas:
The top of the Desktop displays the menu bar and
message area.
The remaining Desktop area displays icons.
Both menu bar and icons provide access to pull-down
menus. See the "Sub-window menus" section in this
chapter, and the "Desktop configuration" and "Additional Desktop features" chapters for more information.
The message area displays information about the operation in process, including relevant error messages.
ELIXIR FORMS EDITOR DESKTOP USER GUIDE 2-1
Page 23
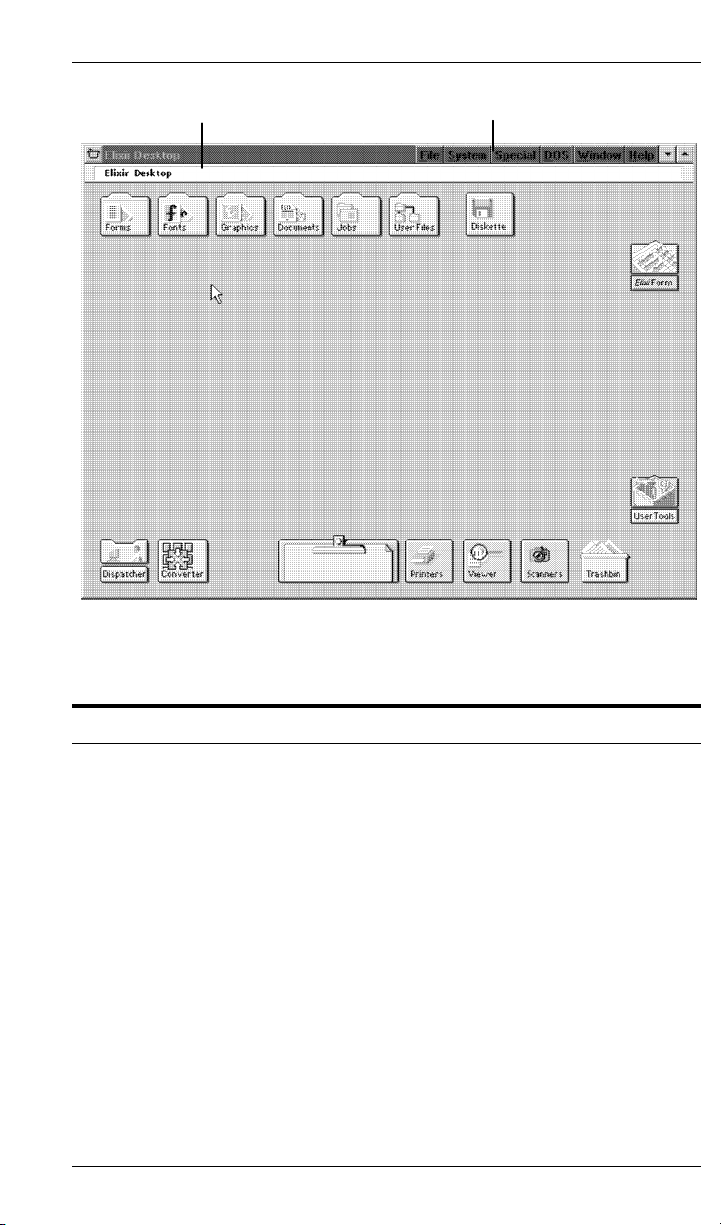
DESKTOP BASICS
Message area
Menu bar
Figure 2-1. Desktop layout
Icons
Each Desktop icon represents an application, folder,
utility or PC device configured for your system. Generally, the name, shape and appearance of an icon indicate its purpose or the type of action you can perform.
The following sections briefly describe each icon and,
where applicable, refer you to chapters where you can
find more information.
2-2 ELIXIR TECHNOLOGIES CORPORATION
Page 24

Elixir folder icons
The five icons displayed at the top left of the Desktop
represent specific DOS directories. You can access
directory files and convert them from one format to
another using these icons.
See the "Additional Desktop features", “Elixir folders”
and "File conversions" chapters for more information.
Forms folder
Represents the drive:\ELIXIR\FORMS directory containing Elixir, Input and Output form files.
Fonts folder
Represents the drive:\ELIXIR\FONTS directory containing Elixir, Input and Output font files.
Graphics folder
Represents the drive:\ELIXIR\PICS directory containing Elixir, Input and Output image files.
DESKTOP BASICS
Documents folder
Represents the drive:\ELIXIR\DOCS directory containing form list files referencing the Elixir-format files for
multi-page documents.
Note that Documents folder functionality for .XGF or
.PDF files requires XGF/PDF option products.
Jobs folder
Represents the drive:\ELIXIR\JOBS\XGFOUT directory containing JDT (Job Descriptor Ticket) files for
transfer to an output XGF printer.
Clipboard icon
Temporarily stores Elixir-format (.ELX) form files during job creation. You can copy an Elixir-format form to
the Clipboard using standard copying procedures,
then copy the form to a specific job when you need it.
ELIXIR FORMS EDITOR DESKTOP USER GUIDE 2-3
Page 25

DESKTOP BASICS
User Files icon
Provides access to all DOS directories and files, and
links applications to files. See the "Additional Desktop
features" and “Accessing DOS files and applications”
chapters for more information.
ElixirForm application icon
Represents the Elixir Forms Editor (or Elixir Forms
Editor for Highlight Color if you installed either the
Highlight Option or Plus).
Opening this icon clears the Desktop and starts the
Elixir Forms Editor application. You can also press
<CTRL> and click the right mouse button on this icon
to display icons for launching other installed form
building products.
Other Elixir application icons
If other Elixir applications such as ElixirFont or ElixirImage are installed, icons representing these applications also display at the right of the Desktop. Opening these icons starts the corresponding application.
User Tools icon
Allows you to create and define icons for DOS applications and batch files so that opening the icon starts
the application.
See the "Additional Desktop features" and “Accessing
DOS files and applications” chapters for more information.
Diskette icon
Allows you to access and format a diskette in your PC
disk drive.
See the “Additional Desktop features” and “Peripheral
devices” chapters for more information.
2-4 ELIXIR TECHNOLOGIES CORPORATION
Page 26

Printers icon
Scanners icon
Dispatcher icon
DESKTOP BASICS
Allows you to access a local proof printer connected to
your PC.
See the "Additional Desktop features" chapter and
"Local Printers" appendix for more information.
Allows you to start a scanner connected to your PC directly from the Desktop.
See the "Additional Desktop features" and "Peripheral
devices" chapters for more information.
Allows you to invoke DOS commands or batch files in
which you can embed replaceable parameters.
See the "Additional Desktop features" and “Accessing
DOS files and applications” chapters for more
information.
Converter icon
Allows you to convert form, font and graphics files and
multi-page documents to different formats by using
simple “drag-and-drop” mouse operations.
See the "Additional Desktop features" and “File conversions“ chapters for more information.
Trashbin icon
Allows you to delete folders and files associated with a
specific directory or application.
See the “Deleting files and folders” section for more
information.
ELIXIR FORMS EDITOR DESKTOP USER GUIDE 2-5
Page 27

DESKTOP BASICS
Viewer icon
Allows you to view Elixir-format files associated with
an application without having to first launch the application.
See the "Additional Desktop features" chapter for
more information.
Sub-window menus
The Elixir Desktop offers additional functionality to
normal Windows operations by providing pull-down
menus in sub-windows (or "child" windows) that you
can access from any Elixir folder icon. The following
sections describe these functions.
Backup button
You can access the backup button by first opening
any Elixir folder on the Desktop (Jobs, Forms, Fonts,
Graphics or Documents), then opening any Elixir, Input or Output folder.
Each click on the backup button (or <Ctrl>+<B>) displays the contents of a directory one level closer to the
root.
You can also use the backup button to change the default directory of an Elixir, Input or Output folder in the
SYSTEM.INI file, as follows:
Select [Save Settings on Exit] in the Usage
Switches dialog box (System menu).
Use the backup button to change to the directory
you want as the default.
Exit/close the folder.
2-6 ELIXIR TECHNOLOGIES CORPORATION
Page 28
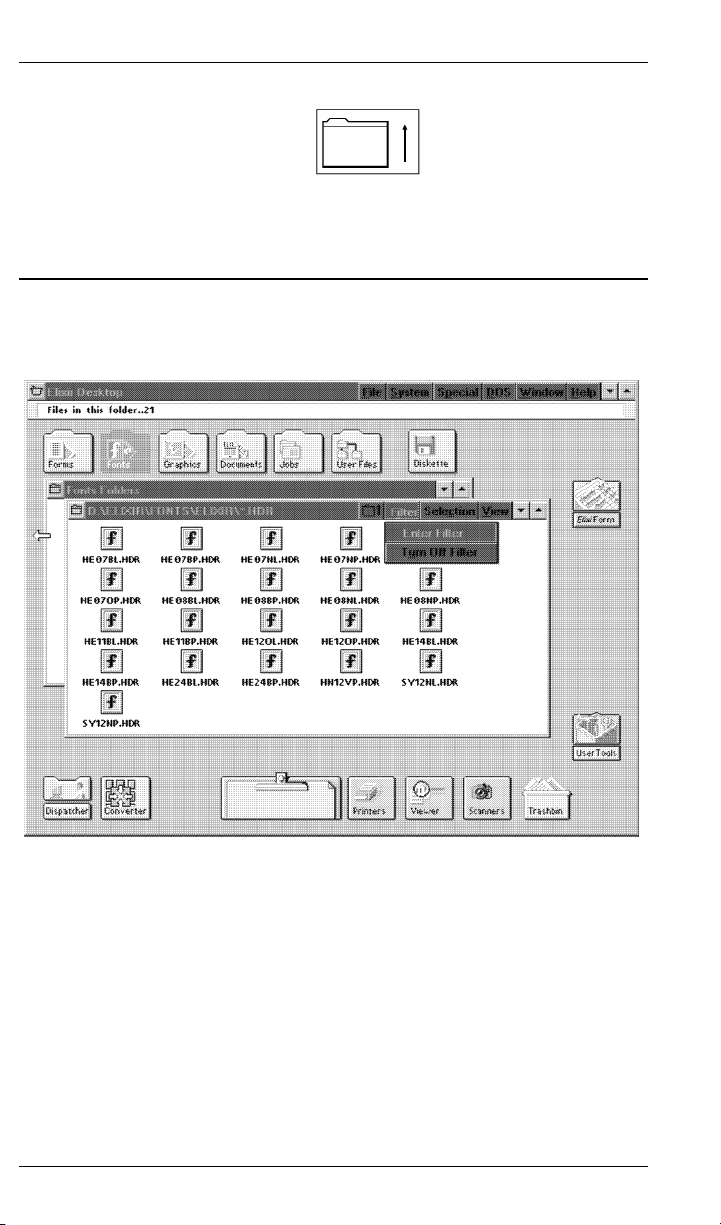
Filter menu
DESKTOP BASICS
Figure 2-2. Backup button
The Filter menu allows you to display files you select
using the * and ? DOS wildcard characters.
Figure 2-3.
Filter
menu
For example, in the previous window, you can enter a
filter to display files that start with X as follows:
1. Select [Enter Filter] from the Filter menu.
2. In the File Name Entry dialog box (shown
below), type X*.*
3. Click on [OK] or press <Enter>.
ELIXIR FORMS EDITOR DESKTOP USER GUIDE 2-7
Page 29
DESKTOP BASICS
Selection menu
The window displays only those files beginning
with the letter X.
4. To turn off the filter, select [Turn Off Filter] in
the Filter menu.
Figure 2-4. File Name Entry dialog box
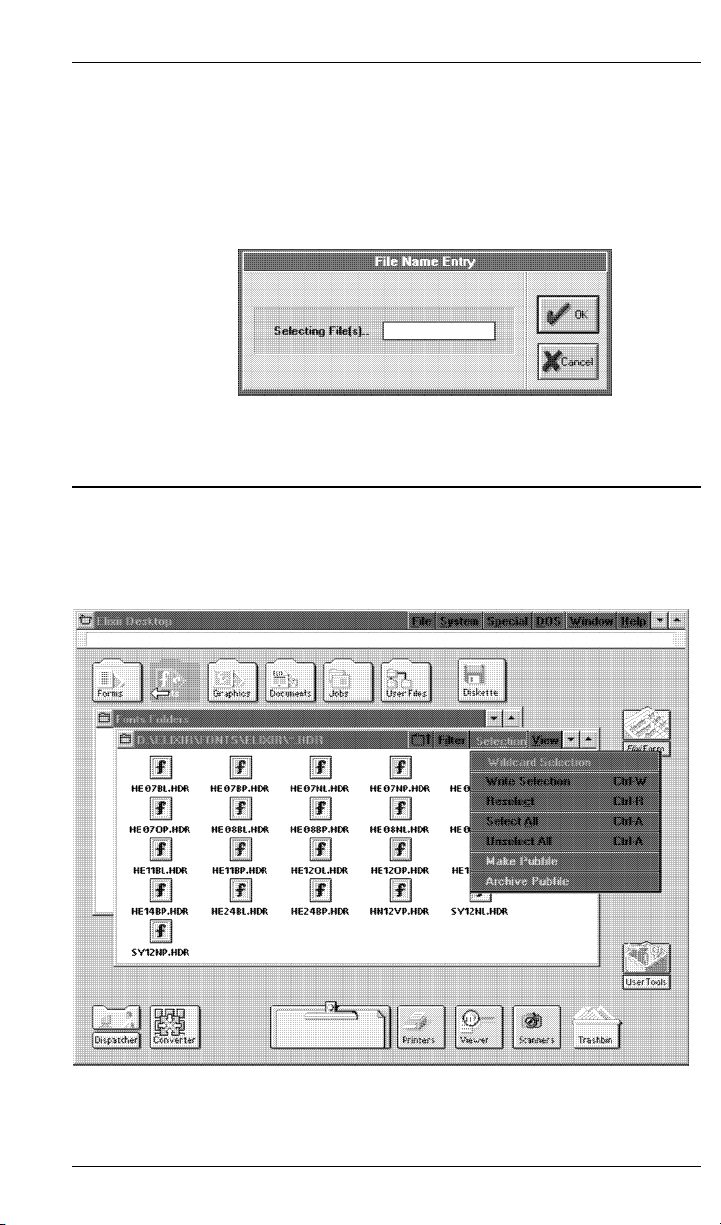
The Selection menu allows you to select and deselect one or more specified files within a folder. The
following figure shows a Selection menu example.
Figure 2-5.
2-8 ELIXIR TECHNOLOGIES CORPORATION
Selection
menu
Page 30

DESKTOP BASICS
The Selection menu contains the following options:
Wildcard Selection
Highlight files specified with * and ? DOS wildcard
characters.
Write Selection <Ctrl>+<W>
"Remember” a number of selected files (see the Reselect option, below).
Reselect <Ctrl>+<R>
Highlight files “remembered” using [Write Selection].
When you use [Write Selection] for files accessed
from a Desktop folder (Jobs, Forms, Fonts, Graphics
or Documents) icon, use [Reselect] to highlight files
with the same stem name (and the same or different
extensions) in another folder.
Select All <Ctrl>+<A>
Highlight all files in a window.
Unselect All <Ctrl>+<A>
Deselect all highlighted files in a window.
Make Pubfile
Copy highlighted drive:\ELIXIR\FORMS\ELIXIR and
subordinate directory form files to a diskette. See the
"Additional Desktop features" chapter for more
information.
Archive Pubfile
See [Make Pubfile], above.
View menu
The following figure shows the
menu and an ex-
View
ample of viewing files using the [Show Actual] option.
ELIXIR FORMS EDITOR DESKTOP USER GUIDE 2-9
Page 31

DESKTOP BASICS
Figure 2-6. Show Actual example
The View menu allows you to display files in a window
in different ways. The available options are:
Short Name
Display files by name only.
Long Name
Display files by name, creation/revision date and size
(in bytes).
Icon
Display files as icons, with names underneath.
Show Actual
Display reduced, bit-mapped screen versions of Elixir
form, font and image files. Allows you to preview files
without invoking the application and loading the file.
Name
Display files alphabetically by file name.
2-10 ELIXIR TECHNOLOGIES CORPORATION
Page 32

Type
Display files alphabetically by file type (extension).
Date
Display files by creation/revision date.
Size
Display files by size (in bytes).
Ascending
Display files in ascending order, either by name or
type (alphabetically, with "A" first), by date (chronologically, with oldest date first) or by size (smallest file
first).
Descending
Display files in descending order, either by name or
type (alphabetically, with "A" last), by date (chronologically, with latest date first) or by size (largest file first).
Accessing DOS
DESKTOP BASICS
The DOS menu allows you to run DOS commands
from the Desktop.
Selecting the [DOS Command] option or pressing
<Ctrl>+<D> displays a dialog box to allow you to enter
any standard DOS command.
Enter a DOS command and select [OK] to display the
Elixir Exec window and execute the DOS command
from either of the following directories:
the \ELIXIR directory, if no windows are open on
the Desktop
the directory corresponding to the window, if a
window is open on the Desktop.
After the DOS command executes, the system
prompts you to enter any key to redisplay the
Desktop.
See the “Accessing DOS files and applications” chapter for additional ways to access DOS.
ELIXIR FORMS EDITOR DESKTOP USER GUIDE 2-11
Page 33

DESKTOP BASICS
Exiting the Desktop
You can exit the Desktop in any of the following ways:
Click on the Exit Box at top left of Desktop
Press <Alt>+<F4>
Press <Alt>+<X>
Use the File menu and select [Exit].
2-12 ELIXIR TECHNOLOGIES CORPORATION
Page 34

3. Elixir folders
This chapter describes the Elixir Forms Editor Desktop folder organization. To better understand this
chapter, you should already be familiar with DOS directory structures.
Folders and DOS directories
Directories and subdirectories are structures DOS
uses to store and organize files. Folder icons on the
Forms Editor Desktop represent DOS directories or
subdirectories. Just as a DOS directory contains files
and subdirectories, Desktop folders contain files and
other folders.
Using folder icons is easier than using DOS directories because you can display folder contents as icons
in a window, and copy files from one folder to another
(see the "Desktop basics" chapter in this guide).
The Elixir folder icons shown in the following figure
display at the top left of the Desktop.
Figure 3-1. Elixir folder icons
ELIXIR FORMS EDITOR DESKTOP USER GUIDE 3-1
Page 35

ELIXIR FOLDERS
Elixir folder icons allow you to use simple mouse operations to:
access and display Elixir-format files
copy Elixir-format files into different folders
convert form, font, image, document and job files
to and from Elixir format.
To the right of the Elixir folder icons, the User Files
icon shown in the following figure displays.
Figure 3-2. User Files icon
The User Files icon allows you to access any file or
directory on your hard disk or diskette drive. See the
“Accessing DOS files and applications” chapter in this
guide for a description of the User Files icon.
Elixir folder structure
This section describes the structure and use of the
five Elixir folder icons.
Most Elixir folder icons contain three subordinate folders labeled Elixir, Input and Output.
For example, when you open the Elixir Forms folder
icon, the following window displays.
3-2 ELIXIR TECHNOLOGIES CORPORATION
Page 36

ELIXIR FOLDERS
Figure 3-3. Forms Folders window
Similarly, opening the Elixir Fonts, Elixir Graphics and
Elixir Documents folder icons display a window showing subordinate folders called Elixir, Input and Output.
This folder structure allows you to edit or view form,
font, image, document and job files having different
formats, as shown in the following figure.
Figure 3-4. Input, Elixir and Output folders
Each Input folder is similar to an “in basket" containing files you can convert to Elixir format by
copying them to the Converter icon. See the “File
conversions” chapter in this guide for more information.
Each Elixir folder is similar to a “working area”
where you can edit and view converted files.
ELIXIR FORMS EDITOR DESKTOP USER GUIDE 3-3
Page 37

ELIXIR FOLDERS
Each Output folder is similar to an “out basket”, to
which edited Elixir-format files are written after
you convert them to their original or other nonElixir format by copying them to the Converter
icon. See the “File conversions” chapter in this
guide for more information.
To use Elixir folders for file editing, follow these steps:
1. Copy a file you want to edit or view to the
appropriate Input folder.
2. Convert the file to Elixir format as described
in the “File conversions” chapter of this
guide.
3. Double-click on the converted Elixir-format
file to start the appropriate Elixir application
(such as Elixir Forms Editor) and load the file.
4. Edit the file using the tools provided by the
Elixir application. After editing, save the file.
5. Convert the edited Elixir-format file to the
format you want. The converted file writes to
the appropriate Output folder.
6. Open the Output folder and copy the
converted file to the desired location.
The “File conversions” chapter in this guide describes
this procedure in more detail.
The following sections describe the different Elixir, Input and Output folders.
3-4 ELIXIR TECHNOLOGIES CORPORATION
Page 38

Forms folder
The Desktop Forms folder corresponds to the
drive:\ELIXIR\FORMS directory and contains the Elixir
Forms, Input Forms and Output Forms folders shown
in the following figure.
Elixir Forms folder
The Elixir Forms folder corresponds to the DOS
drive:\ELIXIR\FORMS\ELIXIR directory and any userdefined subdirectories within the drive:\ELIXIR\
FORMS\ELIXIR directory (such as drive:\ELIXIR\
FORMS\ ELIXIR\ DEMO).
ELIXIR FOLDERS
Figure 3-5. Forms Folders window
The Elixir Forms folder displays Elixir form files (files
with .ELX name extensions). You can edit any file using ElixirForm by opening (double-clicking on) the file.
The Elixir Forms folder also displays files with .BAK,
.PUB and .INV name extensions, as follows:
.BAK extension files are backup form files that
ElixirForm creates. You can edit .BAK files if you
rename their extensions to .ELX.
.PUB extension files are publication files used for
archiving and copying Elixir form files and all related components (such as fonts and graphics
used on the form) to a diskette. See the “Elixir
Fonts folder” section in this chapter for more
information.
ELIXIR FORMS EDITOR DESKTOP USER GUIDE 3-5
Page 39

ELIXIR FOLDERS
Input Forms folder
The Input Forms folder is reserved for future use.
Output Forms folder
The Output Forms folder contains a number of subordinate folders, an example of which shows in the following figure.
When you use the ELXINV utility to convert .ELX
files to a different orientation (from portrait to inverse portrait, for example), you create .INV extension files. To edit these files using ElixirForm,
rename the extensions to .ELX. See the “Standalone utilities” chapter for more information about
the ELXINV utility.
Figure 3-6. Forms Output Folders window
When you use the Converter icon to convert files (as
described in the “File conversions” chapter of this
guide), output files write to the Output folders with appropriate file extensions, as shown in the following table.
3-6 ELIXIR TECHNOLOGIES CORPORATION
Page 40

ELIXIR FOLDERS
Fonts folder
Output Forms
folder
HP PCL Forms \ELIXIR\PRINTS\HPPRINT\*.PRN
PostScript Forms \ELIXIR\FORMS\PSOUT\*.PS
PDF Forms \ELIXIR\FORMS\PDFOUT\*.*
XGF Forms \ELIXIR\PRINTS\XGFOUT\*.*
DOS subdirectory and file extensions
The above Output Forms folders show all formats to
which Elixir Desktop products can be converted.
The Fonts folder corresponds to the drive:\ELIXIR\
FONTS directory and contains the Elixir Fonts, Input
Fonts and Output Fonts folders as shown in the following figure.
Figure 3-7. Fonts Folders window
ELIXIR FORMS EDITOR DESKTOP USER GUIDE 3-7
Page 41

ELIXIR FOLDERS
Elixir Fonts folder
The Elixir Fonts folder corresponds to the DOS
drive:\ELIXIR\FONTS\ELIXIR subdirectory and displays Elixir-format font file names with .HDR extensions. You can edit these files using ElixirFont by
opening (double-clicking on) the files. See the Elixir-
Font User Guide for more information.
Although only .HDR extension files display, each
Elixir-format font consists of three files having the
same stem name but different extension, as follows:
The .GLH and .GLY files are also in the drive: \ELIXIR\FONTS\ELIXIR subdirectory, but do not display in
the window. You can display all three components if
you open the subdirectory using the User Files icon
described in the “Accessing DOS files and applications” chapter of this guide.
When you copy a font from the Elixir Fonts folder using the Desktop copy operation (copying to a diskette,
for example), all three file components copy.
.HDR - the font header file
.GLH - the glyph (character) header file
.GLY - the glyph (character) bitmap file
If you want to copy an Elixir font using either the User
Files icon or DOS COPY command, remember to
copy all three components for each file.
Input Fonts folder
The Input Fonts folder contains subordinate folders,
as shown in the following figure.
3-8 ELIXIR TECHNOLOGIES CORPORATION
Page 42

ELIXIR FOLDERS
Figure 3-8. Fonts Input Folders window
To prepare a font file for conversion, first copy it to the
appropriate Input Fonts folder. Make sure the file has
the correct name extension for the folder, as shown in
the following table.
Input Fonts folder DOS subdirectory and file extensions
HP PCL Fonts \ELIXIR\FONTS\HPIN\*.FNT
Outline Fonts \ELIXIR\FONTS\CONTOURS\*.TDF
(default - also user-definable)
The above Input Fonts folders show all formats from
which Elixir Desktop products can be converted.
Output Fonts folder
The Output Fonts folder contains a number of subordinate folders, as illustrated below.
ELIXIR FORMS EDITOR DESKTOP USER GUIDE 3-9
Page 43

ELIXIR FOLDERS
Figure 3-9. Fonts Output Folders window
When you use the Converter icon to convert files (described in the “File conversions” chapter of this guide),
output files write to the Output folders with appropriate
name extensions, as shown in the following table.
Output Fonts folder DOS subdirectory and file extensions
HP PCL Fonts \ELIXIR\FONTS\PRINTER\*.FLJ
(regular fonts)
\ELIXIR\FONTS\PRINTER\*.RLJ
(rotated fonts)
Screen Fonts \ELIXIR\FONTS\SCREEN\DEMO\*.VGA
(VGA monitors)
\ELIXIR\FONTS\SCREEN\DEMO\*.FNT
(other monitors)
\ELIXIR\FONTS\SCREEN\DEMO\*.WDT
(width tables)
Windows \ELIXIR\FONTS\SCREEN\WINDOWS\*.*
The above Output Fonts folders show all formats to
which Elixir Desktop products can be converted.
Graphics folder
The Graphics folder corresponds to the
drive:\ELIXIR\PICS directory and contains the Elixir
Images, Input Images and Output Images folders
shown in the following figure.
3-10 ELIXIR TECHNOLOGIES CORPORATION
Page 44

Elixir Images folder
The Elixir Images folder corresponds to the
drive:\ELIXIR\PICS\PRINTER directory and contains
Elixir graphics-format files with .LP3 extensions. You
can edit these files by opening (double-clicking on) the
files. Opening a file starts ElixirGraphics and loads the
file.
Input Images folder
ELIXIR FOLDERS
Figure 3-10. Images Folders window
The Input Images folder contains a number of subordinate folders, as shown in the following figure.
Figure 3-11. Images Input Folders window
To prepare a graphics file for conversion, first copy it
to the appropriate Input Images folder. Make sure the
file has the correct name extension for the folder, as
shown in the following table.
ELIXIR FORMS EDITOR DESKTOP USER GUIDE 3-11
Page 45

ELIXIR FOLDERS
Input Images folder DOS subdirectory and file extensions
PCX Pics \ELIXIR\PICS\PCXIN\*.PCX
TIFF Pics \ELIXIR\PICS\TIFFIN\*.TIF
BMP Pics \ELIXIR\PICS\BMPIN\*.BMP
The above Input Images folders show all formats from
which Elixir Desktop products can be converted.
Output Images folder
The Output Images folder contains a number of subordinate folders, as shown in the following figure.
Figure 3-12. Images Output Folders window
When you use the Converter icon to convert files (described in the “File conversions” chapter of this guide),
output files write to the appropriate Output folders with
appropriate file extensions, as shown in the following
table.
3-12 ELIXIR TECHNOLOGIES CORPORATION
Page 46

Output Images folder DOS subdirectory and file extensions
PCX Pics \ELIXIR\PICS\PCXOUT\*.PCX
TIFF Pics \ELIXIR\PICS\TIFFOUT\*.TIF
BMP Pics \ELIXIR\PICS\BMPOUT\*.BMP
Screen Pics \ELIXIR\PICS\SCREEN\*.LW8
The above Output Images folders show all formats to
which Elixir Desktop products can be converted.
Documents folder
The Documents folder corresponds to the DOS
drive:\ELIXIR\DOCS directory and contains subordinate Elixir Document, Input Document and Output
Document folders, as illustrated in the following figure.
ELIXIR FOLDERS
Figure 3-13. Documents Folders window
Elixir Documents folder
The Elixir Documents folder corresponds to the
drive:\ELIXIR\DOCS\DOCLIST subdirectory and contains form list files.
ELIXIR FORMS EDITOR DESKTOP USER GUIDE 3-13
Page 47

ELIXIR FOLDERS
A form list file is a .DAT file you create for proof printing using an ASCII editor, containing a list of Elixir
(.ELX) form files for a multi-page document. See the
“Local Printers” appendix of this guide for more information about creating, viewing and proof printing
.DAT files.
Input Documents folder
The Input Documents folder is reserved for future use.
Output Documents folder
The Output Documents folder contains a number of
subordinate folders, as illustrated in the following
figure.
Figure 3-14. Documents Output Folders window
Note that the PDF and XGF Docs output folders display only if their respective extended converters have
been installed.
When you use the Converter to convert files (as described in the “File conversions” chapter of this guide),
output files write to an Output folder with the appropriate file extension, as shown in the following table.
3-14 ELIXIR TECHNOLOGIES CORPORATION
Page 48

Jobs folder
ELIXIR FOLDERS
Output Documents folder DOS subdirectory
HP PCL Docs \ELIXIR\DOCS\HPOUT\*.*
PostScript Docs \ELIXIR\DOCS\PDFOUT\*.*
PDF Docs \ELIXIR\DOCS\PDFOUT\*.*
XGF Docs \ELIXIR\DOCS\XGFOUT\*.*
The above Output Documents folders show all formats to which Elixir Desktop products can be
converted.
The Jobs folder corresponds to the drive:\ELIXIR\
JOBS\XGFOUT directory and contains Job Descriptor
Ticket (JDT) files ready to be transferred to the XGF
printer.
Figure 3-15. Jobs folder
Elixir Docs Jobs
The Elixir Docs Jobs folder corresponds to the
drive:\ELIXIR\DOCS\DOCLIST directory and displays
a list of Elixir jobs (.DAT files). Each Elixir job is an
ASCII file that contains a list of Elixir form files and
print ticket information for the individual form files.
ELIXIR FORMS EDITOR DESKTOP USER GUIDE 3-15
Page 49

ELIXIR FOLDERS
Elixir Data Jobs
The Elixir Data Jobs folder displays files in the
drive:\ELIXIR\JOBS\ELIXIR\SYSTEM directory.
These are job files created using Elixir AppBuilder.
Note that the DOS file names in drive:\ELIXIR\JOBS\
ELIXIR\SYSTEM are not the same as those in the
Elixir Data Jobs folder; rather, the displayed names
are extracted from the DOS files.
See the Elixir AppBuilder for AFP User Guide for more
information.
3-16 ELIXIR TECHNOLOGIES CORPORATION
Page 50

4. Desktop configuration
To customize your Elixir Desktop, use the options in
the System menu and some of the options in the
Special menu (both of which you access from the
menu bar, shown in the following figure). You can
also access some options using the shortcut keys displayed to the right of menu options.
Figure 4-1. Desktop menu bar
The System menu contains the options shown in the
following figure.
Figure 4-2. System menu
Each option in the System menu allows you to perform certain configuration actions as described below.
ELIXIR FORMS EDITOR DESKTOP USER GUIDE 4-1
Page 51

DESKTOP CONFIGURATION
System Config <Alt> + <F6>
Configures basic system parameters.
Usage Switches
Enables and disables some Desktop functions.
User Privileges
Allows you to set up user access controls.
Diagnostics <Alt> + <F5>
Displays diagnostics information and allows you to access your diagnostic application.
Make Directory <Ctrl> + <M>
Allows you to create a DOS directory
Converter Props
Displays and lets you modify control parameters for
the Converter icon.
Reset to Defaults
Resets all configuration parameters to the default
values.
Refresh
Refreshes the screen display.
Toolset
Selects different Desktop toolsets.
System configuration
The [System Config] option in the System menu (and
the <Alt> + <F6> fast keys) allows you to set system
configuration parameters. The Desktop Basic Setup
dialog box shown in the following figure displays.
4-2 ELIXIR TECHNOLOGIES CORPORATION
Page 52

DESKTOP CONFIGURATION
Figure 4-3. Desktop Basic Setup dialog box
The Desktop Basic Setup dialog box contains the fol-
lowing options:
Warn on low disk space
Displays a warning if disk space falls below the value
specified in [Threshold]. The default is to not warn.
Threshold
The threshold disk space that triggers a warning to
display — applicable only if you specify Yes for [Warn
on low disk space]. The default is 500 KB, and the
maximum is 25 MB.
Show banner logo file
The .BMP file that displays each time you start the
Desktop, if there are no open windows. The banner
logo may not display correctly if the image is very
large. Initially, the default logo is DESKLOGO.BMP;
you can specify any .BMP file located in
drive:\ELIXIR\PICS\BMPIN.
Show conversion parameters
Displays conversion parameters when converting
files.
Clock Running
Displays the date and time in the menu bar message
area when selected. [Set Time and Date] displays a
dialog box for setting the current date and time.
ELIXIR FORMS EDITOR DESKTOP USER GUIDE 4-3
Page 53

DESKTOP CONFIGURATION
Double Click Speed
Sets the speed at which successive mouse clicks interpret as a double-click. The settings are:
[Slowest] (the default)
[Slow]
[Medium] or
[Fast]
Desktop usage switches
The [Usage Switches] option in the System menu allows you to customize the Elixir Desktop. Selecting
this option displays the Usage Switches dialog box, as
shown in the following figure.
Figure 4-4. Usage Switches dialog box
The Usage Switches dialog box contains the following
options:
Confirm file deletions
When deleting one or more files, select to display a
Confirmation for Command dialog box. Otherwise,
deletes the file(s) without requesting confirmation.
4-4 ELIXIR TECHNOLOGIES CORPORATION
Page 54

DESKTOP CONFIGURATION
Confirm file overwrites
When copying one or more files, if a file with the same
name exists in the target folder, select to display the
Confirmation for Command dialog box. Otherwise
overwrites existing file(s) without requesting confirmation. This option is only applicable when you copy
files through the Desktop.
Show diskette property sheet
Select to display the Diskette Properties dialog box
each time you copy a file to or open the Diskette icon.
See the “Additional Desktop features” and “Peripheral
devices” chapters for more information.
Show printer property sheet
Select to display the Printer Properties dialog box
each time you print a file. See the “Peripheral devices” chapter for more information.
Show scanner property sheet
Select to display the Scanner Properties dialog box
each time you use the Scanners icon. See the “Peripheral devices” chapter for more information.
Save Settings on Exit
Retains the Usage Switches changes you made in the
current Desktop session and displays them in future
sessions.
Monochrome Monitor
Select to execute the DOS MODE MONO command,
required for SIGMA monitors on PS/2 systems, and
for newer (after 1990) SIGMA monitors running in
monochrome (not gray-scale) mode. If you have difficulty reading the title bar text on your monochrome
display, select this option.
Converter
Click on [Converter] to display the Converter Properties Dialog dialog box shown below.
ELIXIR FORMS EDITOR DESKTOP USER GUIDE 4-5
Page 55

DESKTOP CONFIGURATION
Figure 4-5. Converter Properties Dialog
See the 'File conversions" chapter for more information about the above dialog box and the options described below.
Working Directory
The directory in which temporary read/writes take
place during file conversions. The default is the root
(\). We recommend specifying a RAM disk for faster
conversions.
Confirm file overwrites during conversion
Allows you to specify whether files you create automatically overwrite existing output files with the same
names. Select to display a dialog box requesting confirmation before overwriting an existing file. If you
convert graphics files to .LGO format, the dialog box
also prompts for the orientation. Not selecting this option automatically overwrites existing files. This is applicable only when converting form and .LGO files to
Elixir format.
dialog box
Show properties before conversions
Allows you to specify default setup options for dialog
boxes for each file conversion type.
Pause after conversions
Select to pause after each conversion.
4-6 ELIXIR TECHNOLOGIES CORPORATION
Page 56

Use Elixir HP PCL and PostScript converters
Select to use Elixir's printer drivers when converting
Elixir forms to HP PCL or PostScript formats. If not
selected, you use Windows printer drivers. Elixir
printer drivers produce optimized files that require
substantially less disk space but create identical
printer output as Windows printer drivers.
Stop process after - Error/All files processed.
Specify whether you want conversion to stop after an
error occurs or after file processing.
User privileges
The [User Privileges] option in the System menu,
shown in the following figure, allows you to set the
level of control over certain Desktop operations for the
Elixir Desktop user.
DESKTOP CONFIGURATION
Figure 4-6. User Privileges dialog box
For example, you can choose whether or not to allow
a user to access an Elixir application from the Desktop. If you choose not to allow access, the icons representing the Elixir application and its associated
folder do not display.
ELIXIR FORMS EDITOR DESKTOP USER GUIDE 4-7
Page 57

DESKTOP CONFIGURATION
Delete Files
Select to allow setting up the Desktop so users cannot
delete files. Otherwise allows deletions.
Change File Properties
Allows users to change the file name in a Properties
dialog box for a file.
Backup beyond default directories
In the Elixir file structure, select to allow you to back
up directories to the specified drive. When not selected, allows you to back up to the default directory
for the Elixir (Forms, Fonts, Graphics, and Documents) folders only. We recommend NOT selecting
this option.
Access Forms
Allows access to ElixirForm or Elixir-format form files.
The icons representing both do not display on the
Desktop if you do not select this option.
Access Fonts
Allows access to ElixirFont or Elixir-format font files.
The icons representing both do not display on the
Desktop if you do not select this option.
Access Graphics
Allows access to ElixiGraphics or Elixir-format graphics files. The icons representing both do not display
on the Desktop if you do not select this option.
Access Documents
Allows access to non-Elixir files. The User Files icon
does not display on the Desktop if you do not select
this option.
Access Userfiles
Allows access to non-Elixir applications. The User
Files icon does not display on the Desktop if you do
not select this option.
Access UserTools
Allows access to the User Tools icon. The icon does
not display if you do not select this option.
Access Dispatcher
Allows access to the Dispatcher icon. The Dispatcher
icon does not display on the Desktop if you do not select this option.
4-8 ELIXIR TECHNOLOGIES CORPORATION
Page 58

Diagnostics
DESKTOP CONFIGURATION
Access Transformer
No access effect - the Transformer is not included in
the Elixir Forms Editor product.
Access Converters
Allows access to the Converter icon. The icon does
not display if you do not select this option.
Perform Reset to Default
Select to enable resetting system defaults from the
System menu.
Access DOS
Allows accessing DOS from the Desktop.
The [Diagnostics] option in the System menu (and the
<Alt> + <F5> fast key) allows you to run a number of
diagnostic utilities and to enter a command to run a
diagnostic program of your choice. Selecting the option displays the Desktop Diagnostics dialog box,
shown in the following figure.
Figure 4-7. Desktop Diagnostics dialog box
Free Memory
Displays available memory in KB.
Free Resources
Displays available Windows resources as a
percentage.
ELIXIR FORMS EDITOR DESKTOP USER GUIDE 4-9
Page 59

DESKTOP CONFIGURATION
Base Memory
Displays total base RAM.
Maximum file list
Displays the maximum number of files according to
the size of the window.
Disk Space Left
Shows the disk space left on the hard disk on which
the Elixir Desktop displays.
Current drive
Displays the current drive.
View Install LOG
Click on to display the log file INSTALL.LOG created
when installing Elixir software on your PC. When you
report any problems to the Support Center, the center
may ask for the contents of this log file to help determine the source of your problem.
View AUTOEXEC.BAT
Click on to display the contents of the
AUTOEXEC.BAT file in a window.
Show Installed ElixiKeys
Click on to display installed ElixiKeys on your PC.
View CONFIG.SYS
Click on to display the contents of the CONFIG.SYS
file in a window.
Creating a directory
The [Make Directory] option in the System menu allows you to create a directory in a path you enter. Selecting this option or pressing <Ctrl> + <M> displays
the Enter Path of Directory to Create dialog box
shown in the following figure.
4-10 ELIXIR TECHNOLOGIES CORPORATION
Page 60

DESKTOP CONFIGURATION
Figure 4-8. Enter Path of Directory to Create
dialog box
Enter the name and path of any directory you want to
create, then click on [OK] to create the directory.
If you do not enter a full path for a directory name:
If a window is open, the directory you enter subordinates to the directory corresponding to the
window.
If the Desktop does not display any open windows, the directory subordinates to the root directory, on the drive where Elixir software loads.
Converter properties
The [Converter Props] option in the System menu
opens the Converters Properties dialog box and allows you to specify certain initial setup options for converting files.
Figure 4-9. Converters Properties dialog box
ELIXIR FORMS EDITOR DESKTOP USER GUIDE 4-11
Page 61

DESKTOP CONFIGURATION
Clicking on each option displays the appropriate dialog box for specifying setup parameters. The "File
conversions" chapter describes these parameters.
Clicking on [Converter Properties] displays the Converter Properties Dialog dialog box described in the
Usage Switches section earlier in this chapter.
Clicking on [Message Reporting] displays the Message Options Dialog dialog box.
Figure 4-10. Message Options Dialog dialog box
Select options to [Show messages after process], or
to write messages to a .LOG file, the stem name of
which you can specify.
You can also specify to append new messages to an
existing .LOG file or to overwrite an existing .LOG file.
Resetting System menu options
The [Reset to Defaults] option displays a dialog box
that allows you to reset (to the initial default values)
the specifications you set in the [System Config],
[User Privileges], and [Diagnostics] options in the Sys-
tem menu.
4-12 ELIXIR TECHNOLOGIES CORPORATION
Page 62

Refreshing the screen
If closing a window does not completely remove it or
leaves “snow” on the screen, use the [Refresh] option
in the System menu to refresh the screen.
Selecting toolsets
When more than one Elixir Desktop installs on a PC
drive, you can switch between Desktops using the
[Toolset] option in the System menu.
Figure 4-11. Desktop Toolsets dialog box
DESKTOP CONFIGURATION
Desktops differ in icon appearances and allowed file
conversions, which display in the Converter icon dialog boxes. See the “File conversions” chapter for
more information about file conversions.
Selecting the [ToolSet] option displays the Desktop
Toolsets dialog box shown in the previous figure.
Full HYBRID Desktop
Allows all conversions for all installed Desktop
versions.
AFP Desktop
Displays the AFP Desktop.
AS/400 Desktop
Displays the AS/400 Desktop.
Distributed Desktop
Displays the Elixir Forms Editor Desktop.
ELIXIR FORMS EDITOR DESKTOP USER GUIDE 4-13
Page 63

DESKTOP CONFIGURATION
Xerox B & W
Allows all black-and-white Xerox conversions. Primarily for ElixirForm/ElixiSys and ElixiSys for Xerox Distributed Printers users.
Xerox H/L Color and B & W
Displays the Desktop for the Elixir HighLight Option
and Plus products. Allows color and black-and-white
Xerox conversions, if you install both versions (for users running both B&W and color monitors and Xerox
4850 and other printers).
Xerox Distributed Printers
Displays the 4235 XES Desktop.
4-14 ELIXIR TECHNOLOGIES CORPORATION
Page 64

5. Additional Desktop
features
This chapter describes additional operations you can
perform using the Desktop icons and menu bar File,
System and Special menus. You can perform most
of these operations using keyboard shortcuts, as described in the "Keyboard shortcuts" appendix.
The following figure shows the Desktop menu bar.
Figure 5-1. Desktop menu bar
Operations described in this chapter include:
opening icons
setting icon properties
displaying/deleting different formats of a file
displaying a logo at start-up
copying files
using the Scheduler Desktop
viewing files.
If you are just starting to use the Desktop, you may
want to read the “Desktop basics” chapter first to become more familiar with general Desktop operations.
Opening icons
Opening an icon typically starts a corresponding application or causes a window or dialog box to display
showing properties related to the icon. In most cases,
ELIXIR FORMS EDITOR DESKTOP USER GUIDE 5-1
Page 65

ADDITIONAL DESKTOP FEATURES
you can modify the properties displayed to affect the
performance of the object represented by the icon.
You can open an icon in any of the following ways:
Double-click on it
Click on it and press <Enter>
Click on it and select [Open] from the File menu.
The following sections describe the results of opening
various icons.
Opening a folder icon
When you open a (Forms, Fonts, Graphics, Documents or Jobs) folder icon, a window showing the contents of the folder displays. Each folder typically
comprises one or more sub-folders containing files.
Note that each folder corresponds to a DOS directory.
Opening Elixir files
Elixir files are generic Elixir-format files that you access from the Desktop Elixir folders, and include:
Elixir-format form files in the Elixir Forms folder
(drive:\ELIXIR\FORMS)
Elixir-format font files in the Elixir Fonts folder
(drive:\ELIXIR\FONTS)
Elixir-format graphics files in the Elixir Graphics
folder (drive:\ELIXIR\PICS)
Elixir-format document files in the Elixir Documents folder (drive:\ELIXIR\DOCS).
When you open an Elixir file, the corresponding Elixir
application starts and the file loads in the application.
For example, when you open an Elixir form file, the
Elixir Forms Editor application starts, and the form file
loads (displays on the screen), ready for editing.
5-2 ELIXIR TECHNOLOGIES CORPORATION
Page 66

Note that your PC must have the corresponding application installed and enabled. Elixir applications can be
enabled/disabled using the System menu, as described in the “Desktop configuration” chapter.
Note also that you cannot open an Elixir document
icon in the Elixir Docs folder (drive:\ELIXIR\DOCS).
Opening the ElixirForm icon
Opening the ElixirForm icon at the right of the Desktop
starts the ElixirForm application. When you exit the
application, the Desktop redisplays.
Note that pressing <CTRL> and clicking the right
mouse button on the icon instead displays icons representing other installed applications.
Opening device icons
Opening a device icon displays a dialog box for viewing or modifying the current properties of the device
represented, as follows:
ADDITIONAL DESKTOP FEATURES
Diskette icon
Allows you to access or configure your PC's internal or
external diskette drive. See the "Icon properties" section and “Peripheral devices” chapter for more information.
Printers icon
Allows you to access or configure a local proof printer
connected to your PC. See the "Icon properties" section and "Local Printers" appendix for more information.
Scanners icon
Allows you to access or configure a scanner connected to your PC. See the "Icon properties" section
and “Peripheral devices” chapter for more information.
ELIXIR FORMS EDITOR DESKTOP USER GUIDE 5-3
Page 67

ADDITIONAL DESKTOP FEATURES
Opening other icons
Opening the User Tools, User Files, Dispatcher, Converter and Viewer icons results in different displays, as
follows:
User Tools icon
Displays the User Tools window which allows you to
create an icon for any DOS application or batch file.
See the "Accessing DOS files and applications" chapter for more information.
User Files icon
Displays the User Files: Directory Paths and Tool
Links dialog box which allows you to link files in a window with DOS applications. See the "Accessing DOS
files and applications" chapter for more informa- tion.
Dispatcher icon
Displays the Dispatcher Commands dialog box which
allows you to enter DOS batch commands. See the
"Icon properties" section and “Accessing DOS files
and applications” chapter for more information.
Converter icon
Displays the Converter Properties dialog box which allows you to convert form, font and graphics files to
and from different formats. See the "Icon properties"
section and "Desktop configuration" and "File conversions" chapters for more information.
Viewer icon
Displays the ASCII-based Windows Notepad dialog
box which allows you to view and edit the contents of
an Elixir-format file without launching the associated
application. See the "Viewing files" section for more
information.
5-4 ELIXIR TECHNOLOGIES CORPORATION
Page 68

Displaying Icon properties
Using the Desktop, you can view and modify property
specifications for the following:
Converter icon
Dispatcher icon
Viewer icon
device (Diskette, Scanners and Printers) icons
file icons.
To display and modify properties for any of the above,
select the appropriate icon, then perform one of the
following:
Press <F2>.
Press the right mouse button.
Select [Properties] from the File menu.
Files
Selecting [Properties] for a file icon displays the File
Object Properties dialog box shown in the following
figure.
ADDITIONAL DESKTOP FEATURES
Figure 5-2. File Object Properties dialog box
The File Object Properties dialog box contains the following options:
File name and extension
The name, including any extension, of the selected
file. This is the only option you can change. Enter a
new file name and extension to rename the file.
ELIXIR FORMS EDITOR DESKTOP USER GUIDE 5-5
Page 69

ADDITIONAL DESKTOP FEATURES
File type
The type of file selected; for example, Elixir, HP PCL,
or PostScript.
File size
The size of the selected file in bytes.
Date of last access
The date you created or last changed the file.
Time of last access
The time you last accessed the file.
If you select more than one file, a dialog box for each
subsequent file displays when you click on [OK] or
[Cancel].
Displaying Elixir file formats
When you convert Elixir and Input folders files, files
with the same stem names but different extensions
write to the appropriate Output folders (see the “Elixir
folders' and “File conversions” chapters for more information).
The Desktop file formats feature allows you to select a
file in any Elixir folder, and to display all files with the
same stem name but different extensions on the drive
to which Elixir installs. This feature also allows you to
delete either all or selected file formats from the
directory.
To display different versions of a file, select the desired file from an Elixir folder, then select [Formats]
from the File menu. The File Formats dialog box displays.
5-6 ELIXIR TECHNOLOGIES CORPORATION
Page 70

ADDITIONAL DESKTOP FEATURES
Figure 5-3. File Formats dialog box
The File Formats dialog box displays the different formats of the selected file, and contains the following
options:
No Operation
Perform no operations on displayed files.
Delete * Formats
Delete all displayed formats of a selected file.
Delete * except Elixir
Delete all formats of a selected file, except the Elixir
format.
Displaying a logo
You can configure the Desktop to display a logo upon
start up. However, the logo displays only if you closed
all windows when last exiting the Desktop.
The displayed logo may be any .BMP graphics file in
drive:\ELIXIR\PICS\BMPIN. The default logo is
DESKLOGO.BMP.
ELIXIR FORMS EDITOR DESKTOP USER GUIDE 5-7
Page 71

ADDITIONAL DESKTOP FEATURES
To specify the logo you want displayed, follow these
steps:
1. Select [System Config] from the System
menu.
2. In the Desktop Basic Setup dialog box, select
[Show banner logo file].
3. In the dialog box, specify the stem name of
the .BMP file in the drive:\ELIXIR\PICS\BMPIN
directory you want displayed.
Figure 5-4. Desktop Basic Setup dialog box
Note that, depending on your monitor's screen resolution, the size of the displayed logo changes.
Copying files
Copying files involves different procedures, depending
on whether you are copying files to or from:
Elixir folders
DOS directories on the hard disk
DOS-format diskettes
DOS Elixir-format diskettes
Viewer icon.
5-8 ELIXIR TECHNOLOGIES CORPORATION
Page 72

In each case, you select files from a window and then
copy them in one of the following ways:
Drag and drop files on the destination icon.
Press <Ctrl>+<C>, then click on destination icon.
Select [Copy] from the File menu, then click on
the destination icon.
Copying files to Elixir folders
You copy files to Elixir folders when you convert files
to different formats. However, before conversion,
make sure the files have the correct name extensions
for the folders in which they reside. See the “Elixir
folders” chapter for more information.
Copying files to a DOS directory
Tc copy one or more files in a window to another hard
disk directory, select the files and drag and drop them
on the User Files icon. A dialog box similar to the following displays.
ADDITIONAL DESKTOP FEATURES
Figure 5-5. User Files: Directory Paths and Tool Links
ELIXIR FORMS EDITOR DESKTOP USER GUIDE 5-9
Page 73

ADDITIONAL DESKTOP FEATURES
The dialog box displays the (current) paths you last
specified and allows you to specify up to twelve DOS
directory paths.
To specify the target directory, perform one of the following:
Select any line and type the directory into which
you want to copy files.
When the directory to which you want to copy files
displays, select (highlight) it.
Select any line that shows a path and edit it.
If the directory you enter does not exist, a dialog box
displays requesting confirmation to create a new directory. Select [Yes] to create the new directory. An
empty window for the new directory displays.
Click on [OK] to copy the files. See the “Accessing
DOS files and applications” chapter for more information.
Copying files from a DOS directory
To copy one or more files from a DOS directory, open
the User Files icon to display the User Files: Directory
Paths and Tool Links dialog box.
Enter the name of the directory from which you want
to copy files or, if the path to the directory displays, select it and click on [OK].
A window similar to the following figure displays,
showing the contents of the directory. In the window,
select the files you want to copy, then drag and drop
the files on the Desktop target icon. The target icon
can be any of the Elixir folders, the Diskette icon or
the User Files icon.
5-10 ELIXIR TECHNOLOGIES CORPORATION
Page 74

Figure 5-6. Directory window example
Copying files to a DOS-format diskette
To copy selected files from a displayed window to a
DOS-format diskette, first insert a diskette into your
PC disk drive.
Copy the selected files to the Diskette icon on the
Desktop.
ADDITIONAL DESKTOP FEATURES
The System Diskette dialog box displays.
Figure 5-7. System Diskette dialog box
In the System Diskette dialog box, specify the following options to copy files to a DOS-format diskette:
Directory on Diskette to open
The diskette directory to which you want to write files.
ELIXIR FORMS EDITOR DESKTOP USER GUIDE 5-11
Page 75

ADDITIONAL DESKTOP FEATURES
Diskette Drive
The identifier for your disk drive (normally A or B).
Diskette Type
Select [DOS User-Defined] to copy files to a DOS
directory.
Diskette Access
As appropriate, select either [For WRITing] for a formatted diskette or [Perform FORMAT] to create a
DOS-formatted diskette.
Click on [OK] to copy files.
Copying files from a DOS-format diskette
To copy files from a DOS-format diskette, open the
Diskette icon to display the Diskette Properties dialog
box shown in the figure above.
In the System Diskette dialog box, specify the following options to copy files from a DOS-format diskette:
Directory on Diskette to open
The diskette directory from which you want to copy
files.
Diskette Drive
The identifier for your disk drive (normally A or B).
Diskette Type
Select [DOS User-Defined] to copy files from a DOS
directory.
A window displays showing the contents of the directory you specified. Select the files you want to copy,
then copy the files to a target icon on the Desktop.
Copying files to a DOS-Elixir format diskette
A DOS Elixir-format diskette is a DOS-format diskette
that contains the Elixir file directory structure. You can
copy files such as .PUB files to a DOS Elixir-format
diskette without first creating the destination Elixir directories on the diskette.
5-12 ELIXIR TECHNOLOGIES CORPORATION
Page 76

ADDITIONAL DESKTOP FEATURES
To copy selected files from a displayed window to a
DOS Elixir-format diskette, insert a diskette into your
PC disk drive. If the diskette is not already DOS Elixir
formatted, select the [DOS Elixir] and [Perform FORMAT] options to format the diskette before copying
files.
Copy the selected files to the Diskette icon on the
Desktop.
The System Diskette dialog box displays.
Figure 5-8. System Diskette dialog box
In the System Diskette dialog box, specify the following options to copy files to a DOS Elixir-format
diskette:
Directory on Diskette to open
Select [DOS Elixir] to display the drive:\ELIXIR directory.
Diskette Drive
The identifier for your disk drive (normally A or B).
Diskette Type
Select [DOS Elixir] to copy files to a DOS Elixir-format
diskette.
Diskette Access
As appropriate, select either [For WRITing] for a formatted diskette or [Perform FORMAT] to create a
DOS-formatted diskette with an Elixir directory
structure.
Click on [OK] to copy files.
ELIXIR FORMS EDITOR DESKTOP USER GUIDE 5-13
Page 77

ADDITIONAL DESKTOP FEATURES
Copying files from a DOS Elixir-format diskette
To copy files from a DOS Elixir-format diskette, open
the Diskette icon on the Desktop to display a Diskette
Properties dialog box shown in the figure above.
In the Diskette Properties dialog box, specify the following options to copy files from a DOS Elixir-format
diskette:
Directory on Diskette to open
The drive from which you want to copy files.
Diskette Drive
The identifier for your disk drive (normally A or B).
Diskette Type
To copy files from an Elixir diskette, select [DOS
Elixir].
Diskette Access
Select [for READing]
Click on [OK].
A window displays showing the contents of the direc-
tory you specified. Select the files you want to copy,
then copy the files to a target icon on the Desktop.
Copying files from Output to Input folders
To copy one or more files from an Elixir Output folder
to a corresponding Input folder, use the following
procedure.
1. Open an Elixir folder, then open the Output
folder in the displayed window.
2. Select the output file(s) you want to copy from
the Output folder.
3. Copy the file(s) to the destination Elixir icon
on the Desktop.
The selected file(s) copy into the appropriate Input
folder.
5-14 ELIXIR TECHNOLOGIES CORPORATION
Page 78

Note that you cannot copy files directly from the Output Documents folder to the Input Documents folder.
Instead, you must copy them to the User Files icon
and, in the displayed User Files: Directory Paths and
Tool Links dialog box, specify the DOS path for the
appropriate Document Input folder.
Note also that you cannot copy files from an Input
folder to an Output folder.
Copying Elixir form files
To copy a form file and all associated elements, use
the Desktop archival feature.
The archival feature allows you to create a publication
(.PUB) file containing references to all font, graphics
and form information for an Elixir-format (.ELX) form
file in the Elixir Forms folder
(drive:\ELIXIR\FORMS\ELIXIR).
You cannot use standard DOS or Elixir copy procedures to copy Elixir form files because these files contain elements such as text, fonts and graphics that
reside in different Elixir directories.
ADDITIONAL DESKTOP FEATURES
Creating a .PUB file
To create a .PUB file for an Elixir form file, follow
these steps:
1. Open the Elixir Forms folder and select the
.ELX file you want to archive.
2. From the Selection menu, either select [Make
Pubfile] or press <Ctrl>+<U>. The dialog box
shown in the following figure displays.
ELIXIR FORMS EDITOR DESKTOP USER GUIDE 5-15
Page 79

ADDITIONAL DESKTOP FEATURES
Figure 5-9. Elixir Publication File
This dialog box contains the following options:
PubFile name
The name of the .PUB file you want to create, based
on the .ELX file stem name.
Include Screen Fonts
Either select to include, or leave unselected to omit,
screen fonts in the .PUB file.
Include Screen Graphics
Either select to include, or leave unselected to omit,
screen images in the .PUB file.
dialog box
Include Printer Fonts
Either select to include, or leave unselected to omit,
proof printer fonts (for the proof printer you specify in
the [Proof Printer Fonts for] option) in the .PUB file.
Also includes rotated fonts, if used.
Include Printer Graphics
Either select to include, or leave unselected to omit,
printer images in the .PUB file.
Proof Printer Fonts For
Allows you to specify your proof printer as [HP LJ].
The Elixir Desktop creates a .PUB file in the Elixir
Forms folder with the same stem name as the file you
selected. If a .PUB file with the same name exists in
the Elixir Forms folder, the program prompts you to
confirm overwriting it.
You can view the contents of a .PUB file by doubleclicking on its icon as shown in the following figure.
5-16 ELIXIR TECHNOLOGIES CORPORATION
Page 80

Figure 5-10. Publication file components example
Copying a .PUB file to a diskette
To copy a .PUB file to a diskette, follow these steps:
1. Insert a formatted diskette into your diskette
drive. Open the Diskette icon and make sure
[Diskette Drive] indicates the correct drive.
2. Select the .PUB file from the Elixir Forms
window.
ADDITIONAL DESKTOP FEATURES
3. From the Selection menu, select [Archive
Pubfile].
Alternatively, copy the .PUB file to the Diskette icon.
All directories and related files required for each element of the .PUB file copy to the diskette. If a .PUB
file with the same name exists on the diskette, the
program prompts you to confirm overwriting it. Your
confirmation also overwrites any component files with
the same stem name.
ELIXIR FORMS EDITOR DESKTOP USER GUIDE 5-17
Page 81

ADDITIONAL DESKTOP FEATURES
Restoring a .PUB file from a diskette
To copy a .PUB file and all associated graphics, font
and form files from a diskette to your hard disk, follow
these steps:
1. Insert the diskette into your diskette drive.
2. Open the Diskette icon, and select
[DOS-Elixir] to display a window with the
diskette contents.
3. Display the
drive
:\ELIXIR\FORMS\ELIXIR (or
subordinate directory) window that contains
the .PUB file.
4. Copy the .PUB file icon to the Desktop Forms
icon.
5. Click on the Elixir Forms folder in the
displayed window.
The .PUB file and all associated files copy to the appropriate Elixir folders. If a .PUB file with the same
name exists in the Elixir Forms folder, the program
prompts you to confirm overwriting it. Your confirmation also overwrites any existing component files with
the same stem name.
If you restore a .PUB file to a PC with a different monitor than the PC from which you copied the form file,
your screen fonts and screen graphics may not display correctly. For correct font and graphics display,
use the Converter icon (described in the “File conversions” chapter of this guide) to regenerate the screen
fonts and graphics.
5-18 ELIXIR TECHNOLOGIES CORPORATION
Page 82

ADDITIONAL DESKTOP FEATURES
Using the Elixir Scheduler Desktop
The Elixir Scheduler Desktop allows you to specify
automated file conversions, batch file execution and
other actions, and to specify the conditions for their
performance.
The actions you can specify are:
file conversions
running transcripts
executing an application defined as a User Tool
executing an application defined in the Dispatcher
icon
executing any .BAT, .EXE or .COM command.
The conditions for which you can specify the above
actions are:
the date and/or time for performing an action
checking for the existence of a file before per-
forming an action
performing an action at specified intervals.
Examples of automated actions you can specify with
the Scheduler Desktop are:
If files in an Input Folder are present, convert
them to one or more formats.
At a certain time, perform a certain action (such
as back up files).
(Later, this section provides detailed examples.)
In addition, if you install the Elixir Desktop on a dedi-
cated PC attached to a network, the Scheduler enables uploading files to another destination, for
example, to a high-speed printer.
As an example of a Scheduler setup:
ELIXIR FORMS EDITOR DESKTOP USER GUIDE 5-19
Page 83

ADDITIONAL DESKTOP FEATURES
You can print an application document to a file on
a Network Scheduler.
The Scheduler Desktop detects the file and converts it from its native format to a high speed
printer format.
The Scheduler then automatically sends the file to
the printer for processing.
Scheduler setup
To execute operations from the Scheduler Desktop,
follow these steps:
First, install the Scheduler Desktop on a dedicated PC
attached to the network.
If you want to specify automated file conversions, follow steps 1 through 4. If you want to specify actions
other than file conversions (such as executing batch
files), go to step 5.
1. Open the User Files icon and specify the
Network Scheduler directory to which the files
print to disk (see the "Accessing DOS files
and applications" chapter for more
information).
2. Install the appropriate converter on the
Network Scheduler drive or set its input and
output paths to the Network Scheduler drive.
3. Right-click on the Dispatcher icon and set up
the Dispatcher to run the files for conversion
through a DOS batch file (see the "Accessing
DOS files and applications" chapter for more
information).
4. Click on [Setup] in the Dispatcher Commands
dialog box and in the displayed User
Application Setup box, click on [Send only
Filename].
Create the batch file to perform the following:
convert input Dispatcher files to the output format
you previously set up in the Desktop
5-20 ELIXIR TECHNOLOGIES CORPORATION
Page 84

ADDITIONAL DESKTOP FEATURES
write an error log; you can set the Scheduler
desktop to check for the existence of the log and
to pause or to transmit an error message if it exists
send files directly to the printer
delete any unwanted files on the PC.
(Later, this chapter describes more details about
these actions).
5. Set up the Scheduler Desktop by selecting
[Scheduler Setup] from the Special menu, or
by pressing <Alt> + <F2>
Make the appropriate selections in the Scheduler
Setup dialog box shown in the following figure.
Figure 5-11. Scheduler Setup dialog box
All Scheduler Activity
Sets processing to [Processing] (on) or [OFF] for up to
eight Scheduler actions. [Processing] polls each
Scheduler action to test it for a TRUE, condition. If a
Scheduler action tests TRUE a consequent action
results.
Task Scheduling by
The processing mode. [ID Priority] processes Scheduler actions using number 1 as the highest priority,
and number 8 as the lowest priority. [Circular processing] processes Scheduler actions sequentially
without priority.
Number of allowable scheduler tasks
The number of Scheduler actions tested for when you
select [Processing]. The maximum is eight actions.
ELIXIR FORMS EDITOR DESKTOP USER GUIDE 5-21
Page 85

ADDITIONAL DESKTOP FEATURES
Timing delay between scheduler tasks
The frequency at which the Scheduler tests for TRUE
Scheduler actions, in seconds.
6. Set up the Scheduler action by selecting
[Scheduler Actions] from the Special menu, or
pressing <Alt> + <F3>.
Figure 5-12. Scheduler Tasks dialog box
Task
Allows definition of up to eight Scheduler actions
(tasks), and to set [Task processing ON] (select) or off
(leave unselected). Click on [Next] or [Prev] to display
and to modify tasks 1 through 8.
Task test
[On File(s)] tests for the existence of a file in a directory, both of which you specify (see next options),
[On DateTime] tests for a specified PC date and time,
[Test TRUE] continually executes the specified action
at the timing interval specified in step 5.
File(s) test Directory
The directory in which the Scheduler checks for the
existence of a file if you select [on File(s)] in Task
test.
Filename(s)
The file for which the Scheduler checks if you selected
[on File(s)] in Task test. DOS wildcards are permissible. [Any] searches for any files in the specified
directory.
5-22 ELIXIR TECHNOLOGIES CORPORATION
Page 86

ADDITIONAL DESKTOP FEATURES
Date
When testing for passage of a specified date, enter
the day, month, and year you want the Scheduler action processed. Select [Any] after the date to process
the Scheduler action every day at the time specified
by Time.
Time
When testing for passage of a specified time, enter
the hours, minutes, and seconds you want the Scheduler action processed.
Action to take
Select [Dispatch] and enter the number of the Dispatcher command to process the Dispatcher command, [Usertool] to process the user tool, or [BATch
File] to process the batch file specified in [Name].
After action
[Delete Files] deletes files after the Scheduler action,
[Task processing OFF] turns processing off after the
action, and [None] specifies that the Scheduler continues processing for further actions.
Please note the following Scheduler operation
conditions:
The Scheduler Desktop pauses during keystrokes, mouse clicks or movements, menu pull
down operations, and dialog displays, but resumes polling after an allotted time delay once
these actions end.
To operate the Scheduler with the [DateTime] option, select the [System Config] option in the Sys-
tem menu and set the system clock on
([Clock]:On) in the Desktop Configuration dialog
box that displays.
To reset the Scheduler functions to defaults, enter the following command at the DOS prompt:
DEL\ELIXIR\DESKTOP\SYSTEM\DISPATCH\*.SRV
<Enter>
ELIXIR FORMS EDITOR DESKTOP USER GUIDE 5-23
Page 87

ADDITIONAL DESKTOP FEATURES
The Scheduler Desktop is single tasking and you
should operate it on a dedicated workstation. You
can accomplish Full Scheduler operations without
using network interrupts and you can perform this
from a DOS-based system.
The Scheduler Desktop is operational in nonnetwork environments, and can process files sent
over modems for printing to a remote printer.
Scheduler Desktop examples
This section describes examples of using the Scheduler Desktop.
Scheduler example 1
The following example describes setting up a Scheduler action to run a batch file at one minute past noon.
The example assumes that you set up the Scheduler
Desktop on a dedicated PC, attached it to a network,
and if applicable, defined the Network Scheduler directory to which files print to disk.
1. Select the [Scheduler Setup] option from the
Special menu and select the options you want
in the dialog box that displays (the options as
described earlier in this section).
2. Select the [Scheduler Actions] option from the
Special menu and enter or select the following
to set up a Scheduler action based on a
DateTime test:
5-24 ELIXIR TECHNOLOGIES CORPORATION
Page 88

ADDITIONAL DESKTOP FEATURES
[Task] 1
[Task test] On DateTime
[Filename(s)] *.SYS
[Date] 02 [Month] 12 [Year] 92
[Hour] 12 [Min] 1 [Sec] 0
[Action to take] BATchFile
[Name] JOBXXX
[After action] Task processing OFF
Figure 5-13. Testing for a passed
date/time example
This example sets up Scheduler action number 2 to
run the file JOBXXX on 12/02/92 at 12:01 PM.
If [Any] is selected for the Date, the Scheduler action
would occur every day at 12:01 PM.
Scheduler example 2
The following example describes setting up a Scheduler action that continuously runs a utility at specified
time intervals.
1. Select the [Scheduler Setup] option from the
Special menu and select the options you want
in the dialog box that displays (the options as
described earlier in this section).
2. Select the [Scheduler Actions] option from the
Special menu and enter or select the following
to set up a Scheduler action based on a Test
TRUE test:
ELIXIR FORMS EDITOR DESKTOP USER GUIDE 5-25
Page 89

ADDITIONAL DESKTOP FEATURES
Task] 2
[Task test]Test TRUE
[Action to take] Usertool
[Name] NETCOMX
[After action] None
Figure 5-14. Testing for a TRUE
This example sets up Scheduler task number 2 to run
the usertool NETCOMX continuously at intervals
specified in step 5 in the Scheduler setup section.
condition example
You can use this Scheduler action to periodically send
messages over the network to inform nodes that the
Scheduler is active and waiting.
Viewing files
The Viewer icon allows you to link applications to file
extensions so that copying a file with a certain extension to the icon starts the application and loads the
file.
For example, you can link all .PCX file to the Windows
PaintBrush program so that copying a .PCX file to the
Viewer icon starts PaintBrush and displays the .PCX
file.
5-26 ELIXIR TECHNOLOGIES CORPORATION
Page 90

ADDITIONAL DESKTOP FEATURES
To link applications to file extensions, use any ASCII
editor to edit the ELX.INI file in the drive:\WINDOWS
directory.
You can also click the right mouse button on the
Viewer icon to start Windows Notepad with ELX.INI
loaded.
In the file, under the [Viewer_Filemap] section add
lines in the following format:
extension=application
extension
is the file extension
application
is the executable linked to extension.
For example:
PCX=PBRUSH.EXE
This line links .PCX files to the PaintBrush application.
Viewing Elixir graphics files
The Viewer icon also allows you to display Elixir format graphics (.LP3) and screen graphics (.LW8) by
copying the files to the icon. You can copy the above
files from any folder to the Viewer icon.
ELIXIR FORMS EDITOR DESKTOP USER GUIDE 5-27
Page 91

ADDITIONAL DESKTOP FEATURES
Figure 5-15. Elixir graphics (.LP3) display example
The Elixir Image Viewer application displays Elixir
graphics or the screen versions of Elixir graphics in an
image window, as shown in the above example.
From the File menu select [Attributes] to display information about the graphics, [Print] to print the graphics,
and [Exit] to exit the Viewer.
Clicking on the arrows in the image window header allows you to zoom in to 2X, 4X, 8X, 16X, and 32X
magnifications and to zoom out to -2X, -4X, and -8X
magnifications. The printed image size also displays
(PRN displays in the window header).
When displaying magnifications greater than 1X, the
left of the window displays the magnified view and the
right of the window shown a portion of the image at 1X
magnification.
Clicking on the button to the right of the arrow toggles
a grid at magnifications of 8X or greater.
5-28 ELIXIR TECHNOLOGIES CORPORATION
Page 92

ADDITIONAL DESKTOP FEATURES
Moving the screen pointer in the window displays the
coordinates of the pointer in dots with respect to the
top left corner of the graphics.
ELIXIR FORMS EDITOR DESKTOP USER GUIDE 5-29
Page 93

6. Peripheral devices
This chapter describes how to access and use peripheral devices connected to your PC. Devices covered
in this chapter include the diskette drives (internal or
external) and scanners.
The "Local printers" appendix describes use of a supported local printer.
See the Elixir ElixirScan User Guide for detailed information if you plan to use the ElixirScan application
with your scanner.
Diskette drive
You access diskette drives through the Desktop Diskette icon.
The Diskette icon allows you to:
specify the drive letter of the diskette drive you
want to access
copy files from the hard disk to a diskette
copy files from a diskette to the hard disk
format a high or low density diskette in DOS or
DOS-Elixir formats (DOS format with the standard
Elixir directory structure on the diskette).
The “Additional Desktop features” chapter describes
procedures for copying DOS files to and from diskettes.
ELIXIR FORMS EDITOR DESKTOP USER GUIDE 6-1
Page 94

PERIPHERAL DEVICES
To assign a drive letter or to format diskettes, open
the Diskette icon to display the System Diskette dialog
box shown in the following figure. This dialog box also
displays when you copy one or more files to a diskette
(by copying file icons to the Diskette icon).
Figure 6-1. System Diskette dialog box
To specify a drive letter, enter the letter for the Diskette Drive option. Any actions you subsequently perform using the Diskette icon apply to the diskette drive
you specify.
To format a diskette, select [Perform FORMAT] for
the [Diskette Access] option, then select the format
type for the [Diskette Type] option.
When you format a diskette the following options
apply:
DOS User-Defined
Formats the diskette using the DOS FORMAT
command.
DOS Elixir
Formats the diskette using the DOS FORMAT command and creates an \ELIXIR subdirectory on the
diskette.
When you copy files to and from a diskette, the following options also apply:
Directory on Diskette to open
The diskette directory you want to access. The default is A:\*.*
6-2 ELIXIR TECHNOLOGIES CORPORATION
Page 95

Diskette Access
[Perform FORMAT] - formats a diskette (see above);
[For READing] - displays a window showing a list of
files and directories on the diskette. [For WRITing] applicable only when you copy files from the hard
disk; copies the hard disk files to the diskette.
Scanner device
You can access any scanning device connected to
your PC through the Desktop Scanners icon when you
have the appropriate scanner software installed that
can create 300 dpi .TIF or .PCX files.
Before using your scanner, configure the Desktop as
described in the following section.
You can run only one scanner from the Desktop.
Configuration
PERIPHERAL DEVICES
To use your scanner from the Desktop, first set the
scanner specifications as follows:
Select the Scanners icon and press <F2> or select
[Properties] from the File menu. The User Application
Setup dialog box shown in the following figure displays:
ELIXIR FORMS EDITOR DESKTOP USER GUIDE 6-3
Page 96

PERIPHERAL DEVICES
Figure 6-2. User Application Setup dialog box
The User Application Setup dialog box contains the
following options:
Command to Execute
The command that executes the application you want
associated with the icon. For example, to create a
WordPerfect icon, you would specify WP.
If you want to link the application to files in the same
directory as the application (see the “Linking files to an
already-defined User Tool” section), you can also type
in the DOS command with an embedded %1 parameter. The embedded %1 parameter specifies the location in the command at which you want the file name
to appear. See also the [Prompt for parameters]
option.
'Nickname' for application
A nickname (up to 8 characters) for the application
you want to run. After creating an icon, the User
Tools window displays the icon with the nickname under it.
Optional Long Name
A descriptive name for the application (up to 29 characters). The long name is informational only; it identifies the application in the dialog box.
6-4 ELIXIR TECHNOLOGIES CORPORATION
Page 97

PERIPHERAL DEVICES
Working Directory
The DOS path for the executable. Use this field if the
application you are running is not present in the
drive:\ELIXIR directory and if you have not specified a
DOS PATH= statement for the directory in which the
application executable resides.
Command Options
Select [DOS Application] if running a DOS application
(enables the [Command Attributes] options).
[Send Only Filename] uses only the stem name of the
file for command execution.
Select [Prompt for parameters] if you want the program to prompt you to enter an argument that appends to the command in [Command to execute].
This displays a dialog box allowing you to enter an argument when you run the application. Leave unselected (the default) to run the application without
prompting for an argument.
[Run Minimized] executes the command in a minimized window.
Command Attributes
Select [Command is .BAT file] if the command you
specify is a DOS batch file. This redisplays the Desktop when you exit the application. Leave unselected
to return you to the directory specified in the batch file.
If the application is a batch file that calls another batch
file, the Desktop does not redisplay when you exit the
application (see the “Starting batch files” section in
this chapter for more information).
Select [Pause after execution] to pause after exiting
the application and to request entering any key to continue before returning to the Desktop. Leave unselected to return to the Desktop after exiting the
application.
Display Options
[Window] displays command execution in a window.
[Full Screen] displays command execution in a full
screen environment.
ELIXIR FORMS EDITOR DESKTOP USER GUIDE 6-5
Page 98

PERIPHERAL DEVICES
[Browse] button
Click on to display the contents of a DOS directory
(which you can change) from which you can select a
file.
Using scanners
To use your scanner, open the Scanners icon. After
confirming that the information in the User Application
Setup dialog box is correct, click on [OK] to start the
scanner application.
See your scanner user manual for information on configuring your system for your scanner..
Using the Elixir HP print driver
The Elixir HP print driver produces files that require
substantially less disk space and take less time to
print.
To use the Elixir HP print driver, follow these steps:
1. Select and drag the files to the Printers icon.
2. In the Print dialog box, select the [Elixir HP
Driver] and click on [Setup].
The Elixir HP Driver dialog box displays. Select from
the following options:
Printer
The type of HP LaserJet printer (II, III or 4).
Printer Port
As Appropriate, either [LPT1], [LPT2] or [LPT3].
Output Mode
Either [Use PCL commands] or [Use rasterization].
The [Use rasterization] option allows you to print objects such as circles and paths that HP PCL may otherwise ignore or print as other objects.
6-6 ELIXIR TECHNOLOGIES CORPORATION
Page 99

PERIPHERAL DEVICES
Font Substitution Tables
Either [No] to use printer-resident fonts or [Selected]
to use fonts from the table you enter in the [Selected
Table] option. You can browse the font tables listed in
the Select Font Table dialog box by clicking on the
[Select Font Table] button.
Create As Macro
A number value in [Macro ID number] to store your
form on the printer for future use.
3. After selecting your options, click on [OK].
4. To print the file, click on [OK] in the Print
dialog box.
ELIXIR FORMS EDITOR DESKTOP USER GUIDE 6-7
Page 100

7. File conversions
The main function of the Elixir Forms Editor Desktop
is to convert form, font, graphics, document and job
files to and from different formats.
General procedures
Before copying or converting a file, you may want to
first check the file's property specifications.
To display file properties:
1. Select one or more files in any open window.
2. Either press <F2> or select [Properties] from
the File menu.
Figure 7-1. File Object Properties dialog box
3. The File Object Properties dialog box displays with the following options:
File name and extension
The name, including any extension, of the selected file. This is the only option you can
change. To rename the file, enter a new file name
and extension.
ELIXIR FORMS EDITOR DESKTOP USER GUIDE 7-1
 Loading...