

Page 1

E
ElixirForm
for AFP™
User Guide
June 1999
Version 4.00
Page 2

Elixir Technologies Corporation
P.O. Box 1559
Ojai, CA 93024
Copyright ©1999 by Elixir Technologies Corporation.
All rights reserved.
June 1999
Version 4.00
Printed in the United States of America
Trademarks and Service Marks/Company:
DocuMerge/Image Sciences Corporation
Elixir/Elixir Technologies Corporation
HP, LaserJet/Hewlett Packard Company
IBM, Personal Computer AT, PS/2, and all IBM products mentioned in this publication are trademarks of
International Business Machines
Logitech/Logitech, Inc.
MS-DOS, Windows, Microsoft Mouse/Microsoft
Corporation
All other product names and trade names used
herein are trademarks of their respective owners.
Copyright protection claimed includes all forms and
matters of copyrightable material and information
now allowed by statutory or judicial law or hereinafter granted, including without limitation, material
generated from the software programs which are
displayed on the screen such as icons, screen display looks, etc.
Changes are periodically made to this document.
Changes, technical inaccuracies and typographic errors will be corrected in subsequent editions.
Page 3

Table of contents
1. Introduction 1-1
ElixirForm overview 1-1
Customer support 1-3
Elixir training 1-3
Who should use this guide 1-3
Conventions 1-4
Display conventions 1-4
Typographical conventions 1-4
On-line Help 1-5
Organization of this guide 1-7
Installation 1-8
Starting ElixirForm 1-8
Exiting ElixirForm 1-8
2. ElixirForm basics 2-1
ElixirForm window 2-1
Toolbox <F10> 2-2
Select tool 2-3
Copy 2-3
Delete 2-3
Group filter options 2-3
Number of Copies 2-3
Movement Selection 2-4
Copy - Horizontal Distance 2-4
ELIXIRFORM FOR AFP USER GUIDE iii
Page 4

TABLE OF CONTENTS
Copy - Horizontal Distance
- On/Off 2-4
Sticky Lines - On/Off 2-4
Copy - Vertical Distance 2-4
Copy - Vertical Distance -
On/Off 2-5
Line tool 2-5
Line - Direction 2-5
Custom Line/Border
Thickness 2-5
Line - Style 2-5
Line - Color 2-5
Path tool 2-5
Path - Shape 2-5
Path - Direction 2-6
Path - Beginning Style 2-6
Path - End Style 2-6
Custom Line/Border
Thickness 2-6
Line/Border Style 2-6
Path - Finish Drawing 2-6
Path - Color 2-7
Path - Fill Color 2-7
Object Fill Pattern/Shading 2-7
Path - Connection Radius 2-7
Box tool 2-7
Box Predefined Shape 2-7
Box - Positioning -
Center/Top Left 2-8
Box - Shape -
Oblong/Square 2-8
Box - Diagonals 2-8
Custom Line/Border
Thickness 2-8
Box - Line/Border Style 2-8
iv ELIXIR TECHNOLOGIES CORPORATION
Page 5

TABLE OF CONTENTS
Box - Border/Split Thickness and Style 2-8
Box - Horizontal Splits 2-9
Box - Vertical Splits 2-9
Box - Color 2-9
Box - Fill Color 2-9
Object Fill Pattern/Shading 2-9
Box - Corner Radius 2-10
Circle tool 2-10
Circle - Radius 2-10
Circle - Drawing Method 2-10
Circle - Diagonals 2-10
Custom Line/Border
Thickness 2-11
Circle - Border Style 2-11
Circle - Start and Finish
Angle 2-11
Circle - Color 2-11
Circle - Fill Color 2-11
Object Fill Pattern/Shading 2-11
Circle Axis 2-12
Text tool 2-12
Text - Direction 2-12
Text - Inter-character/Inter-
word Spacing 2-12
Text - Word Wrapping 2-13
Text - Remove Redundant
Spaces 2-13
Text - Split String 2-13
Text - Justification 2-13
Text - Positioning 2-13
Text - Lines per Inch 2-13
Text - Lines per Inch -
ON/OFF 2-14
Text - Text Color 2-14
ELIXIRFORM FOR AFP USER GUIDE v
Page 6

TABLE OF CONTENTS
Toolbar 2-18
DocuTag/DataMerge - Data
Tags - ON/OFF 2-14
Text - Column Width 2-14
Text - Draw Column Box
Boundaries 2-15
Text - Column Height 2-15
Text - Set Column
Width/Height to Define Box
- ON/OFF 2-15
Font Type 2-16
Text - Add/Remove Font
from List 2-16
Text - Load Font List/Merge
Font List/Save Font List
2-16
Text - Soft Keyboard 2-16
Font Preview Panel 2-17
Image tool 2-17
Image - Name 2-17
Image -
SizeHorizontal/Vertical 2-17
Image - Color 2-17
Image - Fill Color 2-17
Image - Load 2-17
Digital ruler 2-18
Current object - Shape 2-18
Current object - Start Coordinates 2-18
Current object - Dimensions 2-18
Graphic ruler <F3> 2-19
Grid Display <F4> 2-19
Snap to Grid <F5> 2-20
Long Crosshair <F6> 2-20
Zoom in/out 2-20
Undo/Redo 2-21
Spell Check 2-21
vi ELIXIR TECHNOLOGIES CORPORATION
Page 7

TABLE OF CONTENTS
Show/hide Toolbox 2-21
Menu bars 2-21
Creating a form 2-22
Designing a new form 2-22
Reproducing an existing form 2-22
Designing a form to fit in a window
envelope 2-22
Designing a form for merged data 2-22
Loading a form 2-23
Loading a new form <F9 > 2-23
Loading a saved form <F8 > 2-23
Loading GEM forms 2-24
Merging a form group 2-24
Loading a form template 2-25
Selecting template defaults 2-25
Adding form elements 2-26
Using color 2-26
Saving a form with a new name 2-27
Saving a new form 2-27
Modifying a form 2-28
Editing elements 2-28
Shifting elements 2-28
Grouping elements 2-28
Defining a group 2-29
Saving a form group 2-30
Undo/redo feature 2-31
Deleting a form 2-31
Renaming or moving a form 2-31
Proof printing a form 2-32
Editing multiple forms 2-35
Fast keys 2-36
3. Menu bars 3-1
ElixirForm menu bar 3-1
ELIXIRFORM FOR AFP USER GUIDE vii
Page 8

TABLE OF CONTENTS
Work area menu bar 3-5
File menu 3-1
New Form <F9> 3-1
Load Form <F8> 3-1
Save Form <Ctrl> + <S> 3-1
Save Form As <F7> 3-2
Rename/Move Form 3-2
Delete Form 3-2
Merge Form Group 3-2
Save Form Group 3-2
Load Form Template 3-2
Remove Form Template 3-2
Open Dat File 3-3
Close Dat File 3-3
Import Text 3-3
Print 3-3
Exit 3-3
System menu 3-3
Usage Switches 3-3
Filing Options 3-3
Reset to Defaults 3-4
Save Configuration 3-4
Window menu 3-4
Tile 3-4
Form <Ctrl> + <F4> 3-4
Toolbox <F10> 3-4
Help menu 3-4
Edit menu 3-5
Undo <Ctrl> + <Z> 3-5
Redo <Shift> + <Ctrl> +
<Z> 3-5
Cut <Ctrl> + <X> 3-5
Copy <Ctrl> + <C> 3-5
viii ELIXIR TECHNOLOGIES CORPORATION
Page 9

TABLE OF CONTENTS
Paste <Ctrl> + <V> 3-5
Select All <Ctrl> + <A> 3-5
Deselect All <Ctrl> + <A> 3-5
Delete <Del> 3-6
Delete All <Ctrl> + <Del> 3-6
Find <Alt> + <F3> 3-6
Find Next <F3> 3-6
Find Previous <Shift> +
<F3> 3-6
Replace 3-6
Tools menu 3-6
Spell Check 3-7
View menu 3-7
Options menu 3-7
Snap to Grid <F5> 3-7
GEM Forms Load Defaults 3-7
Page Properties 3-7
Page Databasing 3-7
Text/Font Options 3-8
Character Mapping 3-8
Spell Check Options 3-11
Template Options 3-11
4. ElixirForm defaults 4-1
User preferences 4-1
Grid <F4 > 4-1
Displaying/hiding the grid 4-1
Selecting grid properties 4-2
Rulers <F3> 4-4
Graphic ruler 4-4
Digital ruler 4-4
Long crosshair <F6 > 4-6
Zoom in/out 4-6
Keyboard zoom in/out
controls 4-7
ELIXIRFORM FOR AFP USER GUIDE ix
Page 10

TABLE OF CONTENTS
Page settings 4-7
Selecting page properties 4-7
Exceeding form page size limits 4-10
Page databasing 4-11
Text and font options 4-13
GEM form defaults 4-16
Configuring the system 4-18
Setting usage defaults 4-18
Filing options 4-19
Resetting to defaults 4-22
Saving a configuration 4-22
5. Lines 5-1
Line display 5-1
Setting the screen display 5-1
Screen refresh 5-1
Drawing lines 5-2
Editing lines 5-4
Changing line length 5-4
Sticky Lines <Ctrl> + <L> 5-5
Changing line attributes 5-6
Copying lines 5-6
Moving lines 5-7
Deleting lines 5-8
6. Shapes 6-1
Drawing shapes 6-1
Drawing paths 6-1
Drawing boxes 6-4
Drawing circles 6-7
Editing shapes 6-10
Changing shape size 6-10
Changing dimension
coordinates 6-10
Manually 6-11
x ELIXIR TECHNOLOGIES CORPORATION
Page 11

TABLE OF CONTENTS
Changing shape attributes 6-11
Copying shapes 6-12
Moving shapes 6-12
Manually 6-12
Changing dimension coordinates 6-13
Deleting shapes <Del> 6-13
7. Text operations 7-1
Creating text 7-1
Entering text from the keyboard 7-2
Moving a block before finish
entering text 7-2
Specifying text attributes 7-3
Font list 7-8
Selecting a font from the
current list 7-8
Loading 7-9
Merging 7-9
Customizing 7-10
Adding fonts 7-10
Removing fonts 7-10
Entering non-standard characters 7-11
Importing text 7-11
Importing complete text blocks 7-12
Importing text as separate blocks 7-13
Importing text into a box 7-14
Data tags 7-15
Editing text 7-15
Changing text attributes 7-15
Changing fonts 7-16
Replacing fonts 7-16
Applying multiple fonts to a text
block 7-17
Joining text 7-17
Splitting text 7-18
ELIXIRFORM FOR AFP USER GUIDE xi
Page 12

TABLE OF CONTENTS
Moving text 7-19
Manually 7-19
Changing dimension
coordinates 7-19
Copying text 7-20
Cutting, copying and pasting text 7-20
Deleting text 7-21
Finding/replacing text 7-21
Finding 7-21
Replace 7-23
Spell checking 7-24
Setting defaults 7-24
Using the Spell Checker 7-26
8. Images 8-1
Loading an image 8-1
Editing images 8-3
Moving an image 8-3
Manually 8-3
Changing dimension
coordinate 8-4
Copying an image 8-4
Deleting an image 8-5
9. Stand-alone utilities 9-1
Using the utilities 9-1
AFPVIEW 9-2
FONTCHG 9-3
FORMPRN 9-4
IC 9-5
SF 9-7
A. Keyboard shortcuts A-1
Glossary GLOSSARY-1
Index INDEX-1
xii ELIXIR TECHNOLOGIES CORPORATION
Page 13

1. Introduction
ElixirForm for AFP is an interactive forms design tool
that allows you to create and edit forms in WYSIWYG
(What-You-See-Is-What-You-Get) mode using an IBM
PC, AT, PS/2 or compatible computer and optional
proof printer.
If you are familiar with previous GEM versions of ElixirForm for AFP, you will find that the Windows-based
version includes the same functionality plus additional
features and a new interface. You can easily import
forms created in earlier versions of ElixirForm for AFP
and edit them in the new version.
If you have never used ElixirForm for AFP before, you
will find the product highly intuitive and easy to use.
For brevity, "ElixirForm for AFP" is referred to as "ElixirForm" throughout this guide.
ElixirForm overview
A form created with ElixirForm is the static (or boiler
plate) component of a form, and contains elements
such as lines, boxes, text and images. The static form
is then merged with variable data for printing on AFP
high-speed laser printers.
ELIXIRFORM FOR AFP USER GUIDE 1-1
Page 14

INTRODUCTION
The static data adds meaning to the variable data with
which it is merged. For example, the following variable
data from a credit application form
X 123-456-789 9876.23
X 985-234-980 11813.34
is more meaningful when merged with static data and
viewed together:
Previously, creating and editing static forms for printing on AFP printers was the responsibility of applications personnel working on mainframe computers.
Such personnel were required to define form elements using Overlay Generation Language (OGL), a
language that describes the location of line, shape,
text and image elements, as well as page size and
layout.
Limitations to this approach are:
defining and revising an OGL form is complicated
and time-consuming
changes to the form are not apparent when adding OGL statements
the completed OGL file must be compiled and
proof printed on the high-speed printer.
With ElixirForm, you can see each static form element
as you add or revise the element, and then generate
proofs using an optional desktop proof printer. Using
the Elixir Desktop Converter, you can compile your
forms on your PC, thus freeing your AFP printer from
these tasks.
1-2 ELIXIR TECHNOLOGIES CORPORATION
Page 15

Depending upon the ElixirForm product you have installed, your screens and options may differ from the
figures displayed in this guide.
Customer support
Elixir customer support centers provide telephone
technical assistance for Elixir users during business
hours.
If you have purchased your Elixir product directly from
Elixir Technologies then contact one of the support
center hotlines.
See the Elixir Getting Started Guide for information
about contacting your support center.
Elixir training
INTRODUCTION
Elixir Technologies Corporation offers training for the
full range of Windows-based products. For more information, contact:
Elixir Learning
(805) 641-5900 ext. 6
Who should use this guide
This guide serves users needing first-time or ongoing
reference information about ElixirForm.
Users should already be familiar with Microsoft Windows operations, printer and font management operations and PC peripherals, and have access to
reference manuals for related PC software and
hardware.
ELIXIRFORM FOR AFP USER GUIDE 1-3
Page 16

INTRODUCTION
Conventions
This section describes the following:
display conventions
typographical conventions
Display conventions
ElixirForm adheres to Microsoft Windows conventions
for using menus, menu commands, dialog boxes,
command buttons, icons and the mouse. See your
Windows manual for more information.
Many shortcut keys in the new Windows-based product are different from those in previous GEM versions.
This is because the standard Windows operating environment assigns certain functions to keys (for example, <F1> is always used for Help). See the
"Keyboard shortcuts" appendix for a list of keyboard
shortcuts.
Typographical conventions
The following typographical conventions are used
throughout this guide:
Keystrokes are shown enclosed in < > (angle
brackets). For example:
<Enter>.
Key combinations are denoted by a plus sign be-
tween keys. For example:
<Shift> + <F1> indicates simultaneously pressing
the <Shift> and <F1> keys.
Menu titles are shown in bold. Menu options are
enclosed in [ ] (square brackets). For example:
Select [New] from the File menu.
1-4 ELIXIR TECHNOLOGIES CORPORATION
Page 17

INTRODUCTION
Commands, options, actions and parameters that
require description are shown in bold, followed on
the next line by the description.
For example:
Delete
Deletes the selected files.
Steps in a procedure are shown in numbered bold
paragraphs. For example:
1. At the prompt, enter the file name and
extension.
Comments relating to a step (such as this paragraph) are shown in regular text following the bold
paragraph.
Commands you enter at the DOS prompt display
in larger text. Within DOS commands, variable
names and keys you press are shown in italics.
For example:
CD \ELIXIR <Enter>
On-line Help
Elixir software uses the Microsoft Windows Help program to provide on-line Help for all functions.
For more information about Windows Help, select the
[How to Use Help] option in the Help menu, or see
your Microsoft Windows documentation.
The Help files included with your Elixir software include graphics created using screen drivers with large
fonts. If you use a screen driver with small fonts, the
Help file graphics may not display clearly. For optimum graphics display, use a screen driver with large
fonts.
You can display on-line Help in the following ways:
ELIXIRFORM FOR AFP USER GUIDE 1-5
Page 18

INTRODUCTION
Bubble Help
Click on an icon with the right mouse button to view its
properties (if applicable) or to display "bubble help."
Bubble help is a short description of the icon function
that displays in a bubble extending from the icon.
Quick Help
Enable the quick function by selecting the quick help
option in the Usage Switches (or Preferences -- for
ElixirImage) dialog box. When you move the screen
pointer over an icon on the screen, a short description
of the icon function displays in the message area of
the screen. During certain operations a message
about the function you are performing also displays in
the message area. To see these operational messages, disable quick help.
Context sensitive Help
To use this function, click on an icon and press <F1>.
If available, the appropriate Help topic displays. If no
specific topic is available, the Help table of contents
displays.
Help menu
Select [Help] from the top pull-down menu and choose
one of the displayed topics.
Dialog box Help
Click on the [Help] button in a dialog box to view an
associated Help topic. Under Windows 95 and Windows NT, right-click on a dialog box option to display
an associated Help topic.
Help pop-ups and jumps
Within Help topic text, words or phrases underlined in
green are pop-ups or jumps. When you click on a
pop-up topic, a box displays within the current Help
topic with additional information. When you click on a
jump, a different, associated Help topic displays.
1-6 ELIXIR TECHNOLOGIES CORPORATION
Page 19

Help hypergraphics
Hypergraphics are special graphics within Help files
that contain "hot spots". Hot spots are either pop-up
topics or jumps. Hypergraphics in Elixir Help are most
commonly dialog boxes with option hot spots (pop-up
definitions), toolboxes with tool hot spots (topic
jumps), and menus with option hot spots (topic jumps
or pop-up definitions).
Move the cursor over a hypergraphic until a hand displays, then click on this hot spot to display a pop-up
topic, or a "jump". To close a pop-up topic, click the
mouse button. To return to the original Help topic
from a jump, click on <Back> in the Help file menu.
Organization of this guide
This guide contains the following chapter and appendices:
Chapter 1, "Introduction", provides an overview of
ElixirForm functions, features, hardware and software
requirements, and documentation.
INTRODUCTION
Chapter 2, "ElixirForm basics", provides an overview
of ElixirForm and describes basic operations for creating a form.
Chapter 3, "Menu bars", provides information on the
ElixirForm and Work area menu bars.
Chapter 4, "ElixirForm defaults", describes how to set
the defaults for a form.
Chapters 5 through 8 "Lines", "Shapes", "Text operations" and "Images" are reference sections explaining
how to create and edit elements using every icon in
the toolbox.
Chapter 9, "Stand-alone utilities", explains the standalone utilities included with ElixirForm.
Appendix A, "Keyboard shortcuts", lists keyboard
shortcuts (fast keys).
ELIXIRFORM FOR AFP USER GUIDE 1-7
Page 20

INTRODUCTION
"Glossary", contains terms and definitions applicable
to ElixirForm and related Elixir products.
Index.
Installation
See the Elixir for AFP Getting Started Guide for installation information.
Starting ElixirForm
To start ElixirForm from the Elixir Desktop, doubleclick on the ElixirForm icon. The ElixirForm Desktop
displays.
Exiting ElixirForm
To exit ElixirForm and return to the Desktop either:
Double-click on the Close button at the top left of
any Elixir application.
Press <Alt> + <F4>.
Press <Alt> + <X>.
From the File menu and select [Exit]
Click on the [X] at the top right corner of the appli-
cation window.
1-8 ELIXIR TECHNOLOGIES CORPORATION
Page 21
2. ElixirForm basics
This chapter describes the ElixirForm Work area and
basic operations.
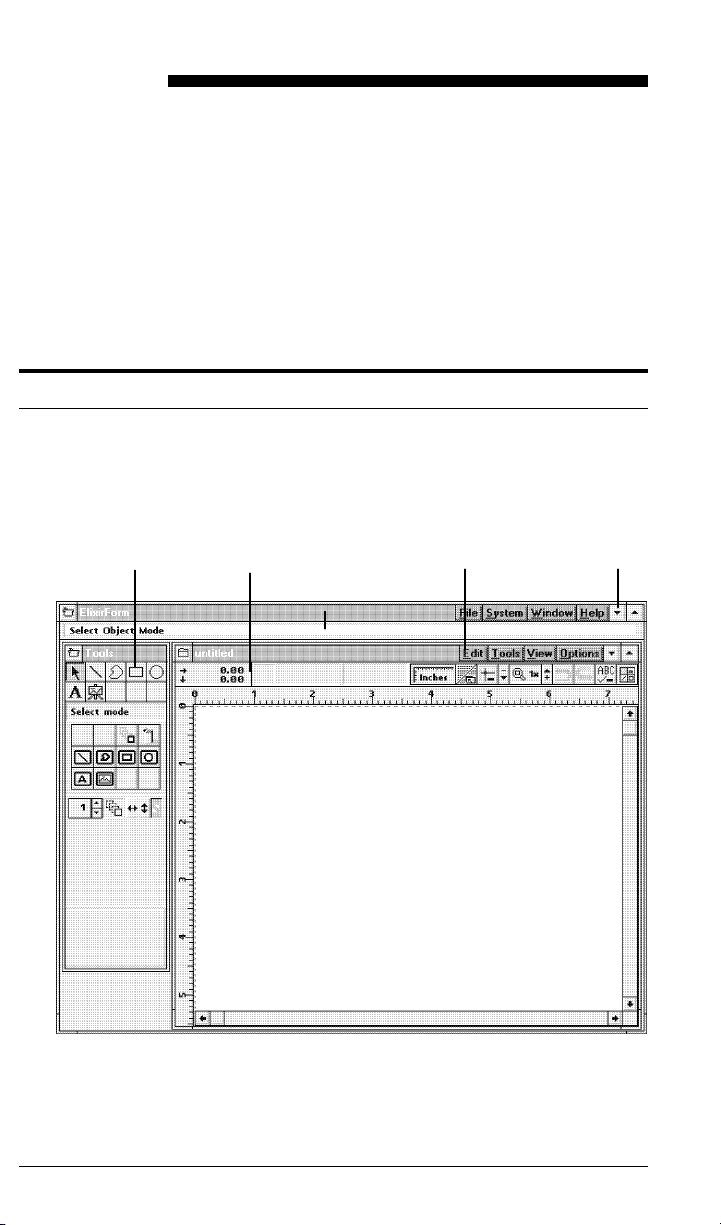
ElixirForm window
To view the ElixirForm main screen, open the Elixir
Desktop and double-click on the ElixirForm icon.
The ElixirForm window displays.
Toolbox Toolbar
Work area
Message area
menu bar
Work area
Figure 2-1. ElixirForm window
ElixirForm
menu bar
ELIXIRFORM FOR AFP USER GUIDE 2-1
Page 22
ELIXIRFORM BASICS
The ElixirForm windows contains the following
features:
Toolbox <F10>
The Toolbox displays on the left of the main Work
area and contains the Select/Edit, Line, Path, Box,
Circle, Text and Image tools.
If you cannot see the Toolbox, pull down the Window
menu and select [Toolbox] or press <F10>.
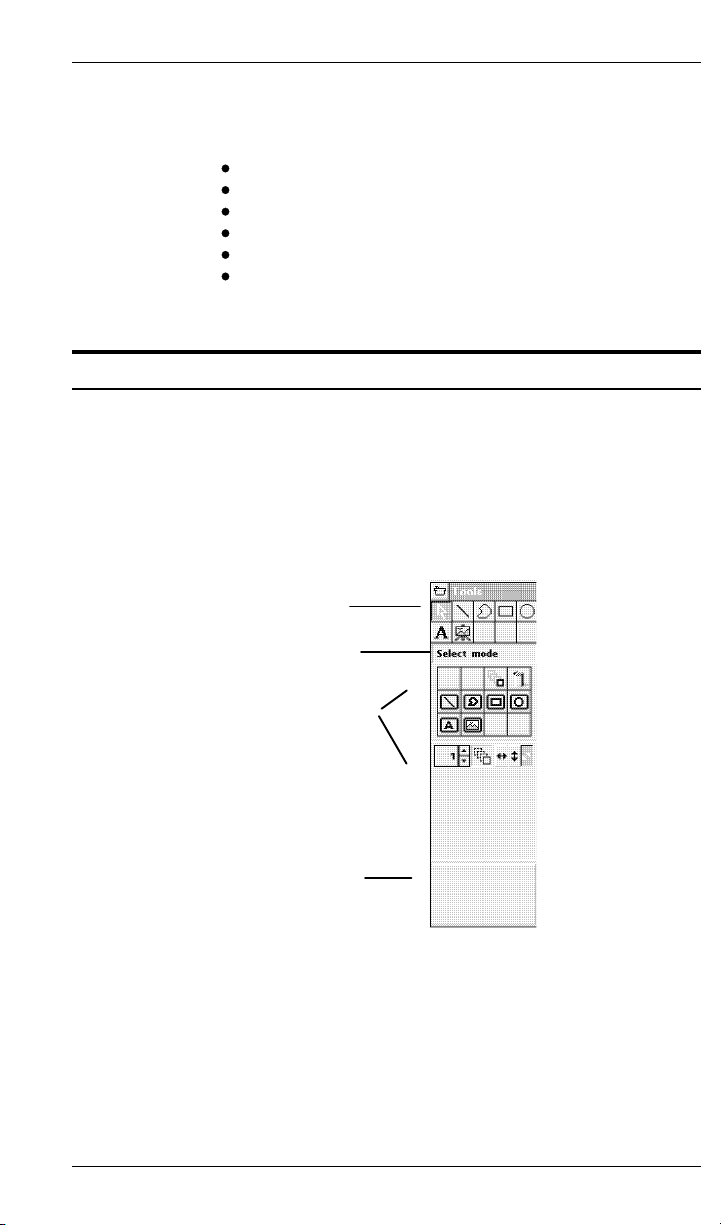
Toolbox
Toolbar
ElixirForm menu bar
Work area menu bar
Message area
Work area
Tools
Message
area
Tool options
Preview
panel
Figure 2-2. Toolbox
Select a tool to display its options in the Toolbox. A
short description of the tool displays in the Message
area, and the Preview panel displays your option
selections.
Color options may or may not display, depending on
the color selected in the Page Properties dialog box.
2-2 ELIXIR TECHNOLOGIES CORPORATION
Page 23

Select tool
ELIXIRFORM BASICS
Selects form or data elements for editing.
Copy
Copies any form element or design object.
Delete
Deletes the selected element(s). When a data element is deleted, it is only removed from the Work
area. The entry in the Document window is preserved.
If you inadvertently delete an element, immediately
select [Undo] from the Edit menu to restore the deleted element to your form.
Group filter options
The Group Filter options from left to right are: [Line],
[Box], [Text], [Data Tag], and [Image].
Select one or more options to exclude the corresponding element from group options such as moving or deleting. Select the option(s) a second time to turn the
filter off. See the "Grouping elements" section for information on grouping elements.
Number of Copies
Specify a value by clicking on the up or down arrows
or click in the numeric display box and enter a
number.
Press and hold <Ctrl> while clicking to
increase/decrease the value by 10.
Movement Selection
Select a movement direction for moving or copying
elements:
[Horizontal only] - cursor moves horizontally with
element(s) attached
ELIXIRFORM FOR AFP USER GUIDE 2-3
Page 24

ELIXIRFORM BASICS
[Vertical only] - cursor moves vertically with element(s) attached
[Free] - cursor moves in any direction with element(s) attached
Copy - Horizontal Distance
Specify a value by clicking on the up or down arrows
or click in the numeric display box and enter a
number.
Press and hold <Ctrl> while clicking to
increase/decrease the value by 1.
Copy - Horizontal Distance - On/Off
Enables the [Copy - Horizontal Distance] option. Select this option a second time to disable this feature.
Sticky Lines - On/Off
Perpendicular lines with ends that connect remain
stuck together when you move one of the lines. Lines
attached to box sides remain connected when you
resize the box.
Select this option a second time to disable this feature. See the “Lines” chapter for more information.
Copy - Vertical Distance
Specify a value by clicking on the up or down arrows
or click in the numeric display box and enter a
number.
Press and hold <Ctrl> while clicking to
increase/decrease the value by 1.
Copy - Vertical Distance - On/Off
Enables the [Copy - Vertical Distance] option. Select
this option a second time to disable this feature.
2-4 ELIXIR TECHNOLOGIES CORPORATION
Page 25

Line tool
ELIXIRFORM BASICS
Draws horizontal, vertical, and free lines; and specifies
line properties. See the "Lines" chapter for more information on the options described below.
Line - Direction
Select the drawing line’s direction: [Horizontal only],
[Vertical only], [Horizontal and Vertical], or [Free].
Custom Line/Border Thickness
Specify a value (in dots) by clicking on the up or down
arrows or click in the numeric display box and enter a
value (maximum 99 dots).
You can also select: standard [Thin] 2 dot, [Medium] 4
dot, or [Thick] 6 dot line widths.
Line - Style
Select the line style: [Solid], [Dashed], or [Dotted].
Line - Color
Select a box border color from the palette in the Color
dialog box, then click on [Close]. The selected color
displays in the bottom half of the icon.
Path tool
Draws paths and specifies path properties. See the
"Shapes" chapter for more information on the options
described below.
Path - Shape
Select a path shape:
[Closed] - path automatically closes when you finish drawing the path
[Open] - path remains open
ELIXIRFORM FOR AFP USER GUIDE 2-5
Page 26

ELIXIRFORM BASICS
Path - Direction
Select a path direction:
[Snapped] - lines drawn snap to horizontal and
vertical lines
[Free] - lines drawn run in any direction
Path - Beginning Style
Select line beginning style: [Square], [Round], or
[Mitered].
Path - End Style
Select line end style: [Square], [Round], or [Mitered].
Custom Line/Border Thickness
Specify a value (in dots) by clicking on the up or down
arrows or click in the numeric display box and enter a
value (maximum 99 dots).
You can also select: [Thin], [Medium], or [Thick] border widths.
Line/Border Style
Select a border style: [Dotted], [Dashed], or [Solid].
Path - Finish Drawing
When you add a path to the Work area, you are in
Draw mode. When you complete a path, select this
option, double-click in the Work area or right-click in
the Work area to toggle to Done mode. You can then
draw another path or switch to another drawing tool.
Path - Color
Select a path border color from the palette in the Color
dialog box, then click on the [Close] button. The selected path color displays in the bottom half of the
icon.
2-6 ELIXIR TECHNOLOGIES CORPORATION
Page 27

ELIXIRFORM BASICS
Path - Fill Color
Right-click to select a path fill color from the palette in
the Color dialog box, then click on the [Close] button.
The selected path fill color displays in the bottom half
of the icon.
Object Fill Pattern/Shading
Select a shade pattern from the Pattern dialog box.
This pattern applies each time you draw a new closed
path, until you change it using the same procedure.
Select [Hollow] for no shading.
Path - Connection Radius
Specify the value of the path connection radius (in
pels) by clicking on the up or down arrows, or click in
the numeric display box and enter a value (maximum
299 pels).
You can also select: [Small] 10 pels, [Medium] 20
pels, [Large] 30 pels, [Square], [Radius Half], or [Radius Maximum].
Box tool
Draws boxes and specifies box properties. See the
"Boxes" chapter for more information on the options
described below.
Box Predefined Shape
Select the box corner style: [All corners square], [All
corners rounded], [Top rounded/bottom square], [Top
square/bottom rounded], [Left rounded/bottom
square], or [Left square/right rounded].
Box - Positioning - Center/Top Left
Select the top half of this option to center the top left
corner of the box on grid coordinates. Select the bottom half of the option to snap the top left corner of the
box flush to grid coordinates.
ELIXIRFORM FOR AFP USER GUIDE 2-7
Page 28

ELIXIRFORM BASICS
Box - Shape - Oblong/Square
Select the top half of this option to draw boxes as rectangles. Select the bottom half of this option to draw
boxes as squares.
Box - Diagonals
Select the diagonal line pattern for inside the box:
[None], [Left], [Right], or [Both].
Custom Line/Border Thickness
Specify a value (in dots) by clicking on the up or down
arrows or click in the numeric display box and enter a
value (maximum 99 dots). Specify [0] to apply an invisible border to a shaded box. Unshaded boxes
must have a border width of [1] or higher.
You can also select: [Thin], [Medium], or [Thick] box
line widths.
Box - Line/Border Style
Select the line style: [Solid], [Dashed], or [Dotted].
Box - Border/Split Thickness and Style
Select width and style options:
[Border Splits] - sets the width and style of the
box border
[Horizontal Splits] - sets the width and style of the
horizontal box splits
[Vertical Splits] - sets the width and style of the
vertical box splits
2-8 ELIXIR TECHNOLOGIES CORPORATION
Page 29

ELIXIRFORM BASICS
Box - Horizontal Splits
Select this option, then click on the up or down arrows
or enter a value in the numeric display box to specify
the number of equal horizontal portions to divide the
box into. The minimum value is 1 (hollow) and the
maximum value is 40.
Select this option a second time to disable horizontal
box splits.
Box - Vertical Splits
Select this option, then click on the up or down arrows
or enter a value in the numeric display box to specify
the number of equal vertical portions to divide the box
into. The minimum value is 1 (hollow) and the maximum value is 40.
Select this option a second time to disable verticalbox
splits.
Box - Color
Select a box border color from the palette in the Color
dialog box, then click on the [Close] button. The selected box color displays in the bottom half of the icon.
Box - Fill Color
Right-click to select a box fill color from the palette in
the Color dialog box, then click on the [Close] button.
The selected box fill color displays in the bottom half
of the icon.
Object Fill Pattern/Shading
Select a shade pattern from the Pattern dialog box. All
boxes you draw contain this shading until you change
it, using the same procedure. Select [Hollow] for no
shading.
Box - Corner Radius
Specify a value by clicking on the up or down arrows
or click in the numeric display box and enter a value
(maximum 299 pels).
ELIXIRFORM FOR AFP USER GUIDE 2-9
Page 30

ELIXIRFORM BASICS
Circle tool
You can also select: [Small] 10 pels, [Medium] 20
pels, [Large] 30 pels, or [Maximum]. This option does
not apply when all corner styles are 90 degrees.
Draws circles and specifies circle properties. See the
"Shapes" chapter for more information on the options
described below.
Circle - Radius
Select one or more of the four circle quarters to compose a circle or partial circle. Select a quarter a second time to deselect it.
Circle - Drawing Method
Select the top half of this option to draw a circle from
its center outward, where the anchor point is the circle
center.
Select the bottom half of this option to draw a circle
within an unseen box, where the anchor point is the
box corner nearest the starting point. This method allows you be more precisely place the circle in relation
to another element.
Circle - Diagonals
Select the diagonal line pattern for inside the circle:
[None], [Left], [Right], or [Both].
Only 360-degree circles display diagonals.
2-10 ELIXIR TECHNOLOGIES CORPORATION
Page 31

ELIXIRFORM BASICS
Custom Line/Border Thickness
Specify a value (in dots) by clicking on the up or down
arrows or click in the numeric display box and enter a
value (maximum 99 dots). Specify [0] to apply an invisible border to a shaded circle. Unshaded circles
must have a border width of [1] or higher.
You can also select: [Thin], [Medium], or [Thick] border widths.
Circle - Border Style
Select the circle line style: [Solid], [Dashed], or
[Dotted].
Circle - Start and Finish Angle
Specify a value by clicking on the up or down arrows
or click in the numeric display box and enter a value
(in degrees) for where you want your circle to begin
and end.
You can also select: [0], [90], [180], or [270] degrees.
Circle - Color
Select a circle border color from the palette in the
Color dialog box, then click on the [Close] button. The
selected circle color displays in the bottom half of the
icon.
Circle - Fill Color
Right-click to select a circle fill color from the palette in
the Color dialog box, then click on the [Close] button.
The selected circle fill color displays in the bottom half
of the icon.
Object Fill Pattern/Shading
Select a shade pattern from the Pattern dialog box. All
circles you draw contain this shading until you change
it, using the same procedure. Select [Hollow] for no
shading.
ELIXIRFORM FOR AFP USER GUIDE 2-11
Page 32

ELIXIRFORM BASICS
Text tool
Circle Axis
Select an axis on which to print to an AFP printer:
[None] - no axis
[Horizontal] - horizontal axis
[Vertical] - vertical axis
[Both] - horizontal and vertical axis
Select text attributes for form elements. See the "Text
operations" chapter for more information on the options described below.
Text - Direction
Select a text display direction:
[Across] - left to right
[Down] - top to bottom
[Back] - right to left
[Up] - bottom to top
Text - Inter-character/Inter-word Spacing
Select a display spacing option:
[Inter-character] - justifies all text blocks by increasing or decreasing the amount of space between characters. This makes the form easier to
read when converted to OGL, but takes longer for
the form to print.
[Inter-word] - justifies all text blocks by increasing
or decreasing the amount of space between
words.
These options are global features. Selected options
apply to all text blocks on the form.
The [Inter-character] or [Inter-word] options apply to a
form only when you convert the .ELX file, when this is
a valid option for your conversion. See your Elixir
Desktop and Converters for AFP User Guide for more
information.
2-12 ELIXIR TECHNOLOGIES CORPORATION
Page 33

ELIXIRFORM BASICS
Text - Word Wrapping
Wraps text between the boundaries set in the [Column Width] option. You can also select the [Box Text]
option and draw a visual box on your form to contain
the text. Select this option when text is justified.
Text - Remove Redundant Spaces
Removes redundant spaces, relative shifts and carriage returns from text blocks that have the [Text Word Wrapping] option selected.
Text - Split String
Splits a single block of text into two separate text
blocks.
Text - Justification
Specify the justification for each text block: [Left Justification], [Center Justification], [Right Justification], or
[Full Justification].
The [Wrap Text] and [Box Text] or [Column Width] options must be selected for text justification.
Text - Positioning
When the [Wrap Text] and [Box Text] options are selected, specify the vertical positioning of a text block:
[Top], [Center], or [Bottom].
Use this option with the [Text Justification] and [Box
Text] options to place text in nine positions within the
box.
Text - Lines per Inch
Specify a vertical lines per inch (LPI) value by clicking
on the up or down arrows or click in the numeric display box and enter a number. Press and hold <Ctrl>
while clicking to increase/decrease the value by 1.0.
This value you affects the current block of text and
any subsequent blocks of text entered using the same
font.
ELIXIRFORM FOR AFP USER GUIDE 2-13
Page 34

ELIXIRFORM BASICS
To return the lines per inch to the default for the current font, use the down arrow to decrease the LPI
value to [0] or press <Del>.
Text - Lines per Inch - ON/OFF
Enables the [Text - Lines per Inch] option. Select this
option a second time to disable this feature.
Text - Text Color
Select a text color from the palette in the Color dialog
box, then click on the [Close] button. The selected
color displays in the bottom half of the icon.
DocuTag/DataMerge - Data Tags - ON/OFF
Displays the Data Tagging dialog box which allows
you to add data tags to forms for use with Elixir's
DocuTag or DataMerge products. Select this option a
second time to disable this feature.
See your Elixir DocuTag User Guide or Elixir Da-
taMerge User Guide for more information on creating
data tags and tag lists.
Text - Column Width
Specify the width for a text block by clicking on the up
or down arrows or click in the numeric display boxes
and enter a number. Press and hold <Ctrl> while
clicking to increase/decrease the value by 1.0. Values
that exceed the form limits are not accepted.
You must select the [Wrap] text option when using
these options. When these options are set to [0.00],
text entered is bound only by the width and height of
the form.
Select the [Box Text] option along with these options
to display a visual guide box with the width and height
dimensions you specify.
2-14 ELIXIR TECHNOLOGIES CORPORATION
Page 35

ELIXIRFORM BASICS
Text - Draw Column Box Boundaries
Select this option after selecting the [Box Text] option
to define column boundaries for text by drawing a visual box in the Work area. Place the cursor in the
Work area and press and hold down the mouse button. Drag the box that displays and release the
mouse button at the bottom right of the box. This box
does not print.
Select the [Wrap Text] option to wrap text at the
boundary of the text box defined by this option. Select
the [Text Positioning] option to position text within the
text box.
Text - Column Height
Specify the height for a text block by clicking on the up
or down arrows or click in the numeric display boxes
and enter a number. Press and hold <Ctrl> while
clicking to increase/decrease the value by 1.0. Values
that exceed the form limits are not accepted.
You must select the [Wrap Text] option when using
these options. When these options are set to [0.00],
text entered is bound only by the width and height of
the form.
Text - Set Column Width/Height to Define Box ON/OFF
Select this option when using the [Draw Text Box] or
[Column Width] and [Column Height] options to enter
text in predefined areas or "boxes." Select this option
a second time to enter free text which is bound only by
the width and height of the form.
Box boundaries are defined by entering values in the
[Column Width] and [Column Height] options or by
drawing a box manually using the [Draw Text Box]
option.
Font Type
Click on this button until the desired font type displays:
[f] - Elixir-version fonts
[T] - True Type fonts
ELIXIRFORM FOR AFP USER GUIDE 2-15
Page 36

ELIXIRFORM BASICS
[a] - ATM fonts
Text - Add/Remove Font from List
Select a font action. The dialog box that displays depends on your selection in the [Font Type] option.
[+] - displays the Add Fonts, Select True Type
fonts, or Select ATM fonts dialog box; select a
font(s) to add to the current Font List, then click
on the [ADD] button
[-] - displays the Replace Font, Select True Type
Fonts, or Select ATM Fonts dialog box; select a
font(s) to remove from the current Font List, then
click on the [DEL] button. If the font is in use on
the form, select a replacement font from the Replace Font dialog box.
Text - Load Font List/Merge Font List/Save Font
List
Select a Font List action:
[down arrow] - displays the Load Font List dialog
box
[double arrows] - displays the Merge Font List dialog box; add fonts to the current Font List by loading another Font List
[up arrow] - displays the Save Font List dialog
box; enter a new file name for the current font list,
or rename an existing font list
Text - Soft Keyboard
Enters characters that are not available on a standard
keyboard. See the "Text operations" chapter for more
information on using the soft keyboard.
Font Preview Panel
Displays the fonts available in the current Font List.
Click on the up or down arrow or use the scroll bar to
scroll through the list to change the current font.
2-16 ELIXIR TECHNOLOGIES CORPORATION
Page 37

Image tool
ELIXIRFORM BASICS
Fonts in use on a form are denoted by a diamond
character to the left of the font name.
Adds Elixir-format screen (.LP3) or printer (.LW8) images, bitmaps (.BMP), or logos to a form. See the "Images" chapter for more information on the options
described below.
Image - Name
Displays the name of the selected image.
Image - Size
Horizontal/Vertical
Displays the horizontal and vertical sizes of the image
in the units selected in the Ruler in the Toolbar. See
the "Toolbar" section for more information.
Image - Color
Select an image border color from the palette in the
Color dialog box, then click on the [Close] button. The
selected image color displays in the bottom half of the
icon.
Image - Fill Color
Right-click to select an image fill color from the palette
in the Color dialog box, then click on the [Close] button. The selected image fill color displays in the bottom half of the icon.
Image - Load
Select an image to add to your form from the Load Image dialog box.
ELIXIRFORM FOR AFP USER GUIDE 2-17
Page 38

ELIXIRFORM BASICS
Toolbar
The Toolbar displays across the top of the Work area
and contains the following options:
Current object - Dimensions
Current object - Shape
Digital Ruler
Current object -
Start Coordinates
Figure 2-3. Toolbar
Digital ruler
Displays the horizontal and vertical position of the
screen pointer relative to the top left corner of the
screen (0,0).
Current object - Shape
Displays an icon representing the element type the
cursor is currently closest to.
Current object - Start Coordinates
Long Crosshair
Grid Display
Snap to Grid
Graphic Ruler
Zoom
in/out
Spell Check
Show/hide
Toolbox
Undo/Redo
Displays the x,y coordinates of the currently selected
element.
Current object - Dimensions
Displays the width and height of the currently selected
element.
2-18 ELIXIR TECHNOLOGIES CORPORATION
Page 39

Graphic ruler <F3>
The graphic ruler displays along the top and left edges
of the Work area in the units selected in the [Ruler
measure] option.
To display the graphic ruler either:
A check mark appears in the menu next to the selected option.
Select this option a second time to remove the graphic
ruler.
Right-click on the Ruler in the Toolbar to display the
Ruler Options dialog box.
Grid Display <F4>
The grid helps you place and align form and data elements accurately. It overlays the Work area to allow
exact placement of elements, but does not print.
ELIXIRFORM BASICS
click on the Toolbar Graphic Ruler
select [Ruler] from the View menu
To display the grid in your Work area either:
click on the Toolbar Grid Display icon
press <F4>
select [Grid] from the View menu
A check mark appears in the View menu next to the
selected option.
Select this option a second time to remove the grid.
Right-click on the Toolbar Grid Display icon to display
the Grid Setting dialog box.
Snap to Grid <F5>
Places elements accurately on the grid.
To use the snap to grid option either:
click on the Toolbar Snap to Grid icon
ELIXIRFORM FOR AFP USER GUIDE 2-19
Page 40

ELIXIRFORM BASICS
Select this option a second time to disable this feature
- elements become free floating and are moveable
anywhere on the screen.
Right-click on the Toolbar Grid icon to display the Grid
Setting dialog box.
Long Crosshair <F6>
Displays horizontally and vertically from the cursor on
the form, and helps you place elements on the form
more precisely.
To display the long crosshair:
A check mark appears next to the option in the menu
when it is selected. Select this option a second time
to remove the long crosshair.
press <F5>
select [Snap to Grid] from the Options menu
click on the Toolbar Long Crosshair icon
press <F6>
select [Long Crosshair] from the
View
menu
Zoom in/out
To zoom in on (magnify) an area of the Work area,
click on the [+] button on the right side of the Zoom
icon in the Toolbar. The highest magnification is [8x].
To zoom out on (reduce the magnification of) an area
of the Work area, click on the [-] button on the left side
of the Zoom icon in the Toolbar. The lowest reduction
is [-8x].
You can also use the <+> and <-> keys on the numeric keyboard to zoom in and out.
Undo/Redo
To cancel your most recent operation:
click on the Toolbar Undo icon
press <Ctrl> + <Z>
select [Undo] from the Edit menu
2-20 ELIXIR TECHNOLOGIES CORPORATION
Page 41

To cancel your most recent Undo operation:
Spell Check
Checks the spelling of the active form. See the "Text
operations" chapter for more information.
Show/hide Toolbox
Hides the Toolbox.
To redisplay the Toolbox:
User preferences are described in the "ElixirForm defaults" chapter.
ELIXIRFORM BASICS
click on the Toolbar Redo icon
press <Shift> + <Ctrl> + <Z>
select [Redo] from the Edit menu
click on this icon a second time
press <F10>
select [Toolbox] from the Window menu
Menu bars
ElixirForm provides two menu bars for accessing
options:
ElixirForm menu bar
Work area menu bar
Select a menu to display its options, then select an
option from the pull-down menu.
See the "Menu bars" chapter for more details and
information.
ELIXIRFORM FOR AFP USER GUIDE 2-21
Page 42

ELIXIRFORM BASICS
Creating a form
Following are suggestions you should consider when
creating a form.
Designing a new form
Sketching the form on paper before drawing it on the
screen makes element sizing and placement easier.
Reproducing an existing form
If you are creating a form from an existing form, have
the original form in front of you as you are recreating it
on the screen. Use a ruler to measure the margins,
lines and other form elements, then use the on-screen
rulers for precise placement of each element.
You can also use Elixir's ElixirScan product to scan an
existing form for conversion to Elixir format, then edit
the form using ElixirForm.
Designing a form to fit in a window envelope
If you are designing a form to fit a window envelope,
first sketch it, fold it and measure it against the envelope window to ensure proper display.
Designing a form for merged data
If your form will subsequently be merged with variable
data, print the formatted data to see how it prints on
the page; it is easier to design a form around data
than to redesign the form.
Loading a form
ElixirForm allows you load a new or previously saved
form, or to merge form groups to create a new form.
Only one form at a time can be loaded into ElixirForm.
2-22 ELIXIR TECHNOLOGIES CORPORATION
Page 43

Loading a new form <F9 >
To load a new form:
1. Select [New Form] from the File menu.
The Page Properties dialog box displays.
See the "ElixirForm defaults" chapter for informa-
tion on the Page Properties dialog box.
2. Select page defaults, then click on [OK].
The Page Databasing dialog box displays.
For information on the Page Databasing dialog
box, see the "ElixirForm defaults" chapter.
3. Enter optional information for the new form,
then click on [OK].
A new, untitled form displays in the work area.
Loading a saved form <F8 >
ELIXIRFORM BASICS
If you are loading a form that was created in a GEM
version of ElixirForm, see "Loading GEM forms" in this
section before loading the form.
To load a previously saved form:
1. Select [Load Form] from the File menu.
The Load Form dialog box displays.
2. Select the form to load, then click on [OK].
The form displays in the Work area.
If a referenced image is missing, a replacement image displays. To delete the image from the form, select the replacement image then press <Del>.
ELIXIRFORM FOR AFP USER GUIDE 2-23
Page 44

ELIXIRFORM BASICS
Loading GEM forms
For forms created with ElixirForm prior to version 3.0,
you can either maintain the original boxed text formatting or use the new Windows box text formatting. You
can also either maintain the original color mode or select a new color mode.
For the currently loaded GEM form only, select
text formatting and color mode options using the
Text and Fonts options dialog box and the Page
Properties dialog box.
For all subsequently loaded GEM forms, select
text formatting and color mode options using the
GEM Forms Load Defaults dialog box.
See the "ElixirForm defaults" chapter for information
about GEM Forms Load Defaults, Text and Font Options and Page Properties dialog boxes.
Merging a form group
ElixirForm allows you to merge a form into the current
work area without replacing work area contents. See
the "Grouping elements" section in this chapter for
more information about saving a form group.
ElixirForm only merges objects that fit within form
boundaries. Before using the [Merge Form Group]
option, ensure that there is sufficient work area space
available to prevent the elements from overlapping or
falling outside form boundaries.
To merge a form group:
1. Select [Merge Form Group] from the File
menu.
The Load Form Group dialog box displays.
2. Select the form to merge, then click on [OK].
Although ElixirForm allows you to merge the currently loaded form with the same form, this is not
recommended as form elements may overlap.
You cannot undo a [Merge Form Group] operation.
2-24 ELIXIR TECHNOLOGIES CORPORATION
Page 45

Loading a form template
A form template is an .ELX form file that is loaded as
an overlay or visual guide for designing a new form.
The template does not become a part of the new
form; only the new form elements are saved.
You can load more than one form file template into the
Work area, although retrieving multiple form templates requires appreciably more memory.
Proof-printing a form comprising one or more templates also prints the templates. To proof- print a form
without the templates, save and reload the form without the templates, then proof-print the reloaded form.
To load a form template:
1. Select [Load Form Template] from the File
menu.
The Load Form Template dialog box displays.
2. Select the template to use, then click on [OK].
ELIXIRFORM BASICS
Selecting template defaults
To select form template defaults:
1. Select [Template Options] from the Options
menu.
The Template Options dialog box displays.
2. Select display defaults, then click on [OK].
The Template Options dialog box contains the following options:
Color
Select a display color for the template from the dropdown list.
Object Filters
Select the form object(s) to display: [Show Lines],
[Show Boxes], [Show texts], [Show Images], [Show
Circles], or [Show Paths].
ELIXIRFORM FOR AFP USER GUIDE 2-25
Page 46

ELIXIRFORM BASICS
Disable template object selection
Prevents form template objects from being selected or
modified.
Lock template
Keeps the current template loaded at all times.
Adding form elements
You create forms in ElixirForm by adding elements
such as lines, paths, boxes, circles, text and images.
You can apply different attributes to any form element
by selecting options from the Toolbox. Elements can
be placed anywhere on the form.
If you need to modify an element that is already on the
form, right-click on the element and apply new properties using options in the Toolbox.
For detailed information about adding or modifying a
form element, see the "Lines", "Shapes", "Text operations" or "Images" chapters.
Using color
Form color usage depends upon the color mode of
the printer you use for final printing. You must select
ElixirForm's color mode before creating a form. This
ensures that only the colors available on your printer
are used.
To select form color mode:
1. Select [Page Properties] from the Options
menu.
The Page Properties dialog box displays. See the
"ElixirForm defaults" chapter for more information.
2. Select the color mode, then click on [OK].
2-26 ELIXIR TECHNOLOGIES CORPORATION
Page 47

Saving a form with a new name
To save an existing form either with a different name
or to another directory:
1. Select [Save Form As] from the File menu.
The Save Form As dialog box displays.
2. Enter information, then click on [OK].
Saving a new form
To save a new form:
1. Select [Save Form] from the File menu.
The Save Form dialog box (similar to previous figure) displays.
2. Enter a file name, then click on [OK].
ELIXIRFORM BASICS
If you plan to convert the form to a different format, save the form with a maximum six-letter file
name; longer file names truncate upon conversion and can overwrite existing files.
Modifying a form
You can update previously-created forms or make a
new one by modifying the form and saving it with a
new name.
Editing elements
ElixirForm allows you to edit individual elements by
moving, copying or deleting form elements, and by
changing element properties.
ELIXIRFORM FOR AFP USER GUIDE 2-27
Page 48

ELIXIRFORM BASICS
Editing procedures are similar for lines, paths, boxes,
circles, images and text, as described in later
chapters.
Shifting elements
You can shift all or selected elements on a form. It is
easier to see the elements shifting if you first select
the grid option.
To shift form elements, hold down the <Ctrl> key and
use the arrow keys to shift elements up, down, left or
right. You can also shift elements using the direction
keys on the numeric keypad by first pressing <Num
Lock>.
To move, copy or delete an element, right-click on
the element to select it, then perform the desired
operation.
To change the properties of an element, double
right-click on the element and make the changes
desired.
Grouping elements
ElixirForm groups form elements for editing purposes.
Once a group is defined, you can edit it like a single
form element.
ElixirForm undoes a group one element at a time. For
example, if you delete a group and then click on the
Undo icon, the elements comprising the group reappear one at a time.
Defining a group
To define a group:
1. Select the Select/Edit tool in the Toolbox.
2. Move the screen pointer near the elements
you want to group.
2-28 ELIXIR TECHNOLOGIES CORPORATION
Page 49

ELIXIRFORM BASICS
3. Click and drag the dotted line until it encloses
the desired elements, then release the mouse
button.
Boxes appear around or inside each grouped element. Grouped text appears in square brackets.
Figure 2-4. Selected group elements
Move, copy or delete the group as a single
element.
To change the properties of one or more grouped
elements, right-click on the element(s) and select
desired properties from the Tool box.
You can also exclude any or all occurrences of a
grouped element:
To exclude all occurrences of an element,
select a group filter option before grouping.
To exclude any one element from the group,
shift-click on the element after grouping.
To include the element again, shift-click on
the element a second time.
ELIXIRFORM FOR AFP USER GUIDE 2-29
Page 50

ELIXIRFORM BASICS
Saving a form group
ElixirForm allows you to select a group in an existing
form and save it as a separate form file. You can then
edit the file, or use it as a template for other forms.
This feature is helpful for reusing standard elements
such as headers and footers in other forms. You can
also merge selected elements from different forms to
create another form. See the "Merging a form group"
section in this chapter.
To save a form group:
1. Define the group as described in the above
section.
2. Select [Save Form Group] from the File menu.
3. Enter a filename in the dialog box, then click
on [OK].
The form group saves to the forms directory
specified.
Undo/redo feature
ElixirForm allows you to undo or redo an operation.
To cancel your most recent operation:
click on the Toolbar Undo icon
press <Ctrl> + <Z>
select [Undo] from the Edit menu
To cancel your most recent Undo operation:
click on the Toolbar Redo icon
press <Shift> + <Ctrl> + <Z>
select [Redo] from the Edit menu
When you cancel a group operation, ElixirForm undoes the operation one element at a time.
2-30 ELIXIR TECHNOLOGIES CORPORATION
Page 51

Deleting a form
To delete a form:
1. Select [Delete Form] from the File menu.
The Delete Form dialog box displays.
2. Select the name of the form to delete, then
click on [OK]
The form deletes.
Renaming or moving a form
To rename or move a form:
1. Select [Rename/Move form] from the File
menu.
The Rename/Move Form dialog box displays.
2. Select the form you want to rename/move,
then click on [OK]
ELIXIRFORM BASICS
A supplemental dialog box displays the directory
and name of the form.
Figure 2-5. Rename/Move Form dialog box
3. Enter a new directory name or a new file
name, then click on [OK].
The form must have an .ELX extension to load
into ElixirForm.
ELIXIRFORM FOR AFP USER GUIDE 2-31
Page 52

ELIXIRFORM BASICS
Proof printing a form
To proof print a form:
1. Pull down the File menu and select [Print].
The Print dialog box displays.
Figure 2-6. Print dialog box
2. Select/enter printer information, then click on
[OK].
3. If printing to a file, enter a file name, then click
on [OK].
ElixirForm creates a print file with a .PRN extension in the drive:\ELIXIR\PRINTS\HPPRINT
subdirectory.
To print a form that has been written to disk, exit
ElixirForm and display the DOS prompt. Specify
the directory of the print file, and use the DOS
COPY command to copy the .PRN file to your active parallel port (for example, LPT1).
COPY filename.PRN LPT1 <Enter>
2-32 ELIXIR TECHNOLOGIES CORPORATION
Page 53

ELIXIRFORM BASICS
where filename is the stem name of the disk file.
Use the COPY/B command when printing HP
PCL files from disk.
The Print dialog box contains the following options:
Printer
Select a PCL 4 or compatible printer based on the following considerations.
Elixir HP Driver
Provides optimal Elixir form proof-printing, including increased printing speed and the ability to
print shaded boxes using HP printer shading
calls, store a form as a macro and call printerresident fonts.
PCL 4
PCL 4 printers print a maximum page size of 8 x
10.33 inches. If your form boundaries fill an 8.5 x
11 inches page, the outer margins of your form
will not print on a PCL 4 printer.
For accurate positioning, shift the print image on
the page using the [Page Shift] option.
PDF format
If you installed Adobe's PDFWriter printer driver
on your PC, you can convert your form to PDF
format by selecting [PDF ON FILE:] from this window. You are then prompted for a directory and
file name.
Set Elixir HP Driver as default printer
Sets the Elixir HP Driver as the default printer.
Orientation
Select form print orientation: [Landscape] or [Portrait].
Page shift
Enter the number of dots to shift your printer output
horizontally or vertically:
[Xshift] - image moves horizontally
[Yshift] - image moves vertically
ELIXIRFORM FOR AFP USER GUIDE 2-33
Page 54

ELIXIRFORM BASICS
Use a negative shift value to shift the print output to
the left, or up; and a positive value to shift your print
output right, or down.
Copies
The number of print copies.
Print to file
Prints your file to disk for proof-printing. To print a
form to a disk file for proof-printing, all proof printer
versions of fonts used in the form must reside on the
proof printer. Click on [OK], then enter the path and
file name in the Print to File dialog box.
Autogen Output Name
ElixirForm automatically names your file.
Print Fonts as Graphic
Rasterizes fonts as graphics. Printing fonts as graphics requires less printer memory, speeding up printing
time.
Load Fonts
Select one of the following font load options:
[Always] - downloads fonts every time form
printed
[Once] - downloads fonts as soft fonts identified
by index number; fonts then managed by and accessed through the Windows Control Panel
[Never] - calls the index number of soft fonts residing on printer; no new font are downloaded
If you select [Once] or [Never], make sure to use the
same font list in your form as on the printer; if not, the
index number may represent a different font.
2-34 ELIXIR TECHNOLOGIES CORPORATION
Page 55

Editing multiple forms
ElixirForm allows you to group multiple form files together for editing with the document editing feature.
An Elixir document is a group of Elixir forms (.ELX)
referenced in a text file with a .DAT extension and resides in the Elixir Documents folder.
Elixir document files are created/edited with any standard text editor or with the Elixir Desktop. See your
Elixir Desktop for AFP User Guide for more
information.
To load a .DAT file:
1. Select [Open DAT File] from the File menu.
The Open Dat File dialog box displays.
2. Select the document to open, then click on
[OK].
To select .DAT file form(s) to edit:
1. Select [Load Form] from the File menu.
ELIXIRFORM BASICS
The Load Forms from Dat File dialog box
displays.
2. Select the form(s) to edit, then click on [OK].
Select [Merge Form Group] from the File menu to
merge pages/forms on top of the currently loaded
form. Select the form(s) to merge, then click on
[OK].
Select [Close DAT File] from the File menu to return to single page/form loading mode. Select
[Filing Options] from the System menus to set the
default directory for .DAT files.
ELIXIRFORM FOR AFP USER GUIDE 2-35
Page 56

ELIXIRFORM BASICS
Fast keys
Fast keys are available for many ElixirForm operations. ElixirForm fast keys display next to options in
pull-down menus. See the "Keyboard shortcuts" appendix for a complete listing.
Exiting ElixirForm
To exit ElixirForm and return to the Desktop either:
press <Alt> + <F4>
select [Exit] from the File menu
double-click on the [Close] button (the top left corner of the screen)
2-36 ELIXIR TECHNOLOGIES CORPORATION
Page 57

3. Menu bars
This chapter provides information on the ElixirForm
and Work area menu bars.
ElixirForm menu bar
The ElixirForm menu bar contains the File, System,
Window, and Help menus. Select a menu to display
its options, then select an option from the pull-down
menu.
File menu
The File menu contains the following options:
New Form <F9>
Select form defaults in the Page Properties dialog
box. See the "ElixirForm Defaults" chapter for more
information on the Page Properties dialog box.
Load Form <F8>
Select an existing form to open in the Load Form dialog box.
Save Form <Ctrl> + <S>
Saves your open form under the original name specified in the Page Properties dialog box. See the "ElixirForm Defaults" chapter for more information on the
Page Properties dialog box.
For a form being saved for the first time, enter a name
in the Save Form As dialog box.
ELIXIRFORM FOR AFP USER GUIDE 3-1
Page 58

MENU BARS
Save Form As <F7>
Enter a new file name to save the open form under in
the Save Form As dialog box.
Rename/Move Form
Rename and/or change the path of an existing form in
the Rename/Move Form dialog box.
Delete Form
Select a form to delete in the Delete Form dialog box.
Merge Form Group
Select a group to add to the current form in the Load
Form Group dialog box. See the "ElixirForm basics"
chapter for more information on form groups.
Save Form Group
Select a group on an existing form to save as a form
file in the Save Form Group dialog box.
Load Form Template
Select a form template to load onto the current form in
the Load Form Template dialog box. The template is
only a visual guide for designing new form elements
around. It does not become part of the form when the
form is saved.
Proof printing a form that includes one or more templates also prints the templates. If you want to proof
print a form without the templates, save and reload
the form without the templates, then proof print the reloaded form. See the "ElixirForm basics" chapter for
more information on loading form templates.
Remove Form Template
Removes all templates from the current form.
3-2 ELIXIR TECHNOLOGIES CORPORATION
Page 59

MENU BARS
Open Dat File
Select the .DAT file to open in the Open Dat File dialog box. A .DAT file is a group of Elixir forms (.ELX)
referenced in a text file with a .DAT extension.
See the "ElixirForm basics" chapter for more information on editing multiple forms.
Close Dat File
Closes the open .DAT file.
Import Text
Select text to import into the current form in the Import
Text dialog box. See the "Text operations" chapter for
more information on importing text.
Print
Select form printing defaults in the Print dialog box.
See the "ElixirForm basics" chapter for more information on printing.
Exit
Exits the current ElixirForm session.
System menu
The System menu contains the following options:
Usage Switches
Select display defaults in the Usage Switches dialog
box. See the "ElixirForm defaults" chapter for more
information on the Usage Switches dialog box.
Filing Options
Select filing defaults in the Filing Options dialog box.
See the "ElixirForm defaults" chapter for more information on the Usage Switches dialog box.
ELIXIRFORM FOR AFP USER GUIDE 3-3
Page 60

MENU BARS
Window menu
Reset to Defaults
Resets all Toolbox options to their default values.
Save Configuration
Saves the current ElixirForm session configuration in
the drive:\ELIXIR\DESKTOP\SYSTEM\JOBDES.INI
and drive:\ELIXIR\DESKTOP\SYSTEM\FBW.INI files.
The Window menu contains the following options. A
check mark appears in the menu next to the selected
option.
Tile
Maximizes all open windows, with the Toolbox displaying to the left of the Work area.
Form <Ctrl> + <F4>
Displays the Toolbar, Work area, and Work area
menu bar. Select this option a second time to hide
these features.
Toolbox <F10>
Displays the Toolbox. Select this option a second
time to hide the Toolbox. See the 'ElixirForm basics"
chapter for more information on the Toolbox.
Help menu
Displays on-line Help for ElixirForm’s windows, dialog
boxes and operations. Help is also available by clicking on a dialog box’s [Help] button. See the "Introduction" chapter for more information on on-line help.
3-4 ELIXIR TECHNOLOGIES CORPORATION
Page 61

Work area menu bar
The Work area menu bar contains the Edit, Tools,
View, and Options menus. Select a menu to display
its options, then select an option from the pull-down
menu.
Edit menu
The Edit menu contains the following options.
Undo <Ctrl> + <Z>
Cancels the most recent action performed.
Redo <Shift> + <Ctrl> + <Z>
Cancels the most recent Undo operation.
Cut <Ctrl> + <X>
MENU BARS
Moves the selected text to the Windows Clipboard.
Copy <Ctrl> + <C>
Copies the selected text to the Windows Clipboard.
Paste <Ctrl> + <V>
Inserts cut or copied text from the Windows Clipboard.
Select All <Ctrl> + <A>
Selects all elements on the current form. This allows
you to delete, copy, or move the elements.
Deselect All <Ctrl> + <A>
Deselects all previously-selected elements.
ELIXIRFORM FOR AFP USER GUIDE 3-5
Page 62

MENU BARS
Delete <Del>
Deletes the selected element(s) from a form.
Delete All <Ctrl> + <Del>
Deletes all selected elements from a form.
Find <Alt> + <F3>
Enter the text string to search the open form for in the
Find text dialog box. See the "Text operations" chapter for more information on the Find text dialog box.
Find Next <F3>
Finds the next occurrence of the text string entered in
the Find text dialog box. See the "Text operations"
chapter for more information on the Find text dialog
box.
Find Previous <Shift> + <F3>
Finds the previous occurrence of the text string entered in the Find text dialog box. See the "Text operations" chapter for more information on the Find text
dialog box.
Replace
Enter the text to search for and the text which replaces it in the Replace Text dialog box. See the
"Text operations" chapter for more information on the
Replace text dialog box.
Tools menu
The options in this menu provide an alternate way to
activate the Toolbox or Toolbar for the tool selected:
Select, Line, Path, Box, Circle, Text, and Image. The
currently selected Toolbox or Toolbar displays with a
check.
Spell Check
Checks the spelling in the active form.
3-6 ELIXIR TECHNOLOGIES CORPORATION
Page 63

View menu
Options menu
MENU BARS
The options in this menu provide an alternate way to
activate the Toolbar options: Ruler, Grid, and Long
Crosshair.
The Options menu contains the following options:
Snap to Grid <F5>
Forces placement of lines, paths and boxes to the
grid.
GEM Forms Load Defaults
For forms created using Elixir’s ElixirForm product
prior to version 3.0, select GEM form display defaults
in the GEM Forms Load Defaults dialog box. See the
"ElixirForm defaults" chapter for more information on
the GEM Forms Load Defaults dialog box.
Page Properties
Select page defaults in the Page Properties dialog
box. See the "ElixirForm defaults" chapter for information on the Page Properties dialog box.
Page Databasing
Select page databasing defaults in the Page Databasing dialog box.
Page databasing places form documentation information on a form and stores with the form until it is
changed or deleted. It does not print.
See the "ElixirForm defaults" chapter for more information on the Page Databasing dialog box.
ELIXIRFORM FOR AFP USER GUIDE 3-7
Page 64

MENU BARS
Text/Font Options
Select text and font defaults in the Text and Font Options dialog box. See the "ElixirForm defaults" chapter for more information on the Text and Font Options
dialog box.
Character Mapping
Select keyboard-entered, imported text, or spell
checker character mapping options in the Character
Mapping Options dialog box.
The Character Mapping dialog box contains the following options:
Keyboard Mapping
Select an option for mapping characters entered via
the keyboard:
[None] - use Windows ANSI mapping; select this
option if you work with ATM or True Type fonts
[OEM] - remaps ANSI keystrokes to DOS
mappings
[OEM/ISO] - remaps ANSI character strokes to
DOS ISO mappings
[KMP] - translates keystrokes using customized
tables
When you select [KMP], the [Windows] and [Elixir] options display:
Windows
Select the character map for the current keyboard
layout from the drop-down list. Most users should
select T100ANSI. If you are using an Eastern
European version of Windows, you should select
T10EEURO.
Elixir
Select the setting that matches your DOS code
page from the drop-down list. This is the character map used by Elixir fonts. To check your DOS
code page, go to the DOS prompt and type:
CHCP <Enter>
3-8 ELIXIR TECHNOLOGIES CORPORATION
Page 65

MENU BARS
The active code page displays.
Text Import Mapping
Select a translation option for characters imported
from an external text file. All mappings (except when
[KMP] is selected) translate to the standard Windows
character set.
[NONE] - when importing or pasting a Windows
text file
[OEM] - when importing or pasting a DOS text file
[OEM/ISO] - when importing a DOS text file from
a non-US DOS environment
[ISO] - when importing or pasting a DOS text file
that has mapped European characters
[KMP] - uses custom translation tables:
When you select [KMP], the [Text File] and [Elixir] options display:
Text File
Select the source text file’s character map from
the drop-down list.
Elixir
Select translation character map for the target
text from the drop-down list. To check your DOS
code page, go to the DOS prompt and type:
CHCP <Enter>
The active code page displays.
Text Paste Mapping
Select a translation option for characters imported
from an external text file. All mappings (except when
[KMP] is selected) translate to the standard Windows
character set.
[NONE] - when importing or pasting a Windows
text file
[OEM] - when importing or pasting a DOS text file
ELIXIRFORM FOR AFP USER GUIDE 3-9
Page 66

MENU BARS
[OEM/ISO] - when importing a DOS text file from
a non-US DOS environment
[ISO] - when importing or pasting a DOS text file
that has mapped European characters
[KMP] - uses custom translation tables:
When you select [KMP], the [Text] and [Elixir] options
display:
Text
Select the source text file’s character map from
the drop-down list.
Elixir
Select translation character map for the target
text from the drop-down list. To check your DOS
code page, go to the DOS prompt and type:
CHCP <Enter>
The active code page displays.
Spell Checker Mapping
Select a spell checker character mapping option:
[None] - use Windows ANSI mapping; select this
option if you work with ATM or True Type fonts
[OEM] - remaps ANSI characters to DOS
mappings
[OEM/ISO] - remaps ANSI characters to DOS
ISO mappings
[KMP] - translates keystrokes using customized
tables
When you select [KMP], the [Windows] and [Elixir] options display:
Windows
Select the Windows character map from the dropdown list. Most users should select T100ANSI. If
you are using an Eastern European version of
Windows, you should select T10EEURO.
3-10 ELIXIR TECHNOLOGIES CORPORATION
Page 67

MENU BARS
Elixir
Select the setting that matches the mapping of
the Elixir fonts used in the form currently being
spell checked.
Spell Check Options
Select spell checking defaults in the Spell Check Options dialog box. See the "Text operations" chapter
for more information on the Spell Checker.
Template Options
Select form template defaults in the Template Options
dialog box. See the "ElixirForm basics" chapter for
more information on the Template Options dialog box.
ELIXIRFORM FOR AFP USER GUIDE 3-11
Page 68

4. ElixirForm defaults
This chapter contains procedures for setting ElixirForm defaults. Although you can change settings for
each form, you will probably find that you can keep the
same defaults for most of your forms.
User preferences
This section describes the Toolbar grid, rulers and
long crosshair options. These options are used to obtain precise form element measurement and placement within the Work area.
Grid <F4 >
The grid helps you place and align form and data elements accurately. It overlays the Work area to allow
exact placement of elements, but does not print.
Displaying/hiding the grid
To display the grid in your Work area either:
click on the Toolbar Grid Display icon
press <F4>
select [Grid] from the
A check mark appears in the
selected option.
Select this option a second time to remove the grid.
Right-click on the Toolbar Grid Display icon to display
the Grid Setting dialog box.
ELIXIRFORM FOR AFP USER GUIDE 4-1
View
menu
menu next to the
View
Page 69

ELIXIRFORM DEFAULTS
Selecting grid properties
To select grid properties:
1. Right-click on the Grid icon in the Toolbar.
The Grid Setting dialog box displays.
Figure 4-1. Grid Setting dialog box
2. Select/enter grid options, then click on [OK].
The Grid Setting dialog box contains the following options. Fields in this dialog box may or may not display,
depending on the options selected.
Grid units
Enter the number of grid units displayed per unit of
measure. Default is 10 x 6 grid units per inch.
Grid step
Enter a grid step value to define the distance between
grid points.
Grid units and Grid step units of measure are defined
by your selection in the [Ruler measure] option. The
size of the grid units or grid step dimensions entered
above are maintained, even though the value may
change based upon the current unit of measure.
4-2 ELIXIR TECHNOLOGIES CORPORATION
Page 70

ELIXIRFORM DEFAULTS
You can enter grid dimensions using either the [Grid
units] or [Grid step] options, but not both.
Ruler measure
Select the unit of measure for display: [Inches], [CM],
[MM], [Dots], [Points], or [Pels]. Your selection also
changes the [Ruler measure] option in the Ruler Options and Page Properties dialog boxes.
Graphic Ruler in Grid Units
The graphic ruler reflects the values specified in the
[Grid units] option.
For example, if the [Grid units] option is set to 8.00 per
1 inch for the horizontal setting and 6.00 per 1 inch for
the vertical setting, the horizontal graphic ruler displays 8 divisions (grid units) per inch and the vertical
graphic ruler displays 6 divisions (grid units) per inch.
Digital Ruler in Grid Units
The digital ruler reflects the values specified in the
[Grid units] option.
See the [Graphic Ruler in Grid Units] option for an
example.
Grid Snap to
Select a snap to option:
[Full Grid] - form elements snap to grid points
[Half Grid] - form elements snap to grid points
and to points halfway between grid points
In both instances, all elements resize to fit the grid.
Grid Color
Select the grid color: [Black], [Dark Shade], or
[Green].
Snap mouse speed
Select the mouse’s snap speed: [Slow], [Moderate], or
[Fast].
Show Grid
Displays the grid in the Work area. Select this option
a second time to remove the grid.
ELIXIRFORM FOR AFP USER GUIDE 4-3
Page 71

ELIXIRFORM DEFAULTS
Snap to Grid
Form elements snap to full grid or half grid points.
You can also select the Snap to Grid feature by click-
ing on the Snap to Grid icon in the Toolbar or by pulling down the Options menu and selecting [Snap to
Grid]. See the "Snapping elements to the Grid" section in this chapter for more information.
Rulers <F3>
The ElixirForm toolbar contains two rulers:
Graphic ruler
To display the graphic ruler either:
Graphic ruler
Digital ruler
click on the Ruler icon in the Toolbar
select [Ruler] from the View menu
A check mark appears next to the option in the
View menu when selected.
Digital ruler
The digital ruler displays the horizontal and vertical position of the screen pointer.
When [Snap to Grid] is selected, the digital ruler
shows only the coordinates of the grid points nearest
to the screen pointer.
To display the position of an element relative to the
form, select the Select/Edit tool and move the cursor
to any area on the element. A second digital ruler displays in the Toolbar, displaying the horizontal and vertical start coordinates of the element. A third digital
ruler shows element width and depth.
Rulers not part of the saved or printed form.
4-4 ELIXIR TECHNOLOGIES CORPORATION
Page 72

ELIXIRFORM DEFAULTS
To select graphic ruler options:
1. Right-click on the Ruler icon.
The Ruler Options dialog box displays.
Figure 4-2. Ruler Options dialog box
2. Select display options, then click on [OK].
The Ruler Options dialog box contains the following
options:
Ruler measure
Select the display unit of measure: [Inches], [CM],
[MM], [Dots], [Points] or [Pels]. Your selection also
changes the [Ruler measure] option in the Grid Setting and Page Properties dialog boxes.
Ruler color
Select the ruler color: [Light Gray] (may be [White] on
some monitors), [Dark Gray] or [Green].
Graphic ruler <F3 >
Displays the graphic ruler along the top and left edges
of the Work area.
Digital ruler
Displays the position of the screen pointer relative to
the top left corner of the Work area (0,0).
in Grid Units
Displays the corresponding ruler in the units of measure entered in the [Grid Units] option in the Grid Setting dialog box.
ELIXIRFORM FOR AFP USER GUIDE 4-5
Page 73

ELIXIRFORM DEFAULTS
Long crosshair <F6 >
The long crosshair helps you to more precisely place
form elements about the work area.
To use the long crosshair:
1. Click on the Long Crosshair icon in the
2. Place cursor onto the desired location in
Zoom in/out
The zoom in feature allows you to move about the
form in magnified view:
Toolbar.
Work area.
The long cross hair displays vertically and horizontally from the cursor.
Figure 4-3. Magnified view
To zoom in on (magnify) an area of the Work area,
click on the [+] button on the right side of the Zoom
icon in the Toolbar. The highest magnification is [8x].
To zoom out on (reduce the magnification of) an area
of the Work area, click on the [-] button on the left side
4-6 ELIXIR TECHNOLOGIES CORPORATION
Page 74

of the Zoom icon in the Toolbar. The lowest reduction
is [-8x].
You can also use the <+> and <-> keys on the numeric keyboard to zoom in and out.
Keyboard zoom in/out controls
ElixirForm support the following keys strokes for
zooming in/out:
Page settings
ELIXIRFORM DEFAULTS
<+> (numeric keypad) to zoom in
<-> (numeric keypad) to zoom out
arrow keys to pan form about the screen
<Home> to pan to the top left of the form
<End> to pan to the bottom left of the form
<Ctrl> + <PgDn> to pan to bottom right of form
<Ctrl> + <PgUp> to pan to top right of form
<PgUp> to scroll up
<PgDn> to scroll down.
This section describes procedures for setting form
page default values.
Selecting page properties
The Page Properties dialog box displays when a new
form loads.
ELIXIRFORM FOR AFP USER GUIDE 4-7
Page 75

ELIXIRFORM DEFAULTS
To change displayed default values:
1. Select [Page Properties] from the Options
menu.
The Page Properties dialog box displays.
Figure 4-4. Page Properties dialog box
2. Select/enter default values, then click on [OK].
The Page Properties dialog box contains the following
options:
Page size
Select the overlay’s page size. The width and length of
the page display below this field in the units of measurement specified in the Units of Measure field.
[8.5 x 11] - U.S. letter size
[8.5 x 14] - U.S. Legal size
[11 x 17] - 11 x 17 inches
[A4] - 8.27 x 11.69 inches
[A3] - 11.69 x 16.54 inches
[Custom] - nonstandard size; enter a width and
height (maximum 17 inches x 17 inches)
4-8 ELIXIR TECHNOLOGIES CORPORATION
Page 76

ELIXIRFORM DEFAULTS
If you change the page size of an existing form, some
form elements may extend beyond the page boundary. If this happens, the Objects Off Page dialog box
displays when you click on [OK]. See the "Exceeding
form page size limits" section for more information on
the Objects Off Page dialog box.
Switch
Changes the page orientation by reversing the width
and height of the page.
Units of measure
Select the unit of measurement for the graphic and
digital rulers and the selected page: [Inches], [CM],
[MM], [Dots], [Points], or [Pels].
Your selection also changes the Ruler measure option
in the Ruler Options and Grid Settings dialog boxes.
Color mode
Select the color mode supported by your output
printer:
[Black and White] - the Color options do not display in the Toolbox
[Highlight Color] - uses the options selected
below:
[Catalog] - select your printer’s catalog from
the drop-down list
[Printer Palette] - select your printer’s color
palette from the drop-down list
[Ink Dominance] - select the dominant color
(if colors overlap):
— [Default] - prints the dominant ink color,
depending on your printer’s default
— [Black] - prints black on color
— [Color] - prints in the currently selected
color in the
[Full color] - uses color for borders, interior fills,
texts and graphics, if supported by your printer
ELIXIRFORM FOR AFP USER GUIDE 4-9
Page 77

ELIXIRFORM DEFAULTS
Page Offset
Enter offset values used when converting Elixir-format
forms (.ELX) to AFP overlay format (.OVE). This shift
does not display on screen.
[Xoffset] - output shifts right by the units specified
in the Units of measure field
[Yoffset] - output shifts down by the units specified in the Units of measure field
Exceeding form page size limits
When you change the size or orientation of an existing
form, some form elements may extend beyond the
page boundary.
If this happens, the Objects Off Page dialog box
displays.
Figure 4-5. Objects Off Page dialog box
The Objects Off Page dialog box lists (by type) all
form elements that extend beyond the page boundaries. For each object, select an action, then click on
[OK]:
Delete
Deletes the object from the form.
Ignore
Increases the page size to accommodate the object.
Move in
Moves the object inside the page boundaries. Form
objects may now overlap.
4-10 ELIXIR TECHNOLOGIES CORPORATION
Page 78

Page databasing
ELIXIRFORM DEFAULTS
Clip
Eliminate only that portion of object that is off page.
The Page Databasing dialog box displays when select
[New Form] from the
menu. The entered informa-
File
tion stores with the form until it is changed or deleted,
but does not print with the form.
To edit databasing information:
1. Select [Page Databasing] from the Options
menu.
The Page Databasing dialog box displays.
Figure 4-6. Page Databasing dialog box
2. Select/enter information, then click on [OK].
The Page Databasing dialog box contains the following options:
Short Page Description
Enter a short description (maximum 60 characters) for
the form.
Page Author
Enter the user ID (maximum 8 characters).
ELIXIRFORM FOR AFP USER GUIDE 4-11
Page 79

ELIXIRFORM DEFAULTS
Made for
Enter the name of the customer (maximum 13
characters).
Page Version
Enter the version number (maximum two characters).
Page Revision
Enter the form revision or modification identifier (one
character only).
Local ID
Enter a name for the form (maximum 8 characters).
This name is used as a comment in the [Made for]
option.
Long Page Comments
Enter comments for the form (maximum 240 characters). Use the mouse to move to another line or any
place within the comments box. Comments save with
each form until they are changed or deleted.
Store Date/Time Stamp
Assigns a date or time stamp to the form after output
datastream generation.
Date Format
Select the month/day/year/ format for the date provided by the [Store Date/Time Stamp] option.
sc:
Enter a date separator character (default /).
Time Format
Select a time format: [12 Hour am/pm] or [24 Hour].
sc:
Enter a time separator character (default :).
4-12 ELIXIR TECHNOLOGIES CORPORATION
Page 80

Text and font options
To specify form text and font defaults:
1. Select [Text/Fonts Options] from the Options
ELIXIRFORM DEFAULTS
menu.
The Text and Font Options dialog box displays.
Figure 4-7. Text and Font Options dialog box
2. Select/enter information, then click on [OK].
The Text and Font Options dialog box contains the following options:
Text Display Options
Text Tab Length
Enter the text tab length. The initial default setting is 5.
Tab length is based on the width of the space character in the active font.
The tab length setting applies to all tabs on the current
form (including those previously entered).
ELIXIRFORM FOR AFP USER GUIDE 4-13
Page 81

ELIXIRFORM DEFAULTS
Text Display Options
Text Formatting Compatibility and Grid Step Precision
Select the text formatting and grid precision for the
current form:
Text Display Options
Tag Display
Prints the data tags included in Elixir forms.
[GEM] - uses original boxed text formatting of a
form created in ElixirForm prior to version 3.0; internal grid step precision set to 0.1 dots
[Windows] - uses Windows boxed text formatting;
internal grid step precision set to 0.01 dots
[None] - does not print the data tags
[Replace Char] - prints the data tag field length
and replacement characters
[Tag Name] - prints the data tag's field name
See your Elixir DataMerge User Guide or Elixir Docu-
Tag User Guide for more information.
Font Options
Font Preference
Select the default font type: [Screen] or [Elixir].
Font Options
Sort Font List
Alphabetically sorts the font list.
Text Import Options
Lock position
Locks text imported from an ASCII file in its initial position in the Work area. Subsequent text blocks are
positioned directly underneath the first text block.
Text Import Options
Separate paragraphs
Allows you to place imported text blocks at different
locations on the form. Paragraphs separated by two
carriage returns create separate blocks you can place
separately. See the "Text operations" chapter for
more information on importing text.
4-14 ELIXIR TECHNOLOGIES CORPORATION
Page 82

ELIXIRFORM DEFAULTS
Join Text Using
Select the format to group blocks of text into a single
block:
[Spaces] - each text block displays under the previous text block; original line beginnings and endings are kept
[Justify] - joined text displays as one continuous
paragraph; the width of the joined text is determined by the position of the left-most and rightmost characters in the text blocks
[Relatives] - each text block retains its position
relative to the previous text block
To take out unwanted spaces or perform paragraph
formatting operations, deselect then select the [Text Word Wrapping] option in the Text toolbox. See the
”Text operations” chapter for information on how to
join text.
Keyboard Input Options
Filter control codes on input
Prevents inadvertent keyboard entry of control codes,
such as characters below decimal 32 (a space).
RTF Paste Options
Select RTF import options:
[Paste Fonts] - maintains font(s) specified in the
imported text file
[Paste Colors] - maintains color(s) specified in the
imported text file
GEM form defaults
For forms created using ElixirForm prior to version
3.0, use the GEM Forms Load Defaults dialog box to
select text formatting, grid step precision and color
mode settings. These settings then apply to all subsequently loaded GEM forms.
ELIXIRFORM FOR AFP USER GUIDE 4-15
Page 83

ELIXIRFORM DEFAULTS
To change settings for the currently loaded GEM form
only, see the "Selecting page properties" and "Text
and font options" sections.
To select GEM form defaults:
1. Select [GEM Forms Load Defaults] from the
Options menu.
The GEM Forms Load Defaults dialog box displays.
Figure 4-8. GEM Forms Load Defaults dialog box
2. Select display options, then click on [OK].
The GEM Forms Load Defaults dialog box contains
the following options:
Options in this dialog box may or may not display, depending on the options selected.
Extend Lines by Halfwidth
Displays horizontal and vertical lines with extensions
equal to half the line thickness at each end. Affects
the printed output only.
4-16 ELIXIR TECHNOLOGIES CORPORATION
Page 84

ELIXIRFORM DEFAULTS
Text Formatting Compatibility and Grid Step Precision
Select the text formatting and grid precision for loaded
GEM forms:
[GEM] - uses original boxed text formatting of a
form created in ElixirForm prior to version 3.0; internal grid step precision set to 0.1 dots
[Windows] - (default) uses Windows boxed text
formatting; internal grid step precision set to 0.01
dots
Your selection is written to the Elixir SYSTEM.INI
file. This formatting affects all GEM forms loaded
afterwards.
Color Mode
Select the display color for loaded GEM forms:
[Black & White] - GEM form displays in black and
white
[Highlight Color] - GEM form displays with the options selected below:
[PAL palette] - select an internal PAL palette
from the drop-down list
[Catalog] - select your printer’s catalog from
the drop-down list
[Printer Palette] - select your printer’s color
palette from the drop-down list
[Full Color] - GEM form displays with the full color
palette selected below:
Configuring the system
ElixirForm allows you to configure your system and to
save the configuration for subsequent work sessions.
ELIXIRFORM FOR AFP USER GUIDE 4-17
Page 85

ELIXIRFORM DEFAULTS
Setting usage defaults
To select ElixirForm usage settings:
1. Select [Usage Switches] from the System
menu.
The Usage Switches dialog box displays.
Figure 4-9. Usage Switches dialog box
2. Select display options, then click on [OK].
The Usage Switches dialog box contains the following
options:
Save State on Exit
Saves the current menu and option settings when you
exit ElixirForm.
Extend Lines by Halfwidth
Displays horizontal and vertical lines with extensions
equal to half the line thickness at each end. Affects
the screen display only - lines print as drawn.
Show Quick Help
Displays a short description of any icon that your cursor passes over in the Message area.
Show Form Dimensions
Display the dimensions of the current form in the upper right hand corner of the screen.
Show Lines as WYSIWYG
Select a display resolution:
[240DPI] - lines and shape borders display as
WYSIWYG on high-resolution monitors.
4-18 ELIXIR TECHNOLOGIES CORPORATION
Page 86

Filing options
ELIXIRFORM DEFAULTS
[300DPI] - displays lines at 300 dpi and shape
borders at 240 dpi
[OFF] - for low resolution monitors such as VGA.
Light and medium lines and borders may display
as the same thickness on low resolution monitors
if this option is not selected.
ElixirForm allows you to specify default directories for
forms, screen fonts, Elixir images, screen images,
texts, tags and Elixir-format documents. Entered information saves to your SYSTEM.INI file.
To specify default filing information:
1. Select [Filing Options] from the System menu.
The Filing Options dialog box displays.
Figure 4-10. Filing Options dialog box
2. Select/enter filing information, then click on
[OK].
ELIXIRFORM FOR AFP USER GUIDE 4-19
Page 87

ELIXIRFORM DEFAULTS
The Filing Options dialog box contains the folowing
options:
Autosave
Enter a time interval from 1 to 9 minutes in the Save
interval field to automatically save your currently active
form. The back-up form saves as AUTOBACK.ELX in
the default forms directory.
Make Backup File (with .BAK extension)
Creates a back-up copy (.BAK) of the form which is
overwritten only when you select [Save] from the File
menu. The [Autosave] option does not overwrite this
file.
The back-up file writes to the default forms directory
and has the same stem name as the original file with
a .BAK extension.
Load Last Form
Automatically loads the form you last worked on when
you start a new ElixirForm session.
Write PostScript File on Form Save
Creates a PostScript file in the directory specified in
the [Doc. Directory] option when the Form saves.
Forms Directory
Enter the directory for Elixir-format form files (.ELX) or
click on the [Browse] button and select one from the
Select Forms directory dialog box. Default is
drive:\ELIXIR\FORMS\ELIXIR\DEMO.
Screen Fonts Directory
Enter the directory for Elixir-format screen font files
(.FNT) and width tables (.WDT) or click on the
[Browse] button and select one from the Select
Screen Fonts directory dialog box. Default is
drive:\ELIXIR\FONTS\SCREEN\DEMO. See the "Text
operations" chapter for more information on screen
and other fonts.
Elixir Images Directory
Enter the directory for Elixir-format image files (.LP3)
or click on the [Browse] button and select one from
the Select Elixir Images directory dialog box. Default is
drive:\ELIXIR\PICS\PRINTER. See the "Images"
chapter for more information on images.
4-20 ELIXIR TECHNOLOGIES CORPORATION
Page 88

ELIXIRFORM DEFAULTS
Screen Images Directory
Enter the directory for Elixir-format screen image files
(.LW8) or click on the [Browse] button and select one
from the Select Screen Images directory dialog box.
Default is drive:\ELIXIR\PICS\SCREEN. See the "Images" chapter for more information on screen images.
Texts Directory
Enter the directory for imported ASCII text files (.TXT)
or click on the [Browse] button and select one from
the Select Texts directory dialog box. Default is
drive:\ELIXIR\TEXTS.
Tags Directory
Enter the directory for tag files (.TAG) or click on the
[Browse] button and select one from the Select Tags
directory dialog box. Tag files are used with DocuTag
for external tag files called for in a form. Default is
drive:\ELIXIR. See your Elixir DocuTag for AFP User
Guide for more information.
Elixir Documents Directory
Enter the directory for the Elixir-format documents
(.DAT) or click on the [Browse] button and select one
from the Select Elixir Documents directory dialog box.
Default is drive:\ELIXIR\DOCS\DOCLIST.
Resetting to defaults
To reset Toolbox options to default values:
1. Select [Reset to Defaults] from the System
menu.
2. Click on [OK].
Saving a configuration
To save the configuration settings specified above,
select [Save Configuration] from the System menu.
The configuration saves for the next time you open
ElixirForm. If the font and screen directories change
in the Elixir Desktop, these changes apply next time
ElixirForm loads.
ELIXIRFORM FOR AFP USER GUIDE 4-21
Page 89

5. Lines
This chapter describes how to draw and edit lines,
with references made to options in the Line tool in the
Toolbox.
Line display
The following section provides information about line
display.
Setting the screen display
If you are using a low resolution monitor such as VGA,
you should set the [Show Lines as WYSIWYG] option
in the Usage Switches dialog box to [Off]; if you do
not, thin lines and borders may display the same
thickness as medium lines and borders.
See the "ElixirForm defaults" chapter for more information.
Screen refresh
After a screen refresh, overlapping lines and boxes
may not display or print in the "front to back" order in
which they were drawn. For example, a shaded box
drawn on top of an existing line may display with the
line on top of the box after a screen refresh operation.
This is due to the page resorting method (from top left
to bottom right) required by certain printers.
To prevent elements refreshing to an incorrect "front
to back" order, avoid drawing elements that overlap.
For example, to draw a box with lines extending from
its borders, connect individual lines to the border of
the box instead of drawing the box on top of a line that
extends beneath and beyond its borders.
ELIXIRFORM FOR AFP USER GUIDE 5-1
Page 90

LINES
Drawing lines
ElixirForm allows you to draw vertical, horizontal and
free lines. You can also specify line thickness, style
and color by selecting options from the Line toolbox.
To display the Line toolbox, select the Toolbox Line
tool or select [Line] from the Tools menu.
Figure 5-1. Line toolbox
To start and end a line at grid points, click on the Toolbar [Show Grid] and [Snap to Grid] options.
If you want the line to snap to grid mid-points as well
as to grid points, set the [Grid Snap] option in the Grid
Setting dialog box to [Half Grid]. See the "ElixirForm
basics" chapter for more information.
To draw a line:
1. Position the screen pointer in the Work area
where you want the line to begin, then press
and hold the mouse.
2. Drag the screen pointer across the Work area.
A line displays.
3. To end the line, release the mouse.
The line locks into position.
5-2 ELIXIR TECHNOLOGIES CORPORATION
Page 91

LINES
4. Select line properties in the Line toolbox.
The Line toolbox contains the following options:
Line Direction
Select a direction for the line: [Horizontal only], [Vertical only], [Horizontal and Vertical] or [Free].
Line Width
Select a width for the line: [Thin] 2 dot, [Medium] 4 dot
or [Thick] 6 dot line widths. You can also click on the
up or down scroll arrow to increment line width by one
dot, or click on the current width display and enter a
new line width value up to 99 dots.
Line Style
Select a line style: [Solid], [Dashed] or [Dotted].
Line Color
If your printer supports color, select a color for the line
as follows:
1. Select the [Color] option.
If you cannot see the color option, select the Page
Properties dialog box [Full Color] option.
The Color dialog box displays.
2. Select a color, then click on the [Color]
button.
3. Place the cursor in the Work area and draw a
line.
The line displays in the color you selected.
All subsequently drawn lines display the same color
until you select another color. Line color selections are
saved with the form when you select [Save].
Editing lines
To select a line for editing:
1. Select the Toolbox Select/Edit tool.
ELIXIRFORM FOR AFP USER GUIDE 5-3
Page 92

LINES
2. Place the cursor on the line you want to edit.
You can now change the line length and attributes.
Changing line length
You can change the length of a line by either entering
new position coordinates or modifying it directly on the
form.
To change line coordinates:
1. Select the Toolbar Current Object - Start
2. Backspace over current value(s) or press the
then right-click.
Boxes appear at each end of the selected line.
The Line toolbox displays.
Coordinates area.
If you cannot click on this area, select the line
again, then right-click.
<Del> key to delete the value(s), enter new
coordinate value(s), then press <Enter>.
If allowed, you can use the <-> key to enter a
negative value.
The line adjusts to the new coordinates.
To manually change line length:
1. Place the cursor at the end of the selected
line.
The cursor changes to a four-way arrow.
2. Drag the end of the line until it reaches the
desired length.
3. Release the mouse button.
The changed line locks into position.
5-4 ELIXIR TECHNOLOGIES CORPORATION
Page 93

LINES
Sticky Lines <Ctrl> + <L>
When you select the [Sticky Lines] option in the
Select/Edit toolbox, perpendicular connected lines
stick together when you either move one of the lines
or change line size. Lines connected to form the sides
of boxes also remain attached when you either move
or resize the box. If you deselect the [Sticky Lines] option, only the selected line is affected by subsequent
line moves or size changes.
You must select either the [Horizontal only] or [Vertical
only] option in the Toolbox when moving sticky lines.
This requirement does not apply when moving or
resizing boxes.
To create sticky lines:
1. Select the [Sticky Lines] option, then select a
line and press <Ctrl>+<L>.
2. Select a line movement restriction option:
[Horizontal only] or [Vertical only].
3. Resize a box either horizontally by moving its
left or right side or vertically by moving its top
or bottom side.
4. Release the mouse button.
The sticky line or box locks into position.
Changing line attributes
To change line width, style or color:
1. Select a line.
To change the attributes of multiple lines, shiftclick on each line or use the group feature described in the "Elixir Form basics" chapter.
2. Select the desired option(s) from the Line
toolbox.
The properties apply to the line(s) you selected.
ELIXIRFORM FOR AFP USER GUIDE 5-5
Page 94

LINES
Copying lines
To copy a line:
1. Select the Toolbox Select/Edit tool.
2. Select the Toolbox [Copy] option.
3. Select the direction for copying: [Horizontal
4. Select the line you want to copy.
5. Select the desired number of copies (99 maxi-
6. Select the line and drag it to where you want
only], [Vertical only] or [Free].
Boxes appear on the line when selected.
mum) by either clicking on the up or down
arrows or clicking on the numeric display box
and entering a new number.
Holding down the <Ctrl> key while clicking on the
arrows increases or decreases the value displayed by 10.
the duplicate line(s) placed.
7. Release the mouse button.
The duplicate line(s) lock into position.
Moving lines
To manually move a line:
1. Select the Toolbox Select/Edit tool.
2. Select the direction for moving: [Horizontal
only], [Vertical only] or [Free].
3. Select the line to move.
Boxes appear on the line when selected and the
screen pointer changes to a hand.
5-6 ELIXIR TECHNOLOGIES CORPORATION
Page 95

LINES
If the screen pointer does not change to a hand,
press and hold the <Ctrl> key as you move the
cursor over the line. When the screen pointer
turns into a hand, you can move the line.
4. Click and drag the line to the new position.
5. Release the mouse button.
The line locks in the new position.
To move a line by entering new coordinates:
1. Select the Toolbar Current Object - Start
Coordinates area.
If you cannot click on this area, select the line
again, then right-click.
2. Backspace over the current values or press
the <Del> key to delete the current values,
enter new coordinate values, then press
<Enter>.
The line adjusts to the new coordinates.
If the sticky lines option is selected, connecting
lines and lines attached to the sides of boxes remain attached when one of the lines or the box is
moved. See the "Sticky Lines" section for more
information.
Deleting lines
To delete a line:
1. Select the Toolbox Select/Edit tool.
2. Select the line to delete, then press <Del>.
To restore a line immediately after deletion, either select the Toolbar Undo icon or select [Undo] from the
Edit menu.
ELIXIRFORM FOR AFP USER GUIDE 5-7
Page 96

6. Shapes
This chapter describes how to draw and edit shapes
using ElixirForm.
Drawing shapes
ElixirForm allows you to draw paths, boxes and circles, and to apply attributes to these shapes by selecting options from the Toolbox.
If you want a box or path to start and end at grid
points, select the Toolbar [Grid] and [Snap to Grid]
icons.
If you want a box or path to snap to grid mid-points as
well as to grid points, set the Grid Setting dialog box
[Grid Snap to] option to [Half Grid].
To draw a shape, click a Toolbox shape tool and select the options for the shape.
Drawing paths
ElixirForm allows you to draw free paths or paths that
snap to horizontal and vertical lines. You can specify
path properties by selecting Path toolbox options.
To display the Path toolbox, either select the Path tool
or pull down the Tools menu and select [Path]. The
Path toolbox displays.
ELIXIRFORM FOR AFP USER GUIDE 6-1
Page 97

SHAPES
Figure 6-1. Path toolbox
You draw a path in segments. To draw a path:
1. Move the screen pointer into the work area.
2. Click and drag the screen pointer to draw the
first path segment.
3. Release the mouse button to finish the segment.
4. Draw the next and subsequent segments by
repeating the above procedure.
The next segment begins where the last ended.
5. End the path by double-clicking or selecting
the Finish Drawing option.
6. Select path properties from the Path toolbox.
7. When path completed, toggle the Path - Finish
Drawing option to [Done] or double-click in
the work area.
The Path toolbox contains the following options:
Path - Shape
Select open or closed paths. An open path remains
open and a closed path automatically closes when
you finish drawin the path.
6-2 ELIXIR TECHNOLOGIES CORPORATION
Page 98

SHAPES
Path - Direction
Specify either [Snapped] or [Free] line segments.
[Snapped] draws lines that snap to horizontal and vertical grid lines; [Free] draws line segments in any direction.
Path - Beginning and End Styles
Select a line beginning and end style: Square, round
or mitered ends.
Custom Line/Border Thickness
Select standard [2], [4] or [6] border widths. Click on
the up or down arrow to change the border width by
one dot, or click on the current value and enter a new
border width value up to 99 dots.
Line/Border Style
Select [Dotted], [Dashed] or [Solid].
Path - Finish Drawing
When you click in the Work area to add a path, you
are in [Draw] mode. When you complete a path, select this option a second time or right-click in the Work
area to toggle to [Done].
Object Fill Pattern/Shading
Applies shaded patterns to closed paths. To select a
shade, click on a shade pattern in the Pattern dialog
box. The pattern applies each time you draw a new
closed path, until you change the pattern. Select the
white shade box for no shading.
Path - Connection Radius
Select the value of the path connection radius by clicking on the radius window up or down arrows, or click
in the numeric display box and enter a value (maximum 299 pels).
You can also select: [Small] 10 pels, [Medium] 20
pels, [Large] 30 pels, [Square], [Radius Half], or [Radius Maximum].
Drawing boxes
ElixirForm allows you to create split boxes (for example, one box evenly divided or split into two or more
boxes), shaded boxes and boxes with varying borders
and styles.
ELIXIRFORM FOR AFP USER GUIDE 6-3
Page 99

SHAPES
To draw a box:
1. Select the Box tool in the Toolbox.
The Box toolbox displays.
Figure 6-2 Box toolbox
2. Position the screen pointer in the work area
where you want a box corner.
3. Press and hold the mouse button.
4. Drag the screen pointer to form the shape of a
box.
5. Release the mouse button to finish the box.
You can use the arrow keys to pan around the
screen when drawing a box that exceeds work
area boundaries.
6. Select box properties from the Box toolbox.
7. Select one of the following options to correspond to above width and style selections:
Border Lines
Select to set the width and style of box borders
(and diagonals, if selected).
6-4 ELIXIR TECHNOLOGIES CORPORATION
Page 100

SHAPES
Horizontal Lines
Select to set the width and style of horizontal
splits in a box (see Box Splits, below).
Vertical Lines
Select to set the width and style of vertical splits
in a box (see Box Splits, below).
8. When shape completed, toggle the Path Finish Drawing option to [Done] or
double-click in the Work area.
The Box toolbox contains the following options:
Box - Predefined Shape
Select the box corner style: [All corners square], [All
corners rounded], [Top rounded/bottom square], [Top
square/bottom rounded], [Left rounded/right square],
or [Left square/right rounded].
Box - Positioning Center/Top Left
Select the top half of this option to center the top left
corner of the box on grid coordinates. Select the bottom half of the option to snap the top left corner of the
box flush to grid coordinates.
Box - Shape Oblong/Square
Select the top half of this icon to draw boxes as rectangles. Select the bottom half of this icon to draw
boxes as squares.
Box - Diagonals
Select the diagonal line pattern for inside the box:
[None], [Left] ,[Right], or [Both]. Each option displays
a sample box.
ELIXIRFORM FOR AFP USER GUIDE 6-5
 Loading...