

Page 1

E
ElixirFont
for AFP™
User Guide
June 1999
Version 4.00
Page 2

Elixir Technologies Corporation
P.O. Box 1559
Ojai, CA 93024
Copyright © 1999 by Elixir Technologies Corporation.
All rights reserved.
June 1999
Version 4.00
Printed in the United States of America
Trademarks and Service Marks/Company:
Elixir/Elixir Technologies Corporation
HP, PCL, LaserJet+/Hewlett Packard Company
IBM, Personal Computer, AT, PS/2, AFP, and all other
IBM products mentioned in this publication are trademarks of International Business Machines.
MS-DOS, Microsoft Mouse, Windows/Microsoft Corporation
LapLink/Travelling Software, Inc.
All other product names and trade names used herein
are trademarks of their respective owners.
Copyright protection claimed includes all forms and
matters of copyrightable material and information now
allowed by statutory or judicial law or hereinafter
granted, including without limitation, material generated from the software programs which is displayed
on the screen such as icons, screen display looks,
etc.
Changes are periodically made to this document.
Changes, technical inaccuracies, and typographic errors will be corrected in subsequent editions.
Page 3

Table of contents
1. Introduction 1-1
Customer support 1-2
Elixir training 1-2
ElixirFont environment 1-2
Who should use this guide 1-3
Conventions 1-3
Display conventions 1-3
Typographical conventions 1-3
On-line Help 1-4
Organization of this Guide 1-6
Installation 1-7
Starting ElixirFont 1-8
Exiting ElixirFont 1-10
2. ElixirFont basics 2-1
Main screen components 2-1
ElixirFont menu bar 2-2
File menu 2-3
System menu 2-4
Window menu 2-5
Help menu 2-5
Toolbox 2-5
Tools 2-6
Toolbox options 2-7
Character Set window menu bar 2-8
ELIXIRFONT FOR AFP USER GUIDE iii
Page 4

TABLE OF CONTENTS
Charset menu 2-8
Edit menu 2-9
Font menu 2-9
Char menu 2-10
Transforms menu 2-10
Code Page window menu bar 2-11
CodePage menu 2-11
CodePoint menu 2-12
View menu 2-12
3. Font structure 3-1
AFP font structure 3-1
Type family 3-1
Typeface 3-2
Type font 3-2
AFP font types 3-2
Unbounded Box fonts 3-3
Bounded Box fonts 3-3
AFP font components 3-3
Character set 3-3
Code page 3-4
Coded font 3-4
AFP font characteristics 3-5
Inline (Print) direction 3-5
Character baseline 3-6
Character rotation 3-7
Toned-Pel box 3-8
Printing adjacent characters 3-8
Raster-Pattern box 3-10
Ascenders and descenders 3-11
Baseline positioning 3-11
Kerning 3-12
Summary: Character placement 3-13
Bounded-box 3-13
iv ELIXIR TECHNOLOGIES CORPORATION
Page 5

TABLE OF CONTENTS
Unbounded-box 3-14
AFP font naming conventions 3-14
Bounded-box naming convention 3-14
Unbounded-box naming convention 3-14
Code Page naming convention 3-15
Elixir font structure 3-16
Elixir font converted from a non-AFP source 3-16
Elixir font converted from an AFP source 3-17
PC-mapped Elixir fonts 3-17
Full character set Elixir fonts 3-18
Elixir character set and font differences 3-19
4. Loading fonts and code pages 4-1
Loading an Elixir-format character set 4-1
Loading a non-AFP font 4-3
Reformatting to a character set 4-5
Loading as a non-AFP font 4-7
Creating new character sets 4-8
Creating a new PC-mapped font 4-9
Adding a bitmap to a cell 4-10
Creating a new AFP character set 4-10
Loading a Code Page 4-12
Editing a code page 4-15
5. Editing non-AFP fonts 5-1
Font basics 5-1
ElixirFont tools 5-3
Select tool 5-3
Edit tool 5-4
Edit Window menu bar 5-5
Edit Window Toolbar 5-6
Edit tool options 5-7
Transform tool 5-9
Kill tool 5-10
Character Properties tool 5-10
ELIXIRFONT FOR AFP USER GUIDE v
Page 6

TABLE OF CONTENTS
Copy tool 5-12
Swap tool 5-12
Merge tool 5-13
Sample tool 5-15
Font Properties tool <Ctrl> + <F2> 5-16
Header submenus 5-17
6. Transforming non-AFP fonts 6-1
Transformation tool options 6-3
Resize 6-4
Rotate 6-5
Shift 6-6
Slant 6-7
Darken 6-8
Lighten 6-9
Underline 6-10
Reverse 6-11
Filter 6-12
Outline 6-13
Halftone 6-15
Mirror 6-17
7. Editing Elixir-formatcharacter sets 7-1
Character set basics 7-1
Editing Elixir fonts 7-2
ElixirFont tools 7-2
Select tool 7-3
Edit tool 7-4
Edit Window menu bar 7-5
Edit Window Toolbar 7-6
Edit tool options 7-7
Transform tool 7-9
Kill tool 7-10
Character Properties tool 7-10
Copy tool 7-12
vi ELIXIR TECHNOLOGIES CORPORATION
Page 7

TABLE OF CONTENTS
Swap tool 7-13
Merge tool 7-13
Sample tool 7-16
Font Properties tool <Ctrl> + <F2> 7-18
Header submenus 7-19
8. Transforming Elixir-format character sets 8-1
Transformation tool options 8-3
Resize 8-4
Rotate 8-5
Shift 8-6
Slant 8-7
Darken 8-8
Lighten 8-9
Underline 8-10
Underlining the entire character set 8-11
Reverse 8-13
Reversing the entire character set 8-13
Filter 8-16
Outline 8-17
Halftone 8-19
Mirror 8-21
A. Keyboard shortcuts A-1
Glossary GLOSSARY-1
Index INDEX-1
ELIXIRFONT FOR AFP USER GUIDE vii
Page 8

1. Introduction
This User Guide describes ElixirFont for AFP™, a sophisticated bitmap character set editor that allows you
to create and edit character sets in what-you-see-iswhat-you-get (WYSIWYG) format.
With ElixirFont, you can perform the following operations to fonts:
edit individual characters in a font by providing
tools to manipulate each character bitmap
apply transformations to one, all, or a sequence
of characters in a font, enabling you to embolden,
italicize, underline and perform other
transformations
display and change character or font properties
such as kerning, baseline offset, orientation, etc.
The current release of ElixirFont fully supports character set editing and creation for conversion to and from
AFP bounded-box and unbounded-box fonts, doublebyte fonts, and HP fonts.
In conjunction with the Elixir Desktop and Converters
for AFP, fonts can easily be imported and converted
to Elixir's generic font format, edited, and reconverted
back to their original or other formats.
ELIXIRFONT FOR AFP USER GUIDE 1-1
Page 9
INTRODUCTION
Customer support
Elixir customer support centers provide telephone
technical assistance for Elixir users during business
hours.
If you have purchased your Elixir product directly from
Elixir Technologies then contact one of the support
center hotlines.
See the Elixir Getting Started Guide for information
about contacting your support center.
Elixir training
Elixir Technologies Corporation offers training for the
full range of our Windows-based family of products.
For more information, contact:
Elixir Learning
(805) 641-5900 ext. 6
ElixirFont environment
ElixirFont is designed to work with the Elixir Desktop
for AFP, a Windows-based desktop. The Elixir Desktop simplifies file conversions and management by
providing icons which you can manipulate with simple
mouse drag-and-drop techniques (see the Elixir Desk-
top and Converters for AFP User's Guide for more
information).
Other Elixir products that you can use with ElixirFont
are:
ElixirImage for AFP, a Windows-based bitmap
graphics editor you can use to tile Elixir-format
images into Elixir-format fonts (see the Elix-
irImage for AFP User's Guide for more
information).
1-2 ELIXIR TECHNOLOGIES CORPORATION
Page 10

ElixirForm for AFP, a forms creation package that
enables users to create and edit boilerplate forms
using standard OGL form elements (see the Elix-
irForm for AFP User's Guide for more
information).
Who should use this guide
This guide is intended for users familiar with AFP
character sets and with AFP page printing resources.
Knowledge of Windows and DOS, specifically navigation through directory and subdirectory structures and
file operations is also required.
Conventions
This section describes display and typographical conventions used in this guide.
INTRODUCTION
Display conventions
ElixirFont adheres to Microsoft Windows conventions
for using menus, menu commands, dialog boxes,
command buttons, icons and a mouse. See your
Windows manual for more information.
Typographical conventions
The following typographical conventions are used
throughout this guide.
Keystrokes are shown enclosed in < > (angle
brackets). For example, <Enter>.
Key combinations are denoted by a plus sign between keys. For example, <Shift> + <F1> indicates to simultaneously press the <Shift> and the
<F1> keys.
ELIXIRFONT FOR AFP USER GUIDE 1-3
Page 11
INTRODUCTION
Menu titles are shown in bold. Menu options are
enclosed in [ ] (square brackets). For example,
Pull down the File menu and select [New Font].
Commands, options, actions, and parameters
that require description are shown in bold followed on the next line by the description. For example:
Delete
Deletes the selected characters.
Steps in a procedure are shown in numbered bold
paragraphs. For example
1. Pull down the Window menu and select [Tile].
Comments relating to a step (such as this paragraph) are shown in regular text following the bold
paragraph.
On-line Help
Elixir software uses the Microsoft Windows Help program to provide on-line Help for all functions.
For more information about Windows Help, select the
[How to Use Help] option in the Help menu, or see
your Microsoft Windows documentation.
The Help files included with your Elixir software include graphics created using screen drivers with large
fonts. If you use a screen driver with small fonts, the
Help file graphics may not display clearly. For optimum graphics display, use a screen driver with large
fonts.
You can display on-line Help in the following ways:
1-4 ELIXIR TECHNOLOGIES CORPORATION
Page 12

INTRODUCTION
Bubble Help
Click on an icon with the right mouse button to view its
properties (if applicable) or to display "bubble help."
Bubble help is a short description of the icon function
that displays in a bubble extending from the icon.
Quick Help
Enable the quick function by selecting the quick help
option in the Usage Switches (or Preferences -- for
ElixirImage) dialog box. When you move the screen
pointer over an icon on the screen, a short description
of the icon function displays in the message area of
the screen. During certain operations a message
about the function you are performing also displays in
the message area. To see these operational messages, disable quick help.
Context sensitive Help
To use this function, click on an icon and press <F1>.
If available, the appropriate Help topic displays. If no
specific topic is available, the Help table of contents
displays.
Help menu
Select [Help] from the top pull-down menu and choose
one of the displayed topics.
Dialog box Help
Click on the [Help] button in a dialog box to view an
associated Help topic. Under Windows 95 and Windows NT, right-click on a dialog box option to display
an associated Help topic.
Help pop-ups and jumps
Within Help topic text, words or phrases underlined in
green are pop-ups or jumps. When you click on a
pop-up topic, a box displays within the current Help
topic with additional information. When you click on a
jump, a different, associated Help topic displays.
ELIXIRFONT FOR AFP USER GUIDE 1-5
Page 13
INTRODUCTION
Help hypergraphics
Hypergraphics are special graphics within Help files
that contain "hot spots". Hot spots are either pop-up
topics or jumps. Hypergraphics in Elixir Help are most
commonly dialog boxes with option hot spots (pop-up
definitions), toolboxes with tool hot spots (topic
jumps), and menus with option hot spots (topic jumps
or pop-up definitions).
Move the cursor over a hypergraphic until a hand displays, then click on this hot spot to display a pop-up
topic, or a "jump". To close a pop-up topic, click the
mouse button. To return to the original Help topic
from a jump, click on <Back> in the Help file menu.
Organization of this Guide
This guide includes the following:
an overview of AFP font structure
how ElixirFont handles fonts converted from AFP
and non-AFP formats
ElixirFont features and how to use them.
This User Guide is organized as follows:
Chapter 1, "Introduction," provides an overview of
ElixirFont and describes how to install and start ElixirFont. It also gives additional information about the
contents of this manual.
Chapter 2, "ElixirFont basics," describes the layout
and components that make up the ElixirFont main
screen.
Chapter 3, "Font structure," describes the AFP and
Elixir-format font structure, and the AFP terminology
used throughout this guide. If you are not familiar with
font structures and, specifically, AFP character sets,
we strongly recommend that you read this chapter.
1-6 ELIXIR TECHNOLOGIES CORPORATION
Page 14

INTRODUCTION
Chapter 4, "Loading fonts and code pages," describes how to create a new character set, load an existing font, and load and edit a code page.
Chapter 5, "Editing non-AFP fonts," describes how
you can edit fonts originating from non-AFP sources.
Chapter 6, "Transforming non-AFP fonts," describes
how to apply a variety of transformations to individual
characters and to the entire font.
Chapter 7, "Editing Elixir-format character sets," describes how to edit character header values and character bitmaps, and how to merge, sample, copy, and
delete characters from an Elixir-format character set.
Chapter 8. "Transforming Elixir-format character sets,"
describes how to apply a variety of transformations to
individual characters and to the entire character set.
Glossary.
Index.
Installation
See the Elixir for AFP Getting Started Guide for installation information.
ELIXIRFONT FOR AFP USER GUIDE 1-7
Page 15

INTRODUCTION
Starting ElixirFont
You can only start ElixirFont from the Elixir Desktop.
To start ElixirFont from the Elixir Desktop, open
(double-click on) the ElixirFont icon at the right of the
Desktop.
The ElixirFont main screen displays.
Figure 1-1. ElixirFont main screen
Alternatively, with the Elixir Desktop displayed:
1. Open the Elixir Fonts folder.
2. Make sure you selected the [Show Charset]
option (as shown below) or the [Show Coded
Fonts] option in the Filter menu.
1-8 ELIXIR TECHNOLOGIES CORPORATION
Page 16

INTRODUCTION
Figure 1-2. Elixir Fonts folder
3. Open (double-click on) any .HDR font file.
The ElixirFont Character Set window displays the font
loaded.
ELIXIRFONT FOR AFP USER GUIDE 1-9
Page 17

INTRODUCTION
Figure 1-3. Loaded font in ElixirFont
Exiting ElixirFont
To exit ElixirFont, double-click on the Exit button at
the top left of the main screen.
1-10 ELIXIR TECHNOLOGIES CORPORATION
Page 18
2. ElixirFont basics
This chapter describes the layout and components
that make up the ElixirFont main screen.
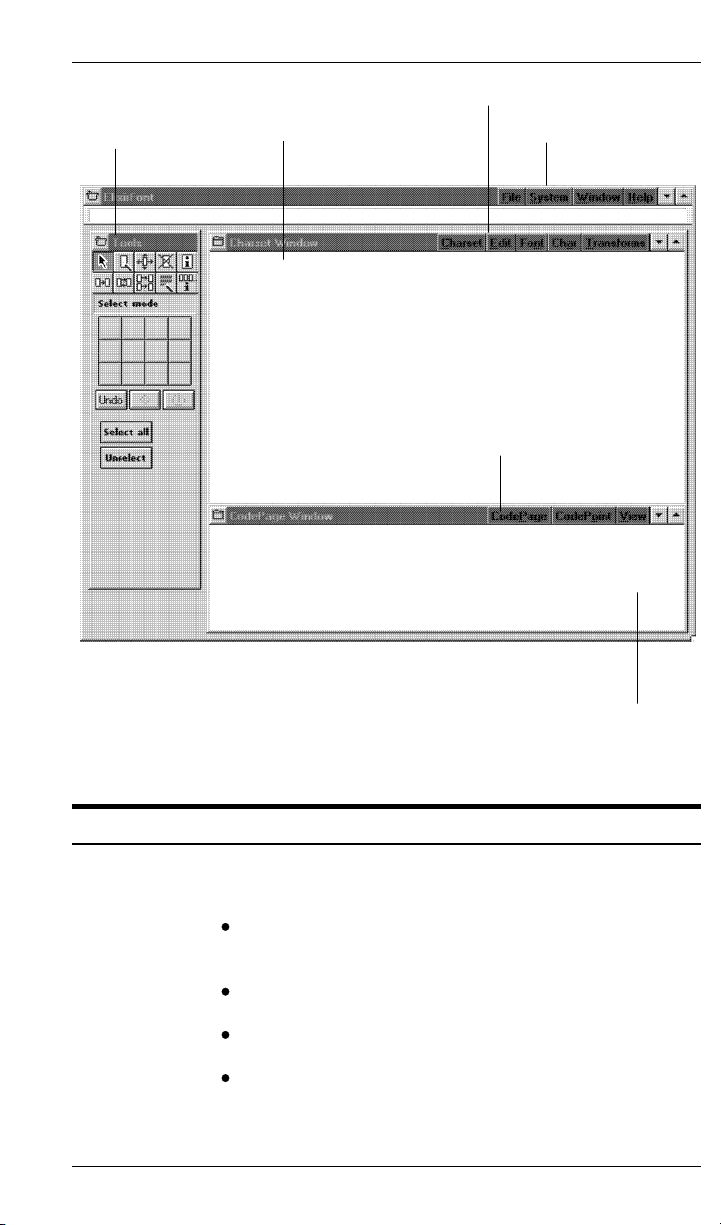
Main screen components
The ElixirFont main screen contains the following
components:
ElixirFont menu bar
Toolbox
Character Set window menu bar
Code Page window menu bar.
Start the ElixirFont application by double-clicking on
the ElixirFont icon. The main screen displays.
ELIXIRFONT FOR AFP USER GUIDE 2-1
Page 19
ELIXIRFONT BASICS
Toolbox
Character Set Window
Character Set Window
Menu Bar
Main Menu Bar
Code Page Window
Menu Bar
Code Page Window
Figure 2-1. ElixirFont main screen
ElixirFont menu bar
The ElixirFont menu bar controls:
loading and saving character sets, coded fonts,
and code pages
usage switches
window display
access to Help files.
2-2 ELIXIR TECHNOLOGIES CORPORATION
Page 20

File menu
ELIXIRFONT BASICS
Figure 2-2. ElixirFont menu bar
The File menu allows you to:
load and save character sets, coded fonts, and
code pages
exit ElixirFont.
Open Coded Font
Displays the Load Coded Font dialog box listing .CDF
files. Select a coded font and click on [OK].
Open Charset
Displays the Load Charset dialog box listing .HDR
files. Select a character set and click on [OK].
Open Code Page
Displays the Load Code Page dialog box listing .COD
files. Select a code page and click on [OK].
Save Coded Font
Allows you to save the .CDF file with the names of the
currently loaded character set and code page.
Save Charset as
Allows you to save an edited character set under a
new name or an existing name (overwrites old file).
Save Code Page as
Allows you to save an edited .COD code page file under a new name or an existing name (overwrites old
file).
Exit <Alt + F4>
Exits ElixirFont and returns you to the Desktop.
ELIXIRFONT FOR AFP USER GUIDE 2-3
Page 21

ELIXIRFONT BASICS
System menu
The
System
menu allows you to:
set usage switches
reset to defaults
save customized configurations.
Usage Switches
Displays the Usage Switches dialog box with the following options:
Figure 2-3. Usage Switches
dialog box
Save State on Exit
Select to save your customized settings. Unse-
lected returns settings to ElixirFont defaults.
Show Quick Help
Select to display short descriptions in the area un-
der the ElixirFont menu bar.
Always bring Toolbox to top
Select to have the Toolbox always display on top
of any window (no need to tile windows to access
Toolbox).
Convert non-AFP font to Charset on load
Select to load and reformat fonts as an Elixir-
format character set. Unselected loads the font
as a non-AFP font.
Highlight chars in the Code Page
Select to display all fonts referenced in the code
page as a different color in the Character Set
window.
2-4 ELIXIR TECHNOLOGIES CORPORATION
Page 22
Window menu
ELIXIRFONT BASICS
Select Charset with Code Point
Reserved for future use.
Reset to Defaults
Resets all configuration parameters to the ElixirFont
default values.
Save Configuration
Saves your customized settings rather than resetting
to ElixirFont defaults.
Help menu
Toolbox
The
Window
dow displays. You can:
tile all displayed windows
toggle the display on or off for the Character Set,
Code Page, and Toolbox windows.
The Help menu allows you to access the on-line help
files for ElixirFont. See the "Introduction" chapter for
information about how to use on-line help.
The left side of the screen shows the Toolbox which
contains buttons you can select to view, edit, and manipulate individual characters or the entire font.
menu controls the way each editing win-
ELIXIRFONT FOR AFP USER GUIDE 2-5
Page 23
ELIXIRFONT BASICS
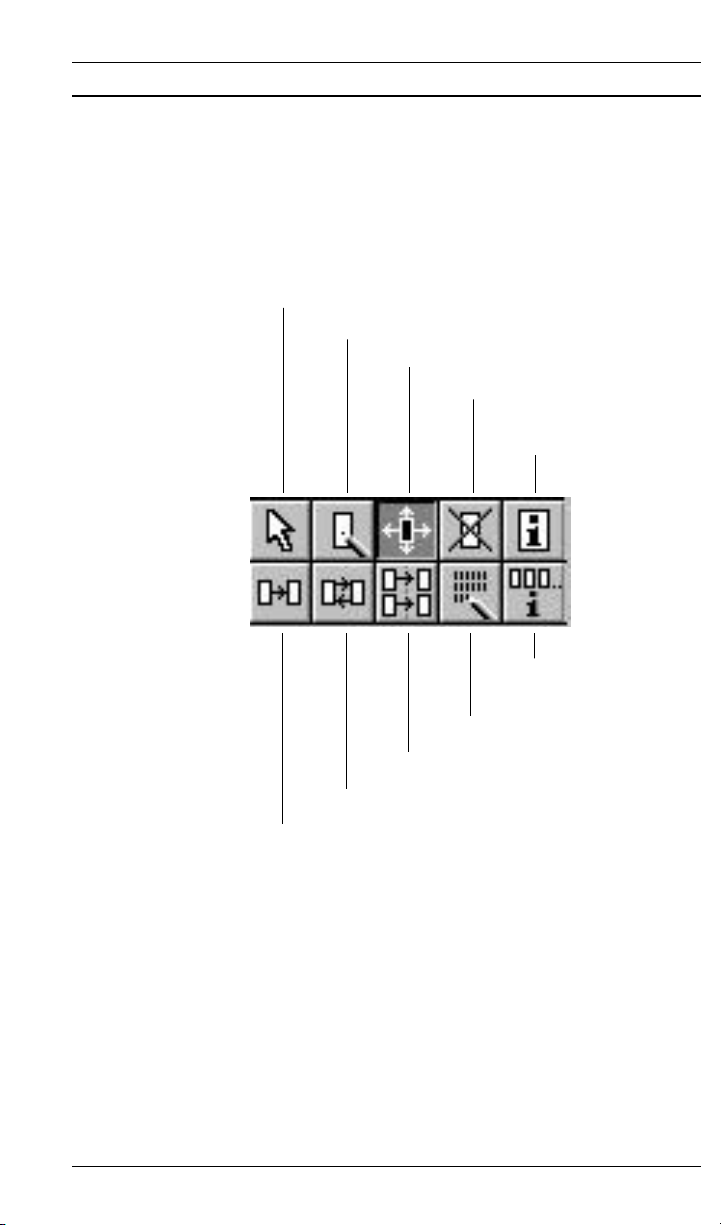
Tools
At the top of the Toolbox are the tools you can select.
These display in two rows as shown in the following
figure.
Select
Edit Bitmap
Transform (selected)
Kill
Character
Properties
Font
Properties
Sample
Merge
Swap
Copy
Figure 2-4. ElixirFont tools
2-6 ELIXIR TECHNOLOGIES CORPORATION
Page 24

Toolbox options
Undo last operation
ELIXIRFONT BASICS
This section describes ElixirFont tools and their
functions.
Select a tool to display options for that tool at the bottom of the Toolbox. Most tools also contain the options shown below.
Tools
Suspend current
conversion
Apply current tool
or conversion
In this area, different options
display depending
on the tool you select
Options
Figure 2-5. Toolbox example
The middle buttons allow you to undo the last operation, suspend the current conversion, or to apply the
current tool or conversion.
If you suspend the current conversion, the undo operation may not be available.
The area below the buttons contains different options
depending on the selected tool.
The ElixirFont tools are described in more detail in the
following chapters of this guide.
ELIXIRFONT FOR AFP USER GUIDE 2-7
Page 25

ELIXIRFONT BASICS
Character Set window menu bar
You use the Character Set window menu bar for creating, editing, and saving character sets with selected
coded fonts.
Figure 2-6. Character Set window menu bar
Charset menu
The options in the
open, and save a coded font, and merge character
sets together.
New Charset
Allows you to create a new character set through use
of several dialog boxes requesting information about
your new character set. Once you have entered the
required information, the new character set displays.
Open Charset
Displays the Load Charset dialog box listing .HDR
files. Select a character set and click on [OK].
Open Coded Font
Displays the Load Coded Font dialog box listing .CDF
files. Select a coded font and click on [OK].
Save Charset
Allows you to save a character set.
Save Charset as
Allows you to save an edited character set under a
new name or an existing name (overwrites old file).
Save Coded Font
Allows you to save the .CDF file with the same name.
Charset
menu allow you to create,
Merge Charsets
Displays the Load Charset for Merge dialog box listing
the .HDR files. Select a character set to merge with
the currently displayed character set and click on
[OK].
2-8 ELIXIR TECHNOLOGIES CORPORATION
Page 26

Edit menu
ELIXIRFONT BASICS
Font menu
The
menu allows you to undo actions and delete
Edit
or select/unselect characters or entire character sets.
Undo
Undoes the last edit operation.
Delete
Allows you to delete selected characters
.
Select all
Allows you to select all characters in the character set.
Unselect all
Allows you to unselect all selected characters in the
character set.
The Font menu allows access to information about
the properties and statistics of a complete font and reformat of a non-AFP font. You can also view a sample of how the font will print.
Properties
Displays the Font Properties dialog box which provides values and parameters of the loaded character
set.
Statistics
Displays the Size of Elixir Format Font dialog box
which provides the size (bytes) of each component
(headers, bitmaps, etc.), and the total size of the
loaded character set.
Sample
Displays a sample pad showing the characters as they
will print on a page.
Reformat
Allows you to reformat a non-AFP font to AFP. Disabled if an AFP character set is loaded.
Convert
For future implementation.
ELIXIRFONT FOR AFP USER GUIDE 2-9
Page 27

ELIXIRFONT BASICS
Char menu
Sort
Sorts characters by their GCID's.
The
an individual character.
Properties
Displays the Character and CodePoint Properties dialog box which provides rotation, GCID, and characteristics of an individual font.
Copy
Allows you to copy a selected font to a new location.
Kill
Allows you to remove a selected character from a
character set.
Swap
Allows you to swap a selected character with another
character.
Load Image
Displays the Load Image dialog box which allows you
to load BMP, LP3, PCX, or TIF images. Size limit is
64K.
Transforms menu
The Transforms menu allows you to perform transformation options to selected characters or to a complete character set. See the chapters on transforming
for complete option descriptions.
menu provides properties and statistics of
Char
Code Page window menu bar
The Code Page window menu bar allows you to create, load, and save code pages, edit code points, and
control how the Code Page window displays.
2-10 ELIXIR TECHNOLOGIES CORPORATION
Page 28

CodePage menu
ELIXIRFONT BASICS
Figure 2-7. Code Page window menu bar
The
CodePage
menu allows you to create, save, or
open an existing code page.
New Code Page
Displays the Code Page Properties dialog box which
provides options that include:
Code Page description
default character information
variable space character information.
Open Code Page
Displays the Load Code Page dialog box listing .COD
files. Select a code page and click on [OK].
Open Coded Font
Displays the Load Coded Font dialog box listing .CDF
files. Select a coded font and click on [OK].
Save Code Page
Allows you to save the loaded code page, overwriting
the original. No warning is given if you edited characters within the code page.
Save Code Page as
Allows you to save an edited code page under a new
name or an existing name (overwrites old file).
Save Coded Font
Allows you to save the loaded coded font file, overwriting the original. If you loaded a character set and
coded font individually, the program prompts you for
the name of the coded font, either creating a new file
or overwriting the existing file.
Properties
Displays the Code Page Properties dialog box containing the following:
Code Page description
default character information
ELIXIRFONT FOR AFP USER GUIDE 2-11
Page 29

ELIXIRFONT BASICS
CodePoint menu
variable space character information.
View menu
The
CodePoint
menu allows you to edit code points.
Properties
Displays the Code Point Properties dialog box which
provides GCID, hex/decimal, and flag information.
Copy
Allows you to copy selected code points.
Swap
Allows you to swap selected code points.
Delete
Allows you to remove a code point.
Undo
Undoes the last edit operation.
The View menu allows you to select the Code Page
window display:
Real Size
Displays the Code Page at actual size.
Fit to Window
Adjusts the display of the Code Page to fit in the Code
Page window.
By Column
Displays the Code Page by column.
By Row
Displays the Code Page by row.
2-12 ELIXIR TECHNOLOGIES CORPORATION
Page 30

3. Font structure
This chapter describes AFP and Elixir font structures
and how ElixirFont handles fonts originating from AFP
and non-AFP sources. We strongly recommend that
you read this chapter, even if you are familiar with
AFP fonts. If you are not familiar with AFP fonts, you
should also read IBM's Host Font Data Stream Refer-
ence and About Type manuals.
ElixirFont uses a proprietary structure that enables
you to display and edit characters in a WYSIWYG format.
Converters in the Elixir Desktop allow you to convert
fonts from AFP Bounded Box and Unbounded Box,
Hewlett-Packard (HP), and Bitstream Facelift outline
(contour) formats, to Elixir format fonts.
AFP font structure
To understand AFP fonts, you must have a basic understanding of some general font-related definitions.
The following sections describe the components of a
type family, a term that encompasses all the characteristics of printed text.
Type family
A type family is a group of typefaces that have a common basic design but can vary in size and style. Examples of type families are:
Sonoran Sans Serif
Courier
ITC Avant Garde Gothic
ELIXIRFONT FOR AFP USER GUIDE 3-1
Page 31
FONT STRUCTURE
Typeface
A typeface is collection of characters with the same
style, weight, and width, as described below:
Style is the inclination of characters with respect
to the vertical axis; for example, Roman (upright)
or italic (top slant to the right).
Type font
Weight is the degree of
for example, semi-light, light, medium, or bold.
Width is the degree of horizontal spacing of a
character; for example, condensed or normal.
Examples of typefaces are:
Sonoran Sans Serif Roman medium normal
Helvetica italic bold condensed
Times italic light normal
A type font (also called a font) is a collection of characters that share the same type family, typeface, and
size. Examples of fonts are:
Sonoran Sans Serif 10-point Roman medium
normal
Helvetica 8-point italic bold condensed
Times 12-point italic light normal
boldness
of a typeface,
AFP font types
AFP fonts can be Bounded Box or Unbounded Box
fonts.
3-2 ELIXIR TECHNOLOGIES CORPORATION
Page 32

Unbounded Box fonts
Unbounded Box fonts are AFP fonts for IBM 3800
printers. A characteristic of Unbounded Box fonts is
that for printing rotated text, a separate font is required for each of the four rotations of the font (0o, 90o,
180o, and 270o from the inline print direction).
Bounded Box fonts
Bounded Box fonts are AFP fonts for IBM printers
other than the 3800. For printing rotated fonts on
these printers, only one version of the font is required
which is rotated "on the fly".
AFP font components
Each AFP font has three components:
Character set
Code page
Coded font
FONT STRUCTURE
Character set
An AFP character set corresponds to the type font (or
font) described in the previous section. A character
set contains information about a single type family,
typeface, bitmap, and point size, and can also include
information about the baseline positioning, rotation,
ascender, etc. Included in the character set is a
unique identifier for each character in the character
set called a graphic character ID (GCID).
Code page
A code page maps keyboard entries to characters in a
character set. Each key on a keyboard corresponds
to a hexadecimal code point. When printing on an
AFP printer, the code point is matched to a GCID in
the code page. This allows you to use different code
pages, for example to print subsets of characters in a
character set (like for different European languages).
ELIXIRFONT FOR AFP USER GUIDE 3-3
Page 33

FONT STRUCTURE
Coded font
Hex. Code Point
C1
...
97
...
D8
Graphic Character ID
LA020000
LP010000
LQ020000
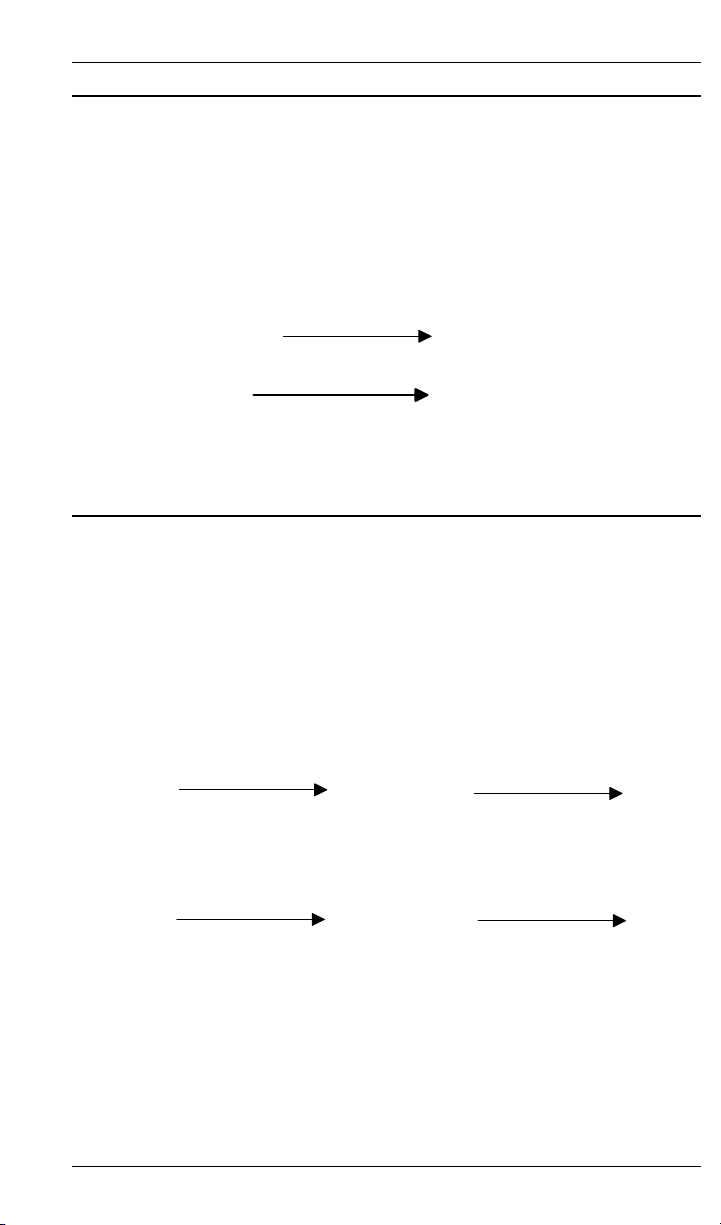
Figure 3-1. Code Page
A coded font links a character set to a code page. In
order for a character to be printed, you must include it
in the character set, and list it in a code page, and the
two must link in a coded font.
Coded Font
Character Set Names Code Page names
Character Set
Character bitmaps
and GCIDs
Code Page
GCIDs and keyboard
code points
Figure 3-2. AFP font components
For example, the binary representation of upper case
(also called the code point). When printing the letter
A:
its code point (C1) is matched to a GCID in the
code page for the font (LA020000 in the example
shown in figure 3-1)
the GCID is matched to a raster pattern in the
character set for the font
the raster pattern is printed as upper case A.
Note that you must include all GCIDs (in the code
page) in the character set, otherwise an error condition will exist at print time.
3-4 ELIXIR TECHNOLOGIES CORPORATION
Page 34

AFP font characteristics
This section describes some characteristics of AFP
fonts, particularly their appearance on a printed page.
Inline (Print) direction
The inline print direction (or simply print direction) is
the direction in which characters are added to a line of
text. The inline print direction has four possible values: 0o, 90o, 180o, and 270o as shown below (with respect to this page):
0
ABCDEF
ABCDEF
FONT STRUCTURE
90
ABCDEF
180
270
ABCDEF
Figure 3-3. Inline (print) directions
Limitation: Unbounded Box fonts do not support 180
print direction.
ELIXIRFONT FOR AFP USER GUIDE 3-5
o
Page 35
p
p
FONT STRUCTURE
Character baseline
The character baseline is a reference to which characters align as they are added to the page in the inline
(print) direction. The character baseline is always parallel to the inline (print) direction.
Character rotation
The character rotation is the angle through which you
rotate a printed character clockwise in 90o increments
about the character baseline.
The following figure shows the four character rotations
for the 0o inline (print) direction.
p
0 Degree Rotation
p
Figure 3-4. Character baseline
Character baseline
Inline (print) direction
p
Character baseline
90 Degree Rotation
Character baseline
180 Degree Rotation
Figure 3-5. Character rotations for 0o inline
print direction
270 Degree Rotation
3-6 ELIXIR TECHNOLOGIES CORPORATION
Page 36

Toned-Pel box
FONT STRUCTURE
As there are four inline print directions, there are a total of 16 combinations of inline (Print) directions and
character rotations. Note that since Unbounded Box
fonts do not support the 180o print direction, only 12
combinations apply for Unbounded Box fonts.
A Toned-Pel box defines the boundaries of a character bitmap. Each character bitmap in a character set
consists of an ordered array of black dots called toned
pels and non-printing blank dots called untoned pels.
The toned pels define the shape of the character and
the untoned pels define the white space in and about
the character.
Toned-Pel Box
Width
Toned-Pel Box
Height
p
Figure 3-6. Toned-Pel box
Printing adjacent characters
When printing side-by-side characters (like text in a
word), each character is positioned according to its
character reference point and character escapement
point.
The character reference point defines the current print
position for the character.
The character escapement point marks the end of the
space along the character baseline allocated for the
character. When printing adjacent characters, the reference point of the next character is placed at this
point.
ELIXIRFONT FOR AFP USER GUIDE 3-7
Page 37

FONT STRUCTURE
The distance from the character reference point to the
near edge of the toned-pel box is the "A-space" for
the character.
The toned-pel box width is the "B-space" for the
character.
The distance from the far edge of the toned-pel box to
the character escapement point is the "C-space" for
the character.
Character
Reference
Point
Character
Escapement
Point
p
A
A + B + C = Character Increment
Figure 3-7. Character measurements
A-space, B-space, and C-space are measured in pels
(dots).
The sum of the A-space, B-space, and C-space is the
character increment.
If a font's characters have the same increment (or uniform increment), the font is a monospaced or fixed
pitch font.
If a font's character increments are different for each
character, the font is a proportional-spaced or typographic font.
B
C
3-8 ELIXIR TECHNOLOGIES CORPORATION
Page 38

Raster-Pattern box
A Raster-Pattern box encloses, or is superimposed on
the toned-pel box. The Raster-Pattern box provides
another method of placing characters on a printed
page.
Raster-Pattern
Box Height
FONT STRUCTURE
Character
Reference
Point
Character
Escapement
Point
p
A
Raster-Pattern Box Width
Figure 3-8. Raster-Pattern box
For a Bounded-box font, the width of the RasterPattern box is measured along the inline (print)
direction.
For an Unbounded-box font, the width of the RasterPattern box is always measured along the top edge of
the printed form.
For a Bounded-box font, the Uniform A-space is the
number of pels of the character's A-space from the
near edge of the Raster-Pattern box to the Character
Reference Point. The Uniform A-space can be zero
or positive (zero means that the Character Reference
Point lies on the near edge of the Raster-Pattern box).
Monospaced Bounded-box fonts have the same uniform A-space value for all characters.
B
C
ELIXIRFONT FOR AFP USER GUIDE 3-9
Page 39

p
FONT STRUCTURE
In an Unbounded-box font, this measurement is the
Uniform Inline Offset and is used to shift characters
left when left kerning. See the "Kerning" section in
this chapter for more information.
Ascenders and descenders
The character ascender is the distance from the character baseline to the topmost toned pel.
The character descender is the distance from character baseline to the lowest toned pel.
Ascender
Descender
Figure 3-9. Ascenders and descenders
Note that ascenders and descenders are different for
different rotations of a character.
Baseline positioning
The character baseline offset specifies where to place
the character relative to the character baseline. The
following figure shows the baseline offset (measured
in pels) for different character rotations.
p
Character
Baseline
3-10 ELIXIR TECHNOLOGIES CORPORATION
Page 40

p
p
p
FONT STRUCTURE
Kerning
p
0 Degree Rotation
180 Degree Rotation
Figure 3-10. Baseline offsets
If the baseline offset is the same for all characters in a
given rotation of a character set, it is a Uniform Baseline Offset.
If the baseline offset is different for characters in a
given rotation, the largest offset is the Maximum
Baseline Offset.
Kerning is a technique of printing characters so that
they partially overlap. Kerning is normally used to
place italicized characters closer to each other for a
more pleasing appearance.
Character baseline
90 Degree Rotation
Character baseline
270 Degree Rotation
Character
Baseline
i
f
Figure 3-11. Left kerning example
ELIXIRFONT FOR AFP USER GUIDE 3-11
Page 41

FONT STRUCTURE
Kerning can be of two types:
A character is Left kerned if it partially overlaps
the preceding character, like the letter f in the figure above.
A character is Right kerned if it partially overlaps
the next character, like the letter f in the following
example.
Figure 3-12. Right kerning example
A left kerned character has a negative A-space.
A right kerned character has a negative C-space.
Summary: Character placement
Characters are placed on the printed page using the
following concepts (described in the previous
sections).
Bounded-box
Bounded-box characters are placed using the
following:
Character reference point
Character A-space
Uniform A-space
Character baseline offset
Uniform baseline offset
Character increment
Uniform increment
Raster-pattern box.
f
i
Character
Baseline
3-12 ELIXIR TECHNOLOGIES CORPORATION
Page 42

Unbounded-box
Bounded-box characters are placed using the
following:
Character reference point
Uniform inline offset
Uniform baseline offset
Character increment
Uniform increment
Raster-pattern box.
AFP font naming conventions
AFP font naming conventions relate the inline (Print)
direction and character rotation combination to a twocharacter file name prefix. The two-character prefix
identifies the coded font or character set, and the remaining (one to six) characters are the coded font ID
or character set ID. See an About Type Reference
Manual for more information.
FONT STRUCTURE
Bounded-box naming convention
All Bounded-box coded fonts are prefixed with X0,
and all Bounded-box character sets are prefixed with
C0.
Unbounded-box naming convention
Unbounded-box font file name prefixes depend on the
inline (print) direction and the font rotation, as shown
in the following table.
ELIXIRFONT FOR AFP USER GUIDE 3-13
Page 43

FONT STRUCTURE
Coded Font
ID Prefix
X1 0
X2 90
X4 270
X5 0
X6 90
X8 270
X9
XA 90
XC 270
XD 0
XE 90
XG 270
Inline (Print)
Direction
o
o
o
o
o
o
o
0
o
o
o
o
o
Character
Rotation
o
0
o
0
o
0
o
90
o
90
o
90
o
180
o
180
o
180
o
270
o
270
o
270
Character
Set ID Prefix
C1
C2
C4
C5
C6
C8
C9
CA
CC
CD
CE
CG
Note that Unbounded-box fonts do not support printing in the 180o inline (print) direction.
Elixir currently only supports X1, X2, and X4 rotations.
Code Page naming convention
AFP code page file names are always prefixed with
T1.
3-14 ELIXIR TECHNOLOGIES CORPORATION
Page 44

FONT STRUCTURE
Elixir font structure
When converted to Elixir format, you can edit a font in
a variety of ways; for example, you can resize a font,
merge it with other fonts, italicize it, etc. The operations you can perform on individual characters and on
the font depends on the source of the font; whether
you converted the font from an AFP character set or
from a non-AFP font.
The following sections in this chapter describe how
ElixirFont handles fonts from AFP (Bounded-box and
Unbounded-box) and non-AFP (such as HP PCL and
Bitstream Facelift) sources.
Chapters following this one describe how to edit and
transform AFP and non-AFP sourced fonts.
Elixir font converted from a non-AFP source
Each Elixir format font includes at least three components with different file extensions in the
drive:\ELIXIR\FONTS\ELIXIR directory. These are:
A .HDR component; this file contains the font
header information.
A .GLH component; this file contains header information for each character.
A .GLY component; this file defines the actual
bitmaps of the characters.
If you converted an Elixir format font from an AFP
source (Bounded-box or Unbounded-box) using the
Elixir Desktop Converter icon, it also contains the files
described in the following section.
ELIXIRFONT FOR AFP USER GUIDE 3-15
Page 45

FONT STRUCTURE
Elixir font converted from an AFP source
When you use the Desktop Converter icon to convert
an AFP (Bounded-box or Unbounded-box) font to
Elixir format, a dialog box prompts you to create either
a "PC-mapped" or "Full" Elixir version of the AFP font.
PC-mapped Elixir fonts
The "PC-mapped" option creates an Elixir version that
is a subset of the AFP font. Because an AFP character set may contain many more characters than allowed by other non-AFP fonts, the "PC-mapped"
version limits the number of characters to 256, the
number allowed by many other font formats. An Elixir
Keyboard Mapping Table determines the subset that
converts (the table is a .KMP file in
drive:\ELIXIR\FONTS\MAPS).
A number of .KMP files are written to the
drive:\ELIXIR\FONTS\MAPS directory during Elixir
Desktop and Converters installation. Each .KMP file
is an ASCII file which lists GCIDs with corresponding
ASCII (hex) keyboard positions. You select the .KMP
file (used for font conversions) when you install the
Elixir Desktop and Converters and normally will not
change it unless generating fonts in another language
(see the Elixir Desktop and Converter for AFP User's
Guide for more information).
Typically, you use the "PC-mapped" option if you do
not want to edit the font, but want to convert it to another non-AFP format (such as HP PCL). The "PCmapped" font contains the three .HDR, .GLH, and
.GLY components described in the previous section.
The "PC-mapped" Elixir font stem name starts with X0
if the source was a Bounded-box font and X1, X2, or
X4 if the source was an Unbounded-box font.
Note: You should not edit a "PC-mapped" font unless
you do not plan to reconvert the font back to AFP
format.
Full character set Elixir fonts
The "Full" character set option converts the entire
AFP character set to an Elixir-format font. You use
3-16 ELIXIR TECHNOLOGIES CORPORATION
Page 46

FONT STRUCTURE
this option if you want to edit the Elixir-format font,
then reconvert the font back to AFP format (Boundedbox or Unbounded-box). When creating a "Full" font,
the following components are generated in the
drive:\ELIXIR\FONTS\ELIXIR directory:
Bounded-box fonts:
.HDR, .GLH, and .GLY components described in
the previous section. The stem names are the
same as the AFP character set and start with C0.
GL1, .GL2, GL3, and .GL4 files. The stem name
of each file is the same as the stem name of the
Bounded-box character set (for example,
C0A075N0.GL1, C0A075N0.GL2, etc.). The files
correspond to 0o, 90o, 180o and 270o rotations of
the Bounded-box character set, respectively.
Note that each is an ASCII file containing metrics
information (such as the A-space, B-space, Cspace, GCID, and orientation) and other information for each character in the character set. All
four files are created during conversion.
A .HDA file with the same stem name as the
Bounded-box character set (starting with C0).
This file contains additional font header information for the Bounded-box font.
Unbounded-box fonts:
HDR, .GLH, and .GLY components described in
the previous section. The stem names are the
same as the AFP Unbounded-box font file and
start with C1, C2, or C4 depending on the source
font orientation.
A .GL0 file (called the GCID Mapping List) with
the same stem name as the Unbounded-box font
(starting with C1 through CG depending on the
source font orientation). The file includes metrics
information (such as the A-space, B-space, Cspace, GCID, and orientation) and other information for each character in the character set.
A .HDA file with the same stem name as the
Unbounded-box character set (starting with C1
through C4 depending on the source font orientation). This file contains additional font header
ELIXIRFONT FOR AFP USER GUIDE 3-17
Page 47

FONT STRUCTURE
information for the Elixir version of the
Unbounded-box font.
The following components are created for both
Unbounded-box and Bounded-box fonts:
A .COD file with the same stem name as the
character set (starting with T1). This is an ASCII
file that derives from the AFP Code Page and is a
list of EBCDIC code points and corresponding
GCIDs for each character in the AFP character
set.
A .CDF file with the same stem name as the character set (starting with X0, X1, X2, or X4 depending on the source font). This is an ASCII file that
derives from the AFP Coded Font and is a list of
correspondence between the character set
name, code page name, and the Keyboard Mapping File (.KMP).
Elixir character set and font differences
The differences described in this section assume that
you are familiar with editing Elixir-format character
sets and non-AFP fonts described in the following
chapters.
ElixirFont handles Elixir-format character sets and
non-AFP fonts differently in the following ways:
AFP-originated character sets are arranged in order of GCID; non-AFP fonts are arranged in
ASCII-sorted order in the displayed character
cells.
Non-AFP fonts may have null (gray) characters;
Elixir-format character sets do not.
The [Swap] option is disabled when editing character sets.
When using the [Merge] option in a character set,
the program prompts you for the character rotation and GCID of each in the target font. If the
GCID exists in the target font, you are prompted
3-18 ELIXIR TECHNOLOGIES CORPORATION
Page 48

FONT STRUCTURE
whether you want the original character replaced.
Otherwise the character is merged in the target
font and the character set is restored. When using the [Merge] option in a non-AFP font, the target character is overwritten.
Character header properties dialog boxes are
different.
The character set header information displays in
three additional dialog boxes.
ELIXIRFONT FOR AFP USER GUIDE 3-19
Page 49

4. Loading fonts and
code pages
This chapter describes how to create a new character
set, load an existing font, and load and edit a code
page.
Loading an Elixir-format character set
To display an Elixir-format character set, load one of
the following by opening them from the Desktop Elixir
Fonts folder, or by using the ElixirFont main screen
menu, or the Character Set window
File
menu (described later in this section):
an Elixir-format character set (C0 or C1 prefixed
file)
Charset
a Coded Font (X0 or X1 prefixed file)
a non-AFP font. (Respond with YES to [Refor-
mat to AFP Charset]).
When opening files note the following:
Opening a Character Set (C0, C1 prefix) displays
the character set in the Character Set window.
Opening a Code Page (T1 prefixed files) displays
the code page in the Code Page window.
Opening a Coded Font (X0, X1 prefixed files) displays both the character set and code page in the
appropriate windows.
ELIXIRFONT FOR AFP USER GUIDE 4-1
Page 50

LOADING FONTS AND CODE PAGES
Figure 4-1. Loaded character set
The ElixirFont screen header shows the ElixirFont
menu bar.
The top right portion of the screen shows the Character Set Window which displays rows of characters arranged (left-to-right and top-to-bottom) in alphabetical
order by character GCID. Each character bitmap displays in a rectangular cell. The Character Set Window header also shows a menu bar.
The left of the screen shows a number of editing tools
arranged in a Toolbox. These and other operations
are briefly described at the end of this chapter and in
more detail in later chapters.
The bottom right portion of the screen is the Code
Page Window (initially blank if you loaded a character
set). Loading and using a Code Page is described
later in this chapter. The Code Page Window header
displays the Code Page Window menu bar.
4-2 ELIXIR TECHNOLOGIES CORPORATION
Page 51

Use the standard Windows handles to enlarge, maximize, and move the Edit and Code Page windows and
to move the Toolbox. Use the Window menu to
hide/show the Edit, Code Page, and Toolbox
windows.
When you move the screen pointer over a character,
the GCID of that character displays at the top left of
the screen. (A gray border displays around the current character cell).
The top of the screen also shows (from left to right)
the positional order of each character in decimal and
hexadecimal notation, the width of the character in
pels, and whether the current character is NONBLANK or a SPACING character. A spacing character is a blank bitmap used for applying spacing
between characters or words. All other characters
which contain bitmaps are NONBLANK characters.
Loading a non-AFP font
LOADING FONTS AND CODE PAGES
To load a non-AFP Elixir font, follow these steps:
1. Pull down the System menu and select [Usage
Switches].
The Usage Switches dialog box displays.
Figure 4-2. Usage Switches dialog box
2. Select the [Convert non-AFP font to Charset
on load] option and click [OK].
ELIXIRFONT FOR AFP USER GUIDE 4-3
Page 52

LOADING FONTS AND CODE PAGES
3. Press <F8> (or pull down the File menu and
select [Open Charset]).
The Load Charset dialog box displays and lists
the .HDR components of fonts.
4. Select a non-AFP font.
Note that AFP character sets begin with C0 and
C1, and that non-AFP fonts can begin with any
character.
5. Click on [OK].
The following dialog box displays:
Figure 4-3. Reformat to Charset option
dialog box
Your selection at this point determines how ElixirFont
handles the loaded non-AFP font:
Click on [Yes] to load the font and reformat it as
an Elixir-format character set. See the "Reformatting to a character set" section in this chapter
for further information.
Click on [No] to load the font as a non-AFP font.
See the "Loading as a non-AFP font" section in
this chapter for further information.
4-4 ELIXIR TECHNOLOGIES CORPORATION
Page 53
Reformatting to a character set
To reformat to a character set:
1. Follow the steps for loading a non-AFP font.
2. Select [Yes] to reformat the font into an
Elixir-format character set.
The Reformatting to AFP Character Set dialog
box displays:
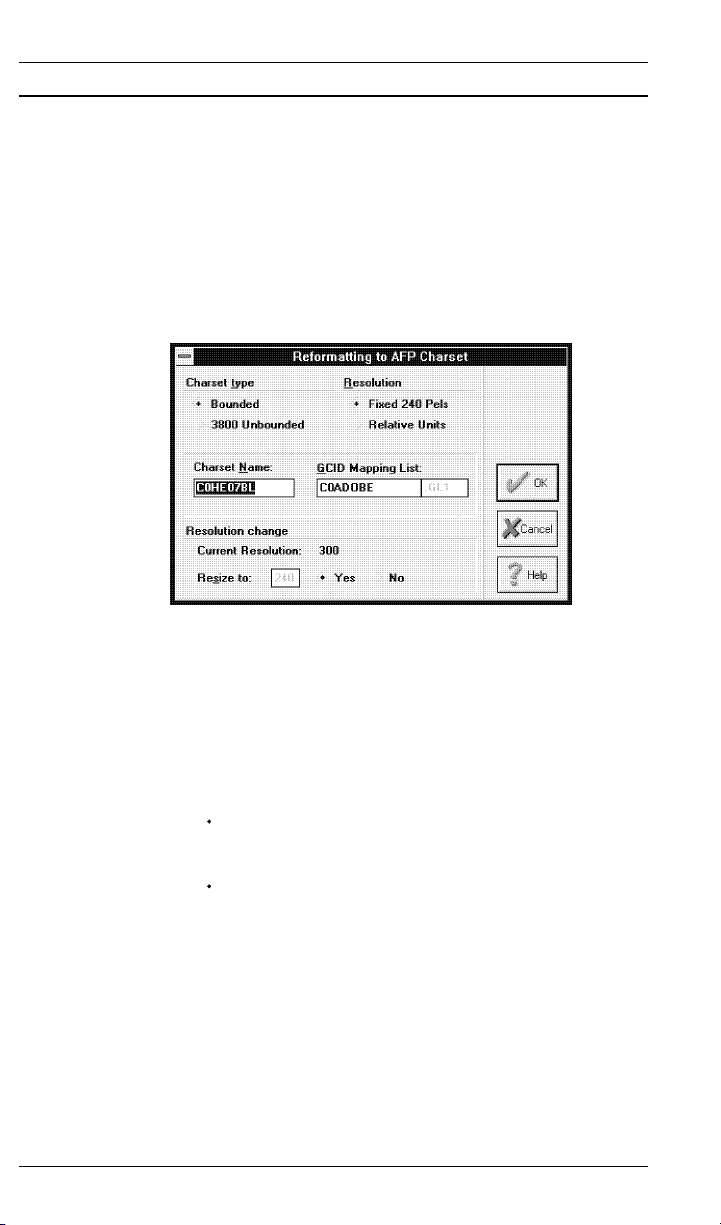
Figure 4-4. Reformatting to AFP Character Set
LOADING FONTS AND CODE PAGES
dialog box
The Reformatting to AFP Character Set dialog
box contains the following options:
Charset type
Select the character set type:
Select [BOUNDED] to reformat the font to a
Bounded-box format.
Select [3800 UNBOUNDED] to reformat the
font to a 0o rotation Unbounded-box format.
Note that you cannot use ElixirFont to reformat an
Unbounded-box font to 90o or 270o rotations. To
do so, you must use the Elixir Desktop Converter
to convert the font to Unbounded-box format and
specify the rotation in the dialog box that displays.
See the Elixir Desktop and Converters User
Guide for more information.
ELIXIRFONT FOR AFP USER GUIDE 4-5
Page 54

LOADING FONTS AND CODE PAGES
Resolution
Select [Fixed 240 Pels] or [Relative Units] to set a
flag which specifies the internal measurements
(such as A-space, etc.) of a Bounded-box font to
fixed 240 dots per inch or to relative units (the actual relative measurement is specified in the AFP
font header and cannot be specified from ElixirFont). Unbounded-box fonts can only be set to
240 pels.
Most users should select [Fixed 240 Pels] unless
you want to generate a font for the IBM 4028
which operates at 300.
Charset name
Select the name of the reformatted character set:
The default for a Bounded-box font is C0 appended to the start of the font stem name.
For example, C014NP converts to
C0C014NP.
The default for an Unbounded-box font is C1
appended to the start of the original file
name. For example, C014NP converts to
C1C014NP.
The last characters of the original non-AFP font
stem name truncate if the original font name contains more than six characters. We recommend
using the default character set name that
displays.
GCID Mapping list
The GCID mapping list is a file that maps character positions in a non-AFP font to predefined
GCIDs. Two default GCID mapping lists are provided: C0ADOBE.GL1 for creating Bounded-box
fonts and C0ADOBE.GL0 for creating
Unbounded-box fonts. You can overwrite these
but we recommend using the defaults.
Current Resolution
The current resolution of the font in pels (cannot
be edited).
4-6 ELIXIR TECHNOLOGIES CORPORATION
Page 55

Resize to 300
Applicable only for Bounded-box fonts when
changing the resolution using the Resolution
field, described above. When you resize the font
by specifying this option, check the quality of the
output font. We recommend resizing the font using the [Resize] option in ElixirFont. See the
"Transforming Elixir-format character sets" chapter for more information about the [Resize] option.
Loading as a non-AFP font
To load as a non-AFP font:
1. Follow the steps for loading a non-AFP font.
2. Select [No] to load the font as an non-AFP
Elixir-format font.
The character set displays in the Character Set
window as shown in the following figure:
LOADING FONTS AND CODE PAGES
Figure 4-5. Loaded non-AFP font
The Character Set window shows the character bit-
maps of the font arranged left-to-right and top-to-
ELIXIRFONT FOR AFP USER GUIDE 4-7
Page 56

LOADING FONTS AND CODE PAGES
bottom by the ASCII position of the character in the
font. The positions are defined in the font header file
(.HDR).
The top of the screen shows the position of each
character in decimal and hexadecimal notation when
you move the screen pointer over the character (a
gray box appears around the current character).
The Code Page window is initially blank.
Also shown is the width (in pels) of the character, and
whether the character is NULL, SPACING, or NONBLANK. A null character means that a character is
not defined for this position and displays as a filled
gray cell (like the first 32 characters in the font). A
spacing character occupies a cell but does not have a
bitmap and prints as a spacing character. All other
nonblank characters contain bitmaps.
The left of the screen displays the Toolbox with tools
that you can use to edit and manipulate the characters
or the entire Elixir-format character set. See the "Editing non-AFP fonts" chapter for more information about
the Toolbox.
Creating new character sets
ElixirFont allows you to create the following types of
font:
PC-mapped font.
Elixir format character set.
Creating a new PC-mapped font
To create a new PC-mapped font,
1. Pull down the Charset menu and select [New
Charset].
The Properties of New Font dialog box displays.
4-8 ELIXIR TECHNOLOGIES CORPORATION
Page 57

LOADING FONTS AND CODE PAGES
Figure 4-6. Properties of New Font
dialog box
2. Select [PC-Mapped Font].
Note that the default stem name and spacing type
for a new PC-mapped font are FONT01 and
NULL.
3. Specify the [Number of Characters], [Height of
character boxes], [Width of character boxes],
and [Baseline from bottom] for the new font
and click on OK.
The Font Properties dialog box displays.
4. Select options in the Font Properties dialog
box.
See the "Editing non-AFP fonts" chapter for information about the options in the Font Properties
dialog box.
5. Click [OK].
A new PC-mapped font containing all NULL characters is created.
ELIXIRFONT FOR AFP USER GUIDE 4-9
Page 58

LOADING FONTS AND CODE PAGES
Adding a bitmap to a cell
To add a bitmap to a cell:
1. Select a NULL cell and press <F2>.
The Properties of Null Character dialog box
displays.
2. Change the character type to [Spacing] and
click on OK.
3. Double-click on the new SPACING character
and edit the bitmap.
See the "Editing non-AFP fonts" chapter for information about editing a bitmap.
Creating a new AFP character set
To create a new AFP character set:
1. Pull down the Charset menu and select [New
Charset].
The Properties of New Font dialog box displays.
Figure 4-7. Properties of New Font
dialog box
2. Select [AFP Character Set].
4-10 ELIXIR TECHNOLOGIES CORPORATION
Page 59

LOADING FONTS AND CODE PAGES
Note that the default stem name and spacing type
for a new AFP character set are C0FONT01 and
SPACING
3. Specify the [Number of Characters], [Height of
character boxes], [Width of character boxes],
and [Baseline from bottom] for the new
character set.
4. Click on OK.
The Reformatting to AFP Character Set dialog
box described earlier in this chapter displays.
Note that the [GCID Mapping List] option is not
available when creating a new character set.
5. Select options and click on [OK] as the
following dialog boxes display:
Font Properties
Character Set Attributes
Character Set Increments
Character Set Design
Options in these dialog boxes are described in
the "Editing Elixir-format character sets" chapter.
A new AFP character set containing all SPACING
characters loads into the Character Set window.
6. Double-click on each new SPACING character
and edit the bitmap.
See the "Editing Elixir-format character sets"
chapter for more information.
ELIXIRFONT FOR AFP USER GUIDE 4-11
Page 60

LOADING FONTS AND CODE PAGES
Loading a Code Page
A Code Page maps keyboard entries to characters in
a character set. Each key on the keyboard corresponds to a hexadecimal Code Point. When printing
on an AFP printer, the Code Point is matched to a
GCID in the Code Page. This allows you to use different code pages (for example to print subsets of characters in a character set which is useful for printing
different European languages).
Elixir provides PC versions of code pages as
T1*.COD format ASCII files in
drive:\ELIXIR\FONTS\ELIXIR.
To load a Code Page:
1. From the Desktop, open a T1, X0, or X1
prefixed file in the Elixir Fonts folder
Note that opening a T1 file loads only a code
page while opening an X0 or X1 file loads both a
code page and its associated character set.
Alternatively:
Make the Code Page Window the active window and either press <F8> or pull down the
CodePage menu and select [Open Coded
Page].
In the ElixirFont Screen, pull down the File
menu and select [Open Code Page].
The Load Code Page dialog box displays a list of
code pages in the default directory.
4-12 ELIXIR TECHNOLOGIES CORPORATION
Page 61

LOADING FONTS AND CODE PAGES
Figure 4-8. Load Code Page dialog box
2. Select a Code Page and click [OK].
The Code Page Window displays the selected Code
Page as shown at the bottom of the following figure. If
a character set is not loaded, the Code Page displays
GCID names only.
Figure 4-9. Loaded Code Page and Character Set
ELIXIRFONT FOR AFP USER GUIDE 4-13
Page 62

LOADING FONTS AND CODE PAGES
3. Pull down the System menu and select [Usage
Switches].
The Usage switches dialog box displays as
shown earlier.
4. Select [Highlight chars in Code Page] and
click on [OK].
This highlights characters in the selected character set that map to the Code Page.
Editing a code page
To edit a code page, maximize the Code Page Window for a better view.
Horizontal/Vertical
Hex Display Toggle
Figure 4-10. Maximized Code Page
4-14 ELIXIR TECHNOLOGIES CORPORATION
Page 63

LOADING FONTS AND CODE PAGES
The Code Page shows a grid of cells arranged in rows
and columns identified by hexadecimal digits across
the top row and left column.
The arrow at the top left of the grid (shown in the figure above) points to the row or column that specifies
the first hex digit of the code point.
For example, in the above figure, the number 1 has a
hex code point B1. To switch rows and columns, click
on the arrow.
Each cell (identified by its hex code point) shows the
GCID and corresponding character bitmap for the current Code Page.
You can edit a Code Page as follows:
Select any character/GCID and drag and drop it
to another blank cell (code point).
Drag and drop a character from the Character Set
Window to any cell in the Code Page Window.
This powerful ElixirFont feature allows you create custom code pages using simple drag and drop
techniques.
ELIXIRFONT FOR AFP USER GUIDE 4-15
Page 64

Font basics
5. Editing non-AFP fonts
This chapter describes how to edit Elixir-format fonts
that were not originally sourced from AFP character
sets.
Some examples of non-AFP fonts are installed in the
drive:\ELIXIR\FONTS\ELIXIR directory on your PC
during installation (CURL, ROUND1, and LION).
You can also generate your own Elixir-format fonts by
using the Efont Factory to convert Bitstream Facelift
fonts to Elixir-format fonts. See the Elixir Desktop and
Converters User's Guide for more information.
This section describes the characteristics of non-AFP
fonts used to display, edit, and apply metrics to nonAFP fonts. The following figure shows some important characteristics of a character in a cell.
ELIXIRFONT FOR AFP USER GUIDE 5-1
Page 65

EDITING NON-AFP FONTS
Above
Below
Above
baseline
Blanks
Left
Cell
Height
Blanks
Right
Below
baseline
Linespacing
Leading
Baseline
Offset
Cell width
Figure 5-1. Character attributes
The next figure shows some character and linespacing attributes on a printed page.
baseline
baseline
Figure 5-2. Character and line attributes
5-2 ELIXIR TECHNOLOGIES CORPORATION
Page 66

The following formula is used for calculating line
spacing:
Line spacing = above baseline + below baseline + leading
ElixirFont tools
This section describes the ElixirFont menus and tools
used for editing, transforming, and setting font
properties.
Select tool
The Select tool allows you to select one character or all char-
Select Tool
EDITING NON-AFP FONTS
acters in a loaded font.
Select all characters
Unselect characters
Figure 5-3. Select tool and options
Use the <Ctrl> + <A> fast key to select and deselect
all characters in a font (toggle).
Select a range of characters by clicking on the first
character, then <Ctrl>-clicking on the last character.
ELIXIRFONT FOR AFP USER GUIDE 5-3
Page 67

EDITING NON-AFP FONTS
Edit tool
The Edit tool allows you to edit individual character
bitmaps.
Select a character and then select the Edit tool to edit
the character. If you do not select a character, the
software defaults to the first non-space or non-null
character. Alternatively, double-click on the character.
The Edit Window displays at the right of the screen.
Edit Tool
Edit Window Toolbar
Figure 5-4. Edit Window
Edit Window Menu Bar
Framing window
The bottom of the screen shows a partial list of characters with the current character selected. You can
click on another character to display it in the edit window. You can also scroll through the entire font using
the <Page Up>, <Page Down>, <Home>, and <End>
keys, or use the Windows scrolling buttons.
5-4 ELIXIR TECHNOLOGIES CORPORATION
Page 68

EDITING NON-AFP FONTS
The right of the screen shows the framing window
which you can move to display different portions of the
character you are editing.
Initially the character displays at 8X magnification
(each dot in the bitmap displays as a black or white
box 8 bits high and 8 bits wide).
The Toolbox now shows editing tools and various options which you can select. A selected tool or option
displays with a black background. In addition, you can
select options available from menus shown in the Edit
Window menu bar, and also from the Edit Window
Toolbar displayed just below the menu bar.
Edit Window menu bar
The Edit Window menu bar contains the following pulldown menus and menu options:
Char
Post
Blend
Prev Char
Next Char
Properties
Edit
Undo
Cut
Copy
Paste
Delete
Tools
Dot
Line
Box
Circle
Brush
Ruler
Move Area
Copy Area
View
Show Grid
Show Coordinates
ELIXIRFONT FOR AFP USER GUIDE 5-5
Page 69

EDITING NON-AFP FONTS
You can also select these functions from the Toolbox.
Edit Window Toolbar
The Edit Window Toolbar displays just below the Edit
Window menu bar.
Figure 5-5. Edit Window Toolbar
The three left blocks display object coordinates and
size, and change based upon the selected tool.
The following are the other options, from left to right:
Grid
Displays or hides the grid. The grid does not display
for magnifications of 4x and less.
Undo
Undoes the last edit operation.
Magnification
Shows the current magnification. Click on the down
arrow to decrease the magnification, or the up arrow
to increase it.
Post
Saves changes made to the character bitmap.
Prev
Displays the previous character in the font for editing.
Prompts for confirmation if you made changes.
Next
Displays the next character in the font for editing.
Prompts for confirmation if you made changes.
5-6 ELIXIR TECHNOLOGIES CORPORATION
Page 70

EDITING NON-AFP FONTS
Edit tool options
The editing tools display at the top of the Toolbox as
shown in the following figure.
Figure 5-6. Editing tools
Character Properties
Displays the Character Properties dialog box. See the
"Character Properties tool" section in this chapter for
more information.
Ruler
Displays the horizontal and vertical coordinates of the
screen pointer from the top left of the character cell (in
dots). The coordinates display at the left of the Edit
Window Toolbar.
Select area
Allows you to select a rectangular area of the displayed character and to move or copy it (by selecting
[M] or [C] in the Toolbox) to another location in the
cell.
Draw dot
Allows you to draw a dot in the character cell. You
can select the color (black, white, or reverse current
dot), and the thickness of the dot.
Draw line
Allows you to draw a line in the character cell. You
can select the color (black, white, or reverse), and the
thickness of the line.
ELIXIRFONT FOR AFP USER GUIDE 5-7
Page 71

EDITING NON-AFP FONTS
Draw box
Allows you to draw a box in the character cell. You
can select the color (black, white, or reverse) and the
thickness of the border, and draw hollow or filled
boxes.
Draw circle
Allows you to draw a circle in the character cell. You
can select the color (black, white, or reverse) and the
thickness of the border, and draw hollow or filled circles.
Draw brush
Allows you to draw with a brush tool. You can select
the brush thickness and color (black, white, or reverse) and paint with hollow or filled strokes.
Blend
Allows you to blend another character into the current
cell. After selecting the Blend tool, click on another
character from the font to view it in the framing window blended with the current character. Click in the
framing window and drag the new character to position it on top of the current character, then click on
[Accept] in the Toolbox to save the blend.
After editing or viewing the bitmap, close the Edit window to return to the ElixirFont main screen.
Transform
Allows you to alternate between edit mode and transform mode with the current character set or character.
See the "Transforming non-AFP fonts" chapter for
more information about transformations.
5-8 ELIXIR TECHNOLOGIES CORPORATION
Page 72

Transform tool
EDITING NON-AFP FONTS
The Transform tool allows you to change the appearance of single characters or the entire font.
The transformations you can perform are:
Resize Rotate Shift Slant
Darken Lighten Underline Reverse
Filter Outline Halftone Mirror
Use the additional setup options to define
how you want to apply the transformation
Figure 5-7. Transformation tools and options
You can also use the
Transforms
menu to perform all
the above actions.
See the "Transforming non-AFP fonts" chapter for in-
formation about the transformation tools and their operations.
ELIXIRFONT FOR AFP USER GUIDE 5-9
Page 73

EDITING NON-AFP FONTS
Kill tool
The Kill tool deletes or blanks a character from the
font, depending on your selection below the Toolbox.
Character Properties tool
Figure 5-8. Kill tool
The Character Properties tool displays the Character
Properties dialog box.
Figure 5-9. Character Properties dialog box
Equivalent ASCII Char
The ASCII representation of the selected character.
5-10 ELIXIR TECHNOLOGIES CORPORATION
Page 74

EDITING NON-AFP FONTS
Character Number
The ordinate position of the character in the font in
decimal and hexadecimal notations.
Cell Width
The width of the character cell. Also called the character width or the delta-X of the character.
Baseline Offset
The distance in dots from the bottom of the character
bitmap to the baseline. The baseline is positive if the
character sits above the baseline and negative if it sits
below the baseline.
Blanks Left
The blanks left of the character. This is the distance
(in dots) between the left side of the character cell and
the start of the character bitmap.
Blanks Right
The blanks right of the character. This is the distance
(in dots) from the right side of the character bitmap
and the edge of the cell. If the character has right
kerning, this value is negative and the character extends past the right side of the cell.
Left Kerning
The left kerning of the character. This is the distance
(in dots) the character extends over the left side of the
cell. This value produces left kerning only after the
font converts. The 9700 family of printers does not
support left kerning.
Bitmap width/Bitmap height
The width and height of the character bitmap in dots.
Char type
The type of the character. [Spacing] makes the character a spacing character and [Null] eliminates the
character. When you select a [Null] or [Spacing] character, a dialog box with fewer options displays
ELIXIRFONT FOR AFP USER GUIDE 5-11
Page 75

EDITING NON-AFP FONTS
Floating accent
The flag for distributed printers which instructs the
printer to map accents to a [High] or [Low] position or
to assign [No] accent to a character. This option is
not used for the 9700 series printers and refers to the
European ISO standard.
Selecting the [Prev] and [Next] buttons displays the
Character Properties dialog box for the previous and
next characters in the font.
Copy tool
The Copy tool allows you to copy a character into any
other position in the font. Select the character to
copy, then select a target position to which you want
to copy the character. If the target position already
contains a character, it is replaced.
You can also copy a range of characters to a new position in a font. Click and <Ctrl>-click to select a range
of characters and click on a target character cell. The
selected range of characters are copied to new positions starting at the target character cell.
Swap tool
The Swap tool allows you to swap the positions of two
characters in the font. Use the screen pointer to select
the first character, then select the second character.
The two characters swap positions.
5-12 ELIXIR TECHNOLOGIES CORPORATION
Page 76

Merge tool
EDITING NON-AFP FONTS
The Merge tool allows you to load another font and
copy the font characters into or replace characters in
your original font. A dialog box displays from which
you select another Elixir-format font. After font selection, the screen splits into source and target font windows. The source window shows the font from which
you want to merge characters; the target window contains the font you originally loaded.
To merge fonts:
1. Select the character you want to merge
(source).
2. Select the [Replace] or [Insert] option in the
Toolbox.
3. Click on the character in the target font you
want to replace or insert a character in front
of.
The character from the source window is copied
to the target window. The Replace operation
overwrites any character in the chosen position of
the target font. The Insert operation inserts characters in the position before the selected character in the target.
To cancel a selected character, select another
character.
Merging a tall character into a smaller font vertically
stretches the cells in the smaller font. See the following figures for an illustration of the effect of merging a
tall character into a smaller one.
ELIXIRFONT FOR AFP USER GUIDE 5-13
Page 77

EDITING NON-AFP FONTS
Figure 5-10. Selecting a character for merging
Figure 5-11. Effect of merging the character
5-14 ELIXIR TECHNOLOGIES CORPORATION
Page 78

Sample tool
EDITING NON-AFP FONTS
The Sample tool displays a font sampling pad in which
you can see how text created with the current font will
display at print time.
Figure 5-12. Sampling pad example
Use the keyboard or click on the characters in the
character set window to place the characters in the
sampling pad.
Select [Print Sample] from the File menu to proof print
the sampling pad (when proof printing, text prints as
bitmaps).
Click on [Line] in the Font window Toolbar to display
the baseline when entering characters (or select
[Show Baseline] from the View menu).
Click on [Kern] in the Font window Toolbar to see the
effect of kerning character pairs (or select [Show
Kerning] from the View menu). The bitmap of the
kerned character must extend beyond the character
cell for this effect to be visible.
ELIXIRFONT FOR AFP USER GUIDE 5-15
Page 79

EDITING NON-AFP FONTS
Font Properties tool <Ctrl> + <F2>
The Font Properties tool displays the Font Properties
dialog box.
Figure 5-13. Font Properties dialog box
Orientation
The orientation of the font: portrait, landscape, inverse
portrait, or inverse landscape.
Resolution
The font resolution: [240], [300], [480], or [600] dpi.
Pitch
Fixed or proportionally spaced. Selecting [Fixed] displays a dialog box requesting a fixed width value.
Linespacing
Changing [Distance Above], [Below], or [Leading]
changes the linespacing. To calculate the new line
spacing, click on the [Linespacing] button.
Point Size
Display only. The point size of the font (a point is 1/72
inches).
Pixel Height
Display only. The height of the font cell in dots.
5-16 ELIXIR TECHNOLOGIES CORPORATION
Page 80

EDITING NON-AFP FONTS
Last Character at
The decimal position of the last character. The first
character position is always 0, and the maximum last
character position is 255. If you increase this value,
new null characters are added to the end of the font. If
you decrease this value, characters are removed from
the end of the font.
Change cell width
Allows you to increase or decrease the width of every
cell in the font by the number of dots you enter. You
can change the relative spacing between characters
for the entire font.
Header submenus
Displays the font header information for HP PCL fonts
(other options are grayed).
HP PCL
Displays the HP PCL Font Properties dialog box.
Figure 5-14. HP PCL Font Properties
dialog box
Options in the dialog box are:
the typeface name (file name of the font)
the typeface number
the symbol set of the font
the style (italic or normal)
ELIXIRFONT FOR AFP USER GUIDE 5-17
Page 81

EDITING NON-AFP FONTS
Select the stroke weight (boldness), from [UltraLight] to [UltraBold]
5-18 ELIXIR TECHNOLOGIES CORPORATION
Page 82

6. Transforming non-
AFP fonts
This chapter describes how to use ElixirFont to apply
transformations to single characters or to all characters in a font.
Transformations are editing functions that change the
printing characteristics of characters. The transformations you can apply are:
Resize, Rotate, Shift, Slant, Darken, Lighten, Underline, Reverse, Filter, Outline, Halftone, and Mirror.
Some examples of single-character transformations
are shown in the following figure.
Figure 6-1. Transformation examples
To apply a transformation:
1. Select either a single character or the entire
font (<Ctrl>-<A>).
2. Pull down the Transforms menu or click on
the Transformation tool (the top center tool in
the Toolbox) and select the transformation
you want to apply.
3. Select the transformation options you want
from the bottom of the Toolbox area.
ELIXIRFONT FOR AFP USER GUIDE 6-1
Page 83

C
TRANSFORMING NON-AFP FONTS
4. Click on the button in the Toolbox to
start the transformation.
5. Click on the button in the Toolbox if
you want to stop the transformation during
execution.
6. Click on the [Undo] button in the Toolbox to
undo the transformation just applied (the
undo function does not reverse a
transformation that is stopped during
execution).
The following sections describe transformations in
more detail.
Transformation tool
Figure 6-2. Transformation tools and menu
Transforms menu
6-2 ELIXIR TECHNOLOGIES CORPORATION
Page 84

Transformation tool options
This section describes the Transformation tool options
in the ElixirFont Toolbox.
Transformation tool
options
Figure 6-3. Transformation tool selected
TRANSFORMING NON-AFP FONTS
ELIXIRFONT FOR AFP USER GUIDE 6-3
Page 85

TRANSFORMING NON-AFP FONTS
Resize
This transformation resizes a single character or the
entire font.
Figure 6-4.
Selected Resize tool and options
The current point size displays. Enter a new point size
by clicking on the up and down arrows (you can only
resize within an allowable range), or specify horizontal
and vertical resize percentages within the allowable
range.
Select the [Filter bitmap] button to remove jagged
edges and single bits after resizing. The bitmap features that are filtered are those currently selected in
the Filter Toolbox. To verify the selected options, select the Filter tool and specify:
Remove single black bits
Remove single white bits
You may want to apply filtering to a single character to
see the effect of different filtering options.
When resizing the entire font, a second dialog box displays requesting resize confirmation. Line spacing,
cell widths, and other values are resized
proportionately.
6-4 ELIXIR TECHNOLOGIES CORPORATION
Page 86

Rotate
TRANSFORMING NON-AFP FONTS
If you are increasing the character size and the enlarged character does not fit in the character cell, a
dialog box requests confirmation for increasing the
size of the character cell.
Repeatedly resizing the same font significantly distorts
the font and is not recommended.
This transformation rotates characters in 90-degree
increments.
Figure 6-5. Selected Rotate tool and options
Select [Clockwise] or [Counter-clockwise] rotation.
If you rotate the entire font more than once, cell di-
mensions such as blanks left are not preserved, and
reversing the rotation does not restore the font
precisely.
This option does not create a landscape font from a
portrait font, or a portrait font from landscape font. To
change the orientation of the font, modify the orientation in the Font Properties dialog box.
ELIXIRFONT FOR AFP USER GUIDE 6-5
Page 87

TRANSFORMING NON-AFP FONTS
Shift
This transformation shifts a character in its cell. Select a direction to shift (up, down, left, or right arrow),
and set the number of dots you want the characters to
shift.
Figure 6-6. Selected Shift tool and options
If shifting a character extends it beyond its cell, a dia-
log box requests confirmation for increasing the size
of the character cell.
6-6 ELIXIR TECHNOLOGIES CORPORATION
Page 88

Slant
TRANSFORMING NON-AFP FONTS
This transformation is useful for creating an italic version of a character or a font.
Figure 6-7. Selected Slant too
and options
Select the slant direction by clicking on it, then select
the number of dots by which you want the character(s)
slanted.
If slanting a character extends it beyond its cell, a
warning dialog box displays.
You should not repeatedly slant characters. Each
slant operation adds distortions (like jagged edges,
single bits, etc.) that are compounded with repeated
operations.
ELIXIRFONT FOR AFP USER GUIDE 6-7
Page 89

TRANSFORMING NON-AFP FONTS
Darken
This transformation darkens (emboldens) characters.
Figure 6-8. Selected Darken tool
and options
This operation adds one or more dots next to existing
dots in the character bitmap.
Specify the number of dots, and the side of the bitmap
to which you want dots added.
6-8 ELIXIR TECHNOLOGIES CORPORATION
Page 90

Lighten
TRANSFORMING NON-AFP FONTS
This transformation lightens (debolds) characters.
Figure 6-9. Selected Lighten tool
and options
This operation removes one or more dots near existing dots in the character bitmap.
Specify the number of dots, and the side of the bitmap
from which you want dots removed.
ELIXIRFONT FOR AFP USER GUIDE 6-9
Page 91

TRANSFORMING NON-AFP FONTS
Underline
This transformation underlines characters.
Figure 6-10. Selected Underline tool
and options
Specify the position of the underline as above or below the baseline, and the distance to the baseline.
You can also specify the thickness of the underline (in
dots, default 4 dots) and whether the width of the underline is across the character or across the cell.
6-10 ELIXIR TECHNOLOGIES CORPORATION
Page 92
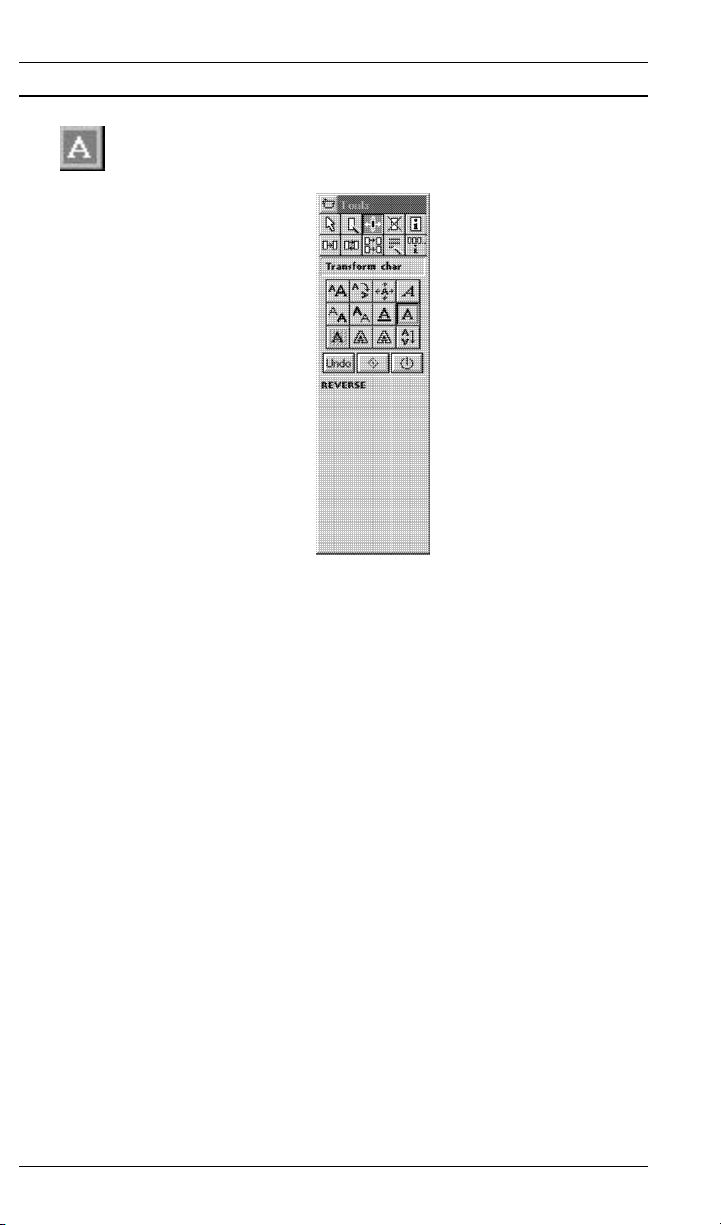
Reverse
TRANSFORMING NON-AFP FONTS
This transformation reverses (changes black to white
and white to black) character cells.
Figure 6-11. Selected Reverse tool
You are prompted for confirmation when you want to
reverse the entire font, but not when you want to reverse a single character.
ELIXIRFONT FOR AFP USER GUIDE 6-11
Page 93

TRANSFORMING NON-AFP FONTS
Filter
This transformation applies filtering to one or more
characters in a font.
Figure 6-12. Selected Filter tool
and options
The following figure shows the features that you can
filter.
Figure 6-13. Filtering features
The effects of the filter are limited. For example, the
filtering result may not be consistent with bits that are
on outer edges of the character bitmap. You should
always check character bitmaps after filtering and performing manual edits.
6-12 ELIXIR TECHNOLOGIES CORPORATION
Page 94

Outline
TRANSFORMING NON-AFP FONTS
This transformation encloses the character bitmap
with a border and reverses the enclosed area.
Figure 6-14. Selected Outline tool
and options
Specify the outline thickness between 1 and 9 dots
(the default is 2 dots).
The following figure shows the effect of outlining.
ELIXIRFONT FOR AFP USER GUIDE 6-13
Page 95

TRANSFORMING NON-AFP FONTS
Figure 6-15. Outlining example
6-14 ELIXIR TECHNOLOGIES CORPORATION
Page 96

Halftone
TRANSFORMING NON-AFP FONTS
This transformation applies line or shading patterns to
characters.
Figure 6-16. Selected Halftone tool
and options
You can apply halftoning as horizontal, vertical, and
slanted (45o and 135o) lines, and in many shades.
You can specify the line width and line separation in
dots, and apply halftoning to the character bitmap
(foreground) or the cell background.
You can also outline the character bitmap and specify
the outline width in dots.
When halftoning a spacing character, reverse it to
black then apply halftoning to the foreground.
ELIXIRFONT FOR AFP USER GUIDE 6-15
Page 97

TRANSFORMING NON-AFP FONTS
Halftoning is applied to solid black portions of a character. Halftoning a character that is not solid black
(for example, a shaded or previously halftoned character) results in halftoning being applied only to the
black portions of the character.
When halftoning an entire font, you may be required
to adjust some character width settings for correct
character fit when placed together, as shown in the
following figure.
Figure 6-17. Incorrect cell spacing example
6-16 ELIXIR TECHNOLOGIES CORPORATION
Page 98

Mirror
TRANSFORMING NON-AFP FONTS
This transformation rotates characters vertically or
horizontally to create a mirror image.
Figure 6-18. Selected Mirror tool
and options
The following figure shows a mirroring example.
original font
vertical
mirror
horizontal
mirror
Figure 6-19. Mirroring example
ELIXIRFONT FOR AFP USER GUIDE 6-17
Page 99

7. Editing Elixir-format
character sets
This chapter describes how to edit Elixir-format character sets that were converted from AFP format using
Elixir converters. See the Elixir Desktop and Convert-
ers for AFP User Guide for more information about
font conversions.
Some examples of Elixir-format character sets are
loaded in the drive:\ELIXIR\FONTS\ELIXIR directory
on your PC during installation (for example,
C0A05570 and C0A05580).
Bounded-box character set names start with C0 and
Unbounded-box character sets can start with C1
through CG; however Elixir only supports C1, C2, and
C4 prefixed character sets, as described below.
ElixirFont supports editing C1, C2, and C4 prefixed
Unbounded-box fonts that were converted from AFP
format using Elixir converters. ElixirFont can also
create C1 prefixed (0o inline print direction)
Unbounded-box character sets. Other inline print directions for Unbounded-box character sets can be obtained by converting to AFP format and selecting 90
or 270o directions.
o
Character set basics
You should refer to the "Font structure" chapter for an
overview of AFP and Elixir-format character sets and
to understand the terminology used in this chapter.
ELIXIRFONT FOR AFP USER GUIDE 7-1
Page 100

EDITING ELIXIR-FORMAT CHARACTER SETS
Editing Elixir fonts
The ElixirFont font editor functions in two different
ways depending on the source of the Elixir font and
the format to which you want to convert the edited
font:
In this guide, Elixir-format fonts that contain only
.GLH, .GLY, and .HDR components are referred to as
"non-AFP" Elixir fonts. These fonts are created in the
following ways:
The Desktop Converter icon was used to create
the Elixir font from a non-AFP source (such as
Bitstream Facelift or HP).
The Desktop Converter icon was used to create
the Elixir font from an AFP (Bounded-box or
Unbounded-box) character set using the "PCmapped" option.
The font was originally a "non-AFP" font and was
edited and saved using ElixirFont.
Alternatively, if you use the Desktop Converter icon to
convert an AFP character set to Elixir format and
specify the "Full AFP font" option, in addition to the
.GLH, .GLY, and .HDR components, the converted
Elixir font includes components described in the previous section. In this guide, these fonts are referred to
as "Elixir-format character sets".
ElixirFont tools
This section describes the ElixirFont menus and tools
used for editing, transforming, and setting font
properties.
7-2 ELIXIR TECHNOLOGIES CORPORATION
 Loading...