

Page 1

ElixiGraphics
User Guide
Publication # 720P22833
June 1999
Version 4.00
Page 2

Elixir Technologies Corporation
P.O. Box 1559
Ojai, CA 93024
Copyright © 1999 by Elixir Technologies Corporation.
All rights reserved. Prepared by Elixir Technologies
Corporation for exclusive publication by Xerox
Corporation.
Publication #720P22833
June 1999
Version 4.00
Printed in the United States of America
Xerox®, 2700, 3700, 4045, 4050, 4075, 4135, 4235,
4650, 4700, 4850, 4890, 8700, 8790, 9700, 9790,
XES, UDK, FRM, FSL, VIPP and all Xerox products
mentioned in this publication are trademarks of Xerox
Corporation.
Trademarks and Service Marks/Company:
Bitstream/Bitstream, Inc.
Elixir/Elixir Technologies Corporation
HP, LaserJet II/Hewlett Packard Company
IBM, Personal Computer AT, PS/2, and all IBM products mentioned in this publication/International Business Machines
MS-DOS, Microsoft Mouse, Windows/Microsoft Corporation
Sigma L-View/Sigma Designs, Inc.
Wyse/Wyse Technology
All other product names and trade names used herein
are trademarks of their respective owners.
Copyright protection claimed includes all forms and
matters of copyrightable material and information now
allowed by statutory or judicial law or hereinafter
granted, including without limitation, material generated from the software programs which are displayed
on the screen such as icons, screen display looks,
etc.
Changes are periodically made to this document.
Changes, technical inaccuracies, and typographic errors will be corrected in subsequent editions.
Page 3

Notes and cautions
The following notes and cautions apply to
ElixiGraphics.
ATM outline font support
ElixiFont now supports ATM outline fonts.
System display colors
If you experience memory problems while editing images, first check your system information by selecting
[System Info] from the System menu. The System Information dialog box displays with information about
the currently loaded file.
Image size
The value listed for "Number of colors" in this dialog
box refers to the number of colors your monitor is set
to display. To resolve any memory problems, you can
change your setup to display 16 colors. If your display
is already set for 16 colors, you should increase the
amount of RAM on your PC.
New image sizes are now available when creating a
new image: Legal, 11 x 17 inches, A3, and Other
(custom sizes).
Page 4

Elixir HP driver
The Elixir HP driver is no longer available when proof
printing from ElixiGraphics. You can proof print using
your Windows HP PCL or PostScript driver, however.
Page 5

Table of contents
Notes and cautions
1. Introduction 1-1
Customer support 1-1
ElixiGraphics environment 1-2
Who should use this guide 1-3
Conventions 1-3
Display conventions 1-3
Typographical conventions 1-3
On-line help 1-4
Organization of this Guide 1-6
Starting ElixiGraphics 1-7
Exiting ElixiGraphics 1-8
2. ElixiGraphics basics 2-1
Overview 2-1
ElixiGraphics and other Elixir products 2-2
ElixiGraphics features 2-3
Overview of features 2-3
Menu bars 2-4
Toolbox 2-5
Toolbar 2-7
Message area 2-8
Using ElixiGraphics 2-8
Configuring the system 2-9
Usage switches 2-9
ELIXIGRAPHICS USER GUIDE v
Page 6

TABLE OF CONTENTS
Configurable colors 2-10
System information 2-12
Reset to defaults 2-12
Save configuration 2-12
Loading an existing image 2-12
Displaying image attributes 2-15
Editing and saving an image 2-16
Creating a new image 2-17
Resetting an image 2-19
Refreshing the screen 2-19
Proof-printing an image 2-19
Additional features 2-21
3. Displaying and drawing an image 3-1
Displaying an image 3-1
View settings 3-2
Magnifying an image 3-2
Reducing an image 3-4
Using the drawing tools 3-5
FG button 3-5
BG button 3-5
Pattern button 3-6
GO button 3-6
Border width 3-6
Border style 3-7
Line 3-7
Curve 3-10
Box 3-12
Ellipse/Circle 3-14
Polyline/Polygon 3-16
Pencil 3-18
Brush 3-19
Airbrush 3-21
Floodfill 3-22
vi ELIXIGRAPHICS USER GUIDE
Page 7

TABLE OF CONTENTS
Eraser/Replacer 3-25
Text tool 3-26
Transform tool 3-27
Drawing modes 3-27
Drawing patterns 3-28
Editing patterns 3-29
4. Manipulating imagesand image areas 4-1
Procedures 4-2
Moving 4-3
Copying 4-4
Saving 4-4
Transforming images and image areas 4-4
Resize 4-5
Rotate 4-6
Mirror 4-8
Distort 4-9
Clear 4-10
Reverse 4-11
Shift 4-12
Halftone 4-13
Outline 4-14
Darken 4-15
Lighten 4-16
Filter 4-18
Import and Export 4-19
Copying to and from the Clipboard 4-19
Copying to the Clipboard 4-19
Pasting from the Clipboard 4-20
5. Using text and clip art 5-1
Entering text 5-1
Specifying text properties 5-4
Clip art 5-10
Importing clip art 5-11
ELIXIGRAPHICS USER GUIDE vii
Page 8

TABLE OF CONTENTS
Converting an image to a font 5-13
Creating clip art 5-14
Tiling an image 5-17
Creating a font from image portions 5-20
6. Additional features 6-1
Ruler 6-1
Merging an image into another image 6-2
Expanding/contracting an image 6-4
Creating a screen version 6-4
Converting an image to a form template 6-5
Breakup image 6-5
A. Working with highlight colors A-1
Highlight color image composition A-1
Applying highlight color shading patterns A-2
Editing highlight color shad-
ing patterns A-4
Editing in black and highlight color planes A-6
Converting a color image to black-and-white A-6
Using the [Color System] option A-7
Using the CLR2BW utility A-7
B. Keyboard shortcuts B-1
C. DOS directories C-1
D. Conversion chart D-1
Glossary GLOSSARY-1
Index INDEX-1
viii ELIXIGRAPHICS USER GUIDE
Page 9

1. Introduction
ElixiGraphics is a full-feature, Windows-based, bitmap
editor that allows you to create and edit Elixir-format
graphics.
Depending on the toolset you selected in the ElixiSys
Desktop, ElixiGraphics allows you to edit or create
black-and-white, highlight color, and full-color Elixirformat graphics.
ElixiGraphics provides the environment and drawing
tools normally found on dedicated graphics
workstations.
Combined with the ElixiSys Desktop (described in the
"ElixiGraphics environment" section of this chapter),
ElixiGraphics provides powerful features to support
your Xerox high-speed laser printing systems.
If you are familiar with GEM versions of ElixiGraphics,
you will find the Windows-based version contains the
functionality of the GEM versions plus added features,
including a new interface. If you have never used
ElixiGraphics before, you will find ElixiGraphics highly
intuitive and easy to use.
Customer support
Elixir customer support centers provide telephone
technical assistance for Elixir users during business
hours.
If you have purchased your Elixir product directly
from Xerox Corporation then you should contact
the Xerox customer support center telephone
number provided by Xerox.
ELIXIGRAPHICS USER GUIDE 1-1
Page 10

INTRODUCTION
If you have purchased your Elixir product directly
from Elixir Technologies then contact one of the
support center hotlines.
See the Elixir Getting Started Guide for information
about contacting your support center.
ElixiGraphics environment
ElixiGraphics is designed to work with the ElixiSys
Desktop, a Windows-based desktop. The ElixiSys
Desktop simplifies file conversions and management
by presenting the user with icons which can be manipulated with simple mouse drag-and-drop techniques (refer to the ElixiSys Desktop User Guide for
more information).
Other Elixir products that you can use with the ElixiSys Desktop are:
ElixiForm, which is a Windows-based WYSIWYG
forms creation package that creates boilerplate
forms for conversion to Xerox-format source or
object data streams. Graphics files created with
ElixiGraphics can be used on ElixiForm forms.
ElixiFont, a sophisticated Windows-based font
editor that you can use to create or edit Elixirformat fonts which you can then convert to Xerox
and other format fonts. Black-and-white graphics
files created with ElixiGraphics can be converted
to Elixir fonts by tiling them so that each tile represents a character in the font.
This guide is intended for users familiar with Xerox
graphics resources.
Knowledge of Windows and DOS, especially navigation through directory and subdirectory structures and
file operations is also required.
1-2 ELIXIGRAPHICS USER GUIDE
Page 11

Who should use this guide
This guide is intended for users familiar with Xerox
graphics resources.
Knowledge of Windows and DOS, especially navigation through directory and subdirectory structures and
file operations is also required.
Conventions
This section describes the display and typographical
conventions.
Display conventions
ElixiGraphics adheres to Microsoft Windows conventions for using menus, menu commands, dialog
boxes, command buttons, icons and a mouse. See
your Windows manual for more information.
INTRODUCTION
Typographical conventions
The following typographical conventions are used
throughout this guide:
Keystrokes are shown enclosed in < > (angle
brackets). For example, <Enter>.
Key combinations are denoted by a plus sign between keys. For example, <Shift> + <F1> indicates to simultaneously press the <Shift> and the
<F1> keys.
Menu titles are shown in bold. Menu options are
enclosed in [ ] (square brackets). For example,
Pull down the File menu and select [Load].
ELIXIGRAPHICS USER GUIDE 1-3
Page 12

INTRODUCTION
On-line help
Commands, options, actions, and parameters
that require description are shown in bold followed on the next line by the description. For example:
Delete
Deletes the selected characters.
Steps in a procedure are shown in numbered bold
paragraphs. For example
1. Pull down the Window menu and select [Tile].
Comments relating to a step (such as this paragraph) are shown in regular text following the bold
paragraph.
ElixiGraphics uses the Microsoft Windows Help program to provide on-line help for all functions.
For more information about Windows Help, select the
[How to Use Help] option in the Help menu, or see
your Microsoft Windows documentation.
The Help files included with ElixiGraphics include
graphics which were created using screen drivers with
large fonts. If you use a screen driver with small
fonts, the Help file graphics may not display clearly.
For optimum graphics display, use a screen driver that
uses large fonts.
You can display on-line help in the following ways:
Bubble help
Click on an icon with the right mouse button to view its
properties (if applicable) or to display "bubble help."
Bubble help is a short description of the icon function
that displays in a bubble extending from the icon.
1-4 ELIXIGRAPHICS USER GUIDE
Page 13

INTRODUCTION
Quick help
Enable the quick help function by selecting the [Show
Quick Help] option in the Preferences dialog box.
When you move the screen pointer over and icon on
the screen, a short description of the icon function displays in the Message area of the screen. During certain operations a message about the function you are
performing also displays in the Message area. You
can disable quick help if you prefer to see these operational messages.
Context sensitive Help
To use this function, press <F1>. The Help table of
contents displays.
Help menu
Select [Help] from the ElixiGraphics menu bar and select one of the displayed topics.
Dialog box Help
Click on the [Help] button in a dialog box to view an
associated Help topic. Under Windows 95 and Windows NT, right-click on a dialog box option to display
an associated Help topic.
Help pop-ups and jumps
Within Help topic text, words or phrases underlined in
green are pop-ups or jumps. When you click on a
pop-up topic, a box displays within the current Help
topic with additional information. When you click on a
jump, a different, associated Help topic displays.
Help Hypergraphics
Hypergraphics are special graphics within Help files
that contain "hot spots". Hot spots are either pop-up
topics or jumps. Hypergraphics in Elixir Help are most
commonly dialog boxes with option hot spots (pop-up
definitions), Toolboxes with tool hot spots (topic
jumps), and menus with option hot spots (topic jumps
or pop-up definitions).
Move the cursor over a hypergraphic until a hand displays, then click on this hot spot to display a pop-up
topic, or a "jump". To close a pop-up topic, click the
mouse button. To return to the original Help topic
from a jump, click on <Back> in the Help file menu.
ELIXIGRAPHICS USER GUIDE 1-5
Page 14

INTRODUCTION
Organization of this Guide
This User Guide is organized as follows:
Chapter 1, "Introduction," is a brief overview of Elixi-
Graphics software and documentation.
Chapter 2, "ElixiGraphics basics," describes how Elixi-
Graphics fits in with your Xerox printing system and
with other Elixir products. Basic information required
for using ElixiGraphics to create an image is described in this chapter along with pointers to other
chapters and appendices for additional information.
Chapter 3, "Displaying and drawing an image," describes how a loaded image displays at various magnifications, how large images are displayed, and how
to use the drawing tools displayed at the left of the
ElixiGraphics screen.
Chapter 4, "Manipulating images and image areas,"
describes operations you can perform on the entire
image or on marked areas in an image.
Chapter 5, "Using text and clip art," describes how you
can bring in text from fonts and how to create fonts
from images (by tiling the image) or image portions
(by cutting areas into a font). The concept of "clip art",
Elixir-format fonts containing image portions, is introduced in this chapter.
Chapter 6, "Additional features," contains descriptions
of features that are not directly related to drawing images but are included as supports for using ElixiGraphics (for example, ruler and grid display and
merging images).
Appendix A, "Working with highlight colors," describes
how to use the highlight color features of ElixiGraphics
(for HighLight Plus, or Option users only).
Appendix B, "Keyboard shortcuts," lists keyboard
shortcuts for ElixiGraphics operations.
Appendix C, "DOS directories," lists the directories
used in ElixiGraphics operations.
1-6 ELIXIGRAPHICS USER GUIDE
Page 15
Appendix D, "Conversion chart," contains a chart
showing supported formats for Graphics conversions.
Glossary
Index
Starting ElixiGraphics
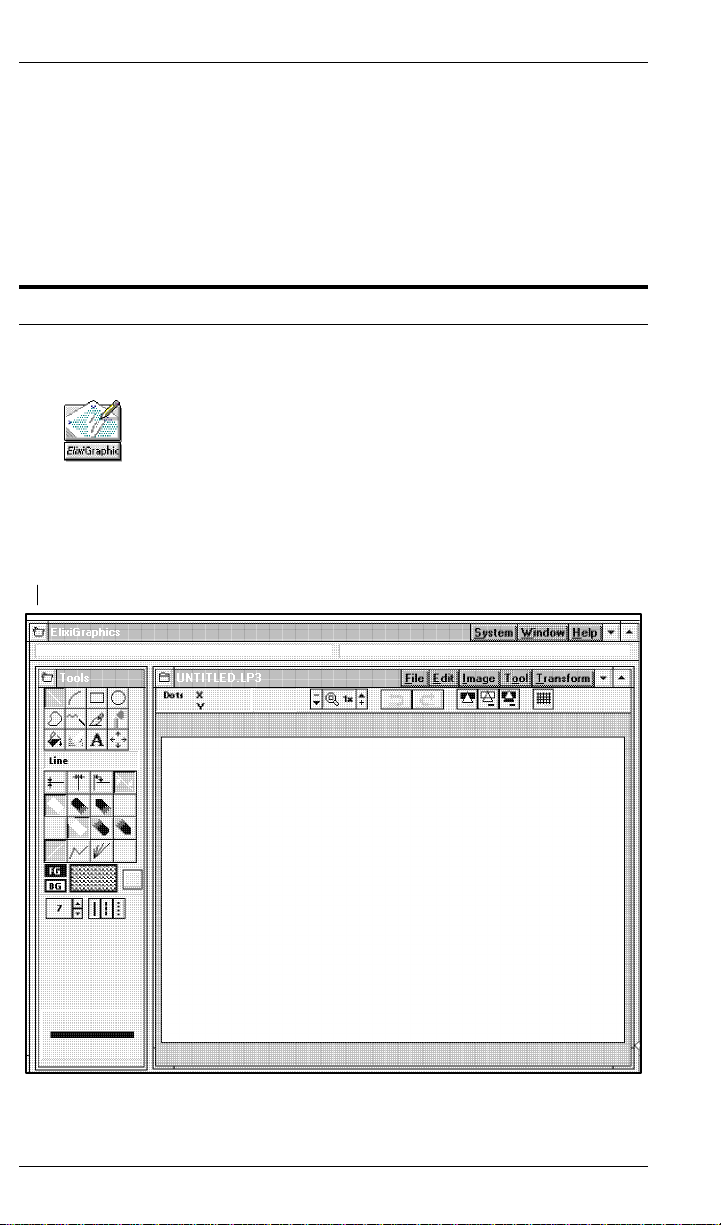
To start ElixiGraphics from the Elixir Desktop:
Open (double-click on) the ElixiGraphics icon at the
right of the Desktop.
The ElixiGraphics window (shown in the following fig-
ure) displays.
Close button
INTRODUCTION
Figure 1-1. ElixiGraphics window
ELIXIGRAPHICS USER GUIDE 1-7
Page 16

INTRODUCTION
Alternatively, with the Elixir Desktop displayed, open
the Graphics folder, then open the Elixir Graphics
folder and double click on a graphics file. The ElixiGraphics window (shown above) displays with the
graphics file loaded and displayed at the center of the
screen.
Exiting ElixiGraphics
To exit ElixiGraphics, pull down the
menu and se-
File
lect [Exit] (or press <Alt> + <X>, or <Alt> + <F4>), or
double-click on the Close button.
1-8 ELIXIGRAPHICS USER GUIDE
Page 17

Overview
2. ElixiGraphics basics
This chapter presents an overview of ElixiGraphics
and brief instructions on how to use it. This chapter
also includes references to other chapters in this user
guide that include detailed information.
PC-based graphics packages can create and edit images in two ways: in bit-mapped format where all
graphics elements created are stored as a collection
of dots, or in vector format where image elements are
stored mathematically. ElixiGraphics edits images in
bit-mapped format.
Other PC-based bitmap graphics formats include
Xerox IMG and LGO, PCX, BMP, and TIFF.
Converters in the Elixir Desktop enable you to import
LGO, IMG, PCX, BMP, and TIFF images and convert
them to Elixir format. When in Elixir format, you can
use ElixiGraphics to edit the images. Afterwards, you
can reconvert your edited images back to the original
format or to Xerox LGO, IMG, PCX, BMP, TIFF, or
Elixir font formats (see the following figure).
IMG LGO
ELIXIGRAPHICS
IMG
Figure 2-1. Importing/exporting ElixiGraphics images
ELIXIGRAPHICS USER GUIDE 2-1
LGO PCX/TIFF/BMP
PCX/TIFF/BMP
FONT
FONT
Page 18

ELIXIGRAPHICS BASICS
See the ElixiSys Desktop User Guide for more information about converting files.
ElixiGraphics and other Elixir products
The Elixir Suite for Xerox products are designed to interconnect. The following paragraphs describe examples of this interconnectivity.
Any scanner that generates PCX or TIFF (Group 4)
formats can be used from the Elixir Desktop. The
Elixir Desktop can then convert the files to Elixir format for use in ElixiGraphics.
ElixiGraphics enables you to create fonts directly from
graphics by tiling the graphic into equal rectangles,
each of which corresponds to a character in the font
(see the "Using text and clip art" chapter). These
fonts can be imported and edited in ElixiFont and then
converted to Xerox format and printed on any Xerox
printer.
You can use the Elixir Desktop to convert a Xerox font
into Elixir format, and then import the font and place it
in an image using ElixiGraphics.
A powerful feature of ElixiGraphics is the inclusion of
clip art libraries which are managed by ElixiFont and
used in large graphics projects (see the "Using text
and clip art" chapter).
Graphics created using ElixiGraphics can be used in
ElixiForm to enhance the appearance of a form. You
can use ElixiGraphics to copy forms from other
sources as follows: You can scan an existing paper
form into an image file (for example, PCX or TIFF),
convert the image to Elixir format, and use the Elixir
graphic as a template in ElixiForm to be traced over to
create a new Elixir form (see the "Additional features"
chapter).
2-2 ELIXIGRAPHICS USER GUIDE
Page 19
ElixiGraphics features
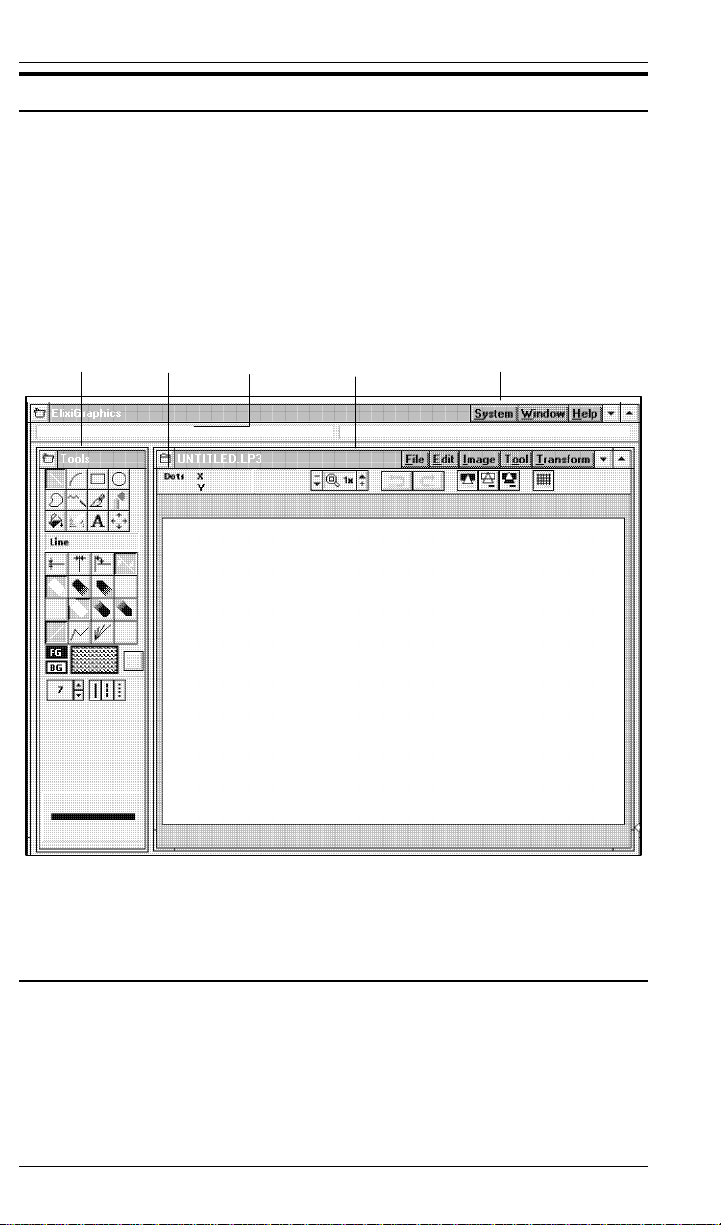
The ElixiGraphics window is shown in the following
figure. A blank Work area displays at the center. The
Work area menu bar displays above the Work area,
and the ElixiGraphics menu bar displays at the top of
the screen. The ElixiGraphics window also displays a
Toolbox, and Toolbar. The menu bars, Toolbox, and
Toolbar are described in the following sections.
ELIXIGRAPHICS BASICS
Toolbox Toolbar
Message
area
Work area
menu bar
Work area
ElixiGraphics
menu bar
Figure 2-2. ElixiGraphics window
Overview of features
This section gives an overview of ElixiGraphics features and refers you to the chapters where features
are explained in detail.
ELIXIGRAPHICS USER GUIDE 2-3
Page 20

ELIXIGRAPHICS BASICS
Menu bars
The ElixiGraphics menu bar contains the following
menus:
System
The options in this menu allow you to configure ElixiGraphics, as described in the "Configuring the system" section of this chapter.
Window
The options in this menu allow you to use the Microsoft Windows Multiple Document Interface (see the
"Loading an existing image" section of this chapter, or
your Microsoft Windows User's Guide for details), and
to toggle between displaying and hiding the Toolbox
(see the "Toolbox" section of this chapter).
Help
This menu allows you to access the on-line help features described in the "Introduction" chapter.
The Work area menu bar contains the following
menus:
File
The options in this menu allow you to load, create,
print, and save images, and exit ElixiGraphics. In addition, there are options for merging an image into an
existing image, resetting an image to the last save
state, and saving an image area.
tions are described in this chapter, the "Manipulating
images and image areas" chapter, and the "Additional
features" chapter.
menu opera-
File
Edit
The options in this menu allow you to cut and paste to
the Windows clipboard, copy a screen area, and delete all drawings in an image area. In addition, this
menu contains the undo and redo features described
in the "Toolbar" section of this chapter.
Edit
menu operations are described in the "Manipulating images
and image areas" chapter.
2-4 ELIXIGRAPHICS USER GUIDE
Page 21

Toolbox
ELIXIGRAPHICS BASICS
Image
The options in this menu allow you to view image attributes, expand or contract an image, set the stretch
mode when reducing images, and refresh the screen.
In addition, this menu allows you to access the Extra
Operations sub-menu which is described in the "Additional features" chapter. Image menu operations
are described in this chapter, the "Manipulating images and image areas" chapter, and the "Additional
features" chapter.
Tool and Transform
These menus correspond to the Toolbox options described in the "Toolbox" section of this chapter.
The following figure displays the ElixiGraphics toolbox.
Tools header
Drawing tools
Message panel
Tool options
Foreground/Background
Preview panel
Go button
Pattern button
Figure 2-3. ElixiGraphics toolbox
The drawing tools at the top of the Toolbox represent
the tools for drawing and editing images or image areas and importing text and clip art. If the Work area is
maximized, the Toolbox displays on top of the Work
area.
To use a drawing tool, select the appropriate tool in
the Toolbox or select the tool from the
ELIXIGRAPHICS USER GUIDE 2-5
Tool
menu.
Page 22

ELIXIGRAPHICS BASICS
The drawing tools are described in the "Displaying and
drawing an image" chapter.
The Transform tool is used to apply transformations,
such as resizing or half-toning, to whole images or image areas and is described in the "Manipulating images and image areas" chapter.
You can set the tool options by clicking on icons in the
Toolbox. Setting options for a drawing tool is described in the "Displaying and drawing an image"
chapter.
The Message panel provides a short description of
any selected tool in the Toolbox.
The Preview panel allows you to preview the option
settings for a drawing tool before you perform any
drawing operations.
You can toggle between hiding and showing the Toolbox by pulling down the Window menu and selecting
[Tools] or by pressing <F10>. To move the Toolbox,
click on the Tools header and drag the Toolbox to the
desired location.
Go
The [Go] button is used to apply the transformations
described in the "Manipulating images and image
area" chapter.
Pattern button
This button shows the current shading pattern when
drawing in color or black-and-white. Clicking on this
button allows you to apply the shading patterns described in the "Displaying and drawing an image"
chapter.
Highlight color users have the additional option of applying the shading patterns described in the "Working
with highlight colors" appendix.
FG/BG
The [FG] (foreground) button allows you to select the
color of your drawing tool.
The [BG] (background) button allows you to set a
background color when performing some of the transformation and drawing operations described in the
"Displaying and drawing an image" chapter and the
2-6 ELIXIGRAPHICS USER GUIDE
Page 23

Toolbar
ELIXIGRAPHICS BASICS
"Manipulating images and image areas" chapter. The
[BG] button also allows you to set a background color
when creating a new image. See the "Creating a new
image" section of this chapter for more information.
If you are a Black and White or highlight color user,
click on the [FG] or [BG] button until the color you
want is displayed.
If you are a full-color user, click on the [FG] or [BG]
button and double-click on a color from the window
that displays.
The following figure displays the Toolbar.
Digital ruler
Magnification/
Reduction
Undo/Redo
Drawing modes
Grid
Figure 2-4. ElixiGraphics Toolbar.
The Toolbar icons provide the following drawing supports for the drawing tools:
Digital ruler
This tool allows you to display the position of a drawing such as a line, circle, or box relative to the image
area, or to display the height and width of a drawing
while using certain drawing tools. This tool is described in the "Additional features" chapter.
Magnification/Reduction
This tool allows you to magnify or reduce an image
and is described in the "Displaying and drawing an image" chapter.
Undo/Redo
The Undo/Redo feature allows you to reverse actions
in ElixiGraphics if the [Number of Undo Levels] option
in the Preferences dialog box is set to one or more
levels. See the "Usage switches" section in this chapter for more information.
ELIXIGRAPHICS USER GUIDE 2-7
Page 24

ELIXIGRAPHICS BASICS
To undo an operation, click on the Undo icon in the
Toolbar or pull down the Edit menu and select [Undo].
You can also use the <Ctrl> + <Z> fast keys.
To redo an operation that was undone using the Undo
feature, click on the Redo icon in the Toolbar or pull
down the Edit menu and select [Redo]. You can also
use the <Shift> + <Ctrl> + <Z> fast keys.
Drawing modes
These icons (from left to right) allow you to access the
opaque, transparent, and reverse drawing modes described in the "Displaying and drawing an image"
chapter.
Grid
This icon allows you to toggle on a grid when displaying magnified views of 8x or more.
Message area
The Message area is split into two sections. The left
section displays the type of image loaded in the Work
area, and operational and error messages. The right
section provides a description of an icon when you
place your cursor over it.
Using ElixiGraphics
This section provides a brief overview of how to use
ElixiGraphics, including information about configuring
ElixiGraphics when you first start using it. If you have
never used ElixiGraphics, you may want to read all of
this section. In it, you will be referred to other chapters in this User Guide which provide more detailed
information.
Configuring the system
ElixiGraphics allows you to configure your system and
then save the configuration.
2-8 ELIXIGRAPHICS USER GUIDE
Page 25
Usage switches
ELIXIGRAPHICS BASICS
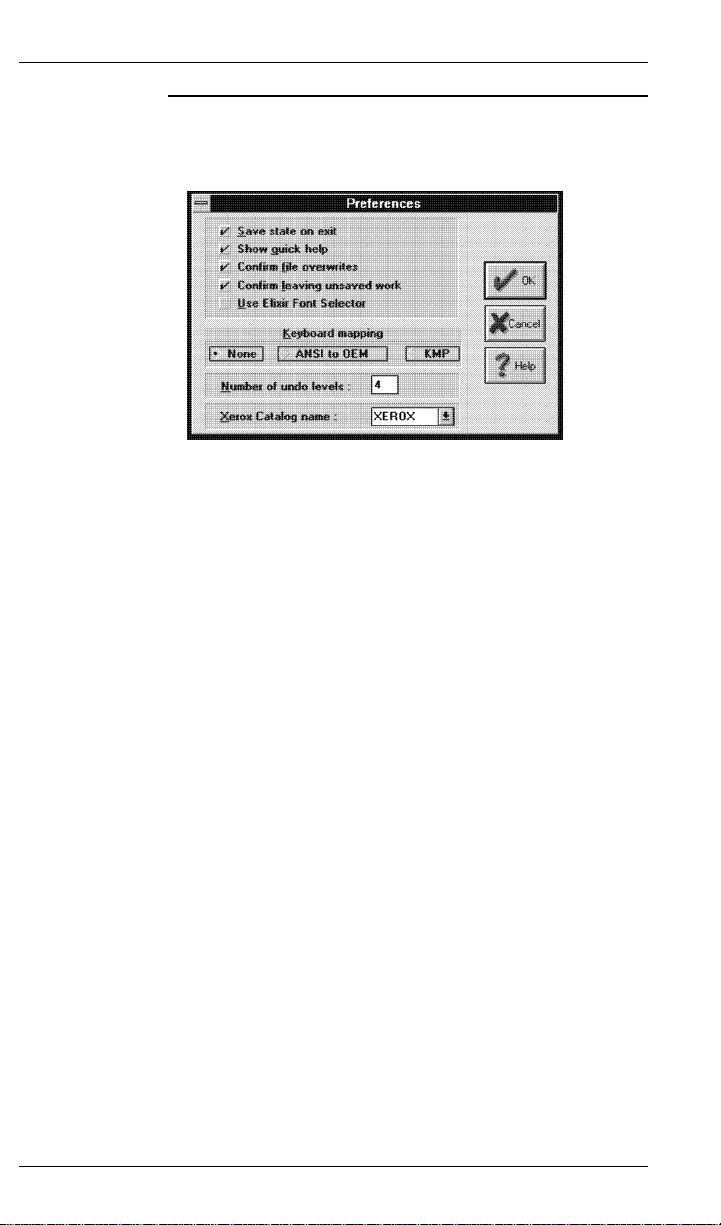
Pull down the
System
menu and select [Usage
Switches] to display the Preferences dialog box.
Figure 2-5. Preferences dialog box
Save state on exit
Select this option if you want to save the menu and
option settings when you exit an image.
Show quick help
Select this option to see the quick help messages described in the "Introduction" chapter.
Confirm file overwrites
Select this option if you want to be prompted before
overwriting a file.
Confirm leaving unsaved work
Select this option if you want to be prompted to save
your work before exiting ElixiGraphics.
Use Elixir font selector
Select this option if you want to use the Elixir Font Selector when you select fonts for your text. The Elixir
Font Selector allows you to select non-default font
widths.
ELIXIGRAPHICS USER GUIDE 2-9
Page 26

ELIXIGRAPHICS BASICS
Deselect this option if you want to use the Windows
Font Selector when you select fonts for your text. The
Windows Font Selector allows you to select only Windows default fonts.
See the "Using text and clip art" chapter for more
information.
Keyboard mapping
Select the [Keyboard Mapping] option:
Select [None] to use Windows ANSI mapping. If you select this option you must have
screen fonts mapped to Windows ANSI
mappings.
Select [ANSI to OEM] to remap ANSI keystrokes to DOS mappings.
Select [KMP] to translate keystrokes using
customized tables. In most cases, if you
chose the appropriate Country Keyboard Map
and Default Code Page during installation,
you can use this option.
Number of undo levels
Select the number of actions or levels (between 1 and
32) that ElixiGraphics can reverse when you use the
[Undo] option.
Xerox catalog name
This option is for highlight color users only. Select the
catalog for your printer: [XEROX] or [XEROX1].
Configurable colors
The Configurable Colors dialog box allows you to
change the color of the grid lines and the locator box.
(See the "Displaying and drawing an image" chapter
for a description of the grid lines and locator box.)
To display the Configurable Colors dialog box, pull
down the
2-10 ELIXIGRAPHICS USER GUIDE
System
menu and select [Colors].
Page 27

ELIXIGRAPHICS BASICS
Figure 2-6. Configurable Colors dialog box
The current colors for the grid lines and locator box
are displayed. To change the colors of either the grid
lines or locator box, click on the corresponding [Edit]
button to display the Color RGB Editor dialog box.
Figure 2-7. Color RGB Editor dialog box
RGB values are Red, Green, and Blue color components that combine to create a color. Use the right
and left arrows next to each color, or click inside the
corresponding box, to specify a component value between 0 and 255. The Result window displays the results of mixing Red, Green, and Blue color
components.
When you accept your changes by clicking on [OK],
your grid lines or locator box displays in the color
shown in the Results box.
ELIXIGRAPHICS USER GUIDE 2-11
Page 28

ELIXIGRAPHICS BASICS
System information
For information regarding your current Windows
screen driver, memory, and disk space available, pull
down the
pressing <Alt> + <F5>. The System Information dialog box displays.
Figure 2-8. System Information dialog box
Reset to defaults
System
menu and select [System Info], or
If you change the configuration settings while using
ElixiGraphics, you can reset to the default configuration by pulling down the System menu and selecting
[Reset to defaults].
Save configuration
To save current menu and option settings, pull down
the System menu and select [Save Configuration] before exiting an image.
Loading an existing image
ElixiGraphics allows you to load up to two images at
one time.
With the ElixiGraphics main screen displayed, load an
existing image as follows:
1. Pull down the File menu and select [Load] or
press <F8>.
2-12 ELIXIGRAPHICS USER GUIDE
Page 29

ELIXIGRAPHICS BASICS
The Load Image dialog box displays with an alphabetical list of all available images. If you
elected to install them, the names of demonstration files are listed. These are Elixir-format .LP3
files in drive:\ELIXIR\PICS\PRINTER. To display
.BMP images, select [.BMP] from the window at
the bottom of the dialog box.
Figure 2-9. Load Image dialog box.
If there are more files than can be displayed, use
the scroll bar to move through the list.
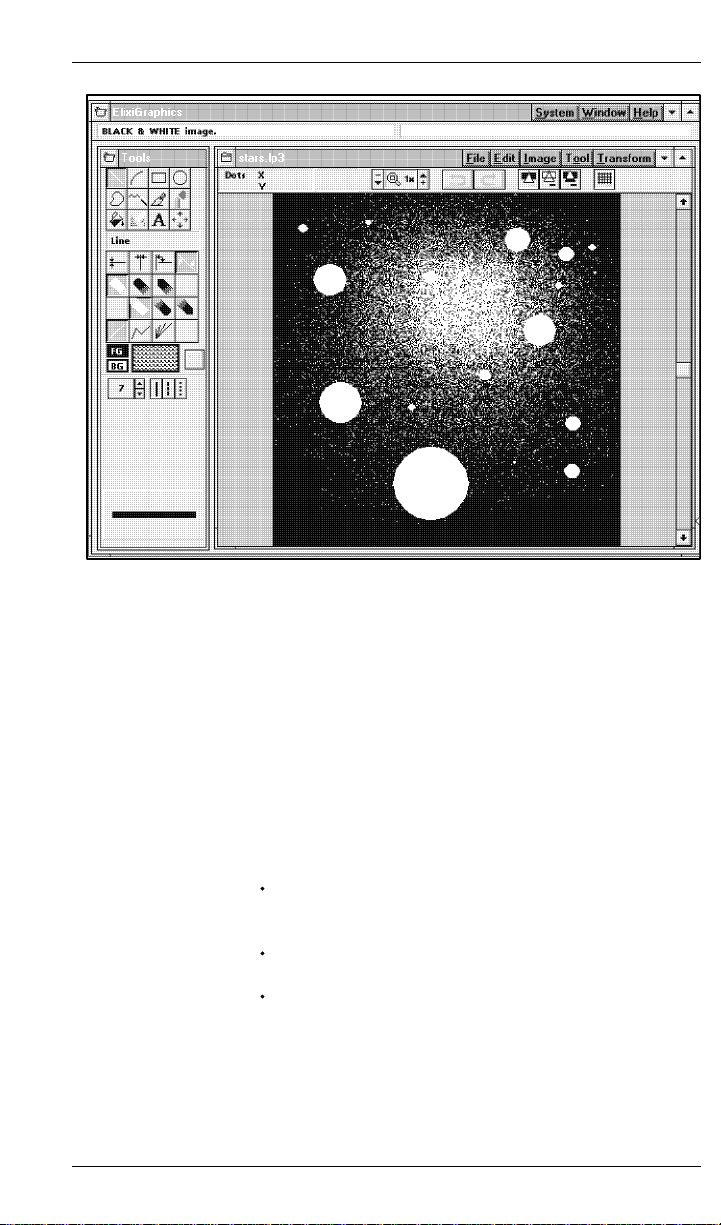
2. Select an image file.
The file displays in the Work area and the file
name displays in the Work area menu bar. The
following figure shows the demonstration file
STARS.LP3 displayed.
ELIXIGRAPHICS USER GUIDE 2-13
Page 30
ELIXIGRAPHICS BASICS
3. To load another image, pull down the Window
Figure 2-10. Loaded file
menu and select [Another Image] to re-display
the Load Image dialog box.
4. Select an image.
You now have two images loaded in two separate
windows.
5. Pull down the Window menu and select one of
the following:
[Cascade] displays the images in two separate overlapping windows.
[Horiz. tile] displays the images side by side.
[Vert. tile] displays one image above the
other.
2-14 ELIXIGRAPHICS USER GUIDE
Page 31

Displaying image attributes
ELIXIGRAPHICS BASICS
To display the image attributes, pull down the
Image
menu and select [Attributes] or press <F2>. The Image Attributes dialog box displays.
Figure 2-11. Image Attributes dialog box
The Image Attributes dialog box displays the following
information: width, height, name, resolution, color system, format, image memory size and memory available. If the image is a highlight color image, the
highlight color being used also displays.
You can select a different resolution only when using
the image in other applications, for example when using Elixir Desktop converters to convert the file to
other formats. Note that the image resolution of the
converted file must be supported by the target printer.
The resolution also affects the size of the image when
importing it into ElixiForm: the higher the resolution,
the smaller the image on the form.
The [Color System] option allows you to convert a
loaded image to [Black & White], [Highlight Color], or
[Full Color], depending on the image you have loaded
and the color system your printer supports.
The following information applies to HighLight Color
users only:
ELIXIGRAPHICS USER GUIDE 2-15
Page 32

ELIXIGRAPHICS BASICS
When your color system is set to [HighLight
Color], the [HighLight Color] option displays and
allows you to change the current highlight color by
pulling down the list and selecting another color.
If the currently loaded image is a highlight color
image, the [Swap Color Planes] option displays.
Click on this option to switch the highlight color
plane and the black plane.
For more information about HighLight Color, see the
"Working with highlight colors" appendix.
Editing and saving an image
ElixiGraphics allows you to edit up to two images at
one time.
To edit a displayed image:
Use the edit/drawing tools in the Toolbox. The
edit/drawing tools are described in the "Displaying
and drawing an image" chapter.
Use the Transform tool to transform a whole image or image area. See the "Manipulating images and image areas" chapter for more
information.
After making changes to an image you can do the
following:
Pull down the
menu and select [Save] (or
File
press <Ctrl> + <S>) to save your changes to the
current file. To save your changes to a new file
pull down the
menu and select [Save as] (or
File
press <F7>). The Save Image dialog box displays which allows you to specify a new file name.
Pull down the
menu and select [Undo], or
Edit
click on the Undo icon in the Toolbar, to undo the
last edit or transform operation.
2-16 ELIXIGRAPHICS USER GUIDE
Page 33

Pull down the Edit menu and select [Redo], or
click on the Redo icon in the Toolbar, to re-insert
the changes you made before you selected
[Undo].
Pull down the File menu and select [Reset] to delete any changes made since loading or saving
the file.
Pull down the Edit menu and select [Delete], or
press <Del>, to delete everything in the Work
area.
Creating a new image
To create a new image:
1. Click on [BG] to select the color of the
background.
2. Click on [FG] to select the color of the
drawing tool.
3. Pull down the File menu and select [New] or
press F9.
ELIXIGRAPHICS BASICS
Figure 2-12. Image Attributes dialog box options
The Image Attributes box displays the following
options:
ELIXIGRAPHICS USER GUIDE 2-17
Page 34

ELIXIGRAPHICS BASICS
Width
Specify the width of the new image in dots.
Note that ElixiGraphics rounds image widths up to
the nearest multiple of eight dots.
Height
Specify the height of the new image in dots.
Name
Specify a name for the image. The default name
is UNTITLED.LP3.
Standard Sizes
Select [Letter] to create an 8.5 x 11 image,
[11x17] to create an 11 x 17 image, [A3] to create
a European legal-size image, or [A4] to create a
European letter-size image.
Resolution
Select [200], [240], [300], [480], [600], [1200], or
[1440] dpi resolution.
Color System
Select the color system for the image you want to
create: [Black & White], [Highlight Color] or [Full
Color].
Format
Select a format for the new image: [.LP3] or
[.BMP].
Highlight Color
This option is for highlight color users only. When
the [Color System] option is set to [Highlight
Color], specify [RED], [GREEN], or [BLUE].
When using an ElixiGraphics image in ElixiForm,
the highlight color set in the ElixiForm application
overrides the ElixiGraphics image highlight color.
You can change the ElixiForm highlight color at
the highlight color printer console.
4. Click on [OK] and use the drawing tools to
create a new image.
2-18 ELIXIGRAPHICS USER GUIDE
Page 35

Resetting an image
When you reset an image, you clear all edits since the
last save operation. To reset an image, pull down the
menu and select [Reset].
File
Refreshing the screen
If a Windows operation leaves "snow" on the screen,
you can use the [Refresh View] option to redisplay the
image bitmap from memory onto the screen. Pull
down the Image menu and select [Refresh View].
Proof-printing an image
When you are ready to proof print your image, pull
down the File menu and select [Print] or press <Ctrl>
+ <Shift> + <F10>. The Print dialog box displays.
ELIXIGRAPHICS BASICS
Figure 2-13. Print dialog box
The Print dialog box contains the following options:
ELIXIGRAPHICS USER GUIDE 2-19
Page 36

ELIXIGRAPHICS BASICS
Printer
Choose your printer as a PCL 4 or compatible, Xerox
4045 or Xerox 2700/4045 printer.
Elixir software has been tested with HP Windows
printer drivers for proof printing. Other printer drivers
are not supported and may produce unpredictable results when used with Elixir software.
PCL 4 considerations
PCL 4 printers print a maximum page size of 8 x
10.33 inches. If your graphics' boundaries fill an 8.5 x
11 inches page, the outer margins of your image will
not print on a PCL 4 printer.
For accurate positioning, shift the print image on the
page using the [Page Shift] option in the Print dialog
box.
Orientation
Select the orientation for your page, [Landscape] or
[Portrait].
Page shift
Select [Page Shift] to shift your proof printer output
horizontally or vertically by the number of dots
specified.
[Xshift] moves your image horizontally and [Yshift]
moves your image vertically.
Use a negative shift value to shift the printed output to
the left or down, and a positive value to shift the
printed output to the right or up.
For a PCL 4 or compatible printer, the normal or centered image value is [Xshift] = -60.
Copies
Select the number of copies you want to print.
Use printer resolution
Select this option to print your image using the current
printer resolution. If you do not select this option, your
image is printed using the image resolution.
2-20 ELIXIGRAPHICS USER GUIDE
Page 37

Print to file
When [Print to File] is selected, ElixiGraphics outputs
a print file to the drive:\ELIXIR\PRINTS\HPPRINT\ directory with a .PRN extension.
Autogen output name
When you select the [Print to File] option, the [Autogen Output Name] option also displays. If you select
this option, ElixiGraphics automatically outputs the
print (.PRN) files with the same stem name as the
Elixir (.ELX) file. If you do not select this option, the
Print To File dialog box displays after you click on
[OK]. Enter the stem name for the file, up to eight
characters.
Additional features
The preceding sections provide a brief overview of
how to use ElixiGraphics. The following chapters provide detailed information about ElixiGraphics drawing\editing tools and features.
ELIXIGRAPHICS BASICS
ELIXIGRAPHICS USER GUIDE 2-21
Page 38

3. Displaying and
This chapter describes how to load and display an image and how to use the drawing tools.
Displaying an image
When you load an image in ElixiGraphics the image
displays in the Work area.
drawing an image
Fig 3-1. Displaying an image in the Work area
ELIXIGRAPHICS USER GUIDE 3-1
Page 39

DISPLAYING AND DRAWING AN IMAGE
The image is bound by a gray, uneditable region.
However, the image can be enlarged to extend into
the gray area as described in the "Additional features"
chapter.
A message displays in the message area identifying
the color mode of the loaded file: [Black-and-White],
[Highlight Color], or [Full Color].
Note that the square border around the image is not
part of the image.
View settings
This section describes how to display a magnified
view or a reduced view of an image using the Zoom
icon in the Toolbar. The Magnification window displays the current magnification level of an image.
Magnifying an image
Click on the up arrow in the Zoom icon (or press the
<+> key on the numeric keypad) to magnify the center
of the image and to display it in a window to the left of
the Work area.
The magnification factor displays in the Magnification
window. The default magnification factor is 1x. Use
the up arrow, or press the [+], to increase the magnification factor to 2x, 4x, 8x, 16x, or 32x magnification.
3-2 ELIXIGRAPHICS USER GUIDE
Page 40

DISPLAYING AND DRAWING AN IMAGE
Scroll bars
Locator Box
Figure 3-2. Magnified view
The magnified area in the left window is defined by the
Locator Box in the right window. Click inside the Locator Box and drag it to magnify a different area of the
image. To change the color of the Locator Box, see
the "ElixiGraphics basics" chapter.
Alternatively, you can use the arrow keys or the scroll
bars to move around and display different portions of
the image.
Click on the Grid icon in the Toolbar to display the
grid. The grid displays only at magnifications of 8x or
higher.
All drawing tools described in the following sections
work in magnified view.
Note that displaying an image at a magnification factor
of 16X or more may cause your system to become
unstable.
ELIXIGRAPHICS USER GUIDE 3-3
Page 41

DISPLAYING AND DRAWING AN IMAGE
Reducing an image
Before building a reduced view of an image, select a
Stretch mode. Stretch mode affects the way an image displays when it is reduced. To select a Stretch
mode, pull down the
Mode]. Select one of the following options:
[Color on Color] preserves black, white, and color
pixels when an image is reduced and is probably
the best mode for performing image reductions.
[Black on White] preserves black pixels at the expense of white pixels when an image is reduced.
[White on Black] preserves white pixels at the expense of black pixels when an image is reduced.
To display a reduced view of an image, click on the
down arrow in the Zoom icon or press the <-> key on
the numeric keypad.
Initially, the image displays at print size (PRN) which
allows you to preview an image at actual size.
Click on the down arrow again to display the image at
-2x, -4x, and -8x reduction factors.
Image
menu and select [Stretch
This feature is especially useful when you want to fit a
large image into the Work area.
Note that you cannot edit an image in a reduced view.
3-4 ELIXIGRAPHICS USER GUIDE
Page 42

Using the drawing tools
FG
BG
The drawing tools display at the top of the Toolbox
and drawing options display in the Toolbar.
To use a drawing tool, select it from the Toolbox or
from the Tool menu. In the figure on the left, the Line
tool is selected.
You can select options for your drawing tools. The
drawing tool you select determines the options available in the Toolbox. Drawing tool options are described in the following sections.
All drawing operations are performed by clicking and
dragging the mouse in the Work area.
Note that you can use all the tools described in this
section in the magnified view mode described earlier
in this chapter.
FG button
The [FG] button allows you to select the color of a
drawing tool as black, white or color, depending on the
color mode selected for your image.
DISPLAYING AND DRAWING AN IMAGE
If you are creating a black and white or highlight color
image, select a color by clicking on the [FG] button
until it displays the color you want.
If you are a full-color user, the Choose Foreground
Color dialog box displays when you click on the [FG]
button. Double-click on the color you want to use.
BG button
The [BG] button allows you to set the background
color when creating a new image, entering text, and
performing some of the transformation operations described in the "Manipulating images and image areas"
chapter. The [BG] button also allows you to set the
color of a fill when drawing filled shapes, as described
in appropriate sections of this chapter.
ELIXIGRAPHICS USER GUIDE 3-5
Page 43

DISPLAYING AND DRAWING AN IMAGE
If you are creating a black and white or highlight color
image, click on the [BG] button until it displays the
background color you want.
If you are a full-color user, the Choose Background
Color dialog box displays when you click on the [BG]
button. Double-click on the color you want to use.
Pattern button
The currently-loaded pattern displays in the Pattern
button. Click on the Pattern button to display the Pattern window from which you can load a shading pattern described in the "Drawing patterns" section of this
chapter.
If you are a highlight color user, you can also choose
one of the highlight color shading patterns described
in the "Working with highlight colors" appendix. Click
on [High...] to display the highlight color shading
patterns.
If you are a full-color user, you can also choose one of
the colors from the full-color palette. Click on [Full...]
and select a color from the pattern window.
GO button
Use the [Go] button to apply the transformation operations described in the "Manipulating images and image areas" chapter.
Border width
The up and down arrows in the Toolbox are used to
set the border width of lines, shapes, brush and pencil
tips, and the eraser.
To set the border width, click on the up arrow to increase the width, or on the down arrow to decrease
the width. The border width displays in the numeric
display box next to the up and down arrows.
3-6 ELIXIGRAPHICS USER GUIDE
Page 44

Border style
Line
DISPLAYING AND DRAWING AN IMAGE
You can also change the current value by backspacing over it and entering a new value. Alternatively, you
can click once in the numeric display box and specify
the lowest border width value by <Ctrl> - clicking in the
box, or the highest border width value by <Shift> clicking in the box.
Select [Solid], [Dashed], or [Dotted] borders when
drawing lines or shapes.
The Line tool allows you to draw single, connected, or
radial lines.
Line options
Figure 3-3. Line options
Select from the following options in the Toolbox:
ELIXIGRAPHICS USER GUIDE 3-7
Page 45

DISPLAYING AND DRAWING AN IMAGE
Line direction
Select the line direction: [Horizontal], [Vertical], [Both],
or [Free].
Select [Horizontal] to draw a line in the horizontal direction only.
Select [Vertical] to draw a line in the vertical
direction only.
If you are drawing connected lines and want
to scroll around the image, the line will stay
connected to the last point. This feature enables you to draw long lines across large images which do not fit in the Work area.
Select [Both] to draw a line in the horizontal or
vertical directions, depending on mouse
movement.
Select [Free] to draw a line in any direction,
including diagonal.
Line beginning and end style
Select the line beginning (top row) and end style (bottom row). Select [Square], [Round], or [Mitered] for
each end of your line. Line beginning and end styles
are most apparent at line widths of 10 or above.
Note that the [Mitered] option is available with diagonal lines only.
The following figure illustrates the effects of [Square],
[Round], and [Mitered] ends.
3-8 ELIXIGRAPHICS USER GUIDE
Page 46

DISPLAYING AND DRAWING AN IMAGE
Figure 3-4. Line end examples
Line style
Select [Single], [Connected], or [Radial].
Select [Single] to draw a single line between
mouse clicks.
Select [Connected] to connect lines between
successive mouse clicks, until you select another line style or drawing tool.
Select [Radial] to create lines that radiate
from a single point. This option applies to
[Free] direction lines only.
Note that the [Undo] option is not available for radial
lines.
You can change the line properties while drawing a
line. You can also use different line widths while
drawing a line as shown in the following figure.
ELIXIGRAPHICS USER GUIDE 3-9
Page 47

DISPLAYING AND DRAWING AN IMAGE
Figure 3-5. Connected lines with different widths
Curve
The Curve tool draws sections of circles or ellipses.
Connecting curves together enables you to produce
high quality line art.
Curve options
Figure 3-6. Curve options
Select from the following options in the Toolbox:
3-10 ELIXIGRAPHICS USER GUIDE
Page 48

DISPLAYING AND DRAWING AN IMAGE
Curve type
Select [Quarter Circle] to use sections of circles to
draw curves or select [Quarter Ellipse] to use sections
of ellipses to draw curves.
Curve direction
Select [Horizontal], [Vertical], or [Any].
Select [Horizontal] to draw the curve
horizontally.
Select [Vertical] to draw the curve vertically.
Select [Any] to draw the curve in any
direction.
Curve style
Select [Single], [Connected], or [Radial].
Select [Single] to draw curves one at a time.
Select [Connected] to connect curves be-
tween successive mouse clicks until you select another curve mode or drawing tool.
Select [Radial] to create curves continuously
from one point.
The following figure shows examples of curves in the
three different modes.
Note: The [Undo] option is not available for radial
curves.
ELIXIGRAPHICS USER GUIDE 3-11
Page 49

DISPLAYING AND DRAWING AN IMAGE
Figure 3-7. Curve examples
Box
The Box tool allows you to draw hollow or filled
squares or rectangles with squared or rounded corners. The width of the box border is determined by
the [Border Width] option.
Box options
Corner radius
options
Figure 3-8. Box options
3-12 ELIXIGRAPHICS USER GUIDE
Page 50

DISPLAYING AND DRAWING AN IMAGE
Select from the following options in the Toolbox:
Box shape
Select to draw a [Square] or [Rectangle].
Box corners
Select [Square] or [Rounded] corners.
Box type
Select [Hollow] or [Filled]. If you select [Filled], the
box fills with the fill pattern or color displayed in the
Pattern window.
Corner radius
Select [Custom] or [Maximum].
Select [Custom] to set the width and height
dimensions of rounded corners using the up
and down arrows next to the Width and
Height boxes.
Select [Maximum] to draw a square or rectangle with rounded corners of equal height and
width dimensions.
The following figure shows examples of boxes.
Figure 3-9. Box examples
Note that square boxes appear distorted on the
screen when the screen aspect ratio is not 1:1. However, these boxes print correctly.
ELIXIGRAPHICS USER GUIDE 3-13
Page 51

DISPLAYING AND DRAWING AN IMAGE
Ellipse/Circle
The hollow or filled Ellipse/Circle tool allows you to
draw hollow or filled circles and ellipses. The width of
the circle or ellipse border is determined by the [Border Width] option.
Ellipse/Circle options
Figure 3-10. Ellipse/Circle options
Select from the following options in the Toolbox:
Circle/Ellipse shape
Select to draw a [Circle] or [Ellipse].
Ellipse/Circle origin
Select [Center] or [Upper Left Quadrant].
Select [Center] to draw a circle from the center outward, where the anchor point is the
circle/ellipse center.
Select [Upper Left Quadrant] to draw an ellipse or circle that expands outward with one
quadrant of the circle or ellipse remaining anchored in the starting position. This method
allows you to place the shape more precisely
in relation to another object.
3-14 ELIXIGRAPHICS USER GUIDE
Page 52

DISPLAYING AND DRAWING AN IMAGE
Ellipse/Circle segment
Select one or more of the four segments to display
that segment of a circle or ellipse.
Ellipse/Circle type
Select [Hollow] or [Filled]. Selecting [Filled] draws circles and ellipses with the fill pattern displayed in the
Pattern window.
Figure 3-11. Circle and ellipse examples
ELIXIGRAPHICS USER GUIDE 3-15
Page 53

DISPLAYING AND DRAWING AN IMAGE
Polyline/Polygon
The Polyline tool draws polylines or filled and unfilled
polygons.
To draw a polyline or polygon, move the screen
pointer into the Work area, click in the image to start
drawing, and keep moving and clicking to draw the
line segments of the polyline or polygon. To end a
polyline or polygon, double-click the left mouse button.
Polyline options
Figure 3-12. Polyline/Polygon options
Select from the following options in the Toolbox:
Polyline/Polygon
Select [Open] or [Closed].
Select [Open] to draw a polyline.
Select [Closed] to draw a polygon.
Polyline/Polygon direction
Select [Horizontal & Vertical] or [Free] line segments.
Select [Horizontal & Vertical] to draw lines
that snap to horizontal or vertical lines.
3-16 ELIXIGRAPHICS USER GUIDE
Page 54

DISPLAYING AND DRAWING AN IMAGE
Select [Free] to draw lines in any direction.
Polygon fill mode
Select [All] or [Alternate] fill mode.
Select [All] to fill the entire polygon with the
pattern or color displayed in the Pattern
window.
Select [Alternate] to only fill areas that are accessible from the outside of the polygon by
crossing an odd number of lines.
Figure 3-13. Alternate polyline
Polyline/Polygon type
Select to draw a [Hollow] or [Filled] polygon.
Selecting [Filled] draws polygons with the fill pattern or
color displayed in the Pattern window.
Note that the border of the polygon is black only if you
select black using the [FG] button.
Figure 3-14. Polygon examples
ELIXIGRAPHICS USER GUIDE 3-17
Page 55

DISPLAYING AND DRAWING AN IMAGE
Pencil
The Pencil tool draws a continuous line in black or
white. Highlight color and full-color users have the additional option of drawing in color.
Pencil options
Figure 3-15. Pencil options
Select from the following options in the Toolbox:
Pencil tip
Select [Square] or [Rounded].
Select [Square] to draw individual dots or a
continuous line with squared ends.
Select [Rounded] to draw individual dots or a
continuous line with rounded ends.
For high-precision work in magnified view, you should
use the Pencil tool with a drawing width of [1].
Note that to see the difference between a [Square]
and [Rounded] pencil tip, select a border width of five
dots or more.
3-18 ELIXIGRAPHICS USER GUIDE
Page 56

Brush
DISPLAYING AND DRAWING AN IMAGE
The Brush tool paints continuous square or circular
dots, or in a series of horizontal, vertical, or diagonal
lines, depending on the drawing mode you select.
Click and drag the brush tip to generate a shape.
The Brush tool paints in black, white, or the currentlyselected fill pattern.
Highlight-color and full-color users have the additional
option of drawing in color.
Brush options
Figure 3-16. Brush options
Select from the following options in the Toolbox:
Basic brush tips
Select a [Square] or [Rounded] brush tip.
Select [Square] to paint continuous square
dots.
Select [Rounded] to paint continuous circular
dots.
Special brush tips
Select [Horizontal], [Vertical], [Diagonal Right], or
[Diagonal Left].
ELIXIGRAPHICS USER GUIDE 3-19
Page 57

DISPLAYING AND DRAWING AN IMAGE
Select [Horizontal] to paint a series of continuous horizontal lines.
Select [Vertical] to paint a series of continuous vertical lines.
Select [Diagonal Right] to paint a series of
continuous diagonal lines that slant to the
right.
Select [Diagonal Left] to paint a series of continuous diagonal lines that slant to the left.
The following figure is an example of the effect of the
[Horizontal], [Vertical], [Diagonal Right], and [Diagonal
Left] brush tips.
To achieve a continuous painting action, draw slowly
so that brush tips overlap.
Figure 3-17. Samples of brush drawing
Brush type
Select [Dots] or [Pattern].
Select [Dots] to paint in black, white or color.
Select [Pattern] to paint with the pattern or
color displayed in the Pattern window.
3-20 ELIXIGRAPHICS USER GUIDE
Page 58

Airbrush
DISPLAYING AND DRAWING AN IMAGE
The Airbrush tool simulates the effect of an airbrush
by "spraying" dots or patterns on the image.
To "spray", press and hold the mouse button.
Airbrush options
Figure 3-18. Airbrush options
Select from the following options in the Toolbox:
Spray type
Select [Dots] or [Pattern].
Select [Dots] to spray black, white or color
dots.
Select [Pattern] to spray with the pattern or
color displayed in the Pattern window.
Area Width/Height
The [Area Height] and [Area Width] options set the dimensions of the spray area (the area in which dots
are randomly sprayed). You may want to experiment
with thin spray areas (for example, width: 6, height: 15
to 99) first.
ELIXIGRAPHICS USER GUIDE 3-21
Page 59

DISPLAYING AND DRAWING AN IMAGE
Use the up and down arrows in the [Area Height] and
[Area Width] options to set the size of the spray in
dots. Alternatively, click in the box and enter a value.
Spot characteristics
Use the up and down arrows in the [Spot Size] and
[Spot Border] options to set values in dots. Alternatively, click in any of the boxes and enter a value.
The [Spot Size] option determines the size of
the spots the Airbrush sprays. As some
Xerox printers cannot print single dots, you
should select a spot size of 2 or larger for correct printing.
The [Spot Border] option determines the border width of the spots. You can use this feature to create special effects. For example,
try a spot size of [9] with a border of [1], and
paint using a gray tone pattern.
Figure 3-19. Airbrushing examples
Floodfill
The Floodfill tool allows you to fill an area bound by
the current foreground color, or fill an area already
having the current foreground color. You can use the
current background color or pattern as floodfill.
3-22 ELIXIGRAPHICS USER GUIDE
Page 60

DISPLAYING AND DRAWING AN IMAGE
Note that this function may not work correctly if ElixiGraphics is running under the Windows 95 operating
system, or if the image is 64 KB or larger.
Floodfill options
Figure 3-20. Floodfill options
Select from the following options in the Toolbox:
Floodfill mode
Select [Interior] or [Solid].
Select [Interior] to fill an area bound by the
current foreground color with the current pattern or the background color, depending on
your [Floodfill Type] selection.
Select [Solid] to fill areas having the current
foreground color with the current pattern or
the background color, depending on your
[Floodfill Type] selection.
Floodfill type
Select [Color] or [Pattern].
Select [Color] to fill an area with the current
background color displayed in the [BG]
button.
ELIXIGRAPHICS USER GUIDE 3-23
Page 61

DISPLAYING AND DRAWING AN IMAGE
Select [Pattern] to fill an area with the current
pattern.
The following figure shows the beach flood-filled with
a brick pattern.
Fig 3-21. Floodfill example
Note that if an area is already filled, you can replace
that area with another pattern or color only if the area
is defined by a border color that is different from the fill
color or pattern.
For example, if you have a shape with a highlight color
border, and a black and white pattern fill, you can replace the black and white pattern with another black
and white pattern, solid black or solid white. However,
if the shape border is black or white, you can not replace the black and white pattern because the border
color is the same as the pattern color.
3-24 ELIXIGRAPHICS USER GUIDE
Page 62

Eraser/Replacer
DISPLAYING AND DRAWING AN IMAGE
Use the Eraser/Replacer tool to clear portions of an
image to white, black, color, or the current pattern.
Eraser options
Figure 3-22. Eraser options
Select from the following options in the Toolbox:
Eraser mode
Select [Stretchy Box] or [Moving Box].
Select [Stretchy Box] to erase using a rectangular box in the image area. Press and hold
the mouse button to start drawing the box
then, as you move the mouse, the box
stretches and erases the area contained in
the box.
Select [Moving Box] to display a square with
the dimensions set in the [Border Width] option. While holding down the mouse button,
drag the pointer. The area covered by the
square is erased.
Eraser direction
If [Moving Box] is selected, select [Horizontal], [Vertical], [Both], or [Free].
ELIXIGRAPHICS USER GUIDE 3-25
Page 63

DISPLAYING AND DRAWING AN IMAGE
Select [Horizontal] to erase in a horizontal direction only.
Select [Vertical] to erase in a vertical direction
only.
Select [Both] to erase in a horizontal and vertical direction only.
Select [Free] to erase in any direction.
Pixel replacement
Select [All] or [Color replace].
Select [All] to clear the whole area with the
current background color, or pattern if the
[Eraser/Replacer Type] option is set to
[Pattern].
Select [Color Replace] to replace sections
having the current foreground color with the
current background color, or pattern if the
[Eraser/Replacer Type] option is set to
[Pattern].
Eraser/Replacer type
Select to [Erase with BG Color] or [Erase with
Pattern].
Select [Erase with BG Color] to erase/replace
with the current background color.
Select [Erase with Pattern] to erase/replace
with the current pattern or color.
Text tool
The Text tool allows you to import clip art images and
to insert text in your images. Using the Text tool is
described in the "Using text and clip art" chapter.
3-26 ELIXIGRAPHICS USER GUIDE
Page 64

Transform tool
The Transform tool is used for copying, moving, creating clip art, and for transforming an image or a
marked image area. Using the Transform tool is described in the "Manipulating images and image areas"
and "Using text and clip art" chapters.
Drawing modes
You can select the drawing mode option from the
Toolbar. These options affect all drawing tools.
The three options are (from left to right) [Replace]
(opaque), [Transparent] and [Reverse]. The following
figure shows the effect of superimposing a filled rectangle using (from top to bottom) the [Replace],
[Transparent], and [Reverse] options.
The drawing modes work for copy operations and all
the drawing tools except the Eraser.
DISPLAYING AND DRAWING AN IMAGE
Figure 3-23. Drawing modes
In replace (opaque) mode, drawing over another
shape replaces the shape underneath.
ELIXIGRAPHICS USER GUIDE 3-27
Page 65

DISPLAYING AND DRAWING AN IMAGE
In transparent mode, drawing does not erase any
shapes underneath.
In reverse mode, drawing reverses the color of
the shapes underneath.
Drawing patterns
Click on the Pattern button to display the Pattern window. The window displays a number of pre-defined
black and white shading patterns.
To select from the full-color window, click on
[Full].
To select highlight color shading patterns,
click on [High]. See the "Working with highlight colors" appendix for more information.
Select a pattern from the Pattern window by clicking
on it. The pattern displays in the Pattern window and
is available for use with the appropriate drawing tools
described earlier in this chapter.
Placing the cursor over a pattern displays the name in
the Pattern name box.
To close the Pattern window, double-click on the
Close button.
To move the Pattern window, click on the Pattern
header and drag the menu to the desired location.
3-28 ELIXIGRAPHICS USER GUIDE
Page 66

DISPLAYING AND DRAWING AN IMAGE
Close button
Patterns
Editing patterns
Pattern name box
Pattern header
Figure 3-24. Black-and-White Pattern window
To edit the currently selected shading pattern, click on
the Pattern button using the right mouse button. The
Shading Pattern window displays from which you can
edit the current pattern.
If you want to edit a highlight color shading pattern,
see the "Working with highlight colors" appendix.
ELIXIGRAPHICS USER GUIDE 3-29
Page 67

DISPLAYING AND DRAWING AN IMAGE
Figure 3-25. Shading Pattern window
The right side of the window shows the pattern at normal magnification. The left side of the window displays a magnified image of the pattern bitmap.
The edit area is within an 8 x 8 dot grid at the center
of the magnified bitmap area.
When you edit a black-and-white shading pattern and
save your changes, the changes are saved to memory
only, they are not saved to your hard disk. To store
the edited bitmap with other program settings, you can
save the current configuration by pulling down the
System menu and selecting [Save Configuration].
Although you can use all the drawing tools to edit the
pattern bitmap, it is easiest to use the Pencil tool with
a width of one for precision editing.
3-30 ELIXIGRAPHICS USER GUIDE
Page 68

DISPLAYING AND DRAWING AN IMAGE
You can also apply the transformation operations described in the "Manipulating images and image areas"
chapter to a pattern bitmap.
You can edit a pattern bitmap in black or white by selecting black or white with the [FG] button.
ELIXIGRAPHICS USER GUIDE 3-31
Page 69

4. Manipulating images
and image areas
ElixiGraphics includes features that allow you to manipulate (transform) a loaded image or a marked rectangular area within a loaded image.
You can perform the following transformation operations on the whole image: move, resize, rotate, mirror,
distort, clear, reverse, shift, halftone, outline, darken,
lighten, filter, or copy to and from the Windows
Clipboard.
You can perform the following transformation operations on an area in an image: all the above operations
plus moving, copying, and saving marked areas in the
image.
The import and export functions allow you to create or
use clip art images. These functions are described in
the "Using text and clip art" chapter.
All the transformation operations described above are
performed using options in the Transform menu or
the Transform toolbox, except copying to and from the
Clipboard which is performed using options in the Edit
menu.
ELIXIGRAPHICS USER GUIDE 4-1
Page 70

MANIPULATING IMAGES AND IMAGE AREAS
Click on Transform
icon to display the
Transform toolbox &
options.
Select a transformation
operation from the
Transform toolbox or
menu
Figure 4-1. Select a transformation
Procedures
To move, copy, transform, cut, paste or save an image area, you must first mark the area. To do this,
select the Transform tool, and then drag the mouse in
the image area. A dashed box displays around the
marked area. The marked area can then be moved,
copied, transformed, cut, paste or saved using the
procedures described in the following sections of this
chapter.
ELIXIGRAPHICS USER GUIDE 4-2
Page 71

MANIPULATING IMAGES AND IMAGE AREAS
Mark an area
Figure 4-2. Marking an area
You do not have to mark an area if you are copying,
moving, transforming, cutting, pasting or saving a
whole image.
Moving
The move operation allows you to move a marked
area to another area, leaving a blank space in place of
the marked area.
To move an area, click in the marked area (the screen
pointer changes to a hand) and drag the mouse. The
area attaches to the screen pointer. Release the
mouse button to place the area in a new location. A
blank space is left in place of the marked area.
ELIXIGRAPHICS USER GUIDE 4-3
Page 72

MANIPULATING IMAGES AND IMAGE AREAS
Copying
The copy operation allows you to make single or multiple copies, leaving the original image or marked area
in place.
To make a single copy, <Ctrl>-click in the marked
area (the screen pointer changes to a hand) and drag
the mouse. Release the mouse button to place the
area.
To create multiple copies, repeat the procedure.
Saving
To save a marked area as an Elixir (.LP3) or Bitmap
(.BMP) image, pull down the File menu and select
[Save Area]. The Save Area into Image dialog box
displays allowing you to specify a file name for the
marked area.
The new image file is written to the
drive:\ELIXIR\PICS\PRINTER directory.
Transforming images and image areas
To transform an image area, select one of the Transform operations described in the following sections.
Click on the [Go] button after marking an area and selecting the desired transformation options.
If you are transforming an entire image, simply click
on the [Go] button without marking an area. Alternatively, pull down the Edit menu and choose [Select All]
to outline the entire image and then click on the [Go]
button to apply the transformation. To deselect the
image, pull down the Edit menu and choose [Unselect] (or press <Ctrl> + <A> to toggle between selecting and unselecting an image).
Successively click on the [Go] button to reapply
transformations.
ELIXIGRAPHICS USER GUIDE 4-4
Page 73

Resize
MANIPULATING IMAGES AND IMAGE AREAS
You can also transform an image area "on the fly"
while moving or copying the area by using the appropriate <Ctrl>-fast key combination. All transformations
except the Resize, Clear, and Shift transformations
can operate in this manner.
Note that the current Toolbox option settings for a
transformation are applied when using this method.
See the "Keyboard shortcuts" appendix for a list of the
transformation fast keys you can use "on the fly."
This operation allows you to resize an image or image
area up or down in independent horizontal and vertical
percentages which you specify by clicking on the up or
down arrows in the [% In Horizontal] or [% In Vertical]
options. Alternatively, click in the box next to the up
and down arrows and enter a different percentage.
Click on [Go] to
apply the Resize option
Specify a horizontal or
vertical resize
Figure 4-3. Resize options
ELIXIGRAPHICS USER GUIDE 4-5
Page 74

MANIPULATING IMAGES AND IMAGE AREAS
If you are upsizing image areas, make sure you have
enough space on the right and below the image area
to place the resized area.
Figure 4-4. Resizing examples
Better results (less distortion) are obtained by resizing
in one step rather than repeatedly resizing.
The maximum horizontal and vertical resize value is
1000%, and the minimum horizontal and vertical
resize value is 10%.
Rotate
This operation allows you to rotate an image or image
area clockwise or counter-clockwise in 90 degree increments, or 180 degrees.
Select [Clockwise], [Counterclockwise], or [180 degrees] as the rotation direction.
ELIXIGRAPHICS USER GUIDE 4-6
Page 75

MANIPULATING IMAGES AND IMAGE AREAS
Click on the Go button
to apply a Rotate option
Specify a direction
Figure 4-5. Rotating options
If you are rotating image areas, make sure you have
enough space on the right and below the image area,
as the image is rotated into this area.
The following figure shows the effect of rotating in the
[180 degrees] direction.
Figure 4-6. Rotating example
ELIXIGRAPHICS USER GUIDE 4-7
Page 76

MANIPULATING IMAGES AND IMAGE AREAS
Mirror
This operation allows you to flip an image or image
area in horizontal or vertical directions.
Select the [Horizontal] or [Vertical] option to specify
the direction in which you want the image flipped.
Click on the Go button
to apply a Mirror option
Specify horizontal or
vertical mirroring
Figure 4-7. Mirroring options
The following figure shows horizontal mirroring.
Figure 4-8. Mirroring examples
ELIXIGRAPHICS USER GUIDE 4-8
Page 77

Distort
MANIPULATING IMAGES AND IMAGE AREAS
This operation allows you to distort an image or image
area in any direction.
Distortion is specified by direction and number of pixels. If you slant the area 28 pixels to the right, the top
row of the area will be distorted to the right by 28 pixels. Each successive row will be distorted less until
the last row is not distorted at all.
A benefit to this operation is that through combinations of distortions to the right and upward or to the
left and downward, you can perform arbitrary bitmap
rotations.
Click on [Go] to
apply a Distort option
Specify direction and the
number of pixels
Figure 4-9. Distorting options
The following figure shows an example of distortion.
ELIXIGRAPHICS USER GUIDE 4-9
Page 78

MANIPULATING IMAGES AND IMAGE AREAS
Figure 4-10. Distort example
Clear
This operation allows you to mark an area in the image and then clear that area or the area outside the
marked area to the current background color.
Select [Inside Area] to clear the marked area, or select [Outside Area] to clear the image outside the
marked area.
Click on [Go] to apply
a Clear option
Specify clearing inside or
outside an area
Figure 4-11. Clearing options
ELIXIGRAPHICS USER GUIDE 4-10
Page 79

Reverse
MANIPULATING IMAGES AND IMAGE AREAS
If a large image is loaded, only the part of the image
that displays in the current window will be cleared.
The following figure shows the effect of clearing outside an image area.
Figure 4-12. Clearing outside an area
This operation changes all black dots in an image or
marked area to white, and all white dots in the area to
black.
This operation does not require you to set options in
the Toolbox. Simply click on the [Go] button to perform the operation.
Figure 4-13. Reversing example
ELIXIGRAPHICS USER GUIDE 4-11
Page 80

MANIPULATING IMAGES AND IMAGE AREAS
Shift
This operation allows you to precisely move an image
area or the whole image with respect to its borders.
Select a direction to shift using the up, down, left, or
right arrow, and set the number of pixels you want the
image to shift.
Specify whether you want a [Normal] or [Circular] shift.
[Normal] replaces the area that was moved with the
current background color. [Circular] begins replacing
the area that was moved with a new version of the image with each click of the [Go] button.
Click on the Go button
to apply a Shift option
Specify shift direction, number
pixels, and shift type (Normal or
Circular).
Figure 4-26. Shift options
The following figure shows an example of a circular
shift with the bigcat logo.
ELIXIGRAPHICS USER GUIDE 4-12
Page 81

Halftone
MANIPULATING IMAGES AND IMAGE AREAS
Figure 4-14. Circular shift example
This operation allows you to apply line or shading patterns to whole images or image areas.
You can apply halftoning as horizontal, vertical, and
slanted (45° and 135°) lines, or as a shading pattern.
Select [Lines] when applying lines for halftoning. The
[Width] and [Separation] options control the width and
frequency of lines on the screen, thus varying the lines
per inch of the halftone.
The color of the halftoning lines is the current foreground color which you can set by clicking on the [FG]
button.
If using a shading pattern to halftone, select [Pattern]
and load the desired shading pattern as described in
the "Displaying and drawing an image" chapter.
ELIXIGRAPHICS USER GUIDE 4-13
Page 82

MANIPULATING IMAGES AND IMAGE AREAS
Figure 4-15. Halftone options
The following figure shows the effect of applying halftoning to the individual characters of the Xerox logo.
Click on the Go button
to apply a Halftone option
Specify Pattern or Lines
Specify line type
Specify Width & Separation
Figure 4-16. Halftone examples
You can apply different halftone screens to the same
area repeatedly to achieve different effects.
Outline
This operation enables you to produce an outlined
(hollow) version of an image or image area.
Select the width of the outline from the Toolbox.
ELIXIGRAPHICS USER GUIDE 4-14
Page 83

MANIPULATING IMAGES AND IMAGE AREAS
Click on the Go button
to apply an Outline option
Specify outline width
Figure 4-17. Outline options
Note that some Xerox printers cannot print lines with a
width of one dot. If printing on Xerox printers, you
should use 2-dot outlining.
Figure 4-18. Outline example
Darken
This operation allows you to darken an image or image area by adding one or more pixels next to existing
pixels in the image.
Specify the number of pixels and the direction in which
you want pixels added.
ELIXIGRAPHICS USER GUIDE 4-15
Page 84

MANIPULATING IMAGES AND IMAGE AREAS
Figure 4-19. Darken options
Click on the Go button
to apply a Darken option
Specify a direction and the
number of dots
Figure 4-20. Darkening example
Lighten
This operation allows you to lighten an image or image area. Each black area in the image or image
area is contracted by the number of pixels and the direction specified in the Toolbox.
Note that you cannot reverse a lighten operation using
the [Darken] option, however, you can use the [Undo]
option to restore the pre-lightened image.
ELIXIGRAPHICS USER GUIDE 4-16
Page 85

MANIPULATING IMAGES AND IMAGE AREAS
Click on the Go button
to apply a Lighten option
Specify the side and the
number of dots
Figure 4-21. Lightening options
Figure 4-22. Lightening example
ELIXIGRAPHICS USER GUIDE 4-17
Page 86

MANIPULATING IMAGES AND IMAGE AREAS
Filter
This operation allows you to apply up to six filtering algorithms to an image or image area.
Figure 4-23. Filter options
Click on the Go button
to apply a Filter option
Apply filtering algorithims
The following figure shows the features you can filter:
sharp corners, hanging or "ragged" dots, and single
bits. Filtering a sharp corner removes the corner dot.
Figure 4-24. Filtering
ELIXIGRAPHICS USER GUIDE 4-18
Page 87

To clean up rough edges on black and white signatures and logos, apply all six filtering algorithms by selecting each one in the Toolbox.
The following figure shows the effect of applying all filters to a halftone image area. The effect is to apply
more contrast to the image.
Import and Export
The Import and Export transform operations are described in the "Using text and clip art" chapter.
MANIPULATING IMAGES AND IMAGE AREAS
Figure 4-25. Filtering example
Copying to and from the Clipboard
You can copy an image or marked area to and from
the Windows Clipboard using the Edit menu.
Copying to the Clipboard
When copying to the Windows Clipboard, pull down
the
press <Ctrl> + <X> for [Cut], or <Ctrl> + <C> for
[Copy]).
ELIXIGRAPHICS USER GUIDE 4-19
menu and select either [Cut] or [Copy] (or
Edit
Selecting [Cut] leaves a blank space in the
marked area.
Page 88

MANIPULATING IMAGES AND IMAGE AREAS
Selecting [Copy] places the image in the Clipboard without changing the original image.
You can also copy an area to the Windows Clipboard
using the [Copy Screen Area] option. To use this option you must have the screen area you want to copy
visible. Use the [Copy Screen Area] option as follows:
1. Pull down the Edit menu and select [Copy
Screen Area].
The cursor changes to a hand pointer.
2. Place the finger tip of the hand pointer at the
top left corner of the area you want to copy,
and drag the mouse to the bottom right corner
of the area.
A temporary box is drawn around the area.
3. Release the mouse button to copy the area to
the Windows Clipboard.
The message "Block copied to Clipboard" displays in the Message area.
Pasting from the Clipboard
If you want to paste an image to a specific area, you
must first select the Transform tool and mark the area
where you want the image pasted.
You must also pull down the
paste mode from the
Set Paste Mode
menu and select a
Edit
sub-menu:
Select [Not Clipped] to paste the image in the
marked area at the actual size. If the image
is larger than the marked area, the image extends beyond the marked area.
Select [Clipped to Area] to paste the image in
the marked area. If the image is larger than
the marked area, only part of the image displays in the marked area.
Select [Fit to Area] to paste the image in a
marked area. If the image is larger than the
ELIXIGRAPHICS USER GUIDE 4-20
Page 89

MANIPULATING IMAGES AND IMAGE AREAS
marked area, the image is reduced so that it
fits in the marked area.
To paste an image from the Clipboard to a marked
area, pull down the Edit menu and select [Paste] (or
press <Ctrl> + <V>).
If you do not mark an area, the image is pasted in the
top left corner of the Work area.
Note for highlight color users: Color images in the
Windows Clipboard are stored as full color images.
When pasting a full color image onto a highlight color
image, the highlight color image may become polluted
with full color characteristics which may cause unpredictable results when printing.
To prevent this from occurring, pull down the Image
menu and select [Filter Colors] after pasting a color
image from the Windows Clipboard on a highlight
color image. This step ensures that your image remains a highlight color image and prints correctly on
your proof-printer.
ELIXIGRAPHICS USER GUIDE 4-21
Page 90

5. Using text and clip art
This chapter describes the following:
Entering text
ElixiGraphics allows you to enter text into an image
area using Windows alpha-numeric TrueType fonts,
ATM fonts, or Elixir-format fonts. Note that as ElixiGraphics is a bit-mapped image editor, the text can
only be edited while placing it in the image. Once it is
placed, it can only be edited as a bitmap using the
drawing tools described in the "Displaying and drawing an image" chapter.
How to enter text into an image.
Using and creating clip art.
How to tile an image into a font.
How to cut and convert an image area to a char-
acter in a font.
If you plan to use Elixir-format fonts, make sure they
are installed in the \ELIXIR\FONTS\ELIXIR directory.
Some fonts are installed in this directory during
installation.
If you are using the Elixir Desktop, you can also generate Elixir fonts from outline fonts by using the Elixir
Font Factory supplied with the desktop. See the Elixi-
Font User Guide for more information about Elixir
fonts and the ElixiSys Desktop User Guide for information about generating fonts with the EFont Factory.
You can also use the Elixir Desktop to convert Xeroxformat fonts to Elixir-format fonts for use in
ElixiGraphics.
ELIXIGRAPHICS USER GUIDE 5-1
Page 91

USING TEXT AND CLIP ART
You insert text into an image by entering text from the
keyboard and selecting text properties from the Text
toolbox.
To display the Text toolbox, select the Text tool in the
Toolbox or select [Text] from the Tool menu. The
Text toolbox displays.
Font Selection icon
Text properties
Font window
Elixir soft keyboard button
Preview selected font
Figure 5-1. Text toolbox
The Text toolbox allows you to select text properties
and displays the current Windows or Elixir-format font
in the Font window.
To enter text, click in the Work area. The Enter New
Text dialog box displays.
Figure 5-2. Enter New Text dialog box
5-2 ELIXIGRAPHICS USER GUIDE
Page 92

USING TEXT AND CLIP ART
Enter characters from the keyboard using the <Backspace> key or <Delete> key to edit text, and using
<Ctrl> + <Enter> to insert a carriage return (CR).
Click on [OK] to display the text in the Work area with
a box around it if you selected [Box Text], or a crosshair pointer if you selected [Free Text]. See the
"Specifying text properties" section of this chapter for
a description of the [Box Text] and [Free Text]
options.
When the text displays with a box around it or a crosshair pointer next to it, the text is in blend text mode.
Blend text mode allows you to edit the text, and position it anywhere in the Work area.
You can also enter characters from the Soft Keyboard
while in blend text mode. Select the Soft Keyboard to
open it, then click on the desired characters. The
characters display at the end of the text you entered
with the standard keyboard. Ensure that the box
around your text is large enough to view these additional characters.
Figure 5-3. Box and Crosshair pointer
To position the text when in blend text mode, move
the cursor inside the box or crosshair pointer until the
cursor changes to a hand, then click and drag the
mouse to move the text to the desired location. Release the mouse button to position the text.
Figure 5-4. Cursor changes to a hand
ELIXIGRAPHICS USER GUIDE 5-3
Page 93

USING TEXT AND CLIP ART
To edit the text when in blend text mode, move the
cursor inside the box or crosshair pointer until the cursor changes to a hand, then click on the right mouse
button to display the Change Text dialog box. Edit the
text and click on [OK] to accept your changes.
Once you are sure of where you want your text positioned, place the text by clicking outside the text block
and selecting [Cancel] from the Enter New Text dialog
box, or by selecting another drawing tool. Once text is
placed, you can only edit it as a bitmap using the
drawing tools described in the "Displaying and drawing an image" chapter.
Specifying text properties
Specify text properties by clicking on the options in the
Text toolbox.
Font type
This option allows you to select [Windows] to use
Windows fonts (including symbolic fonts such as
WingDings), or [Elixir] to use Elixir fonts. Note that
you can only load an Elixir-format font into ElixiGraphics if you have a screen version of the font. See your
ElixiSys Desktop User Guide for information about
generating a screen version of a font.
To use Windows fonts:
1. Select the [Windows] option.
2. Click on the [Font Selection] button.
The dialog box that displays depends on the [Use
Elixir Font Selector] option in the Preferences dialog box. (See the "ElixiGraphics basics" chapter
for more information about the Preferences dialog
box.)
If the [Use Elixir Font Selector] option is not
selected, the Font dialog box displays allowing you to select a font name, style, size and
script type from the fonts you have available
within Windows.
5-4 ELIXIGRAPHICS USER GUIDE
Page 94

USING TEXT AND CLIP ART
Figure 5-5. Font dialog box
If the [Use Elixir Font Selector] option is se-
lected, the Choose Font dialog box displays
allowing you to select the font name, style,
height and width.
Figure 5-6. Choose Font dialog box
3. Select the font you want to use and click on
[OK].
To use Elixir fonts:
1. Select the [Elixir] option.
The Load Font dialog box displays the Elixirformat fonts currently available in the
drive:\ELIXIR\FONTS\ELIXIR directory.
ELIXIGRAPHICS USER GUIDE 5-5
Page 95

USING TEXT AND CLIP ART
Note that if an Elixir-format font is already loaded,
click on the [Font Selection] button to display the
Load Font dialog box.
The Load Font dialog box also displays ElixiGraphics clip art fonts (described later in this
chapter). To avoid confusion, ElixiGraphics clip
art fonts are prefixed with a caret (^).
2. Select an Elixir-format font and click on [OK]
to load the font.
The currently loaded font displays in the Font
window.
You can view an Elixir-format font before entering it in
the Work area by selecting the [Soft Keyboard] option.
See the "Specifying text properties" section for more
information.
Note that you cannot enter grayed out or "null" characters in a font.
To close the window, click on the [Soft Keyboard] button again.
Text boundaries
Select to enter [Box Text] or [Free Text].
Box text is bound by columns. If you select the [Box
Text] option, you must also select the [Wrap Text] option (described later in this section) and define the
column.
To define a column:
1. Select the [Box Text] and [Wrap text] option.
2. Click and drag the mouse in the Work area.
A column displays in the Work area.
3. Release the mouse button when the column is
the correct size.
The Enter Text dialog box displays.
5-6 ELIXIGRAPHICS USER GUIDE
Page 96

USING TEXT AND CLIP ART
4. Type the text in the Enter Text window and
click on [OK].
The text displays inside the column.
5. To resize the column, click and drag any of
the handles.
Free text is not bound by columns; only by the width of
the image.
To use the [Free Text] option:
1. Click in the Work area.
The Enter Text dialog box displays.
2. Enter text and click on [OK].
The text displays as a continuous text string in the
image area .
Note that you can switch between [Box Text] and
[Free Text] until the text has been placed. However, if
the [Wrap Text] option is deselected when entering
free text and you toggle to [Box Text], the [Wrap Text
option is not automatically activated. To activate
[Wrap Text] in this situation, select the [Wrap Text]
option and click inside the column.
Text Baseline Rotation
Select the text rotation: [Left to Right], [Bottom to
Top], [Upside Down], or [Top to Bottom].
Note that due to Windows limitations, not all fonts can
be rotated. If a font does not rotate, select a different
font and try the rotate operation again.
Text Justification
You can justify text when the [Wrap Text] and [Box
Text] options are selected. Specify the justification for
each text block: [Left Justified], [Center Justified],
[Right Justified], or [Full Justified].
Text Positioning
When the [Wrap Text] and [Box Text] options are selected, specify the vertical positioning of the boxed
text: [Top], [Center], or [Bottom].
ELIXIGRAPHICS USER GUIDE 5-7
Page 97

FG
BG
USING TEXT AND CLIP ART
You can use this option with [Text Justification] and
[Box Text] to place the text in twelve positions within
the box.
Note that this option is not available if you have the
[Box Text] option selected for a Windows font type.
FG and BG buttons
Click on the [FG] button to toggle between entering
black, white or color text.
Click on the [BG] button to toggle between entering
text on a black, white or color background.
Font Selection
Select this option to bring up the Windows or Elixir
font selection dialog box to select a font to load.
Soft Keyboard
Select this option when an Elixir font is loaded, to display the Elixir font in a window below the Work area.
at the correct size in proportion to the image.
Figure 5-7. Displaying an Elixir font
5-8 ELIXIGRAPHICS USER GUIDE
Page 98

USING TEXT AND CLIP ART
Use the scroll bar or <PgUp> and <PgDn> keys to
scroll through the font.
If you are in blend text mode, you can enter text from
the soft keyboard by clicking on individual characters.
Wrap Text
Selecting this option toggles between setting [Wrap
Text] on or off. When you select [Wrap Text], any text
you enter is bound in the box you define in the [Box
Text] option.
Intercharacter Spacing (for Windows fonts only)
Intercharacter spacing allows you to justify text by
adding or deleting spaces between characters.
Enter a value in the [Intercharacter Spacing] option by
using the up and down arrows next to the box, or
clicking in the box and entering a new value.
As you increase the value, the spacing between characters increases. As you decrease the value, the
spacing between characters decreases.
Drawing Mode
You can enter text using [Replace], [Transparent] or
[Reverse] mode by selecting the appropriate icon in
the Toolbar. The following figure shows examples of
entering text in the three drawing modes.
ELIXIGRAPHICS USER GUIDE 5-9
Page 99

USING TEXT AND CLIP ART
Figure 5-8. Entering text in an image
Clip art
ElixiGraphics clip art is a collection of images stored
as characters in Elixir-format fonts. You can think of
each font as a "library" of related clip art. Because the
clip art is an Elixir-format font, you can convert it to
Xerox printer format and print the clip art as characters on the Xerox printer.
You can import clip art into your image from an existing clip art library, or you can create your own clip art
library. See the following sections for more
information.
To avoid confusion with normal fonts, ElixiGraphics
clip art file names are prefixed with a caret (^). During
installation, some clip art fonts are written to the
\ELIXIR\FONTS\ELIXIR directory.
5-10 ELIXIGRAPHICS USER GUIDE
Page 100

Importing clip art
USING TEXT AND CLIP ART
This section describes how to import clips from an existing clip art (font) library and place them in an image.
Refer to the following figure when importing a clip art
item into a displayed image.
Clip art library button
Load button
Figure 5-9. Importing clip art options
To import a clip art item into a displayed image:
1. Pull down the Transform menu and select
[Import] or select the Import tool in the
Transform toolbox.
2. Click on the [Clip Art Library] button.
3. Click on the [Load] button to display the Load
Clipart Library dialog box with all the
currently-available clip art libraries (fonts) in
the drive:\ELIXIR\FONTS\ELIXIR directory.
4. Select a library to display the first "page" of
clips in the library and click on [OK].
5. Position the cursor over a clip art item until
the clip art cell is highlighted then press the
mouse button.
ELIXIGRAPHICS USER GUIDE 5-11
 Loading...