

Page 1

Extended Connectivity Print Job
Manager (EC-PJM)
User Guide
For use with Xerox Network Publishing Systems
Extended Connectivity Print Job Manager
User Guide
Part Number: 701P36284
Version 2.0
February, 2001
Page 2

Page 3

Copyright
©2001 XEROX CORPORATION. All rights reserved. XEROX®, The
Document Company
the Xerox products mentioned in this publication are trademarks of
XEROX CORPORATION. Copyright protection claimed includes all
forms and matters of copyrightable material and information now allowed
by statutory or judicial law or hereinafter granted, including without
limitations, material generated from the software programs which are
displayed on the screen such as styles, templates, icons, screen displays
looks, etc.
While every care has been taken in the preparation of this material, no
liability will be accepted by Xerox Corporation arising out of any
inaccuracies or omissions.
All non-Xerox brands and product names are trademarks or registered
trademarks of their respective companies.
Changes are periodically made to this document. Changes, technical
inaccuracies, and typographical errors will be corrected in subsequent
editions.
Part Number: 701P36284
Version 2.0
February, 2001
®
, and all identifying numbers used in connection with
Page 4

Page 5

Table of Contents
Part Number: 701P36284............................................................................................................................i
1. Introduction....................................................................................... 1
Logging on to the EC-PJM Workstation..................................................... 1
Logging Off of the EC-PJM Workstation .................................................... 2
Shutting Down the EC-PJM Workstation ................................................... 2
Changing Passwords ................................................................................. 3
2. EC-PJM Accounts............................................................................. 4
The Administrator Account......................................................................... 4
The Supervisor Account............................................................................. 4
The <EC-PJM User> Account.................................................................... 5
The Guest Account .................................................................................... 5
3. Creating Input and Output Queues ................................................. 6
Creating an Input Queue............................................................................ 6
Creating an Output Queue for a TCP/IP Printer....................................... 15
Creating an Output Queue for a Novell Printer ........................................ 21
4. The Document Control Manager (DCM) Application ................... 26
The DCM Menu and Toolbar Commands ................................................ 27
Sorting Documents in DCM ..................................................................... 30
The DCM Status Bars.............................................................................. 31
Selecting an Input or Output Queue ........................................................ 32
Copying Documents Between Queues .................................................... 33
Moving Documents Between Queues...................................................... 34
Proofing Documents ................................................................................ 35
TABLE OF CONTENTS I
Page 6

Deleting Documents ................................................................................ 36
Saving Documents................................................................................... 37
Viewing Document Information ................................................................ 40
Setting DCM Configuration Options......................................................... 47
Setting DCM System Configuration Options............................................ 47
Setting DCM Initial Queue Configuration Options ...................................49
Setting DCM Last Queue Configuration Options ..................................... 53
Configuring Scanning of Document Names............................................. 56
Adding a Conditional Entry ...................................................................... 57
Editing a Conditional Entry ......................................................................58
Removing a Conditional Entry ................................................................. 58
Adding a Display Name Filter .................................................................. 59
Editing a Display Name Filter ..................................................................61
Removing a Display Name Filter ............................................................. 61
Converting Documents from PDF to PostScript....................................... 62
Configuring EC-PJM to Print PDFs with Prepended Xerox Job Tickets .. 63
Cluster Printing ........................................................................................ 66
5. The Print Icon Application .............................................................68
The Print Icon Menu and Toolbar Commands ......................................... 69
The Print Icon Progress Bars................................................................... 71
Selecting a Printer or Queue.................................................................... 72
Copying Files to the Print Icon Application............................................... 73
Customizing Document Types ................................................................. 75
Modifying the List of Acceptable Document Types.................................. 77
Modifying the List of Acceptable Document Extensions .......................... 78
Appendix A. Creating EC-PJM Privilege Accounts ........................... 80
Appendix B. Sample Xerox Job Ticket .............................................. 84
Appendix C. Virus Protection Recommendations ............................ 85
II TABLE OF CONTENTS
Page 7

EC-PJM INTRODUCTION
1. Introduction
The Extended Connectivity Print Job Manager (EC-PJM) is based upon
Microsoft® Windows™ 2000 server. It provides connectivity from a wide
array of topologies and network operating systems, as well as the
functionality of the standard Print Job Manager. Additionally, the EC-PJM
brings job flow and queue management flexibility to a print shop and
manual load balancing for multiple printer environments.
Logging on to the EC-PJM Workstation
The DocuTech Network Server, NSPlus Server Series and related
servers should be booted before the EC-PJM workstation is switched on.
This power-up order allows the network connection and network drive
mappings between the servers and the EC-PJM to be established when
the EC-PJM is switched on.
To log on to the EC-PJM workstation:
1. Turn the power to the workstation on. A Welcome to Windows dialog
box appears.
2. Simultaneously press the Ctrl+Alt+Del keys. The Log On to
Windows dialog box appears.
3. Enter your user name in the User name text box, your password in
the Password text box, and click the OK button.
USER GUIDE 1
Page 8

INTRODUCTION EC-PJM
Logging Off of the EC-PJM Workstation
To log off of the EC-PJM workstation:
1. On the taskbar, click the Start button and select the Shut Down
option. The Shut Down Windows dialog box appears.
2. Verify that the Log off option is selected from the drop-down list box.
3. Click the OK button.
Shutting Down the EC-PJM Workstation
To shut down the EC-PJM workstation:
1. On the taskbar, click the Start button and select the Shut Down
option. The Shut Down Windows dialog box appears.
2. Verify that the Shut down option is selected from the drop-down list
box.
3. Click the OK button.
4. When the It is now safe to turn off the computer message appears,
switch the power to the workstation off.
2 USER GUIDE
Page 9

EC-PJM INTRODUCTION
Changing Passwords
To change the password for a user account:
1. Log on to the EC-PJM workstation using the user name and password
that you would like to change.
2. Once you are logged on, simultaneously press the Ctrl+Alt+Del keys.
The Windows Security dialog box appears.
3. Click the Change Password button. The Change Password dialog
box appears.
4. Enter the old password in the Old Password text box and the new
password in the New Password and Confirm Password text boxes.
5. Click the OK button.
USER GUIDE 3
Page 10

EC-PJM ACCOUNTS EC-PJM
2. EC-PJM Accounts
At a minimum, four accounts are created and used on the EC-PJM
workstation. They include:
•
The Administrator account
•
The Supervisor account
•
The <EC-PJM User> account
The Guest account
•
Note: For further information about EC-PJM accounts, see Appendix A:
Creating EC-PJM Account Privileges.
The Administrator Account
The Administrator account exists only on the EC-PJM workstation and
allows for complete administrative rights to the workstation. This includes
creating, deleting, and managing user accounts, global groups, and local
groups. Additional functions include sharing directories and printers,
granting resource permissions and rights to users, and installing
operating system files and programs.
The Supervisor Account
The Supervisor account exists on the EC-PJM workstation and on the
DocuTech Network Server, if a DocuTech Network Server exists in the
network configuration. This account is created on the EC-PJM
workstation to administer the DocuTech Network Server. This includes
4 USER GUIDE
Page 11

EC-PJM CREATING INPUT AND OUTPUT QUEUES
creating queues and users, and maintaining and upgrading the Network
Server software.
Note: The Supervisor account does not belong to the Administrator
group. Therefore, this account does not have administrative rights under
Windows 2000. The password for the Supervisor account must be the
same as the Supervisor password on the DocuTech Network Server.
The <EC-PJM User> Account
The EC-PJM workstation is commonly used as a centralized print server
that is maintained and controlled by one or more EC-PJM operators.
In network configurations having a DocuTech Network Server, the <ECPJM User> account belongs to both the PSM OPERATORS and the
NTGATEWAY groups on the DocuTech Network Server. The <EC-PJM
User> account gives the EC-PJM operator the authority to manage print
files and queues. It also gives the operator the authority to submit jobs to
the DocuTech Network server.
The Guest Account
Depending upon the rights and permissions that are set at your site, the
guest account may not be able to log on to the EC-PJM workstation at the
EC-PJM console. In the default configuration, the guest account can only
log on from a client on the network.
If a DocuTech Network Server exists in the network configuration, the
password for the guest account on the EC-PJM workstation must be the
same as the guest password on the DocuTech Network Server.
USER GUIDE 5
Page 12

CREATING INPUT AND OUTPUT QUEUES EC-PJM
3. Creating Input and Output Queues
This section describes how to set up various Input and Output Queues
used in conjunction with the Document Control Manager (DCM) and Print
Icon applications. Before using these applications, it is important to set up
queues in order to manage your workflow.
Two types of queues, Input and Output, must be created in order to utilize
the features of the Document Control Manager and Print Icon
applications. Input Queues enable documents to be submitted to a central
location for distribution to Output Queues at a later time. Output Queues
enable documents to be submitted to the selected print server or local
printer.
Creating an Input Queue
You should complete the following steps for each Input Queue you create
on the Document Control Manager.
To create an Input Queue
1. On the taskbar, click the Start button, and select Settings/Printers.
The Printers dialog box appears.
2. Double-click the Add Printer icon. An Add Printer Wizard appears.
:
6 USER GUIDE
Page 13

EC-PJM CREATING INPUT AND OUTPUT QUEUES
3. Click the Next button. The Local or Network dialog box appears.
4. Select the Local printer radio button.
5. Deselect the Automatically detect and install my Plug and Play
printer checkbox.
USER GUIDE 7
Page 14

CREATING INPUT AND OUTPUT QUEUES EC-PJM
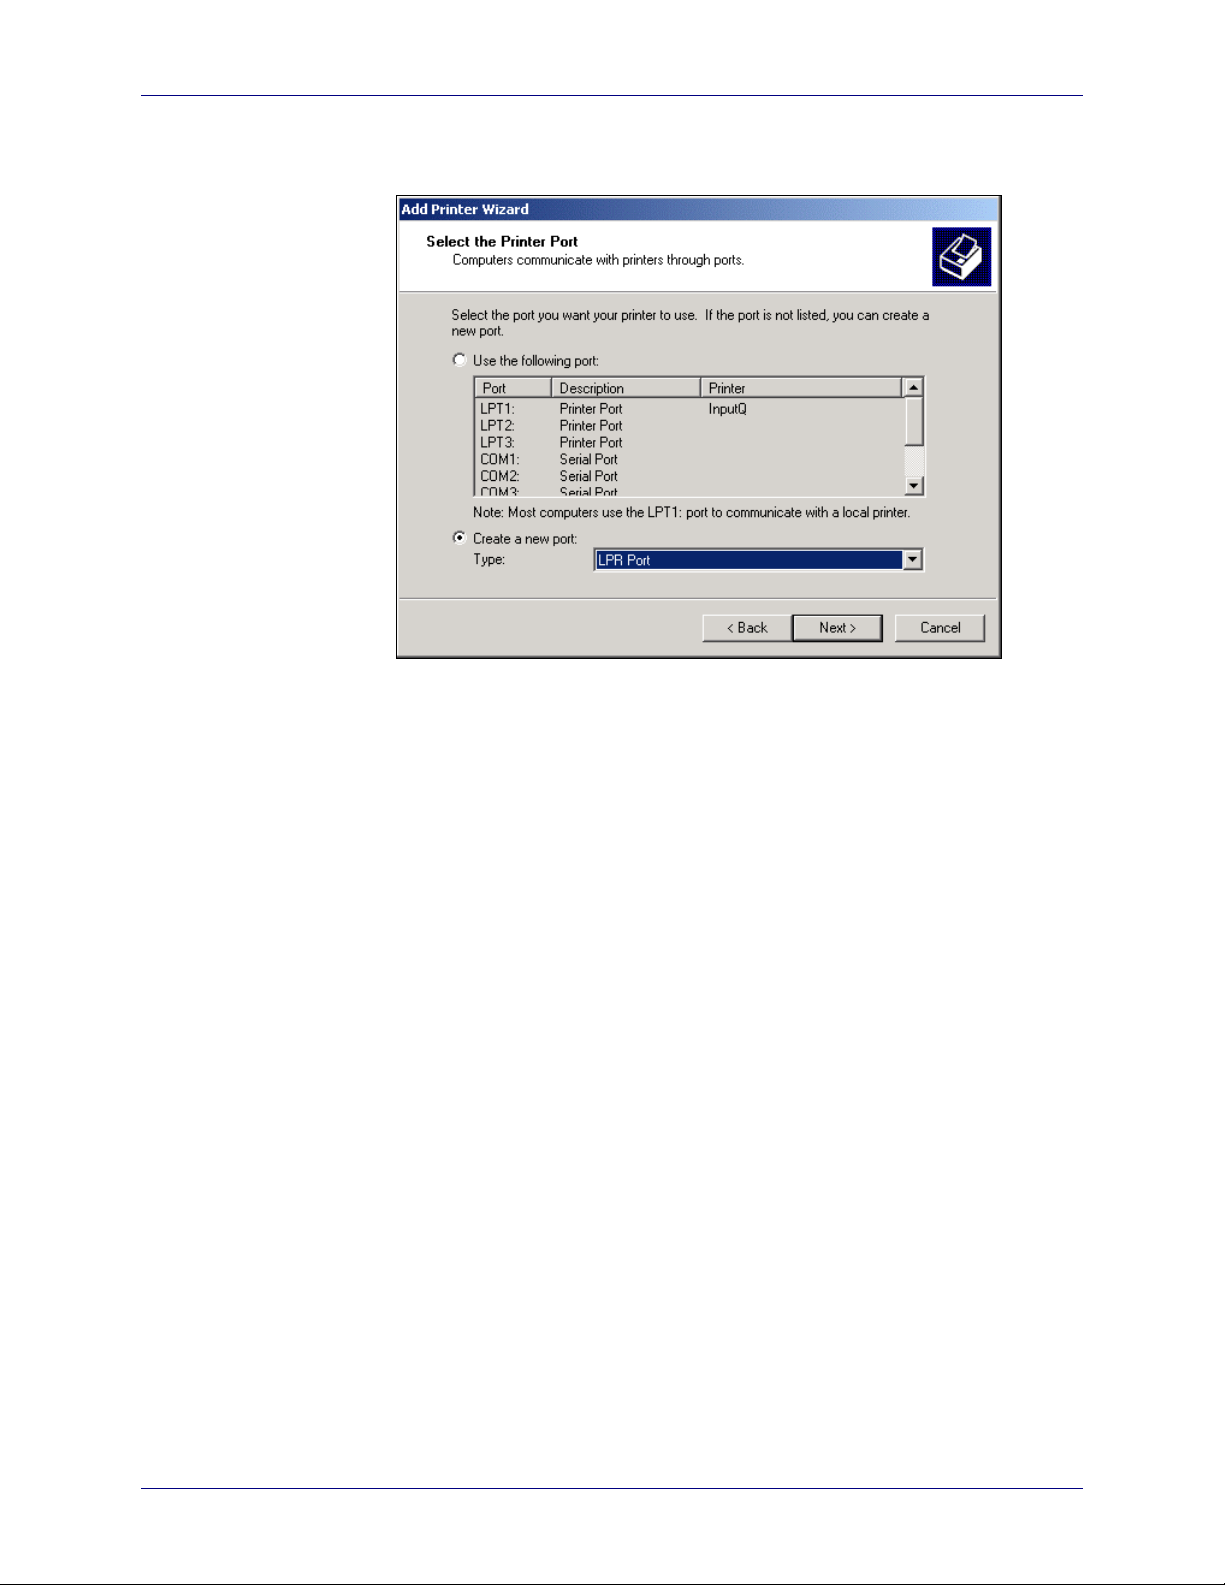
6. Click the Next button. A Select the Printer Port dialog box appears.
7. Verify that the Use the following port radio button is selected.
8. Select a printer port from the list of ports. The printer port selection
must be an LPT or COM port that is not already in use by a physical
printer or redirected printer on the network; however, it can be the
same as a previously created DCM Input Queue.
8 USER GUIDE
Page 15

EC-PJM CREATING INPUT AND OUTPUT QUEUES
9. Click the Next button. An Add Printer Wizard dialog box appears
displaying a list of printer Manufacturers and Printers.
10. Select the Xerox option from the Manufacturers list .The Printers list
box is automatically updated with the printer models available for the
Xerox manufacturer.
11. Select the desired printer model for this Input Queue from the
Printers list.
USER GUIDE 9
Page 16

CREATING INPUT AND OUTPUT QUEUES EC-PJM
12. Click the Next button. Note: If the selected driver is already installed
on the EC-PJM, a Use Existing Driver dialog box appears. You
should select the Keep existing driver (recommended) option and
click the Next button. A Name your Printer dialog box appears.
13. Enter a name for the DCM Input Queue in the Printer name text box.
Note: If you have already created a DCM Input Queue, you will be
asked: Do you want your Windows-based programs to use this
printer as the default? Select the No option.
10 USER GUIDE
Page 17

EC-PJM CREATING INPUT AND OUTPUT QUEUES
14. Click the Next button. A Printer Sharing dialog box appears.
15. Select the Share as option and enter a share name for the DCM Input
Queue in the Share as text box. This name is the Input Queue name
that users will see when printing to the EC-PJM.
USER GUIDE 11
Page 18

CREATING INPUT AND OUTPUT QUEUES EC-PJM
16. Click the Next button. A Location and Comment dialog box appears.
17. If desired, enter a descriptive location in the Location text box and
enter any comments in the Comment text box.
18. Click the Next button. A Print Test page dialog box appears.
19. Select the No option.
12 USER GUIDE
Page 19

EC-PJM CREATING INPUT AND OUTPUT QUEUES
20. Click the Next button. A Completing the Add Printer Wizard dialog
box appears.
21. Verify that your printer settings are correct and click the Finish button.
Note: If you need to make any changes to your settings, use the
Back button.
22. Once you have created an Input Queue, you must pause the queue in
order for documents to remain in the queue for use within Document
Control Manager. From the Start menu, select Settings/Printers. A
Printers dialog box appears.
23. Select the newly created Input Queue.
USER GUIDE 13
Page 20

CREATING INPUT AND OUTPUT QUEUES EC-PJM
24. From the File menu, select the Pause Printing option. A checkmark
appears next to the Pause Printing option to verify that the Input
Queue is now paused. You will also see the word Paused displayed
in red next to the word Status.
14 USER GUIDE
Page 21

EC-PJM CREATING INPUT AND OUTPUT QUEUES
Creating an Output Queue for a TCP/IP Printer
This section describes how to create an Output Queue for a TCP/IP
printer, such as a 61XX, the NSPlus Server series, or the Document
Center series.
To create an Output Queue for a TCP/IP printer:
1. From the Start menu, select Settings/Printers. A Printers dialog box
appears.
2. Double-click the Add Printer icon. An Add Printer Wizard appears.
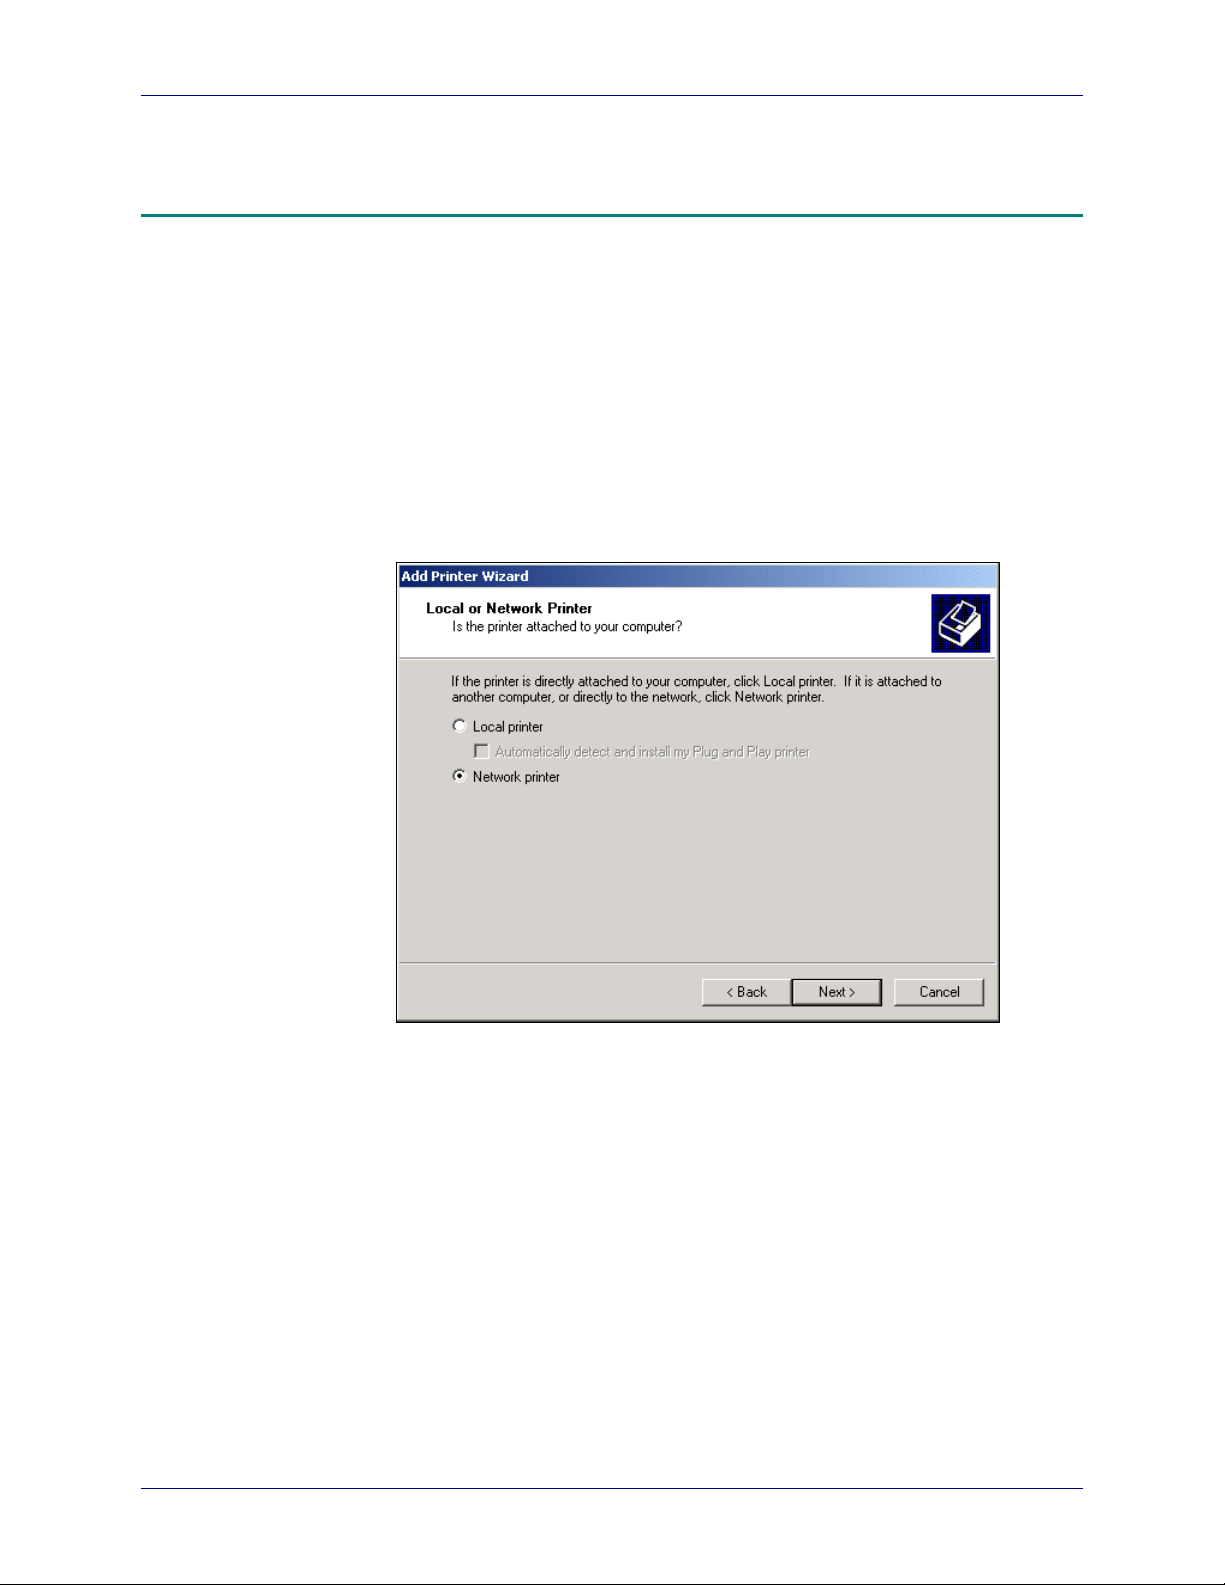
3. Click the Next button. A Local or Network Printer dialog box
appears.
4. Select the Local printer option.
5. Deselect the Automatically detect and install my Plug and Play
printer check box.
USER GUIDE 15
Page 22
CREATING INPUT AND OUTPUT QUEUES EC-PJM
6. Click the Next button. A Select the Printer Port dialog box appears.
7. Select the Create a new port option.
8. Select the LPR Port option from the Type drop-down list box.
16 USER GUIDE
Page 23
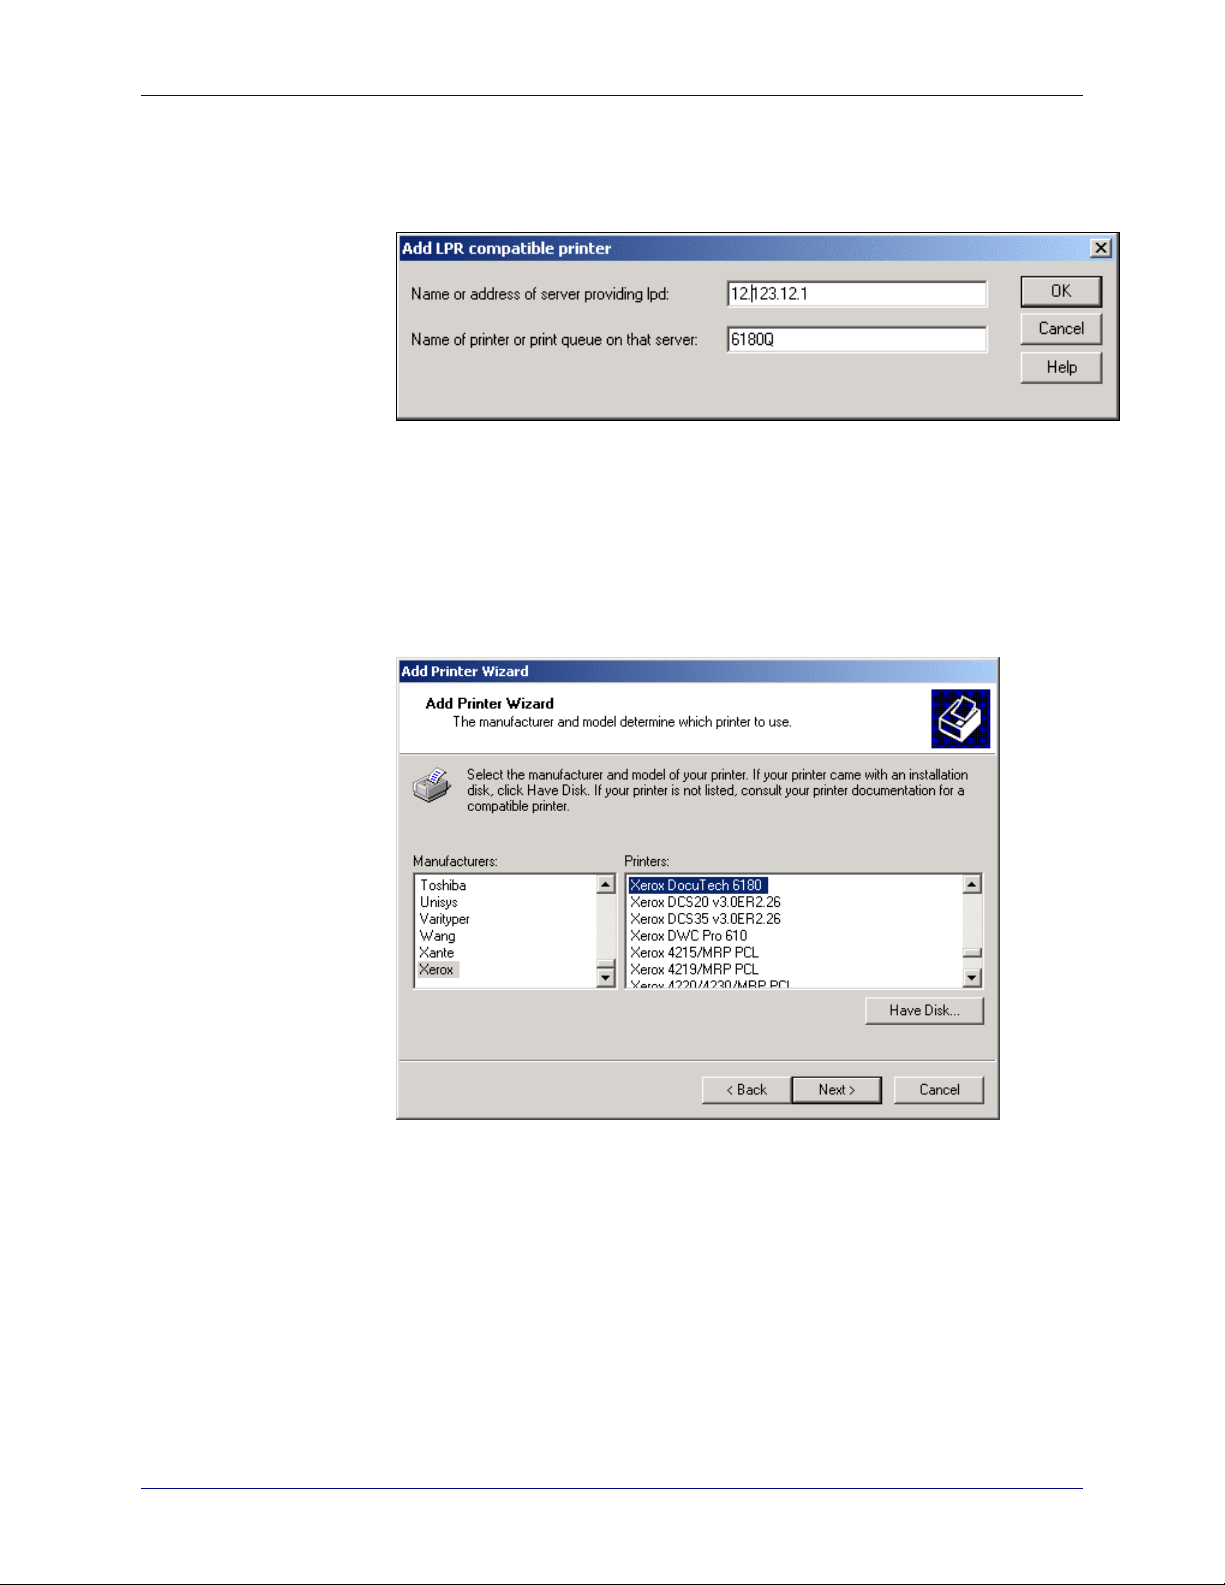
EC-PJM CREATING INPUT AND OUTPUT QUEUES
9. Click the Next button. An Add LPR compatible printer dialog box
appears.
10. Enter the IP address in the Name or address of server providing
lpd text box.
11. Enter the printer or print queue name in the Name of printer or print
queue on that server text box. The queue name must be typed in
exactly as it is at the printer.
12. Click the OK button. The Add Printer Wizard dialog box appears.
USER GUIDE 17
Page 24

CREATING INPUT AND OUTPUT QUEUES EC-PJM
13. Select the Xerox option from the Manufacturers list box. The
Printers list is automatically updated with the printer models available
for the Xerox manufacturer.
14. Select the desired printer model for this Output Queue.
15. Click the Next button. A Name Your Printer dialog box appears.
16. In the Printer name text box, enter a meaningful printer or queue
name you are printing to. Note: If you have already created a DCM
Output Queue, you will be asked: Do you want your Windows-
based programs to use this printer as the default? Select the No
option.
18 USER GUIDE
Page 25

EC-PJM CREATING INPUT AND OUTPUT QUEUES
17. Click the Next button. A Printer Sharing dialog box appears.
18. Select the Do not share this printer option.
19. Click the Next button. A Print Test Page dialog box appears.
20. Select the No radio button.
USER GUIDE 19
Page 26
CREATING INPUT AND OUTPUT QUEUES EC-PJM
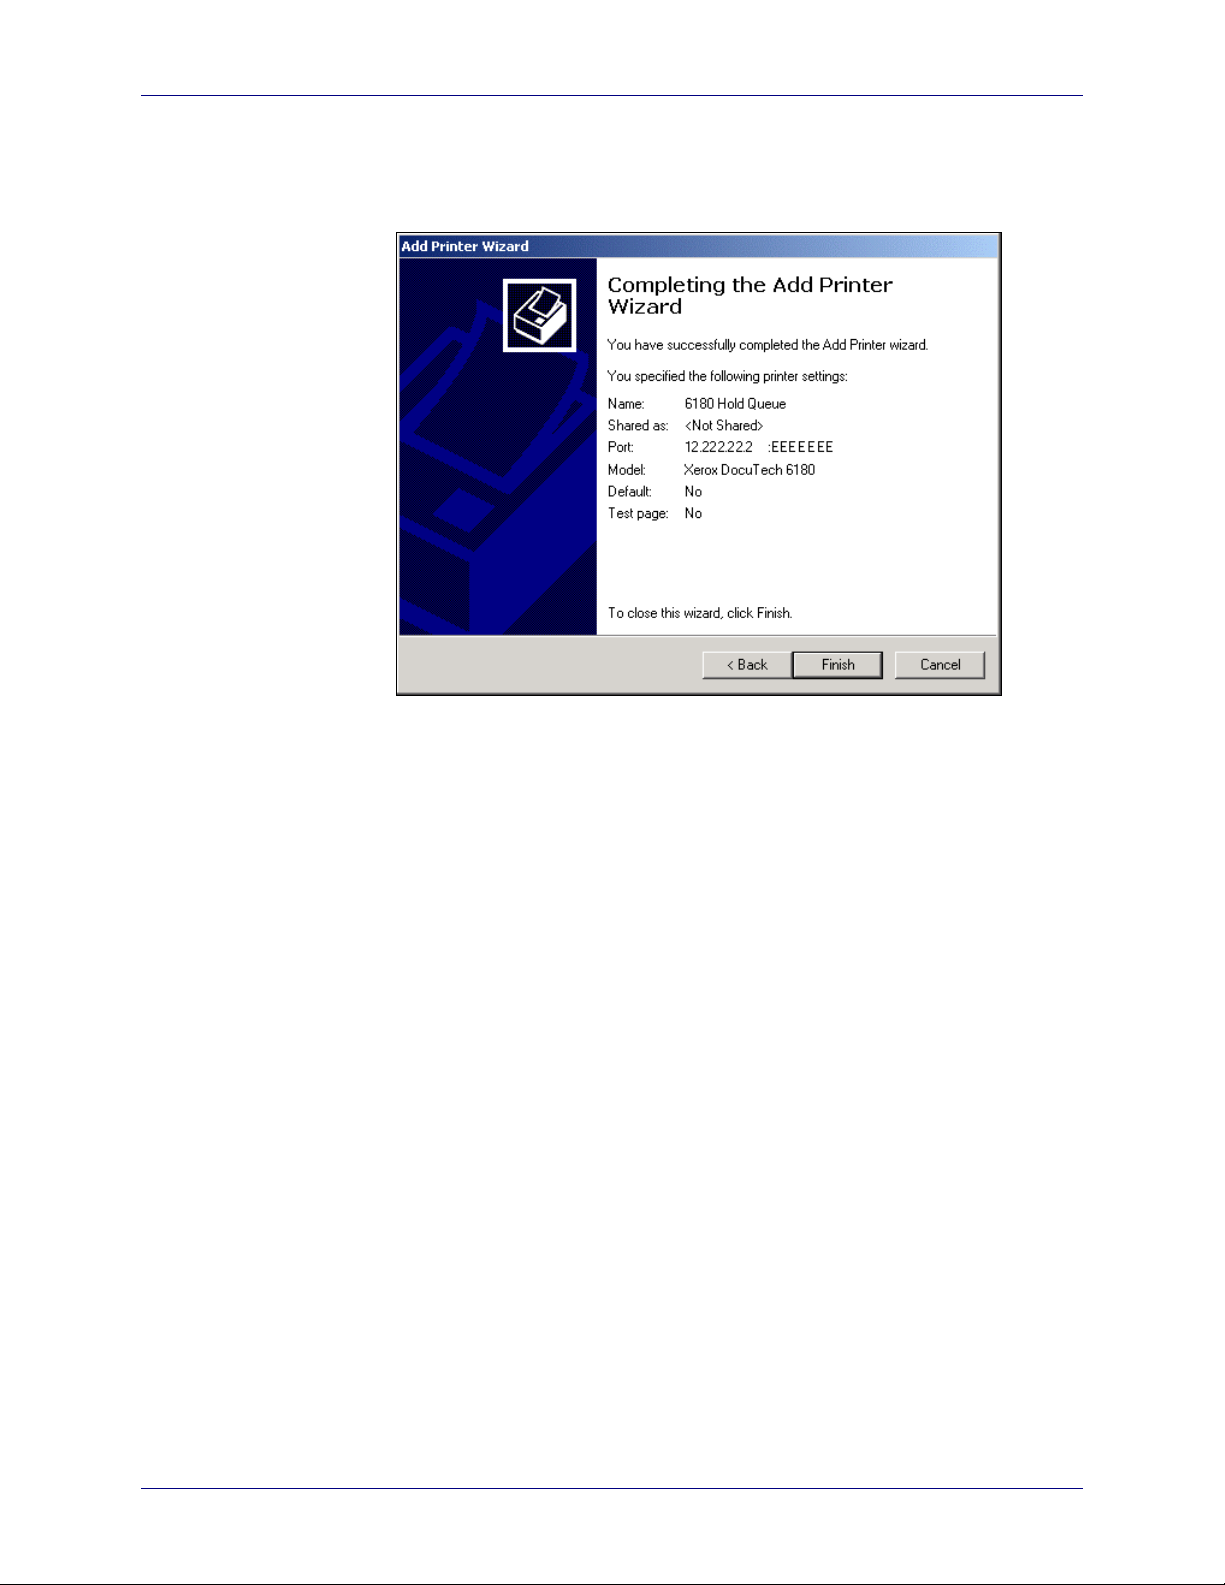
21. Click the Next button. A Completing the Add Printer Wizard dialog
box appears.
22. Verify that your printer settings are correct and click the Finish button.
Note: If you need to make any changes to your settings, use the
Back button.
20 USER GUIDE
Page 27
EC-PJM CREATING INPUT AND OUTPUT QUEUES
Creating an Output Queue for a Novell Printer
This section describes how to create an Output Queue for a Novell
printer, such as a DocuTech Network Server.
To create an Output Queue for a Novell printer:
1. From the Start menu, select Settings/Printers. A Printers dialog box
appears.
2. Double-click the Add Printer icon. An Add Printer Wizard appears.
3. Click the Next button. A Local or Network Printer dialog box
appears.
4. Select the Network printer option.
USER GUIDE 21
Page 28

CREATING INPUT AND OUTPUT QUEUES EC-PJM
5. Click the Next button. A Browse for Printer dialog box appears.
6. Do one of the following:
Enter the appropriate printer to represent your Output Queue in
•
the Printer text box. It should be entered in the format of
\\servername\queuename.
• Double-click the NetWare or Compatible Network option.
Double-click the options representing your DocuTech Network
Server and select the queue that you would like to print to.
22 USER GUIDE
Page 29

EC-PJM CREATING INPUT AND OUTPUT QUEUES
7. Click the Next button. The Add Printer Wizard dialog box appears.
8. Select the Xerox option from the Manufacturers list box. The
Printers list is automatically updated with the printer models available
for the Xerox manufacturer.
9. Select the desired printer model for this Output Queue.
USER GUIDE 23
Page 30

CREATING INPUT AND OUTPUT QUEUES EC-PJM
10. Click the OK button. A Default Printer dialog box appears.
11. Select the No option.
12. Click the Next button. Note: If an acceptable print driver is not
installed on the connected printer, you may be prompted to install the
driver on the EC-PJM workstation and a Connect to Printer dialog
box will appear. You should click the OK button.
24 USER GUIDE
Page 31

EC-PJM CREATING INPUT AND OUTPUT QUEUES
A Completing the Add Printer Wizard dialog box appears.
13. Click the Finish button.
Once the creation and connection of these queues is complete, you are
ready to use the Document Control Manager and Print Icon applications.
USER GUIDE 25
Page 32

THE DOCUMENT CONTROL MANAGER (DCM) APPLICATION EC-PJM
4. The Document Control Manager (DCM) Application
The Document Control Manager (DCM) application allows you to manage
documents through the use of Input and Output Queues. This enables
users to manually balance the distribution of documents within a mixed
network-printing environment from a centralized application.
To start the Document Control Manager application:
On the taskbar, click the Start button, and select Programs/EC-
•
PJM Tools/Document Control Manager. The Document
Control Manager main application window appears.
26 USER GUIDE
Page 33

EC-PJM THE DOCUMENT CONTROL MANAGER (DCM) APPLICATION
The DCM Menu and Toolbar Commands
The DCM menu items and toolbar buttons allow you to manipulate
documents within the currently active Input Queue.
The Document Control Manager Menu Items
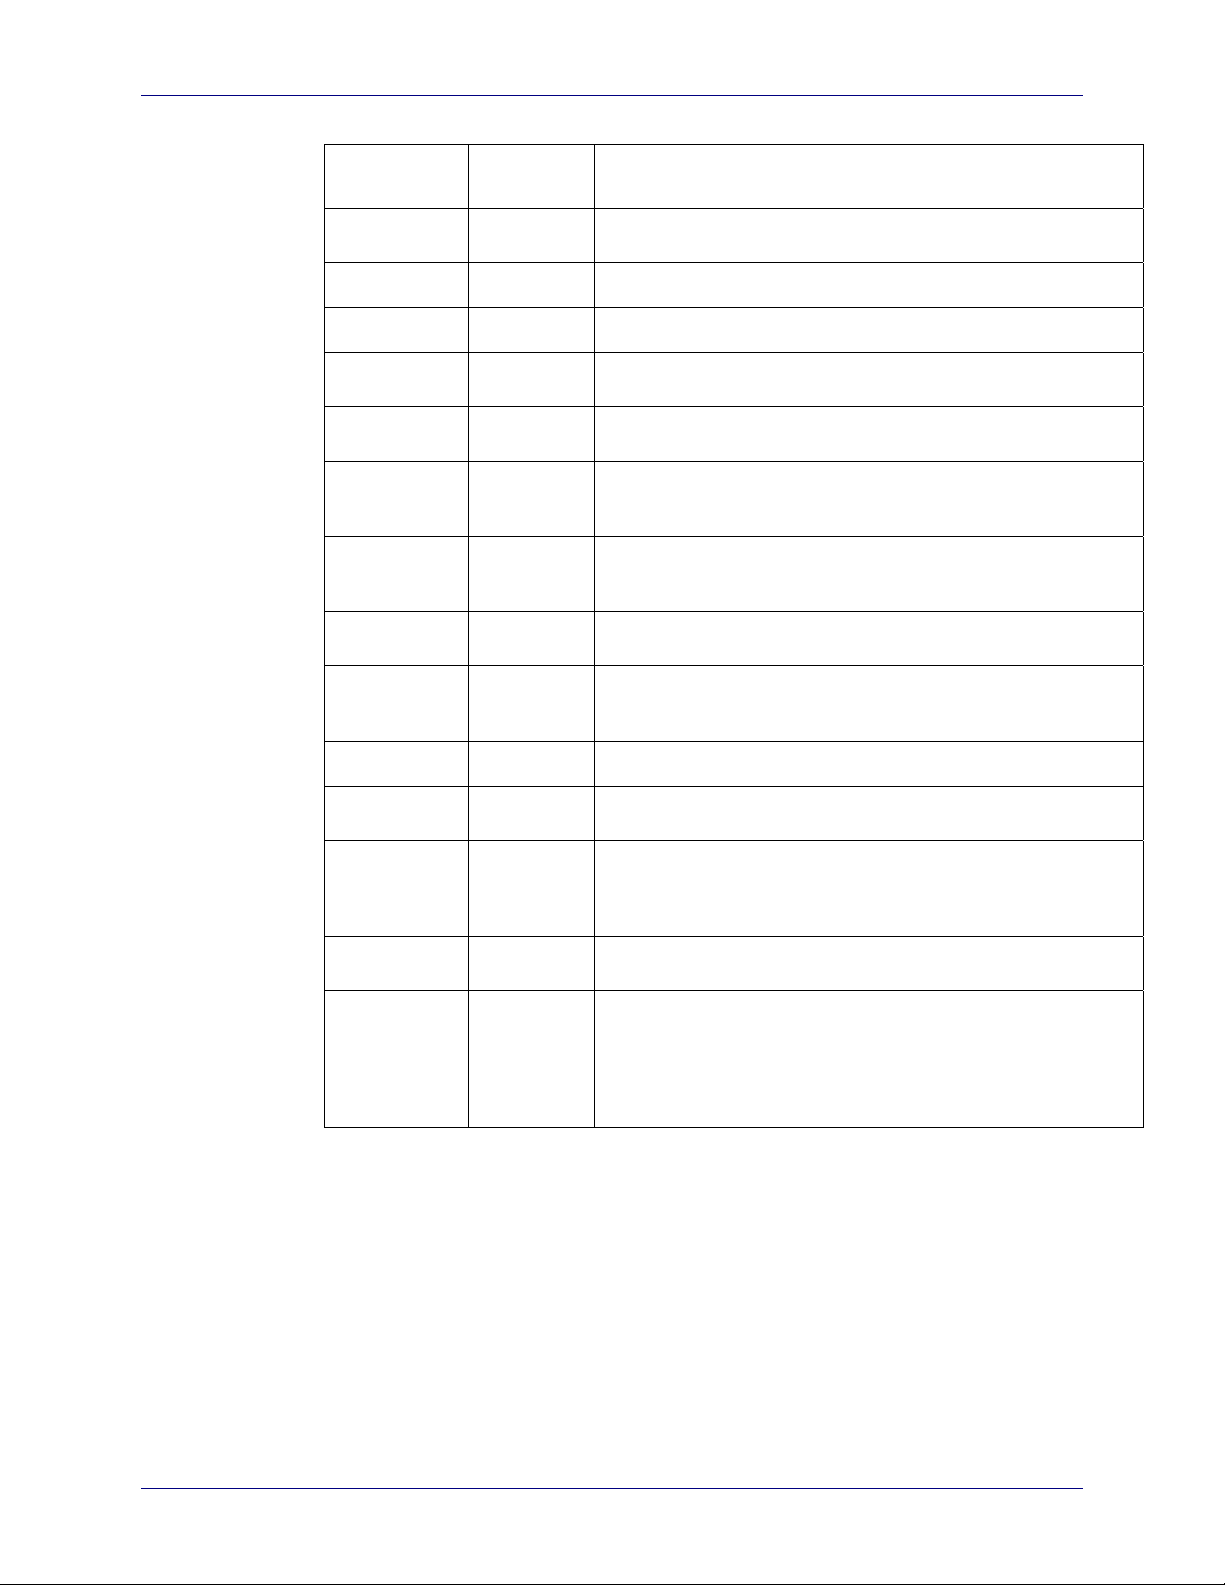
Menu Menu
Option
Document
Document
Document
Document
Document
Document
Document
Document
Document
Save
Delete
Copy
Move
Proof
Info
Print XJTs
Cancel
Printing
Select All
Function
Allows you to save the selected documents from an Input Queue
to file, with or without a Xerox Job Ticket.
Removes the selected documents from the Input Queue.
Copies the selected documents from the Input Queue to either
another Input Queue or an Output Queue. The selected
documents remain in the DCM Input Queue for additional access
at a later time.
Moves the selected documents from the Input Queue to either
another Input Queue or an Output Queue.
Sets the copy count of the document’s job ticket to a quantity of
one and copies the document to either another Input Queue or an
Output Queue. The selected documents remain in the Input
Queue for additional access at a later time.
Displays information about the currently selected document.
Prints Xerox Job Ticket information from the selected documents
to either another Input Queue or an Output Queue. A new
document titled “Job Ticket for <document name>” is generated
for each document and placed in the selected queue. Note: To
view a sample of a printed Xerox Job Ticket, refer to Appendix B:
Sample Xerox Job Ticket.
Cancels the in-progress copy, move, proof, or print XJT operation
for the selected documents.
Selects all documents in an Input Queue.
Document
Document
USER GUIDE 27
Invert
Selection
Close
Changes all selected documents to unselected and all unselected
documents to selected.
Closes the currently active queue window.
Page 34
THE DOCUMENT CONTROL MANAGER (DCM) APPLICATION EC-PJM
Menu Menu
Option
Document
View
View
View
View
View
View
View
View
Options
Exit
Toolbar
Status Bar
Sort
Ascending
Sort
Descending
Sort by
Document
Sort by
Sender
Sort By
Size
Sort by date
Settings
Function
Exits the DCM application, while saving the current state of the
queue windows based upon the configuration options set.
Displays or hides the toolbar.
Displays or hides the status bar.
Arranges documents displayed in the active queue window in
ascending order.
Arranges documents displayed in the active queue window in
descending order.
Arranges documents displayed in the active queue window in
ascending or descending alphabetical order, according to the
document title.
Arranges documents displayed in the active queue window in
ascending or descending alphabetical order according to the
sender name.
Arranges documents displayed in the active queue window in
ascending or descending order according to the document size.
Arranges documents shown in the active queue window in
ascending or descending order according to the displayed
document timestamp.
Displays configuration options for the DCM application.
Options
Options
Options
Options
Always
Scan
Conditional
Scan
Never Scan
Standard
Mode
Always displays the scanned information for all documents placed
in an Input Queue.
Displays the scanned information for a document, which meets
the conditions defined in the Configure Conditional Scanning
dialog box. If a document does not meet the defined conditions,
the system information is displayed.
Always displays only the system information for all documents
placed in an Input Queue.
Places DCM in a mode of operation which requires the user to
manually copy, move, or proof the selected documents from the
Input Queue to either another Input Queue or an Output Queue.
Standard Mode also allows the user to view information about a
document and save the document to file. This is the default mode
of operation.
28 USER GUIDE
Page 35

EC-PJM THE DOCUMENT CONTROL MANAGER (DCM) APPLICATION
Menu Menu
Option
Options
Options
Window
Window
Window
Help
Help
Automatic
Mode
Cluster
Mode
Cascade
Tile
Arrange
Icons
Contents
About DCM
Function
Places DCM in a mode of operation which automatically moves
documents to either another Input Queue or an Output Queue at
the same time the documents arrive in the selected Input Queue.
The final queue destination is selected from a cascading menu of
available queues that displays when Automatic Mode is
selected.
Places DCM in a mode of operation that allows the EC-PJM
operator to configure Input Queues to automatically distribute and
forward jobs to multiple printers.
Places any opened Input and Output Queue windows in a stack,
with each window’s title bar visible.
Horizontally tiles any opened Input and Output Queue windows.
Arranges any minimized Input and Output Queue windows as
non-overlapping icons.
Displays the contents of the DCM online help system, step-bystep instructions for using DCM, and reference information.
Displays version and copyright information about the DCM
application.
The Document Control Manager Toolbar
Toolbar
Button
Toolbar Option Function
Save with Xerox
Job Ticket
Save without Xerox
Job Ticket
Info
Delete
Help Contents
Allows you to save the selected documents to file with a
Xerox Job Ticket.
Allows you to save the selected documents to file without
a Xerox Job Ticket.
Displays information about the currently selected
document.
Removes the selected documents from the Input Queue.
Displays the contents of the DCM online help system,
step-by-step instructions for using DCM, and reference
information.
USER GUIDE 29
Page 36

THE DOCUMENT CONTROL MANAGER (DCM) APPLICATION EC-PJM
Sorting Documents in DCM
You can sort documents in DCM by using the menu options within the
View menu or by selecting the headings, such as Document, Sender,
Size, or Submitted located above the document list. The documents will
be sorted by the selected Sort Ascending or Sort Descending option and
an upward or downward arrowhead will be displayed next to the current
sort by column heading. For example, the following queue displays
documents sorted by submission date in descending order as seen under
the Submitted heading.
30 USER GUIDE
Page 37

EC-PJM THE DOCUMENT CONTROL MANAGER (DCM) APPLICATION
You may sort documents in various manners by selecting multiple column
headings. To do this, hold down the Shift key and select the appropriate
column headings in the order in which you would like to sort the
documents. For example, hold the Shift key and click the Sender name,
Size, and Document name headings in that order, to sort by sender,
size, and then document.
The DCM Status Bars
The Document Control Manager window contains a status bar located at
the bottom of the window. This status bar displays information about the
currently active queue window, including the number of documents in the
queue, the number of currently selected documents, and the sort criteria
of the queue.
A status bar is also displayed at the bottom of a queue window when the
queue is actively printing documents. This status bar displays the status
and name of documents currently being processed. The current
operation, such as proofing, and numeric values, are displayed to
represent which document from the selected set of documents is currently
being processed.
USER GUIDE 31
Page 38

THE DOCUMENT CONTROL MANAGER (DCM) APPLICATION EC-PJM
Selecting an Input or Output Queue
In the DCM application, Input Queues appear above the dotted separator
line and Output Queues appear below the dotted separator line in the
drop-down list box pf queues.
To select an Input or Output Queue:
From the drop-down list box, select the appropriate Input or
•
Output queue. The names of all Input and Output Queues
available on your system appear in this list box. Once the queue is
selected, a window appears displaying the queue name in the title
bar and a list of current documents contained in the queue.
Arrows appear next to the letter Q in a queue window to represent the
type of queue being displayed.
•
The
icon indicates that the queue is an Input Queue.
The
•
The
•
The
•
icon indicates that the queue is an Output Queue.
icon represents a queue in automatic mode.
icon represents a queue in cluster printing mode.
32 USER GUIDE
Page 39

EC-PJM THE DOCUMENT CONTROL MANAGER (DCM) APPLICATION
Copying Documents Between Queues
The Document Control Manager application allows you to copy
documents displayed in an Input Queue to either another Input Queue or
an Output Queue. The selected documents remain in the DCM Input
Queue for additional access at a later time.
To copy documents from an Input Queue to another Input or Output
Queue:
1. Select the desired Input Queue from the drop-down list box. A window
appears displaying the queue name in the title bar and a list of current
documents contained in the queue.
2. Select the documents to be copied in the Input Queue window.
3. Do one of the following:
•
From the Document menu, select the Copy option. A cascading
menu appears representing the available Input and Output
Queues. Select the desired queue you would like to copy the
documents to.
Hold down the CTRL key, select the documents, then drag and
•
drop them onto another Input or Output Queue window.
Press the right mouse button and select the Copy option. Select
•
the desired queue you would like to copy the documents to.
Note: You may cancel the copy operation by clicking the Cancel
button.
USER GUIDE 33
Page 40

THE DOCUMENT CONTROL MANAGER (DCM) APPLICATION EC-PJM
Moving Documents Between Queues
The Document Control Manager allows you to move documents from
Input Queues to another Input or Output Queue.
To move documents between queues:
1. Select the desired Input Queue from the drop-down list box. A window
appears displaying the queue name and a list of current documents
contained in the queue.
2. Select the document to be moved in the Input Queue window.
3. Do one of the following:
•
From the Document menu, select the Move option. A cascading
menu appears displaying the available Input and Output Queues.
Select the desired Input or Output Queue.
•
Drag the highlighted documents, and drop them onto another
Input or Output Queue window.
Press the right mouse button and select the Move option. Select
•
the desired Input or Output Queue.
To cancel the move process, click the Cancel button.
34 USER GUIDE
Page 41

EC-PJM THE DOCUMENT CONTROL MANAGER (DCM) APPLICATION
Proofing Documents
The Document Control Manager allows you to proof documents from
Input Queues. Proofing a document copies the document from the Input
Queue to the Output Queue. If the selected document contains a Xerox
Job Ticket, the copy count of the Xerox Job Ticket will be set to one.
To proof documents:
1. Select the desired Input Queue from the drop-down list box on the
Document Control Manager toolbar. A window appears displaying the
name of the queue and a list of current documents contained in the
queue.
2. Select the documents to be proofed in the Input Queue window.
3. Do one of the following:
•
Select the Proof option from the Document menu. A cascading
menu appears displaying the available queues. Select the desired
Output Queue for proof submission.
•
Hold down the Shift key, drag the highlighted documents, and
drop them onto an Output Queue.
Press the right mouse button and select the Proof option. Select
•
the desired Output Queue for proof submission.
Note: To cancel proofing at any time, click the Cancel button.
USER GUIDE 35
Page 42

THE DOCUMENT CONTROL MANAGER (DCM) APPLICATION EC-PJM
Deleting Documents
The Document Control Manager application allows you to delete or
remove documents from Input Queues. Deleting a document will
permanently remove the document from the Input Queue.
To delete a document:
1. Select the desired Input Queue from the drop-down list box on the
Document Control Manager toolbar. A window appears displaying the
name of the queue and a list of current documents contained in the
queue.
2. Select the documents to be deleted in the Input Queue window.
3. Do one of the following:
Select the Delete option from the Document menu. •
• Click the
toolbar button.
Press the Delete key. •
Note: If the Confirm Delete option has been set, a message box
appears asking you to confirm the deletion.
36 USER GUIDE
Page 43

EC-PJM THE DOCUMENT CONTROL MANAGER (DCM) APPLICATION
Saving Documents
The Document Control Manager allows you to save document(s) from an
Input Queue to file(s). If the document contains a Xerox Job Ticket, you
have the option to save the document with or without the associated
Xerox Job Ticket.
To save document(s) from an Input Queue to file:
1. Select the desired Input Queue from the drop-down list box. A window
appears displaying the queue name in the title bar and a list of the
current documents contained in the queue.
2. Select the document(s) you would like to save.
3. Do one of the following:
Select the Save/Save option from the Document menu or click
•
the
button to save the documents with Xerox job ticketing
information.
Select the Save/Save w/o XJT option from the Document menu
•
or click the
button to save the documents without Xerox job
ticketing information.
The Save As dialog appears.
4. Navigate to the location where you would like to save the files from
the Save in drop-down list box.
USER GUIDE 37
Page 44

THE DOCUMENT CONTROL MANAGER (DCM) APPLICATION EC-PJM
5. Enter a name for the file(s) in the File name text box. If you are
saving multiple files, there are 3 ways you can name the documents:
•
You can assign a single file name to all of the files and a numeric
value will automatically be appended to each file name in order to
distinguish the documents. For example, if you are saving 3 files
and you name the file mydoc, the files will be saved as mydoc1,
mydoc2, and mydoc3.
You can insert the number [#] symbol before, after, or within the
•
file name and a numeric value will automatically be added to each
file name. For example, by entering #mydoc, files would be saved
as 1mydoc, 2mydoc, 3mydoc. Entering multiple [#] symbols
enables you to control the numerical length. For example, by
entering ###mydoc, files would be saved as 001mydoc,
002mydoc, 003mydoc.
To save each file using its display name as the file name, enter a
•
plus [+] symbol in the File name text box.
38 USER GUIDE
Page 45

EC-PJM THE DOCUMENT CONTROL MANAGER (DCM) APPLICATION
6. Click the Save button.
The following graphic displays sample file names:
USER GUIDE 39
Page 46

THE DOCUMENT CONTROL MANAGER (DCM) APPLICATION EC-PJM
Viewing Document Information
The Document Control Manager allows you to view information about a
document stored in an Input Queue.
If the document contains a Xerox Job Ticket, a plus [+] symbol will be
displayed in the icon appearing next to the document name. In addition,
Xerox Job Ticket characteristics, such as portrait staple, dual staple,
bound, and multiple copies will also be displayed in the document’s icon.
When you view the document, the Xerox Job Ticket information will be
displayed.
In some cases, job ticketing information may be present, but not through
the use of the standard Xerox Job Ticket. If the file was submitted with the
use of PostScript Printer Description files, a limited set of ticketing
attributes can be viewed and edited. For further information, refer to the
Xerox PPD tab information later in this section. Because of performance
issues, this feature is typically disabled. Refer to the EC-PJM
Configuration Guide for details on when and how to enable this feature.
To view information about a document stored in an Input Queue:
1. Select the appropriate Input Queue from the drop-down list box. A
window appears displaying the queue name in the title bar and a list
of current documents contained in the queue.
2. Select the document to view.
3. From the Document menu, select the Info option. An Information
dialog box appears.
40 USER GUIDE
Page 47

EC-PJM THE DOCUMENT CONTROL MANAGER (DCM) APPLICATION
4. Select the Naming tab to display the Naming properties.
The Naming tab displays the System, PDL, XJT, and User options
used for naming the selected document. The names that appear on
this tab depend upon the document type and submission method
used to place the document in the Input Queue. The System option
displays the system name and the PDL option displays the PDL name
embedded in the PostScript code. The XJT option displays the Xerox
Job Ticket name and the User option allows the EC-PJM operator to
enter a customized name for additional identification purposes. The
name displayed in an Input Queue window depends upon which
options are selected here. Also, If the Modify XJT Names checkbox
is selected, the selected document and sender names will be updated
in the Xerox Job Ticket when the document is printed.
USER GUIDE 41
Page 48

THE DOCUMENT CONTROL MANAGER (DCM) APPLICATION EC-PJM
5. Select the Base XJT tab. If the document is associated with a Xerox
Job Ticket, the Base XJT properties appear. If the document is not
associated with a Xerox Job Ticket, you may add a default Xerox Job
Ticket to your document.
The Base XJT tab displays the Copy Count, Paper Stock, Image
Description, and Finishing options for the selected document. The
user may modify all fields in the Base XJT property page except for
the Image Shift information.
To save changes made to the Base XJT tab without closing the
•
Information dialog box, click the Apply button.
• • To save changes made to the Base XJT tab and close the
Information dialog box, click the OK button.
To cancel changes made to the Base XJT tab, click the Cancel
button.
42 USER GUIDE
Page 49

EC-PJM THE DOCUMENT CONTROL MANAGER (DCM) APPLICATION
6. Select the Covers tab. If the document is associated with a Xerox Job
Ticket, the Covers properties appear. If the document is not
associated with a Xerox Job Ticket, you may choose to add a default
Xerox Job Ticket to your document.
The Covers property page displays the Size, Type, Color, and
Imaging information for the front and back covers of the selected
document. The user may modify all fields in the Covers property
page.
To save changes made to Covers tab without closing the
•
Information dialog box, click the Apply button.
• • To save changes made to the Covers tab and close the
Information dialog box, click the OK button.
To cancel changes made to the Covers tab, click the Cancel
button.
USER GUIDE 43
Page 50
THE DOCUMENT CONTROL MANAGER (DCM) APPLICATION EC-PJM
7. Select the Notes tab. If the document is associated with a Xerox Job
Ticket, the Notes properties appear. If the document is not associated
with a Xerox Job Ticket, you may choose to add a default Xerox Job
Ticket to your document.
The Notes tab displays the Deliver to, Account, Banner Message,
and Special Instructions information about the selected document.
The user may modify all fields in the Notes tab.
To save changes made to Notes tab without closing the
•
Information dialog box, click the Apply button.
• • To save changes made to the Notes tab and close the
Information dialog box, click the OK button.
To cancel the changes made to the Notes tab, click the Cancel
button.
44 USER GUIDE
Page 51

EC-PJM THE DOCUMENT CONTROL MANAGER (DCM) APPLICATION
• Select the Xerox PPD tab, if one exists. The Xerox PPD
properties appear.
Job ticketing information can be embedded directly into the
PostScript instructions of the document through the use of
Postscript Printer Description files (PPDs). The Xerox PPD tab
displays the Copy Count, Paper Stock, Image Description, and
Finishing options for the selected document. The user may
modify any available fields on the Xerox PPD tab.
To save changes made to the Xerox PPD tab without closing the
•
Information dialog box, click the Apply button.
• • To save the changes made to the Xerox PPD tab and close the
Information dialog box, click the OK button.
To cancel the changes made to the Xerox PPD tab, click the
Cancel button.
USER GUIDE 45
Page 52

THE DOCUMENT CONTROL MANAGER (DCM) APPLICATION EC-PJM
Note: As Xerox Job Ticket options are available for most Xerox printers, it
is recommended that Xerox Job Tickets be used for editing job ticket
data. A user can take advantage of DCM’s PPD display and editing
capabilities when Xerox Job Ticketing is not available on their printer.
This feature is designed to be used specifically with the Xerox Document
Centre family of printers.
8. Select the Raw XJT tab. If the document is associated with a Xerox
Job Ticket, the Raw XJT tab displays all job ticketing information.
This property page cannot be modified.
9. Click the OK or Cancel button to close the Information dialog box.
46 USER GUIDE
Page 53

EC-PJM THE DOCUMENT CONTROL MANAGER (DCM) APPLICATION
Setting DCM Configuration Options
The Document Control Manager application allows you to customize
system-wide DCM settings and individual Input and Output Queue
settings.
Setting DCM System Configuration Options
To view and set the DCM system-wide configuration options:
1. In the DCM application, select the Settings item from the Options
menu. The DCM Configuration Options dialog box appears.
2. Select the System Settings tab. The system settings are displayed.
USER GUIDE 47
Page 54

THE DOCUMENT CONTROL MANAGER (DCM) APPLICATION EC-PJM
The following options are available on the System Settings tab:
•
When the Save Queue Settings on [Document: Exit]
checkbox is selected, DCM stores the window location,
standard or automatic mode settings, column sort and display
settings, conditional scan settings, and PDF print settings for
all queues only when a user selects the Exit option from the
Document menu.
When the Save Queue Settings on all Exits checkbox option
•
is selected, DCM stores the window location, automatic or
standard mode settings, column sort and display settings,
conditional scan settings, and PDF print settings for all queues
when a user selects either the Exit option from the Document
menu or clicks the close X button in the right-hand corner of
the application window.
If the Confirm Deletion of Documents checkbox is selected,
•
a confirmation message displays when you select the Delete
command in order to delete selected documents from an Input
Queue.
•
If the Automatically Delete Documents of Size 0
(Macintosh) checkbox is selected, DCM scans all documents
in DCM Input Queues and automatically removes documents
from the queue that are submitted via AppleTalk and arrive
with a size of zero. Note: This setting is only applicable in
environments where Macintosh clients submit documents to
DCM Input Queues.
•
If the Display European Page Size checkbox is selected,
DCM adds European page size entries to the Paper Stock
Size drop-down list box in the Base XJT tab of the
Information dialog box.
If the Enable Xerox Network Print Manager checkbox is
•
selected, DCM can connect to the Network Print Management
software.
If the Always Confirm File Save checkbox is selected, a
•
Save As dialog box will appear asking for file name
confirmation before saving files.
48 USER GUIDE
Page 55

EC-PJM THE DOCUMENT CONTROL MANAGER (DCM) APPLICATION
•
The Configure Scanning button invokes a dialog box allowing
the user to configure the conditions which the system name of
the document must meet in order for the scanned information
to be displayed. These conditions are exercised when the
Conditional Scan option is selected for an Input Queue.
T
•
•
T
e
h
T
o
l
l
a
o
l
l
a
o
l
l
a
e
u
q
e
u
q
e
u
q
o
r
b
o
r
b
o
r
b
f
n
o
C
o
y
g
n
i
w
y
g
n
i
w
y
g
n
i
w
a
h
t
s
e
u
h
t
s
e
u
h
t
s
e
u
..[Configure Web Printing is a deprecated option.
r
e
s
w
r
e
s
w
.
r
e
s
w
W
e
r
u
g
i
n
e
o
t
u
n
e
o
t
u
o
o
a
a
n
e
o
t
u
e
b
l
l
i
w
t
t
e
b
l
l
i
w
b
l
l
i
w
t
i
r
P
b
e
W
e
l
b
a
W
e
l
b
a
W
e
l
b
a
a
l
i
a
v
a
a
l
i
a
v
a
a
l
i
a
v
a
e
b
g
n
i
t
n
n
i
r
p
b
e
n
i
r
p
b
e
n
i
r
p
b
e
r
o
f
e
l
b
r
o
f
e
l
b
r
o
f
e
l
b
i
n
o
t
t
u
n
a
g
n
i
t
n
a
g
n
i
t
n
a
g
n
i
t
n
i
t
n
i
r
p
n
i
t
n
i
r
p
n
i
t
n
i
r
p
s
e
k
o
v
n
c
e
l
e
s
d
c
e
l
e
s
d
c
e
l
e
s
d
u
o
r
h
t
g
u
o
r
h
t
g
u
o
r
h
t
g
o
l
a
i
d
a
s
e
h
t
t
s
e
h
t
t
s
e
h
t
t
W
a
h
g
W
a
h
g
W
a
h
g
o
l
a
i
d
a
s
e
k
o
v
n
i
n
o
t
t
u
b
g
n
i
t
n
i
r
P
b
e
W
e
r
u
g
i
f
n
o
C
e
h
x
o
b
g
x
o
b
g
f
o
t
e
f
o
t
e
f
o
t
e
b
e
b
e
b
e
x
o
b
g
o
l
a
i
d
a
s
e
k
o
v
n
i
n
o
t
t
u
b
g
n
i
t
n
i
r
P
b
e
W
e
r
u
g
i
f
n
o
C
e
h
•
Though it still can be invoked, there are no guarantees on
functionality or performance]
•
The Apply button allows you to save the changes made to
System Settings tab without closing the DCM Configuration
Options dialog box.
•
The OK button allows you to save the changes made to
System Settings tab and close the DCM Configuration
Options dialog box.
•
The Cancel button allows you to cancel changes made to
System Settings tab.
Setting DCM Initial Queue Configuration Options
To set individual Input and Output Queue states at DCM startup, you can
use the Initial Queue Settings tab on the DCM Configuration Options
dialog box.
To view and set initial queue configuration options:
1. In the DCM application, select the Settings item from the Options
menu. The DCM Configuration Options dialog box appears.
2. Select the Initial Queue Settings tab. The DCM initial queue settings
are displayed.
USER GUIDE 49
Page 56

THE DOCUMENT CONTROL MANAGER (DCM) APPLICATION EC-PJM
3. Select the queue you would like to configure from the Queue drop-
down list box. The dialog box is updated to reflect the settings for the
selected queue.
50 USER GUIDE
Page 57

EC-PJM THE DOCUMENT CONTROL MANAGER (DCM) APPLICATION
The following options are available on the Initial Queue Settings tab.
•
If the Open Queue at Startup checkbox is selected, DCM
automatically opens the selected queue window at startup of
the application. You can enter a numeric value in the Order
text box to represent the order in which the queue windows
are opened in relation to other queue windows.
•
If the Use Current Queue Location checkbox is selected, the
queue is restored in the queue’s currently opened location. If
deselected, the queue is restored in the default location. If
grayed and checked, the queue is restored in the queue’s
previous initial location.
If the Save Queue Mode on Exit checkbox is selected, DCM
•
restores the selected queue in the current mode of the queue.
If deselected, the queue is restored in standard mode. If
grayed and checked, the queue is restored in the previous
initial mode of the queue. The actual mode setting for each
option is displayed in the text box below the Save Queue
Mode on Exit checkbox.
•
If the Save Queue Display/Sort Criteria checkbox is
selected, DCM restores the queue display/sort order in the
queue’s current sort order. If deselected, the queue
display/sort order is restored in the default sort order. If grayed
and checked, the queue display/sort order is restored in the
queue’s previous initial sort order. The actual display/sort
order setting for each option is displayed in the text boxes
below the Save Queue Display/Sort Criteria checkbox.
•
If the Enable PPD Operations checkbox is selected, a Xerox
PPD tab will be displayed in the Information dialog box,
allowing the user to apply ticketing options to a document.
This option is only recommended for use with the Xerox
Document Centre family. Note: For further information, refer to
the Viewing Document Information section.
USER GUIDE 51
Page 58

THE DOCUMENT CONTROL MANAGER (DCM) APPLICATION EC-PJM
•
If the Save Scan Settings on exit checkbox is selected, DCM
restores the queue scan setting to the current scan setting of
the queue. If deselected, the queue scan setting is restored to
Never Scan. If grayed and checked, the queue scan setting is
restored to the previous initial scan setting of the queue. The
actual scan setting for each option (Always, Conditional, or
Never) is displayed in the text box below the Save Scan
Settings on exit checkbox.
•
If the Save PDF to PS Level Conversion on exit checkbox is
selected, DCM restores the queue’s PS level conversion to the
current PS level conversion of the queue. If deselected, the
queue PS level conversion is restored to Postscript Level
Automatic. If grayed and checked, the queue PS level
conversion is restored to the previous initial PS level
conversion of the queue. The actual PS level conversion for
each option (Postscript Level 1, Postscript Level 2, Postscript
Level 3, or Postscript Level Auto) is displayed in the text box
below the Save PDF to PS Level Conversion on exit
checkbox.
•
If the Display Document Size checkbox is selected within the
Output Queue Settings Only section, DCM displays the size
of all documents displayed in an Output Queue. This selection
may cause the DCM application to run slower when Output
Queues are viewed.
•
Click the Apply button to save the changes made to the Initial
Queue Settings tab without closing the DCM Configuration
Options dialog box.
•
Click the OK button to save changes made to the Initial
Queue Settings tab and close the DCM Configurations
Options dialog box.
•
Click the Cancel button to cancel changes made to the Initial
Queue Settings tab.
52 USER GUIDE
Page 59

EC-PJM THE DOCUMENT CONTROL MANAGER (DCM) APPLICATION
Setting DCM Last Queue Configuration Options
To set individual Input and Output Queue states while running the DCM
application, you can use the Last Queue Settings tab on the DCM
Configuration Options dialog box.
To view and set last queue configuration options:
1. In the DCM application, select the Settings item from the Options
menu. The DCM Configuration Options dialog box appears.
2. Select the Last Queue Settings tab. The DCM last queue settings
are displayed.
3. Select the queue you would like to configure from the Queue dropdown list box. The tab is updated to reflect the settings for the
selected queue.
USER GUIDE 53
Page 60

THE DOCUMENT CONTROL MANAGER (DCM) APPLICATION EC-PJM
The following options are available on the Last Queue Settings tab.
•
If the Queue Open checkbox is selected, the selected queue
window is currently open. You cannot modify this setting.
If the Save Queue Location on Exit checkbox is selected,
•
DCM stores the location of the selected queue window upon
closing the queue window.
If the Save Queue Mode on Exit checkbox is selected, DCM
•
stores the automatic or standard queue mode of the selected
queue upon closing the queue window. The actual mode
setting for the selected queue is displayed in the text box
below the Save Queue Mode on Exit checkbox.
If the Save Queue Display/Sort Criteria checkbox is
•
selected, DCM stores the queue display/sort order in the
queue’s current sort order. The drop-down boxes located
below the Save Queue Display/Sort Criteria checkbox
display the current sort order beginning with the top field. Use
these drop-down boxes to modify the sort order for the
selected queue. Use the arrow keys located next to the dropdown field options to indicate ascending or descending sort for
the selected field.
If the Enable PPD Operations checkbox is selected, a Xerox
•
PPD tab will be displayed in the Information dialog box
allowing the user to apply ticketing options to a document.
This option is only recommended for use with the Xerox
Document Centre family. Note: For further information, refer to
the Viewing Document Information section.
If the Save Scan Settings on exit checkbox is selected, DCM
•
stores the queue scan setting for the current scan setting of
the queue. The actual scan setting for each option (Always,
Conditional, or Never) is displayed in the text box below the
Save Scan Settings on exit checkbox to modify the scan
setting for the selected queue. Use these checkboxes to
modify the scan settings.
54 USER GUIDE
Page 61

EC-PJM THE DOCUMENT CONTROL MANAGER (DCM) APPLICATION
•
If the Save PDF to PS Level Conversion on exit checkbox is
selected, DCM stores the queue’s PS level conversion as the
current PS level conversion of the queue. The actual PS level
conversion for each option (Postscript Level 1, Postscript
Level 2, Postscript Level 3, or Postscript Level Auto) is
displayed in the text box below the Save PDF to PS Level
Conversion on exit checkbox. Use these drop-down list
boxes to modify the PS Level Conversion setting for the
selected queue.
If the Display Document Size checkbox is selected within the
•
Output Queue Settings Only section, DCM displays the size
of all documents displayed in an Output Queue. This selection
may cause the DCM application to run slower when Output
Queues are viewed.
•
Click the Apply button to save the changes made to the Last
Queue Settings tab without closing the DCM Configuration
Options dialog box.
•
Click the OK button to save changes made to the Last Queue
Settings tab and close the DCM Configurations Options
dialog box.
Click the Cancel button to cancel changes made to the Last
•
Queue Settings tab.
USER GUIDE 55
Page 62

THE DOCUMENT CONTROL MANAGER (DCM) APPLICATION EC-PJM
Configuring Scanning of Document Names
The Document Control Manager application allows you to construct a list
of conditional entries and filters that can be used to determine whether
scanned information is displayed when the Conditional Scan option is
selected.
To create the conditional entries:
1. From the Options menu, select the Settings item. The DCM
Configuration Options dialog box appears.
2. Select the System Settings tab.
3. Click the Configure Scanning button. The Configure Conditional
Scanning dialog box appears.
56 USER GUIDE
Page 63

EC-PJM THE DOCUMENT CONTROL MANAGER (DCM) APPLICATION
The Conditional Entries list box contains a list of entries, which will be
matched against the system name of the document when a document is
placed in an Input Queue and the Conditional Scan option is selected. If
the system name matches any of the conditional entries, where an
asterisk represents a wildcard comparison, the scanned information is
displayed in the Input Queue.
The Display Name Filters list box contains a list of entries, which will be
matched against the system name of the document when a document is
placed in an Input Queue and the Conditional Scan option is selected. If
the system name begins with any display name filter entries, the display
name filter portion of the system name is replaced with the text that
follows the arrow of the display name filter.
Adding a Conditional Entry
To add a new conditional entry:
1. Click the Add button. The Add dialog box appears.
2. Enter the new entry in the text box. Type the entry in exactly as it
appears in the Input Queue, paying attention to case and spaces.
3. Select either the Begins with, Contains, or Ends with option to set
the condition.
4. Click the OK button. The new entry appears in the Conditional
Entries list box.
USER GUIDE 57
Page 64

THE DOCUMENT CONTROL MANAGER (DCM) APPLICATION EC-PJM
Editing a Conditional Entry
To edit an existing conditional entry:
1. Select the entry in the Conditional Entries list box.
2. Click the Edit button.
3. Edit the entry in the text box as desired.
4. Select the appropriate radio button to modify the condition.
5. Click the OK button. The modified entry is updated in the Conditional
Entries list box.
Removing a Conditional Entry
To remove an entry from the Conditional Entry box:
1. Select the entry in the Conditional Entries list box.
2. Click the Remove button.
58 USER GUIDE
Page 65

EC-PJM THE DOCUMENT CONTROL MANAGER (DCM) APPLICATION
Adding a Display Name Filter
To add a new display name filter to the Display Name Filters list box:
1. Click the Add button. The Name Filter Add/Edit dialog appears.
2. Enter a filter such as Microsoft Word in the Find What text box.
Leaving the Replace with text box blank will remove
“Microsoft Word -” from the document name.
3. Enter the text that will replace the filter in the Replace With field.
USER GUIDE 59
Page 66

THE DOCUMENT CONTROL MANAGER (DCM) APPLICATION EC-PJM
4. Click the OK button. The new filter appears in the Display Name
Filters list box.
60 USER GUIDE
Page 67

EC-PJM THE DOCUMENT CONTROL MANAGER (DCM) APPLICATION
Editing a Display Name Filter
To edit an existing display name filter:
1. Select the entry from the Display Name Filters list box.
2. Click the Edit button. The Name Filter Add/Edit dialog box appears.
3. In the Find What and Replace With text boxes, edit the entries as
desired.
4. Click the OK button.
Removing a Display Name Filter
To remove a display name filter:
1. Select the entry from the Display Name Filters list box.
2. Click the Remove button.
3. Close all open dialog boxes.
USER GUIDE 61
Page 68

THE DOCUMENT CONTROL MANAGER (DCM) APPLICATION EC-PJM
Converting Documents from PDF to PostScript
The DCM application allows you to submit Adobe Acrobat’s Portable
Document Format (PDF) into an Input Queue for conversion to PostScript
prior to sending the document to the Xerox production printers. This
feature allows clients to place PDF documents in a well-known directory
for printing from the EC-PJM without requiring the client or EC-PJM user
to view the PDF document in Acrobat Reader prior to performing the print
operation.
The PDF to PostScript conversion of documents uses a Xerox supplied
Acrobat Reader Plug-In. This plug-in requires Acrobat Reader to be
running in order to complete the PDF to PostScript conversion of
documents.
To submit documents for PDF to PostScript conversion:
1. Place the PDF documents in an Input Queue.
2. Select the Move or Copy options from the Document menu to move or
copy the documents to another Input Queue or Output Queue. The PDF
document will be converted to PostScript prior to placing the document in
the desired queue.
Note: If you try to copy or move the PDF document when Acrobat Reader
is not running, a dialog box will appear informing you that the Document
Control Manager was unable to connect to Acrobat Reader. You should
then verify that Acrobat Reader is running. If it is not running, start the
application and click the Retry button. If Acrobat Reader is running, select
the About Plug-Ins option from the Help menu in Acrobat Reader. A
cascading menu appears displaying the plug-ins currently available on
the system. Verify that the DCM PDF Printing plug-in is displayed in the
menu and click the Retry button. If it is not listed, contact your Xerox
service representative.
PDF documents may be converted to various PostScript levels based
upon the current PostScript settings configured in the Options dialog box.
62 USER GUIDE
Page 69

EC-PJM THE DOCUMENT CONTROL MANAGER (DCM) APPLICATION
The user may set the conversion level to PostScript Level 1, PostScript
Level 2, PostScript Level 3, or Auto PostScript Level. Auto PostScript
Level will output either PostScript Level 1 or PostScript Level 2 based on
the selected Output Queue’s capability. If an Output Queue supports
PostScript Level 3 printing, the PDF is submitted directly to the Output
Queue without PDF to PostScript conversion.
Configuring EC-PJM to Print PDFs with Prepended Xerox Job Tickets
When using the Document Control Manager to print PDF files with
prepended Xerox Job Tickets, a special print queue is required in order to
retain the Xerox Job Ticket.
To create a print queue for ticketed PDFs:
1. Click the Start button and select Settings/Printers. A Printers dialog
box appears.
2. Double-click the Add Printer icon. An Add Printer Wizard appears.
3. Click the Next button. The Local or Network dialog box appears.
4. Select the Local printer radio button.
5. Deselect the Automatically detect and install my Plug and Play
printer checkbox.
USER GUIDE 63
Page 70

THE DOCUMENT CONTROL MANAGER (DCM) APPLICATION EC-PJM
6. Click the Next button. A Select the Printer Port dialog box appears.
7. Select the Create a new port radio button and select the Local Port
option from the Type drop-down list box.
8. Click the Next button. A Port Name dialog box appears.
9. In the Enter a port name text box, enter C:\Temp\pdf2ps.tmp as it is
assumed that “C:\Temp” is the directory where the system stores
temporary files.
10. Click the OK button. The Add Printer Wizard dialog box appears.
64 USER GUIDE
Page 71

EC-PJM THE DOCUMENT CONTROL MANAGER (DCM) APPLICATION
11. Select the Xerox option from the Manufacturers list box. The
Printers list is automatically updated with the printer models available
for the Xerox manufacturer.
12. Select the desired printer model for this queue.
13. Click the Next button. A Name Your Printer dialog box appears.
14. In the Printer name text box, enter DCM PDF-PS. Note: If you have
already created a DCM Output Queue, you will be asked: Do you
want your Windows-based programs to use this printer as the
default? Select the No option.
15. Click the Next button. A Printer Sharing dialog box appears.
16. Select the Do not share this printer option.
17. Click the Next button. A Print Test Page dialog box appears.
18. Select the Yes radio button to print a test document and verify that the
file C:\temp\pdf2ps.tmp now exists.
19. Click the Next button. A Completing the Add Printer Wizard dialog
box appears.
20. Click the Finish button.
USER GUIDE 65
Page 72

THE DOCUMENT CONTROL MANAGER (DCM) APPLICATION EC-PJM
Cluster Printing
Cluster printing allows the EC-PJM to act as a front-end system that
drives multiple printers so they essentially operate as a single output
device, instead of relying on just one output device for mission-critical
high-volume processing.
The EC-PJM operator can configure Input Queues to automatically
distribute and forward jobs to multiple printers. Jobs can be divided and
routed to several printers to maximize production levels, or can be
distributed among the printers based on the printers’ capabilities.
To set cluster printing:
1. Select the desired Input Queue.
2. From the Options menu, select Cluster Mode. A Configure
Clustering dialog box appears.
66 USER GUIDE
Page 73

EC-PJM THE DOCUMENT CONTROL MANAGER (DCM) APPLICATION
3. Select each of the queues to be included in the cluster from the
Available Queues list and click the Add button. The selected queues
are added to the cluster.
4. In the Minimum number of copies text box, enter the minimum
number of copies to be sent to each printer. In no case will the job be
forwarded to any queue in the cluster with less than the minimum
number of copies specified. For example, if you have a 500-copy job
and you printed it to the following cluster, 250 copies would be sent to
the DocuTech6135 and 250 copies would be sent to the DT6180. If
you have a 150-copy job, all 150 copies would be forwarded to the
first Output Queue listed in the cluster.
5. Click the OK button.
USER GUIDE 67
Page 74

THE PRINT ICON APPLICATION EC-PJM
5. The Print Icon Application
The Print Icon application enables you to forward one or more documents
to any queue identified on the EC-PJM workstation. The Print Icon
application is installed by default onto the EC-PJM workstation during the
EC-PJM installation. In addition, the Print Icon application may be
installed on any Windows 2000 workstation.
Note: To install the Print Icon application on a Windows 2000
workstation, refer to the Extended Connectivity Print Job Manager
Installation Guide.
To start the Print Icon application:
On the taskbar, click the Start button, and select Programs/EC-
•
PJM Tools/PrintIcon. The Print Icon main application window
appears.
68 USER GUIDE
Page 75

EC-PJM THE PRINT ICON APPLICATION
The Print Icon Menu and Toolbar Commands
The following tables describe the menu and toolbar functions available in
the Print Icon application.
The Print Icon Menu Items
Menu Menu Option Function
File
Tools
Tools
View
View
Options
Options
Options
Options
Help
Help
Close
Connect to Printer
Windows Explorer Launches the Windows Explorer application from within
Toolbar
Status Bar
Set as selected
printer
Display document
drop confirmation
dialog
Document Types
Restore Options
Settings
Contents
About Print Icon
Closes the Print Icon application.
Allows users to connect to an existing network printer by
using the Add Printer Wizard.
the Print Icon application, providing the user an easy way
to select documents for print submission.
Displays or hides the toolbar.
Displays or hides the status bar.
Saves the current printer selection as the default printer for
subsequent use of the Print Icon application. A checkmark
appears next to this option when the current printer
selection is set as the selected printer.
By selecting this option, Print Icon displays a confirmation
message verifying the operation when you drop documents
onto an open Print Icon application.
Displays a dialog box allowing the user to select from a
pre-defined list of document types that are acceptable for
the drag-and-drop operations of the Print Icon application.
Automatically restores the defaults for all settings.
Displays the contents of the Print Icon help system, stepby-step instructions for using Print Icon, and reference
information.
Displays version and copyright information about the Print
Icon application.
USER GUIDE 69
Page 76

THE PRINT ICON APPLICATION EC-PJM
The Print Icon Toolbar Buttons
Toolbar
Button
Toolbar Option Function
Connect to printer
Windows Explorer Launches the Windows Explorer application from
Document Types
Help Contents
Allows users to connect to an existing network printer
by using the Add Printer Wizard.
within the Print Icon application providing the user an
easy way to select documents for print submission.
Displays a dialog box allowing the user to select from
a pre-defined list of document types that are
acceptable for the drag-and-drop operations of the
Print Icon application.
Displays the contents of the Print Icon help system,
step-by-step instructions for using Print Icon, and
reference information.
70 USER GUIDE
Page 77

EC-PJM THE PRINT ICON APPLICATION
The Print Icon Progress Bars
The Print Icon application window contains two progress bars located
near the bottom of the window. These progress bars indicate the
processing status of documents dropped onto the Print Icon application.
The top progress bar, represented by the single page icon
, displays
the status of the document currently being processed. The document
name is also displayed along with the document’s progress.
The bottom progress bar, represented by the multiple page icon
,
displays the status of the processing for an entire set of documents
dropped onto the Print Icon application.
Numeric values are also displayed next to the progress bar icons. These
values represent which document, from the entire set of documents, is
currently being processed. For example, the top progress bar’s numeric
value display of 10 and the bottom progress bar’s numeric value display
of 20 indicates that the 10th document out of 20 is currently being
processed.
USER GUIDE 71
Page 78

THE PRINT ICON APPLICATION EC-PJM
Selecting a Printer or Queue
The main function of the Print Icon application is to allow PDL and PDF
files to be submitted to a selected printer or Input Queue.
To select the desired printer or Input Queue:
From the Printer Selection drop-down list box, select the
•
appropriate printer. All printers available in your system appear in
the drop-down list box.
72 USER GUIDE
Page 79

EC-PJM THE PRINT ICON APPLICATION
The printer name is also displayed in the title bar of the Print Icon
application. Along with the printer name, the Print To setting is displayed
below the Printer Selection drop-down list box. The Print To name
specifies the destination for the printer output, such as LPT1, COM1, or
FILE.
Note: If the desired printer or Input Queue does not appear in the Printer
Selection drop-down list, click the Connect to printer
display the Add Printer Wizard.
Copying Files to the Print Icon Application
To copy files to the Print Icon application, users may select documents
using the Windows Explorer or My Computer applications.
You may copy files onto the Print Icon application when the application is
either minimized or maximized. If the Print Icon application is minimized, it
appears on the Windows taskbar. When dropping files onto a minimized
Print Icon application, you must hold the mouse over the taskbar until the
Print Icon application window is displayed. You can then drag and drop
the files onto the maximized Print Icon application window.
You may also copy files onto a desktop shortcut that references the Print
Icon application. When files are dropped onto the Print Icon shortcut, the
Print Icon application automatically launches and processes the files.
More than one Print Icon application may be active at any time. This
allows operators to manage their print production environment by placing
documents on multiple printers or Input Queues for future printing.
button to
USER GUIDE 73
Page 80

THE PRINT ICON APPLICATION EC-PJM
To copy files from the Windows Explorer or My Computer applications to
the Print Icon application:
1. Open the Windows Explorer or My Computer application.
2. Select the files you would like to copy to the Print Icon application.
Note: To select all files in a window, choose the Select All option
from the Edit menu.
3. Hold down the left mouse button, drag the highlighted documents, and
drop them onto the Print Icon application.
4. Once the files are placed on the Print Icon application, release the
left mouse button. A system beep confirms that the Print Icon
application has successfully placed your documents into the currently
selected printer or Input Queue.
74 USER GUIDE
Page 81

EC-PJM THE PRINT ICON APPLICATION
Customizing Document Types
The Print Icon application allows the user to customize a list of registered
document types that are acceptable for the drag-and-drop submission of
documents. A document type may be defined by selecting one of several
pre-defined document types that the Print Icon application can identify,
such as Postscript or HPPCL. You may also define a document type by
selecting a document’s extension, such as .ps or .pcl.
To customize document types:
From the Options menu, select the Document Types option. The
•
Document Types dialog appears.
USER GUIDE 75
Page 82

THE PRINT ICON APPLICATION EC-PJM
The Registered Document Types section contains two separate lists of
registered document types. The first list box, Identified By Document
Type, displays a list of pre-defined document types that are acceptable
for submission to the Print Icon application. The second list box,
Identified By Document Extension, displays a list of document
extensions that are used to determine if a document is acceptable for
submission to the Print Icon application.
The Perform document type checking checkbox, when selected,
confirms that all documents submitted to the currently selected printer or
Input Queue are included in the list of registered document types, either
by document type or document extension. If a submitted document is not
a registered document type or document extension, a message box
displays stating that the document is not an acceptable document type.
You can then select Yes to continue submission of this document or No
to cancel the operation.
76 USER GUIDE
Page 83

EC-PJM THE PRINT ICON APPLICATION
Modifying the List of Acceptable Document Types
To modify the list of acceptable document types displayed in the
Identified by Document Type list box:
1. Click the Modify List button. The Edit Registered Document Type
List dialog box appears.
2. Do one of the following:
To add a document type to the Registered document list, select
•
the desired document type in the Other list box and click the
Register button. The selected document type appears in the
Registered list box.
• To remove a document type from the Registered document list,
select the desired document type in the Registered list box and
click the Remove button. The selected document appears in the
Other list box.
USER GUIDE 77
Page 84

THE PRINT ICON APPLICATION EC-PJM
3. Click the OK button. The document types are added to or removed
from the Identified By Document Type list.
Note: A user may only register document types from the pre-defined list
of document types known to the Print Icon application. To register
document types not found in the list, refer to the section Modifying the List
of Acceptable Document Extensions.
Modifying the List of Acceptable Document Extensions
A user may modify the list of acceptable file extensions displayed in the
Identified By Document Extension list box, by either adding a new
document extension, editing an existing extension, or removing an
existing extension.
To add a new document extension to the registered document list:
1. Click the New button. The Add New Document Type Extension
dialog box appears.
2. Enter the new document type extension, such as prn, in the
Document Type Extension text box.
3. Click the OK button. The registered document type extension is
added to the Identified By Document Extension list.
78 USER GUIDE
Page 85

EC-PJM THE PRINT ICON APPLICATION
To edit an existing document type extension in the registered document
list:
1. Click the Edit button. The Edit Document Type Extension dialog
box appears.
2. In the Document Type Extension text box, edit the document type
extension as desired.
3. Click the OK button. The modified document type extension is
updated in the Identified By Document Extension list.
To remove a document extension from the registered document list:
1. Select the desired document type extension from the Identified by
Document Extension list box.
2. Click the Remove button. A dialog box appears to confirm the
operation.
3. Click the Yes button to remove the selected document type extension.
4. Close all open dialog boxes.
USER GUIDE 79
Page 86

CREATING EC-PJM ACCOUNT PRIVILEGES EC-PJM
Appendix A. Creating EC-PJM Account Privileges
The following procedure describes how to create the appropriate level of
access for an Administrator account. You may follow this procedure for
the other user accounts in order to assign appropriate rights. Use the
following privilege level table for guidance.
EC-PJM Account Level of Access
Administrator Administrator
Supervisor Power User
<EC-PJM User > Power User
Guest User
80 USER GUIDE
Page 87

EC-PJM THE PRINT ICON APPLICATION
1. On the taskbar, click the Start button and select
Programs/Administrative Tools/Computer Management. A
Computer Management dialog box appears.
2. Expand the Local Users and Groups icon under the System Tools
heading.
USER GUIDE 81
Page 88
CREATING EC-PJM ACCOUNT PRIVILEGES EC-PJM
3. Select the Users folder and double-click the Administrator name. An
Administrator Properties dialog box appears.
4. Select the Member Of tab.
82 USER GUIDE
Page 89

EC-PJM THE PRINT ICON APPLICATION
5. If the appropriate level of access is not displayed, click the Add
button. The Select Groups dialog box appears.
6. Select the appropriate group in the Name list and click the Add
button.
7. Click OK to return to the Administrator Properties dialog box.
8. Click OK to return to the Computer Management dialog box.
9. Close the Computer Management dialog box.
USER GUIDE 83
Page 90

CREATING EC-PJM ACCOUNT PRIVILEGES EC-PJM
Appendix B. Sample Xerox Job Ticket
Using the Document Control Manager (DCM) application, users are able
to print Xerox Job Ticket information for a document. The following
displays a sample Xerox Job Ticket.
Job Ticket Information For: 70131704.doc
EC-PJM Naming Information
Document Names:
-> System: 70131704.doc
PDL:
XJT: EC-PJM Default Title
User:
Sender Names:
-> System: tbusmire
PDL:
XJT: EC-PJM Default Sender
User:
Modify XJT Names: Checked
Job name: From:
EC-PJM Default Title EC-PJM Default Sender
To: Account number:
Copies Imaging Stock
------------------------------------------------------------------------------------------------------
3 2-Sided US Letter (8.5" x 11") White Standard
Finishing Job type X Shift Y Shift
------------------------------------------------------------------------------------------------------
Collated Standard None None
Bound
No Rotation
Covers:
------------------------------------------------------------------------------------------------------
Front cover Print on Side 1 US Letter (8.5" x 11") Blue Standard
Back cover Print on Side 2 US Letter (8.5" x 11") Blue Standard
84 USER GUIDE
Page 91

EC-PJM THE PRINT ICON APPLICATION
Appendix C. Virus Protection Recommendations
Xerox takes special precautions to ensure the EC-PJM system is shipped
free from computer virus contamination. We recommend that you invest
in a virus detection software application to continue to protect your ECPJM system from viruses.
Computer viruses are best detected by virus detection and control
application software that is accepted by the PC industry. Some of the
virus detection and control applications available to, and widely used by,
the PC industry include:
•
Norton Anti-Virus by Symantec
• McAfee VirusScan by Network Associates, Inc.
To ensure maximum protection from new viruses, update or upgrade your
virus detection software regularly.
We recommend that you adhere to the following guidelines to keep your
EC-PJM system free of viruses:
•
Regularly (at least weekly) run virus protection software on the
EC-PJM server.
•
If a virus is detected on the EC-PJM server, do not remove the
virus. Instead, cancel the virus detection application, backup
important user files including pending or saved documents. Rerun
the virus protection software and repair/remove any detected
viruses.
USER GUIDE 85
 Loading...