


;HUR['RFX3ULQW,36
*XLGHWR3HUIRUPLQJ5RXWLQH0DLQWHQDQFH
Version 7.1
August 2000
721P89060
;HUR[&RUSRUDWLRQ
3ULQWLQJ6\VWHPV'RFXPHQWDWLRQDQG(GXFDWLRQ
6RXWK$YLDWLRQ%RXOHYDUG(60
(O6HJXQGR&$
E\;HUR[&RUSRUDWLRQ$OOULJKWVUHVHUYHG
&RS\ULJKWSURWHFWLRQFODLPHGLQFOXGHVDOOIRUPVDQGPDWWHUVRI
FRS\ULJKWDEOHPDWHULDODQGLQIRUPDWLRQQRZDOORZHGE\VWDWXWRU\RU
MXGLFLDOODZRUKHUHLQDIWHUJUDQWHGLQFOXGLQJZLWKRXWOLPLWDWLRQ
PDWHULDOJHQHUDWHGIURPWKHVRIWZDUHSURJUDPVZKLFKDUHGLVSOD\HG
RQWKHVFUHHQVXFKDVLFRQVVFUHHQGLVSOD\VORRNVHWF
3ULQWHGLQWKH8QLWHG6WDWHVRI$PHULFD
3XEOLFDWLRQQXPEHU3
;HUR[DQGDOO;HUR[SURGXFWVPHQWLRQHGLQWKLVSXEOLFDWLRQDUH
WUDGHPDUNVRI;HUR[&RUSRUDWLRQ3URGXFWVDQGWUDGHPDUNVRIRWKHU
FRPSDQLHVDUHDOVRDFNQRZOHGJHG
&KDQJHVDUHSHULRGLFDOO\PDGHWRWKLVGRFXPHQW&KDQJHVWHFKQLFDO
LQDFFXUDFLHVDQGW\SRJUDSKLFHUURUVZLOOEHFRUUHFWHGLQVXEVHTXHQW
HGLWLRQV
Laser safety
Warning: Adjustments, use of controls, or performance of
!
procedures other than those specified herein may result in
hazardous light exposure.
The Xerox DocuPrint printers are certified to comply with the
performance standards of the U.S. Department of Health, Education,
and Welfare for Class 1 laser products. Class 1 laser products do not
emit hazardous radiation. The DocuPrint printers do not emit
hazardous radiation because the laser beam is completely enclosed
during all modes of customer operation.
The laser danger labels on the system are for Xerox service
representatives and are on or near panels or shields that must be
removed with a tool. DO NOT REMOVE LABELED PANELS OR
PANELS NEAR LABELS. ONLY XEROX SERVICE
REPRESENTATIVES HAVE ACCESS TO THESE PANELS.
Ozone information
This product produces ozone during normal operation. The amount
of ozone produced depends on copy volume. Ozone is heavier than
air. The environmental parameters specified in the Xerox installation
instructions ensure that concentration levels are within safe limits. If
you need additional information concerning ozone, call 1-800-8286571 to request the Xerox publication 600P83222, OZONE.
XEROX DOCUPRINT 4050/4090 IPS GUIDE TO PERFORMING ROUTINE MAINTENANCE iii

Operation safety
Your Xerox equipment and supplies have been designed and tested
to meet strict safety requirements. They have been approved by
safety agencies, and they comply with environmental standards.
Please observe the following precautions to ensure your continued
safety.
• Always connect equipment to a properly grounded electrical
outlet. If in doubt, have the outlet checked by a qualified
electrician.
Warning: Improper connection of the equipment grounding
!
conductor may result in risk of electrical shock.
• Never use a ground adapter plug to connect equipment to an
electrical outlet that lacks a ground connection terminal.
• Always place equipment on a solid support surface with
adequate strength for its weight.
• Always use materials and supplies specifically designed for
your Xerox equipment. Use of unsuitable materials may result in
poor performance and may create a hazardous situation.
• Never move either the printer or the Printer Controller without
first contacting Xerox for approval.
• Never attempt any maintenance that is not specifically
described in this documentation.
• Never remove any covers or guards that are fastened with
screws. There are no operator-serviceable areas within these
covers.
• Never override electrical or mechanical interlocks.
• Never use supplies or cleaning materials for other than their
intended purposes. Keep all materials out of the reach of
children.
• Never operate the equipment if you notice unusual noises or
odors. Disconnect the power cord from the electrical outlet and
call service to correct the problem.
If you need any additional safety information concerning the
equipment or materials Xerox supplies, call Xerox Product Safety at
the following toll-free number in the United States:
1-800-828-6571
For customers outside the United States contact your local Xerox
representative or operating company.
iv XEROX DOCUPRINT 4050/4090 IPS GUIDE TO PERFORMING ROUTINE MAINTENANCE

Table of contents
Laser safety iii
Ozone information iii
Operation safety iv
Introduction vii
About this guide vii
Contents vii
Conventions viii
Related publications ix
1. Feeder trays 1-1
Checking feeder trays 1-1
Loading feeder trays 1-2
Guidelines for loading paper 1-2
Loading the trays 1-3
2. Output trays 2-1
Checking and unloading dual stacker trays 2-1
Checking and unloading the stitcher/stacker tray 2-3
Checking and unloading sample trays 2-4
3. Stitcher wire 3-1
4. Fuser lubricant and pressure roll wiper 4-1
Adding fuser lubricant 4-1
Replacing the pressure roll wiper 4-4
5. Adding dry ink 5-1
6. Cleaning 6-1
Cleaning the keyboard, monitor, and the exterior of the Printer Controller 6-1
Cleaning the 4mm cartridge tape drive 6-2
7. Maintenance and support services 7-1
Xerox Customer Services Support Center 7-1
Xerox Documentation and Software Services 7-2
Xerox Font Center 7-2
Operator Training 7-2
Xerox Customer Education 7-3
Reporting billing meters 7-3
XEROX DOCUPRINT 4050/4090 IPS GUIDE TO PERFORMING ROUTINE MAINTENANCE v

TABLE OF CONTENTS
Index INDEX-1
vi XEROX DOCUPRINT 4050/4090 IPS GUIDE TO PERFORMING ROUTINE MAINTENANCE

About this guide
Introduction
The Xerox DocuPrint 4050/4090 IPS Guide to Performing Routine
Maintenance provides information on how to perform basic
maintenance tasks on the Xerox DocuPrint IPS 4050 and 4090.
This guide is designed for operators whose job consists of operating
each of the system components, running print jobs, solving simple
system problems, and performing basic maintenance tasks, such as
replenishing printer supplies.
Refer to the entire Xerox DocuPrint IPS Series documentation for
information on other tasks required for printing with your DocuPrint
printer.
Users should have an understanding of Printer Controller operations.
Contents
Before using this guide, become familiar with its contents and
conventions.
This section lists the contents of this guide.
• Chapter 1, “Feeder trays,” provides information on how to load
feeder trays for your DocuPrint printer.
• Chapter 2, “Output trays,” describes how to unload output trays
for the DocuPrint printer.
• Chapter 3, “Stitcher wire,” provides information on how to
continue printing when the spool is out of wire.
• Chapter 4, “Fuser lubricant and pressure roll wiper,” describes
how to refill the fuser agent reservoir, and how to replace the
pressure roll wiper.
• Chapter 5, “Adding dry ink,” describes how to add dry ink.
• Chapter 6, “Cleaning,” provides instructions on how to clean the
various printing system components.
• Chapter 7, “Maintenance and support services,” provides
information on how to call for service, order supplies, and report
meter readings.
An index is provided at the back of the guide.
XEROX DOCUPRINT 4050/4090 IPS GUIDE TO PERFORMING ROUTINE MAINTENANCE vii
INTRODUCTION
Conventions
This guide uses the following conventions:
• Italics — Document and library names are shown in italics (for
example, the Xerox DocuPrint 4050/4090 IPS Guide to
Performing Routine Maintenance).
• Capitalization of graphical user interface (GUI) window titles
matches the titles as they appear on the screen. In cases where
a window does not have a title, it is referenced using all lower
case. For example:
— At the graphical user interface, use the Output
Configuration window to group the trays.
— The main window displays the current system status.
Note: Notes are hints that help you perform a task or understand
the text.
Caution: Cautions alert you to an action that could damage
hardware or software.
Warning: Warnings alert you to conditions that could affect the
!
safety of people.
viii XEROX DOCUPRINT 4050/4090 IPS GUIDE TO PERFORMING ROUTINE MAINTENANCE

Related publications
Xerox documents Following is a list of all Xerox DocuPrint IPS documents. For a
INTRODUCTION
This document is part of the Xerox DocuPrint IPS publication set.
complete list and description of available Xerox documentation, refer
to the Xerox Customer Documentation Catalog (publication number
610P17517), or call your service representative.
Application Programmer/System Administrator Quick Reference
Card
Customer Information Quick Reference Card
Generic MICR Fundamentals Guide
Glossary
Guide to Configuring and Managing the System
Guide to Performing Routine Maintenance
Helpful Facts About Paper
Installation Planning Guide
Master Index
Messages Guide
Solutions Guide
System Overview Guide
Troubleshooting Guide
Xerox Standard Font Library Font User Guide
The documentation set also includes an electronic version, the
DocuPrint IPS Interactive Customer Documentation CD.
IBM documents Following are related IBM documents. Contact your local IBM
representative for ordering instructions for IBM AFP/PSF manuals
that might be useful for your specific installation.
IBM 3825 Page Printer Product Description
IBM Intelligent Printer Data Stream Reference
IBM Advanced Function Presentation Printer Summary
IBM ITSC Distributing AFP Printing from a Host System
IBM Advanced Function Printing Data Stream Reference
IBM Data Stream and Object Architectures: Mixed Object Document
Content Architecture Reference
Guide to Advanced Function Presentation
XEROX DOCUPRINT 4050/4090 IPS GUIDE TO PERFORMING ROUTINE MAINTENANCE ix

x XEROX DOCUPRINT 4050/4090 IPS GUIDE TO PERFORMING ROUTINE MAINTENANCE
Checking feeder trays
1. 1Feeder trays
This chapter describes the processes for loading paper in the
4050/4090 IPS feeder trays, and explains what actions are
necessary if a paper stock is changed.
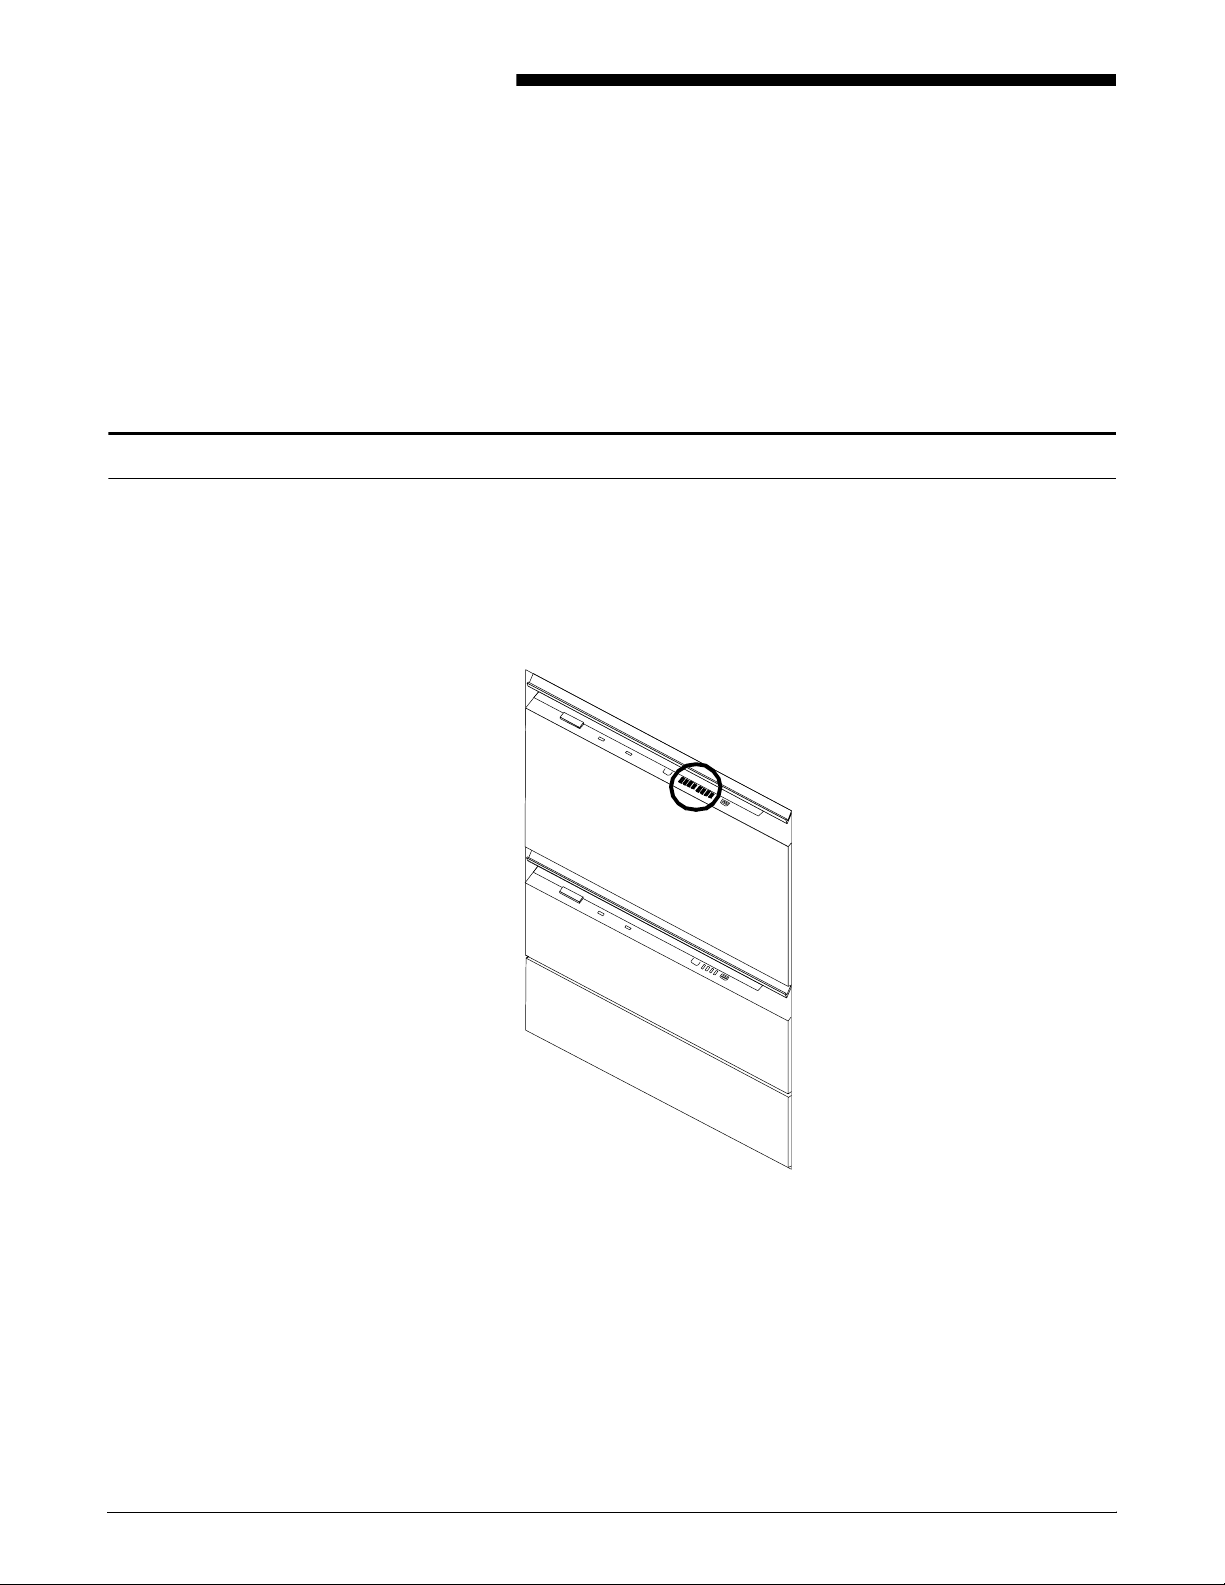
Check the amount of paper in each feeder tray by examining the
green lights on the door of the tray. Each light represents 25 percent
of a ream, or about 125 sheets of 20-pound or 80 gsm (grams per
square meter) paper.
Figure 1-1. Feeder tray lights
• You do not have to interrupt a print job to load paper since you
can refill one tray while the printer is feeding from another tray.
• If you try to load a tray that is currently in use, the feeding
switches to a backup tray if one is available. If a backup tray is
not available, the printer stops.
• The printer does not feed all the paper out of a tray. A stack of
approximately 1/4 inch / 6 mm remains in the tray.
XEROX DOCUPRINT 4050/4090 IPS GUIDE TO PERFORMING ROUTINE MAINTENANCE 1-1

FEEDER TRAYS
Loading feeder trays
Guidelines for loading paper
It is important to load paper properly in the feeder trays to prevent
jams and loss of production time. The following guidelines will help
ensure maximum efficiency of your IPS printer’s operation.
When you are loading the paper, follow these guidelines to prevent
paper jams:
• Remove damaged sheets.
• Load the paper with the package wrapper seam side up.
• Make sure that the direction of the curl is consistent.
• Avoid fanning the paper unless the stock is predrilled.
• Do not load the paper above the MAX line on the length guide.
• Place any paper left in the bottom of the tray on top of the new
paper stack.
• When loading predrilled paper, fan the paper and remove
loose paper plugs.
1-2 XEROX DOCUPRINT 4050/4090 IPS GUIDE TO PERFORMING ROUTINE MAINTENANCE
Loading the trays
FEEDER TRAYS
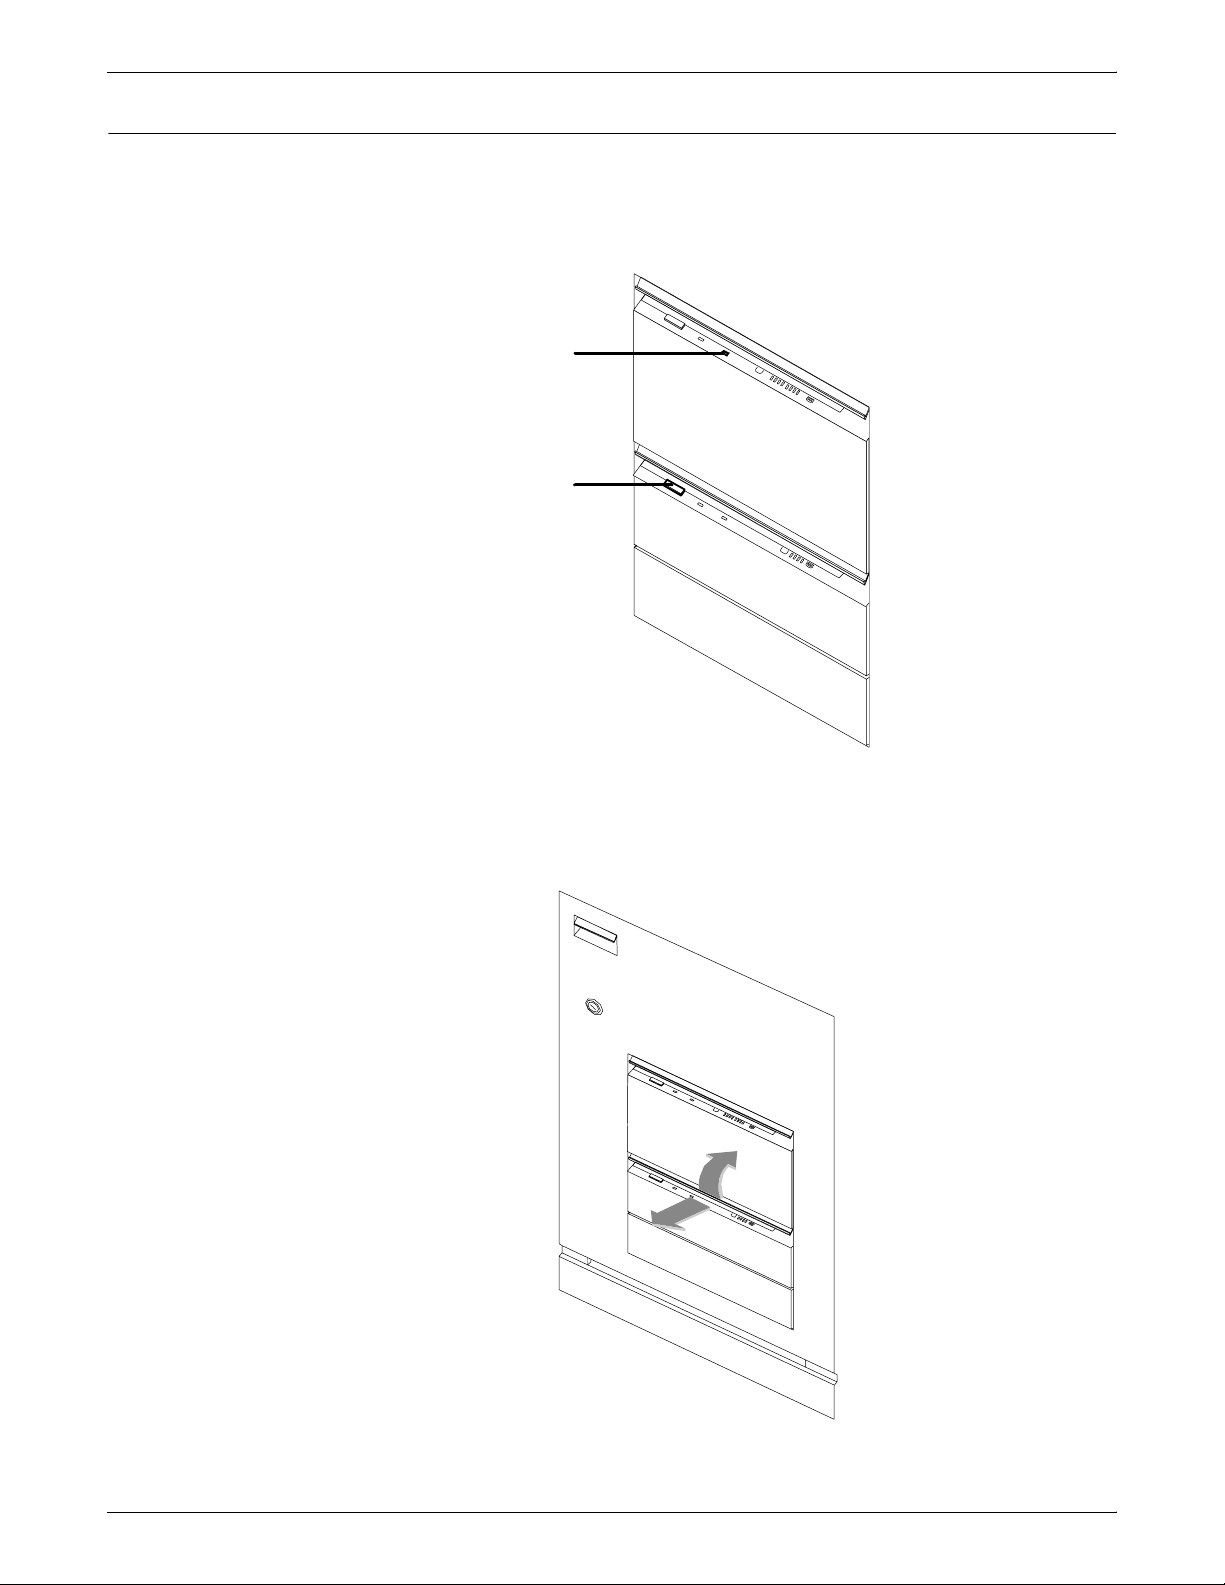
Follow these steps to load a feeder tray:
1. If the Ready To Open indicator on the feeder tray door is not lit,
press the Tray Unlock button and wait for the tray to descend
and the Ready To Open indicator light before opening the tray.
1
2
1 Ready to Open Indicator
2 Tray Unlock button
2. Lift and pull out the bar along the top of the feeder tray. Slide the
tray all the way out for best access and ease of loading.
XEROX DOCUPRINT 4050/4090 IPS GUIDE TO PERFORMING ROUTINE MAINTENANCE 1-3

FEEDER TRAYS
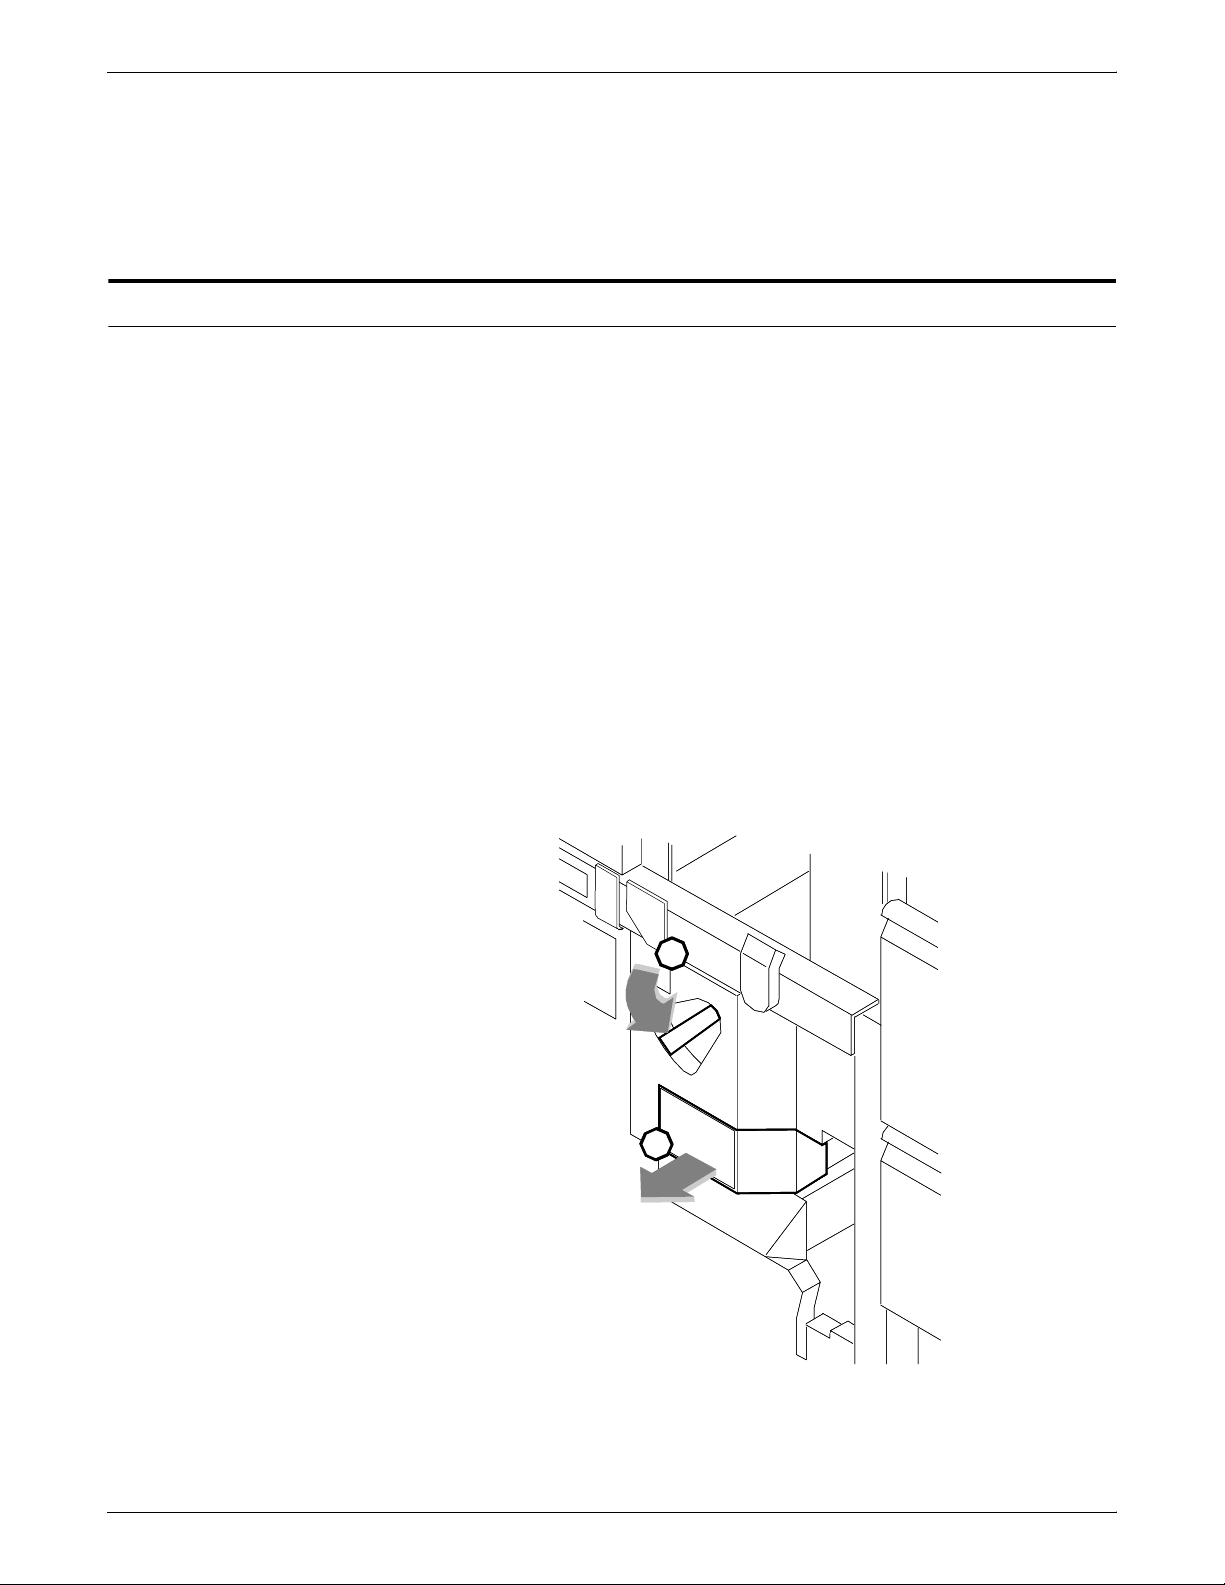
3. Press the green lever down to unlatch the paper feeder
assembly.
Caution: Attempting to move the lever in any other direction
can break it.
4. Pull out any partially fed paper from the feeder assembly and
discard it. There will be some resistance.
5. Squeeze the lever against the back of the length guide and slide
the guide toward the back of the printer.
6. Remove any paper remaining in the tray and set it aside to be
placed on top of the new paper.
1-4 XEROX DOCUPRINT 4050/4090 IPS GUIDE TO PERFORMING ROUTINE MAINTENANCE

FEEDER TRAYS
7. Load paper, following the instructions at the front of the feeder
tray and carefully positioning the paper in the right-front corner
of the tray.
8. Pull the length guide forward to touch the back of the paper
stack.
9. Latch the paper feeder assembly by pressing the green dot next
to the green release lever until the assembly clicks into position.
10. Slide the tray into the printer until it latches. The tray rises
automatically into position.
11. Press the Continue button to resume printing.
Note: If you change the paper stock, you must use the Set Tray
Command to reset the trays. If you change to larger paper after an
extended run of smaller paper, run 20 copies of a sample document
to clean the fusing system. Otherwise, the first pages of the new job
may be of poor quality.
XEROX DOCUPRINT 4050/4090 IPS GUIDE TO PERFORMING ROUTINE MAINTENANCE 1-5

FEEDER TRAYS
Note: When you change the paper size in one of the feeder trays,
a message displays asking you to make sure the printer is warmed
up, ready, and loaded with the proper media. The message displays
the media defined for the tray, as well as the paper currently loaded
in the tray.
Currently, there is no method of restoring the Input Configuration to
its original state. Once you select Modify, the Input Configuration
window appears. Make changes on the window as appropriate, then
save your changes. For detailed information on the Input
Configuration window, refer to the Xerox DocuPrint 4050/4090 IPS
Guide to Configuring and Managing the System.
1-6 XEROX DOCUPRINT 4050/4090 IPS GUIDE TO PERFORMING ROUTINE MAINTENANCE

2. 2Output trays
Your print jobs are sent to printer output trays which you must unload.
You can unload each of the output trays while the system is printing.
How you do so, however, depends on the type of tray. This chapter
discusses how to check and unload the types of trays available.
In all cases, if the printer has stopped due to a full output tray and
does not resume automatically when the tray is emptied, press the
Continue button on the printer control console.
Checking and unloading dual stacker trays
When a stacker tray is full, the following occurs:
• The Tray Full indicator lights on the appropriate stacker tray.
• The printer control console displays a message indicating which
output tray is full.
• The picture on the graphic display shows the location of the full
tray.
• If you select only one tray, the printer stops when that tray is full.
• If the first tray is not emptied by the time the second output tray
is full, the printer stops and displays the message that both
output trays are full.
Each stacker tray holds 750 sheets of 20-pound or 80 gsm (grams
per square meter) paper.
XEROX DOCUPRINT 4050/4090 IPS GUIDE TO PERFORMING ROUTINE MAINTENANCE 2-1

OUTPUT TRAYS
Unloading the dual stacker trays To unload each dual stacker tray, raise the scuffer arm and remove
the printed pages.
1
2
1 Scuffer arm
2 Tray Full indicators
Note: When both trays are full, you must empty at least one tray
before you can resume printing.
2-2 XEROX DOCUPRINT 4050/4090 IPS GUIDE TO PERFORMING ROUTINE MAINTENANCE

Checking and unloading the stitcher/stacker tray
An electronic counter in the stitcher/stacker keeps track of the
number of sheets printed and the number of stapled sets produced.
When a stacker tray is full, printing stops and a message appears on
the printer control console that the output tray is full.
Note: A false tray full condition may occur when you remove small
stapled sets without pulling the tray out. The counter is not reset,
causing the printer to stop before the tray is actually full.
Each stitcher/stacker tray holds 2000 sheets of 20lb (80 gsm) paper.
Unloading the stitcher/stacker tray To unload the stitcher/stacker tray:
1. Lift the black handle on the outside of the tray.
OUTPUT TRAYS
1
2
1 Tray handle
2 Stacker arms
2. Carefully slide the tray up and out and remove the printed
pages.
Note: A false Tray Full condition may occur when you remove
small stapled sets without pulling the tray out. The counter is not
reset, causing the printer to stop before the tray is actually full.
3. Close the tray by sliding it back under the stacker arms.
XEROX DOCUPRINT 4050/4090 IPS GUIDE TO PERFORMING ROUTINE MAINTENANCE 2-3

OUTPUT TRAYS
Checking and unloading sample trays
The sample tray holds up to 100 sheets of paper from 8.5 by 11
inches / 216 by 279 mm to 8.5 by 14 inches / 216 by 356 mm. No
message appears when the sample tray is full. Since a paper jam can
occur if the tray is overfilled, empty the sample tray regularly, if it is in
use.
To empty the sample tray, simply remove the printed pages.
Note: Since the sample tray can receive waste sheets purged after
a paper jam, always clear the sample tray after clearing a jam. This
prevents waste sheets from being confused with good sheets.
2-4 XEROX DOCUPRINT 4050/4090 IPS GUIDE TO PERFORMING ROUTINE MAINTENANCE

3. 3Stitcher wire
The Wire Percentage indicator is located on the printer control
console of IPS systems configured with a stitcher/stacker. It displays
an approximate percentage of stitcher wire remaining on the spool.
Your service representative can set the display to flash at a
predetermined percentage as a warning that you are running low on
stitcher wire.
Figure 3-1. Stitcher wire indicator on the 4050/4090 printer
control console
Note: The percentage that displays on the wire percentage
indicator is an approximation and has a small margin of error.
When the stitcher spool empties, the printer stops, and you see the
following displays on the printer control console:
• The print quantity display shows the fault code L152.
• The message window displays the following sequence of
messages, with the next message appearing each time you
press i:
— STITCHER IS OUT OF WIRE OR
SPOOL NOT ROTATING. PRESS i
— TRAINED OPERATOR CHECK WIRE
MANAGEMENT SYSTEM. PRESS i
— IF UNABLE TO FIX, PRESS CONTINUE
TO RESUME WITHOUT STITCHING
— STITCHER IS OUT OF WIRE
PRESS ’CONTINUE’ TO RESUME PRINTING.
XEROX DOCUPRINT 4050/4090 IPS GUIDE TO PERFORMING ROUTINE MAINTENANCE 3-1

STITCHER WIRE
If you continue printing the job without replacing the wire, the
documents print without being stapled. The printer status display
shows the following message:
OUT OF WIRE
Contact your key operator or your service representative when you
see this message. This should seldom happen because your service
representative checks the wire supply on each service call and
replaces the spool as needed.
To continue printing without replacing the wire, press the Continue
button. The document is then printed without being stapled.
3-2 XEROX DOCUPRINT 4050/4090 IPS GUIDE TO PERFORMING ROUTINE MAINTENANCE

Adding fuser lubricant
4. 4Fuser lubricant and pressure
roll wiper
This chapter describes how to add fuser lubricant and how to replace
the pressure roll wiper on your system.
The fuser uses heat to fuse the print image to the paper. It is critical
that the fuser be kept lubricated with fuser lubricant and that its
reservoir be kept full. This chapter describes the procedure for
adding fuser lubricant in the printer.
Your service representative usually adds fuser lubricant. However,
you might choose to add the fuser lubricant yourself if you have been
trained in this procedure.
To add fuser lubricant:
1. Open the printer doors.
2. Place a dropcloth on the floor under the fuser area.
Warning: If any fuser lubricant is spilled, clean it immediately.
!
Fuser lubricant spills cause the floor to be very slippery.
3. Press down on the green lever (A), moving it counterclockwise.
4. Hold the lever down while you grasp the green fuser drawer
handle (B) and pull out the drawer until it stops.
A
BAB
XEROX DOCUPRINT 4050/4090 IPS GUIDE TO PERFORMING ROUTINE MAINTENANCE 4-1

FUSER LUBRICANT AND PRESSURE ROLL WIPER
!
5. Put on gloves.
Warning: Fuser lubricant contains silicone, which can cause
eye irritation upon contact. Wash your hands with soap and
water after you finish this procedure.
6. Locate the fuser reservoir and remove the cap by turning it
counter-clockwise.
Caution: There is an orange float that indicates the lubricant
level. It may stick to the reservoir wall. Be careful not to overfill
the reservoir or an overflow of lubricant may occur.
4-2 XEROX DOCUPRINT 4050/4090 IPS GUIDE TO PERFORMING ROUTINE MAINTENANCE

FUSER LUBRICANT AND PRESSURE ROLL WIPER
7. Open a tube of fuser lubricant and cut the pointed spout
diagonally. Carefully squeeze the lubricant into the reservoir
until the orange float reaches the top (C), or until you see the oil
reach the top edge below the fuser cap. The reservoir may
require up to two tubes of lubricant if it was empty.
C
8. Replace the reservoir cap by turning it clockwise.
9. Close the fuser drawer by pressing down on the green latch (A)
and pushing the fuser drawer in until it latches in place.
A
10. Dispose of the dropcloth and any empty lubricant tubes in a
trash receptacle. If there is any lubricant left in the tube, cap the
tube and store it for future use.
XEROX DOCUPRINT 4050/4090 IPS GUIDE TO PERFORMING ROUTINE MAINTENANCE 4-3
FUSER LUBRICANT AND PRESSURE ROLL WIPER
11. Remove and dispose of the gloves in a trash receptacle, being
12. Close the printer doors.
13. Wash your hands to remove any fuser lubricant.
Replacing the pressure roll wiper
You need to replace the pressure roll wiper when any of the following
occur:
• Excessive oil or dirt buildup appears on the wiper.
• The first few prints of a job have oil or dirt on them.
• An interval of 80,000 to 100,000 prints are made. (The number
Your service representative usually replaces the pressure roll wiper
for the DocuPrint System. However, you might choose to replace the
pressure roll wiper yourself if you have been previously trained in this
procedure.
careful not to let any residue come in contact with your skin.
of prints made is tracked by the billing meter, which you can
view through the Administration pull-down menu on the IPS
main window.)
To replace the wiper:
1. Power off the printer.
2. Open the printer doors and locate the fuser drawer.
3. Move the green lever (A) counter-clockwise, grasp the green
handle on the fuser drawer, (B) and pull it out until it stops.
A
BAB
4-4 XEROX DOCUPRINT 4050/4090 IPS GUIDE TO PERFORMING ROUTINE MAINTENANCE

FUSER LUBRICANT AND PRESSURE ROLL WIPER
4. Determine if the fuser is cool.
Place your hand approximately 1 inch (25mm) above the fuser
area.
If you feel heat, STOP, leave the fuser drawer out, and wait for
the fuser to cool. DO NOT touch the fuser while it is hot.
If you DO NOT feel heat, continue with the procedure.
Warning: Perform this task only when the fuser is cool.
!
Exercise care to prevent burns when working in this area. Do not
perform this task if the fuser is hot.
5. Put on gloves.
Warning: Fuser agent contains silicone that causes eye
!
irritation upon contact. Wash your hands with soap and water
after you finish this procedure.
XEROX DOCUPRINT 4050/4090 IPS GUIDE TO PERFORMING ROUTINE MAINTENANCE 4-5

FUSER LUBRICANT AND PRESSURE ROLL WIPER
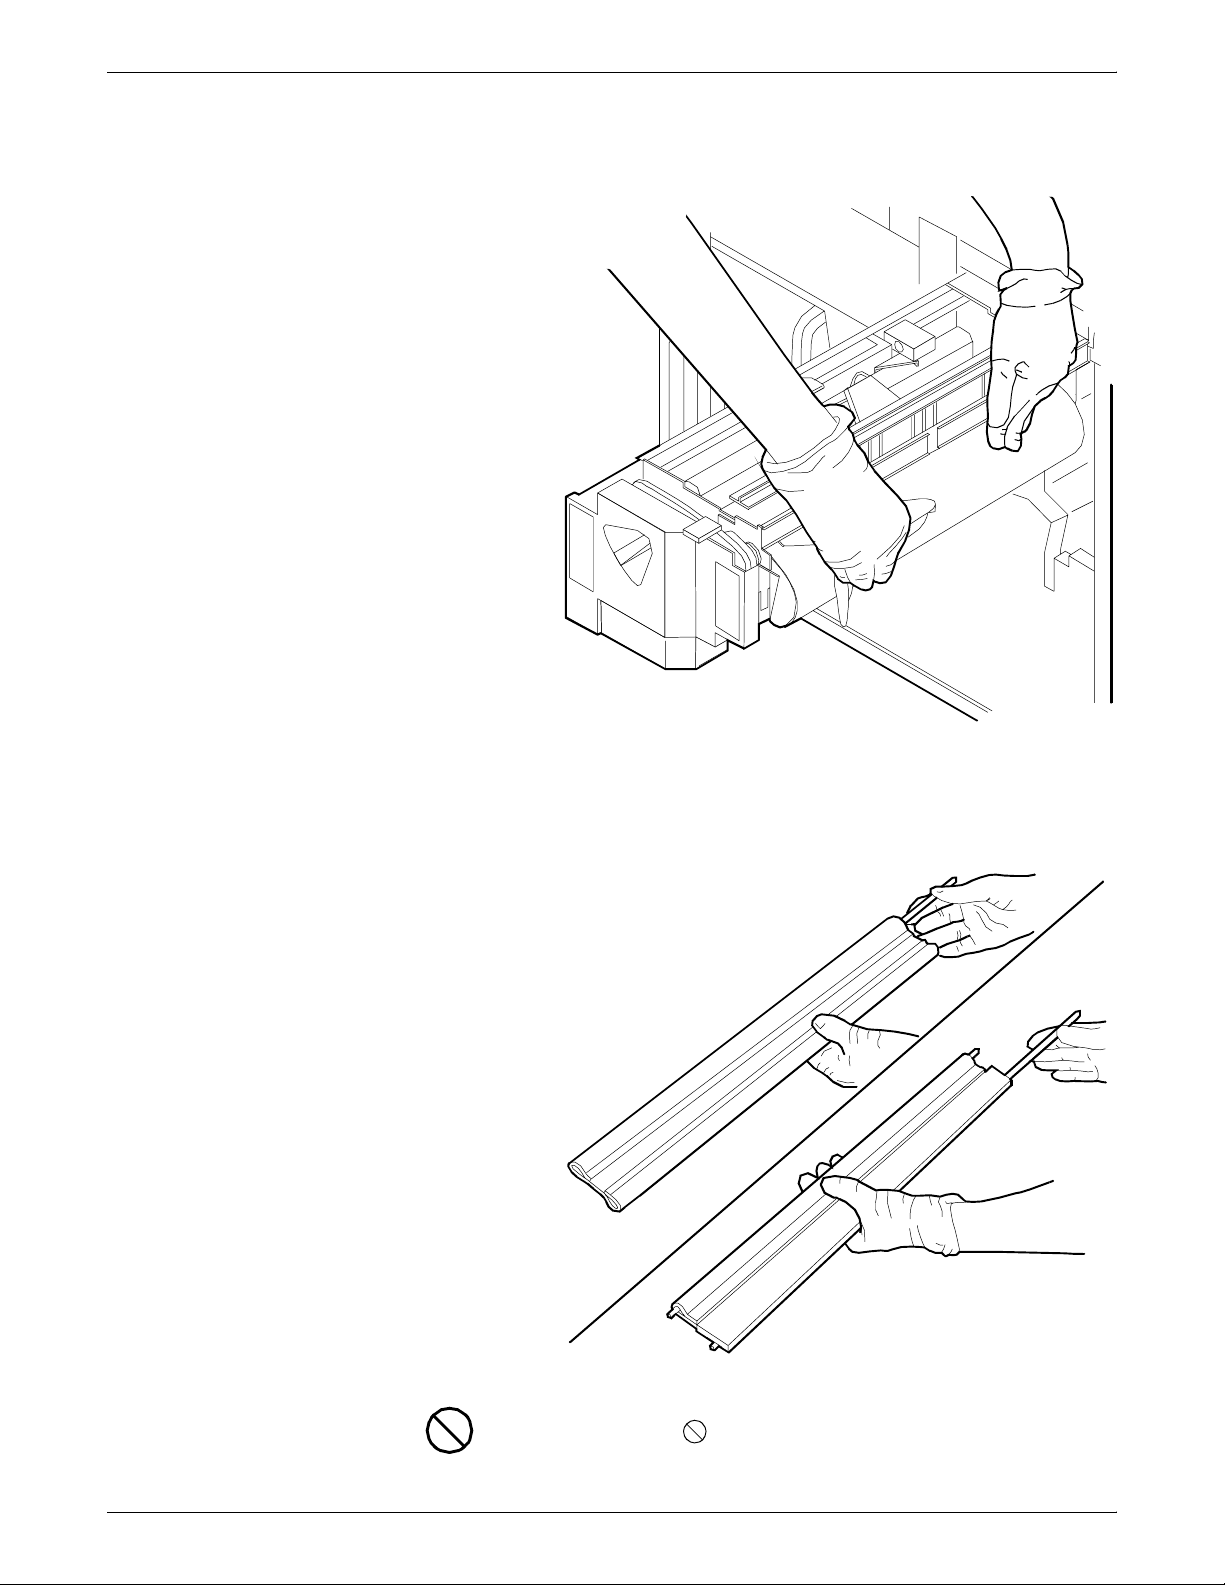
6. Locate the pressure roll wiper assembly and release the top rod
by pulling upward as shown.
7. Remove the lower rod from the springs and lift the wiper
assembly away.
8. Place the used wiper in the plastic bag that came with the new
wiper and dispose of the bag in a trash receptacle.
4-6 XEROX DOCUPRINT 4050/4090 IPS GUIDE TO PERFORMING ROUTINE MAINTENANCE
FUSER LUBRICANT AND PRESSURE ROLL WIPER
9. Rotate the pressure roll while wiping the dirt off with a clean
cloth. Discard the cloth in the trash receptacle when you are
finished.
10. Insert the short rod in the upper loop of the new wiper.
11. Insert the long rod through the lower loop of the new wiper.
12. Insert the lower rod into the springs on both ends of the
pressure roll.
Caution: Make sure the smooth side of the wiper is facing the
pressure roll.
XEROX DOCUPRINT 4050/4090 IPS GUIDE TO PERFORMING ROUTINE MAINTENANCE 4-7

FUSER LUBRICANT AND PRESSURE ROLL WIPER
13. Center the wiper on the pressure roll. Pull up the wiper and
place the upper rod onto the brackets on both ends of the
pressure roll, as shown.
14. Remove and dispose of the gloves in a trash receptacle, being
careful not to let any residue come in contact with your skin.
15. Close the fuser drawer by pressing down on the green latch (A),
and push the fuser drawer in until it latches in place.
A
16. Close the printer doors and power on the printer.
17. Wash your hands to remove any fuser agent.
4-8 XEROX DOCUPRINT 4050/4090 IPS GUIDE TO PERFORMING ROUTINE MAINTENANCE

5. 5Adding dry ink
Dry ink is the black powder that forms the image on the printed page.
This chapter describes the procedure for adding dry ink to the printer.
When the printer is low on dry ink, the message DRY INK BOTTLE
IS EMPTY appears on the printer control console. The graphic
display indicates the location of the dry ink bottle.
You do not need to monitor the amount of dry ink remaining in the
bottle at any given time; the system monitors it for you.
If you do not add dry ink, the printer eventually stops printing. It does
not resume printing until you replace the dry ink bottle.
Note: Do not discard damaged, unused dry ink bottles. Return the
bottles to Xerox for exchange (for credit in the USA).
Caution: To prevent dry ink spillage, remove the cartridge only
when directed to do so by a message on the printer control
console
To add dry ink:
1. Open the printer doors and locate the dry ink area on the left
side of the printer.
1
1 Dry ink bottle
XEROX DOCUPRINT 4050/4090 IPS GUIDE TO PERFORMING ROUTINE MAINTENANCE 5-1

ADDING DRY INK
2. Spread a dropcloth on the floor under the dry ink area.
3. Rotate the green handle toward the right to unlatch the lid.
1
2
1 Dry ink bottle
2 Latch
Caution: If there is still dry ink in the bottle, the ink may spill as
you move the bottle back onto its lid.
4. Pull the empty dry ink bottle toward you until it stops.
5. Remove the empty bottle and discard it.
6. Shake the new ink bottle at least ten rotations, taking care to
support the bottle cap. It is important that you mix the contents
thoroughly by allowing the material inside the bottle to fall and
settle toward the cap at each rotation.
7. Insert the new bottle into the printer until it is latched into place.
The cap remains in the front of the compartment as you push
the bottle toward the back.
5-2 XEROX DOCUPRINT 4050/4090 IPS GUIDE TO PERFORMING ROUTINE MAINTENANCE

8. Move the green handle to the latched position.
1
2
ADDING DRY INK
1 Dry ink bottle
2 Latch
9. Hold the cartridge in place and pull the paper off the mouth of
the bottle.
1
2
1 Dry ink bottle
2 Paper seal
XEROX DOCUPRINT 4050/4090 IPS GUIDE TO PERFORMING ROUTINE MAINTENANCE 5-3

ADDING DRY INK
10. Discard the seal along with the dropcloth.
Caution: If any dry ink gets on your hands, wash them with soap
and cold water. If any dry ink gets on your clothes, brush them with a
dry paper towel or a stiff-bristled brush. If this does not remove the
ink, immediately launder with detergent and cold water. Heat sets the
ink permanently. Inform dry cleaners that the spot is dry ink for a
printer so they do not use a solvent that sets the stain.
5-4 XEROX DOCUPRINT 4050/4090 IPS GUIDE TO PERFORMING ROUTINE MAINTENANCE

6. 6Cleaning
This chapter describes the cleaning tasks you need to perform
regularly on the 4050/4090 IPS.
Cleaning the keyboard, monitor, and the exterior of the Printer Controller
Clean the exterior surfaces of your Printer Controller, including
monitor and keyboard, as required. Clean daily, if possible.
Use the following supplies to clean the exterior surfaces:
• Monitor: Use a soft, lint-free cloth dampened with a glass
cleaner. Do not spray the liquid directly onto the monitor, it may
cause damage.
• Keyboard: Use a mild household detergent that has been
poured or sprayed onto a cloth lightly dampened with water. Do
not saturate the cloth; just dampen it.
• Exterior: Use a mild household detergent that has been poured
or sprayed onto a cloth lightly dampened with water. Do not
saturate the cloth; just dampen it.
Caution: Do not allow liquids to drip onto anything electrical or
mechanical. For the same reason, never spray or pour the cleaner
directly onto the keyboard or the exterior surfaces of the system.
XEROX DOCUPRINT 4050/4090 IPS GUIDE TO PERFORMING ROUTINE MAINTENANCE 6-1

CLEANING
Cleaning the 4mm cartridge tape drive
Clean the 4mm cartridge tape drive every 25 hours of actual tape
operation. Use only a cleaning cartridge designed for the 4mm
cartridge tape drive. No fluids or other preparations are necessary
with the use of these cartridges.
Caution: Do not use cleaning cartridges or any types of fluids
designed for use in audio devices as these can damage your tape
drive.
To clean the tape drive:
1. Insert the cleaning cartridge into the tape drive as you would a
regular tape cartridge.
2. Observe the green LED blinking slowly to indicate that the tape
drive is automatically performing a cleaning cycle.
Note: If the cleaning cartridge has been used for more than
approximately 30 cleaning cycles, the amber LED blinks rapidly.
Press the Unload button to eject the cleaning cartridge and
discard it.
3. Remove the cleaning cartridge after it is automatically ejected
following the cleaning cycle.
You can use the cartridge tape drive immediately after cleaning.
6-2 XEROX DOCUPRINT 4050/4090 IPS GUIDE TO PERFORMING ROUTINE MAINTENANCE

7. 7Maintenance and support
This chapter provides information on the services Xerox provides to
help you keep your DocuPrint printer running efficiently. It describes
the services available to you and how to take advantage of these
services.
Note: The support services described in this chapter apply to the
United States only. For information on the support services available
internationally, consult your Xerox representative.
Xerox Customer Services Support Center
Before calling your Customer Service Support Center, make sure
you have tried the corrective actions described in the
Troubleshooting Guide. If a problem persists, gather the necessary
information and call your customer service support center (or contact
your local Xerox operating company).
services
Refer to the Xerox DocuPrint 4050/4090 Troubleshooting Guide
chapter “Calling for service” for the information you should have
ready when you call.
In the United States, call the following number to report DocuPrint
hardware or software problems:
1-800-822-2979
Note: This phone number is attached to your printer at installation
time.
XEROX DOCUPRINT 4050/4090 IPS GUIDE TO PERFORMING ROUTINE MAINTENANCE 7-1

MAINTENANCE AND SUPPORT SERVICES
Xerox Documentation and Software Services
XDSS distributes the documents you need to install and use the
DocuPrint printer, other Xerox printers, and associated software. If
you register for site subscription service, XDSS will automatically
send you updates and revisions as they become available.
To order this documentation, call Xerox Documentation and Software
services:
1-800-327-9753 (U.S. only), between the hours of 6:00 a.m. and
4:00 p.m., Pacific time.
XDSS representatives will explain the services available, answer
your questions, and take orders for documentation.
You can also order on the web:
www.xdss.com
Xerox Font Center
The Xerox Font Center (or your local Xerox operating company) can
send you samples and catalogs of the fonts available for your printer.
Operator Training
To receive font samples, obtain price information, obtain technical
support, or order licensed or custom fonts, call:
1-800-445-FONT (3668) between 6:00 a.m. and 5:00 p.m.,
Pacific time.
You can get font information on the web:
www.font.net
Operator training is conducted at your location shortly after your
DocuPrint printer is installed. Training takes approximately two to
four hours, depending on the system configuration. It includes handson practice running basic jobs, performing routine maintenance, and
solving problems. Determine the number of operators you want to
attend the initial training, schedule training dates and times through
your Xerox sales representative.
Additional training classes, such as Advanced Customer Training
(ACT) for operators, teach advanced service and maintenance skills.
A variety of classes and workshops are available through Xerox
Customer Education.
7-2 XEROX DOCUPRINT 4050/4090 IPS GUIDE TO PERFORMING ROUTINE MAINTENANCE

Xerox Customer Education
Reporting billing meters
MAINTENANCE AND SUPPORT SERVICES
Xerox offers classes and tutorial documents on various topics
relating to printing systems and document production. For
information about Xerox training courses, or to receive a catalog, call
Xerox Customer Education at:
1-800-445-5554 (U. S. only)
You can also obtain information on the web:
http://www.xerox.com/services/training/customer-ed
On a regular basis, usually every month, you need to report your
printer billing meter readings to Xerox.
To do this, you need the serial number for your system. The serial
number is located behind the narrow door to the far left, on the front
of the printer. If you are reporting meters for other Xerox printers
during the same call, make sure you have the serial number available
for each one before calling.
If you know how to read the billing meters for your system, you can
have that information ready when you call. Otherwise, the service
representative will provide you with instructions when you call.
To report billing meter readings, call 1-800-891-8405 (all U.S.
locations) or contact your local Xerox operating company.
Your printer maintains the page count in the Billing window. You can
read the meters any time the printer is not running. To display the
Billing Information window: From the Administration menu, select
Billing Information.
XEROX DOCUPRINT 4050/4090 IPS GUIDE TO PERFORMING ROUTINE MAINTENANCE 7-3

MAINTENANCE AND SUPPORT SERVICES
Figure 7-1. Billing Information window
Note: The information in the IOT Engine Type field varies,
depending on your IPS model.
• Meter A gives the total impressions successfully delivered by
the printer. This meter keeps a permanent cumulative record of
how many sheets are delivered to an output destination. It
cannot be cleared or reset. This recording is reported by the
customer.
• Meter C counts all sheets fed into the paper path from trays 1,
2, 3, or 4. It is a user meter and can be cleared by the controller.
• Meter E counts all good sheets sent to the intended output
destination. It is a user meter and can be cleared by the
controller.
• Meter F performs the same function as Meter A (total
impressions successfully delivered), except it can be cleared by
the controller.
• Meter H counts all good duplex sheets delivered to the intended
output destination. It is a user meter and can be cleared by the
controller.
• Meter J is not used.
7-4 XEROX DOCUPRINT 4050/4090 IPS GUIDE TO PERFORMING ROUTINE MAINTENANCE

Index
Numerics
4mm cartridge tape drive, cleaning, 6-2
A
Advanced Customer Training (ACT), 7-2
C
checking
dual stacker trays, 2-1
feeder trays, 1-1, 1-2–1-5
sample trays, 2-4
stitcher/stacker trays, 2-3
cleaning
4mm cartridge tape drive, 6-2
keyboard, 6-1
monitor, 6-1
Printer Controller exterior, 6-1
customer education, 7-3
D
danger labels, iii
documentation
other, ix
dry ink
adding, 5-1–5-4
stains, 5-4
dual stacker trays, unloading, 2-1
E
education, customer, 7-3
electronic counter, 2-3
H
hotlines
ozone information, iii
safety, iv
I
input trays, loading, 1-2–1-5
K
keyboard, cleaning, 6-1
L
labels, danger, iii
laser safety, iii
lights, feeder trays, 1-1
loading
paper, 1-2
loading, feeder trays, 1-2–1-5
M
maintenance services, 7-1–7-4
monitor, cleaning, 6-1
O
operation safety, iv
operator training, 7-2
output trays, 2-1–2-4
ozone, iii
P
F
feeder trays, 1-1–1-5
fuser lubricant
adding, 4-1–4-4
G
guidelines, loading paper, 1-2
XEROX DOCUPRINT 4050/4090 IPS GUIDE TO PERFORMING ROUTINE MAINTENANCE INDEX-1
paper
feeder assembly, 1-5
loading, 1-2
predrilled, 1-2
trays, see trays
predrilled paper, 1-2
pressure roll wiper, replacing, 4-4–4-8
Printer Controller exterior, cleaning, 6-1
procedures
dry ink, adding, 5-1–5-4
feeder trays, loading, 1-3–1-5
fuser lubricant, adding, 4-1–4-4

INDEX
pressure roll wiper, replacing, 4-4–4-8
publications, related, ix
R
Ready To Open indicator, 1-3
Reporting billing meters, 7-3
S
safety
hotline, iv
precautions, iv
standards, iii
sample trays, 2-4
service telephone number, 7-1
Set Tray Command, 1-5
silicone, 4-2
stitcher wire
maintaining, 3-1
support services, 7-1–7-4
T
training, operators, 7-2
Tray Full indicator, 2-1
Tray Unlock button, 1-3
trays
loading feeder, 1-2–1-5
output, 2-1–2-4
sample, 2-4
stitcher/stacker, 2-3
U
unloading
dual stacker trays, 2-1
sample trays, 2-4
stitcher/stacker trays, 2-3
W
wiper, see pressure roll wiper, replacing
Wire Percentage indicator, 3-1
X
Xerox Customer Education, 7-3
Xerox Customer Service Support Center, 7-1
Xerox Documentation and Software Services
(XDSS), 7-2
Xerox Font Center, 7-2
INDEX-2 XEROX DOCUPRINT 4050/4090 IPS GUIDE TO PERFORMING ROUTINE MAINTENANCE

../../../IPS & LPS Graphics/dpc0010a.cgm iii
../../../IPS & LPS Graphics/DPC0017A.CGM 1-1
../../../IPS & LPS Graphics/dpc0018a.eps 1-3
../../../IPS & LPS Graphics/DPC0019A.CGM 1-3
../../../IPS & LPS Graphics/DPC0020A.CGM 1-4
../../../IPS & LPS Graphics/DPC0021A.CGM 1-4
../../../IPS & LPS Graphics/DPC0022A.CGM 1-5
../../../IPS & LPS Graphics/DPC0089A.CGM 1-5
../../../IPS & LPS Graphics/dpc0024a.eps 2-2
../../../IPS & LPS Graphics/dpc0026a.eps 2-3
../../../IPS & LPS Graphics/DPC0477A.CGM 3-1
../../../IPS & LPS Graphics/dpc0028a.cgm 4-1
../../../IPS & LPS Graphics/dpc0029a.cgm 4-2
../../../IPS & LPS Graphics/dpc0030a.cgm 4-3
../../../IPS & LPS Graphics/dpc0031a.cgm 4-3
../../../IPS & LPS Graphics/dpc0028a.cgm 4-4
../../../IPS & LPS Graphics/dpc0055a.cgm 4-5
../../../IPS & LPS Graphics/dpc0057a.cgm 4-6
../../../IPS & LPS Graphics/dpc0058a.cgm 4-6
../../../IPS & LPS Graphics/dpc0059a.cgm 4-7
../../../IPS & LPS Graphics/dpc0060a.cgm 4-7
../../../IPS & LPS Graphics/dpc0061a.cgm 4-8
../../../IPS & LPS Graphics/dpc0031a.cgm 4-8
../../../IPS & LPS Graphics/dpc0037a.eps 5-1
../../../IPS & LPS Graphics/DPC0039A.EPS 5-2
../../../IPS & LPS Graphics/DPC0041A.EPS 5-3
../../../IPS & LPS Graphics/DPC0042A.EPS 5-3
../../../IPS & LPS Graphics/bill180.wmf 7-4
DOUBLE-CLICK ON THIS TEXT FROM ANY MASTER PAGE AND EDIT THE DEFINITION -1
 Loading...