

Page 1

DocuPrint 240A/340A
User Guide
(PostScript
®
Software Kit)
Page 2

The AppleTalk protocols and computer programs are licenced from Apple Computer, Inc.
AppleTalk, EtherTalk, Apple and Macintosh are trademarks of Apple Computer, Inc.
TrueType is a registered trademark of Apple Computer, Inc.
Adobe, Adobe Type Connection, Adobe Type Manager, Acrobat, PostScript 3, and the PostScript logo are
trademarks of Adobe Systems Incorporated.
Microsoft, Windows, Windows NT, and Windows Server are either registered trademarks or trademarks of
Microsoft Corporation in the United States and/or other countries.
UNIX is a registered trademark of The Open Group in the United States and other countries.
All product/brand names are trademarks or registered trademarks of the respective holders.
Permission has been obtained from Microsoft Corporation for use of software screen shots.
Important
c This manual is copyrighted with all rights reserved. Under the copyright laws, this manual may not be copied
or modified in whole or part, without the written consent of the publisher.
d Parts of this manual are subject to change without prior notice.
e We welcome any comments on ambiguities, errors, omissions, or missing pages.
Xerox, The Document Company and the stylized X are registered trademarks of Xerox Corporation.
All Xerox and Fuji Xerox product names are either registered trademarks or trademarks of Xerox Corporation and
Fuji Xerox Co., Ltd.
Page 3

Preface
Thank you for choosing this printer. This guide describes the procedure for installing the
PostScript
guide carefully and make sure that you are using it correctly.
The descriptions in this guide assume that users are familiar with their computer
environments (either the Microsoft
with the procedures for using this printer.
Refer to this guide as necessary to maximize the usefulness and performance of this
product.
®
driver, and preparing to use it for printing. Before using the product, read the
®
Windows® operating system or the Macintosh®) and
Preface 3
Page 4

Types of Manuals
Manuals Bundled With the Machine & Their Contents
Setup and Quick Reference Guide Explains how to install this printer, load paper, and troubleshoot of
The Online Help for the
CentreWare Internet Services
The Online Help for the printer
driver
User Guide (PDF) Explains printer settings, and describes control panel menu items
Network Print Environment User
Guide (PDF)
HP-GL, HP-GL/2 Emulation
Settings Guide (PDF)
Manuals Bundled With Optional Accessories
this printer.
Explains how to set the items and features of CentreWare Internet
Services.
Explains how to set the items and features of the printer driver.
and daily care in detail.
This PDF file is included in the CD-ROM bundled with this printer.
Explains how to set the printer for the network environment to use
this printer as a network printer.
This PDF file is included in the CD-ROM bundled with this printer.
Explains how to set the emulation mode for HP-GL and HP-GL/2.
This PDF file is included in the CD-ROM bundled with this printer.
User Guide (PostScript
Kit) (PDF)
Installation Guide
Note
• Adobe
®
Acrobat® Reader needs to be installed to display PDF files.
®
Software
Explains how to set the printer as a PostScript printer and the items
that can be set in the printer driver.
This PDF file is included in the CD-ROM bundled with the
PostScript software kit.
Explains how to install each optional accessory.
4 Types of Manuals
Page 5

Contents
Preface.............................................................................................................. 3
Types of Manuals.............................................................................................. 4
Contents............................................................................................................ 5
Using This Guide .............................................................................................. 7
1 Operation With Windows 95, Windows 98, and Windows Me.................... 9
1.1 About the Software .................................................................................................. 9
1.2 Installing the AdobePS Printer Driver .................................................................... 10
1.3 Printer Driver Properties ........................................................................................ 14
1.4 How to Use Help.................................................................................................... 21
2 Operation With Windows NT 4.0 .............................................................. 22
2.1 About the Software ................................................................................................ 22
2.2 Installing the AdobePS Printer Driver .................................................................... 23
2.3 Device Options and Print Settings ......................................................................... 26
2.4 How to Use Help.................................................................................................... 34
Bundled Software .................................................................................................... 9
Hardware/Software Requirements .......................................................................... 9
Installation Procedure ............................................................................................ 10
Configuration Tab Settings .................................................................................... 14
Options Tab Settings ............................................................................................. 17
Output Settings Tab Settings ................................................................................. 19
Bundled Software .................................................................................................. 22
Hardware/Software Requirements ........................................................................ 22
Installation Procedure ............................................................................................ 23
Device Settings Tab Settings ................................................................................ 27
Configuration Tab Settings .................................................................................... 28
Advanced Tab Settings .........................................................................................29
Output Settings Tab Settings ................................................................................. 32
3 Operation With Windows 2000, Windows XP, and Windows Server
2003 ......................................................................................................... 35
3.1 About the Software ................................................................................................ 35
Bundled Software .................................................................................................. 35
Hardware/Software Requirements ........................................................................ 35
3.2 Installing the Printer Driver .................................................................................... 36
Installation Procedure ............................................................................................ 36
3.3 Device Options and Print Settings ......................................................................... 40
Device Settings Tab Settings ................................................................................ 41
Configuration Tab Settings .................................................................................... 42
Advanced Options Dialog Box Settings .................................................................43
Output Settings Tab Settings ................................................................................. 46
3.4 How to Use Help.................................................................................................... 48
4 Operation on Macintosh Computers......................................................... 49
4.1 About the Software ................................................................................................ 49
Bundled Software .................................................................................................. 49
Hardware/Software Requirements ........................................................................ 49
4.2 Installing the AdobePS Printer Driver (Mac OS 9.x or Earlier) .............................. 50
Installation Procedure ............................................................................................ 50
Setting the Printer Driver (for EtherTalk Connection) ............................................ 51
4.3 Installing the PPD File (Mac OS X) ....................................................................... 52
Installation Procedure ............................................................................................ 52
Contents 5
Page 6

Adding a Printer ..................................................................................................... 53
4.4 Options .................................................................................................................. 55
Configure Settings ................................................................................................. 55
Printer Specific Options Settings ........................................................................... 57
4.5 Installing the Screen Fonts .................................................................................... 60
A Appendix .................................................................................................. 61
A.1 Cautions and Limitations ....................................................................................... 61
Index ............................................................................................................... 62
6 Contents
Page 7

Using This Guide
Prerequisite Knowledge
Read this guide in detail before using this printer. If you are not familiar with the machine to
which the printer is to be connected or the basic operations or concepts of the software,
read the relevant manuals first.
Machines and software to which the printer is to be connected refer to personal computers,
workstations, networks, and the respective operating systems and applications on which
these machines run.
Organization
The following is a summary of each chapter.
1. Operation With Windows 95, Windows 98, and Windows Me
This chapter describes the procedure for installing the printer driver under Windows 95,
Windows 98, and Windows Me, and explains required settings, and settings you can make
when printing.
2. Operation With Windows NT 4.0
This chapter describes the procedure for installing the printer driver under Windows NT
and explains required settings, and settings you can make when printing.
4.0,
3. Operation With Windows 2000, Windows XP, and Windows Server 2003
This chapter describes the procedure for installing the printer driver under Windows 2000,
Windows XP, and Windows Server 2003, and explains required settings, and settings you
can make when printing.
4. Operation on Macintosh Computers
This chapter describes the procedure for installing the printer driver on the Macintosh, and
explains required settings, and settings you can make when printing
A Appendix
This appendix describes cautions and limitations.
Using This Guide 7
Page 8

Conventions
1. In this guide, “computer” refers to both the personal computer and workstation.
2. The following icons are used in this guide:
3. The following conventions are used in this guide:
4. When a check box is checked, it indicates ON, otherwise it indicates OFF.
5. The item with the radio button checked is the selected item.
Important Indicates important information which you should read.
Note Indicates additional information on operations or features.
Refer to Indicates reference sources.
Refer to “xxx” : The cross-reference is within this guide.
Refer to xxx : The cross-reference is not within this guide.
[ ] : Indicates items displayed on the computer and the printer control
panel. Also indicates the title of printed reports/lists from the printer.
< > : Indicates items such as hard buttons and indicators on the keyboard
and printer.
8 Using This Guide
Page 9

1 Operation With Windows 95,
Windows 98, and Windows Me
1.1 About the Software
This section describes the software on the CD-ROM for Windows 95, Windows 98, and
Windows Me.
Bundled Software
The following items are included in the enclosed CD-ROM. Also, be sure to read
[Readme.txt] containing cautionary notes about how to use the printer driver.
AdobePS Printer Driver (ver. 4.5.3) and PPD files
Adobe PostScript driver and PPD files (for Windows 95/98/Me).
ATM (Adobe Type Manager) (ver. 4.0)
Helps you install typefaces, activate and manage your fonts.
Adobe Screen Fonts (TrueType/PostScript)
Includes 136 screen fonts (19 TrueType fonts and 117 PostScript fonts), which are
compatible with the printer fonts. ATM is used to install the PostScript screen fonts. When
using these fonts to print, it is recommended that you use the Adobe PostScript (4.5.3)
printer driver.
Adobe Acrobat Reader
Allows you to view and print PDF files on all major computing platforms.
Hardware/Software Requirements
The minimum system requirements for the Windows 95/Windows 98/Windows Me printer
driver are described below.
Computer System
• i386, i486, or Pentium processor-based personal computer (i486 or Pentium processor
recommended)
• 8 MB of available RAM (16 MB recommended)
• 6 MB of available hard-disk space (8 MB required for full driver installation)
Basic Software
• Windows 95, Windows 98* or Windows Me
* If you use the USB port, Windows 98 Second Edition or later is required.
1.1 About the Software 9
Page 10
1.2 Installing the AdobePS Printer Driver
Install AdobePS 4.5.3 printer driver onto Windows 95, Windows 98 or Windows Me by
following the procedure below.
This section describes how to install the printer driver for Windows 98, as an example.
Note
• It is possible to cancel installation of the printer driver by clicking [Cancel] in the dialog box displayed
during installation. You can also click [Back] to ignore the settings in that dialog box and return to the
previous dialog box.
Installation Procedure
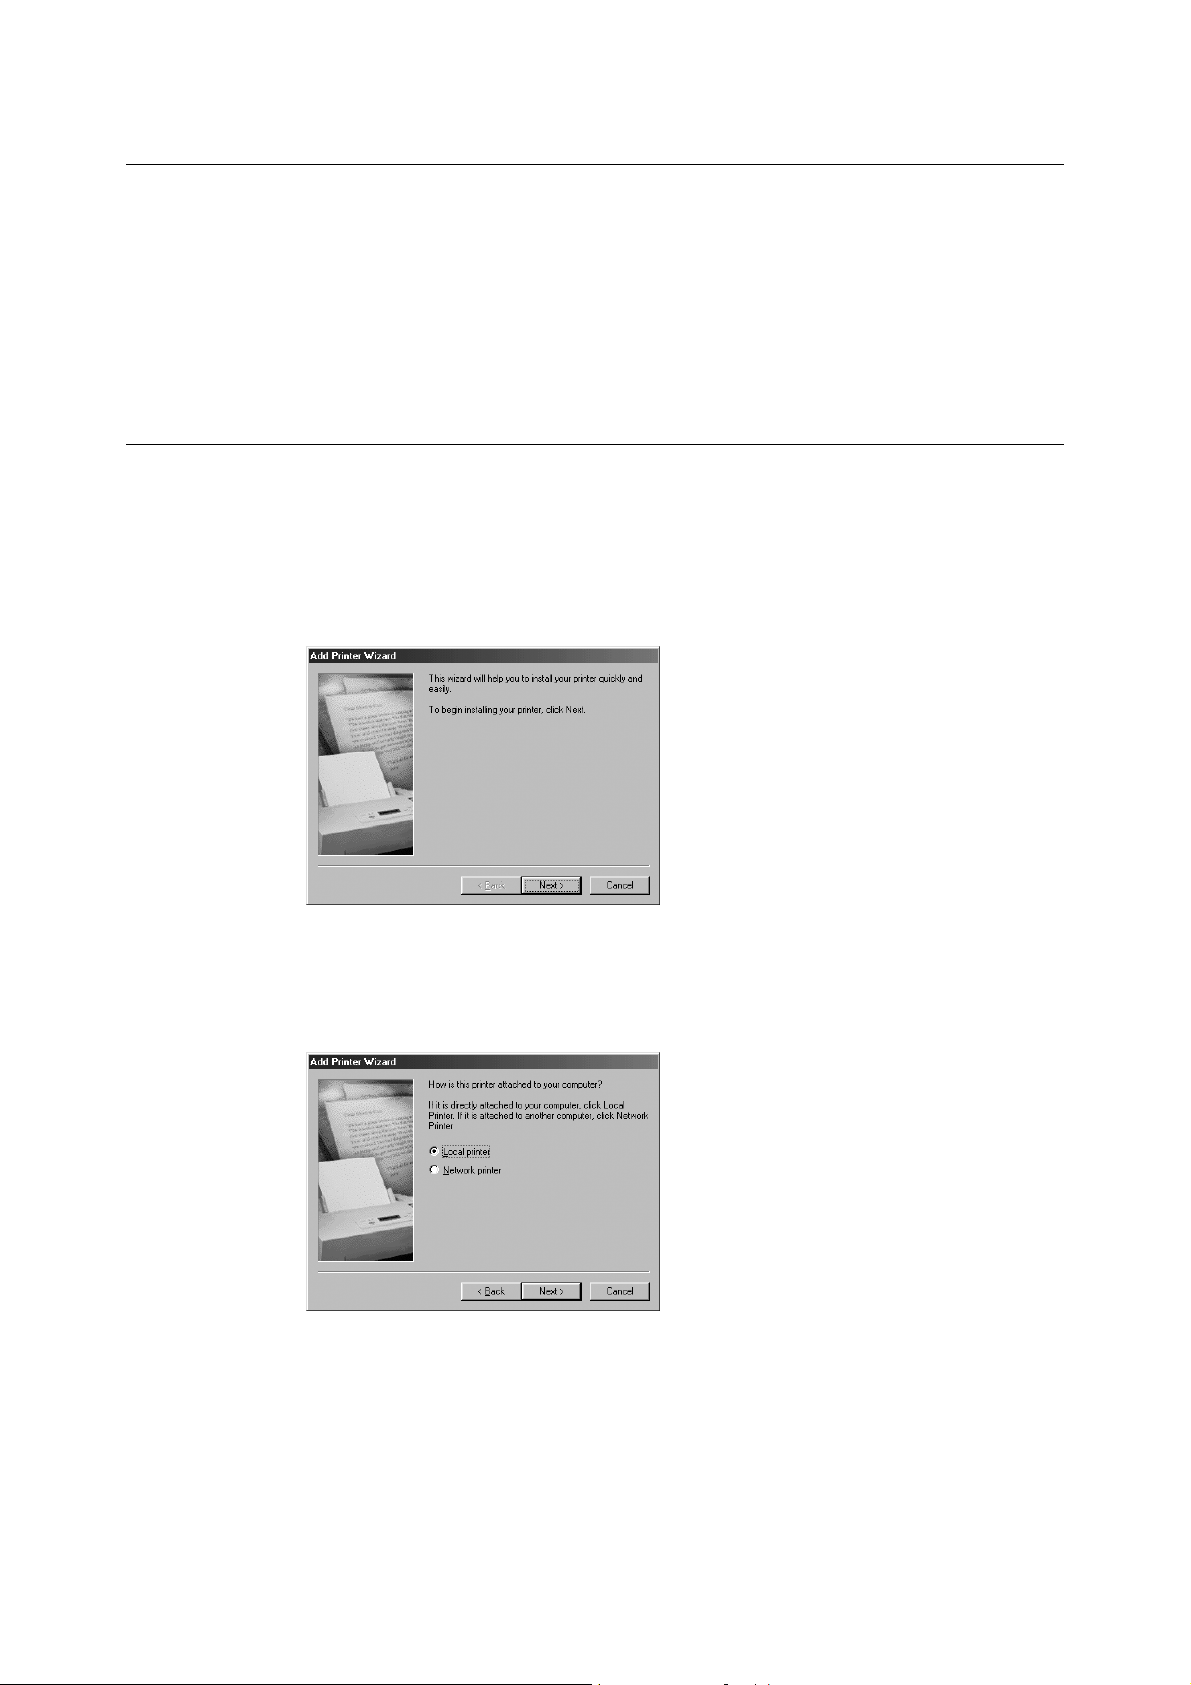
1. Start Windows 98.
2. On the [Start] menu, point to [Settings] and click [Printers].
3. In the [Printers] window, double-click [Add Printer].
4. Click [Next].
5. Select how the printer is connected to the computer and click [Next].
Select [Local printer] when the printer is connected directly to the computer or to the
network in the TCP/IP (LPD) environment. Otherwise, select [Network printer]. As an
example, here is an explanation using a case in which the printer is directly connected
to the computer.
Note
• When you select [Network printer], specify the path to the printer in the network path or queue name box.
6. Insert the CD-ROM bundled with the PostScript software kit.
10 1 Operation With Windows 95, Windows 98, and Windows Me
Page 11
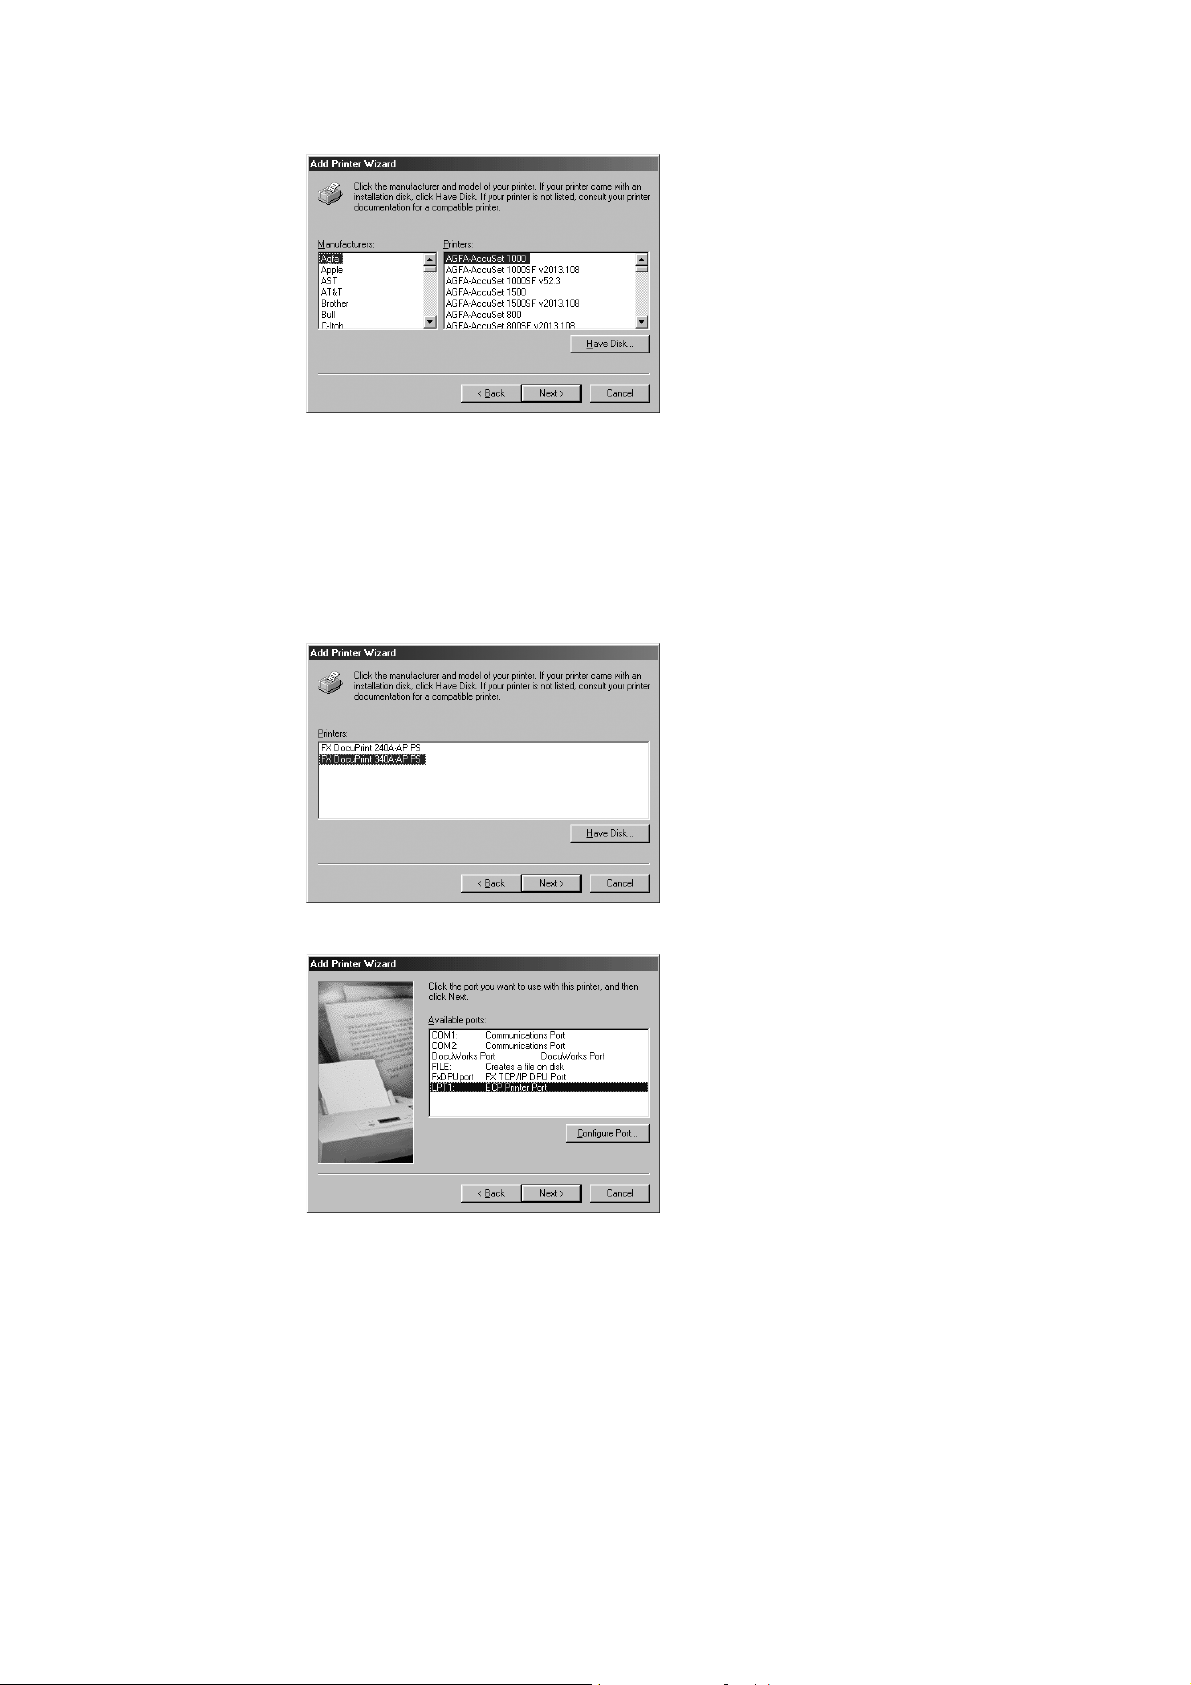
7. Click [Have Disk].
8. In the [Install From Disk] dialog box, enter “E:\DP_340A\Win9x_Me” in the [Copy
manufacturer’s files from:] box and click [OK].
In this guide, we have used “E:” as the CD-ROM drive. If you are using a different
drive for the CD-ROM, specify accordingly.
Note
• Click [Browse] to specify a folder in the CD-ROM.
9. Select your printer model from the [Printers] list and click [Next].
10. Select the port that you are using and click [Next].
Note
• If you use the LPR or Port9100 port to print, use our TCP/IP Direct Print Utility. For details on the TCP/IP
Direct Print Utility, refer to the Network Print Environment User Guide in the Software Pack CD-ROM
bundled with this printer.
• When using the USB port in Windows 98 Second Edition or Windows Me, select the [LPT1] in this
procedure. When you finish installing the printer driver, configure the USB port settings. For details on
how to set the USB port, refer to the Setup and Quick Reference Guide.
1.2 Installing the AdobePS Printer Driver 11
Page 12
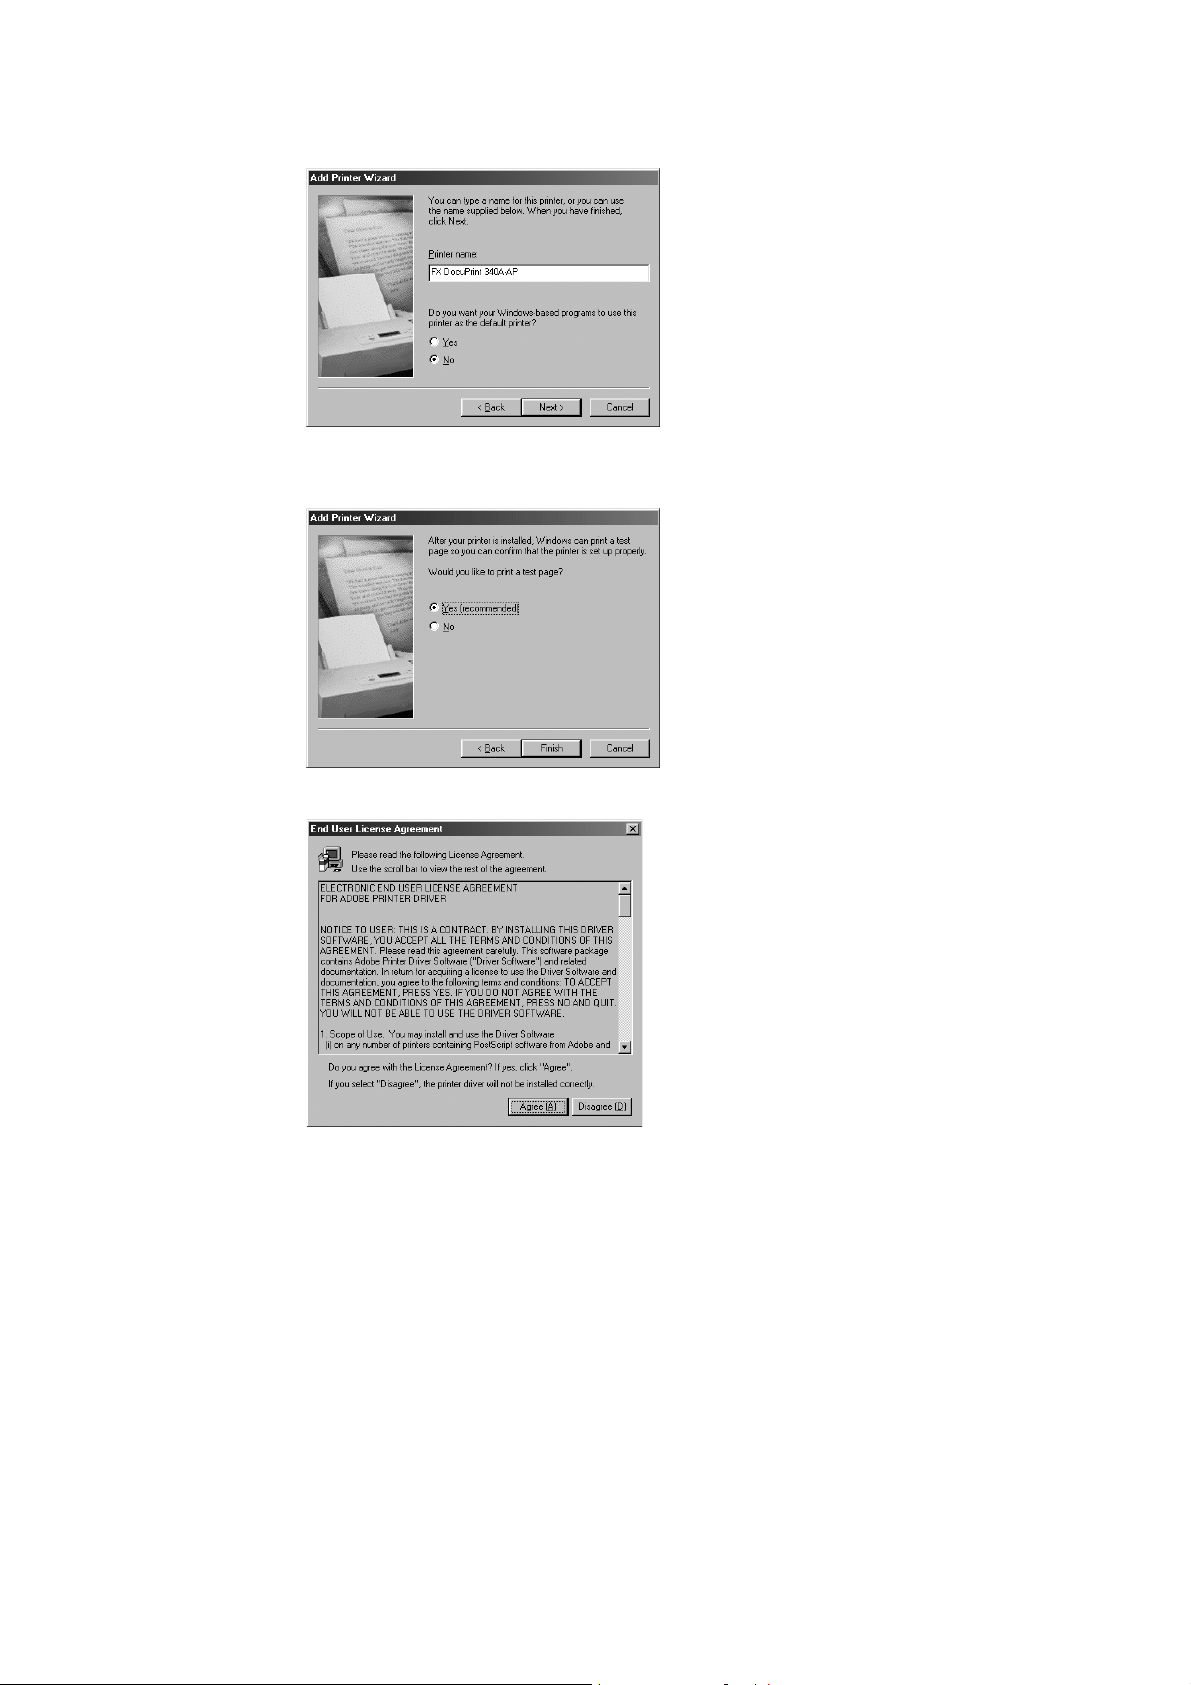
11. Type a name for the printer, specify whether you want to use the printer as the default
printer, then click [Next].
12. Specify whether you want to print a test page, then click [Finish].
Installation begins.
13. Read the [End User License Agreement] and click [Agree].
Note
• If you click [Disagree], refer to “If You Click Disagree in the End User License Agreement” (P. 13) for
details.
12 1 Operation With Windows 95, Windows 98, and Windows Me
Page 13
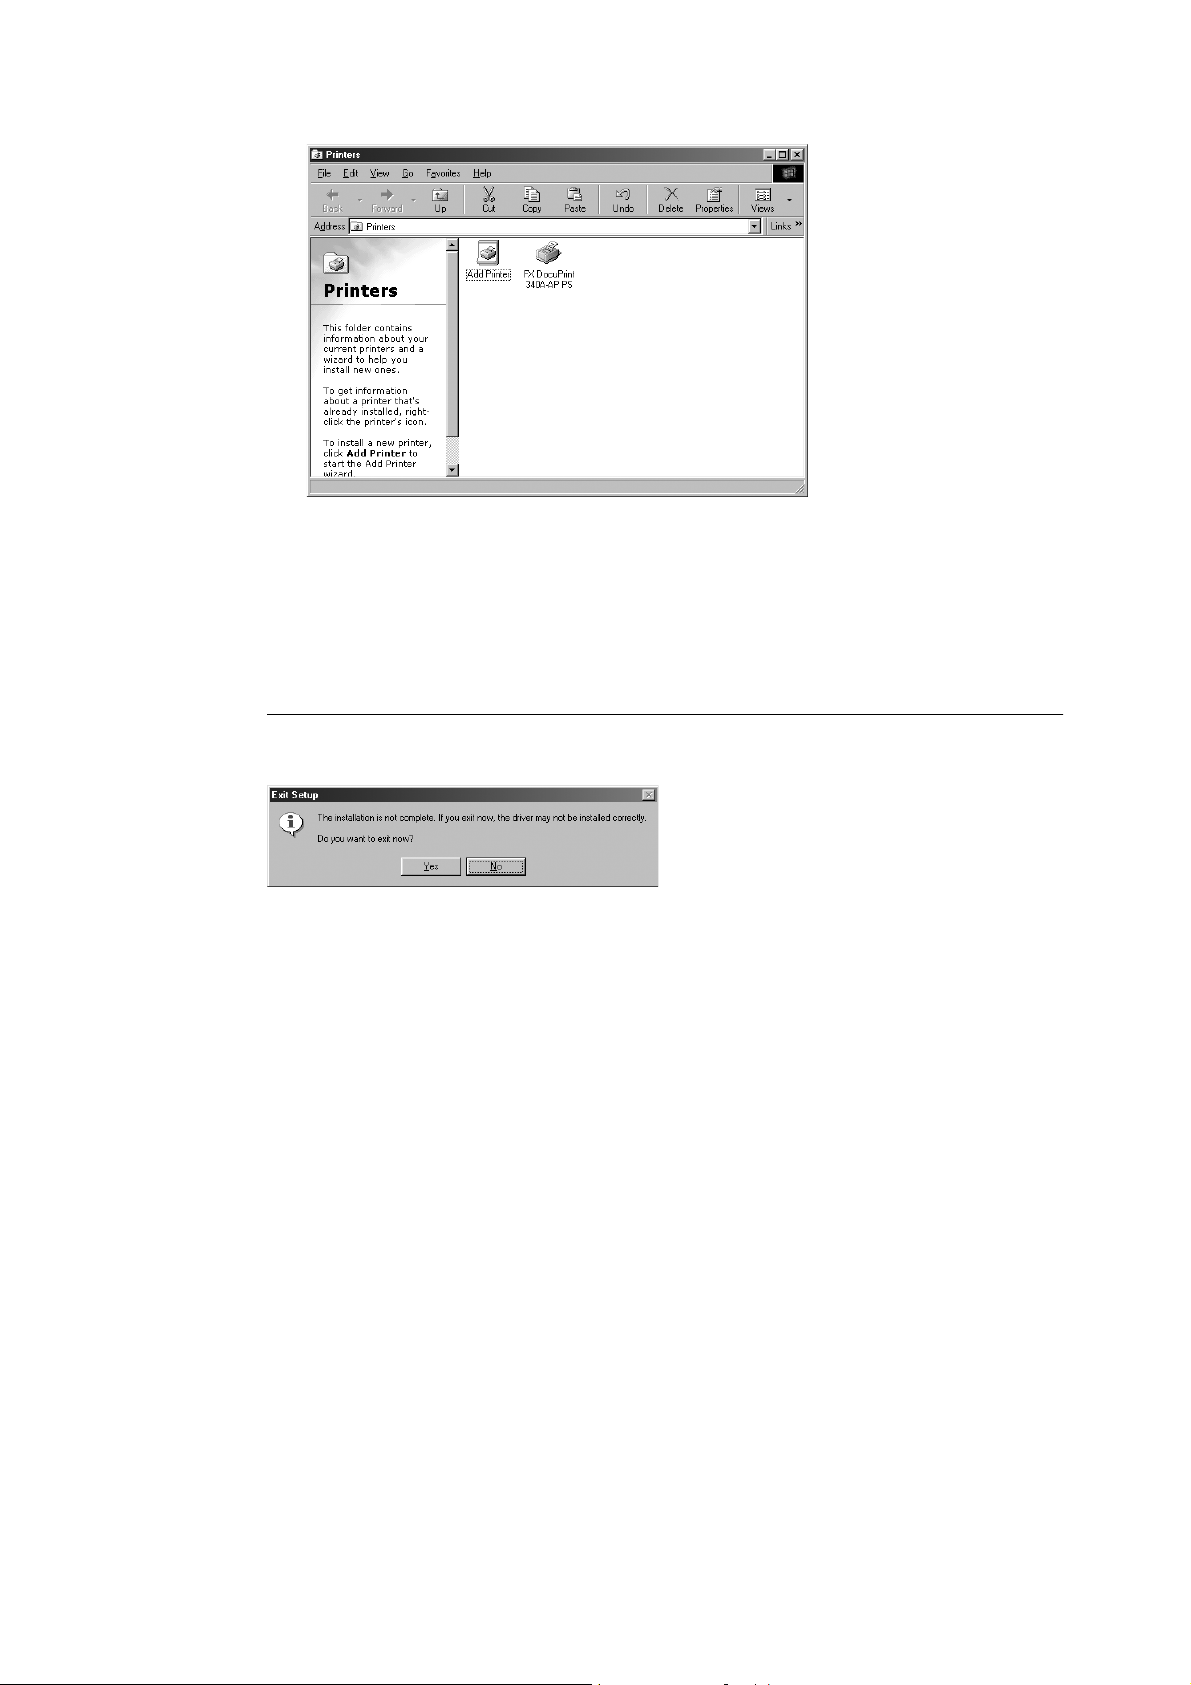
14. Confirm that a printer has been added in the [Printers] window.
This completes installation of the printer driver. Remove the CD-ROM from the drive.
Important
• Store your CD-ROM in a safe place.
Refer to
• Configuring the printer: “1.3 Printer Driver Properties” (P. 14)
If You Click Disagree in the End User License Agreement
When you click [Disagree] in the [End User License Agreement], the following dialog box
appears.
Click [No] to return to step 13 and continue the operation.
Click [Yes] to cancel installation. A printer is added in the [Printers] window, but the printer
driver is not installed properly.
When you right-click the printer and click [Properties] from the menu, the [Reinstall] tab is
added to the printer driver properties dialog box. Follow the directions on that tab.
When you finish reinstalling the printer driver, refer to “1.3 Printer Driver Properties” (P. 14)
to set up the printer.
1.2 Installing the AdobePS Printer Driver 13
Page 14
1.3 Printer Driver Properties
This section describes printer specific settings included in the printer driver properties.
• [Configuration] tab
• [Options] tab
• [Output Settings] tab
Note
• You can also refer to Help for explanations of these settings. For details about how to use Help, refer to
“1.4 How to Use Help” (P. 21).
To view the printer driver properties, select the printer icon in the [Printers] window, then
click [Properties] on the [File] menu.
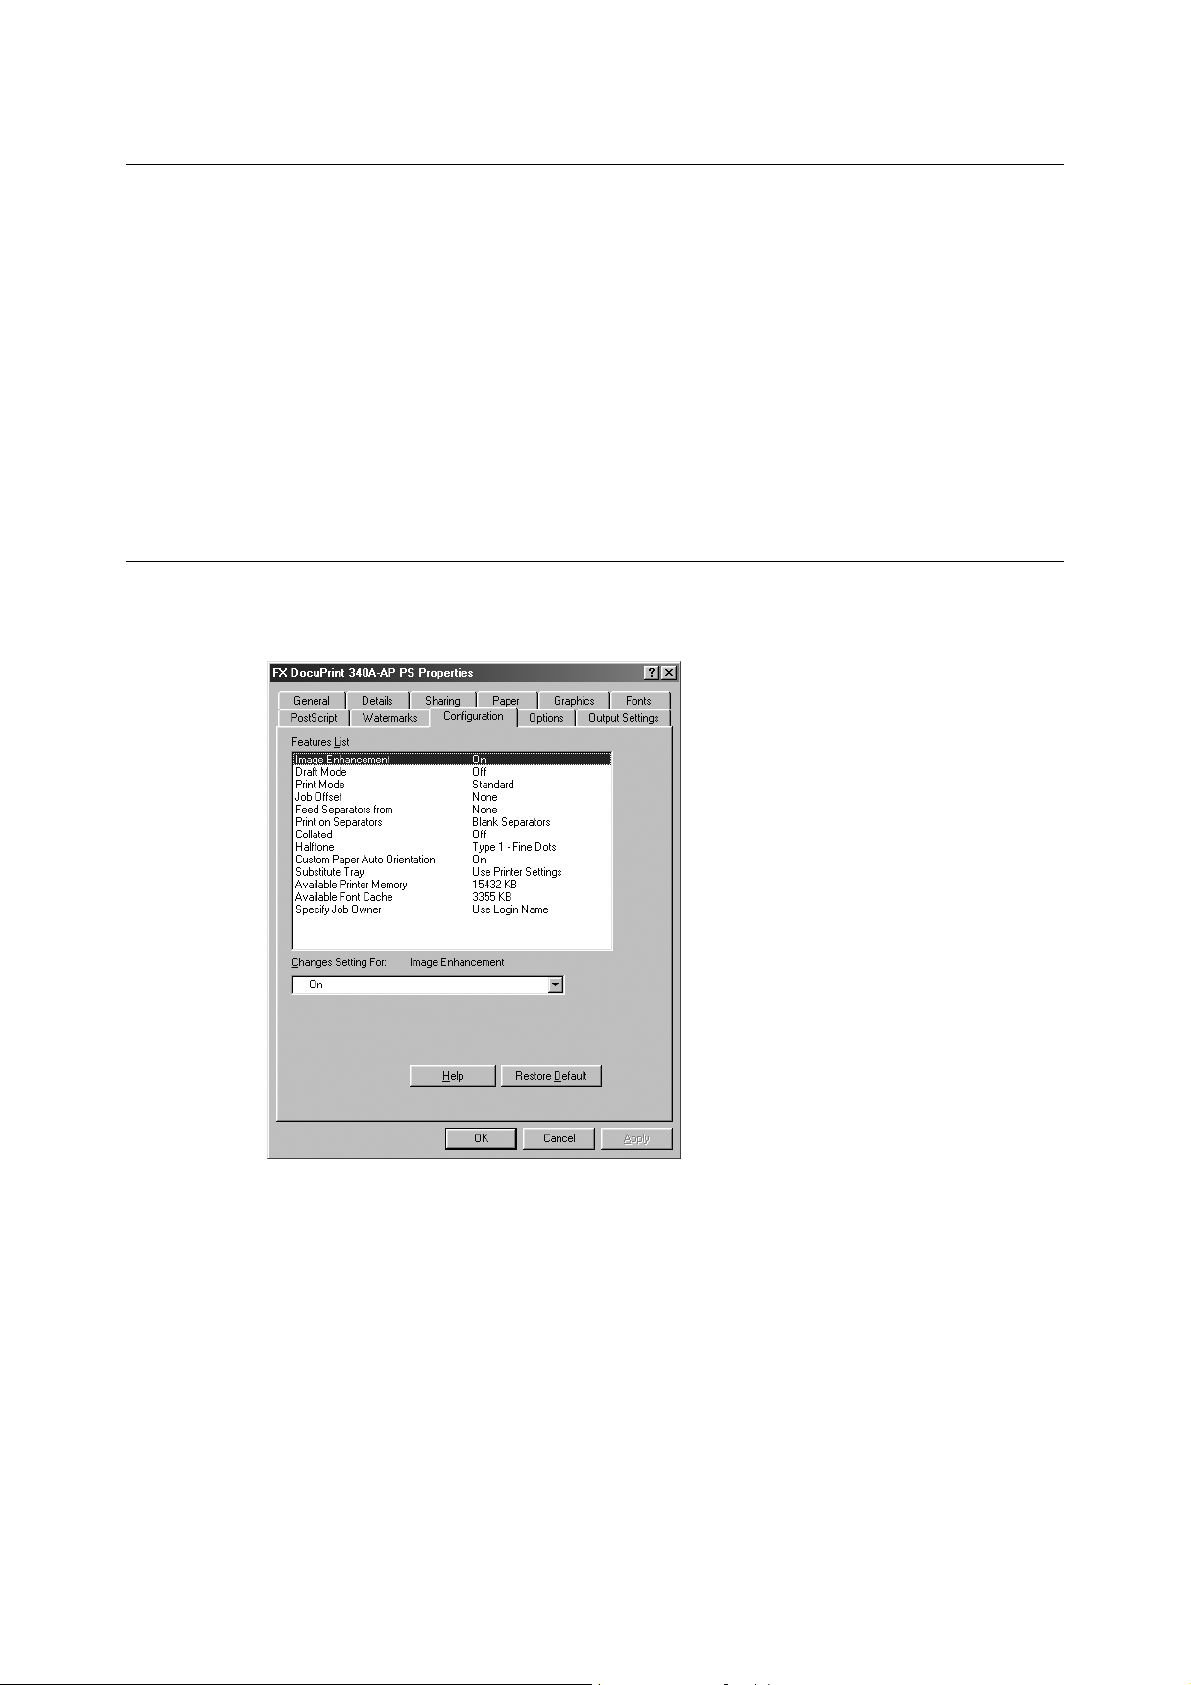
Configuration Tab Settings
This section describes the settings of the [Configuration] tab.
Select the function that you want to set in [Print Features] and change the settings in
[Changes Setting For] below.
Note
• You can restore defaults by clicking [Restore Default].
• The settings that can be selected vary depending on which options have been installed. Make these
settings after confirming that option settings are complete.
Refer to
• “Options Tab Settings” (P. 17)
14 1 Operation With Windows 95, Windows 98, and Windows Me
Page 15

Settings
Image Enhancement
Specify whether to use the [Image Enhancement] function.
Selecting [On] smoothes out boundaries when printing. This reduces jagged edges, thereby
artificially increasing the resolution of the image. When printing an image (bitmap)
composed of coarse halftone dots, smooth color gradation is impossible in certain
situations. In this case, select [Off].
Draft Mode
Specify whether to reduce the amount of toner used when printing drafts.
When you select [On], the overall printed color becomes lighter. This is best for printing
documents when print quality is not necessary.
Print Mode
Specify whether to give priority to the print speed or the image quality.
Job Offset
Specify the method of the job offset function.
To shift the output position for each job, select [Offset Per Job]. To shift the output position
for each copy, select the [Offset Per Set]. If you do not want to shift the output position,
select [None].
[None] (default)
[Offset Per Job]
[Offset Per Set]
Note
• You can set this item only when the offset catch tray (optional) is installed on the printer.
Feed Separators from
Set the destination where the separators are to be fed to when the transparency separator
function is used.
When [Auto] is selected, the tray set on the machine is used as the feed destination.
[None] (default)
[Auto]
[Tray 1]
[Tray 2]
[Tray 3]
[Tray 4]
Print on Separators
Specify whether or not to print the details printed on the transparencies on the separators
as well when the transparency separator function is used.
[Blank Separators] (default)
[Printed Separators]
Collated
Specify whether to collate a multiple-page file per set when they are printed.
1.3 Printer Driver Properties 15
Page 16

Halftone
Specify the type of the halftone from among [Type - 1 Fine Dots], [Type - 1 Thick Dots] or
[Type 3]. The number of screen lines for Type 1 is automatically set according to the
resolution set in the [Print Mode].
All settings provide 256 levels of halftone.
[Type - 1 Fine Dots] (default)
Select this when you print texts or graphics.
[Type - 1 Thick Dots]
Select this when you print photos or images. This provides higher gradation than [Type - 1
Fine dots].
[Type 3]
When the moire interference pattern occurs in the other halftone settings, selecting this may
resolve this problem.
Custom Paper Auto Orientation
Specify whether to change the paper orientation when printing on custom paper.
When printing with custom paper, select [On] to rotate the orientation 90 degrees.
Substitute Tray
Specify what action to take when the paper for the print size is not loaded in the machine.
[Use Printer Settings]
Use the printer setting. The settings can be confirmed on the printer control panel.
[Display Message]
Displays paper supply messages on the printer control panel. Printing is unavailable until
paper is supplied.
[Use Nearest Size (With Zoom)]
Selects the nearest paper size and prints. Automatically reduces images for printing, as
necessary.
[Use Nearest Size (No Zoom)]
Selects the nearest paper size and prints in an equal size.
[Use Larger Size (With Zoom)]
Prints in an equal size on paper larger than the original. Automatically reduces images for
printing, as necessary.
[Use Larger Size (No Zoom)]
Prints in an equal size on paper larger than the original.
Available Printer Memory
Enter the amount of usable printer memory (in KB) in the edit box. Normally, it is not
necessary to change this.
Available Font Cache
Enter the amount of memory available for the font cache (in KB) in the edit box. Normally,
it is not necessary to change this.
16 1 Operation With Windows 95, Windows 98, and Windows Me
Page 17
Specify Job Owner
Select the method of specifying the job owner.
This function is used for counting print job.
[Use Login Name]
Use your Windows Login Name as the job owner name. The job owner name becomes the
“Login User Name\Host Name”.
[Enter Owner Name (For Administrator)]
Select this if you want to specify a custom job owner name for each Windows Login user.
[Job Owner Name]
You can enter up to 31 alphanumeric characters for the job owner name.
If you enter more than 31 characters, only the first 31 characters are used. The default
setting is [UnknownUser].
[Password]
Enter the password for the job owner name. The password can consist of 4 to 12 digits.
Each digit that you enter appears as an asterisk (*).
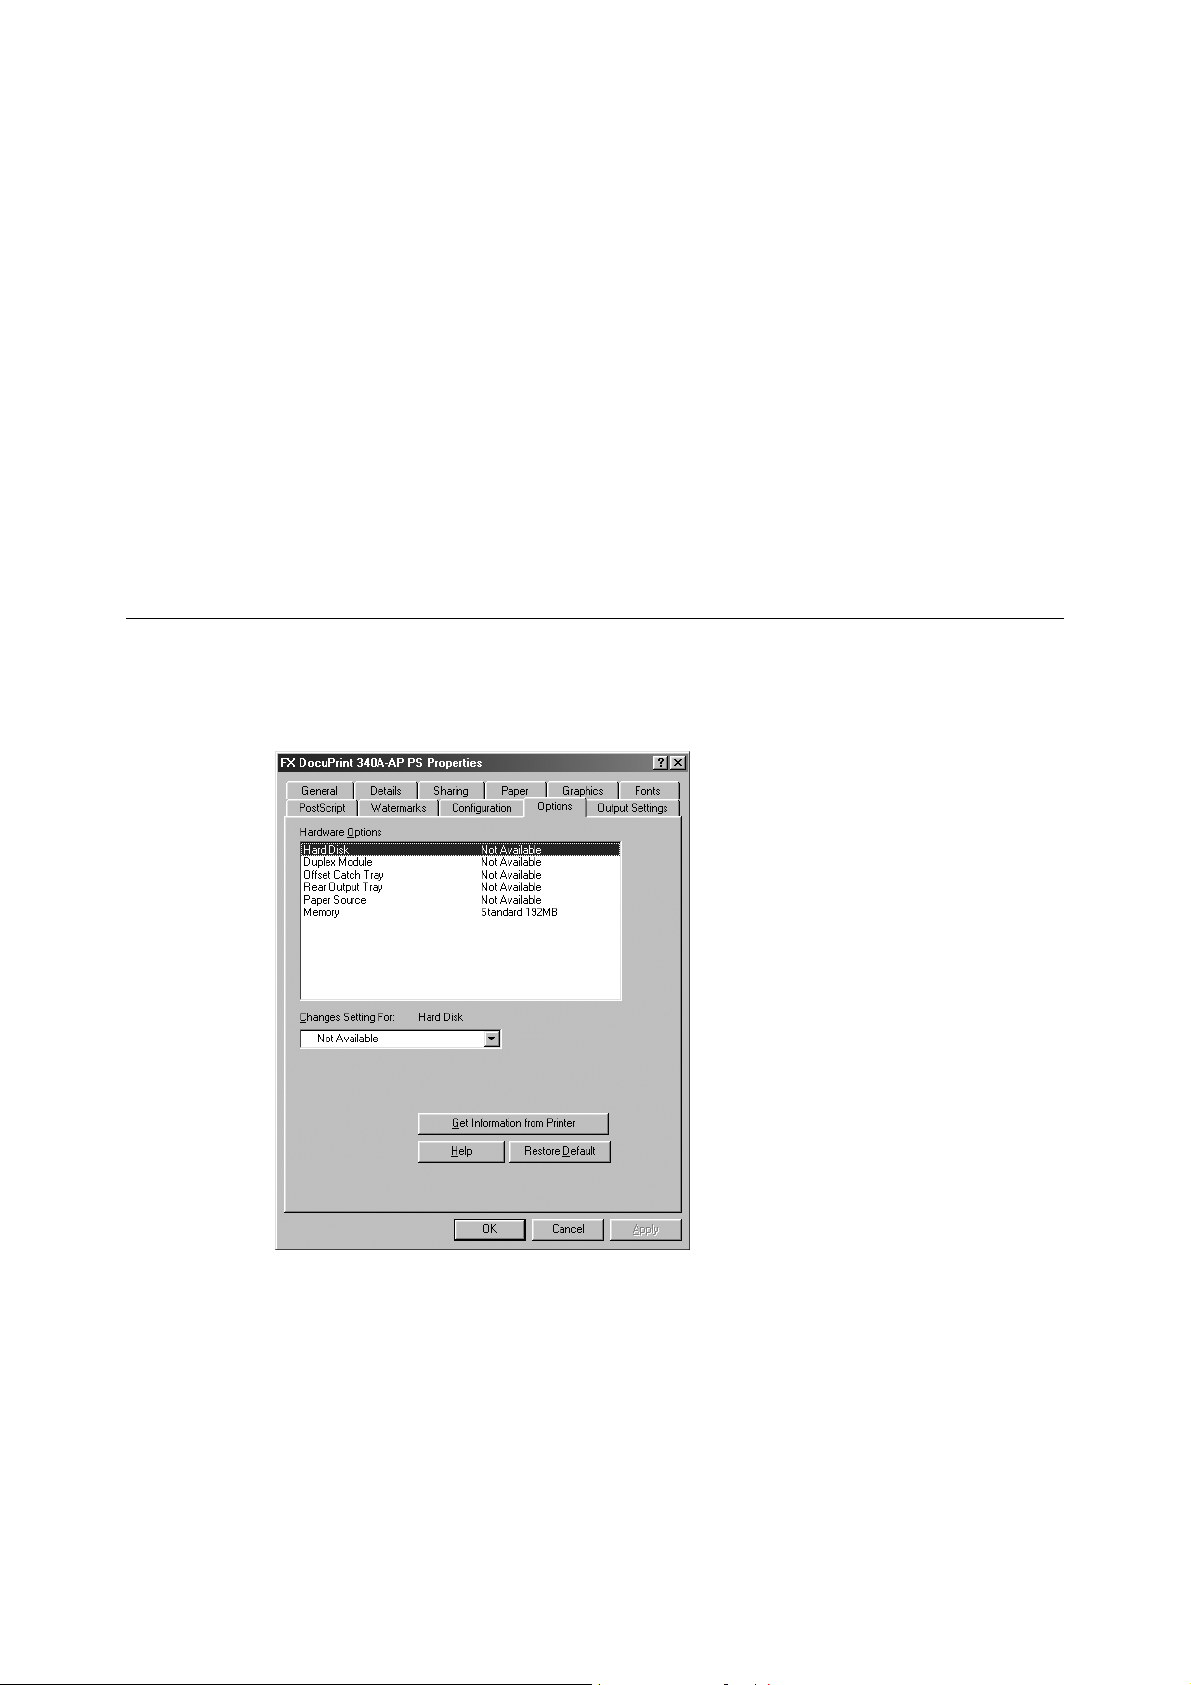
Options Tab Settings
This section describes the settings in the [Options] tab.
Select the settings that you want to make in [Hardware Options] and change them in
[Changes Setting For] below. To use this function, it is necessary to make appropriate
settings in this tab.
Note
• You can restore defaults by clicking [Restore Default].
1.3 Printer Driver Properties 17
Page 18

Settings
Hard Disk
Specify whether or not the hard disk (optional) is installed.
When the hard disk is installed on the printer, set to [Available].
Duplex Module
Specify whether or not the duplex unit (optional) is installed.
When the duplex unit is installed on the printer, set to [Available].
Offset Catch Tray
Specify whether an offset catch tray (optional) is installed.
Rear Output Tray
Specify whether or not the rear tray (optional) is installed.
When the rear tray is installed on the printer, set to [Available].
Paper Source
Specify the configuration of the paper trays to correspond to the optional accessories
actually installed on this printer.
[Not Available] (default)
[3 - Tray Configuration]
[4 - Tray Configuration]
Memory
Specify the amount of printer memory.
Get Information from Printer
Clicking [Get Information from Printer] when this printer is used as a network printer verifies
the optional accessories installed using the printer port to which the printer is connected,
and reflects this in the [Hardware Options] list.
Note
• This function is not available when the printer is used as a local printer. You have to manually set the
required items.
• The rear tray information cannot be obtained. You have to manually set the required items.
Network Address
Display the network address of the printer that is obtained by clicking [Get Information from
Printer].
18 1 Operation With Windows 95, Windows 98, and Windows Me
Page 19
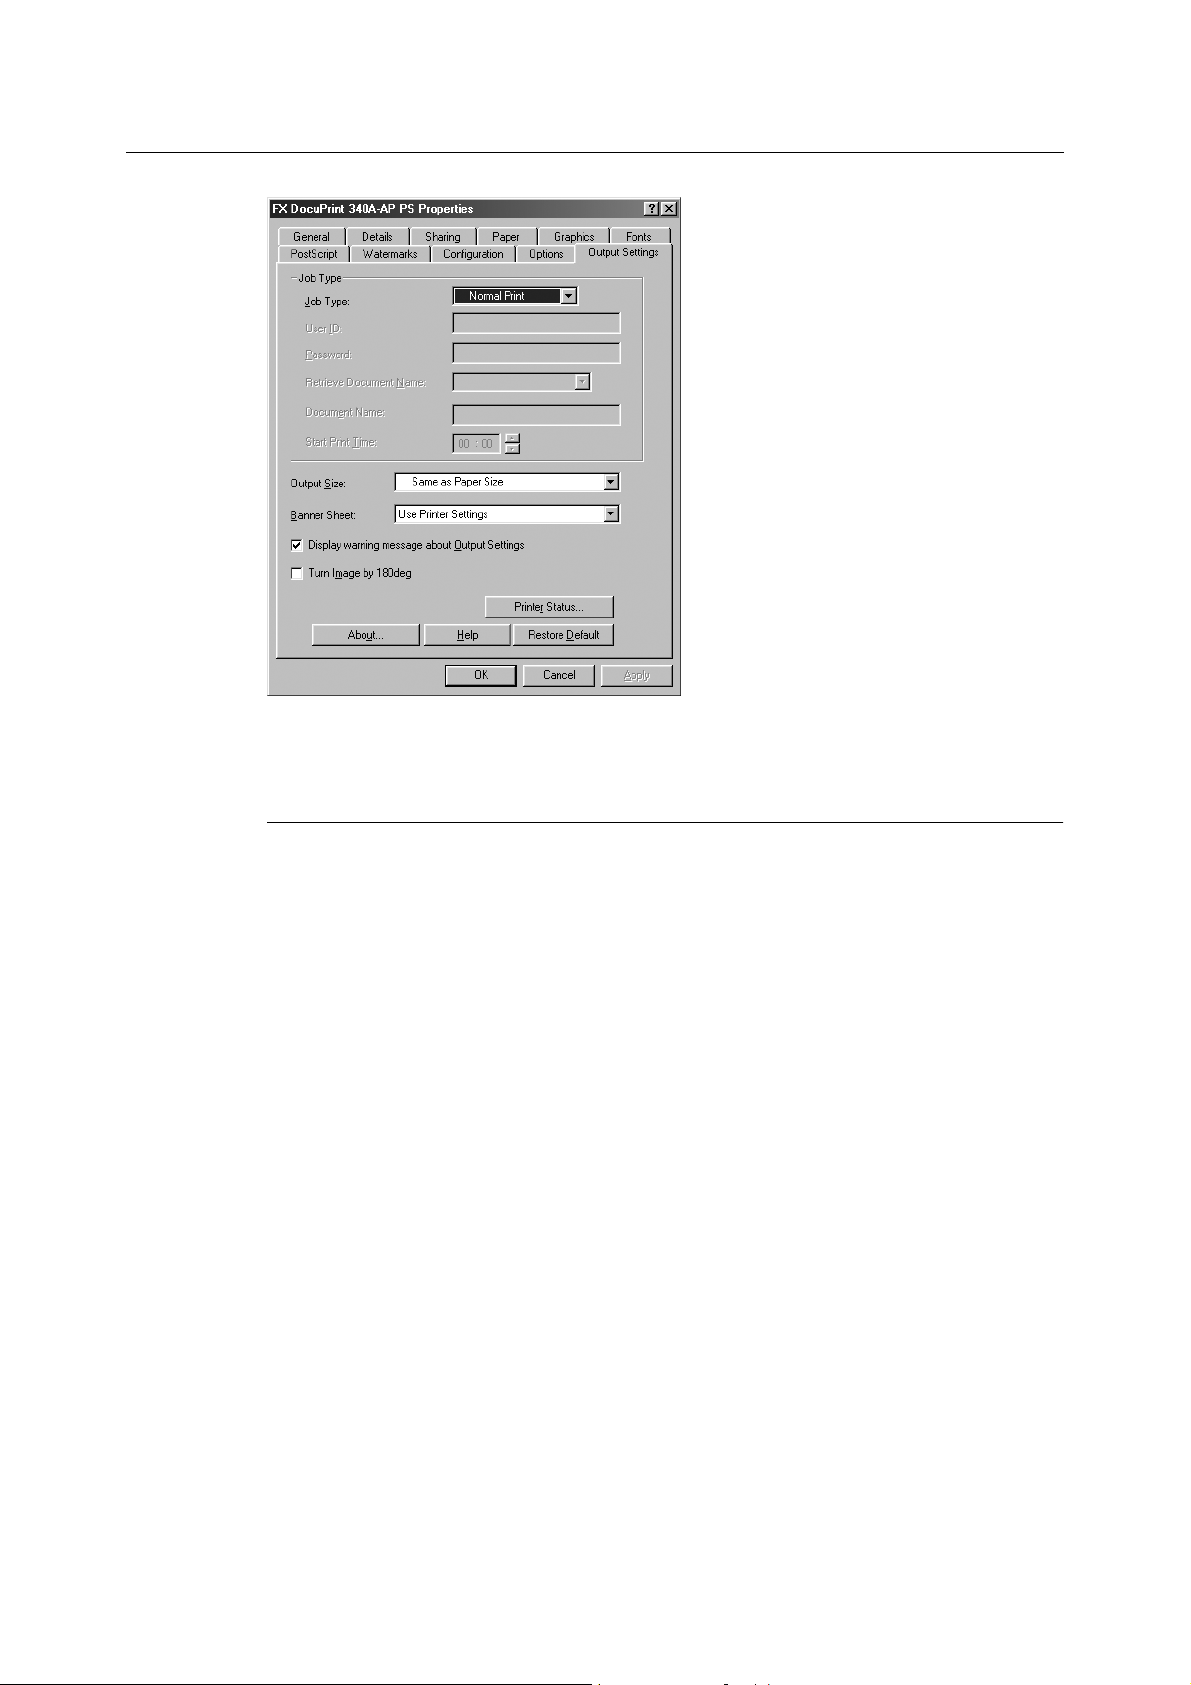
Output Settings Tab Settings
This section describes the settings in the [Output Settings] tab.
Note
• You can restore defaults by clicking [Restore Default].
Settings
Job Type
Job Type
Specify the print function from among [Normal Print], [Secure Print], [Sample Print], and
[Delayed Print].
[Normal Print]
Select when you do not want to specify [Secure Print], [Sample Print], or [Delayed
Print].
[Secure Print]
[Secure Print] is a function that temporarily stores print jobs in the printer, and then
prints them when print instructions are received from the control panel.
This function is available only when the hard disk (optional) is installed.
[Sample Print]
[Sample Print] is a function that outputs only one copy when multiple copies are
specified.
If there is no problem, the remaining sets are printed.
This function is available only when the hard disk (optional) is installed.
Note
• [Collated] must be selected in the [Configuration] tab when using [Sample Print].
[Delayed Print]
[Delayed Print] is a function that temporarily stores print jobs in the printer, and then
prints them at the scheduled time.
This function is available only when the hard disk (optional) is installed.
1.3 Printer Driver Properties 19
Page 20

User ID
For secure print or sample print, specify the [User ID] with up to 8 alphanumeric
characters.
Password
For secure print, specify the password for the user ID with up to 12 alphanumeric
characters.
Each digit that you enter appears as an asterisk (*).
Retrieve Document Name
Select the method of specifying the document name. If you have selected [Auto
Retrieve], the valid document name can be up to 12 alphanumeric characters.
If the printer cannot recognize a document name, it will become the date and time.
Document Name
When [Enter Document Name] is selected in the [Retrieve Document Name] list box,
specify a document name with up to 12 alphanumeric characters.
Start Print Time
Set the time that you want [Delayed Print] to be carried out. Place the cursor in the hour
or minute box and press the up or down triangle to specify the start time. You can also
set the time by entering the time directly into the boxes. The default setting is [00:00].
Output Size
Select the size of the paper used for output. The output is automatically enlarged or
reduced, depending on the paper size selected here and the paper size selected in the
[Paper] tab.
For example, when you select [B5] in [Paper size] in the [Paper] tab and [A4] is selected
here, the output is automatically enlarged and printed.
When you select [Same as Paper Size], the job is printed based on the paper size selected
in the application.
Banner Sheet
Specify whether to print a banner sheet.
You can specify the banner sheet settings from among [Use Printer Settings], [Print Start
Page], or [None].
When [Secure Print] or [Delayed Print] are set in [Job Type], you cannot set [Banner Sheet].
Display warning message about Output Settings
When printing, the printer driver checks whether [Output Size] setting conflicts with other
settings. When this is activated, a conflict dialog box appears if there is non-conformity
during printing. Check the content of the dialog box and resolve the conflicting function to
continue printing. When this is inactive, no conflict dialog box appears, but the conflicting
setting is automatically resolved and printing continues.
Turn Image by 180deg
Check the check box to print documents rotated 180°. Default is off.
20 1 Operation With Windows 95, Windows 98, and Windows Me
Page 21

Printer Status
Check the printer status on CentreWare Internet Services by clicking this button.
About
Displays the version information of the printer driver.
1.4 How to Use Help
This section describes how to use Help.
1. You can see in the upper right, or [Help] in the bottom of the printer driver
properties dialog box.
2. Click and a [?] mark appears next to the pointer. You can then click items for
which you need explanations, opening a pop-up window that contains relevant
information. Click inside the pop-up window to close it.
Also, if you click [Help], an explanation of the current tab appears as Help information.
1.4 How to Use Help 21
Page 22

2 Operation With Windows NT 4.0
2.1 About the Software
This section describes the software on the CD-ROM for Windows NT 4.0.
Bundled Software
The following items are included in the enclosed CD-ROM. Also, be sure to read
[Readme.txt] containing cautionary notes about how to use the printer driver.
AdobePS Printer Driver (ver. 5.2.2) and PPD files
Adobe PostScript driver and PPD files (for Windows NT 4.0).
ATM (Adobe Type Manager) (ver. 4.0)
Helps you install typefaces, activate and manage your fonts.
Adobe Screen Fonts (TrueType/PostScript)
Includes 136 screen fonts (19 TrueType fonts and 117 PostScript fonts), which are
compatible with the printer fonts. ATM is used to install the PostScript screen fonts. When
using these fonts to print, it is recommended that you use the Adobe PostScript (5.2.2)
printer driver.
Adobe Acrobat Reader
Allows you to view and print PDF files on all major computing platforms.
Hardware/Software Requirements
The minimum system requirements for the Windows NT 4.0 printer driver are described
below.
Computer System
• i486 or Pentium processor-based personal computer (i486 or Pentium processor
recommended)
• 16 MB of available RAM (32 MB recommended)
• 6 MB of available hard-disk space
Basic Software
• Windows NT Workstation 4.0/Windows NT Server 4.0 (Service Pack 6a or later)
22 2 Operation With Windows NT 4.0
Page 23

2.2 Installing the AdobePS Printer Driver
Install the AdobePS 5.2.2 printer driver onto Windows NT by following the procedure below.
Note
• It is possible to cancel installation of the printer driver by clicking [Cancel] in the dialog box displayed
during installation. You can also click [Back] to delete the settings in that dialog box and return to the
previous dialog box.
Installation Procedure
1. Start Windows NT 4.0.
Note
• Log on as a Power User group member or an Administrator. Refer to the Windows NT 4.0
documentation for details about the Power User group.
2. On the [Start] menu, point to [Settings] and click [Printers].
3. In the [Printers] window, double-click [Add Printer].
4. Select how the printer is connected to the computer and click [Next].
Select [My Computer] if the printer is connected directly to the computer or to the
network in the TCP/IP(LPD) environment. Select [Network printer server] in other
cases. As an example, here is an explanation using a case in which the printer is
directly connected to the computer.
Note
• Specify the target printer in the [Connect to Printer] dialog box if you selected [Network printer server].
5. Select the port you are using and click [Next].
When the printer is connected in the TCP/IP (LPD) environment:
(1) Click [Add Port].
(2) Select [LPR Port] in the displayed dialog box to add the new port.
2.2 Installing the AdobePS Printer Driver 23
Page 24

6. Insert the CD-ROM bundled with the PostScript software kit.
7. Click [Have Disk].
8. Enter “E:\DP_340A\NT40” in the [Copy manufacturer’s files from:] box and click [OK].
In this guide, we have used “E:” as the CD-ROM drive. If you are using a different
drive for the CD-ROM, specify accordingly.
Note
• Click [Browse] to specify a folder in the CD-ROM.
9. Select your printer model from the [Printers] list and click [Next].
10. Enter a printer name, specify if you want to use the printer as the default printer, then
click [Next].
24 2 Operation With Windows NT 4.0
Page 25

11. Select [Not shared] and click [Next].
Important
• We recommend that you install the driver on each computer with the procedure appropriate to the OS.
12. Specify whether you want to print a test page, then click [Finish].
Installation begins.
13. Read the [End User License Agreement] and click [Agree].
Note
• When you click [Disagree], refer to “If You Click Disagree in the End User License Agreement” (P. 26) for
details.
2.2 Installing the AdobePS Printer Driver 25
Page 26

14. Confirm that the printer has been added in the [Printers] window.
This completes installation of the printer driver. Remove the CD-ROM from the drive.
Important
• Store your CD-ROM in a safe place.
Refer to
• Configuring the printer: “2.3 Device Options and Print Settings” (P. 26)
If You Click Disagree in the End User License Agreement
When you click [Disagree] in the [End User License Agreement], the following dialog box
appears.
Click [No] to return to step 13 and continue the operation.
Click [Yes] to cancel the installation. A printer is added in the [Printers] window, but the
printer driver is not installed properly.
Select the printer and click [Properties] on the [File] menu. The [Reinstall] tab is added to
the printer driver properties dialog box. Follow the directions on that tab.
When you finish reinstalling, refer to “2.3 Device Options and Print Settings” (P. 26) to set
up the printer.
2.3 Device Options and Print Settings
This section describes printer specific settings in the settings in the printer driver properties
and document presets.
• [Installable Options] in the [Device Settings] tab
• [Configuration] tab
• Printer specific sections in the [Device Settings] of the [Advanced] tab
• [Output Settings] tab
Note
• You can also refer to Help for explanations of these settings. For details on how to use Help, refer to “2.4
How to Use Help” (P. 34).
To view the [Device Settings] or [Configuration] tabs, select the printer icon in the [Printers]
window, then click [Properties] on the [File] menu.
To view the [Advanced] or [Output Settings] tabs, select the printer icon in the [Printers]
window, then click [Document Defaults] on the [File] menu.
26 2 Operation With Windows NT 4.0
Page 27

Device Settings Tab Settings
This section describes [Installable Options] in the [Device Settings] tab.
To print correctly, it is necessary to make appropriate settings in this tab.
Select the items in [Installable Options] and change the settings in the [Change Setting] box
at the bottom of the tab.
Settings
Memory
Specify the amount of printer memory.
Hard Disk
Specify whether or not the hard disk (optional) is installed.
When the hard disk is mounted on the printer, set to [Available].
Duplex Module
Specify whether or not the duplex unit (optional) is installed.
When the duplex unit is installed on the printer, set to [Available].
Offset Catch Tray
Specify whether an offset catch tray (optional) is installed.
Rear Output Tray
Specify whether or not the rear tray (optional) is installed.
When the rear tray is installed on the printer, set to [Available].
Paper Source
Specify the configuration of the paper trays to correspond to the optional accessories
actually installed on this printer.
[Not Available] (default)
[3 - Tray Configuration]
[4 - Tray Configuration]
2.3 Device Options and Print Settings 27
Page 28

Configuration Tab Settings
This section describes the settings of the [Configuration] tab.
Note
• You can restore defaults by clicking [Restore Default].
Settings
Specify Job Owner
Specify Job Owner
Select the method of specifying the job owner.
This function is used for counting print job.
[Use Login Name]
Use your Windows Login Name as the job owner name. The job owner name becomes
the “Login User Name\Host Name”.
[Enter Owner Name (For Administrator)]
Select this if you want to specify a custom job owner name for the administrator. This
name is common for all users and is registered only once for all users.
Only users of the Administrators Group or Power Users Group can specify the job
owner name for the administrator.
[Enter Owner Name (For User)]
Select this if you want to specify a custom job owner name for a user.
This name is registered separately for each user of the computer.
Job Owner Name
Enter up to 31 alphanumeric characters for the job owner name for each user.
If you enter more than 31 characters, only the first 31 characters are used. The default
setting is [UnknownUser].
Password
Enter the password for the job owner name. The password can consist of 4 to 12 digits.
Each digit that you enter appears as an asterisk (*).
28 2 Operation With Windows NT 4.0
Page 29

High Speed Printing
Check this if print speed problems occur due to specific applications. Default is off.
Get Information from Printer
Clicking [Get Information from Printer] when this printer is used as a network printer verifies
the optional accessories installed using the printer port to which the printer is connected,
and reflects this in each item of [Installable Options] in the [Device Settings] tab.
Note
• This function is not available when the printer is used as a local printer. You have to manually set the
required items.
• The rear tray information cannot be obtained. You have to manually set the required items.
Network Address
Display the network address of the printer that is obtained by clicking [Get Information from
Printer].
Advanced Tab Settings
This section describes the settings of [Printer Features] in the [Advanced] tab.
Select the items in [Printer Features] under [Document Options] of the [Advanced] tab and
change the settings in the [Change Setting] box at the bottom of the tab.
Note
• The settings that can be selected vary depending on which options have been installed. Make these
settings after confirming that option settings are complete.
Refer to
• “Device Settings Tab Settings” (P. 27)
Settings
Output Destination
Set the destination for output.
Note
• The items that can be selected vary according to whether the offset catch tray (optional) or rear tray
(optional) has been installed.
2.3 Device Options and Print Settings 29
Page 30

Job Offset
Specify the method of the job offset function.
To shift the output position for each job, select [Offset Per Job]. To shift the output position
for each copy, select the [Offset Per Set]. If you do not want to shift the output position,
select [None].
[None] (default)
[Offset Per Job]
[Offset Per Set]
Note
• You can set this item only when the offset catch tray (optional) is installed on the printer.
Feed Separators from
Set the destination where the separators are to be fed to when the transparency separator
function is used.
When [Auto] is selected, the tray set on the machine is used as the feed destination.
[None] (default)
[Auto]
[Tray 1]
[Tray 2]
[Tray 3]
[Tray 4]
Print on Separators
Specify whether or not to print the details printed on the transparencies on the separators
as well when the transparency separator function is used.
[Blank Separators] (default)
[Printed Separators]
Print Mode
Specify whether to give priority to the print speed or the image quality.
Halftone
Specify the type of the halftone from among [Type - 1 Fine Dots], [Type - 1 Thick Dots] or
[Type 3]. The number of screen lines for Type 1 is automatically set according to the
resolution set in the [Print Mode].
All settings provide 256 levels of halftone.
[Type - 1 Fine Dots] (default)
Select this when you print texts or graphics.
[Type - 1 Thick Dots]
Select this when you print photos or images. This provides higher gradation than [Type - 1
Fine dots].
[Type 3]
When the moire interference pattern occurs in the other halftone settings, selecting this may
resolve this problem.
30 2 Operation With Windows NT 4.0
Page 31

Image Enhancement
Specify whether to use the [Image Enhancement] function.
Selecting [On] smoothes out boundaries when printing.
This reduces jagged edges, thereby artificially increasing the resolution of the image.
When printing an image (bitmap) composed of coarse halftone dots, smooth color gradation
is impossible in certain situations. In this case, select [Off].
Draft Mode
Specify whether to reduce the amount of toner used when printing drafts.
When you select On, the overall printed color becomes lighter. This is best for printing
documents when print quality is not necessary.
Custom Paper Auto Orientation
Specify whether to change the paper orientation when printing on custom paper.
When printing with custom paper, select [On] to rotate the orientation 90 degrees.
Substitute Tray
Specify what action to take when the paper for the print size is not loaded in the machine.
[Use Printer Settings]
Use the printer setting. The settings can be confirmed on the printer control panel.
[Display Message]
Displays paper supply messages on the printer control panel. Printing is unavailable until
paper is supplied.
[Use Nearest Size (With Zoom)]
Selects the nearest paper size and prints. Automatically reduces images for printing, as
necessary.
[Use Nearest Size (No Zoom)]
Selects the nearest paper size and prints in an equal size.
[Use Larger Size (With Zoom)]
Prints in an equal size on paper larger than the original. Automatically reduces images for
printing, as necessary.
[Use Larger Size (No Zoom)]
Prints in an equal size on paper larger than the original.
2.3 Device Options and Print Settings 31
Page 32

Output Settings Tab Settings
This section describes the settings in the [Output Settings] tab.
Note
• You can restore defaults by clicking [Restore Default].
Settings
Job Type
Job Type
Specify the print function from among [Normal Print], [Secure Print], [Sample Print], and
[Delayed Print].
[Normal Print]
Select when you do not want to specify [Secure Print], [Sample Print], or [Delayed
Print].
[Secure Print]
[Secure Print] is a function that temporarily stores print jobs in the printer, and then
prints them when print instructions are received from the control panel.
This function is available only when the hard disk (optional) is installed.
[Sample Print]
[Sample Print] is a function that outputs only one copy when multiple copies are
specified.
If there is no problem, the remaining sets are printed.
This function is available only when the hard disk (optional) is installed.
Note
• [Copy Count] must be set to two or more copies, and [Collated Copies] must be selected in the
[Page Setup] tab when using [Sample Print].
[Delayed Print]
[Delayed Print] is a function that temporarily stores print jobs in the printer, and then
prints them at the scheduled time.
This function is available only when the hard disk (optional) is installed.
User ID
For secure print or sample print, specify the [User ID] with up to 8 alphanumeric
characters.
32 2 Operation With Windows NT 4.0
Page 33

Password
For secure print, specify the password for the user ID with up to 12 alphanumeric
characters.
Each digit that you enter appears as an asterisk (*).
Retrieve Document Name
Select the method of specifying the document name. If you have selected [Auto
Retrieve], the valid document name can be up to 12 alphanumeric characters.
If the printer cannot recognize a document name, it will become the date and time.
Document Name
When [Enter Document Name] is selected in the [Retrieve Document Name] list box,
specify a document name with up to 12 alphanumeric characters.
Start Print Time
Set the time that you want [Delayed Print] to be carried out. Place the cursor in the hour
or minute box and press the up or down triangle to specify the start time. You can also
set the time by entering the time directly into the boxes. The default setting is [00:00].
Banner Sheet
Specify whether to print a banner sheet.
You can specify the banner sheet settings from among [Use Printer Settings], [Print Start
Page], or [None].
When [Secure Print] or [Delayed Print] are set in [Job Type], you cannot set [Banner Sheet].
Turn Image by 180deg
Check the check box to print documents rotated 180°. Default is off.
Printer Status
Check the printer status on CentreWare Internet Services by clicking this button.
About
Displays the version information of the printer driver.
2.3 Device Options and Print Settings 33
Page 34

2.4 How to Use Help
This section describes how to use Help.
1. The Help button ( in the diagram) appears on the upper right of the printer driver
properties dialog box.
2. Click and a [?] mark appears next to the pointer. You can then click items for
which you need explanations, opening a pop-up window that contains relevant
information. Click inside the pop-up window to close it.
34 2 Operation With Windows NT 4.0
Page 35

3 Operation With Windows 2000,
Windows XP, and Windows Server
2003
3.1 About the Software
This section describes the software bundled with the CD-ROM for Windows 2000, Windows
XP, and Windows Server 2003.
Bundled Software
The following items are included in the enclosed CD-ROM. Also, be sure to read
[Readme.txt] containing cautionary notes about how to use the printer driver.
Microsoft PScript 5.2 Driver and PPD files
Microsoft PScript 5.2 Driver and PPD files (for Windows 2000, Windows XP, and Windows
Server 2003).
Adobe Acrobat Reader
Allows you to view and print PDF files on all major computing platforms.
Hardware/Software Requirements
The minimum system requirements for the Windows 2000/Windows XP/Windows Server
2003 printer driver are described below.
Computer System
• i486 or Pentium processor-based personal computer (i486 or Pentium processor
recommended)
• 16 MB of available RAM (32 MB recommended)
• 6 MB of available hard-disk space
Basic Software
• Windows 2000 Professional
• Windows 2000 Server
• Windows 2000 Advanced Server
• Windows XP Professional Edition
• Windows XP Home Edition
• Windows Server 2003 Standard Edition
• Windows Server 2003 Enterprise Edition
• Windows Server 2003 Datacenter Edition
• Windows Server 2003 Web Edition
3.1 About the Software 35
Page 36

3.2 Installing the Printer Driver
Install MS PScript 5 printer driver onto Windows 2000, Windows XP, and Windows Server
2003 by following the procedure below.
This section describes how to install the printer driver for Windows XP, as an example.
Note
• It is possible to cancel installation of the printer driver by clicking [Cancel] in the dialog box displayed
during installation. You can also click [Back] to delete the settings in that dialog box and return to the
previous dialog box.
Refer to
• If you want to set up Port 9100, see the Network Print Environment User Guide in the Software Pack
CD-ROM.
Installation Procedure
1. Start Windows XP.
Note
• If your operating system is Windows XP Professional Edition, log on as a Power User group member or
an Administrator. Refer to the Windows XP documentation for details about the Power User group. If
your operating system is Windows XP Home Edition, log on as an Administrator.
2. On the [Start] menu, and click [Printers and Faxes].
3. In the [Printers and Faxes] window, click [Add a Printer].
4. Click [Next].
5. Select how the printer is connect to the computer and click [Next].
Select [Local printer attached to this computer] if the printer is connected directly to
the computer or to the network in the TCP/IP(LPD) environment. Otherwise, select [A
network printer, or a printer attached to another computer]. As an example, here is an
explanation using a case in which the printer is directly connected to the computer.
36 3 Operation With Windows 2000, Windows XP, and Windows Server 2003
Page 37

Note
• When you select [Local printer attached to this computer], deselect the [Automatically detect and install
my Plug and Play printer] check box.
• Specify the target printer in the [Specify a Printer] dialog box if you selected [A network printer, or a
printer attached to another computer].
6. Select the port you are using and click [Next].
When the printer is connected in the TCP/IP(LPD) environment:
(1) Click [Create a new port].
(2) Select [Standard TCP/IP Port] in the [Type of port] list and click [Next].
(3) Click [Next].
(4) Enter the IP address of the printer in [Printer Name or IP Address], then click
[Next].
(5) Click [Finish] in the dialog box that will be displayed.
When the printer is connected through the USB port:
Select [LPT1] in this procedure. When you finish installing the printer driver, configure
the USB port settings. For details on how to set the USB port, refer to the Setup and
Quick Reference Guide.
3.2 Installing the Printer Driver 37
Page 38

7. Insert the CD-ROM bundled with the PostScript software kit.
8. Click [Have Disk].
9. Enter “E:\DP_340A\Win2k_XP” in the [Copy manufacturer’s files from:] box and click
[OK].
In this guide, we have used “E:” as the CD-ROM drive. If you are using a different
drive for the CD-ROM, specify accordingly.
Note
• Click [Browse] to specify a folder in the CD-ROM.
10. Select your printer model from the [Printers] list and click [Next].
11. Enter the printer name, set whether you want to use it as the default printer, and click
[Next].
38 3 Operation With Windows 2000, Windows XP, and Windows Server 2003
Page 39

12. Select [Do not share this printer] and click [Next].
Important
• We recommend that you install the driver on each computer with the procedure appropriate to the OS.
13. Specify whether or not to print a test page, then click [Next].
14. Click [Finish].
Installation begins.
Note
• If the [Digital Signature Not Found] dialog box appears, click [Yes] to continue the installation.
3.2 Installing the Printer Driver 39
Page 40

15. Confirm that the printer has been added in the [Printers and Faxes] window.
This completes the installation of the printer driver. Remove the CD-ROM from the
drive.
Important
• Store your CD-ROM in a safe place.
Refer to
• Configuring the printer: “3.3 Device Options and Print Settings” (P. 40)
3.3 Device Options and Print Settings
This section describes the settings specific to the printer, which are among the settings to
be made using the printer driver properties. For other items, refer to the Help.
• [Installable Options] in the [Device Settings] tab
• [Configuration] tab
• Printer specific sections in [Printer Features] of the [Advanced Options] dialog box
• [Output Settings] tab
Refer to
• Details on how to use Help: “3.4 How to Use Help” (P. 48)
Windows 2000
To view the [Device Settings] tab and the [Configuration] tab, select the printer icon in the
[Printers] window, then select [Properties] on the [File] menu.
To view the [Advanced Options] dialog box, select the printer icon in the [Printers] window,
then select [Printing Preference] in the [File] menu. In the [Layout] tab or the [Paper/Quality]
tab in the displayed screen, click [Advanced].
To view the [Output Settings] tab, select the printer icon in the [Printers] window, then select
[Printing Preference] in the [File] menu.
Windows XP and Windows Server 2003
To view the [Device Settings] tab and the [Configuration] tab, select the printer icon in the
[Printers and Faxes] window, then select [Properties] on the [File] menu.
To view the [Advanced Options] dialog box, select the printer icon in the [Printers and
Faxes] window, then select [Printing Preference] in the [File] menu. In the [Layout] tab or
the [Paper/Quality] tab in the displayed screen, click [Advanced].
To view the [Output Settings] tab, select the printer icon in the [Printers and Faxes] window,
then select the [Printing Preference] in the [File] menu.
40 3 Operation With Windows 2000, Windows XP, and Windows Server 2003
Page 41

Device Settings Tab Settings
This section describes [Installable Options] in the [Device Settings] tab.
To print correctly, it is necessary to make the appropriate settings in this tab.
Select the items in [Installable Options] and change the settings in the menu that appears
on the right.
Settings
Memory
Specify the amount of printer memory.
Hard Disk
Specify whether or not the hard disk (optional) is installed.
When the hard disk is installed on the printer, set to [Available].
Duplex Module
Specify whether or not the duplex unit (optional) is installed.
When the duplex unit is installed on the printer, set to [Available].
Offset Catch Tray
Specify whether an offset catch tray (optional) is installed.
Rear Output Tray
Specify whether or not the rear tray (optional) is installed.
When the rear tray is installed on the printer, set to [Available].
Paper Source
Specify the configuration of the paper trays to correspond to the optional accessories
actually installed on this printer.
[Not Available] (default)
[3 - Tray Configuration]
[4 - Tray Configuration]
3.3 Device Options and Print Settings 41
Page 42

Configuration Tab Settings
This section describes the settings of the [Configuration] tab.
Note
• You can restore defaults by clicking [Restore Default].
Settings
Specify Job Owner
Specify Job Owner
Select the method of specifying the job owner.
This function is used for counting print job.
[Use Login Name]
Use your Windows Login Name as the job owner name. The job owner name becomes
the “Login User Name\Host Name”.
[Enter Owner Name (For Administrator)]
Select this if you want to specify a custom job owner name for the administrator. This
name is common for all users and is registered only once for all users.
Only users of the Administrators Group or Power Users Group can specify the job
owner name for the administrator.
[Enter Owner Name (For User)]
Select this if you want to specify a custom job owner name for a user.
This name is registered separately for each user of the computer.
Job Owner Name
Enter up to 31 alphanumeric characters for the job owner name for each user. If you
enter more than 31 characters, only the first 31 characters are used. The default setting
is [UnknownUser].
Password
Enter the password for the job owner name. The password can consist of 4 to 12 digits.
Each digit that you enter appears as an asterisk (*).
High Speed Printing
Check this if print speed problems occur due to specific applications. Default is off.
42 3 Operation With Windows 2000, Windows XP, and Windows Server 2003
Page 43

Get Information from Printer
Clicking [Get Information from Printer] when this printer is used as a network printer verifies
the optional accessories installed using the printer port to which the printer is connected,
and reflects this in each item of [Installable Options] in the [Device Settings] tab.
Note
• This function is not available when the printer is used as a local printer. You have to manually set the
required items.
• The information of the rear tray cannot be obtained. You have to manually set the required items.
Network Address
Display the network address of the printer that is obtained by clicking [Get Information from
Printer].
Advanced Options Dialog Box Settings
This section describes the settings of the [Advanced Options] dialog box displayed when
clicking [Advanced] in the [Layout] tab.
Select the items from [Printer Features] and change them on the menu displayed to the
right.
3.3 Device Options and Print Settings 43
Page 44

Settings
Output Destination
Set the the destination for output.
Note
• The items that can be selected vary according to whether the offset catch tray (optional) or rear tray
(optional) has been installed.
Job Offset
Specify the method of the job offset function.
To shift the output position for each job, select [Offset Per Job]. To shift the output position
for each copy, select the [Offset Per Set]. If you do not want to shift the output position,
select [None].
[None] (default)
[Offset Per Job]
[Offset Per Set]
Note
• You can set this item only when the offset catch tray (optional) is installed on the printer.
Feed Separators from
Set the destination where the separators are to be fed to when the transparency separator
function is used.
When [Auto] is selected, the tray set on the machine is used as the feed destination.
[None] (default)
[Auto]
[Tray 1]
[Tray 2]
[Tray 3]
[Tray 4]
Print on Separators
Specify whether or not to print the details printed on the transparencies on the separators
as well when the transparency separator function is used.
[Blank Separators] (default)
[Printed Separators]
Print Mode
Specify whether to give priority to the print speed or the image quality.
Halftone
Specify the type of the halftone from among [Type - 1 Fine Dots], [Type - 1 Thick Dots] or
[Type 3]. The number of screen lines for Type 1 is automatically set according to the
resolution set in the [Print Mode].
All settings provide 256 levels of halftone.
[Type - 1 Fine Dots] (default)
Select this when you print texts or graphics.
[Type - 1 Thick Dots]
Select this when you print photos or images. This provides higher gradation than [Type - 1
Fine dots].
44 3 Operation With Windows 2000, Windows XP, and Windows Server 2003
Page 45

[Type 3]
When the moire interference pattern occurs in the other halftone settings, selecting this may
resolve this problem.
Image Enhancement
Specify whether to use the [Image Enhancement] function.
Selecting [On] smoothes boundaries when printing. This reduces the jagged edges, thereby
artificially increasing the resolution of the image. When printing an image (bitmap)
composed of coarse halftone dots, smooth color gradation is impossible in certain
situations. In this case, select [Off].
Draft Mode
Specify whether to reduce the amount of toner used when printing drafts.
When you select [On], the overall printed color becomes lighter. This is best for printing
documents when print quality is not necessary.
Custom Paper Auto Orientation
Specify whether to change the paper orientation when printing on custom paper.
When printing with custom paper, select [On] to rotate the orientation 90 degrees.
Substitute Tray
Specify what action to take when the paper for the print size is not loaded in the machine.
[Use Printer Settings]
Use the printer setting. The settings can be confirmed on the printer control panel.
[Display Message]
Displays paper supply messages on the printer control panel. Printing is unavailable until
paper is supplied.
[Use Nearest Size (With Zoom)]
Selects the nearest paper size and prints. Automatically reduces images for printing, as
necessary.
[Use Nearest Size (No Zoom)]
Selects the nearest paper size and prints in an equal size.
[Use Larger Size (With Zoom)]
Prints in an equal size on paper larger than the original. Automatically reduces images for
printing, as necessary.
[Use Larger Size (No Zoom)]
Prints in an equal size on paper larger than the original.
3.3 Device Options and Print Settings 45
Page 46

Output Settings Tab Settings
This section describes the [Output Settings] tab.
Note
• You can restore defaults by clicking [Restore Default].
Settings
Job Type
Job Type
Specify the print function from among [Normal Print], [Secure Print], [Sample Print], and
[Delayed Print].
[Normal Print]
Select when you do not want to specify [Secure Print], [Sample Print], or [Delayed
Print].
[Secure Print]
[Secure Print] is a function that temporarily stores print jobs in the printer, and then
prints them when print instructions are received from the control panel.
This function is available only when the hard disk (optional) is installed.
[Sample Print]
[Sample Print] is a function that outputs only one copy when multiple copies are
specified.
If there is no problem, the remaining sets are printed.
This function is available only when the hard disk (optional) is installed.
Note
• [Copy Count] must be set to two or more copies, and [Collated] must be selected in the [Advanced
Options] dialog box when using [Sample Print].
[Delayed Print]
[Delayed Print] is a function that temporarily stores print jobs in the printer, and then
prints them at the scheduled time.
This function is available only when the hard disk (optional) is installed.
User ID
For secure print or sample print, specify the [User ID] with up to 8 alphanumeric
characters.
46 3 Operation With Windows 2000, Windows XP, and Windows Server 2003
Page 47

Password
For secure print, specify the password for the user ID with up to 12 alphanumeric
characters.
Each digit that you enter appears as an asterisk (*).
Retrieve Document Name
Select the method of specifying the document name. If you have selected [Auto
Retrieve], the valid document name can be up to 12 alphanumeric characters.
If the printer cannot recognize a document name, it will become the date and time.
Document Name
When [Enter Document Name] is selected in the [Retrieve Document Name] list box,
specify a document name with up to 12 alphanumeric characters.
Start Print Time
Set the time that you want [Delayed Print] to be carried out. Place the cursor in the hour
or minute box and press the up or down triangle to specify the start time. You can also
set the time by entering the time directly into the boxes. The default setting is [00:00].
Banner Sheet
Specify whether to print a banner sheet.
You can specify the banner sheet settings from among [Use Printer Settings], [Print Start
Page], or [None].
When [Secure Print] or [Delayed Print] are set in [Job Type], you cannot set [Banner Sheet].
Turn Image by 180deg
Check the check box to print documents rotated 180°. Default is off.
Printer Status
Check the printer status on CentreWare Internet Services by clicking this button.
About
Displays the version information of the printer driver.
3.3 Device Options and Print Settings 47
Page 48

3.4 How to Use Help
This section describes how to use Help.
1. The Help button ( in the diagram) appears on the upper right of the printer driver
properties dialog box.
2. Click and a [?] mark appears next to the pointer. You can then click items for
which you need explanations, opening a pop-up window that contains relevant
information. Click inside the pop-up window to close it.
48 3 Operation With Windows 2000, Windows XP, and Windows Server 2003
Page 49

4 Operation on Macintosh
Computers
4.1 About the Software
This section describes the Macintosh software bundled on the CD-ROM.
Bundled Software
The following items are included in the enclosed CD-ROM. Also, be sure to read
[Readme.txt] containing cautionary notes about how to use the printer driver.
AdobePS Printer Driver (ver. 8.5.1, 8.7, and 8.8) and PPD files
Adobe PostScript driver and PPD files (for Macintosh).
Fuji Xerox PPD Installer
The PPD file installer for Mac OS X v10.1.5 or 10.2.x.
Adobe Screen Fonts
Contains 117 PostScript fonts and 19 TrueType fonts, which are standard for PostScript 3
printers. In addition, 37 PostScript fonts of Central European (CE) character set are
included.
ATM (Adobe Type Manager)
Helps you to install typefaces, activate and manage your fonts. ATM version 4.5.2 is
included for Macintosh. Use version 4.5.2 when your operating system is Mac OS 9.0.
Adobe Acrobat Reader
Allows you to view and print PDF files on all major computing platforms.
Readme.txt
Contains cautionary notes about how to use the printer driver. Be sure to read this before
use.
Hardware/Software Requirements
The minimum system requirements for the Macintosh printer driver and PPD files are
described below.
Computer System
• For AdobePS 8.5.1:
Mac OS 7.6.1 or later
For AdobePS 8.7:
Mac OS 8.5 and 8.5.1
For AdobePS 8.8:
Mac OS 8.6 through 9.2.2
• For FujiXerox PPD Installer Mac OS X v10.1.5 or 10.2.x.
4.1 About the Software 49
Page 50

• 4 MB or more of available RAM (32 MB recommended)
• 2.1 MB of available hard-disk space (4 MB recommended)
Note
• Using the USB port and LPD port requires Mac OS X or later.
4.2 Installing the AdobePS Printer Driver (Mac OS 9.x or Earlier)
This section describes how to install the Adobe printer driver and how to set the printer
driver for this machine. There are two steps to install the printer driver. Firstly, use the
installer enclosed in the CD-ROM to install the printer driver to the Macintosh. Then,
configure the printer driver according to the printer used.
Installation Procedure
This section describes the procedures for installing the AdobePS printer driver.
This section describes how is the procedure to install Adobe PS8.8, as an example.
1. Insert the bundled CD-ROM into the CD-ROM drive.
2. Double-click the displayed CD-ROM icon.
3. Double-click the appropriate folders, then double-click [AdobePS Installer8.8].
4. Click [Continue].
5. Read through the license agreement carefully and if you have no objections to it, click
[Accept].
50 4 Operation on Macintosh Computers
Page 51

6. Confirm the Install Location and change it if necessary, then click [Install].
7. Click [Restart] or [Quit].
This completes installation.
Proceed to next section “Setting the Printer Driver (for EtherTalk Connection)” to
continue.
Setting the Printer Driver (for EtherTalk Connection)
When you finish installing the AdobePS printer driver, set the PostScript Printer Description
(PPD) file for this printer to the printer driver.
The printer driver controls the functions of this machine based on the information in the PPD
file.
1. Make sure that the printer is on.
2. Check that the printer’s EtherTalk port is set to [Enable].
Note
• You can check the EtherTalk settings in the [System Settings List]. Refer to the Setup and Quick
Reference Guide for details about how to print the [System Settings List].
3. Select the [Chooser] on the [Apple] menu, then click [AdobePS].
4. Select your printer from the [Select a PostScript Printer] list box, which appears to the
right of the Chooser, then click [Create].
It automatically searches for the printer and sets the PPD file.
4.2 Installing the AdobePS Printer Driver (Mac OS 9.x or Earlier) 51
Page 52

Note
• If the PPD file is not automatically searched for, select your printer model from the dialog box showing
PPD files to be selected.
5. To use the options, set [Installable Options].
Note
• [Installable Options] should normally be set automatically according to the bi-directional communications
with this printer. You do not have to change the settings.
Refer to
• “ Configure Settings” (P. 55)
6. Close the Chooser.
4.3 Installing the PPD File (Mac OS X)
This section describes how to install the Postscript Printer Description (PPD) file on a Mac
OS X v10.2.6, as an example.
Note
• The printer driver does not need to be installed on the Mac OS X. It uses the Adobe PostScript driver
that is provided with the OS.
Installation Procedure
This section describes the procedures for installing the PPD file for the Mac OS X.
1. Insert the bundled CD-ROM in the CD-ROM drive.
2. Double-click the displayed CD-ROM icon.
3. Open the appropriate folders, then double-click [FujiXerox PPD Installer].
4. Enter the Administrator’s user name and password, then click [OK].
52 4 Operation on Macintosh Computers
Page 53

5. Confirm the [Install Location] and change it if necessary, then click [Install].
6. Click [Quit].
This completes the installation.
Proceed to next section “Adding a Printer” to continue.
Adding a Printer
After the PPD file has been installed, set the PPD file for the printer driver, and then add the
printer.
The printer driver controls the printer functions based on the information in the PPD file.
1. Switch on the printer.
When using the USB port, do not switch on the computer while the USB cable is
connected.
2. Check that the printer’s port is set to [Enable].
• When using AppleTalk, set the EtherTalk port to [Enable].
• When using IP Printing, set the LPD port to [Enable].
• When using USB, set the USB port to [Enable].
Note
• You can check the EtherTalk, LPD and USB settings in the [System Settings List]. Refer to the Setup and
Quick Reference Guide for details about how to print the [System Settings List].
3. To use the USB port, connect the USB cable between the printer and the Macintosh
computer.
4. Start your Macintosh computer and start [Print Center].
The [Printer List] screen appears.
Note
• You can find [Print Center] in the [Utilities] folder in the [Applications].
5. Click [Add].
4.3 Installing the PPD File (Mac OS X) 53
Page 54

6. Select the protocol used to connect the printer.
When Using USB
(1) Select [USB] from the menu then select the printer you are using from the list.
Your printer model is automatically selected for [Printer Model].
(2) Click [Add].
When Using AppleTalk
(1) Select [AppleTalk] from the menu, and specify the zone for the printer being used.
(2) Select the printer you are using from the list.
(3) Select [Auto Select] from [Printer Model].
(4) Click [Add].
54 4 Operation on Macintosh Computers
Page 55

When Using IP Printing
(1) Select [IP Printing] from the menu, and enter the IP address for the printer being
used in [Printer’s Address].
(2) Select [FX] from [Printer Model], and select the printer to be used.
(3) Click [Add].
Regarding Printer Options
For Mac OS X v10.2.x, click [Printers] on the [Print Center] menu bar, and select [Show
Info].
Next, select [Installable Options], and select the options that have been installed to the
printer.
Note
• The optional accessory settings can be configured, but the conflict settings between the functions of
optional accessory and the other functions are not resolved automatically.
Refer to
• “Configure Settings” (P. 55)
If your operating system is Mac OS X v10.1.5, you cannot configure the optional accessory
settings. All the optional accessories are verified as installed. Note that you can select all
the optional accessories even though some of them are not actually installed.
4.4 Options
This section describes the configuration settings and the printer specific options settings.
Configure Settings
For Mac OS 9.x and Earlier
This section describes installable options for operating systems earlier than Mac OS 9.x.
Note
• Normally, [Installable Options] are automatically set according to the bi-directional communications with
this printer. You do not have to change the settings.
1. Select the printer using the [Chooser] and click [Setup].
4.4 Options 55
Page 56

2. Click [Configure].
3. Set the option menu items in [Installable Options], and click [OK].
For Mac OS X
This section describes installable options for Mac OS X v10.2.x.
If your operating system is Mac OS X v10.1.5, you cannot configure the optional accessory
settings. All the optional accessories are verified as installed. Note that you can select all
the optional accessories even though some of them are not actually installed.
1. Click [Printers] on the [Print Center] menu bar, and select [Show Info].
2. Select [Installable Options], and select the options that have been installed on the
printer, then click [Apply Changes].
Settings
This section describes the items to set in [Installable Options].
Memory
Specify the amount of printer memory.
Hard Disk
Specify whether or not the hard disk (optional) is installed.
56 4 Operation on Macintosh Computers
Page 57

Duplex Module
Specify whether or not the duplex unit (optional) is installed.
Offset Catch Tray
Specify whether or not the offset catch tray (optional) is installed.
Rear Output Tray
Specify whether or not the rear tray (optional) is installed.
Paper Source
Specify the configuration of the paper trays to correspond to the optional accessories
actually installed on this printer.
[Not Available] (default)
[3 - Tray Configuration]
[4 - Tray Configuration]
Printer Specific Options Settings
This section describes the printer specific options to be set in the [Print] dialog box of the
application.
The setting procedures differ between Mac OS 9.x or earlier and Mac OS X, but the setting
items are the same.
This is the procedure for Mac OS 9.x as an example.
1. On the [File] menu of the application, click [Print].
The [Print] dialog box appears.
2. Select [Printer Specific Options].
Note
• If your operating system is Mac OS X, select [Printer Features].
4.4 Options 57
Page 58

3. Specify the functions that you want to set.
Note
• If your operating system is Mac OS X, display each tab to specify the features.
Settings
This section describes the settings of the [Printer Specific Options] list.
Note
• The settings that can be selected vary depending on which options have been installed. Make these
settings after specifying the installed options.
Output Destination
Set the destination for output.
Note
• The items that can be selected vary according to whether the offset catch tray (optional) or rear tray
(optional) has been installed.
Job Offset
Specify the method of the job offset function.
To shift the output position for each job, select [Offset Per Job]. To shift the output position
for each copy, select the [Offset Per Set]. If you do not want to shift the output position,
select [None].
[None] (default)
[Offset Per Job]
[Offset Per Set]
Note
• You can set this item only when the offset catch tray (optional) is installed on the printer.
Collated
Specify whether to collate a multiple-page file per set when they are printed.
Note
• If your operating system is Mac OS X, set [Copies & Pages].
58 4 Operation on Macintosh Computers
Page 59

Feed Separators from
Set the destination where the separators are to be fed to when the transparency separator
function is used.
When [Auto] is selected, the tray set on the printer is used as the feed destination.
[None] (default)
[Auto]
[Tray 1]
[Tray 2]
[Tray 3]
[Tray 4]
Print on Separators
Specify whether or not to print the details printed on the transparencies on the separators
as well when the transparency separator function is used.
[Blank Separators] (default)
[Printed Separators]
Paper Type/Media
Specify whether to set the paper type or media.
Print Mode
Specify whether to give priority to the print speed or the image quality.
Halftone
Specify the type of the halftone from among [Type - 1 Fine Dots], [Type - 1 Thick Dots] or
[Type 3]. The number of screen lines for Type 1 is automatically set according to the
resolution set in the [Print Mode].
All settings provide 256 levels of halftone.
[Type - 1 Fine Dots] (default)
Select this when you print texts or graphics.
[Type - 1 Thick Dots]
Select this when you print photos or images. This provides higher gradation than [Type - 1
Fine dots].
[Type 3]
When the moire interference pattern occurs in the other halftone settings, selecting this may
resolve this problem.
Image Enhancement
Specify whether to use the [Image Enhancement] function.
Selecting [On] smoothes out boundaries when printing. This reduces jagged edges, thereby
artificially increasing the resolution of the image. When printing an image (bitmap)
composed of coarse halftone dots, smooth color gradation is impossible in certain
situations. In this case, select [Off].
Draft Mode
Specify whether to reduce the amount of toner used when printing drafts.
When you select [On], the overall printed color becomes lighter. This is best for printing
documents when print quality is not necessary.
4.4 Options 59
Page 60

Custom Paper Auto Orientation
Specify whether to change the paper orientation when printing on custom paper.
When printing on custom-size paper, select [On] to rotate the orientation 90 degrees.
Substitute Tray
Specify what action to take when the paper for the print size is not loaded in the machine.
[Use Printer Settings]
Use the printer setting. The settings can be confirmed on the printer control panel.
[Display Message]
Displays paper supply messages on the printer control panel. Printing is unavailable until
paper is supplied.
[Use Nearest Size (With Zoom)]
Selects the nearest paper size and prints. Automatically reduces images for printing, as
necessary.
[Use Nearest Size (No Zoom)]
Selects the nearest paper size and prints in an equal size.
[Use Larger Size (With Zoom)]
Prints in an equal size on paper larger than the original. Automatically reduces images for
printing, as necessary.
[Use Larger Size (No Zoom)]
Prints in an equal size on paper larger than the original.
4.5 Installing the Screen Fonts
Install the screen fonts included in the [ScreenFont] folder in the bundled CD-ROM to your
Macintosh computer.
This section describes how to install them for Mac OS 9.2.2, as an example.
1. Start your Macintosh computer and insert the bundled CD-ROM into the CD-ROM
drive.
2. Double-click the displayed CD-ROM icon.
3. Open the [ScreenFont] folder and drag all files in each of the displayed folders to the
Macintosh [Fonts].
4. Restart your Macintosh computer.
Important
• Store your CD-ROM in a safe place.
60 4 Operation on Macintosh Computers
Page 61

A Appendix
A.1 Cautions and Limitations
About the Driver
Cautions and limitations relating to each type of driver are listed [Readme.txt] in the bundled
CD-ROM. Be sure to read it before installing the driver.
Installing the PostScript Software Kit
You must install the additional memory to use this PostScript software kit.
Troubleshooting
Refer to the Setup and Quick Reference Guide or User Guide for error codes and error
messages displayed on the control panel, as well as for how to deal with paper jams.
Printing From Macintosh Computers via USB Port
To detect this printer from Macintosh computers, switch on the printer by following either of
the procedures below.
• Switch on the printer first, then connect the USB cable.
• Switch on the printer first, then switch on your Macintosh computer.
A.1 Cautions and Limitations 61
Page 62

Index
A
Adobe Acrobat Reader . . . . . . . . . . . . . . . . . 49
Adobe Type Manager . . . . . . . . . . . . 9, 22, 49
AdobePS printer driver (ver. 4.5.3) . . . . . . . . . 9
AdobePS printer driver (ver. 5.2.2) . . . . . . . . 22
AdobePS printer driver
(ver. 8.5.1, 8.7, and 8.8) . . . . . . . . . . . . . . . . 49
Advanced Options dialog box . . . . . . . . . . . . 43
Advanced tab . . . . . . . . . . . . . . . . . . . . . . . . . 29
C
Configuration tab . . . . . . . . . . . . . . . 14, 28, 42
D
Device Settings tab . . . . . . . . . . . . . . . . . 27, 41
E
error codes . . . . . . . . . . . . . . . . . . . . . . . . . . 61
error messages . . . . . . . . . . . . . . . . . . . . . . . 61
F
Fuji Xerox PPD Installer . . . . . . . . . . . . . . . . 49
O
Options tab . . . . . . . . . . . . . . . . . . . . . . . . . . 17
Output Settings tab . . . . . . . . . . . . . . . . . 19, 32
P
PPD . . . . . . . . . . . . . . . . . . . . . . . . . . 9, 22, 35
PPD file . . . . . . . . . . . . . . . . . . . . . . . . . . . . . 49
printer specific options settings . . . . . . . . . . . 57
R
Readme.txt . . . . . . . . . . . . . . . . . 9, 22, 35, 49
S
screen fonts . . . . . . . . . . . . . . . . . . . . . . . . . . 49
W
Windows 2000 . . . . . . . . . . . . . . . . . . . . . . . . 35
Windows 95 . . . . . . . . . . . . . . . . . . . . . . . . . . . 9
Windows 98 . . . . . . . . . . . . . . . . . . . . . . . . . . . 9
Windows Me . . . . . . . . . . . . . . . . . . . . . . . . . . 9
Windows NT 4.0 . . . . . . . . . . . . . . . . . . . . . . 22
Windows Server 2003 . . . . . . . . . . . . . . . . . . 35
Windows XP . . . . . . . . . . . . . . . . . . . . . . . . . 35
62 Index
Page 63

Customer Response Sheet
DocuPrint 240A/340A User Guide (PostScript Software Kit) (ME3215E2-1)
To improve our publications, we would appreciate your feedback regarding this guide. Please take a
few moments to complete and return this form to us.
z About Yourself
1. How often do you use this guide?
[ ] Daily [ ] Weekly [ ] Monthly [ ] Infrequently
2. When do you usually refer to the guide?
[ ] Doing a usual operation [ ] Using unfamiliar features
[ ] Solving a problem
3. Which part of the guide do you read frequently?
Chapter/Section/Page:
4. Where do you keep this guide?
5. (Optional)
Your Name: Occupation:
Company or organization:
Address:
z About the Guide
Strongly
agree
1. It is handy. 1 2 3 4 5
2. It is easy to read. 1 2 3 4 5
3. Titles of chapters and sections make sense. 1 2 3 4 5
4. Information is logically placed. 1 2 3 4 5
5. Referencing is easy. 1 2 3 4 5
6. Content is easy to understand. 1 2 3 4 5
7. The step-by-step instructions are easy to follow. 1 2 3 4 5
8. All necessary information is included. 1 2 3 4 5
9. Illustrations aid in the understanding of content. 1 2 3 4 5
10. The use of color is effective. 1 2 3 4 5
Other comments:
After completing this form, detach and send it to the address below.
(Please use your own envelope and postage stamp.)
Thank you for your cooperation.
Fuji Xerox Co., Ltd.
KSP R&D 2D7
3-2-1, Sakado, Takatsu-ku
Kawasaki-shi, Kanagawa-ken
JAPAN 213-0012.
Neutral Strongly
disagree
Page 64

DocuPrint 240A/340A User Guide (PostScript® Software Kit)
Human Interface Design Development
Document Products & Supply Company
Fuji Xerox Co., Ltd.
Copyright
ME3215E2-1 (Edition 1)
©
2003 by Fuji Xerox Co., Ltd.
 Loading...