

Page 1

DocuPrint 181/211
Network Print
Environment
User Guide
Page 2

Page 3
Preface
Thank you for choosing the DocuPrint 181/211.
This manual aims to provide all the information on installing and operating DocuPrint 181/
211 as a network printer, setting up the environment for printing, as well as notes on safety
precautions. To get the most out of your printer, please read the manual carefully and
completely before using the machine.
Please take good care of this manual even if you have completed reading it, as you can refer
to it again when you have doubts on the operation of the machine.
This manual is written with the assumption that you are familiar with the basics of your
computer to be connected, the operating system, the network and the application software.
You may also refer to the respective user manuals regarding the operations of these
products.
Novell and NetWare is a registered trademark of Novell, Inc., in the United States and other
countries.
Microsoft, MS-DOS, Windows, and Windows NT are either registered trademarks or
trademarks of Microsoft Corporation in the United States and/or other countries.
Permission has been obtained from Microsoft Corporation for use of software screen shots.
This software is based in part on the work of the Independent JPEG Group.
All product/brand names are trademarks or registered trademarks of the respective holders.
The production group, in which the Japanese Standards Association played the leading role, has
jointly developed Heisei Mincho Typeface TM.W3 and Heisei Square Gothic TM.W5. These fonts
partly include external characters designed by us. No reproduction is allowed without permission.
Important
1. This manual is copyrighted with all rights reserved. Under the copyright laws, this manual may
not be copied or modified, in whole or part, without the written consent of the publisher.
2. Parts of this manual are subject to change without prior notice.
3. We welcome any comment on ambiguities, errors, omissions, or missing pages.
4. Never attempt any procedure on the machine that is not specifically described in this manual.
Unauthorized operation can cause faults or accidents. Fuji Xerox is not liable for any problems
resulting from unauthorized operation of the equipment.
Xerox is a registered trademark.
CentreWare is a trademark.
The Document Company and Ethernet are trademarks and may be registered in certain
jurisdictions.
i
Page 4

Table of Contents
Preface .............................................................................................................................i
Table of Contents ............................................................................................................ ii
Types of Manuals ........................................................................................................... vi
Using This Guide ........................................................................................................... vii
Organization of This Guide....................................................................................................... vii
Conventions ............................................................................................................................ viii
Using the PDF File .................................................................................................................. viii
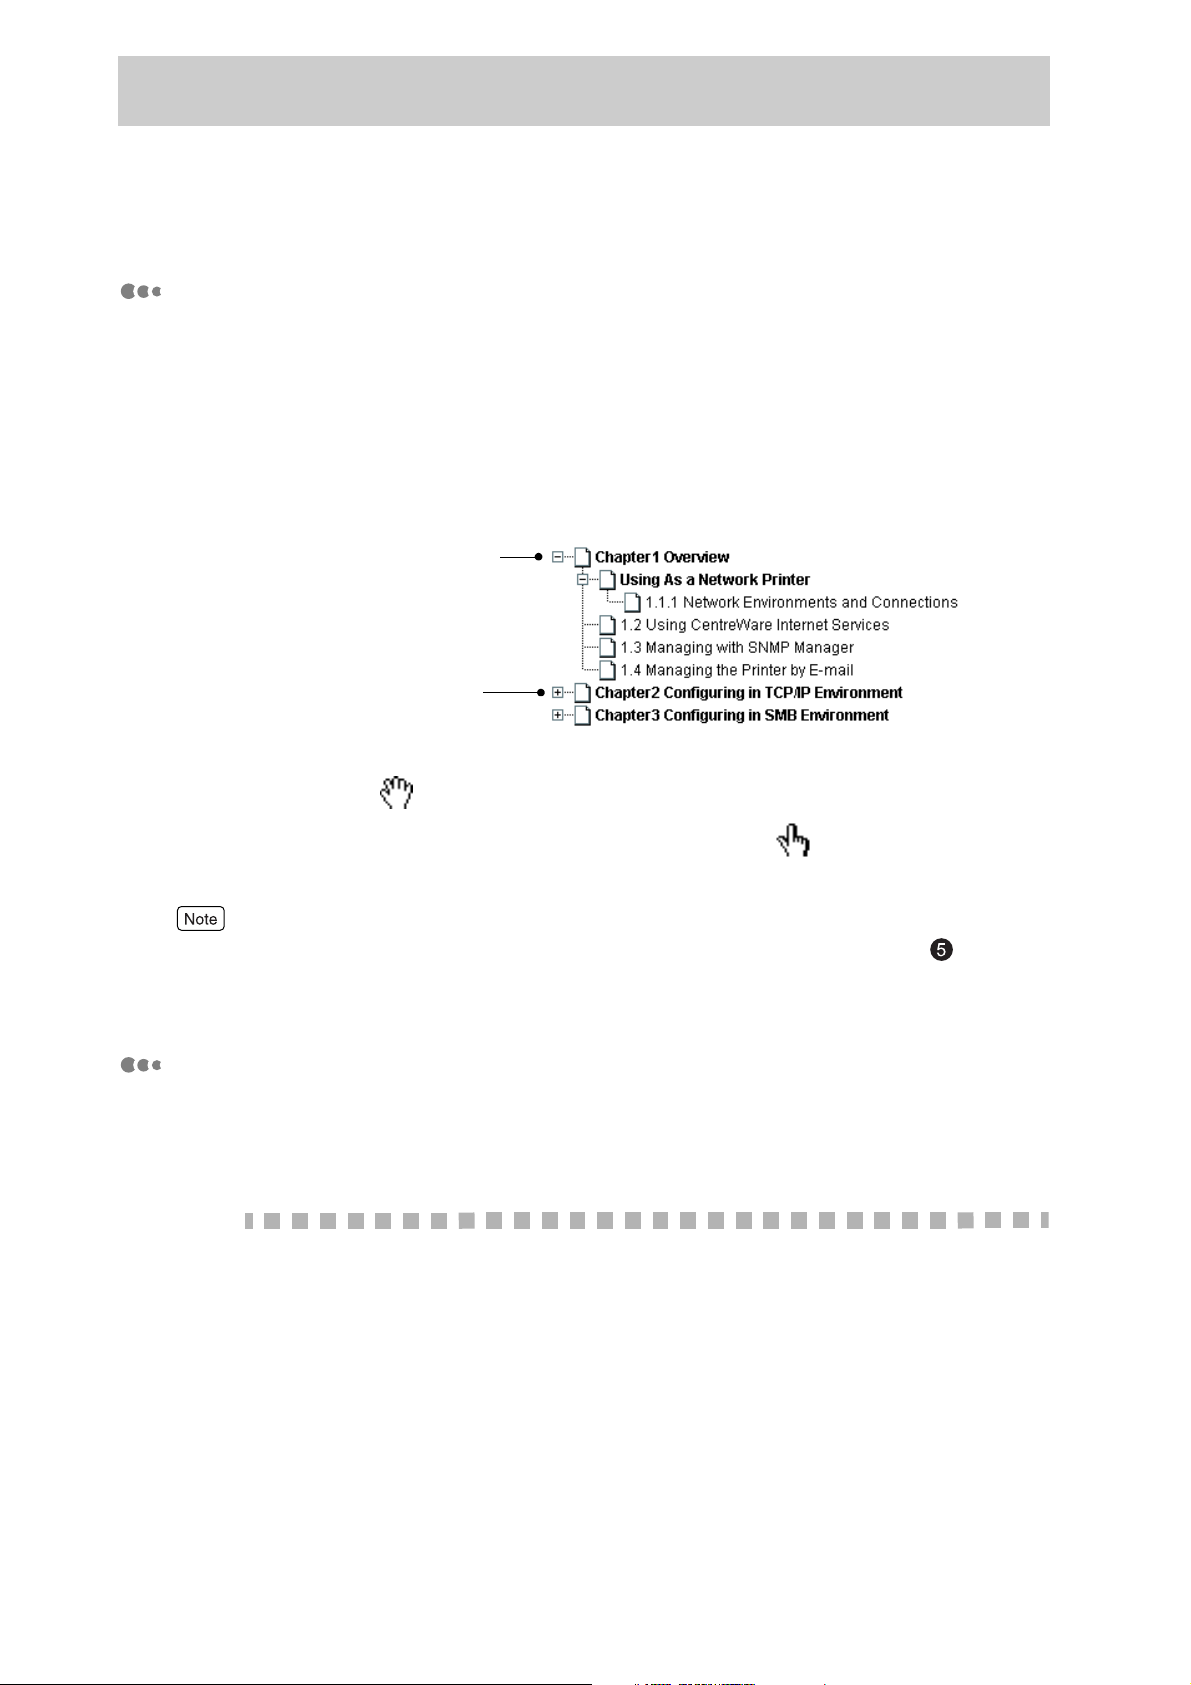
Chapter1 Overview
1.1 Using As a Network Printer ............................................................................................. 2
1.1.1 Network Environments and Connections.......................................................... 3
1.1.2 Installing identically configured printer drivers in two or more computers with
identical operating systems on the network ...................................................... 6
1.2 Using CentreWare Internet Services............................................................................... 7
1.3 Managing with SNMP Manager....................................................................................... 8
1.4 Managing the Printer by E-mail ..................................................................................... 10
Chapter2 Configuring in TCP/IP Environment
2.1 Using in TCP/IP Environment........................................................................................ 12
2.1.1 Interface .......................................................................................................... 12
2.1.2 Overview of the Configuration......................................................................... 12
2.2 Configuring the Printer................................................................................................... 14
2.2.1 Setting IP Address .......................................................................................... 14
2.2.2 Activating the Protocol .................................................................................... 15
2.2.3 Checking the Settings (Printing Printer Settings)............................................ 15
2.3 Configuring CentreWare Internet Services.................................................................... 17
2.4 Configuring Windows NT 4.0/Windows 2000/Windows XP........................................... 32
2.4.1 Installing the Printer Driver (Windows NT 4.0) ................................................ 33
2.4.2 Installing the Printer Driver (Using lpr on Windows 2000/Windows XP) ......... 36
2.4.3 Installing the Printer Driver
(Using Port 9100 on Windows 2000/Windows XP) ......................................... 41
ii
2.4.4 Installing the Printer Driver
(Internet Printing on Windows 2000/Windows XP) ......................................... 46
2.4.5 Using As a Network Server............................................................................. 50
2.5 Configuring Windows 95/Windows 98/Windows Me (TCP/IP Direct Print Utility) .......... 55
2.5.1 Using TCP/IP Direct Print Utility...................................................................... 55
2.5.2 Installing TCP/IP Protocol ............................................................................... 56
2.5.3 Installing TCP/IP Direct Print Utility................................................................. 59
Page 5

2.5.4 Installing the Printer Driver.............................................................................. 63
2.5.5 Adding the Port ............................................................................................... 65
2.5.6 Status Display During Printing ........................................................................ 69
2.5.7 Uninstalling TCP/IP Direct Print Utility ............................................................ 71
2.5.8 Installing the Printer Driver (for Internet Printing (IPP) on Windows Me) ........ 72
Chapter3 Configuring in SMB Environment
3.1 Using in SMB Environment............................................................................................ 76
3.1.1 Overview of the Configuration......................................................................... 76
3.2 Configuring the Printer................................................................................................... 77
3.2.1 Set the IP address........................................................................................... 77
3.2.2 Activating the Protocol..................................................................................... 77
3.2.3 Checking the Settings (Printing Printer Settings)............................................ 77
3.3 Changing the Host Name and Workgroup Name .......................................................... 79
3.3.1 Changing from the Windows Client................................................................. 79
3.4 Configuring the Client .................................................................................................... 85
3.4.1 Installing the Printer Driver (Windows 95/Windows 98/Windows Me)............. 85
3.4.2 Installing the Printer Driver
(Windows NT 4.0/Windows 2000/Windows XP).............................................. 88
Chapter4 Configuring in NetWare Environment
4.1 Using in NetWare Environment...................................................................................... 92
4.1.1 System Environment ....................................................................................... 92
4.1.2 Interface .......................................................................................................... 93
4.1.3 Overview of the Configuration......................................................................... 94
4.2 Configuring the Printer................................................................................................... 95
4.2.1 Activating the Protocol..................................................................................... 95
4.3 Configuring Fuji Xerox Network Utility ........................................................................... 96
4.3.1 Installing Network Utility .................................................................................. 96
4.3.2 Setting NetWare Environment......................................................................... 99
4.3.3 Checking the Settings (Printing Printer Settings).......................................... 120
4.4 Configuring the Client .................................................................................................. 122
4.4.1 Installing the Printer Driver (Windows 95/Windows 98/Windows Me)........... 122
4.4.2 Installing the Printer Driver
(Windows NT 4.0/Windows 2000/Windows XP)............................................ 125
iii
Page 6

Chapter5 Using CentreWare Internet Services
5.1 Using CentreWare Internet Services........................................................................... 130
5.1.1 System Environment ..................................................................................... 130
5.1.2 Target Browsers ............................................................................................ 130
5.2 Configuring the Printer................................................................................................. 132
5.2.1 Set the IP address......................................................................................... 132
5.2.2 Activating the Protocol .................................................................................. 132
5.3 Configuring the WWW Browser................................................................................... 133
5.3.1 Checking Netscape Communicator............................................................... 133
5.3.2 Checking Internet Explorer............................................................................ 134
5.3.3 Proxy Server and Port Number ..................................................................... 135
5.4 Connecting to CentreWare Internet Services .............................................................. 137
5.5 CentreWare Internet Services Features ...................................................................... 139
5.5.1 Job and History ............................................................................................. 139
5.5.2 Status............................................................................................................ 140
5.5.3 Properties...................................................................................................... 141
5.5.4 Assistance..................................................................................................... 143
Chapter6 Managing the Printer by E-mail (Status Messenger)
6.1 Before Using E-mail..................................................................................................... 146
6.1.1 System Requirements................................................................................... 146
6.1.2 Configuration Flow ........................................................................................ 147
6.2 Configuring the Printer................................................................................................. 148
6.2.1 Setting the IP Address .................................................................................. 148
6.2.2 Starting the Protocol ..................................................................................... 148
6.2.3 Confirming Settings (Printing the Printer Settings List)................................. 149
6.3 Making CentreWare Internet Services Settings........................................................... 150
6.4 Using E-mail ................................................................................................................ 158
6.4.1 Sending E-mail to the Printer........................................................................ 159
Chapter7 Troubleshooting
7.1 For TCP/IP Environment.............................................................................................. 162
7.1.1 When Setting Up the Printer ......................................................................... 162
7.1.2 When Using the Printer................................................................................. 163
iv
7.1.3 When Using TCP/IP Direct Print Utility ......................................................... 164
7.2 For SMB Environment ................................................................................................. 165
Page 7

7.2.1 When Setting Up the Printer ......................................................................... 165
7.2.2 When Using the Printer................................................................................. 167
7.3 For NetWare Environment ........................................................................................... 168
7.3.1 When Setting Up the Printer ......................................................................... 168
7.3.2 When Using the Printer................................................................................. 169
7.4 For CentreWare Internet Services............................................................................... 171
7.5 Trouble sending/receiving mail..................................................................................... 173
Appendices
A Network Specifications ................................................................................................ 176
B CentreWare Simple Status Notification........................................................................ 177
B.1 Operating System Requirements .................................................................. 177
B.2 Installing CentreWare SSN ........................................................................... 178
B.3 Checking Printer Status With CentreWare SSN............................................ 180
B.4 CentreWare SSN Features ........................................................................... 183
C Precautions and Limitations......................................................................................... 184
Index ...........................................................................................................................189
v
Page 8
Types of Manuals
The following manuals are bundled with DocuPrint 181/211. Please read the relevant
manual to suit your needs.
Setting Up
Setup Guide
This booklet provides information on items that
come with this printer and explains how to set
up the printer, from unpacking to preparation to
installing the printer driver.
First, check the items supplied with the printer
against this booklet.
S
e
t
u
p
G
u
i
d
e
User Guide
This guide explains how to set up the DocuPrint
181/211 and describes the capabilities of the
printer. It also explains how to install the software
pack provided with the DocuPrint 181/211, how
to use the printer in standalone and network
configurations, and steps for troubleshooting
when problems occur.
Software Pack Operation Guide
This manual explains how to use the DocuPrint 181/211
Software Pack CD-ROM on Windows environment, and how to
install the various software available in the Software Pack.
Once you insert the Software Pack CD-ROM in the CD-ROM
drive of your computer, the Fuji Xerox StartUp Tool will appear
automatically. Click on the desired button to display this
manual on the screen.
U
s
e
r
G
u
i
d
e
vi
Network Print Environment User Guide (this manual)
This manual explains in detail the procedures to set up and
use the printer as a network printer in various networking
environments. This manual is a PDF file and can be found in
the Manual folder in the Software Pack CD-ROM. The name of
this file is Net.pdf.
Page 9

Using This Guide
Organization of This Guide
This manual consists of eight chapters. A brief introduction of each chapter is provided
below.
Chapter 1 Overview
This chapter introduces the different types of connections when using the printer as a
network printer and the network features of the printer.
Chapter 2 Configuring in TCP/IP Environment
This chapter explains the procedures of configuring the printer to use in TCP/IP
environment and printing from computers of different operating systems.
Chapter 3 Configuring in SMB Environment
This chapter explains the procedures of configuring the printer to use in SMB
environment and printing from computers of different operating systems.
Chapter 4 Configuring in NetWare Environment
This chapter explains the procedures of configuring the printer to use in NetWare
environment and printing from computers of different operating systems.
Chapter 5 Using CentreWare Internet Services
This chapter explains the ways of using CentreWare Internet Services.
CentreWare Internet Services is a software that enables a user to check the printer
status or change the printer settings using a WWW browser from a computer on the
network instead of using the control panel.
Chapter 6 Managing the Printer by E-mail
This chapter explains procedures for exchanging e-mail between computers on the
network, verifying the printer settings, and making settings.
Chapter 7 Troubleshooting
This chapter explains the ways of treating problems which arise when setting up the
printer as a network printer and when using it.
Appendices
This section contains network card specifications and CentreWare Simple Status
Notification (CentreWare SSN).
vii
Page 10
Conventions
This manual uses the following conventions:
Notation
Explains points to pay attention to. Be sure to read it.
Gives supplementary information for reference.
Indicates where to find related information.
●
" ": indicates reference to a chapter or section.
●
Italics: indicates that the source of reference is in another manual.
Symbol
Symbol Meaning
Bold Indicates selections or all kinds of buttons.
Example: Click Next.
" " Indicates input contents.
Example: Enter "DocuPrint 181/211" in the text box.
Initial Caps Indicates the names of a window, menu, dialog box, list
box or combo box.
Example: The Add Port dialog box is displayed.
+ Indicates that the key on the keyboard and the button on
the control panel should be pressed simultaneously.
Example: Press the < > + < > buttons.
Using the PDF File
Use the Adobe Acrobat Reader to display the manual in PDF format.
You can use the command bar at the top of the Adobe Acrobat Reader window to
navigate in the PDF document, as well as to magnify or reduce the view.
The following procedures explain how to do all these operations:
viii
Page 11
●
navigating in PDF
●
magnifying and reducing the view
●
jumping to the required page
●
printing
Online Help files or manuals related to Adobe Acrobat Reader for details of using the Adobe
Acrobat Reader
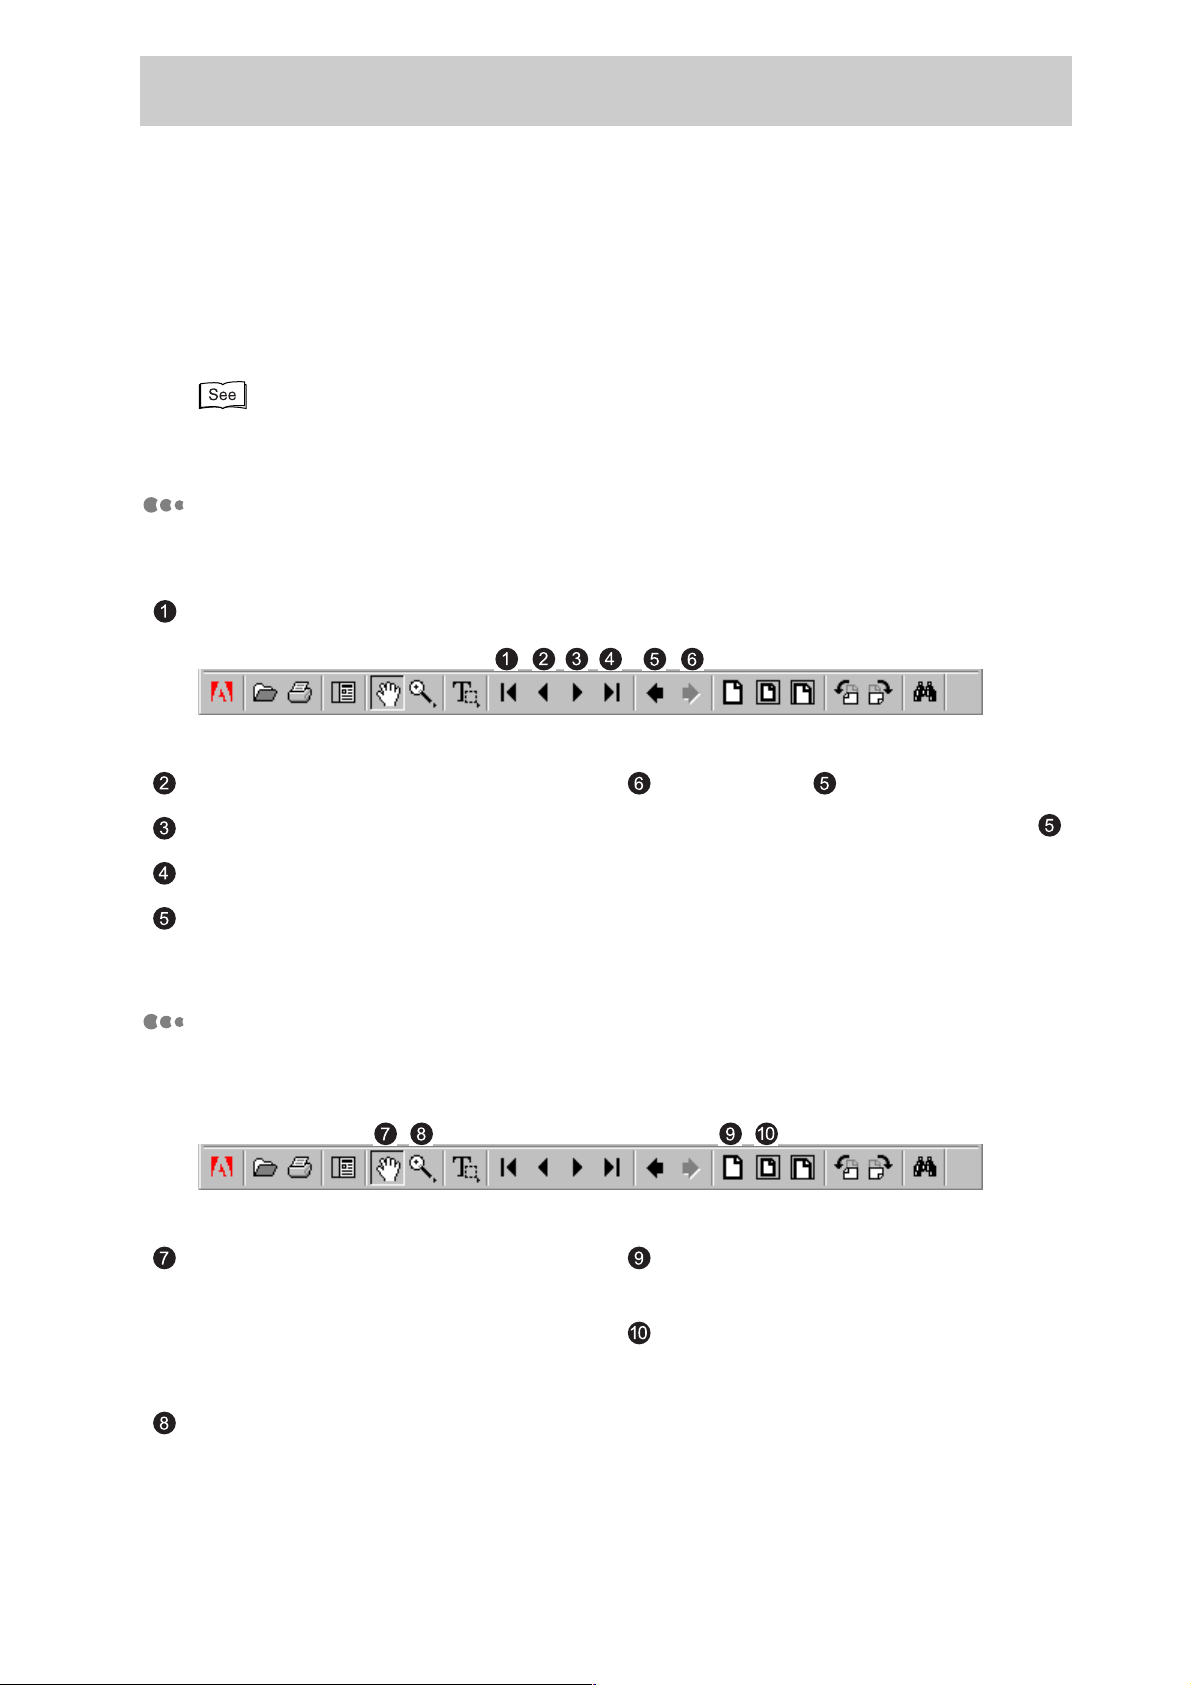
Navigating in the PDF
The following buttons for paging through a PDF document are available at the
Command bar:
To go to the first page.
To go to the previous page. Enabled when is clicked.
To go to the next page.
Click this to return to the page before
is clicked.
To go to the last page.
To go to the previous view.
Magnifying and Reducing the View
The following buttons for magnifying and reducing the view are available at the
Command bar:
When some areas of the page cannot
be seen, select this button and then click
the page to move it around in any
desired direction to view all the areas on
it.
Select this button to display the page
in actual size.
Select this button to resize the page to
fit entirely in the window.
Select this button and then click the
page to magnify the view.
ix
Page 12
Jumping to the Required Page
Clicking on the chapter and section titles on the Contents page will enable you to jump
to the corresponding page.
There are also bookmarks, found on the left side of the window (select Show
Bookmarks from the Window menu if the bookmarks are not displayed) where you
can click on the bookmark icon or the text in the palette to jump to the corresponding
page.
Example of bookmarks:
Indicates that levels below
are displayed.
Indicates that there are
levels below.
When the hand tool is selected on the Tool bar, positioning the mouse pointer over
a linked area on the page will change it to a pointing finger .
To return from the linked page to the page where the link was clicked, select , from the
Command bar.
Printing
The procedure to print out the PDF document is as follows. The procedure might differ
according to the operating system of the computer used. Here, we will use Windows
98 as an example.
Procedure
1
2
3
From the File menu, select Print.
The Print dialog box is displayed.
Select the printer to be used in Name and then click Properties.
The printer properties dialog box is displayed.
Select A4 for paper size at the printer properties dialog box and then
click OK.
x
Page 13

4
Set Print Range at the Print dialog box and then click OK.
The printing begins.
When printing only some pages of the manual, specify Print Range. You can check the page
number of the manual on the bottom left and right side of the page, or at the lower portion of
the Adobe Acrobat Reader window (see example below).
Page number of the displayed page and the total number of pages
xi
Page 14

xii
Page 15

Chapter
1
Overview
1.1 Using As a Network Printer .......................................................... 2
1.2 Using CentreWare Internet Services............................................ 7
1.3 Managing with SNMP Manager..................................................... 8
1.4 Managing the Printer by E-mail .................................................. 10
Page 16
Overview
1
Using As a Network Printer
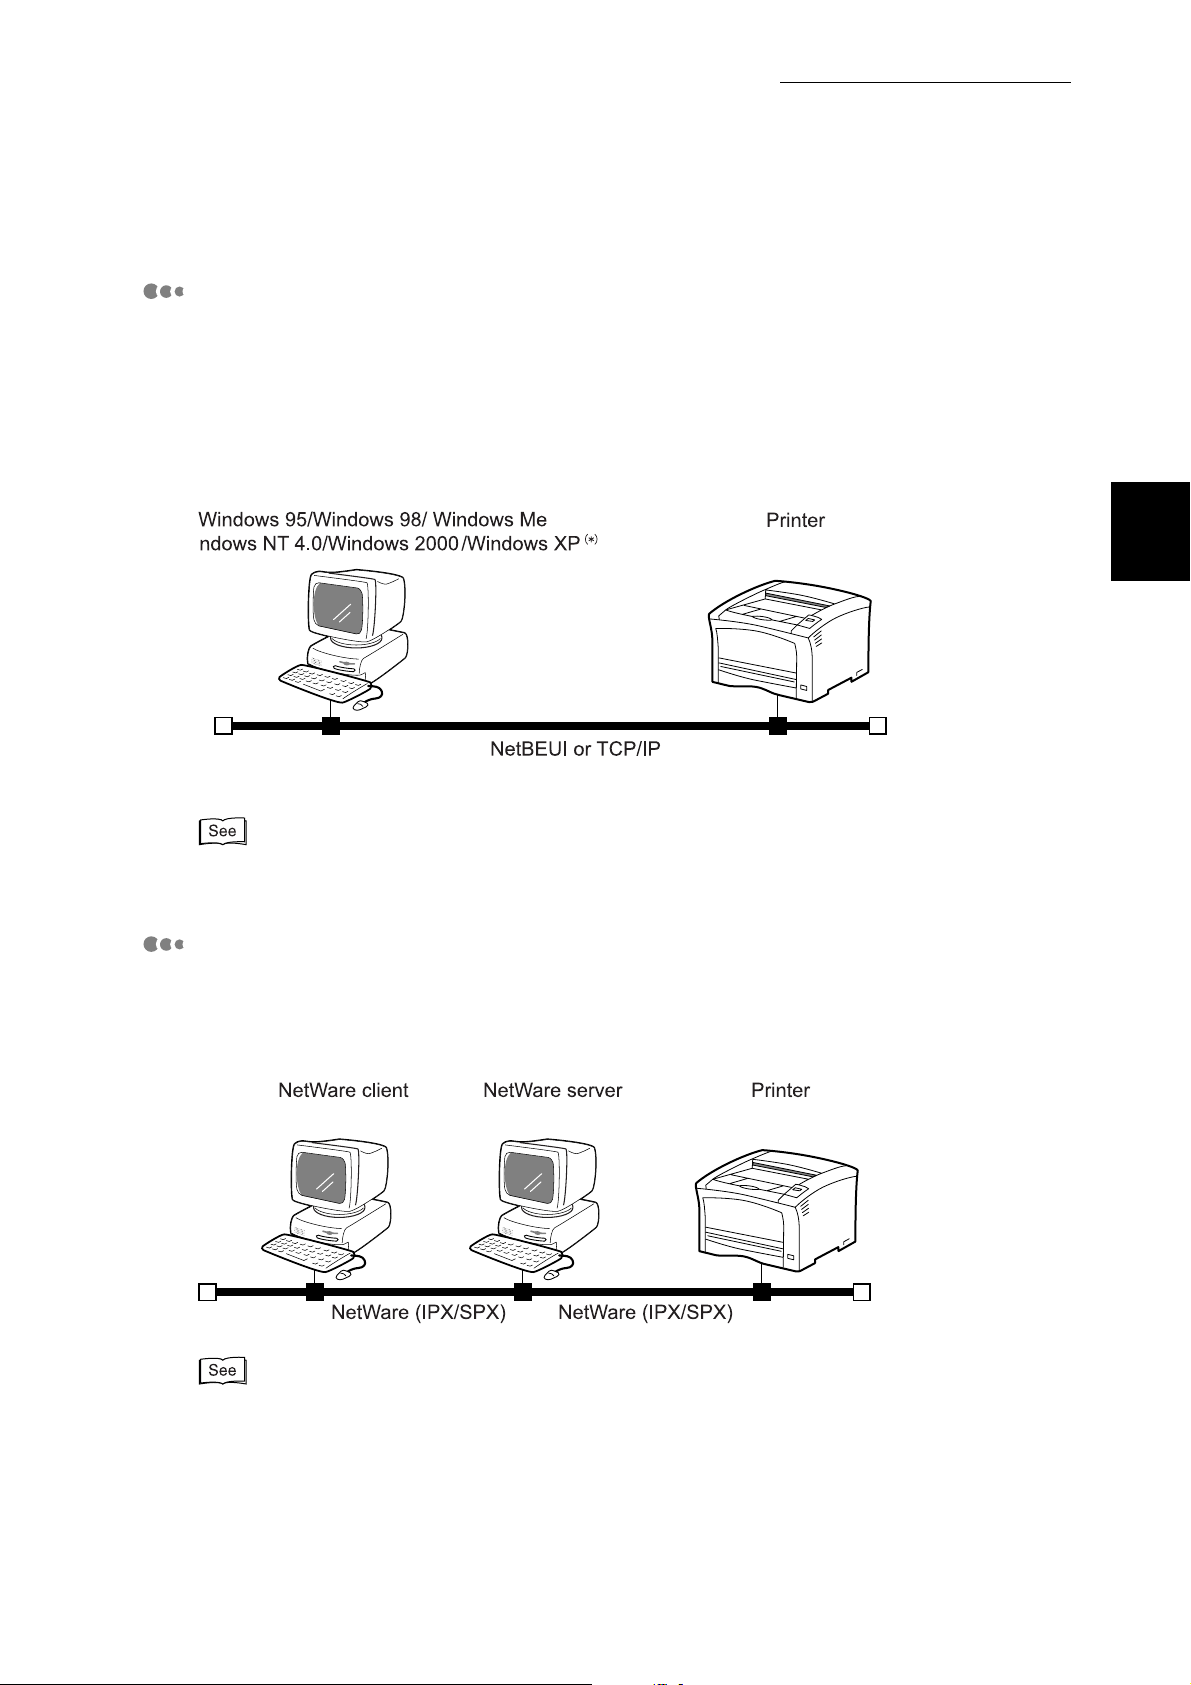
1.1
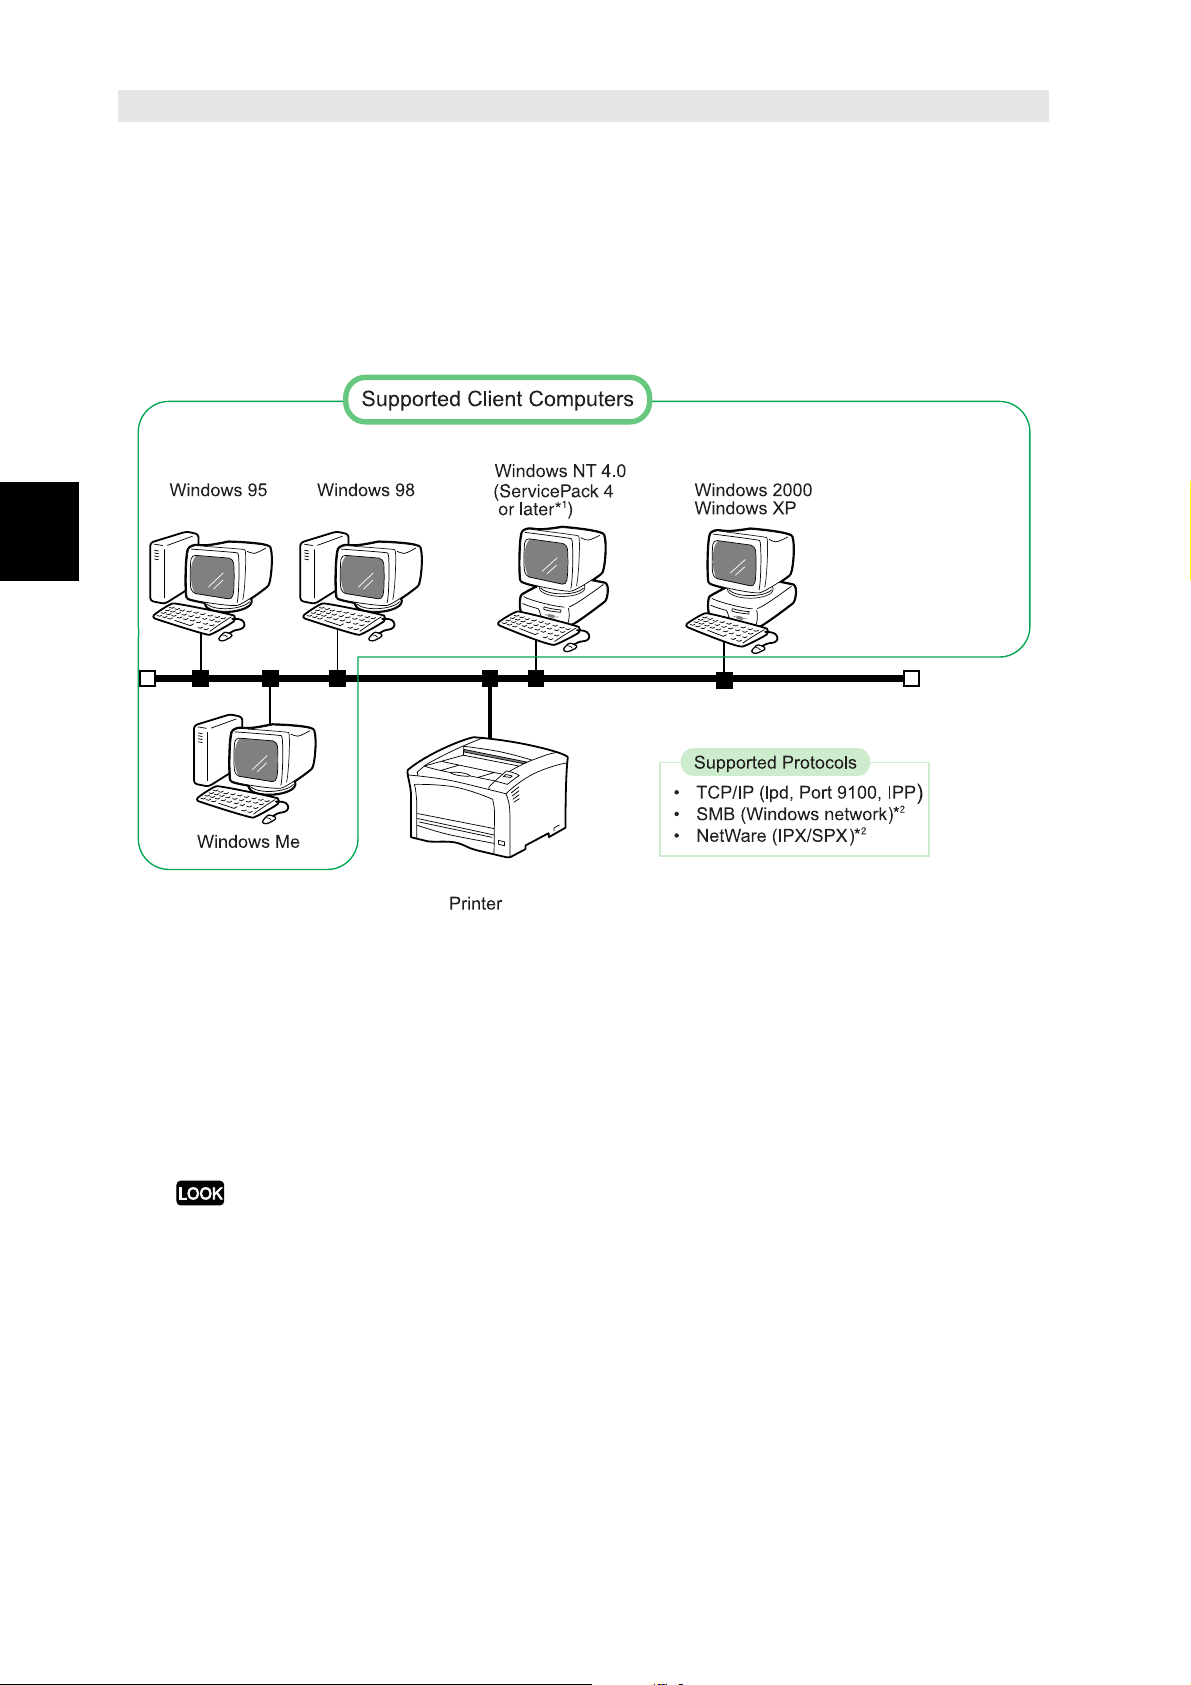
DocuPrint 181/211 can be connected to a network to be used as a network printer.
DocuPrint 181/211 supports multiple protocols (multi-protocol) and multiple client
computers (multi-client), as shown in the diagram below. As such, one DocuPrint 181/
211 can be shared even in a network environment with multiple protocols.
(*1)
This printer driver does not work with Windows NT 4.0 ServicePack 3 or earlier.
(*2)
Optional network expansion card required.
This manual explains the installation procedures for using DocuPrint 181/211 (to be
called "the printer") as a network printer.
The installation procedures differ according to the operating system (OS) of the
computer and the network environment used. Refer to "1.1.1 Network Environments
and Connections" to install the printer efficiently.
●
This manual assumes that the printer has already been connected to a network. If the
printer is not connected to a network by Ethernet cable, refer to User Guide to do so.
●
Usable environments vary according to printer model and types of options installed. Before
installing, make sure that the printer can be used in your environment by checking the
manual included with the printer.
2
Page 17
1.1 Using As a Network Printer
1.1.1
The network environments that can be used for the printer are listed according to
protocol type as follows:
Network Environments and Connections
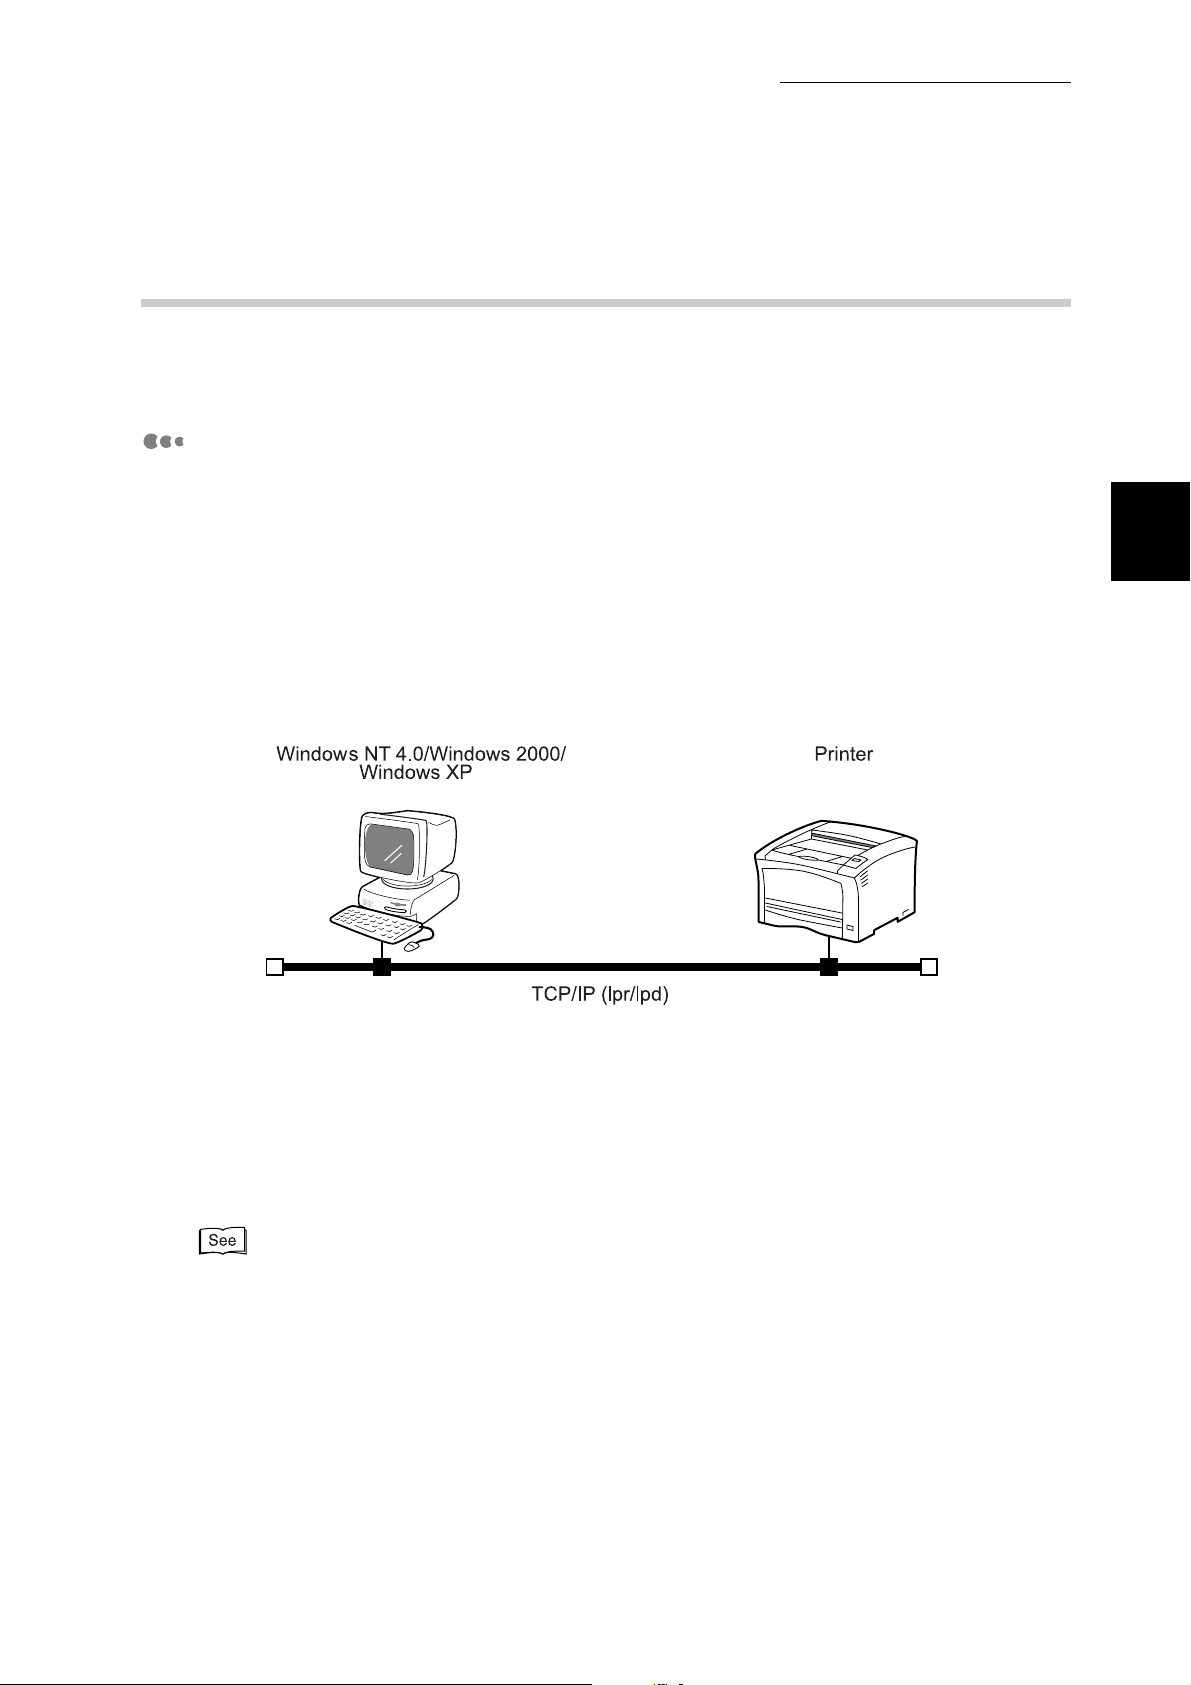
TCP/IP (Windows NT 4.0/Windows 2000/Windows XP)
As the printer supports TCP/IP (lpd) protocol, it can directly transmit and print by lpr,
from a Windows NT 4.0/Windows 2000/Windows XP computer. In this case, it is
necessary to specify the IP address for the printer and the Windows NT 4.0/Windows
2000/Windows XP computer.
It is also possible to share a printer, set up on the Windows NT 4.0/Windows 2000/
Windows XP computer, over the network, and use it as a network server. For
environments with a network server, you can also print through the server from
machines like Windows 95, Windows 98 or Windows Millennium Edition which cannot
directly send print data by lpr on the network.
Overview
1
The following printing can also be done on Windows 2000/Windows XP
●
As the printer supports Port 9100, you can directly send print data to the specified
port to print.
●
As the printer supports IPP, you can assign the URL of the printer as the printer port
to do internet printing.
"Chaper 2 Configuring in TCP/IP Environment" for the installation procedure
3
Page 18
Overview
1
1.1 Using As a Network Printer
TCP/IP (Windows 95/Windows 98/Windows Me)
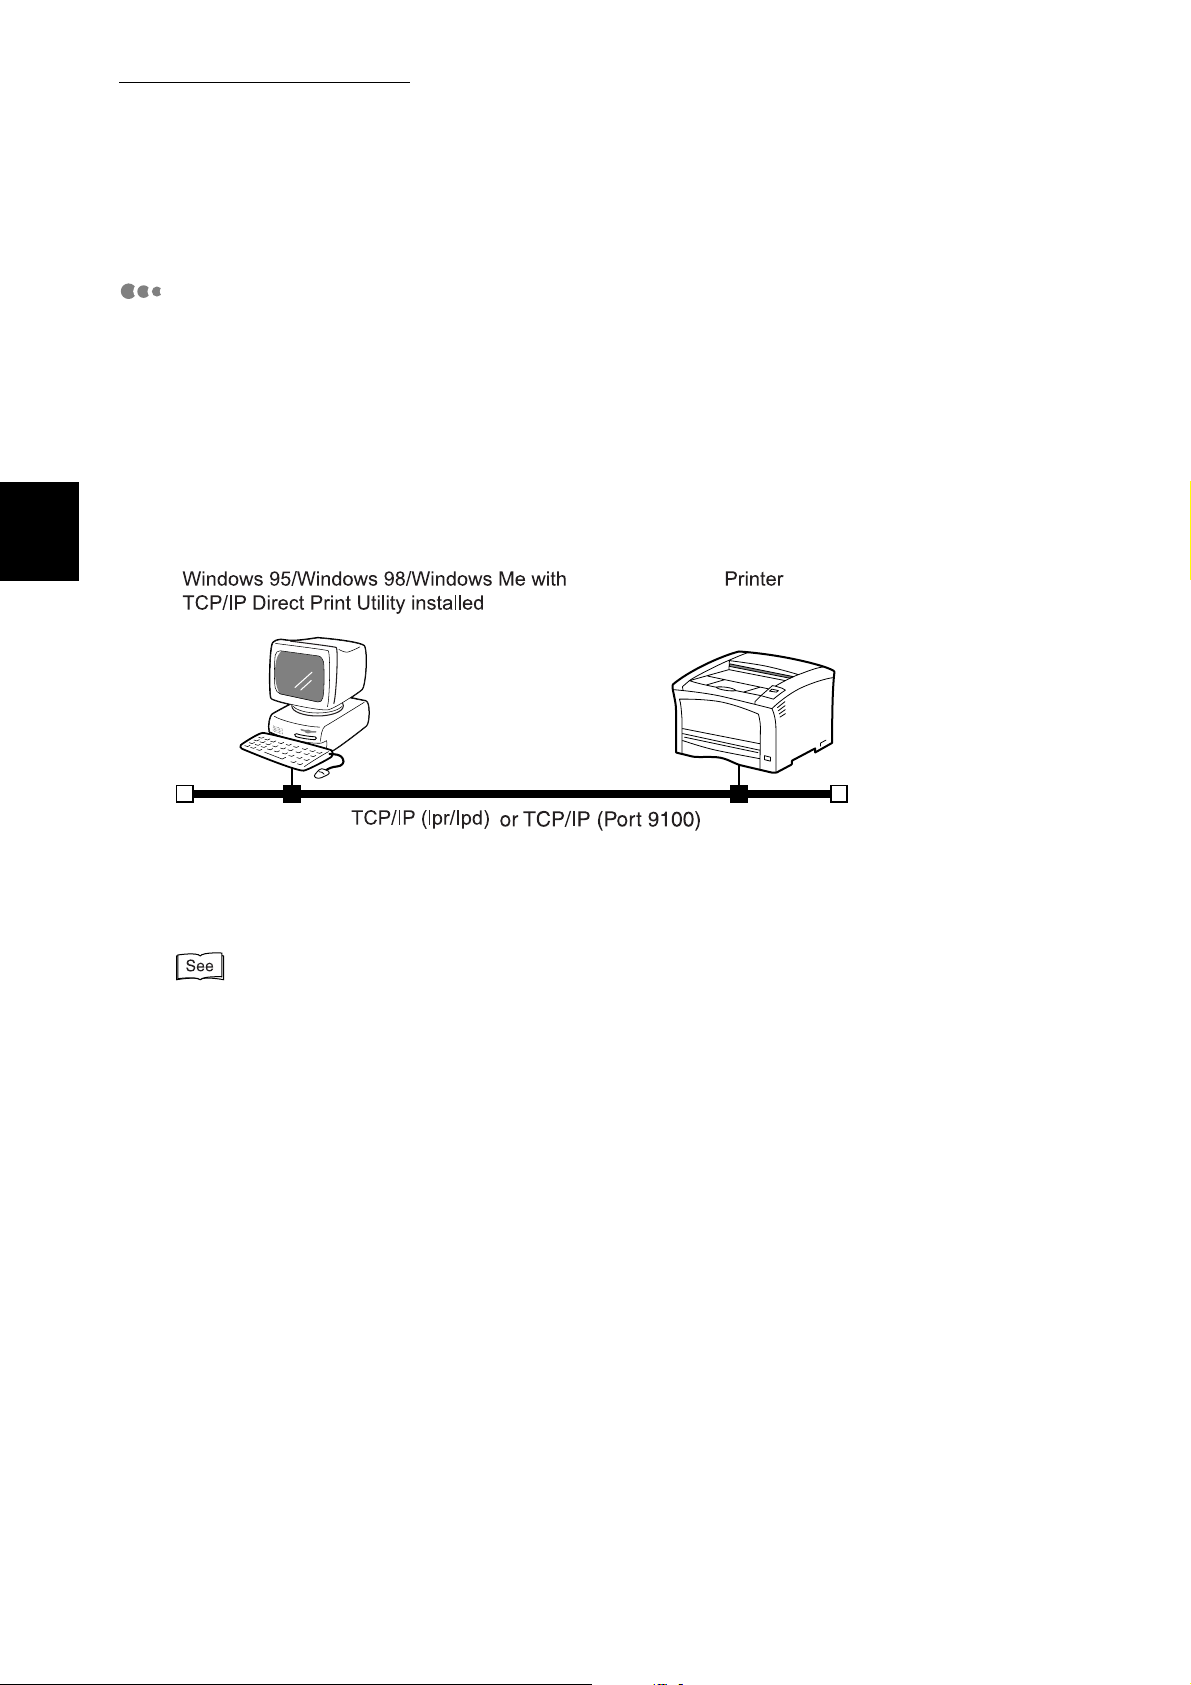
To print from Windows 95, Windows 98 or Windows Me without going through
Windows NT 4.0/Windows 2000/Windows XP in a TCP/IP environment, use TCP/IP
Direct Print Utility.
TCP/IP Direct Print Utility is a software for directly transmitting and printing print data from
a computer to a printer on the network without going through a server.
In this case, you need to set the IP address of the printer and the Windows 95,
Windows 98, or Windows Me computer.
Also, TCP/IP Direct Print Utility protocol works with LPD and Port 9100.
When Windows Me supports IPP, you can also print as follows. Since the printer
supports IPP, you can print by specifying the URL of the printer and sending data to it
through the Internet.
"Chaper 2 Configuring in TCP/IP Environment" for the installation procedure
4
Page 19
1.1 Using As a Network Printer
SMB (Windows Network)
Server Message Block (SMB) is a protocol for sharing files or printers over the network
on Windows 95/Windows 98/Windows Me/Windows NT 4.0/Windows 2000/Windows
XP. Like lpr (for Windows NT4.0/Windows 2000/Windows XP) or TCP/IP Direct Print
Utility (for Windows 95/Windows 98/Windows Me), a server is not needed when you
use SMB protocol. Print data can be sent and printed directly.
You can use NetBEUI or TCP/IP as the transport protocol for SMB.
Overview
1
(*) The NetBEUI protocol cannot be used on Windows XP.
"Chaper 3 Configuring in SMB Environment" for the installation procedure
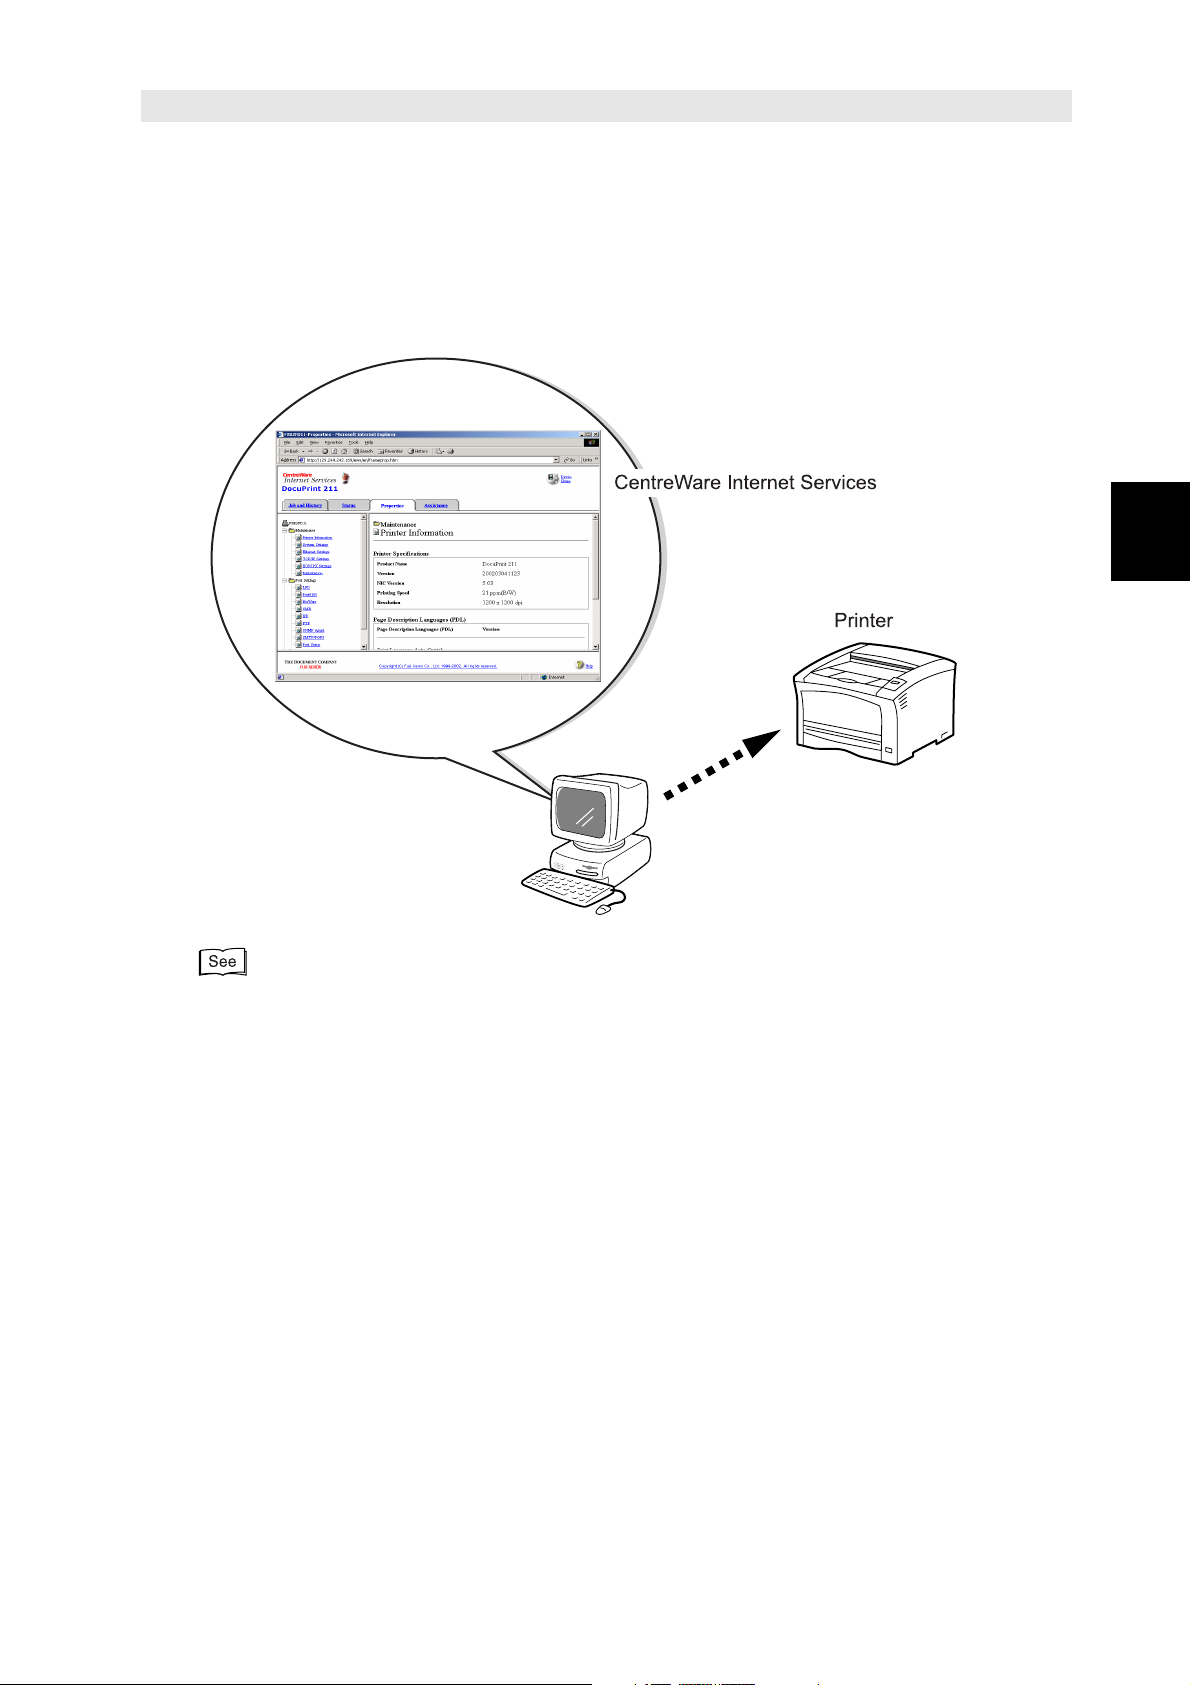
NetWare
As the printer supports IPX/SPX protocol, you can print from a NetWare-client
computer in an environment using Novell NetWare as the network OS.
®
"Chaper 4 Configuring in NetWare Environment" for the installation procedure
5
Page 20

1.1 Using As a Network Printer
Overview
1
1.1.2
Installing identically configured printer
drivers in two or more computers with
identical operating systems on the network
If the printer driver is to be installed in two or more computers, we recommend you to
install the printer driver in the first computer and then create a "setup disk".
When the setup disk has been successfully created, identically configured printer
drivers can be installed in the second and other computers simply by executing the
setup.exe command in the setup disk.
Installation using the setup disk created on computer A
Computer A Computer B Computer C
●
The "Setup Disc" cannot be used on computers, of which the operating system is different
from that under which this disc was produced.
●
When the printer driver was installed with the setting for Internet printing with IPP, the "Setup
Disc" cannot be produced.
For information on how to create a setup disk and how to use it to install the printer driver, refer
to the CD-ROM manual that comes with the product.
6
Page 21
Using CentreWare Internet
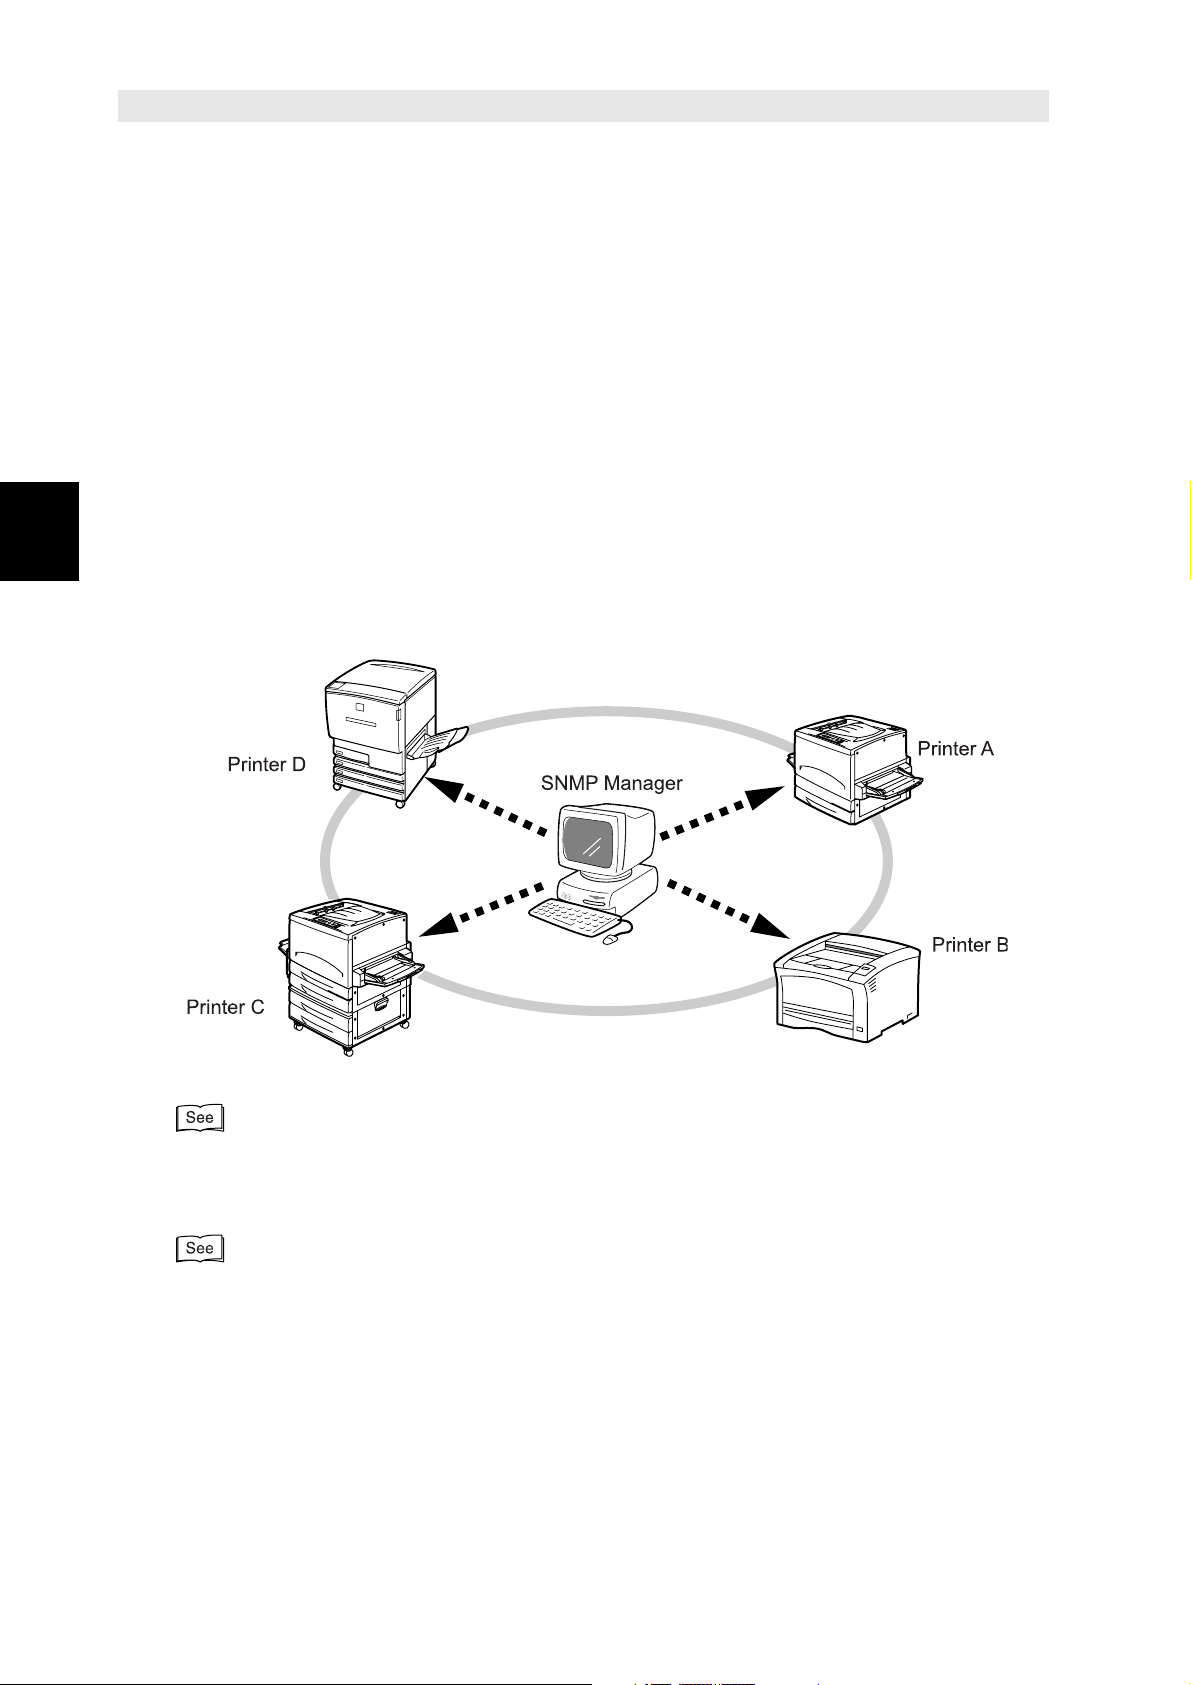
1.2
If DocuPrint 181/211 has been installed in TCP/IP environment, you can use a WWW
browser from a computer on the network to check the printer status or specify various
printer settings. This feature is known as Centreware Internet Services.
Services
Overview
1
"Chaper 5 Using CentreWare Internet Services" for information on CentreWare Internet
Services
7
Page 22
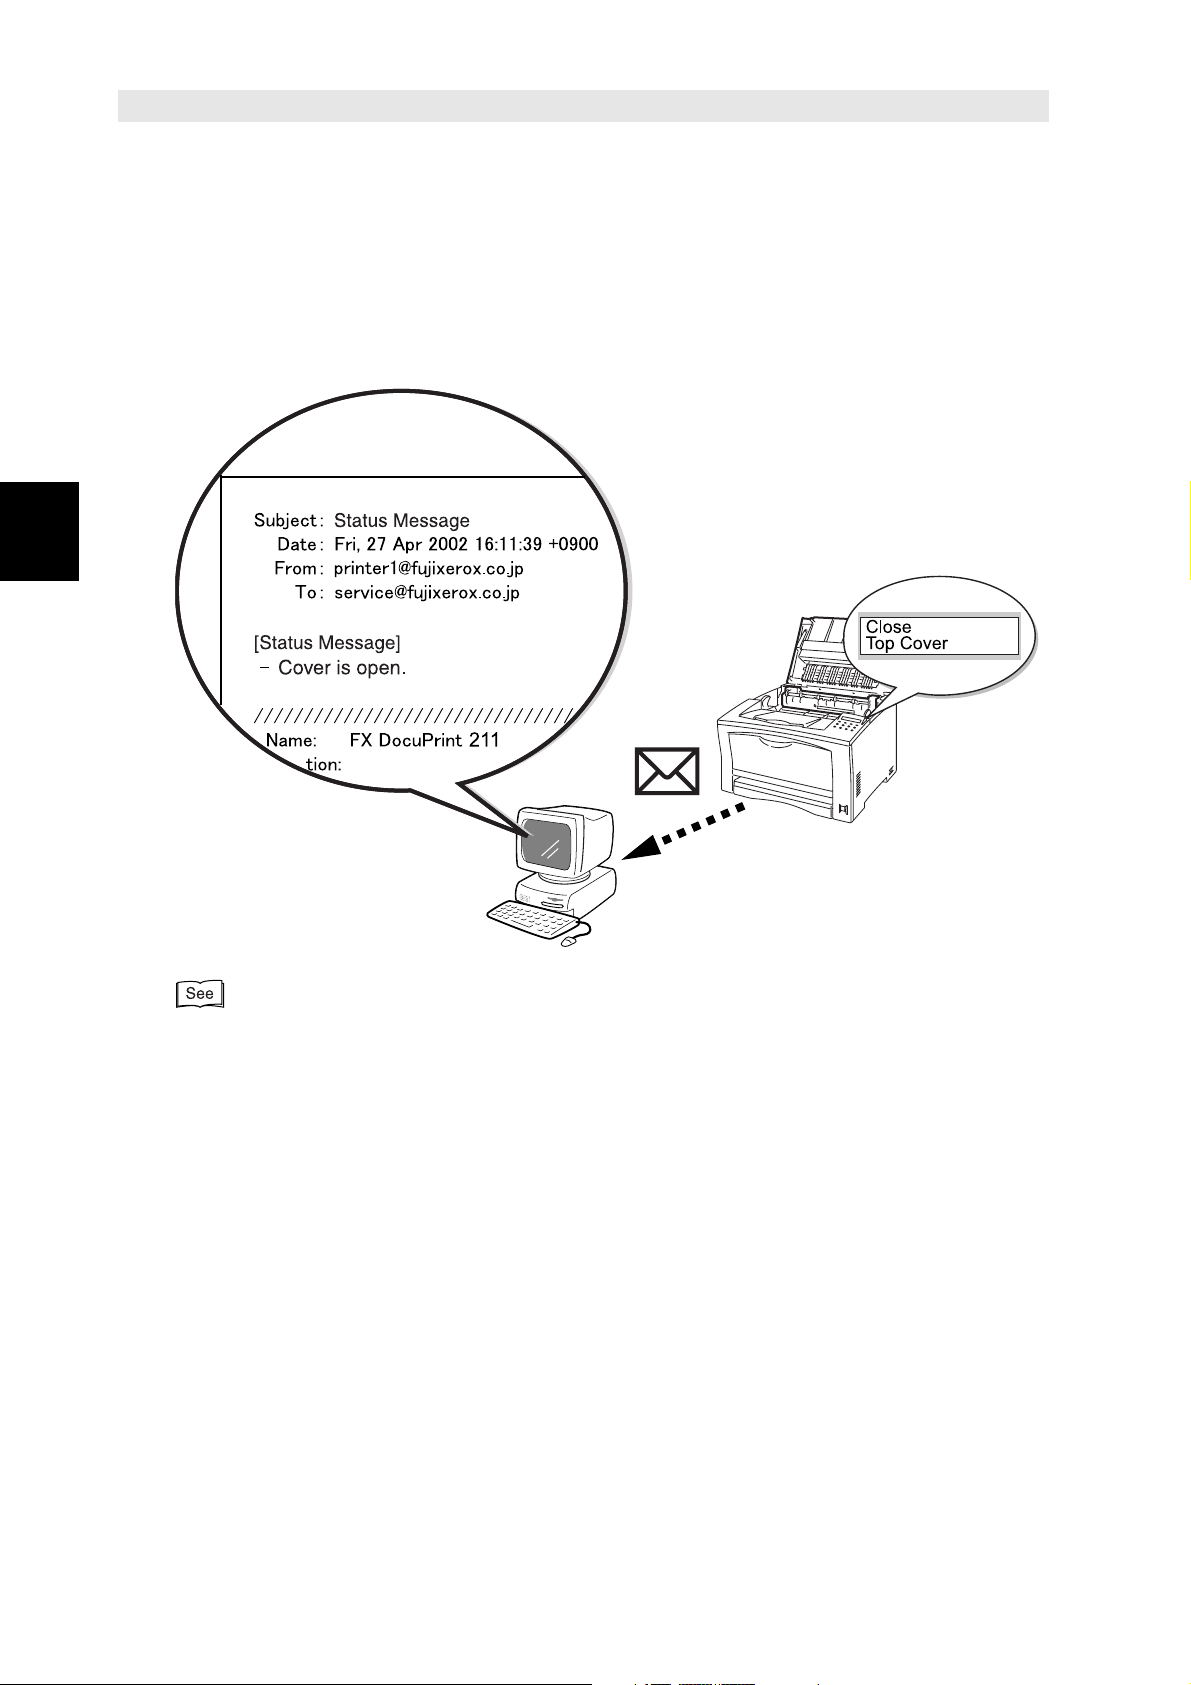
Managing with SNMP
Overview
1
1.3
SNMP agents for TCP/IP and NetWare environments are available in DocuPrint 181/
211. As such, the printer, together with other printers, can be managed by various
types of SNMP managers.
When using the SNMP agents, it is necessary to activate on the printer, the
corresponding protocol for the different network environment:
●
SNMP UDP/IP protocol for TCP/IP environment
●
SNMP IPX protocol for NetWare environment
The factory setting of each protocol is set as Enabled. Refer to the explanation below
to specify the setting only when it has been changed to Disabled.
You can also use the CentreWare Internet Services to specify other settings like
community name, whether or not to have trap notification, and the destination of the
trap notification etc.
Manager
8
Refer to the following sections to activate the different protocols:
●
"2.2.2 Activating the Protocol" for TCP/IP environment
●
"4.2.1 Activating the Protocol" for NetWare environment
"2.3 Configuring CentreWare Internet Services" and "Chaper 5 Using CentreWare Internet
Services" for information on setting SNMP environment using CentreWare Internet Services
In addition, use the features of the SNMP agent to set CentreWare Simple Status
Notification tool that checks printer status on the Windows network computer. This
icon enables you to check the printer status from the dialog box or from the icon
displayed on the desktop of the computer.
Page 23

1.3 Managing with SNMP Manager
"Appendices B CentreWare Simple Status Notification" for details of using CentreWare Simple
Status Notification.
Overview
1
9
Page 24
Managing the Printer
Overview
1
1.4
When the printer is installed on a TCP/IP system, you can use a network computer to
transfer information to and from the printer by e-mail.
●
When you use e-mail to inquire about the printer status, the printer sends a reply.
●
The printer sends e-mail notices to your computer when errors occur.
by E-mail
For information about e-mail settings and how to send e-mail, refer to "Chaper 6 Managing the
Printer by E-mail (Status Messenger)".
10
Page 25

Chapter
2
Configuring in TCP/IP
Environment
2.1 Using in TCP/IP Environment..................................................... 12
2.2 Configuring the Printer ............................................................... 14
2.3 Configuring CentreWare Internet Services ............................... 17
2.4 Configuring Windows NT 4.0/Windows 2000/Windows XP ..... 32
2.5 Configuring Windows 95/Windows 98/Windows Me
(TCP/IP Direct Print Utility) ......................................................... 55
Page 26
Using in TCP/IP
Configuring in TCP/IP Environment
2
2.1
This chapter explains the procedures of configuring DocuPrint 181/211 to use in TCP/
IP environment and print from Windows NT 4.0/Windows 2000/Windows XP/Windows
95/Windows 98/Windows Me.
2.1.1
The following frame type is supported:
●
Ethernet II
2.1.2
The overview of the configuration process is as follows:
Interface
Overview of the Configuration
Environment
Begin
↓
Configuring the Printer
●
Set IP address
"2.2.1 Setting IP Address"
●
Activate protocol (Not needed when setting up printer for the first time)
"2.2.2 Activating the Protocol"
●
Check settings
"2.2.3 Checking the Settings (Printing Printer Settings)"
●
Set WINS/SNMP environment and lpd, Port 9100, IPP (Only when necessary)
"2.3 Configuring CentreWare Internet Services"
Configuring the Computer
●
Windows NT 4.0/Windows 2000/Windows XP
●
Install printer driver
12
"2.4 Configuring Windows NT 4.0/Windows 2000/Windows XP"
●
Only when using as network server
"2.4.5 Using As a Network Server"
Page 27

2.1 Using in TCP/IP Environment
●
Windows 95/Windows 98/Windows Me
●
Install TCP/IP Direct Print Utility and printer driver
"2.5 Configuring Windows 95/Windows 98/Windows Me (TCP/IP Direct Print Utility)"
↓
End
Configuring in TCP/IP Environment
2
13
Page 28
Configuring the Printer
Configuring in TCP/IP Environment
2
2.2
This section describes the setting of IP address and activating the protocol to be used
on the printer.
2.2.1
To use the printer in TCP/IP environment, it is necessary to set the following items on
the printer:
●
IP address
●
subnet mask
●
gateway address
If the printer is connected to a network with a DHCP server, these items can be
obtained automatically from the DHCP server when the printer is switched on.
Setting IP Address
14
If you do not have a DHCP server, set the address assigned by the administrator,
using the control panel.
Decide on whether to obtain the IP address from the DHCP server or to set it at the
control panel, before proceeding with the corresponding procedure.
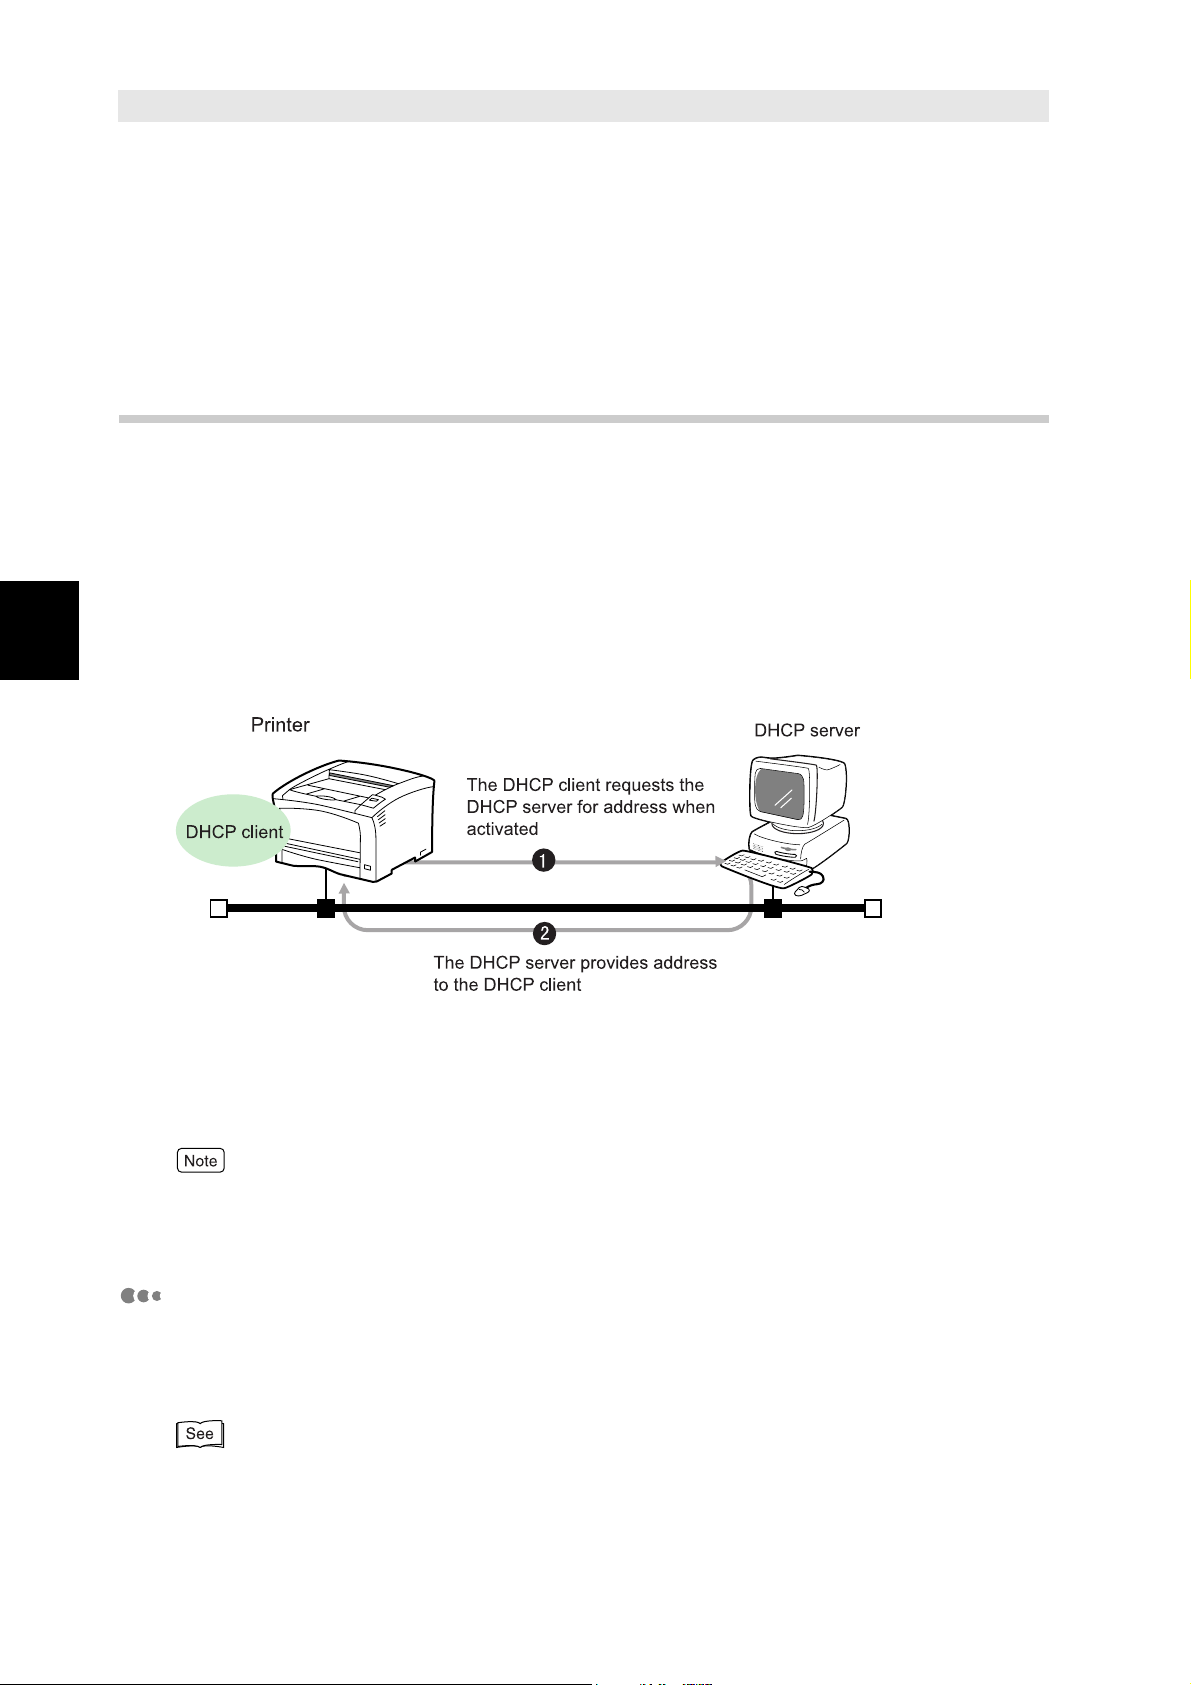
Dynamic Host Configuration Protocol (DHCP) is a protocol which automatically assigns IP
address from the DHCP server to the DHCP client. Check with your network administrator on
whether the printer is connected to a network with DHCP environment.
Obtaining IP Address from the DHCP Server
To obtain the IP address using the control panel, set Setup IP Address as DHCP. The
factory setting of Setup IP Address is already DHCP. Carry out the following
procedure only when the setting has been changed.
For details about how to make the settings, refer to the printer's user's guide.
Page 29

2.2 Configuring the Printer
Setting IP Address at the Control Panel
After using the control panel to specify Setup IP Address as Panel, specify other
settings like the IP address, subnet mask and gateway address.
The IP address is controlled by the whole network system. If a wrong IP address is set, the
whole network might be affected. Confirm the IP address assigned to you with the network
administrator.
For details about how to make the settings, refer to the printer's user's guide.
Configuring in TCP/IP Environment
2
2.2.2
The factory setting of each protocol is set as Enabled. The following procedure is not
necessary when you are setting up the network for the first time using a new printer.
To print in TCP/IP environment, set all the protocols to be used from the following:
●
LPD
●
Port 9100 (available with Windows 95/98/Me/2000/XP)
●
IPP (available with Windows Me/2000/XP)
To start the SNMP agent feature in TCP/IP environment, set SNMP UDP/IP for
Protocol.
For details about how to start the protocol, refer to the printer's user's guide.
2.2.3
Activating the Protocol
Checking the Settings (Printing Printer Settings)
Print the list below to check the printer's configuration.
The contents of the printer settings list differ according to the printer model and the options
installed. For details about how to print the printer settings list, refer to the printer's user's
guide.
15
Page 30

Configuring in TCP/IP Environment
2
2.2 Configuring the Printer
Printer Settings (Example)
Check the portions.
16
Page 31

Configuring CentreWare
2.3
Internet Services
CentreWare Internet Services is a software that enables users to display the printer
status or change the printer settings using a WWW browser from a computer on the
network (instead of using the control panel).
The following items cannot be set at the control panel. Change these items using the
CentreWare Internet Services.
When using Windows Internet Name Service (WINS)
●
Get WINS Server address from DHCP server (Factory setting: enabled)
●
WINS Primary Server (Factory setting: 0.0.0.0)
●
WINS Secondary Server (Factory setting: 0.0.0.0)
When the SNMP agent is activated
●
Community Name (Read/Write) (Factory setting: Nil)
●
Community Name (Trap) (Factory setting: Nil)
●
Trap Notification (IP) (Factory setting: the Notify
check box is unchecked)
●
Trap Notification (IPX) (Factory setting: the Notify
check box is unchecked)
●
Authenticate Error Trap (Factory setting: the Notify
check box is unchecked)
Configuring in TCP/IP Environment
2
When using Ipd
●
Time-Out (Factory setting: 16 seconds)
●
Transport Protocol - TCP/IP
●
ΙP Filter (Factory setting: Disabled)
When using Port 9100 (only on Windows 95/98/Me/2000/XP)
●
Port Number (Factory setting: 9100)
●
Transport Protocol - TCP/IP
●
IP Filter (Factory setting: Disabled)
●
Time-Out (Factory setting: 16 seconds)
When using IPP (only on Windows Me/2000/XP)
●
Connect Time-Out (Factory setting: 60 seconds)
●
Transport Protocol - TCP/IP
●
IP Filter (Factory setting: Disabled)
The factory setting of CentreWare Internet Services is in administrator mode. As such,
you will need the administrator name and password to change settings.
17
Page 32

Configuring in TCP/IP Environment
2
2.3 Configuring CentreWare Internet Services
The factory settings of the administrator name and password are listed below. For better
security management, change the settings as early as possible. Use the CentreWare Internet
Services to make these changes.
●
administrator name: admin
●
password: admin
●
After using the control panel or the DHCP server to set the IP address as mentioned in the
previous section, you can even use the CentreWare Internet Services to change the IP
address setup or activate the various addresses and protocols.
●
CentreWare Internet Services allows you to configure SMTP/POP (Status Messenger)
required for managing the printer by mail.
For information about SMTP/POP3, see "Chapter 6 Managing the Printer by E-mail (Status
Messenger)".
This section explains the procedures for changing the settings of WINS and SNMP
agent, as well as lpd, Port 9100 and IPP using CentreWare Internet Services.
"Chapter 5 Using CentreWare Internet Services" for details on CentreWare Internet Services.
18
Page 33

Activating CentreWare Internet Services
Procedure
2.3 Configuring CentreWare Internet Services
Configuring in TCP/IP Environment
1
2
Switch on the computer and activate the WWW browser.
Here, we use Microsoft® Internet Explorer 5.5 on Windows 2000 as an example.
To ensure that CentreWare Internet Services is working correctly, you need to change the
following settings of the browser.
And if the CentreWare Internet Services is not connected properly, check these settings:
●
Set Check for newer versions of stored pages to Every visit to the page or Every time
you start Internet Explorer.
Enter the IP address or the URL of the printer in the address column of
the browser.
If you do not know the printer IP address, print out the Printer Settings to check. Refer to "2.2.3
Checking the Settings (Printing Printer Settings) for information on printing the Printer Settings.
If you do not know the printer IP address, print out the Printer Settings to check. Refer to "2.2.3
Checking the Settings (Printing Printer Settings)" for information on printing the Printer Settings.
When the network uses the domain name system (DNS) is used for network and the printer host
name is registered in the DNS name server, the user can access the printer using an "URL"in
which is combined with the host name and the domain name. DNS is a name solution service
used to obtain the IP address from the host name via Internet. For whether DNS is used on
network or the URL of the printer, ask your network administrator.
2
3
Entry example 1:When the IP address is 192.168.1.100:
Entry example 2:When the URL is dp.aaa.bbb.fujixerox.co.jp
(Host name: dp, Domain name:fujixerox.co.jp):
Press Enter on the keyboard.
The screen of CentreWare Internet Services is displayed.
19
Page 34

2.3 Configuring CentreWare Internet Services
Configuring in TCP/IP Environment
2
4
To set each settings, click Properties.
20
Page 35

Changing Settings
Changing WINS (TCP/IP) Settings
Procedure
2.3 Configuring CentreWare Internet Services
Configuring in TCP/IP Environment
1
In the left frame of the window, click TCP/IP Settings of Maintenance.
If TCP/IP Settings is not displayed, click the "+" sign on the left of Maintenance to display it.
2
When TCP/IP Settings is clicked, the TCP/IP settings will be displayed in the right
frame.
21
Page 36

2.3 Configuring CentreWare Internet Services
Configuring in TCP/IP Environment
2
2
If necessary, change the items displayed in the right frame.
22
Page 37

2.3 Configuring CentreWare Internet Services
Item Remarks
Host Name
Get IP Address
from DHCP Server
IP Address,
Subnet Mask,
Gateway Address
Get WINS Address
from DHCP Server
WINS Primary
Server
WINS Secondary
Server
Specify the host name. The factory setting is FXnnnnnn
("nnnnnn" is the last six digits of the Ethernet address set for
the network card of the printer).
Check the check box, If this box is checked, the following
addresses will be ignored only when you want to obtain the
IP address from the DHCP server. Uncheck the check box
when there is no DHCP server on the network or when the
server is not being used.
The currently set addresses are displayed.
When DHCP environment is not used, you can change the
addresses here.
Check the check box, If this box is checked, the following
addresses will be ignored only when there is a WINS server
on the network and you want to obtain its IP address from the
DHCP server.
(Refer to the below for information on WINS)
Enter the IP address of the WINS server when the WINS
address is not obtained from the DHCP server. When WINS is
not used, enter "0.0.0.0".
Enter the IP address of another WINS server when the WINS
address is not obtained from the DHCP server and there are
at least two WINS servers. If this has been entered and the
primary WINS server does not work, this server can be used
as the WINS server.
When WINS is not used, enter "0.0.0.0".
Configuring in TCP/IP Environment
2
WINS (Windows Internet Name Services) is used to obtain the IP address from the computer
name in TCP/IP environment. The WINS server has the mapping information of the computer
name and IP address, and when requested by the client, it will provide the IP address
corresponding to the computer name. Check with your network administrator on whether WINS
is used on the network and the IP address of the WINS server.
When you have finished the settings, proceed to "Applying the New Settings""
(p.31).
Changing SNMP Agent Settings
Procedure
1
In the left frame of the window, click SNMP Agent of Port Settings.
If SNMP Agent is not displayed, click the "+" sign on the left of Port Settings to display it.
The settings of SNMP Agent will be displayed in the right frame.
23
Page 38

2.3 Configuring CentreWare Internet Services
Configuring in TCP/IP Environment
2
2
If necessary, change the items displayed in the right frame.
Item Remarks
Community Name
(Read/Write)
Community Name
(Trap)
Trap Notification
(IP)
Trap Notification
(IPX)
Authenticate Error
Tr a p
Transport ProtocolUDP, IPX
When you have finished the settings, proceed to "Applying the New Settings"
(p.31).
Enter the community name used for Read/Write.
Only alphanumeric characters can be entered.
Enter the community name used for trap.
Only alphanumeric characters can be entered.
Check the Notify check box to notify trap occurrences when
activating SNMP agent in TCP/IP environment.
If the check box is checked, enter the IP address of the
destination.
Check the Notify check box to notify trap occurrences when
activating SNMP agent in NetWare environment.
If the check box is checked, enter the address of the
destination.
Select the Notify check box to notify the Authenticate error trap
occurrences.
Click to change the transport protocol. Click UDP to display
TCP/IP Settings in Maintenance or click IPX to display IPX/
SPX Settings in Maintenance.
24
Page 39

Changing Ipd Settings
Procedure
2.3 Configuring CentreWare Internet Services
Configuring in TCP/IP Environment
1
2
In the left frame of the window, click LPD of Port Settings.
If LPD is not displayed, click the "+" sign on the left of Port Settings to display it.
The settings of lpd will be displayed in the right frame.
If necessary, change the items displayed in the right frame.
2
Item Remarks
Time-Out
Transport ProtocolTCP/IP
IP Filter
●
When you have finished the settings, proceed to "Applying the New Settings"
(p.31).
Use the default value (16 seconds). Do not change the setting
for normal operation.
Click this to change the TCP/IP settings.
TCP/IP Settings in Maintenance is displayed.
"Changing WINS (TCP/IP) Settings" (p.21) for details of
changing the TCP/IP settings.
Click this to set the IP Filter. IP Filter is displayed.
"IP Filter Settings" (p.29) for details of setting the IP Filter.
25
Page 40

2.3 Configuring CentreWare Internet Services
Configuring in TCP/IP Environment
Procedure
●
To apply the new settings and reboot the printer, select [Reboot Device to Apply
New Settings].
●
To restore the settings to their original values, select [Restore Settings].
Changing Port 9100 Settings
Port 9100 is only available on Windows 95/98/Me/2000/XP.
2
1
2
In the left frame of the window, click Port9100 of Port Settings.
If Port9100 is not displayed, click the "+" sign on the left of Port Settings to display it.
The settings of Port 9100 will be displayed in the right frame.
If necessary, change the items displayed in the right frame.
26
Page 41

2.3 Configuring CentreWare Internet Services
Item Remarks
Port Number
Time-Out
Transport ProtocolTCP/IP
IP Filter
●
When you have finished the settings, proceed to "Applying the New Settings"
Set the Port Number in the range of 9000 - 9999. The default
value is 9100.
Use the default value (16 seconds). Do not change the setting
for normal operation.
Click this to change the TCP/IP settings.
TCP/IP Settings in Maintenance is displayed.
"Changing WINS (TCP/IP) Settings" (p.21) for details of
changing the TCP/IP settings.
Click this to set the IP Filter. IP Filter is displayed.
"IP Filter Settings" (p.29) for details of setting the IP Filter.
(p.31).
●
To apply the new settings and reboot the printer, select [Reboot Device to Apply
New Settings].
●
To restore the settings to their original values, select [Restore Settings].
Configuring in TCP/IP Environment
2
Changing IPP Settings
IPP is only available on Windows Me/2000/XP.
Procedure
1
In the left frame of the window, click IPP of Port Settings.
IPP
If
is not displayed, click the "+" sign on the left of
The settings of IPP will be displayed in the right frame.
Port Settings
to display it.
27
Page 42

2.3 Configuring CentreWare Internet Services
Configuring in TCP/IP Environment
2
2
If necessary, change the items displayed in the right frame.
Item Remarks
Connect Time-Out
Por t Number
Simultaneous
Connections
Transport ProtocolTCP/IP
IP Filter
●
When you have finished the settings, proceed to "Applying the New Settings"
Set timeout in the range of 1- 255 seconds. The default value
is 60 seconds.
The port number is displayed. The port number is fixed at
"631".
This represents the maximum number of possible
simultaneous connections. It is set at 5.
Click this to change the TCP/IP settings.
TCP/IP Settings in Maintenance is displayed.
"Changing WINS (TCP/IP) Settings" (p.21) for details of
changing the TCP/IP settings.
Click this to set the IP Filter. IP Filter is displayed.
"IP Filter Settings" (p.29) for details of setting the IP Filter
(p.31).
●
To apply the new settings and reboot the printer, select [Reboot Device to Apply
New Settings].
●
To restore the settings to their original values, select [Restore Settings].
28
Page 43

2.3 Configuring CentreWare Internet Services
IP Filter Settings
To set IP address and subnet mask for the IP Filter, enter a value between 0 255 and select the type of access (Permit, Disabled, Reject). A " * " is attached to
the current set value.
You can set a maximum of five items and the first setting takes the first priority.
When setting multiple IP filters, start from the address that has the narrowest
coverage. Refer to he next page for the setting examples.
Configuring in TCP/IP Environment
2
29
Page 44

Configuring in TCP/IP Environment
2
2.3 Configuring CentreWare Internet Services
Examples of IP Filter Settings:
Example 1:Permit printing from a specific user. (IP address: 192.168.100.10)
Example 2:Reject printing from a specific user (IP address: 192.168.100.50)
Example 3:Permit printing from a specific network address (192.168), reject
printing from part of this network address (192.168.200) and permit
printing from a specified user in this rejected network adress
(192.168.200.10).
When you have finished the settings, proceed to "Applying the New Settings"
(p.31).
30
Page 45

Applying the New Settings
Procedure
2.3 Configuring CentreWare Internet Services
Configuring in TCP/IP Environment
1
2
When the setting of each item has been specfied, click Apply New
Settings displayed at the lower portion of the right frame.
Click Restore Settings when you do not want to use the settings made and return to the default
settings.
The following dialog box will be displayed when the settings are
changed for the first time after having activated CentreWare Internet
Services, and the setting is in administrator mode.
Enter the user name and password, and then click OK.
The factory settings of the user name and password are listed below. For better
security management, change the settings as early as possible. Use the Network
Settings below Internet Services to make these changes.
●
user name: admin
●
password: admin
2
3
The contents of the items set will be sent to the printer and the settings
modified. You might need to restart the printer depending on the items.
When prompted with the message to restart the printer, switch off the
printer and then switch it on again.
31
Page 46

Configuring Windows NT 4.0/
Configuring in TCP/IP Environment
2
2.4
To print from Windows NT 4.0/Windows 2000/Windows XP in TCP/IP environment,
install the printer driver to the computer.
The printer driver can be installed using the automatically displayed Fuji Xerox Setup
Menu when the Software Pack CD-ROM is inserted into the CD-ROM drive.
The later part of this section also explains the necessary settings to print from the
client computer when using Windows NT 4.0/Windows 2000/Windows XP as a
network server. Refer to the following according to the environment you are using.
●
When using lpr and print on Windows NT 4.0
"2.4.1 Installing the Printer Driver (Windows NT 4.0)"
●
When using lpr and print on Windows 2000/Windows XP
"2.4.2 Installing the Printer Driver (Using lpr on Windows 2000/Windows XP)"
●
When using Port 9100 and print on Windows 2000/Windows XP
"2.4.3 Installing the Printer Driver (Using Port 9100 on Windows 2000/Windows XP)"
Windows 2000/Windows XP
●
When using IPP and internet print on Windows 2000/Windows XP
"2.4.4 Installing the Printer Driver (Internet Printing on Windows 2000/Windows XP)"
●
When using Windows NT 4.0/Windows 2000/Windows XP as a network server and
print from the client computer
"2.4.5 Using As a Network Server"
Setup Disk
If you want to install the printer driver to multiple computers on the network, it is
recommended that you create a setup disk after installing the printer driver to one
computer. With this disk, you need only to execute the setup.exe command in the disk
to the other computers and you can install a printer driver of similar settings to all the
computers.
●
The setup disk can only be used on the OS on which the disk was created or computers
running the same OS.
●
The setup disk cannot be created if you have installed the printer driver by using the IPP and
internet print settings on Windows 2000/Windows XP.
32
Software Pack Operation Guide which comes with the Software Pack CD-ROM for information
on creating the setup disk and method of installing using the disk.
For details of installing the printer driver, refer to the manuals bundled with this machine.
Page 47

2.4 Configuring Windows NT 4.0/Windows 2000/Windows XP
Configuring in TCP/IP Environment
2.4.1
Installing the Printer Driver (Windows NT
4.0)
Before installing the printer driver, it is necessary to set up TCP/IP Protocol and Microsoft
TCP/IP Printing on the Windows NT 4.0 system. Refer to manuals on Windows NT for details.
The procedure is as follows:
Installing the Printer Driver
Procedure
1
2
Switch on the printer.
Switch on the computer.
Activate Windows NT 4.0, log on as a user of the administrator group or as the
administrator.
2
3
4
Insert the Software Pack CD-ROM into the CD-ROM drive.
The Fuji Xerox StartUp Tool dialog box is displayed automatically.
If the Fuji Xerox StartUp Tool dialog box does not appear automatically, double-click the
Install.exe icon in the CD-ROM.
Cilck Install Language.
The Fuji Xerox Setup Menu is displayed.
33
Page 48

2.4 Configuring Windows NT 4.0/Windows 2000/Windows XP
Configuring in TCP/IP Environment
2
5
6
Click Install Printer Driver.
Follow the displayed screens to carry out the installation.
■
Setting the Destination Port
To set the destination port, click Add Port and proceed as follows using
the Add Ports dialog box.
1. Select Others and click LPR Port from Available ports.
2. Click OK.
The Add LPR compatible printer dialog box is displayed.
3. Enter the items at each text box.
Example: For IP address, "129.249.242.179" and printer name, "Trans5":
Item Remarks
Name or address
of server providing
lpd
Name of printer or
print queue on that
server
Enter the IP address of the printer. You can enter the
registered printer name when it is possible to use software
like WINS.
When the IP address has numbers with less than three
digits, do not enter "0" before these numbers, e.g.
"XXX.XXX.00X.0XX". It will not work properly.
Enter any name for DocuPrint 181/211.
34
Page 49

2.4 Configuring Windows NT 4.0/Windows 2000/Windows XP
When you do not know the IP address of the printer, either check with the network
administrator, or print out the Printer Settings to confirm. Refer to "2.2.3 Checking the
Settings (Printing Printer Settings)" for information on printing the Printer Settings.
4. Click OK.
Configuring in TCP/IP Environment
7
8
Procedure
1
2
When the printer driver has been installed, click
dialog box to close the Fuji Xerox Setup Menu.
Take out the CD-ROM from the CD-ROM drive.
Testing Printing
To check the connection, print the test page.
The procedure is as follows:
Click the Start menu, and select
The Printers windows is displayed.
The DocuPrint 181/211 printer icon has been added by the installation
of the printer driver. Double-click this added printer icon and click
Properties
The printer properties dialog box is displayed.
from the Printer menu.
Settings
Finish
and then
or
Printers
Exit
.
at each
2
3
4
5
Click
A dialog box to confirm whether or not the test page is printed correctly will be
displayed.
Check the print results, and if the test page is printed correctly, click
Yes
Click OK on the printer properties dialog box.
Print Test Page
.
on the General tab.
35
Page 50

2.4 Configuring Windows NT 4.0/Windows 2000/Windows XP
Configuring in TCP/IP Environment
2
2.4.2
Installing the Printer Driver (Using lpr on Windows 2000/Windows XP)
You can select LPR Port or Standard TCP/IP Port as the output destination for the port on
Windows 2000/Windows XP. When you select LPR Port, before installing the printer driver, it is
necessary to install Printing Services for Unix on Windows 2000/Windows XP. Refer to the
manuals on Windows 2000/Windows XP for details.
Here, we use the example of selecting Standard TCP/IP Port as the output
destination.
The procedure for selecting LPR Port is the same as the one on Windows NT 4.0.
Refer to "2.4.1 Installing the Printer Driver (Windows NT 4.0)" for details.
The procedure is as follows. Here, we will use Windows 2000 as an example.
Installing the Printer Driver
Procedure
1
2
3
Switch on the printer.
Switch on the computer.
Activate Windows 2000 and log on as a user of administrator group or as the
administrator.
Insert the Software Pack CD-ROM into the CD-ROM drive.
The Fuji Xerox StartUp Tool dialog box appears automatically.
If the Fuji Xerox StartUp Tool does not appear automatically, double-click the Install.exe icon in
the CD-ROM.
36
Page 51

2.4 Configuring Windows NT 4.0/Windows 2000/Windows XP
Configuring in TCP/IP Environment
4
5
Cilck Install Language.
The Fuji Xerox Setup Menu is displayed.
Click Install Printer Driver.
2
37
Page 52

2.4 Configuring Windows NT 4.0/Windows 2000/Windows XP
Configuring in TCP/IP Environment
2
6
Follow the displayed screens to carry out the installation.
■
Setting the Destination Port
To set the destination port, click Add Port and proceed as follows using
the Add Ports dialog box.
1. Click Others and select Standard TCP/IP Port from Available
ports.
2. Click OK.
The Add Standard TCP/IP Printer Port Wizard dialog box is displayed.
3. Click Next.
38
Page 53

2.4 Configuring Windows NT 4.0/Windows 2000/Windows XP
4. Enter the items at each text box.
Example: For IP address, "129.249.242.179".
Configuring in TCP/IP Environment
2
7
Item Remarks
Printer Name or IP
Address
Por t Name
When you do not know the IP address of the printer, either check with the network
administrator, or print out the Printer Settings to confirm. Refer to "2.2.3 Checking the
Settings (Printing Printer Settings)" on how to print the Printer Settings.
5. Click
6. Check the contents on the screen and click
When the printer driver has been installed, click
dialog box to close the Fuji Xerox Setup Menu.
Next
.
Enter the IP address of the printer. You can enter the
registered printer name when it is possible to use name
solving services like WINS.
When the IP address has numbers with less than three
digits, do not enter "0" before these numbers, e.g.
"XXX.XXX.00X.0XX". It will not work properly.
Enter name or IP address of the printer and the name of port
is automatically set. Enter the port name only when you
want to make changes.
Finish
.
Finish
or
Exit
at each
8
Take out the CD-ROM from the CD-ROM drive.
39
Page 54

2.4 Configuring Windows NT 4.0/Windows 2000/Windows XP
Configuring in TCP/IP Environment
Procedure
Testing Printing
To check the connection, print the test page.
The procedure is as follows:
2
1
2
3
4
5
Click the Start menu, and select Settings and then Printers.
The Printers windows is displayed.
In the case of WindowsXP, click "Printer and Fax" in the Start menu.
The DocuPrint 181/211 printer icon has been added by the installation
of the printer driver. Double-click this added printer icon and click
Properties from the Printer menu.
The printer properties dialog box is displayed.
Click Print Test Page on the General tab.
A dialog box to confirm whether or not the test page is printed correctly will be
displayed.
Check the print results, and if the test page is printed correctly, click
Yes.
Click OK on the printer properties dialog box.
40
Page 55

2.4 Configuring Windows NT 4.0/Windows 2000/Windows XP
Configuring in TCP/IP Environment
2.4.3
Installing the Printer Driver (Using Port 9100 on Windows 2000/Windows XP)
The procedure is as follows. Here, we will use Windows 2000 as an example.
Installing the Printer Driver
Procedure
1
2
3
Switch on the printer.
Switch on the computer.
Activate Windows 2000 and log on as a user of administrator group or as the
administrator.
Insert the Software Pack CD-ROM into the CD-ROM drive.
The Fuji Xerox StartUp Tool dialog box appears automatically.
If the Fuji Xerox StartUp Tool does not appear automatically, double-click the Install.exe icon in
the CD-ROM.
2
4
Cilck Install Language.
The Fuji Xerox Setup Menu is displayed.
41
Page 56

2.4 Configuring Windows NT 4.0/Windows 2000/Windows XP
Configuring in TCP/IP Environment
2
5
6
Click Install Printer Driver
Follow the displayed screens to carry out the installation.
■
Setting the Destination Port
To set the destination port, click Add Port and proceed as follows using
the Add Ports dialog box.
1. Click Others and select Standard TCP/IP Port from Available
ports.
2. Click OK.
The Add Standard TCP/IP Printer Port Wizard dialog box is displayed.
3. Click Next.
42
Page 57

2.4 Configuring Windows NT 4.0/Windows 2000/Windows XP
4. Enter the items at each text box.
Example: For IP address, "129.249.242.179".
Configuring in TCP/IP Environment
2
Item Remarks
Printer Name or IP
Address
Por t Name
When you do not know the IP address of the printer, either check with the network
administrator, or print out the Printer Settings to confirm. Refer to "2.2.3 Checking the
Settings (Printing Printer Settings)" on how to print the Printer Settings.
5. Click
Next
.
6. Check the contents on the screen and click
This completes setting LPR for the protocol. Do the settings for Port 9100 after the printer
driver is installed. Just proceed to the next step from here.
Enter the IP address of the printer. You can enter the
registered printer name when it is possible to use name
solving services like WINS.
When the IP address has numbers with less than three
digits, do not enter "0" before these numbers, e.g.
"XXX.XXX.00X.0XX". It will not work properly.
Enter name or IP address of the printer and the name of port
is automatically set. Enter the port name only when you
want to make changes.
Finish
.
7
When the printer driver has been installed, click
dialog box to close the Fuji Xerox Setup Menu.
Finish
or
Exit
at each
43
Page 58

2.4 Configuring Windows NT 4.0/Windows 2000/Windows XP
Configuring in TCP/IP Environment
2
8
Procedure
1
2
3
4
Take out the CD-ROM from the CD-ROM drive.
Setting Port 9100 and Testing Printing
Set Port 9100 and print a test page to check the connection. The procedure is as
follows.
Click the Start menu, select Settings and followed by Printers.
The Printers window is displayed.
The DocuPrint 181/211 printer icon has been added by the installation
of the printer driver. Double-click this added printer icon and from the
Printer menu, select Properties.
The printer properties dialog box is displayed.
Click the Ports tab.
Select this model, and click Configure Port.
44
Page 59

2.4 Configuring Windows NT 4.0/Windows 2000/Windows XP
Configuring in TCP/IP Environment
5
Select Raw and confirm the Port Number that you have entered in
Raw Settings, and click OK.
Set the port number according to the settings of the network printer. Refer to "Changing Port
9100 Settings" (p.26) for the details about changing the settings of the network printer.
2
6
7
8
Click Print Test Page on the General tab.
A dialog box to confirm whether or not the test page is printed correctly will be
displayed.
Check the print results, and if the test page is printed correctly, click
Yes.
Click OK on the printer properties dialog box.
45
Page 60

2.4 Configuring Windows NT 4.0/Windows 2000/Windows XP
Configuring in TCP/IP Environment
2
2.4.4
Installing the Printer Driver (Internet Printing on Windows 2000/Windows XP)
If you have selected Internet Options on Control Panel and set using the proxy server, a printer
for internet printing cannot be created. In this case, make sure you include the settings that do
not use the proxy in the current IP address. Refer to the manuals on Windows 2000/Windows
XP for details.
The procedure is as follows. Here, we will use Windows 2000 as an example.
Installing the Printer Driver
Procedure
1
2
Switch on the printer.
Switch on the computer.
Activate Windows 2000 and log on as a user of administrator group or as the
administrator.
3
4
5
Insert the Software Pack CD-ROM into the CD-ROM drive.
The Fuji Xerox StartUp Tool dialog box appears automatically.
Cilck Install Language.
The Fuji Xerox Setup Menu is displayed.
Click Printers on Settings from the Start menu. The Printer window is
displayed.
46
Page 61

2.4 Configuring Windows NT 4.0/Windows 2000/Windows XP
Configuring in TCP/IP Environment
6
7
8
Double click the Add Printer icon. The Add Printer Wizard dialog box is
displayed.
Click Next.
Select Network printer and click Next.
2
9
Select Connect to a printer on the internet or on your intranet and
enter "http: //printer host name (IP address):631/ipp/" in URL.
Example: When printer IP address is "129.249.242.179"
"http://129.249.242.179/ipp/"
47
Page 62

2.4 Configuring Windows NT 4.0/Windows 2000/Windows XP
Configuring in TCP/IP Environment
If a number of less than three digits is included in the IP address such as "XXX.XXX.00X.0XX",
do not enter "0" for the digit(s) before the number. It could cause improper operation.
●
If printing is not enabled by the above URL configuration, enter "http://printer's host name (IP
address):631/ipp/". The number "631" is a preset port number of IPP. For further information on
the IPP port, refer to "Changing IPP Settings" on page 27.
If the printer's IP address is not known, check it with the network administrator or by printing the
printer configuration list. For information on how to print this list, refer to the manual supplied
with this equipment.
2
10
11
12
13
14
15
16
Click Next.
If a dialog box displaying a warning message that the correct printer
driver is not installed on the server connected to the DocuPrint 181/211
printer appears and prompts you to install the printer driver to the local
computer, click OK.
Click Have Disk.
Enter the CD-ROM drive: \PrtDrv_E\211\Win2000 in source and click
OK.
Example : when the CD-ROM drive is E, enter E : \PrtDrv_E\211\Win2000.
Select the printer to be installed and click OK.
When the Digital signature Not Found dialog box appears, click Yes
and continue to install.
Select whether to use the printer in ordinary and click Next.
Copying the necessary files starts.
48
17
18
19
When a display notifying that the installation is completed, click Finish.
Take out the CD-ROM from the CD-ROM drive.
If you have installed the optional products, do the settings for the
optional products on the Options tab.
To display the Options tab screen, select the printer icon that was being added, click Properties
from File menu and then click the Options tab.
Page 63

2.4 Configuring Windows NT 4.0/Windows 2000/Windows XP
Configuring in TCP/IP Environment
20
21
Procedure
1
2
Take out the CD-ROM from the CD-ROM drive.
If you have installed the optional products, do the settings for the
optional products on the Options tab.
To display the Options tab screen, select the printer icon that was being added, click Properties
from File menu and then click the Options tab.
Testing Printing
To check the connection, print the test page.
The procedure is as follows:
Click the Start menu, and select Settings and then Printers.
The Printers windows is displayed.
The DocuPrint 181/211 printer icon has been added by the installation
of the printer driver. Double-click this added printer icon and click
Properties from the Printer menu.
2
3
4
5
The printer properties dialog box is displayed.
Click Print Test Page on the General tab.
A dialog box to confirm whether or not the test page is printed correctly will be
displayed.
Check the print results, and if the test page is printed correctly, click
Yes.
Click OK on the printer properties dialog box.
49
Page 64

2.4 Configuring Windows NT 4.0/Windows 2000/Windows XP
Configuring in TCP/IP Environment
2
2.4.5
This section explains how to use Windows NT 4.0/Windows 2000/Windows XP as a
network server and to configure settings that enable printing from clients which cannot
send printing to the printer directly (Windows 95/Windows 98/Windows Me).
Using As a Network Server
Configuring the Network Server (Windows NT 4.0/Windows 2000/
Windows XP)
Share the the printer created in the previous section.
The procedure is as follows. Here, we will use Windows NT 4.0 as an example.
Procedure
1
2
Click the Start menu, and select Settings and then Printers.
The Printers window is displayed.
Double-click the DocuPrint 181/211 printer icon and from the Printer
menu, click Properties.
The printer properties dialog box is displayed.
50
Page 65

2.4 Configuring Windows NT 4.0/Windows 2000/Windows XP
Configuring in TCP/IP Environment
3
Click Shared on the Sharing tab and then enter a name for Share
Name.
Share Name is the name to identify the printer by the other computers on the network.
2
4
5
Click OK.
Check that the shared out printer icon in the Printers window has a
hand mark attached.
51
Page 66

2.4 Configuring Windows NT 4.0/Windows 2000/Windows XP
Configuring in TCP/IP Environment
Procedure
Configuring the Client (Windows 95/Windows 98/Windows Me)
It is also necessary to install the printer driver on the client computer. The procedure is
explained here using Windows 98 as an example.
To use Windows NT 4.0/Windows 2000/Windows XP as a network server, client computer
users have to be registered in order to access Windows NT 4.0/Windows 2000/Windows XP.
For details, refer to manuals related to Windows.
2
1
2
3
Switch on the computer and activate Windows 98.
Insert the Software Pack CD-ROM into the CD-ROM drive.
The Fuji Xerox StartUp Tool dialog box is displayed automatically.
If the Fuji Xerox StartUp Tool dialog box does not appear automatically, double-click the
Install.exe icon in the CD-ROM.
Cilck Install Language.
The Fuji Xerox Setup Menu is displayed.
52
Page 67

2.4 Configuring Windows NT 4.0/Windows 2000/Windows XP
Configuring in TCP/IP Environment
4
5
Click Install Printer Driver.
Follow the displayed screens to continue with the installation.
■
Setting the Destination Port
To set the destination, select Network, and click Browse. Using the
dialog box displayed, specify settings as follows:
2
1. From the network list, search and select the printer. The printer will
assume the shared name set earlier, and will be displayed under the
Windows NT computer with the added printer.
Example: For Windows NT with host name, "Kookaburra" and shared name,
"Trans5".
2. Click OK.
53
Page 68

2.4 Configuring Windows NT 4.0/Windows 2000/Windows XP
Configuring in TCP/IP Environment
2
6
7
8
9
10
11
When the printer driver has been installed, click Finish or Exit at each
dialog box to close the Fuji Xerox Setup Menu.
Take the CD-ROM out from the CD-ROM drive.
To check the connection, print the test page.
Click the Start menu, and select Settings and then Printers.
The Printer window appears.
A DocuPrint 181/211 printer icon is added by the installation of the
printer driver. Select the added printer icon and click Properties from
the Printer menu.
The printer properties dialog box is displayed.
Click Print Test Page on the General tab.
A dialog box to confirm whether or not the test page is printed correctly will be
displayed.
Check the print results, and if the test page is printed correctly, click
Yes.
12
Click OK on the printer properties dialog box.
54
Page 69

Configuring Windows 95/
2.5
Windows 98/Windows Me
(TCP/IP Direct Print Utility)
To print directly to the printer from Windows 95/Windows 98/Windows Me in TCP/IP
environment, install the printer driver and TCP/IP Direct Print Utility to the computer.
2.5.1
TCP/IP Direct Print Utility is a software for printing print data sent from a computer
directly to a printer on the network without going through any server.
TCP/IP Direct Print Utility is available in the Software Pack CD-ROM.
Installation Requirements
To install TCP/IP Direct Print Utility, the computer must meet the following
requirements:
●
installed with the English version of Microsoft Windows 95,Windows 98 or Windows
Millennium Edition operating system.
●
equipped with a 32-bit, Intel CPU (x86 compatible)
●
computer name of ASCII characters (uppercase/lowercase letters, numbers, hyphen
(-), underscore ( _ ))
Using TCP/IP Direct Print Utility
Configuring in TCP/IP Environment
2
●
When the computer name includes non-ASCII characters, there might be problems in printing. In
this case, double-click the Network icon in Control Panel to display its dialog box, and on the
Identification tab, change the entry in Computer name.
●
installed with TCP/IP protocol
Double-click the Network icon in Control Panel to display its dialog box, and check for the following:
Windows 95/Windows 98/Windows Me
On the Configuration tab, check that TCP/IP is available in The following
→
network components are installed.
If TCP/IP is not installed, refer to "2.5.2 Installing TCP/IP Protocol" to add the protocol.
●
When doing Internet printing in Windows Me, check that the "IPP Port Monitor" is installed.
For more information, see a guide to operations related to Windows Me.
55
Page 70

2.5 Configuring Windows 95/Windows 98/Windows Me (TCP/IP Direct Print Utility)
Configuring in TCP/IP Environment
Overview of the Configuration
The overview of the configuration is as follows.
We will use Windows 98 in the procedure as an example.
Begin
↓
●
Install TCP/IP protocol (not needed when already installed)
2
●
●
●
End
2.5.2
"2.5.2 Installing TCP/IP Protocol"
Install TCP/IP Direct Print Utility and printer driver
"2.5.3 Installing TCP/IP Direct Print Utility", "2.5.4 Installing the Printer Driver"
Check settings
"2.2.3 Checking the Settings (Printing Printer Settings)"
Set port
"2.5.5 Adding the Port"
↓
Installing TCP/IP Protocol
56
It is not necessary to carry out the following procedure if the TCP/IP protocol has already been
installed on your computer.
To use TCP/IP Direct Print Utility, it is necessary to install TCP/IP protocol on your
Windows system.
The procedure is as follows:
Manuals related to Windows 95/Windows 98/Window Me for details on TCP/IP protocol
Procedure
1
Switch on the computer and activate Windows 98.
Page 71

2.5 Configuring Windows 95/Windows 98/Windows Me (TCP/IP Direct Print Utility)
Configuring in TCP/IP Environment
2
3
4
Click Start, select Settings, and then Control Panel.
The Control Panel window is displayed.
Double-click the Network icon.
The Network dialog box is displayed.
On the Configuration tab, click Add.
2
5
In the Select Network Component Type dialog box displayed, select
Protocol for Click the type of network component you want to
install, and click Add.
57
Page 72

2.5 Configuring Windows 95/Windows 98/Windows Me (TCP/IP Direct Print Utility)
Configuring in TCP/IP Environment
2
6
7
In the Select Network Protocol dialog box displayed, select Microsoft
for Manufacturers, and TCP/IP for Network Protocols, and then click
OK.
In the Network dialog box, check that TCP/IP is added to The
following network components are installed on the Configuration
tab, and then click OK.
8
The copying of files begins.
After the copying of files has been completed, a message prompting
you to restart your computer is displayed. Click Yes.
58
Page 73

2.5 Configuring Windows 95/Windows 98/Windows Me (TCP/IP Direct Print Utility)
Configuring in TCP/IP Environment
2.5.3
This section explains the installation of TCP/IP Direct Print Utility to your computer.
The procedure is as follows.
Procedure
1
2
3
Installing TCP/IP Direct Print Utility
Switch on your computer and activate Windows 98.
Insert the Software Pack CD-ROM into the CD-ROM drive.
The Fuji Xerox StartUp Tool dialog box appears automatically.
If the Fuji Xerox StartUp Tool dialog box does not appear automatically, double-click the
Install.exe icon in the CD-ROM.
Cilck Install Language.
2
The Fuji Xerox Setup Menu is displayed.
59
Page 74

2.5 Configuring Windows 95/Windows 98/Windows Me (TCP/IP Direct Print Utility)
Configuring in TCP/IP Environment
2
4
5
Click Install TCP/IP Direct Print Utility.
If you are prompted to install TCP/IP protocol when Install TCP/IP Direct Print Utility is clicked,
click OK to stop the operation, and after you have installed TCP/IP protocol to your computer,
carry out the installation again.
Click Next.
60
Page 75

2.5 Configuring Windows 95/Windows 98/Windows Me (TCP/IP Direct Print Utility)
Configuring in TCP/IP Environment
6
Check the path under Destination Folder and click Next if it is all right.
If you need to change the installation directory, click Browse, specify the folder for installation,
and then click Next.
2
The installation of TCP/IP Direct Print Utility begins.
61
Page 76

2.5 Configuring Windows 95/Windows 98/Windows Me (TCP/IP Direct Print Utility)
Configuring in TCP/IP Environment
2
7
When the installation is completed, the following dialog box is
displayed.
Take out the CD-ROM from the CD-ROM drive, select Yes, I want to
restart my computer now, and then click Finish.
The settings will not take effect if you do not restart the system.
62
Page 77

2.5 Configuring Windows 95/Windows 98/Windows Me (TCP/IP Direct Print Utility)
Configuring in TCP/IP Environment
2.5.4
Next, we will install the printer driver to the computer.
Installing the Printer Driver
Setup Disk
If you want to install the printer driver to multiple computers on the network, it is
recommended that you create a setup disk after you have installed the printer driver to
one computer and completed the port setting. With this disk, you need only to execute
the setup.exe command in the disk to the other computers and you can install a printer
driver of similar settings to all the computers.
However, TCP/IP Direct Print Utility cannot be installed using a setup disk. You have to
install from the Fuji Xerox Setup Menu to each and every computer on the network.
The setup disk can only be used on the OS on which the disk was created or computers
running the same OS.
Software Pack Operation Guide which comes with the Software Pack CD-ROM for information
on creating the setup disk and the installation method using the disk.
For details of installing the printer driver, refer to the manuals bundled with this machine.
2
Installing the Printer Driver
The procedure is as follows:
Procedure
1
2
Switch on the computer and activate Windows 98.
Insert the Software Pack CD-ROM into the CD-ROM drive.
The Fuji Xerox StartUp Tool dialog box appears automatically.
If the Fuji Xerox StartUp Tool dialog box does not appear automatically, double-click the
Install.exe icon in the CD-ROM.
63
Page 78

2.5 Configuring Windows 95/Windows 98/Windows Me (TCP/IP Direct Print Utility)
Configuring in TCP/IP Environment
2
3
4
Cilck Install Language.
The Fuji Xerox Setup Menu is displayed.
Click Install Printer Driver.
64
Page 79

2.5 Configuring Windows 95/Windows 98/Windows Me (TCP/IP Direct Print Utility)
Configuring in TCP/IP Environment
5
Follow the displayed screens to continue with the installation.
■
Setting the Destination Port
To set the destination port, select Others, and click Browse.
In the displayed dialog box, select LPT1, and then click OK.
The adding of the port for TCP/IP Direct Print Utility is carried out after the printer driver has
been installed. Here, we select LPT1.
2
6
2.5.5
Procedure
1
2
After the printer driver has been installed, click Finish or Exit at each
dialog box to close the Fuji Xerox Setup Menu.
Adding the Port
Add the port for TCP/IP Direct Print Utility to the printer icon created by installing the
printer driver.
The procedure is as follows:
Click the Start menu, select Settings and followed by Printers.
The Printers window is displayed.
The DocuPrint 181/211 printer icon has been added by the installation
of the printer driver. Double-click this added printer icon and from the
Printer menu, select Properties.
The printer properties dialog box is displayed.
65
Page 80

2.5 Configuring Windows 95/Windows 98/Windows Me (TCP/IP Direct Print Utility)
Configuring in TCP/IP Environment
2
3
4
Click Add Port on the Details tab.
Select Other, and click FX TCP/IP DPU Port from Click the type of
port you want to add.
66
5
Click OK.
The FX TCP/IP DPU Port Setup dialog box is displayed.
Page 81

2.5 Configuring Windows 95/Windows 98/Windows Me (TCP/IP Direct Print Utility)
Configuring in TCP/IP Environment
6
Enter the appropriate value for each item, and click OK.
Example: For port name, "Trans5" and IP address, "129.249.242.179".
Item Remarks
Por t Name
IP Address
Protocol
Enter a name of your choice to identify the printer.
When you are adding multiple TCP/IP Direct Print Utility ports,
do not use port names as in the following.
There is no difference between using upper-case and lowercase characters. Examples of port names that cannot be used
(current port name is "printer"):
●
Adding characters at the end of the current port name.
Example: "printer1", "printer-01" and so forth.
●
Deleting some characters from the current port name.
Example: "prin", "print" and so forth.
Enter the IP address of the printer. If the Domain Name System
(DNS) has been installed, the printer host name can be
entered.
Select the protocol to be used for data transfer.
Select either of printing protocols (1) or (2) below. The default
selection is (1) LPR.
(1) "LPR(L)": The lpr protocol is used for printing.
Enable or disable the "Validate byte count(B)" option by
selecting or deselecting its check box.
The default selection is enabled (check box selected).
(2) "Raw(R)": Port9100 protocol is used for printing.
You can specify a port number at the destination in "Port
Number(N)". This setting is effective only when Raw
protocol is selected. The default setting is "9100". If the
number is deleted, "9100" appears. You can enter up to 5
digits. If you enter a number greater than 65536 and click
OK, "9100" is registered.
2
If you do not know the IP address of the printer, check with your network administrator, or print
out the Printer Settings to confirm. Refer to "2.2.3 Checking the Settings (Printing Printer
Settings)" for information on printing the Printer Settings.
67
Page 82

2.5 Configuring Windows 95/Windows 98/Windows Me (TCP/IP Direct Print Utility)
Configuring in TCP/IP Environment
2
7
On the Details tab of the printer properties dialog box, check that "(FX
TCP/IP DPU Port)" is added to the port name entered in Step in Print
to the following port.
8
9
10
To check the connection, print the test page.
After you have clicked Apply to confirm the settings, click Print Test Page on the
General tab.
A dialog box to confirm whether or not the test page is printed correctly will be
displayed.
Check the print results, and if the test page is printed correctly, click
Yes.
Click OK on the printer properties dialog box.
68
Page 83

2.5 Configuring Windows 95/Windows 98/Windows Me (TCP/IP Direct Print Utility)
Configuring in TCP/IP Environment
2.5.6
Here, we explain the contents displayed in the Printer window after using TCP/IP
Direct Print Utility to send printing from the computer.
Status Display During Printing
Document Name
Name of the printing file.
Status
Status of the printer.
2
The types of printer status listed on the next page will only be displayed if printing is sent from
a computer with TCP/IP Direct Print Utility installed, and an appropriate port added. However,
they will not be displayed if printing is sent from a computer on a network with a shared printer.
The " * " added to the status is displayed not due to TCP/IP Direct Print Utility but to the spooler
of Windows 95/Windows 98/Windows Me.
Display Condition
Printing * Processing the printing.
Sending... Sending print data to the printer.
Cannot print
(Network Error)
Printing cannot be processed.
Either the printer is not switched on or there is a problem in the
network.
For this condition, printing will resume automatically once the problem
is solved.
69
Page 84

2.5 Configuring Windows 95/Windows 98/Windows Me (TCP/IP Direct Print Utility)
Configuring in TCP/IP Environment
Display Condition
Cannot print
(Spool Error)
Deleting... Deleting the document.
Spooling * Saving the print data in the memory (hard disk).
Paused Stopping the process of printing or sending data temporarily.
Printing cannot be processed.
Either the disk capacity is insufficient while spooling the print file or
there is an error in the spool file.
For this condition, printing will not resume automatically even if the
problem is solved. Printing will resume when the problem has been
solved and the machine activated.
2
To resume printing, select Pause Printing from the Document menu
of the Printer window.
Owner
Owner (user who issues printing) of the print file.
Progress
Total number of pages or bytes of the print file.
Started At
Time when printing started.
70
Page 85

2.5 Configuring Windows 95/Windows 98/Windows Me (TCP/IP Direct Print Utility)
Configuring in TCP/IP Environment
2.5.7
Here, we explain how to uninstall TCP/IP Direct Print Utility from Windows 95/Windows
98/Windows Me.
Below is the procedure overview:
1. Deleting all printer ports of TCP/IP Direct Print Utility.
2. Executing the uninstaller.
3. Restarting the computer.
Details are described below.
Be sure to follow the steps below. Windows might be unstable unless you have not followed
them.
Procedure
1
Uninstalling TCP/IP Direct Print Utility
Deleting all printer ports of TCP/IP Direct Print Utility.
1. Start Windows95/98/Me.
2
2. Double-click the My Computer icon and Printers folder.
The Printes window appears.
3. Select
Confirm that number of Document is 0 for all the printers.
If number except for 0 is displayed, select the printer, and from the
Printer menu, select Purge Print Documents (Windows98/Me) or
Purge Print Documents (Windows95).
4. Select any printer icon in the Printers window.
5. Select
The printer properties dialog box appears.
6. On the Details tab, click the
The Delete Port dialog box appears.
7. Select all entries with FX TCP/IP DPU Port and click the OK button.
Ensure that you have deleted all the TCP/IP Direct Print Utility ports
before you take the next step.
• If the port cannot be deleted because the printer is using it, change it to other port in Print
to the following port, click the
• When the TCP/IP Direct Print Utility dialog box is displayed, exit it.
Details
Properties
from the View menu.
from the File menu.
Delete Port
Apply
button then the
button.
Delete Port
button to delete it.
71
Page 86

2.5 Configuring Windows 95/Windows 98/Windows Me (TCP/IP Direct Print Utility)
Configuring in TCP/IP Environment
8. Close the FX TCP/IP Direct Print Utility Port Setup dialog box if it is
displayed.
2
2
3
2.5.8
Executing the uninstaller.
1. Double-click My Computer icon and Control Panel icon.
2. Select
The Add/Remove Programs Properties appears.
3. On the Install/Uninstall tab, select
Utility
4. Click the
The Confirmation of Uninstallation dialog box appears.
5. Click the
6. The InstallShield Wizard Complete dialog box appears. Click the
Finish
Restarting the computer.
Add/Remove Programs
.
Add/Remove
button to execute uninstallation.
Yes
button.
button.
.
Fuji Xerox TCP/IP Direct Print
Installing the Printer Driver (for Internet
Printing (IPP) on Windows Me)
72
When the use of a proxy server is set in the Internet Option on the Control Panel, the printer for
Internet printing may not be created. In such a case, add the IP address of this equipment to
the configuration not to use a proxy server. For further information, refer to instruction manuals
related to Windows Me.
For Internet printing, the printer driver cannot be installed from the Setup dialog box on
the Software Pack CD-ROM. To enable installation, follow the steps below, using the
"Adding Printer Wizard":
Procedure
1
2
3
Turn on the power to this equipment.
Turn on the power to the computer and start Windows Me.
Insert the CD-ROM that comes with the equipment in the CD-ROM
drive.
Page 87

2.5 Configuring Windows 95/Windows 98/Windows Me (TCP/IP Direct Print Utility)
Although the installation menu automatically appears, click End and close it.
Configuring in TCP/IP Environment
4
5
6
7
8
Click Printer from Configuration on the Start menu.
The Printer window is displayed.
Double-click the Adding Printer icon.
The Adding Printer Wizard icon appears.
Click Next.
Select Network Printer and click Next.
Enter "http://printer host name (IP address)/ipp" in the Name of
Network Path or Queues.
Input example: If the IP address of the printer is "192.168.1.100", it is "http://
192.168.1.100/ipp/".
●
If a number of less than three digits is included in the IP address such as "XXX.XXX.00X.0XX",
do not enter "0" for the digit(s) before the number. It could cause improper operation.
●
If printing is not enabled by the above URL configuration, enter "http://printer’s host name (IP
address):631/ipp/". The number "631" is a preset port number of IPP. For further information on
the IPP port, refer to "Changing IPP Settings" (P. 27).
2
9
10
11
12
13
14
15
If the printer’s IP address is not known, check it with the network administrator or by printing the
printer settings list. For information on how to print this list, refer to the manual supplied with this
equipment.
Click Next.
Click Using Disk.
Enter "CD-ROM drive name: ¥Prtdrv_e¥211¥Win9X" in Copy Source of
Producer File and click OK.
Input example: If the CD-ROM drive letter is E, enter "E:¥Prtdrv_e¥211¥Win9X".
Select a printer to be installed and click Next.
Enter Printer Name.
Select whether to use this equipment as the printer for regular use and
click "Completion".
When the printer driver has been successfully installed, remove the
CD-ROM from the CD-ROM drive.
73
Page 88

2.5 Configuring Windows 95/Windows 98/Windows Me (TCP/IP Direct Print Utility)
Configuring in TCP/IP Environment
2
16
17
18
19
20
Proceed with the configuration and test printing of the option.
Select the printer icon that has been added to the Printer window by installing the printer
driver and click Property from the File menu.
The Property dialog box appears.
When an option is installed, configure the option in the [Printer
Configuration] tab.
Click Printing Test in the General tab.
The dialog box to check whether printing is correct appears.
Check the result of printing and click Yes if it is correct.
Click OK in the Property dialog box.
74
Page 89

Chapter
3
Configuring in SMB
Environment
3.1 Using in SMB Environment......................................................... 76
3.2 Configuring the Printer ............................................................... 77
3.3 Changing the Host Name and Workgroup Name...................... 79
3.4 Configuring the Client................................................................. 85
Page 90

3.1
Using in SMB Environment
Configuring in SMB Environment
3.1.1
3
This chapter explains the procedures of configuring DocuPrint 181/211 to use in SMB
(Windows network) environment and print from a Windows client computer.
To use this machine in SMB environments, an optional network expansion card is required.
Overview of the Configuration
The overview of the configuration process is as follows:
Begin
↓
Configuring the Printer
●
IP address settings
●
Activate protocol (Not needed when setting up printer for the first time)
"Chapter 3.2.2 Activating the Protocol"
●
Check settings
"Chapter 3.2.3 Checking the Settings (Printing Printer Settings)"
Configuring the Client
●
Windows 95/Windows 98/Windows Me
●
Install printer driver
"Chapter 3.4.1 Installing the Printer Driver (Windows 95/Windows 98/Windows Me)"
●
Windows NT 4.0/Windows 2000/Windows XP
●
Install printer driver
"Chapter 3.4.2 Installing the Printer Driver (Windows NT 4.0/Windows 2000/Windows XP)"
↓
End
76
Page 91

3.2
Configuring the Printer
Use the control panel to activate the protocol to be used.
To use TCP/IP as the transport protocol, you need to set IP address, subnet mask, and
gateway address to the printer. Refer to "Chapter 2.2.1 Setting IP Address" for information on
setting each of these addresses.
3.2.1
When using TCP/IP as the transport protocol, you must set an IP address, subnet
mask, and gateway address on the printer.
See the manual provided with the printer for procedures.
3.2.2
Set the IP address
Activating the Protocol
Configuring in SMB Environment
3
The factory setting of each protocol is set as Enabled. The following procedure is not
necessary when you are setting up the network for the first time using a new printer.
To use TCP/IP as the transport protocol, activate Protocol as SMB TCP/IP, and to use
NetBEUI, activate as SMB NetBEUI. And to use both, activate both protocols.
The procedure is as follows:
3.2.3
Checking the Settings (Printing Printer Settings)
Print the Printer Settings to check settings. The Printer Settings is printed out using the
control panel.
77
Page 92

3.2 Configuring the Printer
Configuring in SMB Environment
3
Check this
when the IP
address
has been
set.
Printer Settings (Example)
Check the portions.
These are necessary
imformation for
configure the
computer. They can
be changed. Refer to
"3.3 Change the Host
Name and
Workgroup Name" on
how to change them.
78
Page 93

Changing the Host Name
3.3
If necessary, change the SMB host name and workgroup name.
●
Host Name: Factory setting is FXnnnnnn ("nnnnnn" is the last six digits of
●
Work Group Name: Factory setting is WORKGROUP.
These items cannot be set at the control panel. If there is a need to change these
items, do so from the CentreWare Internet Services or the Windows client.
This section explains the procedure to change from the Windows client.
●
From CentreWare Internet Services or the Windows client, you can change not only the host
name and workgroup name, but also other SMB environment settings.
●
CentreWare Internet Services is available in TCP/IP environment and can be used when the
printer has been set with an IP address.
"Chapter 5 Using CentreWare Internet Services" or the online Help files of CentreWare
Internet Services for information on CentreWare Internet Services
and Workgroup Name
the Ethernet address set for the network card)
Configuring in SMB Environment
3
3.3.1
When changing host name or workgroup name from the client computer, you can
access files of the printer through the Windows network. As such, SMB settings can be
changed by overwriting the contents in the files of the printer. However, you will need to
have the administrator name and password to change the settings using this method.
The factory settings of the administrator name and password are listed below. For better
security management, change the settings as early as possible. Use the Windows client or the
CentreWare Internet Services to make these changes.
●
Administrator name: admin
●
Password: admin
The procedure is as follows. Here, we will use Windows 98 as an example.
Procedure
1
Changing from the Windows Client
Switch on the computer and activate Windows 98.
2
3
Double-click the Network Neighborhood icon.
From the Network Neighborhood list, double-click the SMB workgroup
(Factory setting: WORKGROUP) and then the icon with the host name.
79
Page 94

3.3 Changing the Host Name and Workgroup Name
Configuring in SMB Environment
3
4
The factory setting of the host name of the printer is FXnnnnnn ("nnnnnn" is the last six digits of
the Ethernet address set for the network card). Print out the Printer Settings to check and
confirm the host name.
Double-click the admintool folder.
80
5
Enter the password and click OK.
For Windows 95/Windows 98/Windows Me, you need to enter only the password.
For Windows NT 4.0/Windows 2000/Windows XP, the following dialog box is displayed. Enter the
user name (administrator name) and password.
Page 95

3.3 Changing the Host Name and Workgroup Name
6
7
Using Notepad, open the config.txt icon displayed.
Use Notepad to edit the config.txt file. If other editors are used, and you change Reboot to ON
for the config.txt file, the editors might not function temporarily.
If necessary, change each item and then save the config.txt by
overwriting it.
Configuring in SMB Environment
3
If you copy the config.txt file onto the client and edit it, the edited file might not be able to be
saved into the admintool folder. Before copying the config.txt file from the client, delete the
config.txt file inside the admintool folder.
●
Workgroup: can be set up to 15 bytes.
●
Host Name: printer name; can be set up to 15 bytes.
●
For details of the config.txt file, refer to the section after this procedure, "Setting Format of
Config.txt File".
When a config.txt file is saved, a message.txt file will be created in the admintool
folder. You can use the message.txt file to check if the settings based on the config.txt
file is effective or not.
81
Page 96

3.3 Changing the Host Name and Workgroup Name
Configuring in SMB Environment
3
8
Open the message.txt file and check that the following description is
displayed.
●
If the message.txt file is not displayed in the admintool folder, select Refresh from the View
menu of the printer dialog box.
●
If an error message appears in the message.txt file, the settings might not be correctly
specified. Check and correct the contents of the settings using the config.txt file.
Example of incorrect settings:
9
Switch off the printer, and then switch it on again.
82
Page 97

3.3 Changing the Host Name and Workgroup Name
Setting Format of Config.txt File
Item Remarks Value
Printer
Language
Host Name Up to 15 alphanumeric characters can
Workgroup Up to 15 alphanumeric characters can
NETBEUI Set to On when NETBEUI protocol is
TCP/IP Set to On when TCP/IP protocol is
Auto Master
Mode
Encrypt
Password
Unicode Support If unicode is supported, set to Enable.
DHCP Set to On when IP address is
WINS DHCP
Resolve
IP Address The IP address can be set when the
Subnet Mask Set the subnet mask. 0.0.0.0
Gateway
Address
WINS Primary
Server Address
Language to be used. Japanese/
English
Maximum 15
be used for the printer host name.
be used for the printer workgroup
name.
used.
used.
Set to On when the automatic browse
master feature is used.
Set to On when the password coding
is used.
If unicode is not supported and Shift
JIS local code is used, set to Disable.
obtained from the DHCP server.
Set to Yes when WINS server
address is obtained from the DHCP
server while WINS is being used.
IP address is not obtained from the
DHCP server.
Set the gateway address. 0.0.0.0
Enter the IP address of the WINS
server when the WINS address is not
obtained from the DHCP server.
When WINS is not used, enter
"0.0.0.0".
bytes
Maximum 15
bytes
On or Off On
On or Off On
On or Off On
On or Off On
Enable or
Disable
On or Off On
On or Off On
English
FXnnnnnn
(nnnnnn: last six
digits of the
printer Ethernet
address)
WORKGROUP
Disable
0.0.0.0
0.0.0.0
Configuring in SMB Environment
Factory
Setting
3
83
Page 98

3.3 Changing the Host Name and Workgroup Name
Configuring in SMB Environment
3
Item Remarks Value
WINS
Secondary
Server Address
Administrator
Name
Administrator
Password
Location Comments about the location for
Reboot If Yes is set, the printer will be
Enter the IP address of another WINS
server when the WINS address is not
obtained from the DHCP server and
there are at least two WINS servers. If
this has been entered and the WINS
1st server does not work, this server
can be used as the WINS server.
When WINS is not used, enter
"0.0.0.0".
Up to 20 alphanumeric characters can
be used.
Up to 14 alphanumeric characters can
be used. However, the password set
is not displayed after the printer is
rebooted.
setting (like installation floor) can be
entered.
automatically rebooted after editing
the config.txt file.
0.0.0.0
Maximum 20
bytes
Maximum 14
bytes
Maximum 48
bytes
Yes or No No
ADMIN
admin
(not displayed)
Factory
Setting
84
Page 99

3.4
Configuring the Client
To print from a Windows client in SMB environment, install the printer driver to the
computer.
The printer driver can be installed using the automatically displayed Fuji Xerox Setup
Menu when the Software Pack CD-ROM is inserted into the CD-ROM drive.
The procedure to install the printer driver is explained according to the computer OS
type.
Setup Disk
If you want to install the printer driver to multiple computers on the network, it is
recommended that you create a setup disk after installing the printer driver to one
computer. With this disk, you need only to execute the setup.exe command in the disk
to the other computers and you can install a printer driver of similar settings to all the
computers.
The setup disk can only be used on the OS on which the disk was created or computers
running the same OS.
Software Pack Operation Guide which comes with the Software Pack CD-ROM for information
on creating the setup disk and the installation method using the disk.
For details of installing the printer driver, refer to the manuals bundled with this machine.
Configuring in SMB Environment
3
3.4.1
Installing the Printer Driver (Windows 95/ Windows 98/Windows Me)
The procedure is as follows. Here, we will use Windows 98 as an example.
Installing the Printer Driver
Procedure
1
2
3
Switch on the printer.
Switch on the computer and activate Windows 98.
Insert the Software Pack CD-ROM into the CD-ROM drive.
The Fuji Xerox StartUp Tool dialog box appears automatically.
If the Fuji Xerox StartUp Tool dialog box does not appear automatically, double-click the
Install.exe icon in the CD-ROM.
85
Page 100

3.4 Configuring the Client
Configuring in SMB Environment
3
4
5
Cilck Install Language.
The Fuji Xerox Setup Menu is displayed.
Click Install Printer Driver.
86
6
Follow the displayed screens to continue with the installation.
■
Setting the Destination Port
To set the destination port, select Network, and click Browse. Using
the dialog box displayed, specify settings as follows:
1. From the network list, search and select the printer. The printer will
be displayed as "host name-p" and will be under the host name icon.
When you do not know the workgroup name and host name of the printer, either check
with the network administrator, or print out the Printer Settings to confirm.
Refer to "3.2.3 Checking the Settings (Printing Printer Settings)" for information on
printing the Printer Settings.
2. Click OK.
 Loading...